

Page 1
QUICK START GUIDE
Thank you for purchasing a Strand Lighting SPX LED WW
Luminaire. We have designed this luminaire to provide you
with a superior fitting in performance, design, and
engineering. We are confident that it will perform to your
expectations for many years to come.
SPX LED WW
OVERVIEW
Luminaire
This document provides installation and operation instructions for the following
product(s):
Part No. Name Description Weight*
12610 SPX LED WW
*excluding shutter and lens tube
SPX LED WW - mains or DMX dimmable,
warm white profile luminaire engine
without lens tube
6.2 kg
[13.67 lb]
Accessories
Part No. Description
PCT1BE AC Power Input Cable (39 inches/1 meter), powerCON TRUE1 without AC connector (bare end)
PCT1GP AC Power Input Cable (39 inches/1 meter), powerCON TRUE1 with Stagepin Connector
PCT1GTL AC Power Input Cable (39 inches/1 meter), powerCON TRUE1 with Twistlock Connector
PCT1GR AC Power Input Cable (39 inches/1 meter), powerCON TRUE1 with Edison Connector
SC Clamp, Get-a-Grip
82003 Safety cable, black, 1/8 x 30 w/hook
WARNINGS AND CAUTIONS
Dimensions*
(H x W x L)
414 x 327 x 380 mm
[16.29 in x 12.91 in x 14.72 in]
Note: Installation is entirely at your risk. Do not attempt installation unless you are suitably
qualified. Contact Strand Lighting or one of its authorized distributors for assistance.
When using electrical equipment, basic safety precautions should always be followed including the
following:
• Do not use outdoors.
• Do not mount near gas or electric heaters.
• Equipment should be mounted in locations and at heights where it will not readily be subjected to
tampering by unauthorized personnel.
• The use of accessory equipment not recommended by
the manufacturer may cause an unsafe condition.
• Do not use this equipment for other than intended use.
• Refer service to qualified personnel.
2000851
INSTALLATION AND SETUP
Power Requirements
The SPX LED WW Luminaire requires standard AC power distribution from 100-240VAC, 50/60Hz.
Power is 295W max, and current varies depending on the voltage.
IMPORTANT AC POWER CONNECTION NOTES:
• Use only approved cable types.
• Do not overload circuits!
Connecting Power
Ta bl e 1 describes how to connect power to your SPX LED WW Luminaire.
SPX LED WW LUMINAIRE QUICK START GUIDE 1 02.1704.0010 15 AUGUST 2018
Page 2
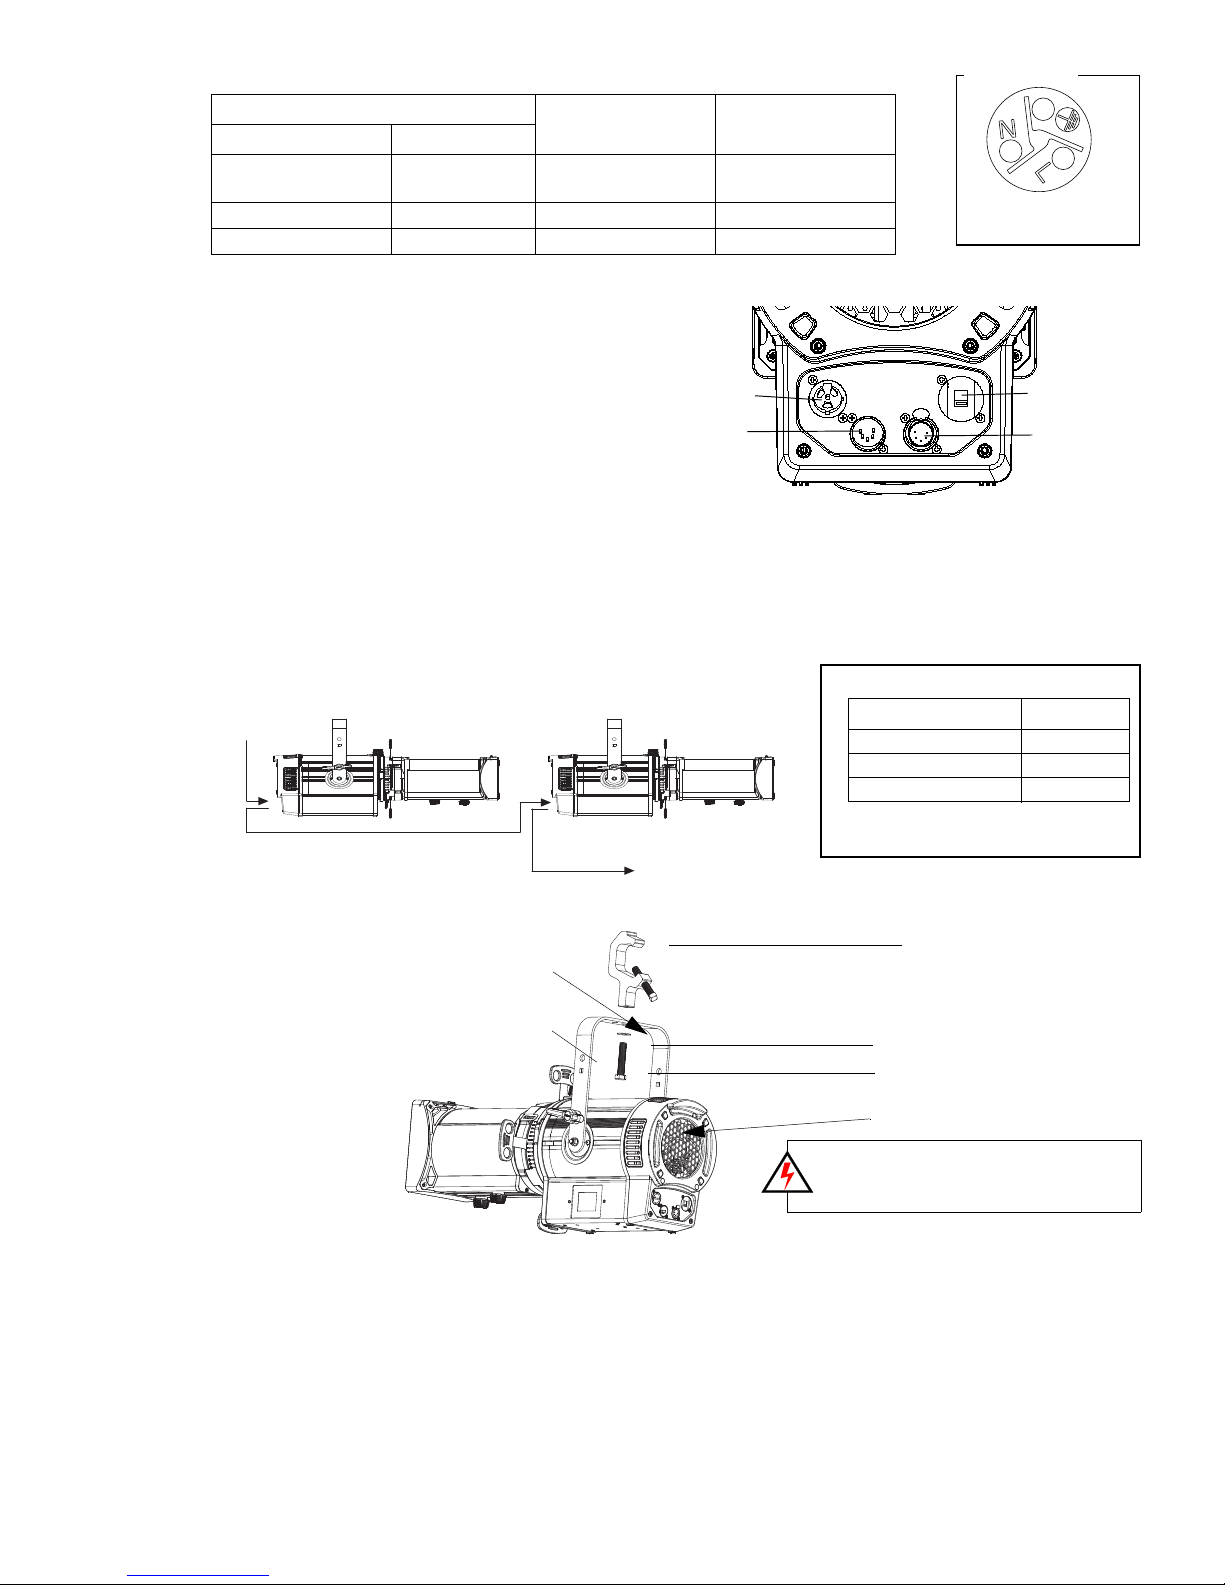
Tabl e 1: SPX LED WW Luminaire AC Input Connections
NOTE: Visit neutrik.com for
detailed wiring instructions for
powerCON TRUE1 connector.
Neutrik Connector
Power In
DMX In
Voltage Select
DMX Thru
DMX512 (out fro m f irst to
second luminaire)
DMX512 (out to the next luminaire
o
r DMX512 controlled device)
SPX LED Profile Luminaires
DMX512 Connections
Note: Remaining pins on each
connector are not used.
DMX512 Signal XLR Pin
Common (Drain) 1
DMX512 - 2
DMX512 + 3
DMX512
(from console or
control device)
Yoke Assembly
Center Clamp
Luminaire Cooling Vents
NOTE: To allow for proper cooling, make
sure luminaire head is oriented as shown
(with cooling vents pointed upwards).
C-Clamp (not included)
Flat Washer (not included)
C-Clamp Bolt (not included)
Mounting Hole
Wire Color
North America EU
White Brown
Black Blue Neutral N
Green Green/Yellow Ground Ground Symbol
Purpose Neutrik Marking
Main / Line
(100 to 240VAC)
L
Selecting Control and Voltage
The SPX LED WW operates on mains or on DMX.
To run the fixture on mains, connect power from a
dimmer. To run the fixture on DMX, connect power
from a non-dimmed circuit and connect DMX. It is
important to select the correct voltage for the
luminaire to function correctly. To select the
voltage, choose “120” or “230” using the voltage
select switch on the rear of the fixture.
Connecting to the DMX512 Network
Basic DMX512 installation consists of connecting multiple SPX LED WW Luminaires together (up to 30
luminaires) in "daisy-chain" fashion. A cable runs from the control console (or DMX512 control source)
to the DMX connector on the first luminaire. Another cable runs from the other DMX connector on the
first unit to a DMX connector on the next luminaire (or DMX512 device to be controlled)
For SPX LED WW Luminaire DMX Mapping, refer to the product user’s manual.
Mounting
Thread clamp
mounting bolt (with
washer installed)
through center clamp
mounting hole at top
of yoke and thread
bolt into C-Clamp.
Securely tighten bolt
(by hand) into clamp.
DO NOT OVERTIGHTEN! C-clamp,
bolt, and washer not
included.
SPX LED WW LUMINAIRE QUICK START GUIDE 2 02.1704.0010 15 AUGUST 2018
Luminaire Mounting
To mount on a telescopic stand, reverse the yoke under the luminaire and bolt to stand. Note luminaire
orientation for proper cooling.
Page 3
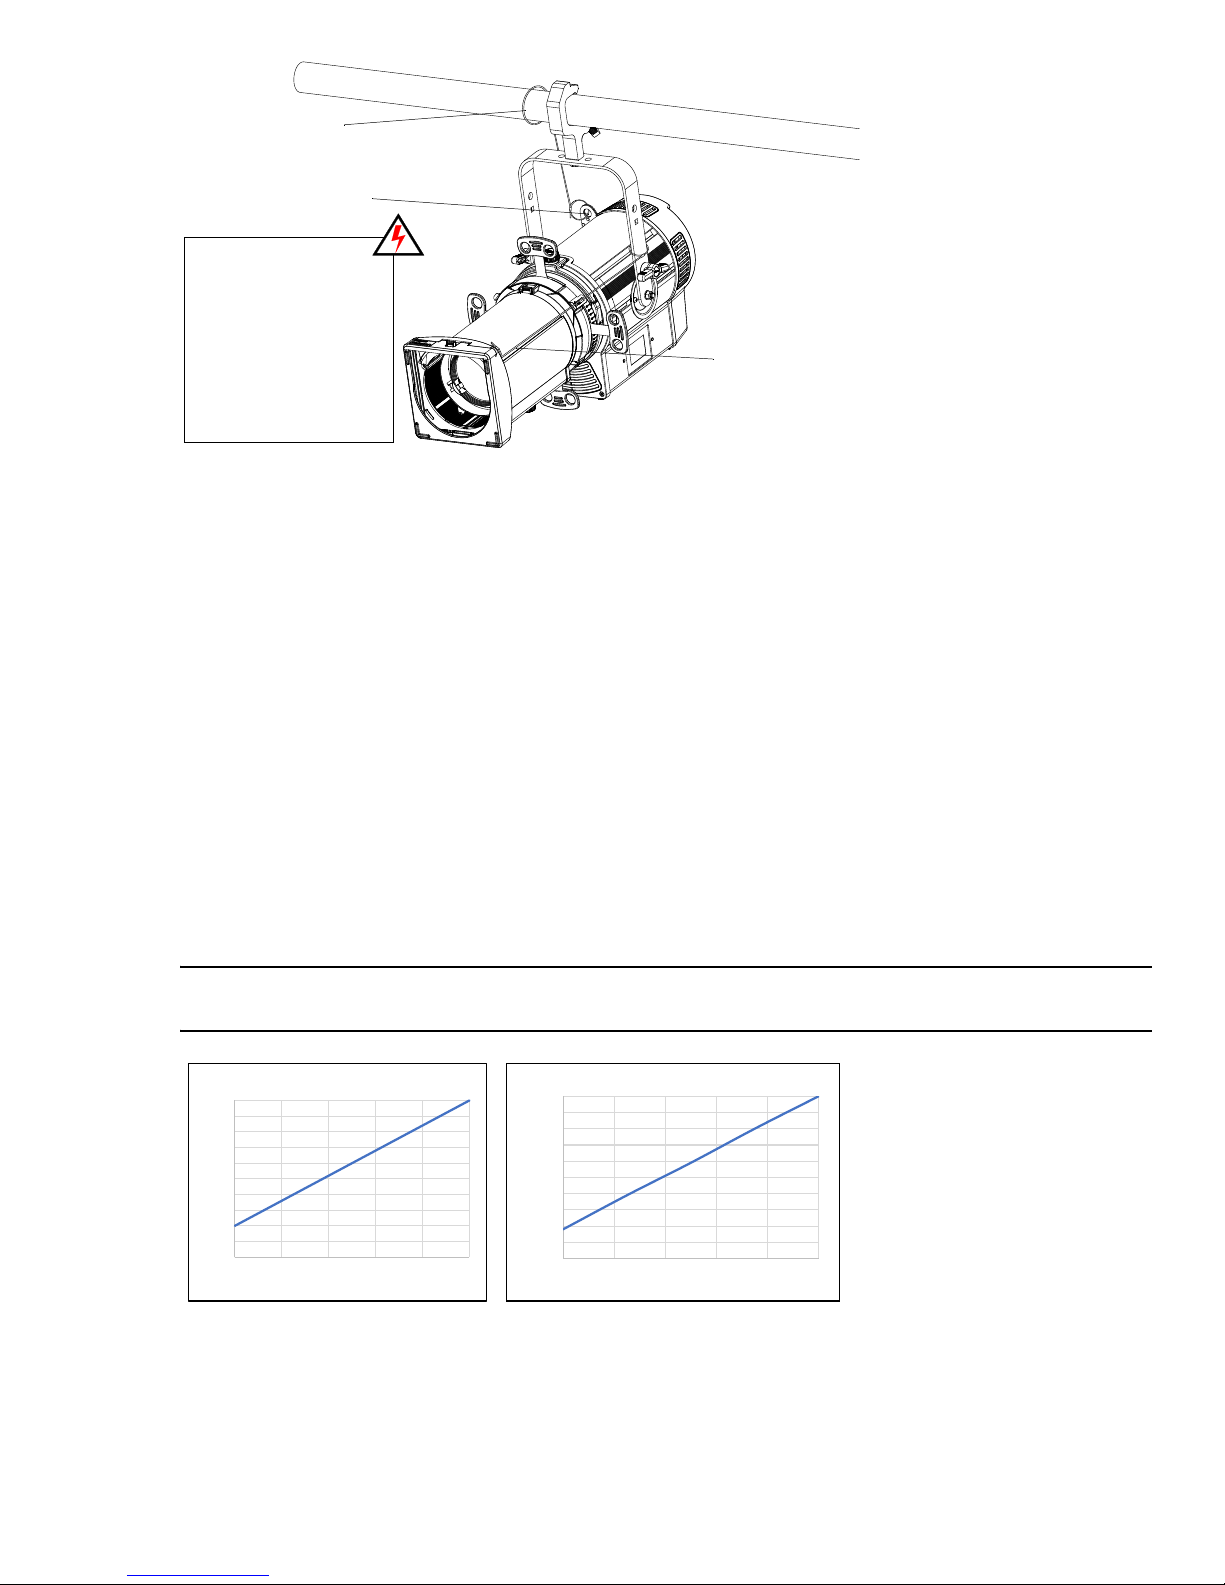
A safety cable MUST always
Safety Cable
(sold separately)
Safety Cable
(not supplied)
Safety Cable
Anchor Point
SAFETY CABLE: FOR
LUMINAIRE, a safety cable is
recommended for all hanging
installations and may be
required by national and local
codes. Loop safety cable
through luminaire safety
cable anchor point. FOR
LENS TUBE, attach a safety
cable (sold separately) to lens
tube anchor point and to
yoke assembly.
0%
10%
20%
30%
40%
50%
60%
70%
80%
90%
100%
0% 20% 40% 60% 80% 100%
Dimmer %
Output %
Dimmer % to Output % on 115V
0%
10%
20%
30%
40%
50%
60%
70%
80%
90%
100%
0% 20% 40% 60% 80% 100%
Dimmer %
Output %
Dimmer % to Output % on 230V
be used when rigging
luminaires on bars, truss, etc.
A safety cable is
recommended for all hanging
installations and may be
required by national and
local codes. Loop or attach
safety cable to luminaire
safety cable anchor point as
shown and attach to
structure. You should always
consult and follow all local
and national codes and
regulations for mounting and
installation of luminaire.
OPERATING THE LUMINAIRE
To set DMX address:
Step 1. At default screen, press LEFT or RIGHT arrow button once.
Step 2. Press LEFT or RIGHT arrow buttons to scroll to DMX Address.
Step 3. Hit [OK] to change DMX address.
Step 4. Press [ESC] at any time to access Main Menu.
Use with Mains Dimming
In order for the SPX LED WW to dim between 0% and 100%, the connected dimmer must provide a
minimum voltage to ensure the fixture is powered and ready to dim. The minimum required voltage
level is shown in the tables below. When the dimmer output falls below the specified minimum, the
SPX LED WW powers off.
For optimal performance, the dimmer should be configured to always generate the minimum required
voltage level when the control signal from the console is at 0%. This can be achieved by adjusting the
dimmer output law (sometimes refereed to as “dimmer curve,” “preheat” or “bottom set” depending on
the manufacturer). Alternatively, it may be possible to produce the same effect by adjusting the output
curve of your console. Consult the manufacturer of your dimmer/console for the specific steps
required.
Note: Strand Lighting technicians cannot provide instructions for adjusting the output curve on
dimmers/consoles not manufactured by Strand Lighting.
SPX LED WW LUMINAIRE QUICK START GUIDE 3 02.1704.0010 15 AUGUST 2018
used when rigging luminaires on bars, truss, etc. A safety cable is recommended for all hanging
installation and may be required by national and local codes.
It is possible to use a dimmer
or console that has not been
adjusted. However, you may
experience different
performance characteristics
and behaviors, including
delays when flashing to full.
Beam Shutter Operation
A safety cable MUST always be
Page 4
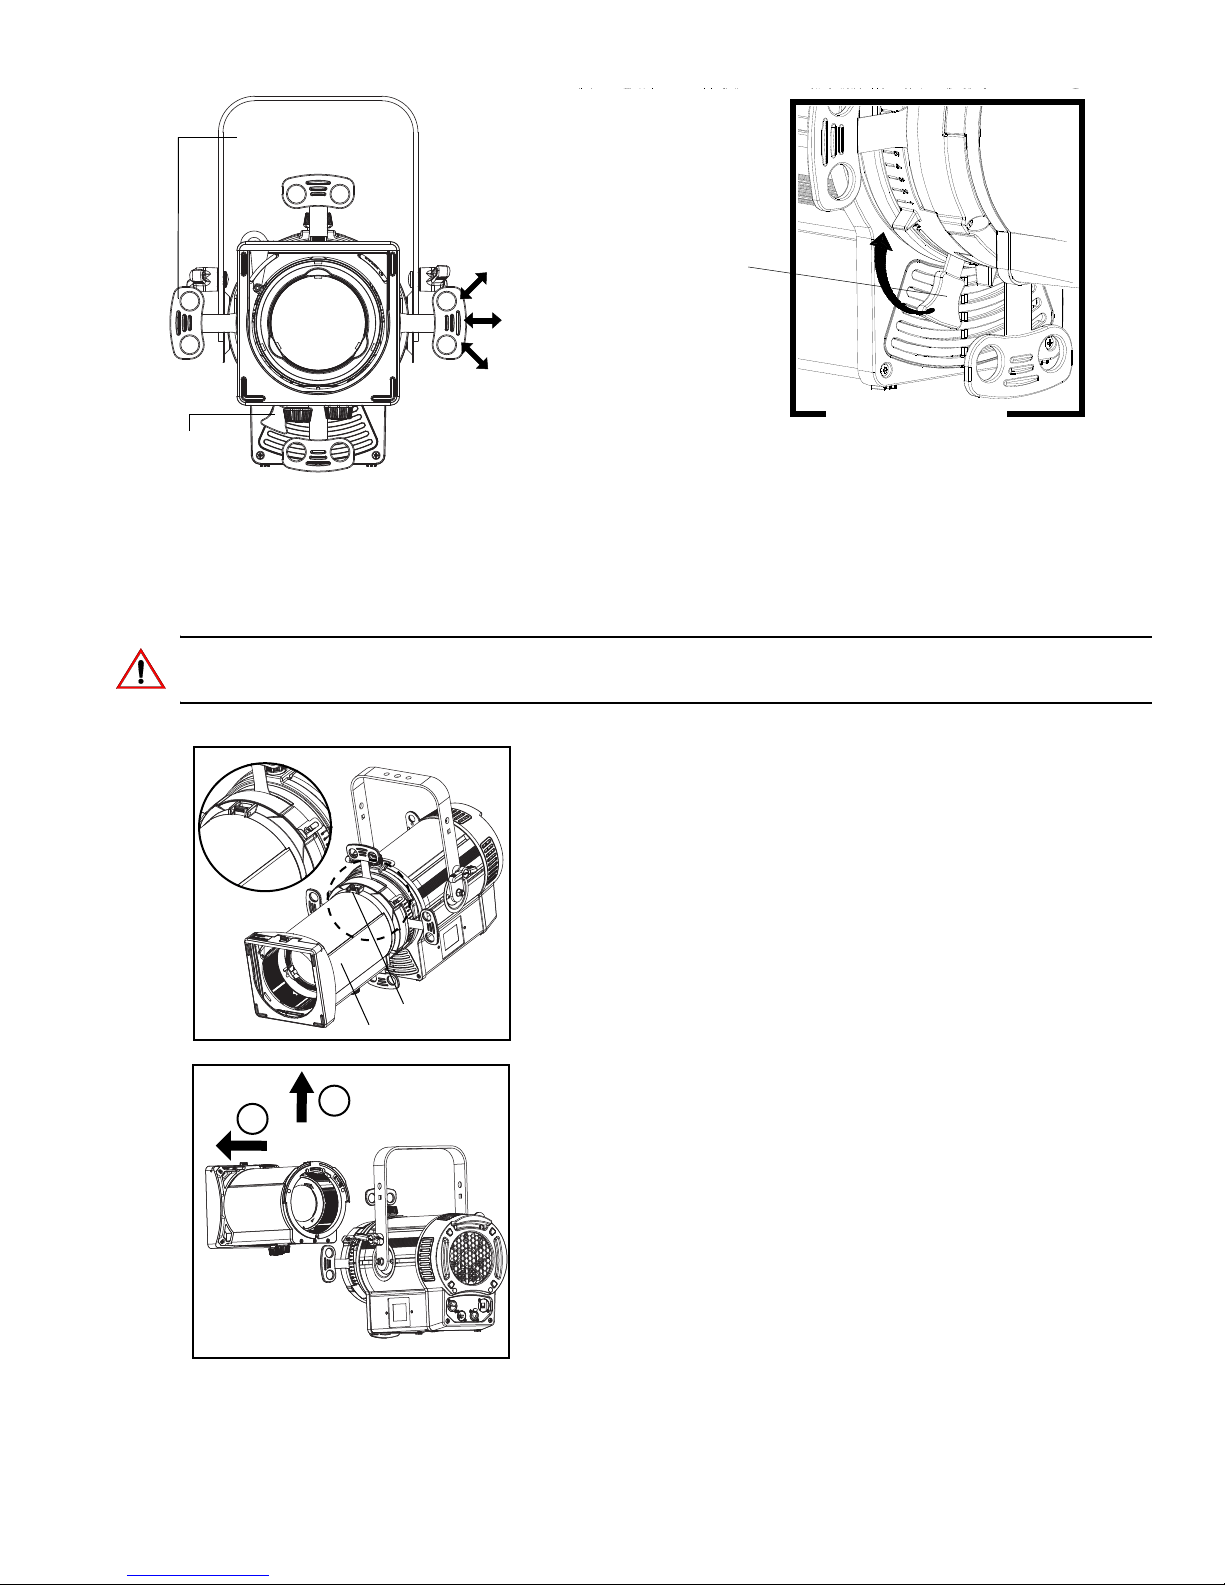
Lens Tube Removal and Installation
Beam Shutters
(4 Each)
Front View
Move beam shutters
in and out as
desired.
Shutter Lock
See Detail
Shutter Lock Detail
Shutter Lock
Lens tube assembly
Lens tube lock
2
1
It is easy and quick to change to the lens tubes on a SPX LED WW Luminaire. Fixed beam and zoom
lens tubes are interchangeable.
CAUTION: Ensure the lens tube locking catch is fully engaged and safety cable is attached before
putting fixture into use.
To remove and install lens tubes:
Step1.Loosen (but do not remove) move lens kno
b(s) towards
front of lens tube assembly.
Step2.Slide lens tube locking catch forward.
Step3.Lift lens tube assembly up and away from light engine
assembly.
Step4.To install perform process in reverse.
CUSTOMER SERVICE
If you have any questions regarding this product, please contact
Customer Service at +1-214-647-7880 or via e-mail at
entertainment.service@signify.com.
LIMITED 3-YEAR WARRANTY
SPX LED WW LUMINAIRE QUICK START GUIDE 4 02.1704.0010 15 AUGUST 2018
Strand Lighting offers a three-year limited warranty of its
luminaires against defects in materials or workmanship from
the date of delivery. A copy of Strand Lighting three-year
limited warranty containing specific terms and conditions can
be obtained from the Strand Lighting web site at
www.strandlighting.com or by contacting your local Strand
Lighting office.
 Loading...