

Page 1

PARTS AND OPERATION MANUAL
WALK-BEHIND TROWEL
SCT36 AND SCT46
SERIES
MODEL #
SERIAL #
Revision #4 (04/02/07)
STOW CONSTRUCTION EQUIPMENTSTOW CONSTRUCTION EQUIPMENT
STOW CONSTRUCTION EQUIPMENT
STOW CONSTRUCTION EQUIPMENTSTOW CONSTRUCTION EQUIPMENT
A DIVISION OF MULTIQUIP INC.
POST OFFICE BOX 6254
CARSON, CA 90749
310-537-3700 • 888-252-SCT SERIES[888-252-7869]
FAX: 310-537-1986 • FAX: 800-556-1986
E-MAIL: stow@multiquip.com • WWW: stowmfg.com
PARTS DEPARTMENT:
800-427-1244
FAX: 800-672-7877
SERVICE DEPARTMENT/TECHNICAL ASSISTANCE:
800-478-1244
FAX: 310-631-5032
P/N 21220
Page 2

Page 3

NOTE PAGE
SCT SERIES WALK-BEHIND TROWEL — PARTS & OPERATION MANUAL — REV. #4 (04/02/07) — PAGE 3
Page 4

SCT SERIES TROWEL— TABLE OF CONTENTS
Here's How To Get Help ............................................ 3
Table Of Contents ..................................................... 4
Parts Ordering Procedures ....................................... 5
Training Checklist ...................................................... 6
Daily Pre-Operation Checklist ................................... 7
Safety Message Alert Symbols .............................. 8-9
Rules For Safe Operation .................................. 10-11
Operation And Safety Decals .................................. 12
Specifications (Trowel) ............................................ 13
Specifications (Engines).......................................... 14
Specifications (Trowel Weights) .............................. 14
General Information ................................................ 15
SCT SERIESTROWEL
Controls and Components ...................................... 16
Basic Engine ........................................................... 17
Assembly and Installation .................................. 18-19
Pre-Inspection .................................................... 20-21
Initial Start-Up (Gasoline Engine) ......................22-23
Operation ................................................................ 24
Options .................................................................... 25
Maintenance (Engine)........................................ 26-27
Maintenance (Trowel)) ....................................... 28-32
Troubleshooting (Trowel) ................................... 33-34
Troubleshooting (Engine)................................... 34-35
Explanation of Codes in Remarks Column ............. 36
Suggested Spare Parts ........................................... 37
Decal Locator ..................................................... 38-39
Standard Handle Assembly ............................... 40-41
4-Blade Spider Assembly ................................... 42-43
Gearbox Assembly ............................................. 44-45
Guard Ring Assembly ........................................46-47
Stabilizer Ring Assembly ................................... 48-49
Engines Assembly .............................................. 50-51
Blades & Adjustment Fixture Assembly. ............ 52-53
HONDA GX160K1QX2ENGINE
Air Cleaner Assy. ................................................ 54-55
Camshaft Assy. .................................................. 56-57
Carburetor Assy. ................................................ 58-59
Control Assy. ......................................................60-61
Crankcase Cover Assy. ...................................... 62-63
Crankshaft Assy. ................................................64-65
Cylinder Barrel Assy. .......................................... 66-67
Cylinder Head Assy. ........................................... 68-69
Fan Cover Assy. ................................................. 70-71
Flywheel Assy..................................................... 72-73
Fuel Tank Asssembly ......................................... 74-75
Ignition Coil Asssembly ...................................... 76-77
Muffler Asssembly .............................................. 78-79
Piston Asssembly ............................................... 80-81
Recoil Starter Asssembly ................................... 82-83
Gaskets ................................................................... 85
Engine Labels .................................................... 86-87
HONDA GX240K1QA2ENGINE
Air Cleaner Asssembly ....................................... 88-89
Camshaft Asssembly ......................................... 90-91
Carburetor Asssembly .......................................92-93
Control Asssembly ............................................. 94-95
Crankcase Cover Asssembly ............................. 96-97
Crankshaft Asssembly ....................................... 98-99
Cylinder Barrel Asssembly .............................100-101
Cylinder Head Asssembly ..............................102-103
Fan Cover Asssembly .................................... 104-105
Flywheel Asssembly ....................................... 106-107
Fuel Tank Asssembly ..................................... 108-109
Ignition Coil Asssembly ..................................110-111
Muffler Asssembly .......................................... 112-113
Piston Asssembly ...........................................114-115
Recoil Starter Asssembly ...............................116-117
Engine Labels ................................................ 118-119
Honda GX340K1QAP2 Engine
Air Cleaner Assembly..................................... 120-121
Camshaft Assembly ....................................... 122-123
Carburetor Assembly ..................................... 124-125
Crankcase Cover Assembly ........................... 126-127
Control Assembly ........................................... 128-129
Cylinder Barrel Assembly ............................... 130-131
Cylinder Head Assembly ................................ 132-133
Crankshaft Assembly .....................................134-135
Fan Cover Assembly ...................................... 136-137
Flywheel Assembly ........................................ 138-139
Fuel Tank Assembly ....................................... 140-141
Ignition Coil Assembly .................................... 142-143
Muffler Assembly ........................................... 144-145
Piston Assembly ............................................. 146-147
Recoil Starter Assembly................................. 148-149
Engine Labels ................................................ 150-151
Terms and Conditions of Sale Parts ..................... 152
PAGE 4 — SCT SERIES WALK-BEHIND TROWEL— PARTS & OPERATION MANUAL — REV. #4 (04/02/07)
Page 5

SCT SERIES TROWEL— PARTS ORDERING PROCEDURES
When ordering parts,
please supply the following information:
❒❒
❒ Dealer account number
❒❒
❒❒
❒ Dealer name and address
❒❒
❒❒
❒ Shipping address (if different than billing address)
❒❒
❒❒
❒ Return fax number
❒❒
❒❒
❒ Applicable model number
❒❒
❒❒
❒ Quantity, part number and description of each part
❒❒
❒❒
❒ Specify preferred method of shipment:
❒❒
✓ FedEx or UPS Ground
✓ FedEx or UPS Second Day or Third Day
✓ FedEx or UPS Next Day
✓ Federal Express Priority One
✓ DHL
✓ Tr u ck
Note: Unless otherwise indicated by customer, all
orders are treated as “Standard Orders”, and will
ship within 24 hours. We will make every effort to
ship “Air Shipments” the same day that the order is
received, if prior to 2PM west coast time. “Stock
Orders” must be so noted on fax or web forms.
Here’s how to get help...
Please have the model and serial number
on hand when calling.
STOW MAIN OFFICE
18910 Wilmington Ave. 800-421-1244
FAX:
Carson, CA 90746
Email: stow@stowmfg.com
Internet: www.stowmfg.com
SALES DEPARTMENT
310-661-4242 Fax: 310-604-9237
877-289-7869 (877-BUY-STOW)
PARTS DEPARTMENT
800-427-1244
310-537-3700
SERVICE DEPARTMENT
800-478-1244
310-537-3700
TECHNICAL ASSISTANCE
800-478-1244
WARRANTY DEPARTMENT
800-421-1244,
310-537-3700,
EXT.
EXT.
279
279
310-537-3927
FAX:
800-672-7877
FAX:
310-637-3284
FAX:
310-537-4259
FAX:
310-631-5032
FAX:
310-537-1173
Place Your Parts Order Via Web or Fax
For Even More Savings!
(Domestic USA Dealers Only)
Extra Discounts!
All parts orders which include complete part numbers and
are received by our automated web parts order system, or
by fax qualify for the following extra discounts:
Ordered Standard Stock orders
via orders ($750 list and above)
Fax 3% 10%
Web 5% 10%
Special freight allowances
when you order 10 or more
line items via Web or Fax!**
FedEx Ground Service
No other allowances on freight shipped by any other
carrier.
**Common nuts, bolts and washers (all items under $1.00
list price) do not count towards the 10+ line items.
NOTE: DISCOUNTS ARE SUBJECT TO CHANGE
at no charge for freight
STOW CONSTRUCTION EQUIPMENTSTOW CONSTRUCTION EQUIPMENT
STOW CONSTRUCTION EQUIPMENT
STOW CONSTRUCTION EQUIPMENTSTOW CONSTRUCTION EQUIPMENT
A DIVISION OF MULTIQUIP INC.
POST OFFICE BOX 6254 CARSON, CA 90749
888-252-STOW [888-252-7869] 310-537-3700
FAX: 310-537-1986 FAX: 800-556-1986
E-MAIL: stow@multiquip.com INTERNET: www.stowmfg.com
SCT SERIES WALK-BEHIND TROWEL — PARTS & OPERATION MANUAL — REV. #4 (04/02/07) — PAGE 5
Direct TOLL-FREE access
to our Parts Department:
Toll-free nationwide — 800-427-1244
Toll-free FAX — 800-6-PARTS-7
(800/672-7877)
Page 6

SCT SERIES TROWEL— TRAINING CHECKLIST
TRAINING CHECKLIST
This checklist will lists some of the minimum requirements for
machine maintenance and operation. Please feel free to detach
it and make copies. Use this checklist whenever a new operator
is to be trained or it can be used as a review for more experienced
operator’s.
TSILKCEHCGNINIART
.ON NOITPIRCSED ?KO ETAD
1 .yletelpmoclaunaMs’rotarepOdaeR
2
3 .erudecorpgnileufer,metsysleuF
4 .)gninnurtonenihcam(slortnocfonoitarepO
5 .noitarepohctiwspotsytefas,slortnocytefaS
6 .serudecorppotsycnegremE
7 .enihcamfoputratS
8 .gnirevuenaM
9 .gnihctiP
01 .seuqinhcetgnihsinifetercnoC
11 .enihcamfonwodtuhS
21 .enihcamfognitfiL
31 .egarotsdnatropsnartenihcaM
dnaenignefognikcehc,stnenopmocfonoitacol,tuoyalenihcaM
.leveldiulfxobraeg
Operator _________________________________________ Trainee __________________________________________
COMMENTS:
PAGE 6 — SCT SERIES WALK-BEHIND TROWEL— PARTS & OPERATION MANUAL — REV. #4 (04/02/07)
Page 7

SCT SERIES TROWEL— DAILY PRE-OPERATION CHECKLIST
DAILY PRE-OPERATION CHECKLIST
1 .leveLliOenignE
2 .leveLdiulFxobraeG
3 .sedalBfonoitidnoC
4 .noitarepOhctiPedalB
5 .noitarepOhctiwSpotSytefaS
COMMENTS:
TSILKCEHCNOITAREPO-ERPYLIAD
SCT SERIES WALK-BEHIND TROWEL — PARTS & OPERATION MANUAL — REV. #4 (04/02/07) — PAGE 7
Page 8
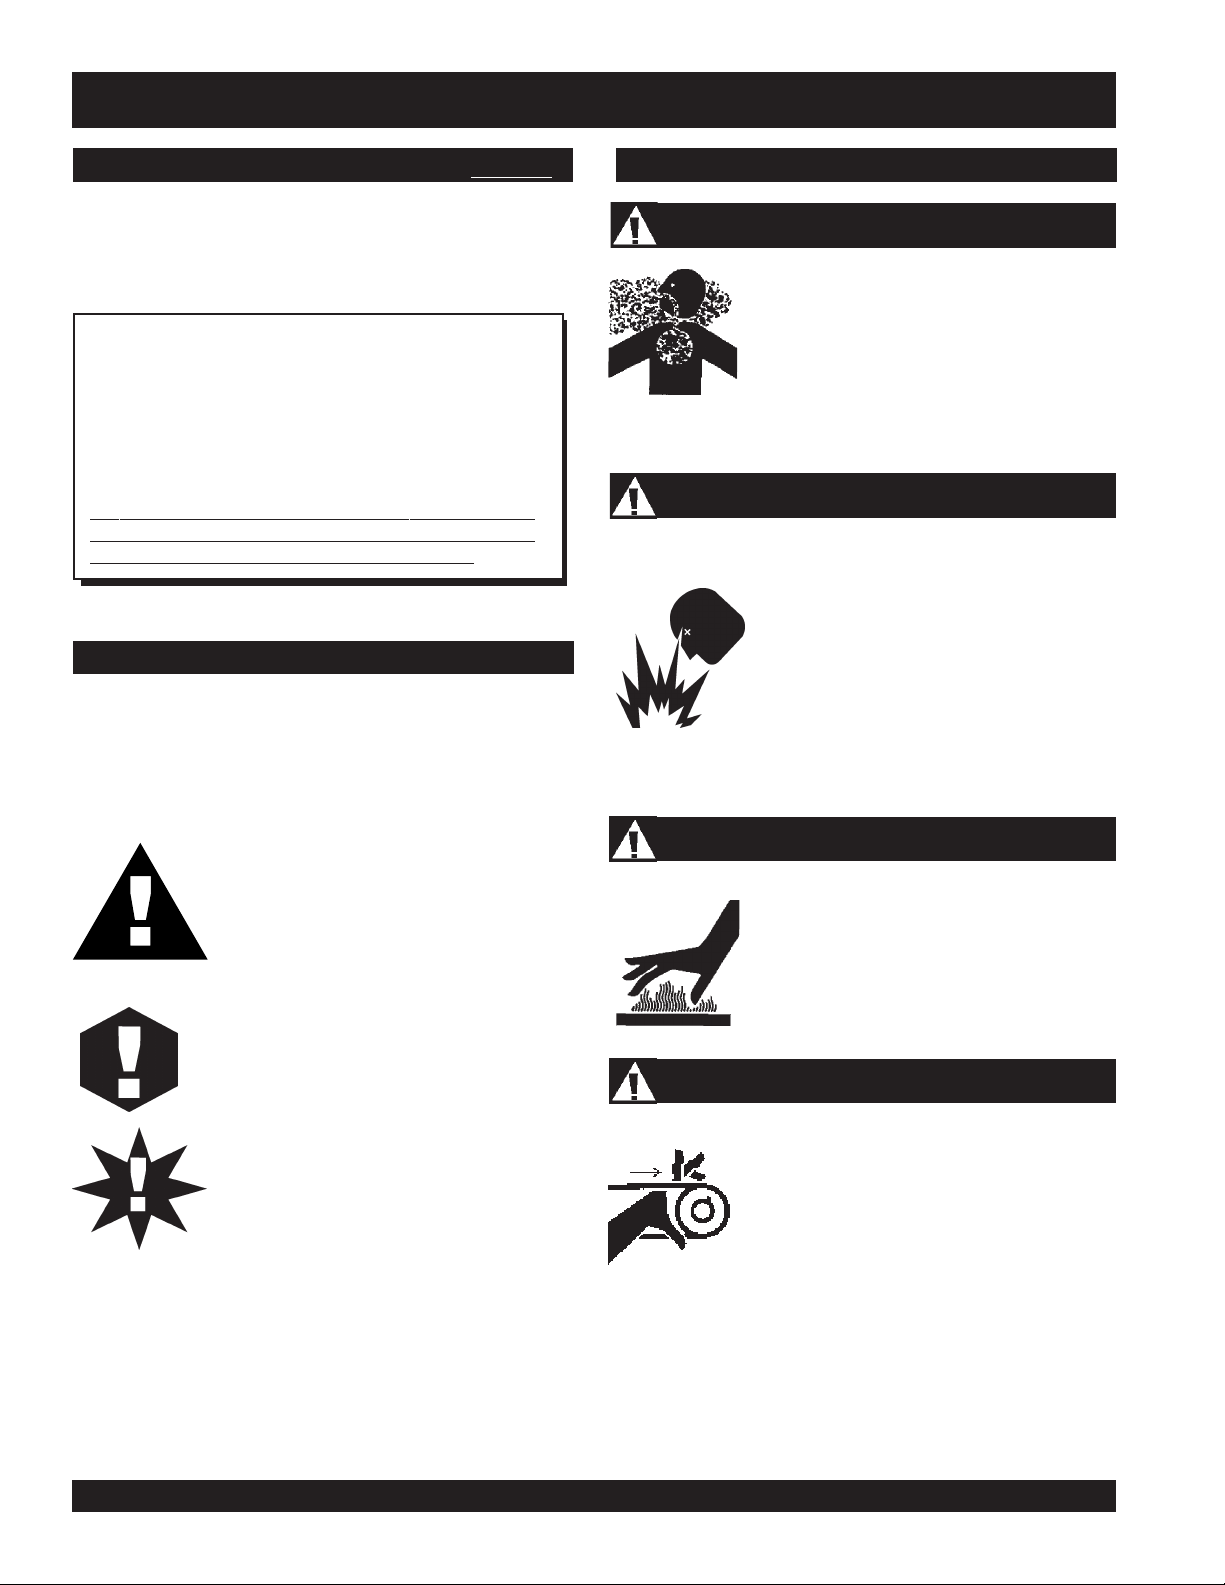
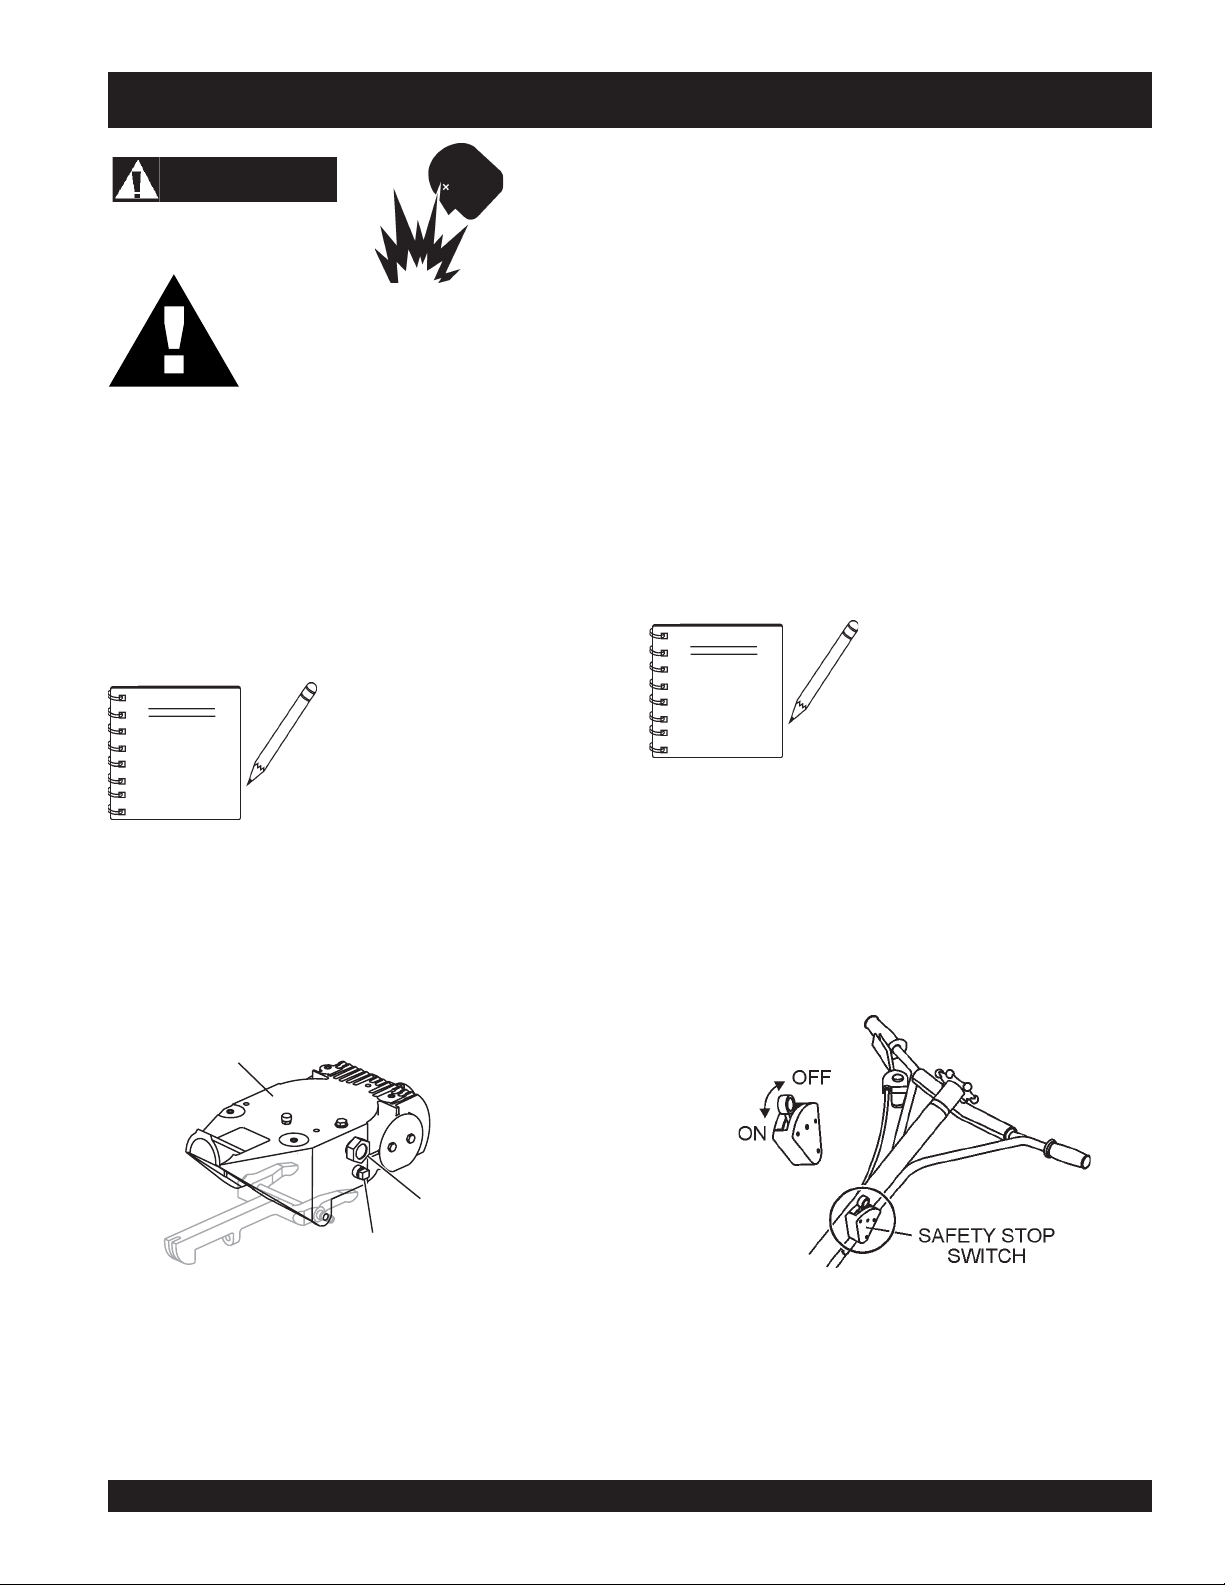
SCT SERIES TROWEL— SAFETY MESSAGE ALERT SYMBOLS
FOR YOUR SAFETY AND THE SAFETY OF OTHERS!
Safety precautions should be followed at all times when operating
this equipment. Failure to read and understand the Safety
Messages and Operating Instructions could result in injury to
yourself and others.
HAZARD SYMBOLS
NOTE
This Owner's Manual has been developed to provide
complete instructions for the safe and efficient operation
of the SCT SERIESWALK-BEHIND TROWEL. For
engine maintenance information, please refer to the
engine manufacturers instructions for data relative to its
safe operation.
Before using this WALK-BEHIND TROWEL, ensure
that the operating individual has read and
understands all instructions in this manual.
SAFETY MESSAGE ALERT SYMBOLS
The three (3) Safety Messages shown below will inform you
about potential hazards that could injure you or others. The
Safety Messages specifically address the level of exposure to
the operator, and are preceded by one of three words: DANGER,
WARNING, or CAUTION.
Lethal Exhaust Gases
Engine exhaust gases contain poisonous
carbon monoxide. This gas is colorless and
odorless, and can cause death if inhaled.
NEVER operate this equipment in a confined
area or enclosed structure that does not
provide ample free flow air.
Explosive Fuel
Gasoline is extremely flammable, and its
vapors can cause an explosion if ignited. DO
NOT start the engine near spilled fuel or
combustible fluids. DO NOT fill the fuel tank
while the engine is running or hot. DO NOT
overfill tank, since spilled fuel could ignite if it
comes into contact with hot engine parts or
sparks from the ignition system. Store fuel in
approved containers, in well-ventilated areas
and away from sparks and flames. NEVER
use fuel as a cleaning agent.
DANGER: You WILL be KILLED or
SERIOUSLY injured if you DO NOT follow
directions.
WARNING: You CAN be KILLED or
SERIOUSLY injured if you DO NOT follow
directions.
CAUTION: You CAN be injured if you
DO NOT follow directions.
Potential hazards associated with trowel operation will be
referenced with "
this manual, and will be referenced in conjunction with Safety
"
Message Alert Symbols
Hazard Symbols
".
" which appear throughout
Burn Hazards
Engine components can generate extreme
heat. To prevent burns, DO NOT touch these
areas while the engine is running or
immediately after operations. NEVER
operate the engine with heat shields or heat
guards removed.
Rotating Parts
NEVER operate equipment with covers, or
guards removed. Keep fingers,
and
clothing
prevent injury.
hands, hair
away from all moving parts to
PAGE 8 — SCT SERIES WALK-BEHIND TROWEL— PARTS & OPERATION MANUAL — REV. #4 (04/02/07)
Page 9
SCT SERIES TROWEL— SAFETY MESSAGE ALERT SYMBOLS
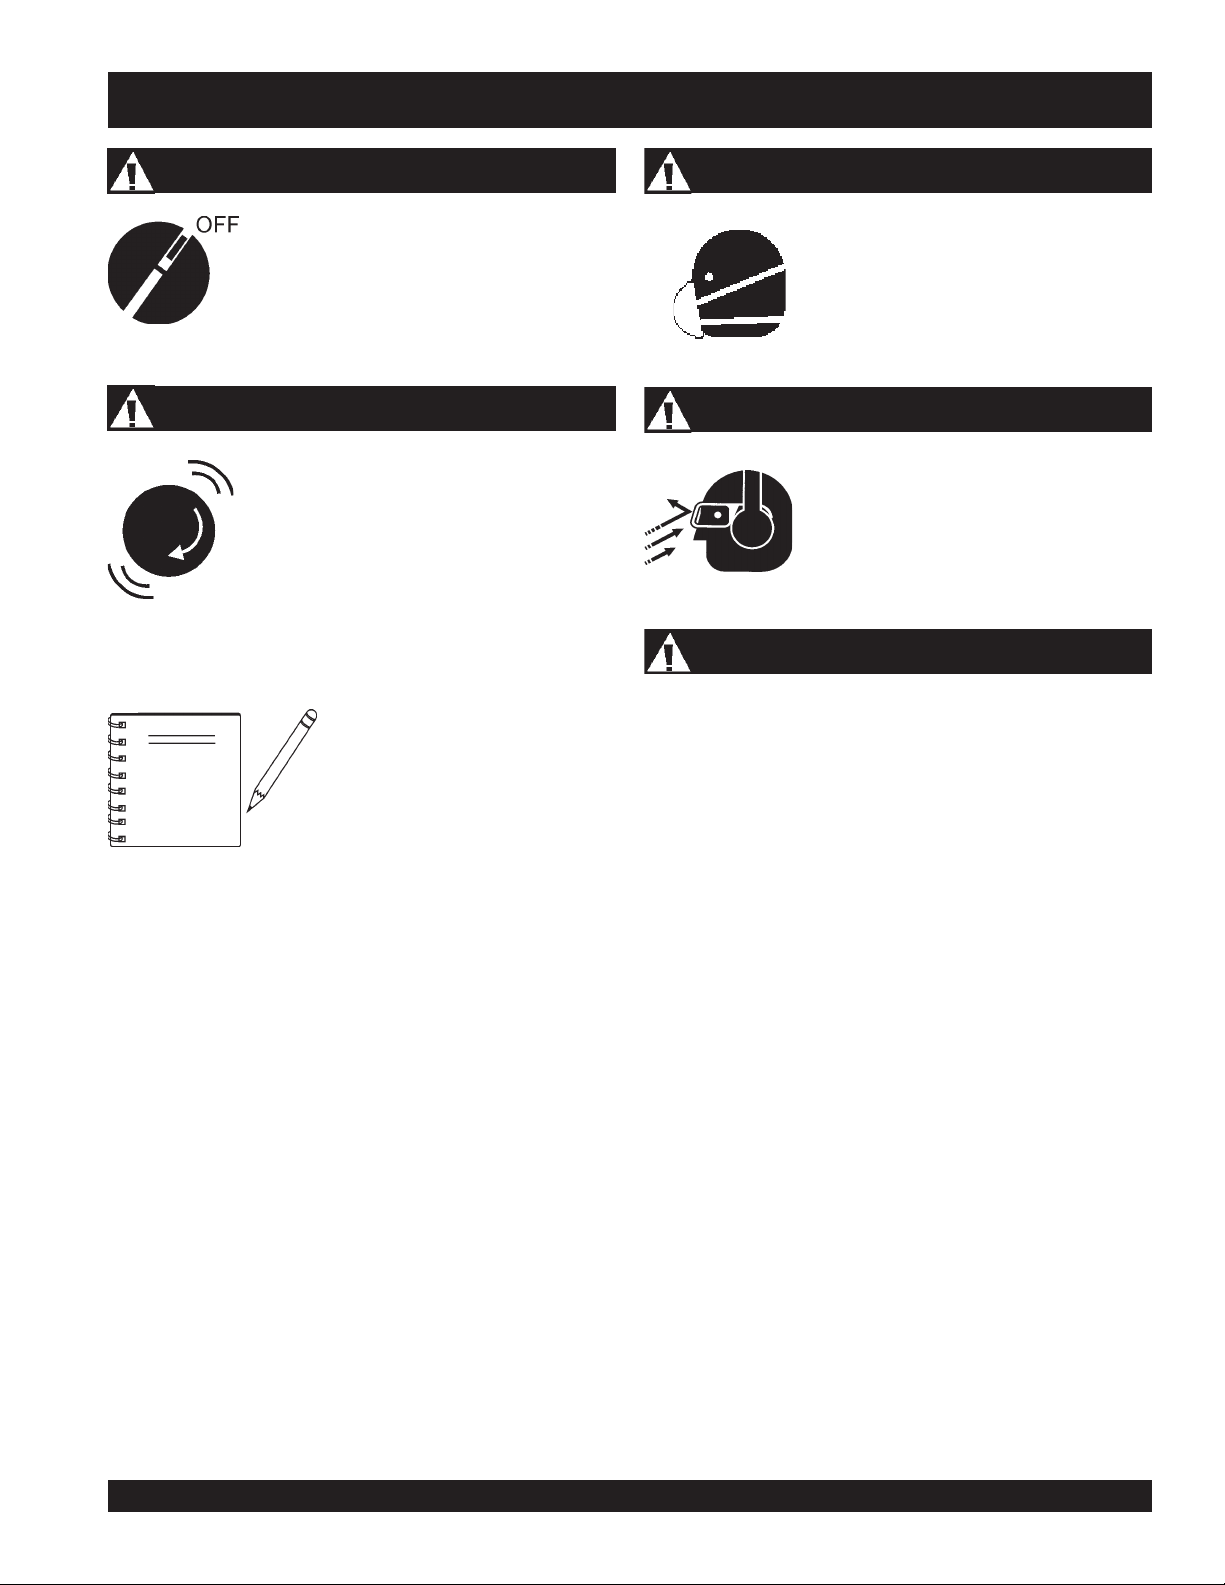
Accidental Starting
ALWAYS place the engine ON/OFF switch
in the OFF position, when the trowel is not
in use.
Over Speed Conditions
NEVER tamper with the factory settings of the
engine governor or settings. Personal injury
and damage to the engine or equipment can
result if operating in speed ranges above
maximum allowable.
This
NOTE
property, or the surrounding
environment could be damaged if
you do not follow instructions.
walk-behind trowel
, other
Respiratory Hazard
ALWAYS wear approved respiratory
protection.
Sight and Hearing hazard
ALWAYS wear approved eye and hearing
protection.
Equipment Damage Messages
Other important messages are provided throughout this manual
to help prevent damage to your trowel, other property, or the
surrounding environment.
SCT SERIES WALK-BEHIND TROWEL — PARTS & OPERATION MANUAL — REV. #4 (04/02/07) — PAGE 9
Page 10

SCT SERIES TROWEL — RULES FOR SAFE OPERATION
■
CAUTION:
Failure to follow instructions in this manual may
lead to serious injury or even death! This
equipment is to be operated by trained and
qualified personnel only! This equipment is
for industrial use only.
The following safety guidelines should always be used when
operating the SCT SERIESwalk-behind trowel.
SAFETY
■
DO NOT operate or service this equipment
before reading this entire manual.
■
This equipment should not be operated by persons under 18
years of age.
■
NEVER operate the trowel without proper protective clothing,
shatterproof glasses, steel-toed boots and other protective
devices required by the job.
NEVER touch the hot exhaust
manifold, muffler or cylinder. Allow
these parts to cool before
servicing the trowel.
■
High Temperatures – Allow the engine to cool before adding
fuel or performing service and maintenance functions. Contact
hot!
with
■
The engine of this trowel requires an adequate free flow of
cooling air. NEVER operate the trowel in any enclosed or
components can cause serious burns.
narrow area where free flow
of the air is restricted. If the
air flow is restricted it will
cause serious damage to
the trowel's engine and
may cause injury to people.
Remember the trowel's
engine gives off
carbon monoxide gas.
DEADLY
■
■
■
NEVER operate this equipment when not feeling
well due to fatigue, illness or taking medicine.
■
NEVER operate the trowel under the
influence or drugs or alcohol.
■
NEVER use accessories or attachments, which are not
recommended by SCT SERIESfor this equipment. Damage
to the equipment and/or injury to user may result.
■
Manufacture does not assume responsibility for any accident
due to equipment modifications.
■
Whenever necessary, replace nameplate, operation and
safety decals when they become difficult to read.
■
ALWAYS check the trowel for loosened screws, nuts, or bolts
before starting.
■
■
■
ALWAYS refuel in a well-ventilated area, away from sparks
and open flames.
ALWAYS use extreme caution when
working with flammable liquids. When
refueling, stop the engine and allow it to
cool.
NEVER
machine. Fire or explosion could result from
fuel vapors
engine.
NEVER operate the trowel in an explosive atmosphere or
near combustible materials. An explosion or fire could result
causing severe
Topping-off the fuel tank filler port is dangerous, as it tends to
spill fuel.
smoke
around or near the
, or if fuel is spilled on a
bodily harm or even death.
hot!
PAGE 10 — SCT SERIES WALK-BEHIND TROWEL— PARTS & OPERATION MANUAL — REV. #4 (04/02/07)
Page 11

SCT SERIES TROWEL — RULES FOR SAFE OPERATION
■
DO NOT operate this trowel unless all guards and safety
devices are attached and in place. See Pages 16 and 17.
■
ALWAYS use proper lifting techniques when moving the
trowel.
■
ALWAYS check to make sure that the operating area is clear
before starting the engine.
■
ALWAYS test the safety
operating the trowel.
■
NEVER place your
while starting or operating this equipment.
■
AVOID wearing jewelry or loose fitting clothing that may snag
on the controls or moving parts, this can cause a serious
injury.
■
ALWAYS keep clear of
operating the trowel.
■
NEVER leave the machine
■
Moving Parts – Shut down the engine before performing
service or maintenance functions. Contact with moving parts
can cause serious injury.
Maintenance Safety
■
Disconnect the spark plug wires before attempting any type
of service.
safety stop switch
feet
or
hands
inside the guard rings
rotating
or
unattended
devices before
moving parts
while running.
while
■
■
■
■
■
CAUTIONCAUTION
CAUTION
CAUTIONCAUTION
Emergencies
Keep the trowel in proper running condition.
Make sure that there is no buildup of concrete, grease, oil or
debris on the trowel.
Fix damage to the trowel immediately and always replace
broken parts.
Dispose of hazardous waste properly. Examples of potentially
hazardous waste are used
High Temperatures – Allow the machine and engine to
cool
before adding fuel or performing service and
maintenance functions. Contact with
cause serious burns.
■
ALWAYS know the location of the nearest
fire extinguisher
the location of the nearest telephone. Also
know the phone numbers of the nearest
ambulance, doctor
This information will be invaluable in the
case of an
motor oil, fuel
and
emergency
and
fuel filters
hot!
components can
first aid kit
and
fire department
.
.
. Know
.
■
Securely support any machine components that must be
raised.
■
NEVER lubricate components or attempt service on a running
machine.
■
DO NOT use food or plastic containers to dispose of
hazardous waste.
■
DO NOT pour
down a drain or into any water source.
waste, oil
or
fuel
directly onto the ground,
SCT SERIES WALK-BEHIND TROWEL — PARTS & OPERATION MANUAL — REV. #4 (04/02/07) — PAGE 11
Page 12
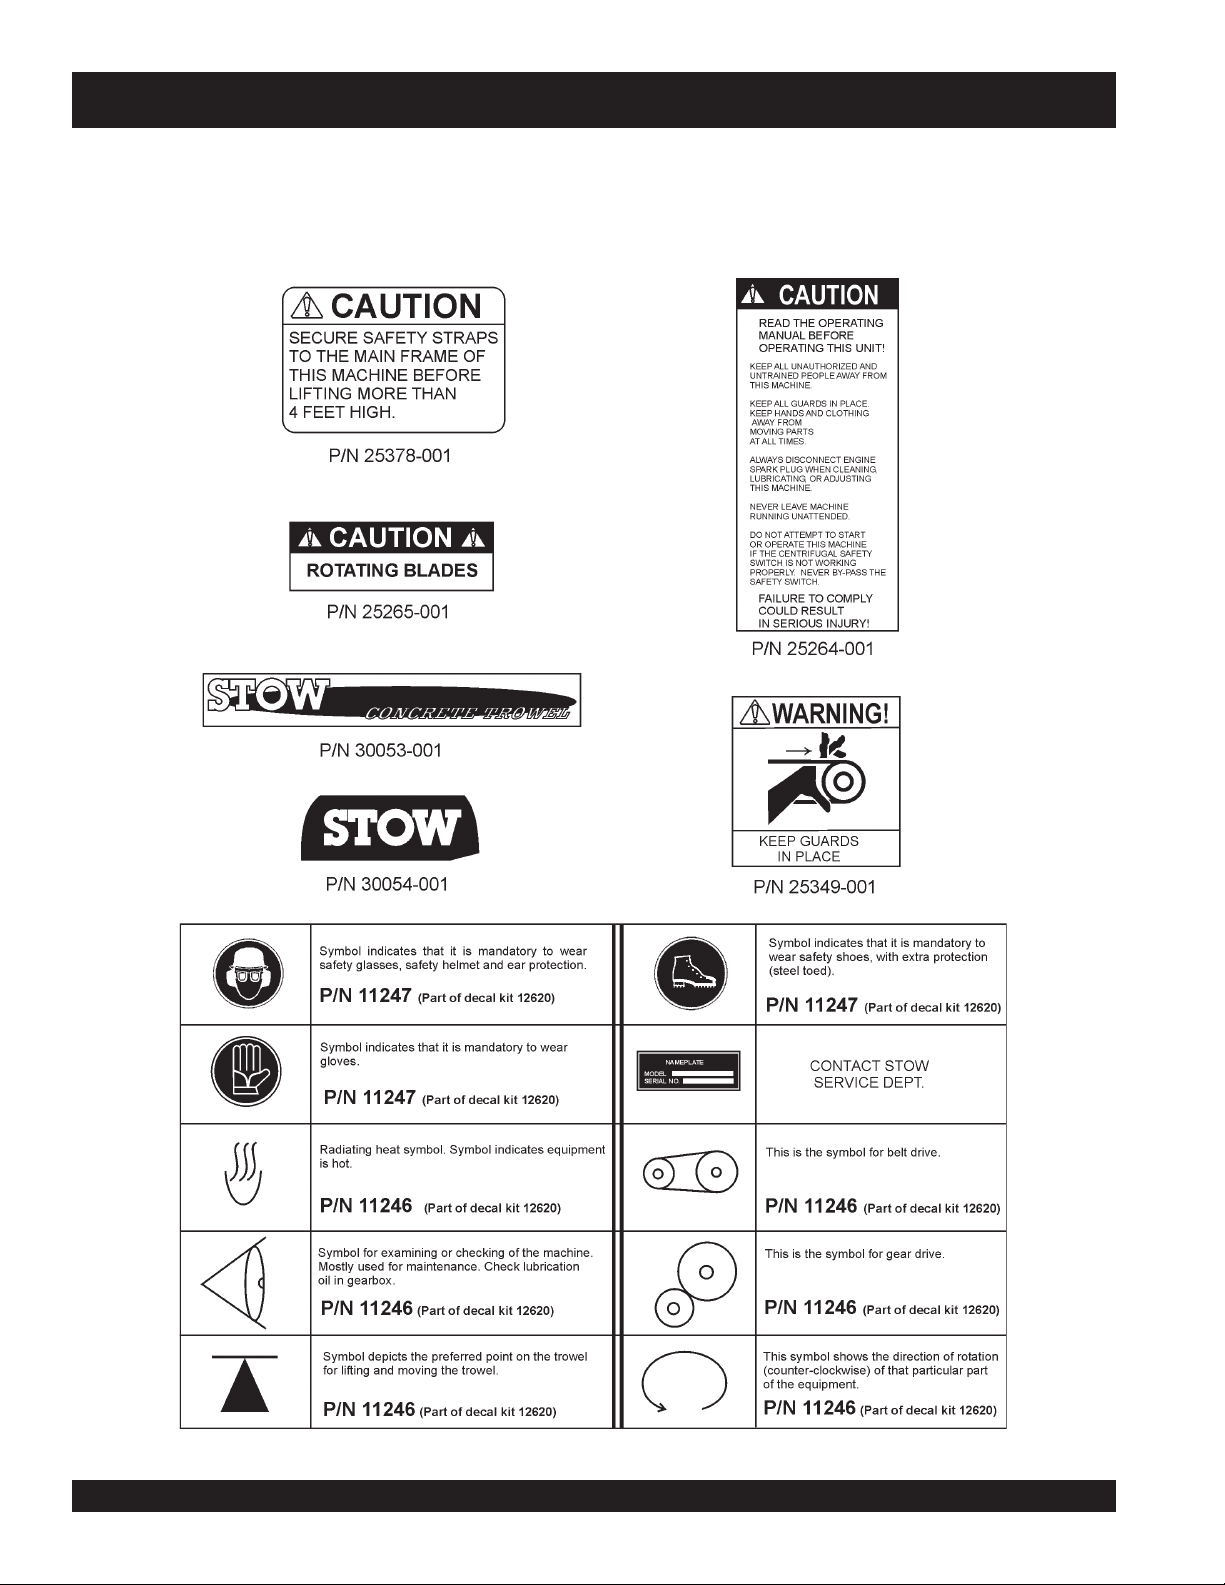
SCT SERIES TROWEL — OPERATION AND SAFETY DECALS
Machine Safety Decals
The SCT SERIESwalk-behind trowel is equipped with a number of safety decals. These decals are provided for operator safety and
maintenance information. Figure 1 below illustrates these decals as they appear on the machine. Should any of these decals
become unreadable, replacements can be obtained from your dealer.
Figure 1. SCT SERIESTrowel Decals
PAGE 12 — SCT SERIES WALK-BEHIND TROWEL— PARTS & OPERATION MANUAL — REV. #4 (04/02/07)
Page 13
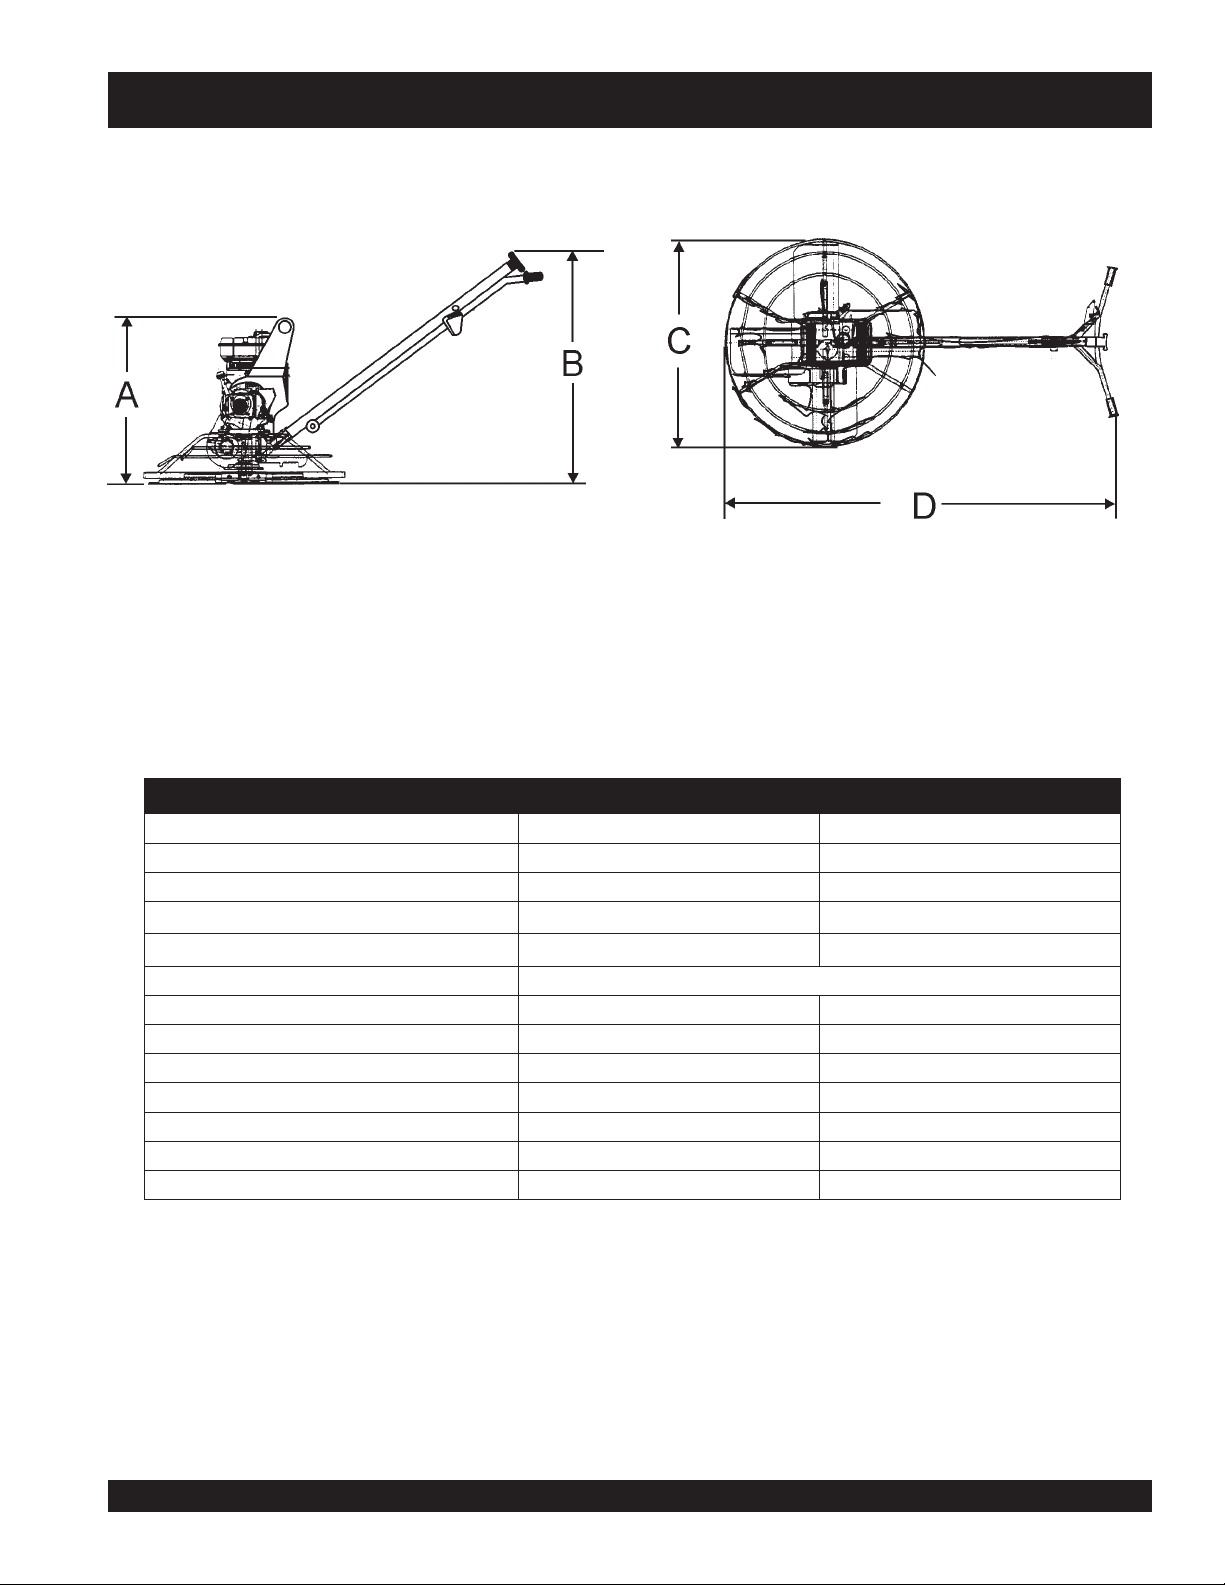
Side View
SCT SERIES TROWEL — SPECIFICATIONS (TROWEL)
Top View
Figure 2. SCT SERIESTrowel Dimensions
LEDOM 63TCS 64TCS
)kooHgnitfiL(thgieH–A )mm6.139(.ni7.63 )mm2.678(.ni5.43
)reveLtnemegagnEthgieH–B )mm2.440,1(.ni4.14 )mm2.440,1(.ni1.14
htdiW–C
htgneL–D
gnitarepO–thgieW 3ELBATEES
1
erusserPdnuoS
2
noitarbiV
bd49 bd79
retemaiDgniR )mc7.29(.ni5.63 )mc711(.ni64
sedalBforebmuN 4 4
)s/m(MPF–deepSpiTedalB )s/m5.6(mpf092,1 )s/m5.6(mpf092,1
)enilosaG(MPR–rotoR mpr0083@441 mpr0083@441
)mc(.ni–htdiWhtaP )mc44.19(.ni63 )48.611(.ni64
NOTE:
1. Sound pressure is a weighted measure. Measured at the
operators ear position while the walk-behind trowel is
operating at full throttle on concrete in a manner most often
experienced in “
normal
” circumstances. Sound pressure
may vary depending upon the condition of the concrete.
Hearing protection is always recommended.
2. The vibration level indicated is the maximum RMS (Root
Mean Square) value obtained at the handle grip while
operating the walk-behind trowel on curing concrete in a
manner most often experienced in “
Values were obtained from all three axes of motion. The
values shown represent the maximum RMS value from
these measurements.
snoitacificepSleworTWOTS.1elbaT
)mm1.729(.ni5.63 )mm4.861,1(.ni0.64
)mm4.987,1(.ni5.07 )mm1.019,1(.ni2.57
2
s/m6.91(g0.2
) s/m5.42(g5.2
2
)
normal
” circumstances.
SCT SERIES WALK-BEHIND TROWEL — PARTS & OPERATION MANUAL — REV. #4 (04/02/07) — PAGE 13
Page 14

SCT SERIES TROWEL— SPECIFICATIONS (ENGINES)
)senignE(snoitacificepS.2elbaT
ledoM2XQ061XGADNOH2AQ1K042XGADNOH2PAQ1K043XGADNOH
elgniS,ekorts4delooc-riA
epyT
enignEenilosaG
ekortSXeroB
tnemecalpsiD)cc361(.ni-uc9.9)cc242(.ni-uc18.41)cc733(.ni-uc6.02
tuptuOxaM.M.P.
yticapaCknaTleuF)sretil6.3(.lag.S.U59.0)sretil6(.lag.S.
leuFenilosaGelibomotuAdedaelnUenilosaGelibomotuAdedaelnUenilosaGelibomotuAdeda
yticapaCliOebuL)retil06.0(.tq.S.U36.0)sretil1.1(.tq.S.U61.1)sretil1.1(.tq.S.U61.1
lortnoCdeepS
dohteM
dohteMgnitratStratSlioceRtratSl
noisnemiD
)HxWxL(
thgieWteNyrD)gK0.51(.sbl1.33)gK52(.sbl1.55)gK13(.sbl4.86
.ni8.1x.ni7.2
R0004/.P.H5.5.M.P.R0063/.P.H0.8.M.P.R0063/.P.H0.11
tfahSlatnoziroH,VHO,rednilyC
)mm54xmm86(
pyTthgiew-ylFlagufirtneCepyTthgiew-ylFlagufirtneCepyTthgiew-ylFlagufirtneC
e
.ni2.31x3.41x0.21
)mm533x263x403(
m37(
U95.1)sretil5.6(lag.S.U27.1
ioceRtratSlioceR
elgniS,ekorts4delooc-riA
tfahSlatnoziroH,VHO,rednilyC
enignEenilosaG
.ni3.2x.ni9.2
)mm85xm
.ni1.61x9.61x0.41
)mm014x034x553(
-riA
elnU
.71x0.51
elgniS,ekorts4delooc
tfahSlatnoziroH,VHO,rednilyC
enignEenilosaG
.ni5.2x.ni2.3
)mm46xmm28(
4.71x7
)mm344x054x083(
)sthgieWleworT(snoitacificepS.3elbaT
LEDOMECRUOSREWOP
55H63TCSadnoHPH5.5)gK78(.sbl091)gK501(.sbl032
63TCSadnoHPH8)gK79(.sbl412)gK611(.sbl452
08H
08H64TCSadnoHPH8)gK011(.sbl242)gK331(.sbl292
11H64TCSadnoHPH11)gK431(.
PAGE 14 — SCT SERIES WALK-BEHIND TROWEL— PARTS & OPERATION MANUAL — REV. #4 (04/02/07)
sbl592)gK161(.sbl553
THGIEWGNITAREPO
)eldnahhtiw(
THGIEWGNIPPIHS
Page 15

SCT SERIES TROWEL— GENERAL INFORMATION
SCT SERIESWalk-Behind Trowel Familiarization
This walk-behind trowel is designed for the
finishing
Take a walk around the trowel. Take notice of all the major
components (see Figure 3, pages 16 and 17) like the engine,
blades, quick adjust control, (on those equiped models), air
cleaner, centrifugal stop switch etc. Check that there is always
oil in the engine.
Read
be found throughout this manual and on the trowel. Keep all
safety information in good, readable condition. Operators should
be well trained on the operation and maintenance of the trowel.
Before using your trowel, test it on a flat watered down section of
finished concrete that is free of any debris and other objects.
This trial test run will increase your confidence in using the trowel
and at the same time it will familiarize you with the trowel’s
controls. In addition you will understand how the trowel handles
under actual conditions.
Engines
The 36" trowel is available with a 5.5 HP HONDA or an 8.0 HP
HONDA gasoline engine while the 46" trowel is available with
an 8.0 HP HONDA or an 11.0 HP HONDA gasoline engine.
Refer to the engine owner’s manual for instructions regarding
the operation and maintenance of your engine. The engine
manual is included with your trowel at the time of shipment.
Please contact your nearest Multiquip Dealer for a replacement
should the original manual disappear or become unusable.
Drive System
Power is transferred from the engine to the gearbox input shaft
via a V-belt or pulley drive system. The pulley engages using a
centrifugal clutch.
Gearbox
The
to the
rotational speed of the trowel and is equipped with two shafts
(input and output).
of concrete slabs.
all the safety instructions carefully. Safety instructions will
gearbox
is located beneath the engine and transfers power
rotor
or
spider
assembly. The gearbox controls the
floating
and
Blades
The blades of the trowel finish the concrete as they are rotated
around the surface. Blades are classified as
(8 inches wide),
inches wide). This trowel comes equipped with four blades
per rotor equally spaced in a radial pattern and attached to
vertical rotating shaft by means of a
Centrifugal Stop Switch
In the event of a trowel runaway condition, (operator releases
the handle), a
and bring the trowel to a halt.
CAUTIONCAUTION
CAUTION
CAUTIONCAUTION
Moving the SCT SERIESWalk-Behind Trowel
This walk-behind trowel is designed to be moved and handled
in several ways. One way to lift the trowel is to use an
lifting tube
tube, always use
These models have a
be attached, allowing a forklift or crane to lift the trowel up onto a
slab of concrete. Use a lifting device of adequate lifting capacity
to lift the trowel.
Training
For proper training, please use the “TRAINING CHECKLIST”
located in the front of this manual (Page 6). This checklist will
provide an outline for an experienced operator to provide training
to a new operator.
combination
float
(10 or 8 inches wide), and finish (6
spider assembly.
centrifugal stop switch
NEVER attempt to
ALWAYS get the assistance of another
person to help lift the trowel or use a crane
or lifting device to move the trowel.
. See page 24, Figure 20. When using the lifting
two persons
lifting bail
to lift the trowel.
installed so strap or chain can
will stop the engine
lift
the trowel by yourself.
optional
Spider
The vertical output shaft of the gearbox connects to a cast hub
spider
called the
that are used for attachment of blades or other accessories.
Remember as the gearbox output shaft rotates so does the spider
assembly.
SCT SERIES WALK-BEHIND TROWEL — PARTS & OPERATION MANUAL — REV. #4 (04/02/07) — PAGE 15
. The spider has 4 arms that extend outward
Page 16
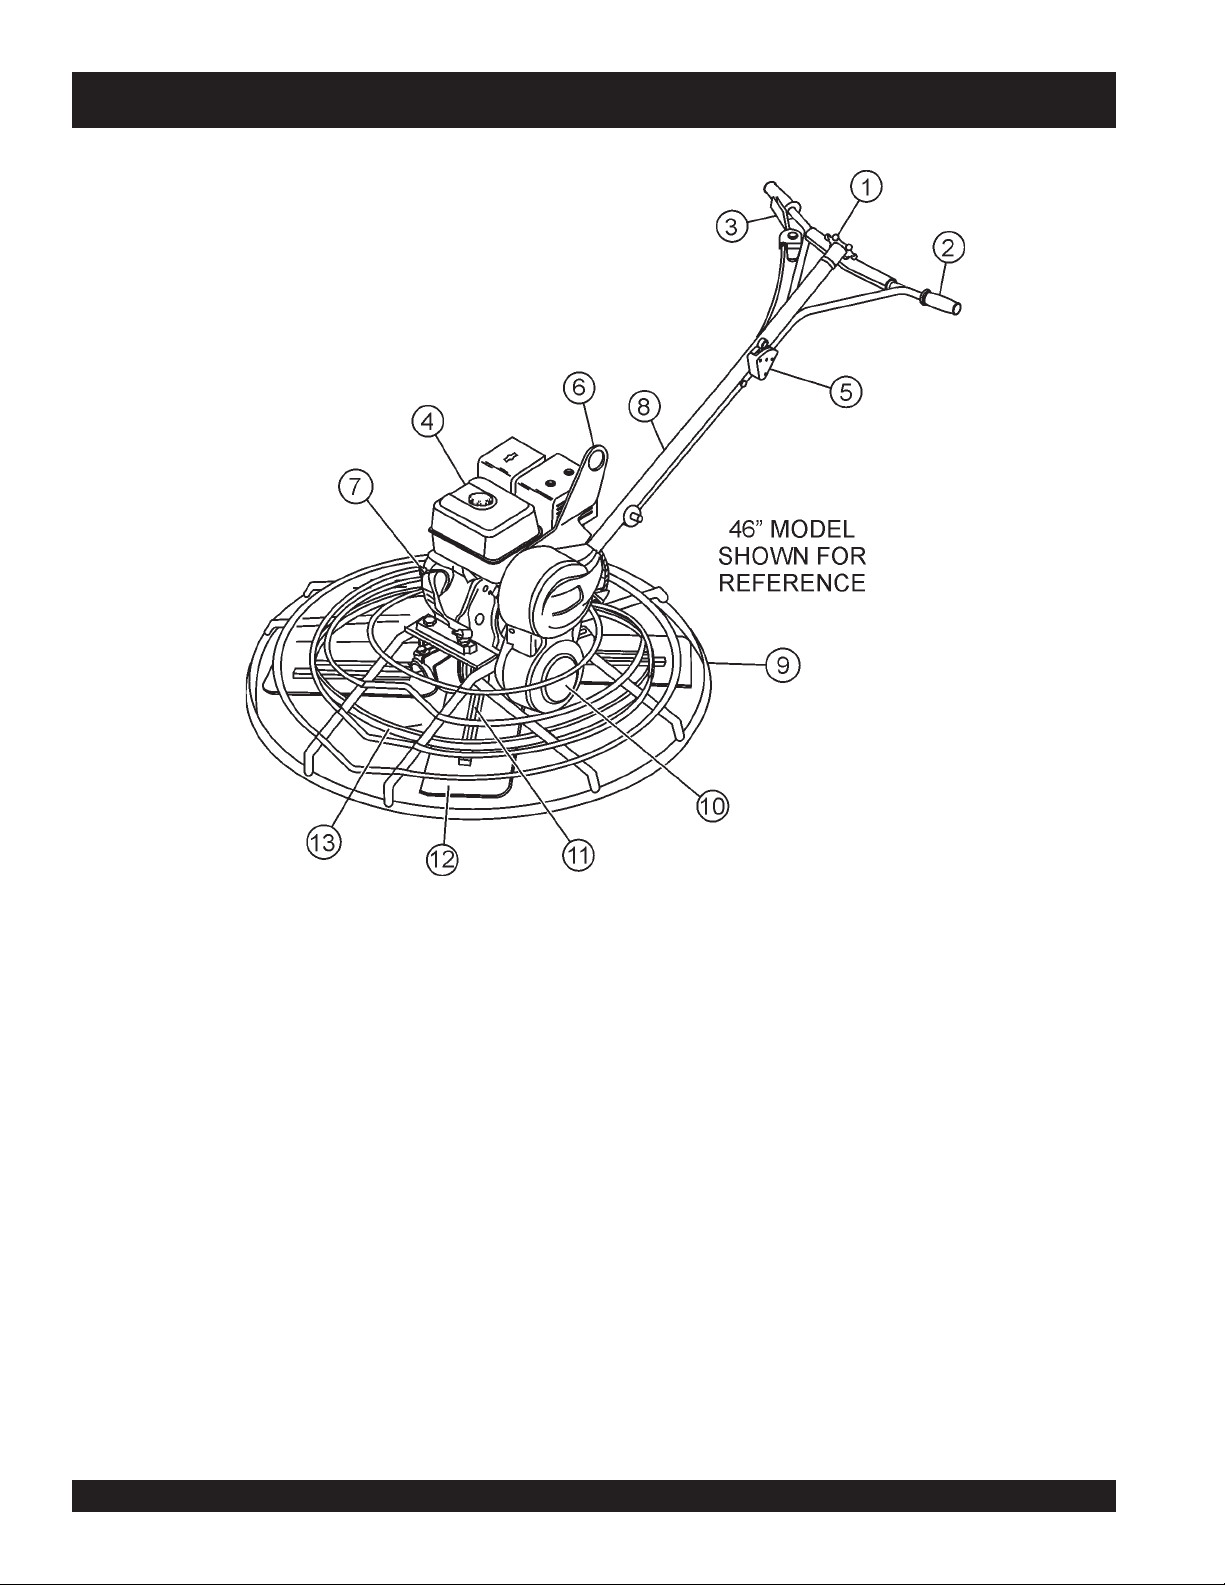
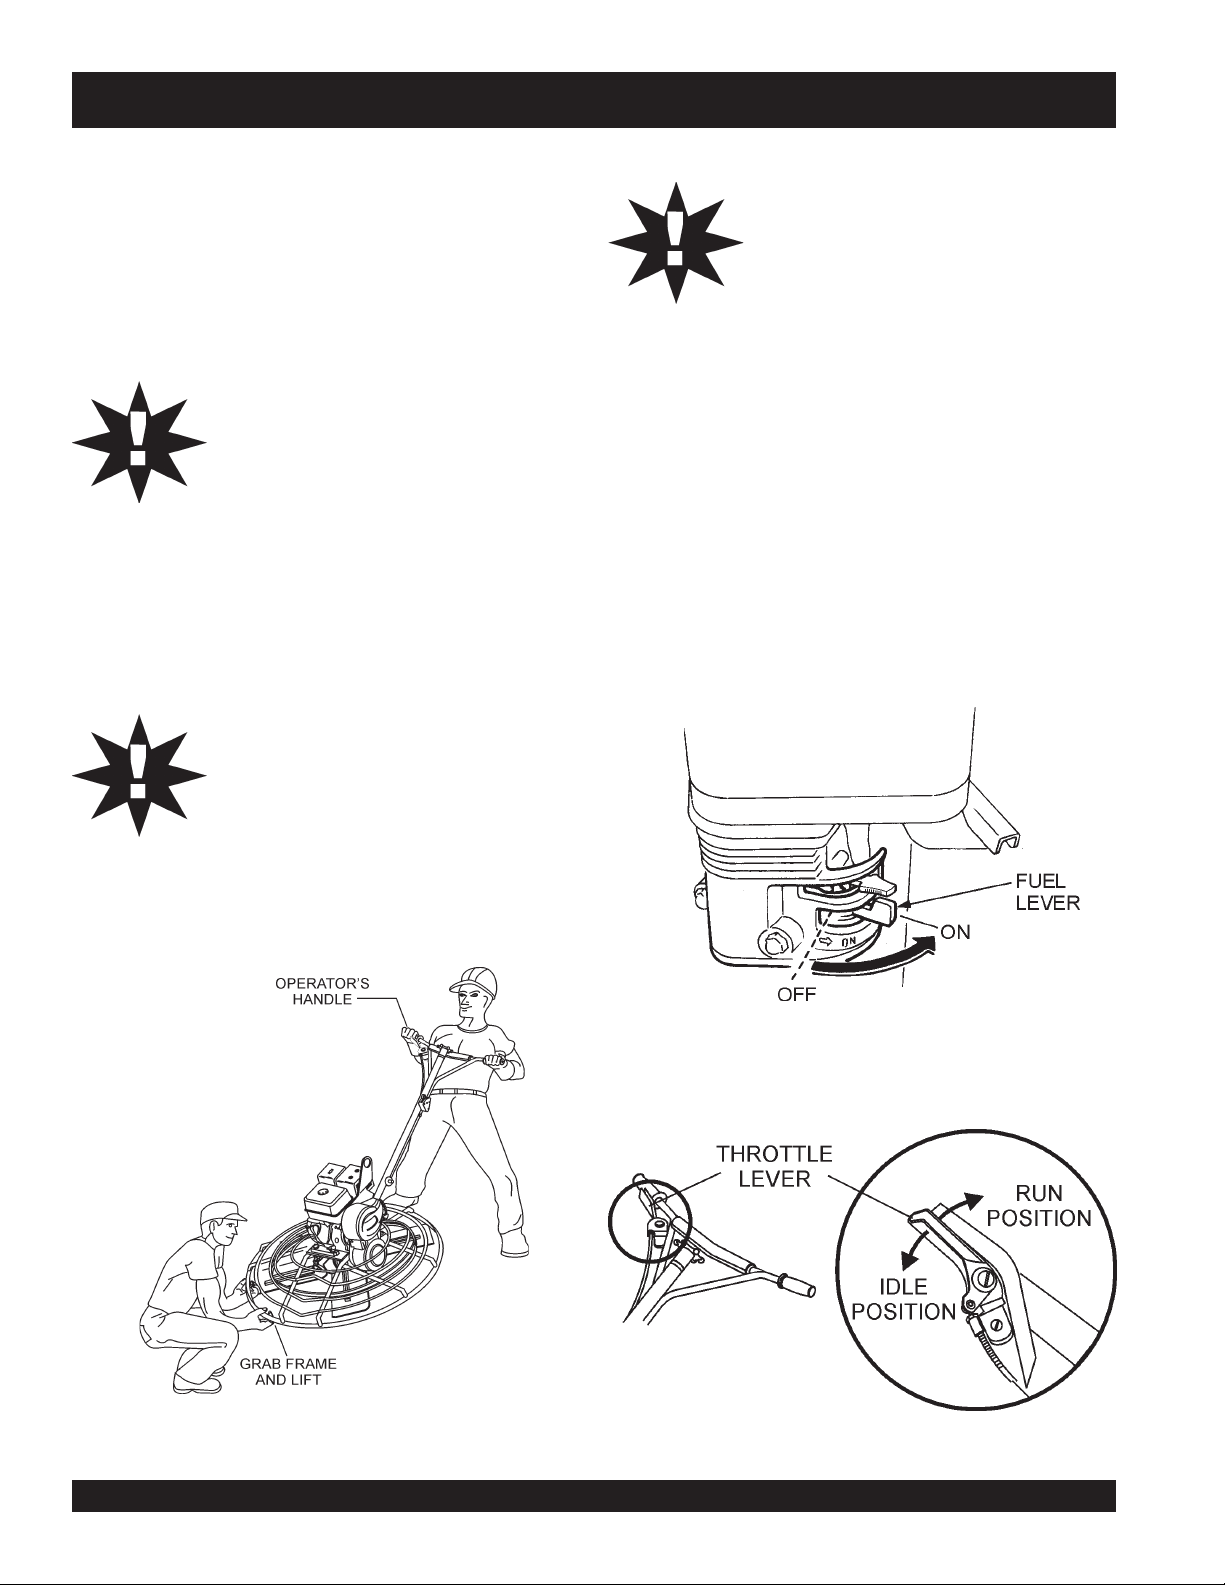
SCT SERIES TROWEL— CONTROLS AND COMPONENTS
Figure 3. SCT SERIESWalk-Behind Trowels
Figures 3 shows the location of the basic controls or components,
for the SCT SERIEStrowel. Listed below is a brief explanation of
each control or component
1. Pitch Control - Turn this "Star Wheel" clockwise for increase
blade pitch, and counter-clockwise for decrease blade pitch
2. Hand Grip/Handle Bar – When operating the trowel, place
both hands on each grip to maneuver the trowel. Replace
hand grips when they become worn or damaged.
3. Throttle – Controls engine speed.
4. Engine – This trowel uses a Honda gasoline engine.
5. Centrifugal Safety Stop Switch – In the event the operator
loses control of the trowel, this switch will shut-down the
engine.
6. Trowel Lifting Point – Use a hoist, forklift, or other suitable
lifting device to lift the trowel on and off the concrete slab.
7. Engine ON-OFF Switch– Turn to the "ON" position for
starting the engine and to the "OFF" position to prevent the
engine from starting.
8. Main Tube - Houses throttle control and pitch cables.
9. Guard Ring- NEVER! put hands or feet inside guard ring.
10. V-Belt Cover – Remove this cover to gain access to the V-
belt. NEVER operate the trowel with this cover removed.
11. Trowel Arm – NEVER operate the trowel with a bent, broken
or out of adjustment trowel arm. If the blades show uneven
wear patterns or some blades wear out faster than others,
the trowel arm may need to be adjusted. Use the trowel
arm adjustment tool P/N 1817 to adjust the trowel arms.
12. Blades – This trowel is equipped with combination blades.
These blades are versatile and should take care of most
troweling needs. In addition float discs can be attached to
the trowel arms that will allow the trowel to float on "wet"
concrete.
13. Stabilizer Ring – Reduces trowel arm vibration. Helps
stabilize trowel arm.
PAGE 16 — SCT SERIES WALK-BEHIND TROWEL— PARTS & OPERATION MANUAL — REV. #4 (04/02/07)
Page 17
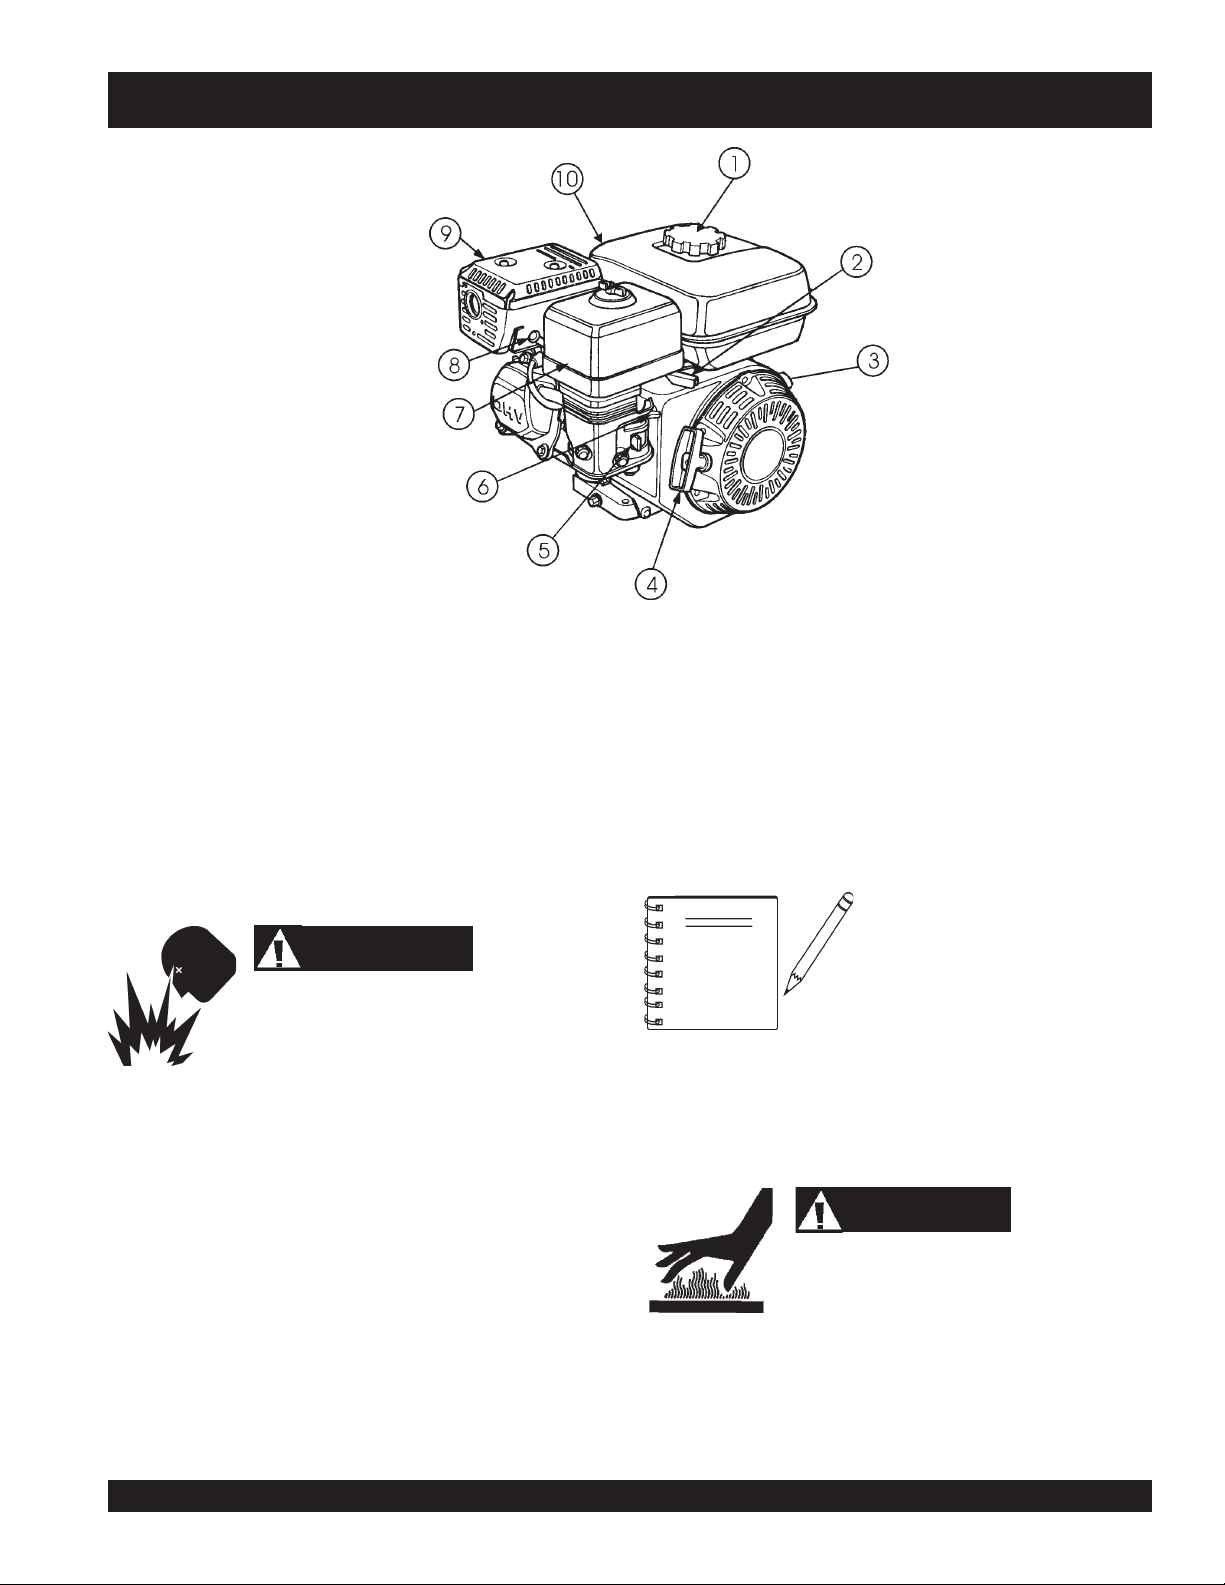
SCT SERIES TROWEL— BASIC ENGINE
Figure 4. Engine Controls and Components
INITIAL SERVICING (ENGINE)
The engine (Figure 4) must be checked for proper lubrication and
filled with fuel prior to operation. Refer to the manufacturers engine
manual for instructions & details of operation and servicing.
1. Fuel Filler Cap – Remove this cap to add unleaded
gasoline to the fuel tank. Make sure cap is tightened
securely. DO NOT over fill.
DANGER
Adding fuel to the tank should be done only when
the engine is stopped and has had an opportunity
to cool down. In the event of a fuel spill, DO NOT
attempt to start the engine until the fuel residue has been completely
wiped up, and the area surrounding the engine is dry.
2. Throttle Lever – Used to adjust engine RPM speed (lever
SLOW
advanced forward
FAST
).
, lever back toward operator
5. Fuel Valve Lever – OPEN to let fuel flow, CLOSE to stop
the flow of fuel.
6. Choke Lever – Used in the starting of a cold engine, or in
cold weather conditions. The choke enriches the fuel
mixture.
7. Air Cleaner – Prevents dirt and other debris from entering
the air intake system. Remove wing-nut on top of air filter
cannister to gain access to filter element.
NOTE
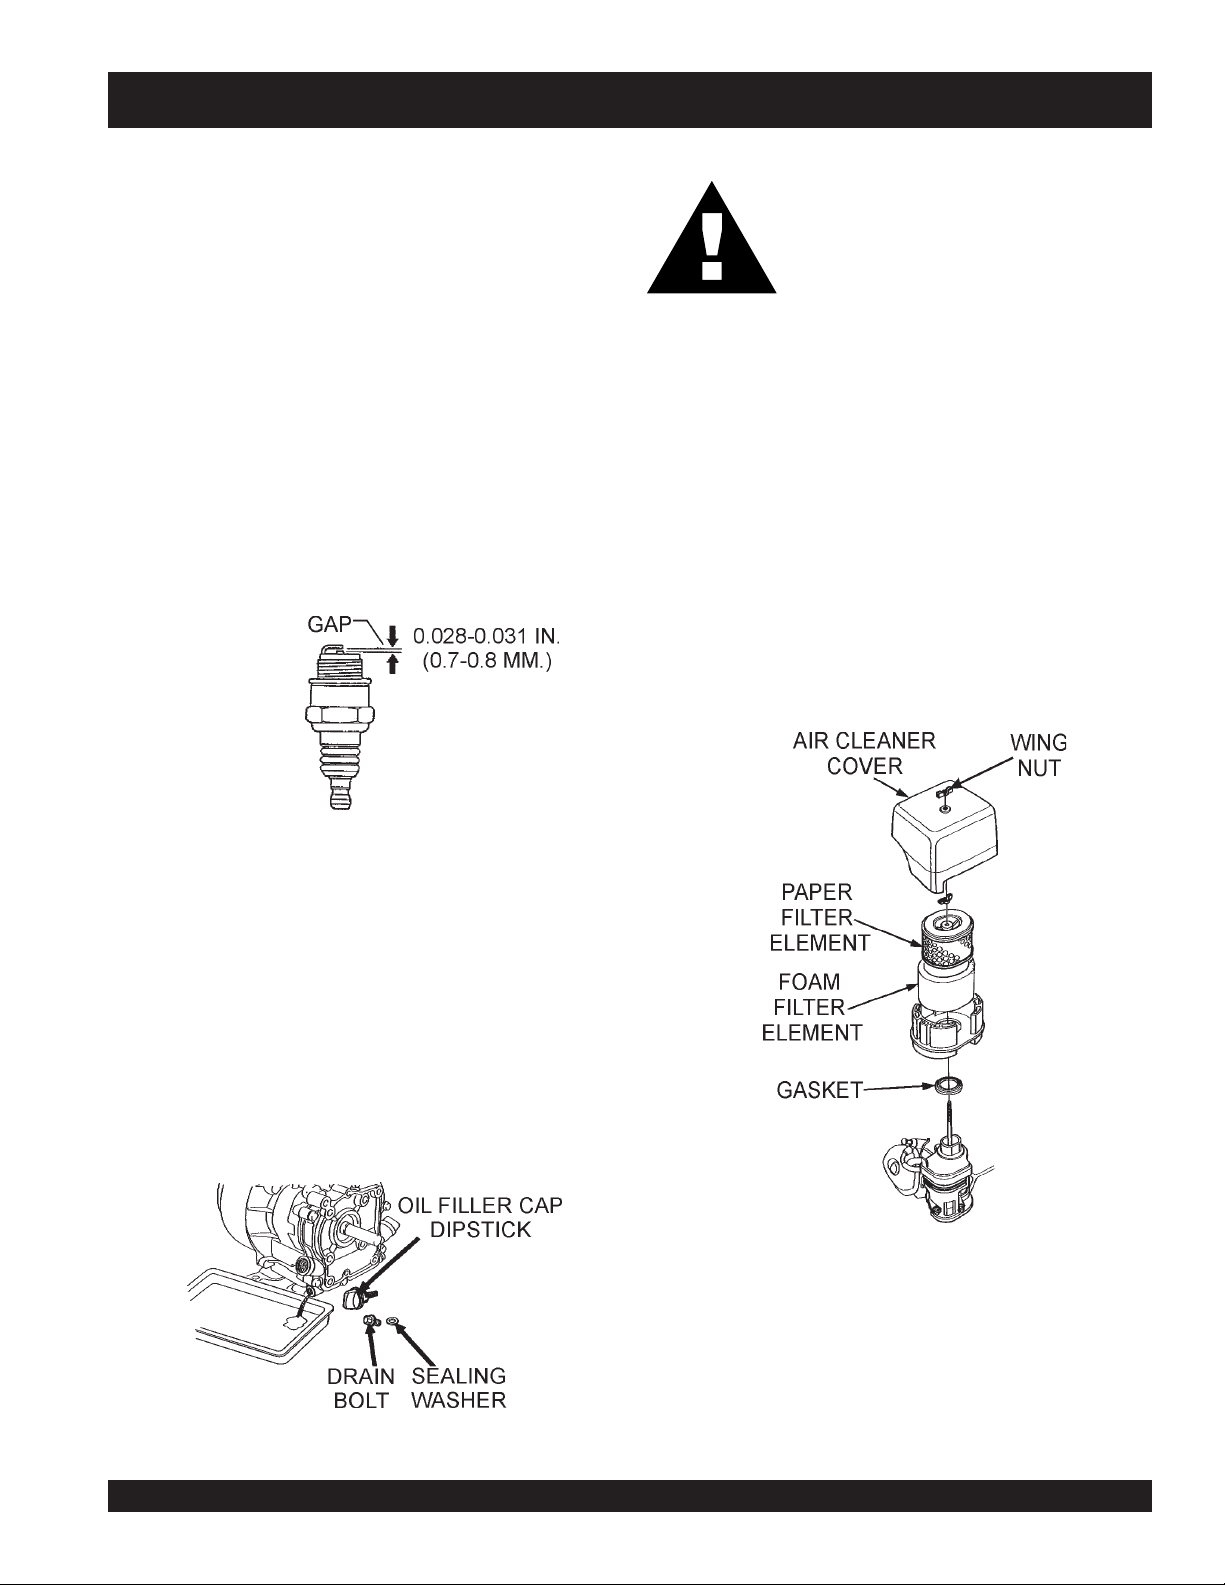
8. Spark Plug – Provides spark to the ignition system. Set
spark plug gap to 0.6 - 0.7 mm (0.028 - 0.031 inch) Clean
spark plug once a week.
9. Muffler – Used to reduce noise and emissions.
Operating the engine without an air
filter, with a damaged air filter, or a
filter in need of replacement will
allow dirt to enter the engine, causing
rapid engine wear
WARNING
3. Engine ON/OFF Switch – ON position permits engine
starting, OFF position stops engine operations.
4. Recoil Starter (pull rope) – Manual-starting method. Pull
the starter grip until resistance is felt, then pull briskly and
smoothly.
10. Fuel Tank – Holds unleaded gasoline. For additional
information refer to engine owner's manual.
SCT SERIES WALK-BEHIND TROWEL — PARTS & OPERATION MANUAL — REV. #4 (04/02/07) — PAGE 17
Engine components can generate extreme heat.
To prevent burns, DO NOT touch these areas
while the engine is running or immediately after
operating. NEVER operate the engine with the
muffler removed.
Page 18
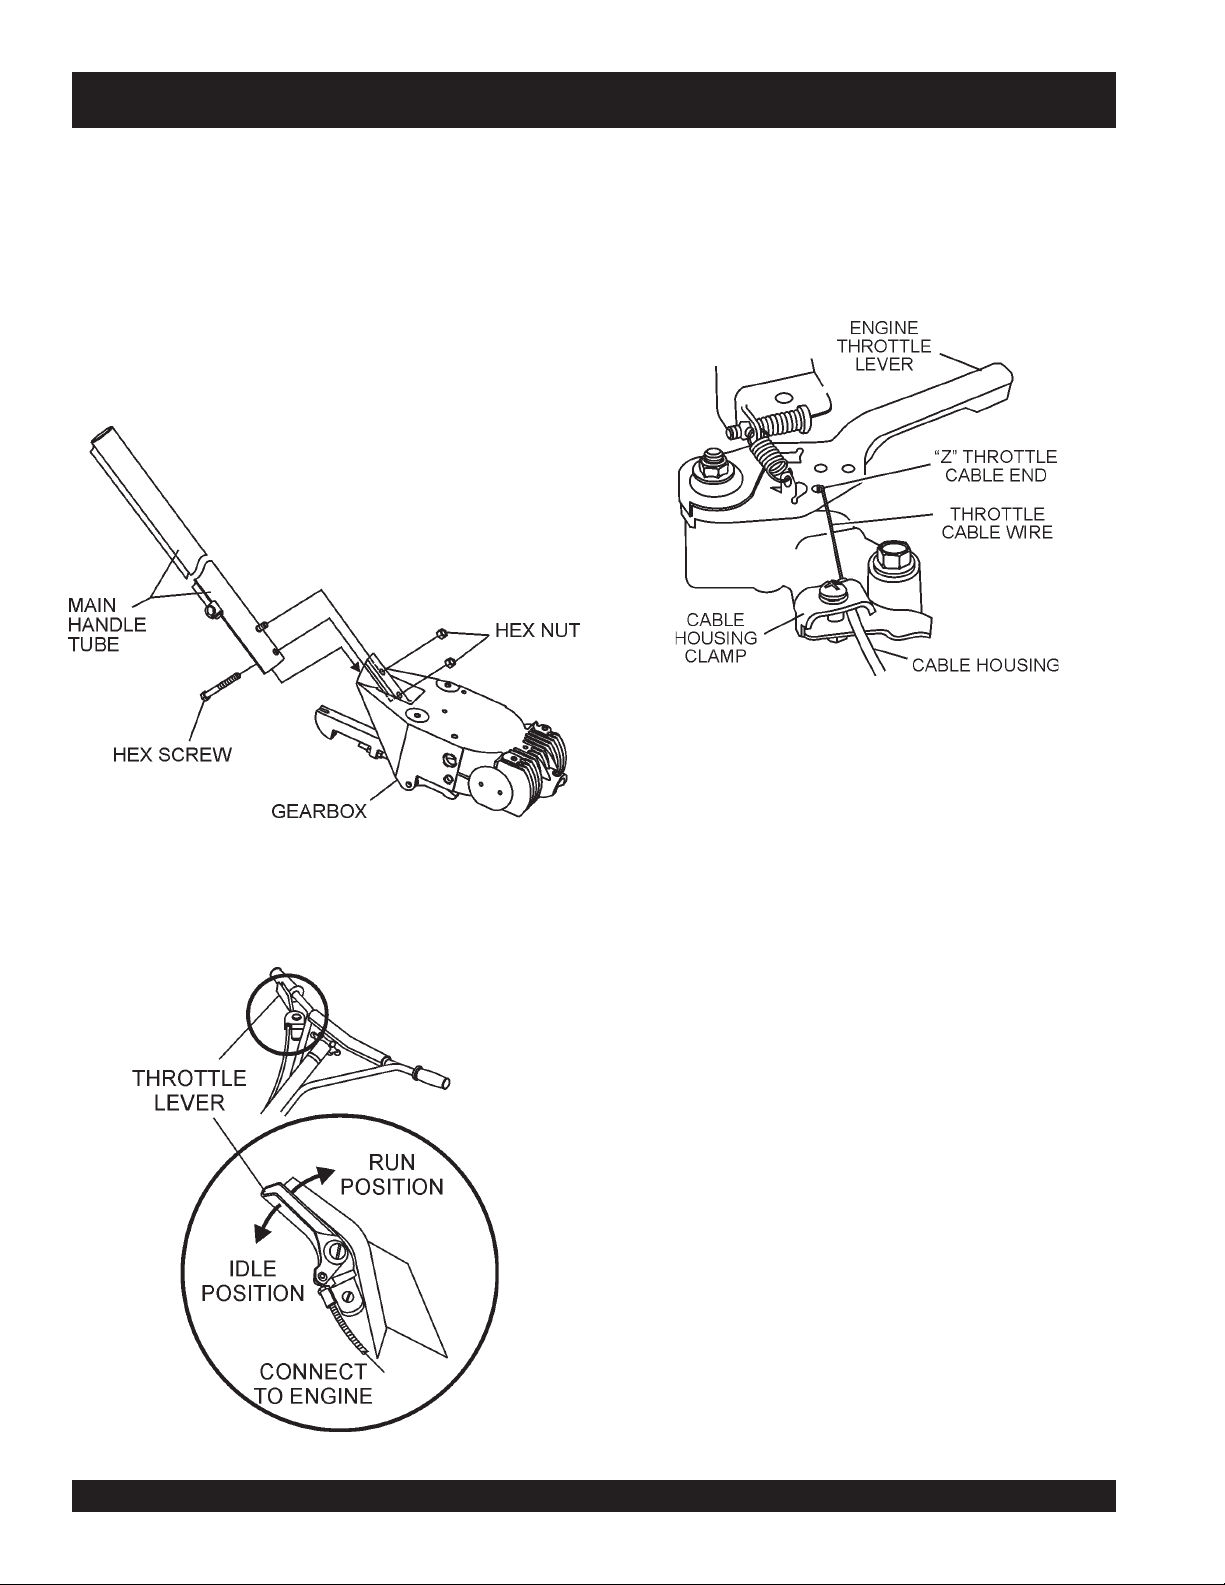
SCT SERIES TROWEL — ASSEMBLY AND INSTALLATION
Assembly and Installation
Before the trowel can be put into operation there are some
components that must be installed before the trowel can be used.
This section provided general instructions on how to install those
components.
Handle Tube Installation
1. Install the
The mounting hardware should be contained in the shipping
container.
handle tube
to the gearbox as shown in (Figure 5).
2. Connect the throttle cable to the engine. (Figure 7). (The air
cleaner housing may have to be removed to provide access
for throttle cable installation.) When connecting the cable
housing, make sure that no more than
cable housing protrudes past the housing clamp on the
engine.
1/4" (6.4mm)
Figure 7. Throttle Cable Connection
of the
Figure 5. Handle Tube Installation
Throttle Cable Installation
1. Set the
from the operator).
throttle
(Figure 6) to the idle position (lever away
3. Tighten cable clamp screw.
4. After the cable has been installed on the engine, work the
throttle lever to verify the throttle cable is at the proper
length. Adjust the cable as necessary.
5. Reinstall the air cleaner housing if previously removed.
Figure 6. Throttle
PAGE 18 — SCT SERIES WALK-BEHIND TROWEL— PARTS & OPERATION MANUAL — REV. #4 (04/02/07)
Page 19
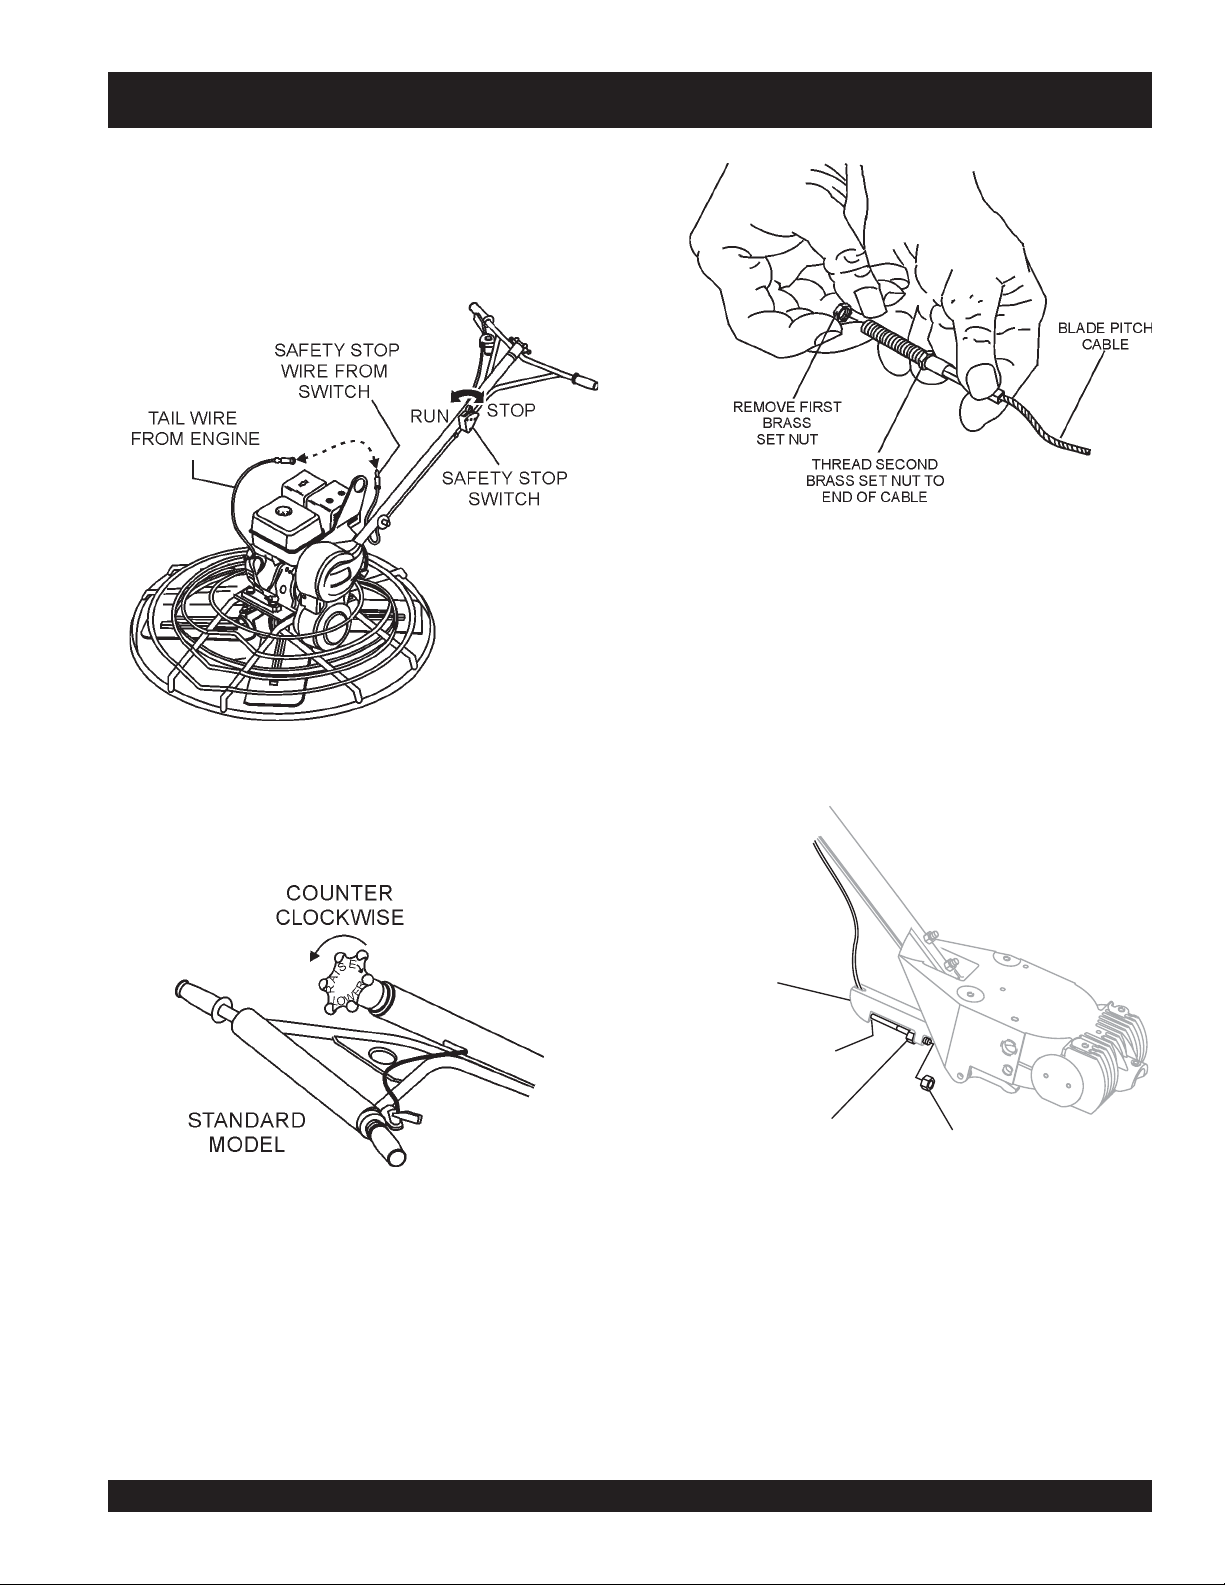
Safety Stop Wire
SCT SERIES TROWEL — ASSEMBLY AND INSTALLATION
Locate the
SAFETY STOP
(Figure 8) and connect it to the
wire protruding from the handle tube
tail wire on the engine. Test the
safety stop switch to insure proper operation.
Figure 8. Engine Safety Stop Wire Connection
Figure 10. Blade Pitch Cable
2. Remove one brass set nut from the blade pitch cable end
as shown in (Figure 10).
3. Thread the second brass set nut towards the cable as far
as possible.
4. Insert the cable end through the yoke eyelet (Figure 11)
Tighten the first brass set nut by hand to remove all the
slack from the cable.
Pitch Cable Installation
THREAD CABLE END
THROUGH YOKE EYELET
TIGHTEN SECOND
BRASS SET NUT
AGAINST YOKE BOSS
Figure 9. "No Pitch" Position
1. Expose the pitch cable to maximum by adjusting the handle
pitch to the "no pitch" position. On the standard model turn
the pitch control counter-clockwise, (Figure 9).
5. Using a wrench, tighten the second brass set nut up against
the yoke boss. This will lock the cable in place.
6. Use a wrench and finish tightening the first brass set nut up
against the yoke boss.
YOKE
USE A WRENCH TO
TIGHTEN FIRST BRASS
SET NUT AGAINST YOKE BOSS
Figure 11. Cable Yoke Attachment
SCT SERIES WALK-BEHIND TROWEL — PARTS & OPERATION MANUAL — REV. #4 (04/02/07) — PAGE 19
Page 20

CAUTIONCAUTION
CAUTION
CAUTIONCAUTION
NEVER operate the trowel
in a confined area or
enclosed area structure
that does not provide
free flow of air
ample
ALWAYS wear approved eye and hearing
protection before operating the trowel.
.
SCT SERIES TROWEL— PRE-INSPECTION
Figure 12. Engine Oil Dipstick (Removal)
NEVER place hands or feet inside the guard
rings while the engine is running. ALWAYS
shut the engine down before performing any
kind of maintenance service on the trowel.
It is recommended that the trowel's
to stop the engine after every use. Doing this will verify that the
switch is working properly and presents no danger to the operator.
Before Starting
1. Read safety instructions at the beginning of manual.
trowel
2. Clean the
filter and carburetor.
3. Check the air filter for dirt and dust. If air filter is dirty, replace
air filter with a new one as required.
4. Check carburetor for external dirt and dust. Clean with dry
compressed air.
, removing dirt and dust, particularly the air
safety stop switch
is used
3. Insert and remove the dipstick without screwing it into the filler
neck. Check the oil level shown on the dipstick.
4. If the oil level is low (Figure 13), fill to the edge of the oil filler
hole with the recommended oil type (Table 4). Maximum oil
capacity is 400 cc.
NOTE
Reference manufacturer engine
manual for specific servicing
instructions.
5. Check fastening nuts and bolts for tightness.
Engine Oil Check
Figure 13. Engine Oil Dipstick (Oil Level)
epyTliO.4elbaT
1. To check the engine oil level, place the trowel on secure level
ground with the engine stopped.
2. Remove the filler dipstick from the engine oil filler hole
(Figure 12) and wipe it clean.
PAGE 20 — SCT SERIES WALK-BEHIND TROWEL— PARTS & OPERATION MANUAL — REV. #4 (04/02/07)
nosaeS erutarepmeT epyTliO
remmuS rehgiHroC°52 03-W01EAS
llaF/gnirpS C°01~C°52 02/03-W01EAS
retniW rewoLroC°0 01-W01EAS
Page 21
Explosive Fuel
CAUTIONCAUTION
CAUTION
CAUTIONCAUTION
Fuel Check
SCT SERIES TROWEL— PRE-INSPECTION
V-belt Check
A worn or damaged V-belt can adversely affect the performance
of the trowel. If a V-belt is defective or worn simply replace the Vbelt as outlined in the maintenance section of this manual.
Blade Check
Motor fuels are highly flammable and can be
dangerous if mishandled. DO NOT smoke
while refueling. DO NOT attempt to refuel the
trowel if the engine is
hot! or running
.
Check for worn or damaged blades. Check to see if one blade is
worn out while the others look new. If this is the case there could
be a blade pitch problem. Refer to the maintenance section of
this manual for blade pitch adjustment procedure. Always replace
any worn or damaged blades.
1. Remove the gasoline cap located on top of fuel tank.
2. Visually inspect to see if fuel level is low. If fuel is low, replenish
with unleaded fuel.
3. When refueling, be sure to use a strainer for filtration. DO
NOT top-off fuel. Wipe up any spilled fuel.
NEVER!
NOTE
Gearbox Oil
1. Determine if the
glass/fill plug located on the side of the gearbox. This plug
will be marked by the "
correct level of the lubrication oil should be to the bottom of
the sight glass/fill plug.
safety stopswitch. It is provided for
operator safety. Injury may result if it
is disable, disconnected or
improperly maintained.
gearbox
check
disable or disconnect the
oil is low by viewing the oil sight
" decal. See (Figure 14). The
CONTROLS
Safety Stop Switch
This trowel has been equipped with a safety safety stop switch.
Safety stop switches should be tested every time the engine is
started.
Centrifugal Type Safety Stop Switch
(Figure 15) The switching mechanism of this switch should
operate freely and should
the switch in the "OFF" position, the engine should not start or
run. The purpose of this switch is to stop the engine in a runaway
situation, (i.e. the operator releasing the handle during operation).
NOTE
NEVER!
safety stopswitch. It is provided for
operator safety. Injury may result if it
is disable, disconnected or
improperly maintained.
always
disable or disconnect the
be kept in this condition. With
GEARBOX
OIL SIGHT/
FILL PLUG
DRAIN
PLUG
Figure 14. Gearbox
2. If lubrication oil cannot be seen in the sight glass, fill with
type ISO 680 (P/N 10139) gearbox lubricant oil until the oil
will show at the center of the oil sight glass when the
gearbox is level..
SCT SERIES WALK-BEHIND TROWEL — PARTS & OPERATION MANUAL — REV. #4 (04/02/07) — PAGE 21
Figure 15. Centrifugal Safety Stop Switch
Page 22
SCT SERIE STROWEL — INITIAL START-UP
This section is intended to assist the operator with the initial
start-up of the walk-behind trowel. It is extremely important that
this section be read carefully before attempting to use the trowel
in the field.
DO NOT use your trowel until this section is thoroughly
understood.
CAUTIONCAUTION
CAUTION
CAUTIONCAUTION
LIFTING THE TROWEL
CAUTIONCAUTION
CAUTION
CAUTIONCAUTION
DO NOT attempt to operate the trowel until
the Safety, General Information and
Inspection sections of this manual have
been read and thoroughly understood.
Depending on engine manufacturer,
operating steps may vary. See engine
manufactures operating manual. The
following start-up procedure makes
reference to a HONDA Gasoline Engine
(Manual Start).
CAUTIONCAUTION
CAUTION
CAUTIONCAUTION
Lifting Bail
A lifting bail is provided at an optimal lifting point for moving the
A hoist or forklift
trowel.
concrete slab. A
Extra care MUST be taken when lifting the machine off the ground.
Serious damage to the machine or personal injury could be
caused by dropping a trowel.
Starting the Engine
1. Place the engine
position.
The trowel must be stabilized by the person
carrying the
If it is not stabilized properly the handle may
swing around and
damage to the trowel and bodily injury.
crane
can be used to lift the trowel onto a building.
fuel valve lever
operator’s handle
flip
the trowel, thus causing
can be used to lift the trowel up onto a
(Figure 17) to the "ON"
(Figure 16).
When lifting of the trowel is required always
two people
use
If another person is not available attach a
crane or lifting device to the trowel's lifting
bale.
With one person lifting from the main handle (Figure 16), and
another person lifting from the front of the frame, lift the trowel onto
a slab.
to lift the trowel onto a slab
.
2. Make sure the
Figure 17. Engine Fuel Valve Lever
throttle
(Figure 18) is in the "idle" position.
Figure 16. Lifting the Trowel
PAGE 22 — SCT SERIES WALK-BEHIND TROWEL— PARTS & OPERATION MANUAL — REV. #4 (04/02/07)
Figure 17. Throttle (Idle Position)
Page 23
SCT SERIES TROWEL — INITIAL START-UP
3. Place the
"ON" position.
CAUTIONCAUTION
CAUTION
CAUTIONCAUTION
centrifugal safety stop switch
Figure 19. Centrifugal Safety Stop Switch
(Figure 19) in the
NEVER disable or disconnect the centrifugal
safety stop switch. It is provided for the
operators’ safety and injury may result if it is
disabled, disconnected or improperly
maintained.
6. If the engine has started, slowly return the choke lever
7.
8. To begin troweling, move the throttle lever (Figure 22) toward
Figure 21. Starter Grip
(Figure 20) to the
started repeat steps 1 through 5.
Before the trowel is placed into operation, run the engine for
several minutes. Check for fuel leaks, and noises that would
associate with a loose guard ring and/or covers.
RUN
the "
" position by pulling back toward the operator..
"OPEN"
position. If the engine has not
4. Place the
position.
5. Grasp the starter grip (Figure 21) and slowly pull it out. The
resistance becomes the hardest at a position corresponding
to the compression point. Pull the starter grip briskly and
smoothly for starting.
Choke Lever
Figure 20. Engine Choke Lever
(Figure 20) in the "
CLOSED
"
Figure 22. Throttle (Run Position)
SCT SERIES WALK-BEHIND TROWEL — PARTS & OPERATION MANUAL — REV. #4 (04/02/07) — PAGE 23
Page 24
SCT SERIES TROWEL — OPERATION
The following steps are intended as a basic guide to machine
operation, and are not to be considered a complete guide to
concrete finishing. We suggest that all operators, (experienced
and novice), read “
Concrete Institute, Detroit, Michigan
section of this manual for more information.
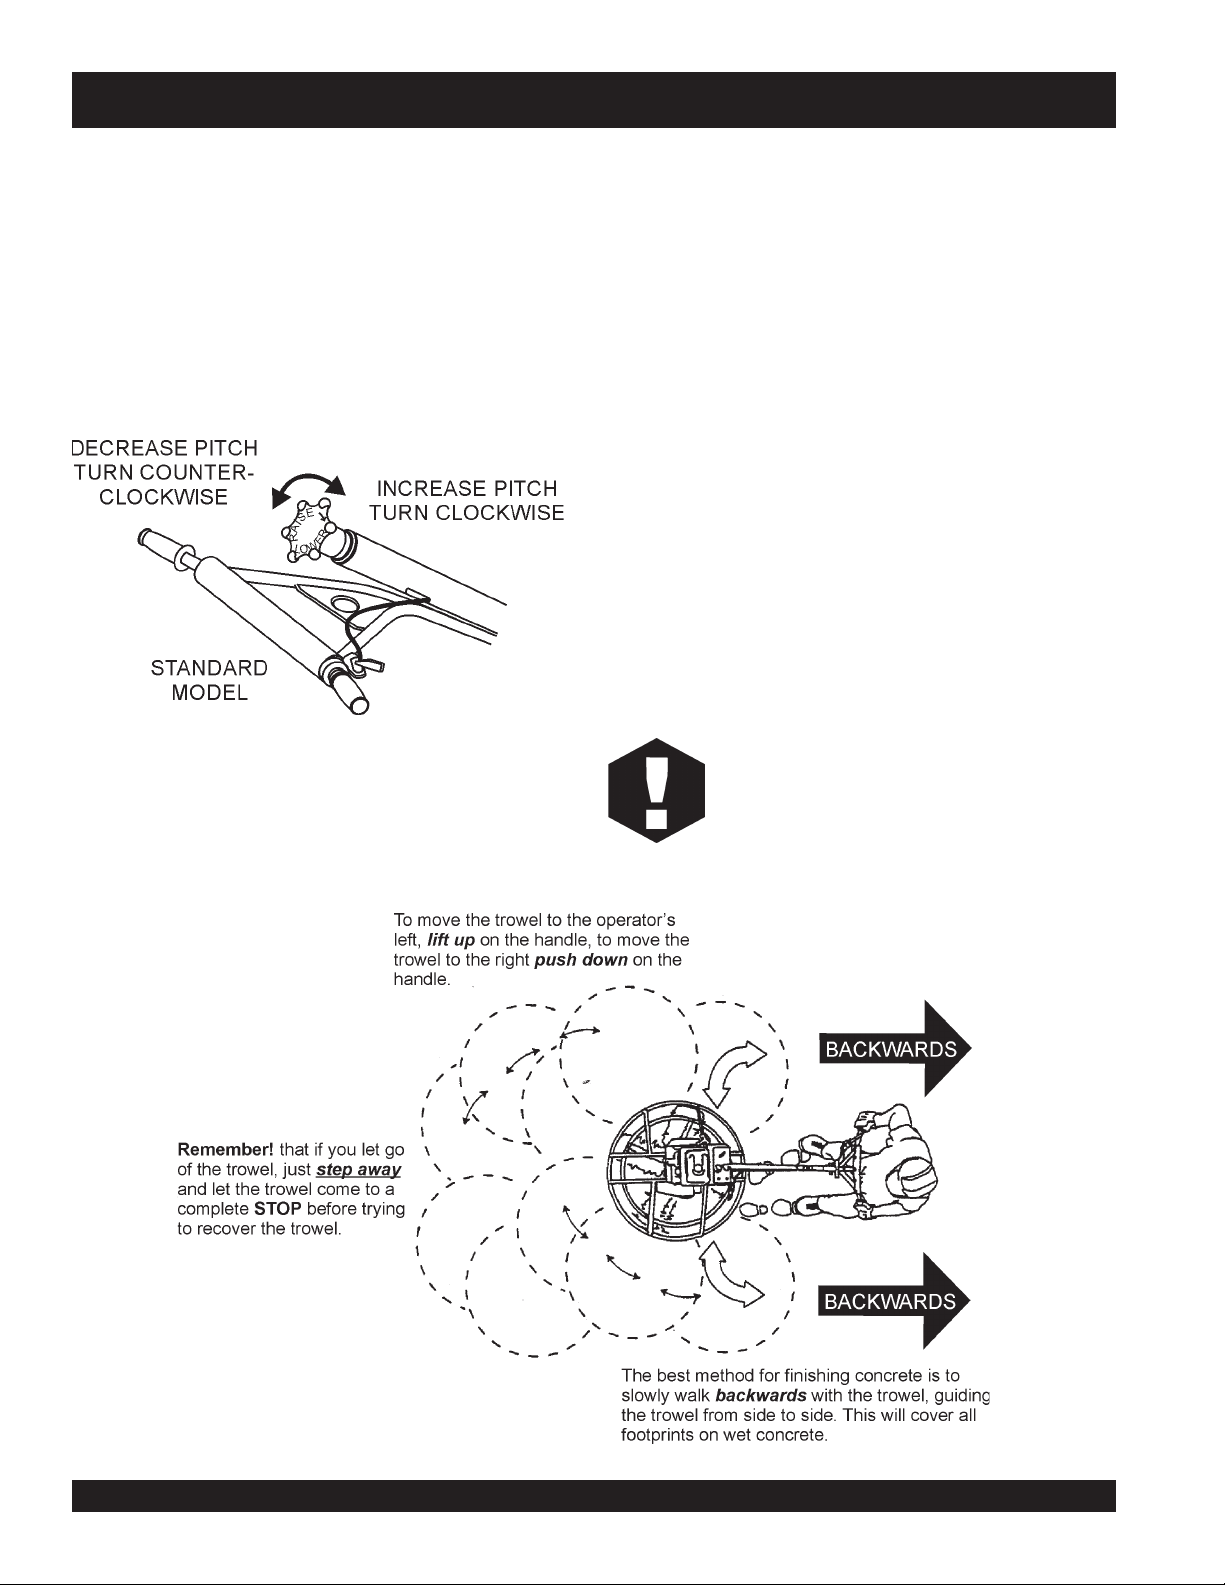
PITCHING THE BLADES
1. To pitch the blades upwards using the "
(Figure 23) simply turn the
star wheel counter clockwise will cause the blades to lay flat.
Figure 24 below illustrates a typical walk-behind trowel
application. Practice maneuvering the trowel. The trick is to let
the trowel do the work.
Slabs on Grade
Figure 23. Pitching the Blades
” published by the
. Read the “Training”
Standard
star-wheel
clockwise. Turning the
American
" handle,
Maneuvering the Trowel
With a secure foothold and a firm grasp on the handles slowly
1.
increase the engine speed until the desired blade speed is
obtained.
2. To maneuver the trowel, gently lift up on or press down on the
main trowel handle. To move the machine to the operator’s
left,
down
3. The best method for finishing concrete is to slowly walk
backwards (Figure 24) with the trowel, guiding the trowel
from side to side. This will cover all footprints on wet concrete.
4. Remember that if you let go of the trowel, just step away and
let the trowel come to a complete stop before trying to recover
the trowel.
Continue to practice maneuvering the trowel. Try to practice
5.
as if you were finishing a slab of concrete. Practice edging
and covering a large area.
WARNINGWARNING
WARNING
WARNINGWARNING
lift up
on the handle, to move machine to the right,
on the handle.
NEVER place your
rings while starting or operating this equipment.
ALWAYS keep clear of
while operating this equipment.
feet
or
hands
rotating
inside the guard
or
moving
push
parts
Figure 24. Maneuvering The Trowel
PAGE 24 — SCT SERIES WALK-BEHIND TROWEL— PARTS & OPERATION MANUAL — REV. #4 (04/02/07)
Page 25
SCT SERIES TROWEL — OPTIONS
Blades
Blades should be changed when
NOTE
they fail to finish concrete in a
satisfactory manner.
Blades are a vital part of finishing concrete. This trowel, or
finisher
built to stringent quality standards out of the finest trowel steel. If
you need replacement blades, consult your parts list in this
manual for part numbers and order them from your Multiquip parts
dealer or importer.
Combo Blades
This trowel was equipped with combination
25) blades as original equipment. These blades have been
designed for optimum performance in both the floating and
finishing operations. These blades are versatile and should take
care of most troweling needs.
, has been designed to finish concrete and the blades are
float/finish
(Figure
Clip-On Float Blades (Optional)
These blades will clip on to an existing installed blade, (Figure
27), allowing the finisher to "float" on “wet” concrete so that the
troweling operation can begin as early as possible. They can be
easily removed, so when the concrete is sufficiently cured, the
troweling operation can continue.
Float Discs (Optional)
These round discs (Figure 28) attach to the spiders and allow the
machine to “float” on “wet” concrete. The disc design allows early
floating and easy movement from wet to dry areas. They are also
very effective in embedding large aggregates and surface
hardeners.
Figure 27. Clip-On Float Blade
Figure 25. Combination Blade
Finish Blades (Optional)
These blades (Figure 26) have been specifically designed for
finish operations with this trowel. They will provide a premium
surface finishing capability from your trowel. They should only be
used after the concrete has set to the point where the trowel does
not sink into the concrete when placed on it.
Trowel Arm Adjustment Tool
If blades show uneven wear patterns or some tend to wear out
faster than others, the trowel arms may need to be adjusted. A
special tool P/N 1817, (Figure 29) is available that can be used
to adjust all of the trowel arms consistently.
See page 33 for Trowel Arm Adjustment procedures using this
tool.
Figure 28. Float Disk
Figure 26. Finish Blade
Figure 29. Trowel Arm Adjustment Fixture
SCT SERIES WALK-BEHIND TROWEL — PARTS & OPERATION MANUAL — REV. #4 (04/02/07) — PAGE 25
Page 26

SCT SERIES TROWEL — MAINTENANCE (ENGINE)
Engine Maintenance
Perform engine maintenance procedures as referenced by
Table 5 below:
)3(NOITPIRCSEDNOITAREPOEROFEB
KCEHCX
liOenignE
EGNAHCX
KCEHCX
renaelCriA
EGNAHC)1(X
stloB&stuNllA
gulPkrapS
fInethgit-eR
yrasseceN
NAELC-KCEHCX
ECALPER X
X
QP40TH — MAINTENANCE (ENGINE)
eludehcSecnanetniaMenignE.5elbaT
TSRIF
HTNOM
RO
.SRH01
YREVE
SHTNOM3
RO
.SRH52
YREVE
SHTNOM6
RO
.SRH05
YREVE
RAEY
RO
01
.SRH0
YREVE
SRAEY2
RO
.SRH002
NOTE
sniFgnilooCKCEHCX
retserrAkrapSNAELC X
knaTleuFNAELC X
retliFleuFKCEHC X
deepSeldITSUJ
ecnaraelCevlaVTSUJDA-KCEHC )2(X
senilleuFKCEHC )2()yrassecenfiecalper(sraey2yrevE
neuqerferomecivreS)1( YTSUD .saera
DA-KCEHC )2(X
nidesunehwylt
resebdluohssmetiesehT)2(
serudecorpecivresroflaunaMpohsADNOHehtotrefeR.tneiciforp
reporpenimretedotnoitarepofosruohgol,esulaicremmocroF)3(
.slavretniecnanetniam
yllacinahcemeradnaslootreporpehtevahuoysselnu,relaedcivresruoyybdeciv
Reference manufacturer engine
manual for specific servicing
instructions.
PAGE 26 — SCT SERIES WALK-BEHIND TROWEL— PARTS & OPERATION MANUAL — REV. #4 (04/02/07)
Page 27
SCT SERIES TROWEL — MAINTENANCE (ENGINE)
Maintenance
Perform the engine maintenance procedures as indicated below:
DAILY
■
Thoroughly remove dirt and oil from the engine and control
area. Clean or replace the air cleaner elements as necessary.
Check and retighten all fasteners as necessary. Check the
spring box and bellows for oil leaks. Repair or replace as
needed.
WEEKLY
■
Remove the fuel filter cap and clean the inside of the fuel
tank.
■
Remove or clean the filter at the bottom of the tank.
■
Remove and clean the spark plug (Figure 30), then adjust
the spark gap to 0.028 ~0.031 inch (0.6~0.7 mm). This unit
has electronic ignition, which requires no adjustments.
DANGER :
ENGINE AIR CLEANER
1. Remove the air cleaner cover and foam filter element as
2. Tap the paper filter element (Figure 32) several times on a
3. Clean foam element in warm, soapy water or nonflammable
DO NOT use gasoline as a cleaning solvent,
because that would create a risk of fire or
explosion.
shown in Figure 32.
hard surface to remove dirt, or blow compressed air [not
exceeding 30 psi (207 kPa, 2.1 kgf/cm
element from the air cleaner case side.
Brushing will force dirt into the fibers. Replace the paper filter
element if it is excessively dirty.
solvent. Rinse and dry thoroughly. Dip the element in clean
engine oil and completely squeeze out the excess oil from the
element before installing.
2
)] through the filter
NEVER
brush off dirt.
Figure 30. Spark Plug Gap
ENGINE OIL
warm
1. Drain the engine oil when the oil is
Figure 31.
2. Remove the oil drain bolt and sealing washer and allow
the oil to drain into a suitable container.
3. Replace engine oil with recommended type oil as listed
in Table 4. DO NOT overfill. See Table 2 for oil capacity.
4. Install drain bolt with sealing washer and tighten securely.
as shown in
Figure 32. Engine Air Cleaner
Figure 31. Engine Oil (Draining)
SCT SERIES WALK-BEHIND TROWEL — PARTS & OPERATION MANUAL — REV. #4 (04/02/07) — PAGE 27
Page 28
See the engine manual supplied with
NOTE
your machine for appropriate engine
maintenance schedule and
troubleshooting guide for problems.
At the front of the book (Page 7) there is a “
Checklist
basis.
CAUTION!CAUTION!
CAUTION!
CAUTION!CAUTION!
”. Make copies of this checklist and use it on a daily
Daily Pre-Operation
SCT SERIES TROWEL — MAINTENANCE
Trowel Arm Adjustment Procedure
The following procedure should be
NOTE
A
level
, clean area to test the trowel prior to and after is essential.
spots
Any unlevel
will give an incorrect perception of adjustment. Ideally, a 5 x 5"
three-quarter inch thick
in the floor or debris under the trowel blades
followed to adjust trowel arms when
it becomes apparent that the trowel
is finishing poorly or in need of
routine maintenance.
flat
steel plate should be used for testing.
ALWAYS allow the engine to cool before
servicing. NEVER attempt any maintenance
hot!
work on a
MAINTENANCE SCHEDULE
Daily (8-10 Hours)
1. Check the oil level in the engine crankcase and gear box,
fill as necessary.
2. Check V-belt.
Weekly (50-60 Hours)
1. Relube arms, thrust collar and clutch.
2. Replace blades if necessary.
3. Check and clean or replace the engine air filter as
necessary.
4. Replace engine oil and filter as necessary, see engine
manual.
Monthly (200-300 Hours)
1. Remove, clean, reinstall and relube the arms and thrust
collar.
2. Adjust the blade arms.
Yearly (2000-2500 Hours)
engine.
1. To determine which blades need adjustment, place the
trowel in the test area (three-quarter inch thick plate) and look
for the following conditions:
■
■
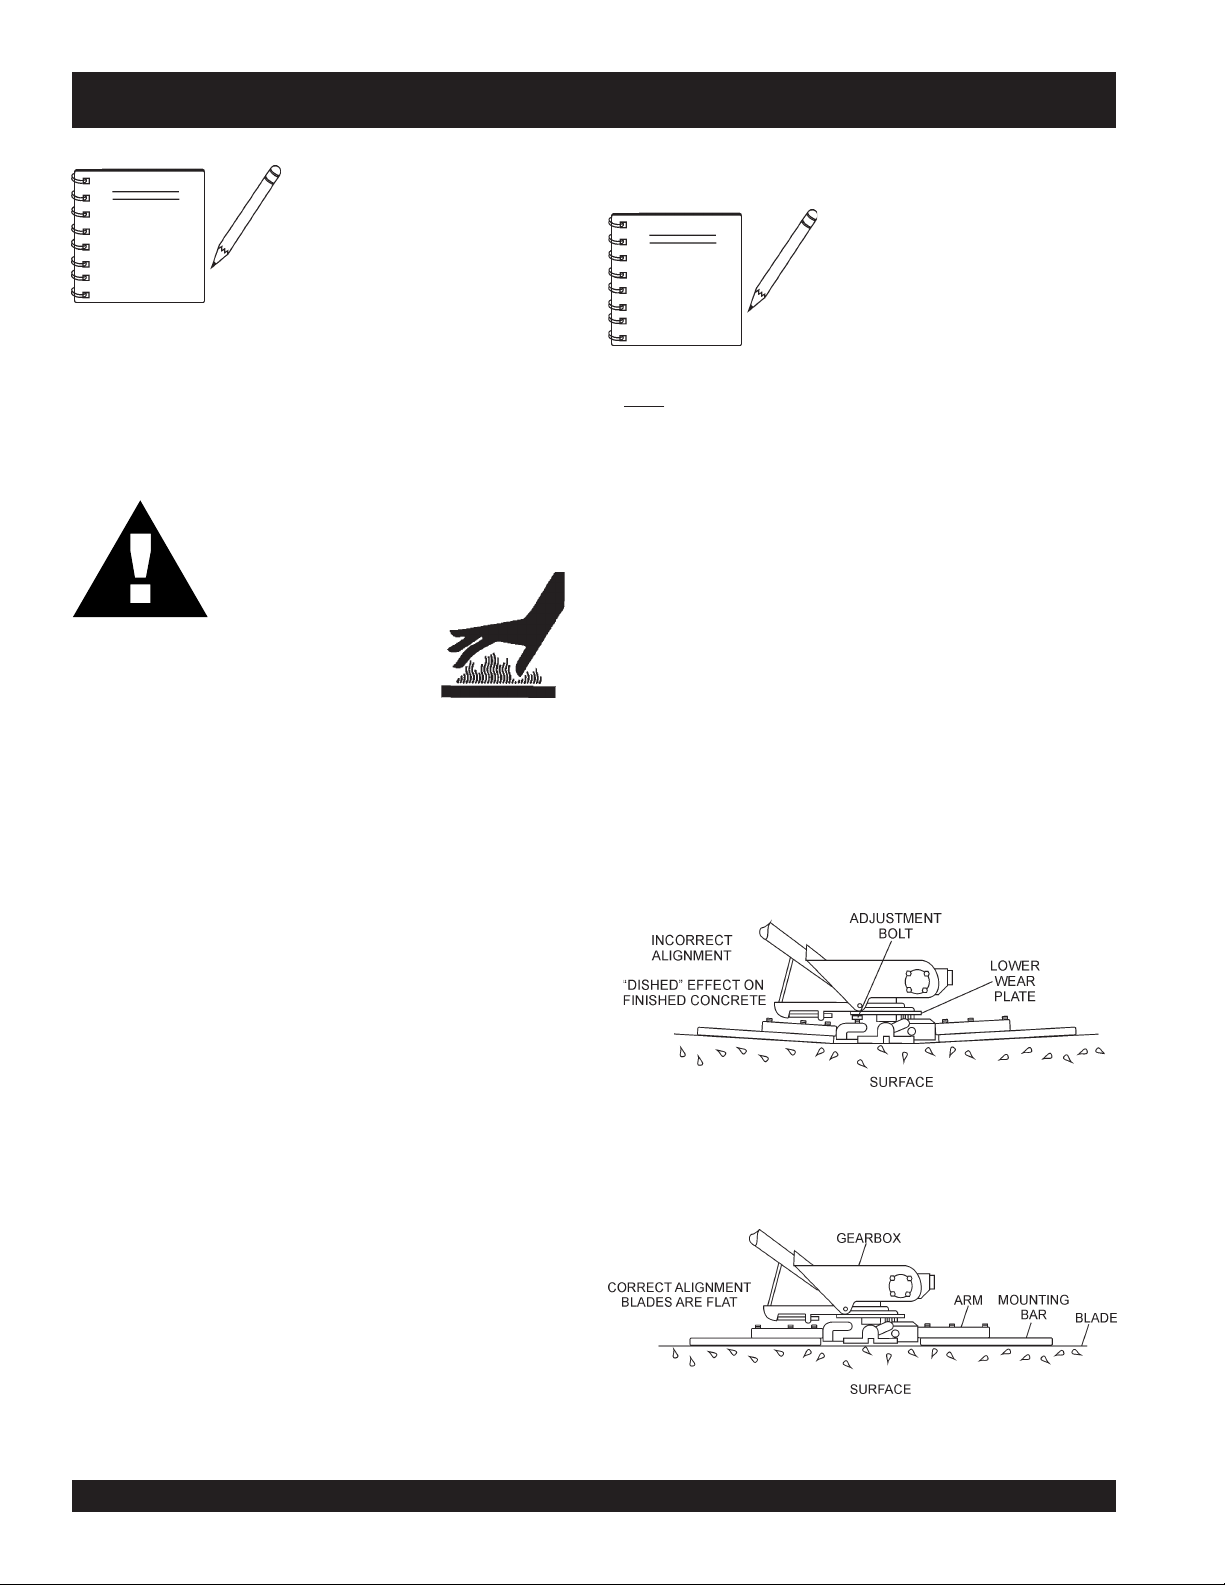
Figure 33 below illustrates a "
trowel arms
touching (0.10" max. clearance) lower wear plate. All alignment
bolts should be spaced the same distance from the lower wear
plate.
Figure 34 below illustrates the "
plate (as shipped from the factory).
Pitch the blades as flat as possible and look at the
adjustment bolts
with the
that one of them is not making contact, some adjustment
will be necessary.
Is the machine wearing out blades unevenly (i.e. one
blade is completely worn out while the others look new)?
lower wear plate
". Check to see that adjustment bolt is barely
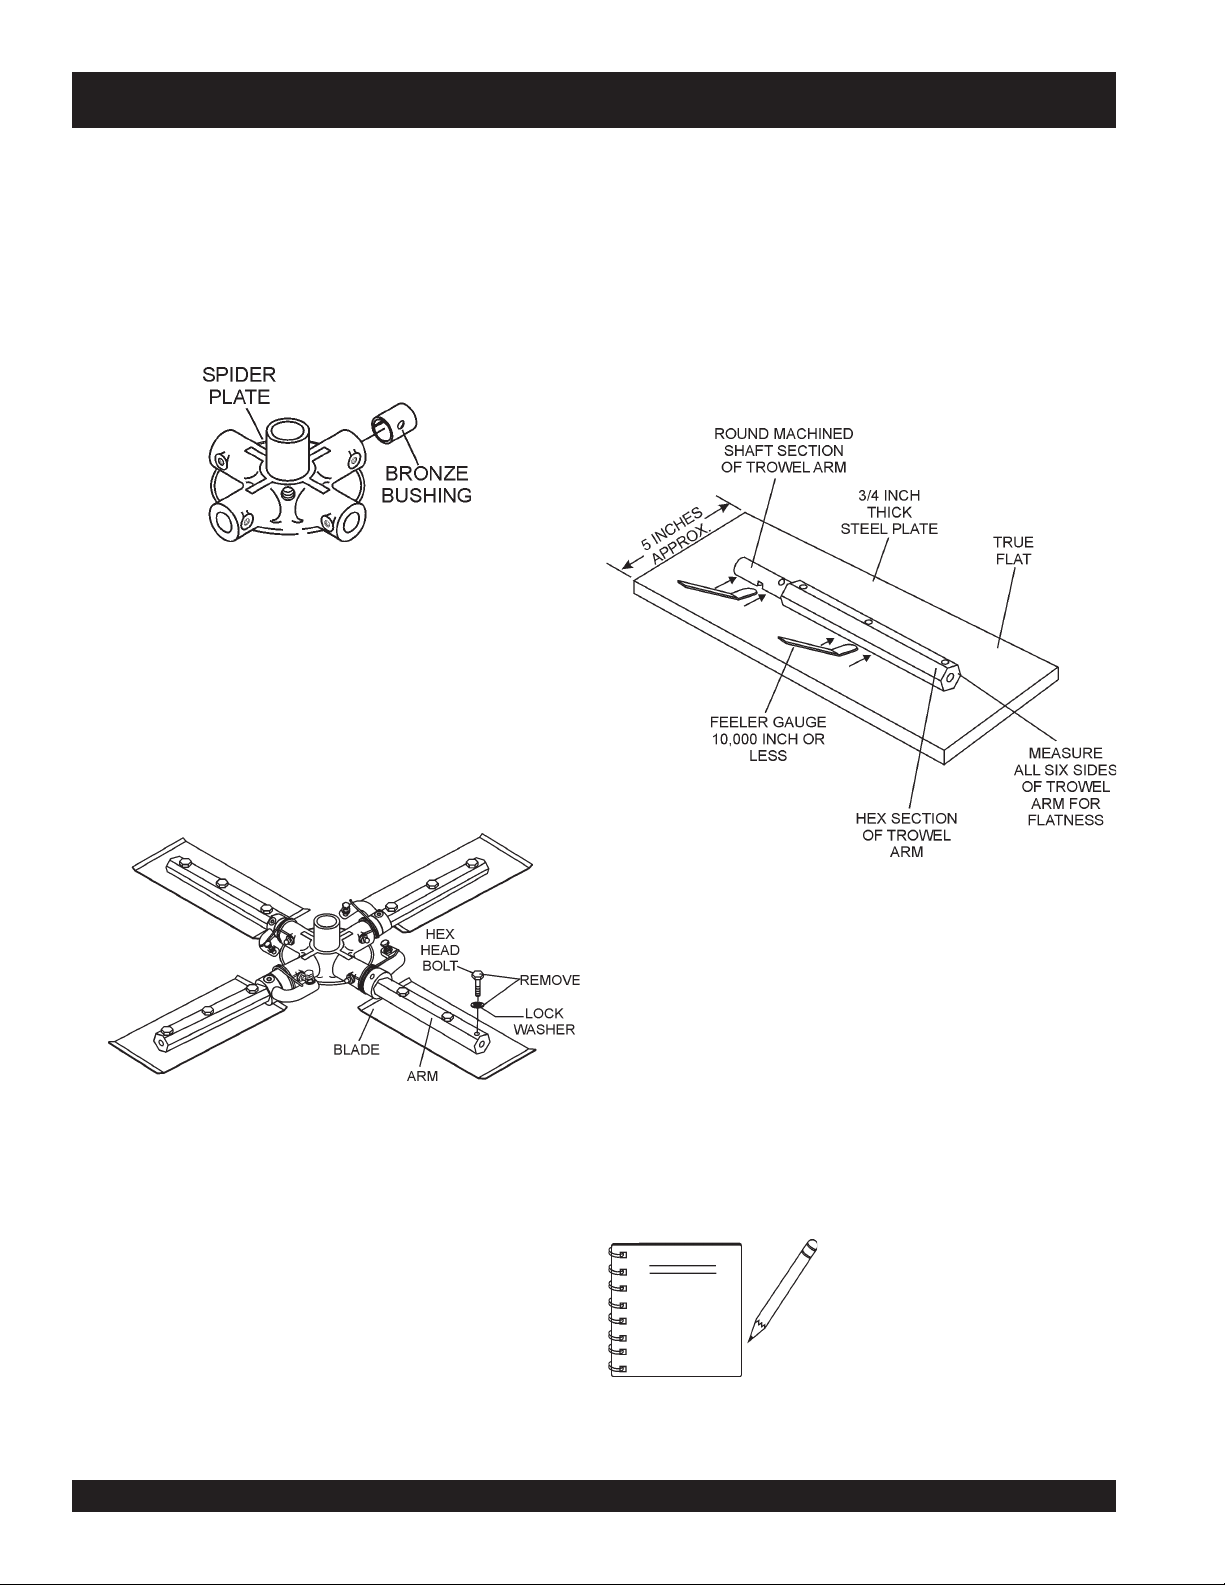
Figure 33. Worn Spider Plate
. They should all barely make contact
on the spider. If you can see
worn spider bushings or bent
correct alignment
" for a spider
1. Check and replace if necessary the arm bushings, thrust
collar bushings and shaft seals.
2. Check pitch control cables for wear.
3. Adjust blade speed.
Figure 34. Correct Spider Plate Alignment
PAGE 28 — SCT SERIES WALK-BEHIND TROWEL— PARTS & OPERATION MANUAL — REV. #4 (04/02/07)
Page 29
SCT SERIES TROWEL — MAINTENANCE
2. Start engine, and bring trowel blades up to full speed and look
for the following conditions:
■
Does the trowel have a perceived rolling or bouncing
motion when in use?
■
Look at the trowel while it is running, does the guard
ring “rock up and down” relative to the ground?
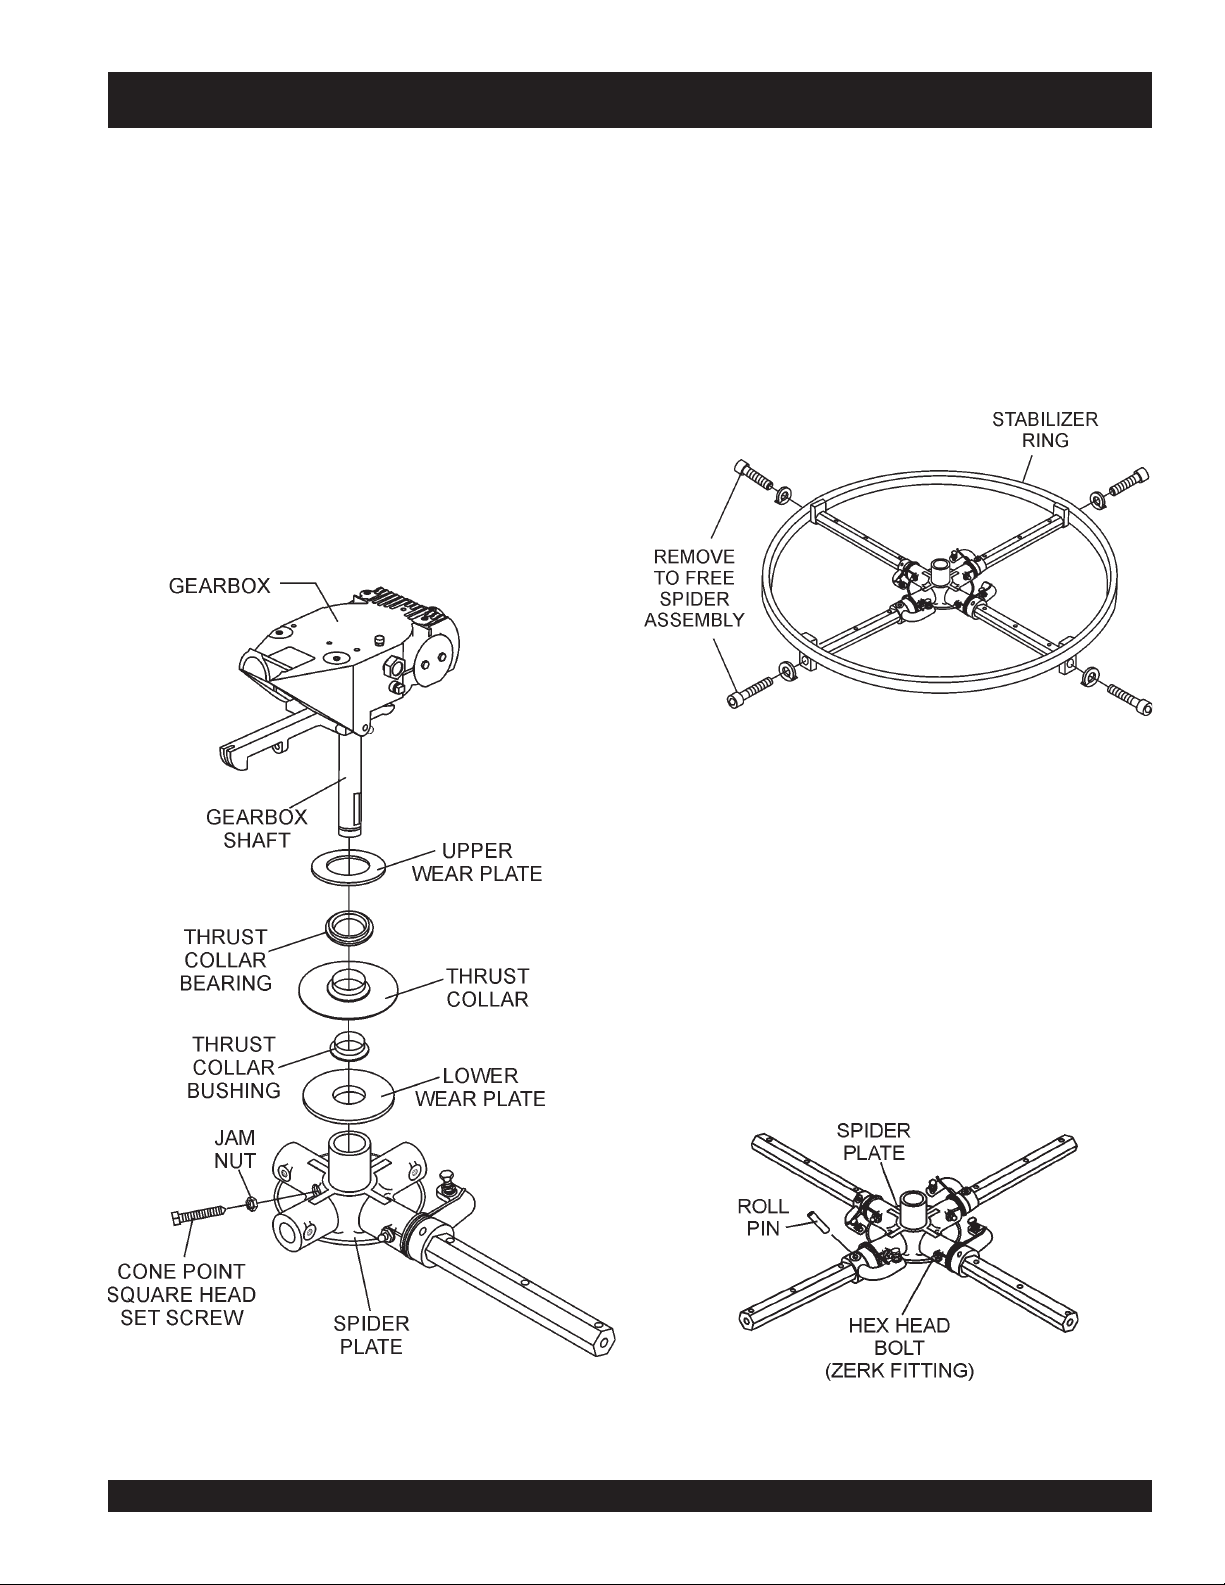
Spider Removal
1. Once it is determined that an adjustment is required, remove
the spider assembly from the gearbox shaft as follows:
a. Locate the cone point square head set screw (Figure 35)
and attached jam nut found on the side of the spider
assembly.
b. Loosen the jam nut and cone point square head set
c. If the trowel is equipped with an outer stabilizer ring
screw, and carefully lift the u
of the spider assembly. A slight tap with a rubber mallet
may be necessary to dislodge the spider from the main
shaft of the gearbox.
(Figure 36), remove the four bolts at the end of each
spider arm.
pper trowel assembly
off
Figure 36. Stabilizer Ring
d. Examine stabilizer ring for out of round or bends. If ring
is damaged, replace ring. If ring is found to be correct with
no damage, set aside.
Trowel Arm Removal
1. Each trowel arm is held in place at the spider plate by a hex
head bolt (zerk grease fitting) and a roll pin. Remove both the
hex head bolt and the roll pin (Figure 37) from the spider
plate.
2. Remove the trowel arm from the spider plate.
Figure 35. Spider/Gearbox Removal
Figure 37. Removing Roll Pin
and Zerk Grease Fitting
SCT SERIES WALK-BEHIND TROWEL — PARTS & OPERATION MANUAL — REV. #4 (04/02/07) — PAGE 29
Page 30
SCT SERIES TROWEL — MAINTENANCE
3. Should the trowel arm inserts (bronze bushing ) come out
with the trowel arm, remove the bushing from the trowel arm
and set aside in a safe place. If the bushing is retained inside
the spider plate, carefully remove the bushing.
4. Examine the bronze trowel arm bushing insert (Figure 38),
and clean if necessary. Replace the bushing if out-of-round
or worn.
Figure 38. Bronze Bushings
Trowel Blade Removal
1. Remove the trowel blades from the trowel arm by removing
the hex head bolts (Figure 39) from the trowel arm. The 36"
model will have two hex head bolts per arm and the 46" model
will have three hex head bolts per arm. Set blades aside.
Trowel Arm Flatness Test
1. Using a piece of 3/4 inch thick steel plate or any surface which
true
is
flatness.
2. Check each of the six sides of the trowel arm (hex section
only) using a ten thousands of an inch (max.) feeler gauge
(Figure 40) between the flat of the trowel arm and an
tremely flat
and
flat
test surface.
, check all
six sides
of each trowel arm for
ex
-
Figure 39. Trowel Blades
Wire brush
2.
trowel arm. Repeat this for the remaining three arms.
any build-up of concrete from all six sides of the
Figure 40. Trowel Arm Flatness Test
3. If the trowel arm is found to be
trowel arm. A bent trowel will not allow the trowel to operate
in a smooth fluid rotation.
4. Next, check each of the six sides of the round machined shaft
section of the trowel arm. Each section should have the
clearance
test surface.
between the round of the trowel arm shaft and the
uneven
or
bent
, replace the
same
Trowel arms can be damaged by
rough handling or by striking
NOTE
exposed plumbing or forms while in
operation.
ALWAYS
look-out for
objects which might cause damage
to the trowel arms.
PAGE 30 — SCT SERIES WALK-BEHIND TROWEL— PARTS & OPERATION MANUAL — REV. #4 (04/02/07)
Page 31

SCT SERIES TROWEL — MAINTENANCE
Trowel Arm Adjustment
Shown in Figure 41 is the adjustment fixture with a trowel arm
inserted. As each trowel arm is locked into the fixture, the arm bolt
is adjusted to where it contacts a stop on the fixture. This will
consistently adjust all of the trowel arms, keeping the finisher as
flat and evenly pitched as possible.
1. Locate the trowel arm adjustment tool P/N 1817. Set the
adjustment tool for a clock-wise blade rotation, meaning the
fixture arm is in the "UP" position.
4. Loosen the locking nut on the trowel arm lever, then turn the
trowel arm adjusting bolt until it barely touches (.010") the
adjusting bolt on the fixture.
5. After the correct adjustment has been made, tighten lock nut
on trowel arm lever to lock in place.
6. Loosen locking bolts on adjustment fixture, and remove
trowel arm from fixture.
7. Repeat steps 2-7 for the remaining trowel arms.
Re-Assembly
1. Clean and examine the upper/lower wear plates and thrust
collar. Examine the entire spider assembly. Wire brush any
concrete or rust build-up. If any of the spider components are
found to be damaged or out of round, replace them.
2. Make sure that the bronze trowel arm bushing is not damage
or out of round. Clean the bushing if necessary. If the bronze
bushing is damage or worn, replace it.
3. Reinstall bronze bushing onto trowel arm.
4. Repeat steps 2 -3 for each trowel arm.
5. Make sure that the spring tensioner is in the correct position
to exert tension on the trowel arm.
6. Insert all trowel arms with levers into spider plate (with bronze
bushing already installed) using care to align grease hole on
bronze bushing with grease hole fitting on spider plate.
7. Lock trowel arms in place by tightening the hex head zerk
grease fitting and jam nut.
8. Re-install the blades back onto the trowel arms.
9. Install stabilizer ring onto spider assembly.
10. Reinstall lower wear plate,
ring
the spider shaft. Make sure that there is little or no lateral
movement between the thrust collar and the spider shaft.
Figure 41. Trowel Arm Adjustment Tool
2. Un-screw the locking bolts on the adjustment tool, and place
the trowel arm into the adjustment fixture channel as shown
in Figure 43. A
holes on the trowel arm. Make sure to align the trowel
adjustment bolt with the fixture adjustment bolt.
3. Using an allen wrench, tighten the locking bolts on the
adjustment tool and securely lock the trowel arm in place.
thin shim
may be required to cover the blade
11. Carefully lift
way on gear box main shaft and insert into spider assembly.
12. Reinstall square head cone point into spider plate and
tighten in place. Tighten jam nut. Use care in making sure
point of set screw engages groove in gear box main shaft.
13. Lubricate all grease points (zerk fittings) with premium
Lithum 12"
"
consistency.
in the
reverse order
the upper trowel assembly
based grease, conforming to NLG1 Grade #2
thrust collar
that they were dis-assembled onto
and
upper wear
, line up the key-
SCT SERIES WALK-BEHIND TROWEL — PARTS & OPERATION MANUAL — REV. #4 (04/02/07) — PAGE 31
Page 32

SCT SERIES TROWEL — MAINTENANCE
Testing
1. Place trowel in test area, start engine and test trowel for
smoothness.
2. If trowel bounces has excessive vibration or does not run
smoothly repeat alignment procedure.
Changing a Blade
It is recommended that
time
. The machine may wobble or bounce if only some of the
blades are changed at one time.
1. Place the machine on a flat, level surface. Adjust the blade
pitch control to make the blades as flat as possible. Note the
blade orientation on the trowel arm.
all the blades be changed at the
same
V-Belt Inspection and Replacement
Inspect the v-belt for wear, fraying and deteriorization. Replace
with the appropriate size belt as follows:
To remove and replace the v-belt:
1. Remove the belt guard by removing the 3 hex head screws,
star washers and flat washers.
2. Slip the belt up and over the top of the clutch assembly.
3. Install the new belt and re-install the belt guard. (No adjustment is necessary on the v-belt.)
Before removing the blades,
NOTE
please note the orientation of the
blade on the trowel arm
5.5 HP Models: P/N 01390
8 HP Models: P/N 01243
11 HP Models: P/N 01523
1. Remove the three bolts and lock washers that secure the
blade to the trowel arm. Remove the blade.
2. Using a wire brush, scrape all concrete particles and foreign
debris from the trowel arm.
3. Install the new trowel blade onto the trowel arm. Make sure
blade is installed correctly, maintaining the proper orientation for direction of rotation
4. Reinstall
blade to the trowel arm. Tighten all three bolts securely.
5. Repeat steps 1-4 for all remaining blades.
the three bolts and lock washers that secure the
.
PAGE 32 — SCT SERIES WALK-BEHIND TROWEL— PARTS & OPERATION MANUAL — REV. #4 (04/02/07)
Page 33

SCT SERIES TROWEL — TROUBLESHOOTING (TROWEL)
GNITOOHSELBUORTLEWORT.6ELBAT
MOTPMYS MELBORPELBISSOP NOITULOS
?noitcnuflamhctiwSpotSytefaS
.lla
tatonrohguorgninnurenignE
tonhctiwSpotSytefaS
.gninoitcnuf
sllor,secnuob“lewortfI
nevenusekamro,etercnoc
.”etercnocnislriws
?leuF
?noitingI
?smelborprehtO .launams’rerutcafunamenignetlusnoC
?snoitcennoceriwesooL .yrassecensaecalpeR.gniriwkcehC
?stcatnocdaB .hctiwsecalpeR
?sedalB
?redipS
?smraleworttneB
?sgnihsubmraleworT
er
.yrassecen
gneeht
.yltcerrocgninoitcnuf
3tahtssel
.rabedalbehtotlellarapdna
saelgnahctipemasehttateserasedalbllatahtkcehC
.yletaidemmitiecalper,tnebylthgilsnevesismra
fihctiwsecalperroNOsihctiwSpotSytefaSehttahterusekaM
otdeilppusgniebleufsierehterusekaM.metsysleufehttakooL
.deggolctonsiretlifleufehttahterusneotkcehC.eni
sidnarewopsahhctiwsnoitingiehttahterusneotkcehC
.nrowylevissecxeton,noitidnocdoognierasedalbniatrecekaM
ehtmorf)mm05("2nahtsselonerusaemdluohssedalbhsiniF
onerusaemdluohssedalbobmoc,egdegniliartehtotrabedalb
thgiartsebdluohsedalbfoegdegniliarT.)mm98("5.
rofelbaliavasiloottnemtsujdadleifA.redipsehttaderusaem
tnempiuqElanoitpOees(smralewortehtfotnemtsujdathgieh
.)
ehtfoenofI.smraleworttnebrofylbmessaredipsehtkcehC
ybenodebnacsihT.ssenthgitrofsgnihsubmralewortehtkcehC
"8/1nahteromsierehtfI.nwoddnapusmralewortehtgnivom
ebdluohssgnihsubeht,mraehtfopitehttalevartfo)mm2.3(
.emitemasehttadecalperebdluohssgnihsubllA.decalp
?ralloctsurhT
?gnihsubralloctsurhT
?nrowgniraebtsurhT
?tfahsniaM
elbitpecrepasahenihcaM
.gninnurelihwnoitomgnillor
?ekoY
?hctiPedalB
ahterom
.ralloctsurhtehtnignihsubehtecalper
.yrassecenfiecalper,pactsurhT
.tnioptnemhcatta
.yrassecensaekoyecalpeR.pacraeweht
.launam
.redipsehtnotignitatorybralloctsurhtehtfossentalfehtkcehC
.ralloctsurhtehtecalper)mm5.0("20.0nahteromybseiravtifI
tlitnactifI.redipsehtnotignikcorybralloctsurhtehtkcehC
,].D.Oralloctsurhtehttaderusaemsa[)mm4.2("23/3n
:etoN.eerfgninnipssititahteesotgniraebtsurhtehtkcehC
ebdluohsylbmessaxobraegehtfotfahstuptuoniamehT
dnathgiartsnurtsumtfahsniamehT.ssenthgiartsrofdekcehc
dipsehttadnuorfotuo)mm80.0("300.0nahteromebtonnac
re
noylnevesserpekoyehtfosregnifhtobtahterusekamotkcehC
emasehtevahotdetsujdasiedalbhcaetahterusneotkcehC
ninoitcesecnanetniamreptsujdA.sedalbrehtollasahctip
SCT SERIES WALK-BEHIND TROWEL — PARTS & OPERATION MANUAL — REV. #4 (04/02/07) — PAGE 33
Page 34

SCT SERIES TROWEL — TROUBLESHOOTING (TROWEL)
MOTPMYS MELBORPELBISSOP NOITULOS
?stleb-VnroW .tleb-VecalpeR
?hctulclagufirtnecytriD .hctulcnaelcdnaelbmessasiD
)DEUNITNOC(GNITOOHSELBUORTLEWORT.6ELBAT
tuonrowroevitcefeD
enigneotesnopserhsiggulS
.egnahcdeeps
?xobraeg
MOTPMYS MELBORPELBISSOP NOITULOS
yrotcafsitastonnoitarepO
.setautculfdeepslanoitatoR
?enil
?hctulclagufirtnec
?xobraegnisgniraebnroW
nisraegnekorbronroW
?reporpmitnemtsujdaronrevoG .reveltcerrocotronrevogtsujdA
?evitcefedgnirpsronrevoG .noitingiecalperronaelC
?citarrewolfleuF .enilleufkcehC
noitcushguorhtninekatriA
.hctulceritneecalpeR
kcehc,ytluciffidhtiwsetatortfahsfI.dnahybtfahstupnietatoR
.yrassecensaecalpeR.sgniraebtfahstuptuodnatupnieht
sitfahstupniehtnehwsetatortfahsxobraegehttahtyfireV
.tesasaraegmrowdnamrowehthtobecalpeR.detator
GNITOOHSELBUORTENIGNE.7ELBAT
.enilnoitcuskcehC
gnikrowtonretratslioceR
.ylreporp
?trapgnitatornitsuD .ylbmessaretratsliocernaelC
?eruliafgnirpsgnirpS .gnirpslairpsecalpeR
PAGE 34 — SCT SERIES WALK-BEHIND TROWEL— PARTS & OPERATION MANUAL — REV. #4 (04/02/07)
Page 35

SCT SERIES TROWEL — TROUBLESHOOTING (ENGINE)
MOTPMYS MELBORPELBISSOP NOITULOS
tratsottluciffiD
?egdirbgniebgulpnoitingI .metsysnoitingikcehC
)DEUNITNOC(GNITOOHSELBUORTENIGNE.7ELBAT
.)elbacnoisnethgihta
rewoP(.etingitonlliw TON
noisserpmoc(setingi )lamron .
noisserpmoc(setingi wol .)
yrotcafsitastonnoitarepO
gulpkrapstubelbaliavasileuF
elbaliavarewoP(.etingitonlliw
?srotalusni
gulpkrapstubelbaliavasileuF
.)elbacnoisnethgihtaelbaliava
?stisoped
gulpkrapsdnaelbaliavasileuF
?)tsud
gulpkrapsdnaelbaliavasileuF
?nrowrednilyC .rednilycecalpeR
?esoolgulpkrapS .gulpkrapsnehgiT
?noitingitatisopednobraC .noitingiecalperronaelC
evitcefedoteudtiucrictrohS
?pagkrapsreporpmI .pagtcerrocehtotpaggulpkrapsteS
?hctiwspotstatiucrictrohS .evitcefedfihctiwspotsecalpeR.tiucrichctiwspotskcehC
?evitcefedliocnoitingI .liocnoitingiecalpeR
nobrachtiwdeggolcrelffuM
,retaw(etauqedaniesunileuF
?deggolcrenaelCriA .renaelcriaecalperronaelC
?teksagdaehrednilycevitcefeD .teksagdaehecalperrostlobdaehrednilycnethgiT
.srotalusniecalpeR
.relffumecalperronaelC
.leufhserfhtiwecalperdnametysleufhsulF
?deggolcrenaelcriA
elbaliavarewophguonetoN
-ssimon,lamronnoisserpmoc(
.)gnirif
elbaliavarewophguonetoN
-ssim,lamronnoisserpmoc(
.)gnirif
?)tsud
.staehrevoenignE
?enilleufniriA .enilleufmorf)riaevomer(deelB
?reporpmirebmahc
?evitcefedliocnoitingI .leufhserfhtiwecalperdnametysleufhsulF
?rebmahcnoitsubmoc
.nobrac
taolfrotaerubracnilevelleuF
?rednilycnistisopednobraC rednilycecalperronaelC
?strohsnetfogulpnoitingI .noitinginaelc,seriwnoitingiecalpeR
,retaw(etauqedaniesunileuF
ninoitsopednobracevissecxE
htiwdeggolcrelffumrotsuahxE
?tcerrocnieulavtaehgulpkrapS .gulpkrapsepyttcerrochtiwgulpkrapsecalpeR
taolfrotaerubractsujdA
.leufhserfhtiwecalperdnametysleufhsulF
.esacknarcecalperronaelC
.relffumecalperronaelC
SCT SERIES WALK-BEHIND TROWEL — PARTS & OPERATION MANUAL — REV. #4 (04/02/07) — PAGE 35
Page 36

EXPLANATION OF CODE IN REMARKS COLUMN
The following section explains the different symbols and remarks
used in the Parts section of this manual. Use the help numbers
found on the back page of the manual if there are any questions.
The contents and part numbers listed in the parts section are
subject to change
guarantee the availibility of the parts listed.
Sample Parts List:
NO. PART NO. PART NAME QTY. REMARKS
1 12345 BOLT ....................... 1 .... INCLUDES ITEMS W/
2
*
2*12347 WASHER, 3/8 IN. .... 1 ....
3 12348 HOSE .................... A/R .. MAKE LOCALLY
4 12349 BEARING ................ 1 .... S/N 2345B AND ABOVE
NO. Column
Unique Symbols - All items with same unique symbol
, #, +, %, or >) in the number column belong to the same
(
*
assembly or kit, which is indicated by a note in the “Remarks”
column.
Duplicate Item Numbers - Duplicate numbers indicate
multiple part numbers are in effect for the same general item,
such as different size saw blade guards in use or a part that
has been updated on newer versions of the same machine.
NOTE
without notice
WASHER, 1/4 IN. ...........
When ordering a part that has more
than one item number listed, check
the remarks column for help in
determining the proper part to order.
. Multiquip does not
NOT SOLD SEPARATELY
MQ-45T ONLY
QTY. Column
Numbers Used - Item quantity can be indicated by a number,
a blank entry, or A/R.
A/R (As Required) is generally used for hoses or other parts
that are sold in bulk and cut to length.
A blank entry generally indicates that the item is not sold
separately. Other entries will be clarified in the “Remarks”
Column.
REMARKS Column
Some of the most common notes found in the “Remarks”
*
Column are listed below. Other additional notes needed to
describe the item can also be shown.
Assembly/Kit
symbol will be included when this item is purchased.
Indicated by:
“INCLUDES ITEMS W/(unique symbol)”
Serial Number Break
range where a particular part is used.
Indicated by:
“S/N XXXXX AND BELOW”
“S/N XXXX AND ABOVE”
“S/N XXXX TO S/N XXX”
Specific Model Number Use
only with the specific model number or model number variant
listed. It can also be used to show a part is NOT used on a
specific model or model number variant.
Indicated by:
“XXXXX ONLY”
“NOT USED ON XXXX”
- All items on the parts list with the same unique
- Used to list an effective serial number
- Indicates that the part is used
PART NO. Column
Numbers Used - Part numbers can be indicated by a number,
a blank entry, or TBD.
TBD (To Be Determined) is generally used to show a part that
has not been assigned a formal part number at time of
publication.
A blank entry generally indicates that the item is not sold
separately or is not sold by Multiquip. Other entries will be
clarified in the “Remarks” Column.
PAGE 36 — SCT SERIES WALK-BEHIND TROWEL— PARTS & OPERATION MANUAL — REV. #4 (04/02/07)
purchased at any hardware shop or made out of available
items. Examples include battery cables, shims, and certain
washers and nuts.
“Not Sold Separately”
purchased as a separate item and is either part of an
assembly/kit that can be purchased, or is not available for
sale through Multiquip.
“Make/Obtain Locally”
- Indicates that the part can be
- Indicates that an item cannot be
Page 37

SCT SERIES TROWEL — SUGGESTED SPARE PARTS
SCT SERIESTROWEL 1 TO 3 UNITS
1 to 3 Units
Qty. ........ P/N .............................. Description
3 ............ 20478 .................... GRIP
2 ............ 20856 .................... SAFETY SWITCH
1 ............ 20285 .................... PITCH CONTROLCABLE
1 ............ 20514 .................... SAFETY STOP WIRE
1 ............ 30033-401 ............ THROTTLE CABLE
4 ............ 1157 A .................. BUSHING
4 ............ 2828 ...................... ARM (11-3/4")
4 ............ 1162 A .................. LUBE CAP
4 ............ 12097 .................... SCREW
4 ............ 1456 ...................... NUT
4 ............ 1875 ...................... WASHER
4 ............ 1322 ...................... SCREW
1 ............ 21046 .................... GASKET KIT
1 ............ 21047 .................... BEARING KIT
1 ............ 1247 ...................... RUBBER GROMMET
1 ............ 1245 ...................... SPACER
1 ............ 10968 .................... THRUST COLLAR KIT
2 ............ 1390 ...................... BELT, A26 5.5 HP HONDA GX160QX2
3 ............ 0152-3 .................. BELT, A28, 8.0 &11.0 HP HAONDA
HONDA ENGINES
Qty. ........ P/N.............................. Description
3 ............ 17210ZE1505 ....... AIR FILTER ELEMENT (GX160QX2)
3 ............ 17210ZE2505 ....... AIR FILTER ELEMENT (GX240K1QA2)
3 ............ 17210ZE3505 ....... AIR FILTER ELEMENT (GX340K1QAP2)
6 ............ 9807955846 .......... SPARK PLUG, BPR5ES, NGK
1 ............ 36100ZH7003 ....... SWITCH ASSEMBLY, ENG. STOP
1 ............ 17620ZH7023 ....... TANK CAP, FUEL FILLER
1 ............ 34150ZH7003 ....... OIL ALERT UNIT
1 ............ 28462ZH8003 ....... ROPE RECOIL GX160QX2
1 ............ 28462ZE2W11 ...... ROPE RECOIL GX240K1QA2
1 ............ 28462ZV7003 ....... ROPE RECOIL GX340K1QAP2
SCT SERIES WALK-BEHIND TROWEL — PARTS & OPERATION MANUAL — REV. #4 (04/02/07) — PAGE 37
Page 38

NAMEPLATES AND DECALS
SCT SERIES TROWEL — DECAL LOCATOR
PAGE 38 — SCT SERIES WALK-BEHIND TROWEL— PARTS & OPERATION MANUAL — REV. #4 (04/02/07)
Page 39

SCT SERIES TROWEL — DECAL LOCATOR
NAMEPLATE AND DECALS
NO. PART NO. PART NAME QTY. REMARKS
1 NAMEPLATE.......................................................... 1 ....... CONTACT MULTIQUIP
.......................................................................................... PARTS DEPT.
2 30053-001 DECAL: SCT SERIESCONCRETE TROWEL 2
3 25349-001 DECAL: WARNING, GUARDS 1
4 30054-001 DECAL: STOW 1
5 25264-001 DECAL: CAUTION, OPERATING INSTR. 1
6 11246 DECAL: ROTATION ............................................... 1 ....... PART OF DECAL KIT P/N 12620
7 25265-001 DECAL: CAUTION, ROTATING BLADES 1
8 11246 DECAL: GEAR DRIVE .......................................... 1 ....... PART OF DECAL KIT P/N 12620
9 11246 DECAL: OIL CHECK ............................................. 1 ....... PART OF DECAL KIT P/N 12620
10 11247 DECAL: HELMET, FOOT AND GLOVE ................. 1 ....... PART OF DECAL KIT P/N 12620
11 11246 DECAL: HOT ......................................................... 1 ....... PART OF DECAL KIT P/N 12620
12 25378-001 DECAL: CAUTION, SAFETY STRAPS 1
13 11246 DECAL: LIFTING POINT ...................................... 1 ....... PART OF DECAL KIT P/N 12620
14 11246 DECAL: BELT DRIVE ........................................... 1 ....... PART OF DECAL KIT P/N 12620
SCT SERIES WALK-BEHIND TROWEL — PARTS & OPERATION MANUAL — REV. #4 (04/02/07) — PAGE 39
Page 40

STANDARD HANDLE
SCT SERIESTROWEL — STANDARD HANDLE
4
5
8
15
19
3
6
9
14
7
2
13
18
19
16
DETAIL “A”
DETAIL “B”
20
SEE
20
1
10
SEE
DETAIL “A”
21
17
11
12
1
25
28
26
25
22
29
24
23
ASM
25
26
25
24
26
DETAIL “B”
CABLE LENGTH IS PRESET AND
ATTACHED TO THROTTLE LEVER
1
AT THE FACTORY. ORDERABLE
AS A UNIT ONLY.
27
30
PAGE 40 — SCT SERIES WALK-BEHIND TROWEL— PARTS & OPERATION MANUAL — REV. #4 (04/02/07)
Page 41

SCT SERIESTROWEL — STANDARD HANDLE
STANDARD HANDLE
NO. PART NO. PART NAME QTY. REMARKS
1 20478 GRIP, HANDLE 2
2 21251 HANDLE 1
3
*
4
*
5
*
6
*
7
*
8
*
9
*
10 06827-006 SCREW, RHM 10-32 X 3/8 2
11 10019 NUT, NYLOC 10-32 2
12 30033-401 LEVER, THROTTLE ASSEMBLY 1
13 0786 SCREW, BHC 1/4- 20 X 3/8 NYL PATCH, NP 1
14 0786A SPACER, .360 X 17/64 X 1/8L 1
15 21249 SLIDE BLOCK, TROWEL CONTROL 1
16 20285 CABLE, PITCH CONTROL 1
17 21250 BLOCK SUPPORT 1
18 20856 SWITCH ASSEMBLY, SAFETY STOP 1
19
20# 20988 SCREW, FHSC PHILLIPS 8-32 X 1 1/4 1
21 20514 WIRE ASSEMBLY, SAFETY STOP SWITCH 1
22 21254 HANDLE TUBE 1
23 21150 HANDLE ASSEMBLY 1
24 0169 SCREW, HHC 3/8-16 X 3.0 2
25 10136 WASHER, FLAT 3/8 SAE 4
26 10133 NUT, NYLOC 3/8-16 4
27 1493 SCREW, HHC 3/8-16 X 3 1/4 1
28 1247 GROMMET, 1/4 X .875ID X 1-5/8OD 1
29 1245 BUSHING 1
30 1116 NUT, BRASS JAM 5/16-18 2
30115-001 HAND WHEEL, PITCH CONTROL 1
1729 PIN, ROLL 3/16 X 1-1/4 1
21248 BEARING, TROWEL CONTROL 1
3615 COLLAR, SET 3/4 ID 1
21282 SHAFT, PITCH CONTROL 1
21279 HAND WHEEL ASSEMBLY, PITCH CONTROL......1...INCLUDES ITEMS W/
0122C SCREW, SHS 3/8-16 X 1/2 1
# 1602 SCREW, RHM 10-24 X 3/8....................................1...INCLUDES ITEMS W/#
*
SCT SERIES WALK-BEHIND TROWEL — PARTS & OPERATION MANUAL — REV. #4 (04/02/07) — PAGE 41
Page 42

4 BLADE SPIDER ASSY.
SCT SERIES TROWEL — 4-BLADE SPIDER ASSY.
PAGE 42 — SCT SERIES WALK-BEHIND TROWEL— PARTS & OPERATION MANUAL — REV. #4 (04/02/07)
Page 43

SCT SERIES TROWEL — 4-BLADE SPIDER ASSY.
4 BLADE SPIDER ASSY.
NO. PART NO. PART NAME QTY. REMARKS
1
*
2
*
3
*
4
*
5
*
6% 1157A BEARING INSERT 4
7% 0164B RADIUS HEAD 3/8- 16 x 1-1/4” 4
8% 4164 ROLL PIN 5/16 x 1-3/4” 4
9% 1876 JAM NUT 3/8- 16 4
10% 0166A LOCK WASHER 3/8” 4
11% 0105 SCREW, HHCS 5/16-18 X 1-1/2 ........................................ 8 ........... 36" MODELS
11% 0105 SCREW, HHCS 5/16-18 X 1-1/2 ...................................... 12 ........... 46" MODELS
12% 0161C WASHER, LOCK 5/16 ....................................................... 8 ........... 36" MODELS
12% 0161C WASHER, LOCK 5/16 ..................................................... 12 ........... 46" MODELS
13% 2828 TROWEL ARM 11-3/4 4
14% 1163 TROWEL ARM LEVER 4
15% 1316 SPRING (RIGHT HAND) 4
16% 1456 HEX NUT 3/8-16 1
17% 12097 SCREW, SQHS 3/8-16 x 1-3/4” CONE POINT 1
18% 1322 RETAINING SCREW ASSY. 4
19% 1162A CAP, GREASE ZERK 4
20% 1875 INT. SHKP. WASHER 3/8” 4
21% 1161 SPIDER PLATE ONLY 1
22 21261 SPIDER PLATE ASSEMBLY ............................................ 1 ........... INCLUDES ITEMS W/%
23 10968 THRUST COLLAR KIT ...................................................... 1 ........... INCLUDES ITEMS W/
12208 WEAR RING 1
12778 FLANGE BEARING 1
10793 THRUST COLLAR ............................................................. 1 ........... INCLUDES ITEMS W/#
# 1471 THRUST COLLAR BUSHING 1
1154A WEAR PLATE 1
*
SCT SERIES WALK-BEHIND TROWEL — PARTS & OPERATION MANUAL — REV. #4 (04/02/07) — PAGE 43
Page 44

GEARBOX ASSY.
SCT SERIES TROWEL — GEARBOX ASSY.
1
2
3
4
5
30
GEARBOX ASSEMBLY
37
38
GASKET/SEAL KIT
BEARING KIT
39
1
12
13
8
4
6
34
11
7
35
36
7
9
7
6
14
2
10
15
31
32
17
16
18
33
32
31
19
20
19
18
6
G
GEARBOX REQUIRES
22 OZ. OF LUBRICATING
OIL FOR OPERATION.
E
B
A
R
O
I
L
2
2
Z
0
QTY. 1
X
O
.
22
21
23
APPLY THREAD LOCK (LOCTITE
1
242 BLUE OR EQUIVALENT).
24
APPLY SEALANT (LOCTITE
2
572 OR EQUIVALENT).
TORQUE TO 15 LB/FT.
3
SHIM AS NECESSARY
FOR 0.005 TO 0.010
4
INTPUT SHAFT ENDPLAY.
SHIM AS NECESSARY
FOR 0.000 TO 0.003
5
OUTPUT SHAFT ENDPLAY.
USE SPECIALLY FORMULATED
WHITEMAN GEARBOX LUBRICANT
6
P/N 10139 OR ISO 680 OIL.
GUARD RING.
7
PAGE 44 — SCT SERIES WALK-BEHIND TROWEL— PARTS & OPERATION MANUAL — REV. #4 (04/02/07)
5
25
26
27
28
3
29
Page 45

SCT SERIES TROWEL — GEARBOX ASSY.
GEARBOX ASSY.
NO. PART NO. PART NAME QTY. REMARKS
1%*0753 SEAL, OIL NATIONAL #470954 1
2% 0131A SCREW, HHC 1/4-20 X 3/4 4
3% 12876 FLANGE, INPUT SHAFT 1
4%*20395 RING, O -139 BUNA N 1
5%*20397 SHIM, INPUT 0.002 THICK 1
20398 SHIM, INPUT 0.003 THICK 1
20399 SHIM, INPUT 0.005 THICK 1
20400 SHIM, INPUT 0.010 THICK 1
20401 SHIM, INPUT 0.020 THICK 1
6%# 20466 BEARING, CUP, TIMKEN #LM11910 2
7%# 20465 BEARING, CONE, TIMKEN #LM11949 2
8% 0627 KEY, SQUARE 3/16 X 1 1/4 1
9% 1851 GEAR, WORM & SHAFT ASSY. 1
10% 12874 CASE, GEAR 1
11% 21218 VENT, AIR 1
12 1394 SCREW, FHSC 3/8 - 16 X 1 4
13 1480 WASHER, C/S EXT. SHKP, 3/8 4
14% 20476 SCREW, HHC 1/4-28 X 3/8 2
15% 21033 SIGHT GLASS, 3/4 M PIPE STEEL 1
16% 0121A FITTING, PLUG 3/8 MP SQ HEAD 1
17% 1138 RING, SNAP, TRUARC 5100-112 1
18%# 20475 BEARING, CUP TIMKEN #M86610 2
19%# 20474 BEARING, CONE TIMKEN #M86647 2
20% 1140 GEAR, WORM, BRONZE 1
21% 20470 SHAFT, OUTPUT 1
22% 1139 KEY, WOODRUFF #21 HARDENED 1
23 1238 KEY, WOODRUFF #25 1
24%*20402 SHIM, OUTPUT 0.002 THICK 1
20403 SHIM, OUTPUT 0.003 THICK 1
20404 SHIM, OUTPUT 0.005 THICK 1
20405 SHIM, OUTPUT 0.010 THICK 1
20406 SHIM, OUTPUT 0.020 THICK 1
25%*20396 RING, O -257 BUNA N 1
26% 12875 COVER, GEARBOX 1
27% 10235 WASHER, C/S EXT. SHKP 4
28% 1146 SCREW, FHSC 5/16-18 X 1, NYLOC NP 4
29%*0254 SEAL, OIL, NATIONAL #470712 1
30 1150 ARM, YOKE 1
31 20802 RING, SNAP, TRUARC 5100-37 OR EQUIV. 2
32 20803 SPACER, .50 OD X .40 ID X 0.25L 2
33 20801 PIN, YOKE 1
34 16045 SPACER, GEARBOX 4
35 0655 SCREW, HHC 5/16-18 X 3/4 1
36 0300B WASHER, FLAT 5/16 SAE 3
37 21219 GEARBOX ASSY. .................................................. 1 .................. INCLUDES ITEMS W/%
38 21046 GASKET SEAL KIT ............................................... 1 .................. INCLUDES ITEMS W/
39 21047 BEARING KIT ........................................................ 1 .................. INCLUDES ITEMS W/#
*
SCT SERIES WALK-BEHIND TROWEL — PARTS & OPERATION MANUAL — REV. #4 (04/02/07) — PAGE 45
Page 46

GUARD RING ASSY.
SCT SERIESTROWEL — GUARD RING ASSY.
PAGE 46 — SCT SERIES WALK-BEHIND TROWEL— PARTS & OPERATION MANUAL — REV. #4 (04/02/07)
Page 47

SCT SERIESTROWEL — GUARD RING ASSY.
GUARD RING ASSY.
NO. PART NO. PART NAME QTY. REMARKS
1 21119 RING, STATIONARY GUARD, 36" 1
2 21122 RING, STATIONARY GUARD, 46" 1
SCT SERIES WALK-BEHIND TROWEL — PARTS & OPERATION MANUAL — REV. #4 (04/02/07) — PAGE 47
Page 48

STABILIZER RING ASSY.
SCT SERIESTROWEL — STABILIZER RING ASSY.
4
SEE DETAIL “A”
DETAIL “A”
3
1
2
1
APPLY LOCTITE 242 BLUE
1
OR EQUIVALENT.
PAGE 48 — SCT SERIES WALK-BEHIND TROWEL— PARTS & OPERATION MANUAL — REV. #4 (04/02/07)
Page 49

SCT SERIESTROWEL — STABILIZER RING ASSY.
STABILIZER RING ASSY.
NO PART NO PART NAME QTY. REMARKS
1 1237 SCREW, SHC 5/16-18 X 3/4 4
2 0161C WASHER, LOCK, 5/16 MED 4
3 21465-001 FLANGE, BEARING 4
4 21471-351 STABILIZER RING ASSEMBLY 1
SCT SERIES WALK-BEHIND TROWEL — PARTS & OPERATION MANUAL — REV. #4 (04/02/07) — PAGE 49
Page 50

SCT SERIES TROWEL — ENGINES, 5.5 HP, 8 HP, 11 HP HONDA ASSY.
ENGINE, 5.5 HP, 8 HP, 11 HP HONDA ASSY.
PAGE 50 — SCT SERIES WALK-BEHIND TROWEL— PARTS & OPERATION MANUAL — REV. #4 (04/02/07)
Page 51

SCT SERIES TROWEL — ENGINES, 5.5 HP, 8 HP, 11 HP HONDA ASSY.
ENGINE, 5.5 HP, 8 HP, 11 HP HONDA ASSY.
NO. PART NO. PART NAME QTY. REMARKS
1 1386 ENGINE 5.5 HP HONDA GX160QX2 1
1 1387 ENGINE 8 HP HONDA GX240K1QA2 1
1 1388 ENGINE 11 HP HONDA GX340K1QAP2 1
2 1391 HHCS 5/16-24 x 1-1/4" 4
3 0161C LOCK WASHER 5/16" 4
4 0300B FLAT WASHER 5/16" 4
5 21293 LIFTING BAIL ................................................................... 1 ... 5.5 HP MODEL
5 30043-351 LIFTING BAIL ................................................................... 1 ...8 HP & 11 HP MODELS
6 0627 KEY , SQUARE, 3/16 X 1-1/4 1
7 1834 DEFLECTOR, EXHAUST .................................................. 1 5.5 HP MODEL
8 1273 SCREW, HHST 8-32 X 3/8 ................................................ 1 5.5 HP MODEL
9 10229 SCREW, HHCS 5/16-24 x 1/2 4
10 0255 AUTO CLUTCH ASSY. 3/4" BORE 5.5 HP MODEL .......... 1 ... INCLUDES ITEMS W/
10 0250 AUTO CLUTCH ASSY. 1" BORE 8 &11 HP MODELS ...... 1 ...INCLUDES ITEMS W/#
11 1390 BELT, A26 ......................................................................... 1 ... 5.5 HP MODEL
11 0152-3 BELT, A28 ......................................................................... 1 ...8 HP & 11 HP MODELS
12 30102-002 BELT GUARD 1
13 0948 WASHER, FLAT 1/4 SAE 3
14 10031 WASHER, EXT SHKP 1/4 3
15 131A SCREW, HHC 1/4-20 X 3/4 3
16 1488 WIRE, SAFETY SWITCH 1
17 1475 CONNECTOR SPLICE 1
18 21140 PULLEY, AK-54 X 3/4 1
19 21141 SPACER, ENGINE MOUNT .............................................. 2 ... 5.5 HP MODEL
20 21256 SPACER, LIFT BAIL ......................................................... 4 ...5.5 HP MODEL
21
22
23
24
25
26
27
28
29# 0252 SPINDLE 1" BORE ........................................................... 1 ...8 HP & 11 HP MODELS
30# 0457 HSSS 3/8-24X1/2" ............................................................ 1 ... 8 HP & 11 HP MODELS
0256 SPINDLE 3/4 BORE ......................................................... 1 ... 5.5 HP MODEL
*
# 0251 CLUTCH HOUSING DRUM 1
*
# 0458 CLUTCH HOUSUNG DRUM BUSHING 1
*
# 0454 WEIGHT SET (INCLUDES 4 WEIGHTS) 1
*
# 0855 SPRING 1
*
# 0253 CLUTCH EXPANSION PLATE 1
*
1868 SHSS 3/8-24 X3/4" ........................................................... 1 ...5.5 HP MODEL
*
# 0456 BELT RUNNER (BEARING) 1
*
*
SCT SERIES WALK-BEHIND TROWEL — PARTS & OPERATION MANUAL — REV. #4 (04/02/07) — PAGE 51
Page 52

SCT SERIESTROWEL — BLADES & ADJUSTMENT FIXTURE ASSY.
BLADES & ADJUSTMENT FIXTURE ASSY.
(OPTIONS)
PAGE 52 — SCT SERIES WALK-BEHIND TROWEL— PARTS & OPERATION MANUAL — REV. #4 (04/02/07)
Page 53

SCT SERIESTROWEL — BLADES & ADJUSTMENT FIXTURE ASSY.
BLADES & ADJUSTMENT FIXTURE ASSY.
NO. PART NO. PART NAME QTY. REMARKS
1 COMBO FLOAT & FINISH BLADE .......................... 4 ......... CONTACT UNIT SALES DEPT./ACCESSORY ITEM
1 ENDURO COMBO FLOAT &FINISH BLADE .......... 4 ......... CONTACT UNIT SALES DEPT./ACCESSORY ITEM
2 FLOAT BLADE ........................................................ 4 ......... CONTACT UNIT SALES DEPT./ACCESSORY ITEM
3 FINISH BLADE ....................................................... 4 ......... CONTACT UNIT SALES DEPT./ACCESSORY ITEM
3 ENDURO FINISH BLADE W/ROTATING ................ 4 ......... CONTACT UNIT SALES DEPT./ACCESSORY ITEM
4 0201 GUARD RING LUG RING 4
5 0202 HHCS 5/16-18X1" RING 4
6 1434 TROWEL LUG (FINISH BLADE ONLY) 4
7 REVERSIBLE COMBO BLADE ............................... 4 ......... CONTACT UNIT SALES DEPT./ACCESSORY ITEM
8 UNIVERSAL MOUNTING BAR ............................... 4 ......... CONTACT UNIT SALES DEPT./ACCESSORY ITEM
9 SNAP PIN 1/4"X1.3/4" ............................................ 8 ......... CONTACT UNIT SALES DEPT./ACCESSORY ITEM
10 UNIVERSAL FINISH BLADE .................................. 4 ........ CONTACT UNIT SALES DEPT./ACCESSORY ITEM
10 ENDURO UNIVERSAL FINISH BLADE .................. 4 ......... CONTACT UNIT SALES DEPT./ACCESSORY ITEM
11 UNIVERSAL COMBO BLADE ................................. 4 ......... CONTACT UNIT SALES DEPT./ACCESSORY ITEM
11 ENDURO UNIVERSAL COMBO BLADE ................ 4 ......... CONTACT UNIT SALES DEPT./ACCESSORY ITEM
12 0487 SHCS 3/8-16X1/2" 20
13 0490 SHCS 7/16-14X1" 3
14 0489 GRINDING DISC HUB 1
15 0488 STONE MOUNT PLATE 1
16 GRINDING DISC ASSY. ......................................... 1 ......... CONTACT UNIT SALES DEPT./ACCESSORY ITEM
17 GRINDING DISC STONE ONLY ............................. 1 ......... CONTACT UNIT SALES DEPT./ACCESSORY ITEM
18 FLOAT DISC LATCH PIN ....................................... 4 ......... CONTACT UNIT SALES DEPT./ACCESSORY ITEM
19 FLOAT DISC ........................................................... 1 ......... CONTACT UNIT SALES DEPT./ACCESSORY ITEM
20 GRINDING BRICK .................................................. 4 ......... CONTACT UNIT SALES DEPT./ACCESSORY ITEM
21 TROWEL ARM ADJ. FIXTURE ASSY. .................... 1 ......... CONTACT UNIT SALES DEPT./ACCESSORY ITEM
SCT SERIES WALK-BEHIND TROWEL — PARTS & OPERATION MANUAL — REV. #4 (04/02/07) — PAGE 53
Page 54

AIR CLEANER ASSY.
HONDA GX160K1QX2 — AIR CLEANER ASSY.
PAGE 54 — SCT SERIES WALK-BEHIND TROWEL— PARTS & OPERATION MANUAL — REV. #4 (04/02/07)
Page 55

HONDA GX160K1QX2 — AIR CLEANER ASSY.
AIR CLEANER ASSY.
NO. PART NO. PART NAME QTY. REMARKS
1 16271ZE1000 GASKET, ELBOW 1
2 17210ZE1505 ELEMENT, AIR CLEANER (DUAL) 1
3 17218ZE1821 FILTER, OUTER 1
4 17230ZE1820 COVER, AIR CLEANER (DUAL) 1
5 17232891000 GROMMET, AIR CLEANER 1
6 17238ZE7010 COLLAR, AIR CLEANER 2
7 17239ZE1000 COLLAR B, AIR CLEANER 1
8 17410ZE1020 ELBOW, AIR CLEANER 1
9 90201415000 NUT, CAP 6MM 2
11 90325044000 WINGNUT, TOOL BOX SETTING .......................... 1 ........... USE FROM ENGINE
SN 2836834
12 90325044000 WINGNUT, TOOL BOX SETTING 1
13 957010602000 BOLT, FLANGE 6 X 20 .......................................... 1 ........... USE FROM ENGINE
SN 3385102
SCT SERIES WALK-BEHIND TROWEL — PARTS & OPERATION MANUAL — REV. #4 (04/02/07) — PAGE 55
Page 56

CAMSHAFT ASSY.
HONDA GX160K1QX2 — CAMSHAFT ASSY.
PAGE 56 — SCT SERIES WALK-BEHIND TROWEL— PARTS & OPERATION MANUAL — REV. #4 (04/02/07)
Page 57

HONDA GX160K1QX2 — CAMSHAFT ASSY.
CAMSHAFT ASSY.
NO. PART NO. PART NAME QTY. REMARKS
1 14100ZE1812 CAMSHAFT ASSEMBLY 1
2 14410ZE1010 ROD, PUSH 2
3 14431ZE1000 ARM, VALVE ROCKER 2
4 14441ZE1000 LIFTER, VALVE ..................................................... 2 ........... USE UP TO ENGINE
SN 4252173
4 14441ZE1010 LIFTER, VALVE 2
5 14451ZE1013 PIVOT, ROCKER ARM 2
6 14568ZE1000 SPRING, WEIGHT RETURN 1
7 14711ZF1000 VALVE, INTAKE 1
8 14721ZF1000 VALVE, EXHAUST 1
9 14751ZF1000 SPRING VALVE 2
10 14771ZE1000 RETAINER, INTAKE VALVE SPRING 1
11 14773ZE1000 RETAINER, EXHAUST VALVE SPRING 1
12 14781ZE1000 ROTATOR, VALVE 1
13 14791ZE1010 PLATE, PUSH ROD GUIDE 1
14 90012ZE0010 BOLT, PIVOT 8MM 2
15 90206ZE1000 NUT, PIVOT ADJ. 2
SCT SERIES WALK-BEHIND TROWEL — PARTS & OPERATION MANUAL — REV. #4 (04/02/07) — PAGE 57
Page 58

CARBURETOR ASSY.
HONDA GX160K1QX2 — CARBURETOR ASSY.
PAGE 58 — SCT SERIES WALK-BEHIND TROWEL— PARTS & OPERATION MANUAL — REV. #4 (04/02/07)
Page 59

HONDA GX160K1QX2 — CARBURETOR ASSY.
CARBURETOR ASSY.
NO. PART NO. PART NAME QTY. REMARKS
■
#+%
1
*
2
*
3 16013ZE0005 FLOAT SET 1
4
*
5
*
6
# 16024ZE1811 SCREW SET, DRAIN ................................... 1 ........... INCLUDES ITEM W/+
*
7
*
8
*
9 16100ZH8W51 CARBURETOR ASSEMBLY, BE65B B ........ 1 ........... INCLUDES ITEMS/
10
*
11
*
12
*
13 16211ZE1000 INSULATOR, CARBURETOR 1
14 16212ZH8800 GASKET, INSULATOR 1
15 16220ZE1020 SPACER, CARBURETOR 1
16 16221ZH8801 GASKET, CARBURETOR 1
17 16610ZE1000 LEVER, CHOKE STANDARD ....................... 1............ INCLUDES ITEM W/$
18
*
19 16954ZE1812 PLATE, LEVER SETTING ............................ 1 ........... USE FROM ENGINE
20
*
21
*
22
*
23
*
24$ 9430520122 PIN, SPRING 2 X 12 1
25
*
25
*
26
*
16010ZE1812 GASKET SET 1
16011ZE0005 VALVE SET, FLOAT 1
16015ZE0831 CHAMBER SET, FLOAT ............................... 1 ........... INCLUDES ITEMS/#
.................................................................................... USE FROM ENGINE
.................................................................................... SN BE65B B
16016ZH7W01 SCREW SET 1
16028ZE0005 SCREW SET B ............................................ 1 ........... INCLUDES ITEM W/%
16044ZE0005 CHOKE SET 1
16124ZE0005 SCREW, THROTTLE STOP 1
16166ZH8W50 NOZZLE, MAIN 1
16173001004 O- RING 1
16953ZE1812 LEVER, VALVE 1
.................................................................................... SN BE65B B
16956ZE1811 SPRING, VALVE LEVER 1
16957ZE1812 GASKET, VALVE 1
16967ZE0811 CUP, FUEL STRAINER 1
93500030060H SCREW, PAN 3 X 6 ...................................... 2 ........... USE FROM ENGINE
.................................................................................... SN BE65B B
99101ZH80650 JET, MAIN #65 (OPTIONAL) 1
99101ZH80680 JET, MAIN #68 (OPTIONAL) 1
99204ZE00350 JET SET, PILOT #35 .................................... 1 ........... INCLUDES ITEM W/
*
■
SCT SERIES WALK-BEHIND TROWEL — PARTS & OPERATION MANUAL — REV. #4 (04/02/07) — PAGE 59
Page 60

CONTROL ASSY.
HONDA GX160K1QX2 — CONTROL ASSY.
PAGE 60 — SCT SERIES WALK-BEHIND TROWEL— PARTS & OPERATION MANUAL — REV. #4 (04/02/07)
Page 61

HONDA GX160K1QX2 — CONTROL ASSY.
CONTROL ASSY.
NO. PART NO. PART NAME QTY. REMARKS
2 16500ZH8823 CONTROL ASSEMBLY, REMOTE ......................... 1............ INCLUDES ITEMS W/
............................................................................................. USE FROM ENGINE
............................................................................................. SN 6331305
4 16551ZE0010 ARM, GOVERNOR 1
5 16555ZE1000 ROD, GOVERNOR 1
6 16561ZE1020 SPRING GOVERNOR 1
7 16562ZE1020 SPRING, THROTTLE RETURN 1
8
*
9
*
10
11
12
13
14
15
17 90013883000 BOLT, FLANGE 6 X 12 (CT200) 2
18 90016ZE5010 BOLT, GOVERNOR ARM 1
19
22
23
24 9405006000 NUT, FLANGE 6MM 1
16571ZH8020 LEVER, CONTROL 1
16574ZE1000 SPRING, LEVR 1
16575ZH8000 WASHER, CONTROL LEVER 1
*
16576891000 HOLDER, CABLE 1
*
16578ZE1000 SPACER, CONTROL LEVER 1
*
16580ZH8812 BASE, CONTROL (REMOTE) ............................... 1............ USE FROM ENGINE
*
16584883300 SPRING, CONTROL ADJUSTING 1
*
16592ZE1810 SPRING, CABLE RETURN 1
*
90114SA0000 NUT, SELF- LOCK 6MM 1
*
93500050250H SCREW, PAN 5 X 25 1
*
938930501600 SCREW, WASHER 5 X 16 1
*
............................................................................................. SN 5551818 TO 6331304
*
SCT SERIES WALK-BEHIND TROWEL — PARTS & OPERATION MANUAL — REV. #4 (04/02/07) — PAGE 61
Page 62

CRANKCASE COVER ASSY.
HONDA GX160K1QX2 — CRANKCASE COVER ASSY.
PAGE 62 — SCT SERIES WALK-BEHIND TROWEL— PARTS & OPERATION MANUAL — REV. #4 (04/02/07)
Page 63

HONDA GX160K1QX2 — CRANKCASE COVER ASSY.
CRANKCASE COVER ASSY.
NO. PART NO. PART NAME QTY. REMARKS
1 11300ZE1641 COVER ASSEMBLY, CRANKCASE (U- TYPE) ..... 1 ........... INCLUDES ITEMS W/
3 11381ZH8801 GASKET, CASE COVER (NON- ASBESTOS) 1
4 15600ZE1003 CAP ASSEMBLY, OIL FILLER 1
5 15600ZG4003 CAP ASSEMBLY, OIL FILLER 1
9 15625ZE1003 GASKET, OIL FILLER CAP 1
10 15625ZE1003 GASKET, OIL FILLER CAP 1
11
12 9430108140 PIN A, DOWEL 8 X 14 2
13 957010803200 BOLT, FLANGE 8 X 32 6
14
91202883005 OIL SEAL 25 X 41 X 6 1
*
961006205000 BEARING, RADIAL BALL 6205 1
*
*
SCT SERIES WALK-BEHIND TROWEL — PARTS & OPERATION MANUAL — REV. #4 (04/02/07) — PAGE 63
Page 64

CRANKSHAFT ASSY.
HONDA GX160K1QX2 — CRANKSHAFT ASSY.
PAGE 64 — SCT SERIES WALK-BEHIND TROWEL— PARTS & OPERATION MANUAL — REV. #4 (04/02/07)
Page 65

HONDA GX160K1QX2 — CRANKSHAFT ASSY.
CRANKSHAFT ASSY.
NO. PART NO. PART NAME QTY. REMARKS
3 13310ZE1601 CRANKSHAFT, Q- TYPE 1
9 90745ZE1600 KEY, 4.78 X 4,78 X 38 1
SCT SERIES WALK-BEHIND TROWEL — PARTS & OPERATION MANUAL — REV. #4 (04/02/07) — PAGE 65
Page 66

CYLINDER BARREL ASSY.
HONDA GX160K1QX2 — CYLINDER BARREL ASSY.
PAGE 66 — SCT SERIES WALK-BEHIND TROWEL— PARTS & OPERATION MANUAL — REV. #4 (04/02/07)
Page 67

HONDA GX160K1QX2 — CYLINDER BARREL ASSY.
CYLINDER BARREL ASSY.
NO. PART NO. PART NAME QTY. REMARKS
2 12000ZH8811 CYLINDER ASSEMBLY, OIL ALERT .................... 1............ INCLUDES ITEMS W/
3 15510ZE1033 SWITCH ASSEMBLY, OIL LEVEL......................... 1 ........... INCLUDES ITEMS W/%
4
*
5
6
8
*
9 16541ZE1000 SHAFT, GOVERNOR ARM 1
10 90131ZE1000 BOLT, DRAIN PLUG 2
11
12 90601ZE1000 WASHER, DRAIN PLUG 10.2MM 2
13
14
15% 91202883005 OIL SEAL 25 X 41 X 6 1
16 91353671003 O- RING 13.5 X 1.5 (ARAI) 1
17 9405010000 NUT, FLANGE 10MM 1
18
19 9425108000 PIN, LOCK 8MM 1
20 957010601200 BOLT, FLANGE 6 X 12 2
16510ZE1000 GOVERNOR ASSEMBLY ...................................... 1 ............ INCLUDES ITEMS W/#
# 16511ZE1000 WEIGHT, GOVERNOR 2
*
# 16512ZE1000 HOLDER, GOVERNOR WEIGHT 1
*
16531ZE1000 SLIDER, GOVERNOR 1
80451ZE1000 WASHER, THRUST 6MM 1
*
90602ZE1000 CLIP, GOVERNOR HOLDER 1
*
% 91001ZF1003 BEARING, RADIAL BALL 6205 1
9410106800 WASHER, PLAIN 6MM 2
*
*
SCT SERIES WALK-BEHIND TROWEL — PARTS & OPERATION MANUAL — REV. #4 (04/02/07) — PAGE 67
Page 68

CYLINDER HEAD ASSY.
HONDA GX160K1QX2 — CYLINDER HEAD ASSY.
PAGE 68 — SCT SERIES WALK-BEHIND TROWEL— PARTS & OPERATION MANUAL — REV. #4 (04/02/07)
Page 69

HONDA GX160K1QX2 — CYLINDER HEAD ASSY.
CYLINDER HEAD ASSY.
NO. PART NO. PART NAME QTY. REMARKS
1 12210ZH8000 CYLINDER HEAD .................................................. 1 ............ INCLUDES ITEMS W/
2
3
4% 12216ZE5300 CLIP, VALVE GUIDE 1
5 12251ZF1800 GASKET, CYLINDER HEAD 1
6 12310ZE1010 COVER, HEAD 1
7 12391ZE1000 GASKET, CYLINDER HEAD COVER 1
8 15721ZH8000 TUBE, BREATHER 1
9 90016ZE1000 BOLT, FLANGE 6 X13 4
10 90043ZE1020 BOLT, STUD 6 X10⁹ 2
11 90047ZE1000 BOLT, STUD 8 X 32 2
12 9430110160 PIN A, DOWEL 10 X16 2
14 957230806000 BOLT, FLANGE 8 X60 4
15 9807956846 SPARK PLUG BPR6ES (NGK) 1
12204ZE1306 GUIDE, VALVE OS (OPTIONAL 1
*
12205ZE1315 GUIDE, EXHAUST VALVE OS (OPTIONAL) ......... 1............ INCLUDES ITEM W/%
*
*
SCT SERIES WALK-BEHIND TROWEL — PARTS & OPERATION MANUAL — REV. #4 (04/02/07) — PAGE 69
Page 70

FAN COVER ASSY.
HONDA GX160K1QX2 — FAN COVER ASSY.
PAGE 70 — SCT SERIES WALK-BEHIND TROWEL— PARTS & OPERATION MANUAL — REV. #4 (04/02/07)
Page 71

HONDA GX160K1QX2 — FAN COVER ASSY.
FAN COVER ASSY.
NO. PART NO. PART NAME QTY. REMARKS
2 19610ZE1000ZC COVER, FAN "NH1" (BLACK) 1
4 19611ZH8810 PLATE, SIDE (OIL ALERT) 1
7 90601ZH7013 CLIP, HARNESS 1
8 19630ZH8000 SHROUD 1
10 32197ZH8003 SUB- HARNESS 1
11 36100ZE1015 SWITCH ASSEMBLY, ENGINE STOP 1
13 90013883000 BOLT, FLANGE 6 X12 (CT200) 6
14 90022888010 BOLT, FLANGE 6 X20 (CT200) 1
17 34150ZH7003 ALERT UNIT, OIL 1
19 957010600800 BOLT, FLANGE 6 X8 1
SCT SERIES WALK-BEHIND TROWEL — PARTS & OPERATION MANUAL — REV. #4 (04/02/07) — PAGE 71
Page 72

FLYWHEEL ASSY.
HONDA GX160K1QX2 — FLYWHEEL ASSY.
PAGE 72 — SCT SERIES WALK-BEHIND TROWEL— PARTS & OPERATION MANUAL — REV. #4 (04/02/07)
Page 73

HONDA GX160K1QX2 — FLYWHEEL ASSY.
FLYWHEEL ASSY.
NO. PART NO. PART NAME QTY. REMARKS
1 13331357000 KEY, SPECIAL WOODRUFF (25 X18) 1
2 19511ZE1000 FAN, COOLING 1
4 28451ZH8003 PULLEY, STARTER 1
5 31100ZE1010 FLYWHEEL 1
5 31100ZE1810 FLYWHEEL, LAMP 1
8 90201878003 NUT, SPECIAL 14MM 1
SCT SERIES WALK-BEHIND TROWEL — PARTS & OPERATION MANUAL — REV. #4 (04/02/07) — PAGE 73
Page 74

FUEL TANK ASSY.
HONDA GX160K1QX2 — FUEL TANK ASSY.
PAGE 74 — SCT SERIES WALK-BEHIND TROWEL— PARTS & OPERATION MANUAL — REV. #4 (04/02/07)
Page 75

HONDA GX160K1QX2 — FUEL TANK ASSY.
FUEL TANK ASSY.
NO. PART NO. PART NAME QTY. REMARKS
1 16854ZH8000 RUBBER, SUPPORTER 107MM 1
2 16955ZE1000 JOINT, FUEL TANK 1
3 17510ZE1020ZB TANK, FUEL *R8* (BRIGHT RED) 1
3 17510ZE1020ZF TANK, FUEL *NH1* (BLACK) 1
5 17620ZH7023 CAP, FUEL FILLER ............................................... 1 ........... INCLUDES ITEM W/
6
*
11 91353671003 O- RING 13.5 X1.5 (ARAI) 1
12 9405006000 NUT, FLANGE 6MM 2
13 950014500360M BULK HOSE, FUEL 4.5 X 3000 (4.5 X 140) 1
14 9500202080 CLIP, TUBE B8 2
15 957010602500 BOLT, FLANGE 6 X 25 1
17631ZH7003 GASKET, FUEL FILLER CAP 1
*
SCT SERIES WALK-BEHIND TROWEL — PARTS & OPERATION MANUAL — REV. #4 (04/02/07) — PAGE 75
Page 76

IGNITION COIL ASSY.
HONDA GX160K1QX2 — IGNITION COIL ASSY.
PAGE 76 — SCT SERIES WALK-BEHIND TROWEL— PARTS & OPERATION MANUAL — REV. #4 (04/02/07)
Page 77

HONDA GX160K1QX2 — IGNITION COIL ASSY.
IGNITION COIL ASSY.
NO. PART NO. PART NAME QTY. REMARKS
1 30500ZE1033 COIL ASSEMBLY, IGNITION 1
2 30700ZE1013 CAP ASSEMBLY, NOISE SUPPRESSOR 1
7 36101ZE1010 WIRE, STOP SWITCH 370MM 1
11 90121952000 BOLT, FLANGE 6 X25 2
SCT SERIES WALK-BEHIND TROWEL — PARTS & OPERATION MANUAL — REV. #4 (04/02/07) — PAGE 77
Page 78

MUFFLER ASSY.
HONDA GX160K1QX2 — MUFFLER ASSY.
PAGE 78 — SCT SERIES WALK-BEHIND TROWEL— PARTS & OPERATION MANUAL — REV. #4 (04/02/07)
Page 79

HONDA GX160K1QX2 — MUFFLER ASSY.
MUFFLER ASSY.
NO. PART NO. PART NAME QTY. REMARKS
1 18310ZF1000 MUFFLER 1
1 18310ZH8810 MUFFLER (OPTIONAL) 1
3 18320ZF1H01 PROTECTOR, MUFFLER 1
7 18355ZE1000 ARRESTER, SPARK (OPTIONAL) 1
8 18381ZH8800 GASKET, MUFFLER 1
11 90050ZE1000 SCREW, TAPPING 5 X 8 (OPTIONAL 4
12 90055ZE1000 SCREW, TAPPING 4 X 6 (OPTIONAL) 1
15 94001080000S NUT, HEX. 8MM 2
SCT SERIES WALK-BEHIND TROWEL — PARTS & OPERATION MANUAL — REV. #4 (04/02/07) — PAGE 79
Page 80

PISTON ASSY.
HONDA GX160K1QX2 — PISTON ASSY.
PAGE 80 — SCT SERIES WALK-BEHIND TROWEL— PARTS & OPERATION MANUAL — REV. #4 (04/02/07)
Page 81

HONDA GX160K1QX2 — PISTON ASSY.
PISTON ASSY.
NO. PART NO. PART NAME QTY. REMARKS
1 13010ZF1023 RING SET, PISTON (STANDARD) ............................ 1 ........ USE UP TO ENG S/N 5495899
1 13010ZH8941 RING SET, PISTON (STANDARD) ............................ 1 ........ USE FROM ENG S/N 5495900
1 13011ZF1023 RING SET, PISTON (OS 0.25) ................................. 1 ........ USE UP TO ENG S/N 5495899
1 13011ZH8941 RING SET, PISTON (OS 0.25), OPTIONAL ............. 1 ........ USE FROM ENG S/N 5495900
1 13012ZF1023 RING SET, PISTON (OS 0.50), OPTIONAL ............. 1 ........ USE UP TO ENG S/N 5495899
1 13012ZH8941 RING SET, PISTON (OS 0.50), OPTIONAL ............. 1 ........ USE FROM ENG S/N 5495900
1 13013ZF1023 RING SET, PISTON (0.75), OPTIONAL ................... 1 ........ USE UP TO ENG S/N 5495899
1 13013ZH8941 RING SET, PISTON (0.75), OPTIONAL ................... 1 ........ USE FROM ENG S/N 5495900
2 13101ZH8000 PISTON (STANDARD) 1
2 13102ZH8000 PISTON (OS 0.25), OPTIONAL 1
2 13103ZH8000 PISTON (OS 0.50), OPTIONAL 1
2 13104ZH8000 PISTON (0.75), OPTIONAL 1
3 13111ZE1000 PIN, PISTON 1
4 132AOZE1000 ROD ASSY., CONNECTING (US 0.25), OPT. 1
4 13200ZE1010 ROD ASSEMBLY, CONNECTING 1
5 90001ZE1000 BOLT, CONNECTING ROD 2
6 90551ZE1000 CLIP, PISTON PIN 18MM 2
SCT SERIES WALK-BEHIND TROWEL — PARTS & OPERATION MANUAL — REV. #4 (04/02/07) — PAGE 81
Page 82

RECOIL STARTER ASSY.
HONDA GX160K1QX2 — RECOIL STARTER ASSY.
PAGE 82 — SCT SERIES WALK-BEHIND TROWEL— PARTS & OPERATION MANUAL — REV. #4 (04/02/07)
Page 83

HONDA GX160K1QX2 — RECOIL STARTER ASSY.
RECOIL STARTER ASSY.
NO. PART NO. PART NAME QTY. REMARKS
1 28400ZH8013ZB STARTER ASSY., RECOIL "NH1" BLACK ................... 1 ............INCLUDES ITEM W/
2
*
3
*
4
*
5
*
6
*
7
*
8
*
9
*
10
11
12 90008ZE2003 BOLT, FLANGE 6 X10 3
28410ZH8003ZB CASE, RECOIL STARTER "NH1" BLACK 1
28420ZH8013 REEL, RECOIL STARTER 1
28422ZH8013 RATCHET, STARTER 2
28433ZH8003 GUIDE, RATCHET 1
28441ZH8003 SPRING, FRICTION 1
28442ZH8003 SPRING, RECOIL STARTER 1
28443ZH8003 SPRING, RETURN 2
28461ZH8003 KNOB, RECOIL STARTER 1
28462ZH8003 ROPE, RECOIL STARTER 1
*
90003ZH8003 SCREW, SETTING 1
*
*
SCT SERIES WALK-BEHIND TROWEL — PARTS & OPERATION MANUAL — REV. #4 (04/02/07) — PAGE 83
Page 84

NOTE PAGE
PAGE 84 — SCT SERIES WALK-BEHIND TROWEL— PARTS & OPERATION MANUAL — REV. #4 (04/02/07)
Page 85

HONDA GX160K1QX2 — GASKET KIT ASSY.
GASKET KIT ASSY.
NO. PART NO. PART NAME QTY. REMARKS
06111ZH8405 GASKET KIT ......................................................... 1............ INCLUDES ITEMS W/
1
*
2
*
3
*
4
*
5
*
6
*
11381ZH8801 GASKET CASE COVER (NON- ASBESTOS) 1
12251ZF1800 GASKET, CYLINDER HEAD 1
12391ZE1000 GASKET, CYLINDER HEAD COVER 1
16212ZH8800 GASKET, INSULATOR 1
16221ZH8801 GASKET, CARBURETOR 1
18381ZH8800 GASKET, MUFFLER 1
*
SCT SERIES WALK-BEHIND TROWEL — PARTS & OPERATION MANUAL — REV. #4 (04/02/07) — PAGE 85
Page 86

ENGINE LABELS ASSY.
HONDA GX160K1QX2 — ENGINE LABELS ASSY.
PAGE 86 — SCT SERIES WALK-BEHIND TROWEL— PARTS & OPERATION MANUAL — REV. #4 (04/02/07)
Page 87

HONDA GX160K1QX2 — ENGINE LABELS ASSY.
ENGINE LABELS ASSY.
NO. PART NO. PART NAME QTY. REMARKS
1 87521ZH8020 ENBLEM 5.5 .......................................................... 1 ........... USE FROM ENGINE
SN 7438468
2 87522ZE1810 MARK, CAUTION (EXTERNAL) ............................ 1 ........... USE UP TO ENGINE
SN 3063877
3 87522ZH9000 LABEL, CAUTION 1
6 87528ZE1810 MARK, CHOKE 1
7 87530ZH8810 LABEL, SPECIFICATION (EXTERNAL) 1
8 87532ZH8810 MARK, OIL ALERT (E) 1
15 887586ZH7W00 LABEL, FUEL CAUTION 1
SCT SERIES WALK-BEHIND TROWEL — PARTS & OPERATION MANUAL — REV. #4 (04/02/07) — PAGE 87
Page 88

AIR CLEANER ASSY.
HONDA GX240K1QA2 ENGINE — AIR CLEANER ASSY.
PAGE 88 — SCT SERIES WALK-BEHIND TROWEL— PARTS & OPERATION MANUAL — REV. #4 (04/02/07)
Page 89

HONDA GX240K1QA2 ENGINE — AIR CLEANER ASSY.
AIR CLEANER ASSY.
NO. PART NO. PART NAME QTY. REMARKS
1 16271ZE2000 GASKET, ELBOW 1
2 17210ZE2822 ELEMENT, AIR CLEANER, DUAL ............. 1 ............. INCLUDES ITEMS W/
3
*
5 17231ZH9820 COVER, AIR CLEANER 1
6 17232891000 GROMMET, AIR CLEANER 1
% 17238ZE2310 COLLAR, AIR CLEANER 2
8
9
% 17239ZE1000 COLLAR B, AIR CLEANER 1
10 17410ZE2020 ELBOW COMP., AIR CLEANER ............... 1 ............. INCLUDES ITEMS W/
13 90325044000 WINGNUT, TOOL BOX SETTING 2
14 90009ZE2003 BOLT- WASHER 6 X 22 1
15 9405006000 NUT, FLANGE 6MM 2
17218ZE2505 FILTER, OUTER 1
*
%
SCT SERIES WALK-BEHIND TROWEL — PARTS & OPERATION MANUAL — REV. #4 (04/02/07) — PAGE 89
Page 90

CAMSHAFT ASSY.
HONDA GX240K1QA2 ENGINE — CAMSHAFT ASSY.
PAGE 90 — SCT SERIES WALK-BEHIND TROWEL— PARTS & OPERATION MANUAL — REV. #4 (04/02/07)
Page 91

HONDA GX240K1QA2 ENGINE — CAMSHAFT ASSY.
CAMSHAFT ASSY.
NO. PART NO. PART NAME QTY. REMARKS
1 14100ZE2W01 CAMSHAFT ASSY. ................................... 1 ............. INCLUDES ITEMS W/
2 14410ZE2013 ROD PUSH 2
3 14431ZE2010 ARM VALVE ROCKER 2
4 14441ZE2000 LIFTER VALVE 2
5 14451ZE1013 PIVOT ROCKER ARM 2
6
7 14711ZE2000 VALVE, IN. 1
8 14721ZE2000 VALVE, EX. 1
9 14751ZE2003 SPRING, VALVE 2
10 14771ZE2000 RETAINER, IN. VALVE SPRING 1
11 14773ZE2000 RETAINER, EX. VALVE SPRING 1
12 14781ZE2000 ROTATOR, VALVE 1
13 14791ZE2010 PLATE, PUSH ROD GUIDE 1
14 90012ZE0010 BOLT, PIVOT 8MM 2
15 90206ZE1000 NUT, PIVOT ADJ. 2
14568ZE1000 SPRING, WEIGHT RETURN 1
*
*
SCT SERIES WALK-BEHIND TROWEL — PARTS & OPERATION MANUAL — REV. #4 (04/02/07) — PAGE 91
Page 92

CARBURETOR ASSY.
HONDA GX240K1QA2 ENGINE — CARBURETOR ASSY.
PAGE 92 — SCT SERIES WALK-BEHIND TROWEL— PARTS & OPERATION MANUAL — REV. #4 (04/02/07)
Page 93

HONDA GX240K1QA2 ENGINE — CARBURETOR ASSY.
CARBURETOR ASSY.
NO. PART NO. PART NAME QTY. REMARKS
1
%+ 16010ZE2812 GASKET SET 1
*
2
*
3
*
5
*
6
*
7
*
8
*
9 16100ZE2W71 CARBURETOR ASSY. ............................... 1 ............. INCLUDES ITEMS W/
10
11
12
13
14 16211ZE2000 INSULATOR, CARBURETOR 1
15 16220ZA0702 SPACER COMP., CARBURETOR 1
16 16221ZA0800 GASKET, CARBURETOR 1
17 16223ZA0800 GASKET, INSULATOR 1
18 16610ZE1000 LEVER COMP., CHOKE, STD. ................. 1 ............. INCLUDES ITEMS W/
19
20
21
22
23
24 93500030060H SCREW, PAN 3 X 6 2
25
26 99101ZH80820 JET, MAIN #82, OPTIONAL 1
26 99101ZH80850 JET, MAIN #85, OPTIONAL 1
26
27
28
16011ZA0931 VALVE SET, FLOAT 1
16013ZA0931 FLOAT SET 1
16016ZHW01 SCREW SET 1
+ 16024ZE1811 SCREW SET, DRAIN 1
16028ZE0005 SCREW SET B 1
16028ZE2005 CHOKE SET 1
16124ZE0005 SCREW, THROTTLE STOP 1
*
16166ZE2W70 NOZZLE, MAIN 1
*
16172ZE3W10 COLLAR, SET 1
*
16173001004 O-RING 1
*
16953ZE1812 LEVER, VALVE 1
*
16954ZE1811 PLATE, LEVER SETTING 1
*
16956ZE1811 SPRING, VALVE LEVER 1
*
16957ZE1812 GASKET, VALVE 1
*
16967ZE0811 CUP, FUEL STRAINER 1
*
■
9430520122 PIN, SPRING 2 X 12 1
99101ZH80880 JET, MAIN #88 1
*
99204ZE20400 JET SET, PILOT #40 ................................. 1 ............. INCLUDES ITEMS W/ %
*
16015ZE8005 CHAMBER SET, FLOAT ............................ 1 ............. INCLUDES ITEMS W/+
*
*
■
SCT SERIES WALK-BEHIND TROWEL — PARTS & OPERATION MANUAL — REV. #4 (04/02/07) — PAGE 93
Page 94

CONTROL ASSY.
HONDA GX240K1QA2 ENGINE — CONTROL ASSY.
PAGE 94 — SCT SERIES WALK-BEHIND TROWEL— PARTS & OPERATION MANUAL — REV. #4 (04/02/07)
Page 95

HONDA GX240K1QA2 ENGINE — CONTROL ASSY.
CONTROL ASSY.
NO. PART NO. PART NAME QTY. REMARKS
1 16550ZE2700 ARM, GOVERNOR 1
2 16551ZE2000 ARM, GOVERNOR 1
3 16555ZE2000 ROD, GOVERNOR 1
4 16561ZE2000 SPRING, GOVERNOR 1
5 16562ZE2000 SPRING, THROTTLE RETURN 1
8 16570ZE2W20 CONTROL ASSY., REMOTE ...................... 1............. INCLUDES ITEMS W/
10
11
12
13
14
15
16
17
19 90013883000 BOLT, FLANGE 6 X 12 CT200 2
20 90015ZE5010 BOLT, GOVERNOR ARM 1
21 90114SA0000 NUT, SELF-LOCK 6MM 1
24
26
27 9405006000 NUT, FLANGE 6MM 1
16571ZE2W00 LEVER, CONTROL 1
*
16574ZE1000 SPRING, LEVER 1
*
16575ZE2W00 WASHER, CONTROL LEVER 1
*
16576891000 HOLDER, CABLE 1
*
16578ZE1000 SPACER, CONTROL LEVER 1
*
16581ZE2W00 BASE COMP., CONTROL 1
*
16584883300 SPRING, CONTROL ADJUSTING 1
*
16592883310 SPRING, CABLE RETURN 1
*
93500050280A SCREW, PAN 5 X 28 1
*
93500050160A SCREW, PAN 5 X 16 1
*
*
SCT SERIES WALK-BEHIND TROWEL — PARTS & OPERATION MANUAL — REV. #4 (04/02/07) — PAGE 95
Page 96

HONDA GX240K1QA2 ENGINE — CRANKCASE COVER ASSY.
CRANKCASE COVER ASSY.
PAGE 96 — SCT SERIES WALK-BEHIND TROWEL— PARTS & OPERATION MANUAL — REV. #4 (04/02/07)
Page 97

HONDA GX240K1QA2 ENGINE — CRANKCASE COVER ASSY.
CRANKCASE COVER ASSY.
NO. PART NO. PART NAME QTY. REMARKS
2 11400ZE2601 COVER ASSY., CRANKCASE .................. 1 ............. INCLUDES ITEMS W/
3 11381ZE2801 GASKET, CASE COVER 1
4 15600ZG4003 CAP ASSY., OIL FILLER .......................... 1 ............. INCLUDES ITEMS W/
5 15600735003 CAP ASSY., OIL FILLER .......................... 1 ............. INCLUDES ITEMS W/+
8+ 15625ZE1000 GASKET, OIL FILLER CAP 1
% 15625ZE1003 GASKET, OIL FILLER CAP 1
9
10
11
12
13
14
15
16
17 90701HC4000 PIN, DOWEL 8 X 12 2
18
19
20 957010803500 BOLT, FLANGE 8 X 35 7
21
22
16510ZE2811 GOVERNOR ASSY., BALANCER ............. 1 ............. INCLUDES ITEMS W/$
*
$ 16511ZE2000 WEIGHT, GOVERNOR 2
*
$ 16512ZE2811 HOLDER, GOVERNOR WEIGHT 1
*
$ 16513ZE2000 PIN, GOVERNOR WEIGHT 2
*
16531ZE2000 SLIDER, GOVERNOR 1
*
90473147000 WASHER 6 X 16 1
*
90602ZE1000 CLIP, GOVERNOR HOLDER 1
*
91201890003 OIL SEAL 30 X 46 X 8 1
*
9410106800 WASHER, PLAIN 6MM 1
*
961006202000 BEARING, RADIAL BALL 6202 1
*
961006206000 BEARING, RADIAL BALL 6206
*
*
%
SCT SERIES WALK-BEHIND TROWEL — PARTS & OPERATION MANUAL — REV. #4 (04/02/07) — PAGE 97
Page 98

CRANKSHAFT ASSY.
HONDA GX240K1QA2 ENGINE — CRANKSHAFT ASSY.
PAGE 98 — SCT SERIES WALK-BEHIND TROWEL— PARTS & OPERATION MANUAL — REV. #4 (04/02/07)
Page 99

HONDA GX240K1QA2 ENGINE — CRANKSHAFT ASSY.
CRANKSHAFT ASSY.
NO. PART NO. PART NAME QTY. REMARKS
2 13320ZE2601 CRANKSHAFT COMP., Q- TYPE .............. 1 ............. INCLUDES ITEMS W/
8 13351ZE2010 WEIGHT, BALANCER 1
10 90745ZE2600 KEY 6.3 X 6.3 X 43 1
12
961006206000 BEARING, RADIAL BALL 6206 1
*
*
SCT SERIES WALK-BEHIND TROWEL — PARTS & OPERATION MANUAL — REV. #4 (04/02/07) — PAGE 99
Page 100

HONDA GX240K1QA2 ENGINE — CYLINDER BARREL ASSY.
CYLINDER BARREL ASSY.
PAGE 100 — SCT SERIES WALK-BEHIND TROWEL— PARTS & OPERATION MANUAL — REV. #4 (04/02/07)
 Loading...