

Page 1
22
·Ö Çø
DD
[]
()
ST SDW45(7712D)
(Stoves)
105
6710020224
01
Page 2
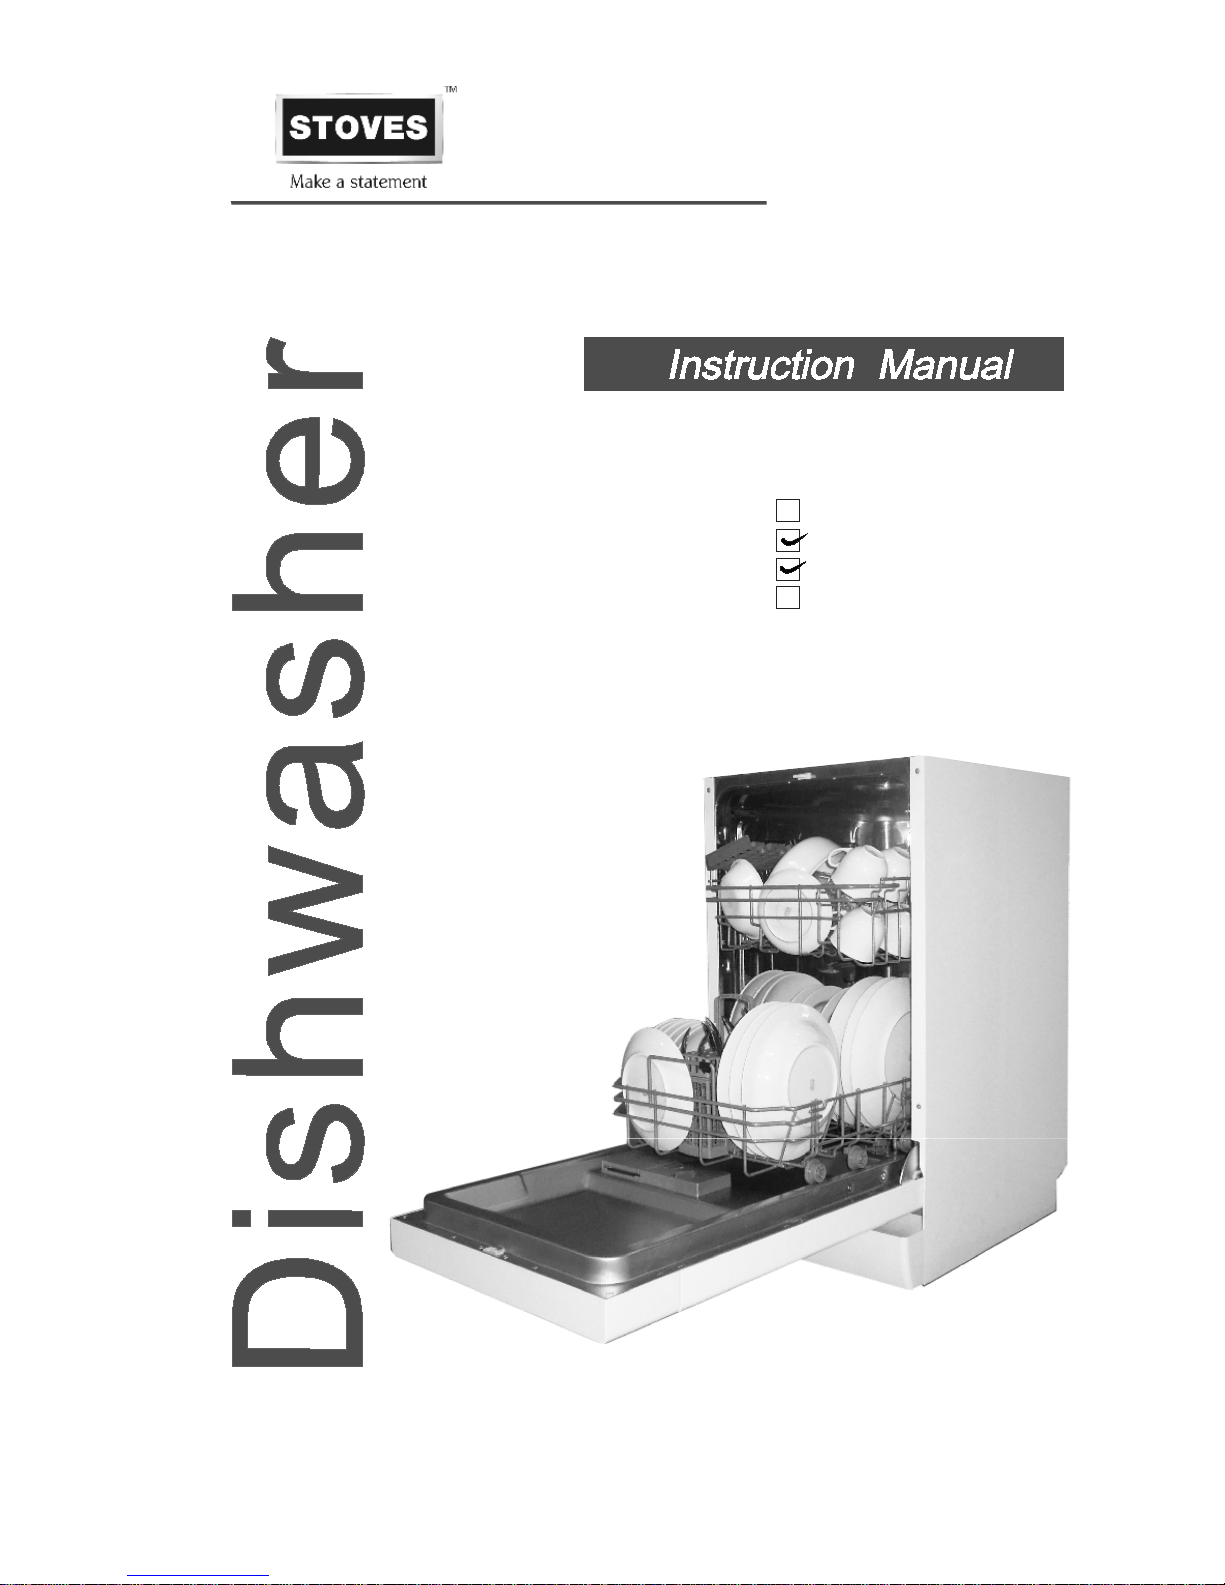
9 place set tings
10 place se ttings
half-load fu nction
Alt function
ST SDW45
Page 3
To revi ew th e s e ct ion on trou bleshooting Tips
will help you t o s o lve s om e comm on probl ems
by your self .
De ar Cu sto mer,
Plea se carefull y rea d thi s manu al be fo re u si ng the
dishwas he r, it will help you to use an d maintain the
dishwas he r properly.
Pass it on to any s ub sequen t o wn er of t he ap pliance.
This manua l c ontai n s sec tio ns on sa fet y Instruction s ,
Oper ati ng Instructions,
Install ati on In str uctions and
Tro ubleshootin g Ti ps , etc.
The man ufa ct urer, f oll owin g a policy o f constant
de ve lopment and updating of t he product, may
ma ke mo dific ati ons with out g iv i ng prior not ice.
Keep it a s a refer in the later days .
If you can no t s olve the prob lems by your self ,
please ask fo r the help of profes siona l t echn ici an s .
Dishw a she r Feat ures. ... ... ... ... .. ....... ... ... ... ... .. .. .6
A Water S often er..... ... ... .. ............ ... ........ . ...... 7、
Attention b efore or after loadin g the Di s hwashe r
Baskets... ... ... ...... ......... ... ... ...... ........ . ... ........ 12
Fi lteri ng System.......... ... ... ... ... ... ............ ........16
Ca ri n g for the Dis hwashe r..... ...... ... . ... .. . .... ... ..1 7.
B Loadi ng the Sal t into the S oftener...... ... ... ... ..8、
C Fill th e Rins e A id Di spenser.......... ....... ........ 8、
D Fu nct io n of Detergen t ....... ..... ... ............... ... 9、
Lo ad ing t he uppe r .. ......... ........... . ... .....13Ba sk et
Lo ading the Low er .. .. .......... ... .. ............13B a sket
Was h Cycl e Tabl e..... ... ... ... .. ................ ... ... .....14
Tur ning on t h e Appliance ... ... . ........ ... ... ... ... ..... 14
Ch ange the Programme.............. .. ..............15....
At th e end of t h e Was h Cycl e....... . ... ... .............15
Befor e calling f or service.. ... ... ... ............... . . ... .25.
Erro r codes....... ......... ... .. .... ... ....... . ... ......... ..26.
Technica l in formation. ... ... ... ... .. ............. .. .. .. .2 7..
Co ntro l Panel........ .. ... .................. ... ... .. . .. ....... ..6
...... ... ... ... ... ... ...... ... ... . 1 8In stall ation prepa ra tio n
...19Aes thetic panel's dimensio n s and ins tal l ation
..............21Tension adjustm ent of th e doo r spring
.. ................... ......... 21Connection of d r ain ho ses
.. .............. . .. ...... 22Dish washer ins t all ation st eps
About Elec tri city Connecting..... ... ... ... ... .......... 23
Co ld Water Co n nection........... ...... ................. 24
Page 4

1
This appliance is intended to be used in household
and similar applications such as:
-sta ff kitchen areas in shops, offices and other
working environ ments;
-far m houses;
-by clients in hotels, motels and other residential type
environments;
-bed and breakfast type environments.
This appliance can be used by children aged from 8
years and above and persons with reduce d physical,
sensory or ment al capabilities or lack of experience
and knowledge if they have been given su pervision
or instruction co ncerning use of the applia nce in a
safe way and understand the hazards involved.
Children shall not play with the appliance. Cleaning
and user mainte nance shall n ot be made by children
without supervision. For EN60335-1
This appliance is not intended for use by persons
(inc luding childr en )with reduced physica l, sensory
or m ental capab ilities, or lack of experien ce and
knowledge ,unle ss they have been given supervision
or instruction co ncerning use of the applia nce by a
person responsible for their s afety. For IEC60335-1
This appliance is for indoor use only, for h ousehold
use only.
To protect against the risk of electrical shock, do not
immerse the uni t, cord or plug in water or other liquid.
Please unplug before cleaning and maintenance the
appliance .
Use a soft cloth moisten with mild soap, and then use
a dry cloth to wipe it again.
( )
( )
When using your dishwasher,
follow the precautions listed below:
Page 5
2
This appliance must be earthed. In the event of a
malfunction or breakdown, earthing will reduce the risk
of an electric shock by providing a path of least
resistance of electric current. This appliance is equipped
with a cord having an equipment-earthing conductor
and a grounding plug.
The plug must be plugged into an appropriate outlet that
is installed and earthed in accordance with all local
codes and ordinances.
Improper connection of the equipment-earthing
conductor can result in the risk of an electric shock.
Check with a qualified electrician or service
representative if you are in doubt whether the appliance
is properly grounded.
Do not modify the plug provided with the appliance;
If it does not fit the outlet.
Have a proper outlet installed by a qualified electrician.
Do not abuse, sit on, or stand on the door or dish rack of
the dishwasher.
Do not operate your dishwasher unless all enclosure
panels are properly in place.
Open the door very carefully if the dishwasher is
operating, there is a risk of water squirting out.
Do not place any heavy objects on or stand on the door
when it is open. The appliance could tip forward.
When loading items to be washed:
1) Locate sharp items so that they are not likely to
damage the door seal;
Page 6

3
2) Warning: Knives and other utensils with sharp points
must be loaded in the basket with their points down or
placed in a horizontal position.
Check that the detergent powder is empty after
completion of the wash cycle.
Do not wash plastic items unless they are marked
dishwasher safe or the equivalent.
For plastic items n
ot so marked,
check the manufacturer's
recommendations.
Use only detergent and rinse additives designed for
an automatic dishwasher.
Never use soap, laundry detergent, or hand washing
detergent in your dishwasher.
Children should be supervised to ensure that they do not
play with the appliance.
The door should not be left open, since this could increase
the risk of tripping.
If the supply cord is damaged, it must be replaced by the
manufacturer or its service agent or a similarly qualified
person in order to avoid a hazard.
During installation, the power supply must not be
excessively or dangerously bent or flattened.
Do not tamper with controls.
The appliance is to be connected to the water mains using
new hose sets and that old hose-sets should not be reused.
The maximum number of place settings to be washed
is 10.
The maximum permissible inlet water pressure is 1MPa.
The minimum permissible inlet water pressure is 0.04MPa.
Page 7
Dispose of the dishwasher packaging material
correctly.
All packaging materials can be recyc led.
Plastic parts are marked with the standard
international abbreviations:
PE for polyethylene, e.g. sheet wrapping material
PS for polystyrene, e.g. padding material
POM polyoxymethylene, e.g. plastic clips
PP polypropylene, e. g. Salt filler
ABS Acrylonitrile Butadiene Styrene, e.g. Control
Panel .
Packaging materi al could be dangerous for children!
For disposing of p ackage and the appliance please
go to a recycling centre. Therefore cut off the power
supply cable and make the door closing device
unusable.
Cardboard packaging is manufactured from recycled
paper and should be disposed in the waste paper
collection for recycling.
By ensuring this p roduct is disposed of correctly, you
will help prevent potential negative consequences
for the environment and human health, which could
otherwise be caused by inappropriate waste handling
of this product.
For more detailed information about recycling of this
product, please contact your local city office and your
household waste disposal service.
DISPOSAL: Do not dispose this product as unsorted
municipal waste. Collection of such waste separately
for special treatment is necessary.
4
Page 8
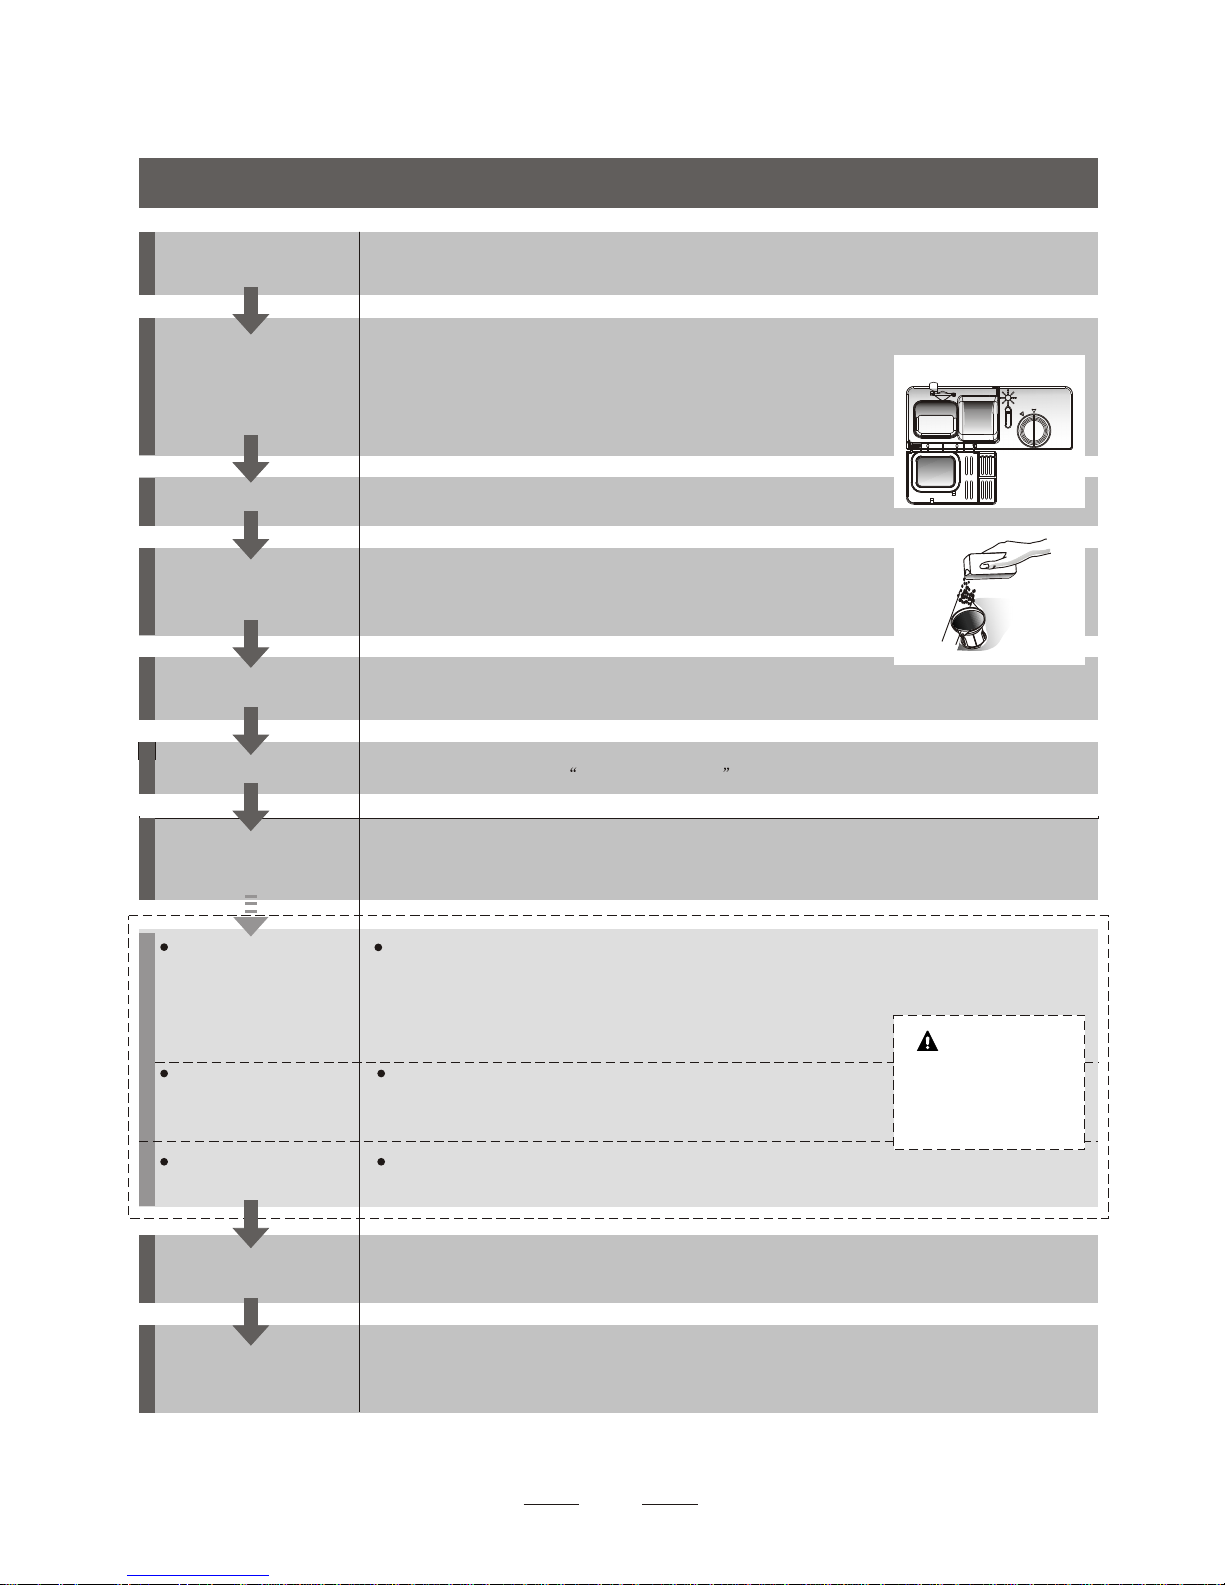
Compartment A:Compartment A:
With each wash cycle.
Compartment B:B:
For programmes with pre-wash only.
(Follow the user instructions!)
Mechanical indicator C. Mechanical indicator C.
Electric indicator on control panel (if provided).
Check the rinse aid level
(On models with water softener system only.)
Electric indicator on control panel (if provided).
If there is no salt warning light in the control panel
(for some models), you can estimate when to fill the salt into
the softener by the number of cycles the dishwasher has run.
Check the regeneration
salt level
Load the baskets
Select a programme
T urn on the water tap ,close the door . The machine will start working after about 10 seconds.
Running the dishwasher
Switch off the appliance
Turn off the water tap,
unload the baskets
Fill the detergent dispenser
Warning: wait a few minutes (about 15 minutes) before unloading the dishwasher to avoid handling
the dishes and utensils while they are still hot and more susceptible to break.
They will also dry better.Unload the appliance, starting from the lower basket.
Changing the programme
Add forgotten dishes in the
dishwasher.
Scrape off any large amount of leftover food. Soften remnants of burnt food in pans,
then load the baskets. Refer to the dishwasher loading instructions.
Press the Programme Button until the selected programme lights up.
( See the section entitled Operation instruction )
When the working cycle has finished, the buzzer of the
dishwasher will sound 8 times, then stop.
Turn off the appliance using the On/Off Button.
If the appliance is switched
off during a wash cycle.
Open the door carefully.
Hot steam may escape
when the door is opened!
WARNING!
If the appliance is switched off during a wash cycle, when switched
on again, please re-select the washing cycle and operate the dishwasher
according to the original Power-on state ).
Switch on the appliance
Open the door,press the On/Off button to switch on the appliance .
1.Open the door a little to stop the dishwasher.
2.After the spray arms stop working, you can open the door completely.
3.Add the forgotten dishes.
4.Close the door, the dishwasher will start running again after 10 seconds.
2.Quick operation guide2.Quick operation guide
For detailed operating method read the corresponding content on the instruction manual.
1. A running cycle can only be modified if it has been running for a short time. Otherwise the detergent
may have already been released and the water already drained. If this is the case, the detergent
dispenser must be refilled.
2. Open the door.
3. Press the Programme Button for more than 3 seconds to cancel the running programme.
4. Select a new programme.
5. Restart the dishwasher.
CC
AA
BB
5
Page 9
3.Operation Instruction3.Operation Instruction
6
Dishwasher FeaturesDishwasher Features
Control PanelControl Panel
before using it for the first time.
To get the best performance from your dishwasher, read all operating instructions
IMPORTANTIMPORTANT
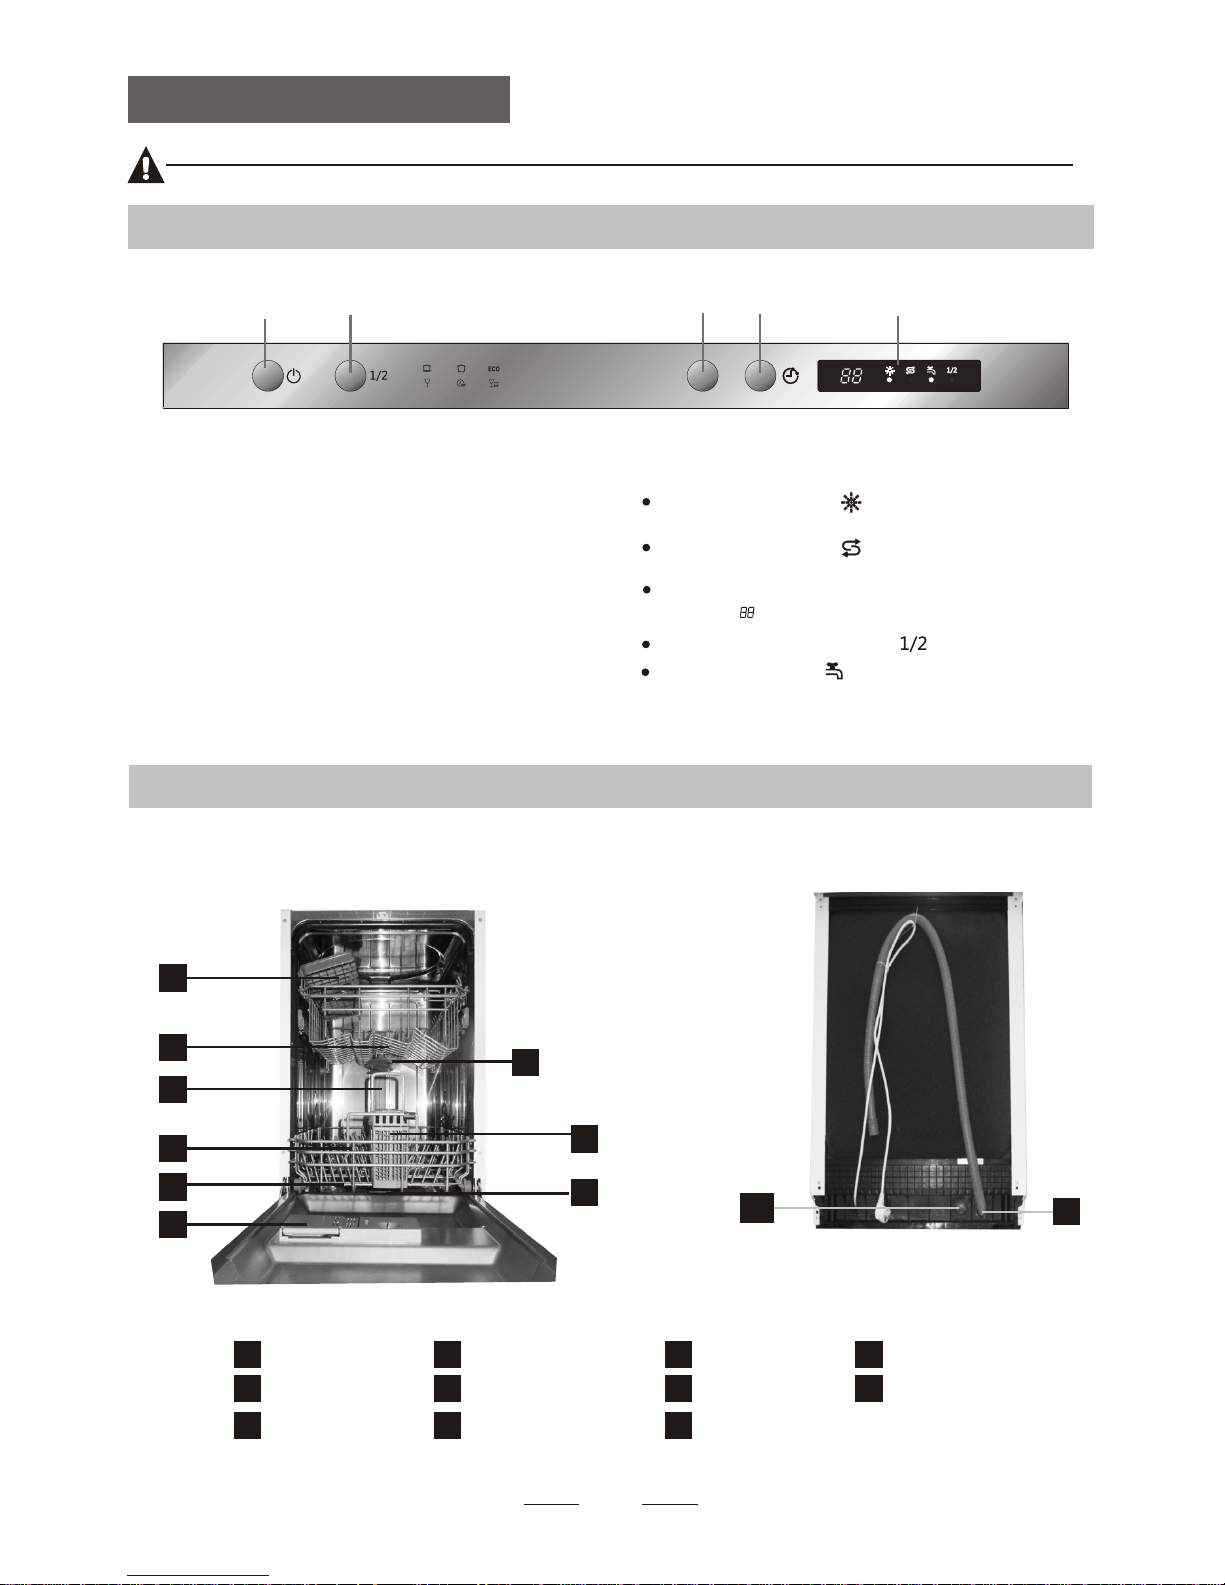
1.On/Off Button: To turn on/off the power supply.
3.Program Button : To Press the button to select a
wash Program.
4.Delay Button : To Press the button to delay.
5. Display screen: to show the error code,delay time etc.
Delay time,Program indicators or error codes
indicator:
Half load functions indicator:
Infall Warning Light :
Being on When faucets is not opened.
Rinse Aid indicator:
Indicates when the dispenser needs to be refilled.
Add salt indicator:
Indicates when the dispenser needs to be refilled.
2.Half load functions Button: To select Half load
functions. (With this Half load function you can
only use it when you have only about or less than
6 place setting dish wave, and you will see less
water and energy consumption , can only be used
with Intensive, Normal, ECO, Glass and 90 min .)
11
22
P1 P2 P3
P4 P5 P6
P
33
44
55
1
2
3
4
5
7
6
11
Back View
8
Front view
Lower basket
Salt container
Dispenser
Cup shelf
Spray arms
Filter assembly
Inlet pipe connector
Drain pipeUpper basket
Cutlery rack
1
Inner pipe
5
6
7
8
9
10
11
3
2
4
9
10
Page 10
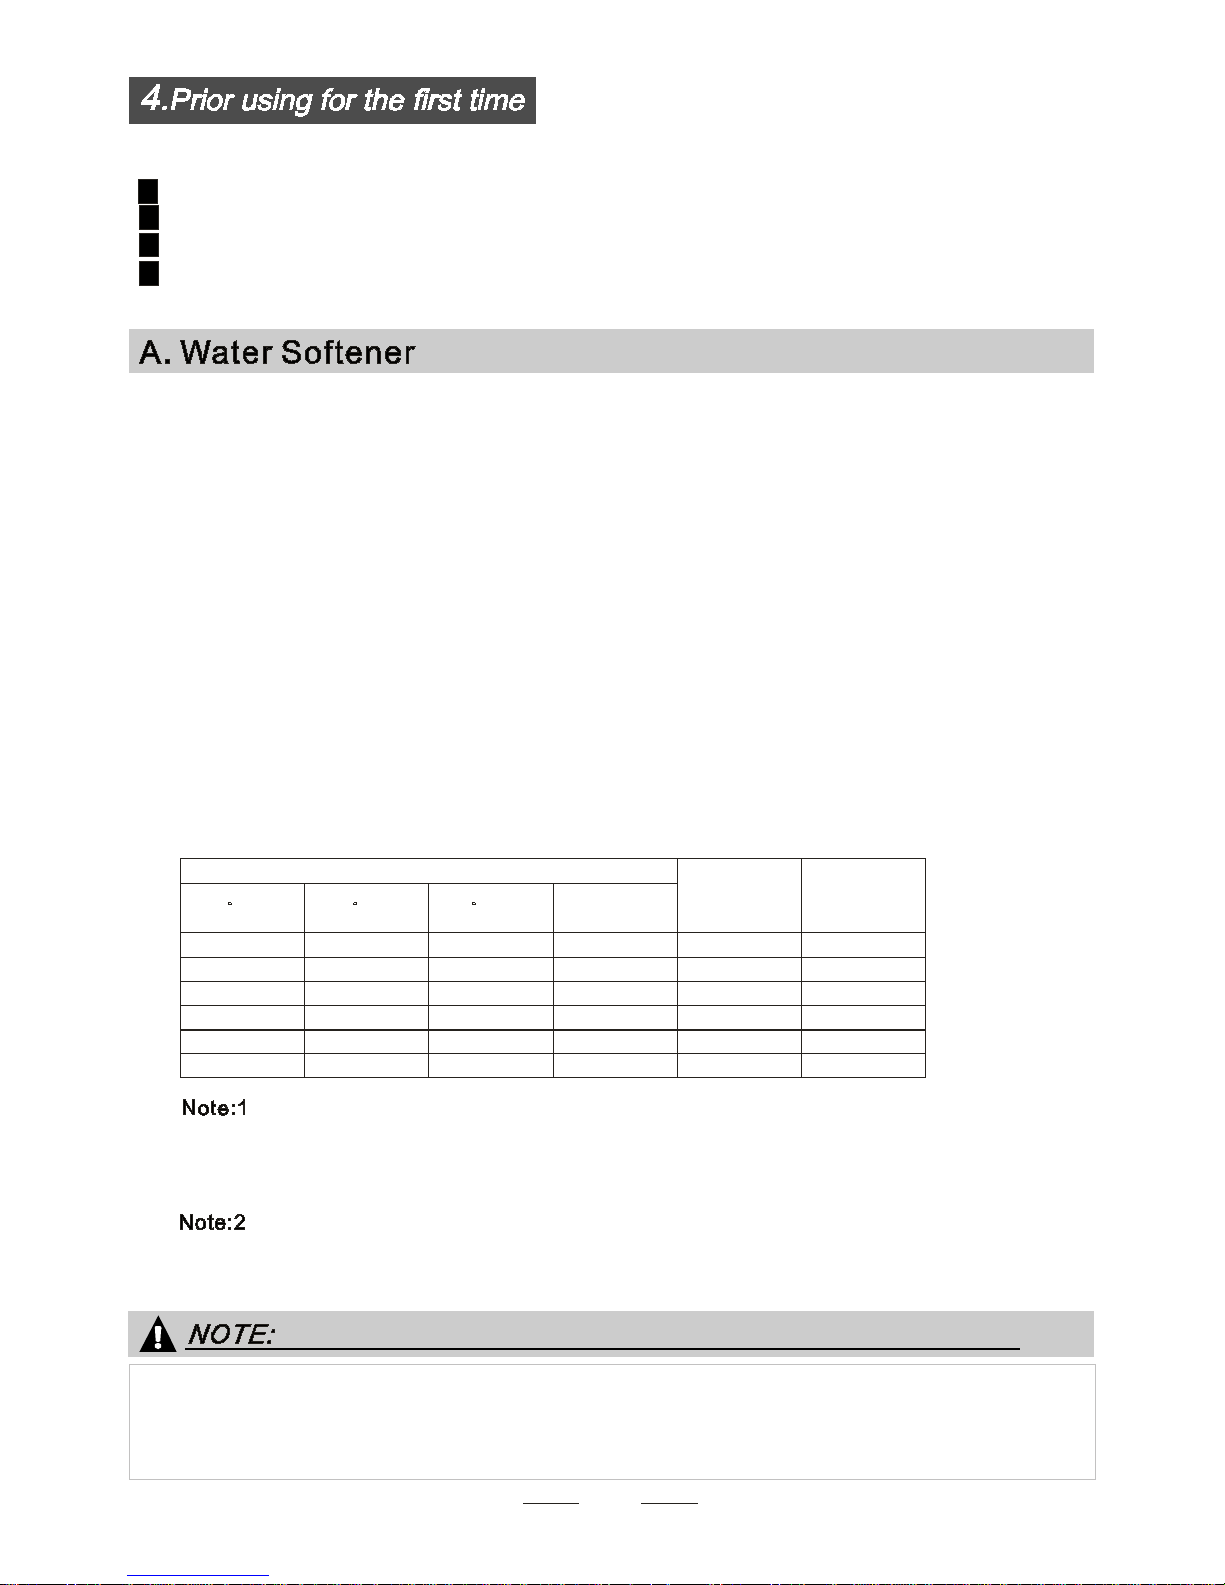
The water soften er must be set manually, usi ng the wa ter hardne ss dia l.
The water soften er is desi g ned t o r emo ve min er als and s alts from the wat er, which wou ld have
a det ri m ental or adve rs e eff ect on the opera tion of the applian ce.
The high er th e c ontent of these mine ra ls an d s a lt s, the ha rd er you r water i s.
The s oftener should b e adjust ed accord ing to t he har dne ss of the water in your area . You r loc al Wa te r Author ity
can advis e you o n t he hardn ess of the water in your area .
Adjusting S alt Consumption
The dishwasher i s desi gned t o allow for adju s tment in the amo unt of salt consumed b ase d o n the har dne ss of
th e w at er use d. This i s int end ed to opt imise and customise the lev e l o f salt consum ption.
1. Ope n t he doo r , Swi tch on the appli a nc e;
2. Press the Pr og ram bu tt on for mo re than 5 seco nds to start the wate r soft ene r
set mod el wi th in 60second s after t he ap pli an ce w as sw itched o n( Th e Salt and
Rinse aid warni ngli g hts will be on peri od i cally when it get in the s et model );
3. Press the Pr og ram bu tt on to s el ect th e p ro per se t a ccording to y our lo cal en vi ron ment,
the set s w ill chan ge in the following seq ue nce: H4 H5 H6 H1 H2 H3;
4. Press the Power b utt on to end the set up mo del.
→ → → → →
WATER SOFTEN ER
The har dness of the wa te r varie s fro m p l ac e to p lace. If har d wat er is used in the dishwa sh er, depos its will
fo rm on th e d ishes and u ten sils.
The app l iance is e qui ppe d with a sp ecial softe ner th at use s a salt containe r specifica lly desig ned to e lim inate
lime an d m inerals from the water.
Co nt act yo ur local water board for inf ormation on the hardness of your water supply.
Plea se follow t he s teps be low fo r adjust ment in s alt consumption.
7
If your model d o es no t ha v e any wa ter softener, y ou m ay sk ip this se ct ion .
C lark: Bri tish de gr ee
fH : Frenc h d egr ee
D H: G erma n degree
dH =1.25 Cla rk e=1. 7 8 f H= 0.1 78mm ol/l
1
Th e ma nuf acto ry se tting: H3 (EN 50 2 42)
Before using your dishwa sher for th e firs t t ime:
A. Set th e wat er sof ten er
B. Ad d 1.5 Kg dishwa sher salt a nd the n ful l fill the s al t cont ai ner with water
C. Fill t he rin se aid di spenser
D. Fill i n deterge nt
dH
mm ol /l
0~ 90 ~ 5 0~ 0. 94
H1
0
10- 20
6-1 1
1. 0- 2. 0
H2
9
21- 30
12- 17 2. 1- 3. 0
H3
12
H4
20
fH
0~ 6
7-14
15- 21
Clarke
WATER HAR DNES S
Sel ec t or Posi ti on
S alt consum pti on
(gr am /cy cl e)
18- 22 31- 40 22- 28 3. 1- 4. 0
41- 6023- 34 4. 1- 6. 0
H5
30
H6
60
29- 42
35- 55 61- 98 43- 69 6. 1- 9. 8
Page 11
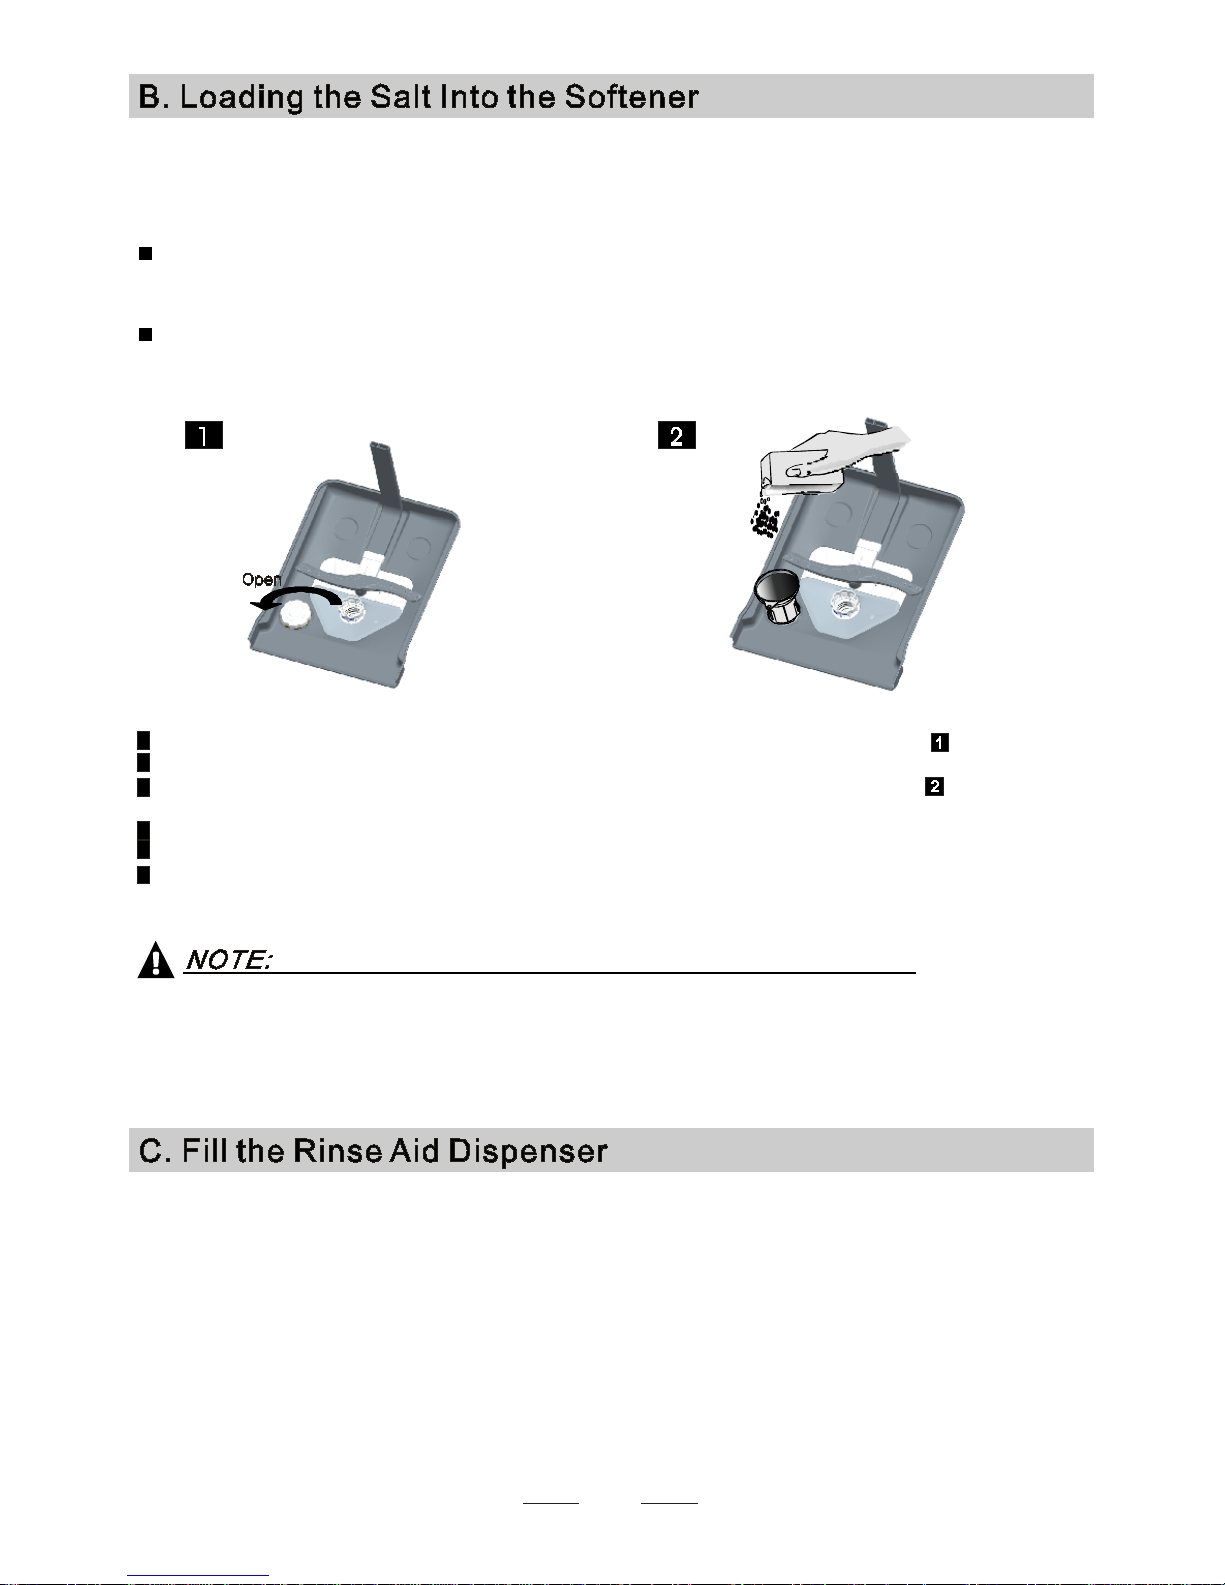
1. The sa l t co ntain er must only be refil led when th e salt w arn ing light in t he control p anel come s on.
Depe nd i ng on how w ell the s alt diss ol ves, t he s al t warn ing light may still be on even t hough the
salt cont ain er is fi lled.
If ther e is no s alt warn ing light i n t he control pan el (fo r s ome Mo de ls) ,y ou can estimate whe n t o fill
the salt i nt o the sof ten er by th e c ycl es tha t t he dishw asher has run.
2. If t here are spill s of t he sal t, a s oa k or a rapid p rogram shou l d b e run to re mov e the exc e ssive salt .
Always use the sa lt intend ed for u se wit h dis hwash er.
The sa lt contai ner is l oca ted be neath the low er baske t an d sho uld be fi l l ed as ex p lained
in the followin g:
Attenti on!
Only u se sa lt spe cific ally d esign ed for the use i n dishw ashe rs! Ever y oth er type o f
salt n ot sp ecif ically desi gned fo r the use in a dis hwasher, es peci a lly ta ble salt, wi ll
dam age the water so ftener. In c ase o f dama ges cause d by t he u se of unsu i ta ble
salt t he m anu fa cturer doe s no t gi ve any wa rr anty no r is lia ble f or any d ama ges caus ed.
Only f ill w ith s alt just befor e start i ng o ne of th e com plete w a shin g prog ram s.
This will pr eve nt an y gr ains of sa lt or salt y wate r, which m ay ha v e be en spi lle d,
rem ain i ng o n th e bottom of the m ac hine for any period o f tim e, wh ich m ay cause
cor rosion.
8
T he r inse aid is rel e a se d duri ng th e f inal rinse to prevent w ater fr om fo rm ing d roplets on yo ur dishes , whi c h can
leave s pots and streaks. I t also im proves dryi ng by all o wi ng wate r t o r o ll of f the dishe s. Your dishw ash er is
de sig ned to use l iqui d r in se aids. T he rinse aid di spens er is loca ted i nside the door nex t t o t he deterg ent dispe nser.
To fil l t he di s penser, o pen t h e ca p and po ur the ri n se a i d into the d isp e ns e r unt i l t he l ev el ind i c ator turns com plet e ly
black. Th e vo lume of t he rin se aid container is a bou t 11 0m l.
Rinse Aid Dispe nser
Fun cti on of Rinse Aid
Rin se ai d is automat ically a dde d d uring the l ast ri nse, ensur ing t horough r i nsi ng, and s pot a nd s tr eak free dr ying .
Attention!
Only use bran de d rinse a i d f or dishwas h er. N ever f ill t h e rins e ai d d ispenser with any o ther substa n ces
( e.g. Di sh w asher cl e ani ng agen t, l iqui d de ter gent) . This wou ld d amage the appl iance .
Ful l fi ll the s al t c onta iner wit h wa ter,I t i s n o rmal fo r a small am ou nt o f wa t er to c om e o ut of t he
sal t conta in er.
A Af te r t he lower b asket ha s be en remo ved , u nscr e w an d re move the c a p f ro m the sa lt co ntai ne r.
B P lace the end of t he funne l ( supp lied ) i nto the h ole an d int ro duc e ab out 1.5k g of dish was he r salt.
C
D A fte r fil l in g t he contain er , scre w th e cap tight ly bac k cl ockw is e.
E The sal t w arni ng li ght will sto p bei n g a fter the s al t cont aine r h as b een fi l led wi th salt .
F Imme di a tely a ft er fill in g t he sal t i nt o t he salt cont ai n er, a wa sh in g pr og ra m s ho uld be s t ar te d
pro gr am Oth e rw ise t he fi lt er sy stem , pum p or o th er imp ortant par ts of th e m achine may b e da mag e d
by s al ty w at er. This is out of w ar ra nty.
(We sug ge st t o u se a s h o rt
) .
Page 12
9
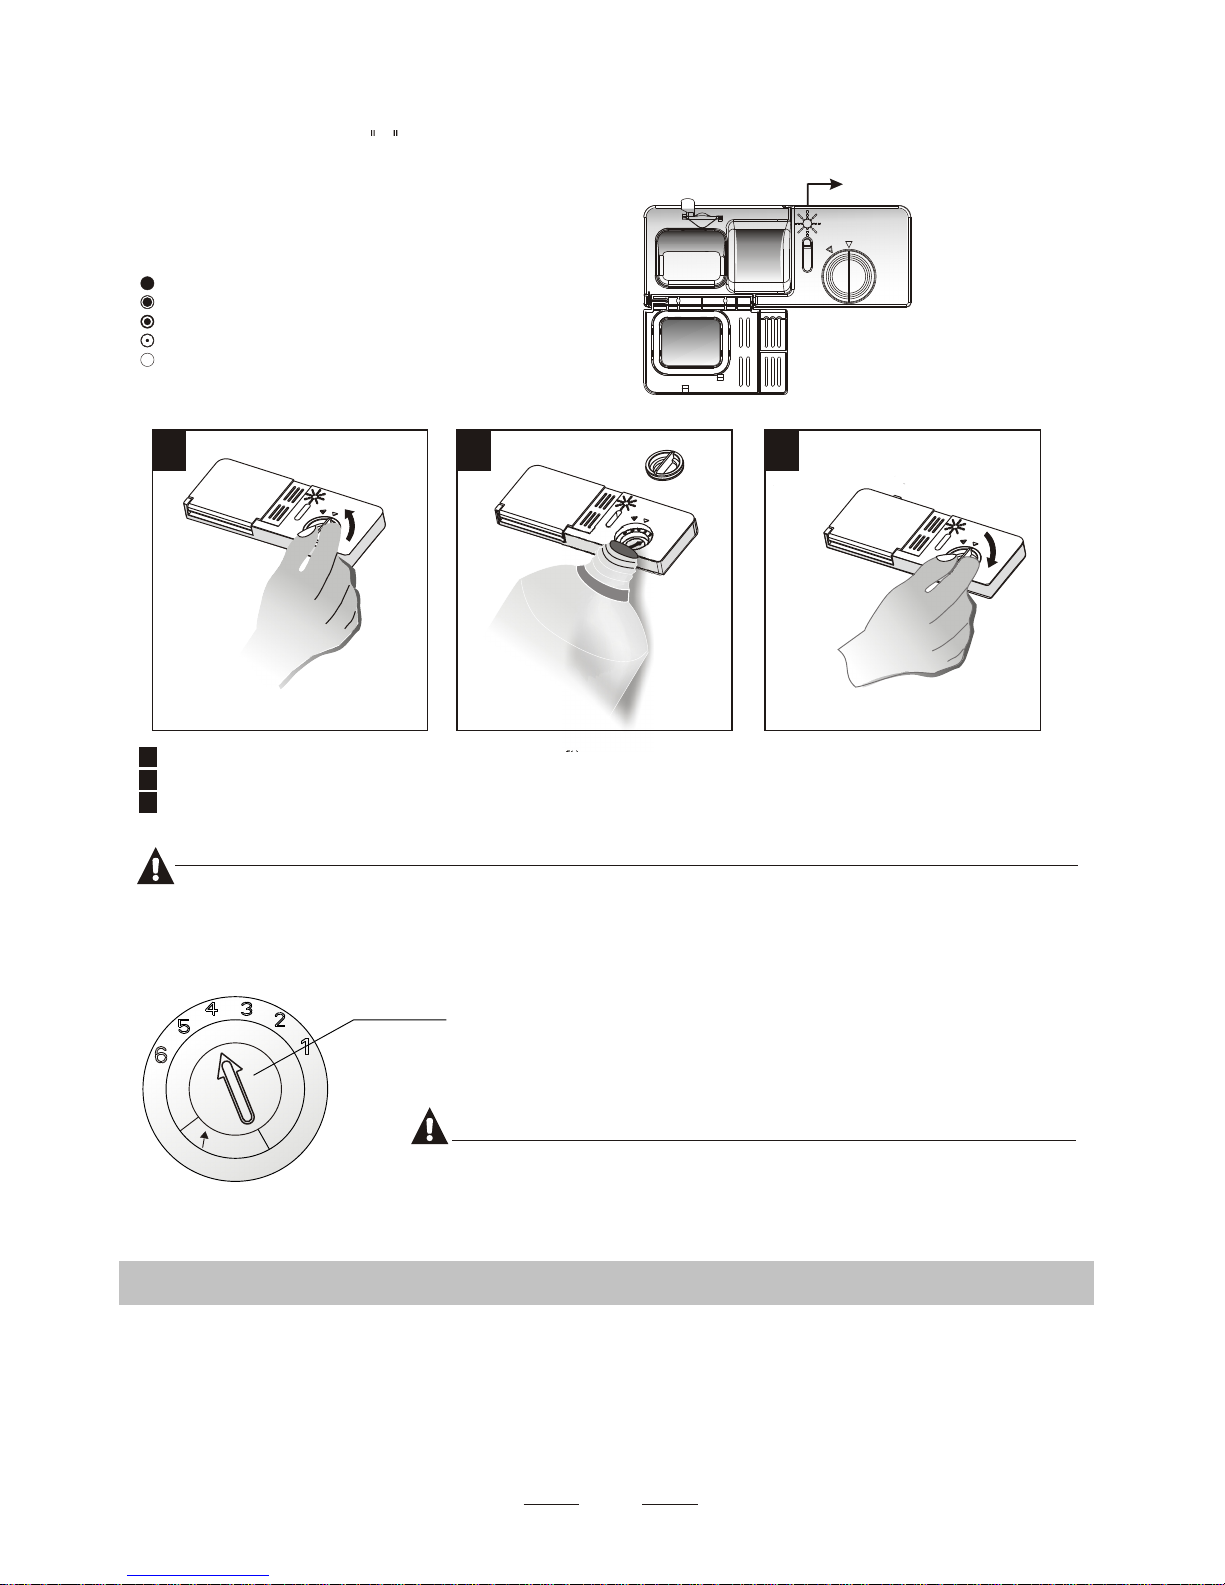
To open the dispenser, turn the cap to the "open" (left) arrow and lift it out.
Pour the rinse aid into the dispenser, being careful not to overfill.
Replace the cap by inserting it aligned with "open" arrow and turning it to the closed (right) arrow.
Adjusting Rinse Aid Dispenser
The rinse aid dispenser has six or four settings. Always start with the dispenser
set on "4". If spots and poor drying are a problem, increase the amount of rinse
aid dispensed by removing the dispenser lid and rotating the dial to "5". If the
dishes still are not drying properly or are show spots, adjust the dial to the next
higher lever until your dishes are spot-free. The recommended setting is "4".
(Factory value is "4".)
Increase the dose if there are drops of water or lime spots on the dishes after washing.
Reduce it if there are sticky whitish stains on your dishes or a bluish film on glassware or
knife blades.
11 22 33
1
2
3
As the rinse aid diminishes, the size of the black dot
on the rinse aid level indicator changes, as illustrated below.
Full
3 / 4 ful l
1 / 2 ful l
1 / 4 full - Should refill to eliminate spotting
Empty
Adjust lever
(Rinse)
When to Refill the Rinse Aid Dispenser
If there is no rinse-aid warning light in the control panel, you can estimate the amount from the colour
of the optical level indicator C located next to the cap. When the rinse-aid container is full, the whole
indicator will be dark .As the rinse-aid diminishes, the size of the dark dot decreases. You should never let
the rinse aid level fall 1 / 4 full.
during the next wash. Don't forget to replace the cap before you close dishwasher door.
Clean up any rinse aid spilled while during filling with an absorbent cloth to avoid excessive foaming
NOTE:NOTE:
NOTE:NOTE:
Detergents with its chemical ingredients are necessary to remove dirt, crush dirt and transport it out of the dishwasher.
Most of the commercial quality detergents are suitable for this purpose.
D. Function of DetergentD. Function of Detergent
MAXMAX
Proper Use of Detergent
Use only detergent specifically made for the use in dishwashers. Keep your detergent fresh and dry.
Don't put powdered detergent into the dispenser until you're ready to wash dishes.
Attention!
C (Rinse-Aid indicator) C
Page 13
10
Amount of Deter gent to Use
Base d o n their c hemic al composition , deterg ent s can be spli t i n two basic types :
De te rge nt tab lets of diffe ren t b ran ds disso lv e at d i ff er ent sp eeds. For t his r eason some
de terge nt tab lets c an no t dissolv e and de ve lop their full cleaning pow er d ur ing shor t
prog rams. Therefore please use lon g programs when using detergen t tabl ets, to
en su re the complete r emova l of d ete rg ent re sidua ls.
The dispenser must be re fil led before the start o f eac h wash cycle following th e instructions
prov ide d in t he wa sh cyc le tab le . Your dishwa sher u ses le ss de tergent and ri ns e aid tha n
Co nv entional di shwas her. Generall y, only one ta blesp oon of de tergent is ne eded f or
a norma l wash load. M ore heav ily so iled i tem s need mor e dete rgent. Alway s a dd the
de terge nt jus t bef ore st arting the dis hwa sher, otherw ise it coul d g et da mp and wi ll no t
diss olve prop erl y.
Concentrated Detergen t
Dete rgent Tablets
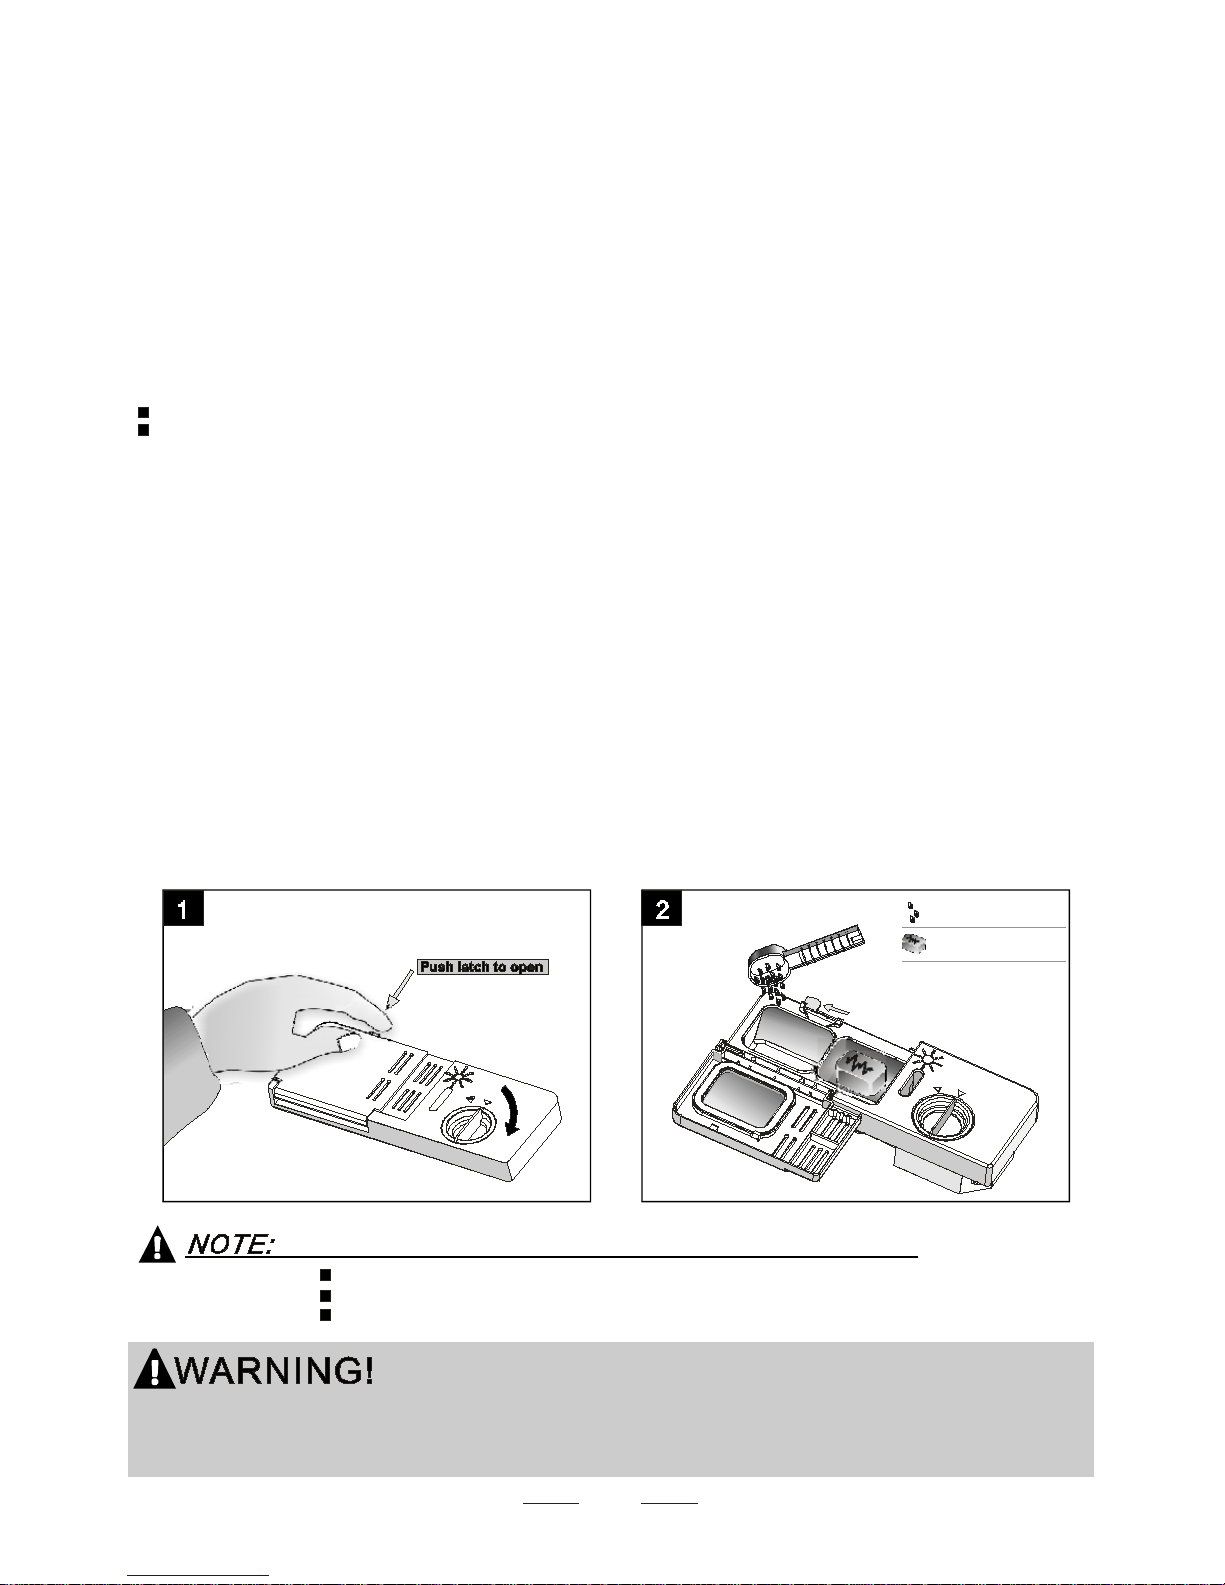
Dete rgent Dispenser
conv en tio nal , alkali ne de terge nts with ca ust ic co m ponents
low alk al ine co ncentrated d etergents wit h n atu ral enzymes
No rm all y n ew pulve ris ed deter ge nt i s w ithout pho s phat e. Thus t he wat er sof te ner func t io n of
ph ospha te is not given. In this case w e reco mme nd to fill salt in the salt cont ainer even w hen
th e h ardne ss of water is on l y 6 dH. If det ergen ts witho ut pho sphat e are use d i n the case of h ar d w ate r
of te n w hit e s pot s a ppear on dishe s a nd glass es. In this case please add mo re deterge nt to r each
be tter r es ults. Deterge nts without chlo rin e do onl y bleach a lit tle. S trong and coloured s pots w ill not
be remo ved comple tel y. In t his case ple ase choo se a progra m with a hi gh er t emperature.
°
Detergents
Ther e are 3 sorts of d eterg ent s
1.Wit h p hos ph ate an d with c hlo rin e
2.With p hosphate and without ch l orine
3.Wit hout p hosph ate an d without c hl ori ne
Alwa ys add the d eterge nt just bef ore s t arting each wash cyc le.
Only us e brande d detergent ai d for dis h washer.
If the l id is cl osed: press releas e button. The lid wil l spring ope n.
Deter gent tab let
Deter gent pow der
Dishwasher detergent is corrosive!
Take care to keep it out of reach of children .
Page 14
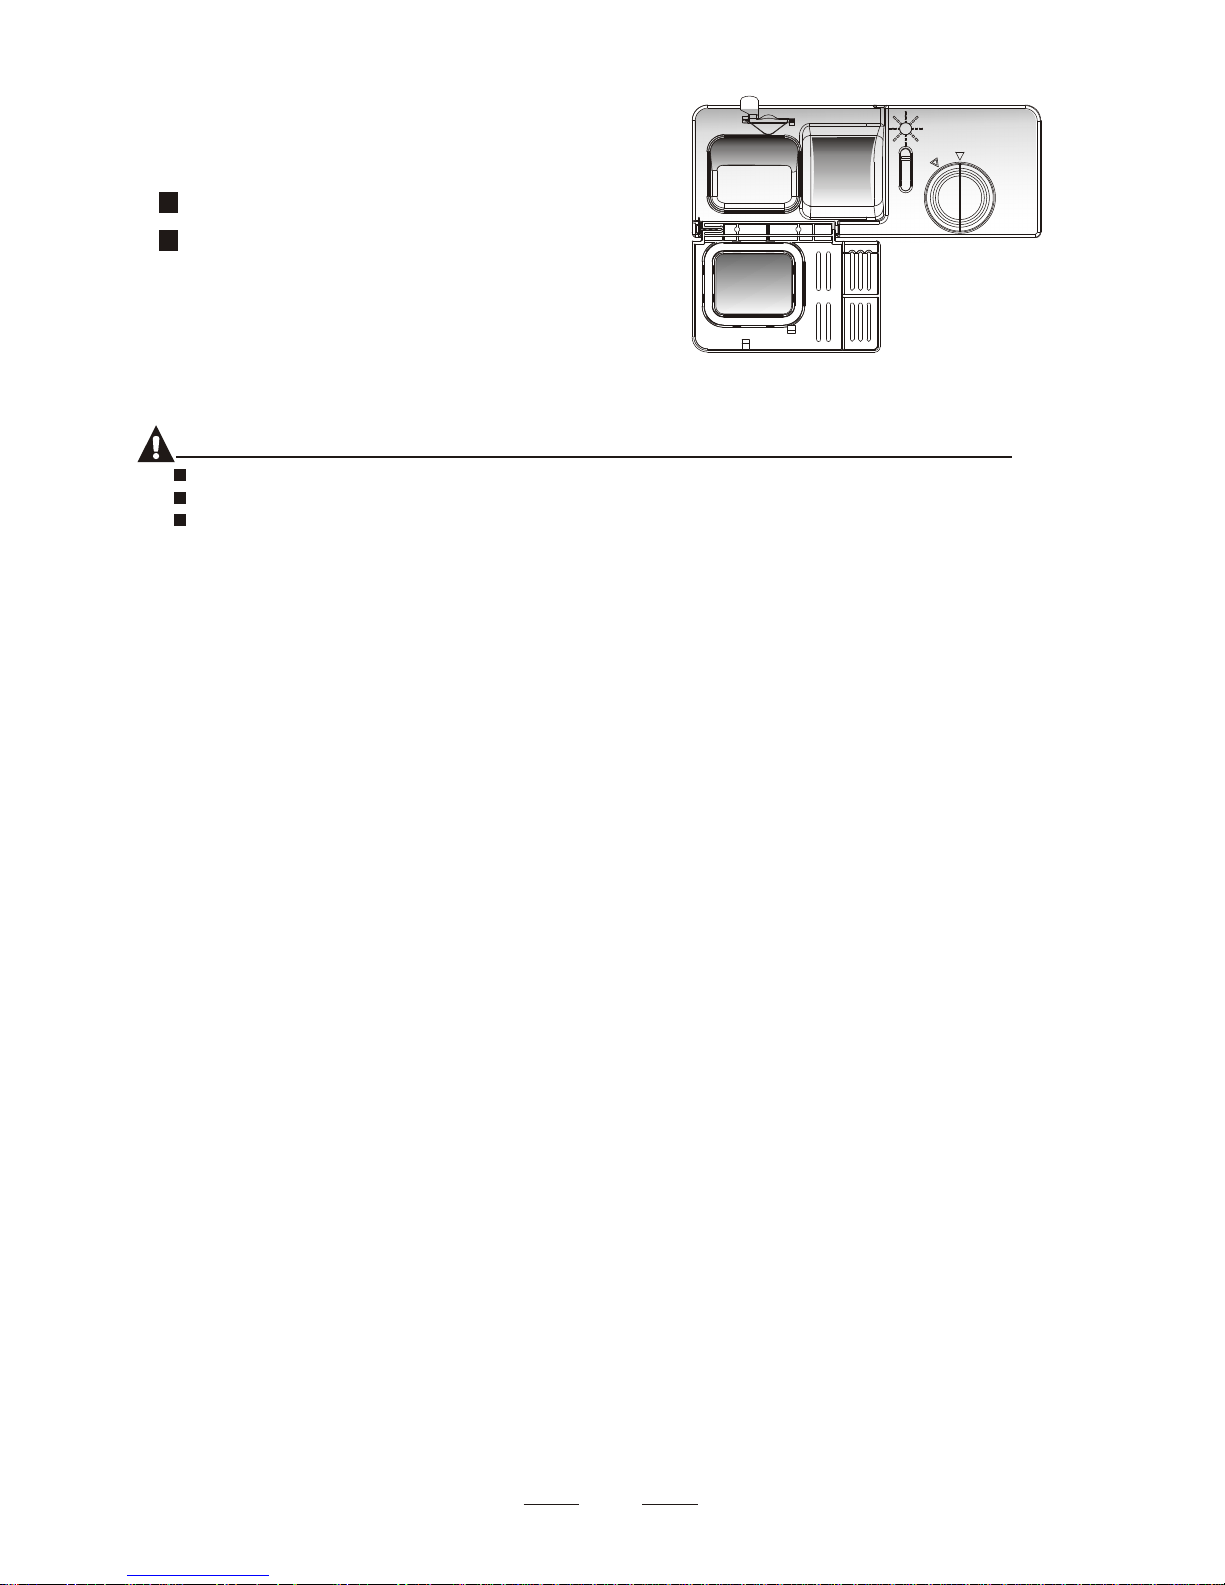
Fill the detergent dispenser with detergent.
The marking indicates the dosing levels , as
illustrated on the right:
The place of main wash cycle detergent placed.
The place of pre-wash cycle detergent placed.
Please observe the manufacturers dosing and storage
Recommendations as stated on the detergent packaging.
Close the lid and press until it locks in place.
If the dishes are heavily soiled, place an additional
detergent dose in the pre-wash detergent chamber. This detergent will take effect during the pre-wash phase.
A
B
Fill in Detergent
You find information about the amount of detergent for the single programme on the last page.
Please aware, that according to the level soiling and the specific hardness of water differences are possible.
Please observe the manufacturer's recommendations on the detergent packaging.
NOTE:NOTE:
11
AA
BB
Page 15
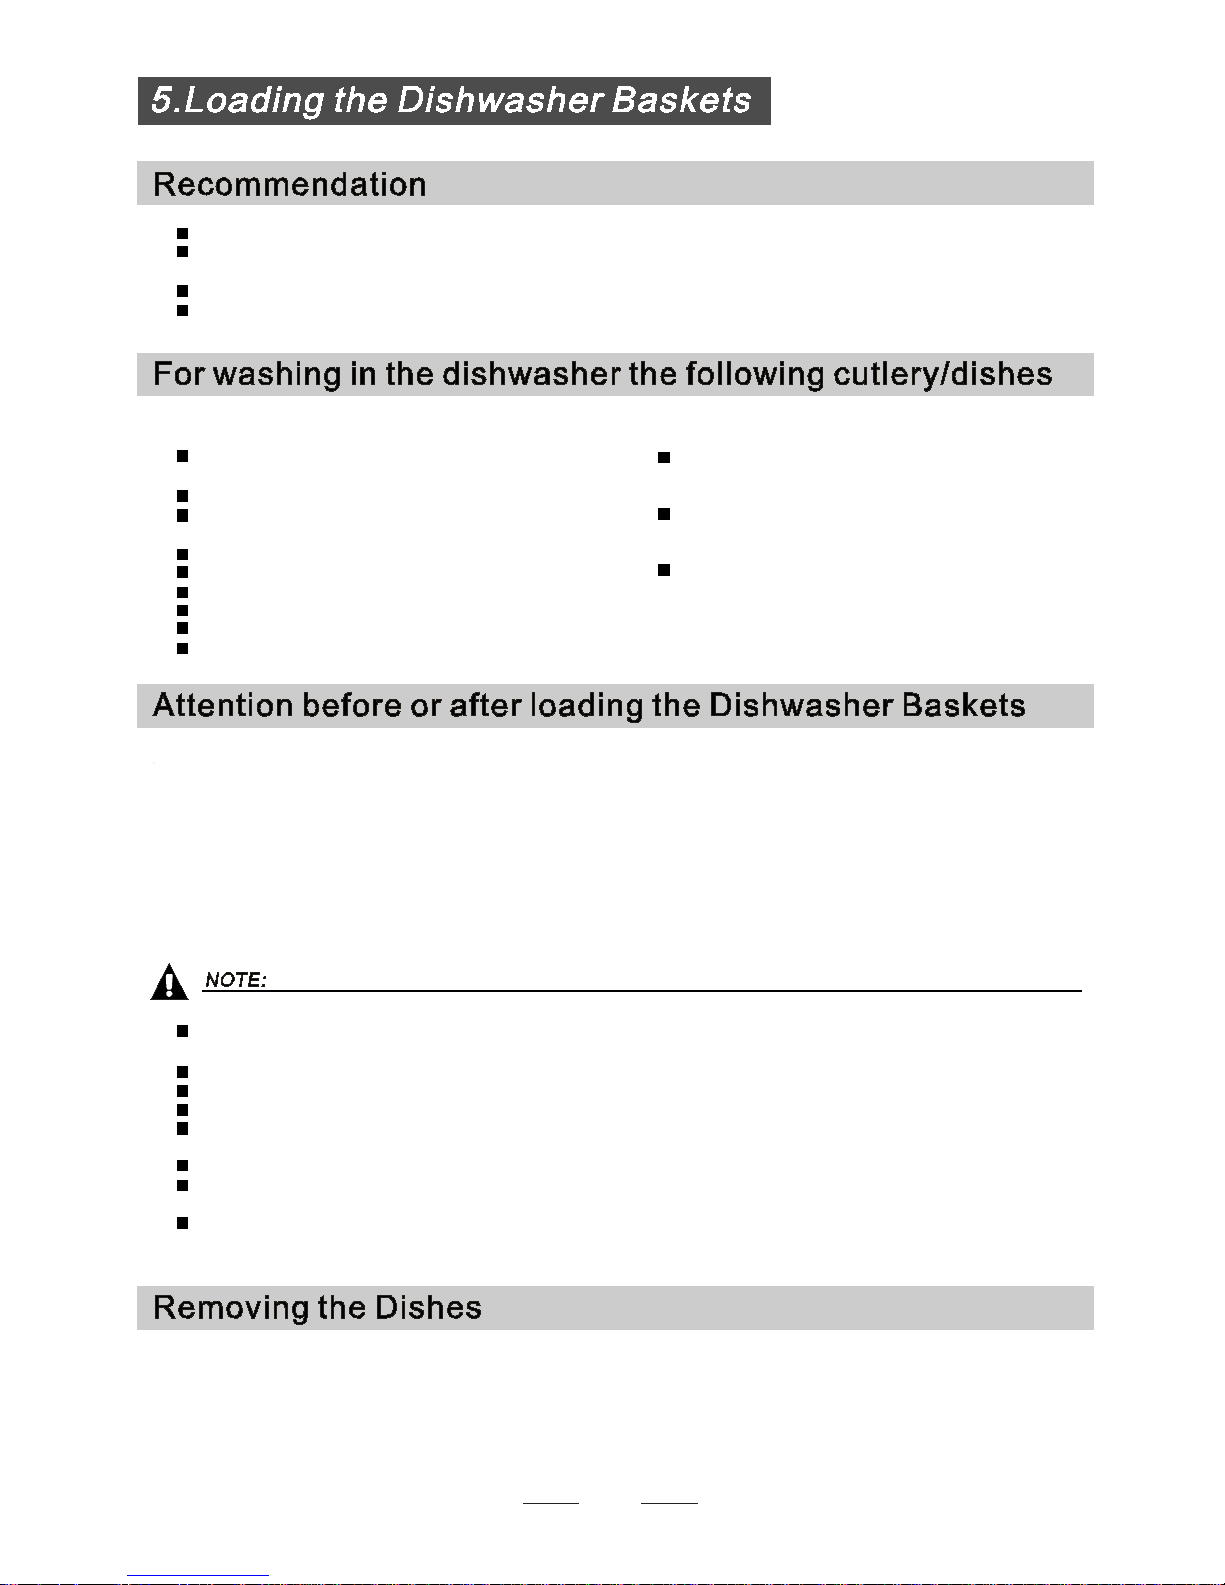
Cu tl ery with wo ode n, horn china or
mo ther- of-pe arl handles
Plas t ic item s that are not heat res istan t
Ol de r cutler y with glued p ar ts tha t are not
te mperature resis t ant
Bonded cut ler y i te ms o r dis hes
Pewter or coo per items
Crys tal glass
Steel i tems subject t o r ust ing
Wooden platt ers
It em s made from sy nt het ic fib re s
Some types of glasses can become
du ll af ter a large number o f w ash es
Silver and alum i nu m p ar t s have a
te nde nc y to d iscolour during washin g
Gl az ed patte rns ma y fade if machin e
wa shed frequently
Are not suitable
Are of lim ited suita bility
Dishes and items of c utlery mus t not l ie in si d e one an oth er, or co ver each othe r.
To avoid d amage to glass es, th ey must not touch.
Load la rg e items which a re mo st diffi cult to clean int o the lower bask et.
The upper bas ket is desi gn ed to hol d m ore de lic ate and l ig hte r dis hwa re suc h as g lasses, coffee
and t ea cups
Long blade d knive s sto re d in a n upri ght posi tion are a pot ent ial h azard!
Long and/or sha rp items of c ut lery such as car vin g k nives mu st b e p ositi on ed
hori zon tally in the upp er bas ket.
Please do not over load you r d ishwashe r. This i s imp ortant f or g ood result s and for
reas ona bl e consumption of ene rg y.
Lo ad hollow items s uch as c u ps , glasses, pan s e tc. With the o pen in g fac ing do wn war ds so that
wa te r cannot co llect in the cont ainer or a d eep ba se.
Co ns ider buy ing utensils which are iden tifie d a s dish washe r-pro of.
Use a mild detergent that is d es cribed as 'kind to d ish es'. If necess ary, seek further
info rm ati o n f ro m the de ter gen t manufact urers.
For partic ular items, sele ct a prog ra m w ith as low a temperatur e as possi b le.
To prev ent damage, do not t ake glass and c ut lery out of the dis hwasher i mmediately
af te r t he progr amme has en ded.
(For best p er for ma nce of th e d ish washe r, follo w the se loading g uideline s.
Feat ures a nd app earance of baskets and c utlery ba skets may va ry fr om your mod el. )
Scrape off any large amoun ts of leftover fo od . S o ften remnan ts of burnt f ood in pans.
It is not nec ess ar y to r inse the dis hes unde r r unn ing wat er.
Plac e objects in t he dis hw asher in follo win g way:
1.I tems suc h as cups, glass es, po ts/pans, et c. are f aced dow nwa rds.
2.C ur ved item s, or one s w ith rece sses, sh ou ld be loa de d a s lant so tha t wat er can run off .
3.All utensils a re sta ck e d securely a nd ca n not tip o ve r.
4.All utensils a re pla ce d in t he way th at the sp ray arms ca n rotate freely dur ing wa shing.
Ver y sma ll ite ms sho ul d not be washe d in t he dis hwasher as t he y could easily fall out o f the ba sk e t.
To prev en t w ate r d ripping from the upper bask et int o the lower bask et, we reco mmend th at you
em pty the low er basket first and th en the upper bas ket .
12
Page 16
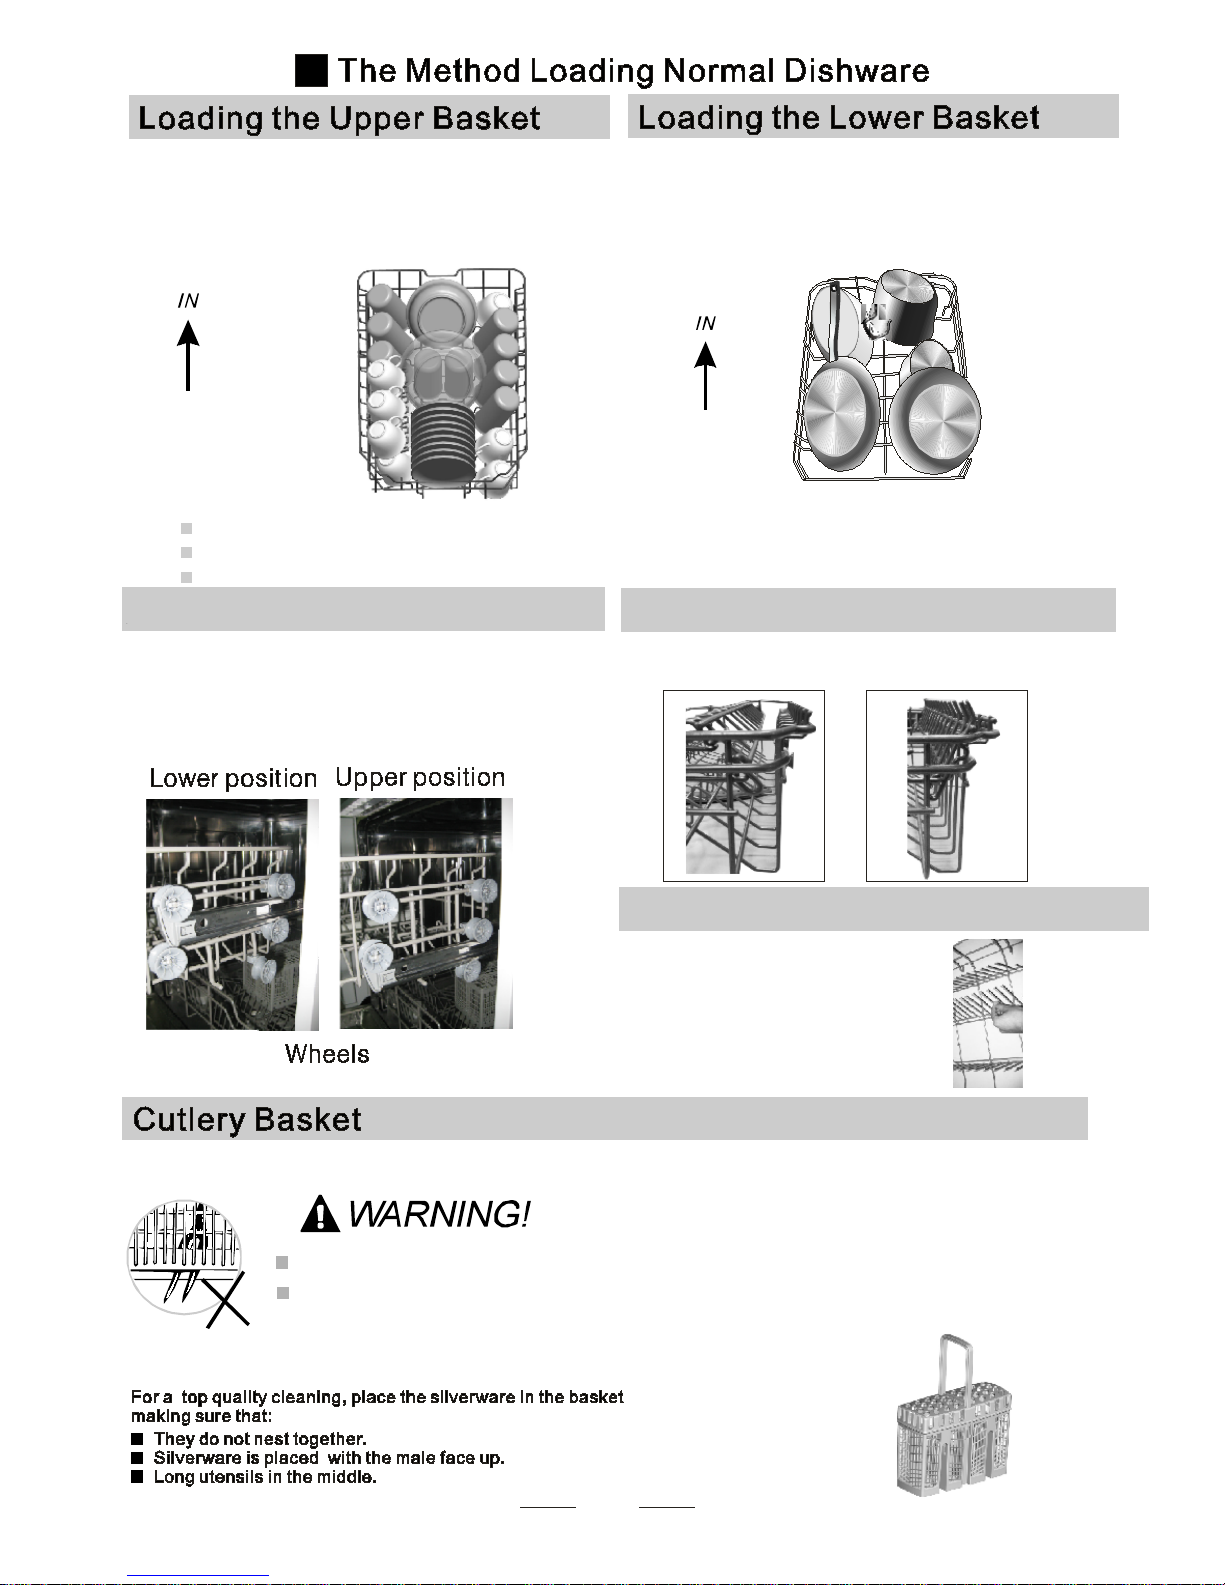
13
The upp er b asket is desi gned t o h ol d mor e de licate
an d lig hter dishware su c h a s gla s se s, co ffee and
te a cups a nd s au cers, as well as plat es , small bowls
an d shallo w pans (as l on g a s they are not to o d irty).
Posi t io n the dishe s a nd cookware so that th ey will
no t g et moved by the spra y o f wat er.
We s ugges t that you pla ce large ite ms an d the mos t
diffic u lt to clean item s a re to be p laced into the lower
ba sk et: s uch as p ots, pans, l ids, s er ving dis hes and
bo wl s, as shown in the figure belo w. It i s p re fer able t o
place s erv ing dish es and li ds on the side of th e ra cks
in order to avoid blo cking the rota tion of t he top spr ay
arm.
Pots, s erving bowls, et c , mus t always be placed top down .
De ep pots sho uld be s lanted to a llow w ate r to f low out .
Plea se be rem inded that:
The B ottom Bask et f ea tu res foldi ng spikes so tha t l a rg er o r mor e pot s and pan s c an be loa ded .
Folding Sp ikes of Lo wer Basket
For b etter stackin g o f pot s and pans,
th e spike s can b e f olded down a s
show in the pictur e r ight.
Adjusting th e Upper Basket
The hei g ht of th e u pper baske t c a n b e adj us t ed in ord er to
cr eat e m or e spac e for la rge utensil s both for the u pper
/lower bas ket . The heig ht of th e u ppe r bas ket ca n b e
ad justed by pl acing the wh eels on differen t h ei ght of the
rails. Lon g items, serving cutle ry, salad se rve rs and kniv es
shou ld be pla ced on t he s helf so that the y do n ot obs tru ct
th e rot ation of the spray arms..
Folding bac k the cup shelives
For b etter stackin g o f pot s and pans,
th e spikes can b e f olded down a s
show in the pictur e r ight.
Cu tl ery sh ould be pla ced in the cut le ry r ack s eparately from ea ch other i n the ap propr iat e p ositi ons , and do
ma ke sure the uten sils do not nest togeth er, this may ca use bad per f ormance .
Do not let any item extend through the bott om.
Always load sharp utensi ls with the sharp
point down!
Page 17
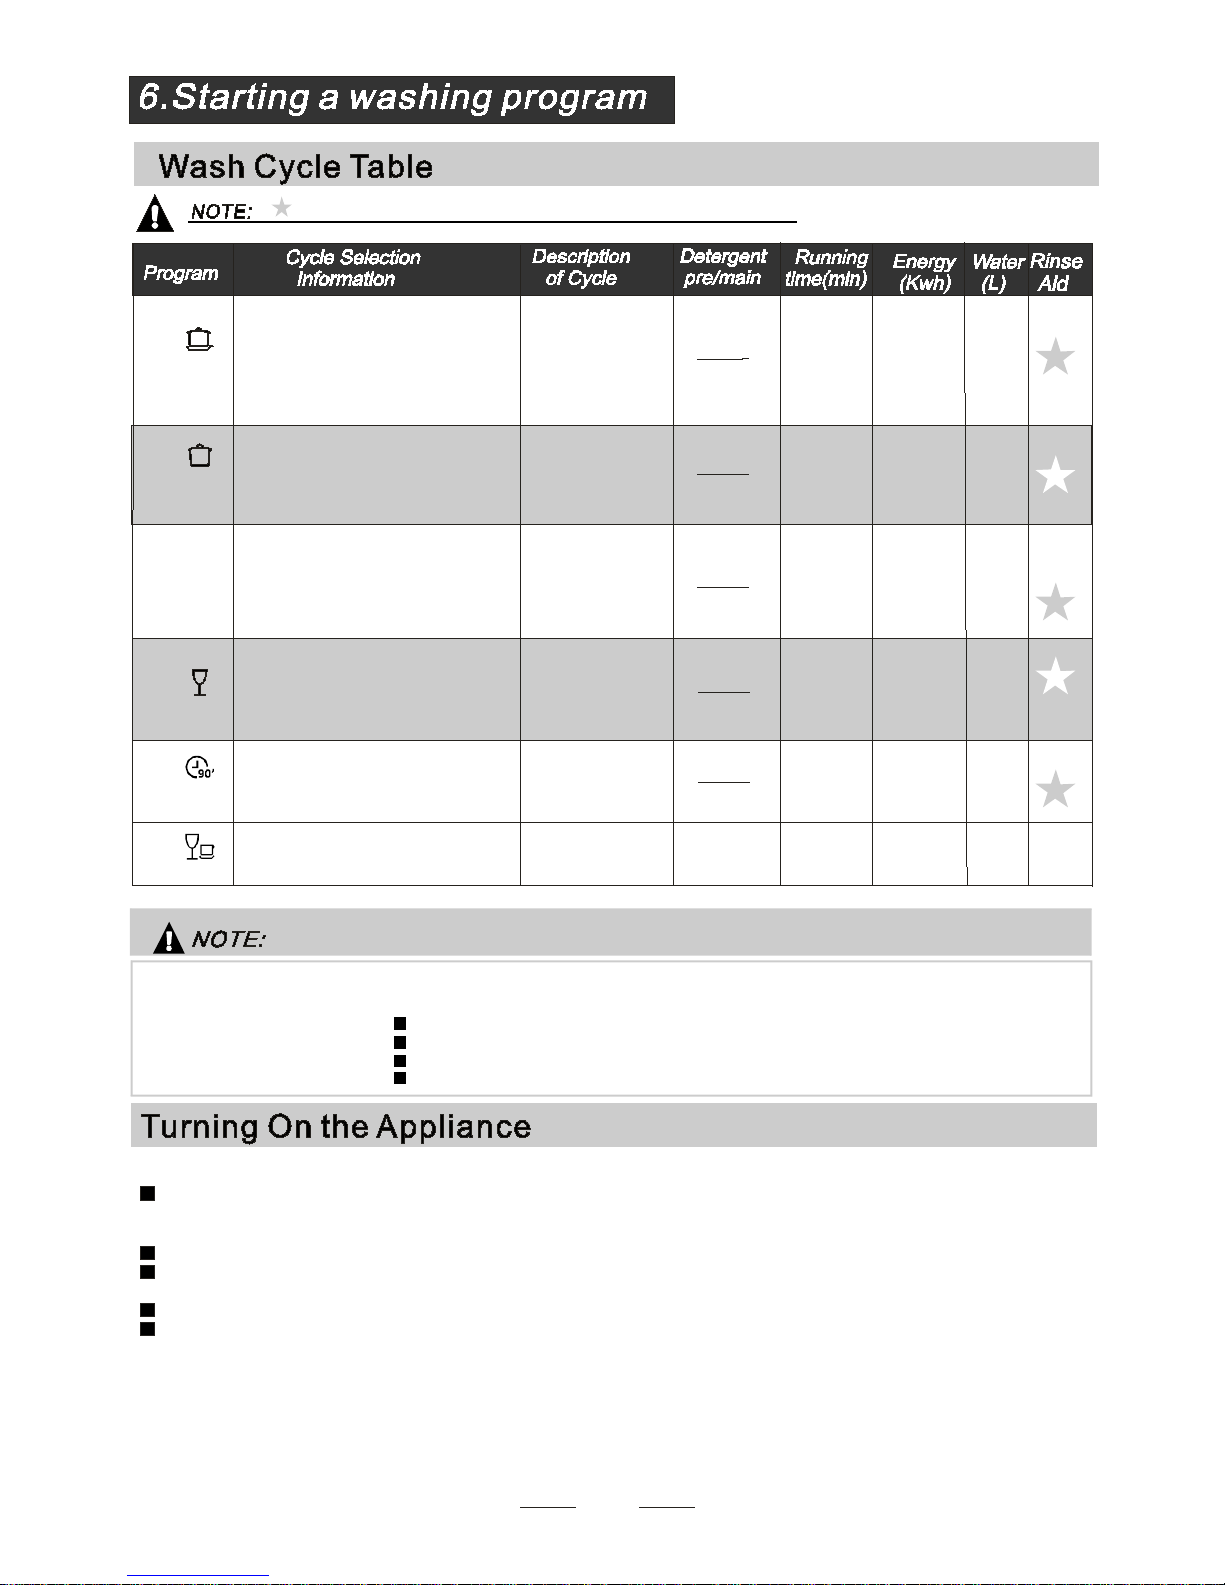
*EN 50242 : This programme is the test c ycl e. Th e inform ati on fo r comp arabi lity t est
in accordance w ith EN 50242, as fo llows :
Ca pa city: 10 se tting
Posi t io n Upp er bas ket: up pe r whe els on rails
Rinse a i d settin g: 6
Pl:0 .49 w; Po: 0.4 5w.
Startin g a cyc l e wash
Draw ou t the lower and upp er b as ket, loa d t he dis hes an d push the m bac k.
It is c om mended to load the low er basket first, the n the up per one ( see the s ect ion entitled
Loading the Di shwasher ).
Pour in t he det ergent (see th e s ection e ntitl e d Salt, D etergent an d Rinse Aid ).
Insert th e plug into the socket. T he power supply is 220 -24 0 VAC /50 HZ , the spe ci fication
of the so ck e t is 1 0A 250 VAC. Ma ke sure that th e water supply is turned on to full pr ess ur e.
Open th e d oor, pres s t he ON /OF F But ton , a nd the ON /OFF l ight w il l turn on.
Pres s the pro gr am But ton , th e was h program w ill be changed as foll ows direction:
If a progra m i s s e lected, the response l ig ht will light. Then cl os e the door, the dishw asher
begins to sta rt.
“ ”
“ ”
P1-> P2->P3-> P4->P 5->P6
;
1
2
3
4
5
Mean s: need to fill rins e i nto the R in s e-Ai d Disp ense r.
( )
14
For norma l ly soiled loa ds,
such a s , plate s, glasse s
an d lig htl y soiled p ans .
pots
Fo r heavi e st soiled cro ckery,
an d normally s oi le d pots
pa ns dish es etc wi th dried
on soil in g.
、
、
For lig htl y soiled loads th at
do not need e xce llent drying
effic i e nc y.
A sho rter w ash for lightly
soil ed loa ds and quick wash .
For lig ht l y soiled cr ocker y
an d glass
(o r )3in1
3/ 22g
(o r )3in1
3/ 22g
(o r )3in1
3/ 22g
Wash (4 5 )
Rin se
Rin se ( 55 )℃℃
17 5
19 0
16 5
30
1. 1
0.7 4
1. 4
0. 7
16. 5
13
9
10
Was h(6 5 )
Rinse
Rinse ( 65 )
Dryi ng
℃
℃
90
11.5
1. 15
20 g
3/ 22g
Pre -w ash
wash(40 )
Rin se
Rin se (60 )
Dry i ng
℃
℃
12 5
0. 75 13. 5
25g
Pre was h 5 0
Wash 60
Rin se
Rin se
Rin se 70
Dry i ng
( ℃ )
( ℃ )
( ℃ )
Pre was h( 45 )
Wash (5 5 )
Rin se
Rin se ( 65 )
Dry i ng
℃
℃
℃
Pre was h
Wash (4 5 )
Rin se (65 )
Dry i ng
℃
℃
This i s stan dard pr og r amm e, it is
suita ble to cl e an n orm a lly soiled
tab le wa r e an d it is the m os t effic ie nt
progr am me i n te rm s of it s com b ine d
energ y a nd w at e r consumption for
tha t typ e of ta blew are .
ECO
Int ens ive
No rmal
(*E N 50242)
Rapid
90 Min
Gl as s
P1
P2
P3
P4
P5
P6
(O r3 in 1 )
(O r3 in 1 )
Page 18
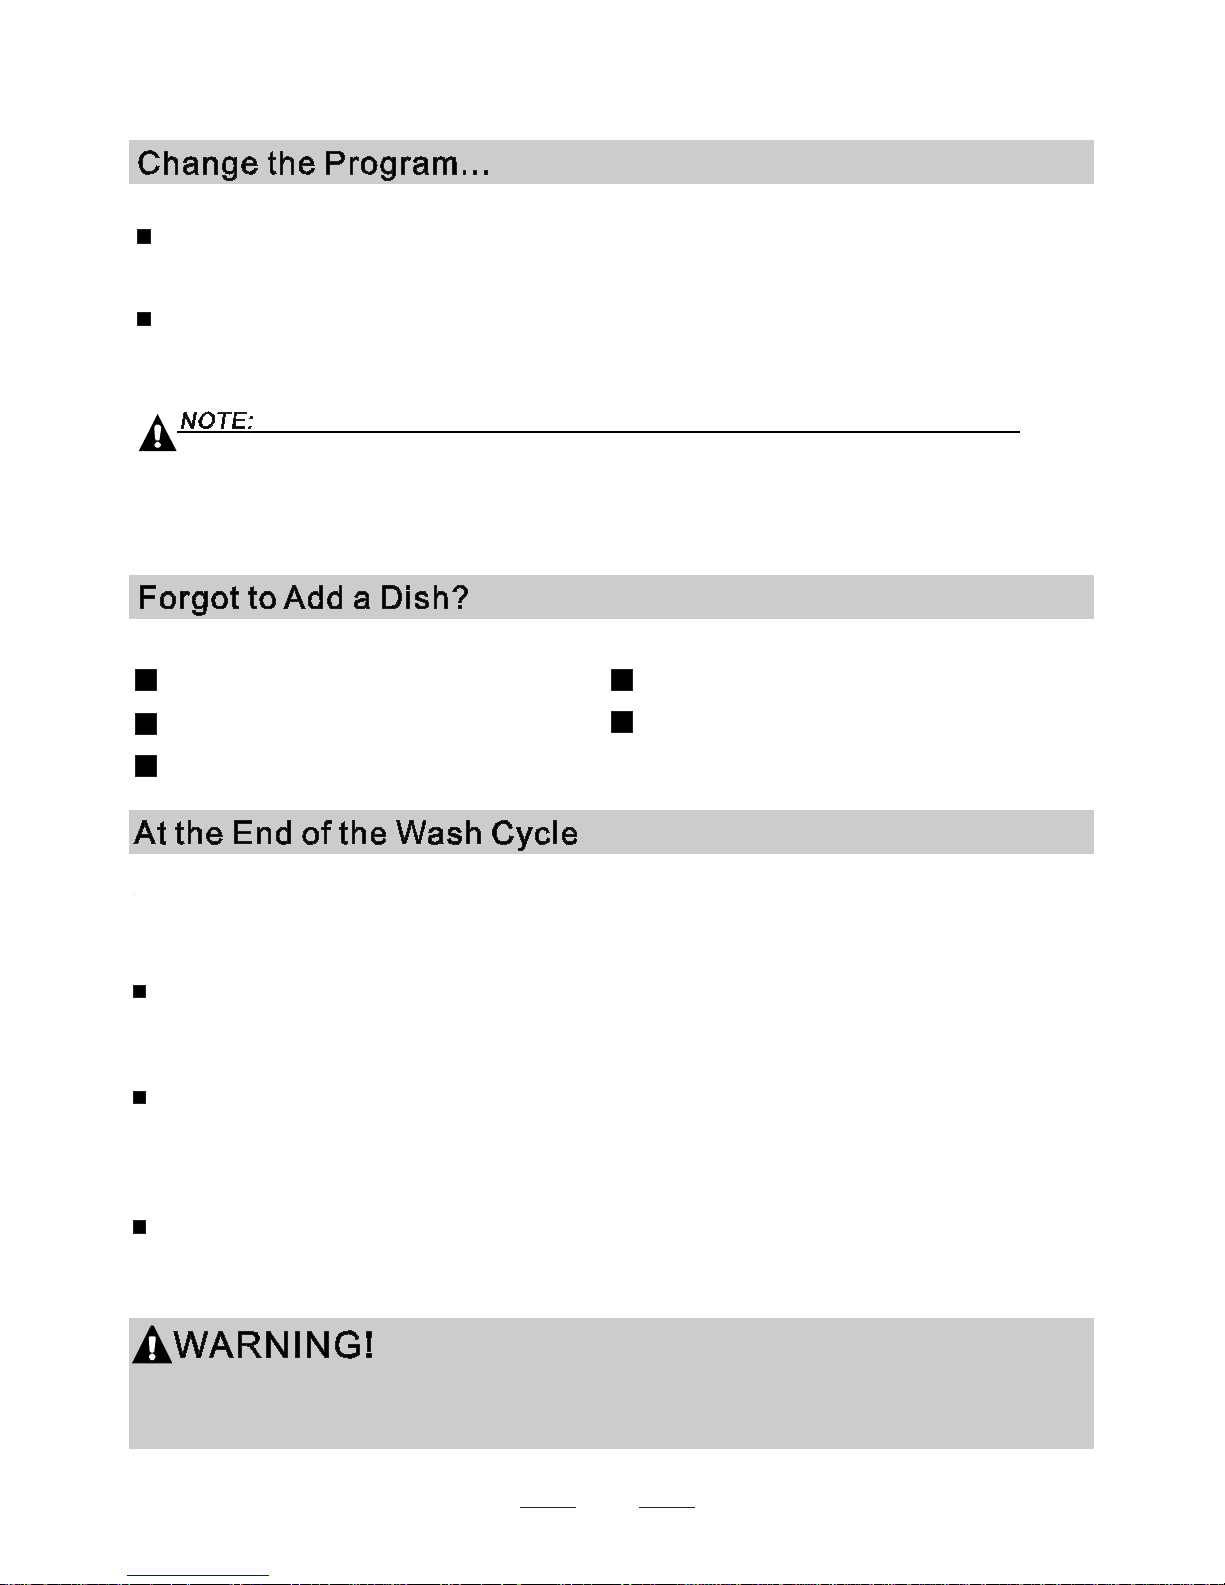
When the workin g c ycl e has fi nished, the buzze r o f the dishw as her will sound for 8 seconds, th en stop. Tur n o ff
th e a pplia nce using the ON /OFF b ut ton, s hut off the wate r s upp ly an d open th e doo r of the dis hwa sher.
Wai t f or a few min ut es b efore un loading the dish washe r to a vo i d h and ling the dish es a nd utensil s w hil e the y
are s ti ll hot an d m ore s u sceptibl e t o breakage. T he y will also dr y b ett er.
Sw itch Off the D ishwa sher
The program l igh t is on but is no t b linking, on ly in this c ase th e p ro gramm e h as e nded.
Open the do or.1. Switch off the dishwasher by pressin g t he ON/OF F button.
2.Tu rn off the water ta p!
Open the door caref u lly.
Ho t d ishes ar e s ensitive to knoc ks . The dishes should th er efore be all owe d to c ool down ar ou nd 15 minut es
be fore rem oving from the appliance .
Open the dishwasher' s doo r, leave i t a jar and w ait a fe w minu te s before re mov ing the dishes. I n t his way the y
will be cool er and the dryi ng will be improved .
Un loading the dishwa sher
It is normal th at the dis h washer is w et inside .
Empty t he low er baske t first a nd the n the up per one. This will av oi d wate r d rippi n g from the up per Basket ont o
th e d ishes in the low er one .
If you open the door , the ma chi ne will pau s e. The progr am light wi ll
stop blink ing and the buzz er w ill moo i ng eve ry minute unless y ou close th e door . After
you close t he door ,th e machine will keep on w orking after 1 0 se conds.
during a wash cycle
Pr em ise:
A cycle that is u nder w ay can o nly be m odified if it has only been runn ing for a short tim e . Othe rwise, the
dete rgent may have already be en re leased , and th e applia nce may have alread y drain e d the wa sh wa ter.
If this is t he case, the detergent d is p e nser must be r efill e d (see the sec tion entitled " L oadin g t he
Detergent " ).
Open th e do or ,p ress t he Pr ogram bu tto n , the machine wil l be i n s ta nd by state,
then yo u can change the progra m t o t he desir ed cyc le setting (see the sectio n e ntitled " St arting a
wash cycl e. . ." ).
more than 3 seconds
1
2
A forgotten dish can be added any time before the detergent cup opens.
Add forgotten dishes.
Close the door
After the spray arms stop working, you can open the door
completely.
2
3
Open the door a little .
1
4
5
The dishwasher will run after 10 seconds.
15
It is dangerous to open the door when washing,
because the hot water may scald you.
Page 19
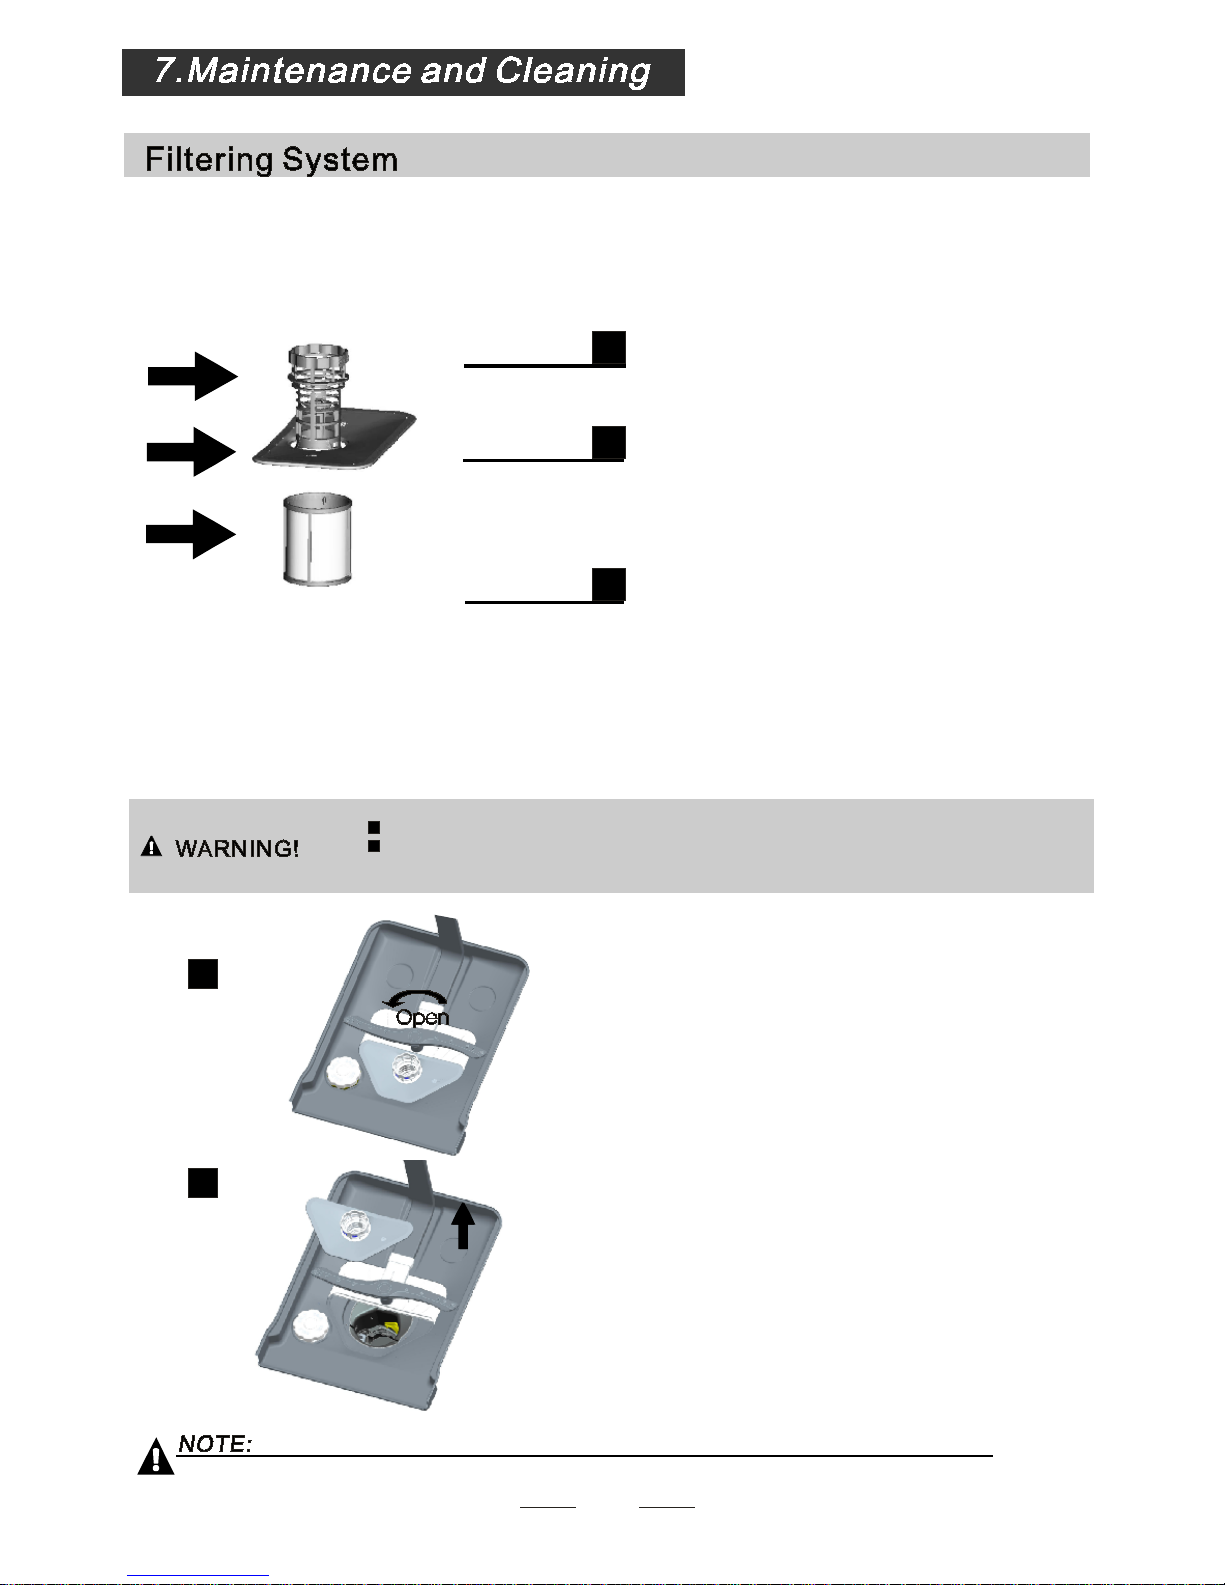
The fil ter pr events l a rg er rem nants of food or oth er ob j ects from get tin g i nside the pum p.
The r esi dues may block the filt er, in this case th ey must be r emove d.
The fil ter system c onsis ts of a coarse fi lte r,a flat (M ain filt er)
And a micr ofilt er(Fine f il ter ).
Food an d soil part icle s tra pped in this filt er ar e pu lverize d b y a
spec ial jet on t he lower spray ar m a nd wa sh ed down to drain.
Larger ite ms, such as pi ec es of bones or glass , that could block
th e d ra in are trapped in the coar se filte r. To remove t he i tem s
caug ht by the filt er, gently sque eze the tap on the top of this
filt er and lift out .
This fil te r hold s s oi l and f ood r esi due s in the su mp area and
prev ents it f ro m being r ede posit on the dishes duri ng w as h cyc le.
Ma in filter
1
Co arse filte r
2
Fine filter
3
2
3
1
Filter assem bly
The fil ter efficie ntly
For b est performan ce and results , t he fi lte r must b e c leaned regular ly. this r eason , it is a good id ea to
remo ve t he larger food p articl es tr apped in the fil ter af ter each wa sh cy cle by r ins ing the s emici rcular f i lter and
cup under run ning w ate r. To remove t he fil te r dev ice , p ull the cup han dle in the up ward dir ection .
removes food p articl es fro m the wash wat er, allo win g i t to b e r ecycled during th e c ycl e.
For
The dishwasher must ne ve r be used wi tho ut th e f ilter s.
Im proper replace me nt of th e filter ma y reduce the per formance level of the appli an c e
an d d ama ge dishes and utensil s.
St e p 1 Turn the f ilter in anti-cl oc kwise direc tion,:
Step 2 li ft the filt er a s sy u p:
When following this procedure from step1 to step 2, the filter system will be removed;
when following it from Step 2 to Step 1, the filter system will be installed.
16
1
2
Page 20
The c ont ro l panel c an be clean ed by u sing a lightl y dam p en ed c loth.
After c lea ning, make s ure t o dry it thorough ly.
For t he exter ior, use a good appl ian ce polis h wax .
Ne ver u se sha rp o bj ects, sc ouring p ads or harsh c lea ners o n a ny pa rt of the dish washer.
Protect Ag ainst Freezing
1.C ut off the electric al po wer to t he dis hwa sher.
2.Tu rn off the water supply a nd disconne c t the wa ter inlet pipe f rom the water valve.
3.D ra in the wa ter from the inlet pip e and water valve . ( Use a pan to gath er the wa ter)
4.R ec onn ect the water inlet pipe to the wate r valve.
5.R em ove the filter at th e b ott om of th e t ub an d u se a s ponge to so ak u p w at er in the sump.
please tak e f rost prot ec tion measur es on the di sh washer in win ter. Every fter wa sh ing cy cles,
please operat e a s f ollow s
time a
:
Cleaning t he Filter
Cleaning The Door
To clean the co arse f ilter and th e f ine filter, us e a clean in g brus h. Re assemb le the filter parts as shown in t he fig ure s
on the l as t pag e a nd r einsert the enti re ass emb ly in th e d i sh washer, posi tioning it in its seat an d pressing dow nwards.
When cleaning the filt e rs, don't knock on t hem. Otherw ise , the fil ters cou ld be
con torted and the p er for mance of the d ishwash er could be decr eased.
To clean the edge a ro und th e d oor, you sh ould us e o nly a s oft w arm , d amp cloth.
To avoid penetrati on of water into the door lock a nd elec t ri cal comp onents, do not
use a spray cle ane r of any kind.
Ne ver u se a spray cleane r to c lea n t he doo r panel a s i t may d amage the door lock
an d e lectr ical compon en ts.
Abra sive agents or so me pap er to we ls should n ot b e used because of the risk of
sc ra tchin g o r leavin g s p ots on the st ainless s te el surfac e.
Cleaning t he Spray Arms
If yo ur dishwa sh er ca nn ot wo rk becaus e o f the i ce ,
plea se co nt ac t p rofessiona l s er vic e p er so ns.
It is necess ar y to clean th e spra y arms regul arly for hard
wa ter chemic al s will clo g the spray arm jets and bear ings.
- Ins pe ct the filters for bloc king after e very tim e t he dis hw asher has been used.
- By unscrewing the coarse filter, you can remo v e t he filte r s ystem . R emo ve any f ood re mn ant s and
cl ean the fil ters u nd er r un ning water.
Remarks:
The entire filt er assembly shou ld be cle aned once a week.
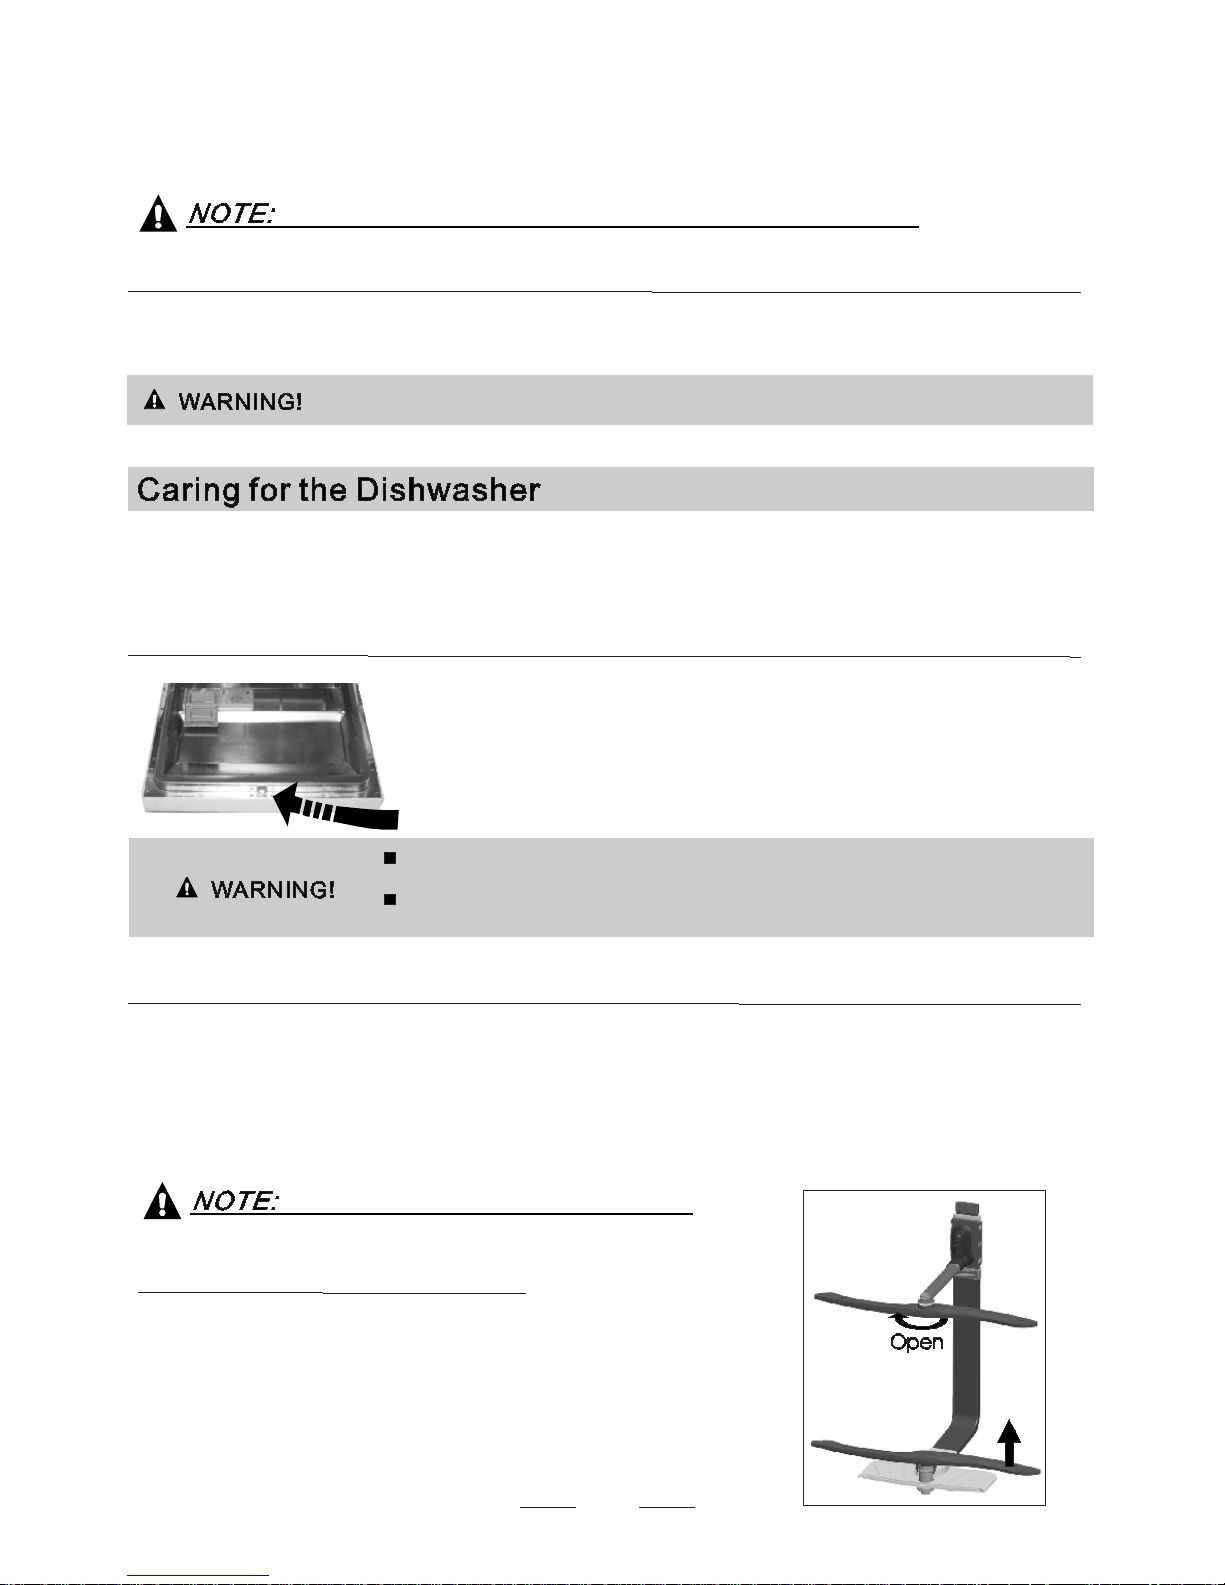
To remove th e lower spray arm , p ull o ut the spray ar m upward.
To remove th e u ppe r s pray a rm, hold the nut, rot ate th e a rm
cl oc kwise to remove it.
Was h the arms i n s oap y a nd warm water a nd us e a so ft brush to
cl ean t he j ets. R eplace them aft er rinsing t hem th oroughly.
17
Page 21
It is reco mm e nd that yo u run a w ash cyc l e w i th the
dishwas he r empt y a nd then remove th e p lug from th e
sock et, tu rn off the water supp l y and le ave th e d oor of
th e a pplia nce slig htly o pe n. This will h elp the d oor
seals to l ast longer and prev ent odou rs from form in g
within the ap pl ian ce.
If the app lia nc e must be m o ved, try to keep it in the
vertical p os ition. If abso lut ely n ecessary, it ca n be
po sitio ne d o n its b ac k.
One of the facto rs that cause odours to f orm in the
dishwas he r is f ood th at remains trapped in the se als.
Peri odic c leaning wit h a da mp sponge will pr ev ent this
from occurring.
Before cl e aning or performing main ten ance, always
remo ve the plug from the socket.
To clean the exter ior and r ubb er pa rt s o f t he dis hwasher,
do not use solve nt s or abrasi ve cleaning product s .
Only us e a cloth with warm so apy water.
To remove sp ot s or stains fr om the su rfa ce of the
interior, use a cloth d ampened wi t h wat er a n a litt le
vi negar, or a cleaning product ma de sp ec ificall y for
dishwas he rs.
Re move the Plug
No Solvents or Abrasi ve Cle aning
Moving t he Ap p liance
Seal s
After e ve ry wash , tur n off th e w ate r s up ply to the
ap pliance an d leave the door sligh tly open so th at
mo is tur e and od ours a re no t trapped inside.
Af ter Eve ry Wash
When no t in U se for a LongTim e
18
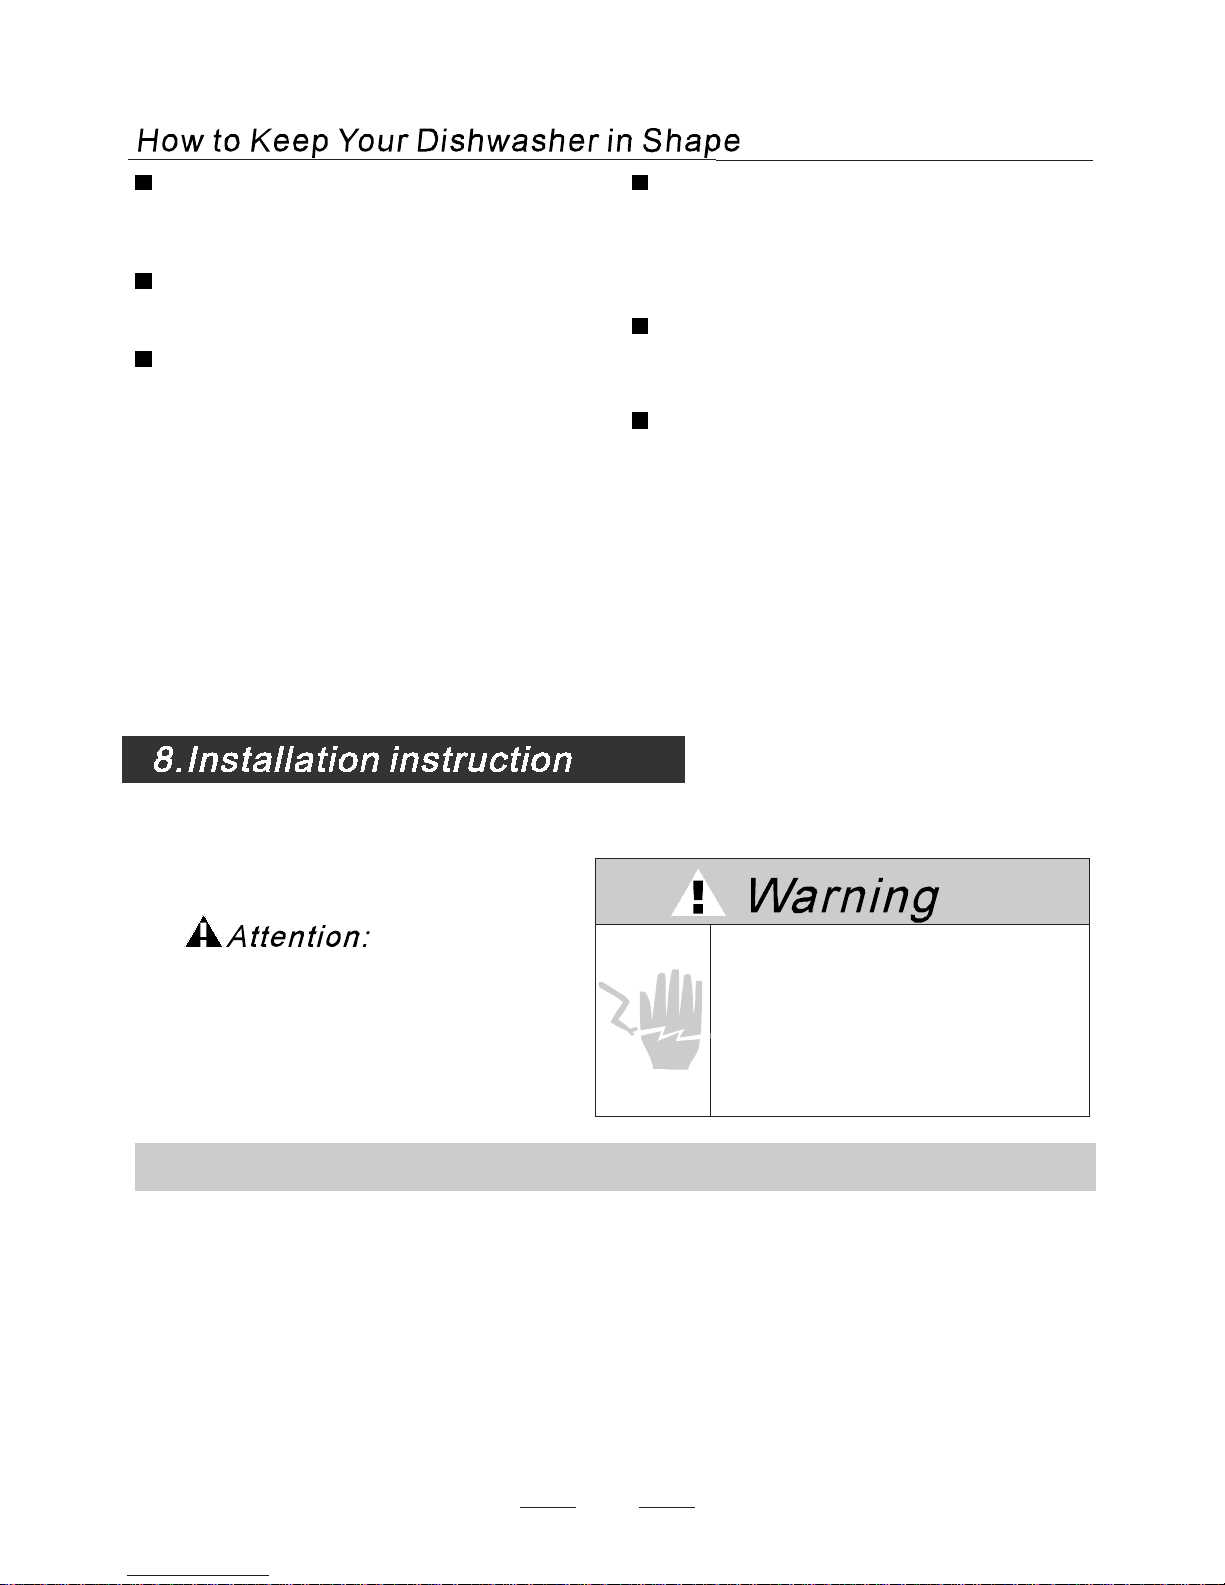
The i nstalla tio n o f t he pip es
an d e lectr ical equip m ents
shou ld be don e b y p rof ess ionals.
Elec t rical Shock Haza rd
Disc onn ec t electri ca l p owe r b ef ore
install ing dishwas her.
Failure to do so can res ul t in death or
electrica l shock.
The i nstalla tio n p osition of dis h wa sher s hou ld be nea r the exi st ing inlet and drain hoses an d
po we r cord .
One s ide of the c ab ine t sin k s hou ld be chosen t o f aci litat e the con nection of drain hoses of
th e d ishwa sher.
Installation preparation
No te : p le a se check th e accompanying in stallat ion accessories( hoo k f or aes thetic p anel, s cr ew)
●
Page 22
19
Pl ease caref ully read th e install ati on instruct ion.
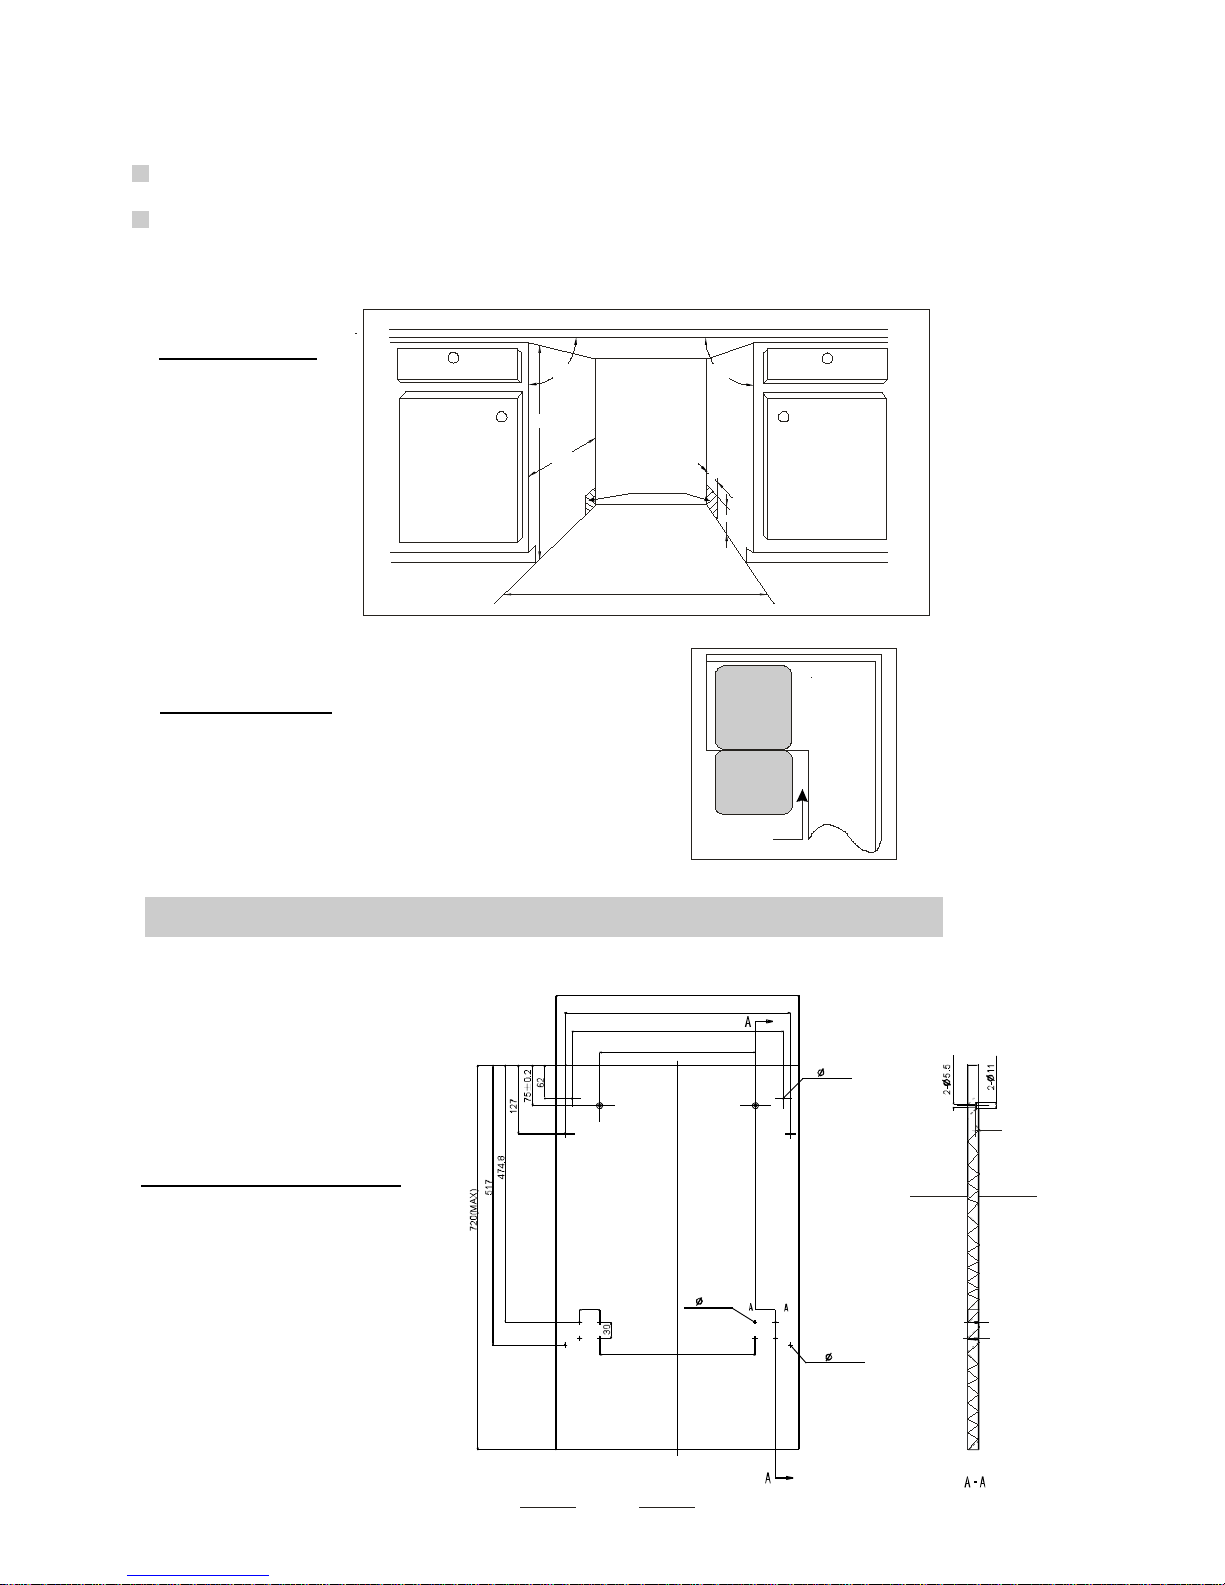
Illustrat ions o f c abinet dime nsions and installation position of t he dishw as her
Pr ep ara t i ons sh ou l d be made b efo re mo vi n g the dishwas her to the i ns talla tion place .
Ch oo se a pl ace ne ar t he sink t o fac ili ta te the inst all ation of inlet an d drain hos es
(s ee fi gu re 1).
If dis h wash er is in stall ed a t the corner of the ca binet, there s hould be some s pa ce
(i llust rate d in f igu re 2) w he n t he doo r is o pened.
2
1
Min im u m s p ac e when
the doo r is op ened
【 】Figu re2
Cabinet di mensi ons
【 】Fig ure1
Cabinet
Dis hwa sh er
Do or of
dis hw as her
Minimum space of 50mm
1
The aestheti c woode n panel c ould b e processe d a c cord ing to the F igur e 3 .
The a es theti c p a nel sh o uld
be p roce s sed in a c cord a nce
with the illustrat ed dimensions
【 】Figure3
●
Aesth etic panel's dimensio ns and ins tallation
Less than 5mm
between the top
of dishw a sher and
cabinet a nd the
outer door al igned
to cabine t.
90 °
90 °
450 mm
820mm
100
580mm
80
Space between cabinet
bottom and floor
Electrical, drain and
water supply line
entrances
(Unit: mm )
dp8
439
416 0.2±
390 0.2±
287.5 0.2±
286
38
8 - 2
dp8
4- 2
dp8
2- 2
20 MAX( )
5
Page 23
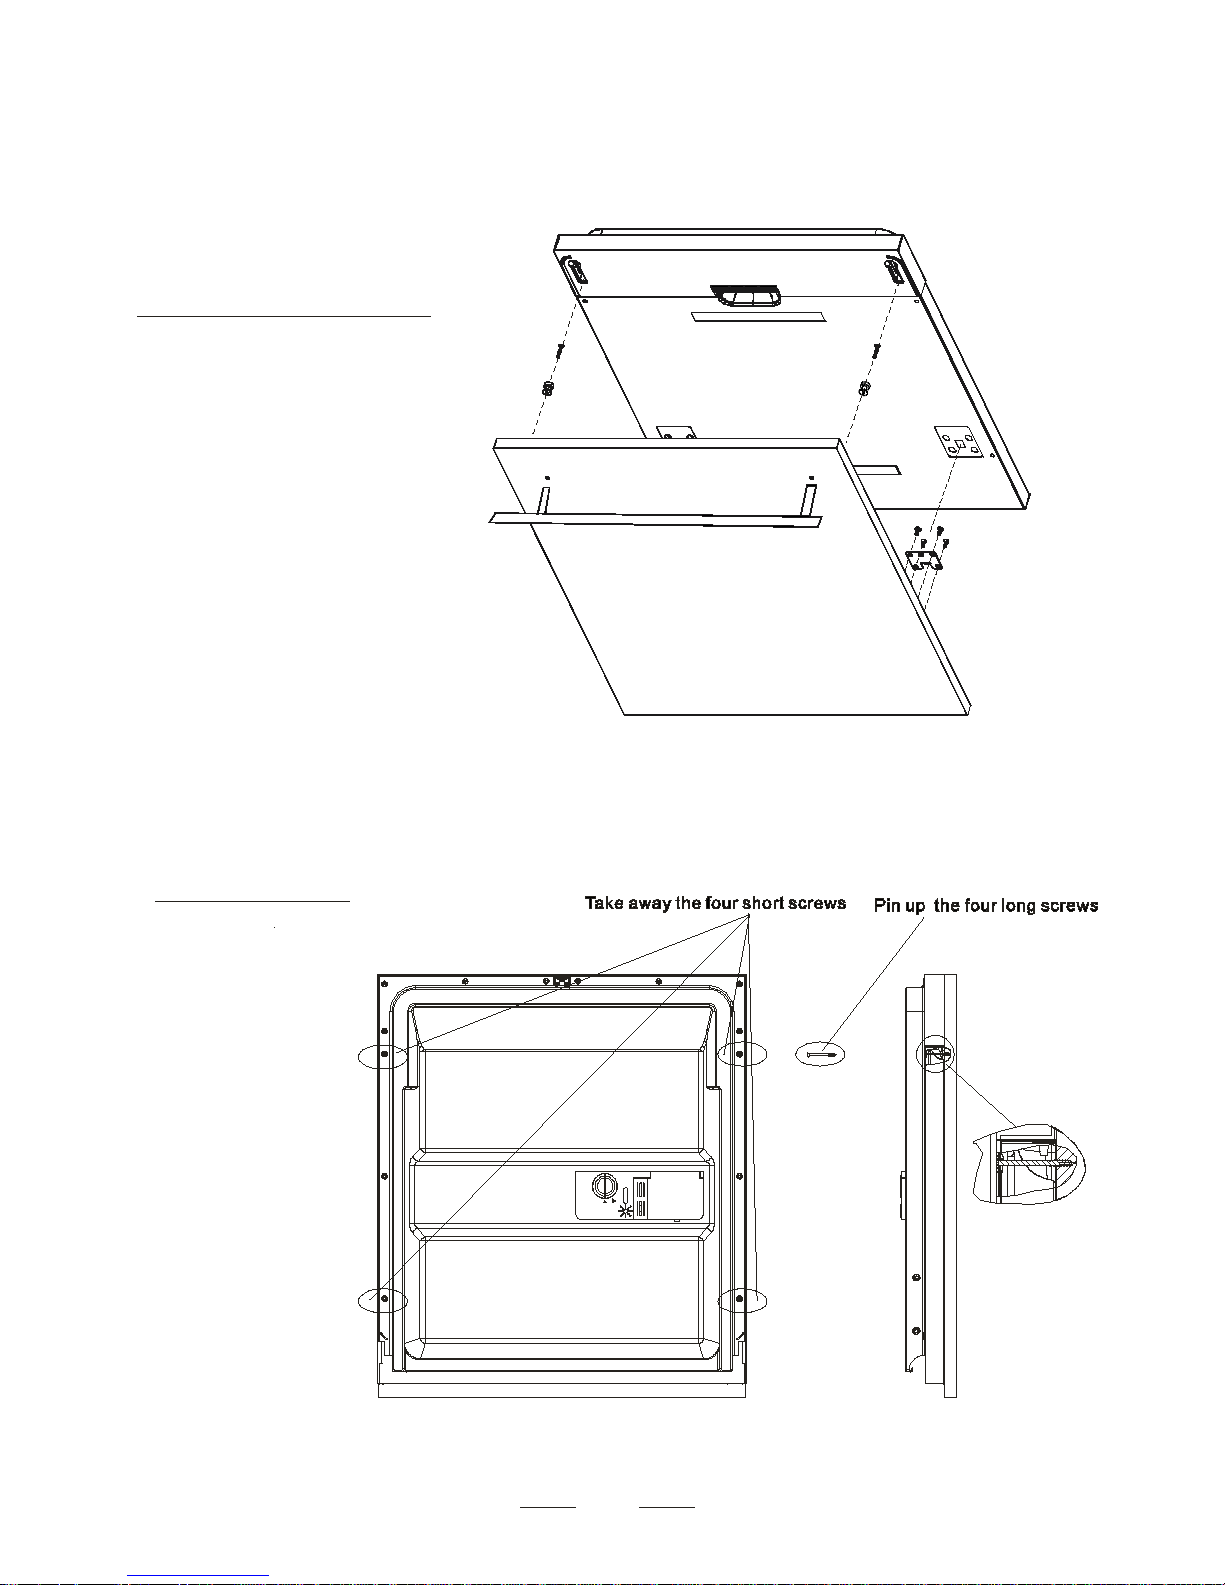
Installa tion of aesth etic pa nel
【 】Figure4a
2 Install the ho ok on the aest het ic wo ode n p ane l and put the hook in to the slot of the outer doo r of
dishwas he r(s ee figure 4 a). After pos ition ing of th e p ane l , fix the panel onto the o uter doo r by
sc re ws and bolt s(See figur e 4b) .
Ins tallatio n of a esthetic
wood en pan el
【 】Figure4b
. take aw a y the f our
shor t s cre ws
. pin up t h e four l ong
scre ws
1
2
20
Page 24
Ten sion adjustm ent
of th e door sprin g
【 】Figure5
Tension adjustment of the door spring
●
Connect ion of drain hoses
●
The door s prings are se t at the factory to the pro per te nsion for the oute r doo r.
If aest hetic woode n pan el are instal led, you will have to adjust the door spri ng tension.
Rotate the adjusti ng s cr ew to drive the ad justor to stra i n or r elax t he ste el cab le
(see fi gure 5 ).
Door spring t ension is correct when
the door remains horiz ontal in the
fully opened position yet rises
to a close wit h the slight lift of a
finger.
,
21
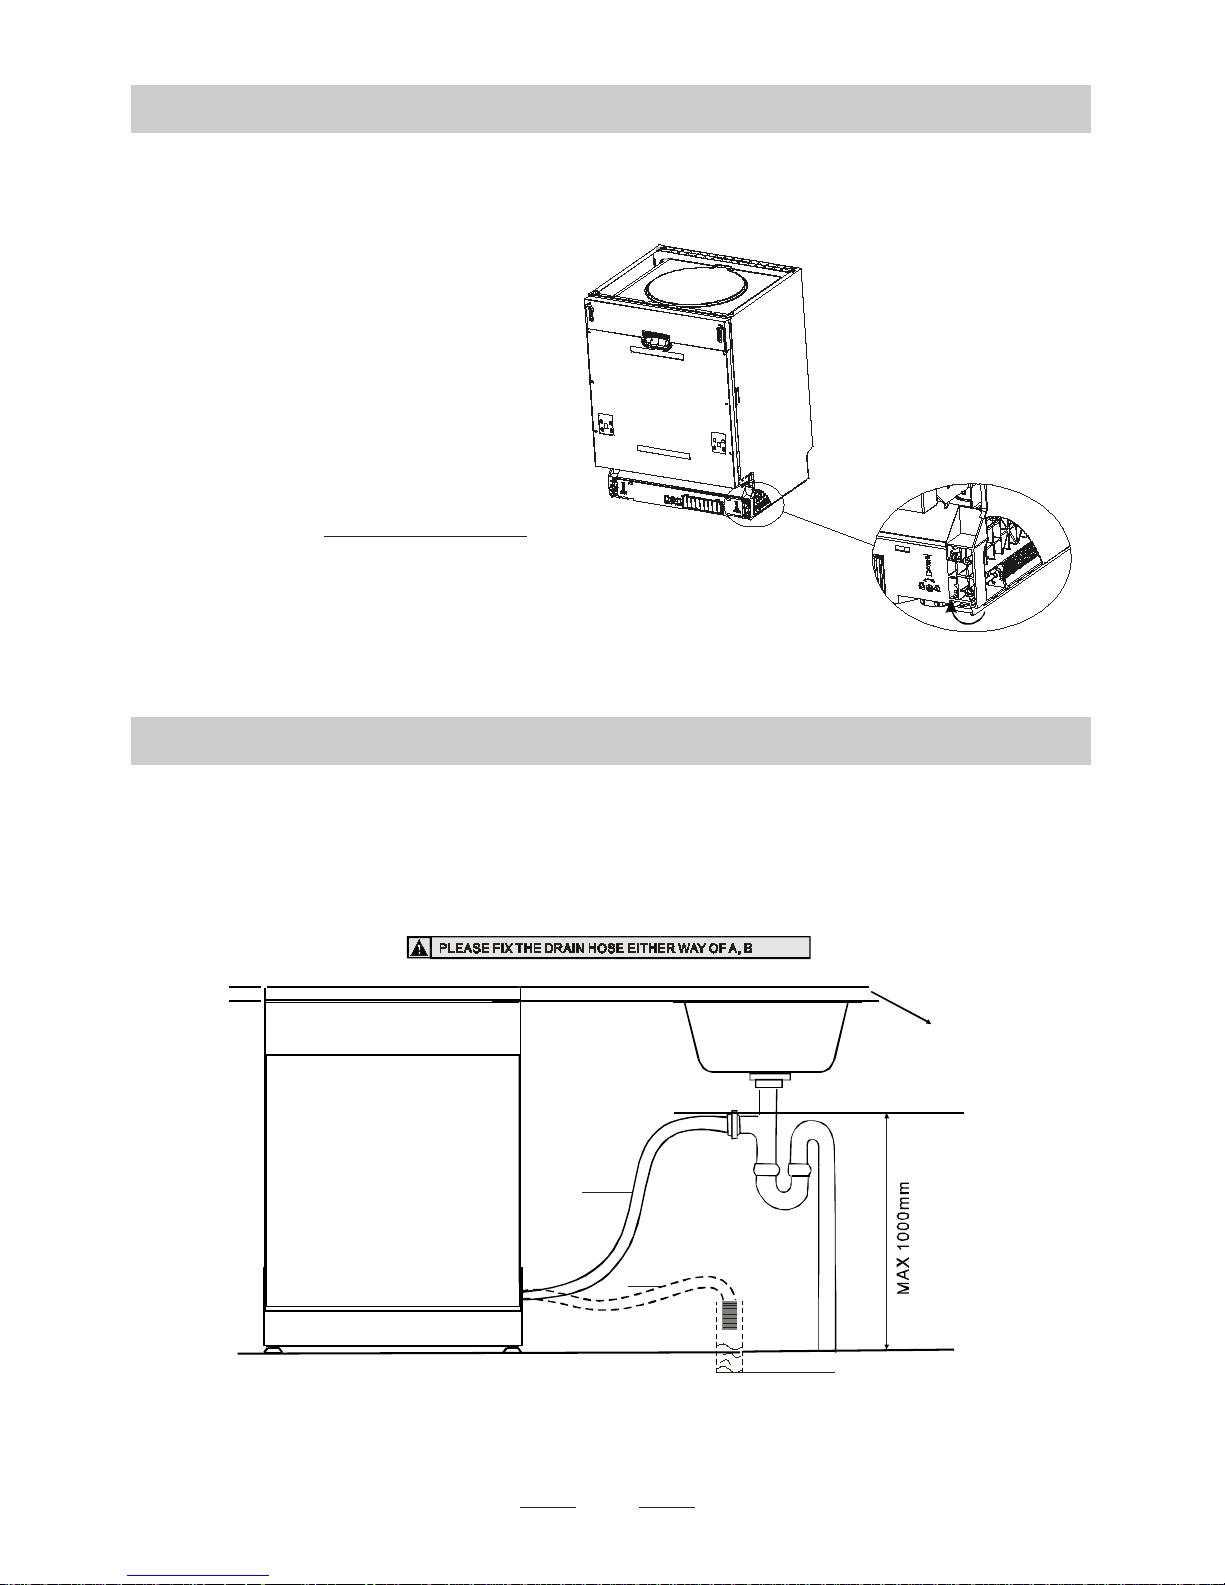
In ser t the dr ai n hose in to a drain pipe wit h a minimum diameter of 4 0mm, or let it ru n into th e sin k, mak ing sure to
avoid b endin g or crim pi ng it. Th e top of the hos e must be less t ha n 1000mm .
A
Counter
Front
Drain pipe
NOTE
The top of the hose
must be less th an
1000mm.
φ 40 mm
B
Page 25
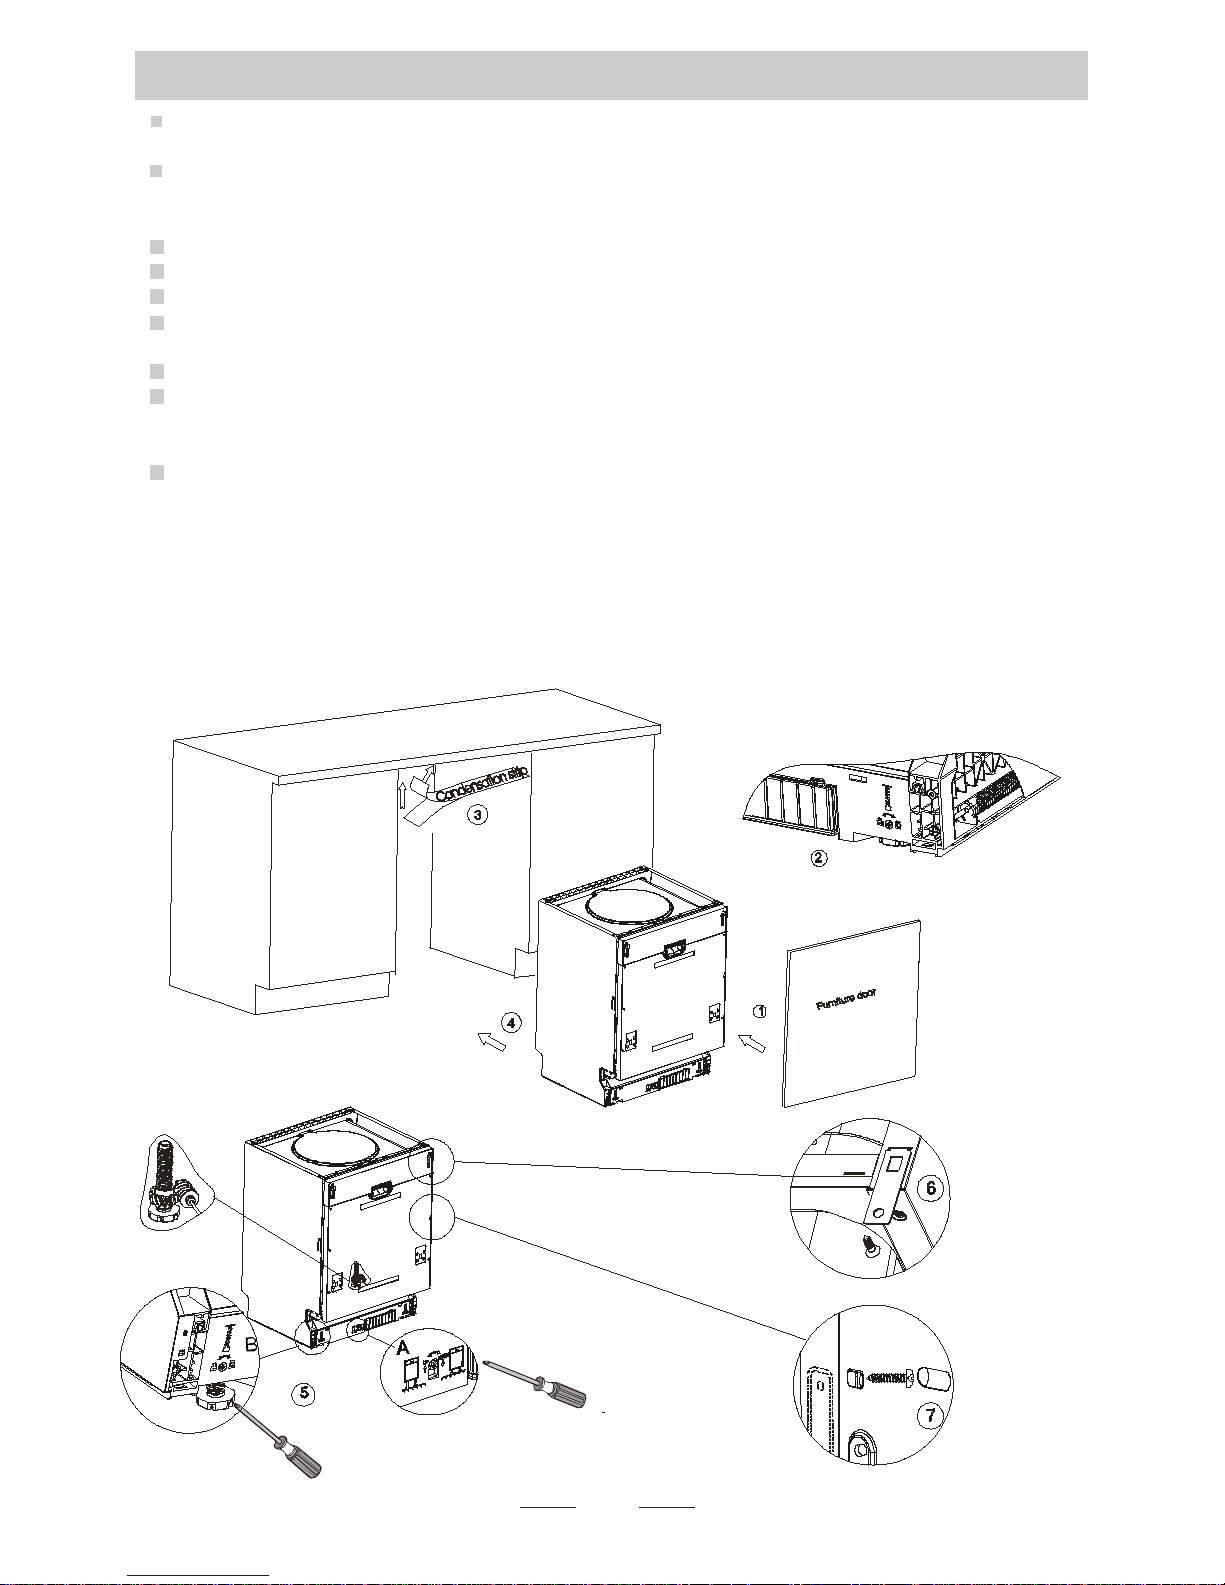
22
Dishwasher installation steps
●
1
2
.
3 .
4 .
5 .
6
7
8
In s tall t h e furniture door t o the ou ter do or of th e dish washe r usi n g the brac kets pro v i ded. Refer
to t he template for positioning of the brac k e ts.
Ad j us t the tension of t he door spri ngs by us ing an All en key turni n g i n a cloc kw ise motion to
tighten the l eft a n d righ t doo r s pring s. Fa ilure to d o thi s could cau se dama ge to y our d i shwas her
(Illust ratio n 2)
Connect the i nl et hose to th e col d water supp ly
Connect the d r a in hose. Refer to diag ram (Figure 6)
Connect the p o wer co rd
Affix th e c onde nsat ion strip under t he w ork surface o f cabinet. P l e ase ensure the co ndens ation
str ip is fl ush with e dge of wo rk surf a ce.
Pl a ce the dishwashe r into p ositi on .(Illustration 4)
Le vel th e dish w asher. The r e ar fo o d ca n be adjusted from t he fro nt of the dish w asher by tu rning
the A llen sc rew in the middle o f the b ase of dishwasher use an Allen key (I llustra tion 5 A). To adjust
the front fe et, us e a flat scr ew driv er and turn t he fro n t feet un til the dis hw asher is level (Illus t ratio n 5B).
9 The di shwashe r mus t be se c ured in place. There are two ways to do thi s:
A. N o rmal work surface:Pu t th e inst a l latio n hoo k into th e sl o t of th e side p l ane and se cure it to the
work surf ace w i t h the wood scre w s (I l lu stra t io n 6).
B. M arble or gran ite work to p:Fix the side w i th Screw. ( Illustratio n 7 ).
【Figure 7】
Page 26
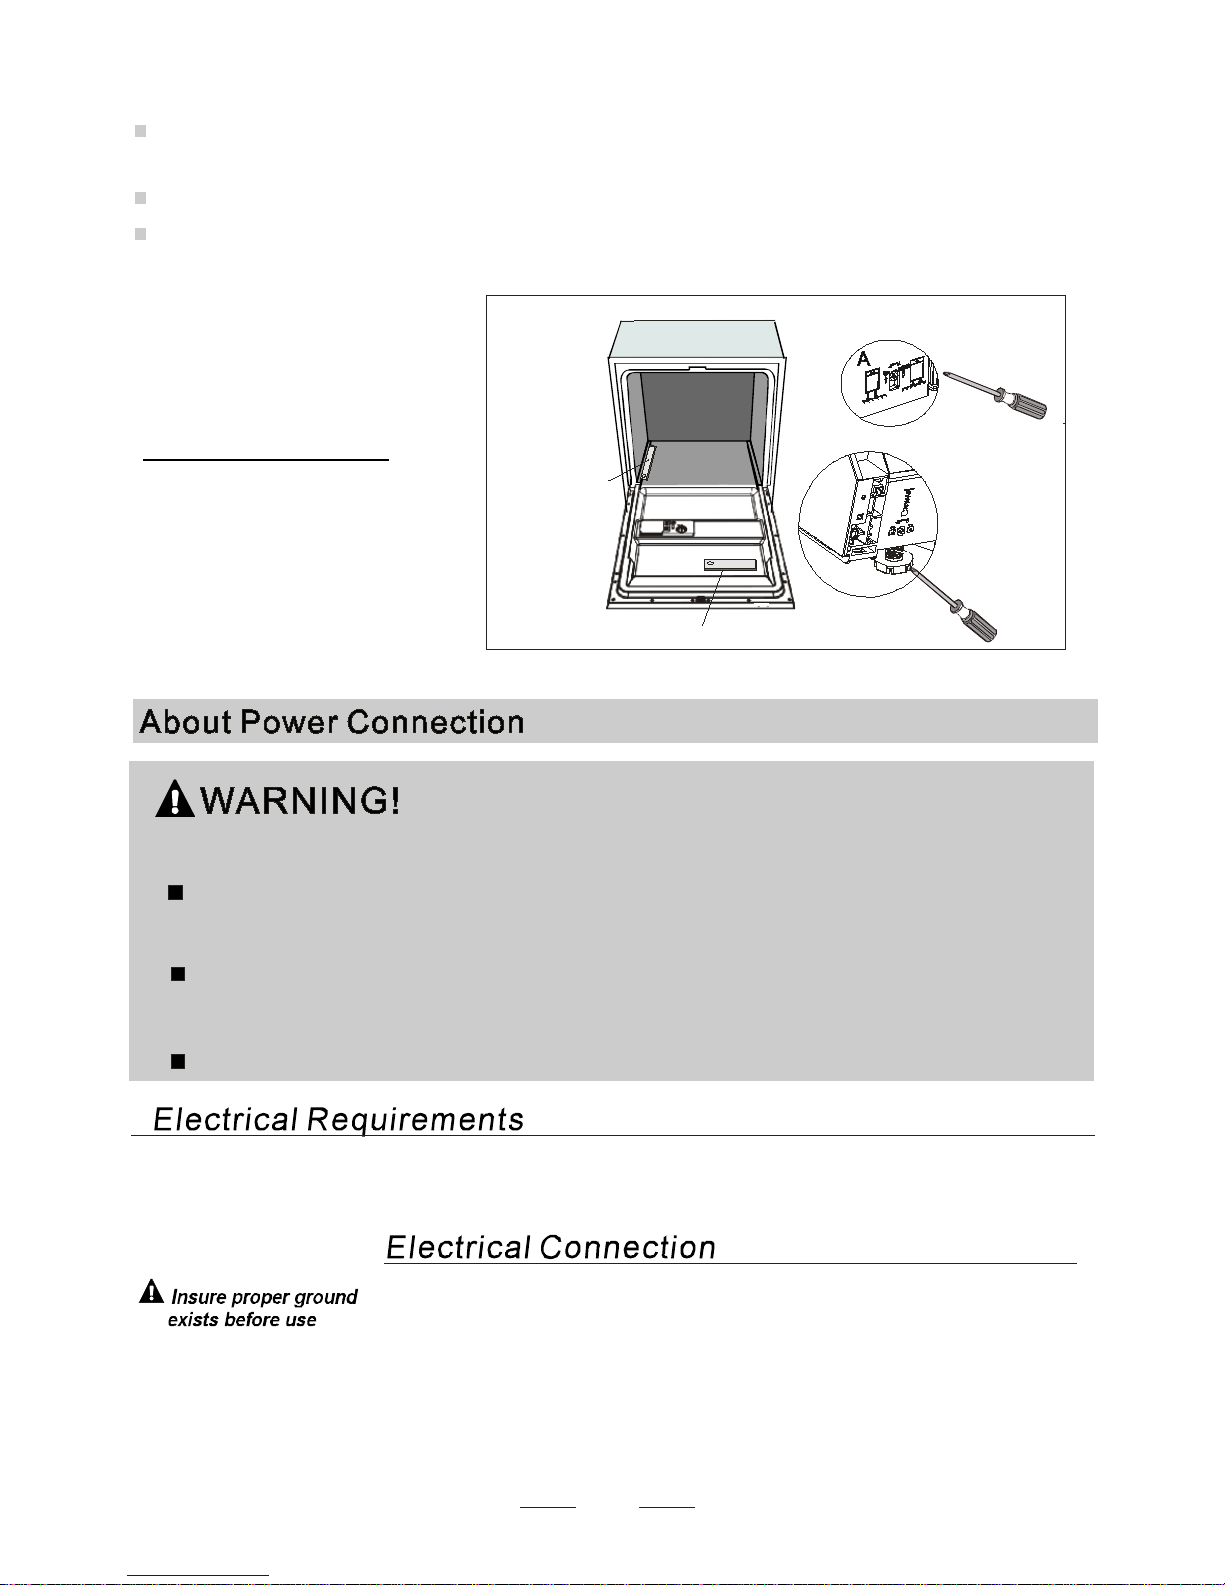
Dishwash er must be level fo r prope r dish rack operati on and wash perfor mance .
Place a spirit level on doo r and rack tr ack ins ide th e tub a s show n to c heck th at the
dishwa sher is level.
level th e dish washe r by adjustin g the three l evellin g legs individ ually.
When leve l the dish washe r, plea se pay atten tion not to le t the d ishwa s her tip over.
1
2
3
Illustratio n of feet adju stment
【 】Figure 8
NO TE:
The maxim um adjustment
hei ght of the fee t is 50 mm.
23
Check le vel side to si de
Spirit l evel
C hec k leve l Front t o Bac k
Ensur e t he vol tage a nd fre quency o f the po wer be ing c or r es ponds to
those on the rating plate. Only in ser t th e plug i n to an ele ctr ical s ock et which is earthed
properly. If t he ele c tr ical sock et to whi ch the app lianc e m u st be connected is n ot
appropr iate fo r the plug , replace the so c ket, rat her than usi ng a adap tor s or t he lik e as
they c ou ld cau se overhe ating and bur ns.
Plea s e l ook at the ra tin g l a be l to know th e rating vo ltage and connect the dish washer t o the a pprop r iate p ower sup ply.
Use t he requir ed fuse 1 0 amp, ti me delay fus e o r circuit br ea ker recommen ded an d p rovide se pa rate circ uit serving
on ly thi s a pplia nce.
For personal safety:
Do not use an extension cord or an adapter plug
with this appliance.
Do not, under any circumstances, cut or remove the
earthing
Connection from the power cord.
Page 27
24
Positioni ng the Appliance
How to Drain Excess Water From Hoses
If the s ink i s 100 0 h i ghe r fro m the floor, the excess water in hose s can not be drained directly
into the sink . It wil l be nece ssary to drai n e xc e ss wat er from hoses int o a bowl or s uit able
cont ainer tha t i s held o uts ide and lower than the si nk.
Water Outlet
Co nn ect the water drain hos e. Th e d rain hos e must be c o rr ec t ly fi t te d to a vo i d wat er lea ks.
Ensu re that t he water inlet hose is not kinked or squ ashed.
The foll owing things shou l d be c hecked before star ting th e dishwashe r.
Syphon Connection
In ser t the dr ai n hose in to a drain pipe wit h a minimum diameter of 4 0mm, or let it ru n into th e sin k, mak ing sure to
avoid b endin g or crim pi ng it. Th e top of the hos e must be less t ha n 1000mm .
Th e content of t his ma n ual is very helpfu l to the u sers.
After install ation, please make sure t o keep this m anual .
Extension Hose
If yo u nee d a drain hose exten s ion, make sure to use a simi lar dr ain hose.
It must be no lo nge r than 4 metres ; o therwise the clea nin g e ffect of the dish washer co uld be reduced .
1 Th e di shwashe r is le vel an d fixed prope rly
2 Th e inle t val v e is ope n
3 Th ere is a leak age at the co nnect ions of the co nducts
4 Th e wire s are t ight ly conne cted
5 Th e po we r is s witche d on
6 Th e inle t and d rain hos es are kno tted
7 All packi ng ma terials and p rintings shou ld be taken ou t from the dishwa sher
Posi t io n the a p pliance in th e d esi red locati on. T he b ack s hould re s t agains t t he wa l l behind it, and the side s,
along the ad jace nt ca binets or walls. The dishwash er is equipped w ith water supply and drain hoses t ha t c an
be positione d ei the r to t he r ight o r t he left side s to f acilitat e p roper installati on .
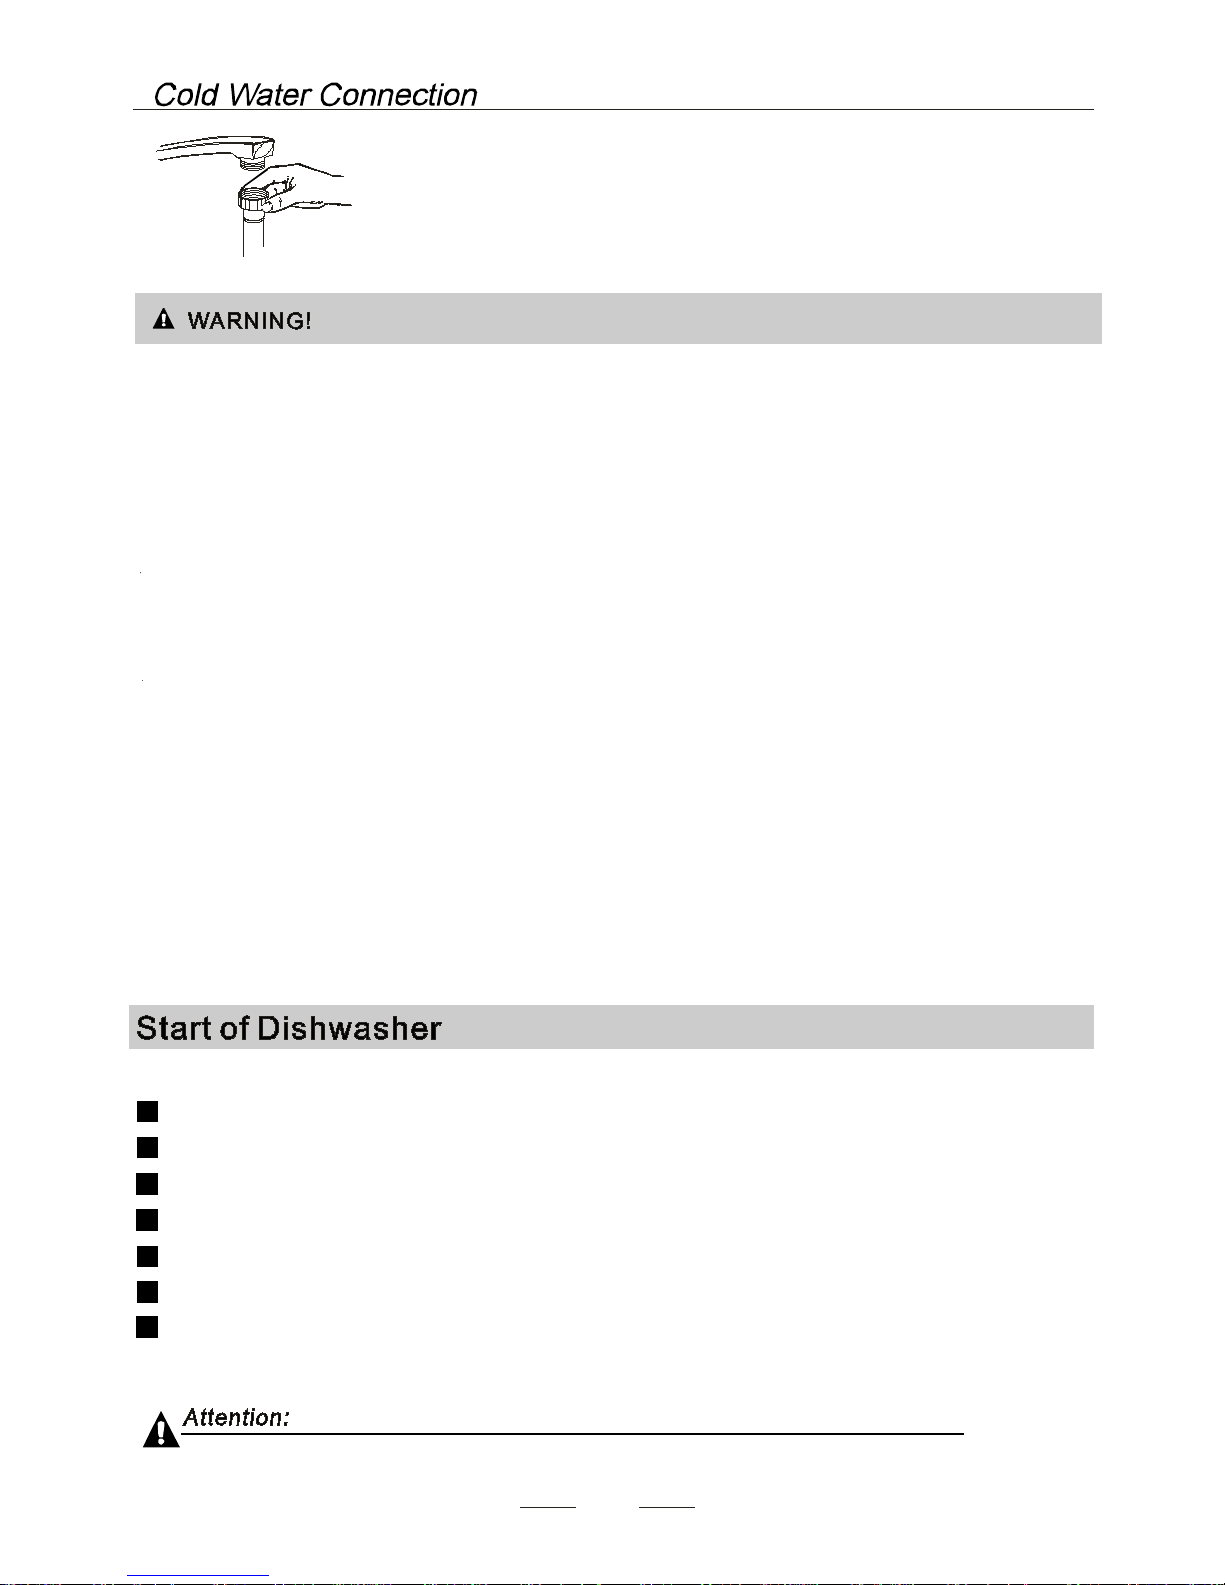
Co nn ect the c old wa te r supply ho se to a threa ded 3/4(i nc h) c onne c tor and make s ur e
th at it is fa s tened tightly in place.
If the wat er pipes are n ew or hav e not been us e d f o r a n extended period of time , l e t t he
wa te r run to make s ure that th e water is clear . Thi s pr ecaut ion is needed to avoid the
ri sk of the wat er inlet to be blo ck e d a nd dam a ge th e app lia nce.
Please clo se the hydran t afte r using.
Page 28
25
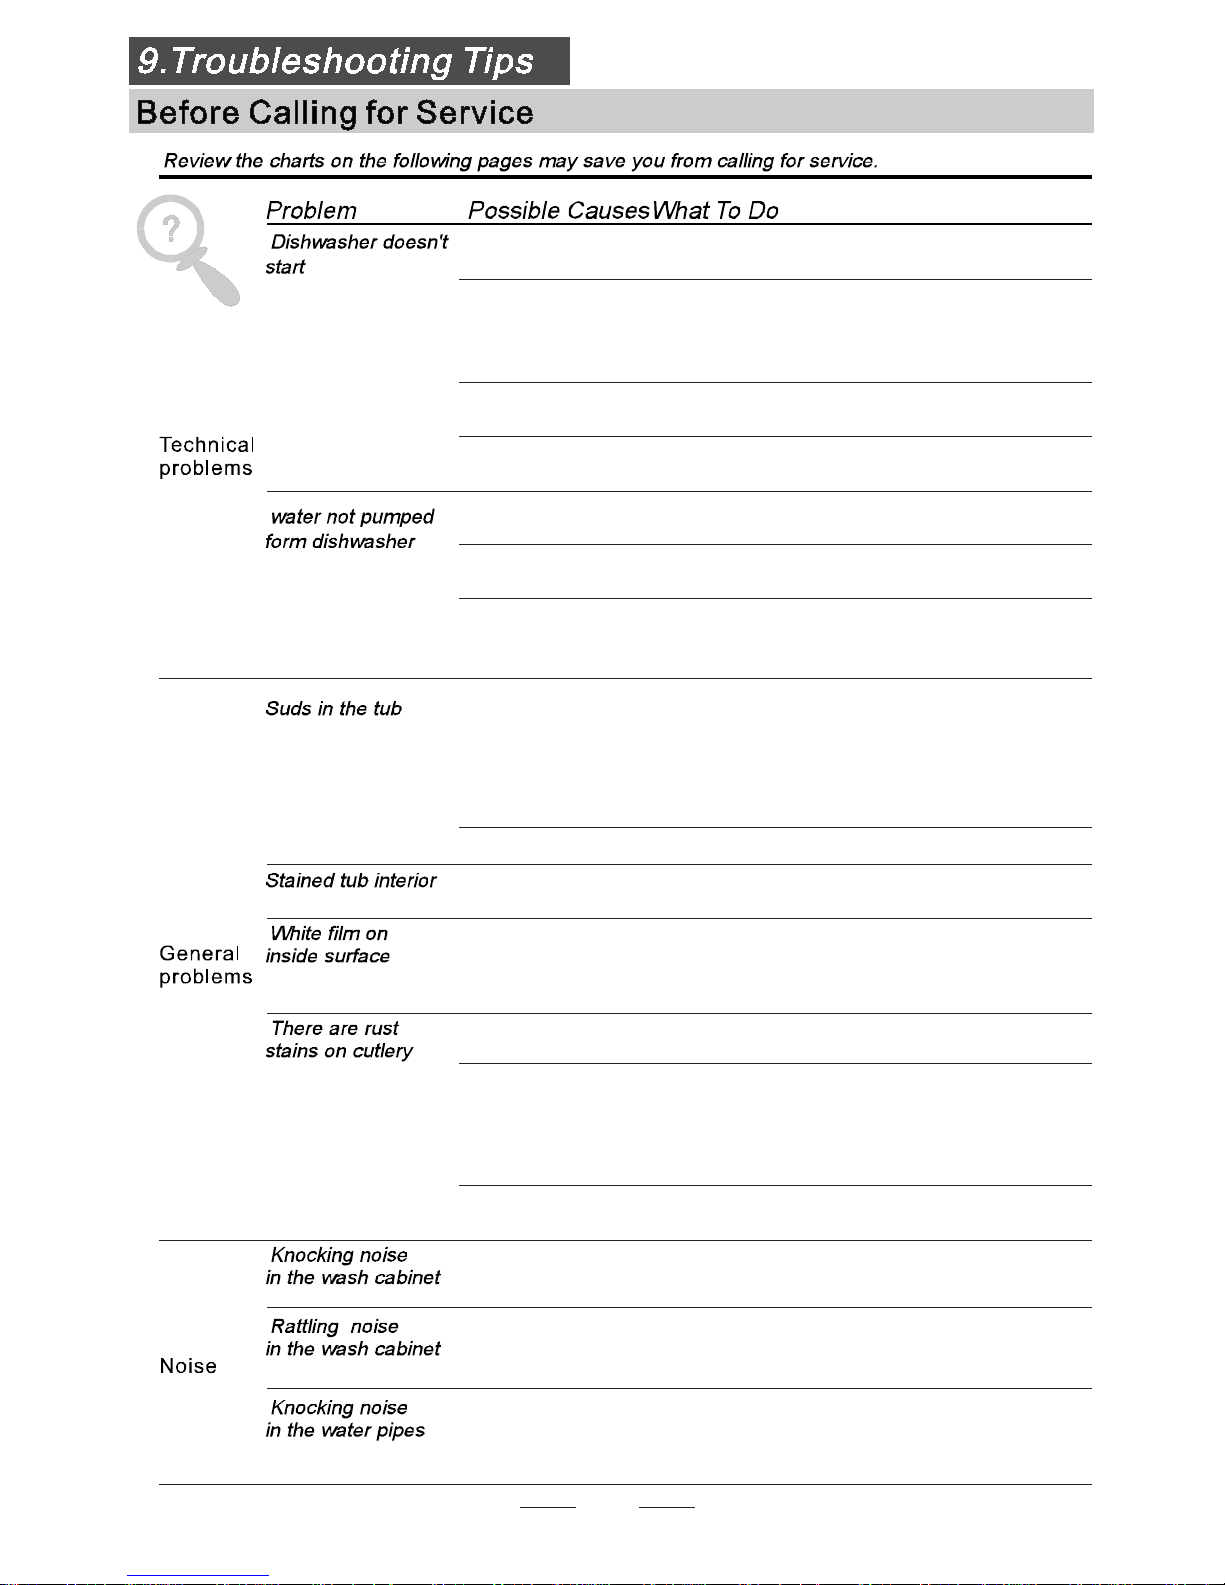
Fuse blown, or the
circuit breaker acted
Replace fuse or reset circuit breaker. Remove any other
appliances sharing the same circuit with the dishwasher
Spilled rinse-aid
Always wipe up rinse-aid spills immediately.
Hard water minerals
The affected items are
not corrosion resistant.
The lid of the softer
is loose
A sp ay arm is
knocking against
an item in a basket
r
Items of crockery
are loose in the
wash cabinet
This may be caused
by on-site installation
or the cross-section of
the piping.
A programme was not
run after dishwasher
salt was added.
Traces of salt have
gotten into the wash cycle.
To clean the interior, use a damp sponge with
dishwasher detergent and wear rubber gloves.
Never use any other cleaner than dishwasher
detergent for the risk of foaming or suds.
Always run the quick wash programme .
without any crockery in the dishwasher and
without selecting the Turbo function (if present),
after adding dishwasher salt.
Check the lip .Ensure the fix is fine.
Interrupt the programme, and rearrange the items
which are obstructing the sp ay arm.r
Interrupt the programme,
and rearrange the items of crockery.
This has no influence on the dishwasher function.
if in doubt, contact a suitably qualified plumber.
Detergent with
colourant was used
Make sure that the detergent is the one without
colourant.
Improper detergent
Make sure the dishwasher is turned on and the door is
closed securely.
Check that the water supply is connected properly and
the water is turned on.
Make sure to close the door properly and latch it.
Make sure the power cord is properly plugged into the
wall socket.
Power supply is not
turned on
Water pressure is low
Door of dishwasher
not properly closed.
Kink in drain hose
Filter clogged
Kitchen sink clogged
Check drain hose.
Check coarse the filter
(see section titled )" Cleaning The Filter "
Check the kitchen sink to make sure it is draining well.
If the problem is the kitchen sink not draining ,you may
need a plumber rather than a serviceman for dishwashers.
Use only the special dishwasher detergent to avoid suds.
If this occurs, open the dishwasher and let suds evaporate.
Add 1 gallon of cold water to the tub. Close and latch the
dishwasher, then select any cycle. Dishwasher will drain
out the water at the first step.Open the door after draining
is stop and check if the suds is disappeared.
Repeat if necessary.
Page 29
Overflow.
When some malfunctions come on, the appliance will display error codes to warn you:
26
Longer inlet time.
Faucets is not opened, or water intake is
restricted,or water pressure is too low.
Some element of dishwasher leaks .
E1
E4
The dishes were not
loaded correctly.
See notes in " Loading the Dishwasher Baskets ".
Select a more intensive programme.
See" Wash Cycle Table ."
Use more detergent, or change your detergent.
Rearrange the items so that the sp ay can rotate freely.r
Clean and/or fit the filter combination correctly.
Clean the sp ay arm jets. See "Cleaning the Spray
Arms".
r
Use less detergent if you have soft water and select
a shortest cycle to wash the glassware and to get
them clean.
Use a mild abrasive cleaner to eliminate those marks.
Re-loading the dishes properly.
Load the dishwasher as suggested in the directions.
Increase the amount of rinse-aid/refill the rinse-aid
dispenser.
Do not empty your dishwasher immediately after
washing. Open the door slightly so that the steam can
escape. Begin unloading the dishwasher only once t
he dishes are barely warm to the touch. Empty the low
basket first. This prevents water form dropping off
dishes in the upper basket.
In short program the washing temperature is lower.
This also lowers cleaning performance. Choose
a program with a long washing time.
Water drainage is more difficult with these items.
Cutlery or dishes of this type are not suitable for
washing in the dishwasher.
The programme was
not powerful enough.
Not enough detergent
was dispensed.
Items are blocking
the path of sp ay arms.r
The filter combination
in the base of wash
cabinet is not clean or
is not correctly fitted.
This may cause
the sp ay arm jets
to get blocked.
r
Combination of soft
water and too much
detergent.
Aluminum utensils
have rubbed against
dishes.
Dishes block
detergent cups.
Improper loading
Too little rinse-aid
Dishes are removed
too soon
Wrong program
has been selected
Use of cutlery with
a low-quality coating
If overflow occurs, turn off the main water supply before calling a service.
If there is water in the base pan because of an overfill or small leak,
the water should be removed before restarting the dishwasher.
Page 30
27
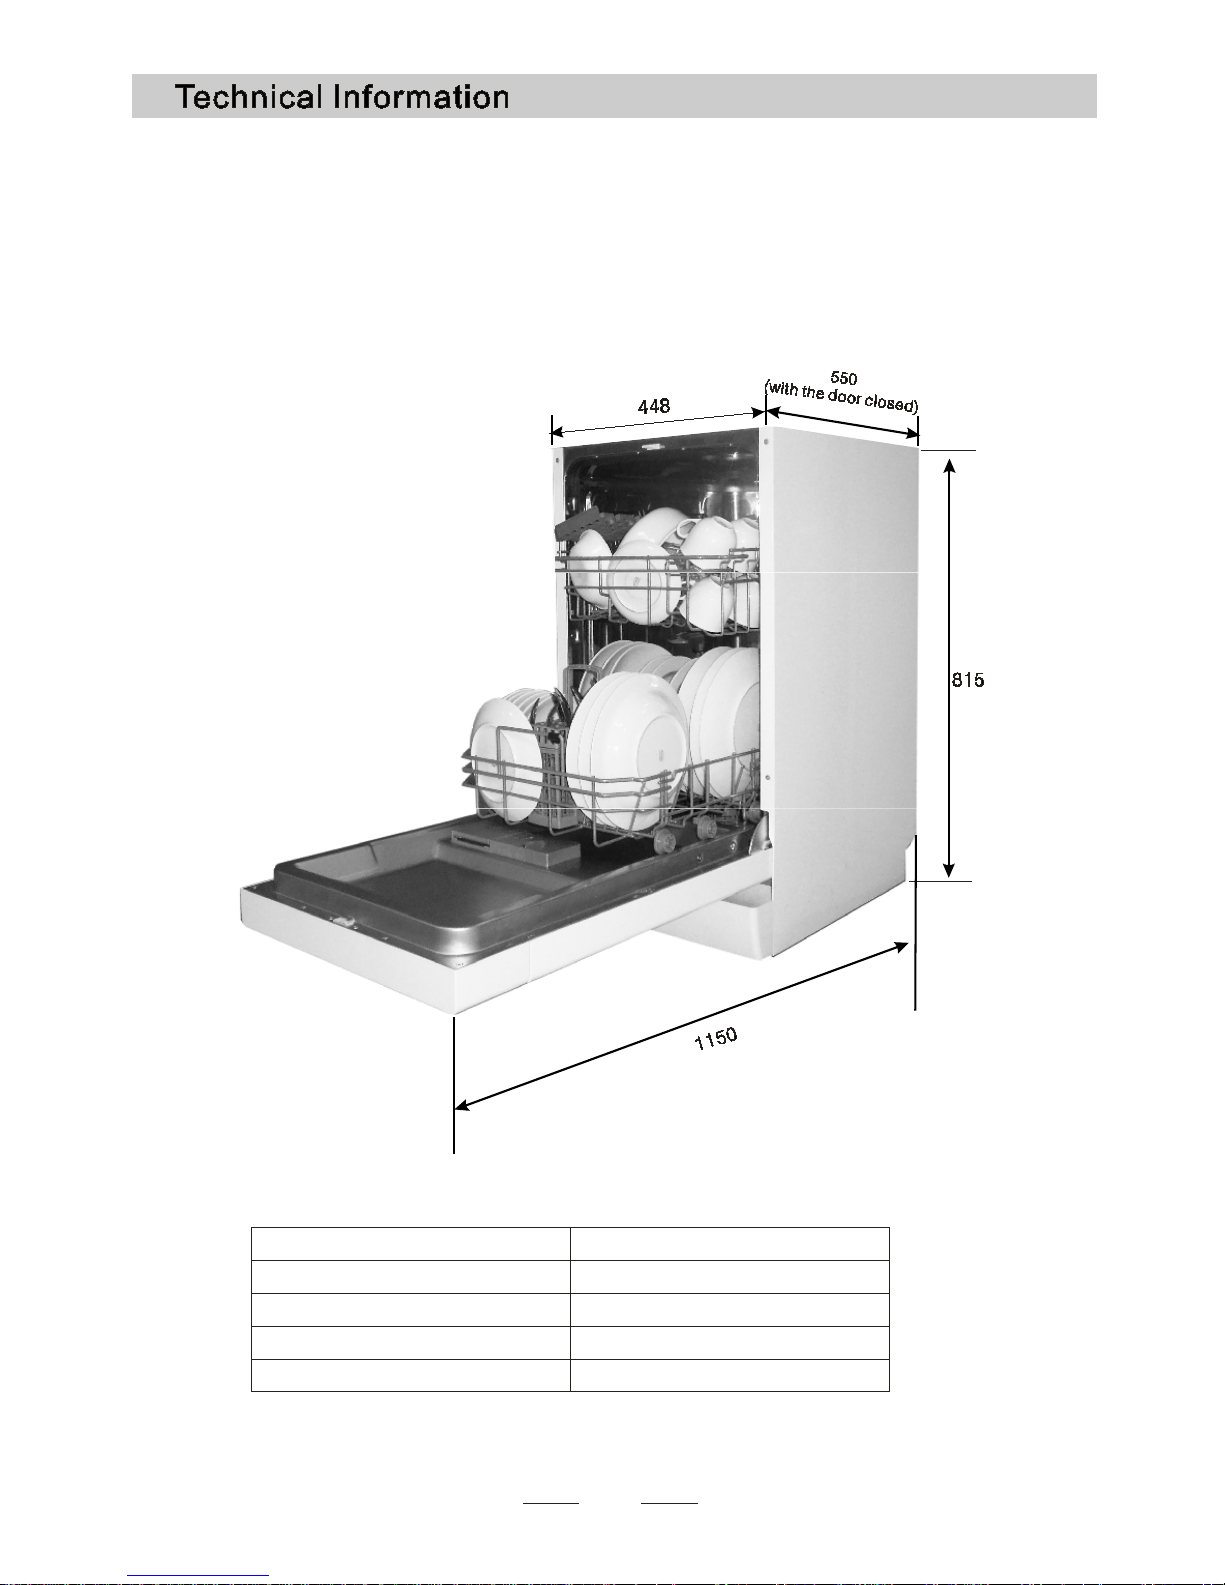
Height : 815mm
Width : 448 mm
Depth : 550mm
( )
with t he do or clos ed
Power supply: se e ra tin g labe l
Capacity: 10 place settings
Page 31
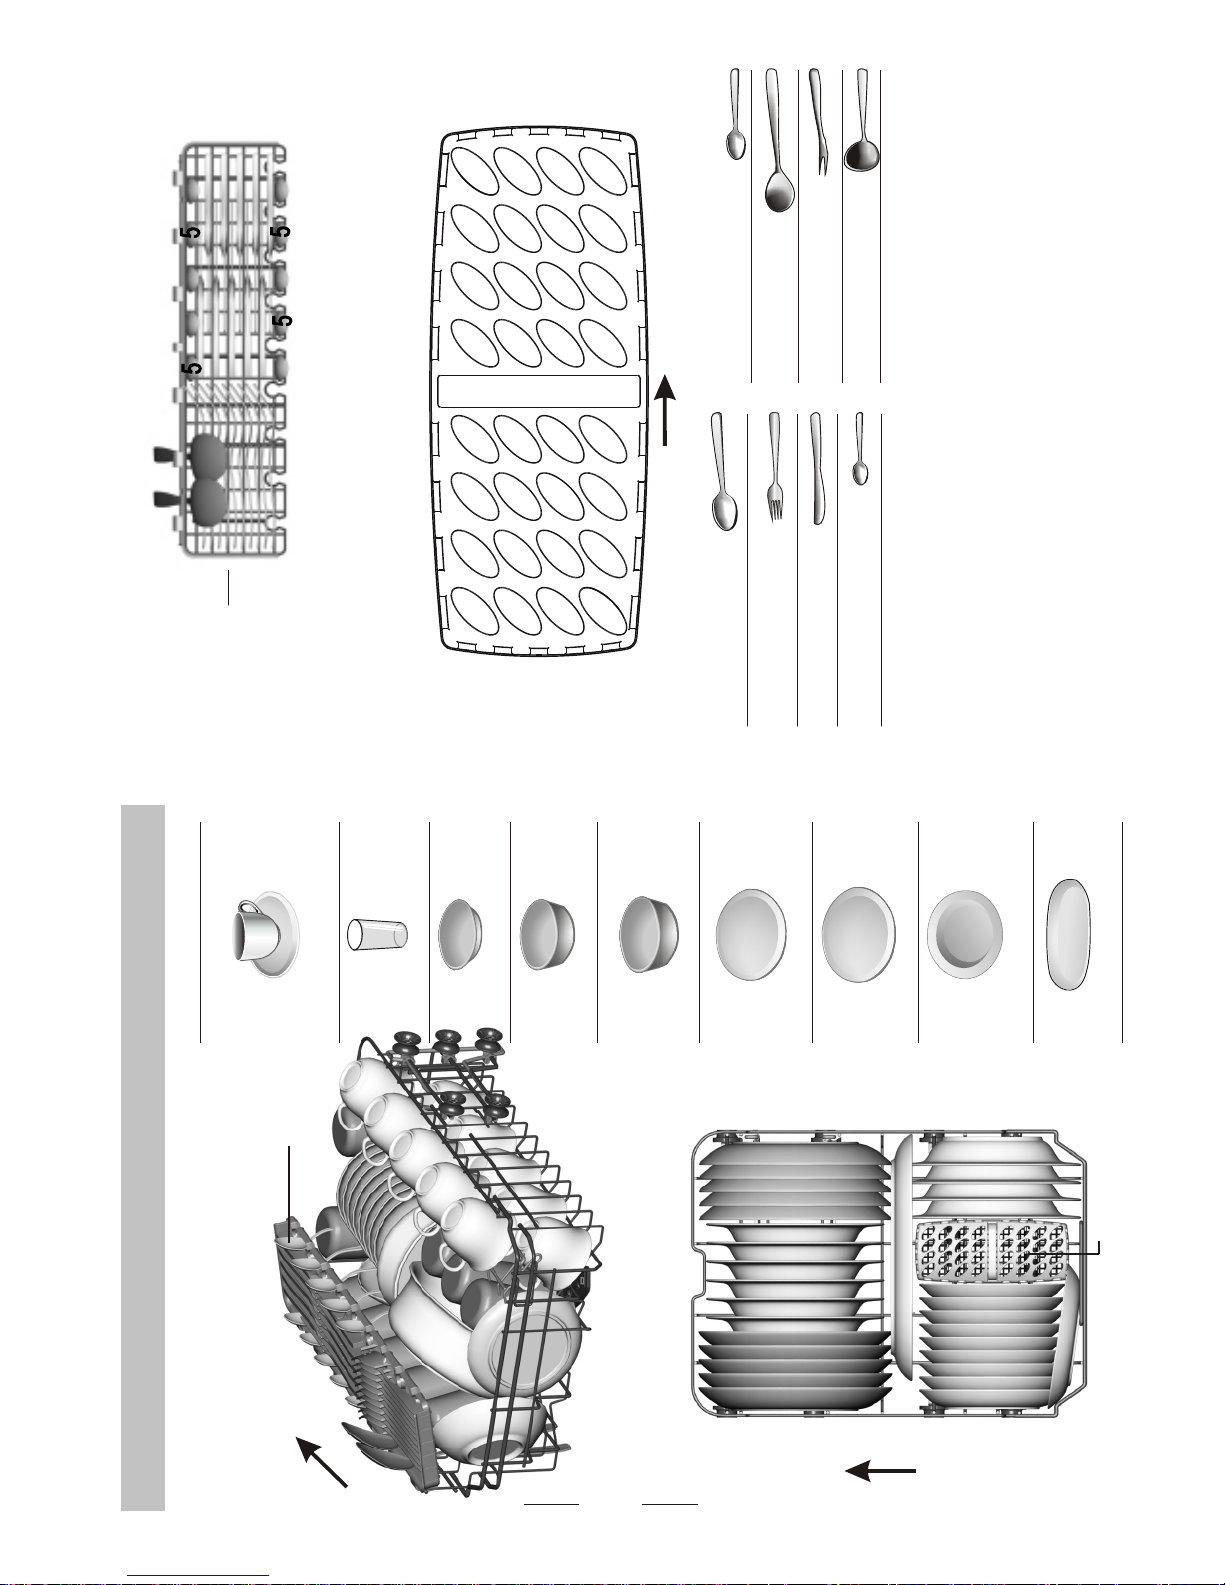
Loading the baskets according to En50242: Loading the baskets according to En50242:
6
Large serving bowl
Small serving bowl
4
5
Medium serving bowl
3
Glasses
Saucers
2
1
Cups
10
Oval platter
8
Dinner plates
9
Soup plates
Dessert dishes
7
Teaspoons
4
Soup spoons
2
Forks
1
Serving forks
8
Serving spoons
6
Knives
5
3
Dessert spoons
7
Gravy ladles
1.Upper basket:1.Upper basket:
2.Low
er basket:2.Low
3.Cutterly basket:3.Cutterly basket:
Information for comparability tests in accordance
with EN 50242
Capacity: 10 place settingsCapacity: 10 place settings
Positio
n of th
e upper basket: lower positio
n
Programme: E
COProgramme: E
Rinse aid setting: 6Rinse aid setting: 6
Softener setting: H4 Softener setting: H4
I
N
IN
ShelfShelf
IN
ShelfShelf
33
33
33
33
33
66
11
11
11
11
2 2
5 5
22
33
33
22
44
11
88
99
88
99
1010
77
77
Cutterly basketCutterly basket
66
33
33
22
1
1
1
1 1
1
1
1
1
1
4
4
4
8
7
4
4
4
4
4
4
4
No
te: Please
place the light
flat wares on the shelf. The
total weight is less than 1.5kg.
28
Page 32
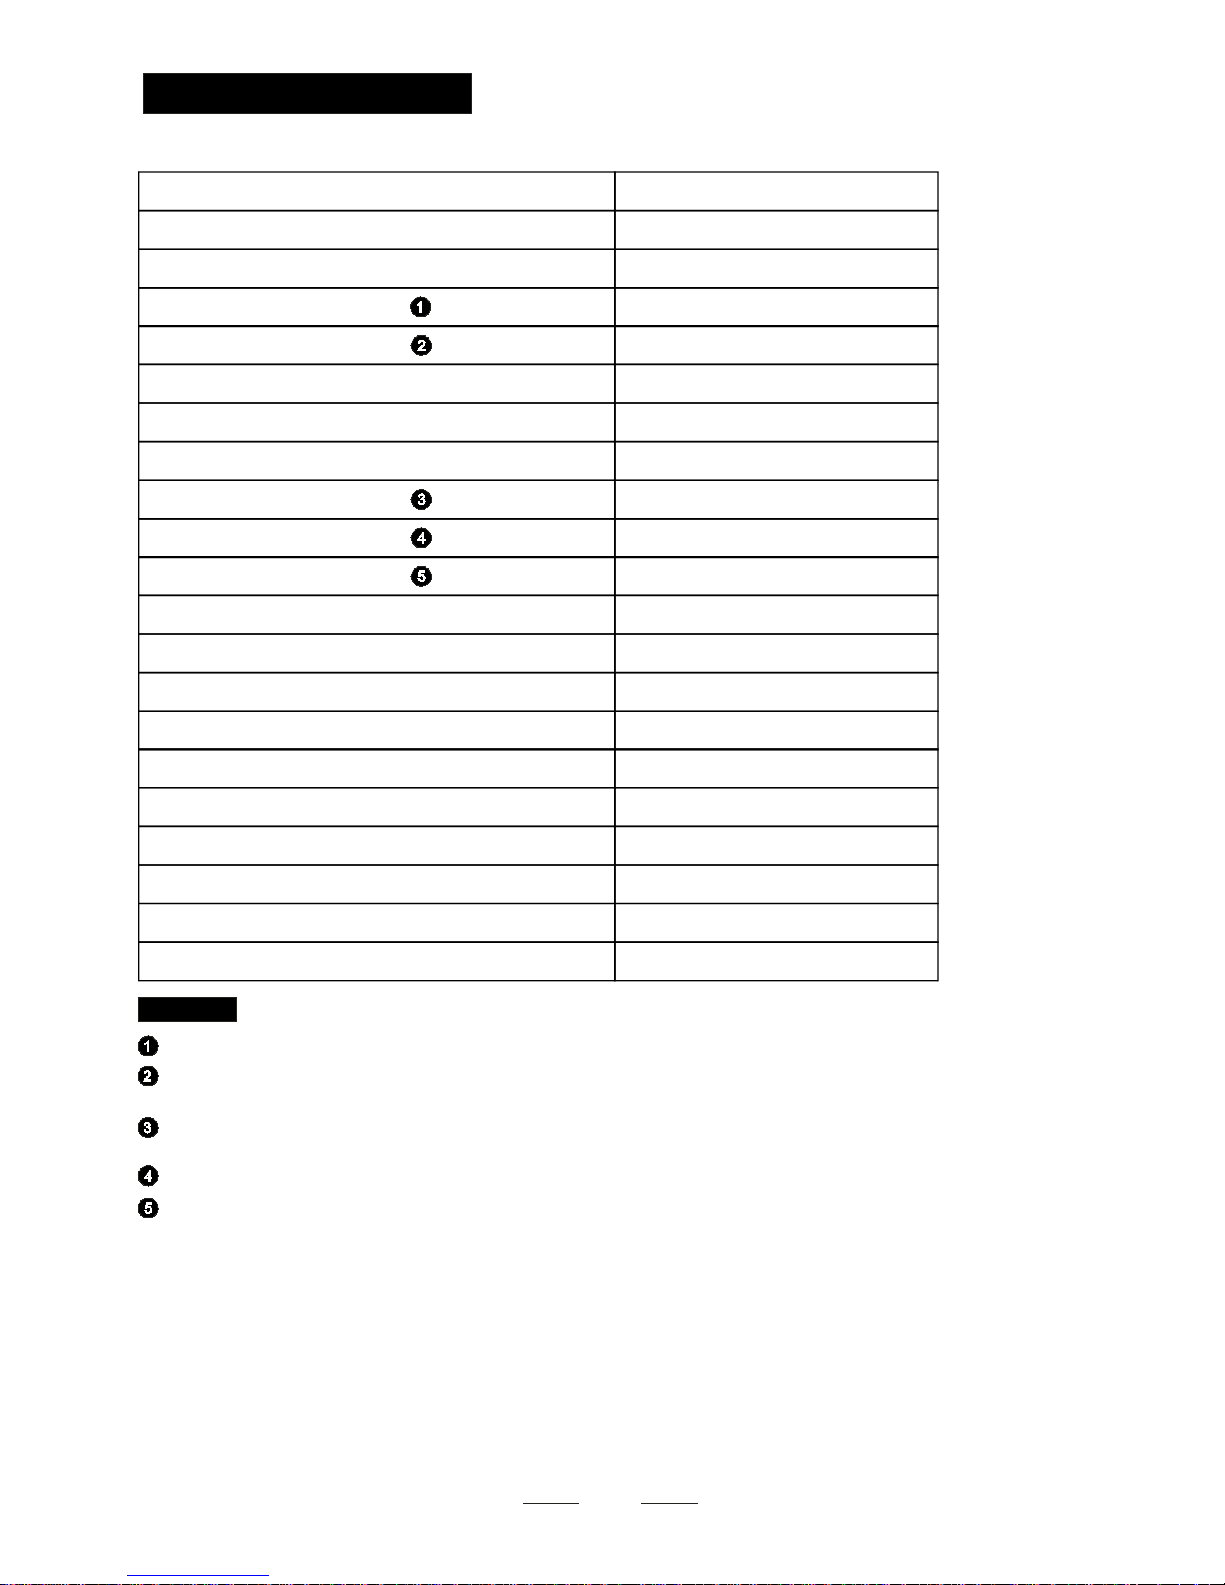
29
10
A++
211 kWh
0. 74 kWh
0. 45 W
0. 49 W
25 20 liter
A
19 0 m in
81 .5 cm
44 .8 cm
55 cm
19 30 W
Sheet of hous eh old dishwasher ac co rding to EU D ir ec t ive 1 059 /2010:
Ma nufac turer
Type / Desc ri p tion
Standard pla c e settings
Energy eff iciency cl ass
Annual ene rg y consumption
Energy con su mpt i on of the standa rd cl ea ning cycl e
Power c o ns ump tion of off -m ode
Power c o ns ump tion of lef t-on m od e
Annual wat er consumption
Dryi ng eff icie ncy cl ass
Standard c lea ning cycle
Pr og ram du ra tion of t he standard cl eanin g cyc le
No ise l e vel
Mo untin g
He ight
Widt h
De pt h ( wit h connector s)
Power c o ns ump tion
Ra te d v olt age / fr equency
A + + + (hig he s t e ffici ency) to D (l o west efficie ncy)
Energy con su mpt i on 211 k Wh per year, bas ed on 2 80 stan dar d cleaning cycle s using c ol d water fil l a nd
th e consumption of th e l ow po wer mo de s . Actu al energy c onsum ption will dep en d o n how the appliance is use d.
“ ”
Wat er con sumpt ion 2520 li tr es per year, based on 28 0 s tandard c leaning cycl e s . Actu al wat er con su mpt ion
will depend on h ow the applian ce is us ed.
“ ”
A (highest effic ien cy) to G (l owest effi ciency)
This pro gr am is suitable fo r c leaning s oi led normall y s oi led tableware and th at it is the
mo st effi cie nt pr og ramme in ter ms of its combined ene rgy an d w ater c onsu mption for
th at ty pe of t ab lewar e.
The dev ice meets the Europ ean standards and th e d irectives i n the current versi on at de liv er y:
- LVD 20 06/95/EC
- EMC20 04/108/EC
- EUP 2009/1 25/ EC
The abo v e values have been measu red in acco rdance with st and ards u nd er specifie d operat ing cond iti ons.
Re sults may va ry gr eatly accord ing to qua ntity and poll uti on of the di shes, wa ter har dne ss,
am ount o f deterg ent , etc .
The man ual is ba sed on the Eu rop ea n U nio n's st andards an d ru les.
Technical Data Sheet
NOTE:
EC O 45℃
4 dB(A) re 1 pW
bu ild u nder
22 0-240 V~ 50 Hz
Wat er p re ss u re (flow p ress ur e) 0. 4-10 bar = 0. 04- 1 MPa
Co ul d be built-in
Yes
STOVES
ST SD W4 5
7
Page 33
DISHWASHER FEATURES
Additional features of this dishwasher are:
Error alarm
.
To alert you to any errors or problems with the
program while it is running
10 place settings
Be sufficient for normal use.
6 wash programs
You can choose desired program according to the
soiled level.
Adjustable upper basket
.
Flexible dish loading available. Adjust the upper
basket for large or awkward loads
Stainless steel tub
. No need to worry about staining
Rinse aid Warning Indicator
.
If the rinse aid is running low, the warning indicator
will light on the panel, alerting you to top it up.
This ensures the best results from your machine
Overflow protection
.
Your dishwasher has an overfill protection
program which automatically shuts off the
inlet valve and starts the drain pump if the
water is overflowing
Time delay feature
This allows the start of the programme to be delay
between 1 and 24 hours, enabling you to benefit
fully from cheaper electricity! Or just to benefit
from the convenience of the programming
finishing when you want to.
SS
1010
66
Broad applied voltage
The broad scope of the applied voltage ,reduce
the code of electric condition.
Salt Warning Indicator
.
If the salt is running low, the warning indicator will
light on the panel, alerting you to top it up. This
ensures the best results from your machine
This symbol on the product or in the instructions means that your electrical and electronic equipment should
Be disposed at the end of its life separately from your household waste. There are separate collection systems
for recycling in the EU.
For more information, please contact the local authority or your retailer where you purchased the product.
Customer Care
In case of difficulty within the UK and Northern Ireland, please
call the customer care help line on 0844 815 3740
Stoney lane,prescot,Merseyside,L35 2XW
 Loading...