

Page 1
USER GUIDE
A commitment to:
Stoves Richmond 600 Ei Part Number: 083690400 Date: 02/02/18
Page 2
To contact Stoves about your appliance, please call:
Calls are charged at the basic rate, please check with your telephone service provider for exact charges
Alternatively general, spares and service information is available from
our website at: www.stoves.co.uk
Glen Dimplex Home Appliances, Stoney Lane, Prescot, Merseyside, L35 2XW
Warranty Registration
0800 952 1065
*Please call our Customer Care team for extended
warranty
Spares Store
0344 815 3745
Customer Care Helpline
0344 815 3740
In case of difculty within the UK
To contact us by email:
To register your appliance by mail:
Please complete the warranty
card and return to the address
supplied
To register your appliance online:
www.stoves.co.uk
Your new appliance comes with our 12-month guarantee, protecting you against electrical and
mechanical breakdown. To register, please complete the registration form included, register online
or by phone. For full terms & conditions of the manufacturer’s guarantee, please refer to the website above. In addition, you may wish to purchase an extended warranty. A leaet explaining how to
do this is included with your appliance.
Our policy is one of constant development and improvement, therefore we cannot guarantee the
strict accuracy of all of our illustrations and specications. Changes may have been made subsequent to publishing.
GB - Great Britain þ
IE - Ireland þ
DE - Germany
ES - Spain
FR - French
IT - Italy
PL - Poland
NL - Netherlands
SE - Sweden
CN - China
NZ - New Zealand
AU - Australia
Countries of destination:
Page 3
Thank you for buying this British-built appliance from us.
This user guide book is designed to help you through each step of owning your new product.
Please read it carefully before you start using your appliance, as we have endeavored to answer as
many questions as possible, and provide you with as much support as we can.
General information, spares and service information is available from our website.
If you should nd something missing from your product or have any questions that are not covered in
this user guide, please contact us (see contact information inside the front cover).
European Directives
As a producer and a supplier of cooking appliances we are committed to the protection of the environ-
ment and are in the compliance with the WEEE directive. All our electric products are labelled
accordingly with the crossed out wheeled bin symbol. This indicates, for disposal
purposes at end of life, that these products must be taken to a recognized collection points,
such as local authority sites/local recycling centres.
This appliance Complies with European Community Directives (CE) for household and similar electrical
appliances and Gas appliances where applicable.
This appliance conforms to European Directive regarding Eco design requirements for energy-related
products. Our policy is one of constant development and improvement, therefore we cannot guarantee
the strict accuracy of all of our illustrations and specications - changes may have been made subsequent to publishing.
Hereby, Glen Dimplex Home Appliances Ltd. declares that the radio equipment types ST RICH 600Ei is
in compliance with Directive 2014/53/EU. The full text of the EU declaration of conformity is available at
the following internet address: www.stoves.co.uk in the online user manual for this appliance.
Disposal of Packaging Material
The packaging materials used with this appliance can be recycled. Please dispose of the packaging
materials in the appropriate container at your local waste disposal facilities.
UK ONLY GAS WARNING:
If you smell gas, Do not try to light any appliance. Do not touch any electrical switch.
Call the Gas Emergency Help line at 0800 111999
INTRODUCTION
Page 4

WARNING
• If the hob surface is cracked, broken or shattered, switch off the
appliance to avoid the possibility of electric shock and call for a
service engineer’s visit.
• During use the appliance becomes hot. Care should be taken to
avoid touching heating elements.
• Children less than 8 years of age shall be kept away unless
continuously supervised. This appliance can be used by children
aged from 8 years and above and persons with reduced
physical sensory or mental capabilities or lack of experience and
knowledge if they have been given supervision or instruction
concerning the use of the appliance in a safe way and understand
the hazards involved. Children shall not play with the appliance.
Cleaning and user maintenance shall not be made by children
without supervision.
• Do not use harsh abrasive cleaners or sharp metal scrapers to
clean the oven door glass since they can scratch the surface,
which may result in shattering of the glass.
• Do not use a steam cleaner on any cooking range, hob or oven
appliance.
• Metallic objects such a knives, forks, spoons and lids should not
be placed on the hob surface since they can get hot.
• If your appliance is tted with a lid, any spillage should be removed
from the lid before opening. The hob surface should be allowed to
cool before closing the lid (if tted).
• After use, switch off the hob element by its control and do not rely
on the pan detector.
• To avoid electric shock, ensure that the appliance is switched off
before replacing the lamp.
• The appliance is not intended to be operated by means of an
external timer or separate control system.
• Unattended cooking on a hob with fat or oil can be dangerous and
may result in re.
• NEVER try to extinguish a re with water, but switch off the
appliance and then cover the ame with a lid or damp cloth.
• Danger of re: Do not store items on the cooking surfaces.
SAFETY
Page 5

• Only use hob guards designed by the manufacturer of the cooking
appliance or indicated by the manufacturer of the appliance in
the instructions for use as suitable or hob guards incorporated in
the appliance. The use of inappropriate hob guards can cause
accidents.
• If the cooker is placed on a base, measures have to be taken to
prevent the appliance slipping from the base.
• Never put items directly on the base of the oven or cover the oven
with foil, as this can cause the base element to overheat.
• This induction hob complies with the applicable EMC and EMF
standards. Therefore it should not interfere with other electronic
units. Persons tted with a pacemaker or any other electrical
implant should clarify with their doctor or the producer of the
implant, whether there implant is adequate and fail-safe. Please
place pans centrally on the cooking zones. The British Heart
Foundation provide additional advice regarding using induction
hobs when a pacemaker is tted.
• Do not place articles on or against the appliance
CAUTION
• The cooking process has to be supervised. A short term cooking
process has to be supervised continuously.
• This appliance must not be installed behind a decorative door in
order to avoid overheating.
• Fire Safety Advice
If you do have a re in the kitchen, don’t take any risks - get everyone out of your home and call the Fire
Brigade.
Ifyouhaveanelectricalreinthekitchen:
• Pull the plug out, or switch off the power at the fuse box - this may be enough to stop the re immediately
• Smother the re with a re blanket, or use a dry powder or carbon dioxide extinguisher
• Remember: never use water on an electrical or cooking oil re.
• Other Safety Advice
• Servicing should be carried out only by authorised personnel.
• Do not operate the appliance without the glass panel correctly tted.
• Do not modify the outer panels of this appliance in any way.
• This appliance must be earthed.
• The appliance must never be disconnected from the mains supply during use, as this will seriously
affect the safety and performance, particularly in relation to surface temperatures becoming hot and gas
operated parts not working efciently. The cooling fan (if tted) is designed to run on after the control
knob has been switched off.
• GAS WARNING! - If you smell gas: Do not try to light any appliance, Do not touch any electrical switch.
Contact your local gas supplier immediately.
Page 6
USING YOUR APPLIANCE
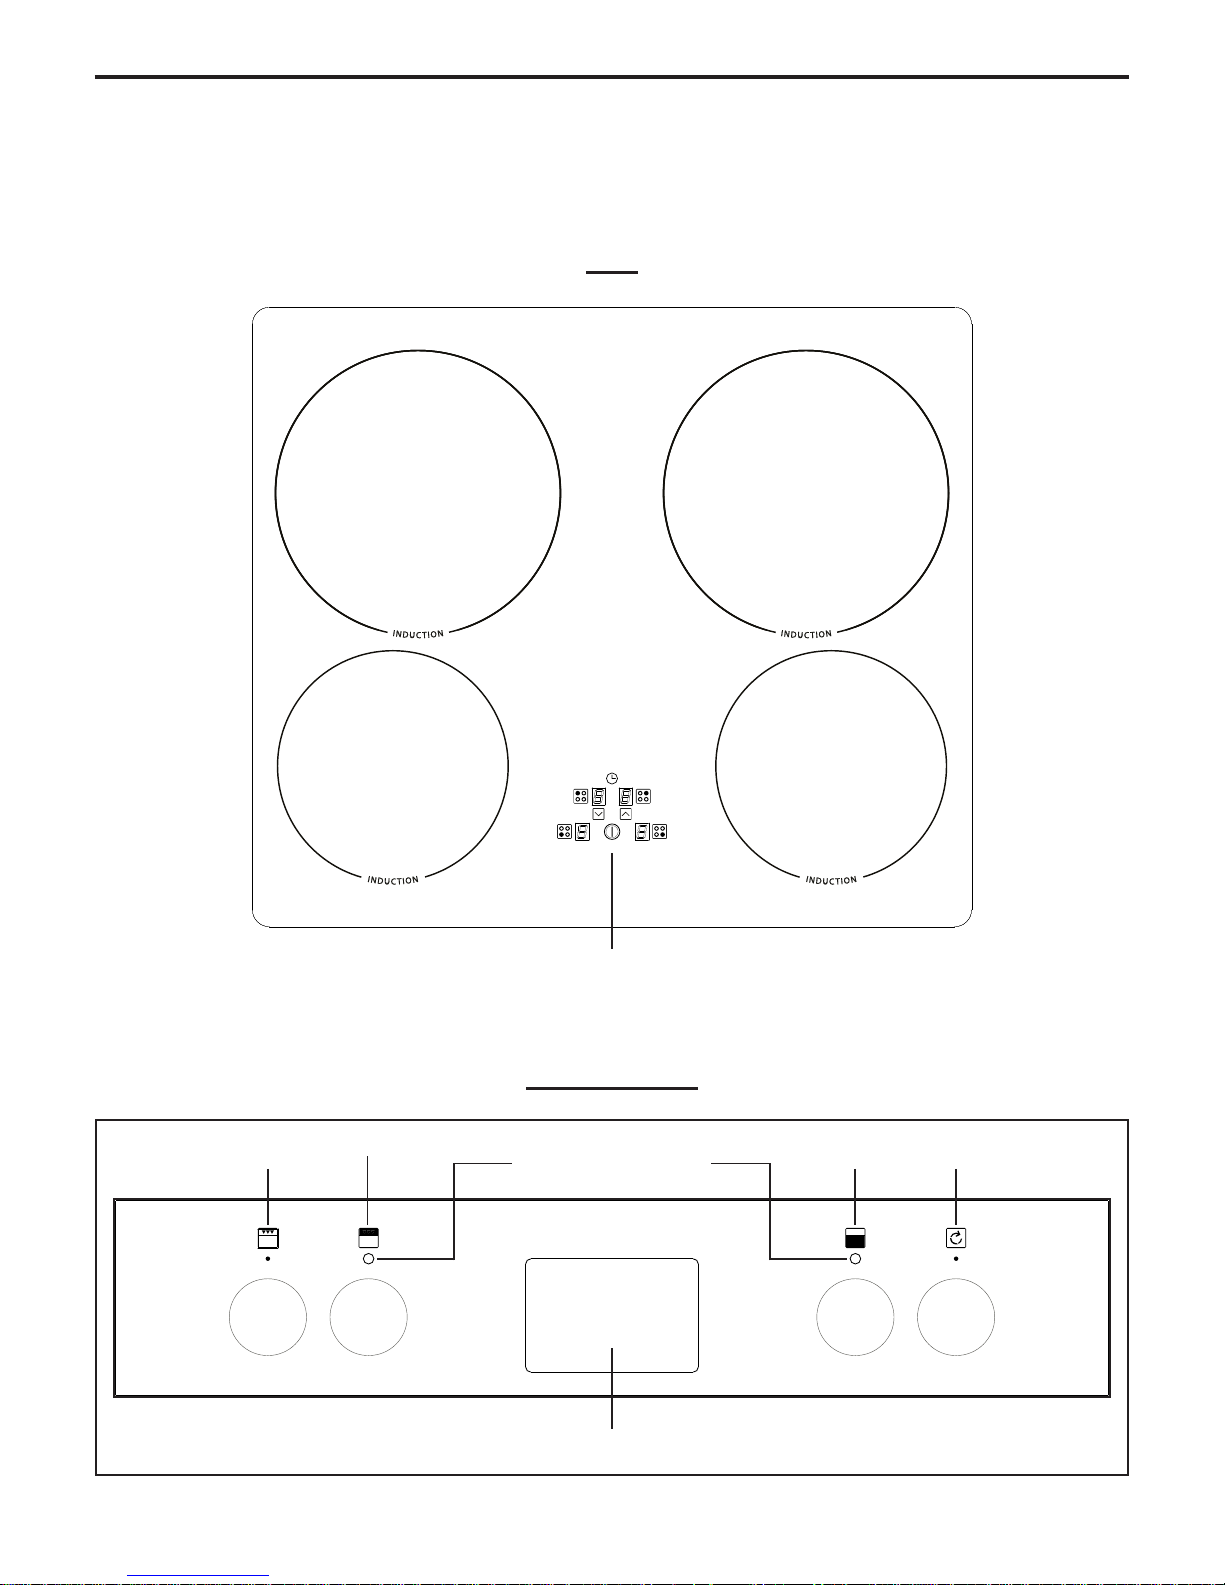
Getting to know your product
Note: Your appliance layout may differ depending on the model.
Hob
Control Panel
Grill
Top Oven/Grill
Main Oven Main Oven Selector
Clock/Programmer
Thermostat Indicator
Hob Controls
Large Large
Medium
Medium
Left hand rear Right hand rear
Left hand front
Right hand front
Page 7
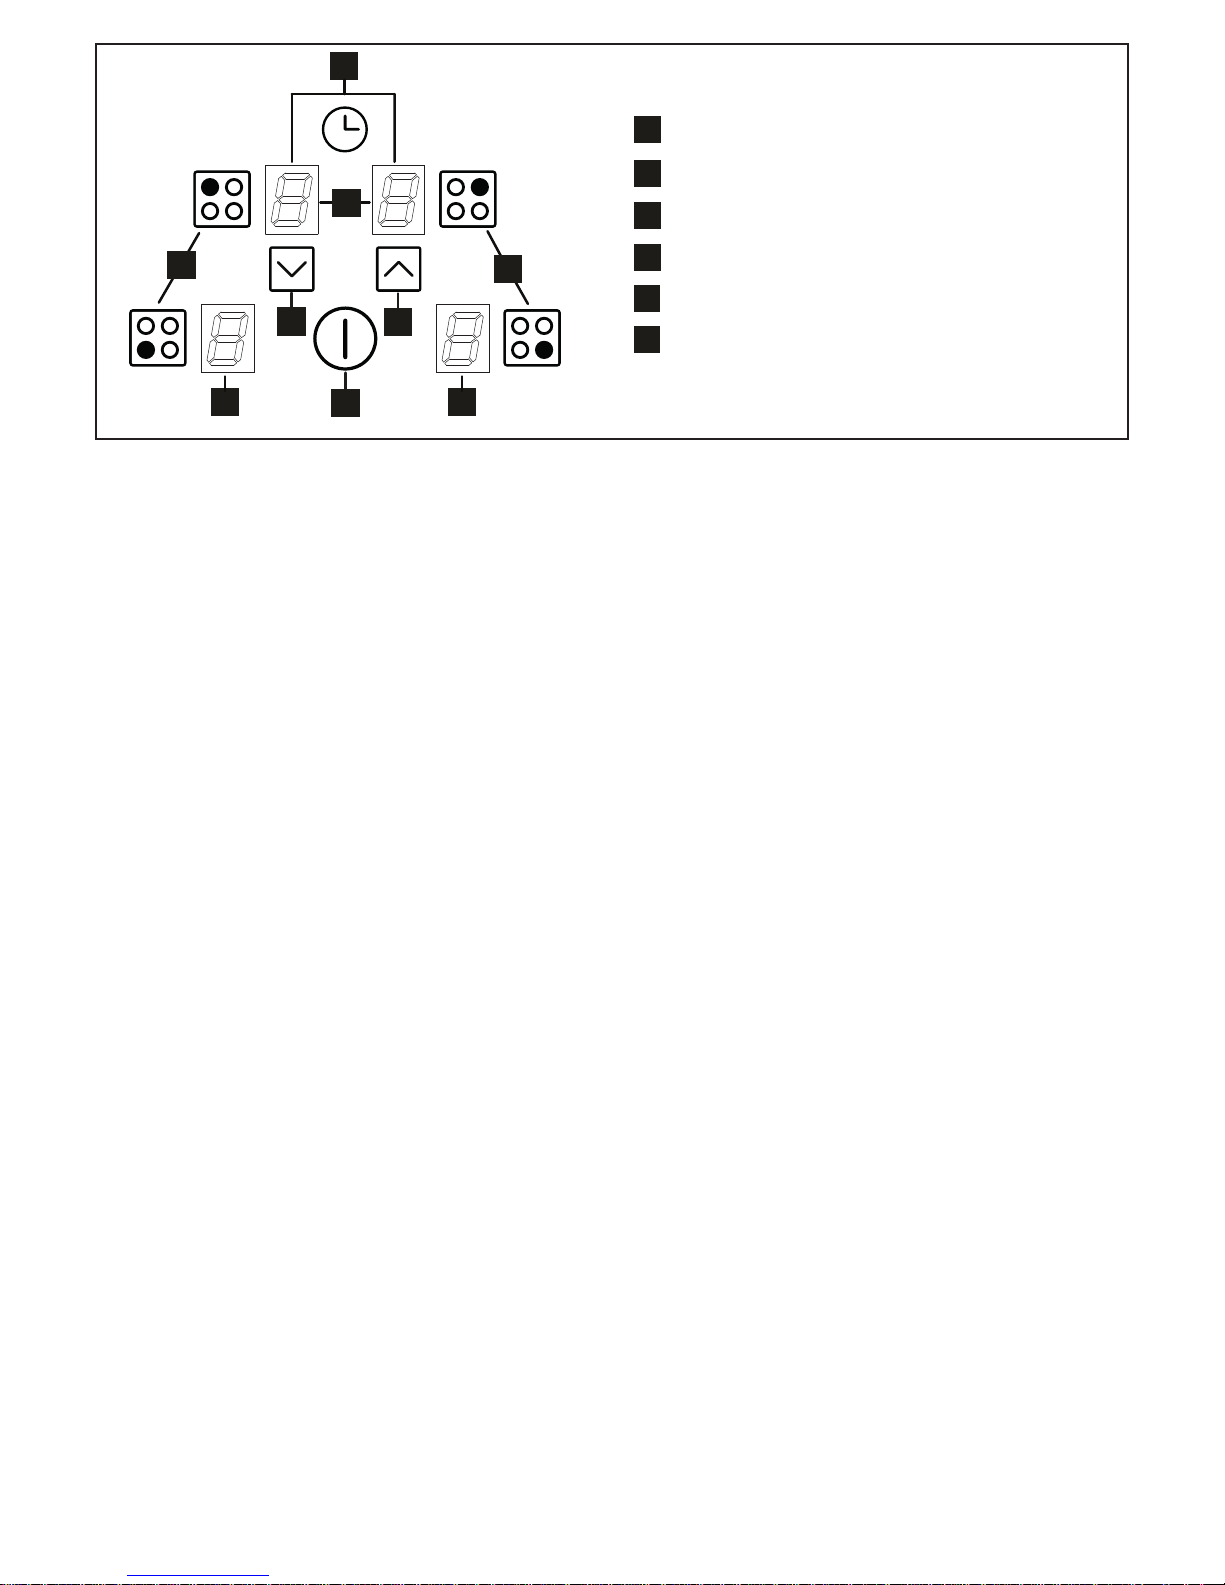
2
3
4
5
1
COOK ZONE KEYS
INDIVIDUAL COOK ZONE DISPLAYS
POWER DOWN KEY
POWER UP KEY
ON/OFF KEY
6
TIMER DISPLAYS
1
6
2
22
3
3
4
5
Page 8
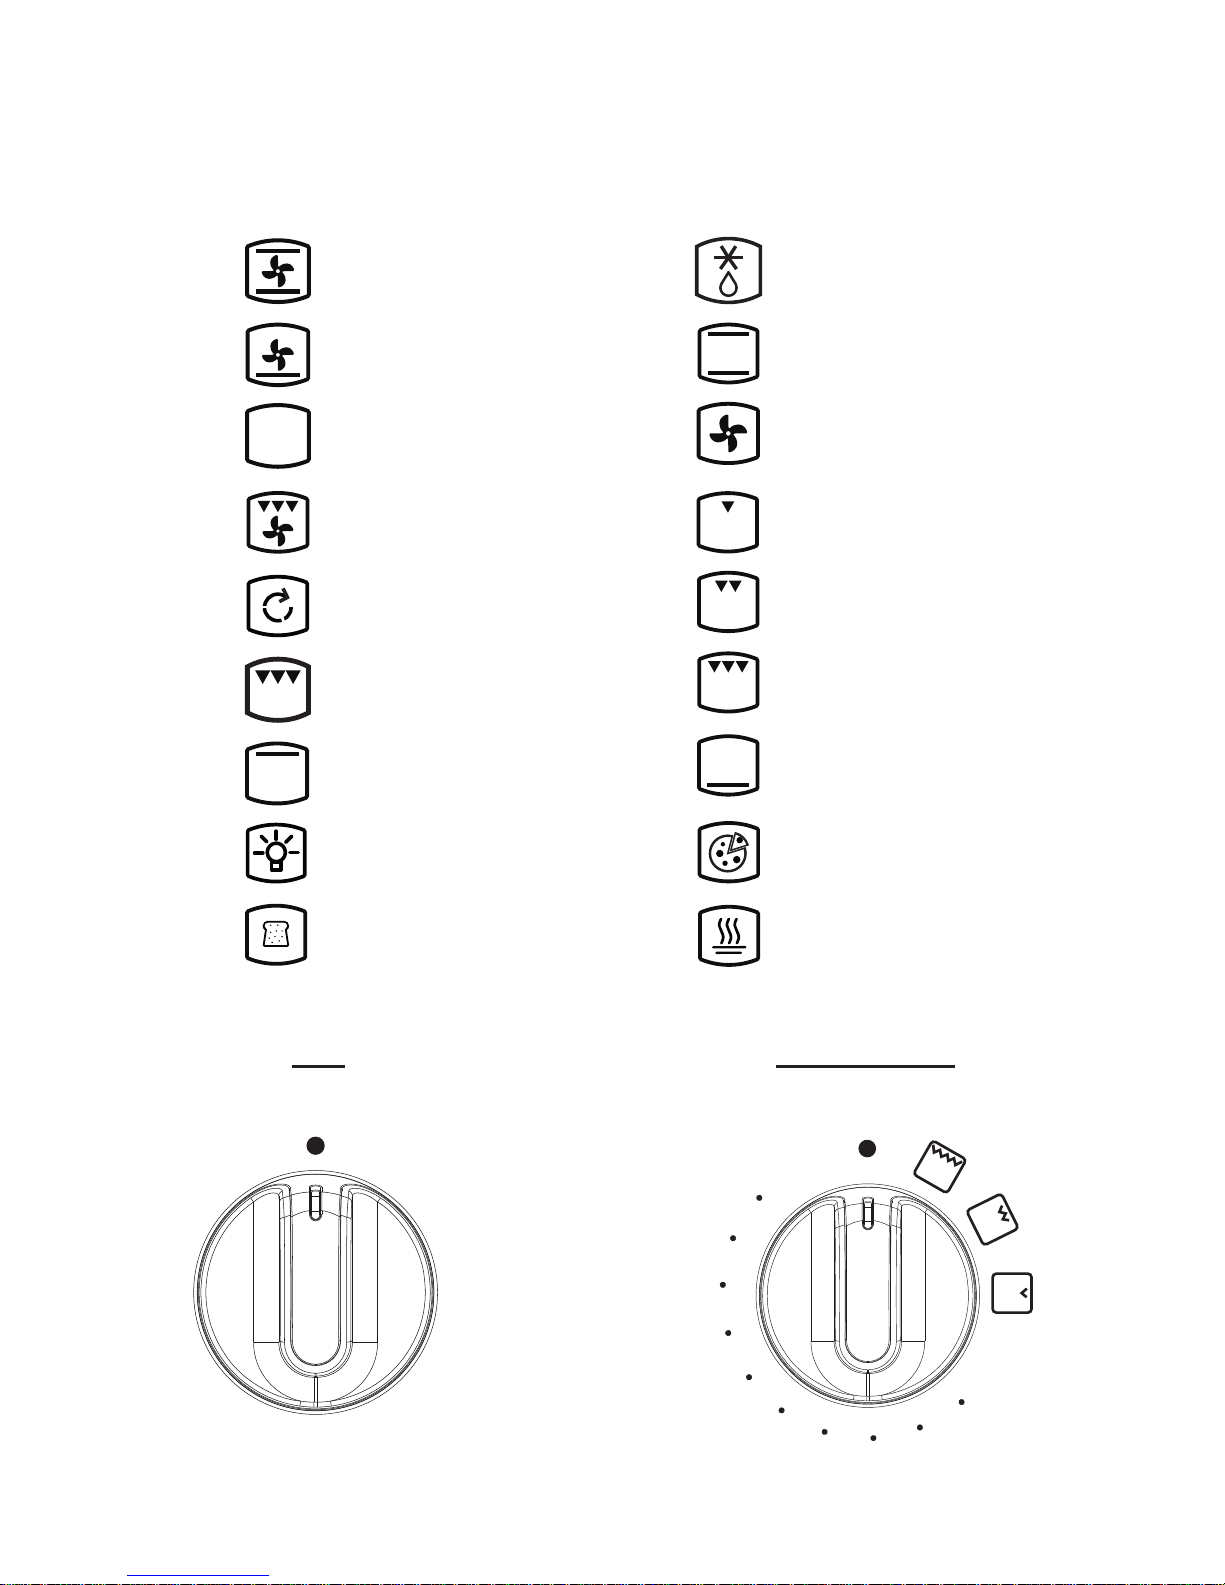
Appliance functions
Note: Your oven may not have all of the functions shown here. We recommend for best cooking results,
please preheat your oven for 15 minutes and 3-5 minutes for grilling.
Do not try to slow cook using any of the other oven functions.
Defrost
Fanned Oven
Base Heat
Pizza Function
Lights only
Bread Proving Keep Warm
Conventional Grill
Conventional Oven
Oven Selector Control
Base Heat with fan
Intense Baking
Low Grill
Single Grill
Top Heat
Dual Grill
Fanned Grill
S
Slow Cook
Grill Top Oven/Grill
OFF
1
7
8
2
3
4
5
6
OFF
60
80
100
120
140
160
180
200
220
240
260
Page 9
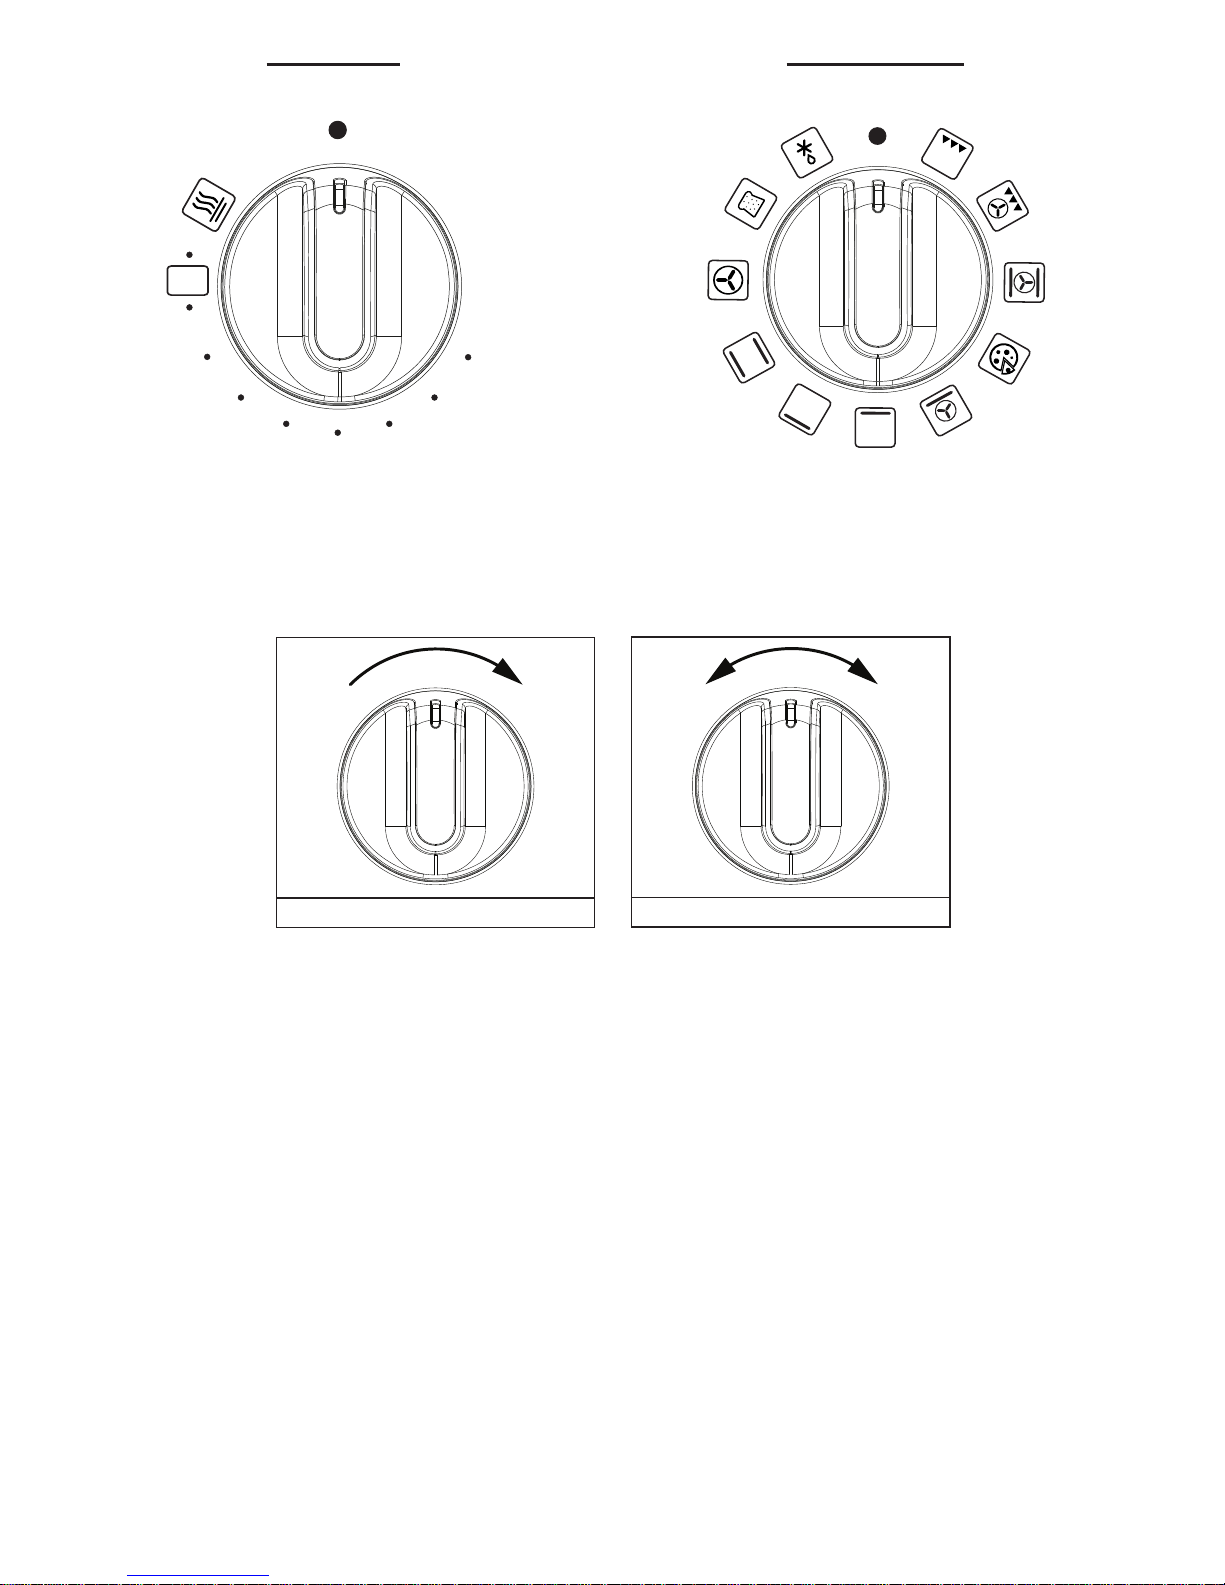
Main Oven Oven Selector
OFF
S
120
140
160
180
200
220
240
260
OFF
Note: The bread proving function can also be used as a defrost setting
Ovens and Grill
Main Oven Selector & Grill Selector
Top Oven/Grill & Main Oven
When using the top oven or main oven, the red thermostat indicator light will come on until the selected
temperature is reached.
When the Top oven/grill or grill is switched on, the cooling fans come on to keep the fascia and control
knobs cool during cooking/grilling. The cooking fans may operate when the main ovens are in use,
depending on the temperature setting. The fans may continue to operate for a period after the oven/grill
has been switched off. During use the fan may cycle on and off, this is normal.
Important: Never put items directly on the base of the oven, or cover the oven base with foil, as this
may cause the element to overheat. Always position items on the shelf.
The main oven will not operate if the programmer is set to Auto, see clock/programmer section.
Page 10
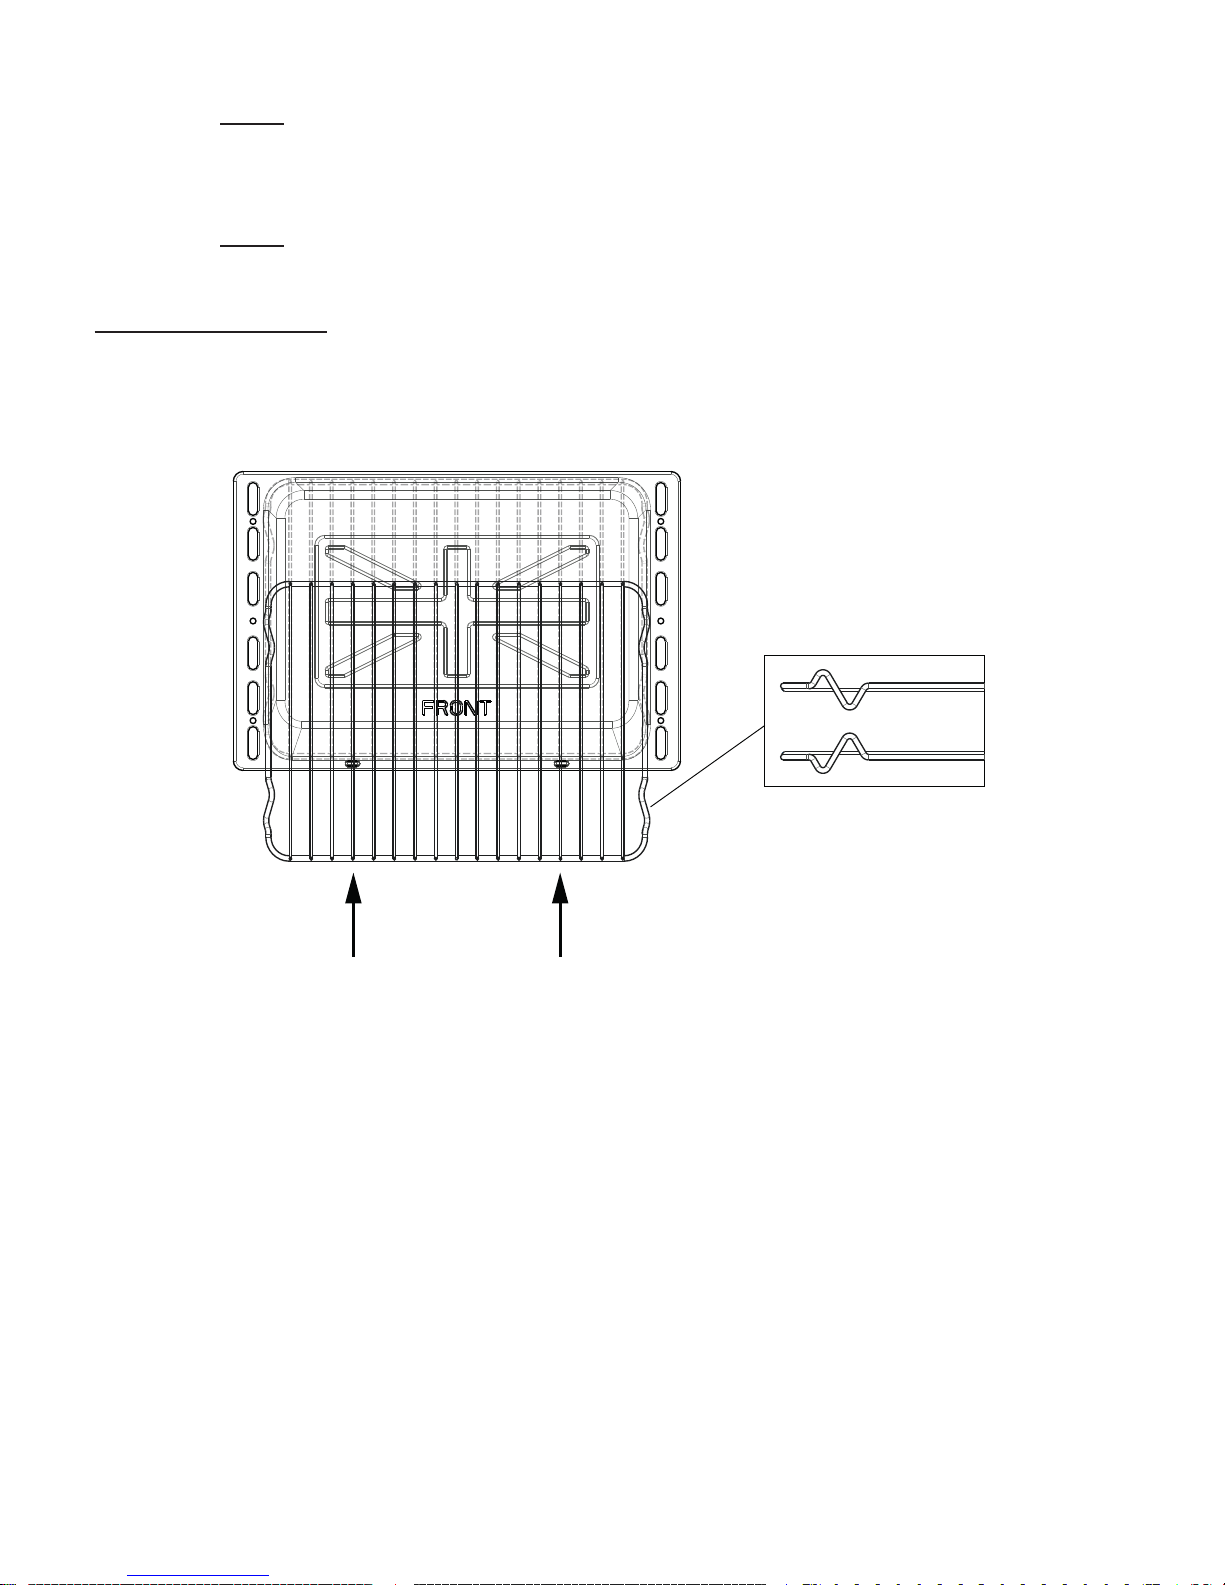
Top Oven - Grill
THE DOOR MUST BE OPEN WHEN THE GRILL IS USED FOR CONVENTIONAL GRILLING.
Main Oven - Grill
THE DOOR MUST BE CLOSED WHEN THE GRILL IS USED FOR FANNED CONVENTIONAL
GRILLING.
Grill pan and trivet
The grill trivet (inside the grill pan) can be inverted to give a high or low position, or it may be removed.
The speed of grilling can be controlled by selecting a higher or lower shelf position, or adjusting the grill
setting.
Inverted
Page 11
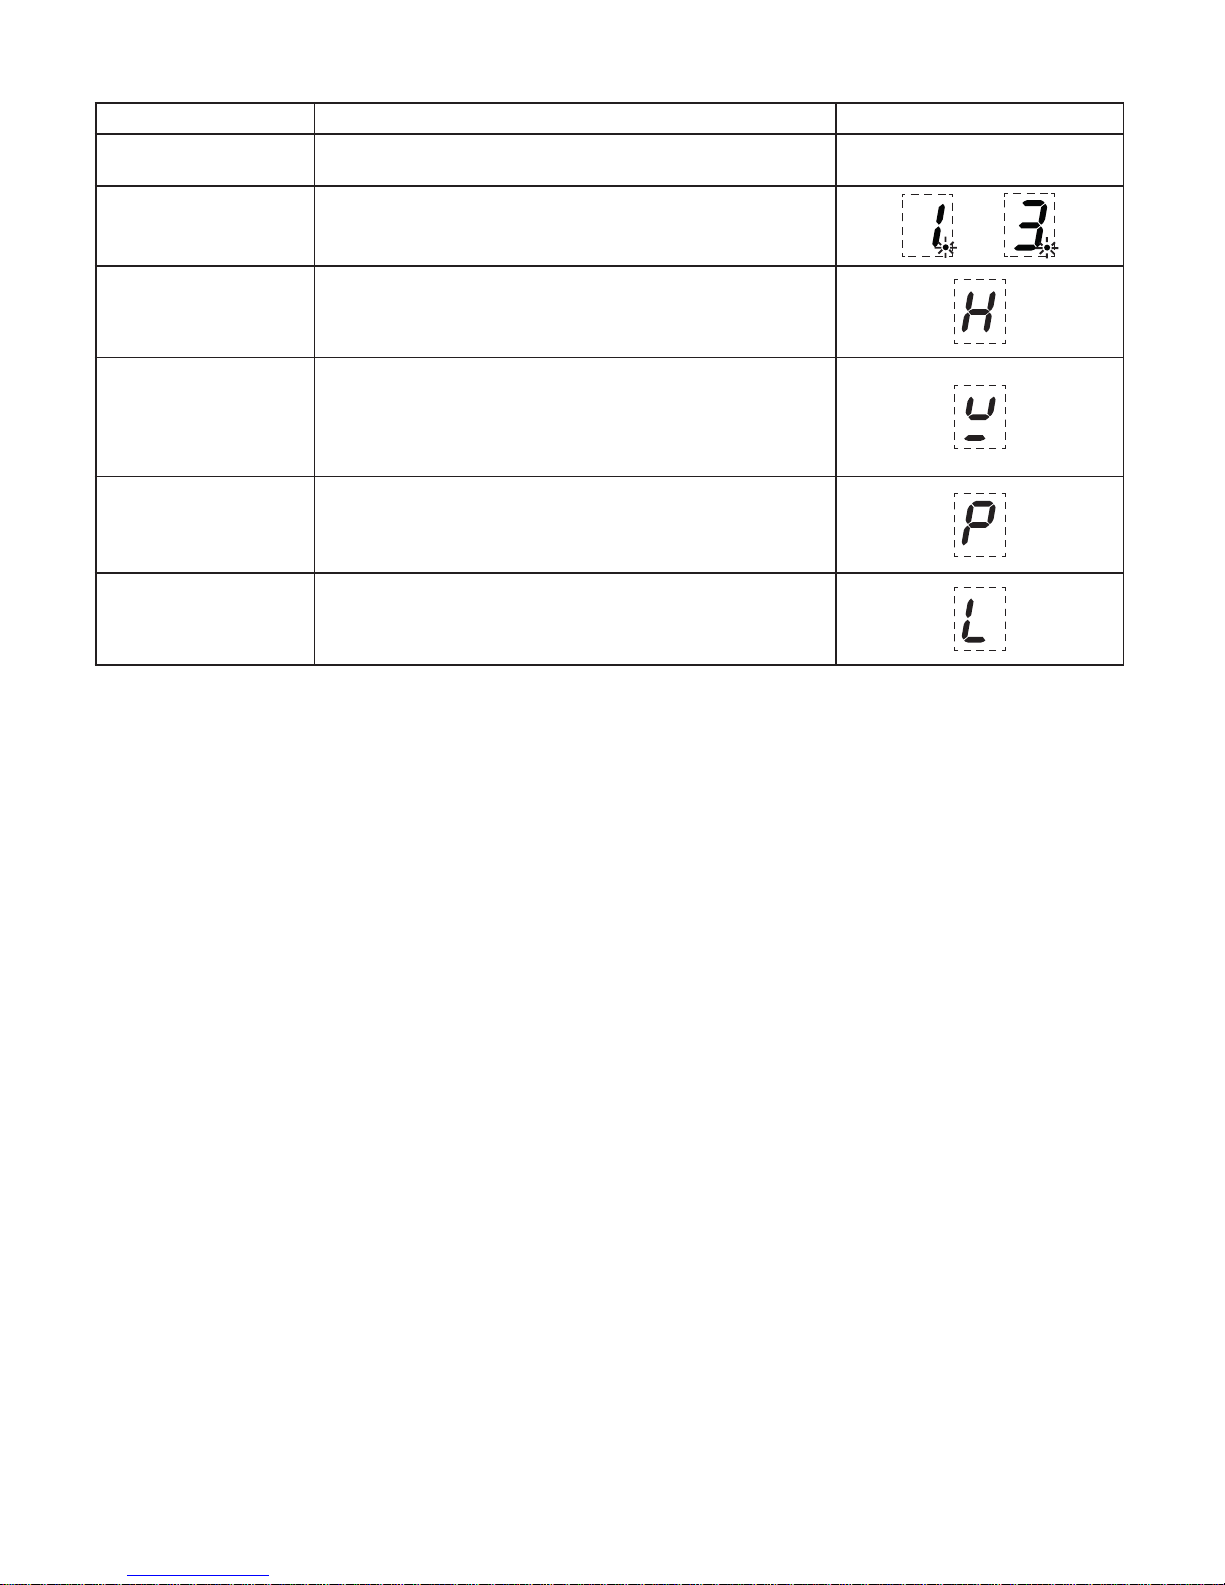
Hob Overview
Function Description Symbol
Power Level
Once a cook zone is selected, a power level can be set to a
low or high temperature.
1-9
Cook zone timer
Once a cook zone is selected, the cook zone timer can be activated
to sound after a pre-determined amount of time. When the alarm
sounds and the dot begins to ash.
Residual Heat
After use, the cooking surface remains hot and the residual
heat symbol will be displayed. As it cools, the number of
rings will reduce until they disappear from the display.
Pan detection
If no pan or an unsuitable pan is detected on an activated
cook zone, the pan detection symbol will be displayed.
Suitable pans - cast iron, metals with magnetic properties.
Non-suitable pans - copper, stainless steel, aluminium,
glass, ceramic, terra-cotta.
Booster function
The booster function temporarily increases the power to a
cook zone allowing for a faster heat up time. It will deactivate
automatically after 5 minutes or if a lower power level is
selected.
Child lock
Child lock can be activated to stop the hob from being
accidentally turned on.
Page 12
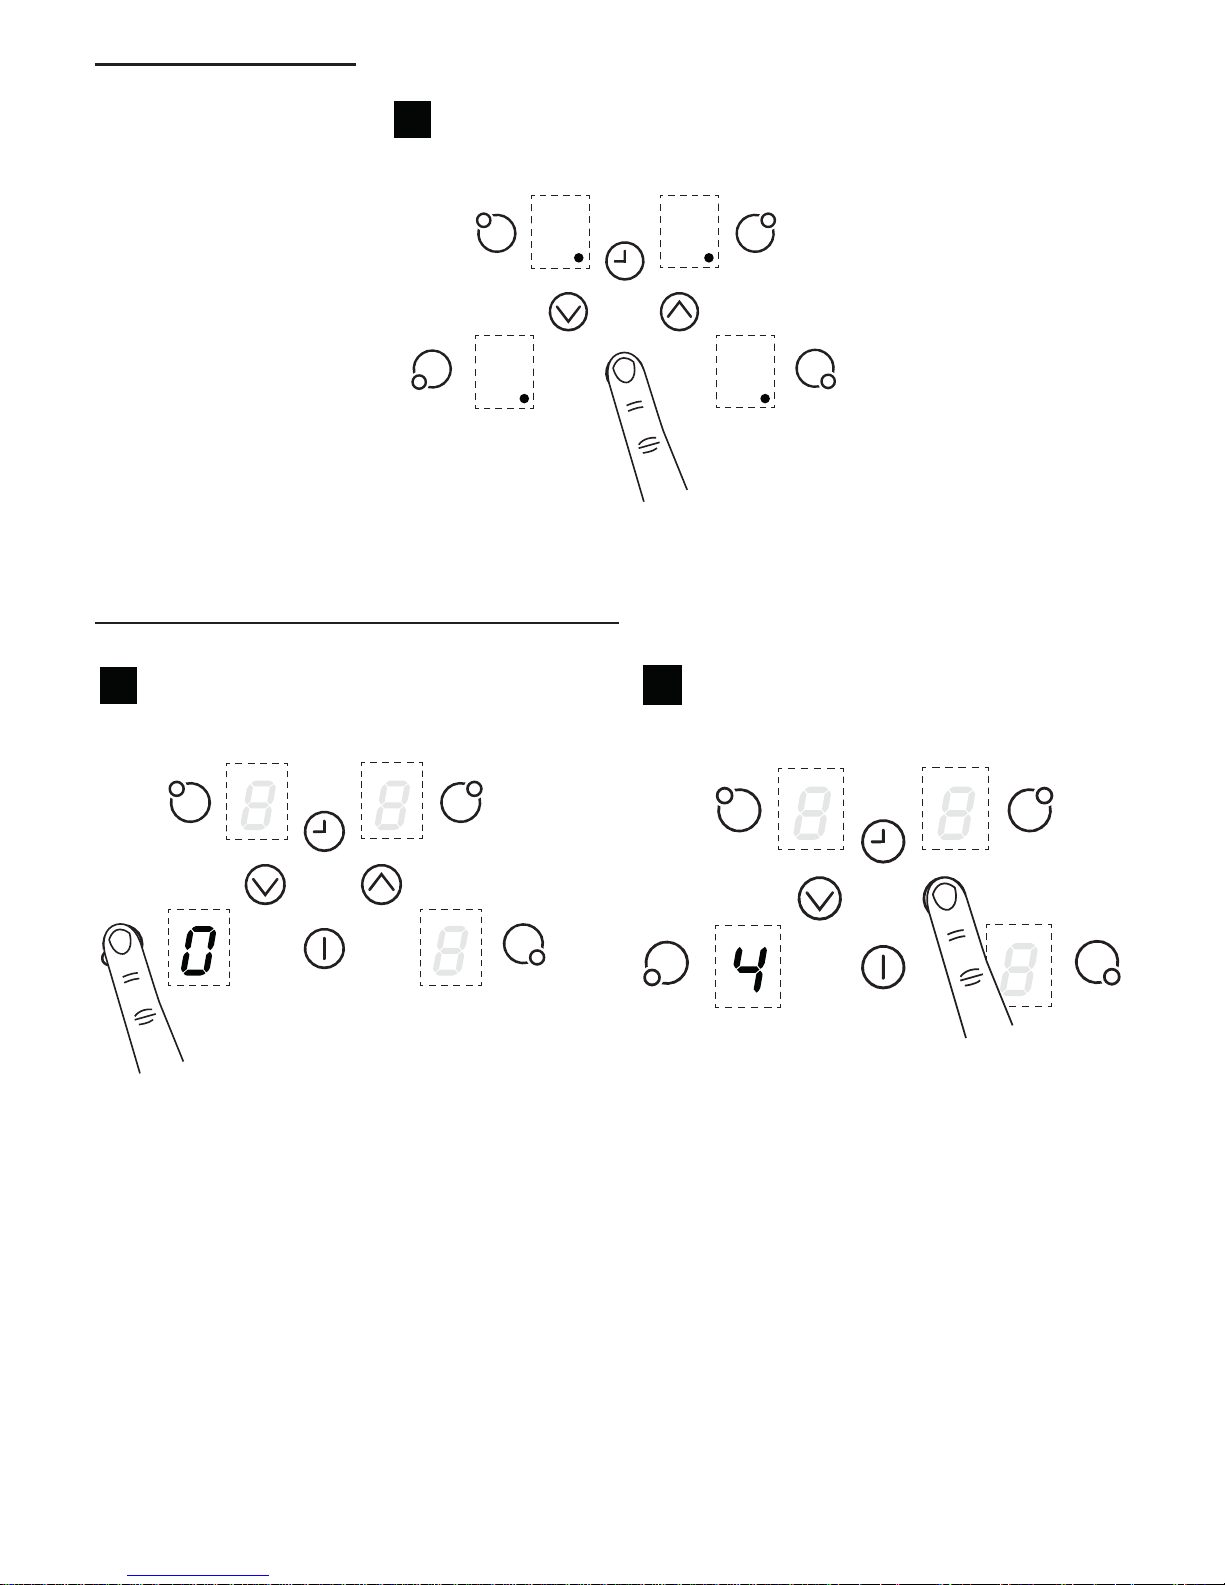
To switch the hob on
1
Touch and hold the on/off key for 1
second
Note: If a zone is not selected in 10 seconds, the hob will turn off automatically.
Switching on an individual hob cook zone
1
Select desired cook zone
2
Use the up or down keys to select a
power level
Pressing the minus key rst selects power level 9.
When the cook zone selection is nished after 10 seconds, a beep sounds and all the zone displays
that were dimmed show the power levels with normal brightness.
Page 13
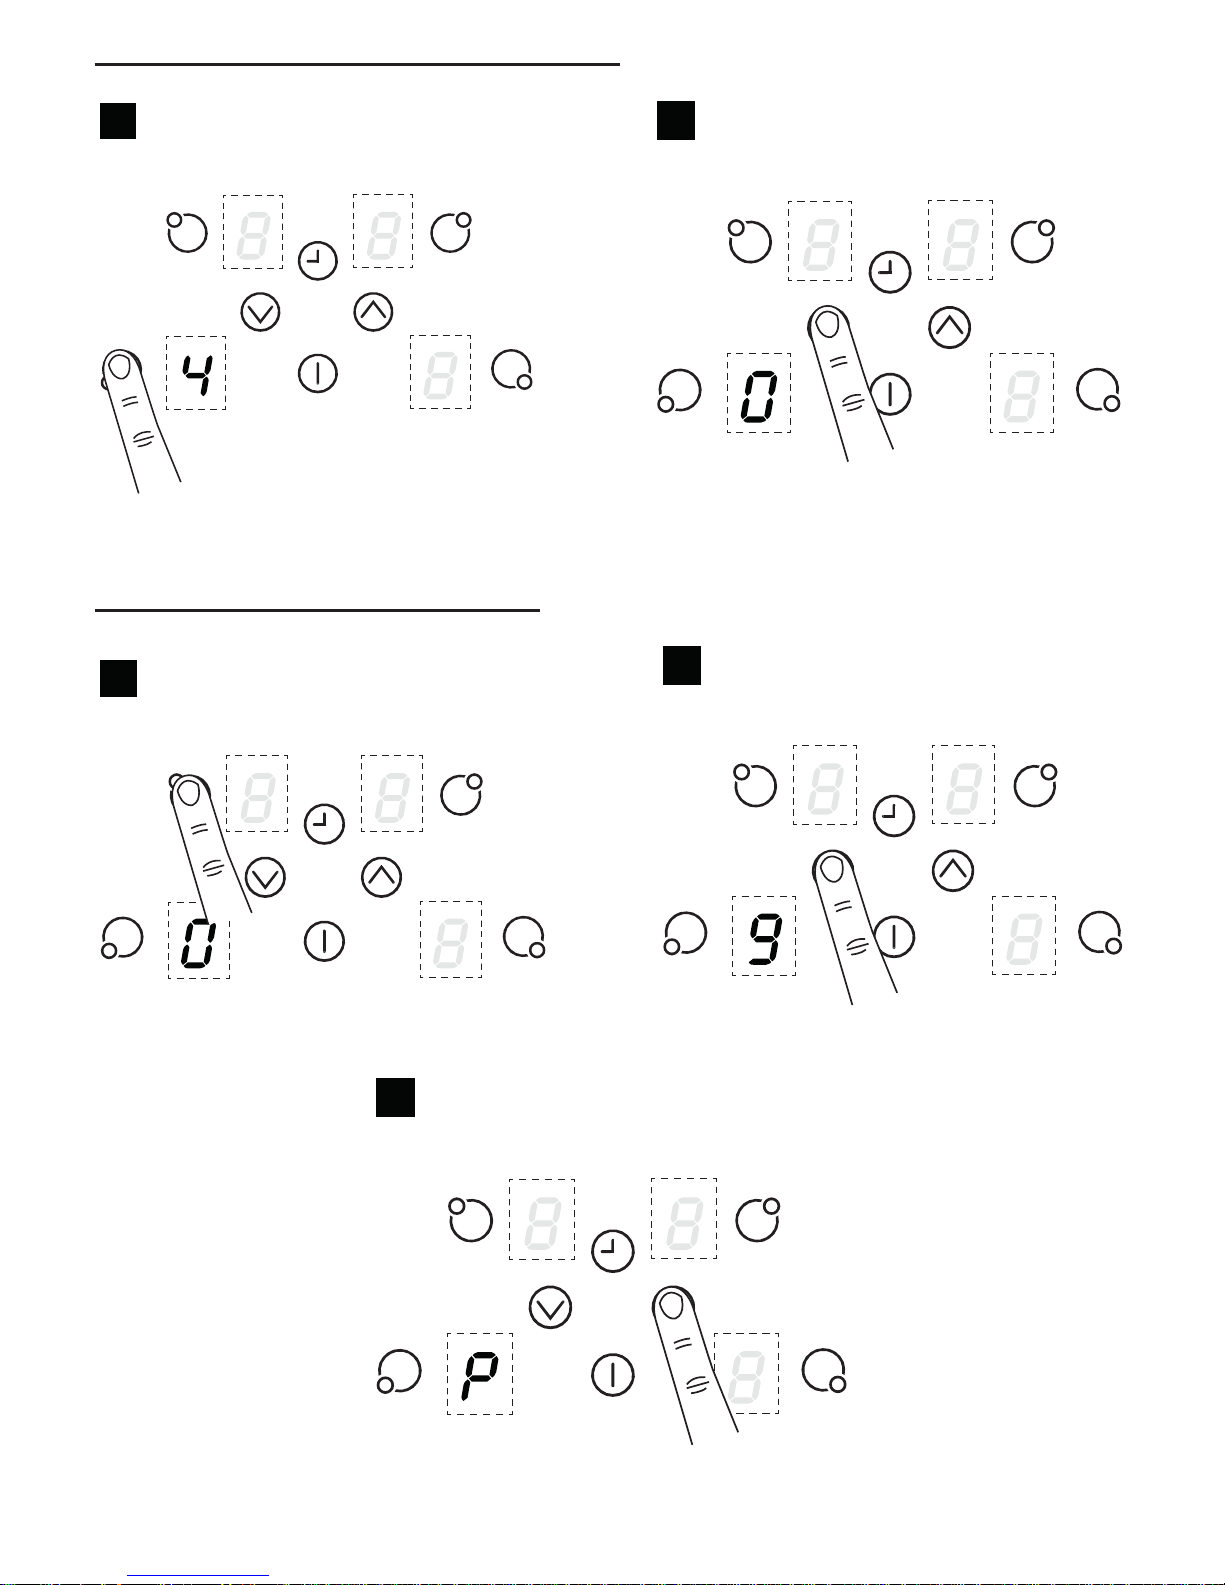
Switching off an individual hob cook zone
1
Select desired cook zone
2
Touch the down key until 0 appears on
the cook zone display
The selected cook zone will be switched off when the display shows “0”.
Power boost (rear cook zones only)
1
Select desired rear cook zone
2
Touch the down key until power level 9
appears
3
Touch the up key and the display will
show power boost level
Note: With one rear cook zone set to boost, the power on the other rear zone is automatically limited to
8.
Page 14
The cook zones can be boosted for a period of up to 5 minutes. When the Power Boost has nished,
the zone will display power level 9.
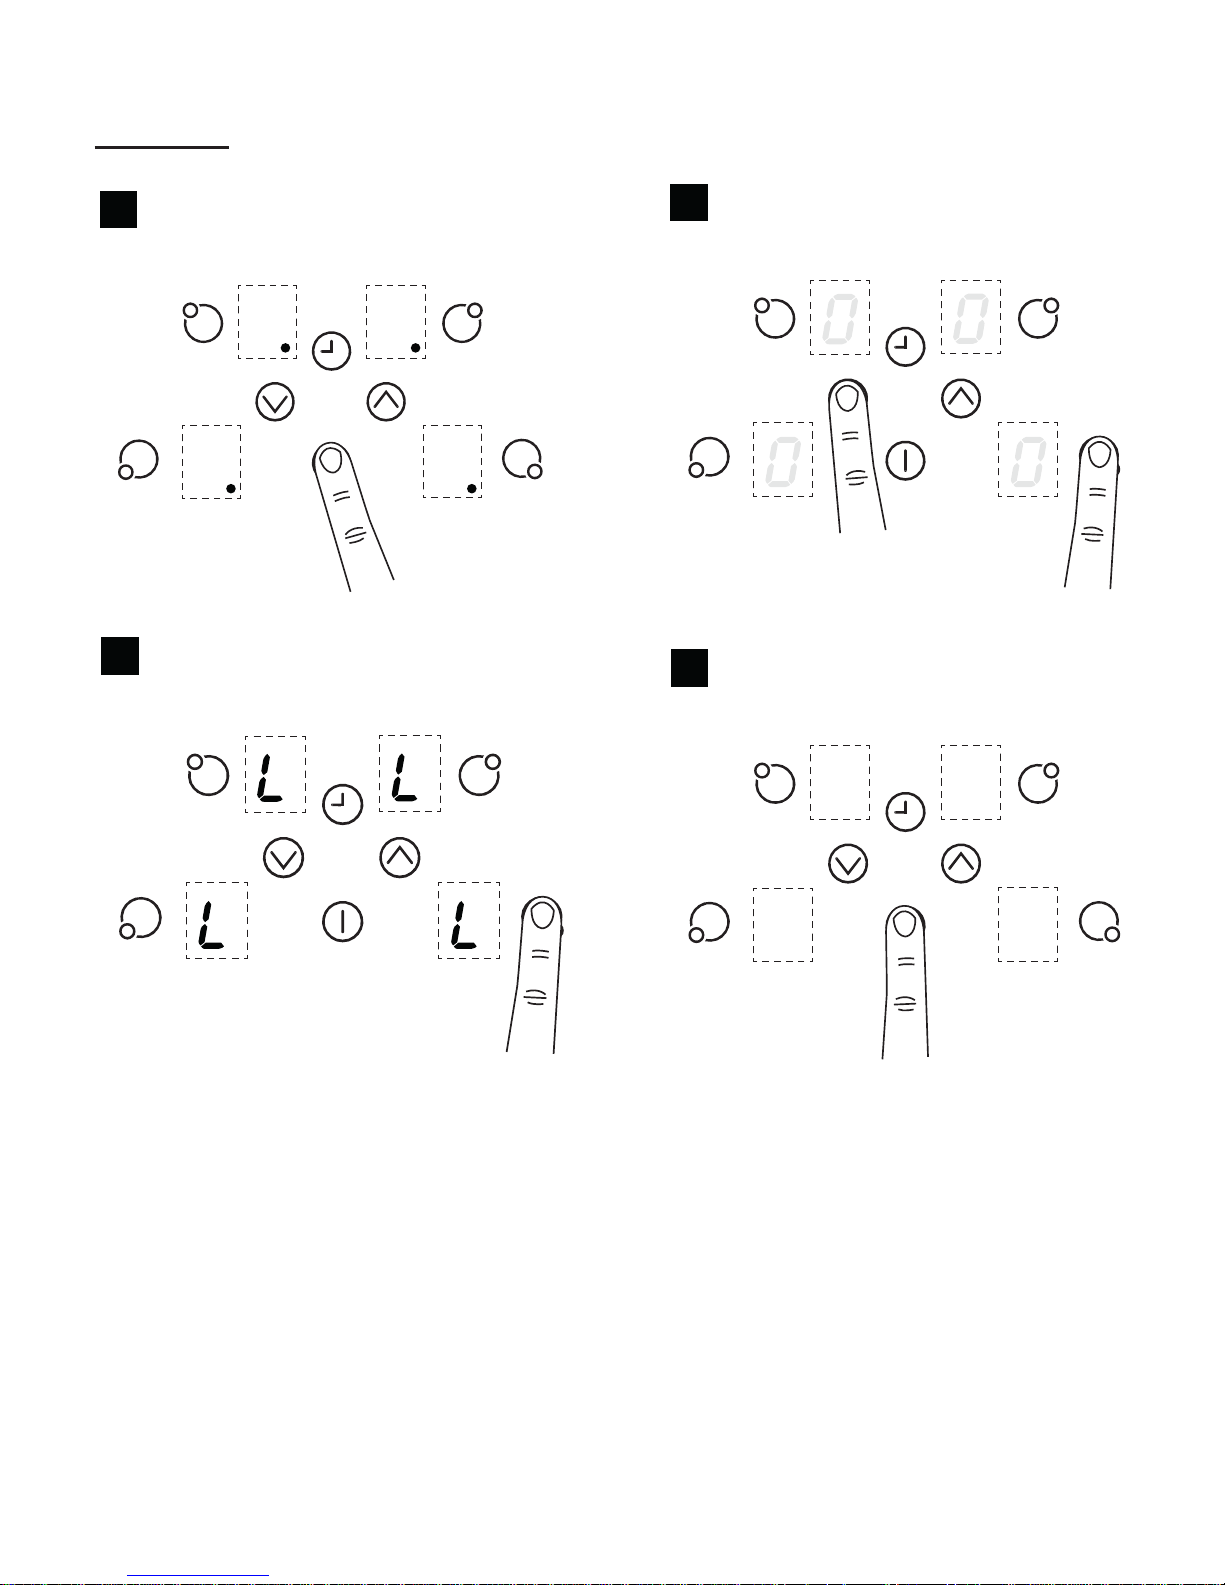
Child Lock
1
Touch and hold the on/off key for 1
second
2
Touch the right hand cook zone key
and the down key together
3
Touch the right hand cook zone key
and L will appear on all displays
4
Press the on/off key to switch the hob
off
When you now switch on the hob “L” will appear in all the cook zone displays. The child lock feature will
to be activated until you switch this feature off.
Page 15
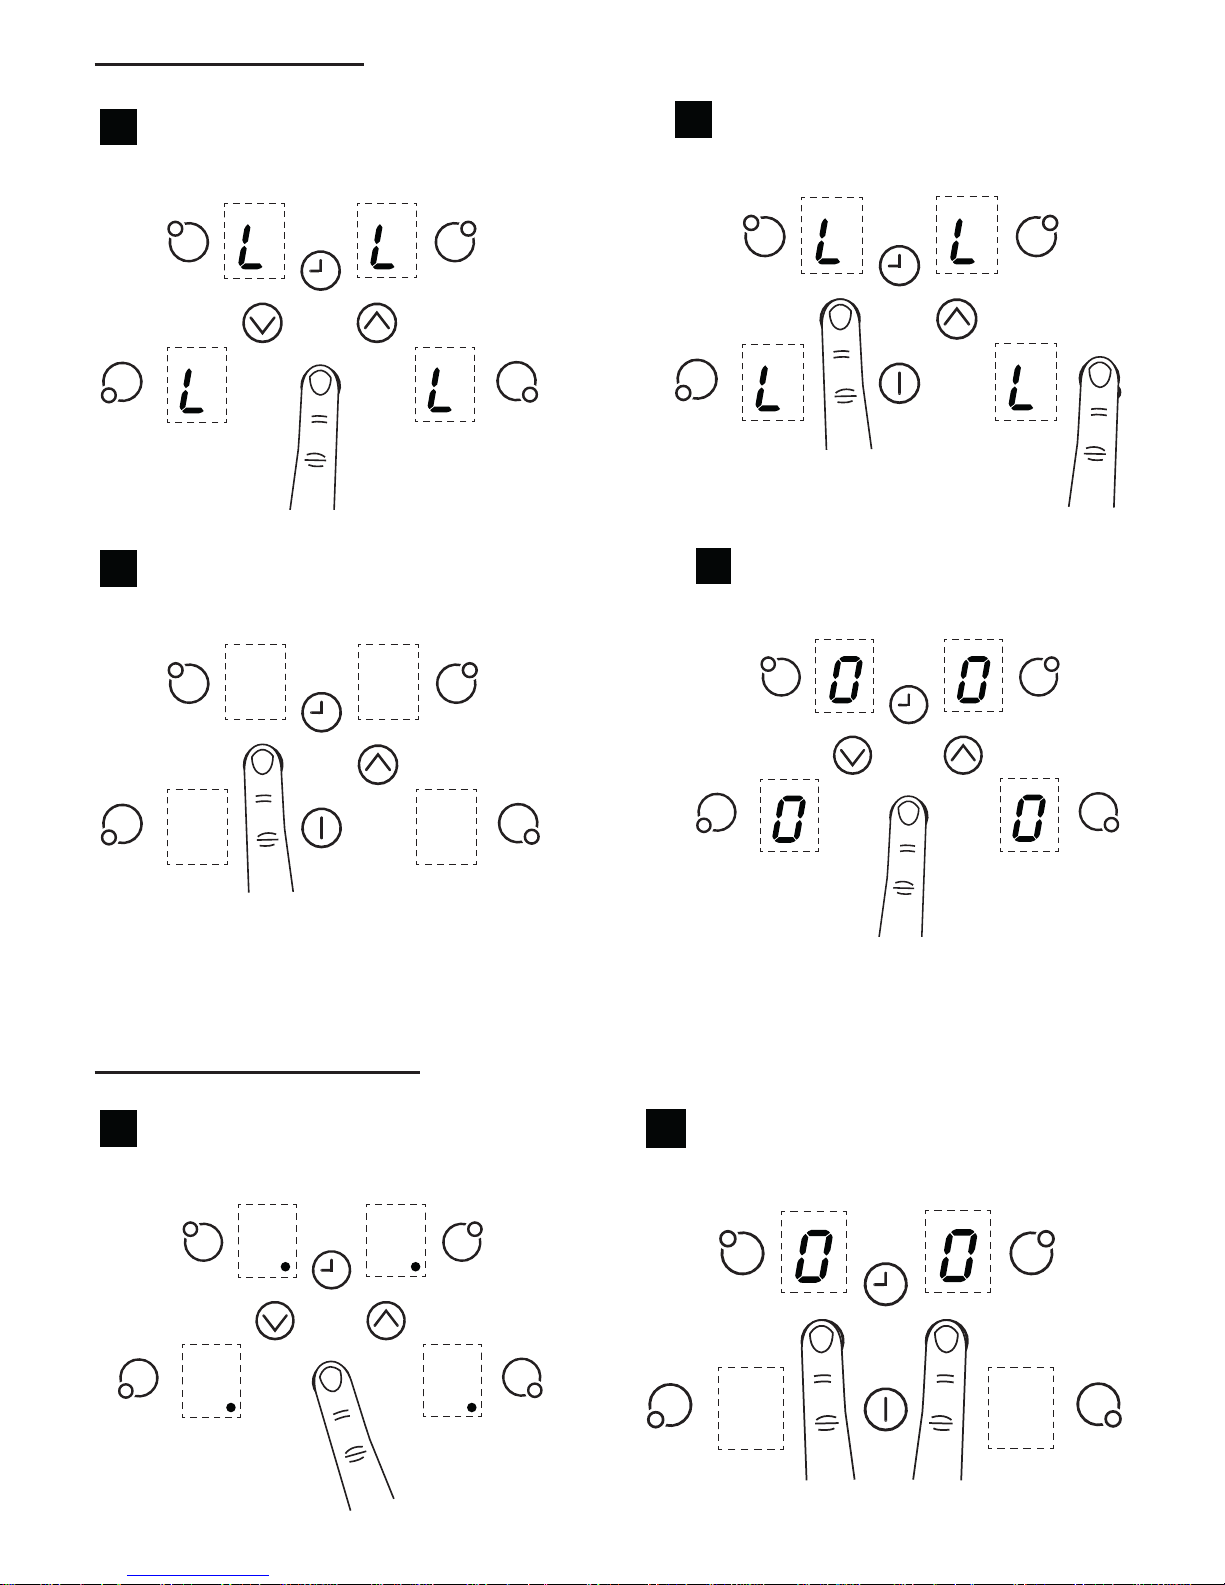
De-activate child lock
1
Select the on/off key and L will appear
on all displays
2
Touch the Right hand front key and the
down key together
3
Press the minus key and the hob
should switch off
4
Switch on the hob and 0 will appear in
all cook zone displays
Note: When you now switch on the hob “0” will be displayed in all cook zone displays, the hob can now
be used normally.
Setting the minute minder
1
Touch and hold the on/off key for 1
second
2
Touch the plus and minus keys together
The display will show 00
Page 16
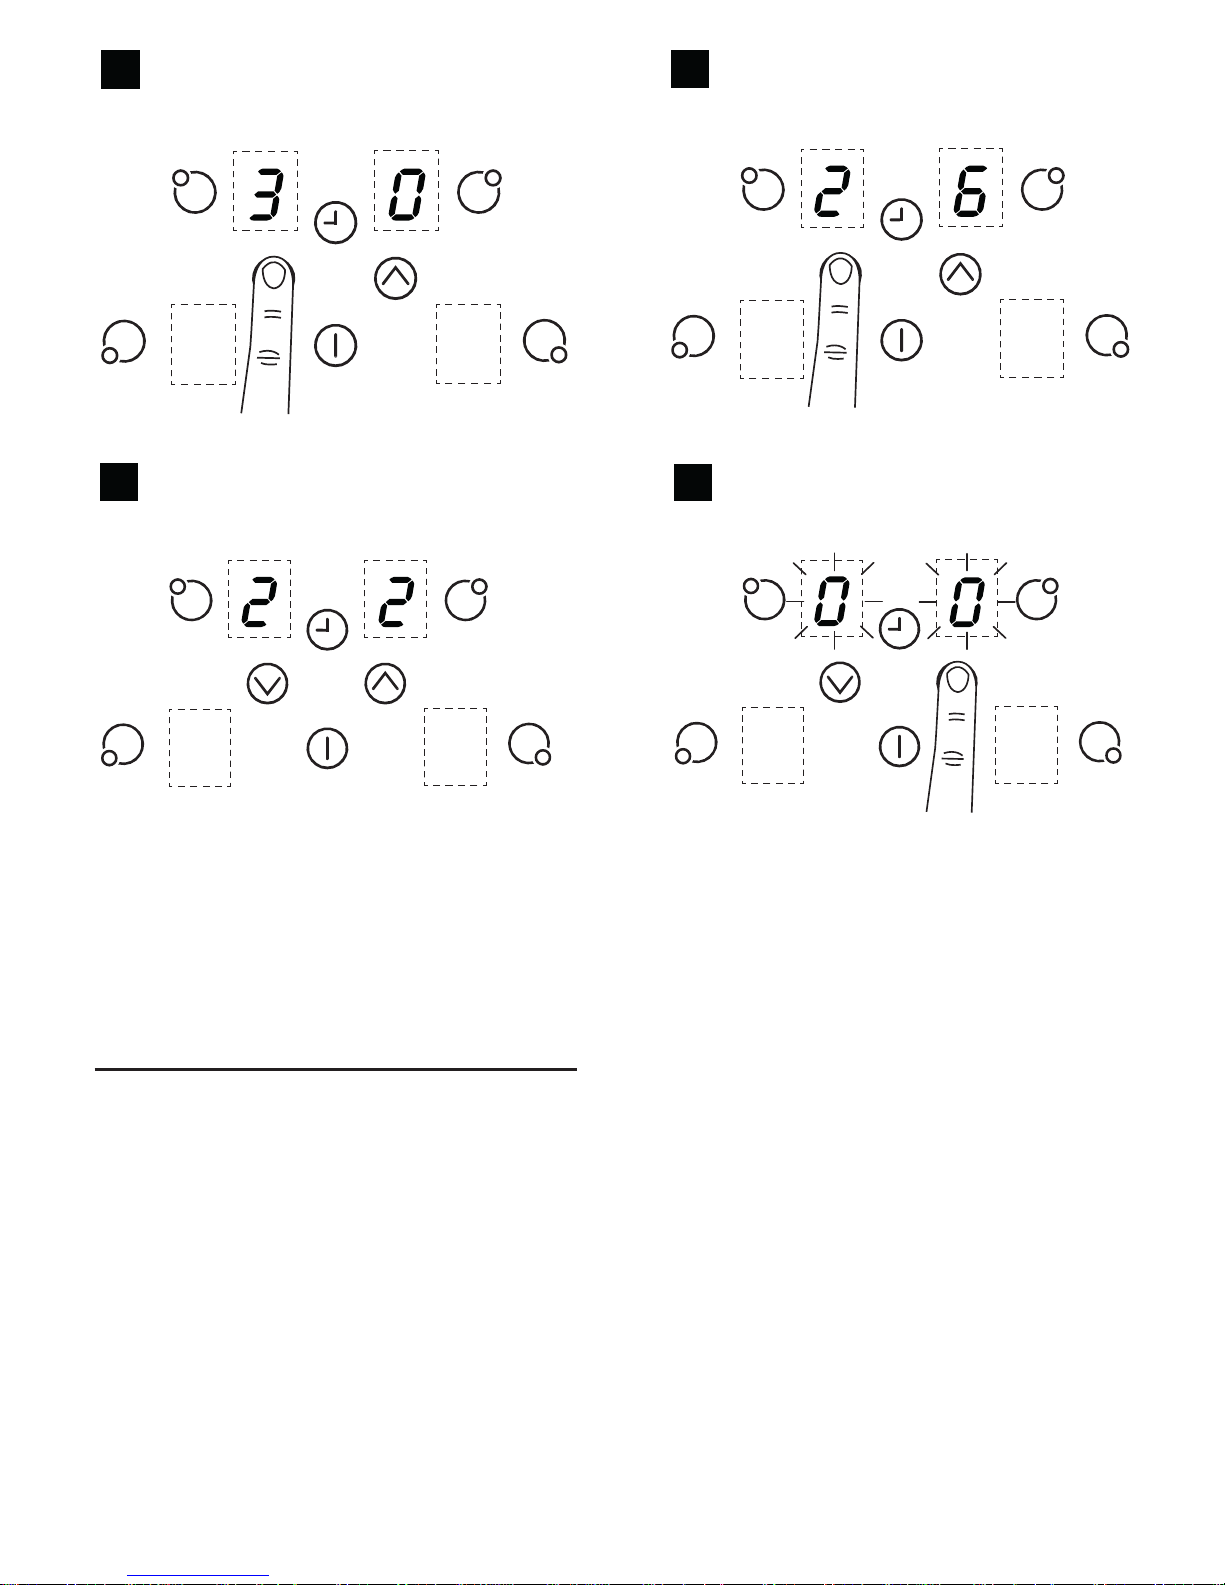
3
Pressing the down key first sets the
timer to 30 minutes
4
Adjust the time by using the up and
down keys
5
Once set, the minute minder will begin
to count down
6
The timer display will flash and bleep when the
time is up. Touch any key to stop
The maximum time that can be set is 99 minutes.
Please ensure that no cook zones have been selected.
When the set time has expired, it does not switch off any cook zones.
The dots will ash on the display if the hob is turned off before the minute minder ends.
To modify or cancel the minute minder
Please follow steps 1 to 5 if the hob is turned off or steps 2 to 5 if the hob is on.
Setting back to zero will cancel the minute minder.
Page 17
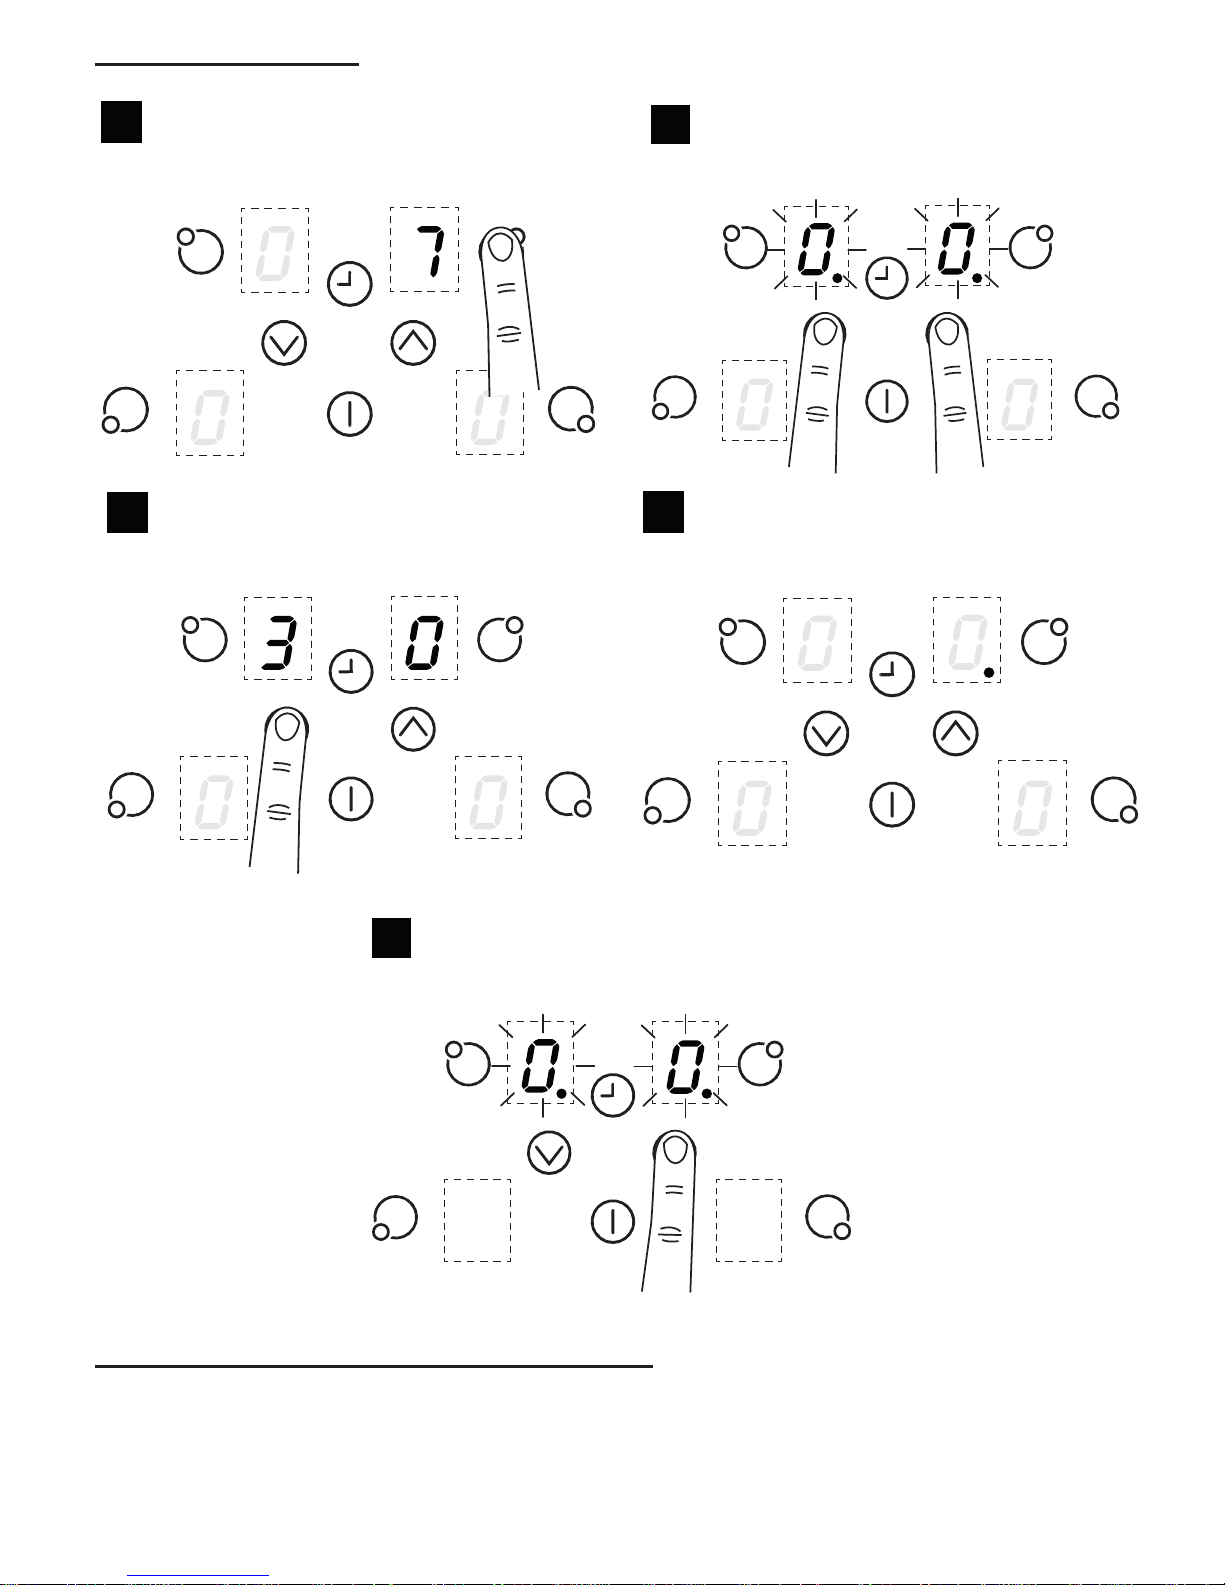
Timer auto switch off
1
Select desired cook zone and ensure the
power level is already set
2
Touch and hold to down and up keys together,
until 00 and a dot flashes in the timer display
3
Use the up and down keys to set a time
4
Once set, the operation of the timer is shown
by a dot appearing in chosen cook zone display
5
The timer display will flash and bleep when the
time is up. Touch any key to stop
To modify or cancel the timer auto switch off
Please follow steps 1 to 5 if the hob is turned off or steps 2 to 5 if the hob is on.
Setting back to zero will cancel the minute minder.
Page 18
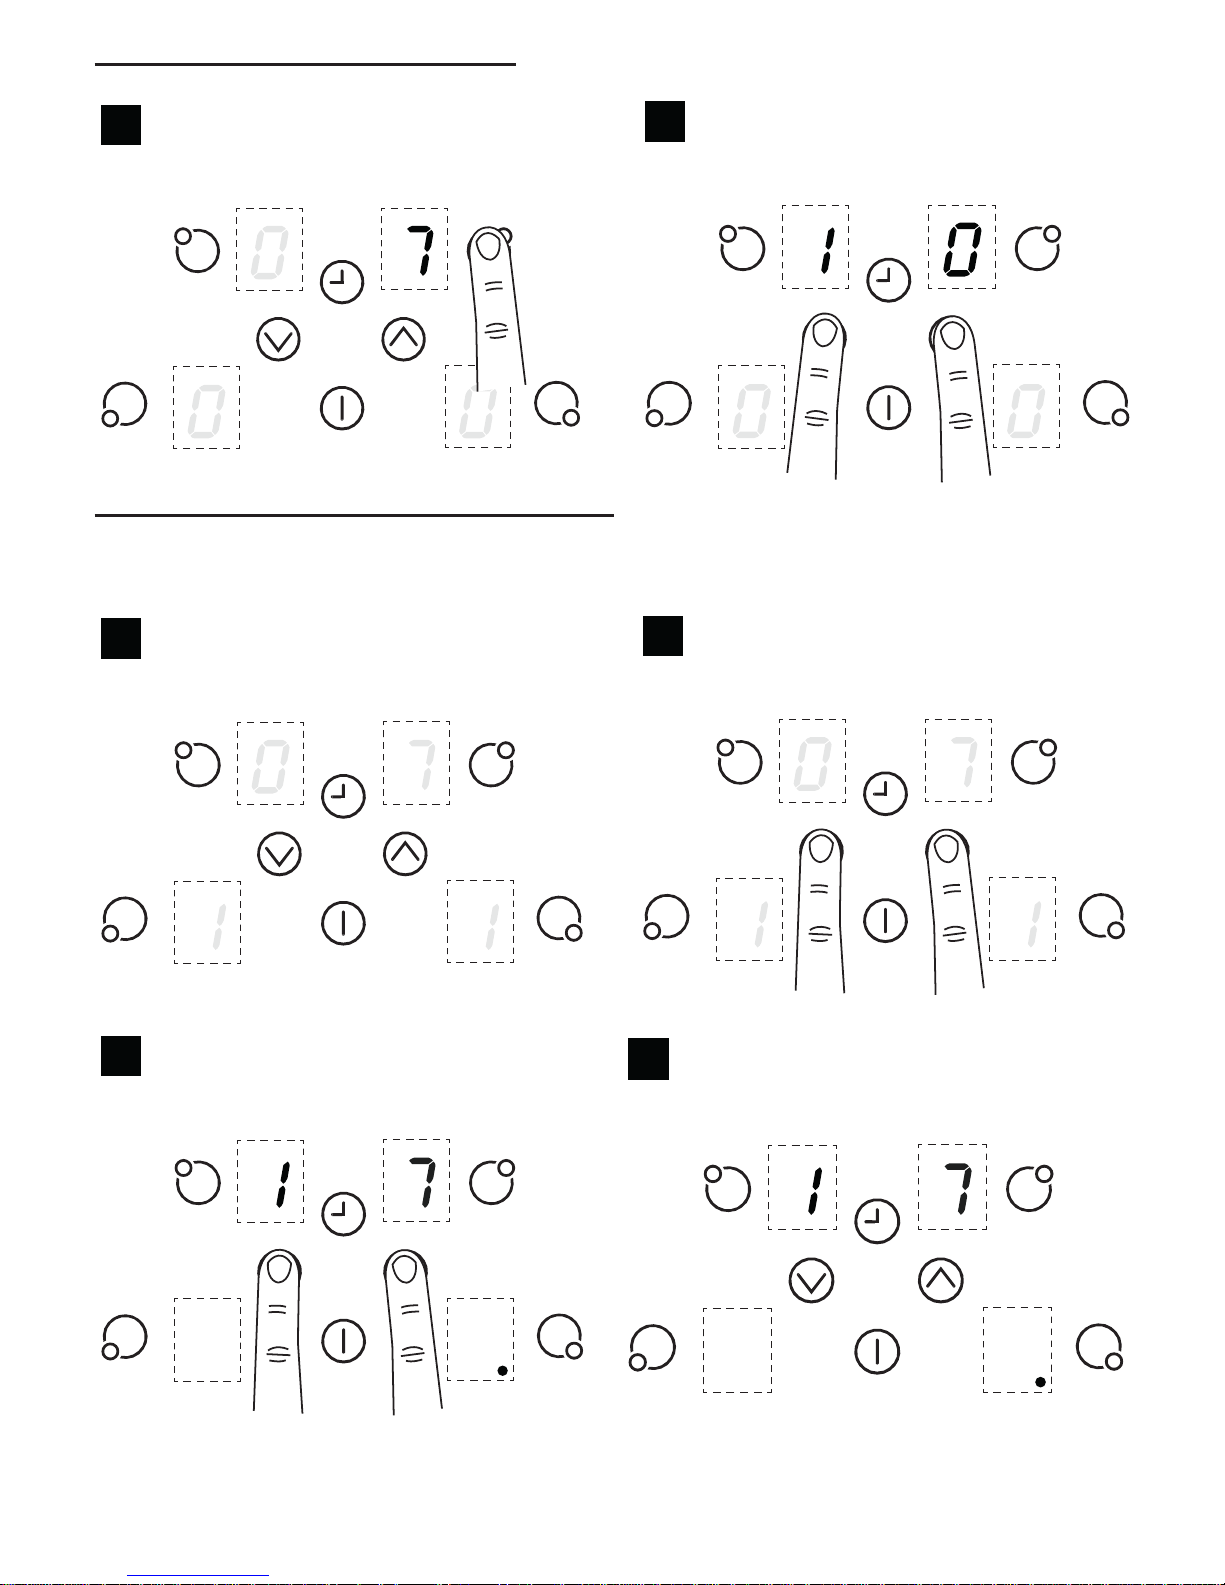
To check the time for a cook zone
1
Select the timed cook zone
2
Press the up and down keys together to
display the time remaining
To check the time on multiple cook zones
If multiple timers have been set:
1
Ensure that a cook zone has not been
selected
2
Select the timer by pressing the up and down
keys together
3
Press the up and down keys as many times as
nesessary to display set times for each cook zone
4
The active cook zone times are cycled clockwise.
A dot will flash in the display for the chosen cook zone
Note: If the minute minder has also been set it will be displayed rst. In this case other timed cooking
zones are shown by a dot in the cook zone display.
Page 19
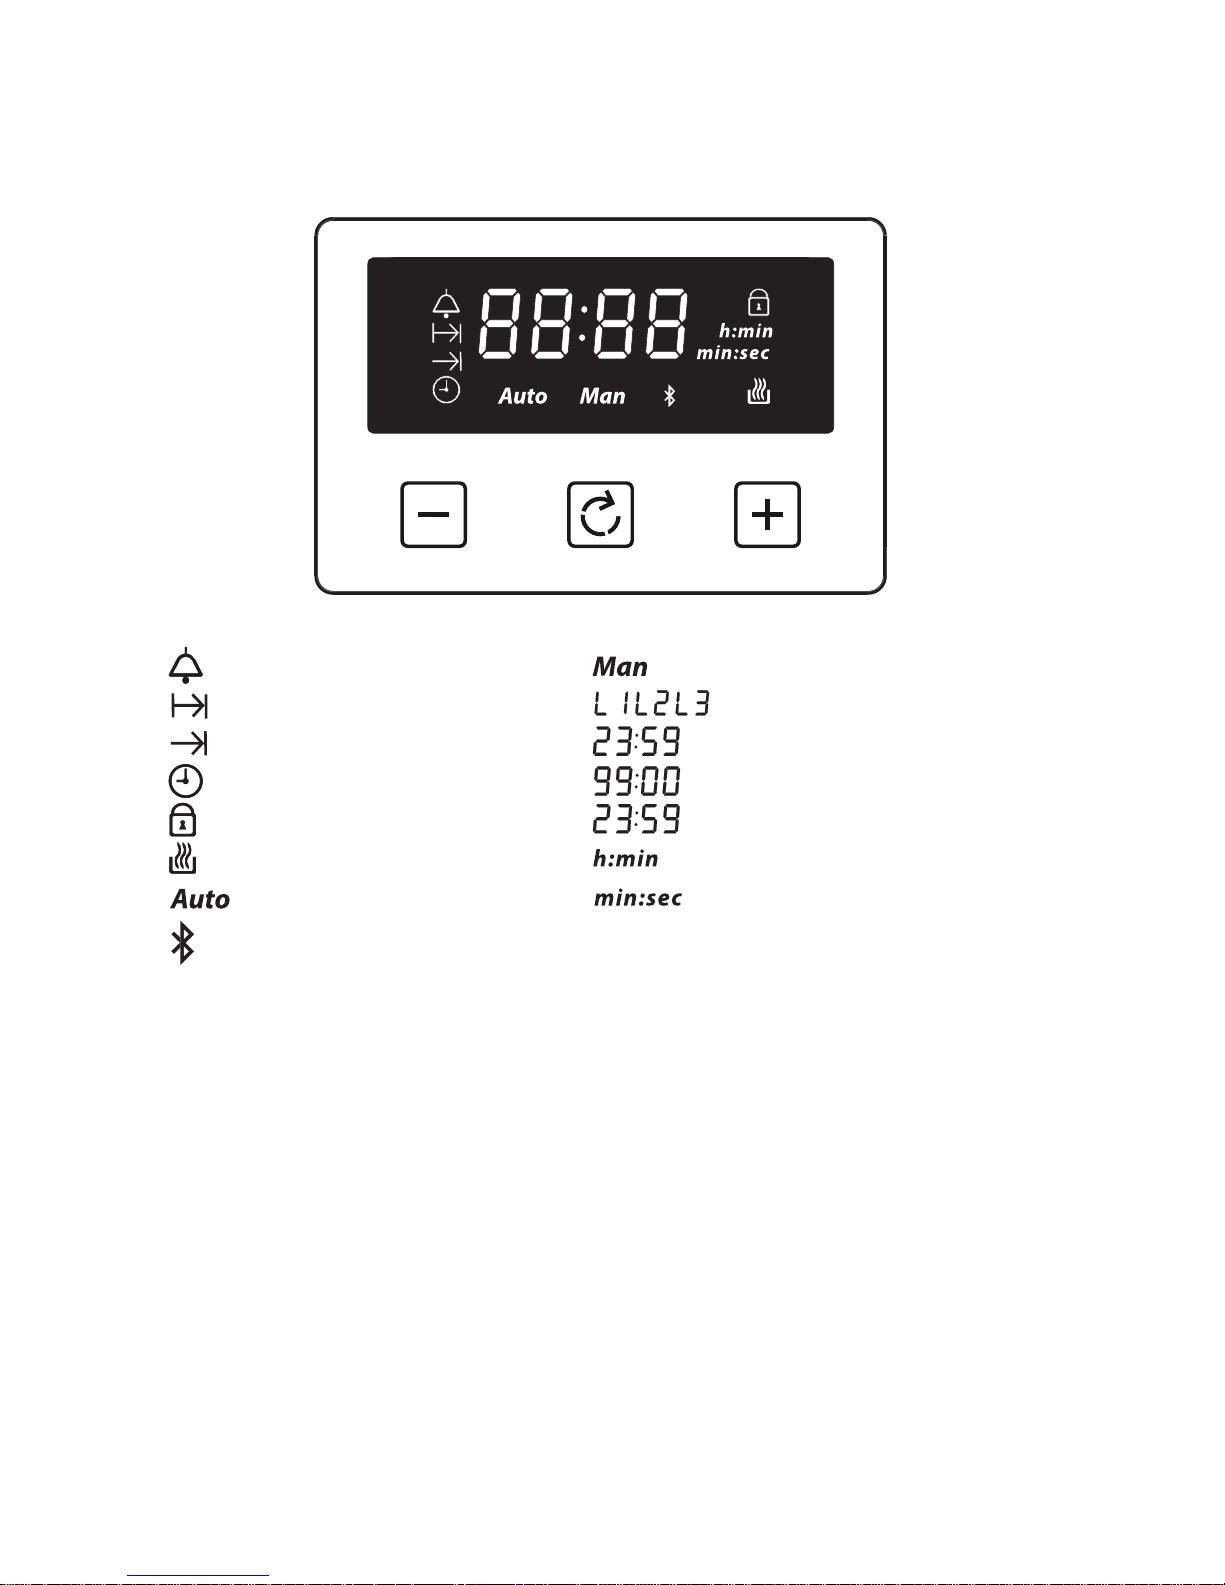
Please be aware that only the main oven is controlled by the programmer.
Clock / Programmer
Note: Your clock / programmer may not have all these functions
Minute minder
MenuMinus Plus
Cooking time / Duration
End of cooking time
Time of day
Keylock
Auto cooking
Automatic mode
Bluetooth Connectivity
Manual mode
Volume level
7-segment display
Max. adjustable minute minder
Max. adjustable cooking time
Display hours:minutes
Display minutes:seconds
, ,
Using the touch controls
Menu - Scroll through to select a function
Plus - Increase time or volume
Minus - Decrease time or volume
When a function is selected and the time or volume is set, the chosen function will automatically start
seven seconds after setting.
Manual Mode
If the programmer is not in semi-automatic or full-automatic mode you can use oven functions manually.
The manual icon is also on the display.
Page 20
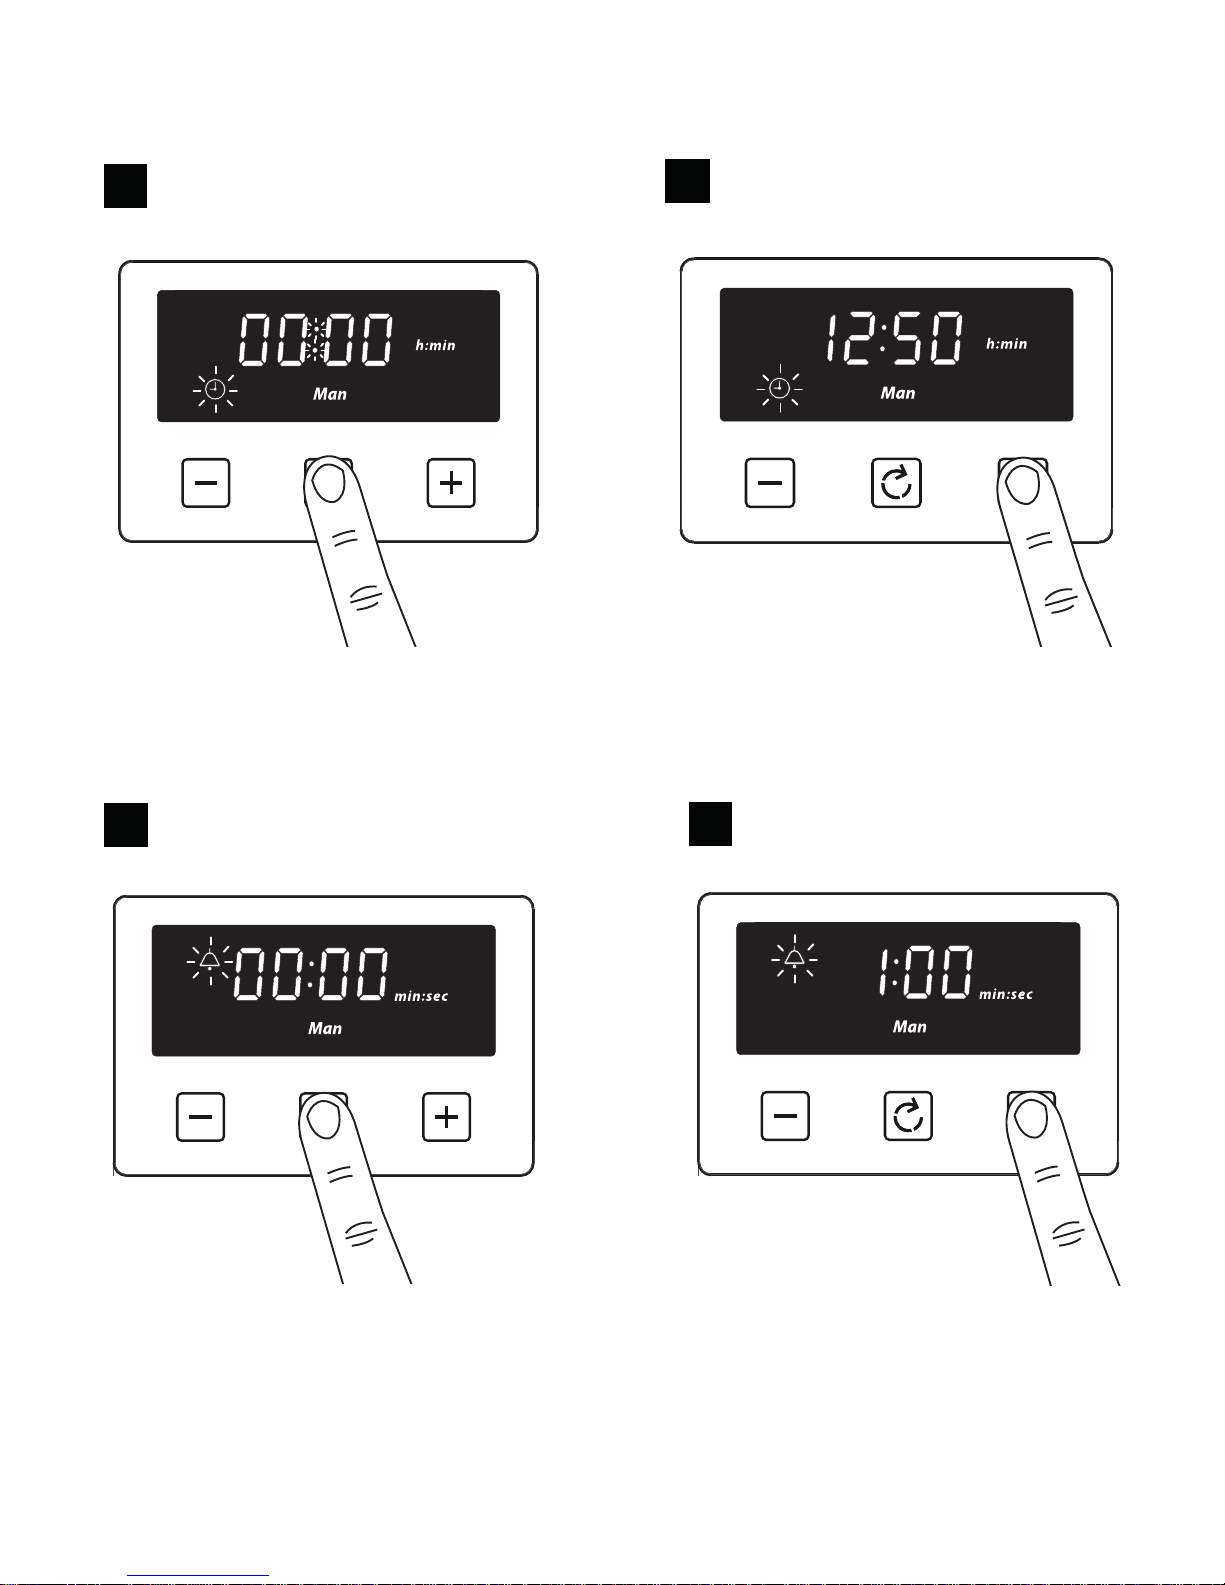
Setting the time of day
By pressing menu, scroll through the functions until you reach ‘time of day’.
1
Press the function button until the ‘time of day’
symbol appears
2
Press the plus or minus buttons to set a time
Setting the minute minder
The maximum cooking time that can be set is 99 minutes.
1
Press the function button until the ‘minute
minder’ symbol appears
2
Press the plus or minus buttons to set a time
Once set, the minute minder will start to countdown in steps of seconds. The display will show the
minute minder symbol and the remaining time. The countdown will continue in the background, if other
functions are being set.
When the set time for the minute minder has completed, an alarm is heard and the minute minder
symbol will ash on the display. Press any button to stop the alarm and the time of day is displayed.
Page 21
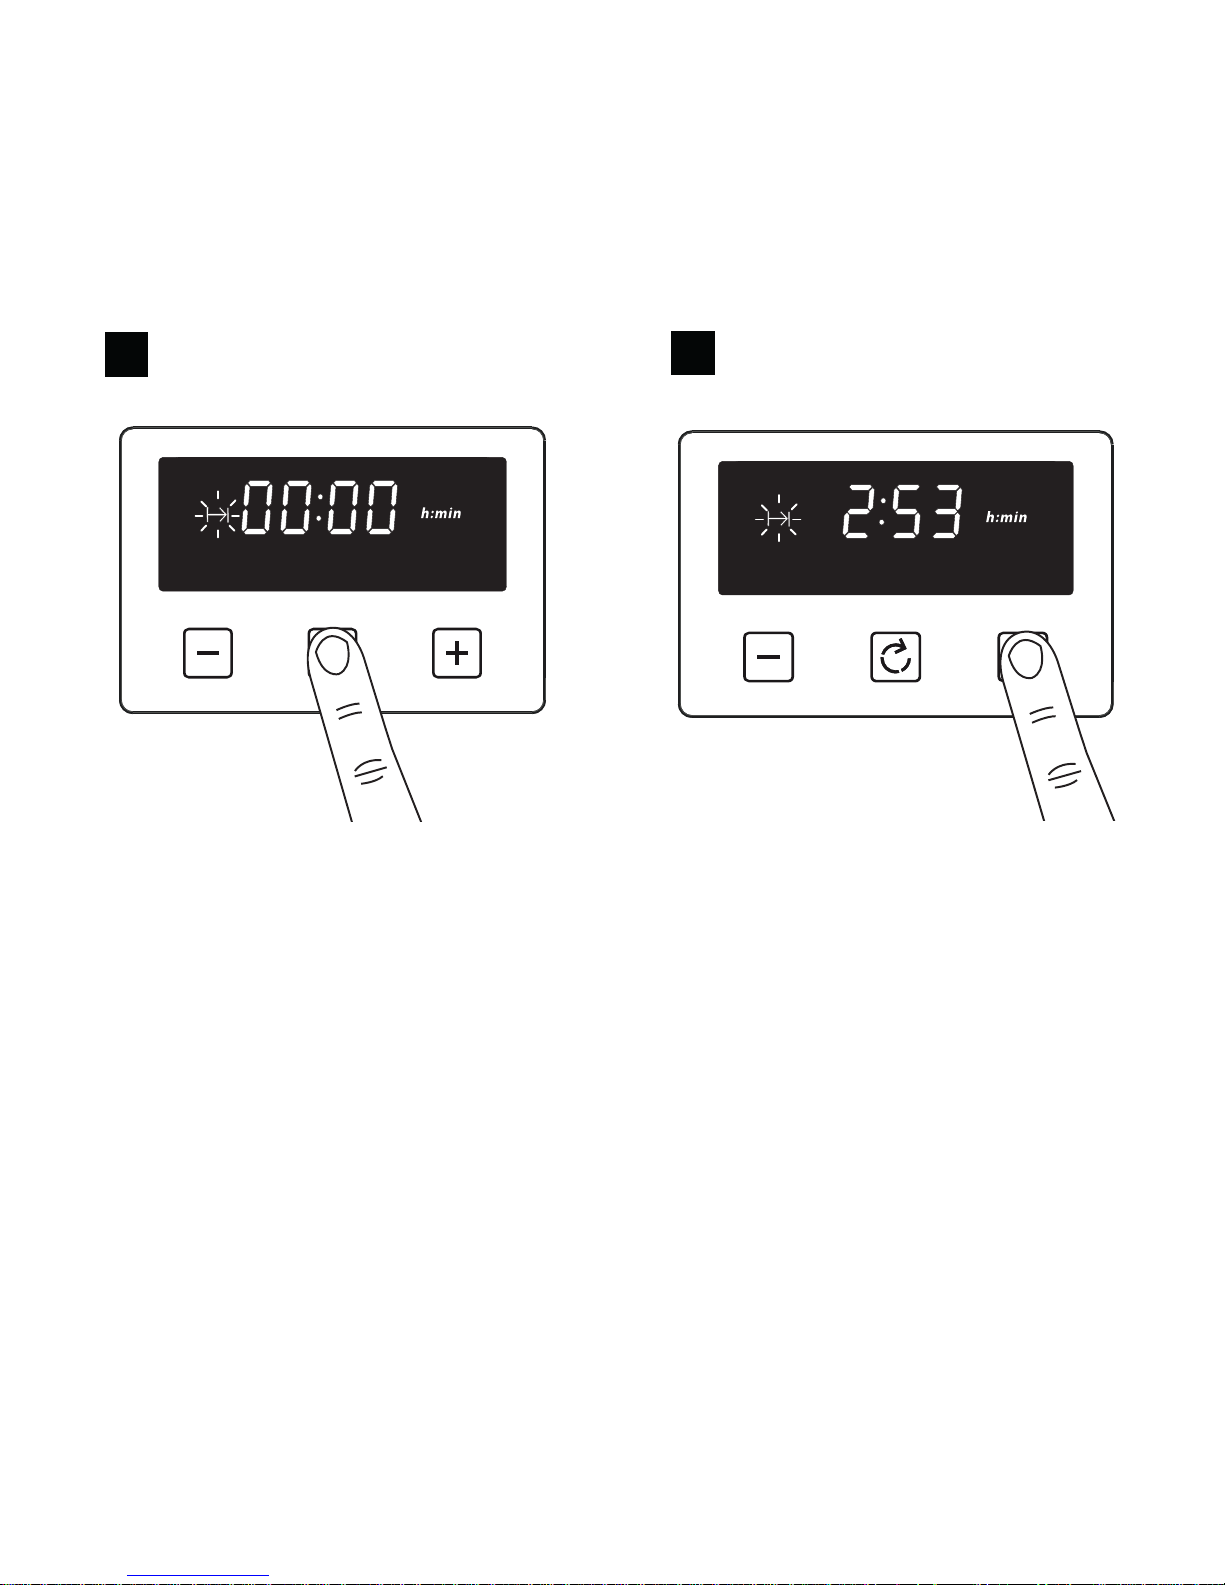
To modify or cancel the minute minder
Return to the minute minder function and use either the plus or minus buttons to adjust the time. By
setting the time to ‘0.00’, this will cancel the countdown.
Setting the cooking time (the duration of time the oven will operate for) Semi Automatic cooking
The maximum cooking time that can be set is 23 hours and 59 minutes.
1
Press the function button until the ‘cooking
time’ symbol appears
2
Press the plus or minus buttons to set a time
Once set, the automatic mode, auto cooking symbol and the time of day is displayed.
When cooking is completed, an alarm is heard and the manual mode symbol ashes on the display.
Press the Menu button to stop the alarm and then the ‘time of day’ will then be displayed. Pressing the
Menu button again will return to manual mode.
To modify or cancel the cooking time
Return to the ‘cooking time’ function and use either the plus or minus buttons to set the time. By setting
the time to ‘0.00’, this will cancel the countdown.
Page 22
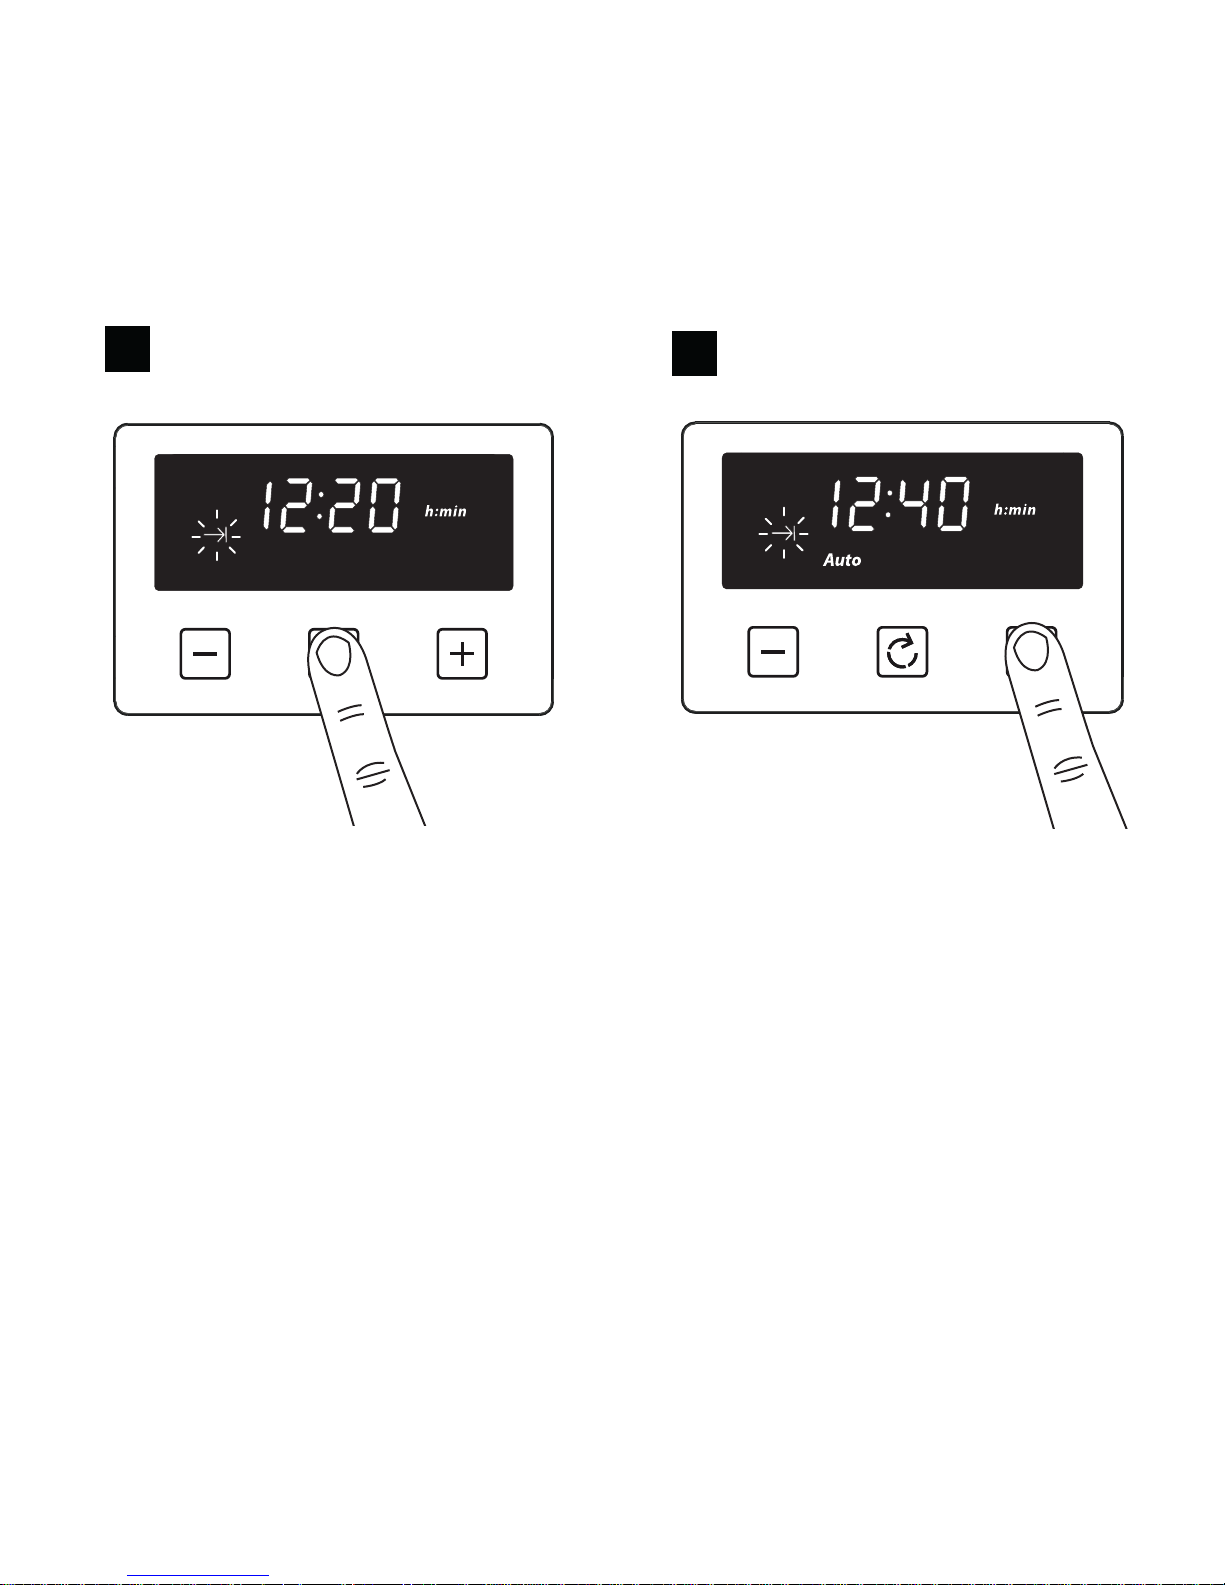
Setting the end of cooking time (to set a time for the oven to turn off) Fully Automatic
Enter cooking duration as described in ‘Setting the cooking time’ section.
The display shows the current ‘time of day’ plus the ‘end of cooking time’ symbol. The latest ‘end of
cooking time’ is limited to the current ‘time of day’ plus the maximum time that can be set (23 hours and
59 minutes).
1
Press the function button until the ‘end of
cooking time’ symbol appears
2
Press the plus or minus buttons to set a time
The auto cooking symbol disappears from the display once the time, the required cooking settings and
temperature have been set. The appliance will not be switched on until the set cooking start time, that is
the difference between the cooking end time and the cooking duration.
When cooking is completed, an alarm is heard and manual mode symbol ashes on the display. Press
the menu button to stop the alarm. Pressing the Menu button again will return to manual mode.
To modify or cancel the end of cooking time
Return to the ‘end of cooking time’ function and use either the plus or minus buttons to set the time. The
‘end of cooking time’ can be deleted by counting back using the minus button until it equals the current
time of day.
Page 23
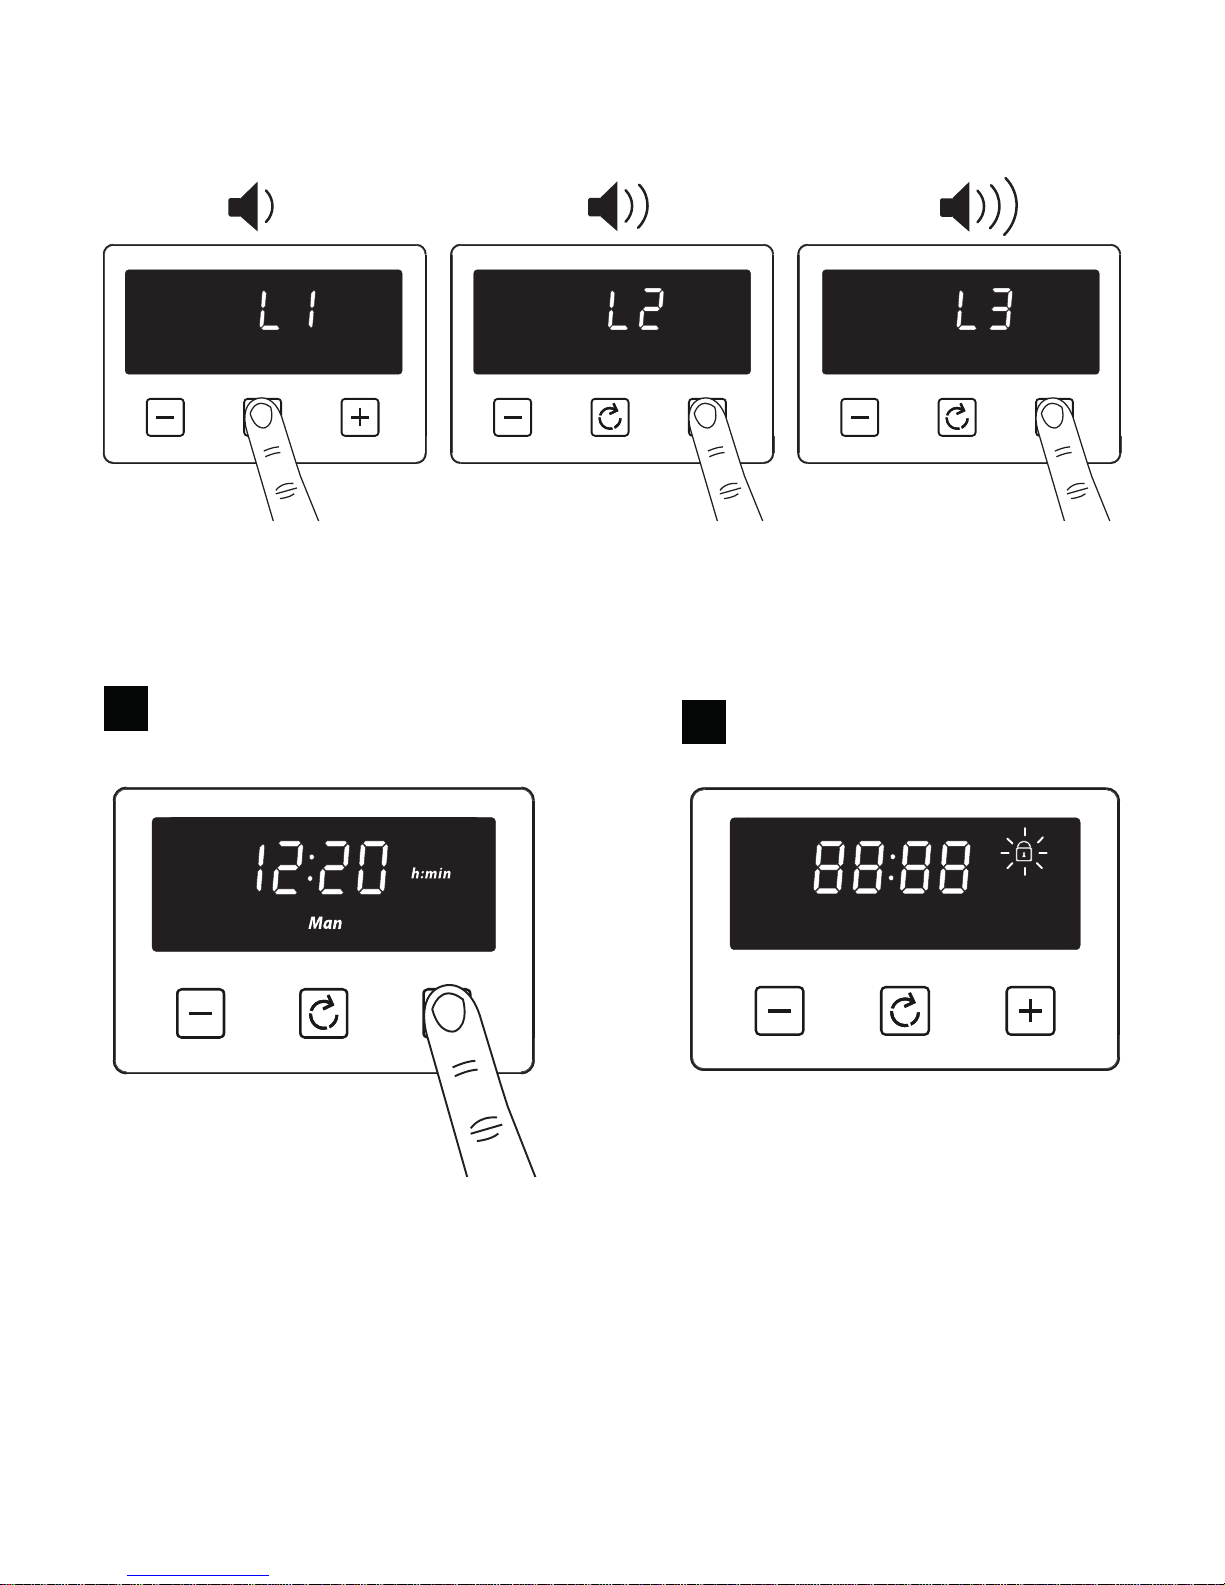
Setting the volume
Press the menu button until “LX” (X = 1, 2 or 3) ashes on the display. Use the plus or minus buttons to
select a tone.
Note: Default tone is L3
Activating / deactivating Key lock
1
Press and hold the plus button for 3-5
seconds
2
Once the Key lock is active, the buttons will be inactive. A two beep signal will be heard if the buttons
are pressed.
To deactivate the Key lock
Press and hold the plus button for 3-5 seconds. The Key lock symbol will disappear and the appliance
can continue to be used.
Note: In case of main power loss for a short time (about 1.5 minutes), timer maintains its status.
Key lock status and buzzer tone are memorized independent of the power loss duration.
Page 24
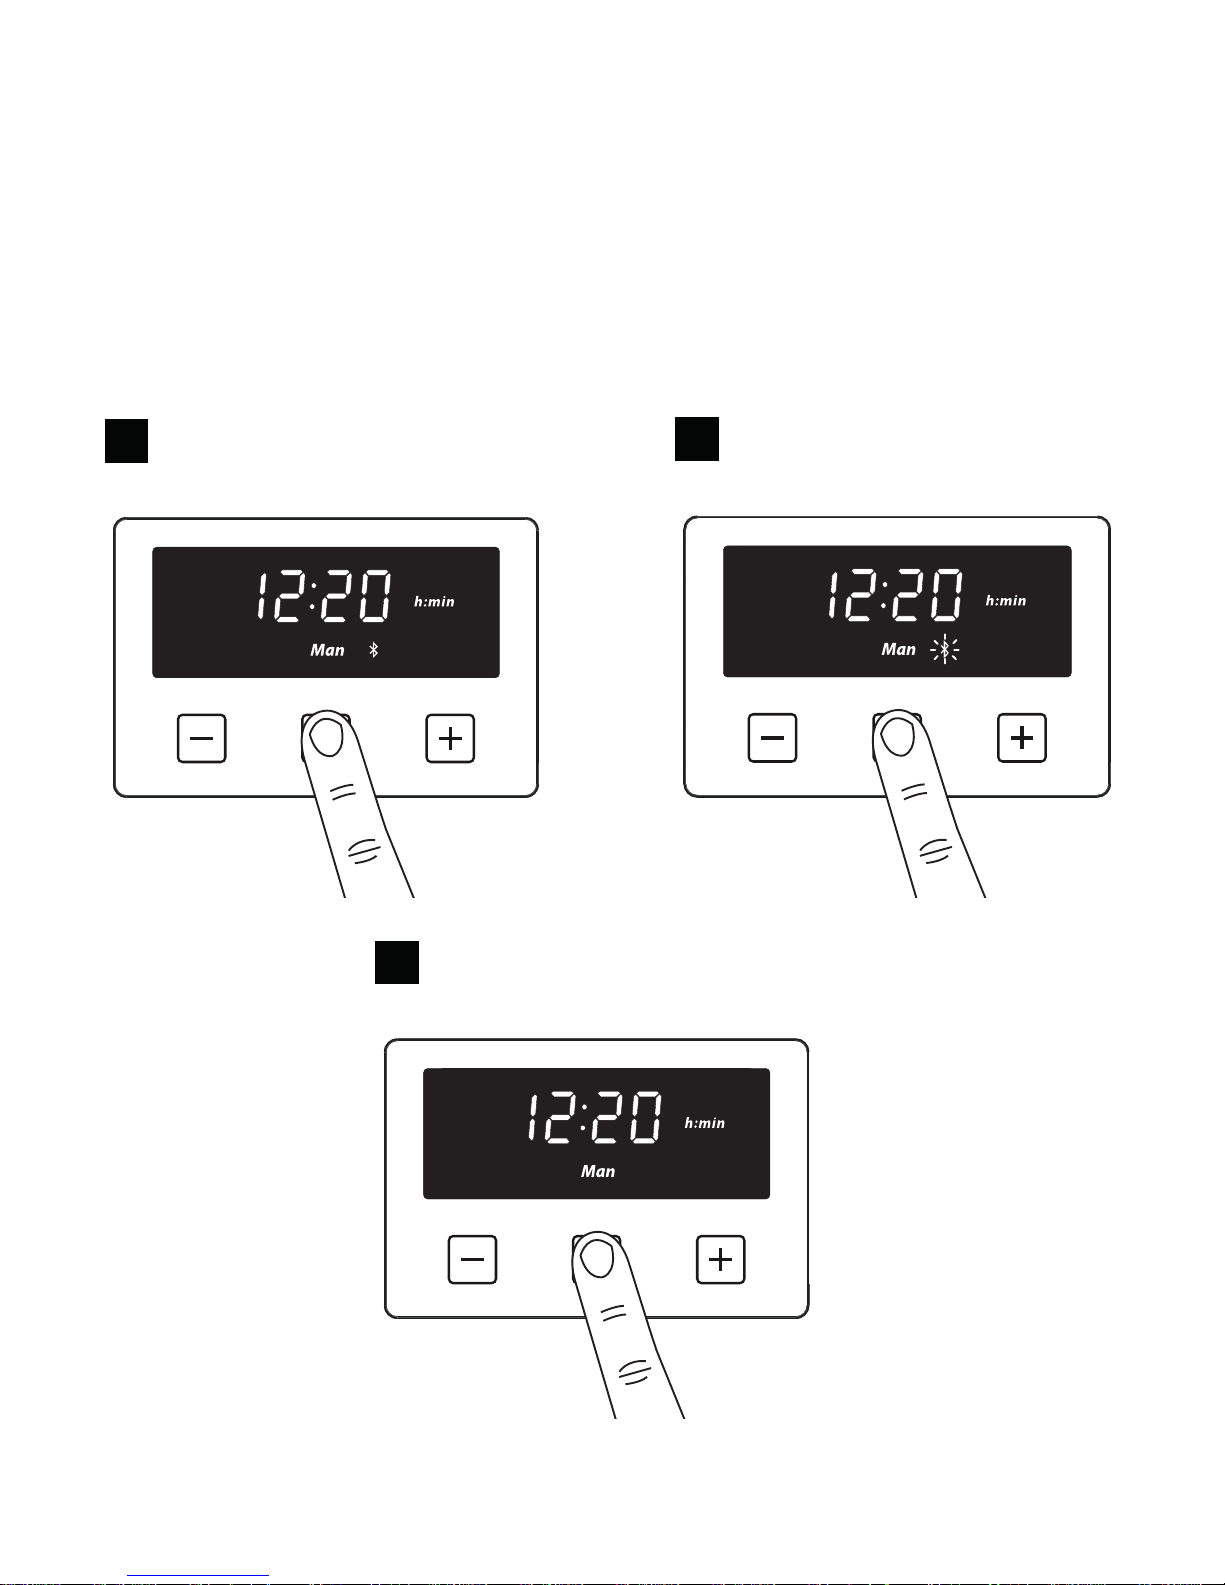
Bluetooth Connectivity
State of Connectivity Symbol
• When the connectivity symbol is not present, the appliance cannot be connected to.
• When the connectivity symbol is blinking, the appliance is ready to be paired with a smart device
using the Zeus App.
• When the connectivity symbol is solid, the appliance is connected to a smart device and can be set
using the Zeus app.
Activating / deactivating the bluetooth connectivity
1
Press and hold the menu button for 2 seconds
until a beep is heard
2
The connectivity symbol will start flashing. The
timer is now ready to be connected to a smart
device
3
To switch off, press and hold the menu button
for 2 seconds. The connectivity symbol will
disappear
Page 25
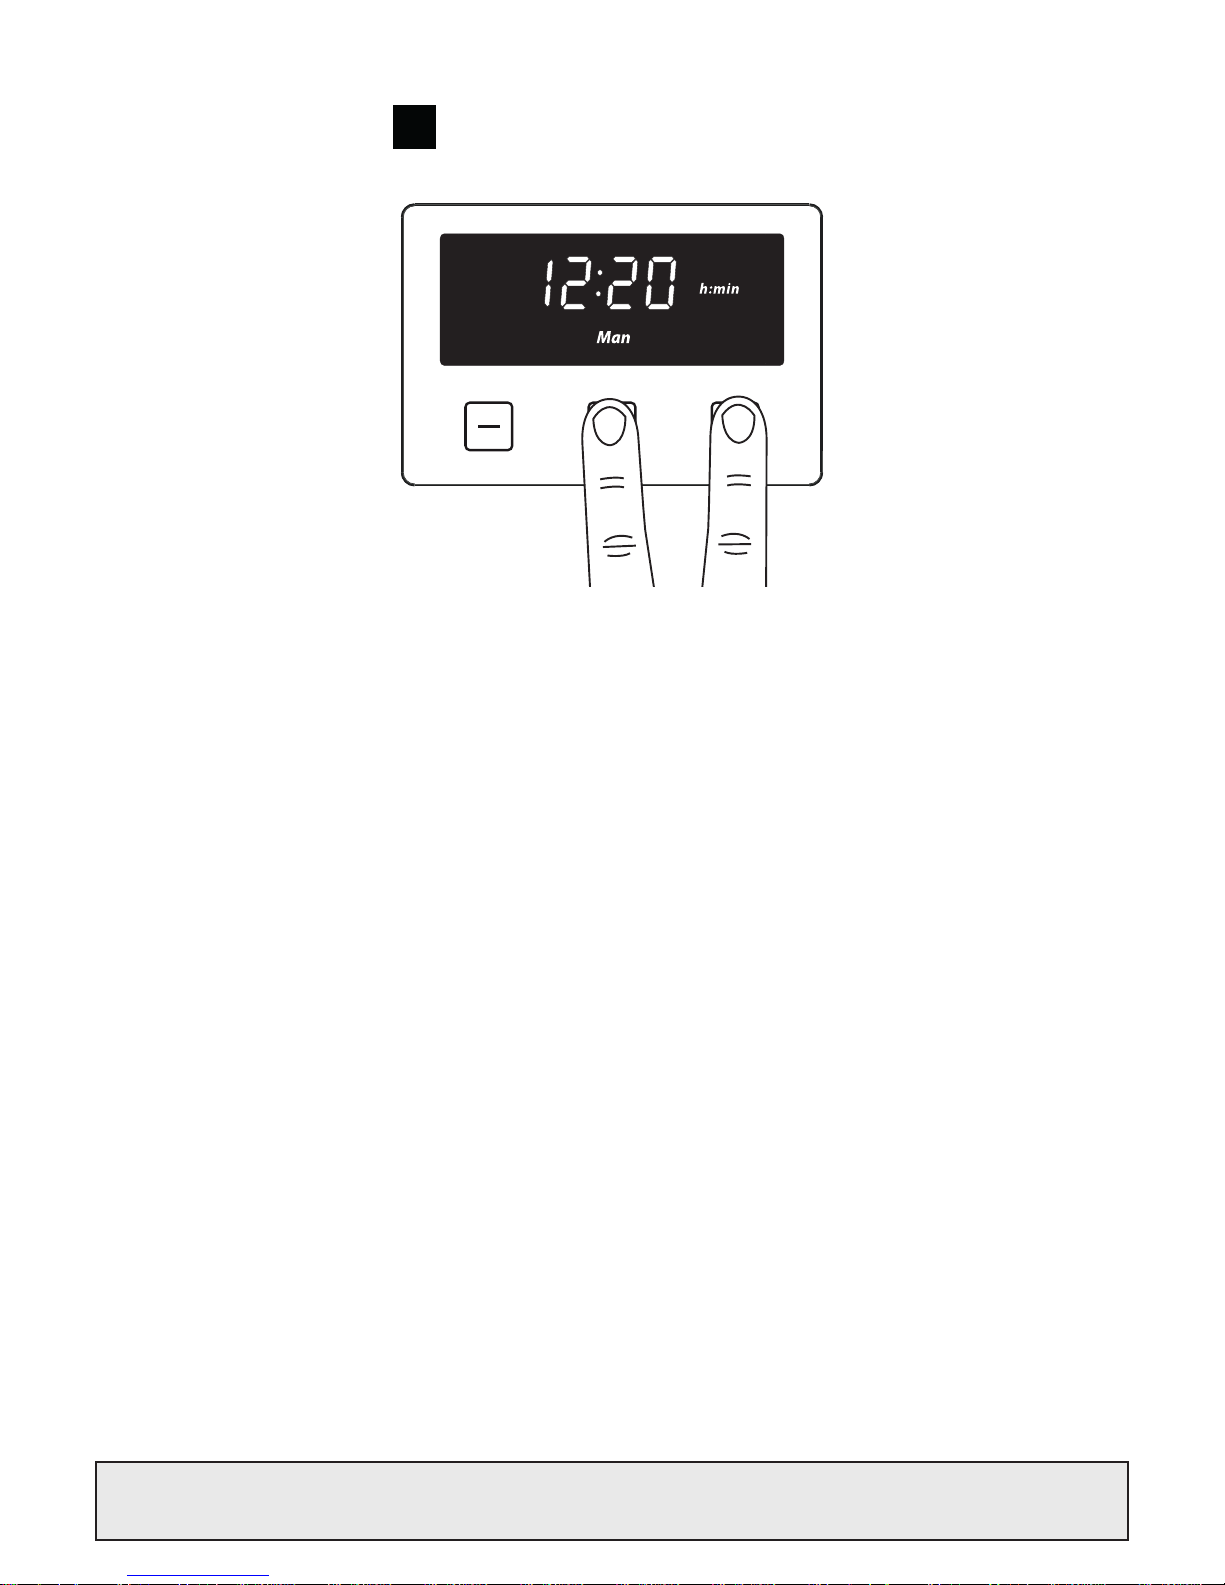
Clear Memory
1
Press the menu and plus button at the same
time until a beep is heard.
Once the beep is heard, any paired data will be cleared.
Delete pairing information in the Bluetooth Settings of your smartphone or tablet.
How to read the 6-digit pairing code
1. When the smart device connects to the appliance through the Zeus App, the App will ask for a
unique pairing code that will be displayed on the timer.
Note: Every time a new smart device connects though the Zeus App to the appliance, a different
pairing code is displayed.
2. When prompted to enter the 6-digit code, the code will appear on the timer.
The 6-digit code will scroll across the timer display from the right to the left.
Note: Be aware that the display can only show four digits at a time.
Please refer to the website at the front of this guide for more information or
download the Zeus App (Available on iPhone and Android)
Page 26
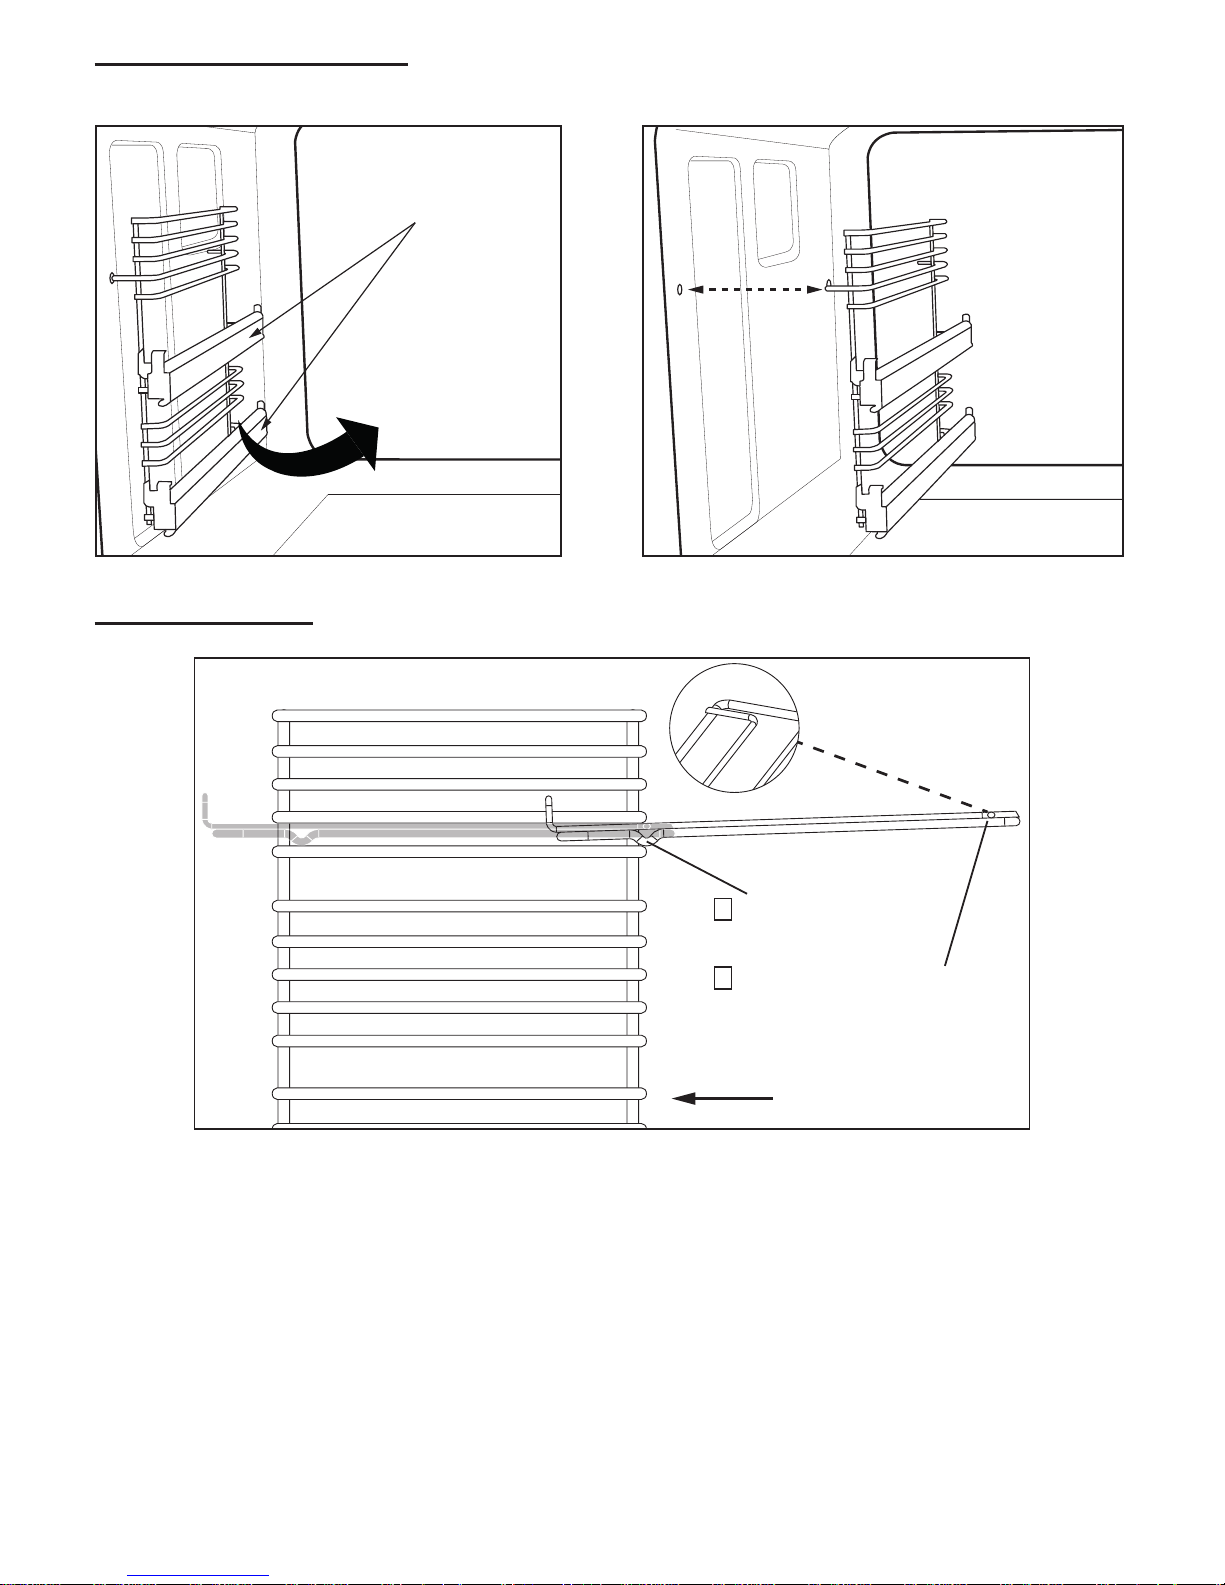
Removing Shelf Runners
Telescopic positions
(if fitted)
Standard shelves
Front of appliance
2
Ensure the shelf is fully pushed
back towards the back of the
oven, until the shelf stopper is
reached.
Slightly raise the shelf and
insert in the chosen shelf
position
1
Page 27
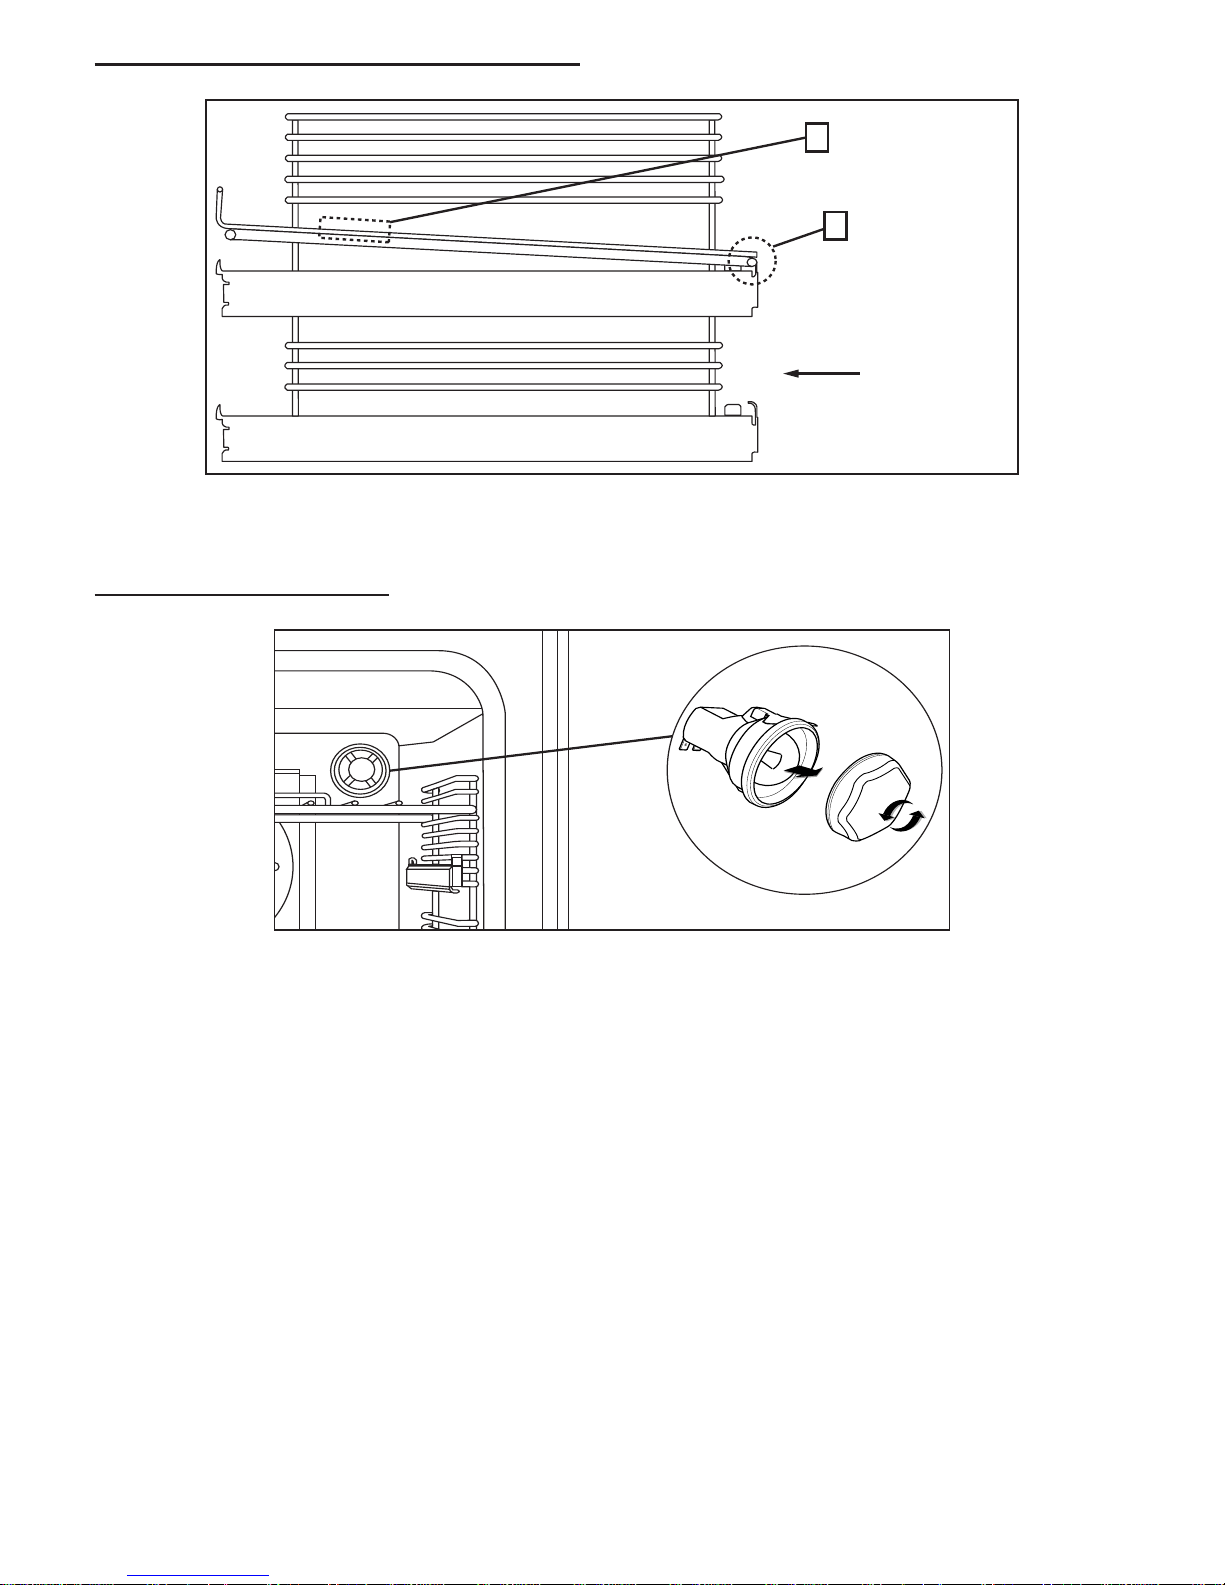
RemovingTelescopicshelves(iftted)
1
2
Grasp and lift shelf
Lift shelf from the
retaining tabs.
Front of appliance
Before removing the shelves completely, please make sure that the shelf is unclipped from the retaining
tabs.
Changing the light bulb
Not all appliances have the same number and type of bulbs. Before you replace your bulb, check to see
what type you have. Please remember that bulbs are not covered by your warranty.
Additional features
Plate rack (if supplied)
1. Pull the shelf out of the cavity.
2. Tilt the plate warmer towards you and make sure that it hooks underneath the shelf bars at the front.
3. Drop the plate warmer carefully into position.
The plate warmer is now secure and you can place your plates into it.
Always make sure that you use oven gloves if you are putting the plate warmer into a hot, or recently
used oven to prevent burns.
Always make sure that your plates are suitable for warming - some plates may shatter or crack when
exposed to heat.
We recommend that you heat the oven to 70°C, or below, if you are warming plates.
Page 28
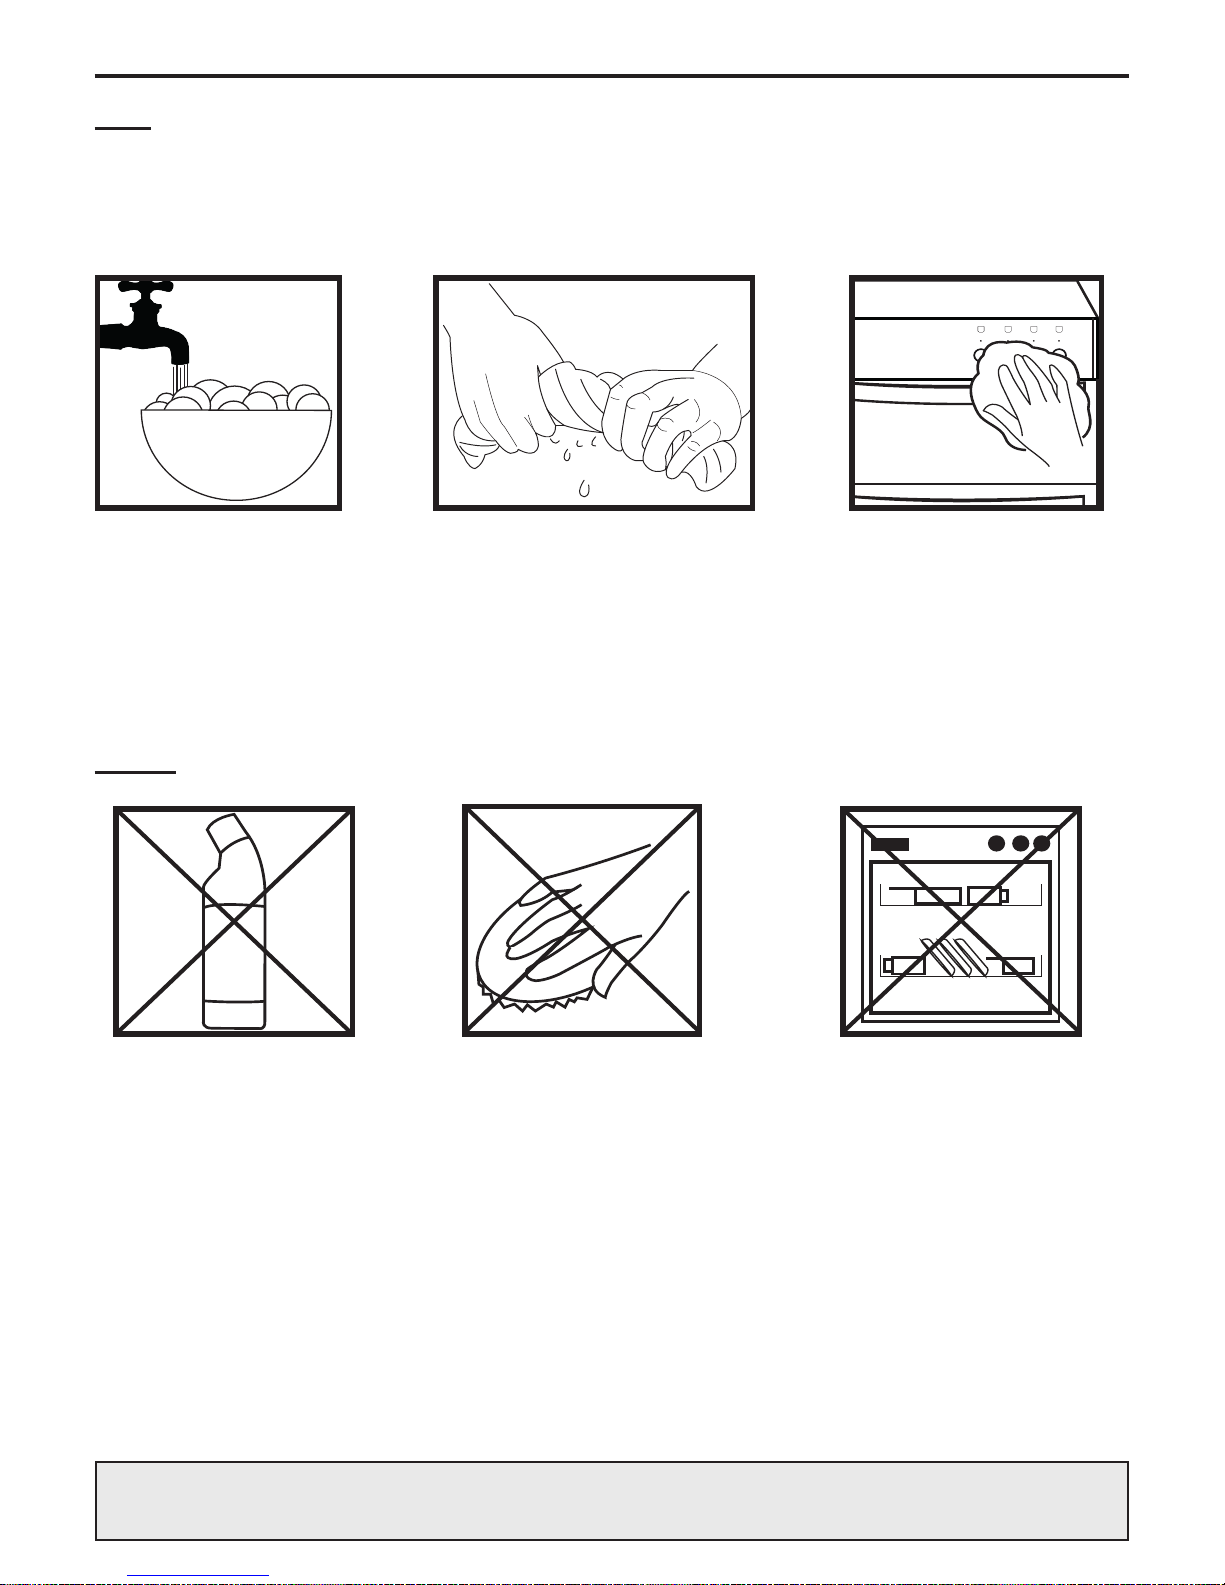
CLEANING YOUR APPLIANCE
Do’s
Note: Always switch off your appliance and allow it to cool down before you clean any part of it.
Note: Please take extra care when cleaning over the symbols on the control panel, as this can lead to
them fading.
H
Tips: Some foods can mark or damage the metal or paint work e.g.; Vinegar, fruit juices and salt.
Always clean food spillages as soon as possible.
Dont’s
IT IS IMPORTANT TO CLEAN YOUR APPLIANCE REGULARLY AS A BUILD UP OF FAT CAN
AFFECT IT’S PERFORMANCE OR DAMAGE IT AND MAY INVALIDATE YOUR GUARANTEE.
IN ADDITION TO THE ABOVE, DO NOT USE METAL SCRAPERS TO CLEAN THE OVEN DOOR
GLASS.
• Undiluted bleaches
• Chloride products
• Warm, soapy water • Wipe with damp cloth
• Dry with a soft cloth
• Clean, wring out cloth
• Wire Wool
• Abrasive cleaners
• Nylon pads
• Steam cleaners
Do not place in the
dishwasher:
• Cast iron griddle
• Pan supports
We offer a great range of cleaning products and accessories for your appliance.
To shop, please visit our website located at the front of this User Guide.
Page 29

Please keep this handbook for future reference, or for anyone else
who may use the appliance.
Page 30

Please keep this handbook for future reference, or for anyone else
who may use the appliance.
Page 31

Please keep this handbook for future reference, or for anyone else
who may use the appliance.
Page 32
Electric Induction Mini Range
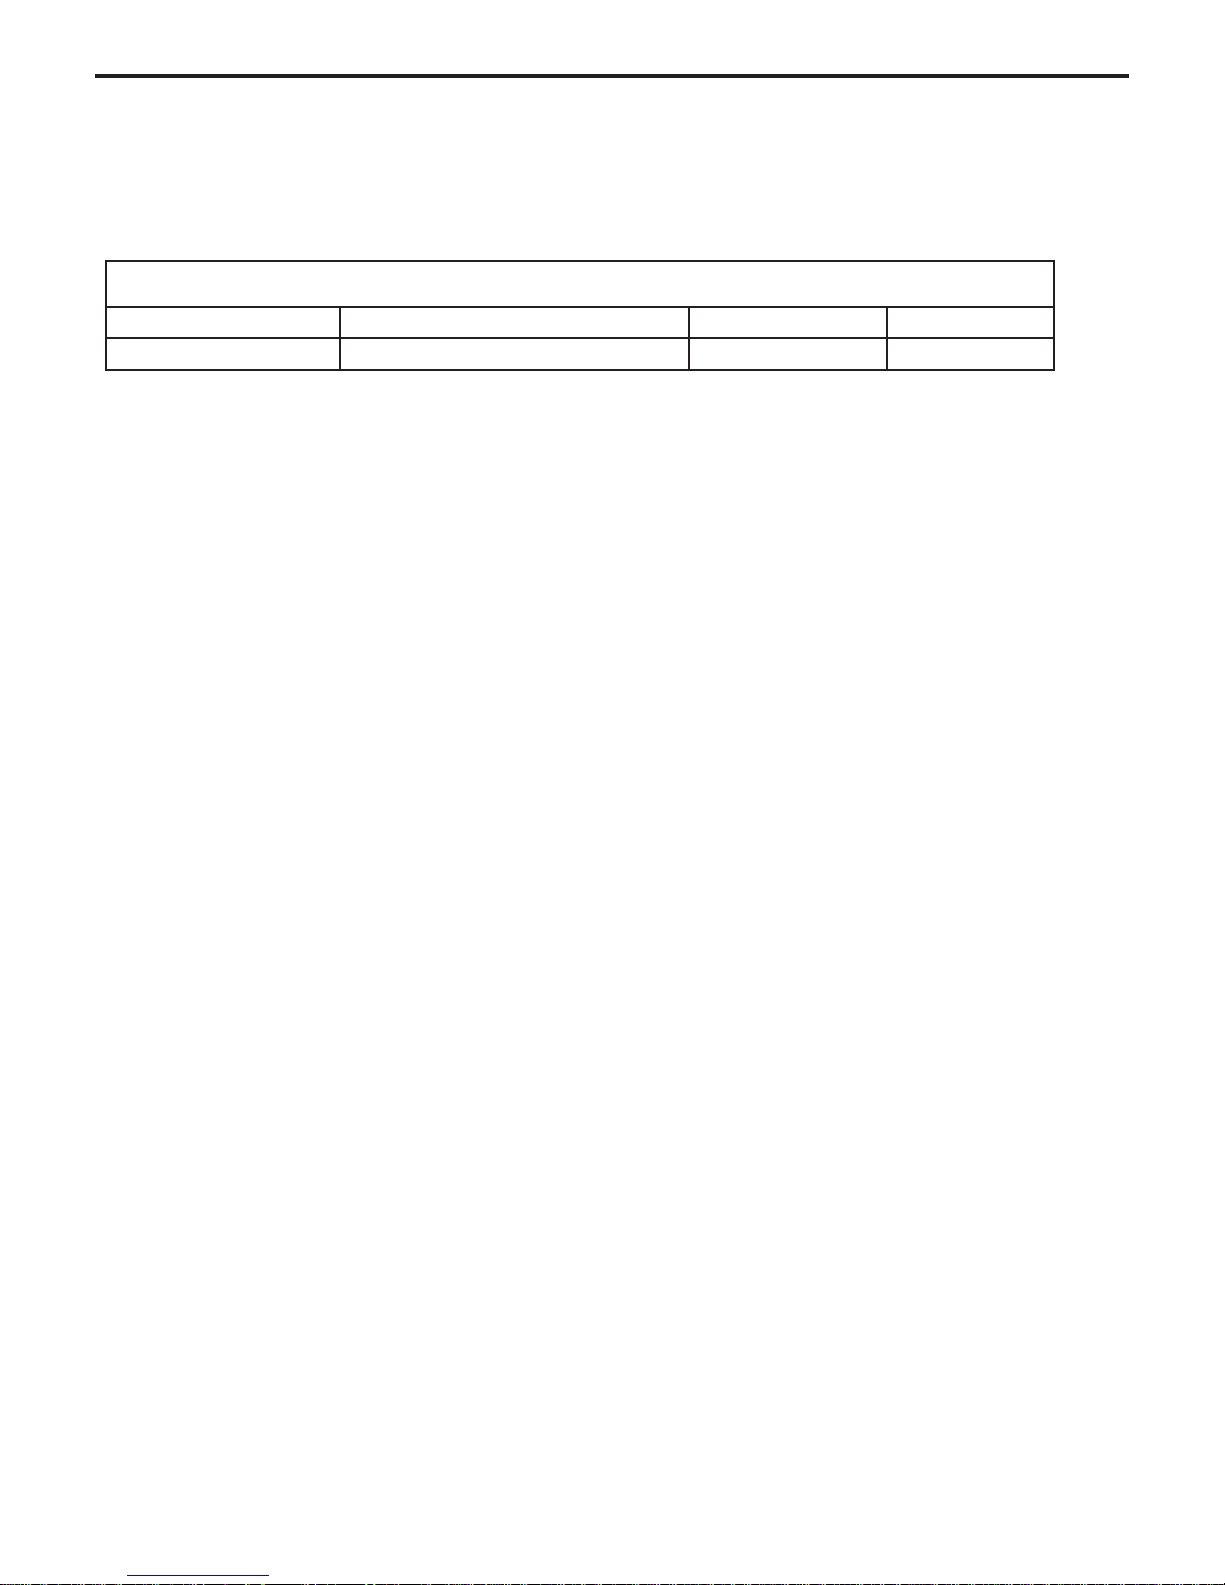
TECHNICAL DATA
Electrical supply / Load
Appliance Size (cm) Electrical supply Hotplate Load (W)
55 / 60 220 - 240V ~ 50Hz Induction 11430 - 12370
The data badge is located at the lower part of front frame, behind the door.
WARNING: This appliance must be earthed.
 Loading...