

Page 1

MADE BETTER
USER GUIDE
STOVES BI45COMW COMPACT
COMBINATION MICROWAVE OVEN
Page 2
2
To contact Stoves about your appliance, please call:
Customer Care Helpline
0344 815 3740
In case of difficulty within the UK
Spares Store
0344 815 3745
To contact us by email:
Warranty Registration
0800 952 1065
*Please call our Customer Care team for extended
warranty
To register your appliance online:
www.stoves.co.uk
To register your appliance by mail:
Please complete the warran ty
card and return to the address
supplied
Alternatively general, spares and service information is available from
our website at: www.stoves.co.uk
Calls are charged at the basic rate, please check with your telephone service provider for exact charges
Your new appliance comes with our 12-month guarantee, protecting you against electrical and
mechanical breakdown. To register, please complete the registration form included, regis ter onli ne
or by phone. For full terms & conditions of the manufacturer’s guarantee, please refer to the website above. In addition, you may wish to purchase an extended warranty. A leaflet explaining how
to do this is included with your appliance.
Our policy is one of constant development and improvement, therefore we cannot guarantee the
strict accuracy of all of our illustrations and specifications. Changes may have been made
subsequent to publishing
Glen Dimplex Home Appliances, Stoney Lane, Prescot, Merseyside, L35 2XW
Page 3
3
INTRODUCTION
ACKNOWLEDGEMENT
Thank you for purchasing our product. We hope you enjoy using the many features and benefits it
provides.
This user guide book is designed to help you through each step of owning your new product.
Please read it carefully before you start using your appliance, as we have endeavoured to a nswer
as many questions as possible, and provide you with as much support as we can.
General information, spares and service information is available from our website.
Ensure that other people using the product are familiar with these instructions as well.
If you should find something missing from your product or have any questions that are not covered
in this user guide, please contact us (see contact information inside the front cover).
European Directives
This appliance is marked according to the European directive 2012/19/EU on Waste
Electrical and Electronic Equipment (WEEE).
By ensuring this product is disposed of correctly, you will help prevent potential negative
consequences for the environment and human health, which could otherwise be caused by
inappropriate waste handling of this product. The symbol on the product indicates that this
product may not be treated as household waste. Instead it shall be handed over to the applicable
collection point for the recy cl i ng of electric al and elec tr oni c equipment. Disposal must be carried out in
accordance with local environmental regulations for waste disposal. For more detailed information
about treatment, recovery and recycling of this product, please contact your local city office, your
household waste disposal service or the shop where you purchased the product
This appliance conforms to European Directives regarding Eco design requirements for energyrelated products.
DECLARATION OF COMPLIANCE
When you have unpacked the oven, make sure that it has not been damaged in any way.
If you have any doubts at all, do not use it: contact a professionally qualified person.
Keep packing materials such as plastic bags, polystyrene, or nails out of the reach of
children because these are dangerous to children.
Page 4

4
SAFETY
WARNING
• During use the appliance becomes hot. Care should be taken to avoid touching
heating elements.
• Children less than 8 years of age shall be kept away unless continuously
supervised. This appliance can be used by children aged from 8 years and above
and persons with reduced physical sensory or mental capabilities or lack of
experience and knowledge if they have been given supervision or instruction
concerning the use of the appliance in a safe way and understand the hazards
involved. Children shall not play with the appliance. Cleaning and user maintenance
shall not be made by children without supervision.
• Do not use harsh abrasive cleaners or sharp metal scrapers to clean the oven
door glass since they can scratch the surface, which may result in shattering of
the glass.
• Do not use a steam cleaner on any range cooker, hob or oven appliance.
• Ensure that the appliance is switched off before replacing the lamp to avoid electric
shock.
• When the oven is first switched on, it may give off an unpleasant smell. Please use
the fanned cooking function to 180°C for about 30 minutes to clean oil impurities
inside the cavity. Ensure that the room is well ventilated during this process.
• Do not allow children to go near the oven when it is operating, especially when
the grill is on.
• The means for disconnection must be incorporated in the fixed wiring in
accordance with the wiring specifications.
• An all-pole disconnection means must be incorporated in the fixed wiring in
accordance with the wiring rules in force.
• If the supply cord is damaged, it must be replaced by the manufacturer, its
service agent or similarly qualified persons in order to avoid a hazard.
• This appliance must be fitted to a switch providing all pole
disconnection with a minimum contact separation of 3mm.
• Connection should be made with a suitable flexible cable with a minimum
temperature rating of 70°C.
• Although every care has been taken to ensure this appliance has no sharp edges,
we recommend that you wear protective gloves when installing and moving this
appliance. This will prevent injury.
• Always switch off your appliance and allow it to cool down before you clean any
part of it.
Page 5

5
C
AUTION
• This appliance must not be installed behind a decorative door in order to avoid
overheating.
• T
he cooking process has to be supervised. A short term cooking process has to
be supervised continuously.
• E
nsure turntable, baking tray and grill rack are positioned correctly.
• F
ire Safety Advice
If you do have a fire in the kitchen, don’t take any risks - get everyone out of your
home and call the Fire Brigade.
I
f you have an electrical fire in the ki t c hen:
• Switch off at the cooker point, or switch off the power at the fuse box - this may be
enough to stop the fire immediately.
• S
mother the fire with a fire blanket, or use a dry powder or carbon dioxide
extinguisher.
• R
emember: never use water on an electrical or cooking oil fire.
• O
ther Safety Advice
• Servicing should be carried out only by authorised personnel.
• Do not operate the appliance if the door is damaged or not closing correctly.
• There is a risk of electric shock, so always make sure you have turned off and
switched off your appliance at the wall before starting any cleaning or
maintenance. Always allow the product to cool down before you change a bulb.
• D
o not modify the outer panels of this appliance in any way.
• This appliance must be earthed.
• The appliance must never be disconnected from the mains supply during use, as this
will seriously affect the safety and performance, particularly in relation to surface
temperatures becoming hot. The cooling fan (if fitted) is designed to run on after th
e
c
ooking process has been completed.
1. TECHNICAL SPECIFICATION
MODEL
ST BI45 COMW
USABLE CAPACITY(L)
35
VOLTAGE
(V)
/ FREQUENCY
(Hz)
220-240 / 50
DISTRIBUTION LINE FUSE(A)/ CIRCUIT
BREAKER(A)
13
MICROWAVE INPUT POWER(W)
1500-1650
MICROWAVE OUTPUT POWER(W)
1000
MICROWAVE WORKING
FREQUENCY(MHz)
2450
Page 6

6
GRILLING POWER(W)
1400-1650
CONVECTION POWER(W)
1350-1500
PRODUCT DIMENSION(W x D x H mm)
594 × 536 × 455
PACKAGE SIZE(W x D x H mm)
675 × 666 × 525
DIAMETER OF ROTATING PLATE(mm)
315
GROSS/NET WEIGH T(Kg)
38.0/34.3
1. SAFETY PRECAUTIONS
Please refer to the installation instructions for the safety regulations for electric or gas
appliance and ventilation requirements.
After installation, carry out a quick test on the oven referring to the instructions; if the
appliance fails to operate, disconnect it and contact the service department.
• WARNING: If the door or door seals are damaged, the oven must not be operated
until it has been repaired by a competent person.
• WARNING: It is hazardous for anyone other than a competent person to carry out
any service or repair operation that involves the removal of a cover which gives
protection against exposure to microwave energy.
• WARNING: Liquids and other foods must not be heated in sealed containers since
they are liable to explode. Accessible parts may become hot during use. Young
children should be kept away.
• WARNING: Only allow children to use the oven without supervision when adequate
instructions have been given so that the child is able to use the oven in a safe way
and understands the hazards of improper use.
• There must be a gap of at least 4mm between the top of the appliance and the top of
the housing unit cavity.
• Only use utensils that are suitable for use in microwave ovens.
• When heating food in plastic or paper containers, keep an eye on the oven due to
the possibility of ignition.
• If smoke is observed, switch off the appliance at the wall and keep the door closed in
order to stifle any flames.
• Microwave heating of beverages can result in delayed eruptive boiling, therefore
care must be taken when handling the container.
• The contents of feeding bottles and baby food jars shall be stirred or shaken and the
temperature checked before consumption, in order to avoid burns.
• Eggs in their shell and whole hard-boiled eggs should not be heated in microwave
ovens since they may explode, even after microwave heating has ended.
• The oven should be cleaned regularly and any food deposits removed.
Page 7

7
Failure to maintain the oven in a clean condition could lead to deterioration of the
surface that could adversely affect the life of the appliance and possibly result in a
hazardous situation.
• If the supply cord is damaged, it must be replaced by the manufacturer, its service
agent or similarly qualified persons in order to avoid a hazard.
• This appliance is not intended for use by persons (including children) with reduced
physical sensory or mental capabilities, or lack of experience and knowledge, unless
they have been given supervision or instruction concerning use of the appliance by a
person responsible for their safety.
• Children should be supervised to ensure that they do not play with the appliance.
Warning: When the appliance is operated in the combination mode, children should
only use the oven under adult supervision due to the high temperatures generated.
• Avoid damage to the oven or other dangerous situations by following these
instructions:
• Do not cover or obstruct the ventilation openings.
• Do not keep any inflammable objects inside the oven as they may ignite if the oven is
switched on accidentally.
• Do not store food inside the oven and do not leave cooked food inside the oven to
keep warm after the cooking process has been completed.
• Do not pour spirits (e.g. brandy, whisky, schnapps, etc.) over hot food inside the oven.
Danger of explosion!
• Accessories such as wire racks and trays, etc. get hot in the cooking space. Always
wear protective oven gloves.
• To avoid being burnt, always use oven gloves for handling dishes and containers and
opening the oven door.
• Do not lean on the opened oven door. This may damage the oven, especially in the
hinge area. The door can bear a maximum weight of 8 kg.
• The turntable, baking tray and grill racks can bear a maximum load of 8 kg. To avoid
damaging the oven, do not exceed this load.
Page 8
8
USING YOUR APPLIANCE
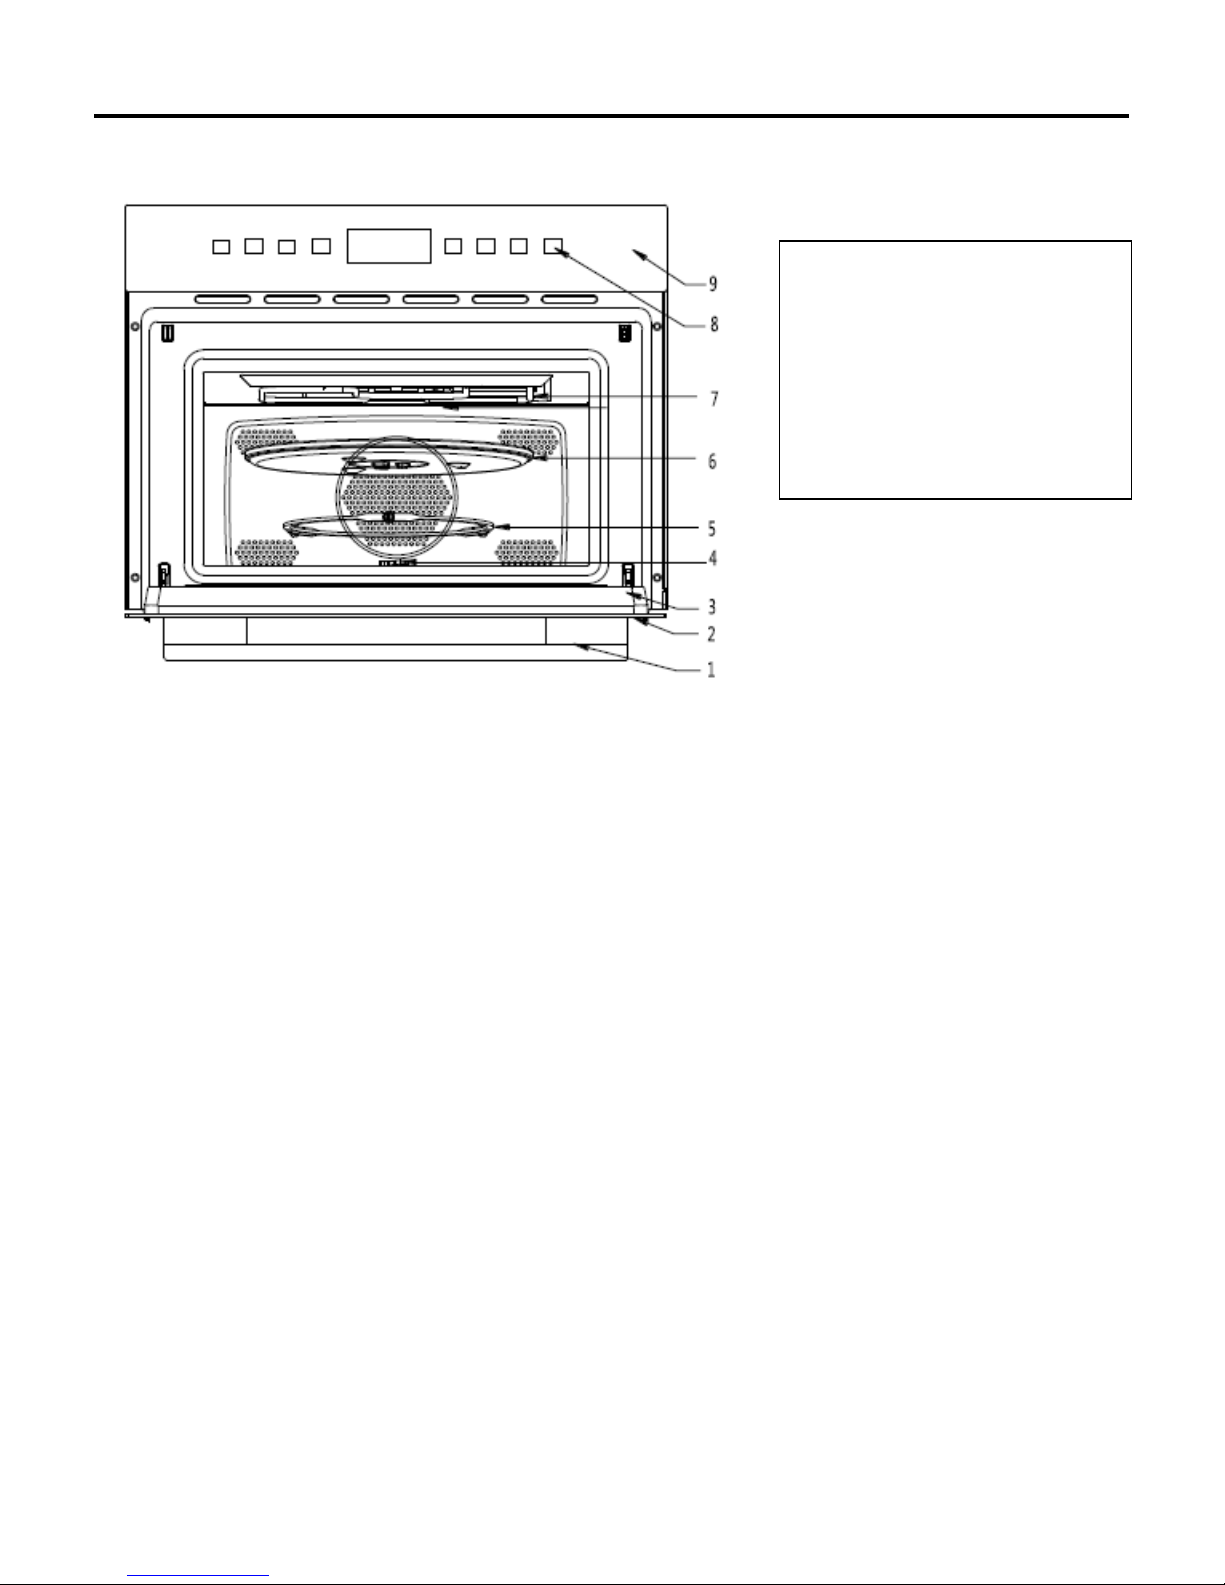
Getting to know your product
3. BEFORE INSTALLATION
The inside of the appliance should be cleaned to remove all manufacturing residues. For
further information about cleaning, see the ‘Cleaning and Maintenance’ section.
4. DESCRIPTION OF FRONT PANEL CONTROL
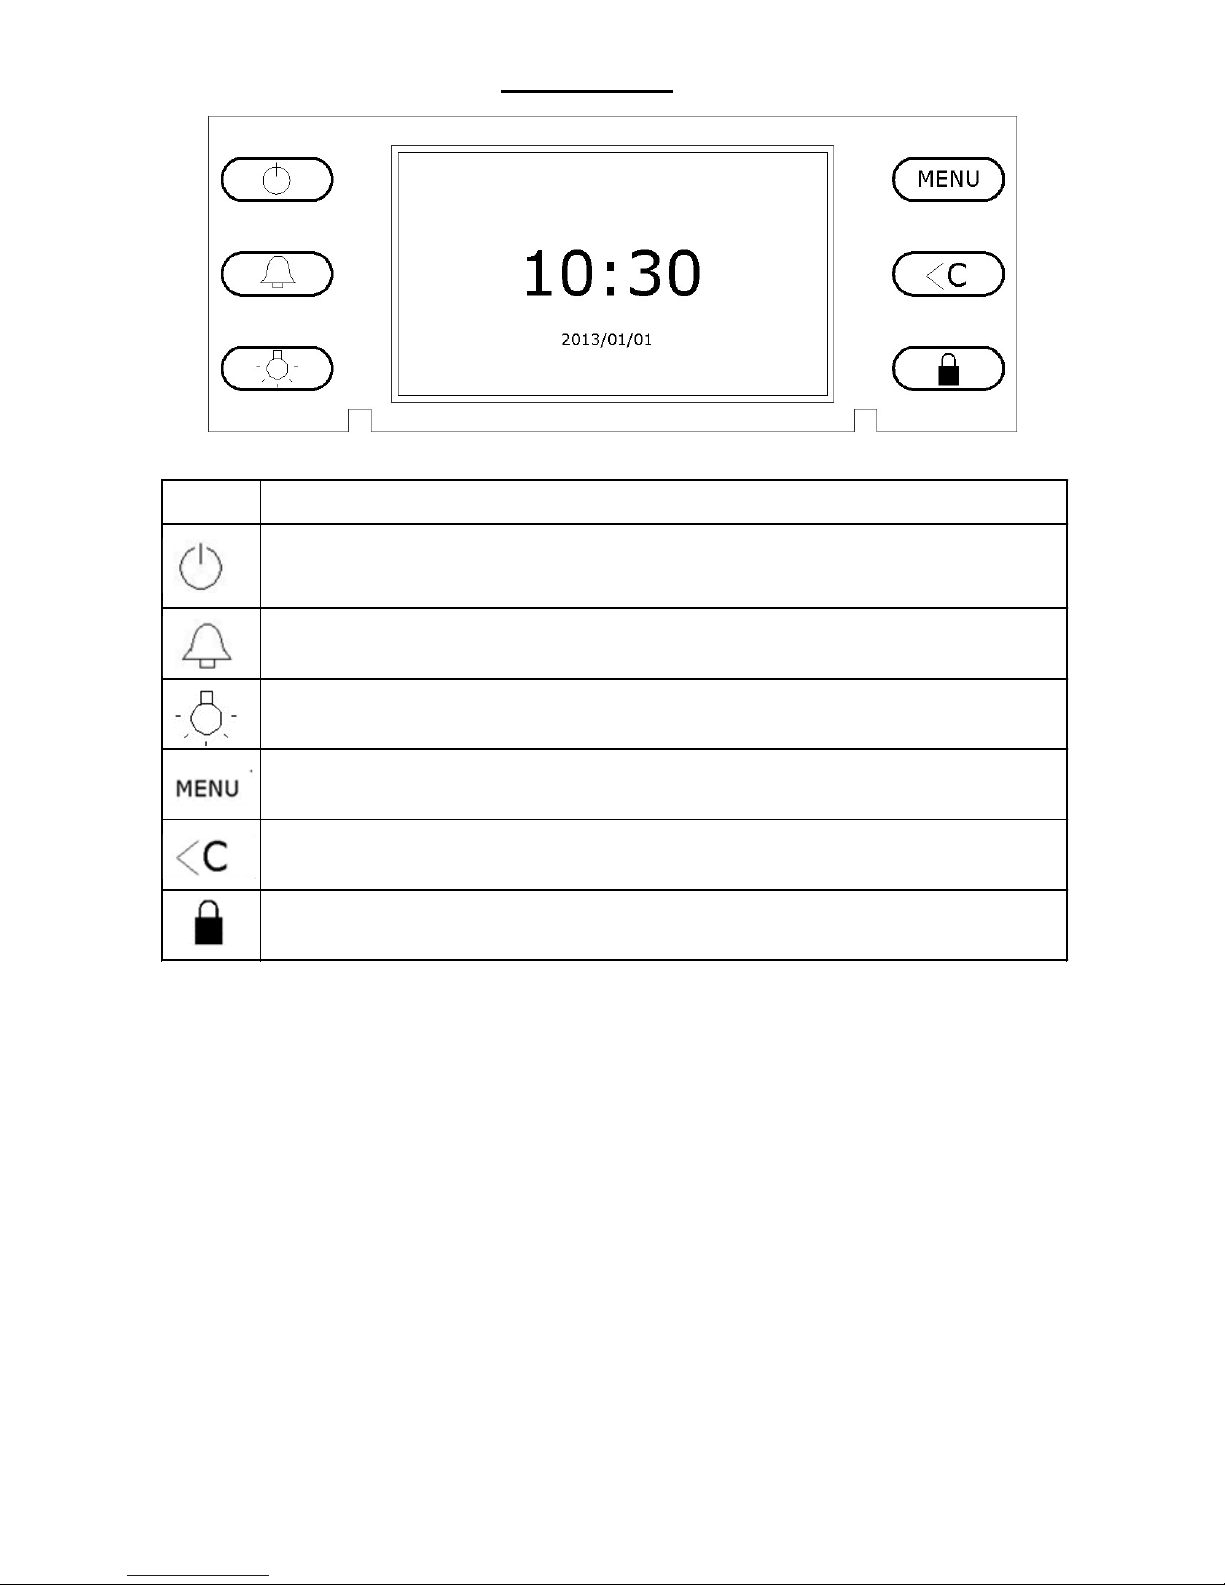
The appliance’s control sensors and display screen are placed together on the control
panel. The table on the following page displays the meaning of the icons.
1) Door Handle
2) Door
3) Door seal
4) Drive shaft
5) Turntable ring
6) Glass turntable
7) Grill element
8) Touch control sensors
9) Control panel
Page 9
9
Control Panel
Symbol Description
On / Off button
Minute minder, to set an alarm without switching the oven off automatically
To turn the light on without the oven heating; useful when wiping the cavity clean.
Accesses the menus.
To cancel out of the current menu and return to the previous menu
Child lock
Page 10
10
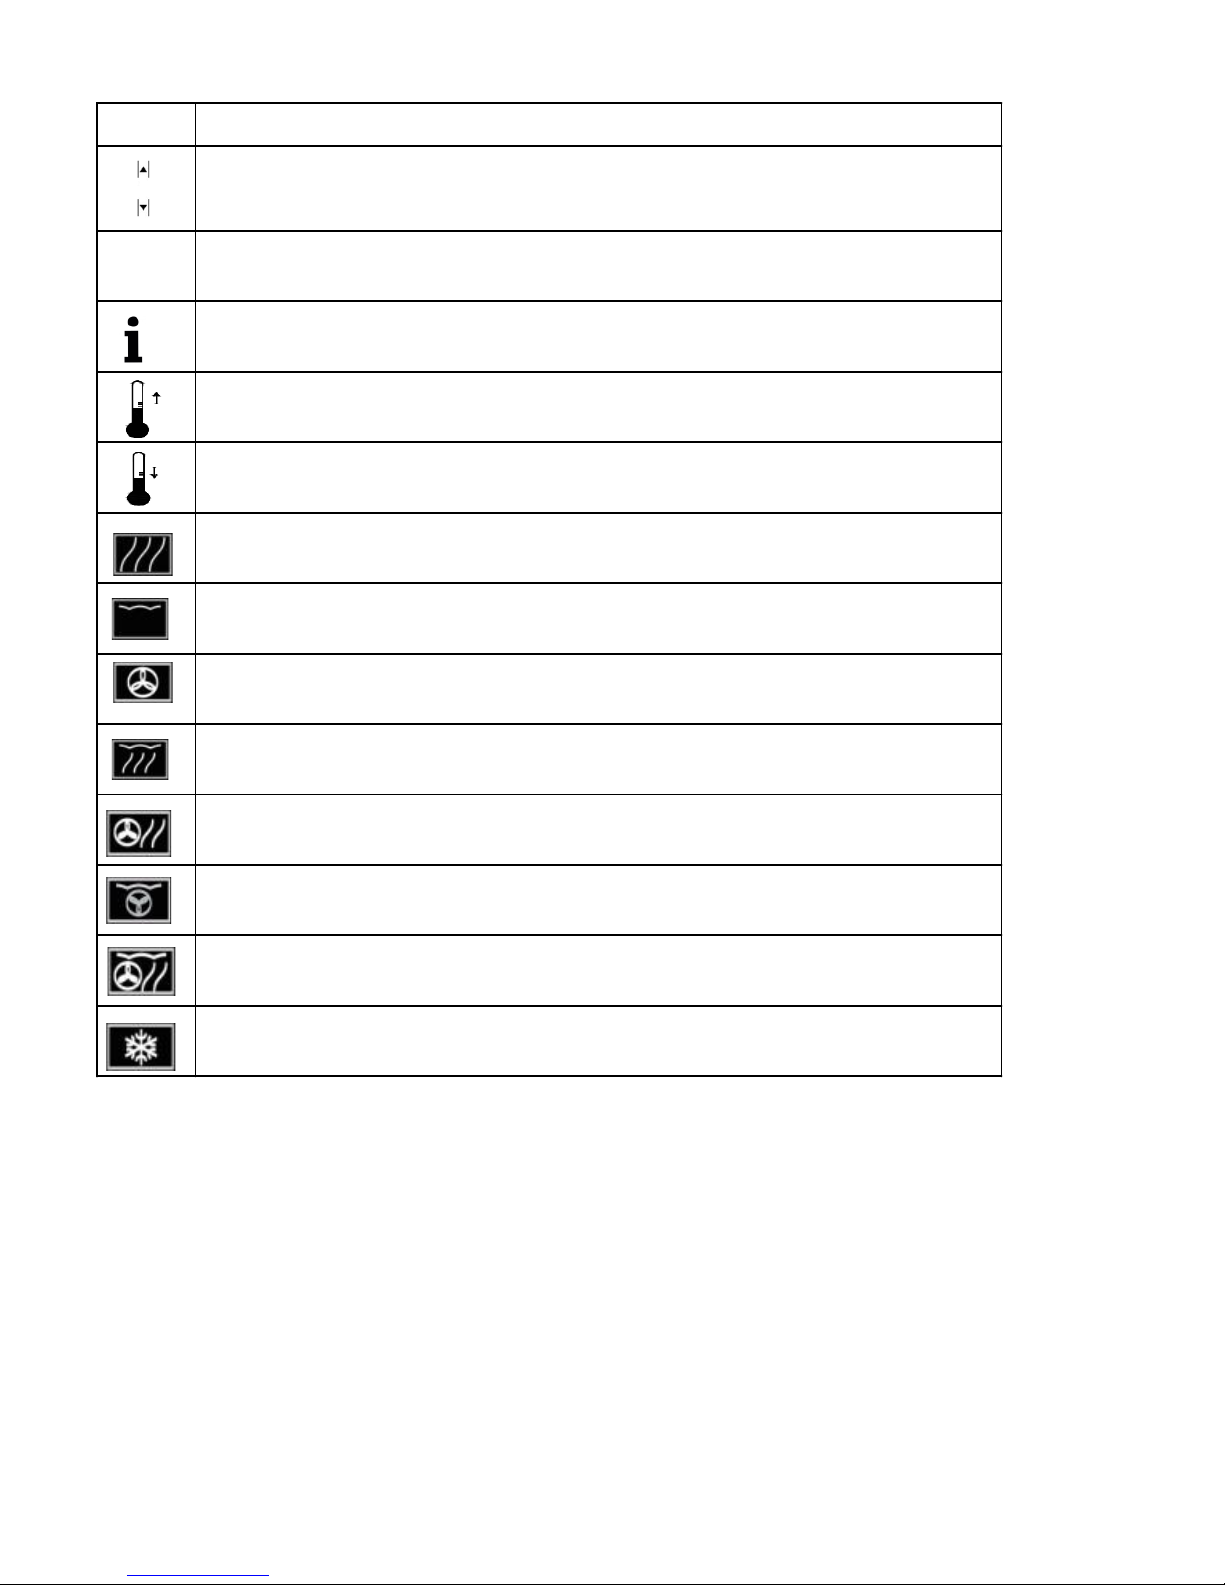
Oven Functions
Symbol Description
A maximum of 4 options can be shown in the display. These arrows indicate if more than
four options are available.
You can scroll up or down the list by touching the appropriate sensor.
The tick symbol will appear next to the option which is currently selected
Information message
Heating up
Cooling phase
Microwave
Grill
Fan Oven
Microwave & Grill
Microwave and Fan oven
Fan oven & Grill
Microwave, Grill & Convection
Defrost
Page 11
11
Setting up the oven for first-time use.
When using the oven for the first time it should be heated empty in fan convection
mode at 180°C for 30 minutes to burn off any oily residues left on during the
manufacturing process which may contaminate foods with unpleasant smells.
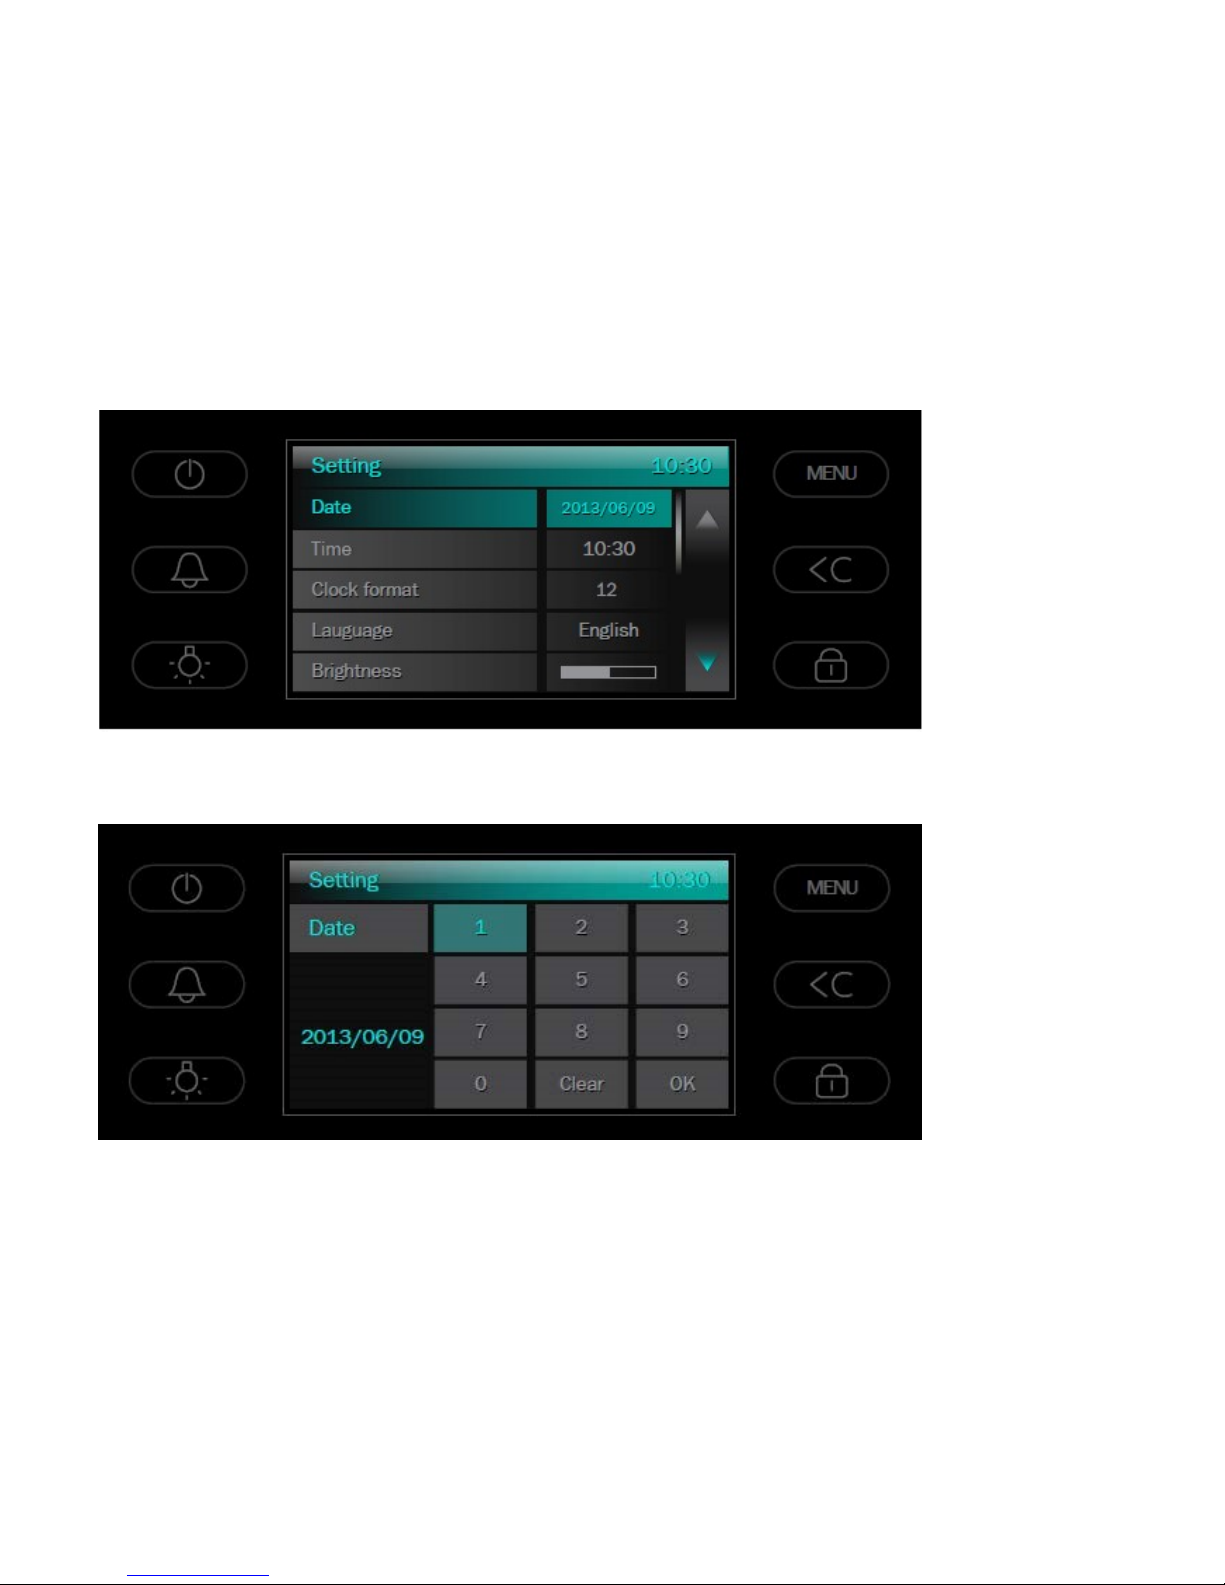
Setting the Time / Date
Touch the ‘on/off’ sensor to switch the oven on. Touch the ‘menu’ senor.
From the main menu, touch ‘settings’ and then ‘date’.
Enter today’s date in the format YYYY MM DD and touch ‘OK’ to confirm.
Page 12
12
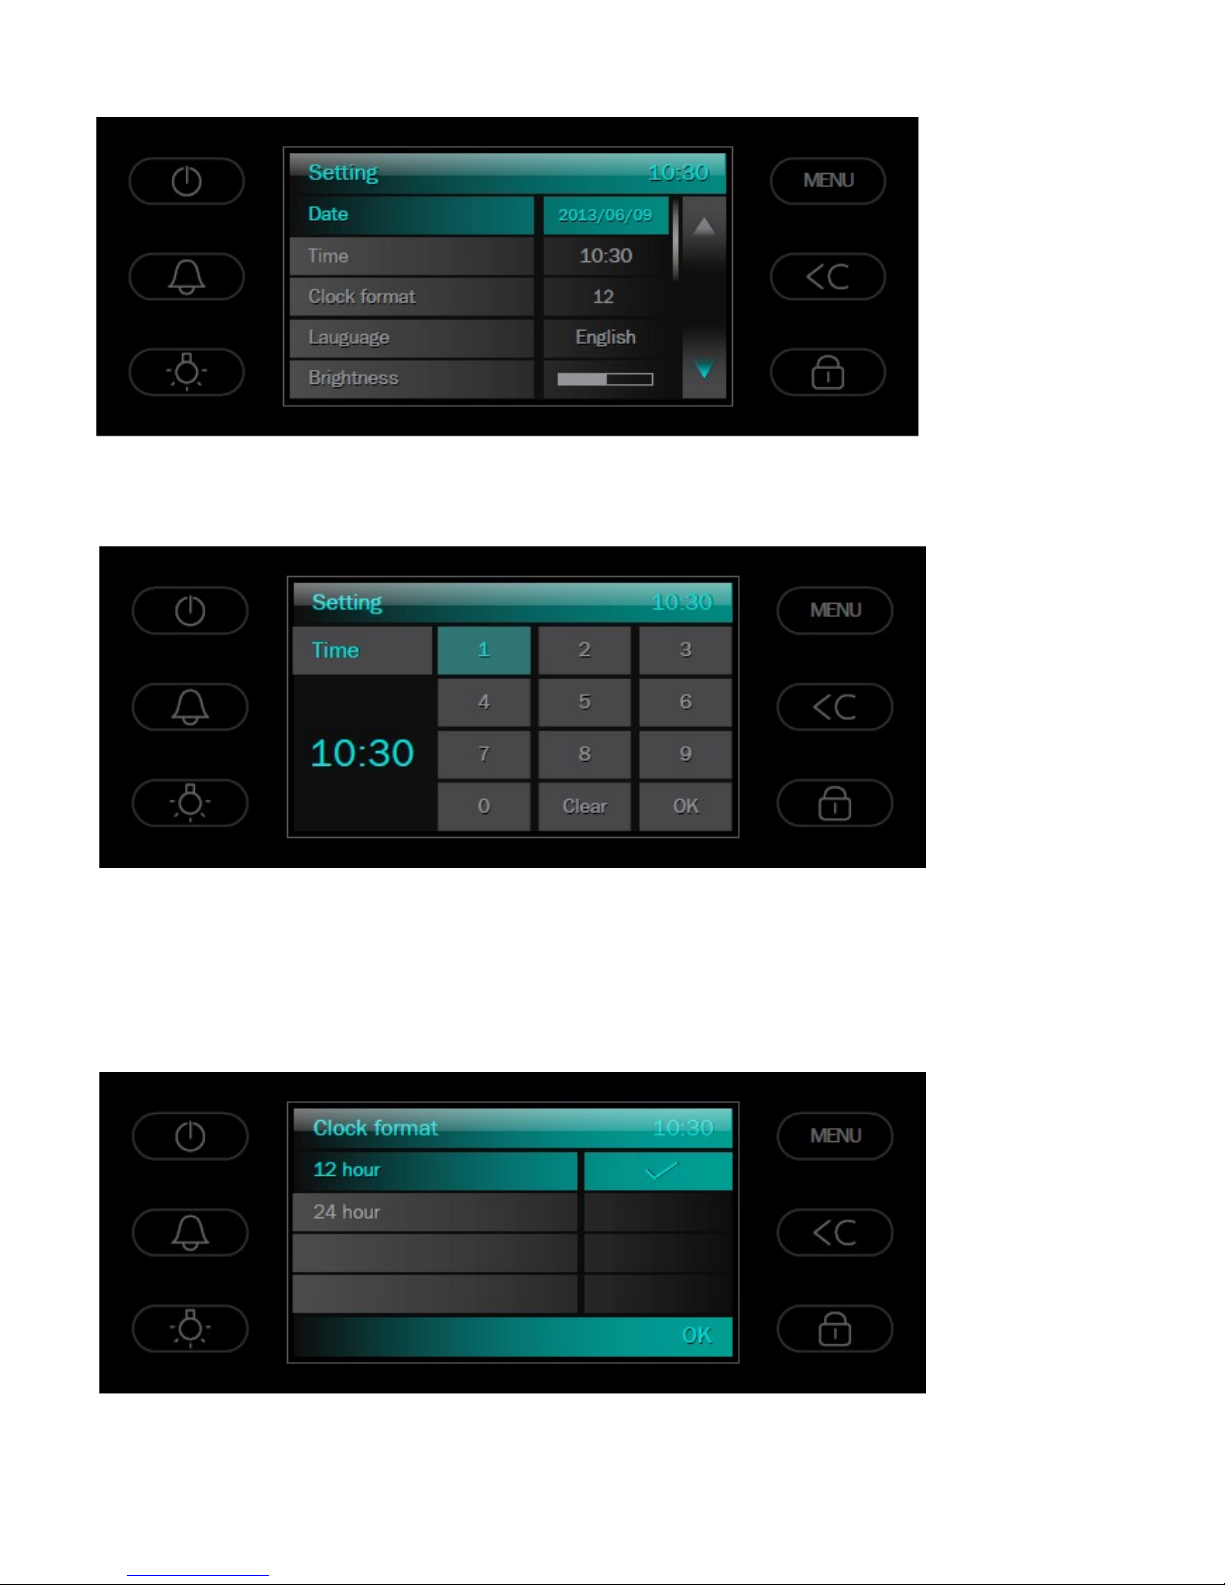
From the main menu, touch ‘settings’ and then ‘time’.
Enter the current time of day, initially using the 12 hour clock, and touch ‘OK’ to
confirm
.
You can display the clock in either 12 hour or 24 hour format. From the main
menu, select ‘settings’ and then ‘clock format’. Touch either ’12 hour’ or ’24 hour’
and touch ‘OK’ to confirm.
Page 13
13
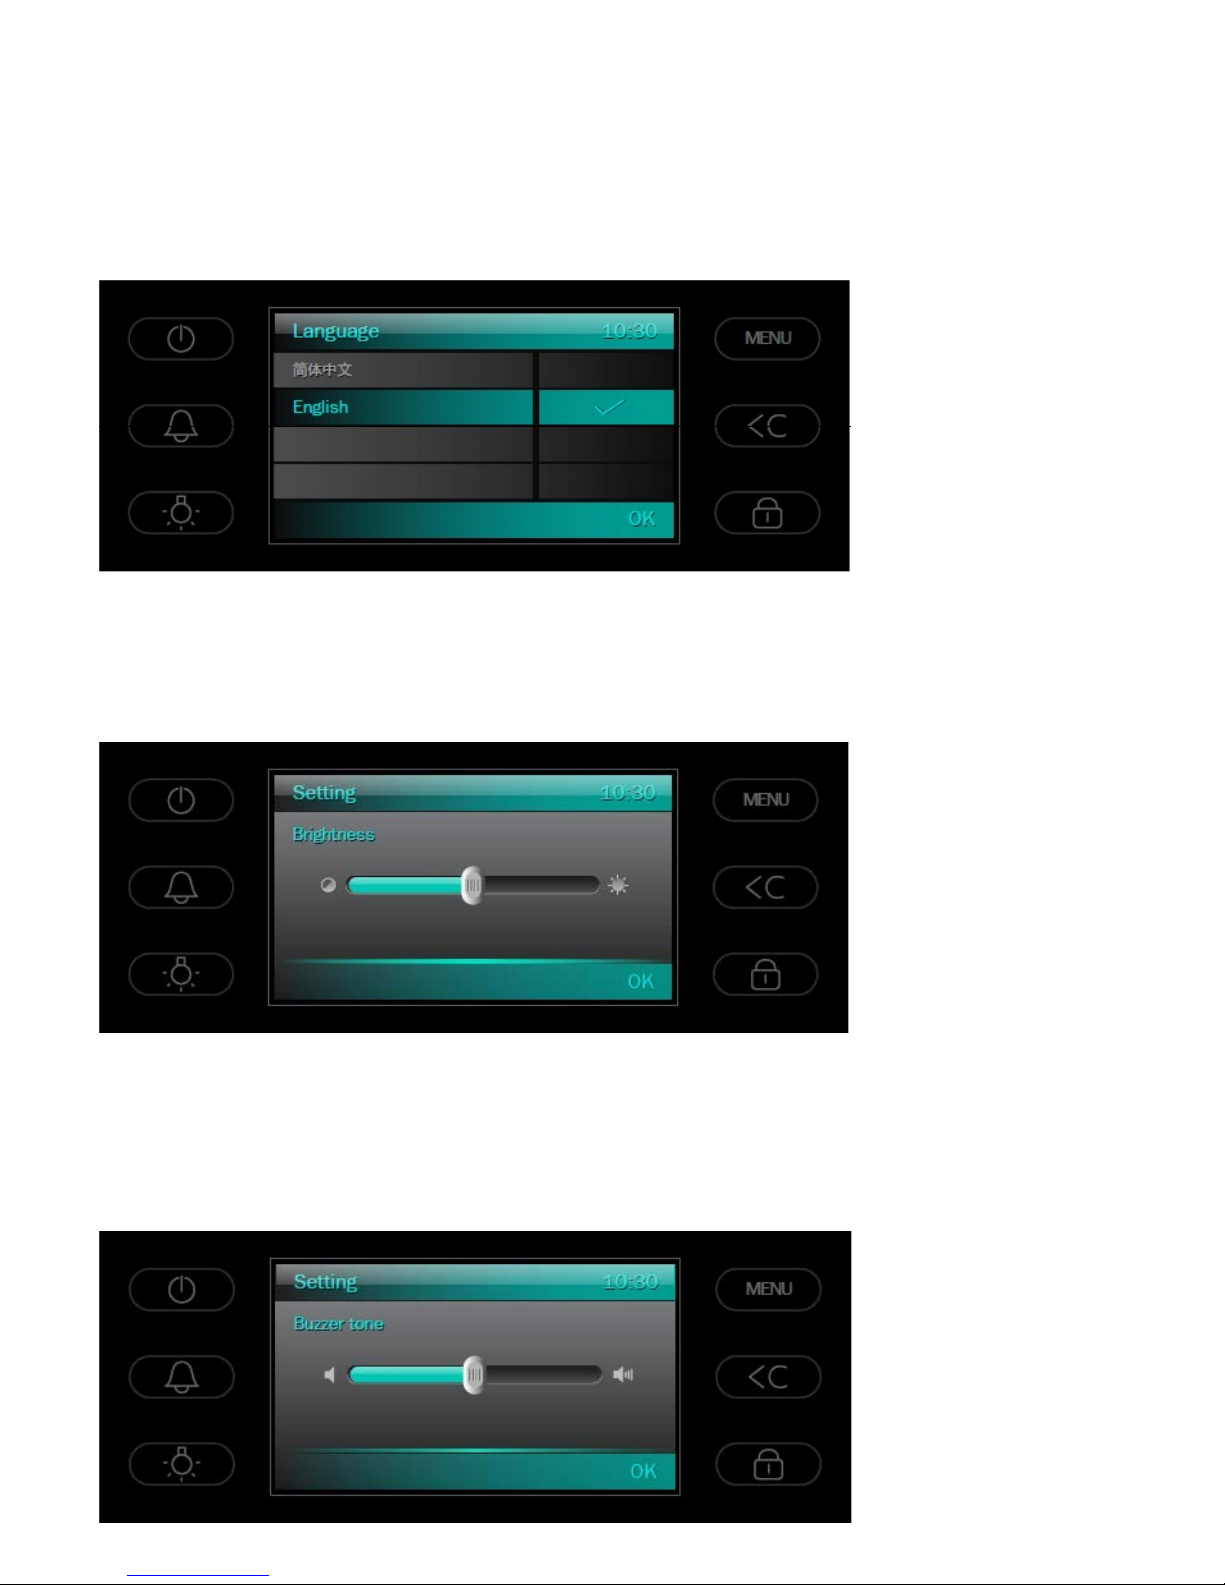
Set the language
From the main menu, select ‘settings’ and then ‘language’. Touch the required
language and touch ‘OK’ to confirm.
Set the brightness
To adjust the brightness, from the main menu select ‘settings’ and then
‘brightness’. Use the slider to adjust the brightness and touch ‘OK’ to confirm.
Set the buzzer tone
To adjust the buzzer tone, from the main menu select ‘settings’, then ‘buzzer
tone’. Use the slider to adjust the buzzer tone to the required setting and then
touch ‘OK’ to confirm
.
Page 14
14
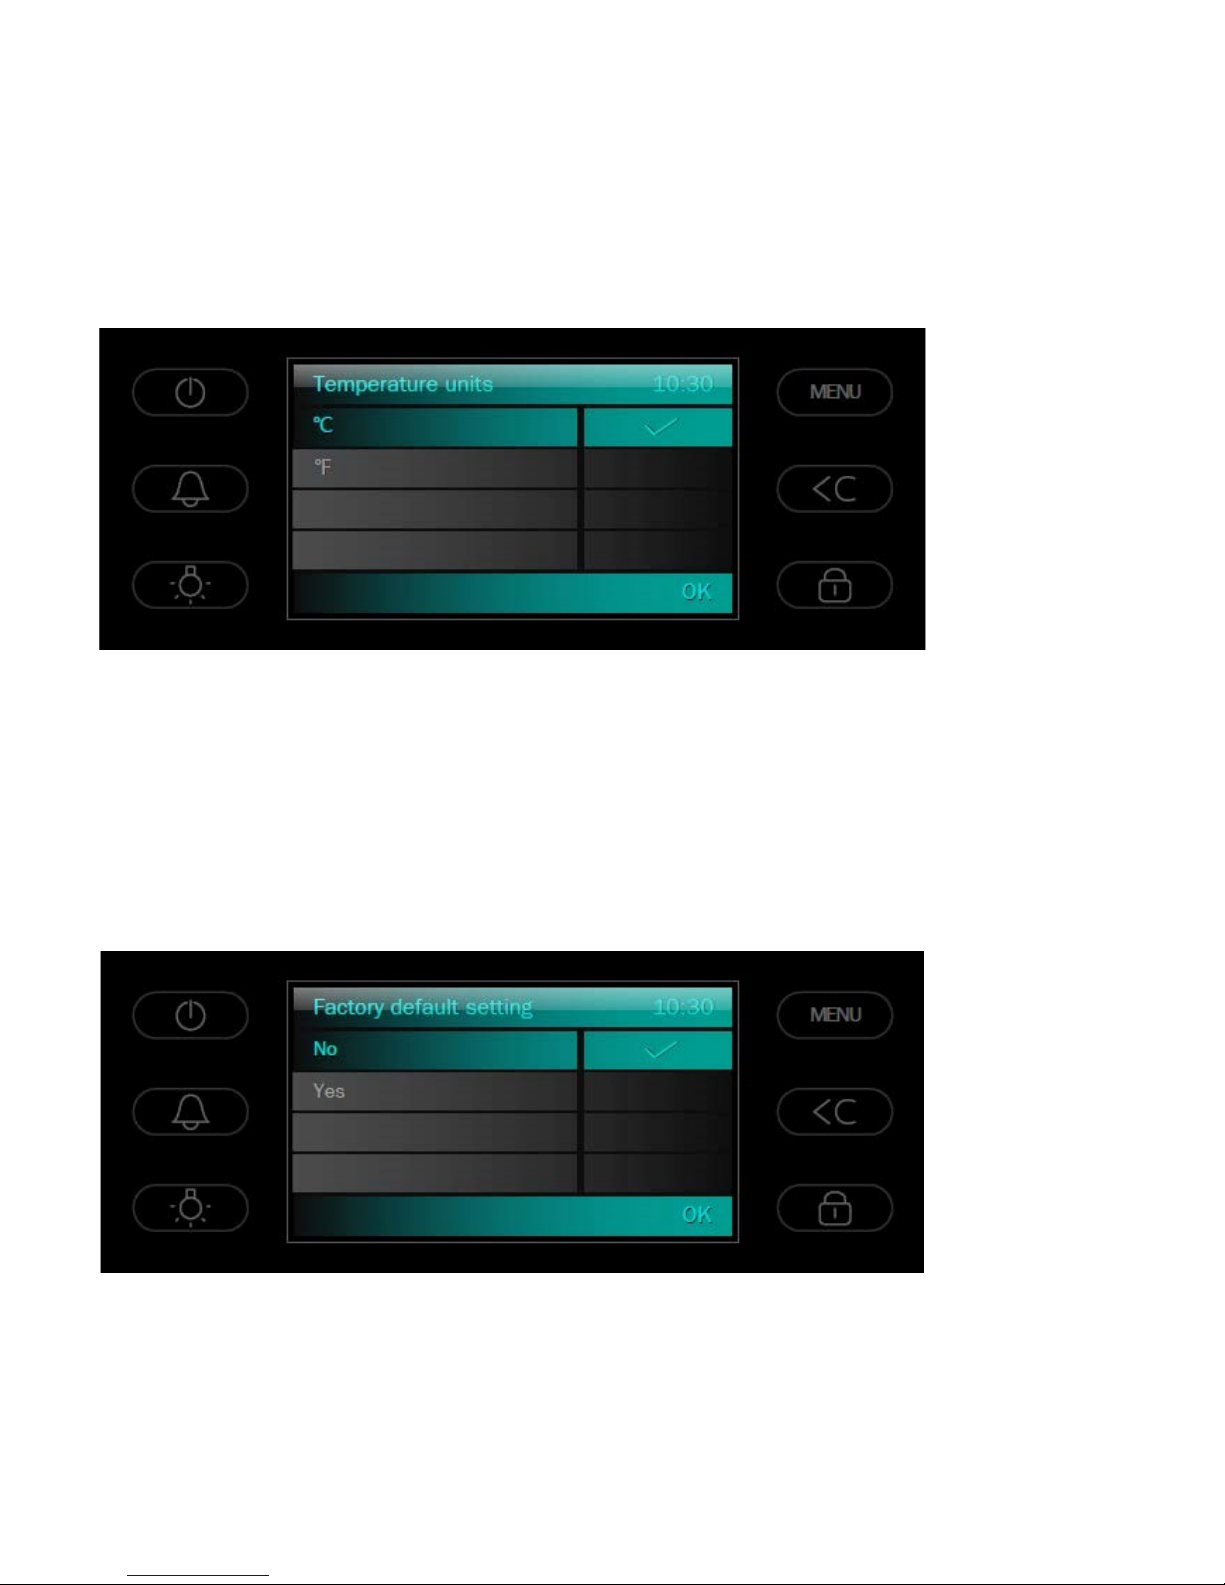
Set the display temperature
The oven temperature can be displayed in Celsius or Fahrenheit. From the main
menu select ‘settings’ and then ‘temperature units’. Select either °C or °F and
touch ‘OK’ to confirm.
Reset to factory default settings
Warning – this function will erase all personal settings and r est ore all
settings to the factory default settings. To reset the oven back to factory
default settings touch ‘settings’ from the main menu and then select ‘factory
default setting’. Select ‘yes’ and then touch ‘ok’ to confirm.
Page 15
15
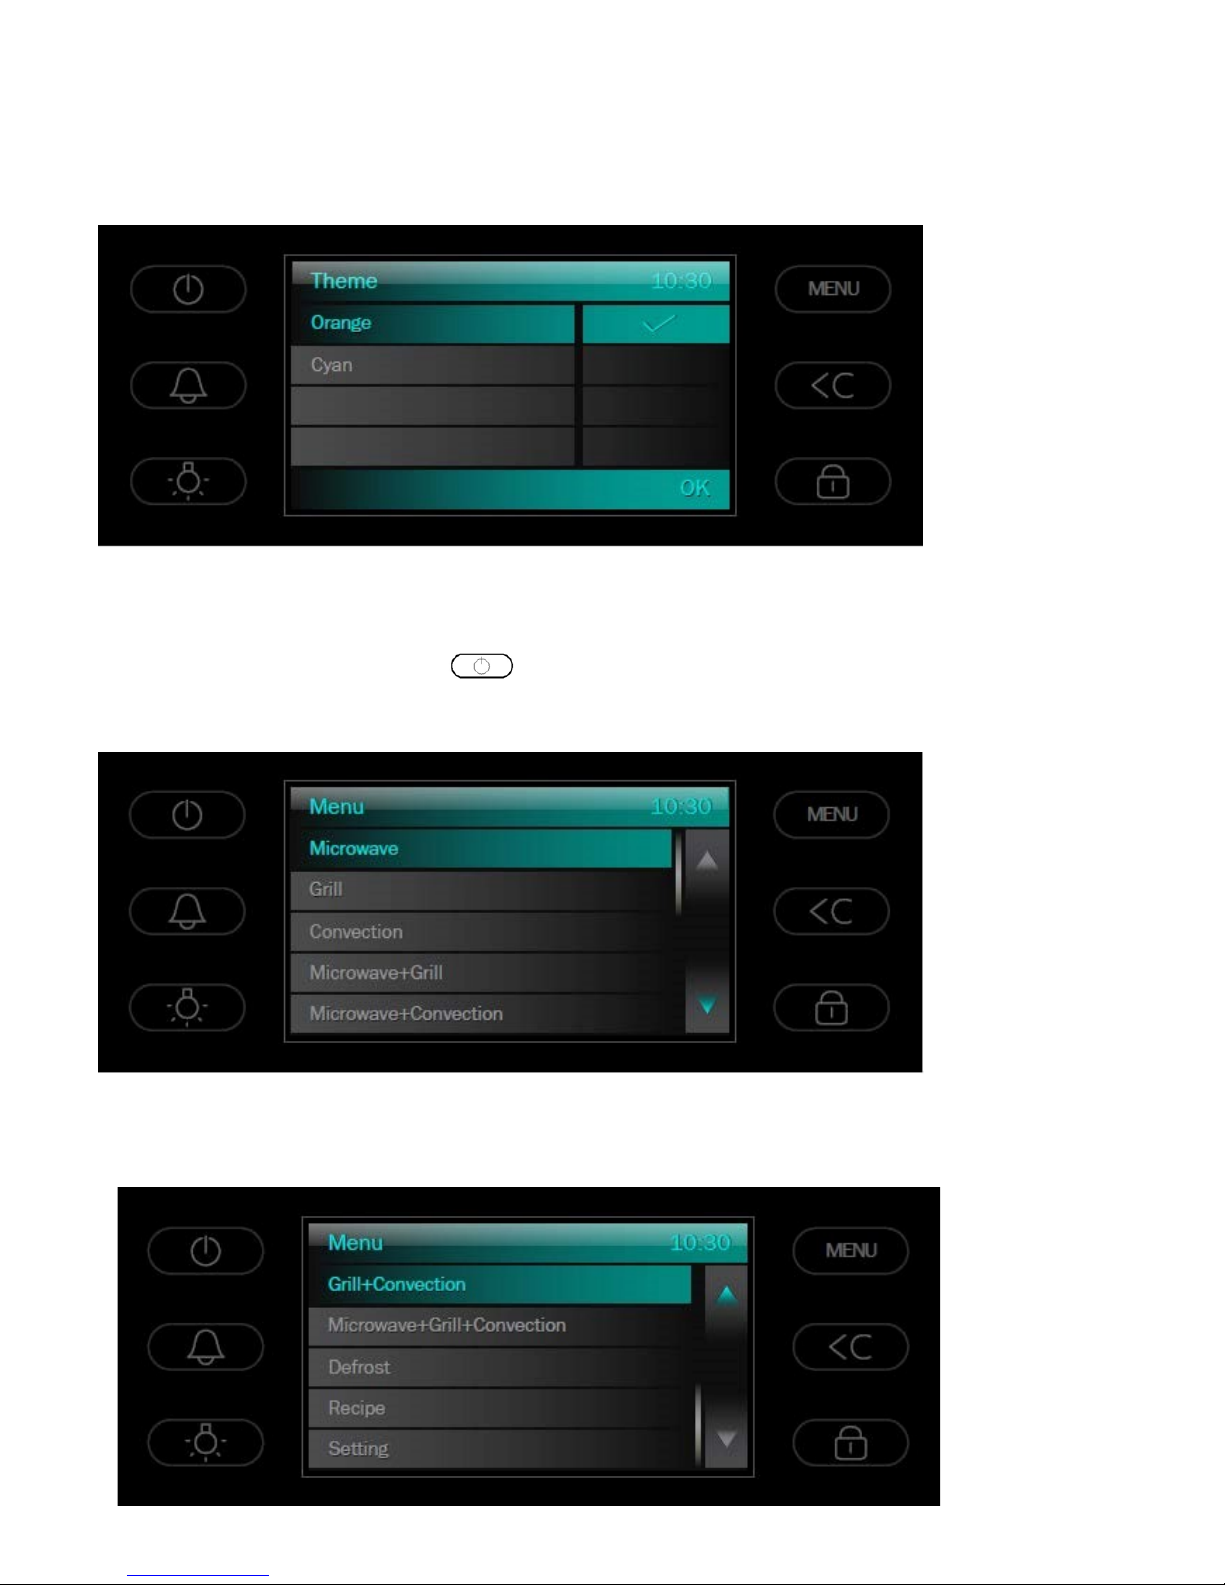
Setting a display theme.
The screen display can be in a blue (cyan) or an orange colour. To select a
display theme touch ‘settings’ from the main menu and then ‘theme’, select
preferred colour theme and touch ‘ok’ to confirm.
Selecting a cooking function
To select a function touch the on / off key or simply touch the screen while it
is in standby mode. Touch the menu key to see the full list of cooking functions.
You can scroll up or down the list by touching the appropriate up or down arrow
sensor.
.
Page 16
16
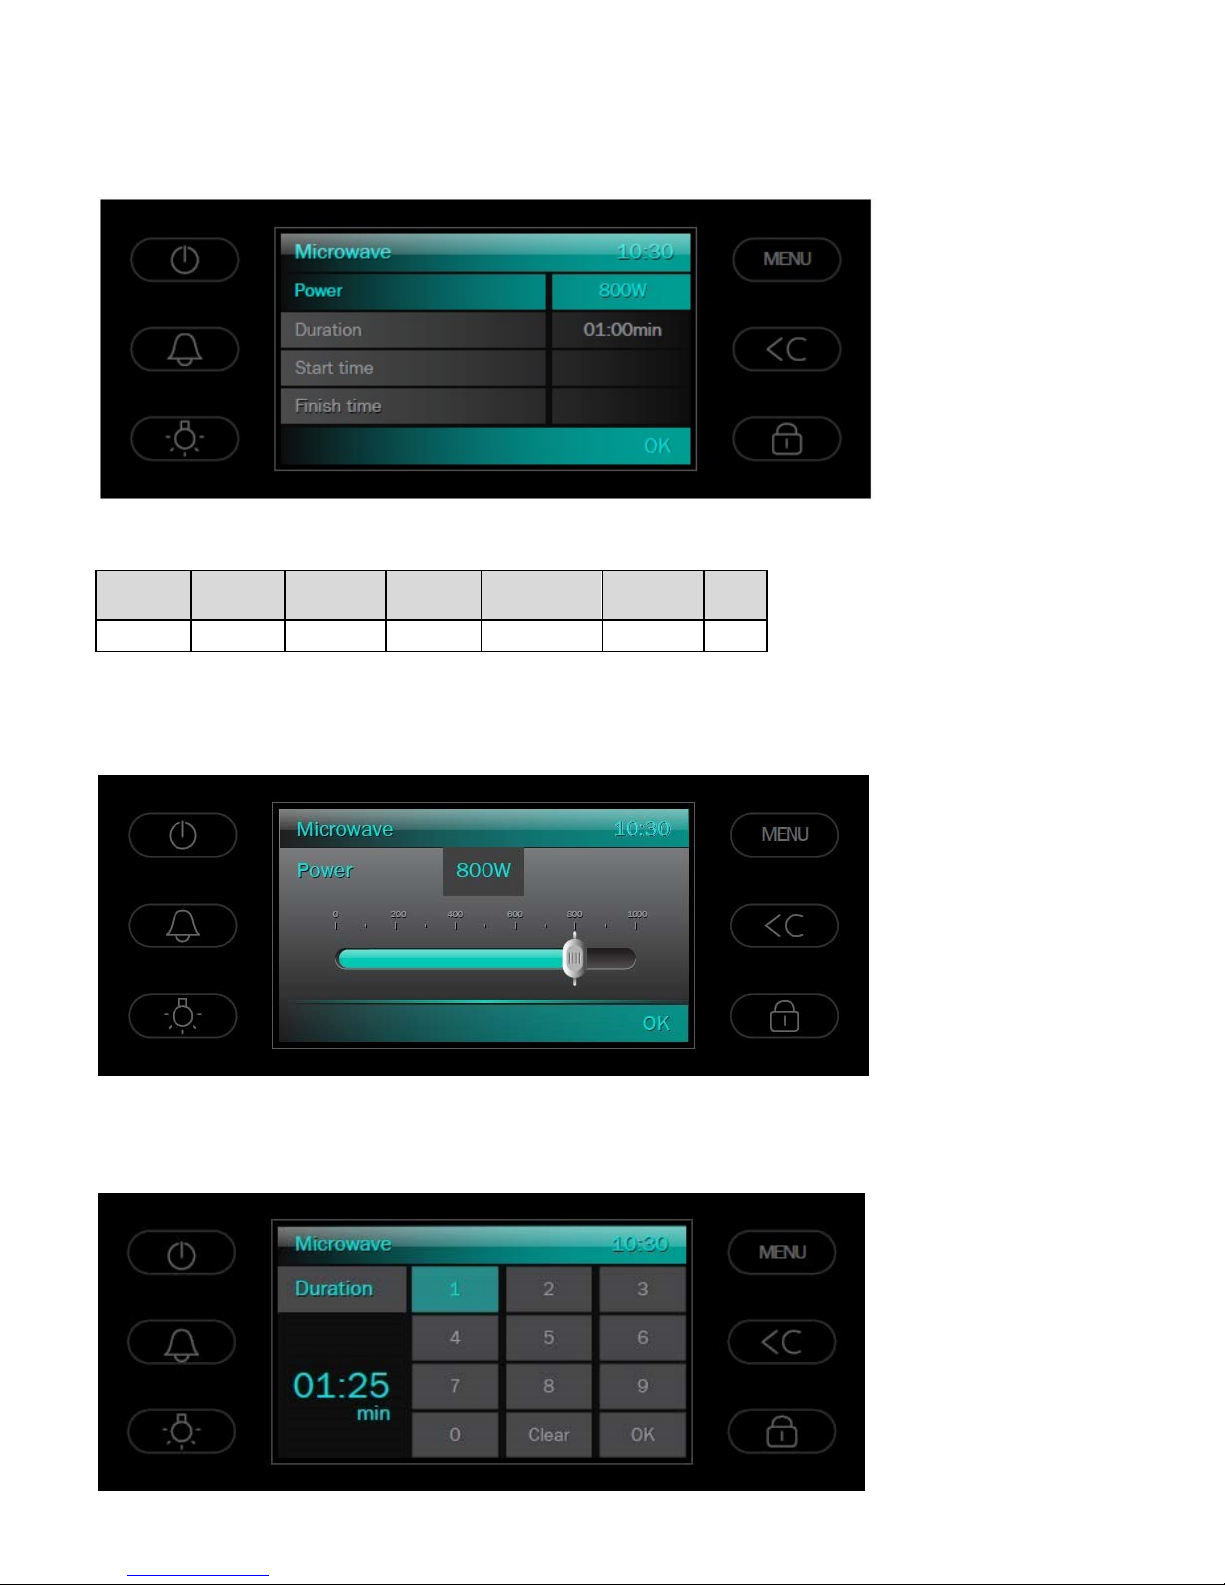
Microwave functions.
Select ‘microwave’ from the main menu and then ‘power’.
Microwave power table:
Display High
Medium-
high
Medium
Medium
-low
Low Cool
Power
1000W
800W
600W
400W
200W
0W
To adjust the power level, touch the slider to select the required power level and touch
‘OK’ to confirm .
Then touch ‘duration’ and input the required cooking time using the numeric keypad
and touch ‘OK’ to confirm.
Page 17
17
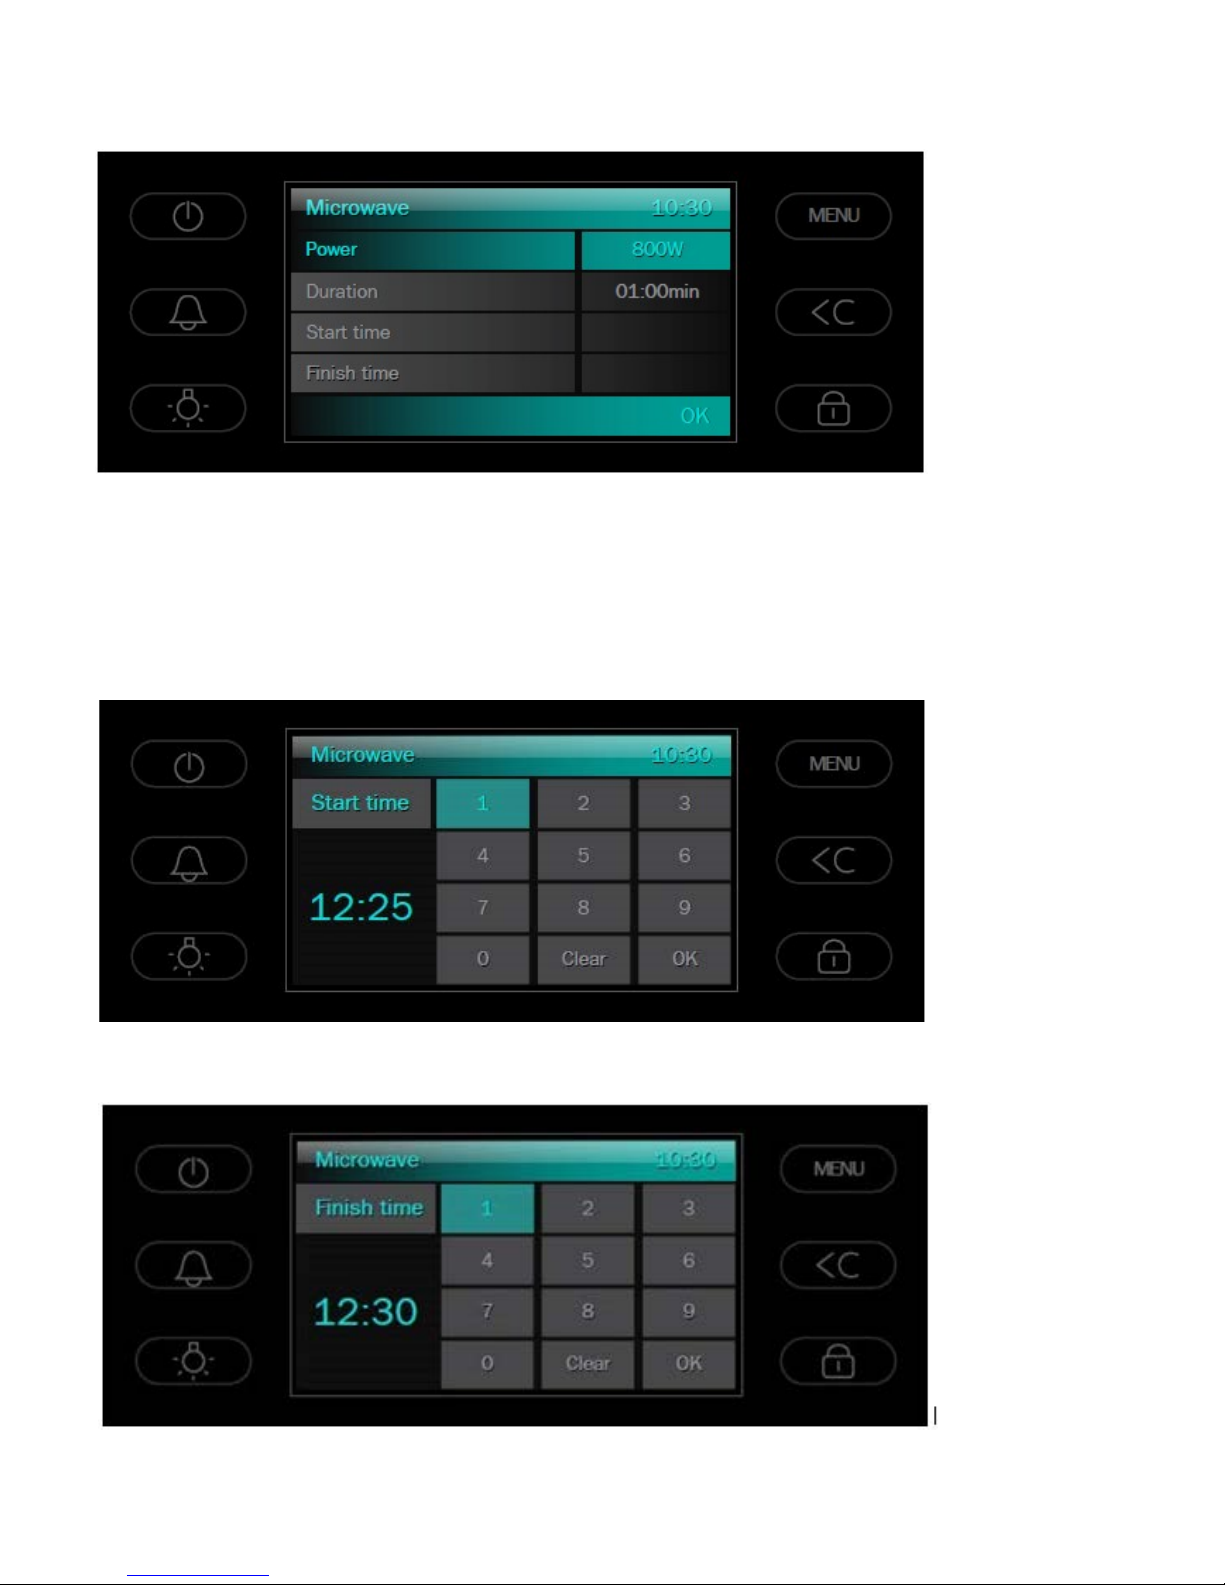
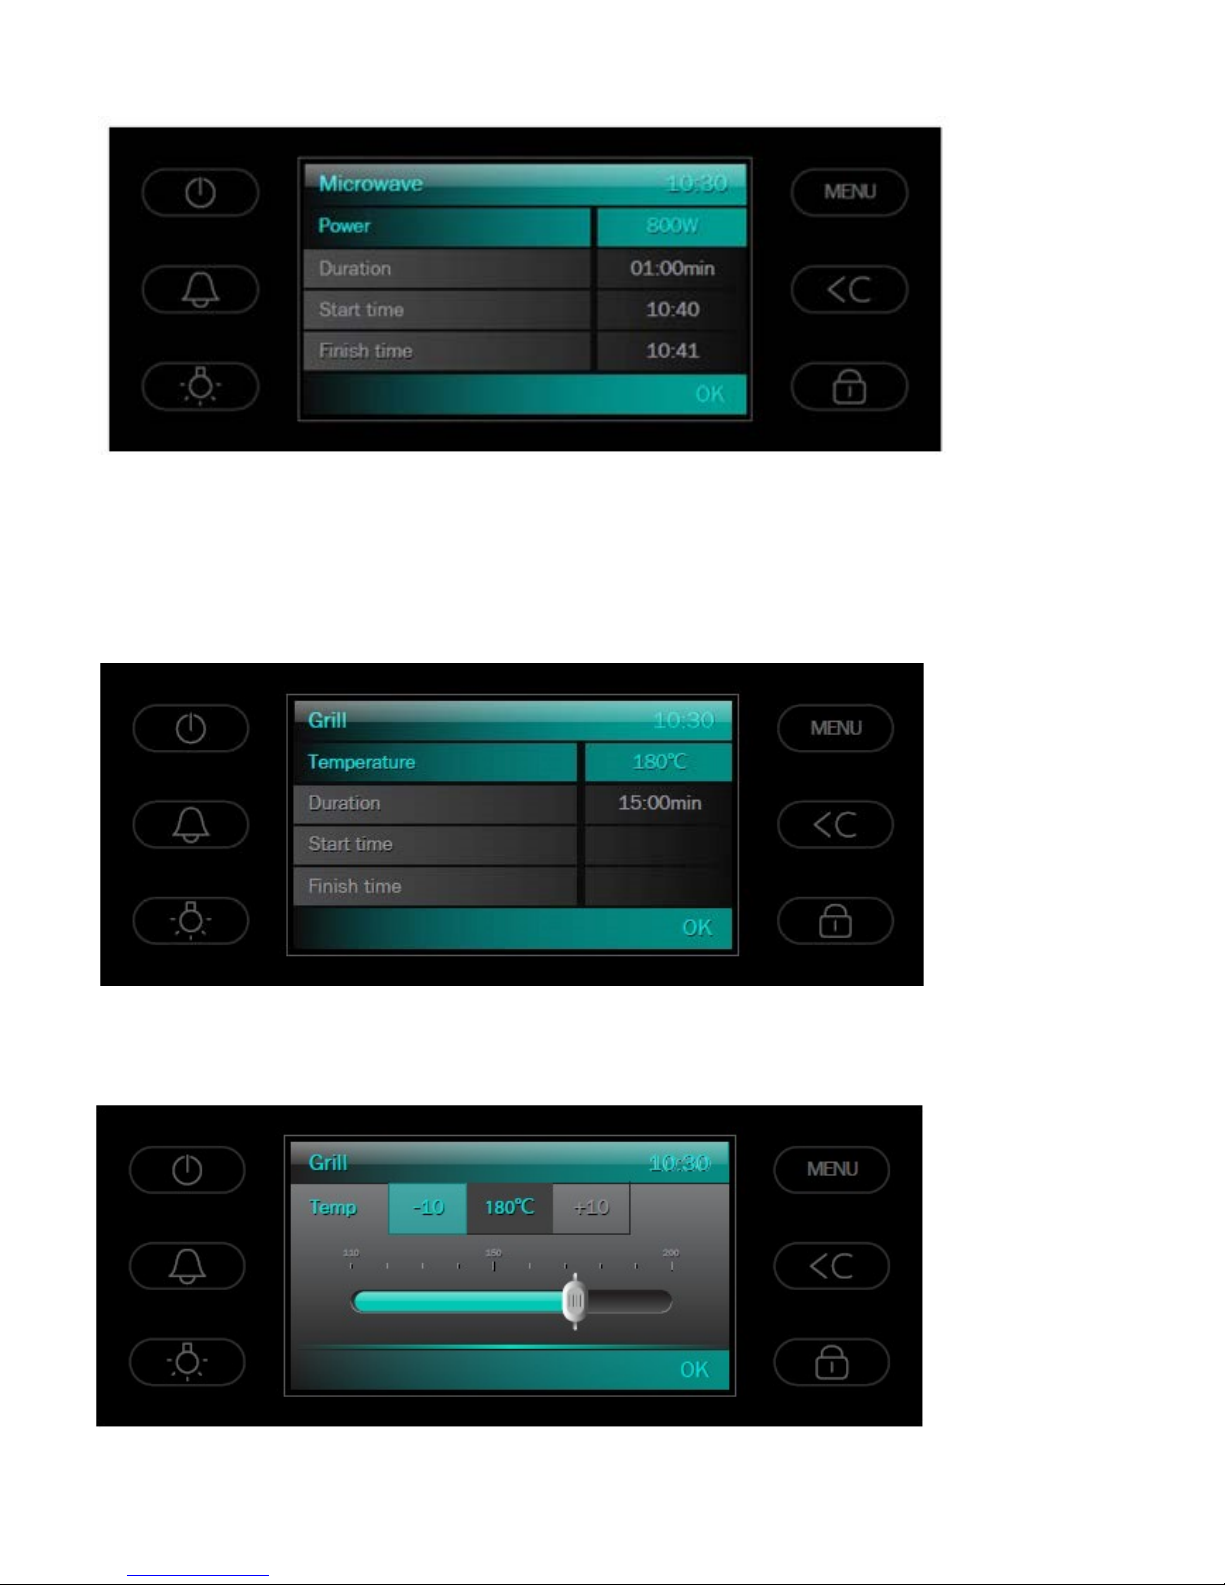
If you want cooking to start immediately and don’t require cooking to start and finish
automatically later on, then you don’t need to set a start time or finish time at this
stage. Simply touch ‘OK’ and cooking will start immediately.
Setting the delayed start (Fully Automatic Cooking)
You can arrange for the oven to start and finish automatically at set times for your
convenience. After selecting a power level or temperature, touch ‘start time’ and enter
the required start time and touch ‘OK’ to confir m
.
Then touch ‘finish time’ and enter the required finish time and touch ‘OK’ to confirm.
Page 18
18
Once you have entered the start time and the finish time, the cooking duration will be
calculated automatically. Touch ‘OK’ to confirm the delayed start function.
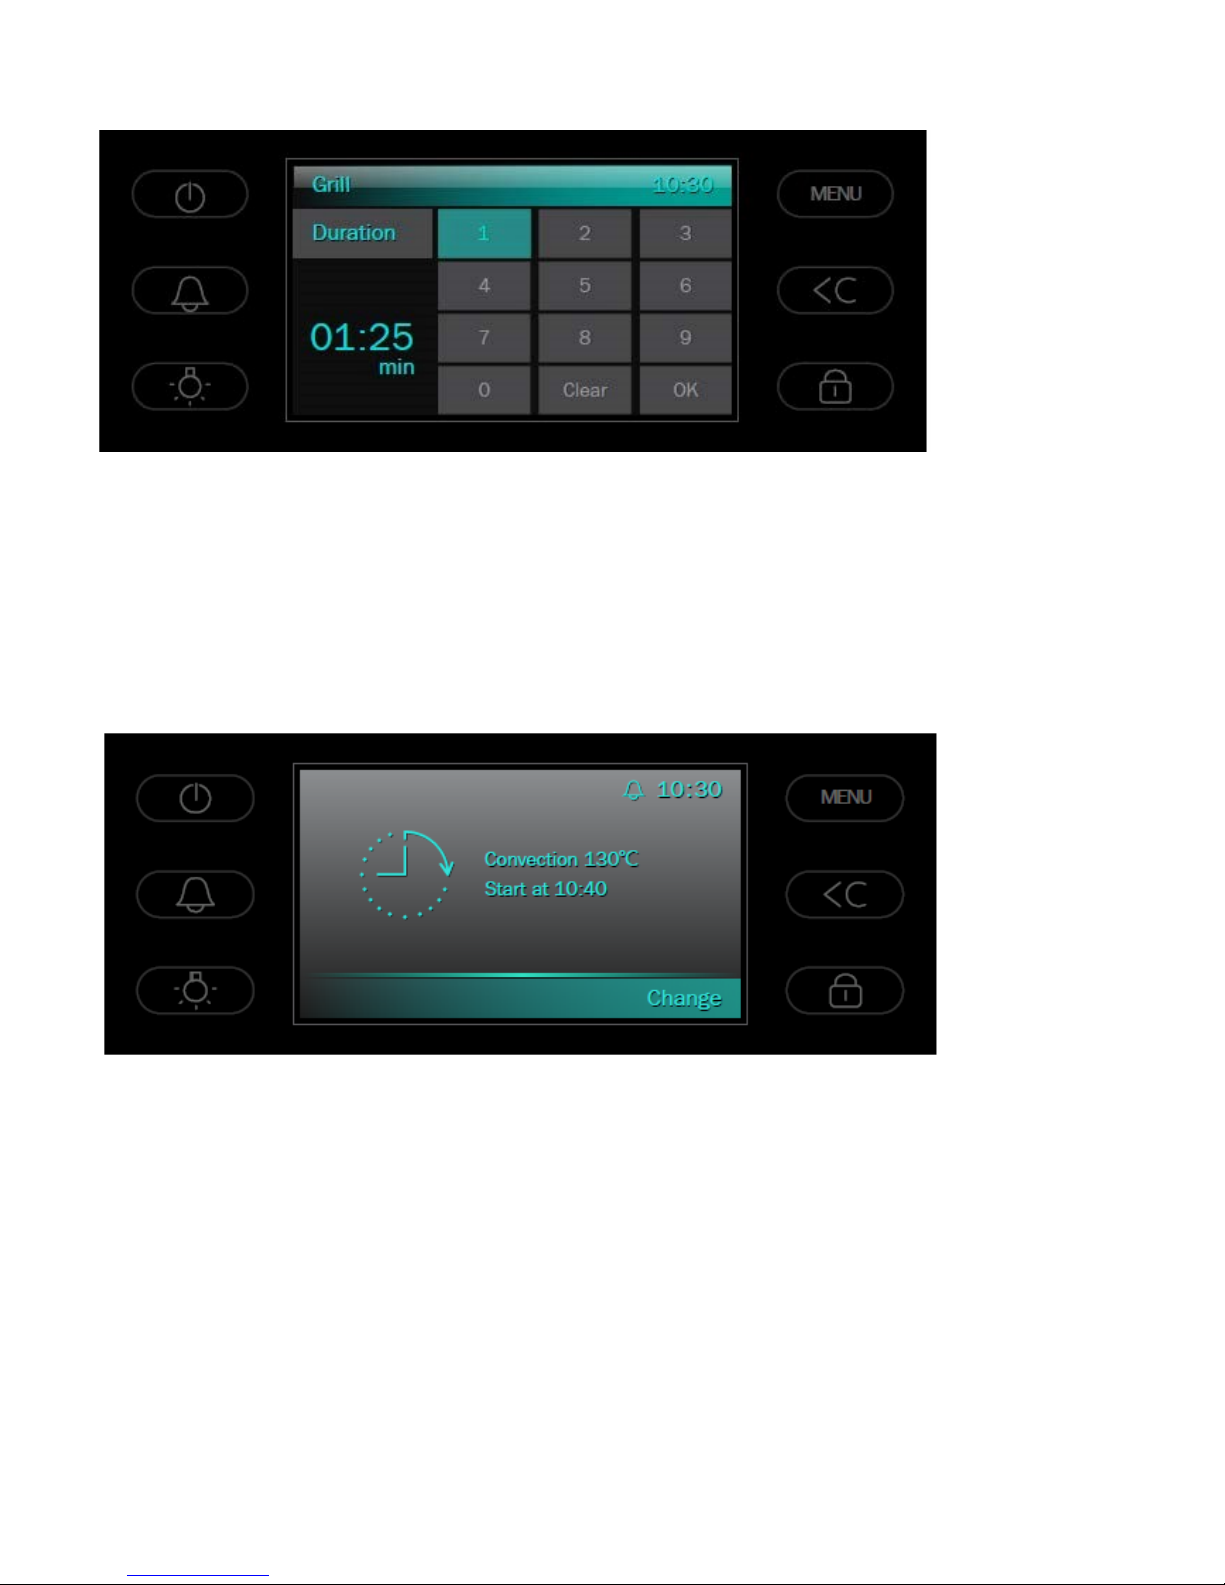
Grill & Convection modes
From the main menu, select ‘grill’ or ‘convection’ as required. Then touch
‘temperature’.
To adjust the grill or convection oven temperature, touch the slider to select the
required temperature and touch ‘OK’ to confirm.
Page 19
19
Touch ‘duration’ to input the required cooking duration time, using the numeric keypad,
and touch ‘OK’ to confirm.
If you want cooking to start immediately and don’t require cooking to start and finish
automatically later on, then you don’t need to set a start time or finish time at this
stage. Simply touch ‘OK’ and cooking will start immediately.
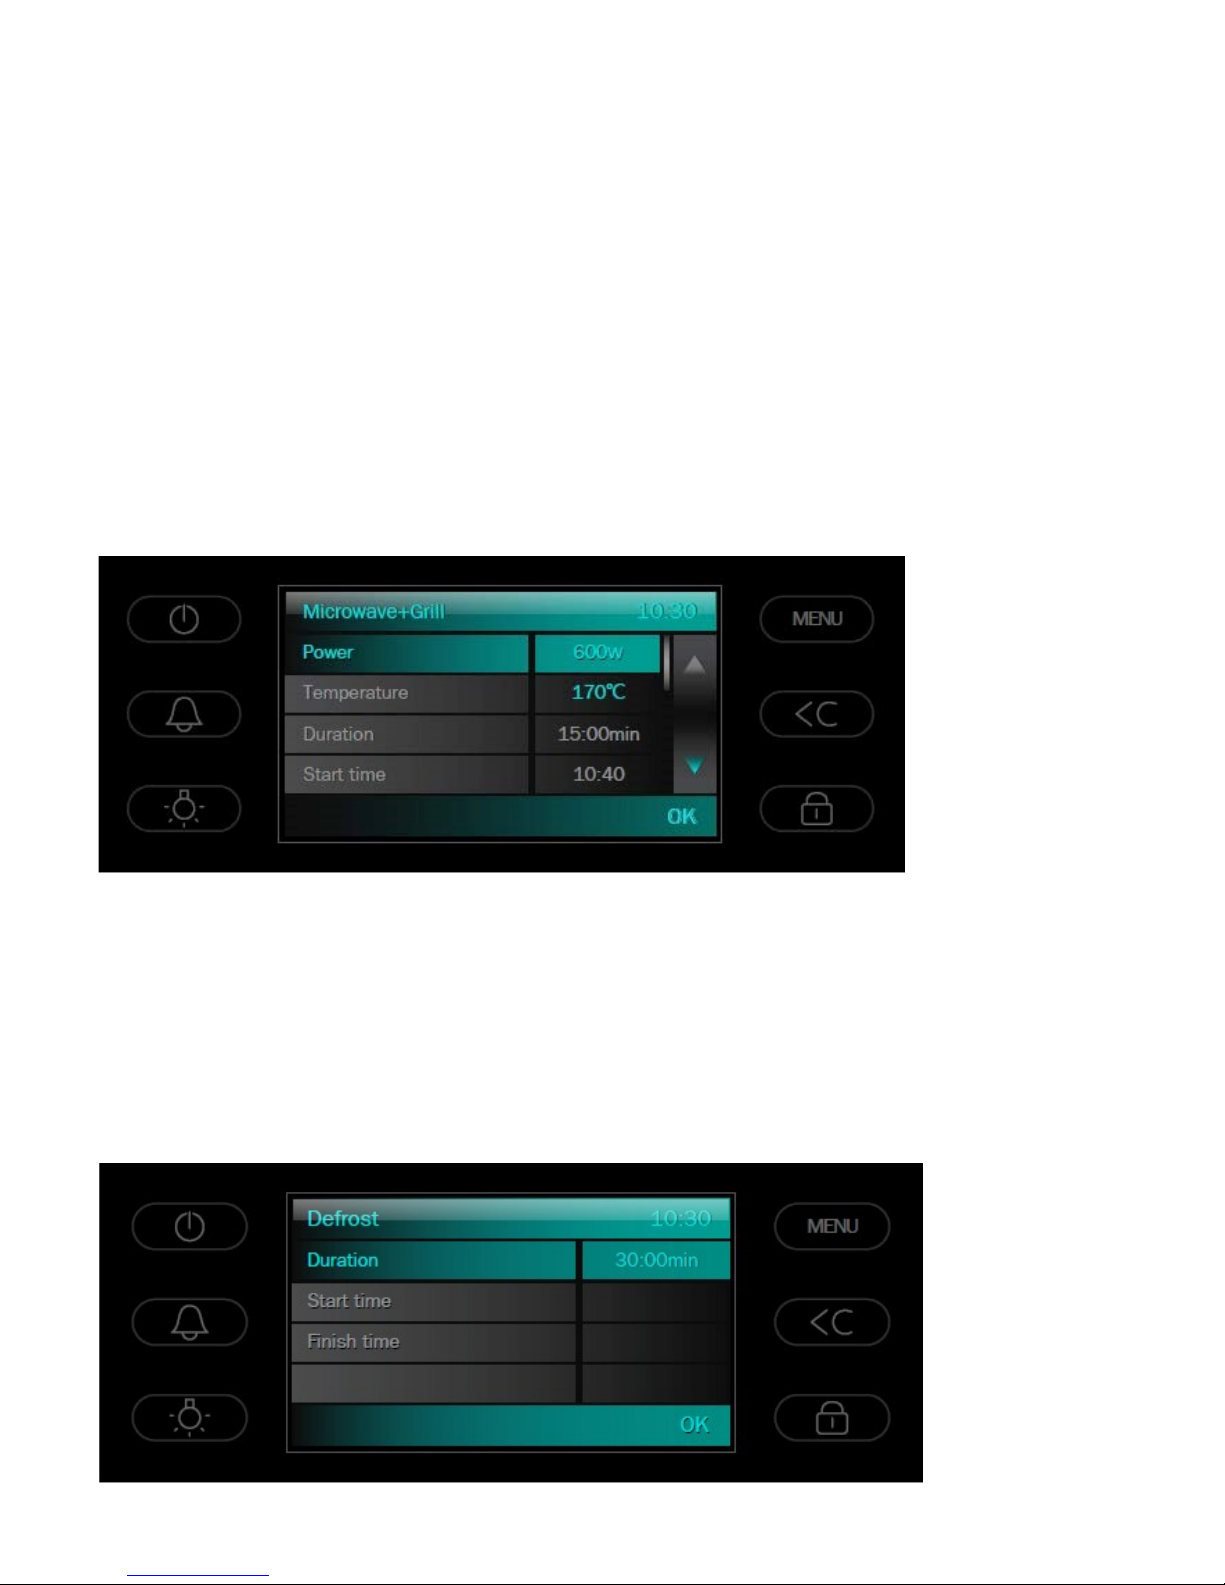
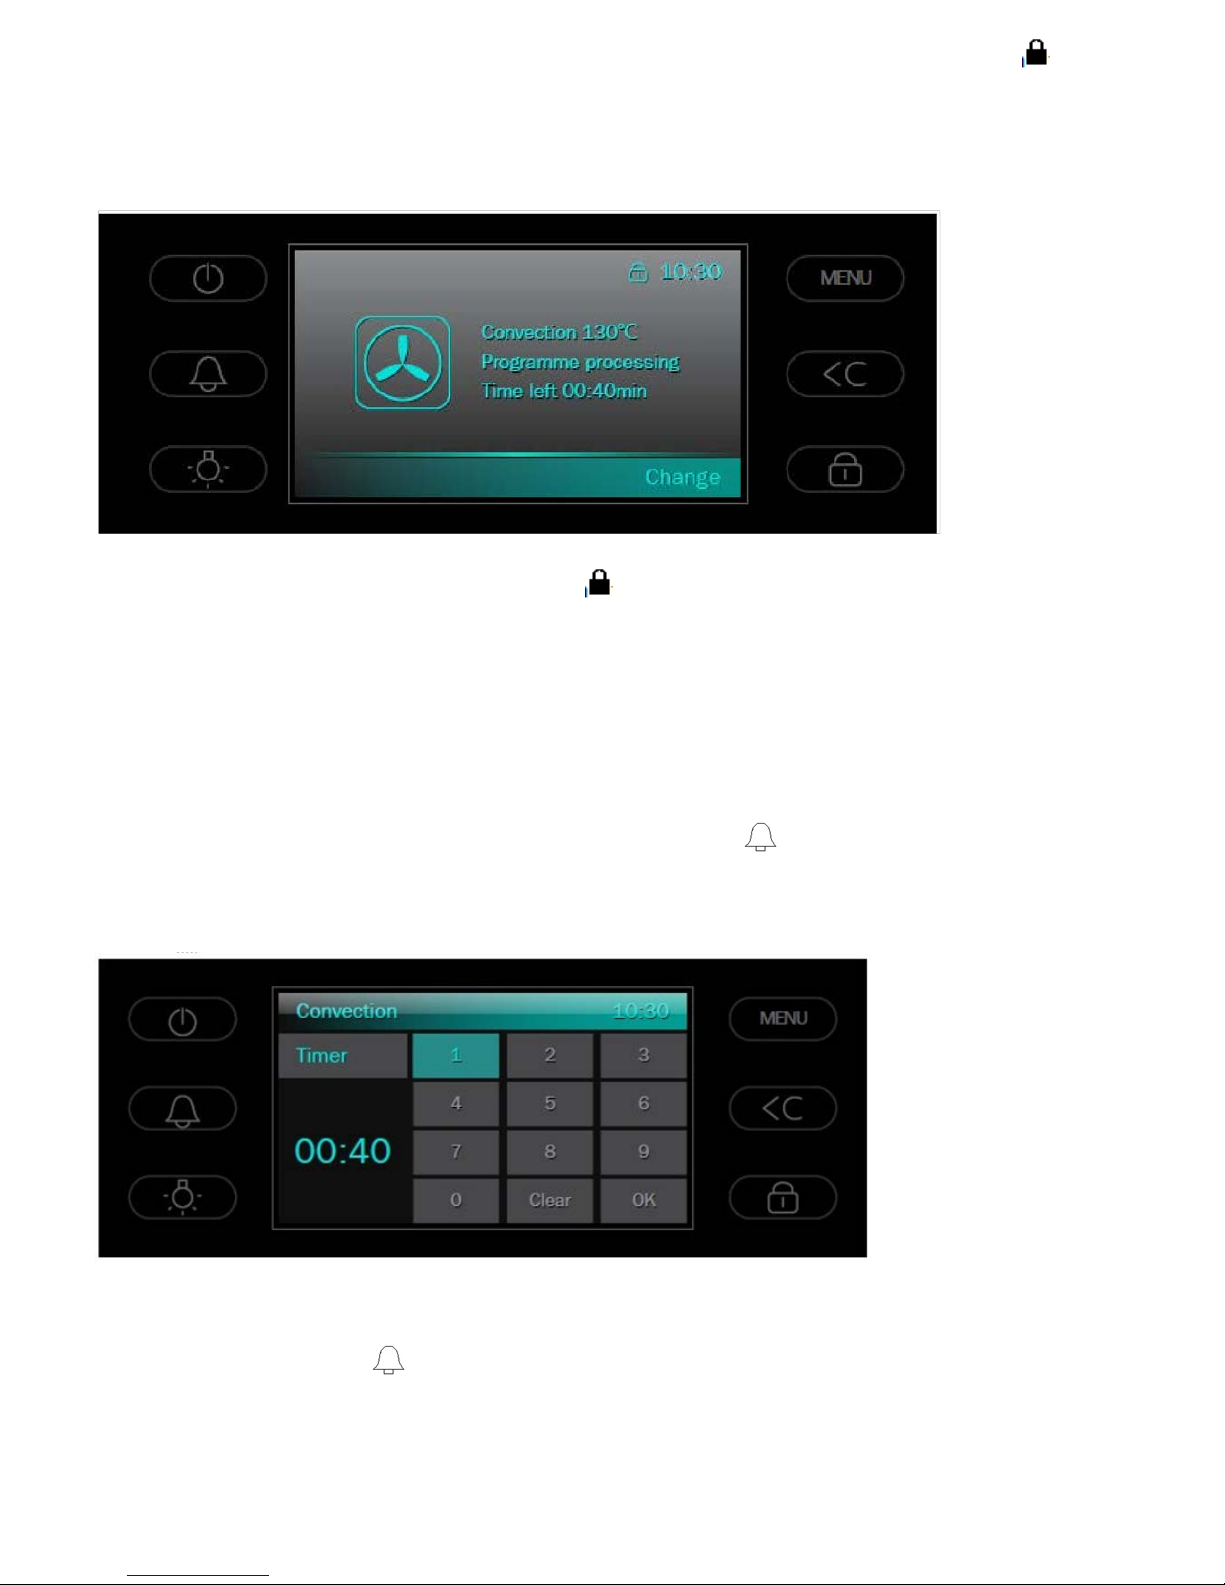
Please note, during cooking, the display screen will show the word ‘change’. You can
touch ‘change’ at any time to adjust parameters like the temperature of cooking
duration time.
Page 20
20
The Combination Cooking Modes (Microwa ve & Grill, Microwave & Convection,
Microwave & Grill & Convection).
From the main menu, select the relevant combination cooking mode (microwave+grill,
microwave+convection, microwave+grill+convection).
Touch ‘power’ and select the microwave power level using the slider. Touch ‘OK’ to
confirm. Please note that only lower microwave power levels are available to select in
combination mode, and this is normal.
Touch ‘temperature’ and select the required temperature for the grill/convection fan
oven using the slider. Touch ‘OK’ to confirm.
Touch ‘duration’ to enter the required cooking duration time, if you wish cooking to start
immediately; or touch ‘start time’ and then ‘finish time’ to enter the required start and
finish times if you require cooking to start and finish automatically later on. Touch ‘OK’
to confirm.
Defrost
From the main menu, select ‘defrost’.
Touch ‘duration’ to enter the required defrost duration time, if you wish defrosting to
start immediately; or touch ‘start time’ and then ‘finish time’ to enter the required start
and finish times if you require defrosting to start and finish automatically later on.
Touch ‘OK’ to confirm.
Page 21
21
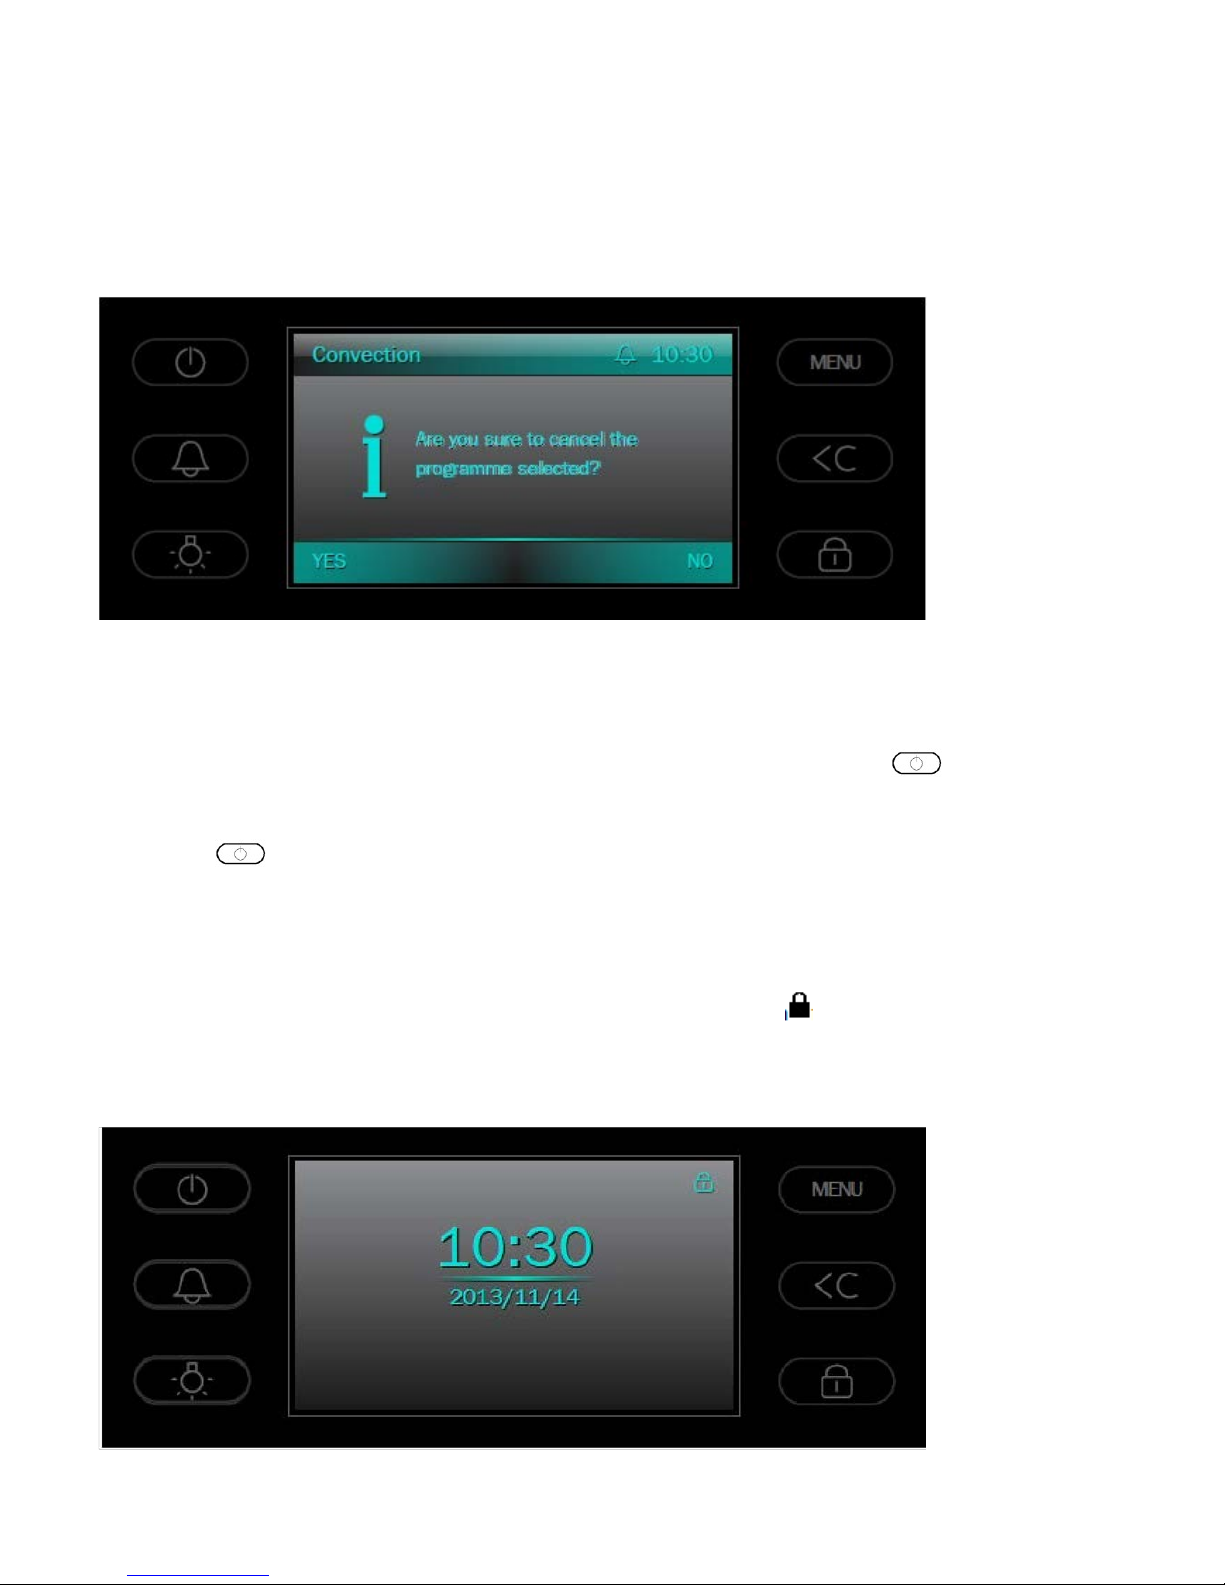
End / Cancel cooking function.
• To cancel a cooking function that has not yet started touch the return key (<C) to
return to the previous menu.
• To cancel a cooking function that has already began touch the retur n key (<C) which
will show the following message:
Touch ‘yes’ to cancel the current function or touch ‘no’ to continue with the current
function.
To return to standby mode
•To return to standby mode when not cooking touch the on / off key
• To return to standby mode during cooking mode touch the on / off key for three
seconds
• The current cooking programme will be cancelled.
Child lock
To lock the oven when in standby mode touch the lock key
for three seconds. The
oven will beep to confirm it has been locked and will display a lock symbol. Now the
oven cannot be turned on.
Page 22
22
To lock the oven while a cooking programme is in operation, touch the lock key for
three seconds. The oven will beep to confirm it has been locked and will display a lock
symbol. Now no changes can be made to the cooking programme until the controls are
unlocked again.
To unlock the controls, touch the lock key for three seconds, until you hear a beep,
and the lock symbol disappears from the screen.
Minute minder
The minute minder function beeps after a set time, but will not switch the oven off
automatically. This is useful, for example, if you wish to be reminded to stir the food
part way through cooking.
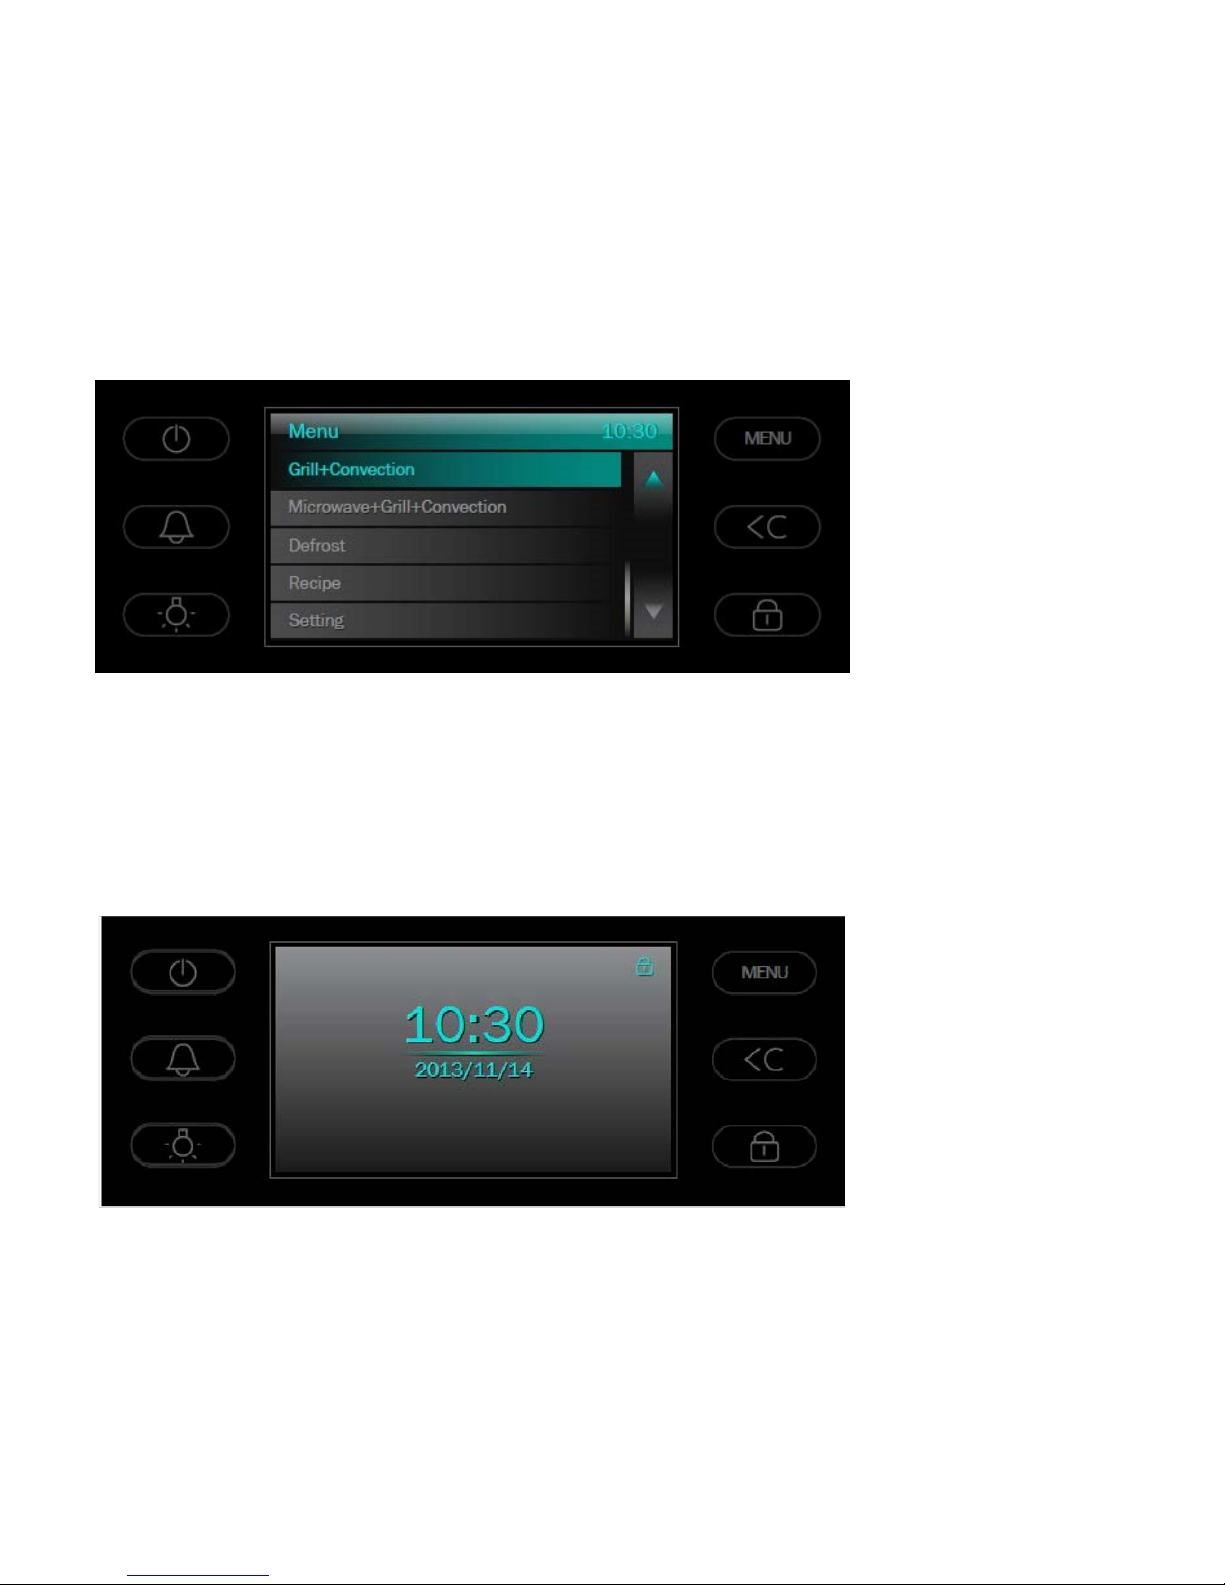
To set the minute minder touch the minute minder bell key and set a time using
the numerical key pad. Touch ‘OK’ to confirm. The set time will then start to
countdown.
When the minute minder duration time has elapsed the buzzer will sound. Touch the
minute minder bell key to silence the buzzer.
Page 23
23
Recipe function
The recipe function is a list of foods for which the cooking mode (G=grill, C=convection
fan oven or M=microwave), power level and cooking duration time have already been
preset in the memory.
From the main menu, select ‘Recipe’ then select the required food from the list. Touch
‘OK’ to confirm.
It may be necessary to adjust the cooking duration time for larger portions of food.
Power Saving Mode
When the oven is in standby mode, with the time of day showing, the oven will enter
power saving mode about 10 seconds after the last touch of a sensor key. The display
screen goes dark. Touch the display screen and the time of day will be displayed
again.
Cooling fan
The oven is equipped with a cooling fan which comes into operation as soon as the
selected cooking function begins. The cooling fan takes in cool air from the back of the
appliance and then blows it out of the front of the appliance between the top of the
door and the control panel, to help keep the door handle and controls cooler during
use. The cooling fan may run on for a while after the end of the cooking programme
and this is normal.
Page 24

24
Door Message
For safet, the oven is equipeed with a door interlock system which prevents microwave
cooking programmes starting unless the door is properly closed. After setting a
microwave power level, cooking duration time and touching ‘OK’ to start the cooking, if
the screen displays a ‘door’ message, it indicates that the door is not properly closed.
Please open the door, check for any blockages and close the door again correctly
before trying to start the cooking programme again.
Light
The oven light will switch on:
• When the oven is in use
• When the oven door is open and in standby mode – (if the oven door is left open
the light will automatically switch off after ten min utes to save energy).
Defrosting instructions
• When defrosting, use only dishes that are appropriate for microwav es, i.e.
glass.
• The defrosting time depends on the quantity and thickness of the food.
Because of this, it is useful to freeze food in smaller, more convenient
portions.
• Distribute the food well. You can use aluminium foil to shield delicate parts of
the food, provided that the pieces of aluminium foil are relatively small relative
to the size of the food. Important: The aluminium foil should not come into
contact with the inner cavity of the oven as this may cause electrical arcing.
• Thick portions of food should be turned over several times in the process of
defrosting.
• Distribute the frozen food as evenly as possible since narrow and thin
portions defrost more quickly than the thicker and broader parts.
• Fat-rich foods, such as butter, cheese and cream should not be completely
defrosted by this method as they will melt and spoil. After partial defrosting, if
they are then kept at room temperature for a few minutes they will then be
ready for serving.
• When defrosting poultry, place the poultry on an upturned plate within a glass
dish so that the meat juices can run off more easily. Always discard this
defrost liquid and under no circumstances allow it to come into contact with
other foods (danger of salmonella poisoning). Wash the plate and glass dish,
your hands, and the sink.
• Remove frozen food from its packaging. Especially remember to remove
metal wire twist tags. Foods in plastic trays may go straight into the
microwave. Foods in metal trays should be transferred into microwave-safe
containers.
• Do not forget that by using the defrosting function you need to allow for
standing time until the food is completely defrosted.
Page 25
25
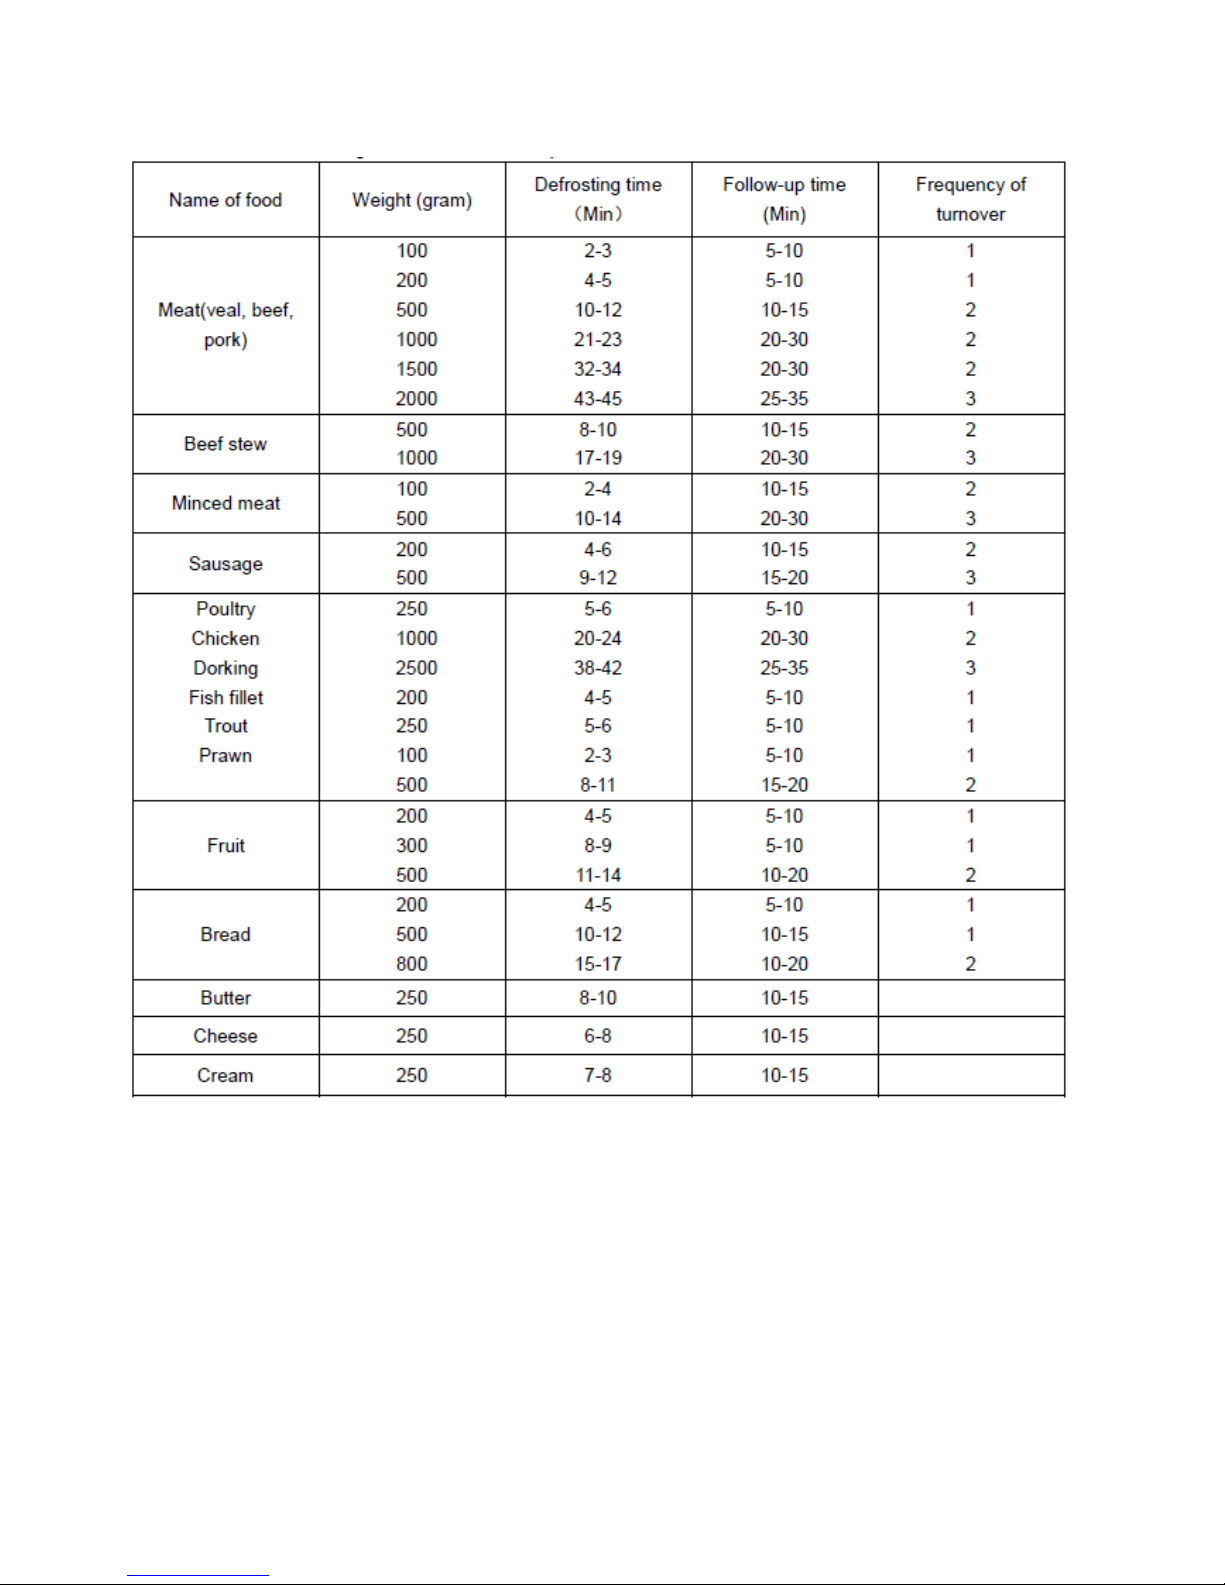
• In defrost process, please turn food over when the microwave oven beeps
and displays "turn". Please refer to the following table for different defrosting
times for various foods
:
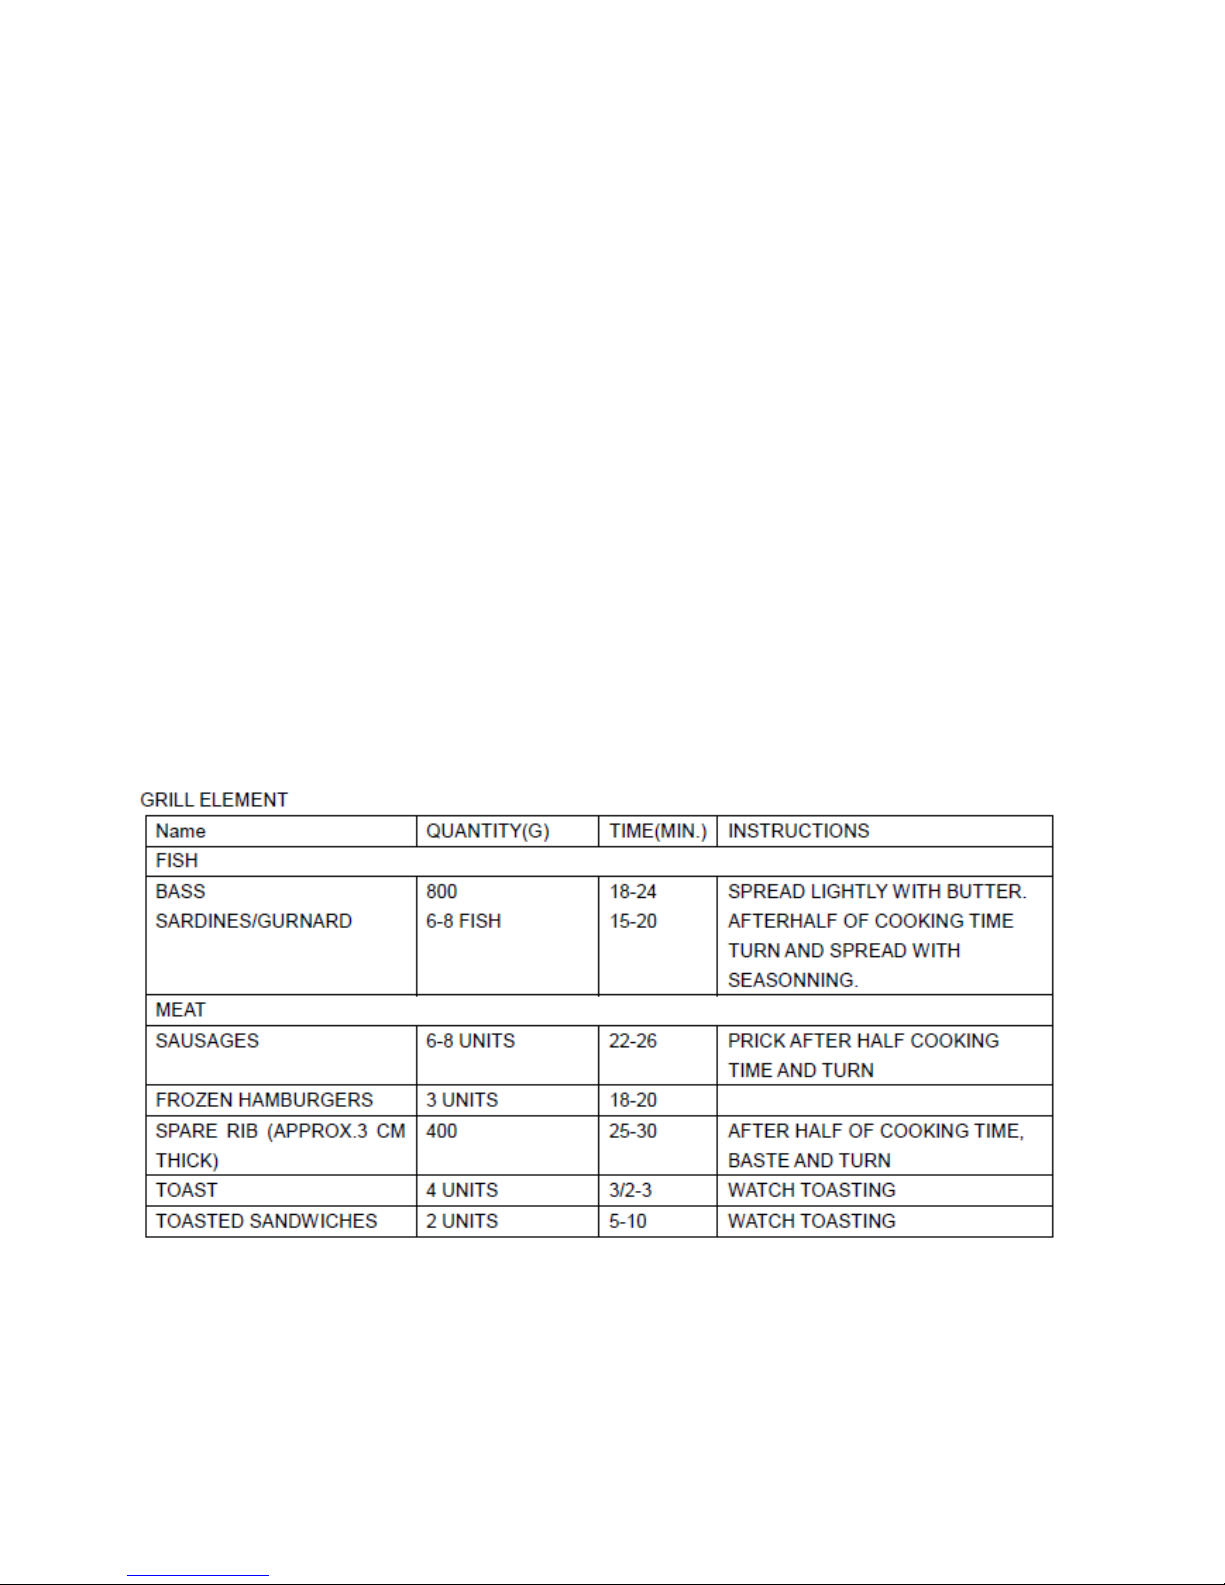
Cooking with the Grill
For better grilling, use the rack supplied to lift the baking tray closer to the grill
element. Insert the rack on the turntable so that it doesn’t come into contact with the
metal surfa ce s of the oven cavity, otherwise electrical arcing which may occur which
may damage the oven.
Page 26
26
IMPORTANT POINTS:
• There will be some smoke and smell when the grill is used for the first time. That
is because of oil left from the manufacturing process.
• The glass of the oven door becomes very hot when the oven is working. Keep
children away.
• When the grill is used for an extended period of time, it is normal to find that the
element will switch itself off and on periodically to maintain the required
temperature and to prevent over-heating.
• Important: When food is to be grilled or cooked in containers you should check
that the container is suitable to cope with the heat from the grill and for
microwave use in combination mode. See the section on types of ovenware!
• When the grill is used it is possible that some splashes of fat may go onto the
element and be burnt off. This is a normal situation and does not mean there is
any kind of operational fault.
• After you have finished cooking, and the oven has cooled down, clean the
interior and the accessories so that food debris does not become baked on when
the oven is next used.
Page 27

27
Microwave function
Warning – always read the safety precautions before using the microwave.
Always follow these recommendations when cooking with a microwave oven:
• Always prick foods with a peel or skin (baking potatoes, sausages, etc.) to prevent
them bursting.
• Only use containers or dishes which are suitable for microwave cooking (e.g.
heatproof glass).
• Microwave cooking works by making water molecules in food vibrate against each
other to create heat. Therefore foods which contain little water (like bread or
popcorn) may cease cooking and start burning very quickly which the risk of fire
and damage to the appliance. You should, therefore, not exceed recommended
cooking times and should monitor the cooking process closely.
• Do not heat oil in the microwave.
• If cooking in several containers at once, space the containers out evenly on the
turntable.
• Do not use metal wire twist tags; use plastic clips if required for closing cooking
bags. Prick cooking bags to allow steam and pressure to escape.
• Foods will require turning and stirring to ensure even heating.
• It is normal for steam to condense to water on the oven door glass, especially when
the kitchen is cold. This will not affect the cooking results. Simply wipe the water
away after cooking when the appliance has cooled.
• When heating liquids, bear in mind that using a wider container can help steam to
evaporate more easily. Bubbles can form unevenly when liquids are microwaved,
resulting in delayed eruptive boiling. This means that the cup or container could
suddenly boil over when removed from the oven with the associated risk of
scalding. Placing a plastic boiling rod (available from kitchenware stores) in the cup
or container during microwaving will help to reduce this risk, but you should still
exercise caution when removing the cup or container from the oven.
• The greater the amount of food, the longer the cooking time will be. As a general
rule: double the quantity = double the time; half the quantity = half the time.
• The lower the temperature of the food, or the lower the microwave power level, the
longer the cooking time will be.
• Foods containing a lot of liquid (water) will heat up more quickly.
• Always distribute food evenly on the turntable; denser foods should be placed on
the outer part of the turntable and less dense foods on the inner part of the
turntable.
• When you need to stir or turn the food, simply open the door and the microwave
function will pause automatically. The microwave function will start again when the
door is closed and ‘start’ is touched.
• Covering foods with a plastic cover or microwave-safe cling film will reduce cooking
times and retain moisture and flavours, but the cover or cling film must have vents
to allow steam and pressure to escape.
• The following table gives guidance on cooking vegetables in the microwave.
• Please bear in mind that these figures are only for guidance, and actual required
cooking times may vary depending on the initial temperature, moisture content and
Page 28
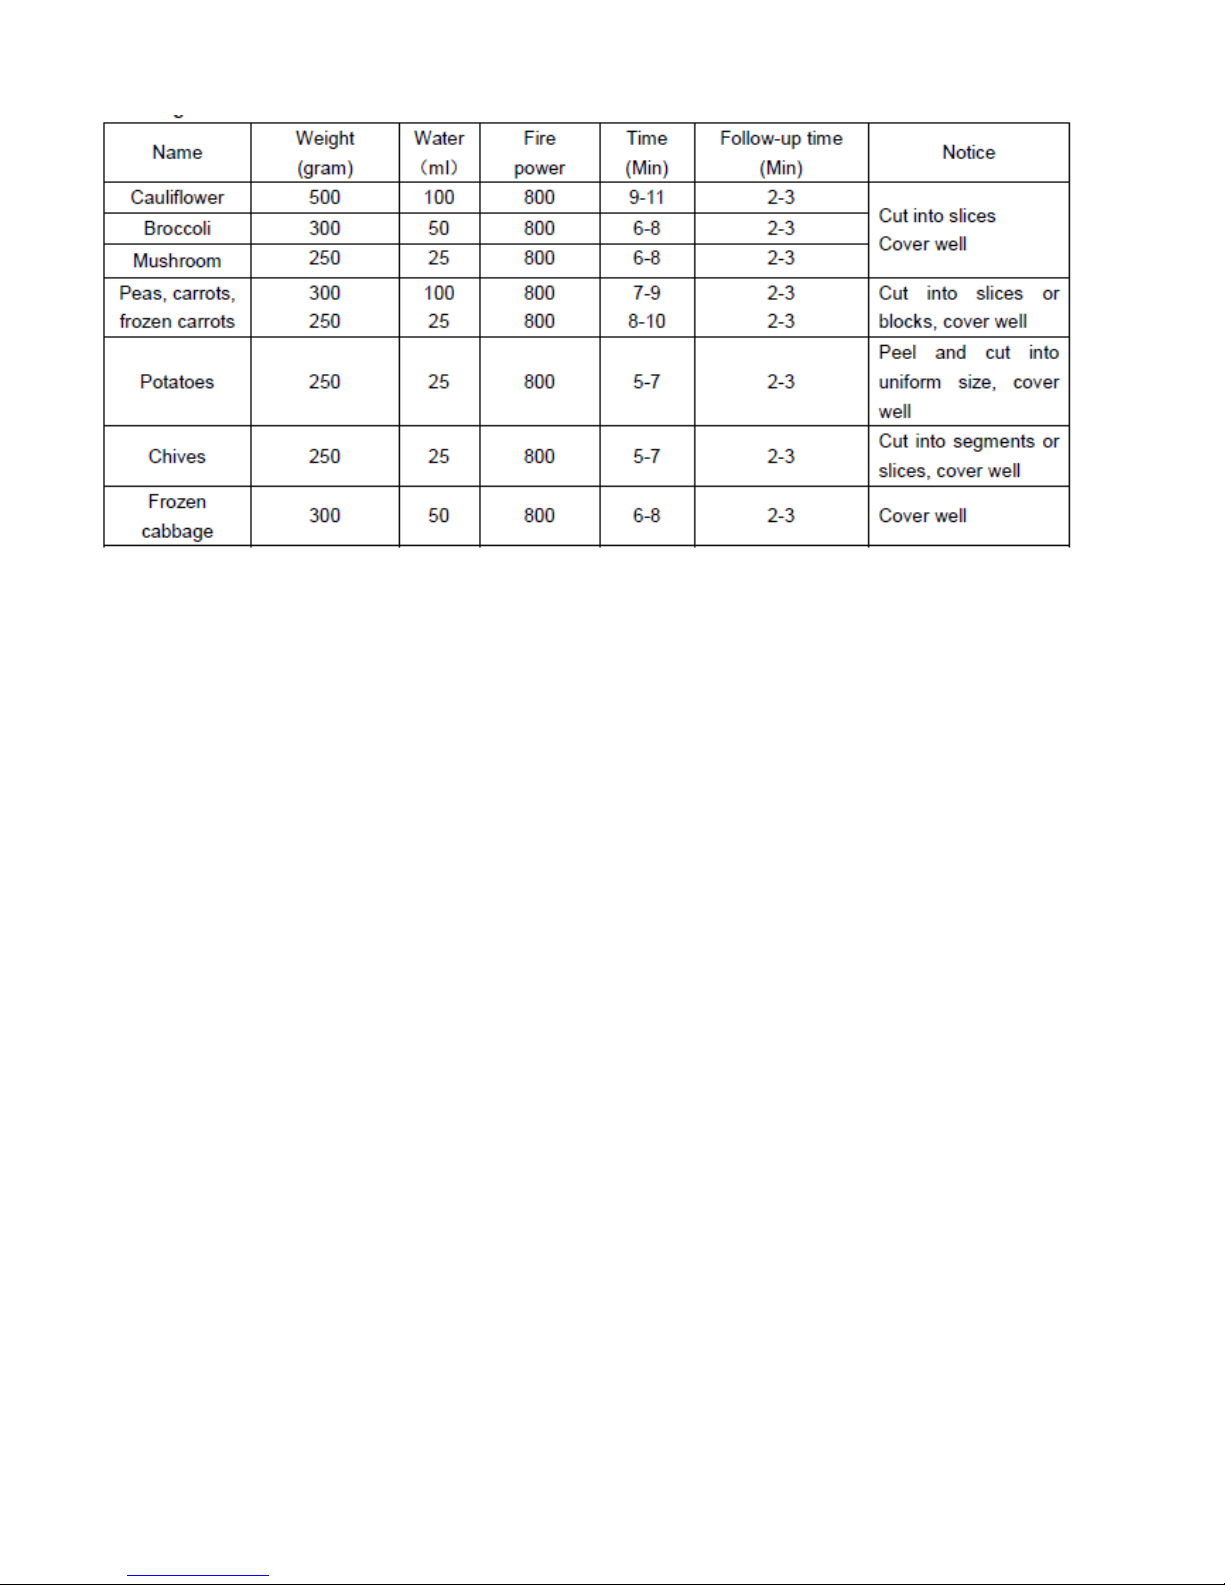
28
quantity of the food. It may be necessary to adjust the cooking duration times
and/or microwave power level a little.
What kinds of ovenware can be used?
• Micr owave energy can pass through glass, china, plastic, clay pots and paper
containers to be absorbed into the food.
• Microwave energy cannot pass through metal containers as the metal reflects the
microwaves.
• Therefore, it is best to use heat-resistant glass containers in the microwave.
• If the glass or china cookware has a metallic trim (like a gold leaf decoration) or
contains metal (like lead crystal), then it cannot be used in the microwave.
• Microwave energy heats the moisture in the food directly rather than heating the
cookware. However, the cookware will become hot eventually from the heat
radiated from the food. Therefore, you must use oven gloves when removing the
cookware from the oven.
• To test if an item of cookware is suitable to use in microwave mode, place it on the
oven turntable with a cup of water next to it. Start the microwave on maximum
power for 20 seconds. At the end of the test, the water in the cup should be warm
(because it has absorbed the microwave energy) and the cookware item should be
cool. The cookware item is then suitable to use in the microwave. If the cookware
item was warm and the water was cold, then that would indicate that the cookware
item had absorbed the microwave energy and would not be suitable to use for
microwave cooking. If you notice any arcing during the test, switch the oven off
immediately.
• For grilling and convection fan oven, cookware needs to be heat-resistant to a t least
300°C.
• Plastic containers are not suitable for grill, convection or grill-combination,
convection-combination or grill-convection-combination functions.
• For combination cooking functions, it is best to use heat-resis tant gla ss cookware.
• Heat-resistant glass will be able to cope with the high temperatures from the grill
and/or convection oven and will also allow microwave energy to pass through the
glass into the food.
Page 29

29
• Exercise caution if using aluminium containers or aluminium foil in microwave
mode.
• Always follow the cooking instructions on the food packaging.
• The aluminium containers must not be more than 3cm high, and must be kept at
least 3cm away from the oven cavity walls.
• Remove any aluminium lid or top from the container.
• Food cooked in an aluminium container will take longer to cook as the microwaves
can only penetrate the food from the top. It is better to take the food out of the
aluminium container and place it into a dish suitable for microwave cooking.
• Aluminium foil must not come into contact with the oven cavity walls as this may
cause arcing.
• Never use aluminium foil in grill or grill-combination modes as it can reflect the heat
from the grill element leading to excessively high temperatures and the risk of fire.
• For covering food during microwaving, it is best to use glass or plastic lids or
covers, or microwave-safe cling film. This will help to preserve moisture and
flavours in the food.
• These should have vents to allow steam and pressure to escape.
• Plastic cooking bags should be left open or lightly closed with plastic clips in
microwave mode.
• If heating baby bottles or baby food in jars, the tops/lids must be removed to prevent
the bottle/jar from bursting.
• Food/liquids must be stirred to ensure even heating.
Page 30
30
CLEANING YOUR APPLIANCE
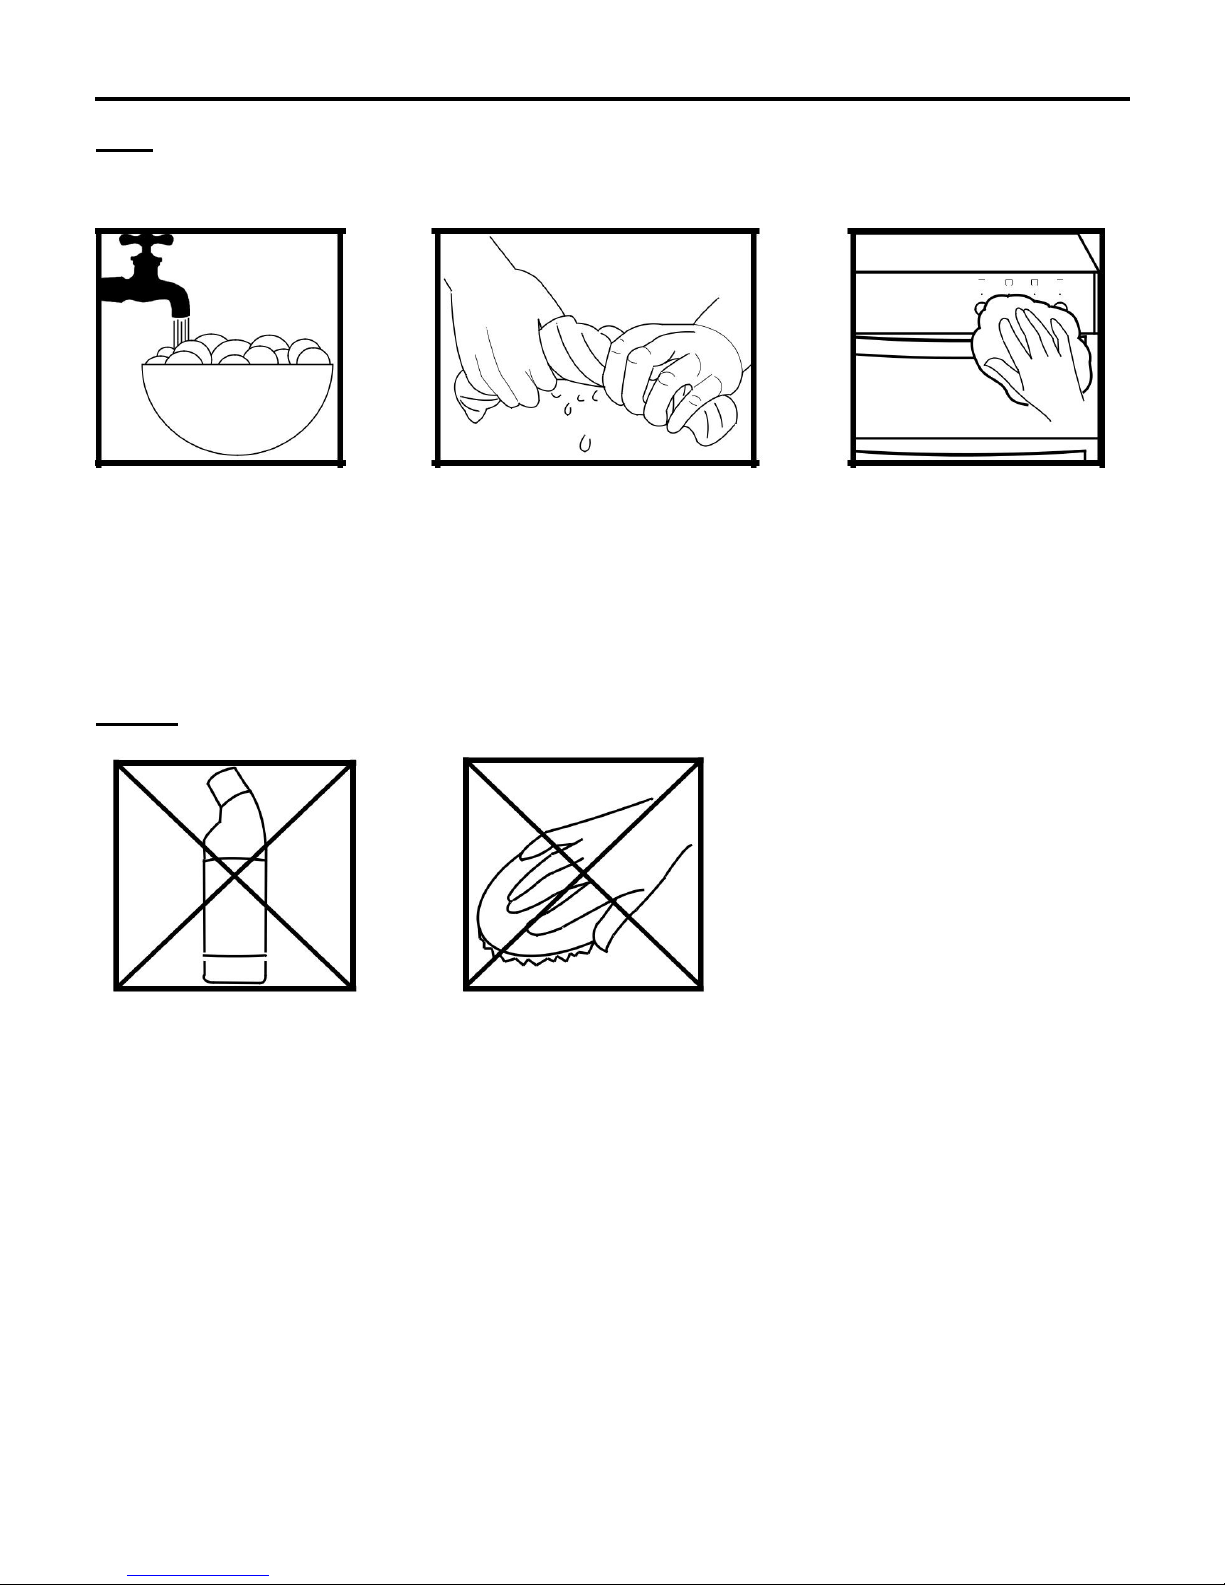
Do’s
Note: Always switch off your appliance and allow it to cool down before you clean any part of it.
H
• Warm, soapy water • Clean, wrung out cloth • Wipe with damp cloth
• Dry with a soft cloth
Tips: Some foods can mark or damage the metal or paint work e.g.; Vinegar, fruit juices and salt.
Always clean food spillages as soon as possible.
Dont’s
•
Undiluted bleaches
•
Wire Wool
•
Chloride products
•
Abrasive cleaners
•
Nylon pads
•
Steam cleaners
• When cleaning the appliance, do not attempt to remove the mica cover, which is
where the microwave energy enters the oven cavity. Do not use the oven with the
mica cover missing.
• Clean the oven regularly to reduce the risk of food deposits catching fire and
causing damage to the appliance.
• Pay particular attention to keeping the oven door and door seal clean to ensure that
the door can close correctly.
• Do not allow water to enter into any ventilation holes.
• If the turntable will not rotate, always take out and clean the glass turntable and
roller ring before replacing them. Never use the oven with the glass turntable or
roller ring missing.
Page 31
31
• For heavier soiling, place a glass of water with lemon juice in it on the turntable and
switch the microwave on at maximum power for about 3 minutes. The steam will
soften grease and dirt to make it easier to wipe away, and the lemon will help to
eliminate odours.
• The baking tray and grill rack can also be washed in warm soapy water.
IT IS IMPORTANT TO CLEAN YOUR APPLIANCE REGULARLY AS A BUILD
UP OF FAT CAN AFFECT ITS PERFORMANCE OR DAMAGE IT AND MAY
INVALIDATE YOUR GUARANTEE.
IN ADDITION TO THE ABOVE, DO NOT USE METAL SCR APERS TO CLEAN
THE OVEN DOOR GLASS
.
We offer a great range of cleaning products and accessories for your appliance.
To shop, please visit our website located at the front of this User Guide.
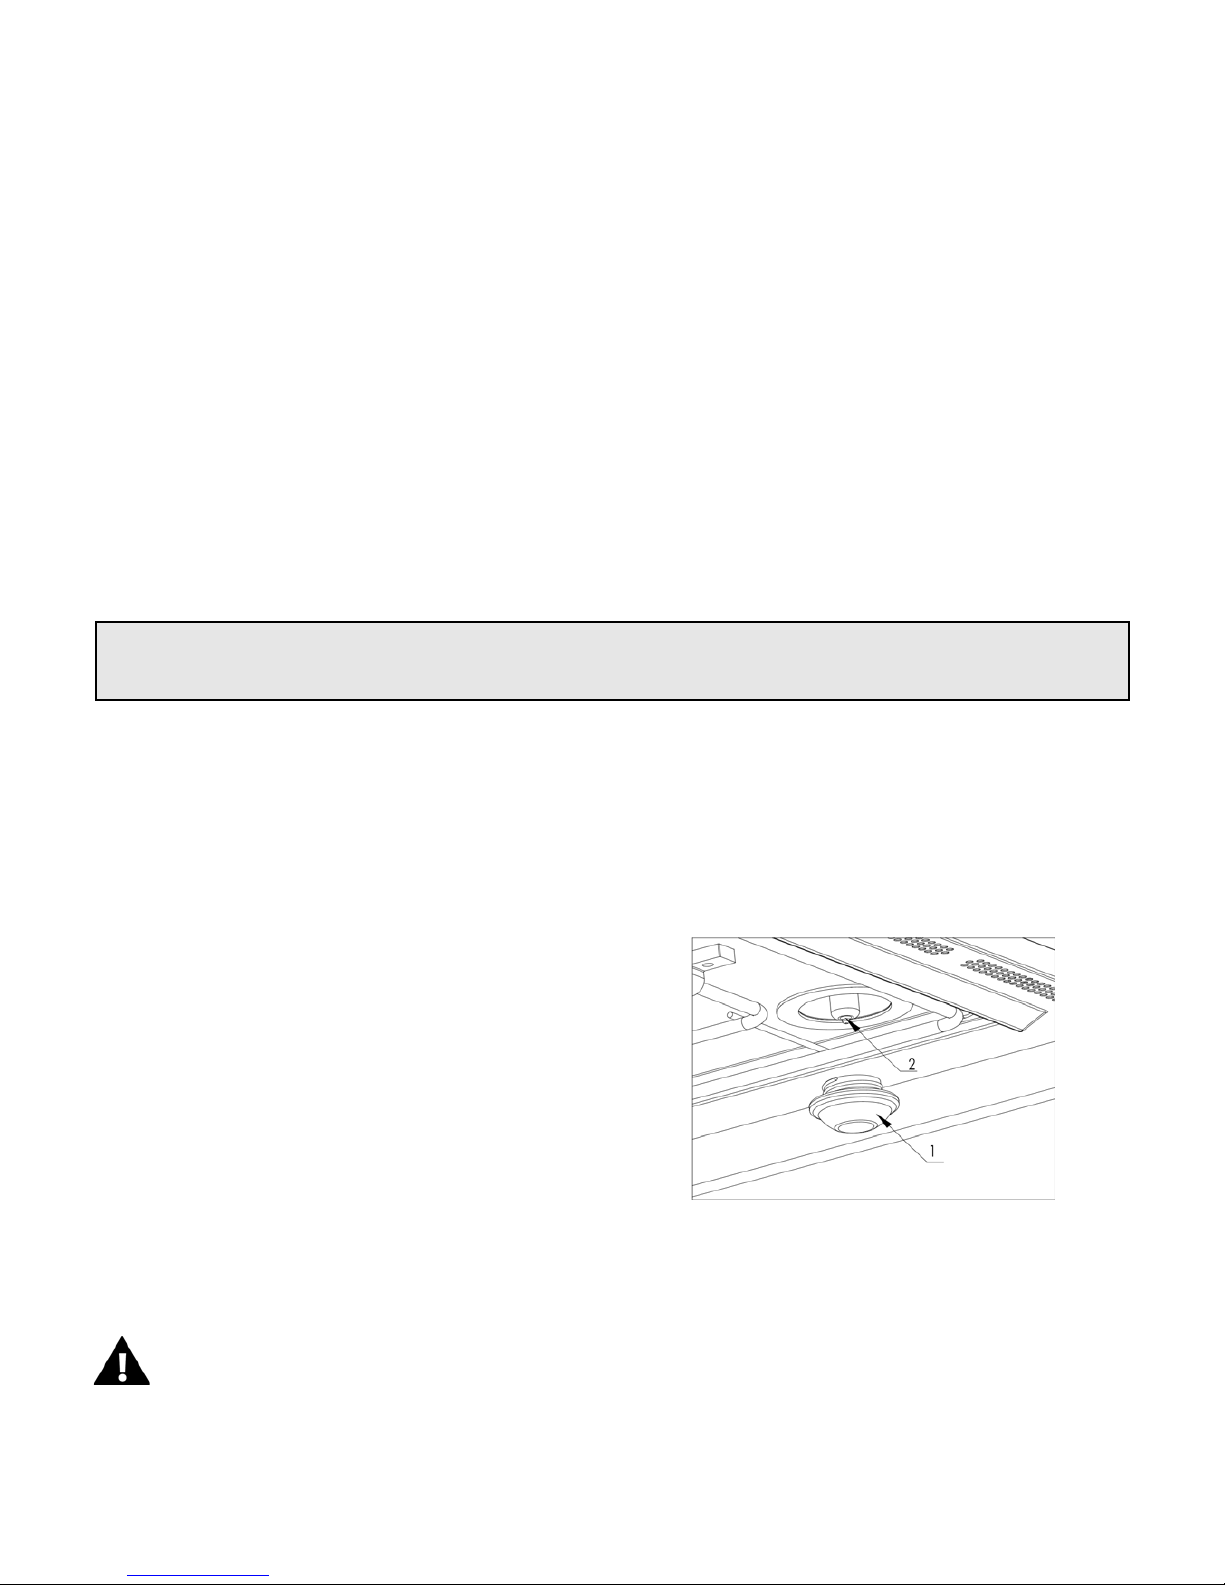
Replacing the lightbulb
• Switch the appliance off and switch off the power supply at the wall. Wait a few
minutes to allow time for the halogen bulb to cool down.
• Place a towel on the floor of the oven cavity to protect the lamp cover from damage
if it falls.
• Unscrew the lamp cover (1).
• This is a good opportunity to clean the lamp
cover in warm soapy water and dry it
thoroughly.
• Remove the halogen bulb (2) WARNING the
bulb may still be hot.
• Fit the new halogen lamp bulb, using one of
the same type (220-240V 25W G9 halogen
bulb).
• Replace the lamp cover.
• Connect the appliance back to the power supply.
If you are having difficulties replacing the lamp bulb, request an engineer service visit.
Page 32
32
INSTALLING THE APPLIANCE
Before The Installation
Open the oven door and remove the accessories and packaging material.
Please make sure that the oven is not damaged in any way checking that the oven
door closes correctly and the inside of the door and front oven panel are not damaged.
Do Not Use the Oven: If the power cable is damaged, if the oven does not
function correctly or if it has been damaged or dropped. Place the oven on a flat
and stable surface prior to installation. The oven should not be installed close to
any heat source, radios or televisions.
During the installation, please make sure that the power cable does not come into
contact with any moisture or objects with sharp edges at the back of the oven. High
temperatures can damage the cable. Warning: after the oven is installed you should
make sure the user can access the isolation switch.
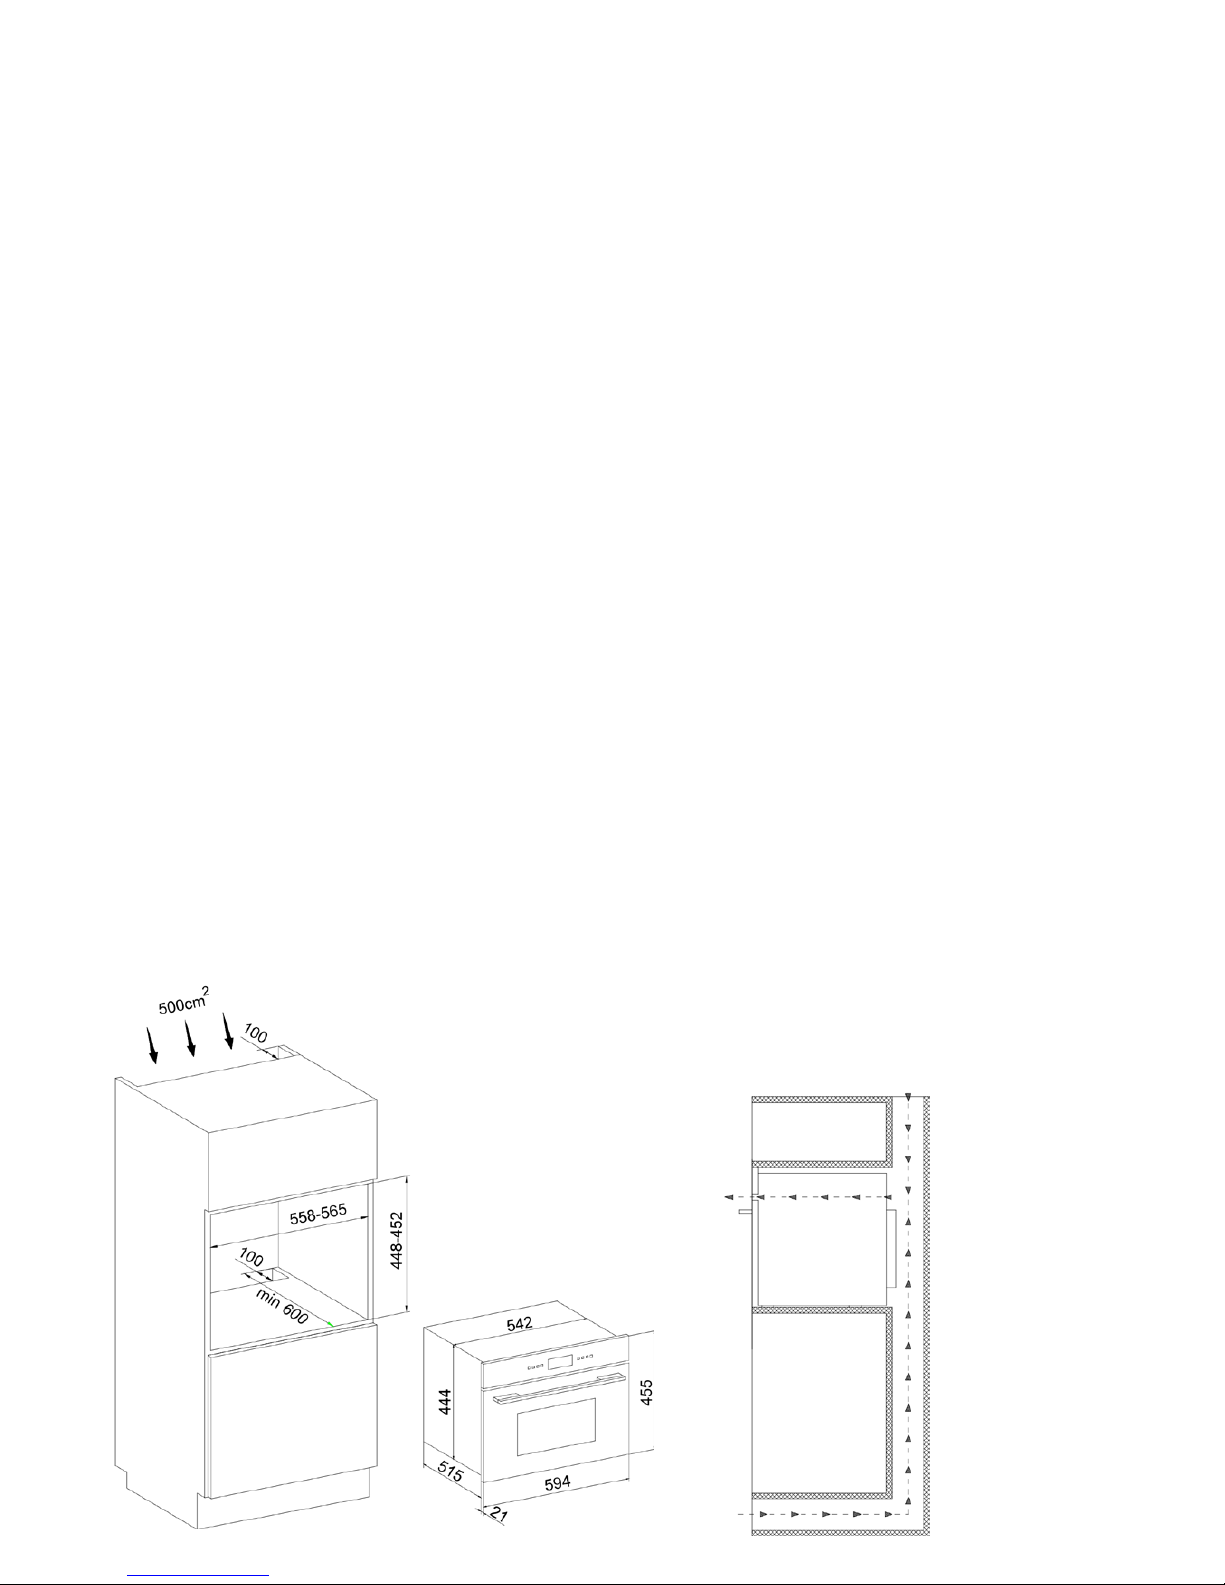
This oven can only be used once it has been built into a housing unit, so that all
electrical components are shielded. The cabinetry must be able to withstand
temperature rises. The cabinet unit must be well ventilated with an air intake of 500cm
2
minimum cross-section in the plinth at the base of the unit. The shelf supporting the
oven must not go right back to the back wall of the housing unit – there must be a gap
of at least 100mm at the back to allow air to circulate. In a tall unit, any additional
shelves or drawers below the oven must also respect this 100mm gap.
Please note: Air vent is required in the plinth at foot of the base unit with a minimum cross section of 500cm
2.
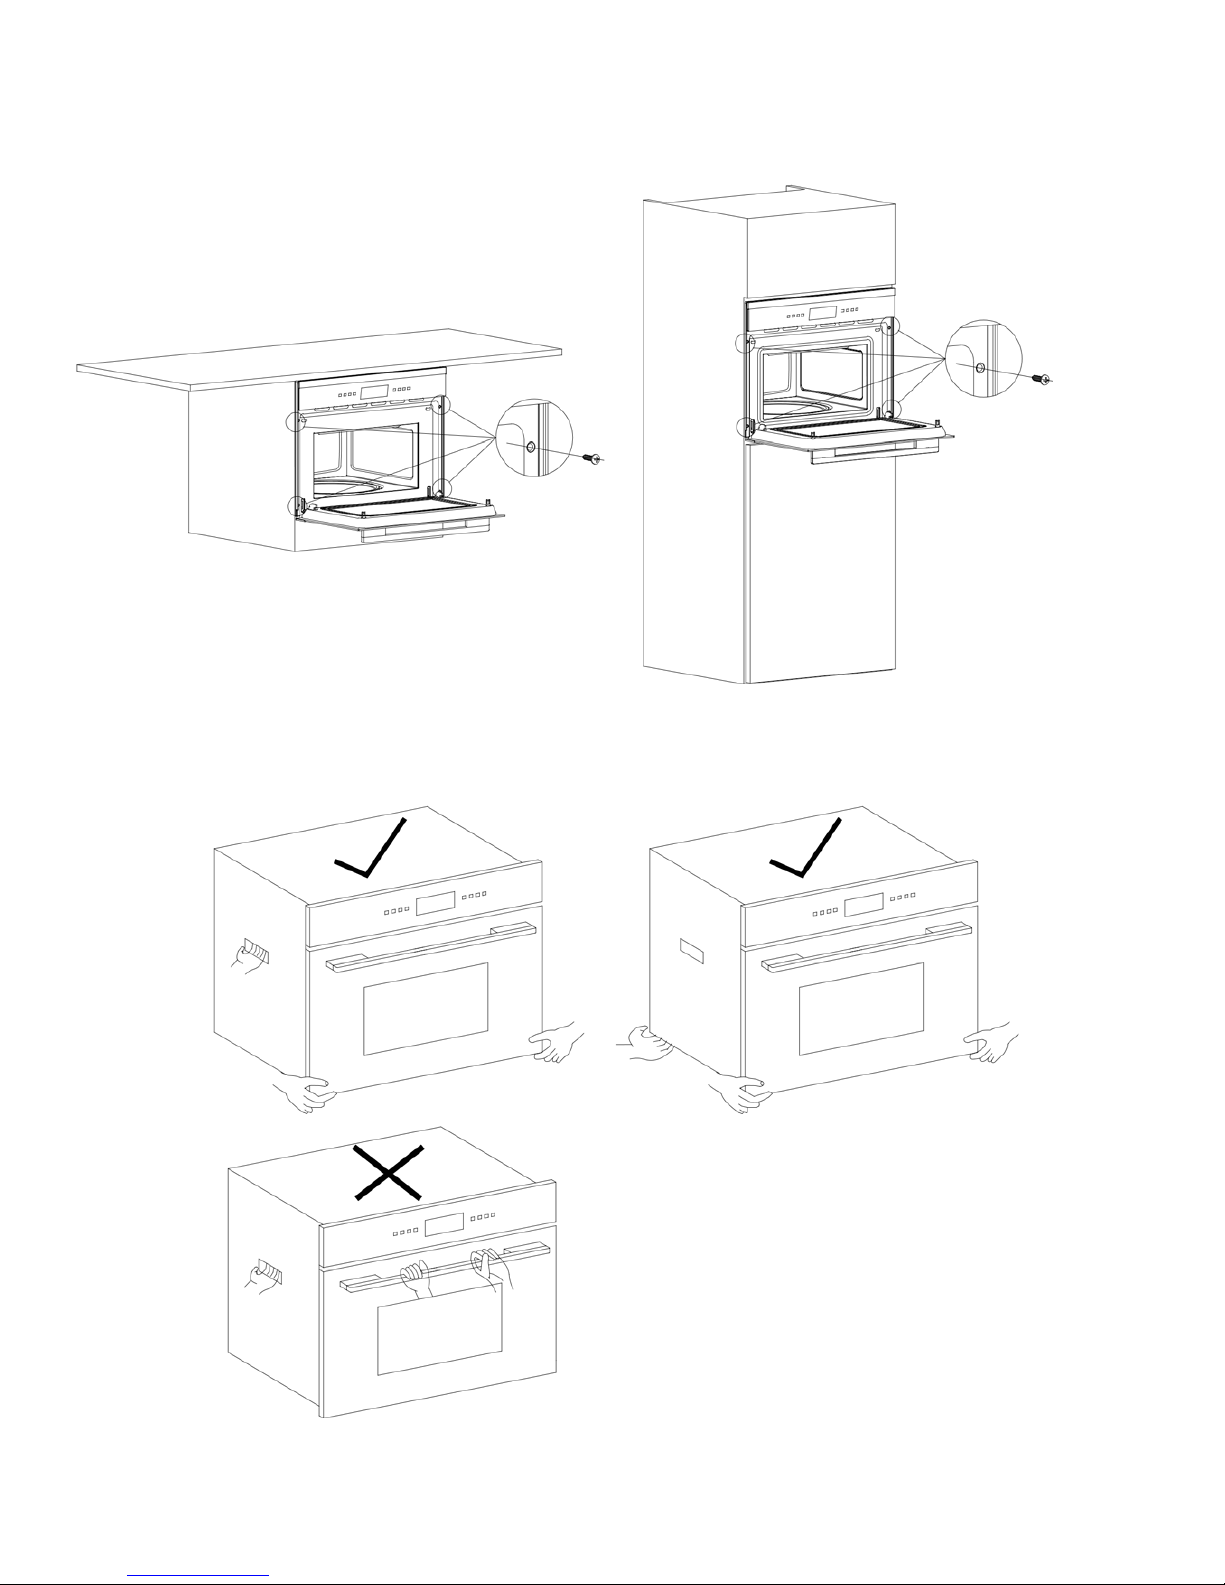
There are 4 screw holes on the inner side of the oven door frame. Use the 4 wood screws to secure the oven into
the housing unit.
Page 33
33
Warning: Please do not lift the oven by the door handle during the installation and removal.
Page 34
34
Troubleshooting.
Some basic issues can be resolved without the need to request a service visit. For other issues, or if
the issue remains after following this advice, please request a service visit.
Issue:
Possible Cause:
Resolution:
The display screen is blank.
No power to the appliance.
Please check that the oven is switched on at
the fused spur cooker point.
Please check that the circuit switch has not
tripped down at the fusebox.
The touch sensors do not respond.
The childlock function may be active.
There may be a film of water or grease on
the control panel.
Please deactivate the childlock function.
Please wipe the control panel clea n.
The cooking programme can be selected, but
cooking does not start.
The door may not be closed correctly.
Please check that the door is closed
correctly; that the door and seal are clean;
and that nothing is trapped between the door
and the oven.
Strange noises and/or arcing.
Metal cookware may have been used by
mistake.
Metal items or aluminium foil may have
touched the wall of the oven cavity.
The glass turntable and/or roller ring may not
be positioned correctly.
Use cookware suitable for mi c r ow av e ovens.
Always allow a gap of at least 3cm between
the cookware and the walls of the oven
cavity.
Position the glass turntable and roller ring
correctly.
The microwave does not heat or the food
cooks slowly in microwave mode.
Metal cookware may have been used by
mistake.
Has the correct microwave power level and
cooking duration time been selected?
Is the quantity of food too large?
Use cookware suitable for microwave ovens.
Select the correct microwave power level
and cooking duration time.
Two smaller portions will cook more quickly
than one large portion.
The sound of a fan continues to run at the
end of the cooking duration time.
This is the sound of the cooling fan running
on for a while to cool the appliance down.
This is normal.
The oven lamp does not work.
No power to the appliance.
Has the oven door been left open for longer
than 10 minutes? The light will switch off to
save energy.
The bulb may need replacing.
Please check that the oven is switched on at
the fused spur cooker point.
Please check that the circuit switch has not
tripped down at the fusebox.
Close the door and open it again.
Replace the bulb.
There is condensation on the door glass.
It is normal that steam can condense to
water on the door glass.
Wipe the condensation with a cloth.
Do not leave food inside the oven to keep
warm at the end of the cooking programme.
Cover food were possible.
Page 35

35
Page 36

36
 Loading...