

Page 1
Page 2
4
Contents Page
Introduction
Positioning the appliance
Removing the doors
About your appliance
Before using your appliance
Using your appliance
About your freezer compartment
About your refrigeration compartment
Using the icemaker & water dispenser
Defrosting food
Maintenance and cleaning
Troubleshooting
Service record
Thank you for buying this high quality appliance form Lec,
we hope that it provides you with a stylish, yet practical
solution to your cooling needs.
We hope that this handbook supplies you with all the
information you require, but please contact us if there is any
thing you are unsure of using the Customer Care Centre
number on the back cover of this handbook.
5
8
9
11
13
15
21
22
23
28
29
32
35
Page 3
5
Introduction
Important
Please be aware that this appliance is for domestic use only.
The right hand side of this appliance is a refrigerator, and
should be used for storing fresh foods.
The left hand side of this appliance used for freezing fresh
foods and storing frozen foods (convenience meals etc.).
These instructions are intended for the user. They describe
the appliance and how to use it safely and correctly. There
may however be some functions / features described which
are not available on your appliance.
Before you start
• Before you plug the appliance into the mains, clean the
inside of the appliance using warm water and
bicarbonate of soda, then dry thoroughly.
• Please leave the appliance to stand for at least six
hours. This will allow the cooling system to settle
following transportation.
• Check that no parts of the appliance are damaged,
especially parts of the cooling system, pipes or leads.
If damage has occurred, DO NOT install the appliance,
you should contact a qualified service engineer or
return the appliance to its place of purchase.
• If the accessories inside the appliance have been
disturbed during transit, reposition them in accordance
with the instructions.
Make sure that the electrical supply to your plug socket is
correct for this appliance – the required information is on
the data badge of the appliance.
Once the appliance is installed, cleaned and dry – it is ready
to be plugged in and switched on.
Warning: This
appliance must be
earthed.
Always make sure a
qualified person
installs this appliance.
The freezer
compartment is rated
at 4 stars.
!
!
Page 4
6
Introduction
Safety
• When replacing old appliances, make sure that you
have disabled any locking mechanisms before disposal
– it may even be best to remove the appliance door
completely – to prevent children from becoming
trapped inside the appliance.
• The appliance must be connected to the power supply
safely. Loose connections, broken plugs and bare
wires are a safety hazard; make sure that all
connections are sound.
• Do not touch cold surfaces of the appliance while it is
in use as this will cause hands to stick to them leading
to freezer burns.
• Effervescent liquids (fizzy drinks) should never be
frozen. These liquids expand during freezing and this
may lead to the bottles / containers shattering or
exploding.
• Never eat frozen foods that are intended to be
defrosted or cooked first e.g. breads, meats etc.
• If food looks or smells strange, do not attempt to eat
it. If in doubt throw it away. Spoiled food can be
harmful to your health.
• Before undertaking any routine maintenance or minor
repairs, disconnect the appliance from the electrical
supply. This includes cleaning, defrosting and
changing light bulbs.
• Never use electrical devices, such as hair dryers, to
defrost this appliance.
• Never use sharp, metal implements to scrape ice off
the surface of this appliance. Only use implements
which are fit for this purpose (i.e. plastic scrapers) and
use carefully to avoid puncturing the lining of the
appliance.
• When moving the appliance take care not to damage
the leads, pipes or condenser unit. Should these parts
become damaged, contact a qualified service engineer.
• The cooling system contains refrigerant and oils, all of
which are harmful to health if leaked. Should leakage
occur, disconnect the appliance and ventilate the room
it is installed in, take care to ensure that you do not
get any coolant near to, or in, your eyes. Then
contact a service engineer or arrange to have the
appliance removed. Do not use the appliance under
any circumstances.
Should any of the
electrical components
or the cooling system
become damaged – do
not use this appliance
until it has been
serviced.
The data badge is
located:
Inside the appliance
(refrigeration
compartment).
WARNING: Use potable
(drinking) water with
this appliance.
WARNING: Keep this
appliance clear of any
obstruction
DO NOT damage the
refrigerant circuit. If it
does become
damaged, do not use
the appliance.
WARNING: Do not use
mechanical devices
(i.e. hair dryers) to
defrost this appliance.
i
!
!!!
!
Page 5
7
Positioning Your Appliance
Choosing the right place
• This appliance should be installed in a room which
is dry and well ventilated.
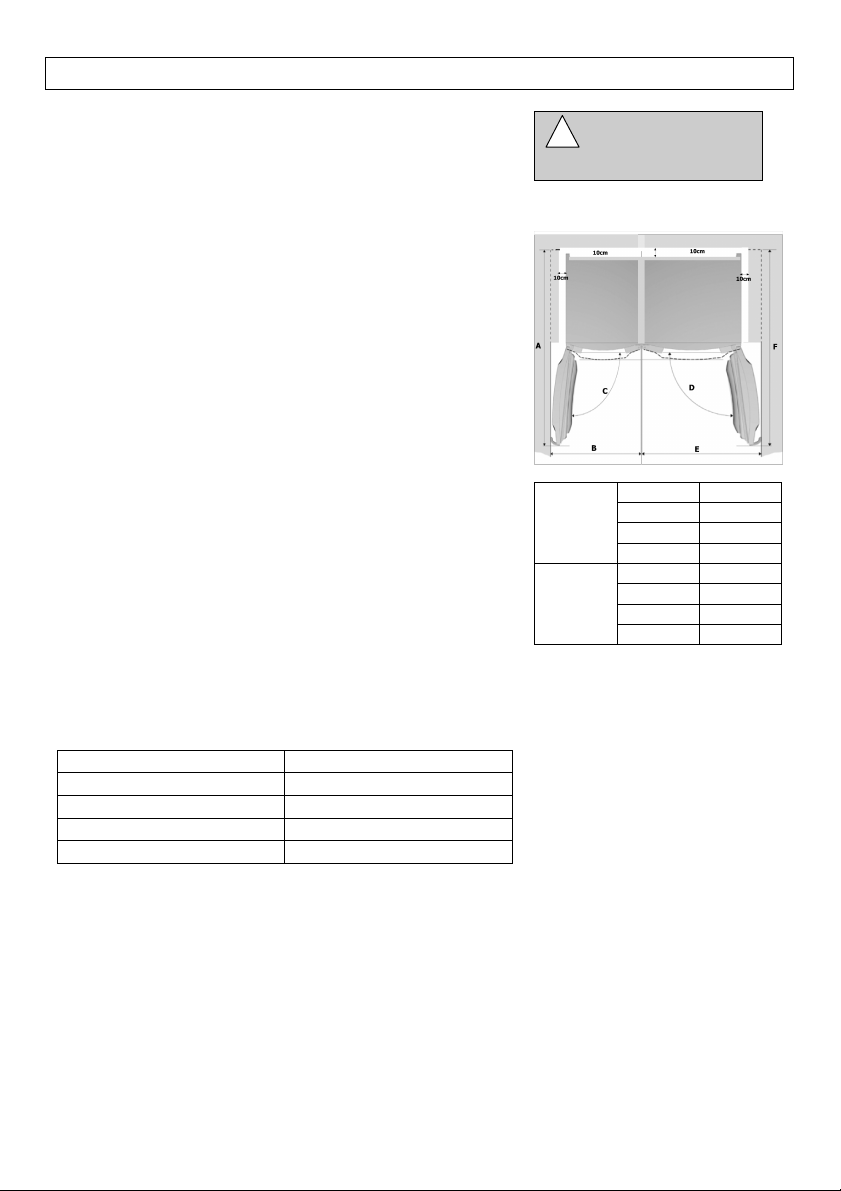
• In order to ensure adequate ventilation, the
appliance should be at least 10cm clear on all sides
from kitchen cabinetry, and any units placed above
the appliance must be clear by 10cm – allowing
adequate ventilation for the appliance. See
clearance diagram.
• This appliance should be 10cm at least from any
electric or gas cooker and 30cm from any coal or oil
stove. If this is not possible, ensure that
appropriate insulation is used.
• Avoid exposing the appliance to direct sunlight, and
sources of heat (radiators, heaters, cookers etc.).
• If this appliance is situated in a cold environment
(shed, out house, garage etc.) it will affect its
performance. You may find that the performance
of the appliance is not consistent and foods may be
damaged by this. Please ensure that the ambient
temperature does not drop below that specified by
the climate class and that temperatures are
maintained as consistently as possible.
• Allowed ambient temperatures depend on the
model (class) of the appliance, which is SN – ST as
stated on the data badge.
Climate Class
Ambient temperature
SN (sub-normal)
From + 10 to + 32
N (normal)
From +16 to +32
ST (sub-tropical)
From + 16 to +38
T (tropical)
From +16 to +43
Connection to the electricity supply
Connect the appliance to the electrical supply (220 –
240V ~ 50Hz) with the plug and lead which are fitted.
Connections to the mains supply should be in accordance
with local regulations.
Always make sure that the plug is accessible after the
appliance has been positioned.
If the plug requires changing, or a new fuse is needed
instructions are included in this handbook (see Cleaning
and Maintenance).
This appliance must be
earthed.
Letter
Measure
A
115 cm
B
66.5 cm
Freezer
C
150˚
D
140˚
E
88.5 cm
Fridge
F
130 cm
NOTE: A & F are the
measurements needed for the
door to be opened to 90
(maximum needed to open the
appliance doors.)
B, C, D & E - door angle and width
needed to adjust the shelves with
ease.
!
Page 6
8
Positioning Your Appliance
Adjustable feet
Make sure that the appliance is on solid flooring,
which is level.
Some appliances have adjustable feet, which are
used to level the appliance. These are usually at
the front of the appliance. Should you need to level
the appliance – use these feet.
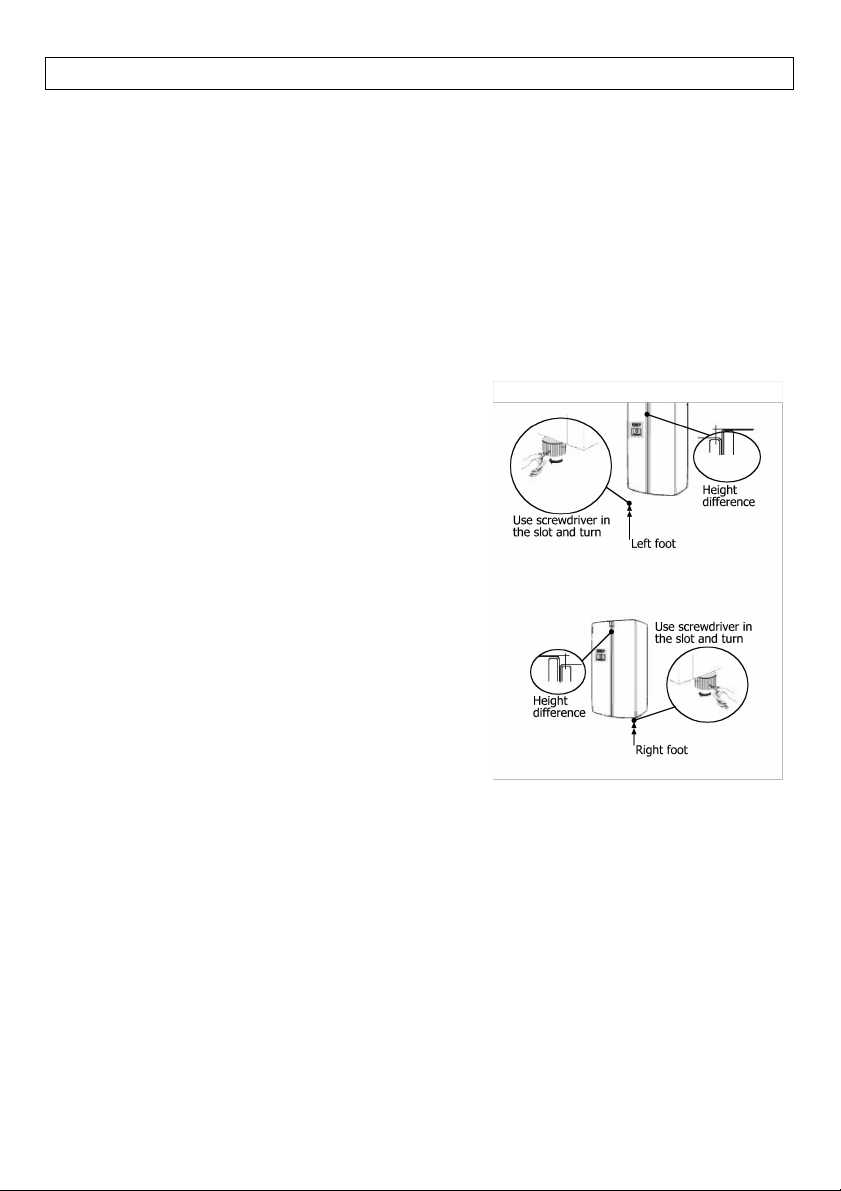
Door adjustment
The freezer door may require some adjustment
before you connect the appliance to the electricity
supply. This can be done by making minor
adjustments to the feet:
• If the door height needs to be raised, use a
screw driver on the slot of the left hand foot at
the base of the appliance, and turn clockwise
until the door height is raised in line with the
fridge door.
• If the door height needs to be dropped, use a
screw driver on the slot of the right hand foot
at the base of the appliance, and turn
clockwise until the door height has changed in
line with the freezer door.
Or you can adjust the level of the door by making
an adjustment to the hinges of the door.
Fitting the bottom plinth
Open the doors and remove the plinth from the
inside of the door. Fix to the appliance using the
two screws supplied.
Fitting the handle
First fix the bolts to the outer of the door. There
are two bolts for each door.
Remove the handle from inside the door.
Fit to the door by lining up the bracket at the end
of each handle to the bolt, push the handle onto
the bolts and slide down until the handle is securely
fitted.
Warning: Take care not to scratch the door while
fitting the handle.
Page 7
9
Removing The Doors
Unplug the appliance before removing the door.
If the size of this appliance exceeds the width of your door
the doors of this appliance will have to be removed - the
instructions below should be followed.
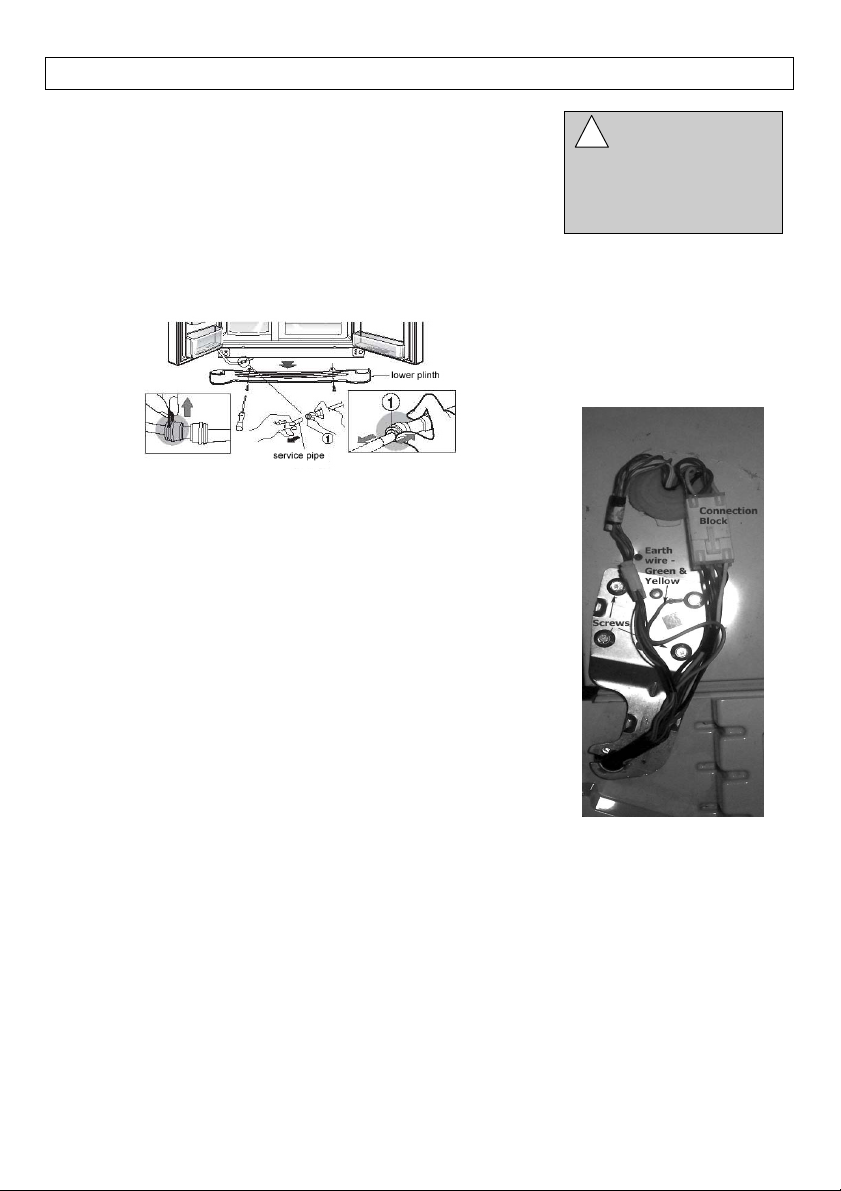
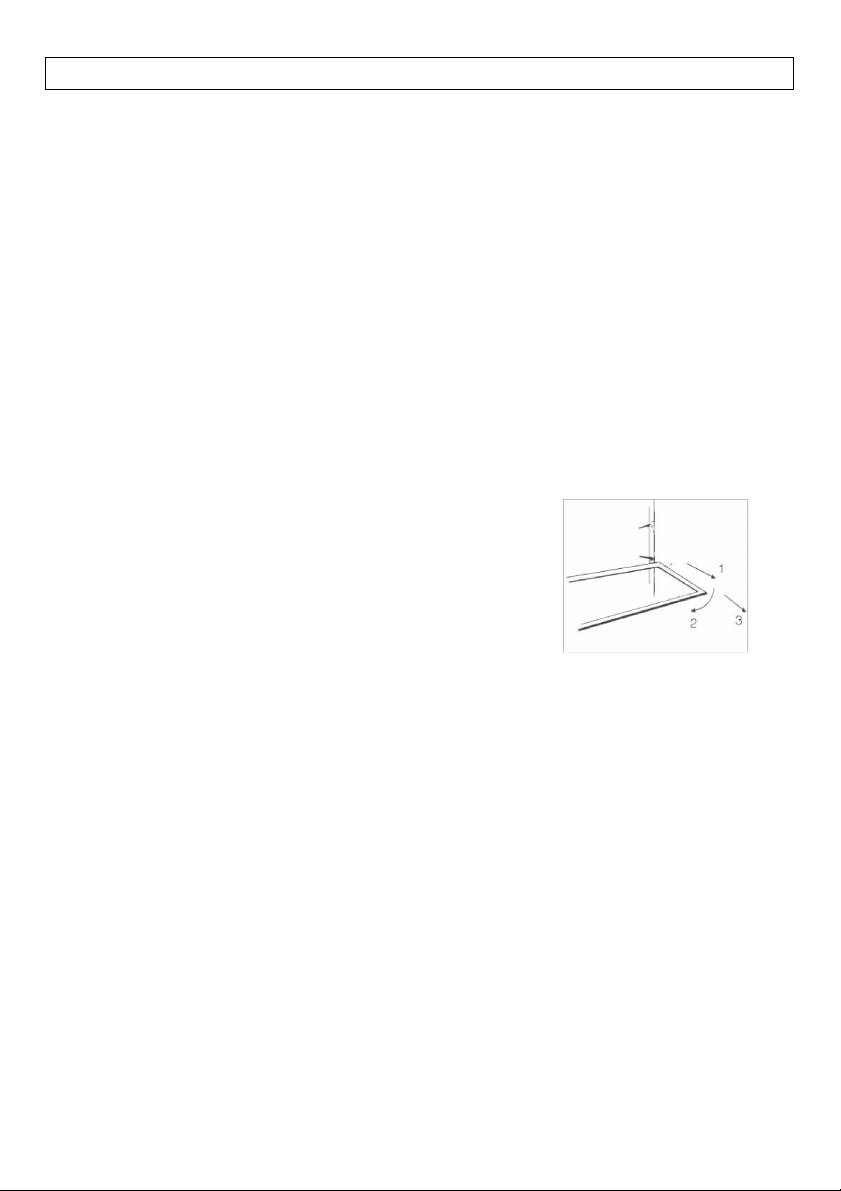
Remove the lower plinth (2 screws) and unfasten the clip,
press position (1) and pull out the service pipe. (See below
picture).
Notice:
If any distortion occurs at the end of the pipe, re-cut the
end of the pipe.
Removal of the Freezer Door
1) Undo the Hinge Cover screw, remove the cover and
disconnect the plastic connection box and the green
and yellow earth wire.
2) Remove the hinge screws and then remove the top
hinge.
Note:
When removing the top hinge, make sure the door is fully
supported and does not fall causing injury or damage.
3) Lift the door of freezer compartment upwards and
remove, make sure it is up to a height where the
service pipe is fully removed from the door.
WARNING:
DANGER OF
ELECTRIC
SHOCK!
!
Page 8
10
Removing The Doors
Note:
Move the door of freezer compartment to the door way and
make sure the service pipe is properly protected.
Removal of the Refrigerator Door
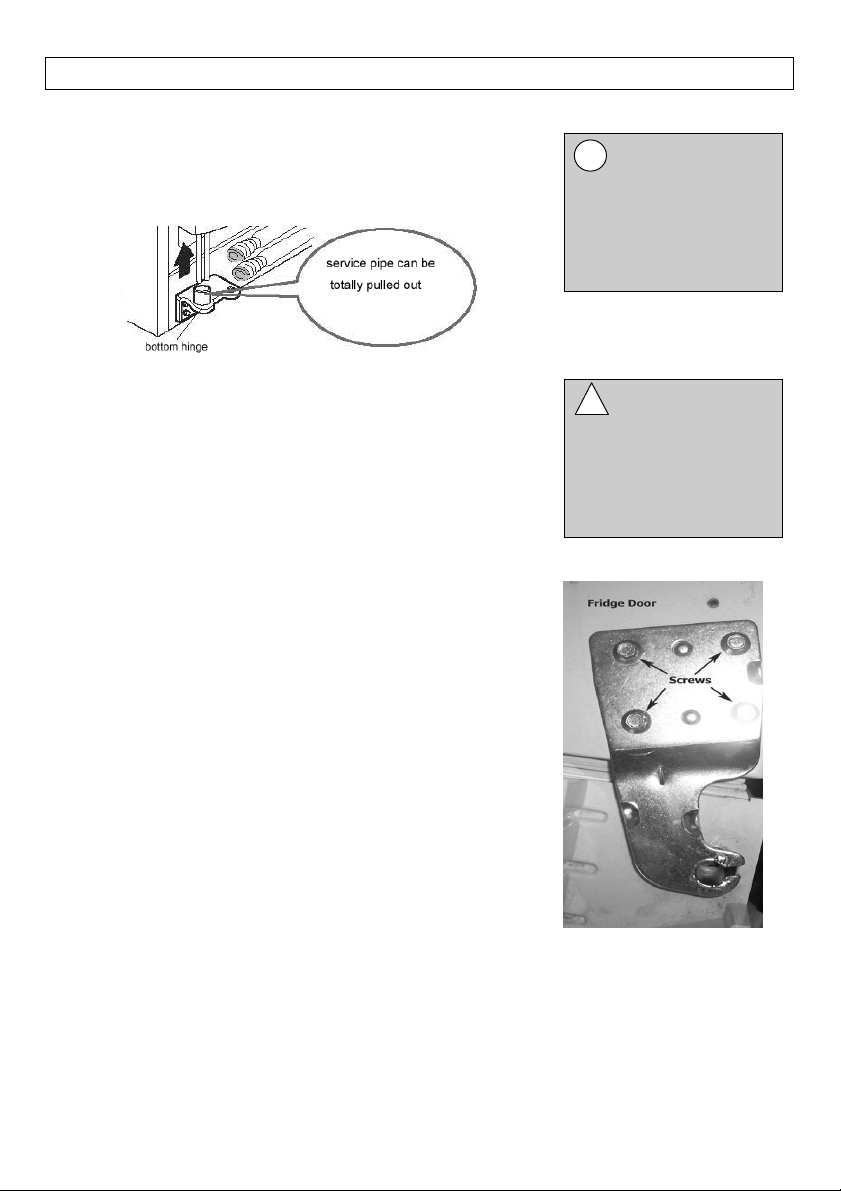
1) Undo the Hinge Cover screw, and remove the cover.
2) Remove the hinge screws and then remove the top
hinge.
3) Lift the door of refrigerator compartment upwards and
remove.
Pass the appliance through the door.
Reassemble of the door
When the appliance has been passed through the door, reassemble the doors by reversing the above instructions.
REMEMBER: Should
the service pipe
become damaged
or distorted then
you should re-cut
the end of the pipe.
WARNING:
This appliance must
be disconnected
from the electricity
before removing
thee doors.
!
Page 9
11
About Your Appliance
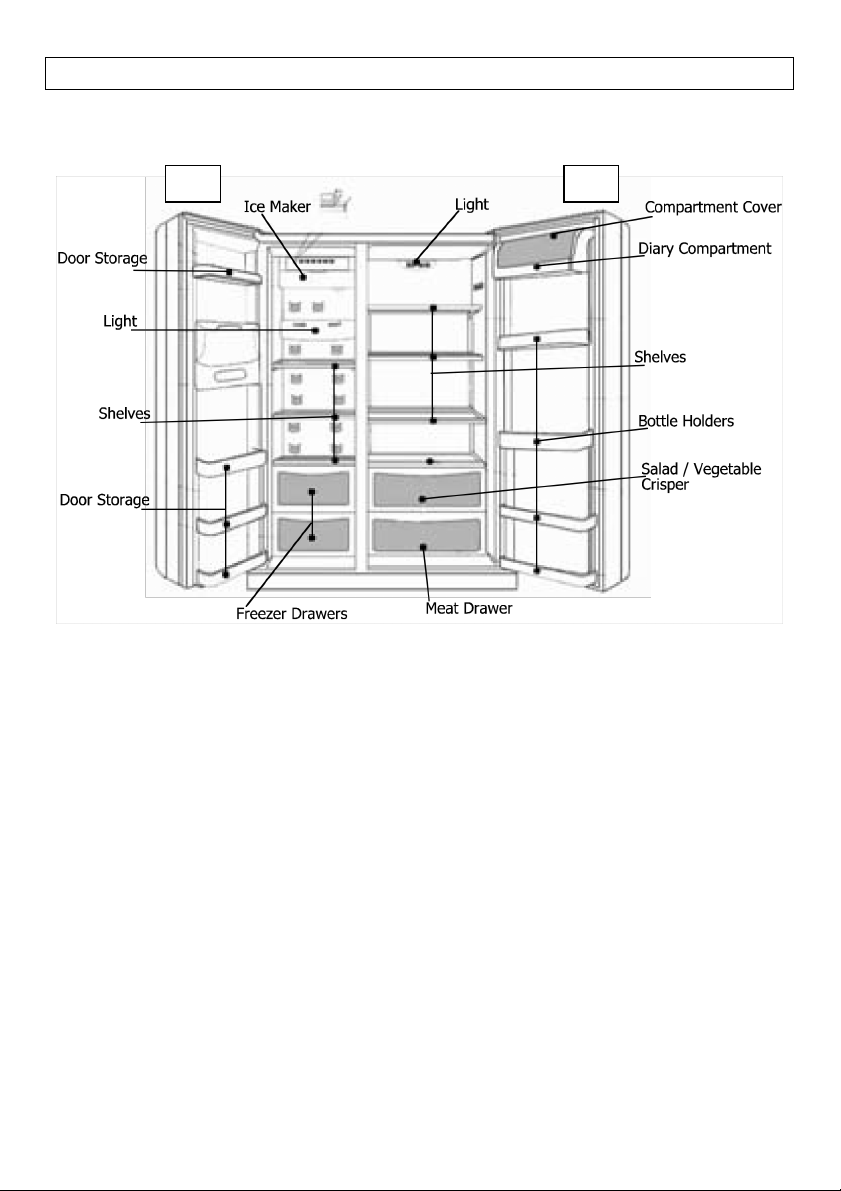
Refrigerator (A)
The refrigerator is used for storing fresh foods for short
periods of time.
Freezer compartment (B)
The freezer compartment is used for storing already frozen
foods and freezing fresh foods for prolonged storage.
Shelves
(Number of shelves supplied; 3 in the fridge, 2 in the
freezer)
Shelves can be positioned wherever you need them within
the freezer or fridge compartment on the shelf runners. The
shelves will not pull out accidentally when you remove
foodstuff from the appliance.
To remove the shelves, open the appliance door to 90 and
pull the shelf towards you. Turn the shelf in direction 2,
until it is perpendicular then remove in direction 3.
Foods that are likely to perish quickly should be placed
towards the rear of the appliance – where it is coolest.
Bottle holder
The bottle holder is intended for storing larger bottles (soft
drinks, water etc.) inside the fridge.
Like the shelves, the bottle rack will not pull out accidentally
and can be removed by holding both sides of the holder and
pulling towards you, and downwards simultaneously.
Warning: Always make sure that large bottles do not prevent
the door from closing.
Dairy Compartment (with cover)
Ideal for storing foods such as eggs, cheeses, butter,
cartons of milk etc, which are best kept away stronger
smelling food.
Page 10
12
About Your Appliance
Crisper drawer
One of the bottom drawers is used for storing fresh fruit and
vegetables that require careful cooling.
Meat drawer
The lowest drawer inside the refrigerator can be used to
store fresh meat in a way which will avoid cross
contamination with other fresh foods.
The lights
The interior lights come on when the door is opened. The
performance of the light is not affected by any of the
appliances other settings. Should the light fail to work, it is
most likely that the bulb needs replacing. (See Changing the
Light bulb).
Ice maker
This appliance is fitted with an ice maker, for more
information; please see the section ‘Using your Ice Maker
and Water Dispenser’.
Notes:
Various accessories may not be available with your
appliance.
Door handles come in a variety of shapes, depending on
your model.
Various extra accessories can be purchased at an additional
cost.
Page 11
13
About Your Appliance
A
B
Page 12
14
Before Using Your Appliance
Environmental Notes
Our products have been packaged using environmentally
friendly materials. All packaging can be recycled. Please
contact your local authority for details on recycling centres in
your area.
All old electrical goods must be disposed of correctly. You
should never dispose of them with household waste. Local
councils / authorities can advise you as to what services
they provide for the disposal of old products – please be
sure that you contact them in order to dispose of all old
appliances. It is possible for recycling services to recycle
many of the components that are in this appliance which is
better for the environment.
Energy Saving Tips
Energy saving is especially important with cooling products.
• Check regularly that your appliance is well ventilated.
Poor air circulation around the appliance can lead to
inefficient operation.
• Whenever possible adjust the thermostat to reflect
seasonal changes, and changes in the quantity of food
stored inside.
• Freshly cooked foods which are to be frozen should be
cooled to at least room temperature before freezing.
• Layers of ice and frost increase energy consumption –
make sure that your appliance is free of heavy frost
and ice.
• Should the door seal become dirty or damaged, please
clean or replace it. A poorly working door seal is
detrimental to the performance of the appliance.
• The vents at the rear of the appliance should always be
clear/cleaned of dust and obstruction. Regularly
checking, and cleaning if need be, should help to keep
the appliance running effectively.
Always make sure that the appliance is installed in
accordance with the instructions given in this handbook –
failure to do so can lead to an invalid warranty and service
charges should you need an engineer.
Page 13
15
Using Your Appliance
Once the appliance has been installed and is connected to
the power supply the appliance will begin to work
automatically. You can adjust the settings of the appliance
to suit your requirements.
Once the temperature required inside the appliance has
been reached, you should begin to load it with food. We
would recommend that you do this all in one go to prevent
repeated opening and closing of the door. See ‘Setting and
Adjusting the Temperature’ for more information.
Temperature selection
Higher settings on the thermostat (towards 5) mean lower
(colder) temperatures within the appliance. Depending on
ambient temperatures, and thermostat setting – the
temperature inside the appliance can drop below 0C. It is
recommended that when the ambient temperature is normal
you set the thermostat to a medium setting. Use the
highest setting only when required or recommended.
Ambient temperature changes outside the appliance affect
the interior temperatures of the appliance, when required;
you may need to adjust the thermostat accordingly.
Note: Temperatures within the appliance can be affected
by how often and how long the door is opened for. Always
try to keep the length of time the door is open to a
minimum.
Warning: Do not
damage the refrigerant
circuit when installing
or cleaning.
Warning: Do not use
any kind of mechanical
device in any
compartments of this
appliance unless they
are of the type
recommended by the
manufacturer.
Warning: Do not use
any electrical devices
to defrost this
appliance unless they
are a type
recommended by the
manufacturer.
Note: There will be
some time between
setting and achieving
the temperature. This
is determined by the
difference in
temperature around
the appliance, and the
temperature you have
selected. It may also
be affected by how
often the door is
opened and how much
food is inside.
!
!
!
Page 14
16
Using Your Appliance
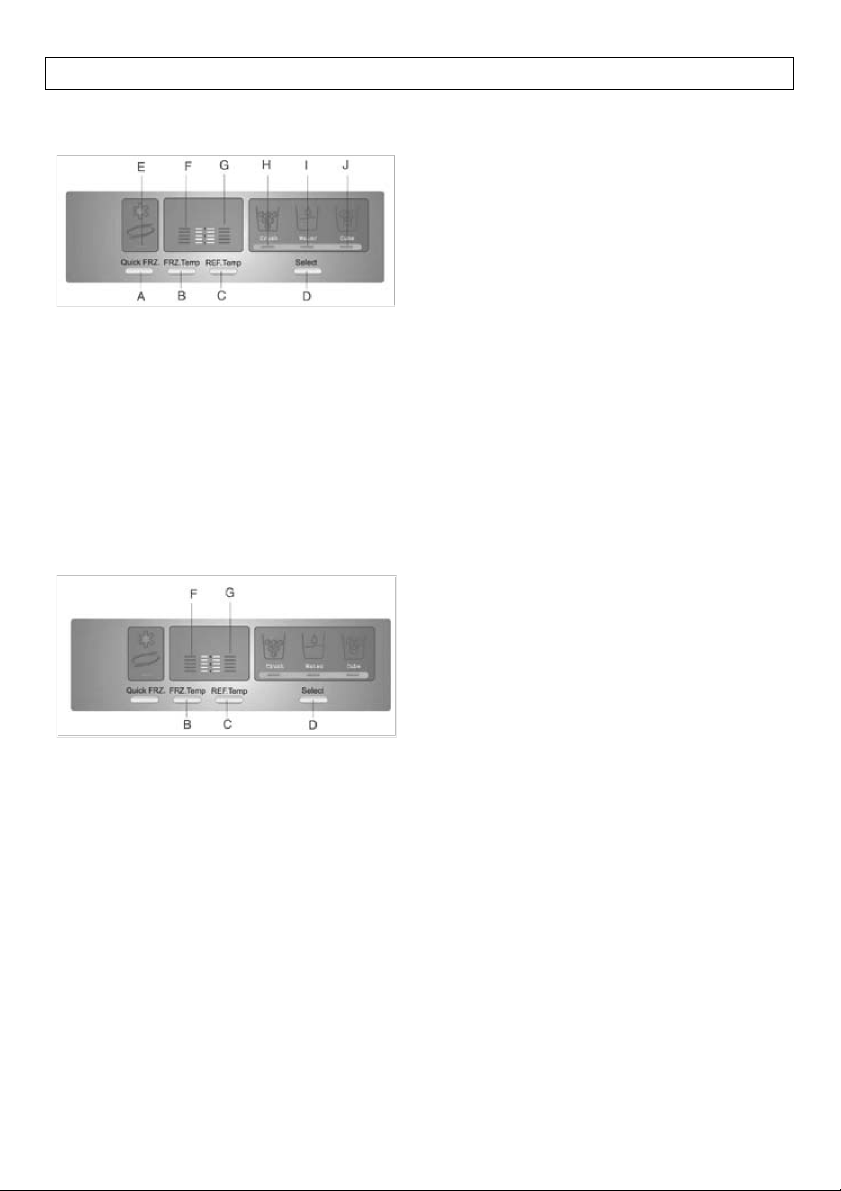
The Control Panel
A. Quick Freeze
B. Freezer temperature
C. Refrigerator temperature
D. Ice/Water
E. Freezer indicator
F. Freezer temperature indicator
G. Refrigerator temperature indicator
H. Crushed ice selected
I. Water selected
J. Cubed ice selected
Setting and Adjusting the Temperature
To adjust the fridge temperature, press button C. The
indicator (G) will illuminate. Each subsequent press of
button C will adjust the temperature scale by one. To clear
the setting, simply keep pressing button C until indicator (G)
is back to level 1.
To adjust the freezer temperature, press button B. The
indicator (F) will illuminate. Each subsequent press of
button B will adjust the temperature scale by one. To clear
the setting, simply keep pressing button B until indicator (F)
is back to level 1.
Page 15
17
Using Your Appliance
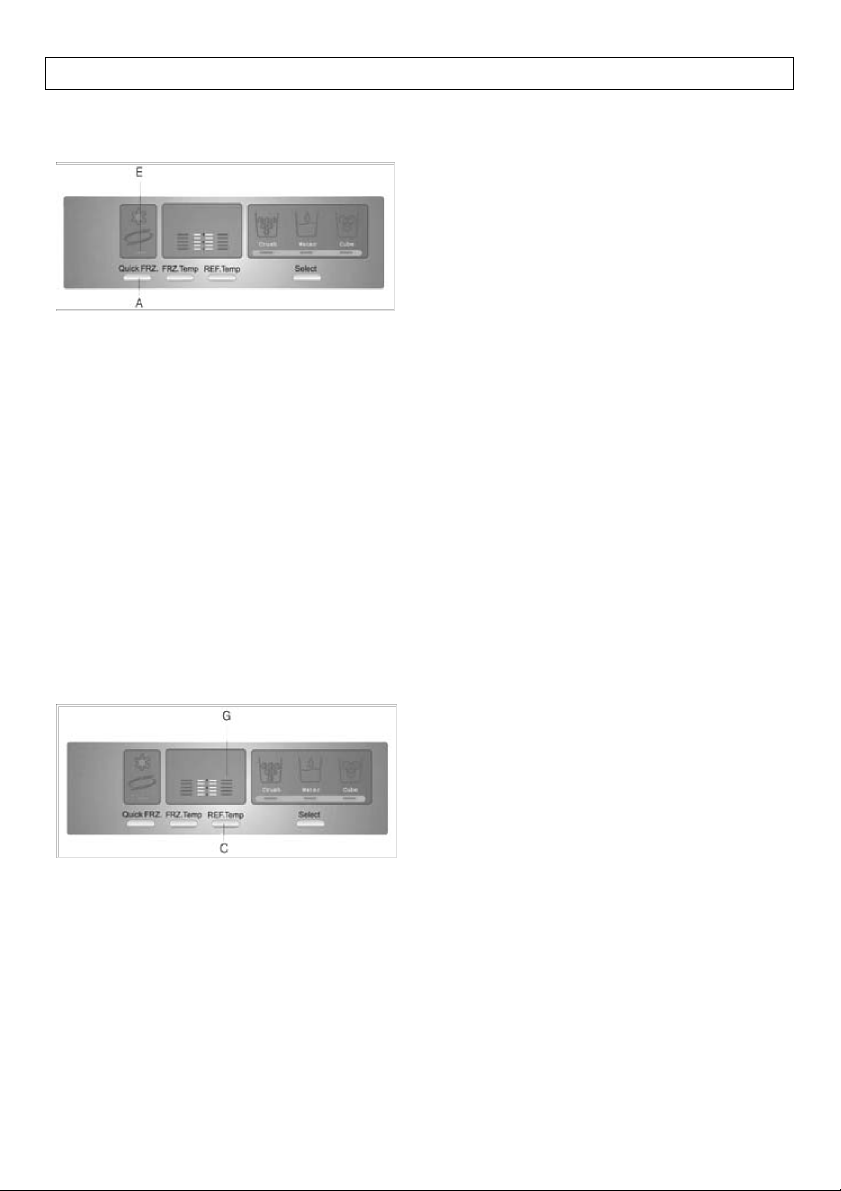
‘Quick Freeze’
To use the ‘Quick Freeze’ function, press button A. Indicator
E will illuminate to show you that the function is operational.
To switch ‘Super Freeze’ off, press button A again – indicator
E will go out.
Open Door Warning
Should the door be left open for an extended period, an
alarm will sound to remind you to close the door.
Control Function Display
30 minutes after the final press of any button, the display will
be blank. The display will illuminate when the door is
opened, or if you press any button.
Switching the appliance On/Off
To switch off the appliance, press and hold button C. The
icon (G) will disappear.
To switch the appliance on again, press and hold button C.
Icon (G) will reappear and the appliance will begin to run as
usual.
Page 16
18
Using Your Appliance
Storing fresh foods
• Packaging fresh foods properly, using the correct
temperature and taking into account food hygiene will
enhance the quality of fresh foods stored within this
appliance.
• Use plastic bags, aluminium foil or other food wraps to
cover fresh foods not in packaging to prevent flavour
transfer and prevent contamination.
• Make sure that foods which have been cooked and
require chilling are at room temperature before placing
them into the appliance. Make sure that these foods
are stored in suitable containers.
• Before storing items in multi packs (i.e. yoghurts)
remove any excess packaging.
• Make sure that foodstuffs are stored systematically
(raw meats with raw meats, dairy with dairy) to avoid
flavour transfer and cross contamination. Raw meats
should be stored towards the bottom of the appliance
to prevent the possibility of it dripping onto uncooked
food. Other foods should be stored above raw meat.
• Never store anything which is flammable, volatile or
explosive inside the appliance.
• Beverages with high alcohol content should be stored
vertically in tightly sealed bottles.
• Foods should not touch the rear wall of the appliance.
• Delicate foods should be stored in the coolest part of
the appliance.
• Try not to open the door too often.
• Set the thermostat to make sure that foods remain
suitably cold, try to avoid freezing within the fridge.
Using a thermometer will help you to judge how cool
the appliance is. Place it into a glass of water and
leave it inside the appliance for several hours to get a
reliable reading.
• Some foods contain natural oils and acids (e.g. citric
acid) which can damage plastics if spilled – make sure
these foods are suitably contained.
• Unpleasant odours inside the fridge are a sign that
something has spilled and cleaning is required. Using
warm water with bicarbonate of soda will clean the
interior of the appliance and remove most spillages.
(See cleaning your appliance).
• Always remember to remove perishable foods from this
appliance before taking prolonged trips of holidays.
Page 17
19
Using Your Appliance
Freezing fresh foods
• As with storing fresh foods, suitable packaging, correct
temperature and food hygiene will enhance the quality
of the food you are freezing.
• Make sure that all foods for freezing are of a high
quality, and suitable for freezing.
• Use suitable packaging (plastic bags etc.) to store food
in, and make sure that it is air tight or well sealed.
Leaking packaging will dehydrate the products and lead
to loss of beneficial vitamins.
• Mark packages with the kind of food contained and the
date of storage.
• Food needs to be frozen quickly, so it is best to freeze
small portions whenever possible and ensure that they
are as cold as possible before storage.
• Keep food which is fresh away from food which is
already frozen, if you need to freeze fresh food every
day, make sure that it is in small portions to prevent
this.
• Do not exceed the maximum load for freezing – which
is given as 10kg / 24H - see data badge for details.
Freezing procedure
This appliance is fitted with a ‘Quick Freeze’ function. This
function is ideal if you are freezing large quantities of foods
as it freezes quickly helping to preserve freshness and
maintain the level of nutrients in foods which can be lost
through freezing.
It is also advisable to use this function before you clean the
appliance interior to ensure that foods are as frozen as
possible.
Page 18
20
Using Your Appliance
Storing frozen foods
• When storing commercially frozen foods, please follow
these guidelines.
• Always follow manufacturers’ guidelines for the length
of time you should store food for. Do not exceed these
guidelines!
• Try to keep the length of time between purchase and
storage as short as possible to preserve food quality.
• Buy frozen foods which have been stored at a
temperature of –18C or below.
• Do not buy food which have ice or frost on the
packaging – this indicates that the products might have
been partially defrosted and re-frozen at some point –
temperature rises affect the quality of food.
• When consuming ice cream or water ices allow them to
warm a little first to prevent freezer burns on hands or
tongue.
• Should there be a power cut, or the freezer /
refrigeration appliance fails for any length of time you
may need to remove food from the freezer and store in
a cold, hygienic place (i.e. garage or out house area)
until the power is restored, or the appliance repaired.
To prevent undue temperature rises; you should wrap
the foods in layers of newspaper to help to maintain
their temperature. It is also important that any food
affected by this situation should be either consumed or
cooked and re-frozen (where suitable) soon afterwards
in order to prevent health risks.
• Layers of newspaper can also be used to help keep
foods cold while you are defrosting the freezer (see
cleaning your appliance).
Page 19
21
About your Freezer Compartment
Storage areas
• As with the refrigerator, certain areas of the freezer are
better for storage of certain foods.
• Ice creams and water ices are best stored towards the
rear of the appliance where it is coldest.
• Large / heavier portions of food, such as meats joints
for roasting are best stored in the drawers at the
bottom of the appliance, while less weighty items
should be stored on the shelves – this is to prevent
damage to the appliance.
• You should always make sure that food stored is
suitable for freezing, and that you have stored it
securely inside the appliance.
Page 20
22
About your Refrigeration Compartment
Storage areas
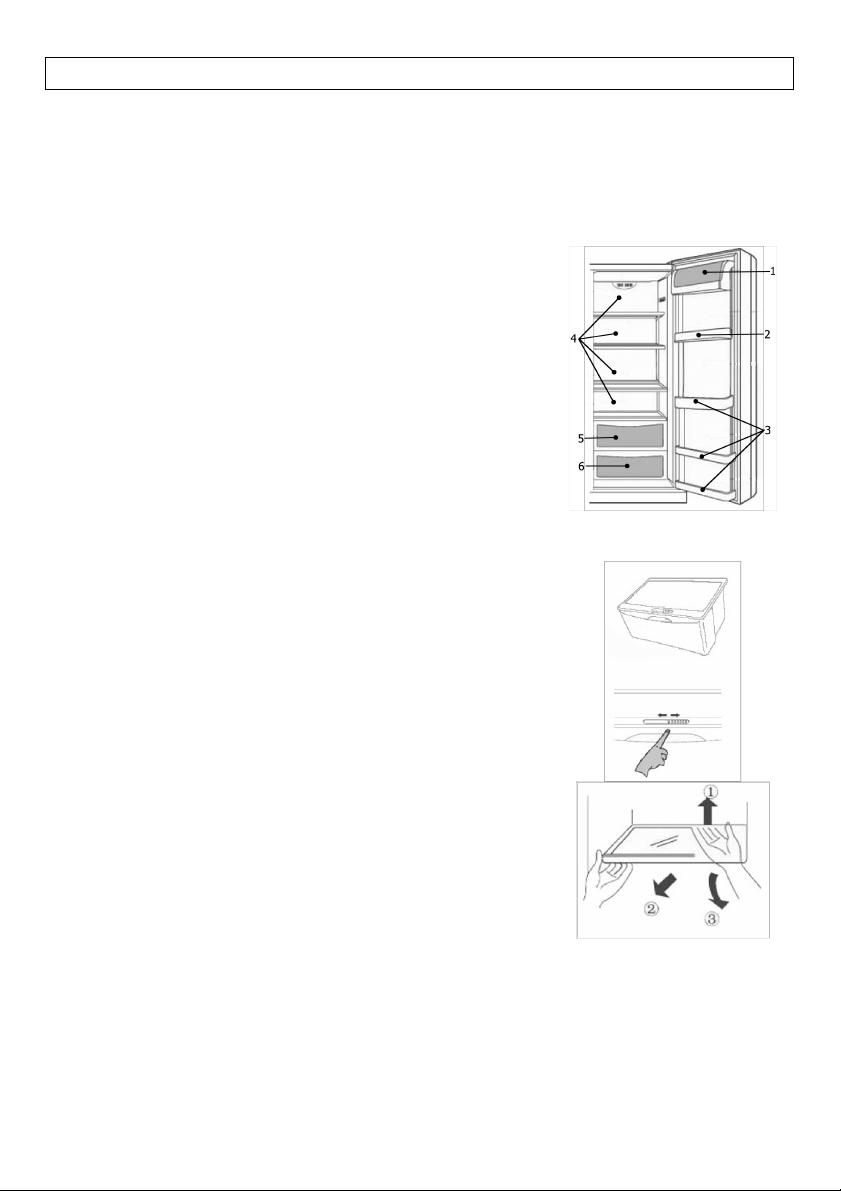
Temperature differences exist inside the refrigerator so it is
sensible to store different foods in different areas of the
appliance.
1. Eggs, butter and cheeses. (Dairy compartment with cover)
2. Large bottles, soft drinks, water, wine etc.
3. Smaller bottles, cans, jars, packages.
4. Any fresh produce – store carefully to avoid cross
contamination.
5. Salad / vegetable drawer
6. Fresh, uncooked meats – store carefully to avoid cross
contamination and spillages.
Crisper compartment
To keep fruit and vegetables crisp and fresh, this appliance
has a crisper compartment with adjustable humidity.
• High humidity will keep foods such as grapes,
cucumbers, kiwi etc. fresh and crisp – this is achieved
by opening fewer holes in the moisture control.
• Lower humidity is ideal for storing foods such as
strawberries, melons, tomatoes and beans. Opening
more holes in the moisture control will lower the
humidity accordingly.
• Always make sure that the front edge of the crisper
compartment is underneath the crisper cover. When
removing the crisper, remove the compartment first
before the cover.
• To remove the cover of the crisper (for cleaning etc.)
remove the drawer first. Lift the food shelf in an
upward direction at the rear (1) and pull it towards you
(2). Then turn the shelf into position (3). You must
have the appliance door open by 90˙.
Page 21
23
Using the Icemaker & Water Dispenser
Before using the Icemaker / Water Dispenser
Water supply installation
• Pressure of the cold water supplied to the automatic
icemaker is between 0.15 – 0.85Mpa.
• The water tube should be of an appropriate length –
usually 12 metres – and should be free of bends after
being inserted into place. If the tube is too long then
pressure will be reduced, therefore reducing the
capacity of ice making.
• We recommend that drinking water be used to create
ice as the appliance does not have a sterilizer in the
purifier. Always use potable / drinking water.
• Keep the water tube clear of heat sources.
• The water tube should be installed and tested by
authorised personnel.
• When used for the first time, press and hold the cold
water button for one minute to prime the water supply.
Do not press the cold water button for any longer as
this may cause the valve to heat up.
Precautions
• Never expose the water pipe to temperatures below
0˙C to avoid freezing.
• Test the tubing for leaks by flushing the tube through
with water, until the water runs clear.
• Once the temperature inside the freezer is at –15C ice
production will begin – we recommend that you do not
store the first load of ice cubes.
• After the appliance has been sited into the location of
your choice, make sure that the water tube is arranged
so it does not incur damage through bends and kinks
and is clear of any heat sources.
• This appliance must be installed by a qualified appliance
installer.
• Do not over use the icemaker. If you attempt to use
the ice cube button too often it will go into a shut down
mode. This is perfectly normal and requires you to wait
for one hour before attempting to re use it.
• Do not use delicate or fragile glassware.
• Do not touch the ice cube outlet with your hands, or
any implements to avoid injury or damage.
WARNING: Carbon
filters must be
changed every 6
months.
Spares may be
obtained from
Customer Care.
Installation instructions
for the connection kit
(to a potable / drinking
water supply) are
found inside the
crisper drawer in the
fridge. Please contact
Customer Care if any
parts are missing.
We recommend that
you use a qualified
engineer to connect
the appliance to the
water supply – and
that the instructions
are followed carefully.
!
i
Page 22
24
Using the Icemaker & Water Dispenser
How the icemaker works
• In every cycle 8 ice cubes are produced.
• Capacity of the icemaker depends on the freezer
temperature, the ambient temperature of the
environment around the appliance and how often the
freezer door is opened.
• Do not store ice cubes which are produced during the
first batch of cubes following appliance start up, or
after a prolonged break. Discard these cubes.
• To ensure that the ice cube tray is filled to maximum
capacity, you will need to manually arrange the ice
cubes periodically.
• Some ice cubes may stick together when dropped into
the storage box – you will need to separate these to
ensure maximum use of the ice box.
First use of the icemaker / water dispenser
Do not consume the first seven (approx) glasses of water as
there may be dust and / or impurities within the water pipes.
This will ensure that the pipes are cleared. If in doubt, keep
re-using the dispenser until the water runs clear.
Noises during ice making
The ice making process can be noisy. You may hear ice
being dropped into the storage compartment. This is
perfectly normal.
Storing ice for extended periods
Ice which is stored for a long period of time may go an
opaque colour and have a strange odour. We recommend
that you dispose of this ice, remove and clean the ice box.
Allow the tray to dry thoroughly and cool down before
replacing into the appliance to prevent ice from sticking.
Page 23
25
Using the Icemaker & Water Dispenser
Preventing ice from being made
If you do not require any ice over a prolonged period of time
(i.e. during winter) you can switch off the valve between the
water supply and the appliance. It is recommended that
you clean the ice box, dry it carefully and replace it back into
the appliance – this will prevent any odours being produced.
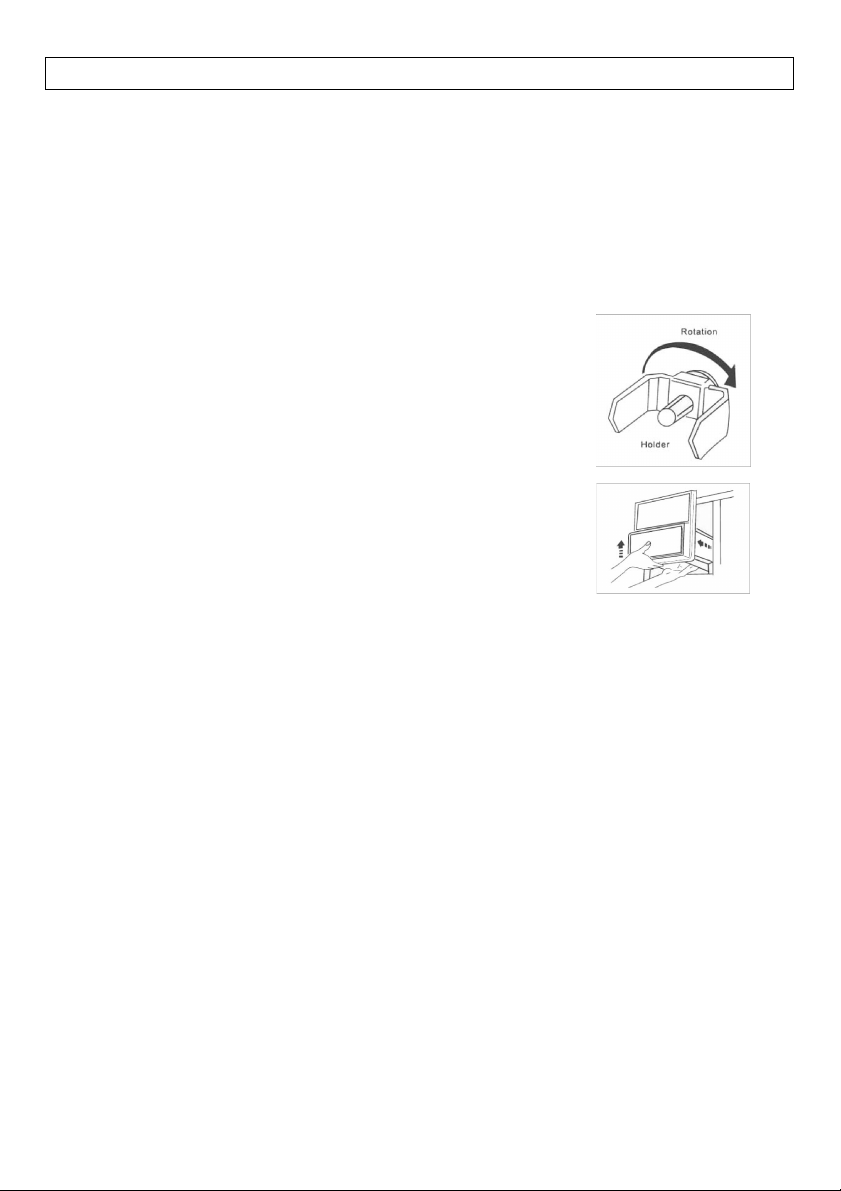
Installation / removal of the ice cube storage tray
If the ice box cannot be easily fitted, remove it and turn the
corkscrew mechanism 90. Then reinstall the ice box,
ensuring that the catch pin on the tray fits into the slot on
the shelf.
To remove the ice box, press the top of the drawer and
simultaneously pull the bottom which will release the unit.
If the ice maker does not work properly
The volume of the ice box equals the quantity of ice cubes
which the appliance can make in one day. Occasionally
small number of ice cubes may remain inside the box. If the
ice gets stuck, this will result in abnormal operation of the
ice cube maker. To avoid this problem, remove the ice box
and rearrange the ice cubes, and remove ice cubes which
cannot be separated.
• Always keep the ice cube outlet clean and clear of
obstructions.
Page 24
26
Using the Icemaker & Water Dispenser
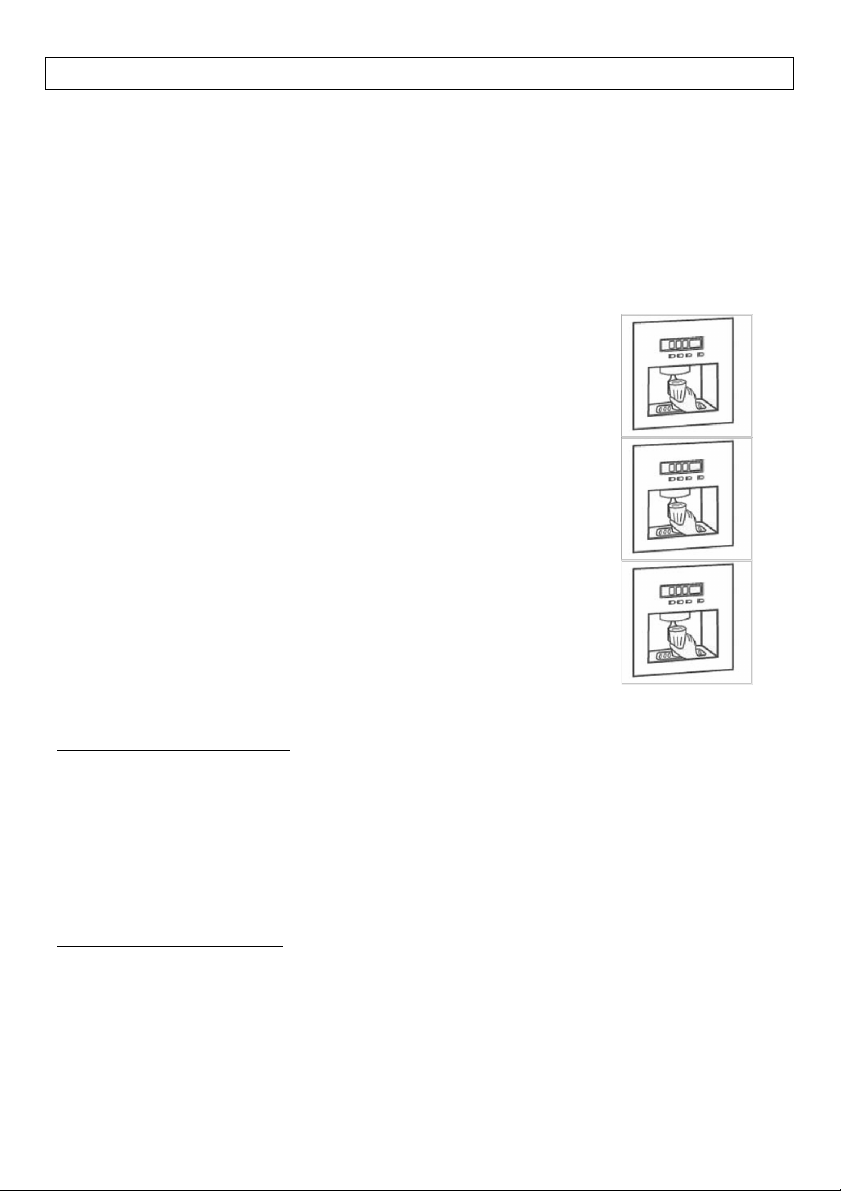
Using the water dispenser
There are three options available with this accessory – crushed
ice, cool water or ice cubes. Always make sure that you hold
your glass up to the dispenser before making your selection to
avoid spillages.
Crushed ice supply
• Hold the glass to the dispenser.
• Press the button for crushed ice.
• Slightly push the glass onto the lever switch and the
crushed ice will be dispensed into the glass.
Ice cubes
• Hold the glass to the dispenser.
• Press the button for ice cubes.
• Slightly push the glass onto the lever switch and the ice
cubes will be dispensed into the glass.
Cool water supply
• Hold the glass to the dispenser.
• Press the button for cool water.
• Slightly push the glass onto the lever switch and the cool
water will be supplied.
Notes:
When crushed ice is supplied;
Some times you may receive crushed ice when you have
selected ice cubes as there may be crushed ice remaining in the
auger (crushing mechanism). This is normal. Try again until
you receive ice cubes.
If crushed ice is supplied frequently, you may notice a build up
of ice around the front of the ice box. This will defrost
automatically and is not a problem.
When cool water is supplied;
Following installation, cool water may not be available
immediately. This is due to air in the pipes. Press the cool
water supply button until water is dispensed to clear the air.
This can take up to two minutes.
The water supply will become cooler and cooler gradually.
Cool water does not contain ice – this should be added before
the water.
Page 25
27
Using the Icemaker & Water Dispenser
Safety
• Do not use excessively deep, narrow, fragile or delicate
glasses.
• Hold the glass as close as possible to dispenser to avoid
spilling water, dropping ice or blockages in the ice cube
dispenser.
• Five seconds after the final delivery of ice or water, the
dispenser flap will close with a ‘phutt’ sound.
• Hold the glass still for a further 2 – 3 seconds (for ice),
1 - 2 seconds (for water) after you have filled your
glass and released the lever switch as additional water
/ ice may be produced.
• Regularly clean the dispenser.
• Crushed ice may be dispensed instead of cubed ice if
crushed ice was the last option selected.
• Never place canned drinks or foods inside the
dispenser, as this will damage the auger / crushing
mechanism.
• Do not touch the dispenser, or remove the icemaker
cover to prevent accidental injury or damage to the
appliance.
• First supply of water (seven glass approx) and ice
cubes (20 pieces approx) should not be consumed after
initial start up or following a lengthy break in use.
Dispose of these accordingly.
• Do not place ice cubes which have not been produced
by the icemaker into the storage drawer to prevent
damage to the mechanism.
• Insufficient water supply may lead to small ice cubes.
Excessive water supply may lead to larger cubes which
may stick together, cause leaks and block the
dispenser. You should adjust the faucet or contact a
service engineer.
Page 26
28
Defrosting food
Defrosting food for cooking
Should food become partially thawed, or defrosted it should
be consumed as soon as possible as the quality will be
affected by defrosting.
Always make sure that foods dishes are thoroughly
defrosted before cooking and no ice crystals remain. This is
especially important for poultry, as this can be extremely
harmful to health.
Always follow the defrosting instructions on packaging when
defrosting ready meals – manufacturers’ guidelines are
always best, as some frozen foods should be cooked from
frozen.
Page 27
29
Maintenance and Cleaning
Automatic defrosting
There is no need to defrost the refrigerator as this appliance
has automatic defrost.
In the event of a power cut
Should there be a prolonged power cut you may need to
remove food from the freezer compartment and store it in a
cold place, wrapped in layers of newspaper to preserve
suitable temperatures.
Once power is restored – replace the food back into the
freezer compartment.
Should food begin to defrost, or the power cut last longer
than expected, it is advised that you consume any food
removed from the freezer.
If the power outage is short term, most foods can be left
inside the freezer compartment – this is the best way of
preserving temperature – and surrounded by ice cubes from
the ice box. This is also an ideal solution for power outages
you may have been pre warned about.
When experiencing a power cut of any kind, do not add any
extra foods to the freezer.
Do not use mechanical
devices to accelerate
the defrosting process
– unless they are of a
type recommended by
the manufacturer.
In the event of a
power cut, food should
remain safely cold for
3 hours approx.
!
Page 28
30
Maintenance and Cleaning
Cleaning the inside of your appliance
• Always disconnect the electricity supply before you
start cleaning.
• Empty the appliance of food and remove the shelves.
• The interior can be cleaned using warm water and
bicarbonate of soda, with a soft cloth. Make sure that
the interior is then dried carefully with a suitable cloth.
• Do not use harsh abrasives, or aggressive cleaners as
these can damage the interior of the appliance.
• Shelves and other accessories (plastic and glass parts)
can be cleaned in the sink using liquid dish washing
liquid and warm water. Make sure all soap is rinsed off
and all parts are dry before replacing them inside the
appliance.
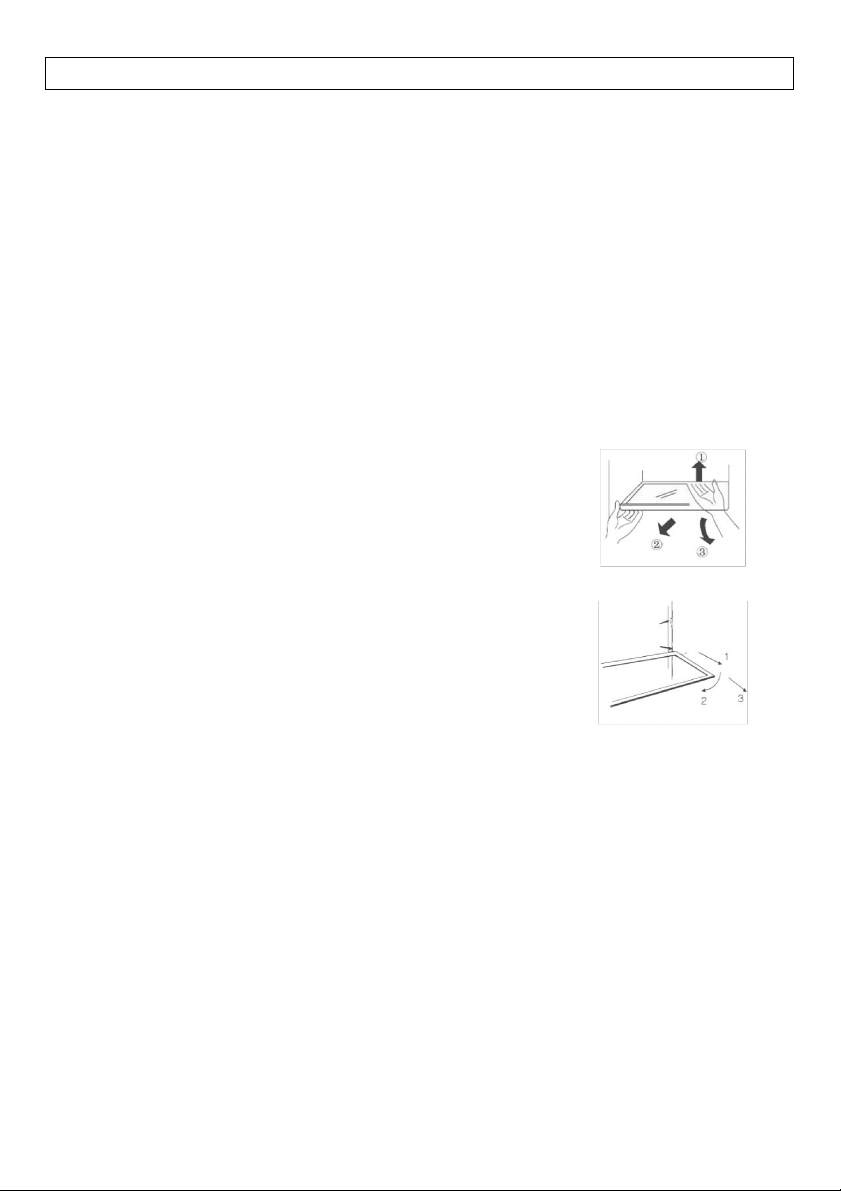
Removing the shelves / crisper cover
• To remove the cover of the crisper (for cleaning etc.)
remove the crisper drawer first. Lift the food shelf in
an upward direction at the rear (1) and pull it towards
you (2). Then turn the shelf into position (3). You
must have the appliance door open by 90.
• Lift the food shelf in an upward direction at the rear (1)
and pull it towards you (2). Then turn the shelf into
position (3). You must have the appliance door open
by 90˙.
• Do not wash plastic parts in a dishwasher.
• Clean the exterior of the appliance with a soft cloth and
an alcohol based cleaner. Do not use abrasive cleaners
on the exterior of the appliance.
• The vents at the rear of the appliance should be
cleaned periodically using a soft bristled brush or the
brush attachment of a vacuum cleaner.
Once cleaning is completed, reconnect the electricity supply
and replace the food.
When not is use
If you are not using the appliance for an extended length of
time, it is recommended that you switch of the electrical
supply, empty any food out, clean the inside of the
appliance and leave the door ajar. This will save energy,
and also prevent a build up of stale odours inside.
Page 29
31
Maintenance and Cleaning
Changing the plug
• This appliance comes fitted with a 13amp plug fitted.
Should you need to replace the fuse, a 13amp ASTA
approved (BS 1362) must be used. Should the plug
itself need to be replaced, the wires in the mains lead
are coloured in accordance with the following code:
ÿ Green and yellow = Earth
ÿ Blue = Neutral
ÿ Brown = Live
• The wire coloured green and yellow must be connected
to terminal marked with the letter E, coloured green
and yellow or marked with the earth symbol:
• The wire coloured blue must be connected to the
terminal marked with the letter N, or coloured black.
• The wire coloured brown must be connected to the
terminal marked with the letter L or coloured red.
• Upon completion, there must be no cut or stray wire
present and the cord clamp must be secure over the
outer sheath.
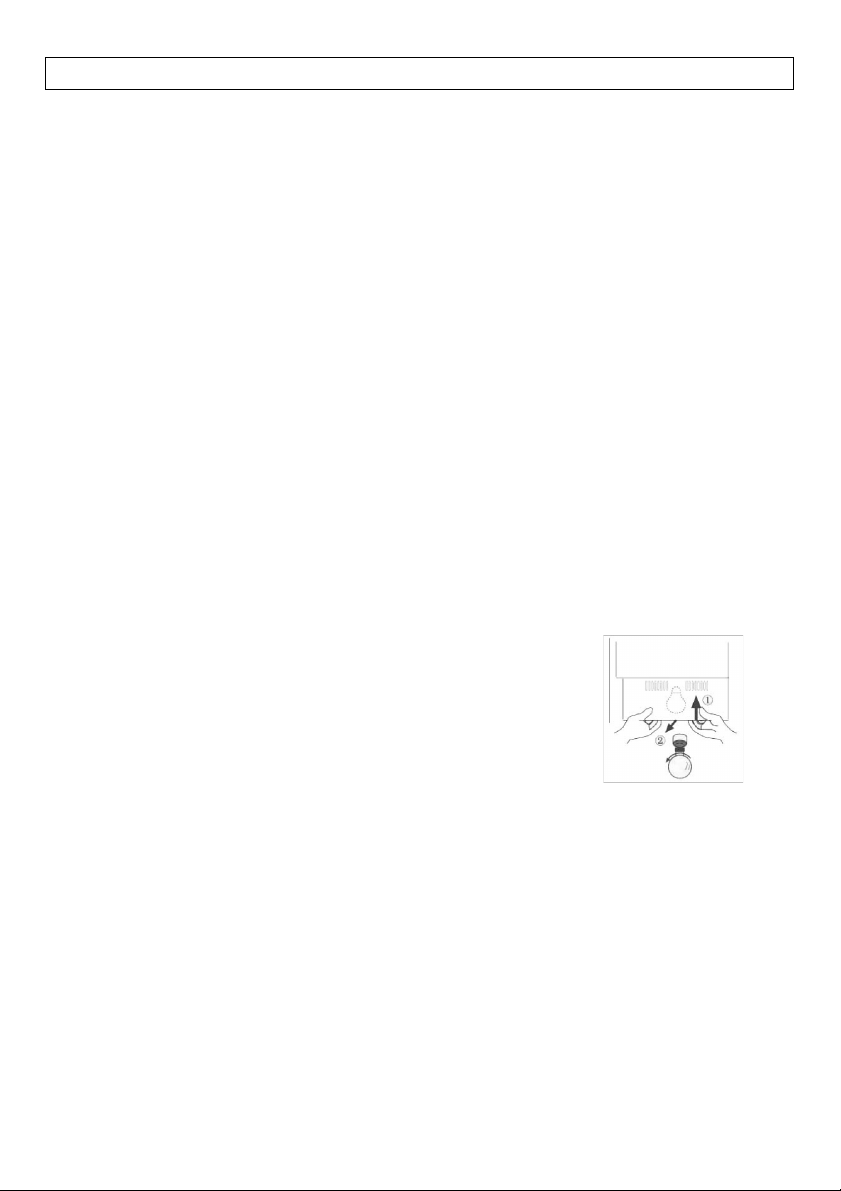
Changing the light bulb
Before replacing the light bulb, switch off the electricity
supply to the appliance and un plug the appliance.
Lamp required: 220 – 240V~25W (fridge only)
Lamp required: 220 – 240V~40W (freezer only)
Lamp holder: E27 (Do not exceed the wattage given for
lamps)
To replace the lamp;
1. Pull the lampshade towards you.
2. Hold up (1) and pull out (2) the lampshade.
3. Rotate the lamp anticlockwise until the lamp is
released.
4. Always replace the bulb with one that is identical.
Bulbs are not covered by any warranty, but can be
purchased at your local hardware store. Remember to take
the old bulb with you if you are unsure of what kind of bulb
to buy.
Page 30
32
Troubleshooting
The appliance fails to work when first connected to
the electricity supply.
• Check there are no faults with the socket you are using
by plugging in an appliance you know to be working.
• Make sure that you have switched the appliance ‘on’.
• The voltage may be incorrect.
The appliance seems to be continually running.
• The appliance will make a sound when first started; this
will gradually fade over a period of time.
• The door has been opened frequently.
• The door isn’t properly closed because the seals need
cleaning, or are damaged.
• The door is damaged – leading to it dropping out of
correct alignment with the appliance.
• The appliance has recently been filled with more food
than usual.
• Ventilation is compromised – the vent requires cleaning
or clearing from obstruction.
• There is inadequate ventilation around the appliance –
other appliances or units are too close.
• The appliance has been overloaded with food for
chilling or freezing.
• The ‘Quick Freeze’ function has been switched on.
The outer casing of the appliance is warm
• The appliance may become warm on the outside when
first switched on to prevent condensation forming.
The lamp does not work
• The appliance is not plugged into the wall socket / a
fuse has blown.
• The bulb requires replacing.
The temperature inside the appliance is not right
• The door has not been closed properly.
• The appliance is too close to a heat source, or in direct
sunlight.
• The vents at the rear are blocked / obstructed.
Page 31
33
Troubleshooting
The appliance is making noises
• The appliance is cooled by the compressor, which will
make a certain amount of noise when the appliance is
switched on. The amount of noise depends on the age
of the appliance (older appliances may become noisier),
the positioning of the appliance (a levelled appliance is
less noisy) and how the appliance is used.
• During use, you may hear the sound of the refrigerant
being circulated, and the sound of it flowing when the
compressor is off. The sound of the compressor itself,
which is a humming sound and a click when the
compressor switches off and on.
• When you are starting the appliance for the first time,
or have had the appliance switched off for a prolonged
length of time, the sounds described above may be
louder.
• You may hear hissing or gurgling noises from the
appliance – these are due to the automatic defrosting
process.
• Piping and the evaporator may also make noises should
the ambient temperature around the appliance change.
• If noises seem to be too loud, or a little unusual it is
more than likely because the appliance requires
levelling, or it is touching an adjacent unit.
Page 32
34
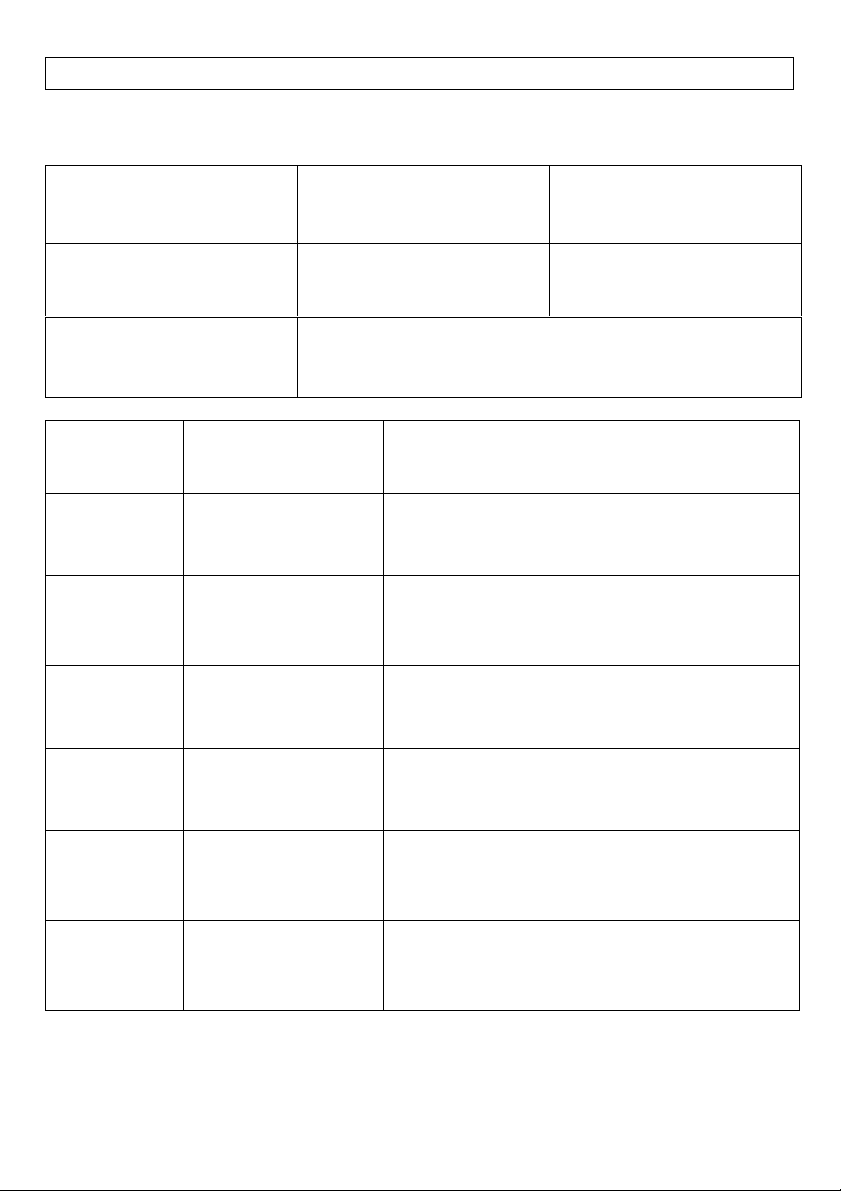
Service Record
Date
Part(s) Replaced
Signature / Engineer Stamp
Date of purchase
Installers stamp /
Printed name
Date of installation
Place of purchase
Page 33
Contact Us
Should you need to contact us, please call our Customer Care Centre on:
0871 22 22 502.
Calls will be answered in strict rotation, as soon as possible.
Model Number
Serial number
Please record your model and serial number in the spaces above.
Having these numbers to hand will help us to help you quickly and more efficiently should
you need to call us for any reason.
08 26387 01. 10.2007. Stoves ST980SXS.
 Loading...