

Page 1

S3 - E900F
900mm Built In Electric Fanned Oven & Grill
Page 2

Contents
About your Appliance 3
Before Use 4
Using your Top Oven – Icons 6
Using your Main Oven - Icons 7
Using the Clock / Programmer 8
SteamCleanse 12
Using your Grill 13
Using your Ovens 14
Cooking Guide – Notes 15
Cooking Guides:
Starters 16
Fish 17
Meats 18
Sweets 19
Care and Cleaning 20
Maintenance 23
Troubleshooting 24
Installation 25
Technical Data 30
Service record 32
Page 3
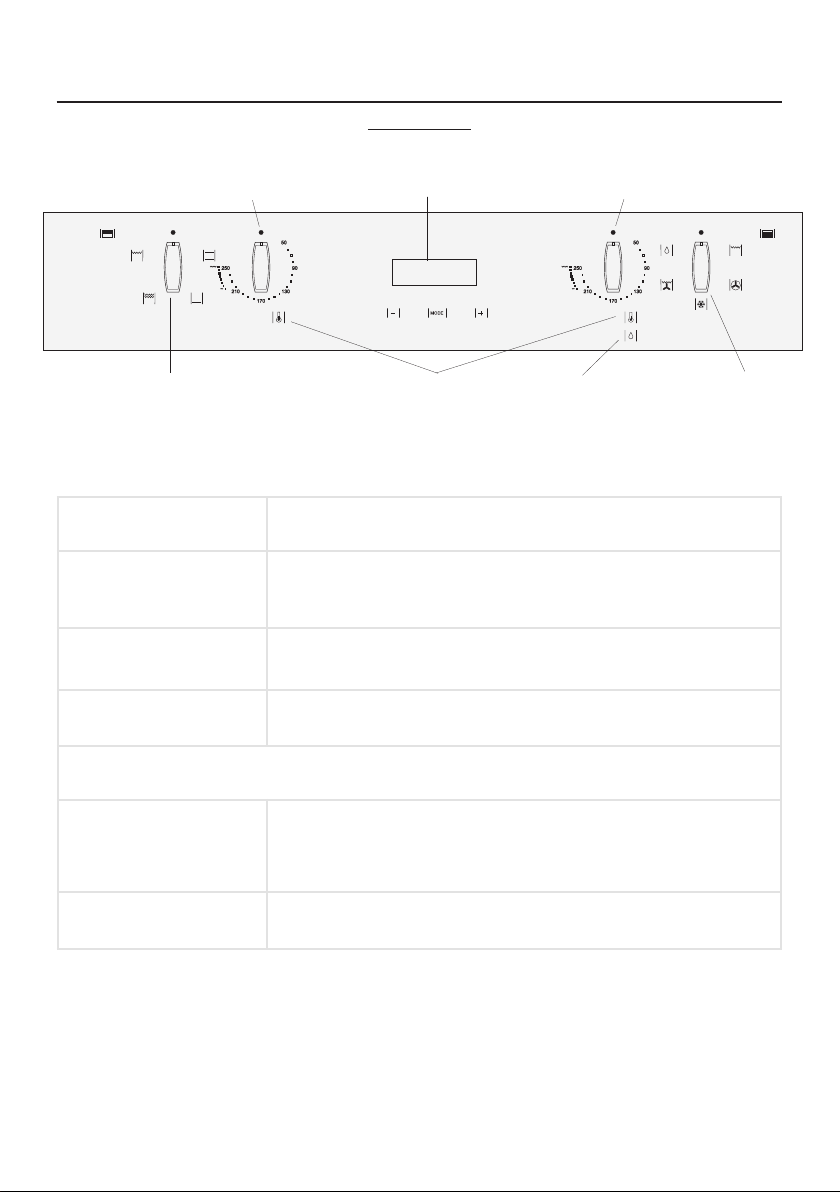
About your Appliance: S9 - E900F
Fascia layout
2) Temperature selector
3) Function selector
(top oven)
top oven)
(
4) Clock / Programmer
ED Display
L
1) Temperature
Indicator
2) Temperature selector
(main oven)
5) SteamCleanse
Indicator
3) Function selector
(main oven)
What is it? What does it do?
1) The temperature indicator Illuminates when the oven has reached the selected temperature, signalling
2) The temperature selector Turn clockwise to set the temperature required in ˚C.
3) The function selector Turn to select the function which best suits the food you are cooking.
that pre-heating is completed.
Use the function selector and the temperature selector together to switch the oven off and on.
4) The clock / programmer
LED display
5) The SteamCleanse indicator Illuminates to show that the SteamCleanse function is in use.
The display shows the current time of day.
The Minute Minder or Automatic Programmer shows the remaining time when
selected.
3
Page 4

Before Use
Carefully read this Instruction Manual before use to get
the best results from your oven.
Before using the appliance for the first time, we recommend that you follow the instructions below:
Remove all the packaging material, including the pro-
tective plastic, if included.
Select the or function at 200 ˚C for one hour.
Allow the oven to cool.
The appliance and any furniture included should be
thoroughly cleaned before use to remove any oils or
residue left behind by the manufacturing process.
During the first use, fumes and odours may occur and
the kitchen should therefore be well ventilated.
Ecological Packaging
The packaging materials are completely recyclable and
can be used again. Check with your local authority on
the regulations for disposing of this material.
Disposing of old appliances
The symbol on the product or on its packaging indicates that this product may not be treated as household
waste, and should be disposed of carefully. By ensuring
this product is disposed of correctly, you will help to prevent damage to the environment and human health,
which could be caused by inappropriate waste handling.
Please make arrangements for the product to be transported to your local recycling centre.
Your local council, household waste disposal service or
the retailer you purchased this appliance from can supply you with information about recycling facilities in your
area.
4
Page 5

Before Use
!!!
i
i
Electrical Safety
Any repairs must be carried out by an authorised
Service Engineer, using original spare parts. Failure to
do so may invalidate any warranty, as well as cause
damage to your appliance.
Unplug your oven if it breaks down, and do not use it
until a Service Engineer visit has taken place, or you
have been advised that it is safe by a Customer Care
Advisor.
Safety Notes
The oven MUST NOT be operated with the door open.
The appliance is not intended for use by young children
or infirm persons without supervision.
This appliance is to be used for domestic cooking
purposes only.
Only use the oven when it is installed within kitchen
units.
Do not use the oven as a storage space - it could be
dangerous if the oven is switched on.
Do not lean, sit or place food on the open door of the
oven.
Do not cover the bottom of the oven with aluminium
foil.
Always use the side guides to support the oven trays
and racks when the oven is in use. The trays and
shelves use a sliding mechanism which allows them to
be extracted safely.
Do not put containers or food on the floor of the oven.
Always use the trays and grids.
While using the oven, open the door as little as possi-
ble to maintain the temperature inside.
When moving or removing hot dishes, make sure you
wear protective oven gloves.
It is not unusual for condensation to form on the door
while the oven is in use - this is most common with
foods which have a high moisture content.
Parts of the appliance
become hot while in use.
lways make sure that
A
children are supervised
hen they are near to
w
the appliance.
Call Customer Care for a
service engineer’s visit if:
You find over a period
of time that the oven
becomes hotter at a particular temperature - the
thermostat may need
replacing.
The cooling fan fails to
work.
Tip: Use the Minute
Minder when cooking.
5
Page 6
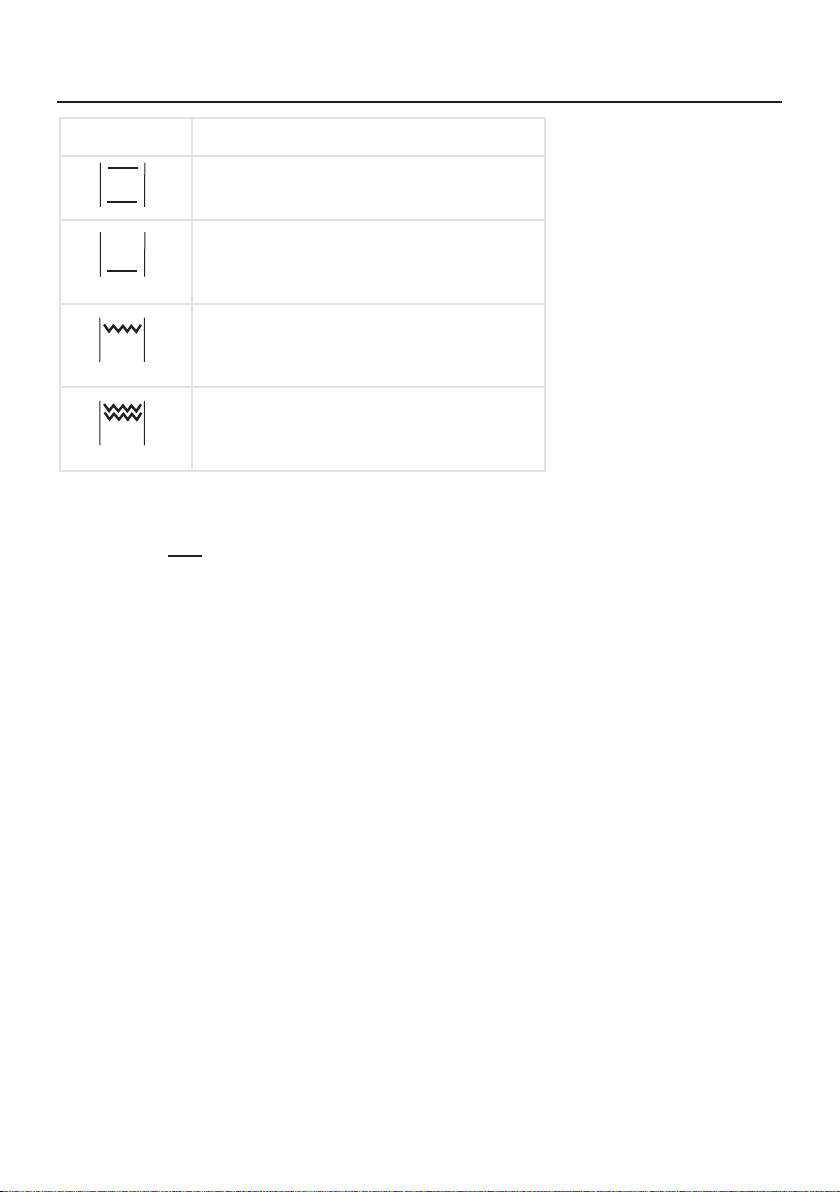
Using Your Top Oven – Icons
Icon What it is
onventional oven (top + bottom heat)
C
Used for general cooking purposes and suits most
recipes.
Base heat
sing the base element only, this suits foods which
U
eed a crisp base. Ideally used towards the end of
n
the cooking time.
Single variable grill
Used for grilling smaller amounts of food - only half
of the grill element is used.
Variable Dual Grill
Used for grilling larger amounts of food as the
whole grill element is used.
CAUTION:
When using ANY of the grill functions the door MUST
remain closed.
6
Page 7
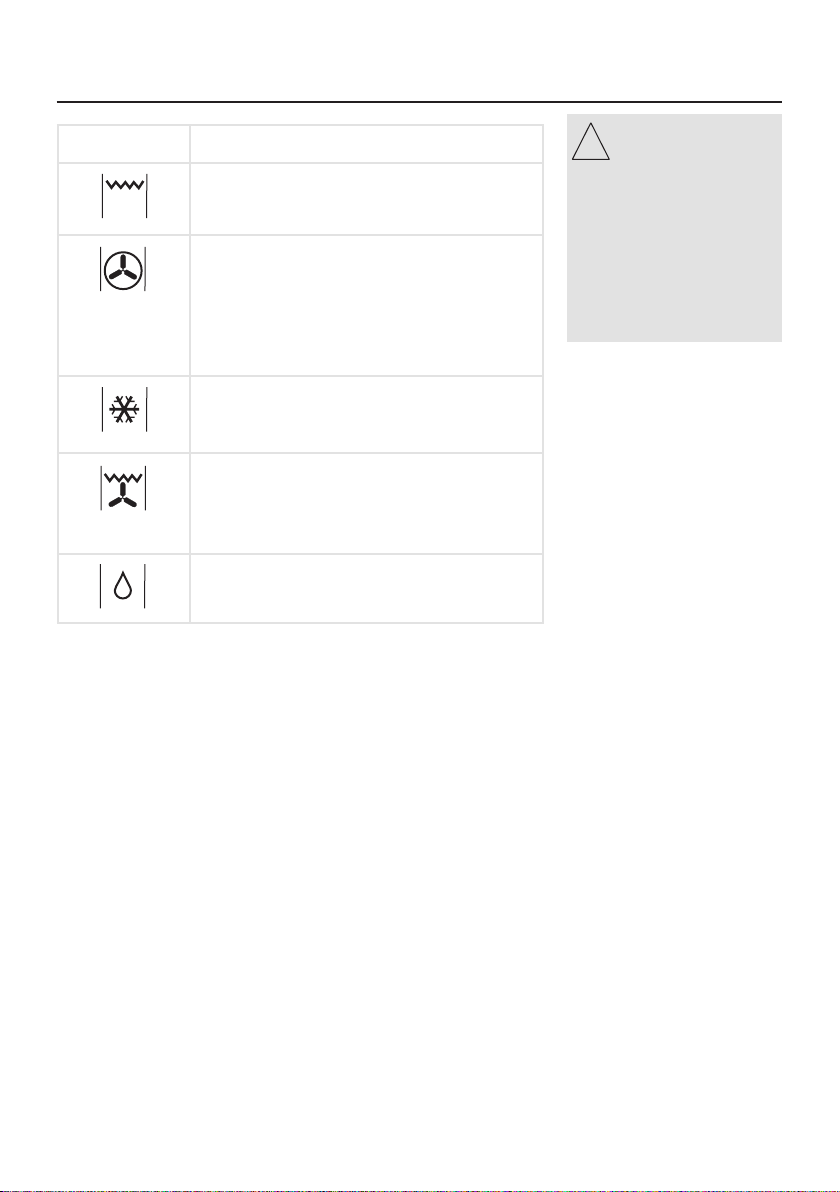
Using Your Main Oven – Icons
!!!
Icon What it is
ingle variable grill
S
sed for grilling smaller amounts of food - only half
U
of the grill element is used.
anned oven
F
sed for general cooking purposes. Provides an
U
even heat throughout the oven, which is useful for
batch baking. You may find that you need to
reduce the temperature setting for recipes, or
reduce the cooking time as this is a very efficient
heat setting.
Defrost
Uses the fan only (no heat). Ideal for defrosting
frozen desserts and joints of meat.
Grill + fan
Used for grilling foods. The fan circulates the heat
quickly around the food – and eliminates the need
for turning on foods such as bacon which is thinly
sliced.
SteamCleanse
Oven cleaning function. See “SteamCleanse” section for more information.
hen using the fanned
W
oven function for cooking,
e recommend either
w
educing the temperature
r
setting by around 10C, or
reduce the recipe time by
round 10 minutes –
a
owever, please bear in
h
mind that all cooking
esults are based on per-
r
sonal preference and
taste.
7
Page 8
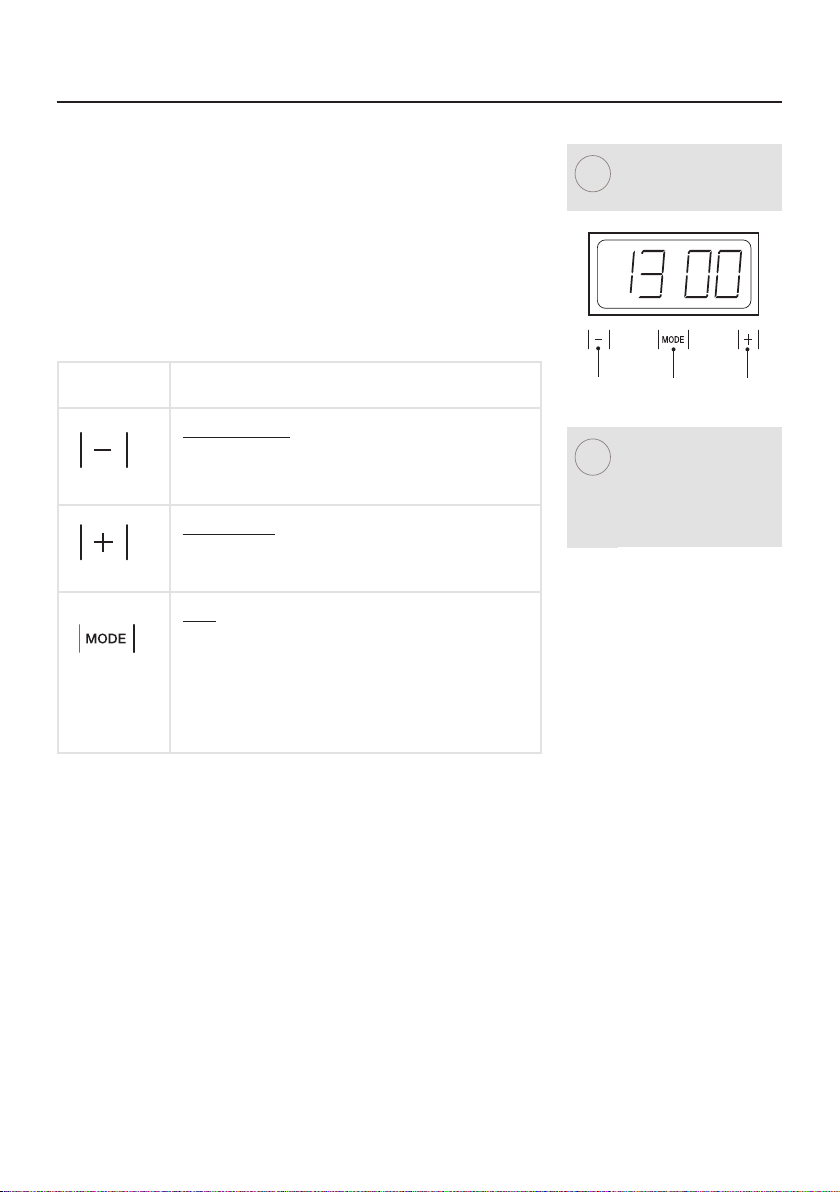
Using The Programmer / Clock
i
F
unction
selector
Minus /
Decrease
Plus /
Increase
i
Through your programmer you will be able to set the
time of day, the minute minder, and use the semi and
fully automatic cooking functions with the main oven.
The programmer is vital to the working of your appliance, and reading this section will make sure that you
get the most out of your oven.
The programmer
The table below shows you what the symbols look like
and what they do.
Symbol What is it?
Decrease / Minus
Used to decrease cook / end time, remove minutes
from the minute minder and adjust the time of day.
Also used for selecting an alarm tone.
Increase / Plus
Used to increase the cook / end time, add minutes to
the minute minder and adjust the time of day.
Mode
Used to select the functions available on the programmer.
Touch once for minute minder.
Touch twice for cook time.
Touch three times for end time.
How to use these functions is explained later in this
section.
What your timer symbols
mean
This is a 24 hour clock.
Before you use your
appliance for the first
time, you must ensure
that the time of day is
set.
Setting the time of day
Touch the plus and minus together for a few seconds
and then release.
The ‘’ in between the numbers on the LED display will
begin to flash.
While the ‘’ is flashing, it is possible to adjust the time
of day using the plus and minus.
Once the time has been set, allow approximately 30
seconds before using any of the other timer functions.
This will ensure that the time of day remains correct.
Changing the alarm tone
Touch the ‘plus’ and ‘minus’ simultaneously. The ‘’ in
the centre of the display will flash.
Touch ‘mode’ to display the text "ton" then touch
‘minus’ repeatedly to change the alarm tone.
8
Page 9
Using The Programmer / Clock
A
A
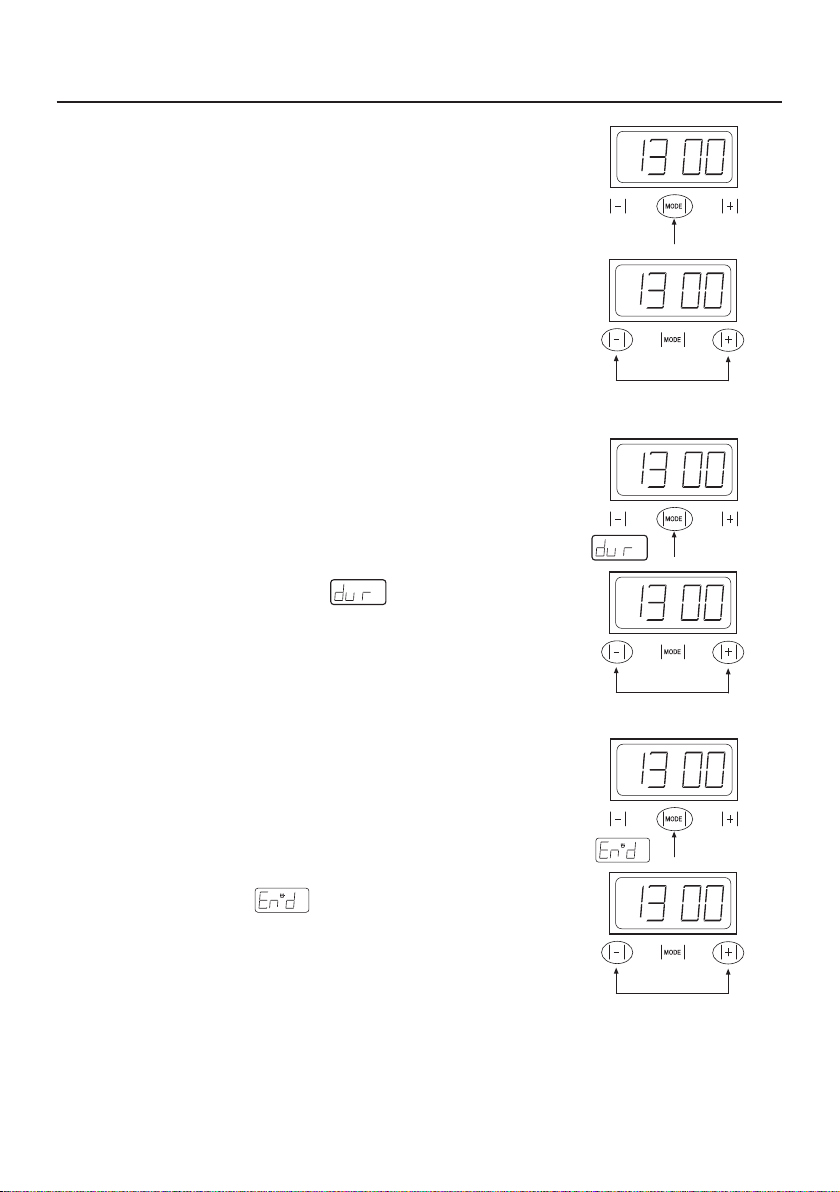
Setting the minute minder
To set the minute minder, touch ‘mode’ once. The bell
symbol will appear and start flashing. The flashing
only lasts for 5 seconds, so the minute minder must be
set within this time.
Use the plus and minus buttons to set the length of
time required. Once this has been done, the minute
minder is set.
When the selected length of time has counted down an
alarm will sound. To cancel the tone, touch any of the
timer pads.
Should you need to cancel the minute minder at any
time during use, touch ‘mode’ once, and then touch the
plus and minus together.
Semi – automatic cooking methods (main oven
only)
The duration method.
(Switch off after a set time period)
Touch ‘mode’ twice, which will skip past the minute
minder.
The display will flash the word and ‘A’ for Auto
will flash on the left hand side of the display.
Use the plus and minus to set the length of time you
want to cook for. This must be done within 5 seconds
– or the time of day will show again.
Once this is done the oven will switch off when the
cooking time has elapsed, and an alarm will sound. To
switch off the alarm touch any of the touch pads.
To view any remaining time, touch ‘mode’ twice.
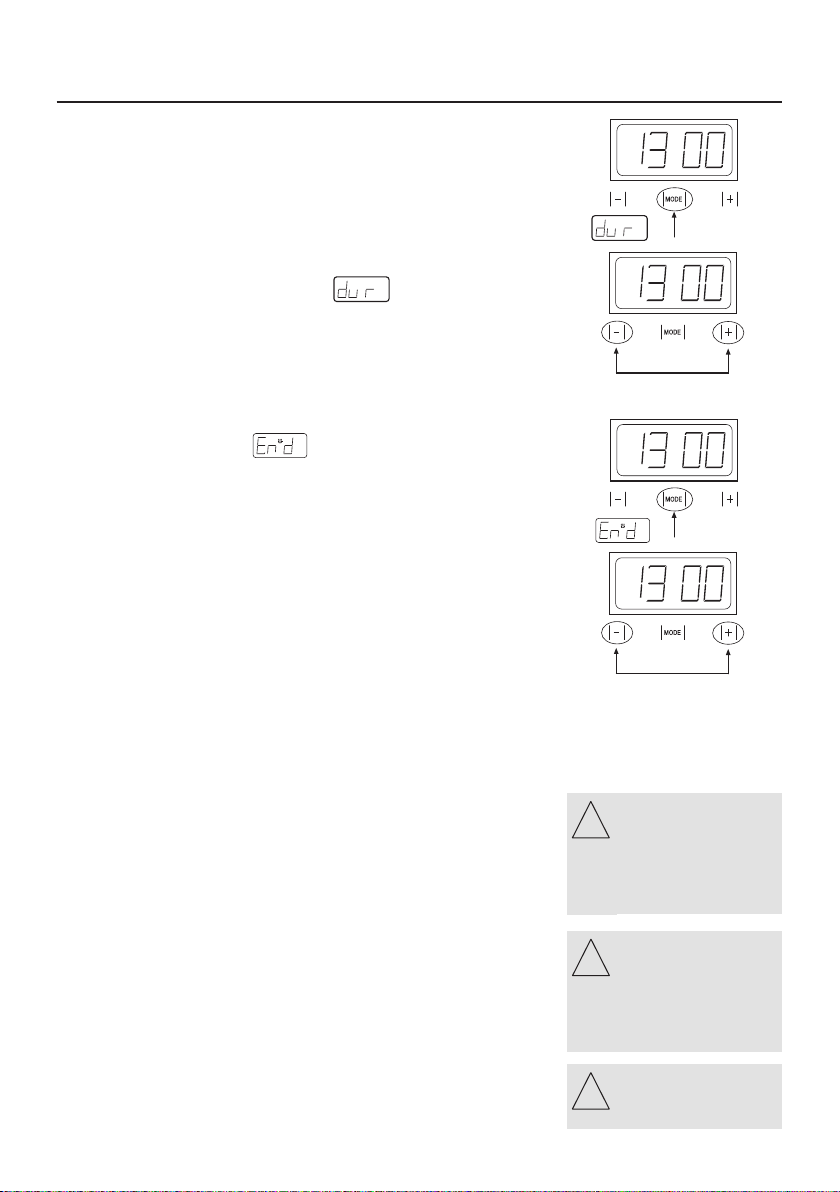
The end time method
(Switch off at a set end time)
Touch ‘mode’ three times, which will skip past the
minute minder and the duration method.
The display will flash and ‘A’ for Auto will flash
on the left hand side of the display.
Use the plus and minus to select the time the oven is
required to turn off.
Once this is done the oven will switch off at the time
you have selected. To switch off the alarm, touch any
of the touch pads for a short period.
To disarm the timer touch ‘plus’ and ‘minus’ together
for a short period.
9
Page 10
!!!
!!!
!!!
Using The Programmer / Clock
A
A
Fully automatic cooking
Switch on and off automatically
This requires both the duration and the end time to be
entered. The timer will work out the start time and
begin cooking.
Touch ‘mode’ twice, which will skip past the minute
minder.
The display will flash the word and ‘A’ for Auto
will flash on the left hand side of the display.
Use the plus and minus to set the length of time you
want to cook for. This must be done within 5 seconds,
or the time of day will show again.
Touch ‘mode’ three times, which will skip past the
minute minder and the duration programmer.
The display will flash and ‘A’ for Auto will flash
on the left hand side of the display.
Use the plus and minus to set the time you require the
oven to switch off at.
Once this is done, the oven will be set to switch off at
the time you have selected.
Set the oven to the temperature, switch on the oven
and place your food inside. The oven light will not be
illuminated at this point.
The timer will then calculate the start time from the
information you have programmed. The oven lights
inside the cavity will switch on indicating that cooking
has begun.
Once cooking is completed, an alarm will sound and
the oven will switch off. To cancel the alarm tone,
press any button.
To cancel any of the semi and full automatic functions
at any time, press the plus and minus buttons together.
The automatic cooking
symbol will appear to
show that the oven is no
longer in manual mode,
but in automatic mode..
Important: Once the oven
has switched off – return
the oven controls to the
‘off’ position.
10
Important: Remove food
as soon as it has cooked.
Page 11

Using The Programmer / Clock
When using the programmer
Do
Familiarise yourself with the use of the programmer.
Select foods that are as cold as possible, preferably
straight from the fridge.
Choose foods that are suitable for cooking from cold
start, as the oven will not be pre-heated. Some foods
will be affected by storage at room temperature for
prolonged periods of time and may not cook properly.
Make sure that all foods are thoroughly thawed espe-
cially meats.
Cover dishes with lids or foil.
Try to keep the end time as close to your return as
possible.
Do not
Place warm food in the oven for delayed start cooking.
Foods should be thoroughly cooled before placing in
the oven.
Set up any automatic programmes while the oven cavity is warm i.e. straight after use. Always allow the
oven to cool down first.
Cook dishes containing poultry or left over meats. Also
pies and pastries with wet fillings should also never be
cooked using the automatic setting as they are not
suitable.
Over fill dishes containing liquids.
Before using your Automatic Programmer
It is a good idea to supervise cooking the first time you
use the Automatic Programmer. Familiarising yourself
with how the Programmer works can help to avoid under
or over cooking food.
11
Page 12

SteamCleanse (main oven only)
About this function
In order to keep your appliance working properly it
should be regularly cleaned to prevent any build up of
food deposits or greases. This function can help to
make the cleaning process easier and more convenient
for you.
How it works
By using heat, steam and a few drops of washing up liquid food deposits are loosened and softened enough to
make their removal much easier – eliminating the need
to scrub the enamel. The symbol is a special heat
setting that is designed for this kind of cleaning.
How to use. .
Remove all oven furniture before use.
Pour 300ml approx. of water with a few drops of wash-
ing up liquid added onto a large absorbent sponge
(recommended size: 360mm x 300mm x 6mm) which is
placed on the base of the oven cavity. If the oven cavity base is heavily soiled, you may want to leave the
solution to soak for a short while before turning on the
function.
Close the oven door.
Select the function. The cleaning indicator neon will
illuminate to show that cleaning is in progress, and
three short beeps can be heard.
The cleaning cycle is approximately 21 minutes long,
and an alarm will sound once it is completed.
Once cleaning is finished, make sure that the appliance
is switched off.
Use the large absorbent sponge to remove any excess
water from the base of the cavity.
You can now clean the inside of the oven using a soft
plastic bristled brush, cloth, sponge or other non abrasive implement and warm soapy water.
Particularly stubborn soiling can be removed with a
specialist scraper (i.e. ceramic glass scraper).
Rinse the cavity thoroughly using plenty of clean water
and a cloth. Then dry carefully throughout using a soft
dry cloth. Make sure than you clean and dry all the
inside, and the surround of the appliance – particularly
the door seals.
12
Page 13
Using Your Grill
i
i
i
i
i
Before you start grilling.
Make sure all utensils and furniture are in place before
switching the grill on.
Close the door while the grill is in use.
1. Turn the selector control knob to the grill function.
(The selector knob may be turned either clockwise, or
anticlockwise)
2. Turn the thermostat control knob to the heat
setting you require, as this is a variable grill you can
adjust the heat to suit the kind of food you are cooking.
(The temperature knob may only be turned clockwise)
To switch off, return the control knob to the ‘off’
position.
The single grill uses part of the element only, and is
better suited to grill smaller amounts of food.
The dual grill uses all of the element, and is better suit-
ed to grill larger amounts of food, and for toasting.
Aluminium Foil
Never cover the grill pan or grid with foil, or allow
fat to build up in the grill pan, as this can create a fire
hazard.
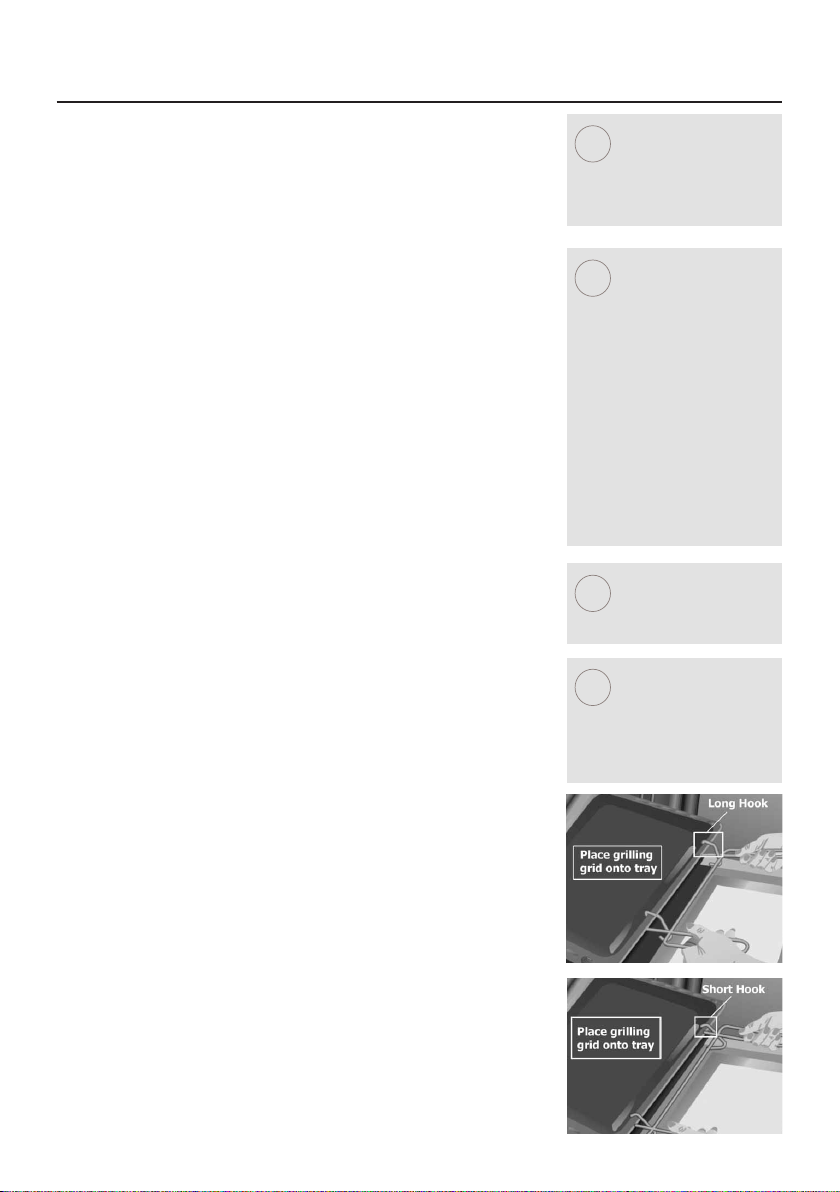
Handle
When removing the tray(s) from under the grill, use the
handle and make sure that your hands are protected the area around the grill may be hot.
The handle supplied can be used with either the cake
tray, or the roasting roasting tray. Use with the long
hook at the top (see picture A) when removing the
roasting tray. Use with the short hook at the top (see
picture B) when removing the cake tray.
Warning: Accessible parts
may become hot when
he grill is in use.
t
Children should be kept
way.
a
ypes of grill
T
Variable rate grill has
adjustable heat settings.
This can be done in the
area marked with the
‘half’ & ‘full’ grill symbols
on the thermostat.
Single grill: has one grill
element.
Dual grill: has two grill
elements, which can be
used together, or as a
single grill.
For best results:
Pre-heat the grill for
about 3 minutes.
Please note: the grill pan
handle is designed for
sliding the grill pan into
and out of the grill cavity.
It is not to be used to lift,
or carry, the pan.
13
Page 14

Using Your Ovens
!!!
!!!
i
Switching on the oven
Use the function control knob to select the function you
wish to use - see the functions table for details.
(The selector knob may be turned either clockwise, or
anticlockwise)
Note: You can change function during cooking if you
wish, as long as the oven is in manual mode.
Turn the temperature control knob to adjust the tem-
perature to suit your requirements if needed.
(The temperature knob may only be turned clockwise)
You must select both a function and a temperature in
order to switch the oven on.
The oven lights will switch on, and the oven will begin
to heat.
The thermostat indicator will come on to show that the
oven is heating, and once the temperature is achieved,
it will go out.
The indicator will cycle on and off as the thermostat
regulates the temperature inside.
To switch off the main oven, simply turn all controls to
the ‘off’ position.
Never place food, or
ishes on the base of the
d
oven.
Always keep children
way from the appliance
a
hile it is in use.
w
The clock must have the
time of day set before
use.
14
Page 15

Cooking Guide Notes
Using the Cooking Guides
Adjustments can be made to suit personal preferences
and tastes.
For best results we recommend that the oven is preheated before use. Pre-heating is finished when the
temperature indicator goes out.
Fanned ovens are more efficient than conventional
ovens. In some instances you may find that you need
to reduce the temperature given in recipes by between
10˚C and 20˚C – if they are given as conventional oven
temperatures. Alternatively, you can reduce the cooking
time.
Always make sure the foods have been cooked thoroughly before consuming them and are piping hot in the
centre. Never consume foods which are not thoroughly
cooked.
Always follow the manufacturer’s instructions given when
cooking convenience meals and packaged foods.
15
Page 16
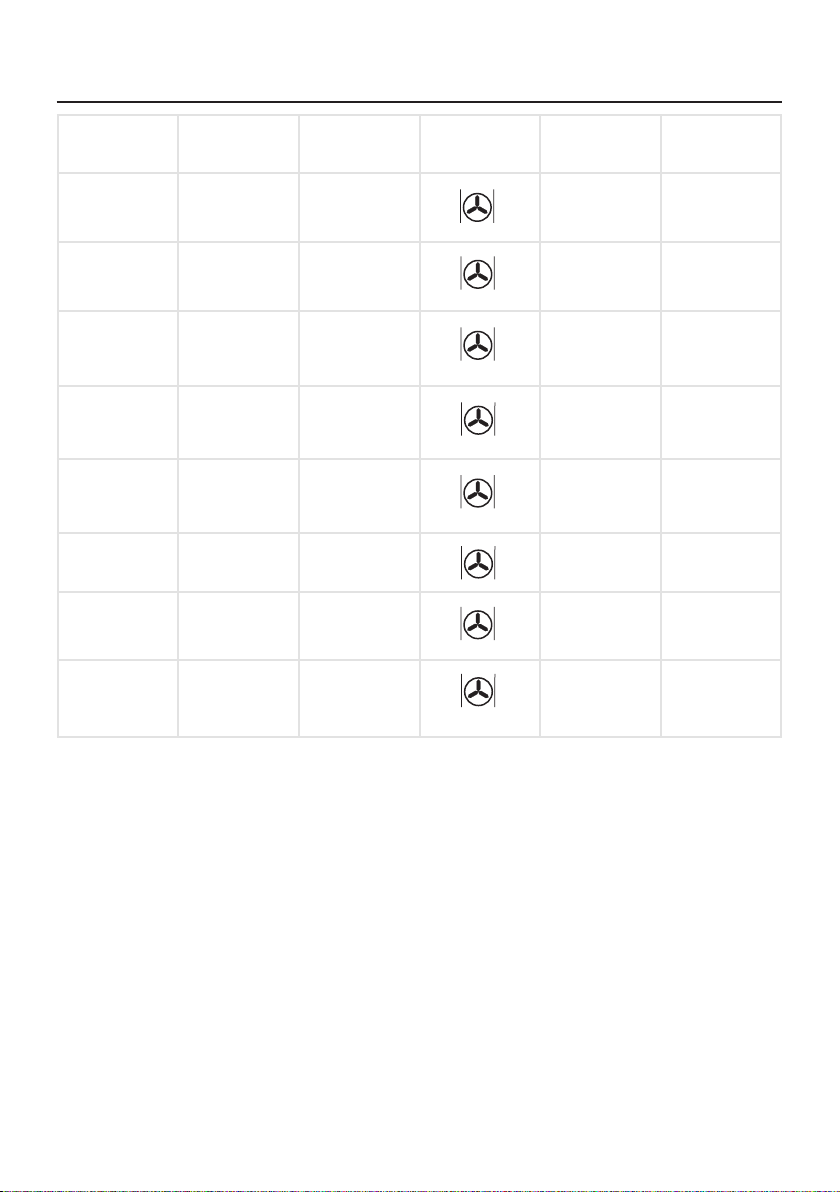
Cooking Guide – Starters
Starters Weight kg Tray position Function Temp ˚C Time (min)
Baked rice 0.35 1 170 - 190 35 - 40
Pastry 1.5 2 160 - 180 30 - 35
Vegetable
pastry
Vegetable
pie
Baked
Potatoes
Pizza 0.65 2 170 - 190 15 - 20
Quiche 1.5 2 160 - 180 45 - 50
Stuffed
tomatoes
1 2 170 - 190 30 - 35
1 2 170 - 190 50 - 55
1 3 180 - 200 50 - 55
0.75 2 160 - 180 10 - 15
16
Page 17
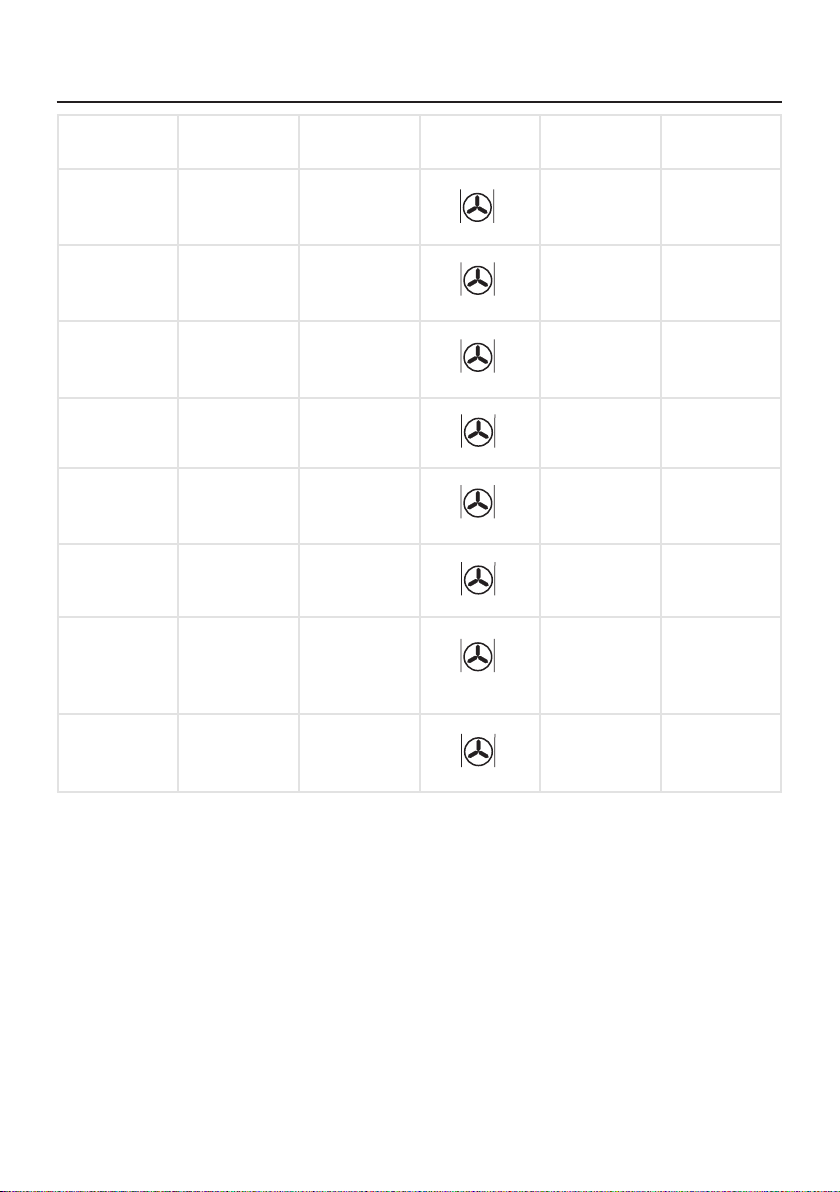
Cooking Guide - Fish
Fish Weight kg Tray position Function Temp ˚C Time (min)
Red Bream 1.5 3 170 - 190 25 - 30
Salted Dorado 1 3 180 - 200 25 - 30
Fish pastry 1 2 180 - 200 30 - 35
Sole 1 3 160 - 180 10 - 15
Sea-Bass 1 3 180 - 200 15 - 20
Hake 1.5 3 180 - 200 20 - 25
Salmon
(in greased
paper)
Trout 1 2 180 - 200 15 - 20
1 3 170 - 190 15 - 20
17
Page 18
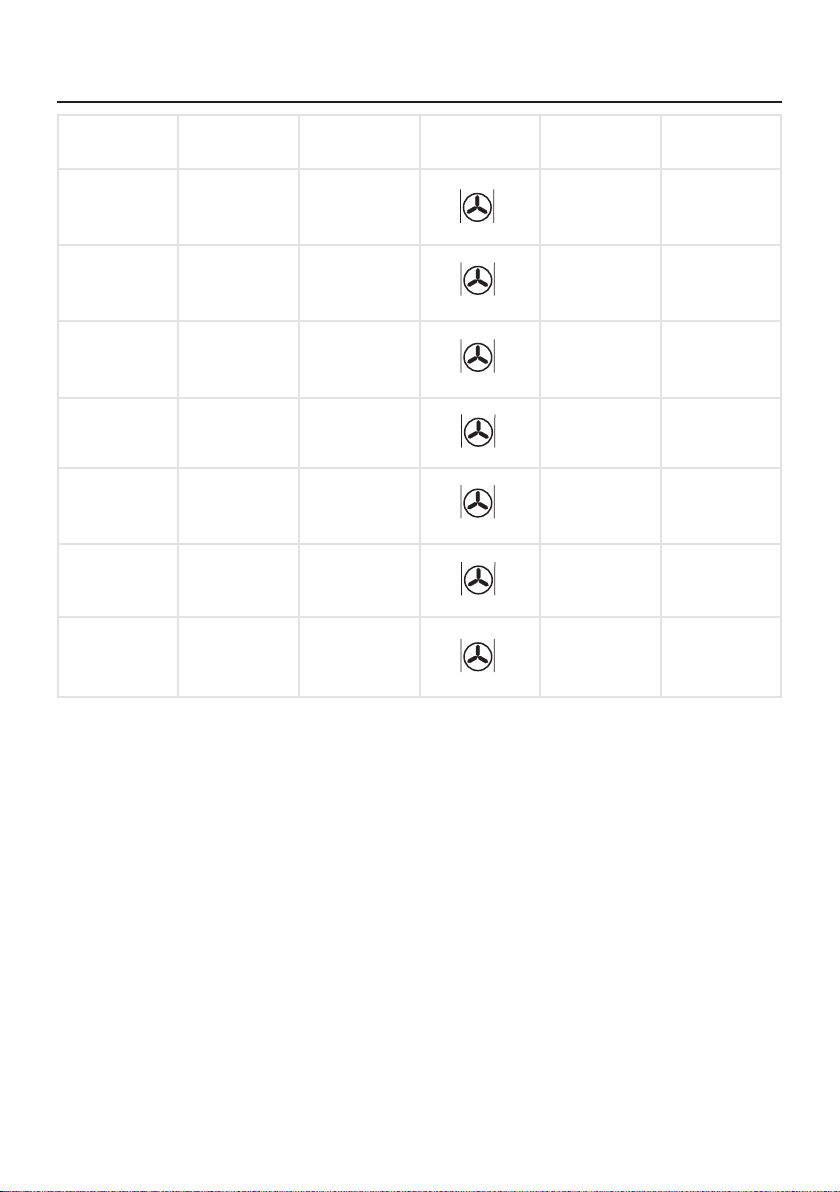
Cooking Guide - Meats
Meats Weight kg Tray position Function Temp ˚C Time (min)
Suckling pig 2 3 180 - 200 80 - 85
Lamb 1.5 3 180 - 200 50 - 55
Joint of meat 1.5 3 170 - 190 30 - 35
Salted pork
loin
Chicken 1.5 3 170 - 190 45 - 50
Roast Beef 1 3 180 - 200 35 - 40
Filet steak in
pastry
1 3 170 - 190 30 - 35
1 3 160 - 180 30 - 35
18
Page 19
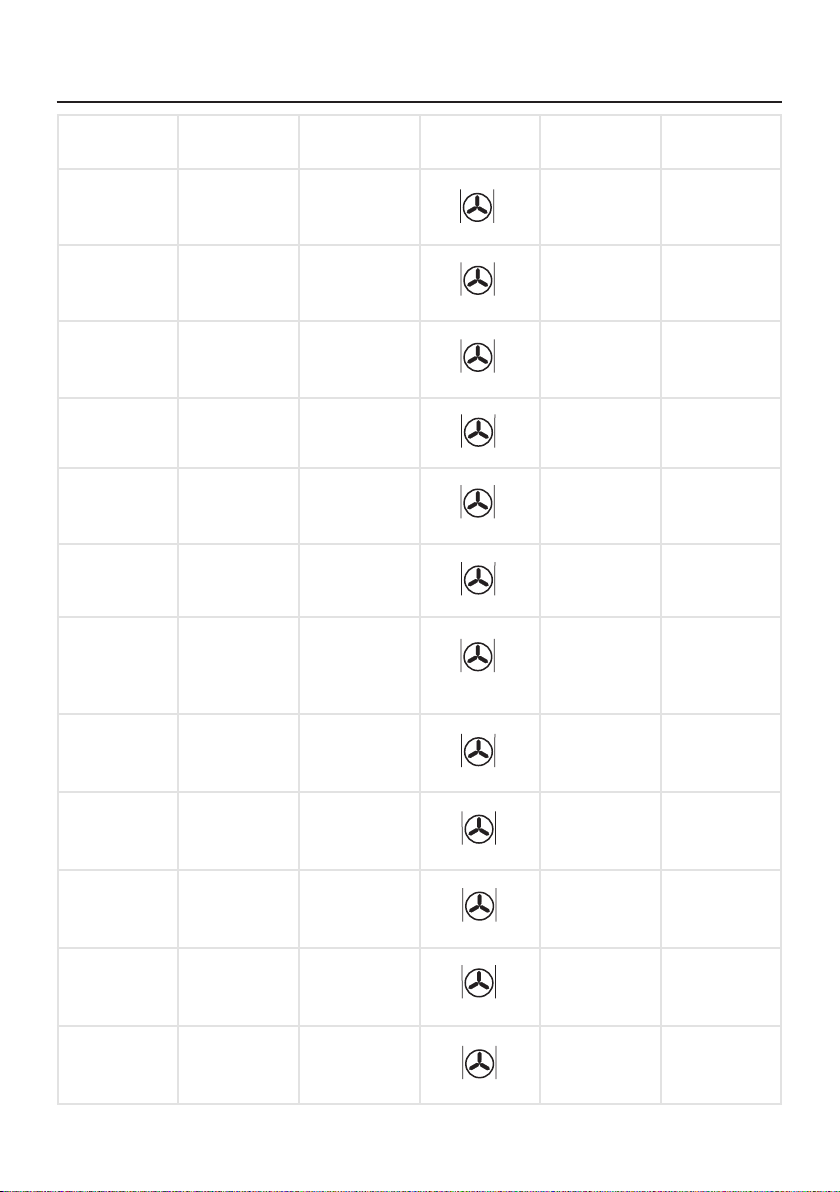
Cooking Guide - Sweets
Sweets Weight kg Tray position Function Temp ˚C Time (min)
Sponge cake 0.5 2 160 - 180 30 - 35
Swiss roll 0.3 3 160 - 180 10 - 15
Flan 0.5 2 160 - 170 55 - 60
Biscuits 0.5 3 150 - 170 15 - 20
Vol-au-vents 0.25 3 170 - 180 15 - 20
Cup cakes 0.5 2 150 - 170 25 - 30
Bakes apples 1 3 170 - 190 30 - 35
Baked
bananas
Puff pastry
biscuits
Plum cake 0.5 2 160 - 180 50 - 55
Apple pie 1 2 160 - 180 45 - 50
Cheese-cake 1 2 170 - 190 35 - 40
0.5 3 170 - 190 10 - 15
0.25 2 170 - 190 20 - 25
19
Page 20
Care and Cleaning
!!!
The inside of the oven should be cleaned to remove any
deposits (food spillage etc) which can give off smoke or
odours and cause stains to appear.
Allow the oven to cool before cleaning
For enamelled surfaces (e.g. the floor of the oven) use
a nylon brush or sponge with warm soapy water. If
using specialist oven cleaning products, use only on
enamelled surfaces and follow the manufacturer’s
instructions.
Clean the outside of the oven and the accessories with
warm soapy water or with a mild detergent.
When cleaning stainless steel parts, use soft cloths or
sponges to avoid scratching the stainless steel. If
using stainless steel cleaners, always follow the instructions on the packaging.
Cautions
Do not clean the inside of your oven with a steam
cleaners or pressurised water.
Do not use either metallic scouring pads or any material that could scratch the appliance.
For your own safety, never switch the oven on without
the back panel that covers the fan.
Do not remove the control knobs when cleaning the
outside of the oven.
Caution
efore carrying out any
B
work, the appliance must
be disconnected from the
electricity supply.
D
E
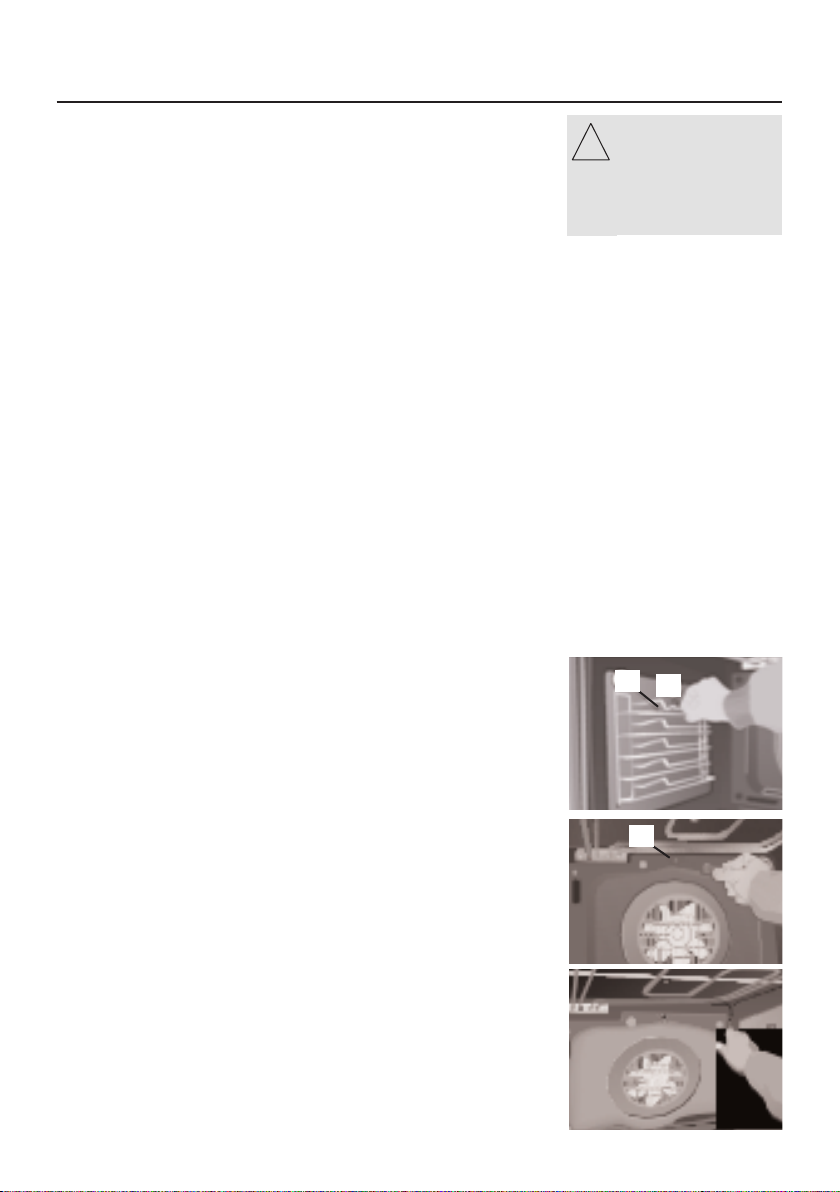
Instructions for Removing the Supports and the
Back Panel.
Remove the accessories from inside the oven.
Ease out the supports (D), releasing them from the
bolt (E)
To disassemble the back panel, remove screw (F).
Reassemble in reverse order.
F
20
Page 21
Care and Cleaning
!!!
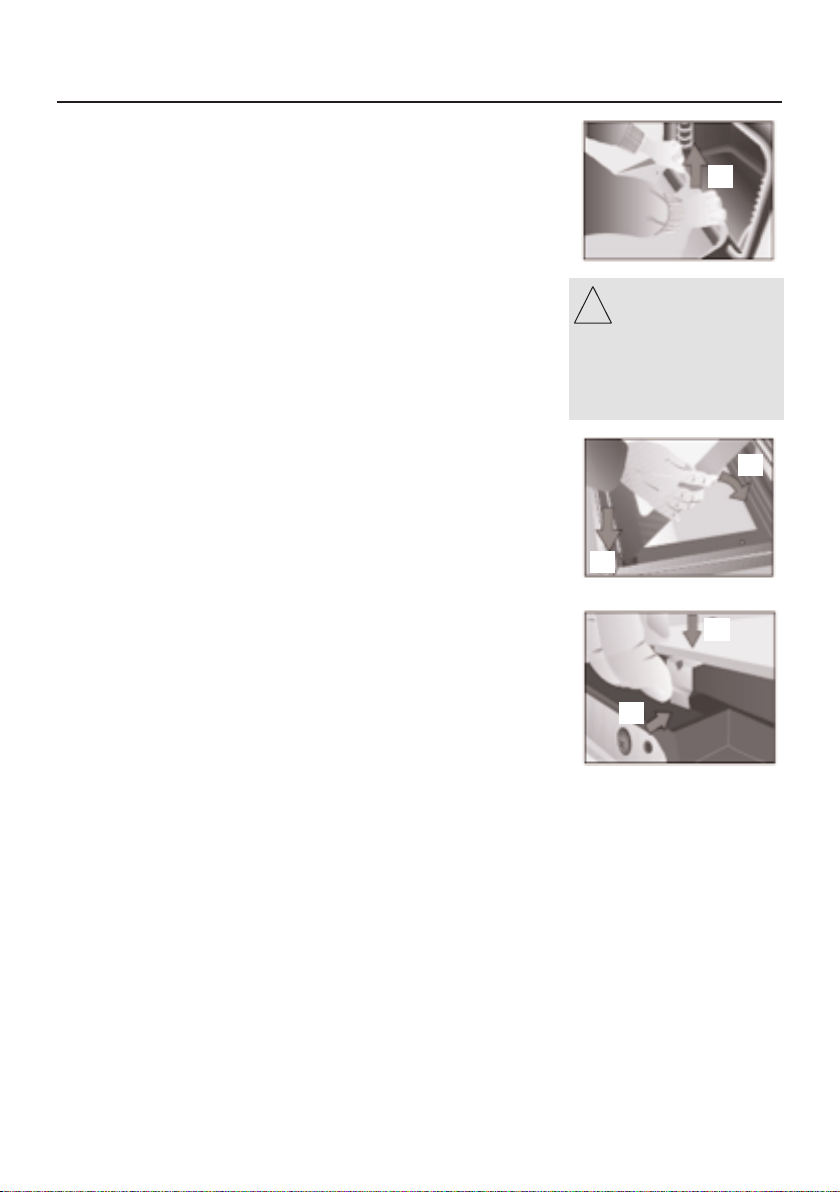
Cleaning the Oven Door
To remove the inner door glass:
Open the door fully.
Pull the glass towards you from the bottom (A).
The Inner door glass can now be removed.
To reassemble the inner door glass:
Holding the inner door glass with the chamfer in the
bottom right hand corner
Insert the metal clips in the cut outs at the top of the
inner door panel (B).
Lower the glass into the door (C).
The glass is fixed to the door by pressing the two
lower supports (D) while pushing the glass into the
door (E).
A
Warning:
Take care when
removing the inner
door glass as once
removed the oven
door will return to
the closed position.
Warning: Should the inner door glass become dam-
aged, cracked or chipped it must be replaced. Even
small chips or cracks in the glass can cause it to shatter suddenly when heated.
Abrasive cleaning agents and metallic cleaning imple-
ments can cause scratches in the glass, and therefore
should be avoided.
For best results use warm soapy water, mild detergents
and a soft cloth.
Always dry the door glass carefully before replacing it.
C
B
E
D
21
Page 22

Care and Cleaning
i
We also sell cleaning products which are available from
the Spares Sales team
Product
description
Rectangular
carbon filters
Round carbon
filters
Ceramic hob
scraper kit
Ceramic hob
cleaner and
conditioner
Sealed
hotplate
cleaner
Product code Qty Where used
082612620 2 Hoods
082611571 1 Hoods
082606781 1 All ceramic glass
hobs, including
induction
082606780 1 All ceramic glass
hobs, including
induction
082606783 1 All sealed / solid
plate hobs
To order or enquire about
any of these products,
lease call the Spares
p
Sales team on:
870 458 9961
0
Stainless steel
Oven cleaner
Multi-purpose
cleaner
spray
kitchen
cleaner
E-Cloth 082813300 1 All cookers, for
082606764 1 All stainless
steel parts
082606786 1 All cookers,
inside cavities
and on glass
082606782 1 General kitchen
cleaner
cleaning glass
and stainless
steel
22
Page 23
Maintenance
Caution
Before carrying out any work, the appliance must be
disconnected from the electricity supply.
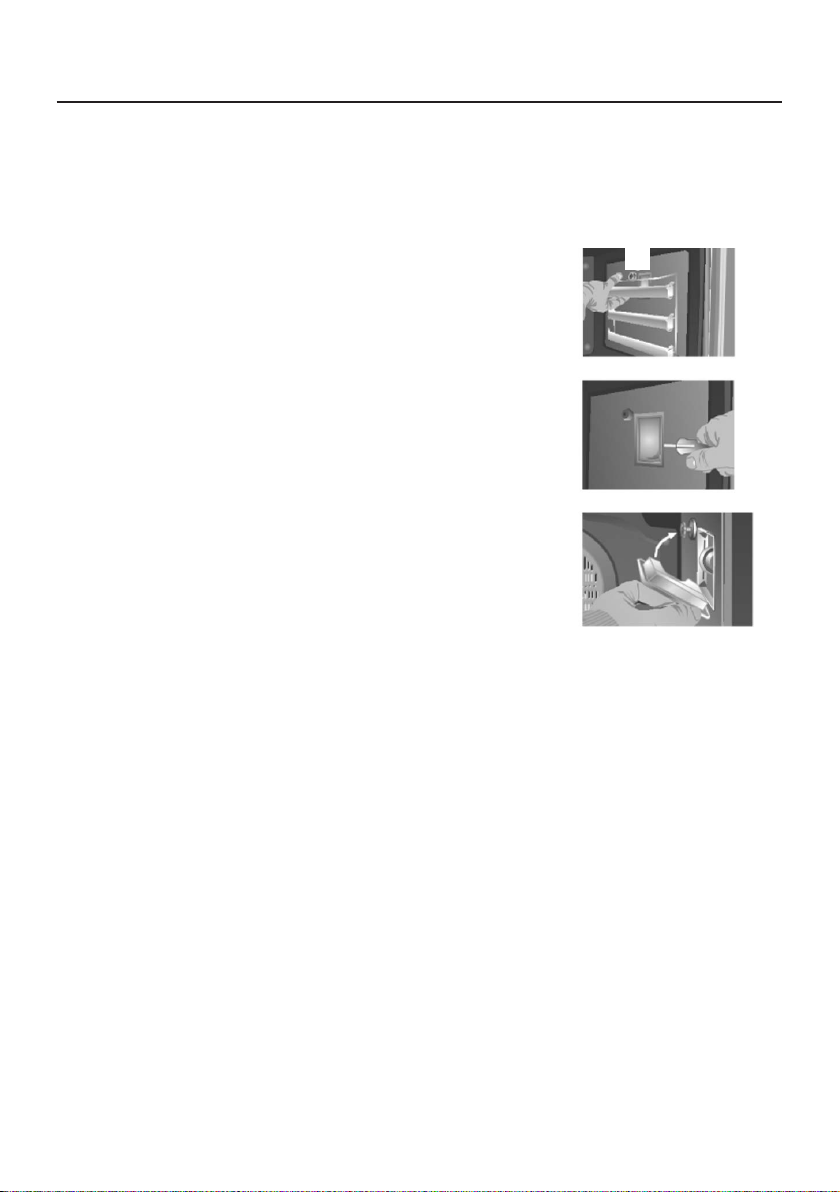
Changing the oven bulb
Ease out the telescopic guides, releasing them from the
bolt (A).
Loosen the lens from the lamp holder with the help of
an appropriate tool.
Replace the old bulb.
Replace the lens, making sure it fits in the correct posi-
tion without forcing it.
The replacement bulb must be temperature resistant to
300 ºC.
These can be ordered from our Customer Care Centre
or be purchased from your local hardware store.
Please take the old bulb with you for reference.
A
23
Page 24

Troubleshooting
i
The oven does not work
Check the connection to the electrical circuit.
Check the fuses and current limiter of your installation.
Ensure the clock is in the manual or programmed
mode.
Check the position of the function and temperature
control knobs.
The inside light of the oven does not work
Change the bulb.
Check that the bulb has been replaced in accordance
with the instruction manual.
The heating indicator light does not work
Select a temperature.
Select a setting.
There is smoke inside the oven during use
This is normal during its first use.
Periodically clean the oven.
Reduce the amount of grease or oil in the tray.
Do not use higher temperature settings than those in
the cooking tables, or recipe.
Expected cooking results are not achieved
Check the cooking tables for futher guidance about
your oven.
Check the recipe that you have been using, and the
function. Fan ovens cook more efficiently than conventional ovens – so adjustment to time and temperature
may be required.
The Customer Care
Centre can be contacted
n:
o
871 22 22 502
0
Please get in touch if you
xperience any problems
e
not covered here.
If, despite these recommendations, the problem continues, contact our Customer Care Centre.
24
Page 25
Installation - Notes
i
!!!
!!!
Installation
This information is intended for the installer, as the person responsible for assembly and electrical connection. If
you install the oven yourself, the manufacturer will not
be held responsible for any possible damage.
Before Installation.
An aperture is required in the kitchen unit to a mini-
mum depth of 560mm.
To fit the oven into this location, the back part of the
unit must be clear of projections (reinforcements,
pipes, sockets etc.)
Always ensure that this appliance is connected by a
competent electrical installer who is a member of a
recognised ‘competent persons’ scheme and whi will
comply with the I.E.E. and local regulations.
Before you start
Always make sure that you have carefully read through
the installation pages of this book - careful planning at
the beginning will ensure a quick and easy installation.
Take care when moving this appliance, it may be heav-
ier than it looks! If you need to lift the appliance, make
sure you use an appropriate lifting method.
Soft, or uneven flooring may be damaged unless the
appliance is moved with care.
DO NOT attempt to move the oven by pulling on the
handles or doors, we recommend that you open the
door and grasp the frame of the cooker. Please wear
protective gloves for this, and make sure the door cannot trap your fingers.
After connecting the electricity, check that all the
lectrical parts of the
e
oven are working.
Installation must only be
performed by a fully qual-
fied electrician who must
i
ensure regulations in
force for installation are
observed.
Warning:
This appliance must be
earthed
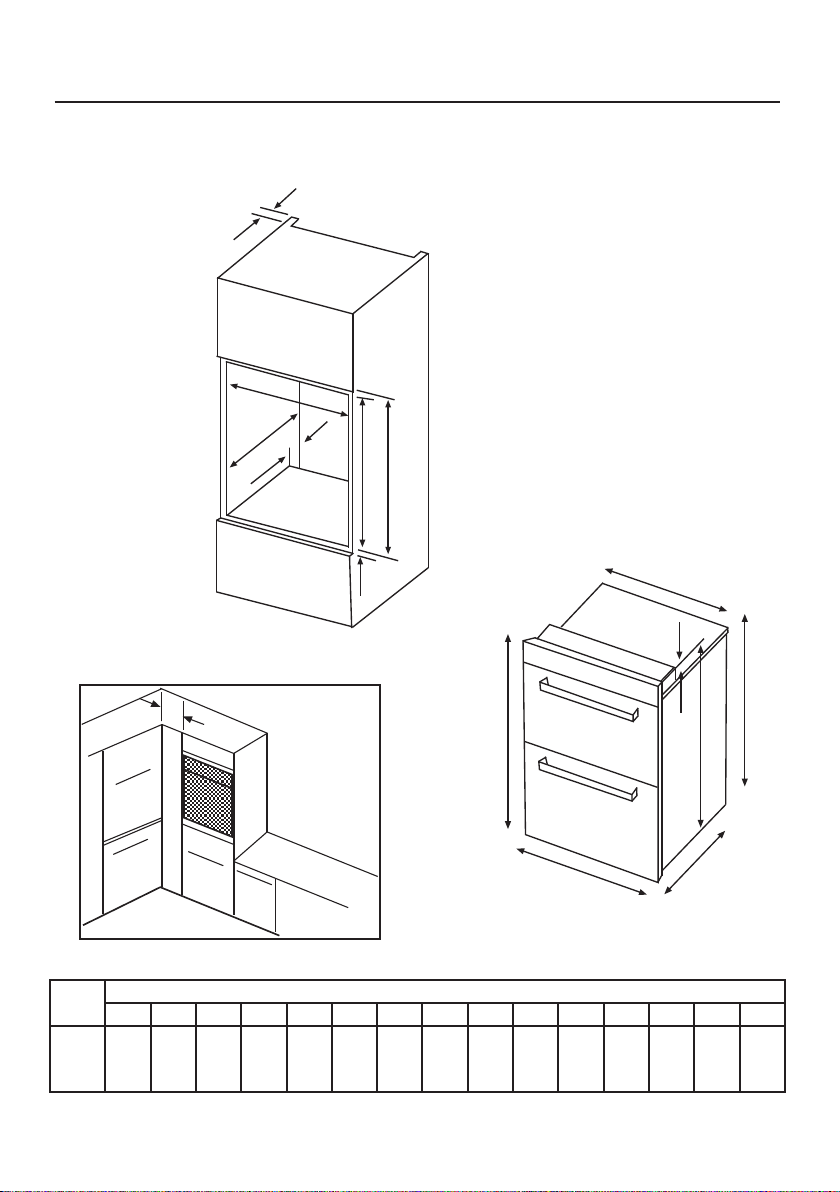
Please make sure that you have enough space for your
appliance, use the table and diagrams shown to help
determine this.
25
Page 26
Installation – Diagrams
K
I
M
J
L
N
P
FIG 1
FIG 3
F
A
B
E
G
C
D
9
0 mm (mi
ni
mum)
FIG 3
F
A
B
E
G
C
D
Product
900mm 557.0 774.0 887.0 540.0 595.0 888.0 1.0 890.0 890.0 890.0 min
Fig 2
A B C D E F G H I J K L M N P
Dimension (mm)
26
560
558 -
568
min 10min 3060 -
100
Page 27

Installation
Leave the appliance in the base tray packaging until
you are ready to install it. When you remove the appliance from the base tray packaging, take care not to
damage it.
Whilst every care is taken to eliminate burrs and raw
edges from this product, please take care when handling - we recommend the use of protective gloves during installation.
Please note that all dimensions and sizes given are
nominal, some variation is to be expected.
If this appliance is to be installed near to a corner
where the adjacent cabinets run at right angles forward of the appliance, there must be a gap of at least
90mm between the appliance and the cabinets, to prevent overheating of the cabinets (FIG 3).
Important:
Do not modify the outer panels of this appliance in
any way.
Fixing screws.
The fixing screws are in a polythene bag in the oven
pack.
Depending on the method of installation, some of the
screws may not be needed.
If you have a non standard size of cabinet which leaves
a gap above or below the appliance, you may be able to
buy a trim kit (to fill in the gap) from the supplier of
your cabinets.
27
Page 28

Installation
!!!
Refer to FIG.1 for the dimensional requirements.
Remove the fixing screws from the polythene bag, but
leave the appliance in the base tray packaging until you
are ready to install it.
Note: When removing the appliance from the base tray
packaging care should be taken not to damage the
appliance, follow lifting instructions in the "Before you
start" section.
1. When installing in a typical built in oven housing unit,
the false back should be removed from the housing
unit to provide the necessary depth for installation.
2. When the false back is removed, it is normally the case
that the support shelf for the appliance leaves a gap
between the back edge and the wall of approximately
80mm.
3. If no gap occurs between the back edge of the shelf
and the wall behind the unit, a minimum gap of 30mm
should be created by shortening the shelf, this is to
provide adequate ventilation for the product.
4. Ventilation is required for the product, to allow it to
function correctly, a cutout should cut into the top of
the housing unit (see FIG.1), to provide this.
5. Slide the appliance into position and secure to the cabinet using the screws provided.
Warning:
his appliance must be
T
arthed
e
The appliance is designed to fit into a standard 600mm
wide housing unit, with minimum internal dimensions as
shown in FIG.1 of the installation dimensions.
Please note that all sizes are nominal, and some variation is to be expected.
28
Page 29
Installation – Electricity Notes
Electrical Connection - Legal Requirements.
IMPORTANT:
We recommend that the appliance is connected by a
qualified electrician, who is a member of the N.I.C.E.I.C.
and who will comply with the I.E.E. and local regulations.
Important: Ensure that you route all mains electrical
cables well clear of any adjacent heat source, such as
an oven or grill.
Warning: This appliance must be earthed.
Where a fixed connection is used, a device allowing
the appliance to be isolated on all poles from the
mains supply with a contact opening width of at least
3mm must be provided.
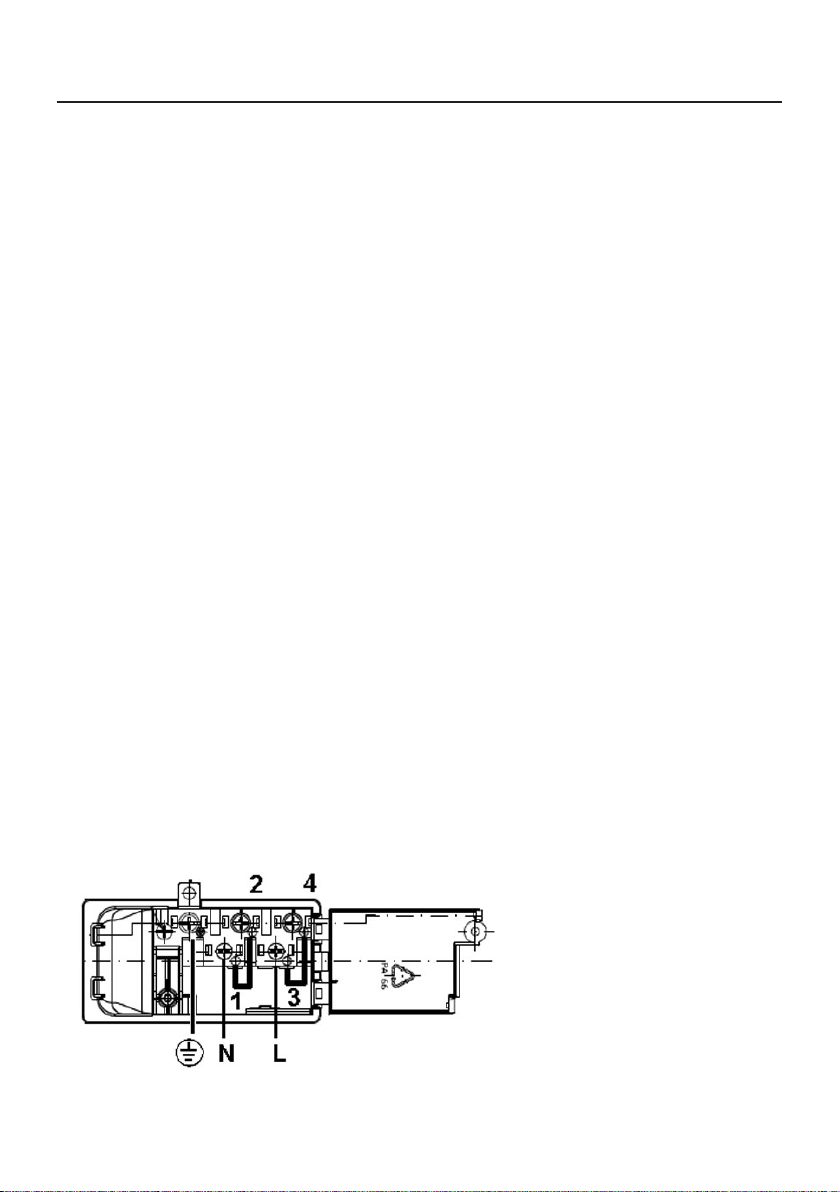
The mains terminal block is positioned at the right
hand rear of the top service panel when viewed from
the back.
Connect the cable to the terminal block, and tighten
the cable clamp - remembering to fit the brass links as
shown in the diagram below.
Close the terminal box, ensuring that the cover is
engaged on the locking tabs.
After connection to the electricity supply please check
that all electrical parts of the appliance are working.
29
Page 30

Technical Data
Technical Information
If the equipment does not work, please contact the
Technical Service Department and advise them of the
problem, indicating:
Serial number.
Appliance model.
When contacting the Customer Care Centre make sure
you have the above numbers to hand. This will help us
to process your call efficiently. There is space for
recording the model and serial numbers at the back of
this handbook.
You will find this information on the rating plate on the
lower part of the oven when the door is opened. There
is a space provided to record this at the back of this
handbook.
The item that you have bought meets the European
directives on electrical material safety (73/23/CEE) and
electromagnetic compatibility (89/336/CEE).
30
Page 31

Technical Data
@ 230v
Top cavity S3 - E900F
Oven 2150W
Grill (variable) 2600W
Main cavity
Fanned oven 2000 W
Grill 1400W
Extras
Lights 25 W (each)
Fan 30 W
Cooling fan 18 W
Total wattage 4698 W
Electrical rating: 220 – 240v ~ 50Hz/60Hz
Countries of Destination: GB (Great Britain) IE (Ireland).
Always make sure that any old appliances have been
disposed of correctly – you should never attempt to dispose of any large appliance with household waste.
Instead, please contact your local council / authority for
information regarding the collection or re-cycling of such
products.
Do not attempt to make any functional repairs on this
appliance yourself, unless you are informed that you can
either within this handbook, or by a qualified service
engineer. If in doubt, please call the Customer Care
Centre.
31
Page 32

Service Record
Date of purchase Installer stamp / Printed name Date of installation
Place of purchase:
Date Part(s) replaced Engineers Stamp/
Printed Name
32
Page 33

Contact Us
Should you need to contact us, please call our Customer Care Centre on:
0871 22 22 502.
Calls will be answered in strict rotation, as soon as possible.
Model Number
Serial Number
Please record your model and serial number in the spaces above.
Having these numbers to hand will help us to help you quickly and more efficiently
should you need to call us for any reason.
Page 34

Stoney Lane, Prescot, Merseyside, L35 2XW
01.2008/ 08 26284 02
3172196 - 002
Stoves
 Loading...