

Page 1
Built In Electric Multifunction Oven and Grill,
with Genus Functions.
Please retain these instructions for future reference.
Visit www.stoves.co.uk for info and ideas.
Page 2

Congratulations on choosing the Stoves Genus!
Genus is quite simply the the ultimate cooking machine. For starters, it’s an
excellent Multifunction cooker in it’s own right, with scores of features.
But what makes Genus a genuine revolution, is it’s ability to not only produce
beautiful results but, to do so on average four times faster.
And here’s how. . . .
Unlike any other cooker, Genus works by combining conventional cooking
methods with it’s own exclusive Genus heating technology. Put simply food is
cooked much more evenly, consistently and with much greater efficiency without
any compromise on the results.
All you have to do is select the appropriate programme.
We have produced this handbook to accompany the Stoves Genus, to take you
through it’s functions successfully. In order to appreciate the full benefits of your
new oven, it is best to read through these instructions fully, and to pay particular
attention to the ‘Safety Information’ located at the back of this book.
We hope you find Stoves Genus an attractive and beneficial addition to your
lifestyle.
Stoves Genus: Revolutionary cooker, remarkable results
Welcome to Genus
Page 3

User Guide. . . . . . . . . . . . . . . . . . . . . . . . . . . . . . . . . . . . . . . .
Introduction . . . . . . . . . . . . . . . . . . . . . . . . . . . . . . . . . . . . . . . . . . . 2 -6
Using the Genus Function . . . . . . . . . . . . . . . . . . . . . . . . . . . . . . . . . 7 -17
About Genus. . . . . . . . . . . . . . . . . . . . . . . . . . . . . . . . . . . . . . . . . . . . . 7
Quick Start Guide . . . . . . . . . . . . . . . . . . . . . . . . . . . . . . . . . . . . . . . . . 8
Genus Functions - Programme Tables. . . . . . . . . . . . . . . . . . . . . . . . 9 - 10
Genus Functions - Foods which need special care . . . . . . . . . . . . . . . . . 11
Genus Functions - Information . . . . . . . . . . . . . . . . . . . . . . . . . . . . . . . 12
Genus Functions - Recommended Cookware . . . . . . . . . . . . . . . . . . . . . 13
Getting Started with Genus (Functions 1 - 7) . . . . . . . . . . . . . . . . . 14 - 15
Using Genus Function 8 - reheat . . . . . . . . . . . . . . . . . . . . . . . . . . 16 - 17
Using the Genus Functions with Automatic Programming . . . . . . . . . . . . 18
Genus Functions - Important Safety Notes. . . . . . . . . . . . . . . . . . . . . . . 19
Using the Multifunction Oven (main oven only) . . . . . . . . . . . . . . 20 - 28
Getting Started . . . . . . . . . . . . . . . . . . . . . . . . . . . . . . . . . . . . . . . . . . 20
Symbols & Recommended Uses . . . . . . . . . . . . . . . . . . . . . . . . . . . . . . 21
Cookware & Bakeware . . . . . . . . . . . . . . . . . . . . . . . . . . . . . . . . . . . . . 22
Pre-heating & Other Notes . . . . . . . . . . . . . . . . . . . . . . . . . . . . . . . . . . 23
Multifunction Cooking Guide . . . . . . . . . . . . . . . . . . . . . . . . . . . . . 24 - 25
Multifunction Roasting Guide . . . . . . . . . . . . . . . . . . . . . . . . . . . . . . . . 26
Defrosting & Slow Cooking . . . . . . . . . . . . . . . . . . . . . . . . . . . . . . . . . . 27
Shelving . . . . . . . . . . . . . . . . . . . . . . . . . . . . . . . . . . . . . . . . . . . . . . . 28
Using the Grills. . . . . . . . . . . . . . . . . . . . . . . . . . . . . . . . . . . . . . . . . 29 - 33
Contents
Page 4

Automatic Programming . . . . . . . . . . . . . . . . . . . . . . . . . . . . . . . . . . . . . 34
Additional Features . . . . . . . . . . . . . . . . . . . . . . . . . . . . . . . . . . . . . . . . . 38
Cleaning . . . . . . . . . . . . . . . . . . . . . . . . . . . . . . . . . . . . . . . . . . . . . . . . . . 39
Trouble Shooting . . . . . . . . . . . . . . . . . . . . . . . . . . . . . . . . . . . . . . . . . . . 43
Setting the Clock . . . . . . . . . . . . . . . . . . . . . . . . . . . . . . . . . . . . . . . . . . . 44
Changing Light Bulbs. . . . . . . . . . . . . . . . . . . . . . . . . . . . . . . . . . . . . . . . 45
Customer Care . . . . . . . . . . . . . . . . . . . . . . . . . . . . . . . . . . . . . . . . . . . . . 46
Frequently Asked Questions . . . . . . . . . . . . . . . . . . . . . . . . . . . . . . 47 - 48
Safety Information. . . . . . . . . . . . . . . . . . . . . . . . . . . . . . . . . . . . . . 49 - 50
Cook Shop . . . . . . . . . . . . . . . . . . . . . . . . . . . . . . . . . . . . . . . . . . . . . . . . 51
Service Record . . . . . . . . . . . . . . . . . . . . . . . . . . . . . . . . . . . . . . . . . . . . . 52
Installation Guide . . . . . . . . . . . . . . . . . . . . . . . . . . . . . . . . . . . . . . . 53 -57
Step 1 -
Preparation
. . . . . . . . . . . . . . . . . . . . . . . . . . . . . . . . . . . . . . 54
Step 2 -
Connect to the Electricity
. . . . . . . . . . . . . . . . . . . . . . . . . . . . . 55
Step 3 -
Fitting the Edging Strip
. . . . . . . . . . . . . . . . . . . . . . . . . . . . . . 56
Step 4 -
Securing the Appliance
. . . . . . . . . . . . . . . . . . . . . . . . . . . . . . 56
Installation Notes . . . . . . . . . . . . . . . . . . . . . . . . . . . . . . . . . . . . . . . . 57
Technical Data . . . . . . . . . . . . . . . . . . . . . . . . . . . . . . . . . . . . . . . . . . . . . 58
Contents
Page 5
Before using the appliance.
Remove any protective polythene film and wash the oven shelves and furniture in
hot soapy water to remove their protective covering of oil.
Even so, when you first turn on the oven or grill you may notice a smell and some
smoke, this is normal, harmless and quite common.
First Steps
Note: When the appliance is first switched on it goes into self test mode for 30
seconds.
The appliance will then go into stand-by mode, and will show the time of day and
the ambient temperature in ˙C.
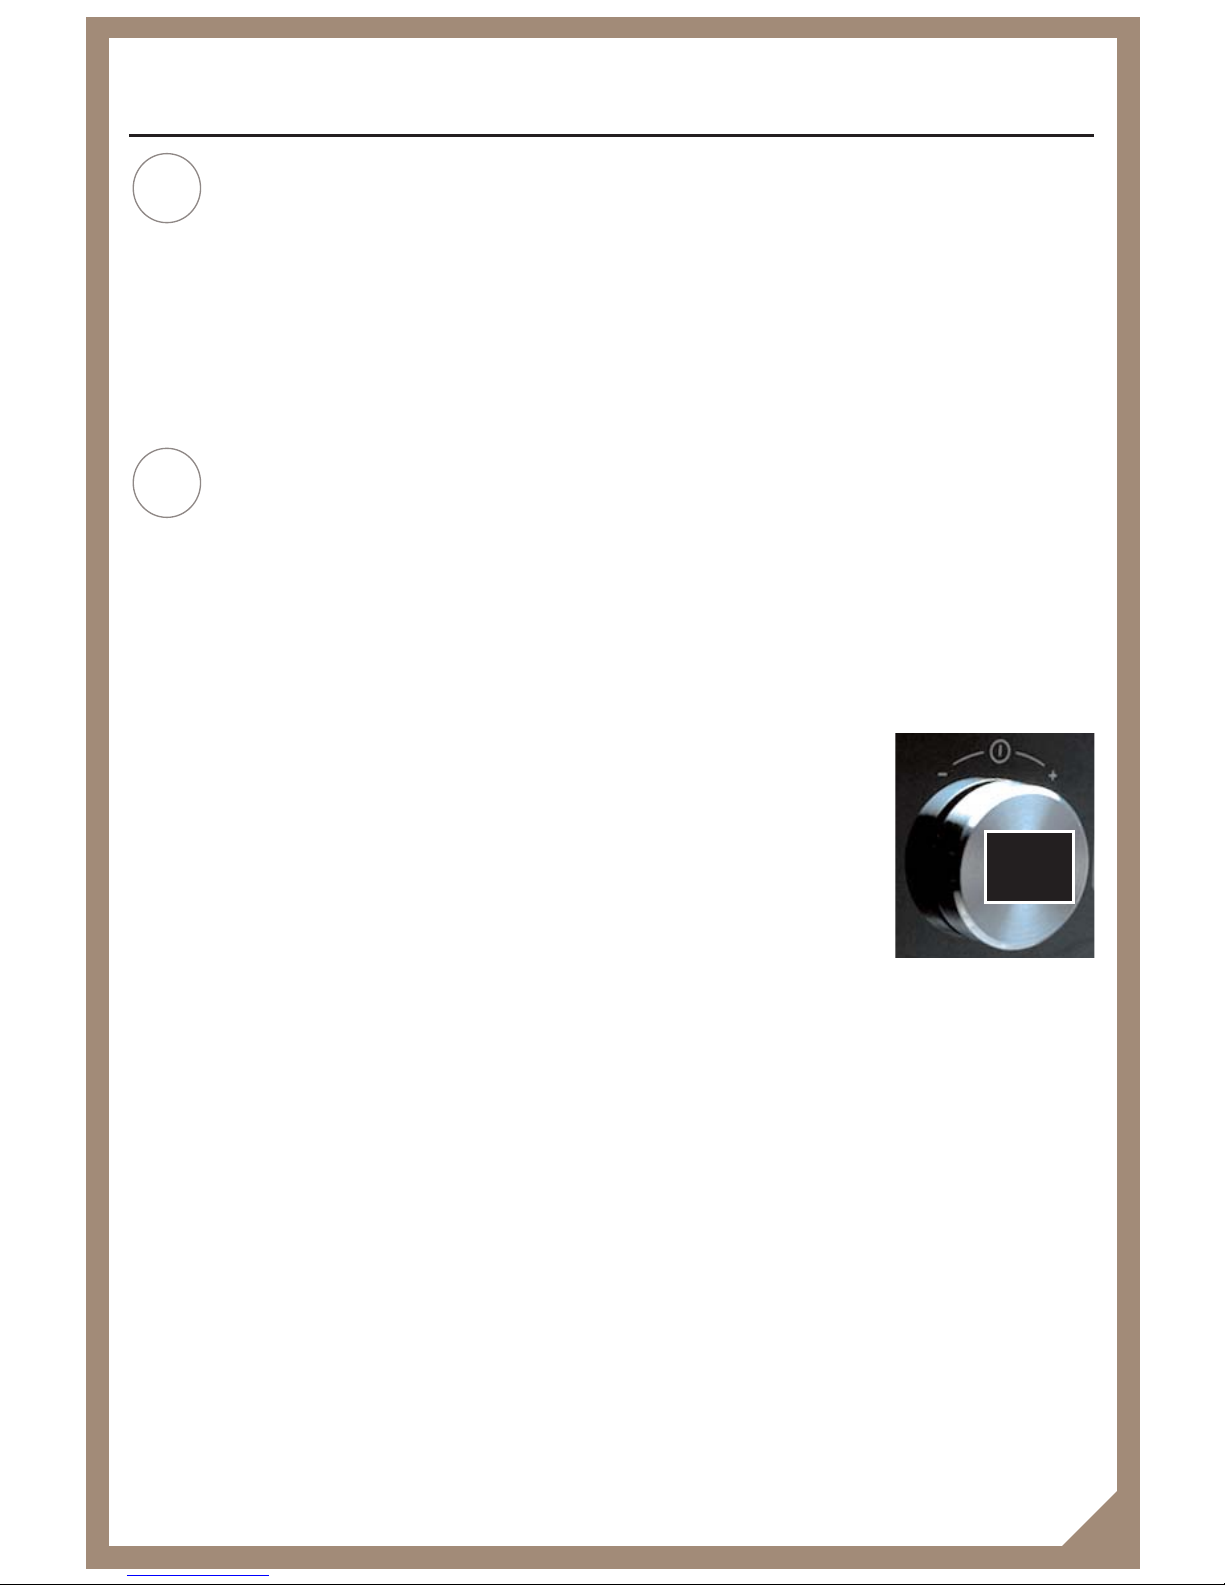
To turn the appliance on, push the on/off control knob in the
centre of the control panel:
The icons on the fascia will illuminate in red to show you available selections.
These icons are touch buttons, and when touched will activate functions. In order
to fully understand your fascia you will need to familiarise yourself with it, there
are tables on the following pages to help you with this.
Don’t be afraid to touch any of the function icons on the fascia and turning them
on (they will turn green) to experiment with them. You won’t damage the oven,
and you can always turn them off by touching them again, turning them back to
red.
If you want to start again, just press the on / off control knob to turn the
appliance off. You can then switch it back on whenever you like.
You can do this as often as you want until you feel comfortable with the touch
buttons and control knob.
Introduction
i
2
i
Press
Page 6
Icons
Red icon means the function is in Standby mode and is available for
selection.
Red flashing icon means the function must be selected.
Green icon mean the function is in use.
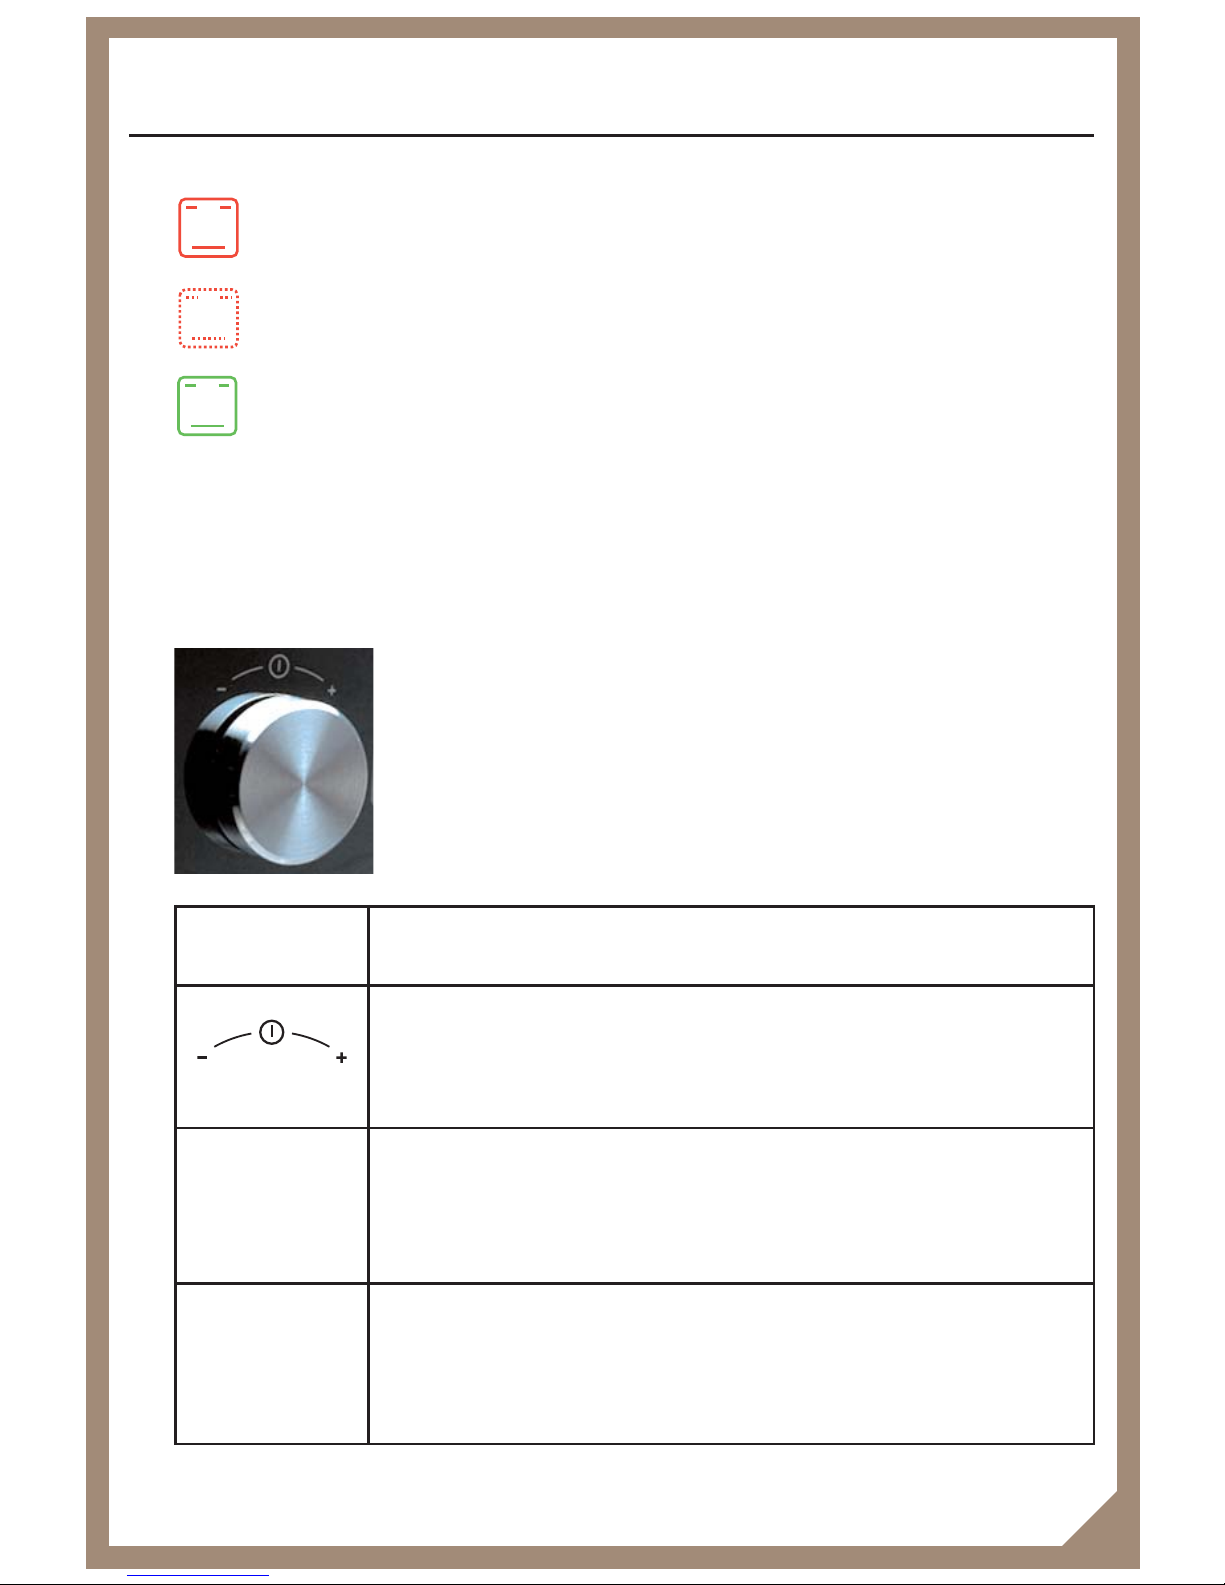
The Control knob
The on / off control knob is used to enter information into
the displays located to the left and right of the control knob.
Information is entered by turning the knob and applies to all
oven functions where required.
Introduction
3
Icon Explanation
On / Off icon
located above the centre control knob
press the control knob to turn the appliance on and off.
To increase time / temperature
located to the right of the centre control knob, turn the control
knob towards + to increase times / temperatures.
To decrease time / temperature
located to the left of the centre control knob turn the control knob
towards - to decrease times / temperatures.
+
-
Page 7
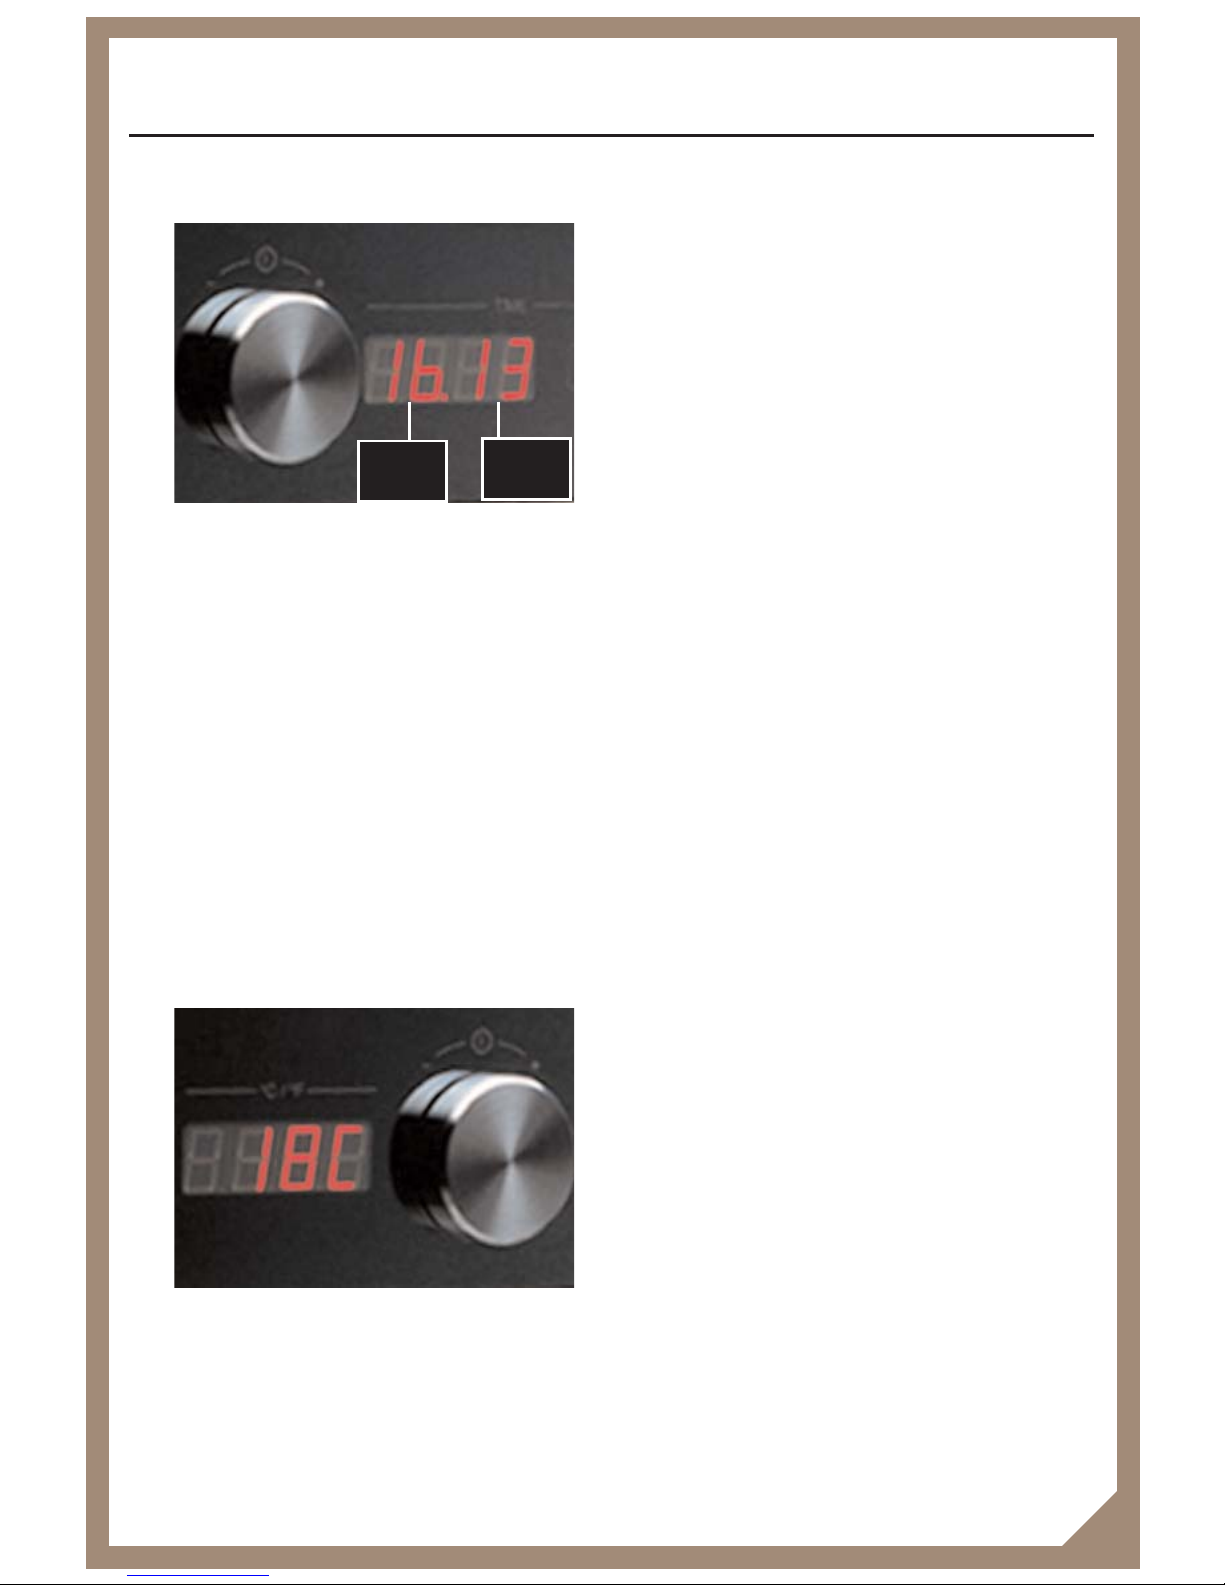
Timer Display
The time display on the right is used for:
Showing the time of day.
Entering recipe or convenience food timings for the Genus Functions - it will
flash to show you need to enter this.
In the Genus Function it will also show the calculation being worked out by the
computer i.e. ‘CAL 2’
In the Genus Function it will also show seconds only when counting down the
final cooking minute.
Entering cook times and end times for automatic programming- it will flash to
show you need to enter this.
Temperature Display
The temperature display on the left will show the temperature of the oven, even
when it is not in use.
Introduction
4
Minutes
Hours
Page 8
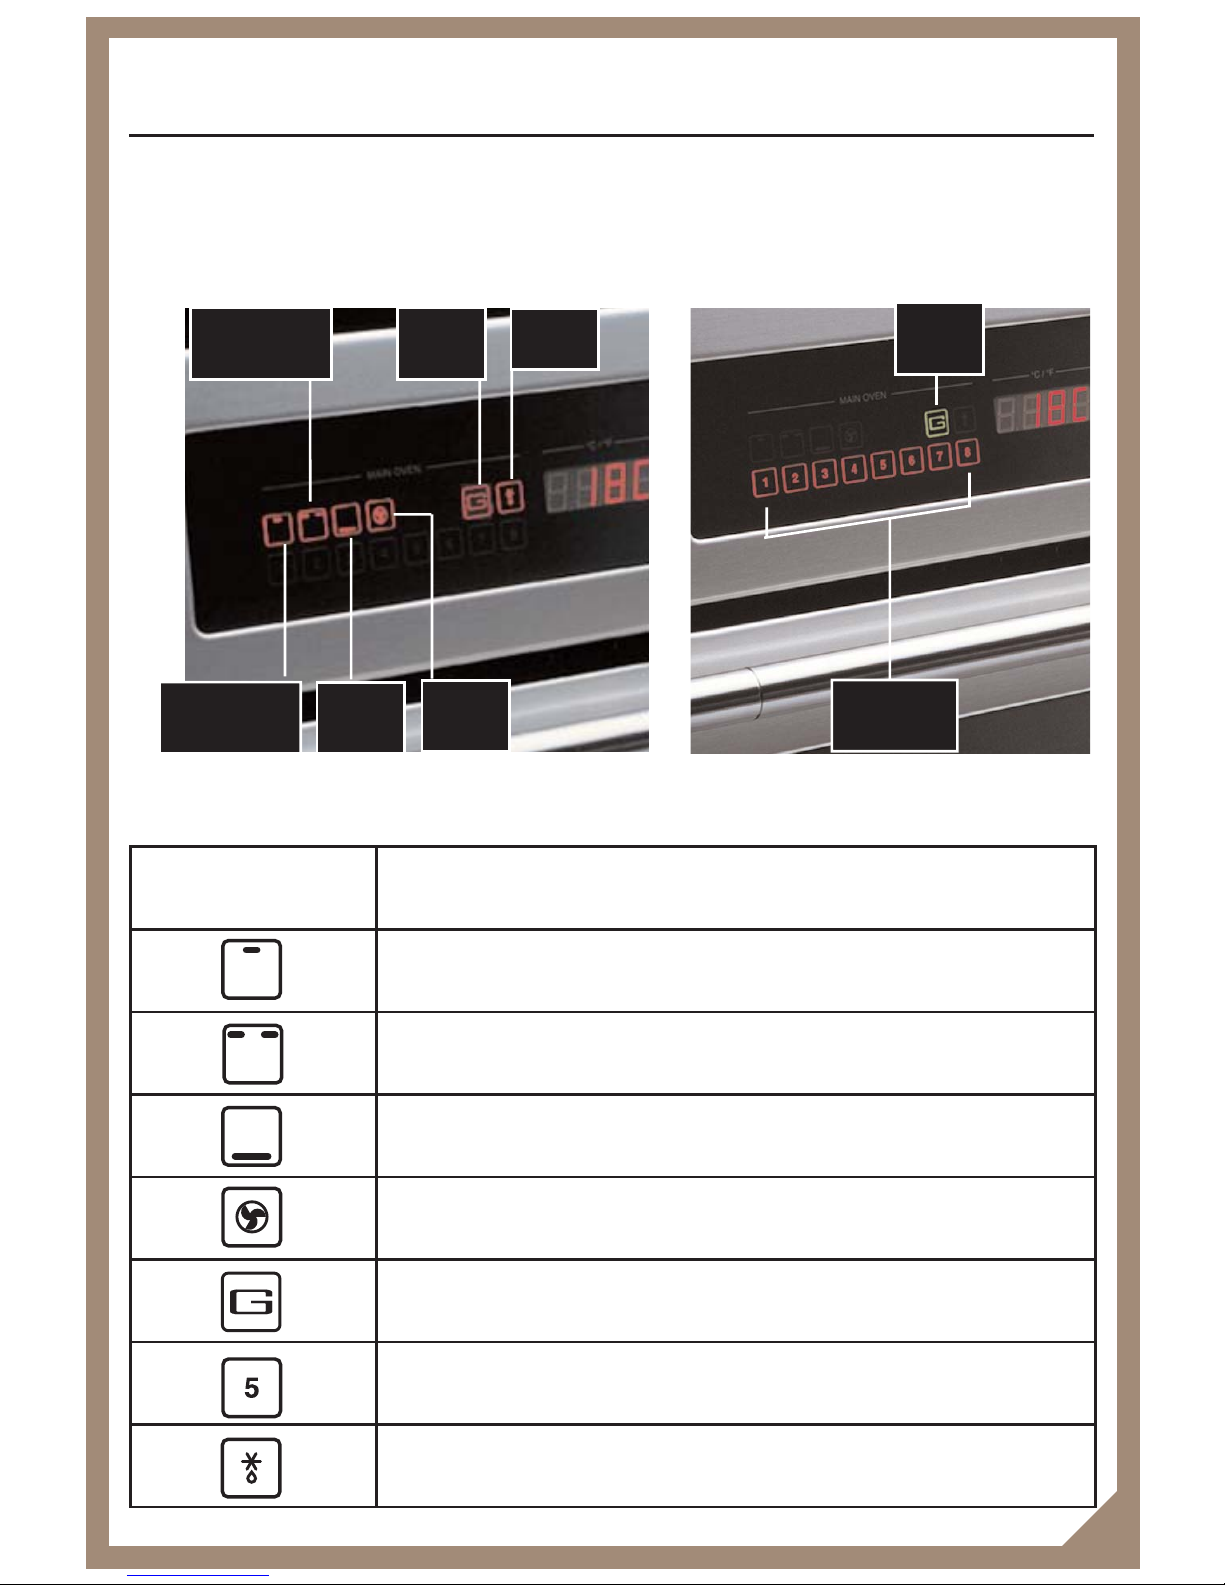
Your Stoves Genus
Oven functions
Introduction
5
Icon Explanation
Inner Top Heat
Outer Top heat
Base heat
Fanned oven
Genus Function
Genus Function programmes 1 - 8
Defrost
Genus
function
Genus
Programmes
Defrost
Genus
function
Fanned
oven
Base
heat
Outer
Top h e at
Inner
Top h e at
Page 9
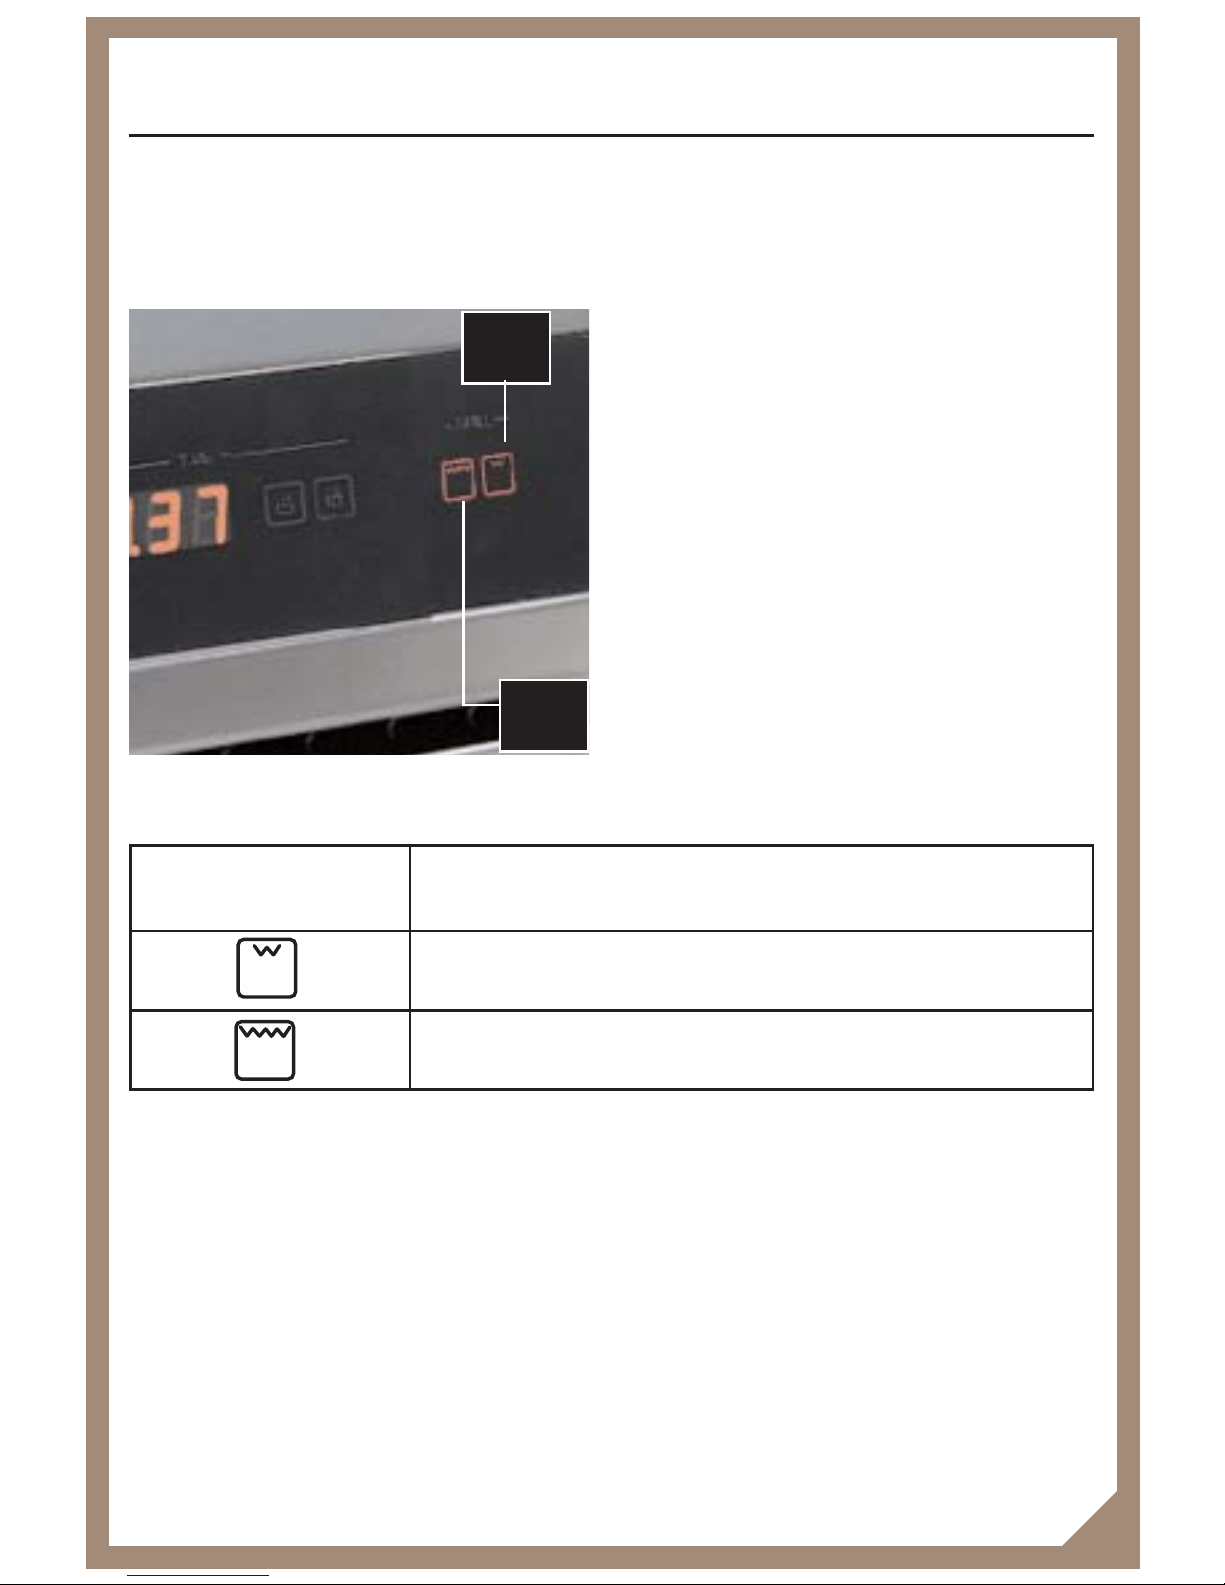
Your Stoves Genus
Grill functions - open door
Introduction
6
Icon Explanation
Economy grill
Full grill
Full
grill
Economy
grill
Page 10
This section is dedicated to using the Genus Functions.
About Genus
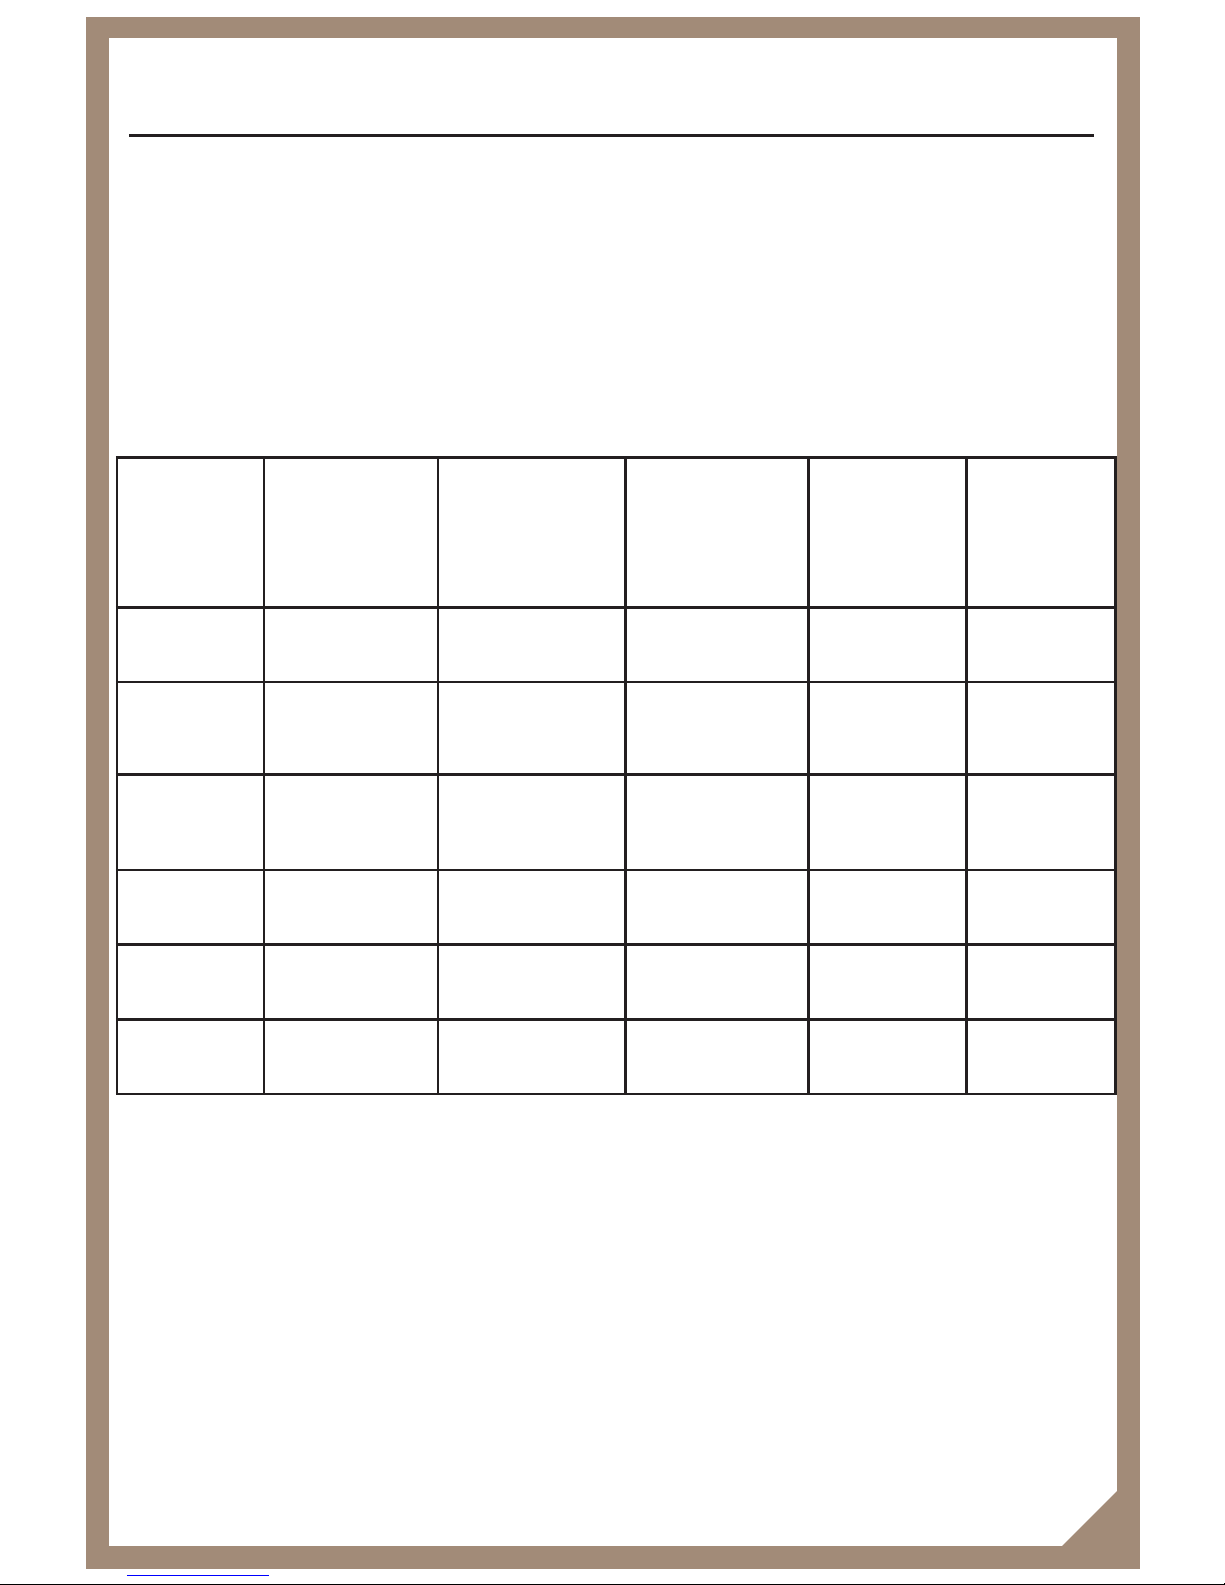
The Genus Function is a rapid cook method which combines a revolutionary heating technology with traditional cooking and baking methods - allowing you to cook
several times faster than you usually would in your oven.
Time can be saved cooking many items, some examples of time savings can be
found in the table below.
* includes 15 minutes pre-heat time
As the Genus Functions do not require pre-heating, this also saves on time and
energy, in addition, the Genus Functions allow you to combine a number of
features - without compromising on taste.
There are a variety of tables and recommendations we suggest that you follow
while using the Genus Functions, these are here to guide you when you use
Genus, and will help you make the most of using the functions available to you.
You may have already used the Quick Start Guide, but if you haven’t, take the time
to get to know your appliance and become familiar with the way it works.
Always remember that if you ever want to start again from the beginning - all you
have to do is press the on / off control knob.
Using the Main Oven Genus Function
7
Genus
Programme
Dish / Item Conventional
Cooking time
(mins)*
Genus
Cooking time
(mins)
No of times
faster
(x)
Time saved
(mins)
4 Fish (Salmon) 50 10 5 40
5 Full Roast
chicken
95 35 3 60
1 Baked potatoes
x 8
105 35 3 70
5 Roast Beef 1kg 90 25 4 65
2 Frozen pizza 30 5 6 25
2 Fresh scone 30 4 8 26
Page 11

Quick Start
Five simple steps to remarkable results.
Step 1 Place your food inside the oven on the 6th shelf up, push the on/off control knob
to switch on the appliance.
Step 2 Select the Genus Function by touching the red “G” touch button. It will then turn
green.
Step 3 The eight available Genus Functions will turn red, touch the programme you wish
to use, for frozen pizza - programme 2 or, see the table on pages 9 and 10 for
other foods. It will then turn green.
Step 4 The display on the right of the on / off control knob will start to flash. This means
you need to enter information, in this case the cooking time
as it appears
on the recipe or packaging
. You can do this by turning the on / off control
knob. The Genus Function will now calculate the cooking time for you.
Step 5 A tone will sound 3 times signalling that the Genus programme is in it’s last minute
of cooking - and the clock will count down in seconds. When this finishes, the
oven goes into stand by mode, and you can add extra time if you want to.
If you need to add some more time, turn the on / off control knob
clockwise to add extra minutes.
If your food is to your satisfaction, you can turn off the oven by
pressing the on / off control knob and then remove your foo
d.
Once you have successfully completed your first meal, you will be
ready to fully develop your Genus skills - for more ideas and details
see the ‘Using the Genus Function’ section.
Using the Genus Function
8
Why not try something simple for the first time, like a frozen pizza?
Remember, you can take your food out before cooking time has
finished if you prefer - or add extra time. It’s up to you!
You have a limited time to enter in the cooking time, so make sure you
have the recipe or packaging handy. If you run out of time, simply
press the on / off control knob and start again from the beginning,
you can do this as often as you need until you are comfortable with the
time you have.
Page 12

Using the Genus Function
Category Food item Shelf*
1
General
Puddings - fruit crumble, bread and butter
Sausage rolls (fresh)
Chilled croissant
Baked potatoes
Baked apples
Home made lasagne & pasta dishes
Roast sweet potatoes
Beef Wellington (individual)
Roasted root vegetables
Hot Pot
Home made puff pastry pies
5
5
5
6
5
5
6
5
6
5
5
2
Rapid
Oven chips
Frozen pizza - all weights, thicknesses and
sizes
Chilled pizza - all weights, thicknesses and
sizes
scone
Bread - all types / sizes
Bread rolls
Fish cakes - home made
Gratin dishes
6
6
6
5
1
3
6
5
3
Cakes
Whisked sponge (2 x 180mm/7”)
Victoria sponge (2 x 180mm/7”)
Madeira cake
Semi rich fruitcake
Coconut and cherry loaf (2 lb)
Very rich fruit cake (7”)
6
6
6
4
3
3
9
* Shelf positions are always counted from the bottom to the top - see page 28
for more information - and are extremely important when using the Genus
Functions.
When using Genus, please be aware the thinner foods should go on a higher
shelf than thicker foods. This means that the Genus heat will reach the food
properly and give you the best possible results.
Page 13
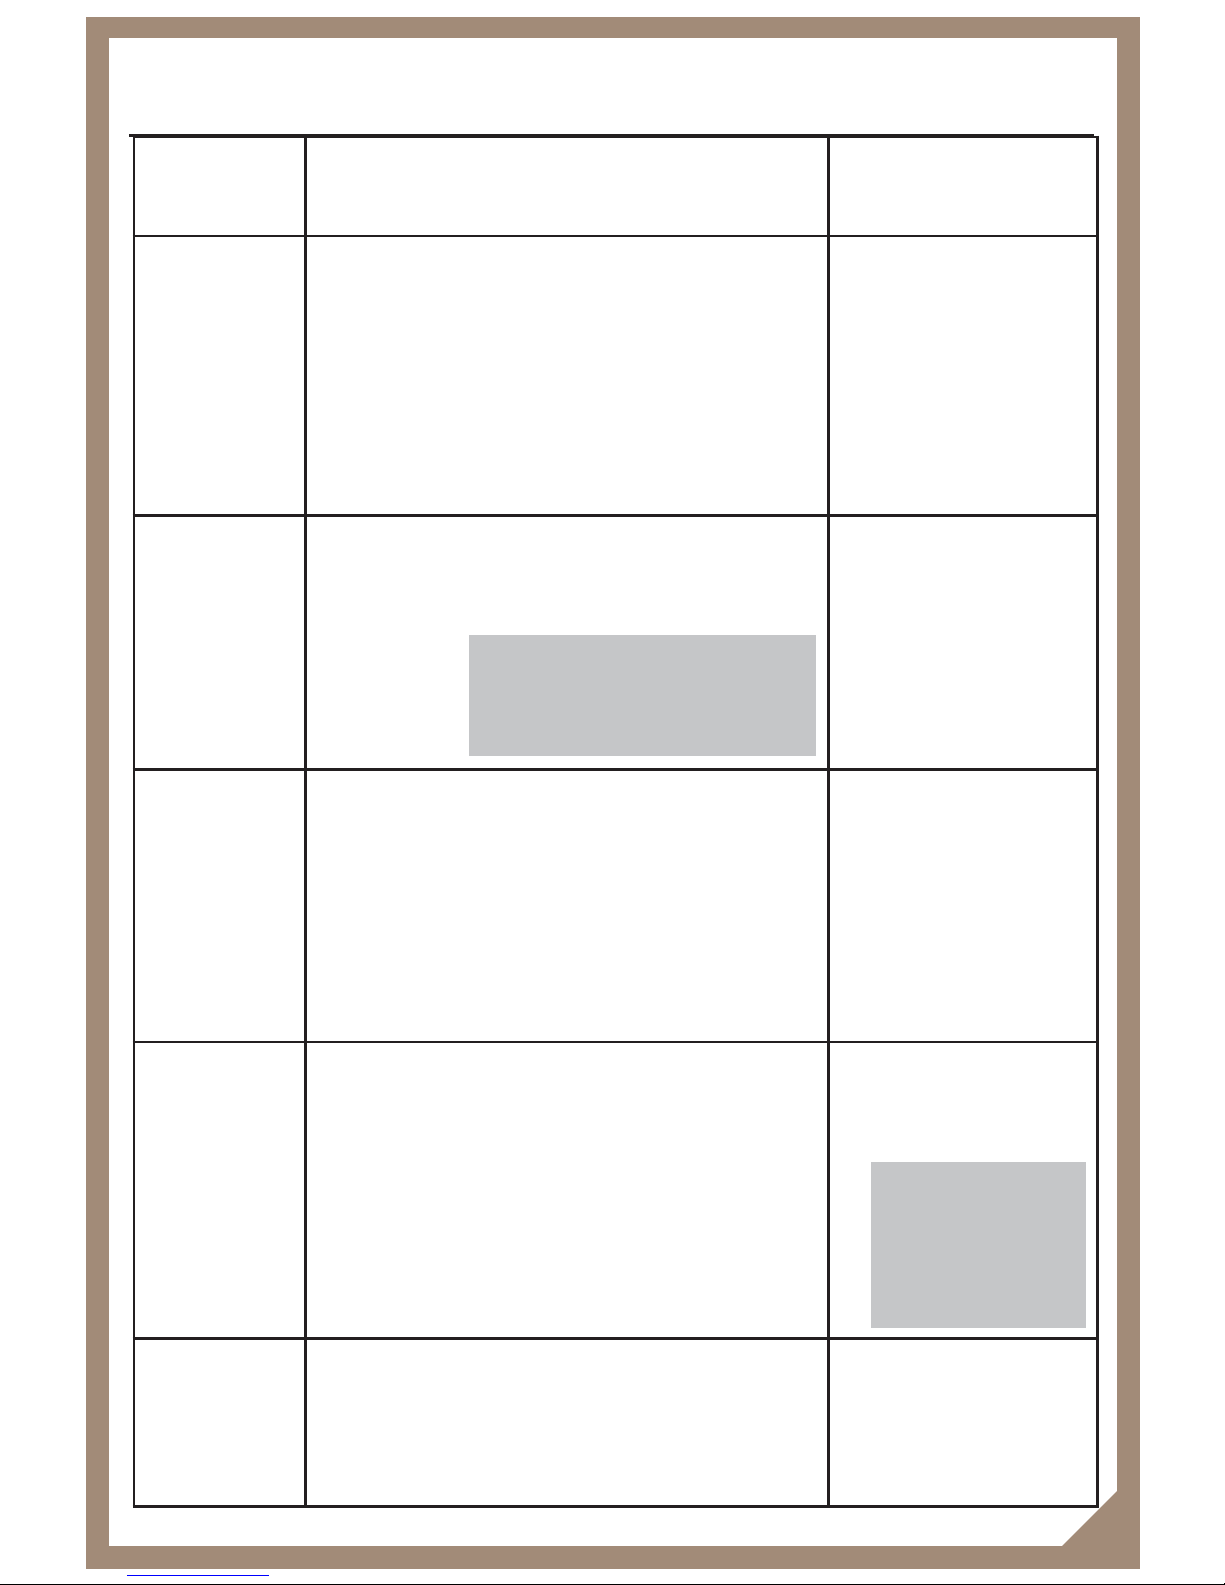
Using the Genus Function
Category Food item Shelf*
4
Fish &
Braised
Fish - whole
Braised dishes
Fish - cutlets / fillets
Fish - all types
Fish pies - pastry and potato topped
Baked fish
Fish - en papillot
6
6
6
6
6
6
6
5
Meats
Meat (roasted)
Poultry (roasted)
5
5
6
Gentle
Rice pudding (made with cold milk)
Baked custard (made with cold milk)
Slow roasted tomatoes
5
5
6
7
Convenience
Chilled convenience meals
Frozen convenience foods - excluding pizza
Frozen & chilled pies (sweet and savoury)
5 - 6
5 - 6
5 - 6
8
Reheat
Plated meals
Meals in medium dishes
Meals in small dishes
8
6
5
10
You must always use the
trivet provided! See page 13
for description.
Shelf position
depends on the
thickness of the
food/ depth of the
dish.
Page 14
Not all foods are suitable for cooking with the Genus Function.
Some foods require special attention while cooking:
Over cooking potatoes can lead to them dehydrating and catching fire. Please
make sure that you regularly check them while they are cooking.
Foods with an unbroken outer skin, such as;
sausages,
egg yolks,
tomatoes,
potatoes
liver (including giblets etc).
When cooking foods like the above, you must make sure you have pierced the
outer skin before you start to cook them.
Using the Genus Function
11
i
Do not boil eggs in this oven! Steam will
build up inside the yolk and explode
causing injury.
Sealed jars/containers may explode and
should not be heated in the oven.
Foods with a high salt content (Thick
Gammon etc.) are not suitable for cooking using the Genus Function - use the
multifunction oven instead.
Foods with a high sugar content (such
as Meringue etc.) are not suitable for
cooking using the Genus Functions - use
the multifunction oven instead.
Page 15

If the food you wish to cook is not in any of the previous tables, you should always
remember that the Genus Functions are calculated based on the type of dish being
cooked.
Type of dish is what food your dish/meal is mostly made from. There may
be other ingredients, but always go on the one the makes up the bulk of
the dish, for example pasta, potato or meat.
Using the table given on pages 9 and 10, see where you think your food is most
likely to be.
For example, a meat based pie would be cooked on the meat programme.
Follow the ‘Using the Genus Function’ instructions to get started.
It is a good idea to keep checking the dish as it cooks, just to make sure it does
not over, or under cook.
You can always add to, or reduce the cooking time as needed - and you can take
the dish out at any point during cooking if you want to. As with all baking, it’s all
down to personal taste.
Notes:
You should be aware however, that it is not possible for you to combine the Genus
Functions - you can only use one at a time, for example you couldn’t use the meat
programme (5) combined with the general programme (1).
You could however surround your roasting joint with the vegetables you wish to
roast - they must be in the same roasting tin - and use the meat programme (5)
to roast them all.
If you need to, you can always give the vegetables a little longer in the oven while
the meat is resting before carving.
You may notice that cooking times are further reduced when you cook several
items, one after the other using the Genus functions.
This is because the Genus function takes into account the residual heat inside the
oven from previous cooking. This will also lead to time savings.
Using the Genus Function
12
i
Page 16
Recommended cookware
Some plastics and papers will combust if used with the Genus Functions, due to
the higher temperatures. Whereas metal covered roasters will prevent the Genus
heat from reaching the food, and therefore cancel out any time savings.
You also should not fully wrap foods, the ovens shelves, or base in aluminium foil
- this too will cancel out the Genus heat.
You can however use:
Glass cookware.
China cookware.
Metal roasting tins, baking trays and cake tins.
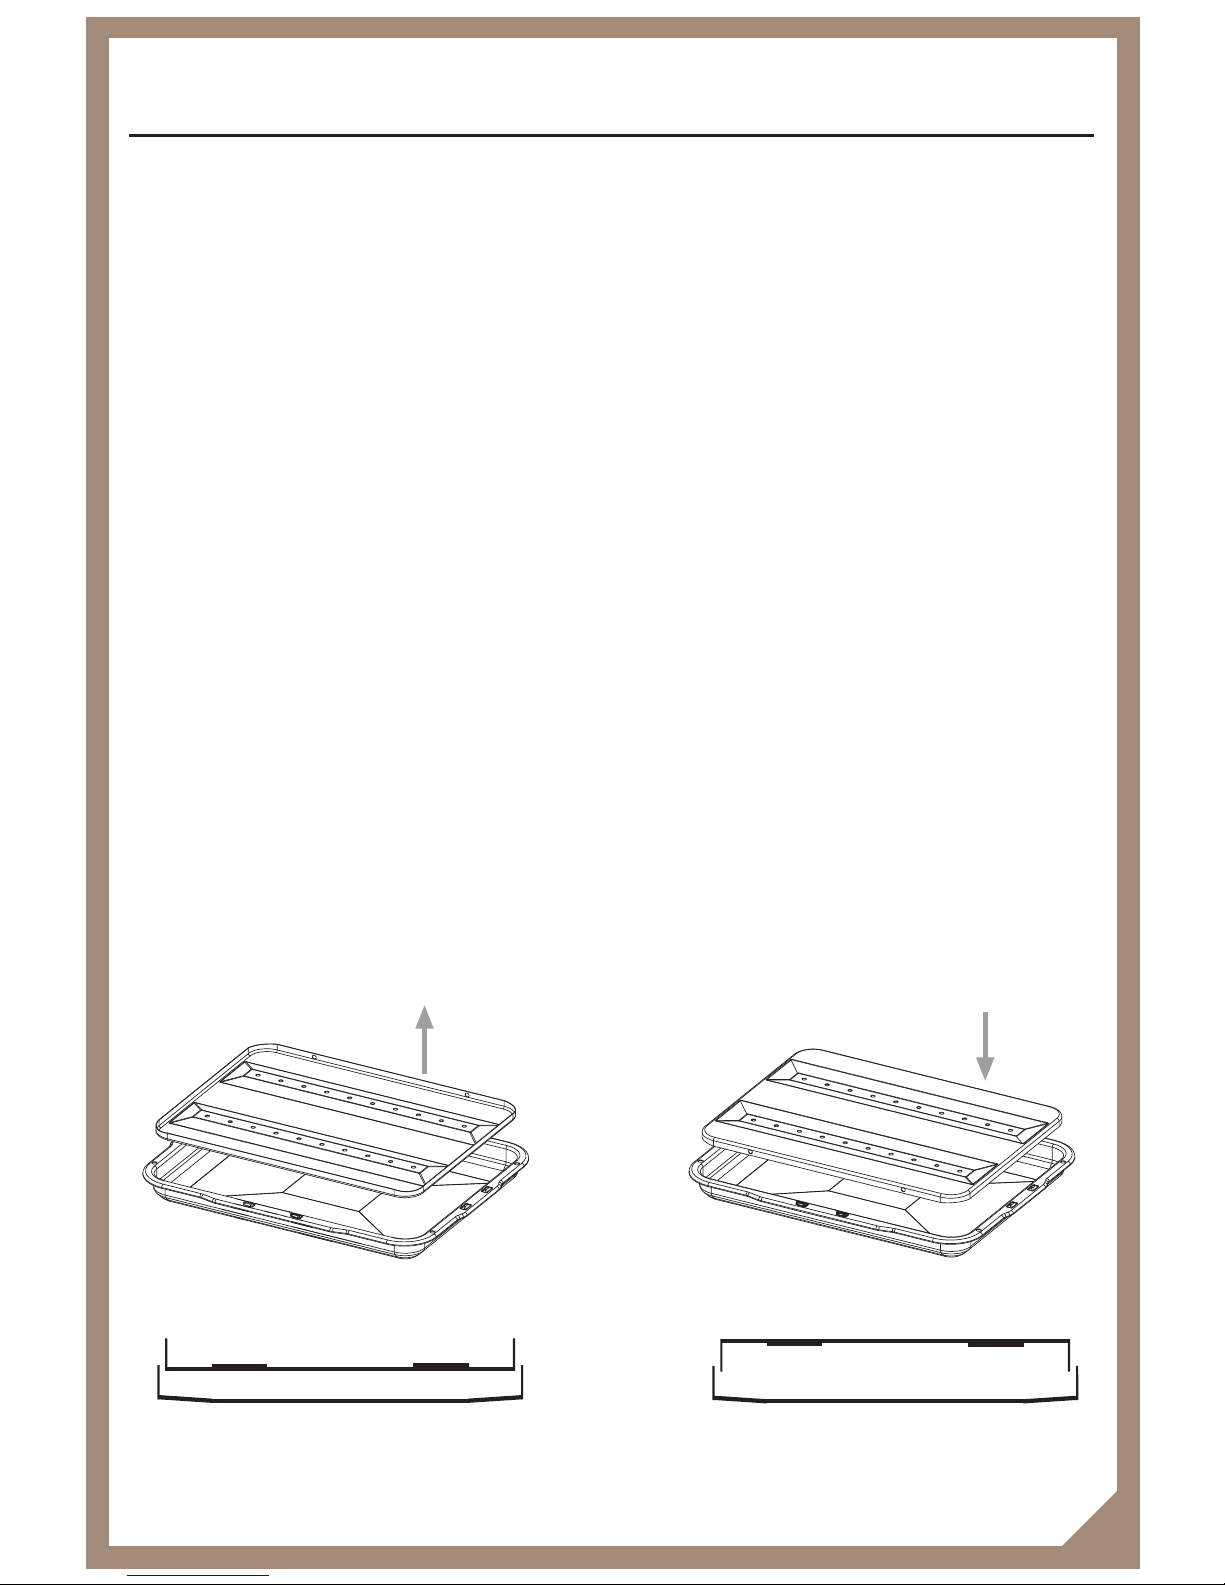
There is bakeware supplied with your Stoves Genus which is suitable for use with
the Genus Functions. The Roasting tin you should always use has a trivet with
holes in it and is specially designed to work with the Genus Functions to give you
the best results.
When you clean the roasting tin and trivet, it is important to replace the trivet
correctly, before using it again. The trivet must be replaced so that the trims point
downward. Please see the illustrations below:
Using the Genus Function
13
Trim facing
upwards
Trim facing
downwards
Trivet
Roasting tin
Trivet
Roasting tin
Page 17
Getting started with the Genus Functions (1 -7)
The Genus Function is one of the functions available for the main oven. It is
activated by using the touch buttons on the fascia, and once you are familiar
with it, it becomes easier to use each time.
Once the on/off control knob has been pressed to switch on the appliance, the
fascia illuminates everything in red.
To use the Genus Function, touch the “G” icon and it will turn green.
Once the “G” has turned green, the numbered categories below will
begin to flash red, signalling that you can select any of them depending on the food you wish to cook.
Use to the tables on pages 9 and 10 to help you find out which function you
require. We would suggest that you do this before you start cooking, until you
are familiar with the functions and the food types which use them.
Always use the shelf positions recommended in the guide.
These numbers will only flash when the Genus Function is selected.
The timer display on the right of the on/off control knob will then flash,
signalling that a time needs to be entered.
The time you enter should be the recommended fanned oven (if
stated) time on the package, or in the recipe. If more than one
time is given (minimum and maximum) use the shortest time. Extra time
can be added at the end. Do not amend these times.
Using the Genus Function
i
14
You have a limited time to enter in the cooking time, so make sure you
have the recipe or packaging handy. If you run out of time, simply press
the on / off control knob and start again from the beginning, you can do
this as often as you need until you are comfortable with the time you
have.
Page 18

Once the category has been chosen, the temperature display on the left hand
side of the control knob will show a temperature selected by the programmer.
This has been set up to give you the optimum performance, but don’t be afraid
to adjust this to suit your personal taste by turning the on/off control knob to
increase (clockwise) or decrease (anti clockwise).
After a couple of seconds, the display will change colour showing that the
programme has been accepted and the new cooking time will be calculated.
The timer display shows CAL while calculating, followed a few seconds later by
the reduced cooking time.
At the last minute of cooking time, a tone will sound 3 times signalling the
cooking time is nearly over, from this point the timer display will show the seconds
counting down. When time has elapsed the appliance goes into standby mode
(approx. 4 minutes long) to allow you to add extra time, if desired.
This switches off the elements but leaves the lights and cooling fan on.
If you “choose” to increase the time by turning the control knob clockwise, then
the oven continues cooking. If you do not want, or need, to add any time
simply turn off the oven by pressing the on / off control knob and remove your
food.
As with a conventional oven you can still:
Adjust times and temperatures by using the control knob to increase or decrease.
Remove food before the end of the programme if it is done to your liking.
Check your food while it is cooking, or stir, by opening the door.
The left hand display will flash with the word ‘DOOR’ to act as a reminder that
the door is open, once you have finished your checks and closed the door fully,
the display will show the temperature again. This will not affect the running of
the Genus Function you are using as it will pause while the door is open.
While the door is open, you will not be able to select any functions, other than
open door grilling.
Using the Genus Function
15
Page 19

Using Genus function 8 - Reheat
As with the other 7 functions, this function will re-calculate your cooking times for
you.
How to use the reheat function.
Touch the “G” icon until it turns green.
Once the “G” has turned green, the numbered categories below will begin to
flash red, signalling the you can select any of them - to select reheat touch the
number 8.
Using the table on page 10, see which type of reheated meal suits your dish
best. i.e. is it a plated meal?
The timer display on the right of the on/off control knob will then flash,
signalling that a time needs to be entered. You should enter the time you
expect it will take the meal or dish to reheat - please take into account things
like the amount of food on the plate, and the thickness of the plate/cookware
and the type of cookware. Genus will then calculate the new, reduced time.
You can add to the reheat time if you feel it has not been long enough, or you
can take food out early if you feel it is heated enough. We recommend that
you check the food regularly while it is cooking.
At the last minute of cooking time, a tone will sound 3 times signalling the
cooking time is nearly over, from this point the timer display will show the seconds
counting down. When time has elapsed the appliance goes into standby mode
(approx. 4 minutes long) to allow you to add extra time, if desired. This switches
off the elements but leaves the lights and cooling fan on.
If you “choose” to increase the time by turning the control knob clockwise, then
the oven continues cooking. If you do not want, or need, to add any time
simply turn off the oven by pressing the on / off control knob and safely remove
your food.
Using the Genus Function
16
Page 20

Using Genus function 8 - Reheat Notes:
As with any reheating you must :
Always make sure your plates and dishes are ovenproof.
Always make sure that the food is piping hot before you serve it.
Always eat reheated food as soon as it is ready.
Never reheat any foods more than once.
You can check your food as often as you want while it is reheating to ensure that
it does not over or under heat.
For some dishes, particularly those which are liquid or sauce based, we
recommend that you stir the dish half way through reheating - this will ensure that
it is reheated right through.
Always make sure that all dishes are reheated underneath some kind of cover to
prevent foods drying out. An upturned plate, or dish cover is ideal, but you should
not use aluminium foil, or plastic wraps (cling film) as they are not suitable for use
with the Genus functions.
Using the Genus Function
17
Page 21

Using the Genus Functions with the programmer
Once you have selected the Genus Function, the category and temperature you
wish to use, enter the fanned oven (if stated) cooking time as stated on the
packaging or recipe. The programmer will calculate the new cooking time after
a couple of seconds.
The oven will now be operational.
The cook time icon will light up in green. If you do not want to use the
fully automatic programmer - do nothing else.
If you want to use the fully automatic programme wait for the end time
icon light up in red. Touch this icon and it will turn green, telling the
programmer you want to set an end time.
Then you should enter the time of day (i.e. 17.30) that you want the food to
be ready at. Once this has been selected, the oven will calculate a start time
based on the Genus Function calculations.
You do not need to worry about working out the start time yourself.
The oven will now ‘power down’ and switch off.
To cancel the automatic cooking function - touch the end time icon twice in
succession.
To amend any of the timer functions, touch the icon for that function twice or
until it flashes for a short period of time while you make your adjustments then store the changes.
Using the Genus Function
18
Page 22

Important safety notes:
Arcing
Arcing or sparks in the oven, are caused by the following:
Metal or foil touching the side of the oven cavity.
Foil not moulded to foods acting as an antenna.
Any gold rimmed dishes, metal twist ties or poultry pins inside the oven.
Some recycled paper products - they may contain metal particals.
Some arcing is inevitable and should you spot any sparks open the oven door
and correct the problem where possible before continuing to cook. Please do so
carefully taking care to avoid any elements, hot shelving and hot dishes.
When Using the Genus Functions there are several items you must not use:
Anything with a plastic or paper wrapping, unless it is suitable for use with very
high temperatures
Plastic containers or bowls, unless it is suitable for use with very high
temperatures
Plastic cookware, unless it is suitable for use with very high temperatures
Wooden equipment should not be used, or left in the oven.
Covered metal roasters.
Super heated water and spontaneous boiling.
Some liquids may have been heated beyond boiling point with no visible signs.
Take care when removing liquids from the oven, or stirring them as the liquid
might suddenly boil over. This can cause serious burns.
Using the Genus Function
19
Page 23
Getting started with the Multifunction Oven
In addition to the Genus Functions, the main oven is also a multifunction oven.
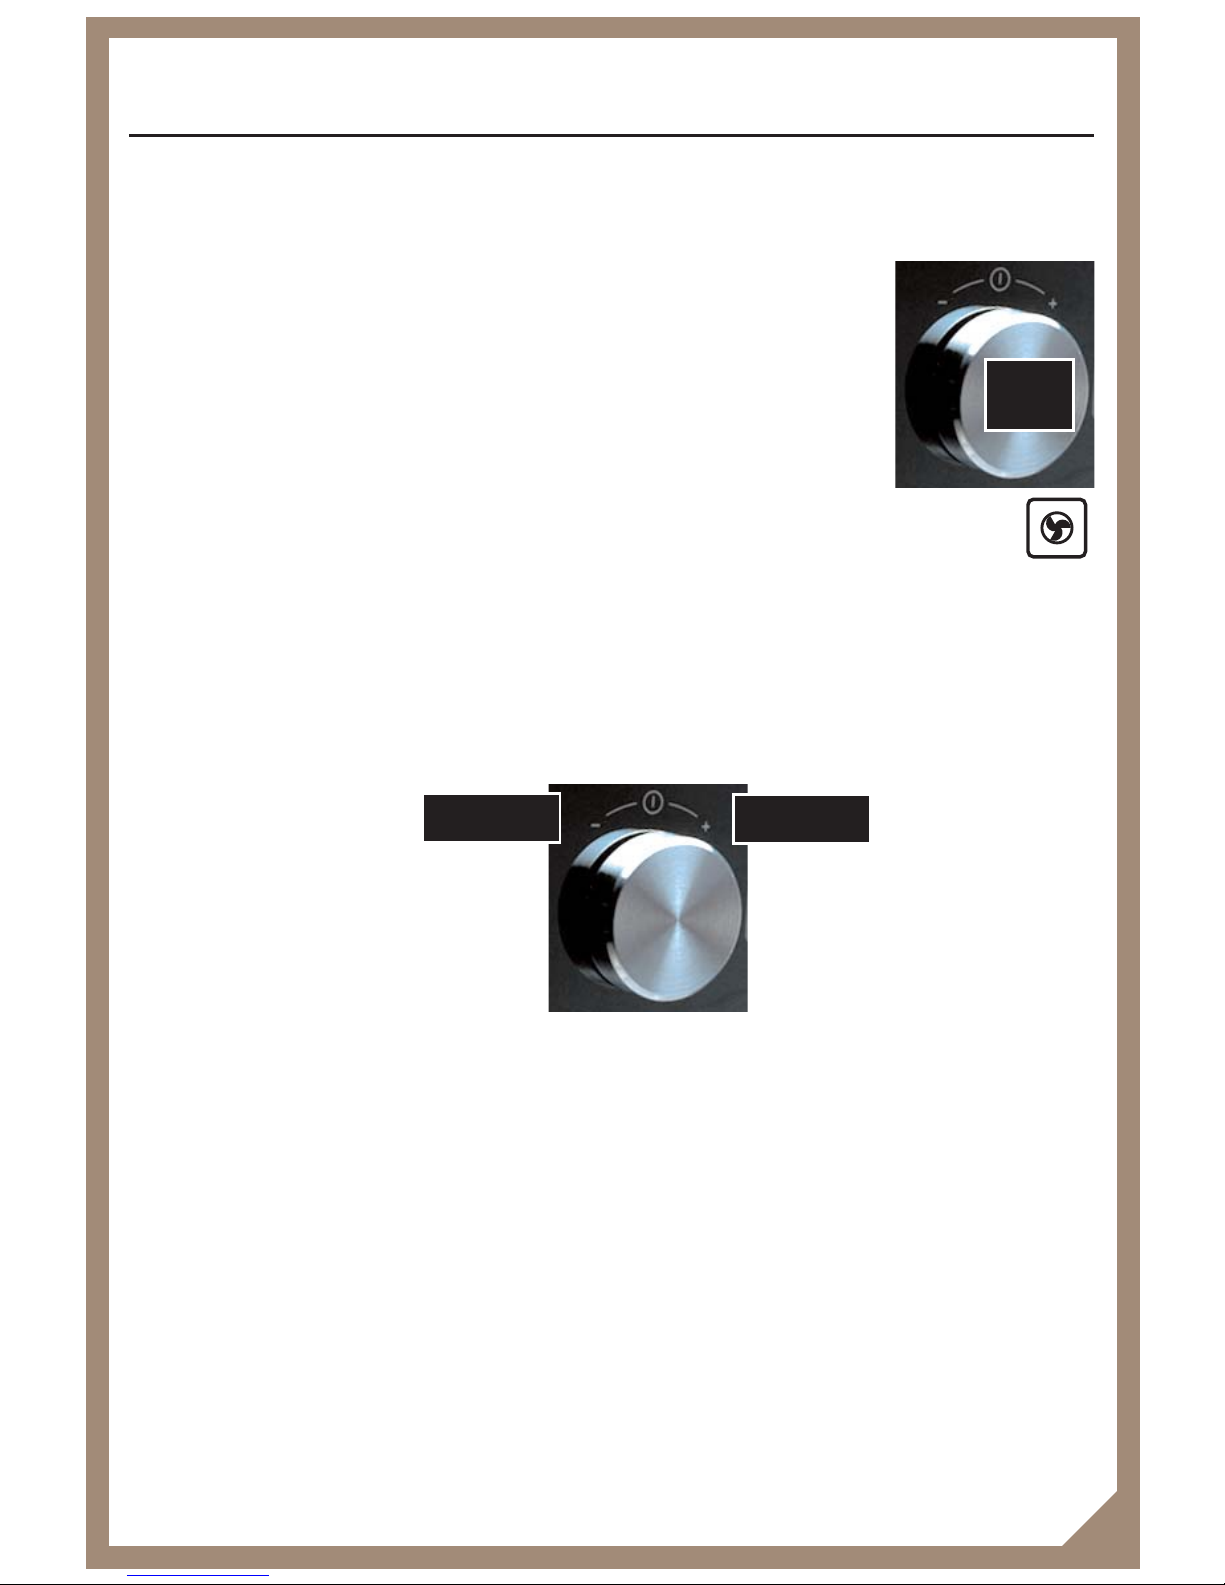
In order to start using the oven in manual mode, first push the
on/off control knob - this will light up all the functions available
to you.
Touch the icon for the function you wish to use, for example, fanned
oven.
This selects your chosen function, and the icon will turn green. The remaining
icons will stay red.
Select the temperature you wish to use by turning the on/off control knob,
either clockwise to increase the temperature, or anti clockwise to decrease the
temperature.
Stoves Genus’ Multifunction oven has been pre-set with a variety of
temperature in order to give optimum results, but you can adjust these if
you find they do not suit your taste.
The oven has a temperature range from 40˙C to 250˙C, offering you a variety of
temperature options. If you chose to use the grill, the heat settings are 1 (low) 9 (high) - see ‘Using the Grill’ section for more information.
After a few seconds the oven lights will illuminate, and the oven will start to work,
this delay is perfectly normal for this appliance. You can then start cooking your
food.
Condensation
When hot and cold air meet, condensation forms. The outer door is air cooled and
the inner door gets hot, so some condensation might form; this is normal and will
disappear within a few minutes.
Using the Multifunction Oven
20
Press
Increase
Decrease
Page 24
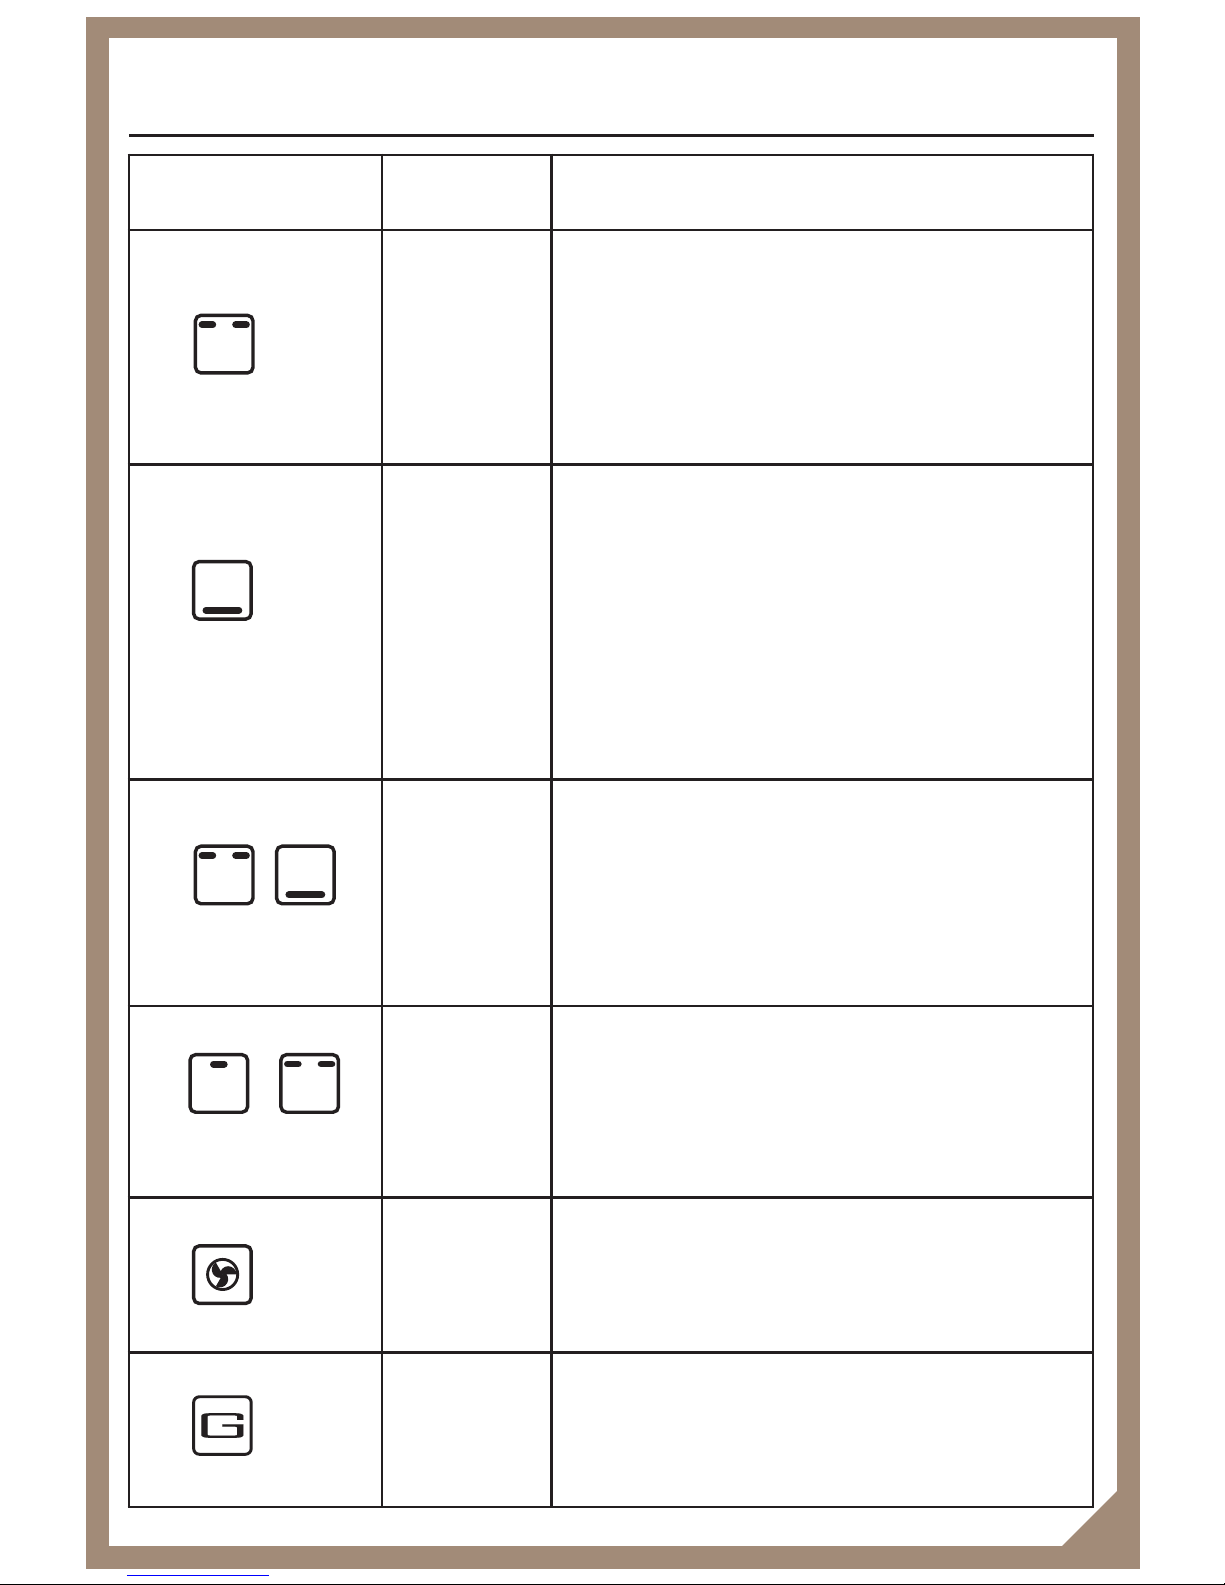
Symbol Notes Recommended uses
Browning
function
The top heat function operates with an
adjustable heat setting.
The top heat function can be used towards the
end of a cooking period to brown the tops of
foods such as cauliflower cheese.
Base crisping
The base heat function operates with an
adjustable heat setting.
The base heat function can be used towards the
end of a cooking period to brown and crisp the
bases of foods such as pizzas, pastry cases,
quiche and pies.
Base heat can also be used to cook dishes
without a top crust such as jam tarts or open
mince pies.
For best results
pre-heat
The zones of heat throughout the oven when it
is used as a conventional oven, make this
function suitable for traditional roasting. Place
the meat towards the centre of the oven, roast
potatoes towards the top and puddings towards
the base.
Touch both.
For browning larger quantities of food, the main
oven inner and outer heats can be utilised.
You can use the inner heat on it’s own for
smaller portions if desired.
No need to
pre-heat on
certain items.
The even temperature throughout the fanned
oven makes this function suitable for batch
baking and batch cooking foods.
No need to
pre-heat
Details of the Genus Function are explained
earlier in this handbook.
Using the Multifunction Oven
21
Page 25

Bakeware and cookware
The following bakeware can be used with this multifunction oven:
Glass cookware.
China cookware.
Covered roasters
Metal roasting tins, baking trays and cake tins.
Any other dish which is ovenproof.
Any convenience food containers -
please check the manufacturers instructions
first.
Always make sure that any dish you use to cook with is ovenproof.
Always use good quality baking trays and roasting tins - poor quality utensils
may warp in the oven, leading to poor results.
Never use items which may melt or catch fire, i.e. wooden items or non
ovenproof plastics.
If you are roasting meats, you can cover the roasting tin with aluminium foil.
However you should not wrap the oven shelves or cover the oven base with foil.
Using the Multifunction Oven
22
Page 26

Pre-heating:
The main oven performs at it’s best when pre-heated for some functions. The
temperature display will change colour once pre-heating has finished.
Remember you do not need to pre-heat at all when using the
Genus
Functions.
When you use the
Fanned Oven we recommend you do pre-heat for the
following:
Chilled / Frozen foods.
Sensitive foods such as Yorkshire puddings or souffle.
For other food types there is no need to pre-heat.
Automatic operation
See the ‘Automatic Programming’ section which starts on page 36.
To switch off the oven:
If the icon is green, touch it once.
This will de-select any functions you have been using.
To switch the oven off completely, press the on / off control knob. As with the
Genus Function, you can switch the oven off this way at any time.
Using the Multifunction Oven
23
i
Page 27
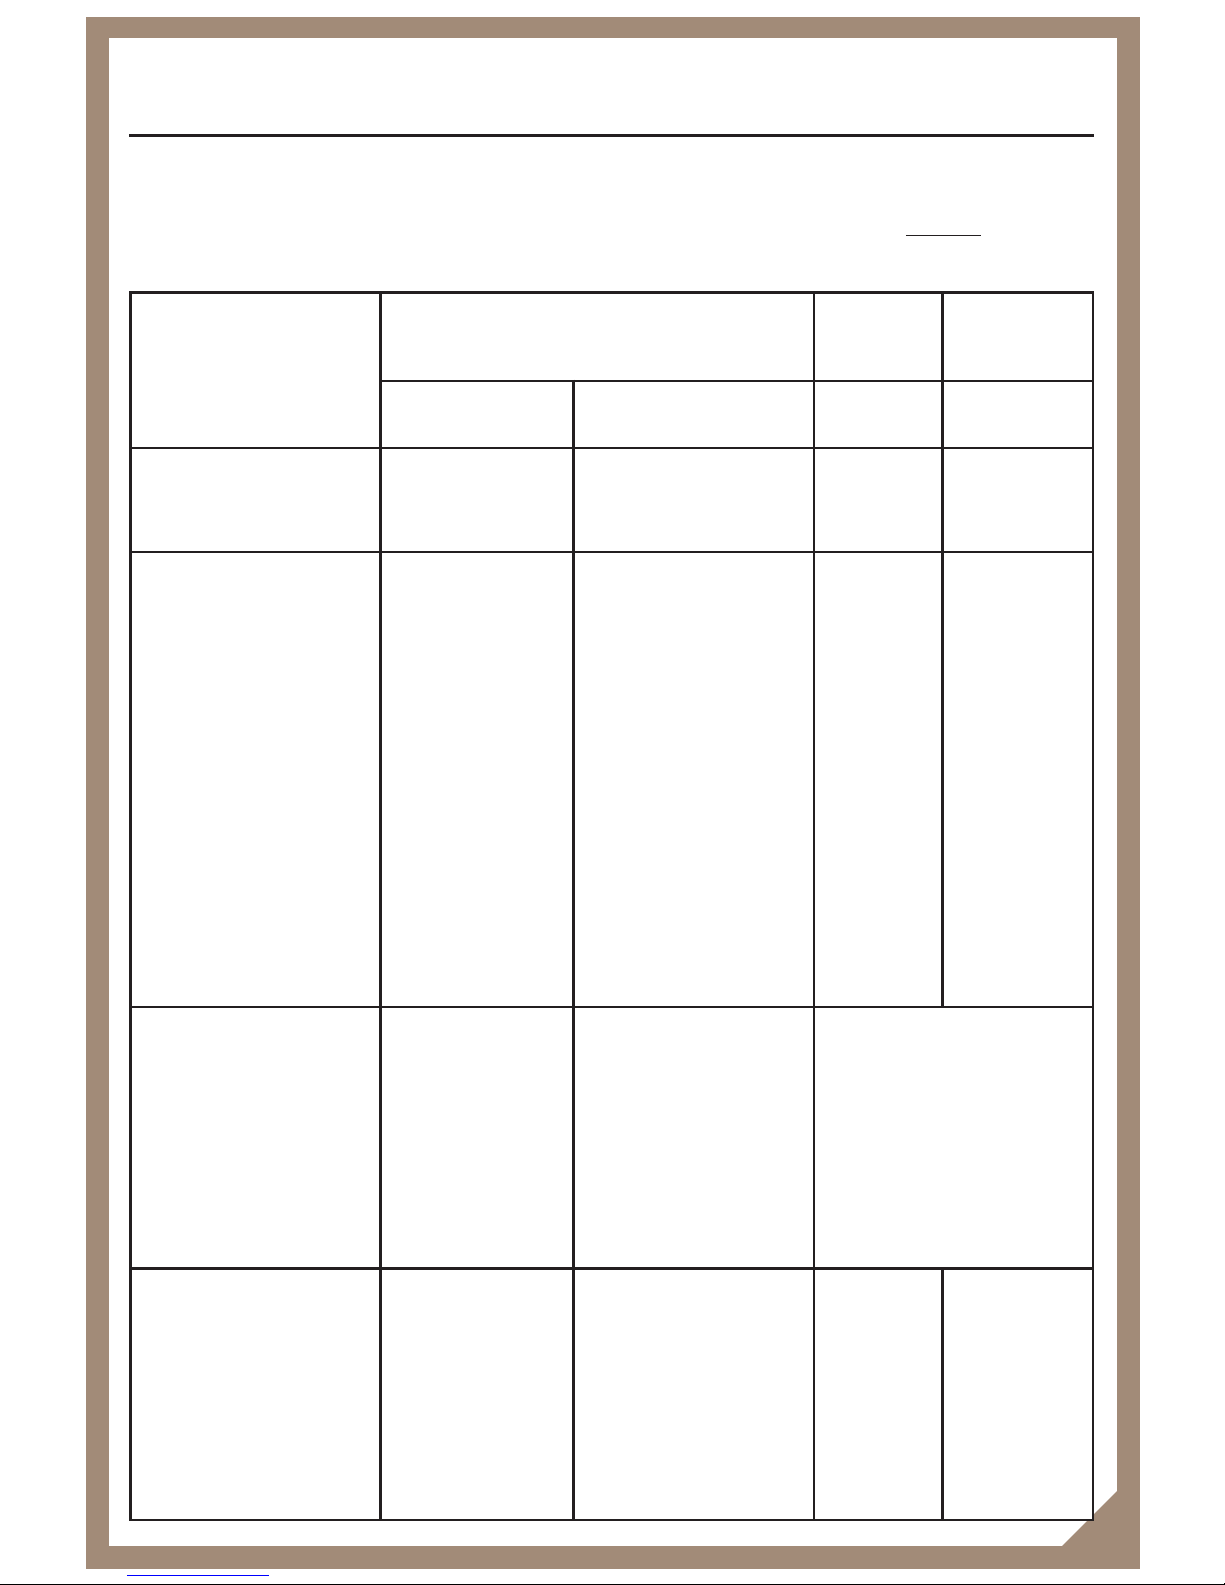
Using the Multifunction Oven
24
Dish
Recommended temperature
(˚C)
Shelf Cook time
Conventional Fanned
scone
Meringue
220
120
200
110
6 & 12
2
8 - 15 mins
2 - 3 hrs
Cakes
Small Cakes
Whisked sponge
Swiss roll
Victoria sandwich
(2 x 180mm/7”)
Genoese sponge
Madeira
(2 x 180mm/7”)
Semi rich fruit cake
(205mm/8”)
Dundee cake
(205mm/8”)
190
190
205
180
180
170
140
140
175
175
190
160
160
150
125
125
9
9
5
7
8
5
5
5
15 - 25 mins
20 - 25 mins
10 - 12 mins
20 0 30 mins
25 - 30 mins
1 - 1
1
⁄4 hrs
2
1
⁄2 - 3hrs
2
1
⁄2 - 3hrs
Pastry
Flaky / Puff
Shortcrust
Choux
Plate tarts
(2 x 180mm/7”)
220
200
200
200
200
180
180
180
Depends on recipe and
type of filling
Biscuits
Shortbread rounds
Nut brownies
Brandy snaps
Flapjacks
Ginger nuts
180
180
190
190
180
160
160
170
180
160
10
9
11
9
11
10 - 20 mins
35 - 40 mins
8 - 12 mins
25 - 40 mins
15 - 20 mins
Note:
For best results when using the conventional oven cooking function, only one tray
of cakes or scone should be baked. When baking more than one tray, the fanned oven
cooking function should be used. Shelf positions are counted from the bot
tom to the top
(see page 24 for an illustration)
Page 28
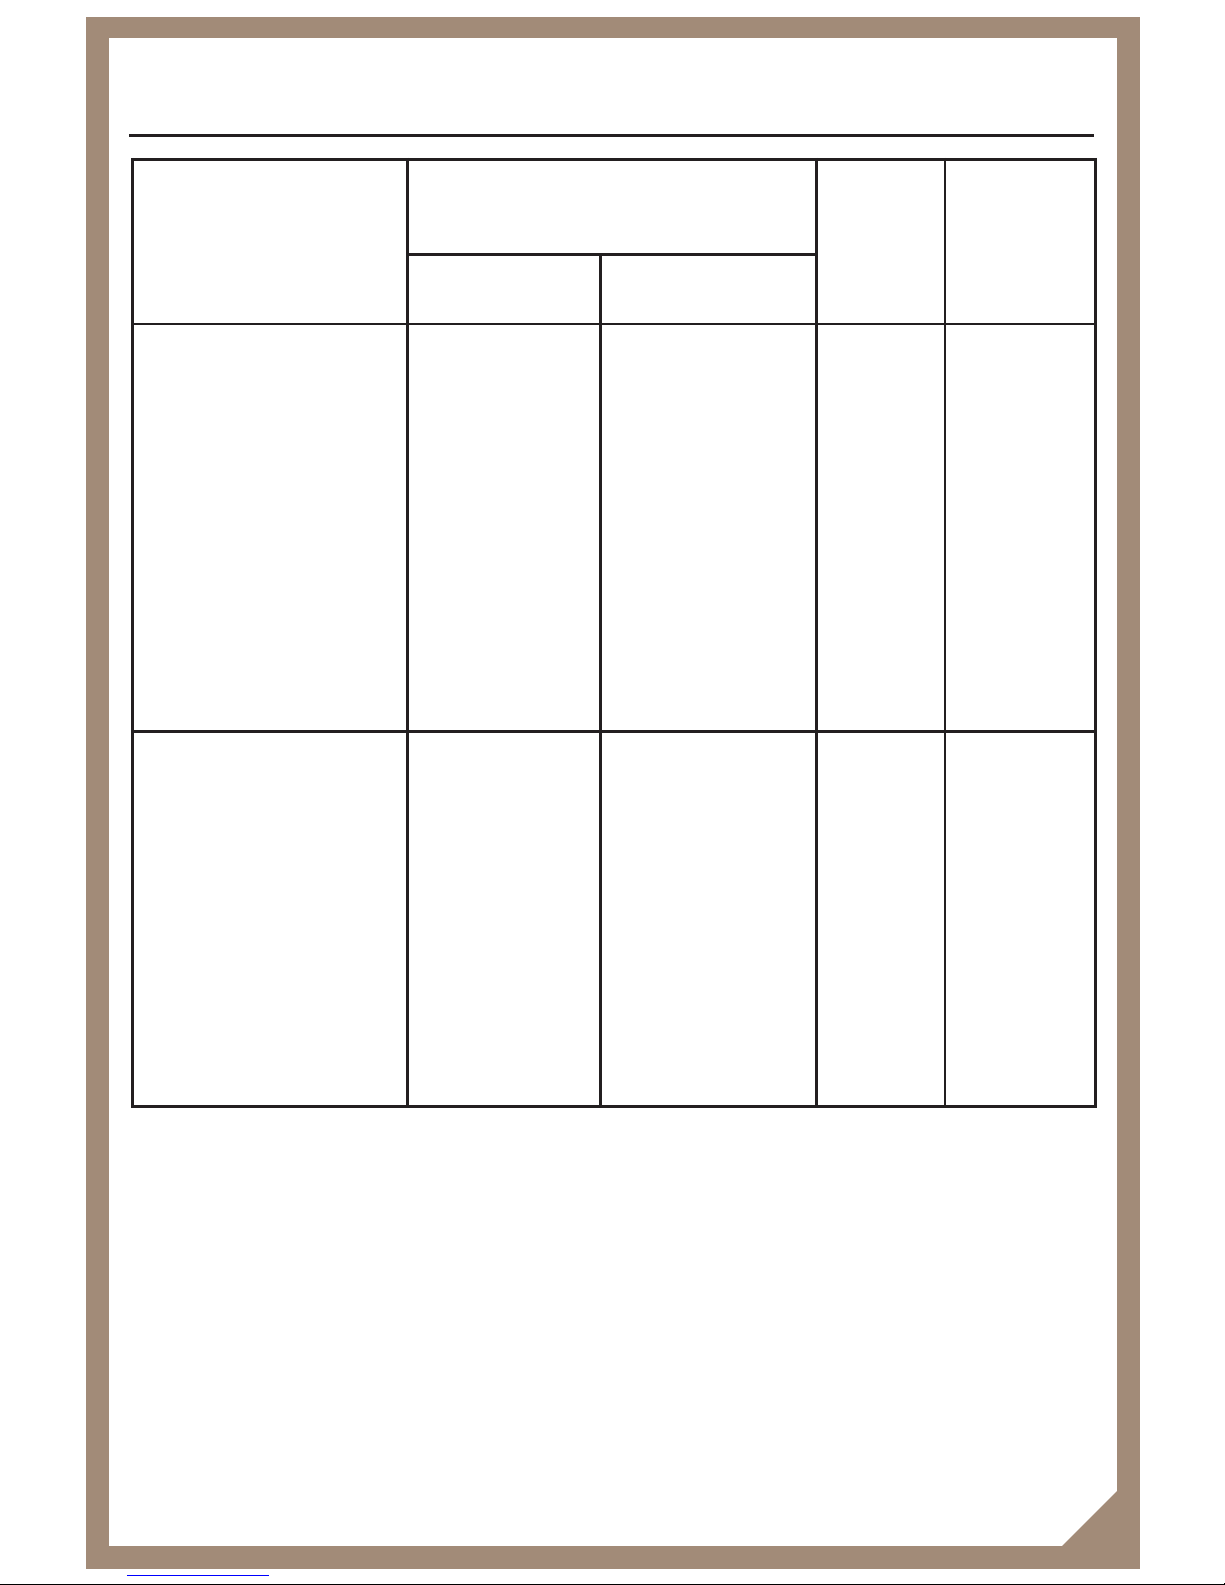
Using the Multifunction Oven
25
Dish Recommended temperature
(˚C)
Shelf
Cook
Time
Conventional Fanned
Puddings
Rice pudding
(1/2 pint dish)
Baked custard
(1/2 pint dish)
Bread & butter pudding
(1/2 pint dish)
Hot souffle
Fruit crumble
150
170
170
180
190
140
150
150
160
175
6
9
9
7
9
13⁄4 - 2hrs
50 - 60
mins
3
⁄4 - 1 hr
30 - 45 mins
40 mins - 1hr
Miscellaneous
Yorkshire pudding
large
small
Toad in the hole
Bread
2 x 1lb loaves
bread rolls
220
220
220
220
220
200
200
200
200
200
11
12
11
7
10
40 - 45 mins
15 - 20 mins
40 - 45 mins
20 - 30 mins
10 - 15 mins
The shelf positions shown in the guide are for conventional cooking only.
The information contained in these table can be adjusted to suit personal taste
when required.
Page 29
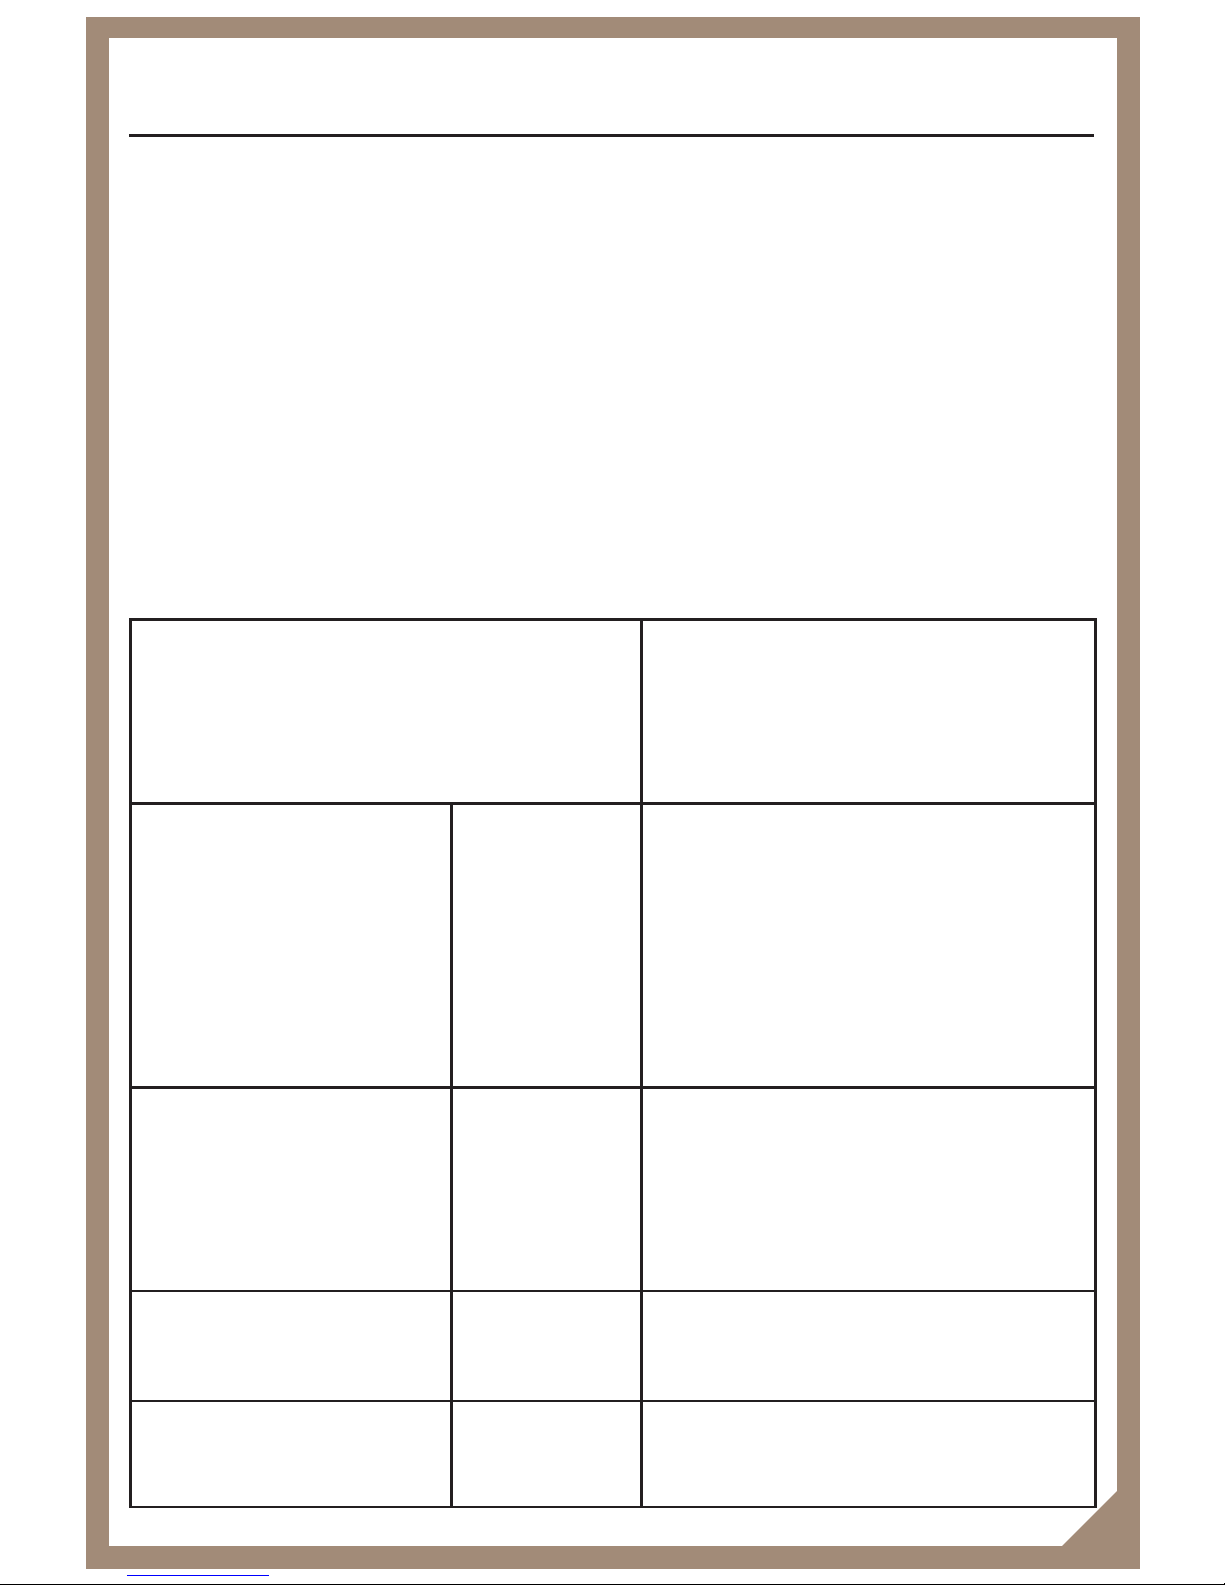
Using the Multifunction Oven
26
Cook in oven at :
175ºC - fanned oven
190ºC - conventional oven
180ºC - top oven
Approximate cooking time
(Preheated oven)
Beef
Rare
Medium
Well done
20 minutes per450g (1lb)
plus 20 minutes.
25 minutes per 450g (1lb)
plus 25 minutes.
30 minutes per 450g (1lb)
plus 30 minutes
Lamb
Medium
Well done
25 minutes per 450g (1lb)
plus 25 minutes.
30 minutes per 450g (1lb)
plus 30 minutes
Pork
35 minutes per 450g (1lb)
plus 35 minutes
Poultry
20 minutes per 450g (1lb)
plus 20 minutes
Frozen meat should be thoroughly thawed before cooking. For large joints, it is
advisable to thaw overnight.
Frozen poultry should be thoroughly thawed before cooking (unless packaging
advises otherwise), the time required depends on the size of the bird - eg: a large
turkey may take up to 48 hours to thaw.
Adjust the shelf positions so the meat or poultry will be in the centre of the oven
when using the conventional mode.
The times given in the roasting guide are only approximate because the size
and age of the bird will influence cooking times, as will the shape of the joint and
the proportion of bone.
Page 30

Using the Multifunction Oven
27
Defrosting
Press and release the on/off control knob to access the functions.
Touch the defrost only icon to select it as your choice.
You do not need to select a temperature when defrosting or cooling.
After a few seconds the oven lights will illuminate and the oven will start to
operate.
To
defrost frozen foods, place food in the centre of the oven and close
the door.
Be safe
•
Do not
defrost stuffed poultry using this method.
•
Always
have some kind of container underneath the food you are defrosting,
such as a roasting tin, in order to catch any water or juices from the
defrosting food.
•
Do not
defrost larger joints of meat or poultry over 2kg / 4lb using this
method.
•
Never
place uncooked food which is to be defrosted next to cooked food which
is to be cooled, as this can lead to cross contamination.
• You can use the semi automatic programmer to time the defrost function - see
‘Automatic Programming’ page 35 - for more information.
Slow cooking
Press and release the on/off control knob to access the functions.
Touch the icons for either the conventional oven or fanned oven. Do not
try to
slow cook using any of the other oven functions.
For roasting joints of meat or poultry and for pot roasts, preheat the oven to 190˚C
- 200˚C and cook for 30 minutes, then adjust the oven temperature control to 110
- 120˚C for the remainder of the cooking time.
• Always use the top half of the oven when slow cooking in the main oven with
the conventional oven function.
• Slow cooking times will be about
three
times as long as conventional cooking
times.
• Make sure that frozen foods are thoroughly thawed before cooking.
•Do not
slow cook joints of meat or poultry weighing more than 2
1
⁄4kg.
Page 31
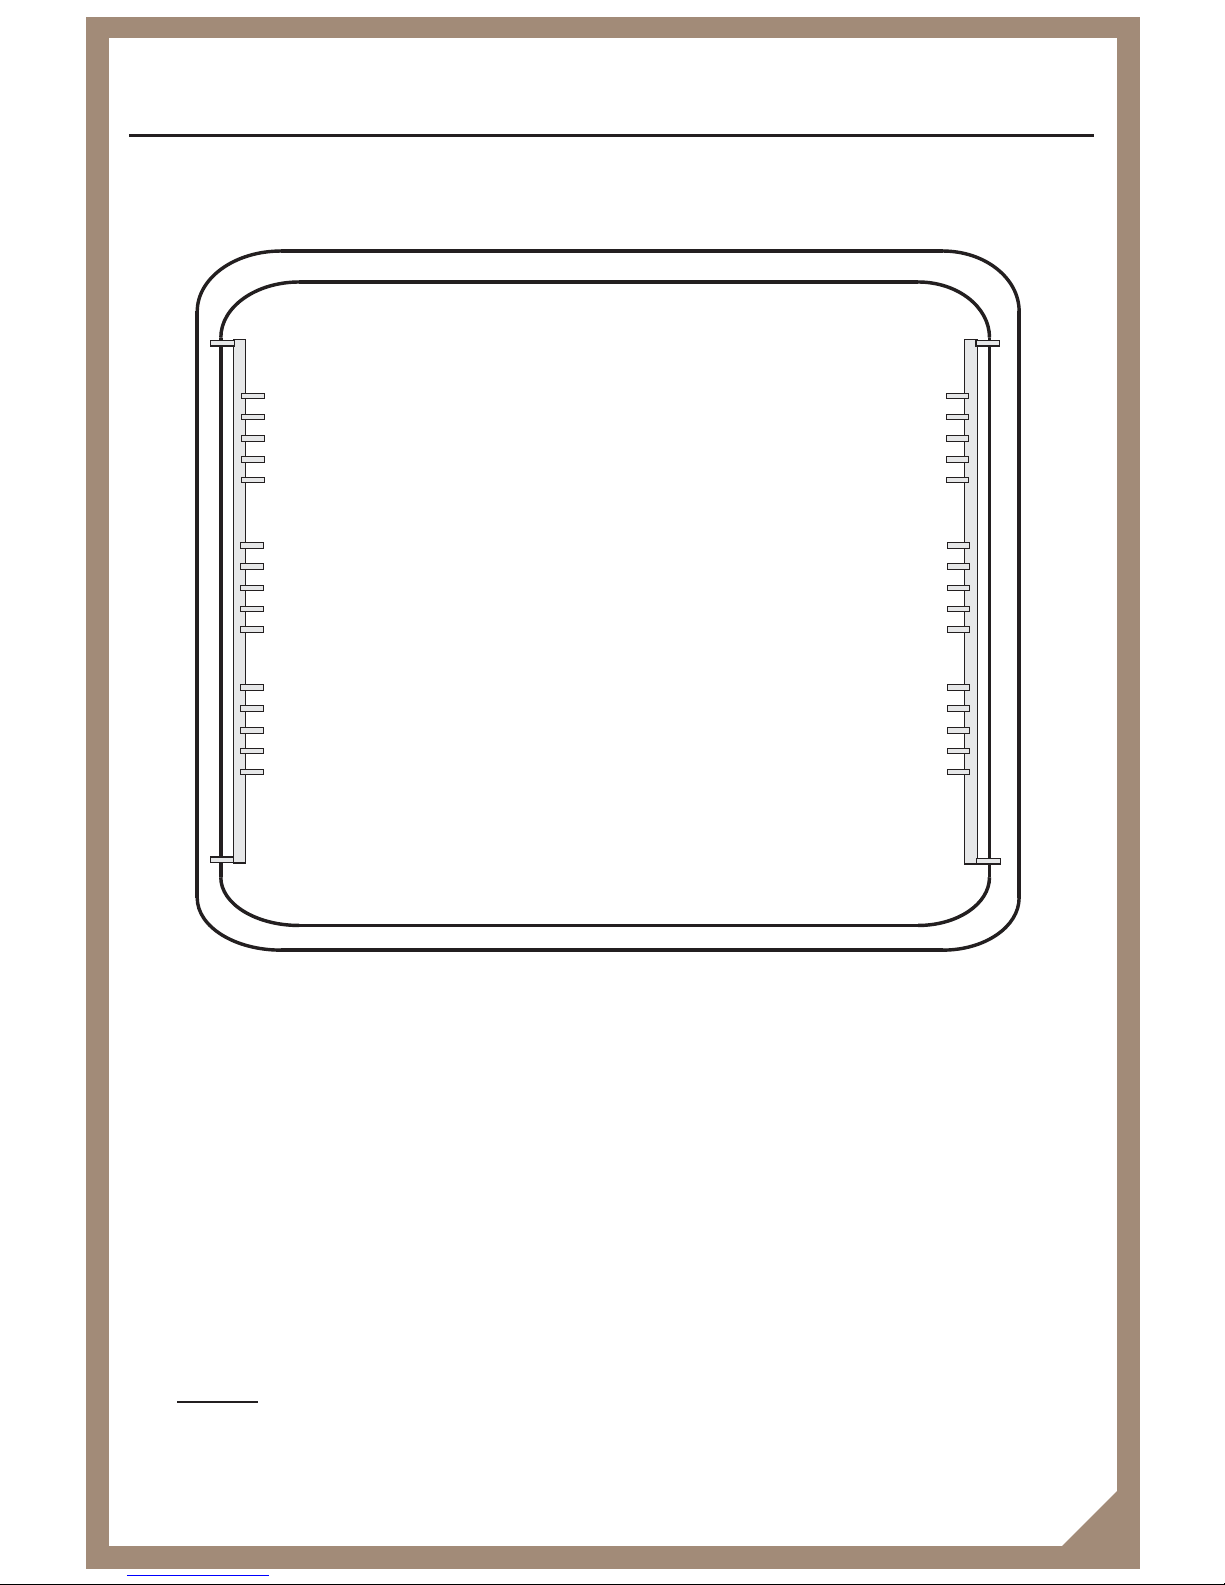
The main oven has twelve shelf positions inside, which are counted from the
bottom up - as shown. The cooking guides in this handbook are accompanied
by a recommended shelf position see pages 24 - 26 for details.
To help the air circulate freely
• Position the shelves evenly within the oven and maintain a clearance from the
oven roof and base.
• If more than one cooking dish or baking tray is to be used on a shelf, leave a
gap of at least 25mm between the items themselves and the oven interior.
• Allow enough space between shelves for food that will rise during cooking.
•
Do not
place items on the oven base as this will prevent air from circulating
freely.
Main Oven Shelving
1
2
3
4
5
6
7
8
9
10
11
12
5
7
6
8
9
10
11
12
1
2
3
4
28
Page 32
CCaauuttiioonn:
:
Accessible parts may be hot when the grill is used, young chil-
dren should be kept away.
Using the grill - Grill Functions (right hand side of the fascia)
Stoves Genus has grill functions as part of it’s mutlifunctions.
The oven door must be kept open while grilling using this function.
Follow the instructions given on the next page when operating this grill.
Preheating
The grill is at its best when pre-heated.
Aluminium foil
Using aluminium foil to cover the grill pan, or putting items wrapped in foil under
the grill can create a fire hazard, and the high reflectivity can damage the grill
element.
Detachable grill pan handle
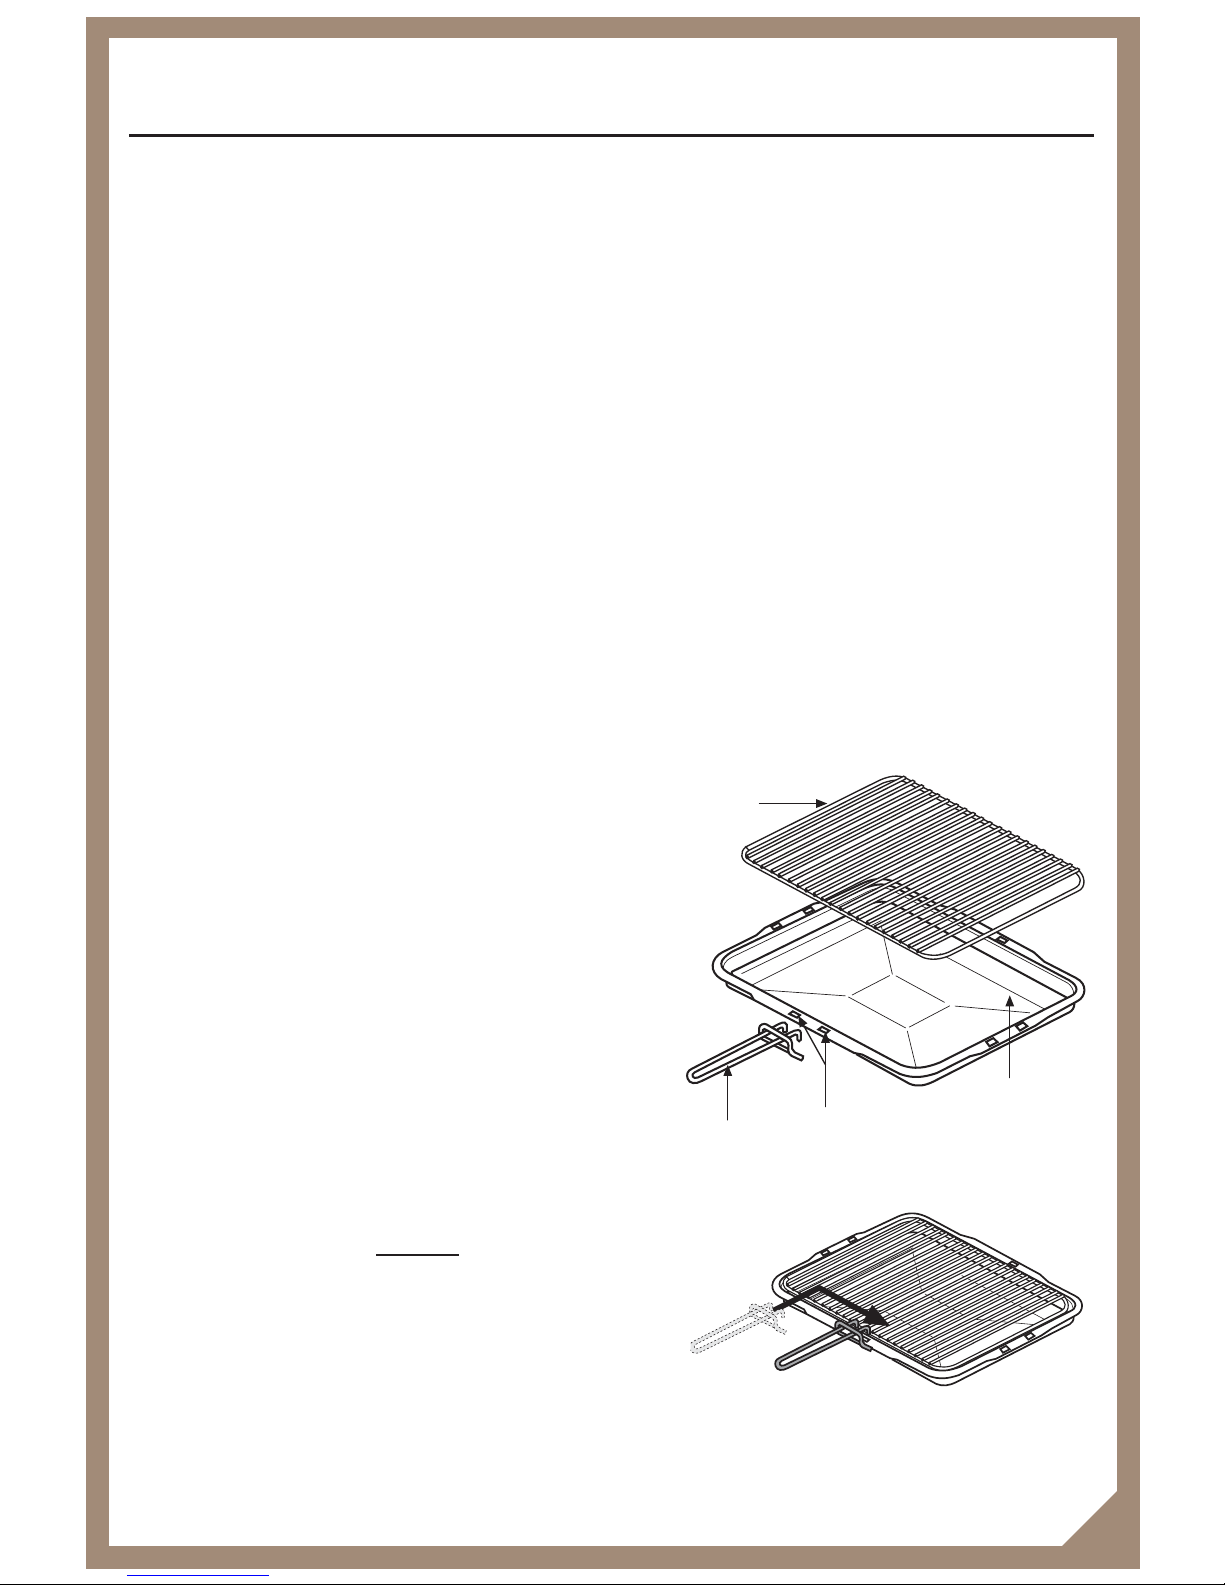
Place the handle over the edge of the grill
pan, at the narrow side edges. Slide the
handle to the centre, and locate between
the handle position indicators.
The handle should be removed from the
pan during grilling, to prevent overheating.
The handle is designed for removing /
inserting the grill pan under the grill when
grilling.
If cleaning the grill pan when it is hot, use oven
gloves to move it.
Do not
use the handle to
pour hot fats from the grill pan.
Food for grilling should be positioned centrally
on the grid.
Using the Grill
handle
grill pan
grid
handle position
indicators
29
Page 33
Grilling
Note: You must use the grill functions with the door open.
To give you more choice, the grill is fully variable, meaning you can adjust the
temperature when you want giving you a full range of temperatures to cook with.
You can adjust the temperature to suit the thickness and quantity of foods you are
cooking.
The grill is regulated using temperature levels from 1 - 9.
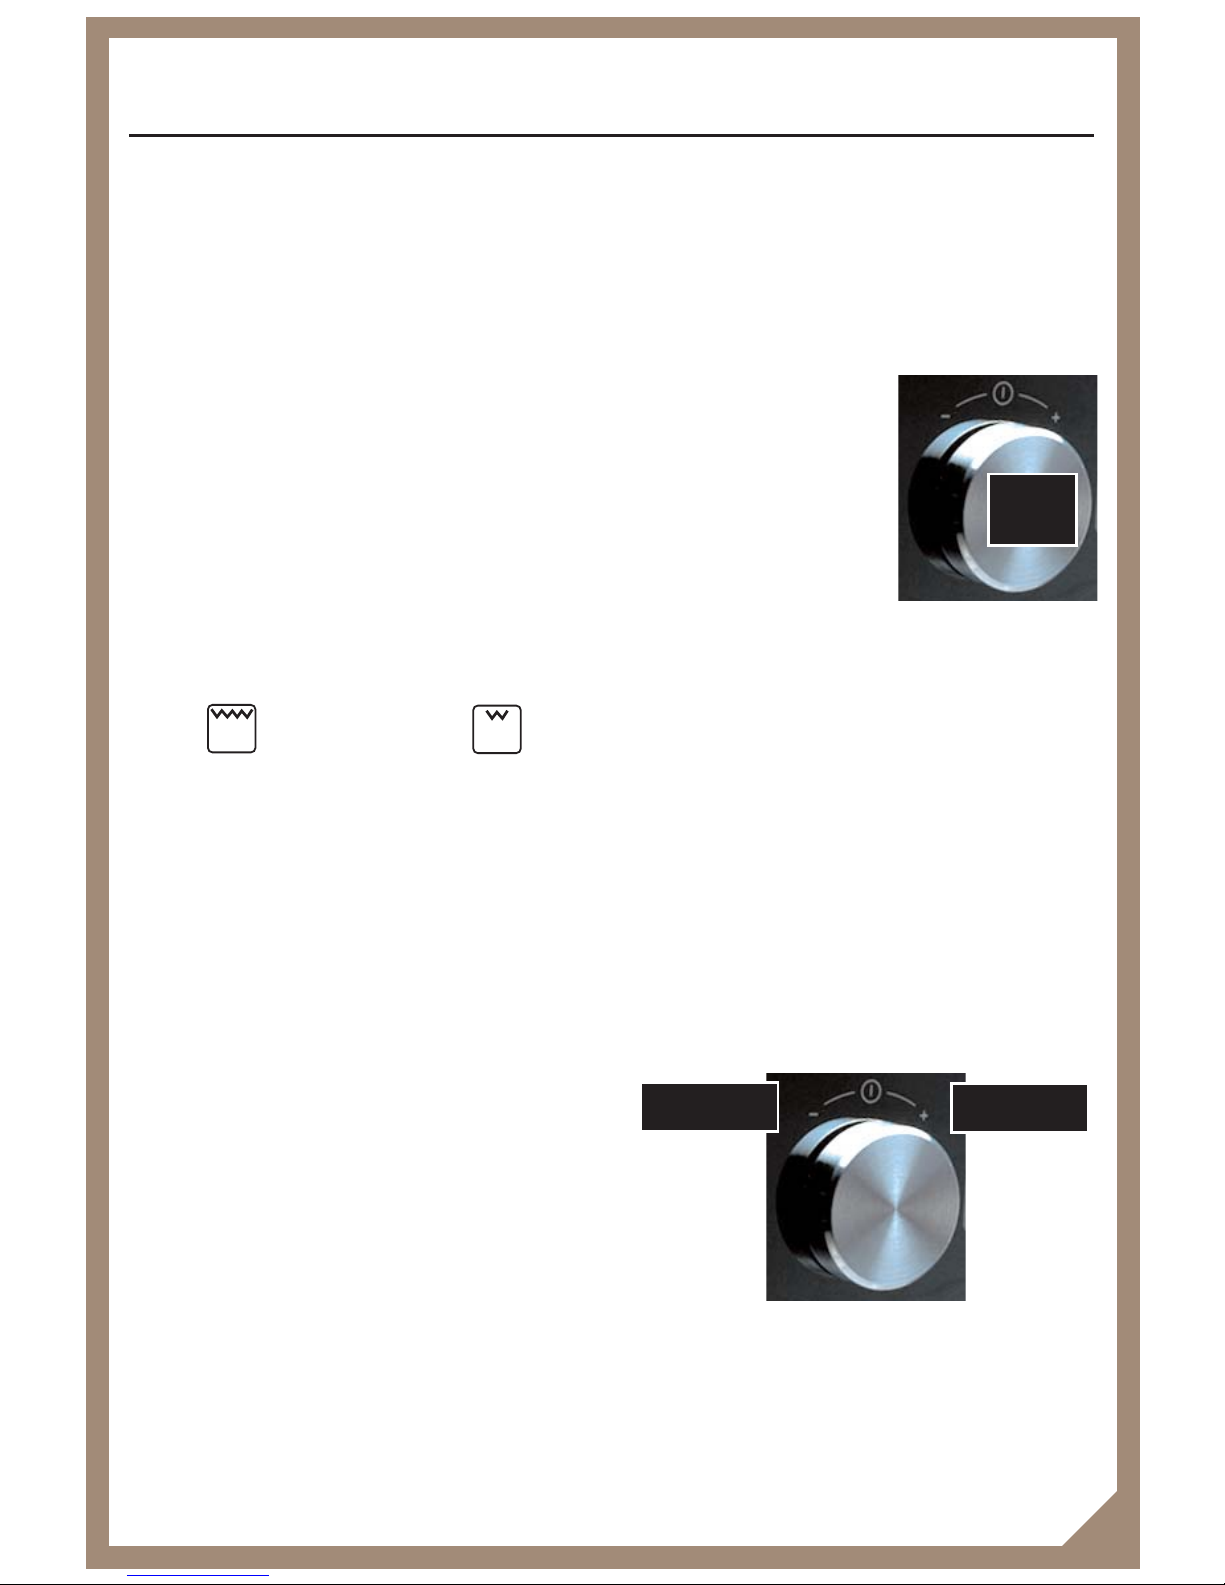
To switch on the grill
Press the on/off control knob to switch the appliance on.
The icons will all light up red. Open the door and leave open.
Using the touch buttons, touch the icon for the grill type you want
to use:
Full grill Economy grill
The economy grill settings only use the inner element of the grill.
The selected icon will turn green, while the icons not currently in use will remain
red. The display on the left hand side of the on/off control knob will show the
pre-set grill setting as 9 in red, once selected this will turn green.
As with the other functions on the Stoves Genus, the heat setting can be changed.
You can choose any grill setting between 1 and 9.
This is done by turning the on/off control knob left to
decrease the setting, and right to increase the setting. You can do this whenever you want during
cooking.
If you do not adjust the setting up or down within a few seconds it will
automatically select
9 as the grilling level, this is the pre-set heat setting and it
will remain on this throughout cooking if you don’t adjust it. If the door is not
open when either of these functions are selected a message will appear in the left
hand display stating ‘OPEN DOOR’.
Using the Grill
30
Press
Increase
Decrease
Page 34

To change functions
For additional flexibility, you can change between grill functions while the grill is
in use, just by touching the icon you wish to change to, i.e. full grill to half grill.
To switch off the grill:
If the icon is green, touch it once.
This switches off the grill functions and all functions become available.
To switch off completely, press the on / off control knob.
Using the Grill
31
Page 35

Grilling - notes
IImmppoorrttaanntt:
:
The door must be kept open when the right hand grill functions are
used - either fully open or using the door stop position - open the door about
75mm and it will hold open.
If the grill door is closed whilst the grill is in use, a message will appear in the left
hand display window stating ‘OPEN DOOR’. If the door is not opened after 30 seconds, the appliance will return all icons to red (available for selection). If the door
is opened, the grill will continue to function at the previous heat setting.
If, for whatever reason the grill door is closed while the grill functions are in use,
the appliance will display “Open Door” for approximately 30 seconds before the
icons on the fascia turn red making them available to select.
Note: The grill cannot be controlled by the programmer.
Using the Grill
32
Page 36
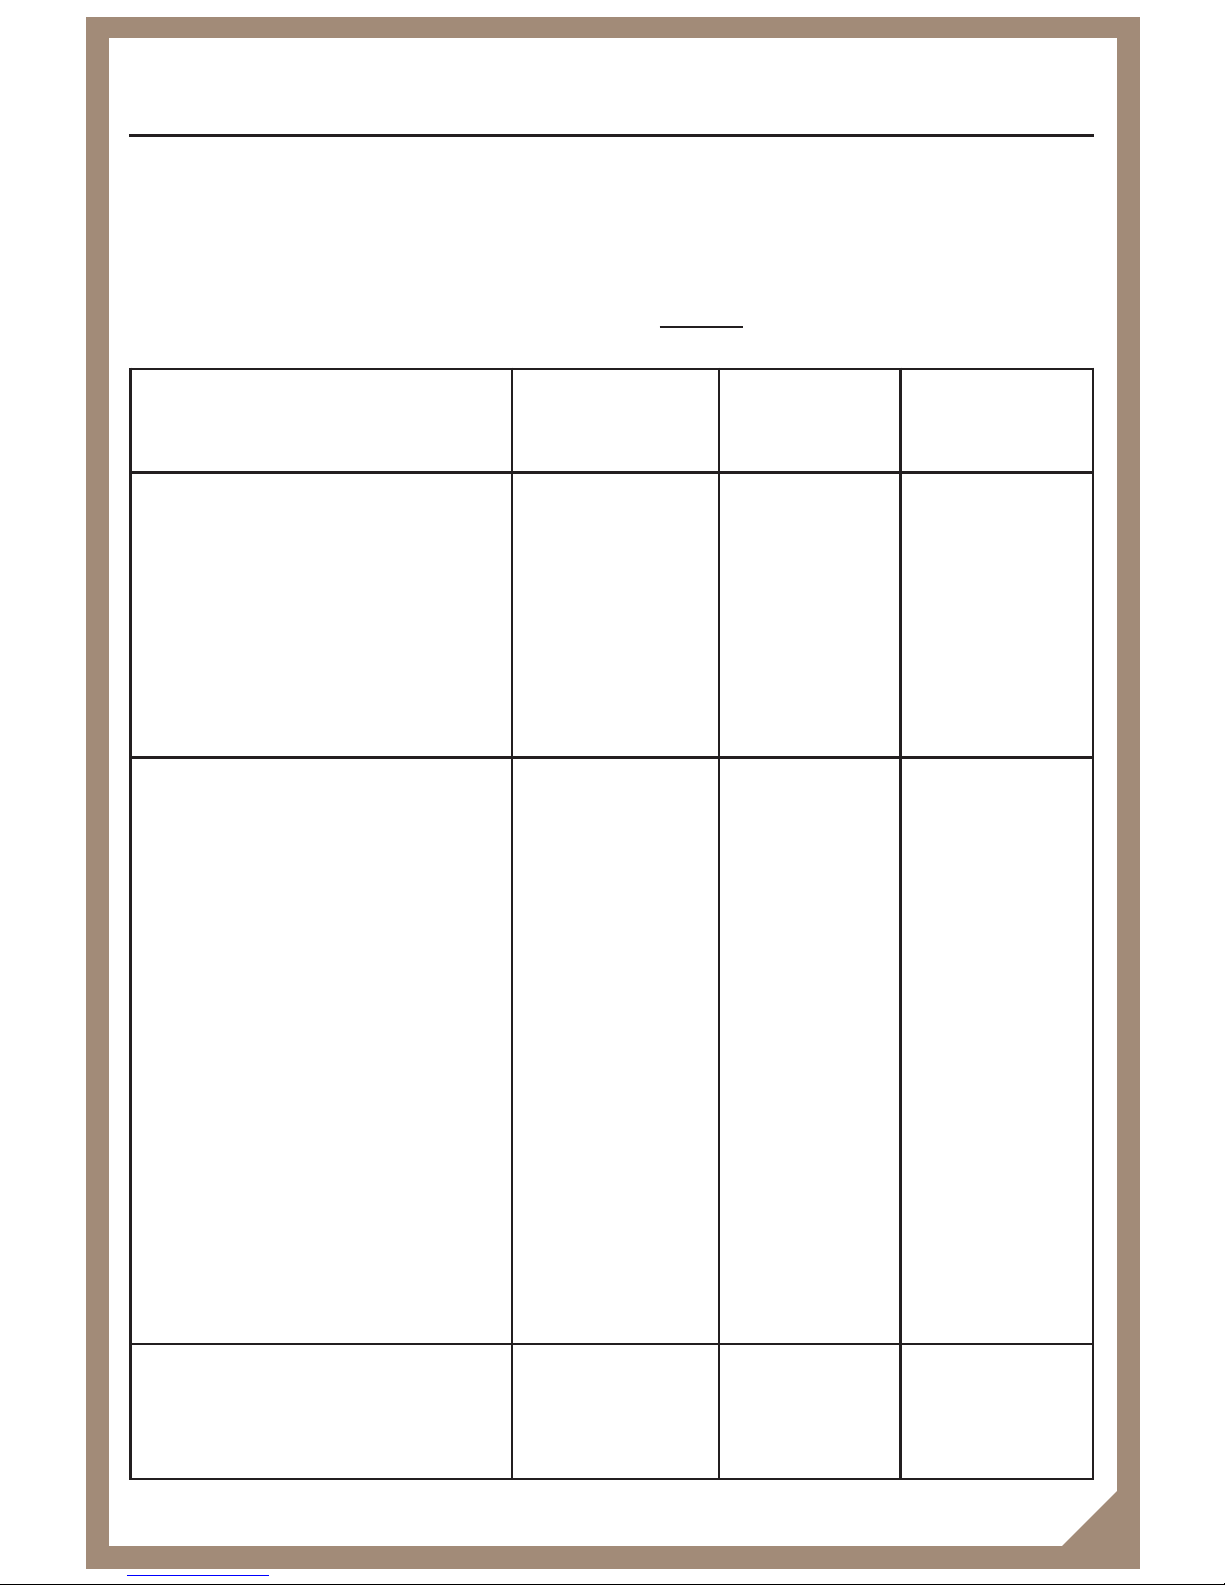
The grilling times given in the guide are only approximate, as the difference in
thickness, size of portion and personal preference will influence cooking times.
The times given in the grilling guide are based upon the grill being preheated
for a few minutes.
Shelf positions are always counted from the bot
tom upwards, and the door must
be open.
Grilling Guide
Food Shelf
Position
Grid
Position
Cooking
Time
Bread
Toast - 4 rounds
Cheese on toast - 4 rounds
Tea cakes
4
3 or 4
2 or 3
High
High
High
3 - 5 mins
4 - 6 mins
3 - 5 mins
Meat and Poultry
Bacon rashers
Sausages
Steak - Rare
- Medium
- Well done
Lamb chops
Pork chops
Gammon steaks
Chicken fillets
4
3
4
3
3
2
2
4
2
High
High
High
High
High
High
High
High
High
7 - 10 mins
14 - 18 mins
8 - 12 mins
12 - 16 mins
16 - 22 mins
14 - 18 mins
15 - 20 mins
12 - 16 mins
15 - 20 mins
Fish
Fish fillets
3 High 15 - 20 mins
33
Page 37

Notes of importance when automatic or semi-automatic cooking:
The timer display will show the end time while the auto programmer is running.
On the last minute of cook time the audio sounds. From this point onwards, the
timer counts down in seconds.
When the cook time has elapsed the appliance goes into standby mode (approx.
4 minutes long) to allow you to amend the time, if desired. This switches off the
elements but leaves the lights and cooling fan on. If you “choose” to increase the
time, then the appliance continues cooking.
If you “choose not” to amend the time then the appliance shuts down.
Please remember that the Grill functions cannot be used with the Automatic
Programmer.
To cancel the automatic programmer:
Cancelling the oven. Touch the illuminated icon you wish to cancel, ensuring it
turns red. You may need to touch the icon twice.
Automatic Programming
34
Page 38

Using the Multifunction Oven.
Semi Automatic cooking - Duration method
Semi-Automatic cooking procedure for the Multifunction Oven:
Use the procedure below, then wait a few seconds for the timer to store the
information.
Select the function you wish to use, once touched the icon will turn green.
You can use any function in the oven for semi-automatic cooking - apart
from the right hand grilling functions.
The temperature display on the left hand side will begin to flash, signalling that you
should either adjust the temperature, or leave it at the pre-set temperature.Use
the on/off control knob to set the temperature you require for cooking.
Please be aware the oven is now operational.
The cook time icon has now illuminated, once touched the icon will turn
green.
When the timer on the right flashes, enter your required “cooking time”. (Minimum
of 1 minute)
As this is semi automatic cooking, you have only set the length of time you want
the oven to remain on for. You must leave the timer for 5 seconds, this enables it
to store all of the information.
Automatic Programming
35
Page 39

Using the Multifunction Oven.
Semi Automatic Cooking continued.
At the last minute of cooking time, a tone will sound 3 times signalling the cooking
time is nearly over, from this point the timer display will show the seconds counting
down.
At the end of cooking time, the alarm will sound for 15 seconds, the oven lights will
remain on and the function icon will flash for approximately 4 minutes, during this
time you can extend the cooking time if it is needed, by turning the on/off control
knob.
If no more cooking time is required, please turn off the oven, and make sure
nothing is left on.
We recommend that if you are using the Automatic cooking function for the first time,
you remain close by in order to keep checking that everything is working to your
satisfaction.
If you should encounter any difficulties, please make sure you have followed the
procedure out lined in this book.
For Genus Function programming see page 18.
Automatic Programming
36
Page 40

Using the Multifunction Oven.
Fully Automatic cooking
Use the procedure below, then wait a few seconds for the timer to store the
information.
Select the function you wish to use, once touched the icon will turn green.
You can use any function in the oven for semi automatic cooking - apart
from the right hand open door grilling functions.
The temperature display on the left hand side will begin to flash, turn the on/off
control knob to set the temperature you require for cooking.
Please be aware the oven is now operational.
The cook time icon has now illuminated, once touched the icon will turn
green.
When timer flashes enter your required “cooking time”. (Minimum of 1 minute).
As this is fully automatic cooking, you have to set the time you would like the oven
to switch off at.
Touch the end time icon, it will turn green confirming that it has been
selected. The oven will then switch off.
Using the on/off control knob, enter in the time of day (i.e. 17.30) that you
would like the oven to turn off at.
Remember: This is a 24 hour clock.
Leave the timer for 5 seconds, to allow it to store the information. It may seem
like the oven has shut down, but this is part of the fully automatic cooking programme. The oven will turn itself on at the pre-set time, which has been calculated by the programmer.
To adjust the time, touch the cook time icon. The time will flash and can be
amended using the central control knob.
Automatic Programming
37
Page 41
Lights Only mode.
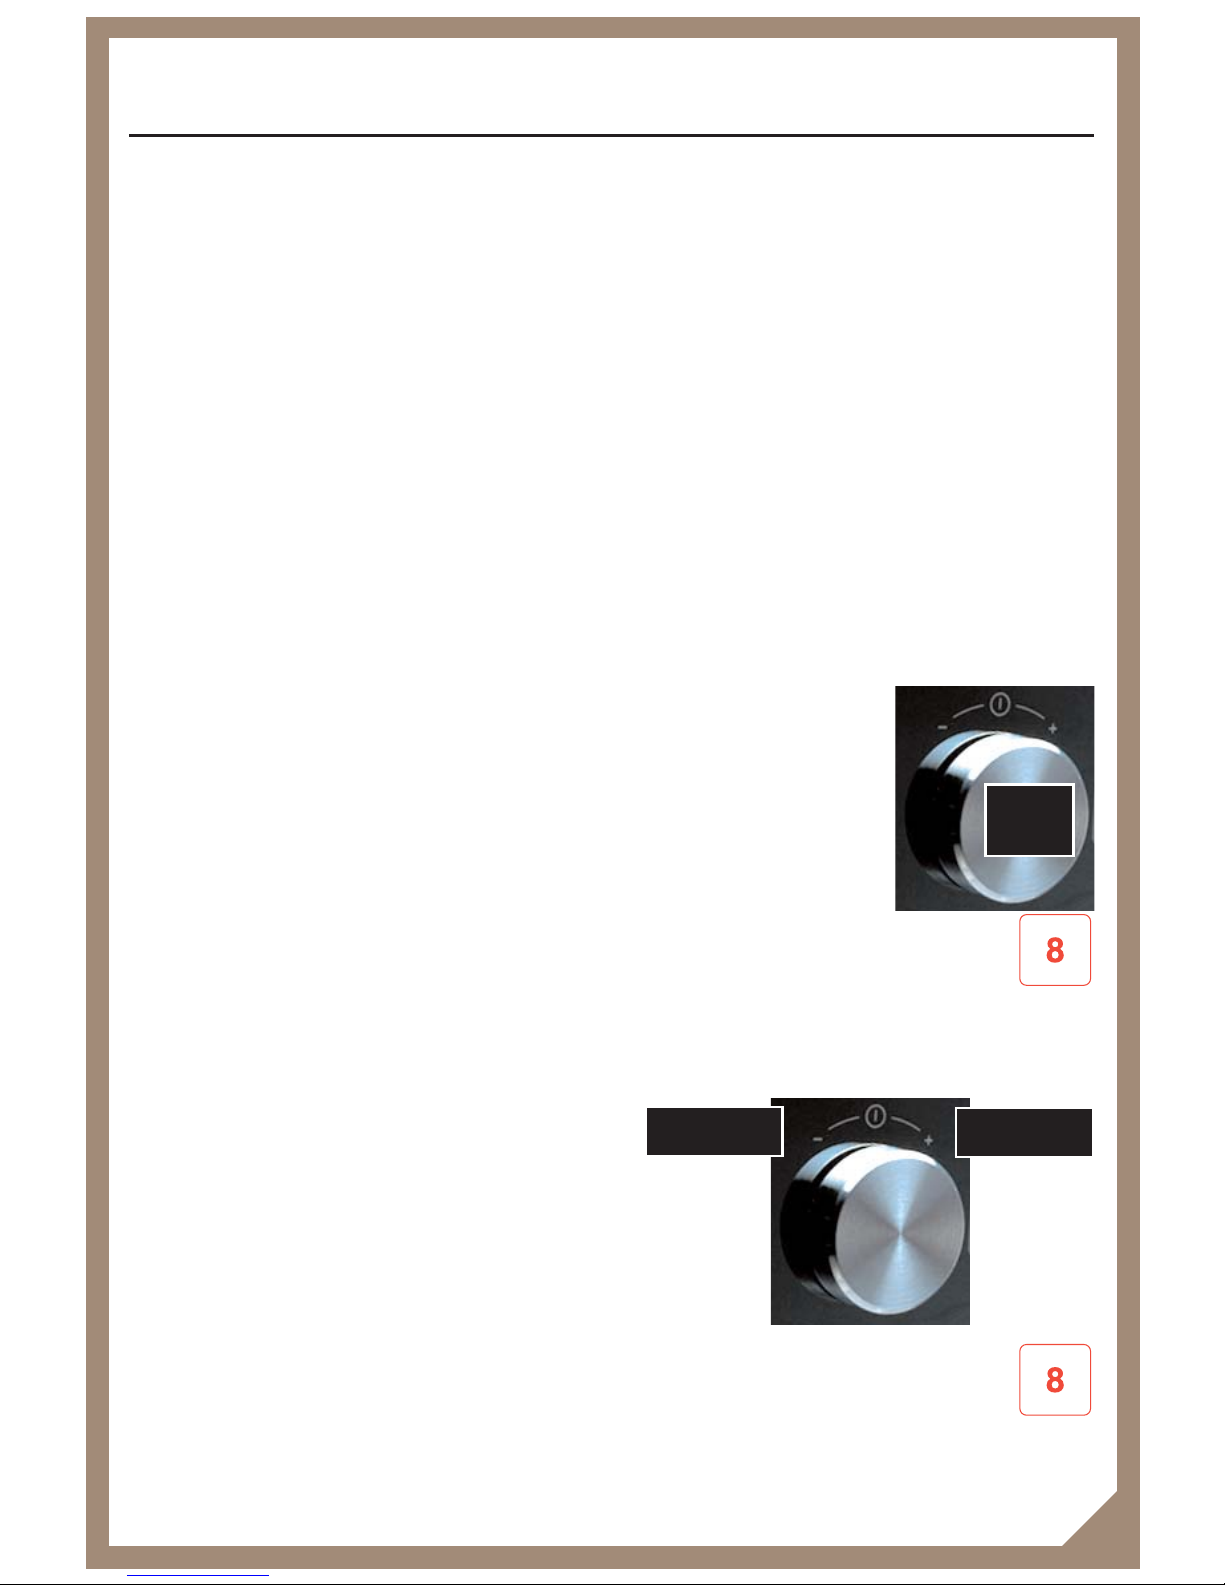
You can turn just the oven lights on with Stoves Genus.
To switch on the lights only, press and hold the on / off control knob for
5 seconds.
To switch off the lights, press and hold the on / off control knob until the lights
turn off.
This is particularly useful when you are cleaning the oven cavity.
Volume Control / Adjustments
To suit your needs you can adjust the volume of the appliance (touch button tones
and alarm tones) on Stoves Genus, to do this:
Press the on / off control knob.
Then touch and hold the ‘8’ icon.
The beeper will sound continuously, you can then adjust the volume by turing the
on / off control knob clockwise - to make it louder, and anti-clockwise - to make
it quieter.
Once you have made your choice, touch the ‘8’ icon.
This can be re-adjusted at any time you like.
Additional Features
38
Press
Increase
Decrease
Page 42
CCaauuttiioonn:
:
Any cleaning agent used incorrectly may damage the
appliance.
Always let the oven cool before cleaning.
Some cooking operations generate considerable amount of grease, this combined
with spillage can become a hazard if allowed to accumulate on the oven through
lack of cleaning. In extreme cases this may amount to misuse of the appliance
and could invalidate your guarantee.
It is recommended that the appliance is cleaned after open roasting.
Do not use caustic, corrosive or abrasive cleaning products, products containing
bleach, coarse wire wool or any hard implements, as they will damage the
surfaces.
All parts of the appliance can be safely cleaned with a cloth wrung out in hot soapy
water.
In order to make cleaning the oven cavities and sides easier, it is possible to turn
on just the lights. This can be done by pressing and holding the on/off control
knob until the light illuminates.
Chrome plated parts
oven shelves & oven shelf runners, grill pan grid
Do not use abrasives or polishes, use a moist soap
pad - e.g. “Brillo”. These items may also be cleaned
in a dishwasher.
Note:
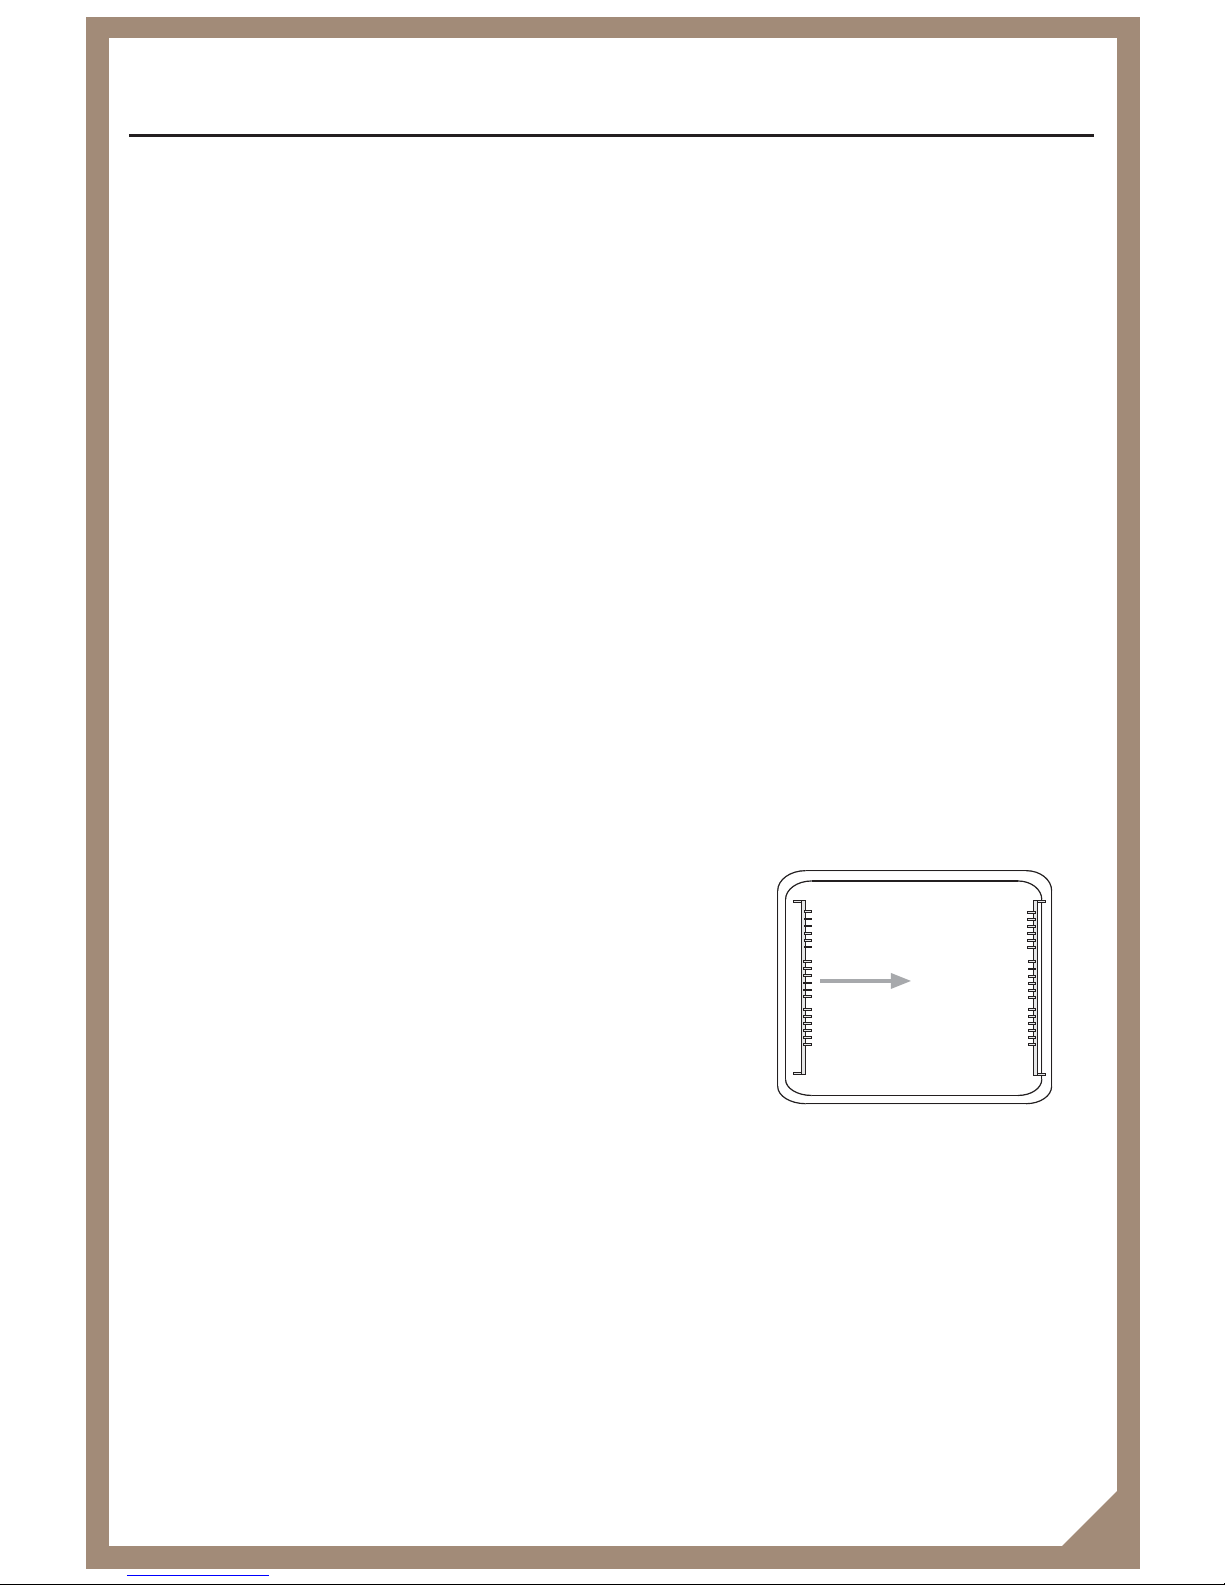
Oven shelf runners can be removed for
cleaning. Grasp the runners, and slide out of the
hanging holes as shown.
Pristine Enamel Parts
We recommend that the appliance is cleaned after open roasting. Use of a trivet
in a roasting tin when roasting will help reduce fat splashing.
Use a few drops of washing up liquid in hot water. Wipe the surfaces with a clean
cloth wrung out in hot soapy water - if larger splashes of fat do not readily disappear, use a mild cream cleaner i.e. “Cif”. Stubborn marks can be cleaned off using
a soap filled pad - e.g. “Brillo”.
Cleaning
Pull out to clean
39
Page 43

Cleaning
40
External Glass parts
Oven door glass - stainless steel models
Fascia panel - stainless steel models
Use hot, soapy water on stubborn marks.
Use a mild cream cleaner - e.g.; “Cif”. Rinse thoroughly and dry with a soft
cloth. Do not
use abrasive cleaners or polishes.
External Glass parts
Oven door glass - black glass models
Fascia panel - black glass models
Use hot, soapy water on stubborn marks.
Use a mild cream cleaner - e.g.; “Cif”. Rinse thoroughly and dry with a soft
cloth. Do not
use abrasive cleaners or polishes.
Please take care when handling, using or cleaning all glass panels as any damage
to the surfaces or edges may result in the glass breaking without warning, or
apparent cause at a later date.
As the oven doors are made of glass, should any glass panel become damaged,
we strongly recommend that it is replaced immediately.
Please call Customer Care to arrange a service engineers visit, and do not use the
appliance until it is repaired
Page 44
Cleaning
41
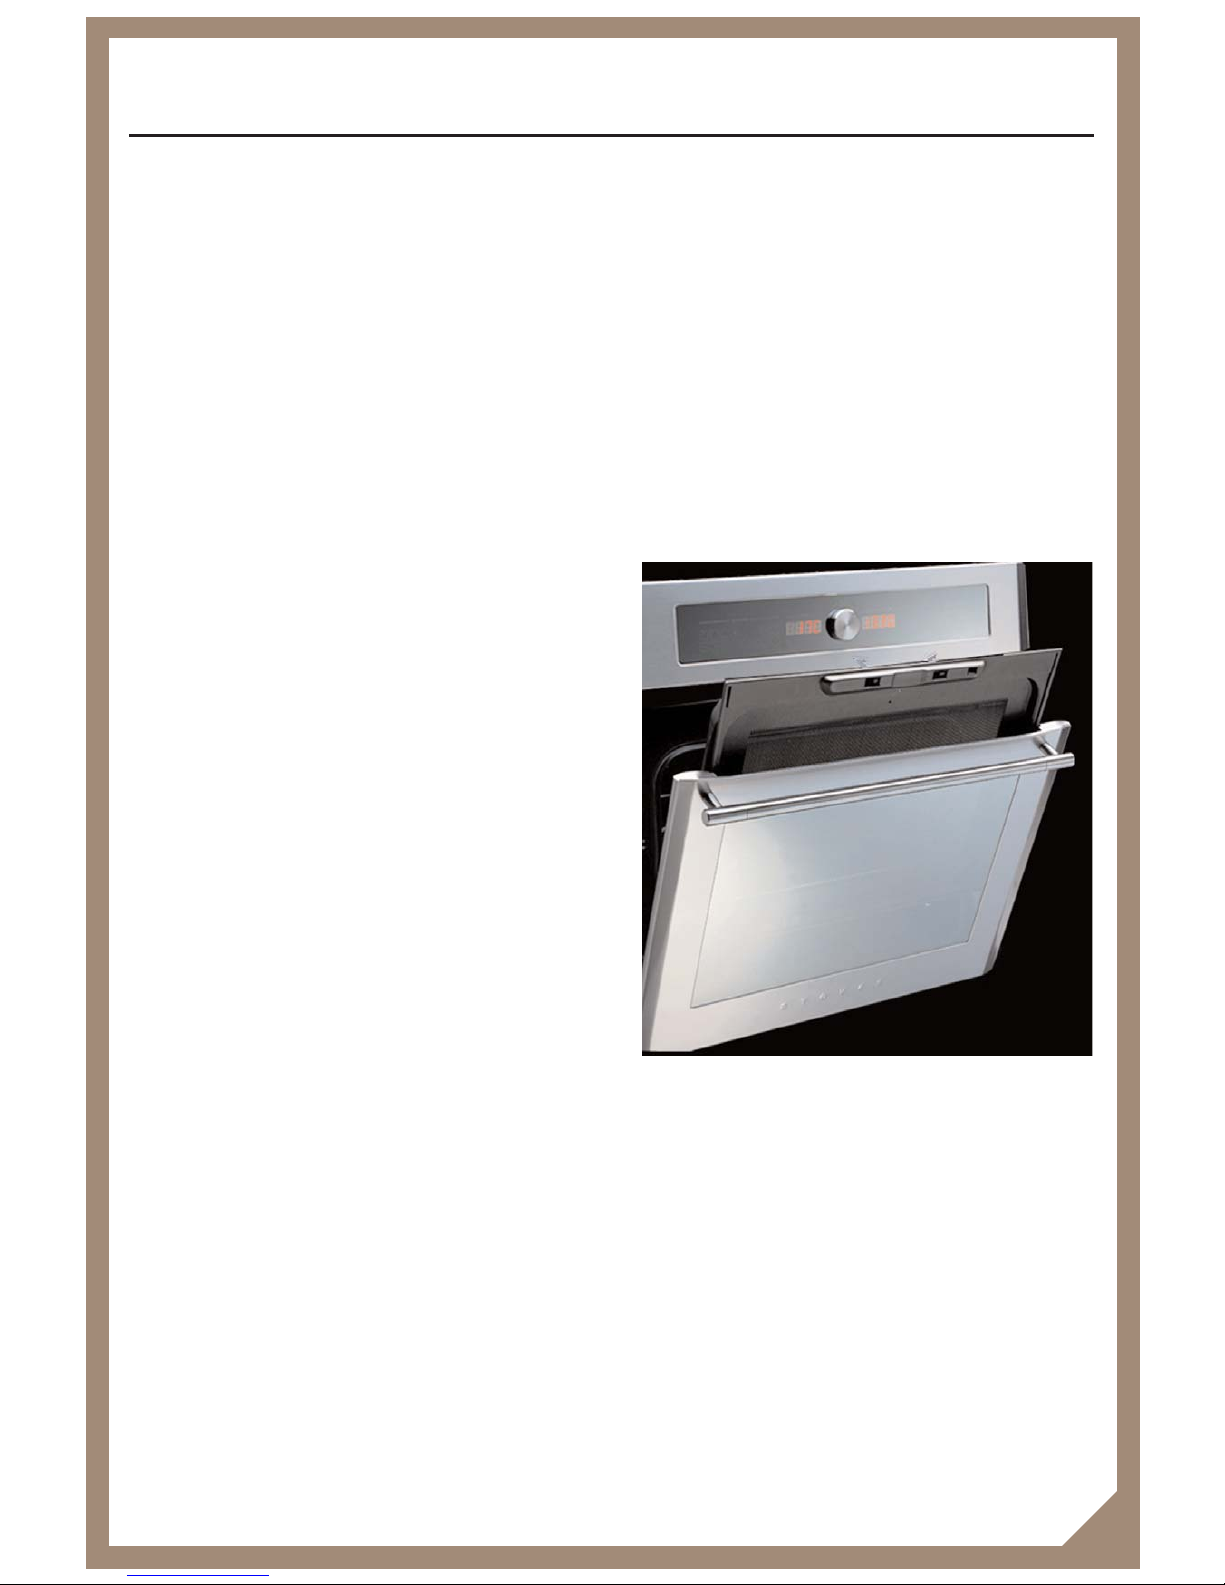
Main Oven Inner Door Choke
The main oven does not have a removable inner glass, however you can clean the
glass by removing the door choke. Take care when removing the door choke not
to damage it - if the door choke becomes damaged please call for a service
engineer.
The door choke is teflon coated, and we recommended that you clean it with soap,
warm water and a cloth. Dry carefully using a soft, clean cloth.
Do not use anything abrasive, wire pads or cleaners such as ‘Cif’, on this part as
it might lead to damage - which will compromise its performance.
Do not clean the door choke in a dishwasher
The door choke is removed by sliding it out
of the door frame while the oven door is
open, preferably to the door stop position
(about 30˚ open), hold the top and bottom edges of the choke and slide out.
Note that if the door is opened fully when
removing the door choke, the door may
spring shut.
The door choke is replaced by sliding it
back into the door frame. Always make
sure you have pushed the choke in as far
as it will go to prevent damaging it or the
door frame.
Glass panels
To meet the relevant Standards of Domestic cooking appliances, all the glass panels on this appliance are toughened to meet the fragmentation requirements of
BS3193. This ensures that, in the unlikely event that a panel breaks, it does so
into small fragments to minimise the risk of injury.
Please take care when handling, using or cleaning all glass panels as any damage
to the surfaces or edges may result in the glass breaking without warning, or
apparent cause at a later date. Should any glass panel be damaged, we strongly recommend that it is replaced immediately.
Important: You must make sure the choke is replaced before using the
appliance again.
Page 45

Painted, plastic and metal finish parts
door frame & handle, control knob
Only use a clean cloth wrung out in hot soapy water.
Stainless Steel surfaces
fascia panel, handles, door panels
Only use a clean cloth wrung out in hot soapy water, and dry with a soft cloth.
Stubborn marks can be removed using a stainless steel cleaner. We recommend
that you clean the whole of the stainless steel area to maintain a uniform finish.
Supplies can be purchased from the Customer Care Centre.
Do not use undiluted bleach, any products containing chlorides, or cleaning
creams such as ‘Cif’, as they can permanently damage the steel.
Extra care should be taken when cooking food in salted water. Some foods are
corrosive - e.g.; vinegar, fruit juices and especially
salt
- they can mark or
damage stainless steel if they are left on the surface. Turn off and wipe any
spillage immediately, taking care to avoid skin contact with any hot surface or
spillage.
Sharp objects can mark the surface of stainless steel, but marks will become less
noticeable with time.
To maintain the finish of the stainless steel, or to remove any greasy marks, wipe
the stainless steel surface sparingly with a
minimum
amount of Baby Oil and kitchen
paper.
Do not use cooking oils, as these may contain salt, which can damage the stain-
less steel surface.
Cleaning
42
Page 46

In the event of a power cut
Should there be a power cut, or interruption to the power supply, the appliances
timer/control function is fitted with a back up battery. Therefore the time should return
to correct setting once power is restored.
If “F1”, “F2”, “F3” and “F4” appear in the temperature display and the
appliance will not work.
This means there is a fault with the appliance - you must call our Customer Care Centre
for a Service Engineer visit.
When using the Genus Function, you find your food is overcooked.
Next time you cook the same meal - reduce the cooking time, or take food out earlier.
As with any cooking, most success depends on personal preferences.
When using the Genus Function, you find your food is undercooked.
Next time you cook - lengthen the cooking time, or add extra time at the end. Again,
most success depends on personal preferences.
For Frequently Asked Questions see pages 48 & 49.
Common Sandwich cakes and sponge problems
Domed top
Insufficient creaming of mixture, cake baked on too high a shelf position or at too high
a temperature. Paper liners can cause the outer edge not to rise and the centre to peak.
Hollowed / sunken top
Too much raising agent, oven temperature too low or incorrect shelf position, cake
removed from oven before it is cooked, or use of soft tub margarine.
Close / doughy texture
Too much liquid or too little flour or too much sugar. Insufficiently creamed, not enough
raising agent, ingredients too warm, or insufficient air incorporated during mixing.
Common Pastry problems
Hard and tough
Insufficient fat, too much liquid, over baking, or oven too cool.
Soggy
Too much liquid, oven too cool, insufficient baking, lack of steam vent, or filling too hot
when covered by pastry.
Shrinking
Over-stretched during rolling and shaping, or insufficient resting time.
Trouble shooting
43
Page 47
Timer Function.
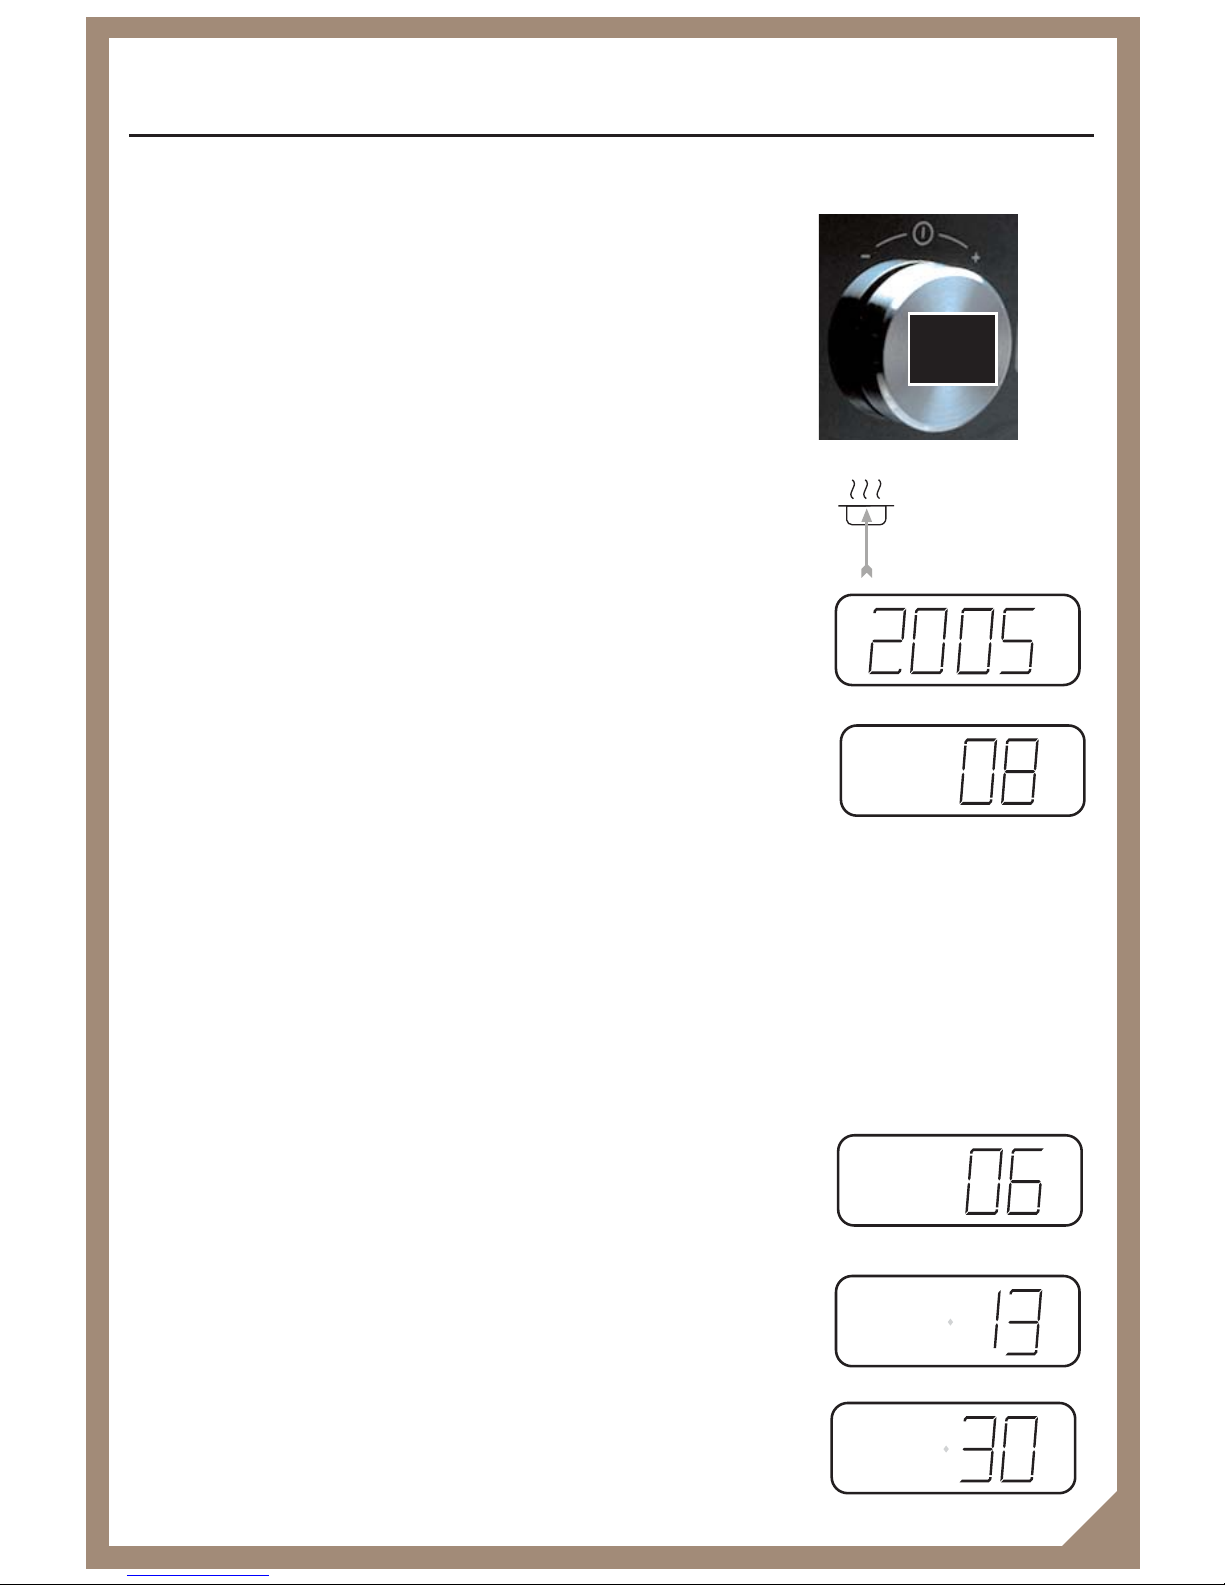
If adjustment is required to the clock, please follow the instructions below:
Press rotary control knob to switch on the appliance.
Touch and hold (for 10 seconds) the cook time icon,
located on the right hand side of the timer display.
The icon will light once activated.
YEAR will then appear in the left hand display.
Turn the control knob until the correct year is set.
CAL will be shown on the left hand display.
Turn the control knob until the month is correct.
The word DAY will appear on the left hand display.
Set day of the week by turning the control knob, using the following codes:
00 – Sunday
01 – Monday
02 – Tuesday
03 – Wednesday
04 – Thursday
05 – Friday
06 – Saturday
DATE will appear on the left hand display.
Turn the control knob to set the correct date.
Indicator will flash until stored.
HOUR will appear on the left hand display.
Turn the control knob to set the correct hour.
Indicator will flash until stored.
Set minutes. Indicator will flash until stored.
Setting the Clock
44
Press
Page 48
Changing Light Bulbs
Not all appliances have the same number and type of bulbs. Before replacing
your bulb, open the top/main oven door and see which type you have. Then
use the table below to help you change your bulb correctly.
Please remember that bulbs are not covered by your warranty.
Bulbs can be purchased from hardware stores (always take the old bulb with
you).
Warning: There is a danger of electric shock. Always make sure that your
appliance is switched off before you change the bulb.
Number
of bulbs
Position
& details
Changing instruction
2 Sides
Main Oven
10W halogen
bulb
Switch off the electricity supply and wait until the oven
is cool, then remove the oven shelves.
Unscrew the lens, taking care to avoid touching the
lamp itself, as this may cause damage.
Pull out the bulb and replace with a new halogen bulb.
Do not touch the new halogen bulb with your bare
hands as this will affect the life span of the new bulb.
45
Page 49

46
Our Warranty
Should you need it . . . .
Inside the paperwork which has come with this appliance,
there is a leaflet and card explaining the terms of our
extended warranty and guarantee.
In order to apply for our five year guarantee, simply fill in
the details on the card and post it off, this will register your
appliance.
Should you wish to take out extended warranty, please fill
in the details on the leaflet and post this off to:
Glen Dimplex Australia,
Unit 2, 205 Abbotts Road
Dandenong South
Victoria 3175
Australia
If your appliance is covered by the warranty and guarantee,
you will not be billed for work undertaken should your
appliance be faulty, terms and conditions do apply, so
please read through the literature carefully.
Please ensure that you have available your appliances
model number and serial number, there is a space at the
back of this book for recording that information.
Page 50

How will Genus benefit me?
If you’ve had a busy day and don’t feel like cooking, you don’t have to
wait 15 minutes for the oven to pre-heat. You can also cook food straight
from frozen and, for the ultimate in convenience, programme the oven to
come on when you’re out and have the food ready for you when you get
home.
Genus cooks food beautifully in a fraction of the time it takes to cook
conventionally, saving precious time and effort. Whether you are a novice
cook or an expert, Genus makes the cooking process effortless – all the
intelligence is built-in.
Does the way this cooker works affect the quality of the food;
like a microwave?
There are no adverse effects on any type of food. Genus is kind to food
and won’t alter its texture in the process of speeding up cooking.
In tandem with the three conventional sources of heat, the Genus
Program reduces cooking times and helps cook food more thoroughly and
evenly. Furthermore, cooking times are easier to judge, making ideal
results simpler to achieve.
Do I have to pre-heat the oven?
No. In Genus mode you can cook from cold or even frozen, saving precious time and providing greater efficiency.
When using as a conventional or multifunction oven, pre-heating is
advised, as you would a normal oven.
I enjoy cooking and like to take my time. Will this cooker change
that?
No. You can use Genus as a top-of-the-range multifunction cooker. Genus
has been programmed to produce beautiful results at normal speed as
well.
So when you want to cook in the conventional way, you can – and when
you want to cook something in a fraction of the time, you can do that
too. Total flexibility for modern living.
Questions & Answers
47
Q
A
Q
A
Q
A
Q
A
Page 51

If it’s up to four times faster, how do I calculate the cooking
times of everything?
You don’t. All the cooking times for various foods are pre-programmed so
that all you have to do is input the kind of dish you’re preparing and the
conventional cooking time.
Genus will then select the recommended temperature and recalculate the
time. But remember, you can always manually adjust the temperature and
time selected by Genus at the touch of a button – you have ultimate
control.
Is it just for cooking convenience food?
No. Genus has been specifically programmed to cook the most popular
dishes, whether it’s a casserole, the traditional Sunday roast or a frozen
pizza.
It is designed to save precious time by reducing the cooking time by a
quarter or more. We think that it takes convenience food to another level
– there is no longer a trade-off situation between speed and performance.
What if the food I want to cook isn’t in the pre-programmed
menus?
Genus works from the main ingredients in the dish, so all pasta dishes for
example would be the same programme. All main food types are covered
in the pre-set menu, so there should never be a problem. But of course,
you can adjust the time and temperature at any point during cooking if
required.
Questions and Answers
48
Q
A
Q
A
Q
A
Page 52

General oven safety
When you are cooking, keep children away from the vicinity of
appliance.
This product is designed as a domestic cooking appliance for the preparation and
cooking of domestic food products, and should not be used for any other purpose.
• Remove all packaging from the appliance before using for the first time.
• Make sure you read and understand the instructions before using the appliance.
• Keep electrical leads short so they do not drape over the appliance or the edge of the
worktop.
• Keep all flammable materials (such as curtains, furnishings & clothing) away from the
appliance.
• Parts of the appliance may be hot during or immediately after use. Care should be
taken to avoid touching heating elements inside the oven. Allow sufficient time for the
appliance to cool after switching off.
• When opening the appliance door, take care to avoid skin contact with any steam which
may escape from the cooker.
• Do not use aluminium foil to cover the grill pan, or put items wrapped in foil under the
grill, as this creates a fire hazard. The high reflectivity can also damage the element.
• Do not use the ovens with the door inner glass panel removed, or the door choke
removed (see the Cleaning section for more information).
• Do not drape tea towels over the flue vents or doors, as this creates a fire hazard.
• Use oven gloves when removing hot food / dishes from the oven or grill. The oven /
grill and utensils will be very hot when in use.
• Do not use foil on oven shelves, or allow foil to block the oven flue as this creates a
fire hazard preventing good heat circulation.
• When cooking heavy items - e.g.; turkeys - do not pull the oven shelf out with the item
still on the shelf.
•
Drop-down doors:
Do not place items on the door when open.
• Switch off the electricity supply before replacing the oven light bulb, to avoid the pos-
sibility of electric shock.
• Never use the appliance for heating a room.
All installation, servicing and maintenance work should be carried out by a competent person who will comply with current Regulations, Standards and
Requirements - see the Installation section at the rear of this handbook.
WWaarrnniinngg:
:
This appliance must be earthed.
When you have finished cooking check that the appliance is switched
off.
Safety Information
49
Page 53

Safety notes for the accelerated cooking functions
Please read carefully and keep for future reference
• Warning: This appliance can NOT be used as a Microwave.
• Warning: It is hazardous for anyone other than a service engineer to carry out any
service or repair which involves the removal of the back cover of this appliance.
• Warning: If the door or door seals are damaged this appliance must not be used
until a qualified service engineer has repaired it.
•
Warning: Liquids and other foods must not be heated in sealed containers since they
are liable to explode.
• Warning: Only allow children to use this appliance when they are supervised, or when
adequate instructions for use have been given enabling the child to use the oven in a
safe way, and understand the hazards of improper use:
- When heating food in paper, or plastic wrappings always keep an eye on the oven due
to the possibility of combustion.
- You cannot use this appliance for heating beverages, feeding bottles or baby food -
these kinds of items are not suitable.
- Eggs in their shell and whole hard boiled eggs should not be heated using the Genus
Function as they may explode - even after the Genus Function has finished.
- If smoke is observed, and it has nothing to do with the food items being cooked, switch
off or unplug the appliance and keep the door closed to stifle any flames.
Please be aware that some dishes may cause splashes of fat to land on the oven
cavity, if this occurs in moderation, there is no need to turn off the oven.
•
Do not completely enclose food in foil, or use covered roasters as this will
prevent the Genus Function working correctly. You may use covered dishes
which have glass lids.
• Details for cleaning:
- The oven should be cleaned regularly and deposits of food should be removed.
- Failure to maintain the oven in a clean condition could lead to deterioration of the sur-
faces adversely affecting the life of the appliance and possibly resulting in a hazardous
situation.
Safety Information
50
Page 54
Service Record
Date of purchase Installers stamp / Printed name Date of installation
Place of purchase:
51
Date Part(s) replaced Engineers Stamp/
Printed Name
Model Number
4 4 4 4 4
Serial Number
Please record your model number and serial number in the space below.
Having these numbers to hand will help us to help you, quickly and more
efficiently. Model number and serial number are on your appliance
databadge, which can be found on the front frame, near to the oven cavity.
When contacting Stoves, please use the Customer Care number on the back
cover of this handbook
Page 55
Installation
52
600 installation built in (high level) and built under (low level)
Remove the fixing screws from the polythene bag on the top of the appliance, but
leave the appliance in the base tray packaging until you are ready to install it.
Note:
When removing the appliance from the base tray packaging care should be
taken not to damage the appliance.
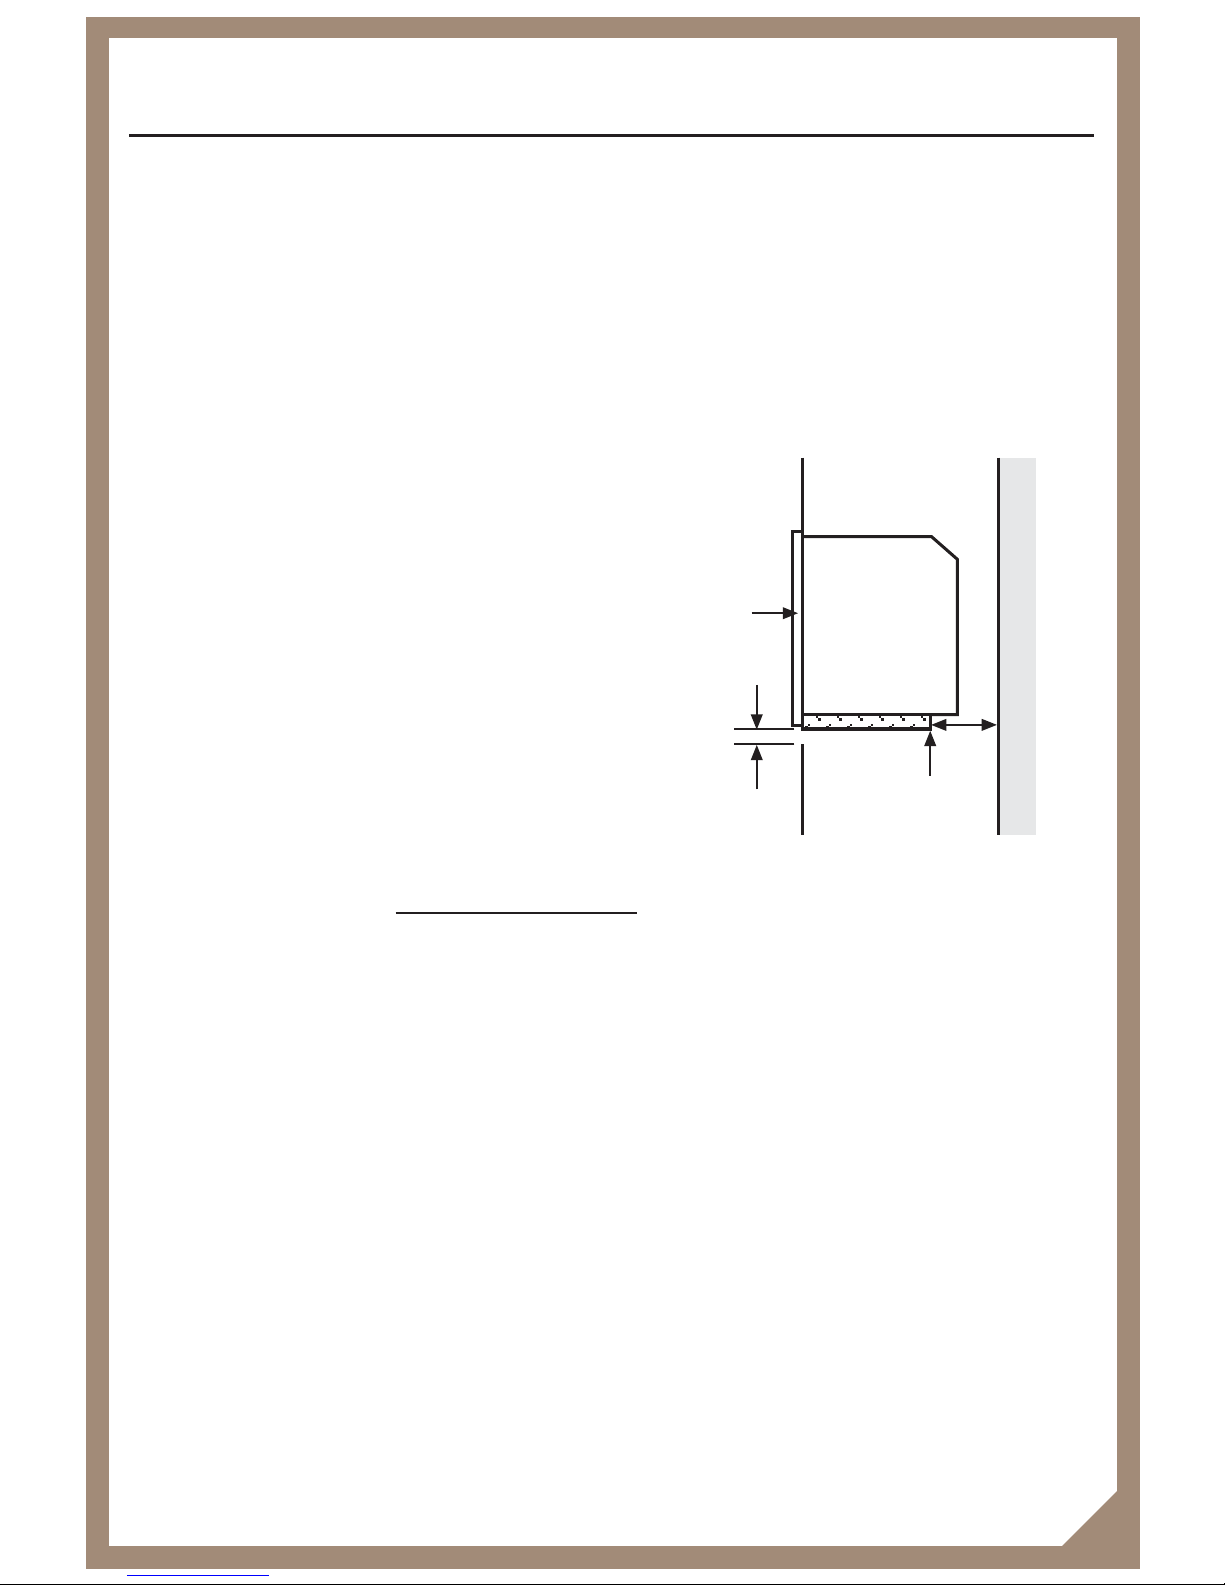
1. When installing in a typical 600mm
deep, built in housing unit, the false
back should be removed from the housing unit to provide the necessary depth
for installation.
2. When the false back is removed, it is
normally the case that the support shelf
for the appliance leaves a gap between
the back edge and the wall of approximately 80mm.
3. If no gap occurs between the back edge
of the shelf and the wall behind the unit,
we recommend that a gap of at least
30mm is made by shortening the shel
f.
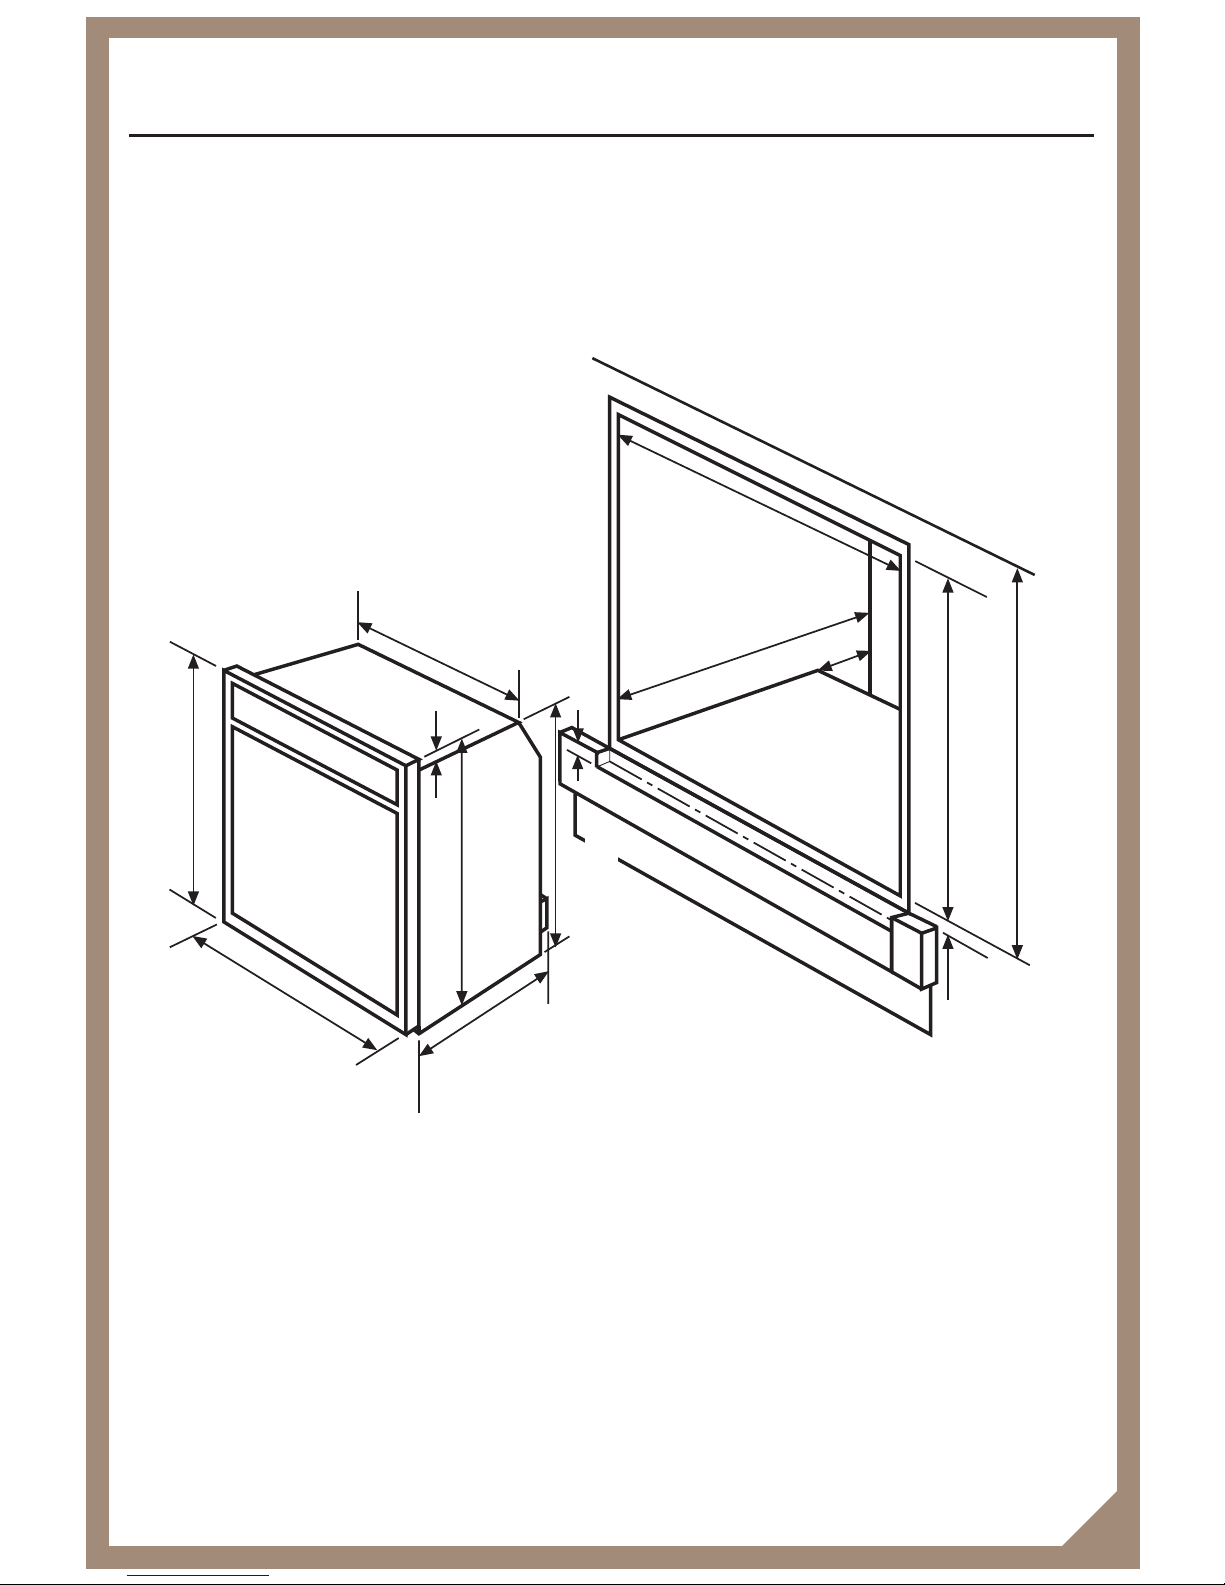
The appliance is designed to fit into a standard 600mm wide housing unit, with
minimum internal dimensions as shown.
Note:
590mm is to the underside of the worktop when the appliance is built
under, or to the underside of the panel above, when the appliance is installed into
a tall housing unit.
Please note that all sizes are nominal, and some variation is to be expected.
Installing appliance under a worktop
Where the appliance is installed under a worktop, with a hob installed above it, the
installation instructions for the hob must be read in conjunction with these instructions.
Front
of oven
Back edge of
support shelf
30-80
mm
12mm
gap
Rear
Wall
Page 56
Installation
53
DDiimmeennssiioonnss 660000 bbuuiilltt uunnddeerr aanndd bbuuiilltt iin
n
585
mm
min
560mm
595mm
550mm
568
mm
547mm
20mm
min 550mm
30 - 80mm
min
580
mm
min
590
mm
12mm
gap in plinth
6mm
588
mm
Page 57
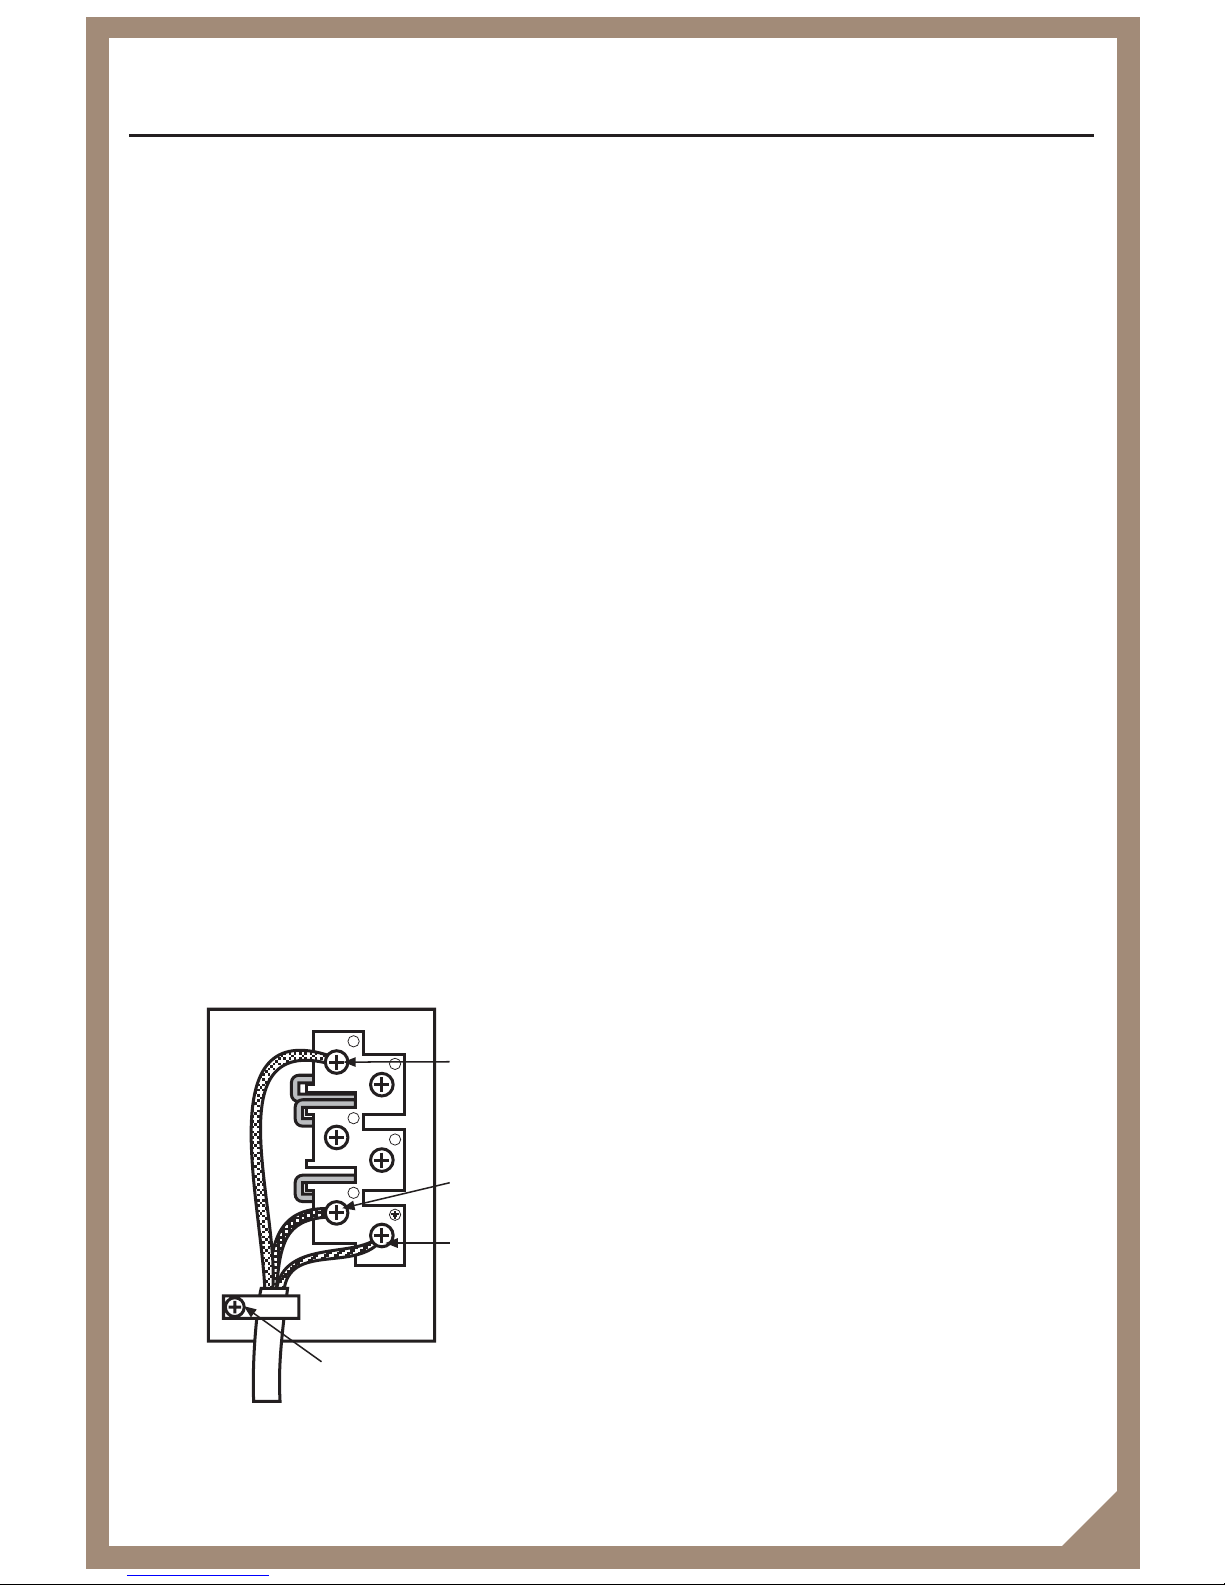
Step 2: Connect to the electricity supply
WWaarrnniinngg:
:
This appliance must be earthed.
The appliance must be installed by a competent electrician using a double pole
control unit of 32 ampere minimum capacity with 3mm minimum contact
separation at all poles.
We recommend that the appliance is connected by a qualified electrician, who will
comply with the AS/NZS 3000:2000. and local regulation.
1. Access to the mains terminal is gained by opening the terminal block cover at
the rear of the appliance (use a small flat-bladed screwdriver).
2. Connection should be made with suitable cable so as to comply with AS/NZS
3000:2000 and local regulations.
3. First strip the wires, then push the cable through the cable clamp in the terminal block cover.
4. Connect the cable to the terminal block, ensuring all cables and links are
securely fixed and then tighten the cable clamp cover.
5. Close the terminal box, ensuring that the cover is engaged on the locking tabs.
Minimum cable thickness
must be 6mm2.
Installation
54
1
2
3
4
5
Live
(Red or Brown)
Neutral
(Black or Blue)
Earth
(Green / Yellow
or sleeving)
Cable Clamp
Page 58
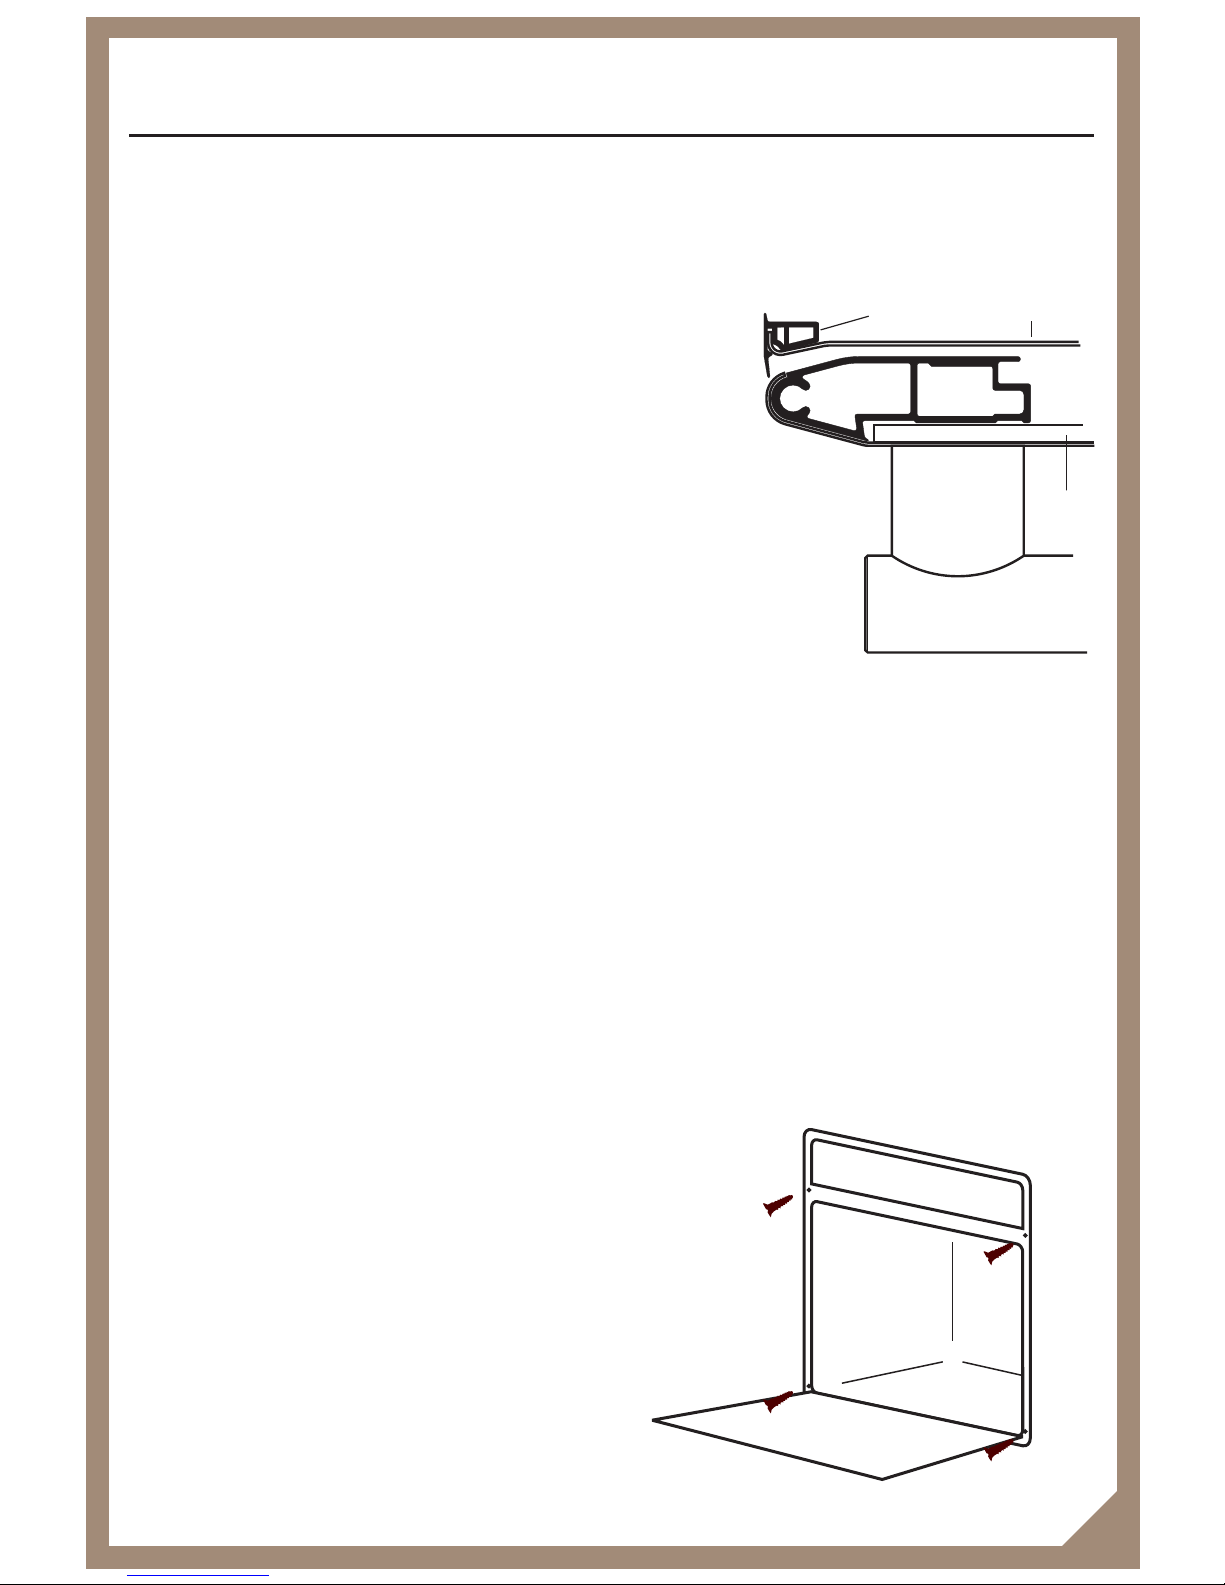
Step 3: Check edging strip
The edging strip is factory fitted to the front side edges of the appliance front
frame. This strip provides the cabinetry with extra protection from any escape of
heat.
When installing the product, ensure that the edging
strip is correctly located on the outer edges of the
front frame, before positioning and securing the
appliance to the cabinet.
When securing the appliance, the fixing screws provided are driven through the
edging strips into the cabinet - the seal will straighten up and sit flush to the
cabinet when the screws are fully home.
Step 4: Secure appliance into housing unit
Insert appliance into cabinet.
Note:
The unit housing the appliance must be appropriately fixed.
To secure appliance to housing unit
Note:
Ensure that the appliance is centrally located.
Take care not to damage the appliance or cabinet.
Insert appliance into cabinet.
To secure the appliance to the housing unit,
open the oven door and screw 4 screws - 2
at top, 2 at bottom - through the holes in
the front frame.
Installation
seal
front frame
door
handle
55
Page 59

Do not attempt to install appliance if there is damage to:
The door
(bent).
The hinges or latches
(loosened or broken).
The door seals and sealing surfaces.
The lead or plug. (If fitted)
Or if the appliance has been dropped.
Environmental Protection
We are committed to protecting the environment and operate an Environmental
Management System which complies with BS EN ISO 14001
Disposal of packaging
• All our packaging materials are recyclable and environmentally friendly.
• Please help us to protect our environment by disposing of all packaging in an
environmentally friendly manner.
• Please contact your local authority for the nearest recycling centre.
CCaauuttiioonn:
:
Packaging materials can pose a risk of suffocation - keep away from
children.
Installation Notes
i
56
Page 60
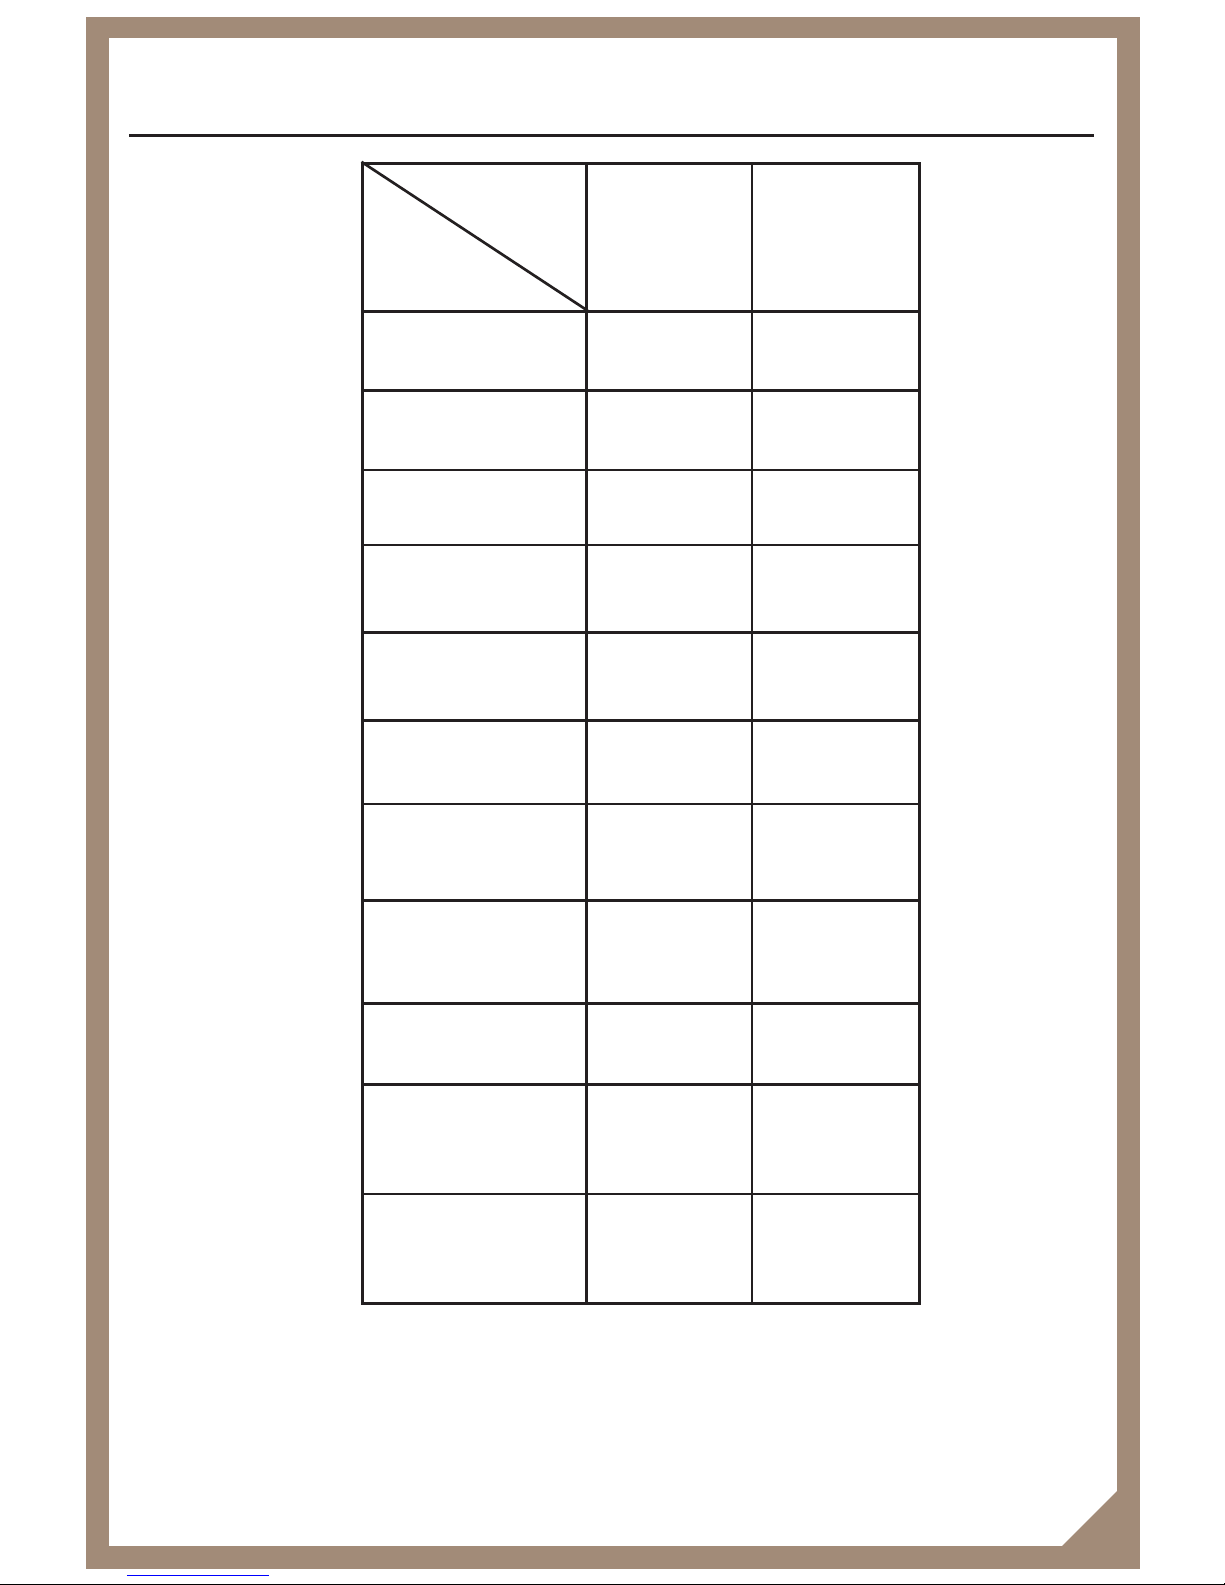
Maximum Load: 7360W
Electrical supply: 220 - 240V ~ 50Hz
Technical Information
57
Cavity
Element
Main Oven
@240v
Genus
Function
Base 1000W
Top 1000W
Single grill 1800W
Dual grill 2800W
Fan element 2300W
Cooling fan 37W
2.45GHz
Frequency
600W
Power output
Lights 10W x 2
Energy rating A
Country of
destination
AUS
Page 61
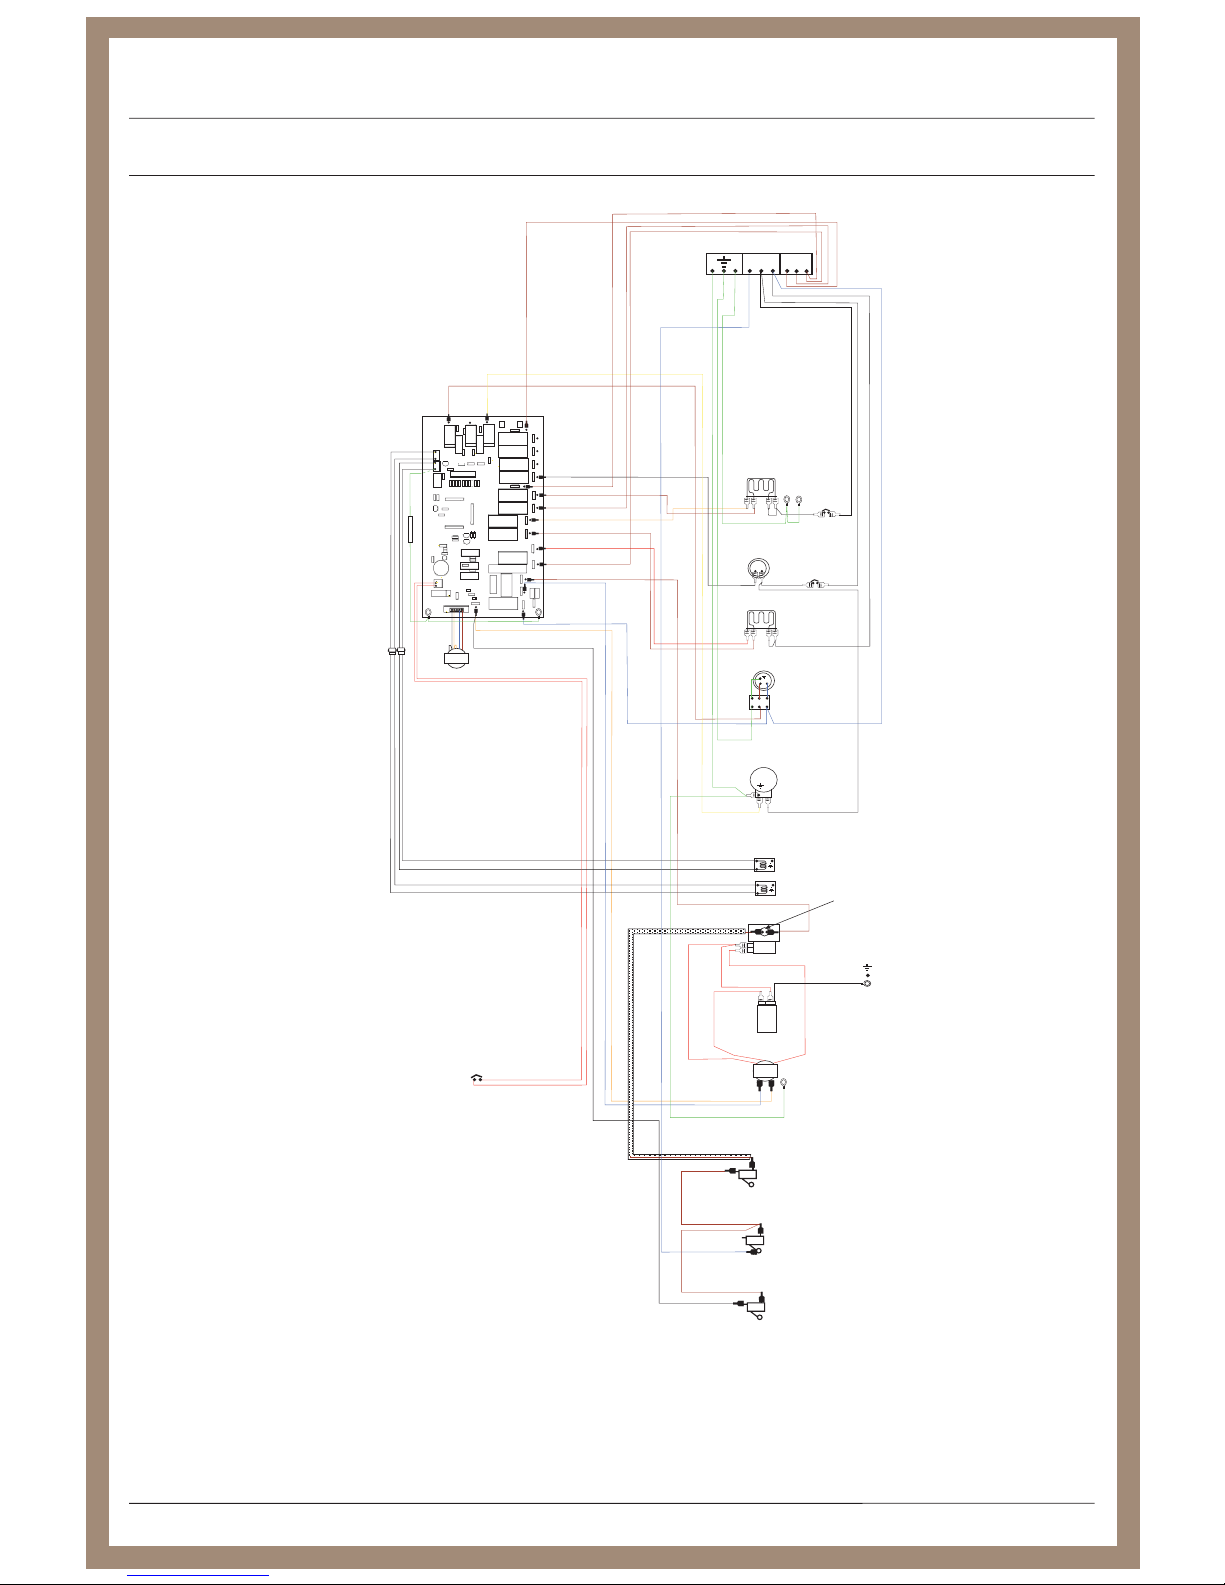
ISSUE A
STOVES 600 GENUS - AU
NO
NC
MAIN OVEN
GRILL ELEMENT
MAIN OVEN
BASE ELEMENT
MAIN OVEN
CONVECTION FAN
ELEMENT
MAIN
APPLIANCE
COOLING FAN
MAIN OVEN
FREQUENCY STIRRER
MAGNETRON
Main Oven
Lights
NO
NC
MICROWAVE
SECONDARY DOOR
SWITCH
MICROWAVE
PRIMARY DOOR
SWITCH
NO
NC
MICROWAVE
DOOR SWITCH
MONITOR
MAINS INLET
TERMINAL BLOCK
100°C
16Amp
Thermal
Cutout
Terminal Block
for Cooling Fan
MICROWAVE
TRANSFORMER
CAPACITOR
DIODE
ARRANGEMENT
EARTH POINT
CHASSIS
LN
TRANSFORMER
40 VA
Transformer
60 VA 10.5v
C2
D5
D4
R27
R2
R18
R17
R15
R14
C12 C11
D2
D1
Q2
Q1
K7
K8
K1 K2
K4K15
K12
K3
CT20
CT1
T1
T2
T3
CT3
CT4
FS1
R6
R1
R11
R7
R5
C1
C4
CT18 CT17
Q3
IC5
IC4
IC3
CT16
R26
R13
R12
R29
R9
R21
R8
R20
R19
R25
R24
R23
R22
IC1
R3
R28
Q5
CT2
CT5 CT6
CT9
CT7
CT13
CT23
CT8
CT11
CT10
CT24
CT19
CT14
CT50
CT25
CT150
CT22
D6
R4
D7
CT21
CT15
IC7
D3
K9
C7
C6
C8
L1
FS2
K5
IC6
IC2
R10
C17
Q4
C13
R16
C3
C5
CT29
L120°C
16Amp
Thermal
Cutout
L70°C
16Amp
Thermal
Cutout
L70°C
16Amp Fan Stall
Centre Duct
Thermal Cutout
Green 200mm
Page 62

NOTES
Page 63

NOTES
Page 64

Glen Dimplex Australia, Unit 2, 205 Abbotts Road, Dandenong South, Victoria 3175
Australia
e-mail: [email protected]
web: www.glendimplex.com.au
08 27316 01 © 10.2007
Built In Genus
Model Names: Genus 600
Contact Us
Calling for a service
If you should experience any problems with your cooker please contact your retailer or
place of purchase.
Important note:
Service work is to be conducted by authorised persons only. It is also adviseable that
your cooker is checked regularly and maintained in good condition. An annual maintenance is recommended.
Always check the instruction book before calling a service agent to make sure you have
not missed anything.
Glen Dimplex Australia Pty Ltd Customer Care:
Tel: 1-300-556-816
Before you contact a service agent, make sure that you have the following information to
hand:
Model Number
Serial Number
Date of Purchase
Postcode
 Loading...