

Page 1
Page 2

Our Warranty
Should you need it . . . .
Inside the paperwork which has come with this appliance,
there is a leaflet and card explaining the terms of our
extended warranty and guarantee.
In order to apply for our five year guarantee, simply fill in
the details on the card and post it off, this will register your
appliance.
Should you wish to take out extended warranty, please fill
in the details on the leaflet and post this off to:
PO Box 33, Springwood, Queensland,4127
If your appliance is covered by the warranty and guarantee, you will not be billed for work undertaken should your
appliance be faulty, terms and conditions do apply, so
please read through the literature carefully.
Please ensure that you have available your appliances
model number and serial number, there is a space at the
back of this book for recording that information.
Page 3

1
Introduction . . . . . . . . . . . . . . . . . . . . . . . . . . . . . . . . . . . . . . . . . . . . . . . . . 2
Be Safe - Not Sorry. . . . . . . . . . . . . . . . . . . . . . . . . . . . . . . . . . . . . . . . . . . . 3
Using the Hob. . . . . . . . . . . . . . . . . . . . . . . . . . . . . . . . . . . . . . . . . 4
Your induction hob . . . . . . . . . . . . . . . . . . . . . . . . . . . . . . . . . . . . . . . . . . . . 4
How induction works. . . . . . . . . . . . . . . . . . . . . . . . . . . . . . . . . . . . . . . . . . . 6
How to use the induction hob cooking zones . . . . . . . . . . . . . . . . . . . . . . . . . . 7
Safety . . . . . . . . . . . . . . . . . . . . . . . . . . . . . . . . . . . . . . . . . . . . . . . . . . . . . 9
Choice of pans. . . . . . . . . . . . . . . . . . . . . . . . . . . . . . . . . . . . . . . . . . . . . . 10
Cooking with your induction hob . . . . . . . . . . . . . . . . . . . . . . . . . . . . . . . . . 12
Cooking guide . . . . . . . . . . . . . . . . . . . . . . . . . . . . . . . . . . . . . . . . . . . . . . 14
Care & cleaning . . . . . . . . . . . . . . . . . . . . . . . . . . . . . . . . . . . . . . 15
Cleaning . . . . . . . . . . . . . . . . . . . . . . . . . . . . . . . . . . . . . . . . . . . . . . . . . . 15
Care of your induction hob . . . . . . . . . . . . . . . . . . . . . . . . . . . . . . . . . . . . . 16
Troubleshooting . . . . . . . . . . . . . . . . . . . . . . . . . . . . . . . . . . . . . . 17
Installation Instructions . . . . . . . . . . . . . . . . . . . . . . . . . . . . . . . . . 18
General information . . . . . . . . . . . . . . . . . . . . . . . . . . . . . . . . . . . . . . . . . . 18
Choosing your installation . . . . . . . . . . . . . . . . . . . . . . . . . . . . . . . . . . . . . . 19
Fitting into worktop . . . . . . . . . . . . . . . . . . . . . . . . . . . . . . . . . . . . . . . . . . . 20
Connect to the electricity supply . . . . . . . . . . . . . . . . . . . . . . . . . . . . . . . . . . 22
Technical Data . . . . . . . . . . . . . . . . . . . . . . . . . . . . . . . . . . . . . . . 23
Stoves Customer Support . . . . . . . . . . . . . . . . . . . . . . . . . . . . . . . 24
Please keep this handbook for future reference or for anyone else
who may use the appliance.
CONTENTS
Page 4

2
Thank you for choosing a
Stoves by Eurolec appliance
We hope the following information
will help you to quickly familiarise
yourself with the features of the
appliance, and to use it successfully
and safely.
Our policy is one of constant
development and improvement.
Strict accuracy of illustrations and
specifications is not guaranteed.
Modification to design and materials
may be necessary subsequent to
publication.
Your 1st year guarantee
To fulfil the conditions of your guarantee,
this appliance must be correctly
installed and operated in accordance
with these instructions, and only used
for normal domestic purposes.
Electrical connection
Please refer to installation instructions
for electrical connection.
In your own interest, and that of safety,
make sure that the installation is carried
out by a competent person.
Disconnection of electric appliances
should always be carried out by a
competent person.
Warning: This appliance must be
earthed.
Environmental Protection
We are committed to protecting the
environment and operate an
Environmental Management System.
Disposal of packaging
• All our packaging materials are
recyclable and environmentally
friendly.
• Please help us to protect our
environment by disposing of all
packaging in an environmentally
friendly manner.
• Please contact your local authority
for the nearest recycling centre.
Caution: Packaging materials can
pose a risk of suffocation - keep away
from children.
Before use
Please read the instructions in this
handbook before using or installing
this appliance.
Make sure that all packaging is
removed before installation.
Before using the hob for the first time,
apply a thin coating of cleaner
conditioner to the hotplate glass, and
polish the glass surface with a clean
dry cloth. Follow the instructions given
in the “Care & Cleaning” section.
INTRODUCTION
Page 5

3
Keep children away from the
vicinity of the hob when you
are cooking.
Cooking will be a pleasure if you follow
a few rules and look after your hob.
• Use pans with a flat base which are
stable in use, and avoid using any
old misshapen pans or any pan
which is unstable when placed on
a flat surface.
• Never
leave fat or oil unattended
on an operating hotplate.
• Keep all flammable materials
away from the hob.
• Do not place aluminium foil on the
hob surface.
• When cooking, turn pan handles
to a safe position, so they are out
of reach of children, not overhanging the appliance and cannot
be caught accidentally.
•
Caution: Do not use the hob if
the glass is cracked, as electrical
parts are directly beneath. To
avoid the possibility of electric
shock, disconnect the appliance
from the electricity and arrange a
Service call.
Do not use any part of the hob
before the vitro-ceramic top has
been changed.
• Commercial simmering aids
should not be used as they create
excessive temperatures that can
damage the surface and may
cause a hazard.
• The vitro-ceramic surface is very
tough, but it is not unbreakable;
don’t bang pans down onto it.
• Pan bases which are very rough may
trap and carry substances which
may mark or scratch the hob.
• Avoid friction; over a period of
time, this may damage the pattern
on the vitro-ceramic top.
• Nothing should ever be left lying
on the hob.
• Do not store
CLEANING PRODUCTS or
FLAMMABLE ITEMS in the unit under-
neath your cooking hob.
• Metallic objects such as knives,
forks and spoons should not be
placed on the hob surface, they
are likely to get hot.
• When plugging electric appliances
into sockets near the hob, make
sure that the cable does not come
into contact with a heating zone.
When you have finished
cooking check that all hotplate
controls are switched off.
BE SAFE - NOT SORRY
Page 6
4
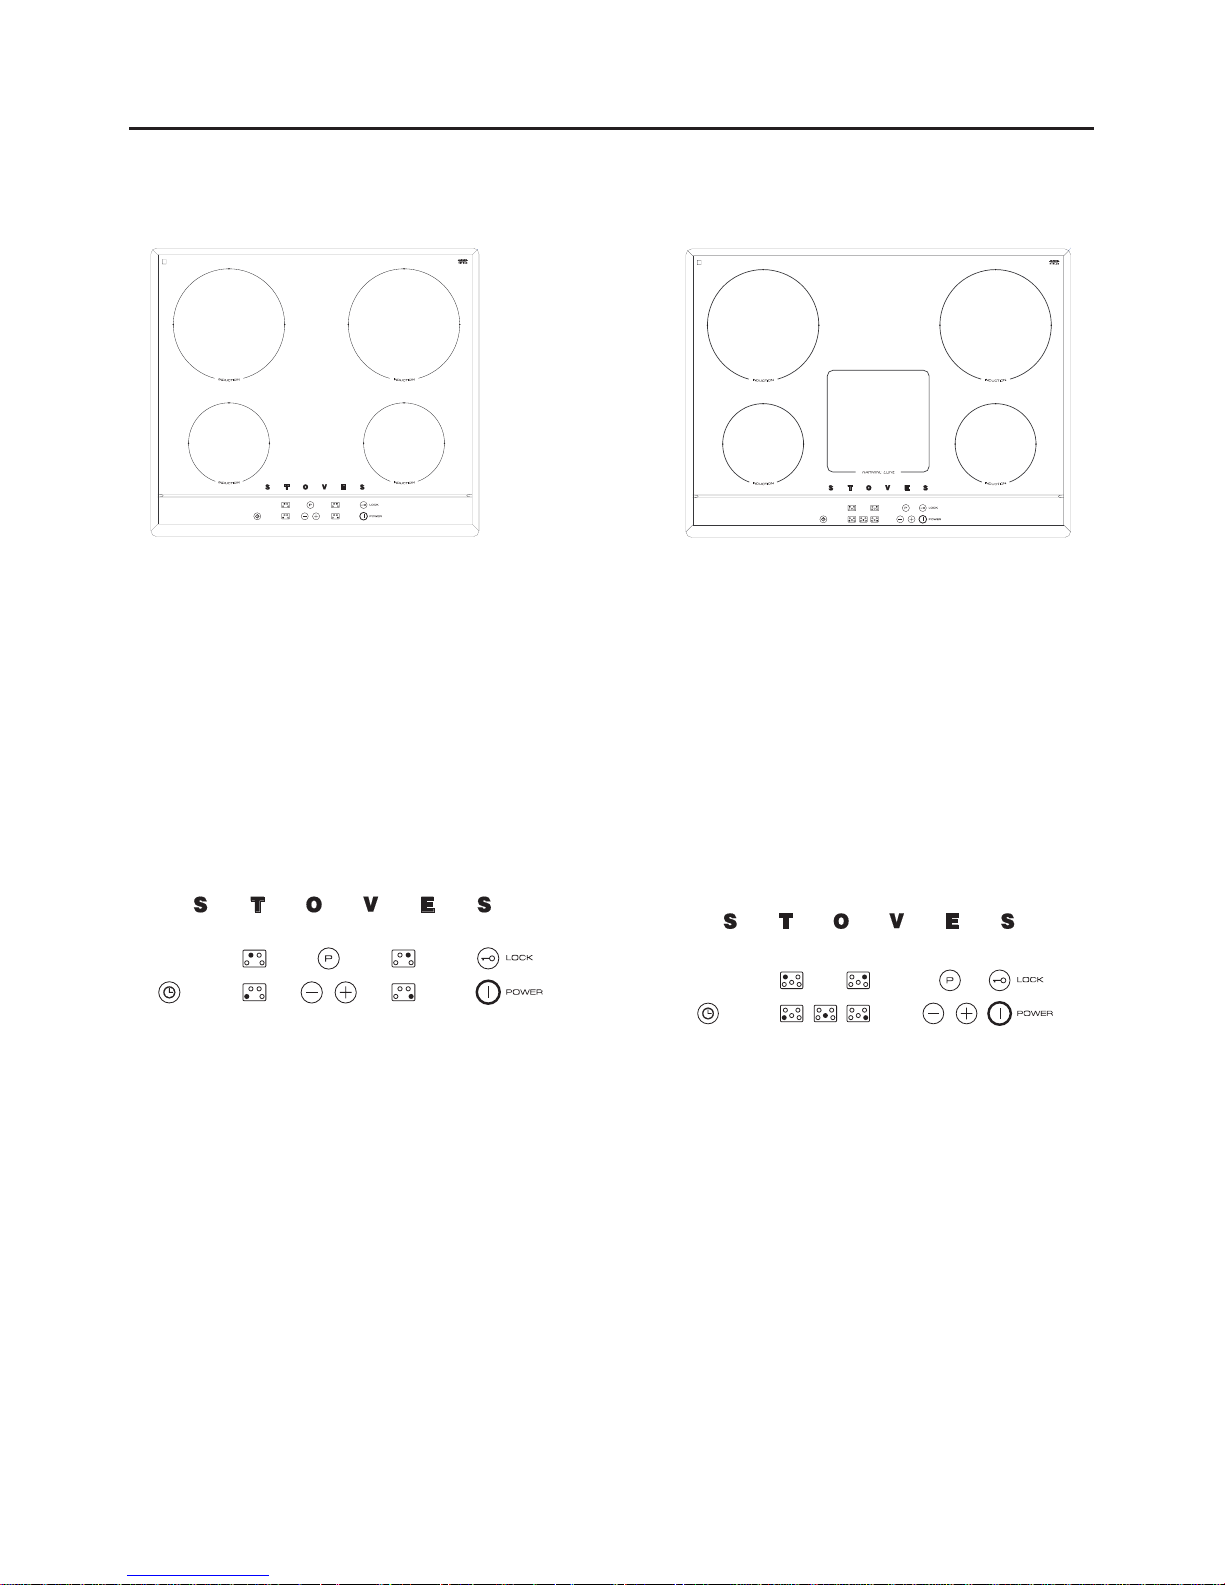
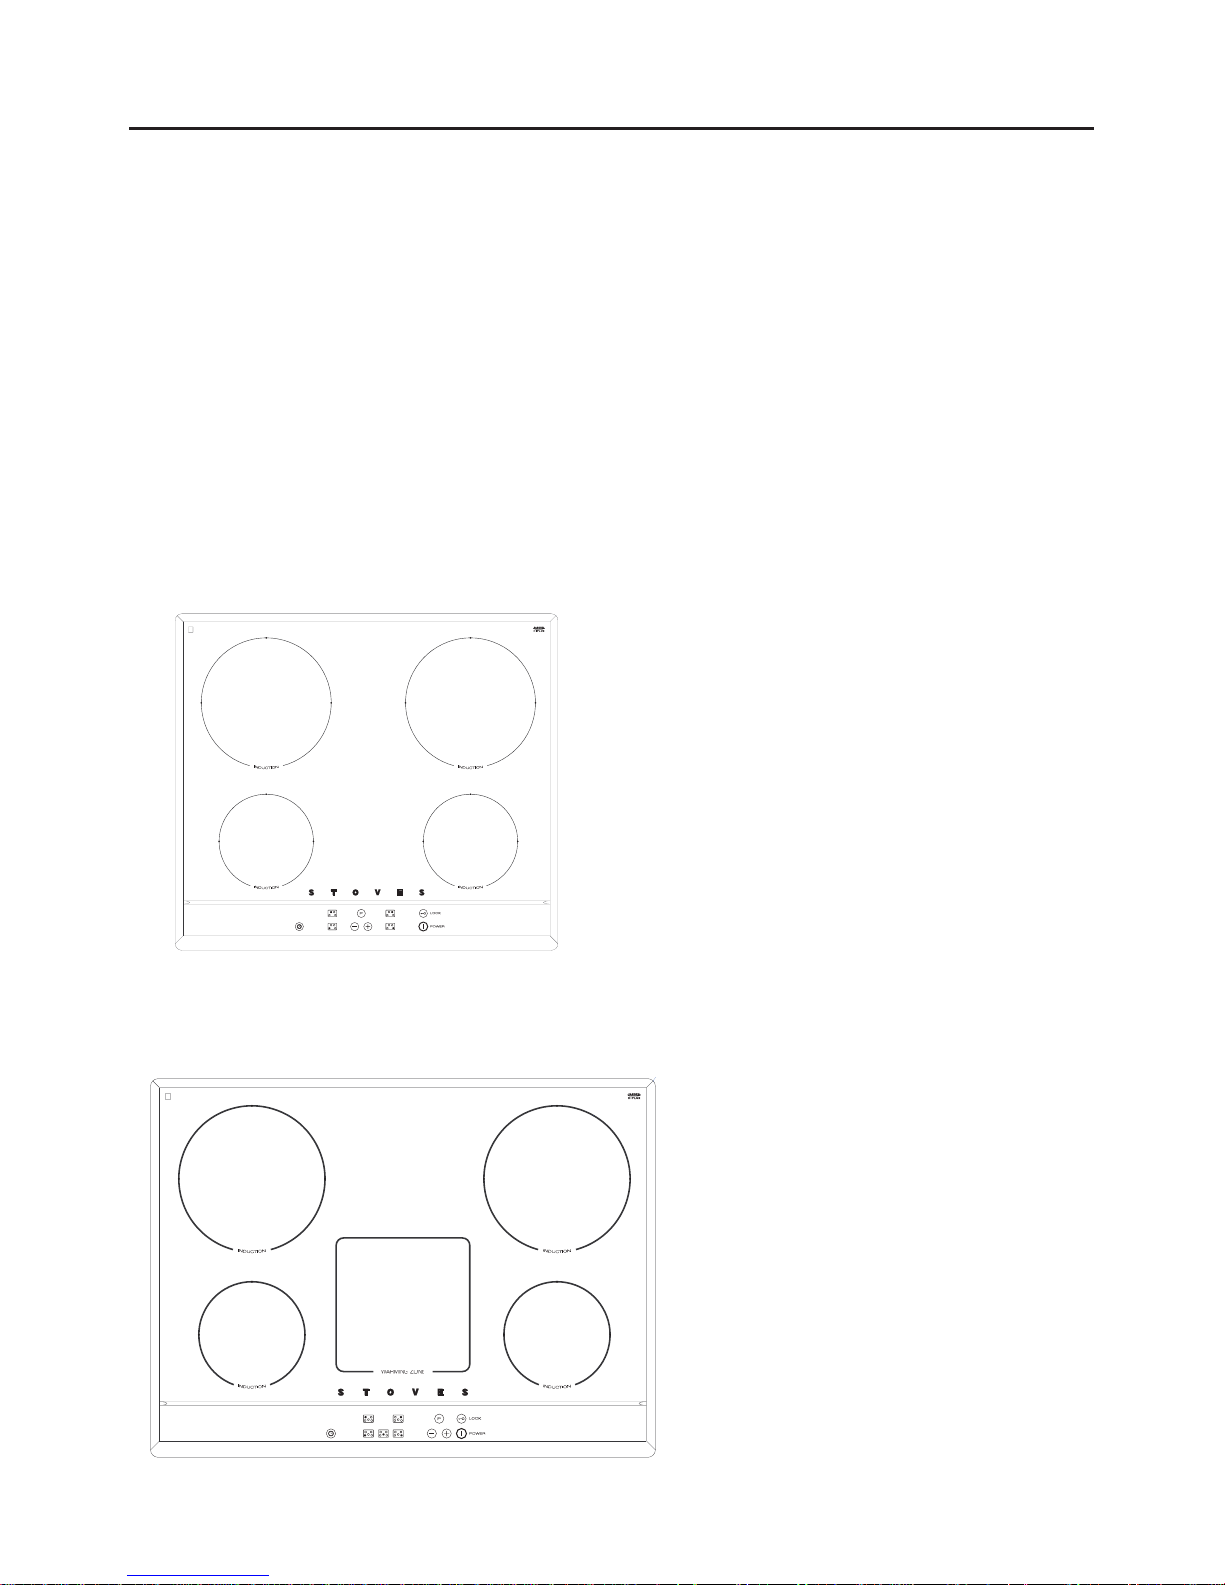
Your induction hob
600CTI
Graphics detail
700CTI
Graphics detail
USING YOUR HOB
Page 7
USING YOUR HOB
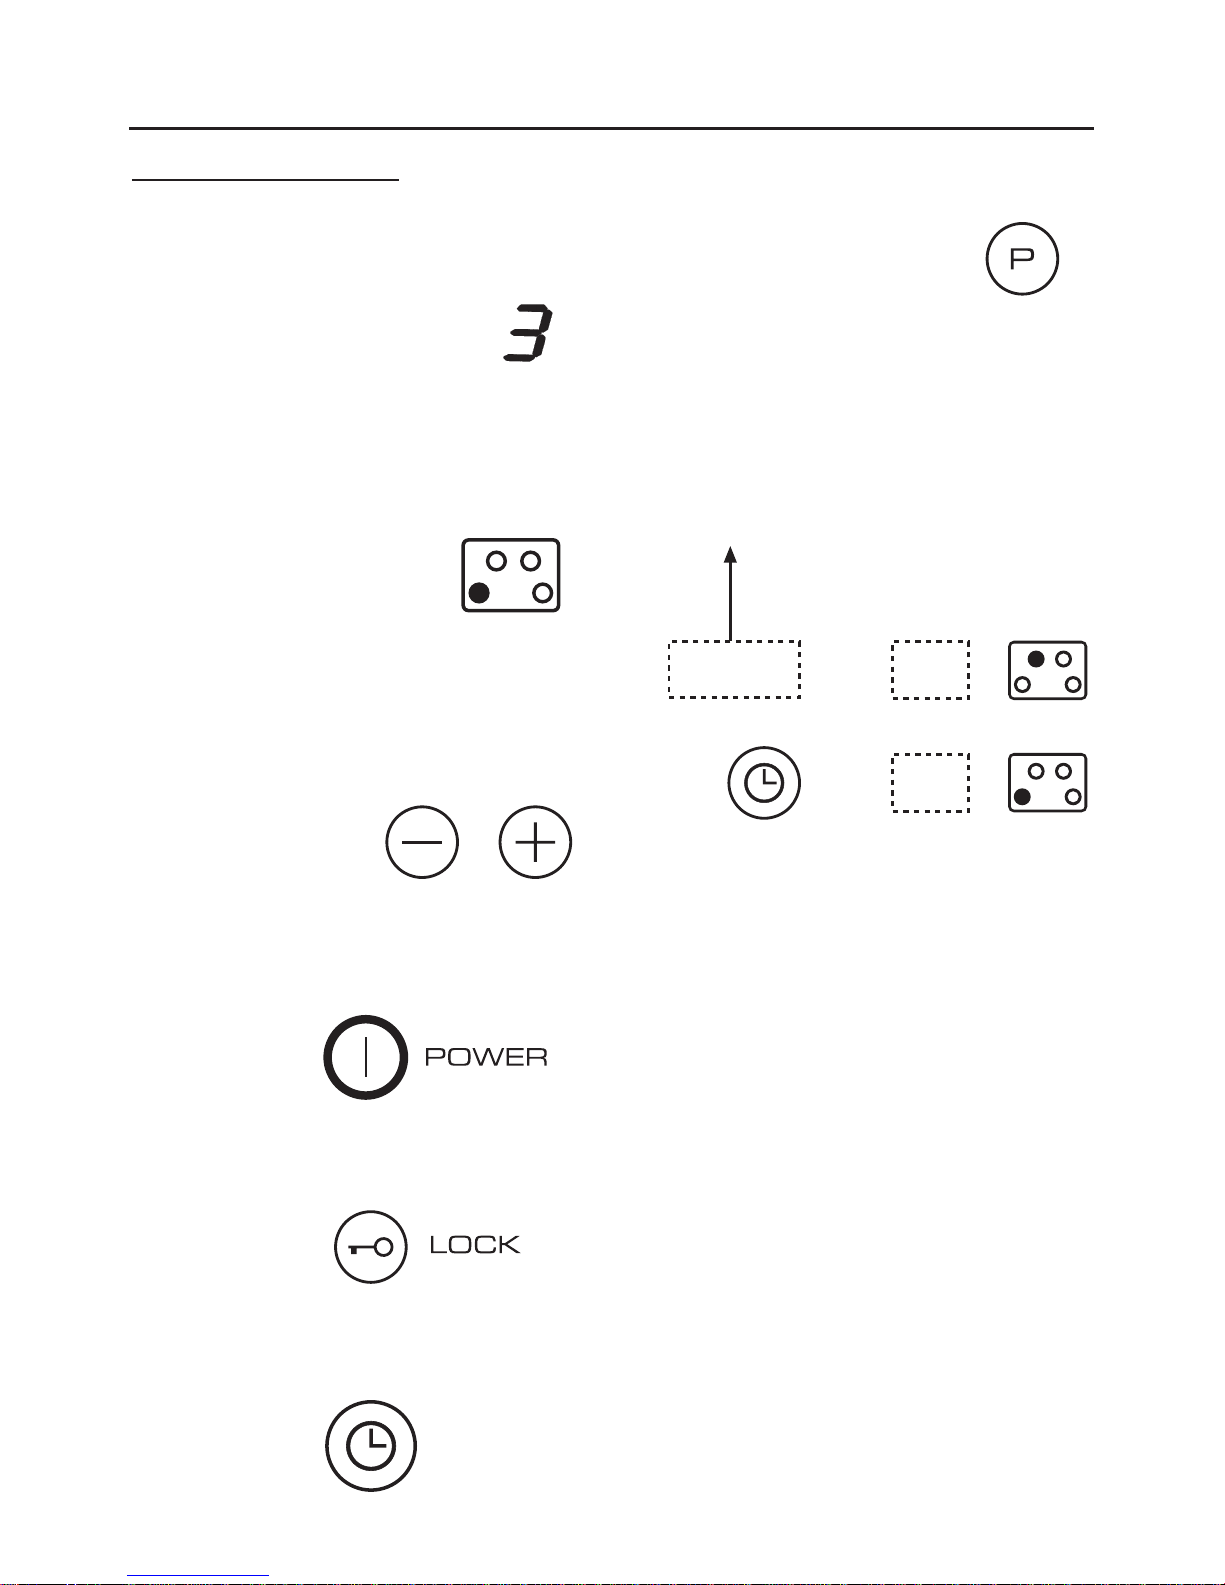
Your Induction hob
Indicator (1 to 9) of power level
selected for each heating zone.
Symbol indicating the heating zone on
the hob.
Adjustment of power (+ or -) for each
heating zone.
On/off control
Hob lock sensor
Timer sensor
Boost ‘Power’ Function
The illustration below shows where the
power indicators and timer indicator
are on your hob (shown as dotted
boxes)
5
Timer display
Page 8
6
How induction works
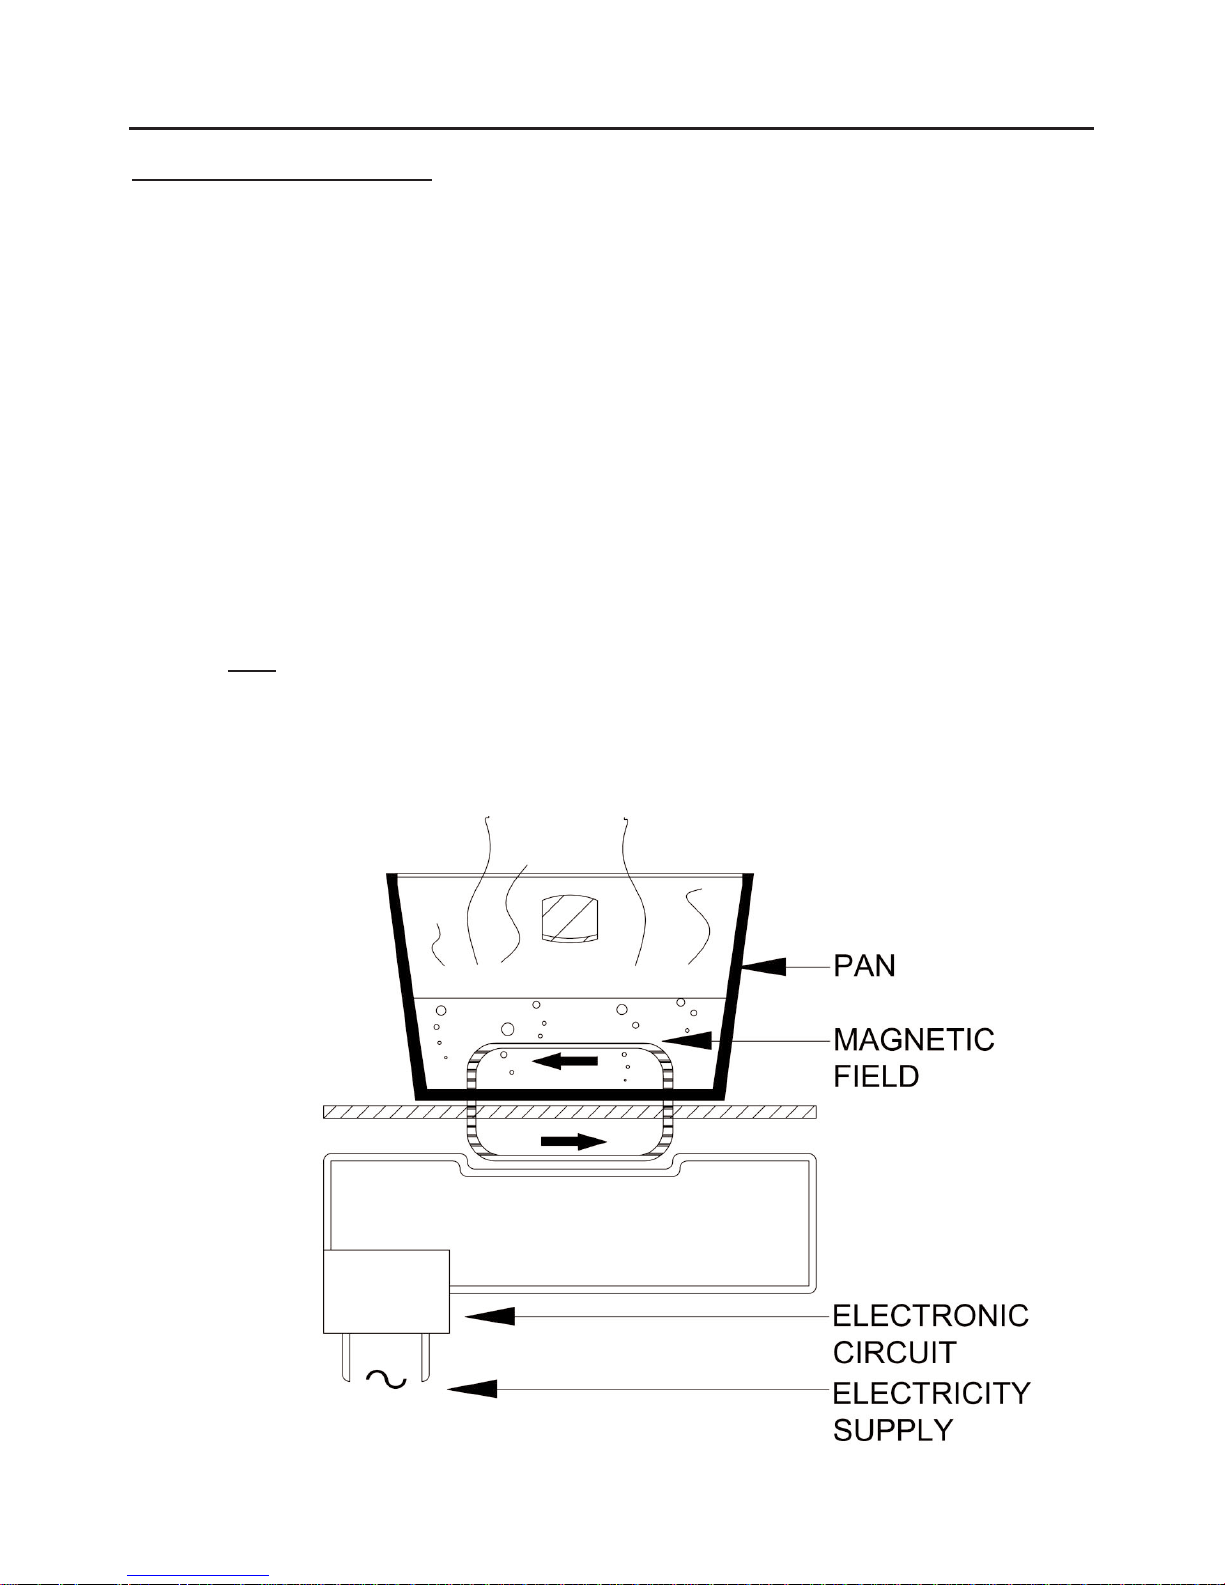
Principle of induction
“Induction” currents instantly heat the
pan*, which then passes its heat on to
the food it contains.
*Pans in enamelled steel, cast iron or
stainless steel are suitable for use on
an induction hob.
With an induction hob, the heat
necessary for cooking the food is
produced directly inside the pan; the
vitro-ceramic glass hardly heats up at
all, as it only
receives the heat from the
pan placed on it.
When compared with conventional
cooking hobs, your induction hob is;
• More economical - when a pan
is lifted off, the zone stops heating
immediately.
• Quicker - 3000W of power is
immediately available at the
heating zone.
• More precise - the hob reacts
immediately to your instructions.
• Safer - the temperature of the
glass top remains relatively low.
USING YOUR HOB
Page 9

7
How to use the induction hob
cooking zones
Switching on
Look for the controls which correspond
to the zone where you have put
your pan.
• Press the key.
The power indicator shows 0, next
to all the heating zone selectors
and the hob is switched on.
• Use the heating zone selectors to
choose which zone you wish to
use. Ensure that your pans are in
place first.
• Adjust the heating power you
want using the
+ and - key.
After you have pressed the on/off
control key, if you do not
touch any sensor within 10 seconds, the instruction will be automatically cancelled.
• Adjust the power during cooking.
You can adjust the heating power
from 1 to 9 at any time during
cooking using the + and - keys.
Please note:
Next to the power indicator is a ‘.’
this will flash when a zone has not
been selected. When the ‘.’ is static
a zone has been selected and the
power levels can be adjusted.
You must make sure you have selected a zone before you start, otherwise
you cannot make any adjustments.
The Zone Indicator (Timer)
On the timer there are four lights at
the corners, these correspond to you
heating zones. As with the power
indicators, these will flash when not
selected and remain static when
selected. See the programming information on the following page for
more details.
The Power Booster
To use the power booster for rapid
heating, touch the Booster sensor ‘P’,
the power indicator will display a P.
The booster function stops after 4 minutes automatically. While the booster
is on the heating zones at the front of
the hob will only reach 600W, this is
to prevent over heating.
Turning a heating zone off
There are two ways to switch off the
Induction hob:
• Touch the ‘-’ sensor until the display shows ‘0’
• Touch the ‘+’ and ‘-’ sensors
together.
Note:
The hob is equipped with 4 residual
heat indicators. The display shows ‘H’
if the temperature of that heating zone
exceeds 60˚C.
This prevents the risk of burning.
Although there may be slight differ-
ences between both types of hob i.e.
graphics, the principles of operation
remain the same.
USING THE HOB
Page 10

8
Programming a cooking
duration
select the timer key to access the
programming function. The corresponding indicator lights flashes.
Press the ‘+’ key to display the
required cooking duration (max 99
mins)
Press the timer key to confirm the
programming operation.
The timer starts counting down immediately. An audio signal sounds at the
end of the cooking time and the heating zone switches off. Press the off
key to switch off the appliance.
Multiple programming
It is possible to programme more than
one heating zone at a time. Simply
repeat the above steps on whichever
zones you wish to use.
Note: The indicator light will remain lit
once the duration has been confirmed.
Once a further zone is programmed
and confirmed, that will remain lit and
the indicator light for the zone programmed first will begin to flash. This
is not an error, continue with cooking, or programming.
To see how long a zone has, select the
zone you wish to look at and touch the
sensor. The indicator light will remain
lit and the time remaining will show.
An audio signal will sound once the
various times have counted down and
the zone will switch itself
off.
The warming zone
700CTI only
The 700CTI hob incorporates a warming zone which is ideal for keeping
food items on an extremely low heat to
prevent boiling over or burning.
To operate the warming zone touch
the warming zone symbol.
The display above will show ‘1’ to
indicate that the zone is active.
Place you pan on top.
To switch off the warming zone, simply touch the warming zone symbol
again. The display will show ‘H’ alerting you that it may be hot to touch
with any residual heat. Alternatively,
the zone can be turned off when the
power symbol is touched to turn off the
hob.
USING THE HOB
Page 11

9
Safety
Regularly check that there is nothing
(cloth, paper, etc) which might block
the air inlet underneath your hob (see
section “Installation Instructions”).
Hob Lock
For your safety this hob has fitted with
a hob lock. To activate touch the sensor marked:
To unlock, simply press the senor
again.
Audio Warning
An audio signal sounds when your
appliance detects a problem on the
control panel, such as:
An object (pan, cover, etc) placed
on the control panel for more than ten
seconds.
A spill on the control panel
Prolonged pressure on the control
panel.
The hob will also switch itself off.
To reset, simply touch the power on
sensor.
Detection of an object or a pan
on the heating zone
A small object - such as a fork, a
spoon or even a ring - placed on a
hob cooking zone on its own is not
detected as a pan.
The display flashes and no heating
power is supplied.
The security system acts in the same
way when it detects a pan which is not
suitable for use on an induction hob.
If you are fitted with a pacemaker
or an active implant
The functions of the hob comply with
the applicable standards on electromagnetic interference
Your induction cooking hob thus
complies fully with the statutory
requirements (Directive 89/336/EEC).
It is designed to not interfere with the
functioning of other electrical equipment
as long as these also comply with the
same regulations.
Your induction hob generates magnetic
fields in its immediate vicinity.
So that there is no interference
between your cooking hob and a
pacemaker, the pacemaker must be
designed in compliance with the
appropriate regulations.
In this respect we can only guarantee
the compliance of our own product.
You can ask the manufacturer or your
doctor about the compliance or any
incompatibilities of your pacemaker.
USING THE HOB
Page 12

10
Choice of pans
The most suitable pans for induction
cooking are listed below.
Note : A pan with a base not absolutely
flat may still be suitable, as long as it
is not too distorted.
Choose a pan bearing the logo
on its base or packaging to be sure
that it is perfectly suitable for use on
your hob under normal conditions of use.
You can also find a range of pans
suitable for induction cooking by
looking in quality kitchen shops. Look
for the wording and symbol “suitable
for induction”.
You probably already have some
suitable pans:
• Pans in enamelled steel, with
or without non-stick coating
For example; cooking pot, chip pan,
frying pan, meat grill pan, etc.
•
Cast iron pans
To avoid the risk of scratching the
glass top of your hob, use pans
with an enamelled base, or avoid
sliding the pan across the glass
surface.
• Stainless steel pans suitable
for induction
Most stainless steel pans are suitable
for induction cooking (saucepan,
pot, frying pan, chip pan, etc).
Some stainless steel pans have
copper bases which are usually
not
suitable.
• Aluminium pans with a
special base
Choose pans with a thick base, as
this ensures more even cooking (the
heat is more evenly distributed).
Incompatible pans
Glass, ceramic or earthenware pans,
aluminium pans (unless they have a
special base), copper pans, some nonmagnetic steel pans.
The pan test
Because of its leading-edge technology,
your induction hob is able to “recognise”
most pans.
Place your pan on a heating zone on
power setting 4;
• If the indicator stays fixed, your
pan is compatible.
• If the
indicator flashes, the pan
cannot be used for induction
cooking.
USING THE HOB
Page 13

11
Advice for selecting suitable pans
• When buying new pans, always
refer to the pan manufacturer’s
guidelines.
• For best results and energy
efficiency it is important to use flat
bottomed pans of the correct type.
• Always use pans which are large
enough to prevent spillage,
especially for deep frying, making
jam or cooking with sugar or syrup
based substances.
• Trivets, round based woks, heat
diffuser pads and over-sized pans
are not recommended.
• Avoid using double pans, or old
misshapen pans which are unstable
and dangerous.
Looking after your pans
Stainless steel pans
Abrasive products should never be
used on stainless steel pans. They
should be washed with a sponge.
A
PPEARANCE OF WHITE MARKS:
Cause: salt added to cold water.
Solution: add salt when the water
boils.
A
PPEARANCE OF SPECKS:
Cause: hard water.
Solution: boil diluted vinegar in the
pan, then rinse and dry.
B
URNED FOOD STUCK TO THE BOTTOM OF
THE PAN
:
Cause: temperature too high.
Solution: leave the pan to soak, or boil
soapy water in it (1 part washing-up
liquid to 10 parts of water).
Cast iron pans
Cast iron pans should only be cleaned
with a sponge or nylon brush or a nonabrasive washing-up product.
Wipe with a little vinegar to regain the
pan’s shine.
This also works for colour-enamelled
cast iron. For “matt black” items, use
vinegar instead of bleach, then oil
carefully and wipe with kitchen roll.
USING THE HOB
Page 14

12
Cooking with your induction hob
• Do not leave an empty pan on a
heating zone.
• Pans should be placed in the
centre of the heating zone.
• Never heat up a sealed tin of
food, as it may explode.
•
After use, please ensure that
you switch the appliance
off. Do not rely on the pan
detector.
• When you use a pan with a nonstick coating (eg; Teflon) with little
or no fat, heat the pan first for a
moment on setting 6 or 7.
• We recommend that you do not
put metal cooking utensils, cutlery,
knives or other metal objects on
the hob, as they could become hot
if they are near a cooking area
which is in use.
• It is perfectly possible to use a pan
with a smaller diameter than that of
the ring marked on the vitro-ceramic
glass (note that we recommend a
minimum 5” pan base diameter);
there will be no loss of energy as
is the case with conventional
cookers (electricity and gas).
• Nothing should ever be left lying
on the hob.
•
Do not
use the hotplate surface for
storage.
• Lift pans onto and off the hob,
rather than sliding them across
the surface, to avoid marks and
scratches.
• As soon as the water boils, turn the
cooking zones down to a lower
setting; this will help prevent pans
boiling over.
•
Do not
use the vitro-ceramic glass
surface as a work surface or
chopping board, as it will damage
it, and if any plastic utensils come
into contact with a warm hob, they
may melt onto it.
• As pans are on a smooth surface,
they will move easily if knocked
accidentally; turning pan handles
so they are not overhanging the
edge of the hob, will help prevent
this happening and keep them out
of the reach of children.
• Be careful when cooking foods in
salted water, or foods containing
large amounts of sugar or syrup, if
they are spilt onto hot areas of the
hob they may damage the glass.
Wipe any spillage as soon as
possible.
Use pans which are large enough
to avoid overflows onto the vitroceramic glass hob surface.
USING THE HOB
Page 15

13
Cooking tips
• Green vegetables (spinach, broccoli,
sorrel, etc) or vegetables rich in
sulphur compounds (cabbage,
onions, etc) should be cooked
without a lid in plenty of boiling
water; they will cook more quickly,
and will keep their green colour
(some vegetables only), vitamin
and minerals content.
• Pasta, rice, cereals, etc absorb
water during cooking and increase
in volume; cook them in plenty of
boiling salted water in order to
dilute the starch they contain.
• Make sure you use a sufficiently
large pan to avoid boiling over; the
temperature setting may need to
be reduced to maintain a simmer.
• Mushrooms should be poached in
a small quantity of boiling water,
with salt, butter and lemon juice.
• When liquids boil, reduce the
control setting to maintain a simmer.
• Vegetables will cook quicker if
chopped in smaller pieces.
Aluminium foil
When cooking, never use kitchen foil
and never put items wrapped in
kitchen foil straight onto the hob.
The aluminium kitchen foil may melt
and do irreparable damage to your
appliance.
USING THE HOB
Page 16

14
Cooking guide
For best cooking results, follow the
examples in the guide below, bearing
in mind that settings 8 and 9 are
maximum positions and should only
be used for deep frying and bringing
up to the boil quickly.
USING THE HOB
Preparations Very fast, Fast Medium Slow Simmering, Keeping
Frying Re-heating warm
9 8 7 6 5 4 3 2 1
Soups
THIN SOUPS 5
THICK SOUPS 4
Fish
COURT-BOUILLON 7
DEEP FRIED 5
Sauces
THICK, FLOUR-BASED SAUCES 3
BUTTERY SAUCES CONTAINING EGGS (Béarnaise, Hollandaise)
2
Vegetables
SPINACH 6 5
PULSES 3
BOILED POTATOES 4
CARROTS 6 5
SAUTÉ POTATOES 6 5
FROZEN VEGETABLES 4
Meat
THIN CUTS OF MEAT 9
FRIED STEAK 8
GRILLED MEAT (using cast-iron grill pan) 9
Deep frying
FROZEN CHIPS 9
FRESH CHIPS 9
Other types of cooking
PRESSURE COOKER 9 5 (ONCE PRESSURE HAS BUILT UP)
STEWED FRUIT 4
PANCAKES 9 8
CUSTARD 2
TO MELT CHOCOLATE 1
JAM 4
MILK 7
FRIED EGGS 7
PASTA 9 4
RE-HEATING GLASS JARS OF BABY FOOD (in a pan of water) 3
STEWS 4
RICE PUDDING 2
KEEPING FOOD WARM 1
Page 17

15
Caution: Any cleaning agent
used incorrectly may damage
the hob.
Some cooking operations generate a
considerable amount of grease. This,
combined with spillage, can become a
hazard if allowed to accumulate on
the hob through lack of cleaning. In
extreme cases this may amount to
misuse of the appliance and could
invalidate your guarantee.
Do not use caustic pastes, abrasive
cleaning powders, coarse wire wool,
products containing bleach or any
hard implements, as they will damage
the surfaces.
All user accessible parts of the hob
can be safely cleaned with a cloth
wrung out in hot soapy water.
Please note: Do not steam clean any
part of your hob
Cleaning
Never clean your hob while it is on.
Set all the controls to 0 first.
Do not use abrasive powder cleaners,
soap filled pads, metal wire, bleaches,
abrasive-backed sponge, bath stain
removers, or chemical oven cleaners;
all these product types will damage
the vitro-ceramic glass.
Use non-abrasive cream cleaners, with
an ordinary sponge or special sponge
suitable for delicate items.
The following recommendations will
help to keep the vitro-ceramic glass
surface bright and clean;
• Use a dampened paper towel
or clean damp cloth to apply a
small dab of cleaner conditioner
to clean each heating area.
• Use another paper towel or a clean
dry soft cloth to wipe dry, and then
polish the whole glass surface.
• To remove any stubborn marks or
heavy soiling, a non scratching,
mild cream cleaner may be used.
Alternatively, a “ceramic hob
scraper” may be used.
CARE & CLEANING
Page 18

16
Care of your induction hob
Before using the hob for the first time,
apply a thin coating of cleaner conditioner
to the vitro-ceramic glass, and polish
the surface with a clean cloth.
The conditioner gives a protective
covering to the vitro-ceramic glass
which not only makes the hob easier
to clean, but also ensures that you will
gain maximum life out of this product.
Occasional use will help prevent the
build up of mineral deposits which can
cause discolouration of the hob surface.
Discolouration of the hob
Do not use a dishcloth or dish sponge
to wipe the hob - this can leave a film
of detergent on the surface which will
discolour the hob next time a heating
area is used. Clean cloths kept for the
cleaning of the hob can be used.
Do not use too much cleaner
conditioner - only a thin coating is
required, any excess may burn on and
discolour the hob when it is next in use.
If persistent stains or marks remain on
the vitro-ceramic glass surface, it can
be cleaned using a mild cream
cleaner, or a ceramic hob scraper.
This will also remove any accumulated
salts or minerals before they have an
opportunity to discolour the vitro-ceramic glass.
Wipe clean with a damp paper towel
or clean damp cloth and re-apply
cleaner conditioner.
CARE & CLEANING
Page 19

17
The hob produces a smell the
first few times it is used
• Heat a pan full of water on each
zone for half an hour.
Pans make a noise during
cooking!!
• This is caused by vibration due to
the passage of energy from the
hob to the pan.
On a high setting this is quite normal
for certain types of saucepan. It
will not damage the hob.
The hob makes a slight clicking
sound
• This is caused by the distribution of
power between two heating zones
on the same side of the hob.
The top of the hob is always
warm (even when not in use)
• The electronic part of the hob, like
any other electronic equipment (TV,
transformer, etc), becomes warm.
The fan keeps working for a
few minutes after the hob has
been turned off
• To cool down the electronics.
Once a cooking zone has been
turned on, the indicators on the
panel keep flashing !!
• The pan you are using is not
suitable for induction cooking or is
less than 12cm (5”) in diameter.
The hob won’t work. The
indicators don't come on
• The electricity supply is not reaching
the appliance (faulty supply or
connection);
Check the fuses and the cut-out
switch.
• The electronic circuit is not working
properly;
Call Stoves Customer Support, or
your supplier.
When it is turned on, the
appliance cuts out
• The hob connection is faulty.
Check the connection and check
that the connection complies with
the appropriate standards.
When it is turned on, only one
side of the hob works
• The hob connection is faulty.
Check the connection and check
that the connection complies with
the appropriate standards.
TROUBLESHOOTING
Page 20
18
General information
INSTALLATION SHOULD ONLY BE
CARRIED OUT BY A QUALIFIED
INSTALLER OR ENGINEER.
Please keep to the following points
most carefully;
• The hob should not be fitted above
a washing machine, a fridge or a
freezer.
• Wall surfaces above the work
surface and in the immediate
vicinity of the cooking hob must be
heat resistant.
• Laminated surfaces and the adhesive
used for fixing them must be heat
resistant in order to avoid any
damage.
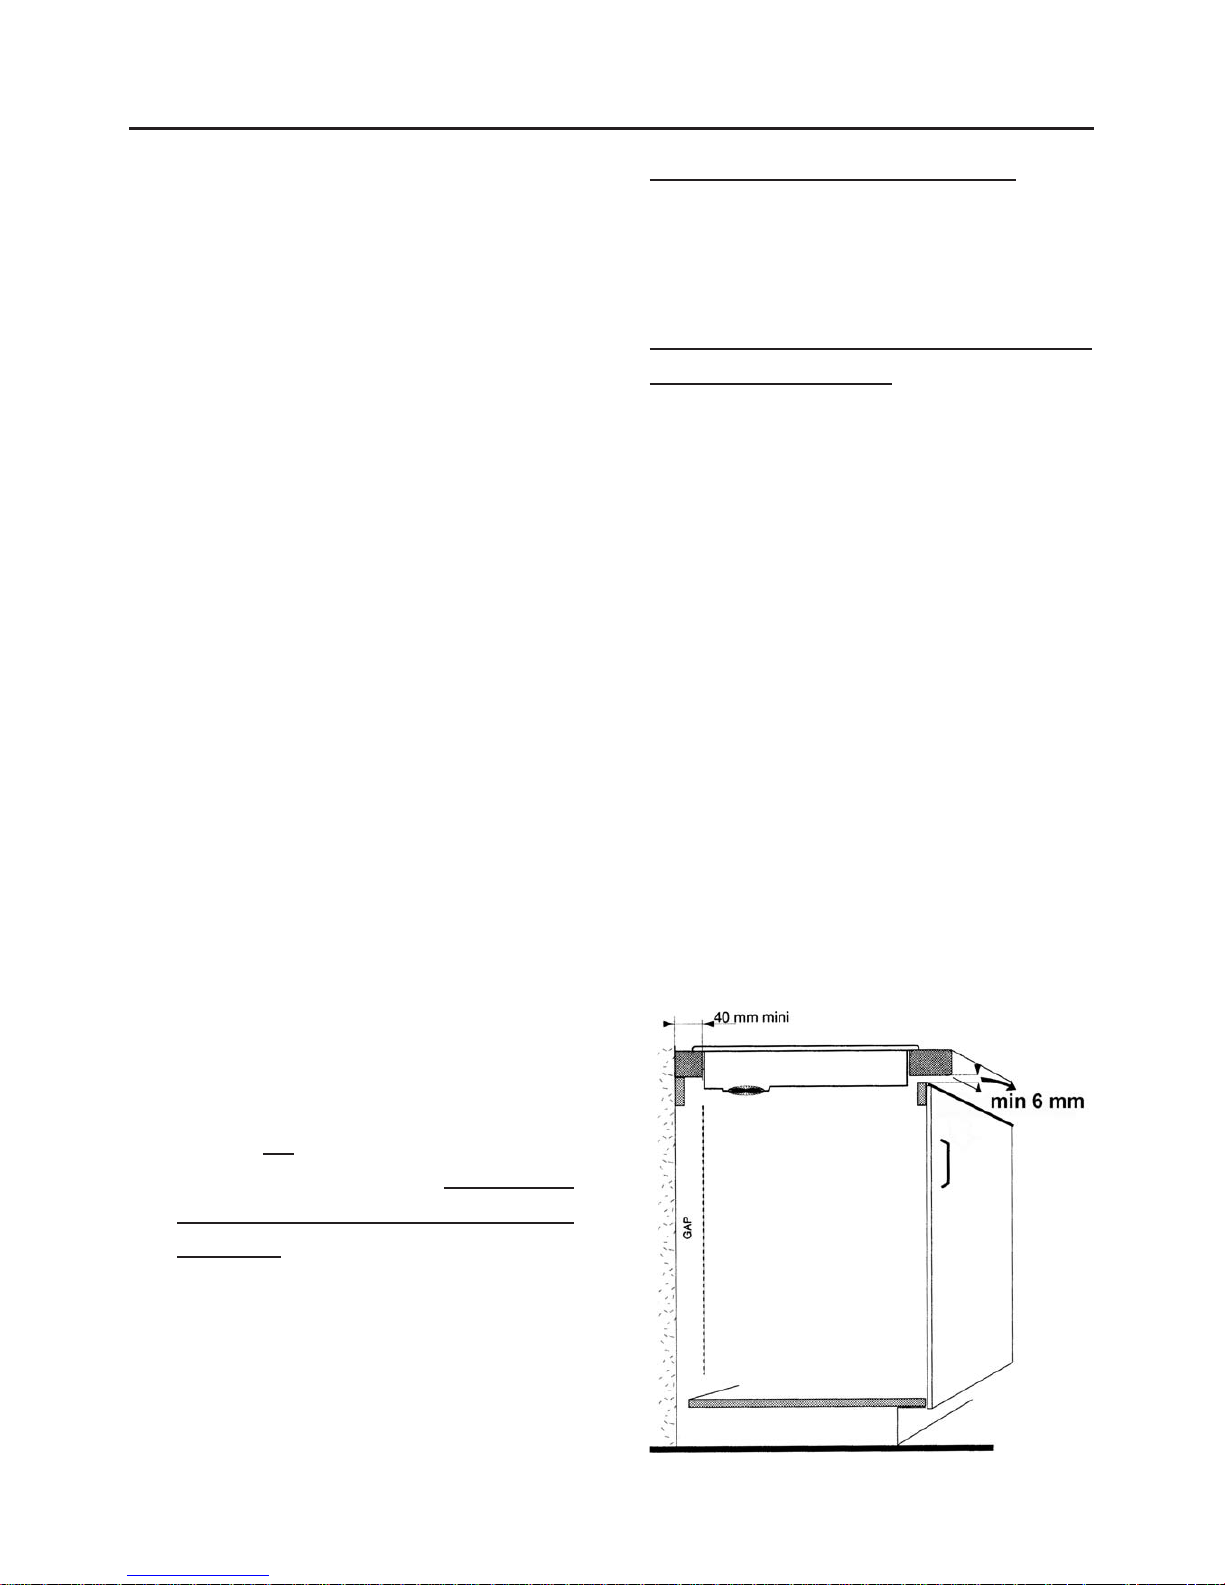
• The space for air circulation, located
underneath and at the back of the
hob improves its reliability by
ensuring that it will cool down,
however it has been fitted in.
We recommend that you install this appliance in a work top which is a minimum
38mm deep.
The hob can
be fitted into a a work top
less than 38mm deep, but the 9mm gap
between hob base and appliance must be
maintained
Choosing your installation
1. Over a unit with a door or drawer.
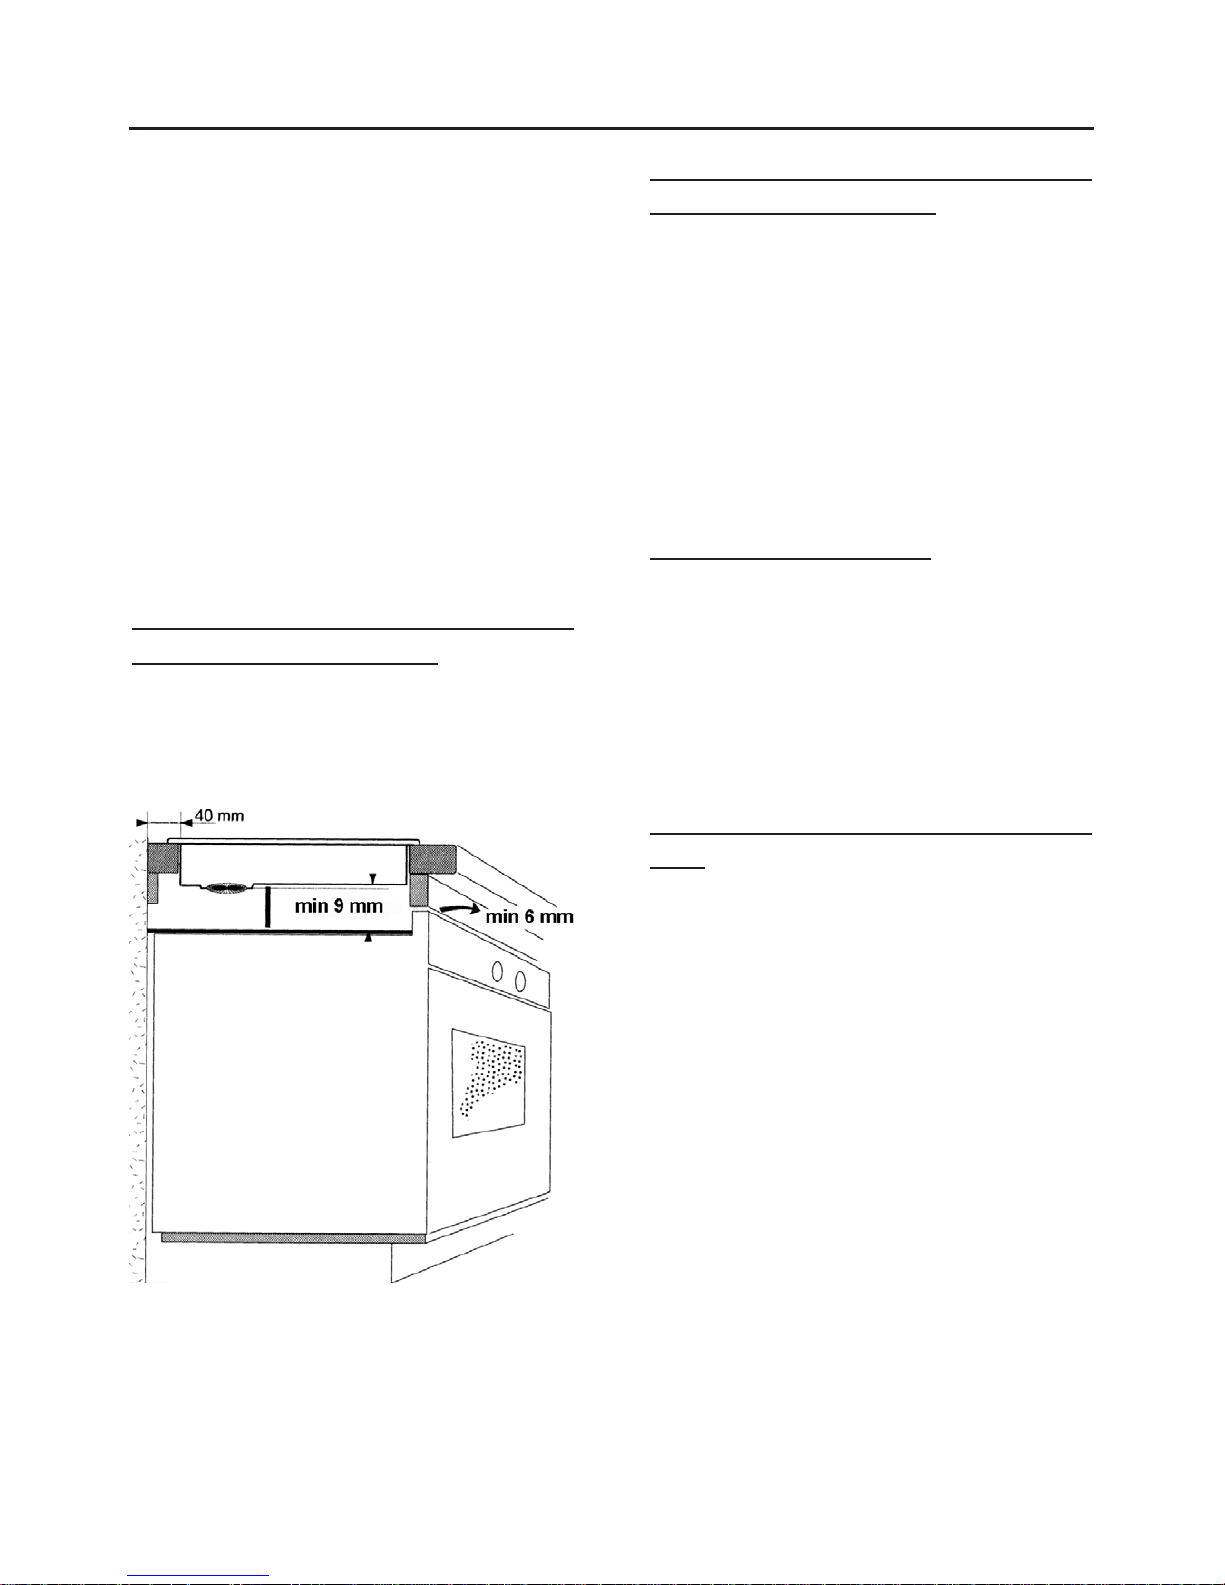
2. Above an oven.
In all cases your induction hob needs
to be well ventilated.
Make sure that the air inlet through the
ventilator grid underneath the hob are
never blocked.
1. Installing the hob over a unit
with a drawer or door
Air outlet is underneath work surface.
If necessary, remove the front cross-
piece of the unit.
Suitable protection to prevent obstruction
of the air inlet to the fans must be
provided.
INSTALLATION INSTRUCTIONS
Page 21
19
. Installing the hob above an
oven
In the even of repeated operation of
the thermal protection devices, you
can install an insulation kit between
the oven and the hob (available from
Stoves Customer Support or your local
supplier).
With this configuration, the oven can
be fitted in the unit in the lower
position only.
Installing the hob above a Stoves
600mm single cavity oven
A minimum 9mm gap must be maintained between the oven top and the
base of the hotplate.
Installing the hob above a Stoves
720mm twin cavity oven
A minimum 9mm gap must be maintained between the oven top and the
base of the hotplate.
The appliance MUST be fitted on the
runner kit provided. It is not suitable
for shelf type installation if the plinth
line is to be maintained.
Ovens other than Stoves
Refer to the manufacturer’s instructions
for clearances above the oven.
We recommend a 9mm gap between
hob and appliance, should the work
surface be less than 38mm deep.
Installing the hob above a pyrolytic
oven
If installing the hob above a pyrolytic
oven, additional provision for air
circulation / ventilation may be required.
Due to the exessive temperatures
attained during pyrolosis, using the hob
at the same time may cause the thermal
safety device within the hob to operate.
INSTALLATION INSTRUCTIONS
Page 22
20
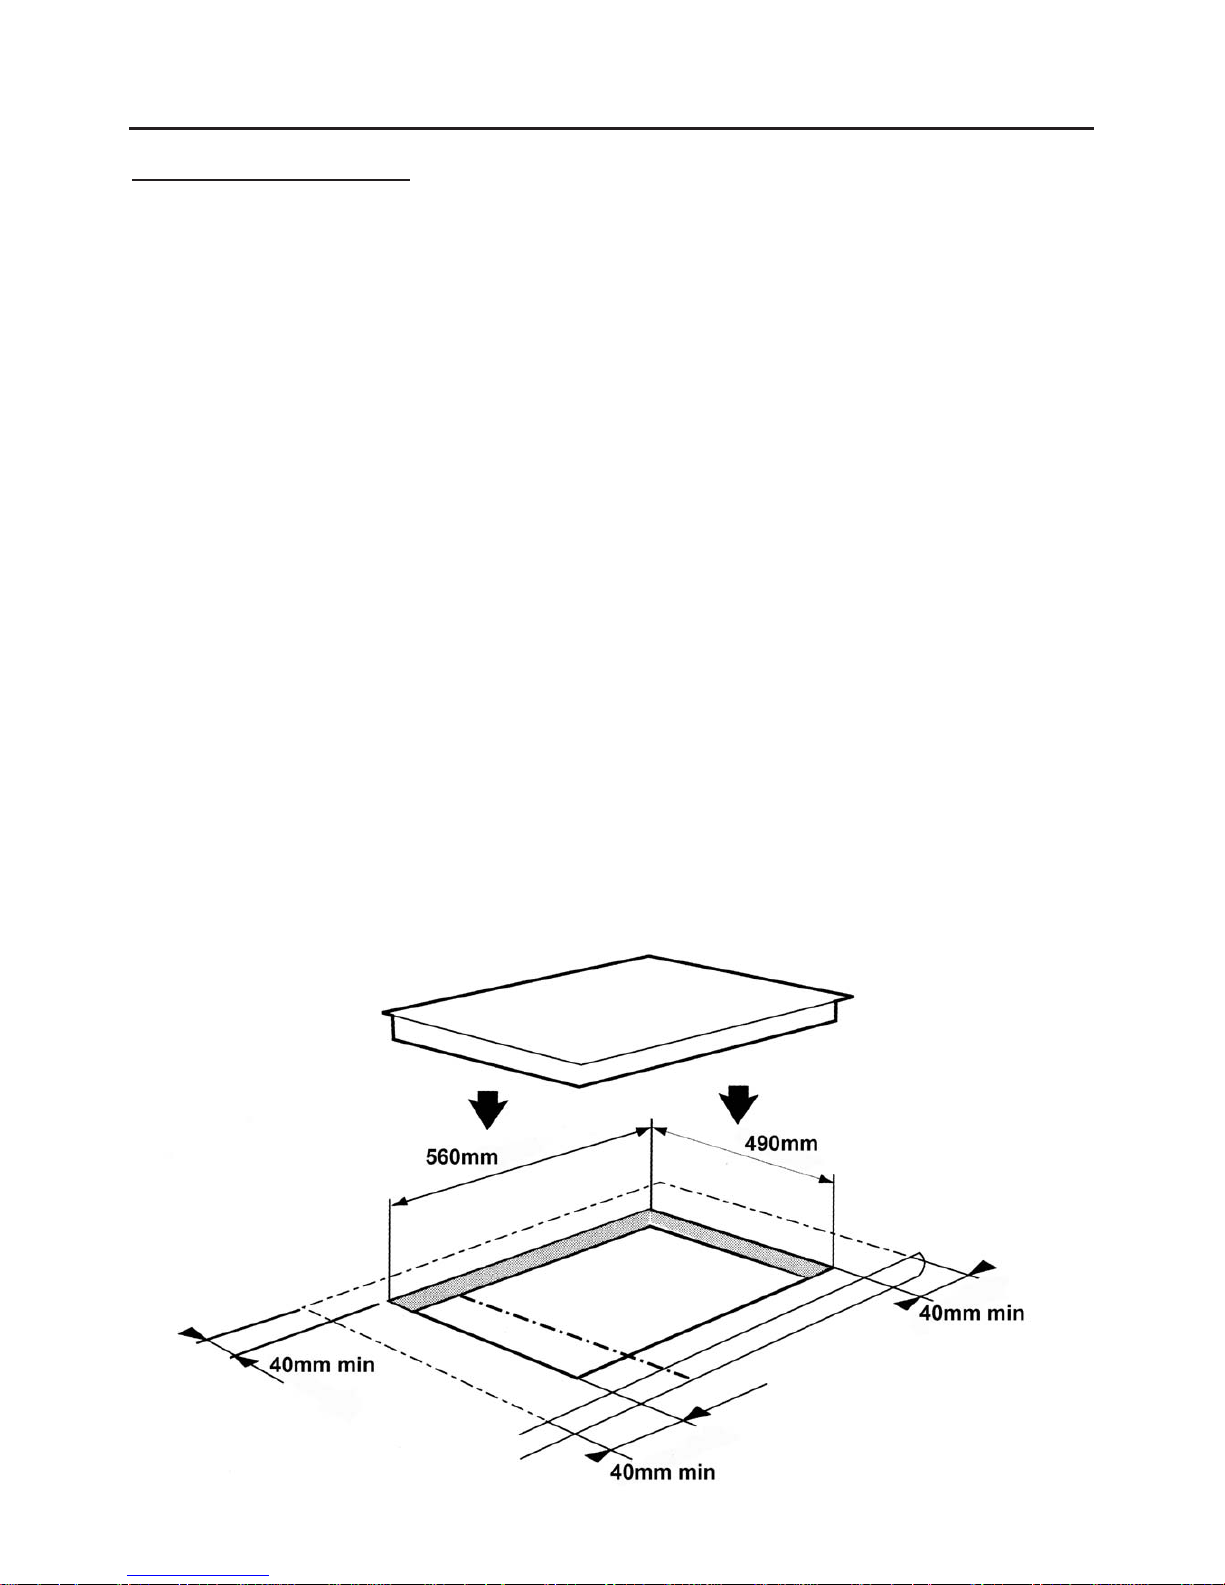
Fitting into worktop
• Cut a hole in the work surface to
the required size.
A clearance of at least 40mm
should be maintained between the
cutout and any rear or side wall.
• The cooking hob should be fitted
into a worktop which is least
40mm thick. The worktop must be
of heat-resistant material or covered
with heat-resistant material.
• Protecting the cut-out;
The types of chipboard used for
work surfaces swell relatively
quickly in contact with humidity.
Apply a special varnish or adhesive
to the cut edge to protect it from
steam or condensation which may
form under the work surface under
the hob.
Minimum clearance above the
hob
300mm
Important: So that cooking utensils can
be used easily, there should be no unit
or vertical surface within 300mm of
the cooking hob.
INSTALLATION INSTRUCTIONS - 600CTI
Page 23
21
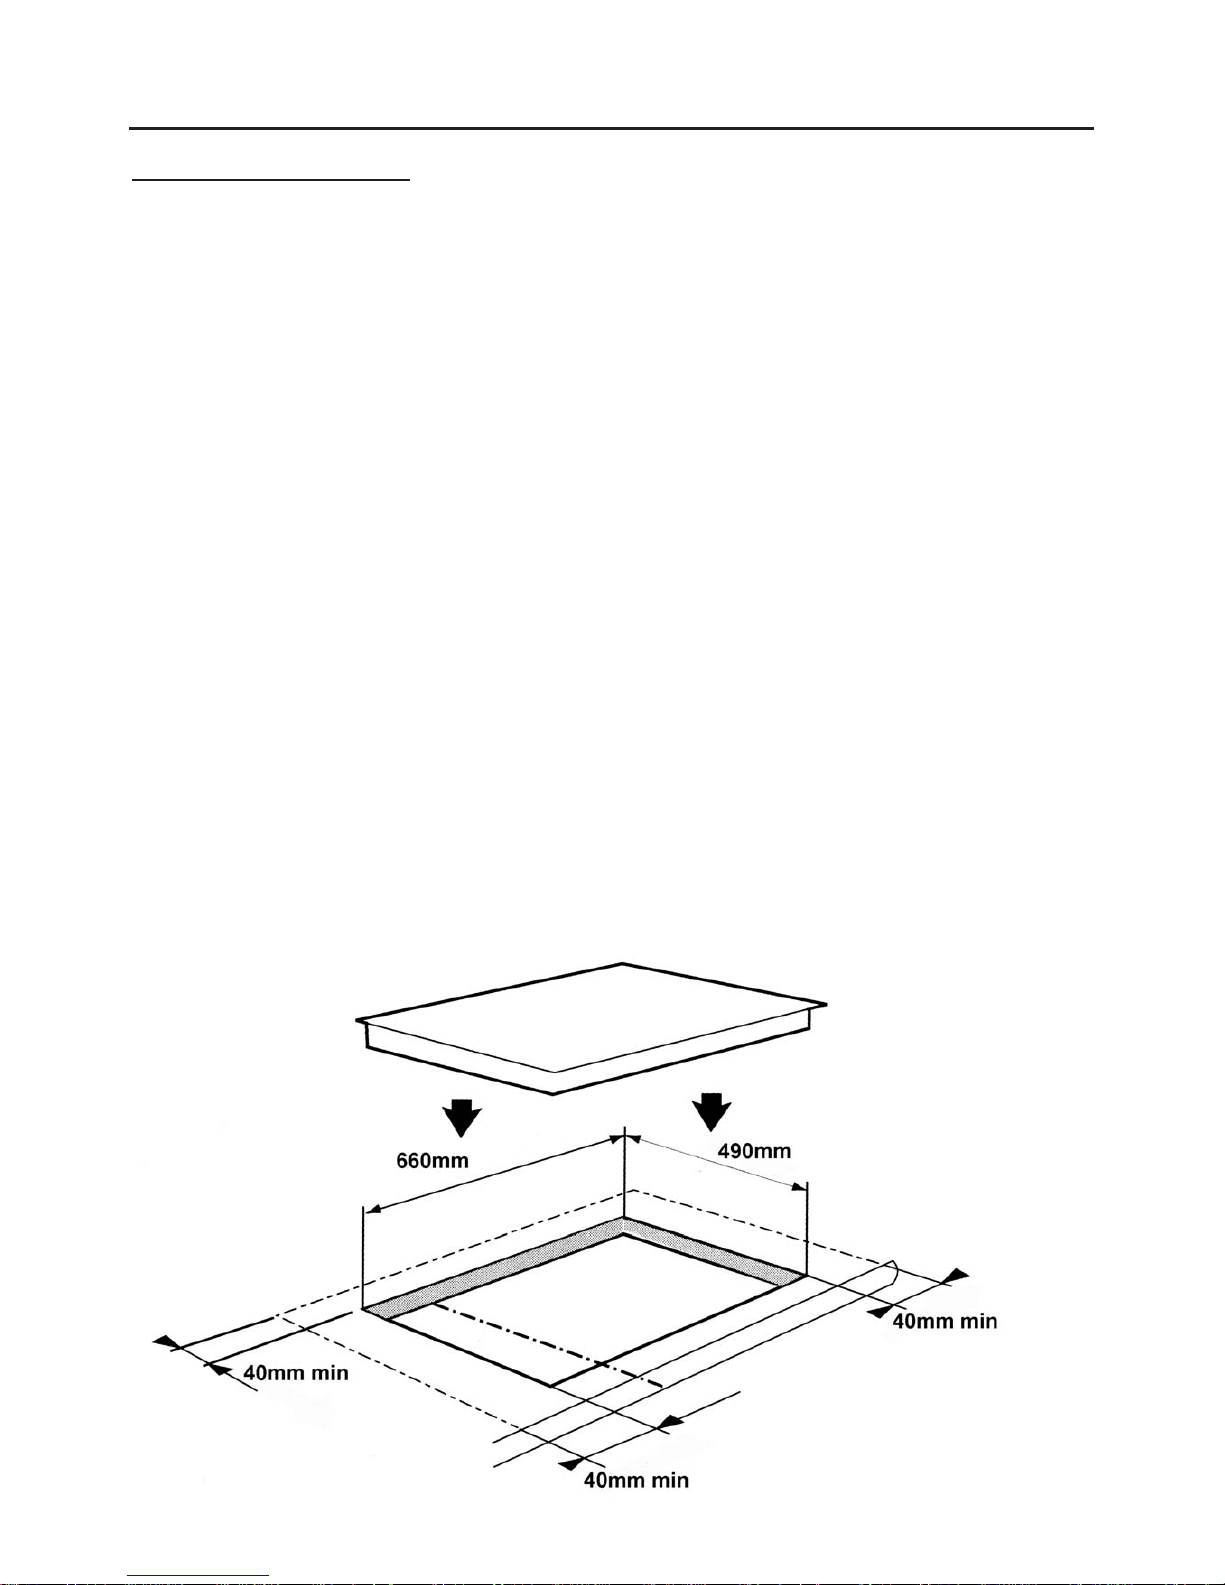
Fitting into worktop
• Cut a hole in the work surface to
the required size.
A clearance of at least 40mm
should be maintained between the
cutout and any rear or side wall.
• The cooking hob should be fitted
into a worktop which is least
40mm thick. The worktop must be
of heat-resistant material or covered
with heat-resistant material.
• Protecting the cut-out;
The types of chipboard used for
work surfaces swell relatively
quickly in contact with humidity.
Apply a special varnish or adhesive
to the cut edge to protect it from
steam or condensation which may
form under the work surface under
the hob.
Minimum clearance above the
hob
300mm
Important: So that cooking utensils can
be used easily, there should be no unit
or vertical surface within 300mm of
the cooking hob.
INSTALLATION INSTRUCTIONS - 700CTI
Page 24
22
Connect to the electricity supply
Warning: This appliance must be
earthed.
The hob must be installed by a competent electrician, using a double pole
control unit of 32 ampere minimum
capacity, with 3mm minimum contact
separation at all poles.
We recommend that the appliance is
connected by a qualified electrician
who will comply with the AS/NZS
3000:2000 electrical installation and
local regulations.
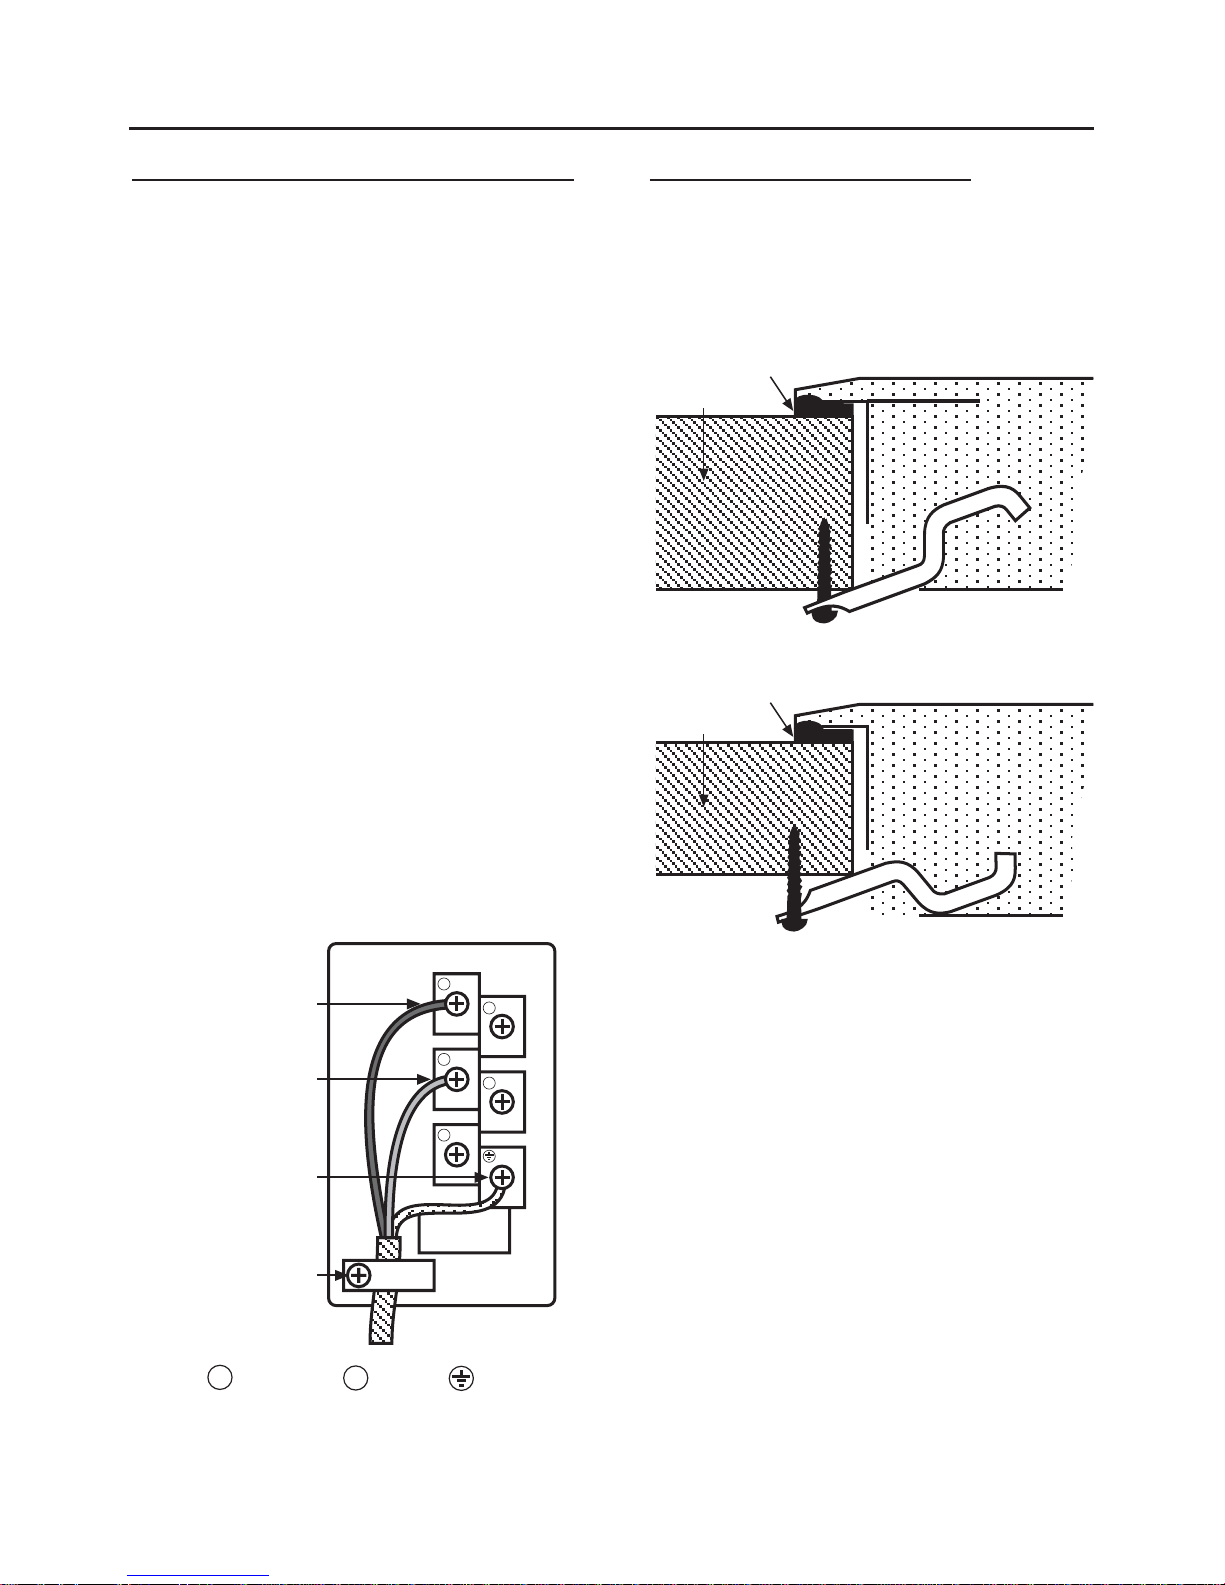
1. Connection should be made with
minimum 4.0mm
2
twin & earth cable.
4. First strip the wires, then push the
cable through the cable clamp in
the terminal block cover.
5. Connect the cable to the terminal
block and tighten the cable clamp
screw (see diagram).
6. Close the terminal box, ensuring
that the cover is engaged on the
locking tabs.
Secure hob to worktop
After connecting to the electrical
supply, place the hob in the cutout and
secure in place using the four brackets
and screws provided.
The brackets should be orientated to
suit the worktop thickness as shown, then
inserted into the four slots (two on the
front edge and two on the rear) and
screwed into the underside of the worktop
using the woodscrews provided.
The screws should be tightened just
sufficiently to secure the hob to the
worktop, but not overtightened as this
may damage the glass top.
If the base of the hob is accessible
after installation, then a partition must
be fitted 20mm below the base to
prevent access.
INSTALLATION INSTRUCTIONS
1
2
3
4
5
Cable
clamp
Earth
(Green / Yellow
or sleeving)
Live
(Red or Brown)
Neutral
(Black or Blue)
Live , Neutral , Earth .
1 3
seal
hob
40mm
worktop
seal
hob
30mm
worktop
Page 25
23
Power supply
220 - 240V ~ 50Hz
Maximum load at 230V
600CTI - 7200W
700CTI - 7310W
Weight
13.5kg approx
600CTI
700CTI
Country of destination
AUS
TECHNICAL DATA
1200W
1200W
1800W
1800W
1200W
1800W
1800W
1200W
110W
Page 26
26
ISSUE A
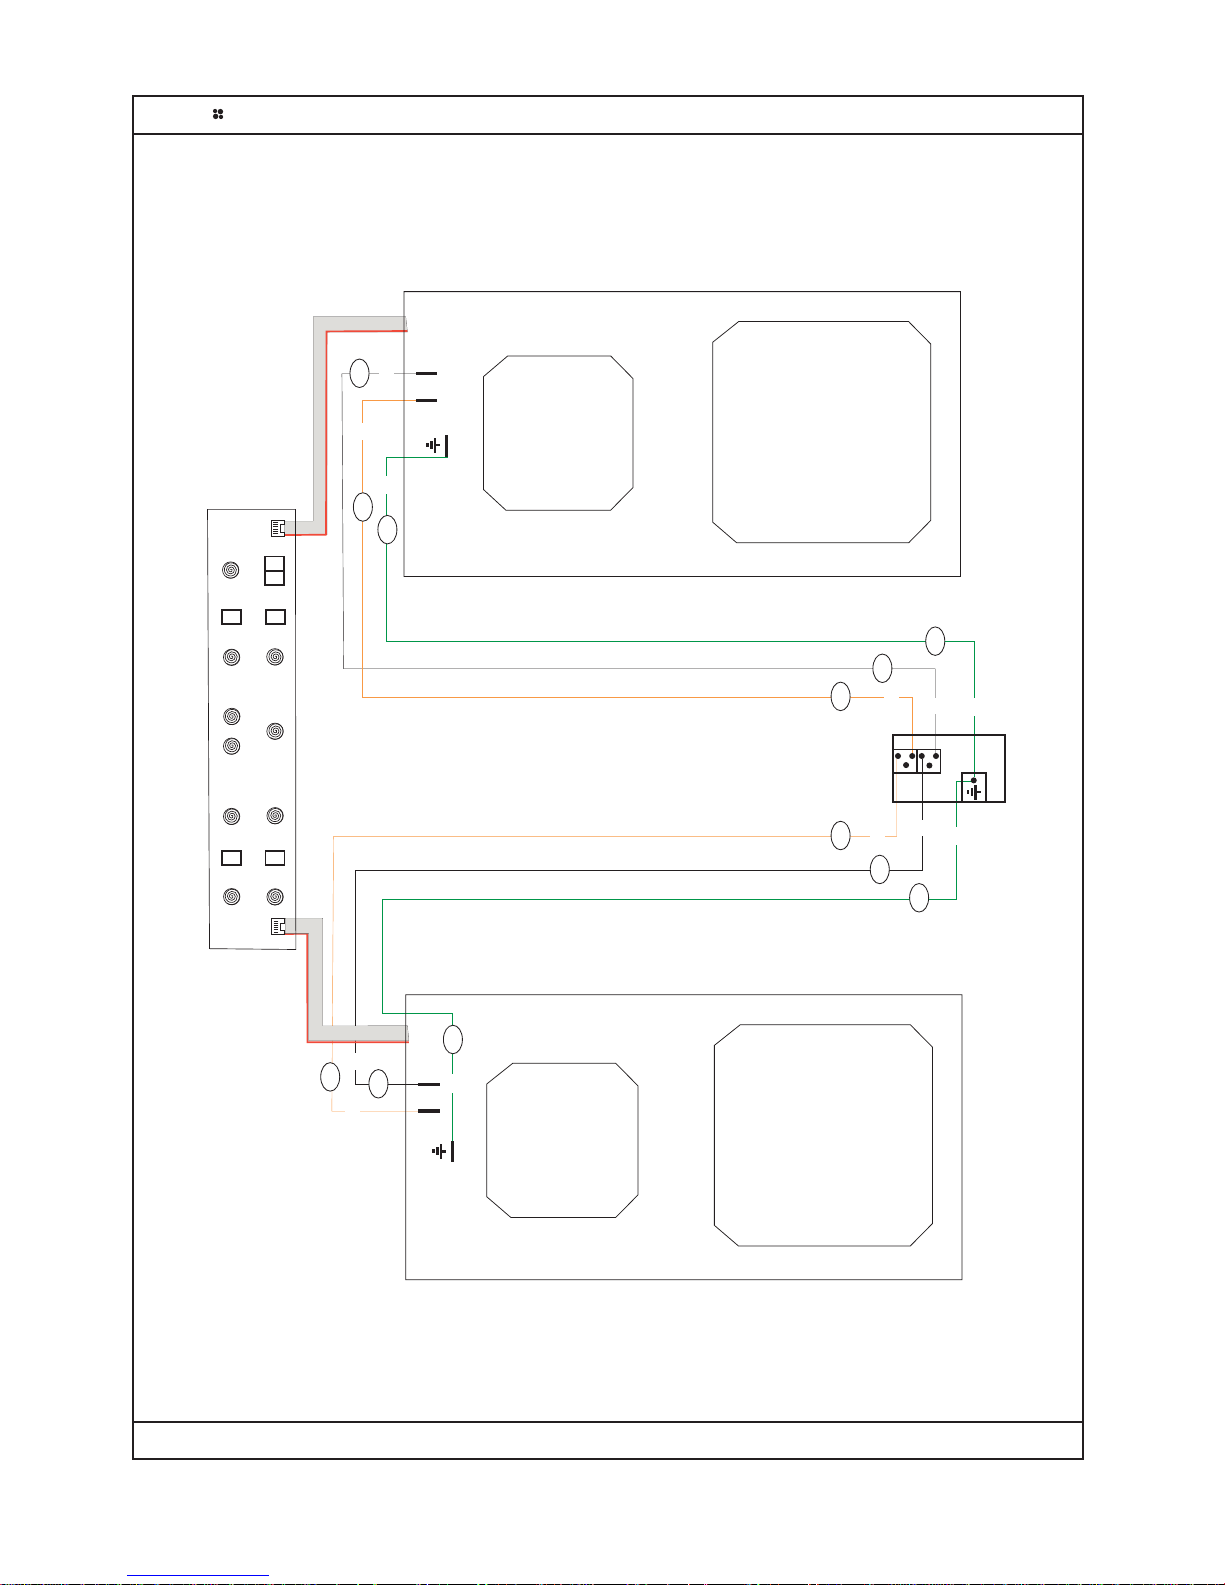
600 CTI - AU
06/07/06
Wiring colour code: Bk - Black, Bn - Brown, Bu - Blue, Gn - Green, Or - Orange, R - Red, W - W
h
TOVE SS
TERMINAL
BLOCK
NL
INDUCTION
ELEMENT
INDUCTION
ELEMENT
NL
INDUCTION
ELEMENT
INDUCTION
ELEMENT
L
N
Or
Or
Or
Or
475 475
475
475
Gn
Bk
Bk
Gn
218
218
219
219
219
Bk
Bk
Gn
Gn
218
218
219
Page 27
27
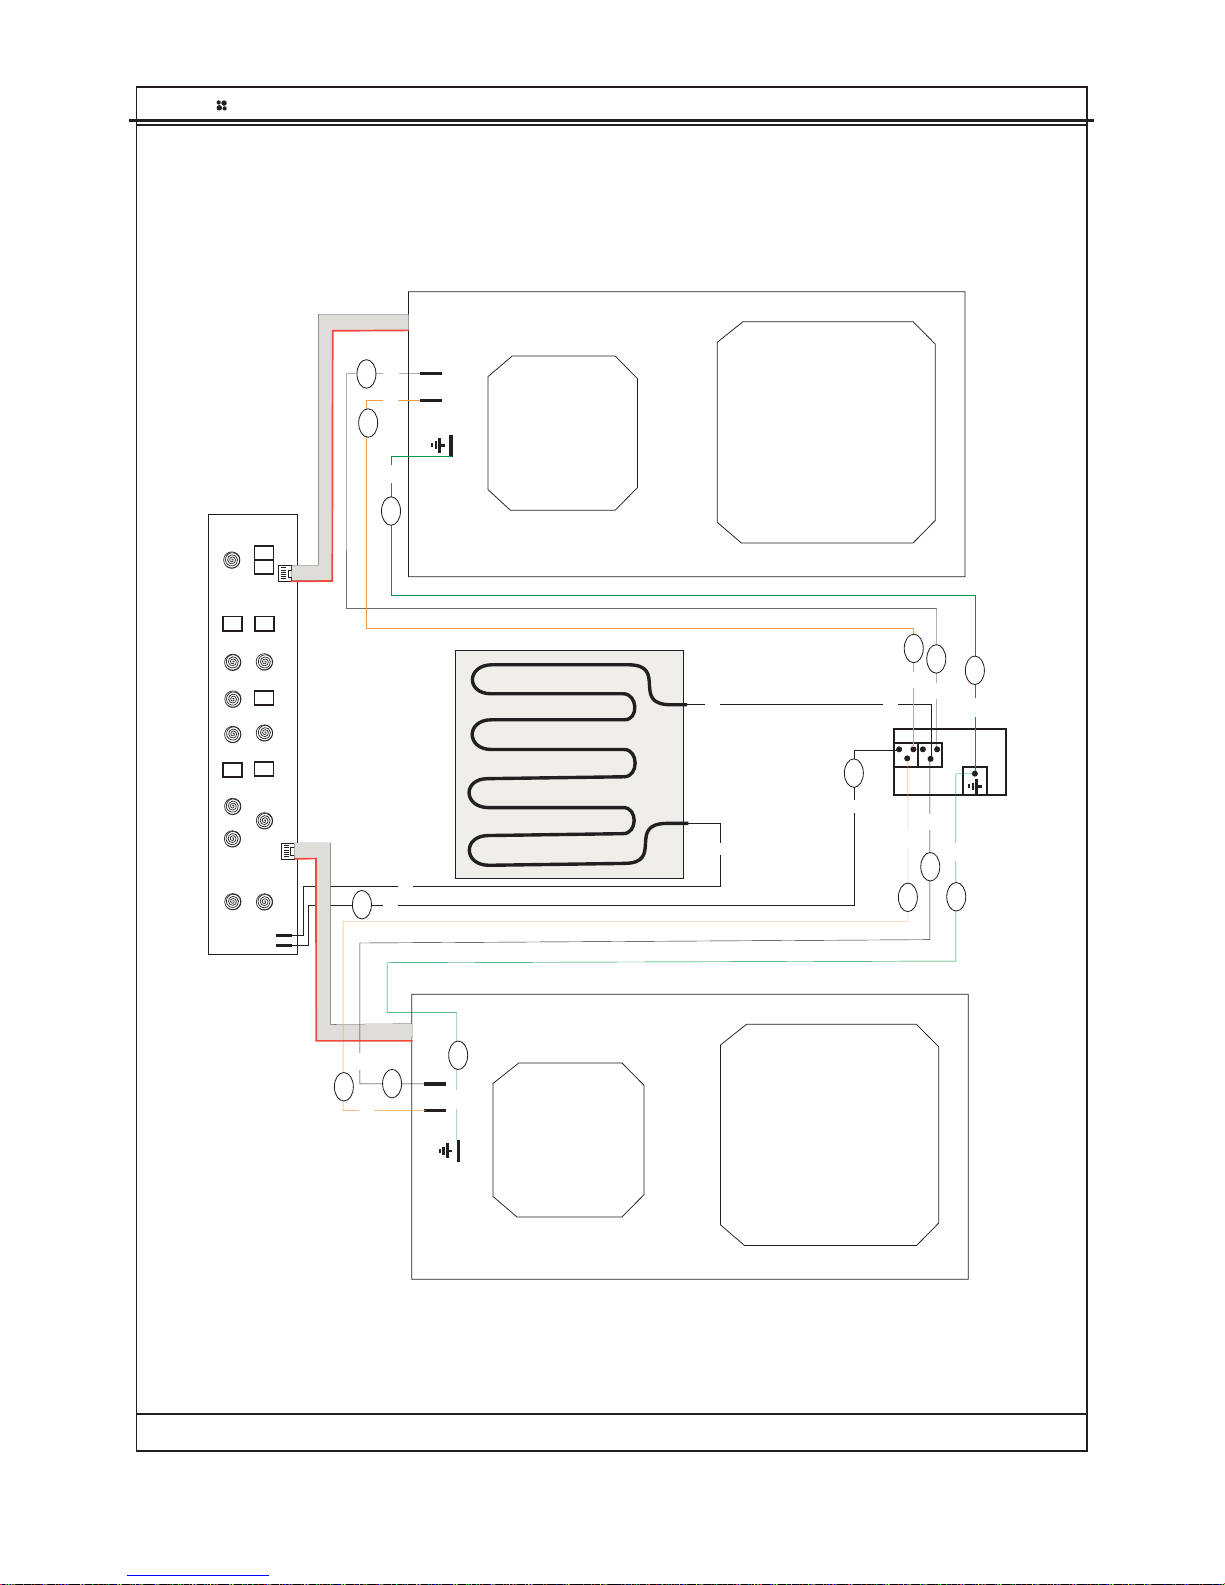
700CTI - AU
ISSUE A
06/07/06
Wiring colour code: Bk - Black, Bn - Brown, Bu - Blue, Gn - Green, Or - Orange, R - Red, W - W
h
TOVE SS
TERMINAL
BLOCK
NL
INDUCTION
ELEMENT
INDUCTION
ELEMENT
NL
INDUCTION
ELEMENT
INDUCTION
ELEMENT
L
N
Or
Or
Or
Or
475
475
475
475
Gn
Bk
Bk
Gn
218
218
219
219
219
Bk
Bk
Gn
Gn
218
218
219
204
W
204
W
W
W
W
W
Page 28

28
NOTES
Page 29

29
NOTES
Page 30

30
NOTES
Page 31
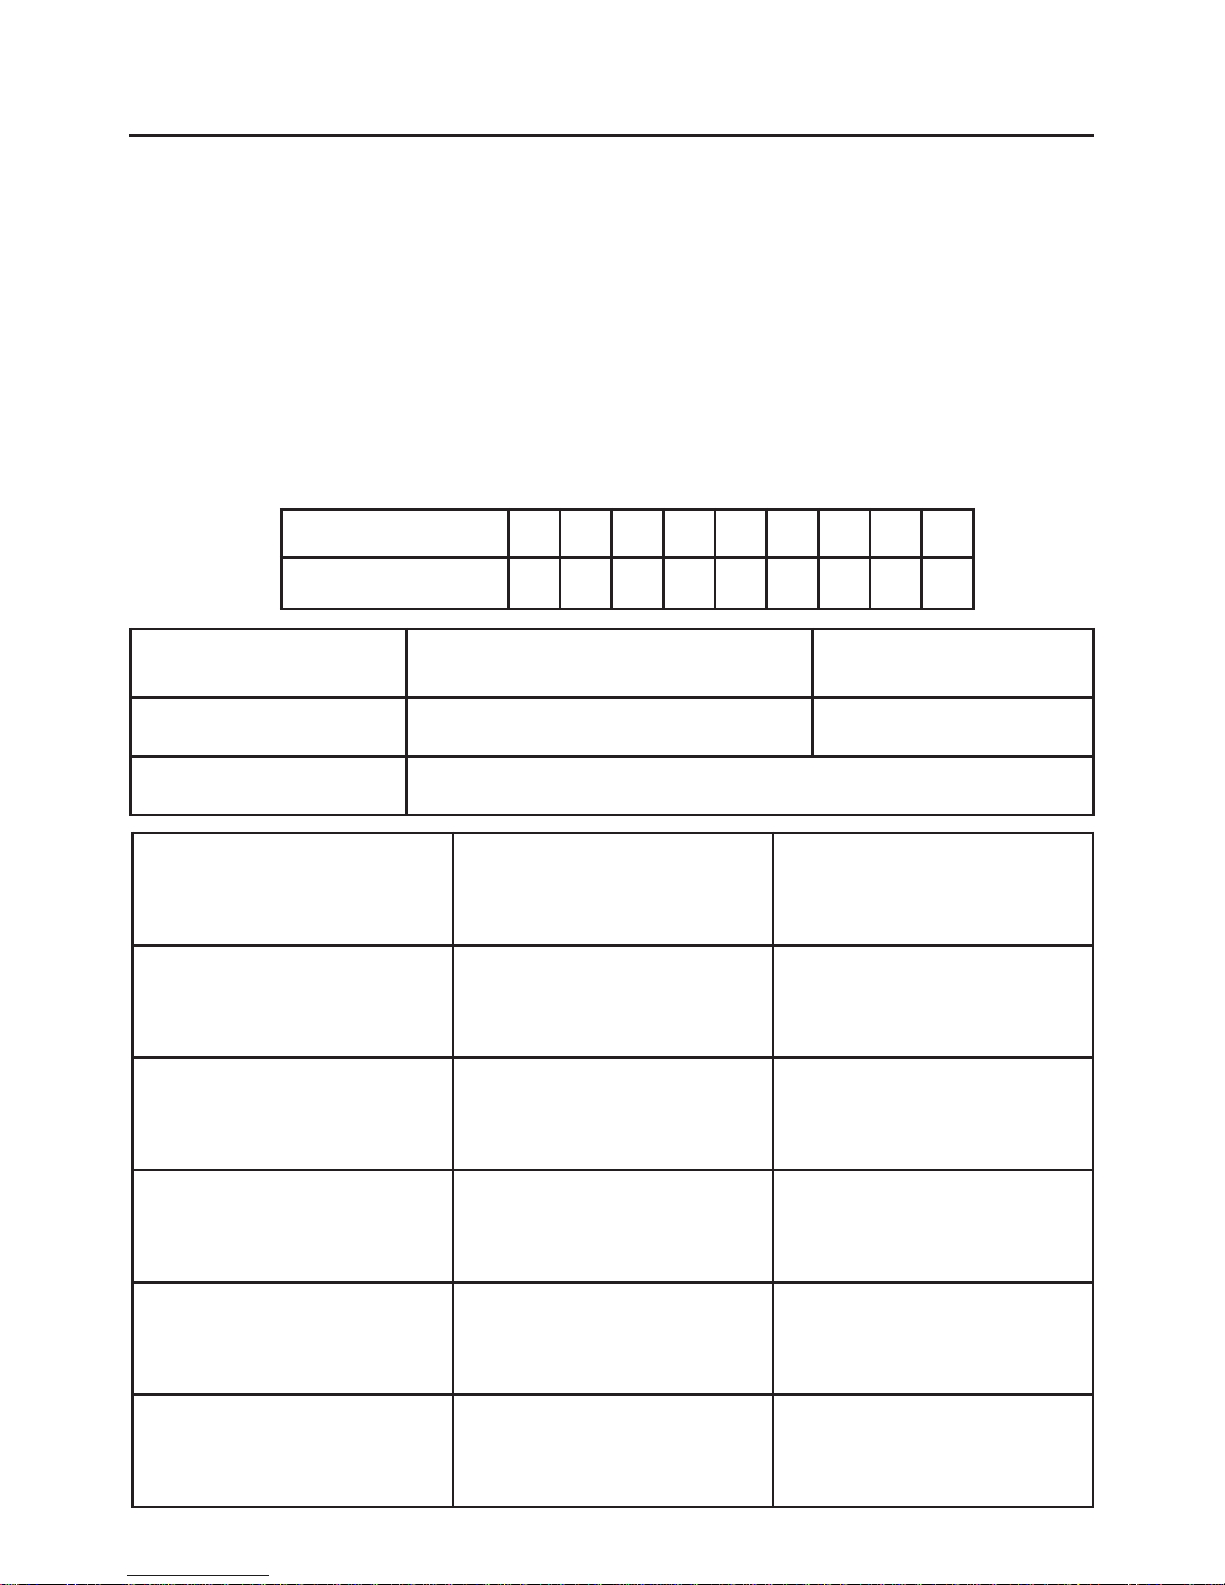
Service Record
Date of purchase Installer stamp / Printed name Date of installation
Place of purchase:
Date Part(s) replaced Engineers Stamp/
Printed Name
Model Number
Serial Number
Please record your model number and serial number in the space below.
Where are my model and serial numbers?
Freestanding HL appliances: base of storage drawer
Freestanding appliances: front frame near oven cavity
Built in oven: front frame near oven cavity
Hobs: base plate of the hob
Having these numbers to hand will help us to help you, quickly and more efficiently.
When contacting us, please use the Customer Care number on the back cover of this
book.
Page 32

08 27320 00 © 07.2006
Electric Induction Hob
Model Names:
600CTI, 700CTI
Contact Us
Proudly distributed by Eurolec.
Head Office address: 27 Watland Street, Springwood, Queensland 4127
For Service information please call:
Tel: 1800 033700
Calling for a service
If you should experience any problems with your cooker please contact your retailer or
place of purchase.
Important note:
Service work is to be conducted by authorised persons only. It is also adviseable that
your cooker is checked regularly and maintained in good condition. An annual maintenance is recommended.
Always check the instruction book before calling a service agent to make sure you have
not missed anything.
Before you contact a service agent, make sure that you have the following information to
hand:
Model Number
Serial Number
Date or Purchase
Postcode
 Loading...