

Page 1
Page 2

Our Warranty
Should you need it . . . .
Inside the paperwork which has come with this appliance,
there is a leaflet and card explaining the terms of our
extended warranty and guarantee.
In order to apply for our five year guarantee, simply fill in
the details on the card and post it off, this will register your
appliance.
Should you wish to take out extended warranty, please fill
in the details on the leaflet and post this off to:
PO Box 33, Springwood, Queensland,4127
If your appliance is covered by the warranty and guarantee, you will not be billed for work undertaken should your
appliance be faulty, terms and conditions do apply, so
please read through the literature carefully.
Please ensure that you have available your appliances
model number and serial number, there is a space at the
back of this book for recording that information.
Page 3

1
Using the Hob . . . . . . . . . . . . . . . . . . . . . . . . . . . . . . . . . . . . . 2 - 12
Introduction . . . . . . . . . . . . . . . . . . . . . . . . . . . . . . . . . . . . . . . . . . . . . . . . . 2
Be Safe - Not Sorry. . . . . . . . . . . . . . . . . . . . . . . . . . . . . . . . . . . . . . . . . . . . 3
The Touch-Control hob. . . . . . . . . . . . . . . . . . . . . . . . . . . . . . . . . . . . . . . . . . 4
Operating instructions . . . . . . . . . . . . . . . . . . . . . . . . . . . . . . . . . . . . . . . . . . 5
To switch on a heater . . . . . . . . . . . . . . . . . . . . . . . . . . . . . . . . . . . . . . . . . . 6
Using the hob. . . . . . . . . . . . . . . . . . . . . . . . . . . . . . . . . . . . . . . . . . . . . . . . 7
Advice for cooking with a ceramic glass hob. . . . . . . . . . . . . . . . . . . . . . . . . . 9
To save energy. . . . . . . . . . . . . . . . . . . . . . . . . . . . . . . . . . . . . . . . . . . . . . . 9
Choice of pans. . . . . . . . . . . . . . . . . . . . . . . . . . . . . . . . . . . . . . . . . . . . . . 10
Care & cleaning. . . . . . . . . . . . . . . . . . . . . . . . . . . . . . . . . . . . . . . . . . . . . 11
Installation Instructions . . . . . . . . . . . . . . . . . . . . . . . . . . . . . 13 - 18
Installation requirements . . . . . . . . . . . . . . . . . . . . . . . . . . . . . . . . . . . . . . . 13
Installation advice - cabinetry . . . . . . . . . . . . . . . . . . . . . . . . . . . . . . . . . . . . 15
Standard installation . . . . . . . . . . . . . . . . . . . . . . . . . . . . . . . . . . . . . . . . . . 16
Flush fitting installation . . . . . . . . . . . . . . . . . . . . . . . . . . . . . . . . . . . . . . . . 17
Connect to the electricity supply . . . . . . . . . . . . . . . . . . . . . . . . . . . . . . . . . . 18
Secure hob to worktop . . . . . . . . . . . . . . . . . . . . . . . . . . . . . . . . . . . . . . . . 18
Fault Finding. . . . . . . . . . . . . . . . . . . . . . . . . . . . . . . . . . . . . . . . . 19
Technical Data . . . . . . . . . . . . . . . . . . . . . . . . . . . . . . . . . . . . . . . 20
Customer Care . . . . . . . . . . . . . . . . . . . . . . . . . . . . . . . . . . . . . . . 21
Please keep this handbook for future reference or for anyone else
who may use the appliance.
CONTENTS
Page 4

2
Thank you for choosing a
Stoves by Eurolec appliance!
We hope the following information
will help you to quickly familiarise
yourself with the features of the
appliance, and to use it successfully
and safely.
Our policy is one of constant
development and improvement.
Strict accuracy of illustrations and
specifications is not guaranteed.
Modification to design and materials
may be necessary subsequent to
publication.
Your 1st year guarantee
To fulfil the conditions of your guarantee,
this appliance must be correctly
installed and operated in accordance
with these instructions, and only used
for normal domestic purposes.
Electrical connection
Please refer to installation instructions
for electrical connection.
In your own interest, and that of safety,
make sure that the installation is carried
out by a competent person.
Disconnection of electric appliances
should always be carried out by a
competent person.
Warning: This appliance must be
earthed.
Environmental Protection
We are committed to protecting the
environment and operate an
Environmental Management System
which complies with BS EN ISO
14001.
Disposal of packaging
• All our packaging materials are
recyclable and environmentally
friendly.
• Please help us to protect our
environment by disposing of all
packaging in an environmentally
friendly manner.
• Please contact your local authority
for the nearest recycling centre.
Caution: Packaging materials can
pose a risk of suffocation - keep away
from children.
Before use
Please read the instructions in this
handbook before using or installing
this appliance.
Make sure that all packaging is
removed before installation.
Before using the hob for the first time,
apply a thin coating of cleaner
conditioner to the hotplate glass, and
polish the glass surface with a clean
dry cloth. Follow the instructions given
in the “Care & Cleaning” section.
INTRODUCTION
Page 5

3
Keep children away from the
vicinity of the hob when you
are cooking.
• Use pans with a flat base of
minimum 100mm / 4 ins diameter,
and maximum 230mm / 9 ins
diameter, which are stable in use,
and avoid using any old misshapen
pans or any pan which is unstable
when placed on a flat surface.
• Never
leave fat or oil unattended
on a lit hotplate.
• Do not stare at the Halogen hob
elements - doing so may temporarily impair your vision.
• Keep all flammable materials
away from the hob.
• Do not place aluminium foil or
plastic utensils on hot surfaces.
• Do not let pans overhang the
control panel, as this will lead to a
“fault” condition (see “Fault
Finding” section).
• Turn pan handles to a safe
position, so they are out of reach
of children, not overhanging the
appliance and cannot be caught
accidentally.
• Commercial simmering aids
should not be used as they create
excessive temperatures that can
damage the surface and may
cause a hazard.
•
Caution: Do not use the hob if
the glass is cracked, as electrical
parts are directly beneath. To
avoid the possibility of electric
shock, turn off the electricity supply
to the hob at the socket and
arrange a Service call.
• When the hob is not in use, never
place items on the surface - if the
sensors are activated, the hob may
switch on.
• The hob may be left in “Standby”
mode when it is not in use.
However, to ensure that it cannot
be operated accidentally, we
recommend that you allow the hob
to cool then switch off at the mains
when it is not in use.
When you have finished
cooking check that all hotplate
controls are switched off.
BE SAFE - NOT SORRY
Page 6
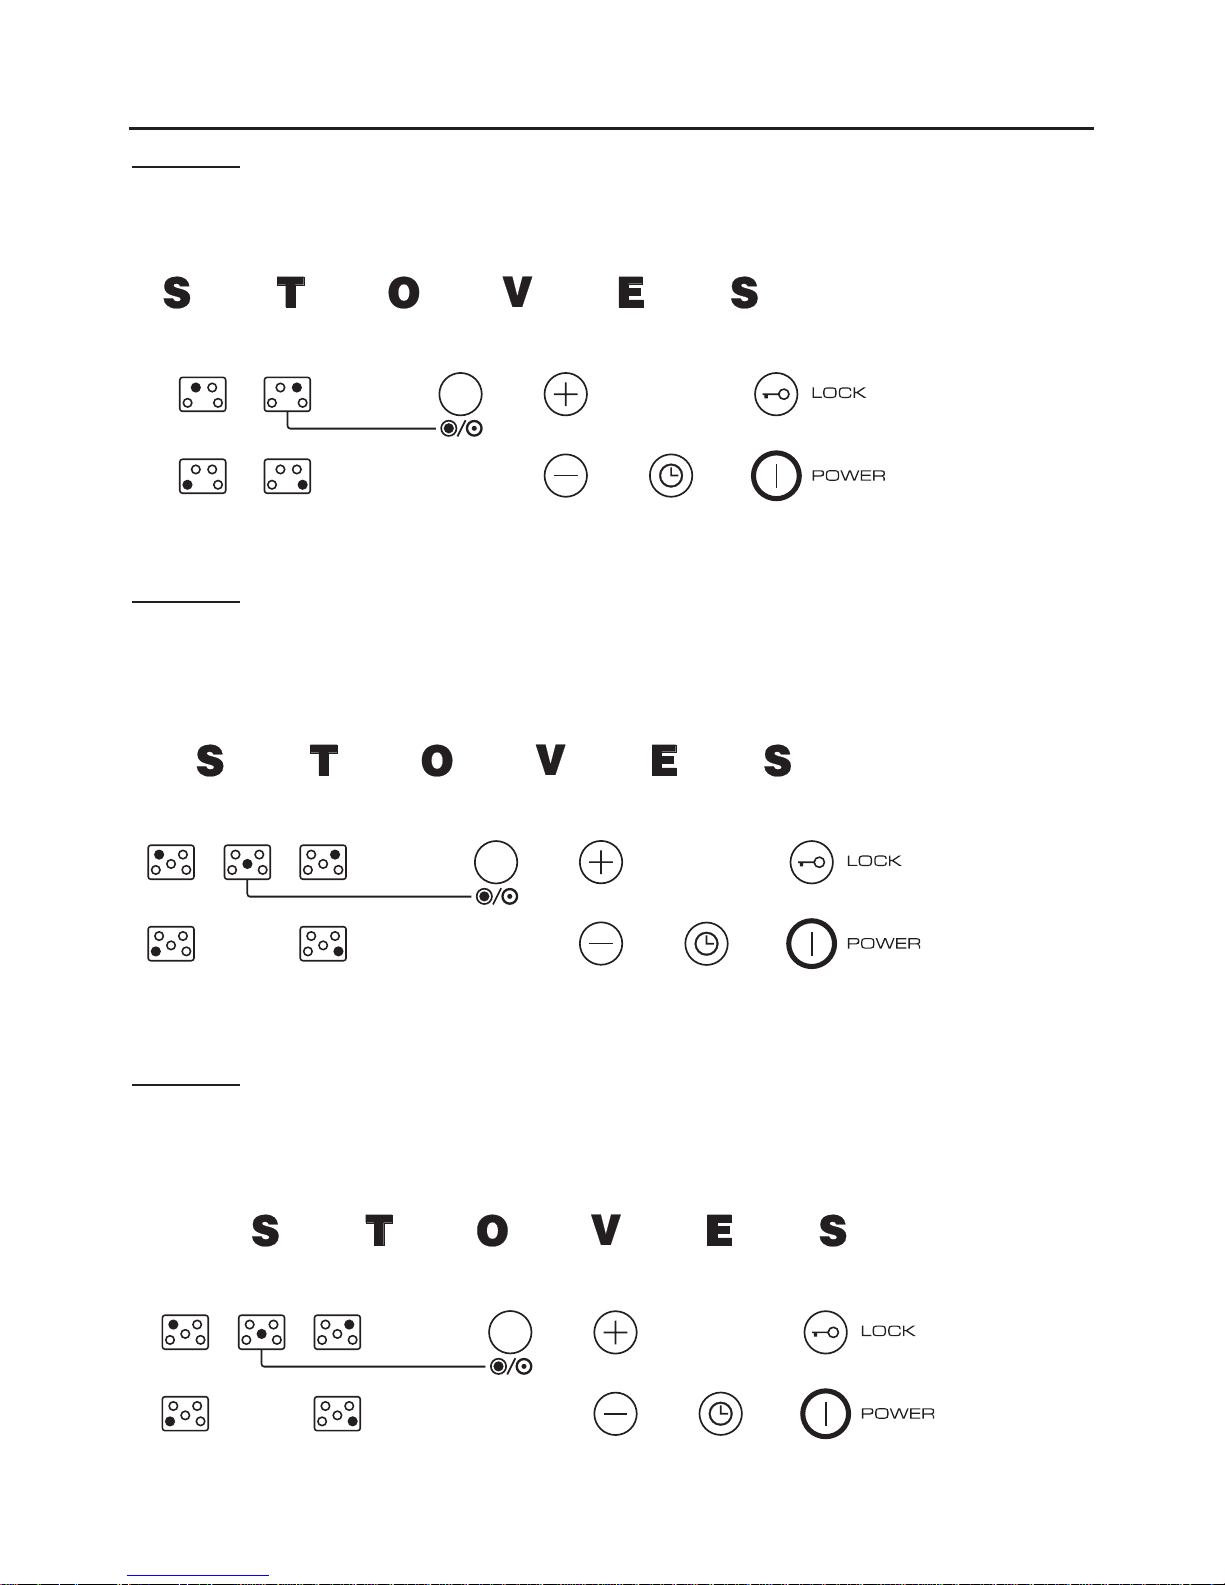
4
700CTH
Control layout
USING THE HOB
600CTH
Control layout
900CTH
Control layout
Page 7

5
USING THE HOB
Touch Control Symbols
Power on
Burner selector
Dual zone selector Dual zone on/off
selector
Hob Lock
Timer
Plus / Minus
Page 8

6
The Touch Control hob
To activate a sensor, touch the sensor
until the required setting is achieved.
Features
The heater controls operate between
heat settings 1 - 9.
There is a “Heat boost” function on all
heaters for a faster heat-up time.
Note that the heaters will cycle on and
off as they maintain the selected
temperature.
The hob also has a “Lock” function,
which can be used to lock the controls
onto a desired setting, or to lock the
hob “off”.
600CTH hobs
The rear right-hand heater is a dual
circuit element.
700CTH hobs
The front centre element is a dual-circuit element.
900CTH hobs
The centre element is a “fish kettle”
dual-circuit element.
Operating instructions
Make sure that there are no objects
over the sensors or on the hob.
Switch the hob on at the mains supply.
When the hob is switched on at the
mains, basic calibration is carried out
- this will take about 5 seconds, and a
tone will sound to indicate completion.
If any “H” symbols show before the
hob is operated for the first time, this is
not a fault and the symbols will go off
after approximately 1 hour.
The hob is now in “Standby” mode.
“Standby” mode
The hob is switched on at the mains
supply. All heaters are switched off,
and displays are not illuminated.
Hold the main “Power” sensor for
approximately 2 seconds to bring the
hob into “Ready mode”.
“Ready” mode
When the hob goes to “Ready” mode,
“0” appears on each heater display
for 10 seconds.
If no sensor is touched within 10
seconds, the hob returns to “
Standby”.
If a heater sensor is touched while the
hob is in “Ready” mode, the hob will
go to operating mode.
“Operating” mode
When at least one heater is on (setting
1 - 9), the hob is in “Operating” mode.
If no heaters are switched on, and no
sensor is activated within 10 seconds,
the hob returns to “Standby”.
USING THE HOB
Page 9

7
To switch on a heater
Touch and hold the power on/off sensor, shown below, for approximately
2 seconds.
Normal use:
With the display showing ‘0.’ and the
‘.’ flashing, any heater can be
switched on. Use the hob symbols
(shown on the previous page) to select
the burner you wish to use.
The display will change and the ‘.’
will stop flashing and remain lit.
By using the Plus and Minus sensors,
select the heat setting required - this
can be between 1 and 9.
Please note : The Plus and Minus will
control the display which shows the ‘.’
Heat Boost
When this function is activated, the
selected heater remains on full power
for a set period of time. This allows
the pans to heat up faster. After the
boost period is over the heater will
cycle on and off according to the temperature set, between 1 and 8.
To activate this function:
Increase the heat setting past 9 - using
the Plus sensor.
The display will flash, showing both
the heat setting, and an ‘A’.
While the ‘A’ is flashing, the lower
heat setting can be entered, using the
Minus sensor.
The heat setting and the ‘A’ will continue to flash throughout the boost period.
When the heat setting and ‘A’ stops
flashing, the heater has returned to it’s
normal operating mode.
Please note : 9 is the
maximum set-
ting, therefore it is not necessary to use
the heat booster. If you should set the
heat booster, it will only come on for
10 seconds at the most.
Dual-Circuit Heaters
The inner element of dual-circuit
heaters is operated as for standard
heaters, as described in the “Normal
Use” and “Heat Boost” sections.
To use the full heater (both inner and
outer elements), first set the inner element to the desired heat setting as
above, then touch the “dual on/off”
sensor to bring the outer element on as
well. The dual circuit LED will come
on. The heat setting can be adjusted
using the “
+” and “-” sensors as
required.
To return to just the inner element,
touch the “dual on/off” sensor again.
USING THE HOB
Page 10

8
To switch off
To switch off an individual heater,
touch the “+” and “-” sensors simulta-
neously.
To switch off all heaters, touch the
main “Power” sensor - this will return
the hob to “Standby”.
After a heater has been switched off,
the display will show “H” (hot) until
the glass has cooled.
Fault indicator
This touch control hob can only be activated by the touch of a finger to the
glass. If, however, the sensor is
touched for 10 seconds or longer then
all the heating elements will switch off,
and an alarm will sound. This will go
on until the sensor has been deactivated.
“Lock” function
The “Lock” function can be used to
prevent the hob from being switched
on unintentionally.
To operate the lock, press the “Lock”
symbol, and the “Lock” LED will be
displayed.
The “Lock” sensor can also be used
to lock the heaters onto the selected
temperature setting.
After selecting the desired heater
setting, touch the “Lock” sensor until
the
“Lock” LED illuminates.
Heaters cannot be switched on
when the hob - or one or more heaters
- is in “Lock” mode, but the hob can
still be switched off with the main
“on/off” sensor.
To deactivate the “Lock” function,
touch the “Lock” sensor for at least 3
seconds - the alarm will sound, and the
“Lock” LED will go out.
If the appliance is disconnected from
the mains supply, the lock function will
be deactivated.
USING THE HOB
Page 11

9
Timer Function
The Timer function can be used as a
simple minute minder, or to automatically switch off a selected heating
element.
The minute minder can be operated by
touching the timer sensor when none
of the heating elements have been
selected i.e there is no ‘.’ next to any
of the 0’s on the display.
The timer display will then show 00.
and the minute minder can be set from
0-99 minutes using the + and - sym-
bols. When the set time has elapsed ,
the beeper will sound until the timer
sensor is touched.
The automatic function is operated is
the same manner as the minute minder, but first select the heating element
which is to be controlled, by touching
the appropriate element symbol.
The timer sensor can then be touched
and the display will show 00. in addition an LED will light around the display to show which element has been
selected. Using the + and - selected
the required time period (0-99), the
bleeped will sound when the time has
elapsed, and the element will switch
itself off.
To stop the bleeper touch the timer
sensor.
Note:
Although this hob has an automatic
timer and minute minder, please be
aware that they are not suitable for all
food items cooked on hobs.
We recommend that even when using
these features you monitor your cooking to prevent any instances of boiling
over or burning.
USING THE HOB
Page 12
10
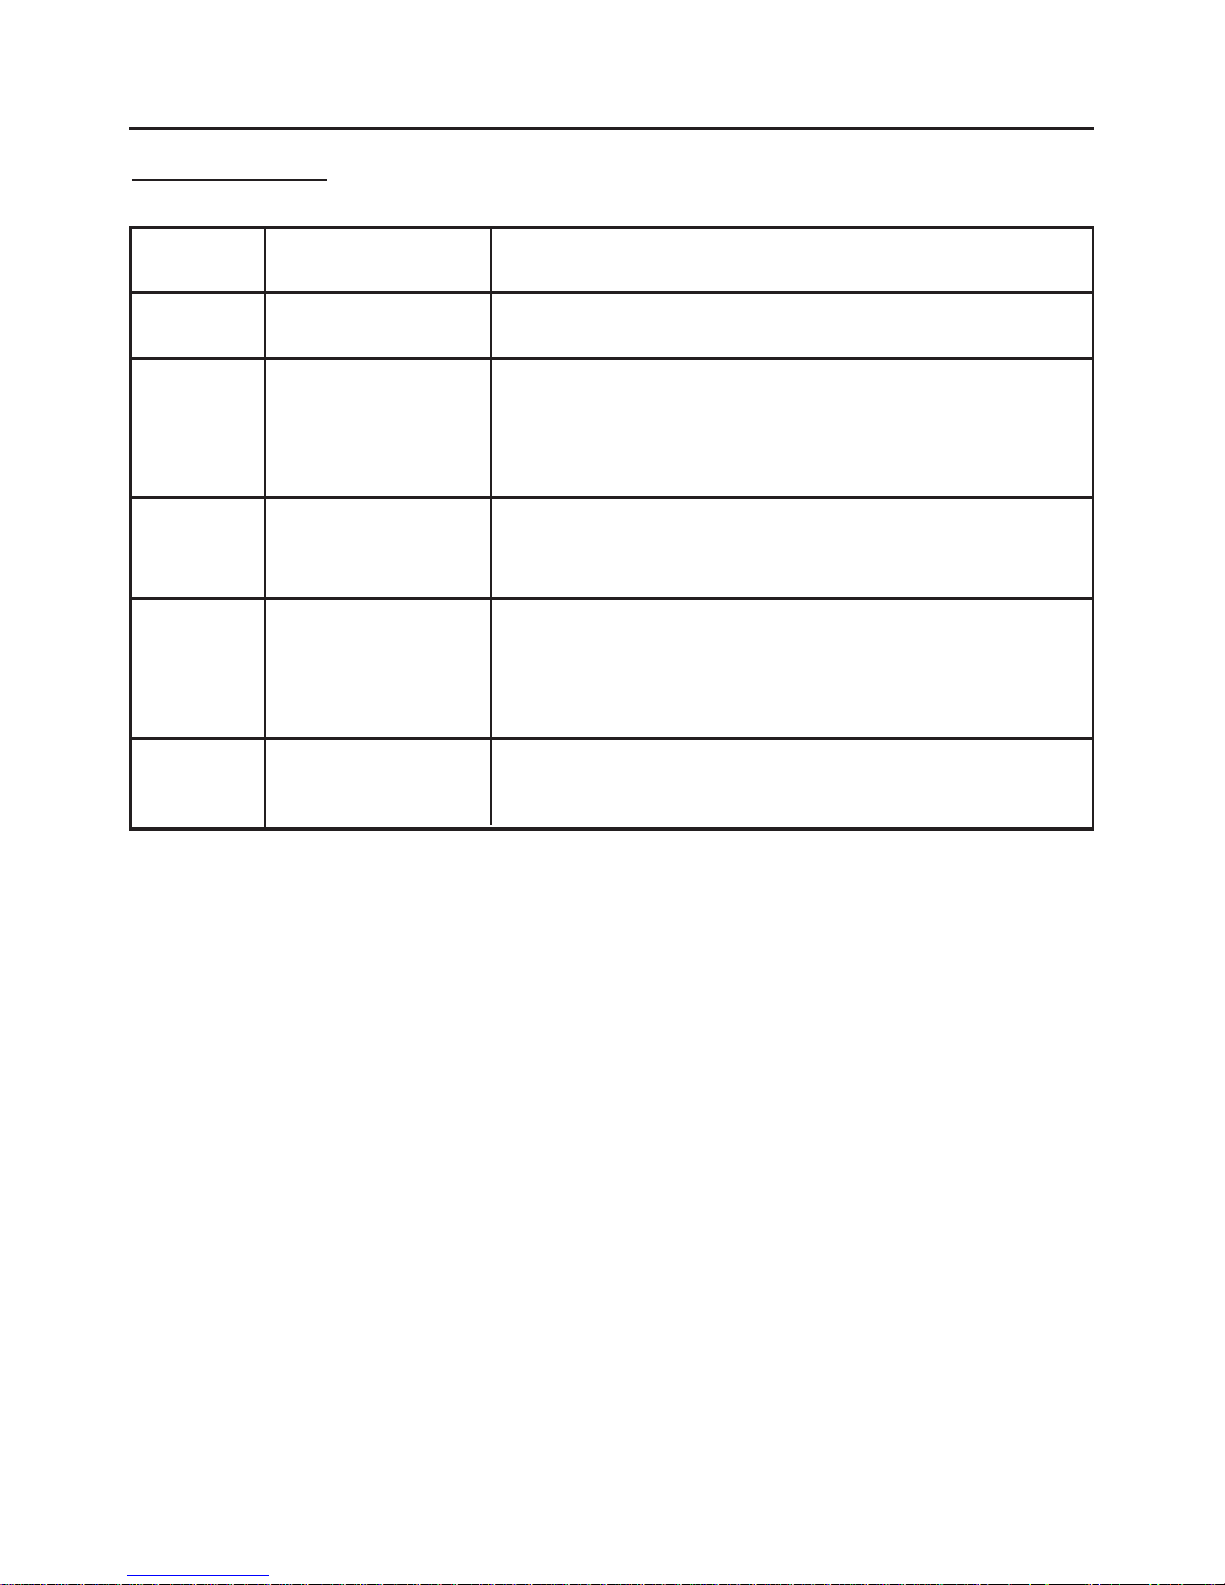
display setting status / use for;
0 on standby
1 low simmering, casseroling, sauces, stock, soups
2 low
3 low / medium
4 medium general domestic use, fast simmer
6 medium
7 medium / high boiling, shallow frying
8 high fast frying
9 high
H hot heater still hot after use
Using the hob
USING THE HOB
Page 13

11
Advice for cooking with a
ceramic glass hob
• Never place objects over the
control area.
• Do not
use the ceramic glass hob
as a work surface or chopping
board, as it will damage it, and if
any plastic utensils come into
contact with a warm hob, they
may melt onto it.
• Do not
use the ceramic hotplate
surface for storage.
• As pans are on a smooth surface,
they will move easily if knocked
accidentally; turning pan handles
so they are not overhanging the
edge of the hob, will help prevent
this happening and keep them out
of the reach of children.
• Be careful when cooking foods in
salted water, or foods containing
large amounts of sugar or syrup, if
they are spilt onto hot areas of the
hob they may damage the glass.
Wipe any spillage as soon as
possible, taking care to avoid
contact with hot surfaces.
Use pans which are large enough
to avoid overflows onto the
ceramic glass hob.
• Lift pans onto and off the hob,
rather than sliding them across
the surface, to avoid marks and
scratches.
• Aluminium foil must not
be placed
on the hob as it will reflect any
heat back into the element, which
can damage it.
• Leaving a hotplate on for a length
of time - without it being covered
by a pan - can cause overheating
of surrounding areas which could
damage the glass.
• Halogen rings
Warning: Do not stare at the
halogen hob elements - doing so
may temporarily impair your vision.
To save energy
• Always position pans centrally
over the heating area.
• Put lids on saucepans and only heat
the amount of liquid you need.
• When liquids boil, reduce the
control setting to maintain a simmer.
• Consider the use of a pressure
cooker for the cooking of a
complete meal.
• Vegetables will cook quicker if
chopped in smaller pieces.
• Larger heating elements are ideal
for faster cooking methods - such as
boiling or frying, and larger pans.
Smaller heating elements are ideal
for simmering and stewing, and
for smaller pans.
USING THE HOB
Page 14

12
Choice of pans
The choice of cookware is important if
you are to achieve maximum benefit
from cooking with your hob.
The following guidelines may help in
your selection.
• When buying new pans, always
refer to the pan manufacturer’s
guidelines.
• For best results and energy
efficiency it is important to use flat
bottomed pans of the correct type.
• Always use pans which are large
enough to prevent spillage,
especially for deep frying, making
jam or cooking with sugar or syrup
based substances.
• Trivets, round based woks, heat
diffuser pads and over-sized pans
are not recommended.
• Certain makes / brands of pressure
cookers may not be suitable for use
on ceramic hobs - they do not come
to pressure. Stainless steel pressure
cookers will give optimum results.
Size of pan base
The right size of pan base will ensure
maximum contact with the hob and
rapid cooking times.
Use pans with a flat base of minimum
100mm diameter and maximum
280mm diameter.
Pan bases that are much smaller or much
larger than the hotplate - eg; by 50mm
- will result in slower cooking times.
Type of pan
Avoid using double pans, or old
misshapen pans which are unstable
and dangerous.
Cast iron, stainless steel, or enamelled
steel pans are all suitable for use on
ceramic glass hobs.
Aluminium pans will give good cooking
results but care must be taken in their
use. If they are slid across the surface of
a ceramic hob they tend to leave visible
marks which can be difficult to remove.
Certain types of copper based pans
may become slightly concave when
heated, which can result in slower
cooking times.
Glass pans can be used, but if used on
halogen rings, the glow from the heating
areas transmitted through transparent
glass may cause some visual discomfort.
Type of pan base
Pan bases should be thick, flat and
smooth, to ensure maximum heat
contact with the hob, maximum heat
conduction and rapid cooking times.
Pans with dull or dark coloured bases
will give the quickest cooking results.
Pans with thin, dented or ridged bases
can result in very slow cooking times
and should not be used.
Pans with highly polished bases reflect
heat back into the hob causing the
hotplate element to cycle on and off
rapidly, which slows down cooking.
USING THE HOB
Page 15

13
Caution: Any cleaning agent
used incorrectly may damage
the hob.
Always let the hob cool before
cleaning.
Some cooking operations generate a
considerable amount of grease. This,
combined with spillage, can become a
hazard if allowed to accumulate on
the hob through lack of cleaning. In
extreme cases this may amount to
misuse of the appliance and could
invalidate your guarantee.
Do not use caustic pastes, abrasive
cleaning powders, coarse wire wool,
products containing bleach or any
hard implements, as they will damage
the surfaces.
All parts of the hob can be safely
cleaned with a cloth wrung out in hot
soapy water.
Please note: Do not steam clean any
part of the hob
CARE & CLEANING
Page 16

14
Cleaning
Allow the hob to cool before
cleaning.
Switch off the electricity supply to the
hob before cleaning.
Do not use abrasive powder cleaners,
soap filled pads, metal wire, bleaches,
bath stain removers, or chemical oven
cleaners; all these product types will
damage the ceramic glass.
The following recommendations will
help to keep the ceramic glass surface
bright and clean:
• Use a dampened paper towel
or clean damp cloth to apply a
small dab of cleaner conditioner to
clean each heating area.
• Use another paper towel or a clean
dry soft cloth to wipe dry, and then
polish the whole glass surface.
• To remove any stubborn marks or
heavy soiling, a non scratching,
mild cream cleaner may be used.
Alternatively, a “ceramic hob
scraper” may be used.
Important: If you use a wet paper
towel or clean damp cloth to remove
spillage from a warm heating area of the
hob, be careful to avoid steam burns.
Care and maintenance
Before using the hob for the first time,
apply a thin coating of cleaner conditioner
to the ceramic glass, and polish the
surface with a clean cloth.
The conditioner gives a protective
covering to the ceramic glass which
not only makes the hob easier to
clean, but also ensures that you will
gain maximum life out of this product.
Occasional use will help prevent the
build up of mineral deposits which can
cause discolouration of the hob surface.
Discolouration of the hob
Do not use a dishcloth or dish sponge
to wipe the hob - this can leave a film
of detergent on the surface which will
discolour the hob next time a heating
area is used. Clean cloths kept for the
cleaning of the hob can be used.
Do not use too much cleaner
conditioner - only a thin coating is
required, any excess may burn on and
discolour the hob when it is next in use.
If persistent stains or marks remain on
the ceramic glass surface, it can be
cleaned using a mild cream cleaner,
or a ceramic hob scraper. This will
also remove any accumulated salts or
minerals before they have an opportunity to discolour the ceramic glass.
Wipe clean with a damp paper towel
or clean damp cloth and re-apply
cleaner conditioner.
CARE & CLEANING
Page 17

15
Installation requirements
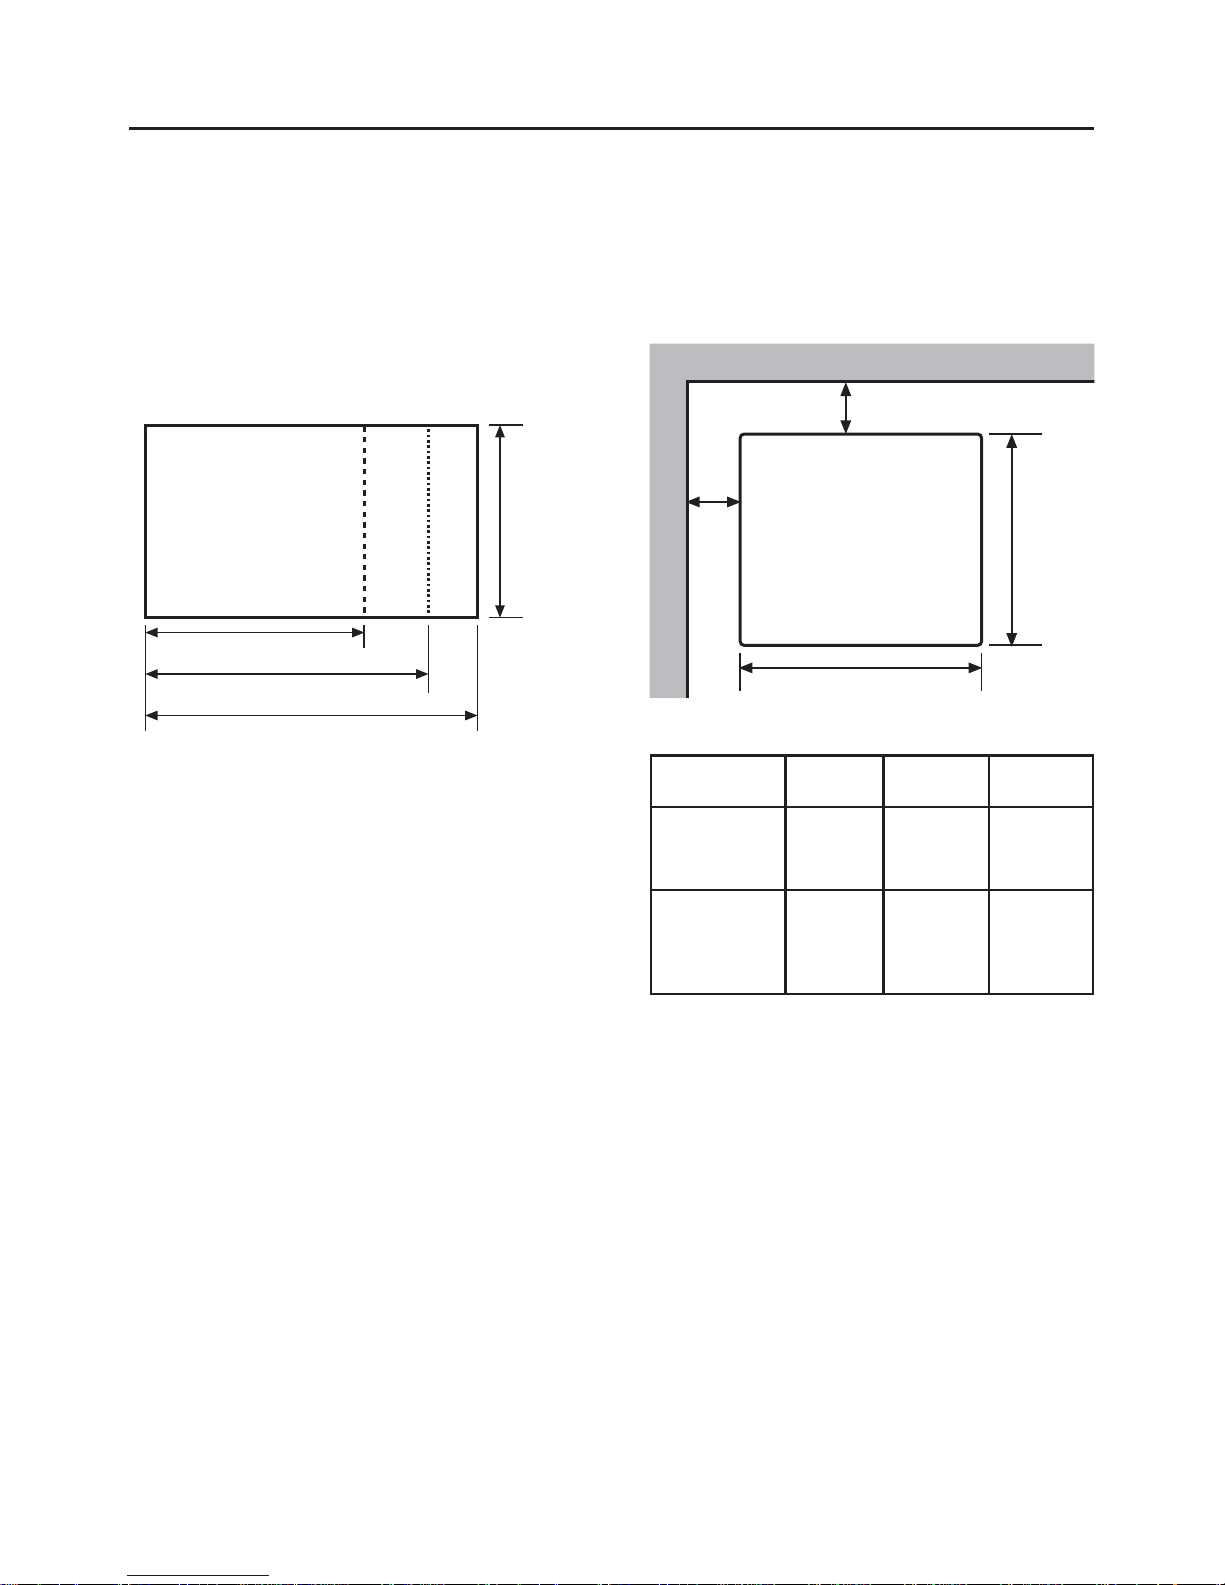
Clearances and dimensions
1. No shelf or overhang of combustible
material should be closer than
650mm above the hob.
2. There must be a minimum clearance
of 50mm between the edges of the
hob and any side walls; this
clearance must be maintained up
to 420mm above the worktop.
3. There must be a minimum clearance
of 40mm between the rear edge of
the hob and the rear wall. This
clearance must be maintained up
to 650mm above the worktop.
4. When installing a Stoves extractor
hood above the hob, there must be
a minimum 650mm clearance
above the hob.
(For other extractors, refer to their
Manufacturer’s instructions.)
INSTALLATION INSTRUCTIONS
420
mm
Wall Unit
worktop
cooking surface
This area must
be kept clear
of combustible
materials.
50 mm
50 mm
Wall Unit
600 / 700 / 900 mm
650
mm
600mm - 600CTH
700mm - 700CTH
900mm - 900CTH
Page 18
Hob dimensions
600CTH - 580 mm wide
700CTH - 680 mm wide
900CTH - 880 mm wide
Depth of hob from top of worktop to
underneath of base tray 40mm.
Cutout dimensions
Before making the cutout in the worktop, make sure the clearances listed on
the previous page will be maintained.
16
clearance
clearance
rear wall
side wall
worktop
cutout
cutout width
cutout depth
510
mm
580 mm
880 mm
680 mm
hob
INSTALLATION INSTRUCTIONS
600CTH 700CTH 900CTH
Cutout width 555mm 655mm 860mm
Cutout depth 485mm 485mm 490mm
clearances:
Side wall 60mm 60mm 60mm
Rear wall 50mm 50mm 50mm
Page 19

17
Installation advice - cabinetry
Dealing with sides, cross-rails
and back-panels in cabinetry
Depending on the cabinets, the worktop
thickness and the hob positioning, it is
possible for the hob base and/or the
clamp brackets to interfere with parts
of the cabinet. These can be dealt
with as follows:
Cabinet sides
If the hob is to be installed across the
top of two cabinet housing units, then
the base of the hob may interfere with
the sides of these units. It will be necessary to cut away the top of the unit
sides locally to clear the hob and/or
the clamp brackets.
Cross-rails
1. Interference with hob base
If there are any cross-rails which
obstruct the hob base by running
across the worktop cutout, they can
simply be removed or locally cutaway to allow the hob to be
installed, depending on the particular installation. Any modifications must ensure that the strength
of the cabinet is maintained.
2. Interference with clamp brackets
If there are any cross-rails which
prevent the clamps from being
positioned on the front or rear
edges of the hob, then they can be
removed or locally cut-away around
the brackets to allow the brackets
to be installed. Any modifications
must ensure that the strength of the
cabinet is maintained.
Back-panel
If the cabinet has a back-panel which
prevents the clamps from being positioned
on the rear edge of the hob, then this
panel can be completely removed or
locally cut-away to allow the brackets
to be installed.
Stone (Granite or equivalent)
worktops
Depending on the type of worktop
being used, there may or may not be
any backing material to screw the
clamp screws into.
1. If the worktop is a composite type
(backed with MDF or similar) there
may be enough backing to screw
directly into. This will depend on the
worktop thickness & backing thickness
and will have to be assessed at the
installation. In this case, install the
hob as for a standard worktop.
2. If there is insufficient backing material
to screw into, or if the worktop is
completely solid in construction, then
it will be necessary to glue a strip
of wood, MDF, fibreboard or similar
to the underside of the worktop,
along the front and rear edges of
the cutout. Use a strong, proprietary
adhesive to bond these strips and
allow to cure before attempting to
clamp the hob into position.
INSTALLATION INSTRUCTIONS
Page 20
18
Note:
Important: Ensure that you route all
mains electrical cables well clear of
any adjacent heat source, such as an
oven or grill.
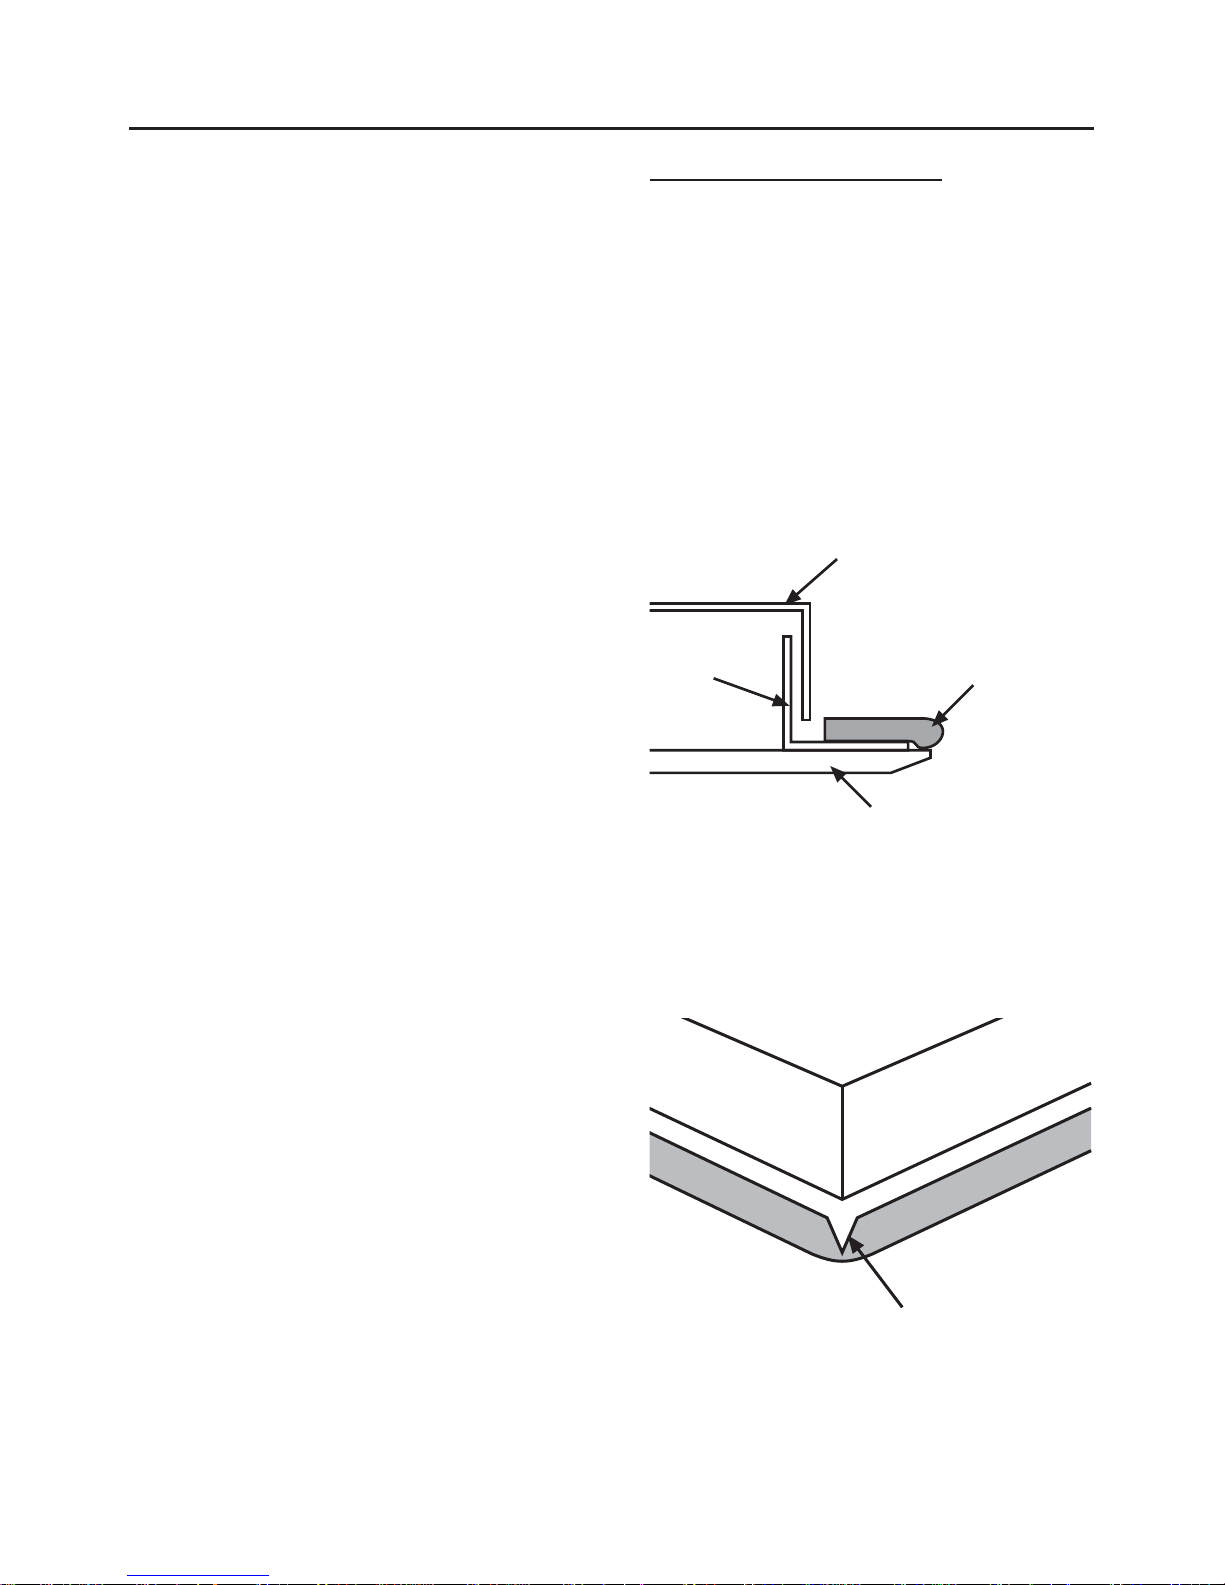
Standard installation
Make the cutout in the worktop to the
dimensions given, and in a location so
that all the given clearances are met.
Turn the hob upside down and attach
the seal supplied to the metal struts on
the underside of the glass, starting in
the centre of the rear edge with the
wider part of the section adjacent to
the glass edge.
When running the seal around a
corner, cut a “v”-shaped notch in the
seal to allow it to pass around the
corner.
Basetray
Strut
Hob glass
Stick seal to strut
with wider part of
section adjacent
to glass edge.
Cut “v”-shaped notch in seal to
allow it to pass around the corner
INSTALLATION INSTRUCTIONS
Page 21

19
Connect to the electricity supply
Warning: This appliance must be
earthed.
The hob must be installed by a competent electrician, using a double pole
control unit of 32 ampere minimum
capacity, with 3mm minimum contact
separation at all poles.
We recommend that the appliance is
connected by a qualified electrician
who will comply with the AS/NZS
3000:2000. and local regulations.
1. Connection should be made with
minimum 4.0mm
2
twin & earth cable.
4. First strip the wires, then push the
cable through the cable clamp in
the terminal block cover.
5. Connect the cable to the terminal
block and tighten the cable clamp
screw (see diagram).
6. Close the terminal box, ensuring
that the cover is engaged on the
locking tabs.
Secure hob to worktop
After connecting to the electrical
supply, place the hob in the cutout and
secure in place using the four brackets
and screws provided.
The brackets should be orientated to
suit the worktop thickness as shown, then
inserted into the four slots (two on the
front edge and two on the rear) and
screwed into the underside of the worktop
using the woodscrews provided.
The screws should be tightened just
sufficiently to secure the hob to the
worktop, but not overtightened as this
may damage the glass top.
If the base of the hob is accessible
after installation, then a partition must
be fitted 20mm below the base to
prevent access.
INSTALLATION INSTRUCTIONS
1
2
3
4
5
Cable
clamp
Earth
(Green / Yellow
or sleeving)
Live
(Red or Brown)
Neutral
(Black or Blue)
Live , Neutral , Earth .
1 5
seal
hob
40mm
worktop
seal
hob
30mm
worktop
Page 22

20
Power supply
220 - 240V ~ 50Hz
Maximum load at 230V
600CTH 5415W
700CTH 7070W
900CTH 7715W
Country of destination
AUS
Element ratings:
600CTH Front
1560W
1100W
1100W
1655W
HALOGEN
TECHNICAL DATA
900CTH Front
1655W
1655W
1100W
2205W
HALOGEN
1100W
HALOGEN
700CTH Front
1655W
1100W
1655W
1100W
HALOGEN
1560W
HALOGEN
Page 23
215
600 CTH-AU
Wiring colour code: Bk - Black, Bn - Brown, Bu - Blue, Gn - Green, Or - Orange, R - Red, W - W
h
ISSUE A
L
N
C7
C8
C9
C10
C11
C12
C13
C14
C15
C16
C6
C5
C4
C3
C2
C1
C17
C18
H4+ H4 H3 H2 H1
203
203
203
203
204
203
208
208
203
204
203
208
208
203
203
203
TOVE SS
H
S
4
2
H
S
4
2
H
S
2
4
4
4a
S
2
H
TERMINAL
BLOCK
L
N
215218
215218
215
215
215215
215215
215
215
215
Bu
Br
Bu
Bu
Bu
Br
Bu
W
Bu
Bu
Bu
Bu
Bu
Bu
Br
Br
Bu
W
Bu
Bu
Bu
Bu
Gn
Gn
18
54
HALOGEN
18
54
8
44
63
27
06/07/06
Page 24

700 CTH - AU
Wiring colour code: Bk - Black, Bn - Brown, Bu - Blue, Gn - Green, Or - Orange, R - Red, W - W
h
ISSUE A
C11
C16
C15
C14
C13
C12
C10
C9
C8
C7
L
N
H5
H4
H3
H2
H1
C2
C6
C3
C4
C5
C1
C17
C18
DZ1
DZ2
TOVE SS
TERMINAL
BLOCK
L
N
60
24
H
S
2
4
2
4
43
7
H
S
4
2
H
S
21
57
HALOGEN
15
51
H
S
2
4
HALOGEN
2
S
H
4
4A
66
30
Bu
Bu
Bu
Bu
Bu
Br
Br
Bu
Br
W
208
Br
Br
Br
Bu
Bu
Bu
W
218
218
Gn
Gn
215
217
215
215
215
217
217
208
217
217
217
208
Bu
204
204
43
Or
43
43
Or
Bu
Or
Or
Or
Or
202
202
202
202
202
211
202
202
Or
Or
Or
Or
217
202
211
211
211
211
211
06/07/06
Page 25

900 CTH - AU
Wiring colour code: Bk - Black, Bn - Brown, Bu - Blue, Gn - Green, Or - Orange, R - Red, W - W
h
ISSUE A
C11
C16
C15
C14
C13
C12
C10
C9
C8
C7
L
N
H5
H4
H3
H2
H1
C2
C6
C3
C4
C5
C1
C17
C18
DZ1
DZ2
TOVE SS
2
4
S
H
4A
27
9
69
TERMINAL
BLOCK
L
N
4
2
H
S
HALOGEN
15
51
2
4
H
S
9
45
HALOGEN
2
4
S
H
57
21
4
2
H
S
44
8
208
204
204
208
208
215
215
204
204
W
Bu
Bu
Bu
Br
Br
Br
Br
Br
Br
Bu
Bu
W
Bu
W
218
Gn
218
Gn
514
514
445
469
469
W
203
211
211
211
211
211 211
203
203
203
203
203
Bu
W
W
203
Bu
Bu
Bu
Bu
Bu
Bu
Bu
203
W
W
204
204
445
06/07/06
Page 26

NOTES
Page 27
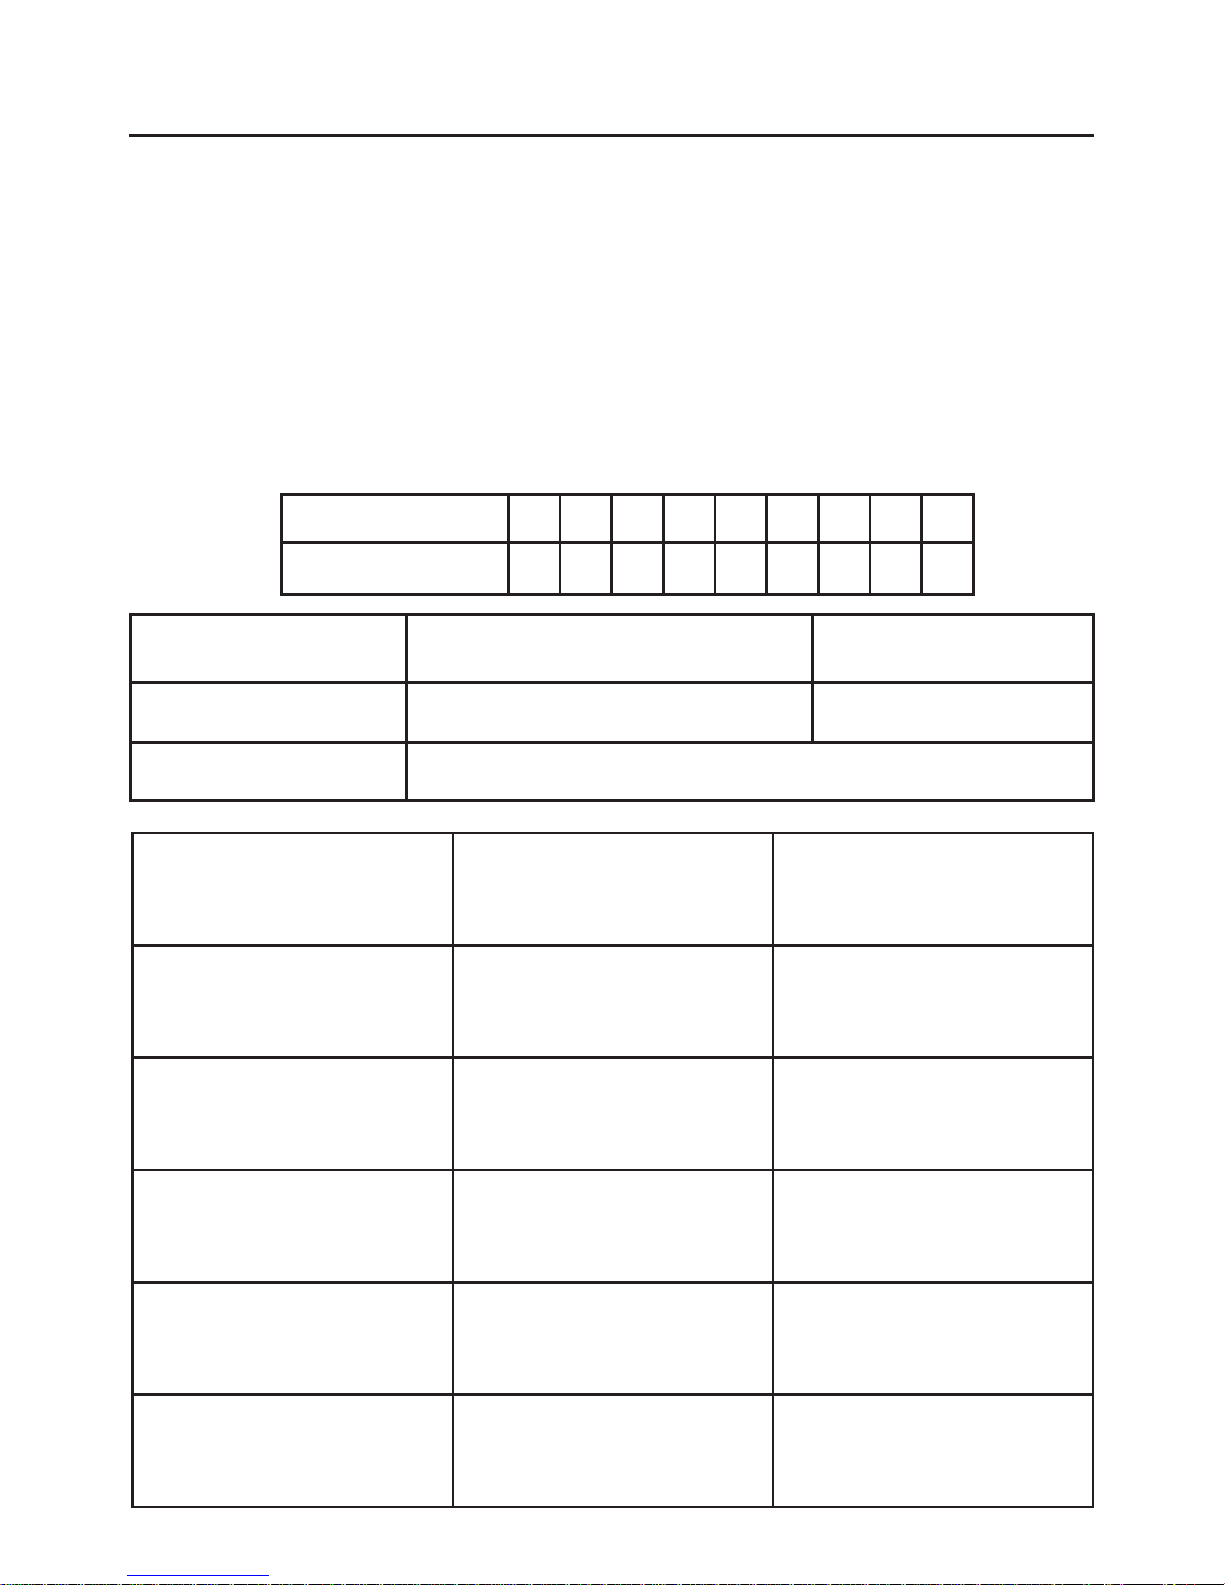
Service Record
Date of purchase Installer stamp / Printed name Date of installation
Place of purchase:
Date Part(s) replaced Engineers Stamp/
Printed Name
Model Number
Serial Number
Please record your model number and serial number in the space below.
Where are my model and serial numbers?
Freestanding HL appliances: base of storage drawer
Freestanding appliances: front frame near oven cavity
Built in oven: front frame near oven cavity
Hobs: base plate of the hob
Having these numbers to hand will help us to help you, quickly and more efficiently.
When contacting us, please use the Customer Care number on the back cover of this
handbook.
Page 28

08 27322 00 © 07.2006
Halogen Hob
Model Names: 600CTH, 700CTH, 900CTH
Contact Us
Proudly distributed by Eurolec.
Head Office address: 27 Watland Street, Springwood, Queensland 4127
For Service information please call:
Tel: 1800 033700
Calling for a service
If you should experience any problems with your cooker please contact your retailer or
place of purchase.
Important note:
Service work is to be conducted by authorised persons only. It is also adviseable that
your cooker is checked regularly and maintained in good condition. An annual maintenance is recommended.
Always check the instruction book before calling a service agent to make sure you have
not missed anything.
Before you contact a service agent, make sure that you have the following information to
hand:
Model Number
Serial Number
Date or Purchase
Postcode
 Loading...