

Page 1
www.stormblue.co.kr
Table of
Contents
Table
Digital Audio Player, XUKE 4
Cautions 6
To maintain good performance 7
Product Introduction
Included Accessories 8
Name of Parts / Function of buttons 9
First step to use the player
Connect XUKE to the USB port in the PC 10
Software Installation 14
Detail Menu of XUKE
Basic Operation to play music 16
Mode menu 19
Sound menu 20
Play menu 21
Display menu 23
Time menu 25
System menu 27
Other Functions of XUKE
FM Radio 30
Voice Recording 31
Line-in Recording 32
Photo album 33
Information
Specifications 34
Trouble shooting 35
Warranty 36
Note 37
of Contents
Page 2
Digital Audio Player, XUKE
Digital Audio Player, XUKE
Greetings from Stormblue
Thank you for purchasing XUKE MP3 player.
Xuke is the trademark of MP3 players developed and
manufactured by STORMBLUE located in Seoul, Korea.
Xuke MP3 players are focusing on those who are very concerned
about the sound and design as well as the color.
Please, visit our website at
more about us.
www.stormblue.co.kr to find
Digital Audio Player, XUKE
[]
Characteristics of Multimedia player, XUKE
1. Photo Album and Slide show on 65K Color OLED (JPEG/BMP)
2. USB2.0 high speed
3. Li-polymer rechargeable battery (420mA) : More than 25 hours
playback
4. FM Radio Listen & FM Recording by reservation (FM Auto Recording)
5. Voice Recording through both built-in microphone and external
microphone
6. Support DRM and Lyric display (automatic and manual)
7. Direct Encoding
8. Digital Watch and alarm function
9. Support worldwide 40 languages
10. 3D sound effect
11. Convenient and friendly GUI (Graphic user interface)
0
4
0
5
Page 3
Cautions
To
maintain good performance
[]
Cautions
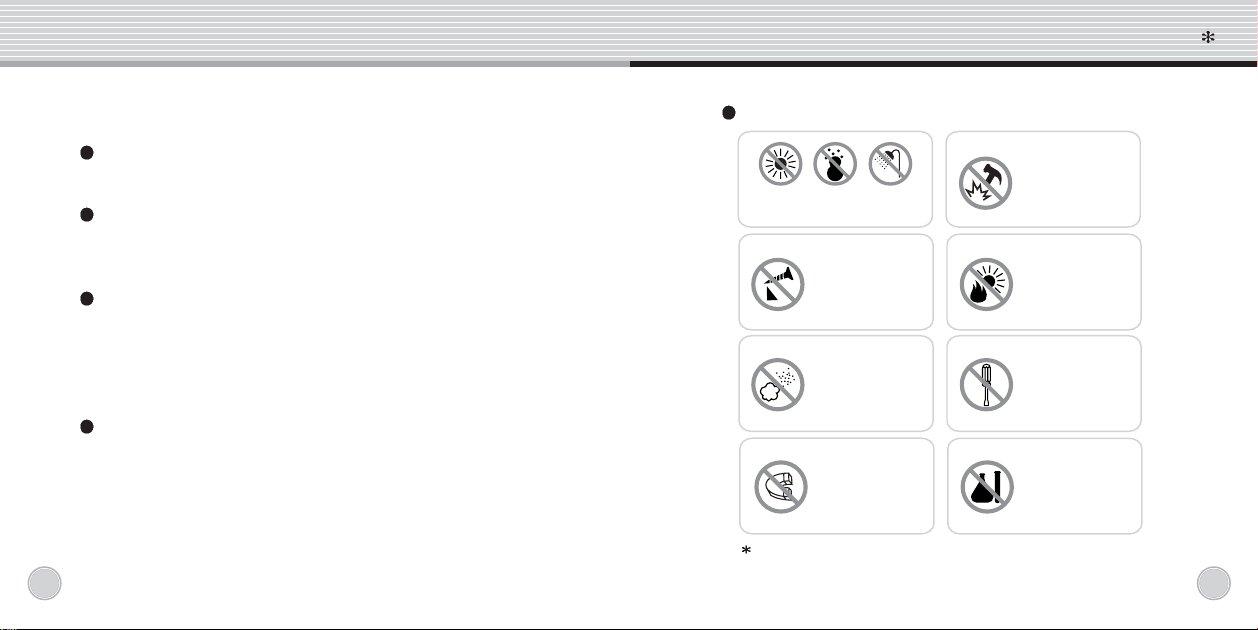
Do not shake or apply heavy shocks on the product
It might be the cause of malfunction or damaged
Avoid contacting the product with water
This may cause serious damage to the product. If the player gets
wet, wipe with a soft towel or rag as soon as possible.
When using your headphones/earphones
Do not wear earphones while driving an automobile, bicycle, or
motorcycle. Not only it is dangerous but also it is illegal in some
jurisdictions. Listening to the player at large volume level for
extended periods result in damaging your ears.
Turn on the player before you plug in the USB port
0
6
To maintain good performance
Do not drop or cause
impact upon
Avoid high or cold temperature
and moisture.
Do not have other
different things in the
product.
Avoid placing the
product under high
moisture or dust level
Do not place any
magnetic device near
the product.
Earphone should not be inserted into the player when the player
is recharged by USB Port from PC.
the product.
Avoid direct sunlight,
high temperature from
heating device.
Never disassemble,
repair or rebuild
Do not use thinner,
alcohol, or benzene
when cleaning the
product
0
7
Page 4
Product introduction
Product Introduction
Product introduction
Included Accessories
[]
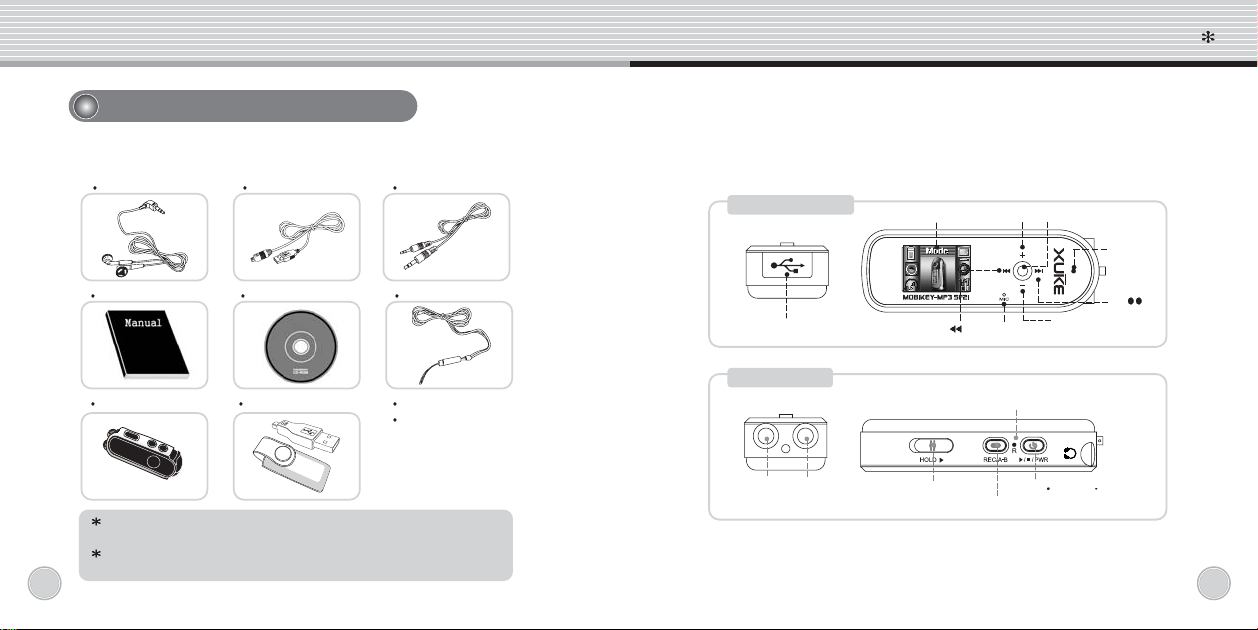
Earphones USB Cable Line-in Cable
Manual CD Neck Strap
Carrying Case USB Jack / Case Arm Band(Optional)
Optional accessories
External microphone / AC charger / Armband
Accessories could be changed without notice to increase the
0
performance or quality of the product.
8
External Mic(Optional)
Name of Parts / Function of buttons
[]
Front
USB Connector
Tops & Side
Earphone JackLINE IN
65K Color OLED Display Volume + Jog key :
) Microphone
(
REW
Reset Button
HOLD KEY
Recording/ A-B repeat / Return
short click (menu)
Long click (file navigation)
Volume -
ON OFF / Play Pause
LED
FF
)
(
0
9
Page 5
First step to use the player
First step to use the player
First step to use the player
[]
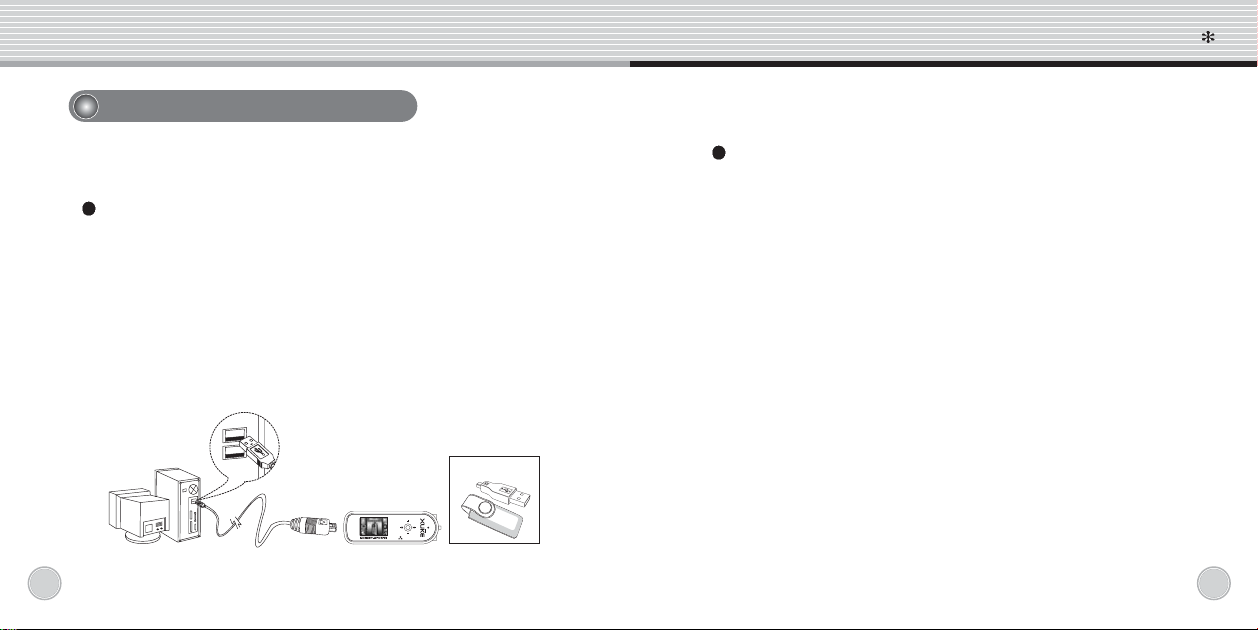
Connect XUKE to the USB port in the PC
Connecting XUKE to computer
Turn the player on by pushing and holding the power
button before you connect it to your PC.
Then, the PC recognizes the player as a removable disk.
(Earphone should not be inserted into the Player when the player
is connected to PC)
a. You can use mini USB jack included for direct connection to
the USB port
b. You can connect the player to the USB port using a USB Cable
included.
MINI USB JACK
1
0
Charge your player
Just connect the player to the USB port. Then the charging lamp
will be turned on.
You don’t need to turn on the player before connecting to the USB
port if you want to just charge the player. When fully charged, the
charging lamp will be turned out.
When the player is turned off. :
The player is fully charged within 1.5 ~ 2 hours.
When the player is turned on. :
The player is fully charged within 4 to 5 hours.
1
1
Page 6

First step to use the player
First step to use the player
File upload/download (The player should be turned on
before you plug in)
a. Open Windows Explorer and select the removable disk newly
created.
b. You can create many folders in the removable disk to sort out music
files.
c. Just copy or move any files including music files from your PC to a
certain folder in your removable disk.
d. You don’t necessarily need to create folders and you can just
copy/move files to the root directory of the removable disk without
creating folders.
e. You can delete/rename any files stored in the removable disk as same
as you do in the PC.
Format the disk
Open Windows Explorer and click the removable disk by the right
button of the mouse. Then click the format menu by the left button of
the mouse.
Caution : Format function will delete all files in the player. Backup all the
important data before formatting the removable disk.
1
2
Disconnecting from the PC
Before unplugging the player from the PC, make sure to double click the
Green Arrow icon on the right bottom task bar of the PC screen.
When the dialogue box is displayed on the monitor, Click on the stop
button to stop USB Mass Storage Device.
When a new dialogue box appears, click “OK” to clearly remove the
removable disk from your PC.
Caution
Fatal error may occur in the PC or the player if you remove the
player without completing above procedures.
1
3
Page 7
Software installation
Software installation
Software Installation
[]
Install Image Editor program.
Insert the included CD in the CD-ROM drive and Run the ‘image
editor.exe’ File.
Using Image Editor(JPG/BMP File supported)
a. Turn on XUKE and connect it to the usb port. Run the image
editor program
b. Click the ‘open’ menu and select images you want to store to the
mp3 player
c. Click the ‘add’ button and it will be converted and moved to the
right chamber. Repeat this operation to each images you want to
see in the mp3 player.
d. Click 'save' button and a dialog box will be appeared.
Then, select picture folder of the removable disk to save the
selected images. 1 file contains many picture images and you can
store many files to make your own photo album.
e. Finish the program by clicking Exit button.
f. Several image files that contains many photograph can be made
this way
1
4
Firmware upgrade
XUKE help users do firmware upgrade very easily.
a. Download the latest firmware from our website.
If the firmware file is a zip file, plz unzip it before you proceed.
b. Turn on XUKE and connect it to the usb port
c. Make a 'firm_up' folder in the root directory of the player.
Then, copy the firmware file to 'firm_up' folder.
d. Safely remove the player from your PC.
Enter the menu mode (by click on the jog key) and enter
the system menu.
Then, select 'firmware upgrade' menu and select 'yes'.
Now, the player upgrade firmware by itself and turn off.
(Refer to the 'firmware upgrade' section of the system menu)
Caution
For users whose OS version is Windows 98 or
Windows 98SE
Make sure to install the driver for Window 98/SE. It should be
installed if you use Windows 98 or 98SE version. In Windows 98/SE,
the player is not to be recognized as external USB drive without
installing this drive. Do not install the driver if your OS is Windows
ME/2000/XP.
- Insert the provided program CD to the CD rom drive
- Run the Driver for Win98/SE OS.
1
5
Page 8
Detail menu of XUKE
Detail menu of XUKE
Detail Menu of XUKE
[]
Basic Operation to play music
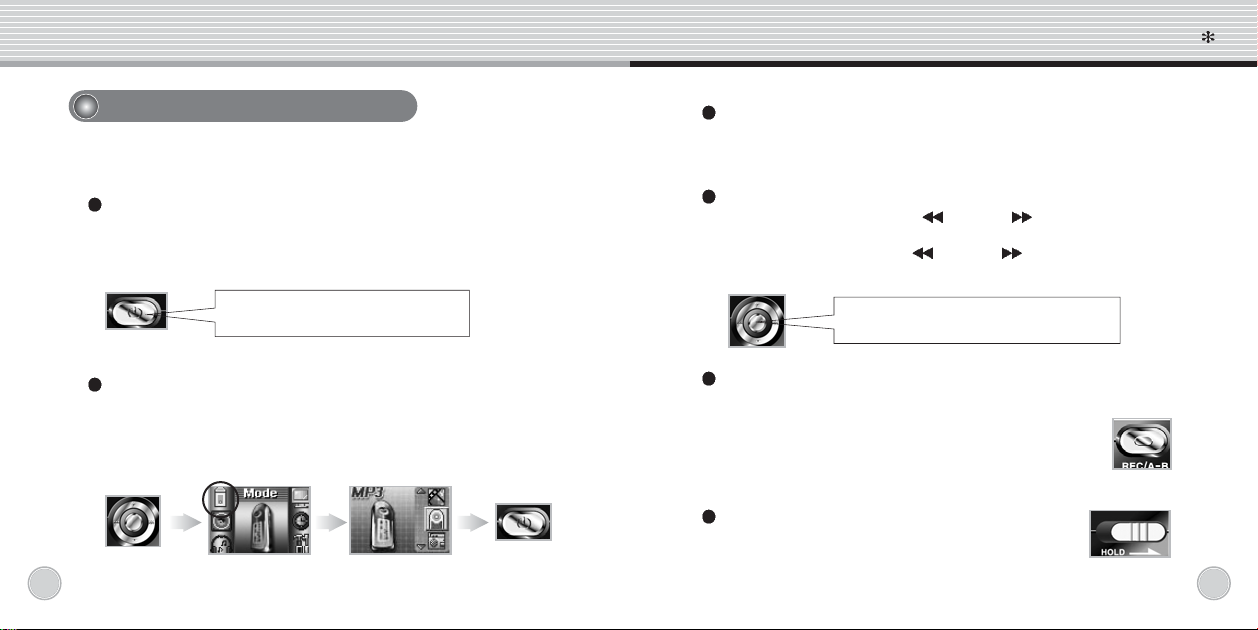
Power On/Off
Press and hold the Power ON/OFF (PLAY/STOP) button over 1
second to turn the power on.
Do the same again over 1 second to turn the power off.
Long click for power on or off / short
click to play or stop the player
Playback of the Music/ Stopping (Pausing) the music
Click the jog key shortly to enter the Menu. After you enter the
menu, select mode menu by a click on the jog key. Then, select
MP3 playing mode by a click on the jog key. You can start music
by clicking the power key short.
1
6
Volume control and File navigation
Push the jog key in + or – direction to increase or decrease the volume level.
Push the jog key in + or – direction to move forward or backward
the files stored in the player.
REW/FF and Next song/ Previous song
Push and hold the jog key in FF(
forward or backward of the music on the go.
Push shortly the jog key in FF(
to the next song or the previous song.
Long push for winding / short push for
changing songs forward or backward
A-B repeat
This function makes a repeated playback of designated part of music file.
When you listen to the music in mp3 mode, press this button
shortly to mark the start point. Then, press it again after a
certain period of time to decide the repeating part. The player
will play the designated part of the song repeatedly. To stop
the A-B repeat, just click the same button again.
Using Hold button
This function disables all the product’s buttons to avoid
unintentional button operation
) or REW( ) direction to move
) or REW( ) direction to move
1
7
Page 9
Detail menu of XUKE
Detail menu of XUKE
Navigation mode
You can enter navigation mode by long click on the jog key when you are in
mp3 mode. REC/A-B Button cancel the navigation mode
1) You can select recording files to play as voice recording files, encoding files,
and FM recording files in navigation mode.
2) Use volume +/- key to navigate and push FF (
REW (
3) Push 'play' key to play those recording files.
FF (
[]
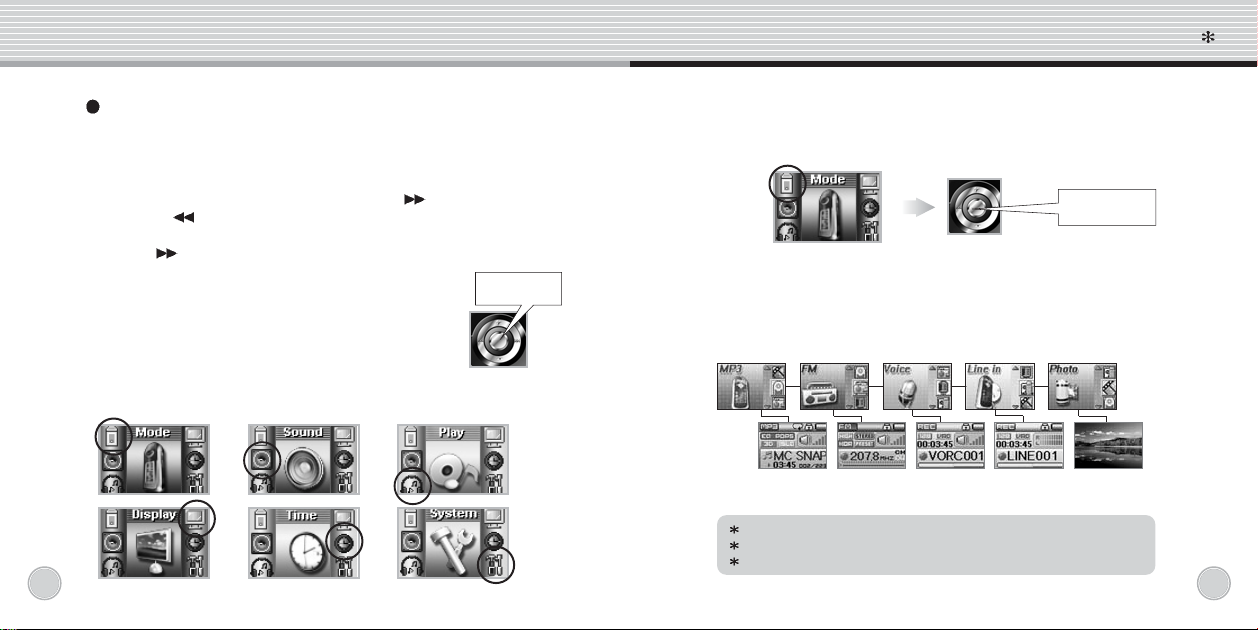
Menu Selection
Press the jog key shortly to enter Menu. After you enter the
menu, push the jog key in + or – direction to shift the menu.
Press the jog key again to enter sub-menu when the cursor is
on desirable menu.
[ Menu switch by Jog key move in +/– direction ]
1
8
) key to enter/get out of the folders.
) key can do the same function.
) key or
Short click
[]
Mode menu
Press the jog key when the cursor is on the mode menu.
Short click
After entering the mode menu, push the jog key in + or – direction to
shift the mode among MP3 mode, FM radio mode, Voice Recording
mode, Line-in Recording mode (encoding) and photo album mode.
[ Each mode ]
MP3 FM VOICE
Click A-B/REC button to return to the previous stage.
Click and hold A-B/REC button to return to the initial stage.
Click the joy key to save the function.
RECORDING
LINE-
EN
CODING
PHOTO
1
9
Page 10
Detail menu of XUKE
[]
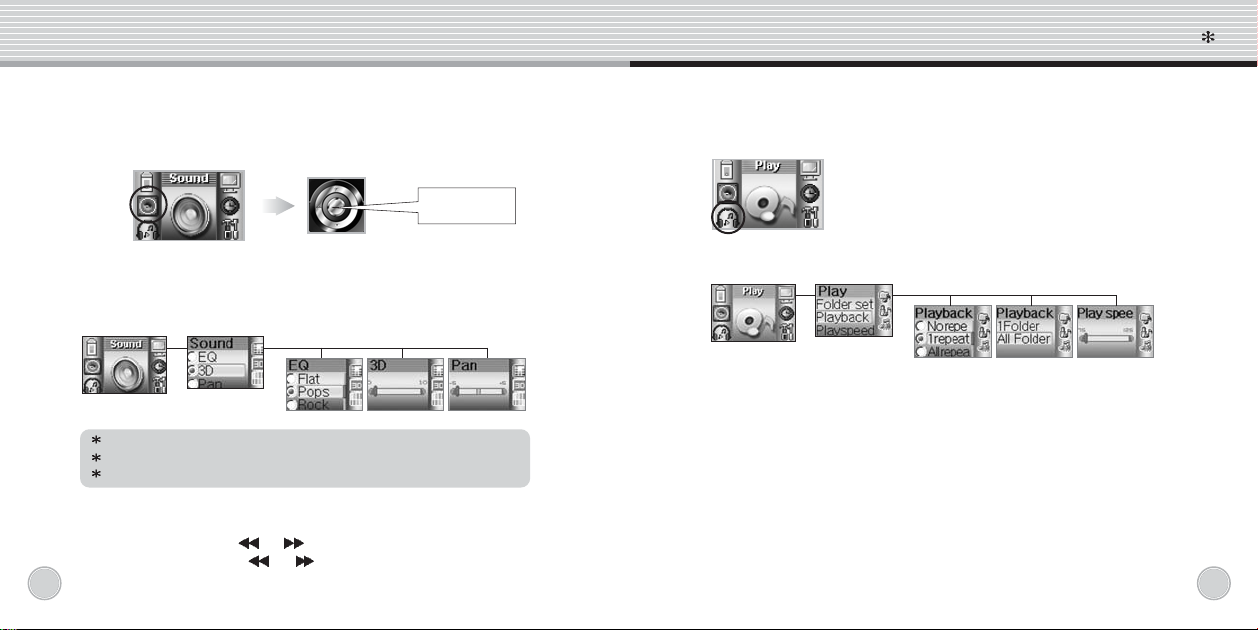
Sound menu (To adjust EQ, 3D sound and PAN)
Detail menu of XUKE
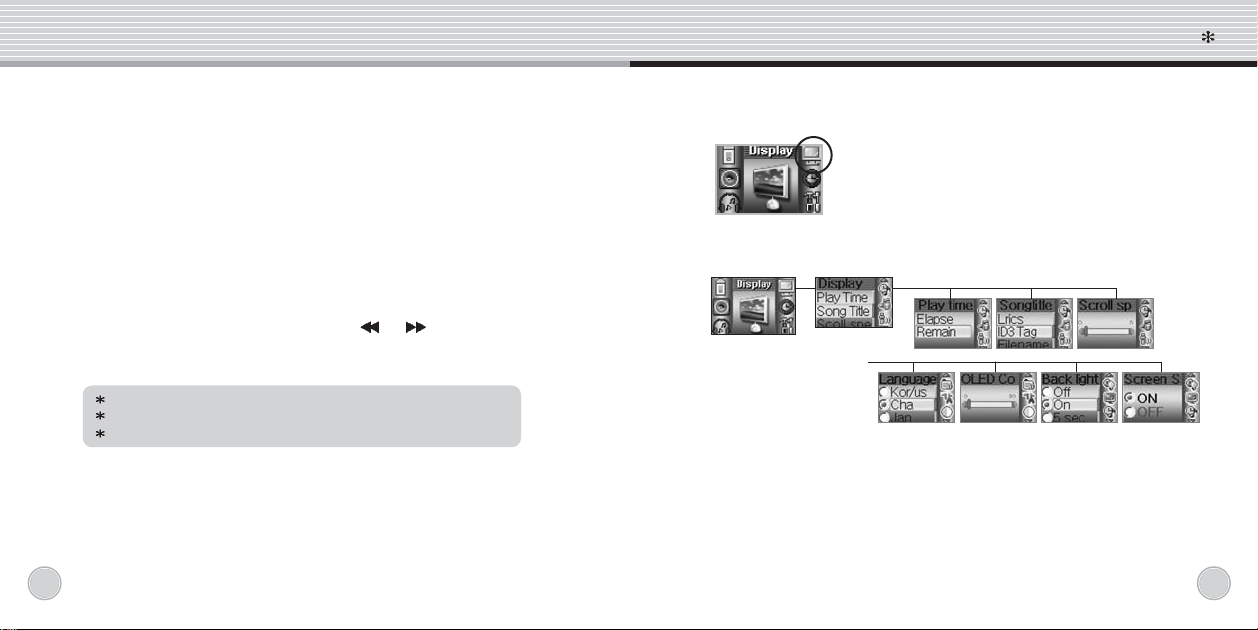
Play menu (Selection of Repeat, Folders, Play speed)
[]
Press the jog key when the cursor is on the sound menu.
After entering the sound menu, push the jog key in + or – direction to
select among EQ, 3D and Pan menu and then click the jog key to enter
the submenu (EQ, 3D, PAN).
[ Each mode ]
Click A-B/REC button to return to the previous stage.
Click and hold A-B/REC button to return to the initial stage.
Click the joy key to save the function.
EQ : Push the jog key in + or – direction to select your favorite EQ mode.
(Flat, POP, Rock, Live, Classic, Vocal, D-Bass, User)
3D : Push the jog key in
PAN : Push the jog key in
2
0
or direction to adjust 3D effect.
or direction to adjust Left/Right sound balance.
Short click
Press the jog key when the cursor is on the play menu.
After entering the play menu, push the jog key in + or –
direction to select among folder menu, playback menu and
play speed menu and then click the jog key to enter the
submenu (Folder, playback and Play speed)
Folder : Push the jog key in + or – direction to select your favorite
Folder mode.
Folder1 : this means ‘play the songs in the current folder’
Folder all : this means ‘play all songs in the player regardless of
folders division’
2
1
Page 11
Detail menu of XUKE
Detail menu of XUKE
Playback : Push the jog key in + or – direction to select repeat mode.
Normal : no repeat
Repeat 1 : this means “repeat the current songs on the go”
Repeat all : this means “repeat all songs in the current
directory or in all directory”
Random : to play all songs in the current directory or in all
directory at random
Intro : to play initial 10 seconds of all songs in the directory for
overview.
Play speed : Push the jog key in
the play speed of music files. (75% ~ 125%)
Click A-B/REC button to return to the previous stage.
Click and hold A-B/REC button to return to the initial stage.
Click the joy key to save the function.
2
2
or direction to adjust
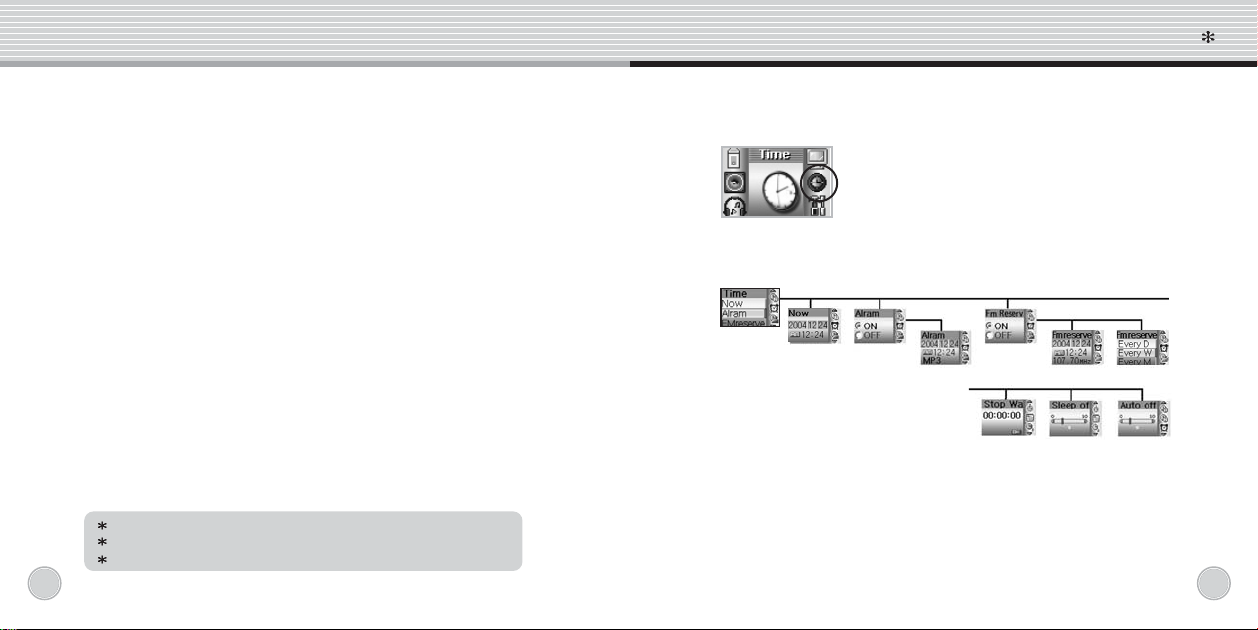
Display menu
[]
Press the jog key when the cursor is on the Display
menu.
After entering display menu, push the jog key in + or – direction to
select among submenus
Play time : Push the jog key in + or – direction to select the way to show
the time of songs.
Elapse : to show the elapsed time of the song on the go.
Remain : to show the remaining time of the song on the go.
Song tile : Push the jog key in + or – direction to select the way to show
the information of songs.
2
3
Page 12
Detail menu of XUKE
Detail menu of XUKE
Lyric : to display the lyric of the song on the go.
ID3 tag : to display the ID3 tag of the song on the go
File name : to display the file name of the song on the go.
Scroll speed : Push the jog key in + or – direction to select the
scrolling speed of information.
Language : Push the jog key in + or – direction to select your favorite
menu language.
(English and Korea is available. French will be supported by
firmware upgrade later)
Back light time : Push the jog key in + or– direction to select the
automatic off time of OLED.
This function help you save the battery time very
much.
LCD saver : Push the jog key in + or – direction to turn on/off this
function.
Click A-B/REC button to return to the previous stage.
Click and hold A-B/REC button to return to the initial stage.
Click the joy key to save the function.
2
4
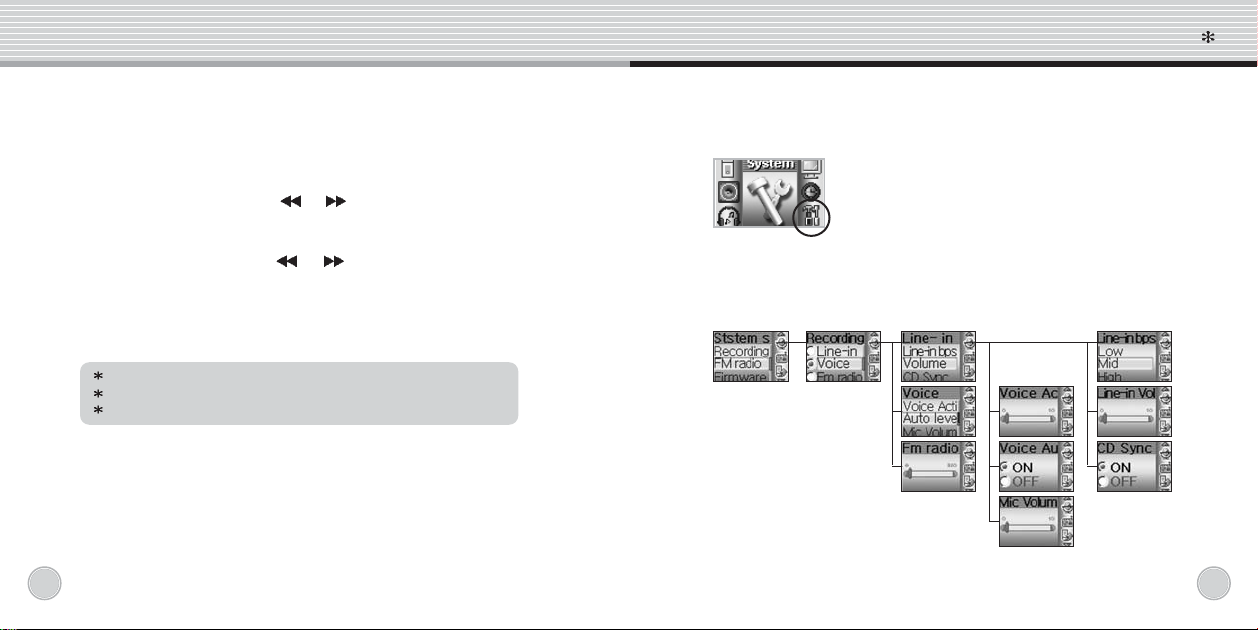
Time menu
[]
Press the jog key when the cursor is on the time
menu.
After entering time menu, push the jog key in + or –
the jog key to enter the submenu. When you need to proceed to the
next step of menu, you have to click on the jog key.
Now : Adjust the current time
Alarm : Adjust the alarm time.
direction to select among submenus and then click
2
5
Page 13
Detail menu of XUKE
FM Reserv : Adjust the reservation time for automatic FM recording.
[]
System menu
Detail menu of XUKE
Stop watch : Stop watch function is available
Sleep off : Push the jog key in
Auto off : Push the jog key in
2
6
length of sleep off time.
of automatic off time.
The player will be turned off if there is no operation for the
adjusted period of time.
Click A-B/REC button to return to the previous stage.
Click and hold A-B/REC button to return to the initial stage.
Click the joy key to save the function.
or direction to adjust the
or direction to adjust the length
Press the jog key when the cursor is on the system
menu.
After entering system menu, push the jog key in + or – direction to
select among submenus and then click the jog key to enter the submenu.
When you need to proceed to the next step of menu, you have to click
on the jog key.
2
7
Page 14
Detail menu of XUKE
Detail menu of XUKE
1. submenu-1 : Recording
a. Line-in Recording
- Line-in bps : Select the bps (resolution) of the recording
- Line-in volume : Adjust the volume of the recording
- CD sync : When you want to record CD track, turn CD sync
function on to make respective mp3 files for each track.
b. Voice recording
- Voice active : The recording pauses when there is no sound. Select
the sensitivity of this function
- Voice auto level : This function make automatic gain control for
voice and sound.
- Mic Volume : Adjust the Volume of microphone. As the volume
setting grows larger the noise level gets louder.
- Voice bps : select the bps (resolution) of the voice recording
c. FM Radio recording
- Select the bps (resolution) of the recording
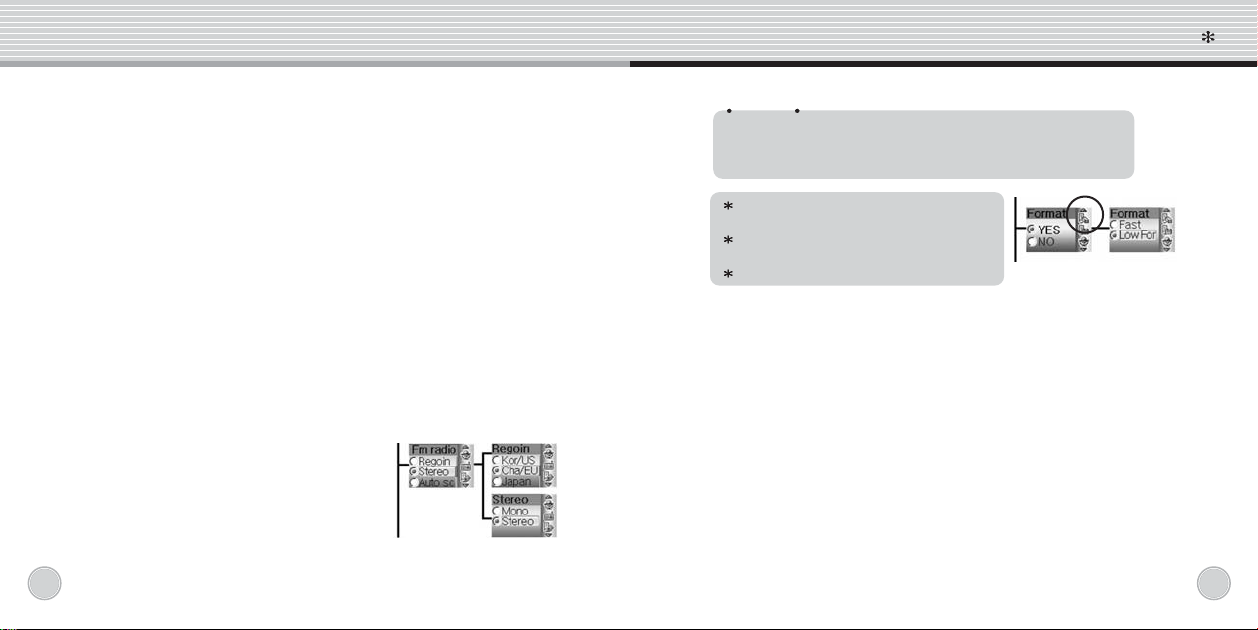
2. submenu-2 : FM Radio
a. Region : select your region. This setting is
important to listen to FM
b. Stereo : Select Stereo or Mono for your
preference.
3. submenu-3 : Format
This function is to format the internal flash ram.
2
8
Caution
Format function will delete all files in the player.
Backup all the important data before formatting
the removable disk.
Click A-B/REC button to return to the
previous stage.
Click and hold A-B/REC button to return to
the initial stage
Click the joy key to save the function.
4. Submenu-4 : USB mode
(this fuction will be supported later by firmware upgrade)
a. USB mode : You can use the player as external storage drive (removable disk)
b. MP3 mode : You can play the player during charging it
5. Submenu-5 : firmware upgrade
a. Download latest firmware from our website.
If the file format is 'zip' file, plz unzip it before you proceed.
b. Turn on the player and connect it to the usb port.
c. Make a 'firm_up' folder to the root directory of the player.
Copy the downloaded firmware file to the 'firm_up' folder.
d. Safely remove the player from your PC.
e. Then, enter the menu mode and enter the system menu.
Select 'firmware upgrade' menu and select 'yes'
Now, the player will upgrade firmware by itself and turn off
2
9
Page 15
Other functions of XUKE
Other functions of XUKE
Other functions of XUKE
[]
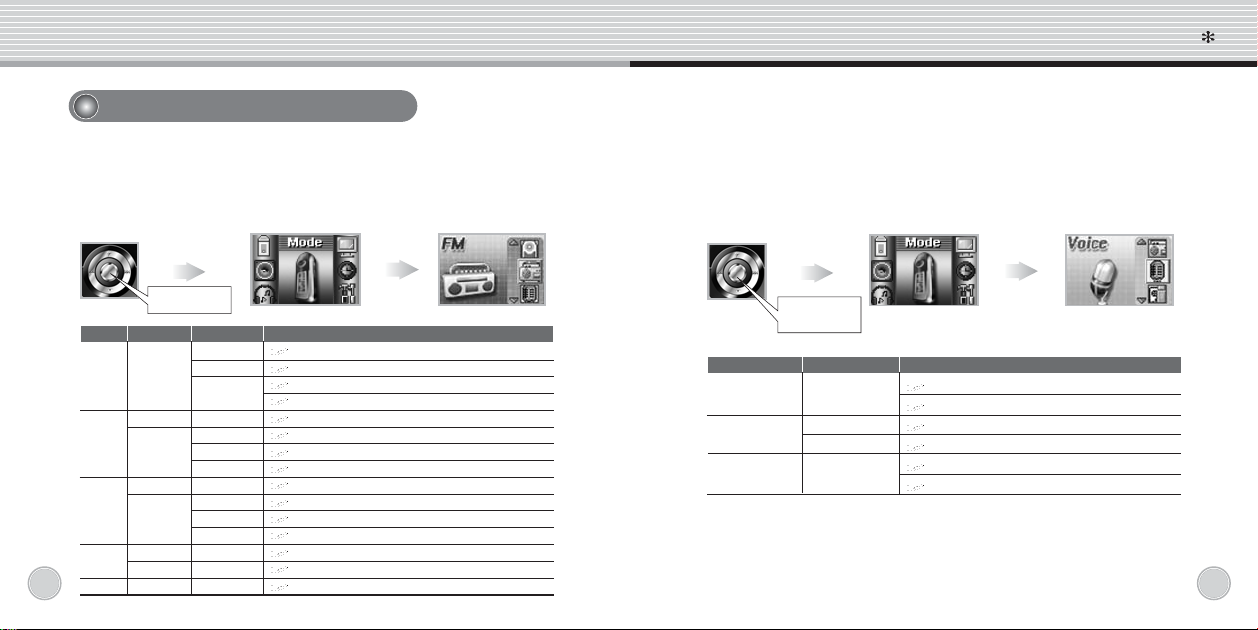
FM radio
Turn on the player by pressing and holding the power key.
Press the jog key shortly to enter Menu. After you enter the menu, select
mode menu by pushing jog key. Then, select the FM menu.
Short click
Long / Short
Button
short
Power
long
FF
short
Long
REW
short
Long
MENU
3
0
short
-
B
A
short
Mode
Preset
Scan
Scan
Scan
Scan
Preset
Scan
Scan
Scan
Preset
Operation
Auto preset start/finish
Show the Station no./ Save the Station No.
Pause FM recording
Restart FM recording
Search stations increasing the frequency
Increasing the frequency by 1 step
Select the No. of the station increasing the number
Next station
Search stations decreasing the frequency
Decreasing the frequency by 1 step
Select the No. of the station decreasing the number
Previous station
Switch between Preset Mode / Scan mode
Enter MENU mode
Start FM recording / Finish FM recording
[]
Voice Recording
Turn on the player by pressing and holding the power key.
Press the jog key shortly to enter Menu. After you enter the menu, select
mode menu by pushing jog key. Then, select Voice recording menu.
Short click
Button
Play / Pause
MENU
-
B/REC
A
Button Touch
short
long
short
short
Operation
Play the voice recording files(in MP3 Mode)
Pause/Resume the recording.
Enter the Navigation Mode.(in MP3 Mode)
Finish the voice recording mode
Start to record.
Finish the record.
3
1
Page 16
Other functions of XUKE
Other functions of XUKE
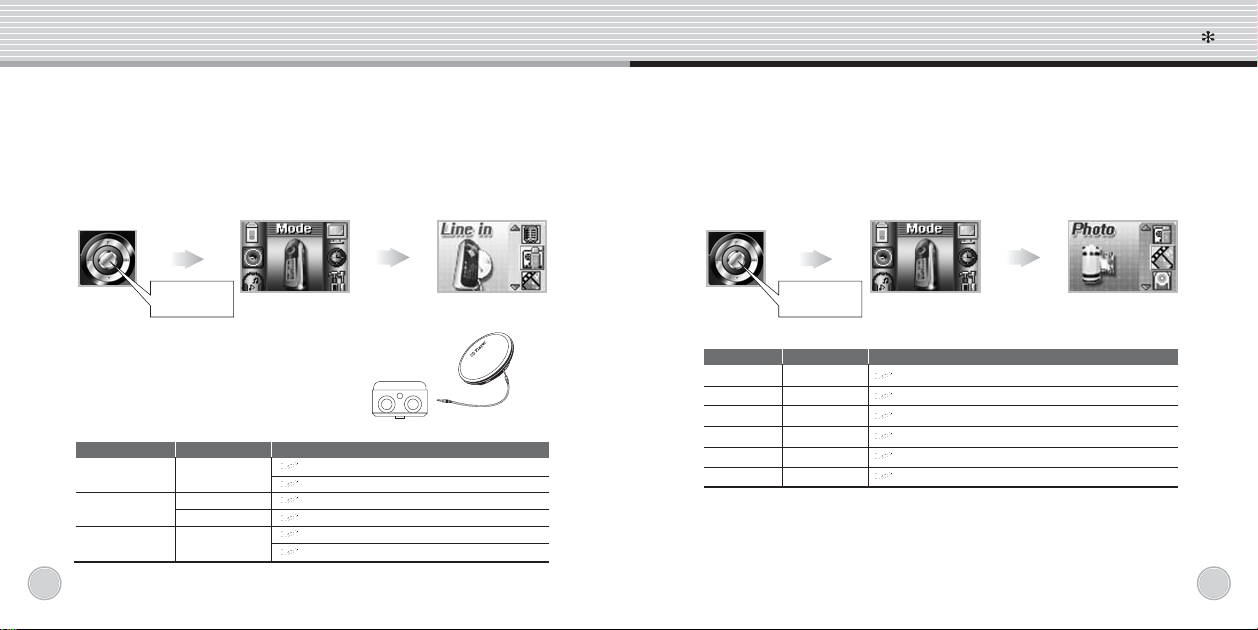
Line-in Recording
[]
Turn on the player by pressing and holding the power key.
Press the jog key shortly to enter Menu. After you enter the menu, select
mode menu by pushing jog key. Then, select Line-in recording menu.
Short click
Connect your player and CD (or other sound
resources) player.
(Connect Sound out pin hole of CD to the
line-in pin hole of the player with the included
line-in cable)
Button
Play / Pause
MENU
-
B/REC
A
3
2
Button Touch
short
long
short
short
Operation
Play the encoding files(in MP3 Mode)
Pause/Resume the encoding
Enter the Navigation Mode(in MP3 Mode)
Finish the line-in recording mode
Start to encoding external audio sources
Finish the encoding
Photo album
[]
Turn on the player by pressing and holding the power key.
Press the jog key shortly to enter Menu. After you enter the menu, select
mode menu by pushing jog key. Then, select photo album menu.
Short click
FF
REW
C
Button Touch
short
short
short
short
short
short
Operation
Next image file
Previous image file
Next image (of Current file)
Previous image (of Current file)
Enter the MENU/ Finish photo album mode
Start/finish slideshow mode
Button
Volume+
Volume-
Menu(Jog key)
A-B/RE
3
3
Page 17
Information
Information Trouble shooting
[]
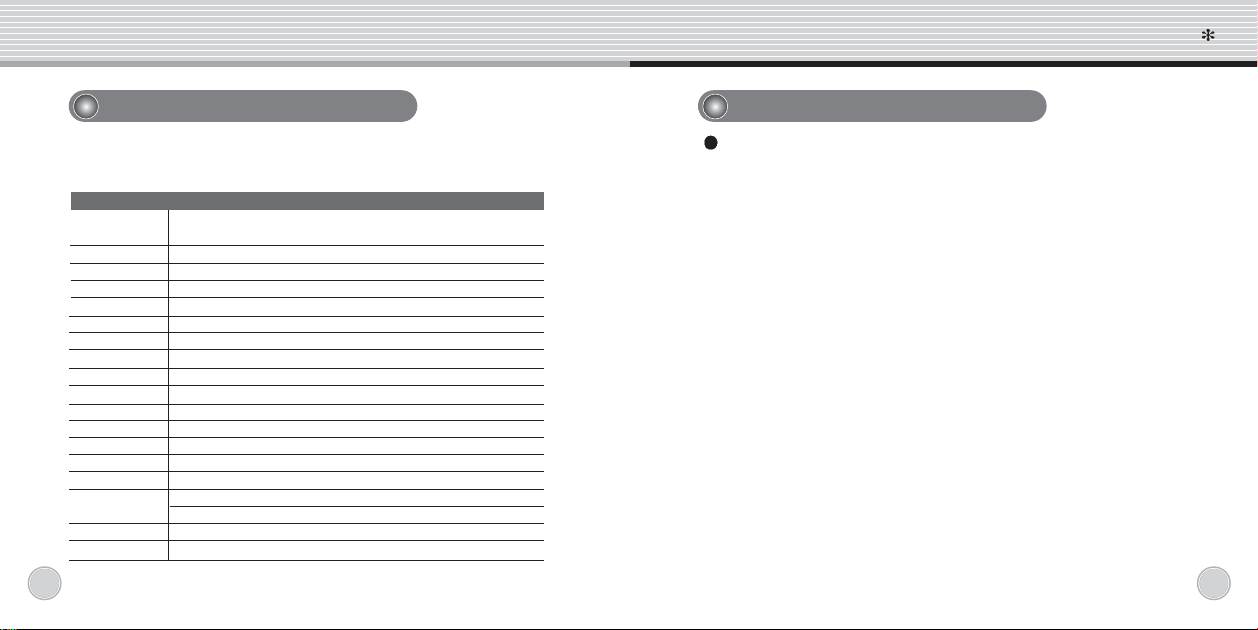
Specifications
XUKE SPECIFICATIONS
MPEG 1/2/2.5 Audio Layer 3 (8Kbps ~ 320Kbps) (8Khz ~ 48Khz) VBR
WMA (20Kbps ~ 320Kbps) (8Khz ~ 48Khz)
128MB,256MB,512MB,1GB
HIGH SPEED USB2.0
UP Load 7MB , Down Load 4MB
Builtin Li-poly battery (420mA)
90 minutes
Play,REC,JOG,HOLD
65K Color OLED 96 * 64 DOT
90dBA
Earphones 32ß 6mW + 6mW
20Hz ~ 20Khz
25 hours (in standard condition)
76.0Mhz ~ 108.0Mhz
46 hours (128MB)
POP,ROCK,CLASSIC,VOCAL,LIVE,D-BASS,FLAT,USER EQ,3D
Windows98/se/ME/2000/XP/2003/LINUX2.4 or later version,Mac8.6 or
later version
74 * 26 * 16m/m
35g (including battery)
3
4
File support
Memory
PC interface
Speed
Power
Charging time
Buttons
Display
S/N
Sound output
Frequency
Play time
FM Frequency
Recording time
EQ
OS support
Size
Weight
Information
Check the following list before requesting A/S.
1. The Player does not power on
- Lock is in the HOLD position? (Release the hold)
- The batteries are exhausted? (Recharge the batteries)
- Click the Reset Button and initialize the player
2. No sound is heard from player or distortion is heard during playback
- Check whether VOLUME is set to “0” .
- Make sure that there are MP3 files in the memory
- Check whether plug is dirty.
- Corrupted MP3 or WMA files may make a static noise and the
sound may cut off. Try with other files.
3. Characters on LED are abnormal
- Check the language is setting to “English” in MENU
4. FM Radio does not work
-Adjust the position of the player and earphones.
(The earphones works as antenna, they must plugged in for
best reception)
- Turn off the power of other electric devices near the player.
5. Failed download
- Make sure the USB Cable is connected properly.
- Check the condition of the battery.
6. The player works abnormally or does not play
- Click the Reset button and initialize the player.
3
5
Page 18
Warranty
Note
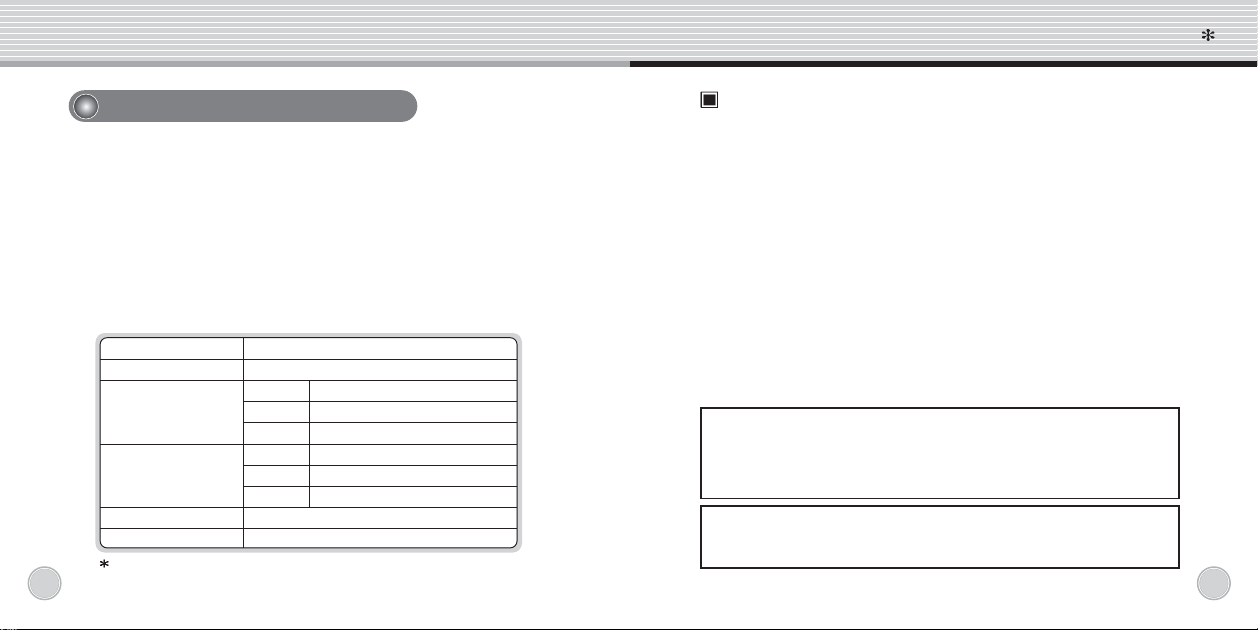
Warranty
1. This product has been manufactured under strict quality and
control inspections.
2. If the product breaks down during normal usage, our
dealer or service center will fix the product for the period free
listed in the warranty as below.
3. A service fee may apply after the warranty period or in case
of the following.
- If the problem was caused by the customer’s misuse.
- If any internal modification was done by the customer.
4. We do not reissue warranty certificate. Please store it in a
safe space.
Product
Model Name
Name
Customer
Purchaser
Date of Purchase
Period of Warranty
For more warranty information and RMA service, please visit our
3
6
web-site at http://www. stormblue.co.kr
Address
Tel
Name
Address
Tel
Month Day Year
Note
This equipment has been tested and found to comply with the limits for a class
B digital device, pursuant to Part 15 of the FCC Rules.
These limits are designed to provide reasonable protection against harmful
interference in a residential installation.
This equipment generates, uses and can radiate radio frequency energy and if
not installed and used in accordance with the instructions, may cause harmful
interference to radio communications.
However, there is no guarantee that interference will not occur in a particular
installation. If this equipment does cause harmful interference to radio or
television reception, which can be determined by turning the equipment off
and on, the user is encouraged to try to correct the interference by one or
more of the following measures :
- Reorient or relocate the receiving antenna
- Increase the separation between the equipment and receiver
-Connect the equipment into an outlet on a circuit different from that to which the
receiver is connected
- Consult the dealer or an experienced radio/TV technician for help.
This device complies with Part 15 of the FCC Rules.
Operation is subject to the following two conditions :
(1) this device may not cause harmful interference, and (2) this
device must accept any interference received, including interference
that may cause undesired operation.
**CAUTION : Changes or modifications not expressly approved by
the party responsible for compliance could void the user's authority to
operate the equipment.
3
7
Page 19
 Loading...