

Page 1
Linux System Recovery Guide
Version 8.2
Page 2

Trademarks and Copyrights
© Copyright Storix, Inc. 1999-2014
SBAdmin is a registered trademark of Sto rix, Inc.
SBAdmin is a trademark of Storix, Inc in the USA a nd othe r countries
Intel is a registered trademark o f Intel, Inc.
Linux is a registered trademark of Linus Torvalds.
Intel, Pentium, IA32, Itanium, Cele ron and IA64 a re registere d tradema rks of Int el Corp oration.
AMD, Opteron, and Athlon are registered trademarks of Advanced Micro Devices.
HP Integrity servers are regis tered tradema rks of Hewlet t-Packa rd Devel opment Compan y.
Publicly Available Software
This product either includes or i s develo ped usi ng sourc e code tha t is publicl y availabl e:
AESCrypt* Rijndael and Cipher Block Feedback
mode (CFB-128) encryption/decryption
algorithms
BusyBox Single executable containing tiny
versions of common UNIX utilities
LILO LInux boot Loader Copyright 1999-2003 John Coffman.
Tcl Open source scripting language Copyright Regents of the University of Californi a,
Tk Tk graphics toolkit Copyright Regents of the University of Californi a,
DropBear A Smallish SSH 2 Server and Client Copyright 2002, 2003 Matt Johnston
GRUB Grand Unified Bootloader (GNU GRUB) Copyright 1989, 1991 Free Software Foundation, Inc.
Lighttpd Secure, fast, compliant and flexi ble
web-server
OpenSSL Toolkit implementing Secure Socket
Layer
Xpdf PDF Document viewer (for AIX) Copyright 1996-2003 Glyph & Cog, LLC.
bpgetfile RPC Bootparams client (for Sola ris) Copyright 2000 Re nsselaer P olytechnic Institute, Departme nt of
parted GNU parted Copyright 2007 Free Soft ware F oundatio n, Inc.
ELILO Linux boot loader for EFI/x86_64 based
systems
btrfs-progs Btrfs utilities programs Copyright 2007 Oracle
Copyright 1999, 2000 Enhanced Software Technologies Inc.
http://aescrypt.sourceforge. net/
Copyright 1989, 1991 Free Software Foundation, Inc.
http://busybox.net/cgi-bin/cvswe b/busyb ox/
Copyright 1992-1998 Werner Almesberger.
http://freshmeat.net/projects /lilo/
Sun Microsystems, Inc.
http://tcl.sourceforge.net
Sun Microsystems, Inc.
http://tcl.sourceforge.net
http://www.matt.ucc.asn.au/dro pbear /dropbea r.html
http://www.gnu.org/software/grub/grub.html
Copyright 2004 Jan Kneschkle, incremental
http://www.lighttpd.net
Copyright 1998-2008 The OpenSSL Projec t
Copyright 1995-1998 Eric A. Young, Tim J. Hud son
http://www.openssl.org
http://www.foolabs.com/xpdf
Computer Science
http://www.gnu.org/software/parted
Copyright 2000-2003 Hewlett Packard Co.
Copyright 2006-2010 Intel Co.
ftp://ftp.hpl.hp.com/pub/linux-ia 64
Copyright 2012 STRATO AG
http://www.btrfs.wiki.kernel.org
Storix System Backup Administrator 2 Version 8.2 Linux System Recover y Guide
Page 3

*Encryption Software
Storix System Backup Administr ator Backu p Data E ncr yption Featur e has a crypt ographic compon ent, using Advanced
Encryption Standard (AES) "Rijndael" encryption algorith m in Cip her Block Fe edback (st ream) mo de (CFB -128) , supportin g
128, 192 and 256-bit keys.
It is not for export or redistribution to any of what are called the "T-10 Terrorist States" as determined by the U.S. Department
of State. Storix System Backup Administrator Backup Data Encryp tion Feature has be en register ed with U.S. Bur eau of
Information and Security and is distributed unde r Export Contro l Classi fication Numb er (E CCN) 5D 992. This e ncryptio n item
is authorized for export and re-export unde r section 742.15 (B )(2) of the Export Administrati on Regulations (EA R).
Storix System Backup Administrator 3 Version 8.2 Linux System Recover y Guide
Page 4

Table of Contents
1. Introduction.........................................................................................................7!
When to Use this Guide .............................................................................................................................. 7!
Terminology................................................................................................................................................ 7!
System and Program Requirements............................................................................................................ 8!
Kernel Support Requirements................................................................................................................ 8!
System Memory.....................................................................................................................................9!
UEFI Firmware Support Requirements................................................................................................... 9!
Programs for Creating and Writing Bootable CDROMs........................................................................... 9!
The Device Filesystem (Devfs)............................................................................................................... 9!
Boot Loaders ....................................................................................................................................... 10!
2. Creating System Recovery Boot Media...........................................................11!
When to Create Boot Media ...................................................................................................................... 11!
When You Should Create New Boot Media ............................................................................................... 11!
Creating System Installation Boot Media................................................................................................... 11!
CDROM image ..................................................................................................................................... 12!
Tape .................................................................................................................................................... 13!
Hard Disk............................................................................................................................................. 14!
Network ............................................................................................................................................... 14!
Customizing the Boot Media...................................................................................................................... 16!
Select SCSI Modules ........................................................................................................................... 16!
Network Modules ................................................................................................................................. 17!
Boot console device............................................................................................................................. 18!
Kernel Release Level........................................................................................................................... 19!
No-prompt Installation............................................................................................................................... 19!
Enabling Remote Installation Manager...................................................................................................... 20!
Configuring RIM when Creating Boot Media......................................................................................... 20!
Configuring RIM after Booting from the Boot Media.............................................................................. 21!
Connecting to the Remote Install Process ............................................................................................ 21!
3. Network Boot/Install Configuration ................................................................. 23!
Understanding Network Boot and Network Installation .............................................................................. 23!
Enable/Disable Client for Network Boot/Install........................................................................................... 23!
Disable a Network Install Client ................................................................................................................. 26!
Using an Alternate Network to Restore the Data ....................................................................................... 26!
Using a Different Install Server than the Boot Server................................................................................. 26!
Using the Same Boot Server to Install Different Linux Versions ................................................................. 27!
Updating Network Boot Images................................................................................................................. 28!
4. Booting to the System Installation Process....................................................29!
Booting the Various System Types............................................................................................................ 29!
Booting to the System Installation Process ................................................................................................ 29!
CDROM or Tape.................................................................................................................................. 29!
Hard Disk............................................................................................................................................. 29!
Network Boot ....................................................................................................................................... 30!
Tape Boot............................................................................................................................................ 32!
Completing the Boot Process.................................................................................................................... 33!
Troubleshooting a Network Boot ............................................................................................................... 34!
Determining the Network Adapter Hardware Address................................................................................35!
5. Reinstall from a System Backup...................................................................... 36!
Cloning Systems....................................................................................................................................... 36!
Installing onto UEFI-Based Firmware Systems.......................................................................................... 36!
No-Prompt Installation............................................................................................................................... 36!
Storix System Backup Administrator 4 Version 8.2 Linux System Recover y Guide
Page 5

Installing from an Encrypted Backup ......................................................................................................... 37
Enter a HEX Key .................................................................................................................................. 38!
Enter an ASCII (text) Key..................................................................................................................... 38!
System Installation Process ...................................................................................................................... 38!
After booting from a network boot server .............................................................................................. 38!
Verifying the hardware configuration.................................................................................................... 38!
The System Installation and Maintenance Menu ....................................................................................... 39!
Using Keys and Getting Help ............................................................................................................... 39!
Select Installation Device/Backup ............................................................................................................. 40!
Select Local Tape Device Drives(s)...................................................................................................... 40!
Select Local Disk Backup ..................................................................................................................... 42!
Install From Local NFS Mount.............................................................................................................. 43!
NFS Considerations............................................................................................................................. 44!
Set or Change Network Configuration.................................................................................................. 44!
Select Remote Tape Device ................................................................................................................. 45!
Select Remote Disk Backup................................................................................................................. 45!
TSM Configuration.................................................................................................................................... 46!
TSM Client Configuration ..................................................................................................................... 48!
TSM Server Configuration.................................................................................................................... 48!
TSM Administrator Configuration.......................................................................................................... 48!
Change the Installation Settings................................................................................................................ 48!
Install the System with Current Settings.................................................................................................... 48!
6. View/Change Installation Settings...................................................................50!
Select Disks to Use for Installation............................................................................................................ 50!
View/Change Partition Table................................................................................................................ 51!
Assign All Contents of a Disk to a Different Disk .................................................................................. 53!
Migrate a Partition to a Different Disk................................................................................................... 53!
Select Not to Restore Data to a Disk.................................................................................................... 53!
Change Partition Tables ............................................................................................................................ 53!
Logical Volume Management.................................................................................................................... 54!
Add or Remove Physical Volumes........................................................................................................ 55!
Add or Change Volume Groups............................................................................................................ 55!
Add or Change Logical Volumes.......................................................................................................... 57!
Add or Change Meta-disks ........................................................................................................................ 59!
RAID 0+1.................................................................................................................................................. 61!
Add or Change Filesystems...................................................................................................................... 61!
External Journals................................................................................................................................. 63!
Minimum Filesystem Size versus Device Size......................................................................................63!
Add or Change Swap Devices................................................................................................................... 64!
Change Boot Options................................................................................................................................ 64!
!
7. Install the System .............................................................................................66!
Verification Process .................................................................................................................................. 66!
Starting the Installation ............................................................................................................................. 67!
Configuration Files.................................................................................................................................... 67!
Making the System Bootable..................................................................................................................... 67!
The Boot Loader.................................................................................................................................. 67!
Initial Ramdisk Image ........................................................................................................................... 68!
The /boot filesystem............................................................................................................................. 68!
Doing it yourself................................................................................................................................... 69!
Installation Errors...................................................................................................................................... 70!
System Boot Problems .............................................................................................................................. 70!
Network Re-configuration (avoiding conflicts) ............................................................................................ 70!
8. System Recovery Utilities ................................................................................72!
Load Additional Device Adapter Modules.................................................................................................. 72!
Start a Maintenance Shell......................................................................................................................... 73!
Configure Remote Install Manager............................................................................................................ 74!
Storix System Backup Administrator 5 Version 8.2 Linux System Recover y Guide
Page 6

Configure Backup Group ID ...................................................................................................................... 75
Index......................................................................................................................76!
!
Storix System Backup Administrator 6 Version 8.2 Linux System Recover y Guide
Page 7

1. Introduction
The SBAdmin for Linux S ystem R ecove ry Guide is a suppl ement to the SBAdmin User Guid e, providi ng
details on reinstalling a Linux system from a SBAdmin System Backup. Note that a System Backup is not
limited to reinstalling the s ame syst em from which it was mad e, but it may also be used t o “clone” t he orig inal
system onto different systems cont aining th e same or different h ardware.
When to Use this Guide
This guide provides instructions for booting and reinstalling a system from a SBAdmin System Backup. This
document should be reviewed after first installing the software to become familiar with this process and its
requirements BEFORE a system recovery is required.
Installation from a System Backup is f airly int uitive, b ut there i s informati on and ste ps that must be taken to be
prepared in the event that a system re-installation is required. The System Backup contains all of the backup
data and the information nee ded to recr eate t he syst em and re store th e data. T o access t he S ystem Insta llation
Process, boot media must first be creat ed. This m ay be either a bootable CDROM, network boot image, system
backup disk, or tape (for systems which support tape boot).
This guide will refer to information found in the SBAdmin User Guide. When doing so, the reference term or
section will be shown in Blue Text. If you need to refer to that informat ion in t he SBAdmin User Guide,
highlighted sections (in bold) can be found in the Table of Contents, and other terms can be found in the
Index.
Terminology
The system recovery proc ess is straight-f or ward and pr ovides i nstructi on and help scre ens to gu ide yo u throug h
the process. Even when creating and changing devices, filesystems, partition maps, logical volumes, etc, the
information provided s hould make th e proc ess fair ly intuit ive. T here are a f ew terms you s hould understa nd
before beginning this process:
Linux kernel: This is the first “program” that gets executed when your Linux system starts. It is
•
considered the “base oper ating s ystem” f rom whic h all other pr ocesse s are ru n. Vari ous kern els
provide support for different types of hardware and software devices and filesystem types.
Kernel modules: These are individual programs providing support for various devices and
•
filesystems. If the modules are compiled into the kernel, they are considered “built-in”. Otherwise, they
are compiled into binary programs outsi de of the kernel (but ma y only be executed b y the kernel) and
are just referred to as “modules”. These are placed in a spec ific direct ory wher e the kernel kno ws
where to find them. This directory is /lib/modules/kernel-name, where kernel-name is the name of
your kernel. The kernel “name” is compiled into the kernel, and usually includes the kernel release level
and an optional suffix, oft en referr ing to t he Lin ux distrib ution (i. e. “/lib/ modules/ 2.4. 18mdk”). Y ou can
query the kernel name on yo ur system by typi ng “uname –r” at the command line.
Boot Loader: This is a program that exist s on the b oot disk or CDROM th at is use d to find and
•
execute the Linux kernel. It usuall y will ins tall a n initia l filesyste m in memor y, and execut e progra ms
within to load device modules needed to access the root (/) filesystem. The boot loader depends on the
firmware of the system, since the firmware must kno w how to lo ad and execut e the b oot loader.
Firmware: The firmware of a mac hine is a m ini-o peratin g system t hat is used to detect av aila ble boot
•
devices (disks, CDs, tapes or network adapters) and load and execute the “real” operating system. The
following table shows the system firmware supported by SBAdmin:
Storix System Backup Administrator 7 Version 8.2 Linux System Recover y Guide
Page 8

Firmware Supported Systems Boot Media Types Boot loaders
BIOS Intel-based (32-bit,
AMD64 and EM64T)
OpenFirmware (IEEE1275 Standard)
UEFI 64-bit Intel-based
The firmware typically reads a boot loader from the boot media, which must be written in a manner that
the firmware understands how to find. The boot loader is an additional program that is designed to read
and execute the Linu x kern el, pro viding it inf ormat ion ne eded t o conf igure a dditi onal d evices, et c.
LVM: This is Logical Volume Management, and provides the ability to create devices similar to
•
“software partitions”, that are easily res izable, relocatable, and provide optional data striping (RAID 0)
for enhanced performance. LVM is supported by most Linux distributions today. If it is available on your
system it will be automatically included on the SBAdmin boot media even if you are not using it. This
allows you to implement LVM during the install process if you are not already doing so.
Metadisks: Also referred to as “mu lti-disks”, thi s is a form of “soft ware RAID” that prov ides diff erent
•
RAID types, such as striping (RAID 0), mirroring (RAID 1), striping with parity (RAID 4), striping with
striped parity (RAID 5), striping with double striped parity (RAID 6), and striping of mirrors (RAID 10). It
also provides the ability to combine devices into a single sequential device they refer to as “linear”
RAID. Meta-disk, or “md” devices are supported by most Linux distributions. If available on your system
it will be automatically includ ed on the SBAdm in boot media ev en if you are not usi ng it. This allo ws
you to implement meta-disk devices if yo u are not alread y doing so.
IBM POWER, System p
and System i (CHRPbased systems)
(x86_64)
Disk, CDROM, network LILO, GRUB, GRUB2
Disk, tape, CDROM,
network, tape
Disk, CDROM, network ELILO
Yaboot
Filesystems: There are numerous filesystem t ypes availa ble on Linux. D ifferent Linux distr ibutions
•
automatically provide support for different filesystems, and others may be added to the kernel or
compiled as modules. Others n ot include d in the distri bution m ay us ually b e found on the int ernet,
downloaded and built into the kernel. SBAdmin supports most popular filesystem types, including ext2,
ext3, ext4, ReiserFS, JFS, XFS, Minix, MSDOS (3.1) and Vfat (win95 and later). Filesystems build on
ext2, for instance, may be changed to a JFS filesystem during the system recovery process, providing
simple conversion to more robust filesystems.
System and Program Requirements
Every Linux distribution is different, and this poses certain challenges since SBAdmin must depend on some
common programs or support to be installed on your system. The requirements are few, and most Linux
distributions provide the base support b y default, or as an option al packag e. This section d escribes
requirements of SBAdmin that differ most commonly between distributions.
Kernel Support Requirements
To be able to boot from the SBAdmin boot media (or most any media), you must have R AM disk support
and Initial RAM disk support built into the kernel. Also, the process of creating the media uses either RAM
disks or loopback devices. If your RAM disk driver is only configured to support the default of 4 MB, then
the loopback device support will also be required (may be compiled as a module). Refer to your
documentation for rebuilding the kernel or adding kernel modules. We recommend the following settings:
Storix System Backup Administrator 8 Version 8.2 Linux System Recover y Guide
Page 9

Block Devices:
Loopback device support: Module
RAM disk support: Built into kernel
Default RAM disk size: 32768 (This will allow up to a 32MB ramdisk to be created)
Initial RAM disk (initrd) support: Built into kernel
System Memory
The SBAdmin System Installation pr ocess re quires that t he syste m have at le ast 64 MB of memory to
operate, although a minimum of 256 MB is recomm ended.
UEFI Firmware Support Requirements
Performing recovery to a system that boots from UEFI firmware requires that you boot from UEFI firmware
using SBAdmin boot media, a nd then r estore from a back up that suppo rts UEFI f irmware. S BAdmin
determines that a system has support for UEFI firmware based on the following requirements:
UEFI Support Requirements:
x86_64 systems (output of uname -m command)
2.6.21 kernel level or later (out put of uname -r command)
CONFIG_EFI support enabled in kernel (typically found in /boot/config-RELEASE)
Support for creating VFAT filesystem (mkfs.vfat command)
Programs for Creating and Writing Bootable CDROMs
The program “mkisofs” or “genisofs” is a free program that m ust exist o n the system from whic h yo u will
create the bootable CDROM. This program is included on most distributions but may not be installed by
default. If you receive a message that this program is missing, you will need to install it from your
distribution media or download a copy from the internet. This program will be used to generate the “ISO”
image, which is a CDROM format compatible with many operati ng systems.
To create a bootable CDROM, this software will generate the CDROM image file. It is then up to you to
copy that image to a CD Writer device using your own CD Writer software. On most Linux systems, the
“cdrecord” program e xists. If not, then you can usually instal l it from your distributio n media or download a
copy from the internet. You will need to refer to the instructions or “man” pages that accompany that
program. If you choose any other pr ogram to c opy the CDROM i mage to the C D Writer, t hen you must b e
sure to specify, if necessary, that this is an ISO image.
The Device Filesystem (Devfs)
The Device Filesystem is a function implemented on some Linux systems for management of devices. It
has, however, been replaced in more recent Linux distributions by Udev. Devfs is not a requirement of
SBAdmin, but its existence or use can pose certain problems, so it d eserves menti on here. Its function is to
provide a consistent nam ing co nventio n for d evices ba sed on t heir ph ysical l ocati on, rat her than allo wing
the system to name the devices (possibly differently) each time the system is booted based on their order
of detection.
Unfortunately, this presents many problems for products designed to work with the “classic” Linux device
naming conventions, and also creates quite lengthy filenames and symbolic links between old and new
names that are more difficul t to manage. A classic p artiti on name suc h as “/dev/hda1”, for example, will be
named “/dev/ide/host0/bus0/t arget0/lu n0/par t1” under Devfs. Devfs often creates another link to this file
“/dev/hd/c0b0t0u0p1”.
SBAdmin must be able to scan for devices on the system, and does so by looking for devices of the classic
Linux convention, as this is most widely used. To look also for Devfs filenames would probably result in
detecting the same physical devices under multiple different names, so SBAdmin will only recognize
devices my the known “classic” device names.
Storix System Backup Administrator 9 Version 8.2 Linux System Recover y Guide
Page 10

The product will work quite well on syste ms with Devfs impl emented as lon g as the system maint ains the
classic device naming conventions as well. This is the default for most Linux implementations using Devfs.
All functions of the product will work the same on a Devfs system as for those not using Devfs, but all
references to disks, partitions and tape devices will use the classic names. SBAdmin also attempt s to
cross-references the devfs names to the classic names whenever the system configuration files use the
devfs names (as occurs automatically whe n some Linux distr os are instal led). Syste m configurat ion files
which may use either devfs or classic nam es include:
• /etc/fstab – Filesystem definitions
• /etc/raidtab – Software RAID device definitions
• /etc/mtab – Mounted filesystem table (automat ically u pdated b y the syst em)
To avoid any potential problems if yo u are using D evfs, you shoul d make sure thes e files refere nce the
classic disk and partition names, such as /dev/sda (first SCSI disk) and /dev/hdc3 (third partition on the
third IDE disk) whenever possible. If you attempt to perform a System Backup with SBAdmi n and are
informed that the root filesyst em, or an y other files ystem, is e ither not fo und or n ot mounted, t hen SBA dmin
may have been unable to determine the devfs names, and you probably need to put the classic names in
the /etc/fstab file.
Boot Loaders
SBAdmin will attempt to determine which b oot loader the syst em is current ly using when p erformin g a
system backup. If the backup process is unable to determine the boot loader used, the backup will fail.
Initial Ramdisk (initrd/initramfs) Support
One of the most difficult issues with an y system reco very product is trying to figure out how to make the
system bootable. The confi guratio n files re stored fr om the backup ma y no longer be a pplicabl e if changes
to the hardware or storage configur ation have bee n made. After a SBAdmin S ystem Install ation is
completed, the boot loader is configured to make the system bootable based on that kernel and the root
filesystem. This is often not enough information to make everything available at system startup that is
required. For example, if your root filesystem resides on a SCSI disk, and the SCSI adapter support is not
built into your kernel, then your system probably loads an Initial Ram Disk (initrd/initramfs) containing the
SCSI adapter support, which allows the adapter to be configured before attempting to mount the root
filesystem. SBAdmin will determine if an initrd is necessary and create one automatically. If not required,
SBAdmin will configure the system to boot from your kern el without an initr d image. If your ker nel has builtin support for any devices or filesystems required to mount your root filesystem, you should have no
problems. If an initrd image is requir ed, yo u are g iven t he opp ortunit y at t he end of t he sys tem rec overy
process to configure your own boot loader, or modify the boot loader configuration file to handle any
potential problems. Note that SBAdmin does not support systems using monolithic kernels (no loadable
kernel modules).
More specific informatio n creatin g an
Initial Ramdisk Image is provided later in this document.
Storix System Backup Administrator 10 Version 8.2 Linux System Recover y Guide
Page 11

2. Creating System Recovery Boot Media
The SBAdmin User Interfac e (either Xwind ows GUI or W eb Interf ace) p rovides a very sim ple pr ocedur e for
creating boot media, which i s describ ed in this section. T his int erface may be used t o create b ootabl e tapes,
boot CDROM images, network boot images, or can configure a local hard disk to boot to the system recovery
process. This interface m ay cre ate an y of the b oot medi a types. Also refer t o the stmakeboot command in the
Commands Reference, which may be run on any client to make bootable media directly from that system. All
media types will boot the t arget s ystem int o the sa me recover y menu s.
When to Create Boot Media
It is generally a good idea to create bootable media for each individual system that is backed up using
SBAdmin. This is because most systems do not ru n under t he sam e Linux ker nel lev el, have t he same device
support installed and configured, and have the same software level of various device support and other
applications installed.
If you attempt to boot from media c reated u sing on e Linux ker nel vers ion (i.e. “2.4”), th en attem pt to inst all the
system from a backup that was ru nning under a v ersion 2. 6 ker nel, you m ay ru n into problem s duri ng or after
the installation completes. This is because the devices and filesystems created during the system recovery will
be later accessed by a different Linux kernel vers ion that may n ot be compatib le or provide the pr oper support.
For this reason, the SBAdmin Installation process provides strong warnings if you boot from a different kernel
than was running at the time the back up was cr eated. T he instal lation pr ocess als o verifies t hat your boot me dia
contains the device and f ilesyst em supp ort that i s requir ed to inst all t he syst em, base d on th ose devic es or
filesystems that were in use at the t ime of th e backup. If th e support is not provid ed by the bo otable media, you
will be required to remove or change those devices or filesystems that are not supported.
If you have multiple systems, all running the same kernel level (but not necessary the exact same kernel), it is
generally safe to use the same boot media to bo ot and install d ifferent systems. B ecause the boot me dia is
probably the most important boot media you will ever need, it is a good idea to keep at least one spare or create
boot media of different types.
When You Should Create New Boot Media
1. Any time you update your operating system or compile/install a new kernel. Even if the kernel version
does not change, support for built-in devices or filesystems may have been added or removed, and
device or filesystem modules may also have been added or removed.
2. Any time you inst all a new releas e level of SBA dmin. Although we try to maintain compatibility between
current and past versions, there may be times when a new feature supported by the backup software
also adds new support to the system recovery process. Since the system recovery pr ograms ar e
written to your boot media, you will need to remake t he boot m edia to mak e sure you ar e using t he
latest installation programs.
Creating System Installation Boot Media
To create the boot media, select Utilities->Create/Manage Boo t Media->( CDROM, Netw ork, H ard Disk or
Tape Boot Images) from the menu bar in the admini strator m ain men u. If usi ng a Network Ad ministra tor, you
will be prompted to select the server on which the boot media will be stored, the name of the image to
create/update, and the cli ent o n which th e boot me dia sh ould be created. N ote that t he bo ot media is creat ed on
the selected client, but may be used to boot other clients of similar system type and operating system release
levels.
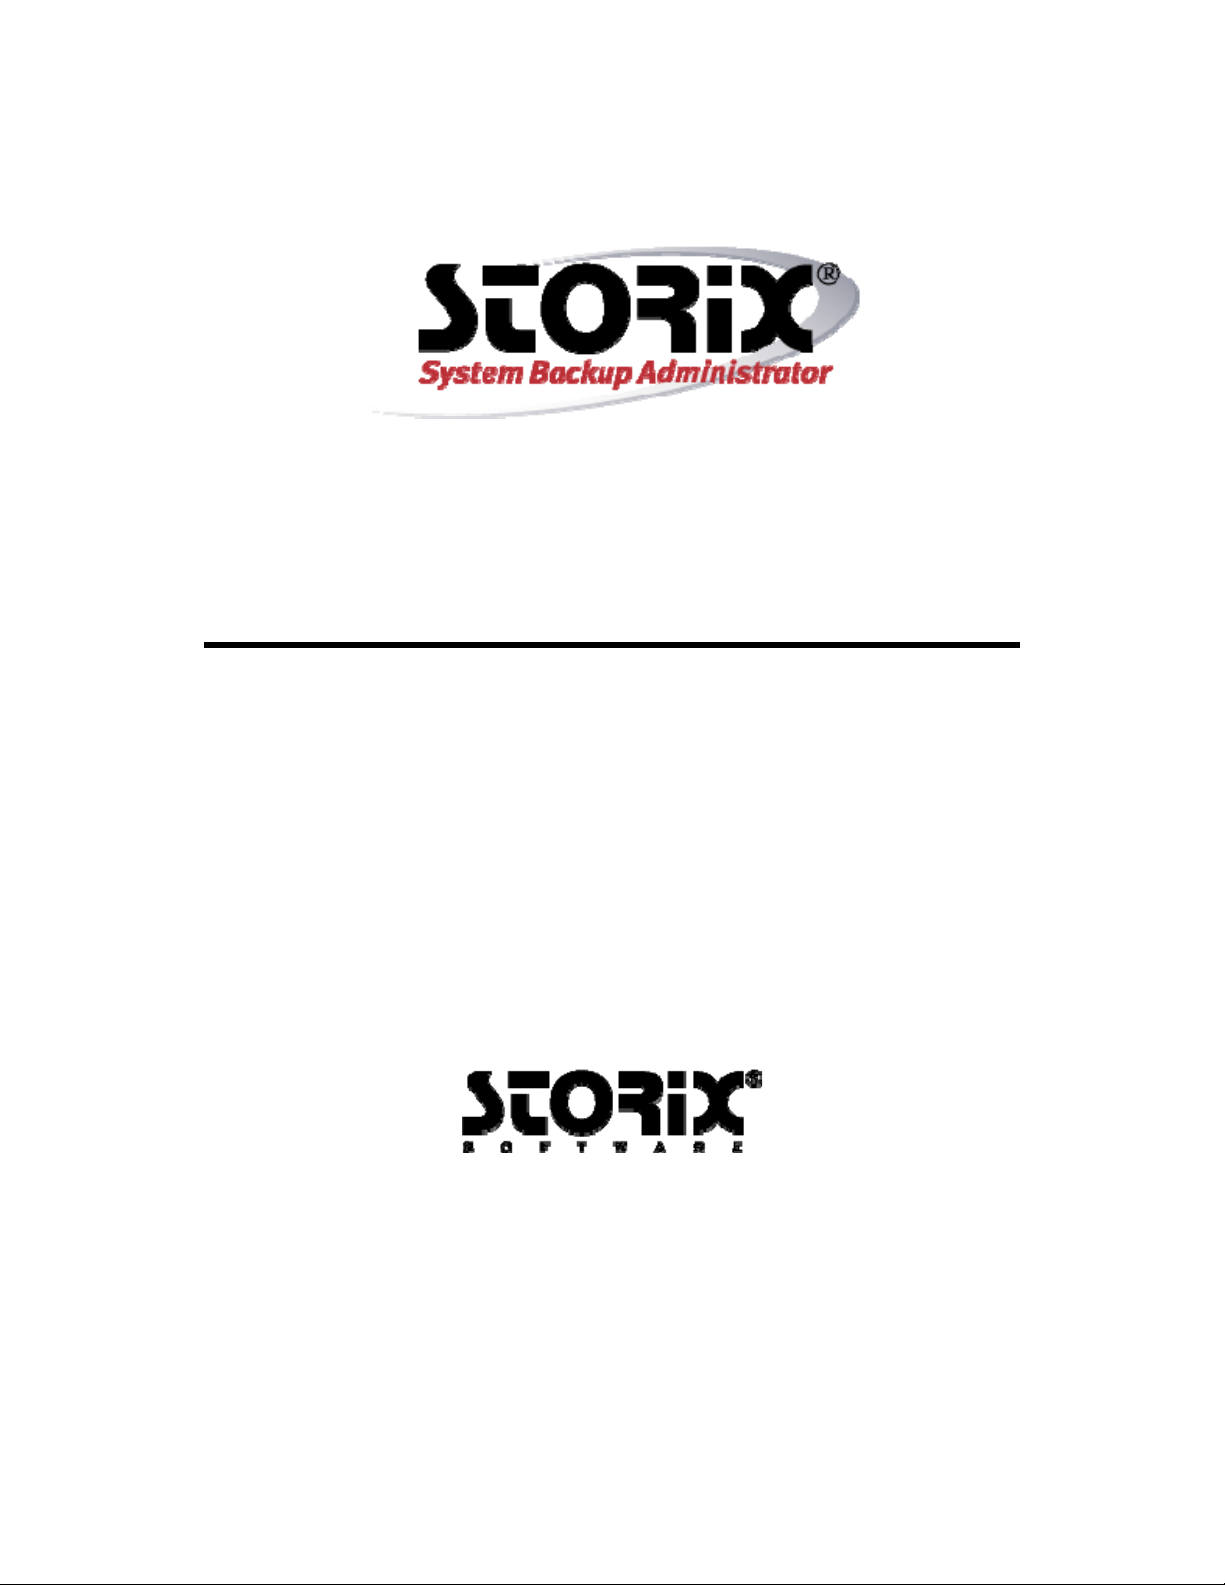
When selecting A Linux client, a screen similar to the following will appear:
Storix System Backup Administrator 11 Version 8.2 Linux System Recover y Guide
Page 12
Remember to use the QuickHelp (right mouse button) o n any button or entr y field for d etails on the use an d
options for each when using the Graphical User Interface (GUI). When using the Web Interface, utilize the
Over Help
for details.
Roll-
Creation of each media type is descri bed separat ely:
CDROM image
This process will make a CDROM ISO image, but will not actually burn the image to the CDROM. This
image may be copied t o an y system where your CD/ RW d evice r esides where you c an us e any s oftware or
program you choose to cop y the ima ge to the C DROM. If us ing t he Network Ad ministrat or you can make
the CDROM image for any client you have configured.
To create a bootable CDROM, select Utilities!Create/Manage Boot Media!CDROM Boot Images.
When using Workstation E dition, you w ill not be pr ompted for the C lient and Bo ot
Server Name.
Using Network Administrat or a min imum of thr ee field s are r equire d Boot Server name, CDROM Boot
Image Name, and Client Name.
Storix System Backup Administrator 12 Version 8.2 Linux System Recover y Guide
Page 13
The Boot Server name is the name of th e server t he boot media will be stor ed on. Use the d rop do wn arro w
to select a configured server. The boot media will be created using the selected client, but will be copied to
“Client Directory for CDROM & Net work Bo ot Images” direct ory as config ured o n the s elected boot serv er.
You may also select “Store On Client” to keep the image on the client rather than send it to a server.
The CDROM Boot Image Name is the na me of the imag e as it will be store d on the files ystem. Fo r clarit y
you may choose to name the image to reflect the hostname or operating system level of the client. Further
details about the image can be saved in the User Description field and can be viewed when managing boot
media through the SBAdmin int erface.
The Client Name is selected with the drop down menu to th e right of the fi eld. This is the clie nt used to
create the boot media. The client’s Kernel Release Level and Platform Type will automatically be populated
into the appropriate fields.
The UEFI Boot Support will be enabled if the client has
support booting from BIOS firmware. However, if you wish to create the CDROM boot media with support
for booting from both BIOS and UEFI firmware, then select “Yes”.
Boot media is not specific to this client, and can be used to perform recover y from backups of similar
systems running the same Linux distribution and update level.
When this process is complete, you may copy this image to a system containing the CD writer device, if
there is no CD burner on the Boot Server.
support for UEFI. The boot media will always
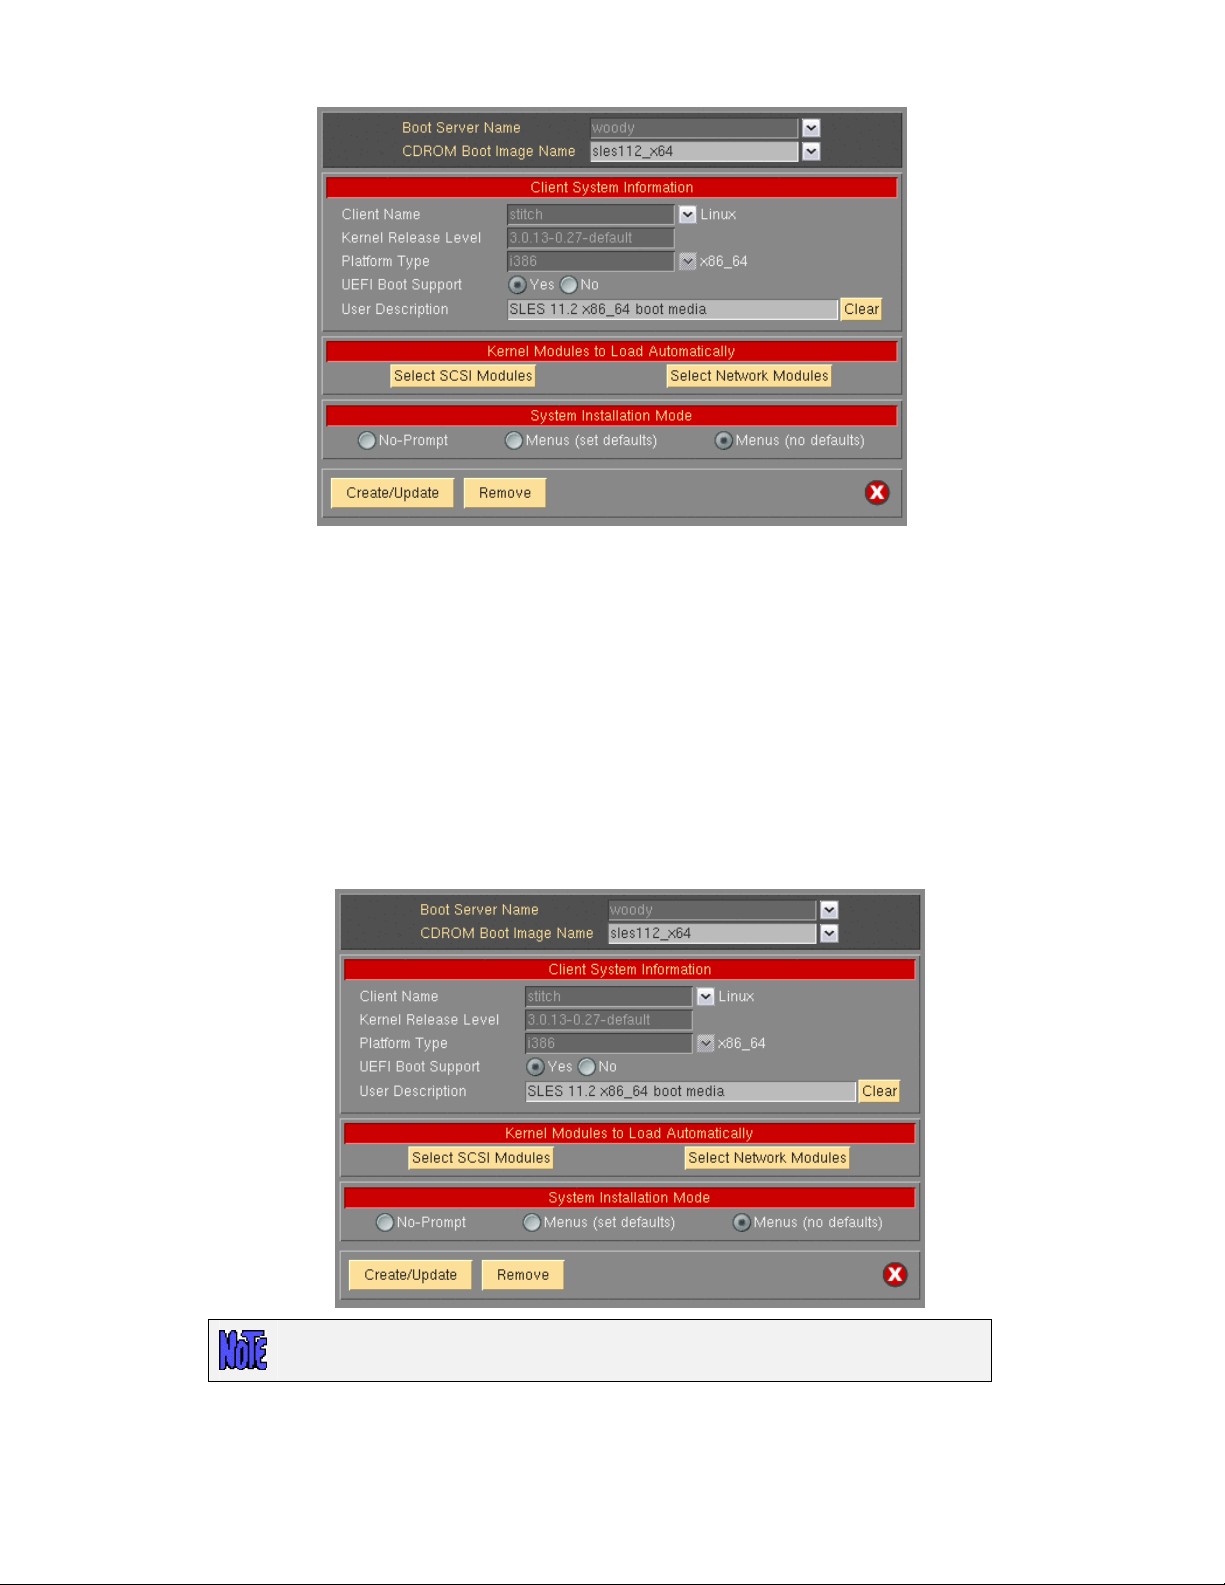
Tape
A bootable tape may be created for any hardware platform that supports tape boot. Currently, only the IBM
PowerLinux (POWER, System p) and System i systems are c apabl e of b ooting f rom a tape drive. T o creat e
the boot tape, you need only insert the tape into the drive, and the boot images will be written to the start of
the tape. Note that any other data on the tape will not be readable after making the tape bootable.
To create a bootable tape, select Utilities!Create System Installation Boot Media!Tape Boot Media.
For systems which support bo oting from t ape, the t ape will aut omatic ally be m ade bo otable when you
create a System Backup to the start of the tape. You can stack additional System Backu ps to the ta pe, but
no further boot images will be written since they must be at the start of the tape.
If using a Network Administ rator, select the Server Name, the Tape Drive Nam e, and the Client Name.
To boot from the tape, you must have the tape in the drive, and select to boot from the tape devic e within
the system firmware (OpenFirmware on IBM System p and System i hardware). After booting fro m a
Storix System Backup Administrator 13 Version 8.2 Linux System Recover y Guide
Page 14
bootable system backup, the tape will be the def ault instal l device, and you can co ntinue the s ystem
installation from the same tape without a need to select any other options.
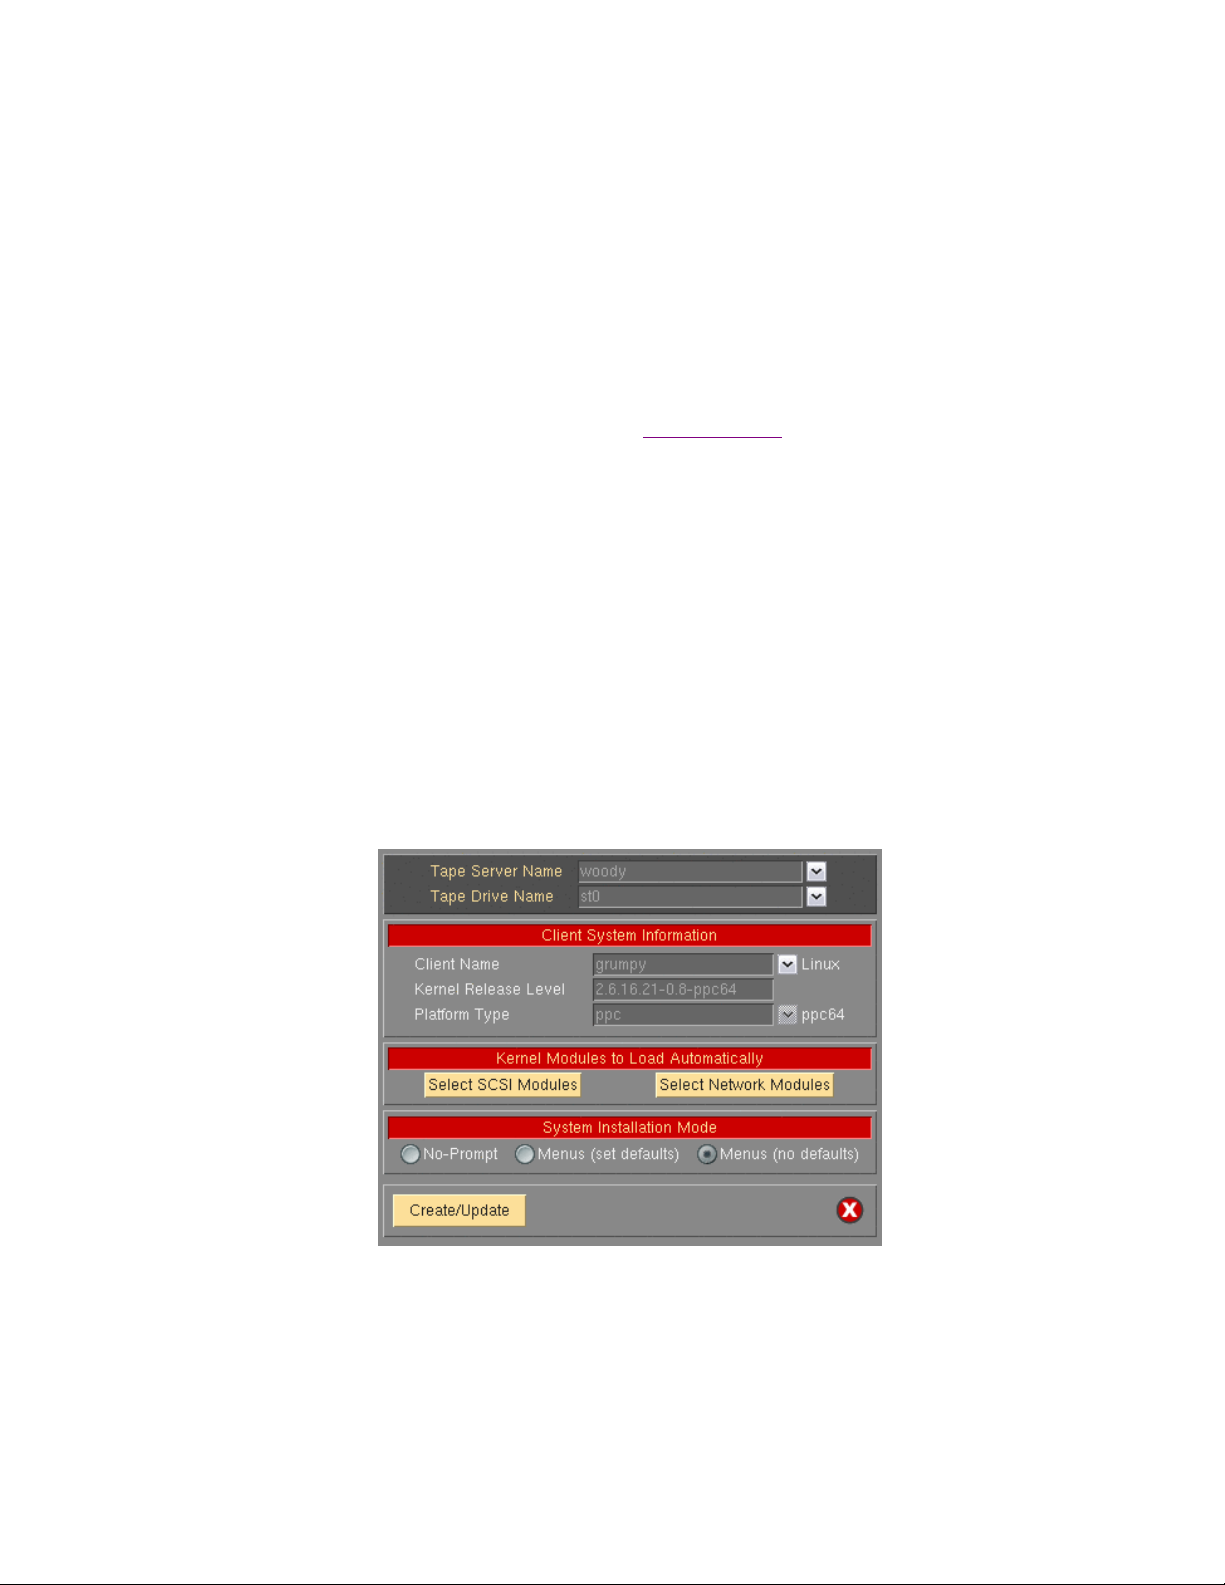
Hard Disk
If you configured a disk as a Local System Backup Disk (see SBAdmin User Guide), then this disk (or
disks) can also be made bootabl e to boot directly t o the system r ecover y process. T his all ows you t o
perform your system backups to a local (or SAN-attached/portable) disk, then boot and reinstall the system
from that same disk with no need f or other backup m edia.
Using this option will not change how the syste m boots by defa ult. After configuri ng
a disk to boot to the SBAdmin System Install process, you must select to boot from
that disk from within your system firmware boot menus.
To create a bootable disk, select Utilities!Create System Installati on Boot Media! Hard Disk Boot Media.
Select the Client Name to configure using t he dro p do wn arrow to th e right. Ne xt, sele ct the disk t o
configure in the Hard Disk Name field by using the arrow to the right of the e ntry fie ld. When pressin g the
arrow, the system will be queried to find one or more disks that were configured as a Local System
Backup Disk. If no disks are listed, then none were co nfigured fo r system bac kup/recov ery. T he UEFI Bo ot
Support option will be selected based on how the disk was or iginally c onfigured a nd cannot be cha nged.
Network
Use this option to create a network boot image to be used with various network boot loaders to boot a
client system over the net work from a n etwork boot serv er.
To create a network boot image on any configure d client or server an d save the image on th e boot server,
select either:
Configure!Net work Boot/Install!Create/Update a Network Boot Image or
Utilities!Create System Installation B oot Medi a!Network Boot Images
Storix System Backup Administrator 14 Version 8.2 Linux System Recover y Guide
Page 15

Select the Boot Server Name. This is the server on which the network boot image will be stored after it is
created. The network boot server may be the s ame system from which the network boot image is created.
Next, type the name of the boot image in the Network Boot Image Name field or select the name of an
existing image to overwrite by pressi ng the arrow button t o the right of the entry field. If yo u enter a unique
name, a new image will be created using that name. Not e that the networ k boot “image” actually consists of
several files on disk, but will always be referred to within the application as a single image by a unique boot
image name. The files ar e copie d into t he direct ory s peci fied as t he Client Dir ectory for CDROM &
Network Boot Images directory when the s erver was c onfig ured. Yo u may also use t he sel ect butto n to the
right to choose an existing name. The named image will be overwritten.
Finally, select the Client name for which boot media is to be created using th e drop d own arro w to th e right
of the Client Name field. Kernel Release Level and Platform Type will be automatically populated with the
appropriate information f rom the c lient. T he UEFI Boot Support will be enabled if the client has
UEFI. The boot media will always support booting from BIOS firmware. However, if you wish to create the
Network boot images capable of booting from both BIOS and UEFI firmware, then select “Yes”.
Upon successful completion, the network boot image will be created and transferred to the boot server. It
will now be possible to configure any client to boot from this image using the option “
Network Installation of a Client” below.
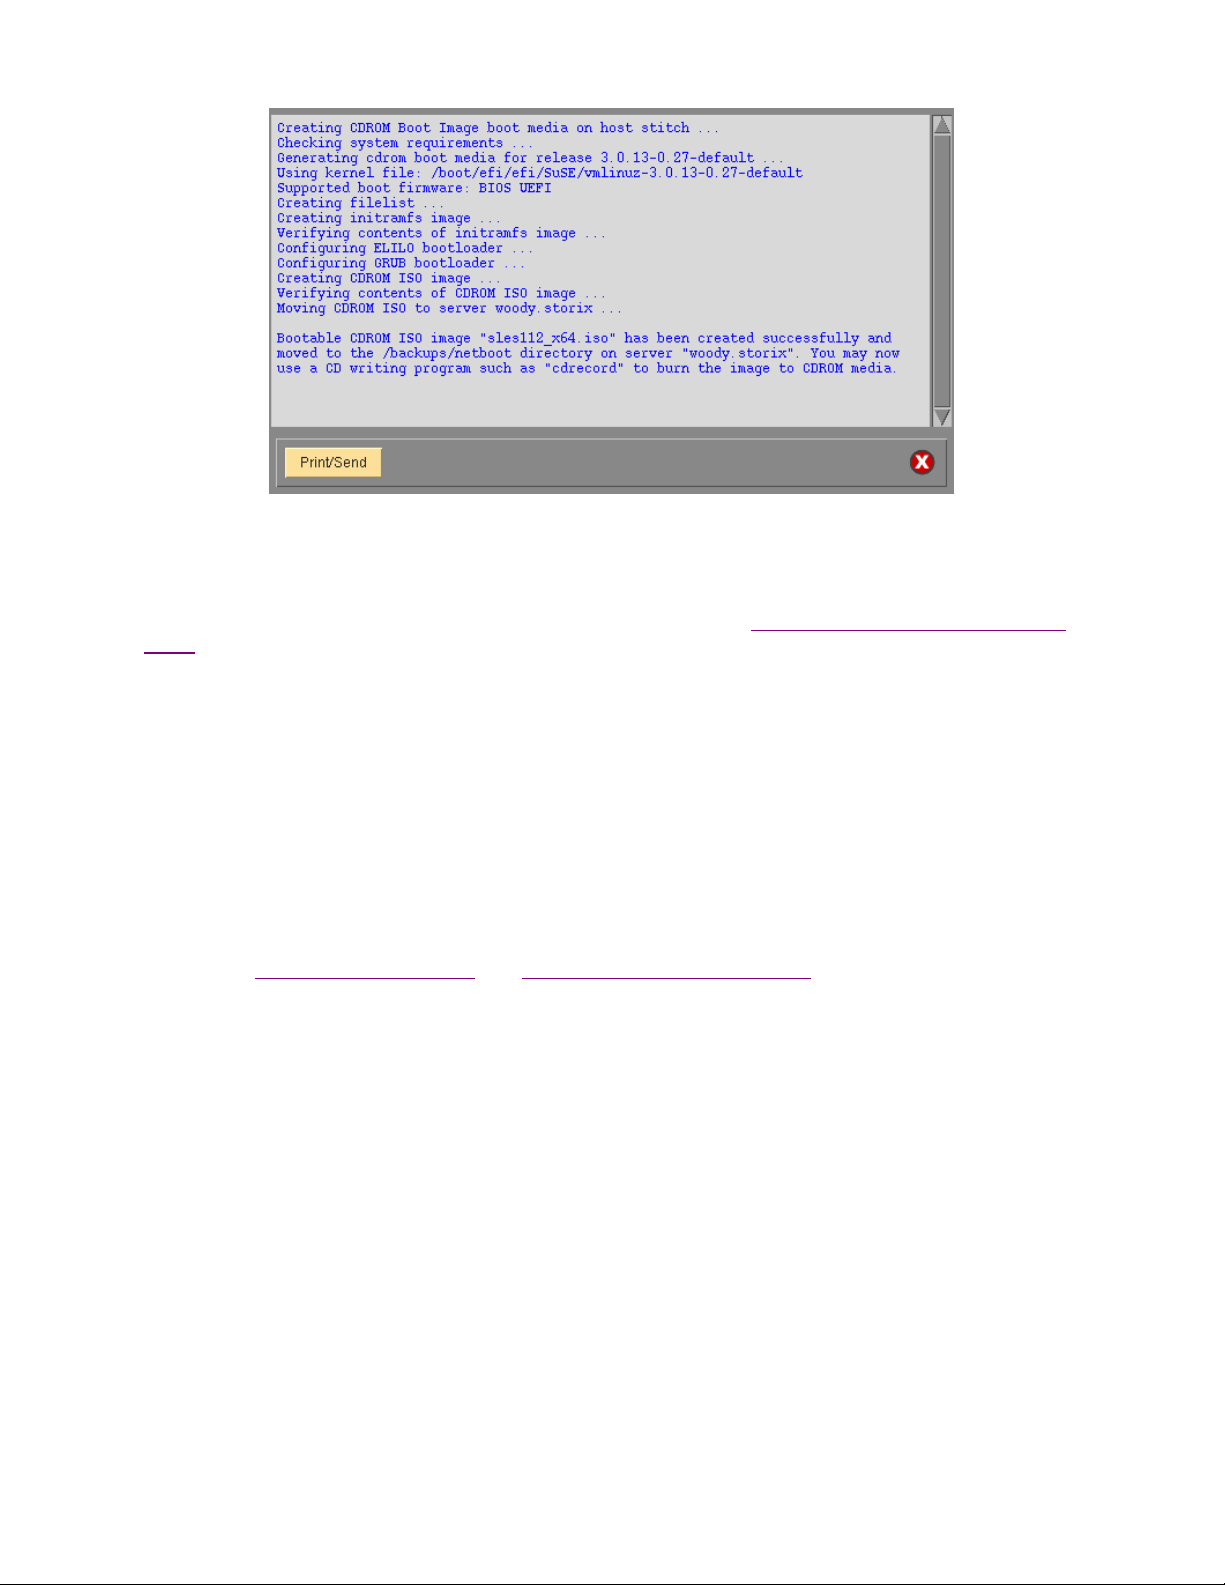
When all selections are complete, press t he Create/Update button. A new window will appear with the output of
the command to create the media a nd any er ror messa ge if they s hould oc cur, such as in the f ollo wing
example:
Enable/Disable
support for
Storix System Backup Administrator 15 Version 8.2 Linux System Recover y Guide
Page 16
Customizing the Boot Media
There are a number of options when configuring boot media, which may be used to boot the system on different
systems and allow it to recognize different types of devices. Refer to the Create Linux System Installation Boot
Media screen. The options specific to each boot media type are defined above. Each option for customizing the
boot media is described below:
Select SCSI Modules
SBAdmin boot media created from most 2.6 kernel distributions should be able to detect and automatically
load all necessary modu les/dr ivers to perform t he rec overy to t he same or diss imilar h ardware. However, i n
those instances where the detection is not possible you may select which specific SCSI adapter or Fibre
Channel Host Bus Adapter (HBA) support should be automatically loaded when booting from the media. If
there are devices (i.e. disk or tape) attached to an adapter of a selected type, those devices will be made
available automatically.
All SCSI and HBA support (if included) will be available on the boot media. Therefore, even if the desired
adapter support is not loaded automatically when booting from the media, it may be loaded at a later time
from the
To select which SCSI or HBA modules will be automatically loaded on system boot, press the Select SCSI
Modules button. By default, SBAdmin will automatically load only the modules which ar e curr ently lo aded
on the client system. Those adapters, if any, will be aut omatic ally selected on th e screen whic h appears,
similar to the following:
System Installation Menus (see Loading Additional Device Support).
Storix System Backup Administrator 16 Version 8.2 Linux System Recover y Guide
Page 17
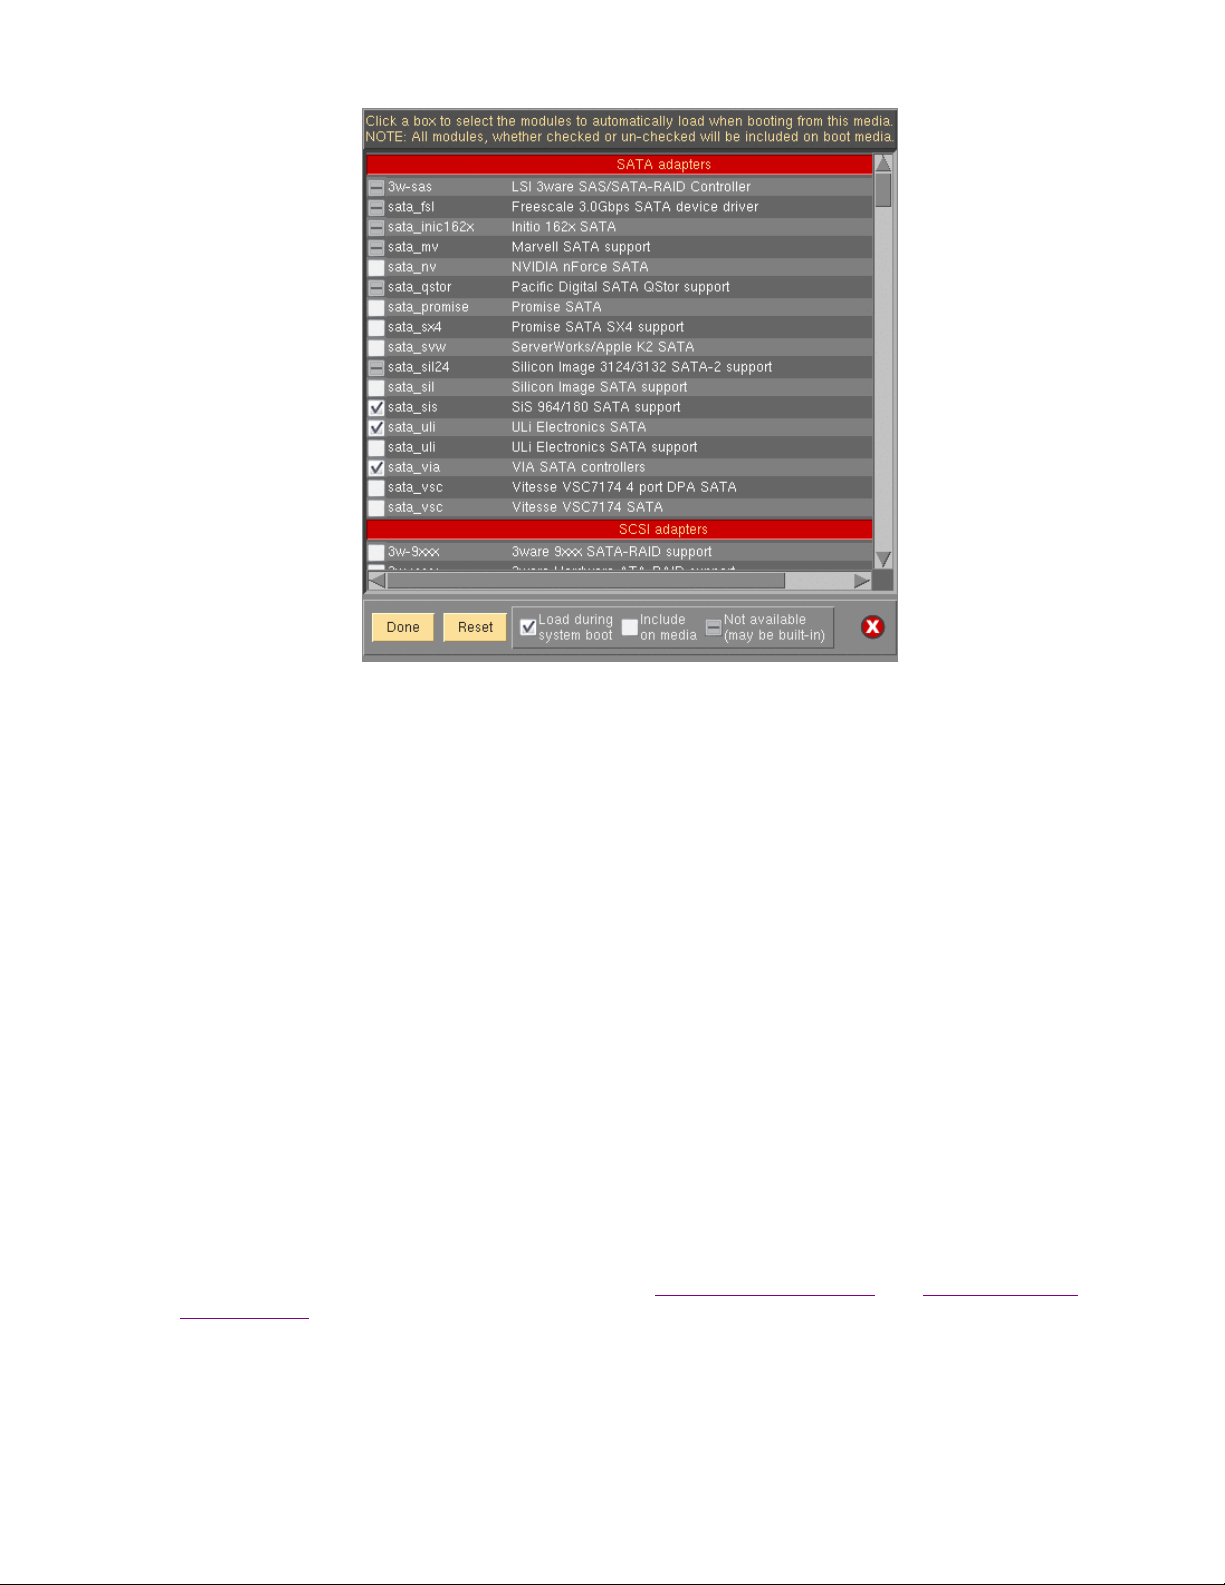
Modules with a dash are defined in the configuration file, but do n ot exist on the syst em, and t heref ore
cannot be selected or de-selected. Those wit h a checkmark are currently s elected and will be loa ded on
system boot. Lines with an empty box indicate those available on the system that will be included on the
boot media, but not automatically loaded on boot. To select or de-se lect a module, move the cursor ov er
the box and press the left mouse button.
When finished with selections, press the Done button. The Reset button may be used if you wish to revert
back to the original confi guratio n file di stribute d with t he soft ware. If you wish to ca ncel on ly the c hanges
made in this session, press the Cancel button on the far right.
Network Modules
SBAdmin boot media created from most 2.6 kernel distributions should be able to detect and automatically
load all necessary modu les/dr ivers to perform t he rec overy to t he same or diss imilar h ardware. However, i n
those instances where the detection is not possible, you may wish to manually select the network module
support to automatically load on the boot media. Select or de-se lect them by pressing the Select N etwo rk
Modules button. By default, SBAdmin will include all network modules available f or the s elected k ernel
release level. Only modules that are selected will be loaded automatically. It is not recommended to
automatically load all network module support as some modules may conflict when they are loaded (often
causing the boot process to hang). If a network adapt er is detected b y one of the load ed modules, a
network device will be automatically created.
Again, all network modules on the system the boot media is created from will be available on the boot
media. Therefore, even if the desired network adapter support is not loaded automatically when booting
from the media, it may be lo aded at a l ater tim e from th e
Device Support).
To select which network adapter modules will be automatically loaded on system boot, press the Select
Network Modules button. By default, SBAdmin will automatically load only the network modules which are
currently loaded on the system. Those adapters, if any, will be automatically selected on the screen which
appears, similar to the following:
Storix System Backup Administrator 17 Version 8.2 Linux System Recover y Guide
System Installation Menus (see Loading Additi onal
Page 18
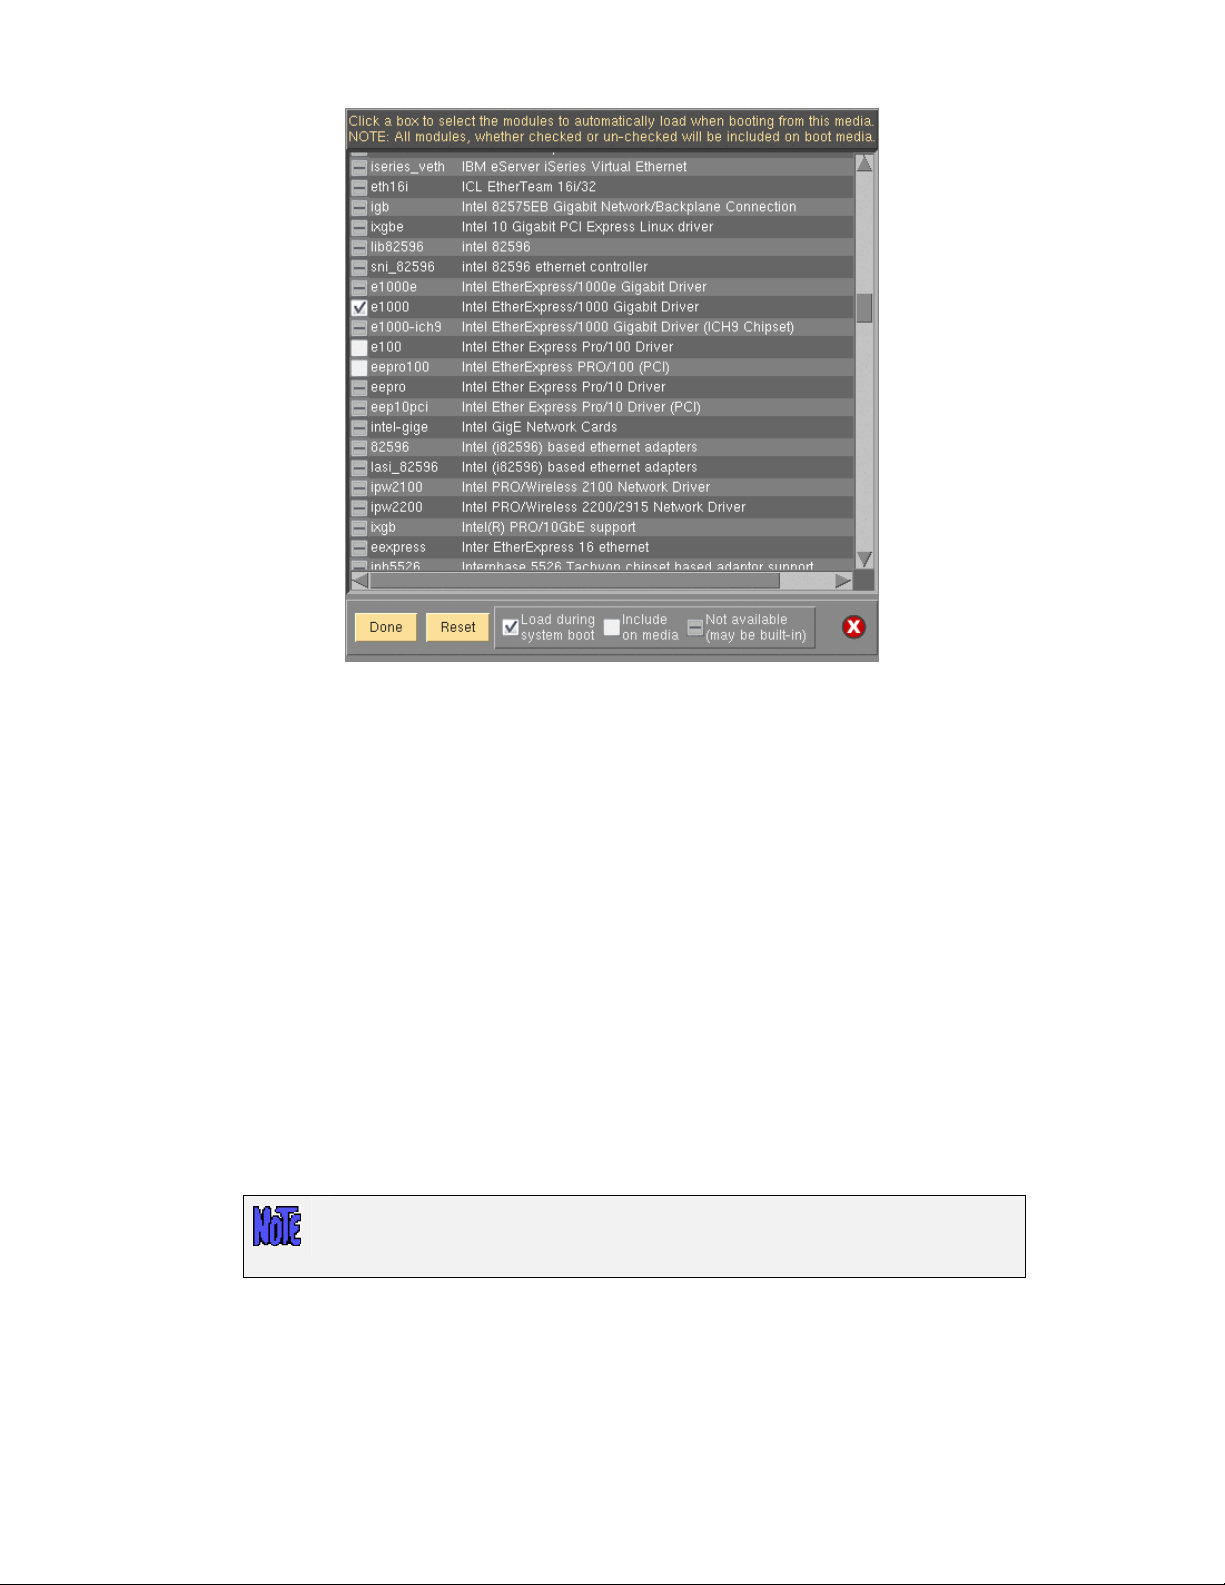
Modules with a dash are defined in the configuration file, but do n ot exist on the syst em, and t heref ore
cannot be selected or de-selected. Those wit h a checkmark are currently s elected and will be loa ded on
system boot. Lines with an empty box indicate those available on the system th at will be included on the
boot media, but not automatically loaded on boot. To select or de-se lect a module, move the cursor ov er
the circle and press the left mouse button.
When finished with selections, press the Done button. The Reset button may be used if you wish to revert
back to the original confi guratio n file di stribute d with t he soft ware. If you wish to ca ncel on ly the c hanges
made in this session, press the Cancel button on the far right.
Boot console device
By default, SBAdmin will create boot media t o be displayed on a grap hical disp lay direct ly attached to the
system (tty0). If you will be using a console other than tty0, it is necessary to define the type of console
device that will be used.
To define the boot conso le devic e you must se lect eit her No-P rompt or Menus (set defaults) as the
Installation Mode. Use the arrow next to the Console Device T ype field to list and select a device name.
Note the description of each device name.
When using a serial console attache d to a serial port, select ttyS0. Other types may include ttyUSB0 (for
USB-attached console devices), etc.
The boot media can only be created to boot a particular console type. If you select
the wrong type, the boot process will compl ete, but you ma y not see the Installati on
Menus on the screen.
If booting from a serial terminal, the terminal must be connected to the first serial port (S1 or COM1) and
must be set to 9600 baud, 8 bits, 1 stop bit and no parity (9600, 8,1,NONE).
Storix System Backup Administrator 18 Version 8.2 Linux System Recover y Guide
Page 19
Kernel Release Level
Your system may be configured with multiple kernels a nd associated mod ules. This is typical of a syst em
that is being tested or in the pr ocess of upgra ding. T his proces s will a utomatica lly displa y the name of th e
kernel (as provided by the “uname –r” command) that the client is currently running under in th e Kernel
release level field.
If you wish to create boot media using a ker nel releas e level oth er than the curr ently run ning level, you may
do so by using the stmakeboot command on the client. Documentation f or this c omman d may be found in
the Commands Reference Guide.
When you boot from this media, the kernel and modules you will be running under will match those
displayed here. Keep in mind that the kernel release level and modules level should also match the level of
backup that you will be restoring.
the
No-prompt Installation
CDROM and Network boot media ma y be creat ed wit h the def ault i nstallati on opti ons set, also al lowing t he
system to be installed as soo n as a syst em is boote d from this m edia. This all ows an insta llation t o take p lace
simply by booting from a network boot image, for instance, with no operator intervention required.
Be careful not to leave the CDROM in the drive with the system firmware set to boot
from CDROM first, as a no-prompt installation could occur without any user
intervention.
Be very careful when using this option, as the user will not have the option of intervening in the system recovery
process if the boot media was creat ed for no-prom pt installat ion. The ex ception, however, is if the def aults are
not valid (such as an installation device not being available), or if the backup data will not fit onto the new
system’s hardware without some re-configuration. In this case, the installation menus will be presented to allow
the user to make the necessary changes.
When creating CDROM boot media, the following options are available when using the option to
Installation Media. For Network boot media, the options are available when selecting to Enable Network
Installation of a Client. The reason is that, when creating network boot media, a single network boot image may
be used for different client system s, and each c lient s ystem can be confi gured with differ ent defa ults. Ref er to
each corresponding section for additional details.
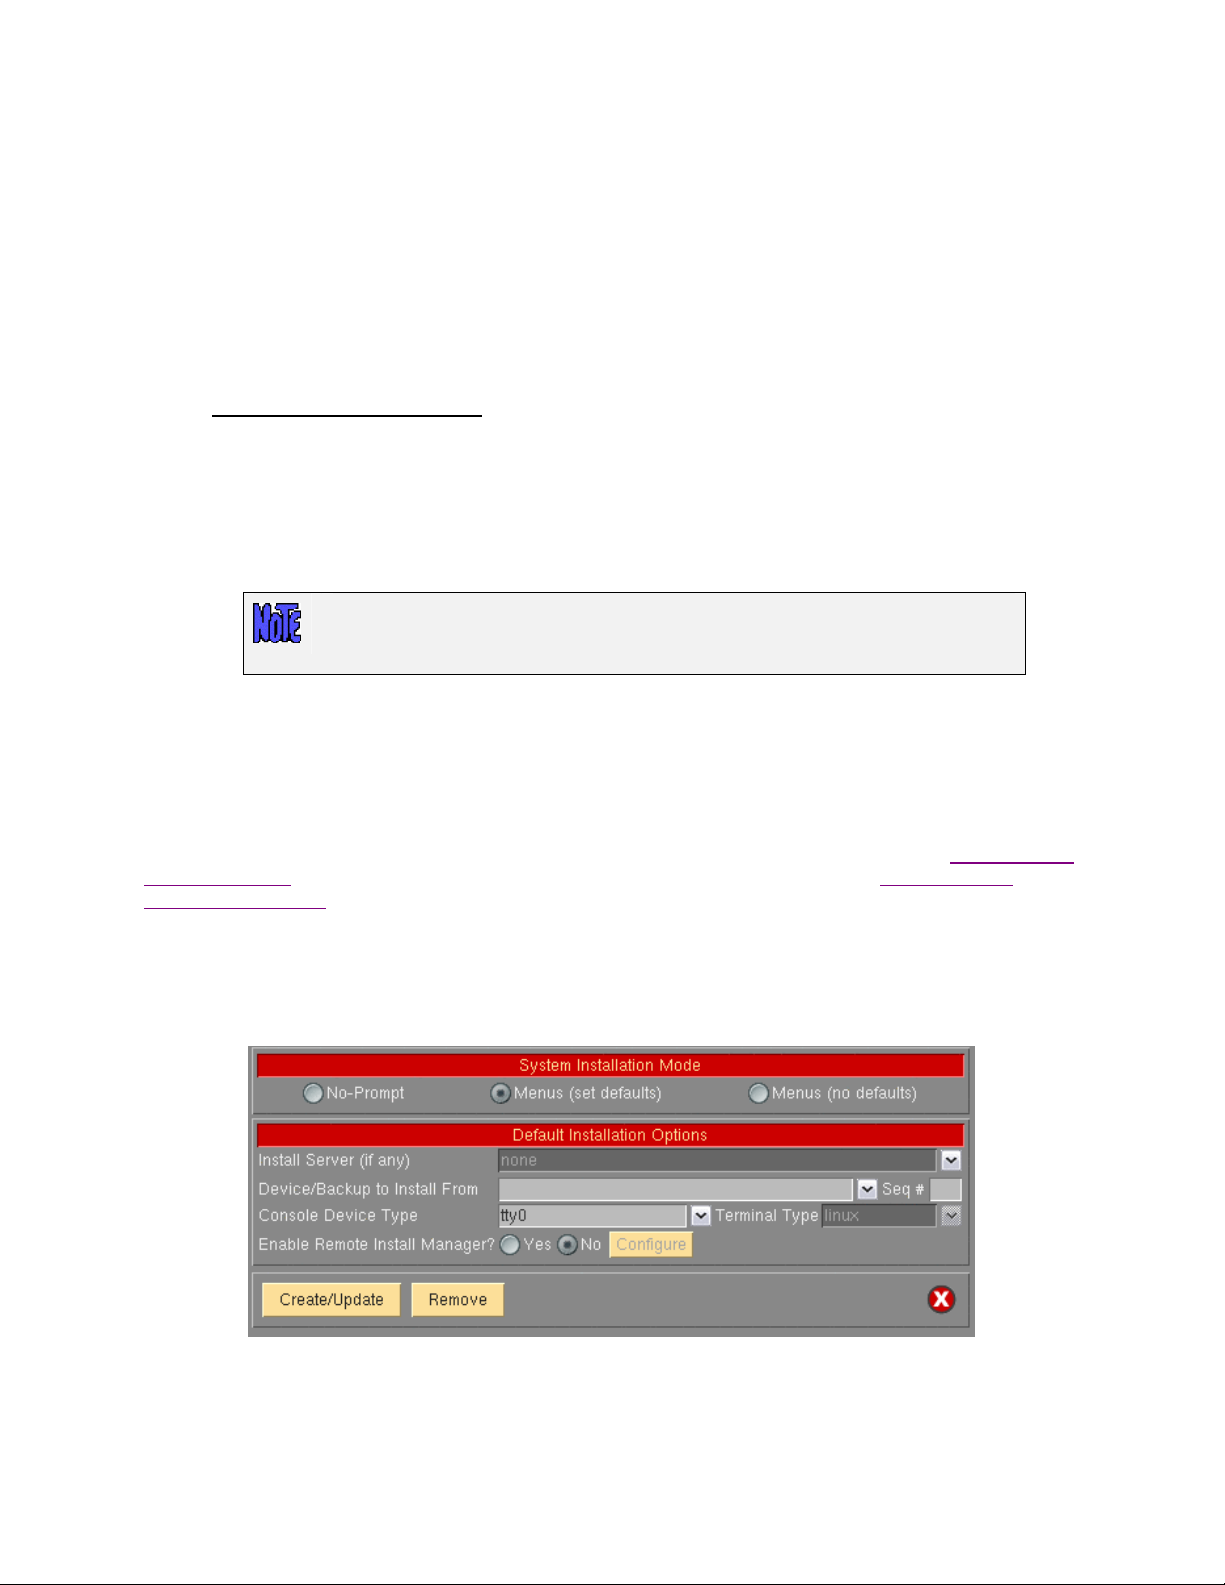
If you select either “No-prompt” or “Menus (set defaults)” for the Installation Mode, additional information will
appear within the window, such as in the following example:
The Install Server is available onl y if using a Network Ed ition or TSM Edition license. If the client will in stall from
a backup on a local device (ie. Tape or local system b ackup device ), leave this field set t o “none”. If the system
will be installed from a remote server, use the arrow button to the right of this field to select a server name.
Create System
Storix System Backup Administrator 19 Version 8.2 Linux System Recover y Guide
Page 20
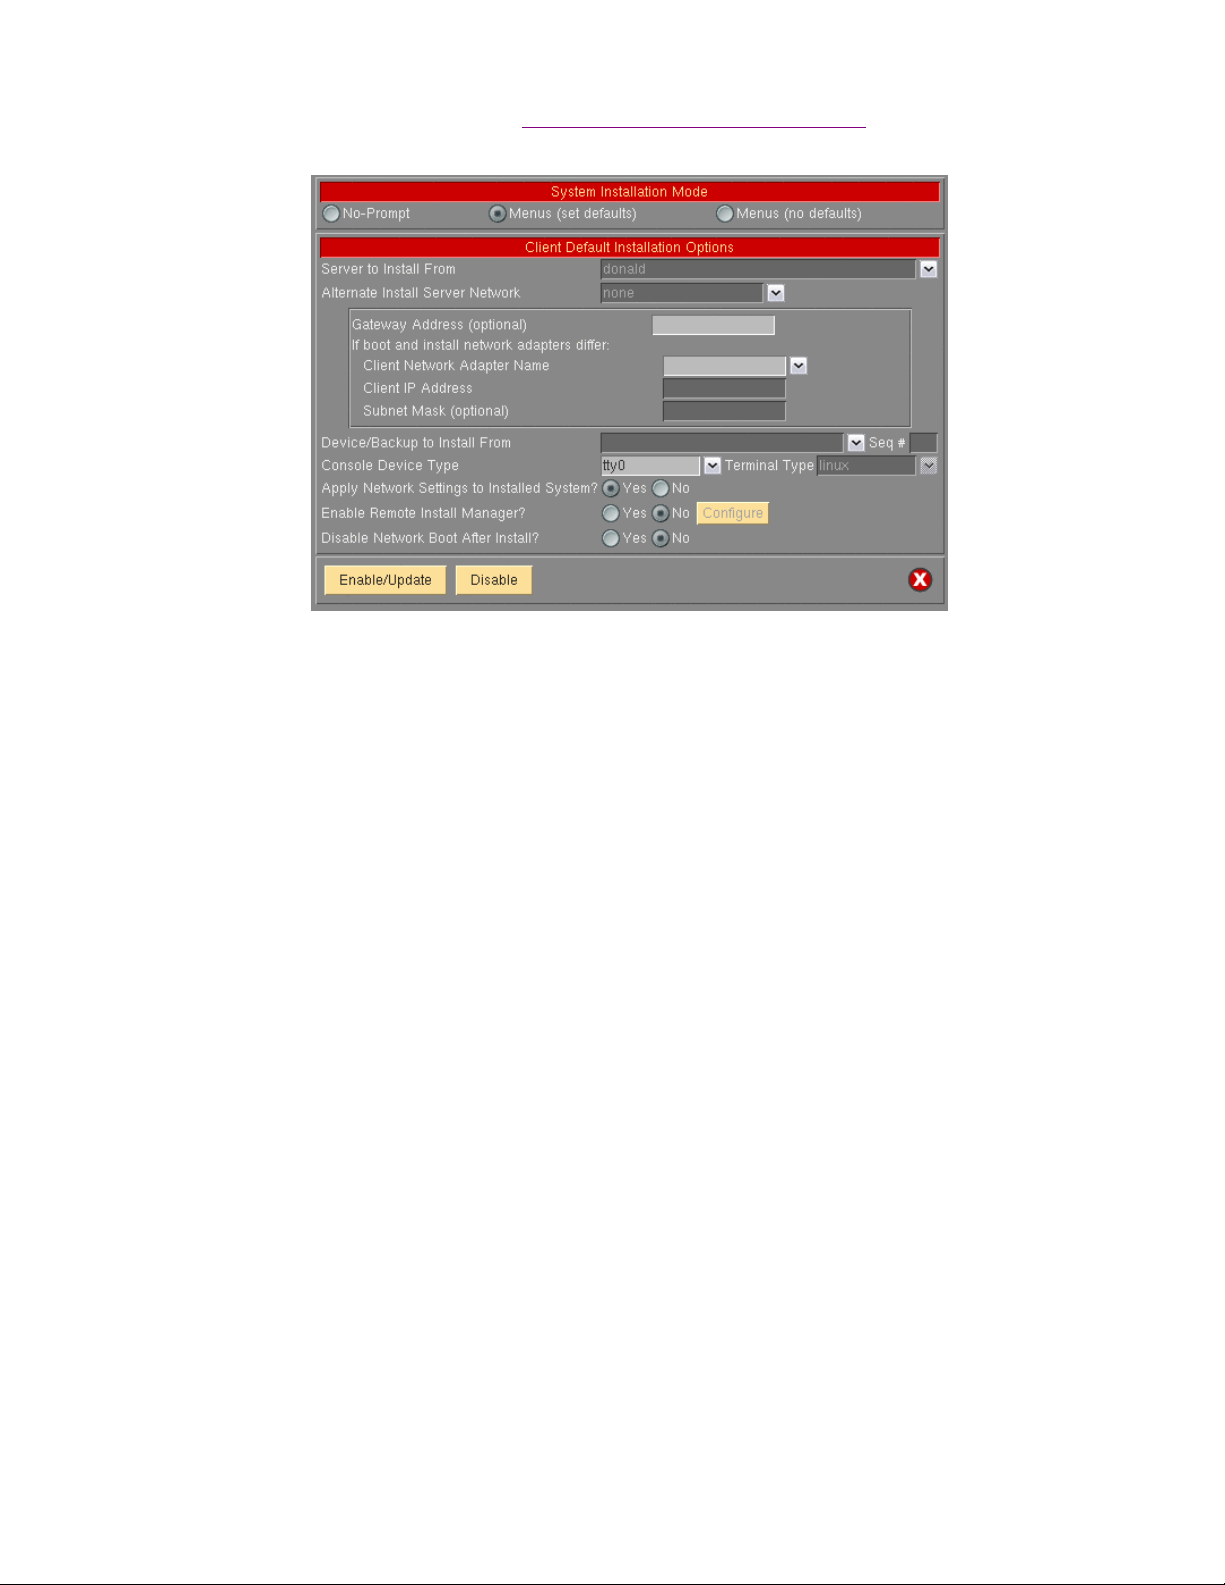
When selecting an Install S erver name when
differ from the boot server, more information will appear on the screen belo w this field:
For the client to be install ed from a remot e server , you m ust select t he nam e of the cl ient to be inst alled ( which
must a configured client). Also, the network adapter name (of the client) will be required. Other fields are
optional, but may be required for the client to contact the server.
Enabling a Client for Network B oot/Inst all and th e instal l server
Select the Alternate Server N etwork if t he serv er was conf igure d with an alternat e server net work. In this cas e,
the client will retrieve the backup data from the server using this alternate network. Be sure to select the correct
adapter name the client will us e to c ontact the serv er via its altern ate adapt er.
Enabling Remote Installation Manager
This feature will allow connection to the SBAdmin System Installation Process from any remote system. With
proper authority, a remote user can perform all of the tasks in recovering a system as if they were at the locally
attached console. This proc ess ma y be st arted fr om the SBA dmin int erface on a Net work Admi nistrat or syst em,
or from any SSH client appli cation. T heref ore, in stallat ion of eve n a Work statio n Editio n system may be
managed remotely.
The remote user will be required to enter a password to access the system installation process. This password
may have been defined when the boot media was created or may be defined in the system installation menus
after booting from the m edia.
The Remote Install Manager (RIM) may be configured and started in one of t wo ways:
Configuring RIM when Creating Boot Media
To start RIM automatically when booting a system from SBAdmin boot medi a:
Utilities!Create System Installatio n Media
Select either Menus (set defaults) or No prompt for the installation mode. The screen will expa nd to inc lude
the following options:
Storix System Backup Administrator 20 Version 8.2 Linux System Recover y Guide
Page 21
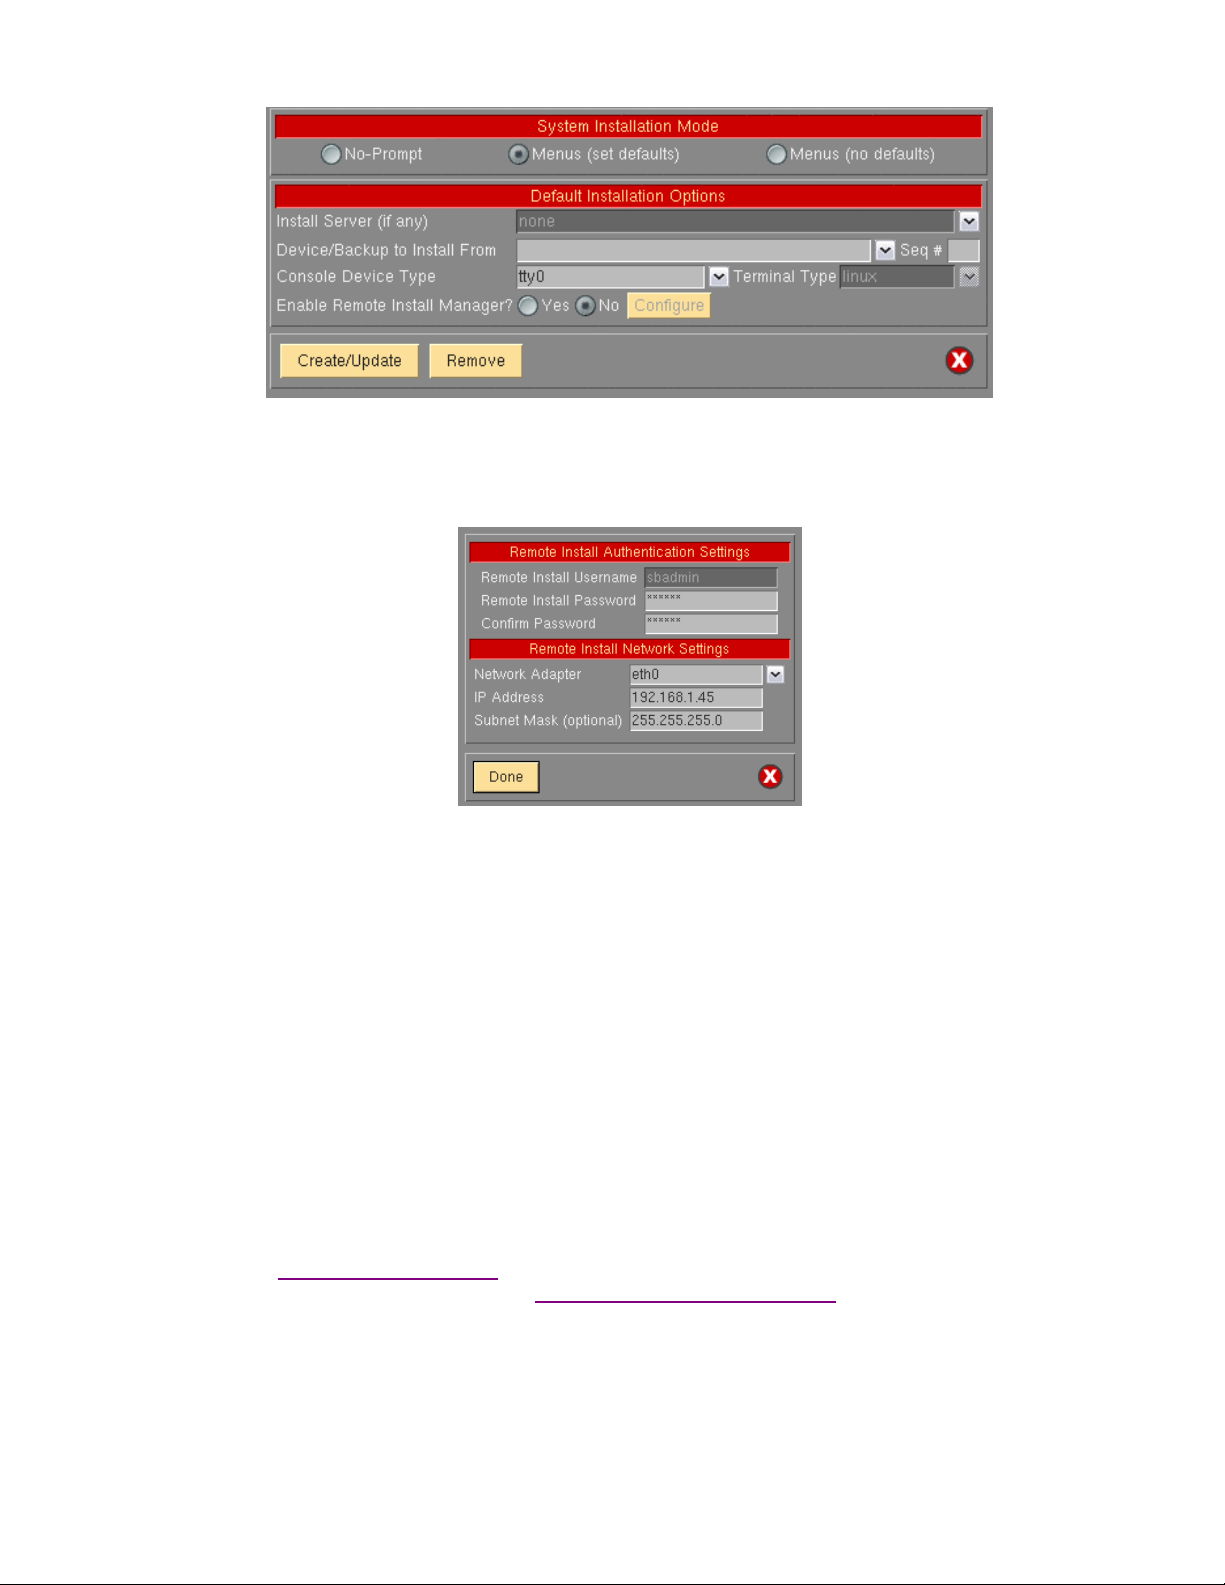
Select “Yes” for Enable Remote Install Manager
Select the Configure button to the right to configure the settings. You will be presented with the following
window:
The Remote Install Username is set to “sbadmin” and may not be changed. Enter a password in the Remote
Install Password field. The password will be necessary to login to the remote install client.
Select the Network Adapter that should be c onfigure d to connect t o the r emote inst all clie nt. If perfor ming a
network boot, then you may select UseBootAdapter to use the adapter that was used to perform the network
boot. If you configured the Client Netw ork Adapter on the previous scree n, you can select UseInstallAdapter
to use the same adapter configure d for net work instal lation.
Enter the IP Address used to configure the network adapter. This field will be disabled if you selected to use
either the boot or install adapter, which will already be configured.
Enter the Subnet Mask used (if necessary) when configuring the network adapter. This field will be disabled if
you select to use either the boot or install adapter.
After pressing Done, the settings will be saved in the boot configuration. The adapter will be enabled, and a
remote connection (with appropriate password) will be accepted when booting from this media.
Configuring RIM after Booting from the Boot Media
From within the System Installation Menus select System Recovery Util ities. T hen select Confi gure Remote
Install Manager, and follow the instructions for
Configuring Remote Install Manager in the Utilities section.
Connecting to the Remote Install Process
To connect to the remote instal l client use o ne of th e follo wing:
Storix System Backup Administrator 21 Version 8.2 Linux System Recover y Guide
Page 22

a. SSH client program (i.e. “ssh sbadmin@192.168.1.121”): Note that you will always use the user id
“sbadmin” and the password you selected in the pr evious step. If you do not have an SSH client
program, you can use the one installed on the SBAdmi n Administr ator System. This pr ogram is calle d
strimsh (i.e. “/opt/storix/bin/strimsh sbadmin@192.168.1.121”).
or
Select Utilities!Start Remote Install Manager from the SBAdmin Interface. A window will appear
where you must enter the remote install password:
Select the Remote Install Client Name from the drop-down list. The primary IP address of the client
will be shown in the Remote Install Client IP field. You may change this IP address if you are
connecting using a different adapter.
When you press the Connect button, a new terminal window will display, and the
System Installation
Menus will appear. You can, from this window, perform all system installation and maintenance tasks
for the remote client.
Storix System Backup Administrator 22 Version 8.2 Linux System Recover y Guide
Page 23

3. Network Boot/Install Configuration
The information provided in this section will prepare a client system for network boot and installation from a
backup server.
Understanding Network Boot and Network Installation
Any client system defined to the admin system may be installed o r reinst alled fr om a System Backup. That
System Backup will typically reside on the disk or on a tape device attached to a backup server. In order for the
client to restore from this backup data, it must f irst be booted over th e net work from a bo ot serve r, and then
installed from an install server.
• The boot server is used solely to deliver the boot images to the target client. The boot images will provide
a basic operating system with whic h the cl ient will run t he remain der of th e insta llation proces s.
• The install server is used only to provide access t o the data to be rest ored. If the backup is on tape, t he
install server will be the system on which the tape drive is attached. Likewise, if the backup is a disk image
file, the disk will be attached to the install server.
Although the boot server and install server are typically the same system, this is not a requirement. If, for
instance, there are several systems on which tape driv es are attache d, the client ma y be installe d from any tape
on any system, even though the clie nt is always boot ed from th e same b oot server.
The first step is to create a net work boot image f rom the c lient or any ot her syst em runni ng the sa me leve l of
Linux that you will be installing. The system from which the network boot image is created must also have
installed and selected the device support necessary for the target network adapter. To create a network boot
image on any system and copy the boot image to the boot server, refer to “
Media - Network”.
Create System installation Boot
Enable/Disable Client for Network Boot/Install
This section provides det ails on conf igurin g a clie nt to be bo oted an d install ed from a net work boot server
and/or network install server. Altho ugh the b asic sett ings are sim ple, ther e are o ptio nal sett ings whi ch ma y be
used for more flexibility, such as c onfigur ing a
backup data) from a different network adapter than the one the client was booted from.
To setup the client, select the opti on Configure!Network Boot/Inst all!Enable/Disable Network Installation of a
Client from the menu bar. Y ou will b e prompted fo r the client t o config ure. Sele ct the client and pr ess the
Continue button. A screen similar to the following will appear:
no-prompt installation of the client, or installing (reading the
Storix System Backup Administrator 23 Version 8.2 Linux System Recover y Guide
Page 24
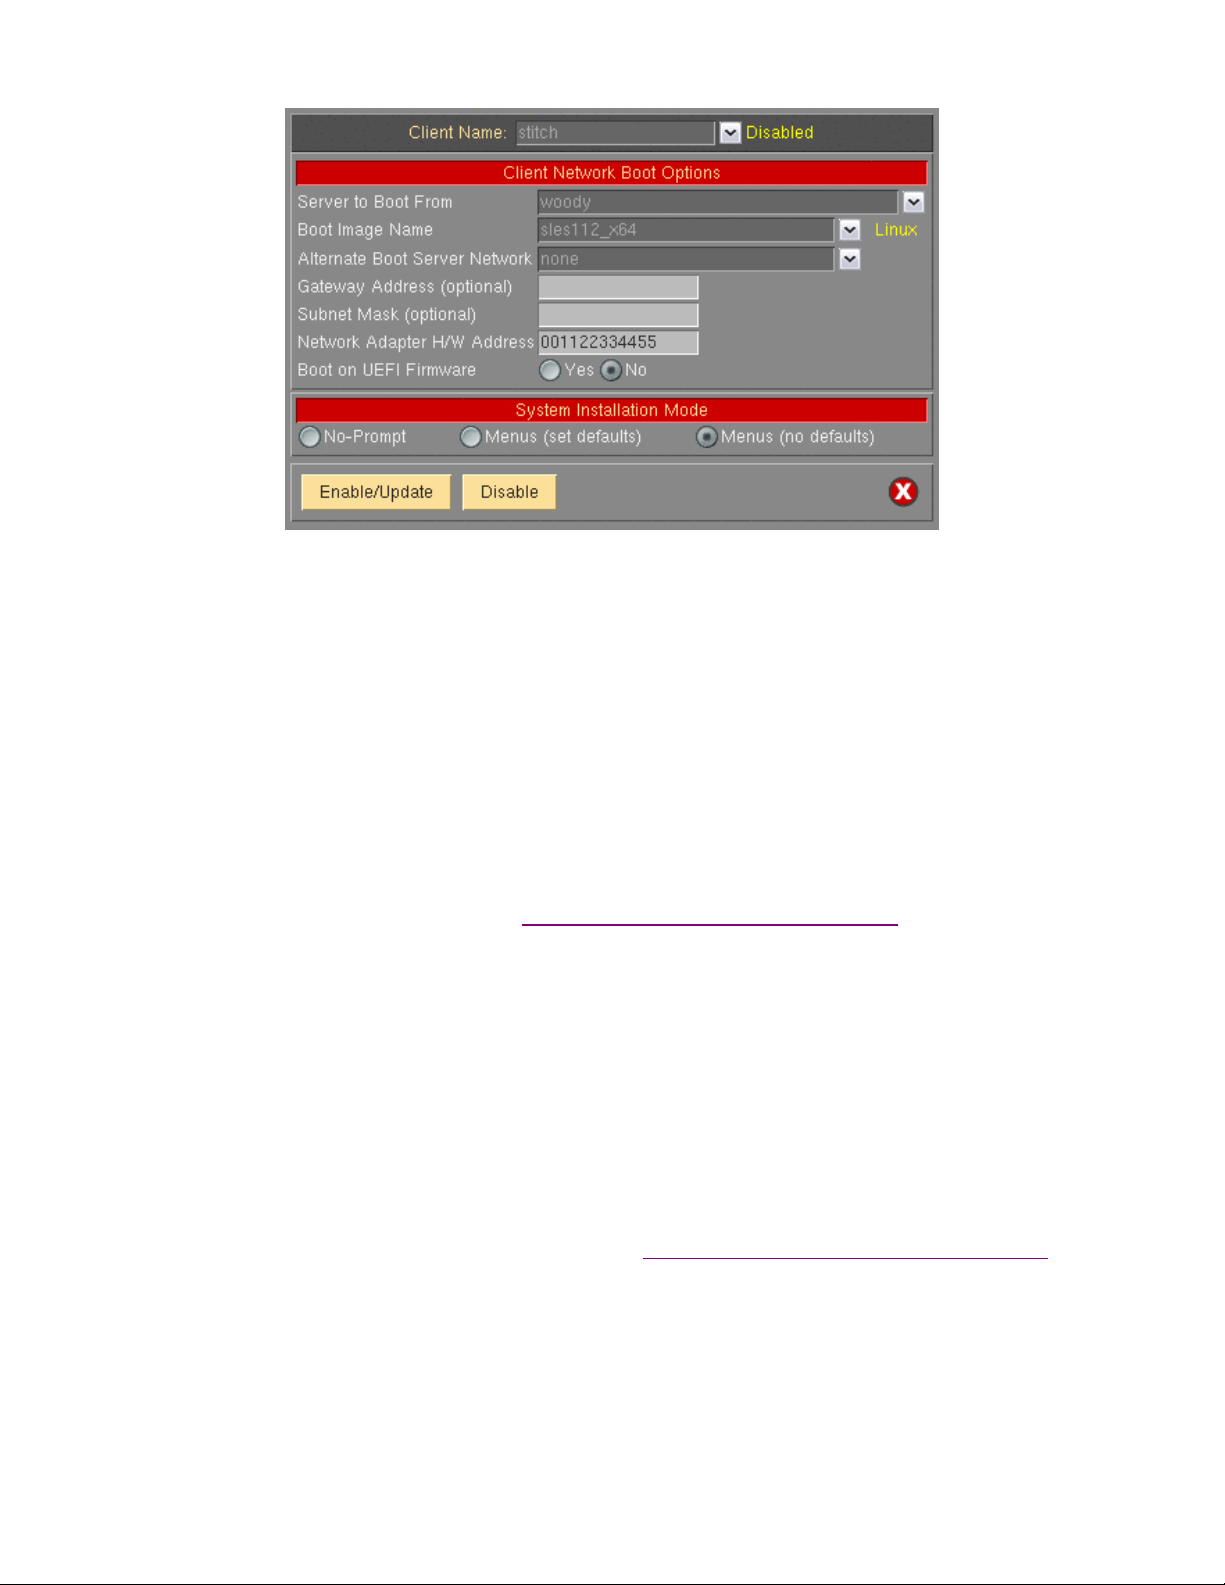
Options may appear or disappear from this screen depending on your selections. The screen is broken into two
main sections; one for conf igur ing th e Client network boot options and one for config uring t he Client network
install options. The setting for the Sy stem In stallatio n Mode to wards the bottom of the screen determines
whether or not the Client network install options section will appear.
The following fields are used to c onfig ure th e client to boot from a boot serve r:
1. Server to Boot From: If the server in this field is incorrect, use the ar row button to list and select a
different server from which to boot fr om. By d efault, the boot serv er is ass umed t o be the inst all serve r
as well. However, the install server may be changed as described later. If updating an image and you
choose to change the boot server, t he ima ge on the o ld boot server will be automat ically d isabled.
If the boot server has been configured with an Alternate Server Network and you wish to perform the
network boot over that network, select the network from the drop-down list.
2. Boot Image N ame: Use t he arro w button to t he right of t he entr y field to s elect from a list of b oot
images previously created using the
image name selected will determine the operating system, platform and network type that will be used
to install the client.
3. Gateway Address: If the client must go through a gateway to reach the boot server, enter the IP
address of the gateway machine.
4. Subnet Mask: If the client is on a subnet, enter the subnet mask.
Create Bootable Installati on Medi a (Net work) option. The boot
5. Network Adapter Hardw are Addre ss: The process for network booting a Linux system is referred to
as a broadcast boot. It is required that the client and server a re on th e same network ( no gat eway
between them). The broadcast is initiated from the client network adapter using the client's network
adapter hardware address. T his is als o refe rred to as t he MAC add ress . Having the MAC address
available on the server allo ws the client s ystem t o be boot ed without k nowing th e server or client IP
address, as this information is obtained from the server. Refer to the section Boot a Client for
Installation from a System Backup for details on
Because the MAC address is required, yo u will need to enter the tar get client’s ha rdware address when
configuring a client for network boot.
6. Boot on UEFI Firmware: To perform a network boot of th e client on UEFI firm ware select “Yes” to this
option. Otherwise, the client will be enabled to boot from BIOS. This option is only selectable for boot
images that were created wi th support f or booti ng from UEFI firm ware.
Storix System Backup Administrator 24 Version 8.2 Linux System Recover y Guide
determining the client hardwar e adapter addr ess.
Page 25

7. System Installation Mod e: You must select here whether you want to perform a no-prompt or menu-
driven installation:
a. By selecting No-prompt, the client will be installed without entering any information on the
client. This is referred to as a
be filled in.
b. If Menus (set defaults) is selected, you will be provided the additional prompts now, all of
which are optional. The information you provide will appear as defaults on the client after it is
booted, but those options may also be changed on the client.
c. If Menus (no-defaults) is selected, it is assumed that all install options will be selected from
the client install menus once it is booted. When selected, all remaining options will disappear
from the screen as they no longer a pply.
8. Server to install from: This field will, by default, contain the name of the boot server. If the backup
data will be restored from a different server than you booted from, select a different install server in this
field. If the install server differs from the boot server, additional fields will appear on the screen, which
are described in the section
If you wish to install the c lient using t he ser ver’s a lternat e net work, select th e net work from th e
Alternate Server Network drop-down list. If selected, additional fields will appear as described in the
section
different adapter to reach this alternat e net work on the install serv er.
9. Device or File to install from: Use the arro w button to list and s elect the dev ice from which the
backup data will be restored. If a directory device is selected, you will be prompted for the specific
System Backup from which to install. After selecting the backup, t he backup ID of the b ackup image
will be placed in this field, and the Backup Sequence Number field will be automatically filled in with
the sequence number of the client backup selected. If you select a tape device for this field, the device
name will be placed in the field, but the backup will
be in the drive at the moment.
Using a Different Install S erver t han the Bo ot Ser ver belo w, si nce th e clie nt may need t o use a
Using a Different Install Server t han the Boot Serv er below.
no-prompt install. If selected, all of the remaining prompts must
not be read at this time, since the backup m ay not
10. Backup Sequence Number: If the client will be installed from a tape de vice, you must man ually sele ct
the backup sequence number on the tape media to install from. If there is only one System Backup on
the tape, the backup sequence number will be 1 (default). If there is more than one, you must enter the
appropriate backup sequence number. If you are unsure as to the correct sequence number to use,
view the backup label and use th e backup sequenc e numb er that corr esponds t o the desired backu p.
11. Console Device Name: Select the name of the consol e device th at will be used o n the clie nt. If the
client is using a graphical display, this is likel y "tty0".
12. Console terminal type: If the console device selected was a graphic al devic e, the te rminal t ype will be
set to linux. Otherwise, an ASCII terminal is assumed and you must list a nd select t he sp ecific term inal
type. Using the arrow key, you can list the termi nal types that are ava ilable duri ng the instal lation
process and select one from the list.
13. Disable Network Boot After Install: Select “yes´ if you wish to have the client automatically disabled
for network boot following a successful system recovery. The default is “no”.
14. Apply Network Setting s to Inst alled S ystem: W hen perf orming a recover y over the network or fr om a
local NFS share, if the net work confi gurati on used t o perf orm the r ecovery is differ ent than t he net work
configuration of the ori ginal backup c lient t hen the net work conf igurati on will be mi grated to t he
configuration used for the re cover y. This is don e to pr event mult iple s ystems co nfigur ed with th e same
IP, which may cause conflicts an d network pr oblems. S elect “no” to t his option if you do not want this
network migration to take place.
When all selections have been made, select the Enable/Update button at the bottom of the screen. The client
boot information will be saved and the client will be ready to boot and install. If you have changed the boot
Storix System Backup Administrator 25 Version 8.2 Linux System Recover y Guide
Page 26

server, the image on the old boot server will be dis abled automat icall y. Refer to the sectio n
Installation from a System Backup to initiate the installation process.
Boot a Client for
Disable a Network Install Client
It may be desirable to disabl e the n etwork in stall f or a clie nt once th e install ation of t he cli ent is co mplete. If t he
client should inadvertentl y boot o ver the n etwork and th e client is conf igured f or a no-prompt install, the client
may end up being reinstalled aut omatic ally.
To unconfigure the client, simply se lect th e opti on Configure!Network Boot/Inst all!Enable/Disable Network
Installation of a Client from the menu bar. Select the client to disable. The client network install config uratio n
will appear. Simply press the Disable button at the bottom of the screen to unconfigu re the net work inst all.
Unconfiguring the network install cl ient will preve nt the clie nt from bo oting o ver the n et work. Althoug h the
network install will be disabled, the information for the network install will be retained and will be automatically
used as defaults should the same client be configured for network install again in the future.
Using an Alternate Network to Restore the Data
Even though the boot and insta ll serv er may b e the same, it may be desir able t o perform t he net work i nstall
(actual restoration of the data) usi ng a different net work than was used to perform the net work boot. For
instance, the client may boot from th e serv er usi ng the ent0 (ethernet) network, but may want to restore the
data from the
redirect the restore data traffic on to a diff erent net work tha n that which is in us e by other applic ations.
same server using the tok0 (token-ring) network instead. This is commonly done in order to
To install using an alternate server network, a drop-down list is provided on the Network Boot/Install
Configuration Screen labeled "Alternate I nstall S erver Network ". If you want the alternate se rver network
connection to be used for network install, select the appropriate network. If no option is selected, the default
network connection used by the client to reach the server (as defined by the server hostname and network
routing information on the client) will be used.
Note that this option will not be available if there was no Alternate Server Networks configured on th e install
server. To set the Alternate Server Networks for a server, ref er to the ser ver configuration options.
If you select this button, additional options will appear which will be required only if you are using a different
network adapter on the client system to contact the install server than was used to boot the client. Refer to the
section
Using a Different Install Serv er Tha n the Boot Serv er below for additional instructions.
Using a Different Install Server than the Boot Server
If the Server to install from (install server) is not the sa me as the Server to boot from (boot server), or if you
selected to use an alternat e serv er net work, addit ional fi elds wil l appe ar on the sc reen al lowing you t o confi gure
the network differently for contact ing the install serv er:
Storix System Backup Administrator 26 Version 8.2 Linux System Recover y Guide
Page 27

1. Gateway Address: If the client must go through a gateway t o reac h the inst all serv er, enter th e gate way IP
address in this field.
2. Subnet Mask: If the network the client uses to reac h the in stall ser ver uses a subnet mask, enter t he
subnet mask here.
3. Client Network adapte r na me: If the c lient will use a differ ent net work adapt er to r each t he inst all serve r
than was used to reach the boot server, use the arrow button to select an adapter name from the list. If you
select a different adapter, you must also fill in the additional field as well:
a. Client IP Address: Enter the IP address associated with the adapter selected. If you are using a
different install server than the boot server, the install server must recognize the client by this IP
address and the hostname associated with this IP addre ss must have been used to confi gure the clie nt
in the administrator application. If you ar e using the sam e server but an alter nate server net work, you
must enter the client IP address that will be used to contact the server using the server’s alternate
network. Refer to the Configure Servers option for information on using an Alternate Server Network.
Using the Same Boot Server to Install Diff erent Linux Versions
The same boot server may be used to boot clients of any platform, network type and Linux version. The boot
server does not need to have any device support installed to support the client’s hardware and does not need to
run the same level of Linux a s the cli ent. If ever y syst em is d ifferent, you ma y creat e a sepa rate b oot image f or
each client. Or, you may create a single boot image for all clients of similar hardware type and Linux version.
SBAdmin will create a network boot image from any client, and then copies that boot image to the boot server.
Each boot image is saved under a different name (of your choosing) and may be separately selected when you
configure a client to network boot. Th is allo ws a sing le boot im age to b e used t o instal l diffe rent cli ent syste ms.
This 2-step process is described above in this section. First,
the boot image to the boot server), then
the server you previousl y created.
Storix System Backup Administrator 27 Version 8.2 Linux System Recover y Guide
Enable the Network Install of a Client by sel ecting the bo ot image o n
Create a Network Boot Image (which also copies
Page 28

Updating Network Boot Images
If you have updated the operating system or installed new base system hardware support (network devices,
disk drives, platform types or display adapters) onto a system that you previously created a network boot image
from, you will need to recreate that network boot image before the new device support will be accessible to the
clients booting from that image.
After installing the new device support, simply follow the instructions for
to recreate the boot image and copy to the boot server. If you recreate the boot image for the same platform,
network and Linux version/release level, it will not be necessary to reconfigure the clients for network
boot/install since the clients using the previous boot image will automatically begin using the newly created boot
image.
Create/Update a Network B oot Image
Storix System Backup Administrator 28 Version 8.2 Linux System Recover y Guide
Page 29

4. Booting to the System Installation Process
Booting the Various System Types
This section will provide general guidelines for booting a system to the Installation and Maintenance Menu,
used to install a system from a System Backup. Note that the steps diff er widel y bet ween s ystems. Becaus e
new systems are being introduced frequently, this is not intended to be a compete guide for all systems. The
following guidelines represent those systems most commonly found in our test and customer environments. If
you are not familiar with t he proc ess of booting your s ystem from differ ent media, you s hould r efer to your
system documentation for de taile d instructi ons.
To begin the system recovery pr ocess, the client s ystem must b e boote d from SBAdmin Boot Media. This may
be a local bootable cdrom, tape, hard disk, or a network boot image storied on a boot server. In any case, the
remainder of the installation proces s will be the same.
The instructions for booting the system vary for each boot type and also differ greatly depending on the type of
the machine to be booted. SBAdmin supports Intel-based 32 and 64-bit systems which use BIOS firmware,
and all IBM POWER (System p) and System i systems which use OpenFirmware. The exact details of how to
boot each can vary with each model of hard ware and version of firm ware.
Although specific instructio ns on bo oting t he syste ms from the installation media are not described here, here
are some hints to help get you started:
Booting to the System Installation Process
CDROM or Tape
If your system uses BIOS or UEFI, it must be configured to allo w booting from CDROM. Curr ently onl y the
IBM POWER (System p) and System i systems (using OpenFirmware) support booting from tape. If your
firmware (BIOS/UEFI/SMS) attempts to boot from a hard disk before booting from CDROM or Tape, you will
need to change this in case there is already a bootable hard disk in the system.
Typically the BIOS can be accessed on most Intel-based (x86) systems by pressing the Delete key
immediately after the display messages begin to appear. Once your BIOS is setup to boot from the correct
media, just exit the BIOS menu or reset the system.
64-bit Intel-based systems (x86_64) with UEFI firmware will configure the device boot order using the EFI
Boot Manager. In most cases, the default option to boot from CDROM will allow you to boot SBAdmin boot
media directly from the UEFI firmwar e. Howev er, it may be nece ssary f or you t o sele ct “Boot Fr om File ” in
the EFI Boot Manager to boot from the media in UEFI-mode. This will allow you to traverse the boot
filesystem tree, where you would se lect the fil e “elilo. efi” to boot from.
For other firmware types, which will scan the system for bootable devices, you will normally receive a
firmware prompt where you can s elect the s pecific device to boot from.
Hard Disk
To install from a hard disk configured as a system recovery boot disk, you must select to boot from the disk
within the BIOS, UEFI, or SMS menus.
Storix System Backup Administrator 29 Version 8.2 Linux System Recover y Guide
Page 30

Assuming your firmware is setup to boot by d efault from th e correct me dia, just t urn on or reset t he system.
The remainder of the boot pr ocess wil l complete without f urther int eractio n.
Network Boot
To network boot an Intel-based system with BIOS/UEFI:
Most BIOS or UEFI-based systems are not, themselves, net work boot capable. Ho wever, if you have a
network adapter card with network boot capabilities, you can have the system boot to the firmware on
the network card. Therefore, the network card will be used to provide the network boot capabilities the
system firmware does not.
Initiating a network boot will vary depending on your version of the firmware installed on the system.
On most systems with BIOS or UEFI, there will be an option to boot from the network during POST by
selecting a specific functio n key (i. e. F12). Others ma y re quire you to s et the net work a dapter as t he
first boot device in the boot order.
It may also be necessary to se lect the Network B oot Pro tocol to use. If thi s opti on is pr ovided, s elect
“PXE”, unless you have manually configured a different boot protocol on the boot server.
Depending on the firmware of your network adapter, you may be provided the option of entering the
client and server IP address (and optional gateway address). If your boot server is configured with your
network adapter hardware (MAC) address, you may perform a broadcast boot without entering the IP
addresses. If not, you will need to enter this information. If you are booting across a gateway, you must
enter the client, server and gateway addr esses (in which cas e a broadcast b oot is not possibl e).
If you follow the instructions prov ided her e, and/or on t he screen, and th e boot proces s does not work
(or no network boot option is provided), then neither the system nor your network adapter are bootcapable. You will need to use a network adapter that includes the PXE network boot protocol.
To network boot IBM POWER (System) p and System i (CHRP) systems from the O penF irm ware
prompt:
1. CHRP systems network boot dire ctly from Op enFirm ware (OF) without a boot loader. You must
specify the OF device nam e to bo ot from as well as all neces sary k erne l comman d-line opti ons at
the OF prompt. For network devices, there is often an alias established in OF that points to the OF
device name. This is because the OF device name is rather lengthy and complicated. To illustrate,
in the example we will use below, t he OF device name
/pci@800000020000002/pci@2,2/ethernet@1
is:
The alias for this device is “network”. If you perform network installs often, you may want to set up
this alias. To determine the OF de vice name of the n etwork d evice:
Select “Select Boot Options” from the SMS “Main Menu”
Select, “Select Install/Boot Device” from the “Multiboot me nu”
Select, “List all Devices” from the “Select Device Type” menu
Select the “Device Number” of the network device.
Select “Information” for the task to perform.
This will present an information screen that will provide d etails about the ether net device, incl uding
the OpenFirmware device name.
SMS 1.6 (c) Copyright IBM Corp. 2000,2005 All rights reserved.
------------------------------------------------------------------------------ Device Information
IBM,FW-ADAPTER-NAME: IBM 10/100/1000 Base-TX PCI-X Adapter
Storix System Backup Administrator 30 Version 8.2 Linux System Recover y Guide
Page 31

/pci@800000020000002/pci@2,2/ethernet@1
: (Bootable)
DEVICE : Ethernet
( loc=U7879.001.DQDHZCX-P1-C4-T1 )
NAME : ethernet
DEVICE-TYPE : network
SUPPORTED-NETWORK-TYPES:
: ethernet,auto,rj45,auto <== chosen
: ethernet,10,rj45,half
: ethernet,10,rj45,full
: ethernet,100,rj45,half
: ethernet,100,rj45,full
: ethernet,1000,rj45,full
MAC-ADDRESS : 000255d33813
------------------------------------------------------------------------------Navigation keys:
M = return to Main Menu N = Next page of list
ESC key = return to previous screen X = eXit System Management Services
------------------------------------------------------------------------------Type menu item number and press Enter or select Navigation key:
In this example the OF device name is /pci@800000020000002/pci@2,2/ethernet@1. This
procedure is
ONLY to get the OF device name. Do not select to boot from this device. You must
enter this device name manually (or use an alias) at the OF prompt.
2. Initiate OpenFirmware (OF) by pressing F8 (graphical display) or the “8” key (ASCII terminal)
when the system configuration icons or messages begin to appear on the screen. After the system
configuration completes, the OpenFirm ware prom pt will appear
3. From the OF prompt, enter t he follo wing line to boot from the network adapter.
ok> boot network_adapter_device_name console=tty0 load_ramdisk=1
init=/init ramdisk_size=65536 rw seli nux=0 devf s=nomount
raid=noautodetect
a. For the network_adapter_device_name, use the OpenFirmware (OF) device name of the
network adapter you wish to boot from.
You may also use a device alias for network_adapter_device_name. To determine if an alias
is already set up for your device type:
ok> devalias
To create a device alias called “network” using the OF device name obtained from SMS type:
ok> devalias network network_adapter_device_nam e
To create a device alias that is retained across reboots, you should use the nvalias command:
ok> nvalias network network_adapter_device_name
You can then use the “network” alias you create d in place of the
network_adapter_device_name in the co mmand abov e.
b. For the console option, use tty0 for a display attached to a graphics adapter, or ttyS0 for a
directly attached serial (ASCII) terminal. If installing onto an LPAR system, use hvc0 (virtual
console).
c. The selinux option is needed only on systems with Security Enhanced Linux support, but will
be ignored otherwise.
d. The devfs option is needed only on systems with DEVFS support, but will be ignored
otherwise.
Storix System Backup Administrator 31 Version 8.2 Linux System Recover y Guide
Page 32

e. The raid option is needed onl y on systems with disks pr eviousl y containi ng software RAID
devices, but will be ignored other wise.
Depending on the firmware of your network adapter, you may be provided the option of entering the
client and server IP address (and optional gateway address). If your boot server is configured with your
network adapter hardware (MAC) address, you may perform a broadcast boot without entering the IP
addresses. If not, you will need to enter this information. If you are booting across a gateway, you must
enter the client, server and gateway addr esses (in which cas e a broadcast b oot is not possibl e).
Tape Boot
Tape boot IBM POWER (System p) and System i (CHRP) systems from t he Open Firmware prompt:
1. CHRP systems initiate a boot from tape directly from OpenFirmware (OF) without a boot loader. You
must specify the OF device name to b oot from as well as all n ecessar y ker nel comm and-li ne opti ons at
the OF prompt. For some devices (lik e disk and net work), ther e often i s an alia s establ ished i n OF that
points to the OF device name. This is because the OF device name is rather lengthy and complicated
and the device can be referred to as “disk” or “network”. To illustrate, in the exampl e we will use belo w,
the OF device name for the tape device is:
/pci@80000002000000b/pci@2,2/pci1069,b166@1/scsi@0/st@2,0
Unfortunately, our experience sh ows that tape drives rarel y have an alias set u p. The ali as for the t ape
drive in our example will be “ tape”. If you perform tap e boots often, you may want to set up this ali as.
To determine the OF device name of t he tape d rive:
Select “Select Boot Options” from the SMS “Main Menu”
Select, “Select Install/Boot Device” from the “Multiboot me nu”
Select, “List all Devices” from the “Select Device Type” menu
Select the “Device Number” of the t ape drive.
Select “Information” for the task to perform.
This will present an informati on scree n that will provid e detai ls about t he tape drive, i ncluding t he
OpenFirmware device name.
SMS 1.6 (c) Copyright IBM Corp. 2000,2005 All rights reserved.
------------------------------------------------------------------------------ Device Information
/pci@80000002000000b/pci@2,2/pci1069,b166@1/scsi@0/st@2,0
: (Bootable)
DEVICE : SCSI Tape
( loc=U7879.001.DQDHZDC-P1-C4-T1-L2-L0 )
NAME : st
DEVICE-TYPE : byte
Parent Information
IBM,FW-ADAPTER-NAME: Dual Ultra-320
NAME : scsi
DEVICE-TYPE : scsi-2
------------------------------------------------------------------------------Navigation keys:
M = return to Main Menu
ESC key = return to previous screen X = eXit System Management Services
------------------------------------------------------------------------------Type menu item number and press Enter or select Navigation key:
In this example the OF device name is:
Storix System Backup Administrator 32 Version 8.2 Linux System Recover y Guide
Page 33

/pci@80000002000000b/pci@2,2/pci1069,b166@1/scsi@0/st@2,0
This procedure is ONLY to get the OF device name. Do not select to boot from this device. You
must enter this device name manually (or use an alias) at the OF prompt.
2. Initiate OpenFirmware (OF) by pressing F8 (graphical display) or the “8” key (ASCII terminal) when the
system configuration icon s or mes sages b egin to ap pear on the s cree n. After the system config uration
completes, the OpenFirmware prom pt will a ppear
3. From the OF prompt, enter t he follo wing line to boot from the tape drive.
ok> boot tape_drive_device_name co nsole=tty0 load_ramd isk=1 init =/init
ramdisk_size=65536 rw selinux=0 devfs =nomount raid=noautodetect
(1) For the tape_drive_device_name, use the OpenFirmware (OF) device name of the tape drive
you wish to boot from.
You may also use a device alias for tape_drive_device_name. To determ ine if an alias is
already set up for your device type:
ok> devalias
To create a device alias called “tape” using the OF device name obtained from SMS type:
ok> devalias tape tape_drive_device_name
To create a device alias that is retained across reboots, you should use the nvalias command:
ok> nvalias tape tape_drive_device_name
You can then use the “tape” alias you created i n place of the
tape_drive_device_name in the command above.
(2) For the console option, use tty0 for a display attached to a graphics adapter, or ttyS0 for a
directly attached serial (ASCII) terminal. If installing onto an LPAR system, use hvc0 (virtual
console).
(3) The selinux option is needed only on systems with Security Enhanced Linux support, but will
be ignored otherwise.
(4) The devfs option is needed only on systems with DEVFS support, but will be ignored
otherwise.
(5) The raid option is needed only on systems with disks previou sly containi ng software RAI D
devices, but will be ignored other wise.
Completing the Boot Process
If the installation mode of the bo ot media was config ured for no-prompt install, the inst allat ion will proceed
without any user prompts. This assumes that a con sole and rest ore devic e was pre-det ermined and t he storage
configuration information on the backup media is com patibl e with the system being install ed. Refer to the
section Enable Client for Network Installation for details on the configuration of a no-prom pt insta ll.
If not performing a no-prompt install (or problems were detected with a no-prompt install), the following
Installation and Maintenance screen will appear:
Storix System Backup Administrator 33 Version 8.2 Linux System Recover y Guide
Page 34

The detailed instructio ns for us ing th e opti ons on t his men u are pr ovid ed in th e secti ons Re install a Syst em from
a Backup and View/Change Installation Settings.
Troubleshooting a Network Boot
To boot from the network, a server m ust have f irst been co nfigured t o prov ide a n etwork bo ot image t o this
client. Those steps are out lined in t he sect ion
To perform a network boot, SBAdmin uses a standard network process called “BOOTP”. BOOTP is initiated
from the client and communicates with a BOOT P daemon on the boot ser ver, who in turn prov ides the client
with information needed to obt ain and exec ute a net work boot image.
If you are able to initiate th e BOOTP pr ocess, but t he client st ill f ails to get to t he SBAdm in Instal lation a nd
Maintenance process, there may h ave been an error in n etwork commu nication bet ween the cli ent and server or
an error in the network boot configuration. Be sure to check the following:
Network Boot/Install Configuration.
1. Check that the settings in the
Specifically be sure that the client gateway, subnet mask, platform and adapter type are correct.
2. If you are booting an IBM System p or System I system, and trying to perform a broadcast BOOTP (by
leaving the client and server IP address fields blank), try filling out the client and server addresses instead.
Note that a broadcast BOOTP cannot be performed if a gateway is used between the client and server.
Also, BIOS and EFI-based systems will only support broadcast boot, so entering IP addresses is not an
option.
3. Be sure that the bootpd or dhcpd daemons, as well as the tftpd daemons are enabled on the boot server.
Specifics for checking for the availability and enabling the daemons differ with each Linux distribution, so
details cannot be provided here.
4. Check that the server’s IP address is correct, and that you specified the correct gateway and subnet mask
(if needed). Keep in mind that the gateway address should be the gateway the
server, not the other way around.
5. The SMS and many PXE boot menus have options to “ping” the boot server. This is handy to determine if
the TCP/IP communication is valid bet ween the systems, rather t han a BOOTP config uration issue.
6. If you are entering a gateway address in the network boot screen on the client, be sure to enter the
gateway address the
client uses to reach the server, not the gateway address f ound on the ser ver.
Enable Network Installation of a Client process are configur ed pro perl y.
client uses to connect to the
Storix System Backup Administrator 34 Version 8.2 Linux System Recover y Guide
Page 35

7. If you are attempting a broadcast boot and the boot fails, return to the network boot menu (if any) and make
sure there are no IP addresses entered in the network boot settings. Remove any entries if they exist. If
any entries are found, they will be used instead of a broadcast boot.
Determining the Network Adapter Hardware Address
Some systems require that the adapter hardware address, also referred to as the MAC address, be used to
network boot a client. The MAC address is used to initiate a broadcast boot. In other words, the boot request
is broadcast on the network, and each server running the bootpd or dhcpd daemon will examine the request to
see if it is configured to resp ond to t hat MAC addr ess.
A non-broadcast boot requires you enter the IP address of the server and the IP address assigned to the client
you are booting. Since this re quest is se nt directl y to the ser ver, and t he server respon ds to the cl ient IP, th ere
is no need to know the MAC address.
Performing a broadcast boot, therefore, does not require that you enter the server or client IP addresses into
the network boot screen (and for some systems this is not an option). The broadcast boot, however, requires
that the MAC address be entered when
network adapter hardware address of the client differ widely depending on the platform and system model. If
you do not know how to determine the ada pter hard ware addres s, you can usu ally fin d this inform ation on th e
screen when initiating a network boot operation (even if the boot is unsuccessful) or when displaying the
available network adapters to bo ot from.
setting up the client for network installation. The steps to obtain the
Storix System Backup Administrator 35 Version 8.2 Linux System Recover y Guide
Page 36

5. Reinstall from a System Backup
A System Backup may be used to reinstall either the origin al system or a diff erent s ystem with eithe r the same
or different hardware conf igur ation. T o init iate th e installation, you must first boot the client from CDROM,
network boot server, local (internal, or external/portable) disk, or from the local tape using the instructions found
in the section
To setup a client system to be i nstalled fr om a S ystem Back up on a n etwork in stall ser ver, you must first
configure it using the proces s descri bed in th e sectio n
Cloning Systems
"Cloning" a system means to install a system from a backu p originat ing on another s ystem. The system fro m
which the backup was made may be identical or completely different than the system you are installing.
If the system to be installed i s identic al in h ardware t ype and confi guration t o the one th e backup was made
from, the installation may be performed with no cu stomizati on requ ired. However, if the s ystems differ, t here
may be changes required. For instance, if the disk configuration on which the volume groups were placed is not
available on the new system, messages will be displayed that the original disks are not available and you must
select new physical volumes into which the volume groups will be placed. See
Settings.
Installing onto UEFI-Based Firmware Systems
Booting to the System Installati on Process .
Enable/Disable Network Installation of a Client.
View/Change Installation
In order to perform a system in stall ation which will su bsequent ly b oot from UEFI firm ware, yo u mus t first boot
the system from UEFI using SBAdmin b oot medi a. Then you must perform t he rec overy us ing a b ackup th at is
supported on UEFI.
also
Most UEFI-based systems are capable of boot ing from both UEFI and BIOS (often referred to as Legacy). In the
event you are unable to boot from UEFI firm ware, the SBAdmin boot medi a, backup, and s ystem instal lation
process will always be supported when booting from BIOS or Legacy mode.
No-Prompt Installation
If the system is set to no-prompt installation, the Installation and Maintenance Menu will not appear (as
described in the following section), but the installation will proceed without any input from the user. If your boot
media was created for a no-prompt installation, a banner will display as follows:
As indicated, you will have 60 seconds to turn off the system to prevent the system rec overy proc ess from
continuing (and possibly over writing all d ata on the syst em).
Storix System Backup Administrator 36 Version 8.2 Linux System Recover y Guide
Page 37

However, if any error occurs, such as an install server or device not being available, or if the backup data read
from the installation medi a cannot be inst alled onto th e detect ed har dware without user int ervent ion, a n error
message will occur and the
Refer to Creating Boot Media and Enable/Disable Network Installation of a Client for information how to pre-
answer any questions normally asked during the install process which are required for a no-prompt installat ion.
If configured for no-prompt installation, the installation process will proceed automatically as follows:
1. The defined install server and device will be checke d to ensure they are available a nd readable
2. The selected backup will be read and the installation information will be extracted
3. The configuration informati on from t he backu p will be c ompare d against th e current system co nfigur ation t o
ensure the storage configur ation m ay b e create d accord ing to t he back up data. If t here are non-f atal
problems which can be corrected, t hey will be c orrected automatica lly.
4. If there are any fatal problems, s uch as n o disks o n the ne w system that m atch the original s ystem, or if the
disks on the new system are not large enough to contain the original data, the s ystem will enter prom pted
mode and the installation menus will appear in order for the user to make changes to correct the problems
before continuing.
System Installation Menus will appear.
Installing from an Encrypted Backup
If the backup to be restored from was encrypted during the backup process, it will be necessary to decrypt the
data during the restor e. Unli ke rest orin g data o n a live syst em, wher e th e encr yption keys a re ava ilabl e on t he
backup system, the encryption key must be entered manually during the system installation. The encryption
keys are not stored in the b oot medi a or th e back up infor mation as this might b e penetra ble to ha ckers.
As warned during the backup process, an encrypted backup cannot be restored
without the proper e ncrypti on key. This key may not be retrieved from the backup,
nor can SBAdmin assist in providing the correct key. If you do not have the proper
encryption key needed to decrypt this b ackup, you will not restore this data!
The encryption key is a v alue t hat the user d efined pr ior to perform ing the b ackup. If t he encr yption key is not
known, you will not be able to restore the system from this backup. However, to make encryption keys easier to
remember and/or enter, it may be entered either as a hexadeci mal number or an ASC II text equivalent (if this
was the form used to create the original key).
When selecting to install from an encrypted backup, the following message will appear:
Select the appropriate option for entering either a HEX or ASCII encryption key. The third option may be used to
start a shell to type commands at the command line should you need to perform system tasks without reading
the backup data.
Storix System Backup Administrator 37 Version 8.2 Linux System Recover y Guide
Page 38

Enter a HEX Key
The length of the key will depend on the number of bits of encryption. For 128-bit encryption, a 32-byte
hexadecimal number is re quire d. For 192- bit encr yption, a 48-b yte num ber is ne eded, and for 256-bi t
encryption, a 64-byte hex number is needed. Select option 1 from the list above, then when prompted to
"Enter your 32-byte HEX key (or pre ss Enter t o reselect key type) ", enter they key, or
press Enter to return to the options above.
Enter an ASCII (text) Key
The length of the key will depend on the number of bits of encryption. For 128-bit encryption, a 16-byte
ASCII string is required. For 192-bit encryption, a 24-byte string is needed, and for 256-bit encryption, a 32byte string is needed. Select option 1 from the list above, then when prompted to "Enter your 16-byte
ASCII (text) key (or press Enter to r eselect ke y type)", ent er they key, or press E nter to
return to the options above.
The key you enter will be converted to an app ropriate he xadecim al number and us ed to decrypt the dat a,
just as if you entered the hex key yo urself.
Upon entry of a valid key, the restoration of the data will continue. If an invalid key is entered, you will be
informed so, and returned to the above menu of options.
System Installation Process
After booting from a network boot server
When the system is booted from the network, the client net work installatio n options will also be copi ed from
the boot server to the client. Any installation options setup when the client was config ured for network boot
Enable/Disable Network Installation of a Client) will be used by default for the installation. These pre-
(see
set defaults may include the install server and device, the console device and terminal type, the backup
sequence number, or anything else required for the installation to proceed with no required input from the
user. If the user selected a no- prompt install ation (see
continue automatically. Otherwise, the installation menus will appear and the user may manually change
any prior defaults, add any settings that were not pre-configured, or continue the installation process with
the current settings.
No-Prompt Installation above), the installation will
Verifying the hardware configuration
Once the backup media is s elected, and yo u chos e to eit her co ntinue t he insta llation with th e current
settings or to change the storage configuration, the following will occur:
1. The disks defined on the backup ar e compared a gainst the current system ’s hard ware configurat ion. If
there are problems that would prev ent the backup fr om bein g instal led onto t he sys tem, such as
missing disks or disks that are too small to contain th e backup dat a, a list of messages indicating the
problems will be displayed and the user will be required to either make changes manually or may select
to automatically fix any problems that are non-fatal.
2. Non-fatal errors are those that require changes to the configuration in order to allow the data to be
restored, although some settings may differ from those of the origina l system. If such non-fatal error s
occur when checking the system inf ormatio n, you will be pr ovided t he option of a utomatica lly fixi ng the
errors. You may also change the storage configuration manually to either add more disk space or
change other attributes manually that would allow it to fit on the new hardware.
More details of the verification that takes place are descri bed later in
Storix System Backup Administrator 38 Version 8.2 Linux System Recover y Guide
Verification Process.
Page 39

The System Installation and Maintenance Menu
When the boot process has c omplet ed, the System Installation and Maintenance Menu will appear:
Using Keys and Getting Help
Because these menus are designed to appear on both graphic and serial (ASCII), the menus are provided
in a form viewable on ASCII terminals. The use of th e mouse i s not av ailable. M ost ke yboard s will sup port
arrow keys while others do not. Also, some keyboards have page up and page down keys, help keys, etc,
that others do not. For this reason, there is a variety of methods which may be used to trav erse the menus
and options in the installation screens:
• To move between fields, use the Up-arrow and Down-arrow keys on the keyboard.
• To make a selection, press the Enter key, and
• To return to a previous screen, use the F3 or ESC (escape) key
• For pop-up lists, help screens and other messages, you may use the arrow keys to move up and
down the list or to scroll t he text. Y ou ma y also use the Page-up and Page-down keys, if
available, or use CTRL-N for ‘next page’ and CTRL-P for ‘previous page’ if not.
Help Windows: The F1 or “!” key (shift/1) may be pressed at a ny fiel d or men u item to obtain help
instructions, detailing the use and options for the corresponding item. A help window will appear in the
center of the screen as in the f ollo wing exam ple:
If the help information is lengthy for a particular option (indicated by [more] at the bottom), it may be
necessary to page the mess age us ing the page or c ontro l keys d escrib ed abov e. To rem ove the help
window and return to the previous entry, press t he F3 or ESC key.
Storix System Backup Administrator 39 Version 8.2 Linux System Recover y Guide
Page 40

Pop-up List Options: Pop-up lists are available for many entry options. When supported, “List=F4” will
appear at the bottom of the screen. At that fiel d, you m ay press th e F4 or “$” key (shif t/4) to list the
available options for the c orresp onding f ield an d sel ect an opt ion fro m the l ist. To se lect an opt ion, use t he
arrow keys to highlight the desired opt ion and press Ent er. The selected option will be placed in the entry
field and the pop-up window will disappear.
Select Installation Device/Backup
The installation server and device, if any, will be displayed at the bottom of the screen. If the system was
booted from the network, the install server will default to the boot server unless a different install server was
defined when the client was configur ed for net work boot. If the s ystem was booted fr om a loca l tape, the server
is assumed to be “local” (or none) and the installation device is assumed to be the tape drive the s ystem was
booted from.
Select the Select Installation Device/Backup o ption if you wish to cha nge th e server on whic h the back up
media is attached, or the remote or local instal lation dev ice. You will only be able to sele ct a remote server
when using the Network Edition license. After selecting this option, you are present ed with one of th e following
additional option screens:
The following menu options appear if you did not have TSM support installed onto
the client from which the backu p media w as created. R efer to the TSM Co nfigura tion
section below for information an d example s.
Highlight the option you wish to select using the up and down arrow keys on the keyboard. Each option is
described in detail below:
Select Local Tape Device Drives(s)
Regardless of the type of SBAdmin boot media us ed to boot the target syst em, you may chang e the
installation settings to allow installat ion from a local tape drive, even a diff erent drive th an was booted from.
When selecting this option, a list of local tape d evices will be d isplaye d.
Storix System Backup Administrator 40 Version 8.2 Linux System Recover y Guide
Page 41

If you are restoring from a parallel tape device, then you should s elect al l tape drives that make u p that
device. Otherwise you should only select a single tape drive.
After selecting the tape drive, press F3 or ESC and the following window will pop-up on the screen:
If the backup you wish to install from is not the first backup on the media, type the backup sequence
number in the Backup Sequence Number field. Refer to the backup sequence number in the backup label
if you do not know the correct backup sequence number to use. If an Autoloader is used with the device,
select “y” in the Autoloader used? field. Refer to Virtual Devices for more information on the use of
sequential autoloaders. Once you have selected the desired options, press F3 or ESC to return to the
Change Installation Server or Device menu.
When selecting multiple tape drives, the following window will pop-up on the screen:
Storix System Backup Administrator 41 Version 8.2 Linux System Recover y Guide
Page 42

The Backup Sequence Number and Autoloader used? optio ns are t he sam e as prev iousl y descr ibed.
However, there is a Parallel Read Policy which shoul d be set to “y” if the backup was creat ed using a
Parallel Tape Device.
If the backup was created using a Parallel Tape Device, you must select all ta pe drives that mak e up this
device and enter “y” for Parallel Read Policy. The devices previously config ured on t he syst em are not
known when booting in installation mode, so this option provides you a method of defining a parallel tape
device on the local system. You must select at least two drives from the list. To do so, highlight the desired
entry and press Enter. An arrow (==>) will appear next to each option selected.
Important: You must select the same number of devices used to create the backup
and you must select them in the sa me order as they were previously configured
You may also use sequential tape devices to restore from the backup if the backup spans multiple tapes
and you want the installation to autom atical ly span the tapes in serted in diff erent devic es. This opti on is
identical to the use of a Sequenti al Tape Device. The d evices prev iously confi gured on the system ar e not
known when booting in installation mode, so this option provides you a method of defining sequential
devices on the local system.
You must select at least two drives from t he list. T o do so, hi ghlight th e desire d entry and press Ent er. An
arrow (==>) will appear next to each option selected.
Important: You must select the devices in the same order in which they will be read.
Select Local Disk Backup
If you configured a locally-attached (o r SAN-attached) disk for system backup/recovery (refer to SBAdmin
User Guide), and you performed the System Back up to a configured lo cal system backup disk, you may
reinstall the system using that backup. If you select this option, the system will be scanned for one or more
system backup disks, and then the disks will be queried for available system backups. If any are found, a
screen similar to the foll owing will ap pear, from which yo u may se lect th e backup t o restor e:
Storix System Backup Administrator 42 Version 8.2 Linux System Recover y Guide
Page 43

Select a backup by highlighting the desired line and pressing ENTER, or press F3 or ESC key to cancel the
selection. After making your se lection, you ar e ret urned to t he
Change Installation Server or Device menu.
Install From Local NFS Mount
If the system backup you wish to use fo r the r ecover y is locate d on a r emote NF S shar e, you m ay us e this
option to get access to the backup by performing a NFS mount of the share to the loc al system. Perform ing
recovery from local NFS mount is supported with Network Edition and Workstation Edition licenses only.
You must first select the Set or Change NFS Mount Conf iguration option which will display a screen
similar to the following:
To restore from a NFS mount ed backu p the Server IP Address, the Client IP Address, the Network
Device, and the Share on Server fields must b e filled in. If the client req uires a gate way to reach the NFS
server enter the Gateway Address. When selecting the network device, use the F4 key to list the adapters
available on the system. The opti on to Apply Network Configuration to Restored System indicates
whether you wish to migrate the abov e client network settings to the r estore d system.
If you receive a message that no network devic es are found, then yo u probabl y
need to Load Additional Network Device Modules.
You should enter “y” in the NFS Version 4 option if the shar e you will b e accessing is to be mounted usin g
NFS v4 (NFS v2, v3, and v4 are s upport ed). T he Mount Options field allows you to enter any mount
command “-o” options necessary to mount the remote share. Press F3 or ESC to save the options and
configure the network.
Storix System Backup Administrator 43 Version 8.2 Linux System Recover y Guide
Page 44

After entering the above NFS mount configuration options, select the Select NFS Mount Backup option.
Selecting this option will mount the remote shar e locally and l ist all system back ups found in the sh are.
Only backups of type FULL SYSTEM will be listed. If any are found a screen similar to the following will be
shown:
NFS Considerations
SBAdmin in no way confi gures th e remote NFS serve r. It must b e config ured to a llow th e client IP you are
using read access to the fil es in th e shar e.
The share is mounted using the optio ns you prov ided and th e mount command as follows:
mount –t nfs –o MOUNTOPTIONS SERVERIP:NFSSHARE /images
The system recovery pr ocess d oes not s upport mo unting NFS sh ares th at requir e
any type of authenticatio n (ie K erber os).
Set or Change Network Configuration
When performing recovery from a rem ote SBA dmin serv er, you m ay s et or chang e the network install
server from which to obtain the backup. The backup itself may be on a tape attac hed to the server or on the
server’s disk drive. Upon selecting this option, a screen similar to the following will be displayed:
Storix System Backup Administrator 44 Version 8.2 Linux System Recover y Guide
Page 45

To use a network install server, the Server IP Address, Client IP Address and Network Device fields
must be filled in. If a gateway is required for the client to reach the install server, enter the gateway the
client must use in the Gateway Address field. Under Adapter Conf igurati on, press F4 to list t he devices
available on the system. The opti on to Apply Network Configuration to Restored System indicates
whether you wish to migrate the abov e client network settings to the r estore d system.
If you receive a message that no network devic es are found, then yo u probabl y
need to Load Additional Network Device Modules.
Press the F3 or ESC key to end and return to the
have finished your selectio n. When you d o so, th e net work will b e config ured ac cordin g to the s ettin gs you
chose, and the new server will be displayed at the bottom of the screen. If the server has changed, any
previous device selection will be removed and you will be required to select a new installation device.
Change Installation Server or Device menu once you
Select Remote Tape Device
If a network install server is selected and available (indicated by the Server at the bottom of the screen),
you may select to install fr om a b ackup in a tape dr ive at tached t o the r emote s erver. Not e that you ma y
select a remote server and devic e regardl ess of the t ype of boot media used. Whe n selecti ng this opti on, a
list of tape devices on the server will be displayed and you may select a tape device from the list.
Once you have made your selection, the drive will be checked to ensure that it is available and the name of
the device will be displayed at the bottom of the screen, and you will be returned to the
Server or Device menu.
Change Installation
Select Remote Disk Backup
If a network install server is selected and available (indicated by the Server field at the bottom of the
screen), you may select to install from a disk fi le backup avai lable on th e server. Note t hat you may sel ect
to install from a remote server a nd device regardles s of the t ype of boot media us ed.
When selecting this option, a list of director y devices will be displa yed. T his list will only incl ude those
directory devices that are confi gured fo r System B ackups. Ref er to Configuring Backup Ser vers and
Devices for more information on conf iguring d evices f or system backups.
Storix System Backup Administrator 45 Version 8.2 Linux System Recover y Guide
Page 46

After selecting the directory device, a list of System Backup images on the server will be displayed which
you may select. The list will also display the client from which the backup was originally made, the date and
backup job ID.
If you expect a backup image to appear in the list that does not, it may be that the backup was written with
permission for only the original c lient to read it. If t he client to install is not the s ame as th e origina l client
(or the client is installing f rom a differe nt net work adapt er and ther efor e has a differ ent hostnam e), you
must change the backup image to a llow clients other tha n the or iginat ing clie nt to read it. Refer to Chang e
Access Permission of a Disk Backup for details. Only backups of type FULL SYSTEM will appear in the
list.
Once you have made yo ur sel ectio n, the Backup ID of the backup file will be displayed in the Device field
at the bottom of the screen, and you will be returned to the
Once the installation server and/or device have been selected, press the F3 or ESC key to return to the
Installation and Maintenance Menu.
Change Installation Server or Device menu.
TSM Configuration
When selecting the Change Installation Server or Device option from the main menu and TSM support was
enabled on the client from whom you cr eated th e boot m edia, t he Set Install D evice or Server menu will look a
bit different as shown below:
Storix System Backup Administrator 46 Version 8.2 Linux System Recover y Guide
Page 47

If you wish to install from a T SM server, se lect Use T SM Ser ver from the list above. The following screen will
appear:
You will need to enter additional information used to contact the TSM server on the screen below:
Storix System Backup Administrator 47 Version 8.2 Linux System Recover y Guide
Page 48

TSM Client Configuration
You are required to enter t he NODEname of the TSM c lient you ar e install ing. Not e that this is not
necessarily the same node from which the backup was originally created. If you know the node’s password,
enter it in the NODE Password field. If you do not know the node password, then you will be required to
supply the TSM Administrator username and password in the fields below.
Note that, when logging onto the server using the nodename and password, you will have access to
backups created by this node, as well as any backups of other nodes for which the backup read permission
was set to allow access to any cl ient. If yo u need access to all c lient backu ps on t he server, you will nee d to
log on using the administrative user name and pass word as descri bed below.
TSM Server Configuration
The required field in this section is the TCPServeraddress. You must use the TCP address, not the
hostname, since host name services are not avail able when booti ng from the installa tion media. The
remainder of the fields may typically use the defaults shown. Use the F1 key to display detailed help
information for any screens.
TSM Administrator Configuration
The TSM administrative user informat ion need onl y be entered if yo u do not kno w the NODE Password .
Also, by logging onto the server as the administrative u ser, instea d of using the nod e password, yo u will
have access to all backups o n the serv er, eve n those f or which the per missio n was set t o only allow o wner
access in the backup profile.
Once you have entered all of the requ ired TSM inf ormati on, press t he F3 or ESC key to return to the previous
menu.
Change the Installation Settings
The sizes, locations and all ot her attri butes for disks, partit ions, volum e groups, logical volumes, meta-disks,
swap spaces and filesystems as defined on the backup may be changed using this option. If the backup
settings have not been previously read from the backup, the backup will be read and the settings, according to
the original system, will be extracted from the backup. The settings will then be verified to ensure they are
compatible with the current syste m’s hard ware co nfigur ation. If the v erificat ion fa ils, yo u will b e requir ed to fix
the information to accommodate installation of the backup onto the current system. This may be done either
automatically or by changing the setting manually as described in the section
above.
Upon selection of this option, a set of menus will appear that allow you to customize virtually any attribute of a
partition, volume group, logical volume, m eta-disk or fil esystem defin ed on the backu p. You may also choo se to
exclude certain elements fro m being c reate d or rest ored, or yo u may select to creat e them without actuall y
restoring the data. These menus and optio ns are numerous, a nd are describ ed in detail in th e chapter
View/Change Installation Settings.
Once you have completed all changes, press the F3 or ESC key to return to the
Menu.
Verify the hardware configur ation
Installation and Maintenance
Install the System with Current Settings
When you have completed all steps ne cessary pr ior to instal ling the syst em, such as chan ging the install ation
server, device or volume group information, you may select this option to begin the installation of the system
using the current settings.
Storix System Backup Administrator 48 Version 8.2 Linux System Recover y Guide
Page 49

The backup settings will again be ver ified to ensure co nsistenc y wit h the c urrent har dware co nfigur ation as
described in the
Maintenance Menu.
If no problems in the system co nfigurat ion wer e found t hat pr event t he insta llation fr om proc eedin g, a
confirmation screen will appear, showing you the disks that will be overwritten by the installat ion. You will be
required to press Enter to continue. A final warni ng will appe ar and you must then pr ess "y" to contin ue the
installation or "n" to return to the Installation and Maintenance Menu.
Once you have selected to co ntinue, t he insta llation will pr oceed with no furt her use r input. T he partitio n tables,
volume groups, logical volumes, meta-disks and filesystems will be created and restored from the backup as
defined in the backup information and as prev iousl y customized.
Verification Process. If any problems are found, you will be returned to the Installation and
More details on the complete installation process are found in the
Install the System chapter below.
Storix System Backup Administrator 49 Version 8.2 Linux System Recover y Guide
Page 50

6. View/Change Installation Settings
From the Main Menu, select View/Change Installation Settings. The first time you enter this option, the
backup information will be read from the installation media and compared with the system and disk
configuration to ensure there is adequate space on the available disks to perform the installation. Checks will
also be made to ensure you booted from boot media that supports all of the devices you will be restoring from
the backup. If there are any inconsistencies, you will be required to make changes within these menus to
correct the problem.
It is important to note that any options or changes made in these selections have NO
AFFECT on the actual disks or their contents until AFTER you begin the installation.
If you change your mind at any time, you can cancel or change information without
worry as to the state of t he da ta on t he di sks!
The following is the Change Installation Settings M enu:
At times, you may be required to make changes throughout these menus to correct problems that would prevent
the devices from being created or the data from b eing restor ed. Only after r eturning t o the
pressing F3 or ESC, and selecting t o begi n the i nstall ation, will t he dat a be chec ked a gain for c onsist ency a nd
additional changes may be required.
Main Menu by
Select Disks to Use for Installation
If the disks detected on the s ystem do n ot exact ly mat ch thos e describ ed on t he back up, this o ption will appear
automatically. Otherwise, you can select this option from the Settings Menu to displ ay a scre en sim ilar to t he
following. We will refer to this as the Disk Table Menu.
Storix System Backup Administrator 50 Version 8.2 Linux System Recover y Guide
Page 51

Many options are available from this screen for moving data between disks. This is necessary when the disks
currently available do n’t mat ch thos e defi ned on t he bac kup, or if you sim ply want to reor ganiz e the data o n the
disks for better performance or implement RAID striping or Logical Volume Management (all described later).
To return to the
enough room on the disks for the partitions or other data as you have defined them. If not, you will be warned,
but can make changes in this or other settings to fix the problem before the installation is actually performed.
The above screen shows you the original disk the data resided on and the new disk that is assigned that data.
There may be previous disks that are not a ssigned to a ne w disk, or even additional detected disks that have no
data currently assigned to t hem. By s electing o ne of the lines on t he scre en, you are pr ovided s everal o ptions
as shown below:
Note that the options for displaying or migrating partitions only appear if the selected disk was previously
partitioned or you have chosen to create partitions on it. Each option is described below:
Settings Menu, press F3 or ESC. The backup data will again be checked to ensure you have
View/Change Partition Table
When selecting this option the partitions on the disk will be displayed as in this example:
Storix System Backup Administrator 51 Version 8.2 Linux System Recover y Guide
Page 52

You may select to add a new partition by pressi ng Enter at the highl ighted lin e at the top, or move the
highlighted line over the part ition you wish to change. Wh en adding a ne w partition yo u will be prom pted
where to insert the partition within the table. Then, when either adding or changing a partition, a window
similar to the following will be displayed:
The above screen allows editing of partit ions for MSDOS partition tables. Most systems only support these
partition table types. If you are using an I ntel IA/64 s ystem which use s GPT part ition t ables, t he opt ions will
differ slightly as follows:
You may change any of the options shown. The Size of the partition can be set by either entering the
number of sectors (512-bytes each) or by entering the number of megabytes. In either case, the other will
be adjusted accordingly. You normally will not need to change the Partition type or Partition flag, even if
creating a RAID or LVM device on the partition bec ause the soft ware will automati cally do that for you. T he
Boot flag is not used by the software, and need only be changed if the partition contains a non-Linux
operating system that requires it. If your backup contains raw partition data, the Option will show
Create/Restore. If you do not want to restore that data, change this to Create only.
When finished with your selections, press F3 or ESC to return to the
Storix System Backup Administrator 52 Version 8.2 Linux System Recover y Guide
Change/View Partition Table options.
Page 53

Assign All Contents of a Disk to a Different Disk
Select this option only if you want to move all of the previ ously defi ned backup conten ts to a different disk.
You will then be asked which disk to assign the data to. If you select a disk that is currently assigned other
data, you’ll be given the option of making the other data unassigned so that you can either move it to a
different disk or choose not to restore it.
Migrate a Partition to a Different Disk
If you select this option, the partition table will be displayed where you can select a partition to be moved to
a different disk. You will the n be prom pted for the l ocation on the new disk t o plac e the p artitio n. If the dis k
you are moving to currently has no partitio ns assigned to it, you can select to make th e new partitio n either
a physical (partitions 1-3) or logical (partitions 5-16). Note that partition 4 is always reserved for the
extended partition, on which all log ical partit ions are creat ed.
Select Not to Restore Data to a Disk
By selecting this option, yo u are ch oosing not to resto re the dat a that is assig ned to th e selecte d disk. By
doing so, all previous contents will bec ome undefin ed, and the disk will n ot be used when instal ling the
system. Any data that actually resides on the disk at this time will not be ov erwritten.
If selecting not to restore a disk’s contents causes any problems which would prevent the installation from
being performed (for instance, removing one partition of a striped meta-disk), you will be informed so and
required to make additional changes before continuing the installation.
When you have finished all changes press F3 or ESC to return to the
return to the
Settings Menu.
Disk Table Menu and F3 or ESC again to
Change Partition Tables
This option on the menu is really just a shortcut into the same o ptions availa ble when selectin g disks to use for
installation. You have the same options of changing partition information or adding new partitions to a disk, but
must use the
If your system supports both MSDOS and GPT partition tables, you will be provided the following option:
Select the first option to view or change the existing partition table. Refer to View/Change Partition Table for
additional information. If you select to change the partition table type, you will be asked whether you want the
partition table to be MSDOS or GPT format.
GPT partition tables have only one partition format, but MSDOS tables have Primary and Logical partitions
(logical partitions are contai ned within an Extended partition).
When changing from MSDOS to GPT, the Extended partition (only used in MSDOS tables) is removed and all
partitions are changed to a “primary” type. When changing from GPT to MSDOS, the first 3 partitions are
converted to a Primary partition, an Extended partition is created as partition 4 (if needed) and additional
partitions are created as Logical. After the conver sion takes plac e, the new partition ta ble is displaye d where
you may change the partition information. Refer to
Select Disks to Use for Installation option to move partitions or other data between disks.
View/Change Partition Table for addit iona l informat ion.
Storix System Backup Administrator 53 Version 8.2 Linux System Recover y Guide
Page 54

Logical Volume Management
The Logical Volume Manager (LVM) support, included with many distributions, prov ides the flex ibility of
logically managing multiple physical disks as one large logical disk. This allows, for instance, a filesystem to be
spread sequentially across multiple disks, striped across disks, and the filesystem (contained in a logical
volume) does not have to us e contig uous se gments of disk sp ace. Th erefor e, you can exp and and reduce t he
size of these containers even if there is not contiguous disk space available. Since LVM support in SBAdmin is
quite extensive, we’ll provi de a quick lesson in LVM ter minolog y, but you should ref er to your LVM
documentation and th e “man” p ages for th e LVM co mmands f or deta ils:
• Physical Volumes (PVs): In most cases, this is the physical disk assigned to LVM, but may also be
other types of block devices, including partitions, m eta-disks, and ot her logical v olumes. PVs ar e
assigned to volume groups t o grou p them into a si ngle l arge “lo gical” disk.
• Volume Groups (VGs): This is basically the logical view of a disk, which actuall y contains one or more
physical volumes. A volume group m ay th en be sp lit int o smaller units which ma y be us ed for stor ing
raw data or filesystems.
• Logical Volumes (LVs): Volume groups are broken down into logical volumes, which is similar to a
disk “partition”. The differ ence i s that th e segm ents mak ing up t he logi cal volu mes ma y actu ally exi st
on different disks and do not need to be contiguous. A logical volume may also be “striped”, providing
added I/O performance by making use of multiple physical volumes concurrently.
• Physical Extents (PEs): This is a unit a physical volume is divided into, each in size. A PE may be
from 1 Kbyte up to 128 megabytes in size, and is the smallest unit of allocation for logical volumes. A
logical volume might be made up of PEs existing on different physical volumes.
• Logical Extents (LEs): A logical volume is actually made up of LEs, which at t his tim e is the same as
a PE. We refer to PEs when talking of the physical units of allocation and LEs when talking of the
logical units of allocation. T he re ason for t he diff erenti ation i s for futu re suppo rt of mirror ed logi cal
volumes, where a 100 megabyte logical volume, made up of 25 4 megabyte LEs actually takes up 50
PEs (since every LE will be mirrored onto 2 PEs).
When selecting this option from the menu, you will be provided another list of options:
You will note that these options may not only be used to change settings of existing LVM definitions, but also for
creating new PVs, VGs and LVs. After refining new logical volumes, you will be able to later either create a new
filesystem in the logical v olu me or ev en move a files ystem pr evious ly resid ing on a disk part iti on int o a logi cal
volume!
Storix System Backup Administrator 54 Version 8.2 Linux System Recover y Guide
Page 55

You will also find that physical volumes may be created on meta-disks and meta-disks can be created from
logical volumes. This will allow a
Add or Remove Physical Volumes
This option is used to define a block device as a physic al volume for us e with LVM. When sel ecting this
option a list of potential physical volume devices as well as those currently defined is displayed:
This list will only contain devices, such as disks, partitions or meta-disks, that do not already have other
data assigned to them. Those i ndicate d with => are curr ently ph ysical v olumes. You may se lect any line to
either define or un-define t his as a physic al volum e. The Type/(VG) column will display either the type of
device (it not currently a physical volume), or the volume group name (or none) the physical volume
currently is assigned to.
When finished with your selections, press F3 or ESC to return to the
LVM Settings Menu.
Add or Change Volume Groups
Use this option to change the attributes of a volume group, delete a volume group or to add a new volume
group. When selecting this option, a screen similar to the following will first appear:
Storix System Backup Administrator 55 Version 8.2 Linux System Recover y Guide
Page 56

This will show the currently defined volume groups, if any. If you select the <Add New> option at the top,
you can define a new volume group. You wi ll be re quired i n this cas e to have fi rst defi ned at le ast one
physical volume to assign t o the vo lume gr oup.
After making your selection, the following screen will be displayed:
Remember to press F1 at any time for detailed help on a particular fiel d. Use F4 in most fields to display a
list of available choices. From this screen you can change the VG name, the physical volumes assigned to
the VG, the PE size and other options.
Notice that the amount of spac e avai lable in the volume gr oup is shown at the bottom, as well as the
amount of space used by current lo gical vol umes.
The Create Option may be changed to either “C” (create) or “D” (delete). If you change the option to
Delete, you will be given warning, and the volume group and any logical volumes assigned to it will be
removed. Any physical volumes assi gned to it will beco me availabl e to assign to ot her volume gro ups, if
any.
Storix System Backup Administrator 56 Version 8.2 Linux System Recover y Guide
Page 57

If you change the PE size, any logical volumes currently assigned to the volume groups will be adjusted to
fit. The number of LEs assigned to each LV will change, and in some cases, the LV size may change
slightly in order to round up to the new PE size.
To select physical volumes for the VG, press F4 in the Physical Volume List field. A pop-up window will
display similar to the following will be shown:
You may only select a physical volume that is either currently assigned to this VG (in order to un-assign it),
or a physical volume listed as “free”, indicating that it does not belong to a volume group. By selecting the
line, the list will refresh showing the PV either assigned or unassigned. Press F3 to return to the
Volume Group screen.
Change
Add or Change Logical Volumes
Select this option to add, delete or change logical volumes. When selecting this option, a screen containing
the currently defined LVs is shown:
Select <Add New> to create a new logical volume or select a line containing a current logic al volume to
change or remove it. The logical volume settings can then be changed on the following screen:
Storix System Backup Administrator 57 Version 8.2 Linux System Recover y Guide
Page 58

Use the F1 key for help on any field or the F4 key to list current choices.
The amount of space available in the vo lume grou p, and the minimum L V size (if the LV previ ously
contained data) is shown at the bottom of the screen. These numbers will be adjusted as you change the
size of the LV, which may be specified in eith er LEs or megabyt es.
You may also change the na me of t he volu me group t he LV is assi gned to. N ote that t his will chang e the
actual LV device name, since the name of the lo gical volum e device is actual ly “/dev/VGname/LVname”
(but we of course don’t bother you with the /dev prefix).
To select the specific phys ical vo lumes within t he volum e group where yo u want t his LV placed, m ove to
the Physical Volumes field and press F4. It is not necessary to assign PVs to the LV unless you plan to
stripe the LV or you have a desire to specify its location (you may want 2 LVs that perform different I/O
workloads located on different PVs, for example). A window will pop up showing the physical volumes
currently assigned to the volume gr oup, and you can s elect or desele ct PVs from the list.
Note that you must select at least 2 PVs when you c hoose to stripe the logical volume data across PVs (by
setting the Stripe Size value to any non-zero value).
If you select to have more than 1 Copies then you are utilizing LVM mirroring and additional options will
become selectable as follows:
Storix System Backup Administrator 58 Version 8.2 Linux System Recover y Guide
Page 59

When finished with your selections, press F3 or ESC to return to the list of LVs, and F3 or ESC again to
return the
Change LVM Settings menu.
Add or Change Meta-disks
Use this option to add a new meta-disk (software RAID device) or to remove an existing meta-disk or change its
attributes. Details on the use of meta-disks can be found throughout the Linux documentation as well as in the
mkraid and raidstart command man pages. A brief description is provided here.
A meta-disk provides var ious levels of soft ware RAID, other wise ref erred to as “RAI D levels”. T he le vels are
defined as follows:
0 (Striping) Data is striped across 2 or more physical devices for better performance.
1 (Mirroring) Identical copies of the data is stored on two or more physical devices.
5 (Striping/parity) Data is striped across 2 or more physical volumes, and an additional disk is used to
contain parity information, which its elf is st riped across t he disks.
9 (Linear) OK, “9” was of our own choosing since we wanted to use a number for consistency.
Linear means that there is no striping or mirroring, b ut multiple devic es can be
combined sequentially t o prov ide a s ingle larger-s ized dev ice.
When selecting this option you are first provided a list of meta-disks currentl y defined, if any, and an option to
<Add New> meta-disks:
Storix System Backup Administrator 59 Version 8.2 Linux System Recover y Guide
Page 60

In any case, your next selection will take you the screen for adding, changing or removing meta-disk definitions
as follows:
From this screen you can choose to Create, Create and Resto re, or Delete a meta-disk. Th e opti on to
Create/Restore is only available if this is a meta-disk whose raw data contents were included on the system
backup. The MD Name must begin with “md” and is followed by a number between 0 and 31.
Specify the RAID Level as described above, keeping in mind the minimum number of devices that must be
assigned to this meta-disk to accommodate the RAID level.
Information on the other options may be displayed by pressing the F1 (help) key. For a list of selections for a
particular field, press th e F4 key.
The Device type may be one of DISK (for whole disks), PP (for partitions), LV (for logical volumes) or MD (to
build the meta-disk on other meta-disks). The RAID devices field may only be fill ed in with devi ces of t he type.
Press F4 in the RAID devices field to list the devices available (of t he t ype specifi ed in t he Device type field)
and select from the list as shown:
Storix System Backup Administrator 60 Version 8.2 Linux System Recover y Guide
Page 61

)
)
The example above shows logical volumes to be assigned. Note that the LVs shown are of varying sizes, which
is not recommended for striped or mirrored meta-disks, since the maximum am ount of space av ailable would be
that of the smallest disk (times the number of disks). This will work fine for linear met a-disks, however.
When finished with your selections, press F3 or ESC to return to the
return to the
Change Settings menu.
meta-disk list, and F3 or ESC again to
RAID 0+1
RAID 0+1 is both striping and mirrored. It means building a mirrored RAID device from striped RAID devices.
Since mirroring usually causes I/O performance degradation, this design is typically used to get normal disk I/O
performance while still havi ng mirror ed (re dundant ) data. Si nce bot h Logical Volumes and meta-disks can
stripe data, and they are both block devices, they can b oth be used to b uild a mirrored met a-disk! Here’ s an
example:
md0
(mirrored
-
vg0/lvo l 1
(striped logical
volume
PV1 PV2
The logical volumes are striped across mu ltiple ph ysical v olumes ( PV) and t hen you r strip ed logica l volum es
are combined into a mirror ed met a-disk. T his mea ns that as data is written to t he met a-disk (md0), an identical
copy is written to both logical volumes vg0/lvol1 and vg0/lvol2. Those logical volu mes each st ripe th e data
across 2 of the 4 physical volumes assigned to them, alleviating much of the performance hit taken by mirroring
in the first place.
PV3
vg0/lvo l 2
(striped logical
volume
PV4
Refer to the
LVM Settings section for more information on logical volumes.
Add or Change Filesystems
This option may be used to change any of the settings for the filesystems, which vary depending on the
filesystem type. SBAdmin supports th e follo wing most po pular files ystem types at this t ime:
ext2 Linux Second Extended
ext3 Linux Journaled Third Extended
ext4 Linux Journaled Fourth Extended
Storix System Backup Administrator 61 Version 8.2 Linux System Recover y Guide
Page 62

reiserfs Reiser Filesystem
btrfs Btrfs Filesystem
jfs IBM Journaled Filesystem
xfs SGI Extended Filesystem
vfat MSDOS/Windows FAT Filesystem
minix Old Linux Filesystem
msdos MS/DOS FAT12 Filesystem
Virtually any of the attributes which are av ailabl e for th e filesyst ems abo ve can be set or chang ed from the
menus. Since some filesystems provid e advanced feat ures and perfor mance not pre viously avai lable on, for
instance, an ext2 filesystem, you can simply change the t ype of th e file system to t ake a dvanta ge of the n ew
features. You can even sele ct extern al devic es to us e for j ournalin g ext3, ext4 and xfs data, adding
performance by placing th e journa l on a separate disk tha n the files ystem.
When you select this option you will receive a list of filesystems currently defined:
Select <Add New> to add a new filesystem. You will be required to specify the new mount point, or directory,
for this new filesystem. Then, the following options screen will appear:
Storix System Backup Administrator 62 Version 8.2 Linux System Recover y Guide
Page 63

The options displayed h ere are f or an “e xt2” f ilesyst em. If you chan ge to a d ifferent f iles ystem t ype, th e option s
will change as well. We won’t describe the options in detail since you have much information available with the
F1 (help) key. Also use t he F4 ke y to sho w lists of a vailab le optio ns.
The options common to all filesystems are:
Create Option – Here you can sp ecif y to Create the filesystem only, Create it and resto re th e data, or
Delete it. Although the fil esystem d ata may be on t he backu p, you c an ch oose to cr eate the f iles ystem witho ut
actually restoring the data into it.
Mount point – You can change the directory where the filesystem will be mounted. The data is restored relative
to this directory, so the conte nts, if any will n ot change. You cannot change th e mount poi nt of the ro ot (/), /boot
or /usr (if any) filesystems.
Device – Here you can s elect a new de vice where t he file system sh ould be cr eated a nd/or r estored. Possib le
filesystem devices are whole disks, partitions, mate-disks and logica l volumes. When pr essing F4 at this field,
you will get a list of any devices that are not alread y assigned data as f ollows:
Filesystem type – Here’s where you can select the t ype of fil esystem t o creat e. Only the files ystem t ypes
supported by BOTH the boot media and the backup to be restored will be selectable within this field. Changing
this field will change the options while appear in the Additional options section below.
Only filesystems supported by the boot loader w ill be available for th e root
filesystem UNLESS you have a /boot or /yaboot filesystem. In that case, the /boot or
/yaboot filesystem will be limited to filesystem types supported by the boot loader.
Mount options – Pressing F4 at this field will display a lengthy list of mount options which apply to all
filesystems as well as additional m ount op tions spe cific to t he select ed files ystem typ e. You can combin e them
in most cases, and some options, when selected, will prompt you for additional input. In most cases, you can
use “default”. Don’t change these unless you know what you’re doing.
Additional Options – Various options such as block size, fragment size, external journal devic e, label id, etc,
will appear, based on the filesystem type selected. The options vary for each filesystem, and the list of
available selections under each option will also vary depending on both the filesystem type and the other
options selected.
External Journals
Some filesystem types provi de the abilit y to use external jour nals. In t his case, you can s elect anot her
device (same type as the filesystem itself) where the filesystem metadata will be journaled. Since journaling
the metadata can be a bit of a performance hit, this allows you to keep the journal on a separate disk than
the filesystem itself to ease the I/O workload.
Minimum Filesystem Size versus Device Size
The minimum filesystem siz e displ ayed i n vari ous plac es in t he menu s is th e size of t he data i n the origin al
filesystem that was backed up. The size of the devic e may have to be quite a bit l arger depen ding on the
amount of space the filesys tem met adata and j ournal ing requir es.
Storix System Backup Administrator 63 Version 8.2 Linux System Recover y Guide
Page 64

The journal size can be specified in some cases. We generally recommend using the default size, which
varies by filesystem type. If you change the journal size, more or less room in the device itself will be taken
up by the journal. The size of the journal also varies in most cases based on t he size of the filesystem.
SBAdmin tries to keep track of the mi nimum si ze of th e devic e based o n the am ount of data to be rest ored,
and this calculation vari es bas ed on th e files ystem t ype, th e journa l size, and man y other options that are
configurable here. If you change any of the options, such as the number of inodes in a filesystem, be sure
you have plenty of free s pace availab le (bas ed on t he size of the device) in cas e the cha nge req uires m ore
space than the filesystem previously needed.
After you have finished making changes, press F3 or ESC to return to the
or ESC again to return to the
Change Settings menu.
filesystem selection screen. Press F3
Add or Change Swap Devices
Use this option to select the device or devices which should be used as swap devices (also known as swap
space and paging space) on t he system. Any raw dev ice, includin g partitions, lo gical volumes, or met a-disks
may be used for swap. When selecting this option, a screen similar to the following will appear:
If an arrow (") appears next to a device, then that device is currently configured as a swap device. To select a
device, highlight the desired li ne and pres s Enter. If you do not want to use that device for swap, press Enter
and the arrow will disappear. This device will not be used, and may be instead used for other features, such as
filesystem data.
After you’ve completed your selections, press F3 or ESC to return to the
Change Settings menu.
Change Boot Options
This option will allow you to select or change the boot loader that will be used to boot the system after the
installation completes. By default, the boot loader used on the original system when the backup was made will
be used (if it could be determined at the time of the backup). Refer to
When selecting this option, a screen similar to the following will appear:
Storix System Backup Administrator 64 Version 8.2 Linux System Recover y Guide
Boot loaders for additional information.
Page 65

Each option is described below:
Boot loader – Press F4 to select the boot loader to use. The only options provided are those available on the
system and appropriate for t he syst em typ e. The LILO boot load er will alwa ys be availa ble for Intel 32-bit-based
systems, ELILO for Intel-based systems that boot from UEFI, and the Yaboot boot loader will be the only
available option for IBM System p and System i systems.
Boot device – Press
the disk containing the boot f ilesystem. F or GRUB, it can be any disk on the system (and need not contain the
boot filesystem). The boot disk must be a disk contai ning a partition table. The boot devi ce (disk) is the de vice
you must later set your system firmware to boot from after the installation completes.
Kernel options – This field will display the kernel options used to boot the system when the backup was made.
Some options specific to the boot process
may change the options tha t are pa ssed to t he kern el from the boot loader by editing this field. Anything you
enter in this field will be available to the kernel and the system boot process, whether valid or not.
Console type – This field indicates if th e system c onsol e will b e a graphi cal display or a serial (ASCII/text)
terminal. This field is filled i n with the c onsole t ype you booted fr om.
Console device – This field indicates the name of the device to use as the system console. The default will be
the console device you booted from if known, “tty0” for graphical displays or “ttyS0” for serial terminals.
Terminal type – If using a serial term inal, yo u shou ld spec ify t he termi nal t ype in this field. If you boote d from a
serial terminal you were asked to select a terminal type during the boot process, and this terminal type will be
the default. You may set this to the terminal type that should use used after logging into the system console
after system startup.
Also, refer to The
F3 or ESC to return to the
F4 to list and select the name of the boot disk. F or LILO and Yaboot, t h i s wi l l always b e
that do not apply will be removed after restoration of the system. You
Boot loader in Making the Syst em Boo table. When you’ve completed your selections, press
Change Settings menu.
Storix System Backup Administrator 65 Version 8.2 Linux System Recover y Guide
Page 66

7. Inst all the System
To install the system from the SBAdmin System Backup, you first must have selected the
(which may be located on a local or remote host). You then have the option
Settings, where you can make any changes to the backup information stored on the backup media. If you used
that option, then the backup information was already restored from the backup, verified and modified as needed
to ensure the installation ca n be start ed.
View/Change the Installation
Verification Process
If you select the option Inst all the S ystem with Curr ent Settin gs, this backup data will be checked (again if
necessary) to ensure the defined devi ces and filesyst ems can be creat ed successful ly. Here are a few thin gs
that are checked:
1. The devices and fi lesyste ms defi ned on t he ba ckup ar e checke d to en sure th e kern el and mo dules
available from the boot media are adequate to create them. This includes ensuring that LVM and the
various RAID levels are available if req uired.
2. Ensures any backup data previously residing on a disk is assigned to a new disk unless the user
explicitly chose not to r estore data.
3. Verifies that all devices assigned to meta-disks ar e valid and th at there are enough devices assigned
for the appropriate RAID level.
Installation Device
4. Verifies that the phys ical vol umes as signed t o both v olume gr oups an d logic al volu mes are v alid.
5. Checks that volume groups are large enough to hold the logical volumes defined.
6. Verifies physical volumes assigned to logical volumes are adequate for striping, if defined.
7. Validates the partition table and automatically adds an extended partition if needed to allow future
expansion into logical partitions. This is important also since the backup may be installed onto larger
disks, and using all primary partitions would prevent the abilit y to expand onto them.
8. Verifies that part itions will fit onto t heir r espectiv e disks and that prima ry part ition sizes ar e def ined at
disk track boundaries (in case the disk geometry has changed).
9. Checks that all filesystems are being created on devices large enough to restore the data. Even if a
device has not changed, the requirements may change if, for instance, the filesystem type was
changed to one which requires more space for filesystem metadata than was previously needed.
10. Verifies that the r oot files ystem is bei ng rest ored and the device on which it is defined is still valid.
11. Verifies that t he confi guratio n conforms t o boot loa der requirements of the specif ic system type.
If any problems are detected, you will be informed of the problem and a recommended solution. In some cases
the process will offer to fix t he pr oblem f or you. If probl ems persi st, yo u will n eed to ret urn to th e
Settings menu to make any changes required to restore the data.
Change
Storix System Backup Administrator 66 Version 8.2 Linux System Recover y Guide
Page 67

Starting the Installation
If all checks out, you are given one final warning:
Press “y” to continue the installat ion or “n” to return to the
If you choose to continue the install, the system will begin by reading additional information from the backup
media, then creating the devices and file systems that are defi ned. Dev ices are creat ed in the c orrect or der so
that meta-disks created on lo gical vo lumes, for inst ance, ar e creat ed after th ose logi cal volume s they depen d
on, etc. After the devices are create d, all files ystems ar e creat ed and mo unted.
If the backup was encrypted when it was created, yo u will be asked t o enter the encryption key to decrypt the
data during the installation. I f the corr ect key is not ent ered, yo u will no t be able to continue the instal lation.
Refer to
As the data is restored from the backup, a progress indicator will appea r showing the status of the r estore
including the estimated amount of data and time to completion. When all data for included on the backup is
restored, the system will perform some cleanup and post-installation processing and attempt to make the
system bootable.
Installing from an Encrypted Backup for more information.
Main Menu.
Configuration Files
During the installation, a copy of any former configuration files that were modified by the installation will be
saved into the STXPATH/temp/storix_install directory (where STXPAT H is the St orix d ata dir ector y of th e
target system). This will include s ystem fil es modified during t he install ation proc ess, suc h as the / etc/fst ab,
/etc/raidtab and /etc/lilo.conf files ( if used). You s hould e xamine t hese fil es and c ompare t o the modif ied files
to verify the changes.
Making the System Bootable
When all data is restored and the installation processing is complete, the final, and very important step, is to
make sure the system will now reboot successfully.
The Boot Loader
SBAdmin uses one of the follo wing as t he boot loader to config ure th e system f or bo ot-up, de pending on
the system type:
1. For Intel-based systems, SBAdmin uses either:
GRUB – If the system previously had GRU B confi gured, a c opy of the origi nal GR UB conf igurat ion files
grub.conf, menu.lst, and device.map will be copied into the STXPATH/temp/storix_install directory
(where STXPATH is the St orix d ata direct ory) . The grub.conf file will be modified to add the new boot
configuration as the defa ult syst em to boot from.
GRUB2 – If the system previously ha d GRUB 2 config ured, a c opy of t he orig inal GR UB conf igurat ion
files /etc/default/grub, /etc/grub.d/01_* will be copied into the STXPATH/temp/storix_inst all
Storix System Backup Administrator 67 Version 8.2 Linux System Recover y Guide
Page 68

directory (where STXP ATH is th e Stori x data director y). A ne w GRUB2 b oot optio n config uration f ile
/etc/grub.d/01_storix will be created.
LILO – If GRUB or GRUB2 are not being used, LILO will be used i nstead. If the re was a previous
configuration in the /etc/lilo.conf file, that co nfigurat ion i s saved to t he STXP ATH/temp/storix_in stall
directory (where STXP ATH is the Stor ix dat a directo ry). A n ew stanza with t he boot c onfigur ation will
be added to the prior lilo.conf file, if any, or if the previous file was invalid (or unused) a new file will be
created with only one stanza used to boot the system. If a previous file existed, the original copy will be
saved in the STXPATH/temp/storix_install directory (where STXPATH is the Storix data direct ory).
ELILO – Systems that boot from UEFI firmware with use the ELILO boot loader. The boot loader
configuration file used b y ELILO is elilo.conf and will be found in the VFAT filesystem used as the boot
filesystem (typically /boot/efi or a subdirectory of /boot/efi). If the system previously used ELILO, the
original version will be copied to STXPATH/storix/storix_install (where STXPATH is the Storix data
directory) before it is changed.
2. For IBM POWER (System p) and Syst em i systems
Yaboot - SBAdmin does not use the utilities that accompany this boot loader, as they differ greatly
between distributions. Instead, SBAdmin creates its own /etc/yaboot.conf file, then copies the yaboot
boot loader (yaboot.chrp) to the PReP Boot or FAT16 partition. If a previous yaboot.conf file existed,
it will be copied to the STXPATH/temp/storix_install direct ory ( where STXPAT H is the Stori x data
directory) before being chan ged.
Refer also to the Boot loader section.
Initial Ramdisk Image
SBAdmin will attempt to determine if any device support is required to mount the root filesystem that is not
already built into your kernel. This may include various filesystem support, LVM commands and modules, or
software RAID commands and modules. If it is determined that required device support is not built into the
kernel, then an Initial Ramdisk Image (initrd/initramfs) is automatically created.
The initrd/initramfs image will contain the device support modules and programs, a nd a script for loading
and initializing the modules. The initrd is loaded by the kernel prior to mounting the r oot filesyst em.
Therefore, the initrd will initialize any support needed to mount the root filesystem
The /boot filesystem
Boot loaders must be able to access informat ion resto red to the s ystem dur ing start up. This i nformat ion is
contained in the /boot directory (or sometimes /yaboot or /boot/efi) of a filesystem. The /boot directory
may be in the root (/) filesystem or may be its own filesystem. We’ll just refer to it as the “boot” filesystem
here.
The system recovery process will verif y that your system configur ation, boot load er
and boot device are valid and will requir e you to make changes as nec essar y in the
installation menus. In the installation me nus, you w ill only be able to make
selections that are valid, based on your system type, boot filesystem type, and
support available on your system. The menus will also recommend creating a
separate /boot filesystem w hen necess ary.
The boot filesystem must be of a type that the boot loader recognizes. LILO, for instance, must map the
physical disk blocks that make up the boot conf igurat ion files, kernel an d initrd image. To do so, it must
know the filesystem format. Yaboot and GRUB boot loaders must be able to mount the boot filesystem in
order to find the configuration fil e, kernel and initr d. In any case, th e boot fil esystem must be a fil esystem
type that the boot loader supports. ELILO must be on a VFAT type filesystem and t he partition mu st be
marked with the boot flag.
Storix System Backup Administrator 68 Version 8.2 Linux System Recover y Guide
Page 69

Intel 32-bit (BIOS) systems using LILO or GRUB : In addition, the boot filesystem must be in a primary
disk partition (1-4), not in an LVM logical volume or a striped software RAID (meta-di sk) device.
Intel 64-bit (UEFI) systems using ELILO: In addition, the boot filesystem (/boot/efi) must be a VFAT
filesystem on a partition with the boot flag set. This may be either GPT or MSDOS partition table, but it
is recommended that the boot filesystem is on the first partition of the boot disk.
IBM System p and System i using Yaboot: These systems require that you have a PReP boot (type 41)
or FAT16 partition on the boot disk, into which the yabo ot b oot load er is co pied. Wh en using a PReP
partition, be careful to make thi s partit ion smal l (< 10 M B) since t he enti re part ition is read int o memor y.
The boot filesystem must also be in a primary (1- 4) partitio n on the same disk, and co ntain an ext 2,
ext3, reiserfs or xfs filesystem.
It is sometimes advantageous to have the root (/) filesystem in a striped logical volume or software RAID,
or be a Reiserfs filesystem, for instance. For this t o be poss ible, you cann ot use t he root fil esystem as the
boot filesystem. Theref ore, you can cr eate a /boot (or /yaboot or /boot/efi) filesystem in addition to the
root filesystem. This will become the boot filesystem, and may be of a size only large enough to contain the
boot configuration files, kernel and initrd images. Since the root filesystem is no longer part of the boot
process, there are no lim itatio ns on th e type of cont ainer (LV M, RAID, partition, etc) of the root fi lesystem,
or its filesystem type.
If these conditions are met, SB Admin will create t his files ystem d uring th e syst em install proce ss and us e it
to store the boot configuratio n files, kern el and initrd im age requ ired to mount the “re al” root fil esystem.
With all of the informati on and fil es requi red by t he boot l oader ex isting in this f iles ystem th ere are n o
longer ANY limitations on what device or filesystem the root filesystem can be created on!
Refer to the
Boot loader section for additional information on each boot loader’s requirements.
Doing it yourself
In some cases, SBAdmin may not be able to determine what device support is required or already built into
the kernel. Therefore, at th e end of t he ins tallatio n proc ess, you are pl aced in a pro mpt (assu ming t his is
not a no-prompt installation), where you can use you r own comm ands f or config uring a differ ent bo ot
loader as needed. At this point, you are given a message similar to the following:
================================= ========== ========== ========== ======
THE SYSTEM HAS BEEN RESTORED S UCCESSFULL Y!
================================= ========== ========== ========== ======
LILO has been configured as the b oot loader . If you w ant to use a
different boot loader or require additional configura tion prior to
rebooting the system, you may do so now.
The LILO boot configuration file is /etc/li lo.conf. Y our origin al
lilo.conf, if any, has been saved as /stori x/temp/sto rix_instal l/lilo. conf.
---------------------------- ---------- ---------- -- Please remove any boot media and be su re the
system firmware is configure d to boot from "sda" .
---------------------------- ---------- ---------- -- ================================= ========== ========== ========== ======"
When done, type "exit" to complet e the inst allation p rocess and reboot .
sh>
At this point, if no change is required, just type “exit” to allow the system to reboot. If you want to make
changes, you can manually update your boot loader configuration or install a different boot loader. T his will
override the boot loader con figurat ion th at SBAdm in applie d. If you want to rev ert back to t he ori ginal b oot
loader configuration that was overwritten by SBAdmin, the original copies of the config files are located in
the /storix/temp/storix_install direct ory (assumi ng /stori x is the data dir ectory o n client). Be warne d
however that the SBAdmin confi guratio n has t aken int o accou nt any c hanges t o the s ystem to ensure it will
boot after the restore. The previous configuration may no longer be valid.
Storix System Backup Administrator 69 Version 8.2 Linux System Recover y Guide
Page 70

Only when you are sure you have correctly applied the boot configuration should you type “exit”. Once you
do so the system will be rebooted normally.
Installation Errors
If any error occurs in creating t he dev ices, creat ing or mounting th e files ystems, or r estor ing the d ata, you will
be provided a message cont aini ng the details and the f ailin g comman d and asked t o correct t he pr ocess
manually before continuing the installation. At this point you are placed at a shell prompts where you can
diagnose and correct the pro blem. The c ommand which fai led must be compl eted be fore t he instal lation c an
continue successfully. When the problem is corrected, type “exit” to exit the shell and continue the installation.
System Boot Problems
The SBAdmin installation process does its best to prevent you from making any changes that might prevent the
system from booting. For exampl e, yo u are not allo wed to put t he /bo ot files ystem o n a logic al vol ume sinc e
boot loaders can’t read the boot c onfigur ation or k ernel from a l ogical volume.
The most common boot problem after an install is simply that your system firmware is trying to boot from the
wrong device. First remove any removable boot media from the system and try again. If you changed the disk
containing the /boot (or root if no / boot) fi lesystem, you ma y need t o tell your firm ware to bo ot from the n ew
disk. Each firmware used has different menu options and even names the disks differ ently, so you will have to
refer to your system documentation for details.
SBAdmin takes care of ensuring that all devices, LVM and/ or software RAID are run ning if they’re need ed to
access the root filesystem. Onc e the ro ot filesys tem is availabl e, contr ol is t urned ov er to the normal system
initialization procedures. Any errors that occur at this point will not usually render the system unusable, but may
require additional customization (beyond the scope of SBAdmin) to restart all system processes in the correct
order.
Should all else fail, at least we know that the system has been configured and restored successfully, so we just
need to figure out how to get it to boot. Your SBAdmin Boot CDROM can help. You can boot from the CDROM,
and when the menus appear, select “Enter a Maintenance Shell”. At this time, you can attempt to mount your
root filesystem manually. Once yo u hav e successf ully m ounted t he root fil esystem, you can ch root to t hat
filesystem and attempt to correct your boot config uration.
Should any system, even when changing the disk configuration, not startup at the end of the installation process
the same as the original sys tem, you shoul d report the probl em to Stor ix immed iatel y. With t he vast n umber of
Linux distributions changing daily, it’s virtually impossible for Storix to test every scenario. However, we will do
our best to ensure that your system gets up and runni ng!
Network Re-configuration (avoiding conflicts)
If the system is reinstalled from a rem ote install s erve or from local NFS mount ( except Workst ation Editi on),
you entered the client IP address when either booting the system, or when selecting to restore from a remote
server. In either case, the client IP address entered will be used to reconfigure the network adapter information
restored from the backup. In addition, any additional network adapter configurations restored from the backup
will be disabled on reboot.
This behavior may be pre vented b y selectin g to not ap ply the ne twork co nfigura tion
to the restored system when con figuring t he network se ttings .
This is handy when a single backup is used to reinstall multiple clients, as each client will then reboot with its
own customized network configurat ion, re gardless of what was on the backup. Net work adapt ers not used
during the installation are disabled on reboot to prevent any duplicate IP addresses (i.e. this system and that of
the original client the backup was taken from).
Storix System Backup Administrator 70 Version 8.2 Linux System Recover y Guide
Page 71

If, however, you installed the system from local boot media (CDROM, tape or hard disk), the new network
configuration, if different, is n ot known. It is assu med th at the backu p being r estored cam e from th e same
system, and the network configurat ion is uncha nged. Theref ore, when the syst em reboots at the en d of the
install, it the network will configur e with t he origi nal settin gs restor ed from the b ackup. If the backup conta ins IP
addresses used by another system on the network, you should unplug the system from the network to prevent
IP address conflicts until you have changed the network settings on the newly restored system.
Storix System Backup Administrator 71 Version 8.2 Linux System Recover y Guide
Page 72

8. System Recovery Utilities
From the
following options:
System Installation and MaintenanceMain Menu, select System Recovery Utilities to display the
Load Additional Device Adapter Modules
This option is used to load SCSI, Fibre-channel or Network adapter modules that were not automatic ally load ed
when the system was booted from the media. While most necessary modules will be detected and automatically
loaded, if you are installing onto a different system with different adapters, it may be necessary to load
additional modules before all devices are detected.
For SCSI and Fibre-channel storage adapters, select Load Additional SCSI/FC Adapter Modules. For
networks, select Load Additional Network Adapter Modules. As with the following (Network) exa mple, a l ist
of available modules and their descriptions will appear:
Storix System Backup Administrator 72 Version 8.2 Linux System Recover y Guide
Page 73

An arrow (==>) will appear next to the device modules that are currently loaded on the system. If you highlight
and select a line for a module that is not currently loaded, a message will appear indicating that the module is
being loaded. If the module is loaded successfully and new devices (or adapters) are detected, a message will
appear showing you the names of the configured devices. If no new devices are detected, the module will be
unloaded automatically and a message to that affect will appear on the screen.
If you highlight a line c ontai ning an arro w and press enter , you will be in formed t hat the m odule i s current ly
loaded and asked if you want to unload the module. Note that unloading a module may cause devices currently
configured to become unavailable (i.e. disk or tape drives), and some modules may not be unloaded if they are
currently in use (i.e. network adapters for active networks).
When you have finished your selections, press ESC or F3 to return to the System Recovery Utilities menu.
Start a Maintenance Shell
Select this option to start a maintenance shel l where you may perform vario us operatio ns for performing s ystem
maintenance or recover y such as m ounting and rep airing disk fil esystems, or reconf igur ing the disk bo ot loader.
When entering the shell, no disk filesystems will be loaded, and only the command set available on the boot
media for system recovery are available. The user will need to perform the manual tasks needed to mount the
root (/) or other filesystems if acc ess to the data stored on the dis ks is des ired. The c ommands a nd options f or
doing this vary much too widely to be discussed here, as some filesystems reside in LVM, others are made from
RAID devices, etc.
When you have finished th e system m ainte nance t asks, you m ay rebo ot the s ystem fr om the c ommand l ine, or,
if you wish to return to the system installation process, you may type “exit” at the prompt to return to the menus.
Note: There is no job contr ol in th e maint enance shell. Therefor e usi ng CRTL- C to en d a proce ss will n ot work.
This is important to note if you are attempting to use the “ping” command to diagnose network issues. Any
command you run should exit by it self. For examp le, if yo u are u sing t he “pin g” comm and, ad d an arg ument to
limit the number of tries (nor mally th e –c fl ag) so that t he com mand will exit on its o wn.
Storix System Backup Administrator 73 Version 8.2 Linux System Recover y Guide
Page 74

Configure Remote Install Manager
If you configured RIM at the time you created the boot m edia, it will be automatically enabled and it will not be
necessary to configure in this option. If, however you did not pre-configure RIM, or if you need t o change the
RIM configuration, you m ake cha nges from with in the system Installation menus after booting from the SBAdmin
boot media. To do so, select the System Recovery Utilities option from the main menu to display the following:
Select Configure Remote Install Manager. The following screen will display:
1. The Remote Install Username is set to “sbadmin” and may not be changed. Enter a password in the Remote
Install Password field. The password will be necessary to login to the remote install client.
2. Select the Network Device (adapter) that should be configured to connect to the remote install client.
3. Enter the IP Address used to configure the network adapter. Note that, if the selected adapter is already
configured (as a boot or install device) an d you enter a d ifferent IP address th an the adapter is cu rrently
using, you will be provided a warning and allowed to continue. If you do so, however, the previous settings
will no longer apply, and the adapter will be reconfigured under the new IP address.
4. Enter the Subnet Mask (if necessary) used when configuring t he net work adapt er. As with the IP Address, if
the adapter is currently configured under a different subnet mask, you will be warned and allowed to
reconfigure the adapter under th e new subnet mask.
Storix System Backup Administrator 74 Version 8.2 Linux System Recover y Guide
Page 75

When you have finished your selections, press ESC or to return to the
Server. The network adapter will be configured with these settings and the RIM server will be started. You can
see the current status of t he RIM serv er by lo oking at t he Local SS H settings which appear on the screen.
RIM Menu. Then select Start Local SSH
Configure Backup Group ID
This option is used if you have configured a server with an “Optional client with access to all groups”. For further
information about configuring the server this way please see the SBAdmin User Guide.
If a backup has been copied to a shared server, the new group id will not match the group id of the orig inal
client backup. When restoring from the shared server, you will need to ensure a cl ient is c onfig ured with acce ss
to all groups, and you have the appro priate grou p ID.
To change the groups ID simply begin typing and it will replace the old group id. Press the escape key to save
the new setting and return to t he prev ious me nu.
Storix System Backup Administrator 75 Version 8.2 Linux System Recover y Guide
Page 76

Index
A!
boot type, 18
serial settings, 18
ascii
encryption key, 38
B!
backup sequence number, 41
network install, 25
boot
booting to install process, 29
console, 18
making system bootable, 67
problems, 70
boot loader, 8
definition, 7
boot media
cdrom, 12
creating, 11–28
disk, 14
kernel level, 19
network, 14
network adapter support, 17
when to make, 11
boot server. See network boot server
booting, 29, See also network boot
bootloader, 10, 67
boot filesystem, 68
configure or change, 65
ELILO, 68
GRUB, 67, 68
GRUB2, 67
initrd support, 10
Intel-based systems, 67
LILO, 68
pSeries systems, 68
yaboot, 68
bootloader, 68
BOOTP, 34
bootpd, 34
broadcast boot, 24, 30, 32, 34, 35
D!
decrypt. See encryption
devfs, 9
device filesystem. See devfs
dhcpd, 34
disk
configure boot disk, 14
disk backup file
local install device, 42
disks
selecting for installation, 50–53
E!
EFI Boot Manager, 29
ELILO, 65, 68
encryption, 38, 67
installing, 37
software, 3
F!
filesystem
changing install settings, 48
filesystems
adding/changing, 61
definition, 8
types, 61
firmware, 7
definition, 7
G!
GPT
partitions, 52, 53
GRUB, 65, 67, 68
GRUB2, 67
H!
C!
cdrecord, 9
cdrom
create ISO image, 12
writer programs, 9
client
booting for system installation, 29
network installation, 23
cloning systems, 36
configure
network boot/install, 23
network boot/install client, 24
console
Storix System Backup Administrator 76 Version 8.2 Linux System Recover y Guide
hard disk. See boot media: disk
help, 39
system installation menu, 39
hex
encryption key, 38
I!
initial ramdisk. See initrd
initrd, 8, 10
install
from system backup.
install device
parallel virtual device, 42
sequential virtual device, 42
See system installation
Page 77

install server. See network install server
installation. See system installation
ISO. See boot media: cdrom
J!
journals
external, 63
K!
kernel
boot options, 65
boot release level, 19
definition, 7
modules. See modules
release level, 19
support requirements, 8
keys. See encryption
L!
LILO, 65, 68
linear
meta-disks, 59
logical extents', 54
logical volume
changing install settings, 48
Logical Volume Management. See LVM
logical volumes, 54, 57
loopback device, 9
LVM, 54–59
definition, 8
M!
MAC address, 24, 35
menu
system installation and maintenance, 33
metadisks, 59
definition, 8
metadisks, 69
mirroring
logical volumes, 58
meta-disks, 59
mkisofs, 9
modules
kernel modules
definition, 7
loading/unloading adapters support, 72
selecting network adapter support, 17
selecting scsi adapter support, 16
MSDOS
filesystem, 8, 62
partitions, 52, 53
N!
network, 23
adapter hardware address, 24, 35
alternate install server, 25
Storix System Backup Administrator 77 Version 8.2 Linux System Recover y Guide
re-configuration after system install, 71
selecting adapter modules, 17
network adapter
hardware address, 30, 32
remote installation manager, 21, 74
network boot server, 15, 23, 24, 26, 27, 38
network boot/install, 23
alternate install server, 26
boot image
creating, 14
updating, 28
boot loaders, 14
boot server, 14, 23, See network boot server
install device, 25
install server. See network install server
installing different Linux levels, 27
troubleshooting network boot, 34
unconfigure install client, 26
using alternate network, 26
using different boot and install servers, 26
network install device
tape, 45
network install server, 23, 25, 26, 27, 45
changing during install, 40
nfs mount backup file
local install device, 43
no-prompt install, 19
no-prompt install, 25, 33, 36
O!
OpenFirmware, 8
device name
network, 30
tape, 32
prompt, 31, 33
P!
paging space. See swap devices
partition
boot device, 65
bootloader, 69
migrating, 53
partition table
changing, 51, 53
PE size, 57
physical extents, 54
physical volumes, 54, 55
R!
RAID. See also metadisks
level 0+1, 61
levels, 59
recovery. See system installation
remote install manager
configuring from install menus, 74
remote installation manager, 20
RIM. See remote installation manager
Page 78

S!
T!
SCSI
selecting modules, 16
shell
maintenance, 73
software RAID. See metadisks
ssh program, 22
strimsh program, 22
striping
logical volumes, 58
meta-disks, 59
support for UEFI, 13, 15
swap devices, 64
system backup
network install, 23
system installation, 36
system backup disk
local install device, 42
system backup nfs
local install device, 43
system installation
booting, 29
booting in installation mode, 29
changing LVM and filesystem settings, 48
cloning systems, 36
device, 40
errors, 70
install device
changing, 40
selecting a remote device, 45
installing the system, 66
main menu, 34
mode, 25
network install server
changing, 40, 44
no-prompt install, 19, 36
settings, 64, 65
starting, 67
UEFI, 36
verification, 66
system recovery. See system installation
tape
autoloader, 41
network install device, 45
tape boot, 32
tape drive
remote, 45
text
encryption key, 38
tftpd, 34
Tivoli. See TSM
TSM
administrative user, 48
client, 48
configuration, 46
server, 48
U!
UEFI firmware boot, 29
UEFI support, 9
utilities. See system recovery utilities
configure remote install manager, 74
loading/unloading adapters support, 72
maintenance shell, 73
V!
verify
hardware configuration, 38
virtual devices
parallel, 42
sequential, 42
volume group
changing install settings, 48
volume groups, 54, 55
Y!
yaboot, 65, 68
Storix System Backup Administrator 78 Version 8.2 Linux System Recover y Guide
 Loading...