

Page 1

Vac Tec 25 Schleifstaubsauger
DE
Vac Tec 25 Spanenzuiger
Vac Tec 25 Aspirateur à poussière de ponçage
Vac Tec 25 Aspiratore per molatori
Vac Tec 25 vacuum cleaner
Vac Tec 25 Průmyslový vysavač prachu z broušení
NL
FR
IT
GB
CZ
1
Page 2

DE
Vielen Dank
für Ihr Vertrauen zu STORCH. Mit dem Kauf haben Sie sich für ein Qualitäts-Produkt entschieden.
Haben Sie trotzdem Anregungen zur Verbesserung oder aber vielleicht einmal ein Problem, so freuen wir uns sehr, von
Ihnen zu hören.
Bitte sprechen Sie mit Ihrem Außendienst-Mitarbeiter oder in dringenden Fällen auch mit uns direkt.
Mit freundlichen Grüßen
STORCH Service Abteilung
Telefon: +49 (0)2 02 . 49 20 - 112
Fax: +49 (0)2 02 . 49 20 - 244
kostenlose Service-Hotline: 08 00. 7 86 72 47
kostenlose Bestell-Hotline: 08 00. 7 86 72 44
kostenloses Bestell-Fax: 08 00. 7 86 72 43
(nur innerhalb Deutschlands)
Inhaltsverzeichnis Seite
Technische Daten 2
Beschreibung 3
1. Sicherheitshinweise 4
2. Vor dem Gebrauch 4
3. Verwenden Sie Originalzubehör 4
4. Einsatzbereiche 5
5. Inbetriebnahme 5
5.1 Elektrische Ausstattung 5
6. Saugen 5
6.1 Trockensaugen 5
6.2 Naßsaugen 5
6.3 Filterreinigung 5
6.4 Behälterentleerung 6
6.5 Vliesfilterbeutel 6
7. Reinigung 6
8. Wartung 6
9. Zubehör 6
10. Selbsthilfe bei Störungen 6
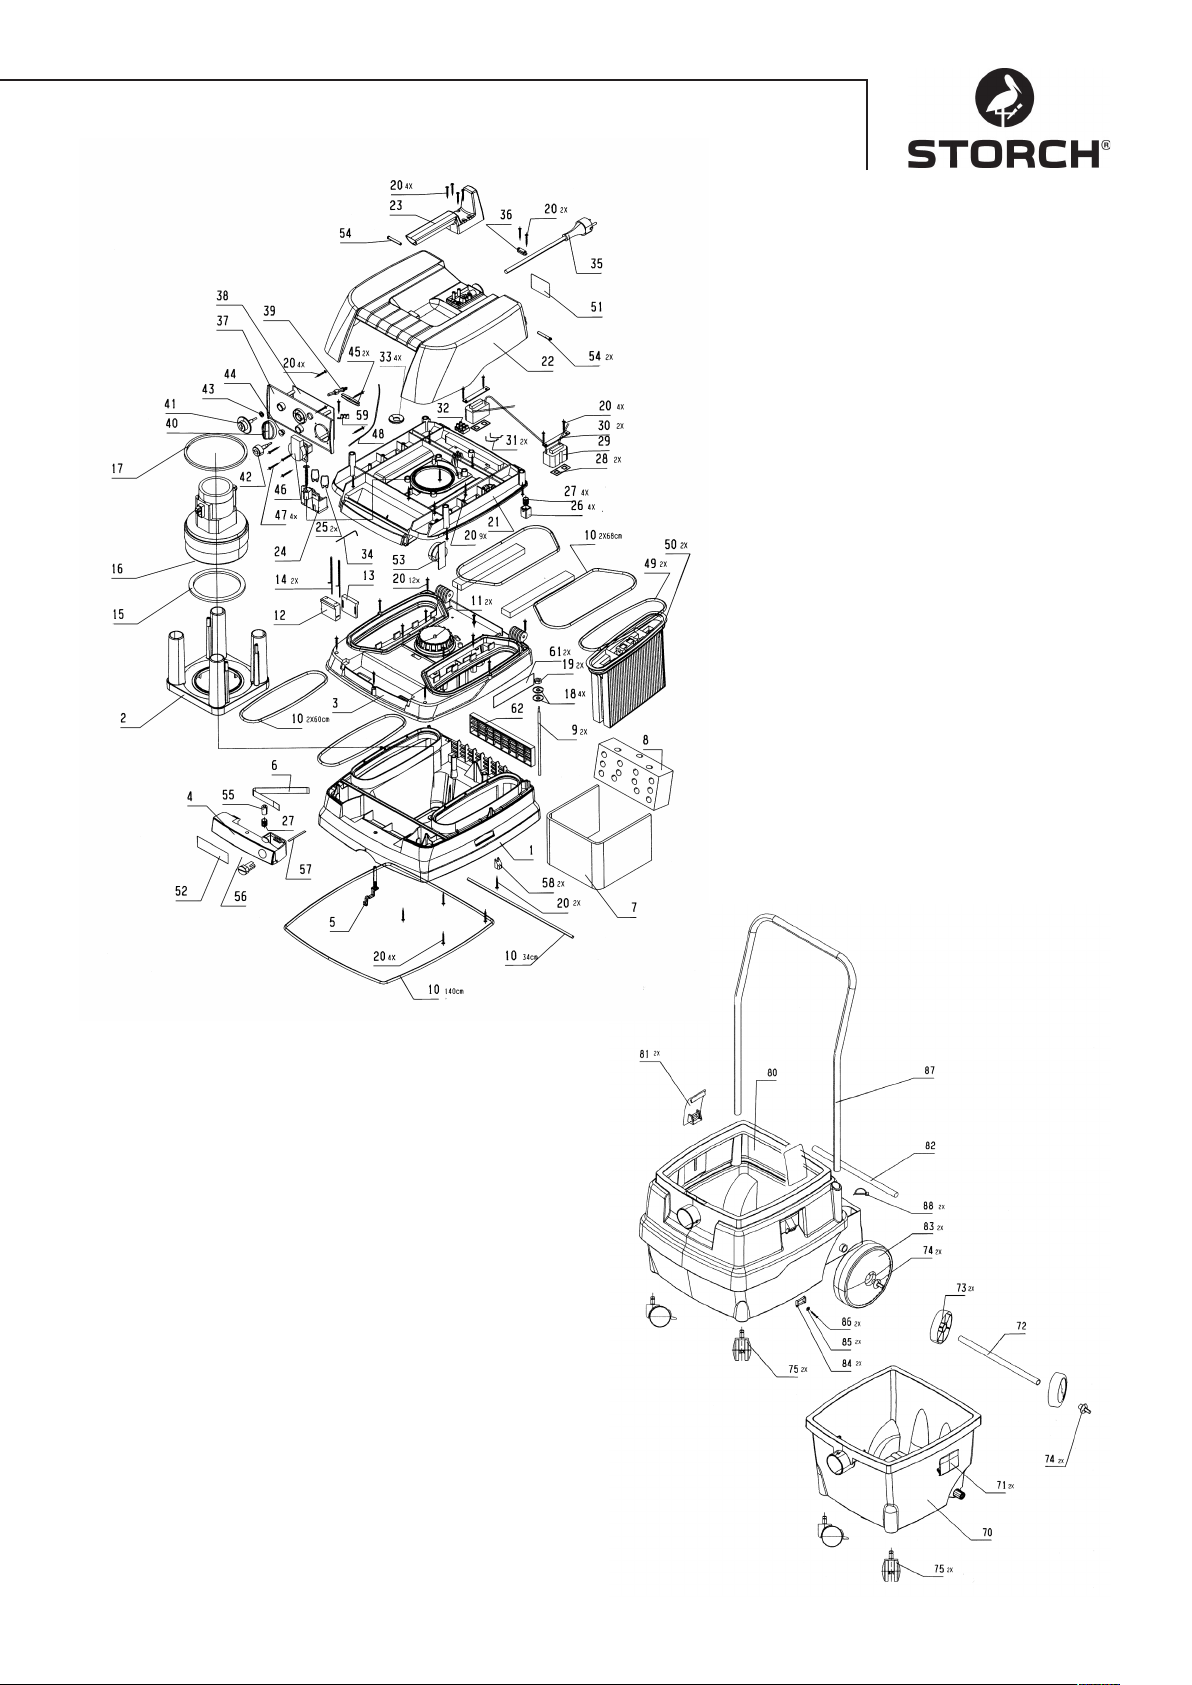
Explosionszeichnungen 7
Garantie 8
EG-Konformitätserklärung 9
Technische Daten
Geräteausführung IS 12 ...
Nennleistung 1.200 W
max. Leistung 1.400 W
Typischer Schalldruckpegel 69,5 dB(A) (nach DIN EN 60704-1)
Anschlußleitung bei Geräten ohne Steckdose: H05VV F 2 x 1
Anschlußleitung bei Geräten mit Steckdose: H05VV F 3 x 1,5
Aufschlüsselung der Serien-Nummer
Typenschild: 08/2012 123456
08 = Herstellungsmonat, 2012 = Herstellungsjahr, 123456 = fortlaufende Nummer
Lieferumfang
Staubsauger, Saugschlauch, Universaldüse, Faltenfiltersatz, 1 Vliesfilterbeutel, Bedienungsanleitung.
2
Page 3

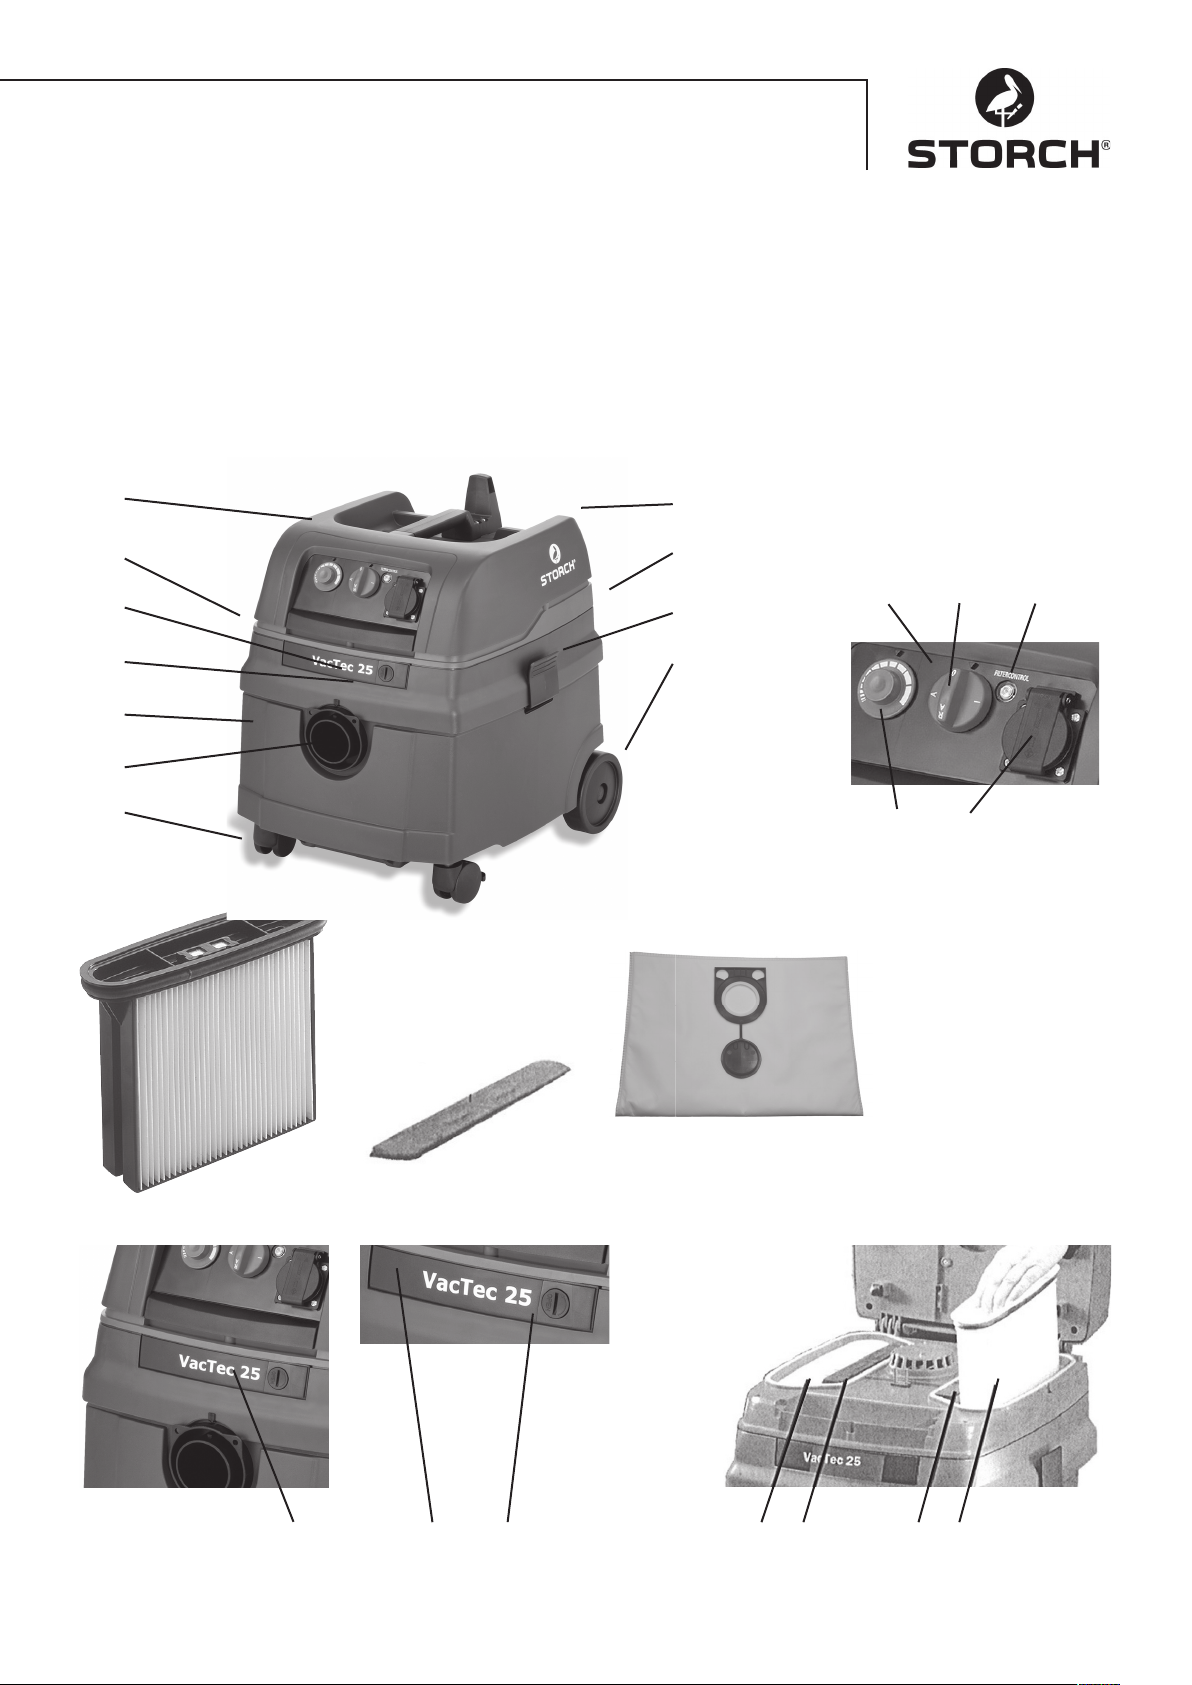
Beschreibung
1 Oberteil
2 Funktionsplatte
2a Drehschalter Ein / Aus / Automatik / Rüttler
2b Steckdose für Elektrowerkzeug
2c Volumenstromanzeige
2d Drehknopf für Drehzahlsteller
3 Kühllufteintritt
4 Riegel
5 Verschluß
6 Anschlußleitung
7 Behälter
8 Saugöffnung
9 Rastverschlüsse
10 Räder
11 Lenkrollen
12 Filterkassetten
13 Motorschutzfilter
14 Vliesfilterbeutel
15 Einhängung für Drahtkorb
3
4
5
7
8
11
1
6
15
2 2a 2c
9
10
2d 2b
12 13 14
4 4 5 12 13 13 12
3
Page 4

1. Sicherheitshinweise
Das Gerät besitzt einen Spannungsbereich, von dem eine elektrische Gefahr für Mensch und Tier ausgehen
kann. Es darf nur von autorisierten Personen aufgeschraubt und / oder demontiert werden. Ebenso dürfen
Instandhaltung und Reparaturen nur von Elektrofachkräften und autorisierten Fachwerkstätten ausgeführt
werden. Der Betrieb des Gerätes geschieht auf eigene Verantwortung und Gefahr des Käufers / Nutzers.
- Dieses Gerät ist für den gewerblichen Gebrauch geeignet, z.B. in Hotels, Schulen, Krankenhäusern, Werkstätten,
Fabriken, Läden, Büros und Vermietergeschäften.
- Achtung! Der Sauger ist nicht zum Absaugen gesundheitsgefährlicher Stäube geeignet. Es dürfen keine brennbaren
oder explosiven Lösungsmittel, mit Lösungsmittel getränktes Gut, explosionsgefährliche Stäube, Flüssigkeiten wie
Benzin, Öl, Alkohol, Verdünnung bzw. Gut, das heißer ist als 60°C, aufgesaugt werden. Es besteht sonst
Explosions- und Brandgefahr! Das Gerät darf nicht in die Nähe von entflammbaren Gasen und Substanzen benutzt
werden.
- Verpackungsmaterial, wie Folienbeutel, gehören nicht in Kinderhände. Erstickungsgefahr.
- Die Spannung auf dem Geräte-Typenschild muß mit der Netzspannung übereinstimmen.
- Steckdose muß über eine Haushaltssicherung mit geeigneter Stromstärke abgesichert sein.
- Geräte einschließlich Zubehör nicht in Betrieb nehmen wenn:
– Gerät erkennbare Schäden (Risse/Brüche) aufweist,
– Netzanschlußleitung defekt ist, oder Rißbildung bzw. Alterung aufweisen,
– Verdacht auf einen unsichtbaren Defekt (nach einem Sturz) besteht.
- Keine beschädigte Verlängerungsleitungen verwenden.
- Anschlußleitung nicht über scharfe Kanten ziehen, knicken oder einklemmen.
- Düse, Schlauch oder Rohr nicht auf Menschen oder Tiere richten.
- Bei Kindern, alten oder gebrechlichen Personen ist in besonderem Maße Vorsicht geboten.
- Besondere Sorgfalt ist beim Saugen von Treppen geboten. Achten Sie auf sicheren Stand.
- Die Steckdose am Gerät darf nur für die in der Gebrauchsanleitung festgelegten Zwecke verwendet werden.
- Bei Elektrobürsten, die rotierenden Bürsten nicht mit der Netzanschlußleitung in Berührung kommen lassen.
- Achtung! Nur die mit dem Gerät versehenen oder die in der Gebrauchsanleitung festgelegten Bürsten verwenden.
Die Verwendung anderer Bürsten kann die Sicherheit beeinträchtigen.
- Bei Austritt von Schaum oder Wasser sofort abschalten. Behälter und ggf. Faltenfilter entleeren.
- Säure, Azeton und Lösungsmittel können Geräte teile anätzen.
- Gerät nicht unbeaufsichtigt lassen. Bei längerer Arbeitsunterbrechung Netzstecker ziehen.
- Vor jeder Wartung und nach jedem Gebrauch Gerät ausschalten und Netzstecker ziehen.
- Gerätestecker nicht mit Anschlußleitung aus Steckdose ziehen.
- Wenn die Anschlußleitung des Gerätes beschädigt wird, muß sie durch eine besondere Anschlußleitung ersetzt
werden, die beim Hersteller oder seinem Kundendienst erhältlich ist.
- Reparaturen nur von Fachkräften, z.B. Kundendienst, ausführen lassen. Nur Original-Ersatzteile verwenden.
Nicht fachgerecht reparierte Geräte stellen eine Gefahr für den Benutzer dar.
- Andere Arbeiten als hier beschrieben, dürfen nicht ausgeführt werden.
- Bei Zweckentfremdung, unsachgemäßer Bedienung oder nicht fachgerechter Reparatur, wird keine Haftung
für eventuelle Schäden übernommen.
2. Vor dem Gebrauch
Lesen Sie alle Informationen aufmerksam durch. Sie geben wichtige Hinweise für Gebrauch, Sicherheit sowie Wartung
und Pflege. Bewahren Sie die Gebrauchsanleitung sorgfältig auf und geben Sie diese ggf. an die Nachbesitzer weiter.
3. Verwenden Sie Originalzubehör
Beschreibung Art.-Nr.
Vliesfilterbeutel FBV 25 für 25 L-Behälter, 5 Stück = 1 Satz 65 15 33
Vliesfilterbeutel FBV 50 für 50 L-Behälter, 5 Stück = 1 Satz 65 15 34
Faltenfilter Polyestermaterial, 2 Stück = 1 Satz 65 15 30
Handwerker Zubehörset: Griffrohr, 2 Saugrohre, Universaldüse, Fugendüse 65 15 40
Gummisaugdüse DN 35 für E-Maschinen 65 15 42
4
Page 5

4. Einsatzbereiche
Zum Naß- und Trockensaugen. Zum Aufsaugen gesundheitsgefährlicher Stäube nicht geeignet. Der Sauger mit Steckdose und Ein-/Ausschaltautomatik ist für den Anschluß von Elektrowerkzeugen vorgesehen.
5. Inbetriebnahme
Achten Sie beim Auspacken auf Vollständigkeit und Transportschäden.
5.1. Elektrische Ausstattung
Mit Schalter 2a, siehe Abb.1 am Oberteil 1 Gerät ein-/ ausschalten,
(bzw. in Automatikbetrieb oder Rüttlerbetrieb schalten).
0 = Sauger >aus<
I = Sauger >ein<, (Manueller Betrieb)
A = Bereitschaftsbetrieb für Ein-/Ausschaltautomatik. (Sauger wird vom Elektrowerkzeug ein- und ausgeschaltet)
AR = Geräteausführungen mit der Ausstattung „AR“ können wie unter „A“ betrieben werden, allerdings wird hier
die automatische Filterabreinigung bei Aufleuchten der Volumenstromanzeige eingeschaltet.
Die Steckdose 2b ist für den Anschluß eines Elektrowerkzeugs vorgesehen.
Achtung! Elektrowerkzeug muß beim Anschluß abgeschaltet sein. Die Steckdose steht bei eingestecktem
Netzstecker unabhängig von der Schalterstellung immer unter Spannung. In Schalterstellung „0“ kann die
Steckdose als Verlängerungsleitung (für z.B. Leuchte) genutzt werden. Anschlußwert: Sauger und angeschlossenes Gerät max. 16 A.
Bei Geräteausführungen mit elektronischer Saugkraftregulierung steht ein Drehknopf 2d zur Verfügung, mit der dem
Sauggut entsprechend, die Saugleistung des Saugers angepaßt werden kann.
Spätestens beim Aufleuchten der Volumenstromanzeige 2c (Warnlampe) sollte, die Abrüttelung betätigt werden, oder
bei nachlassender Saugleistung.
Absaugöffnungen der Elektrowerkzeuge sind noch nicht genormt. Daher steht der Adapter (Gummidüse) 65 15 76 zur
Verfügung, der durch Kürzen an das jeweilige Elektrowerkzeug angepaßt werden kann. Bei sehr kleinen Ansaugöffnungen an E-Werkzeugen kann es dazu kommen, daß die Volumenstromanzeige 2c beim Arbeiten permanent leuchtet,
da der Volumenstrom gering ist, durch die Bypassmotorkühlung ist ein dauerhaftes Arbeiten unter diesen Bedingungen
unproblematisch. Solche Geräte sollten in Schalterstellung „A“ und nicht „AR“ betrieben werden.
6. Saugen
Bei Geräten mit Griffrohr kann mit dem Nebenluftschieber die Saugleistung dem Sauggut angepaßt werden.
6.1. Trockensaugen
Nur mit trockenem Filter, Gerät und Zubehör, damit Staub nicht haften bleibt und verkrustet. Wenn Ruß, Zement,
Gips, Mehl oder ähnliche Stäube gesaugt werden, empfehlen wir einen Vliesfilterbeutel einzusetzen. Vliesfilterbeutel
immer in Verbindung mit Filterpatronen einsetzten.
6.2. Naßsaugen
Ohne Vliesfilterbeutel saugen. Die Filterkassetten sind zum Naßsaugen geeignet. Der eingebaute Sensor schaltet den
Motor bei vollem Behälter ab. Gerät wie unter 6.4 beschrieben entleeren. Wird das Gerät nicht ausgeschaltet, bleibt
weiterhin der Wiederanlaufschutz wirksam. Erst nach dem Abschalten und dem erneutem Einschalten ist das Gerät
wieder betriebsbereit.
- Vor dem Entleeren zuerst den Saugschlauch aus der Flüssigkeit nehmen.
- Durch hohe Saugleistung und strömungsgünstige Behälterform, kann nach dem Abschalten etwas Wasser
aus dem Schlauch zurücklaufen.
- Bei anschließendem Trockensaugen trockene Filter einsetzen. Bei häufigen Wechsel zwischen Trocken- und
Naßsaugen empfehlen wir den Einsatz eines zweiten (Tausch-) Filters.
6.3. Filterreinigung
Geräte, die mit einer elektromagnetischen Abreinigung ausgestattet sind, können den anhaftenden Staub von der Filterkassette abrütteln. Dies gewährleistet eine optimale Nutzung der Filterkassetten und verlängert die Arbeitszyklen.
Spätestens beim Aufleuchten der Volumenstromanzeige 2c (Warnlampe) sollte, die Abrüttelung (Schalterstellung V)
betätigt werden, oder bei nachlassender Saugleistung.
5
Page 6

6.4. Behälterentleerung
Ausschalten 2a, Stecker 6 ziehen, Rastverschlüsse 9 öffnen. Oberteil 1 und Saugschlauch vom Behälter 7 nehmen.
Behälter auskippen bzw. Vliesfilterbeutel von Saugöffnung abziehen.
6.5. Vliesfilterbeutel
Flansch des Vliesfilterbeutels über die Ansaugöffnung schieben.
7. Reinigung
Filterkassetten (bei Geräten ohne R-Ausführung) mit weicher Bürste oder ggf. Wasser reinigen. Behälter und Zubehör
mit Wasser reinigen. Oberteil 1 mit feuchtem Tuch abwischen. Filter, Behälter und Zubehör trocknen lassen.
8. Wartung
Läßt die Saugleistung des Saugers nach und auch das Abreinigen der Filterkassetten erhöht die Saugleistung nicht
mehr (vorausgesetzt, Behälter 7 ist geleert und Vliesfilterbeutel 14 ist ausgetauscht), dann ist es notwendig die Filterkassetten 12 zu erneuern.
Filterkassetten 12 vor dem Filterwechsel noch mal abrütteln. Mit Münze oder ähnlichem Gegenstand den Verschluß 5
am Riegel 4 um 90° gegen den Uhrzeigersinn drehen und Riegel 4 nach hinten drücken. Haube aufklappen und die
Filterpatronen nach oben herausnehmen. Neue Filterkassetten wieder einsetzten, dabei auf sauberen und festen Sitz
der Filter achten. Der Motorschutzfilter muß von Zeit zu Zeit gereinigt werden. Nehmen Sie dazu die Filter aus dem
Motorgehäuse. Waschen Sie die Filter unter fließendem Wasser und lassen Sie sie gut trocknen. Motorschutzfilter
wieder einsetzen. Verunreinigungen entfernen, Haube herunterklappen und durch leichtes Drücken auf die Haube den
Riegel 4 in Ausgangslage bringen. Gerät ist wieder verschlossen.
9. Zubehör
Fixierung der Saugrohre durch Einstecken in die vorgesehenen Aussparungen an der Behälter Rückwand.
10. Selbsthilfe bei Störungen
Funktionsstörungen sind nicht immer auf Gerätedefekte zurückzuführen!
Störung: Mögliche Ursache Behebung:
Nachlassen der Saugleistung Filter verschmutzt reinigen
Vliesfilter voll wechseln
Behälter voll entleeren
Motorschutzfilter zugesetzt reinigen
Düse, Rohre oder Schlauch verstopft reinigen
Gerät läuft nicht an Stecker in Steckdose?
Netz spannungslos?
Netzleitung in Ordnung?
Gerätehaube richtig geschlossen?
Wassersensor hat abgeschaltet?
Keine weiteren „Eingriffe“ vornehmen sondern an Kundendienstwerkstatt wenden.
6
Page 7

7
Page 8

Garantie
Garantiebedingungen
Für unsere Geräte gelten die gesetzlichen Gewährleistungsfristen von 12 Monaten ab Kaufdatum / Rechnungsdatum
des gewerblichen Endkunden.
Geltendmachung
Bei Vorliegen eines Gewährleistungs- bzw. Garantiefalles bitten wir, dass das komplette Gerät zusammen mit der
Rechnung frei an unser Logistik Center in Berka oder an eine von uns autorisierte Service-Station eingeschickt wird.
Zuvor bitten wir Sie, uns unter unserer kostenlosen STORCH Service-Hotline 08 00. 7 86 72 47 zu kontaktieren.
Gewährleistungs- bzw. Garantieanspruch
Ansprüche bestehen ausschließlich an Werkstoff- oder Fertigungsfehler sowie ausschließlich bei bestimmungsgemäßer
Verwendung des Geräts. Verschleißteile fallen nicht unter die Garantieansprüche. Sämtliche Ansprüche erlöschen durch
den Einbau von Teilen fremder Herkunft, bei unsachgemäßer Handhabung und Lagerung sowie bei offensichtlicher
Nichtbeachtung der Betriebsanleitung.
Durchführung von Reparaturen
Sämtliche Reparaturen dürfen ausschließlich durch unser Werk oder von STORCH autorisierten Service-Stationen
durchgeführt werden.
8
Page 9

EG-Konformitätserklärung
Name / Anschrift des Ausstellers: STORCH Malerwerkzeuge & Profigeräte GmbH
Platz der Republik 6-8
D - 42107 Wuppertal
Hiermit erklären wir,
dass das nachstehend genannte Gerät aufgrund dessen Konzipierung und Bauart sowie in der von uns in
Verkehr gebrachten Ausführung den einschlägigen, grundlegenden Sicherheits- und Gesundheitsanforderungen der EG-Richtlinien entspricht.
Bei einer nicht mit uns abgestimmten Änderung des Gerätes verliert diese Erklärung ihre Gültigkeit.
Bezeichnung des Gerätes: Vac Tec 25 Schleifstaubsauger
Geräte-Typ: Staubsauger
Artikel-Nummer: 65 15 00
Angewandte Richtlinien
Maschinen-Richtlinie: 2006 / 42 / EG
EG-Richtlinie Elektromagnetische
Verträglichkeit: 2004 / 108 / EG
Bevollmächtigter für die Zusammenstellung der technischen Unterlagen:
STORCH Malerwerkzeuge & Profigeräte GmbH
Platz der Republik 6-8
42107 Wuppertal
Jörg Heinemann
- Geschäftsführer -
Wuppertal, 02 - 2013
9
Page 10

NL
Hartelijk dank
voor uw vertrouwen in STORCH. Met deze aankoop hebt u voor een kwaliteitsproduct gekozen.
Als u desondanks een tip voor verbeteringen hebt of wellicht ooit een probleem ondervindt, dan horen wij graag van u.
Neem contact op met de medewerker buitendienst of in dringende gevallen rechtstreeks met ons.
Met vriendelijke groeten,
STORCH serviceafdeling
Tel.: +49 (0)2 02 . 49 20 - 112
Fax: +49 (0)2 02 . 49 20 - 244
Gratis service-hotline: 08 00. 7 86 72 47
Gratis bestel-hotline: 08 00. 7 86 72 44
Gratis bestel-fax: 08 00. 7 86 72 43
(alleen binnen Duitsland)
Inhoudsopgave Pagina
Technische gegevens 10
Beschrijving 11
1. Veiligheidsinstructies 12
2. Voor het gebruik 12
3. Gebruik originele accessoires 12
4. Toepassingsgebieden 13
5. Inbedrifstelling 13
5.1 Elektrische uitrusting 13
6. Zuigen 13
6.1 Droogzuigen 13
6.2 Natzuigen 13
6.3 Filterreiniging 13
6.4 Ledigen van de ketel 14
6.5 Vliesfilterzak 14
7. Reinigen 14
8. Onderhoud 14
9. Accessoires 14
10. Zelf verhelpen van storingen 14
Detailtekening 15
Garantie / garantievoorwaarden 16
EG-conformiteitverklaring 17
Technische gegevens
Uitvoering v/h apparaat IS 12....
Nominaal vermogen 1.200 W
Max. vermogen 1.400 W
Geluidsniveau DIN EN 60704-1) 69,5 dB(A)
Netsnoer bij apparaten zonder stopcontact: H05VV F 2 x 1
Netsnoer bij apparaten met stopcontact: H05VV F 3 x 1,5
Codering van de serienummers
Typeplaatje: 08/2012 123456
08 = Productiemaand, 2012 = Productiejaar, 123456 = Volgnummer
Levering
Stofzuiger, zuigslang, universele zuiger, vouwfilterset, 1 vliesfilterzak, bedieningshandleiding.
10
Page 11

Beschrijving
1 Bovendeel
2 Bedieningspaneel gereedschap
2a Draaischakelaar Aan/Uit/Automat/Trilmechanisme
2b Stopcontact voor elektrisch
2c Volumestroomaanduiding
2d Draaiknop voor toerentalregelaar
3 Koelluchtinvoeropening
4 Grendel
5 Sluiting
6 Netsnoer
7 Ketel
8 Zuigopening
9 Ketelklemmen
10 Wielen
11 Zwenkwielen
12 Filtercassetten
13 Motorveiligheidsfilter
14 Vliesfilterzak
15 Onhanging voor opergmand
3
4
5
7
8
11
1
6
15
2 2a 2c
9
10
2d 2b
12 13 14
4 4 5 12 13 13 12
11
Page 12

1. Veiligheidsinstructies
Het apparaat heeft een spanningsbereik dat elektrische gevaren voor mens en dier kan opleveren. Dit mag
alleen door geautoriseerde personen worden geopend en / of worden gedemonteerd. Instandhouding en
reparaties mogen alleen door elektriciens en geautoriseerde werkplaatsen worden uitgevoerd. Het gebruik
van het apparaat is de verantwoordelijkheid van en voor risico van de koper / gebruiker.
- Dit product is geschikt voor professioneel gebruik werkplaatsen, fabrieken, bouwbedryven, verhuurbedryven,
afwerkingsbedryven, door schilders, stukadours en installateurs.
- Opgelet! De zuiger is niet geschikt voor het opzuigen van stoffen die gevaarlijk zijn voor de gezondheid. Er mogen
geen brandbare of explosieve oplosmiddelen, in oplosmiddelen gedrenkte stoffen, explosiegevaarlijke stoffen,
vloeistoffen zoals benzine, olie, alcohol, verdunning resp. stoffen, die warmer zijn dan 60°C mee worden opge-
zogen. Anders bestaat er explosie- en brandgevaar! Het apparaat mag niet gebruikt worden in de buurt van
ontvlambare gassen en substanties.
- Verpakkingsmateriaal, zoals folie etc. uit de buurt van Kinderen houden. Verstikkingsgevaar.
- De spanning op het typeplaatje van het apparaat moet overeenstemmen met de netspanning.
- Het stopcontact moet beveiligd zijn met een huishoudssmeltveiligheid met geschikte stroomsterkte.
- De apparaten, inclusief accessoires niet in bedrijf nemen, wanneer:
– het apparaat zichtbare schade (scheuren, breuken) vertoont,
– de netaansluiting defect is, of scheurvorming resp. veroudering vertoont,
– er Twyfel bestaat op een onzichtbaar defect (na een val).
- Geen beschadigde verlengkabels gebruiken.
- Het netsnoer niet over scherpe kanten trekken, knikken of vastklemmen.
- Mondstuk, slang of buis niet op mensen of dieren richten.
- Bij kinderen, oudere of gehandicapte personen is bijzondere voorzichtigheid geboden.
- Bijzondere zorgvuldigheid is geboden bij het zuigen van trappen. Let op een stabiele stand.
- Het Stopcontact op het apparaat mag alleen gebruikt worden voor de in de gebruiksaanwijzing bepaalde
doeleinden.
- Bij elektrische borstels, de roterende borstels niet met het netsnoer in aanraking laten komen.
- Opgelet! Alleen de met het apparaat geleverde of in de gebruiksaanwijzing bepaalde borstels gebruiken. Het
gebruik van andere borstels kan de veiligheid in het gedrang brengen.
- Bij het uittreden van schuim of water onmiddellijk uitschakelen. Ketel en evt. vouwfilter ledigen.
- Zuur, aceton en oplosmiddelen kunnen delen van het apparaat invreten.
- Het apparaat niet zonder toezicht laten. Bij langere arbeidsonderbreking de netstekker uit het stopcontact halen.
- Voor ieder onderhoud en na ieder gebruik het apparaat uitschakelen en de netstekker uit het stopcontact halen.
- De netstekker niet met het netsnoer uit de stopcontact trekken.
- Wanneer het netsnoer van het apparaat wordt beschadigd, moet dit door een bijzonder netsnoer worden vervangen,
dat verkrijgbaar is bij de producent of zijn klantenservice.
- Reparaties alleen door vaklui, bijv. klantenservice, laten uitvoeren. Alleen originele reserveonderdelen gebruiken.
Niet deskundig gerepareerde apparaten vormen een gevaar voor de gebruiker.
- Andere werkzaamheden dan deze die hier worden beschreven, mogen niet worden uitgevoerd.
- Bij ondoelmatig gebruik, ondeskundige bediening of ondeskundige reparatie wordt er geen aansprakelijkheid
overgenomen voor eventuele schade.
2. Voor het gebruik
Lees aandachtig alle informatie. Deze geven belangrijke instructies over het gebruik, de veiligheid, alsook het onderhoud en de verzorging. Bewaar de gebruiksaanwijzing zorgvuldig en geef deze evt. aan een navolgende eigenaar door.
Wij behouden ons constructie- en uitrustingsveranderingen voor.
3. Gebruik originele accessoires
Beschrijving Bestelnr.
Vliesfilterzakken FBV 25 voor 25 l ketels, 5 stuks = 1 set 65 15 33
Vliesfilterzakken FBV 50 voor 50 l ketels, 5 stuks = 1 set 65 15 32
polyestermateriaal 2 stuks = 1 set 65 15 30
Set accessoires voor vaklieden: greepbuis, 2 zuigbuizen, universele zuiger, voegenzuiger 65 15 40
Gummizuigstuk DN 35 voor elektrische machines 65 15 42
12
Page 13

4. Toepassingsgebieden
Voor nat- en droogzuigen. Niet geschikt voor het opzuigen van stoffen, die schadelijk zijn voor de gezondheid. De
zuiger met stopcontact en aan-/uitschakelautomaat is voor-zien voor de aansluiting van elektrische gereedschappen.
5. Inbedrifstelling
Achten Sie beim Auspacken auf Vollständigkeit und Transportschäden.
5.1. Elektrische uitrusting
Let bij het uitpakken op volledigheid en transportschade.
Met schakelaar 2a, zie afb. 1, op het bovendeel 1, het apparaat aan-/uitschakelen (resp. in automatische werking of op
trillingsmechanisme inschakelen).
0 = zuiger >uit<
l = zuiger >aan<, (handmatig bedrijf)
A = bedrijfsklare toestand voor aan-/uitschakelautomaat. (De zuiger wordt aan- en uitgeschakeld
door het elektrisch gereedschap.)
AR = Apparaatuitvoeringen met de uitrusting „AR“ kunnen gebruikt worden zoals onder „A“, hier wordt echter de
automatische filterreiniging ingeschakeld bij het oplichten van de volume-stroomaanduiding.
Het stopcontact 2b is voorzien voor de aansluiting van een elektrisch gereedschap. Opgelet! Het elektrisch
gereedschap moet bij de aansluiting uitgeschakeld zijn. De contactdoos staat bij aangesloten netstekker
steeds onder spanning, onafhankelijk van de schakelaarstand. In schakelaarstand „0“ kan de stopcontact
gebruikt worden als verlengkabel (bijv. voor een lamp). Aansluitwaarde: zuiger en aangesloten apparaat
max. 16 A.
Bij apparaatuitvoeringen met elektronische zuigkrachtregeling staat de draaiknop 2d ter beschikking, waarmee de zuigkracht van de zuiger kan worden aangepast aan de op te zuigen stoffen.
Als laatste bij het oplichten van de volumestroomaanduiding 2c (waarschuwings-lamp) moet de trillautomaat worden
ingeschakeld, alsook bij verminderende zuigprestatie.
De afzuigopeningen van de elektrische gereedschappen zijn nog niet genormeerd. Daarom staat de adapter (rubberen
mondstuk) 65 15 76 ter beschikking, die door inkorting aan het betreffende elektrische gereedschap kan worden aangepast. Bij zeer kleine aanzuigopeningen aan elektrische gereedschappen kan het zijn, dat de volumestroomaanduiding 2c tijdens de werkzaamheden permanent oplicht, omdat de volumestroom gering is. Door de bypass-motorkoeling
vormen langdurige werkzaamheden onder deze voorwaarden geen probleem. Zulke apparaten worden best gebruikt in
de schakelaarstand „A“ en niet in „AR“.
6. Zuigen
Bij apparaten met zuigbuizen en handgreep kan het zuigvermogen met de luchtregelaar worden aangepast aan de op te
zuigen stoffen.
6.1. Droogzuigen
Alleen met droge filters, apparaat en accessoires, zodat het stof niet aanhecht en geen korst vormt. Wanneer er roet,
cement, gips, meel of dergelijke stoffen worden opgezogen, raden wij aan, een vliesfilterzak te gebruiken. Vliesfilterzakken steeds in combinatie met filterpatronen gebruiken.
6.2. Natzuigen
Zonder vliesfilterzak zuigen. De filtercassetten zijn geschikt voor het natzuigen. De ingebouwde sensor schakelt de
motor uit wanneer het ketel vol is. Het apparaat ledigen zoals beschreven in 6.4. Wanneer het apparaat niet wordt
uitgeschakeld, blijft de beveiliging tegen het herstarten actief. Eerst na het uitschakelen en het herinschakelen is het
apparaat weer bedrijfsklaar.
- Voor het ledigen de zuigslang uit de vloeistof nemen.
- Door het hoge zuigvermogen en de stromingsgunstige reservoirvorm kan er na het uitschakelen een beetje water
uit de slang teruglopen.
- Bij het aansluitende droogzuigen een droog filterplaatsen. Bij het dikwijls wisselen tussen nat- en droogzuigen
raden wij het gebruik van een tweede (wissel-) filter aan.
6.3. Filterreiniging
Apparaten, die met een elektromagnetische reiniging zijn uitgerust, kunnen het aanhechtende stof van de filtercassette
12 afschudden. Dit vrijwaart een optimaal gebruik van de filtercassetten en vergroot de arbeidscyclussen.
Als laatste moet bij het oplichten van de volumestroomaanduiding 2c (waarschuwings-lamp) het trilmechanisme (schakelaarstand V) worden ingeschakeld, alsook bij verminderende zuigprestatie.
13
Page 14

6.4. Ledigen van de ketel
Uitschakelen 2a, netstekker 6 uit stopcontact halen, ketelklemmen 9 openen. Bovendeel 1 en zuigslang van het reservoir 7 afnemen. Ketel leegmaken resp. vliesfilterzak 14 van de zuigopening afnemen.
6.5. Vliesfilterzak
Schuif de flens van de vliesfilterzak over de aanzuigopening.
7. Reinigen
Filtercassetten (bij apparaten zonder R-uitvoering) met een zachte borstel of evt. water reinigen. Filter en ketel laten
drogen, zodat het stof niet aan vochtige delen kan aanhechten. Om sterke vervuiling en korstvorming te vermijden
moet droog stof worden verwijderd alvorens nat te zuigen. Het reservoir en de accessoires met water reinigen, het
bovendeel 1 met een vochtige doek afwissen.
8. Onderhoud
Wanneer het zuigvermogen van de zuiger vermindert en ook het reinigen van de filters 12 het zuigvermogen niet verhoogt (onder voorwaarde, dat ketel 7 leeg is gemaakt en de gevulde vliesfilterzak 12 is vervangen), dan is het noodzakelijk, de filtercassetten 12 te vernieuwen.
De filtercassette 12 voor de filterwisseling nog een keer afschudden. Met een muntstuk of een dergelijk voorwerp de
sluiting 5 aan grendel 4 tegen de wijzers van de klok in 90° draaien en grendel 4 naar achter drukken. De kap openklappen en de filterpatronen 12 vanboven uitnemen. Nieuwe filtercassetten plaatsen, daarbij letten op de juiste en
vaste zitting van de filters. Vuil verwijderen, de kap naar beneden klappen en door licht op de kap te drukken grendel 4
in uitgangspositie brengen. Het apparaat is weer gesloten.
9. Accessoires
Fixering van de zuigbuizen door het insteken in de voorziene openingen aan de achterkant van het reservoir.
10. Zelf verhelpen van storingen
Functiestoringen zijn niet altijd te wijten aan storingen van het apparaat!
Storing: Mogelijke oorzak verhelping
vermindering van het zuigvermogen Filter vervuild reinigen
vliesfilterzak vol wisselen
ketel vol ledigen
motorbeschermfilter verstopt reinigen
Mondstuk, buis of slang verstopt reinigen
apparaat loop niet aan Stekker in stopcontact?
Net spanningsloos?
Netsnoer in orde?
Kap van apparaat goed gesloten?
Watersensor heeft uitgeschakeld?
Geen verdere „ingrepen“ uitvoeren, maar de klantenser-vicedienst contacteren.
14
Page 15

15
Page 16

Garantie
Garantievoorwaarden:
Voor onze apparaten gelden de wettelijke garantieperioden van 12 maanden vanaf aankoopdatum/factuurdatum van
de eindklant. Indien wij langere perioden in een garantieverklaring hebben toegezegd, dan worden deze speciaal in de
gebruiksaanwijzingen van de desbetreffende apparaten toegelicht.
Indienen van garantieclaims:
Bij een garantieclaim vragen wij u het gehele apparaat samen met de rekening franco aan ons logistiekcentrum in Berka of naar een door ons geautoriseerd servicestation te verzenden.
Neem eerst contact op met de STORCH Service-Hotline (hiervoor worden kosten in rekening gebracht):
+49 (0)202 . 49 20 – 110.
Garantieclaims
Claims uitsluitend met betrekking tot materiaal- of productiefouten en uitsluitend bij gebruik van het apparaat conform
de voorschriften. Voor slijtdelen gelden deze aanspraken niet. Alle claims vervallen bij inbouw van onderdelen van
externe herkomst, bij verkeerde hantering en opslag en bij het klaarblijkelijk niet in acht nemen van de gebruiksaanwijzing.
Reparaties uitvoeren
Reparaties mogen uitsluitend door onze fabriek of door STORCH geautoriseerde servicestations worden uitgevoerd.
16
Page 17
EG-conformiteitverklaring
Naam / adres van de ondertekenaar: STORCH Malerwerkzeuge & Profigeräte GmbH
Platz der Republik 6-8
D - 42107 Wuppertal
conform EG-machinerichtlijn 2006 / 42 / EG, bijlage II A
Hiermee verklaren wij dat de hieronder aangeduide machine:
Omschrijving van de machine: Vac Tec 25
Machinetype: Spanenzuiger, industrieel
Artikelnummer: 65 15 00
aan de geldende bepalingen van de volgende richtlijnen voldoet:
Machinerichtlijn: 2006 / 42 / EG
EMV-richtlijn: 2004 / 108 / EG
Verantwoordelijke voor samenstelling van de technische documentatie:
STORCH Malerwerkzeuge & Profigeräte GmbH
Platz der Republik 6-8
42107 Wuppertal
Jörg Heinemann
-Directeur-
Wuppertal, october 2010
17
Page 18

FR
Nous vous remercions
de la confiance dont vous témoignez envers STOCH. Avec cet achat vous avez opté pour un produit de
qualité. Si vous avez malgré tout des suggestions pour l‘amélioration ou si vous deviez rencontrer un problème, nous
sommes avec plaisir à votre disposition.
Dans ce cas, contactez votre représentant, ou directement notre service clients, s‘il s‘agit d‘un problème urgent.
Salutations dévouées
SAV STORCH
Tél.: +49 (0) 2 02 . 49 20 - 112
Fax: +49 (0)2 02 . 49 20 - 244
Ligne d‘assistance SAV gratuite: +49 800 7 86 72 47
Service gratuit de commande par téléphone: +49 800. 7 86 72 44
Fax de commande gratuit: +49 800. 7 86 72 43
(uniquement en Allemagne)
Sommaire Page
Caractéristiques techniques 18
Description 19
1. Consignes de sécurité 20
2. Avant utilisation 20
3. Utilisez les accessoires d’origine 20
4. Domaines d’application 21
5. Mise en service 21
5.1 Equipement électrique 21
6. Aspirer 21
6.1 Aspiration de la poussière 21
6.2 Aspiration de liquides 21
6.3 Nettoyage du filtre 21
6.4 Vidage de la cuve 22
6.5 Sac filtrant en toile 22
7. Nettoyage 22
8. Maintenance 22
9. Accessoires 22
10. Remèdes en cas de pannes 22
Schéma éclaté 23
Garantie / Conditions de garantie 24
Déclaration de conformité CE 25
Caractéristiques techniques
Version de l’appareil IS 12....
Puissance nominale 1.200 W
Puissance maxi. 1.400 W
Niveau sonore typique 69,5 dB(A) (selon DIN EN 60704-1)
Conduite de raccordement sur les appareils sans prise de courant: H05VV F 2 x 1
Conduite de raccordement sur les appareils avec prise de courant: H05VV F 3 x 1,5
Explication du numéro de série
Plaque signalétique 08/12 123456
08 = mois de fabrication, 2012 = année de fabrication, 123456 = numéro croissant
Étendue des fournitures
aspirateur, tuyau d‘aspiration, buse universelle, jeu de filtres à pli, 1 sac filtrant en toile, instructions de service.
18
Page 19
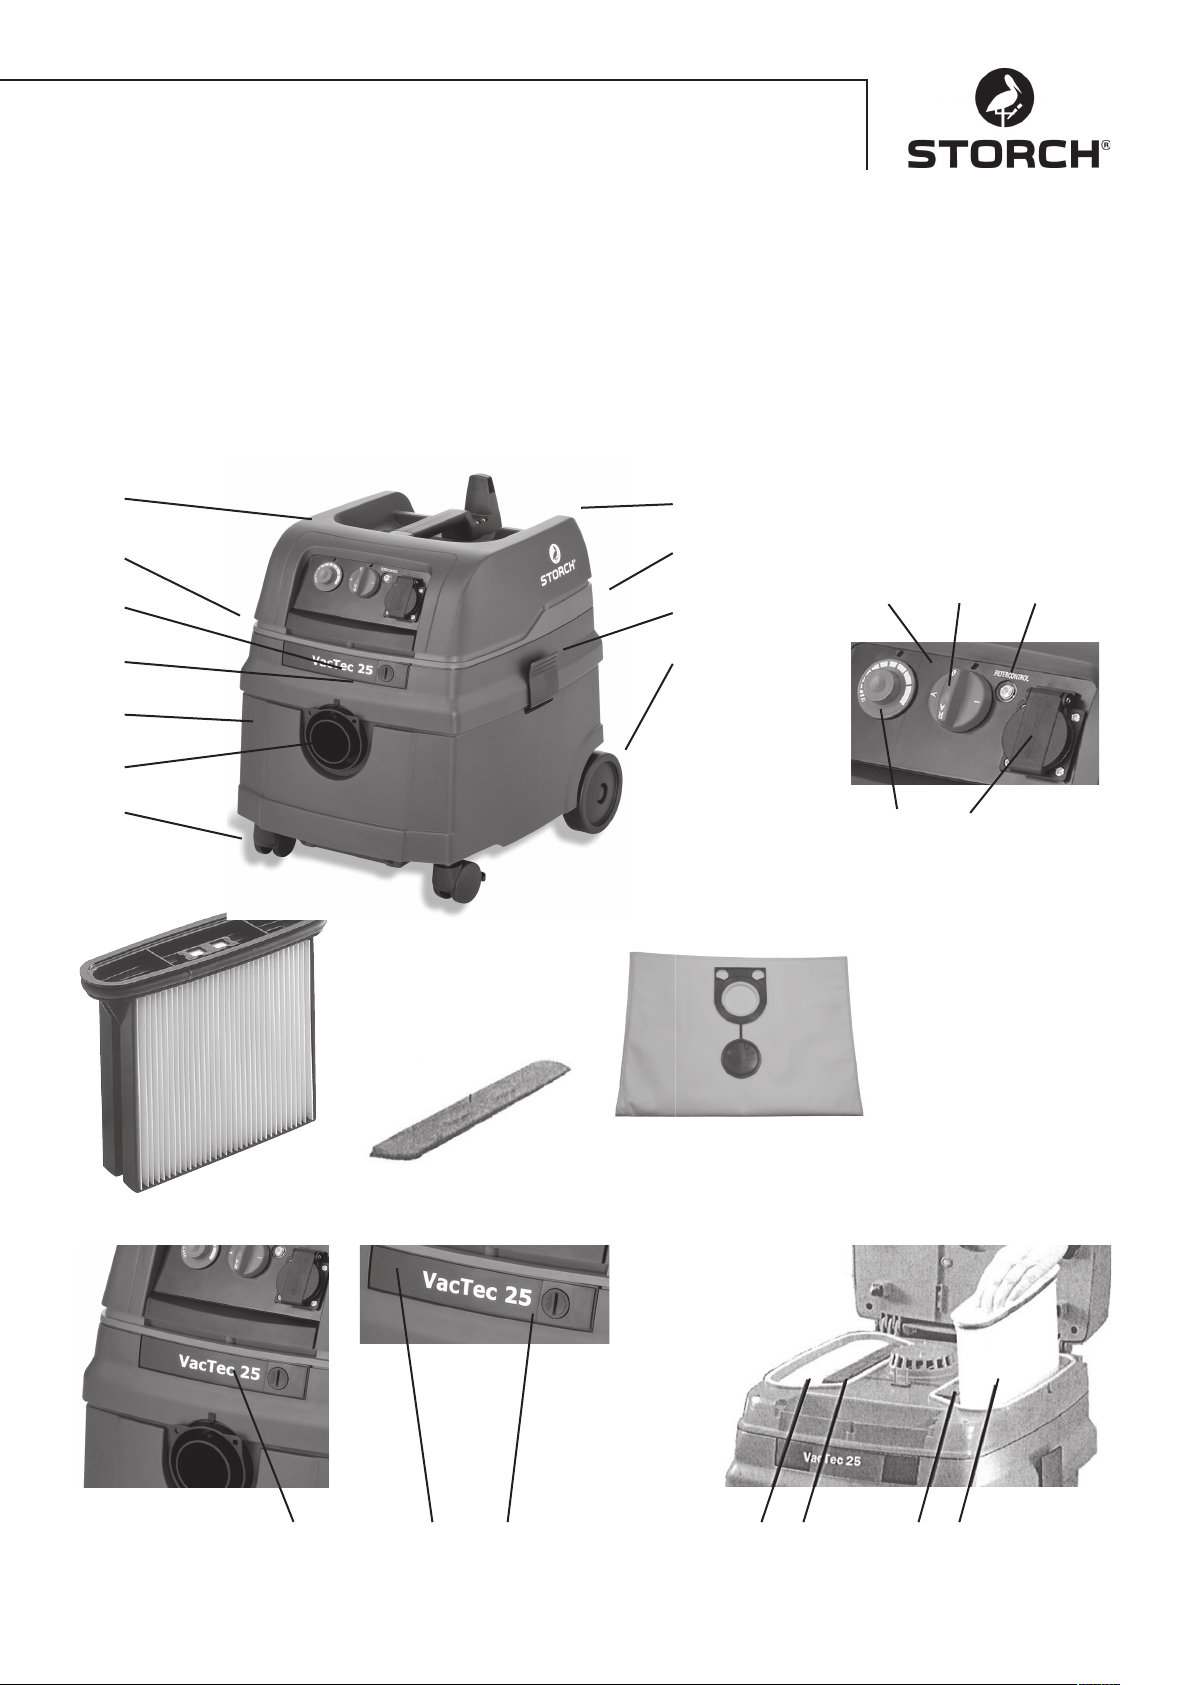
Description
7 Cuve
1 Partie supérieure
2 Plaque de fonctionnement
2a Sélecteur marche/arrêt/automatique/vibreur
2b Prise pour les outils électriques
2c Affichage du débit volumétrique
2d Bouton rotatif pour régleur du moteur
3 Entrée air de refroidissement
4 Verrou
5 Fermeture
6 Conduite de raccordement
8 Ouverture d‘aspiration
9 Fermeture á crans
10 Roues
11 Roues-guides (accessoire spécial)
12 Cassettes filtre
13 Filtre de protection
14 Sac filtrant en toile
15 Suspension pour le panier en fil métallique
3
4
5
7
8
11
1
6
15
2 2a 2c
9
10
2d 2b
12 13 14
4 4 5 12 13 13 12
19
Page 20

1. Consignes de sécurité
La plage de tension de l‘appareil présente un risque électrique pour les hommes et les animaux. Seul des
personnes autorisées sont habilitées à dévisser et / ou à démonter l‘appareil. De même, les réparations et
l‘entretien sont exclusivement réservés à des électriciens qualifiés et à des ateliers spécialisés autorisés.
L‘exploitation de l‘appareil se fait sous la seules responsabilité et aux risques exclusifs de l‘acheteur / de
l‘utilisateur.
- Cet appareil est bien approprié à un usage professionnel, par ex. dans les hôtels, les écoles, les hôpitaux, les
ateliers, les fabriques, les magasins, les bureaux et les agences.
- Attention! L’aspirateur n’est pas approprié à aspirer des poussières nocives. Ce n’est pas permis d’aspirer des
solvants inflammables ou explosifs, des produits imprégnés de solvants, des poussières explosives, des liquides tels
qu’essence, huile, alcool, diluant, voire des produits qui dépassent 60°C. Sinon, il y aura risques d’explosion et
d’incendie! Il ne faudra pas utiliser l’appareil à proximité de gaz ni de substances inflammables.
- Le matériau d’emballage, tel que sacs en film ne doit pas être laissé à la portée des enfants. Risque d’étouffement.
- Il faut que la tension indiquée sur la plaque signalétique de l’appareil coïncide avec celle du réseau.
- Il faut que la prise de courant soit protégée par un fusible domestique à intensité de courant appropriée.
- Ne pas mettre l’appareil en service ni ses accessoires si:
– l’appareil présente des dommages bien reconnaissables (fissures/cassures),
– la conduite d’alimentation est défectueuse ou si elle présente des fissures, voire des signes d’usure.
– on soupçonne la présence d’un défaut invisible (après une chute).
- Ne pas utiliser de câbles de rallonge endommagés.
- Ne pas tirer la conduite de raccordement sur des arêtes vives, ni la plier ni la coincer.
- Ne viser personne ni animaux avec la buse, le tuyau ni le tube.
- En présence d’enfants, de personnes âgées ou faibles, on agira avec la plus grande prudence.
- Une attention toute particulière sera requise lorsque vous aspirerez dans des escaliers. Veiller à une bonne stabilité.
- La prise de courant qui se trouve sur l’appareil ne sera utilisée qu’aux seules fins déterminées dans le mode d’emploi.
- En cas de brosses électriques, ne pas mettre en contact les brosses rotatives avec la conduite d’alimentation.
- Attention! Utiliser l’appareil exclusivement avec les brosses dont il est doté ou qui sont définies dans le mode
d’emploi. L’utilisation d’autres brosses serait susceptible d’altérer la sécurité.
- En cas de dégagement de mousse ou d’eau, éteindre immédiatement. Vider la cuve et le cas échéant le filtre
plissé plat.
- Des acides, de l’acétone et des solvants peuvent attaquer certaines pièces de l’appareil.
- Ne pas laisser l’appareil sans surveillance. En cas d’interruption plus longue du travail, le débrancher.
- Avant chaque maintenance et après chaque utilisation, éteindre l’appareil et le débrancher.
- Ne pas titrer le connecteur de l’appareil de la prise de courant avec la conduite de raccordement.
- Si la conduite de raccordement de l’appareil se trouve endommagée, il faudra la remplacer par une conduite de
raccordement spéciale que vous pourrez vous procurer chez le fabricant ou à son service Après-Vente.
- Ne faire faire les réparations que par du personnel qualifié, par ex. par le Service Après-vente. Utiliser exclusive-
ment des pièces de rechange d’origine. Des appareils non réparés par des spécialistes représentent un risque pour
l’utilisateur.
- D’autres travaux que ceux décrits dans les présentes ne doivent pas être réalisés.
- En cas d’utilisation non conforme, de manipulation inadéquate ou de réparation par des non-spécialistes, aucune
responsabilité d’éventuels dommages ne sera prise.
2. Avant utilisation
Lisez bien attentivement toutes les informations. Elles contiennent de précieux conseils pour l’emploi, la sécurité ainsi
que pour la maintenance et l’entretien. Conservez le mode d’emploi en lieu sûr et transmettez-le au propriétaire suivant
éventuel. Sous réserve de modifications de construction et d’équipement.
3. Utilisez les accessoires d’origine
Désignation Référence
Sacs filtrant en toile FBV 25 pour cuve de 25 l , 5 pièces = 1 jeu 65 15 33
Sacs filtrant en toile FBV 50 pour cuve de 50 l, 5 pièces = 1 jeu 65 15 34
en polyester 2 pièces = 1 jeu 65 15 30
Kit d‘accessoires pour l‘artisan : manche, 2 tubes d‘aspiration, buse universelle, buse à joints 65 15 40
Buse d‘aspiration en caoutchouc DN 35 pour machines électriques 65 15 42
20
Page 21
4. Domaines d’application
Pour aspirer l’eau et les poussières. Non approprié à aspirer des poussières nocives. L’aspirateur à prise de courant et
Marche/Arrêt automatiques est prévu pour le raccordement d’outils électriques.
5. Mise en service
Lors du déballage veillez à l’intégralité des pièces et aux dommages dus au transport.
5.1. Equipement électrique
Allumez/éteindre l’appareil avec l’interrupteur 2a, cf. fig. 1, qui se trouve sur la partie supérieure 1 de l’appareil (voire,
mettre en service automatique ou de secouage).
0 = aspirateur > arrêt <
I = aspirateur > marche<, (service manuel)
A = en ordre de marche pour marche/arrêt automatique. (L’aspirateur est allumé et éteint par l’outil électrique)
AR = versions de l’appareil comprenant l’équipement „AR“, ils peuvent être manipulés comme en „A“, mais par
ailleurs, dans ce cas, le nettoyage automatique des filtres est allumé lorsque le voyant du débit volume s’allume.
La prise de courant 2b est prévue pour le raccordement d’un outil électrique. Attention!: lors du raccordement, il faut que l’outil électrique soit éteint. La prise de courant est toujours sous tension quand le
connecteur au réseau est branché in-dépendamment de la position de l’interrupteur. A la position de
l’interrupteur „0“, la prise de courant peut être utilisée comme conduite de rallonge (par ex. pour lampe).
Puissance connectée : aspirateur et appareil raccordé maxi. 16 A.
Sur les versions d’appareil comprenant un réglage électronique de la puissance d’aspiration, un bouton rotatif 2d est
disponible et permet d’adapter la puissance d’aspiration de l’aspirateur au produit aspiré.
Il faudrait actionner le secouage au plus tard lorsque le voyant du volume 2c (lampe témoin) s’allume ou lorsque la
puissance d’aspiration diminue.
Les ouvertures d’aspiration des outils électriques ne sont pas encore normalisées. C’est pourquoi l’adaptateur (buse
en caoutchouc) 65 15 76 est disponible, il peut être adapté aux outils électriques respectifs en le raccourcissant. En
cas d’ouvertures d’aspiration très petites sur les outils électriques, il peut arriver que le voyant du débit de volume
2c soit allumé en permanence étant donné que le volume est faible. Le refroidissement du moteur à by-pass permet
dans ces conditions de travailler en permanence sans problème. Ces appareils devraient être utilisés à la position de
l’interrupteur „A“ et non „AR“.
6. Aspirer
Sur les appareils à tube-poignée, c’est possible d’adapter la puissance d’aspiration par le volet d’air additionnel.
6.1. Aspiration de la poussière
Seulement avec un filtre, un appareil et des accessoires bien secs afin que la poussière ne puisse par adhérer ni
s’incruster. Quand de la suie, du ciment, du plâtre ou de la farine ou des poussières similaires sont aspirées, nous
recommandons l’utilisation d’un sac filtrant en toile. Toujours utiliser les sac filtrant en toile en liaison avec des cartouches de filtres.
6.2. Aspiration de liquides
Aspirer sans sac filtrant en toile. Les cassettes filtre sont bien appropriées à l’aspiration de liquides. Le palpeur in-corporé arrête le moteur lorsque la cuve est pleine. Vider l’appareil comme décrit en 6.4. Si l’appareil n’est pas éteint, la
protection contre la remise en marche reste active. L’appareil ne sera à nouveau en ordre de marche qu’après avoir été
éteint et allumé à nouveau.
- Avant de vider, commencer par retirer le tuyau d’aspiration du liquide.
- Suite à la grande puissance d’aspiration et la forme de la cuve favorable à l’écoulement, il est possible qu’après
la mise en circuit un peu d’eau du tuyau revienne en arrière.
6.3. Nettoyage du filtre
Sur les appareils équipés d‘un nettoyage électromagenétique, c‘est possible de secouer la poussière qui colle sur la
cassette filtre 12. Ceci garantit une utilisation optimale des cassettes filtre et allonge les cycles de travail. Il faudrait
actionner le secouage (position de l‘interrupteur V) au plus tard lorsque le voyant du volume 2c (lampe témoin) s‘allume
ou lorsque la puissance d‘aspiration diminue.
21
Page 22

6.4. Vidage de la cuve
Eteindre 2a, débrancher le connecteur 6, ouvrir les ouvertures à crans 9. Retirer de la cuve la partie supérieure 1 et le
tuyau d‘aspiration. Faire basculer la cuve, voire retirer le sac filtrant en toile 14 de l‘ouverture d‘aspiration.
6.5. Sac filtrant en toile
Pousser la bride du sac filtrant en toile sur l‘orifice d‘aspiration.
7. Nettoyage
Nettoyer les cassettes filtre (sur les appareils sans version R) à l’aide d’une brosse douce ou, le cas échéant, avec de
l’eau. Laisser sécher le filtre et la cuve afin que la poussière ne reste pas collée sur les pièces humides. Afin d’éviter un
fort encrassement et une incrustation, éliminer le la poussière aspirée avant de commencer une aspiration de liquide.
Nettoyer la cuve et les accessoires avec de l’eau, passer un torchon humide sur la partie supérieure 1.
8. Maintenance
Si la puissance d’aspiration de l’aspirateur diminue et si le nettoyage des filtres 12 n’augmente plus non plus la puissance d’aspiration (à condition que la cuve 7 ait été vidée et le sac filtrant en toile 14 plein ait été remplacé), il sera
alors nécessaire de remplacer les cassettes filtre 12. Avant de changer le filtre, secouer encore une fois les cassettes
filtre 12. A l’aide d’une pièce de monnaie ou d’un objet semblable, tourner la fermeture 5 qui se trouve sur le verrou 4
de 90° dans le sens contraire des aiguilles d’une montre. Ouvrir le capot et retirer vers le haut les cartouches de filtre
12. Remettre en place des nouvelles cassettes de filtre en faisant attention à ce que le filtre soit bien propre et tienne
bien. Eliminer les salissures, refermer le capot et en appuyant légèrement sur le capot, ramener le verrou 4 à sa position de départ. L’appareil est à nouveau fermé.
9. Accessoires
Fixer les tubes d’aspiration en les installant dans les évidements prévus sur le dos de la cuve.
10. Remèdes en cas de pannes
Les pannes de fonctionnement ne sont pas toujours dues à des défauts de l’appareil!
Panne: Cause possible élimination:
Diminution de la puissance d’aspiration Filtre encrassé nettoyer
Sac filtrant en toile plein changer
Cuve pleine vider
Filtre de protection du moteur encrassé nettoyer
Buse, tubes ou flexible bouchés nettoyer
L’appareil ne démarre pas Connecteur dans la prise de courant?
Réseau sans tension?
Conduite d’alimentation O.K.?
Capot de l’appareil bien fermé?
Capteur d’eau éteint?
Ne procéder à aucune autre „intervention“ mais s’adresser à l’atelier du service Après-Vente.
22
Page 23
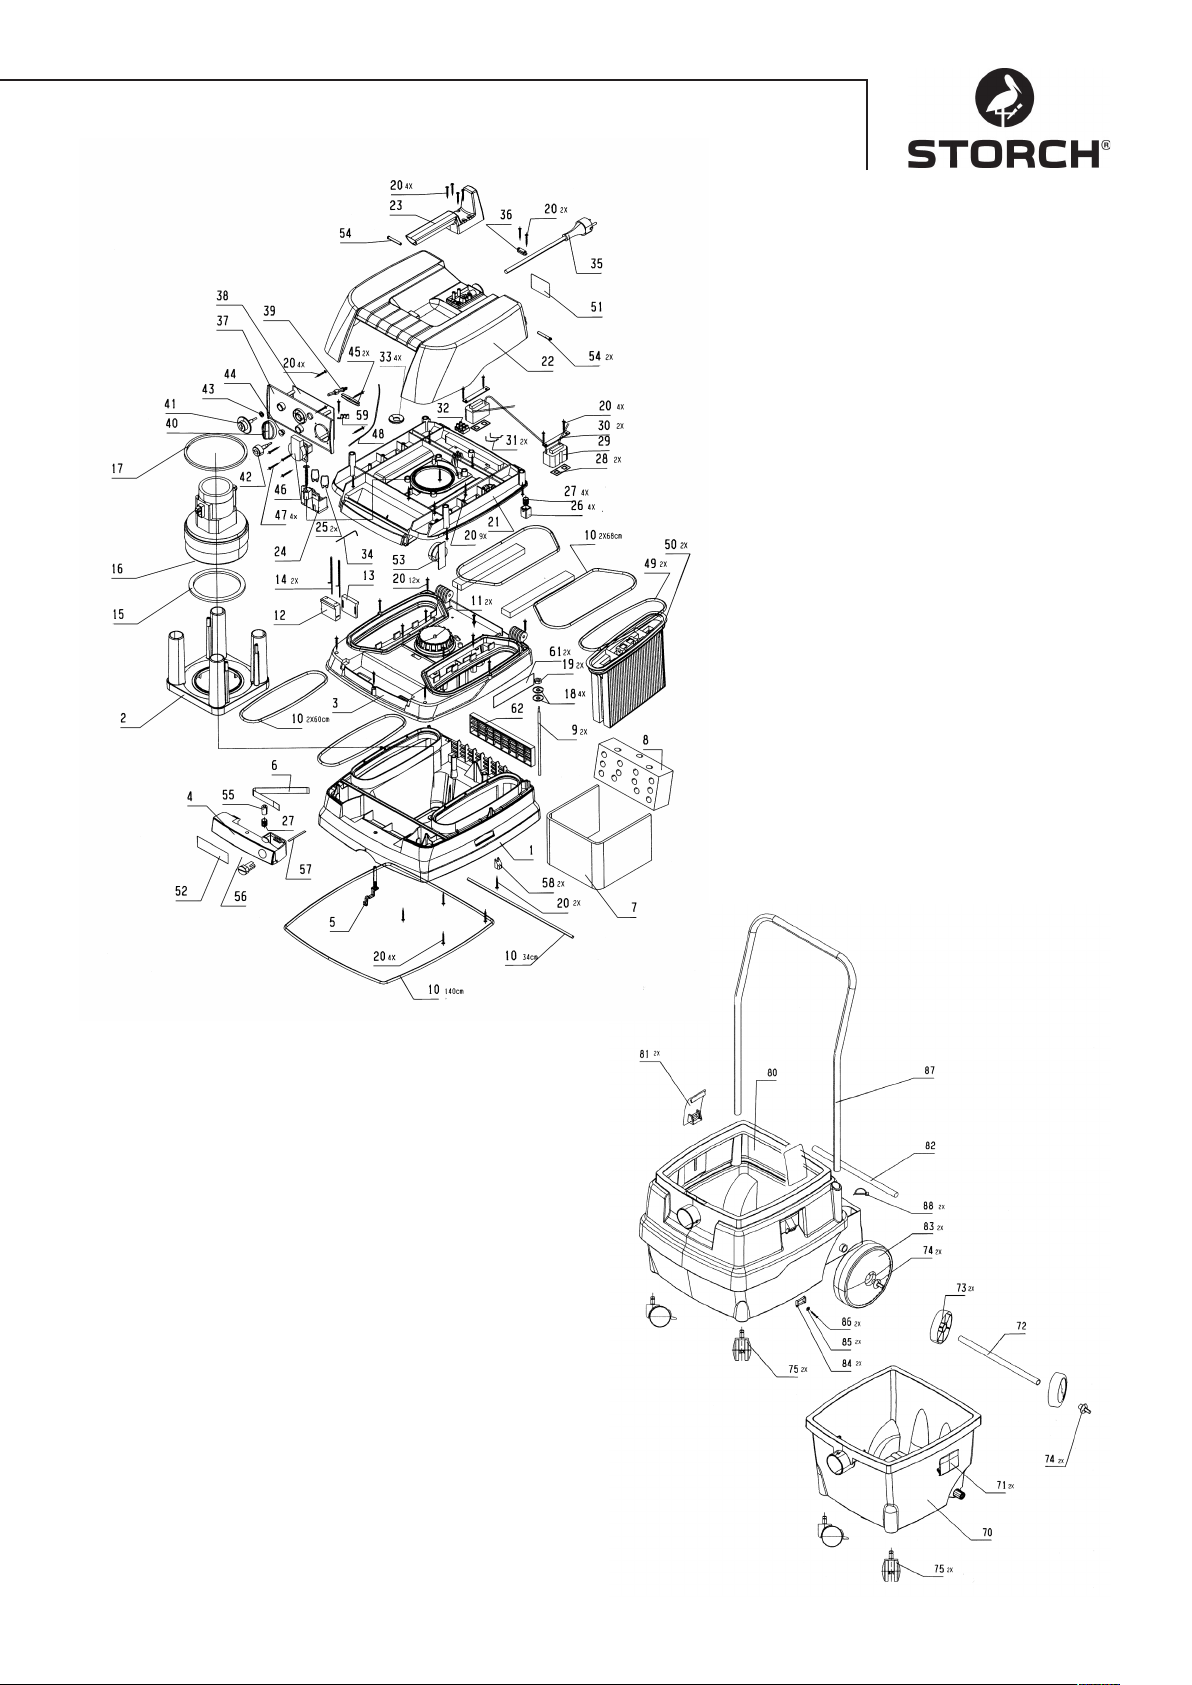
23
Page 24

Garantie
Conditions de garantie
Les durées de garantie légales de 12 mois à compter de la date d'achat / de la facture du client final professionnels
s'appliquent à nos appareils. Si nous mentionnons des délais supérieurs dans le cadre d'une déclaration de garantie,
ceux-ci sont mentionnés dans les instructions de service des appareils concernés.
Exercice
Dans un cas couvert par la garantie, nous vous demandons de renvoyer l'appareil complet franco à notre centre logistique à Berka accompagné de la facture ou de l'expédier à une station SAV agréée par nous.
Veuillez contacter préalablement l‘assistance téléphonique payante de la société STORCH: +49 (0)202 . 49 20 – 110.
Demande de prise en garantie
Les demandes couvrent exclusivement les défauts de matériau ou d‘ouvrage et ne couvrent qu‘une utilisation conforme
à la destination de l‘appareil. Les pièces d‘usure ne sont pas prises en charge par la garantie. Tout droit à garantie est
rendu caduque par le montage de pièces qui ne sont pas d‘origine, par une manipulation et un entreposage incorrects
ainsi qu‘en cas de non-respect évident des instructions de service.
Exécution de réparations
Toutes les réparations doivent exclusivement être réalisées par notre usine ou par des services SAV agréés par
STORCH.
24
Page 25
Déclaration de conformité CE
Nom / adresse du rédacteur : STORCH Malerwerkzeuge & Profigeräte GmbH
Platz der Republik 6-8
D - 42107 Wuppertal
Selon la directive relative aux machines 2006 / 42 CE Annexe II A
Par la présente nous déclarons que a machine sus-nommée :
Désignation de la machine : Vac Tec 25
Type de machine : Aspirateur à poussière de ponçage professionnel
Numéro de l'article : 65 15 00
satisfait aux dispositions applicables des directives suivantes :
Directive Machines : 2006 /42 / CE
Directive CEM : 2004 / 108 / CE
Responsable de la compilation de la documentation technique :
STORCH Malerwerkzeuge & Profigeräte GmbH
Platz der Republik 6-8
D- 42107 Wuppertal
Jörg Heinemann
- Gérant -
Wuppertal, octobre 2010
25
Page 26

IT
Grazie
per la fiducia accordata a STORCH. Con l‘acquisto avete scelto un prodotto di qualità.
Se comunque avete dei suggerimenti volti a migliorare la nostra offerta o se doveste incontrare
qualche difficoltà, non esitate a rivolgerVi a noi.
Contattate il Vostro rappresentante oppure rivolgeteVi direttamente a noi in casi urgenti.
Distinti saluti,
STORCH Reparto Assistenza
Tel.: +49 (0)2 02 . 49 20 - 112
Fax: +49 (0)2 02 . 49 20 - 244
Hotline di servizio gratuita: +49 (0) 8 00. 7 86 72 47
numero verde ordinazioni: +49 (0) 8 00. 7 86 72 44
numero verde ordinazione via fax: +49 (0) 8 00. 7 86 72 43
(solo in Germania)
Indice Pagina
Dati tecnici 26
Descrizione 27
1. Avvertenze sulla sicurezza 28
2. Prima dell’uso 28
3. Usare accessori originali 28
4. Campi d’impiego 29
5. Messa in funzione 29
5.1 Dotazione elettrica 29
6. Aspirare 29
6.1 Aspirazione di polvere 29
6.2 Aspirazione di liquidi 29
6.3 Pulizia del filtro 29
6.4 Svuotamento del contenitore 30
6.5 Sacchetto filtrante ad ovatta 30
7. Pulizia 30
8. Manutenzione 30
9. Accessori 30
10. Iniziative personali in caso di anomalie 30
Disegno esploso 31
Garanzia / Condizioni di garanzia 32
Dichiarazione di conformità CE 33
Dati tecnici
Modello IS 12....
Potenza nominale 1.200 W
Potenza max. 1.400 W
Livello di pressione acustica tipico 69,5 dB(A) (se-condo DIN EN 60704-1)
Linea di collegamento in caso di apparecchi senza presa: H05VV F 2 x 1
Linea di collegamento in caso di apparecchi con presa: H05VV F 3 x 1,5
Decodificazione del numero di serie
Targhetta: 08/2012 123456
08 = mese di fabbricazione, 2012 = anno di fabbricazione, 123456 = numero progressivo
Materiale compreso nella fornitura
Aspirapolvere, tubo flessibile di aspirazione, ugello universale, set di filtri pieghevoli, 1 sacchetto filtrante ad ovatta,
istruzioni per l‘uso.
26
Page 27
Descrizione
1 Parte superiore
2 Pannello di funziamento
2a Interruttore rotante Acceso/ Spento/
Funziuonamento automatico/ Vibratore
2b Presa per utensili elettrici
2c Indicazione del flusso del volume
2d Manopola per la regolazione
3 Entrata aria di raffreddamento
4 Dispositivo di bloccaggio
5 Chiusura
6 Linea di collegamento
7 Contenitore
8 Bocca di
9 Chiusure ad
10 Ruote
11 Rulli di guida
12 Cartuccia filtro
13 Filtro di protezione mtore
14 Sacchetto filtrante ad ovatta
15 Attacco per cesto metallico
3
4
5
7
8
11
1
6
15
2 2a 2c
9
10
2d 2b
12 13 14
4 4 5 12 13 13 12
27
Page 28

1. Avvertenze sulla sicurezza
L‘apparecchio ha un campo di tensione che può comportare un pericolo elettrico per persone ed animali. Esso
devo essere svitato e / oppure smontato solamente da persone autorizzate. Inoltre devono essere eseguiti i
lavori di manutenzione e riparazione solo da elettricisti specializzati e officine specializzate. Il funzionamento
dell‘apparecchio avviene a propria responsabilità e pericolo dell‘acquirente / utente.
- Questo apparecchio è adatto per l’uso professiona le, p. es., in alberghi, scuole, ospedali, officine, fabbriche, negozi,
uffici ecc.
- Attenzione! L’aspiratore non è idoneo all’aspirazione di polveri nocive. Non devono essere aspirati solventi
infiammabili o esplosivi, materiale imbevuto di solventi, polveri esplosive, liquidi come benzina, olio, alcol,
diluizioni o materiali con temperature superiori a 60°C. In caso contrario esiste pericolo di esplosione e di
incendio! L’apparecchio non può essere usato nelle vicinanze di gas e sostanze infiammabili.
- Il materiale di imballaggio, come sacchetti di plastica, non deve giungere nelle mani dei bambini.
Pericolo di soffocamento!
- La tensione indicata sulla targhetta dell’apparecchio deve corrispondere a quella di rete.
- La presa deve essere protetta da un dispositivo di protezione per elettrodomestici con amperaggio adatto.
- Non mettere in funzione l’apparecchio e gli accessori se:
– l’apparecchio mostra danni visibili (incrinature / crepe),
– la linea di collegamento alla rete è difettosa oppure mostra formazioni di screpolature o usura,
– esiste il sospetto di un difetto non visibile (dopo un urto).
- Non utilizzare prolunghe danneggiate.
- Non far passare la linea di collegamento su spigoli vivi, ne piegarla o incastrala.
- Non puntare la bocchetta di aspirazione, il tubo flessibile o il tubo su persone o animali.
- Con bambini, persone anziane o malferme si richiede la massima attenzione.
- Si richiede una particolare precauzione durante la pulizia delle scale. Garantire condizioni di stabilità.
- La presa sull’apparecchio può essere usata solo per gli scopi indicati nelle istruzioni per l’uso.
- In caso di spazzole elettriche, evitare il contatto tra le spazzole rotanti e la linea di collegamento alla rete.
- Attenzione! Utilizzare solo le spazzole di cui l’apparecchio è dotato o quelle indicate nelle istruzioni per l’uso.
L’impiego di altre spazzole può pregiudicare la sicurezza.
- In caso di fuoriuscita di schiuma o acqua, spegnere immediatamente. Svuotare il contenitore ed eventualmente il
filtro pieghettato.
- Acidi, acetone e solventi possono corrodere parti dell’-apparecchio.
- Non lasciare incustodito l’apparecchio. In caso di interruzione prolungata del lavoro, staccare la spina.
- Prima di qualsiasi lavoro di manutenzione e dopo ogni uso, spegnere l’apparecchio e staccare la spina.
- Non staccare la spina dell’apparecchio tirando la linea di collegamento.
- Se la linea di collegamento dell’apparecchio viene danneggiata, essa deve essere sostituita con un’altra linea
speciale, disponibile presso il produttore o il suo servizio assistenza.
- Fare eseguire le riparazioni solo da tecnici specializzati, p. es. dal servizio assistenza. Utilizzare solo pezzi di
ricambio originali. Gli apparecchi non riparati a regola d’arte rappresentano un pericolo per l’utente.
- Non devono essere eseguiti altri lavori oltre a quelli qui descritti.
- In caso di uso non conforme alla destinazione, utilizzo non appropriato o riparazione non a regola d’arte, non viene
assunta alcuna responsabilità per eventuali danni.
2. Prima dell’uso
Leggere attentamente tutte le informazioni. Esse forniscono indicazioni importanti sull’uso, sulla sicurezza nonché sulla
manutenzione e la cura. Custodire con cura le istruzioni per l’uso e consegnarle all’eventuale proprietario successivo. Ci
riserviamo il diritto di modifiche di progettazione e dotazione.
3. Usare accessori originali
Denominazione N. art.
Sacchetto filtrante ad ovatta FBV 25 per contenitore da 25 l., 5 pezzi = 1 set 65 15 33
Sacchetto filtrante ad ovatta FBV 50 per contenitore da 50 l., 5 pezzi = 1 set 65 15 34
poliestere 2 pezzi = 1 set 65 15 30
Set di accessori per artigiani: tubo impugnatura, 2 tubi d‘aspirazione, ugello universale, ugello per giunti 65 15 40
Ugello di aspirazione in gomma DN 35 per macchinari elettrici 65 15 42
28
Page 29
4. Campi d’impiego
Per l’aspirazione di liquidi o polveri. Non idoneo all’aspirazione di polveri nocive. L’aspiratore con presa e accensione/
spegnimento automatico è previsto per l’allacciamento di utensili elettrici.
5. Messa in funzione
Durante il disimballaggio controllare se la fornitura è completa e se l’apparecchio presenta danni causati dal trasporto.
5.1. Dotazione elettrica
Accendere/spegnere l’apparecchio con l’interruttore 2a, vedi illustrazione 1 sulla parte superiore 1, (oppure commutare
su funzionamento automatico o a vibrazioni).
0 = aspiratore >spento<
I = aspiratore >acceso<, (funzionamento manuale)
A = funzionamento standby per l’accensione / spegnimento automatico. (L’aspiratore viene acceso e spento
dall’utensile elettrico)
AR = i modelli con la dotazione „AR“ possono essere fatti funzionare come descritto sotto „A“, ma la pulizia
automatica del filtro viene inserita se l’indicatore del flusso del volume si accende.
La presa 2a è prevista per l’allacciamento di un utensile elettrico. Attenzione! Al momento del collegamento
l’uten-sile elettrico deve essere spento. Indipendentemente dalla posizione dell’interruttore, a spina di collegamento alla rete inserita, la presa è sempre sotto tensione. Se l’interruttore è posizionato su „0“, la presa
può essere usata come linea di prolungamento (p. es. per lampade). Potenza allacciata: aspiratore e apparecchio collegato max. 16 A.
Nei modelli con regolazione elettronica della forza aspirante, è disponibile una manopola 2d con la quale la potenza di
aspirazione può essere adeguata al materiale da aspirare.
Al più tardi quando l’indicazione del flusso del volume 2c (spia luminosa) si illumina o quando la potenza aspirante si
riduce, si dovrebbe azionare la pulizia del filtro mediante vibrazione. Le bocche di aspirazione degli utensili elettrici non
sono ancora standardizzate. A questo scopo è disponibile l’adattatore (bocchetta di gomma) 65 15 76 che può essere
adattato al rispettivo utensile elettrico mediante accorciamento. In caso di bocche di aspirazione degli utensili elettrici
molto piccole può succedere che, durante i lavori, l’indicatore del flusso del volume 2c rimanga illuminato permanentemente poiché il flusso di volume è scarso. Grazie al raffreddamento a bipasso del motore, un lavoro continuo in queste
condizioni non crea problemi. Tali apparecchi dovrebbero essere fatti funzionare sulla posizione dell’interruttore „A“ e
non „AR“.
6. Aspirare
Negli apparecchi con tubo di presa, con la valvola dell’aria secondaria la potenza di aspirazione può essere adattata al
materiale da aspirare.
6.1. Aspirazione di polvere
Solo con filtro, apparecchio e accessori asciutti per evitare che la polvere aderisca formando incrostazioni. Se vengono
aspirati fuliggine, cemento, gesso, farina o polveri simili, consigliamo di inserire un sacchetto filtrante ad ovatta. Usare
sempre il sacchetto filtrante ad ovatta abbinato alle cartucce filtro.
6.2. Aspirazione di liquidi
Aspirare senza sacchetto filtro di carta. Le cartucce filtro sono adatte per l’aspirazione di liquidi. Se il contenitore è
pieno il sensore incorporato disinserisce il motore. Svuotare l’apparecchio come descritto al punto 6.4. Se l’apparecchio
non viene spento, la protezione da riaccensione rimane attiva. Solo dopo lo spegnimento e la riaccensione l’apparecchio
è di nuovo pronto al funzionamento.
- Prima di svuotare l’apparecchio, togliere il tubo flessibile di aspirazione dal liquido.
- A causa dell’alta potenza di aspirazione e della forma del contenitore che favorisce il flusso, dopo lo spegnimento
dal tubo flessibile può fuoriuscire un po’ d’acqua.
- Se successivamente si aspira polvere, inserire un filtro asciutto. Se si passa spesso dall’aspirazione di polveri a
quella di liquidi consigliamo l’uso di un secondo filtro (di ricambio).
6.3. Pulizia del filtro
Apparecchi muniti di un dispositivo di pulizia elettromagnetico possono togliere la polvere che aderisce alla cartuccia
filtro mediante vibrazioni. Questo garantisce un utilizzo ottimale delle cartucce filtro e prolunga i cicli lavorativi. Al più
tardi quando l’indicazione del flusso del volume 2c (spia luminosa) si illumina o quando la potenza aspirante si riduce, si
dovrebbe azionare la pulizia del filtro mediante vibrazione (posizione interruttore V).
29
Page 30

6.4. Svuotamento del contenitore
Spegnere 2a, estrarre la spina 6, aprire le chiusure ad incastro 9, togliere dal contenitore 7 la parte superiore 1 e il tubo
flessibile di aspirazione, svuotare il contenitore oppure rimuovere il sacchetto filtrante ad ovatta 14 dalla bocca di aspirazione.
6.5. Sacchetto filtrante ad ovatta
Spingere la flangia del sacchetto filtrante ad ovatta oltre l‘apertura di aspirazione.
7. Pulizia
Pulire le cartucce filtro (in caso di apparecchi senza dotazione R) con spazzole morbide od eventualmente acqua.
Lasciare asciugare il filtro e il contenitore in modo che la polvere non aderisca a parti umide. Per evitare forti imbrattamenti e incrostazioni, rimuovere le sostanze asciutte aspirate prima di aspirare liquidi. Pulire contenitore e accessorio
con acqua. Pulire la parte superiore 1 con un panno umido.
8. Manutenzione
Se la potenza di aspirazione si riduce e se anche la pulizia del filtro 12 non aumenta più la forza di aspirazione (presupposto che il contenitore 7 sia stato svuotato e il sacchetto filtrante ad ovatta 14 pieno sia stato sostituito), allora è
necessario sostituire le cartucce filtro 12.
Prima della sostituzione, pulire di nuovo le cartucce filtro 12 con la vibrazione. Con una moneta o un oggetto simile
girare in senso antiorario di 90° la chiusura 5 posta sul dispositivo di bloccaggio 4 e spingere quest’ultimo all’indietro.
Aprire la calotta e togliere le cartucce filtro 12 estraendole dall’alto. Reinserire saldamente le nuove cartucce filtro
facendo attenzione che la sede sia pulita. Rimuovere le impurità, chiudere la calotta e, premendo leggermente su di
essa, portare il dispositivo di bloccaggio 4 nella posizione iniziale. L’apparecchio è di nuovo chiuso.
9. Accessori
Fissaggio dei tubi di aspirazione mediante inserimento nelle rientranze previste sul lato posteriore del contenitore.
10. Iniziative personali in caso di anomalie
I difetti di funzionamento non sono sempre da ricondursi a guasti dell’apparecchio!
Anomalia: Possibile causa eliminazione:
Riduzione della potenza di aspirazione Filtro sporco pulire
Sacchetto filtrante ad ovatta pieno sostituire
Contenitore pieno svuotare
Filtro di protezione motore sporco pulire
Bocchetta di aspirazione, tubi o tubo
flessibile ostruiti pulire
L’apparecchio non si accende Spina nella presa?
Rete senza tensione?
Linea di collegamento alla rete in ordine?
Calotta dell’apparecchio chiusa correttamente?
Il sensore dell’acqua ha disinserito?
Non effettuare alcun altro „intervento“ ma rivolgersi all’officina del servizio assistenza.
30
Page 31
31
Page 32

Garanzia
Condizioni di garanzia:
Per i nostri apparecchi sono applicabili dei periodi di garanzia di 12 mesi a partire dalla data di acquisto / data della
fattura del cliente finale commerciale. Se da parte nostra vengono accordati dei periodi di garanzia più estesi, ciò sarà
riportato separatamente nelle istruzioni per l'uso inerenti ai rispettivi dispositivi.
Rivendicazioni:
In casi in cui si intende far valere il diritto di garanzia, vi preghiamo di inviarci il dispositivo in modo completo con fattura, franco nostro centro di logistica a Berka oppure ad una service-station da noi autorizzata.
Si prega di consultare prima la Hotline di servizio STORCH a pagamento: 02 - 66 22 77 15
Diritto alla garanzia
Il diritti si possono far valere solo per errori di materiale o di produzione nonché esclusivamente in caso di utilizzo
appropriato del dispositivo. Pezzi soggetti all‘usura non sono soggetti a diritti di garanzia. Decadranno tutti i diritti di
garanzia con l‘aggiunta delle componenti di terzi, maneggio e magazzinaggio non appropriato come anche in casi di
ovvia non osservanza delle istruzioni per l‘uso.
Esecuzione di riparazioni
Ogni intervento di riparazione va eseguito esclusivamente nei nostri stabilimenti o presso una service-station autorizzata STORCH.
32
Page 33
Dichiarazione di conformità CE
Nome / Indirizzo dell'emittente: STORCH Malerwerkzeuge & Profigeräte GmbH
Platz der Republik 6-8
D - 42107 Wuppertal
ai sensi della Direttiva macchine CE 2006 / 42 / CE allegato II A
Con la presente, noi dichiariamo che la macchina di seguito specificata:
Denominazione della macchina: Vac Tec 25
Tipo di macchina: Aspiratore commerciale per molatori
Numero articolo: 65 15 00
corrisponde alle disposizioni pertinenti delle seguenti normative:
Direttiva macchine: 2006 / 42 / EG
Direttiva sulla compatibilità elettromagnetica: 2004 / 108 / EG
Procuratore per la composizione della documentazione tecnica:
STORCH Malerwerkzeuge & Profigeräte GmbH
Platz der Republik 6-8
D-42107 Wuppertal
Jörg Heinemann
-Direttore-
Wuppertal, octobre 2010
33
Page 34

GB
Thank you
for purchasing a STORCH product. You have purchased a quality product.
If you would like to suggest an improvement, or experience a problem with your product, please do not hesitate to
contact us.
Please contact your field sales representative or, in urgent cases, contact us directly.
Yours sincerely,
STORCH Service Department
Tel.: +49 (0)2 02 . 49 20 - 112
Fax: +49 (0)2 02 . 49 20 - 244
Free service hotline: 0800 786 72 47
Toll-free order hotline: +49 800 7867244
Toll-free order fax: +49 800 7867243
(only available in Germany)
Table of Contents Page
Technical data 34
Description 35
1. Safety instructions 36
2. Prior to use 36
3. Only use original accessories 36
4. Fields of application 37
5. Setting into operation 37
5.1 Electrical equipment 37
6. Vacuum cleaning 37
6.1 Dry vacuum cleaning 37
6.2 Wet vacuum cleaning 37
6.3 Filter cleaning 37
6.4 Emptying the container 38
6.5 Fleece filter bag 38
7. Cleaning 38
8. Maintenance 38
9. Accessories 38
10. Remedying faults 38
Exploded view 39
Warranty / warranty conditions 40
EC Declaration of Conformity 41
Technical data
Version IS 12....
Rated capacity 1.200 W
Maximum capacity 1.400 W
Typical sound level
(acc. to DIN EN 60704-1) 69,5 dB(A) (nach DIN EN 60704-1)
Connecting cable for appliances without socket: H05VV F 2 x 1
Connecting cable for appliances with socket: H05VV F 3 x 1.5
Serial number structure
Identification plate: 08/2012 123456
08 = Month of manufacture, 2012 = Year of manufacture, 123456 = Serial number
Scope of delivery
Vacuum cleaner, suction hose, universal nozzle, set of folded filters, 1 fleece filter bag, operating manual.
34
Page 35
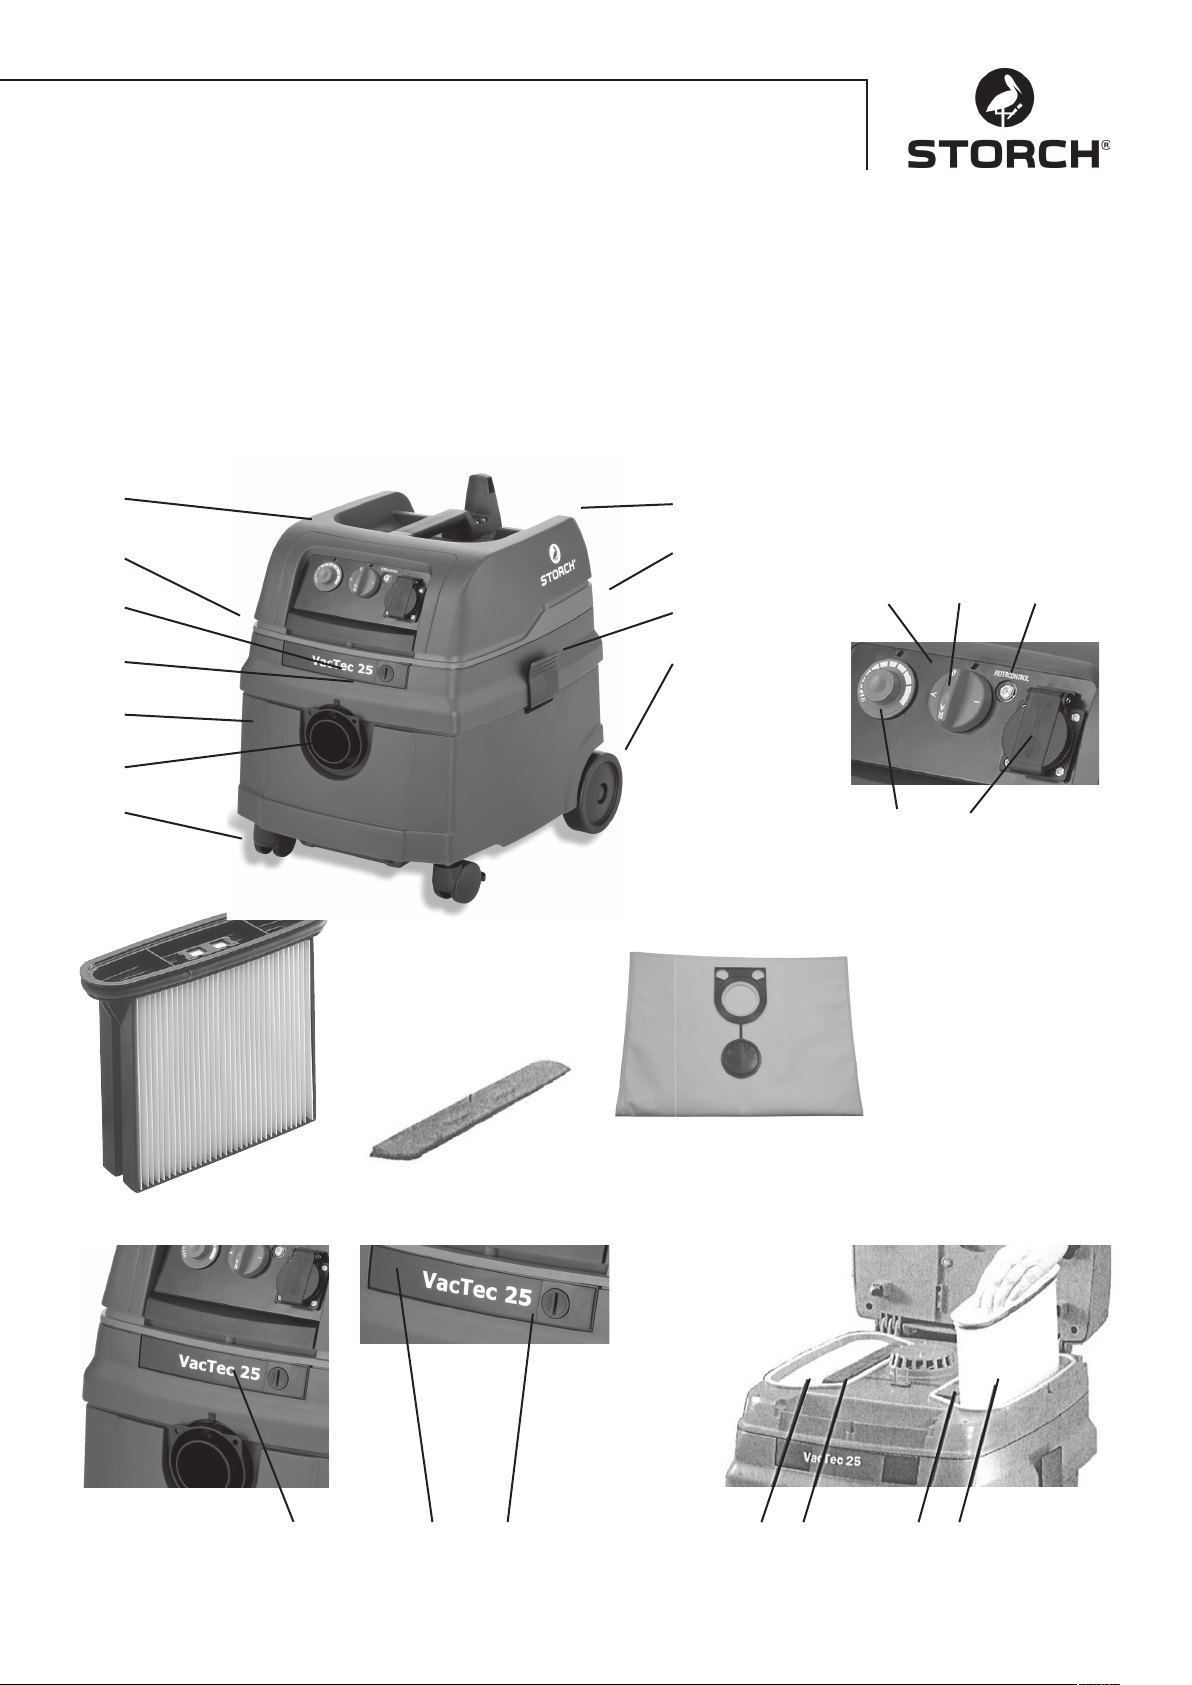
Description
1 Top section
2 Functional plate
2a Rotary switch ON/OFF/Automatic/Vibration
2b Power socket for electric tools
2c Volume flow display
2d Knob to set rotating speed
2e Power socket for accessoires
3 Cold air inlet
4 Locking bar
5 Lock
6 Connecting line
7 Container
8 Suction opening
9 Snap-in locks
10 Wheels
11 Steering castors
12 Filter cassettes
13 Motor protection filter
14 Fleece filter bag
15 Suspension for wire basket
16 Wire basket (optional accessory)
3
4
5
7
8
11
1
6
15
2 2a 2c
9
10
2d 2b
12 13 14
4 4 5 12 13 13 12
35
Page 36

1. Safety instructions
The device possesses a voltage range which can pose an electrical hazard to humans and animals. This
should only be screwed and / or disassembled by authorised personnel. Similarly, maintenance and repair
work should only be conducted by electrical specialists and authorised service centres. The buyer / user operates the device at their own risk and under their own responsibility.
- This appliance is intended for commercial use, for instance in hotels, schools, hospitals, factories, shops, offices and
leasing companies.
- WARNING! The vacuum cleaner is not suitable for removing health hazardous dusts. Never vacuum flammable and
explosive solvents, objects soaked with solvents, explosive dusts and liquids such as petrol, oil, alcohol and
thinners, or substances that are hotter than 60°C as this will result in an explosion or cause a fire! The appliance
must not be used in the vicinity of flammable substances.
- Keep packaging material, particularly plastic bags, out of reach of children. Danger of suffocation!
- The voltage on the appliance type plate must conform with the mains voltage.
- The mains socket must be protected by a domestic fuse with the appropriate amperage.
- The appliance and its accessories must not be operated if:
– Damage (cracks/breakages) are discernible on the appliance.
– The power cable is damaged or indicates signs of cracking or ageing.
– If invisible damage is suspected, for instance after dropping or falling.
- Never use damaged extension leads.
- Never draw the connecting cable over sharp edges, nor kink, fold or squeeze.
- Never point the hose or pipe at people or animals.
- Special care must be taken in the presence of children, old and frail people.
- Special care must be taken when vacuuming stairs. Ensure that you are standing firmly.
- The socket on the appliance must only be used for the purpose defined in these operating instructions.
- Do not allow electric rotating brushes to come into contact with the power supply cable.
- WARNING! Only operate the appliance with the supplied brushes or with the brushes specified in the operating
instructions. Safety can be impaired if other brushes are used.
- Instantly switch off the appliance if foam or water leaks out. Empty the container and folded filter.
- Acids, acetone and solvents can etch appliance parts.
- Do not leave the appliance unattended. Always disconnect the plug from the mains socket when work is interrupted
for extended periods.
- Always switch off the appliance, and disconnect the plug from the mains socket, after use and prior to any
maintenance work.
- Never disconnect the appliance plug from the mains socket by pulling the connecting cable.
- A damaged appliance connecting cable must only be replaced with a special connecting cable available from the
manufacturer or the after-sales service.
- Repairs must only be completed by competent specialists or the after-sales service. Only use original spare parts.
An incorrectly repaired appliance is a hazard for the user.
- Other work than the work described in these instructions must not be performed.
- Liability for possible damage is not accepted if the appliance is misused, incorrectly operated or not competently
repaired.
2. Prior to use
Please read these instructions carefully as they contain important information concerning use, safety, maintenance and
care. Keep these operating instructions in a safe place and ensure that they are passed on to any possible sub-sequent
owner. Subject to changes of design and configuration without previous notification.
3. Only use original accessories
Description Art.-no.
Fleece filter bag FBV 25 for 25-l container; 1 set of 5 65 15 33
Fleece filter bag FBV 50 for 50-l container; 1 set of 5 65 15 34
Polyester material 1 set of 2 65 15 30
Accessories set for professionals: tube-shaped handle, 2 suction pipes, universal nozzle, crevice nozzle 65 15 40
DN 35 rubber suction nozzle for electrical motors 65 15 42
36
Page 37
4. Fields of application
For wet and dry vacuum cleaning. Not suitable for vacuuming health hazardous dusts. The vacuum cleaner with socket
and ON/OFF automatic switching system is intended for the connection of electric tools.
5. Setting into operation
When unpacking, check that the appliance is complete and that there is no transport damage.
5.1. Electrical equipment
The appliance is switched ON/OFF with the switch 2a (see fig. 1 on the top section 1 of the appliance),
or switch to automatic or vibration mode.
O = Suction >OFF<
I = Suction >ON< (manual operation)
A = Ready for ON/OFF automatic switching system (the vacuum cleaner is switched on and off by
the connected electric tool).
AR = Appliance version featuring “AR“ can be operated as described under “A“ except that automatic
filter cleaning is turned on when the volume flow display lights up.
The power socket 2b is intended for the connection of an electric tool.
WARNING! An electric tool must be switched off when it is connected. The socket is always live when the
plug is inserted in a mains socket, irrespective of the switch position. In the “0“ switch setting, the socket
can be used for an extension line (e.g. for a light). Connected load: Suction unit and appliance max. 16 A
Appliances with an electronic suction force control feature a rotary knob 2d with which the suction force can be adapted
to the object that is being cleaned.
The vibrating device should be activated at the latest when the volume flow display 2c (warning light) lights up or
when the suction power decreases.
The suction openings of electric tools are not standard. Consequently, an adapter (rubber nozzle) 65 15 76 is available
that can be shortened to fit the given electric tool. With electric tools that have a very small suction opening the volume flow display 2c may remain per-manently illuminated during operation because the volume flow is small. However,
bypass motor cooling ensures that no problems can arise when operating continuously under these conditions. Such
appliances should be operated in the “A“ switch setting and not “AR“.
6. Vacuum cleaning
The suction force of appliances with a handle tube can be matched to the object being cleaned with the secondary air
slide.
6.1. Dry vacuum cleaning
Dry vacuum cleaning must only be performed with a dry filter, appliance and accessories so that the dust cannot adhere
and become encrusted. If the appliance is used to vacuum soot, cement, gypsum, flour and similar dusts, it is advisable
to use a fleece filter bag. A fleece filter bag must always be used in conjunction with a filter cartridge.
6.2. Wet vacuum cleaning
Vacuum cleaning is performed without a fleece filter bag. The filter cassettes are suitable for wet cleaning. The built-in
sensor turns off the motor when the container is full. Empty the container in the manner described in 6.4. The restart
lockout remains effective if the appliance is not switched off. The appliance is only operational again after it has been
switched off and switched on again.
- Always lift the suction hose out of the liquid before emptying.
- Due to the high suction force and flow-promoting container shape, some water may flow out of the hose
when the appliance is switched off.
- Use a dry filter for subsequent dry vacuum cleaning. Use a second (exchangeable) filter when frequently
alternating between dry and wet vacuum cleaning.
6.3. Filter cleaning
Appliances fitted with an electromagnetic cleaning system can shake off the dust that is adhering to the filter cassette
2. This guarantees optimal use of the filter cassettes and lengthens their working cycles. The vibrating device should
be activated (switch position V) at the latest when the volume flow display 2c (warning light) lights up or when the suction power decreases.
37
Page 38

6.4. Emptying the container
Turn off 2a, disconnect the plug 6, and open the lock-in closure 9. Remove the top section 1 and hose from the container 7. Empty the container or remove the fleece filter bag 14 from the suction opening.
6.5. Fleece filter bag
Push the fleece filter bag flange over the intake opening.
7. Cleaning
Filter cassettes (non-“R“ appliances) should be cleaned with a soft brush and, possibly, with water. Dry the filter and
container thoroughly so that dust cannot adhere to moist parts. To prevent dirt accumulation and encrustation, dry dust
must be removed before changing over to wet vacuum cleaning. Clean the container and accessories with water. Wipe
the top section 1 with a moist cloth.
8. Maintenance
The filter cassettes 12 must be renewed when the suction power declines and does not increase again after the filter 12
has been cleaned. Obviously, this presupposes that the container 7 has been emptied and a full fleece filter bag 14 has
been replaced.
Shake the filter cassettes 14 once again before the filter is exchanged. Use a coin or similar object to turn the lock 5 on
the locking bar 4 anti-clockwise by 90°, and then push the locking bar 4 to the back. Fold open the hood and lift out
the filter cartridges 12. Insert new filter cassettes. Ensure that the filters are correctly and securely seated. The motor
protection filter 13 must be cleaned from time to time. Remove the filter from the motor case. Wash the filter under
flowing water and then dry thoroughly. Return the motor protection filter. Remove any dirt. Fold down the hood and
press it lightly so that the locking bar 4 returns to its initial position. The appliance is now properly closed.
9. Accessories
Fix the vacuum tube by inserting it in the corresponding recesses in the rear wall of the container.
10. Remedying faults
Functional faults are not necessarily always due to a defective appliance.
Fault: Possible Cause Remedy:
Decreasing suction force Clogged filter clean
Fleece filter is full change
Container full empty
Clogges motor protection filter clean
Clogged nozzle, tube or hose clean
Appliance does not start Is the plug inserted in the socket?
Mains failure?
Is the power supply cable broken?
Has the appliance hood been properly closed?
Has the water sensor switched off the appliance?
No other “interventions“ are permitted; please consult the servicing workshop.
38
Page 39
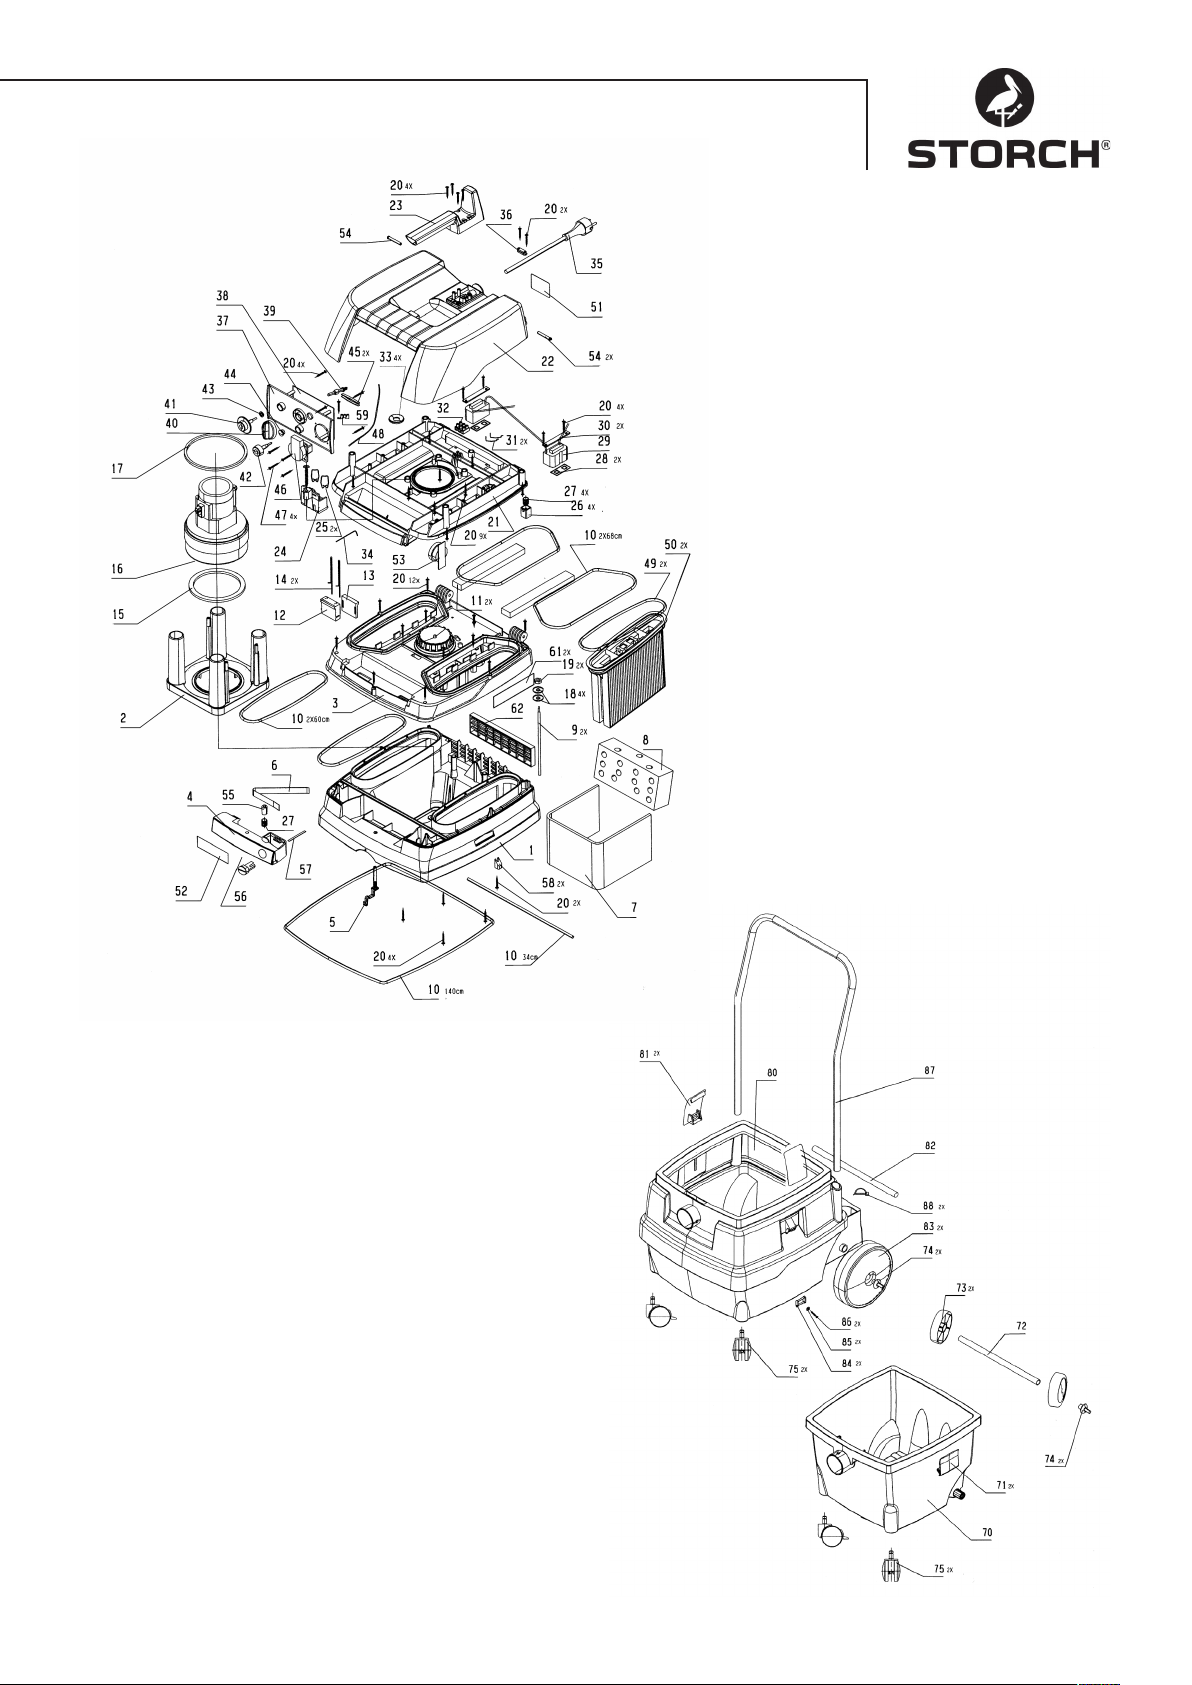
39
Page 40

Warranty
Warranty conditions:
A warranty period of twelve months from the date of purchase/date of invoice applies to our tools for commercial
customers. If we have granted an extended warranty period, this period will be noted separately in the operating manual for the equipment in question.
Claims:
If you wish to claim under our warranty or guarantee, please return the complete device and your invoice to our logistics centre in Berka, postage paid, or send it to one of our authorised service centres.
Please contact the chargeable STORCH service hotline first: +49 (0)202 . 49 20 – 110.
Your rights under our warranty or guarantee:
Claims can only be accepted for material defects or manufacturing errors, and only assuming intended use of the appliance. Wear parts are not covered by such claims. All claims shall become void in the event of installation of third party
components, improper handling and storage, as well as in the event of obvious disregard of the operating instructions.
Repairs:
All repairs have to be conducted on our premises or by an authorised STORCH service centre.
40
Page 41
EC Declaration of Conformity
Name / address of the issuer: STORCH Malerwerkzeuge & Profigeräte GmbH
Platz der Republik 6 - 8
D - 42107 Wuppertal
according to EC Machine Directive 2006 / 42 EC Appendix II A
We hereby declare that the following machine:
Description of the machine: Vac Tec 25
Machine type: Industrial vacuum cleaner
Article number: 65 15 00
complies with the relevant provisions of the following directives:
Machinery directive: 2006 / 42 / EC
EMC Directive: 2004 / 108 / EC
Authorised agent for compilation of the technical documents:
STORCH Malerwerkzeuge & Profigeräte GmbH
Platz der Republik 6-8
D-42107 Wuppertal
Jörg Heinemann
- Managing Director -
Wuppertal, october 2010
41
Page 42

CZ
Děkujeme Vám
za důvěru ve firmu STORCH. S nákupem výrobku jste se rozhodli pro kvalitní produkt.
Pokud přesto máte podněty na zlepšení nebo možná nějaký problém, tak bychom byli velmi rádi, kdybyste se nám
ozvali.
Promluvte si s příslušným externím spolupracovníkem naší firmy nebo se v naléhavých případech obracejte přímo na
nás.
S přátelským pozdravem
Servisní oddělení STORCH
Tel.: +49 (0)2 02 . 49 20 - 112
Fax: +49 (0)2 02 . 49 20 - 244
bezplatná linka Hotline-servis: 08 00. 7 86 72 47
bezplatná linka Hotline-objednávky: +49 800. 7 86 72 44
bezplatný fax-objednávky: +49 800. 7 86 72 43
(pouze v Německu)
Obsah Strana
11. Technická data 42
Beschreibung 43
1. Bezpecnostní upozornení 44
2. Pred použitím 44
3. Používejte originální príslušenství 44
4. Oblasti použití 45
5. Uvedení do provozu 45
5.1 Elektrotechnické vybavení 45
6. Vysávání 45
6.1 Vysávání za sucha 45
6.2 Vysávání za vlhka (mokra) 45
6.3 Cistení filtru 45
6.4 Cistení zásobníku 46
6.5 Filtrační sáček z textilie 46
7. Cistení 46
8. Údržba 46
9. Príslušenství 46
10. Samostatná pomoc pri poruchách 46
Rozložený výkres 47
Záruka / Záruční podmínky 48
ES - Prohlášení o shodě 49
Technická data
Provedení spotrebice: IS 12....
Jmenovitý výkon: 1.200 W
Maximální výkon: 1.400 W
Typická hladina hluku: 69,5 dB(A) (podle DIN EN 60704-1)
Prívod u prístroju bez zásuvky: H05VV F 2 x 1
Prívod u prístroju se zásuvkou: H05VV F 3 x 1,5
Rozklíčování sériových čísel
Typový štítek: 08/2012 123456
08 = měsíc výroby, 2012 = rok výroby, 123456 = pořadové číslo
Rozsah dodávky
Vysavač, sací hadice, univerzální tryska, skládaný filtr - sada, 1 filtrační sáček z textilie, návod k obsluze.
42
Page 43
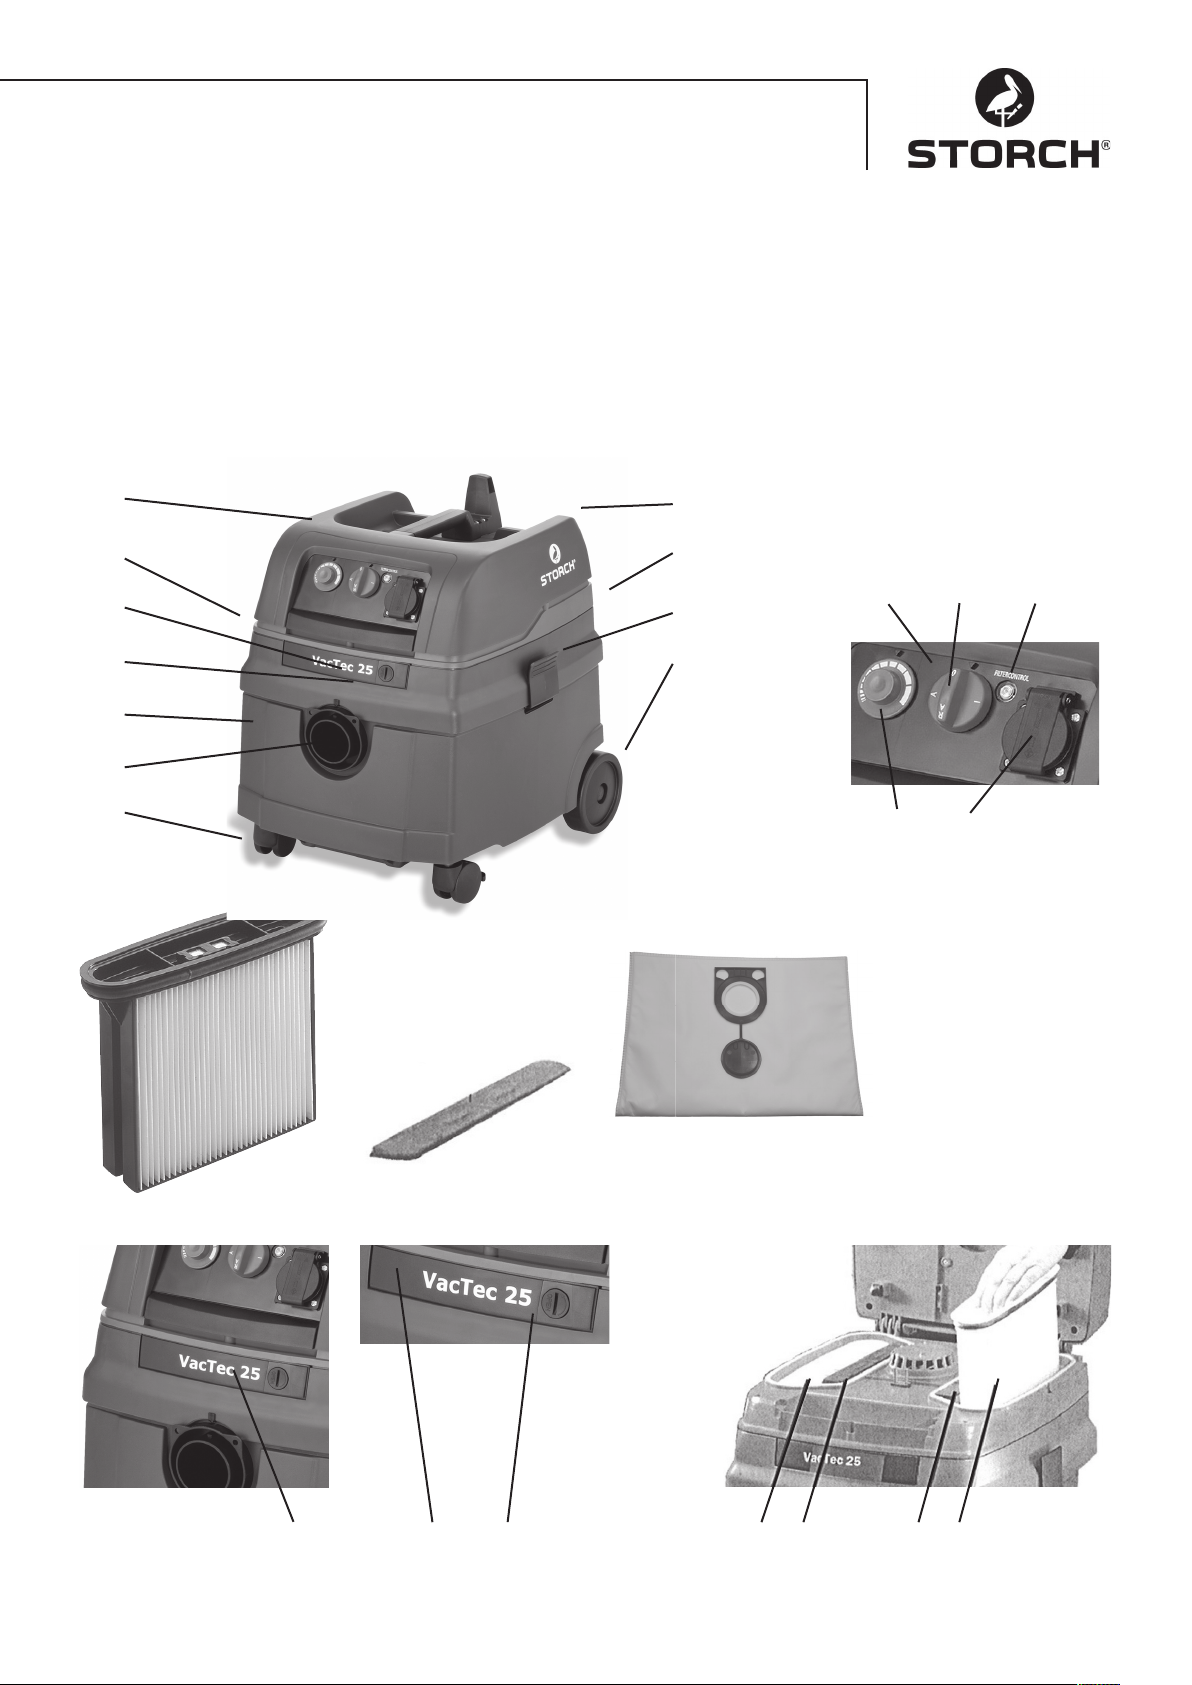
Beschreibung
1 Horní díl
2 Deska funkcí
2a Otocný prepínac zapnuto / vypnuto / automatika /
oklepávac
2b Zásuvka pro elektrické rucní náradí
2c Indikátor objemového toku
2d Otocný knoflík regulátoru otácek
3 Vstup chladného vzduchu
4 Závora
5 Uzáver
6 Pripojovací vedení
7 Zásobník
8 Sací otvor
9 Aretacní uzávery
10 Kolecka - príslušenství
11 Podperná zvratná kolecka
12 Filtracní kazety
13 Ochranný filtr motoru
14 Filtrační sáček z textilie
15 Záves pro drátený koš
3
4
5
7
8
11
1
6
15
2 2a 2c
9
10
2d 2b
12 13 14
4 4 5 12 13 13 12
43
Page 44

1. Bezpecnostní upozornení
Přístroj má rozsah napětí, od kterého může vzniknout nebezpečí pro lidi a zvířata. Přístroj smějí přimontovat
a / nebo demontovat pouze autorizované osoby. Stejně tak údržbu a opravy smějí provádět pouze odborní
elektro pracovníci a autorizované odborné dílny. Provoz přístroje se uskutečňuje na vlastní zodpovědnost a
nebezpečí kupujícího / uživatele.
- Tento spotrebic je vhodný pro verejné budovy, napríklad pro hotely, školy, nemocnice, dílny, banky, lázne,
kanceláre a obchodní škodlivých prachu. Nesmejí být odsávána žádná horlavá nebo výbušná rozpouštedla,
rozpouštedla obsahující materiály, explozí hrozící prašné materiály, kapaliny jako je benzín, alkohol, redidlo
prípadne materiál, který má teplotu vyšší jak 60° C. Hrozí zde nebezpecí výbuchu a požáru. Spotrebic nesmí
být používán v blízkosti horlavých plynu a substancí. Obalový materiál, jako je napríklad fóliový pytel, nepatrí do
detských rukou. Je zde nebezpecí zadušení.
- Napetí uvedené na typovém štítku spotrebice musí souhlasit s napetím síte.
- Zásuvka musí být jištena domovní pojistkou odpovídajícího proudové hodnoty.
- Spotrebice vcetne príslušenství se nesmí uvést do provozu za následujících podmínek:
- prístroj vykazuje znatelná poškození (trhliny, zlomy), - prívod sítového napetí je poškozen, nebo má praskliny
(trhliny), nebo vykazuje príznaky stárnutí,
- nebo existuje podezrení, že ve spotrebici setrvává skrytá závada (napríklad po pádu).
- Nepoužívejte poškozená prodlužovací vedení.
- Nevlecte prodlužovací vedení pres ostré hrany.
- Hubicí, hadicí nebo trubkou nemirte na lidi nebo zvírata. U detí, osob starých nebo nemocných (poranených) je
nutno dbát na zvýšenou opatrnost. Zvláštní opatrnost je nutno dodržovat pri vysávání schodišt. Zajistete si
bezpecnou pracovní polohu.
- Zásuvka ve spotrebici se smí používat pouze k úcelum, které jsou uvedeny v Návodu pro použití.
- U kartácu pohánených elektromotorem neumožnete dotyk rotujících kartácu s pripojovacím vedením síte.
- Pozor! Používejte pouze kartáce, kterými je spotrebic vybaven, nebo které jsou uvedeny v Návodu pro použití
Použití jiných kartácu muže nepríznive ovlivnit bezpecnost.
- Pri výstupu peny nebo vody spotrebic okamžite vypnete.
- Kyseliny, aceton nebo rozpouštedla mohou díly spotrebice naleptat.
- Spotrebic nenechávejte bez dozoru. Pri delším prerušení práce odpojte vysavac ze síte.
- Pred každou údržbou a po každém použití spotrebic vypnete a zástrcku odpojte ze síte.
- Je-li pripojovací vedení spotrebice poškozeno, musí se nahradit speciálním pripojovacím vedením, které je možno
získat u výrobce nebo u jeho servisní služby.
- Opravy nechejte provést u odborníku, napríklad u servisní služby.
- Neodborne opravené spotrebice predstavují pro svého uživatele nebezpecí.
- Jiné práce, nežli jsou zde uvedeny se nesmí provádet.
- Pri použití jiném, nežli pro které je spotrebic urcen, nesprávné obsluze, nebo neodborne provedené oprave,
neprebírá výrobce za škody prípadne vzniklé žádnou záruku.
2. Pred použitím
Proctete pozorne informace, obsahují duležité instrukce týkající se použití, bezpecnosti, údržby a obsluhy. Návod pro
použití peclive uschovejte a predejte jej prípadnému dalšímu majiteli.
3. Používejte originální príslušenství
Označení Výr. č.
Filtrační sáček z textilie FBV 25 pro zásobník 25 l; 5 kusu = 1 sada 65 15 33
Filtrační sáček z textilie FBV 50 pro zásobník 50 l; 5 kusu = 1 sad 65 15 34
Skládaný filtr Materiál: polyester, 2 kusy = 1 sada 65 15 30
Sada doplnku pro manuální cinnost: Úchopová trubice, 2 sací trubice, univerzální hubice, spárová hubice 65 15 40
Gumová sací hubice pro stroje typu R 65 15 42
44
Page 45
4. Oblasti použití
Pro vysávání za sucha a za mokra. Není vhodný pro vysávání zdraví škodlivých prachu. Vysavac je vybaven zásuvkou a
automatikou zapínání a vypínání pro pripjení elektrického rucního naradí.
5. Uvedení do provozu
Pri vybalování si všímejte úplnosti dodávky a škod prípadne vzniklých dopravou.
5.1. Elektrotechnické vybavení
Vypínacem 2a, viz obrázek 1, se provede zapnutí / vypnutí, prípadne zapnutí do automatického provozu nebo otrepání.
0 = vysavac je vypnut;
1 = vysavac je zapnut (manuální provoz);
A = pohotovostní režim pro automatiku zapnutí / vypnutí; (vysavac je zapínán / vypínán elektrickým
rucním náradím);
AR = Spotrebice v provedení „AR“ mohou být provozovány jako dle bodu „A“, avšak je zde zapínáno automatické
cistení filtru pri rozsvícení indikátoru objemového toku.
Zásuvka 2b je urcena pro pripo jení pouze jednoho elektrického rucního náradí.
Pozor! El. náradí musí být pri napojení vypnuto. Zásuvka je pri zastrcené sítové zástrcce stále pod
napetí, a to nezávisle na poloze vypínace. V poloze vypínace „0“ muže být zásuvka použita jako soucást
prodlužovacího vedení (napríklad pro svetlo). Maximální príkon : vysavac a k nemu pripojené el. náradí smí
odebírat max. proud 16 A.
U spotrebicu provedených s elektronicky regulovaným sacím výkonem je k dispozici otocný knoflík 2d, kterým je
možno prizpusobit sací výkon vysavace vysávanému materiálu. Nejpozdeji pri rozsvícení indikátoru objemového toku
2c nebo pri poklesu sacího výkonu by mel být zapnut oklep (poloha vypínace R).
Odsávací otvory el. rucních náradí nejsou dosud normovány. K tomuto úcelu je k dispozici adaptér (gumová hubice)
65 15 76, který muže být zkrácením prizpusoben konkrétnímu el. rucnímu náradí U velmi malých odsávacích otvoru na
náradí muže dojít k tomu, že indikátor objemového toku 2c svítí behem provozu trvale, protože objemový tok je nízký,
avšak obtokem vedené chlazení motoru je pri trvalém provozu za techto podmínek bez problému. Takové spotrebice by
mely být provozovány pri poloze vypínace „A“, nikoliv pri „AR“.
6. Vysávání
U spotrebicu s držadlovou trubicí je možné škrtítkem falešného vzduchu prizpusobit sací výkon vysávanému materiálu
(podkladu).
6.1. Vysávání za sucha
Provádejte vždy se suchým filtrem, s vysušeným spotrebicem a príslušenstvím, aby nedošlo k ulpívání prachu a vytvorení tvrdé vrstvy. Jsou-li odsávány saze, cement, sádra, mouka nebo jiný prachový materiál, doporucujeme použít
papírový filtracní pytel. Filtrační sáček z textilie používejte vždy ve spojení s filtracními patronami.
6.2. Vysávání za vlhka (mokra)
Vysávejte bez filtrační sáček z textilie. Pro vysávání za vlhka jsou vhodné filtracní kazety. Zabudované cidlo motor
pri plném zásobníku odpojí. Spotrebic vyprázdnete, jak je popsáno pod bodem 6.4. Není-li spotrebic vypnut, zustává
nadále v cinnosti ochrana proti opakovanému spuštení. Teprve po vypnutí a opetovném zapnutí je spotrebic opet pripraven k provozu.
- Pred vyprázdnením vytáhnete nejdríve sací hadici z kapaliny.
- Vysokým sacím výkonem a tvarem zásobníku príznivým pro proudení muže po vypnutí vytéci zpet trochu vody z
hadice. Pri castém strídání vysávání za sucha a vysávání za mokra doporucujeme použití druhého (ponorného)
filtru.
6.3. Cistení filtru
Spotrebice, které jsou vybaveny elektromagnetickým oklepem mohou z filtracní kazety oklepat nakupený prach. Toto
zarucuje optimální využití filtracních kazet a prodlužuje pracovní cykly. Nejpozdeji pri rozsvícení indikátoru objemového toku 2c (varovného svetelného indikátoru ) nebo pri poklesu sacího výkonu by mel být zapnut oklep (poloha vypínace V).
45
Page 46

6.4. Cistení zásobníku
Vypnout 2a, vytáhnout zástrcku 6, otevrít aretacní uzávery 9. Sejme se horní díl 1 a sací hadice ze zásobníku 7. Zásobník se vyklopí, prípadne se stáhne filtrační sáček z textilie ze sacího otvoru.
6.5. Filtrační sáček z textilie
Přírubu sáčku filtru z textilie nasuňte přes sací otvor.
7. Cistení
Filtracní kazety se vycistí mekkým kartácem, prípadne vodou. Zásobník a príslušenství se vycistí vodou, horní cást 1 se
otre vlhkou látkou. Filtr, zásobník a príslušenství se nechají vyschnout.
8. Údržba
Jestliže se sací výkon vysavace i po vycistení filtracních kazet 12 nezvýší (za predpokladu, že zásobník je vyprázdnen a
je vymenen papírový filtracní sácek 14, potom je potreba vymenit filtracní kazety 12.
Filtracní kazety 12 se pred výmenou filtru ješte jednou vytrepou. Mincí, nebo podobným predmetem se otocí proti smeru pohybu hodinových rucek o 90° uzáver 5 na závoru 4 a závora 4 se zatlací dozadu. Poklop se odklopí a filtracní
patrony se vytáhnou nahoru. Vloží se nové filtracní kazety pricemž se dbá na cisté a pevné dosednutí filtru. Ochranný
filtr motoru se rovnež musí cas od casu vycistit. Pro tento úcel vytáhnete filtr ze skríne motoru, vypláchnete filtr pod
tekoucí vodou a nechejte jej dobre vyschnout. Odstrante necistoty, ochranný filtr motoru opet vložte, víko sklopte dolu
a lehkým tlacením na víko uvedte závoru 4 do výchozí polohy. Prístroj opet uzavrete.
9. Príslušenství
Upevnení sací hadice zastrcením do príslušných vybrání na zadní strane zásobníku.
10. Samostatná pomoc pri poruchách
Poruchy funkce se ne vždy vztahují k poruchám spotrebice!
Porucha: Možná prícina odstranení:
Pokles sacího výkonu Je znecisten filtr vycistit
Filtrační sáček z textilie je plný vymenit
Je plný zásobník vy-prázdnit
Dodatecne vycistit ochranný filtr motoru vycistit
Jsou ucpány hubice, trubky nebo hadice vycistit
Prístroj nefunguje, nebo se zastavil Je zástrcka v zásuvce?
Je sít pod napetím?
Je víko spotrebice správne zavreno?
Nevypnulo cidlo vody?
Neprovádejte žádné další zásahy, ale obratte se na servisní dílnu pro zákazníky.
46
Page 47
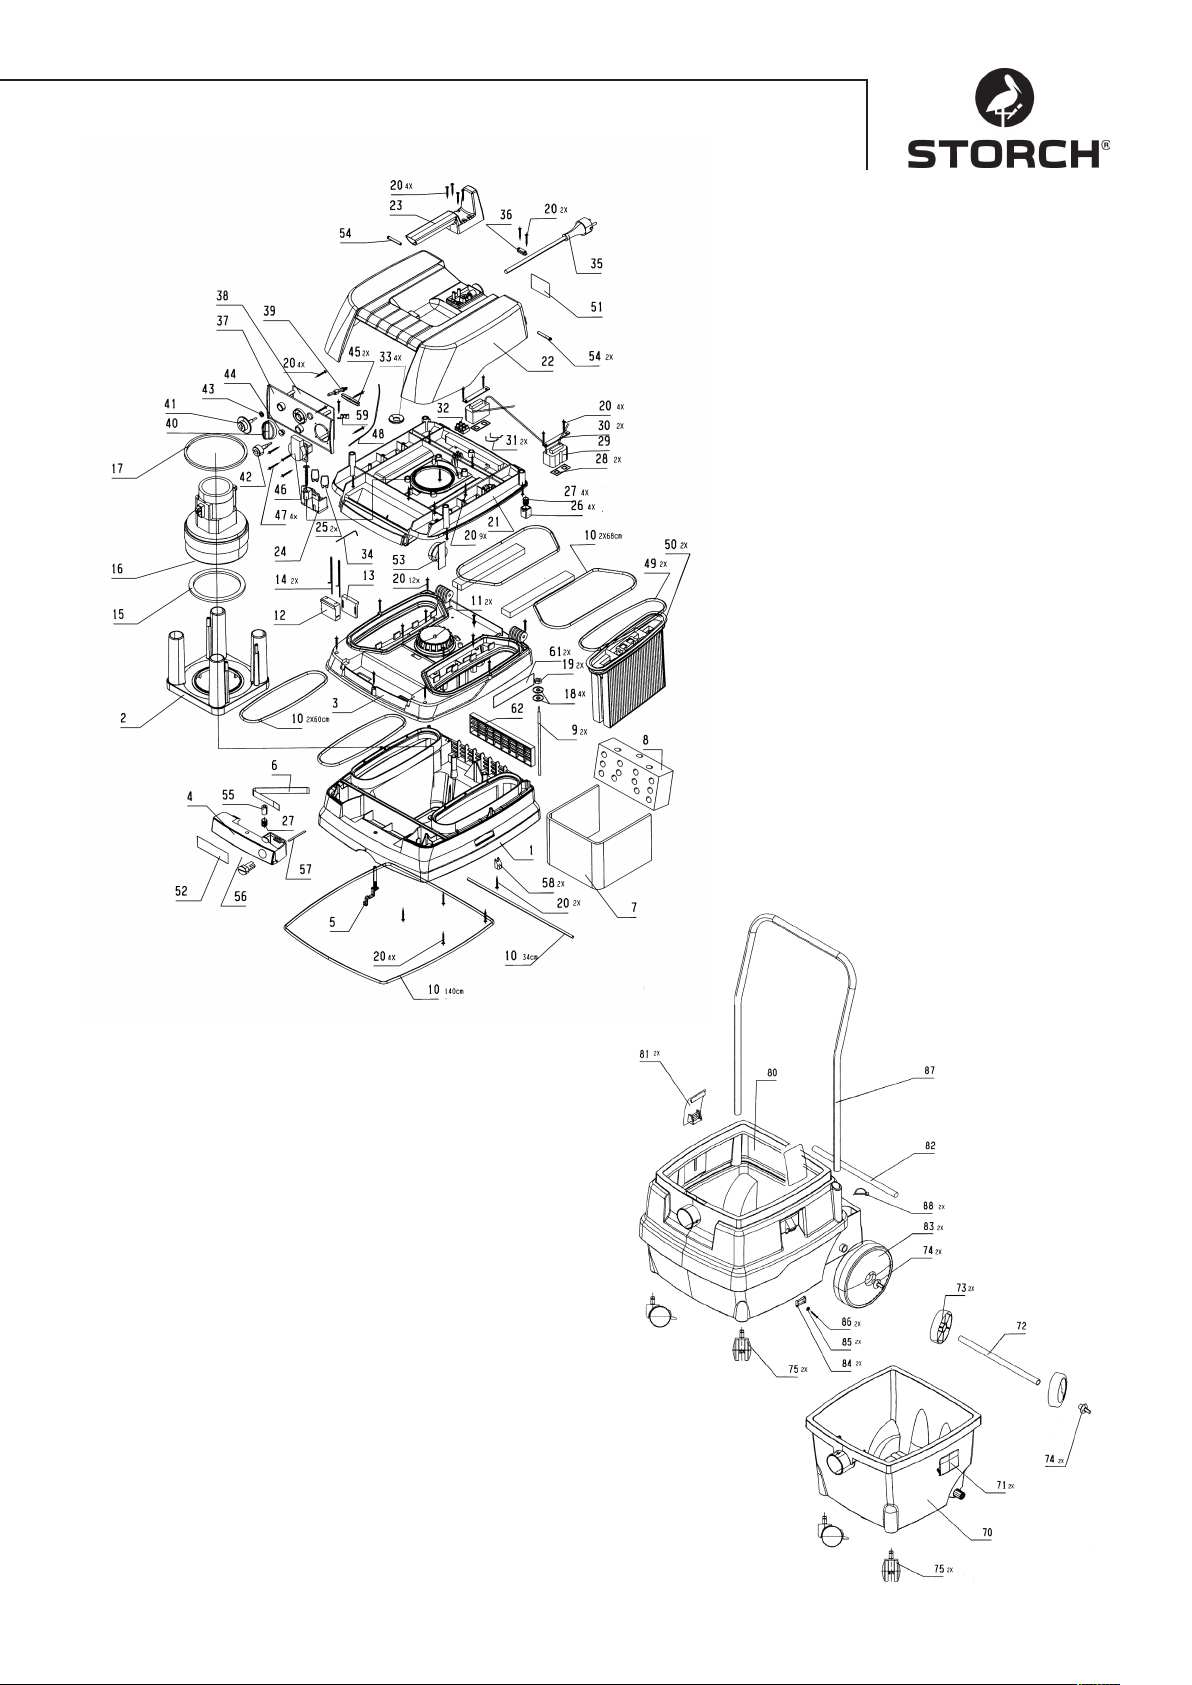
47
Page 48

Záruka
Záruční podmínky:
U našich zařízení platí zákonné záruční lhůty 12 měsíců od data zakoupení/data faktury obchodního konečného zákazníka. Pokud jsou delší lhůty v cestě námi vypsanému prohlášení o záruce, jsou zvláště vyznačeny v návodu k obsluze
příslušných zařízení.
Uplatňování:
V případě záručního příp. garančního případu žádáme, aby bylo zasláno kompletní zařízení dohromady s fakturou do
našeho střediska Logisitk Center v Berka nebo do námi autorizované servisní stanice.
Kontaktujte prosím nejdříve placený hotline servis firmy STORCH: +49 (0)202 . 49 20 – 110.
Nárok na záruku příp. garanci
Nároky na záruku existují výhradně u materiálu nebo výrobní vady a také výhradně při používání přístroje v souladu s
určeným účelem. Díly podléhající opotřebení nespadají do nároků na záruku. Veškeré nároky zanikají zamontováním
dílů cizího původu, při nepřiměřeném zacházení a skladování a také při zřejmém nedodržování provozního návodu.
Provádění oprav
Veškeré opravy smějí být prováděny výhradně naším závodem nebo servisními stanicemi autorizovanými firmou
STORCH.
48
Page 49
ES - prohlášení o shodě
Název / adresa firmy, která vystavila prohlášení: STORCH Malerwerkzeuge & Profigeräte GmbH
Platz der Republik 6-8
D - 42107 Wuppertal
ve smyslu směrnice ES o strojích 2006 / 42 ES - příloha II A
Tímto prohlašujeme, že následně označený stroj:
Označení stroje: Vac Tec 25
Typ stroje: Průmyslový vysavač prachu z broušení
Číslo výrobku: 65 15 00
odpovídá příslušným ustanovením následujících směrnic:
Směrnice o strojích: 2006 / 42 / ES
Směrnice o elektromagnetické kompatibilitě: 2004 / 108 / ES
Zplnomocněnec k sestavení technických podkladů:
STORCH Malerwerkzeuge & Profigeräte GmbH
Platz der Republik 6-8
D-42107 Wuppertal
Jörg Heinemann
-Jednatel-
Wuppertal, v září 2010
49
Page 50

505152
Page 51

Page 52
Art.-Nr. Bezeichnung
65 15 00 Vac Tec 25 Schleifstaubsauger
Art. nr. Beschrijving
65 15 00 Vac Tec 25 Spanenzuiger
Référence Désignation
65 15 00 Vac Tec 25 Aspirateur
à poussière de ponçage
N. art. Denominazione
65 15 00 Vac Tec 25 Aspiratore per molatori
Art. no. Description
65 15 00 Vac Tec 25 vacuum cleaner
Výr. č. Označení
65 15 00 Vac Tec 25
Průmyslový vysavač prachu z broušení
Malerwerkzeuge & Profigeräte GmbH
Platz der Republik 6 - 8
D-42107 Wuppertal
Telefon: +49 (0)2 02 . 49 20 - 0
Telefax: +49 (0)2 02 . 49 20 - 111
[email protected]
H 002259
www.storch.de
10-2014
 Loading...