

Page 1
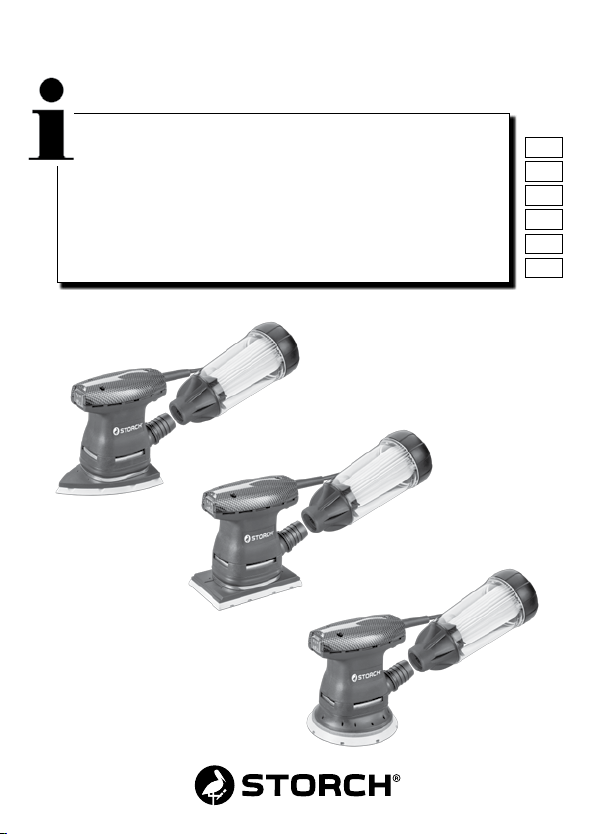
Schwingschleifer / Exzenterschleifer mit Staubabsaugung
Slingerslijper / Excenterschuurmachine met stofafzuiging
Ponceuse vibrante / Ponceuse excentrique avec aspiration
Levigatrice orbitale / Levigatrice eccentrica con aspirazione
Orbital sander / random orbital sander with self-generated vacuum
Vibrační bruska / Excentrická bruska s odsávání
Delta 100
Quadra 80
Omega 125
DE
NL
FR
IT
GB
CZ
Page 2

DE
Vielen Dank
für Ihr Vertrauen zu STORCH. Mit dem Kauf haben Sie sich
für ein Qualitäts-Produkt entschieden. Haben Sie trotzdem
Anregungen zur Verbesserung oder aber vielleicht einmal ein
Problem, so freuen wir uns sehr, von Ihnen zu hören.
Bitte sprechen Sie mit Ihrem Außendienst-Mitarbeiter oder in
dringenden Fällen auch mit uns direkt.
Mit freundlichen Grüßen
STORCH Service Abteilung
Telefon: +49 (0)2 02 . 49 20 - 112
Fax: +49 (0)2 02 . 49 20 - 244
kostenlose Service-Hotline: 08 00. 7 86 72 47
kostenlose Bestell-Hotline: 08 00. 7 86 72 44
kostenloses Bestell-Fax: 08 00. 7 86 72 43
(nur innerhalb Deutschlands)
Übersetzung der Originalanleitung
2
Page 3

Inhaltsverzeichnis Seite
Technische Daten 4 - 5
Bestimmungsgemäße Verwendung 6
Sicherheitshinweise 6 - 8
Piktogramme 8
Bauteile der Maschine 9
Inbetriebnahme 10 - 12
Staubabsaugung 12 - 13
Entsorgung 14
Garantie 15
EG-Konformitätserklärung 16 - 17
3
Übersetzung der Originalanleitung
Page 4
Technische Daten
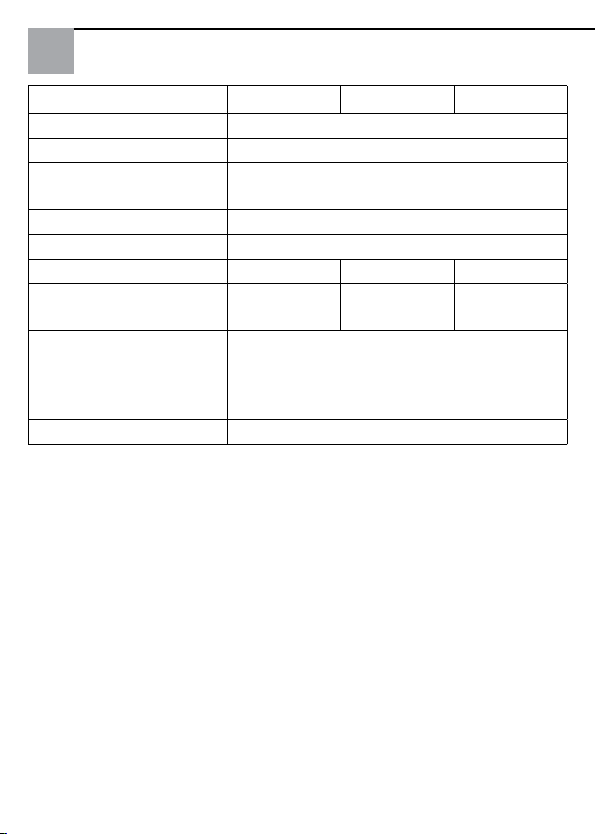
62 13 10 62 13 20 62 13 30
Isolationsklasse II
Leistungaufnahme 200 W
Elektronische Dreh-
ja
zahlregelung
Drehzahl im Leerlauf 7.000 - 13.000 U/min.
Schleifhub 2 mm
Schleifteller-Form dreieckig rechteckig rund
Schleifteller-Abmes-
100 x 147 mm80 x 130 mmØ 125 mm
sung
Absaugsystem * Selbstabsaugend
(Staubkasette im Lieferumfang).
Optionaler Anschluss eines
Schleif-Staubsaugers
Gewicht 1,15 kg
Die dargestellten Werte basieren auf einer Nennspannung von
230 V / 50 Hz. Im Falle von Spannungen und Frequenzen von
verschiedenen Leistungswerten können diese variieren. Technische Spezifikationen auf dem Typenschild beziehen sich auf
die Nennwerte des Werkzeuges. (*) Die genannten Geräte
dürfen nur zusammen mit einer passenden Staubabsaugung
betrieben werden.
Angaben ohne Gewähr! Technische Änderungen und Irrtümer vorbehalten!
Übersetzung der Originalanleitung
4
Page 5
Informationen Schallpegel / mittlere Beschleunigung
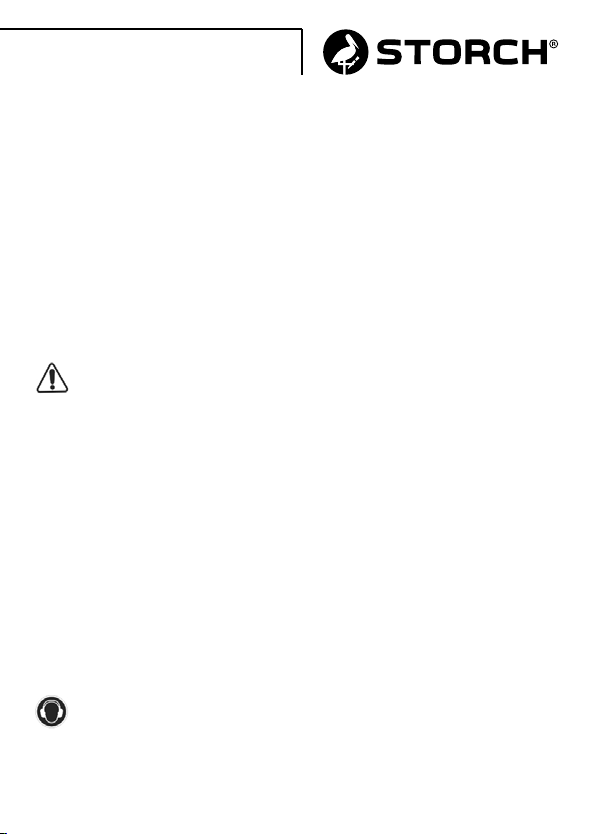
Der Schalldruckpegel (Geräuschentwicklung) und die mittlere
quadratische Beschleunigung der Maschine, gemessen gemäß
EN 60745.
Schalldruckpegel
LPA: 74 dB(A) LWA: 85 dB(A)
Schalleistungspegel:
Messunsicherheit: 3
3-Achsen Vibrationspegel:
ah: 3,00 m/s
Messunsicherheit: 1,50 m/s
2
2
ACHTUNG:
Die angegebenen Messwerte gelten für neue Geräte. Im täglichen Einsatz verändern sich Geräusch- und Schwingungswerte. Bei den gezeigten Pegelwerten handelt es sich um
Vergleichswerte, die zu einer vorläufigen Einschätzung des
Risikos für den Bedienenden während der Arbeitszeit dienen.
Für eine angemessene Einschätzung der Arbeitszeit müssen
die Zeiten berücksichtigt werden, in denen sich das Gerät im
Ruhezustand befindet oder ausgeschaltet ist. Diese Werte
wurden anhand der Haupteinsatzgebiete des Geräts ermittelt.
Wenn das Gerät für andere Aufgaben oder mit anderen Zubehörprodukten verwendet wird oder keine regelmäßigen Wartungsarbeiten durchgeführt werden, können diese Werte beim
Betrieb deutlich überschritten werden.
Gehörschutz benutzen!
5
Übersetzung der Originalanleitung
Page 6

Bestimmungsgemässe Verwendung
Dieses elektrische Werkzeug ist zur Funktion als Schleifmaschine vorgesehen, geeignet zum Trockenschleifen von Holz,
Plastik, Metall, Spachtel und lackierten Oberflächen. Die
Sicherheitshinweise, die Anleitungen, Darstellungen und die
Spezifikationen lesen, die mit diesem Werkzeug geliefert werden. Die Nichtbeachtung der gestellten Anleitungen kann zu
einem Stromschlag, einem Brand bzw. schweren Unfällen
führen.
Sicherheitshinweise
Kein Zubehör verwenden, das nicht ausdrücklich für den vorgesehenen Gebrauch hergestellt oder vom Hersteller empfohlen wurde. Die bloße Tatsache, dass das Zubehör auf Ihrem
Werkzeug angebracht werden kann, garantiert keine Funktionsweise unter völlig sicheren Bedingungen.
Die Nenngeschwindigkeit des Zubehörs muss mindestens der
auf dem Werkzeug angegebenen Höchstgeschwindigkeit entsprechen. Zubehör, dass bei einer Geschwindigkeit über der
Nenngeschwindigkeit verwendet wird, kann brechen und in
die Luft geschleudert werden.
Der Außendurchmesser und die Stärke Ihres Zubehörs müssen
sich für den Schutzgrad der Sicherheitsvorrichtung Ihres Werkzeugs eignen. Zubehör mit nicht korrekten Größen kann nicht
angemessen geschützt oder kontrolliert werden.
Die Beschaffenheit des Zubehörs muss sich korrekt an die
Spindel des Werkzeugs anpassen. Das Zubehör mit Öffnungen der Welle, die nicht den Montageelementen auf dem
Werkzeug entsprechen, bleiben nicht im Gleichgewicht, werden übermäßig vibrieren und können einen Kontrollverlust
Übersetzung der Originalanleitung
6
Page 7

nach sich ziehen.
Beschädigte Werkzeuge nicht verwenden. Ist das Werkzeug
oder das Zubehör heruntergefallen, auf eventuelle Schäden
prüfen oder ein nicht beschädigtes Zubehör verwenden. Nach
der Prüfung und Installation eines Zubehörs, bringt man sich
und die anwesenden Personen in einen Sicherheitsabstand
zu dem drehenden Zubehör und nimmt das Werkzeug bei
maximaler Geschwindigkeit im Leerlauf, eine Minute lang in
Betrieb. Beschädigtes Zubehör bricht im Allgemeinen während dieses Probezeitraums.
Das Elektrowerkzeug ausschließlich zum Trockenschleifen verwenden. Das Verwenden von Wasser oder anderen flüssigen
Kühlmitteln kann zu Elektrokution oder einem Elektroschlag
führen.
Das Elektrowerkzeug nicht in der Nähe von brennbaren Materialien in Betrieb nehmen. Die beim Schleifen von Metall
erzeugten Funken könnten diese Materialien entzünden.
Ein Überhitzen des zu bearbeitenden Materials und der
Schleifmaschine vermeiden. Vor dem Beginn einer Pause muss man die Staubfilter-Kassette leeren. Der Schleifstaub in der Staubfilter-Kassette und im Filter kann sich bei
ungünstigen Bedingungen, wie zum Beispiel ein Funken bei
dem Schleifen von Metall, entzünden. Während der Schleifarbeiten kann schädlicher Staub erzeugt werden, der Kontakt
oder das Einatmen können die Gesundheit der Bediener und
der Personen die sich in nächster Nähe aufhalten, gefährden.
Die Sicherheitsvorschriften des Landes beachten, in dem das
Werkzeug betrieben wird.
7
Übersetzung der Originalanleitung
Page 8
Zum Schutz der Gesundheit tragen Masken. Zur Befestigung
des Werkstücks Klemmen benutzen. Das Werkstück keinesfalls mit einer Hand und das Elektrowerkzeug mit der anderen
Hand, während dessen Verwendung, halten. Befestigt man
das Werkstück mit Klemmen, hat man beide Hände frei und
kann das Werkzeug bestens verwenden.
Piktogramme
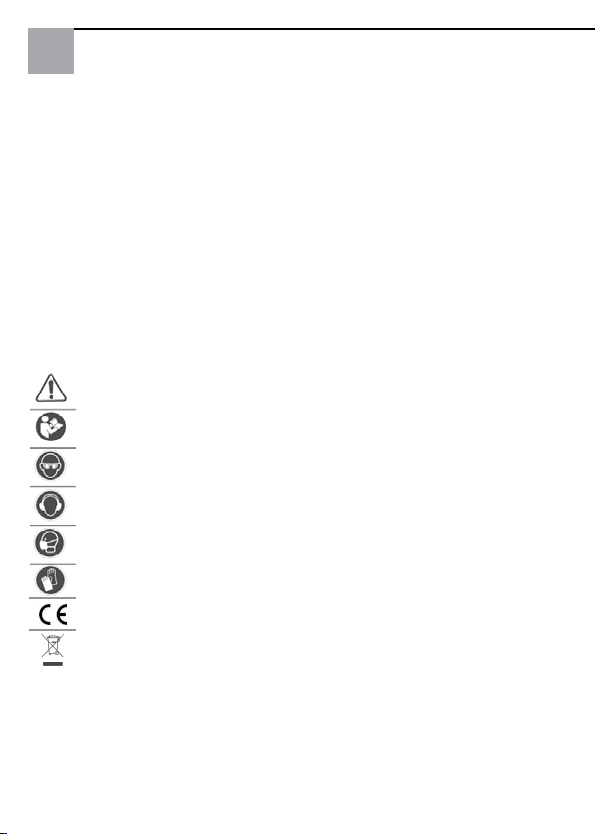
Einige der folgenden Symbole können am Werkzeug vorhanden sein. Bitte studieren und lernen Sie ihre Bedeutung. Die
richtige Interpretation wird die optimale Nutzung des Werkzeuges ermöglichen.
Wichtige Sicherheitshinweise
Lesen Sie die Bedienungsanleitung
Schutzbrille tragen
Gehörschutz tragen
Tragen Sie eine Atemschutzmaske
Schutzhandschuhe tragen
Prüfzeichen
Entsorgung nicht über den Hausmüll
Übersetzung der Originalanleitung
8
Page 9
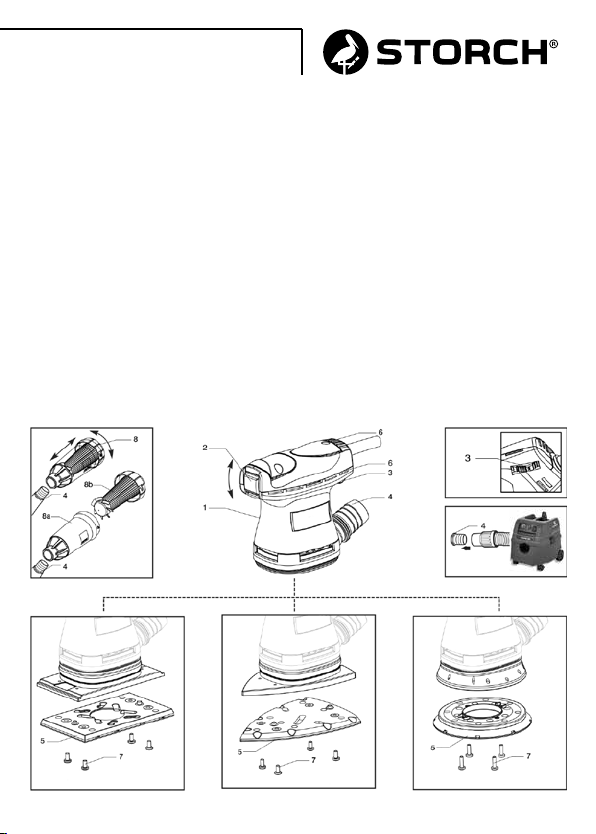
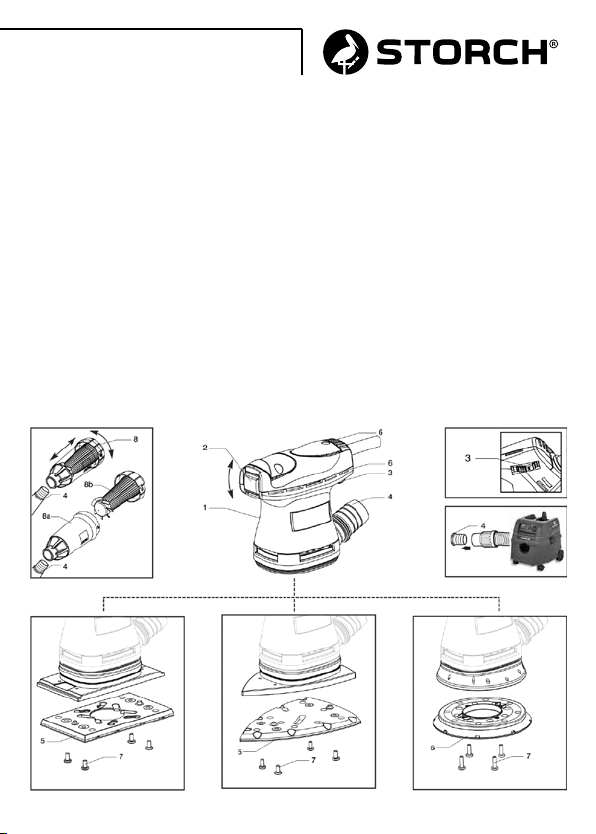
Bauteile der Maschine
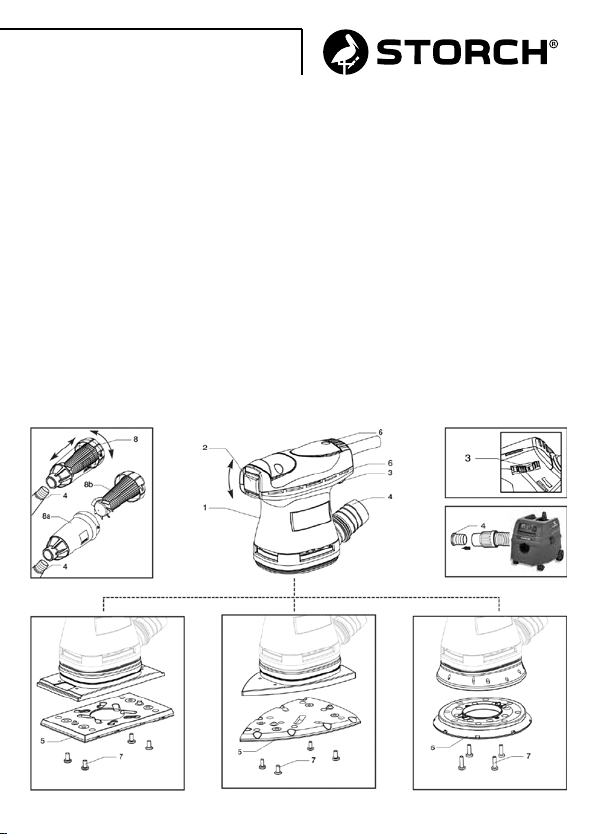
1 Typenschild mit technischen Daten
2 EIN-/AUS-Schalter
3 Drehzahleinstellung
4 Absaugstutzen Ø 29 mm
5 Schleifteller Klettverschluss-Schleifpapierhalter
5a Rechteckig (62 13 20)
5b Dreieckig (62 13 10)
5c Rund (62 13 30)
6 Schlitze zur Motorkühlung
7 Befestigungsschrauben Schleifteller
8 Staub-Filterkassette
8a Filterhalter
8b Kassette
62 13 3062 13 1062 13 20
9
Übersetzung der Originalanleitung
Page 10
Inbetriebnahme
ACHTUNG:
Die Netzspannung beachten! Die Netzspannung muss dem
Angaben auf dem Typenschild mit den technischen Daten entsprechen (1).
Gefahr:
Vor dem Wechseln von Zubehör und etwaigen Arbeiten an
dem Elektrowerkzeug muss man den Stecker aus der Steckdose ziehen.
Vor der Inbetriebnahme:
Vor einer Inbetriebnahme des Gerätes sollten Sie sicherstellen:
- daß die Verpackung unversehrt ist und keine Beschädi-
gungen durch Transport bzw. Lagerung aufweist;
- daß das Gerät vollständig ist, also Anzahl und Art der
Gerätekomponenten mit den Angaben in dieser Gebrauchs anleitung überein stimmen;
- das Stromntez entspricht den Gerätekenndaten;
- Anschlußkabel und-Stecker sind in ordnungsgemäßem
Zustand;
- der EIN/AUS (2)-Schalter funktioniert einwandfrei.
Zur Überprüfung die in Kapitel “Inbetriebnahme” beschrie benen Schaltstellungen - allerdings bei gezogenem Netz stecker - ausprobieren;
- Sämtliche Gerätekomponenten sind ordnungsgemäß
montiert und zeigen keine. Anzeichen von Beschädigung;
- die Lüftungsschlitze (6) sind nicht verstopft;
- die Maschine muß an eine sinngemäß bemessene und
funktionstüchtige Staubabsaugung angeschlossen sein.
Übersetzung der Originalanleitung
10
Page 11
Wechsel der Schleifpapiere / Montage:
- Die Schleifpapier unter Andrücken auflegen. Dabei darauf
achten, daß die Löcher in der Schleifpapierscheibe über den
Absaugöffnungen im Schleifteller liegen (10).
Demontage:
- Verbrauchte Schleifpapier nehmen Sie durch Abreißen ab;
- die neue Haftschleifpapier mit Klettsystem drücken (siehe
„Montage“)
Wechsel des Schleiftellers
Eine beschädigte Schleifscheibe sofort austauschen.
Ausgezeichnete Ergebnisse erhält man nur mit Original-Ersatzteilen. Die Montage eines Schleiftellers mit falschen
Maßen kann zu starken Vibrationen führen, die nicht zulässig
sind.
- Die Schrauben auf dem Schleifteller (7) lösen;
- zur Montage in umgekehrter Reihenfolge vorgehen
Schalten Sie das Gerät ein und stellen Sie fest, daß die
Schleifscheibe nicht vibriert, und rund lauft. Andernfalls das
Gerät sofort ausschalten und die Störung beheben.
Einschalten und Ausschalten
- Einschalten: den Umschalter (2) nach unten auf “EIN”
stellen.
- Ausschalten: den Umschalter (2) nach oben auf “AUS”
stellen.
ACHTUNG:
Sollte nach Unterbrechung der Stromzufuhr der Ein-/
Aus-Schalter auf „EIN“ stehen, muss man den Schalter auf
„AUS“ stellen.
11
Übersetzung der Originalanleitung
Page 12
Elektronische Drehzahlregelung
Die Drehzahl stellen Sie über das Rädchen des Geschwindigkeitsreglers (3) im hinteren Abschnitt des Gerätes ein. Wählen Sie die Drehzahl passend zur Art der Schleifpapierscheibe
sowie den Eigenschaften des bearbeiteten Materials.
Staubabsaugung
ACHTUNG:
Während des Schleifens kann gesundheitsschädlicher Staub
erzeugt werden. Immer an ein angemessenes Absaugsystem
anschließen.
Bei Arbeiten bei denen Staub entsteht, muss man eine
Schutzmaske tragen.
Integriertes Absaugsystem
- Um eine optimale Staubabsaugung zu garantieren, muss
man den kegelförmigen Filter (8) rechtzeitig entleeren, den
Filterhalter (8a) sorgfältig reinigen, wie auch die Kassette
(8b);
- Während der Arbeiten an vertikalen Oberflächen, muss man
die Maschine so halten, dass der kegelförmige Filter nach
unten zeigt.
- Montage des kegelförmigen Filters: Den kegelförmigen
Filter (8) an dem Anschluss des Absaugrohrs (4) positionie ren. Den kegelförmigen Filter bis zum Anschlag eindrücken.
- Prüfen des Füllzustands des kegelförmigen Filters: Der
Füllzustand des kegelförmigen Filters kann dank des
durchsichtigen Filterhalters (8.a) mühelos geprüft werden.
- Reinigung des kegelförmigen Filters: Um den kegelförmigen
Filter zu leeren, von dem Anschluss des Absaugrohrs entfer nen, dabei die Montageanleitungen in umgekehrter Reihen folge ausführen;
Übersetzung der Originalanleitung
12
Page 13
- Die Kassette (8.b) aushaken und aus dem Filterhalter
ziehen;
- Den Filterhalter leeren;
- Die Lamellen der Kassette mit einer weichen Bürste
reinigen.
Externe Absaugung
- Während der Arbeiten an vertikalen Oberflächen, muss
man die Maschine so halten, dass das Absaugrohr nach
unten zeigt.
- Montage: Das Absaugrohr an den Anschluss des
Absaugrohrs ansetzen (4);
- Das Absaugrohr an ein angemessenes Absaugsystem
anschließen (nicht mitgeliefert).
Pflege des Gerätes
Sämtliche Eingriffe bei gezogenem Netzstecker ausfüh-
ren. Das Gerät nach der Arbeit sowie bei Bedarf mit Druckluft
von Staub befreien. Besonders darauf achten, daß die Lüftungsschlitze des Motors sauber sind.
Sonstige Eingriffe durch den Geräteanwender sind nicht zulässig. Für die Wartung und die periodische Reinigung von den
inneren Teilen z. B.: Bürsten, Lagern, Zahnrädern usw. oder
andere Bedürfnisse wenden Sie sich bitte an eine autorisierte
Kundendienststelle. Verwenden Sie nur die Original STORCH
Teile oder Zubehör.
13
Übersetzung der Originalanleitung
Page 14

Entsorgung
Nur für EU-Länder: Gemäß der Europäischen Richtlinie über
die elektrischen und elektronischen Geräte und deren Umsetzung in Konformität der nationalen Normen ist Elektroschrott
separat zu sammeln, damit er auf umweltfreundliche Weise
wiederverwertet werden kann. Wenn das Produkt das Ende
seiner Lebensdauer erreicht hat, darf es nicht in der Umwelt
freigesetzt oder zusammen mit dem Hausmüll weggeworfen
werden, sondern muss bei autorisierten Recycling-Sammelzentren entsorgt werden (kontaktieren Sie die kompetenten
örtlichen Behörden, um zu erfahren, wo das Produkt laut
Gesetz zu entsorgen ist). Die korrekte Entsorgung des Produkts trägt zum Schutz der Gesundheit und der Erhaltung der
Umwelt bei. Eine illegale Entsorgung des Produkts hat Strafmaßnahmen zu Lasten des Gesetzesübertreters zur Folge.
Die korrekte Entsorgung des Produkts trägt zum Schutz der
Gesundheit und der Umwelt bei. Die missbräuchliche Entsorgung des Produkts zieht Sanktionen zu Lasten des Verursachers nach sich.
Übersetzung der Originalanleitung
14
Page 15

Garantie
Garantiebedingungen
Für unsere Geräte gelten die gesetzlichen Gewährleistungsfristen von 12 Monaten ab Kaufdatum / Rechnungsdatum des
gewerblichen Endkunden.
Geltendmachung
Bei Vorliegen eines Gewährleistungs- bzw. Garantiefalles bitten wir, dass das komplette Gerät zusammen mit der Rechnung frei an unser Logistik Center in Berka oder an eine von
uns autorisierte Service-Station eingeschickt wird. Zuvor
bitten wir Sie, uns unter unserer kostenlosen STORCH Service-Hotline 08 00. 7 86 72 47 zu kontaktieren.
Gewährleistungs- bzw. Garantieanspruch
Ansprüche bestehen ausschließlich auf Werkstoff- oder Fertigungsfehler sowie ausschließlich bei bestimmungsgemäßer
Verwendung des Geräts. Verschleißteile fallen nicht unter
die Garantieansprüche. Sämtliche Ansprüche erlöschen durch
den Einbau von Teilen fremder Herkunft, bei unsachgemäßer
Handhabung und Lagerung sowie bei offensichtlicher Nichtbeachtung der Betriebsanleitung.
Durchführung von Reparaturen
Sämtliche Reparaturen dürfen ausschließlich durch unser
Werk oder von STORCH autorisierten Service-Stationen
durchgeführt werden.
15
Übersetzung der Originalanleitung
Page 16

EG-Konformitätserklärung
Name / Anschrift des Ausstellers:
STORCH Malerwerkzeuge & Profigeräte GmbH
Platz der Republik 6-8 . D - 42107 Wuppertal
Hiermit erklären wir,
dass das nachstehend genannte Gerät aufgrund dessen Konzipierung und Bauart sowie in der von uns in Verkehr gebrachten Ausführung den einschlägigen, grundlegenden Sicherheitsund Gesundheitsanforderungen der EG-Richtlinien entspricht.
Bei einer nicht mit uns abgestimmten Änderung des Gerätes
verliert diese Erklärung ihre Gültigkeit.
Bezeichnung des Gerätes / Schwingschleifer Delta 100
Artikel-Nummer: 62 13 10
Schwingschleifer Quadra 80
62 13 20
Exzenterschleifer Omega 125
62 13 30
Geräte-Typ: Schleifmaschine
Angewandte EG-Richtlinien
Maschinen-Richtlinie: 2006 / 42 / EG
Niederspannungs-Richtlinie: 2006 / 95 / EG
EG-Richtlinie Elektromagnetische
Verträglichkeit: 2004 / 108 / EG
RoHS-Richtlinie: 2011 / 65 / EG
Übersetzung der Originalanleitung
16
Page 17
Angewandte harmonisierte Normen
EEN 60745-1: 2009 + A11: 2010
EN 60745-2-4:2009+ A11:2011.
EN 55014-1: 2006 + A1: 2009 + A2: 2011
EN 55014-2: 1997 + A1: 2001 + A2: 2008
EN 61000-3-2: 2006 + A1: 2009 + A2: 2009
EN 61000-3-3: 2008
EN 50581: 2012
Bevollmächtigter für die Zusammenstellung der technischen
Unterlagen:
STORCH Malerwerkzeuge & Profigeräte GmbH
Platz der Republik 6 - 8
42107 Wuppertal
Jörg Heinemann
- Geschäftsführer -
Wuppertal, 11-2016
17
Übersetzung der Originalanleitung
Page 18

NL
Hartelijk dank
voor uw vertrouwen in STORCH. Met deze aankoop hebt u
voor een kwaliteitsproduct gekozen.
Als u desondanks een tip voor verbeteringen hebt of wellicht
ooit een probleem ondervindt, dan horen wij graag van u.
Neem contact op met de medewerker buitendienst of in
dringende gevallen rechtstreeks met ons.
Met vriendelijke groeten,
STORCH serviceafdeling
Tel.: +49 (0)2 02 . 49 20 - 112
Fax: +49 (0)2 02 . 49 20 - 244
Gratis service-hotline: 08 00. 7 86 72 47
Gratis bestel-hotline: 08 00. 7 86 72 44
Gratis bestel-fax: 08 00. 7 86 72 43
(alleen binnen Duitsland)
Vertaling van de originele handleiding
18
Page 19

Inhoudsopgave Pagina
Technische gegevens 20 - 21
Beoogd gebruik 22
Veiligheid 22 - 24
Pictogrammen 24
Onderdelen van ve machnie 25
Ingebruikneming 26 - 28
Stofafzuiging 28 - 29
Verwijdering 30
Garantie 31
EG-conformiteitsverklaring 32 - 33
19
Vertaling van de originele handleiding
Page 20
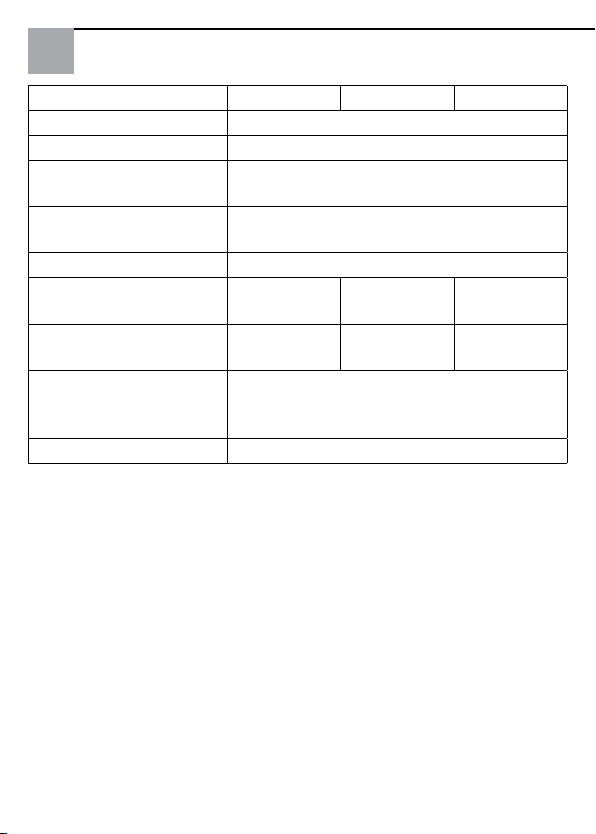
Technische gegevens 62 13 10 62 13 20 62 13 30
Lessen van isolatie II
Opgenomen vermogen 200 W
Elektronische snel-
ja
heidsregeling
Aant. toeren onbelast/
7.000 - 13.000 U/min.
min.
Schuurcirkel 2 mm
Vorm van de schuur-
driehoekig rechthoekig cirkelvormig
zool
Afmetingen schuurzool 100 x 147 mm80 x 130 mmØ 125 mm
Afzuiging systeem * Zelf-afzuigend
(stofcassette meegeleverd). Optionele
aansluiting van een schuur-stofzuiger
Gewicht 1,15 kg
De getoonde waarden zijn gebaseerd op een nominale spanning van 230V/50Hz. Bij spanningen en frequenties van verschillende vermogens waarden kunnen variëren. Raadpleeg
het label technische specificaties om de nominale waarden
van het gereedschap. (*) De machine mag alleen functioneren
als hij op een geschikt afzuigsysteem aangesloten stof (zie
Stofafzuiging).
Informatie onder voorbehoud! Technische wijzigingen en
fouten voorbehouden!
Vertaling van de originele handleiding
20
Page 21
Informatie uitgestraald geluid / gemiddelde
Versnellingswaarde
Het equivalente geluidsdrukniveau (geluidsoverlast), gemeten. De kwadratische gemiddelde versnellingswaarde volgens
de norm EN 60745.
Geluidsdruk
LPA: 74 dB(A) LWA: 85 dB(A)
Geluidsvermogen:
Onzakerheid: 3
Trillingsniveau 3 assen:
ah: 3,00 m/s
Onzakerheid: 1,50 m/s
2
2
LET OP:
De aangegeven meetwaarden gelden voor nieuwe gereed
schappen. Bij dageliJks gebruik veranderen geluids -e trillingswaarden.De bovenstaande waarden zijn vergelijkende
waarden en zijn bedoeld voor een eerste beoordeling van de
risico’s waaraan de gebruiker van deze machine blootstaat
tijdens de gebruiksperiode. Voor een juiste bepaling van de
gebruiksperiode moeten ook de momenten worden meegeteld waarop de machine onbelast draait en is uitgeschakeld.
De bovenstaande waarden hebben betrekking op de normale
gebruiksdoeleinden van deze machine. Als de machine voor
andere doeleinden wordt gebruikt, als andere accessoires worden gebruikt of als de machine niet regelmatig wordt onderhouden, kunnen de geluids- en trillingswaarden tijdens het
gebruik aanzienlijk hoger liggen..
Gebruik gehoorbescherming!
21
Vertaling van de originele handleiding
Page 22

Beoogd gebruik
Dit elektrische gereedschap is bedoeld om te functioneren
als schuurmachine, geschikt voor het droog schuren van hout,
kunststof, metaal, stucwerk en gelakte oppervlakken. Lees
het veiligheidsadvies, de instructies, de illustraties en de specificaties, verstrekt met het gereedschap. Als de onderstaande instructies niet in acht worden genomen, kan dit leiden tot
elektrische schokken, brand of ernstige ongevallen.
Veiligheid
Gebruik geen accessoires die niet specifiek voor het daarvoor bedoelde gebruik zijn gemaakt of door de fabrikant worden aangeraden. Het simpele feit dat het accessoire op uw
gereedschap past garandeert geen veilige werking.
De nominale snelheid van het accessoire moet minstens gelijk zijn aan de maximale snelheid die op het gereedschap is
aangegeven. Accessoires die met een hogere snelheid dan
de nominale snelheid werken kunnen defect raken en worden
weggeslingerd.
De buitendiameter en de dikte van uw accessoire moet
geschikt zijn voor de capaciteiten van de veiligheidsbescherming van uw gereedschap. Accessoires met onjuiste afmetingen kunnen niet correct worden beschermd of beheerd.
De hulpstukken moeten goed op de spindel van het gereedschap passen. Hulpstukken waarvan de gaten niet overeenstemmen met de montageelementen van het gereedschap
zullen niet in evenwicht blijven en overmatig trillen waardoor
de controle kan worden verloren. Gebruik geen beschadigde
hulpstukken. Als het gereedschap of het hulpstuk is gevallen,
Vertaling van de originele handleiding
22
Page 23

de eventuele schade onderzoeken of een niet beschadigd hulpstuk installeren. Na een hulpstuk te hebben onderzocht en
geïnstalleerd, u samen met de andere aanwezige personen op
een veilige afstand van het draaiend hulpstuk plaatsen en het
een minuut onbelast op maximale snelheid in werking stellen.
Beschadigde accessoires breken over het algemeen tijdens
deze testperiode.
Gebruik het elektrisch gereedschap enkel voor droog schuren.
Het gebruik van water of andere koelvloeistoffen kan elektrocutie of elektrische schokken veroorzaken. Het elektrisch
gereedschap niet laten werken in de buurt van ontvlambare
materialen. De vonken, veroorzaakt door het schuren van
metalen, zouden deze materialen kunnen ontsteken.
Oververhitting van het te bewerken materiaal en de schuurmachine voorkomen. Voor het begin van een pauze moet u
de stoffilter-cassette leegmaken. De schuurstof in de stoffilter-cassette en in de filter kan onder ongunstige omstandigheden, zoals bij een vonk bij het slijpen van metalen, ontbranden. Tijdens het schuren kan er schadelijk stof worden geproduceerd; contact of inademing kunnen een gevaar vormen
voor de gezondheid van de gebruikers en personen die in de
buurt zijn. De veiligheidsvoorschriften die van toepassing zijn
in de betreffende landen in acht nemen.
Het elektrisch gereedschap niet laten werken in de buurt van
ontvlambare materialen. De vonken, veroorzaakt door het
schuren van metalen, zouden deze materialen kunnen ontsteken.
23
Vertaling van de originele handleiding
Page 24

Gebruik klemmen voor de bevestiging van het te bewerken
werkstuk. Houd tijdens het gebruik in geen enkel geval het te
bewerken werkstuk in de ene hand en het elektrisch gereedschap in de andere hand. Door het te bewerken werkstuk met
klemmen te bevestigen, kunnen beide handen vrij blijven
waardoor het gereedschap beter kan worden beheerd.
Pictogrammen
Sommige van de volgende symbolen kunnen aanwezig zijn op
uw instrument. Gelieve ze te bestuderen en hun betekenis te
leren. Juiste interpretatie zal het beste gebruik en veilig hulpmiddel mogelijk te maken.
Waarschuwing
Lees de volgende instructie voor u het product gebruikt
Draag een veiligheidsbril
Draag gehoorbescherming
Draag een masker
Draag beschermende handschoenen
Merkteken van overeenstemming
Verwijdering van ontmanteld
Vertaling van de originele handleiding
24
Page 25
Onderdelen van de machine
1 Identificatielabel met technische gegevens
2 ON/OFF schakelaar
3 Snelheidsregeling
4 Aansluiting voor afzuigslang inw. Ø 29 mm
5 Schuurzool houder voor klittenband schuurpapier
5a Rechthoekig (62 13 20)
5b Driehoekig (62 13 10)
5c Cirkelvormig (62 13 30)
6 Ventilatiegleuven van de motor
7 Bevestigingsschroeven van de pad
8 Stof-filtercassette
8a Filterhouder
8b Cassette
25
Vertaling van de originele handleiding
62 13 3062 13 1062 13 20
Page 26
Ingebruikneming
LET OP:
Neem de netspanning in acht! De netspanning moet overeenstemmen met de spanning aangeduid op de identificatielabel met technische gegevens (1).
GEVAAR:
Voor het vervangen van accessoires of uitvoeren van werkzaamheden aan het elektrische gereedschap moet u de stekker uit het stopcontact trekken.
Voorafgaand het gebruik:
Alvorens de machine in te schakelen moet gecontroleerd worden of:
- de doos intact is en geen tekenen van beschadiging door het
transport en de opslag vertoont;
- de machine compleet is; er moet gecontroleerd worden of
het aantal en de aard van deonderdelen klopt met dat wat in
dit boekje staat;
- de energiebron in overeenstemming is met de kenmerken
van de machine;
- het elektrische snoer en de betreffende stekker in goede
staat zijn;
- de ON/OFF (2) goed functioneert, maar werk met de stekker
uit het stopcontact;
- alle onderdelen van de machine op de juiste manier
gemonteerd zijn en geen beschadigingen vertonen;
- de ventilatiegleuven (6) niet verstopt zijn;
- dat de machine op de juiste manier op een geschikt en
doeltreffend afzuigsysteem aangesloten is.
Vervanging van de papierschijf / Montage:
- Zorg ervoor dat de papierschijf goed aan de schuurpad hecht
Vertaling van de originele handleiding
26
Page 27
door erop te drukken waarbij u erop moet letten dat de
gaten die in de schuurschijf aangebracht zijn precies goed
ten opzichte van de afzuiggaten die in de schuurpad (10)
aangebracht zijn komen te zitten.
Demontage:
- Trek de gebruikte schuurschijf eraf;
- doe de nieuwe schuurschijf erop door hem op de schuurpad
(zie „Montage“)
Vervanging van het schuurplateau
Een beschadigd schuurplateau onmiddellijk vervangen.
Optimale resultaten kunnen enkel verkregen worden met originele hulpstukken. De montage van een schuurplateau met
verkeerde afmetingen kan overmatige trillingen veroorzaken
die niet toegelaten zijn.
- Draai de schroeven (7) van de schuurpad los;
- volg de omgekeerde procedure bij het monteren.
Start de machine en controleer of er geen abnormale trillingen
zijn en of de schuurschijf niet uit het midden draait. Als dit
wel het geval is moet u de machine onmiddellijk uitschakelen
en de storing proberen te verhelpen.
Starten en stoppen
- Starten: druk de schakelaar (2) naar beneden op stand “ON”.
- Stoppen: druk de schakelaar (2) naar boven op stand “OFF”.
LET OP:
Als de ON/OFF schakelaar is ingeschakeld, moet na een
onderbreking van de elektrische stroomtoevoer de schakelaar
vrij gelaten worden (zie stilstand).
27
Vertaling van de originele handleiding
Page 28
Elektronische regeling van het toerental
Het toerental kan geregeld worden door in de gewenste mate
aan het wieltje de snelheidsregelaar (3) aan de achterkant van
de machine te draaien. De snelheid moet ingesteld worden op
basis van de kenmerken van de schuurschijven en het materiaal dat bewerkt moet worden.
Stofafzuiging
LET OP:
Tijdens het schuren kan er schadelijk stof worden geproduceerd: Altijd op een geschikt afzuigsysteem aansluiten.
Bij werkzaamheden waarbij stof wordt geproduceerd een
masker dragen.
Ingebouwde afzuiging
- Voor een optimale stofafzuiging van tijd tot tijd het kegel
filter (8) legen en de filterhouder (8a) zorgvuldig reinigen en
regelmatig het patroon (8b) reinigen;
- Tijdens werkzaamheden op verticale oppervlakken de
machine zo vasthouden dat het kegelfilter naar beneden is
gericht.
- Monteren van het kegelfilter: plaats het kegelfilter (8) op
het aansluitpunt voor de afzuigleiding (4). Het kegelfilter
aanduwen tot aan de aanslag.
- Controleer de vulling van het kegelfilter: de vulstatus van
het kegelfilter is gemakkelijk te controleren via de door zichtige filterhouder (8 a).
- Kegelfilter reinigen: om het kegelfilter te legen moet het
worden verwijderd uit het aansluitpunt voor de afzuigleiding,
door het in de tegenovergestelde richting als bij de montage
te draaien;
Vertaling van de originele handleiding
28
Page 29
- Maak het patroon (8.b) los en trek het uit de filterhouder;
- Leeg de filterhouder;
- De plaatjes van het patroon met een zachte borstel reinigen.
Externe afzuiging
- Tijdens werkzaamheden op verticale oppervlakken de
machine zo vasthouden dat de afzuigleiding naar beneden is
gericht.
- Montage: een afzuigleiding op het aansluitpunt voor de
afzuigleiding (4) aanbrengen;
- De afzuigleiding op een geschikt afzuigsysteem aansluiten
(niet meegeleverd)..
Onderhoud
Alle werkzaamheden moeten uitgevoerd worden ter-
wijl de stekker uit het stopcontact gehaald is. Aan het einde van het werk of indien nodig, moet het machineblok met
een straal perslucht schoongeblazen worden waarbij er goed
op gelet moet worden dat de ventilatiegleuven van de motor
goed schoongemaakt worden.
De gebruiker mag geen andere werkzaamheden uitvoeren.
Voor het onderhoud en de periodieke reiniging van de inwendige delen, zoals de borstels, de lagers, de tandwielen enz.
of in andere gevallen moet u zich tot een erkende servicedienst wenden of www.storch.de. Gebruik alleen de originele
STORCH onderdelen of accessoires.
29
Vertaling van de originele handleiding
Page 30

Verwijdering
Uitsluitend voor landen binnen de EG: Conform de Europese richtlijn inzake het afval van elektrische en elektronische
apparatuur en de tenuitvoerlegging ervan volgens de nationale
wetgevingen, moeten gebruikt elektrisch apparatuur dat wordt
afgedankt gescheiden worden ingezameld om een milieuvriendelijke recycling te bevorderen.
Aan het einde van het nuttige leven mag het apparaat niet in
het milieu worden geloosd of bij het normale huisafval worden gestopt, maar moet het worden verwijderd door erkende
afvalverwerkingsbedrijven (informeer bij de plaatselijke autoriteiten naar de manier waarop het product volgens de wet
moet worden verwijderd). Een correcte verwijdering van het
product draagt bij aan de bescherming van de gezondheid en
het milieu. De illegale verwijdering van het product zal worden beboet.
Een juiste verwerking van het product draagt bij aan de
bescherming van de volksgezondheid en het milieu. Een illegale afvoer van het product is strafbaar.
Vertaling van de originele handleiding
30
Page 31

Garantie
Garantievoorwaarden:
Voor onze apparaten gelden de wettelijke garantieperioden
van 12 maanden vanaf aankoopdatum/factuurdatum van de
eindklant. Indien wij langere perioden in een garantieverklaring hebben toegezegd, dan worden deze speciaal in de
gebruiksaanwijzingen van de desbetreffende apparaten toegelicht.
Indienen van garantieclaims:
Bij een garantieclaim vragen wij u het gehele apparaat samen
met de rekening franco aan ons logistiekcentrum in Berka of
naar een door ons geautoriseerd servicestation te verzenden.
Neem eerst contact op met de STORCH Service-Hotline
(hiervoor worden kosten in rekening gebracht): +49 (0)202 .
49 20 – 110.
Garantieclaims
Claims uitsluitend met betrekking tot materiaal- of productiefouten en uitsluitend bij gebruik van het apparaat conform
de voorschriften. Voor slijtdelen gelden deze aanspraken niet.
Alle claims vervallen bij inbouw van onderdelen van externe herkomst, bij verkeerde hantering en opslag en bij het
klaarblijkelijk niet in acht nemen van de gebruiksaanwijzing.
Reparaties uitvoeren
Reparaties mogen uitsluitend door onze fabriek of door
STORCH geautoriseerde servicestations worden uitgevoerd.
31
Vertaling van de originele handleiding
Page 32

EG-conformiteitsverklaring
Naam/adres van de opsteller:
STORCH Malerwerkzeuge & Profigeräte GmbH
Platz der Republik 6-8 . D - 42107 Wuppertal
Bij deze verklaren wij
Dat het hieronder vermelde apparaat op basis van zijn ontwerp en type en in de door ons in omloop gebrachte uitvoering
aan de toepasselijke elementaire veiligheids- en gezondheidseisen van de EU-richtlijnen voldoet.
Bij een niet met ons afgestemde modificatie van het apparaat
is deze verklaring niet langer geldig.
Aanduiding van het apparaat / Slingerslijper Delta 100
Artikelnummer: 62 13 10
Slingerslijper Quadra 80
62 13 20
Roterende excentrische
Excenterschuurmachine
Omega 125 / 62 13 30
Apparaattype: Schuurmachine
Toegepaste EG-richtlijnen
Machinerichtlijn: 2006 / 42 / EG
Laagspanningsrichtlijn: 2006 / 95 / EG
EG-richtlijn Elektromagnetische
compatibiliteit: 2004 / 108 / EG
RoHS-richtlijn: 2011 / 65 / EG
Vertaling van de originele handleiding
32
Page 33
Toegepaste geharmoniseerde normen
EEN 60745-1: 2009 + A11: 2010
EN 60745-2-4:2009+ A11:2011.
EN 55014-1: 2006 + A1: 2009 + A2: 2011
EN 55014-2: 1997 + A1: 2001 + A2: 2008
EN 61000-3-2: 2006 + A1: 2009 + A2: 2009
EN 61000-3-3: 2008
EN 50581: 2012
Gevolmachtigde voor samenstelling van de technische
documentatie:
STORCH Malerwerkzeuge & Profigeräte GmbH
Platz der Republik 6 - 8
42107 Wuppertal
Jörg Heinemann
- Directeur -
Wuppertal, 11-2016
33
Vertaling van de originele handleiding
Page 34

FR
Nous vous remercions
de la confiance dont vous témoignez envers STOCH. Avec cet
achat vous avez opté pour un produit de qualité. Si vous avez
malgré tout des suggestions pour l‘amélioration ou si vous
deviez rencontrer un problème, nous sommes avec plaisir à
votre disposition.
Dans ce cas, contactez votre représentant, ou directement
notre service clients, s‘il s‘agit d‘un problème urgent.
Salutations dévouées
SAV STORCH
Tél. : +49 (0) 2 02 . 49 20 - 112
Fax : +49 (0)2 02 . 49 20 - 244
Ligne d‘assistance SAV gratu +49 800 7 86 72 47
Service gratuit de commande par téléphone :
+49 800. 7 86 72 44
Fax de commande gratuit : +49 800. 7 86 72 43
(uniquement en Allemagne)
Traduction des instructions d‘origine
34
Page 35

Table des matières Page
Caracteristiques techniques 36 - 37
Utilisation conforme 38
Instructions de securite 38 - 40
Symboles 40
Parties de la machine 41
Mise en service 42 - 44
Aspiration des poussières 44 - 45
Élimination 46
Garantie 47
Déclaration de conformité CE 48 - 49
35
Traduction des instructions d‘origine
Page 36
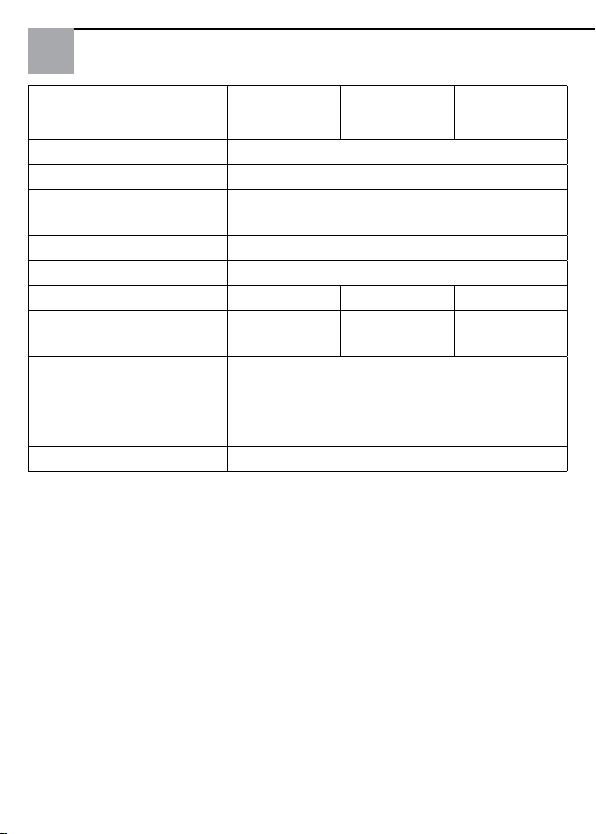
Caracteristiques
62 13 10 62 13 20 62 13 30
techniques
Classe d‘isolation II
Puissance absorbee 200 W
Reglage electronique
de la vitesse
n0 tours à vide 7.000 - 13.000 U/min.
Diametre orbite 2 mm
Forme plateau triangulaire rectangulaire circulaire
Dimensions plateau 100 x 147 mm80 x 130 mmØ 125 mm
Systeme d’aspiration * Auto-aspiration (cassette à poussière
incluse dans la fourniture).
Raccordement en option d‘un
aspirateur à ponceuse
Poids 1,15 kg
Les valeurs indiquées sont basées sur une tension nominale
de 230V / 50Hz. Dans le cas des tensions et des fréquences
de différentes valeurs de la puissance peut varier. Reportezvous aux spécifications techniques d‘étiquettes pour les
valeurs nominales de l‘outil. (*) La machine doit fonctionner
reliée à un système d’aspiration approprié des poussières (voir
Aspiration des poussières).
ja
Toutes données sans garantie! Sous réserve de modifications techniques et d‘erreurs!
Traduction des instructions d‘origine
36
Page 37
Informatoin noise / mean acceleration value
Le niveau équivalent de la pression sonore (niveau de bruit) e
la valeur quadratique moyenne de l‘accèlérationest est mesurés conformément aux normes EN 60745.
Niveau de pression acoustique
LPA : 74 dB(A) LWA : 85 dB(A)
Niveau de puissance acoustique :
Incertitude : 3
Niveau des vibration selon 3 axies :
ah : 3,00 m/s
Incertitude : 1,50 m/s
2
2
DANGER :
Les valeurs d’émission relevées sont comparatives et ne
doivent être employées que pour une évaluation provisoire du
risque auquel l’opérateur est exposé au cours de la période de
travail. Une évaluation appropriée de la période de travail doit
également inclure des périodes d’inactivité et d’arrêt de l’outil. Ces valeurs d’émission sont représentatives des principales
applications auxquelles l’outil est destiné. Si l’outil est utilisé
dans d’autres applications, avec d’autres accessoires, ou s’il ne
bénéficie pas d’un entretien régulier, les valeurs d’émission en
cours de fonctionnement peuvent s’accroître dans des proportions significatives.
Utilisez une protection acoustique !
37
Traduction des instructions d‘origine
Page 38

Utilisation conforme
La fonction prévue de cet outil électrique est le ponçage ; il
est approprié pour le ponçage à sec du bois, du plastique, du
métal, du stuc et des surfaces peintes. Lire toutes les mises
en garde de sécurité, les instructions, les illustrations et les
détails fournis avec cet outil. Le non-respect de toutes les
instructions reportées ci-dessous peut causer une électrocution, un incendie et/ou un accident grave.
Instructions de securite
N’utilisez pas d’accessoires n’ayant pas été spécialement réalisés pour l’utilisation prévue ou conseillés par le fabricant. Le
simple fait que l’accessoire puisse être fixé sur votre outil ne
garantit pas un fonctionnement en toute sécurité.
La vitesse nominale de l’accessoire doit être au moins égale
à la vitesse maximale indiquée sur l‘outil. Les accessoires
fonctionnant à une vitesse supérieure à la vitesse nominale
peuvent se briser et être projetés en l’air.
Le diamètre extérieur et l’épaisseur de votre accessoire
doivent être adaptés aux caractéristiques de capacité du protecteur de votre outil. Il est impossible de protéger ou de
contrôler de façon appropriée les accessoires présentant des
dimensions non correctes.
La taille des meules ou de tout autre accessoire doit être
adaptée à la broche de l’outil. Les accessoires dont le perçage
ne correspond pas exactement aux éléments de montage de
l’outil sont en déséquilibre, vibrent excessivement et peuvent
entraîner une perte de contrôle.
La conformation des accessoires doit s‘adapter correctement
à la broche de l‘outil. Les accessoires dotés de trous de l‘ar-
Traduction des instructions d‘origine
38
Page 39

bre qui ne correspondent pas aux éléments de montage sur
l‘outil ne restent pas en équilibre, ils vibrent excessivement et
peuvent provoquer une perte de contrôle.
Ne pas utiliser un accessoire endommagé. Si l‘outil ou l‘accessoire a subi une chute, examiner les dommages éventuels ou
installer un accessoire non endommagé. Après avoir examiné
et installé un accessoire, mettez-vous, avec les personnes
présentes, à une distance de sécurité de l‘accessoire rotatif et
faites fonctionner l‘outil à la vitesse maximum à vide pendant
une minute.
En général, les accessoires endommagés se cassent au cours
de cet d’essai. Utiliser l‘outil électrique exclusivement pour
le polissage à sec. L‘utilisation d‘eau ou d‘autres liquides de
refroidissement liquides peut provoquer une électrocution.
Ne pas faire fonctionner l‘outil électrique à proximité de
matériaux inflammables. Les étincelles générées par le ponçage de matériau métallique pourraient enflammer ces matériaux.
Éviter une surchauffe du matériau à usiner et de la ponceuse.
Avant de commencer une pause, il convient de vider la cassette du filtre à poussière. La poussière de ponçage dans la cassette du filtre à poussière et dans le filtre peut s‘enflammer
par exemple du fait d‘une étincelle lors du ponçage. Durant
les opérations de polissage, des poussières nuisibles peuvent
être produites, le contact ou l‘inhalation peuvent constituer un
danger pour la santé des utilisateurs et des personnes qui se
trouvent à proximité. Observer les dispositions de sécurité valables dans les pays respectifs. Brancher l‘outil à une extraction de l‘appareil de la poussière approprié.
39
Traduction des instructions d‘origine
Page 40
Pour protéger la santé porter des masques Utiliser des étaux
pour la fixation de la pièce à usiner. Ne jamais tenir la pièce
à usiner avec une main et l‘outil électrique avec l‘autre main,
pendant qu‘on l‘utilise. En fixant la pièce avec des étaux, on
peut avoir les deux mains libres pour une meilleure gestion de
l‘outil électrique.
Symboles
Certains des symboles suivants peuvent être utilisés sur votre
outil. Se il vous plaît de les étudier et apprendre leur signification. Une interprétation correcte de ces symboles vous permettra d‘utiliser l‘outil meilleur et plus sûr.
Symbole d‘avertissement
Lisez le manuel d‘instruction
Porter des lunettes de protection
Porter une protection de l‘oreille
Porter un masque
Porter un des gants
Conforme aux normes CE
Élimination des déclassés
Traduction des instructions d‘origine
40
Page 41
Parties de la machine
1 Etiquette d‘identification des données techniques
2 Interrupteur ON/OFF
3 Régulateur de vitesse
4 Bouche d’aspiration Ø 29 mm
5 Plateau porte-papier abrasif velcro
5a Rectangulaire (62 13 20)
5b Triangulaire (62 13 10)
5c Circulaire (62 13 30)
6 Fentes pour ventilation moteur
7 Vis de fixation de la plateau
8 Cassette filtrante à poussière
8a Support de filtre
8b Cassette
41
Traduction des instructions d‘origine
62 13 3062 13 1062 13 20
Page 42
Mise en service
ATTENTION :
Observer la tension de réseau ! La tension du réseau doit
correspondre à celle indiquée sur l‘étiquette d‘identification
données techniques (1).
DANGER :
Avant un remplacement des accessoires et les éventuels travaux sur l‘outil électrique, il est impératif de débrancher la
fiche de la prise électrique.
Avant la mise en service :
Avant de mettre la machine en service, s‘assurer que:
- l‘emballage est intégre et qu‘il ne montre aucun signe
d‘endomma-gements dus au transport et au stockage;
- la machine est complète; s‘assurer que le nombre et la
nature des composants sont conformes aux
indications contenues dans le présent livret d‘instructions;
- la source d‘énergie est conforme aux caractéristiques de la
machine;
- le câble d‘alimentation et la fische relative sont en parfait
état;
- l‘interrupteur de mise en ON/OFF (2) est efficace en agis
sant cependant lorsque la fiche est débranchée;
- tous les composants de la machine sont montès
correctement et ne présentent pas de signes
d‘endommagement;
- les fentes de ventililation (6) ne sont pas bouchées;
- la machine soit relièe à un dispositif d’aspiration appropriè
et efficace.
Traduction des instructions d‘origine
42
Page 43
Remplacement de papier abrasif
montage :
- Appliquer le papier abrasif par pression en veillant à ce que
les trous du papier correspondent aux trous d’aspiration qui
se trouvent sur le porte-disque (10).
Demontage :
- Arracher les papier abrasif usés;
- le montage des nouveaux papier abrasifs à fixation par
velcro (voir „Montage“)
Remplacement du plateau
Remplacer immédiatement un plateau endommagé. On
obtient d‘excellents résultats uniquement avec des accessoires
originaux. Le montage d‘un plateau de dimensions erronées
peut causer de vibrations excessives et non admises pour la
machine.
- Dèvisser les vis (7) présentes sur le porte-disque;
- pour le montage, agir dans le sens inverse.
Mettre la machine en marche et s‘assurer qu’il n’y a pas de
vibrations anomales et que disque abrasif n‘est pas décentré.
Dans le cas contraire, énteindie la machine immediatement et
éliminer les anomalies.
Mise en marche et arret
- Mise en marche: placer l’interrupteur (2) en position “ON”.
- Arrêt : placer l’interrupteur (2) en position “OFF”.
ATTENTION:
Après une interruption de l‘énergie électrique, si l‘interrupteur
ON/OFF est enclenché, il faut libérer l’interrupteur (voir Arrêt).
43
Traduction des instructions d‘origine
Page 44
Réglage électronique du nombre de tours
Le réglage du nombre de tours s’obtient en manoeuvrant de
manière appropriée le bouton du régulateur de vitesse (3) situé
sur la partie arrière de la machine. Le choix de la vitesse doit
être fait en fonction des caractéristiques des disques du papier
abrasif et du matériau à usiner.
Aspiration des poussières
ATTENTION :
Durant les opérations de polissage, des poussières nuisibles
peuvent être produites : Toujours brancher à un dispositif d‘aspiration adapté.
En cas de travaux qui produisent de la poussière, porter
un masque.
Aspiration intégrée
- Afin de garantir une aspiration optimale des poussières,
vider à temps le filtre conique (8), nettoyer soigneusement
le porte-filtre (8a) et nettoyer régulièrement la cartouche
(8b) ;
- Durant les travaux sur des surfaces verticales, tenir la
machine de façon à ce que le filtre conique soit tourné vers
le bas.
- Montage du filtre conique: placer le filtre conique (8) sur le
raccordement pour tuyau d‘aspiration (4). Pousser le filtre
conique jusqu‘à l‘amener sur la butée.
- Contrôle remplissage filtre conique: l‘état de remplissage du
filtre conique peut être facilement contrôlé à travers le
porte-filtre (8a) transparent.
Traduction des instructions d‘origine
44
Page 45
- Nettoyage du filtre conique: pour vider le filtre conique, le
retirer du raccordement pour tuyau d‘aspiration en agissant
en sens contraire au montage ;
- Décrocher la cartouche (8.b) et l‘extraire du porte-filtre ;
- Vider le porte-filtre ;
- Nettoyer les lames de la cartouche avec une brosse douce.
Aspiration externe
- Durant les travaux sur des surfaces verticales, tenir la
machine de façon à ce que le tuyau d‘aspiration soit tourné
vers le bas.
- Montage : introduire un tuyau d‘aspiration sur le
raccordement pour tuyau d‘aspiration (4) ;
- Brancher le tuyau d‘aspiration avec un système d‘aspiration
adapté (non fourni).
Entretien
Toutes les opèrations doivent être effectuées à fiche
ètant débranchèe. A la fin du travail et en cas de nècessitè,
dèpoussièrer le corps de la machine à l’aide d’un jet d’air comprimè en faisant particuliérement attention au nettoyage des
fentes de ventilation du moteur.
Aucune autre intervention de l’utilisateur n’est pas admise.
Tous les travaux d’entretien et les travaux de polissage des
piéces internes, comme les brosses, coussinet, engrenages
etc., doivent être effecuès par un atelier de réparation autorisè
www.storch.de. Utilisez uniquement les pièces ou accessoires
originaux STORCH.
45
Traduction des instructions d‘origine
Page 46

Élimination
Uniquement pour les pays de l’UE : Conformément à la
directive européenne relative aux déchets d’équipements
électriques et électroniques et son application selon les normes nationales, les équipements électriques usagés doivent
être collectés séparément afin d’être recyclés de manière écologiquement responsable.
Le produit, lorsqu‘il atteint sa fin de vie, ne doit pas être dispersé dans l’environnement ou jeté avec les déchets ménagers, mais doit être collecté dans un centre de tri sélectif afin
d’être éliminé (Veuillez contacter les autorités locales pour
obtenir les centres de tri conformes à la législation).
L‘élimination correcte du produit contribue à la protection de
la santé et de l‘environnement. Des sanctions contre les personnes ne respectant pas l‘élimination correcte du produit
seront prises.
L’élimination correcte du produit contribue à la protection de
la santé et de l’environnement. En n’éliminant pas le produit
conformément à la loi en vigueur vous vous exposez à des
sanctions.
Traduction des instructions d‘origine
46
Page 47

Garantie
Conditions de garantie
Les durées de garantie légales de 12 mois à compter de
la date d'achat / de la facture du client final professionnels
s'appliquent à nos appareils. Si nous mentionnons des délais
supérieurs dans le cadre d'une déclaration de garantie, ceux-ci
sont mentionnés dans les instructions de service des appareils
concernés.
Exercice
Dans un cas couvert par la garantie, nous vous demandons de
renvoyer l'appareil complet franco à notre centre logistique à
Berka accompagné de la facture ou de l'expédier à une station
SAV agréée par nous. Veuillez contacter préalablement l‘assistance téléphonique payante de la société STORCH: +49
(0)202 . 49 20 – 110.
Demande de prise en garantie
Les demandes couvrent exclusivement les défauts de matériau ou d‘ouvrage et ne couvrent qu‘une utilisation conforme
à la destination de l‘appareil. Les pièces d‘usure ne sont pas
prises en charge par la garantie. Tout droit à garantie est rendu caduque par le montage de pièces qui ne sont pas d‘origine, par une manipulation et un entreposage incorrects ainsi
qu‘en cas de non-respect évident des instructions de service.
Exécution de réparations
Toutes les réparations doivent exclusivement être réalisées
par notre usine ou par des services SAV agréés par STORCH.
47
Traduction des instructions d‘origine
Page 48

Déclaration de conformité CE
Nom / adresse de l‘exposant :
STORCH Malerwerkzeuge & Profigeräte GmbH
Platz der Republik 6-8 . D - 42107 Wuppertal
Nous déclarons, par le présent acte,
que le produit cité ci-après respecte les exigences fondamentales et en vigueur en matière de sécurité et de santé des
directives européennes de par leur conception ainsi que dans
la version commercialisée par nos soins.
En cas de modification non convenue avec nous, la présente
déclaration perd toute validité.
Désignation de l‘appareil / Ponceuse vibrante
Référence article : Delta 100 / 62 13 10
Ponceuse vibrante
Quadra 80 / 62 13 20
Roterende excentrische
Ponceuse excentrique
Omega 125 / 62 13 30
Type d‘appareil : Ponceuse
Directives CE appliquées
Directive sur les machines : 2006 / 42 / EG
Directive sur la basse tension : 2006 / 95 / EG
Directive européenne sur la
compatibilité électromagnétique : 2004 / 108 / EG
Directive RoHS : 2011 / 65 / EG
Traduction des instructions d‘origine
48
Page 49
Normes harmonisées appliquées
EEN 60745-1: 2009 + A11: 2010
EN 60745-2-4:2009+ A11:2011.
EN 55014-1: 2006 + A1: 2009 + A2: 2011
EN 55014-2: 1997 + A1: 2001 + A2: 2008
EN 61000-3-2: 2006 + A1: 2009 + A2: 2009
EN 61000-3-3: 2008
EN 50581: 2012
Fondé de pouvoir pour la compilation des documents
techniques :
STORCH Malerwerkzeuge & Profigeräte GmbH
Platz der Republik 6 - 8
42107 Wuppertal
Jörg Heinemann
- Gérant -
Wuppertal, 11-2016
49
Traduction des instructions d‘origine
Page 50

IT
Grazie
per la fiducia accordata a STORCH. Con l‘acquisto avete
scelto un prodotto di qualità. Se comunque avete dei suggerimenti volti a migliorare la nostra offerta o se doveste incontrare qualche difficoltà, non esitate a rivolgerVi a noi.
Contattate il Vostro rappresentante oppure rivolgeteVi direttamente a noi in casi urgenti.
Distinti saluti,
STORCH Reparto Assistenza
Tel.: 02 - 66 22 77 15
Istruzioni originali
50
Page 51

Indice Pagina
Dati tecnici 52 - 53
Uso conforme alla destinazione 54
Indicazioni di sicurezza 54 - 56
Simboli 56
Parti della macchina 57
Messa in funzione 58 - 60
Aspirazione delle polveri 60 - 61
Smaltimento 62
Garanzia 63
Dichiarazione di conformità CE 64 - 65
51
Istruzioni originali
Page 52
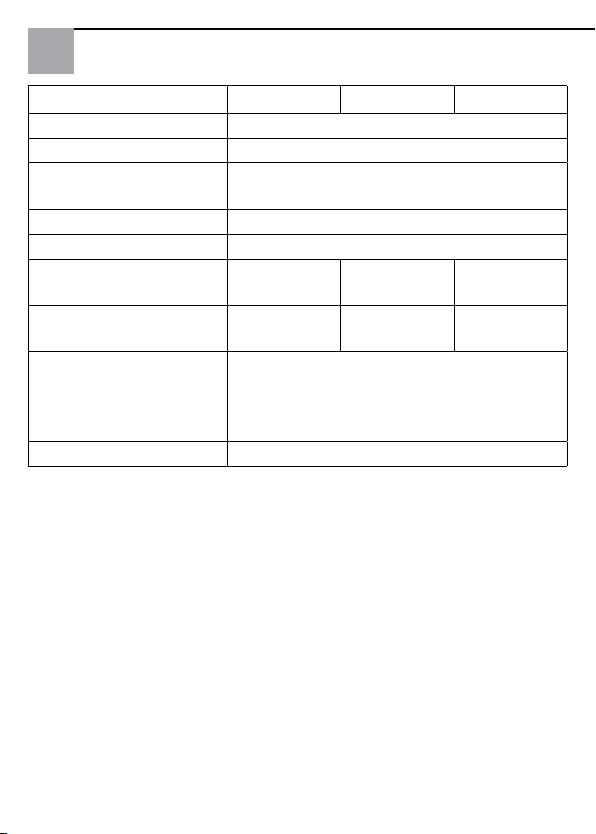
Dati tecnici
62 13 10 62 13 20 62 13 30
Classe di isolamento II
Potenza assorbita 200 W
Regolazione elettroni-
si
ca della velocità
n0 giri a vuoto 7.000 - 13.000 U/min.
Diametro orbita 2 mm
Forma piastra/pla-
triangolare rettangolare circolare
torello
Dimensioni piastra/
100 x 147 mm80 x 130 mmØ 125 mm
platorello
Sistema di aspirazione *Auto-aspirante (cassetta raccogli
polvere compresa nella fornitura).
Collegamento opzionale di un
aspirapolvere per levigatura
Massa 1,15 kg
I valori indicati sono riferiti ad una tensione nominale di 230
V / 50 Hz. In caso di tensioni o frequenze d’alimentazione
differenti, i valori possono variare. Riferirsi all’etichetta dati
tecnici per conoscere i valori di targa dell’utensile. (*) La macchina deve funzionare collegata ad un opportuno sistema di
aspirazione delle polveri (vedi Aspirazione delle polveri).
Tutte le indicazioni senza garanzia! Con riserva di modifiche
tecniche ed errori!
Istruzioni originali
52
Page 53
Informazione di rumore / valore medio
dell‘accelerazione
Il livello equivalente di pressione sonora (rumorosità) e il valore quadratico medio dell‘accelerazione è misurati secondo le
norme EN 60745.
Livello di Pressione acustica
LPA: 74 dB(A) LWA: 85 dB(A)
Potenza sonora:
Incertezza: 3
Livello di vibrazioni su 3 assi:
ah: 3,00 m/s
Incertezza: 1,50 m/s
2
2
ATTENZIONE:
I valori di misura indicati sono validi solo per utensili nuovi.
Nell’impiego quotidiano i valori di rumore e vibrazione cambiano. I valori di emissione indicati sono comparativi e utilizzabili per una valutazione provvisoria dei rischi di esposizione
dell’operatore durante il periodo di lavoro. La corretta valutazione del periodo di lavoro deve comprendere anche i tempi
di funzionamento a vuoto e di arresto dell’utensile. I valori di
emissioni indicati sono rappresentativi delle principali applicazioni dell’utensile. Se l’utensile viene utilizzato per altre applicazioni, con altri accessori o se non viene sottoposto a regolare manutenzione, i valori di emissione possono aumentare
sensibilmente durante il funzionamento.
Usare le protezioni acustiche!
53
Istruzioni originali
Page 54

Uso conforme alla destinazione
Il presente elettroutensile è destinato alla funzione come
levigatrice, adatta alla levigatura a secco di legno, plastica,
metallo, mastice e superfici verniciate. Leggere tutti gli avvertimenti di sicurezza, le istruzioni, le illustrazioni e le specifiche forniti con questo utensile. Il mancato rispetto di tutte le
istruzioni sotto riportate può causare una scossa elettrica, un
incendio e/o un incidente grave.
Indicazioni di sicurezza
Non utilizzare accessori non specificatamente realizzati per
l’uso previsto o non consigliati dal produttore. Il semplice fatto che l’accessorio possa essere fissato al vostro utensile non
garantisce un funzionamento in tutta sicurezza.
La velocità nominale dell’accessorio deve essere almeno pari
alla velocità massima indicata sull’utensile. Gli accessori fatti
funzionare a una velocità superiore a quella nominale possono
rompersi ed essere proiettati in aria.
Il diametro esterno e lo spessore del vostro accessorio devono
essere adatti alle caratteristiche di capacità della protezione di
sicurezza del vostro utensile. Gli accessori che hanno dimensioni non corrette non possono essere protetti o controllati adeguatamente.
La conformazione degli accessori deve adattarsi correttamente
al mandrino dell’utensile. Gli accessori dotati di fori dell’albero
che non corrispondono agli elementi di montaggio sull’utensile
non rimarranno in equilibrio, vibreranno eccessivamente e potranno provocare una perdita di controllo. Non usare un accessorio danneggiato. Se l’utensile o l’accessorio ha subito una
Istruzioni originali
54
Page 55

caduta, esaminare i danni eventuali o installare un accessorio
non danneggiato. Dopo aver esaminato e installato un accessorio, mettetevi, insieme alle persone presenti, a una distanza
di sicurezza dall’accessorio rotante e fate funzionare l’utensile
alla velocità massima a vuoto per un minuto. Gli accessori
danneggiati si romperanno in genere in questo periodo di prova.
Utilizzare l’elettroutensile esclusivamente per levigatura a
secco. L’utilizzo di acqua o di altri refrigeranti liquidi può provocare un’elettrocuzione o una scossa elettrica.
Non far funzionare l’utensile elettrico in prossimità di materiali
infiammabili. Le scintille generate dalla levigatura di materiale metallico potrebbero infiammare questi materiali.
Evitare un surriscaldamento del materiale da lavorare e della levigatrice. Prima di una pausa occorre svuotare il cassetto del filtro antipolvere. In caso di condizioni sfavorevoli, quali
ad esempio la generazione di scintille durante la lavorazione
di metallo, la polvere di levigatura nel cassetto del filtro antipolvere e nel filtro stesso può incendiarsi. Durante le operazioni di levigatura possono essere prodotte polveri dannose,
il contatto o l’inalazione possono costituire un pericolo per la
salute degli utenti e delle persone che si trovano nelle vicinanze. Osservare le disposizioni di sicurezza valide nei rispettivi
paesi.
Utilizzare morsetti per il fissaggio del pezzo da lavorare. In
nessun caso tenere il pezzo da lavorare con una mano e l’utensile elettrico con l’altra mano, mentre lo si utilizza. Fissando
il pezzo da lavorare con morsetti si possono avere ambedue
le mani libere per una migliore gestione dell’utensile elettrico.
55
Istruzioni originali
Page 56
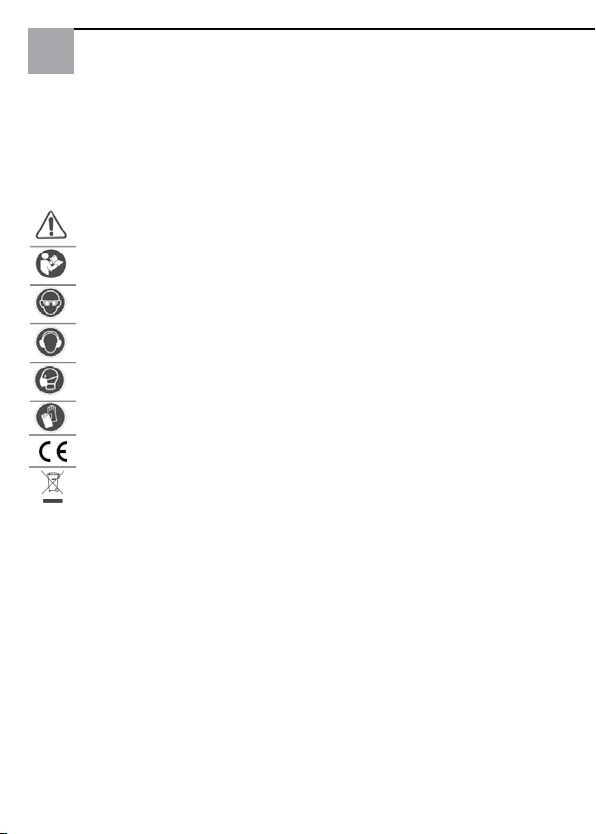
Simboli
Alcuni dei seguenti simboli possono essere presenti sul vostro
utensile. Si prega di studiarli e imparare il loro significato.
Una corretta interpretazione permetterà un utilizzo migliore e
sicuro dell’utensile.
Attenzione pericolo
Leggere le istruzioni
Indossare gli occhiali protettivi
Indossare le protezioni acustiche
Indossare una maschera
Indossare guanti protettivi
Marcatura di conformità
Smaltimento dell’apparecchio dismesso
Istruzioni originali
56
Page 57
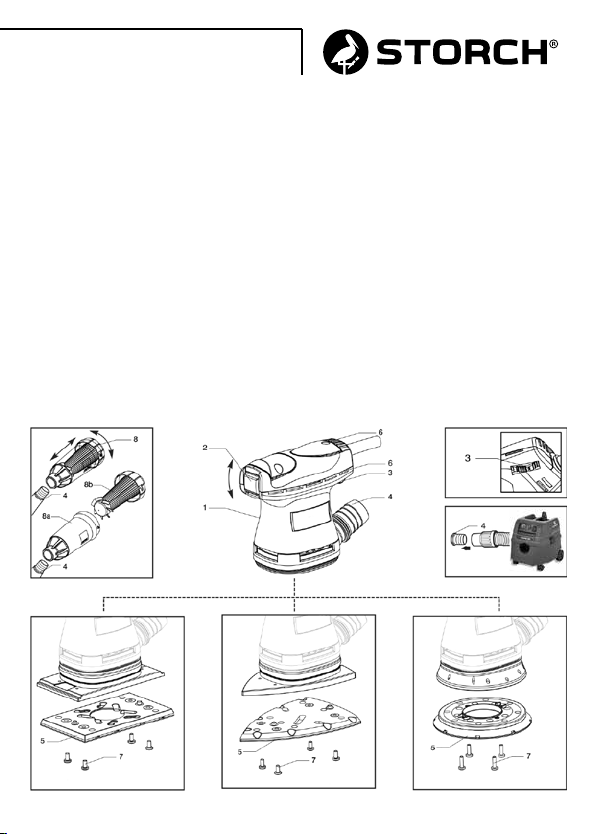
Parti della macchina
1 Etichetta di identificazione dati tecnici
2 Interruttore ON/OFF
3 Regolatore di velocità
4 Attacco per tubo di aspirazione Ø interno di 29 mm
5 Piatra/platorello portacarta abrasiva velcrata:
5a Rettangolare (62 13 20)
5b Triangolare (62 13 10)
5c Circolare (62 13 30)
6 Feritoie per ventilazione motore
7 Viti fissaggio piastra/platorello
8 Cassetto filtro antipolvere
8a Porta filtro
8b Cassetto
62 13 3062 13 1062 13 20
57
Istruzioni originali
Page 58
Messa in funzione
ATTENZIONE:
Osservare la tensione di rete! La tensione della rete deve corrispondere a quella indicata sulla targhetta dell’elettroutensile. (1).
ATTENZIONE:
Prima di cambiare eventuali accessori e prima di eseguire
eventuali lavori all‘elettroutensile, occorre staccare la spina
dalla presa elettrica.
Prima della messa in funzione:
Prima di mettere in funzione la macchina accertarsi che:
- l’imballo sia integro e non mostri segni di danneggiamento
dovuti a trasporto e magazzinaggio;
- la macchina sia completa; controllare che numero e natura
dei componenti siano conformi a quanto riportato sul
presente libretto;
- la fonte di energia sia conforme alle caratteristiche della
macchina;
- cavo di alimentazione e relativa spina siano in perfetto
stato;
- l’interruttore ON/OFF (2) sia efficiente operando, però,
a spina disinserita;
- tutti i componenti della macchina siano montati
correttamente e non presentino segni di danneggiamento;
- le feritoie di ventilazione (6) non siano ostruite;
- la macchina sia correttamente collegata ad un sistema
d’aspirazione idoneo ed efficiente.
Istruzioni originali
58
Page 59
Sostituzione della carta abrasiva montaggio:
- Fare aderire mediante pressione la carta abrasiva al platorello (5) avendo cura che i fori praticati sulla carta coincidano con
i fori di aspirazione esistenti sul platorello. (10).
Sostituzione:
- Asportare a strappo la carta abrasiva usata;
- applicare la nuova carta abrasiva (vedi “Montaggio”)
Sostituzione del piastra/platorello
Sostituire immediatamente una piastra/platorello dan-
neggiato. Risultati ottimali si conseguono solo con accessori
originali. Il montaggio di un platorello di dimensioni errate può
causare vibrazioni eccessive e non ammesse per la macchina.
- Svitare le viti (7) presenti sulla piastra/platorello;
- per il montaggio operare in senso inverso.
Avviare la macchina e controllare che non siano presenti vibrazioni anomale o scentrature dell’utensile. In caso contrario
spegnere la macchina immediatamente e provvedere ad eliminare le anomalie.
Avviamento e fermata
- Avviamento: premere in basso l’interruttore ON/OFF (2)
in posizione “ON”.
- Fermata: premere in alto l’interruttore ON/OFF (2) in
posizione “OFF”
ATTENZIONE:
dopo un’interruzione dell’energia elettrica se l’interruttore ON/
OFF è inserito, è necessario rilasciare l’interruttore (vedi Fermata).
59
Istruzioni originali
Page 60
Regolazione elettronica del numero di giri
La regolazione del numero di giri si ottiene manovrando opportunamente la rotella del regolatore di velocità (3) posta nella parte posteriore della macchina. La scelta della velocità va
fatta in funzione delle caratteristiche dei dischi di carta abrasiva e del materiale da lavorare.
Aspirazione delle polveri
ATTENZIONE:
Durante le operazioni di levigatura possono essere prodotte
polveri dannose: Collegare sempre ad un dispositivo di aspirazione adeguato.
In caso di lavori che producono polvere, indossare una
mascherina.
Aspirazione integrata
- Per garantire un’aspirazione ottimale della polvere svuotare
per tempo il filtro conico (8), pulendo accuratamente il
porta- filtro (8a) e pulire regolarmente la cartuccia (8b);
- Durante i lavori su superfici verticali tenere la macchina in
modo che il filtro conico sia rivolta verso il basso.
- Montaggio del filtro conico: posizionare il filtro conico (8)
sull’attacco per tubo di aspirazione (4). Spingere il filtro
conico fino a portarlo in battuta.
- Verifica riempimento filtro conico: lo stato di riempimento
del filtro conico è facilmente controllabile attraverso il
porta-filtro (8a) trasparente.
- Pulizia del filtro conico: per svuotare il filtro conico toglierlo
dall’attacco per tubo di aspirazione agendo in senso
contrario al montaggio;
Istruzioni originali
60
Page 61
- Sganciare la cartuccia (8.b) ed estrarla da porta- filtro;
- Svuotare il porta-filtro;
- Pulire le lamelle della cartuccia con una spazzola morbida.
Aspirazione esterna
- Durante i lavori su superfici verticali tenere la macchina in
modo che il tubo di aspirazione sia rivolto verso il basso.
- Montaggio: inserire un tubo di aspirazione sull’attacco
per tubo di aspirazione (4);
- Collegare il tubo di aspirazione con un adeguato sistema
di aspirazione (non fornito).
Manutenzione
Tutte le operazioni vanno eseguite a spina disinserita.
A fine lavoro, od in caso di necessità, spolverare con getto di
aria compressa il corpo macchina prestando particolare attenzione alla pulizia delle feritoie di ventilazione del motore.
Non sono ammessi altri interventi da parte dell‘utente. Per la
manutenzione e la periodica pulizia delle parti interne, come
spazzole, cuscinetti, ingranaggi etc. o altre necessità rivolgersi
ai Centri di Assistenza autorizzati anche sul sito www.storch.
de sezione Service. Utilizzare solo ricambi originali STORCH.
61
Istruzioni originali
Page 62

Smaltimento
Solo per i Paesi CE: Secondo la Direttiva Europea sui rifiuti di
apparecchiature elettriche ed elettroniche e la sua attuazione
in conformità delle norme nazionali, le apparecchiature elettriche esauste devono essere raccolte separatamente, ai fini di
essere riciclate in modo eco-compatibile. Il prodotto, quando
giunge a fine vita, non deve essere disperso nell’ambiente o
gettato tra i rifiuti domestici, ma deve esse smaltito presso i
centri di raccolta differenziata autorizzati (contattare le autorità locali competenti per conoscere dove smaltire il prodotto
secondo le norme di legge). Il corretto smaltimento del prodotto contribuisce alla tutela della salute e alla salvaguardia
dell’ambiente. Lo smaltimento abusivo del prodotto comporta
sanzioni a carico dei trasgressori.
Istruzioni originali
62
Page 63

Garanzia
Condizioni di garanzia:
Per i nostri apparecchi sono applicabili dei periodi di garanzia
di 12 mesi a partire dalla data di acquisto / data della fattura
del cliente finale commerciale. Se da parte nostra vengono
accordati dei periodi di garanzia più estesi, ciò sarà riportato
separatamente nelle istruzioni per l'uso inerenti ai rispettivi
dispositivi.
Rivendicazioni:
In casi in cui si intende far valere il diritto di garanzia, vi
preghiamo di inviarci il dispositivo in modo completo con fattura, franco nostro centro di logistica a Berka oppure ad una
service-station da noi autorizzata. Si prega di consultare prima la Hotline di servizio STORCH a pagamento: 02 - 66 22
77 15
Diritto alla garanzia
Il diritti si possono far valere solo per errori di materiale o di
produzione nonché esclusivamente in caso di utilizzo appropriato del dispositivo. Pezzi soggetti all‘usura non sono soggetti
a diritti di garanzia. Decadranno tutti i diritti di garanzia con
l‘aggiunta delle componenti di terzi, maneggio e magazzinaggio non appropriato come anche in casi di ovvia non osservanza delle istruzioni per l‘uso.
Esecuzione di riparazioni
Ogni intervento di riparazione va eseguito esclusivamente nei
nostri stabilimenti o presso una service-station autorizzata
STORCH.
63
Istruzioni originali
Page 64

Dichiarazione di conformità CE
Nome / indirizzo dell‘emittente:
STORCH Malerwerkzeuge & Profigeräte GmbH
Platz der Republik 6-8 . D - 42107 Wuppertal
Con la presente la società
che l‘apparecchio in seguito specificato, a causa della sua concezione e il suo tipo costruttivo come anche della sua esecuzione da noi messa in circolazione corrisponde alle pertinenti
ed essenziali esigenze sulla sicurezza e salute riportate nelle
Direttive CE.
In caso di una modifica apportata all‘utensile non concordata
con noi, questa dichiarazione perde ogni sua validità.
Denominazione dell‘apparecchio / Levigatrice orbitale
Numero articolo: Delta 100 / 62 13 10
Levigatrice orbitale
Quadra 80 / 62 13 20
Levigatrice eccentrica
Omega 125 / 62 13 30
Tipo di utensile: Levigatrice
Applicate direttive CE
Direttiva macchine: 2006 / 42 / EG
Direttiva sulla bassa tensione: 2006 / 95 / EG
Direttiva CE sulla Compatibilità
elettromagnetica: 2004 / 108 / EG
Direttiva RoHS: 2011 / 65 / EG
Istruzioni originali
64
Page 65
Norme armonizzate applicate
EEN 60745-1: 2009 + A11: 2010
EN 60745-2-4:2009+ A11:2011.
EN 55014-1: 2006 + A1: 2009 + A2: 2011
EN 55014-2: 1997 + A1: 2001 + A2: 2008
EN 61000-3-2: 2006 + A1: 2009 + A2: 2009
EN 61000-3-3: 2008
EN 50581: 2012
Procuratore per la composizione della documentazione
tecnica:
STORCH Malerwerkzeuge & Profigeräte GmbH
Platz der Republik 6 - 8
42107 Wuppertal
Jörg Heinemann
- Direttore -
Wuppertal, 11-2016
65
Istruzioni originali
Page 66

GB
Thank you
for purchasing a STORCH product. You have purchased a
quality product. If you would like to suggest an improvement,
or experience a problem with your product, please do not
hesitate to contact us.
Please contact your field sales representative or, in urgent
cases, contact us directly.
Yours sincerely,
STORCH Service Department
Tel.: +49 (0)2 02 . 49 20 - 112
Fax: +49 (0)2 02 . 49 20 - 244
Free service hotline: 0800 786 72 47
Toll-free order hotline: +49 800 7867244
Toll-free order fax: +49 800 7867243
(only available in Germany)
Translation of the original instruction
66
Page 67

Table of contents Page
Technical data 68 - 69
Specific use 70
Safety instructions 70 - 72
Symbols 72
Parts of the tool 73
Starting up 74 - 76
Dust extraction 76 - 77
Disposal 78
Warranty 79
EC Declaration of Conformity 80 - 81
67
Translation of the original instruction
Page 68

Technical data
62 13 10 62 13 20 62 13 30
Isolation class II
Absorbed power 200 W
Electronic speed control Yes
n0 idle 7.000 - 13.000 U/min.
Orbital diameter 2 mm
Pad shape triangular rectangular circular
Pad dimensions 100 x 147 mm80 x 130 mmØ 125 mm
Extraction system * Self-suction (dust cartridge in scope
of supply). Optional connection of
a sanding vacuum cleaner
Weight 1,15 kg
The values shown are based on a nominal voltage of 230V
/ 50Hz. In the case of voltages and frequencies of different
power values may vary. Refer to the label technical specifications to the nominal values of the tool. (*) The tool must
be connected to a suitable dust extraction system (see Dust
extraction).
All information is without guarantee! Subject to technical
modifications and errors!
Translation of the original instruction
68
Page 69
Informatoin noise / mean acceleration value
The tools are suppressed in accordance for the prevention and
elimination of radio disturbances measured in accordance with
standard:EN 60745.
Sound pressure level
LPA: 74 dB(A) LWA: 85 dB(A)
Sound power level:
Uncertainty: 3
3 axis vibration level:
ah: 3,00 m/s
Uncertainty: 1,50 m/s
2
2
DANGER:
The indicate measurements refer to new power tools. Daily
usa causes the noise and vibration values to change. Displayed emission values are comparative and are to be employed
for a provisional assessment of the operator’s risk exposure
during the work period. Appropriate evaluation of work period must also include tool’s idle and stop periods. These emission values represent the tool’s main applications. If the tool
is used for other applications, with other accessories, or if it
does not undergo regular maintenance, emission values can
significantly increase during operations.
Use hearing protection!
69
Translation of the original instruction
Page 70

Proper use
This electrical tool is intended for use as a grinding machine;
it is suitable for dry grinding of wood, plastic, metal, stucco
and painted surfaces. Read all safety warnings, instructions,
illustrations and specifications supplied with this tool. Failure to respect all instructions indicated below can cause an
electric shock, fire and/or a serious accident.
Safety instructions
Do not use accessories that are not specifically designed for
the intended use of the tool or that have not been recommended by the manufacturer. The fact that an accessory can be
fixed to the tool does not imply that it can be used safely.
The rated speed of accessories must be at least equivalent to
the maximum speed of the tool. If operated at a greater speed
than the rated one, accessories may break and cause the ejection of chips.
The external diameter and thickness of accessories must be
appropriate to guarantee the protection and safety of the tool.
Accessories with incorrect dimensions cannot be adequately
protected or controlled.
The conformation of the accessories must be correctly
adapted to the spindle of the tool. The accessories equipped
with holes of the shaft that do not correspond to the assembly
components on the tool, will not remain in balance, they will
vibrate excessively and can cause a loss of control.
Do not use a damaged accessory. If the tool or accessory has
suffered a fall, examine any damages or install an accessory
Translation of the original instruction
70
Page 71

that is no damaged. After examining and installing an accessory, all persons present, must keep a safe distance from the
rotating accessory and operate the tool at maximum empty
speed for one minute. Damaged accessories generally break
during this test period.
Use the electric tool only for dry sanding. The use of water
or other liquid coolants can cause electrocution or an electric
shock.
Do not operate the electrical tool in the proximity of flammable material. The sparks generated by sanding metal material
can ignite these materials.
Avoid the material to be processed or the grinding machine
overheating. Empty the dust filter cartridge before taking a
break. The grinding dust in the dust filter cartridge and in the
filter can ignite in adverse conditions, e.g. sparks when grinding metal. Hazardous dust can be produced during sanding
operations, contact with which or inhalation can pose a danger
for the user’s health and for people nearby. Comply with the
valid safety specifications in the respective countries.
71
Translation of the original instruction
Page 72
Connect the tool to a device suitable dust extraction. To protect the health wear masks. Use clamps to secure the work
piece. Under no circumstances should you hold the work piece
with one hand and the electrical tool with the other hand, while it is being used. By securing the work piece with clamps,
you can have both hands free to better operate the electrical
tool.
Symbols
Some of the following symbols may be used on your tool.
Please study them and learn their meaning. Proper interpretation of these symbol will allow you to operate the tool better
and safer.
Warning symbol
Read instruction manual
Wear eye protection
Wear ear protection
Wear a mask
Wear gloves
CE compliant
Disposal of decommissioned
Translation of the original instruction
72
Page 73
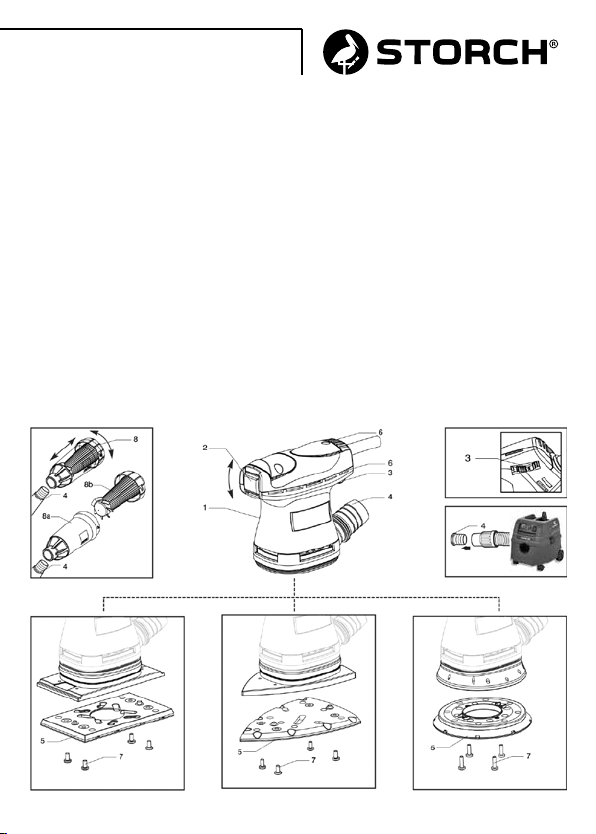
Parts of the tool
1 Technical data identification label
2 ON/OFF switch
3 Speed control
4 Suction port Ø 29 mm
5 Velcro pad holder
5a Rectangular (62 13 20)
5b Triangular (62 13 10)
5c Circular (62 13 30)
6 Motor ventilation slots
7 Pad fixing screws
8 Dust filter cartridge
8a Filter holder
8b Cartridge
73
Translation of the original instruction
62 13 3062 13 1062 13 20
Page 74
Starting up
WARNING:
Pay attention to the mains voltage! The mains voltage must
correspond to the voltage indicated on the technical data identification place (1).
DANGER:
You must remove the plug from the socket before replacing
accessories or performing any work on the electrical tool.
Before starting the tool:
Before starting-up the tool, ensure that:
- the packaging is complete and does not show signs of
having been damaged during storage or transport;
- the tool is complete; check that the number and type of
components comply with that reported in this instruction
booklet;
- the power supply and socket outlet can support the load
reported in the table and that indicated on the tool
identification plate reproduced;
- the power supply cable and plug are in perfect condition;
- the ON/OFF (2) switch works properly though with the
power supply disconnected;
- all the parts of the tool have been assembled in the proper
manner and that there are no signs of damage;
- the ventilation slots (6) are not obstructed;
- the tool must be connected to a suitable and efficient
aspiration device.
Translation of the original instruction
74
Page 75
Replacement of the abrasive paper assembly:
- Press the abrasive paper into the pad (10) ensuring that the
holes in the paper coincide with extraction holes in the pad.
Disassembly:
- Used abrasive paper can be removed by simply tearing them
off;
- new velcro abrasive paper it’s mounted (see “Assembly”)
Sanding pad replacement
Replace damaged sanding pad immediately. Opti-
mal results are achieved only using original accessories.The
assembly of a sanding pad with incorrect dimensions can cause excessive vibrations which are not allowed for the machine.
- Unscrew the screws (7) on the pad;
- reverse the procedure when fitting the pad.
Start the tool and check that there are no unusual vibration,
no dismatching movement of the abrasive disc. Otherwise
switch-off the tool immediately and eliminate the cause.
Starting and stopping
- Starting: press the switch (2) down in position “ON”.
- Stopping: press the switch (2) up in position “OFF”.
WARNING:
after an interruption of the electrical energy, if the ON/OFF
switch is inserted, it is necessary to release the switch (see
Stopped).
75
Translation of the original instruction
Page 76
Electronic rpm regulation
The rpm can be adjusted by rotating the wheel speed adjustment wheel (3) located on the rear of the tool. The choice of
speed depends on the characteristics of the abrasive paper
disc and the material to be worked.
Dust extraction
ATTENTION:
Hazardous dust can be produced during sanding operations:
Always connect an adequate extraction device.
In case of work producing dust, wear a mask.
Integrated extraction
- To guarantee optimal extraction of the powder empty the
conical filter (8) in time, accurately cleaning the filter holder
(8 a) and regularly cleaning the cartridge (8 b);
- During works on the vertical surfaces, position the machine
so the conical filter is turned downwards.
- Conical filter assembly: position the conical filter (8) on the
extractor tube coupling (4). Push the conical filter until it
stops.
- Conical filter filling testing: the filling status of the conical
filter is easily controlled using the transparent filter holder
(8 a).
- Conical filter cleaning: to empty the conical filter, remove
it from the extractor tube coupling working in the opposite
direction to assembly;
- Release the cartridge (8.b) and release it from the filter
holder;
- Empty the filter holder;
- Clean the cartridge plates with a soft brush.
Translation of the original instruction
76
Page 77
External extraction
- During vertical surface works position the machine in such a
way the extractor tube is turned downwards.
- Assembly: insert an extractor tube on the coupling for the
extractor tube (4);
- Connect the extractor tube to an adequate vacuum system
(not supplied).
Maintenance
All maintenance operations are carried out with the
power supply disconnected. At the end of each work session,
or when required, remove any dust from the body of the tool
using a jet of compressed air, paying particular attention to
the motor ventilation slots.
No other maintenance operations must be undertaken by the
user. Maintenance and cleaning of the inner parts, like brushes, ball bearings, gears etc. or others, must be carried out
only by an authorized customer-service workshop or on www.
storch.de. Use only the original STORCH parts or accessories.
77
Translation of the original instruction
Page 78

Disposal
For EC countries only: According to the European Directive on
Waste from electrical and electronic equipment and its implementation in conformity with national standards, exhausted
electrical equipment must be collected separately, in order to
be recycled in an environmentally friendly way. The product,
when it reaches the end of its life, must not be dispersed in
the environment or thrown away as household waste. It must
be disposed at authorized recycling centres (contact your local
authorities to know where to dispose of the product according
to the law). The correct disposal of the product contributes to
the health and preservation of the environment.
Illegal disposal of the product will entail penalties against the
offenders.
Disposing of the product correctly contributes to protecting
human health and safeguarding the environment. Any illegitimate disposal of the product will be punishable by law.
Translation of the original instruction
78
Page 79

Warranty
Warranty conditions:
A warranty period of twelve months from the date of purchase/date of invoice applies to our tools for commercial customers. If we have granted an extended warranty period, this
period will be noted separately in the operating manual for
the equipment in question.
Claims:
If you wish to claim under our warranty or guarantee, please
return the complete device and your invoice to our logistics
centre in Berka, postage paid, or send it to one of our authorised service centres. Please contact the chargeable STORCH
service hotline first: +49 (0)202 . 49 20 – 110.
Your rights under our warranty or guarantee:
Claims can only be accepted for material defects or manufacturing errors, and only assuming intended use of the appliance. Wear parts are not covered by such claims. All claims
shall become void in the event of installation of third party
components, improper handling and storage, as well as in the
event of obvious disregard of the operating instructions.
Repairs:
All repairs have to be conducted on our premises or by an
authorised STORCH service centre.
79
Translation of the original instruction
Page 80

EC Declaration of Conformity
Name / Address of issuer:
STORCH Malerwerkzeuge & Profigeräte GmbH
Platz der Republik 6-8 . D - 42107 Wuppertal
We herewith declare:
that the following machine complies with the fundamental
health and safety requirements of the EC Directives in terms
of its design, construction and version we have brought into
circulation. This warranty loses its validity in case of unauthorised modification of the tool.
Designation of the machine / Delta 100 Orbital sander
Item number 62 13 10
Quadra 80 Orbital sander
62 13 20
Omega 125 random orbital
sander / 62 13 30
Machine Type: Orbital sander
Applied EC directives
Machinery Directive: 2006 / 42 / EG
Low Voltage Directive: 2006 / 95 / EG
EC- Electromagnetic Compatibility
Directive: 2004 / 108 / EG
RoHS Directive: 2011 / 65 / EG
Translation of the original instruction
80
Page 81
Applied harmonised standards
EEN 60745-1: 2009 + A11: 2010
EN 60745-2-4:2009+ A11:2011.
EN 55014-1: 2006 + A1: 2009 + A2: 2011
EN 55014-2: 1997 + A1: 2001 + A2: 2008
EN 61000-3-2: 2006 + A1: 2009 + A2: 2009
EN 61000-3-3: 2008
EN 50581: 2012
Representative authorised to compile the technical documentation:
STORCH Malerwerkzeuge & Profigeräte GmbH
Platz der Republik 6 - 8
42107 Wuppertal
Jörg Heinemann
- Managing Director -
Wuppertal, 11-2016
81
Translation of the original instruction
Page 82

CZ
Děkujeme Vám
za důvěru ve firmu STORCH. S nákupem výrobku jste se
rozhodli pro kvalitní produkt. Pokud přesto máte podněty na
zlepšení nebo možná nějaký problém, tak bychom byli velmi
rádi, kdybyste se nám ozvali.
Promluvte si s příslušným externím spolupracovníkem naší
firmy nebo se v naléhavých případech obracejte přímo na nás.
S přátelským pozdravem
Servisní oddělení STORCH
Tel.: +49 (0)2 02 . 49 20 - 112
Fax: +49 (0)2 02 . 49 20 - 244
bezplatná linka Hotline-servis:
08 00. 7 86 72 47
bezplatná linka Hotline-objednávky:
+49 800. 7 86 72 44
bezplatný fax-objednávky: +49 800. 7 86 72 43
(pouze v Německu)
Překlad originálu návodu
82
Page 83

Obsah Strana
Technické údaje 84 - 85
Použití v souladu s určením 86
Bezpečnostní pokyny 86 - 88
Piktogramy 88
Konstrukční díly stroje 89
Uvedení do provozu 90 - 92
Odsávání prachu 92 - 93
Likvidace 94
Záruka 95
Prohlášení o shodě ES 96 - 97
83
Překlad originálu návodu
Page 84
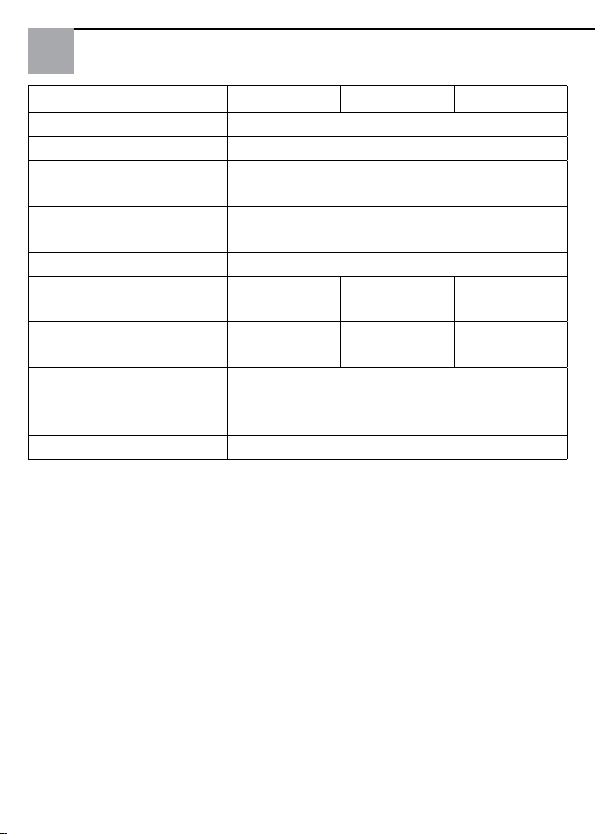
Technické údaje
62 13 10 62 13 20 62 13 30
Izolační třída II
Příkon 200 W
Elektronická regulace
ano
počtu otáček
Počet otáček ve volno-
7.000 - 13.000 ot./min.
běhu
Brusný zdvih 2 mm
Tvar brusného talíře trojúhelní-
obdélníkový kulatý
kový
Rozměry brusného
100 x 147 mm80 x 130 mmØ 125 mm
talíře
Systém odsávání * Samoodsávací (prachová kazeta v
rozsahu dodávky) Volitelné připojení
vysavače brusného prachu
Hmotnost 1,15 kg
Zobrazené hodnoty jsou založeny na jmenovitém napětí 230
V / 50 Hz. V případě napětí a frekvence u různých hodnot
výkonu se tyto veličiny mohou lišit. Technické specifikace na
typovém štítku se vztahují na jmenovité hodnoty nářadí. (*)
Uvedené přístroje smí být provozovány pouze dohromady s
vhodným odsáváním prachu.
Všechny údaje bez záruky! Technické změny a omyly vyhrazeny!
Překlad originálu návodu
84
Page 85
Informace hladina hluku / střední zrychlení
Hladina akustického tlaku (vývoj hluku) a střední kvadratické
zrychlení stroje, měřeno podle EN 60745.
Hladina akustického tlaku
LPA: 74 dB(A) LWA: 85 dB(A)
Hladina akustického výkonu
Nepřesnost měření: 3
3-osy hladina vibrací:
ah: 3,00 m/s
Nepřesnost měření: 1,50 m/s
2
2
POZOR:
Uvedené naměřené hodnoty platí pouze pro nové přístroje.
Při každodenním používání se mění hodnoty hluku a chvění.
U obou zobrazených hodnot hladin se jedná o porovnávací
hodnoty, které slouží k předběžnému odhadnutí rizika pro
pracovníka obsluhujícího přístroj během pracovní doby. Pro
přiměřené odhadnutí pracovní doby musí být zohledněny
časy, ve kterých se přístroj nachází v klidovém stavu nebo je
vypnutý. Tyto hodnoty byly stanoveny na základě hlavních
oblastí použití přístroje. Když je přístroj používán pro jiné
úlohy nebo s jinými produkty příslušenství nebo u něj nejsou
prováděny pravidelné údržbářské práce, mohou být tyto hodnoty při provozu významně překročeny.
Používejte ochranu sluchu!
85
Překlad originálu návodu
Page 86

Použití v souladu s určením
Toto elektrické nářadí je určeno pro funkci jako bruska, je vhodné k broušení za sucha - dřeva, plastu, kovu, stěrky a lakovaných povrchů. Přečtěte si bezpečnostní pokyny, návody,
zobrazení a specifikace, které jsou dodány s tímto nářadím.
Nedodržování dodaných návodů může vést k úderu el.proudu,
požáru příp. těžkých nehodám.
Bezpečnostní pokyny
Nepoužívejte žádné příslušenství, které není výhradně vyrobeno pro předpokládané použití nebo výrobcem nebylo
doporučeno. Pouhá skutečnost, že příslušenství lze připevnit
k Vašemu nářadí, nezaručuje žádný způsob funkce za zcela
bezpečných podmínek.
Jmenovitá rychlost příslušenství musí minimálně odpovídat
maximální rychlosti uvedené na nářadí. Příslušenství, které je
používáno při rychlosti nad jmenovitou rychlost, se může zlomit a být vymrštěno do vzduchu.
Vnější průměr a síla Vašeho příslušenství se musí hodit ke
stupni ochrany bezpečnostního zařízení Vašeho nářadí. Příslušenství s nesprávnými velikostmi nemůže být přiměřeně
chráněno nebo kontrolováno.
Charakter příslušenství se musí správně hodit (pasovat) k
vřetenu nástroje. Příslušenství s otvory hřídele, které neodpovídají montážním prvkům na nástroji, nezůstanou v rovnováze, budou nadměrně vibrovat a mohou vyvolat ztrátu kontroly.
Nepoužívejte poškozené nářadí. Když nářadí nebo příslušenství spadlo na zem, překontrolujte případné poškození nebo
Překlad originálu návodu
86
Page 87

použijte nepoškozené příslušenství. Po přezkoušení a instalaci
příslušenství, se Vy a přítomné osoby umístěte do bezpečné
vzdálenosti od otáčejícího se příslušenství a uveďte nářadí
do volnoběhu při maximální rychlosti, v provozu po dobu jedné minuty. Poškozené příslušenství se obecně poničí (zlomí)
během této zkušební doby.
Elektro nářadí používejte výhradně k broušení za sucha.
Použití vody nebo jiných kapalných chladicích prostředků
může vést k elektrokuci nebo úderu el.proudu.
Elektro nářadí neuvádějte do provozu v blízkosti hořlavých
materialů. Při broušení kovu vznikající jiskry mohou tyto
materiály zapálit.
Zabraňte přehřátí opracovávaného materiálu a brusky. Před
přerušením práce (pauza) je nutné vyprázdnit prachovou kazetu s filtrem. Prach z broušení nacházející se v prachové kazetě
s filtrem a ve filtru se může vznítit při nepříznivých podmínkách, jako je třeba jiskra při broušení kovu. Během prací
na broušení se může vytvářet škodlivý prach z broušení, kontakt nebo vdechnutí mohou ohrozit zdraví pracovníka obsluhy
a osob, které se zdržují v blízkosti. Respektujte bezpečnostní
předpisy země, ve které je nářadí provozováno.
87
Překlad originálu návodu
Page 88
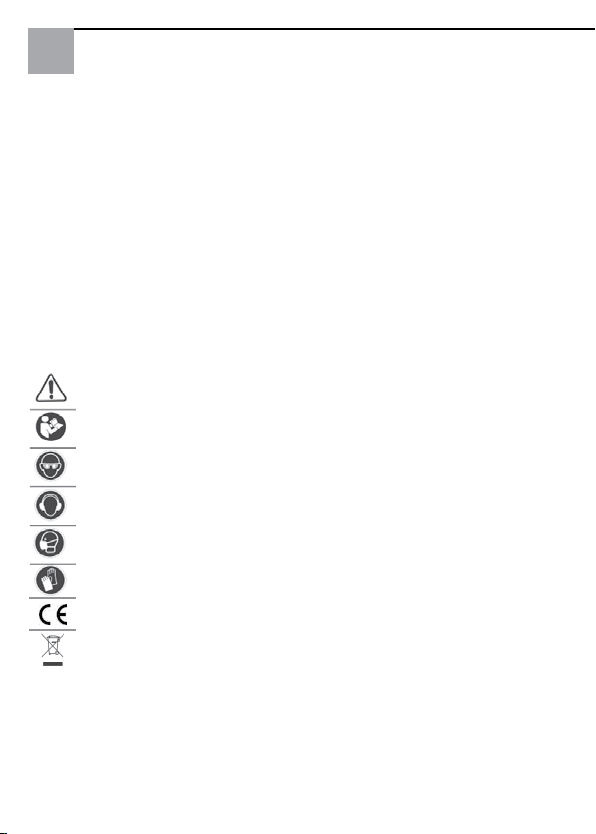
Na ochranu zdraví noste masky. K připevnění obráběného
kusu používejte svorky. V žádném případě obráběný kus
nedržte jednou rukou a nářadí elektro druhou rukou, během
jeho použití. Když se obráběný kus připevní svorkami, máte
obě ruce volné a můžete nářadí lépe používat.
Piktogramy
Některé z následujících symbolů mohou být na nářadí. Nastudujte a naučte se jejich význam. Správná interpretace umožní
optimální používání nářadí.
Důležité bezpečnostní pokyny
Přečtěte si návod k obsluze
Noste ochranné brýle
Noste ochranu sluchu
Noste ochrannou dýchací masku
Noste ochranné rukavice
Kontrolní značka
Likvidace ne přes normální domovní odpad
Překlad originálu návodu
88
Page 89
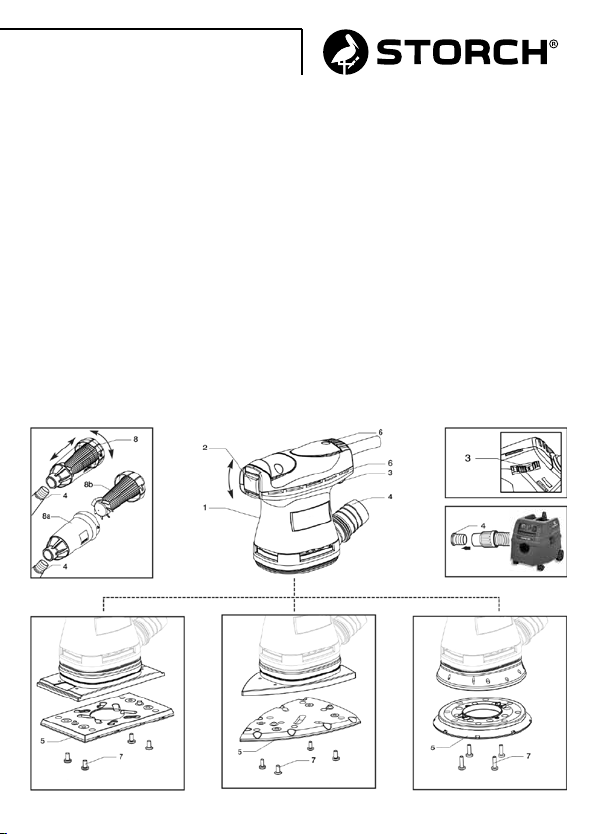
Konstrukční díly stroje
1 Typový štítek s technickými údaji
2 Spínač ZAPNOUT / VYPNOUT
3 Nastavení počtu otáček
4 Odsávací hrdlo Ø 29 mm
5 Brusný talíř držák brusného papíru se suchým zipem
5a Obdélníkový (62 13 20)
5b Trojúhelníkový (62 13 10)
5c Kulatý (62 13 30)
6 Štěrbina pro chlazení motoru
7 Připevňovací šrouby brusný talíř
8 Prachová kazeta s filtrem
8a Držák filtru
8b Kazeta
89
62 13 3062 13 1062 13 20
Překlad originálu návodu
Page 90
Uvedení do provozu
POZOR:
Respektujte síťové napětí! Síťové napětí musí odpovídat údajům na typovém štítku s technickými údaji (1).
Nebezpečí:
Před výměnou příslušenství a případným prováděním prací na
elektro nářadí je nutné vytáhnout zástrčku ze zásuvky.
Před uvedením do provozu:
Před uvedením přístroje do provozu byste měli zajistit:
Ȥ aby byl obal nepoškozený a nevykazoval žádné poškození
transportem příp. skladováním;
Ȥ aby byl přístroj kompletní, tedy aby počet a druh kompo-
nent přístroje souhlasil s údaji v tomto návodu k použití;
Ȥ aby síť el.proudu odpovídala identifikačním údajům
přístroje;
Ȥ aby připojovací kabel a zástrčka byly v řádném stavu;
Ȥ aby spínač ZAP/VYP (2) bezvadně fungoval.
K přezkoušení spínacích poloh popsaných v kapitole
“Uvedení do provozu” - aby však při zkoušení byla vždy
vytažená zástrčka ze sítě;
Ȥ Veškeré komponenty přístroje jsou řádně namontované a
nevykazují žádné známky poškození;
Ȥ větrací štěrbiny (6) nejsou ucpané;
Ȥ stroj musí být připojen ke smysluplně dimenzovanému a
funkčnímu odsávání prachu.
Výměna brusného papíru / montáž:
Ȥ Brusný papír nasaďte a přitiskněte. Při tom dbejte na to,
aby otvory v kotouči brusného papíru byly umístěny nad
odsávacími otvory v brusném talíři (10).
Překlad originálu návodu
90
Page 91
Demontáž:
Ȥ Opotřebovaný brusný papír vyjměte odtržením;
Ȥ nový přilnavý brusný papír se systémem suchého zipu při-
tiskněte (viz „Montáž“)
Výměna brusného talíře
Poškozený brusný kotouč okamžitě vyměňte. Vynika-
jících výsledků se dosáhne pouze s originálními náhradními
díly Montáž brusného talíře s chybnými rozměry může vést k
silným vibracím, které jsou nepřípustné.
Ȥ Povolte šrouby na brusném talíři (7);
Ȥ pro montáž postupujte v obráceném pořadí
Zapněte přístroj a zjistěte, zda brusný kotouč nevibruje a
má správný chod. Jinak přístroj okamžitě vypněte a poruchu
odstraňte.
Zapnutí a vypnutí
Ȥ Zapnutí: přepínač (2) nastavte dolů na “ZAP”.
Ȥ Vypnutí: přepínač (2) nastavte nahoru na “VYP”.
POZOR:
Pokud by po přerušení přívodu el.proudu spínač Zap/Vyp byl
na „ZAP“, musí se spínač nastavit na „VYP“.
91
Překlad originálu návodu
Page 92
Elektronická regulace počtu otáček
Počet otáček nastavíte přes kolečko regulátoru rychlosti (3) v zadní části přístroje. Zvolte počet otáček vhodný ke
druhu kotouče brusného papíru a také k vlastnostem opracovávaného materiálu.
Odsávání prachu
POZOR:
Během broušení se může vytvářet zdraví škodlivý prach. Vždy
připojte přiměřený systém odsávání.
Při provádění prací, při kterých vzniká prach, je nutné
nosit ochrannou masku.
Integrovaný systém odsávání
Ȥ Aby bylo zaručeno optimální odsávání prachu, je nut-
né včas vyprázdnit filtr kuželovitého tvaru (8), pečlivě
vyčistit držák filtru (8a), a stejně tak kazetu (8b);
Ȥ Během provádění prací na vertikálm povrchu je nutné
stroj držet tak, aby filtr kuželovitého tvaru směroval dolů.
Ȥ Montáž filtru kuželovitého tvaru: Filtr kuželovitého tvaru
(8) umístěte u připojení odsávací trubky (4). Filtr kuželo-
vitého tvaru vtlačte až k zarážce.
Ȥ Kontrola stavu naplnění filtru kuželovitého tvaru: Stav
naplnění filtru kuželovitého tvaru lze díky průhlednému
držáku filtru (8a) bez námahy zkontrolovat.
Ȥ Čištění filtru kuželovitého tvaru: Abyste vyprázdnili fil-
tr kuželovitého tvaru, odstraňte jej od připojení odsávací
trubky, při tom proveďte montážní návod v obráceném
pořadí;
Ȥ Kazetu (8b) vyhákněte a vytáhněte z držáku filtru;
Překlad originálu návodu
92
Page 93
Ȥ Držák filtru vyprázdněte;
Ȥ Lamely kazety vyčistěte měkkým kartáčem.
Externí odsávání
Ȥ Během provádění prací na vertikálm povrchu je nutné
stroj držet tak, aby odsávací trubka směrovala dolů.
Ȥ Montáž: Odsávací trubku nasaďte na připojení odsávací
trubky (4);
Ȥ Odsávací trubku připojte k přiměřenému systému
odsávání (není dodáno).
Péče o přístroj
Veškeré zásahy provádějte při vytažené zástrčce ze sítě.
Po provedení práce přístroj zbavte prachu pomocí stlačeného
vzduchu a stejně tak v případě potřeby. Zvláště dbejte na to,
aby větrací štěrbiny motoru byly čisté.
Ostatní zásahy prováděné uživatelem přístroje nejsou přípustné. Pro údržbu a periodické čištění jiných dílů např.: kartáčů,
ložisek, ozubených kol atd. nebo jiné potřeby se obraťte na
autorizované zákaznické středisko. Používejte pouze originální díly nebo příslušenství STORCH.
93
Překlad originálu návodu
Page 94

Likvidace
Pouze pro země EU: Podle evropské směrnice o elektrických
a elektronických přístrojích a jejich aplikaci v konformitě národních norem je třeba elektro odpad zvlášť sbírat, aby mohl
být znovu zhodnocen ekologickým způsobem. Když produkt
dosáhl konce své životnosti, nesmí být uvolněn do okolního
prostředí nebo vyhozen s domovním odpadem, nýbrž musí
být zlikvidován v autorizovaném sběrném dvoře (kontaktujte kompetentní místní úřady, abyste zjistili, kde má být produkt podle zákona zlikvidován). Správná likvidace produktu
přispívá k ochraně zdraví a k zachování životního prostředí.
Ilegální likvidace produktu má za následek trestní opatření k
tíži toho, kdo překračuje zákon. Správná likvidace produktu
přispívá k ochraně zdraví a životního prostředí. Nepatřičná likvidace produktu vyvolá sankce k tíži původce.
Překlad originálu návodu
94
Page 95

Záruka
Záruční podmínky:
U našich zařízení platí zákonné záruční lhůty 12 měsíců od
data zakoupení/data faktury obchodního konečného zákazníka. Pokud jsou delší lhůty v cestě námi vypsanému prohlášení o záruce, jsou zvláště vyznačeny v návodu k obsluze
příslušných zařízení.
Uplatňování:
V případě záručního příp. garančního případu žádáme, aby
bylo zasláno kompletní zařízení dohromady s fakturou do
našeho střediska Logisitk Center v Berka nebo do námi autorizované servisní stanice. Kontaktujte prosím nejdříve placený
hotline servis firmy STORCH: +49 (0)202 . 49 20 – 110.
Nárok na záruku příp. garanci
Nároky na záruku existují výhradně u materiálu nebo výrobní vady a také výhradně při používání přístroje v souladu s
určeným účelem. Díly podléhající opotřebení nespadají do
nároků na záruku. Veškeré nároky zanikají zamontováním dílů
cizího původu, při nepřiměřeném zacházení a skladování a
také při zřejmém nedodržování provozního návodu.
Provádění oprav
Veškeré opravy smějí být prováděny výhradně naším závodem nebo servisními stanicemi autorizovanými firmou
STORCH.
95
Překlad originálu návodu
Page 96

Prohlášení o shodě ES
Název / adresa výstavce:
STORCH Malerwerkzeuge & Profigeräte GmbH
Platz der Republik 6-8 . D - 42107 Wuppertal
Tímto prohlašujeme,
že následně uvedené zařízení na základě své koncipace a
druhu konstrukce a také v provedení námi uvedeném do provozu odpovídá příslušným základním bezpečnostním požadavkům a požadavkům k ochraně zdraví směrnic ES.
Při námi neodsouhlasené změně zařízení ztrácí toto prohlášení svou platnost.
Označení zařízení / Vibrační bruska Delta 100
Výrobek číslo: 62 13 10
Vibrační bruskaQuadra 80
62 13 20
Excentrická bruska Omega 125
62 13 30
Typ nářadí: Bruska
Použité směrnice ES
Směrnice o strojích: 2006 / 42 / EG
Směrnice o nízkém napětí: 2006 / 95 / EG
Směrnice ES Elektromagnetická
slučitelnost: 2004 / 108 / EG
Směrnice RoHS: 2011 / 65 / EG
Překlad originálu návodu
96
Page 97
Použité harmonizované normy
EEN 60745-1: 2009 + A11: 2010
EN 60745-2-4:2009+ A11:2011.
EN 55014-1: 2006 + A1: 2009 + A2: 2011
EN 55014-2: 1997 + A1: 2001 + A2: 2008
EN 61000-3-2: 2006 + A1: 2009 + A2: 2009
EN 61000-3-3: 2008
EN 50581: 2012
Zplnomocněnec k sestavení technických podkladů:
STORCH Malerwerkzeuge & Profigeräte GmbH
Platz der Republik 6 - 8
42107 Wuppertal
Jörg Heinemann
- Jednatel -
Wuppertal, 11-2016
97
Překlad originálu návodu
Page 98

9899100
Page 99

Page 100
Art.-Nr. Bezeichnung
62 13 10 Schwingschleifer Delta 100
62 13 20 Schwingschleifer Quadra 80
62 13 30 Exzenterschleifer Omega 125
N. art. Denominazione
62 13 10 Levigatrice orbitale Delta 100
62 13 20 Levigatrice orbitale Quadra 80
62 13 30 Levigatrice eccentrica Omega 125
Art. nr. Beschrijving
62 13 10 Slingerslijper Delta 100
62 13 20 Slingerslijper Quadra 80
62 13 30 Excenterschuurmachine
Omega 125
Réf. Désignation
62 13 10 Ponceuse vibrante Delta 100
62 13 20 Ponceuse vibrante Quadra 80
62 13 30 Ponceuse excentrique
Omega 125
Art. no. Description
62 13 10 Delta 100 orbital sander
62 13 20 Quadra 80 orbital sander
62 13 30 Omega 125 random orbital
sander
Výr. č. Označeni
62 13 10 Vibrační bruska Delta 100
62 13 20 Vibrační bruska Quadra 80
62 13 30 Excentrická bruska Omega 125
Malerwerkzeuge & Profigeräte GmbH
Platz der Republik 6 - 8
D-42107 Wuppertal
Telefon: +49 (0)2 02 . 49 20 - 0
Telefax: +49 (0)2 02 . 49 20 - 111
[email protected]
www.storch.de
11-2016
 Loading...