

Page 1

ProDist compact
Laser-Entfernungsmessgerät
Laser-afstandmeetapparaat
Appareil de mesure
de distances laser
Misuratore di distanza laser
Laser distance measuring device
Laserový dálkoměr
DE
NL
FR
IT
GB
CZ
Page 2

DE
Vielen Dank
für Ihr Vertrauen zu STORCH. Mit dem Kauf haben Sie sich für ein
Qualitäts-Produkt entschieden. Haben Sie trotzdem Anregungen
zur Verbesserung oder aber vielleicht einmal ein Problem, so freuen wir uns sehr, von Ihnen zu hören. Bitte sprechen Sie mit Ihrem
Außendienst-Mitarbeiter oder in dringenden Fällen auch mit uns direkt.
Mit freundlichen Grüßen
STORCH Service Abteilung
Telefon: +49 (0)2 02 . 49 20 - 112
Fax: +49 (0)2 02 . 49 20 - 244
kostenlose Service-Hotline: 08 00. 7 86 72 47
kostenlose Bestell-Hotline: 08 00. 7 86 72 44
kostenloses Bestell-Fax: 08 00. 7 86 72 43
(nur innerhalb Deutschlands)
Inhaltsverzeichnis Seite
Lieferumfang 3
Bestimmungsgemäße Verwendung 3
Technische Daten 3
Sicherheitshinweise 4 - 6
Gerätebeschreibung
Tastenfunktionen und LCD-Display
Inbetriebnahme und Einstellungen 8
Messungen vornehmen 9
Weitere Funktionen 9 - 11
Fehlersignale / Fehlerbehebung 12
Wartung 13
Garantie 14
EG-Konformitätserklärung 15
6 - 7
2
Page 3

Lieferumfang
Laser-Entfernungsmessgerät ProDist compact, Holstertasche, Bedienungsanleitung, Batteriedeckel-Montagewerkzeug, 2 x 1,5 Volt
AAA-Batterien
Bestimmungsgemäße Verwendung
Das vorliegende Gerät ist zur Ermittlung von Distanzen, Flächen und
Volumina mittels Laser bestimmt. Die Verwendung bezieht sich ausschließlich auf den gewerblichen Gebrauch und ist hierbei den Gegebenheiten vor Ort entsprechend zu verwenden. Keinesfalls darf das
Gerät zum Anzeigen/Markieren von Stellen (analog eines „Laser-Pointers“ verwendet werden oder zu anderen Zwecken, bei denen der
Laserstrahl auf Menschen gerichtet werden könnte. Das Gerät ist zur
Verwendung im Innen- und Außenbereich bestimmt.
Technische Daten
Messbereich: 0,05 - 65 m
Messgenauigkeit: ± 1,5 mm
Kleinste Messeinheit: 1 mm
Messeinheiten: m, in, ft.
Laserklasse: 2 (nach DIN EN 60825-1/11.01)
Lasertyp: 635nm (P < 1mW)
Automatische Abschaltung
Laser: 30 Sek.
Gerät: 3 Min.
Erwartete Lebensdauer der Batterie: bis zu 4.000
Einzelmessungen
Batterien: 2 x 1,5 Volt AAA-Batterien (Alkaline)
Optimale Betriebstemperatur: 0° C bis 40° C
Lagertemperatur: -10° C bis 60° C
Schutzklasse: IP 54
Abmessungen: 115 x 47 x 28 mm
Gewicht: 132g (mit Batterien)
3
Page 4

Sicherheitshinweise
Das Gerät besitzt einen Spannungsbereich, von dem eine elektrische
Gefahr für Mensch und Tier ausgehen kann. Das Gerät darf nur von
autorisierten Personen aufgeschraubt und / oder demontiert werden.
Ebenso dürfen Instandhaltung und Reparaturen nur von Elektrofachkräften und autorisierten Fachwerkstätten ausgeführt werden. Der
Betrieb des Gerätes geschieht auf eigene Verantwortung und Gefahr
des Käufers / Nutzers.
Vor Verwendung dieses Gerätes alle Anweisungen dieses Handbuchs
lesen und verstehen. Die Nichtbeachtung von Anweisungen kann zu
gefährlicher Laserstrahlenbelastung, Stromschlag und/oder Körperverletzungen führen.
VORSICHT: Nicht versuchen, die Funktionsweise des Gerätes
auf irgendeine Weise zu modifizieren. Dies kann zu gefährlicher
Laserstrahlenbelastung führen.
LASERSTRAHLUNG. Nicht in den Strahl blicken. Gerät der
Laserklasse 2. Den Laserstrahl nur dann einschalten, wenn das
Gerät benutzt wird. Der Laser schaltet sich automatisch, nach
30 Sekunden aus. Um den Laser manuell abzuschalten, tippen
Sie die Taste
Nicht bestimmungsgemäße Ausführung der Arbeitsabläufe bzw.
Verwendung der Bedien- und Einstellelemente laut vorliegender
Bedienungsanleitung können zu gefährlicher Strahlenbelastung
führen.
Die Verwendung von optischen Instrumenten wie Teleskope zur
Ansicht des Laserstrahls verstärkt die augenschädigende Wirkung.
.
Das Gerät ist mit einem integrierten Laser ausgestattet. Es handelt
sich um Laser der Klasse 2 mit einer maximalen Ausgangsleistung von
1 mW und einer Wellenlänge von 635 nm. Normalerweise verursachen
solche Laser keine Augenschäden. Blicken Sie dennoch nicht direkt in
den Strahl, da dies zu Blitzblindheit führen kann.
4
Page 5

Auf Ihrem Laser-Entfernungsmessgerät befindet sich folgendes Etikett:
Das Etikett (Laseraustritt) kennzeichnet die Stelle, an welcher der digitale Laser-Entfernungsmesser das Laserlicht erzeugt. Bei Einsatz des
Gerätes sollten Sie wissen, wo das Laserlicht austritt. Sorgen Sie dafür,
dass sich alle anwesenden Personen der Gefahren bewusst sind, welche mit direktem Augenkontakt mit dem Laserstrahl verbunden sind.
• Produktetiketten nicht entfernen oder verändern.
• Der digitale Laser-Entfernungsmessgerät ist kein Spielzeug. Immer in
einem für Kinder nicht zugänglichen Ort aufbewahren. Das von diesem
Gerät erzeugte Laserlicht darf auf keinen Fall auf Personen oder Tiere
gerichtet werden.
• Das Gerät nicht in Anwesenheit von Kindern verwenden, und Kindern
nicht erlauben, das Gerät zu benutzen.
• Das Gerät nicht so positionieren, dass jemand absichtlich oder unabsichtlich in den Laserstrahl schauen kann.
• Nicht auf glänzenden oder reflektierenden Oberflächen wie Stahlblech verwenden. Die reflektierende Oberfläche könnte den Strahl zum
Benutzer zurück reflektieren.
• Das Gerät immer ausschalten, wenn es nicht benutzt wird. Ein im eingeschalteten Zustand belassenes Gerät erhöht das Risiko, dass jemand
versehentlich in den Laserstrahl blickt.
• Nicht versuchen, das Gerät zu reparieren oder auseinander zu bauen.
Falls nicht qualifizierte Personen versuchen, dieses Gerät zu reparieren, können ernsthafte Verletzungen auftreten. Jegliche erforderlichen
Reparaturarbeiten an diesem Lasermesser dürfen nur vom autorisierten
Kundendienst von STORCH durchgeführt werden.
5
Page 6

• Das Gerät nicht in feuergefährdeten Bereichen wie beispielsweise in
der Nähe von entflammbaren Flüssigkeiten, Gasen oder Stäuben verwenden.
• Der Einsatz von für andere Laser-Entfernungsmessgeräte vorgesehenem Zubehör kann zu ernsthaften Verletzungen führen.
• Batterien außerhalb der Reichweite von Kindern aufbewahren.
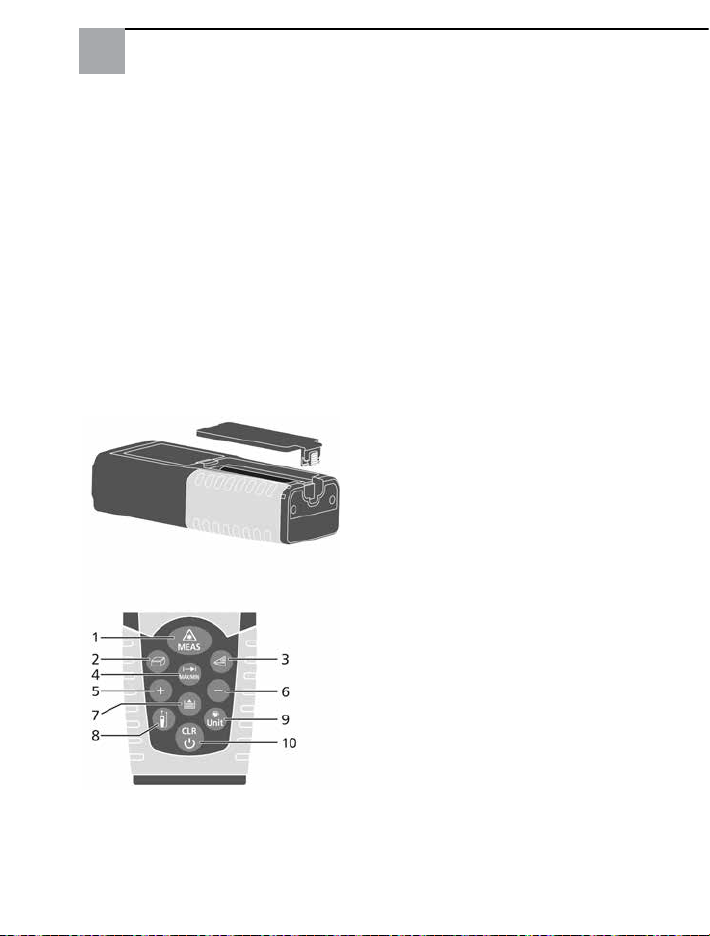
Gerätebeschreibung und LCD-Display
ProDist compact Übersicht der Funktionen und der Bedienelemente
1 An / Messung
2 Flächen- / Volumenmessung
3 Indirekte Messung
(Pythagoras)
4 Einfache Messung /
Dauermessung
5 Plus + / Addition
der gemessenen Werte
6 Minus - / Subtraktion
der gemessenen Werte
7 Speicherungen der
gemessenen Werte / Archiv
8 Umschalten des
Messreferenzpunktes
(von Geräte-Oberkante,
Geräte Unterkante
9 Display Beleuchtung An/Aus /
Maßeinheiten ändern
(m, in, ft)
10 Werte löschen / Aus
6
Page 7

Batterien austauschen
Im Lieferumfang des Gerätes befindet sich das passende Montagewerkzeug (kleiner Schraubenzieher). Dieser wird für den Austausch der
Batterien benötigt.
1. Batteriefach-Schieber auf der Geräte-Unterseite aufschrauben
2. Batteriefach aufklappen
3. Batterien, unter Berücksichtigung der richtig platzierten Pole (+/-)
einstecken
4. Fach aufsetzen und wieder zuschrauben
Tipp: Bewahren Sie das Montagewerkzeug stets im kleinen, vorderen
Fach der Aufbewahrungstasche auf.
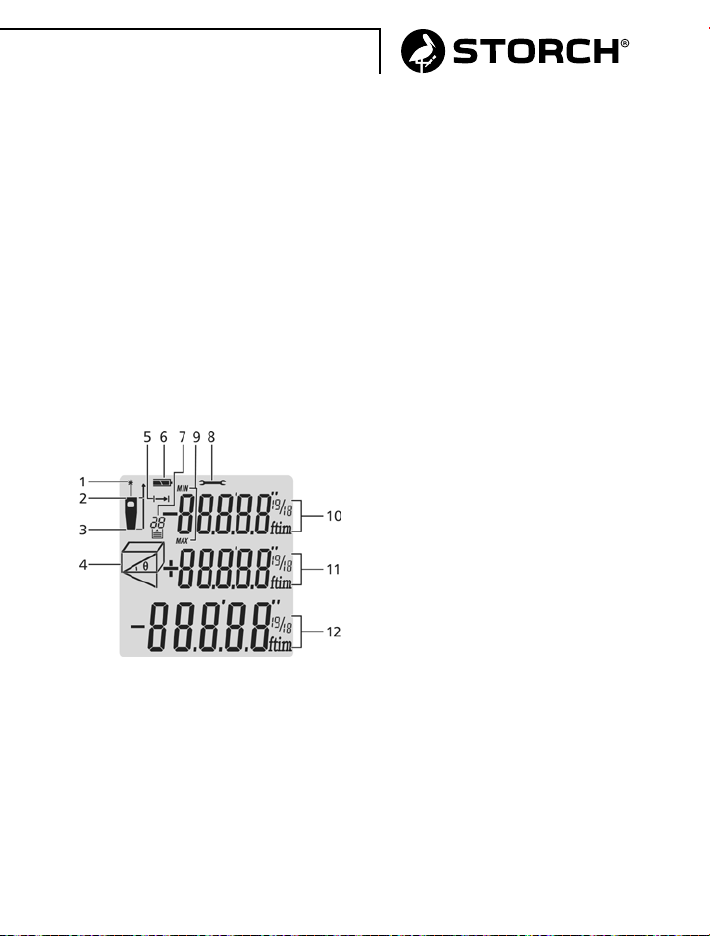
ProDist compact Übersicht des LCD-Displays
1 Laser an
2 Referenzpunkt Messung oben
3 Referenzpunkt Messung
unten
4 Anzeigen der Messfunktionen
• Flächenmessung
• Volumenmessung
• Einfache Pythagoras
• Doppelte Pythagoras
5 Einfache Distanzmessung
6 Batterie-Anzeige-Status
7 Gespeicherte Werte/Archiv
8 Fehlermeldung Gerät
9 Dauermessung und
Min/Max-Messung
10 Zwischenwert 1
11 Zwischenwert 1
12 Zusammenfassungen
der gemessenen Werte
7
Page 8

Inbetriebnahme und Einstellungen
Ein- und Ausschalten des Geräts
-Taste. Schaltet das Gerät und Laser ein.
-Taste länger gedrückt halten, um das Gerät und Laser auszuschalten.
Der Laser schaltet sich automatisch nach 30 Sekunden und das Gerät
nach 3 Minuten aus.
Werte löschen
-Taste kurz antippen. Die vorher gemessenen Werte werden vom
Gerät gelöscht.
Bestimmung des Referenzpunktes (Bilder der Punkte)
Die Messung ist auf die Unterkante des Gehäuses voreingestellt.
Um dies zu ändern, drücken Sie die Referenzpunkt-Taste
anderen Referenz-Messpunkte (oben, unten) zu bestim- men.
Ein akustischer Ton bestätigt die Auswahl.
Nach Ausschalten des Geräts, versetzt sich die Einstellung wieder in
die Werkseinstellung und misst wieder von der Unterkante des Geräts
aus.
LCD-Display-Beleuchtung
Durch das Tippen der
leuchtung ein- und aus- geschaltet werden.
Maßeinheiten ändern (m, ft. In, ft+in)
Halten Sie die
ändern zu kön- nen.
-Taste, kann die Display-Hintergrund-Be-
-Taste länger gedrückt, um die Maßeinheiten
, um die
8
Page 9

Messungen vornehmen
Einfache Distanzmessung
Drücken Sie die
das Laserzei- chen angezeigt und der rote Laserpunkt wird auf
der Oberfläche sichtbar, auf die das Lasermessgerät ausgerichtet wird.
Drücken Sie die Taste wiederholt, um den Messvorgang zu starten. Die
gemessenen Werte werden direkt im Display angezeigt.
Dauermessung (Verfolgung) & Min / Max Messung
Während der Dauermessung wird das Gerät auf das Mess-Objekt ausgerichtet und währenddessen, werden die gemessenen Werte alle 0,5
Sekunden aktualisiert.
Die entsprechenden Minimal- und Maximalwerte werden dynamisch in
der ersten und zweiten Linie angezeigt.
Für die Dauermessung im Min / Max Modus, zur Ermittlung der kürzesten, sowie der längsten Strecke, halten Sie die
gedrückt. Um die Dauermessung zu unterbrechen, drücken
Sie entweder die
Die Dauermess-Funktion endet automatisch nach 100 Messauslösungen.
-Taste um den Laser zu aktiveren. Im Display wird
-Taste
-, oder die -Taste.
Weitere Funktionen
Addition (+) / Subtraktion (-)
Einfache Distanzmessung
+
Die nächste Messung wird der vorherigen zuaddiert.
-
Die nächste Messung wird von der vorherigen subtrahiert.
Der letzte Schritt wird annulliert.
Zurückkehren zur einfachen Distanzmessung
9
Page 10

Flächenmessung
Drücken Sie kurz die
Das Flächen-Sym- bol
wird im Display angezeigt.
Drücken Sie die
die erste Distanz zu messen
(z. B. Länge)
Drücken Sie die
die zweite Distanz zu
messen (z.B. Breite)
Das Ergebnis wird automatisch
ermittelt und im xx²-Format
angezeigt.
Volumenmessung
Drücken Sie die
pelt.
Das Volumen-Symbol wird
im Display angezeigt wird.
Drücken Sie die
die erste Distanz zu messen
(z. B. Länge)
Drücken Sie die
die zweite Distanz zu
messen (z.B. Breite)
Drücken Sie die
die dritte Distanz zu messen
(z.B. Höhe)
Das Ergebnis wird automatisch
ermittelt und im xx³-Format
angezeigt.
-Taste.
-Taste um
-Taste um
-Taste dop-
-Taste um
-Taste um
-Taste um
messen, die nicht direkt gemessen werden können, weil ein Hindernis den Laserstrahl blockieren
würde oder sich keine Zielfläche
als Reflektor eignet.
Indirekte Messung bestimmt
einer Strecke mithilfe von 2 Hilfsmessungen.
Drücken Sie die
das
angezeigt wird. Die zuerst zu
messende Distanz wird auf dem
Symbol als blinkende Linie angezeigt.
Zielen Sie auf den oberen Punkt
und lösen Sie die
Nach der ersten Messung wir der
erste Wert angezeigt. Nun richten
Sie das Lasermessgerät möglichst
horizontal aus. Lösen Sie die
zweite Messung, mithilfe der
Das Ergebnis wird automatisch
ermittelt und im Display angezeigt.
-Symbol im Display
-Taste aus.
-Taste, bis
-Taste aus.
Indirekte Messung (Pythagoras)
Ermittlung einer Strecke mit
zwei Messungen
Die Indirekte Messung wird verwendet, um Entfernungen zu
10
Page 11

Indirekte Messung 2 (doppelte
Pythagoras)
Ermittlung einer Strecke mit
drei Messungen
Drücken Sie die
pelt, bis das
play angezeigt wird. Die zuerst zu
messende Distanz wird auf dem
Symbol als blinkende Linie angezeigt.
Zielen Sie auf den unteren Punkt
und lösen Sie die
Nach der ersten Messung wird
der erste Wert angezeigt. Nun
richten Sie das Lasermessgerät
möglichst horizontal aus.
Historische Archivierung /
Interner Speicher
-Taste dop-
-Symbol im Dis-
-Taste aus.
Lösen Sie die zweite Messung,
mithilfe der
Lösen Sie die dritte Messung aus.
Zielen Sie auf den oberen Punkt
und drücken Sie die
Das Ergebnis wird automatisch
ermittelt und im Display angezeigt.
-Taste aus.
-Taste.
Mithilfe der
die letzten 20 Messergebnisse
ab. Um zwischen den Ergebnissen umschalten zu können,
nutzen Sie die
-Tasten.
Um das Archiv komplett zu
löschen, drücken Sie die
-Tasten gleichzeitig.
-Taste, rufen Sie
und
+
-
und
11
Page 12

Fehlersignale / Fehlerbehebungen
Fehlercode
204 Rechnungsfehler Wiederholen Sie die letzte Mes-
208 Empfangssignal des
209 Empfangssignal des
252 Temperatur zu hoch Kühlen Sie das Lasermessgerät ab
253 Temperatur zu nied-
255 Hardware Fehler Schalten Sie das Lasermessgerät
Ursache Korrekturmaßnahme
sung / Messprozedur
Lasers zu schwach,
Distanz weiter als
65 m
Lasers zu stark
rig
Nutzen Sie ein alternatives Messziel
Reflektionen auf der Zielfläche.
Nutzen Sie ein alternatives Messziel. Verringern Sie die Entfernung
Bringen Sie das Lasermessgerät
auf die notwendige Betriebstemperatur
aus und wieder an. Sollte sich die
Fehlermeldung wiederholen, kontaktieren Sie unsere Servicehotline.
12
Page 13

Wartung
Der ProDist compact ist ein wartungsarmes Gerät. Allerdings sind zur
Sicherstellung der Leistung folgende einfachen Richtlinien zu beachten.
1. Das Gerät immer vorsichtig behandeln. Es handelt sich um ein
optisches Instrument, welches mit empfindlicher Elektronik bestückt
ist.
2. Vermeiden, dass das Gerät Stößen, ständiger Vibration oder extremer Hitze oder Kälte ausgesetzt wird.
3. Das Gerät immer innen aufbewahren. Wenn es nicht benutzt wird,
das Gerät immer in seiner Schutztasche aufbewahren.
4. Das Gerät immer von Staub und Feuchtigkeit fernhalten. Nur mit
einem sauberen und weichen Tuch reinigen. Verwenden Sie, falls nötig,
ausschließlich für die Geräteoberfläche schonende Reinigungsmittel.
5. Die Linse niemals mit den Fingern berühren.
6. Die Batterien regelmäßig prüfen, um vorzeitige Alterung zu verhindern. Wenn das Gerät für längere Zeit nicht genutzt wird, immer die
Batterien entnehmen.
7. Die Batterien ersetzten, wenn die Batterieanzeige auf dem
LCD-Display auf „Leer“ steht.
8. Das Gerät auf keinen Fall auseinanderbauen; dadurch kann der
Benutzer gefährlicher Strahlung ausgesetzt werden.
9. Auf keinen Fall versuchen, einen Teil der Laserlinse zu modifizieren.
13
Page 14

Garantie
Garantiebedingungen
Für unsere Geräte gelten die gesetzlichen Gewährleistungsfristen von
12 Monaten ab Kaufdatum / Rechnungsdatum des gewerblichen Endkunden.
Geltendmachung
Bei Vorliegen eines Gewährleistungs- bzw. Garantiefalles bitten wir,
dass das komplette Gerät zusammen mit der Rechnung frei an unser
Logistik Center in Berka oder an eine von uns autorisierte Service-Sta-
tion eingeschickt wird. Zuvor bitten wir Sie, uns unter unserer kostenlosen STORCH Service-Hotline 08 00. 7 86 72 47 zu kontaktieren.
Gewährleistungs- bzw. Garantieanspruch
Ansprüche bestehen ausschließlich an Werkstoff- oder Fertigungsfehler sowie ausschließlich bei bestimmungsgemäßer Verwendung des
Geräts. Verschleißteile fallen nicht unter die Garantieansprüche. Sämtliche Ansprüche erlöschen durch den Einbau von Teilen fremder Herkunft, bei unsachgemäßer Handhabung und Lagerung sowie bei offensichtlicher Nichtbeachtung der Betriebsanleitung.
Durchführung von Reparaturen
Sämtliche Reparaturen dürfen ausschließlich durch unser Werk oder
von STORCH autorisierten Service-Stationen durchgeführt werden.
14
Page 15

EG-Konformitätserklärung
Name / Anschrift des Ausstellers:
STORCH Malerwerkzeuge & Profigeräte GmbH
Platz der Republik 6-8 . D - 42107 Wuppertal
Hiermit erklären wir,
dass das nachstehend genannte Gerät aufgrund dessen Konzipierung
und Bauart sowie in der von uns in Verkehr gebrachten Ausführung den
einschlägigen, grundlegenden Sicherheits- und Gesundheitsanforderungen der EG-Richtlinien entspricht. Bei einer nicht mit uns abgestimmten Änderung des Gerätes verliert diese Erklärung ihre Gültigkeit.
Bezeichnung des Gerätes: ProDist compact
Laser-Entfernungsmessgerät
Geräte-Typ: Laser-Entfernungsmessgerät
Artikel-Nummer: 26 68 65
Angewandte Richtlinien
EG-Richtlinie Elektromagnetische Verträglichkeit:
2004 / 108 / EG
EG-Richtlinie zur Beschränkung der Verwendung bestimmter
gefährlicher Stoffe in Elektro- und Elektronikgeräten:
2011 / 65 / EU (RoHS)
EN 62321:2008 EN 61326-1: 2006
EN 61326-2-1:2006 EN 60825-1: 2007 (2-nd Edition)
Bevollmächtigter für die Zusammenstellung
der technischen Unterlagen:
STORCH Malerwerkzeuge & Profigeräte GmbH
Platz der Republik 6-8 · 42107 Wuppertal
Jörg Heinemann
- Geschäftsführer -
Wuppertal, 03- 2015
15
Page 16

NL
Hartelijk dank
voor uw vertrouwen in STORCH. Met deze aankoop hebt u voor een
kwaliteitsproduct gekozen. Als u desondanks een tip voor verbeteringen hebt of wellicht ooit een probleem ondervindt, dan horen wij graag
van u. Neem contact op met de medewerker buitendienst of in dringende gevallen rechtstreeks met ons.
Met vriendelijke groeten,
STORCH serviceafdeling
Tel.: +49 (0)2 02 . 49 20 - 112
Fax: +49 (0)2 02 . 49 20 - 244
Gratis service-hotline: 08 00. 7 86 72 47
Gratis bestel-hotline: 08 00. 7 86 72 44
Gratis bestel-fax: 08 00. 7 86 72 43
(alleen binnen Duitsland)
Inhoudsopgave Pagina
Levering 17
Gebruik volgens voorschriften 17
Technische data 17
Veiligheidsrichtlijnen 18 - 20
Apparaatbeschrijving Gerätebeschreibung
knopfuncties en LCD-display
Inbedrijfsname en instellingen 22
Metingen uitvoeren 23
Verdere functies 23 - 25
Foutsignalen / fouten verhelpen 26
Onderhoud 27
Garantie 28
EG-conformiteitsverklaring 29
20 - 21
16
Page 17

Levering
Laser-afstandmeetapparaat ProDist compact, holstertas, gebruiksaanwijzing, batterijvak-montagegereedschap, 2 x 1,5 Volt AAA-batterijen
Gebruik volgens voorschriften
Dit apparaat is bestemd voor het met behulp van een laser bepalen
van afstanden, oppervlakken en volumes. Het apparaat is uitsluitend
voor commercieel gebruik bestemd en dient op de omstandigheden ter
plaatse te worden afgestemd. Het apparaat mag in geen geval voor
het weergeven/markeren van plaatsen (zoals bij een laserpointer) worden gebruikt of andere doelen waarbij de laserstraal op mensen kan
worden gericht. Het apparaat is bestemd voor gebruik zowel binnenals buitenshuis.
Technische data
Meetbereik: 0,05 - 65 m
Meetnauwkeurigheid: ± 1,5 mm
Kleinste meeteenheid: 1 mm
Meeteenheden: m, in, ft.
Laserklasse: 2 (conform DIN EN 60825-1/11.01)
Lasertype: 635nm (P < 1mW)
Automatische uitschakeling
laser: 30 sec
apparaat: 3 min.
Verwachte levensduur
van de batterij: tot 4000 afzonderlijke metingen
Batterijen: 2 x 1,5 Volt AAA-batterijen (Alkaline)
Optimale bedrijfstemperatuur: 0° C tot 40° C
Opslagtemperatuur: -10° C tot 60° C
Veiligheidsklasse: IP54
Afmetingen: 115 x 47 x 28 mm
Gewicht: 132g (incl. batterijen)
17
Page 18

Veiligheidsrichtlijnen
Het apparaat heeft een spanningsbereik dat elektrische gevaren voor
mens en dier kan opleveren. Het apparaat mag alleen door geautoriseerde personen geopend en/of gedemonteerd worden. Instandhouding
en reparaties mogen alleen door elektriciens en geautoriseerde werkplaatsen worden uitgevoerd. Het gebruik van het apparaat is de verantwoordelijkheid van en voor risico van de koper/gebruiker.
Voor gebruik van dit product altijd alle aanwijzingen van dit handboek
lezen en begrijpen. Het niet in acht nemen van aanwijzingen kan tot
gevaarlijke laserstraalbelasting, elektrische schokken en/of verwondingen leiden.
PAS OP: Probeer de functie van het apparaat op geen enkele
manier aan te passen. Dit kan tot gevaarlijke laserstraalbelasting leiden.
LASERSTRALING. Niet in de straal kijken. Apparaat van
laserklasse 2. De laserstraal alleen inschakelen wanneer het
apparaat wordt gebruikt. De laser wordt automatisch uitgeschakeld na 30 seconden. Om de laser handmatig uit te scha-
kelen, drukt u op de knop
Het niet volgens voorschrift uitvoeren van de werkprocedures
en het niet volgens deze gebruiksaanwijzing gebruiken van
bedienings- en instelelementen kan tot gevaarlijke straalbelasting leiden.
Het gebruik van optische instrumenten zoals telescopen om
de laserstraal te bekijken, versterkt de oogbeschadigende werking.
.
Het apparaat beschikt over een geïntegreerde laser. Dit is een laser
van klasse 2 met een maximaal uitgangsvermogen van 1 mW en een
golflengte van 635 nm. Normaal gesproken veroorzaken deze lasers
geen oogschade. Kijk desondanks niet direct in de straal; dit kan tot
verblinding leiden.
18
Page 19

Op uw laser-afstandmeetapparaat bevinden zich de volgende etikett
Het etiket (laseruitvoer) duidt de plek aan waar het digitale laser-afstandmeetapparaat het laserlicht produceert. Bij gebruik van het apparaat moet u weten waar het laserlicht uit het apparaat komt. Zorg ervoor dat alle aanwezige personen op de hoogte zijn van de gevaren die
zijn verbonden aan direct oogcontact met de laserstraal.
• Productetiketten niet verwijderen of wijzigen.
• Het digitale laser-afstandmeetapparaat is geen speelgoed. Altijd op
een voor kinderen ontoegankelijke plek bewaren. Het door dit apparaat
geproduceerde laserlicht mag in geen geval op personen of dieren worden gericht.
• Gebruik het apparaat niet in aanwezigheid van kinderen en sta het
kinderen niet toe het apparaat te gebruiken.
• Postioneer het apparaat niet zodanig dat iemand expres of per ongeluk in de laserstraal kan kijken.
• Niet op glanzende of reflecterende oppervlakken zoals plaatstaal
gebruiken. De reflecterende oppervlakken kunnen de staal terug naar
de gebruiker reflecteren.
• Zet het apparaat altijd uit wanneer hij niet wordt gebruikt. Als u het
apparaat ingeschakeld laat, verhoogt u het risico dat iemand per ongeluk in de laserstraal kijkt.
• Probeer het apparaat niet te repareren of uit elkaar te halen. Indien
niet gekwalificeerde personen proberen het apparaat te repareren, kunnen er ernstige verwondingen ontstaan. Alle noodzakelijke reparatiewerkzaamheden aan deze lasermeter mogelijk alleen door de geautoriseerde klantenservice van STORCH worden uitgevoerd.
19
Page 20

• Gebruik het apparaat niet op brandgevaarlijke plaatsen zoals in de
buurt van ontvlambare vloeistoffen, gassen of stoffen/dampen.
• Het gebruik van voor andere laser-afstandmeetapparaten bestemde
accessoires kan tot ernstige verwondingen leiden.
• Batterijen buiten bereik van kinderen bewaren.
Apparaatbeschrijving en LCD-display
ProDist compact Overzicht van de functies en bedieningselementen
1 Aan/meting
2 Oppervlakte- / volumemeting
3 Indirecte meting (Pythagoras)
4 Enkelvoudige meting /
continu meting
5 Plus + / optellen van de
gemeten waarden
6 Minus -/ aftrekken van de
gemeten waarde
7 Opslaan van de gemeten
waarden / archief
8 Omschakelen van het
meetreferentiepunt
(van apparaat-bovenkant,
apparaat-onderkant
9 Displayverlichting aan/uit /
meeteenheden wijzigen
(m, in, ft)
10 Waarden wissen / uit
20
Page 21

Batterijen vervangen
Bij het apparaat wordt passend montagegereedschap meegeleverd
(kleine schroevendraaier). Dit is nodig voor vervangen van de batterijen
1. Schroef het batterijvak aan de onderkant van het apparaat open
2. Klap het batterijvak open
3. Plaats de batterijen en houd rekening met polariteit (+/-)
4. Plaats het vakje terug en schroef het weer dicht
Tip: Bewaar het montagegereedschap altijd in het kleinste voorste vak
van de bewaartas.
ProDist compact Overzicht van het LCD-display
1 Laser aan
2 Referentiepunt meting boven
3 Referentiepunt meting onder
4 Weergave van de
meetfuncties
• Oppervlaktemeting
• Volumemeting
• Enkelvoudige Pythagoras
• Dubbele Pythagoras
5 Eenvoudige afstandsmeting
6 Batterij-weergavestatus
7 Opgeslagen waarden/archief
8 Foutmelding apparaat
9 Continue meting en
Min/Max-meting
10 Tussenwaarde 1
11 Tussenwaarde 1
12 Samenvattingen
van de gemeten waarden
21
Page 22

Inbedrijfsname en instellingen
Het apparaat in- en uitschakelen
-knop. Het apparaat en de laser inschakelen.
-knop langer indrukken om het apparaat en de laser uit te scha-
kelen.
De laser wordt automatisch uitgeschakeld na 30 seconden en het
apparaat na 3 minuten.
Waarden wissen
-Druk kort op de knop. De eerder gemeten waarden worden gewist
op het apparaat.
Bepalen van het referentiepunt (foto‘s van de punten)
De meting is op de onderkan van de behuizing ingesteld.
Om dit te veranderen, druk op de referentiepunt-knop
andere referentie-meetpunten (boven, onder) te bepalen. Een geluidssignaal bevestigt de selectie.
Na uitschakelen van het apparaat gaat de instelling weer terug naar de
fabrieksinstelling en wordt er weer vanaf de onderkant van het apparaat gemeten.
LCD-displayverlichting
Door kort te drukken op de
chting worden in- en uitgeschakeld.
Meeteenheiden wijzigen (m, ft. In, ft+in)
Houd de
-knop langer ingedrukt om de meeteenheden te wijzigen.
-knop kan de displayachtergrondverli-
22
, om de
Page 23

Metingen uitvoeren
Eenvoudige afstandsmeting
Druk op de
het laserte- ken weergegeven en de rode laserpunt wordt op het
oppervlak zichtbaar waarop het lasermeetapparaat wordt gericht. Druk
nogmaals op de knop om de meting te starten. De gemeten waarden
worden direct op het display weergegeven.
Continue meting (tracking) & Min / Max meting
Tijdens de continue meting wordt het apparaat op het meetobject uitgelijnd en worden de gemeten waarden elke 0,5 seconden geactualiseerd.
De betreffende minimale en maximale waarden worden dynamisch op
de eerste en tweede regel weergegeven.
Voor de continue meting in de Min / Max modus, voor bepalen van de
kortste en de langste afstand, houdt u de
continue meting te onderbreken, drukt u op
De functie voor continue meting eindigt automatisch na 100 metingen.
-knop om de laser te activeren. Op het display wordt
-knop ingedrukt. Om de
-, of .
Verdere functies
Optellen (+) / aftrekken (-)
Eenvoudige afstandsmeting
+
De volgende meting wordt bij de vorige opgeteld
-
De volgende meting wordt van de vorige afgetrokken
De laatste stap wordt geannuleerd
Terugkeren naar eenvoudige afstandsmeting
23
Page 24

Oppervlaktemeting
Druk kort op de
Het (oppervlakte)-symbool wordt op het display
weergegeven.
Druk op de
ste afstand te meten
(bijv. lengte)
Druk op de
tweede afstand te
meten
(bijv. breedte)
De uitkomst wordt automatisch
berekend en in het xx²-formaat
weergegeven.
Volumemeting
Druk twee keer op de
Het (volume)-symbool op
het display wordt weergegeven.
Druk op de
ste afstand te meten (bijv.
lengte)
Druk op de
tweede afstand te
meten (bijv. breedte)
Druk op de
de afstand te meten
(bijv. hoogte)
De uitkomst wordt automatisch
berekend en in het xx³-formaat
weergegeven.
-knop.
-knop om de eer-
-knop om de
-knop.
-knop om de eer-
-knop om de
-knop om de der-
Indirecte meting (Pythagoras)
meten van een afstand met twee
De indirecte meting wordt gebruikt om afstanden te meten die
niet direct kunnen worden gemeten omdat een hindernis de laserstraal blokkert of de doelvlakken
niet als reflector geschikt zijn.
Indirecte meting bepaalt een
afstand met behulp van 2 hulpmetingen.
Druk op de
-symbool op het display
wordt weergegeven. De eerst te
meten afstand wordt op het symbool als knipperende lijn weergegeven. Richt op het bovenste
punt en gebruik de
de eerste meting wordt de eerste
waarde weergegeven. Richt het
lasermeetapparaat nu horizontaal
uit.
Voer de tweede meting uit met
-knop.
de
De uitkomst wordt automatisch
berekend en op het display weergegeven.
-knop totdat het
-knop. Na
24
Page 25

Indirecte meting 2 (dubbele
Pythagoras) - meten van een
afstand met drie metingen
Druk op twee keer de
totdat het
display wordt weergegeven. De
eerst te meten afstand wordt op
het symbool als knipperende lijn
weergegeven.
Richt op het onderste punt en
gebruik de
ste meting wordt de eerste waarde weergegeven. Richt het lasermeetapparaat nu horizontaal uit.
Voer de tweede meting uit met
-knop.
de
Historische archivering /
interne opslag
Met de
laatste 20 meetresultaten op.
Om tussen de resultaten over te
schakelen,
gebruikt u de
pen.
-symbool op het
-knop. Na de eer-
-knop roept u de
en --knop-
+
-knop
Voer de derde meting uit. Richt
op het bovenste punt en druk op
-knop.
de
De uitkomst wordt automatisch
berekend en op het display weergegeven.
Om het archief volledig te wissen,
drukt u tegelijk op de
-knoppen.
en
25
Page 26

Foutsignalen / fouten oplossen
Foutcode
204 Berekeningsfout Herhaal de laatste meting/meet-
208 Ontvangstsignaal
209 Ontvangstsignaal van
252 Temperatuur te hoog Laat het lasermeetapparaat afko-
253 Temperatuur te laag Breng het lasermeetapparaat op de
255 Hardwarefout Schakel het lasermeetapparaat uit
Oorzaak Correctiemaatregel
procedure
van de laser te zwak,
afstand groter dan
65 m
de laser te sterk
Gebruik een ander meetdoel
Reflecties op de doelvlakken.
Gebruik een ander meetdoel. Verklein de afstand
elen
vereiste bedrijfstemperatuur
en weer aan. Als de foutmelding
zich opnieuw voordoet, neemt u
contact op met de service-hotline.
26
Page 27

Onderhoud
De ProDist compact is een onderhoudsarm apparaat. Neem desondanks
voor een goede werking de volgende eenvoudige richtlijnen in acht.
1. Behandel het apparaat altijd voorzichtig. Het gaat om een optisch
instrument dat over gevoelige elektronica beschikt.
2. Stel het apparaat niet bloot aan stoten, constante trillingen of
extreme hitte of koude.
3. Bewaar het apparaat altijd binnenshuis. Wanneer het niet wordt
gebruikt, dient u het apparaat altijd in de beschermtas te bewaren.
4. Houd het apparaat altijd uit de buurt van stof en vocht. Alleen met
een schone, zachte doek reinigen. Gebruik indien nodig, en uitsluitend
voor de oppervlakken van het apparaat, een zacht schoonmaakmiddel.
5. Raak de lens nooit met uw vingers aan.
6. Controleer de batterijen regelmatig om voortijdige veroudering te
voorkomen. Verwijder altijd de batterijen wanneer het apparaat voor
langere tijd niet wordt gebruikt.
7. Vervang de batterijen wanneer de batterij-aanduiding op het
LCD-display op „leeg“ staat.
8. Demonteer het apparaat in geen geval; hierdoor kan de gebruiker
aan gevaarlijke straling worden blootgesteld.
9. Probeer nooit onderdelen van de laserlens aan te passen.
27
Page 28

Garantie
Garantievoorwaarden:
Voor onze apparaten gelden de wettelijke garantieperioden van 12
maanden vanaf aankoopdatum/factuurdatum van de eindklant. Indien
wij langere perioden in een garantieverklaring hebben toegezegd, dan
worden deze speciaal in de gebruiksaanwijzingen van de desbetreffende apparaten toegelicht.
Indienen van garantieclaims:
Bij een garantieclaim vragen wij u het gehele apparaat samen met de
rekening franco aan ons logistiekcentrum in Berka of naar een door
ons geautoriseerd servicestation te verzenden Neem eerst contact op
met de STORCH Service-Hotline (hiervoor worden kosten in rekening
gebracht): +49 (0)202 . 49 20 – 110.
Garantieclaims
Claims uitsluitend met betrekking tot materiaal- of productiefouten en
uitsluitend bij gebruik van het apparaat conform de voorschriften. Voor
slijtdelen gelden deze aanspraken niet. Alle claims vervallen bij inbouw
van onderdelen van externe herkomst, bij verkeerde hantering en opslag en bij het klaarblijkelijk niet in acht nemen van de gebruiksaanwijzing.
Reparaties uitvoeren
Reparaties mogen uitsluitend door onze fabriek of door STORCH geautoriseerde servicestations worden uitgevoerd.
28
Page 29

EG-conformiteitsverklaring
Naam/adres van de opsteller:
STORCH Malerwerkzeuge & Profigeräte GmbH
Platz der Republik 6 - 8 · D - 42107 Wuppertal
Bij deze verklaren wij
Dat het hieronder vermelde apparaat op basis van zijn ontwerp en type
en in de door ons in omloop gebrachte uitvoering aan de toepasselijke elementaire veiligheids- en gezondheidseisen van de EU-richtlijnen
voldoet. Bij een niet met ons afgestemde modificatie van het apparaat
is deze verklaring niet langer geldig.
Artikelbenaming: ProDist compact
Laser-afstandmeetapparaat
Apparaattype: Laser-afstandmeetapparaat
Artikelnumme: 26 68 65
Toegepaste richtlijnen
EG-richtlijn Elektromagnetische compatibiliteit:
2004 / 108 / EG
EG-richtlijn ter beperking van het gebruik van bepaalde
gevaarlijke stoffen in elektrische en elektronische apparatuur:
2011 / 65 / EU (RoHS)
EN 62321:2008 EN 61326-1: 2006
EN 61326-2-1:2006 EN 60825-1: 2007 (2-nd Edition)
Gevolmachtigde voor samenstelling
van de technische documentatie::
STORCH Malerwerkzeuge & Profigeräte GmbH
Platz der Republik 6-8 · 42107 Wuppertal
Jörg Heinemann
- Directeur -
Wuppertal, 03- 2015
29
Page 30

FR
Nous vous remercions
de la confiance dont vous témoignez envers STOCH. Avec cet achat
vous avez opté pour un produit de qualité. Si vous avez malgré tout
des suggestions pour l‘amélioration ou si vous deviez rencontrer un
problème, nous sommes avec plaisir à votre disposition. Dans ce cas,
contactez votre représentant, ou directement notre service clients, s‘il
s‘agit d‘un problème urgent.
Salutations dévouées
SAV STORCH
Tél. : +49 (0) 2 02 . 49 20 - 112
Fax : +49 (0)2 02 . 49 20 - 244
Ligne d‘assistance SAV gratu +49 800 7 86 72 47
Service gratuit de commande par téléphone :
+49 800. 7 86 72 44
Fax de commande gratuit : +49 800. 7 86 72 43
(uniquement en Allemagne)
Sommaire Page
Contenu de la livraison 31
Utilisation conforme 31
Données techniques 31
Consignes de sécurité 32 - 34
Description de l‘appareil -
Fonctions des touches et de l‘écran LCD
Mise en service et réglages 36
Procéder à des mesures 37
Autre fonctions 38 - 39
Signaux de dysfonctionnement /
Élimination des dysfonctionnements
Entretien 41
Garantie 42
Déclaration de conformité CE 43
30
34 - 35
40
Page 31

Contenu de la livraison
Appareil de mesure à distance laser ProDist compact, poches révolver,
mode d‘emploi, outils de montage couvercle de piles, 2 x 1,5 volts piles
AAA
Utilisation conforme
L‘appareil ci-présent convient pour le calcul de distances, de surfaces
et de volumes à l‘aide d‘un laser. L‘utilisation concerne uniquement
l‘utilisation commerciale et doit être par conséquent adaptée aux circonstances sur place. L‘appareil ne doit être utilisé en aucun cas pour
afficher/marquer des endroits (utilisé comme pour un pointeur laser
ou à d‘autres fins pour lesquelles le rayon laser pourrait être dirigé sur
des personnes. L‘appareil est destiné à une utilisation à l‘intérieur et à
l‘extérieur.
Données techniques
Zone de mesure : 0,05 - 65 m
Précision de la mesure :
± 1,5 mm
Unité de mesure la plus petite : 1 mm
Unités de mesure : m, in, ft.
Classe de laser : 2 (selon DIN EN 60825-1/11.01)
Type de laser : 635nm (P < 1mW)
Désactivation automatique
laser : 30 sec.
appareil : 3 min.
Durée de vie prévue de la pile jusqu‘à : 4 000 mesures
individuelles
Pile : 2 x 1,5 volts piles AAA (alcaline)
Température de service optimale : de 0 °C à 40 °C
Température de stockage : de -10 °C à 60 °C
Classe de protection : IP 54
Dimension : 115 x 47 x 28 mm
Poids : 132g (piles comprises)
31
Page 32
Consignes de sécurité
La plage de tension de l‘appareil présente un risque électrique pour les
hommes et les animaux. Seules des personnes autorisées sont habilitées à dévisser et / ou à démonter l‘appareil. De même, les réparations et l‘entretien sont exclusivement réservés à des électriciens qualifiés et à des ateliers spécialisés agréés. La mise en service de l‘appareil s‘effectue aux risques et périls de l‘acheteur / l‘utilisateur.
Lire et comprendre les instructions du présent manuel avant l“utilisation de ce produit. Le non-respect des instructions peut entraîner une
exposition dangereuse aux rayons laser, une électrocution et/ou des
dommages corporels.
ATTENTION : ne tentez pas de modifier de quelque façon que
ce soit le mode de fonctionnement de l‘appareil laser. Ceci
peut entraîner une exposition dangereuse aux rayons laser.
RAYONS LASER. Ne regardez pas dans le rayon. Appareil de
classe laser 2. N‘allumez le rayon laser que lorsque vous utilisez l‘appareil. Le laser s‘éteint automatiquement au bout de
30 secondes. Pour éteindre le laser manuellement, appuyez
sur la touche
L‘exécution non-conforme des processus de travail ou l‘utilisation non-conforme des éléments de commande et de réglage
selon la notice d‘emploi fournie peuvent entraîner une exposition dangereuse aux rayons.
L‘utilisation d‘instruments optiques tels que les télescopes
pour visualiser le rayon laser amplifie les effets nocifs pour les
yeux.
.
L‘instrument de mesure est doté d‘un laser intégré. Il s‘agit d‘un laser
de classe 2 avec une puissance de sortie maximale de 1 mW et une
longueur d‘onde de 635 nm. Ne regardez néanmoins pas directement
dans le rayon, puisque cela peut provoquer une cécité temporaire.
32
Page 33

L‘étiquette suivante se trouve sur votre appareil de mesure à distance
laser
L‘étiquette (sortie du laser) identifie l‘endroit où l‘appareil de mesure
de distances laser numérique génère la lumière. Lors de l‘utilisation
de l‘appareil, vous devez savoir à quel endroit la lumière laser sort du
boîtier. Veillez à ce que toutes les personnes présentes soient conscientes du danger liées à un contact direct des yeux avec le rayon laser.
• Ne pas retirer ou modifier les étiquettes sur le produit.
• L‘appareil de mesure de distances laser n‘est pas un jouet. Conservez-le toujours à un endroit inaccessible aux enfants. La lumière laser
générée par l‘appareil ne doit jamais être dirigée sur les personnes ou
les animaux.
• N‘utilisez pas l‘appareil en présence d‘enfants et ne permettez pas à
des enfants de l‘utiliser.
• Ne positionnez pas l‘appareil de sorte que quelqu‘un puisse regarder
intentionnellement ou accidentellement dans le rayon laser.
• N‘utilisez pas l‘appareil sur des surfaces réfléchissantes telles que les
tôles d‘acier. La surface réfléchissante peut rediriger les rayon directement vers l‘utilisateur.
• Éteignez toujours l“appareil lorsque vous ne l‘utilisez pas. Un appareil
laissé allumé augmente le risque que quelqu‘un regarde par mégarde
directement dans le rayon laser.
• Ne tentez pas de réparer l‘appareil de mesure de distances laser ou
de le désassembler. Si des personnes non qualifiées tentent de réparer
cet appareil, elles risquent de graves blessures. Toutes les réparations
nécessaires sur cet instrument de mesure laser doivent être uniquement
confiées au service clients agréé par STORCH.
33
Page 34
• N‘utilisez pas l‘appareil dans des zones à risques d‘incendies telles
que par ex. à proximité de liquides, gaz ou poussières inflammables.
• L‘utilisation d‘accessoires destinés à d‘autres appareils de mesure à
distance laser peut entraîner des blessures graves.
• Conservez les piles hors de portée des enfants.
Description de l‘appareil et écran LCD
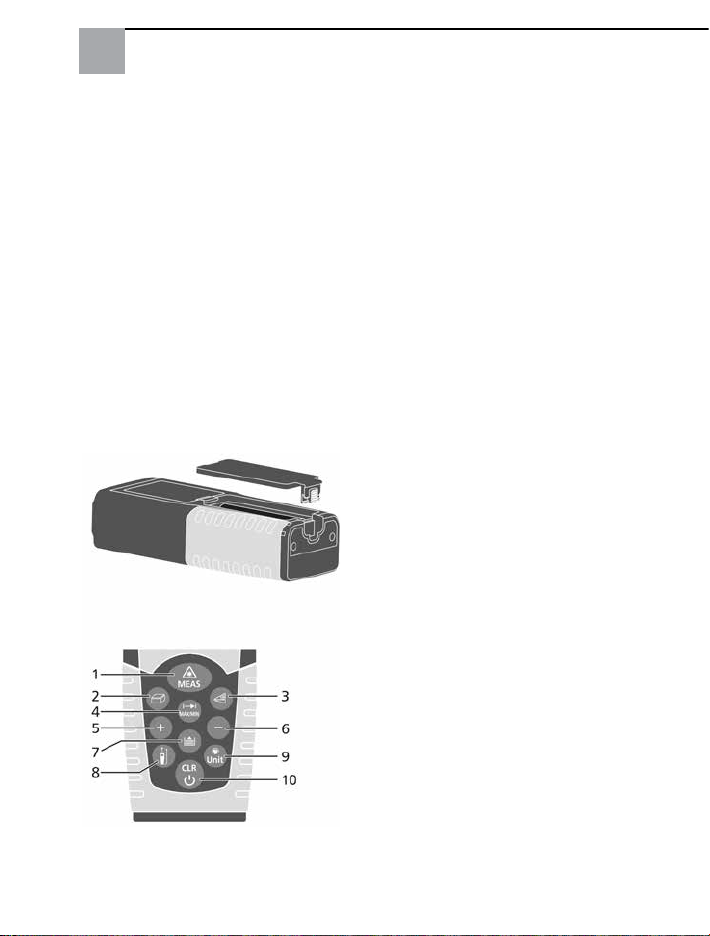
ProDist compact Vue d‘ensemble des fonctions et des éléments de commande
1 marche/mesure
2 mesure surface / volume
3 mesure indirecte (pythagore)
4 mesure simple /
mesure continue
5 plus + / addition des valeurs
mesurées
6 moins / soustraction des
valeurs mesurées
7 Touche / archive sauvegarde
des valeurs mesurées
8 Commutation du point de
référence de mesure
(du bord supérieur de
l‘appareil, bord inférieur de
l‘appareil
9 écran éclairage allumé/éteint
/ modifier les unités de
mesure (m, in, ft)
10 supprimer valeurs / arrêt
34
Page 35
Remplacer les piles
Dans le contenu de la livraison se trouvent les outils de montage correspondants (petit tournevis). Celui-ci est nécessaire pour le remplacement des piles.
1. Dévisser le coulisseau du compartiment piles situé sur la partie
inférieure de l‘appareil
2. Ouvrir le compartiment pile
3. Insérer les piles en faisant attention à placer les pôles (+/-) correctement
4. Replacer le compartiment et revisser
Astuce : stockez toujours les outils de montage dans le petit compartiment avant de la poche de rangement.
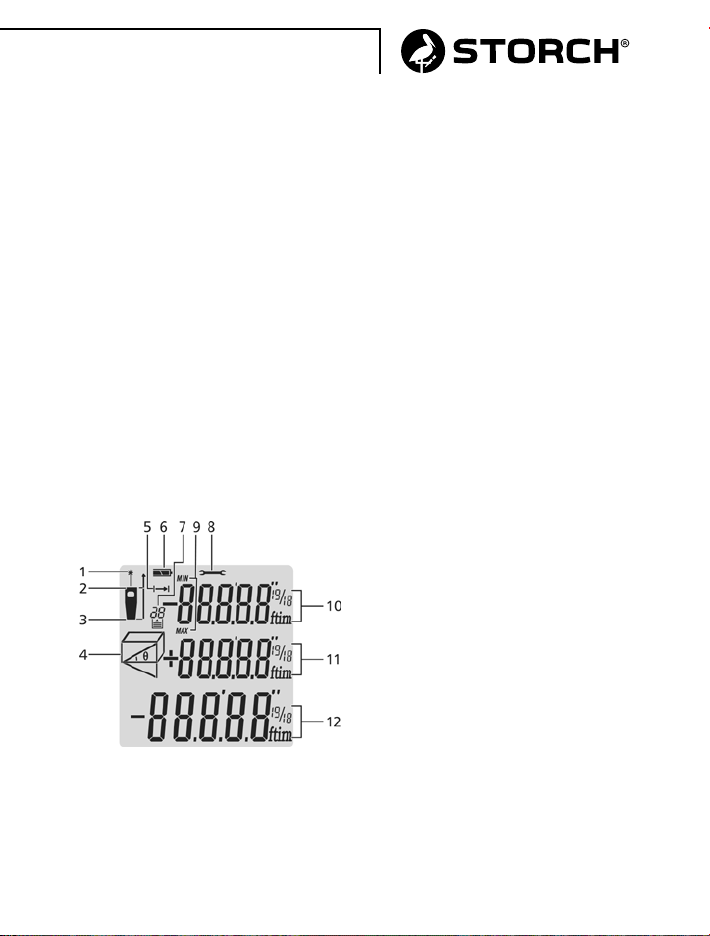
ProDist compact Vue d‘ensemble de l‘écran LCD
1 Allumer le laser
2 Point de référence
mesure haut
3 Point de référence mesure bas
4 Affichage des fonctions de
mesure
• Mesure de surface
• Mesure de volume
• Pythagore simple
• Pythagore double
5 Mesure de distance simple
6 Affichage état de la pile
7 Valeurs enregistrées / archive
8 Message d‘erreur appareil
9 Mesure continue et mesure
min/max
10 Valeur intermédiaire 1
11 Valeur intermédiaire 1
12 Récapitulatifs des valeurs
mesurées
35
Page 36
Mise en service et réglages
Allumer et éteindre l‘appareil
Touche
. Allume l‘appareil et le laser.
Touche
et le laser. Le laser s‘éteint automatiquement au bout de 30 secondes
et l‘appareil au bout de 3 minutes.
Supprimer les valeurs
Toucher légèrement la touche
ment sont supprimées par l‘appareil.
Détermination du point de référence (photos des points)
La mesure est préréglée sur le bord inférieur du boîtier.
Pour modifier cela, appuyez sur la touche de point de référence
afin de déterminer les autres points de mesure de référence (en
haut, en bas). Un signal acoustique confirme la sélection.
Après avoir éteint l‘appareil, le réglage se positionne à nouveau sur le
réglage d‘usine et mesure de nouveau à partir du bord inférieur de l‘appareil.
Éclairage affichage LCD
En appuyant sur la touche
peut être allumé et éteint.
Modifier les unités de dimensions (m, in, ft+in)
Maintenez la touche
modifier les unités de dimensions.
. Appuyer longtemps sur la touche pour éteindre l‘appareil
. Les valeurs mesurées précédem-
, l‘éclairage d‘arrière-plan de l‘affichage
enfoncée plus longtemps afin de pouvoir
,
36
Page 37
Procéder à des mesures
Mesure de distance simple
Appuyez sur la touche
s‘affiche sur l‘écran et le point rouge du laser devient visible sur la
surface sur laquelle l‘appareil de mesure laser doit être dirigé. Appuyez
à nouveau sur la touche pour démarrer la procédure de mesure. Les
valeurs mesurées s‘affichent directement sur l‘écran.
Mesure continue (poursuite) & mesure min/max
Pendant la mesure continue, l‘appareil est dirigé sur l‘objet de la mesure et pendant ce temps, les valeurs mesurées sont actualisées toutes les 0,5 secondes. Les valeurs minimales et maximales correspondantes s‘affichent de façon dynamique à la première et seconde ligne.
Pour la mesure continue en mode min /max, pour calculer le parcours
le plus court ainsi que le plus long, maintenez la touche
enfoncée. Pour interrompre la mesure continue, appuyez soit sur la
touche
La fonction de mesure continue se termine automatiquement au bout
de 100 déclenchements de mesure.
, soit sur la touche .
pour activer le laser. Le symbole du laser
Autre fonctions
Addition (+) / soustraction (-)
Mesure de distance simple
+
La mesure suivante est ajoutée à la précédente.
-
La mesure suivante est soustraite à la mesure précédente
La dernière procédure est annulée.
Retour à la mesure de distance simple
37
Page 38
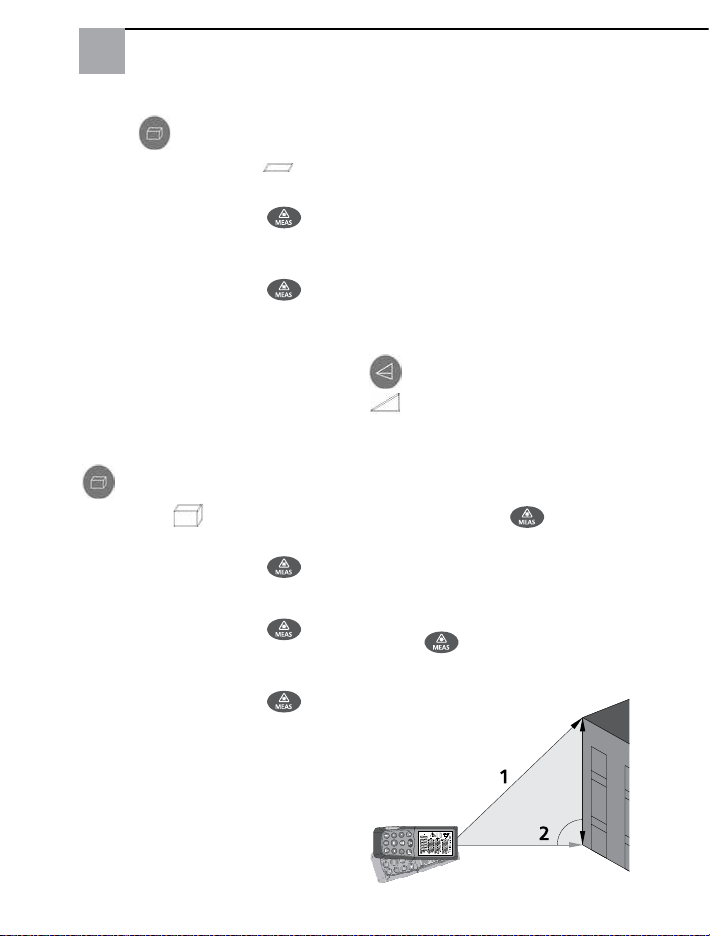
Mesure de surface
Appuyez brièvement sur la
touche
Le symbole (surface) s‘affiche sur l‘écran.
Appuyez sur la touche
de mesurer la première
distance (par ex. longueur)
Appuyez sur la touche
de mesurer la secon- d e
distance (par ex. largeur)
Le résultat est calculé automatiquement et affiché dans le format xx².
Mesure de volume
Appuyez deux fois sur la touche
(volume) s‘affiche sur
l‘écran.
Appuyez sur la touche
de mesurer la première
distance (par ex. longueur)
Appuyez sur la touche
de mesurer la secon- d e
distance (par ex. largeur)
Appuyez sur la touche
de mesurer la troisième
distance (par ex. hauteur).Le
résultat est calculé automatiquement et affiché dans le format xx³.
.
afin
afin
jusqu‘à ce que le symbole
afin
afin
afin
Mesure indirecte (pythagore) Calcul d‘un parcours avec deux
mesures
La mesure indirecte est utilisée
pour mesurer des distances qui
ne peuvent pas être mesurées
directement parce qu‘un obstacle
bloquerait le rayon laser ou parce qu‘aucune surface cible n‘est
suffisamment réfléchissante. La
mesure indirecte détermine un
parcours à l‘aide de 2 mesures
auxiliaires.
Appuyez deux fois sur la touche
jusqu‘à ce que le symbole
s‘affiche sur l‘écran. La
distance à mesurer d‘abord s‘affiche sous la forme d‘une ligne
clignotante sur le symbole.
Ciblez le point supérieur et déclenchez la touche
première mesure, la première
valeur s‘affiche. Positionnez
maintenant l‘appareil de mesure
laser à l‘horizontal. Déclenchez la
deuxième mesure à l‘aide de la
touche
Le résultat est calculé automa-
tiquement et affiché sur l‘écran.
.
. Après la
38
Page 39
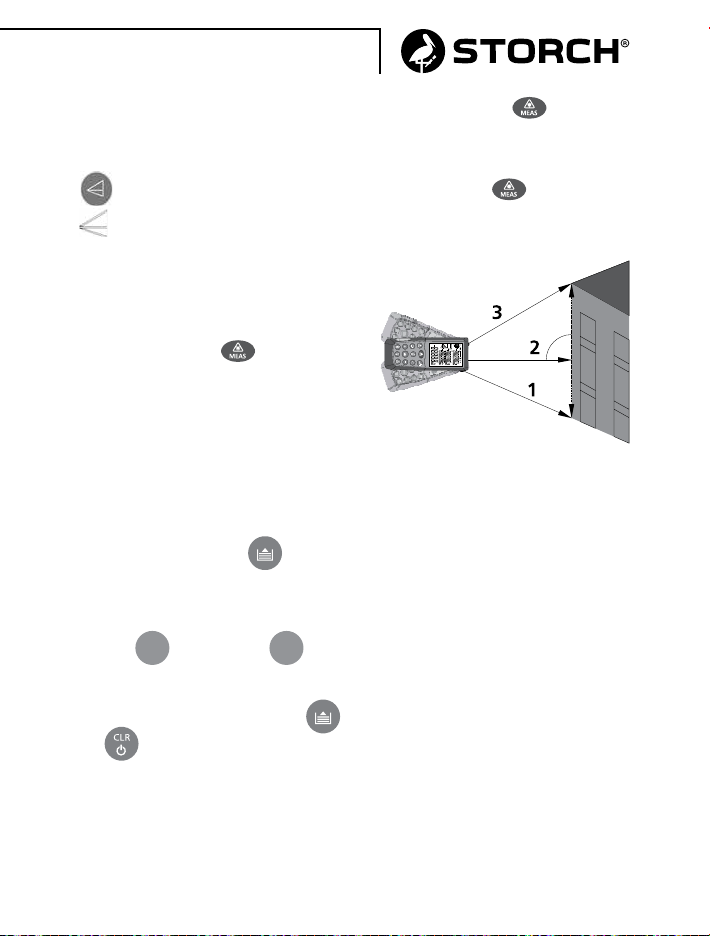
Mesure indirecte 2 (double
pythagore) - Calcul d‘un parcours
avec trois mesures
Appuyez deux fois sur la touche
jusqu‘à ce que le symbole
s‘affiche sur l‘écran. La
distance à mesurer d‘abord s‘affiche sous la forme d‘une ligne
clignotante sur le symbole.
Ciblez le point supérieur et déclenchez la touche
première mesure, la première
valeur s‘affiche. Positionnez
maintenant l‘appareil de mesure
laser à l‘horizontal.
Archivage de l‘historique /
Mémoire interne
. Après la
Déclenchez la deuxième mesure à
l‘aide de la touche
Déclenchez la troisième mesure.
Ciblez le point supérieur et décle-
nchez la touche
Le résultat est calculé automatiquement et affiché sur l‘écran.
.
.
À l‘aide de la touche
tionnez les 20 derniers résultats
de mesure. Pour pouvoir commuter entre les résultats, utilisez la
touche
Pour effacer entièrement l‘archive, appuyez sur les touches
et
et la touche -.
+
en même temps.
, sélec-
39
Page 40

Signaux d‘erreur/Élimination des erreurs
Code
d'erreur
204 Erreur de calcul Répétez la dernière mesure/procé-
208 Signal de réception
209 Signal de réception
252 Température trop
253 Température trop
255 Erreur de matériel Éteignez et rallumez l'appareil de
Cause Mesure de correction
dure de mesure
du laser trop faible,
distance plus longue
que 65 m
du laser trop fort
élevée
basse
Utilisez un objectif de mesure
alternatif
Réfléchissements sur la surface
cible. Utilisez un objectif de mesure alternatif. Diminuez la distance
Refroidissez l'appareil de mesure
laser
Amenez l'appareil à la température
de service nécessaire
mesure laser. Si le message d'erreur se répète, contactez notre ligne
d'urgence.
40
Page 41

Entretien
Le ProDist compact est un appareil nécessitant peu d‘entretien. Toutefois, vous devez respecter les directives simples suivantes pour assurer
les performances de l‘appareil.
1. Maniez toujours l‘appareil avec soin. Il s‘agit d‘un instrument optique
qui est équipé de composants électroniques sensibles.
2. Evitez d‘exposer l‘appareil à des chocs, des vibrations continues ou
des températures extrêmes.
3. Conservez toujours l‘appareil à l‘intérieur. S‘il n‘est pas utilisé, rangez-le toujours dans sa pochette de protection.
4. Protégez toujours l‘appareil de la poussière et de l‘humidité. Nettoyez-le uniquement avec un chiffon propre et doux. Utilisez, si nécessaire, uniquement des produits nettoyants doux pour la surface de l‘appareil.
5. Ne touchez jamais la lentille des doigts.
6. Contrôlez régulièrement les piles pour empêcher tout vieillissement
précoce. Retirez toujours les piles si vous n‘utilisez pas l‘appareil pendant une période de temps assez longue.
7. Remplacez les piles dès que l‘affichage piles sur l‘écran indique que
les piles sont épuisées.
8. Ne démontez en aucun cas l‘appareil, l‘utilisateur pourrait alors être
exposé à des rayons dangereux.
9. Ne tentez en aucun cas de modifier un quelconque élément de la
lentille laser.
41
Page 42

Garantie
Conditions de garantie
Les durées de garantie légales de 12 mois à compter de la date d'achat
/ de la facture du client final professionnels s'appliquent à nos appareils. Si nous mentionnons des délais supérieurs dans le cadre d'une
déclaration de garantie, ceux-ci sont mentionnés dans les instructions
de service des appareils concernés.
Exercice
Dans un cas couvert par la garantie, nous vous demandons de renvoyer
l'appareil complet franco à notre centre logistique à Berka accompagné de la facture ou de l'expédier à une station SAV agréée par nous.
Veuillez contacter préalablement l‘assistance téléphonique payante de
la société STORCH: +49 (0)202 . 49 20 – 110.
Demande de prise en garantie
Les demandes couvrent exclusivement les défauts de matériau ou
d‘ouvrage et ne couvrent qu‘une utilisation conforme à la destination
de l‘appareil. Les pièces d‘usure ne sont pas prises en charge par la
garantie. Tout droit à garantie est rendu caduque par le montage de
pièces qui ne sont pas d‘origine, par une manipulation et un entreposage incorrects ainsi qu‘en cas de non-respect évident des instructions de
service.
Exécution de réparations
Toutes les réparations doivent exclusivement être réalisées par notre
usine ou par des services SAV agréés par STORCH.
42
Page 43

Déclaration de conformité CE
Nom / adresse de l‘exposant :
STORCH Malerwerkzeuge & Profigeräte GmbH
Platz der Republik 6-8 . D - 42107 Wuppertal
Nous déclarons, par le présent acte,
que le produit cité ci-après respecte les exigences fondamentales et en
vigueur en matière de sécurité et de santé des directives européennes
de par leur conception ainsi que dans la version commercialisée par
nos soins. En cas de modification non convenue avec nous, la présente
déclaration perd toute validité.
Désignation de l‘appareil : ProDist compact
Appareil de mesure
à distance laser
Type d‘appareil : Appareil de mesure
à distance laser
Référence article : 26 68 65
Directives appliquées
Directive européenne sur la compatibilité
électromagnétique: 2004 / 108 / EG
Directive européenne pour la limitation de l‘utilisation de certaines
matières dangereuses dans les apapreils électriques et électroniques :
2011 / 65 / EU (RoHS)
EN 62321:2008 EN 61326-1: 2006
EN 61326-2-1:2006 EN 60825-1: 2007 (2-nd Edition)
Fondé de pouvoir pour la compilation des documents techniques :
STORCH Malerwerkzeuge & Profigeräte GmbH
Platz der Republik 6-8 · 42107 Wuppertal
Jörg Heinemann
- Gérant -
Wuppertal, 03- 2015
43
Page 44

IT
Grazie
per la fiducia accordata a STORCH. Con l‘acquisto avete scelto un prodotto di qualità. Se comunque avete dei suggerimenti volti a migliorare
la nostra offerta o se doveste incontrare qualche difficoltà, non esitate
a rivolgerVi a noi. Contattate il Vostro rappresentante oppure rivolgeteVi direttamente a noi in casi urgenti.
Distinti saluti,
STORCH Reparto Assistenza
Tel.: 02 - 66 22 77 15
Indice Pagina
Materiale compreso nella fornitura 45
Uso regolamentare 45
Dati tecnici 45
Avvertenze di sicurezza 46 - 48
Descrizione del dispositivo
Funzioni dei tasti e display a cristalli liquidi
Messa in funzione e impostazioni 50
Eseguire delle misurazioni 51
Ulteriori funzioni 52 - 53
Segnali di errore / Correzione degli errori 54
Manutenzione 55
Garanzia 56
Dichiarazione di conformità CE 57
48 - 49
44
Page 45

Materiale compreso nella fornitura
Misuratore di distanza laser ProDist compact, borsellino, istruzioni per
l‘uso, attrezzi di montaggio per il coperchio del vano batteria, 2 batterie da 1,5 Volt tipo AAA
Uso regolamentare
Il presente dispositivo è ideato per la determinazione di distanze,
superfici e volumi per mezzo del laser. Il dispositivo deve essere utilizzato esclusivamente per scopi commerciali e secondo le condizioni
sul posto. Il dispositivo non deve mai essere usato per indicare/marcare
particolari punti (come as esempio con un „laser pointer“) oppure per
altri scopi nei quali il raggio laser potrebbe essere puntato verso delle
persone. Il dispositivo è ideato per l‘utilizzo all‘interno e all‘esterno.
Dati tecnici
Campo di misurazione:
0,05 - 65 m
Precisione: ± 1,5 mm
Unità minima di misurazione: 1 mm
Unità di misurazione: m, in, ft.
Classe di laser: 2 (secondo DIN EN 60825-1/11.01)
Tipo laser: 635nm (P < 1mW)
Spegnimento automatico Laser: -30 sec.
Dispositivo: - 3 Min.
Durata prevista della batteria: fino a 4000
misurazioni singole
2 batterie da 1,5 Volt tipo AAA (alcaline)
Temperatura d‘esercizio ottimale: 0° C fino a 40° C
Temperatura di conservazione: -10° C fino a 60° C
Classe di protezione: IP 54
Dimensioni: 115 x 47 x 28 mm
Peso: 132g (con batterie)
45
Page 46
Avvertenze di sicurezza
Il dispositivo ha componenti elettrici che possono comportare un pericolo elettrico per persone ed animali. Esso deve essere svitato e /
oppure smontato solamente da persone autorizzate. Inoltre, i lavori di
manutenzione e riparazione devono essere eseguiti solo da elettricisti
specializzati e officine specializzate. L‘utilizzo del dispositivo avviene
sotto la responsabilità ed a pericolo dell‘acquirente / utente.
Leggere e capire tutte le istruzioni contenute in questo manuale prima di utilizzare questo dispositivo. L‘inosservanza delle istruzioni può
causare un‘esposizione pericolosa ai raggi laser, una scossa elettrica e/
oppure oppure delle lesioni gravi.
ATTENZIONE: Non tentare di modificare in qualsiasi modo la
funzione del dispositivo. Ciò può causare un‘esposizione pericolosa ai raggi laser.
RADIAZIONE LASER. Non guardare nel raggio. Classe di
laser 2. Attivare il raggio laser solo quando il dispositivo va
utilizzato. Il laser si spegne automaticamente dopo 30 secondi. Al fine di spegnerlo manualmente occorre premere il tasto
.
Un‘esecuzione delle fasi di lavoro opp. un‘utilizzo degli elementi di comando ed impostazione in maniera non conforme
allo scopo previsto riportato nelle presenti istruzioni per l‘uso
possono risultare in un‘esposizione pericolosa ai raggi laser.
L‘utilizzo di strumenti ottici quali telescopi per la veduta del
raggio laser amplificano l‘effetto dannoso per gli occhi.
Il dispositivo è dotato di un laser integrato. Si tratta di un laser della
classe 2 con una potenza massima di uscita di un 1 mW ed una lunghezza d‘onda di 635 nm. Normalmente i laser di questo tipo non
causano dei danni agli occhi. Tuttavia, si consiglia di non guardare
direttamente nel raggio perchè possa risultare una cecità immediata.
46
Page 47

Sul vostro misuratore di distanza laser vi sono le seguenti etichette
L‘etichetta (uscita del laser) specifica il luogo in cui il misuratore digitale di distanza a laser genera la luce laser. Durante l‘utilizzo del dispositivo è consigliato sapere dove fuoriesce la luce laser. Provvedete
ad istruire tutte le persone presenti sui pericoli connessi ad un contatto
diretto degli occhi con il raggio laser.
• Non rimuovere o modificare le etichette del prodotto.
• Il misuratore digitale di distanza laser non è un giocattolo. Conservarlo
sempre in un luogo fuori dall‘accesso dai bambini. La luce laser generata questo apparecchio non deve essere mai diretta verso delle persone
degli animali.
• Non utilizzare l‘apparecchio con la presenze di bambini, e non permettere ai bambini di utilizzare l‘apparecchio.
• Non posizionare il dispositivo in modo che qualcuno possa guardare
nel raggio laser sia intenzionalmente che che involontariamente.
• Non utilizzarlo su superfici lucide o riflettenti come come ad esempio
lamiera d‘acciaio. La superficie riflettente potrebbe riflettere il raggio
direttamente verse l‘utente.
• Sempre spegnere il dispositivo quando esso non va utilizzato. Un dispositivo rimasto acceso aumenta il rischio che una persona possa involontariamente guardare nel raggio laser.
• Non tentare di riparare o smontare il dispositivo. In caso eventuali
riparazioni non siano eseguite da persone qualificate, possono derivarne
delle lesioni gravi. Qualsiasi riparazione necessaria a questo misuratore
laser dev‘essere esclusivamente eseguita dal servizio assistenza autorizzato STORCH.
47
Page 48
• Non utilizzare il dispositivo in zone a rischio di ,quali ad esempio nelle
vicinanze di liquidi, gas o polveri infiammabili.
• L‘utilizzo di accessori previsti per altri apparecchi misuratori di
distanza laser può causare delle lesioni gravi.
• Conservare le batterie fuori dalla portata dei bambini.
Descrizione del dispositivo e display
a cristalli liquidi
ProDist compact Panoramica delle funzioni e degli elementi di comando
1 Accensione/Misurazione
2 Misurazione superfici /
volumi
3 Misurazione indiretta
(Pitagora)
4 Misurazione singola /
Misurazione continua
5 Più + / Addizione dei valori
misurati
6 Meno / Sottrazione dei valori
misurati
7 Memorizzazione dei valori
misurati / Archivio
8 Commutazione del punto di
riferimento della misurazione
(dal bordo superiore del
dispositivo, bord inferiore
del dispositivo)
9 Illuminazione del display
On/Off / Cambiare le unità
di misurazione (m, in, ft)
10 Cancella / Spegnimento
48
Page 49
Sostituire le batterie
Il dispositivo viene consegnato con un attrezzo di montaggio adatto
(cacciavite). Queste serve per cambiare le batterie
1. Svitare il nasello scorrevole del vano batteria sul lato inferiore del
dispositivo
2. Aprire il vano batteria
3. Inserire le batterie osservandone la corretta polarità (+/-)
4. Riapplicare il coperchio e avvitarlo
Suggerimento: Si consiglia di conservare l‘attrezzo di montaggio nello
scomparto anteriore del sacchetto di conservazione.
ProDist compact Panoramica del display a cristalli liquid
1 Laser attivo
2 Riferimento misurazione
in alto
3 Riferimento misurazione
in basso
4 Visualizzazioni delle funzioni
di misurazione
• Misurazione di superfici
• Misurazione di volumi
• Pitagora singolo
• Pitagora doppio
5 Misurazione di distanza
semplice
6 Stato di visualizzazione
batteria
7 Valori memorizzati/Archivio
8 Messaggio di errore
dispositivo
9 Misurazione continua e
misurazione Min/Max
10 Valore intermedio 1
11 Valore intermedio 1
12 Riassunto dei valori misurati
49
Page 50
Messa in funzione e impostazioni
Accendere e spegnere l‘apparecchio
Tasto
. Avvia il dispositivo e il laser.
Tenere premuto il tasto
laser si spegne automaticamente dopo 30 secondi e il dispositivo dopo
3 minuti.
Cancellare i valori
Premere brevemente il tasto
dal dispositivo.
Determinazione del punto di riferimento (immagini dei punti)
Il dispositivo è preimpostato con il bordo inferiore del dispositivo come
punto di riferimento. Per cambiare questo, occorre premere il tasto del
punto di riferimento
mento (in alto, in basso). La selezione viene confermata attraverso un segnale acustico.
Dopo lo spegnimento del dispositivo, l‘impostazione torna alle
impostazioni di fabbrica e la misurazione viene eseguita dal bordo inferiore del dispositivo.
Illuminazione del display a cristalli liquidi
Premendo brevemente il tasto
retroilluminazione del display.
Cambiare le unità di misurazione (m, ft. In, ft+in)
Tener premuto il tasto
, per spegnere il dispositivo e il laser. Il
. I valori misurati vengono cancellati
, e selezionare uno degli altri punti di riferi-
è possibile accendere e spegnere la
per poter cambiare le unità di misurazione.
50
Page 51
Eseguire delle misurazioni
Misurazione di distanza semplice
Premere il tasto
cato sul display e il punto laser rosso appare sull‘oggetto verso
il quale viene puntato il misuratore a laser. Premere di nuovo il tasto
per avviare la procedura di misurazione. I valori misurati vengono direttamente indicati sul display.
Misurazione continua (inseguimento) & misurazione
Min/Max
Durante la misurazione continua il dispositivo viene orientato verso
l‘oggetto da misurare attualizzando i valori misurati ogni 0,5 secondi.
I relativi valori minimi e massimi saranno dinamicamente indicati nella
prima e nella seconda riga.
per attivare il laser. Il simbolo del laser viene indi-
Tener premuto il tasto
Min / Max così come per determinare la distanza più corta e
quella più lunga. Al fine di interrompere la misurazione continua, pre-
mere il tasto
La funzione di misurazione continua si spegne automaticamente dopo
100 misurazioni.
oppure il tasto .
-per la misurazione continua nella modalità
Ulteriori funzioni
Addizione (+) / Sottrazione (-)
Misurazione di distanza semplice
La prossima misurazione viene addizionata alla
+
misurazione precedente.
La prossima misurazione viene sottratta dalla
-
misurazione precedente.
L‘ultimo passo viene annullato.
Ritorno alla misurazione semplice della distanza
51
Page 52
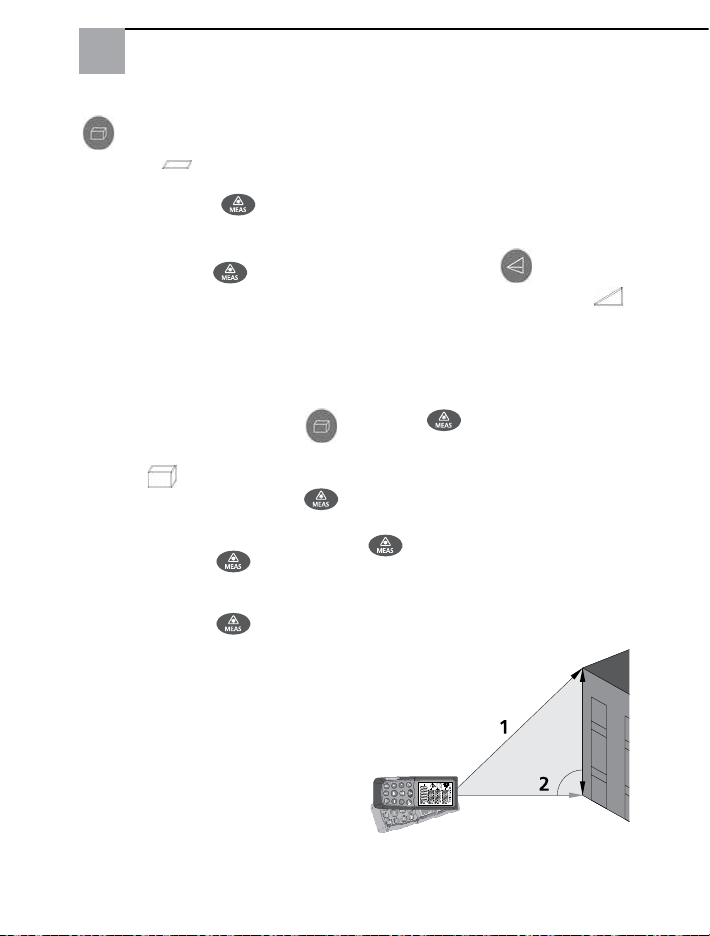
Misurazione di superfici
Premere brevemente il tasto
.
Il simbolo (superficie) viene
indicato nel display.
Premere il tasto
are la prima distanza
(ad es. larghezza)
Premere il tasto
are la seconda distanza (ad es.
larghezza). Il risultato viene automaticamente determinato e visualizzato nel formato xx².
per misur-
per misur-
zata per misurare delle distanze
che non possono essere rilevate
in maniera diretta a causa di un
ostacolo bloccante il raggio laser
oppure una superficie con basso
potere riflettente. La misurazione
indiretta determina una distanza
attraverso 2 misurazioni.
Premere il tasto
display visualizza il simbolo
La prima distanza a misurare
viene indicata come linea lampeggiante sul simbolo.
fino a che il
.
Misurazione di volumi
Premere due volte il tasto
fino a che il display visualizza il
simbolo (volume).
Pre- mere il tasto
per misurare la prima
distanza (ad es. larghezza)
Premere il tasto
are la seconda distanza
(ad es. larghezza)
Premere il tasto
are la terza distanza
(ad es. altezza)
Il risultato viene automaticamente determinato e visualizzato
nel formato xx³.
Misurazione indiretta (Pitagora)
Determinazione di una distanza
attraverso due misurazioni
La misurazione indiretta va utiliz-
per misur-
per misur-
Mirare al punto in alto e premere
il tasto
razione il display indica il primo
valore. Ora orientare il misuratore
di distanza a laser in posizione
orizzontale. Eseguire la seconda
misurazione per mezzo del tasto
Il risultato viene automaticamente determinato e visualizzato
sul display.
52
. Dopo la prima misu-
.
Page 53
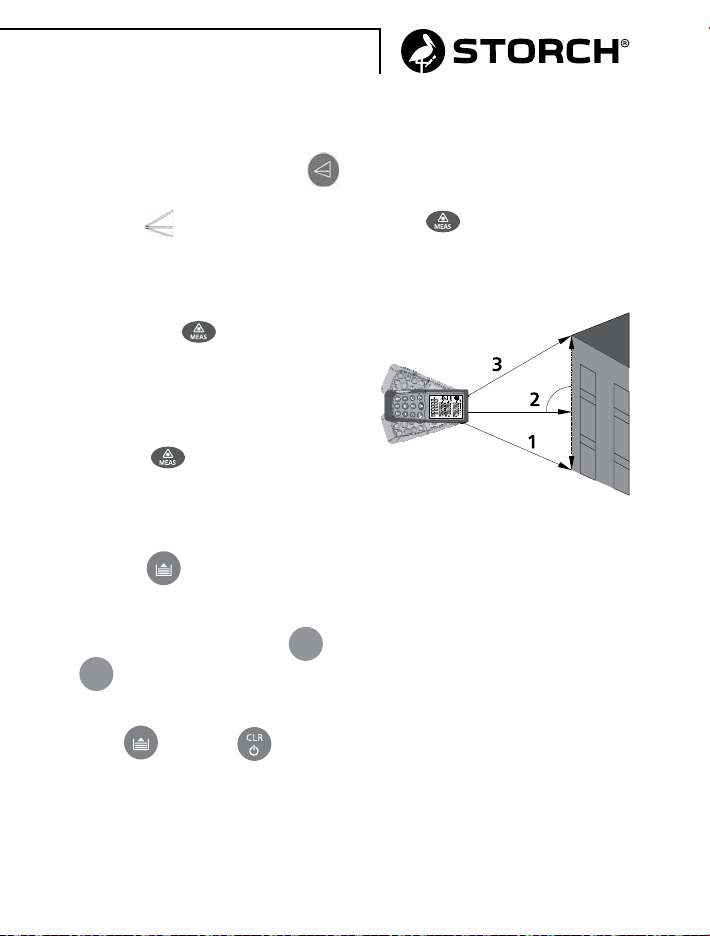
Misurazione indiretta 2 (doppio
Pitagora)
Determinazione di una distanza
attraverso tre misurazioni
Premere due volte il tasto
fino a che il display visualizza il
simbolo
misurare viene indicata come
linea lampeggiante sul simbolo.
Mirare al punto in basso e premere il tasto
misurazione il display indica il primo valore. Ora orientare il misuratore di distanza a laser in posizione orizzontale. Eseguire la
seconda misurazione per mezzo
del tasto
Archiviazione / Memoria interna
. La prima distanza a
. Dopo la prima
.
Eseguire la terza misurazione.
Mirare al punto in alto e premere
il tasto
Il risultato viene automaticamente determinato e visualizzato
sul display.
.
Il tasto
mare le ultime 20 misurazioni.
Al fine di poter commutare tra i
risultati, premere i tasti
.
-
Premere contemporaneamente il
tasto
cellare l‘archivio completamente
consente di richia-
e
+
e il tasto per can-
53
Page 54

Segnali di errore / Eliminazione degli errori
Codice
di errore
204 Errore di calcolo Ripetere l'ultima misurazione/pro-
208 Il segnale di ricezione
209 Il segnale di ricezione
252 La temperatura è
253 La temperatura è
255 Errore del hardware Spegnere e riaccendere il misura-
Causa Misura correttiva
cedura di misurazione
del laser è troppo
debole, distanza oltre
65 m
del laser è troppo
forte
troppo alta
troppo bassa
Utilizzare un bersaglio di misurazione alternativo
Riflessioni sulla superficie del bersaglio. Utilizzare un bersaglio di
misurazione alternativo. Ridurre la
distanza
Far raffreddare il misuratore a laser
Far riscaldare il misuratore a
laser alla temperatura di esercizio
necessaria
tore a laser. Nel caso il messaggio
di errore appaia di nuovo contattare
il nostro hotline di servizio.
54
Page 55

Manutenzione
Il ProDist è un dispositivo che non richiede molta manutenzione. Per
garantire le prestazioni occorre però osservare le seguenti linee guida.
1. Sempre maneggiare il dispositivo con attenzione. Si tratta di uno
strumento ottico dotato di un sistema elettronico sensibile.
2. Evitare che il dispositivo sia esposto ad urti, alla vibrazione continua
oppure ad un calore o freddo estremo.
3. Sempre conservare il dispositivo all‘interno. Nel caso in cui esso non
vada utilizzato, sempre conservarlo nella guaina protettiva.
4. Conservare il dispositivo lontano dalla polvere e dall‘umidità. Pulirlo
solo con un panno pulito e morbido. Se necessario, utilizzare esclusivamente un detergente delicato per la pulitura della superficie.
5. Mai toccare la lente con le dita.
6. Per evitare che le batterie si invecchino precocemente, si consiglia di
controllarle regolarmente. Nel caso in cui il dispositivo non venga utilizzato per un lungo periodo, sempre rimuovere le batterie dallo scomparto.
7. Sostituire le batterie quando l‘indicatore batteria sul display a cristalli
liquidi indica „scarica“.
8. In nessun caso smontare lo strumento; altrimenti l‘utente potrebbe
esporsi ad una radiazione pericolosa.
9. In nessun caso tentare di modificare qualsiasi parte della lente del
laser.
55
Page 56

Garanzia
Condizioni di garanzia:
Per i nostri apparecchi sono applicabili dei periodi di garanzia di 12
mesi a partire dalla data di acquisto / data della fattura del cliente finale commerciale. Se da parte nostra vengono accordati dei periodi di
garanzia più estesi, ciò sarà riportato separatamente nelle istruzioni per
l'uso inerenti ai rispettivi dispositivi.
Rivendicazioni:
In casi in cui si intende far valere il diritto di garanzia, vi preghiamo di
inviarci il dispositivo in modo completo con fattura, franco nostro centro di logistica a Berka oppure ad una service-station da noi autorizzata. Si prega di consultare prima la Hotline di servizio STORCH a pagamento: 02 - 66 22 77 15
Diritto alla garanzia
Il diritti si possono far valere solo per errori di materiale o di produzione nonché esclusivamente in caso di utilizzo appropriato del dispositivo. Pezzi soggetti all‘usura non sono soggetti a diritti di garanzia.
Decadranno tutti i diritti di garanzia con l‘aggiunta delle componenti di
terzi, maneggio e magazzinaggio non appropriato come anche in casi di
ovvia non osservanza delle istruzioni per l‘uso.
Esecuzione di riparazioni
Ogni intervento di riparazione va eseguito esclusivamente nei nostri
stabilimenti o presso una service-station autorizzata STORCH.
56
Page 57

Dichiarazione di conformità CE
Nome / indirizzo dell‘emittente:
STORCH Malerwerkzeuge & Profigeräte GmbH
Platz der Republik 6-8 . D - 42107 Wuppertal
Con la presente la società
che l‘apparecchio in seguito specificato, a causa della sua concezione
e il suo tipo costruttivo come anche della sua esecuzione da noi messa
in circolazione corrisponde alle pertinenti ed essenziali esigenze sulla
sicurezza e salute riportate nelle Direttive CE. In caso di una modifica
apportata all‘utensile non concordata con noi, questa dichiarazione perde ogni sua validità.
Denominazione ProDist compact
dell‘apparecchio: Misuratore di distanza laser
Tipo di utensile: Misuratore di distanza laser
Numero articolo: 26 68 65
Direttive applicate
Direttiva CE sulla Compatibilità elettromagnetica:
2004 / 108 / EG
Direttiva CE sulla restrizione dell‘uso di determinate sostanze
pericolose nelle apparecchiature elettriche ed elettroniche:
2011 / 65 / EU (RoHS)
EN 62321:2008 EN 61326-1: 2006
EN 61326-2-1:2006 EN 60825-1: 2007 (2-nd Edition)
Procuratore per la composizione della
documentazione tecnica:
STORCH Malerwerkzeuge & Profigeräte GmbH
Platz der Republik 6-8 · 42107 Wuppertal
Jörg Heinemann
- Direttore -
Wuppertal, 03- 2015
57
Page 58

GB
Thank you
for purchasing a STORCH product. You have purchased a quality product. If you would like to suggest an improvement, or experience a problem with your product, please do not hesitate to contact us. Please
contact your field sales representative or, in urgent cases, contact us
directly.
Yours sincerely,
STORCH Service Department
Tel.: +49 (0)2 02 . 49 20 - 112
Fax: +49 (0)2 02 . 49 20 - 244
Free service hotline: 0800 786 72 47
Toll-free order hotline: +49 800 7867244
Toll-free order fax: +49 800 7867243
(only available in Germany)
Table of contents Page
Scope of delivery 59
Proper use 59
Technical Data 59
Safety instructions 60 - 62
Device description
key functions and LCD display
Commissioning and settings 64
Performing measurements 65
Other functions 66 - 67
Error signals/Troubleshooting 68
Maintenance 69
Warranty 70
EC Declaration of Conformity 71
62 - 63
58
Page 59

Scope of delivery
ProDist compact laser distance measuring device, holster bag, operating instructions, battery cover removal tool, 2 x 1.5 Volt AAA batteries
Proper use
The present device is designed for measuring distances, areas and
volumes using laser technology. Its use is for commercial applications
only; it must be used in accordance with the local conditions. The
device must never be used to indicate/mark positions (like a laser pointer), or for other purposes in which the laser beam could be directed at
persons. The device is designed for use in interior and exterior applications.
Technical Data
Measuring range: 0.05 - 65 m
Measuring accuracy: ± 1.5 mm
Smallest unit: 1 mm
Units: m, in, ft.
Laser class: 2 (as per DIN EN 60825-1/11.01)
Laser type: 635nm (P < 1mW)
Automatic switch-off
Laser: 30 sec.
Device: - 3 min.
Anticipated battery life up to: 4,000 individual measurements
Battery 2 x 1.5 Volt AAA batteries (alkaline)
Optimum operating temperature: 0° C to 40° C
Storage temperature: -10° C to 60° C
Protection class: IP 54
Dimensions: 115 x 47 x 28 mm
Weight: 132g (with batteries)
59
Page 60
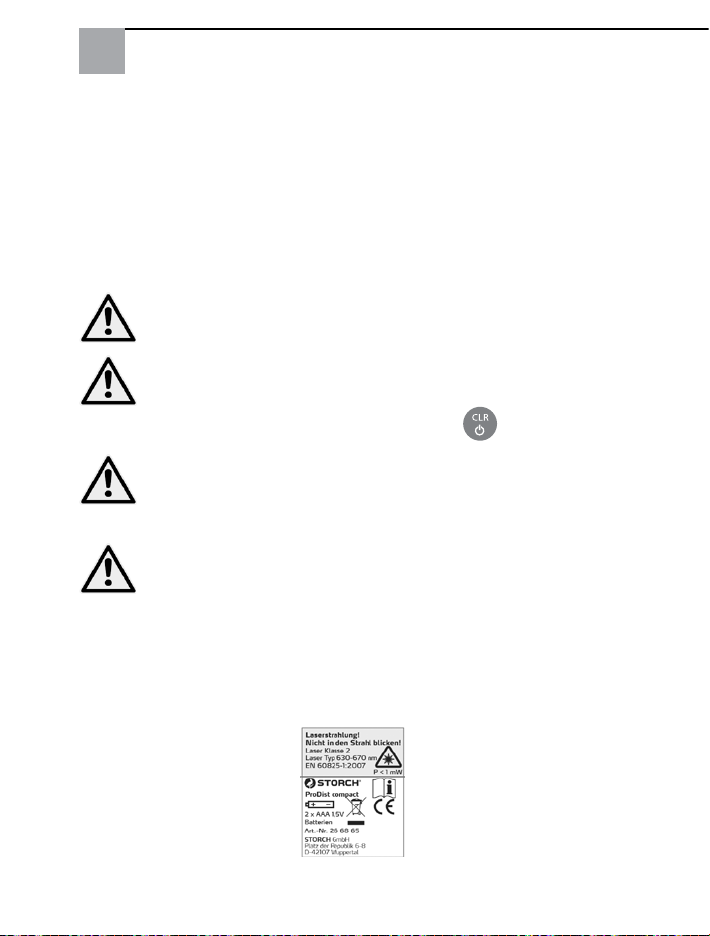
Safety instructions
The device uses a voltage range that can pose a hazard for humans
and animals. The device must only be opened and/or disassembled by
authorised persons. Similarly, maintenance and repairs must be performed by a qualified electrician or an authorised repair shop. The owner/
operator operates the device on their own liability and at their risk.
Before using the device, read and make sure you understand all the
instructions in this manual. Failure to observe instructions can cause a
risk of laser radiation hazard, electric shock and/or physical injury.
The device is equipped with an integrated laser. This is a class 2 laser
with a maximum output of 1 mW and a wavelength of 635 nm. This
type of laser will not normally cause any eye damage. But you should
still not look directly into the beam as this can cause flash blindness.
CAUTION: Never attempt to modify the function of the device
in any way. This can lead to hazardous laser radiation.
LASER BEAM. Never look into the beam. Laser class 2
device. Only switch on the laser beam when you are using the
device. The laser switches off automatically after 30 seconds.
To switch off the laser manually, tap the
Improper execution of operational procedures or the use of
operating and adjusting elements in a way other than that
specified in this manual can result in hazardous exposure to
radiation.
The use of optical instruments such as telescopes to view the
laser beam aggravates its potential for eye damage.
button.
The laser distance measuring device has the following label
60
Page 61

The label (laser outlet) marks the point at which the digital laser
distance measuring device generates its laser light. When using the
device, you need to know where the laser light is emitted. Make sure
that all users are aware of the dangers related to direct eye contact
with the laser beam.
• Do not remove or modify any of the product labels.
• The digital laser distance measuring device is not a toy. Always keep
it out of the reach of children. The laser light generated by this device
must not be pointed at persons or animals.
• Do not use the device in the presence of children or allow children to
operate the device.
• Never position the device so that a person can deliberately or inadvertently look into the laser beam.
• Do not use the device on shiny or reflective surfaces such as sheet
steel. The reflective surface could direct the beam back towards the
operator.
• Always switch off the device when it is not in use. Leaving the device
switched on increases the risk of a person inadvertently looking into the
laser beam.
• Never attempt to repair or disassemble the device. If unqualified persons attempt to repair this device, the consequence could be serious
injuries. Any repair worked required on the laser measuring device must
be performed by STORCH‘s authorised after-sales service.
• Do not operate the device in combustible areas, for example, in the
vicinity of flammable liquids, gases, or dust.
• The use of accessories designed for other laser measuring devices can
lead to serious injuries.
• Keep batteries out of the reach of children.
61
Page 62
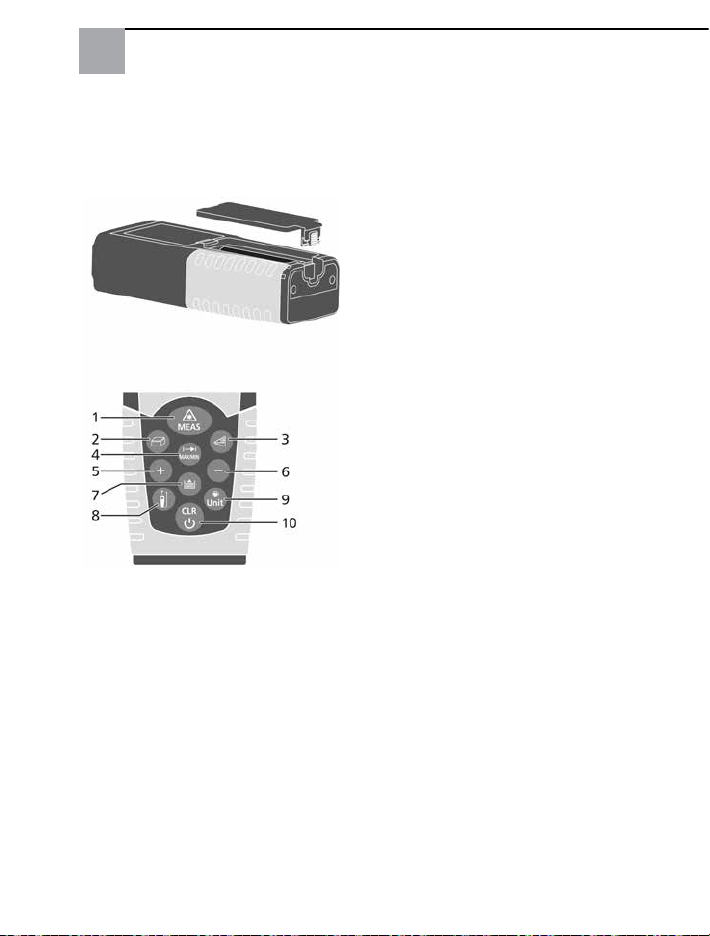
Device description and LCD display
ProDist compact Overview of functions and controls
1 On/off measure
2 Area/volume measurement
3 Indirect measurement
(Pythagoras)
4 Single measurement /
permanent
measurement
5 Plus button + / Addition of
measured values
6 Minus button -/subtraction of
measured values
7 Button for storing / archiving
the measured values
8 Button for switching the
measurement reference point
(upper edge / lower edge of
the device)
9 Display lighting on/off /
Change unit (m, in, ft)
10 Delete values /Off
62
Page 63
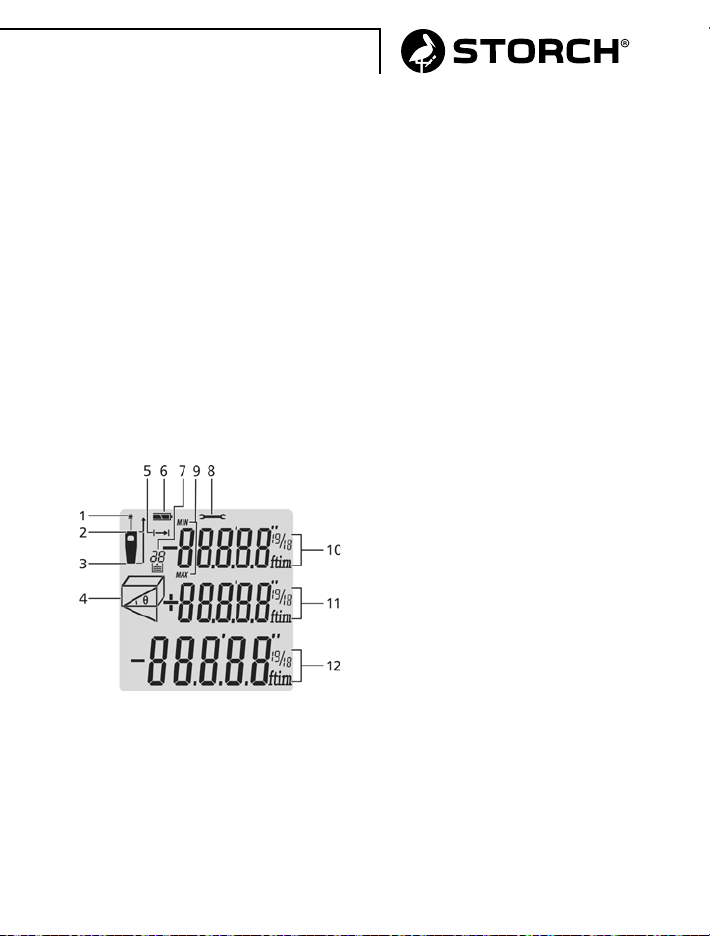
Replacing the batteries
A matching assembly tool (a small screwdriver) is supplied with the
device. This is required for replacing the batteries
1. Unscrew the battery compartment slide cover on the
underside of the device.
2. Open the battery compartment
3. Insert the batteries, taking the polarity (+/-) into
consideration.
4. Replace the cover and screw down
Tip: Always keep the assembly tool in the small front pocket of the
storage holster.
ProDist compact LCD display overview
1 Laser on
2 Reference point
measurement top
3 Reference point
measurement bottom
4 Measuring function displays
• Area measurement
• Volume measurement
• Single Pythagoras
• Double Pythagoras
5 Single distance measurement
6 Battery display status
7 Stored values/archive
8 Device error message
9 Permanent measurement
and min / max measurement
10 Intermediate value 1
11 Intermediate value 1
12 Sum of the measured values
63
Page 64
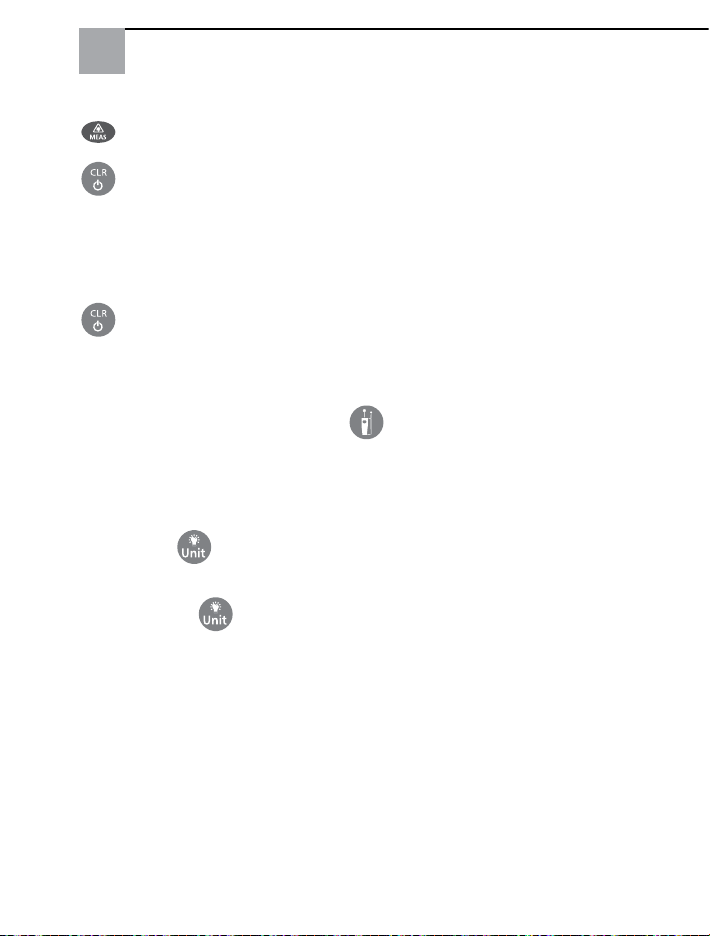
Commissioning and settings
Switching the Device On and Off
button. Switches the device and the laser on
hold down the button to switch the device and laser off.
The laser switches off automatically after 30 seconds;
the device after 3 minutes.
Delete values
tap the button. This deletes previously measured values from the
device.
Determining the reference point (figs. of the points)
Measurement is set to the bottom edge of the housing. To change this,
press the reference point button
measuring point (top, bottom). An audible tone confirms your
selection. After switching off the device, it reverts to the factory setting and measures from the bottom edge of the device again.
LCD display lighting
Tapping the
Changing the unit (m, ft. In, ft+in)
Hold down the
button switches the display back-lighting on or off.
button to change the units.
, and select another reference
64
Page 65
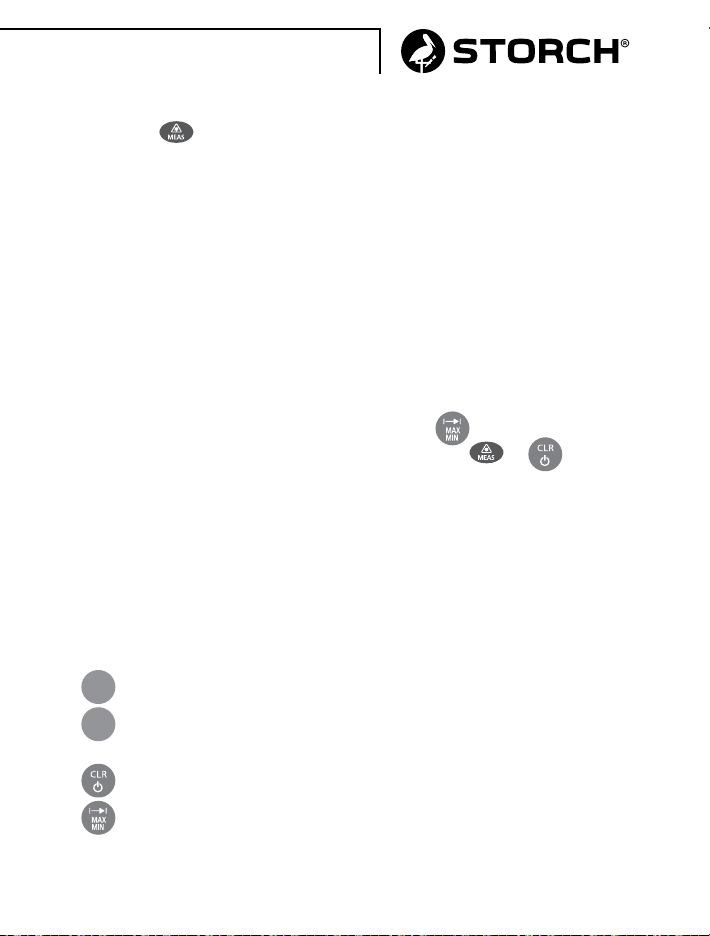
Performing measurements
Single distance measurement
Press the
the dis- play, and the red laser dot appears on the surface the
laser measuring device is pointed at. Press the button again to start
the measuring action. The measured values are shown directly in the
display.
Permanent measurement (tracking)
and min/max measurement
For permanent measurement, the device is pointed at the object to be
measured; the measured values are then updated every 0.5 seconds.
The corresponding minimum and maximum values are shown dynamically in the first and second lines.
For a permanent measurement in min/max mode, to determine the
shortest and longest distance, hold down the
the permanent measurement, either press the
The permanent measurement function is automatically terminated
after triggering 100 measurements.
button to enable the laser. The laser symbol appears in
button. To interrupt
or button.
Other functions
Addition (+) / Subtraction (-)
Single distance measurement
+
The next measurement is added to the previous one.
-
The next measurement is subtracted from
the previous one.
The last step is undone.
Return to single distance measurement.
65
Page 66
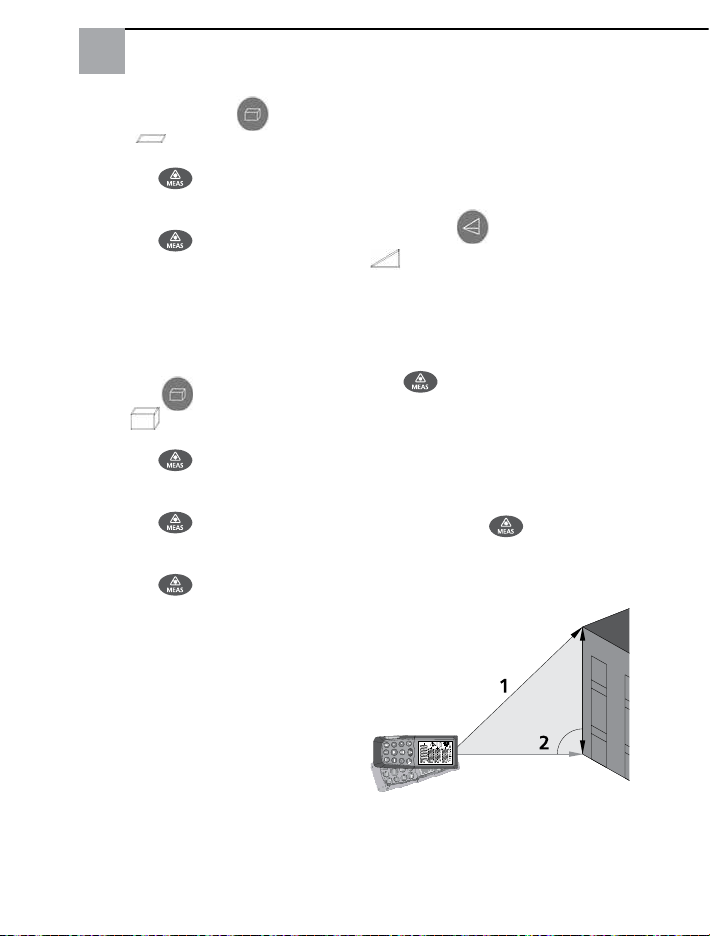
Area measurement
Briefly press the
The (area) symbol
is shown in the display.
Press the
the first distance (e.g.,
length)
Press the
the second distance
(e.g., width)
The result is automatically determined and shown in an xx² format.
Volume measurement
Press the
the (volume) symbol is
Press the
the first distance (e.g.,
length)
Press the
the second distance
(e.g., width)
Press the
the third distance (e.g.,
height)
The result is automatically determined and shown in an xx³ format.
button to measure
button to measure
button twice until
shown in the display.
button to measure
button to measure
button to measure
button.
obstacle would block the laser
beam, or there is no suitable target surface as a reflector.
Indirect measurement for determining a distance with 2 auxiliary
measurements.
Press the
symbol appears in the display. The distance to measure
first is shown as a flashing line in
the symbol.
Point to the top point and press
the
measurement, the first value is
displayed. Now level the laser
measuring device horizontally to
the extent possible.
Initiate the second measurement
by pressing the
The result is automatically determined and shown in the display.
button until the
button. After the first
button.
Indirect measurement (Pythagoras)
determining a distance with two
measurements
Indirect measuring is used to
measure distances that cannot
be measured directly because an
66
Page 67
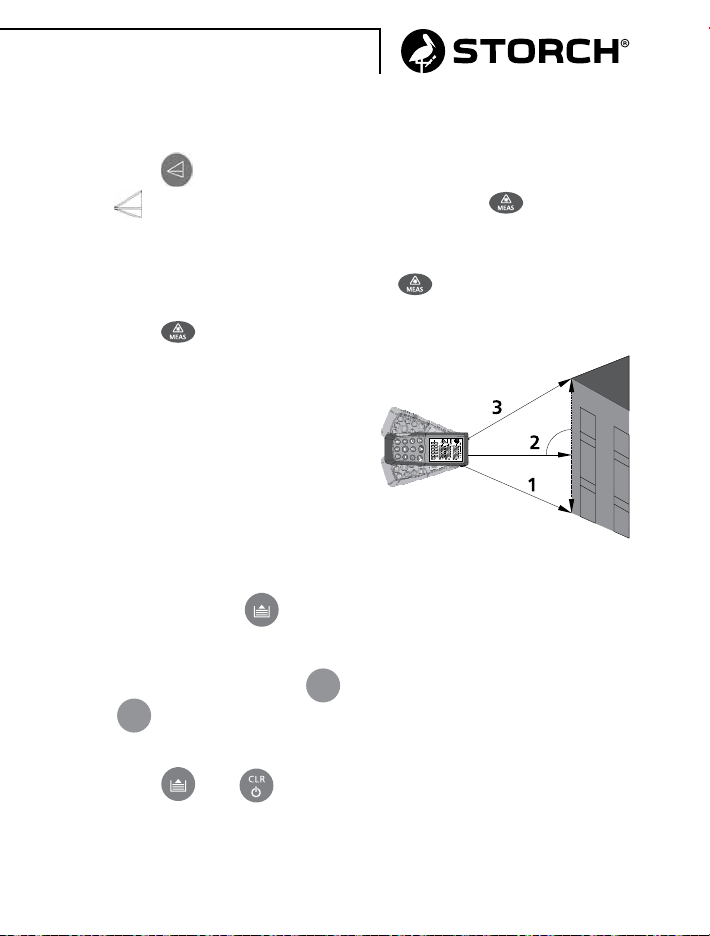
Indirect measurement 2 (double
Pythagoras) - determining a
distance with three measurements
Press the
the
display. The distance to measure
first is shown as a flashing line in
the symbol.
Point to the bottom point and
press the
first measurement, the first value
is displayed. Now level the laser
measuring device horizontally to
the extent possible.
History, archiving /
internal memory
You can press the
to retrieve the last 20 measurements. To toggle between the
measurements, press the
and
-
To completely clear the archive,
press the
at the same time.
button twice until
symbol appears in the
button. After the
button
+
buttons.
and buttons
Initiate the second measurement
by pressing the
Initiate the third measurement.
Point to the top point and press
the
The result is automatically determined and shown in the display.
button.
button.
67
Page 68

Error signals / troubleshooting
Error
code
204 Computation error Repeat the last measurement/
208 Reception signal
209 Reception signal of
252 Temperature too high Cool the laser measuring device
253 Temperature too low Warm up the laser measuring
255 Hardware error Switch the laser measuring device
Cause Remedy
measuring procedure
of laser too weak,
distance above 65 m
laser too strong
Use an alternative target.
Reflections on the target surface.
Use an alternative target. Reduce
the distance
device to the required operating
temperature
off and back on. If the error message is still shown, contact our
service hotline.
68
Page 69

Maintenance
The ProDist compact is a low-maintenance device. However, you
should follow these simple guidelines to ensure best possible performance.
1. Always handle the device carefully. It is an optical instrument with
sensitive electronics.
2. Avoid exposing the device to shock, continuous vibration or extreme
hot and cold temperatures.
3. Keep the device indoors at all times. When it is not in use, always
keep the device in its protective holster.
4. Keep the device away from dust and moisture. Clean with a clean and soft cloth only. If needed, use a gentle cleaning agent on the
device‘s surface only.
5. Never touch the lens with your fingers.
6. Check the batteries regularly to avoid premature aging. If will not
be using the device for an extended period of time, always remove the
batteries.
7. Replace the batteries when the battery charge message on the LCD
display is „empty“.
8. Do not disassemble the device under any circumstances; doing so
can expose the user to hazardous radiation.
9. Never attempt to modify any part of the laser lens.
69
Page 70

Warranty
Warranty conditions:
A warranty period of twelve months from the date of purchase/date
of invoice applies to our tools for commercial customers. If we have
granted an extended warranty period, this period will be noted separately in the operating manual for the equipment in question.
Claims:
If you wish to claim under our warranty or guarantee, please return the
complete device and your invoice to our logistics centre in Berka, postage paid, or send it to one of our authorised service centres. Please
contact the chargeable STORCH service hotline first:
+49 (0)202 . 49 20 – 110.
Your rights under our warranty or guarantee:
Claims can only be accepted for material defects or manufacturing
errors, and only assuming intended use of the appliance. Wear parts
are not covered by such claims. All claims shall become void in the
event of installation of third party components, improper handling and
storage, as well as in the event of obvious disregard of the operating
instructions.
Repairs:
All repairs have to be conducted on our premises or by an authorised
STORCH service centre.
70
Page 71

EC Declaration of Conformity
Name / Address of issuer:
STORCH Malerwerkzeuge & Profigeräte GmbH
Platz der Republik 6-8 . D - 42107 Wuppertal
We herewith declare:
that the following machine complies with the fundamental health
and safety requirements of the EC Directives in terms of its design,
construction and version we have brought into circulation. This warranty loses its validity in case of unauthorised modification of the tool.
Designation of the machine: ProDist compact
Laser distance measuring device
Machine Type: Laser distance measuring device
Item number: 26 68 65
Applicable Directives
EC- Electromagnetic Compatibility Directive:
2004 / 108 / EG
EC Directive on the restriction of the use of certain hazardous
substances in electrical and electronic equipment:
2011 / 65 / EU (RoHS)
EN 62321:2008 EN 61326-1: 2006
EN 61326-2-1:2006 EN 60825-1: 2007 (2-nd Edition)
Representative authorised to compile the technical
documentation:
STORCH Malerwerkzeuge & Profigeräte GmbH
Platz der Republik 6-8 · 42107 Wuppertal
Jörg Heinemann
- Managing Director -
Wuppertal, 03- 2015
71
Page 72

CZ
Děkujeme Vám
za důvěru ve firmu STORCH. S nákupem výrobku jste se rozhodli pro
kvalitní produkt. Pokud přesto máte podněty na zlepšení nebo možná
nějaký problém, tak bychom byli velmi rádi, kdybyste se nám ozvali.
Promluvte si s příslušným externím spolupracovníkem naší firmy nebo
se v naléhavých případech obracejte přímo na nás.
S přátelským pozdravem
Servisní oddělení STORCH
Tel.: +49 (0)2 02 . 49 20 - 112
Fax: +49 (0)2 02 . 49 20 - 244
bezplatná linka Hotline-servis: 08 00. 7 86 72 47
bezplatná linka Hotline-objednávky: +49 800. 7 86 72 44
bezplatný fax-objednávky: +49 800. 7 86 72 43
(pouze v Německu)
Obsah Strana
Rozsah dodávky 73
Použití v souladu s určením 73
Technické údaje 73
Bezpečnostní pokyny 74 - 76
Popis přístroje
funkce tlačítek a LCD displej
Uvedení do provozu a nastavení 78
Provádění měření 79
Další funkce 80 - 81
Chybové signály / Odstranění chyb 82
Údržba 83
Záruka 84
Prohlášení o shodě ES 85
76 - 77
72
Page 73

Rozsah dodávky
Laserový dálkoměr ProDist compact, přenosné pouzdro, návod k obsluze, kryt na baterie - montážní nářadí, 2 x 1,5 voltu AAA baterie
Použití v souladu s určením
Přístroj je určen ke zjišťování vzdáleností, ploch a objemu pomocí laseru. Použití se vztahuje výhradně na firemní a podnikatelskou oblast a
při tom je třeba přístroj používat adekvátně skutečnostem daným na
místě. V žádném případě nesmí být přístroj používán k ukazování /
označování míst (analogicky jako „Laser pointer“ nebo k jiným účelům,
při nichž by laserový paprsek mohl být nasměrován na lidi. Přístroj je
určen k použití v oblasti uvnitř a venku.
Technické údaje
Rozsah měření: 0,05 - 65 m
Přesnost měření: ± 1,5 mm
Nejmenší měrná
jednotka: 1 mm
Měrné jednotky: m, in, ft.
Laserová třída: 2 (podle DIN EN 60825-1/11.01)
Typ laseru: 635 nm (P < 1 mW)
Automatické vypnutí
laser: -30 sek.
přístroj: - 3 min.
Očekávaná životnost baterie Až do:
4.000 jednotlivých měření
Baterie: 2 x 1,5 voltu AAA baterie (alkalické)
Optimální provozní teplota: 0° C až 40° C
Skladovací teplota: -10° C až 60° C
Ochranná třída: IP54
Rozměry: 115 x 47 x 28 mm
Hmotnost: 132g (s bateriemi)
73
Page 74
Bezpečnostní pokyny
Přístroj má rozsah napětí, od kterého může vzniknout nebezpečí úrazu elektrickým proudem pro lidi a zvířata. Přístroj smí přimontovat a /
nebo demontovat pouze autorizované osoby. Stejně tak údržbu a opravy smí provádět pouze kvalifikovaní elektrikáři a autorizované odborné
dílny. Provoz přístroje se uskutečňuje na vlastní zodpovědnost a nebezpečí kupujícího / uživatele.
Před použitím tohoto přístroje si přečtěte všechny pokyny uvedené v
této příručce a obeznamte se s nimi. Nedodržení pokynů může vést k
nebezpečnému zatížení laserovými paprsky, zasažení elektrickým proudem a/nebo k tělesnému úrazu.
POZOR: Nepokoušejte se nějakým způsobem upravit způsob funkce přístroje. To může vést k nebezpečnému zatížení
laserovými paprsky.
LASEROVÉ ZÁŘENÍ. Nedívejte se do paprsku. Přístroj laserové třídy 2. Laserový paprsek zapněte pouze tehdy, když je
přístroj používán. Laser se automaticky vypne po 30
sekundách. K manuálnímu vypnuití laseru poklepejte na
tlačítko
Provádění pracovních postupů příp. používání ovládacích a
nastavovacích prvků podle přiloženého návodu k obsluze,
které není v souladu s určeným účelem, může vést k nebezpečnému zatížení laserovými paprsky.
Použití optických nástrojů jako teleskopy k pohledu na laserový paprsek zesiluje účinek, který poškozuje zrak.
.
Přístroj je vybaven integrovaným laserem. Jedná se o laser třídy 2 s
maximálním výstupním výkonem 1 mW a s vlnovou délkou 635 nm.
Normálně nezpůsobují takové lasery žádné poškození zraku. Přesto se
nedívejte přímo do parsku, protože to může vést k bleskové slepotě.
74
Page 75

Na Vašem laserovém dálkoměru se nacházejí následující etikety
Etiketa (vyzařování laseru) označuje místo, na kterém digitální laserový dálkoměr vytváří laserové světlo. Při používání přístroje byste měli
vědět, odkud vychází laserové světlo. Postarejte se o to, aby všechny
přítomné osoby věděly o nebezpečí, které je spojeno s přímým kontaktem očí s laserovým paprskem.
• Etiketu z výrobku neodstraňujte ani ji neměňte.
• Digitální laserový dálkoměr není žádná hračka. Přechovávejte ho
na místě nepřístupném dětem. Laserové světlo vystupující z tohoto
přístroje nesmí být v žádném případě namířeno na osoby nebo zvířata.
• Přístroj nepoužívejte za přítomnosti dětí a dětem nedovolte přístroj
používat.
• Přístroj neumisťujte tak, aby se někdo vědomě nebo nevědomě mohl
dívat do laserového paprsku.
• Nepoužívejte na lesklém povrchu nebo na povrchu odrážejícím světlo jako ocelový plech. Povrch odrážející světlo by mohl paprsek odrazit
směrem zpět k uživateli.
• Přístroj vypněte vždy, když není používán. Opuštěný přístroj v zapnutém stavu zvyšuje riziko, že se někdo nedopatřením podívá do
laserového paprsku.
• Nepokoušejte se přístroj opravovat nebo ho rozebírat. Pokud budou
zkoušet nekvalifikované osoby opravovat tento přístroj, může dojít k
vážným úrazům. Jakékoli potřebné práce na opravách tohoto laserového měřicího přístroje smí provádět pouze autorizovaný zákaznický
servis firmy STORCH.
75
Page 76
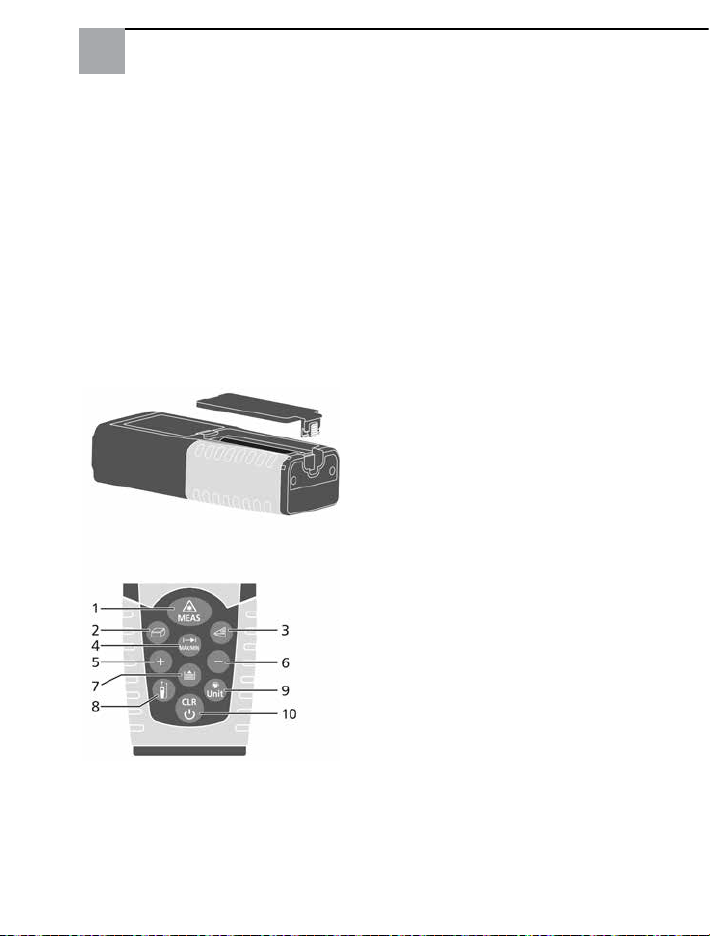
• Přístroj nepoužívejte v oblastech ohrožených ohněm jako například v
blízkosti hořlavých kapalin, plynů nebo hořlavého prachu.
• Používání příslušenství určeného pro jiné laserové dálkoměry může
vést k vážným úrazům.
• Baterie skladujte vždy mimo dosah dětí.
Popis přístroje a LCD displej
ProDist compact
Přehled funkcí a ovládací prvky
1 Tlačítko Zap / Měření
2 Tlačítko Měření ploch /
objemu
3 Tlačítko Nepřímé měření
(Pythagorova věta)
4 Tlačítko Jednoduché měření /
Trvalé měření
5 Tlačítko Plus + / sečtení
měřených hodnot
6 Tlačítko Minus -/ odečtení
měřených hodnot
7 Tlačítko Uložení měřených
hodnot / Archiv
8 Přepnutí referenčního bodu
měření (od horního okraje
přístroje, spodní okraj
přístroje
9 Osvětlení displeje Zap/Vyp /
Tlačítko Změna měrných
jednotek (m, in, ft)
10 Tlačítko Smazání hodnot /
Vyp
76
Page 77
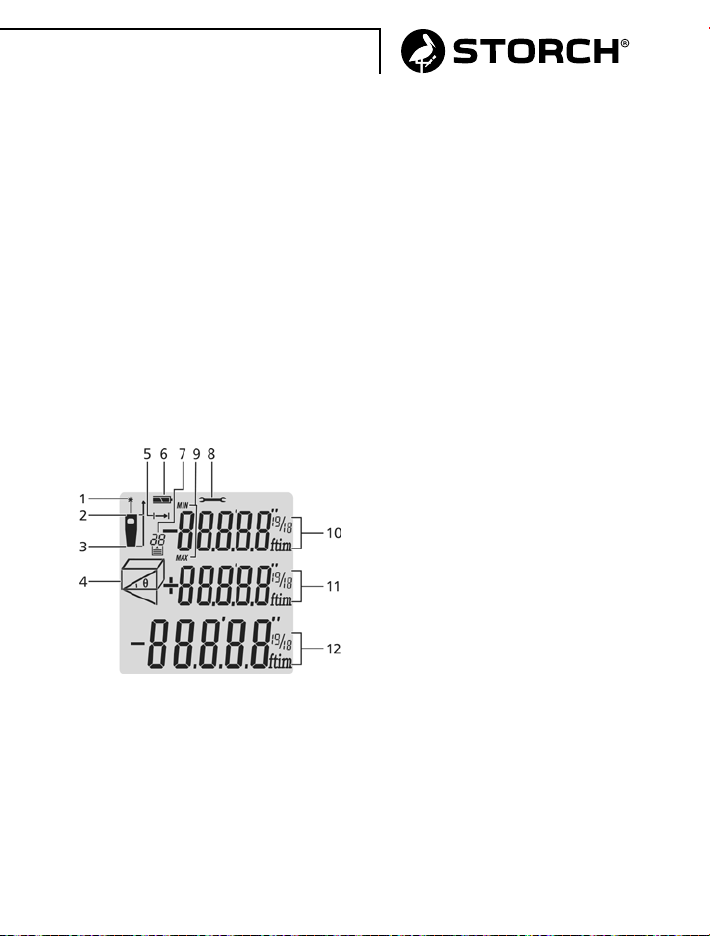
Výměna baterií
V rozsahu dodávky přístroje se nachází vhodné montážní nářadí (malý
šroubovák). Ten je třeba pro výměnu baterií.
1. Odšroubujte posouvací kryt přihrádky na baterie na spodní straně
přístroje
2. Odklopte přihrádku na baterie
3. Vsuňte baterie, se zohledněním správně umístěných pólů (+/-)
4. Nasaďte přihrádku a opět přišroubujte.
Tip: Montážní nářadí mějte stále uschované v přední přihrádce tašky k
ukládání přístroje.
ProDist compact
přehled LCD displeje
1 Laser Zap
2 Referenční bod měření
nahoře
3 Referenční bod měření dole
4 Zobrazení měřicích funkcí
• Měření ploch
• Měření objemu
• Jednoduchá Pythagorova
věta
• Dvojitá Pythagorova věta
5 Jednoduché měření
vzdálenosti
6 Baterie - ukazatel stavu
7 Uložené hodnoty / Archiv
8 Chybové hlášení přístroje
9 Trvalé měření a měření
Min / Max
10 Mezihodnota 1
11 Mezihodnota 1
12 Shrnutí měřených hodnot
77
Page 78
Uvedení do provozu a nastavení
Zapnutí a vypnutí přístroje
- tlačítko. Zapne přístroj a laser.
- tlačítko držte déle stisknuté, aby se přístroj a laser vypnul.
Laser se automaticky vypne po 30 sekundách a přístroj po 3
minutách.
Smazání hodnot
- tlačítko krátce poklepejte. Dříve naměřené hodnoty budou smazány z přístroje.
Určení referenčního bodu (obrázky bodů)
Měření je předem nastaveno na spodní okraj krytu.
Aby se toto změnilo, stiskněte tlačítko referenční bod
určili jiné referenční body měření (nahoře, dole). Zazněním akustického
tónu se potvrdí volba.
Po vypnutí přístroje se nastavení opět změní na nastavení ze závodu a
měří opět od spodního okraje přístroje
Osvětlení LCD displeje
Poklepáním na tlačítko
displeje.
Změna měrných jednotek (m, ft. In, ft+in)
Držte tlačítko
ky.
déle stisknuté, abyste mohli změnit měrné jednot-
lze zapnout a vypnout osvětlení pozadí
78
, abyste
Page 79
Provádění měření
Jednoduché měření vzdáleností
Stiskněte tlačítko
laseru a červený laserový bod je vidět na povrchu, na který je
laserový měřicí přístroj nasměrován. Stiskněte opakovaně tlačítko,
abyste spustili proces měření. Měřené hodnoty jsou zobrazovány přímo
na displeji.
Trvalé měření (rychlý sled) & Měření Min / Max
Během trvalého měření je přístroj nasměrován na měřený objekt a
během toho jsou měřené hodnoty aktualizovány každé 0,5 sekundy.
Příslušné minimální a maximální hodnoty se dynamicky zobrazí na
první a druhé řádce.
Pro trvalé měření v módu Min / Max, k určení nejkratší a také nejdelší
vzdálenosti, držte stisknuté tlačítko
stiskněte buď tlačítko
Funkce trvalé měření skončí automaticky po 100 stisknutích měření.
k aktivování laseru. Na displeji se objeví značka
. K přerušení trvalého měření
, nebo tlačítko .
Další funkce
Sčítání (+) / odčítání (-)
Einfache DistanzmessungJednoduché měření vzdálenosti
+
Příští měření bude přičteno k předchozímu.
-
Příští měření bude odečteno od předchozího,
Poslední krok bude anulován.
Návrat zpět k jednoduchému měření vzdálenosti.
79
Page 80
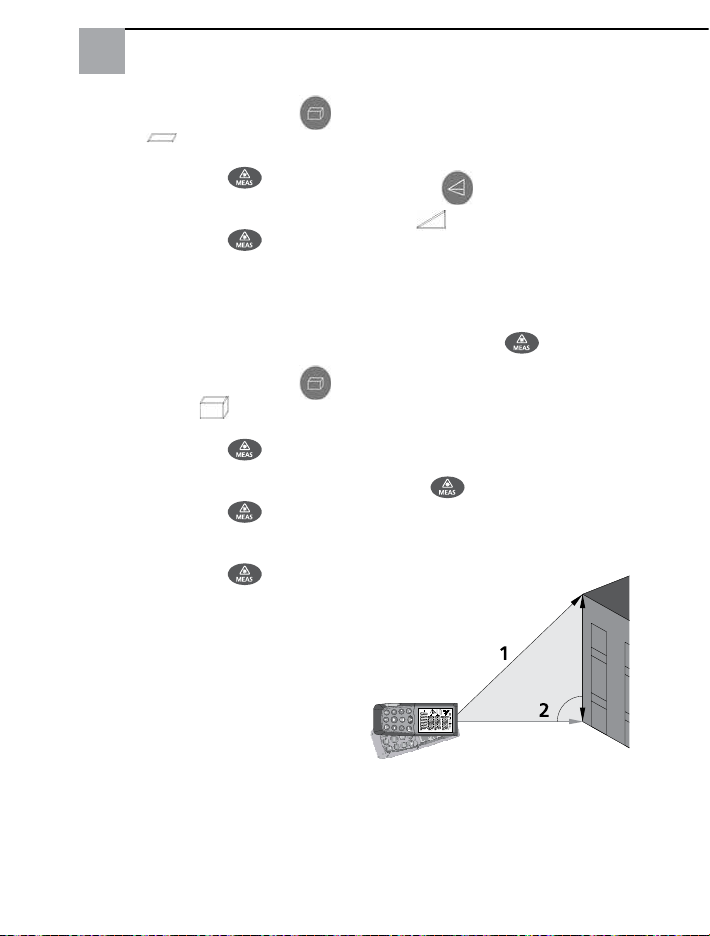
Měření ploch
Stiskněte krátce tlačítko
Symbol (ploch) se zobrazí na displeji.
Stiskněte tlačítko
první vzdálenosti (např.
délka)
Stiskněte tlačítko
druhé vzdálenosti (např. šířka)
Výsledek je určen automaticky a
zobrazen ve formátu xx².
Měření objemu
Stiskněte dvakrát tlačítko
až je symbol (objem)
zobrazen na displeji.
Stiskněte tlačítko
první vzdálenosti (např.
délka)
Stiskněte tlačítko
druhé vzdálenosti (např. šířka)
Stiskněte tlačítko
třetí vzdálenosti (např.
výška)
Výsledek je určen automaticky a
zobrazen ve formátu xx³.
k měření
k měření
k měření
k měření
k měření
.
,
vá plocha nehodí k odrazu jako
ŕeflektor. Nepřímé měření určí
vzdálenost pomocí 2 pomocných
měření.
Tiskněte
až se
pleji. Nejprve bude měřená
vzdálenost zobrazena na symbolu
jako blikající čára.
Nasměrujte na horní bod a
aktivujte tlačítko
měření se zobrazí první hodnota.
Nyní nasměrujte laserový měřicí
přístroj pokud možno horizontálně.
Spusťte druhé měření pomocí
tlačítka
Výsledek je určen automaticky a
zobrazen na displeji.
tlačítko tak dlouho,
symbol zobrazí na dis-
. Po prvním
.
Nepřímé měření (Pythagorova
věta)
určení vzdálenosti pomocí dvou
měření
Nepřímé měření se používá k
měření vzdáleností, které nelze
změřit přímo, protože by nějaká
překážka blokovala laserový
paprsek nebo se žádná cílo-
80
Page 81
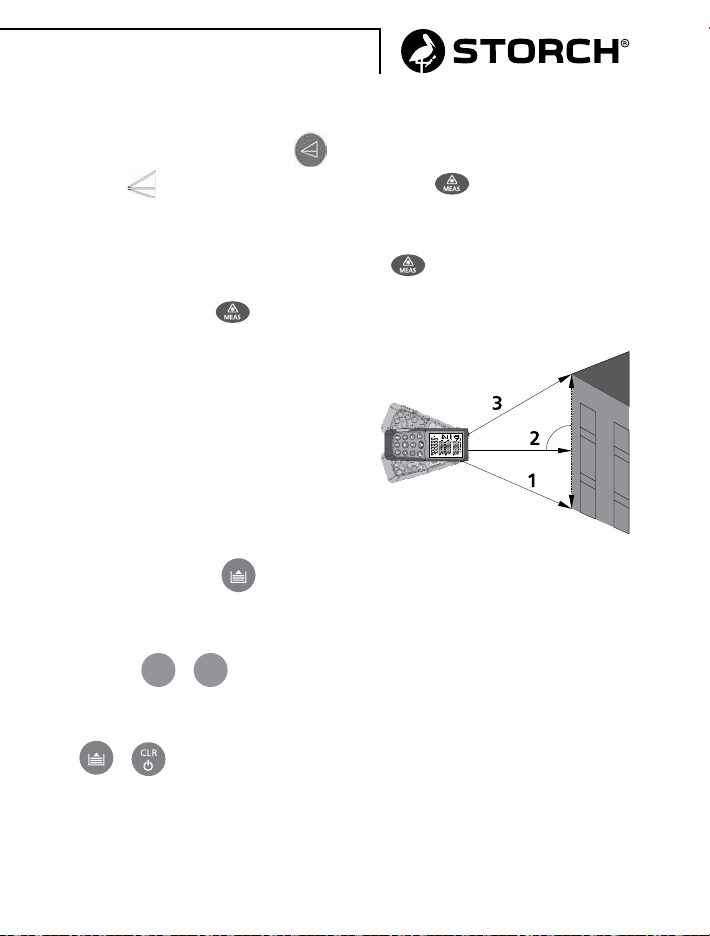
Nepřímé měření 2 (dvojitá
Pythagorova věta) - určení
vzdálenosti pomocí tří měření
Stiskněte dvakrát tlačítko
až se
pleji. Nejprve měřená vzdálenost
je na symbolu zobrazena jako blikající čára.
Nasměrujte na spodní bod a
aktivujte tlačítko
měření se zobrazí první hodnota.
Nyní nasměrujte laserový měřicí
přístroj pokud možno horizontálně.
Historické archivování / Interní
paměť
Pomocí tlačítka
posledních 20 výsledků měření.
Aby bylo možno přepínat mezi
jednotlivými výsledky, použijte
tlačítka
Aby byl Archiv kompletně smazán, stiskněte současně tlačítka
symbol zobrazí na dis-
a -.
+
a .
. Po prvním
, vyvoláte
-,
Spusťte druhé měření pomocí
tlačítka
Aktivujte třetí měření. Nasměrujte na horní bod a stiskněte tlačít-
ko
Výsledek je určen automaticky a
zobrazen na displeji.
.
.
81
Page 82

Chybové signály / odstranění chyb
Chybový kód
204 Chyba výpočtu Opakujte poslední měření / proce-
208 Příjmový signál
209 Příjmový signál lase-
252 Teplota je příliš
253 Teplota je příliš nízká Laserový měřicí přístroj uveďte na
255 Chyba hardware Laserový měřicí přístroj vypněte a
Příčina Opatření k nápravě
duru měření
laseru je příliš slabý,
vzdálenost je delší
než 65 m
ru je příliš silný
vysoká
Použijte alternativní cíl měření
Odrážení na cílové ploše. Použijte
alternativní cíl měření. Zmenšete
vzdálenost
Nechte laserový měřicí přístroj
zchladnout
potřebnou provozní teplotu
opět zapněte. Pokud by se opakovalo chybové hlášení, kontaktujte
naši servisní bezplatnou linku
Hotline.
82
Page 83

Údržba
ProDist compact je přístroj, který nevyžaduje žádnou údržbu.
Každopádně je však třeba k zajištení jeho výkonu dodržovat jednoduché
pokyny.
1. S přístrojem zacházejte vždy opatrně. Jedná se o optický nástroj,
který je vybaven citlivou elektronikou.
2. Zabraňte nárazu přístroje, stálým vibracím nebo aby byl vystaven
extrémnímu horku nebo chladu.
3. Přístroj vždy přechovávejte uvnitř. Pokud není používán, přístroj
mějte vždy v ochranném pouzdru.
4. Přístroj vždy chraňte před prachem a vlhkostí. Čistěte ho pouze měkkým a čistým hadříkem. Pokud je to nutné, použijte výhradně
čistící prostředky šetrné k povrchu přístroje.
5. Čočky se nikdy nedotýkejte prsty.
6. Baterie pravidelně kontrolujte, aby se zamezilo předčasnému stárnutí. Pokud přístroj není delší dobu používán, vždy vyjměte baterie.
7. Vyměňte baterie, pokud je na LCD displeji zobrazeno „Vybité“:
8. Přístroj v žádném případě nerozebírejte, tím se může uživatel vystavit nebezpečnému záření.
9. V žádném případě nezkoušejte upravit nějaký díl laserové čočky.
83
Page 84

Záruka
Záruční podmínky:
U našich zařízení platí zákonné záruční lhůty 12 měsíců od data zakoupení/data faktury obchodního konečného zákazníka. Pokud jsou delší
lhůty v cestě námi vypsanému prohlášení o záruce, jsou zvláště vyznačeny v návodu k obsluze příslušných zařízení.
Uplatňování:
V případě záručního příp. garančního případu žádáme, aby bylo zasláno
kompletní zařízení dohromady s fakturou do našeho střediska Logisitk
Center v Berka nebo do námi autorizované servisní stanice. Kontaktujte prosím nejdříve placený hotline servis firmy STORCH:
+49 (0)202 . 49 20 – 110.
Nárok na záruku příp. garanci:
Nároky na záruku existují výhradně u materiálu nebo výrobní vady a
také výhradně při používání přístroje v souladu s určeným účelem. Díly
podléhající opotřebení nespadají do nároků na záruku. Veškeré nároky
zanikají zamontováním dílů cizího původu, při nepřiměřeném zacházení a skladování a také při zřejmém nedodržování provozního návodu.
Provádění oprav:
Veškeré opravy smějí být prováděny výhradně naším závodem nebo
servisními stanicemi autorizovanými firmou STORCH.
84
Page 85

Prohlášení o shodě ES
Název / adresa výstavce:
STORCH Malerwerkzeuge & Profigeräte GmbH
Platz der Republik 6-8 . D - 42107 Wuppertal
Tímto prohlašujeme,
že následně uvedené zařízení na základě své koncipace a druhu konstrukce a také v provedení námi uvedeném do provozu odpovídá
příslušným základním bezpečnostním požadavkům a požadavkům k
ochraně zdraví směrnic ES. Při námi neodsouhlasené změně zařízení
ztrácí toto prohlášení svou platnost.
Označení zařízení: ProDist compact
Laserový dálkoměr
Typ nářadí: Laserový dálkoměr
Výrobek číslo: 26 68 65
Směrnice ES Elektromagnetická slučitelnost: 2004 / 108 / EG
Směrnice ES k omezení používání určitých nebezpečných látek v
elektrických a elektronických
zařízeních: 2011 / 65 / EU (RoHS)
EN 62321:2008 EN 61326-1: 2006
EN 61326-2-1:2006 EN 60825-1: 2007 (2-nd Edition)
Zplnomocněnec k sestavení technických podkladů:
STORCH Malerwerkzeuge & Profigeräte GmbH
Platz der Republik 6-8 · 42107 Wuppertal
Jörg Heinemann
- Jednatel -
Wuppertal, 03- 2015
85
Page 86

86
Page 87

87
Page 88

Art.-Nr. Bezeichnung
26 68 65 ProDist compact
Laser-Entfernungsmessgerät
Art. nr. Beschrijving
26 68 65 ProDist compact
Laser-afstandmeetapparaat
Référence Désignation
26 68 65 ProDist compact - Appareil
de mesure de distances laser
N. art. Denominazione
26 68 65 ProDist compact
Misuratore di distanza laser
Art. no. Description
26 68 65 ProDist compact
Laser distance measuring device
Výr. č. Označení
26 68 65 ProDist compact
Laserový dálkoměr
Malerwerkzeuge & Profigeräte GmbH
Platz der Republik 6 - 8
D-42107 Wuppertal
Telefon: +49 (0)2 02 . 49 20 - 0
Telefax: +49 (0)2 02 . 49 20 - 111
[email protected]
03-2015
www.storch.de
 Loading...