

Page 1

Strichlaser Crossline
DE
Laserdiode Crossline
Laser à ligne Crossline
Laser a striscia Crossline
CrossLine line laser
Čárový laser CrossLine
NL
FR
IT
GB
CZ
Page 2

DE
Vielen Dank
für Ihr Vertrauen zu STORCH. Mit dem Kauf haben Sie sich für ein Qualitäts-Produkt entschieden.
Haben Sie trotzdem Anregungen zur Verbesserung oder aber vielleicht einmal ein Problem, so freuen wir uns sehr,
von Ihnen zu hören.
Bitte sprechen Sie mit Ihrem Außendienst-Mitarbeiter oder in dringenden Fällen auch mit uns direkt.
Mit freundlichen Grüßen
STORCH Service Abteilung
Telefon: +49 (0)2 02 . 49 20 - 112
Fax: +49 (0)2 02 . 49 20 - 244
kostenlose Service-Hotline: 08 00. 7 86 72 47
kostenlose Bestell-Hotline: 08 00. 7 86 72 44
kostenloses Bestell-Fax: 08 00. 7 86 72 43
(nur innerhalb Deutschlands)
Inhaltsverzeichnis Seite
Lieferumfang 2
Technische Daten 3
Sicherheitshinweise 3
Geräteeigenschaften 3
Laserlinien-Darstellung 4
Gerätebeschreibung 4
Bedienfeld 4
Bedienung 5
Pflege und Wartung 5
Garantiebedingungen 6
EG-Konformitätserklärung 7
Lieferumfang
1. Strichlaser Crossline
2. Aluminium-Transport und Aufbewahrungsbox, innen gepolstert.
3. Laser-Sichtbrille
4. 3 x (AA) Alkaline-Batterien
5. Bedienungsanleitung
Originalanleitung
2
Page 3

Technische Daten
Laserstrahl 4V1H1D
Lichtquellen
Lasersicherheitsklasse Klasse 2 < 5 mW
Max. Ausgangsleistung < 1 mW
Laserdiode 635 nm
Lotstrahl Laserklasse 2 < 1 mW
Lotstrahldiode 650 nm
Genauigkeit ± 2 mm / 10 m
Selbstnivellierbereich ± 3°
Nivellierzeit < 5 Sekunden
Arbeitsbereich Radius 15 m
Empfindlichkeit Dosenlibelle 60‘ / 2 mm
Drehung 360°
Angaben ohne Gewähr! Technische Änderungen und Irrtümer vorbehalten!
Feineinstellmechanismus für die vertikalen Laserlinien
Stromversorgung 3 x 1,5 V
Batteriebetrieb +/- 5 St. bei Volllast
Stativgewinde 5/8“
Betriebstemperatur -10° C ~ +40° C
Gewicht 1,1 kg
Größe Ø 90 mm x 195 mm
Sicherheitshinweise
1. Der Strichlaser Crossline entspricht der Laserklasse 2 (5 mW) gemäß CFR21.
2. Nicht in den Laserstrahl blicken, da dies zu Augenschäden führen kann.
(AA)-Batterien
(inkl. Batterien)
3. Das Gerät vor dem Transport ausschalten.
4. Die Taste auf der Geräteoberseite nicht mit spitzen Gegenständen (z.B. Fingernägel) betätigen.
5. Verwenden Sie möglichst die Batterien des gleichen Herstellers und des gleichen Typs.
6. Wenn das Gerät nicht verwendet wird, die Batterien entnehmen, um ein mögliches Auslaufen der Batterie zu vermeiden.
7. Die Batterie nicht aufbrechen oder ins Feuer werfen; Altbatterien umweltgerecht entsorgen.
8. Das Strichlaser nicht unter feuchten Bedingungen verwenden oder aufbewahren.
Geräteeigenschaften
1. Separate Tasten für Horizontal- und Vertikallinien. Dimmer-Taste Hell / Dunkel.
2. Magnetische Selbstnivellierung.
3. Ausrichtungs-Libelle im Fuß.
4. Sollte die Neigung des Gerätes den Grenzwert überschreiten, beginnt der Laserstrahl automatisch zu blinken und ein
Warnton ertönt.
5. Der um 360° drehbare Feineinstellmechanismus ermöglicht eine präzise Ausrichtung der vertikalen Laserlinien.
6. Beim Ausschalten wird die magnetische Selbstnivellierung mit Hilfe der eingebauten Sperrvorrichtung automatisch
gesperrt um während des Transports jegliche Schäden an der Feinelektronik zu vermeiden.
3
Originalanleitung
Page 4

Laserlinien-Darstellung
4 x vertikale Laser
1 x horizontaler Laser
1 x Laser-Lot Punkt nach unten.
(Die Position des Lot Punkts liegt
parallel zu der Überschneidung der
vertikalen Laserlinien an der Decke.)
Gerätebeschreibung
Kreuz-Linienlaser Crossline mit gut
sichtbaren Laserlinien eignen sich
hervorragend zum Ausrichten von
Fliesen, Ständerwerk, Fenster, Türen
etc.
1.
Tasten-Bedienfeld
2.
4 Laserstrahlaustritts-Fenster für
Vertikallaser
3.
Ein / Aus-Schalter
4.
Batteriefachdeckel
5.
1 Laserstrahlaustritts-Fenster für
Horizontallaser
6.
Tragegurt
7.
Feinjustierung der vertikalen Laserlinien mit Libelle
8.
3 justierbare Füße mit Nivellierschrauben
9.
Lotlaser und Stativgewinde mit 5/8“
Bedienfeld
1.
Taste Vertikallinie „V“
2.
Kontroll-LED
3.
Taste Horizontallinie „H“
4.
Dimmertaste „Glühbirnen-Symbol“
Hell / Dunkel
2
3
5
7
9
1
4
6
8
Originalanleitung
4
Page 5

Bedienung
1. Den Batteriefachdeckel (Pos.4) abnehmen. drei 1,5 V (AA) Alkaline-Batterien in das Batteriefach unter Beachtung
der Polaritätszeichen „+ und -“ einlegen, anschließend den Batteriefachdeckel wieder anbringen.
2. Crossline kann als Standgerät genutzt werden und ist auf eine stabile und vibrationsfreie Unterlage zu stellen. Bei
Bedarf und der Nivellierarbeit in bestimmter Höhe, kann es auf die entsprechenden Haltevorrichtungen montiert werden. (Optional auf dem Stativ (Art.-Nr. 441505) oder der Wandhalterung (Art.-Nr. 441512). Bei der Verwendung eines
Stativs die Zentriermutter des Gerätes mit einer Hand halten, und die Schraube des Statives in die Zentriermutter am
Gerät einschrauben. Die Schraube anziehen. Bei Verwendung der Wandhalterung das Gerät auf dem Trage-Arm positionieren und von unten mit der Feststellschraube der Wandhalterung festziehen.
3. Das Gerät einschalten (Pos. 3): Die Stromversorgung wird eingeschaltet und die tragende Laserdioden-Halterung im
Inneren des Gehäuses wird gleichzeitig entsperrt, um die automatische Selbstnivellierung zu ermöglichen. (Gerät ausschalten: Die Stromversorgung wird ausgeschaltet, und die Laserdioden-Halterung wird automatisch gesperrt.)
4. Die drei Nivellierschrauben so einstellen, dass die Libellenblase im Fuß in den schwarzen Ring gelangt.
Bitte beachten: die Libelle dient nur zur Hilfe der geraden Aufstellung des Crossline. Die Nivellierung der Laserdioden
erfolgt intern und ist von der Libelle unabhängig.
5. Die Laserdioden lassen sich über das Bedienfeld einschalten. Die vertikalen Linien lassen sich durch die Betätigung
der „V-Taste“ einzeln zuschalten: 1 x drücken - 1 vertikaler Laser an, 2 x drücken – 2 vertikale Laser an, die einen 90
Grad Winkel bilden, 3 x drücken – alle 4 vertikalen Laser an. Die horizontale Linie schaltet sich durch eine Tastenbetätigung der „H-Taste“ ein. Bei Bedarf erhöhen Sie die Leuchtkraft der Laserdioden mit der Dimmertaste „Glühbirnen-Symbol“.
6. Richten Sie die vertikalen Laserlinien auf die vorgesehene Stelle aus, indem Sie Gehäuseoberteil des Geräts auf die
gewünschte Position drehen. Mithilfe des drehbaren Feinstellmechanismus (Pos. 7.) die vertikalen Linien präzise auf
die gewünschte Position einstellen.
Bitte beachten: Der Feineinstellmechanismus dient nur zur Feinjustierung der angepeilten Markierstelle und nicht für
eine komplette 360-Grad-Drehung.
7. Sollte der Laserstrahl blinken und ein Warnton ertönen, während das Instrument eingeschaltet wird, ist die Neigung
des Gerätes zu groß; die drei Schrauben oder das Stativ/Wandhalterung entsprechend nachjustieren.
8. Wenn die Neigung des Strichlasers aus irgendeinem Grund während des Betriebs den Grenzwert überschreitet,
beginnt der Laserstrahl zu blinken. In diesem Fall bitte mit Hilfe der drei Nivellierschrauben (bei der Stativ- und der
Wandhalterungsmontage die jeweilige Haltevorrichtung nachjustieren) die Einstellung entsprechend ändern, bis der
Laserstrahl nicht mehr blinkt.
Unter Umständen kann die Ursachen für die Verstellung zu starke Vibrationen oder Erschütterungen im Aufstellbereich
des Crossline sein. Stellen Sie in diesem Fall sicher, dass die Störungsursachen abgestellt werden.
9. Verwendung des Geräts nach einer Arbeitsunterbrechung. Mithilfe des Lotstrahls, der vom Gerät aus unten am
Gehäuse auf den Boden projiziert wird, haben Sie die Möglichkeit die Aufstellposition zu markieren um das Gerät nachträglich auf die gleiche Position aufstellen zu können. Ebenfalls können Sie die Positionen der vertikalen und der horizontalen Laserlinien markieren um die letzte bekannte Position leichter wiederherstellen zu können.
Pflege und Wartung
1. Nicht versuchen, den Crossline zu öffnen. Das Gerät darf nur von qualifizierten Servicepartnern der Fa. STORCH
repariert werden.
2. Um die Präzision zu gewährleisten, schützen Sie den Strichlaser vor Stürzen, Stößen und Erschütterungen.
3. Beim Einlagern des Gerätes für längere Zeit die Batterie aus dem Batteriefach entfernen.
4. Das Gerät mit einem weichen Tuch und milder Seife reinigen.
5. Keine aggressiven Chemikalien, Waschbenzin oder Reinigungsmittel verwenden und das Gerät nicht in staubigen
oder stark verschmutzten Bereichen aufbewahren.
6. Die roten Brillengläser mit einem Brillenputztuch reinigen.
5
Originalanleitung
Page 6

Garantie
Garantiebedingungen
Für unsere Geräte gelten die gesetzlichen Gewährleistungsfristen von 12 Monaten ab Kaufdatum / Rechnungsdatum
des gewerblichen Endkunden.
Geltendmachung
Bei Vorliegen eines Gewährleistungs- bzw. Garantiefalles bitten wir, dass das komplette Gerät zusammen mit der
Rechnung frei an unser Logistik Center in Berka oder an eine von uns autorisierte Service-Station eingeschickt wird.
Zuvor bitten wir Sie, uns unter unserer kostenlosen STORCH Service-Hotline 08 00. 7 86 72 47 zu kontaktieren.
Gewährleistungs- bzw. Garantieanspruch
Ansprüche bestehen ausschließlich an Werkstoff- oder Fertigungsfehler sowie ausschließlich bei bestimmungsgemäßer
Verwendung des Geräts. Verschleißteile fallen nicht unter die Garantieansprüche. Sämtliche Ansprüche erlöschen durch
den Einbau von Teilen fremder Herkunft, bei unsachgemäßer Handhabung und Lagerung sowie bei offensichtlicher
Nichtbeachtung der Betriebsanleitung.
Durchführung von Reparaturen
Sämtliche Reparaturen dürfen ausschließlich durch unser Werk oder von STORCH autorisierten Service-Stationen
durchgeführt werden.
Originalanleitung
6
Page 7

EG-Konformitätserklärung
Name / Anschrift des Ausstellers: STORCH Malerwerkzeuge & Profigeräte GmbH
Platz der Republik 6-8
D - 42107 Wuppertal
Hiermit erklären wir,
dass das nachstehend genannte Gerät aufgrund dessen Konzipierung und Bauart sowie in der von uns in Verkehr
gebrachten Ausführung den einschlägigen, grundlegenden Sicherheits- und Gesundheitsanforderungen der EG-Richtlinien entspricht.
Bei einer nicht mit uns abgestimmten Änderung des Gerätes verliert diese Erklärung ihre Gültigkeit.
Bezeichnung des Gerätes: Strichlaser Crossline
Geräte-Typ: Lasergerät
Artikel-Nummer: 44 15 10
Angewandte Richtlinien
EMV-Richtlinie: 2004 / 108 / EG
Angewandte harmonisierte Normen
EN 55014-1: 2006 + A1: 2009 EN 55014-2: 1997 + A2: 2008
EN 61000-3-2: 2006 + A2: 2009 EN 61000-3-3: 2008
EN 62471: 2008
Bevollmächtigter für die Zusammenstellung der technischen Unterlagen:
STORCH Malerwerkzeuge & Profigeräte GmbH
Platz der Republik 6-8
42107 Wuppertal
Jörg Heinemann
- Geschäftsführer -
Wuppertal, 08 - 2014
7
Originalanleitung
Page 8

NL
Hartelijk dank
voor uw vertrouwen in STORCH. Met deze aankoop hebt u voor een kwaliteitsproduct gekozen.
Als u desondanks een tip voor verbeteringen hebt of wellicht ooit een probleem ondervindt, dan horen wij graag van u.
Neem contact op met de medewerker buitendienst of in dringende gevallen rechtstreeks met ons.
Met vriendelijke groeten,
STORCH serviceafdeling
Tel.: +49 (0)2 02 . 49 20 - 112
Fax: +49 (0)2 02 . 49 20 - 244
Gratis service-hotline: 08 00. 7 86 72 47
Gratis bestel-hotline: 08 00. 7 86 72 44
Gratis bestel-fax: 08 00. 7 86 72 43
(alleen binnen Duitsland)
Inhoudsopgave Pagina
Levering 8
Technische data 9
Veiligheidsrichtlijnen 9
Apparaateigenschappen 9
Laserlijn-weergave 10
Apparaatbeschrijving 10
Bedieningspaneel 10
Bediening 11
Onderhoud 11
Garantievoorwaarden 12
EG-conformiteitsverklaring 13
Levering
1. Laserdiode Crossline
2. Aluminiumtransport en -bewaarbox, met padding aan binnenzijde.
3. Laserbril
4. 3 x (AA) alkaline-batterijen
5. Gebruiksaanwijzing
Vertaling van de originele handleiding
8
Page 9
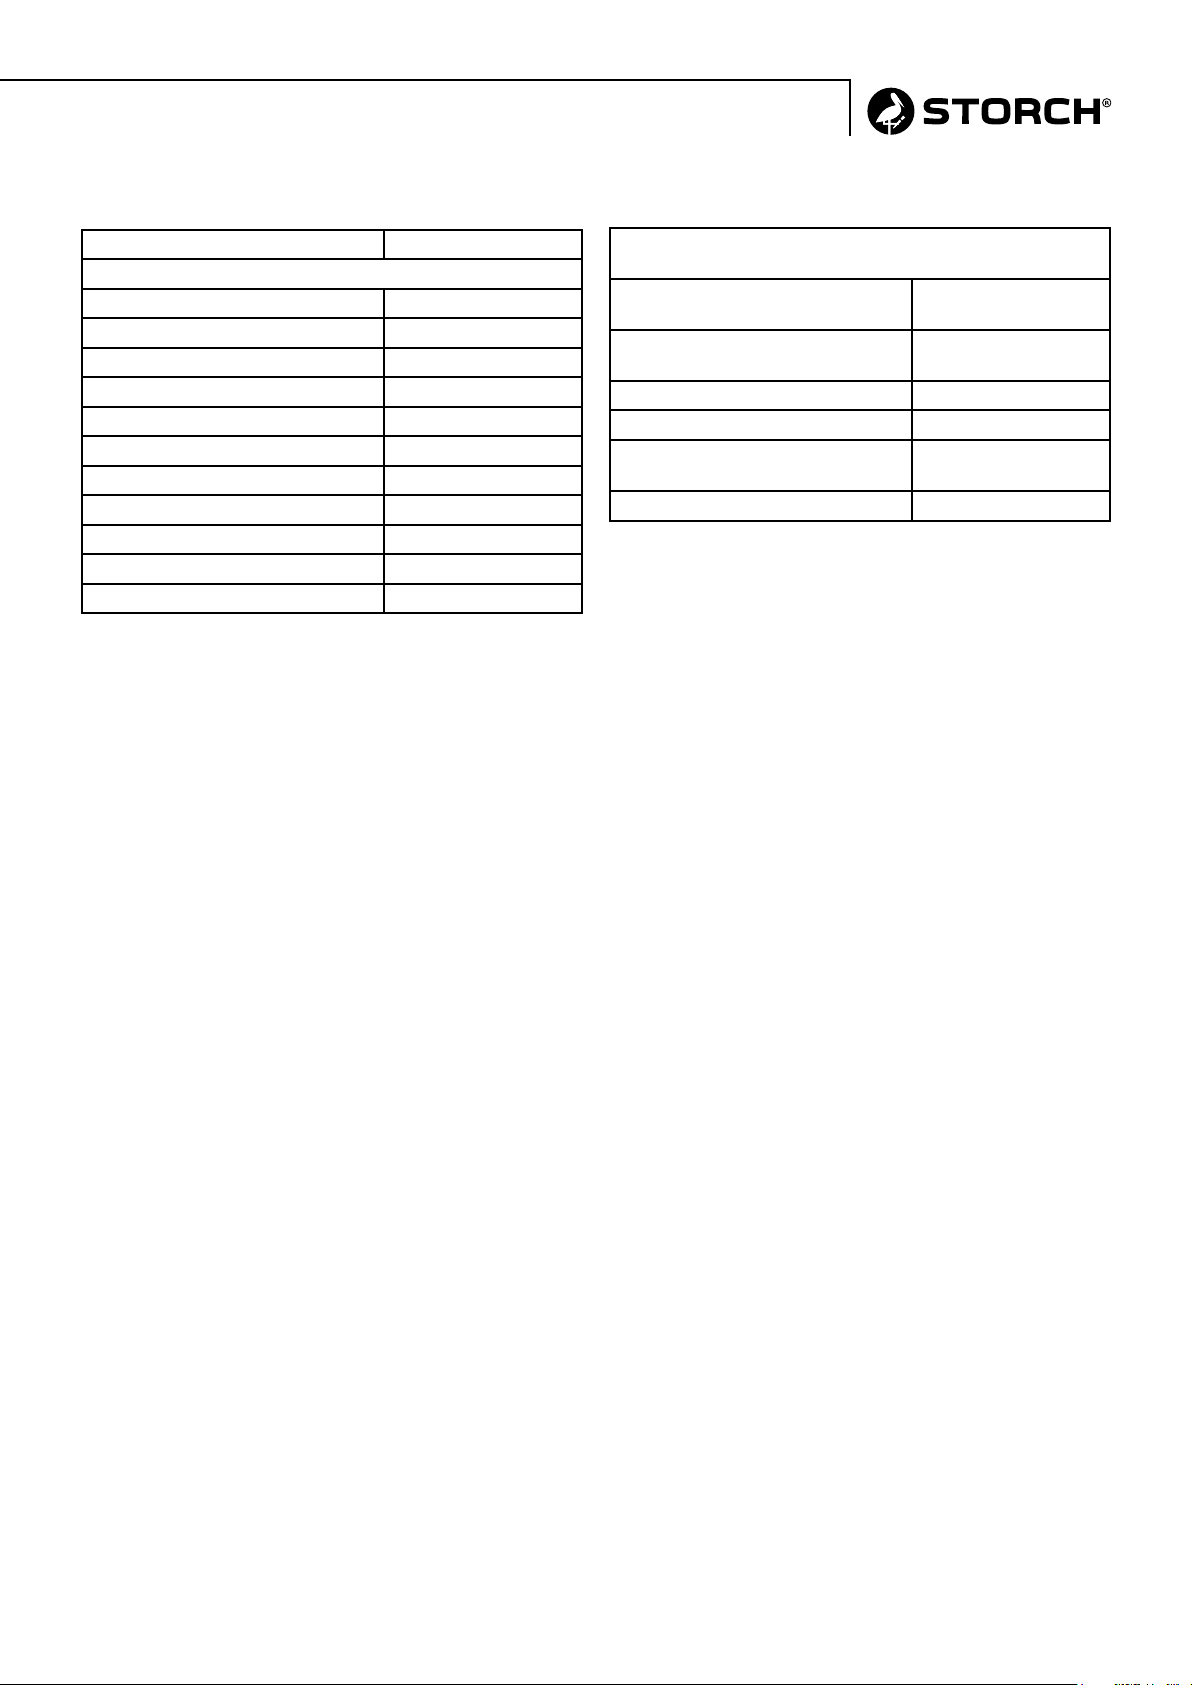
Technische data
Laserstraal 4V1H1D
Lichtbronnen
Laser-veilgheidsklasse Klasse 2 < 5 mW
Max. uitgangsvermogen < 1 mW
Laserdiode 635 nm
Loodstraal laserklasse 2 < 1 mW
Loodstraal diode 650 nm
Nauwkeurigheid ± 2 mm / 10 m
Bereik zelf-nivellering ± 3°
Nivelleertijd < 5 seconden
Werkbereik Radius 15 m
Gevoeligheid waterpas 60‘ / 2 mm
Draaiing 360°
Informatie onder voorbehoud! Technische wijzigingen en fouten voorbehouden!
Mechanisme voor fijninstelling voor de verticale laserlijnen
Stroomvoorziening 3 x 1,5 V (AA)-batte-
Werking op batterijen +/- 5 uur bij volledi-
Statiefschroefdraad 5/8“
Bedrijfstemperatuur -10° C ~ +40° C
Gewicht 1,1 kg (incl. batteri-
Formaat Ø 90 mm x 195 mm
Veiligheidsrichtlijnen
1. De diodelaser Crossline voldoet aan laserklasse 2 (5 mW) conform CFR21.
2. Niet in de laserstraal kijken, dit kan tot oogschade leiden.
rijen
ge belasting
jen)
3. Schakel het apparaat voor het transport uit.
4. De knop bovenop het apparaat niet met spitse voorwerpen (bijv. vingernagels) gebruiken.
5. Gebruik indien mogelijk de batterijen van dezelfde fabrikant en hetzelfde type.
6. Verwijder de batterijen als het apparaat niet wordt gebruikt om eventueel lekken van de batterijen te voorkomen.
7. De batterij niet openen of in het vuur gooien; oude batterijen milieuvriendelijk weggooien.
8. De lijnlaser niet onder vochtige omstandigheden gebruiken of bewaren.
Apparaateigenschappen
1. Afzonderlijke knoppen voor horizontale en verticale lijnen. Dimmer-knop licht / donker.
2. Magnetische zelfnivellering.
3. Uitlijning-waterpas in voet.
4. Wanneer de hellingshoek van het apparaat de grenswaarde overschrijdt, begint de laserstraal automatisch te knipperen en klinkt er een waarschuwingstoon.
5. Het 360° draaibare mechanisme voor fijninstelling maakt een precieze instelling van de verticale laserlijnen mogelijk.
6. Bij het uitschakelen wordt de magnetische zelfnivellering via de ingebouwde blokkering automatisch vergrendeld om
tijdens het transport schade aan de elektronica te voorkomen.
9
Vertaling van de originele handleiding
Page 10
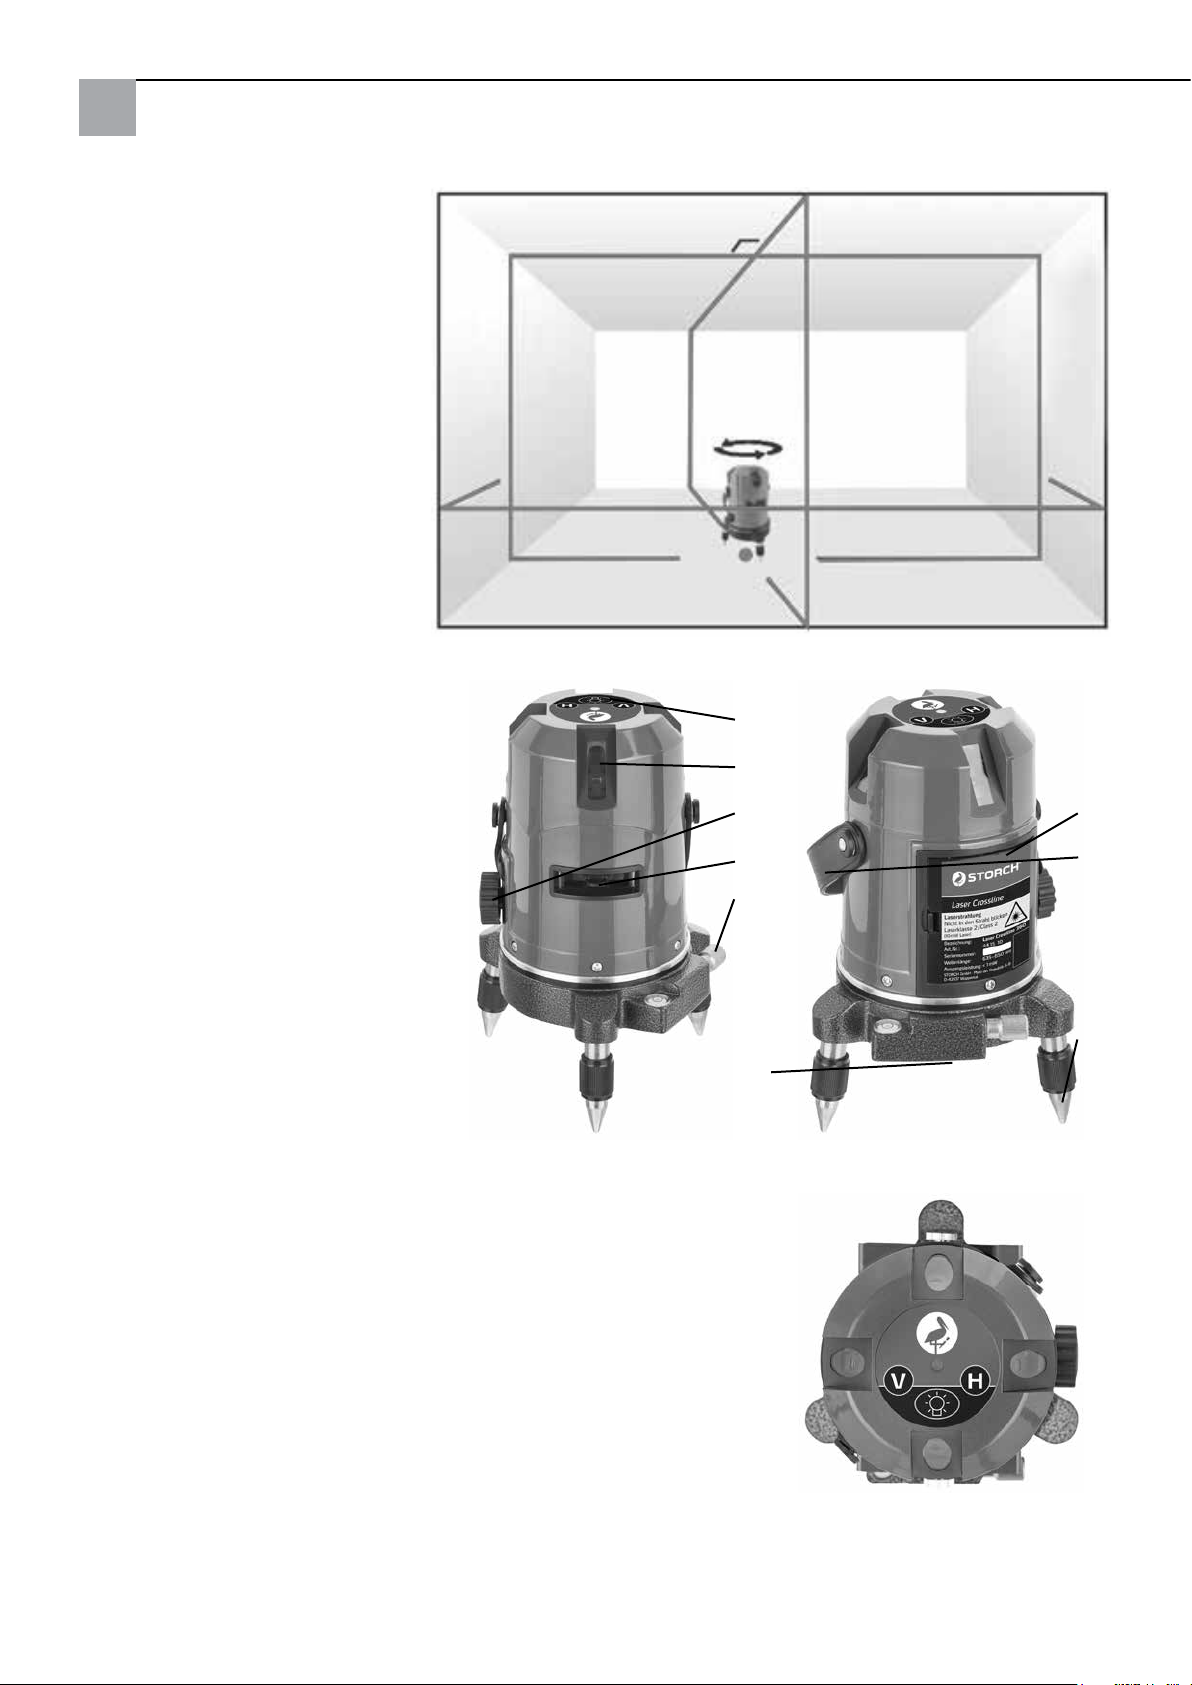
Laserlijn-weergave
4 x verticale laser
1 x horizontale laser
1 x laser-loodpunt naar onder.
(De positie van de loodpunt is parallel aan het snijden van de verticale
laserlijn op het plafond.)
Apparaatbeschrijving
Kruis-lijnlaser Crossline met goede
zichtbare laserlijnen zijn bijzonder
geschikt voor het uitlijnen van tegels,
balken, ramen, deuren etc.
1
2
3
4
1.
Knoppen bedieningspaneel
2.
4 laserstraal-uitgangsvenster voor
verticale laser
3.
Aan/Uit-schakelaar
4.
Deksel van batterijvak
5.
1 laserstraal-uitgangsvenster voor
horizontale laser
6.
Draagriem
7.
Exacte instelling van de verticale
laserlijnen met waterpas
8.
3 instelbare voeten met nivelleerschroeven
9.
Loodlaser en statiefschroefdraad met
5/8“
Bedieningspaneel
1.
Knop verticale lijn “V“
2.
Controle-LED
3.
Knop horizontale lijn “H“
4.
Dimmerknop "gloeilamp-symbool“
licht / donker
5
7
9
6
8
Vertaling van de originele handleiding
10
Page 11

Bediening
1. Verwijder de deksel van het batterijvak (pos. 4). Plaats drie 1,5 V alkaline-batterijen in het batterijvak en let op de
polariteit "+" en "-"; plaats vervolgens de deksel van het batterijvak weer terug.
2. Crossline kan als staand apparaat worden gebruikt en dient op een stabiele en trillingsvrije ondergrond te staan.
Indien nodig en bij nivelleerwerkzaamheden op bepaalde hoogte kan het apparaat op de betreffende houdervoorzieningen worden gemonteerd. (Optioneel op het statief (art.nr. 441505) of de wandhouder (art.nr. 441512)). Bij gebruik van
een statief de centreermoer met één hand vasthouden en de schroef van het statief in de centreermoer van het apparaat draaien. Draai de schroef vast. Bei Verwendung der Wandhalterung das Gerät auf dem Trage-Arm positionieren
und von unten mit der Feststellschraube der Wandhalterung festziehen.
3. Schakel het apparaat in (pos. 3): de stroomvoorziening wordt ingeschakeld en de dragende laserdiode-houder aan de
binnenkant van de behuizing wordt tegelijkertijd ontgrendeld om de automatische zelf-nivellering mogelijk te maken.
(Apparaat uitschakelen: de stroomvoorziening wordt uitgeschakeld en de laserdiode-houder wordt automatisch geblokkeerd.)
4. Stel de drie nivelleerschreoven zodanig in dat het belletje van de waterpas in de voet in de zwarte ring komt.
Let op: de waterpas dient alleen voor het horizontaal opstellen van de Crossline. De nivellering van de laserdioden
vindt intern plaats en is onafhankelijk van de waterpas.
5. De laserdioden kunnen via het bedieningspaneel worden ingeschakeld. De verticale lijnen kunnen via de “V-Taste“
afzonderlijk worden ingeschakeld: 1 x drukken - 1 verticale laser aan, 2 x drukken – 2 verticale lasers aan die een hoek
van 90 graden vormen, 3 x drukken – alle 4 verticale laserlijnen aan. De horizontale lijn wordt ingeschakeld via de
"H-knop“. Desgewenst verhoogt u de lichtsterkte van de laserdioden met de dimmerknop “gloeilamp-symbool“.
6. Richt de verticale laserlijnen op de gewenste plaats door het bovenste deel van de behuizing van het apparaat naar
de gewenste positie te draaien. Met behulp van het draaibare exacte instelmechanisme (pos. 7) stelt u de verticale
lijnen exact op de gewenste positie in.
Let op het volgende: de fijninstelling dient alleen voor de fijne aanpassing van de aangegeven markeerplaats en niet
voor een complete draaiing van 360 graden.
7. Wanneer de laserstraal knippert en er een waarschuwingsgeluid klinkt bij inschakelen van het instrument, dan is de
hellingshoek van het apparaat te groot; pas de drie schroeven of het statief/de wandhouder aan.
8. Wanneer de hellingshoek van de lijnlaser tijdens het gebruik de grenswaarde overschrijdt, begint de laserstraal automatisch te knipperen. Gebruik dan de drie nivelleerschroeven (bij de statief- en de wandhoudermontage de betreffende
houdervoorziening instellen) om de instelling aan te passen zodat de laserstraal niet meer knippert.
In sommige gevallen kan de oorzaak voor de verstelling zijn gelegen in te sterke trillingen of schokken bij de plaatsingslocatie van de Crossline. Zorg er in dit geval voor dat de storingsoorzaken worden verholpen.
9. Gebruik van het apparaat na een werkonderbreking. Met behulp van de loodstraal die vanuit het apparaat naar onder
op de bodem wordt geprojecteerd, kunt u de opstelpositie markeren om het apparaat later weer op dezelfde positie op
te stellen. U kunt ook de posities van de verticale en horizontale laserlijnen markeren om eenvoudig de laatst bekende
positie te kunnen herstellen.
Onderhoud
1. Probeer de Crossline niet te openen. Het apparaat mag alleen door gekwalificeerde servicepartners van STORCH
worden gerepareerd.
2. Om de nauwkeurigheid te garanderen, dient u de diodelaser te beschermen tegen vallen, stoten en schokken.
3. Bij langdurige opslag de batterij uit het vak verwijderen.
4. Reinig het apparaat met een zachte doek en milde zeep.
5. Gebruik geen agressieve chemicaliën, wasbenzine of scherpe reinigingsmiddelen en bewaar het apparaat niet in
stoffige of vuile ruimtes.
6. Reinig de rode brillenglazen met een brillendoekje.
11
Vertaling van de originele handleiding
Page 12

Garantie
Garantievoorwaarden:
Voor onze apparaten gelden de wettelijke garantieperioden van 12 maanden vanaf aankoopdatum/factuurdatum van
de eindklant. Indien wij langere perioden in een garantieverklaring hebben toegezegd, dan worden deze speciaal in de
gebruiksaanwijzingen van de desbetreffende apparaten toegelicht.
Indienen van garantieclaims:
Bij een garantieclaim vragen wij u het gehele apparaat samen met de rekening franco aan ons logistiekcentrum in Berka of naar een door ons geautoriseerd servicestation te verzenden.
Neem eerst contact op met de STORCH Service-Hotline (hiervoor worden kosten in rekening gebracht):
+49 (0)202 . 49 20 – 110.
Garantieclaims
Claims uitsluitend met betrekking tot materiaal- of productiefouten en uitsluitend bij gebruik van het apparaat conform
de voorschriften. Voor slijtdelen gelden deze aanspraken niet. Alle claims vervallen bij inbouw van onderdelen van
externe herkomst, bij verkeerde hantering en opslag en bij het klaarblijkelijk niet in acht nemen van de gebruiksaanwijzing.
Reparaties uitvoeren
Reparaties mogen uitsluitend door onze fabriek of door STORCH geautoriseerde servicestations worden uitgevoerd.
Vertaling van de originele handleiding
12
Page 13

EG-conformiteitsverklaring
Naam/adres van de opsteller: STORCH Malerwerkzeuge & Profigeräte GmbH
Platz der Republik 6 - 8
D - 42107 Wuppertal
Hiermee verklaren wij
dat het hieronder vermelde apparaat op basis van zijn ontwerp en type in de door ons in omloop gebrachte uitvoering
aan de toepasselijke elementaire veiligheids- en gezondheidseisen van de EU-richtlijnen voldoet.
Bij een niet met ons afgestemde verandering van het apparaat is deze verklaring niet langer geldig.
Omschrijving van het apparaat: Diodelaser Crossline
Apparaattype: Laserapparaat
Artikelnummer: 44 15 10
Toegepaste EG-richtlijnen
Elektromagnetische compatibiliteit: 2004 / 108 / EG
Toegepaste geharmoniseerde normen
EN 55014-1: 2006 + A1: 2009 EN 55014-2: 1997 + A2: 2008
EN 61000-3-2: 2006 + A2: 2009 EN 61000-3-3: 2008
EN 62471: 2008
Verantwoordelijke voor samenstelling van de technische documentatie:
STORCH Malerwerkzeuge & Profigeräte GmbH
Platz der Republik 6 - 8
D-42107 Wuppertal
Jörg Heinemann
- Directeur -
Wuppertal, 08 - 2014
13
Vertaling van de originele handleiding
Page 14

FR
Nous vous remercions
de la confiance dont vous témoignez envers STOCH. Avec cet achat vous avez opté pour un produit de
qualité. Si vous avez malgré tout des suggestions pour l‘amélioration ou si vous deviez rencontrer un problème, nous
sommes avec plaisir à votre disposition.
Dans ce cas, contactez votre représentant, ou directement notre service clients, s‘il s‘agit d‘un problème urgent.
Salutations dévouées
SAV STORCH
Tél.: +49 (0) 2 02 . 49 20 - 112
Fax: +49 (0)2 02 . 49 20 - 244
Ligne d‘assistance SAV gratuite: +49 800 7 86 72 47
Service gratuit de commande par téléphone: +49 800. 7 86 72 44
Fax de commande gratuit: +49 800. 7 86 72 43
(uniquement en Allemagne)
Sommaire Page
Étendue des fournitures 14
Données techniques 15
Consignes de sécurité 15
Caractéristiques de l'appareil 15
Représentation lignes laser 16
Description de l'appareil 16
Touches sensitives 16
Utilisation 17
Entretien et maintenance 17
Conditions de garantie 18
Déclaration de conformité CE 19
Étendue des fournitures
1. Trait à laser Crossline
2. Boîte de transport et de rangement en aluminium, rembourrée à l'intérieur.
3. Lunette laser
4. 3 x piles alcalines (AA)
5. Notice d'emploi
Traduction des instructions d‘origine
14
Page 15
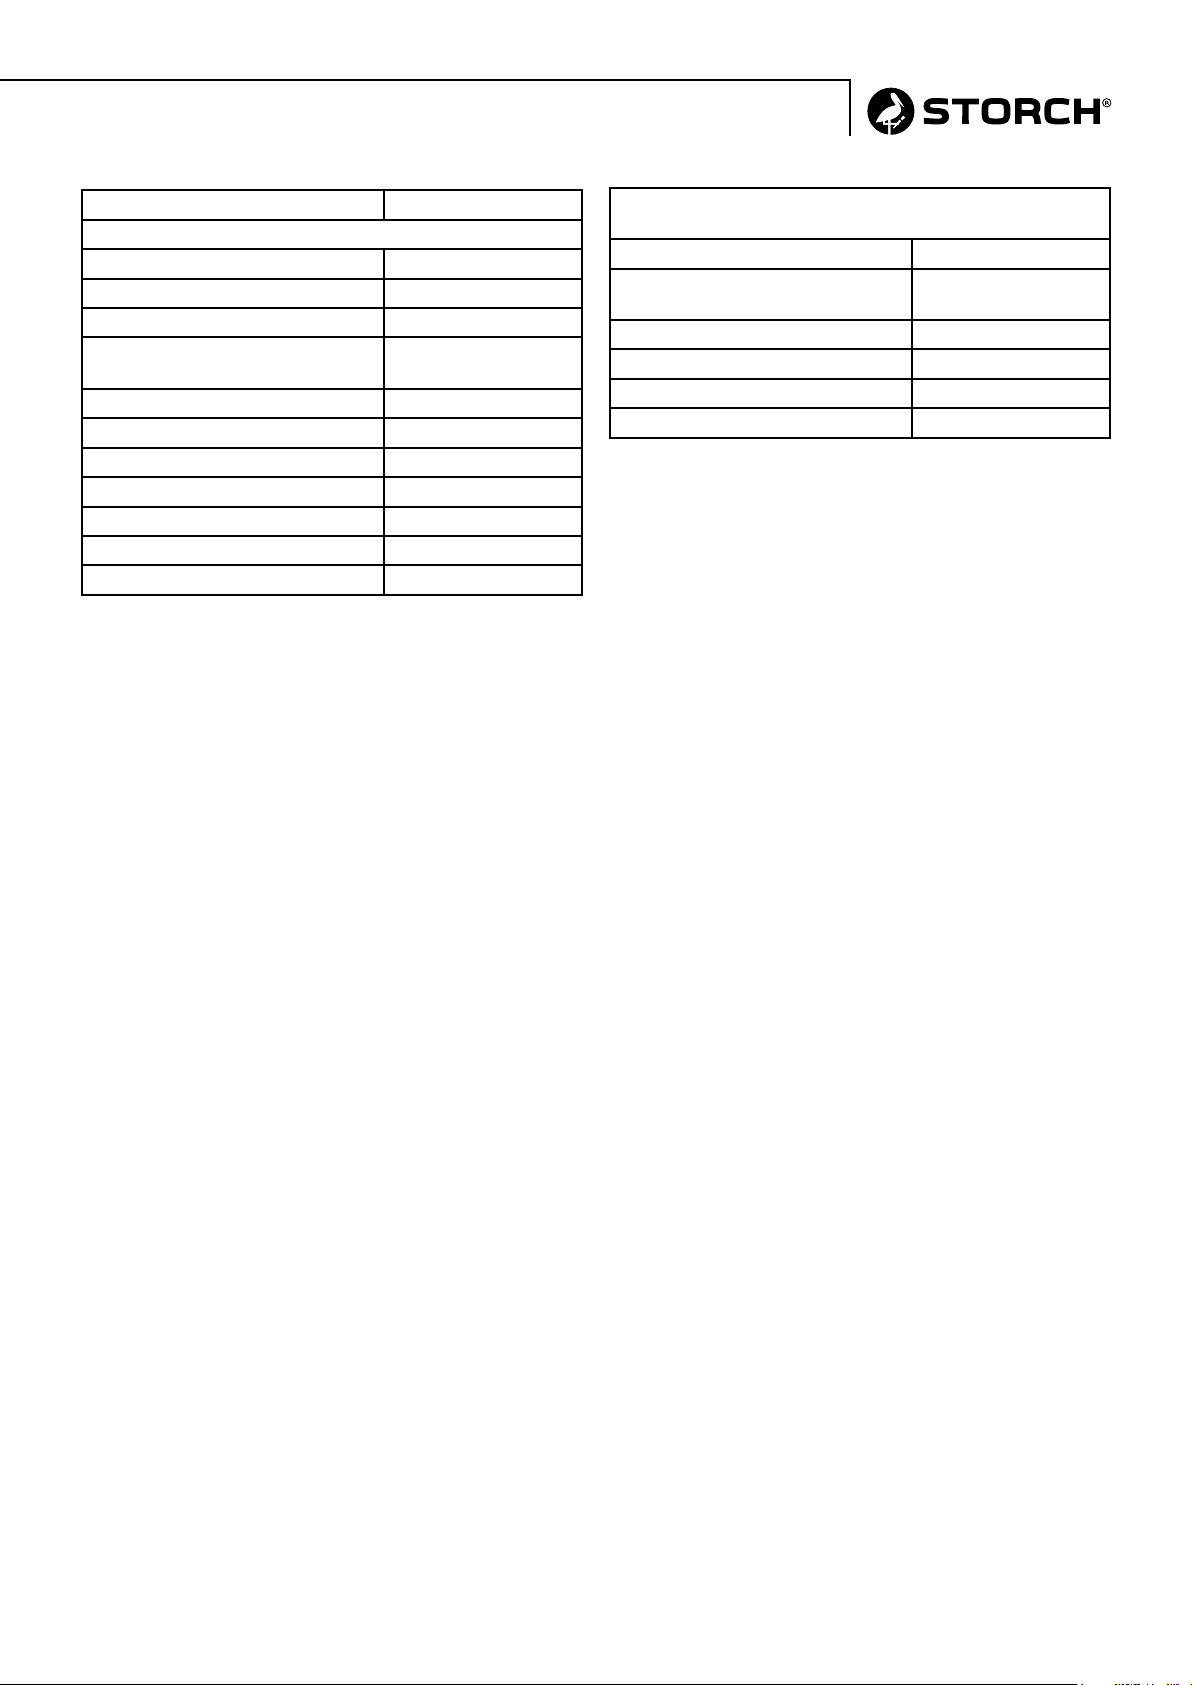
Rayonnement laser 4V1H1D
Sources lumineuses
Classe de sécurité du laser Classe 2 < 5 mW
Puissance de sortie max. < 1 mW
Diode laser 635 nm
Faisceau d'aplomb Classe de
laser
Diode à faisceau d'aplomb 650 nm
Précision ± 2 mm / 10 m
Zone d'autonivellement ± 3°
Temps de nivellement < 5 secondes
Plage de travail Rayon de 15 m
Sensibilité du niveau à bulle 60‘ / 2 mm
Rotation 360°
Toutes données sans garantie! Sous réserve de modifications techniques et d‘erreurs!
2 < 1 mW
Mécanisme de réglage fin pour les lignes à laser verticales
Alimentation électrique 3 x piles 1,5 V (AA)
Fonctionnement à piles +/- 5 h à pleine char-
Filetage du trépied 5/8“
Température de service -10° C ~ +40° C
Poids 1,1 kg (piles incluses)
Dimensions Ø 90 mm x 195 mm
Consignes de sécurité
1. Le trait à laser Crossline correspond à la catégorie de laser 2 (5 mW) selon CFR21.
2. Ne pas regarder le rayon laser, risque de blessures des yeux.
ge
3. Arrêter l'appareil avant le transport.
4. Ne pas actionner la touche située sur la face supérieure de l'appareil avec des objets pointus (p. ex. des ongles de
doigts).
5. Utiliser, autant que possible, les piles du même fabricant et du même type.
6. Lorsque l'appareil n'est pas utilisé, il faut retirer la batterie afin d'éviter d'épuiser la batterie.
7. Ne pas ouvrir la batterie, ne pas la jeter dans le feu, mettre les batteries usagées au rebut conformément aux règlementations relatives à la protection de l'environnement.
8. Ne pas utiliser ou conserver le trait à laser dans des conditions humides.
Caractéristiques de l'appareil
1. Touches séparées pour les lignes horizontales et verticales. Touche variateur Clair / Foncé.
2. Autonivellement magnétique.
3. Niveau d'alignement situé dans le pied.
4. Si l'inclinaison de l'appareil dépasse la valeur limite, le rayon laser se met à clignoter automatiquement.
5. Le mécanisme de réglage fin rotatif à 360° permet un alignement précis des lignes à laser verticales.
6. Á l'arrêt, l'autonivellement magnétique se bloque automatiquement grâce au dispositif de blocage intégré afin d'éviter les vibrations pendant le transport.
15
Traduction des instructions d‘origine
Page 16
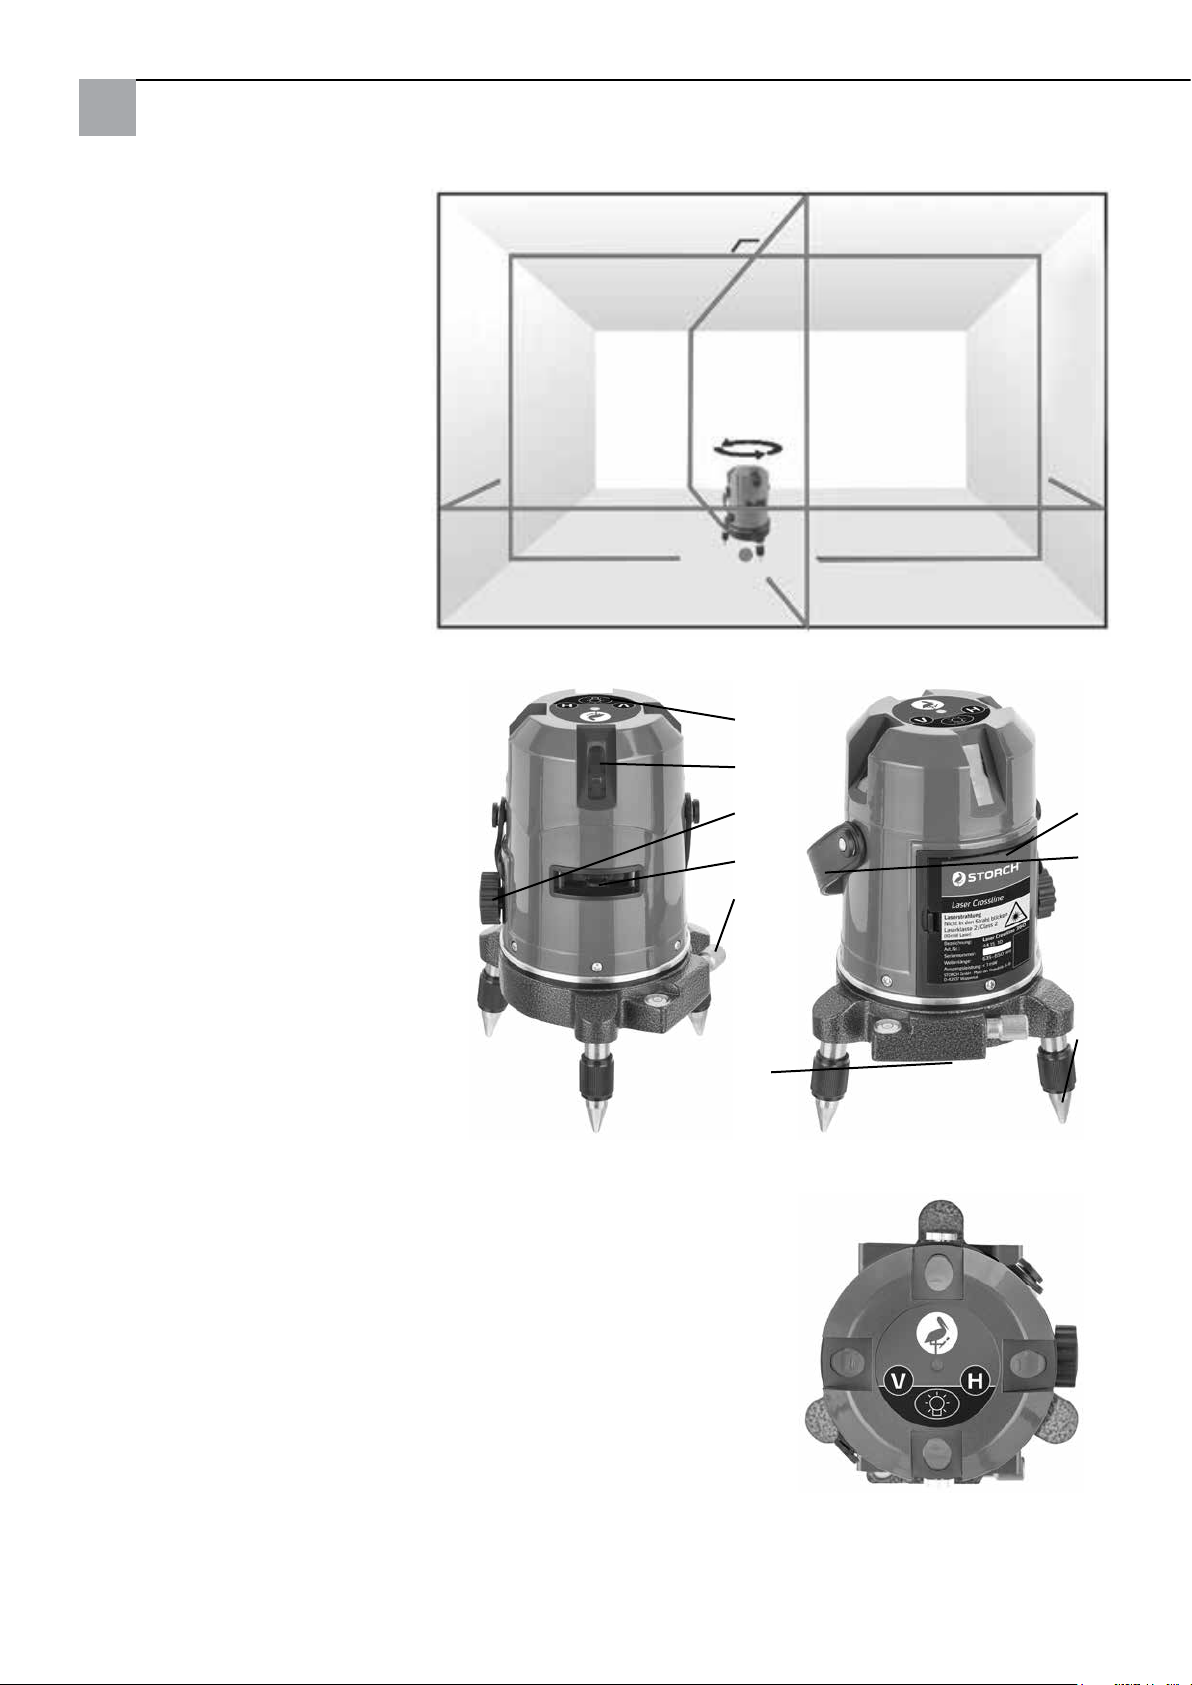
Représentation lignes laser
4 x lasers verticaux
1 x laser horizontal
1 x point d'aplomb laser vers le bas.
(La position du point d'aplomb se
situe parallèlement au recoupement
des lignes à laser verticales au niveu
du plafond.)
Description de l'appareil
Les lignes à laser croisée Crossline
avec lignes à laser bien visibles conviennent parfaitement à l'alignement
des carreaux, des ossatures, des fenêtres, des portes etc.
1.
Touches sensitives
2.
4 fenêtres de sortie du rayon laser
pour laser vertical
3.
Commutateur Marche/Arrêt
4.
Couvercle du compartiment à batteries
5.
1 fenêtre de sortie du rayon laser pour
laser horizontal
6.
Sangle
7.
Ajustement précis des lignes à laser
verticales avec le niveau à bulle
8.
3 pieds ajustables avec vis de nivellement
9.
Laser vertical et filetage du trépied
avec 5/8“
Touches sensitives
1.
Touche ligne verticale « V »
2.
LED de contrôle
3.
Touche ligne horizontale « H »
4.
Touche variateur « Symbole ampoule » Clair / Foncé
1
2
3
5
7
9
4
6
8
Traduction des instructions d‘origine
16
Page 17

Utilisation
1. Retirer le couvercle du compartiment à batteries (pos. 4). insérer trois piles alcalines 1,5 V (AA) dans le compartiment à batteries en respectant les signes de polarité « + » et « - », puis remettre le couvercle du compartiment à batteries.
2. Le Crossline peut être utilisé comme appareil fixe et doit être placé sur un support stable et exempt de vibrations.
En cas de besoin et lors des travaux de nivellement à une hauteur déterminée, il peut être monté sur les dispositifs
de maintien correspondants. (En option sur le trépied (réf. art. 441505) ou le support mural (réf. art. 441512). Si un
trépied est utilisé, tenir l'écrou de centrage d'une main et visser la vis du trépied dans l'écrou de centrage de l'appareil.
Serrer la vis. En cas d'utilisation du support mural, positionner l'appareil sur le bras d'appui et serrer depuis le bas avec
la vis de réglage du support mural.
3. Mettre l'appareil en route (pos. 3) : l'alimentation électrique est activée et le support des diodes laser se trouvant
à l'intérieur est simultanément débloqué afin de permettre l'autonivellement automatique. (Mettre l'appareil à l'arrêt :
l'alimentation électrique est interrompue et le support des diodes laser est automatiquement bloqué.)
4. Régler les trois vis de nivellement de telle façon que la bulle du niveau du pied se trouve dans le cercle noir.
Veuillez prendre en compte : le niveau à bulle sert uniquement à aider à installer le Crossline bien droit. La mise à
niveau des diodes laser est effectuée en interne et est indépendante du niveau à bulle.
5. Les diodes laser peuvent s'allumer au moyen des touches sensitives. Les lignes verticales peuvent être connectées
séparément en actionnant la « touche V » : appuyer 1 x - 1 laser vertical activé, appuyer 2 x – 2 lasers verticaux activés
qui forment un angle à 90 degrés, appuyer 3 x – les 4 lasers verticaux activés. La ligne horizontale s'allume en actionnant la « touche ». En cas de besoin, vous augmentez l'intensité lumineuse des diodes laser avec la touche variateur
« Symbole ampoule ».
6. Aligner les lignes à laser verticales à l'endroit prévu en tournant la partie supérieure du boîtier de l'appareil sur la
position souhaitée. Régler avec précision les lignes verticales sur la position souhaitée à l'aide du mécanisme de réglage fin rotatif (pos. 7.).
Á noter : le mécanisme de réglage fin est uniquement destiné à l'ajustage de précision du point de marquage visé, pas
à une rotation complète à 360 degrés.
7. Si le rayon laser clignote et qu'un bip sonore est émis alors que l'appareil est en marche, l'inclinaison de l'appareil est
trop importante, il faut alors régler en conséquence les trois vis ou le trépied/support mural.
8. Si l'inclinaison du trait à laser dépasse la valeur limite pour une raison ou pour une autre, le rayon laser se met à
clignoter. Il faut dans ce cas modifier le réglage en conséquence au moyen des trois vis de nivellement (régler le dispositif de maintien correspondant en cas de montage du trépied et du support mural) jusqu'à ce que le rayon laser ne
clignote plus.
Il se peut que de trop fortes vibrations ou secousses dans la zone d'installation du Crossline soient à l'origine du
déréglage. Dans ce cas, s'assurer que les causes du dérangement sont éliminées.
9. Utilisation de l'appareil après une interruption de travail. Á à l'aide du faisceau d'aplomb qui est projeté depuis l'appareil en bas au niveau du boîtier sur le sol, vous avez la possibilité de marquer la position de montage pour pouvoir
monter ultérieurement l'appareil sur la même position. Vous pouvez également marquer les positions des lignes à laser
verticales et horizontales afin de pouvoir rétablir plus facilement la dernière position connue.
Entretien et maintenance
1. Ne pas essayer d'ouvrir le Crossline. L'appareil ne doit être réparé que par des techniciens qualifiés des partenaires
agréés de STORCH.
2. Pour garantir la précision, il faut protéger l'appareil contre les coups, les secousses et les chutes.
3. En cas d'entreposage de l'appareil pendant une longue durée, il faut retirer la batterie du compartiment à batteries.
4. Nettoyer l'appareil à l'aide d'un chiffon souple et d'un savon doux.
5. Ne pas utiliser de produits chimiques agressifs, d'essence ou de produits de nettoyage agressifs et ne pas entreposer
l'appareil dans des endroits fortement encrassés.
6. Nettoyer les verres rouges à l'aide d'un chiffon de nettoyage de verres de lunettes.
17
Traduction des instructions d‘origine
Page 18

Garantie
Conditions de garantie
Les durées de garantie légales de 12 mois à compter de la date d'achat / de la facture du client final professionnels
s'appliquent à nos appareils. Si nous mentionnons des délais supérieurs dans le cadre d'une déclaration de garantie,
ceux-ci sont mentionnés dans les instructions de service des appareils concernés.
Exercice
Dans un cas couvert par la garantie, nous vous demandons de renvoyer l'appareil complet franco à notre centre
logistique à Berka accompagné de la facture ou de l'expédier à une station SAV agréée par nous.
Veuillez contacter préalablement l‘assistance téléphonique payante de la société STORCH: +49 (0)202 . 49 20 – 110.
Demande de prise en garantie
Les demandes couvrent exclusivement les défauts de matériau ou d‘ouvrage et ne couvrent qu‘une utilisation conforme
à la destination de l‘appareil. Les pièces d‘usure ne sont pas prises en charge par la garantie. Tout droit à garantie est
rendu caduque par le montage de pièces qui ne sont pas d‘origine, par une manipulation et un entreposage incorrects
ainsi qu‘en cas de non-respect évident des instructions de service.
Exécution de réparations
Toutes les réparations doivent exclusivement être réalisées par notre usine ou par des services SAV agréés par
STORCH.
Traduction des instructions d‘origine
18
Page 19
Déclaration de conformité CE
Nom / Adresse de l'exposant : STORCH Malerwerkzeuge & Profigeräte GmbH
Platz der Republik 6 - 8
D - 42107 Wuppertal
Nous déclarons, par le présent document,
que l'appareil cité ci-après respecte, de par sa conception, ainsi que dans la version que nous avons commercialisée, les
exigences fondamentales correspondantes en matière de sécurité et de santé des directives européennes.
En cas de modification non convenue avec nous, la présente déclaration perd toute validité.
Désignation de l'appareil : trait à laser Crossline
Type d'appareil : appareil laser
Référence article : 44 15 10
Directives CE appliquées
Directive européenne sur la
compatibilité électromagnétique : 2004 / 108 / CE
Normes harmonisées appliquées
EN 55014-1: 2006 + A1: 2009 EN 55014-2: 1997 + A2: 2008
EN 61000-3-2: 2006 + A2: 2009 EN 61000-3-3: 2008
EN 62471: 2008
Fondé de pouvoir pour la compilation des documents techniques :
STORCH Malerwerkzeuge & Profigeräte GmbH
Platz der Republik 6 - 8
42107 Wuppertal
Jörg Heinemann
- Gérant -
Wuppertal, 08 - 2014
19
Traduction des instructions d‘origine
Page 20

IT
Grazie
per la fiducia accordata a STORCH. Con l‘acquisto avete scelto un prodotto di qualità.
Se comunque avete dei suggerimenti volti a migliorare la nostra offerta o se doveste incontrare
qualche difficoltà, non esitate a rivolgerVi a noi.
Contattate il Vostro rappresentante oppure rivolgeteVi direttamente a noi in casi urgenti.
Distinti saluti,
STORCH Reparto Assistenza
Tel.: 02 - 66 22 77 15
Indice Pagina
Materiale compreso nella fornitura 20
Dati tecnici 21
Avvertenze di sicurezza 21
Caratteristiche del dispositivo 21
Rappresentazione fascio laser 22
Descrizione dell'apparecchio 22
Pannello di controllo 22
Uso 23
Cura e manutenzione 23
Condizioni di garanzia 24
Dichiarazione di conformità CE 25
Materiale compreso nella fornitura
1. Laser a striscia Crossline
2. Cofanetto di trasporto e conservazione in alluminio, con imbottitura interna
3. Occhiali per laser
4. 3 x Batterie alcaline (AA)
5. Istruzioni d'uso
Traduzione delle istruzioni originali
20
Page 21
Raggio laser 4V1H1D
Fonti di luce
Categoria di sicurezza laser Categoria 2 < 5 mW
Potenza di uscita max. < 1 mW
Diodo laser 635 nm
Raggio a piombo categoria laser 2 < 1 mW
Diodo raggio a piombo 650 nm
Precisione ± 2 mm / 10 m
Intervallo di autolivellamento ± 3°
Tempo di livellamento < 5 secondi
Area di applicazione Raggio 15 m
Sensibilità livella sferica 60‘ / 2 mm
Torsione 360°
Tutte le indicazioni senza garanzia! Con riserva di modifiche tecniche ed errori!
Meccanismo di regolazione precisa per i fasci laser verticali
Alimentazione di corrente 3 x 1,5 V batterie
(AA)
Alimentazione a batteria +/- 5 ore in caso di
carico massimo
Filettatura del cavalletto 5/8“
Temperatura di esercizio -10° C ~ +40° C
Peso 1,1 kg (batterie inclu-
se)
Dimensione Ø 90 mm x 195 mm
Avvertenze di sicurezza
1. Il laser a striscia Crossline corrisponde alla categoria Laser 2 (5 mW) secondo il codice di normativa federale CFR21.
2. Non puntare gli occhi nel raggio laser, visto che ciò può danneggiare gli occhi.
3. Spegnere l'attrezzo prima di trasportarlo.
4. Non azionare il tasto posto nella parte superiore dell'attrezzo con oggetti appuntiti (ad es. unghia).
5. Si consiglia l'impiego di batterie dello stesso produttore e dello stesso tipo.
6. Se non si utilizza il dispositivo, rimuovere le batterie, per evitare che si verifichino delle eventuali perdite o fuoruscite.
7. Non forzare la batteria e non gettarla nel fuoco; smaltire batterie esauste secondo le norme anti-inquinamento..
8. Non utilizzare o conservare il laser a striscia in condizioni caratterizzate da umidità.
Caratteristiche del dispositivo
1. Tasti separati per fasci orizzontali e verticali. Tasto dimmer chiaro / scuro.
2. Autolivellamento magnetico.
3. Livella di orientamento nel piede di appoggio.
4. Se la pendenza del dispositivo supera il livello massimo, il raggio laser inizia automaticamente a lampeggiare e verrà emesso un segnale acustico.
5. Il meccanismo di regolazione precisa rotabile di 360° permette un orientamento preciso del fascio laser verticale.
6. Quando si spegne l'attrezzo, la funzione di autolivellamento magnetica viene bloccata automaticamente dal meccanismo di arresto integrato, per evitare che in fase di trasporto vengano danneggiate le sensibili componenti elettroniche.
21
Traduzione delle istruzioni originali
Page 22
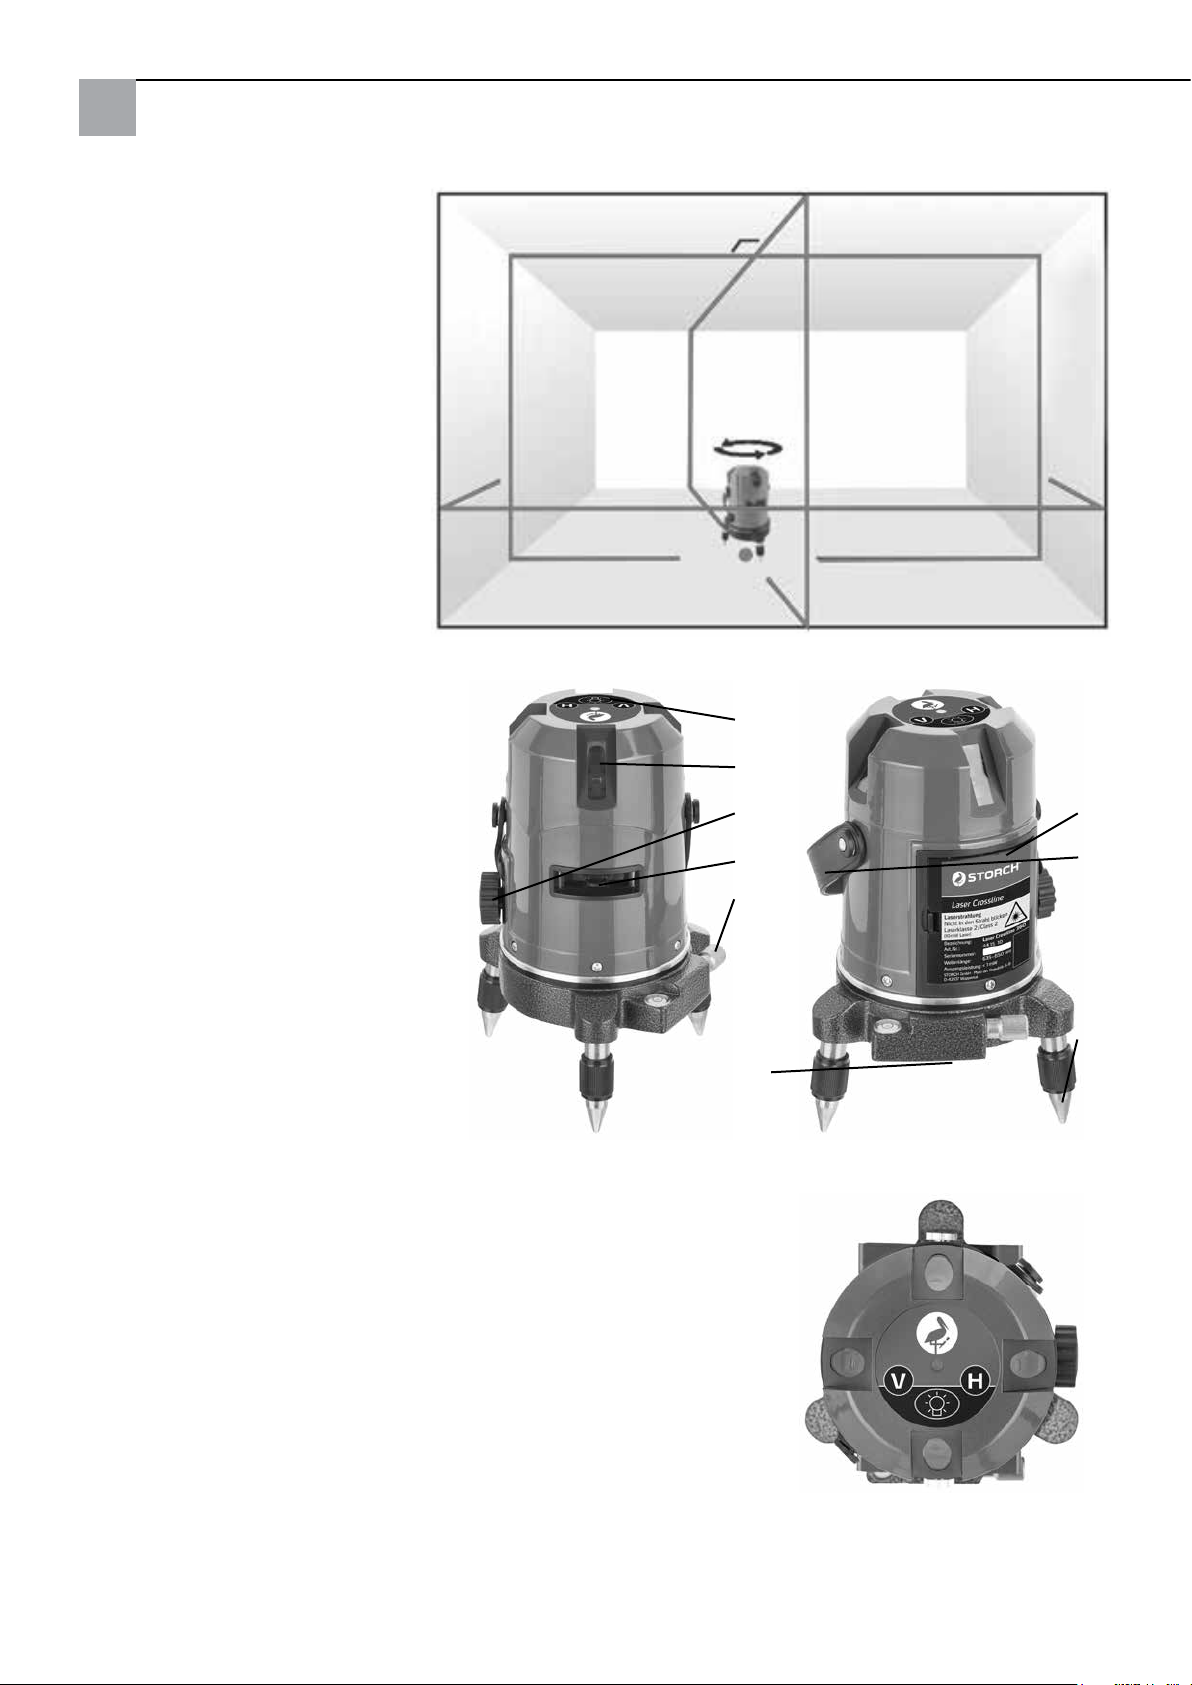
Rappresentazione fascio laser
4 x Laser verticale
1 x Laser orizzontale
1 x Punto a piombo laser verso il basso.
(La posizione del punto a piombo è in
parallelo rispetto all'incrocio del fascio laser verticale al soffitto.)
Descrizione dell'apparecchio
Dispositivi laser a striscia incrociata
del tipo si prestano perfettamente,
grazie al fascio laser ben visibile, per
orientare mattonelle, strutture di supporto, finestre, porte etc.
1.
Pannello di controllo - tasti
2.
4 Finestra uscita fascio laser per
laser verticale
3.
Interruttore ON / OFF
4.
Coperchio per alloggiamento batteria
5.
1 Finestra uscita fascio laser per laser
orizzontale
6.
Cinghia
7.
Regolazione precisa delle strisce
laser verticali con livella
8.
3 piedi di appoggio regolabili con viti
di livellamento
9.
Laser a piombo e filettatura del
cavalletto con 5/8“
Pannello di controllo
1.
Tasto fascio verticale "V"
2.
LED di controllo
3.
Tasto fascio orizzontale "H"
4.
Tasto dimmer "simbolo lampadina"
chiaro / scuro
1
2
3
5
7
9
4
6
8
Traduzione delle istruzioni originali
22
Page 23

Uso
1. Rimuovere il coperchio del vano batterie (Pos.4). Inserire tre batterie alcaline da 1,5 V (AA) nell'apposito vano,
badando ai simboli inerenti alla polarità "+" e "-" , quindi richiudere il vano batterie.
2. Crossline può essere utilizzato in piedi, posizionandolo su una superficie stabile e priva di vibrazioni. All'occorrenza e
per lavori di livellamento ad una certa altezza, il dispositivo si lascia montare su appositi supporti. (Come optional sul
cavalletto (N° art. 441505) oppure supporto a parete (N° art. 441512). In caso di utilizzo di un cavalletto tenere il dado
di centraggio del dispositivo con una mano e avvitare la vite del cavalletto nel dado di centraggio del dispositivo. Serrare la vite. Ricorrendo ad un supporto a muro, posizionare il dispositivo sul braccio di supporto e fissare l'apparecchio
dal basso tramite la vite di fissaggio del supporto a muro.
3. Accendere il dispositivo (Pos. 3): si attiva l'alimentazione di rete e viene sbloccato contemporaneamente il supporto
dei diodi laser all'interno dell'alloggiamento, al fine di permettere l'autolivellamento automatico. (Spegnere il dispositivo: l'alimentazione di rete viene disattivata ed il supporto dei diodi laser viene bloccato automaticamente.)
4. Impostare le tre viti di livellamento in modo che la bolla di livellamento nel piede d'appoggio si trovi all'interno
dell'anello nero.
Tenere presente: la livella è solamente un ausilio per posizionare in modo dritto Crossline. Il livellamento dei diodi
laser avviene internamente ed in modo indipendente dalla livella.
5. I diodi laser si lasciano accendere tramite il pannello di controllo. Le linee del fascio verticale si lasciano attivare singolarmente tramite il tasto "V": premere 1 x, si accende 1 linea laser verticale, premendo 2 x si accendono 2 linee laser
verticali che formano un angolo di 90 gradi, premendo 3 x si accendono tutte e quattro linee laser verticali. Azionando
il tasto "H", si accende la linea orizzontale. In base alle necessità, il grado di luminosità delle diodi laser si lascia incrementare tramite il tasto dimmer, con il simbolo di una "lampadina".
6. Puntare il fascio laser verticale sul punto previsto, ruotando la parte superiore dell'alloggiamento del dispositivo nella posizione desiderata. Impostare il fascio verticale in modo preciso sul punto desiderato, ricorrendo al meccanismo di
regolazione precisa ruotabile (Pos.7.).
Tenere presente: il meccanismo di regolazione fine serve solo per la regolazione fine della posizione marcata e non per
una rotazione intera di 360 gradi.
7. Se il fascio laser dovesse lampeggiare e viene emesso un segnale acustico, mentre l'attrezzo viene acceso, la pendenza dell'attrezzo è troppo elevata; regolare di conseguenza le tre viti oppure il cavalletto / supporto a muro.
8. Se per un motivo qualsiasi la pendenza del laser a striscia dovesse superare in fase operativa il valore limite, il fascio laser inizierà a lampeggiare. In questo caso regolare le tre viti di livellamento (in caso di cavalletto e montaggio su
supporto a muro, intervenire sul rispettivo dispositivo di supporto) in modo che il fascio laser cessi di lampeggiare.
Eventualmente il tutto può essere dovuto a vibrazioni troppo forti oppure a scotimenti che si verificano nell'area di posizionamento di Crossline. In tal caso, accertarsi che la causa del disturbo venga eliminata.
9. Impiego dell'attrezzo dopo un' interruzione dei lavori. Grazie al raggio a piombo che dal basso viene proiettato sul
pavimento, sussiste la possibilità di marcare il posizionamento, per poter riposizionare l'attrezzo successivamente sullo
stesso punto. E' data altresì la possibilità di marcare il posizionamento del fascio laser verticale ed orizzontale per poter
ripristinare con maggior facilità il precedente posizionamento dell'attrezzo.
Cura e manutenzione
1. Non tentare di aprire Crossliner. Il dispositivo va riparato esclusivamente da partner di assistenza tecnica di STORCH,
con appropriata qualifica.
2. Per garantire la precisione del dispositivo, proteggere il laser a striscia da cadute, urti e scotimenti.
3. Se il dispositivo verrà conservato per un prolungato arco di tempo, rimuovere la batteria dall'apposito alloggiamento.
4. Pulire il dispositivo con un panno morbido e sapone non aggressivo.
5. Non utilizzare agenti chimici aggressivi, benzina solvente o agenti detergenti aggressivi e non conservare il dispositivo in aree con molta polvere o molte sporche.
6. Pulire i vetri rossi degli occhiali con un panno idoneo pulire occhiali.
23
Traduzione delle istruzioni originali
Page 24

Garanzia
Condizioni di garanzia:
Per i nostri apparecchi sono applicabili dei periodi di garanzia di 12 mesi a partire dalla data di acquisto / data della
fattura del cliente finale commerciale. Se da parte nostra vengono accordati dei periodi di garanzia più estesi, ciò sarà
riportato separatamente nelle istruzioni per l'uso inerenti ai rispettivi dispositivi.
Rivendicazioni:
In casi in cui si intende far valere il diritto di garanzia, vi preghiamo di inviarci il dispositivo in modo completo con fattura, franco nostro centro di logistica a Berka oppure ad una service-station da noi autorizzata.
Si prega di consultare prima la Hotline di servizio STORCH a pagamento: 02 - 66 22 77 15
Diritto alla garanzia
Il diritti si possono far valere solo per errori di materiale o di produzione nonché esclusivamente in caso di utilizzo
appropriato del dispositivo. Pezzi soggetti all‘usura non sono soggetti a diritti di garanzia. Decadranno tutti i diritti di
garanzia con l‘aggiunta delle componenti di terzi, maneggio e magazzinaggio non appropriato come anche in casi di
ovvia non osservanza delle istruzioni per l‘uso.
Esecuzione di riparazioni
Ogni intervento di riparazione va eseguito esclusivamente nei nostri stabilimenti o presso una service-station autorizzata STORCH.
Traduzione delle istruzioni originali
24
Page 25
Dichiarazione di conformità CE
Nome / indirizzo del fornitore: STORCH Malerwerkzeuge & Profigeräte GmbH
Platz der Republik 6-8
D - 42107 Wuppertal
Con la presente la società dichiara
che l'utensile menzionato di seguito corrisponde, tenendo conto della sua progettazione e tipologia nonché considerato
come modello da noi commercializzato, ai requisiti fondamentali in termini di sicurezza e tutela della salute delle relative direttiva dell'Unione Europea.
In caso di una modifica apportata all'utensile non concordata con noi, questa dichiarazione perde ogni sua validità.
Denominazione dell'utensile: Laser a striscia Crossline
Tipo di utensile: Attrezzo laser
Numero articolo: 44 15 10
Applicate direttive CE
Direttiva CE sulla Compatibilità
elettromagnetica: 2004 / 108 / CE
Norme armonizzate applicate
EN 55014-1: 2006 + A1: 2009 EN 55014-2: 1997 + A2: 2008
EN 61000-3-2: 2006 + A2: 2009 EN 61000-3-3: 2008
EN 62471: 2008
Procuratore per la composizione della documentazione tecnica:
STORCH Malerwerkzeuge & Profigeräte GmbH
Platz der Republik 6-8
D-42107 Wuppertal
Jörg Heinemann
- Direttore -
Wuppertal, 08 - 2014
25
Traduzione delle istruzioni originali
Page 26

GB
Thank you
for purchasing a STORCH product. You have purchased a quality product.
If you would like to suggest an improvement, or experience a problem with your product, please do not hesitate to contact us.
Please contact your field sales representative or, in urgent cases, contact us directly.
Yours sincerely,
STORCH Service Department
Tel.: +49 (0)2 02 . 49 20 - 112
Fax: +49 (0)2 02 . 49 20 - 244
Free service hotline: 0800 786 72 47
Toll-free order hotline: +49 800 7867244
Toll-free order fax: +49 800 7867243
(only available in Germany)
Table of contents Page
Delivery contents 26
Technical data 27
Safety instructions 27
Device characteristics 27
Laser line view 28
Device description 28
Control Panel 28
Operation 29
Care and maintenance 29
Warranty conditions 30
EC Declaration of Conformity 31
Delivery contents
1. CrossLine line laser
2. Aluminium transport and storage box, padded on the inside.
3. Laser glasses
4. 3 x (AA) Alkaline batteries
5. Operating instructions
Translation of the original instruction
26
Page 27

Technical data
Laser beam 4V1H1D
Light sources
Laser safety classes Class 2 < 5 mW
Max. output < 1 mW
Laser diode 635 nm
Plumbline beam laser class 2 < 1 mW
Plumbline beam diode 650 nm
Accuracy ± 2 mm / 10 m
Self-levelling range ± 3°
Adjusting time < 5 seconds
Working range Radius 15 m
Sensitivity circular level 60‘ / 2 mm
Rotation 360°
All information is without guarantee! Subject to technical modifications and errors!
Fine adjustment mechanism for the variable laser lines
Power supply 3 x 1.5 V (AA) batte-
Battery operation +/- 5 St. at full load
Tripod thread 5/8“
Operating temperature -10° C ~ +40° C
Weight 1.1 kg (incl. batteries)
Size Ø 90 mm x 195 mm
Safety instructions
1. The Line Laser CrossLine is a Class 2 laser 2 (5 mW) pursuant to CFR21.
2. Do not stare at the laser, it will damage your eyes.
ries
3. When moving the device, please turn off the power.
4. Do not use an acute article like finger nail to push the button on the top of the unit.
5. If ever possible, please use batteries of one manufacturer and of the same type.
6. When the instrument does not be used, please take off the batteries to avoid battery electrolyte effusion.
7. Do not open the batteries or throw them onto the fire: dispose of used batteries in a responsible manner.
8. Do not use or keep the line laser in damp conditions.
Device characteristics
1. Separate keys for horizontal and vertical lines. Dimmer key bright / dark.
2. Magnetic self-levelling.
3. Directing spirit-level in the base.
4. If the device angle exceeds the limit value, the laser beam will automatically start to flash and an alarm sounds.
5. The fine adjustment mechanism which can be turned by 360° allows precise alignment of the vertical laser lines.
6. When switched off, the magnetic self-levelling mechanism is automatically locked by the integrated locking device
to avoid any damage at the fine electronics during transportation.
27
Translation of the original instruction
Page 28
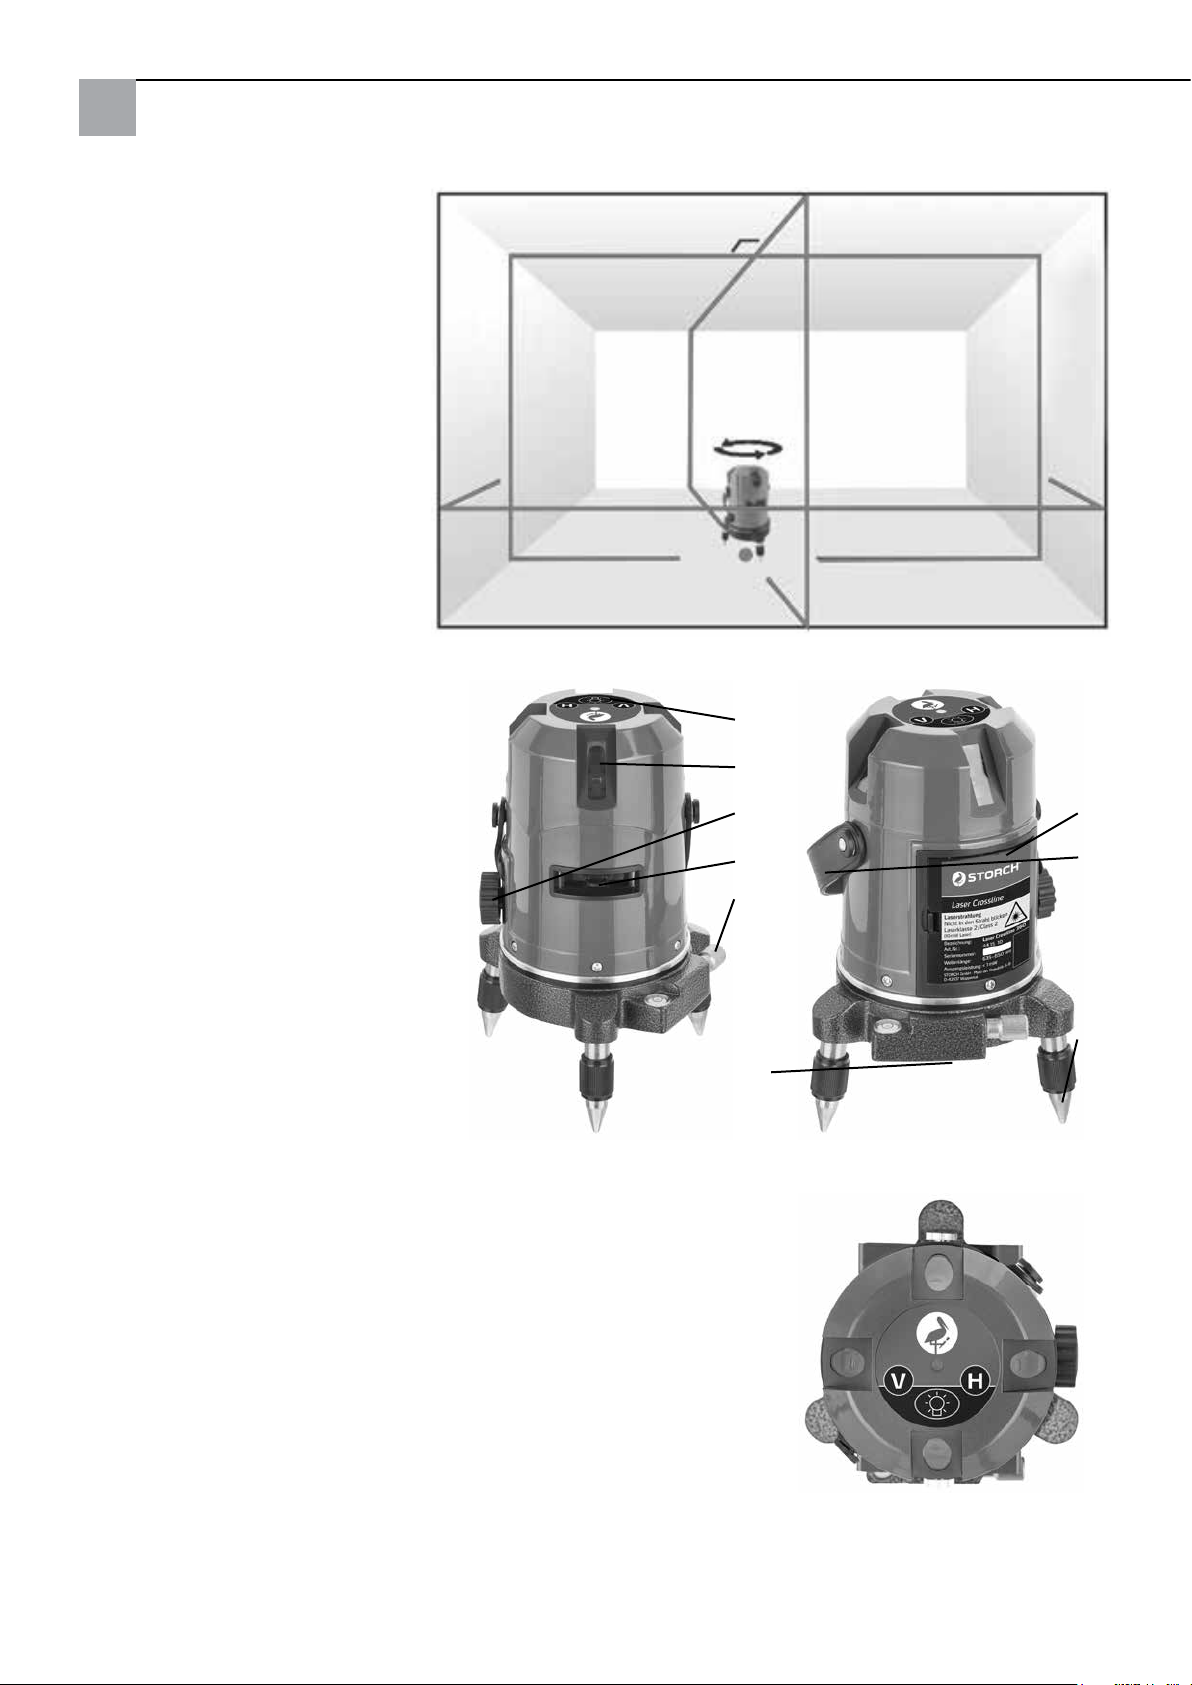
Laser line view
4 x vertical laser
1 x horizontal laser
1 x laser lot point downwards.
(The position of the lot point lies parallel to the intersection of the vertical
laser lines at the ceiling.)
Device description
CrossLine cross line lasers with well
visible laser lines are excellent for
aligning tiles, framework, windows,
doors etc.
1
2
3
4
1.
Key control panel
2.
4. Laser exit window for vertical
laser
3.
On/off switch
4.
Battery cover
5.
1. Laser exit window for horizontal
laser
6.
Carrying belt
7.
Fine adjustment of the vertical laser
lines with spirit-level
8.
3. Adjustable feet with levelling
screws
9.
Plumbline laser and tripod thread
with 5/8"
5
7
9
Control Panel
1.
Key Vertical line "V"
2.
Control LED
3.
Key horizontal line "H"
4.
Dimmer button "bulb icon" bright / dark
6
8
Translation of the original instruction
28
Page 29

Operation
1. Remove the battery compartment cover (pos. 4), insert three 1.5 V (AA) Alkaline batteries into the battery compartment observing the + and - polarity signs; then reposition the battery compartment cover.
2. CrossLine can be used as a standing device and is to be positioned onto a stable and vibration-free support. In case
of need and in case of levelling work at a determined height it can be mounted onto the corresponding holding devices.
(Optionally onto the tripod (item no. 441505) or at the wall bracket (item no. 441512)). If you use a tripod, hold the
centring nut on the device in one hand and turn the screw on the tripod into the centring nut on the device. Tighten the
screw. In case of using the wall bracket position the device onto the supporting arm and tighten from below by means
of the locking screw of the wall bracket.
3. Switch on the device (pos. 3): this switches on the power supply and the supporting laser diode bracket in the inside of the housing is unlocked at the same time to allow for automatic self-levelling. (Switch off the device: the power
supply is switched off and the laser diode bracket is automatically locked).
4. Adjust the three levelling screws so that the spirit-level bubble in the base is in the black circle.
Please note: the spirit-level is only used as an aid for levelling the CrossLine. Levelling of the laser diodes is handled
internally and is independent of the spirit-level.
5. The laser diodes can be switched on via the control panel. The vertical lines can be activated individually by actuating the "V-button": press 1 x - 1 vertical lasers on, press 2 x – 2 vertical lasers on, forming an angle of 90 degrees,
press 3 x – all 4 vertical lasers on. The horizontal line is switched on by actuating the "H-button". In case of need you
increase the luminosity of the laser diodes by means of the dimmer button "bulb icon".
6. Direct the vertical laser lines onto the provided position by turning the upper housing part of the device into the
desired position. Precisely adjust the vertical lines onto the desired position by means of the rotating fine adjustment
mechanism (pos. 7).
Please note: the fine adjustment mechanism is only used for fine adjustment of the targeted mark and not for a complete 360 degree rotation.
7. If the laser beam flashes while the device is switched on, the angle of the device is too large; readjust the three
screws of the tripod / wall mount accordingly.
8. If the line laser angle exceeds the limit for some reason during operation, the laser beam will automatically start to
flash. In this case use the three levelling screws (in case of the tripod and wall mount mounting readjust the respective
holding device) to adjust the setting until the laser beam stops flashing.
Possibly, reasons for setting changes can be too strong vibrations or impacts in the installation area of CrossLine. In
this case make sure that the malfunction causes are eliminated.
9. Usage of the device after interruption of operation. By means of the plumbline beam projected by the device from
the bottom of the housing onto the ground it is possible for you to mark the installation position for being able to set up
the device subsequently on the same position. You will be able as well to mark the position of the vertical and horizontal laser lines in order to be able to restore the last known position easier.
Care and maintenance
1. Never attempt to open the CrossLine. Only qualified STORCH service partners are allowed to repair the device.
2. To guarantee precision, protect the line laser against dropping, knocks and impacts.
3. When storing the device for an extended period of time, remove the batteries from the battery compartment.
4. Clean the device with a soft cloth and a mild detergent.
5. Never use aggressive chemicals, petroleum ether or cleaning agents, and do not keep the device in a dusty or heavily contaminated environment.
6. Clean the red lenses with a spectacles cleaning cloth.
29
Translation of the original instruction
Page 30

Warranty
Warranty conditions:
A warranty period of twelve months from the date of purchase/date of invoice applies to our tools for commercial
customers. If we have granted an extended warranty period, this period will be noted separately in the operating
manual for the equipment in question.
Claims:
If you wish to claim under our warranty or guarantee, please return the complete device and your invoice to our
logistics centre in Berka, postage paid, or send it to one of our authorised service centres.
Please contact the chargeable STORCH service hotline first: +49 (0)202 . 49 20 – 110.
Your rights under our warranty or guarantee:
Claims can only be accepted for material defects or manufacturing errors, and only assuming intended use of the appliance. Wear parts are not covered by such claims. All claims shall become void in the event of installation of third party
components, improper handling and storage, as well as in the event of obvious disregard of the operating instructions.
Repairs:
All repairs have to be conducted on our premises or by an authorised STORCH service centre.
Translation of the original instruction
30
Page 31
EC Declaration of Conformity
Name/Address of issuer: STORCH Malerwerkzeuge & Profigeräte GmbH
Platz der Republik 6 - 8
D-42107 Wuppertal
We hereby declare
that the equipment mentioned below complies with the pertinent, basic safety and health requirements of the EC
Directives, both in its conception and design as well as in the version marketed by us.
This warranty loses its validity in case of unauthorised modification of the tool.
Device description: CrossLine line laser
Device model: Laser device
Article number: 44 15 10
Applied EC directives
EC- Electromagnetic Compatibility
Directive: 2004 / 108 / CE
Applied harmonised standards
EN 55014-1: 2006 + A1: 2009 EN 55014-2: 1997 + A2: 2008
EN 61000-3-2: 2006 + A2: 2009 EN 61000-3-3: 2008
EN 62471: 2008
Representative authorised to compile the technical documentation:
Name/Address of issuer: STORCH Malerwerkzeuge & Profigeräte GmbH
Platz der Republik 6 - 8
D-42107 Wuppertal, Germany
Jörg Heinemann
- Managing Director -
Wuppertal, 08/2014
31
Translation of the original instruction
Page 32

CZ
Děkujeme Vám
za důvěru ve firmu STORCH. S nákupem výrobku jste se rozhodli pro kvalitní produkt.
Pokud přesto máte podněty na zlepšení nebo možná nějaký problém, tak bychom byli velmi rádi, kdybyste se nám
ozvali.
Promluvte si s příslušným externím spolupracovníkem naší firmy nebo se v naléhavých případech obracejte přímo na
nás.
S přátelským pozdravem
Servisní oddělení STORCH
Tel.: +49 (0)2 02 . 49 20 - 112
Fax: +49 (0)2 02 . 49 20 - 244
bezplatná linka Hotline-servis: 08 00. 7 86 72 47
bezplatná linka Hotline-objednávky: +49 800. 7 86 72 44
bezplatný fax-objednávky: +49 800. 7 86 72 43
(pouze v Německu)
Obsah Strana
Rozsah dodávky 32
Technické údaje 33
Bezpečnostní pokyny 33
Vlastnosti přístroje 33
Zobrazení laserových linií 34
Popis přístroje 34
Ovládací pole 34
Obsluha 35
Péče a údržba 35
Záruční podmínky 36
Prohlášení o shodě ES 37
Rozsah dodávky
1. Čárový laser CrossLine
2. Hliníkový box k přepravě a uschování, uvnitř vypolstrovaný.
3. Brýle pro viditelnost laseru
4. 3 x (AA) alkalinové baterie
5. Návod k obsluze
Překlad originálu návodu
32
Page 33
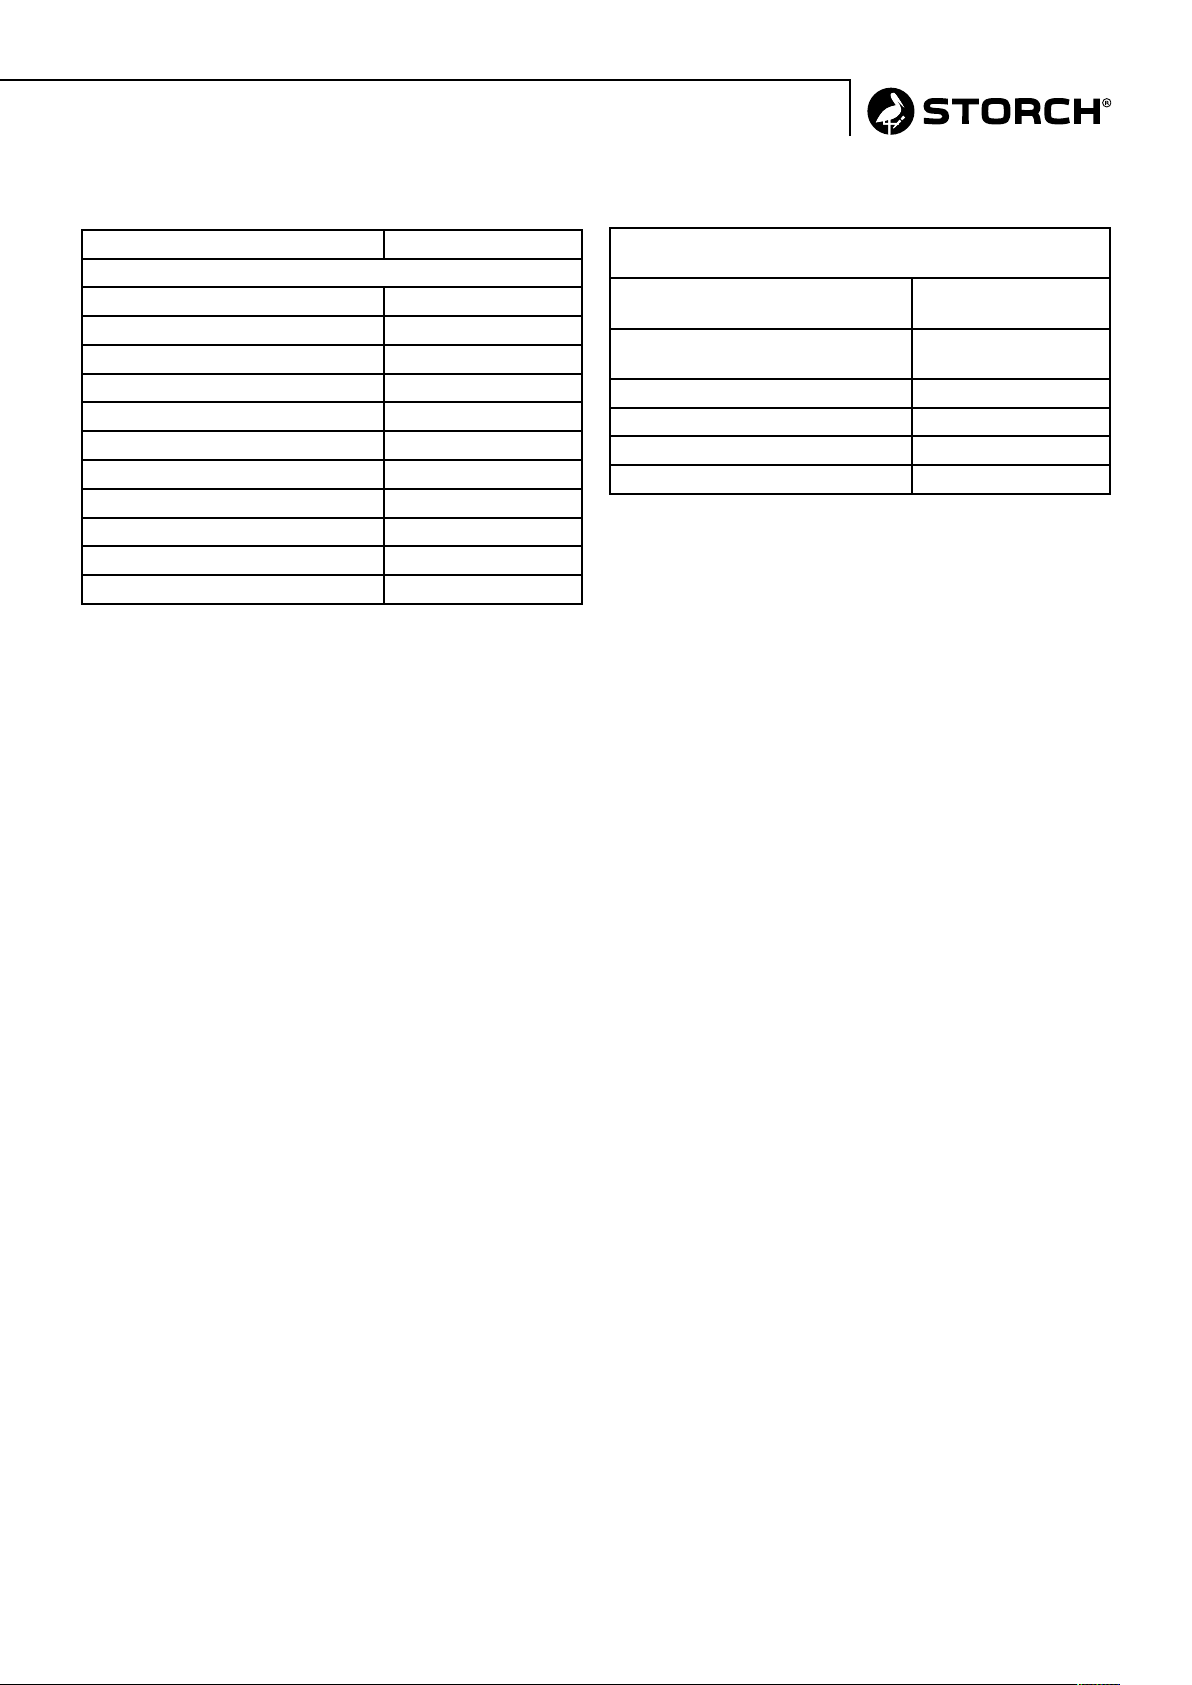
Technické údaje
Laserový paprsek 4V1H1D
Světelné zdroje
Bezpečnostní třída laseru Třída 2 < 5 mW
Max. výstupní výkon < 1 mW
Laserová dioda 635 nm
Paprsek olovnice laserová třída 2 < 1 mW
Paprsek olovnice dioda 650 nm
Přesnost ± 2 mm / 10 m
Samonivelační oblast ± 3°
Doba nivelace < 5 sekund
Pracovní oblast Poloměr 15 m
Citlivost krabicová libela 60‘ / 2 mm
Otočení 360°
Všechny údaje bez záruky! Technické změny a omyly vyhrazeny!
Jemně nastavitelný mechanismus pro vertikální laserové linie
Napájení 3 x 1,5 V (AA) bate-
Provoz na baterie +/- 5 hod. při plném
Závit pro stativ 5/8“
Provozní teplota -10° C ~ +40° C
Hmotnost 1,1 kg (vč. baterií)
Velikost Ø 90 mm x 195 mm
Bezpečnostní pokyny
1. Čárový laser Crossline odpovídá třídě laseru 2 (5 mW) podle CFR21.
2. Nedívejte se do laserového paprsku, protože to může vést k poškození očí.
rie
zatížení
3. Přístroj před přepravováním vypněte.
4. Tlačítko na horní straně přístroje nestiskávejte špičatými předměty (např. nehty).
5. Používejte pokud možno baterie stejného výrobce a stejného typu.
6. Když se přístroj nepoužívá, vyjměte z něj baterie, aby se zabránilo možnému vytečení baterie.
7. Baterie nezkoušejte roztrhnout ani je nevhazujte od ohně; staré baterie zlikvidujte v souladu s životním prostředím.
8. Čárový laser nepoužívejte nebo neuschovávejte ve vlhkých podmínkách.
Vlastnosti přístroje
1. Zvláštní tlačítka pro horizontální a vertikální linie. Tlačítko k regulování intenzity světla světlé / tmavé.
2. Magnetická samonivelace.
3. Vyrovnávací libela v noze.
4. Pokud by sklon přístroje překročil mezní hodnotu, začne laserový paprsek automaticky blikat a zazní výstražný tón.
5. O 360° otočný jemně nastavitelný mechanismus umožňuje přesné vyrovnání vertikálních laserových linií.
6. Při vypnutí se magnetická samonivelace automaticky zablokuje pomocí zabudovaného blokovacího zařízení, aby se
zabránilo jakémukoli poškození jemné elektroniky během přepravy.
33
Překlad originálu návodu
Page 34
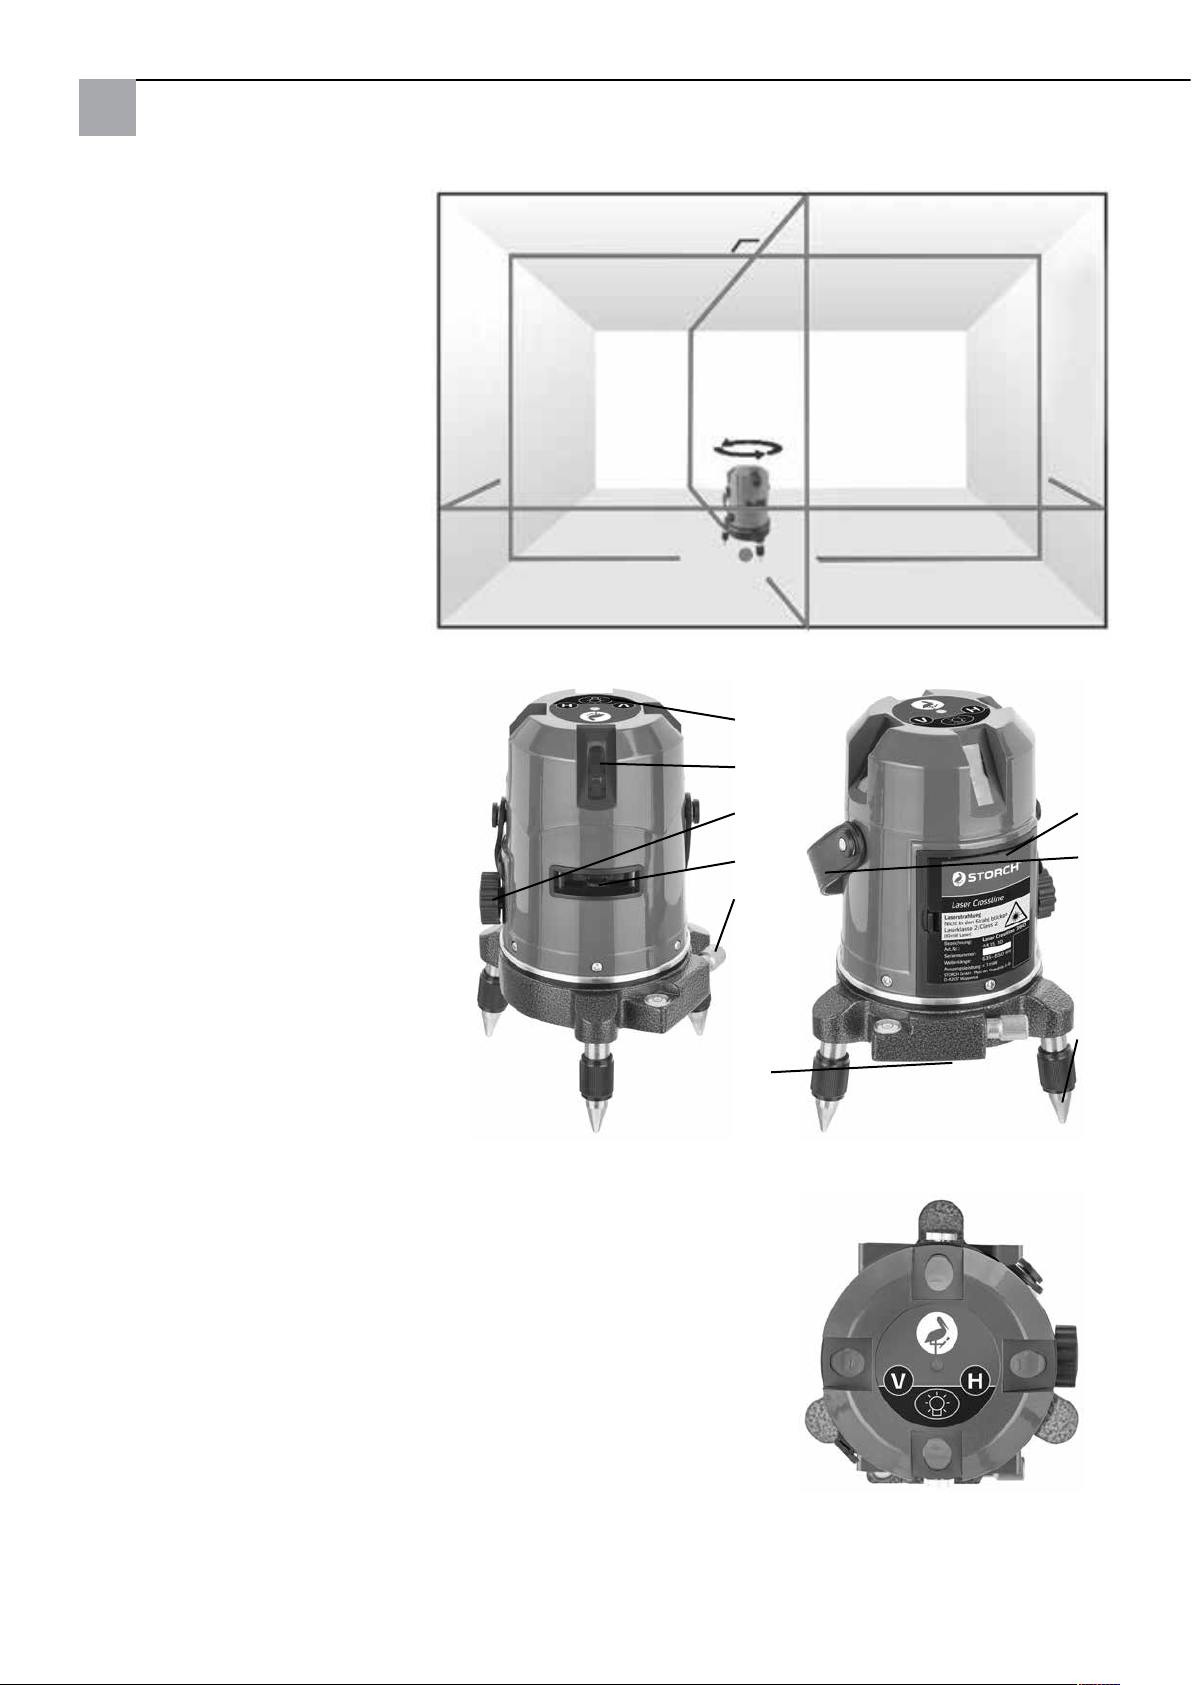
Zobrazení laserových linií
4 x vertikální lasery
1 x horizontální laser
1 x bod laserové olovnice dolů.
(Poloha bodu olovnice leží paralně k
protnutí vertikálních laserových linií
na stropě.)
Popis přístroje
Křížový liniový laser Crossline s
dobře viditelnými laserovými liniemi
se výborně hodí k vyrovnání dlaždic,
stojanových konstrukcí, oken, dveří
atd.
1.
Tlačítkové ovládací pole
2.
4 Okno pro výstup laserového paprsku pro vertikální laser
3.
Spínač Zapnout / Vypnout
4.
Kryt přihrádky na baterie
5.
1 Okno pro výstup laserového paprsku
pro horizontální laser
6.
Nosný popruh
7.
Jemné seřízení vertikálních laserových linií s libelou
8.
3 nastavitelné nohy s nivelačními
šrouby
9.
Olovnice laseru a závit pro stativ s
5/8“
2
3
5
7
9
Ovládací pole
1.
Tlačítko vertikální linie „V“
2.
Kontrolní LED
3.
Tlačítko horizontální linie „H“
4.
Tlačítko k regulování intenzity světla
„Symbol žárovky“ světlé / tmavé
1
4
6
8
Překlad originálu návodu
34
Page 35

Obsluha
1. Sejměte kryt přihrádky na baterie (pol. 4), vložte tři 1,5 V (AA) alkalinové baterie do přihrádky na baterie a respektujte značení polarity „+ a -“, následně opět na přihrádku na baterie nasaďte kryt.
2. Crossline lze používat jako stojací přístroj a je třeba ho postavit na stabilní podklad bez vibrací. V případě potřeby
a při nivelační práci v určité výšce, lze přístroj namontovat na příslušné držáky. (Volitelně na stativu (obj.č. 441505)
nebo držáku (obj.č. 441512)). Při použití stativu držte centrovací matici přístroje rukou a šroub stativu našroubujte do
centrovací matice na přístroji. Šroub dotáhněte. Při použití nástěnného držáku přístroj umístěte na nosné rameno a
zespoda dotáhněte zajišťovacím šroubem nástěnného držáku.
3. Zapnutí přístroje (pol. 3): Zapne se napájení a současně se odblokuje nosný držák laserových diod uvnitř krytu, aby
umožnil automatickou samonivelaci. (Vypnutí přístroje: Vypne se napájení, a současně se automaticky zablokuje držák
laserových diod.)
4. Tři nivelační šrouby nastavte tak, aby bublina libely byla umístěna v černém kroužku v noze.
Respektujte: libela slouží jen jako pomůcka k rovnému postavení přístroje Crossline. Nivelace laserových diod se
uskutečňuje interně a na libele nezávisí.
5. Laserové diody lze zapnout přes ovládací pole. Vertikální linie lze jednotlivě zapnout stisknutím tlačítka „V“: 1 x stisknout - 1 vertikální laser zap, 2 x stisknout – 2 vertikální lasery zap, které tvoří úhel 90 stupňů, 3 x stisknout – všechny 4 vertikální laserové linie zap. Horizontální linie se zapne stisknutím tlačítka „H“. V případě potřeby zvýšíte nebo
snížíte intenzitu světla laserových diod tlačítkem k jejímu regulování „Symbol žárovky“.
6. Nasměrujte vertikální laserové linie na stanovené místo tím, že otáčíte horní částí krytu přístroje na požadovanou
polohu. Pomocí otočného jemně nastavitelného mechanismu (pol. 7) nastavte vertikální linie přesně na požadovanou
polohu.
Respektujte: Jemný mechanismus nastavení slouží jen k jemnému seřízení zaměřeného místa označení a ne ke kompletnímu otáčení o 360 stupňů.
7. Pokud by laserový paprsek blikal a zazněl výstražný tón při zapínání instrumentu, je sklon přístroje příliš velký;
dodatečně nastavte tři šrouby nebo stativ / nástěnný držák.
8. Pokud sklon čárového laseru z nějakého důvodu během provozu překročí mezní hodnotu, začne laserový paprsek
blikat. V tomto případě změňte příslušně nastavení pomocí tří nivelačních šroubů (při montáži stativu a nástěnného
držáku dodatečně nastavte držák), až již laserový paprsek nebliká.
Za určitých okolností mohou být příčinou změny nastavení příliš silné vibrace nebo otřesy v oblasti umístění Crossline.
V tomto případě zajistěte, aby byly odstraněny příčiny rušení.
9. Použití přístroje po přerušení práce. "Pomocí paprsku olovnice, který je z přístroje dole u krytu promítán na podlahu,
máte možnost označit polohu umístění, aby bylo možno přístroj později umístit na stejnou polohu. Rovněž můžete
označit polohy vertikálních a horizontálních laserových linií, aby bylo možno snadněji opět vytvořit poslední známou
polohu.
Péče a údržba
1. Nezkoušejte liniový laser Crossline otevřít. Přístroj smějí opravovat pouze kvalifikovaní servisní partneři firmy
STORCH.
2. Aby byla zaručena přesnost, chraňte čárový laser před pádem, nárazy a otřesy.
3. Při uschování přístroje na delší dobu vyjměte baterie z přihrádky na baterie.
4. Přístroj očistěte měkkou utěrkou a jemným mýdlem.
5. Nepoužívejte žádné agresivní chemikálie, čistící benzín nebo čistící prostředky a přístroj neuchovávejte v silně
znečištěných oblastech.
6. Červená skla brýlí čistěte utěrkou k čištění brýlí.
35
Překlad originálu návodu
Page 36

Záruka
Záruční podmínky:
U našich zařízení platí zákonné záruční lhůty 12 měsíců od data zakoupení/data faktury obchodního konečného zákazníka. Pokud jsou delší lhůty v cestě námi vypsanému prohlášení o záruce, jsou zvláště vyznačeny v návodu k obsluze
příslušných zařízení.
Uplatňování:
V případě záručního příp. garančního případu žádáme, aby bylo zasláno kompletní zařízení dohromady s fakturou do
našeho střediska Logisitk Center v Berka nebo do námi autorizované servisní stanice.
Kontaktujte prosím nejdříve placený hotline servis firmy STORCH: +49 (0)202 . 49 20 – 110.
Nárok na záruku příp. garanci
Nároky na záruku existují výhradně u materiálu nebo výrobní vady a také výhradně při používání přístroje v souladu s
určeným účelem. Díly podléhající opotřebení nespadají do nároků na záruku. Veškeré nároky zanikají zamontováním
dílů cizího původu, při nepřiměřeném zacházení a skladování a také při zřejmém nedodržování provozního návodu.
Provádění oprav
Veškeré opravy smějí být prováděny výhradně naším závodem nebo servisními stanicemi autorizovanými firmou
STORCH.
Překlad originálu návodu
36
Page 37

Prohlášení o shodě ES
Název / adresa výstavce: STORCH Malerwerkzeuge & Profigeräte GmbH
Platz der Republik 6-8
D - 42107 Wuppertal
Tímto prohlašujeme,
že dále uvedené zařízení na základě své koncepce a druhu konstrukce a také v provedení námi uvedeném do provozu
odpovídá příslušným základním bezpečnostním požadavkům a požadavkům k ochraně zdraví směrnic ES.
Při námi neodsouhlasené změně zařízení ztrácí toto prohlášení svou platnost.
Označení přístroje: Čárový laser Crossline
Typ přístroje: Laserový přístroj
Číslo výrobku: 44 15 10
Použité směrnice ES
Směrnice ES Elektromagnetická
slučitelnost: 2004 / 108 / ES
Použité harmonizované normy
EN 55014-1: 2006 + A1: 2009 EN 55014-2: 1997 + A2: 2008
EN 61000-3-2: 2006 + A2: 2009 EN 61000-3-3: 2008
EN 62471: 2008
Zplnomocněnec k sestavení technických podkladů:
STORCH Malerwerkzeuge & Profigeräte GmbH
Platz der Republik 6-8
42107 Wuppertal
Jörg Heinemann
- Jednatel -
Wuppertal, 08 - 2014
37
Překlad originálu návodu
Page 38

383940
Page 39

Page 40

Art.-Nr. Bezeichnung
44 15 10 Strichlaser Crossline
Art. nr. Beschrijving
44 15 10 Laserdiode Crossline
Référence Désignation
44 15 10 Trait à laser Crossline
N. art. Denominazione
44 15 10 Laser a striscia Crossline
Art. no. Description
44 15 10 CrossLine line laser
Výr. č. Označení
44 15 10 Čárový laser Crossline
Malerwerkzeuge & Profigeräte GmbH
Platz der Republik 6 - 8
D-42107 Wuppertal
Telefon: +49 (0)2 02 . 49 20 - 0
Telefax: +49 (0)2 02 . 49 20 - 111
[email protected]
04-2016
www.storch.de
 Loading...