

Page 1

S10A100 1
StorCase® Technology
InfoStation
®
SAF-TE Processor Board
& SAFTEmon
User's Guide
Part No. D89-0000-0130 E00 September 2004
StorCase Technology, Inc.
17600 Newhope Street
Fountain Valley, CA 92708-9885
Phone (714) 438-1850 Fax (714) 438-1847
SAFTEmon Users Guide - Rev. E00 StorCase Technology, Inc.
Page 2

2 S10A100
LIMITED WARRANTY
STORCASE TECHNOLOGY, Incorporated (StorCase) warrants that its products will be free
from defects in material and workmanship, subject to the conditions and limitations set forth
below. StorCase will, at its option, either repair or replace any part of its product that proves
defective by reason of improper workmanship or materials. Repair parts or replacement
products will be provided by StorCase on an exchange basis, and will be either new or
reconditioned to be functionally equivalent to new.
This warranty does not cover any product damage that results from accident, abuse, misuse,
natural or personal disaster, external power surge or failure, or any unauthorized disassembly, repair or modification. StorCase will not be responsible for any software, firmware or other
customer data stored within, or interfacing with a StorCase product.
Duration of Warranty
Seven-Year Warranty: The following StorCase products are covered by this warranty for
a period of seven (7) years from the original date of purchase from StorCase or its authorized
resellers: all Data Express® removable device enclosures and all Data Silo®, Data Stacker
and InfoStation® external expansion chassis, except for those components integrated into
or purchased separately for use with these products which are identified and covered by the
three-year or hard drive warranties described below. All StorCase interface cables and other
accessories specifically intended for use with the StorCase products identified above are also
covered by this (7) year warranty.
®
Three-Year Warranty: The following components integrated into or purchased separately
for use with StorCase Data Express, Data Silo, Data Stacker and/or InfoStation products are
subject to warranty for a period of three (3) years from the original date of purchase from
StorCase or its authorized resellers: all RAID controllers, power supplies, fans and blowers.
Two-Year Warranty: The following StorCase products are covered by this warranty for a
period of two (2) years from the original date of purchase from StorCase or its authorized
resellers: all Rhino®JR fixed external expansion chassis (model types FJR) and all RhinoJR
removable device enclosures (model types RJR).
One-Year Warranty: All StorCase products identified as Reconditioned or Special Inventory
are covered by this warranty for a period of one (1) year from the original date of purchase
from StorCase or its authorized resellers. Reconditioned products may only be exchanged for
reconditioned products.
Hard Disk Drive Warranty: All hard disk drives purchased from StorCase or through its
authorized resellers, whether purchased separately or integrated into StorCase products, are
subject to the warranty terms and conditions provided by the drive manufacturer.
Third Party Software Warranty: All third party software purchased from StorCase for use
with and/or as part of StorCase products is subject to the warranty terms and conditions
provided by the software manufacturer.
StorCase Technology, Inc. SAFTEmon Users Guide - Rev. E00
Page 3
S10A100 3
Warranty Claim Requirements
To obtain warranty service, the defective product must be returned to your local authorized
StorCase dealer or distributor, or, with prior StorCase approval, to the StorCase factory
service center.
For defective products returned directly to StorCase, a Return Material Authorization (RMA)
number must be obtained by calling StorCase Customer Service at (714) 445-3455. The RMA
number must be prominently displayed on the outside of the return package. Shipments must
be freight-prepaid and insured, and must include the product serial number, a detailed
description of the problem experienced, and proof of the original retail purchase date. Products
must be properly packaged to prevent damage in transit. Damage resulting from improper
packaging will not be covered by this warranty. The StorCase factory service center is located
at 17650 Newhope Street, Receiving Dock, Gate #4, Fountain Valley, CA 92780, U.S.A.
Free Technical Support
StorCase provides free technical support. If you experience any difficulty during the
installation or subsequent use of a StorCase product, please contact StorCases Technical
Support Department prior to servicing your system. This warranty covers only repair or
replacement of defective StorCase products, as described above. StorCase is not liable for,
and does not cover under warranty, any costs associated with servicing and/or installation
of StorCase products.
StorCase Technical Support can be reached in the U.S. at (714) 438-1858 or toll-free at (888)
435-5460 (U.S. and Canada only). StorCase European Technical Support can be reached in
the U.K. at +44 (0) 1932 738900.
Disclaimers
The foregoing is the complete warranty for the products identified above and
supersedes all other warranties and representations, whether oral or written.
StorCase expressly disclaims all warranties for the identified products, which are
not stated herein, including, to the extent permitted by applicable law, any implied
warranty of merchantability or fitness for a particular purpose. In no event will
StorCase be liable to the purchaser, or to any user of a StorCase product, for any
damages, expenses, lost revenues, lost savings, lost profits, or any other
incidental or consequential damages arising from the purchase, use or inability
to use a StorCase product, even if StorCase has been advised of the possibility
of such damages.
Copyright © 2004 StorCase Technology. All rights reserved. All registered
trademarks are the property of StorCase Technology. All other logos and trademarks
are properties of their respective companies.
SAFTEmon Users Guide - Rev. E00 StorCase Technology, Inc.
Page 4
4 S10A100
Declaration of Conformity
Company Name:
Corporate Office Address:
Manufacturing Address:
Product Name:
Model Number:
Conforms to the following standards:
EMC Directives:
(89/336/EEC)
EMI Standards:
EMC Standards:
Year of Manufacture:
StorCase Technology, Inc.
17600 Newhope Street
Fountain Valley, CA 92708
17600 Newhope Street
Fountain Valley, CA 92708
InfoStation SAF-TE Processor Board
S10A100
EN 50081-1: 1992 Generic Emission
- EN 55022/CISPR22 Class A
EN 55024: 1998 ITE Immunity
- EN 61000-4-2 - EN 61000-4-6
- EN 61000-4-3 - EN 61000-4-8
- EN 61000-4-4 - EN 61000-4-11
- EN 61000-4-5
FCC Part 15, Class A
AS/NZS 3548 Information Technology Equipment
2001
Signature:___________________
Full name: Dieter Paul
Position: President
StorCase Technology, Inc. SAFTEmon Users Guide - Rev. E00
Page 5

S10A100 5
Table of Contents
INTRODUCTION ........................................................................................................................ 7
System Requirements ......................................................................................................... 8
HARDWARE INSTALLATION ................................................................................................... 9
SAF-TE Board SCSI ID Set-Up ...................................................................................... 12
SAF-TE Board Multiple LUN Set-Up .............................................................................. 13
SAF-TE Board LUN Set-Up............................................................................................ 14
SOFTWARE INSTALLATION .................................................................................................. 15
Main Status Screen ........................................................................................................... 17
Chassis Configuration Status Screen .......................................................................... 19
SCSI Information Screen ............................................................................................... 20
Drive Bay Status Screen ............................................................................................... 21
Drive Insertion Statistics Screen .................................................................................. 22
Reader's Comments............................................................................................................... 23
List of Figures
Figure 1: InfoStation SAF-TE Processor Board ................................................................ 7
Figure 2: Removing the I/O Repeater Module from the InfoStation Chassis.................. 10
Figure 3: Installing the SAF-TE Board onto the I/O Repeater Module ............................ 11
Figure 4: RAID Controller Module Administrator Utility Configuration Menu................... 14
Figure 5: SAFTEmon.exe Window ................................................................................... 16
Figure 6: Main Status Screen ........................................................................................... 18
Figure 7: Chassis Configuration Status Screen .............................................................. 19
Figure 8: SCSI Information Screen ................................................................................... 20
Figure 9: Drive Bay Status Screen .................................................................................. 21
Figure 10: Drive Insertion Statistics Screen ...................................................................... 22
SAFTEmon Users Guide - Rev. E00 StorCase Technology, Inc.
Page 6

6 S10A100
NOTICE: This User's Guide is subject to periodic updates without notice. While reason-
able efforts have been made to ensure accuracy of this document, Storcase
Technology, Inc. assumes no liability resulting from errors or omissions in this
publication, or from the use of the information contained herein.
Please check the StorCase web site at http://www.storcase.com or contact
your StorCase representative for the latest revision of this document.
StorCase Technology, Inc. SAFTEmon Users Guide - Rev. E00
Page 7
S10A100 7
INTRODUCTION
NOTE: The StorCase SAF-TE Processor Board for the InfoStation enclosure has been
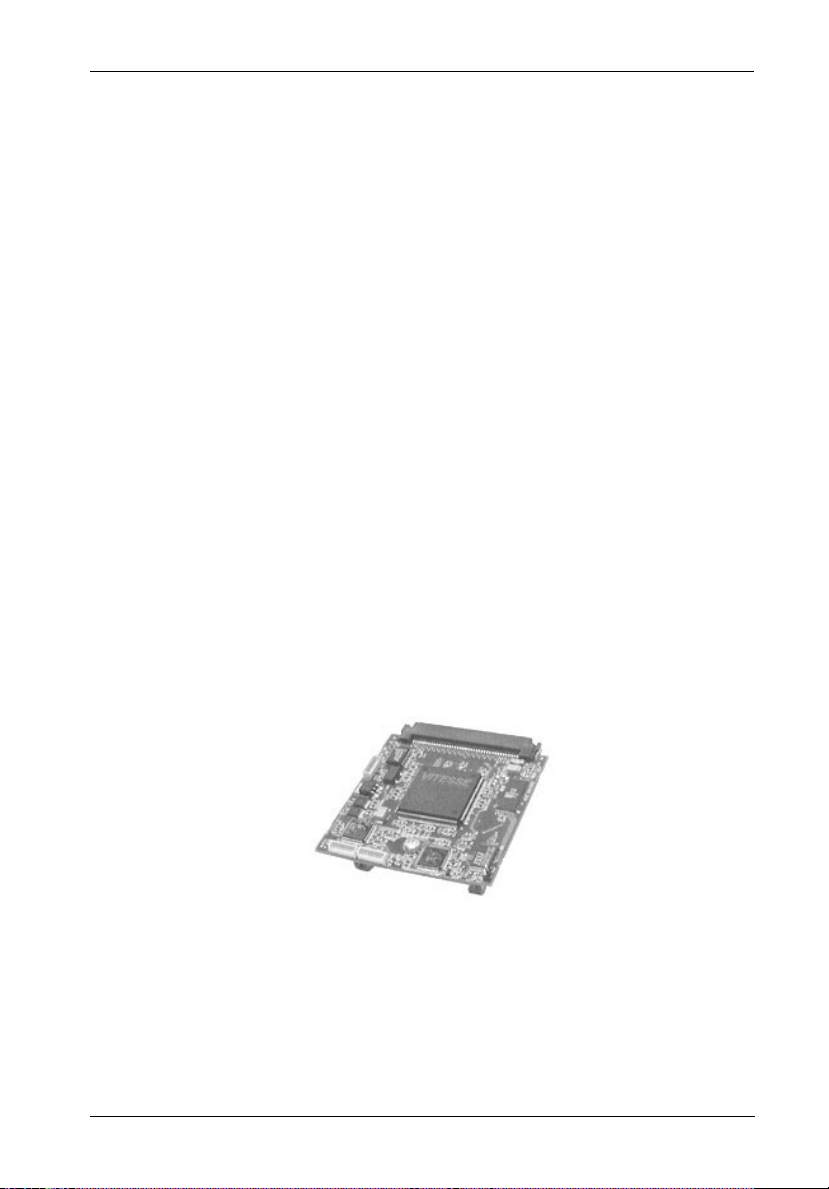
The StorCase® Technology SAF-TE Processor Board (P/N S10A100) is an optional upgrade
for InfoStation 9, 10, 12, 14, and 16-Bay backplane enclosures.
Features include:
- Monitors status of each InfoStation blower, power supply module, and bay
- Monitors all chassis temperature sensors
- Dedicated, user-selectable SCSI ID (via the InfoStation User Interface)
- Supports multi-mode (LVD/S.E.) SCSI bus communication
- SAFTEmon® management software included
- Field-upgradable firmware
- Fully compliant with SAF-TE Specification Rev. 1.0
designed and tested for use with StorCase SCSI-to-SCSI and Fibre-to-SCSI
RAID Controller Modules. Due to the many options and configuration types
associated with PCI-based RAID controllers, you may or may NOT experience
incompatibility when using the SAF-TE Board option in PCI-based RAID applications. Please contact StorCase Technical Support at (888) 435-5460
regarding apparent SAF-TE incompatibilities experienced with your implementation.
Figure 1: InfoStation SAF-TE Processor Board
SAFTEmon Users Guide - Rev. E00 StorCase Technology, Inc.
Page 8

8 S10A100
System Requirements
To install and operate the SAFTEmon software, the computer system must meet the following
requirements:
Operating System: Microsoft® Windows® 95/98/NT/2000/XP
CPU: IBM-compatible 486 or higher
Memory: 32MB RAM
Hard Disk Space: 2MB
Internet Connection: Required only if monitoring via the internet
Internet Browser: Microsoft Internet Explorer 5.0 (or higher) or
Netscape Communicator 4.7 (or higher)
StorCase Technology, Inc. SAFTEmon Users Guide - Rev. E00
Page 9

S10A100 9
HARDWARE INSTALLATION
(The following information only applies to the 9 & 14-Bay 4U InfoStations)
CAUTION: Remove ALL power from the InfoStation and verify that all cables have been
WARNING: The I/O repeater module is NOT hot swappable! Remove ALL power to chassis
NOTES: The StorCase SAF-TE Processor Board for the InfoStation enclosure has been
disconnected.
before removing and installing the I/O repeater module.
designed and tested for use with StorCase SCSI-to-SCSI and Fibre-to-SCSI
RAID Controller Modules. Due to the many options and configuration types
associated with PCI-based RAID controllers, you may or may NOT experience
incompatibility when using the SAF-TE Board option in PCI-based RAID applications. Please contact StorCase Technical Support at (888) 435-5460
regarding apparent SAF-TE incompatibilities experienced with your implementation.
Only one (1) SAF-TE board is required per InfoStation chassis. Install the
SAF-TE board onto I/O repeater module #1 only (this applies to both single and
multiple InfoStation chassis configurations).
If the InfoStation chassis has more than one I/O repeater module, install the
SAF-TE board onto I/O repeater module #1 only (this applies to both single and
multiple InfoStation chassis configurations).
For SCSI-to-SCSI RAID controller modules, Disk Channel 1 should be connected
to I/O repeater module #1 only (this applies to both single and multiple InfoStation
chassis configurations).
For FC-to-SCSI RAID controller modules, Disk Channel 0 should be connected
to I/O repeater module #1 only (this applies to both single and multiple InfoStation
chassis configurations).
Refer to both the InfoStation Installation and User's Guide, and the InfoStation
RAID Controller Module User's Guide for further information.
1. Unplug the InfoStation and verify that ALL cables have been disconnected.
2. Place the InfoStation on a soft, clean surface to protect the finish of the chassis.
3. Loosen and remove the two (2) #6-32 Phillips Pan Hd. screws securing the I/O
repeater module to the InfoStation chassis (Figure 2).
4. Remove the I/O repeater module by grasping handle and pulling out from chassis.
SAFTEmon Users Guide - Rev. E00 StorCase Technology, Inc.
Page 10

10 S10A100
IFS_22a
InfoStation
Chassis
I/O Repeater
Module
#6-32 Phillips
Head Screw
(2 places)
Figure 2: Removing the I/O Repeater Module from the InfoStation Chassis
5. Install the mounting peg (provided) onto the I/O repeater module (Figure 3).
6. Carefully install the SAF-TE processor board onto the I/O repeater module (refer to
Figure 3 for further information).
7. Reinstall the I/O repeater module into the InfoStation chassis by simply reversing
Steps 1-4.
StorCase Technology, Inc. SAFTEmon Users Guide - Rev. E00
Page 11

S10A100 11
SAF-TE
Processor
Board
3
2
I/O Repeater
Module
SAF-TE
Processor
Board
Mounting Peg
1
1
Install the mounting peg (provided) onto the I/O repeater module.
Carefully install the SAF-TE board onto the I/O repeater module by
2
mating the connectors together.
Once the connectors are mated, carefully push down on the SAF-TE
3
board so that it snaps onto the mounting peg.
I/O Repeater Module
(Side View)
IFS_71
Figure 3: Installing the SAF-TE Board onto the I/O Repeater Module
8. If the SAF-TE board was installed into an InfoStation without a RAID controller module,
simply reconnect I/O repeater module #1 to the host system.
If the SAF-TE board is installed into an InfoStation with a RAID controller module,
proceed to section "SAF-TE Board LUN Set-Up" for further installation information.
If the SAF-TE board is installed and used in conjunction with a non-StorCase RAID
Controller (such as a PCI-based controller), proceed to section SAF-TE Board
Multiple LUN Set-Up for further installation information.
SAFTEmon Users Guide - Rev. E00 StorCase Technology, Inc.
Page 12

12 S10A100
SAF-TE Board SCSI ID Set-Up
(The following information only applies to the 9 & 14-Bay 4U InfoStations)
NOTES: SAF-TE board SCSI ID is factory set to SCSI ID15.
The SAF-TE SCSI ID can be changed anytime. It will only take effect after a
system power up however.
Press CANCEL at anytime to exit the menu system and return to the Default
Display. The menu system will automatically cancel after 15 seconds of User
inactivity.
The following steps show how to change the SAF-TE board SCSI ID via the InfoStation UI
Module. Refer to the InfoStation User's Guide (specifically, section "InfoStation User
Interface") for further information.
1. Press ENTER at the Default Display so that
2. Press DOWN until display = SAFT Cfg.
3. Press ENTER so that display = SCSI ID.
4. Press ENTER again so that display = SAFT1:xx.
5. Press UP or DOWN to change the SAF-TE SCSI
6. Press ENTER to accept the change.
StorCase Technology, Inc. SAFTEmon Users Guide - Rev. E00
display = Status.
This is the current SAF-TE SCSI ID.
ID.
Page 13

S10A100 13
SAF-TE Board Multiple LUN Set-Up
(The following information only applies to the 9 & 14-Bay 4U InfoStations)
NOTES: Only necessary if the optional SAF-TE board is installed and used in conjunction
The following steps show how to change the SAF-TE processor board Multiple LUN set-up.
The Multiple LUN feature is only supported by the StorCase RAID Controller. Change the setting
(to Single LUN) when using the optional SAF-TE board in conjunction with a non-StorCase RAID
Controller (such as a PCI-based controller).
ENTER
DOWN
ENTER
DOWN
with a non-StorCase RAID Controller.
MulLUN 0 = Single LUN
MulLUN 1 = Multiple LUN (Factory Default)
Press CANCEL at anytime to exit the menu system and return to the Default
Display. The menu system will automatically cancel after 15 seconds of User
inactivity.
T E M P : x x C
1. Press ENTER at the Default Display so that
S t a t u s
2. Press DOWN until display = SAFT Cfg.
S A F T C f g
3. Press ENTER so that display = SCSI ID.
S C S I I D
4. Press DOWN so that display = MultiLUN.
display = Status.
M u l t i L U N
ENTER
M u l L U N = 1
UP/DOWN
M u l L U N = 0
ENTER
M u l L U N = 0
SAFTEmon Users Guide - Rev. E00 StorCase Technology, Inc.
5. Press ENTER so that display = MulLUN=x.
This is the current MultiLUN setting.
6. Press UP or DOWN to change the MultiLUN
setting.
7. Press ENTER to accept the change.
Page 14
14 S10A100
SAF-TE Board LUN Set-Up
NOTE: Refer to the InfoStation RAID Controller Module User's Guide for further
To set up the SAF-TE board into an InfoStation with RAID controller module installed:
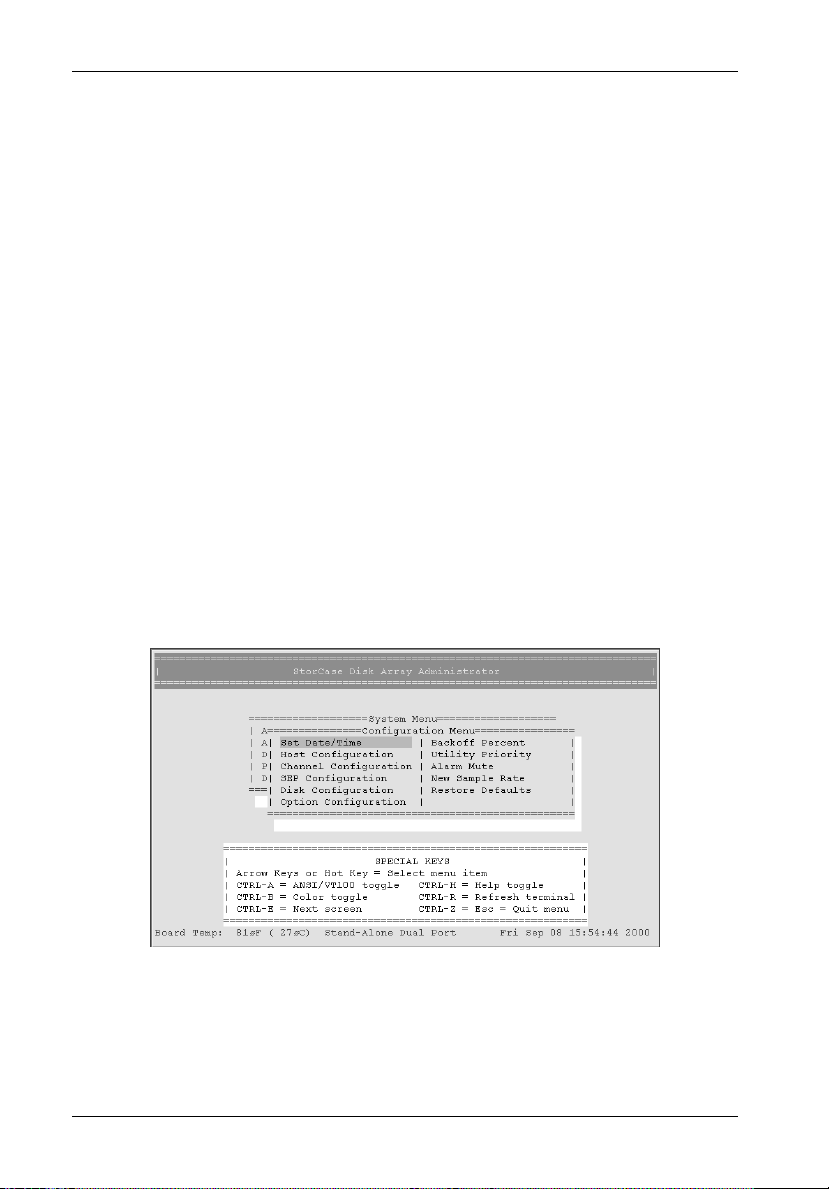
1. Select Configuration Menu from the RAID Controller Module Administrator Utility
2. Select SEP Configuration and then press Enter.
3. Select SEP LUN and then press Enter. The system will automatically assign the
4. Type Y to confirm or N to cancel and press Enter.
5. Reboot the system.
information.
System Menu (Figure 4) and press Enter.
next available LUN to the SAF-TE board.
Figure 4: RAID Controller Module Administration Utility Configuration Menu
StorCase Technology, Inc. SAFTEmon Users Guide - Rev. E00
(Example shown, actual screen may vary)
Page 15

S10A100 15
SOFTWARE INSTALLATION
NOTES: To install and operate the SAFTEmon® software, the computer system must
1. Exit and close ALL programs before installing SAFTEmon onto the computer sys-
2. Insert CD into computer. Double-click the SAFTEmon.exe file (an Installation
If the Installation Wizard experiences problems with installing SAFTEmon onto the computer
system, you will have to manually install SAFTEmon as directed below:
1. Create a directory (e.g. c:/SAFTEmon)
2. Unzip the SAFTEmon zip file into the newly created directory.
3. Run SAFTEmon.exe
meet certain system requirements (refer to Page 5 of this document for further
information).
An IP address is required for remote monitoring via the internet. Please contact
your system administrator to set up an IP address for the InfoStation and host
system.
SAFTEmon is user-customizable. Custom modification of the SAFTEmon files
requires a certain level of HTML and Javascript experience on the part of the
user.
tem.
Wizard will take you through the SAFTEmon installation process).
The SAFTEmon.exe window should appear on the screen (Figure 5).
NOTE: If an error occurs while running SAFTEmon, check the connection between
SAFTEmon Users Guide - Rev. E00 StorCase Technology, Inc.
the host system and the InfoStation. SAFTEmon will not run if the host system
and InfoStation are not properly connected.
Page 16

16 S10A100
Figure 5: SAFTEmon.exe Window
NOTE: The SAFTEmon.exe window will only appear on the host system. It cannot be
SAFTEmon is comprised of five (5) HTML files:
To view any of these HTML files on the host system, double-click on any of the file names within
the SAFTEmon.exe window. The HTML file will then open up in the system default browser.
These HTML files are accessible for remote monitoring via the internet (refer to Figures 6-10
for further information).
StorCase Technology, Inc. SAFTEmon Users Guide - Rev. E00
viewed by remote monitoring via the internet (only the HTML files within the
SAFTEmon.exe window are viewable via the internet).
SAFTEmon Main
Configuration
SCSI Information
Drive Bay Status
Drive Insertion Statistics
Page 17

S10A100 17
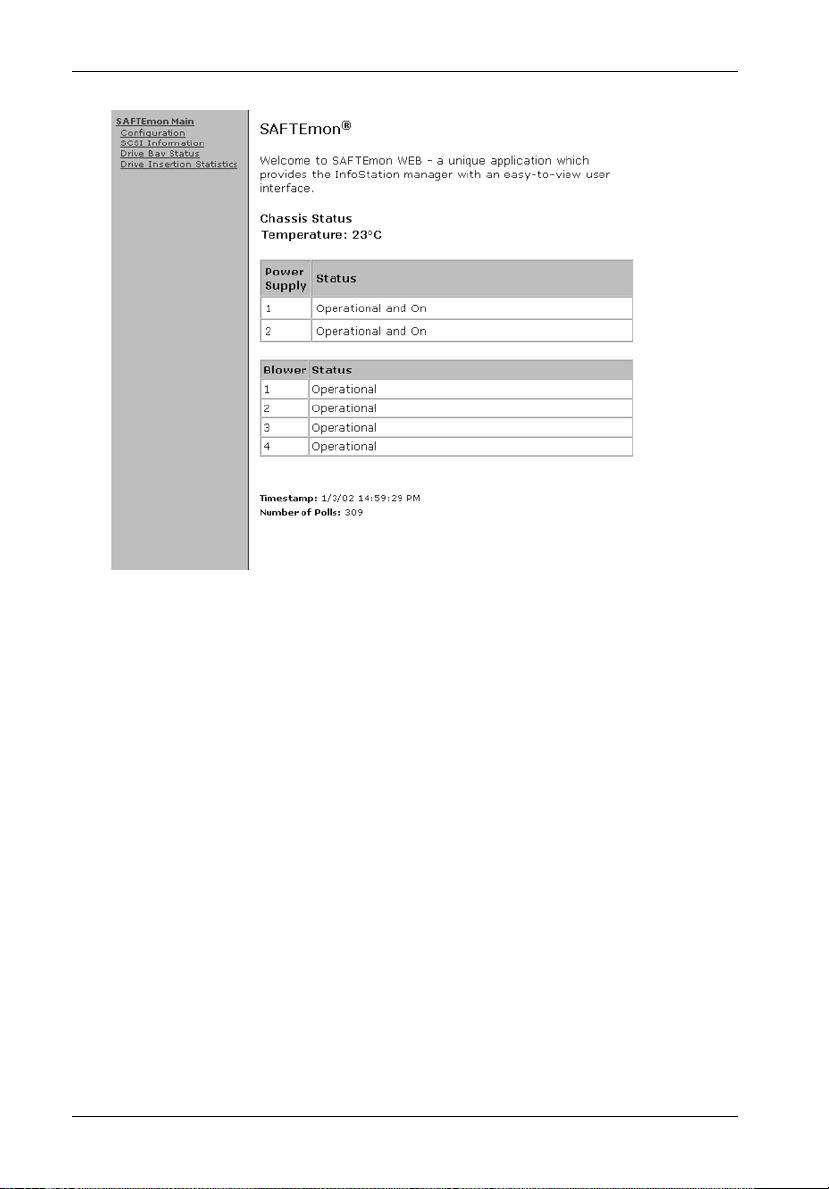
Main Status Screen
NOTES: When remote monitoring via the internet, always hit "Refresh" on the browser
The Main Status Screen (Figure 6) displays the following "at-a-glance" InfoStation chassis
status information (according to SAF-TE Specification Rev. 1.0):
Power Supply Displays the status of each InfoStation power supply module.
Status
Blower Status Displays the status of each InfoStation blower.
Enclosure Displays the average temperature of the InfoStation enclosure.
Temperature
Timestamp Displays calendar date and time.
NOTES: Timestamp is located at the bottom of each SAFTEmon page.
to make sure you are viewing the most up-to-date information.
Actual screen may vary depending on your InfoStation.
SAFTEmon allows the user to synchronize the time of the InfoStation
chassis with the time of the host system. Simply double-click on the clock
located on the bottom toolbar (lower righthand corner) to set the day/time
properties. Once the desired setting is achieved, click on "OK" to synchronize the time (the new time will not show until the next SAFTEmon poll).
Number Displays total count of SAFTEmon polls.
of Polls
NOTES: Polling interval is factory set at 15 seconds. Interval may be changed via
SAFTEmon Users Guide - Rev. E00 StorCase Technology, Inc.
the SAFTEmon.exe window (Figure 5).
Total count of polls will reset back to "0" once SAFTEmon.exe is closed.
Page 18
18 S10A100
Figure 6: Main Status Screen
(Example shown, actual screen may vary)
Click on the links located in the left navbar to navigate through the rest of SAFTEmon (refer
to Figures 7-10 for further information).
StorCase Technology, Inc. SAFTEmon Users Guide - Rev. E00
Page 19

S10A100 19
Chassis Configuration Status Screen
NOTES: When remote monitoring via the internet, always hit "Refresh" on the browser
The Chassis Configuration Status Screen (Figure 7) displays the current configuration of the
InfoStation chassis.
to make sure you are viewing the most up-to-date information.
Actual screen may vary depending on your InfoStation.
Figure 7: Chassis Configuration Status Screen
(Example shown, actual screen may vary)
SAFTEmon Users Guide - Rev. E00 StorCase Technology, Inc.
Page 20

20 S10A100
SCSI Information Screen
NOTES: When remote monitoring via the internet, always hit "Refresh" on the browser
The SCSI Information Screen (Figure 8) displays the current SCSI information for the host
adapter and SAF-TE device.
to make sure you are viewing the most up-to-date information.
Actual screen may vary depending on your InfoStation.
Figure 8: SCSI Information Screen
(Example shown, actual screen may vary)
StorCase Technology, Inc. SAFTEmon Users Guide - Rev. E00
Page 21

S10A100 21
Drive Bay Status Screen
NOTES: When remote monitoring via the internet, always hit "Refresh" on the browser
The Drive Bay Status Screen (Figure 9) displays the current configuration for each InfoStation
drive bay.
to make sure you are viewing the most up-to-date information.
For drive bay number assignments, refer to your specific InfoStation Users
Guide.
Actual screen may vary depending on your InfoStation.
Figure 9: Drive Bay Status Screen
(Example shown, actual screen may vary)
SAFTEmon Users Guide - Rev. E00 StorCase Technology, Inc.
Page 22

22 S10A100
Drive Insertion Statistics Screen
NOTES: When remote monitoring via the internet, always hit "Refresh" on the browser
The Drive Insertion Statistics Screen (Figure 10) displays the number of drive insertions for
each InfoStation drive bay.
to make sure you are viewing the most up-to-date information.
Drive insertions are only counted while InfoStation chassis power is ON
(insertions are counted even when SAFTEmon. exe is not running). Insertion
count will not reset to "0" upon chassis power OFF.
For drive bay number assignments, refer to your specific InfoStation Users
Guide.
Actual screen may vary depending on your InfoStation.
Figure 10: Drive Insertion Statistics Screen
(Example shown, actual screen may vary)
StorCase Technology, Inc. SAFTEmon Users Guide - Rev. E00
Page 23

S10A100 23
Reader's Comments
Please take a few moments when your computer system is up and running to send us your ideas
and suggestions for improving our products and documentation. Did the installation go
smoothly for you? Are there any changes you would like us to make, either with the hardware
itself, or with the installation instructions? Everyone at StorCase Technology is working toward
the goal of providing you with the highest quality, most cost effective, products available on the
market, and we need your comments to guide our efforts. We look forward to hearing from you
soon!
Date:
Your Name:
Address:
Telephone: ( )
To mail this page, carefully remove it from the manual, fold it, staple or tape it shut, and drop
it in the mail. To FAX this page, carefully remove it from the manual (or make a photocopy) and
FAX it to us at (714) 438-1847. Thank you for taking the time to help us make our products
better!
SAFTEmon Users Guide - Rev. E00 StorCase Technology, Inc.
Page 24

24 S10A100
FOLD ALONG THIS LINE AND STAPLE SHUT
CUT ALONG THIS LINE FROM BOTTOM TO TOP OF PAGE
NO POSTAGE
NECESSARY
IF MAILED
IN THE
UNITED STATES
BUSINESS REPLY MAIL
FIRST CLASS MAIL PERMIT NO. 10686 SANTA ANA, CA
POSTAGE WILL BE PAID BY ADDRESSEE
TECHNOLOGY CORPORATION
17600 NEWHOPE STREET
FOUNTAIN VALLEY CA 92708-9885
StorCase Technology, Inc. SAFTEmon Users Guide - Rev. E00
 Loading...