

Page 1

StorCase® Technology
Rhino®JR
FJR100
1-Bay External
Expansion Chassis
User's Guide
Part No. D89-0000-0095 C00 August 2003
StorCase Technology, Inc.
17600 Newhope Street
Fountain Valley, CA 92708-9885
Phone (714) 438-1850
Fax (714) 438-1847
Page 2
Declaration of Conformity
1
Company Name:
Corporate Office Address:
Manufacturing Address:
Product Name:
Model Number:
Conforms to the following standards:
EMC Directives:
(89/336/EEC)
Safety Standards:
CSA (NRTL/C)
TUV:
EMI Standards:
StorCase Technology, Inc.
17600 Newhope Street
Fountain Valley, CA 92708
17600 Newhope Street
Fountain Valley, CA 92708
RhinoJr. 1-Bay Expansion Chassis
FJR100-1
EN 50081-1: 1992 Generic Emission
- EN 55022: 1998
- EN 61000-3-2 Harmonic Current
- EN 61000-3-3 Voltage Fluctuations and Flicker
EN 55024: 1998 ITE Immunity
- EN 61000-4-2 - EN 61000-4-5
- EN 61000-4-3 - EN 61000-4-6
- EN 61000-4-4 - EN 61000-4-8
- EN 61000-4-11
CAN/CSA-C22.2 No. 950-95
ANSI/UL 1950-1997
EN 60950: 1992 + A1 + A2 + A3 + A4 + A11
FCC Part 15, Class B
EMC Standards:
Year of Manufacture:
Signature:___________________
Full name: Dieter Paul
Position: President
FJR100 Users Guide - Rev. C00 StorCase Technology, Inc.
AS/NZS 3548 Information Technology Equipment
2000
Page 3
2
STORCASE® TECHNOLOGY
RHINOJR
FJR100-1
The StorCase® Technology RhinoJR (P/N FJR100-1) 1-bay external expansion chassis provides low cost, rugged and reliable housing for 3.5 half-height storage devices. The
RhinoJR is constructed of rugged steel and polycarbonate. Each chassis is equipped with
an auto-ranging power supply, power-on and device activity LEDs, highly-rated cooling fan,
and all necessary hardware to mount one (1) fixed 3.5 half-height device.
INTRODUCTION
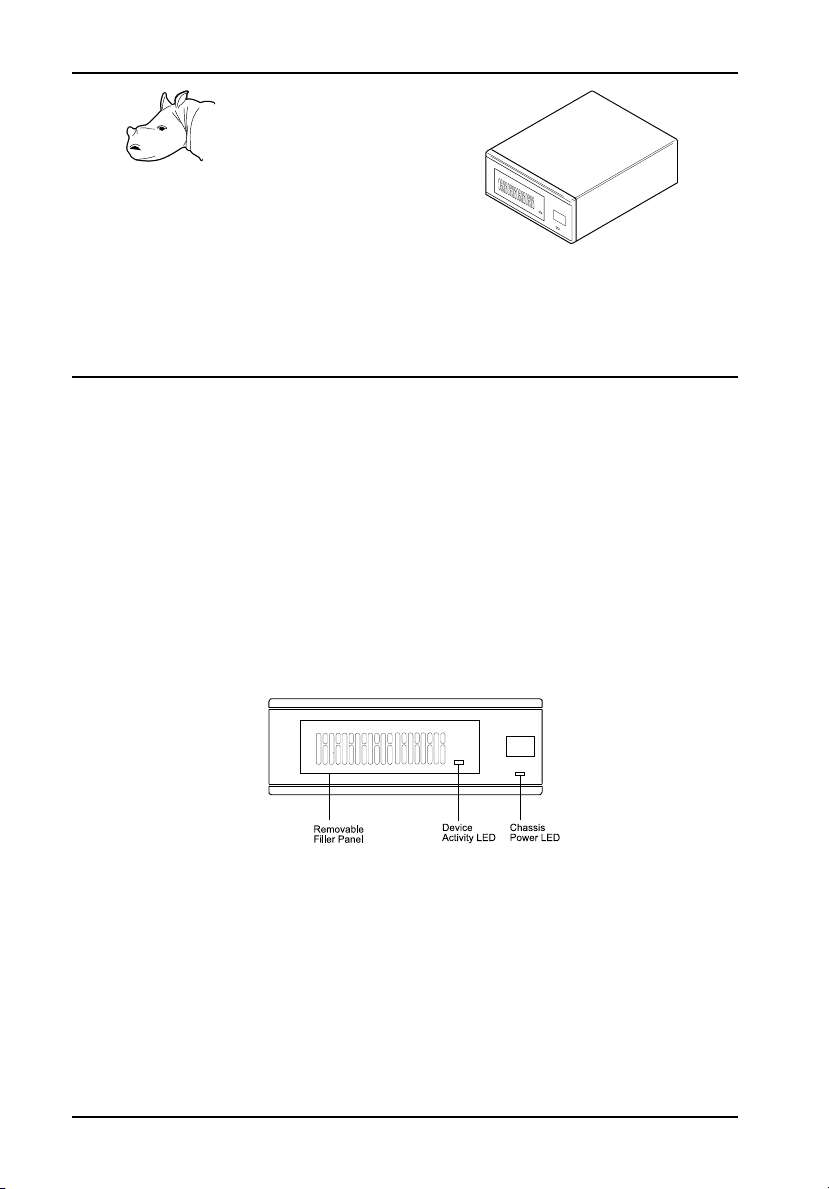
Front Panel
(Figure 1)
Removable Filler Panels - Accomodate removable media devices (CD-ROM, DAT drives,
etc.)
Device Activity LED - Provides a visual indication of device activity.
Chassis Power LED - Indicates that power is being supplied to the RhinoJR chassis.
Front
Figure 1: FJR100 Front Panel
Rear Panel
(Figure 2)
Power Switch - Provides power to the RhinoJR chassis.
A/C Power In - Accepts U.S. and other available international standard power cables.
Contact StorCase for further ordering information.
StorCase Technology, Inc. FJR100 Users Guide - Rev. C00
Page 4

SCSI ID Select Switch - Provides SCSI ID selection (Refer to section Selecting the SCSI ID
Number for further information).
Cooling Fan - Provides ample chassis ventilation (22.1 CFMs).
SCSI I/O Connector - RhinoJR can be equipped with 50-pin Centronics, 50-pin Microminia-
ture (HD50) , 68-pin High Density, or 68-pin VHDCI (used for Ultra2 and Ultra160) connectors.
Contact StorCase for further ordering information.
Rear
Figure 2: FJR100 Rear Panel
3
Selecting the SCSI ID Number
The RhinoJR SCSI ID selection switch is
located on the rear panel of the chassis
(Refer to INTRODUCTION). Carefully select the appropriate SCSI ID number for
the installed device as shown. Switch
can be adjusted with either the tip of a
pen or a straightened paper clip. Note
that some switch settings may be invalid
for your interface type. Selecting an invalid ID number, or selecting the same number on different devices may cause unpredictable results and the computer system may not recognize the installed device.
NOTE: Refer to this section after the
FJR100 Users Guide - Rev. C00 StorCase Technology, Inc.
drive installation is complete.
Page 5

4
INSTALLATION
Removing the RhinoJR Cover
While performing the steps in this section, work on a soft surface to prevent excessive
shock to the drive being installed. Also refer to the manufacturers documentation provided
with the drive. Phillips #1 and #2 screwdrivers will be required during this procedure.
CAUTION:
Remove ALL power from the RhinoJR before removing the cover. The RhinoJR contains NO
USER SERVICEABLE PARTS inside the unit.
1. Unplug the RhinoJR and verify that all cables have been disconnected.
2. Remove the four (4) screws located underneath the chassis (Figure 3).
3. Carefully slide the cover rearward off the chassis.
Figure 3: Removing the Cover
StorCase Technology, Inc. FJR100 Users Guide - Rev. C00
Page 6

Installing the Drive into the RhinoJR
NOTE: Removal of the chassis cover is required in order to install the drive.
5
Figure 4: Hard Drive Installation
FJR100 Users Guide - Rev. C00 StorCase Technology, Inc.
Page 7

6
Signal Row
Black (ID0)
Brown (ID1)
Red (ID2)
Orange (ID3)
Black (GND)
GND Row
For Hard Drives:
(Figure 4)
1. Connect the 4-pin DC power cable to the drive.
2. Connect the 5-wire ID select cable to the drive (Figure 5).
3. Attach I/O plates (not included) to the RhinoJR chassis (as shown in
Figure 4).
4. Connect the I/O cable to the drive.
5. Attach the drive mounting brackets to the drive. Install the drive/mounting bracket assembly into the chassis and bottom mount with four (4)
#6-32 screws (included) as shown.
6. Re-install the cover onto the chassis.
Figure 5: 16-Bit SCSI ID Cable Connection
StorCase Technology, Inc. FJR100 Users Guide - Rev. C00
Page 8

Figure 6: Tape Drive Installation
7
For Tape Drives:
(Figure 6)
1. Connect the 4-pin DC power cable to the drive.
2. Connect the 5-wire ID select cable to the drive (Figure 5).
NOTE: Use the 0.1 connectors on the ID select cable when connecting to tape drives.
3. Attach I/O plates (not included) to the RhinoJR chassis (Figure 4).
4. Connect the I/O cable to the drive.
5. Remove the filler panel by gently pushing it out of the drive bay.
6. Attach the stand-offs (included) to the drive. Install the drive/stand-off
7. Re-install the cover onto the chassis.
FJR100 Users Guide - Rev. C00 StorCase Technology, Inc.
assembly into the chassis and bottom mount with four (4) #6-32 screws
(included) as shown.
Page 9

8
Figure 7: Zip Drive Installation
For Zip Drives:
(Figure 7)
1. Connect the 4-pin DC power cable to the drive.
2. Connect the 5-wire ID select cable to the drive (Figure 5).
3. Attach I/O plates (not included) to the RhinoJR chassis (Figure 4).
4. Connect the I/O cable to the drive.
5. Remove the filler panel by gently pushing it out of the drive bay.
6. Install the adapter filler panel (included) by gently pushing it into the top
6. Attach the stand-offs (included) to the drive. Install the drive/stand-off
7. Re-install the cover onto the chassis.
StorCase Technology, Inc. FJR100 Users Guide - Rev. C00
of the drive bay.
assembly into the chassis and bottom mount with four (4) #6-32 screws
(included) as shown.
Page 10

SPECIFICATIONS
SCSI RhinoJR chassis conform to the Small Computer Systems Interface (SCSI) Standard set
by the American National Standards Institute (ANSI). The following specifications are for
reference only.
9
FJR100 Users Guide - Rev. C00 StorCase Technology, Inc.
Page 11

10
LIMITED WARRANTY
STORCASE TECHNOLOGY, Incorporated (StorCase) warrants that its products will be free
from defects in material and workmanship, subject to the conditions and limitations set forth
below. StorCase will, at its option, either repair or replace any part of its product that proves
defective by reason of improper workmanship or materials. Repair parts or replacement
products will be provided by StorCase on an exchange basis, and will be either new or
reconditioned to be functionally equivalent to new.
This warranty does not cover any product damage that results from accident, abuse, misuse,
natural or personal disaster, external power surge or failure, or any unauthorized disassembly, repair or modification. StorCase will not be responsible for any software, firmware or other
customer data stored within, or interfacing with a StorCase product.
Duration of Warranty
Seven-Year Warranty: The following StorCase products are covered by this warranty for
a period of seven (7) years from the original date of purchase from StorCase or its authorized
reseller: all Data Express® removable device enclosures and all StorCase interface cables and
accessories specifically intended for use with these products. Data Silo®, Data Stacker® and
InfoStation® products are covered by this warranty for a period of seven (7) years, excepting
the RAID controller, power supply, fan and blower components, which are covered by the
three-year warranty described below.
Three-Year Warranty: The following StorCase products are covered by this warranty for
a period of three (3) years from the original date of purchase from StorCase or its authorized
reseller: all Rhino®JR external expansion chassis and all RAID controller modules. In addition,
the following components of the Data Silo®, Data Stacker®, InfoStation® products are subject
to warranty for a period of three (3) years: all power supplies, fans and blowers.
Warranty Claim Requirements
To obtain warranty service, the defective product must be returned to your local authorized
StorCase dealer or distributor, or, with prior StorCase approval, to the StorCase factory
service center.
For defective products returned directly to StorCase, a Return Material Authorization (RMA)
number must be obtained by calling StorCase Customer Service at (714) 445-3455. The RMA
number must be prominently displayed on the outside of the return package. Shipments must
be freight-prepaid and insured, and must include the product serial number, a detailed
description of the problem experienced, and proof of the original retail purchase date. Products
must be properly packaged to prevent damage in transit. Damage resulting from improper
packaging will not be covered by this warranty. The StorCase factory service center is located
at 17650 Newhope Street, Receiving Dock, Gate #4, Fountain Valley, CA 92780, U.S.A.
StorCase Technology, Inc. FJR100 Users Guide - Rev. C00
Page 12

11
Free Technical Support
StorCase provides free technical support. If you experience any difficulty during the
installation or subsequent use of a StorCase product, please contact StorCases Technical
Support Department prior to servicing your system. This warranty covers only repair or
replacement of defective StorCase products, as described above. StorCase is not liable for,
and does not cover under warranty, any costs associated with servicing and/or installation
of StorCase products.
StorCase Technical Support can be reached in the U.S. at (714) 438-1858 or toll-free at (888)
435-5460 (U.S. and Canada only). StorCase European Technical Support can be reached in
the U.K. at +44 (0) 1932 738900.
Disclaimers
The foregoing is the complete warranty for the products identified above and
supersedes all other warranties and representations, whether oral or written.
StorCase expressly disclaims all warranties for the identified products, which are
not stated herein, including, to the extent permitted by applicable law, any implied
warranty of merchantability or fitness for a particular purpose. In no event will
StorCase be liable to the purchaser, or to any user of a StorCase product, for any
damages, expenses, lost revenues, lost savings, lost profits, or any other
incidental or consequential damages arising from the purchase, use or inability
to use a StorCase product, even if StorCase has been advised of the possibility
of such damages.
Copyright © 2003 StorCase Technology. All rights reserved. All registered
trademarks are the property of StorCase Technology. All other logos and trademarks
are properties of their respective companies.
NOTICE: This User's Guide is subject to periodic updates without notice. While reason-
FJR100 Users Guide - Rev. C00 StorCase Technology, Inc.
able efforts have been made to ensure accuracy of this document, StorCase
Technology, Inc. assumes no liability resulting from errors or omissions in this
publication, or from the use of the information contained herein.
Please check the StorCase website at http://www.storcase.com or contact
your StorCase representative for the latest revision of this document.
 Loading...