

Page 1
OPERATING INSTRUCTIONS
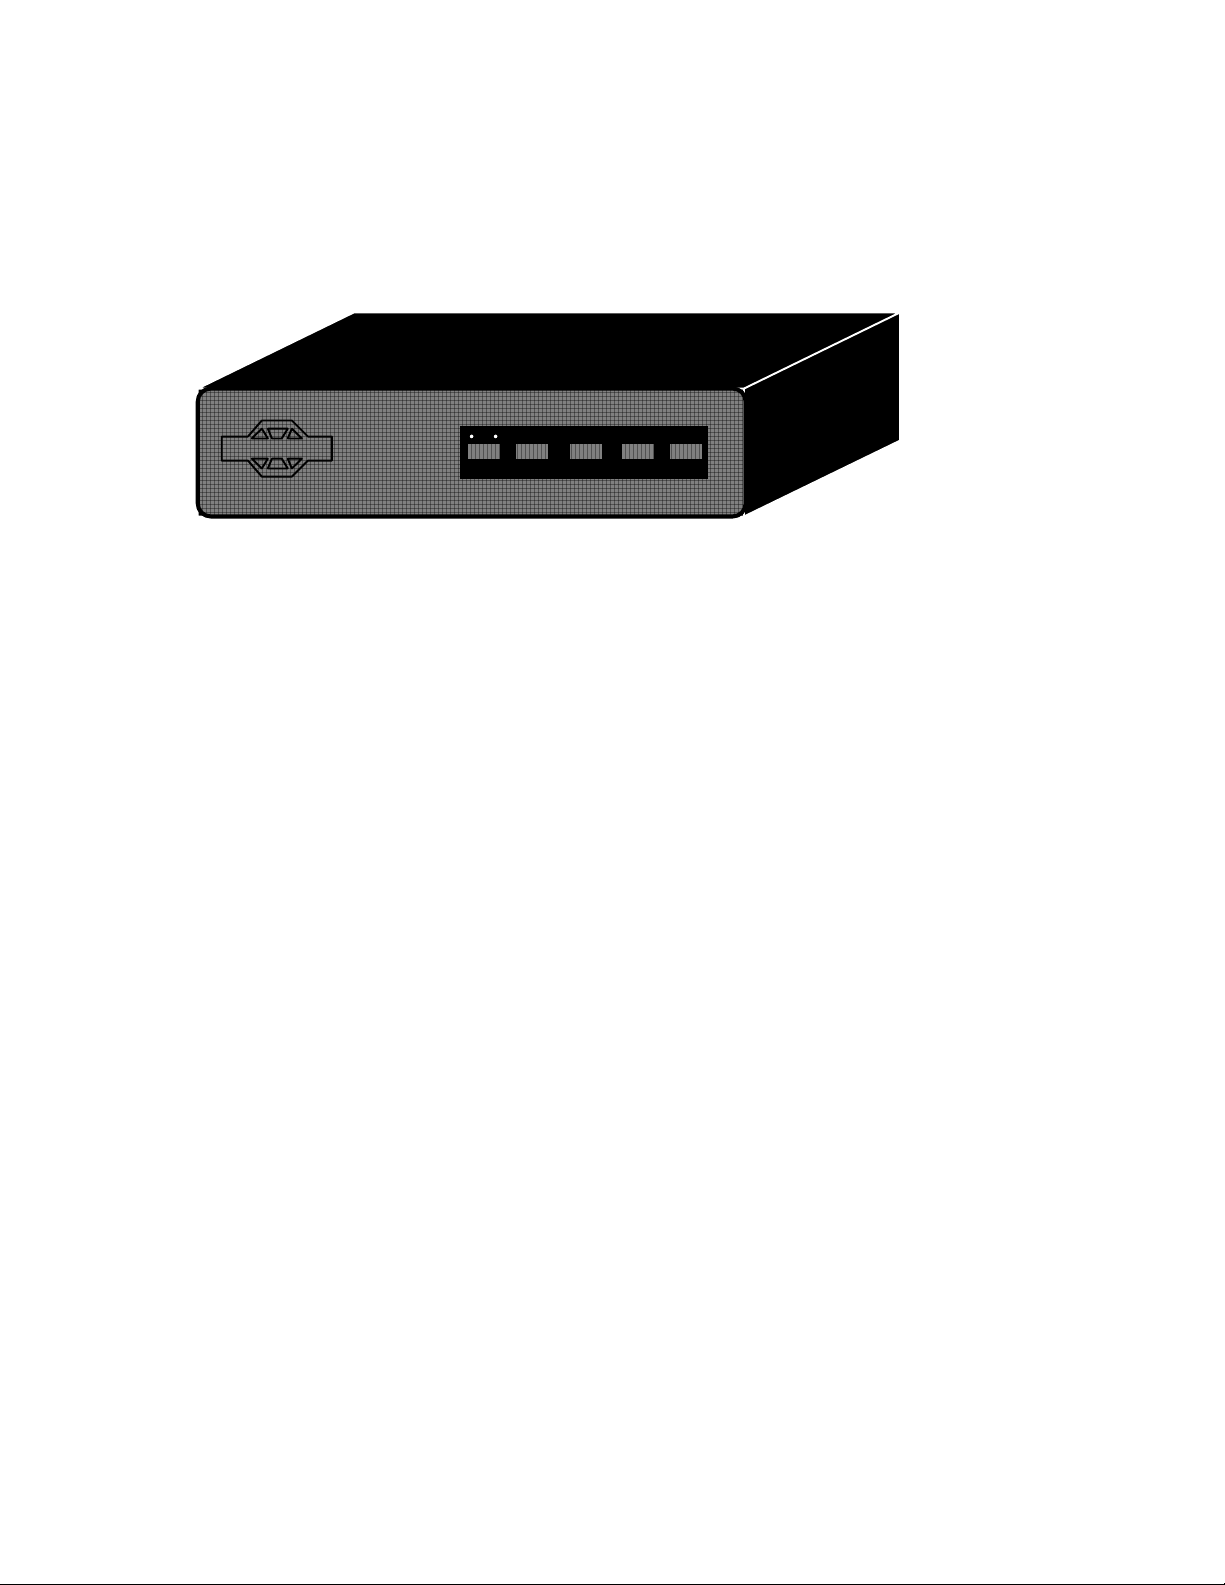
DIGITAL MESSAGE RECORDER 'S'
STOP AND LISTEN INC.
REC/PB STARTSTOP VOL (+)VOL (-)
STOP & LISTEN
DIGITAL MESSAGE RECORDER S
Configuration ...................................... pg. 1
Product Overview ............................... pg. 2
Making the Right Connections ............ pg. 3
Recording Made Easy ...................... pg. 4
Playback! ............................................ pg. 5
Care and Cleaning ............................. pg. 6
Specifications ..................................... pg. 7
CSA/FCC Notification ......................... pg. 7
TroubleShooting Guide ...................... pg. 8
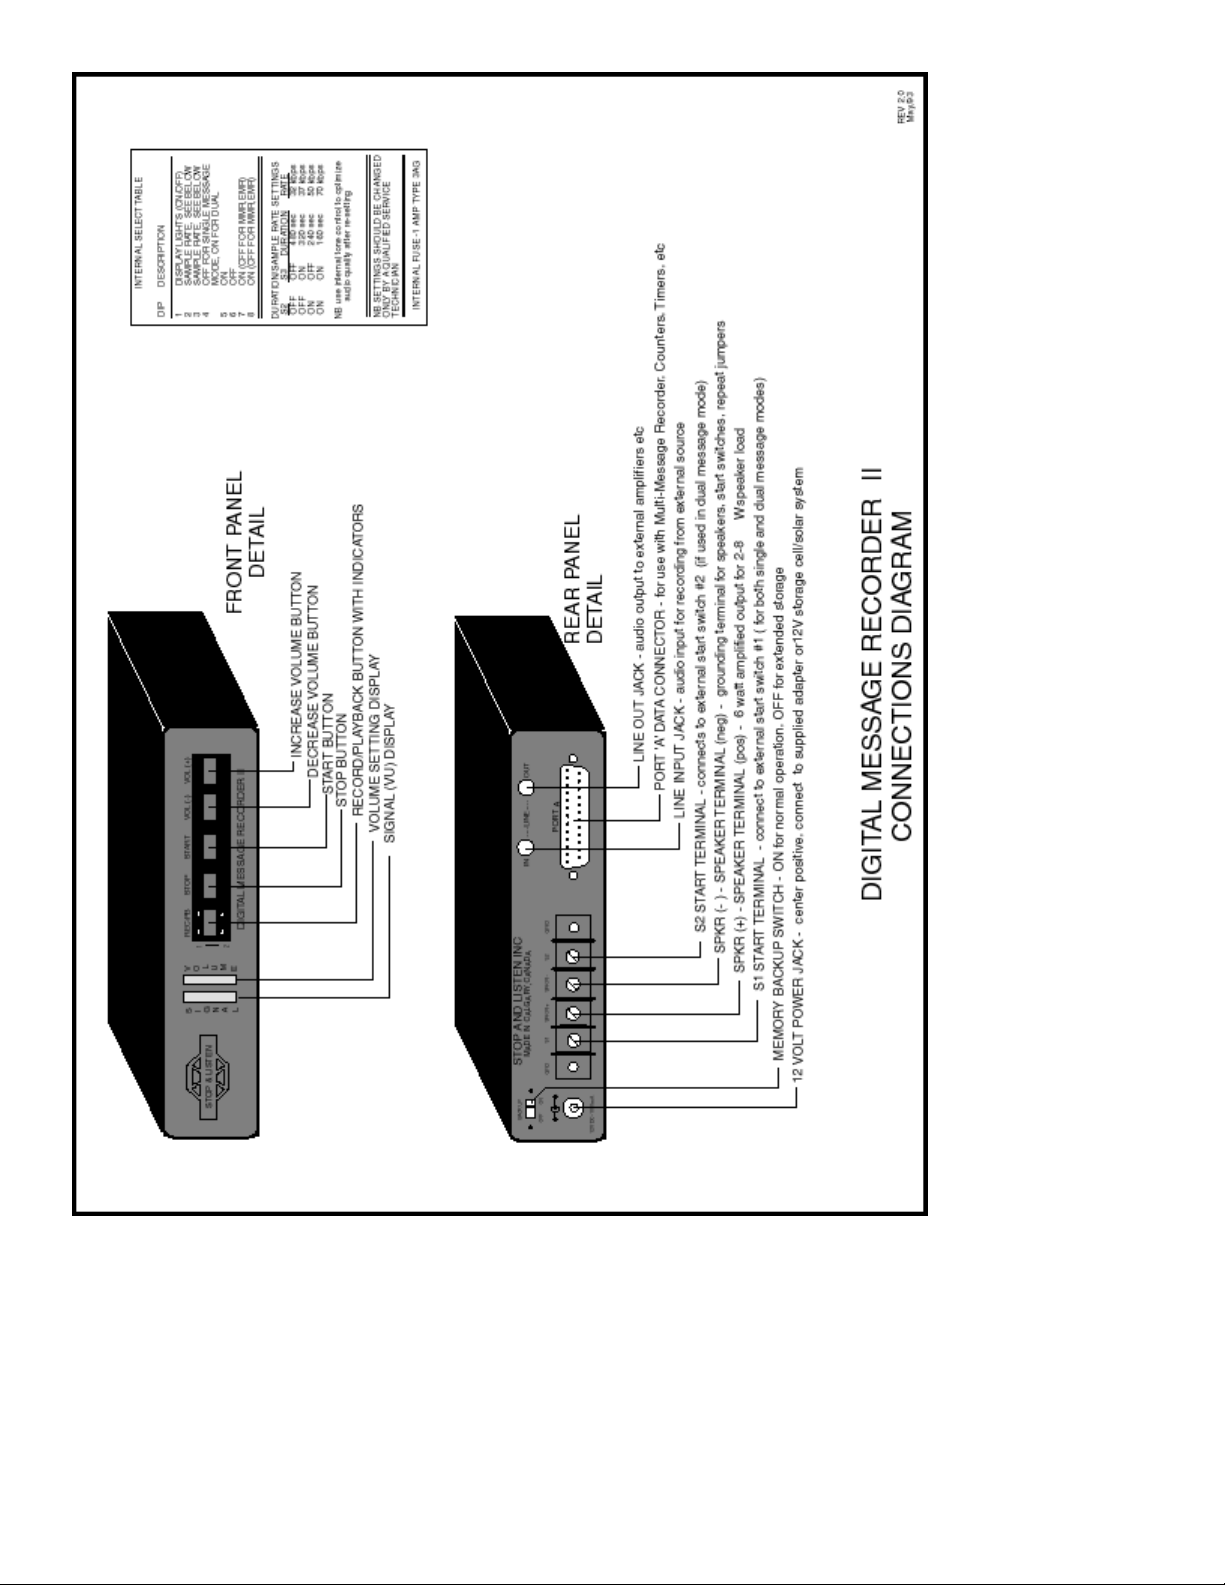
Connections Diagram ....................... pg. 9
CONTENTS
CONFIGURATION
Your new DMR 'S' has a series of internal dip switches has been set during manufacture. These
switches are used to select digital sampling rate vs. maximum message duration. This unit has
been pre-configured as indicated below:
SERIAL NUMBER ________________
MAX. MESSAGE DURATION 80 / 120 / 160 / 240 (sec.)
DIGITAL SAMPLING RATE (kbps) 32 / 37 / 50 / 70
Dip settings should only be changed by a qualified service technician. Refer to the Internal Select Table on the
CONNECTIONS DIAGRAM for switch settings options. There is also an internal tone control that should be re-
adjusted for audio fidelity if the above settings are changed
.
Stop and Listen Digital Message Recorder 'S': Operating Instructions
Page
1
Page 2

OVERVIEW
The DMR 'S' is a solid-state monaural audio recording and playback device that operates much
the same as a tape recorder. Because it is solid state there are no parts to wear out, ensuring
year after year of trouble free service, with no loss in fidelity.
The DMR 'S' is capable of recording and storing an audio track of up to 4 minutes total duration,
depending on how a series of internal dip switches has been set.
Audio is loaded into the DMR 'S' from an audio source with a line level or headphone output and
is then converted into a digital format and stored on state-of-the-art DRAM memory chips. On
playback audio is converted back into it's original (analog) form.
An internal memory backup battery maintains standby power to the memory, ensuring that
messages are safe even after a long power failure. An automatic float-charging system is built-in
to maintain the internal battery in peak condition.
The internal amplifier allows the DMR 'S' to be played back directly into an external speaker with
no need for additional equipment. A line level output is provided for applications where the audio
will be played back through other equipment.
Playback is initiated using a number of different methods, whether from the front control panel or
from a variety of external switches or triggering devices. The system can also play continuously
using a simple start jumper connected across the rear switch contacts.
At Stop and Listen we have gone to great lengths to ensure that your new DMR 'S' represents the
ultimate in durability and ease of use. As you become more familiar with the DMR 'S' you will find
that the on-board recording features can add a whole new dimension to your application. You will
soon be able to communicate much more effectively with your audience.
BEFORE YOU BEGIN:
Prior to connecting your Digital Message Recorder 'S' (DMR 'S') we recommended that you read
through these instructions from beginning to end to familiarize yourself with the installation and
operation of the device. Remember to keep these instructions (along with the original shipping
carton) in a safe place for future reference. Notify your shipping company or your dealer
immediately if any shipping damage is evident. In the package you will find:
• the Digital Message Recorder 'S' Unit
• Power Adapter - 12 volt DC, 1000 mA
• Audio Input Cord - 1/8” stereo mini plug to phono (RCA) plug
• Audio Patch Cord - phono (RCA) plug to phono (RCA) plug
• Auto-Repeat (looping) Jumper
• These instructions
Stop and Listen Digital Message Recorder 'S': Operating Instructions
Page
2
Page 3
SECTION 1: MAKING THE RIGHT CONNECTIONS
1.1 Plug the power adapter (supplied) into an unswitched 120 volt wall outlet and plug it into
the power jack on rear of the DMR 'S'. The LED indicator lights on the front panel will be
illuminated indicating that there is power.
1.2 Make sure the battery BACKUP switch, located on the rear panel, is in the ON
position. This will ensure that messages won't be accidentally erased, even during
extended power disruptions (or as long as 20 days). Once power is re-established,
the internal backup system will recharge automatically. If you plan to store the DMR 'S' for longer
periods, this switch should be turned OFF to preserve the internal battery. Remember to turn it
back ON before putting the unit back into service.
1.3 Leave the DMR 'S' plugged in overnight with the BACKUP switch ON to ensure the backup
system is fully charged. (The DMR 'S' will act erratically if it has not been sufficiently charged.) It
is advisable to allow the unit to charge in this manner after any extended period that the DMR 'S'
has not been plugged in.
1.4 Finish making the rest of the connections as illustrated in the CONNECTIONS DIAGRAM.
If you are using optional equipment refer to the literature supplied with that equipment for
additional connection details.
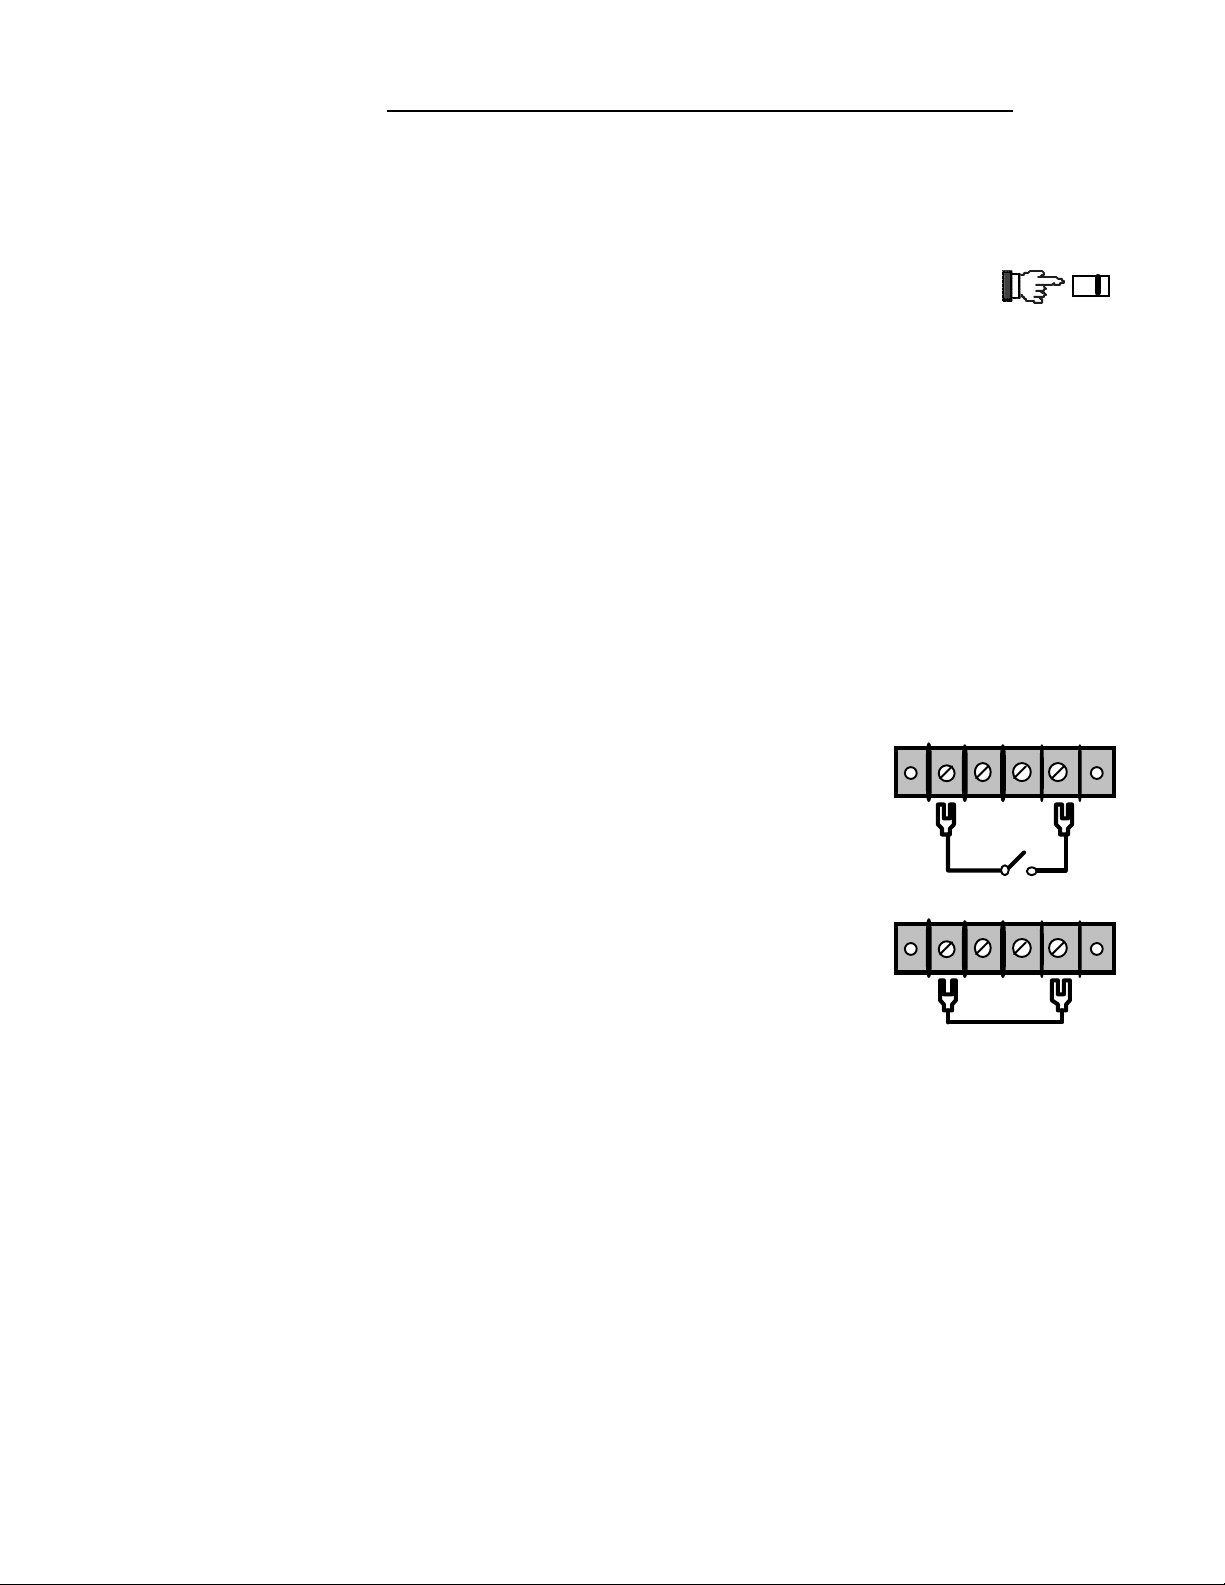
START SWITCHES - connect one lead to the terminal marked S1 and the
SP KR +S1 S2SPKR -
other lead to the terminal marked S2.
A variety of switches can be used. Contact style should be normally open,
momentary contact.
MOMENTARY,
NORMALLY OPEN
REPEAT JUMPER - if continuos playback Is desired, simply connect a
SP KR +S1 S2SPKR -
jumper across switch terminals S1 and S2 as shown. Remember to
temporarily disconnect the jumper prior to recording.
SPEAKERS connect positive lead to the terminal marked SPKR (+), negative lead to terminal
marked SPKR (-).
BA CK UP
ONOFF
Stop and Listen Digital Message Recorder 'S': Operating Instructions
Page
3
Page 4
SECTION 2 - RECORDING MADE EASY
2.1 Ensure that the audio source is connected to the LINE IN jack of the DMR 'S' as shown in
the CONNECTIONS DIAGRAM and that any auto repeat jumpers (if used) have been temporarily
disconnected or disabled.
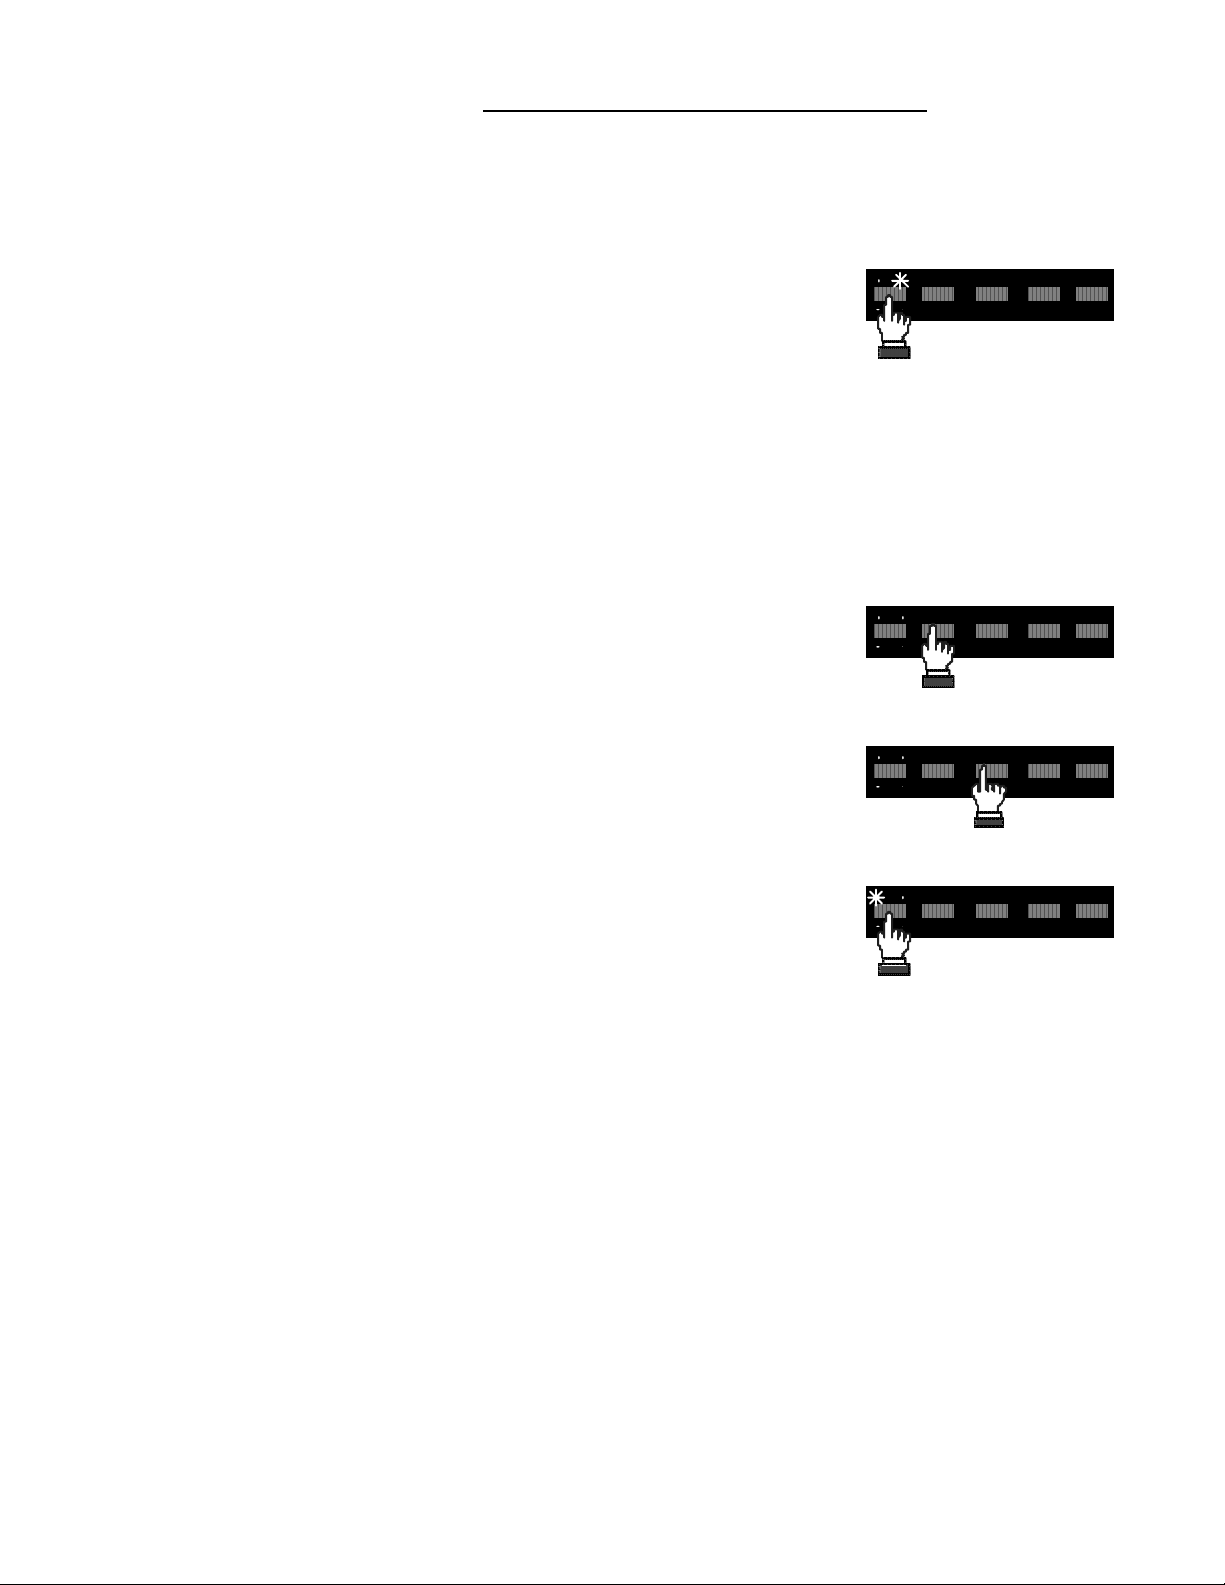
2.2 Press the REC/PB (record/playback) button until the red
(record) indicator light turn s on.
2.3 Set the output level of the Source (typically a cassette recorder is used). The DMR 'S'
has a monitor feature that allows you to hear what is being recorded through the external
speaker. If distortion is apparent through the monitor feature, the input level is too high and
should be reduced accordingly.
TIP A good rule of thumb is to use as much input level as possible without going into clipping. It
is not possible to damage the unit by overdriving the input.
2.4 Press STOP - this erases any previously recorded message and
prepares the DMR 'S' for recording. Cue the audio source to the point
at which you wish the recording to begin.
2.5 Press the START button to begin the recording process and
start the audio source. When you have finished recording press the
STOP button to end the recording process.
2.6 Your message is now stored in digital memory and will remain
so until you wish to record something else.
Your recording is now held in digital memory and will remain so until you wish to record something
else. The DMR 'S' will retain the message in memory indefinitely unless the power to the unit is
disconnected for a period of longer than 3 weeks (20 days).
Should the DMR 'S' be left unplugged for a long period it is recommended the unit be plugged in
for a minimum of 24 hours prior to re-recording to ensure the internal backup system is
adequately charged.
REC/PB STARTSTOP VOL (+)VOL (-)
1
2
REC/PB STARTSTOP VOL (+)VOL (-)
1
2
REC/PB STARTSTOP VOL (+)VOL (-)
1
2
REC/PB STARTSTOP VOL (+)VOL (-)
1
2
Stop and Listen Digital Message Recorder 'S': Operating Instructions
Page
4
Page 5

SECTION 3 - PLAYBACK !
3.1 Press the REC/PB button until the green playback indicator light
turns on
3.2 Press the START button to begin playback and set the
VOLUME controls to the desired listening level. The external start
switch can also be used to start playback at this point.
3.3 Press VOL(+) to increase the volume and VOL(-) to decrease
the volume. Small increments in volume can be attained by using short
taps on the buttons. (Th e DMR 'S' will “remember” the volume setting
you have selected on every
subsequent playback, even if the DMR 'S' remains unplugged
over a period of time.)
3.4 The message can be stopped during playback by pressing
STOP on the front panel of the DMR 'S' (assuming that any auto repeat
jumpers have been disconnected).
Note The DMR 'S' has been designed so that the message can not be stopped or interrupted
from the external start switch to avoid any interruptions during playback.
3.5 If continuous playback (looping) is desired, connect the auto-repeat jumper between S1
and S2 on the back of the DMR 'S'. At the conclusion of the message the DMR 'S' will restart at
the beginning of the message with no gaps or delays. Remove the auto-repeat jumper to disable
this feature. Continuous playback is useful for background audio, public announcements, etc.
TIP If a delay is desired before the audio track repeats itself, simply leave a bit of blank space
at the beginning or end of the audio track (prior to pushing STOP) when making the recording.
DIFFICULTIES?? - CALL OUR TECHNICAL SUPPORT LINE
TOLL FREE
REC/PB STARTSTOP VOL (+)VOL (-)
1
2
REC/PB STARTSTOP VOL (+)VOL (-)
1
2
REC/PB STARTSTOP VOL (+)VOL (-)
1
2
REC/PB STARTSTOP VOL (+)VOL (-)
1
2
OR
1-800-387-2365
Stop and Listen Digital Message Recorder 'S': Operating Instructions
Page
5
Page 6

CARE AND CLEANING
Your new Digital Message Recorder 'S' has been designed and constructed for the utmost
in quality and durability. Because of it’s 100% solid-state design, the only thing you should
ever have to do is dust it with a dry cloth. A cloth dampened with a mild soapy water
solution can also be used. Do not immerse the unit in water.
If any of the cords become damaged or frayed they should be replaced immediately to
avoid damage to the equipment or any peripheral devices. Contact your nearest dealer or
Stop and Listen for replacements.
The DMR 'S' should be plugged-in to the power source even when not in use to maintain
the internal battery in peak condition. To protect the internal memory backup battery for
long term storage, ensure that it has been sufficiently charged by leaving the unit plugged
in with the (Memory) Backup switch turned ON for 48 hours, then turn the (Memory)
Backup switch OFF and unplug the unit.
N.B. It is recommended that the 120 volt power outlet used for the equipment be
uninterruptable (unswitched) to avoid damage to the equipment due to 'power spikes’.
SPECIAL NOTE: OUTDOOR APPLICATIONS
This equipment has been designed for ruggedness and is suitable for operation in almost
any climate, from minus 30°F to plus 140°F. There are a few precautions ,however, which
should be followed to prolong the service life of the units where they are exposed to
environmental extremes:
Where the equipment may be subject to extreme humidity or free standing water the unit
should be enclosed in a water tight and dust-proof enclosure. These can be found (typically
stocked) at an electrical supply store or ordered through Stop and Listen. All connections
to outside equipment should be through the bottom of the enclosure through a “gland nut”
packing or equivalent water-tight connector.
Equipment can be special ordered with a protective (conformal) coating for situations
where exposure to corrosive liquids or gasses is anticipated.
Where extreme cold temperatures are expected (colder than minus 30°F ) the equipment
enclosure should be suitably insulated. Where a battery is used in conjunction with the
units, such as in winter solar applications, consideration should also be given to keeping
the battery at suitable operating temperatures.
Where substantial vibration is anticipated the units should be shock-mounted using
appropriate fasteners and all associated wiring and connections should be well secured.
Stop and Listen Digital Message Recorder 'S': Operating Instructions
Page
6
Page 7

SPECIFICATIONS
Digital Sampling Rate is internally selectable and effects Frequency Response and Max. Recording Time as outlined.
Higher frequency responses are preferable for music.
Max. Recording Time (min:sec) 1:20 2:00 2:40 4:00
Frequency Response (@-30dB input) 50-15KHz 50-12KHz 50-6.8KHz 50-4.5KHz
Message Capability Single message, single or continuous play
Audio Input Line Level (200 mV p-p sensitivity), 10 K impedance
Audio Output - Line Level 200 mV p-p to 1V p-p adjustable, 10 K impedance
- Speaker Level 6 watts @ 4 ohms
Memory Type 80nS Fast Page Dynamic RAM
Digital Sampling Rate 70, 50, 37, 32 (Kbps, peak ADPCM)
Memory Backup 14 day capacity, 3.2A-hr storage cell, float charging
A/D Conversion Adaptive Delta Pulse Code Modulation, Flash Approx.
Start Inputs - S1, S2 Momentary Contact Closure for Single Play,
Sustained Contact Closure for Continuous Play
Expansion Capability Not expandable
Power Consumption 360 mA @ 12 VDC (typical, average)
Power Supply 12 VDC output nominal @ 1000 mA, 120 VAC source
Approvals CSA, UL, FCC CLASS A Tested and Approved
Construction Standard Industrial/Commercial, carbon steel enclosure
Operating Temp -20°F to +130°F (-30°C to +55°C)
Dimensions, Weight 6.5"w x10.0"d x1.5"h, 6.5 lbs (16.5w x 25.5d x 3.8h cm., 3 kg)
FCC, CSA NOTIFICATION
This equipment has been tested and found to comply with the limits for a Class A digital device, pursuant to Part 15 of
the FCC Rules. These limits are designed to provide reasonable protection against harmful interference when the
equipment is operated in a commercial environment. This equipment generates, uses, and can radiate radio frequency
energy and, if not installed and used in accordance with these instructions, may cause harmful interference to radio
communications. Operation of this equipment in a residential area may cause harmful interference in which case the
user will be required to correct the interference at his own expense. Equipment changes or modifications not expressly
approved by the party responsible for compliance could void the user's authority to operate the equipment. This
equipment does not exceed Class A limits for radio noise emissions as set out in Schedule V to VIII of the Radio
Interference Regulations of Communications Canada.
WARRANTY
This Stop and Listen Inc. product is warranted against defects in workmanship and materials. If any failure resulting
from a defect in either workmanship or material shall occur under normal use within
purchase, such failure shall be corrected free of charge to the original purchaser by repair or, at Stop and Listen Inc.'s
sole option, replacement of the defective part or parts. No charge shall be made for labor or services performed during
said one year period providing the product is delivered to an Authorized Service Center in the original shipping carton.
This warranty does not cover equipment which has been tampered with in any way, or damage caused by accident,
negligence, alteration, or misapplication. This product must be returned transportation prepaid, properly packed and
insured. This warranty applies only to the original purchaser. NO OTHER WARRANTIES ARE EXPRESSED OR
IMPLIED. STOP AND LISTEN INC. IS NOT LIABLE FOR CONSEQUENTIAL DAMAGES.
one year
from the original date of
Stop and Listen Digital Message Recorder 'S': Operating Instructions
Page
7
Page 8

TROUBLE SHOOTING GUIDE
Please take a few minutes to review the Operating Instructions and to check that all connections
have been made in accordance with the CONNECTIONS DIAGRAM. The most common source
of problems with electronic equipment is due to faults in the external wiring and connections. It is
rare that the electronic component itself will develop a fault.
Following the instructions in a step-by-step manner helps pinpoint the source of any problems and
helps to eliminate procedural problems. Once you are confident of the connections and have
reviewed the instructions, the following guidelines may prove helpful. Effective trouble shooting is
best done by using a process of elimination.
No Power, lights don't come on:
checked with a lamp). Check the internal fuse and replace with a 1 Amp, Type 3AG if required
Erratic Operation
minimum 10 seconds. Turn the BACKUP switch back on and plug the unit in, re-record the audio track. Ensure the unit
has been adequately charged by leaving it plugged in overnight with the BACKUP switch turned ON.
Doesn't Record, monitor feature doesn't work
connecting the monitor speaker to a source that is known to be working.
Can't Record Whole Message
configuration on pg. to ensure dip switches have been set correctly and that message length doesn't exceed max.
recording time
Audio Crackles or Breaks Up
input signal level
Severe Distortion on Playback
whether the problem is with the source material or with the equipment itself. If using a compact disc or DAT tape
player there may be digital 'beating through the output that interferes with the DMR. Try using a conventional analog
tape player.
Low Playback Volume
to see that external speakers are connected in parallel, not series.
Message is Frequently Lost
plugged into continuous, unswitched power and has been plugged in long enough to recharge internal battery (24 hrs)
- reset the microprocessor by disconnecting the power and turning the BACKUP switch OFF for a
- check to see that source has adequate drive for recording (see RECORDING section). Check
make sure the unit has been plugged into a working power outlet (the outlet can be
- check all connections, ensure that the source output is OK. Try
- ensure the unit has been sufficiently charged with the BACKUP switch ON, check
during high volume sections of audio track- review instructions under recording, reduce
- try recording with no input signal (Line In disconnected). This will quickly determine
- check that the BACKUP switch is in the ON position. Check to ensure that the unit is
If you still experience difficulties after going through the steps outlined above, give our Technical
Support Hotline a call TOLL FREE 1-800-387-2365. Please have a complete description of the
problem along with the model and serial numbers handy.
Stop and Listen Digital Message Recorder 'S': Operating Instructions
Page
8
Page 9
Stop and Listen Digital Message Recorder 'S': Operating Instructions
Page
9
 Loading...