

Page 1
STONEX D1
Digital Level
User Guide
www.stonexpositioning.com
Page 2

Stonex D1 Digital Level – User Guide 1
STONEX D1 Digital Level – User Guide
Ver. 2 – Rev. 2 (December 2015)
Page 3

Stonex D1 Digital Level – User Guide 2
Table of contents
1. What is in the box ........................................................................................ 4
2. Introduction.................................................................................................. 5
3. Technical specifications .............................................................................. 6
4. Preliminary operations................................................................................ 8
4.1 Parts of the instrument .............................................................................................. 8
4.2 Remove and recharge the battery ........................................................................ 9
4.3 Buttons function ........................................................................................................ 10
4.4 Bar-code leveling staff ............................................................................................ 10
5. General operation ...................................................................................... 11
5.1 Instrument set up ..................................................................................................... 11
5.2 Levelling-up................................................................................................................. 11
5.3 Sighting and focusing ............................................................................................. 11
5.4 Optical reading on staff ......................................................................................... 11
5.5 Azimuth measuring .................................................................................................. 12
5.6 Electronic reading ..................................................................................................... 13
5.7 Measuring error types ............................................................................................ 14
6. Instrument settings ................................................................................... 15
6.1 Unit setting .................................................................................................................. 15
6.2 Auto Off setting ......................................................................................................... 16
6.3 Repeated measurement setting ......................................................................... 17
6.4 Setting of positive staff and reverse staff ....................................................... 18
6.5 Setting of measuring times .................................................................................. 19
7 Check and adjustments .............................................................................. 21
7.1 Tripod............................................................................................................................. 21
7.2 Circular bubble........................................................................................................... 21
7.3 Electronic i angle check and adjust ................................................................... 22
8. Instrument maintenance........................................................................... 24
8.1 Cleaning and Drying ................................................................................................ 24
8.2 Storage .......................................................................................................................... 24
8.3 Transportation ............................................................................................................ 24
8.4 Check ............................................................................................................................. 24
9. Copyrights, warranty and environmental recycling ............................. 25
9.1 Safety Recommendations ..................................................................................... 29
Page 4

Stonex D1 Digital Level – User Guide 3
Page 5

Stonex D1 Digital Level – User Guide 4
1. What is in the box
Stonex D1 Digital Level instrument unit N.1
p/n 30-350551 BT32, Li-Ion battery, 7.4V, 2.000mAh N.1
p/n 30-350502 FDJ6-L1, battery charger 110/220V for
BT32/BT82/BT 43 N.1
N/A B3120, flexible barcode tape (2m) N.1
N/A Silica gel N.1
N/A Plastic Rain cover N.1
N/A Wrench (2.5mm) N.1
N/A Wrench (3mm) N.1
N/A Adjusting pin N.1
User Guide (ENG)
Available barcode staffs (to be ordered separately, not included in the
bundle)
p/n 30-070051 B2620, high accuracy fiberglass staff, 2m, 1 segment,
barcode on side 1, mm on side 2
p/n 30-070053 B2650, aluminium staff, 5m, 4 segments, barcode on side 1,
mm on side 2
Page 6

Stonex D1 Digital Level – User Guide 5
2. Introduction
Thank you and congratulations for your choice and confidence in STONEX.
STONEX D1 Digital Level is a rugged and reliable tool that will cut your working
times and any possible typing and reading error.
To fully appreciate your new Digital Level we suggest to read and fully
understand the User manual.
In case you need additional explanations, please contact your local Stonex
Dealer or forward the request to [email protected].
Product identification.
The model and the serial number are on the right side of the instrument.
Please enter the S/N in the following field refer to this information when you
contact your Dealer or the STONEX Support/Service.
Product: STONEX D1 Digital Level - Serial N.: ___________________
STONEX D1 digital level is designed with a new coding technology, which
maximize work efficiency and minimize typing and staff reading errors,
providing consistent measurement precision and speed, regardless of
operator skill.
Stonex D1 is the perfect levelling instrument for general construction
engineering, deformation surveys, agricultural water conservancy and
geodetic leveling. Using the accurate Stonex fiberglass staff, Stonex D1 can be
used for Third and Fourth-order Geodetic leveling networks.
The fast and accurate automatic compensator gives always high accuracy
measurements and working efficiency. The instrument’s working temperature
is between -20℃ and +50℃.
Page 7

Stonex D1 Digital Level – User Guide 6
3. Technical specifications
ACCURACY
Standard Deviation (1 km double run - ISO 17123-2)
Electronic measurement
±1.5mm (1)
Optical measurement
±1.5mm (1)
Distance measuring accuracy
D ≤10m <±10mm
D >10m <±0.2 %×D (1)
ELECTRONIC MEASUREMENT
Time for single measurement
< 2s
Measuring range
2-80m
Measuring mode
single, tracking
DISPLAY RESOLUTION (mm/ft)
Height
1/0.01
Distance
10/0.1
TELESCOPE
Image
Erect
Magnification
28x
Clear objective aperture
45mm
Field of view at 100m
2.6m
Shortest focusing distance
0.8m
AUTOMATIC COMPENSATOR
Working range
15′
Setting accuracy
±0.4″
POWER
Battery (B31-1400)
Li-ion, 2000mAh, 7.4V
rechargeable
Continuous operation time
Approx. 40 hours
Page 8

Stonex D1 Digital Level – User Guide 7
(1) using Stonex fiberglass staff p/n 30-070051
MEASURING PROGRAMS
On-board programs
DH, inverse staff measurement,
i error checking and adjustment
OTHERS
Display
Segment display
Keyboard
Function key board,6 keys
Interface
RS-232C
Sensitivity of circular level
8'/2mm
Water and dust protection
IP54
Operating temperature
-20℃~+50℃
Net weight
2kg, battery included
Specifications subject to change without notice
Page 9
Stonex D1 Digital Level – User Guide 8
4.Preliminary operations
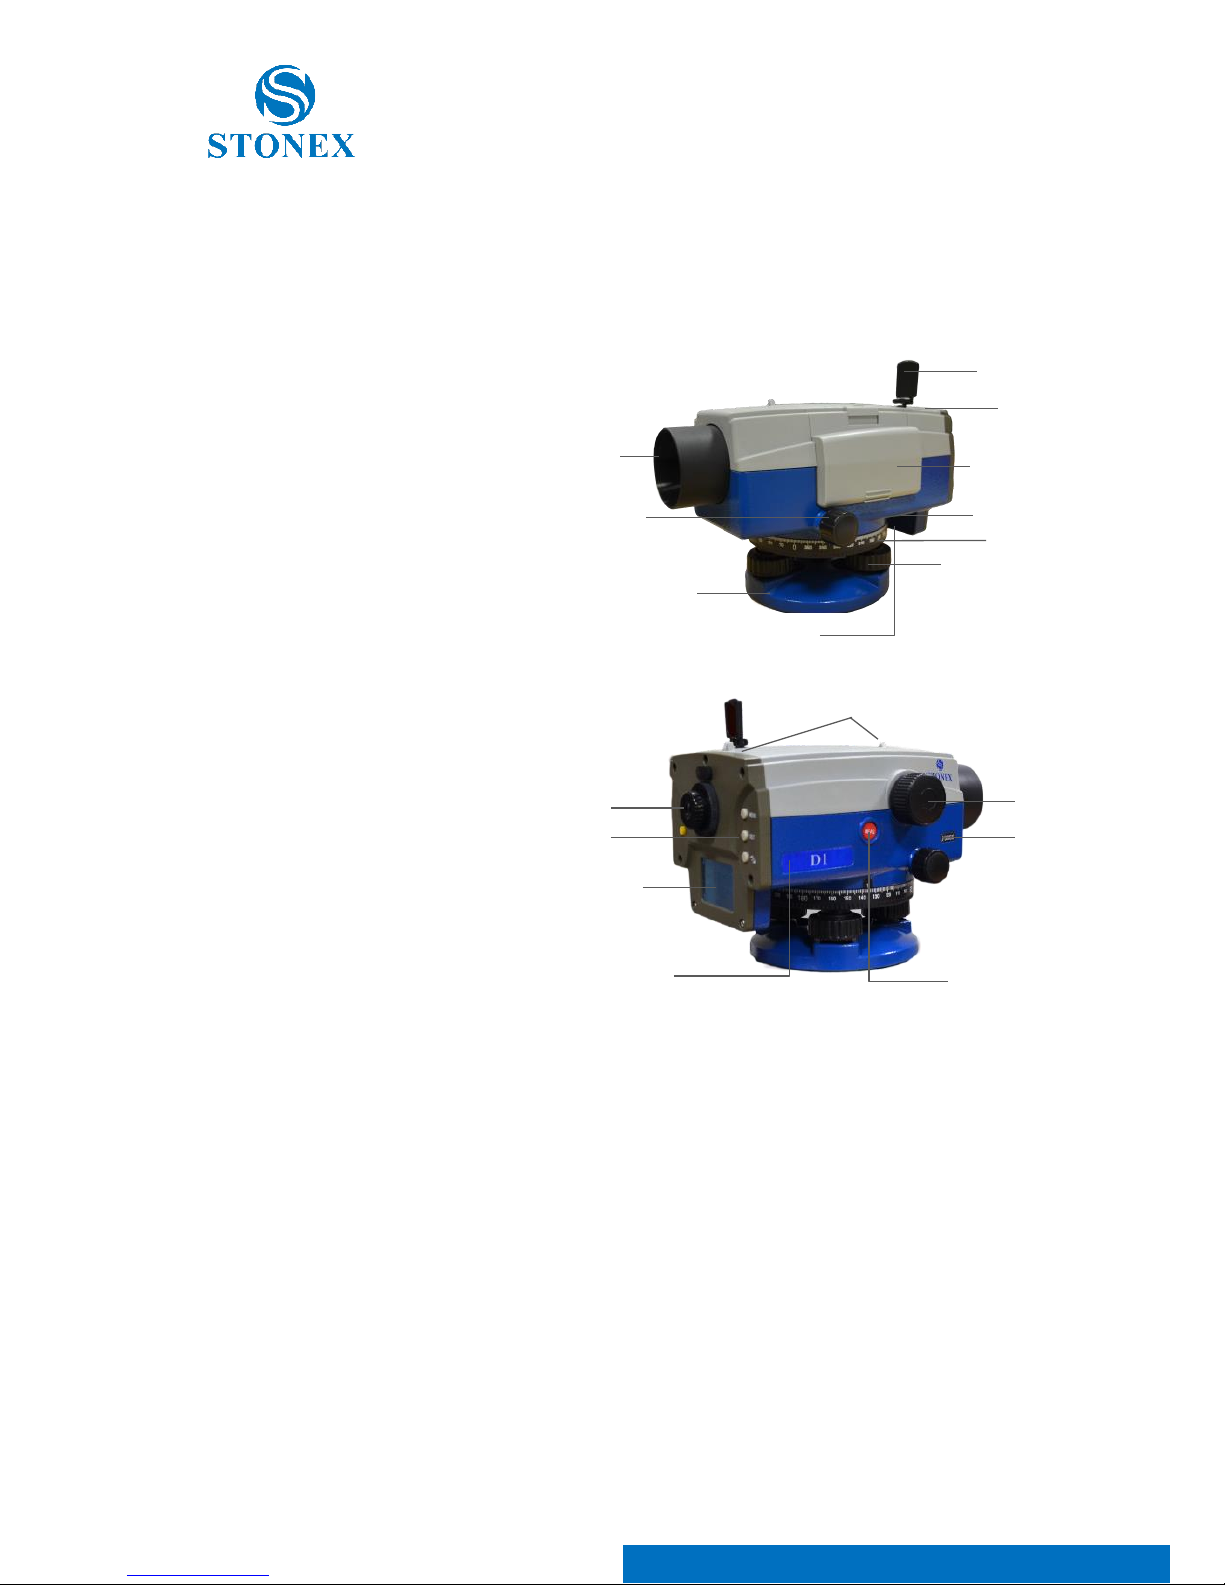
4.1 Parts of the instrument
1. Footscrew
2. Horizontal circle
3. Adjusting screw for circular bubble
4. Battery
5. Circular bubble
6. Mirror
7. Objective
8. Horizontal movement knob
9. Bottom plate
10. Compensator check button
11 Gunsights
12. Eyepiece ring
13. Keyboard
14. Display
15. Model label
16. Trigger key
17. Serial number
18. Focusing knob
1 9 8
7 6 5
4
3
2
10
11
12
13
14
15
16
17
18
Page 10
Stonex D1 Digital Level – User Guide 9
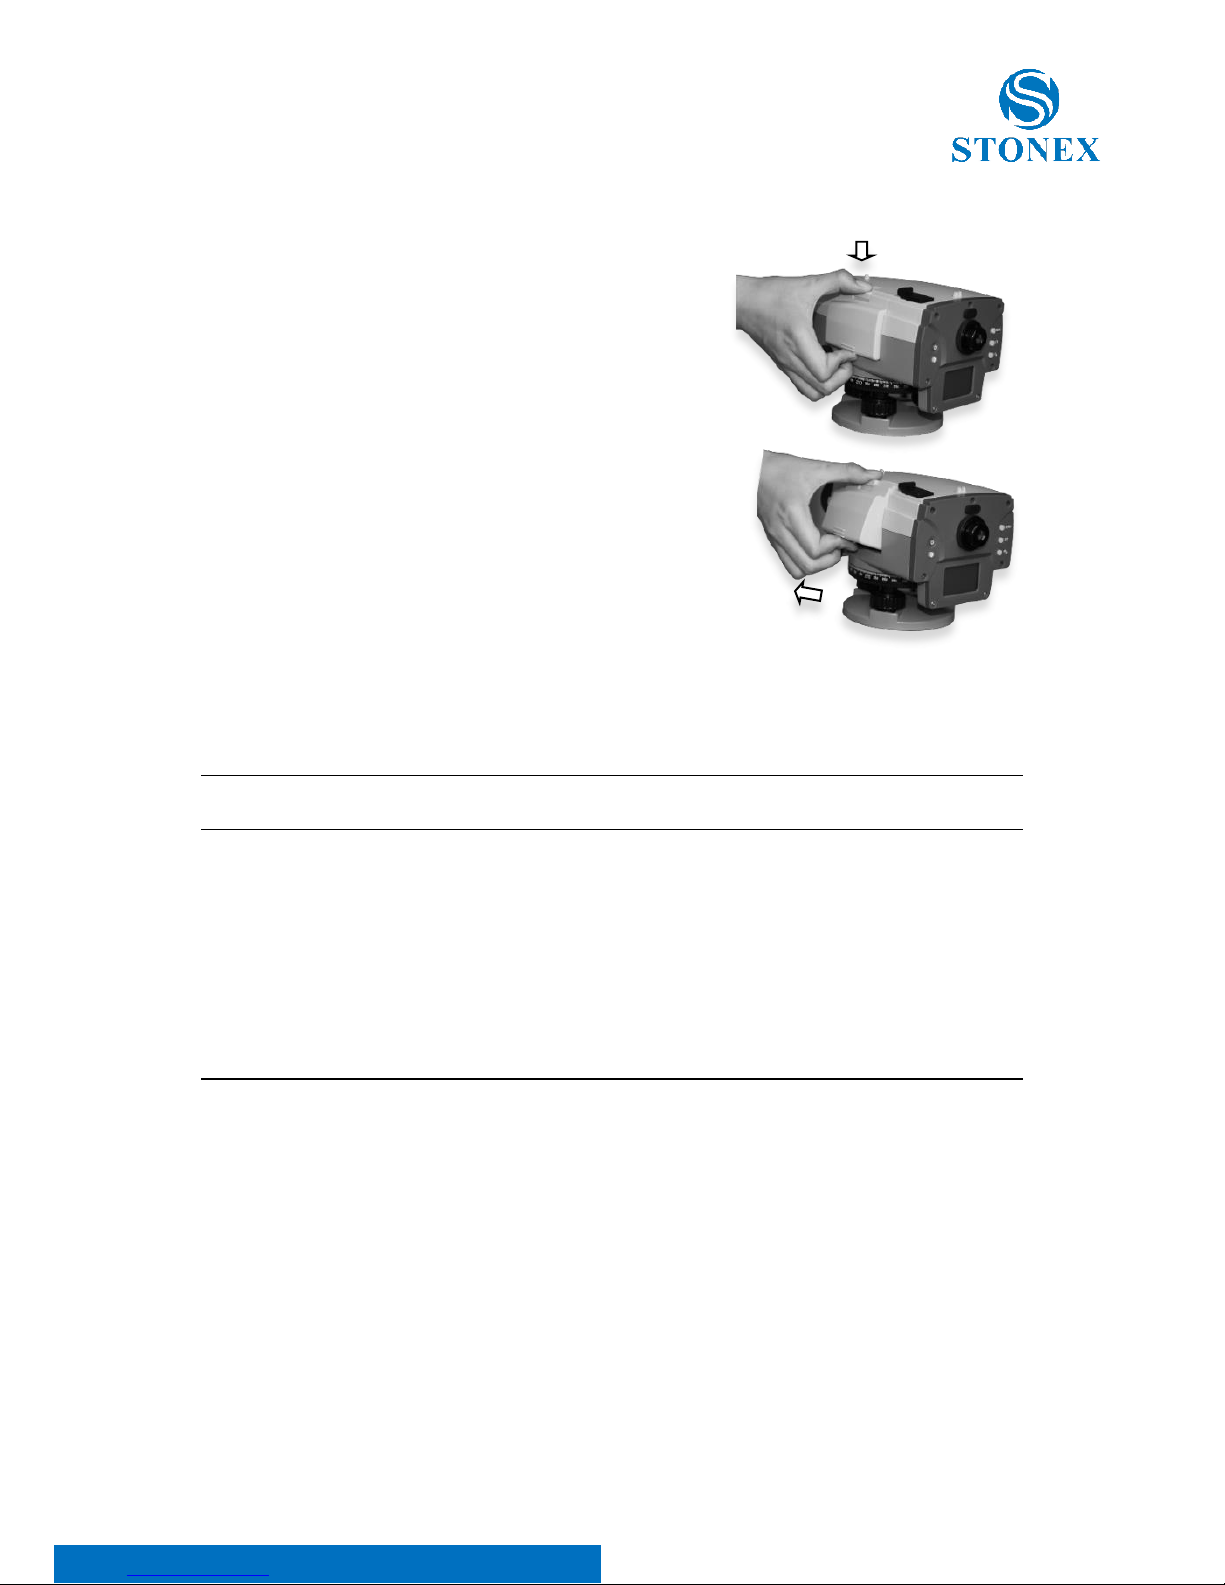
4.2 Remove and recharge the battery
Removing the battery
Press the buckle and pull out the battery.
Recharging the battery:
Insert the charger jack into the plug of
the battery;
insert the charger into a 100VAC-
240VAC (50-60Hz) plug,
check if the the LED is lite (RED).
As the recharge is completed, the LED turns
green. This takes about 3-4 hours.
Caution: the battery charger is intended for indoor use only.
Note:
1. New batteries need to be fully charged and discharged several times to reach their
best performances; the first charge should be not less than 10 hours, continuing the
charge even when the led is green;
3. LED behavior:
- RED lit: charging in progress;
- GREEN lit: charging completed;
- RED Flashing: no-loading, connection failed or defective battery.
Page 11
Stonex D1 Digital Level – User Guide 10
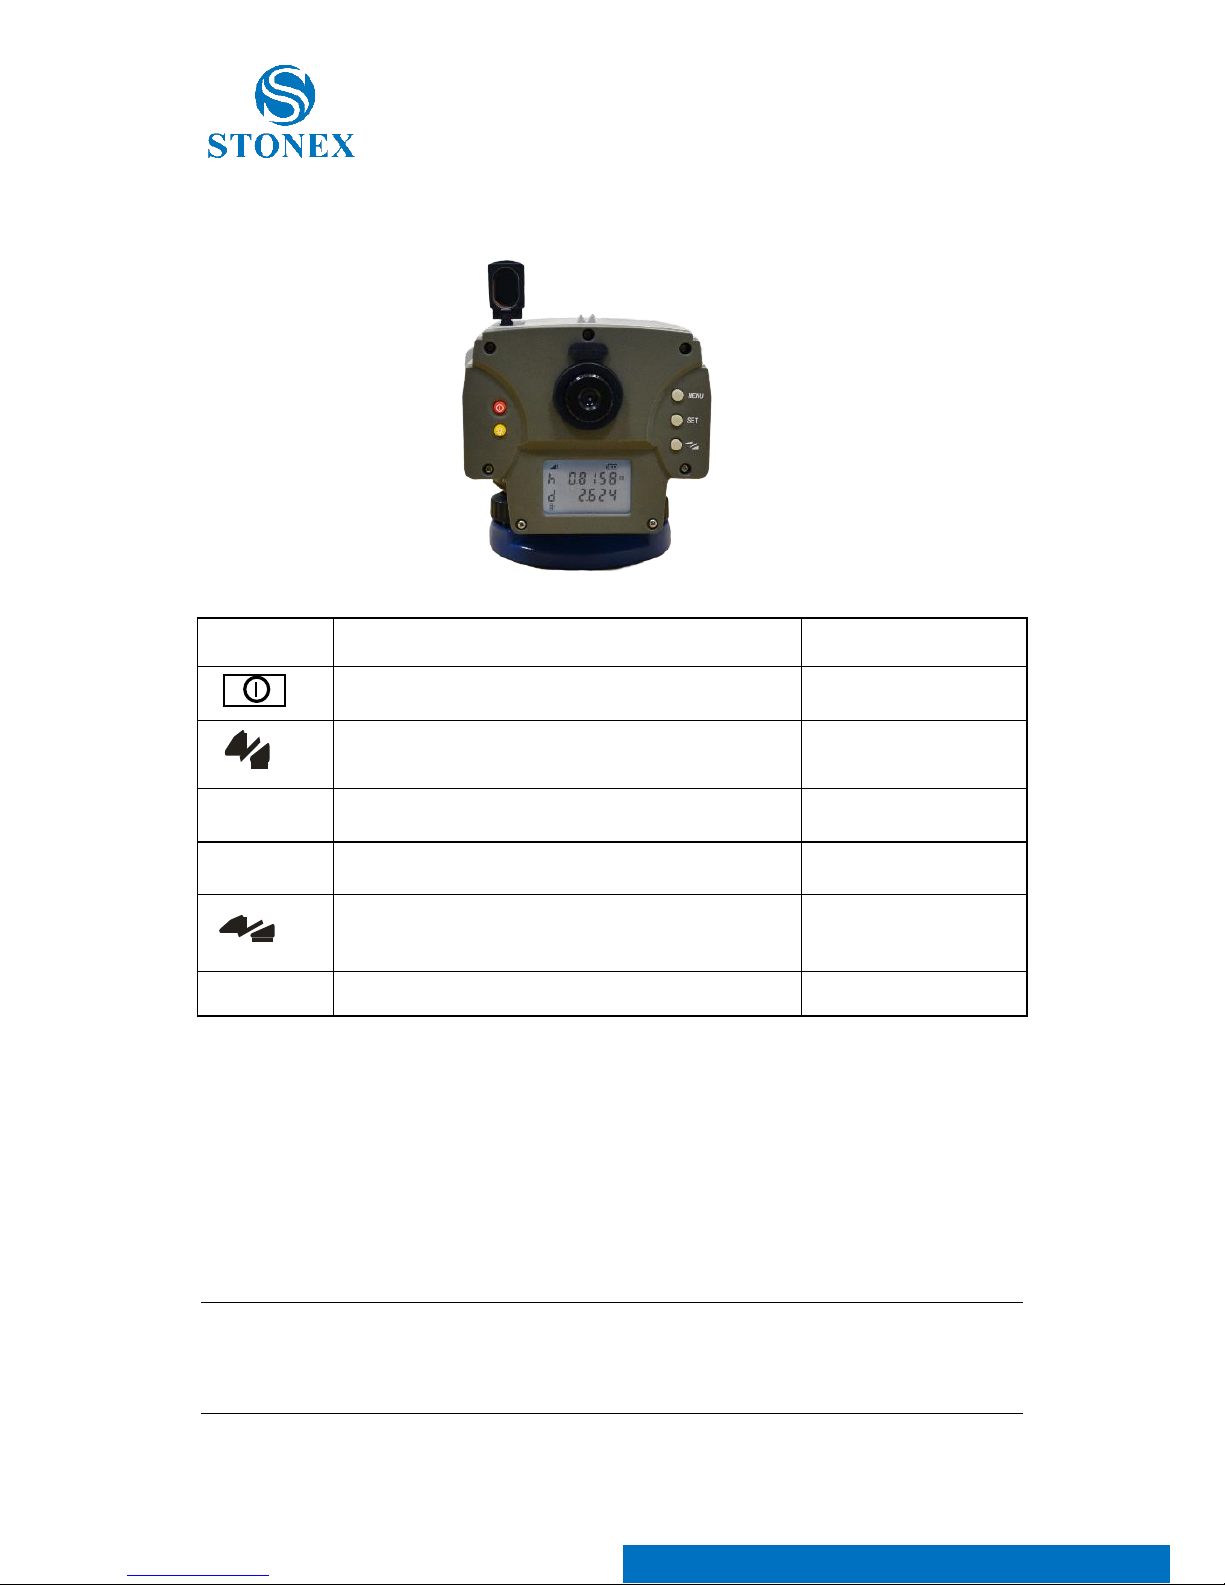
4.3 Buttons function
Key
First Function
Second Function
Power on/off
Backlight on/off
MENU
Enter and shift setting menu
Change settings
SET
Save settings
Change display mode for distance and height
Return to previous
menu
MEAS
Start measuring
4.4 Bar-code leveling staff
Digital level D1 electronic readings require a specific bar-code staff. The best
leveling precision is reached using accurate fiberglass one section bar-code
staffs. Anyway even aluminium foldable staff and the coded band included in
the basic set can be used for less accurate leveling operations.
Note
Only Stonex barcoded staff must be used with D1; staffs from any other producer give
no electronic reading of the staff itself.
Page 12

Stonex D1 Digital Level – User Guide 11
5. General operation
5.1 Instrument set up
Position a solid tripod – aluminium or wooden – on a suitable place around in
the middle of the levelling base, and firmly fix it on the ground; the tripod
head should be leveled as flat as possible, to minimize the levelling procedure
using the bubble on the instrument.
Carefully take the instrument from the transport case and place it on the tripod
head. Support it with one hand, and tighten the 5/8” centering screw of the
tripod on the bottom of the unit to make sure it is secured to the tripod.
5.2 Levelling-up
Once the instrument is fixed on the tripod, turn the footscrews to make it
perfectly leveled. As the bubble is in the middle of the circular level, the
instrument is pretty leveled.
The bubble image can be directly observed through the mirror (N. 6, pag.7)
5.3 Sighting and focusing
Before to aim to the staff, it is necessary to focus the telescope crosshair. Aim
the telescope toward a bright background and turn the eyepiece ring (N. 12,
pag. 7) until the crosshair appears sharp and absolutely black.
Then aim to the staff sighting through the gunsights (N. 11, pag.7), and turn
the focusing knob (N.18, pag.7) until the staff image appears sharp and is free
from parallax with respect to the crosshair, i.e. there should be no apparent
movement between the horizontal crosshair and a staff graduation when the
observer moves his eye slightly up and down.
Finally turn the instrument with the horizontal movement knob (N.8, pag.7)
unitl the vertical crosshair is exactly aimed on to the centre of the staff.
5.4 Optical reading on staff
After sighting the staff, check whether the circular bubble is in the middle, and
press the compensator button (N.10, pag.7) to check whether the
compensator is working properly.
Read out the value through eyepiece according to the position of horizontal
crosshair on the staff.
Page 13
Stonex D1 Digital Level – User Guide 12
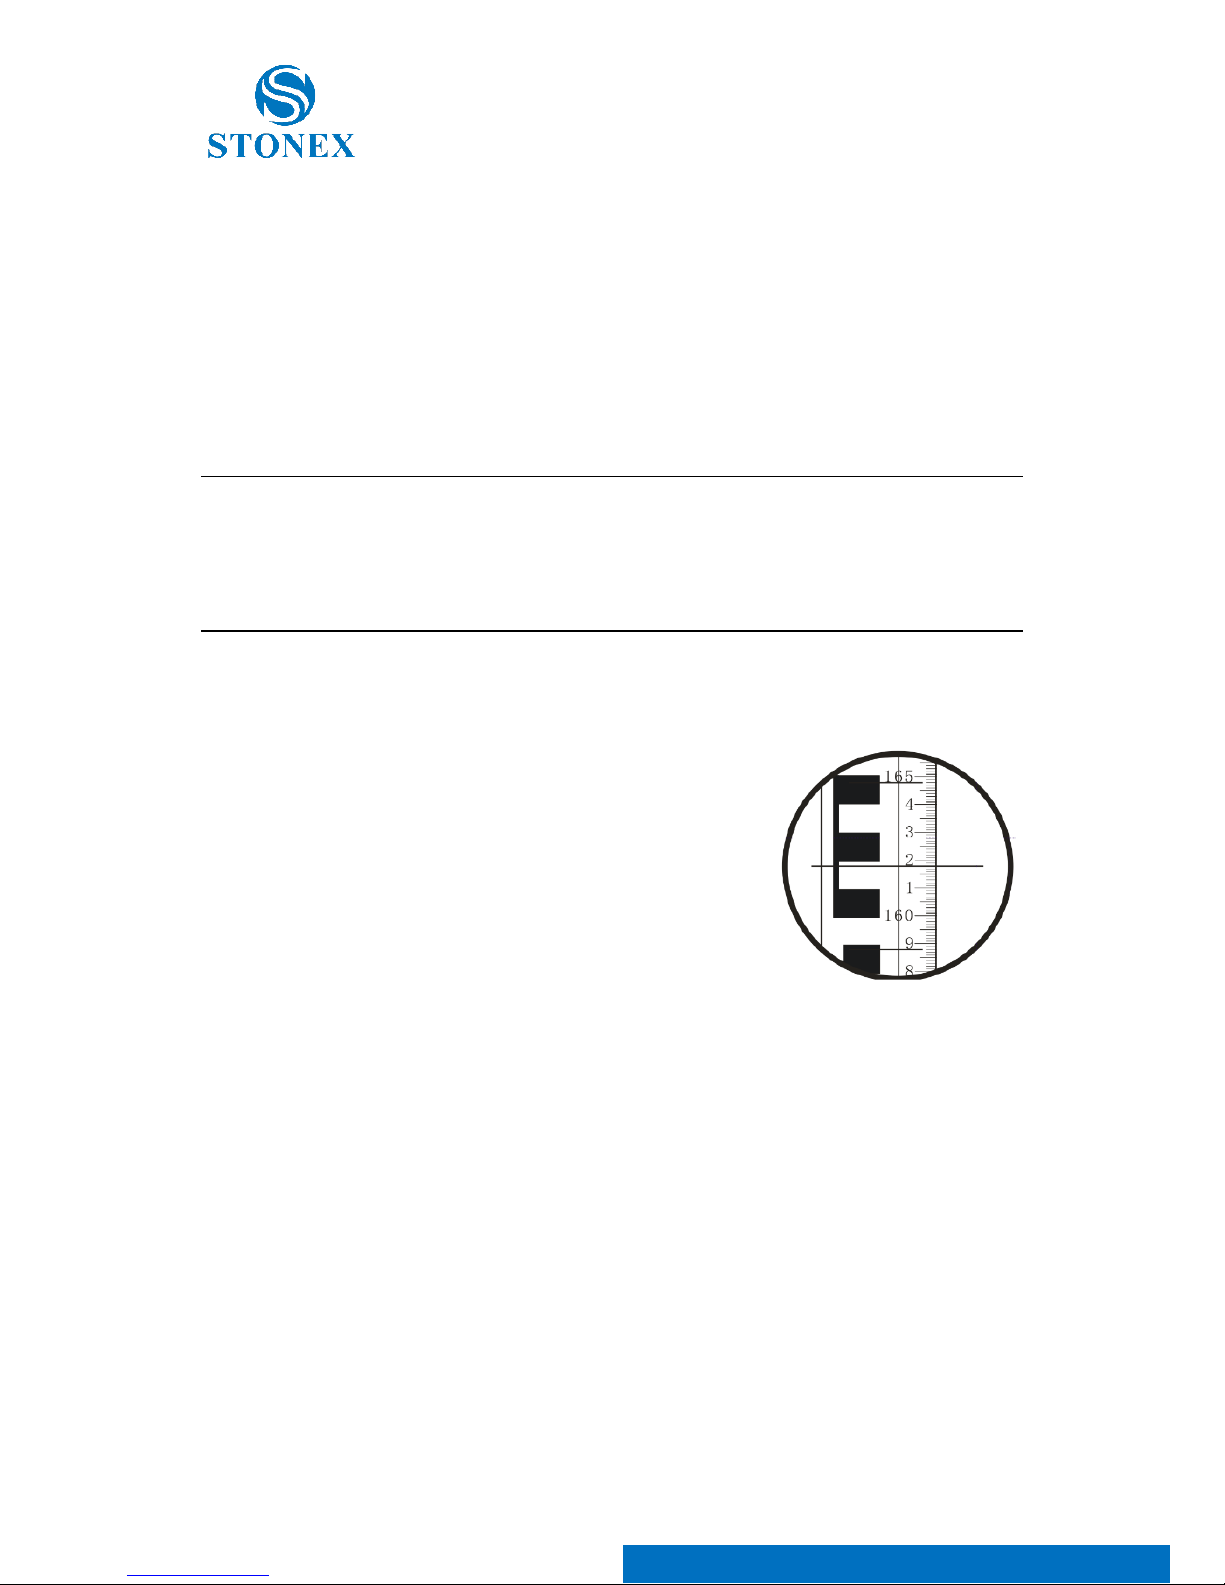
Then read out the millimeter value on the display which is within a centimeter
interval and relevant to horizontal crosshair. When strong wind or ground
vibration happens, the Surveyor should support the center of tripod with
hands so as to make it more stable.
In order to compute the horizontal distance, the following procedure is
necessary:
Read out the values of top line and bottom line of stadia hairs. Calculate the
distance from instrument to staff, that is, L=100×l.
Note:
l: Distance between top line and bottom line in the cross hairs.
L: The distance from target to instrument.
100: Multiplication factor of telescope.
In the right figure, the difference between the upper (1.648) and the bottom
(1.588) line is 0.060m, thus the horizontal distance is 0.060×100=6.0m.
Optical reading of horizontal crosshair is: 1.618m.
Optical reading of top line is: 1.648m.
Optical reading of bottom line is: 1.588m.
Imaging information on staff:
Optical reading of elevation is: 1.618m.
Horizontal distance is: 6.0m.
5.5 Azimuth measuring
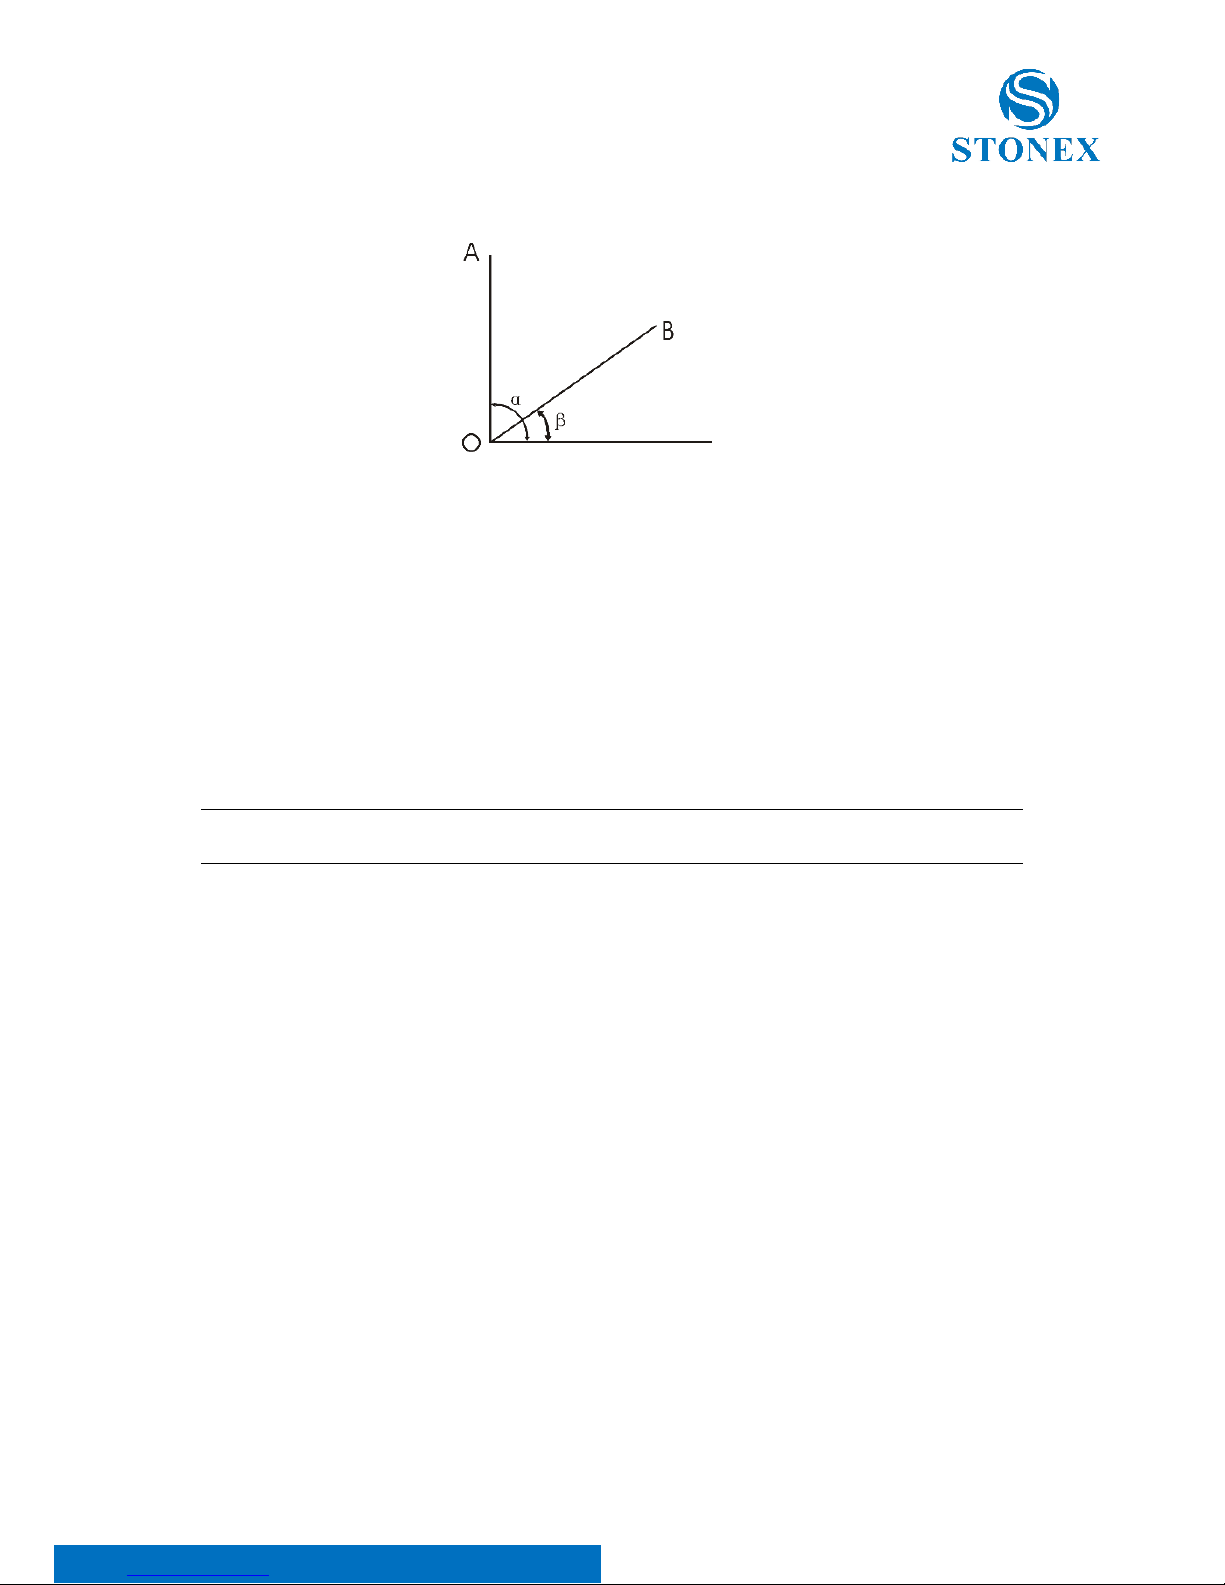
Collimate target A with vertical crosshair, the angle value of horizontal index
plate is X, rotate the instrument, and collimate target B, the angle value of
horizontal index plate is Y, then ∠AOB=X-Y.
Imaging information on staff
Page 14
Stonex D1 Digital Level – User Guide 13
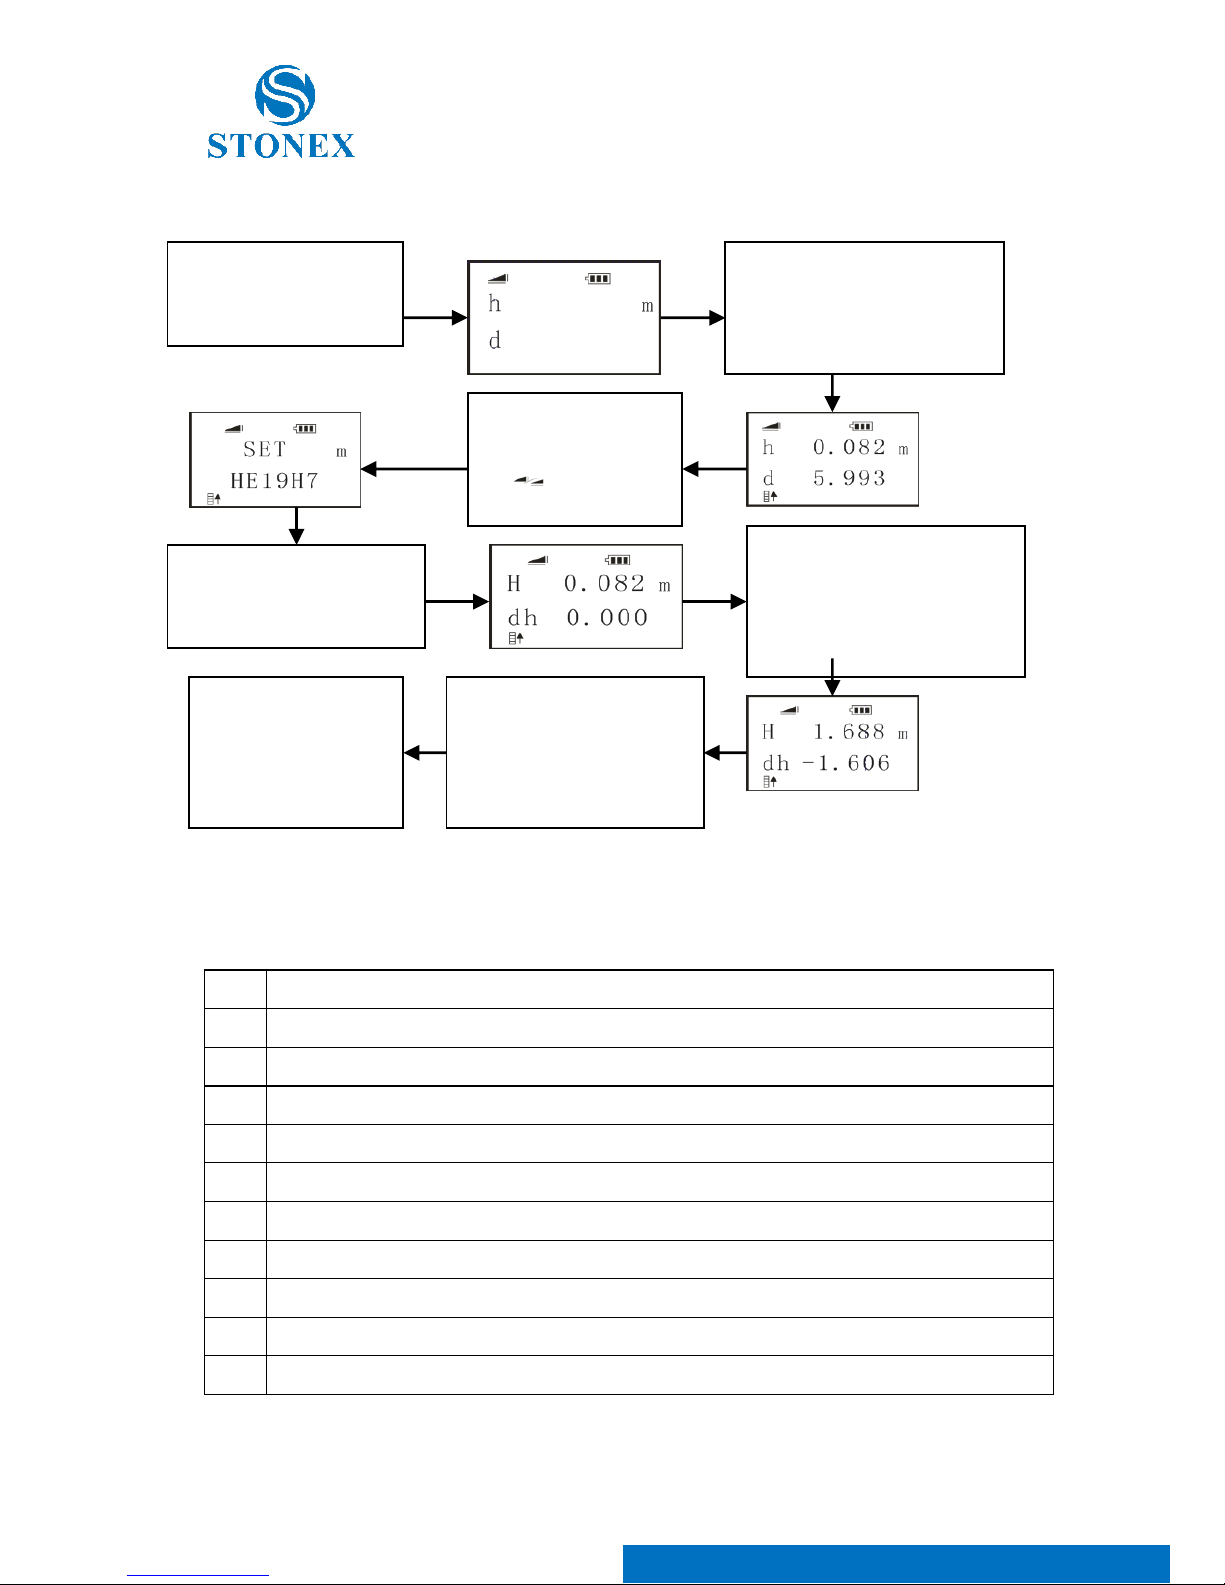
5.6 Electronic reading
Switch on the instrument by long pressing the “POWER” button, and aim to
the staff with optical sight. Turn focusing knob until the staff image appears
sharp and is free from parallax with respect to the crosshair.
The staff must be turned on the bar code side.
Turn tangent screw to place vertical crosshair of reticle in the middle of the
staff. If the horizontal crosshair of the reticle is not perpendicular to staff, move
the staff to make it through. Press “MEAS” button to start measuring.
After measuring result is obtained, press “height” button to enter “height
difference” display, press “MEAS” button again, the instrument calculates and
displays elevation difference automatically.
Press “backlight” button to turn on or off backlight of the screen. After
initiating the instrument, short press “POWER” button to turn on or off battery
indicator. After measurement complete, long press “POWER” button to power
off.
Azimuth measuring
Page 15
Stonex D1 Digital Level – User Guide 14
5.7 Measuring error types
01
Environment is too dark
02
Lack of contrast, environment is not good for digital measurement
03
Incorrect barcode, false focusing, blurry barcode, etc; focus and collimate again
04
Wrong barcode, check staff, focus and collimate again
05
Staff is too close
06
Below barcode is not enough to read, check staff
07
Some barcode is not enough to read, check staff
08
Up barcode is not enough to read, check staff
09
Wrong barcode, check staff
10
Some barcode is not enough to read, check staff
11
Wrong barcode, check staff
Long press
“POWER” button
to power on
Collimate bar-code staff
and press “MEAS”
button to carry out
measuring
press “height”
( ) button
Press “MEAS” button
again to start
measuring
Place bar-code staff
on next surveying
point and press
“MEAS” button
Repeat above steps
until all surveying
points are measured
completely
Long press
“POWER”
button to power
off
Page 16
Stonex D1 Digital Level – User Guide 15
12
Measuring stop, collimate and measure again
13
Environment is too bright
17
Measuring error
6. Instrument settings
As the instrument is initialized, press “MENU” button to enter the preferred
settings. Press “height” button to exit.
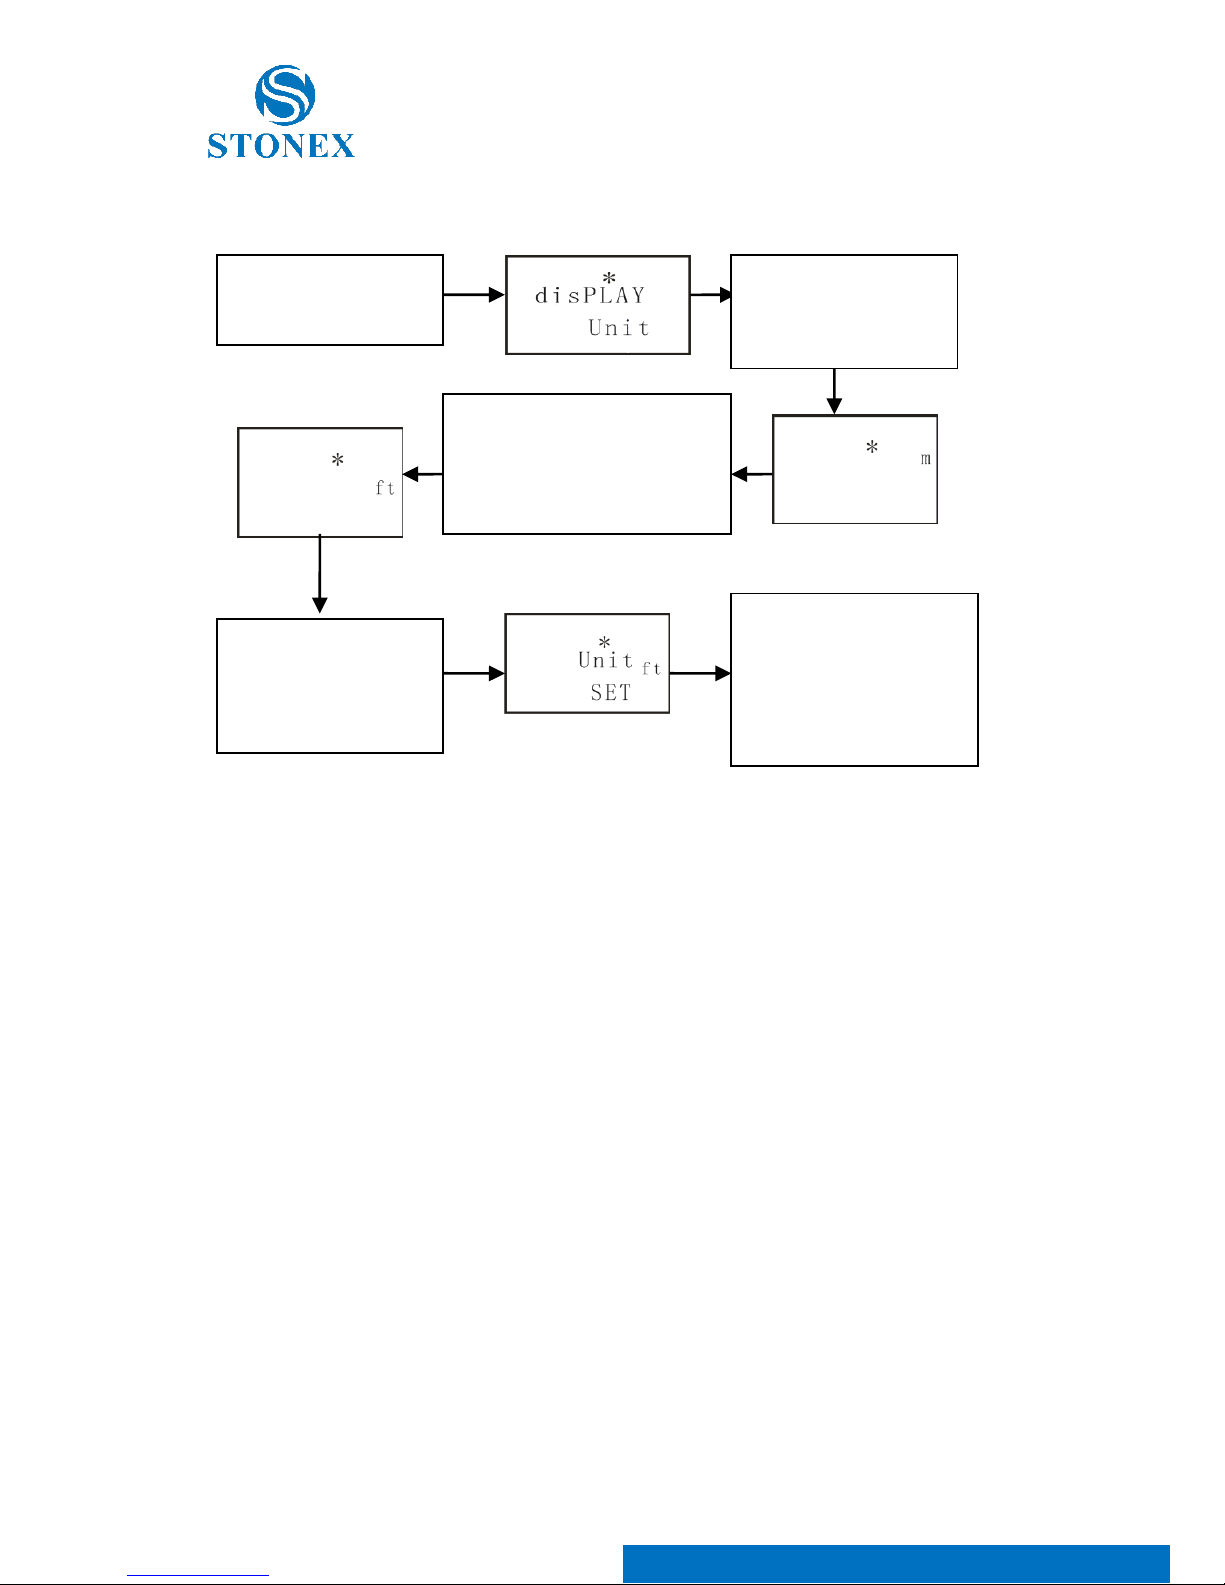
6.1 Unit setting
Display unit (unit selection), and default setting is m(meter). Relevant
minimum resolution is shown in below table.
① Steps:
Press “SET” button to enter function selection menu;
Press “MENU” button to select unit (display circularly): m(meter),
ft(feet), f.i (feet/inch);
Press “SET” button to confirm;
Press “height” button to return to the selection menu.
Unit selection
Displayed value
Minimum resolution
m(meter)
h(height)/dh(elevation difference)
0.0002m
d(distance)
0.001m
ft(feet)
h(height)/dh(elevation difference)
0.0001ft
d(distance)
0.001ft
f.i(feet/inch)
h(height)/dh(elevation difference)
1/8inch
d(distance)
1/8inch
Page 17
Stonex D1 Digital Level – User Guide 16
② Flow diagram:
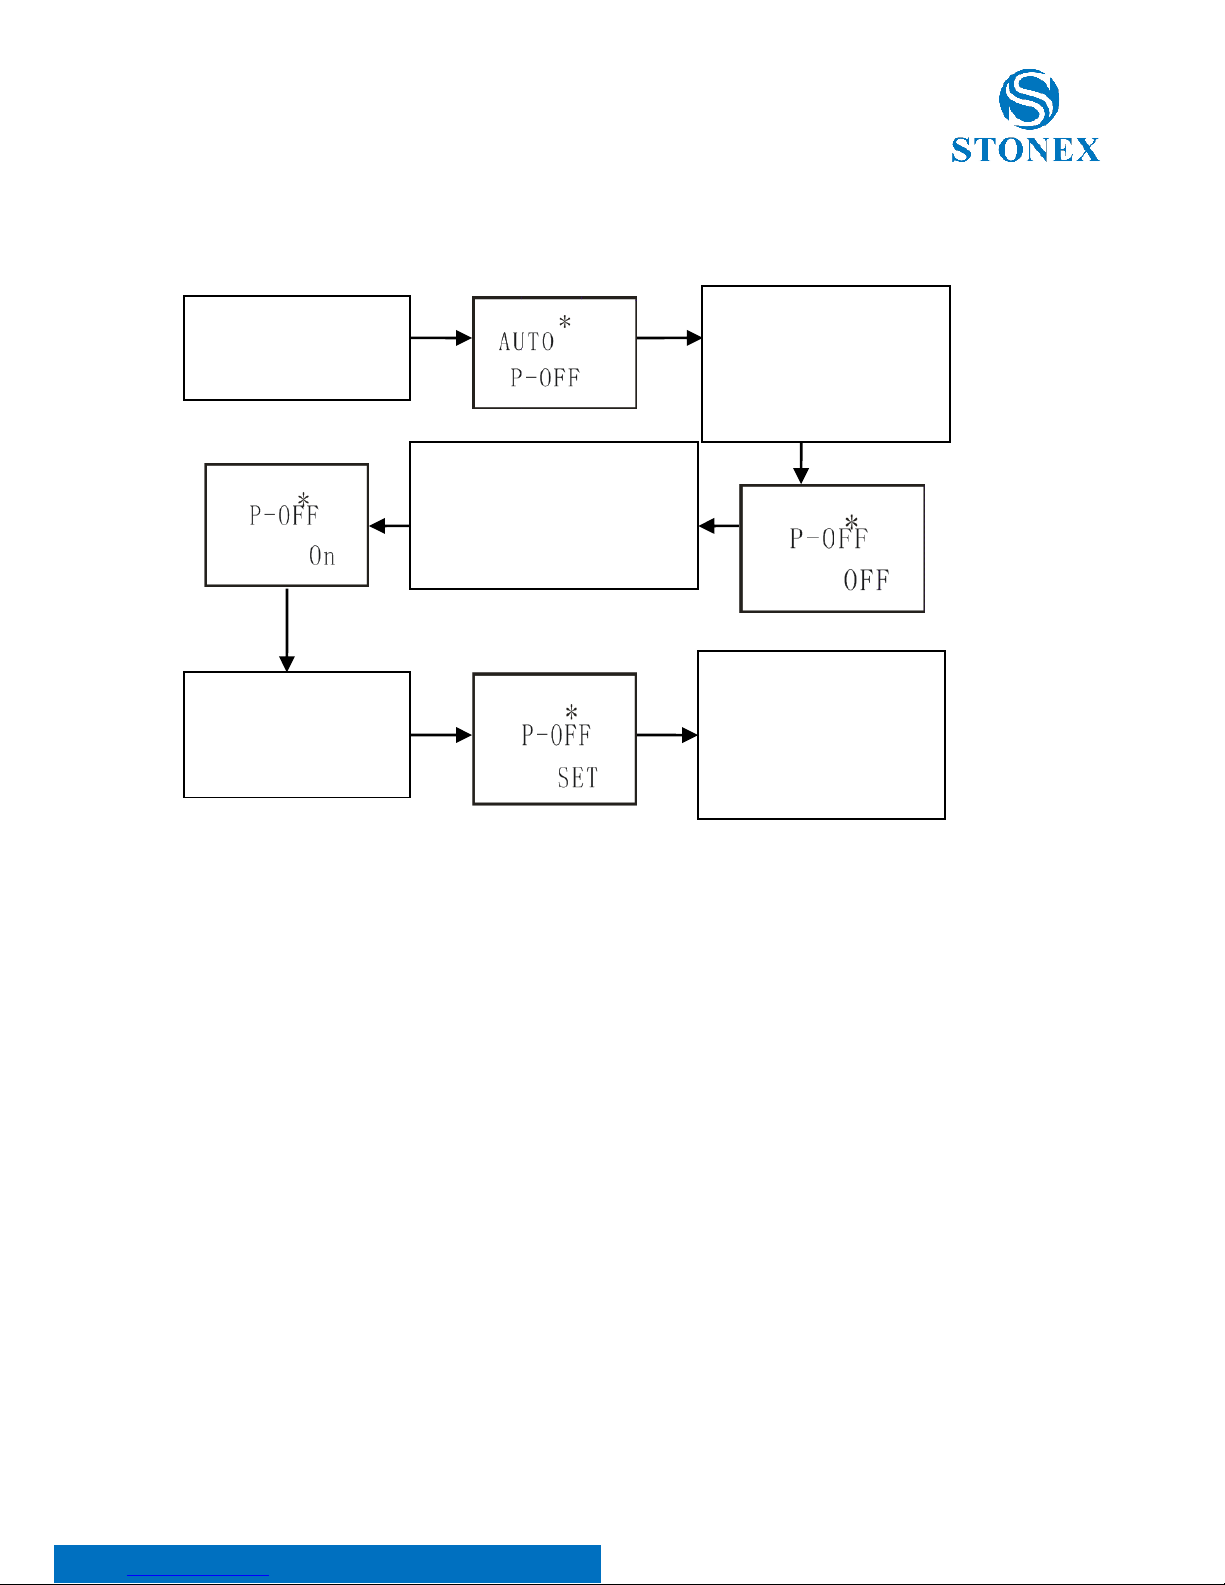
6.2 Auto Off setting
Auto p-off (power off automatically), and default setting is off. When auto off
setting is on and there’s no operation on instrument in ten minutes, the
instrument will be powered off automatically.
① Steps:
Press “SET” button to enter function selection menu;
Press “MENU” button to select (display circularly): off/on;
Press “SET” button to confirm;
Press “height” button to return function selection menu.
Press “MENU”
button
Press “MENU” button
to
Press “SET”
button to
confirm setting
Press “height”
button to return
interface of
instrument settings
Press “SET”
button to enter
into unit setting
Page 18
Stonex D1 Digital Level – User Guide 17
② Flow diagram:
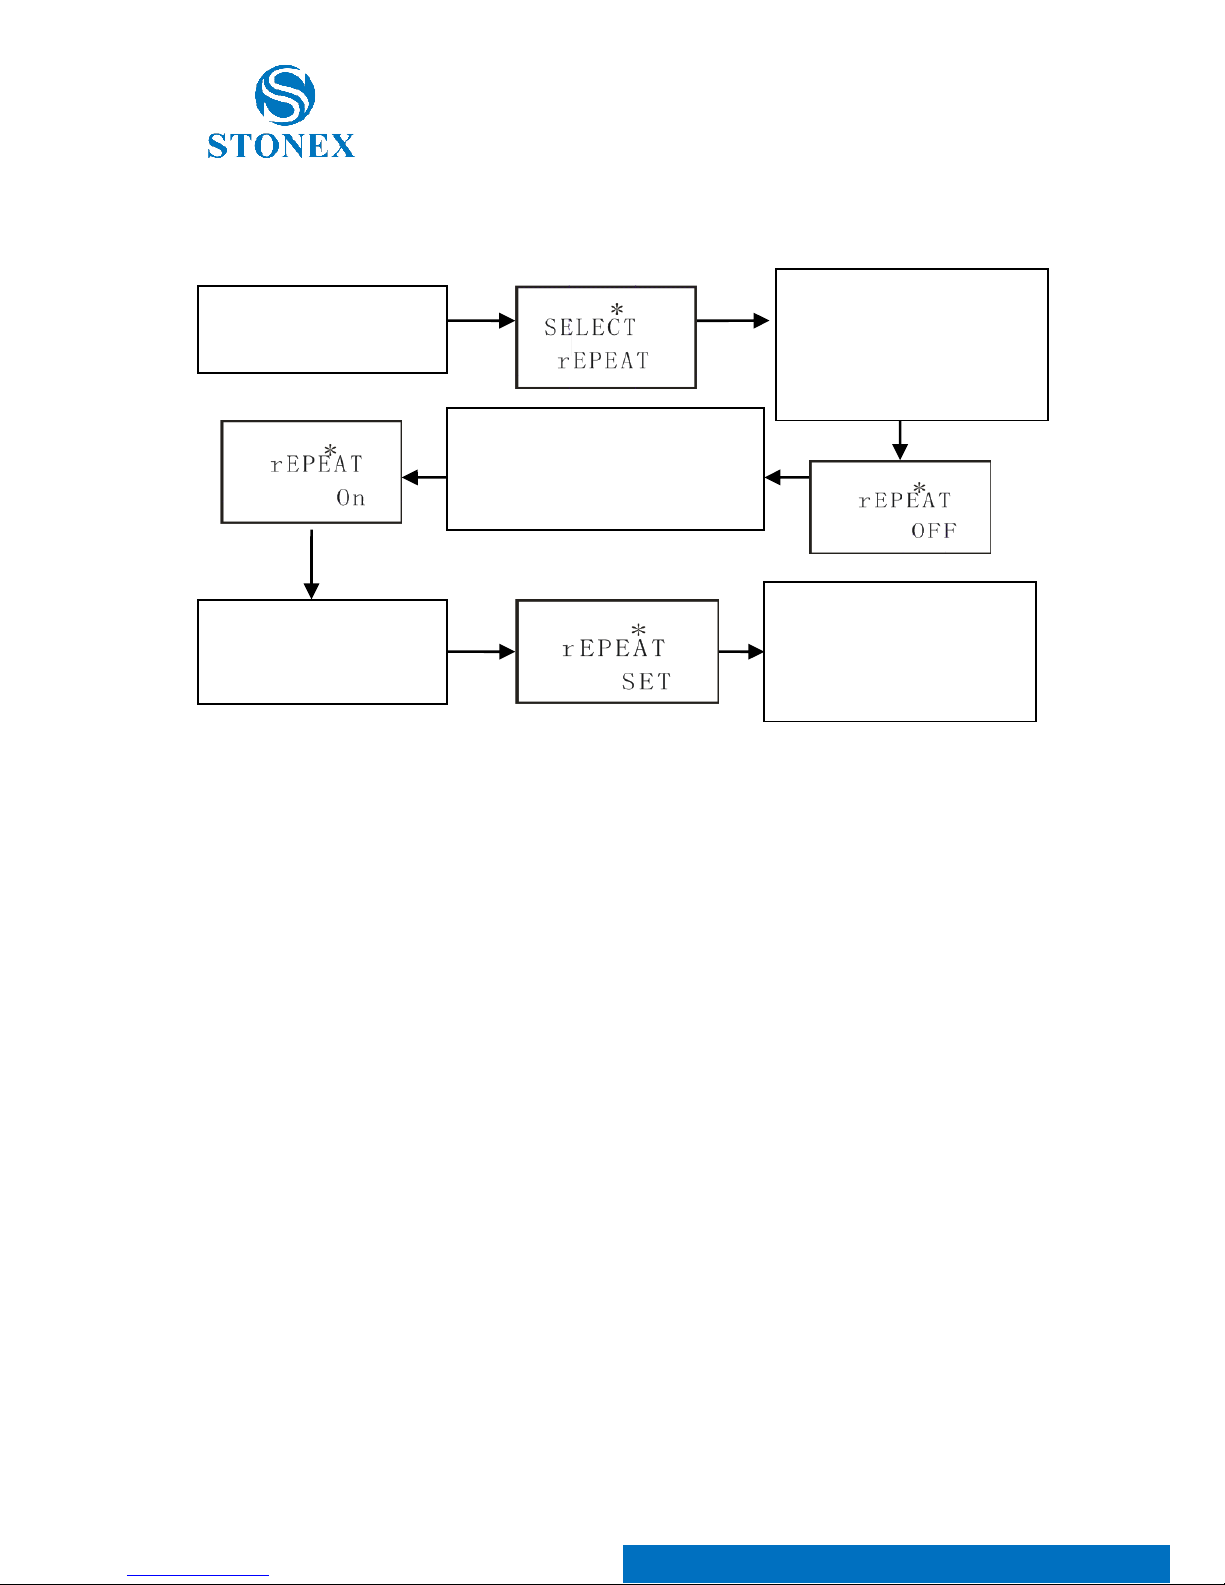
6.3 Repeated measurement setting
Select Repeat (repeated measurement setting), default setting is off.
① Steps:
Press “SET” button to enter function selection menu;
Press “MENU” button to select (display circularly): off/on;
Press “SET” button to confirm;
Press “height” button to return function selection menu.
Press “MENU”
button twice
Press “MENU” button
to set circularly: turn
on(on)/turn off(off)
Press “SET”
button to
confirm setting
Press “height”
button to return
interface of
instrument settings
Press “SET” button
to enter into
setting of powering
off
Page 19
Stonex D1 Digital Level – User Guide 18
② Flow diagram:
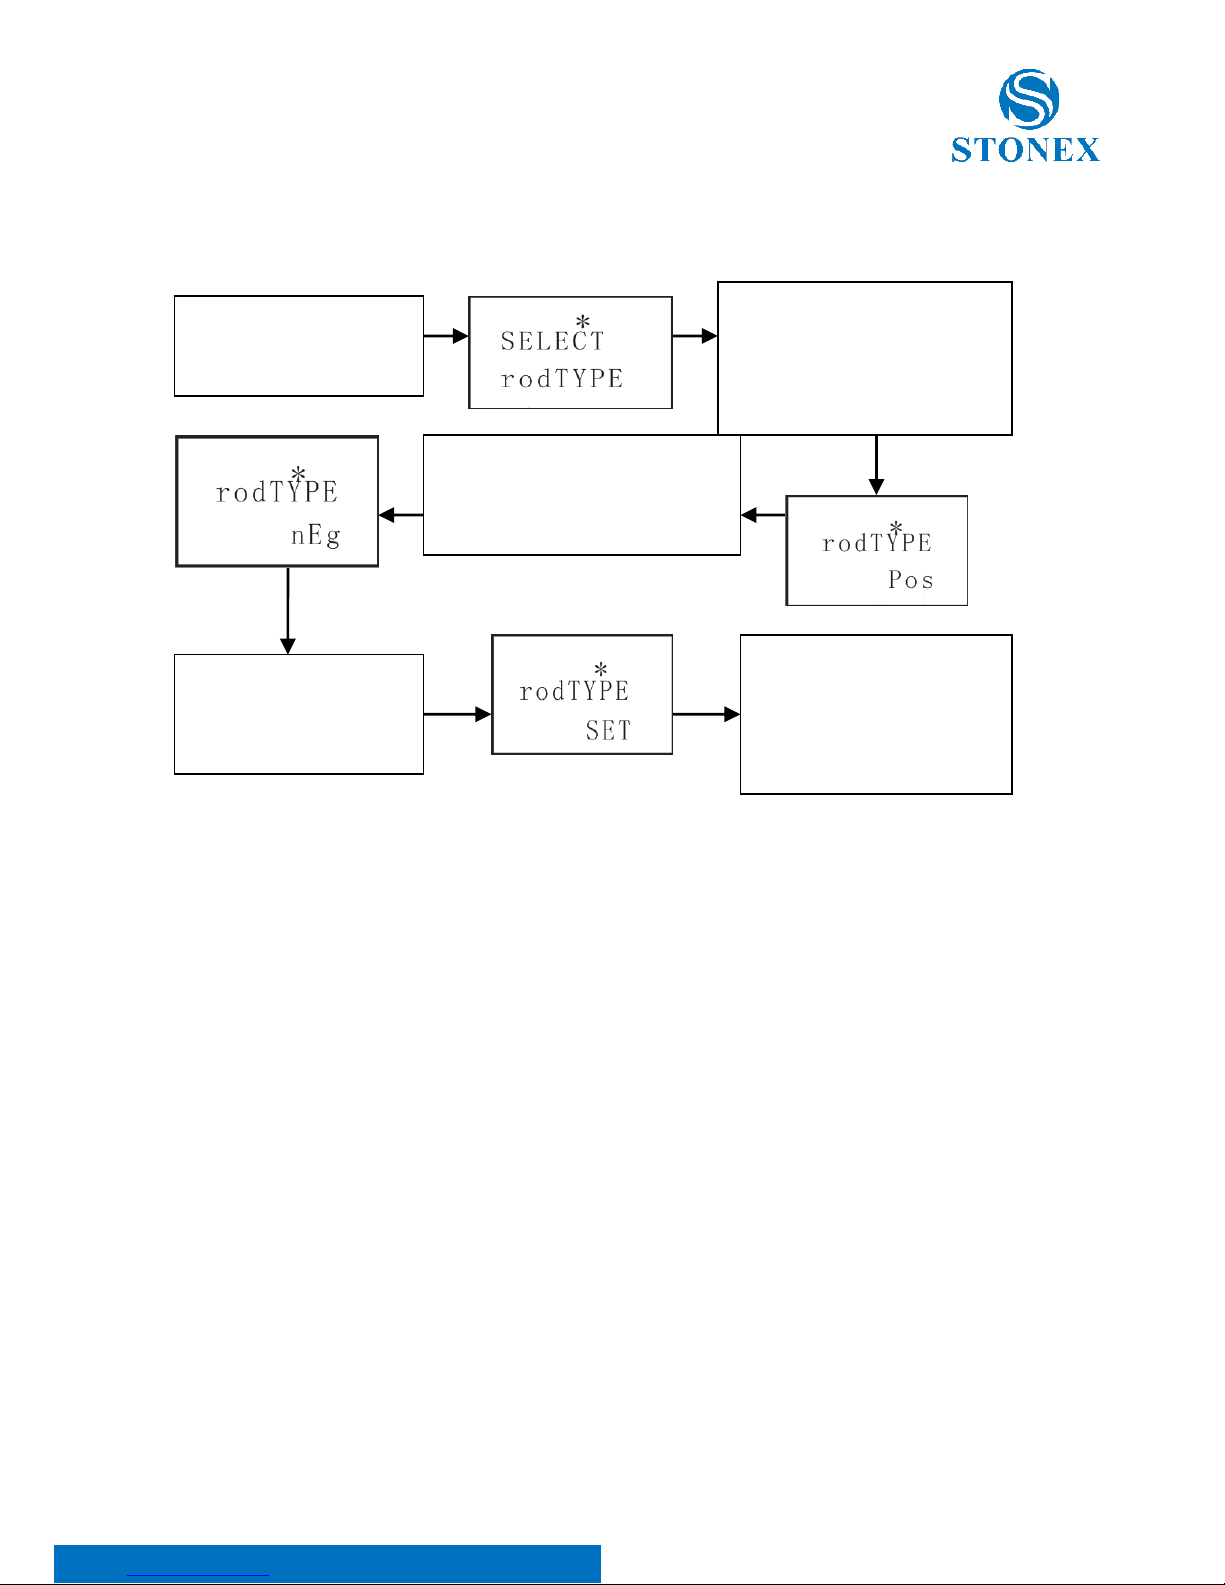
6.4 Setting of positive staff and reverse staff
Select Rodtype (setting of positive or reverse staff), default setting is “pos”
mode (positive staff). Underground and indoor survey often are more
comfortable using reverse staff (“neg” mode).
Once set as “neg” mode, the instrument will enter into this mode while
measuring. Normal measuring can be carried out under the condition that the
instrument must be reset as positive staff (“pos” mode).
① Steps:
Press “SET” button to enter function selection menu;
Press “MENU” button to select (display circularly): pos (positive
staff), neg (reverse staff);
Press “SET” button to confirm;
Press “height” button to return function selection menu.
Press “MENU”
button three times
Press “MENU” button to
set circularly: turn
Press “SET” button
to confirm setting
Press “height” button
to return interface of
instrument settings
Press “SET” button to
enter into setting of
repeating
measurement
Page 20
Stonex D1 Digital Level – User Guide 19
② Flow diagram:
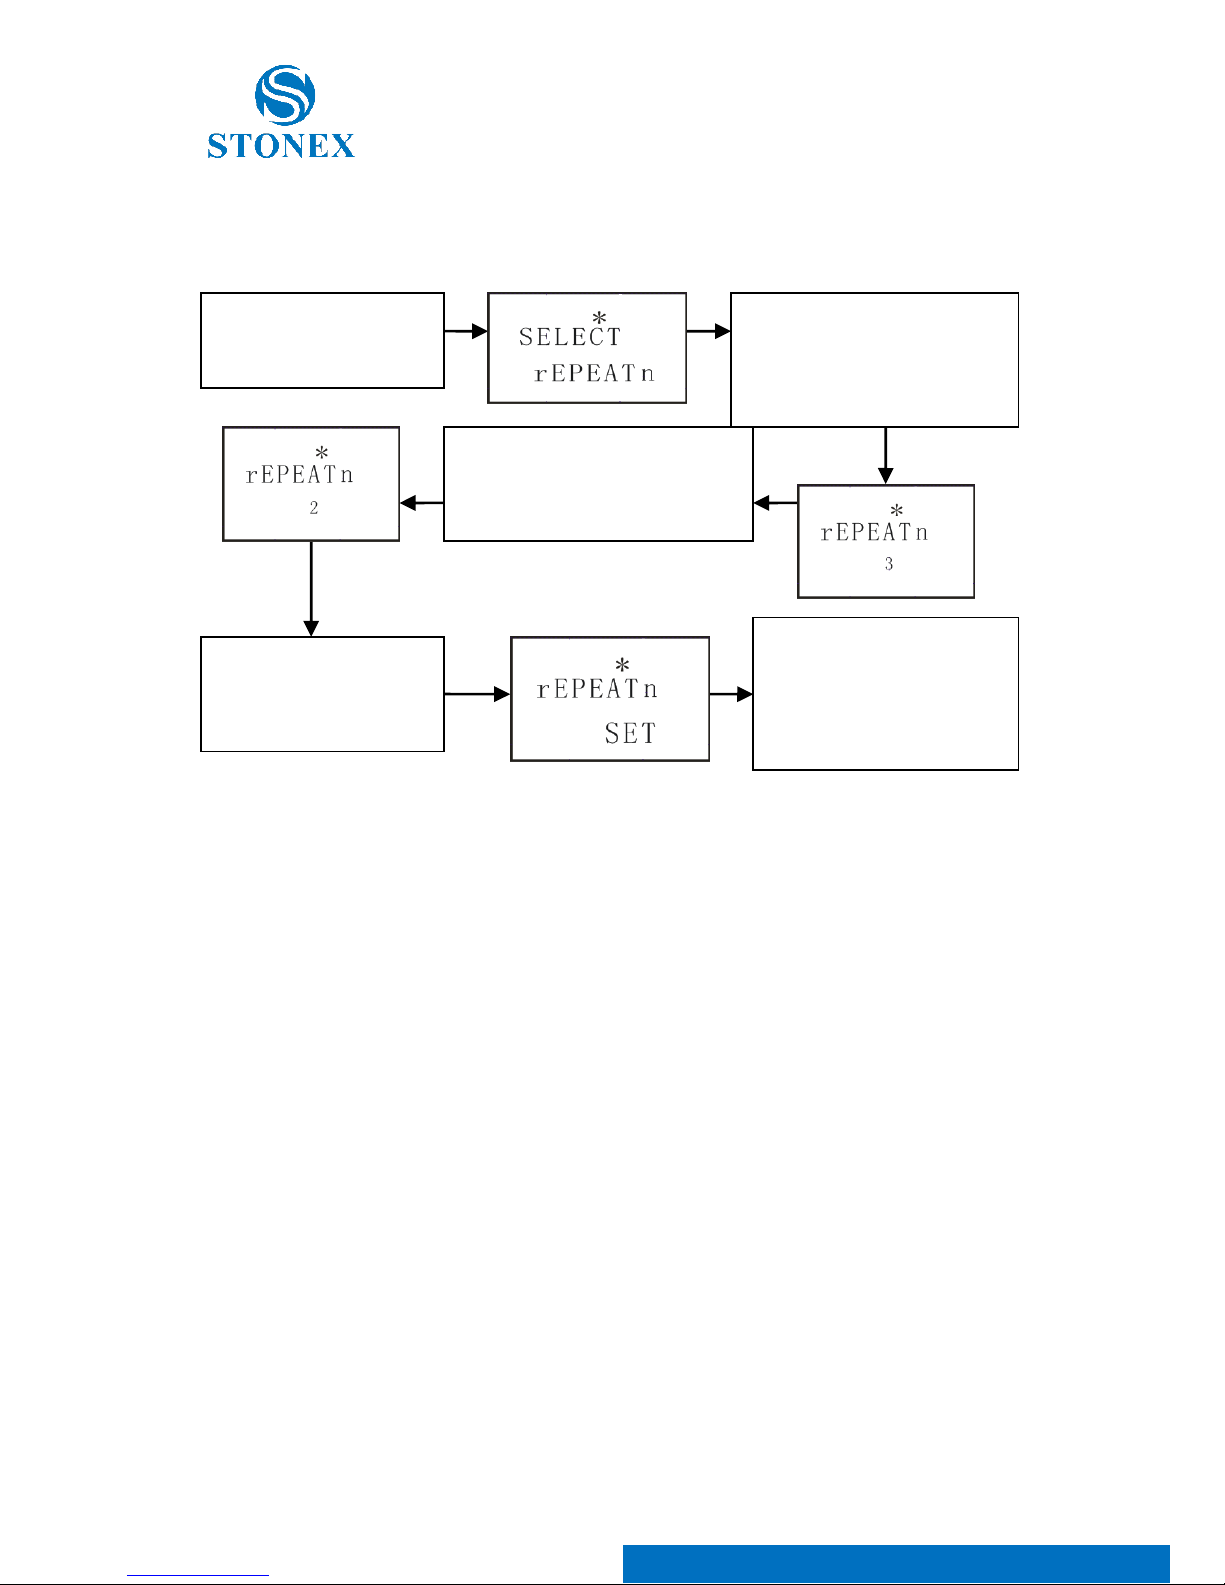
6.5 Setting of measuring times
Select Repeat N (setting of measuring times), default setting is 3 times.
① Steps:
Press “SET” button to enter;
Press “MENU” button to select (display circularly): 1—10;
Press “SET” button to confirm;
Press “height” button to return function selection menu.
Press “MENU”
button four times
Press “MENU” button to
set circularly: (Pos)/ (nEg)
Press “SET” button
to confirm setting
Press “height” button
to return interface of
instrument settings
Press “SET” button to
enter into setting of
positive staff and
reverse staff
Page 21
Stonex D1 Digital Level – User Guide 20
② Flow diagram:
Press “MENU”
button five times
Press “MENU” button to
set circularly: 1,2…10
Press “SET” button
to confirm setting
Press “height” button
to return interface of
instrument settings
Press “SET” button to
enter into setting of
measuring times
Page 22

Stonex D1 Digital Level – User Guide 21
7 Check and adjustments
7.1 Tripod
Before to start a measurement session check the tripod steadiness. If necessary
use a wrench to adjust tightness of the tripod screws.
7.2 Circular bubble
After firmly set up the tripod on the ground and configured the instrument,
turn three footscrews, and center the circular bubble, then rotate the
instrument 180 degrees.
If the bubble moves and doesn’t remain in the center of circular level, further
adjustment of the bubble is necessary.
Half of bubble displacement is taken out with the footscrews and the other
half with one cross screwdriver and two adjustment screws. As an adjustment
screw is tightened the bubble runs towards it and, as it is loosened, the bubble
runs away from it.
The first adjustment screw to be turned, therefore, is the one that is the nearest
to the line connecting the middle of the bubble and the centre of the setting
circle. It is turned only until the bubble reaches the centre of the circle or until
it can be set in the centre by means of the other screw.
It is necessary to complete the adjustment that the screws must be tuned. The
circular bubble is in correct adjustment when it stays in the centre of the circle
in whatever direction the telescope is pointing.
Keep the circular level in adjustment, thereby ensuring that the compensator
will always be well within its working range.
Page 23
Stonex D1 Digital Level – User Guide 22
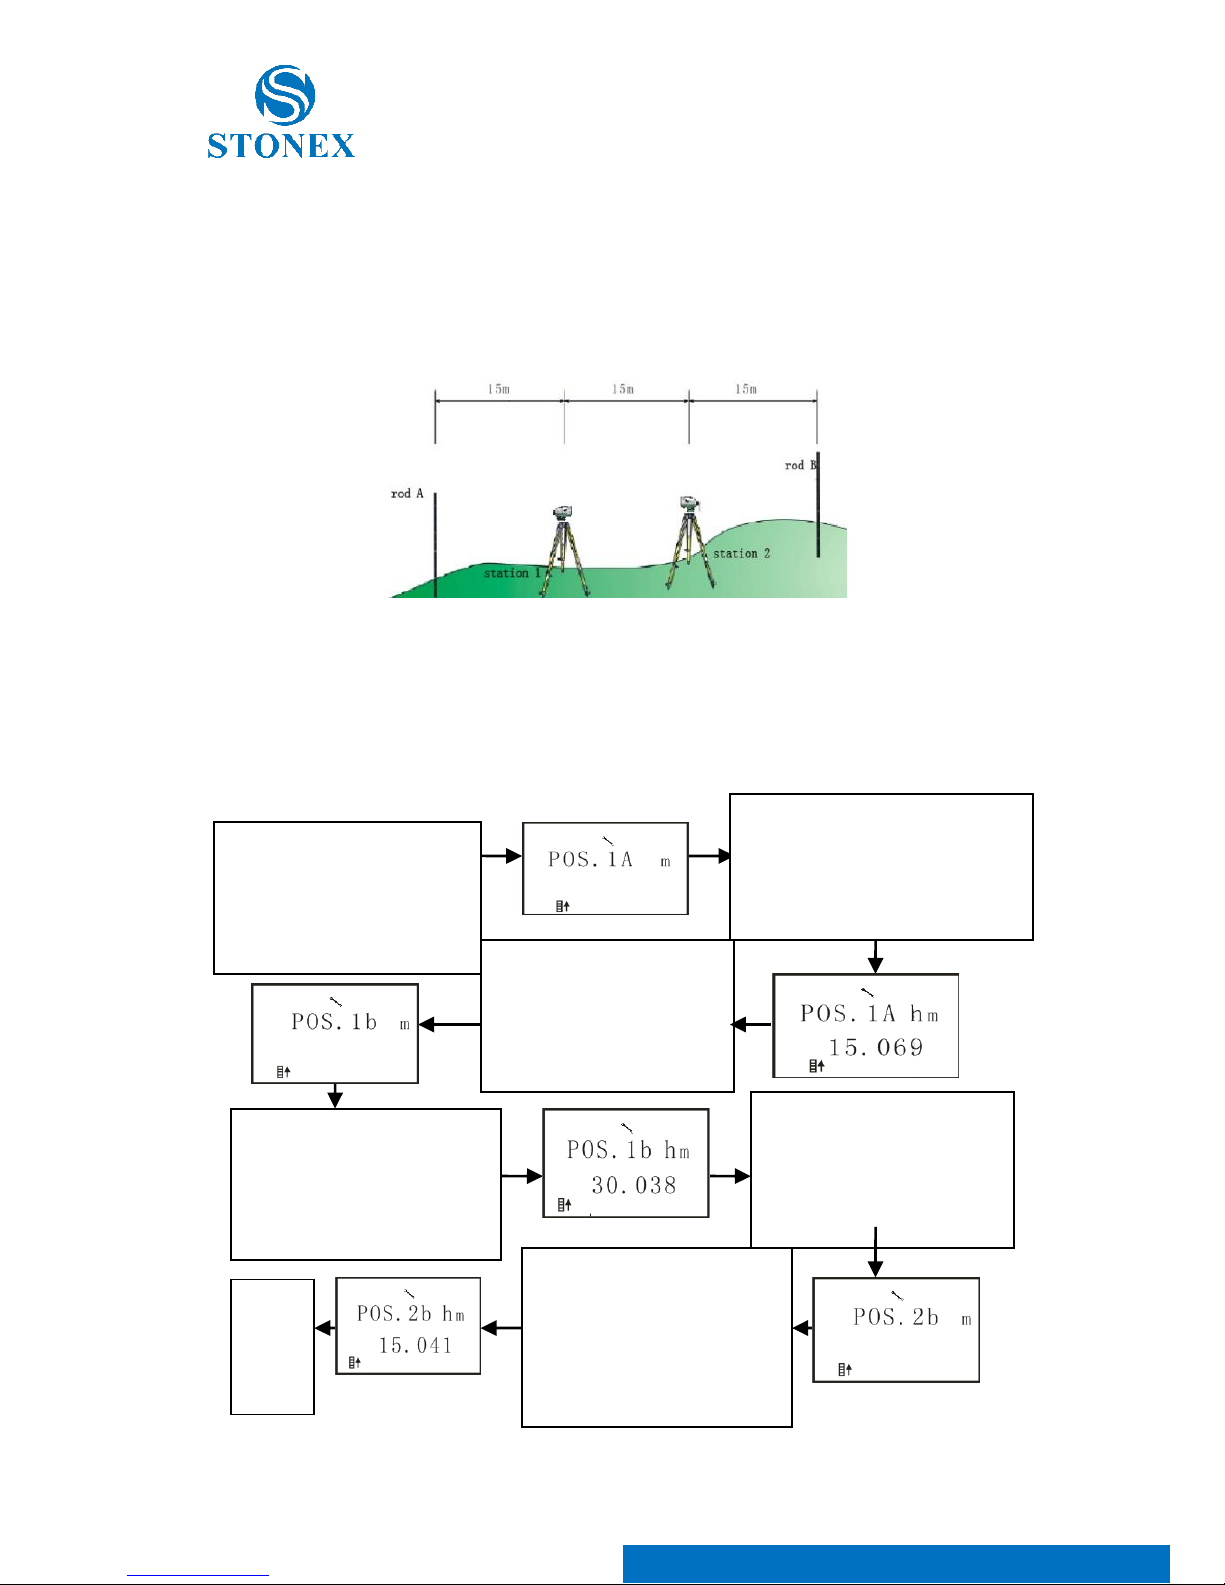
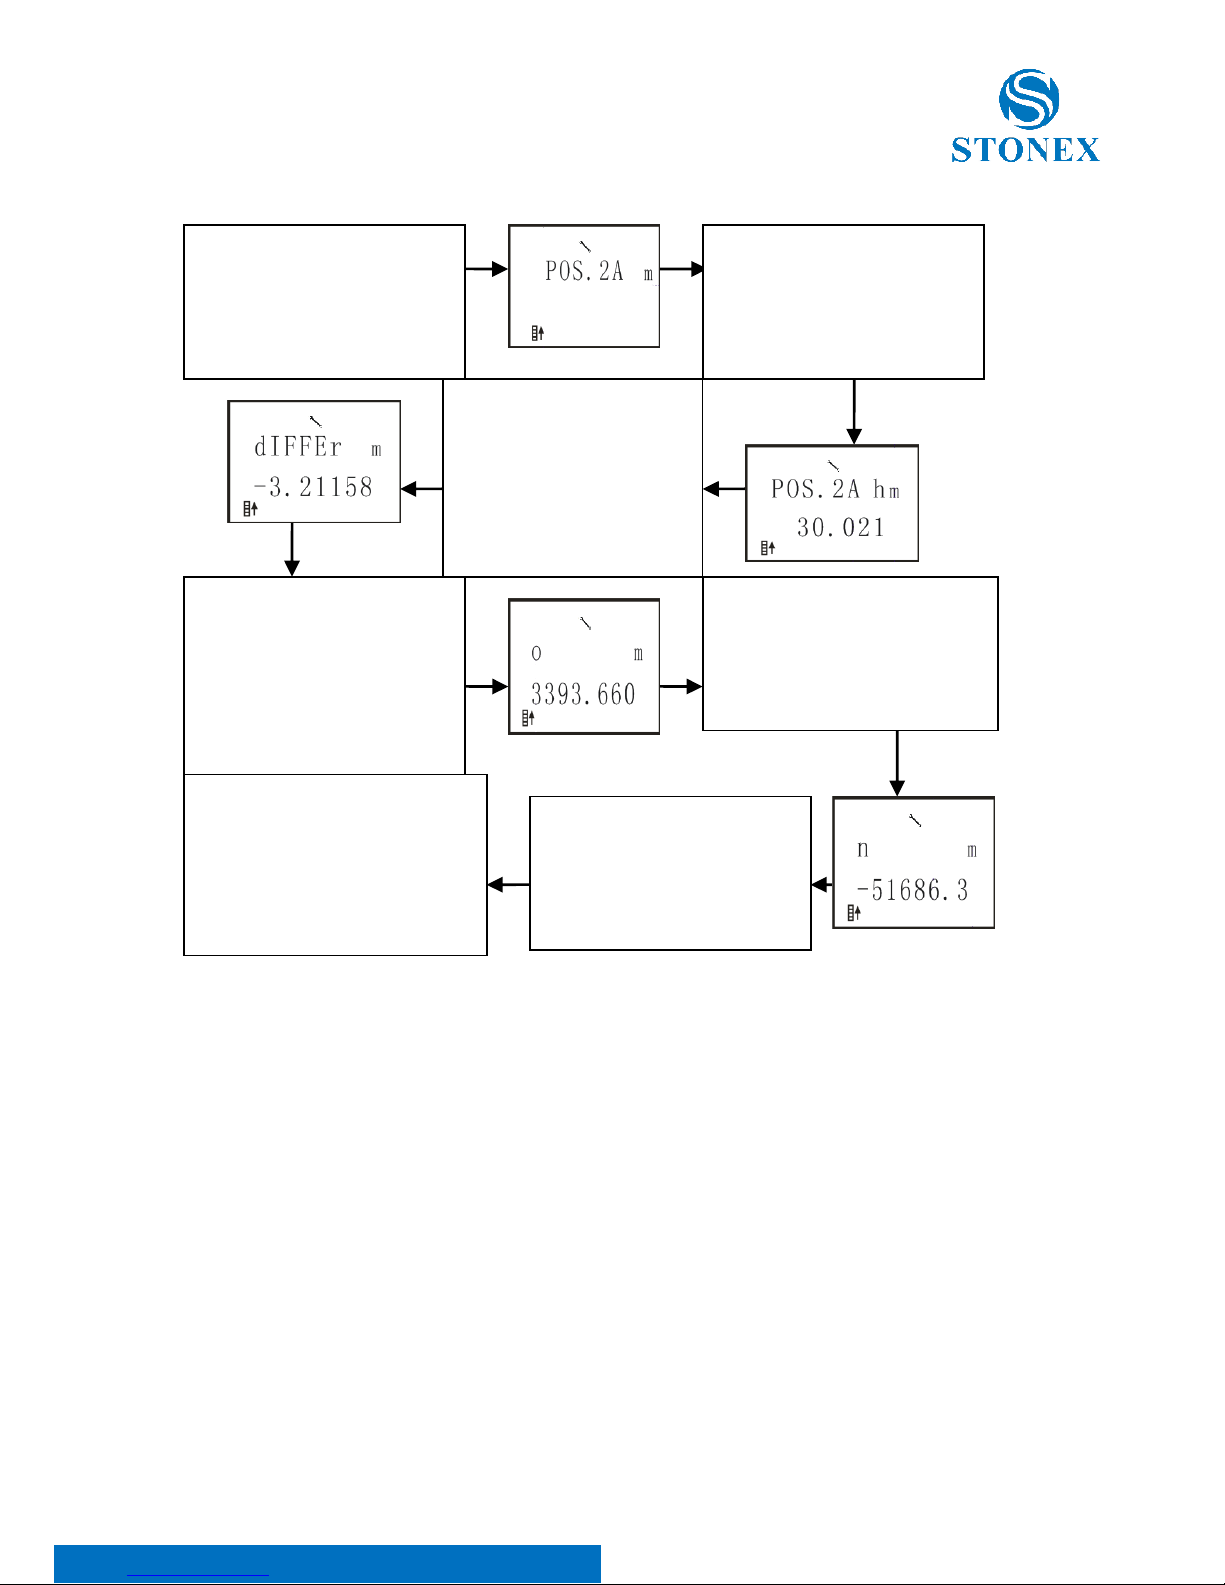
7.3 Electronic i angle check and adjust
Adjust i angle of instrument in order to avoid influences on surveying results
from long-distance transportation, long-term storage, temperature change
and so on.
Put two level staffs (rod A and rod B) on two ground points on a distance of
around 45m .
Divide the distance into three equal parts and place instrument on station
points (station 1 and station 2) separately. Thus respectively observe two
numerical readings of rods based on each station.
Press “MENU” button
and “POWER”
button to enter into
adjustment
After measurements
display, press “SET”
button to proceed
to next step
collimate rod B on
station 1 and press
“MEAS” button to
measure
After measurements
display, press “SET”
button to proceed to
next step
Place instrument on
station 1,collimate rod A
and press “MEAS”
button to measure
Place instrument on
station 2, collimate
rod B and press
“MEAS” button to
measure
To
nex
t
Page 24
Stonex D1 Digital Level – User Guide 23
After measurements
display, press “SET”
button to proceed to
next step
After measurements
display, press “SET”
button to proceed
to next step
press “Menu” button
to display adjustment
values circularly:
difference value(differ)
press “Menu” button to
display adjustment
values circularly: old
value (o)
Collimate rod A on
station 2 and press
“MEAS” button to
measure
press “Menu” button
to display adjustment
values circularly: new
value (n)
Press “SET” button to
save adjustment results,
long press “POWER”
button to power off
Page 25

Stonex D1 Digital Level – User Guide 24
8. Instrument maintenance
8.1 Cleaning and Drying
Wipe up painted surface.
Blow dust off lenses.
Use only a clean degreasing cotton for cleaning up. If necessary,
moisten the cotton with little pure alcohol. Do not use other liquids
(oil, gasoline, water, etc) which may attack the polymer components.
Never touch the glass lens with fingers.
Be careful to wipe damp the instrument. Take out the instrument
from the case and dry it completely. Do not store the instrument in
case if wet. Besides, keep the case clean inside and outside, and keep
it dry.
8.2 Storage
When the instrument is stored for a long time, take it out from case in order
to allow the air to circulate and avoid lens’s mildew. Storage must be under
the conditions of dust prevention, air circulation and low humidity.
In wet areas use desiccator and fuming cupboard. In cold regions, do not move
the instrument indoors during the period of not using it, it’s supposed to
remain in safe places under ambient temperature, which can prevent water
vapour condensed on optical glasses and inside of instrument.
8.3 Transportation
Put the instrument into the case which includes foam inserts or other
shockproof stuff for transportation.
8.4 Check
Check the instrument on a regular basis, and adjust it according to
instruction manual if necessary.
NOTE:
These designs, figures and specifications are subject to change without notice. We
shall not hold liability for damages resulting from errors in this instruction manual.
Page 26

Stonex D1 Digital Level – User Guide 25
9. Copyrights, warranty and environmental recycling
Copyrights and trademarks
© 2014, STONEX® Limited. All rights reserved.
Copyrights, warranty and environmental recycling
Terms and conditions of this Limited Warranty constitute the complete and
exclusive warranty agreement between the Customer or Dealer and STONEX®
for the Product and supersede any prior agreement or representation made
in any STONEX® sales document or advice that may be provided to Customer
by any STONEX® representative in connection with Customer’s purchase of
the Product. No change to the conditions of this Limited Warranty is valid
unless it is made in written form and signed by an authorized STONEX®
supervisor.
STONEX ® warrants that its products:
(1) are free from defects in materials or workmanship for 2 years.
a) Accessories or specific parts for which different limited warranty
period shall apply.
(2) Have been tested/calibrated in proper working status before the
shipment.
The warranty period starts from date of first sale of the instruments.
At its sole discretion, under the warranty period, STONEX® will repair the
product or send parts for replacement at its expense.
STONEX® agrees to repair or replace the defected instrument within thirty
(30) days only if STONEX® recognizes that the defects of the instrument are
not caused by human factors or no obvious damage to its surface is visible.
STONEX® warrants any new replaced parts or products are warranted to be
free from defects in materials and workmanship for thirty (30) days or for the
remainder of the Limited Warranty Period of the Product in which they are
installed, whichever is longer. Faulty Parts or Products replaced under this
Limited Warranty shall become property of STONEX®.
All products that have to be repaired have to be returned to our technical
representative office location via any delivery company the customer prefers,
nevertheless STONEX® is not accountable for the unlikely event that the
Products gets lost in transit.
Page 27

Stonex D1 Digital Level – User Guide 26
Any damage inflicted by the customer or by third party after the products has
been delivered to the customer is excluded from the limited warranty as well
any damage arising from an improper use, from any action or use not provided
for in the enclosed user guides and/or manuals.
Shipping policy
The Customer is required to pay for the charges for shipping of fault part or
instruments to STONEX® representative office and STONEX® is providing the
shipping for return. Dealers must follow STONEX® repair/service procedure
to achieve a better and prompt service result.
Return policy Dead On Arrival instruments
All returned products have to be shipped to STONEX® representative office.
The original Purchaser has a period of seven (7) days starting from date of
purchasing to signal the existence of a defect in the instrument for a full refund
(less shipping and handling), provided the product is in new, resalable
condition and returned in the original, undamaged packaging. Customer has
to pay for both the return and the original freight fees, regardless of the
original freight paid by the Company.
All warranty books, instruction manuals, parts and accessories must be
included as well as the original box in which the item was shipped.
We recommend to place the original carton inside another box, to avoid any
additional damage to the carton itself. In some cases, returns of special items
will require a re-stock fee. Acceptance of returned merchandise is final only
after inspection by STONEX®.
Above terms and policies shall apply as for hardware. Dealers need to follow
STONEX® repair/service procedure to achieve a better and prompt service
result.
Page 28

Stonex D1 Digital Level – User Guide 27
Firmware/Software warranty
Stonex® doesn’t warrant that operation of Firmware/Software on any
instruments will be uninterrupted or error-free, or that functions contained in
Firmware/Software will operate to meet your requirements.
Stonex® will forward the Software/Firmware Fix to the dealer or customer.
Firmware/software Fix means an error correction or other update created to
fix a previous firmware version that substantially doesn’t conform to the
instruments specification.
Over Warranty repair(s) policy
The Customer shall pay the standard repair fees for any service (whether part
replacement or repairs) and performed by STONEX® under request and
explicit authorization of the customer itself. In this case the customer is
charged for return shipment’s fees as well.
Disclaimer and Limitation of Remedy
All other express and implied warranties for this product, including the implied
warranties of merchantability and fitness for a particular purpose and/or not
infringement of any third party’s rights, are hereby disclaimed. Stonex®
expressly disclaims all warranties not stated in this limited warranty. Any
implied warranties that may be imposed by law are limited in duration to the
term of this limited warranty. Some jurisdictions do not allow the exclusion of
implied warranties or limitations on how long an implied warranty lasts, so the
above exclusions or limitations may not apply to customer.
Customer must read and follow all set-up and usage instructions in the
applicable user guides and/or manuals enclosed. If customer fails to do so,
this product may not function properly and may be damaged.
Customer may lose data or sustain personal injuries. Stonex®, its affiliates and
suppliers do not warrant that operation of this product will be uninterrupted
or error free; as do all electronics at times. If this product fails to work as
warranted above, customer’s sole and exclusive remedy shall be repair or
replacement. In no event will Stonex®, its affiliates or suppliers be liable to
customer or any third party for any damage in excess of the purchase price of
the product.
Page 29
Stonex D1 Digital Level – User Guide 28
This limitation applies to damages of any kind whatsoever including (1)
damage to, or loss or corruption of, customer’s records, programs, data or
removable storage media, or (2) any direct or indirect damages, lost profits,
lost savings or other special, incidental, exemplary or consequential damages,
whether for breach of warranty, contract, tort or otherwise, or whether arising
out of the use of or inability to use the product and/or the enclosed user
guides and/or manuals, even if Stonex®, or an authorized Stonex®
representative, authorized service provider or reseller has been advised of the
possibility of such damages or of any claim by any other party. Some
jurisdictions do not allow the exclusion or limitation of incidental or
consequential damages for some products, so the exclusions or limitations
may not apply to customer. This limited warranty gives customer specific legal
rights, and customer may also have other rights which vary from
country/state/jurisdiction to country/state.
Instruments
Two (2) years on STONEX® Products:
Stonex D1
Excluding power supply accessories, for which warranty time is 6 month
Environmental recycling
The carton box, the plastic in the package and the various parts of this product
have to be recycled and disposed of in accordance with the current legislation
of your Country.
Page 30

Stonex D1 Digital Level – User Guide 29
9.1 Safety Recommendations
Warnings and Cautions
An absence of specific alerts does not mean that there are no safety risks
involved in the use of this equipment.
Always follow the instructions that accompany a Warning or Caution, reported
in this.
This information are intended to minimize the risk of personal injury and/or
damage to propriety. In particular, observe safety instructions that are
presented in the following form:
WARNING - A Warning alerts about risk for health and/or damage to the
propriety. A warning identifies the nature of the risk and the extent the possible
injury and/or damage. It also describes how to protect yourself and/or the
equipment from this risk.
CAUTION - A Caution alerts about a possible risk of damage to the equipment
and/or loss of data, but no risk for human safety.
WARNING
- Do not creates damage at the rechargeable Lithium-ion battery.
A damaged battery can cause an explosion, with risk or fire, and can result in personal
injury and/or property damage.
To prevent injury or damage:
– Do not use or charge the battery if it appears to be damaged. Signs of damage are
discoloration, warping, leaks of liquids.
– Do not expose the battery to fire, high temperature, or direct strong sunlight.
– Do not introduce the battery in water or liquid substance , in general.
– Do not use or store the battery in very hot ambient.
– Do not drop or puncture the battery.
– Do not open the battery and do not put in short-circuit its electrical contacts.
Page 31

Stonex D1 Digital Level – User Guide 30
WARNING
- Avoid direct contact with the rechargeable Lithium-ion battery if it appears
damage. Battery liquids are corrosive and, and contact with it can result in personal
injury or damage to proprieties.
To prevent injury or damage:
– If the battery leaks, avoid contact with the battery fluid.
– If battery fluid gets into your eyes, immediately rinse your eyes with clean water
and seek medical attention. Do not rub your eyes!
– If battery fluid gets onto your skin or clothing, immediately use clean water to
wash off the battery fluid.
Page 32

Stonex D1 Digital Level – User Guide 31
This page is intentionally blank
STONEX® SRL
Via Cimabue, 39 - 20851 Lissone (MB) - Italy
Phone: +390392783008; +390392785575 | Fax: +390392789576
www.stonexpositioning.com | [email protected]
 Loading...