

Page 1
STONEFLY USO-HA
Cluster High-Availability HyperConverged Appliance
Quick Start Guide
Page 2

Copyright © 2006-2018 StoneFly Inc.
All rights are reserved. No part of this document may be photocopied or reproduced with-
out the prior written consent of StoneFly.
The information contained in this document is subject to change without notice. StoneFly
shall not be liable for errors contained herein or for consequential damages in connection
with the furnishing, performance, or use of this material.
StoneFly, the StoneFly logo, Storage Concentrator, Integrated Storage Concentrator, ISC,
Modular Storage Concentrator, StoneFly Backup Advantage, StoneFusion, StoneFly Repli-
cator CDP, ValueSAN, Unified Scale Out, USO, Twin Scale Out, TSO, Unified Storage &
Server, USS, Unified Deduplicated Storage, UDS, Unified Encrypted Storage, UES, Opti-
SAN, StoneFly Voyager, StoneFly Mirroring, Storage Concentrator Virtual Machine, SCVM,
Software-Defined Unified Storage and SDUS are property of StoneFly, Inc., a wholly
owned subsidiary of Dynamic Network Factory, Inc.
Other brands and their products are trademarks or registered trademarks of their respec-
tive holders.
Page 3

USO-HA
Introduction............................................................................................................1
Table of Contents
With the StoneFly USO
System diagram and description...........................................................................3
Getting Started......................................................................................................5
Step 1: Mounting Rails Installation...............................................................5
Step 2: Rack Mounting Considerations........................................................6
Step 3: Locking tabs.....................................................................................9
Step 4: Cabling the Equipment....................................................................11
Connecting the Storage Concentrators to the RAID Storage Array..............................12
USO-HA™ Power Up and Initial Access......................................................................15
™, you can.........................................................................2
Page 4

USO-HA
Quick Start Guide
Introduction
This document is aimed for system administrators who would like to know how to get
started with the StoneFly Unified Scale Out - High Availability (USO-HA™) Appliance. It
describes initial steps for launching the USO-HA™ Appliance.
The StoneFly USO-HA™ appliance provides a powerful Storage solution that can Scale
Out Storage capacity while scaling up performance. Active-active cluster nodes coupled
with Storage subsystems featuring active-active hot-swappable RAID controllers,
hot-swappable disk drives and power supplies provide the utmost in high-availability.
1
The StoneFly USO-HA™ includes a pair of StoneFly Hyper-Converged Storage Concen-
trator (SC) Cluster Nodes and one or more StoneFly High-Availability RAID Expansion
Arrays. These Expansion Arrays include two RAID controllers and zero or more High-Avail-
ability Expansion Units.
The StoneFly SCVM™ will provide the iSCSI-SAN with data services (Snapshot, Dedupli-
cation, Encryption, Mirroring, Cloud Connect, Thin provisioning ..,etc.). The Data is stored
in shared dual ports Storage array with dual active-active failover failback hardware RAID
controller.
This guide gives detail about the basic connections between all the devices. Multiple
storage devices may be connected by following the basic patterns described here.
StoneFly Resource Library:
https://stonefly.com/resources
The StoneFly SCVM™ Webpage:
https://stonefly.com/hyper-converged/scvm-virtual-storage-appliance
Page 5

USO-HA
Quick Start Guide
With the StoneFly USO-HA™, you can:
• Replace existing or deploy physical servers or virtual host into HyperConverged appli-
ance.
• Quickly spin up new Virtual Machines on the StoneFly USO-HA™.
• Use the StoneFly USO-HA™ appliance’s iSCSI/Fibre/Object as target Storage for your
other host servers or physical machines.
• Global shared back-end object/block/image Storage for OpenStack
2
• Create numerous delta-based snapshots to back up the volumes containing your VMs
and Storage. Then use mountable read-write snapshot volumes for recovery.
• Synchronously replicate (campus mirror) all of your VMs and storage to a second on
premises USO-HA™ appliance for business continuity.
• Asynchronously replicate all of your VMs and Storage to the cloud or a StoneFly USO at
a remote site for disaster recovery.
• Protect your data and increase system uptime with high availability cluster nodes featur-
ing failover and failback along with high performance active-active hardware RAID control-
lers.
• Optimize your data with StoneFly’s optional enterprise-level features including data
deduplication, encryption, thin provisioning,..etc.
• Integrated cloud connection to Microsoft Azure or Amazon AWS for replication.
• And More!
Page 6
USO-HA
System diagram and description
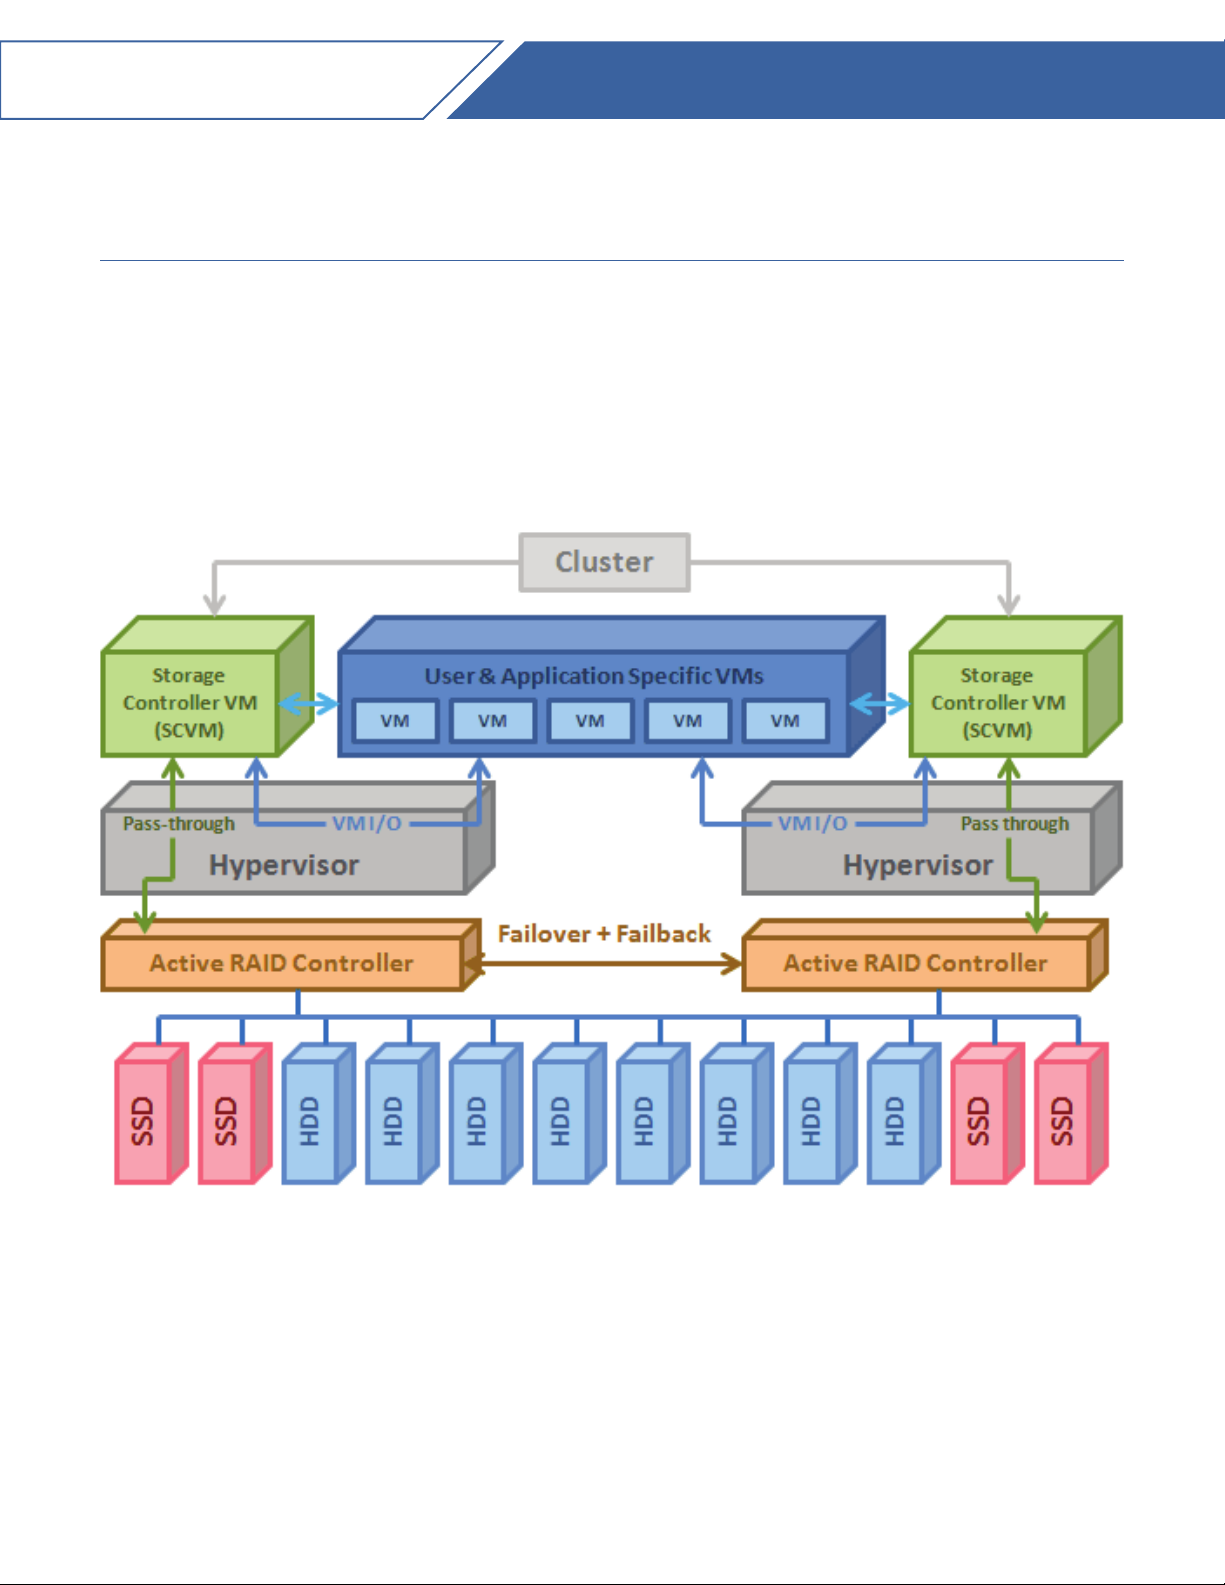
Below you can find the network interconnection diagram of the StoneFly USO-HA™ Appli-
ance. It consists of two StoneFly Hyper-Converged Storage Concentrator (SC) Cluster
Nodes. Also, it includes shared dual ports Storage array with dual Active-Active failover
failback hardware RAID controllers.
Quick Start Guide
3
Figure 1: StoneFly USO-HA™ Block Diagram.
Page 7
USO-HA
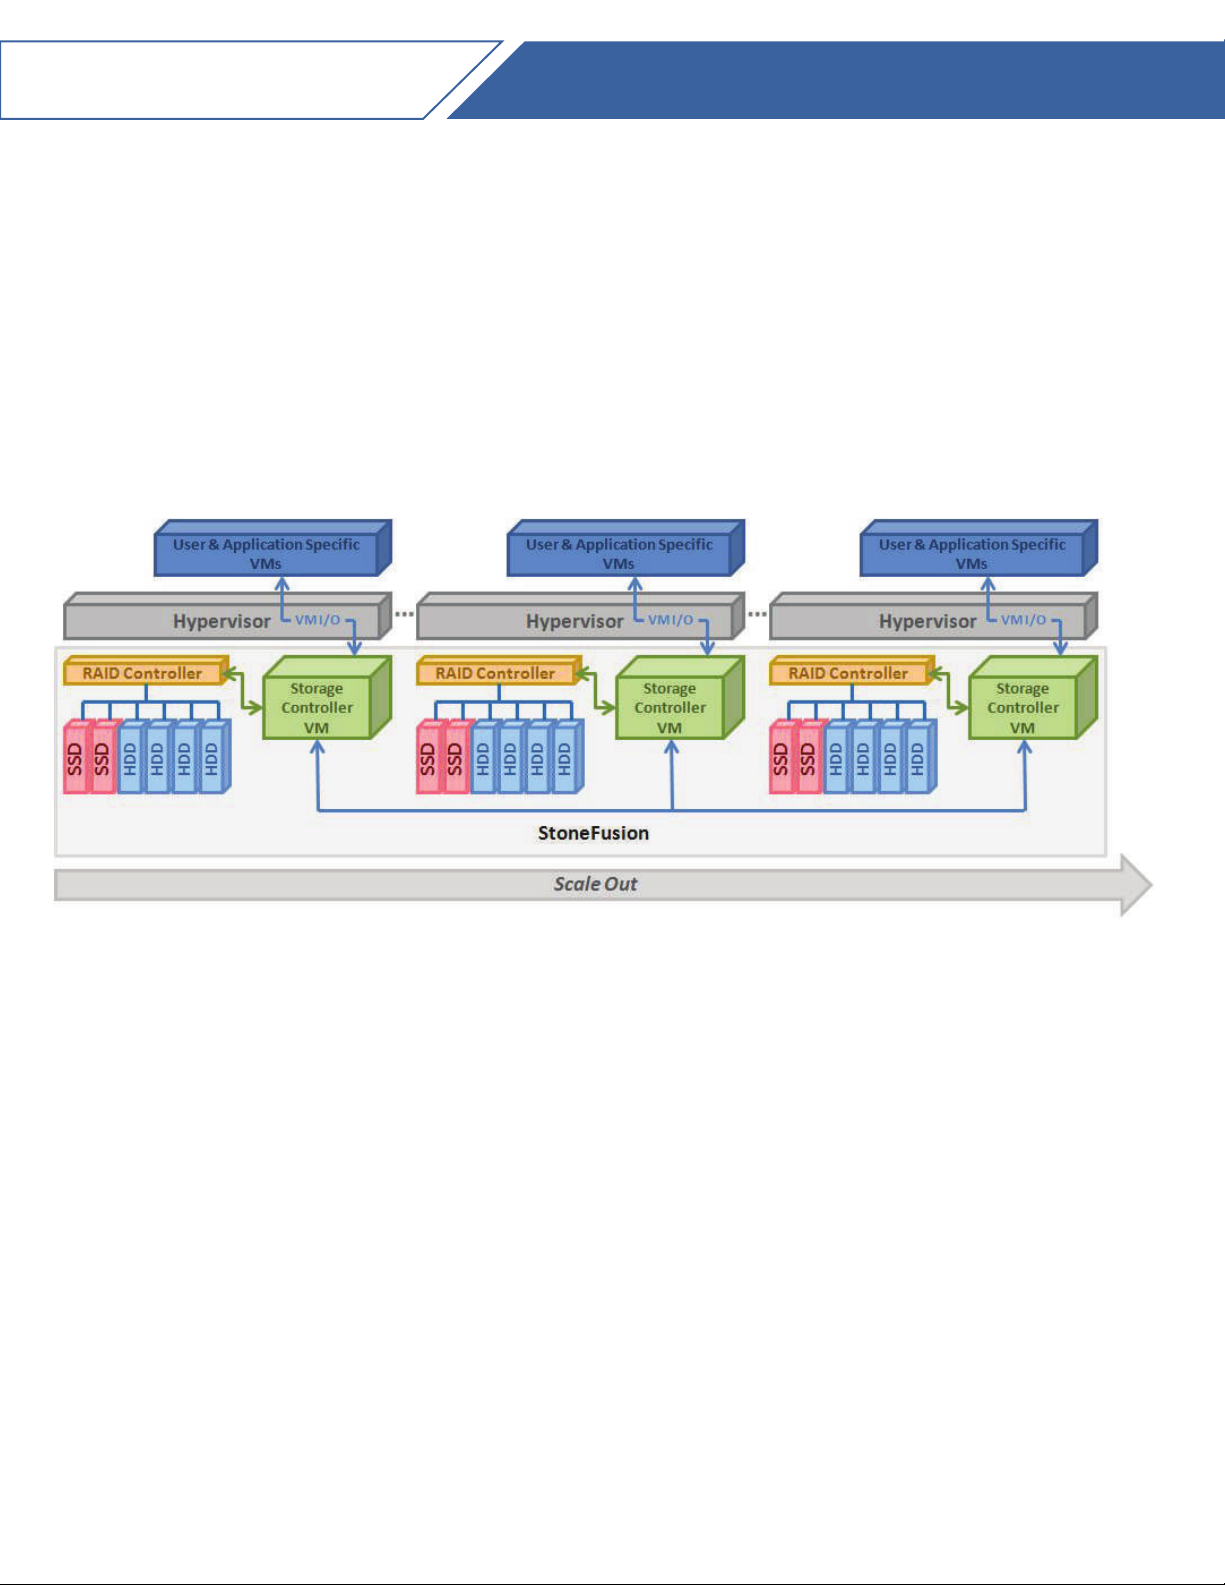
The system is fully pre-configured and ready to be integrated into the existing infrastruc-
ture. Each StoneFly USO-HA comes preconfigured with VMware vSphere Essentials Plus
Kit and StoneFly SCVM™ Virtual Storage Controller.
Quick Start Guide
4
Figure 2: Scale Out configuration of USO Appliance Nodes.
Caution: Please review the following safety information completely before installing your
Storage Concentrator.
Page 8

USO-HA
Quick Start Guide
Getting Started
The StoneFly USO-HA comes in Dual 1U, Dual 2U or Dual 3U Storage Concentrator Clus-
ter. There are several stages to setting up the StoneFly USO-HA™ Appliance.
Environmental: Requirements for power and network availability must be taken into con-
sideration when planning where to place your Storage Concentrator. The space should
have well regulated temperature and humidity and should be relatively free of dust and
other contaminants.
Step 1: Mounting Rails Installation
5
Mounting rails should be installed on any units requiring them. The Storage Array User
Guide includes specific instructions on how to make the attachments. Place all the equip-
ment in its operational environment.
A simple configuration is 7U high comprising two SC’s and one Storage Array. Note that
the SAS cables connecting the Storage Arrays and the Expansion Units are short. The
length of the cables dictates these units must be rack mounted very close to each other. If
more Expansion Units will be added later it is best to allow room for them at the initial
installation of the USO-HA.
Choosing a Setup Location
Leave enough clearance in front of the rack to enable you to open the front door complete-
ly.
• Leave approximately 30 inches of clearance in the back of the rack to allow for sufficient
airflow and ease in servicing.
• This product is for installation only in a Restricted Access Location (dedicated equipment
rooms, service closets and the like).
Page 9

USO-HA
Rack Precautions
• Ensure that the leveling jacks on the bottom of the rack are fully extended to the floor
with the full weight of the rack resting on them.
• In single rack installation, stabilizers should be attached to the rack.
• Always make sure the rack is stable before extending a component from it.
• You should extend only one component at a time - extending two or more simultaneously
may cause the rack to become unstable.
Server Precautions
• Determine the placement of each component in the rack before you install the rails.
Quick Start Guide
6
• Install the heaviest StoneFly components on the bottom of the rack first, then work up.
• Use a regulating uninterruptible power supply (UPS) to protect the StoneFly Appliance
from power surges, voltage spikes and to keep your system operating in case of a power
failure.
• Always keep the rack's front door and all panels and components on the StoneFly Appli-
ance components closed when not servicing to maintain proper cooling.
• Make sure all power and data cables are properly connected and not blocking the chas-
sis airflow. See the StoneFly Read Me for details on cable connections.
Step 2: Rack Mounting Considerations
Ambient Operating Temperature
If installed in a closed or multi-unit rack assembly, the ambient operating temperature of
the rack environment may be greater than the ambient temperature of the room. There-
fore, consideration should be given to installing the equipment in an environment compati-
ble with the manufacturer’s maximum rated ambient temperature.
Reduced Airflow
The StoneFly Appliance should be mounted into a rack so that the amount of airflow
required for safe operation is not compromised.
Page 10

USO-HA
Circuit Overloading
Consideration should be given to the connection of the StoneFly Appliance to the power
supply circuitry and the effect that any possible overloading of circuits might have on over-
current protection and power supply wiring. Appropriate consideration of equipment name-
plate ratings should be used when addressing this concern.
Reliable Ground
A reliable ground must be maintained at all times. To ensure this, the rack itself should be
grounded. Particular attention should be given to power supply connections other than the
direct connections to the branch circuit (i.e. the use of power strips, etc.).
Quick Start Guide
7
Removing the Protective Film
Before operating the StoneFly Storage Concentrators for the first time, it is important to
remove the protective film covering the top of the chassis, in order to allow for proper
ventilation and cooling.
1. Peel off the protective film covering the top cover and the top of the chassis.
2. Check that all ventilation openings on the top cover and the top of the chassis are clear
and unobstructed.
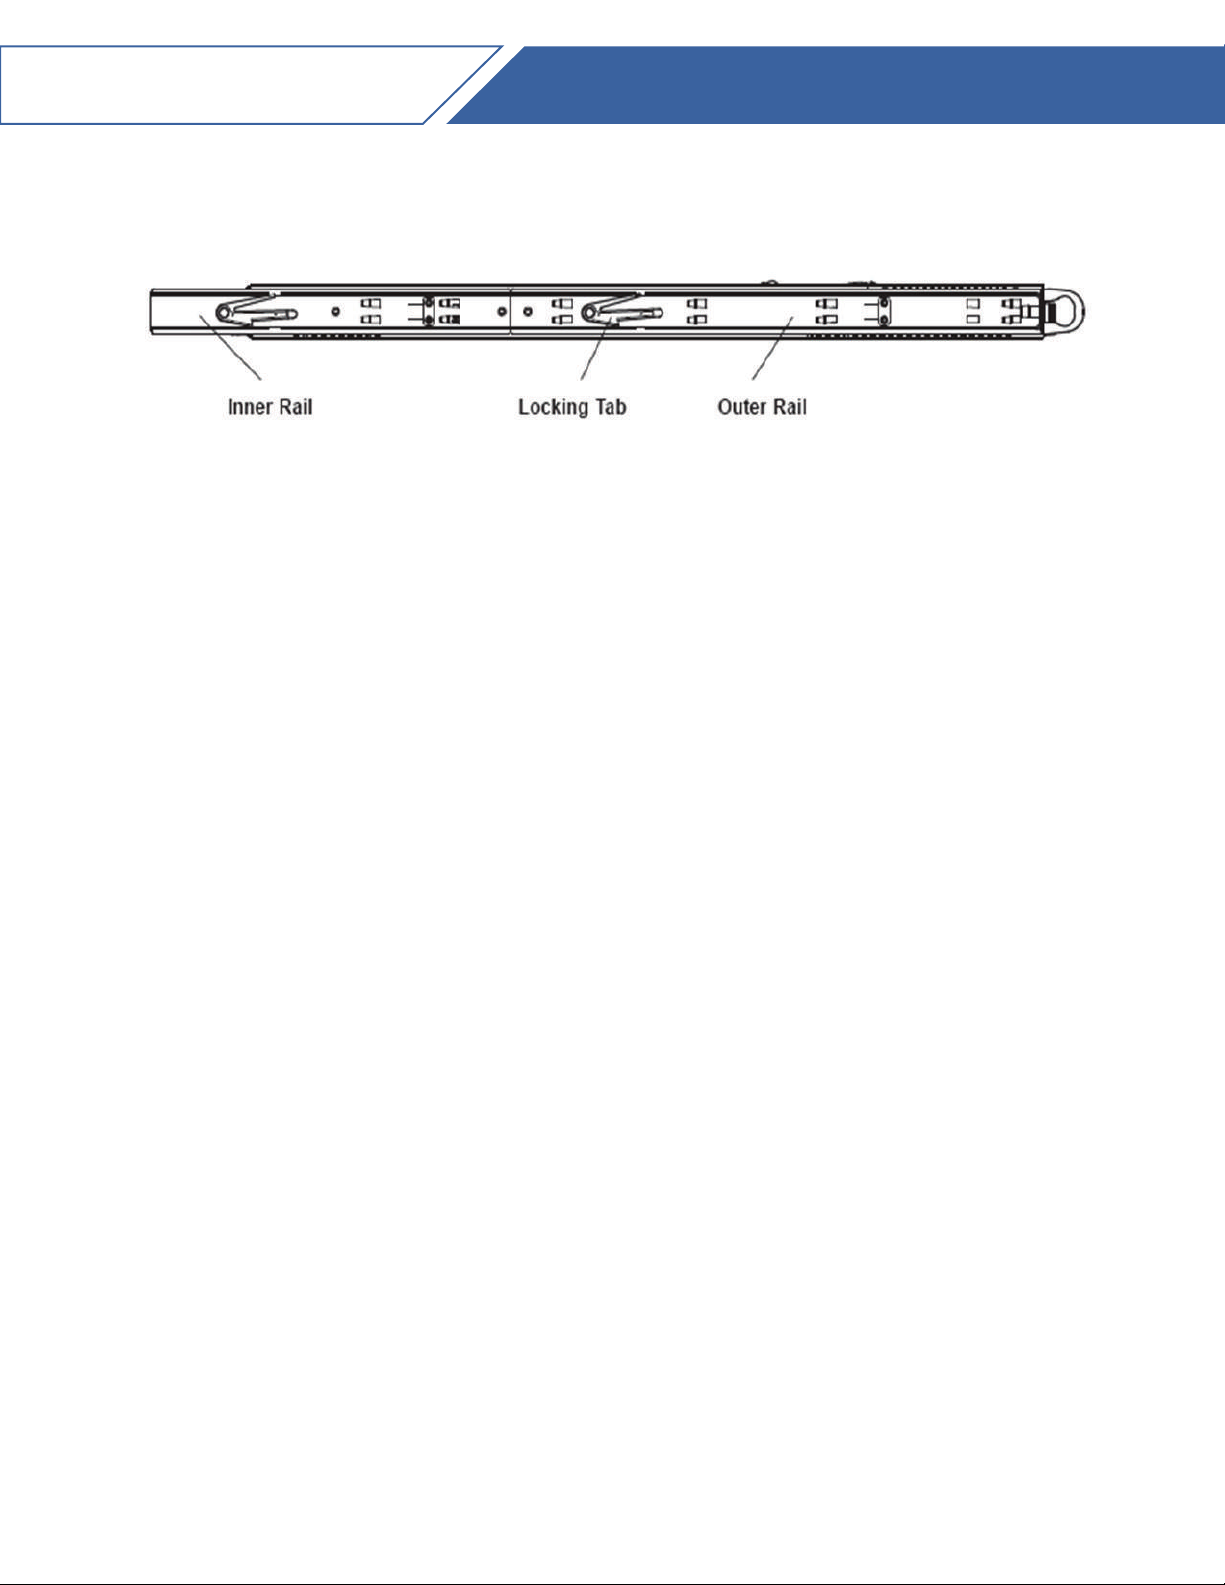
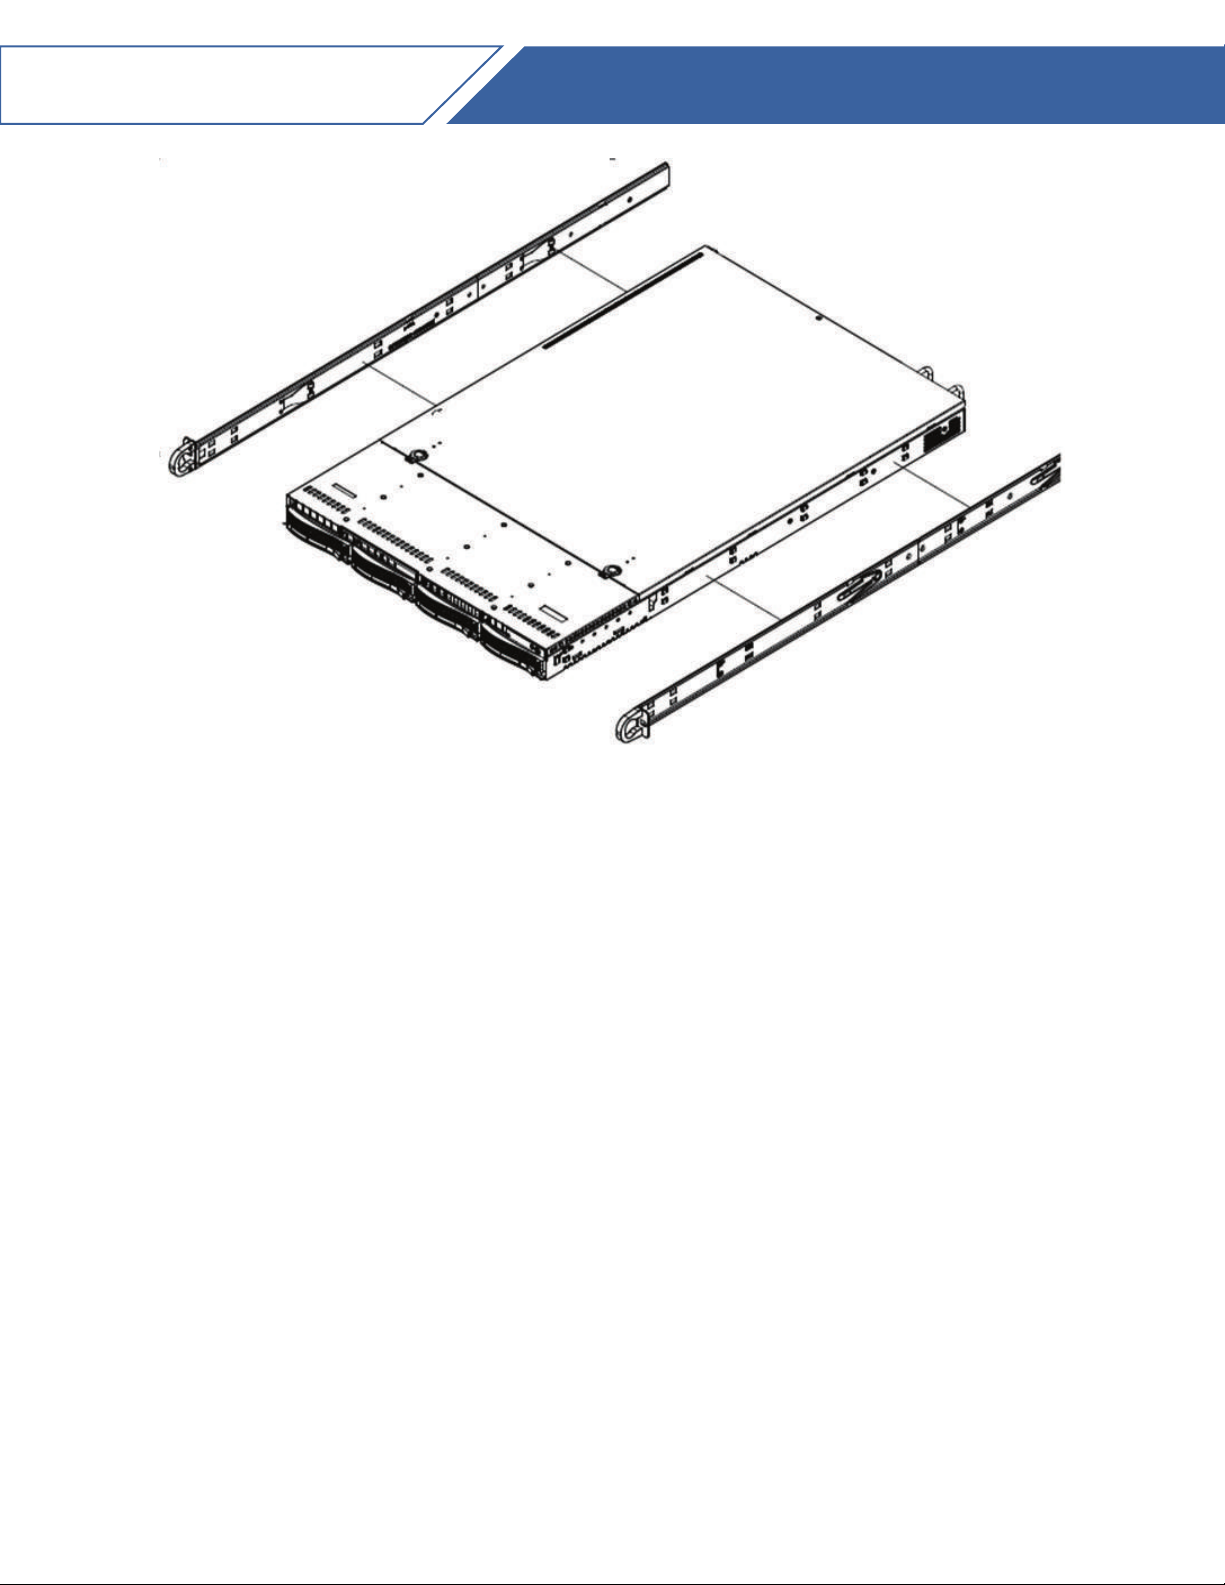
Identifying the Sections of the Rack Rails
You should have received two rack rail assemblies in the rack mounting kit. Each assem-
bly consists of two sections: an inner fixed chassis rail that secures directly to the server
chassis and an outer fixed rack rail that secures directly to the rack itself . Two pairs of
short brackets to be used on the front side of the outer rails are also included.
Installing the Inner Rails
Both the left and right side inner rails have been pre-attached to the Storage Concentrator
chassis. Proceed to the next step.
Page 11
USO-HA
Figure 3: Identifying the Sections of the Rack Rails
Installing the Outer Rails
1. Begin by measuring the distance from the front rail to the rear rail of the rack.
Quick Start Guide
8
2. Attach a short bracket to the front side of the right outer rail and a long bracket to the
rear side of the right outer rail.
3. Adjust both the short and long brackets to the proper distance so that the rail can fit
snugly into the rack.
4. Secure the short bracket to the front side of the outer rail with two M4 screws and the
long bracket to the rear side of the outer rail with three M4 screws.
5. Repeat these steps for the left outer rail.
Page 12
USO-HA
Quick Start Guide
9
Figure 4: Installing the Rack Rails
Step 3: Locking Tabs
Both StoneFly Storage Concentrator rails have a locking tab, which serves two functions.
The first is to lock the Storage Concentrator into place when installed and pushed fully into
the rack, which is its normal position. Secondly, these tabs also lock the Storage Concen-
trator in place when fully extended from the rack. This prevents the Storage Concentrator
from coming completely out of the rack when you pull it out for servicing.
Installing the Storage Concentrator into the Rack
You should now have rails attached to both the Storage Concentrator and the rack unit.
The next step is to install the Storage Concentrator into the rack.
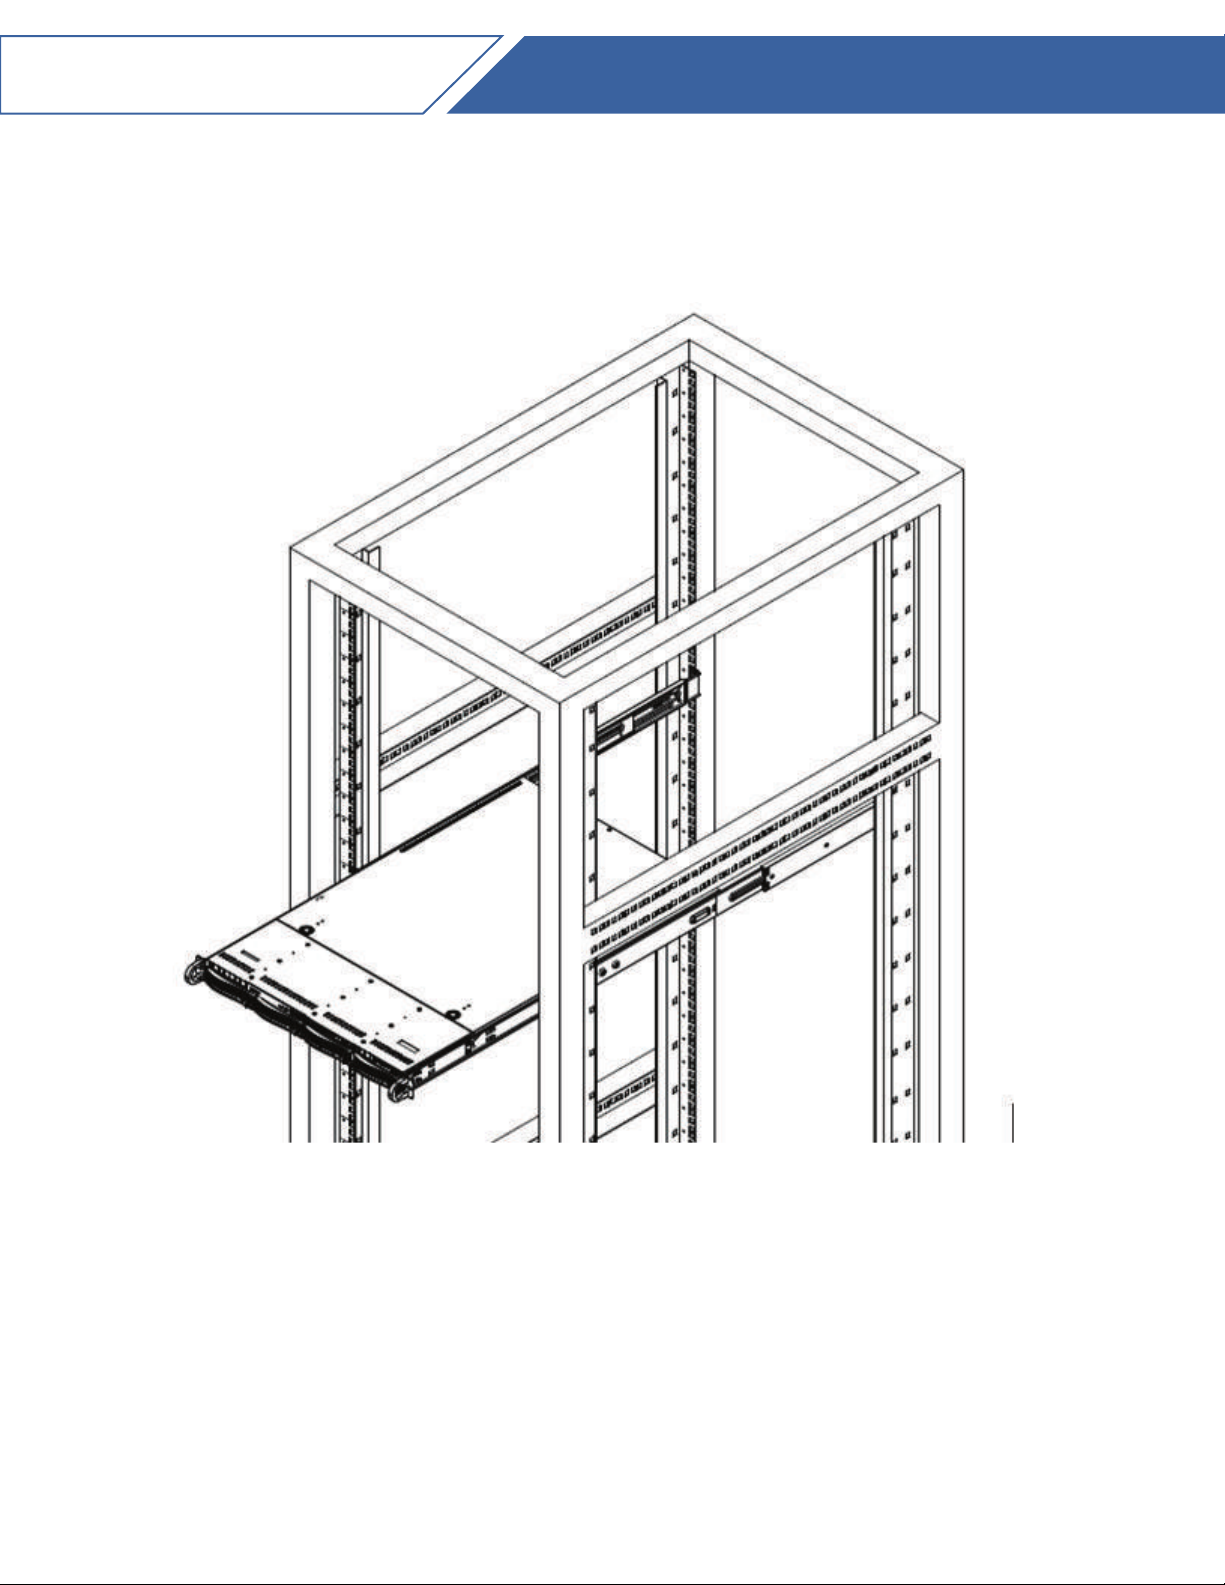
1. Do this by lining up the rear of the chassis rails with the front of the rack rails.
2. Slide the chassis rails into the rack rails, keeping the pressure even on both sides
(you may have to depress the locking tabs when inserting). See Figure 3. When the
Storage Concentrator has been pushed completely into the rack, you should hear the
locking tabs "click".
Page 13
USO-HA
3. Insert and tighten the thumbscrews that hold the front of the server to the rack.
Quick Start Guide
10
Figure 5: Installing the USO appliance into a Rack
Page 14

USO-HA
To install the StoneFly Storage Concentrators into a Telco type rack, use two L-shaped
brackets on either side of the chassis (four total). First, determine how far follow the Stor-
age Concentrator will extend out the front of the rack. Larger chassis should be positioned
to balance the weight between front and back. If a bezel is included on your Storage
Concentrator, remove it. Then attach the two front brackets to each side of the Storage
Concentrator, then the two rear brackets positioned with just enough space to accommo-
date the width of the Telco rack. Finish by sliding the Storage Concentrator into the rack
and tightening the brackets to the rack.
The StoneFly Storage Concentrators should now be securely mounted into the rack/cabi-
net in which they were installed.
Quick Start Guide
11
Step 4: Cabling the Equipment
The cabling plan is straightforward to describe and must be followed to make the USO-HA
completely functional. The following description shows the steps for two Storage Concen-
trator components, two storage arrays, and one expansion unit. Additional storage compo-
nents are connected in a similar manner.
Storage Concentrator Ethernet connections are made between one or more switches and
the Ethernet ports on each Storage Concentrator in the cluster. In a configuration with
dual-gigabit Ethernet connections in each Storage Concentrator both connectors in the
PCI slot must be filled with standard Cat5 or Cat6 cable. A clustered pair of Storage Con-
centrators presents several configurations of Ethernet ports (maximum per cluster):
1 Six or Ten 1 GbE ports
2 Two, Four or Eight 10 GbE ports
Page 15
USO-HA
Quick Start Guide
Connecting the Storage Concentrators to the RAID Storage Array:
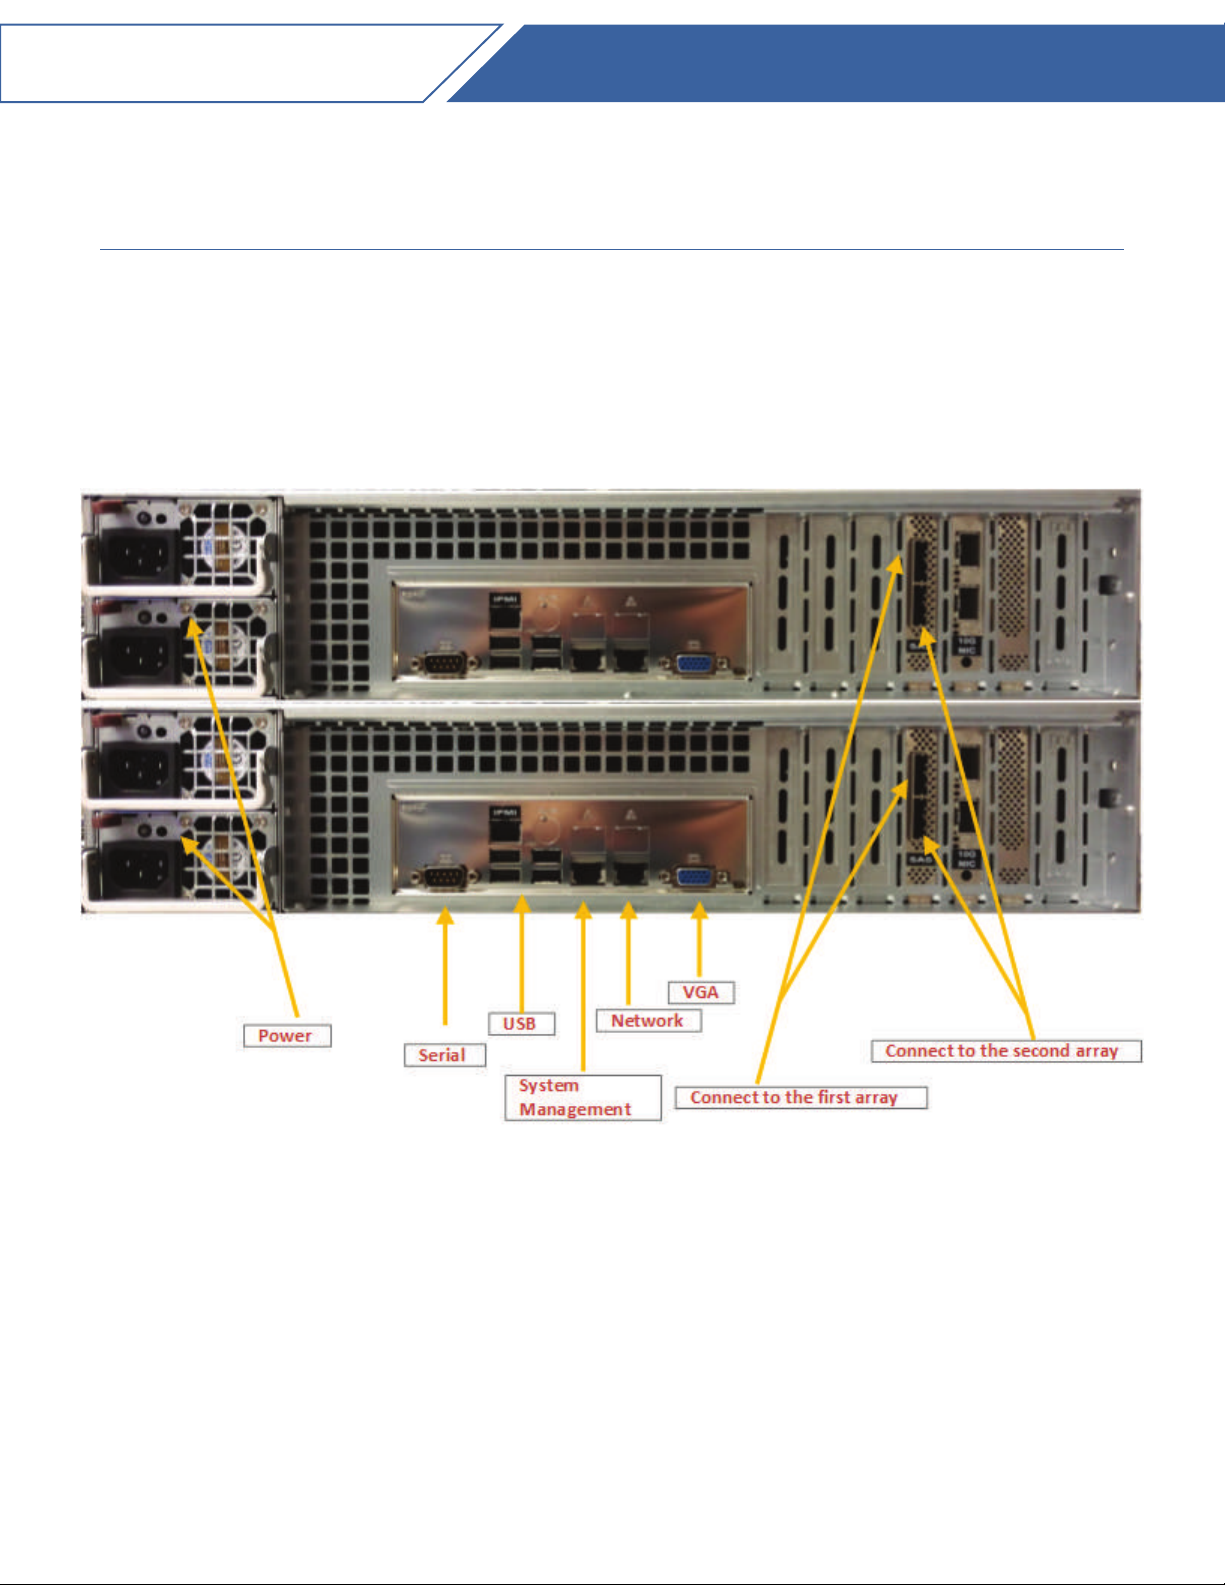
Cabling the Storage Arrays to the Storage Concentrator requires two SAS cables for each
array. Each Storage array is connected to each Storage Concentrator with one cable. The
connections to the RAID storage arrays must be configured exactly as described. The SAS
cables must be attached to the correct SAS port on the Storage Array (See Figure 6).
12
Figure 6: StoneFly USO-HA™ Cluster
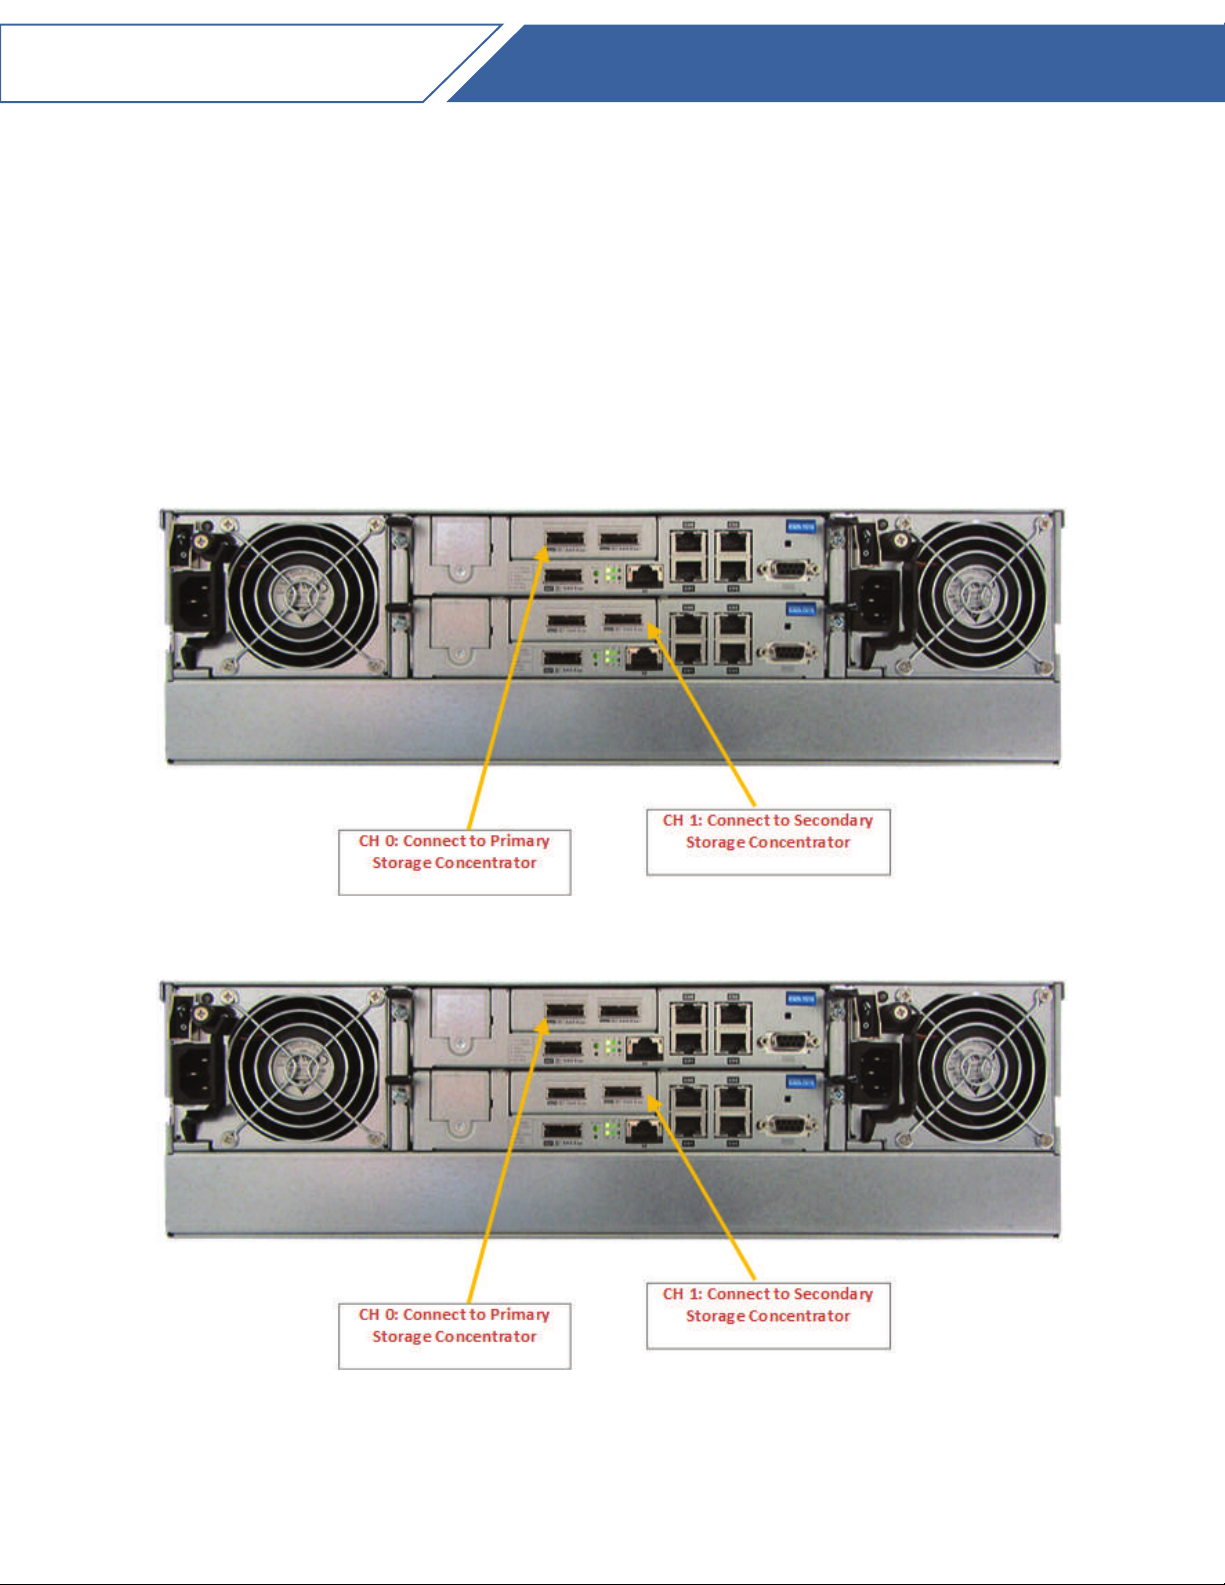
Each of these SAS connections is connected to one of the SAS ports on the back of each
Storage Concentrator. The First RAID Storage Array should be connected to the first SAS
port on the rear of the Storage Concentrator, and the Second RAID Array (if applicable)
should be connected to the second SAS port on the rear of each Storage Concentrator
(See Figure 7 and 8).
Page 16
USO-HA
The top RAID Storage Array is the primary one (Fig. 7). The bottom RAID Storage Array
(Fig. 8) is the secondary (redundant) which is idle during normal operation and takes over
the management role when the Primary Controller cannot function properly due to hard-
ware error, controller module removal, etc.
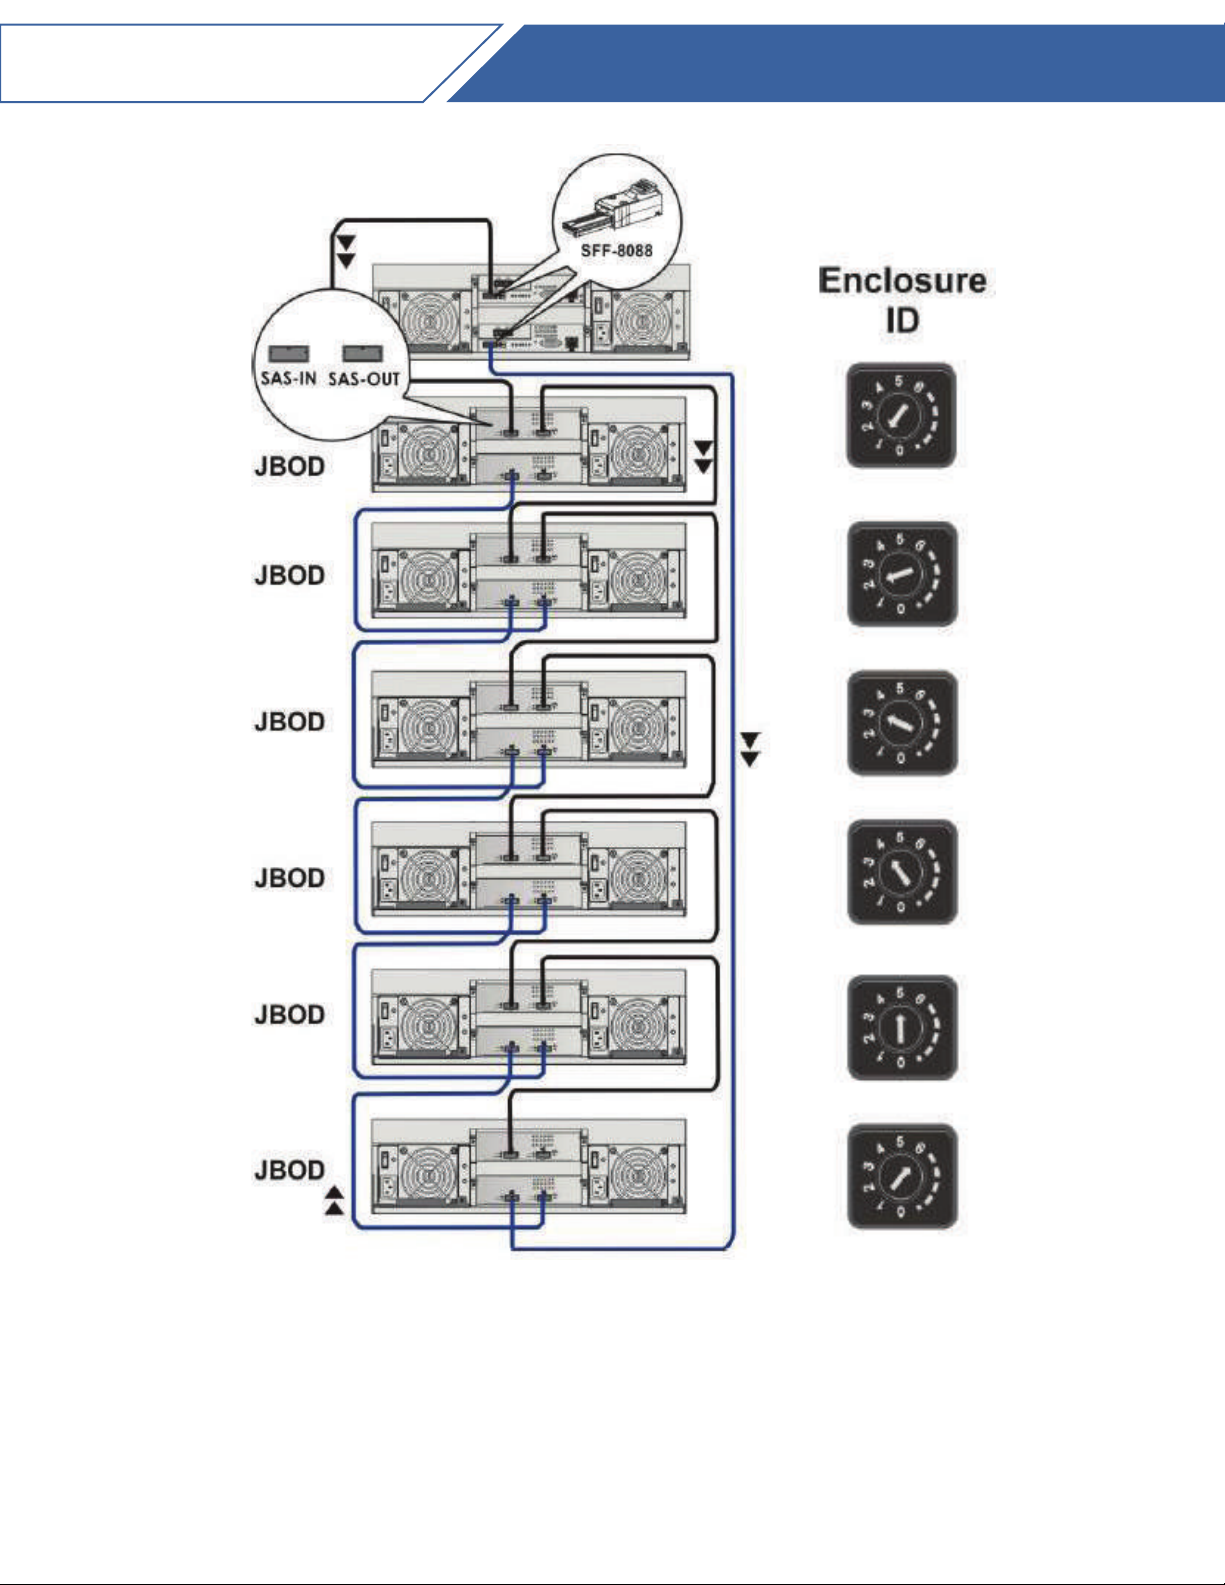
The following picture is a suggestion for connecting two StoneFly RAID Storage Arrays to
a StoneFly USO-HA™ cluster. Figure 9 illustrates the RAID storage array expansion con-
nection.
Quick Start Guide
13
Figure 7: First RAID Array.
Figure 8: Second RAID Array.
Page 17
USO-HA
Quick Start Guide
14
Figure 9: Storage Array Expansion Connection.
Page 18
USO-HA
Quick Start Guide
USO-HA™ Power Up and Initial Access
This section will provide step-by-step instructions for initial system configuration and hard-
ware setup of the StoneFly USO-HA™.
1. Connect both power supply modules to a power outlet using the included power
cords.
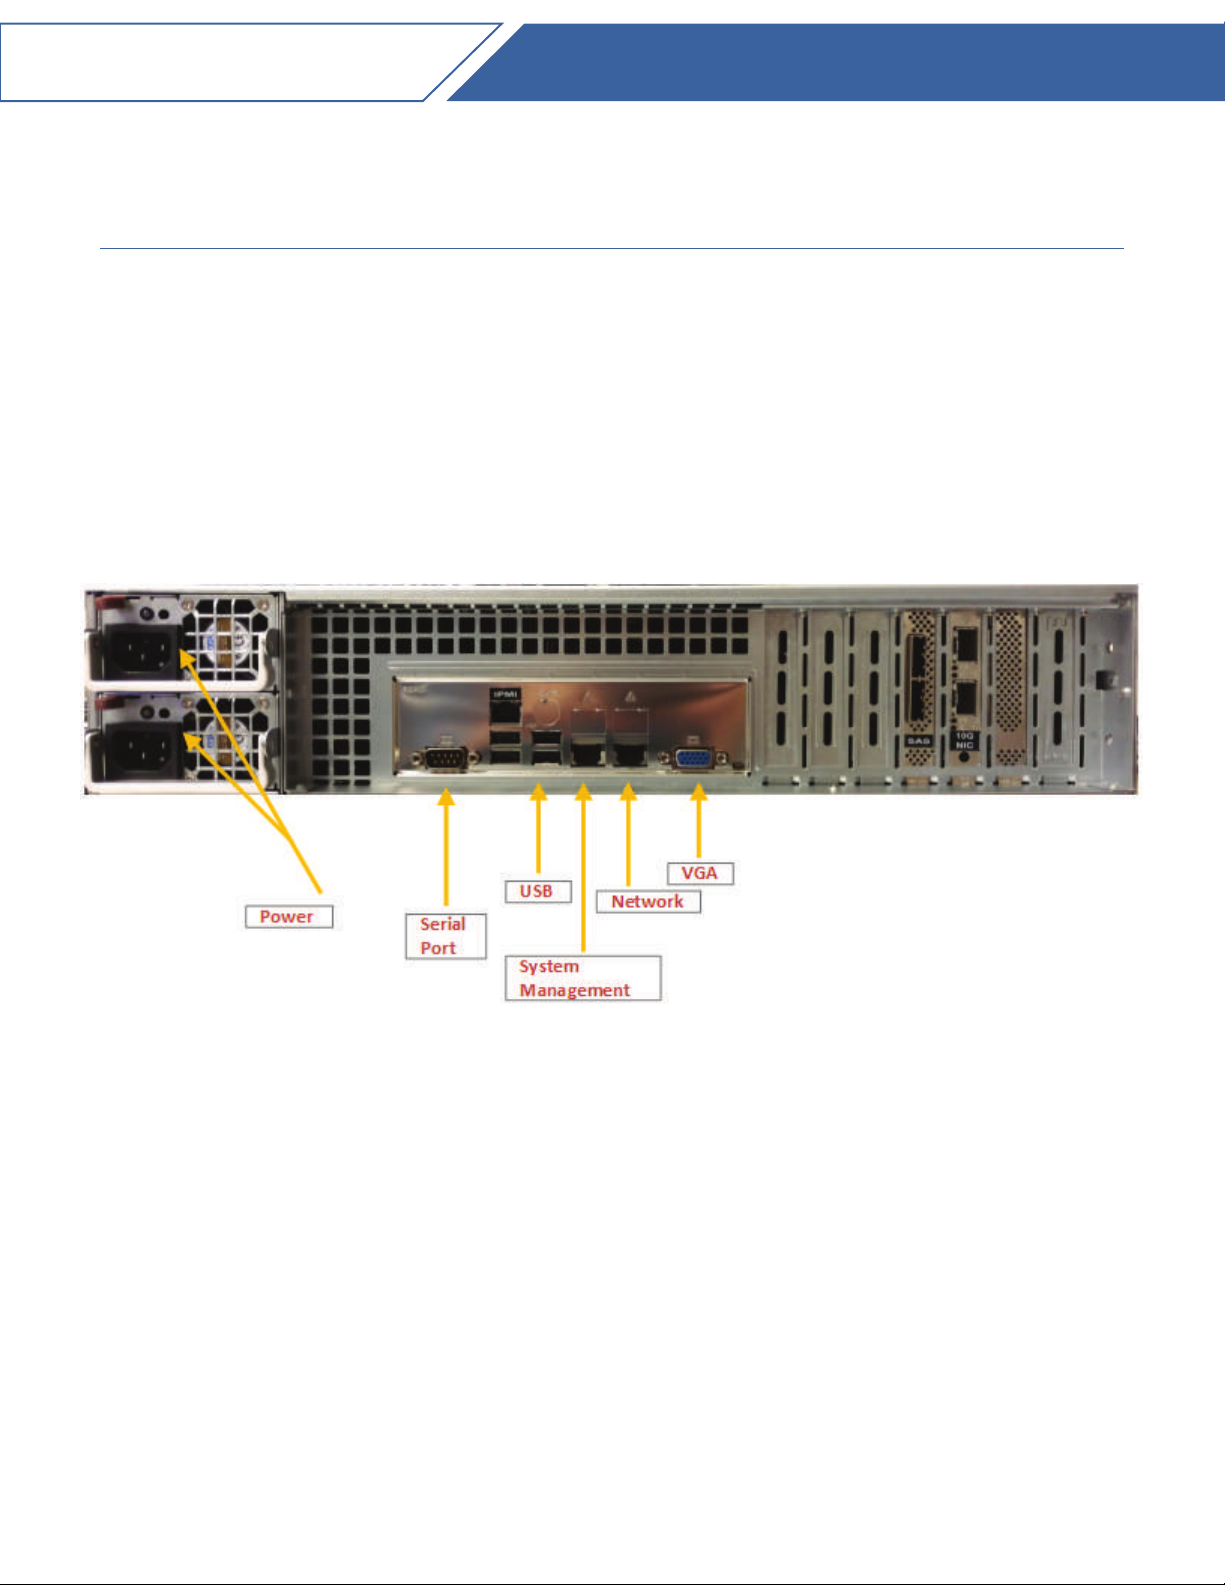
2. Connect an Ethernet cable to the Ethernet port as shown in picture below:
15
Figure 10: System Connections.
3. Turn on the power switch in front of the box.
4. Configure a computer to be able to access subnet DHCP since the default IP
address for the StoneFly USO-HA™ is set to DHCP.
5. A monitor is not needed to access the StoneFly USO-HA™, but if you have a
monitor hooked up to the box, you will see when the box is ready for access.
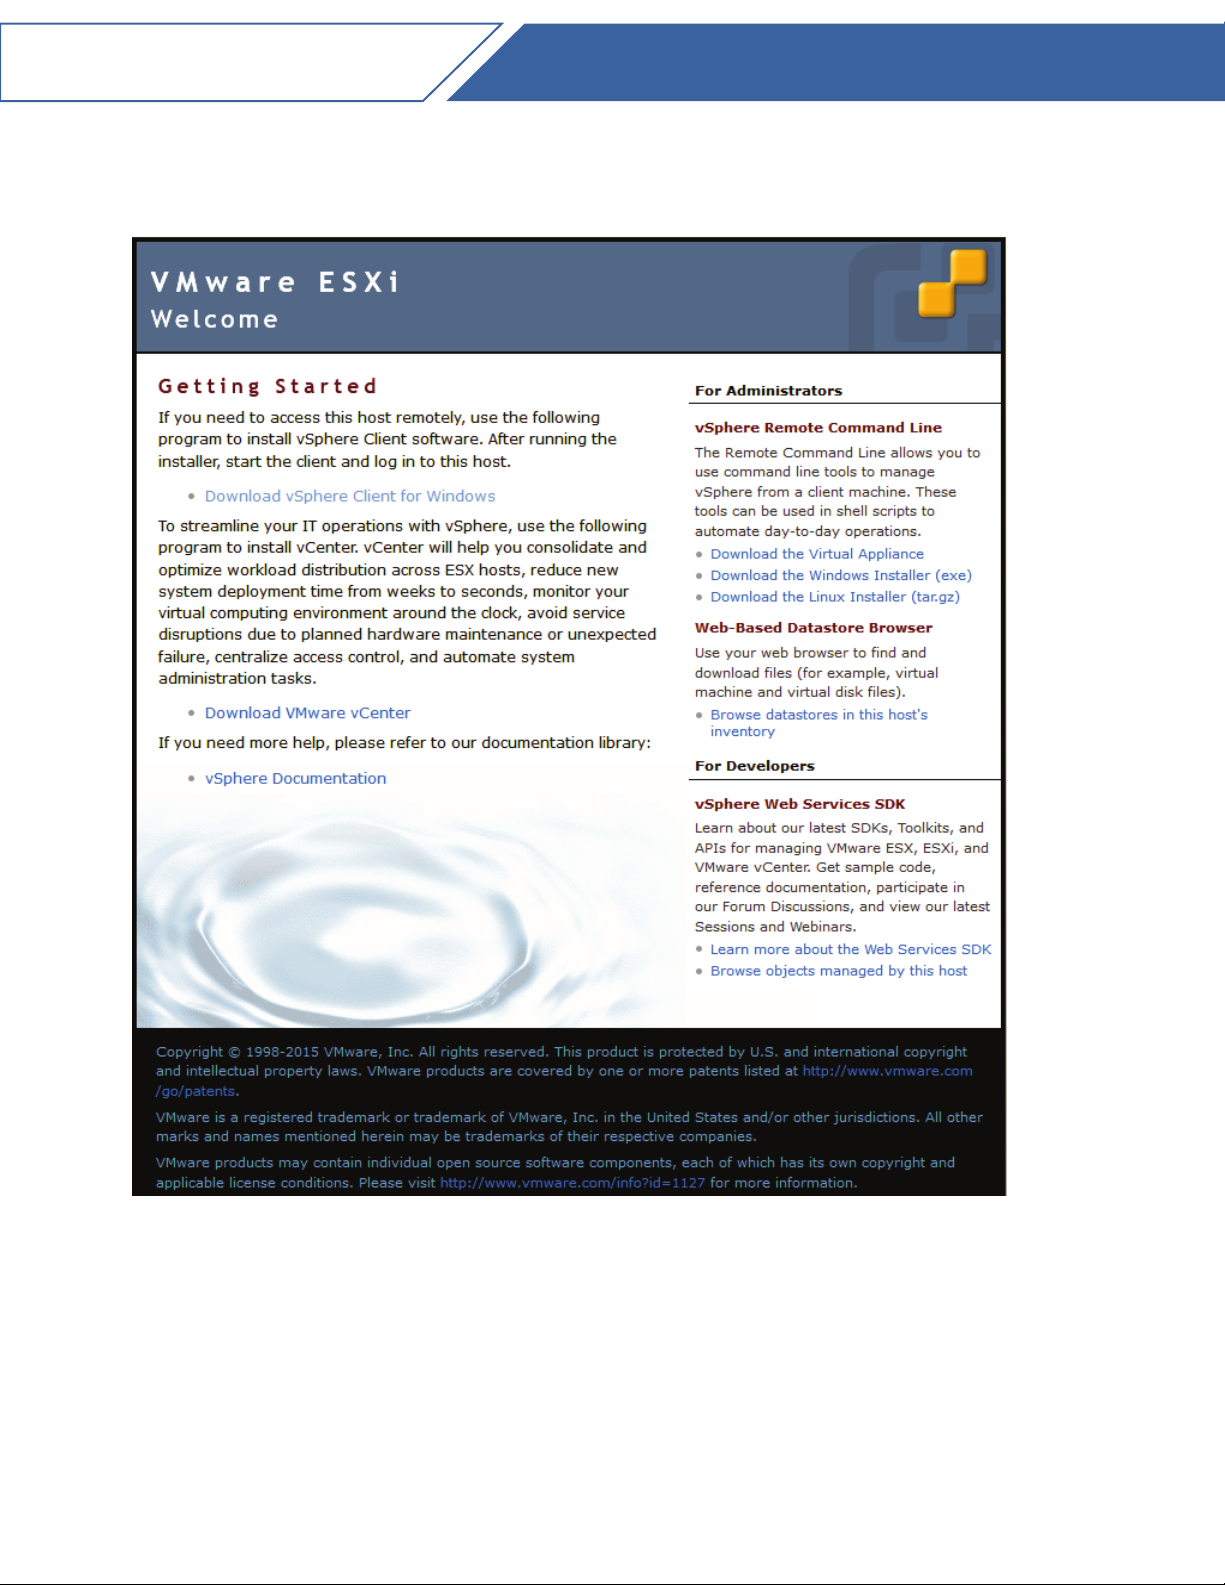
6. Open a web browser and in address bar, type in http://DHCP_IP and hit return.
You will see a screen like the one shown below:
Page 19
USO-HA
Quick Start Guide
16
7. Click on the Download VSphere Client link and that will guide you to download
and install a client agent that you will use to access your USO-HA™ which is
running VMware ESXi as its hypervisor.
Page 20
USO-HA
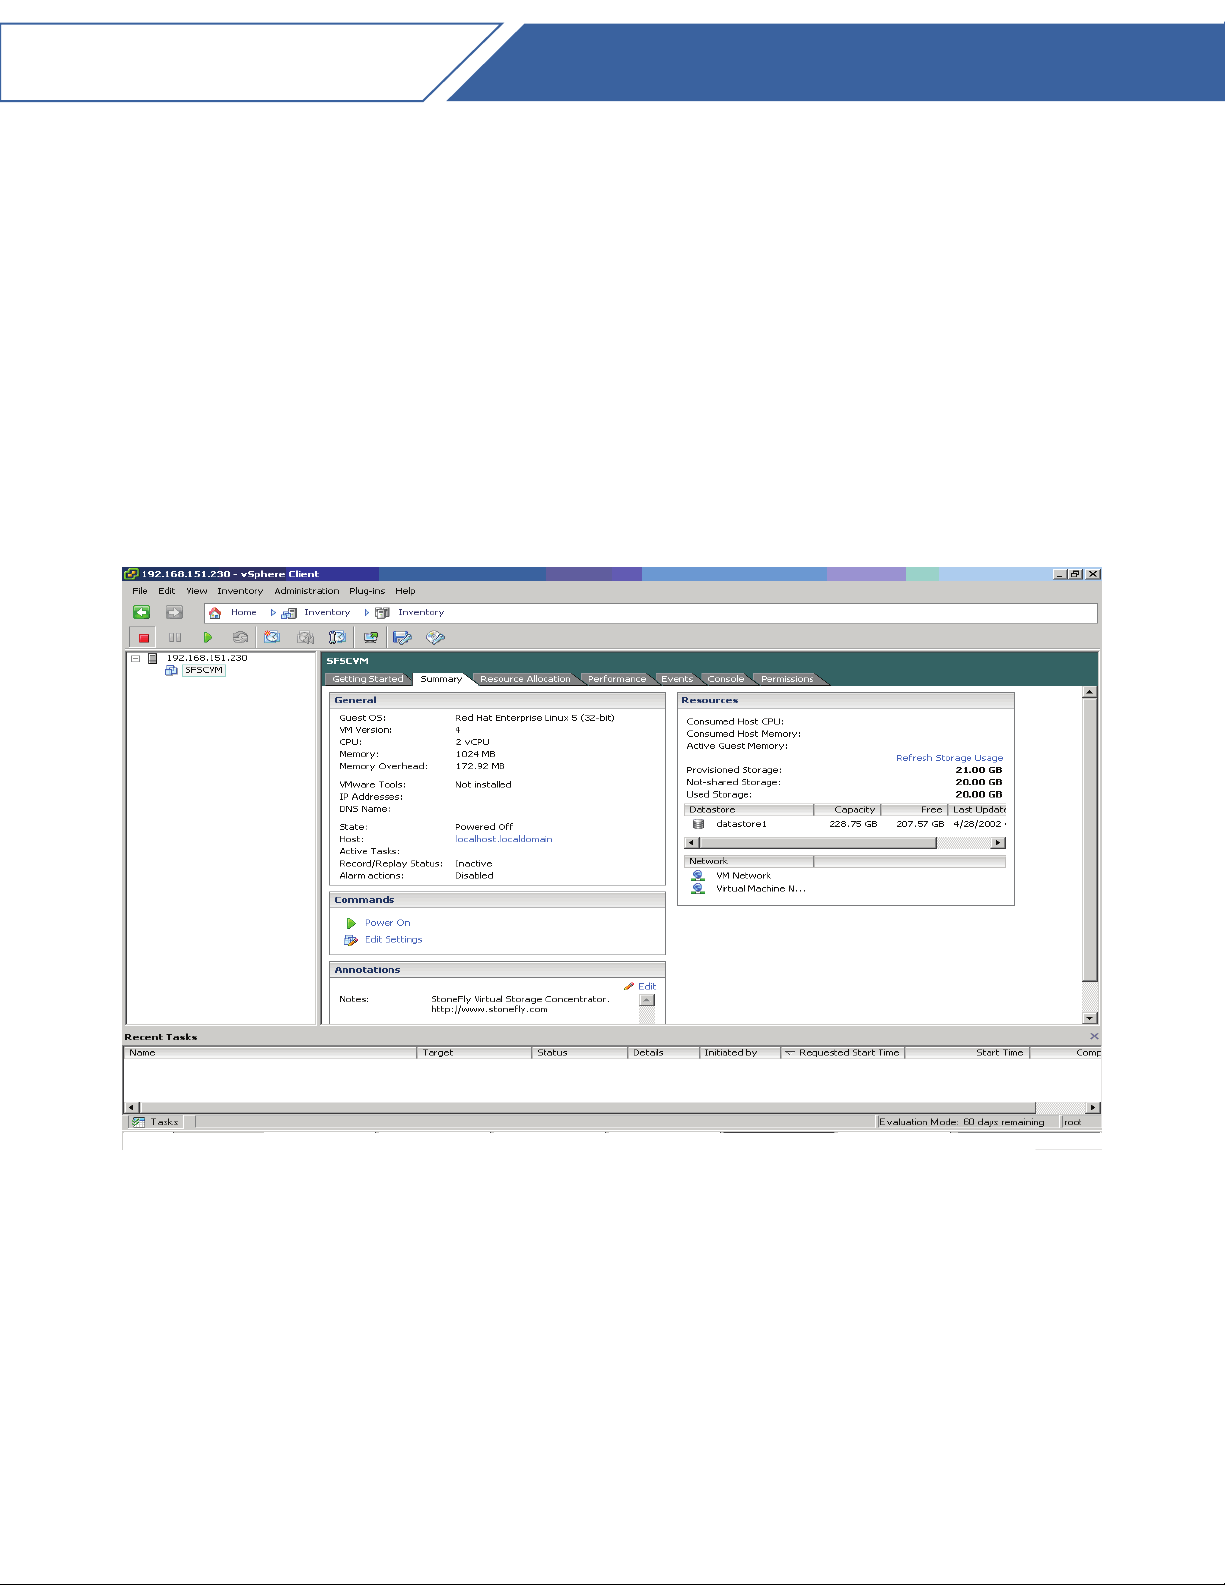
8. After the client is installed, it will create an icon on your desktop for launching the
client. Double click on the client icon and it will give you a screen to enter the user
name and password. Enter root for the username and stonefly for the password.
9. You will see a screen like the one shown below:
Quick Start Guide
17
Page 21
USO-HA
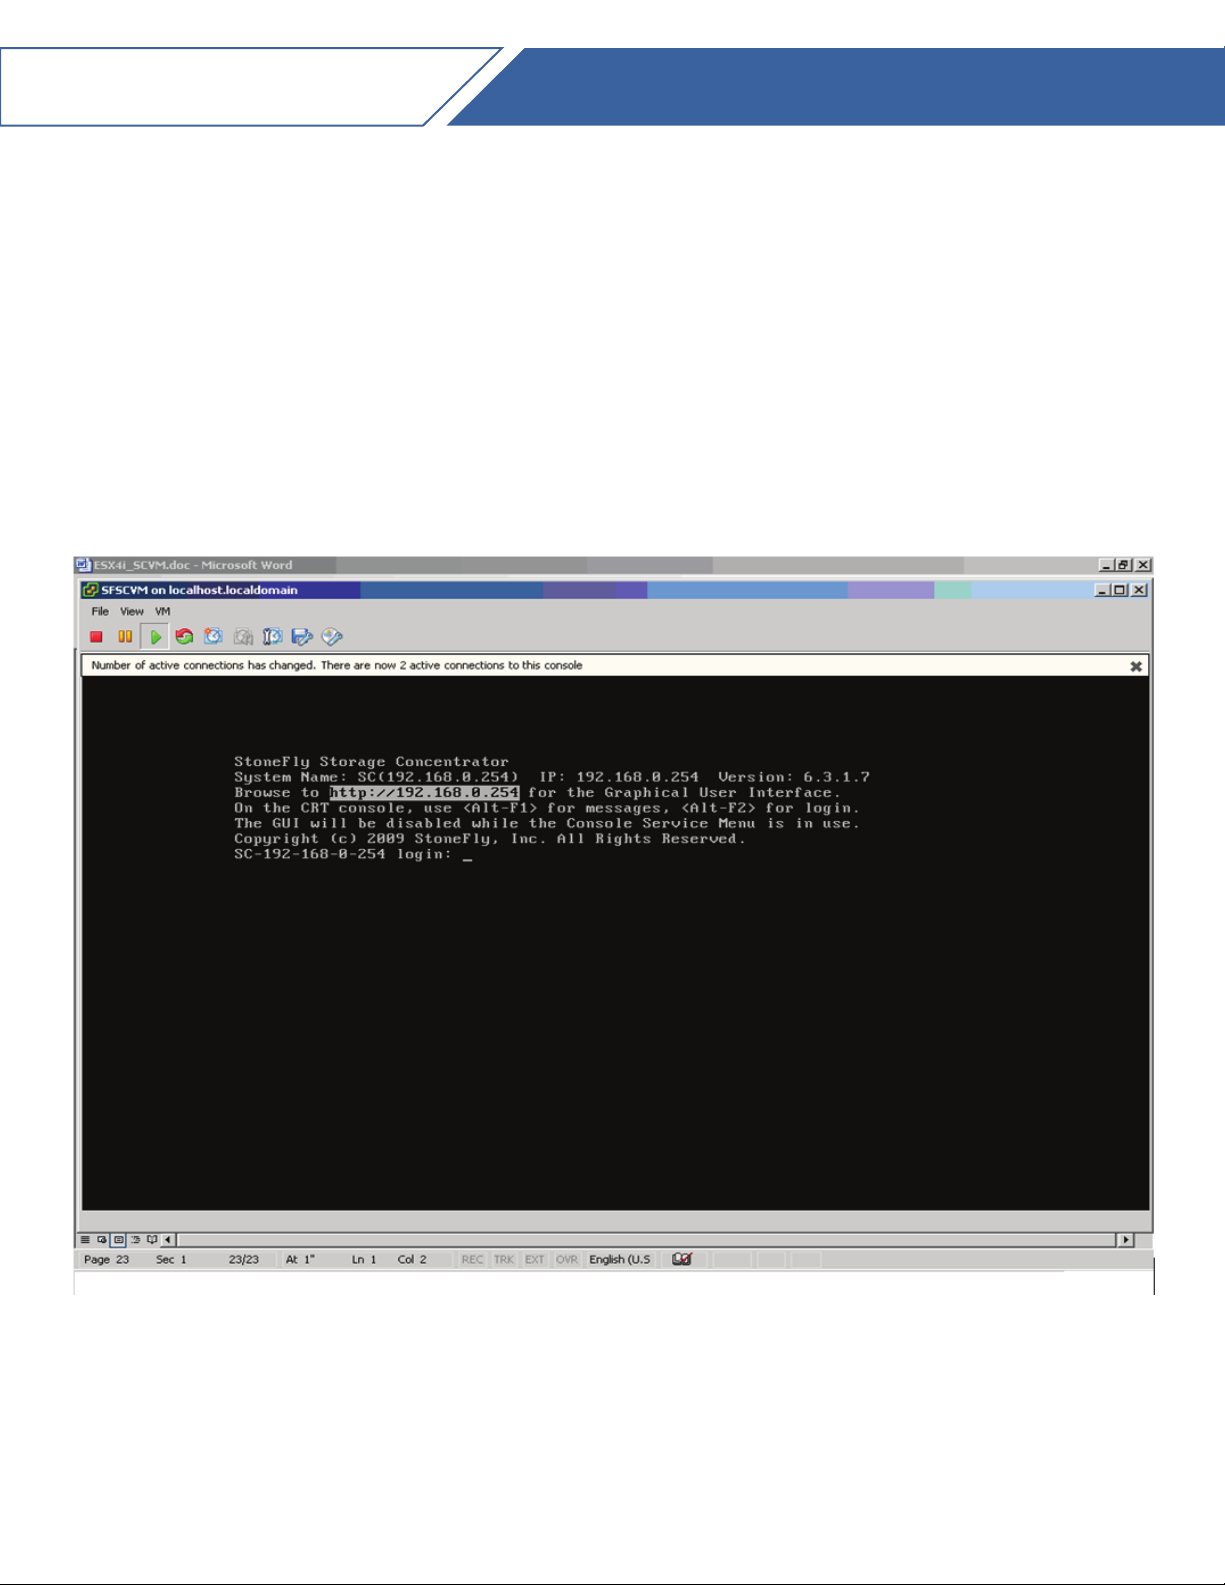
Accessing the Pre-Installed SCVM
The previous screenshot shows one SCVM is already installed. If you want to access the
user interface for that particular SCVM, click on that SCVM first and then click on the Con-
sole Tab. You will see a screen like the one shown below:
Quick Start Guide
18
Page 22
USO-HA
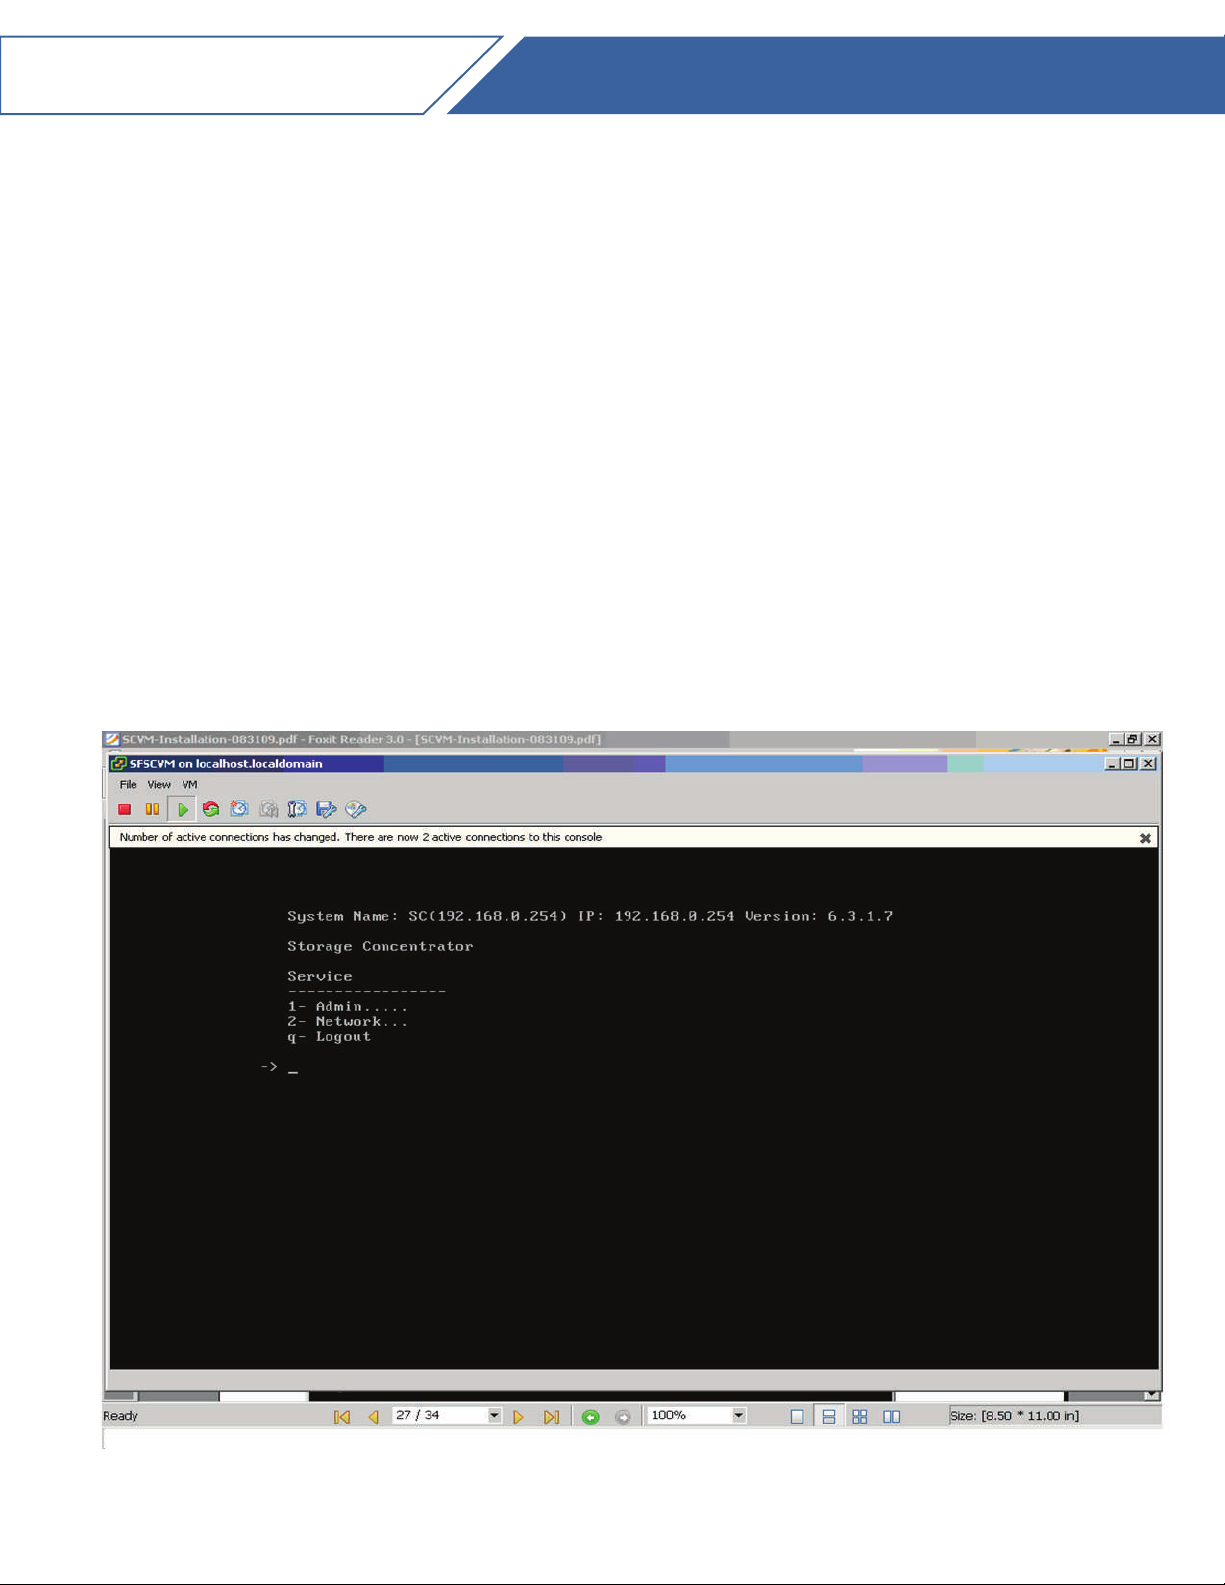
Steps to use the pre-installed SCVM:
1- The SCVM Storage Controller management network interface is preconfigured with
the default IP address of 192.168.0.254. This must be changed to a valid address for your
LAN network. Login to the “SC Service” console using the VMware “Virtual Console” for
the SCVM by doing the following:
a. Press “Enter” to display the login prompt.
b. At the user ID prompt type ‘console’ and hit “Enter”.
c. At the password prompt type ‘coni100o’ and hit “Enter”. Note that the user ID and
password are case sensitive.
2- Using the “SC Service” menu, configure the management network by selecting
Quick Start Guide
19
option ‘2’, for “2 – Network”.
Page 23
USO-HA
Quick Start Guide
20
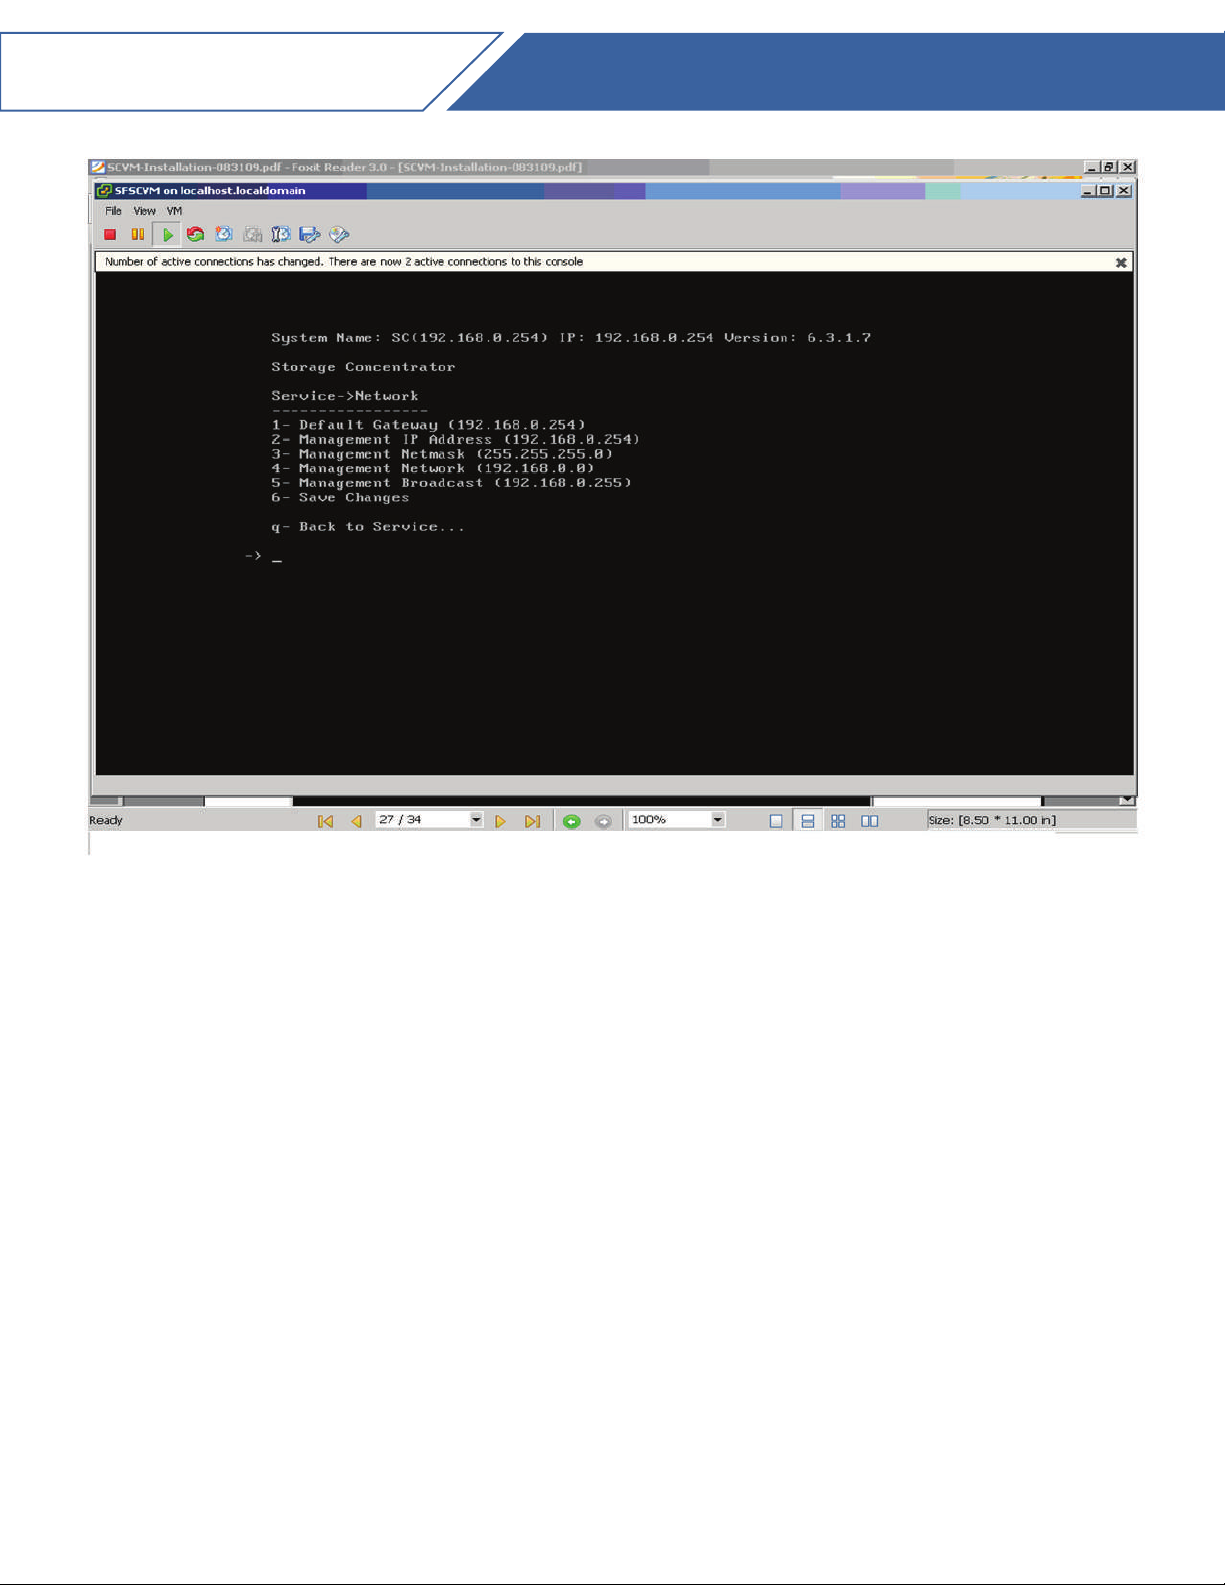
3- At the “ServiceNetwork” menu, change all of the Storage Concentrator manage-
ment network settings to values appropriate for your LAN network, save them, and then
completely exit the “SC Service” menu using the ‘q’ option for “q – Logout”. The “login:”
prompt should reappear.
Note that the browser access to the Storage Controller Management GUI is blocked while
the “SC Service” menu is active. Also note that there can be a short delay before the
Storage Concentrator GUI becomes available.
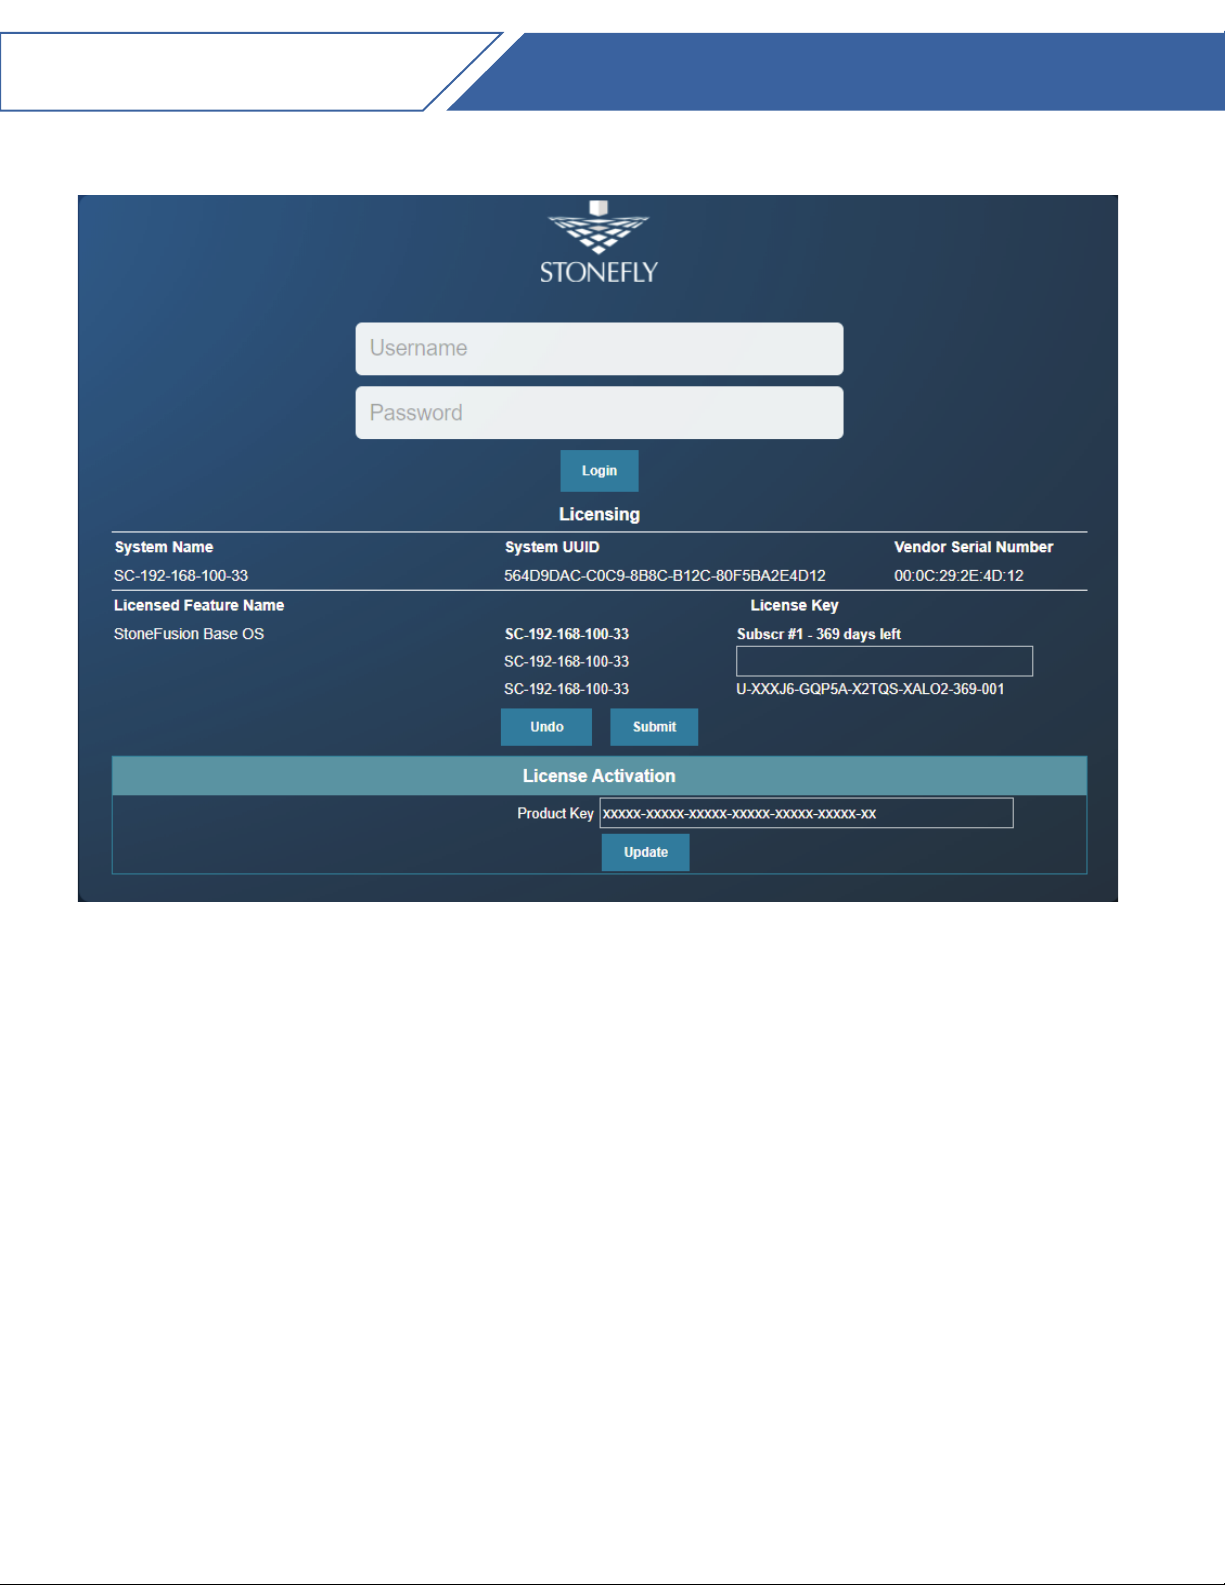
4- At this point, it should be possible to login to the Storage Concentrator Management
GUI by browsing to the management IP address that you have configured. The default
administrative “User ID” is ‘stonefly’, with a “Password” of ‘stonefly’. Once logged in, you
should configure the SAN data network settings.
Page 24
USO-HA
Quick Start Guide
21
Figure 11: Storage concentrator login screen.
For more information about the configuration and use of the Storage Concentrator, please
consult the StoneFly "Storage Concentrator User Guide" supplied in your package.
Page 25

StoneFly Inc.
26250 Eden Landing Rd-
Hayward, CA 94545
(510) 265-1122
www.StoneFly.com
 Loading...