

Page 1

Operator Manual
Model:
Mud BuggyMud Buggy
Mud Buggy
Mud BuggyMud Buggy
SB1600, SB2100, FB1000SB1600, SB2100, FB1000
SB1600, SB2100, FB1000
SB1600, SB2100, FB1000SB1600, SB2100, FB1000
™
MATERIAL HANDLER
REVISION / REVISIÓN / RÉVISION / REVISIONE M 9/2010 P/N / N/P / Réf. n° / N. cat. 56486
Page 2

Stone Construction Equipment, Inc.
Right Built PrRight Built Pr
Right Built Pr
Right Built PrRight Built Pr
machines that lower lifetime costs. They’re designed
to be reliable, productive, operator friendly and
serviceable, always with the end user in mind.
oducts Foducts F
oducts F
oducts Foducts F
rr
om A Right Built Comom A Right Built Com
r
om A Right Built Com
rr
om A Right Built Comom A Right Built Com
Right Built means tough, reliable, easy to use
panpan
pan
panpan
yy
..
y
.
yy
..
Page 3

FF
OREWOREW
ORD / LIMITEDORD / LIMITED
F
OREW
ORD / LIMITED
FF
OREWOREW
ORD / LIMITEDORD / LIMITED
Parker Hose/Connectors Warranty .............................................................. 6
INTRINTR
ODUCTIONODUCTION
INTR
ODUCTION
INTRINTR
ODUCTIONODUCTION
Introduction ........................................................................................... 8
Intended Use ...........................................................................................8
General Description ............................................................................... 8-9
Machine Diagram ................................................................................... 10
TECTEC
HNICHNIC
AL DAL D
AA
TT
TEC
HNIC
TECTEC
HNICHNIC
Machine Specifications ........................................................................... 12
Lubrication Specifications ....................................................................... 12
Engine Specifications ............................................................................. 13
Machine Sound Level Specifications .......................................................... 13
Machine Dimensions ............................................................................... 14
Engine Controls ..................................................................................... 15
Machine Operation Controls ..................................................................... 16
Pin and Plate Location ............................................................................ 17
HEALHEAL
TH & STH & S
HEAL
TH & S
HEALHEAL
TH & STH & S
Decal Placement ................................................................................ 20-21
Safety Warnings ................................................................................ 22-26
Safety Use ............................................................................................. 27
OPERAOPERA
TIONTION
OPERA
TION
OPERAOPERA
TIONTION
General Safety Notes ............................................................................... 30
Prevent Damage to Machine ..................................................................... 31
Safety Symbols ...................................................................................... 32
Delivery Inspection ................................................................................ 32
Break-In Period ..................................................................................... 32
Know Your Buggy ................................................................................... 32
Machine Cleanliness ............................................................................... 32
Pre-Start Checklist ................................................................................. 33
Starting the Machine .............................................................................. 33
To Shut Off Engine.................................................................................. 34
Machine Operation ................................................................................. 34
Mounting / Dismounting Buggy ............................................................... 34
Operator Controls ................................................................................... 35
Dumping Operation ................................................................................ 36
Quick Release Dual Wheels ....................................................................... 36
Cold Weather Starting ............................................................................. 37
Hoses, Fittings and Leakage..................................................................... 37
Cleaning Machine ................................................................................... 37
Parking Buggy ....................................................................................... 37
Transporting Machine ............................................................................. 38
Mud Buggy Lifting Points ........................................................................ 38
Hydraulic Oil ......................................................................................... 39
Fuel ..................................................................................................... 39
Hardware/ ............................................................................................ 39
Cleaning/Storage ................................................................................... 40
T
AL D
A
AL DAL D
AA
TT
AFETAFET
AFET
AFETAFET
............................................................................................................................................................................
......................................................................................
............................................................................................................................................................................
W W
ARRANTARRANT
W
ARRANT
W W
ARRANTARRANT
......................................................................................................................................................................
...................................................................................
......................................................................................................................................................................
AA
..............................................................................................................................................................
A
...............................................................................
AA
..............................................................................................................................................................
YY
..........................................................................................................................................................
Y
.............................................................................
YY
..........................................................................................................................................................
YY
........................................................................................................................
Y
............................................................
YY
........................................................................................................................
4-54-5
4-5
4-54-5
7-17-1
7-1
7-17-1
11
1-11-1
1
1-1
11
1-11-1
11
9-29-2
1
9-2
11
9-29-2
29-4029-40
29-40
29-4029-40
00
0
00
Table of
Contents
77
7
77
77
7
77
MAINTENMAINTEN
MAINTEN
MAINTENMAINTEN
CC
ALIFALIF
C
ALIF
CC
ALIFALIF
ANAN
CECE
....................................................................................................................................................................
AN
CE
..................................................................................
ANAN
CECE
First Service 50 Hours / Additional Service Info .......................................... 42
Lubrication Points ................................................................................. 42
Chassis Grease/Lube Points ................................................................ 42-43
Engine ................................................................................................. 44
Engine Oil / Air Filter ........................................................................ 44
Spark Plug / Engine RPM / Cooling System / Valve Clearance................... 45
Electric Start Option ............................................................................... 46
Battery / Battery Policy ..................................................................... 46-47
Power Train ........................................................................................... 47
Transmission ......................................................................................... 48
Hoses, Fittings & Leakage ........................................................................ 49
Brake Adjustments / Service Brake Adjustment .......................................... 49
Tires, Lugnuts and Hardware .................................................................... 49
Fuel Tank .............................................................................................. 50
Storage / Spring Start Up ........................................................................ 50
Maintenance Chart Machine Breakdown / Maintenance Chart........................ 51
Maintenance Log.................................................................................... 52
Troubleshooting .................................................................................... 53
ORNIA PRORNIA PR
ORNIA PR
ORNIA PRORNIA PR
....................................................................................................................................................................
OPOSITION 65 WOPOSITION 65 W
OPOSITION 65 W
OPOSITION 65 WOPOSITION 65 W
ARNINARNIN
ARNIN
ARNINARNIN
GG
........................................................................................................
G
....................................................
GG
........................................................................................................
44
4
44
1-51-5
1-5
1-51-5
IBCIBC
IBC
IBCIBC
44
4
44
MUD BUGGY
3
Page 4
Location of wLocation of w
Location of w
Location of wLocation of w
infinf
inf
infinf
oror
mation:mation:
or
mation:
oror
mation:mation:
arar
ar
arar
rr
antyanty
r
anty
rr
antyanty
1. Information on S/N tag.
2. Information on engine
tag.
3. Information on S/N tag if applicable.
4. Date you purchased
machine.
5. Dealer machine was
purchased from.
These instructions include:
Safety regulations
Operating instructions
Maintenance instructions
··
These insThese ins
·
These ins
··
These insThese ins
ff
or tor t
f
or t
ff
or tor t
··
· These instructions are intended to simplify operation of the machine and to avoid
··
trtr
uctions hauctions ha
tr
uctions ha
trtr
uctions hauctions ha
he maintenance engineerhe maintenance engineer
he maintenance engineer
he maintenance engineerhe maintenance engineer
vv
e been pre been pr
v
e been pr
vv
e been pre been pr
..
.
..
eparepar
epar
eparepar
ed fed f
ed f
ed fed f
or operor oper
or oper
or operor oper
ation on tation on t
ation on t
ation on tation on t
he conshe cons
he cons
he conshe cons
trtr
uction site anduction site and
tr
uction site and
trtr
uction site anduction site and
malfunctions through improper operation.
··
· Observing the maintenance instructions will increase the reliability and service life of
··
the machine when used on the construction site and reduce repair costs and downtimes.
··
AlwAlw
aa
yy
s ks k
eep teep t
e te t
e t
e te t
oror
or
oror
eep t
eep teep t
ate tate t
ate t
ate tate t
he safhe saf
he saf
he safhe saf
s and ts and t
s and t
s and ts and t
hese inshese ins
hese ins
hese inshese ins
he mache mac
he mac
he mache mac
·
Alw
a
y
··
··
·
··
··
·
··
··
· The manufacturer is not liable for the function of the machine when used in an im-
··
s k
AlwAlw
aa
yy
s ks k
OnlOnl
y opery oper
Onl
y oper
OnlOnl
y opery oper
ObserObser
vv
Obser
v
ObserObser
vv
trtr
ade association. Obserade association. Obser
tr
ade association. Obser
trtr
ade association. Obserade association. Obser
comcom
pactpact
com
pact
comcom
pactpact
trtr
uctions at tuctions at t
tr
uctions at t
trtr
uctions at tuctions at t
hine as inshine as ins
hine as ins
hine as inshine as ins
ee
ty rty r
egulations as wegulations as w
e
ty r
egulations as w
ee
ty rty r
egulations as wegulations as w
he perhe per
tinent rtinent r
he per
tinent r
he perhe per
tinent rtinent r
vv
v
vv
e te t
e t
e te t
he safhe saf
he saf
he safhe saf
he place of use of the place of use of t
he place of use of t
he place of use of the place of use of t
trtr
ucted and fucted and f
tr
ucted and f
trtr
ucted and fucted and f
ell as tell as t
he guidelines of the guidelines of t
ell as t
he guidelines of t
ell as tell as t
he guidelines of the guidelines of t
ee
ty rty r
ules fules f
e
ty r
ules f
ee
ty rty r
ules fules f
egulations fegulations f
egulations f
egulations fegulations f
or tor t
or t
or tor t
olloollo
ollo
olloollo
or tor t
or t
or tor t
he prhe pr
he pr
he prhe pr
he mache mac
he mac
he mache mac
w tw t
hese inshese ins
w t
hese ins
w tw t
hese inshese ins
he operhe oper
he oper
he operhe oper
ee
vv
e
v
ee
vv
trtr
tr
trtr
he civil engineerhe civil engineer
he civil engineer
he civil engineerhe civil engineer
ation of ration of r
ation of r
ation of ration of r
ention of accidents.ention of accidents.
ention of accidents.
ention of accidents.ention of accidents.
hine.hine.
hine.
hine.hine.
uctions.uctions.
uctions.
uctions.uctions.
oad road r
oad r
oad road r
olleroller
oller
olleroller
inging
ing
inging
s ands and
s and
s ands and
proper manner and for other than the intended purpose.
··
· Operating errors, improper maintenance and the use of incorrect operating materials
··
are not covered by the warranty.
··
· The above information does not extend the warranty and liability conditions of busi-
··
ness of the manufacturer.
Please enter the following data. This will help expedite any service or warranty work.
1. Machine Type: ________________________________________________________
6. Information on battery
and battery warranty
card.
Machine S/N: _________________________________________________________
2. Engine Type: __________________________________________________________
Engine S/N: __________________________________________________________
3. VIN: ________________________________________________________________
4. Purchase Date: ________________________________________________________
5. Dealer/Distributor Information:
Name: _______________________________________________________________
Address: _____________________________________________________________
____________________________________________________________________
Phone #: _____________________________________________________________
Fax # ________________________________________________________________
6. Battery Manufacturer: __________________________________________________
Battery Type: _________________________________________________________
Battery S/N: __________________________________________________________
MUD BUGGY
4
SS
tt
one Consone Cons
S
t
one Cons
SS
tt
one Consone Cons
P.O. Box 150, Honeoye, New York 14471
Phone: (800) 888-9926 +1(585)229-5141 Fax: +1(585) 229-2363
trtr
uction Equction Eq
tr
uction Eq
trtr
uction Equction Eq
uipment, Inc.uipment, Inc.
uipment, Inc.
uipment, Inc.uipment, Inc.
Page 5
Limited Warranty
The Manufacturer warrants that products manufactured
shall be free from defects in material and workmanship
that develop under normal use for a period as hereinafter
set forth from the date of shipment. The foregoing shall
be the exclusive remedy of the buyer and the exclusive
liability of the Manufacturer.
Our warranty excludes normal replaceable wear items,
i.e. gaskets, wear plates, seals, O-rings, V-belts, drive
chains, clutches, etc. Any equipment, part or product,
which is furnished by the Manufacturer but manufactured
by another, bears only the warranty given by such other
manufacturer.
The Manufacturer’s sole responsibility for any breach of
the foregoing provision of this contract, with respect to
any product or part not conforming to the Warranty or
the description herein contained, is at its option (a) to
repair, replace or refund such product or parts upon the
SUHSDLGUHWXUQWKHUHRIWRORFDWLRQGHVLJQDWHGVSHFLÀFDOO\
by the Manufacturer. Product returns not shipped prepaid
or on an economical transportation basis will be refused
(b) as an alternative to the foregoing modes of settlement
- the Manufacturer’s dealer to repair defective units
with reimbursement for expenses, except labor, and
be reviewed with the Manufacturer prior to repair. A
Warranty Evaluation Form must accompany all warranty
claims. Warranty is voided by product abuse, alterations,
and use of equipment in applications for which it was not
intended, use of non-manufacturer parts, or failure to
follow documented service instructions.
Except as set forth hereinabove and without limitation of
WKHDERYHWKHUHDUHQRZDUUDQWLHVRURWKHUDIÀUPDWLRQV
which extend beyond the description of the products and
WKHIDFWKHUHRIRUDVWRRSHUDWLRQDOHIÀFLHQF\SURGXFW
reliability or maintainability or compatibility with products
furnished by others. In no event whether as a result of
breach of contract or warranty or alleged negligence, shall
the Manufacturer be liable for special or consequential
GDPDJHVLQFOXGLQJEXWQRWOLPLWHGWR/RVVRISURÀWVRU
revenues, loss of use of the product or any associated
product, cost of capital, cost of substitute products,
facilities or services or claims of customers.
No claim will be allowed for products lost or damaged in
WUDQVLW6XFKFODLPVVKRXOGEHÀOHGZLWKWKHFDUULHUZLWKLQ
ÀIWHHQGD\V
The foregoing warranty is exclusive of all other warranties
whether written or oral, expressed or implied. No warranty
RIPHUFKDQWDELOLW\RUÀWQHVVIRUDSDUWLFXODUSXUSRVHVKDOO
apply. The agents, dealer and employees of Manufacturer
DUHQRWDXWKRUL]HGWRPDNHPRGLÀFDWLRQWRWKLVZDUUDQW\RU
additional warranties binding on Manufacturer. Therefore,
additional statements, whether oral or written, do not
constitute warranty and should not be relied upon.
Effective September 2010.
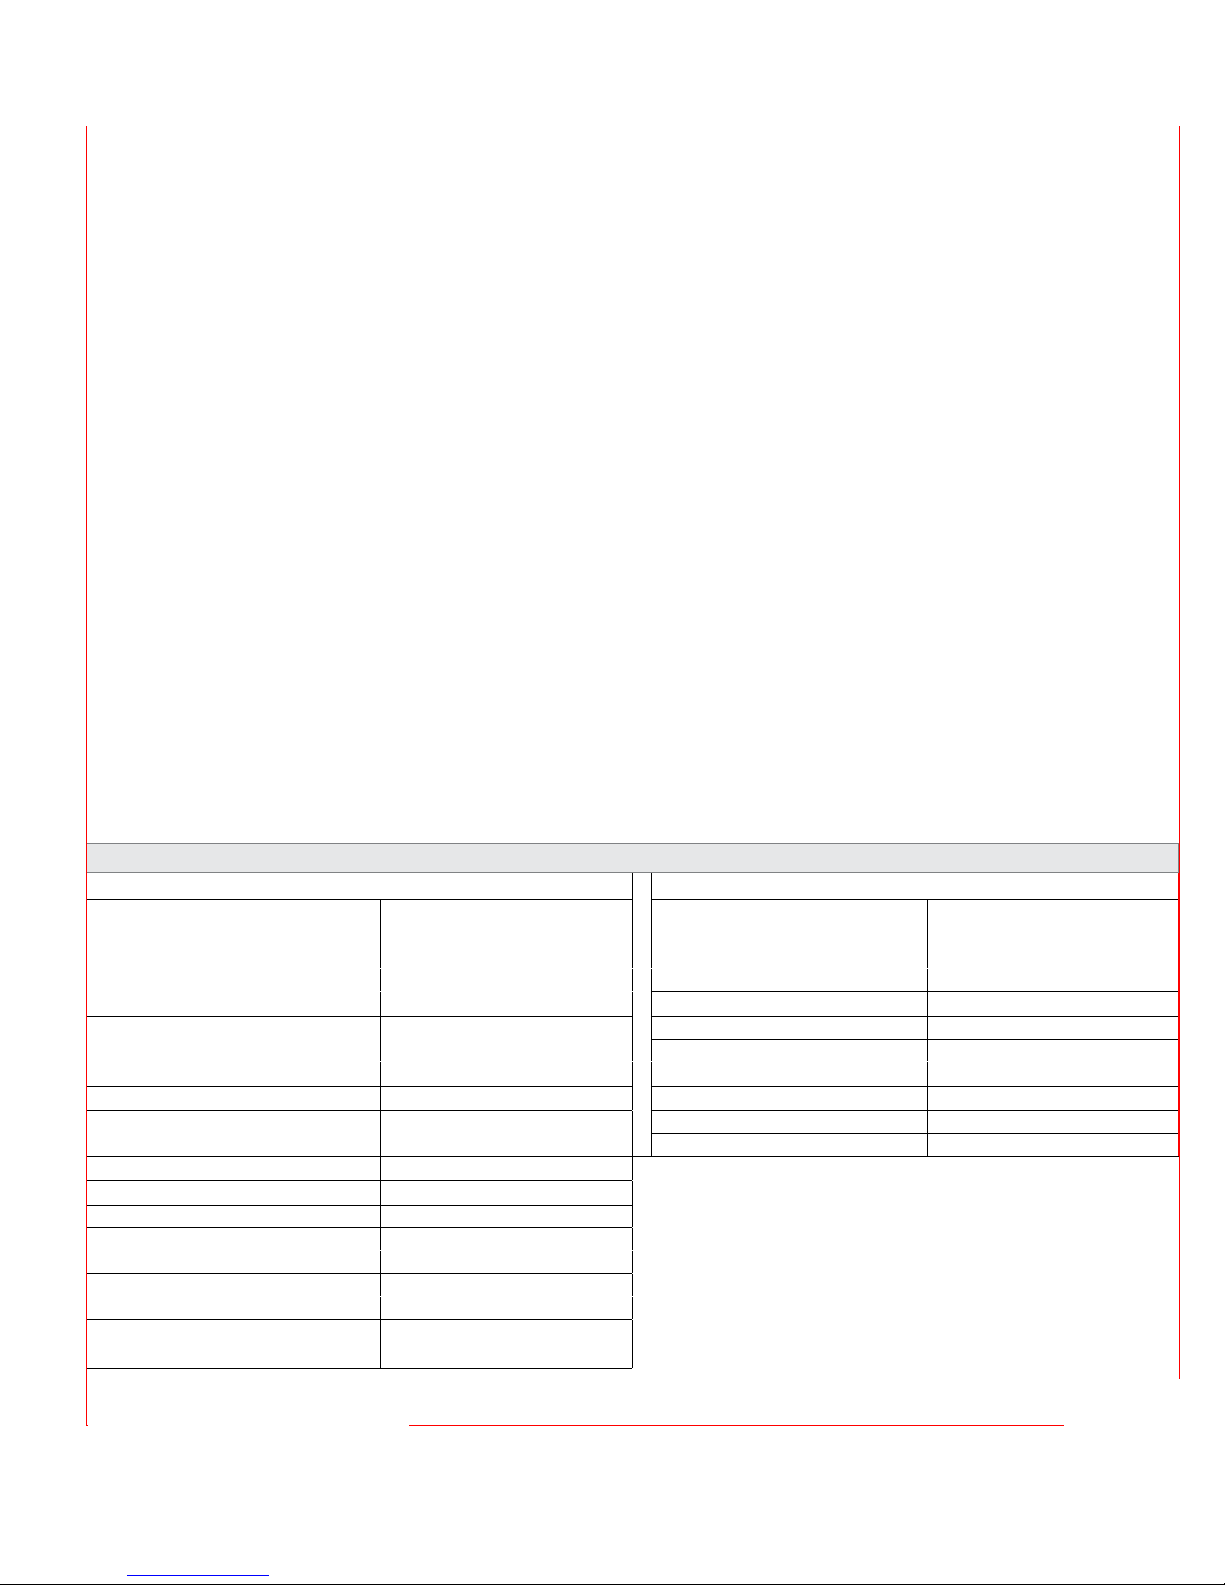
WARRANTY PERIODS
Concrete and Masonry Equipment Compaction Equipment
Mortar Mixers including:
Champion™ Mortar Mixers 1 Year Bulldog
Buddy™ by Stone Mixers 2 Year - Mixer Drum 3 Year - Microprocessor (ECIB)
Champion™ Hydraulic Mixers Lifetime* - Bearing & Seals 5 Year - Eccentric Bearings
Champion™ Silo Mixers Reversible Plates 1 Year
Champion™ Concrete Mixers 1 Year Rhino® Single-Drum Dirt Rollers 1 Year
2 Year - Mixer Drum Silver Fox™ Forward Plates 2 Year
Lifetime* - Spindle Bearing 2 Year - Eccentric Bearings
Concrete Vibrators 1 Year Stompers
Cretemower® Concrete Grinders 1 Year Walk-Behind Rollers 2 Year
1 Year - Diamond Head WolfPac™ Asphalt Rollers 1 Year
Groutzilla™ Placement System 2 Year
Lift Jockey™ Vertical Mast Lifts 2 Year
Mud Buggy™ Material Handlers 1 Year
Smooth Operator™ Power Trowels 1 Year
2 Year - Trowel Gearbox
Saw Devil® Pavement and Block 1 Year
Saws 1 Year - Saw Blades
Power Screeds including:
The Screed Bull™
1 Year
1 Year - Screed Board (Aluminum)
® Trench Rollers
®
* The Manufacturer extends the warranty period to “Lifetime” for
the drum bearings and seals for the mortar mixers, and agrees to
furnish, free of charge, the bearing and seals only upon receipt of
the defective parts. The Manufacturer extends the warranty period
to “Lifetime” for the spindle bearings for the concrete mixers, and
agrees to furnish, free of charge, the bearing and seal only upon
receipt of the defective parts.
2 Year
2 Year
Construction Equipment
Right Built. Bred Tough. Born To Work.
STONE CONSTRUCTION EQUIPMENT, INC.
8662 Main Street
Honeoye, NY 14471-0150
www.stone-equip.com
e-mail: [email protected]
Toll-free: 1-800-888-9926
Phone: +1-585-229-5141
Fax: +1-585-229-2363
P/N 66609 Rev A 9110
5
Page 6
THE PARKER HOSE/CONNECTORS WARRANTY
• Elastomeric Connections (Tube/Hose & Port End) covered for three
years from date of purchase by end user.
• Hose assemblies covered for one year from date of purchase by end
user.
• Product must be registered with Parker to activate warranty. You can
register a system on-line at www.parker.com/fcg/gpp or complete
the form below and return by mail to:
Stone Construction Equipment, Inc.
PPG Program
P.O. Box 150
Honeoye, NY 14471
Attn: Technical Services
• A Parker representative will contact the end user to explain the War-
ranty and close the loop.
• In the event of a claim, the end user should contact thier Parker
representive or Stone dealer for assistance.
• A Parker representative or Application Engineer will determine cause
of the Claim and recommend a solution.
• Parts returned to Parker which are determined to have leaked due to
defects in materials or Workmanship will be replaced at no charge.
Name:
Company:
Address:
City: State: Zip:
Country:
Phone:
E-Mail:
Date of Purchase:
Equipment Manufacturer:
Model Number:
Serial Number:
Stone Construction Equipment, Inc.
Dealer Where Purchased:
MUD BUGGY
6
Dealer’s City: Dealer’s State:
Page 7
Stone Construction
Equipment, Inc.
1. Introduction
Page 8
INTRODUCTION
Introduction
Congratulations on your purchase of a Stone Mud Buggy™! You've made an excellent
choice! Stone buggies have been specifically designed as the ideal machine for the professional contractor who is engaged in professional concrete finishing. The Stone Mud Buggy is
ergonomically engineered to optimize operator interface with the total machine--it's really
"user friendly". Besides good visibility, you'll find that the controls are in exactly the right
all tall t
places for maximum comfort. And, it's really convenient to monitor
gg
as and oil leas and oil le
g
as and oil le
gg
as and oil leas and oil le
Our common sense approach to servicing is a valuable benefit on the mud buggy. Thanks to
our modular design, everything that needs servicing has easy-access
The following instructions were compiled to provide you information on how to obtain long
and trouble-free use of the buggy. Periodic maintenance is essential. Read the manual in its
entirety and follow the instructions carefully. Refer to the Technical Data Section to
familiarize yourself with machine controls and components. Failure to do so may injure
yourself or a bystander.
vv
v
vv
els.els.
els.
els.els.
he consumables--he consumables--
all t
he consumables--
all tall t
he consumables--he consumables--
..
.
..
INTENDED USE
These machines are dynamically balanced to meet standards for lateral stability, longitudinal
stability, parking and service brake effectiveness which provides a stable, reliable and
productive machine for carrying and moving all types of materials for any job site. The Mud
Buggy moves concrete, mortar, gravel, dirt or debris around job sites.
This safThis saf
This saf
This safThis saf
identifidentif
identif
identifidentif
safsaf
saf
safsaf
manual.manual.
manual.
manual.manual.
When yWhen y
When y
When yWhen y
symbol, be alersymbol, be aler
symbol, be aler
symbol, be alersymbol, be aler
safsaf
saf
safsaf
CarCar
Car
CarCar
messagmessag
messag
messagmessag
infinf
inf
infinf
ee
ty alerty aler
e
ty aler
ee
ty alerty aler
ies imies im
ies im
ies imies im
ee
ty messagty messag
e
ty messag
ee
ty messagty messag
ou see tou see t
ou see t
ou see tou see t
ee
ty is inty is in
e
ty is in
ee
ty is inty is in
efullefull
y ry r
efull
y r
efullefull
y ry r
e te t
hat fhat f
e t
hat f
e te t
hat fhat f
oror
m om o
tt
her operher oper
or
m o
t
her oper
oror
m om o
tt
her operher oper
es in tes in t
es in t
es in tes in t
ead tead t
ead t
ead tead t
olloollo
ollo
olloollo
t symbolt symbol
t symbol
t symbolt symbol
porpor
tt
antant
por
t
ant
porpor
tt
antant
hishis
his
hishis
hishis
his
hishis
t, yt, y
ourour
t, y
our
t, yt, y
ourour
vv
olol
vv
ed.ed.
v
ol
v
ed.
vv
olol
vv
ed.ed.
hehe
he
hehe
ww
s ands and
w
s and
ww
s ands and
atat
oror
s.s.
at
or
s.
atat
oror
s.s.
Use of the machine in any other way is considered contrary to the intended use and will void
the warranty.
DangDang
er Zoneer Zone
Dang
er Zone
DangDang
er Zoneer Zone
While the machine is in use unauthorized persons must remain outside the danger zone.
GENERAL DESCRIPTION
YY
our neour ne
w Sw S
tt
Y
our ne
YY
our neour ne
tivitytivity
tivity
tivitytivity
Capacity tCapacity t
Capacity t
Capacity tCapacity t
Walk behind or ride on this machine to
haul up to 21 cu. ft. of material. The
hydraulic dump system allows you to
move and dump up to 2,500 lbs loads.
The Stake Bed version carries up to 10
cu.ft. or 2,500 lbs.
OperOper
Oper
OperOper
Extra large, platform-mounted ser vice
brake does not require operator to step
off platform to activate brake pedal.
Machine has a fold up lockable angled
platform for more maneuverability.
one Mud Buggy™ comes sone Mud Buggy™ comes s
w S
t
one Mud Buggy™ comes s
w Sw S
tt
one Mud Buggy™ comes sone Mud Buggy™ comes s
, per, per
ff
oror
, per
, per, per
atat
at
atat
mance and safmance and saf
f
or
mance and saf
ff
oror
mance and safmance and saf
o Haulo Haul
o Haul
o Haulo Haul
or Platfor Platf
or Platf
or Platfor Platf
oror
or
oror
mm
m
mm
ee
tyty
. Lis. Lis
e
ty
. Lis
ee
tyty
. Lis. Lis
tt
andarandar
t
andar
tt
andarandar
ted beloted belo
ted belo
ted beloted belo
d witd wit
d wit
d witd wit
w arw ar
w ar
w arw ar
h manh man
h man
h manh man
e juse jus
e jus
e juse jus
t a ft a f
t a f
t a ft a f
y fy f
y f
y fy f
ee
w of tw of t
e
w of t
ee
w of tw of t
eatureatur
eatur
eatureatur
es tes t
o enhance pro enhance pr
es t
o enhance pr
es tes t
o enhance pro enhance pr
hese fhese f
eatureatur
hese f
eatur
hese fhese f
eatureatur
es:es:
es:
es:es:
oduc-oduc-
oduc-
oduc-oduc-
MUD BUGGY
8
Page 9

HeaHea
vy Duty Fvy Duty F
Hea
vy Duty F
HeaHea
vy Duty Fvy Duty F
Reduces vibration, increases traction and lowers center of gravity for stability--empty or
full.
PP
olol
yy
-Cont-Cont
P
ol
y
-Cont
PP
olol
yy
-Cont-Cont
Easy-to-clean, heavy-duty polethylene tub designed and contoured to control splash. It is
easily removed with six bolts and can be replaced with optional steel tub. Tub and base can
be exchanged with the Stake Bed.
ourour
our
ourour
rr
ameame
r
ame
rr
ameame
ed Ted T
ed T
ed Ted T
ubub
ub
ubub
Introduction
Easy SerEasy Ser
Easy Ser
Easy SerEasy Ser
One-piece, lift away, polyethylene engine cover requires no tools to be removed. The liftaway engine cover allows easy access to all maintenance points.
Easy AEasy A
Easy A
Easy AEasy A
Operator controls are located within easy reach. The integrated speed and directional
control levers are handlebar mounted for ease of use. The dual function dump pedal or
dump lever can be used for controlled dumping. The cam locking parking brake lever
provides secure locking of the automotive-type brake shoes with a knob on the lever to
allow brake tension adjustment.
QuicQuic
Quic
QuicQuic
The Quick Release Tire System allows quick
removal of the outer Buggy tires. The quick
release option allows the Buggy to be
converted from a 46 inch to a 36 inch wide
machine without any special tools for hub
removal.
SS
tt
akak
S
t
ak
SS
tt
akak
Offers 3-in-1 versatility of a stake bed, flat bed or extended flat bed. Convenient utility cart
carries loads of paneling, shingles, concrete bags, etc. with weights up to 2,500 lbs. The
extended flat bed supports wider loads while the narrower flat bed fits through a standard
doorway once outer tires are removed.
viceabilityviceability
viceability
viceabilityviceability
ccess tccess t
ccess t
ccess tccess t
k Rk R
elease Telease T
k R
elease T
k Rk R
elease Telease T
e Bed Ve Bed V
e Bed V
e Bed Ve Bed V
o Contro Contr
o Contr
o Contro Contr
irir
ir
irir
erer
sionsion
er
sion
erer
sionsion
olsols
ols
olsols
e Hubse Hubs
e Hubs
e Hubse Hubs
Dual ADual A
Dual A
Dual ADual A
Dump or spread the load with the stake bed utility cart’s dual-ction tailgate. Can be
unhinged at the top or bottom.
ction Tction T
ction T
ction Tction T
ailgailg
ailg
ailgailg
ateate
ate
ateate
MUD BUGGY
9
Page 10
introduction
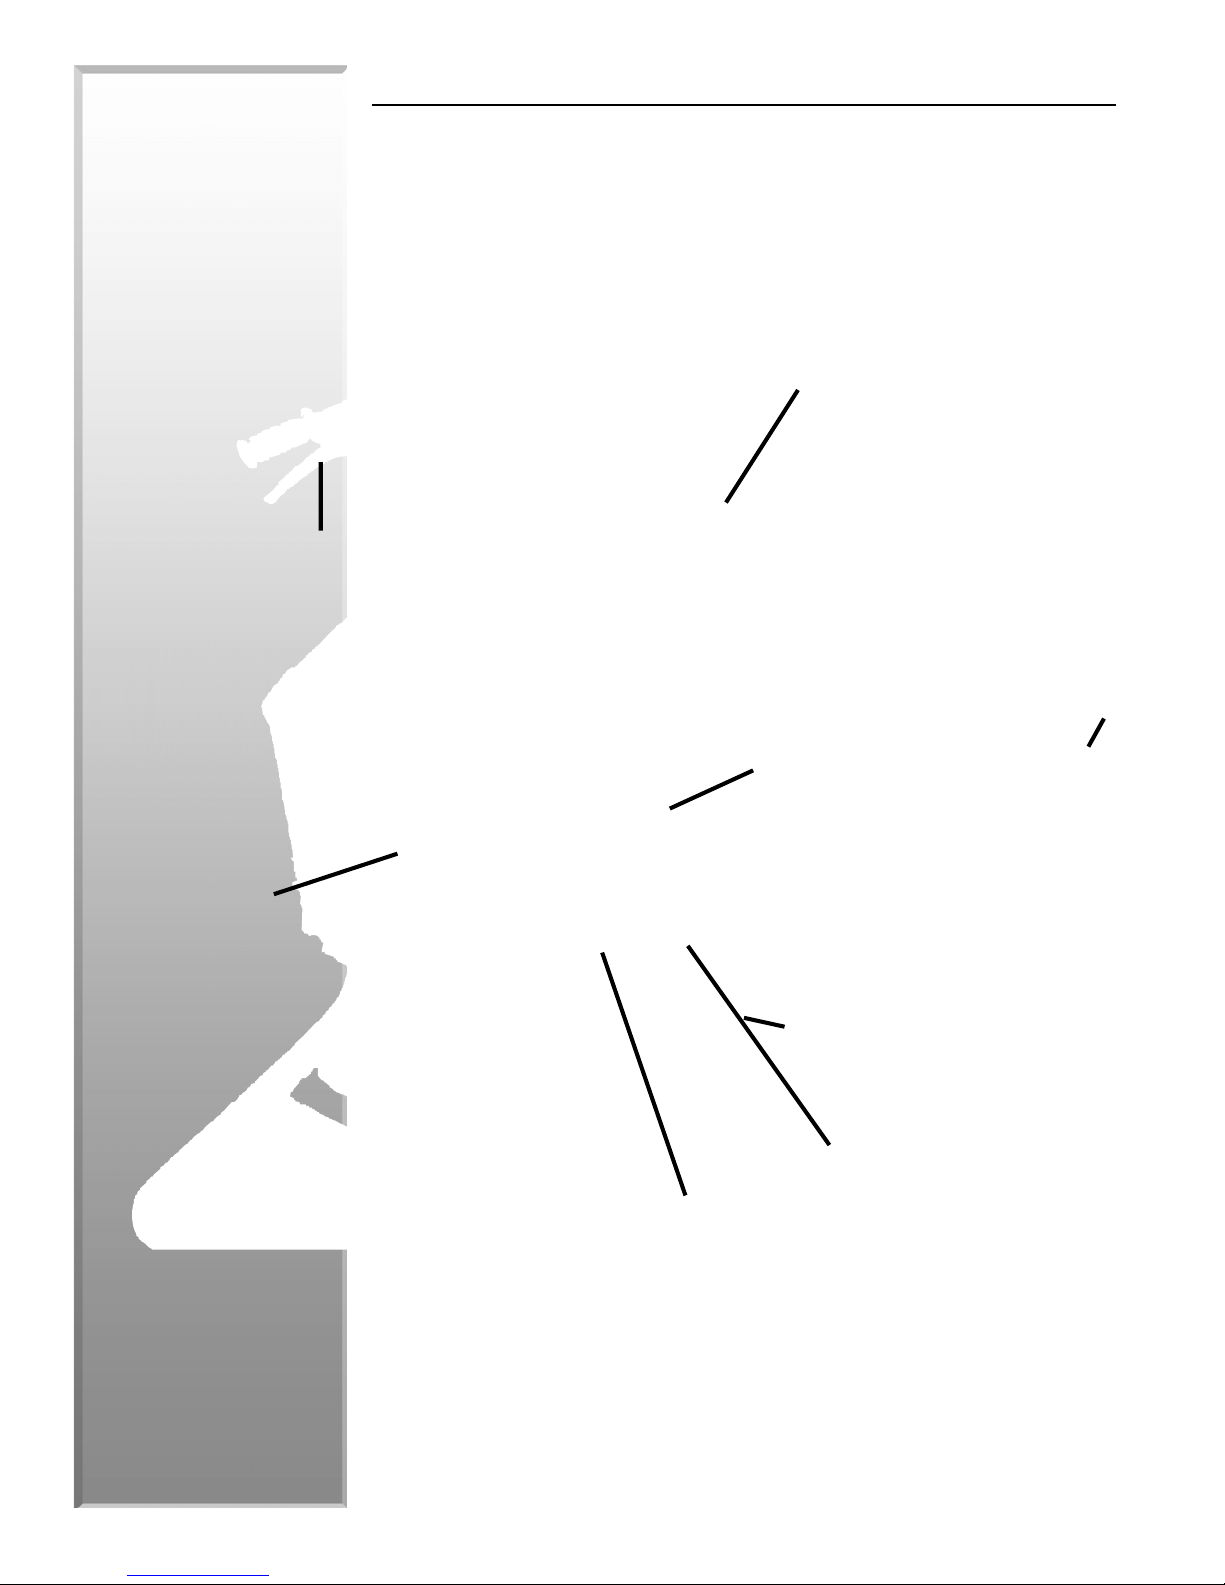
MACHINE DIAGRAM
rr
everse speedeverse speed
r
everse speed
rr
everse speedeverse speed
contrcontr
contr
contrcontr
ol handleol handle
ol handle
ol handleol handle
handle barshandle bars
handle bars
handle barshandle bars
fuel tankfuel tank
fuel tank
fuel tankfuel tank
forwarforwar
forwar
forwarforwar
speedspeed
speed
speedspeed
contrcontr
contr
contrcontr
handlehandle
handle
handlehandle
cowlcowl
cowl
cowlcowl
dumpdump
dump
dumpdump
handle/handle/
handle/
handle/handle/
pedalpedal
pedal
pedalpedal
olol
ol
olol
dd
d
dd
hopperhopper
hopper
hopperhopper
drive tirdrive tir
drive tir
drive tirdrive tir
eses
es
eses
engineengine
engine
engineengine
operatoroperator
operator
operatoroperator
platformplatform
platform
platformplatform
MUD BUGGY
brake pedalbrake pedal
brake pedal
brake pedalbrake pedal
hydraulichydraulic
hydraulic
hydraulichydraulic
tanktank
tank
tanktank
steer tirsteer tir
steer tir
steer tirsteer tir
parkingparking
parking
parkingparking
brakebrake
brake
brakebrake
eses
es
eses
10
Page 11
Stone Construction
Equipment, Inc.
2. Technical Data
Page 12
MACHINE SPECIFICATIONS
Technical
Data
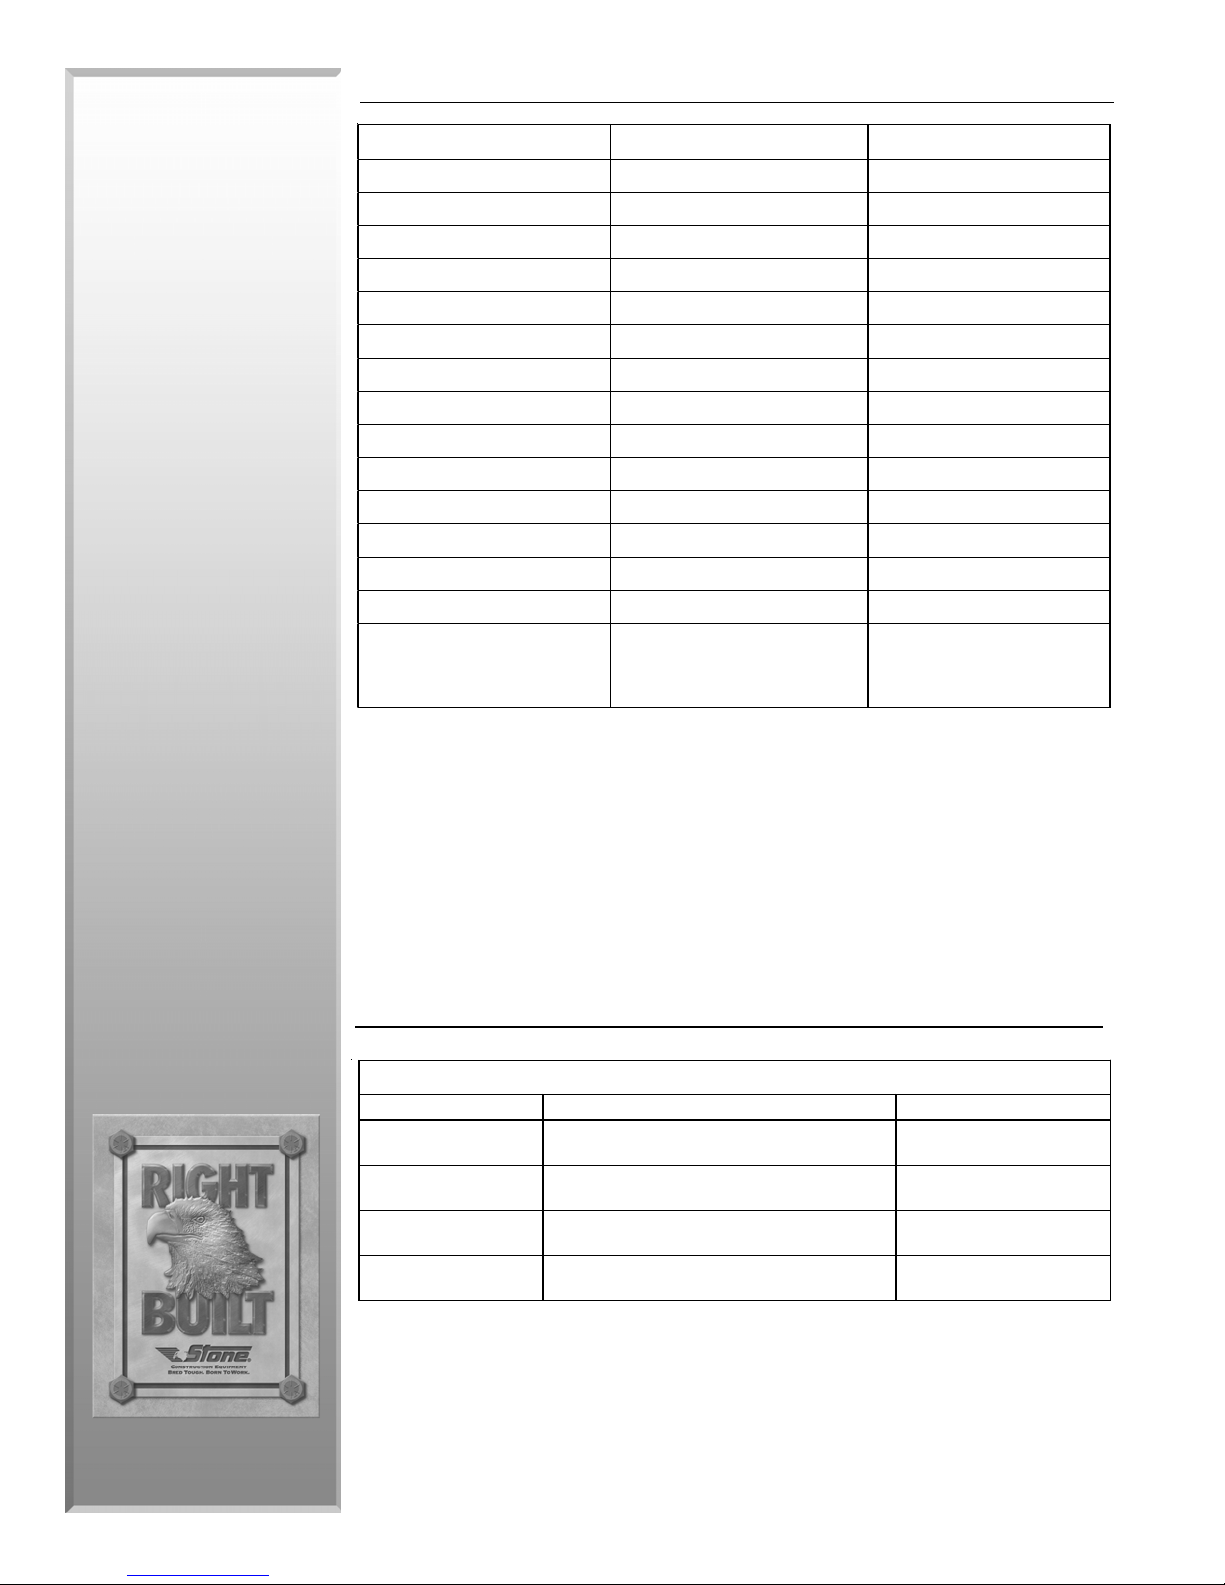
MODELS SB1600 FB1000
Origin U.S.A. U.S.A.
Capacity (m3) 16 cu. ft. (.45) 10 cu. ft. (.28)
Weight (kg) 1370 lbs. (621) 1520 lbs. (689)
Length (cm) 105.5 in. (268) 105.5 in. (268)
Width (single wheel) (cm) 33.75 in. (86) 33.75 in. (86)
Width (Double wheel) (cm) 46 in. (117) 46 in. (117)
Height (cm) 45 in. (114,3) 45 in. (114,3)
Wheelbase (cm) 42 in. (107) 42 in. (107)
Max. Load (kg) 2500 lbs. (1136) 2500 lbs. (1136)
Tub Polyethylene Stake Bed
Engine (kW) Honda GX390 11 hp* (8,2) Honda GX390 11 hp* (8,2)
Speed (km/h) 7.0 mph (11,3) 7.0 mph (11,3)
Fuel Tank (l) 7 gal. (26,5) 7 gal (26,5)
Discharge Height (cm) 6.5 in (16,5) 6.5 in (16,5)
Quick-Release Removable Tires
Options
Foam-filled Tires
Steel Drum
Electric Start
Quick-Release Removable
Foam-filled Tires
Electric Start
Tires
* N* N
oo
te: te:
* N
o
te: Engine power ratings are calculated by the individual engine manufacturer and the
* N* N
oo
te: te:
rating method may vary among engine manufacturers. Stone Construction Equipment, Inc.
makes no claim, representation or warranty as to the power rating of the engine on this equipment and disclaims any responsibility or liability of any kind whatsoever with respect to the
accuracy of the engine power rating. Users are advised to consult the engine manufacturer's
owners manual and its website for specific information regarding the engine power rating.
LUBRICATION SPECIFICATIONS
Lubrication Specifications SB1600, SB2100, FB1000
Type Quantity
Engine Crankcase
quarts/liter
Wheel Bearings
Grease Fittings oz /
mm
Hydraulic System
quarts/liter
Mobilfluid 424 Hydraulic Oil (VI-152)
See Engine Manual 1.6 / 1,1
Mobilgrease XHP 222
(NLGI 2EP lithium complex)
Mobilgrease XHP 222
(NLGI 2EP lithium complex)
SUS255 55 CST ISO VG55
Once A Year or
As Needed
As Required
30 / 28,39
ManufManuf
Manuf
ManufManuf
MUD BUGGY
12
acturactur
actur
acturactur
ed under Ued under U
ed under U
ed under Ued under U
.S. P.S. P
.S. P
.S. P.S. P
atent Natent N
atent N
atent Natent N
o(S). 7o(S). 7
o(S). 7
o(S). 7o(S). 7
,20,20
11
,453 and 7,453 and 7
,20
1
,453 and 7
,20,20
11
,453 and 7,453 and 7
,399,038,399,038
,399,038
,399,038,399,038
Page 13
ENGINE SPECIFICATIONS
Engine Specifications
Engine Type 11hp* 4-cycle Overhead Valve
Engine Make Honda
Engine Model GX390
Torque@ 2500 RPM 19.5 ft.lb. (26.5 Nm)
Operating RPM 3900
Battery 165 amp
Fuel Type
Fuel Tank Capacity 7 gal (26.5 liter)
Fuel Consumption 1.14 gph (4.2 liter)
* Outside of U.S. Use Highest Available Octane Rating
Unleaded Gasoline
Minimum 86 Octane—U.S. *
Technical
Data
SOUND LEVEL
Machine Sound Level Test
Machine Type Mud Buggy Material Handler
Sound Level Meter Calibration Date February 15, 2000
Meter Type Simpson Model 886-2 Type 2
Test Date 9/20/2001
Test Conditions
Temperature 31 degrees Fahrenheit / 1 degree Celsius
Ambient Sound Dba Fast mode
Soil Condition Silts and clays
Moisture Limit Approximately equal to 50%
Engine Speed 3600 RPM 60 Hz
Test Site Honeoye, New York USA
Sound Level at Operator Position 73 dba
Since the permissable
noise level rating of 89
dB(A) can be exceeded
with this machine, the
operator must wear
suitable hearing
protection!
MUD BUGGY
13
Page 14
Introduction
CC
C
CC
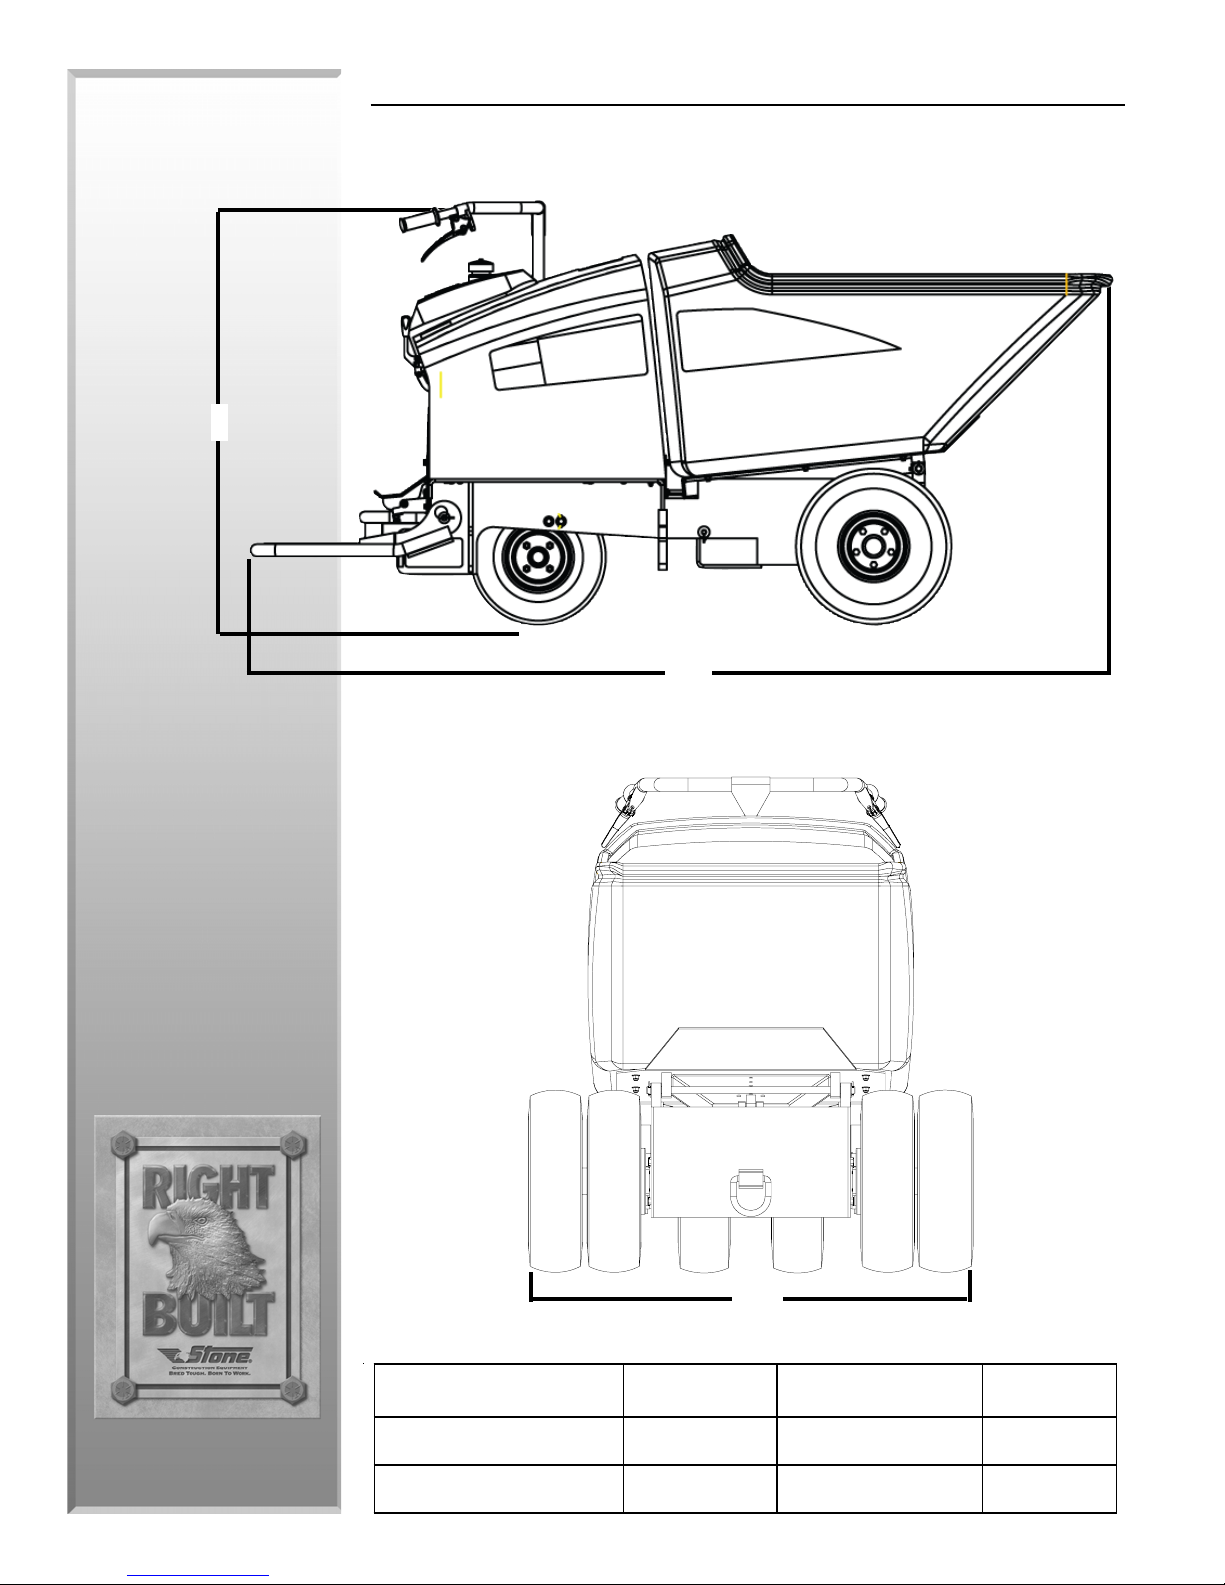
MACHINE DIMENSIONS
AA
A
AA
SB1600
MUD BUGGY
14
FB1000
Dimensions
L x W x H In / cm
L x W x H In / cm
BB
B
BB
A
Length
105.5 / 268 46 / 117 45 / 114,3
105.5 / 268 46 / 117 45 / 114,3
B
Width
C
Height
Page 15

ENGINE CONTROLS
Technical
Manual RManual R
Manual R
Manual RManual R
Engine Choke
Gas
Valve
ecoil Secoil S
ecoil S
ecoil Secoil S
Throttle
Lever
tt
arar
tt
t
ar
t
tt
arar
tt
Engine Fuel
Stop Switch
Data
Choke
Gas Valve
(carburetor)
ElectrElectr
Electr
ElectrElectr
Throttle
ic Opic Op
ic Op
tiontion
tion
ic Opic Op
tiontion
Engine Fuel
Stop Switch
Engine Start
Button
Key Switch
‘ON’
MUD BUGGY
15
Page 16
Technical
Data
MACHINE OPERATION CONTROLS
Reverse
Speed
Control
Handle
Forward Speed
Control Handle
Brake Pedal
Dump Handle
Parking Brake
Dump Pedal
MUD BUGGY
16
Page 17

P/N & PLATE LOCATION
Technical
Data
SS/N Plate
SEngine P/N
MUD BUGGY
17
Page 18

Technical
Data
MUD BUGGY
Notes/Notas/Notes/Note:
_____________________________________________________________________________________________________
______________________________________________________________
_____________________________________________________________
_____________________________________________________________
______________________________________________________________
_____________________________________________________________
_____________________________________________________________
_____________________________________________________________
______________________________________________________________
_____________________________________________________________
_____________________________________________________________
_____________________________________________________________
______________________________________________________________
_____________________________________________________________
_____________________________________________________________
_____________________________________________________________
______________________________________________________________
_____________________________________________________________
_____________________________________________________________
_____________________________________________________________
______________________________________________________________
_____________________________________________________________
_____________________________________________________________
_____________________________________________________________
______________________________________________________________
_____________________________________________________________
_____________________________________________________________
_____________________________________________________________
______________________________________________________________
_____________________________________________________________
_____________________________________________________________
_____________________________________________________________
______________________________________________________________
_____________________________________________________________
_____________________________________________________________
_____________________________________________________________
______________________________________________________________
_____________________________________________________________
_____________________________________________________________
_____________________________________________________________
______________________________________________________________
_____________________________________________________________
_____________________________________________________________
_____________________________________________________________
______________________________________________________________
_____________________________________________________________
_____________________________________________________________
_____________________________________________________________
______________________________________________________________________________________________________________________________
18
Page 19
Stone Construction
Equipment, Inc.
3. Health & Safety
Page 20
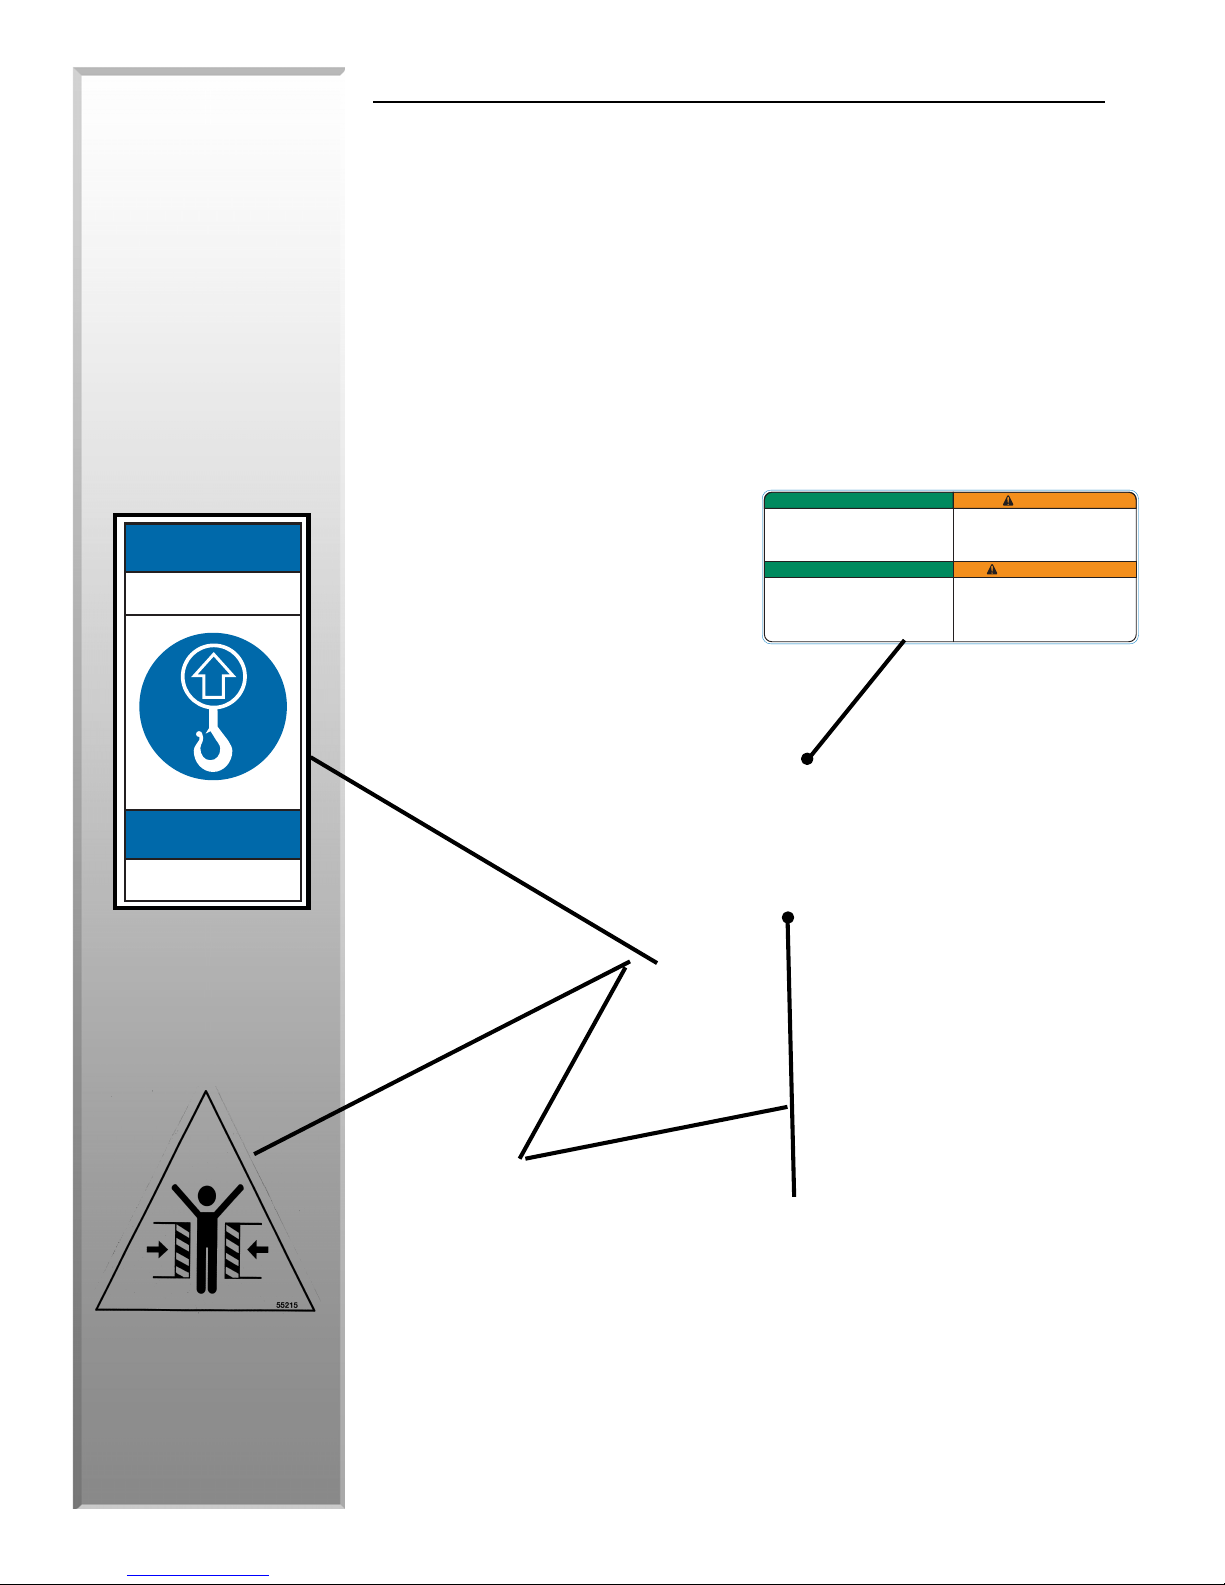
DECAL PLACEMENT
IMPORTANT
SAFETY INSTRUCTIONS
Read and understand the operator's manual and all safety labels before operating this machine.
Only a trained person is to be permitted to operate this equipment. Training should include
operation instruction under normal conditions and emergency situations.
Personnel working on or near this equipment shall be instructed as to the location and
operation of pertinent stopping devices.
Under no circumstances are the safety characteristics of this equipment to be altered.
Routine inspections and corrective/preventative maintenance measures are to be conducted to
ensure that all guards and safety features are retained and function properly.
Cut, crush and tip over hazards.
Look out for pedestrians, other vehicles or obstructions.
Transport load only in lowered position.
Use caution when placing a raised load.
Tilt tub or stake bed slowly to release load.
Do not exceed rated operating capacity.
Peligros de cortes, aplastamientos y volcaduras.
Esté atento al paso de peatones, otros vehículos u obstrucciones.
Transporte la carga sólo en posición baja.
Sea cauteloso al colocar una carga elevada.
Incline la cubeta o la plataforma de estacas lentamente para liberar la carga.
No exceda la capacidad de operación especicada.
IMPORTANTE
INSTRUCCIONES DE SEGURIDAD
Lea y entienda el manual del operador y todas las etiquetas de seguridad antes de operar esta
máquina.
Sólo se permite operar este equipo a las personas capacitadas. La capacitación debe incluir las
instrucciones de operación bajo condiciones normales y situaciones de emergencia.
El Personal que trabaja con o cerca de este equipo deberá ser instruido acerca de la ubicación
y operación de los dispositivos de paro pertinentes.
Bajo ninguna circunstancia se podrán alterar las características de seguridad de este equipo.
Se deberán llevar a cabo inspecciones de rutina y medidas de mantenimiento correctivo /
preventivo para asegurar que todas las guardas y características de seguridad sean retenidas y
funcionen adecuadamente.
WARNING
ADVERTENCIA
55575
Health &
Safety
NOTICE
LIFT POINT
BefBef
oror
e using te using t
Bef
or
e using t
BefBef
oror
e using te using t
witwit
h its operh its oper
wit
h its oper
witwit
h its operh its oper
especiallespeciall
especiall
especiallespeciall
rr
ized parized par
r
ized par
rr
ized parized par
When wWhen w
When w
When wWhen w
immediatelimmediatel
immediatel
immediatelimmediatel
self and oself and o
self and o
self and oself and o
FF
ailurailur
F
ailur
FF
ailurailur
FF
or oror or
F
or or
FF
or oror or
y cy c
y c
y cy c
ts fts f
ts f
ts fts f
arar
ar
arar
e te t
o do so mao do so ma
e t
o do so ma
e te t
o do so mao do so ma
derder
ing, ring, r
der
ing, r
derder
ing, ring, r
his eqhis eq
uipment, suipment, s
his eq
uipment, s
his eqhis eq
uipment, suipment, s
ation. Do noation. Do no
ation. Do no
ation. Do noation. Do no
hildrhildr
en, ten, t
hildr
en, t
hildrhildr
en, ten, t
or seror ser
vice.vice.
or ser
vice.
or seror ser
vice.vice.
ning decals arning decals ar
ning decals ar
ning decals arning decals ar
y at 1-800-888-9926 fy at 1-800-888-9926 f
y at 1-800-888-9926 f
y at 1-800-888-9926 fy at 1-800-888-9926 f
tt
herher
s, it is ims, it is im
t
her
s, it is im
tt
herher
s, it is ims, it is im
y ry r
y r
y ry r
efef
er ter t
ef
er t
efef
er ter t
t allot allo
t allo
t allot allo
o opero oper
o oper
o opero oper
o o
o
o o
ate tate t
ate t
ate tate t
e dese des
e des
e dese des
perper
ativativ
per
ativ
perper
ativativ
esult in seresult in ser
esult in ser
esult in seresult in ser
Decal IdentifDecal Identif
Decal Identif
Decal IdentifDecal Identif
tudy ttudy t
his entirhis entir
tudy t
his entir
tudy ttudy t
his entirhis entir
w untrw untr
w untr
w untrw untr
trtr
oo
tr
o
trtr
oo
e te t
e t
e te t
ained or unautained or unaut
ained or unaut
ained or unautained or unaut
his eqhis eq
uipment. Use onluipment. Use onl
his eq
uipment. Use onl
his eqhis eq
uipment. Use onluipment. Use onl
yy
ed or missing, conted or missing, cont
y
ed or missing, cont
yy
ed or missing, conted or missing, cont
or ror r
eplacement. Feplacement. F
or r
eplacement. F
or ror r
eplacement. Feplacement. F
hat that t
he fhe f
he f
he fhe f
olloollo
ollo
olloollo
in P in P
in P
in P in P
hat t
hat that t
ious injurious injur
ious injur
ious injurious injur
icationication
ication
icationication
e manual te manual t
e manual t
e manual te manual t
wing rwing r
wing r
wing rwing r
y or deaty or deat
y or deat
y or deaty or deat
arar
ts Manual.ts Manual.
ar
ts Manual.
arar
ts Manual.ts Manual.
horhor
hor
horhor
act tact t
act t
act tact t
or tor t
he safhe saf
or t
he saf
or tor t
he safhe saf
ules arules ar
ules ar
ules arules ar
h.h.
h.
h.h.
o become fo become f
o become f
o become fo become f
ized perized per
ized per
ized perized per
y fy f
y f
y fy f
he Manufhe Manuf
he Manuf
he Manufhe Manuf
sonnel,sonnel,
sonnel,
sonnel,sonnel,
actact
oror
y auty aut
act
or
y aut
actact
oror
y auty aut
ee
ty of yty of y
e
ty of y
ee
ty of yty of y
e obsere obser
e obser
e obsere obser
amiliaramiliar
amiliar
amiliaramiliar
ho-ho-
ho-
ho-ho-
acturactur
actur
acturactur
ourour
our
ourour
vv
ed.ed.
v
ed.
vv
ed.ed.
erer
er
erer
55427
AVISO
Punto de izamiento
MUD BUGGY
20
Page 21
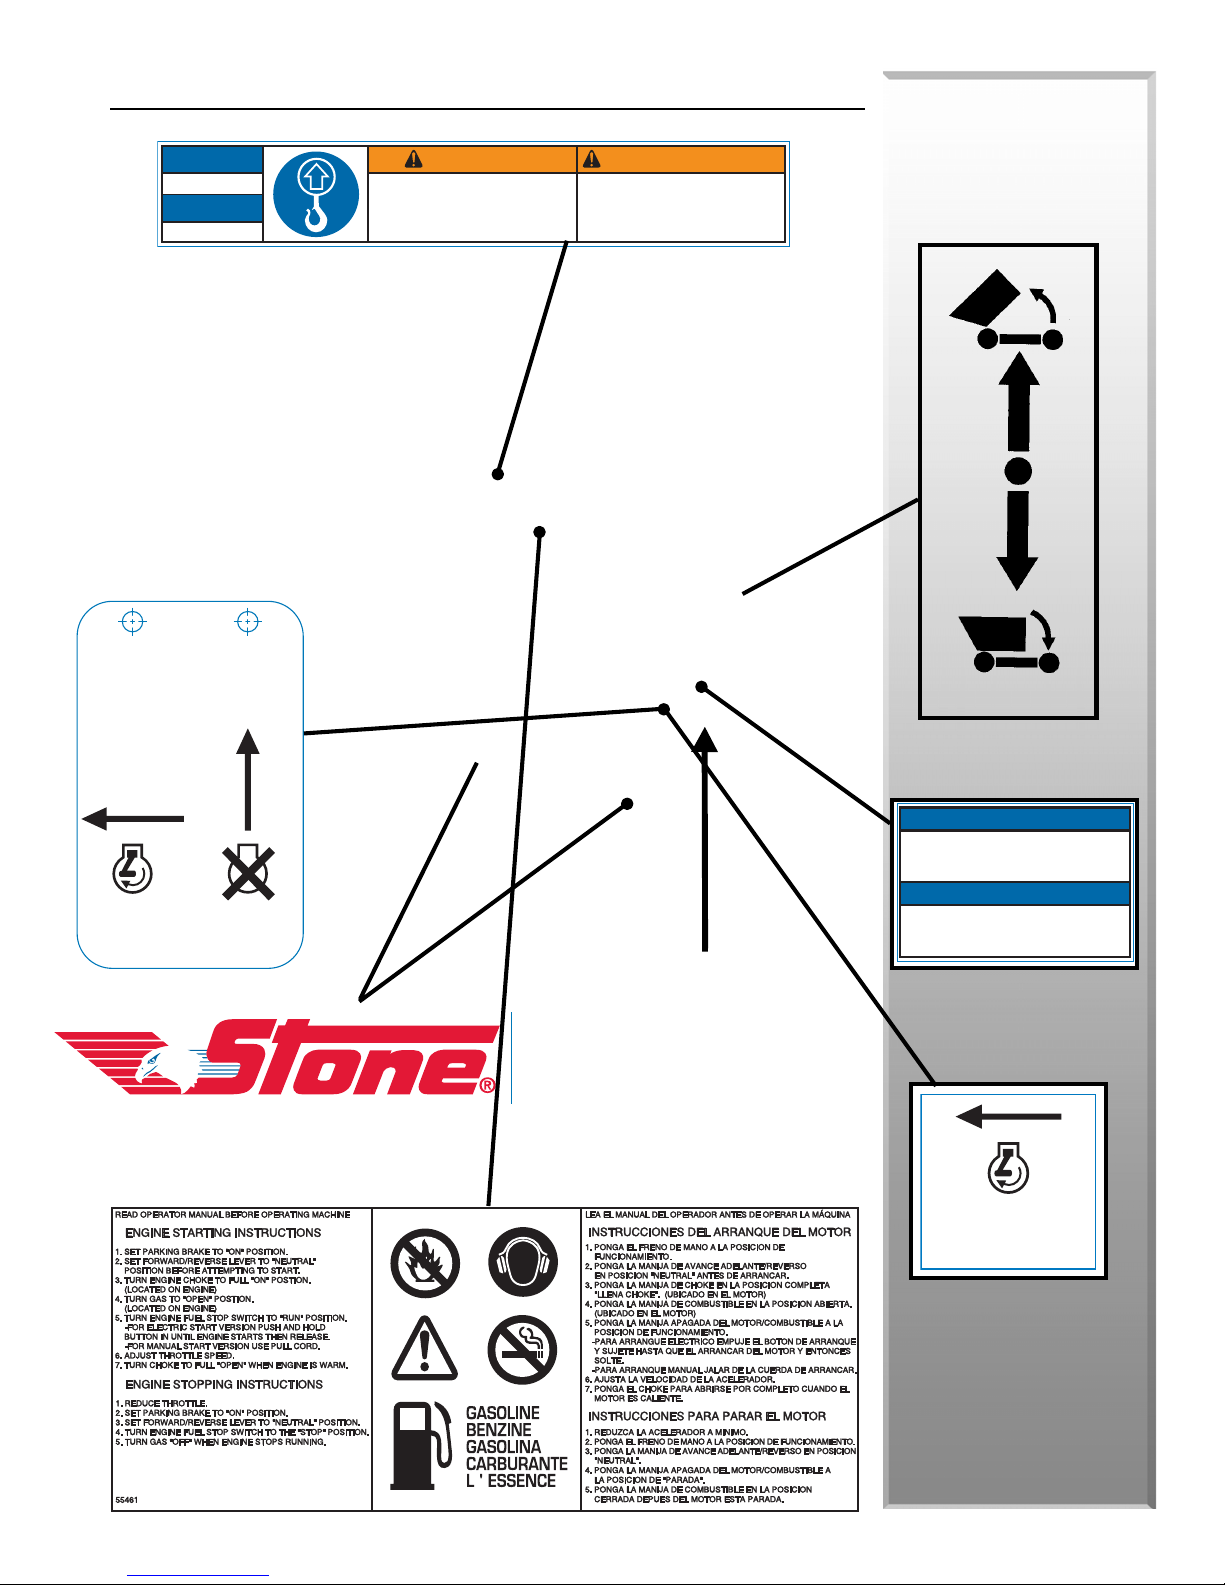
DECAL PLACEMENT
55486
PUSH TO START
EMPUJE PARA
PONER EN MARCHA
ADVERTENCIA
WARNING
LIFT POINT
NOTICE
AVISO
55516
Punto de izamiento
Cut, crush and tip over hazards.
Lift point for stake bed only.
Do not use stake bed lift point to lift machine.
Peligro de cortes, aplastamientos y volcaduras.
Punto de izamiento solo para plataforma de estacas.
No utilice el punto de izamiento de la plataforma de
estacas para elevar la máquina.
55541
If safety or hazard decals or operator's
manual are missing from this equipment,
contact the manufacturer immediately at
1-800-888-9926 or (585) 229-5141
Si las etiquetas de seguridad o peligro o el
manual del operador faltan en este equipo,
contactar inmediatamente al fabricante al
1-800-888-9926 o al (585) 229-5141.
NOTICE
AVISO
SS
tt
akak
S
t
ak
SS
tt
akak
e Bed onle Bed onl
e Bed onl
e Bed onle Bed onl
Health &
Safety
yy
y
yy
RUN
MARCHA
55593
STOP
APAGAR
55485
MUD BUGGY
21
Page 22
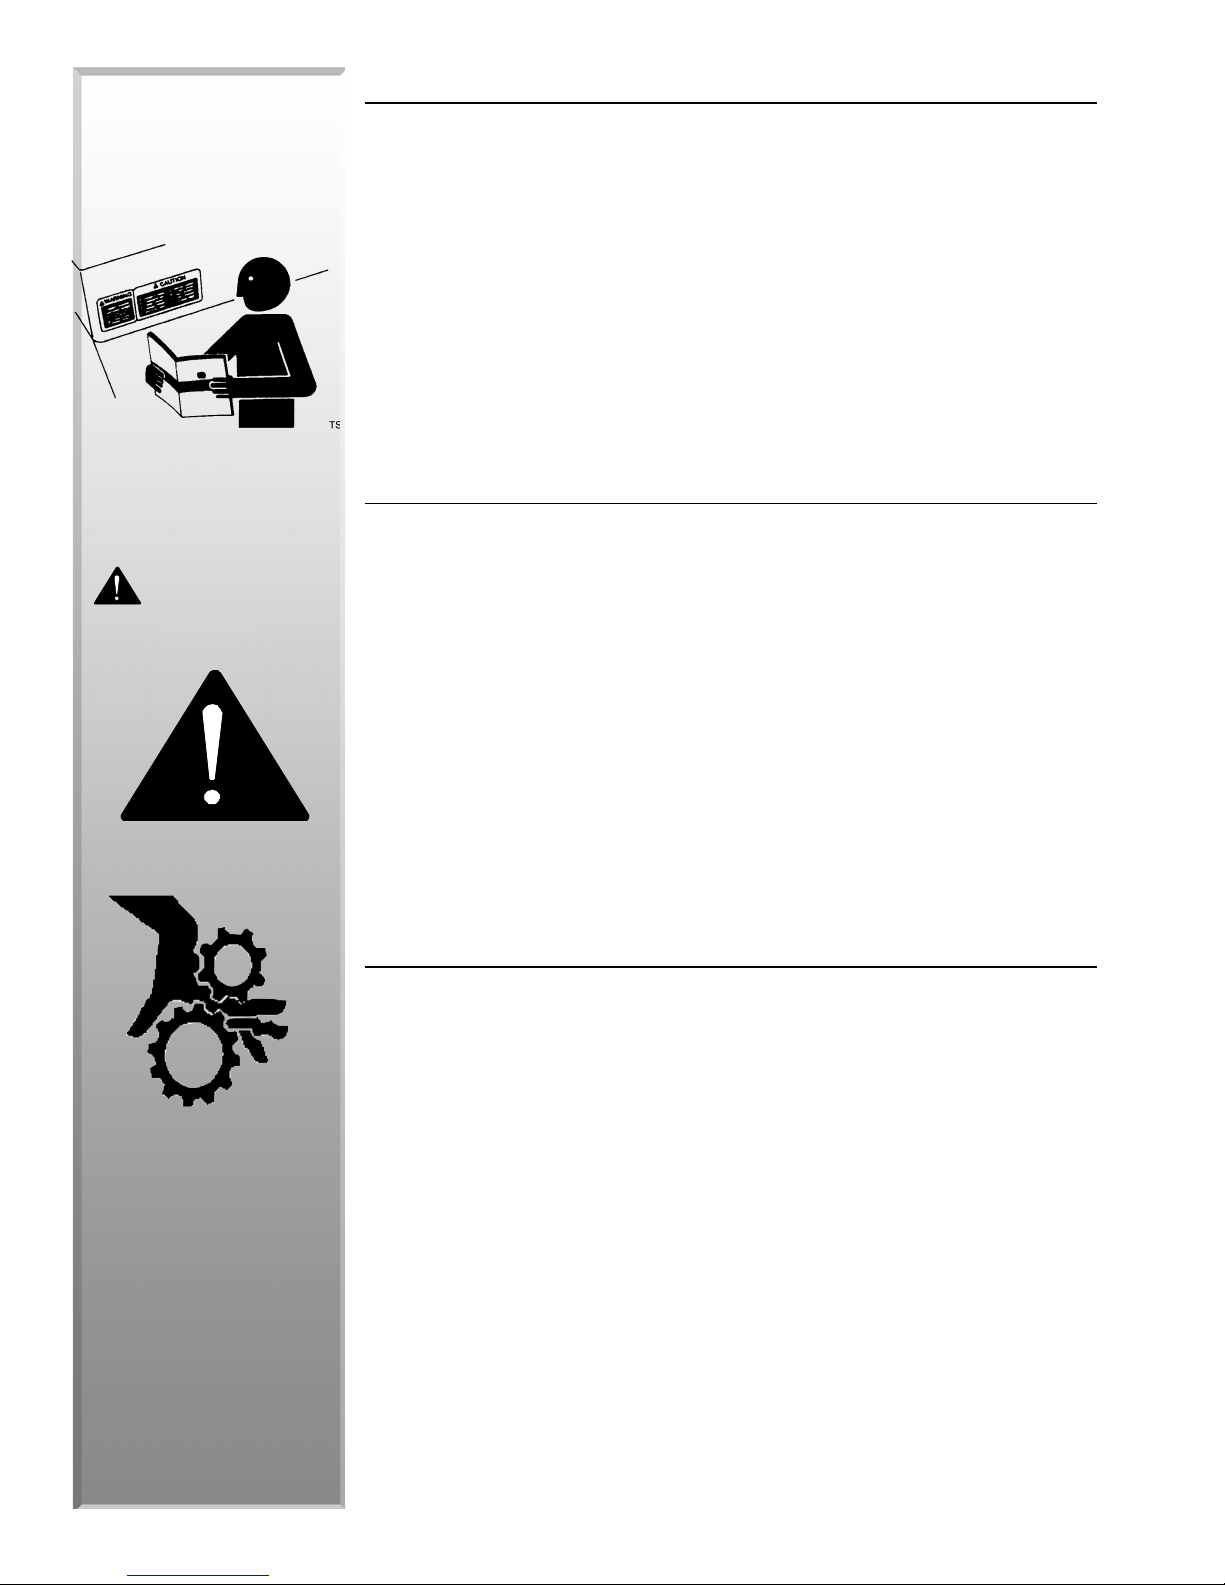
FOLLOW SAFETY INSTRUCTIONS
Health &
Safety
WARNING
• Carefully read all safety messages and decals in this manual and on your machine
safety signs. Keep decals in good condition. Replace missing or damaged decals.
Be sure new equipment components and repair parts include the current safety
signs. Replacement safety signs and decals are available through your dealer.
• Learn how to operate the machine and how to use controls properly. Do not let
anyone operate without instruction.
• Keep your machine in proper working condition. Unauthorized modifications to
the machine may impair the function and/or safety and affect machine life.
• If you do not understand any part of this manual and need assistance, contact
your dealer.
UNDERSTAND SIGNAL WORDS
• A signal word – DANGER, WARNING, or CAUTION – is used with the safety-alert
symbol. DANGER identifies the most serious hazards.
• DANGER or WARNING safety signs are located near specific hazards. General
precautions are listed on CAUTION safety signs. IMPORTANT also calls attention to
safety messages in this manual.
• This notation appears before warnings in the text. It means that the step that
follows must be carried out to avoid the possibility of personal injur y or death.
These warnings are intended to help the technician avoid any potential hazards
encountered in the normal service procedures. We strongly recommend that the
reader takes advantage of the information provided to prevent personal injury or
injury to others.
MUD BUGGY
22
PRACTICE SAFE OPERATION
• Users must be trained to operate this unit. Read the Operator’s Manual and
Engine Owner’s Manual. Learn to operate this unit safely.
• Never perform any work on the unit while it is running.
• Before working on the unit, stop the engine and disconnect the spark plug wire(s)
to prevent accidental starting. If electric, unplug motor.
• Keep cowl closed and latched during operation, close and latch cowl immediately
after starting.
• Keep hands, clothing and jewelry away from all moving parts.
• Before starting machine, make sure that there are no persons or obstacles near or
under machine.
• Do not operate the unit in standing water.
• Ear protection required when operating this equipment.
• Exposure to loud noise can cause impairment or loss of hearing.
• For foot protection, wear steel toe shoes or toe pads.
Page 23
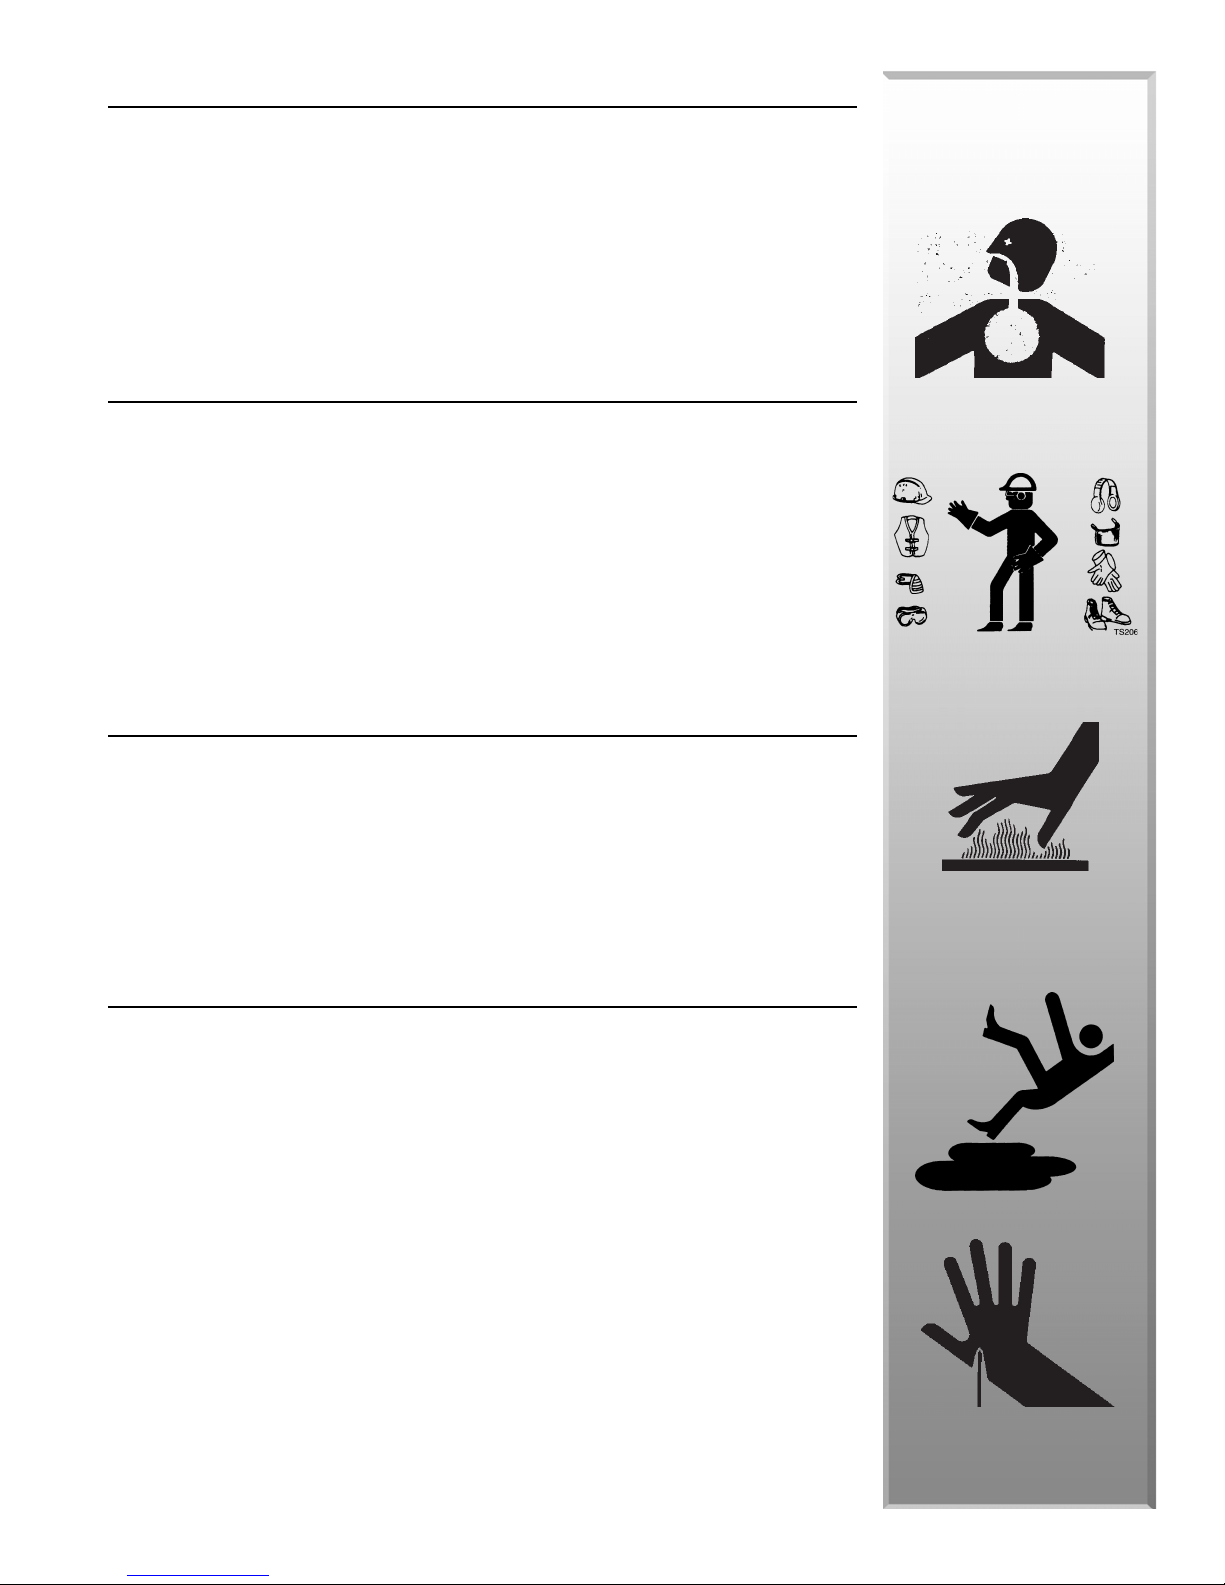
PROPER VENTILATION
• Never operate unit in a poorly ventilated or enclosed area.
• Avoid prolonged breathing of exhaust gases.
• Engine exhaust fumes can cause sickness or death.
WEAR PROTECTIVE CLOTHING
• Wear close fitting clothing and safety equipment appropriate to the job.
• Prolonged exposure to loud noise can cause impairment or loss of hearing.
• Wear a suitable hearing protective device such as earmuffs or earplugs to protect
against objectionable or uncomfortable loud noises.
• Operating equipment safely requires the full attention of the operator. Do not wear
radio or music headphones while operating machine.
Health &
Safety
HOT SURFACES
• Muff ler, engine, and engine shroud may be hot.
• Allow all components in the engine compartment to cool before performing any
service work.
PRACTICE SAFE MAINTENANCE
• Understand service procedure before doing work. Keep area clean and dry.
• Never lubricate, service or adjust machine while it is moving. Keep hands, feet, and
clothing from power-driven parts. Disengage all power and operation controls to
relieve pressure. Stop the engine. Allow machine to cool.
• Securely support any machine elements that must be raised for service work.
• Keep all parts in good condition and properly installed. Fix damage immediately.
Replace worn or broken parts. Remove any buildup of grease, oil, or debris.
• Disconnect battery ground cable (-) before making adjustments on electrical
systems or welding on machine.
• Never perform any work on the unit while it is running. Before working on the unit,
stop the engine and disconnect the spark plug wire(s) to prevent accidental
starting, wheels to prevent rolling.
• Keep engine cover closed during the operation.
• Keep all guards in place.
MUD BUGGY
23
Page 24
USE COMMON SENSE WHEN HANDLING FUELS
Health &
Safety
••
• Transport and handle fuel only when contained in approved
••
safety containers.
• Do not smoke when refueling the engine or during any other
fuel handling operation.
• If fuel is spilled during refueling, wipe it off from the engine
immediately and discard the rag in a safe place.
• Do not operate the equipment if fuel or oil leaks exist-repair
immediately.
• Never operate this equipment in an explosive atmosphere.
• Starting fluid (ether) is highly flammable, do not use or an
explosion or fire may result.
PREPARE FOR EMERGENCIES
• Be prepared if a fire starts.
• Keep a first aid kit and fire extinguisher handy.
• Keep emergency numbers for doctors, ambulance service, hospital, and fire
department near your telephone.
STARTING FLUID
• Starting fluid (ether) is highly flammable, do not use or an
explosion or fire may result.
MUD BUGGY
24
Page 25
WARNING - USE CAUTION
• Never leave equipment unattended while running.
• Be certain you can control both speed and direction before
moving.
• This is a one-person buggy. Never permit riders.
• Avoid sharp turns at high speed.
DISPOSE OF WASTE PROPERLY
• Improperly disposing of waste can threaten the environment and ecology. Potentially harmful waste used with equipment include such items as oil, fuel, coolant,
brake fluid, filters, and batteries.
• Use leak proof containers when draining fluids. Do not use
food or beverage containers that may mislead someone
into drinking from them.
• Do not pour waste onto the ground, down a drain, or into
any water source.
Health &
Safety
• Inquire on the proper way to recycle or dispose of waste
from your local environmental or recycling center.
WARNING - EYE PROTECTION
• Always wear splash goggles when operating equipment.
EXTENSION CORDS
• Always use the proper size grounded extension cord, conforming to the National
Electric Code and Local Ordinances.
• Inspect all extension and electrical cords for cuts, frayed wire and broken connectors before use. Do not use cords if not in good condition.
• Do not route extension cords through standing water.
• Do not operate the unit in standing water.
• When cleaning the unit, never spray water over the motor.
MUD BUGGY
25
Page 26
Health &
Safety
BATTERY CHARGING
• Read and understand the Maintenance Section of this manual before attempting to
charge the battery.
• Before using a charger, read all the manufacturers’ instructions for, and caution
markings on (1) charger and (2) battery.
• Wear personal protective equipment including gloves and complete eye protection
that protects eyes from all angles.
• Never work alone with electrical equipment. Make sure that someone is nearby to
give assistance if you need help.
• Reduce explosive gas (hydrogen). Batteries give off explosive gases when charging
and serious injuries can occur. Be sure the area around the battery is clean and well
ventilated before and during the charging process.
• Avoid flames and sparks near the battery. Do not smoke or weld near the battery.
Keep flames, matches, lighters, cigarettes or other ignition sources away from the
battery.
• Use only cables and clamps that are well insulated and in good condition to make
connections between battery and charger.
• Exercise caution in using metal tools on or near the battery to reduce the risk of
short circuits that may cause battery explosions. Do not place tools on top of the
battery.
• Avoid overcharging batteries. Some chargers can overcharge a battery if left
connected for an extended period of time resulting in loss of water and creation of
hydrogen gas. Rising battery temperature and vigorous gassing are clear indications
of excessive charging which may reduce battery life.
• So called FAST (also known as High Rate or Boost) chargers should be used with
caution. Do not use a fast charger for more than 30 minutes on any battery.
• In very cold weather, a discharged battery may freeze. Never charge a frozen
battery. Gases may form which can crack the case and release battery acid.
• Avoid contact with corrosion due to battery acid. Battery posts may have acid
corrosion that may be harmful to eyes and skin.
• If the battery is to be removed and/or replaced, always use a battery carrier.
Carrying the batter y by hand may put pressure on its ends, causing battery acid to
be forced out the vent caps. Avoid tipping the battery, which may cause the release
of battery acid through the vent caps. Avoid dropping the battery. Batteries can be
heavy and may cause injuries if dropped. Dropping the battery can crack the case
and release battery acid.
• Be sure to wash your hands with soap and water after servicing or handling the
battery. This will help neutralize any acid you may have contacted. Always have
plenty of fresh water and soap nearby in case battery acid contacts the eyes, skin or
clothing. If battery acid contacts the skin or clothing, wash immediately with soap
and water. If battery acid enters the eye, immediately flood eye with cold running
water for at least fifteen (15) minutes and get medical help immediately.
MUD BUGGY
26
Page 27

SAFETY USE
These machines are designed to carry out the function
of moving concrete, mortar, gravel, dirt, debris,
paneling, or shingles.
Health &
Safety
If used correctly they will provide an effective and safe
means of moving loads and meet the appropriate
performance standards.
It is essential that the operator of the machine is
adequately trained in its safe operation, be authorized
to operate it, and have sufficient knowledge of the
machine to ensure that it is in full working order
before being put to use.
MUD BUGGY
27
Page 28
MUD BUGGY
Notes/Notas/Notes/Note:
____________________________________________________________________________________________________
_______________________________________________________________________________________________________________________________
______________________________________________________________
_____________________________________________________________
_____________________________________________________________
______________________________________________________________
_____________________________________________________________
_____________________________________________________________
_____________________________________________________________
______________________________________________________________
_____________________________________________________________
_____________________________________________________________
_____________________________________________________________
______________________________________________________________
_____________________________________________________________
_____________________________________________________________
_____________________________________________________________
______________________________________________________________
_____________________________________________________________
_____________________________________________________________
_____________________________________________________________
______________________________________________________________
_____________________________________________________________
_____________________________________________________________
_____________________________________________________________
______________________________________________________________
_____________________________________________________________
_____________________________________________________________
_____________________________________________________________
______________________________________________________________
_____________________________________________________________
_____________________________________________________________
_____________________________________________________________
______________________________________________________________
_____________________________________________________________
_____________________________________________________________
_____________________________________________________________
______________________________________________________________
_____________________________________________________________
_____________________________________________________________
_____________________________________________________________
______________________________________________________________
_____________________________________________________________
_____________________________________________________________
_____________________________________________________________
______________________________________________________________
_____________________________________________________________
_____________________________________________________________
_____________________________________________________________
28
Page 29
Stone Construction
Equipment, Inc.
4. Operation
Page 30
operation
GENERAL SAFETY NOTES
If Applicable, Obser If Applicable, Obser
If Applicable, Obser
If Applicable, Obser If Applicable, Obser
Operators and maintenance personnel must always comply with the following safety
precautions. These precautions are given here for your safety. Review them carefully
before operating the machine and before performing general maintenance or repairs.
Supervising personnel should develop additional precautions relating to specific work
area and local safety regulations.
• Before operating the machine ensure you have had proper training and are fully
conversant with the machine and its operation - If in Doubt ASK!
• Read this instruction manual carefully before operating the machine. Ensure this
instruction manual is kept with the machine at all times and in good condition replace the manual immediately if it becomes dirty, damaged or lost.
• Decals are fitted to the machine for safety purposes and MUST be replaced
immediately if they are not readable or lost. If the machine is repaired and parts
have been replaced on which decals were fixed, ensure new decals are fitted
before the machine is put into service.
• Always make sure there is adequate ventilation around the machine. Never run
the engine in an enclosed area without good ventilation or next to combustible
materials.
vv
v
vv
e te t
e t
e te t
he Fhe F
he F
he Fhe F
olloollo
ollo
olloollo
wing Pwing P
wing P
wing Pwing P
oints foints f
oints f
oints foints f
or Yor Y
or Y
or Yor Y
our Safour Saf
our Saf
our Safour Saf
ee
ty and Prty and Pr
e
ty and Pr
ee
ty and Prty and Pr
oo
tectiontection
o
tection
oo
tectiontection
• Stop the engine before refuelling. If there is a spillage, mop it up and do not start
the engine until it is safe again.
• The exhaust gets extremely hot. Do not place anything on top of it and keep all
combustible materials clear. Do not attempt any maintenance on a hot engine.
• Check your local laws, the engine may require a spark arrester etc.
• Do not inspect or clean the machine with the engine running.
• Mare sure you and anyone else who uses the machine have been shown how to
operate it safely.
• A hard hat, safety boots, safety glasses and reflective clothing must be worn at all
times.
• Establish a training program for all operators to ensure safe operation.
• Do not operate the machine unless thoroughly trained.
• Do not operate the machine if it is damaged, improperly adjusted or not completely and correctly assembled.
MUD BUGGY
30
Page 31

PREVENT DAMAGE TO MACHINE
operation
Obser Obser
Obser
Obser Obser
vv
e te t
he Fhe F
olloollo
v
e t
he F
vv
e te t
he Fhe F
• Always replace hoses, couplers and other parts with parts supplied or recommended
by Stone Construction Equipment, Inc. NEVER USE SPARE PARTS OF INFERIOR
SPECIFICATION.
• Never allow unqualified people to perform repairs on the machine.
• Never overfill the engine oil or fuel tank.
• If a hose bursts, stop the engine immediately - ALWAYS replace with a hose of the
correct specification.
• Check the reason for low oil level.
• Follow the engine starting instructions in this manual and on the machine.
• If you see oil leaking, report it and get it fixed immediately.
• Make sure the correct fuel, oils and grease are used.
• Never use the machine for purposes other than those it was manufactured for.
• Always ensure workmates are aware of your work plan.
ollo
olloollo
wing Pwing P
wing P
wing Pwing P
oints, If Applicable, toints, If Applicable, t
oints, If Applicable, t
oints, If Applicable, toints, If Applicable, t
o Pro Pr
o Pr
o Pro Pr
ee
vv
ent Damagent Damag
e
v
ent Damag
ee
vv
ent Damagent Damag
e te t
e t
e te t
o to t
o t
o to t
he Mache Mac
he Mac
he Mache Mac
hinehine
hine
hinehine
• If equipped, ensure all tires are serviceable before using the machine.
• Do not operate the machine if it is damaged, improperly adjusted or not completely
and correctly assembled.
• Establish a training program for all operators to ensure safe operation.
MUD BUGGY
31
Page 32
SAFETY SYMBOLS
operation
Safety symbols are used in these instructions to bring attention to actions that may cause
personal injury or damage to the equipment. Always observe these symbols, they are
included for your safety and for the protection of the machine.
DELIVERY INSPECTION
CC
Upon receipt of your equipment,
damage should be immediately reported to the carrier and a claim registered.
This unit is manufactured to the strictest specifications and inspection procedures. If any
material or manufacturing defects are found, return the tag on the machine with the
assembler’s signature and your findings to the manufacturer. We want to know when a
product is less than perfect. We also welcome any and all input on how the product may
serve you better.
AREFULLAREFULL
C
AREFULL
CC
AREFULLAREFULL
Y CY C
Y C
Y CY C
HECHEC
K FK F
OR ANY FREIGHT DOR ANY FREIGHT D
HEC
K F
OR ANY FREIGHT D
HECHEC
K FK F
OR ANY FREIGHT DOR ANY FREIGHT D
AMAAMA
AMA
AMAAMA
GE.GE.
GE. Any
GE.GE.
BREAK-IN PERIOD
This unit is ready for normal operation. However, extra care during the first 50 hours of
operation will result in more satisfactory, long-term machine performance and cost of
ownership. Do not exceed 50 hours of operation before conducting the break-in first
service.
• Run engine at full throttle.
• Idle engine 3 minutes before stopping.
• DO NOT idle engine for long periods.
• Check engine oil level daily.
• Periodically inspect for loose hardware.
KNOW YOUR BUGGY
Read and understand the owner’s manual before starting the unit. Make sure you understand
the purpose of every control. When operating the unit, remember the capacity it can carry
and adjust speed and load for changing conditions.
Inspect MacInspect Mac
Inspect Mac
Inspect MacInspect Mac
A daily inspection of the unit is recommended to ensure all systems are in proper working
order.
ChecChec
k Tk T
Chec
k T
ChecChec
k Tk T
Inspect the surface on which the unit is going to travel. Avoid soft soil, slippery spots, and
water spots. Avoid anything that could make you lose control.
hinerhiner
yy
hiner
y
hinerhiner
yy
rr
aa
vv
el Pel P
atat
r
a
v
el P
rr
aa
vv
el Pel P
at
atat
hh
h
hh
MACHINE CLEANLINESS
Keep unit clean of all debris. Make sure foot stand stays clean to prevent accidents.
MUD BUGGY
32
Page 33
PRE-START CHECKLIST
• Read Operator Manual and check that operator and engine controls function
properly before starting.
WW
arar
rr
• Check the oil level before starting the engine.
oil.oil.
oil.
Consult the
oil.oil.
and oil recommendations.
• Check engine air filter.
• Check engine fuel level.
• Check hydraulic f luid level.
Engine ManualEngine Manual
Engine Manual supplied with this unit for specific instructions
Engine ManualEngine Manual
W
ar
WW
arar
anty is Vanty is V
r
anty is V
rr
anty is Vanty is V
OID if rOID if r
OID if r
OID if rOID if r
WARNING
ENEN
GINE IS EQUIPPED WITH LGINE IS EQUIPPED WITH L
EN
GINE IS EQUIPPED WITH L
ENEN
GINE IS EQUIPPED WITH LGINE IS EQUIPPED WITH L
STARTING THE MACHINE
TT
o So S
tt
arar
T
o S
TT
o So S
Read Operator Manual before operating machine.
tt
t
ar
t
tt
arar
tt
OW OIL SHUTDOWNOW OIL SHUTDOWN
OW OIL SHUTDOWN
OW OIL SHUTDOWNOW OIL SHUTDOWN
ENEN
GINE OIL IS LGINE OIL IS L
EN
GINE OIL IS L
ENEN
GINE OIL IS LGINE OIL IS L
OWOW
OW
OWOW
. UNIT WILL SHUTDOWN IF. UNIT WILL SHUTDOWN IF
. UNIT WILL SHUTDOWN IF
. UNIT WILL SHUTDOWN IF. UNIT WILL SHUTDOWN IF
..
.
..
un witun wit
un wit
un witun wit
houthout
hout
houthout
operation
1. Set parking brake to ‘on’ position (figure 1)
2. Turn engine choke to full ‘on’ position
3. Turn gas to ‘open’ position (figure 2)
4. Turn engine fuel stop switch to ‘run’ position (figure 2)
For electric start version push and hold button in until engine starts then release
For manual start version use pull cord
5. Adjust throttle speed (figure 2)
6. Turn choke to full ’open’ when
engine is warm (figure 2)
NN
OO
TE:TE:
N
O
TE: These starting instructions are
NN
OO
TE:TE:
general guidelines only. Consult the
ENGINE MANUAL included with the unit
for specific instructions.
Parking Brake ‘On’
Figure 1
MUD BUGGY
33
Page 34

TO SHUT OFF ENGINE
operation
1. Reduce throttle.
2. Set parking brake to ‘on’ position
(figure 1).
3. Turn engine fuel stop switch to
the ‘stop’ position (figure 2).
4. Turn gas ‘off’ when engine stops
running (figure 2).
Engine Fuel
Stop Switch
Throttle
Choke
Key Switch
Gas Valve (Carburetor)
Figure 2
Engine Controls Electric Option
MACHINE OPERATION
1. Start engine as described under section Starting The Machine.
2. Adjust throttle lever to obtain desired RPM (figure 2).
3. Release parking brake lever to off position (figure 4).
4. Two controls are located on the handle bar (see figure 3). The control on the
operator’s left-hand side is for reverse and the control on the right-hand side is for
forward motion. Select the control for the corresponding motion you want to go.
Engine Start
Button
‘On’
5. Squeeze speed control handle (figure 3) on handle bar to move the machine. Note:
The more you squeeze the handle the faster the machine will travel.
6. When you release the speed control handle the machine will stop (if machine does
not stop when speed control is released, have machine inspected by Certified Repair
Person).
7. Service Brake Pedal (see figure 3). Brakes are adjusted at factory and will need to be
adjusted as brake shoes wear. Check operation daily. Adjust at 25 hours then as
needed. Refer to Service Manual.
MOUNTING/DISMOUNTING BUGGY
Always use ‘three point contact’ when mounting the buggy. Three points refers to three out
of four arms/legs are in contact with buggy during mounting and dismounting. Always face
the buggy whether mounting or dismounting.
MUD BUGGY
34
Page 35
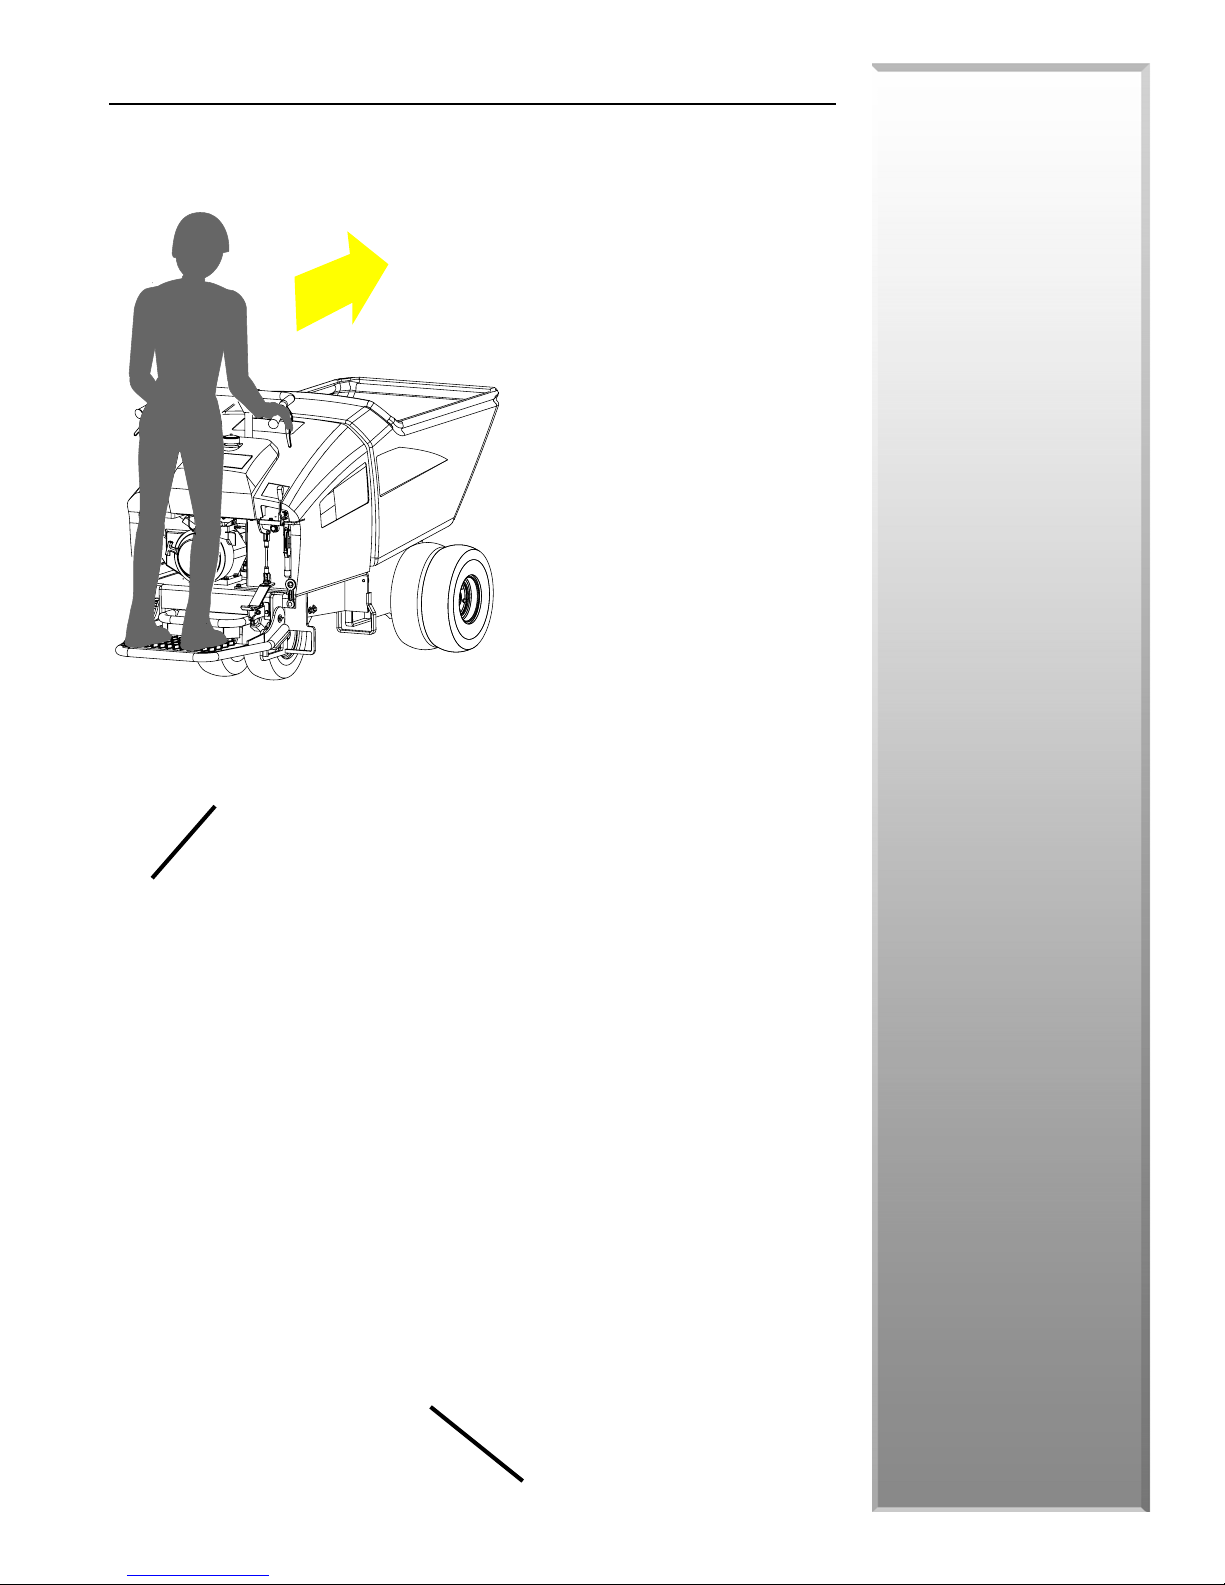
OPERATOR CONTROLS
Before operating this unit, it is important to familiarize yourself, and any other personnel
who will be using it, with the location and proper use of the controls to insure safe and
efficient operation.
NN
oo
te: Alwte: Alw
aa
yy
s fs f
ace face f
oror
ww
arar
d, td, t
oo
ww
N
o
te: Alw
a
y
s f
ace f
NN
oo
te: Alwte: Alw
aa
yy
tt
he handle bar and contrhe handle bar and contr
t
he handle bar and contr
tt
he handle bar and contrhe handle bar and contr
operoper
ating tating t
ating t
ating tating t
ols in anols in an
ols in an
ols in anols in an
he unit. Operhe unit. Oper
he unit. Oper
he unit. Operhe unit. Oper
oper
operoper
contrcontr
contr
contrcontr
rr
esult in seresult in ser
r
esult in ser
rr
esult in seresult in ser
or
s fs f
ace face f
oror
y oy o
tt
her manner maher manner ma
y o
t
her manner ma
y oy o
tt
her manner maher manner ma
ious injurious injur
ious injur
ious injurious injur
w
ar
ww
arar
y or deaty or deat
y or deat
y or deaty or deat
arar
d, t
o
w
ar
d, td, t
oo
ww
arar
ols whenols when
ols when
ols whenols when
ation ofation of
ation of
ation ofation of
hh
h.
hh
Figure 3
operation
dd
d
dd
yy
y
yy
Reverse Speed
Control Handle
Forward Speed
Control Handle
Dump Handle
Brake Pedal
Parking Brake
Dump Pedal
MUD BUGGY
35
Page 36
operation
DUMPING OPERATION
CapacityCapacity
Capacity
CapacityCapacity
Know the load capacities of your buggy and never exceed them. Buggies normally operate on
uneven, unpaved, bumpy and/or inclined surfaces--adjust load accordingly.
1. Position the machine where you intend to dump load.
2. Push handle forward to dump (figure 3).
3. Pull handle back to lower bucket.
QUICK RELEASE DUAL WHEELS (SB1600 AND FB1000 ONLY)
Changing Dual Wheel tChanging Dual Wheel t
Changing Dual Wheel t
Changing Dual Wheel tChanging Dual Wheel t
SS
tt
andarandar
S
t
andar
SS
tt
andarandar
NN
oo
te:te:
N
o
te: Maximum payload reduced by 25% (1875 lbs)when operating machine without dual
NN
oo
te:te:
wheels.
QuicQuic
Quic
QuicQuic
d Macd Mac
d Mac
d Macd Mac
1. Jack machine up. Apply parking brake.
2. Remove five (5) lug bolts.
3. Remove outer wheel.
4. Remove five (5) lug nuts from inner dual wheel adapter then remove adapter.
5. Replace five (5) lug nuts on inner wheel and torque to 90 ft. lbs.
6. Repeat above steps on opposite side of machine.
k Rk R
elease Wheel Opelease Wheel Op
k R
elease Wheel Op
k Rk R
elease Wheel Opelease Wheel Op
1. Position machine inner wheel over 2x4 and apply parking brake.
2. Remove large tee bolt in center of wheel with crow bar (figure 4).
hinehine
hine
hinehine
o Singo Sing
o Sing
o Singo Sing
tiontion
tion
tiontion
le Wheelle Wheel
le Wheel
le Wheelle Wheel
3. Remove outside wheel with quick-change hub attached.
4. Repeat above steps on opposite side of machine.
MUD BUGGY
36
Figure 4
Page 37

COLD WEATHER STARTING
Hard starting may occur in temperatures below 35 degrees Fahrenheit. Using a lighter grade
of oil in both the engine and hydraulic tank is recommended. Return oil to the proper grade
when temperatures are above 35 degrees Fahrenheit.
HOSES, FITTINGS AND LEAKAGE
Check weekly for loose hose fittings, damage, and leakage--it is important to check entire
machine periodically.
CLEANING MACHINE
Wash daily with warm, soapy water. Rinse off mud and dirt. Use pressurized air (30 PSI
max) to blow debris. Dirt and mud build up will decrease machine performance and/or
cause failures. Avoid spraying water directly on electrical components or electrical damage
may occur.
PARKING BUGGY
PP
arar
king on a Grking on a Gr
P
ar
king on a Gr
PP
arar
king on a Grking on a Gr
Parking the unit on a grade should be avoided if possible. If unit must be parked on a grade,
park it at right angles to the slope and apply the parking brake and block the wheels if
necessary.
adeade
ade
adeade
operation
Long TLong T
Long T
Long TLong T
When unit is not in use for long period of time, tilt tub up so water, snow, and debris will not
collect inside. Cover dump cylinder shaft to prevent corrosion. Apply parking brake and
park unit out of main traffic areas.
If buggy will be exposed to wet freezing weather for any length of time, place tub in the
dump position to prevent any possibility of freezing water damaging the tub. Cover dump
cylinder shaft to prevent corrosion.
MoMo
Mo
MoMo
The unit can be moved short distances if the engine won’t run. The transmission is provided
with a bypass valve. Turn this valve counterclockwise to tow and clockwise to run.
erer
m Pm P
er
m P
erer
m Pm P
ving Macving Mac
ving Mac
ving Macving Mac
arar
kingking
ar
king
arar
kingking
hine Whine W
hine W
hine Whine W
itit
hout Engine Phout Engine P
it
hout Engine P
itit
hout Engine Phout Engine P
oo
ww
erer
o
w
er
oo
ww
erer
Bypass Valve
Figure 5
MUD BUGGY
37
Page 38
TRANSPORTING MACHINE
operation
When transporting unit, observe overall height for proper clearance of obstacles overhead.
Make sure bucket is lowered and latched down. Secure unit with the proper devices and in the
proper locations.
MUD BUGGY LIFTING POINTS
The unit can be hoisted with three (3) lift points under the hopper. Tilt the hopper forward to
locate the three lift loops and attach chain or straps at each of the loops as shown below. Take
up slack in chain or straps to properly balance the unit.
There are two ways of lif ting the unit, from the side or from the front. Lifting the standing
platform will allow access to the fork pockets. Accessing the side fork pockets is straightforward.
Figure 6
PrPr
oper Toper T
Pr
oper T
PrPr
oper Toper T
Tie unit down with proper devices. Make sure all blocking is secure.
PrPr
oper Toper T
Pr
oper T
PrPr
oper Toper T
Always know overall height to allow proper clearance for overhead obstructions such as power
lines, overhangs, and doorways when transporting unit on a high vehicle
ie Doie Do
ie Do
ie Doie Do
rr
ansporanspor
r
anspor
rr
ansporanspor
wn Prwn Pr
wn Pr
wn Prwn Pr
tt
ation Pration Pr
t
ation Pr
tt
ation Pration Pr
acticesactices
actices
acticesactices
acticesactices
actices
acticesactices
Figure 7
MUD BUGGY
38
FF
oror
k Pk P
ococ
kk
ee
F
or
k P
FF
oror
k Pk P
oc
ococ
tsts
k
e
ts
kk
ee
tsts
Page 39
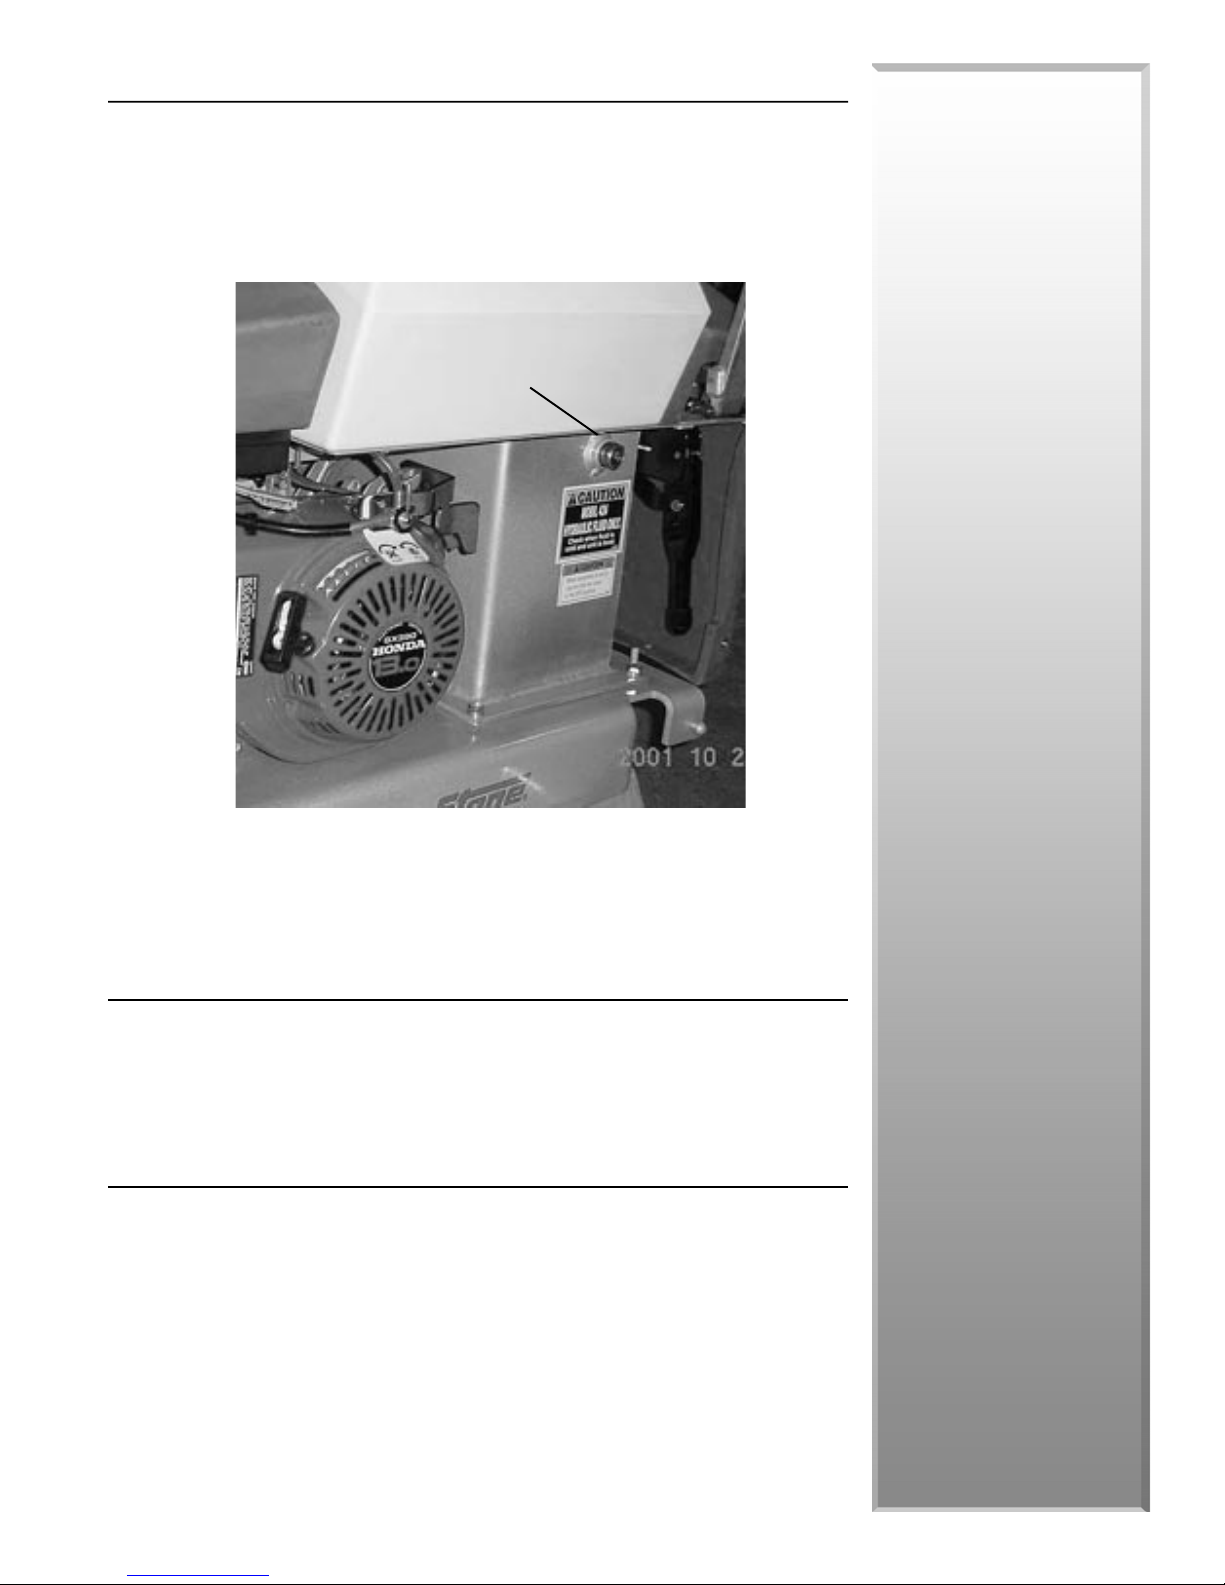
HYDRAULIC OIL
Check oil sight gauge (see Figure 8) located on the side of the hydraulic oil tank in the
engine compartment when the oil is at ambient temperature. Keep oil level in middle of
sight glass. Consult
mendations.
ManualManual
Manual supplied with this unit for specific instructions and oil recom-
ManualManual
Figure 8
Hydraulic Oil
Sight Gauge
operation
FUEL
Fill the gas tank with clean gasoline from a safety can. Consult the
with this unit for the proper type of gasoline required.
DO NDO N
OO
TT
DO N
O
T mix oil with gasoline.
DO NDO N
OO
TT
HARDWARE
Check all hardware on equipment before starting. Consult the Torque Chart section in the
Service/Parts manual and tighten any loose hardware accordingly.
Follow the guidelines found in the SAFETY PRECAUTION section of this manual whenever
handling gasoline.
Engine ManualEngine Manual
Engine Manual supplied
Engine ManualEngine Manual
MUD BUGGY
39
Page 40
operation
CLEANING/STORAGE
WARNING
NEVER POUR OR SPRANEVER POUR OR SPRA
NEVER POUR OR SPRA
NEVER POUR OR SPRANEVER POUR OR SPRA
Cleaning tCleaning t
Cleaning t
Cleaning tCleaning t
For consistent performance, long life and continued high quality use of this mud buggy,
thoroughly clean the bucket inside and out at the end of each day’s operation. To prevent
lumps of dried plaster from forming and contaminating further batches of plaster or mortar,
do not allow build up materials to form on bucket side walls.
Before cleaning, shut the engine off and disconnect the spark plug wire to prevent accidental
starting. Spray the bucket with water before the mix dries to remove any accumulations.
Dried mix should be scraped out as necessary. DO NOT beat on the bucket with a shovel,
hammer or other device to break up accumulations of dried mix, as this will dent and damage
the bucket and void the warranty.
SS
tt
oror
agag
S
t
or
ag
SS
tt
oror
agag
Always store the equipment with the hydraulic cylinder contracted. This will prevent
corrosion of the cylinder shaft.
Prior to storage, perform any required repairs and maintenance. See Operator and/or Parts
Manuals.
ee
e
ee
he Eqhe Eq
he Eq
he Eqhe Eq
uipmentuipment
uipment
uipmentuipment
Y WY W
Y W
Y WY W
AA
TER OTER O
A
TER O
AA
TER OTER O
VER THE ENVER THE EN
VER THE EN
VER THE ENVER THE EN
GINE.GINE.
GINE.
GINE.GINE.
MUD BUGGY
40
Page 41
Stone Construction
Equipment, Inc.
5. Maintenance
Page 42
FIRST SERVICE 50 HOURS
Maintenance
After the 50 hour break-in period, perform the following services:
• Change the engine oil (See Engine Oil section).
• Clean air filter (see Engine Air Filter section)
ADDITIONAL SERVICE INFORMATION
This is not a detailed engine service manual. For more detailed service information refer to
engine manuals.
IMPORIMPOR
TT
ANTANT
IMPOR
IMPORIMPOR
ing or performing maintenance.
: :
T
ANT
: Read engine Emission Warranty Statement and Engine Manual before operat-
TT
ANTANT
: :
LUBRICATION POINTS
FF
uel Capuel Cap
F
uel Cap
FF
uel Capuel Cap
GaugGaug
ee
Gaug
e
GaugGaug
ee
Engine OilEngine Oil
Engine Oil
Engine OilEngine Oil
FF
ill / Dipsill / Dips
F
ill / Dips
FF
ill / Dipsill / Dips
Wheel BearWheel Bear
Wheel Bear
Wheel BearWheel Bear
ContrContr
Contr
ContrContr
tictic
kk
tic
k
tictic
kk
ol Cablesol Cables
ol Cables
ol Cablesol Cables
ingsings
ings
ingsings
HydrHydr
Hydr
HydrHydr
aulic Faulic F
aulic F
aulic Faulic F
HopperHopper
Hopper
HopperHopper
PivPiv
Piv
PivPiv
SS
teerteer
ing Columning Column
S
teer
ing Column
SS
teerteer
ing Columning Column
BearBear
ing Housinging Housing
Bear
ing Housing
BearBear
ing Housinging Housing
illill
ill
illill
oo
tsts
o
ts
oo
tsts
MUD BUGGY
42
Page 43
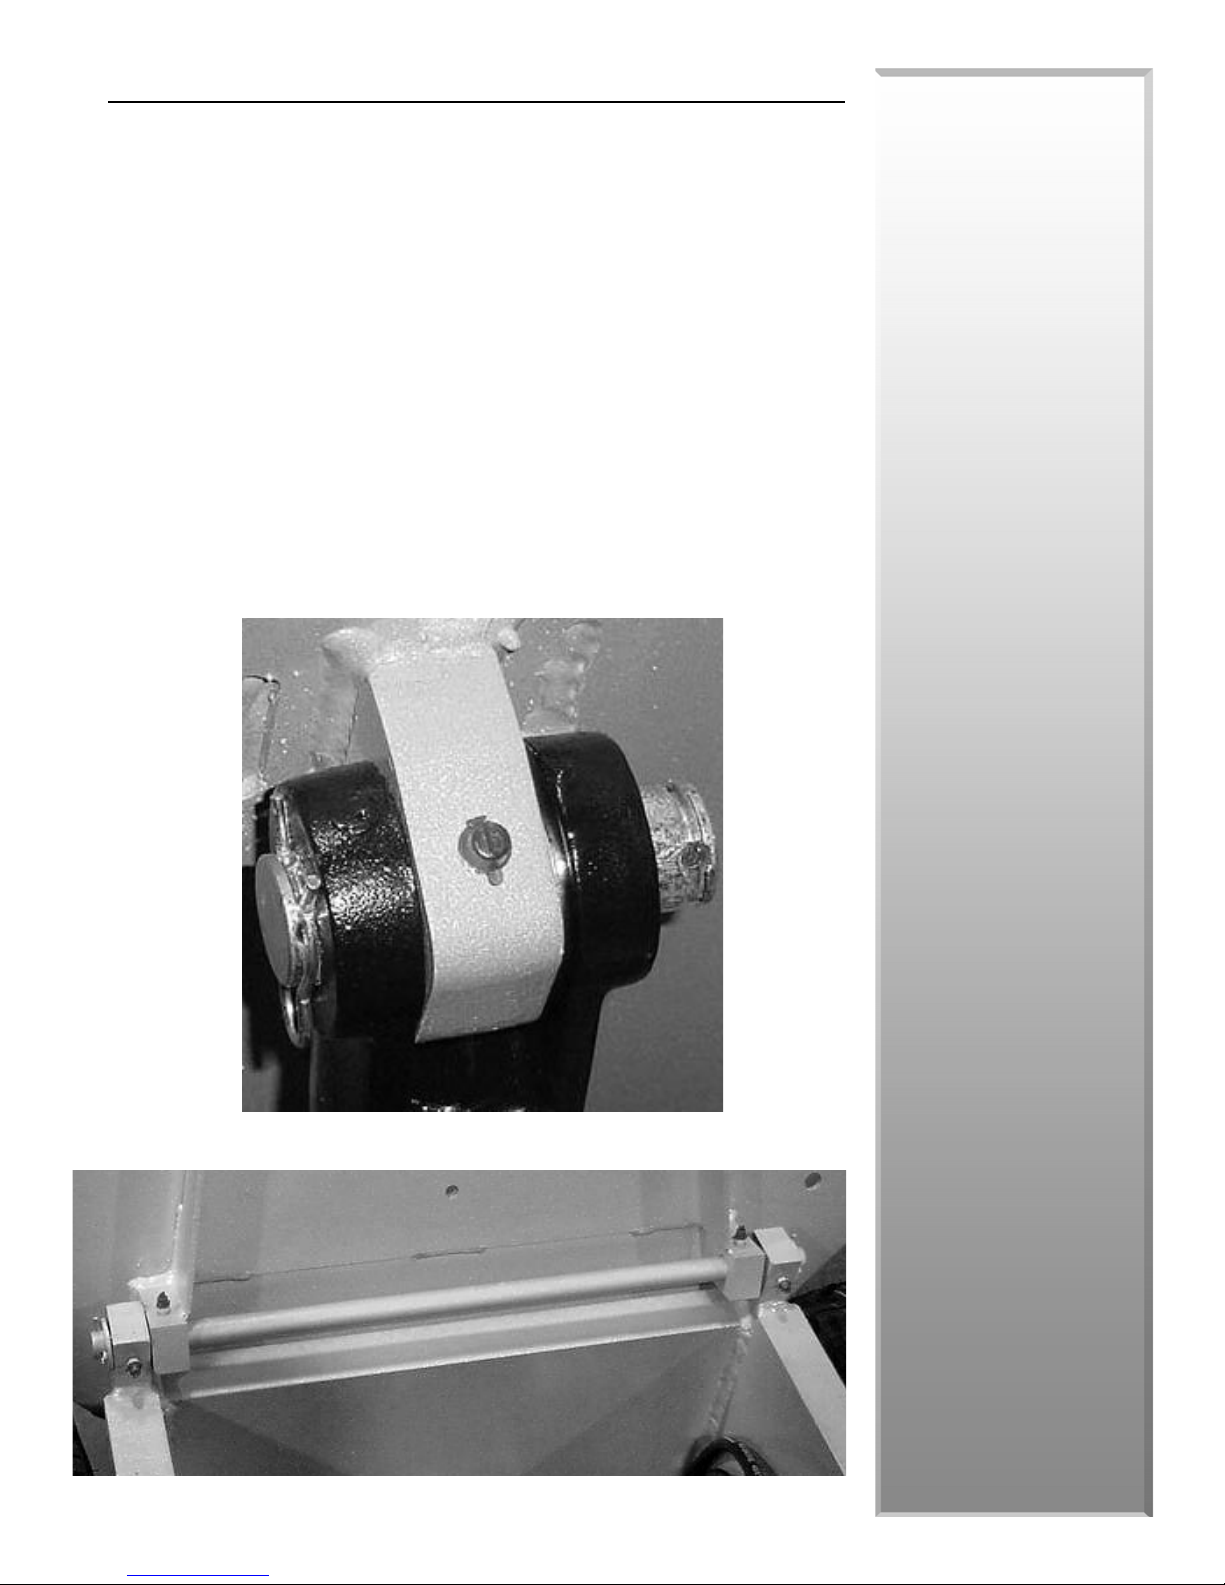
CHASSIS GREASE/LUBE POINTS
See Lubrication Specifications for requirements.
• Pivot Points (2 fittings)
• Cylinder Pivots (2 fittings)
• Steering Pivot (1 fitting--located on steering housing)
• Rear Wheel Bearings--repack bearings yearly
Grease weekly using a grease gun. Remove the blue protection caps before greasing and
replace when finished.
Moving Joints, Hinges, and Cables-
--
-Lubricate with oil every 500 hours.
--
Maintenance
CyCy
linder Pivlinder Piv
Cy
linder Piv
CyCy
linder Pivlinder Piv
PivPiv
oo
t Pt P
Piv
PivPiv
ointsoints
o
t P
oints
oo
t Pt P
ointsoints
oo
tsts
o
ts
oo
tsts
MUD BUGGY
43
Page 44
ENGINE
Maintenance
Refer to engine manual for specific engine information.
Engine OilEngine Oil
Engine Oil
Engine OilEngine Oil
1. Change oil after the first 50 hours, then change oil every 100 hours under normal
use. For severe service, change engine oil every 50 hours.
2. Remove the oil filler cap and drain bolt. Drain oil into a suitable container
3. Clean and install the drain bolt, tighten securely.
4. Fill with recommended oil to the upper limit mark on the dipstick. Install and
tighten the oil filler cap securely.
5. Run engine for 2 – 3 minutes, stop engine and check oil level.
NN
oo
te:te:
N
o
te: Please dispose of used motor oil in a manner that doesn’t harm the environment.
NN
oo
te:te:
Oil GrOil Gr
ade and Capacityade and Capacity
Oil Gr
ade and Capacity
Oil GrOil Gr
ade and Capacityade and Capacity
Engine requires 1.16 quarts/1.1 liter.
• Over 40 Degrees Fahrenheit/13 Degrees Celsius SAE 30
• Below 40 Degrees Fahrenheit/13 Degrees Celsius SAE 20
WARNING
ENEN
GINE IS EQUIPPED WITH LGINE IS EQUIPPED WITH L
EN
GINE IS EQUIPPED WITH L
ENEN
GINE IS EQUIPPED WITH LGINE IS EQUIPPED WITH L
OW OIL SHUT DOWNOW OIL SHUT DOWN
OW OIL SHUT DOWN
OW OIL SHUT DOWNOW OIL SHUT DOWN
ENEN
GINE OIL IS LGINE OIL IS L
EN
GINE OIL IS L
ENEN
GINE OIL IS LGINE OIL IS L
OWOW
OW
OWOW
. UNIT WILL SHUT DOWN IF. UNIT WILL SHUT DOWN IF
. UNIT WILL SHUT DOWN IF
. UNIT WILL SHUT DOWN IF. UNIT WILL SHUT DOWN IF
..
.
..
Air FAir F
ilterilter
Air F
ilter
Air FAir F
ilterilter
Check air filter before each use and clean after every 50 hours of service.
Clean primary (outer) element at 50 hours (after break-in period) then every 50 hours or 12
months.
Service air cleaner more frequently in dusty conditions.
IMPORIMPOR
TT
ANTANT
IMPOR
IMPORIMPOR
1. Remove air cleaner cover.
2. Remove primary (outer) element only.
3. Thoroughly clean all dirt from inside filter housing. Insert the air nozzle into
IMPORIMPOR
IMPOR
IMPORIMPOR
an ordinary nozzle may severely damage filter element. DO NOT exceed 30 PSI (2.1 bar) when
cleaning filter element.
4. Inspect filter to determine if it is practical to clean or for damage after cleaning
: :
T
ANT
:
DO NOT operate engine without the filter cover.
TT
ANTANT
: :
element, hold air nozzle about 1” (25.4 mm) from perforated metal retainer. Force
air (30 psi max) through filter from inside to outside and move air gun up and down
pleats to remove as much dirt as possible.
TT
ANTANT
: :
T
ANT
:
Only a special air cleaning gun should be used. Concentrated air pressure from
TT
ANTANT
: :
filter. If necessary, repeat step three to remove additional dirt.
MUD BUGGY
44
a. Hold a bright light inside element--check carefully for holes. Discard any
element that shows the smallest hole or rupture.
b. Be sure outer screen is not dented. Vibration would quickly wear a hole in
filter.
c. Be sure filter gasket is in good condition. If gasket is damaged or missing,
replace element.
Page 45

SparSpar
k Plugk Plug
Spar
k Plug
SparSpar
k Plugk Plug
The recommended spark plug is a BPR6ES (NGK) or W20EPR-U (DENSO). To ensure proper
engine operation, the spark plug must be properly gapped and free of deposits. Clean and
replace at scheduled maintenance interval. Clean engine before removing spark plug to
prevent contaminants from entering engine. Visually inspect the spark plug and discard if
insulator or tip is damaged. Check that the spark plug washer is in good condition. If spark
plug is to be reused, clean with a wire brush and set gap .028-.031in(.70-.80mm). Thread
the spark plug in by hand to prevent cross threading. After the spark plug is seated, tighten
with a spark plug wrench to 18-22 ft lb (24.4-29.8 Nm).
Note:
• The spark plug must be securely tightened. An improperly tightened spark plug
can become very hot and may cause engine damage.
• Use only the recommended spark plug or equivalent. A spark plug that has an
improper heat range may cause engine damage.
Engine RPMEngine RPM
Engine RPM
Engine RPMEngine RPM
• Start the engine and allow it to warm up to normal operating temperature,
check the idle speed 1400 +/- 100, and adjust the idle stop screw as required.
• Check the full speed 3600 +/-100 and adjust the full speed stop screw as
required.
Maintenance
Cooling SyCooling Sy
Cooling Sy
Cooling SyCooling Sy
The machine should be cleaned at scheduled maintenance interval. This should include
cleaning the air inlet screens and the engine cooling fins. Wash machine with warm soapy
water, rinse off mud and dirt with water, and use pressurized air(30psi max) to blow dirt
and debris from engine.
VV
alal
vv
e Cleare Clear
V
al
v
e Clear
VV
alal
vv
e Cleare Clear
Due to special tool requirements and training, an authorized engine dealer should perform
this service unless the owner has the proper tools and proper shop manuals.
ss
temtem
s
tem
ss
temtem
anceance
ance
anceance
ELECTRIC START OPTION
Inspect battery connections daily for cleanliness and tightness. Replace worn or frayed
wires.
MUD BUGGY
45
Page 46

BATTERY
Maintenance
For battery replacement call Exide at 800-782-7848 for battery equal to 12V 165 CCA battery.
See Engine Specifications Section for battery requirements.
Battery vapors can explode. Keep sparks and flames away from batteries. Use a flashlight to
check battery electrolyte level. Never check battery charge by placing a metal object across
the posts. Use a voltmeter or hydrometer. Sulfuric acid in battery electrolyte is poisonous. It
is strong enough to burn skin, eat holes in clothing, and cause blindness if splashed into
eyes.
Avoid hazard by:
- Filling batteries in a well-ventilated area.
- Wearing eye protection and rubber gloves.
- Avoid breathing fumes when electrolyte is added.
- Avoid spilling or dripping electrolyte.
- Use proper jump start procedures.
If you spill acid on yourself:
- Flush your skin with water.
- Apply baking soda or lime to help neutralize the acid.
- Flush your eyes with water for 10 - 15 minutes. Get medical attention
immediately.
If acid is swallowed:
- Drink large amounts of water or milk.
- Then drink milk of magnesia, beaten eggs, or vegetable oil.
- Get medical attention immediately.
• Once a month check the battery condition. With engine off, check the battery for
12.5 volts with a voltmeter or check the specific gravity of the electrolyte fluid in
each cell.
• Check for proper electrolyte fluid level. Use distilled water when adding and run 30
minutes to mix. Clean battery, posts, and terminals. Disconnect battery cables
before charging to avoid damage to the electrical system.
• Once a month, check the charging system with the engine running at full speed for
13 - 14 volts with a voltmeter to ensure engine voltmeter readings are correct.
• Keep batteries clean by wiping them with a damp cloth. Keep all connections clean
and tight. Remove any corrosion and wash terminals with a solution of 1 part
baking soda and 4 parts water. Tighten all connections and check that the battery is
securely fastened with properly installed hold downs.
NN
OO
TE:TE:
N
O
TE:
Coat battery terminals and connectors with a mixture of petroleum jelly and baking
NN
OO
TE:TE:
soda to retard corrosion.
• Keep battery fully charged, especially during cold weather. If a battery charger is
MUD BUGGY
46
used, turn charger off before connecting charger to battery. Attach POSITIVE (+)
battery charger lead to POSITIVE (+) battery post. Then attach NEGATIVE (-) battery
charger lead to a good ground.
Page 47
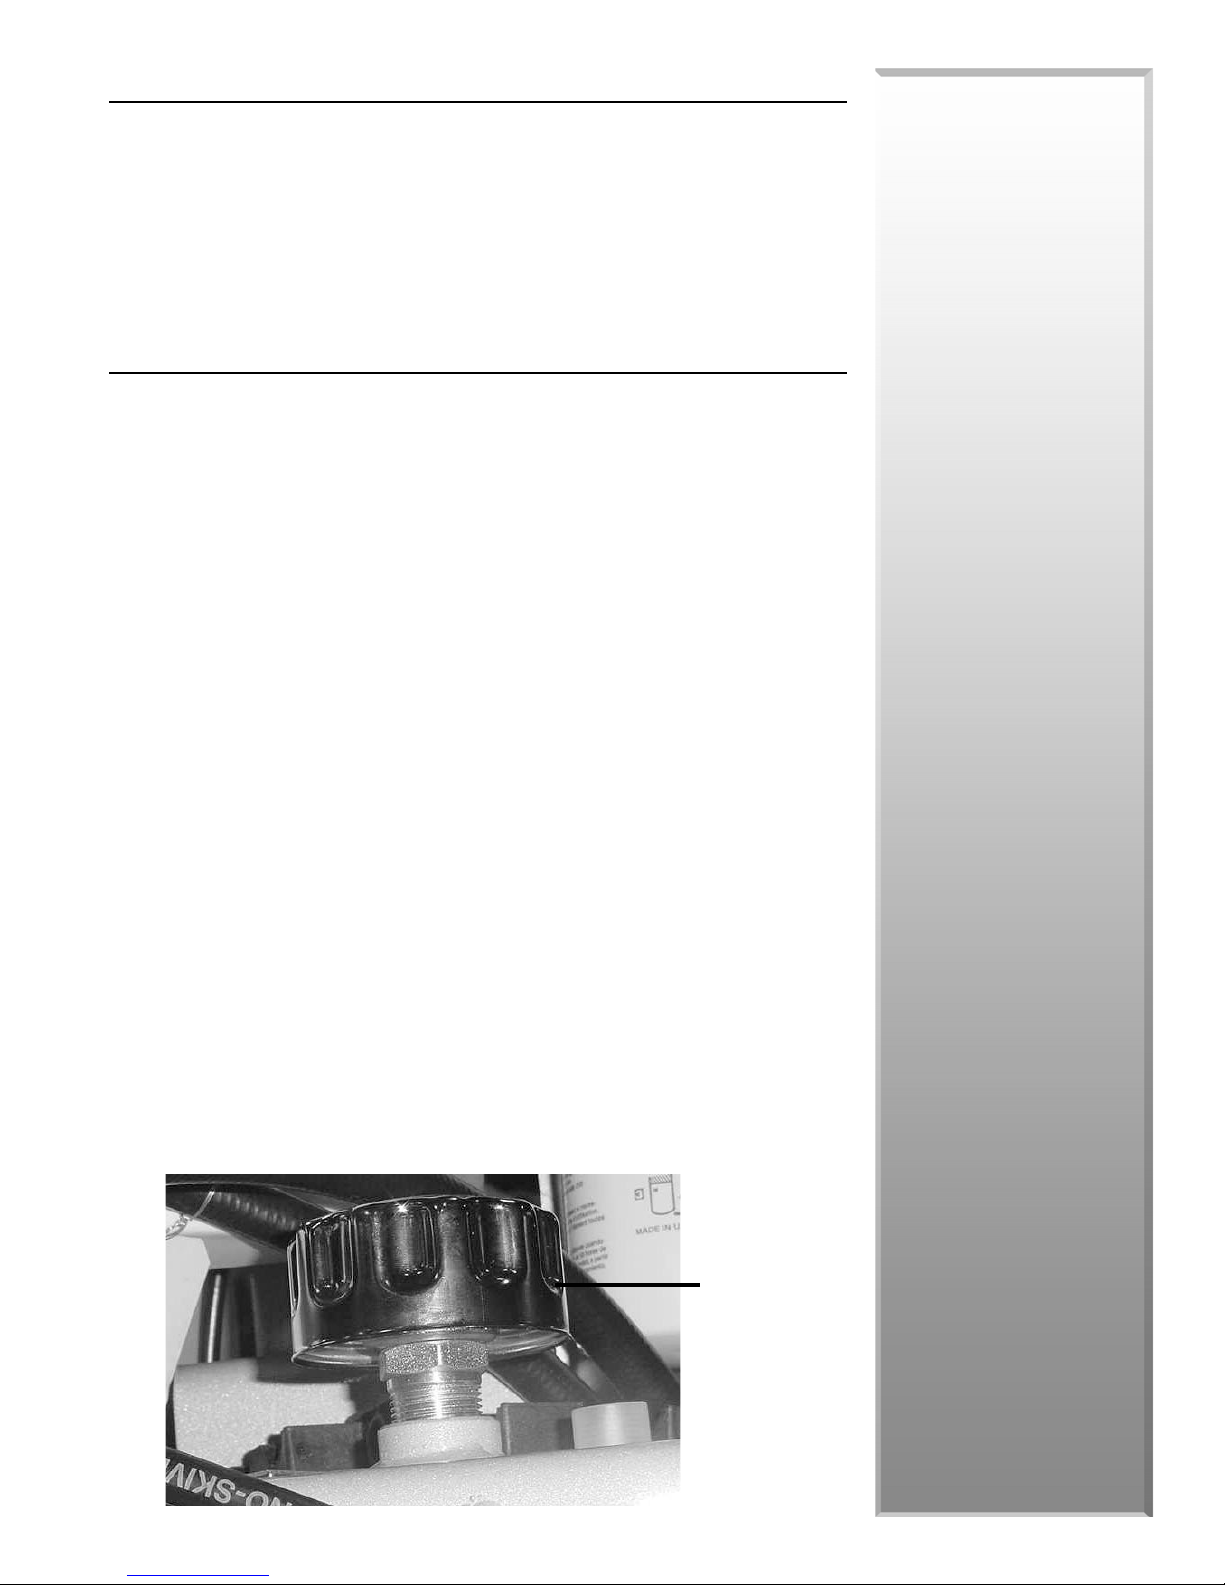
BATTERY POLICY
Battery warranty begins when equipment is sold from Stone Construction Equipment, Inc.
or a Stone dealer to a customer.
Battery warranty claims must include the unit’s purchase receipt with date. Claims without
purchase receipt will be based on the battery identification numbers.
Battery returns and/or adjustments are made through battery distributors.
POWER TRAIN
See Lubrication Specifications Section. Check hydraulic oil level daily using the sight
gauge located on the hydraulic tank. A 1/2- 3/4” air bubble will be seen at the top of the
gauge. Keep filled to proper level with Mobil 424 Hydraulic oil or equivalent. Your local oil
vendor can determine compatible oils. Mobil 424 Hydraulic Oil or equivalent should be
changed every 200 hours. The Hydraulic Oil Filter needs to be changed every time the
Hydraulic Oil is changed. For temperatures below 35 degrees, oil should be switched to
thinner 15 weight hydraulic fluid.
For satisfactory operation, the following oil conditions apply:
• Accurate level readings can be obtained only when the f luid is cold and machine is
on level ground.
• If the natural color of the fluid has become black or milky, it is possible that an
overheating or water contaminant problem exists.
Maintenance
• DO NOT mix hydraulic fluids. See Lubrications Specifications Section for hydraulic
system recommendations.
• Add hydraulic oil through breather tube. Pour hydraulic oil through strainer
basket into hydraulic tank.
The hydraulic drive motors are extremely reliable and will ordinarily not need maintenance
or repair. If a vibration is experienced with engine running, check the coupler between the
engine and the hydraulic pump. Do not make this inspection while engine is running. It will
be necessary to remove the inspection cover. After adjusting and tightening the coupler,
replace the inspection cover and then start engine to see if the problem has been corrected.
Do not run the engine or operate the buggy with the cover removed or not firmly attached.
CC
AA
UTION:UTION:
C
A
UTION:
CC
AA
Loosen cap slowly to avoid injury whenever adding oil or working on the hydraulic system.
Use a wrench on the hex directly under the cap.
The hydraulic breather cap is designed to pressurize the reservoir to 5 PSI.
UTION:UTION:
BrBr
Br
BrBr
CapCap
Cap
CapCap
eateat
eat
eateat
herher
her
herher
MUD BUGGY
47
Page 48
TRANSMISSION
Maintenance
The hydrostatic transmission is properly adjusted when no movement of the unit is visible
when controls are released.
TT
rr
ansmission Ransmission R
T
r
ansmission R
TT
rr
ansmission Ransmission R
The hydrostatic transmission is equipped with a self-centering device that centers the swash
plate to stop flow to the wheel motors, stopping the machine. If unit creeps one direction
when controls are released adjustment may be required. To adjust use the following procedure:
1. Follow procedure in the Operation Section of this manual to Shut Off Machine.
2. Detach throttle control cables at transmission and jack front wheels off of ground.
3. Start machine. Increase engine throttle to full speed while checking for front drive
wheel rotation. If wheels rotate proceed to Step 4. If no rotation is observed shut off
machine and reattach control cables.
4. Note the directional movement of the front drive wheels. SHUT OFF MACHINE.
Loosen the lock down screw until the return arm can be rotated. If wheels were
observed moving forward—rotate return arm clockwise. If wheels were observed
moving in reverse—rotate counterclockwise. Tighten lock down screw and follow
step 3.
ee
e
ee
turtur
tur
turtur
n tn t
n t
n tn t
o No N
o N
o No N
eutreutr
eutr
eutreutr
al Aal A
al A
al Aal A
djusdjus
djus
djusdjus
tmenttment
tment
tmenttment
MUD BUGGY
WARNING
POPO
TENTIAL FTENTIAL F
PO
TENTIAL F
POPO
TENTIAL FTENTIAL F
OPERAOPERA
OPERA
OPERAOPERA
DO NOT ATTEMPT any adjustments with the engine running. Use Extreme CAUTION while
inspecting all vehicle linkage.
OR SERIOUS INJUROR SERIOUS INJUR
OR SERIOUS INJUR
OR SERIOUS INJUROR SERIOUS INJUR
TED WHILE RAISED OFF OF GRTED WHILE RAISED OFF OF GR
TED WHILE RAISED OFF OF GR
TED WHILE RAISED OFF OF GRTED WHILE RAISED OFF OF GR
YY
. CER. CER
Y
. CER
YY
. CER. CER
IS PRIS PR
IS PR
IS PRIS PR
TT
AIN PRAIN PR
T
TT
OUND. TO PREVENT INJUROUND. TO PREVENT INJUR
OUND. TO PREVENT INJUR
OUND. TO PREVENT INJUROUND. TO PREVENT INJUR
OPERLOPERL
OPERL
OPERLOPERL
OCEDURES REQUIRE THE MAOCEDURES REQUIRE THE MA
AIN PR
OCEDURES REQUIRE THE MA
AIN PRAIN PR
OCEDURES REQUIRE THE MAOCEDURES REQUIRE THE MA
Y SECURED.Y SECURED.
Y SECURED.
Y SECURED.Y SECURED.
CC
HINE THINE T
C
HINE T
CC
HINE THINE T
YY
, ENSURE THE MA, ENSURE THE MA
Y
, ENSURE THE MA
YY
, ENSURE THE MA, ENSURE THE MA
O BEO BE
O BE
O BEO BE
CC
HINEHINE
C
HINE
CC
HINEHINE
LocLoc
kk
Loc
k
LocLoc
kk
DownDown
Down
DownDown
ScrScr
ee
Scr
e
ScrScr
ee
ww
w
ww
48
Page 49

HOSES, FITTINGS AND LEAKAGE
Check weekly for loose hose fittings, damage, and leakage--it is important to check entire
machine periodically.
BRAKE ADJUSTMENTS
Brakes are adjusted at factory and will need to be adjusted as brake shoes wear. Check
operation daily. Adjust at 25 hours then as needed.
SERVICE BRAKE ADJUSTMENT
Brake adjustment rods need adjusting in equal amounts. Jack machine up so that front tire
is off ground. Remove clevis pin from yoke. While screwing yoke, keep count of number of
turns for repeating the same procedure on other side until brake is adjusted.
Parking Brake Adjustment--Turning the knob on the parking brake handle clockwise will
adjust the parking brakes.
TIRES, LUGNUTS AND HARDWARE
DO NOT exceed rated pressure. To ensure long tire life and safe handling check tire pressure
weekly. Proper inflation pressure on pneumatic filled tire is 50 lbs/(3.5 Bar).
Maintenance
Proper Care--Inspect tires for cuts, slashes, or bulges. Tires with defects need to be replaced
or repaired for proper handling and safety.
Check that all lugnuts are tight weekly usinga torque of 90 ft. lbs. (122 Nm). This is
important on new machines or newly replaced wheels.
Inspect all hardware is tight weekly (see Torque Charts Section).
Hardware Guidelines--Shear bolts are designed to fail under predetermined loads. Always
replace shear bolts with identical grade.
Fasteners should be replaced with the same or higher grade. If higher grade fasteners are
used, these should only be tightened to the strength of the original.
Make sure fasteners threads are clean and that you properly start thread engagement. This
will prevent them from failing when tightening.
When installing or replacing hardware, loctite 262 threadlocker is required to prevent
loosening.
MUD BUGGY
49
Page 50
FUEL TANK
Maintenance
Gasoline ONLY (see Engine Specifications Section for requirements).
Fill fuel tank at the end of each day’s operation to prevent condensation in the tank.
Drain and flush fuel tank every 1,000 hours or 12 months.
Avoid storing fuel over long periods of time. If fuel is stored for more than a month prior to
use or there is a slow turnover in fuel tank or supply tank, add a fuel conditioner to stabilize
the fuel and prevent water condensation.
Proper fuel storage is critically important. Use clean storage and transfer tanks. Periodically
drain water and sediment from the bottom of the tank. Store fuel in a convenient place away
from buildings.
STORAGE
If equipment is taken out of operation for the Winter season or a prolonged period, follow
below procedures to prevent machine or engine damage.
1. Clean the unit completely.
2. Drain the fuel system and fill it with preservative fuel. If preservative fuel is not
used, the system can be kept full with normal fuel but the fuel must be drained and
discarded at the end of the storage period.
3. Operate the engine until it is warm. Stop the engine and change the engine oil.
4. Operate the engine for a short period in order to circulate the lubricating oil.
5. Disconnect and remove the battery. Put the battery into safe storage in a fully
charged condition. Before the battery is put into storage, protect its terminals
against corrosion. Grease may be used on the terminals.
6. Remove the air filter. Seal the vent pipe of the fuel tank or the fuel filler cap with
waterproof tape.
SPRING START-UP
1. Drain engine preservative oil and fill with normal engine oil. Check engine oil level.
2. If fuel preservative was not used,
3. Charge battery and install.
4. Check air filter.
5. Check hydraulic oil level.
6. Check hardware for looseness. If loose, tighten according to torque chart.
7. Check hoses for looseness or leaking.
drain and replace fuel.
8. Reacquaint yourself with Operations and Owner’s Manuals.
MUD BUGGY
50
Page 51
IMPORTANT!
The person attempting
maintenance tasks must be authorized to do so and
have read
and
understood
manual.
MAINTENANCE CHART MACHINE BREAKDOWN
M7M7
M7
M7M7
M3M3
M3
M3M3
E7E7
E7
E7E7
E1 - E6E1 - E6
E1 - E6
E1 - E6E1 - E6
M2M2
M2
M2M2
any
of the following
all
sections within this
M1M1
M1
M1M1
M6M6
M6
M6M6
M8M8
M8
M8M8
Maintenance
M5M5
M5
M5M5
M4M4
M4
M4M4
Check/Adjust
o
Clean/Replace
ENGINE
E1 Oil Level
Air Filter & Pre-cleaner
E2
E3 Spark Plug
Engine RPM Idle/Full
E4#
Clean Cooling System
E5
Valve Clearance
E6##
Fuel Tank
E7
MACHINE
Hydraulic Oil Level
M1
Hydraulic Filter
M2
Hydraulic Breather
M3
Wheel Hubs
M4
Rear Steering Column
M5
M6 Hopper Pivot/Dump Cylinder
Control Cable
M7
Battery/Charge System
M8
# Important READ Engine Emissions Warranty Statement, Manual and Engine Manual
## See AUTHORIZED Engine Service Dealer and/or Refer to Engine Shop Manual for Procedures
Daily
READ EMISSION WARRANTY, OPERATOR &
o
o
o
o
o
o
o
o
Other
Weekly
ENGINE MANUAL
Replace at 50-hrs, then every 100-hrs SAE 30W AP, SH
o
or SJ
Clean every 50-hrs, replace every 300-hrs
o
Clean every 100-hrs, gap setting .028 inch, replace
every 300-hrs
Check idle at full speed RPM every 300-hrs
Clean/blow out air inlets, engine fins (30 psi max)
o
Check/adjust every 300-hrs
Clean every year or 300-hrs
Replace every 200-hrs Mobil 424
o
Replace every 100-hrs (PN 45150)
Replace every 800-hrs (PN 38521)
Repack yearly with Wheel Bearing Grease
Lube weekly with Lithium Base Grease
Check operation, lube pivots weekly with Lithium Base
Grease
Check operation, lube cable every 50 hrs, light oil
o
Check/clean monthly/check for 13-14 volts at full RPM
Instructions
MUD BUGGY
51
Page 52
Maintenance
MAINTENANCE LOG
Maintenance Log
Machine Model
Serial Number Engine Serial Number
Use this chart to record dates of service and hours on machine.
Maintenance
Engine Oil / Filter (100 hrs)
Air Cleaner (300 hrs)
Spark Plugs (100 hrs)
Valves (300 hrs)
Hydraulic Oil (200 hrs)
Hydraulic Filter (100 hrs)
Hydraulic Breather (800 hrs)
Battery (monthly)
Grease Rear Wheel Hub (yearly)
Grease Steering Column (weekly)
Lubricate Cables and Pivot (50 hrs)
Other
Other
Date/
Hours
Date of Purchase
Date/
Hours
Date/
Hours
Date/
Hours
Date/
Hours
Date/
Hours
Date/
Hours
MUD BUGGY
52
Page 53

TROUBLESHOOTING
Troubleshooting Your Buggy
Engine Lacks Power Fuel line plugged Clean or replace
Dirty fuel filter Clean or replace
Air filter dirty Clean or replace
Too much oil in crankcase Drain to proper level
Oil Consumption Worn valve guides Replace
Too much oil in crankcase Drain to proper level
Blue Smoke Worn valves/valve guides Replace
Too much oil in crankcase Drain to proper level
Does Not Start Empty fuel tank Fill tank
Worn cylinder and piston
rings
Worn cylinder and piston
rings
Loose bolts on engine
crankcase
Worn cylinder and piston
rings
Oil seal at intake valve
defective
Replace
Replace
Tighten
Replace
Replace
Maintenance
Weak or dead battery Charge or replace
Stop lever is engaged Disengage
Poor ground connection
Loose wire connection in
wire harness
Run/off switch is in OFF
position
Tighten and/or clean
terminals
Tighten
Move switch to proper
position
MUD BUGGY
53
Page 54

Maintenance
MUD BUGGY
Notes: _________________________________________________________
_______________________________________________________________
_______________________________________________________________
_______________________________________________________________
_______________________________________________________________
_______________________________________________________________
_______________________________________________________________
_______________________________________________________________
_______________________________________________________________
_______________________________________________________________
_______________________________________________________________
_______________________________________________________________
_______________________________________________________________
_______________________________________________________________
_______________________________________________________________
_______________________________________________________________
_______________________________________________________________
_______________________________________________________________
_______________________________________________________________
_______________________________________________________________
_______________________________________________________________
_______________________________________________________________
_______________________________________________________________
_______________________________________________________________
_______________________________________________________________
_______________________________________________________________
_______________________________________________________________
_______________________________________________________________
_______________________________________________________________
_______________________________________________________________
_______________________________________________________________
_______________________________________________________________
_______________________________________________________________
_______________________________________________________________
_______________________________________________________________
_______________________________________________________________
_______________________________________________________________
_______________________________________________________________
_______________________________________________________________
_______________________________________________________________
_______________________________________________________________
_______________________________________________________________
_______________________________________________________________
_______________________________________________________________
_______________________________________________________________
_______________________________________________________________
_______________________________________________________________
_______________________________________________________________
_______________________________________________________________
_______________________________________________________________
54
Page 55

CALIFORNIA PROPOSITION 65 WARNING: Engine exhaust from
this product contains chemicals known to the State of California
to cause cancer, birth defects, or other reproductive harm.
ADVERTENCIA SEGÚN PROPOSICIÓN 65 DEL ESTADO DE CALIFORNIA: El uso de este equipo y/o los vapores de escape del
motor de este producto producen agentes químicos reconocidos
en el Estado de California como causantes del cáncer, de defectos
congénitos y de otros daños al sistema reproductor.
MUD BUGGY
55
Page 56

A 100% employee-owned American manufacturer
© 2001 Stone Construction Equipment, Inc.
Stone Construction Equipment, Inc.
P.O. Box 150, Honeoye, New York 14471
Phone: (800) 888-9926
+1 (585) 229-5141
Fax: +1 (585) 229-2363
e-mail: [email protected]
www.stone-equip.com
Printed in U.S.A.
SPR
Page 57
SPR
Printed in U.S.A.
© 2001 Stone Construction Equipment, Inc.
Una empresa manufacturera norteamericana de propiedad de los empleados
www.stone-equip.com
Correo electrónico: [email protected]
Fax: (585) 229-2363
Phone: (800) 888-9926 (585) 229-5141
P.O. Box 150, Honeoye, New York 14471 EE.UU.
Stone Construction Equipment, Inc.
Page 58

55
MUD BUGGY
congénitos y de otros daños al sistema reproductor.
en el Estado de California como causantes del cáncer, de defectos
motor de este producto producen agentes químicos reconocidos
CALIFORNIA: El uso de este equipo y/o los vapores de escape del
ADVERTENCIA SEGÚN PROPOSICIÓN 65 DEL ESTADO DE
Page 59

54
_______________________________________________________________
_______________________________________________________________
MUD BUGGY
_______________________________________________________________
_______________________________________________________________
_______________________________________________________________
_______________________________________________________________
_______________________________________________________________
_______________________________________________________________
_______________________________________________________________
_______________________________________________________________
_______________________________________________________________
_______________________________________________________________
_______________________________________________________________
_______________________________________________________________
_______________________________________________________________
_______________________________________________________________
_______________________________________________________________
_______________________________________________________________
_______________________________________________________________
_______________________________________________________________
_______________________________________________________________
_______________________________________________________________
_______________________________________________________________
_______________________________________________________________
_______________________________________________________________
_______________________________________________________________
_______________________________________________________________
_______________________________________________________________
_______________________________________________________________
_______________________________________________________________
_______________________________________________________________
_______________________________________________________________
_______________________________________________________________
_______________________________________________________________
_______________________________________________________________
_______________________________________________________________
_______________________________________________________________
_______________________________________________________________
_______________________________________________________________
_______________________________________________________________
_______________________________________________________________
_______________________________________________________________
_______________________________________________________________
_______________________________________________________________
_______________________________________________________________
_______________________________________________________________
_______________________________________________________________
_______________________________________________________________
_______________________________________________________________
Notas: _________________________________________________________
Page 60
53
MUD BUGGY
posición correcta
Mover el interruptor a la
Apretar
bornes
Apretar y/o limpiar los
Desengranar
Cargar o reemplazar
Llenar el tanque
Reemplazar
Vaciar al nivel correcto
Reemplazar
Reemplazar
en posición de apagado
Interruptor de encendido
de alambrado
Alambre suelto en arnés
a tierra
Mala conexión de puesta
está accionada
La palanca de apagado
muerta
Batería descargada o
vacío
Tanque de combustible
admisión
aceite en válvula de
el cárter
desgastados
válvulas/guías de válvula
Desgaste de
arranca
El motor no
Defecto de sello de
Exceso de aceite en
Cilindros y aros de pistón
humo azul
El motor emite
Mantenimiento
Pernos flojos en el cárter Apretar
el cárter
Vaciar al nivel correcto
desgastados
Reemplazar
válvulas
Reemplazar
Vaciar al nivel correcto
Reemplazar
Limpiar o reemplazar
Limpiar o reemplazar
Desgaste de guías de
cárter
desgastados
sucio
obstruida
Línea de combustible
Exceso de aceite en
Cilindros y aros de pistón
de aceite
Consumo excesivo
Exceso de aceite en el
Cilindros y aros de pistón
Filtro de aire sucio Limpiar o reemplazar
Filtro de combustible
potencia del motor
Pérdida de
Localización de averías del Mud Buggy
LOCALIZACIÓN DE AVERÍAS
Page 61

52
MUD BUGGY
(50 horas)
Lubricar cables y pivote
dirección (semanalmente)
Engrasar la columna de la
traseras (anualmente)
Engrasar cubo de ruedas
Batería (mensual)
(800 horas)
Respiradero hidráulico
Filtro hidráulico (100 horas)
Aceite hidráulico (200 horas)
Válvulas (300 horas)
Bujías (100 horas)
Filtro de aire (300 horas)
(100 horas)
horas
Fecha/
horas
Fecha/
horas
Fecha/
horas
Fecha/
horas
Fecha/
horas
Fecha/
horas
Fecha/
Aceite de motor / Filtro
Mantenimiento
máquina.
Usar esta tabla para registrar las fechas de mantenimiento y las horas de la
Número de serie __________________________ Número de serie del motor ___________
Modelo de máquina _______________________ Fecha de compra ___________________
Registro de mantenimiento
Mantenimiento
REGISTRO DE MANTENIMIENTO
Page 62
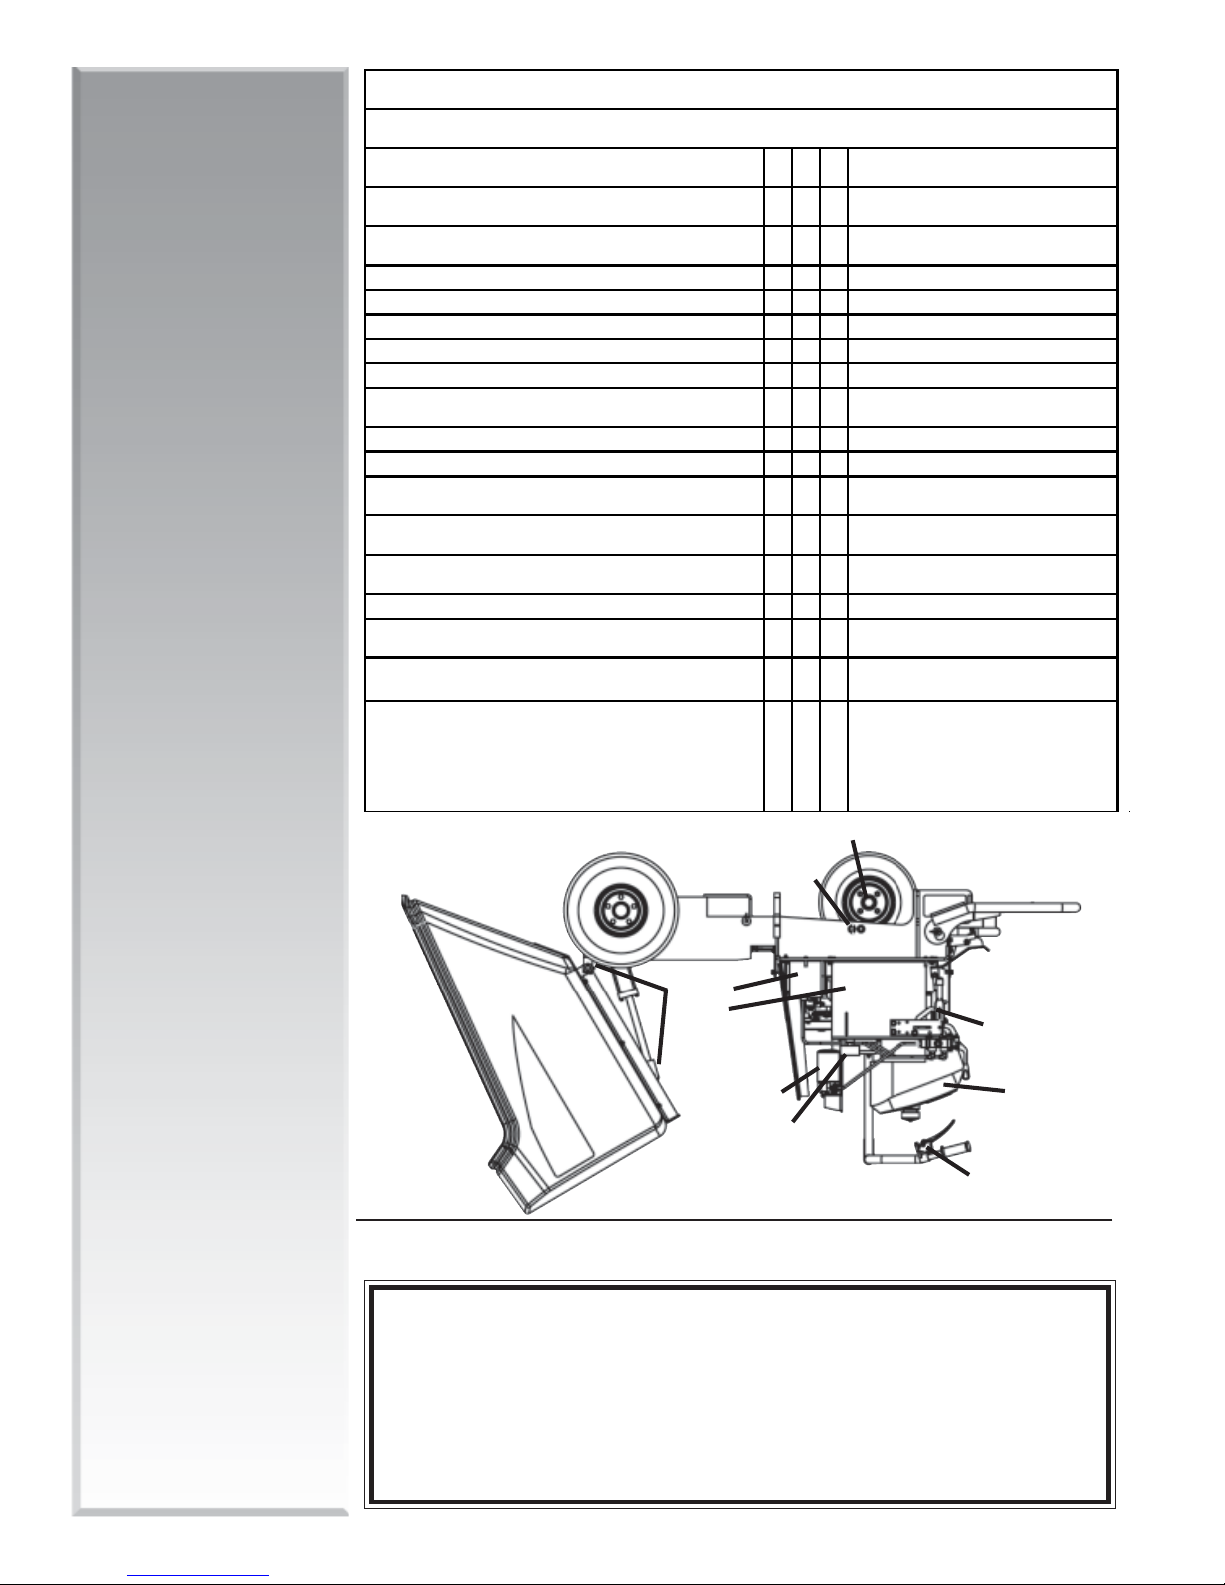
51
MUD BUGGY
motor para los procedimientos
## Consultar al concesionario de servicio de motores AUTORIZADO y/o consultar el Manual de taller del
manual del motor
# Importante LEER la Declaración de garantía de emisiones del motor, el manual de la máquina y el
13-14 V a velocidad máxima
Revisar/limpiar mensualmente/revisar si hay
aceite liviano
Revisar el funcionamiento, lubricar el cable cada 50 horas,
semanalmente con grasa a base de litio
Revisar el funcionamiento, lubricar los pivotes
Lubricar semanalmente con grasa a base de litio
Engrasar una vez al año con grasa para cojinetes de rueda
Reemplazar cada 800 horas (N/P 38521)
Reemplazar cada 100 horas (N/P 45150)
Cambiar cada 200 horas Mobil 424
Limpiar cada año ó 300 horas
Revisar/ajustar cada 300 horas
del motor (máx. 30 psi [207 kPa])
Limpiar/aplicar aire comprimido a entradas de aire y aletas
Revisar velocidad de ralentí y máxima cada 300 horas
(0,71 mm), reemplazar cada 300 horas
Limpiar cada 100 horas, ajustar la separación en 0.028 in.
Limpiar cada 50 horas; cambiar cada 300 horas
AP, SH o SJ
Cambiar a las 50 horas, luego cada 100 horas con SAE 30W
MANUALES DEL OPERADOR Y DEL MOTOR
LEER LA GARANTÍA DE EMISIONES Y LOS
Instrucciones
Otro
o
o
o
o
o
o
o
o
o
o
o
o
o
Semanal mente
Diariamente
M8 Batería/sistema de carga
M7
Cable de control
cilindro de descarga
M6
Pivote de la cubeta /
M5
Columna de la dirección trasera
M4
Cubos de rueda
M3
Respiradero hidráulico
M2
Filtro hidráulico
M1 Nivel de aceite hidráulico
MÁQUINA
E7
Tanque de combustible
E6##
Juego de válvulas
enfriamiento
E5
Limpiar el sistema de
máx. de motor
E4# Velocidad de ralentí/
E3 Bujía
E2
Filtro de aire y prefiltro
E1
Nivel de aceite
MOTOR
o Limpiar/reemplazar
Revisar/ajustar
las
todas
M4M4
M4
M4M4
M5M5
M5
M5M5
M8M8
M8
M8M8
M6M6
M6
M6M6
M1M1
M1
M1M1
M2M2
M2
M2M2
M3M3
M3
M3M3
M7M7
M7
M7M7
E1 -E1 -
E1 -
E1 -E1 -
E7E7
E7
E7E7
DESPIECE DE LA MÁQUINA PARA TABLA DE MANTENIMIENTO
secciones de este manual.
y
comprendido
correspondiente y debe haber leído
mantenimiento siguientes debe contar con la autorización
de las tareas de
cualquiera
Toda persona que intente
Mantenimiento
¡IMPORTANTE!
Page 63

, vaciar y volver a llenar
50
8. Repasar el contenido de los Manuales del operador y del propietario.
7. Revisar si hay mangueras flojas o con fugas.
de apriete.
6. Revisar si hay tornillería floja. Si está f loja, apretar de acuerdo a la tabla de pares
5. Revisar el nivel de aceite hidráulico.
4. Revisar el filtro de aire.
3. Cargar e instalar la batería.
el combustible.
2.
Si no se usó agente preservativo en el combustible
nivel de aceite del motor.
1. Vaciar el aceite preservativo del motor y llenar con aceite de motor normal. Revisar el
MUD BUGGY
ARRANQUE EN LA PRIMAVERA
tapa de llenado de combustible con cinta impermeable.
6. Retirar el filtro de aire. Sellar el tubo de ventilación del tanque de combustible o la
sus bornes contra la corrosión. Puede usarse grasa en los bornes.
seguro en condición de plenamente cargada. Antes de almacenar la batería, proteger
5. Desconectar y retirar la batería. Colocar la batería en un lugar de almacenamiento
4. Hacer funcionar el motor un período corto para hacer circular el aceite lubricante.
de motor.
3. Hacer funcionar el motor hasta que se caliente. Apagar el motor y cambiar el aceite
finalizar el período de almacenamiento.
con combustible normal, pero el combustible debe ser vaciado y descartado al
Si no se usa combustible con agente preservante, el sistema se puede mantener lleno
2. Vaciar el sistema de combustible y llenarlo con combustible con agente preservante.
1. Limpiar la unidad completamente.
la máquina o en el motor.
prolongado, seguir los procedimientos que se presentan a continuación para evitar daños en
Si el equipo se pone fuera de servicio durante la temporada de invierno o por un período
ALMACENAMIENTO
del tanque. Almacenar el combustible en un lugar apropiado alejado de edificios.
almacenamiento y transferencia limpios. Vaciar periódicamente el agua y sedimento del fondo
El almacenamiento apropiado del combustible es de suma importancia. Usar tanques de
tible y evitar la condensación del agua.
tanque de suministro, agregar un acondicionador de combustible para estabilizar el combusde un mes antes de utilizarse o se presenta una rotación lenta en el tanque de combustible o
Evitar almacenar combustible por períodos prolongados. Si se almacena combustible por más
Vaciar y enjuagar el tanque de combustible cada 1000 horas ó 12 meses.
el tanque.
Llenar el tanque de combustible al final de cada jornada para evitar la condensación en
ÚNICAMENTE gasolina (ver la sección de especificaciones del motor para los requisitos).
Mantenimiento
TANQUE DE COMBUSTIBLE
Page 64

49
MUD BUGGY
que la tornillería se af loje.
Al instalar o sustituir tornillería, se requiere pasta selladora de roscas Loctite 262 para evitar
debidamente. De esta manera se evita que fallen al apretarlos.
Asegurarse que las roscas de los sujetadores estén limpias y que los mismos se engranen
sujetador original.
sujetadores de grado superior, éstos deberán apretarse únicamente al valor de apriete del
Los sujetadores deben sustituirse por otros de grado igual o superior. Si se utilizan
idéntico.
ciertas cargas predeterminadas. Siempre sustituir los pernos rompibles por otros de grado
Pautas para la tornillería--Los pernos rompibles están diseñados para fallar si se exponen a
pares de apriete).
Inspeccionar semanalmente que toda la tornillería esté apretada (ver la sección Tablas de
repuesto nuevas.
apriete de 90 lb-ft (122 Nm). Esto es importante en máquinas nuevas o en ruedas de
Verificar semanalmente que todas las tuercas de rueda estén apretadas usando un par de
y seguridad apropiados.
abultamientos. Los neumáticos con defectos deben sustituirse o repararse para manejo
Mantenimiento correcto--Inspeccionar los neumáticos en busca de cortes, rayaduras o
neumático es 50 psi (3,5 bar).
revisar la presión del neumático semanalmente. La presión de inflado correcta de un
NO exceder la presión nominal. Para asegurar larga vida útil del neumático y manejo seguro,
NEUMÁTICOS, TUERCAS DE RUEDA Y TORNILLERÍA
sentido horario se ajusta el freno de estacionamiento.
Ajuste del freno de estacionamiento--Al girar la perilla del freno de estacionamiento en el
freno esté ajustado.
de la cantidad de vueltas para repetir el mismo procedimiento en el otro lado hasta que el
pasador de horquilla de la horquilla. Mientras se atornilla la horquilla, mantener la cuenta
con gatos de manera que las ruedas delanteras queden separadas del suelo. Retirar el
Las varillas de ajuste de los frenos deben ajustarse en cantidades iguales. Elevar la máquina
AJUSTE DE LOS FRENOS DE SERVICIO
Mantenimiento
sea necesario.
se desgastan. Revisar el funcionamiento diariamente. Ajustar a las 25 horas y luego como
Los frenos se ajustan en la fábrica y deberán ajustarse a medida que las zapatas de los frenos
AJUSTES DE LOS FRENOS
es importante revisar la máquina completa periódicamente.
Revisar semanalmente en busca de adaptadores de manguera sueltos, daños y fugas--
MANGUERAS, ADAPTADORES Y FUGAS
Page 65

48
AA
A
AA
ueoueo
ueo
ueoueo
ARAARA
ARA
ARAARA
nillonillo
nillo
nillonillo
AMENTE.AMENTE.
AMENTE.
AMENTE.AMENTE.
O. PO. P
O. P
O. PO. P
de bloqde bloq
de bloq
de bloqde bloq
TT
oror
T
or
TT
oror
OPIADOPIAD
A APR
OPIAD
A APRA APR
OPIADOPIAD
ARADARAD
A DEL SUELA DEL SUEL
ARAD
A DEL SUEL
ARADARAD
A DEL SUELA DEL SUEL
OS REQUIEREN QUE LOS REQUIEREN QUE L
OS REQUIEREN QUE L
OS REQUIEREN QUE LOS REQUIEREN QUE L
AD
ADAD
T
Á FIJ
TT
Á FIJÁ FIJ
ADAD
AA
, SEP, SEP
AD
A
, SEP
ADAD
AA
, SEP, SEP
OCEDIMIENTOCEDIMIENT
OCEDIMIENTOCEDIMIENT
TT
Á FIJÁ FIJ
ADAD
A APRA APR
A ESA ES
A ES
A ESA ES
TT
Á ELEVÁ ELEV
T
Á ELEV
TT
Á ELEVÁ ELEV
TT
OS PROS PR
T
OS PR
OCEDIMIENT
TT
OS PROS PR
A MÁQUINA MÁQUIN
A MÁQUIN
A MÁQUINA MÁQUIN
VES. CIERVES. CIER
VES. CIER
VES. CIERVES. CIER
AR MIENTRAS ESAR MIENTRAS ES
CION
AR MIENTRAS ES
CIONCION
AR MIENTRAS ESAR MIENTRAS ES
G
A FUN
GG
A FUNA FUN
CIAL DE LESIONES GRACIAL DE LESIONES GRA
CIAL DE LESIONES GRA
CIAL DE LESIONES GRACIAL DE LESIONES GRA
GG
A FUNA FUN
CIONCION
todo el varillaje del vehículo.
NO INTENTAR ningún ajuste con el motor en marcha. Tener sumo CUIDADO al inspeccionar
EVITEVIT
AR LESIONES, ASEGURAR QUE LAR LESIONES, ASEGURAR QUE L
EVIT
AR LESIONES, ASEGURAR QUE L
EVITEVIT
AR LESIONES, ASEGURAR QUE LAR LESIONES, ASEGURAR QUE L
A SE HAA SE HA
A SE HA
A SE HAA SE HA
TENTEN
TEN
TENTEN
MÁQUINMÁQUIN
MÁQUIN
MÁQUINMÁQUIN
RIESGO PORIESGO PO
RIESGO PO
RIESGO PORIESGO PO
MUD BUGGY
y continuar con el paso 3.
retroceso, girarlo en sentido contrahorario. Apretar el tornillo de bloqueo
de retorno en el sentido horario. Si se observó que las ruedas giraban en sentido de
de retorno. Si se observó que las ruedas giraban hacia adelante, girar el brazo
MÁQUINA. Aflojar el tornillo de bloqueo hasta que se pueda girar el brazo
4. Tomar nota del sentido de movimiento de las ruedas motrices delanteras. APAGAR LA
de control.
con el paso 4. Si no se observa giro, apagar la máquina y volver a conectar los cables
mientras se comprueba si giran las ruedas delanteras. Si las ruedas giran, continuar
3. Arrancar la máquina. Aumentar la velocidad del motor a aceleración máxima
delanteras con gato separadas del suelo.
2. Soltar los cables de control del acelerador en la transmisión y levantar las ruedas
máquina.
1. Seguir el procedimiento de la sección Funcionamiento de este manual para apagar la
ajustar usar el procedimiento siguiente:
lentamente en un sentido cuando se sueltan los controles puede requerirse ajuste. Para
para detener el flujo a los motores de las ruedas y parar la máquina. Si la unidad se mueve
La transmisión hidrostática tiene un dispositivo autocentrador que centra la placa oscilante
AjusAjus
ee
tt
oror
tt
oo
t
o
tt
oo
o muero muer
o muer
o muero muer
ansmisión a puntansmisión a punt
ansmisión a punt
ansmisión a puntansmisión a punt
no de la trno de la tr
e
t
or
no de la tr
ee
tt
oror
no de la trno de la tr
te del rte del r
Ajus
te del r
AjusAjus
te del rte del r
de la unidad con los controles soltados.
La transmisión hidrostática está ajustada adecuadamente cuando no hay movimiento visible
Mantenimiento
TRANSMISIÓN
Page 66

47
MUD BUGGY
aderader
oo
ader
o
aderader
oo
rr
espirespir
r
espir
rr
espirespir
TT
apa delapa del
T
apa del
TT
apa delapa del
debajo de la tapa.
trabajar en el sistema hidráulico. Usar una llave en la superficie hexagonal directamente
a 5 psi (0,3 bar). Aflojar la tapa lentamente para evitar causar lesiones al añadir aceite o
PRECPREC
AA
UCIÓN:UCIÓN:
PREC
A
La tapa del respiradero hidráulico ha sido diseñada para presurizar el tanque
UCIÓN:
AA
UCIÓN:UCIÓN:
PRECPREC
en marcha el motor o usar el Mud Buggy con la cubierta retirada o no fijada firmemente.
inspección y luego arrancar el motor para ver si el problema se ha corregido. No poner
inspección. Después de ajustar y apretar el acoplador, volver a colocar la cubierta de
inspección cuando la máquina está funcionando. Será necesario retirar la cubierta de
funcionando, revisar el acoplador entre el motor y la bomba hidráulica. No efectuar esta
no requieren mantenimiento o reparación. Si se experimenta vibración con el motor
Los motores de mando hidráulicos son extremadamente confiables y normalmente
a través de la canasta del tamiz dentro del depósito hidráulico.
• Añadir aceite hidráulico a través del tubo del respiradero. Verter el fluido hidráulico
las recomendaciones del sistema hidráulico.
• NO mezclar aceites hidráulicos. Ver la sección Especificaciones de lubricación para
problema de sobrecalentamiento o de contaminación con agua.
• Si el color natural del fluido se ha vuelto negro o lechoso, es posible que exista un
está frío y la máquina está en suelo nivelado.
• Las indicaciones de nivel precisas se pueden obtener solamente cuando el fluido
Para un funcionamiento satisfactorio, se aplican las siguientes condiciones de aceite:
hidráulico más delgado de peso 15.
el aceite hidráulico. Para temperaturas inferiores a 35°F (1,7°C), se debe pasar a fluido
cambiar cada 200 horas. El filtro de aceite hidráulico se debe cambiar cada vez que se cambie
puede determinar aceites compatibles. El aceite hidráulico Mobil 424 ó equivalente se debe
adecuado con el aceite hidráulico Mobil 424 ó uno equivalente. El proveedor de aceite local
1/2 - 3/4 in. (13 - 20 mm) en la parte superior de la mirilla. Mantenerlo lleno hasta el nivel
hidráulico usando la mirilla situada en el depósito hidráulico. Se verá una burbuja de aire de
Ver la sección Especificaciones de lubricación. Verificar diariamente el nivel de aceite
TREN DE FUERZA
Mantenimiento
Las devoluciones y/o ajustes de las baterías se hacen a través de distribuidores de baterías.
batería.
fecha. Los reclamos sin el recibo de compra se basarán en los números de identificación de la
Los reclamos en garantía de la batería deben incluir el recibo de compra de la unidad con la
ment, Inc. o en un concesionario Stone a un cliente.
La garantía de la batería comienza cuando se vende el equipo en Stone Construction Equip-
POLÍTICA RESPECTO DE LA BATERÍA
Page 67

46
a tierra.
Luego conectar el conductor NEGATIVO (-) del cargador de baterías a una buena conexión
conductor POSITIVO (+) del cargador de baterías al borne POSITIVO (+) de la batería.
cargador de baterías, apagar el cargador antes de conectarlo a la batería. Conectar el
MUD BUGGY
• Mantener la batería completamente cargada, especialmente en tiempo frío. Si se usa un
bicarbonato de soda para retardar la corrosión.
NN
OO
TT
A: A:
N
O
T
A:
Cubrir los bornes y los conectores de la batería con una mezcla de vaselina y
NN
OO
TT
A: A:
instalados de manera apropiada.
las conexiones y comprobar que la batería esté instalada firmemente con retenedores
solución de una parte de bicarbonato de soda y cuatro partes de agua. Apretar todas
y apretadas todas las conexiones. Quitar toda la corrosión y lavar los bornes con una
• Mantener limpias las baterías, limpiándolas con un paño húmedo. Mantener limpias
indicaciones del voltímetro del motor son correctas.
funcionando a aceleración máxima, indique 13 - 14 V para asegurar que las
• Una vez por mes, comprobar con un voltímetro que el sistema de carga, con el motor
daños al sistema eléctrico.
los terminales. Desconectar los cables de la batería antes de la carga para evitar
agua y hacer funcionar por 30 minutos para mezclar. Limpiar la batería, los bornes y
• Comprobar que el nivel de electrólito sea apropiado. Usar agua destilada para añadir
electrólito en cada celda.
que la batería tenga 12,5 V con un voltímetro o revisar la gravedad específica del
• Una vez por mes, comprobar el estado de la batería. Con el motor apagado, revisar
- Obtener atención médica inmediatamente.
- Luego beber leche de magnesia, huevos batidos o aceite vegetal.
- Beber grandes cantidades de agua o leche.
Si se traga ácido:
inmediatamente.
- Enjuagar los ojos con agua por 10 - 15 minutos. Obtener atención médica
- Aplicar bicarbonato de soda o cal para ayudar a neutralizar el ácido.
- Enjuagar la piel con agua.
Si derrama ácido sobre su persona:
- Usar un procedimiento apropiado de arranque con batería de refuerzo.
- Evitar derramar o gotear el electrólito.
- Evitar respirar los vapores cuando se agrega electrólito.
- Usar protección para los ojos y guantes de caucho.
- Llenar las baterías en una zona bien ventilada.
Para evitar estos peligros:
quemar la piel, perforar agujeros en la ropa y causar ceguera si salpica los ojos.
El ácido sulfúrico del electrólito de la batería es venenoso. Es lo suf icientemente fuerte para
batería colocando un objeto metálico entre los bornes. Usar un voltímetro o un hidrómetro.
Usar una linterna para revisar el nivel del electrólito de la batería. Nunca revisar la carga de la
El gas de la batería puede explotar. Mantener las chispas y las llamas alejadas de las baterías.
de arranque en frío. Ver la sección Especificaciones del motor para los requisitos de la batería.
Para reemplazo de la batería, llamar a Exide al 800-782-7848 para una batería de 12 V, 165 A
Mantenimiento
BATERÍA
Page 68

45
MUD BUGGY
Sustituir los alambres desgastados o deshilachados.
Inspeccionar diariamente que las conexiones de la batería estén limpias y apretadas.
ARRANQUE ELÉCTRICO OPCIONAL
cuente con las herramientas y los manuales de taller apropiados.
autorizado del motor debe realizar estas tareas de servicio, a menos que el propietario
Debido a que se requieren herramientas y capacitación especiales, el concesionario
álál
vulasvulas
ál
vulas
álál
vulasvulas
oo
o
oo
iamientiamient
iamient
iamientiamient
Juego de vJuego de v
Juego de v
Juego de vJuego de v
de aire comprimido (30 psi / 2,1 bar máx.) para eliminar la tierra y los residuos del motor.
máquina con agua jabonosa tibia, enjuagar el barro y la tierra con agua y usar un chorro
limpiar las rejillas de admisión de aire y las aletas de enfriamiento del motor. Lavar la
La máquina se debe limpiar en el intervalo de mantenimiento programado. Esto debe incluir
SisSis
tema de enfrtema de enfr
Sis
tema de enfr
SisSis
tema de enfrtema de enfr
oror
or
oror
de velocidad máxima como sea necesario.
• Verificar la velocidad máxima, 3600 +/- 100, y ajustar el tornillo de tope
tope de ralentí como sea necesario.
funcionamiento; verificar la velocidad de ralentí, 1400 +/- 100, y ajustar el tornillo
• Arrancar el motor y dejarlo calentar hasta la temperatura normal de
VV
tt
t
tt
gama de temperatura inadecuada puede causar daños al motor.
calentar mucho y causar daños al motor.
elocidad del moelocidad del mo
V
elocidad del mo
VV
elocidad del moelocidad del mo
• Usar solamente la bujía recomendada o una equivalente. Una bujía que tiene una
• La bujía se debe apretar firmemente. Una bujía apretada incorrectamente se puede
Nota:
esté asentada, apretar con una llave de bujías a 18-22 lb-ft (24,4-29,8 Nm).
0,80 mm). Enroscar la bujía con la mano para impedir dañar la rosca. Después de que la bujía
limpiarla con un cepillo de alambre y ajustar la separación a 0.028 - 0.031 in. (0,70 Verificar que la arandela de la bujía esté en buen estado. Si la bujía se va a volver a usar,
Inspeccionar visualmente la bujía y desecharla si el aislador o la punta está dañado.
el motor antes de retirar la bujía para evitar que los contaminantes entren al motor.
depósitos. Limpiar y reemplazar en el intervalo de mantenimiento programado. Limpiar
funcionamiento correcto del motor, la bujía debe tener el espacio apropiado y no tener
La bujía recomendada es una BPR6ES (NGK) o W20EPR-U (DENSO). Para asegurar el
BujíaBujía
Bujía
BujíaBujía
Mantenimiento
empaquetadura está dañada o falta, cambiar el elemento.
c. Comprobar que la empaquetadura del filtro esté en buenas condiciones. Si la
agujero rápidamente en el filtro.
b. Comprobar que la rejilla exterior no esté abollada. La vibración produciría un
pequeños que sean.
busca de agujeros. Botar todo elemento que tenga agujeros o rupturas, por
a. Sostener una luz brillante dentro del filtro--revisarlo cuidadosamente en
tierra adicional.
Page 69

NO poner el motor en marcha sin la cubierta del filtro.
Sólo se debe emplear una pistola de aire especial para limpiar filtros. La presión
daños después de haberlo limpiado. De ser necesario, repetir el paso tres para quitar
4. Inspeccionar el filtro para determinar si resulta práctico limpiarlo, o para ver si tiene
TT
ANTE:ANTE:
T
ANTE:
TT
ANTE:ANTE:
tanta tierra como sea posible.
filtro, del interior al exterior, y mover la pistola a lo largo de los pliegues para quitar
del retenedor metálico perforado. Forzar el aire (30 psi / 2,1 bar máx.) a través del
pistola de aire en el elemento, sujetar la boquilla a aproximadamente 1 in. (25,4 mm)
3. Limpiar completamente toda la tierra del interior de la caja del filtro. Insertar la
2. Retirar el elemento primario (exterior) solamente.
1. Quitar la cubierta del filtro de aire.
TT
ANTE: ANTE:
T
ANTE:
TT
ANTE: ANTE:
elemento del filtro. NO exceder una presión de 30 psi (2,1 bar) al limpiar el elemento del filtro.
de aire concentrada que producen las boquillas comunes puede causarle daños graves al
IMPORIMPOR
IMPOR
IMPORIMPOR
IMPORIMPOR
IMPOR
IMPORIMPOR
Darle servicio al filtro de aire con más frecuencia si se trabaja en condiciones polvorientas.
inicial) y de allí en adelante cada 50 horas ó 12 meses.
Limpiar el elemento primario (exterior) a las 50 horas de funcionamiento (después del rodaje
44
MUD BUGGY
A SEA SE
A SE
A SEA SE
AJO.AJO.
AJO.
AJO.AJO.
A MÁQUINA MÁQUIN
A MÁQUIN
A MÁQUINA MÁQUIN
CEITE. LCEITE. L
CEITE. L
CEITE. LCEITE. L
TT
OR ES BOR ES B
T
OR ES B
TT
OR ES BOR ES B
CEITE DE MOCEITE DE MO
CEITE DE MO
CEITE DE MOCEITE DE MO
AA
GG
AJO NIVEL DE AAJO NIVEL DE A
AJO NIVEL DE A
AJO NIVEL DE AAJO NIVEL DE A
ADO POR BADO POR B
A
G
ADO POR B
AA
GG
ADO POR BADO POR B
APAP
AA
GG
ARÁ SI EL NIVEL DE AARÁ SI EL NIVEL DE A
AP
A
G
ARÁ SI EL NIVEL DE A
APAP
AA
GG
ARÁ SI EL NIVEL DE AARÁ SI EL NIVEL DE A
ADO CADO C
ON APON AP
ADO C
ON AP
ADO CADO C
ON APON AP
ee
e
ee
TT
Á EQUIPÁ EQUIP
T
Á EQUIP
TT
Á EQUIPÁ EQUIP
Revisar el filtro de aire antes de cada uso y limpiar cada 50 horas de servicio.
FF
iltriltr
o de airo de air
F
iltr
o de air
FF
iltriltr
o de airo de air
EL MOEL MO
TT
OR ESOR ES
EL MO
T
OR ES
EL MOEL MO
TT
OR ESOR ES
• Menos de 40°F/13°C SAE 20
• Más de 40°F/13°C SAE 30
El motor requiere 1.16 qt / 1,1 l.
GrGr
ado y capacidad del aceiteado y capacidad del aceite
Gr
ado y capacidad del aceite
GrGr
ado y capacidad del aceiteado y capacidad del aceite
NN
oo
tt
a:a:
N
o
t
a: Desechar el aceite de motor usado de una manera que no dañe el medioambiente.
NN
oo
tt
a:a:
de aceite.
5. Hacer funcionar el motor por 2 - 3 minutos, detener el motor y revisar el nivel
de medición. Instalar y apretar la tapa de llenado de aceite firmemente.
4. Llenar con el aceite recomendado hasta la marca de límite superior en la varilla
3. Limpiar e instalar el perno de vaciado; apretar firmemente.
oror
or
oror
recipiente adecuado
2. Sacar la tapa de llenado de aceite y el perno de vaciado. Vaciar el aceite en un
cada 50 horas.
100 horas bajo condiciones de uso normales. Para servicio severo, cambiar el aceite
1. Cambiar el aceite después de las primeras 50 horas, luego cambiar el aceite cada
AA
tt
t
tt
ceite del moceite del mo
A
ceite del mo
AA
ceite del moceite del mo
Consultar el manual del motor para información específica del motor.
Mantenimiento
MOTOR
Page 70

43
MUD BUGGY
PuntPunt
oo
tete
o
te
oo
tete
PivPiv
oo
oo
o
oo
tes de cilindrtes de cilindr
Piv
o
tes de cilindr
PivPiv
oo
tes de cilindrtes de cilindr
os de pivos de piv
Punt
os de piv
PuntPunt
os de pivos de piv
Mantenimiento
Juntas móviles, articulaciones y cables--Lubricar con aceite cada 500 horas.
antes de engrasar y volverlas a colocar al terminar.
Engrasar semanalmente con una pistola para engrasar. Quitar las tapas de protección azules
• Cojinetes de ruedas traseras--llenar con grasa anualmente
• Pivote de la dirección (1 grasera en la caja de la dirección)
• Pivotes de cilindro (2 graseras)
• Puntos de pivote (2 graseras)
Ver Especificaciones de lubricación para los requerimientos.
PUNTOS DE ENGRASE / LUBRICACIÓN DEL CHASIS
Page 71
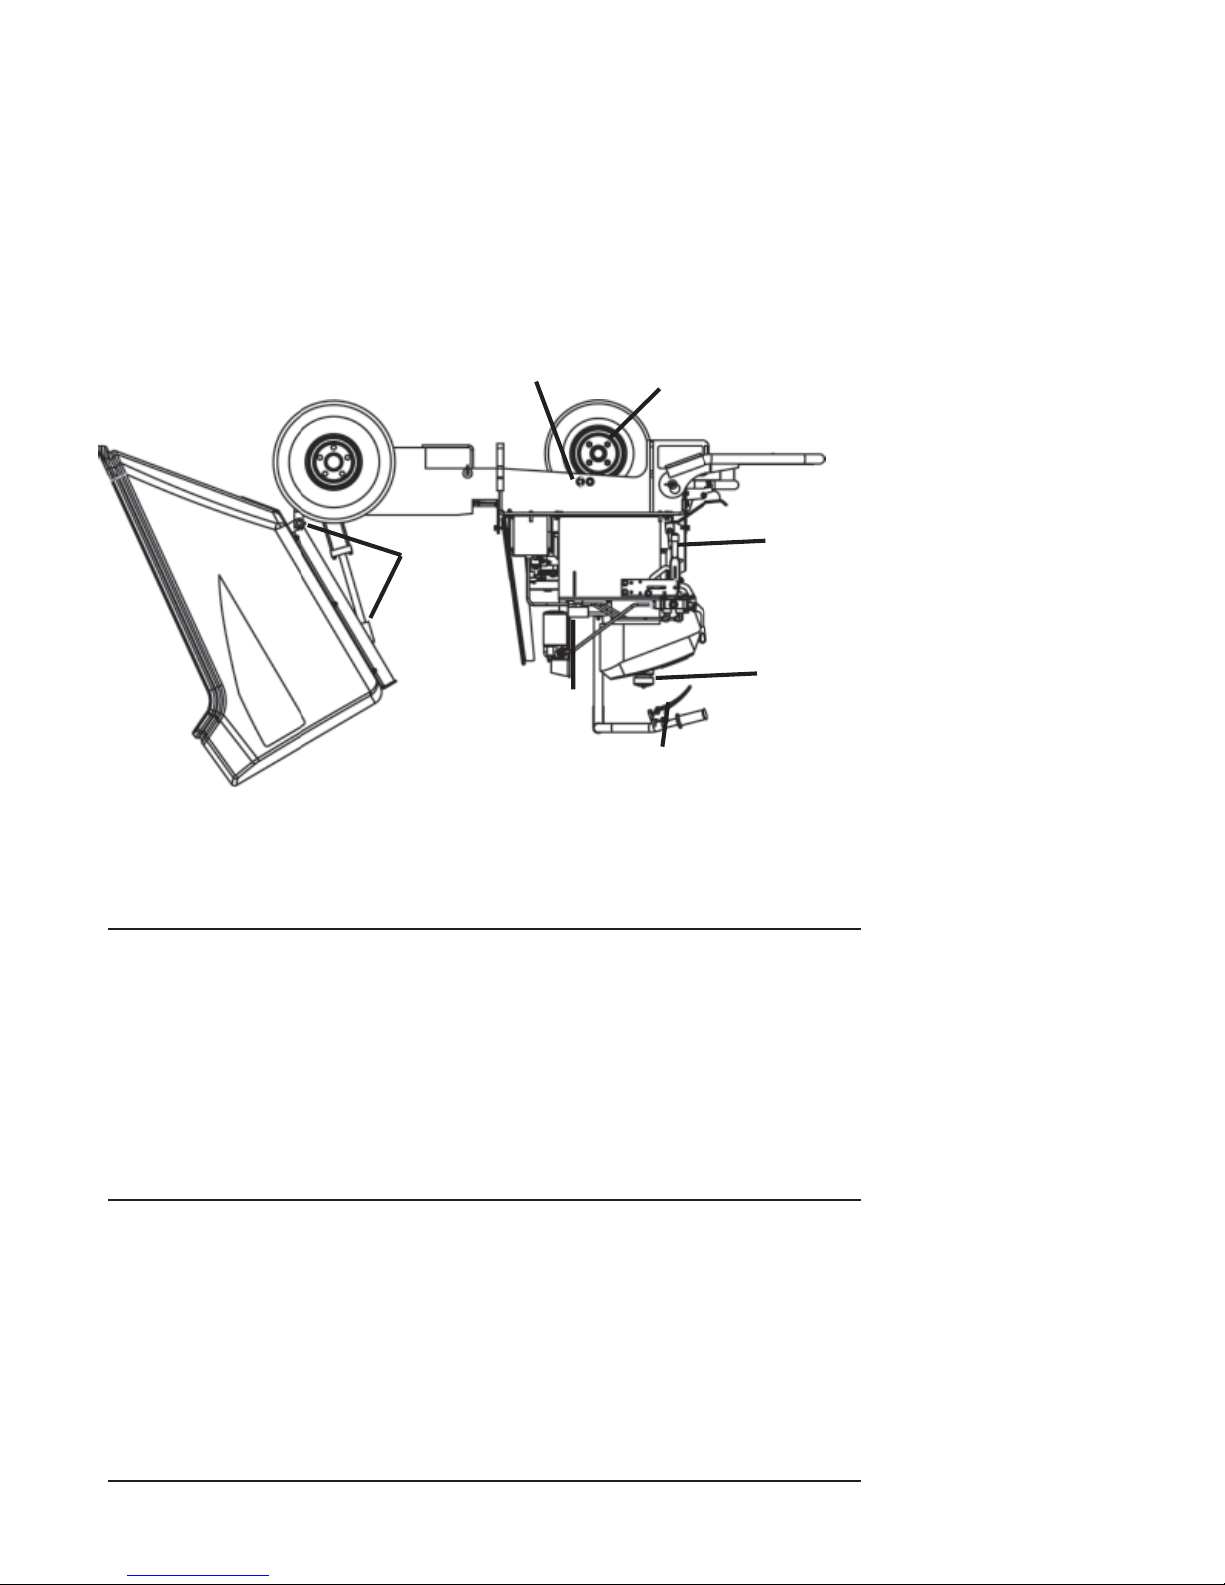
42
MUD BUGGY
ecciónección
ección
ecciónección
te de late de la
te de la
te de late de la
tt
aa
t
a
tt
aa
testes
tes
testes
oo
o
oo
cubecube
cube
cubecube
de lade la
de la
de lade la
PivPiv
Piv
PivPiv
columna de dircolumna de dir
columna de dir
columna de dircolumna de dir
CaCa
ja del cojineja del cojine
Ca
ja del cojine
CaCa
ja del cojineja del cojine
hidrhidr
áulicoáulico
hidr
áulico
hidrhidr
áulicoáulico
LlenadoLlenado
Llenado
LlenadoLlenado
olol
ol
olol
uedasuedas
uedas
uedasuedas
tes de rtes de r
tes de r
tes de rtes de r
tt
oror
t
or
tt
oror
CojineCojine
Cojine
CojineCojine
illa deilla de
illa de
illa deilla de
tibletible
tible
tibletible
a dea de
a de
a dea de
Cables de contrCables de contr
Cables de contr
Cables de contrCables de contr
mediciónmedición
medición
mediciónmedición
/ v/ v
arar
/ v
ar
/ v/ v
arar
aceite del moaceite del mo
aceite del mo
aceite del moaceite del mo
Llenado deLlenado de
Llenado de
Llenado deLlenado de
combuscombus
combus
combuscombus
medidormedidor
medidor
medidormedidor
TT
apaapa
T
apa
TT
apaapa
TT
ANTE: ANTE:
T
ANTE: Leer la Declaración de garantía de emisiones y el manual del motor antes de
TT
ANTE: ANTE:
• Limpiar el filtro de aire (ver la sección Filtro de aire del motor)
• Cambiar el aceite del motor (ver la sección Aceite del motor).
PUNTOS DE LUBRICACIÓN
usarlo o realizar tareas de mantenimiento.
IMPORIMPOR
IMPOR
IMPORIMPOR
detallada, consultar los manuales del motor.
Éste no es un manual de servicio del motor detallado. Para información de servicio más
INFORMACIÓN ADICIONAL DE SERVICIO
Después del período de rodaje inicial de 50 horas, efectuar las siguientes tareas de servicio:
PRIMER SERVICIO A LAS 50 HORAS
Mantenimiento
Page 72

5. Mantenimiento
Equipment, Inc.
Stone Construction
Page 73

40
MUD BUGGY
TT
OR.OR.
T
OR.
TT
OR.OR.
GUGU
A SOBRE EL MOA SOBRE EL MO
GU
A SOBRE EL MO
GUGU
A SOBRE EL MOA SOBRE EL MO
OCIAR AOCIAR A
OCIAR A
OCIAR AOCIAR A
A VERA VER
TER O RTER O R
A VER
TER O R
A VERA VER
TER O RTER O R
CC
C
CC
oo
o
oo
uipouipo
uipo
uipouipo
NUNNUN
NUN
NUNNUN
Ver el Manual del operador y/o el de piezas.
Antes del almacenamiento efectuar todas las reparaciones y mantenimiento requeridos.
la varilla del cilindro.
Siempre almacenar el equipo con el cilindro hidráulico retraído. Esto evitará la corrosión de
AlmacenamientAlmacenamient
Almacenamient
AlmacenamientAlmacenamient
acumulaciones de mezcla seca, pues se puede abollar o dañar y anular la garantía.
necesario. NO golpear la cubeta con una pala, martillo u otra cosa para desprender las
todo el material acumulado. La mezcla seca debe sacarse con una rasqueta según sea
arranque accidental. Rociar la cubeta con agua antes de que la mezcla se seque para sacar
Antes de la limpieza, apagar el motor y desconectar el cable de la bujía para impedir el
argamasa, no permitir la acumulación de materiales en las paredes laterales de la cubeta.
la formación de trozos de yeso seco y la contaminación de futuras amasadas de yeso o
Buggy, limpiar a fondo la cubeta por dentro y por fuera al final de cada jornada. Para evitar
Para lograr un rendimiento uniforme, larga duración y un uso de alta calidad de este Mud
LimLim
pieza del eqpieza del eq
Lim
pieza del eq
LimLim
pieza del eqpieza del eq
LIMPIEZA / ALMACENAMIENTO
Funcionamiento
Page 74

39
MUD BUGGY
SEGURIDAD en este manual.
Siempre que se trabaje con gasolina, seguir las pautas que se dan en la sección MEDIDAS DE
acuerdo con ello.
de apriete en el Manual de servicio/piezas y apretar la tornillería que pueda estar suelta de
Revisar toda la tornillería del equipo antes de arrancar. Consultar la sección Tabla de pares
TORNILLERÍA
NN
OO
N
O mezclar aceite con la gasolina.
NN
OO
tt
oror
t
or provisto con esta unidad para el tipo de gasolina requerido.
tt
oror
hidráulico
aceite
Mirilla de
Manual del moManual del mo
Manual del mo
Manual del moManual del mo
Consultar el
Llenar el tanque de combustible con gasolina limpia, utilizando una lata aprobada.
COMBUSTIBLE
Funcionamiento
figura 8
unidad para las instrucciones específicas y recomendaciones de aceite.
Mantener el nivel de aceite en la mitad de la mirilla. Consultar el manual provisto con esta
hidráulico en el compartimiento del motor cuando el aceite está a temperatura ambiente.
Revisar la mirilla de aceite (ver la Figura 7) ubicada en el costado del depósito de aceite
ACEITE HIDRÁULICO
Page 75

opiadasopiadas
opiadas
opiadasopiadas
te aprte apr
te apr
te aprte apr
ansporanspor
anspor
ansporanspor
horquillas
Cavidades para
figura 6
la unidad en un vehículo alto.
superiores tales como líneas eléctricas, objetos sobrecabeza y marcos de puertas al transportar
Siempre conocer la altura total para dejar un espacio libre adecuado con las obstrucciones
PrPr
ácticas de trácticas de tr
Pr
ácticas de tr
PrPr
ácticas de trácticas de tr
38
MUD BUGGY
figura 6
rr
e adecuadase adecuadas
r
e adecuadas
rr
e adecuadase adecuadas
Amarrar la unidad con dispositivos adecuados. Asegurarse que todos los bloques estén fijos.
PrPr
ácticas de amarácticas de amar
Pr
ácticas de amar
PrPr
ácticas de amarácticas de amar
cavidades laterales para horquillas es sencillo.
plataforma del operador se permite el acceso a los cavidades para horquillas. El acceso a las
Hay dos maneras de levantar la unidad, desde el costado o desde el frente. Al levantar la
para equilibrar la unidad adecuadamente.
una de las argollas como se ilustra a continuación. Quitar el huelgo de las cadenas o correas
cubeta hacia adelante para ubicar las tres argollas de levante y fijar cadenas o correas a cada
La unidad puede ser levantada con tres (3) puntos de levante debajo de la cubeta. Inclinar la
PUNTOS DE LEVANTE DEL MUD BUGGY
dispositivos adecuados en las ubicaciones adecuadas.
obstáculos superiores. Asegurarse que la cubeta está abajo y trabada. Fijar la máquina con los
Al transportar la unidad, observar la altura total para el espacio libre apropiado con los
Funcionamiento
TRANSPORTE DE LA MÁQUINA
Page 76

37
MUD BUGGY
Válvula de derivaciónfigura 5
oror
or
oror
tt
t
tt
tencia del motencia del mo
tencia del mo
tencia del motencia del mo
uina sin pouina sin po
uina sin po
uina sin pouina sin po
o de la máqo de la máq
o de la máq
o de la máqo de la máq
remolcar y en sentido horario para hacer funcionar.
provista de una válvula de derivación. Girar esta válvula en sentido contrahorario para
La unidad se puede mover distancias cortas si el motor no funciona. La transmisión está
MoMo
vimientvimient
Mo
vimient
MoMo
vimientvimient
corrosión.
que el agua congelada dañe la cubeta. Cubrir la varilla del cilindro de descarga para evitar
período prolongado, colocar la cubeta en posición de descarga para evitar toda posibilidad de
Si el Mud Buggy se expondrá a climas húmedos con temperaturas de congelación por un
o a laro a lar
go plazogo plazo
o a lar
go plazo
o a laro a lar
go plazogo plazo
afuera de las zonas principales de tránsito.
descarga para evitar corrosión. Aplicar el freno de estacionamiento y estacionar la unidad
agua, la nieve y los desperdicios no se acumulen adentro. Cubrir la varilla del cilindro de
Cuando la máquina no se usa por períodos prolongados, inclinar la cubeta de manera que el
EsEs
tt
acionamientacionamient
Es
t
acionamient
EsEs
tt
acionamientacionamient
de estacionamiento y bloquear las ruedas de ser necesario.
estacionar en una pendiente, estacionarla en ángulo recto con la pendiente, aplicar el freno
Debe evitarse estacionar la unidad en una pendiente, de ser posible. Si la unidad se debe
EsEs
tt
o en una pendienteo en una pendiente
o en una pendiente
o en una pendienteo en una pendiente
acionamientacionamient
Es
t
acionamient
EsEs
tt
acionamientacionamient
ESTACIONAMIENTO DEL MUD BUGGY
directamente en los componentes eléctricos o pueden producirse daños eléctricos.
y lodo perjudica el rendimiento de la máquina y/o causa fallas. Evitar rociar agua
comprimido (30 psi / 2 bar máx.) para soplar los desperdicios. La acumulación de tierra
Lavar diariamente con agua jabonosa tibia. Enjuagar el lodo y la suciedad. Usar aire
LIMPIEZA DE LA MÁQUINA
es importante revisar la máquina completa periódicamente.
Revisar semanalmente en busca de adaptadores de manguera sueltos, daños y fugas--
MANGUERAS, ADAPTADORES Y FUGAS
Funcionamiento
35°F (1,7°C).
hidráulico. Volver al aceite con el grado apropiado cuando las temperaturas son superiores a
Se recomienda usar un aceite de grado más liviano tanto en el motor como en el depósito
Pueden producirse dificultades con el arranque con temperaturas inferiores a 35°F (1,7°C).
ARRANQUE EN CLIMA FRÍO
Page 77

Pedal de
figura 4
opuesto de la máquina.
anteriores en el lado
rápido unido.
con el cubo de cambio
(Figura 5).
de estacionamiento.
ado rado r
ápido opcionalesápido opcionales
ado r
ápido opcionales
ado rado r
ápido opcionalesápido opcionales
4. Repetir los pasos
3. Retirar la rueda exterior
2. Retirar el perno en T grande del centro de la rueda con una barra de pata de cabra
1. Colocar la rueda interior de la máquina sobre un bloque de madera y aplicar el freno
RR
uedas de soltuedas de solt
R
uedas de solt
RR
uedas de soltuedas de solt
36
MUD BUGGY
ueda sencillaueda sencilla
ueda sencilla
ueda sencillaueda sencilla
ruedas dobles.
NN
oo
tt
a:a:
N
o
t
a: La carga útil máxima se reduce en 25% (1875 lb / 850 kg) cuando se usa la máquina sin
NN
oo
tt
a:a:
6. Repetir los pasos anteriores en el lado opuesto de la máquina.
(122 Nm).
5. Volver a colocar cinco (5) tuercas de rueda en la rueda interior y apretar a 90 lb-ft
retirar el adaptador.
4. Retirar cinco (5) tuercas de rueda del adaptador de rueda doble interior y luego
3. Retirar la rueda exterior.
2. Retirar cinco (5) pernos de rueda.
1. Levantar la máquina con gato. Aplicar el freno de estacionamiento.
MáqMáq
tt
ándarándar
t
ándar
tt
ándarándar
ueda doble a rueda doble a r
ueda doble a r
ueda doble a rueda doble a r
uina esuina es
Máq
uina es
MáqMáq
uina esuina es
Cambio de rCambio de r
Cambio de r
Cambio de rCambio de r
SOLAMENTE)
RUEDAS DOBLES DE SOLTADO RÁPIDO (SB1600 Y FB1000
3. Tirar de la palanca hacia atrás para bajar la cubeta.
2. Empujar la palanca hacia adelante para descargar (Figura 3).
1. Estacionar la máquina donde se propone descargar la carga.
inclinadas--ajustar la carga del modo apropiado.
normalmente funcionan en superficies irregulares, no pavimentadas, accidentadas y/o
Conocer las capacidades de carga del Mud Buggy y nunca superarlas. Los Mud Buggy
CapacidadCapacidad
Capacidad
CapacidadCapacidad
FUNCIONAMIENTO DE DESCARGA
Funcionamiento
Page 78
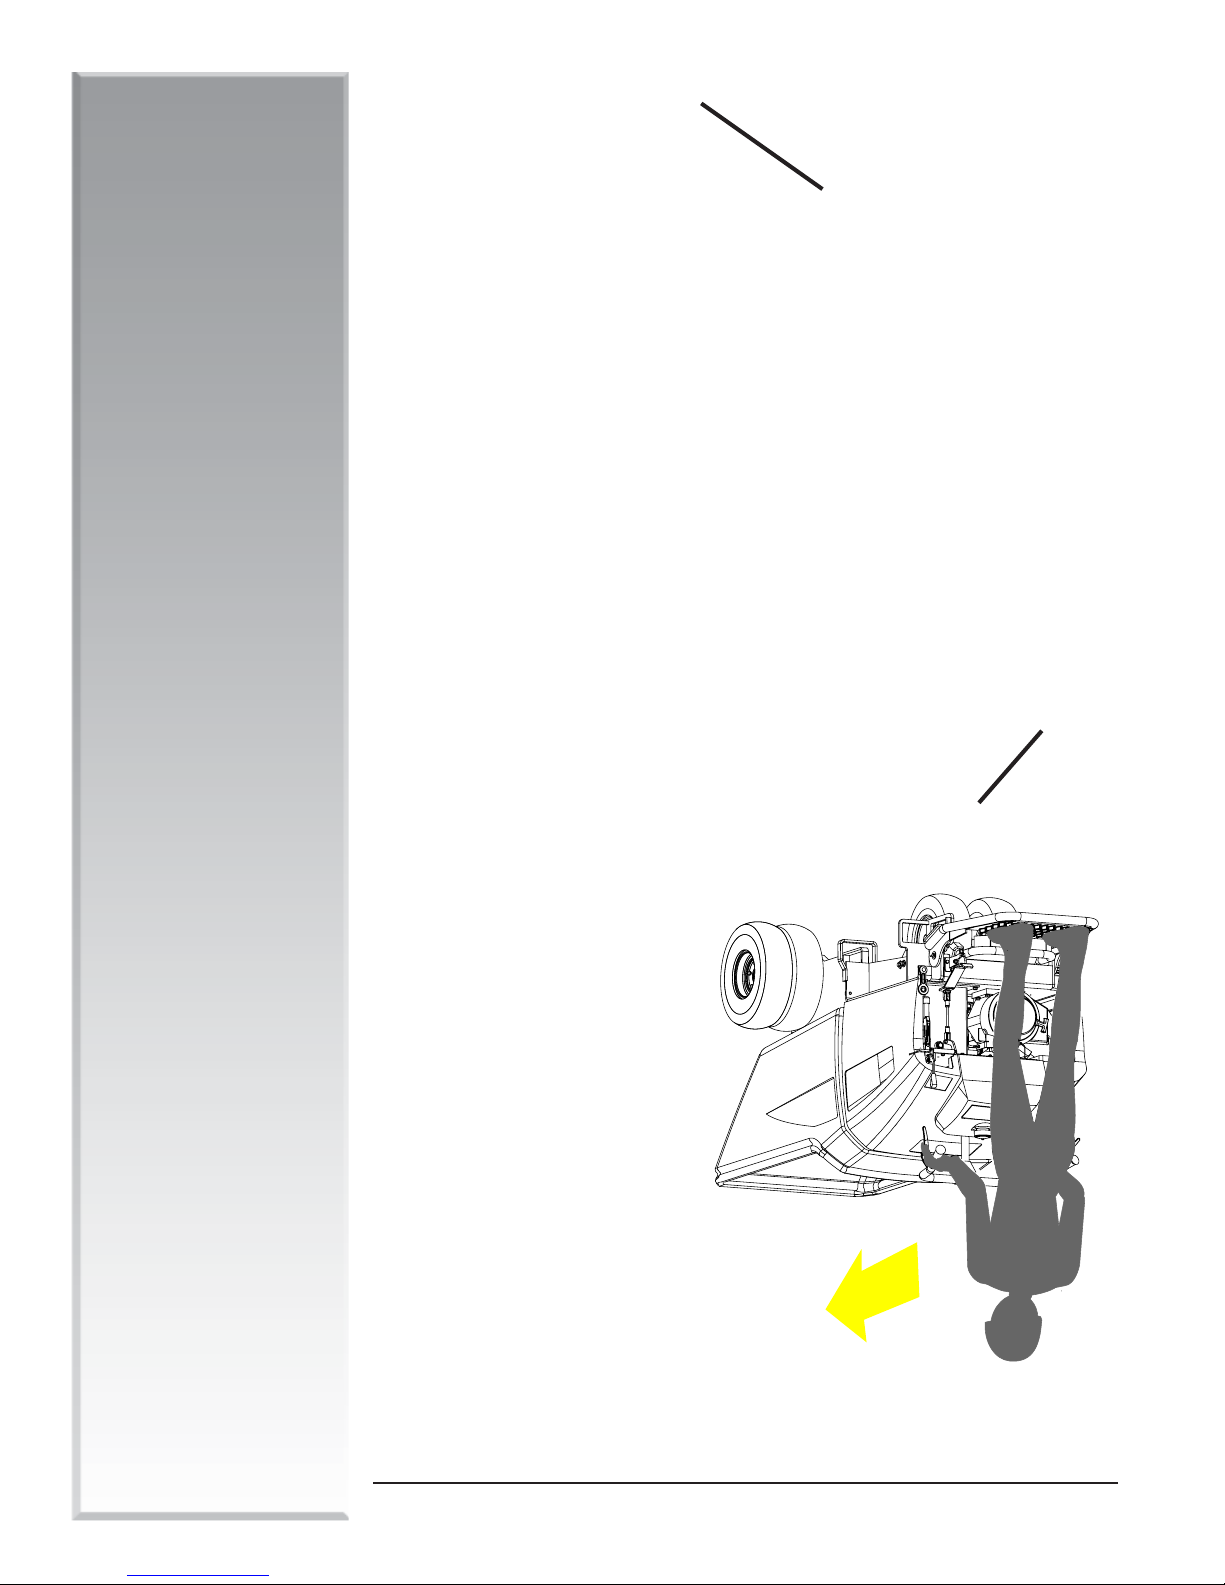
35
MUD BUGGY
Pedal de descarga
estacionamiento
Freno de
Palanca de descarga
velocidad de avance
Palanca de control de
Pedal de freno
figura 3
velocidad de retroceso
Palanca de control de
en lesiones graves o en muerte.
cualquier otra forma puede resultar
funcionamiento de los controles en
cuando use la unidad. El
hacia el manillar y los controles
Nota: Siempre utilice hacia adelante,
Funcionamiento
funcionamiento seguro y eficiente.
se familiarice con la posición y el uso correcto de sus controles para asegurar un
Antes de usar esta unidad, es importante que todo el personal que vaya a utilizarla
CONTROLES DEL OPERADOR
Page 79

Siempre enfrentar al Mud Buggy, sea bajando o subiendo.
que tres de los cuatro brazos/piernas estén en contacto con el Mud Buggy al subir y bajar.
Siempre usar 'tres puntos de contacto' al subirse al Mud Buggy. Los tres puntos se refieren a
SUBIDA / BAJADA DEL MUD BUGGY
Consultar el Manual de servicio.
funcionamiento diariamente. Ajustar a las 25 horas, luego, como sea necesario.
y deberán ajustarse a medida que se desgastan las zapatas de freno. Revisar el
7. Pedal del freno de servicio (ver la Figura 3). Los frenos se ajustan en la fábrica
máquina por personal certificado para reparaciones).
no para cuando se suelta la palanca de control de velocidad, hacer inspeccionar la
6. Cuando se suelta la palanca de control de velocidad, la máquina para (si la máquina
34
MUD BUGGY
conectada
Llave de contacto
opcional
Controles del motor eléctrico
figura 2
Válvula de combustible (carburador)
máquina.
máquina. Nota: Cuanto más se apriete la palanca, más rápidamente se desplazará la
5. Apretar la palanca de control de velocidad (Figura 3) del manillar para mover la
deseado.
movimiento de avance. Seleccionar el control para el sentido de movimiento
operador es para movimiento de retroceso y el control del lado derecho es para
4. El manillar tiene dos controles (ver la Figura 3). El control del lado izquierdo del
3. Soltar la palanca del freno de estacionamiento a la posición de soltado (Figura 4).
2. Ajustar la palanca del acelerador para obtener la velocidad deseada (Figura 2).
1. Arrancar el motor como se describió en la sección Arranque de la máquina.
FUNCIONAMIENTO DE LA MÁQUINA
motor se detiene (Figura 2).
en la posición de ‘cerrada’ cuando el
4. Colocar la válvula de combustible
Estrangulador
del motor
Botón de arranque
Acelerador
combustible del motor
Control de corte de
‘parada’ (Figura 2).
combustible en la posición de
3. Colocar el control de corte de
1).
en la posición de ‘aplicado’ (Figura
2. Colocar el freno de estacionamiento
1. Reducir la aceleración.
Funcionamiento
PARA APAGAR EL MOTOR
Page 80

33
MUD BUGGY
aplicado
Freno de
estacionamiento
instrucciones específ icas.
incluye con esta máquina para
Consultar el MANUAL DEL MOTOR que se
constituyen sólo una guía general.
NN
OO
TT
A:A:
N
O
T
A: Estas instrucciones de arranque
NN
OO
TT
A:A:
(Figura 2)
cuando el motor esté caliente
‘abierto’
6. Colocar el estrangulador en
A SEA SE
A SE
A SEA SE
figura 1
A MÁQUINA MÁQUIN
A MÁQUIN
A MÁQUINA MÁQUIN
AJO.AJO.
AJO.
AJO.AJO.
CEITE. LCEITE. L
CEITE. L
CEITE. LCEITE. L
TT
OR ES BOR ES B
T
OR ES B
TT
OR ES BOR ES B
CEITE DE MOCEITE DE MO
CEITE DE MO
CEITE DE MOCEITE DE MO
AA
GG
AJO NIVEL DE AAJO NIVEL DE A
AJO NIVEL DE A
AJO NIVEL DE AAJO NIVEL DE A
ADO POR BADO POR B
A
G
ADO POR B
AA
GG
ADO POR BADO POR B
uinauina
uina
uinauina
APAP
AA
GG
ARÁ SI EL NIVEL DE AARÁ SI EL NIVEL DE A
AP
A
G
ARÁ SI EL NIVEL DE A
APAP
AA
GG
ARÁ SI EL NIVEL DE AARÁ SI EL NIVEL DE A
ON APON AP
ON AP
ON APON AP
ADO CADO C
ADO C
ADO CADO C
Á EQUIPÁ EQUIP
Á EQUIP
Á EQUIPÁ EQUIP
(Figura 2)
Para la versión con arranque manual usar la cuerda de arranque
motor arranque, luego soltarlo
Para la versión con arranque eléctrico mantener oprimido el control hasta que el
(Figura 2)
rr
ancar la máqancar la máq
r
ancar la máq
rr
ancar la máqancar la máq
OR ESOR ES
TT
OR ES
T
OR ESOR ES
TT
TT
T
TT
5. Ajustar la velocidad del acelerador
4. Colocar el control de corte de combustible en la posición de ‘marcha’ (Figura 2)
3. Colocar la válvula de combustible en la posición de ‘abierta’
2. Colocar el estrangulador del motor en la posición completamente ‘activado’
1. Colocar el freno de estacionamiento en la posición de ‘aplicado’ (Figura 1)
Leer el Manual del operador antes de trabajar con la máquina.
PP
arar
a ara ar
P
ar
a ar
PP
arar
a ara ar
ARRANQUE DE LA MÁQUINA
EL MOEL MO
EL MO
EL MOEL MO
Funcionamiento
ARÁARÁ
ARÁ
ARÁARÁ
tt
oror
t
or provisto con esta
tt
oror
La gLa g
arar
antía se ANULantía se ANUL
La g
ar
antía se ANUL
La gLa g
arar
antía se ANULantía se ANUL
Manual del moManual del mo
Manual del mo
Manual del moManual del mo
Consultar el
• Revisar el nivel de fluido hidráulico.
• Revisar el nivel de combustible del motor.
• Revisar el filtro de aire del motor.
unidad para las instrucciones específicas y recomendaciones de aceite.
si se hace funcionar sin aceite.si se hace funcionar sin aceite.
si se hace funcionar sin aceite.
si se hace funcionar sin aceite.si se hace funcionar sin aceite.
• Revisar el nivel de aceite del motor antes de arrancarlo.
funcionen adecuadamente antes de arrancar.
• Leer el Manual del operador y comprobar que los controles del operador y del motor
LISTA DE REVISIONES ANTES DEL ARRANQUE
Page 81

32
MUD BUGGY
permanezca limpia para evitar accidentes.
Mantener la unidad limpia de todos los desperdicios. Asegurarse que la plataforma
LIMPIEZA DE LA MÁQUINA
resbaladizos y charcos de agua. Evitar todo lo que pueda ocasionar la pérdida del control.
Inspeccionar la superficie sobre la cual se conducirá la máquina. Evitar suelo blando, puntos
ExEx
oo
o
oo
ia de desplazamientia de desplazamient
ia de desplazamient
ia de desplazamientia de desplazamient
uinauina
uina
uinauina
or
oror
y
ect
yy
ectect
a
aa
aa
yy
ectect
oror
aminar la traminar la tr
Ex
aminar la tr
ExEx
aminar la traminar la tr
encuentran en buenas condiciones de trabajo.
Se recomienda una inspección diaria de la unidad para asegurar que todos los sistemas se
Inspección de la máqInspección de la máq
Inspección de la máq
Inspección de la máqInspección de la máq
puede soportar y ajustar la velocidad y carga según las condiciones.
entender el propósito de cada control. Al usar la máquina, recordar la capacidad que ésta
Leer y comprender el manual del propietario antes de arrancar la máquina. Asegurarse de
CONOCER EL MUD BUGGY
A DE DA DE D
AÑOS OCURRIDOSAÑOS OCURRIDOS
A DE D
AÑOS OCURRIDOS
A DE DA DE D
AÑOS OCURRIDOSAÑOS OCURRIDOS
AMENTE EN BUSCAMENTE EN BUSC
AMENTE EN BUSC
AMENTE EN BUSCAMENTE EN BUSC
ADOS
ADOSADOS
O CUID
O CUIDO CUID
O CUIDO CUID
ADOSADOS
TE.TE.
TE. Informar de inmediato al transportista en cuanto a los daños y
TE.TE.
ARLARL
ARL
ARLARL
REVISREVIS
REVIS
REVISREVIS
• Inspeccionar periódicamente en busca de tornillería suelta.
• Revisar el nivel de aceite del motor diariamente.
• NO hacer funcionar el motor a ralentí durante períodos prolongados.
• Hacer funcionar el motor a ralentí por 3 minutos antes de detenerlo.
• Hacer funcionar el motor a aceleración máxima.
funcionamiento antes de realizar el primer servicio de rodaje inicial.
satisfactorio y prolongado, y reducirá el costo de propiedad. No exceder las 50 horas de
durante las primeras 50 horas de funcionamiento ofrecerá un rendimiento de la máquina más
Esta unidad está lista para funcionamiento normal. Sin embargo, el cuidado adicional
PERÍODO DE RODAJE INICIAL
para servirle mejor.
recibimos con agrado las sugerencias respecto a mejoras que pueden incorporarse al producto
fabricante. Nos interesa saber si le ha llegado un producto menos que satisfactorio. También
máquina que tiene la firma del ensamblador junto con una descripción del defecto hallado al
estrictos. Si se encuentran defectos de materiales o de fabricación, enviar la etiqueta de la
Esta máquina se fabrica según las especificaciones y procedimientos de inspección más
presentar un reclamo por escrito.
DURANTE EL TRANSPORDURANTE EL TRANSPOR
DURANTE EL TRANSPOR
DURANTE EL TRANSPORDURANTE EL TRANSPOR
Al recibir el equipo,
INSPECCIÓN DE ENTREGA
incluyen para su seguridad y para protección de la máquina.
acciones que pueden causar lesiones o dañar el equipo. Siempre observar estos símbolos; se
Los símbolos de seguridad se usan en estas instrucciones para llamar la atención a las
Funcionamiento
SÍMBOLOS DE SEGURIDAD
Page 82

31
MUD BUGGY
el funcionamiento seguro.
• Establecer un programa de capacitación para todos los operadores para asegurar
armada completa y correctamente.
• No hacer funcionar la máquina si está dañada, ajustada incorrectamente o no
de usar la máquina.
• Si los tiene, asegurarse que todos los neumáticos estén en buenas condiciones antes
• Siempre asegurarse que los compañeros de trabajo conozcan el plan de trabajo.
• Nunca usar la máquina para otros fines fuera de aquéllos para los que fue fabricada.
• Asegurarse de usar combustible, aceites y grasa correctos.
• Si se observa fuga de aceite, informarla y hacerla reparar inmediatamente.
la máquina.
• Seguir las instrucciones de arranque del motor establecidas en este manual y en
• Revisar la causa del bajo nivel de aceite.
con una manguera con la especificación correcta.
• Si una manguera se rompe, apagar el motor inmediatamente - SIEMPRE sustituirla
• Nunca llenar en exceso el depósito de aceite del motor o el tanque de combustible.
• Nunca permitir que personal no calificado efectúe reparaciones en la máquina.
USAR REPUESTOS DE ESPECIFICACIÓN INFERIOR.
suministradas o recomendadas por Stone Construction Equipment, Inc. NUNCA
• Siempre sustituir las mangueras, acopladores y otras piezas con piezas
Funcionamiento
uinauina
uina
uinauina
a ima im
pedir daños a la máqpedir daños a la máq
a im
pedir daños a la máq
a ima im
pedir daños a la máqpedir daños a la máq
esponden, paresponden, par
esponden, par
esponden, paresponden, par
rr
r
rr
os siguientes, si coros siguientes, si cor
os siguientes, si cor
os siguientes, si coros siguientes, si cor
ar los puntar los punt
ar los punt
ar los puntar los punt
Obser
v
Obser Obser
vv
Obser Obser
vv
EVITAR DAÑAR LA MÁQUINA
Page 83

30
MUD BUGGY
armada completa y correctamente.
• No hacer funcionar la máquina si está dañada, ajustada incorrectamente o no
• No usar la máquina sin estar completamente capacitado.
el funcionamiento seguro.
• Establecer un programa de capacitación para todos los operadores para asegurar
y ropa reflectora.
• Usar en todo momento casco protector, calzado de seguridad, gafas de seguridad
hacerla funcionar con seguridad.
• Asegurarse que se haya mostrado a cualquier persona que use la máquina cómo
• No inspeccionar o limpiar la máquina con el motor funcionando.
• Verificar las leyes locales - el motor puede requerir un parachispas, etc.
mantenimiento en un motor caliente.
alejados todos los materiales combustibles. No intentar ningún trabajo de
• El sistema de escape se calienta mucho. No colocar nada sobre él y mantener
nuevamente.
limpiarlo con un fregador y no arrancar el motor hasta que esté seguro
materiales combustibles.
Nunca usar el motor en una zona cerrada sin buena ventilación ni cerca de
asegurarse de colocar etiquetas nuevas antes de poner la máquina en servicio.
es reparada y se han reemplazado piezas en las que estaban fijadas etiquetas,
reemplazadas inmediatamente si no son legibles o se pierden. Si la máquina
inmediatamente si se ensucia, daña o pierde.
máquina en todo momento y en buen estado - sustituir el manual
máquina. Asegurarse que este manual de instrucciones sea mantenido con la
de dudas, ¡PREGUNTAR!
y de familiarizarse completamente con la máquina y su funcionamiento. En caso
• Apagar el motor antes de reabastecer el combustible. Si hay un derrame,
• Siempre asegurarse que haya ventilación apropiada alrededor de la máquina.
• Se fijan etiquetas en la máquina para fines de seguridad y DEBEN ser
• Leer este manual de instrucciones cuidadosamente antes de trabajar con la
• Antes de hacer funcionar la máquina, asegurarse de tener capacitación adecuada
de seguridad locales.
precauciones adicionales relacionadas con la zona de trabajo específica y los reglamentos
de mantenimiento general o reparaciones. El personal de supervisión debe desarrollar
Revisarlas cuidadosamente antes de trabajar con la máquina y antes de efectuar trabajos
precauciones de seguridad. Estas precauciones se imparten aquí para su seguridad.
Los operadores y el personal de mantenimiento siempre deben cumplir las siguientes
oo
teccióntección
o
tección
oo
teccióntección
idad y pridad y pr
idad y pr
idad y pridad y pr
a su segura su segur
a su segur
a su segura su segur
vv
os siguientes paros siguientes par
os siguientes par
os siguientes paros siguientes par
ar los puntar los punt
v
ar los punt
vv
ar los puntar los punt
rr
esponde, obseresponde, obser
r
esponde, obser
rr
esponde, obseresponde, obser
Si cor Si cor
Si cor
Si cor Si cor
NOTAS GENERALES SOBRE SEGURIDAD
Funcionamiento
Page 84

4. Funcionamiento
Equipment, Inc.
Stone Construction
Page 85

28
_____________________________________________________________
MUD BUGGY
_____________________________________________________________
_____________________________________________________________
______________________________________________________________
_____________________________________________________________
_____________________________________________________________
_____________________________________________________________
______________________________________________________________
_____________________________________________________________
_____________________________________________________________
_____________________________________________________________
______________________________________________________________
_____________________________________________________________
_____________________________________________________________
_____________________________________________________________
______________________________________________________________
_____________________________________________________________
_____________________________________________________________
_____________________________________________________________
______________________________________________________________
_____________________________________________________________
_____________________________________________________________
_____________________________________________________________
______________________________________________________________
_____________________________________________________________
_____________________________________________________________
_____________________________________________________________
______________________________________________________________
_____________________________________________________________
_____________________________________________________________
_____________________________________________________________
______________________________________________________________
_____________________________________________________________
_____________________________________________________________
_____________________________________________________________
______________________________________________________________
_____________________________________________________________
_____________________________________________________________
_____________________________________________________________
______________________________________________________________
_____________________________________________________________
_____________________________________________________________
_____________________________________________________________
______________________________________________________________
_____________________________________________________________
_____________________________________________________________
______________________________________________________________
_______________________________________________________________________________________________________________________________
____________________________________________________________________________________________________
Notas:
Page 86

27
MUD BUGGY
trabajo antes de ponerla en uso.
que la misma se encuentre en buenas condiciones de
suficiente información de la máquina para asegurarse
uso seguro, tenga autorización para usarla, y posea
adecuadamente capacitado en los procedimientos de
Es esencial que el operador de la máquina esté
normas de rendimiento correspondientes.
eficaz y seguro de mover cargas y cumplir con las
Si se usan correctamente, proporcionan un medio
desperdicios, tableros o tejas.
función de mover hormigón, argamasa, grava, tierra,
Estas máquinas han sido diseñadas para cumplir la
MANEJO SEGURO
seguridad
Salud y
Page 87
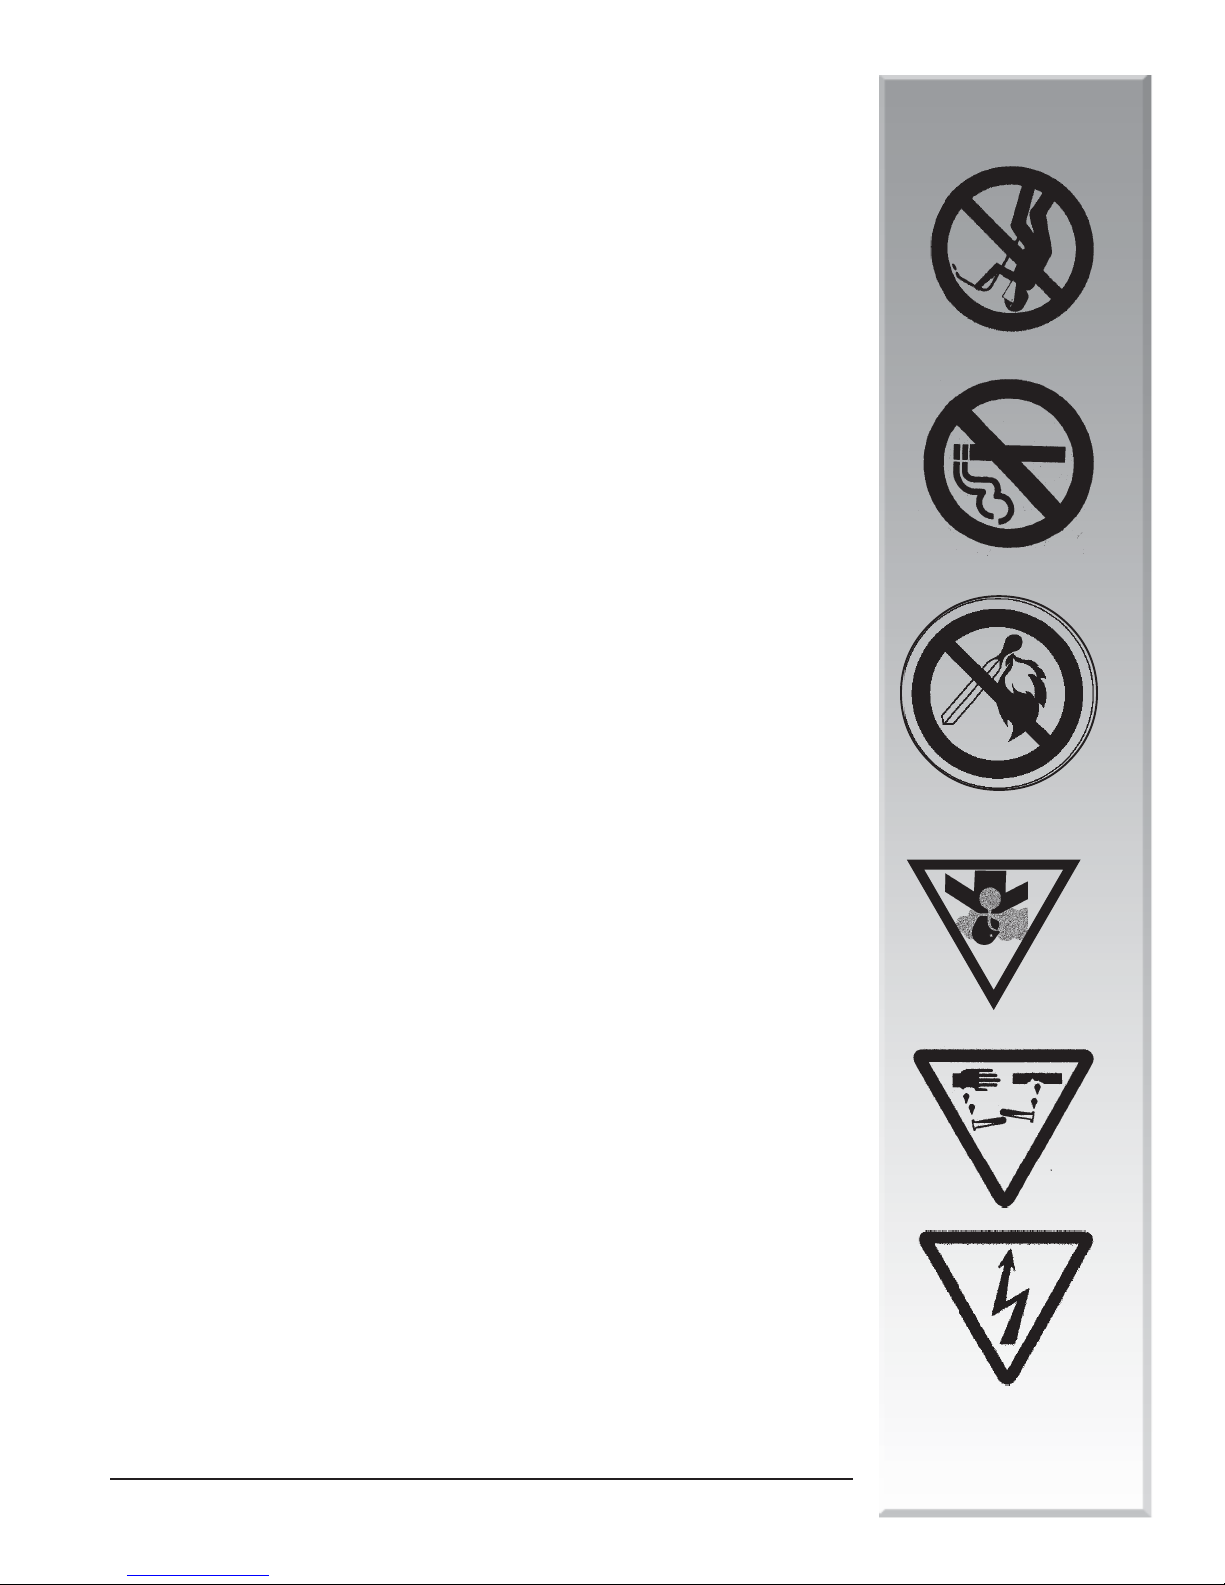
26
MUD BUGGY
y pedir ayuda médica inmediatamente.
inmediatamente con agua corriente fría durante quince (15) minutos como mínimo
con agua y jabón. Si el ácido de la batería entra en el ojo, enjuagar el ojo
ácido de la batería entra en contacto con la piel o la ropa, lavarla inmediatamente
por si el ácido de la batería entra en contacto con los ojos, la piel o la ropa. Si el
haber entrado en contacto. Siempre tener cerca abundante agua potable y jabón
batería o manipularla. De este modo, se neutralizará el ácido con el que se pueda
• Asegurarse de lavarse las manos con agua y jabón después de prestar servicio a una
la batería.
causar lesiones al caerse. Si se cae la batería, se puede rajar la caja y liberar ácido de
tapas ventiladas. No dejar caer la batería. Las baterías pueden ser pesadas y pueden
la batería, ya que podría causarse la liberación de ácido de la batería a través de las
provocando la salida de ácido de la batería por las tapas ventiladas. Evitar inclinar
Al transportar la batería a mano se puede ejercer presión sobre los extremos,
• Si se debe sacar y/o sustituir la batería, siempre usar un transportador de batería.
la piel.
de las baterías pueden presentar corrosión por ácido, que puede dañar los ojos y
• Evitar el contacto con la corrosión causada por el ácido de la batería. Los bornes
de la batería.
batería congelada. Pueden formarse gases que pueden rajar la caja y liberar ácido
• En tiempo muy frío, una batería descargada puede congelarse. Nunca cargar una
durante más de 30 minutos en ninguna batería.
velocidad o reforzadores) se deben usar con precaución. No usar un cargador rápido
• Los cargadores denominados RÁPIDOS (también conocidos como cargadores de alta
útil de la batería.
vigorosa de gas son signos claros de una carga excesiva que puede reducir la vida
y creación de gas hidrógeno. El aumento de la temperatura de la batería y la salida
si se dejan conectados durante un período prolongado, causando pérdida de agua
• Evitar sobrecargar las baterías. Algunos cargadores pueden sobrecargar una batería
No colocar herramientas encima de la batería.
reducir el riesgo de cortocircuitos, que pueden causar la explosión de la batería.
• Tener cuidado al usar herramientas metálicas en la batería o cerca de la misma para
efectuar las conexiones entre la batería y el cargador.
• Usar únicamente cables y abrazaderas bien aislados y en buenas condiciones para
de ignición alejados de la batería.
batería. Mantener las llamas, fósforos, encendedores, cigarrillos y otras fuentes
• Evitar las llamas y las chispas cerca de la batería. No fumar o soldar cerca de la
durante el mismo.
zona alrededor de la batería esté limpia y bien ventilada antes del proceso de carga y
cuando se están cargando y pueden producir lesiones graves. Asegurarse que la
• Reducir el gas explosivo (hidrógeno). Las baterías despiden gases explosivos
ayudar si es necesario.
• Nunca trabajar solo con equipos eléctricos. Asegurarse que alguien esté cerca para
los ojos que proteja los ojos desde todos los ángulos.
• Usar equipo de protección personal, incluidos guantes y protección completa para
marcas de precaución, del (1) cargador y (2) la batería.
• Antes de usar un cargador, leer todas las instrucciones del fabricante, así como las
cargar la batería.
• Leer y comprender la sección Mantenimiento de este manual antes de intentar
seguridad
Salud y
CARGA DE LA BATERÍA
Page 88
25
MUD BUGGY
• Durante la limpieza de la máquina, no rociar el motor con agua.
• No hacer funcionar la máquina en charcos de agua.
• No pasar los cordones de extensión por charcos de agua.
cordones que estén en malas condiciones.
busca de cortaduras, alambres deshilachados y conectores rotos. No usar
• Antes de usar, inspeccionar todos los cordones de extensión y eléctricos en
de conformidad con los códigos eléctricos y ordenanzas locales.
• Siempre usar el cordón de extensión de calibre apropiado con conexión a tierra,
• Siempre usar gafas protectoras contra salpicaduras al usar este equipo.
respecto a los métodos apropiados de reprocesar o de botar los desechos.
• Consultar al centro de control ambiental o de reprocesamiento de la localidad
de agua alguna.
• No verter los desechos directamente al suelo, por un sumidero, ni en fuente
ingiera su contenido.
alimentos o bebidas que pudieran confundir a alguna persona y llevar a que
• Usar recipientes sin fugas para el vaciado de fluidos. No usar envases de
frenos, filtros y baterías.
incluyen artículos tales como aceite, combustible, refrigerante, fluido de
la ecología. Los desechos potencialmente dañinos que se usan con los equipos
• El tratamiento incorrecto de los desechos puede perjudicar el medioambiente y
CORDONES DE EXTENSIÓN
ADVERTENCIA - PROTECCIÓN PARA LOS OJOS
seguridad
Salud y
TRATAMIENTO ADECUADO DE DESECHOS
• Evitar los virajes bruscos con alta velocidad.
• Éste es un vehículo para una persona. Nunca llevar pasajeros.
• Cerciorarse de poder controlar la velocidad y sentido antes de moverse.
• No dejar nunca el equipo sin vigilancia mientras está funcionando.
ADVERTENCIA - TENER CUIDADO
Page 89
24
MUD BUGGY
riesgo de incendios y explosiones.
• El fluido auxiliar de arranque (éter) es sumamente inflamable; no usarlo debido al
FLUIDO AUXILIAR DE ARRANQUE
hospitales y cuerpo de bomberos cerca del teléfono.
• Mantener una lista con números de emergencia de médicos, servicio de ambulancia,
• Mantener un juego de primeros auxilios y un extinguidor de incendios a la mano.
• Estar preparado en caso de iniciarse un incendio.
PREPARACIÓN PARA EMERGENCIAS
al riesgo de incendios y explosiones.
• El fluido auxiliar de arranque (éter) es sumamente inflamable; no usarlo debido
• Nunca usar este equipo en una atmósfera explosiva.
• No usar este equipo si tiene fugas de combustible o aceite - repararlas de inmediato.
motor y botar en un lugar seguro los trapos usados.
• En caso de derramarse combustible al abastecerlo, limpiarlo inmediatamente del
trabajo con combustible.
• No fumar mientras se reabastece de combustible el motor o durante cualquier otro
aprobados de seguridad.
• Transportar y manipular el combustible sólo si el mismo se guarda en recipientes
seguridad
Salud y
USAR EL SENTIDO COMÚN AL MANIPULAR COMBUSTIBLE
Page 90
23
MUD BUGGY
• Mantener todos los protectores en su lugar.
• Mantener la cubierta del motor cerrada durante el funcionamiento.
para impedir el arranque accidental y bloquear las ruedas para impedir el giro.
intervenir en la máquina, apagar el motor y desconectar el o los cables de bujía
• No efectuar trabajo alguno en la máquina mientras está funcionando. Antes de
eléctrico o de hacer soldaduras en la máquina.
• Desconectar el cable de puesta a tierra (-) de la batería antes de ajustar el sistema
todas las acumulaciones de grasa, aceite o basura.
Reparar los daños de inmediato. Sustituir las piezas desgastadas o rotas. Quitar
• Mantener todas las piezas en buenas condiciones y debidamente instaladas.
elevar para efectuar los trabajos de mantenimiento.
• Sostener de modo seguro todos los elementos de la máquina que sea necesario
se enfríe.
funcionamiento para aliviar la presión. Apagar el motor. Dejar que la máquina
los componentes móviles. Desconectar toda la potencia y los controles de
encuentre en movimiento. Mantener la ropa, las manos y los pies alejados de
• Nunca lubricar, dar mantenimiento o ajustar la máquina mientras ésta se
Mantener la zona limpia y seca.
• Comprender el procedimiento de mantenimiento antes de iniciar los trabajos.
PRÁCTICAS SEGURAS DE MANTENIMIENTO
de efectuar trabajos de servicio.
• Dejar que se enfríen todos los componentes en el compartimiento del motor antes
• El silenciador, el motor y su envuelta pueden estar calientes.
SUPERFICIES CALIENTES
audífonos para escuchar música cuando se maneja la máquina.
• El manejo seguro del equipo requiere la atención completa del operador. No usar
incomodidad.
proteger los oídos contra los ruidos de intensidad tal que causan molestias o
• Usar dispositivos protectores adecuados, tales como orejeras o tapones, para
del oído.
• La exposición prolongada a ruidos intensos puede causar perjuicios y pérdidas
• Usar ropa ajustada y equipo de seguridad apropiado para la tarea a realizar.
USAR ROPA PROTECTORA
seguridad
Salud y
• Los vapores de escape del motor pueden causar malestares o incluso la muerte.
• Evitar la inhalación prolongada de los gases de escape.
• Nunca hacer funcionar la máquina en una zona cerrada o con mala ventilación.
VENTILACIÓN APROPIADA
Page 91
las puntas.
• Para protegerse los pies, usar zapatos con punta de acero o protectores en
22
• La exposición a ruidos intensos puede causar perjuicios y pérdidas del oído.
• Es necesario llevar protectores en los oídos al usar este equipo.
• No hacer funcionar la máquina en charcos de agua.
o debajo de la máquina.
• Antes de arrancar la máquina, asegurarse que no hay personas u obstáculos cerca
• Mantener las manos, la ropa y las joyas alejadas de las piezas en movimiento.
después del arranque.
funcionamiento, cerrar la envuelta y enganchar el pestillo inmediatamente
• Mantener la envuelta cerrada y con su pestillo enganchado durante el
desenchufarlo.
bujía para impedir el arranque accidental. Si la máquina tiene motor eléctrico,
• Antes de intervenir en la unidad, apagar el motor y desconectar el o los cables de
• No efectuar trabajo alguno en la máquina mientras está funcionando.
máquina de modo seguro.
del operador y el Manual del propietario del motor. Aprender a manejar esta
• Los usuarios de esta máquina deben recibir la capacitación debida. Leer el Manual
PRÁCTICAS SEGURAS DE FUNCIONAMIENTO
provista para evitar lesiones personales o lesiones a terceros.
servicio. Recomendamos enfáticamente que el lector aproveche la información
peligros potenciales encontrados durante los procedimientos normales de
muerte. Estas advertencias tienen como propósito ayudar al técnico a evitar
siguiente debe efectuarse para evitar la posibilidad de lesiones personales o la
• Este símbolo aparece en el texto antes de las advertencias. Significa que el paso
MUD BUGGY
identifica a los mensajes de seguridad en este manual.
contienen precauciones de tipo general. La palabra IMPORTANTE también
puntos de peligro específico. Los avisos de seguridad con el rótulo PRECAUCIÓN
• Las etiquetas con los rótulos PELIGRO y ADVERTENCIA se encuentran cerca de
rótulo PELIGRO.
símbolo de advertencia de seguridad. Los peligros más graves se identifican con el
• Se usa una palabra clave - PELIGRO, ADVERTENCIA o PRECAUCIÓN - junto con el
COMPRENDER LOS TIPOS DE MENSAJES
comunicarse con el concesionario.
• Si no se comprende alguna parte de este manual y se requiere asistencia,
la seguridad y acortar su vida útil.
autorizadas hechas a la máquina pueden perjudicar su buen funcionamiento y/o
• Mantener la máquina en buenas condiciones de trabajo. Las modificaciones no
permitir que ninguna persona la maneje sin contar con la capacitación adecuada.
• Aprender a manejar la máquina y a usar los controles de modo adecuado. No
través del concesionario.
actualizadas. Se pueden obtener avisos y etiquetas de seguridad de repuesto a
los componentes nuevos y repuestos del equipo incluyan etiquetas de seguridad
buenas condiciones. Sustituir las etiquetas faltantes o dañadas. Comprobar que
manual y en los avisos de seguridad de la máquina. Mantener las etiquetas en
• Leer detenidamente todos los mensajes y etiquetas de seguridad dados en este
OBSERVAR LAS MEDIDAS DE SEGURIDAD
seguridad
Salud y
Page 92
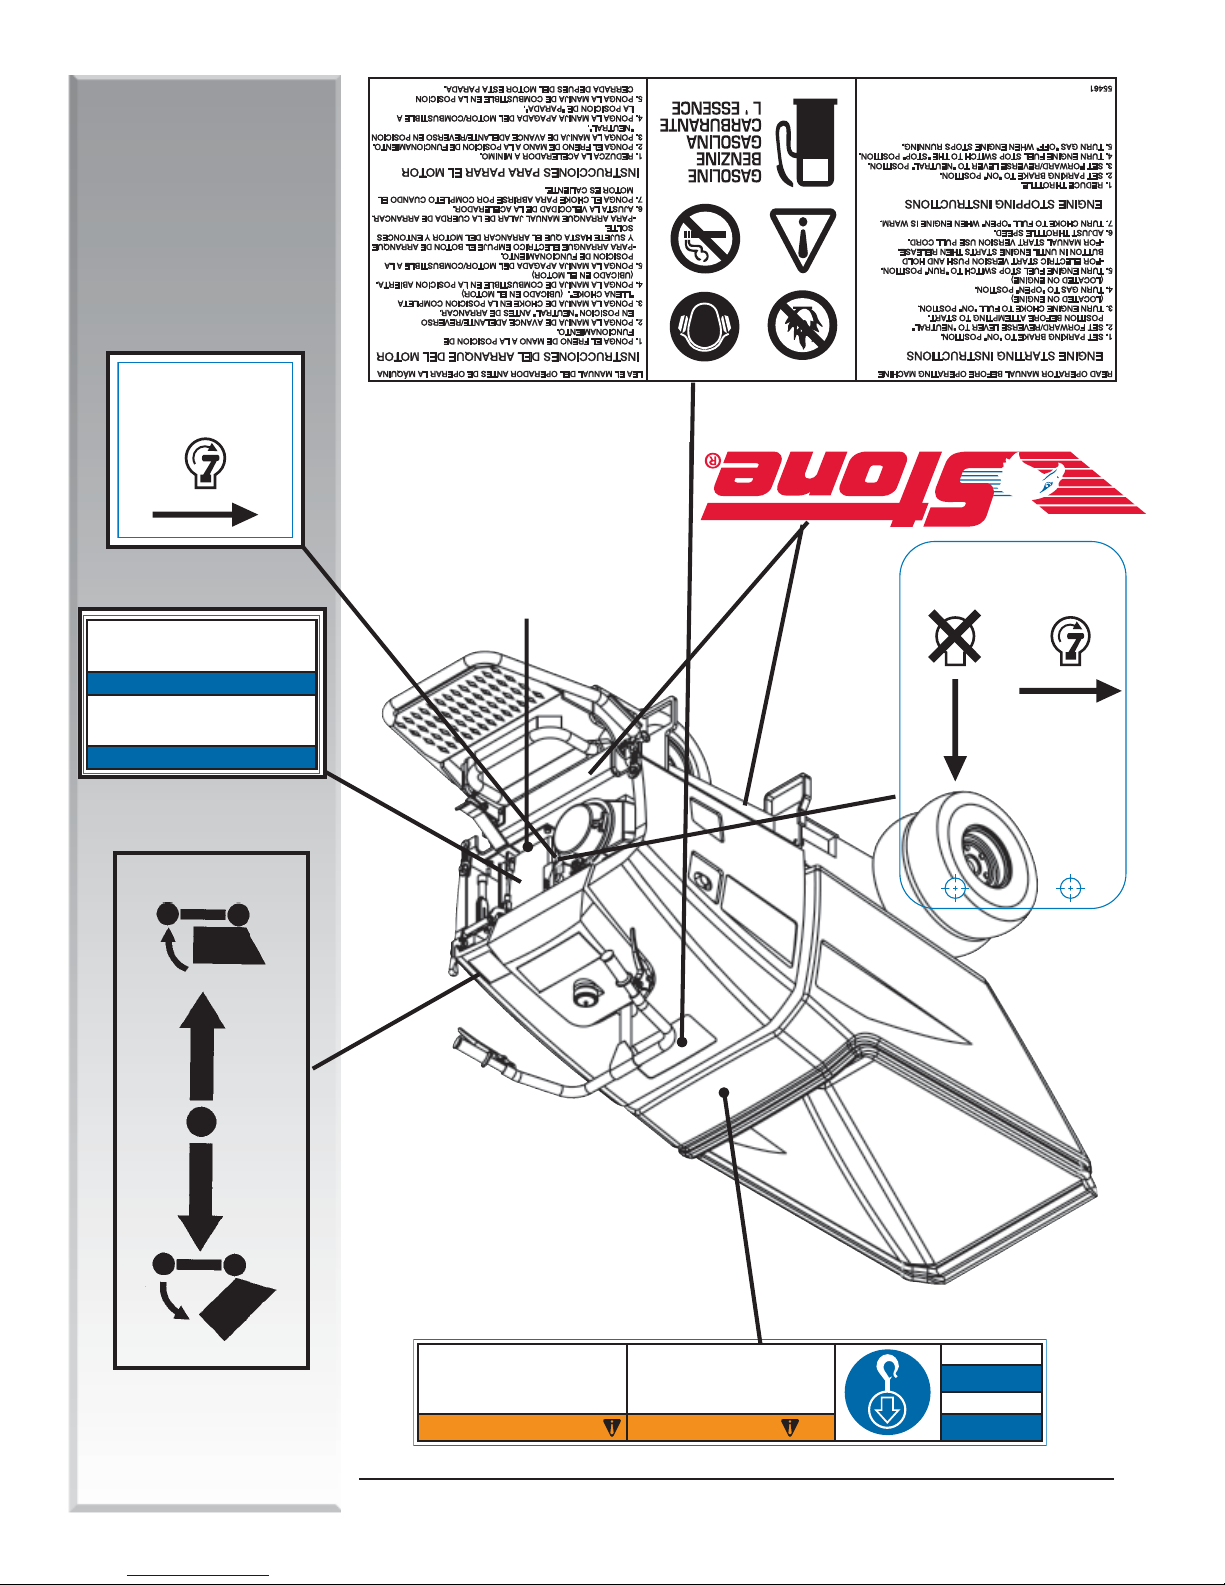
21
ADVERTENCIA
WARNING
LIFT POINT
NOTICE
AVISO
55516
Punto de izamiento
Cut, crush and tip over hazards.
Lift point for stake bed only.
Do not use stake bed lift point to lift machine.
Peligro de cortes, aplastamientos y volcaduras.
Punto de izamiento solo para plataforma de estacas.
No utilice el punto de izamiento de la plataforma de
estacas para elevar la máquina.
55486
PUSH TO START
EMPUJE PARA
PONER EN MARCHA
55541
If safety or hazard decals or operator's
manual are missing from this equipment,
contact the manufacturer immediately at
1-800-888-9926 or (585) 229-5141
Si las etiquetas de seguridad o peligro o el
manual del operador faltan en este equipo,
contactar inmediatamente al fabricante al
1-800-888-9926 o al (585) 229-5141.
NOTICE
AVISO
MUD BUGGY
55593
55485
APAGAR
STOP
MARCHA
RUN
seguridad
Salud y
oror
ma dema de
or
ma de
oror
ma dema de
borbor
tt
acas solamenteacas solamente
t
acas solamente
tt
acas solamenteacas solamente
afaf
af
afaf
de de esde de es
de de es
de de esde de es
PlatPlat
Plat
PlatPlat
bor
borbor
COLOCACIÓN DE ETIQUETAS
Page 93
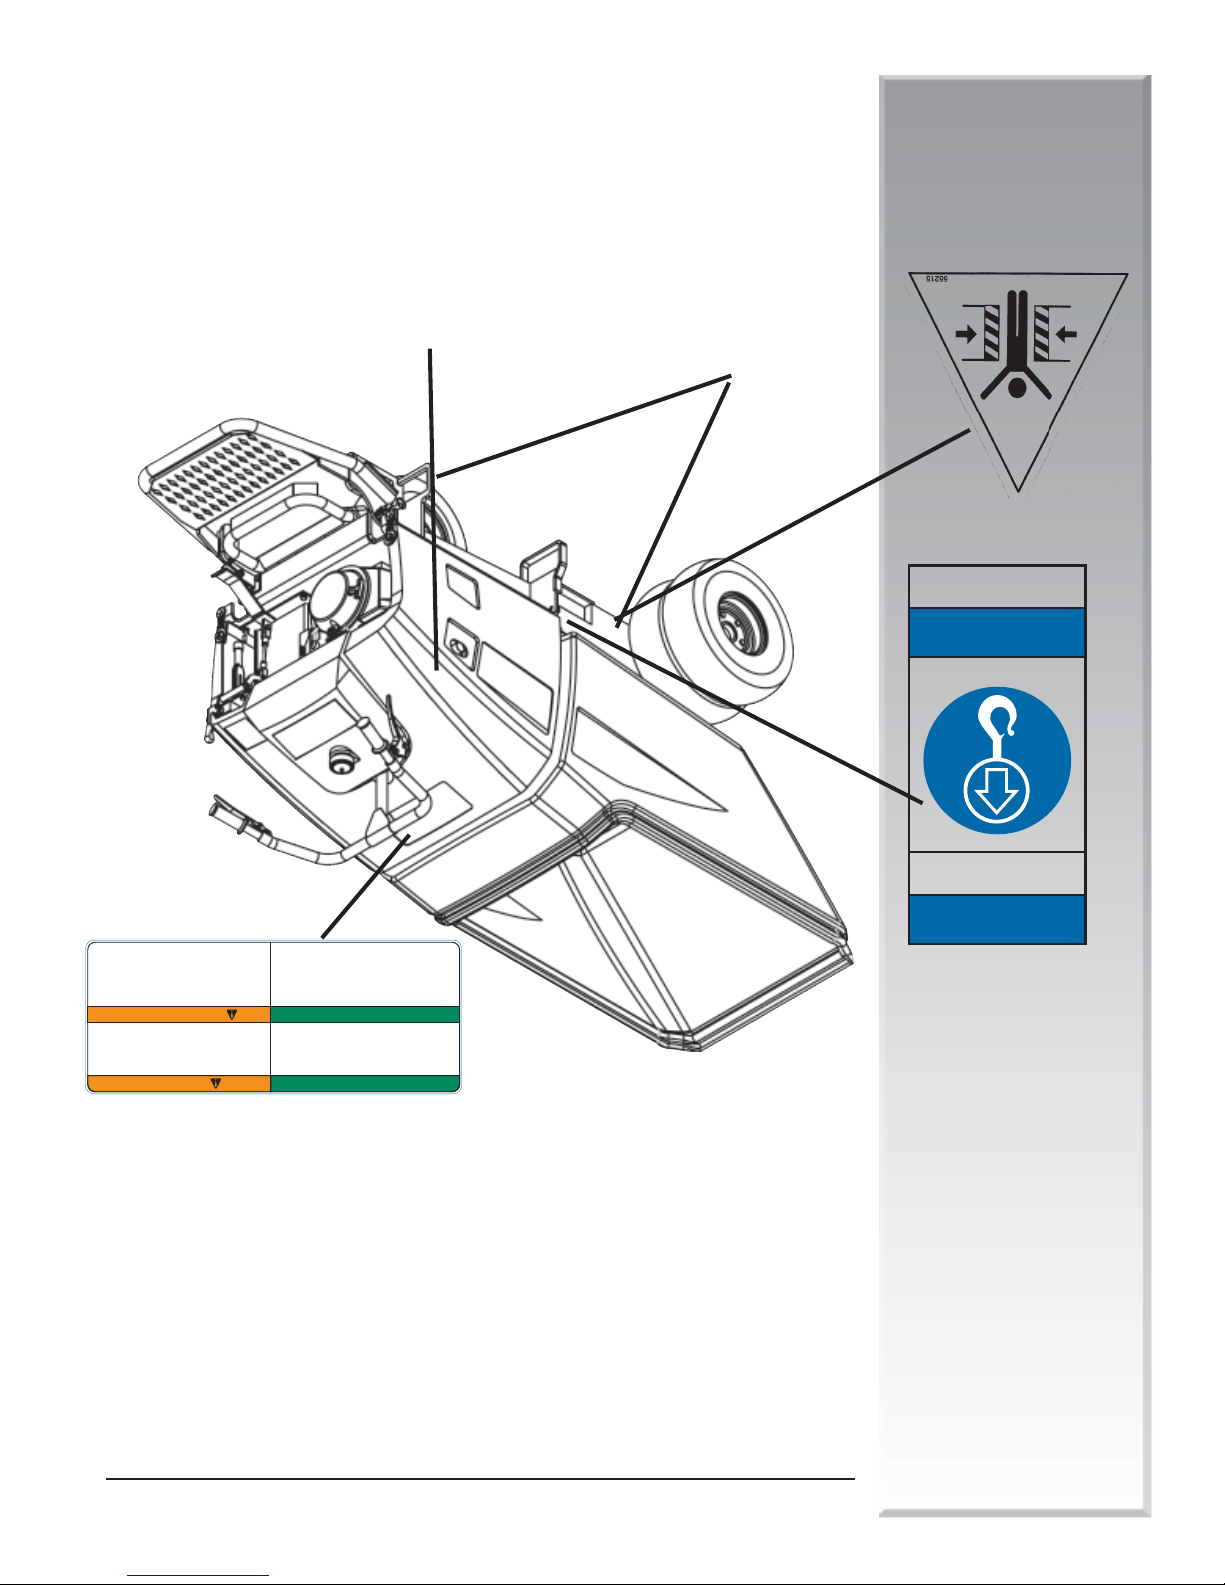
20
NOTICE
AVISO
55427
LIFT POINT
Punto de izamiento
IMPORTANT
SAFETY INSTRUCTIONS
Read and understand the operator's manual and all safety labels before operating this machine.
Only a trained person is to be permitted to operate this equipment. Training should include
operation instruction under normal conditions and emergency situations.
Personnel working on or near this equipment shall be instructed as to the location and
operation of pertinent stopping devices.
Under no circumstances are the safety characteristics of this equipment to be altered.
Routine inspections and corrective/preventative maintenance measures are to be conducted to
ensure that all guards and safety features are retained and function properly.
Cut, crush and tip over hazards.
Look out for pedestrians, other vehicles or obstructions.
Transport load only in lowered position.
Use caution when placing a raised load.
Tilt tub or stake bed slowly to release load.
Do not exceed rated operating capacity.
Peligros de cortes, aplastamientos y volcaduras.
Esté atento al paso de peatones, otros vehículos u obstrucciones.
Transporte la carga sólo en posición baja.
Sea cauteloso al colocar una carga elevada.
Incline la cubeta o la plataforma de estacas lentamente para liberar la carga.
No exceda la capacidad de operación especicada.
IMPORTANTE
INSTRUCCIONES DE SEGURIDAD
Lea y entienda el manual del operador y todas las etiquetas de seguridad antes de operar esta
máquina.
Sólo se permite operar este equipo a las personas capacitadas. La capacitación debe incluir las
instrucciones de operación bajo condiciones normales y situaciones de emergencia.
El Personal que trabaja con o cerca de este equipo deberá ser instruido acerca de la ubicación
y operación de los dispositivos de paro pertinentes.
Bajo ninguna circunstancia se podrán alterar las características de seguridad de este equipo.
Se deberán llevar a cabo inspecciones de rutina y medidas de mantenimiento correctivo /
preventivo para asegurar que todas las guardas y características de seguridad sean retenidas y
funcionen adecuadamente.
WARNING
ADVERTENCIA
55575
MUD BUGGY
en el Manual en el Manual
as
en el Manual
asas
en el Manual en el Manual
tiq
ue
t
tiqtiq
ueue
tt
tiqtiq
ueue
tt
asas
rr
aa
vv
eses
r
a
v
es
rr
aa
vv
eses
vv
as.as.
v
as.
vv
as.as.
se dese de
se de
se dese de
uina.uina.
uina.
uina.uina.
trtr
ado oado o
tr
ado o
trtr
ado oado o
se conse con
se con
se conse con
espeespe
ten lasten las
espe
ten las
espeespe
ten lasten las
izarizar
izar
izarizar
o qo q
ue se rue se r
ue se r
o q
ue se r
o qo q
ue se r
a obtener nuea obtener nue
a obtener nue
a obtener nuea obtener nue
altalt
an, comunicaran, comunicar
alt
an, comunicar
altalt
an, comunicaran, comunicar
vicio de la máqvicio de la máq
vicio de la máq
vicio de la máqvicio de la máq
te eqte eq
uipo. Usar únicamenteuipo. Usar únicamente
te eq
uipo. Usar únicamente
te eqte eq
uipo. Usar únicamenteuipo. Usar únicamente
sonal no adiessonal no adies
sonal no adies
sonal no adiessonal no adies
a fa f
amiliaramiliar
a f
amiliar
a fa f
amiliaramiliar
ue perue per
ue per
ue perue per
icación de eicación de e
icación de e
icación de eicación de e
lo podría causar lesiones glo podría causar lesiones g
lo podría causar lesiones g
lo podría causar lesiones glo podría causar lesiones g
perper
ativativ
per
ativ
perper
ativativ
uyuy
en o fen o f
uy
en o f
uyuy
en o fen o f
ante el serante el ser
ante el ser
ante el serante el ser
IdentifIdentif
ar ar
Identif
ar
IdentifIdentif
ar ar
trtr
tr
trtr
ábrábr
ica durica dur
ábr
ica dur
ábrábr
ica durica dur
o pero per
mitir qmitir q
o per
mitir q
o pero per
mitir qmitir q
te manual parte manual par
te manual par
te manual parte manual par
tudiar estudiar es
tudiar es
tudiar estudiar es
erer
tencia se destencia se des
tencia se des
er
tencia se destencia se des
erer
opiado. Nopiado. N
opiado. N
opiado. Nopiado. N
os.os.
t
os.
tt
os.os.
ectuar pedidos, consultectuar pedidos, consult
ectuar pedidos, consult
ectuar pedidos, consultectuar pedidos, consult
te.te.
te.
te.te.
idad y la de los demás, es imidad y la de los demás, es im
idad y la de los demás, es im
idad y la de los demás, es imidad y la de los demás, es im
abrabr
icante al 1-800-888-9926 paricante al 1-800-888-9926 par
abr
icante al 1-800-888-9926 par
abrabr
icante al 1-800-888-9926 paricante al 1-800-888-9926 par
izados por la fizados por la f
izados por la f
izados por la fizados por la f
o apro apr
o apr
o apro apr
te eqte eq
uipo, esuipo, es
te eq
uipo, es
te eqte eq
uipo, esuipo, es
o con el fo con el f
o con el f
o con el fo con el f
tiqtiq
ueue
tt
as de advas de adv
as de adv
as de advas de adv
oror
or
oror
tiq
ue
t
tiqtiq
ueue
tt
tt
os autos aut
t
os aut
tt
os autos aut
oror
izado, especialmente niños, utilice esizado, especialmente niños, utilice es
or
izado, especialmente niños, utilice es
oror
izado, especialmente niños, utilice esizado, especialmente niños, utilice es
de r
epues
de rde r
epuesepues
PP
arar
a efa ef
P
ar
a ef
PP
arar
a efa ef
o la muero la muer
o la muer
o la muero la muer
rr
egeg
las dadas a continuación. El no hacerlas dadas a continuación. El no hacer
r
eg
las dadas a continuación. El no hacer
rr
egeg
las dadas a continuación. El no hacerlas dadas a continuación. El no hacer
PP
or su seguror su segur
P
or su segur
PP
or su seguror su segur
inmediatinmediat
inmediat
inmediatinmediat
Si las eSi las e
Si las e
Si las eSi las e
rr
epuesepues
r
epues
rr
epuesepues
no autno aut
no aut
no autno aut
su funcionamientsu funcionamient
su funcionamient
su funcionamientsu funcionamient
Antes de usar esAntes de usar es
Antes de usar es
Antes de usar esAntes de usar es
de rde r
epuesepues
tt
COLOCACIÓN DE ETIQUETAS
seguridad
Salud y
Page 94

3. Salud y seguridad
Equipment, Inc.
Stone Construction
Page 95

18
_____________________________________________________________
_____________________________________________________________
_____________________________________________________________
______________________________________________________________
_____________________________________________________________
_____________________________________________________________
_____________________________________________________________
______________________________________________________________
_____________________________________________________________
_____________________________________________________________
_____________________________________________________________
______________________________________________________________
_____________________________________________________________
_____________________________________________________________
_____________________________________________________________
______________________________________________________________
_____________________________________________________________
_____________________________________________________________
_____________________________________________________________
______________________________________________________________
_____________________________________________________________
_____________________________________________________________
_____________________________________________________________
______________________________________________________________
_____________________________________________________________
_____________________________________________________________
_____________________________________________________________
______________________________________________________________
_____________________________________________________________
_____________________________________________________________
_____________________________________________________________
______________________________________________________________
_____________________________________________________________
_____________________________________________________________
_____________________________________________________________
______________________________________________________________
_____________________________________________________________
_____________________________________________________________
_____________________________________________________________
______________________________________________________________
_____________________________________________________________
_____________________________________________________________
_____________________________________________________________
______________________________________________________________
_____________________________________________________________
_____________________________________________________________
______________________________________________________________
_______________________________________________________________________________________________________________________________
____________________________________________________________________________________________________
Notas:
MUD BUGGY
técnicos
Datos
Page 96

17
MUD BUGGY
SPlaca de N/S
SN/P del motor
técnicos
Datos
UBICACIÓN DE LA PLACA DE CARACTERÍSTICAS Y DEL N/P
Page 97

Pedal de descarga
estacionamiento
Freno de
16
MUD BUGGY
Pedal de freno
descarga
Palanca de
de avance
velocidad
control de
Palanca de
de retroceso
velocidad
control de
Palanca de
técnicos
Datos
CONTROLES DE FUNCIONAMIENTO DE LA MÁQUINA
Page 98

15
MUD BUGGY
conectada
contacto
Llave de
del motor
arranque
Botón de
combustible del motor
Control de corte de
AceleradorAcelerador
Acelerador
AceleradorAcelerador
ico opcionalico opcional
ico opcional
ico opcionalico opcional
EléctrEléctr
Eléctr
EléctrEléctr
(carburador)
Válvula de combustible
EstranguladorEstrangulador
Estrangulador
EstranguladorEstrangulador
técnicos
Datos
dada
da
dada
combustible del motor
Control de corte de
Acelerador
anqanq
ue manual por cuerue manual por cuer
anq
ue manual por cuer
anqanq
ue manual por cuerue manual por cuer
combustible
Válvula de
del motor
Estrangulador
ArAr
rr
Ar
r
ArAr
rr
CONTROLES DEL MOTOR
Page 99
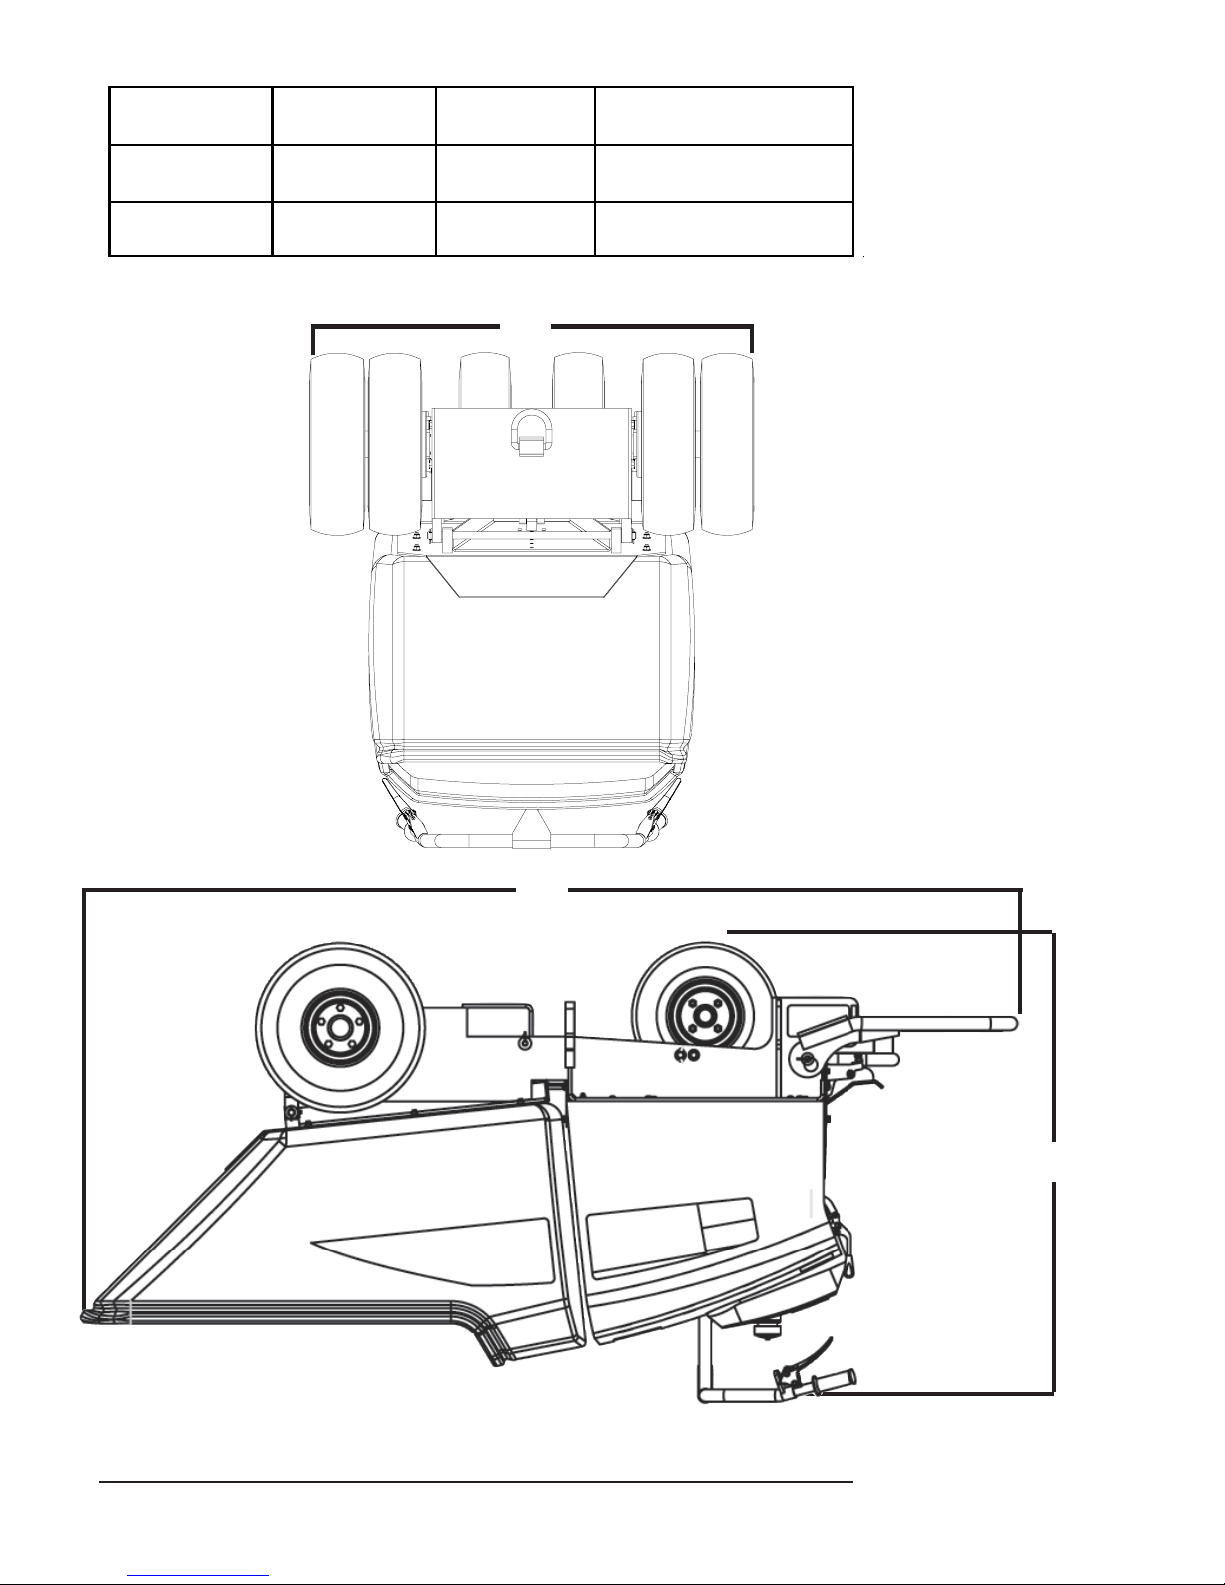
C
14
Dimensiones
L x An x Alt (in. / cm)
FB1000
L x An x Alt (in. / cm)
SB1600
MUD BUGGY
105.5 / 268 46 / 117 45 / 114,3
105.5 / 268 46 / 117 45 / 114,3
A
Longitud
BB
B
BB
Altura
Ancho
B
AA
A
AA
CC
C
CC
Introducción
DIMENSIONES DE LA MÁQUINA
Page 100
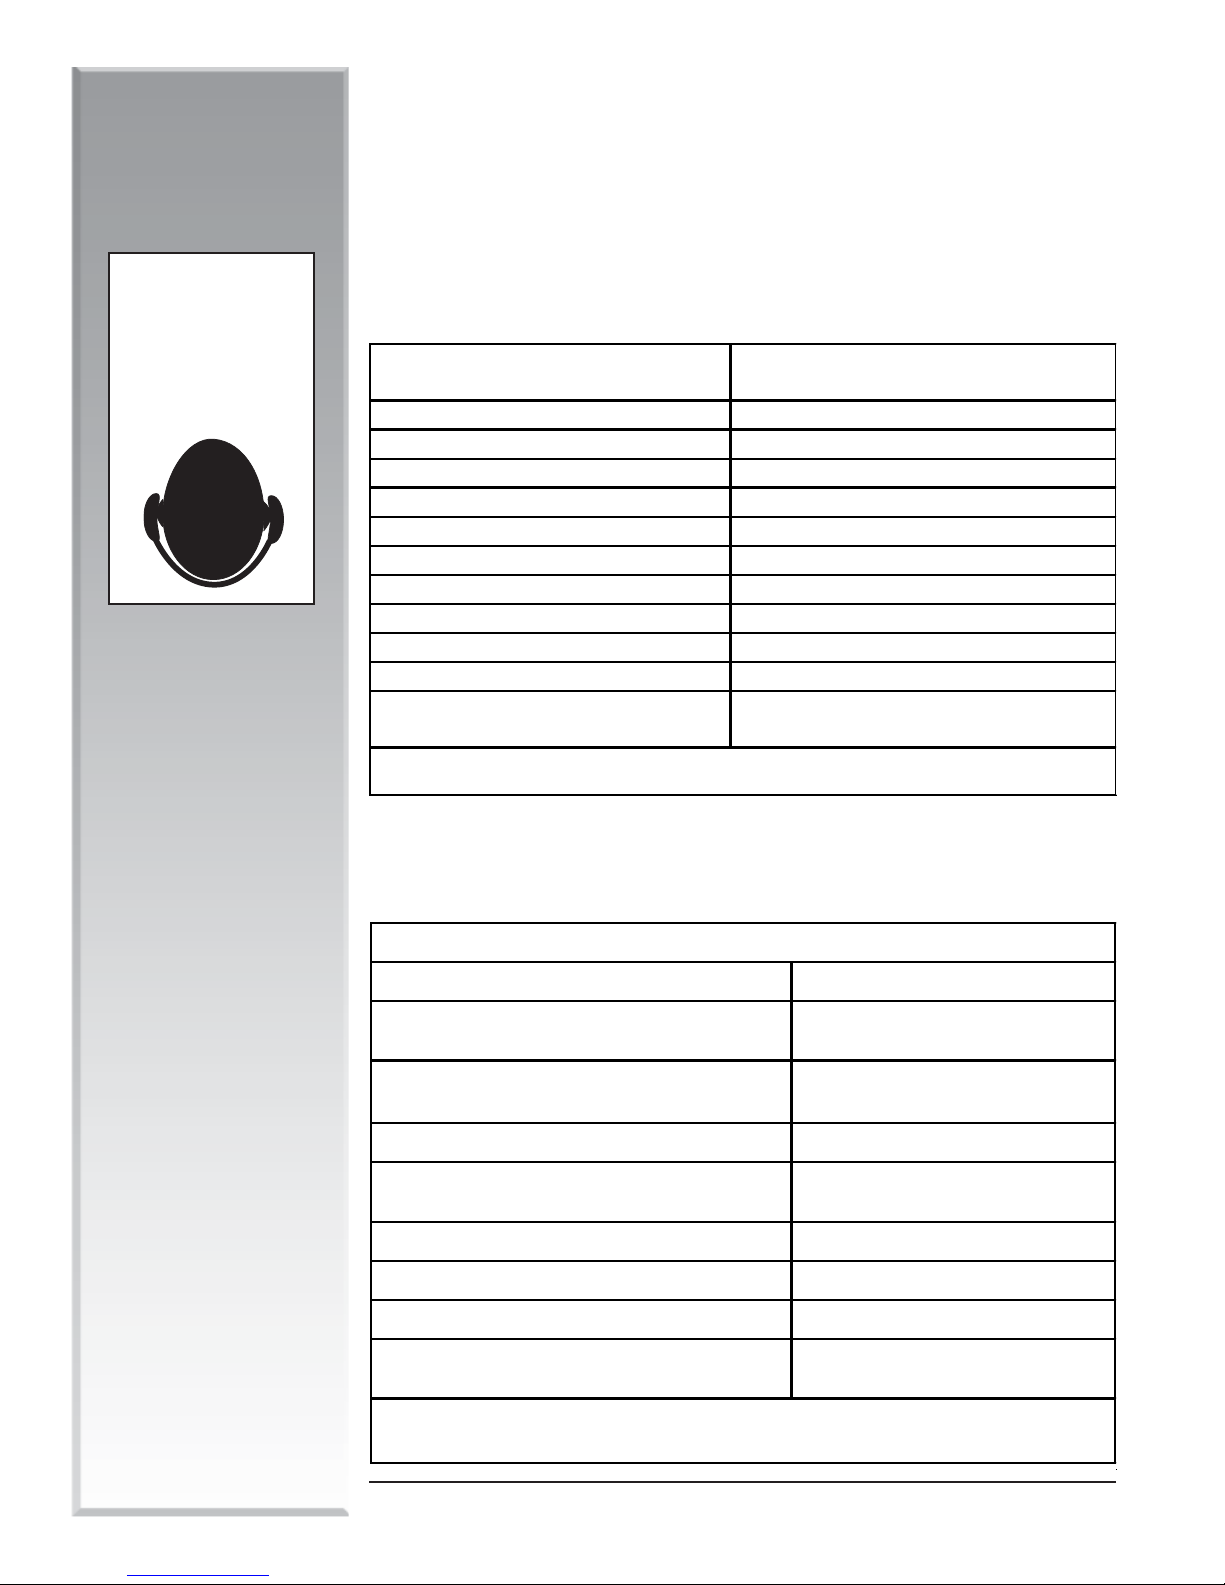
13
MUD BUGGY
89 dB(A), el operador
permitido de
ruido nominal
sobrepasar el nivel de
máquina se puede
Dado que con esta
73 dBa
Buggy
Manipulador de materiales Mud
operador
Nivel sonoro en el puesto del
Sitio de la prueba Honeoye, NY EE.UU.
Velocidad del motor 3600 rpm 60 Hz
Límite de humedad Aproximadamente igual a 50%
Condición del suelo Sedimentos y arcillas
Sonido ambiental dBa modo rápido
Temperatura 31°F / –1°C
Condiciones de la prueba
Fecha de prueba 9/20/2001
Tipo de medidor Simpson modelo 886-2 tipo 2
Fecha de calibración del sonómetro 15 de febrero de 2000
Tipo de máquina
Prueba del nivel sonoro de la máquina
* Fuera de EE.UU. usar el octanaje más alto disponible
Consumo de combustible 1.14 gph (4,2 l/h)
7 gal (26,5 l)
86 octanos mínimo—EE.UU. *
Gasolina sin plomo
combustible
Capac. del tanque de
Tipo de combustible
Batería 165 A
3900
funcionamiento (rpm)
Velocidad de
Par motor a 2500 rpm 19.5 lb-ft (26,5 Nm)
Modelo del motor GX390
Marca del motor Honda
técnicos
Datos
en culata
13 hp (9,7 kW), 4 ciclos, válvulas
Tipo de motor
Especificaciones del motor
ESPECIFICACIONES DEL MOTOR Y LUBRICANTES
 Loading...