

Page 1
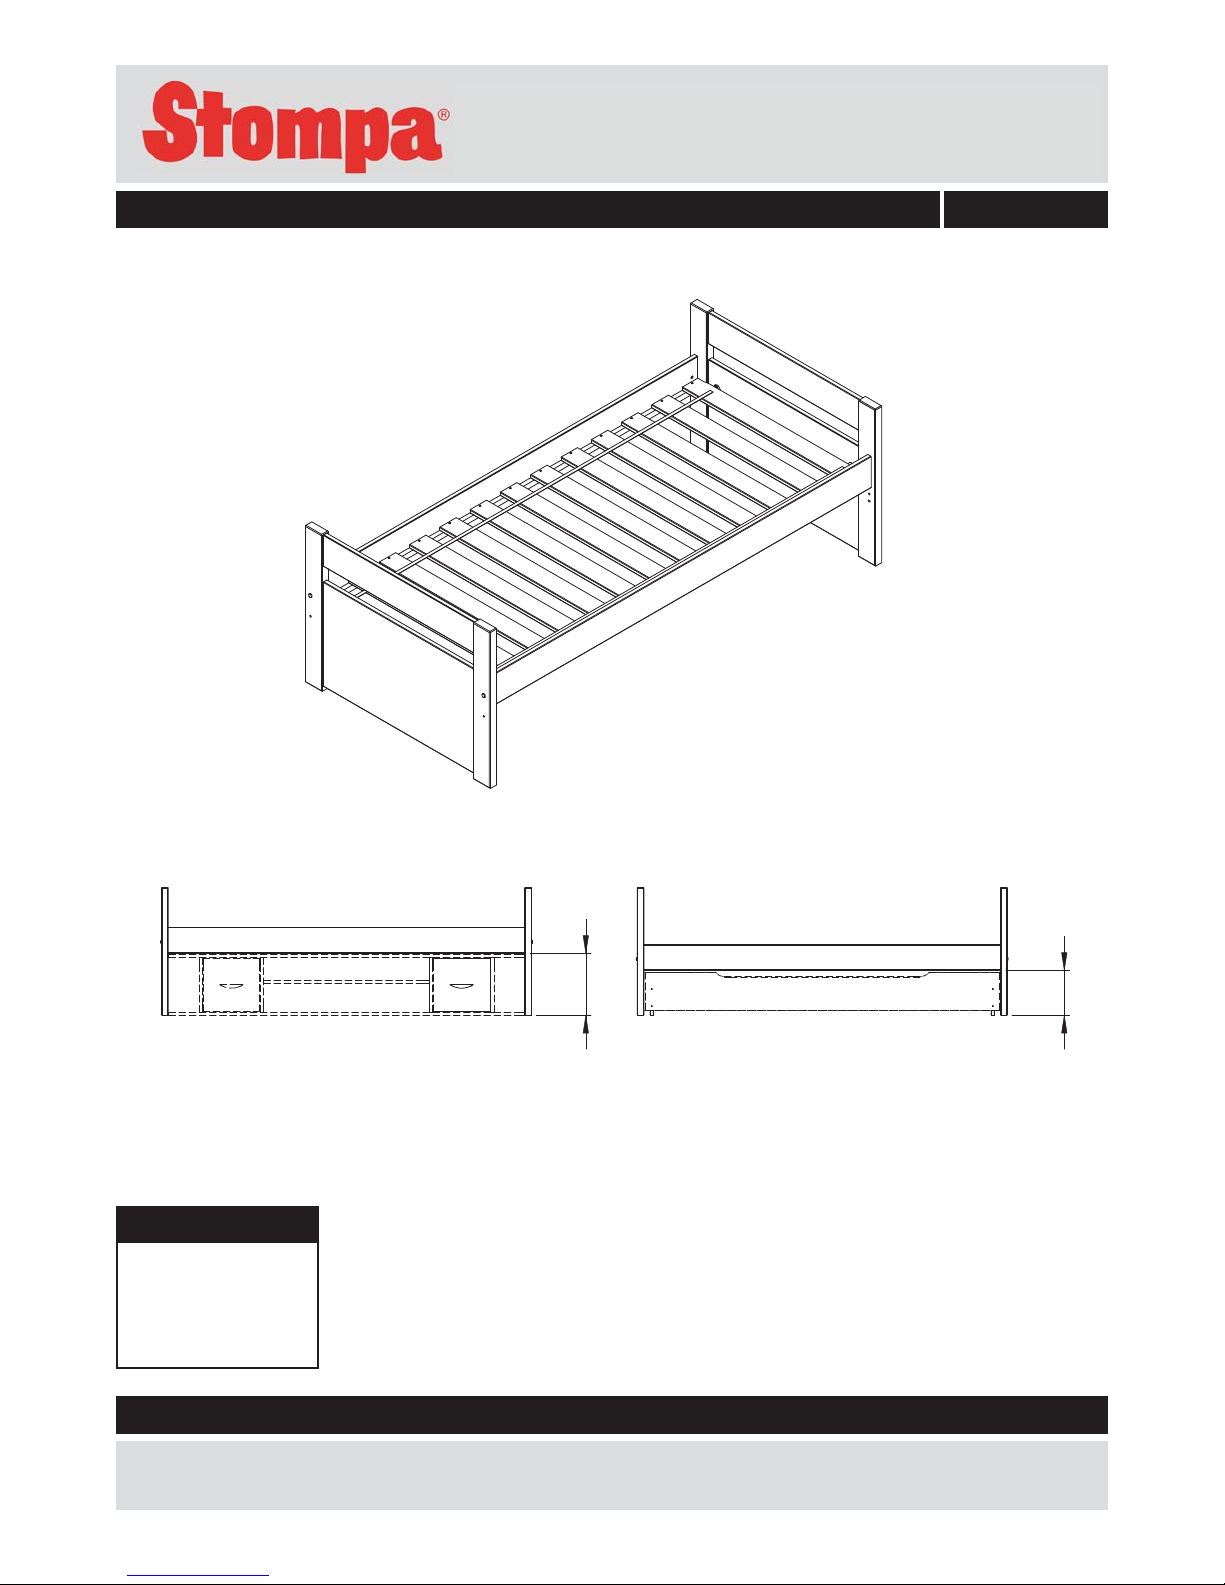
White - 4ft6 Bed with Slats
Dimensions
Width - 148cm
Depth - 204cm
Height -109cm
Issue 1 - 22/10/10
Important – Please read these instructions fully before starting assembly
If you need help or have damaged or missing parts, call the Customer Helpline: 0844 8008475
Assembly Instructions - Please keep for future reference 6564942
Use this position if adding
the Truckle/drawer
This is a universal cabin bed that can be used on its own
or with one of the 2 optional storage solutions shown below
POSITION 2
254
POSITION 1
Use this position if adding
the Under bed Storage Unit
350
- Cabin bed
80364503
208,2cm
98,2cm
72 cm
80364503 LV431-V6
Issue 3 -22/08/12
Page 2
· Warning! Children can become trapped
between the bed and the wall.
To avoid risk of serious injury the
distance between the top safety barrel
and the wall shall not exceed 75 mm or
shall be more than 230mm.
Glue safety - Take care when using glue, please follow the advice below
Skin contact: Remove
contamination by washing with
soap and water. This procedure
should also be followed prior to
eating and drinking.
Eye contact: Rinse immediately
with clean water for 15 minutes
and seek medical advice.
If swallowed: Seek medical
advice immediately.
Care and maintenance
80364503
• Do not use the bed if any structural
part is broken or missing.
• Periodically tighten all screws and
load-bearing connecting parts to ensure
permanent stability.
• Mattress: This bed is designed to use
a mattress size 200cm long and 90 cm
wide.
• The bed meets the British Standard
BS 8509:2008+A1:2011.
Warning: Do not place this child`s bed
near heat sources, windows and other
furniture.
Warning: This product is suitable for
children above the age of 4 years old
Before Starting Assembly
• Only clean using a damp cloth
and mind detergent, do not use
bleach or abrasive cleaners.
• Regularly check that there are
no loose screws on this unit and
retighten when necessary.
Parts of your product are produced
from solid pine which is a natural
product containing a beautiful
wooden structure.
Direct sunlight can speed up the
natural process of the resin
contained in the pine knots to
change colour around knots.
This is a normal process happening
to natural wood and cannot be seen
as a manufacturers fault. All wood
has been dryed to Industry
standards for furniture timber and all
procedures for obtaining the best
lacquring finish have been followed.
Our furniture will endure most
temperatures in the home but it is best
to avoid placing furniture next to heat
sources as radiators or fire. Be
particularly careful with solid wood as
the lack of humidity caused by central
heating can cause damage such as
warping.
2
Page 3
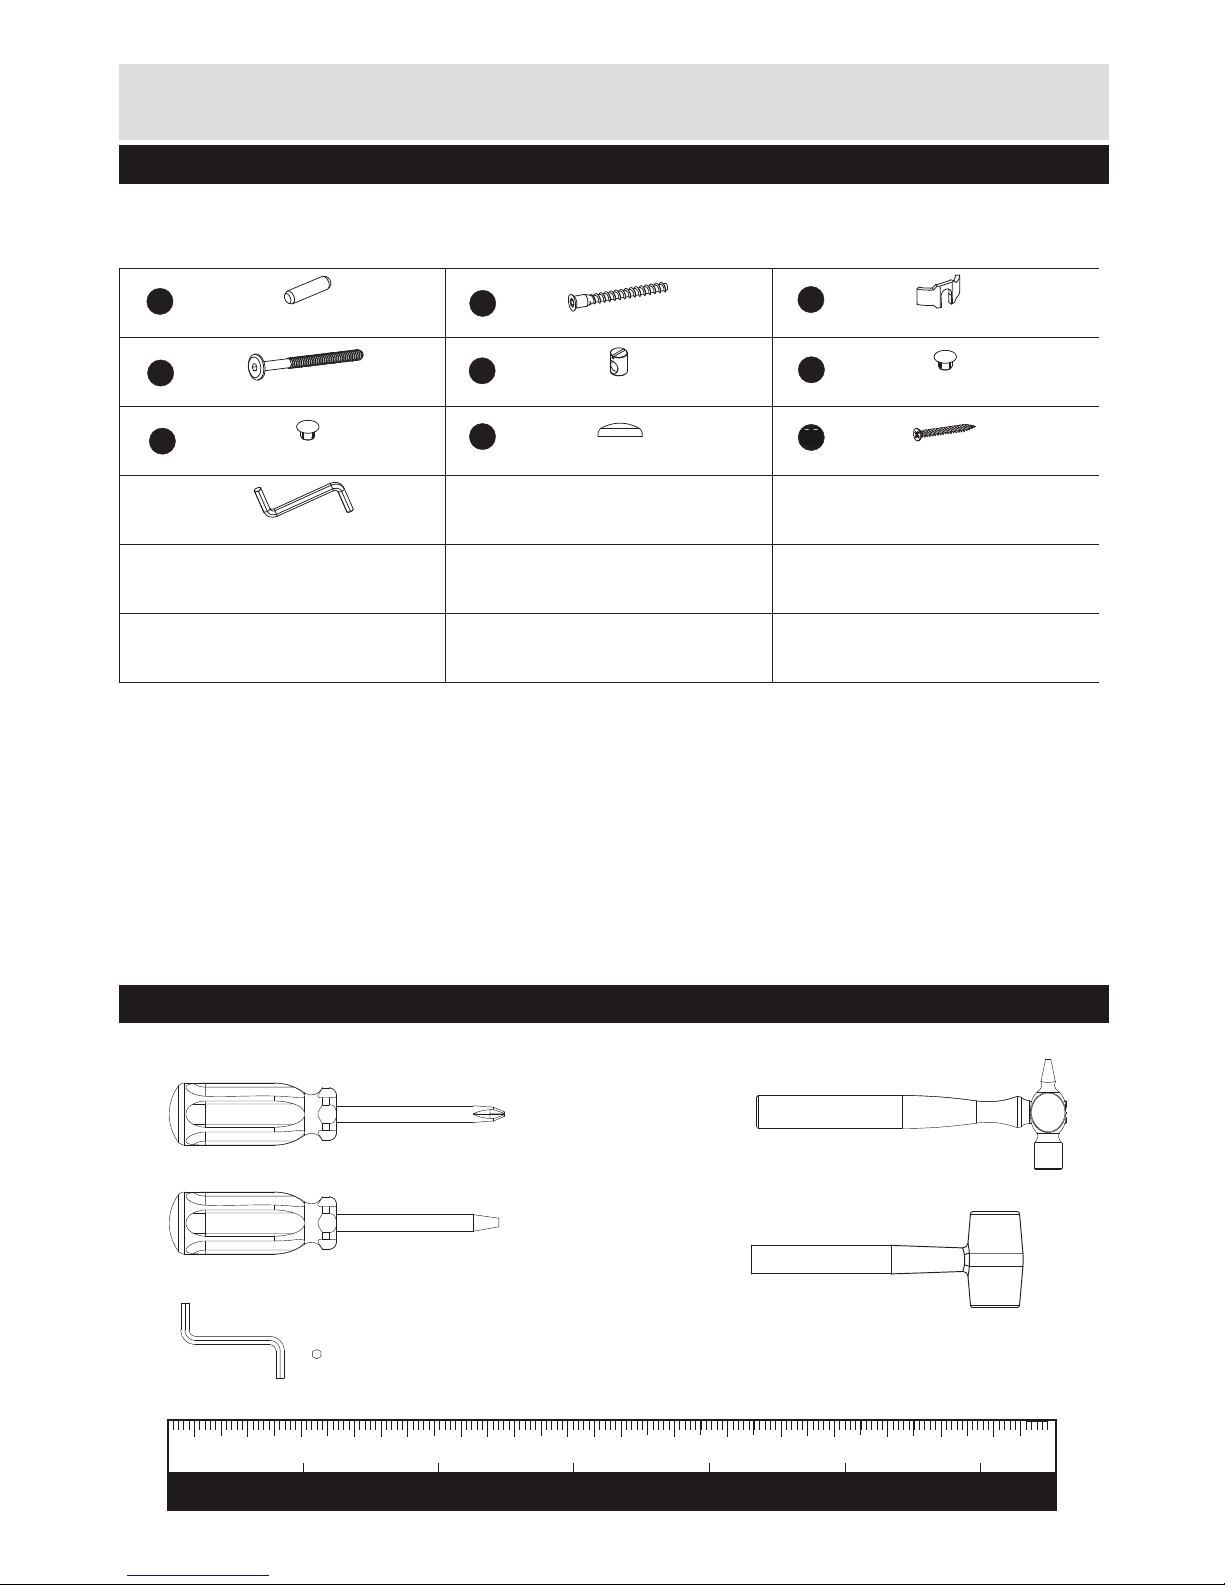
Components - Fittings
Please check you have all the fittings listed below
Note: The quantities below are the correct amount to complete the assembly. In some cases more
fittings may be supplied than are required.
A
Tools reqiured
1cm 2
3
4
56
7
8910
11 12
13
14
15
16
1 inch
2
3
4
56
Rulers - Use this ruler to help correctly identify the screws
Philips screwdriver (medium)
Flathead screwdriver (medium)
Allen key (incl)
Small hammer
Dowel Ø8x40 x34
Conformat screw Ø7x 60mm x20
Screw 3.5 x 35mm x60
Barrel nut Ø10 x 14mm x24
Allen key 4mm x1
Cover cap Ø15/Ø18 x12
Cover cap Ø8/Ø13 x16
E F
H K L
N P
Spacer 20x72x3mm x2
3
Rubber hammer
Q
Connecting bolt M6 x 50mm x5
Connecting bolt M6 x 75mm x19
R
Metal dowel x16
S
Locking nut x32
T
Cover cap Ø4/Ø17 x12
U
Cover cap Ø10/Ø13 x6
V
Cover cap Ø12/Ø3 x20
Y
Rubber hammer
Rubber hammer
10x40 Wooden dowel x 36
M6x75 Bolt x 4
D35 Sector x 4
7x60mm Screw x 4
M6x10x13 Cross dowel x 4
D10x15 Cover Cap x 8
4mm Allen key x 1
3,5x40 Screw x 26
D15 Cover Cap x 4
D8x13 Cover Cap x 8
A
B
C
D
E
F
G
H
H
J
3
Page 4
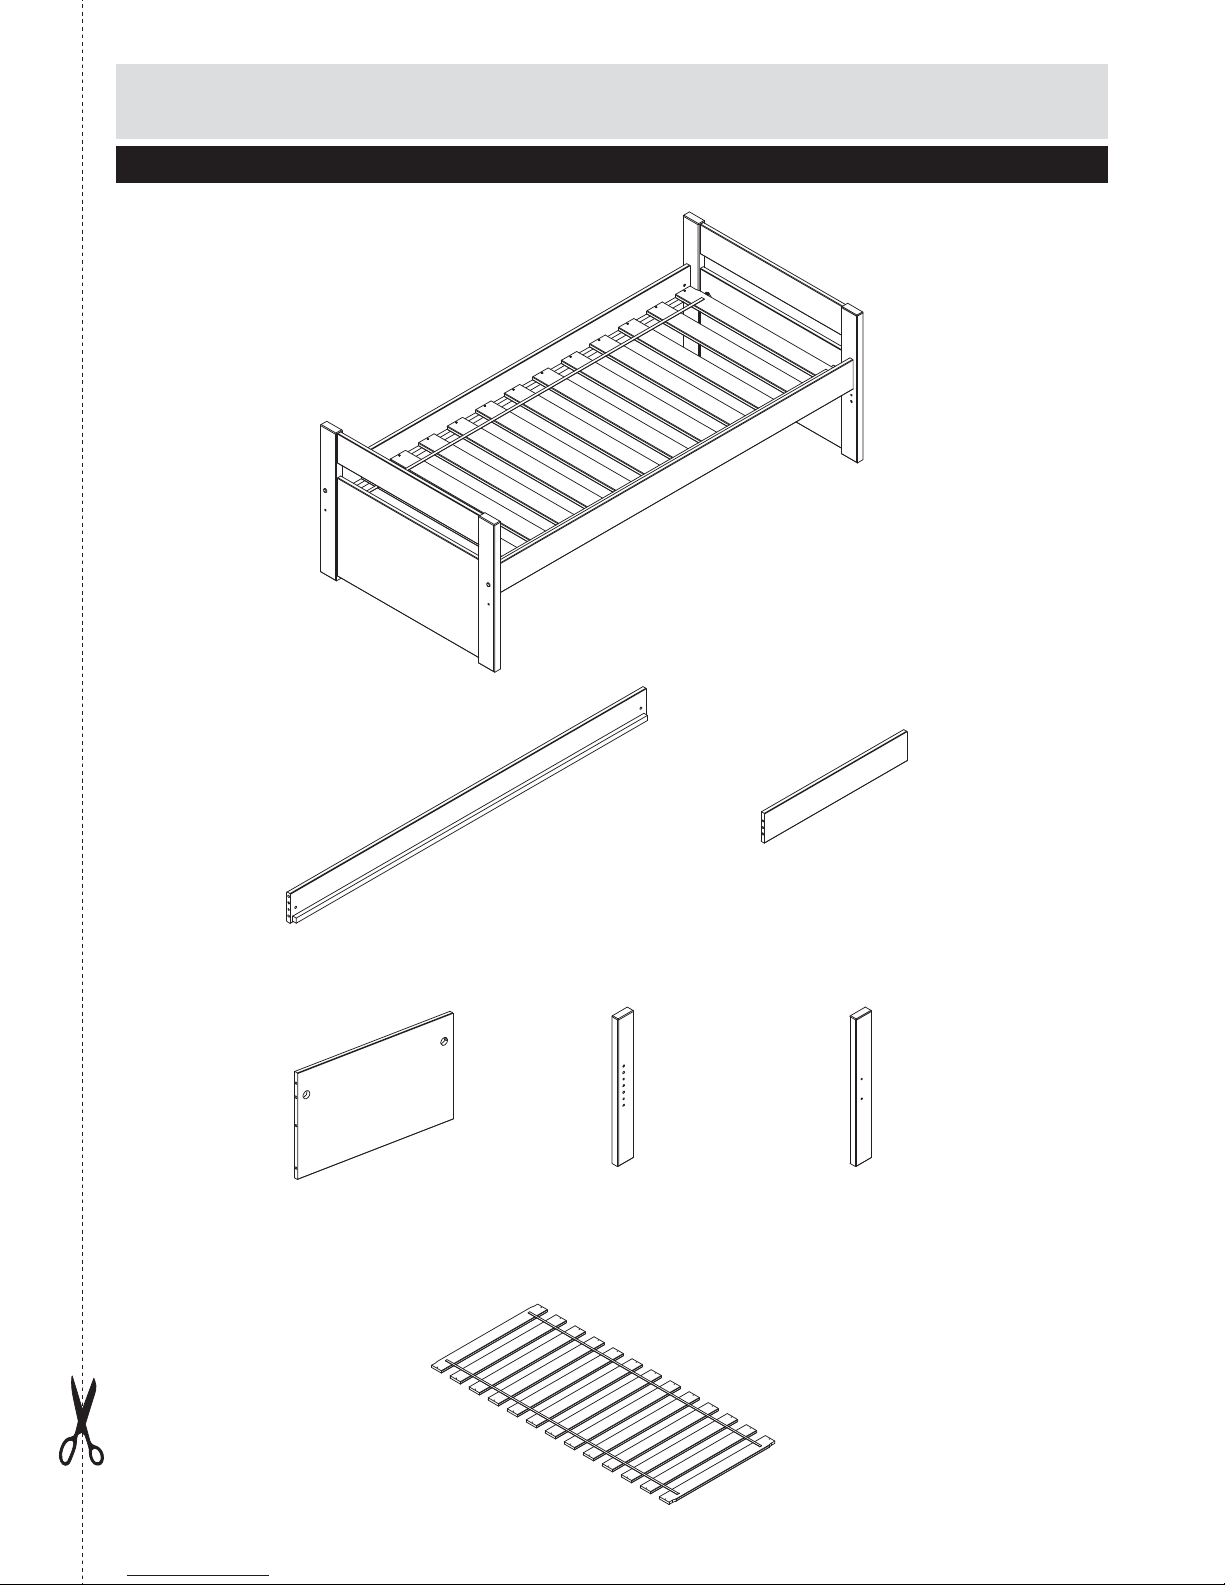
Components - Panels
3OHDVH FKHFN \RX KDYH DOO WKH SDQHOV OLVWHG EHORZ
End panel x 2
6
Leg x 2
5
Slats x1
(72x9x3,8 cm)
3
(80,2x48x2 cm)
4
Leg x 2
(72x9x3,8 cm)
2 End rail x 2
(80,2x14,5x2 cm)
1
Bed rail x 2
(200,6x14,5x2 cm)
4
1
5
1
2
2
3
3
4
5
6
4
Page 5
4
Assembly Instructions
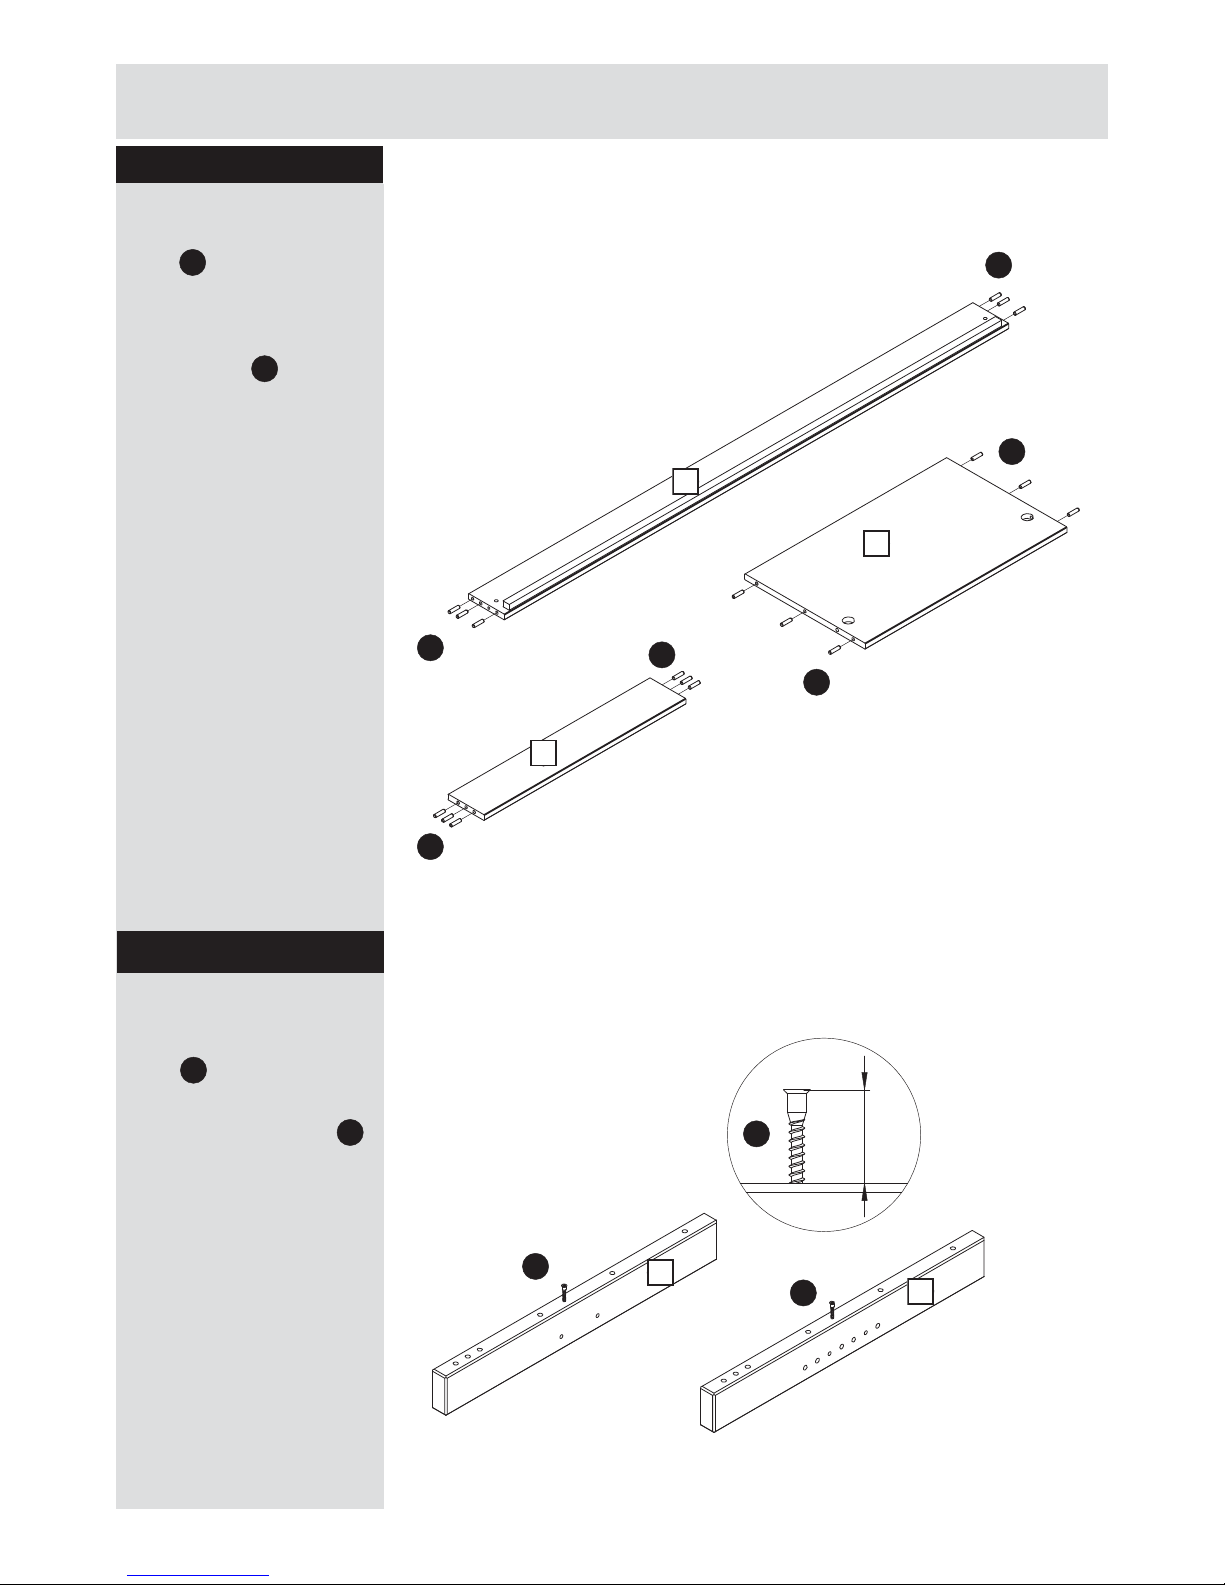
Step 1
Fitting dowels
Insert wooden dowels
A
into the holes in bed rails
1
, headboard rails 2
,
3
, footboard 6 and
bottomrail
7
.
Note: It may be
nessesary to tap the
dowel in very gently with
small hammer.
Insert wooden dowels
H
into the holes in
headboard panels
4
and
5
.
Note: It may be
nessesary to tap the
dowel in very gently with
small hammer.
Assembling
headboard
Position details and
attach headboard panels
WRKHDGERDUGUDLOVOLNH
showed on illustration at
side.
Step 2
A
A
A
A
A
H
A
A
A
A
A
A
1
1
2
6
7
A
H
H
H
3
4
5
2
5
3 4
4
4
4
4
4
x 6
4
B
35 mm
Step 2
In this step use this fitting:
In this step use this fitting:
A
B
B
A
A
A
A
A
A
B
B
C
4
C
5
C
2
C
3
C
1
A
B
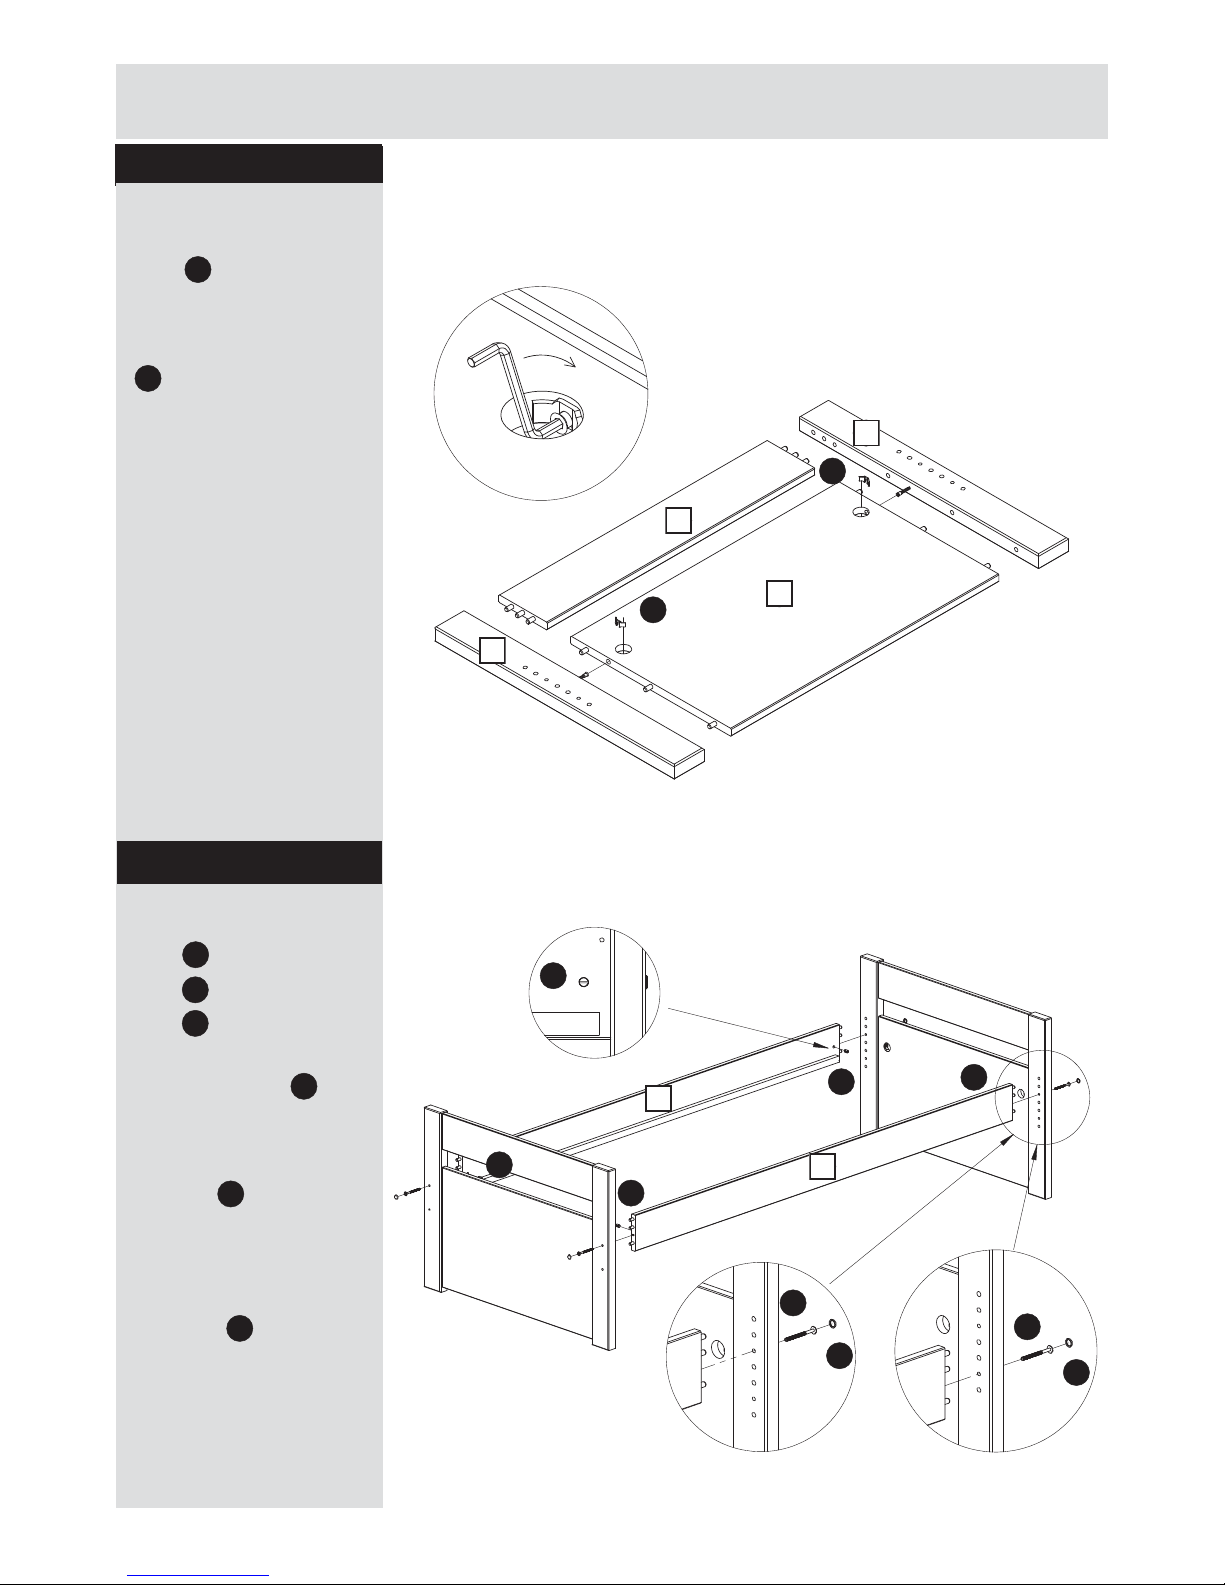
Insert dowels into the
holes in bed rails 1, end
rails 2 and end panels 3.
Note: It may be necessary
to tap dowel in very gently
with small hammer.
Screw connecting screws
into holes of legs using 4mm
Allen key.
x3
x36
x3
x3
x3
x3
x3
x4
x2
x2
x2
x2
5
Page 6
4
Assembly Instructions
Step 1
Fitting dowels
Insert wooden dowels
A
into the holes in bed rails
1
, headboard rails 2
,
3
, footboard 6 and
bottomrail
7
.
Note: It may be
nessesary to tap the
dowel in very gently with
small hammer.
Insert wooden dowels
H
into the holes in
headboard panels
4
and
5
.
Note: It may be
nessesary to tap the
dowel in very gently with
small hammer.
Assembling
headboard
Position details and
attach headboard panels
WRKHDGERDUGUDLOVOLNH
showed on illustration at
side.
Step 2
A
A
A
A
A
H
A
A
A
A
A
A
1
1
2
6
7
A
H
H
H
3
4
5
2
5
3 4
4
4
4
4
4
x 6
4
POSITION 1 POSITION 2
Step 3
Step 4
In this step use this fitting:
In this step use this fitting:
C
C
C
E
D
H
H
D
E
E
D
H
E
E
E
C
1
C
1
C
3
C
2
C
4
C
5
C
E
D
H
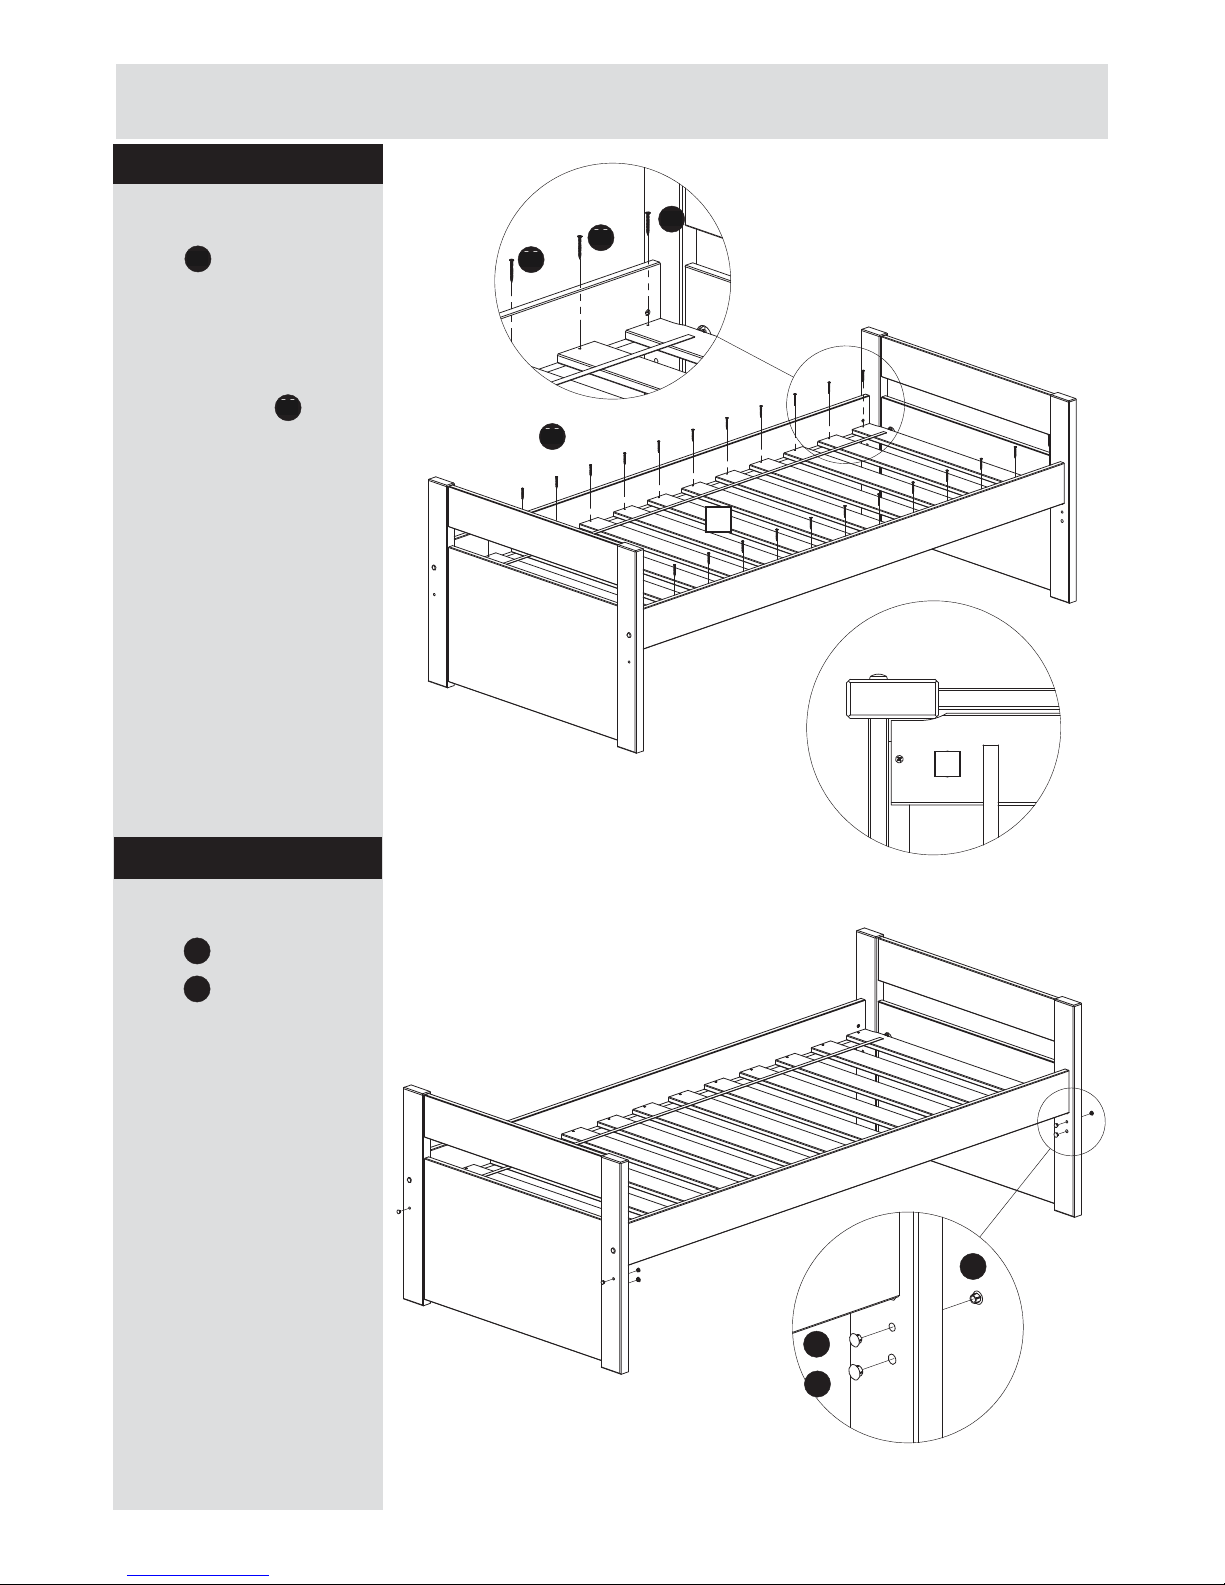
Position legs. Insert sectors
into 35mm holes as
shown in the picture.
Tighten screws with 4mm
Allen key.
Push Cross dowel into
hole in bed rails 1
the groove on Cross dowel
should be horizontal.
Push Bolt through each
leg to meet Cross dowel
and then fasten with the
Allen key.
Cover all bolt heads with
cover caps
x4
x4
x4
x4
x2
6
Page 7
4
Assembly Instructions
Step 1
Fitting dowels
Insert wooden dowels
A
into the holes in bed rails
1
, headboard rails 2
,
3
, footboard 6 and
bottomrail
7
.
Note: It may be
nessesary to tap the
dowel in very gently with
small hammer.
Insert wooden dowels
H
into the holes in
headboard panels
4
and
5
.
Note: It may be
nessesary to tap the
dowel in very gently with
small hammer.
Assembling
headboard
Position details and
attach headboard panels
WRKHDGERDUGUDLOVOLNH
showed on illustration at
side.
Step 2
A
A
A
A
A
H
A
A
A
A
A
A
1
1
2
6
7
A
H
H
H
3
4
5
2
5
3 4
4
4
4
4
4
x 6
4
Step 5
Step 6
In this step use this fitting:
In this step use this fitting:
H
J
H
J
H
J
H
J
H
J
G
F
F
F
G
C
6
H
J
C
6
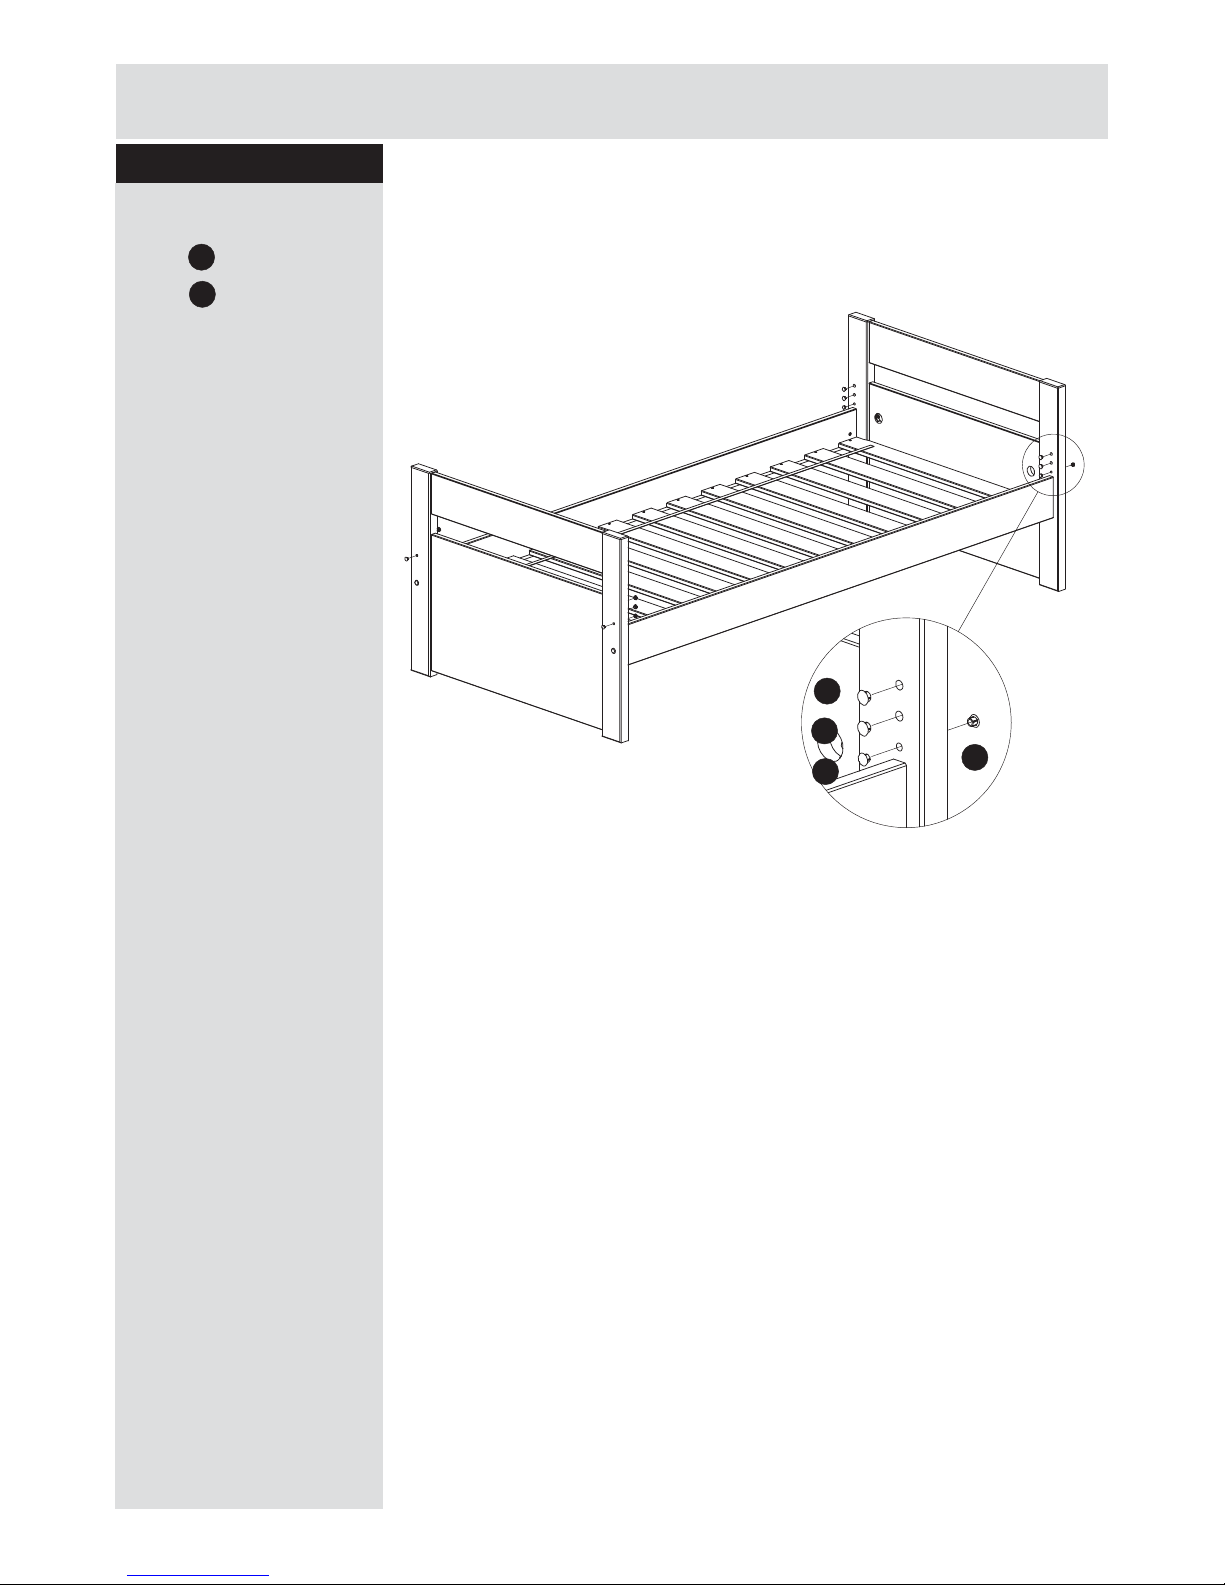
Position slats equally.
End slats must be in contact
with legs.
Place two screws in each
slat and tighten using a
Philips screwdriver.
If using the bed position 1
with underbed storage unit.
Cover all unused holes with
cover caps as shown.
x26
x26
x8
x4
Assembling the bed
in position 1
7
Page 8
4
Assembly Instructions
Step 1
Fitting dowels
Insert wooden dowels
A
into the holes in bed rails
1
, headboard rails 2
,
3
, footboard 6 and
bottomrail
7
.
Note: It may be
nessesary to tap the
dowel in very gently with
small hammer.
Insert wooden dowels
H
into the holes in
headboard panels
4
and
5
.
Note: It may be
nessesary to tap the
dowel in very gently with
small hammer.
Assembling
headboard
Position details and
attach headboard panels
WRKHDGERDUGUDLOVOLNH
showed on illustration at
side.
Step 2
A
A
A
A
A
H
A
A
A
A
A
A
1
1
2
6
7
A
H
H
H
3
4
5
2
5
3 4
4
4
4
4
4
x 6
4
Step 7
In this step use this fitting:
F
G
F
G
G
F
If using the bed position 2.
Cover all unused holes with
cover caps as shown.
x8
x8
Assembling the bed
in position 2
8
Page 9

9
Page 10

Customer Service Form
Please return complete to
Fax: 0560 1132071
Name:
Address:
Contact No:
Date of purchase:
Place of purchase:
Product Name:
See assembly instructions:
Problem:
Parts Needed: Part No.
Quantity
Please quote assembly
instruction or number
Description
e.g drawer base
10
 Loading...