

Page 1

White - 4ft6 Bed with Slats
Dimensions
Width - 148cm
Depth - 204cm
Height -109cm
Issue 1 - 22/10/10
Important – Please read these instructions fully before starting assembly
If you need help or have damaged or missing parts, call the Customer Helpline: 0844 8008475
Assembly Instructions - Please keep for future reference 6564942
Page 2
Safe and Care Advice
Important - Please read these instructions fully before starting assembly
Glue safety - Take care when using glue, please follow the advice below
Check you have all the
components and tools listed on
page 2 and 3.
Remove all fittings from the
plastic bags and separate them
into their groups.
Keep children and animals
away from the work area, small
parts could choke if swallowed.
Make sure you have enough
space to lay out the parts before
starting.
Do not stand or put weight on
the product, this could cause damage.
Assemble the item as close
to its final position (in the same
room) as possible.
Assemble on a soft level
surface to avoid damaging the
unit or your floor.
Parts of the assembly will be
easier with 2 people.
We do not
recommend the
use of power
drills/drivers,for
inserting screws
as this could damage the unit.
Only use hand screwdrivers.
Dispose all packaging
carefully and responsibly.
(GB) IMPORTANT, READ CAREFULLY - RETAIN FOR FUTURE REFERENCE
Only clean using a damp cloth
and mild detergent, do not use
bleach or abrasive cleaners.
From time to time check that
there are no loose screws on
this unit.
This product should not be
discarded with household
waste. Take to your local
authority waste disposal centre.
Skin contact: Remove
contamination by washing with
soap and water. This procedure
should also be followed prior to
eating and drinking.
Eye contact: Rinse immediately
with clean water for 15 minutes
and seek medical advice.
If swallowed: Seek medical
advice immediately.
Care and maintenance
Note: if required the next
page can be cut out and used
as reference throughout the
assembly. Keep this page with
these instructions for future
reference.
Current legislation requires
that the bunkbed must be fitted
with a ladder or platform for the
upper bunk bed.
The bunk bed meets the european
EN 747-1:2007 standards for security
and durability.
This bed is designed to
use a mattress size 200 cm long
and 90 cm wide. The total
thickness must not exceed 16.1 cm
The label on the ladder side indicates
maximum height of mattress to be used
in this bed.
Mattress: Important: High beds and the upper
bed of a bunk are not suitable for
children under six years due to the risk
of injury from falls.
Do not use the bed if any structural
part is broken or missing.
Be aware that children can strangle
in items such as ropes, strings, cords,
harnesses and belts attached to or
hung on a bunk bed/high bed.
Children can become trapped
between the bed and the wall.
To avoid risk of serious injury the
distance between the
and the wall shall not exceed
75 mm or shall be more than 230 mm.
top safety
barrel
WARNING
Page 3
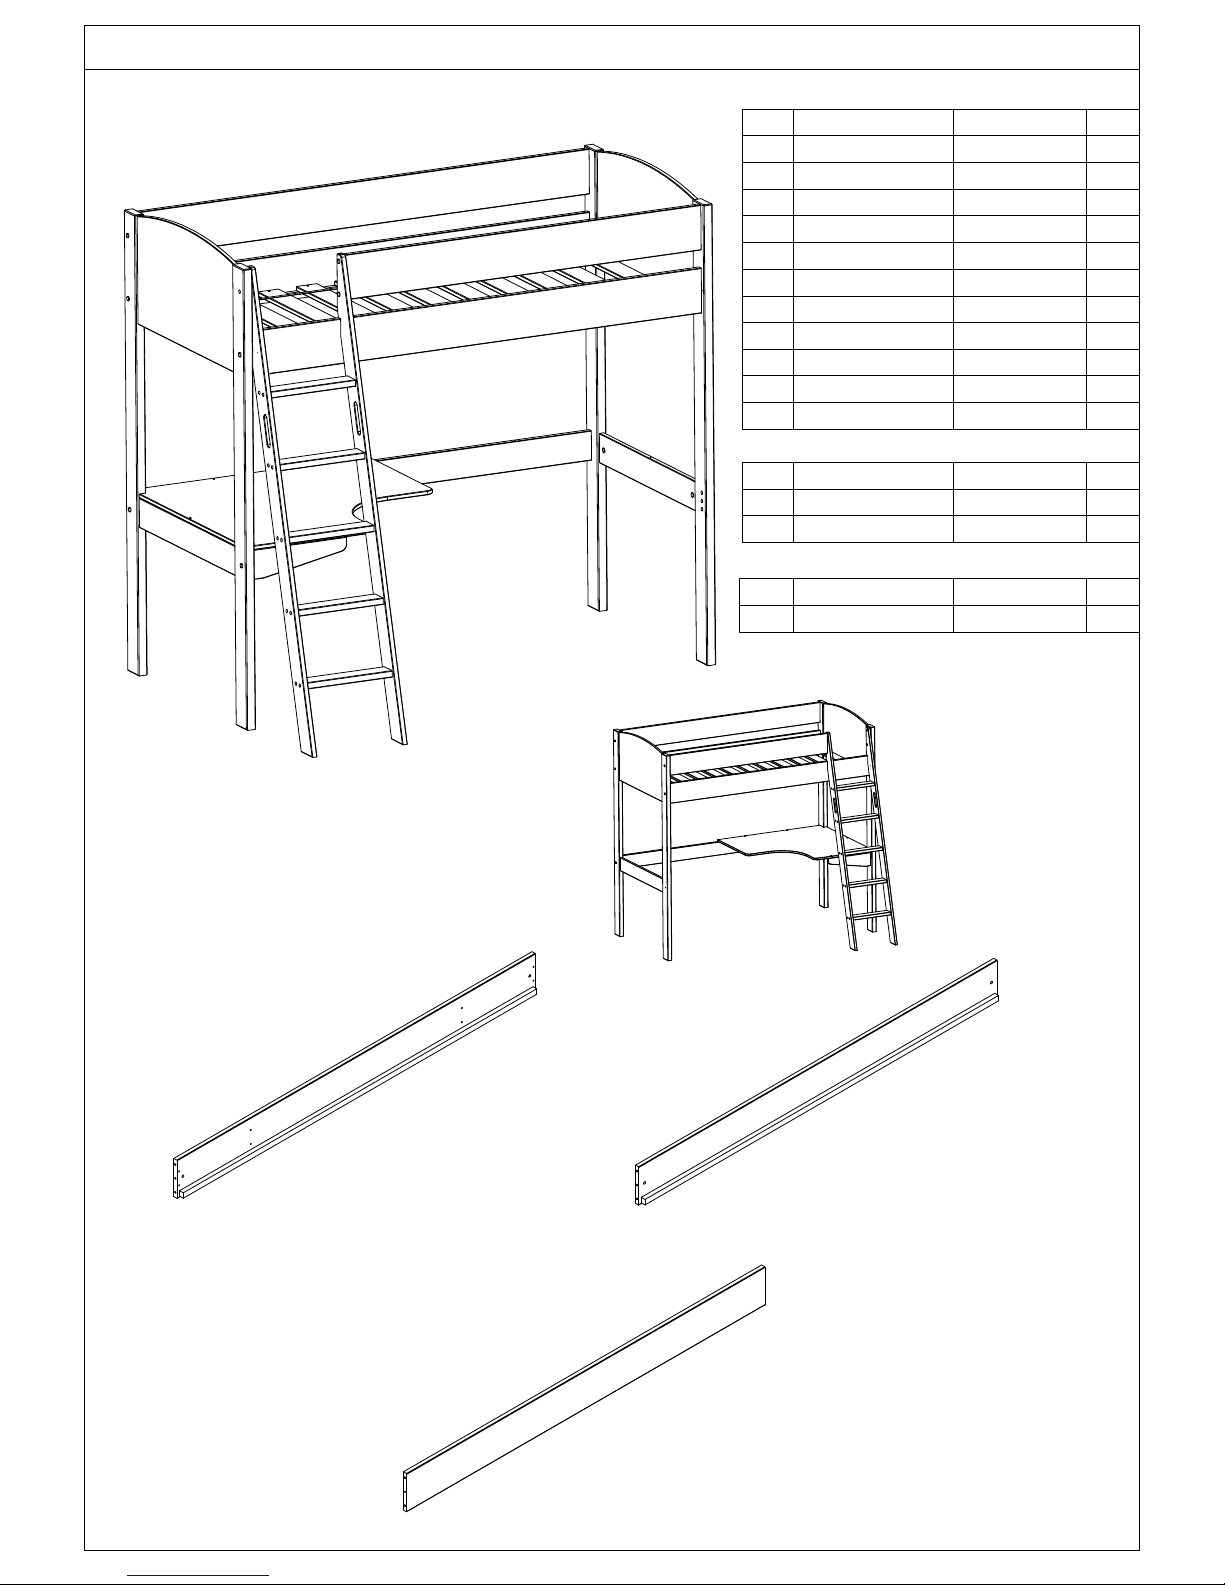
BOX C
End panel 80,2x46,5x1,9 2
7
8
9
12
11
Large desk top 100x64,1x1,6
10
3
11
13
Components
BOX B
1
Ladder side 185,8x9x2 2
12
Step 36x6,8x2,5 5
13
Support 40x11,5x2 1
CODE COMPONENT QTY
1 Front side rail 190x17,5x2 1
2 Back side rail 190x17,5x2 1
3 Side rail 190x17,5x2 1
4 Bottom back side rail 190x11,5x2 1
5 Side rail 150x17,5x2 1
7 End rail 80,2x11,5x2 2
8 Leg 179x9x3,8 2
9 Leg 179x9x3,8 2
10
CODE COMPONENT QTY
6
CODE COMPONENT QTY
14 Slats 89,5x9x1,7 12
1
Front side rail x1
(190x17,5x2 cm)
3
Side rail x1
(190x17,5x2 cm)
3/10
BOX A
PART LIST
1
2
6
5
4
6
7
8
9
10
14
11
11
11
11
Ladder can be fitted
right or left side
2
Back side rail x1
(190x17,5x2 cm)
Page 4
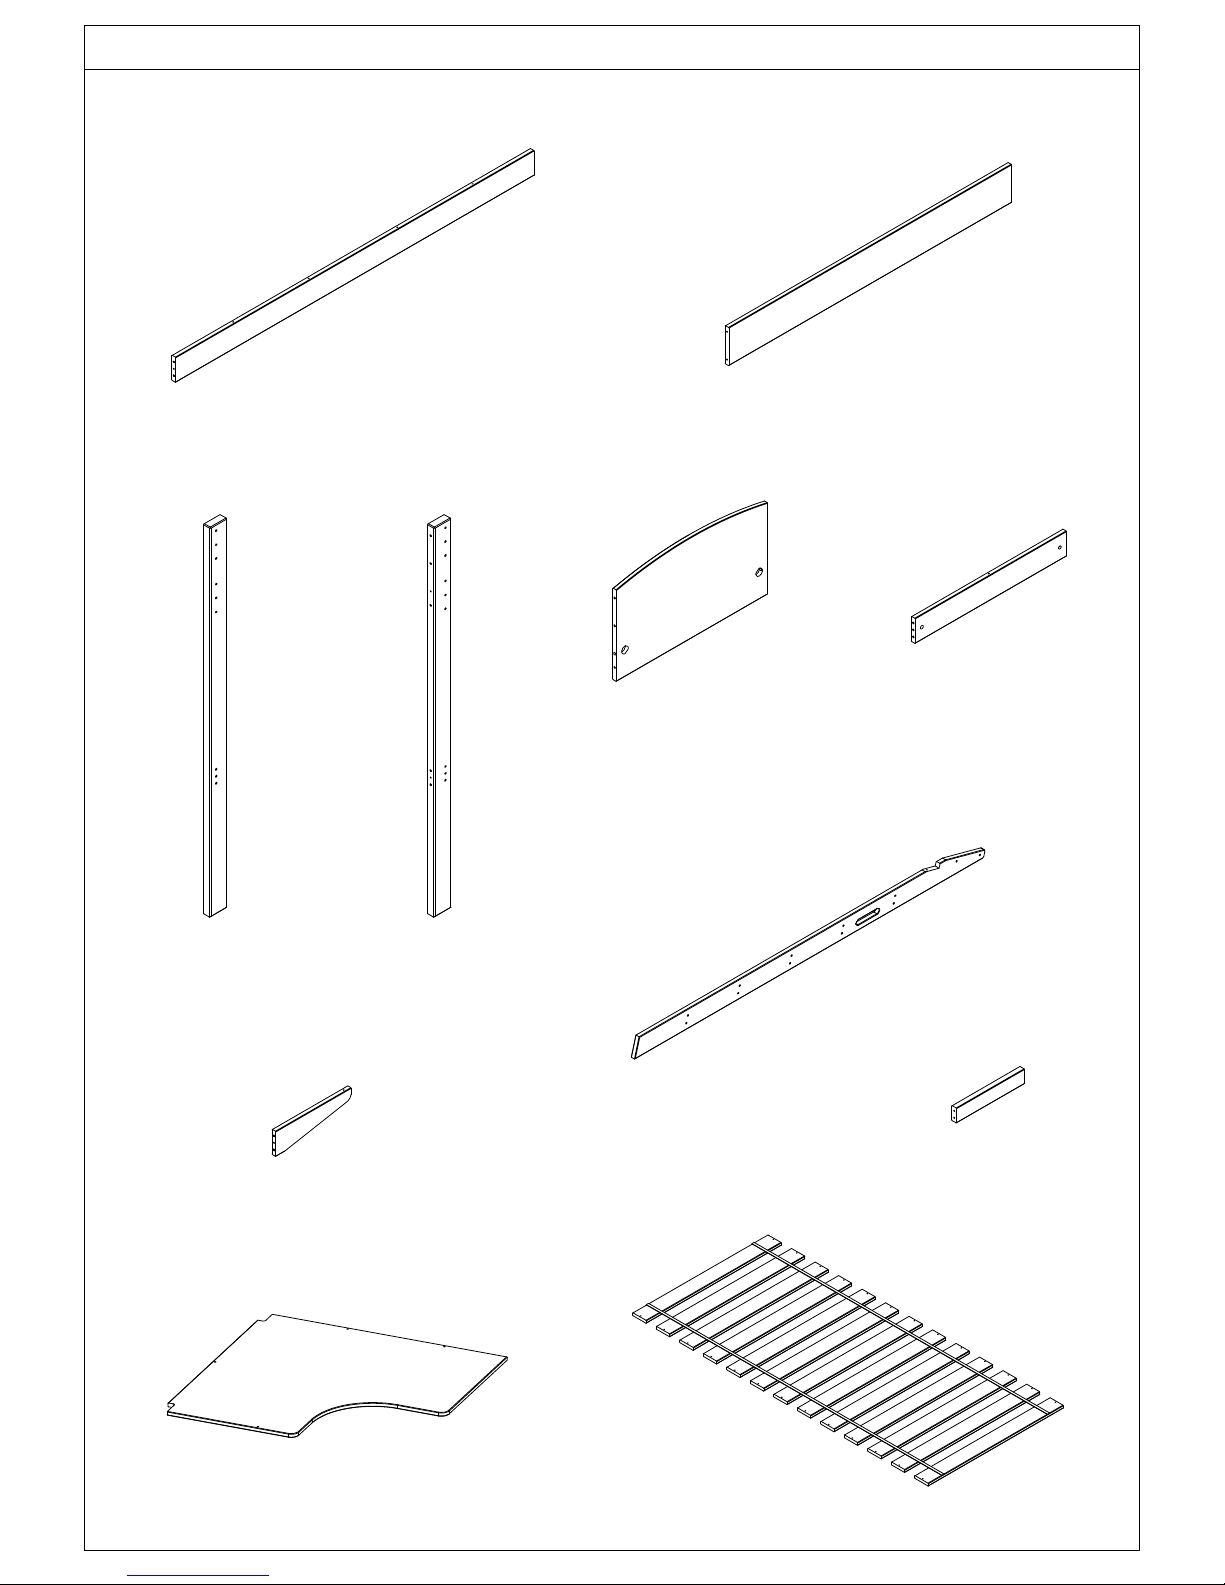
(100x94,1x1,6 cm)
Large desk top x1
13
(179x9x3,8 cm)
8 Leg x2
6 End panel x2
(80,2x46,5x1,9 cm)
Leg x2
(179x9x3,8 cm)
9
Slats x1214
(89,5x9x1,7 cm)
10
Ladder side x2
(185,8x9x2 cm)
Step x5
(36x6,8x2,5 cm)
11
12
Support x1
(40x11,5x2 cm)
4/10
4
Bottom back side rail x1
(190x11,5x2 cm)
5 Side rail x1
(150x17,5x2 cm)
7
End rail x2
(80,2x11,5x2 cm)
Page 5
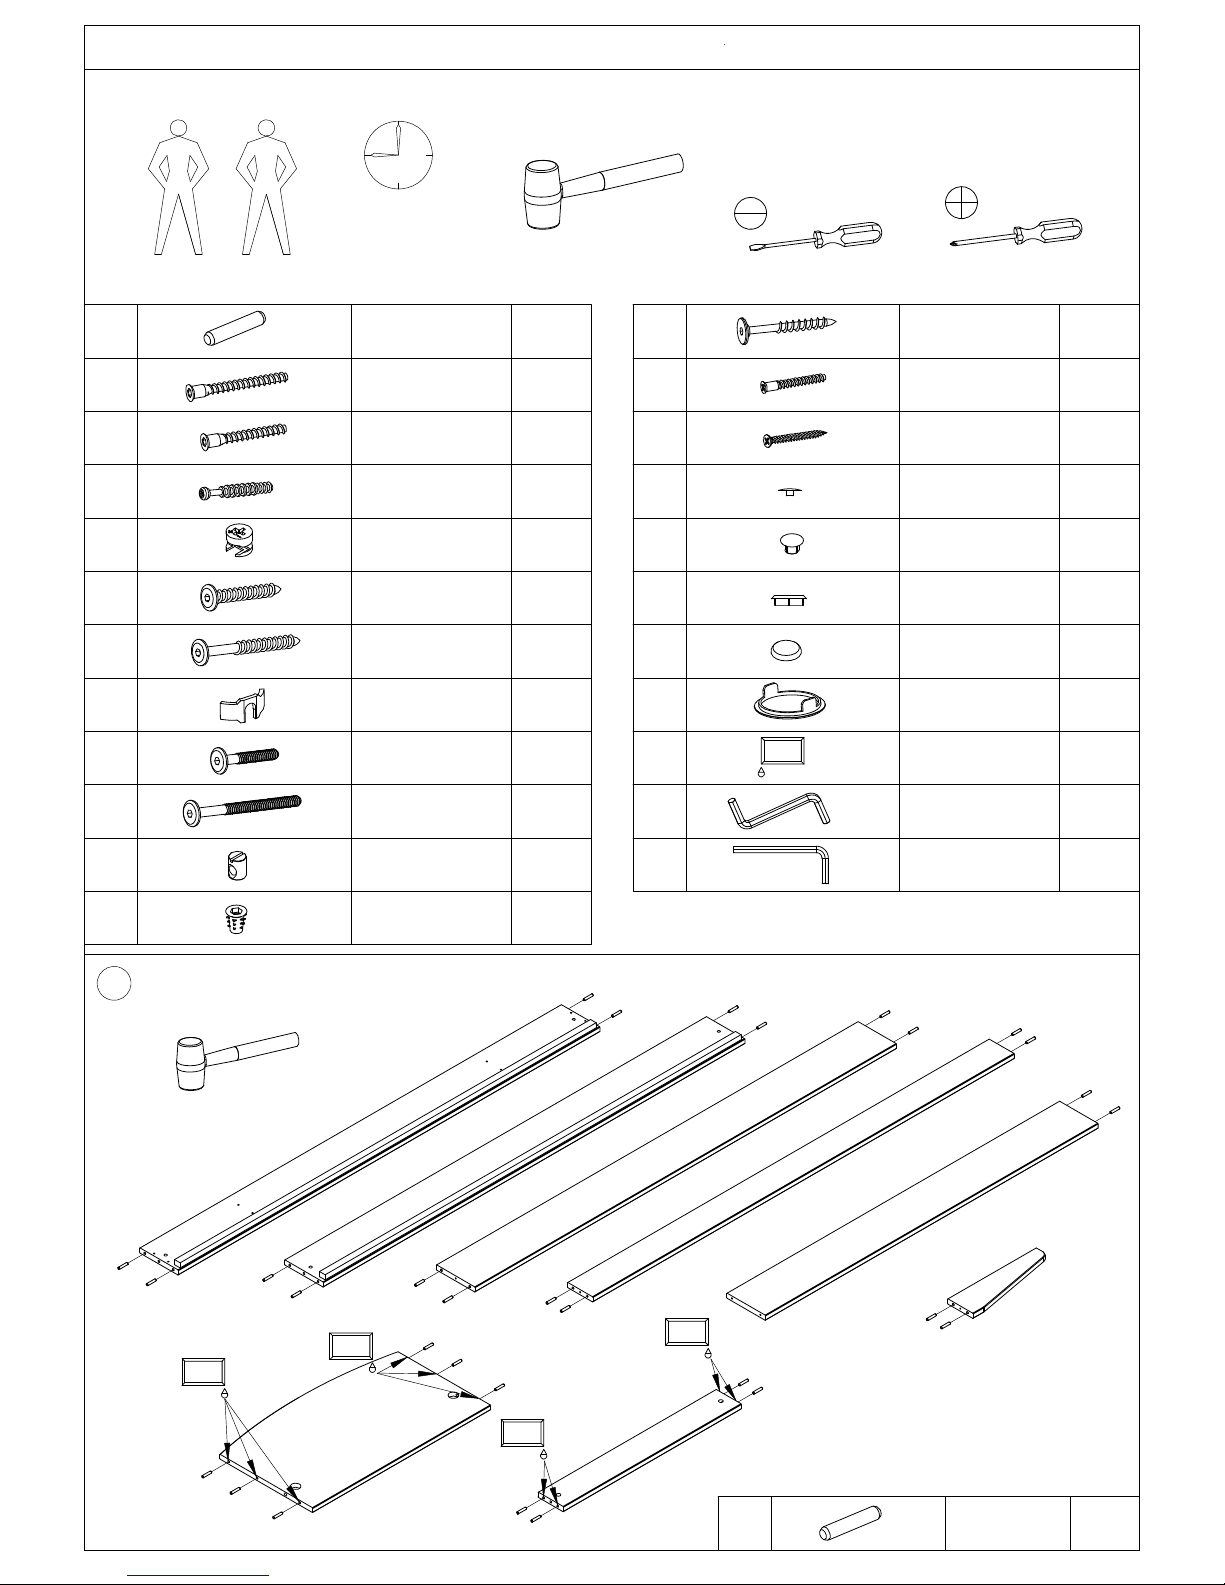
5/10
60 min
1
2x7
23
A8x40x40
A8x40x40
B7x60x4
C7x50x20
D7x34x4
E 15x12 x4
F6,3x50x2
G6,3x70x6
HD35x4
J M6x40 x2
K M6x75 x4
L M6x10x13 x4
M M6x10x13Zn x2
N 55x12,5x5 x2
P5x38x4
Q3,5x40x24
R D4x13 x20
S D8x13 x5
T D15x18x3 x4
U D15x18 x14
V D35x40 x4
XGLUEx1
Y4mmx1
Z6mmx1
GLUE
GLUE
GLUE
GLUE
GLUE
2xA
6
1
2x
A2x
A
5
4
12
2x
A3x
A2x
A2x
A2x
A2x
A2x
A2x A2x
A2x
A2x
3x
A
Tools needed (not supplied)
Page 6
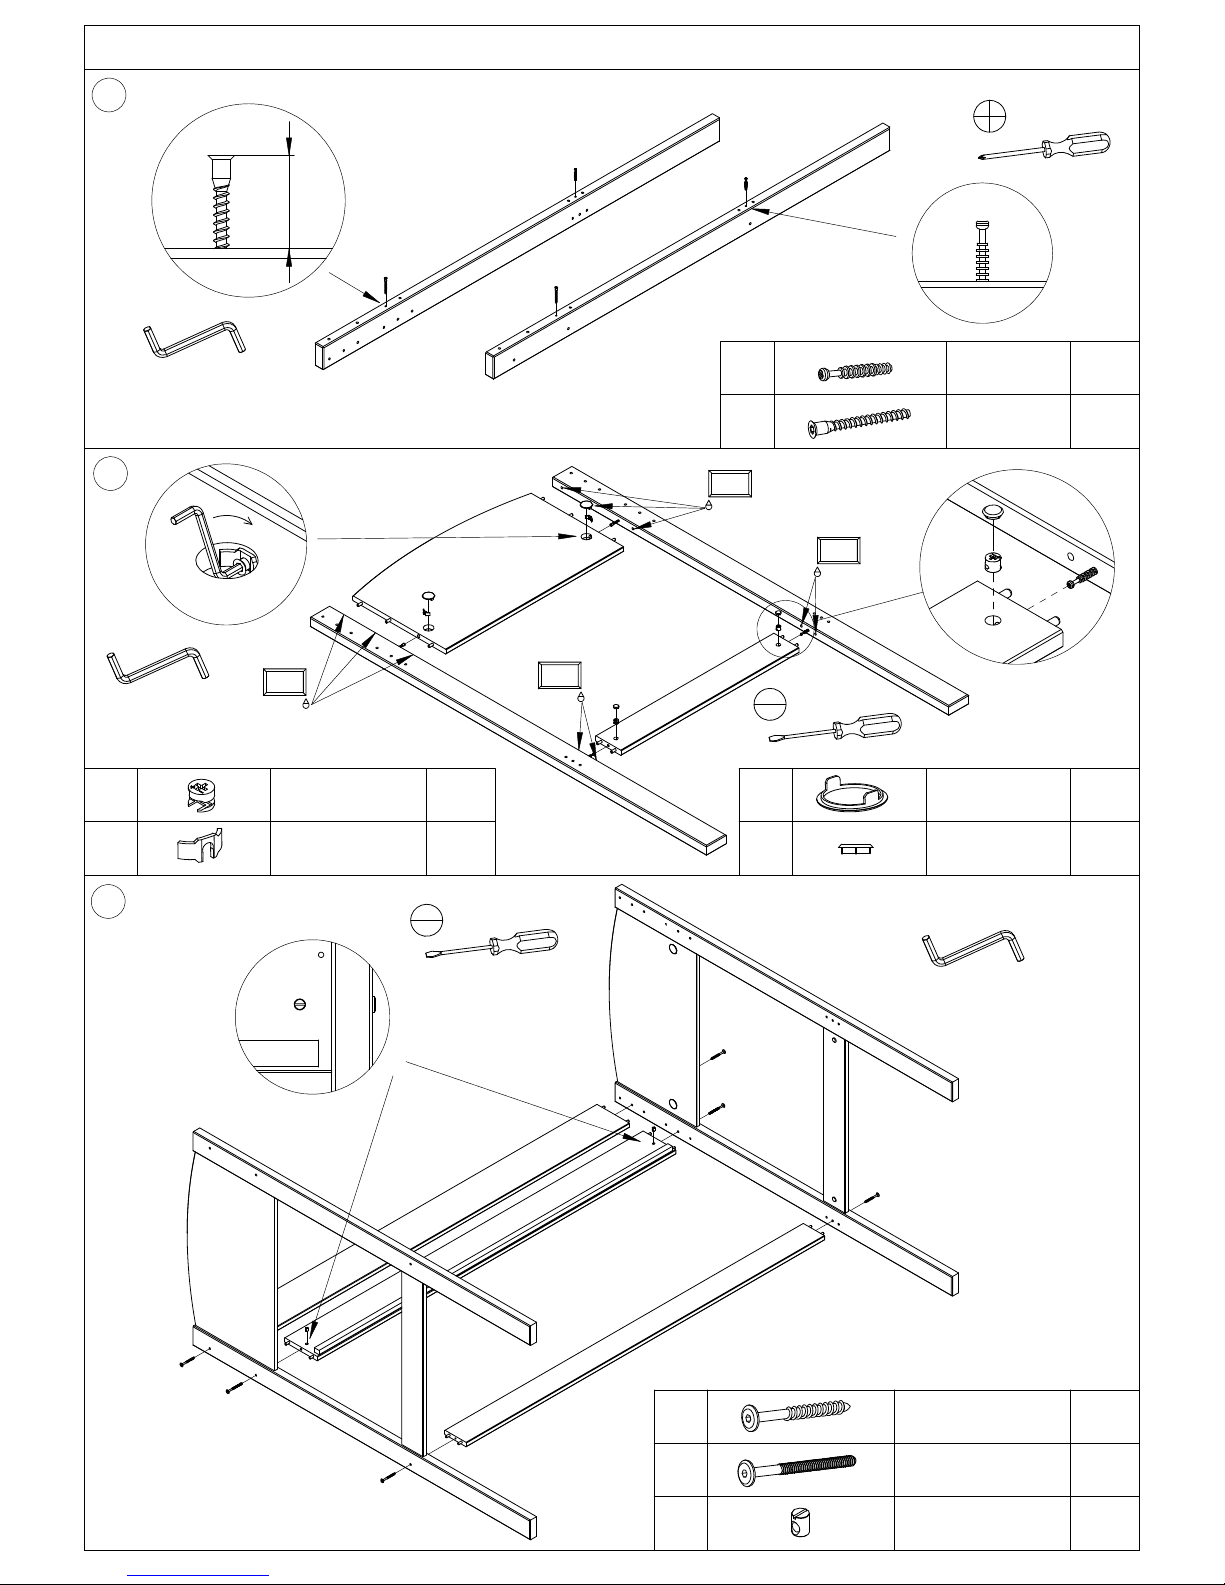
2
E 15x12 x4
HD35x4
D7x34x4
B7x60x4
G6,3x70x4
K M6x75 x2
L M6x10x13 x2
V D35x40 x4
T D15x18x3 x4
6/10
4mm
GLUE
GLUE
B
35 mm
D
H
V
T
6
7
E
9
8
E
E
H
H
V
T
2x
3
2x8B
D
B
D
2x9
GLUE
4mm
GLUE
4
2
L
G
3
K
K
G
G
G
L
4
L
4mm
V
Page 7
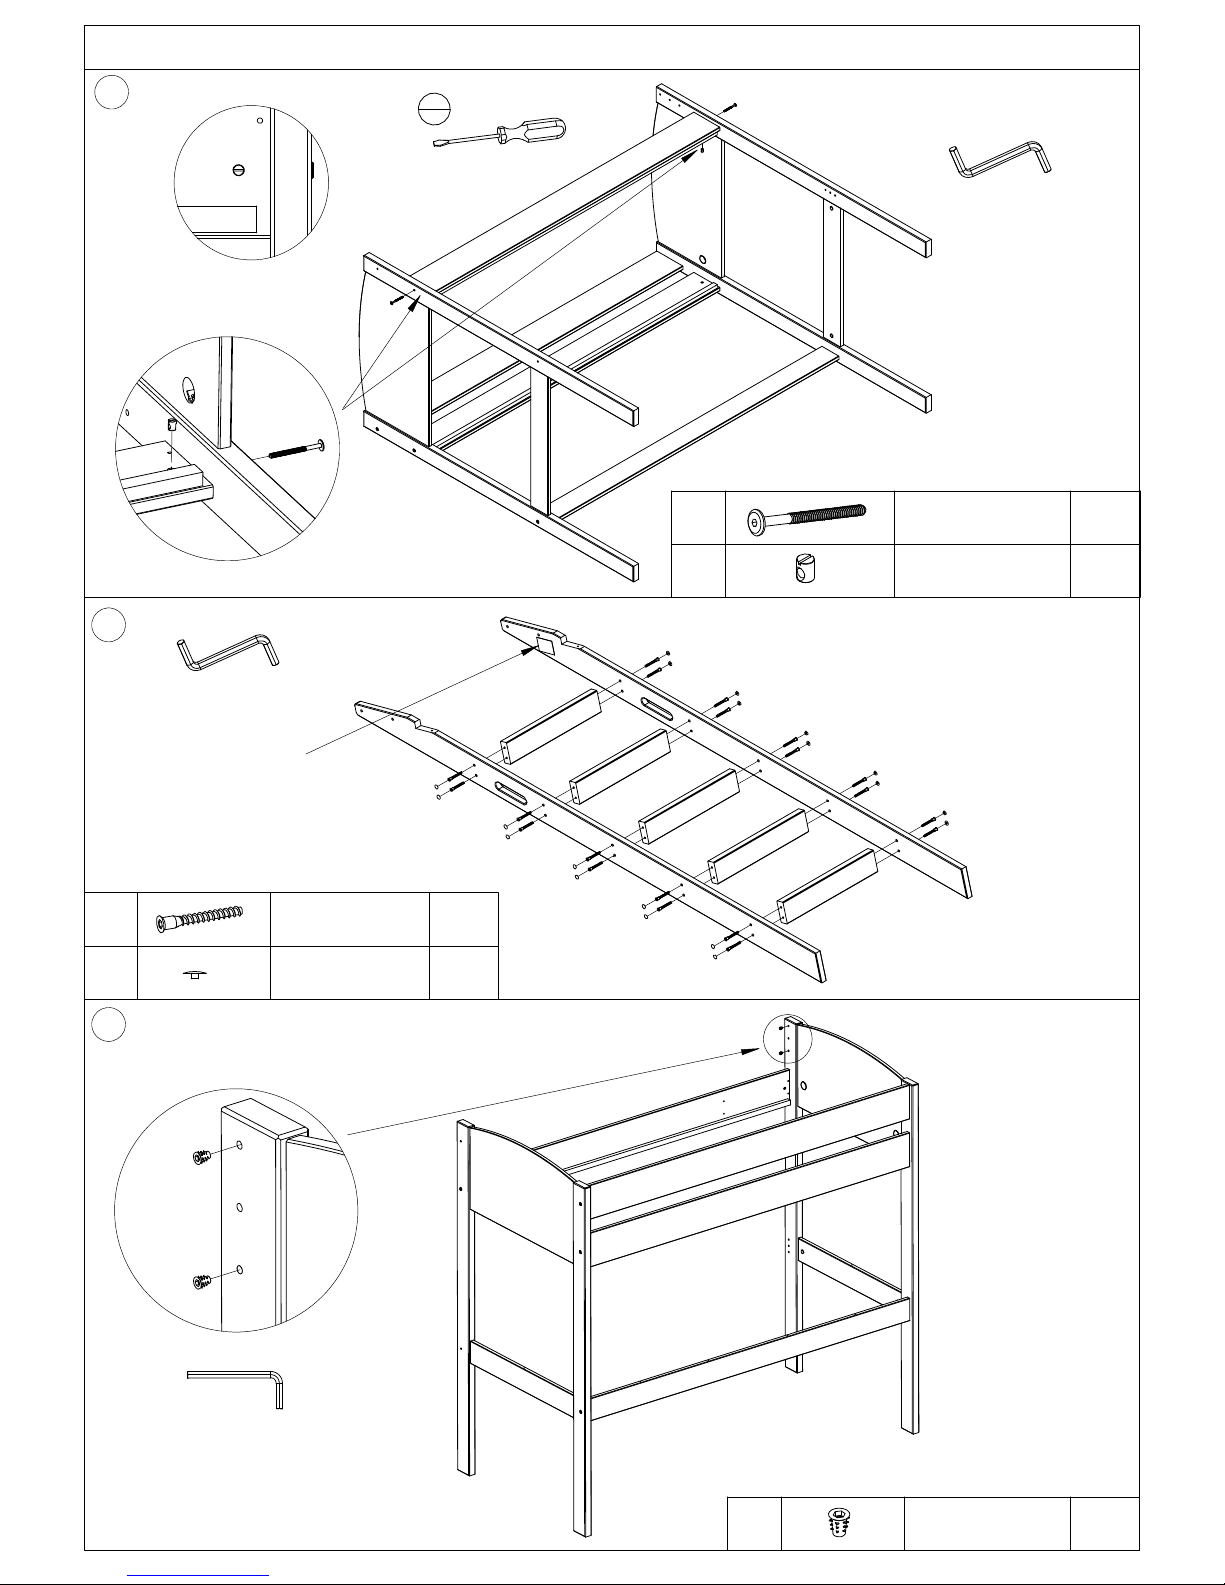
M6x75 x2
D4x13R
5
ASSEMBLING LADDER LEFT SIDE
6
K
Decide which side to attach ladder.
7
x20
x2M6x10x13L
C7x50x20
M
M6x10x13Zn
x2
7/10
LK
2xM
6mm
2xC
2xC
2xC
2xC
C
2x
2x
C
Always placed
R
2x
inside the ladder
2x
C
10
11
11
10
11
11
11
2x
R2x
R2x
R2x
R2x
R2x
R2x
R2x
R2x
R2x
C2x
C
Max.mattress height
2xC
L
K
1
K
L
4mm
4mm
L
Page 8
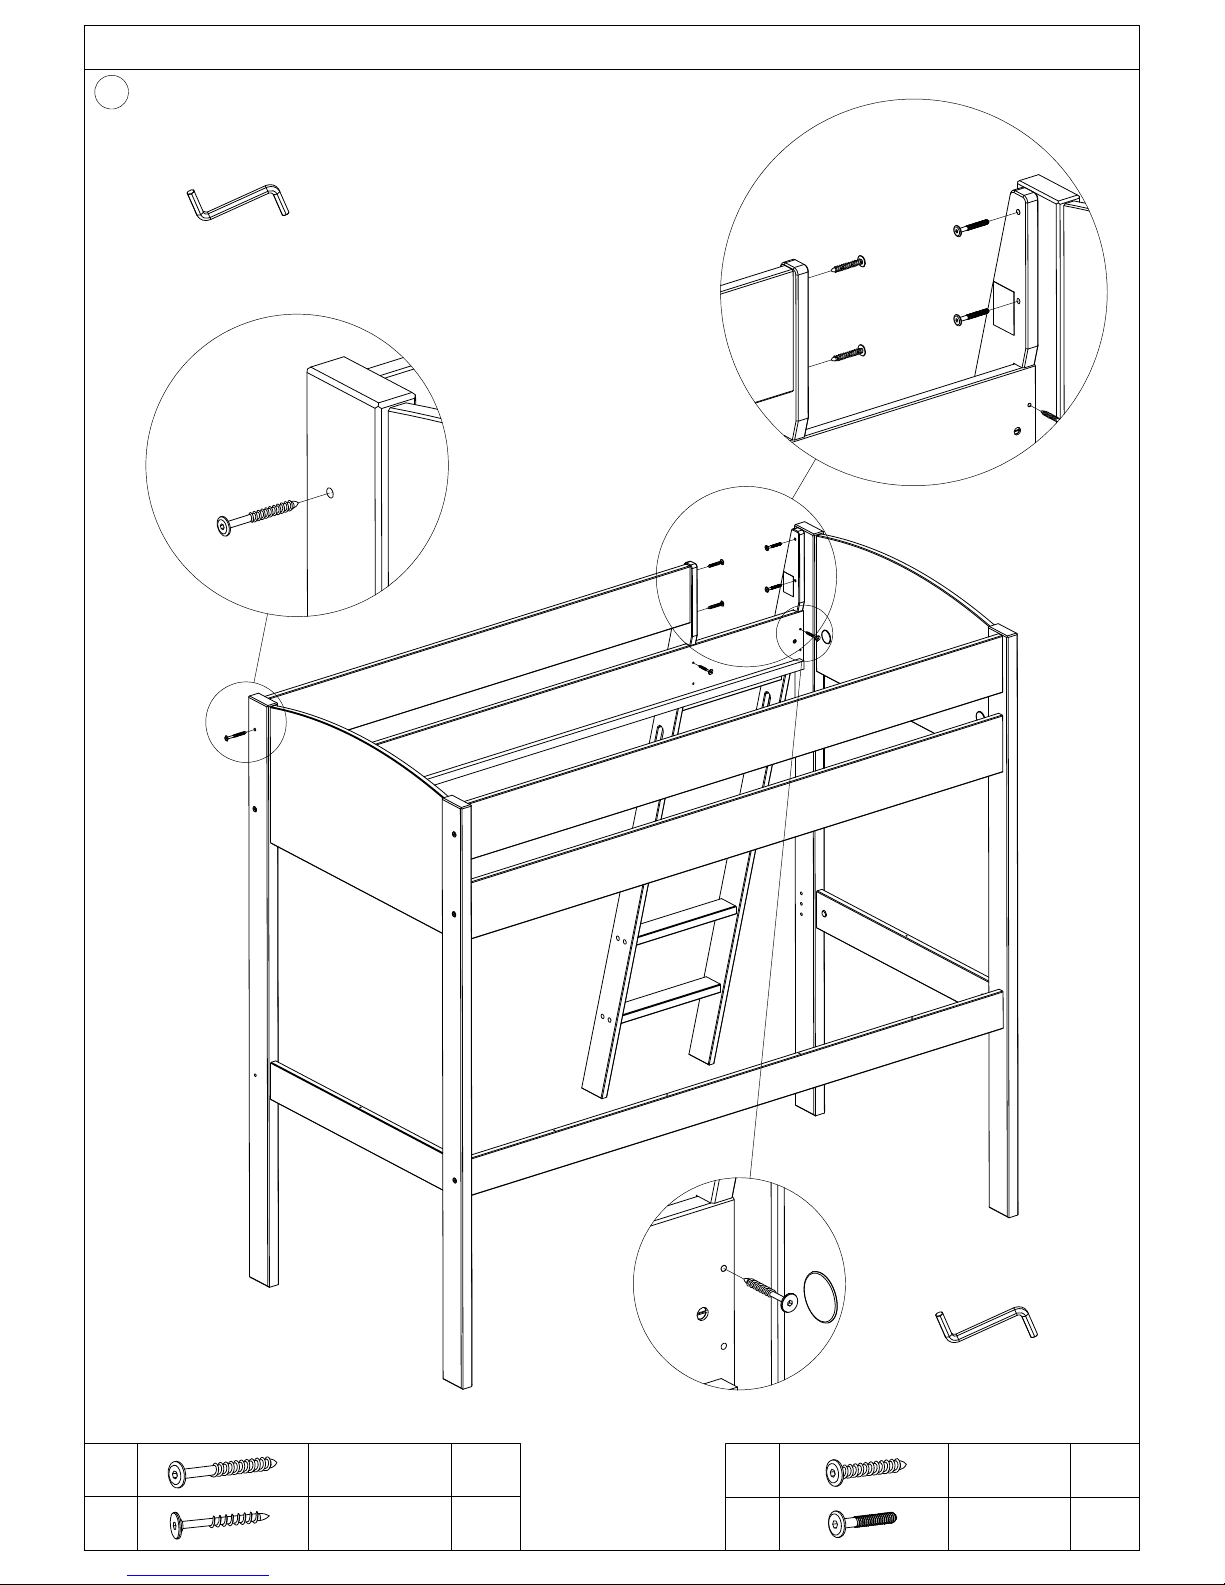
5
2xN
8
G6,3x70x1
N 55x12,5x5 x2
F6,3x50x2
J M6x40 x2
8/10
4mm
4mm
N
G
2xF
2xJ
5
Page 9
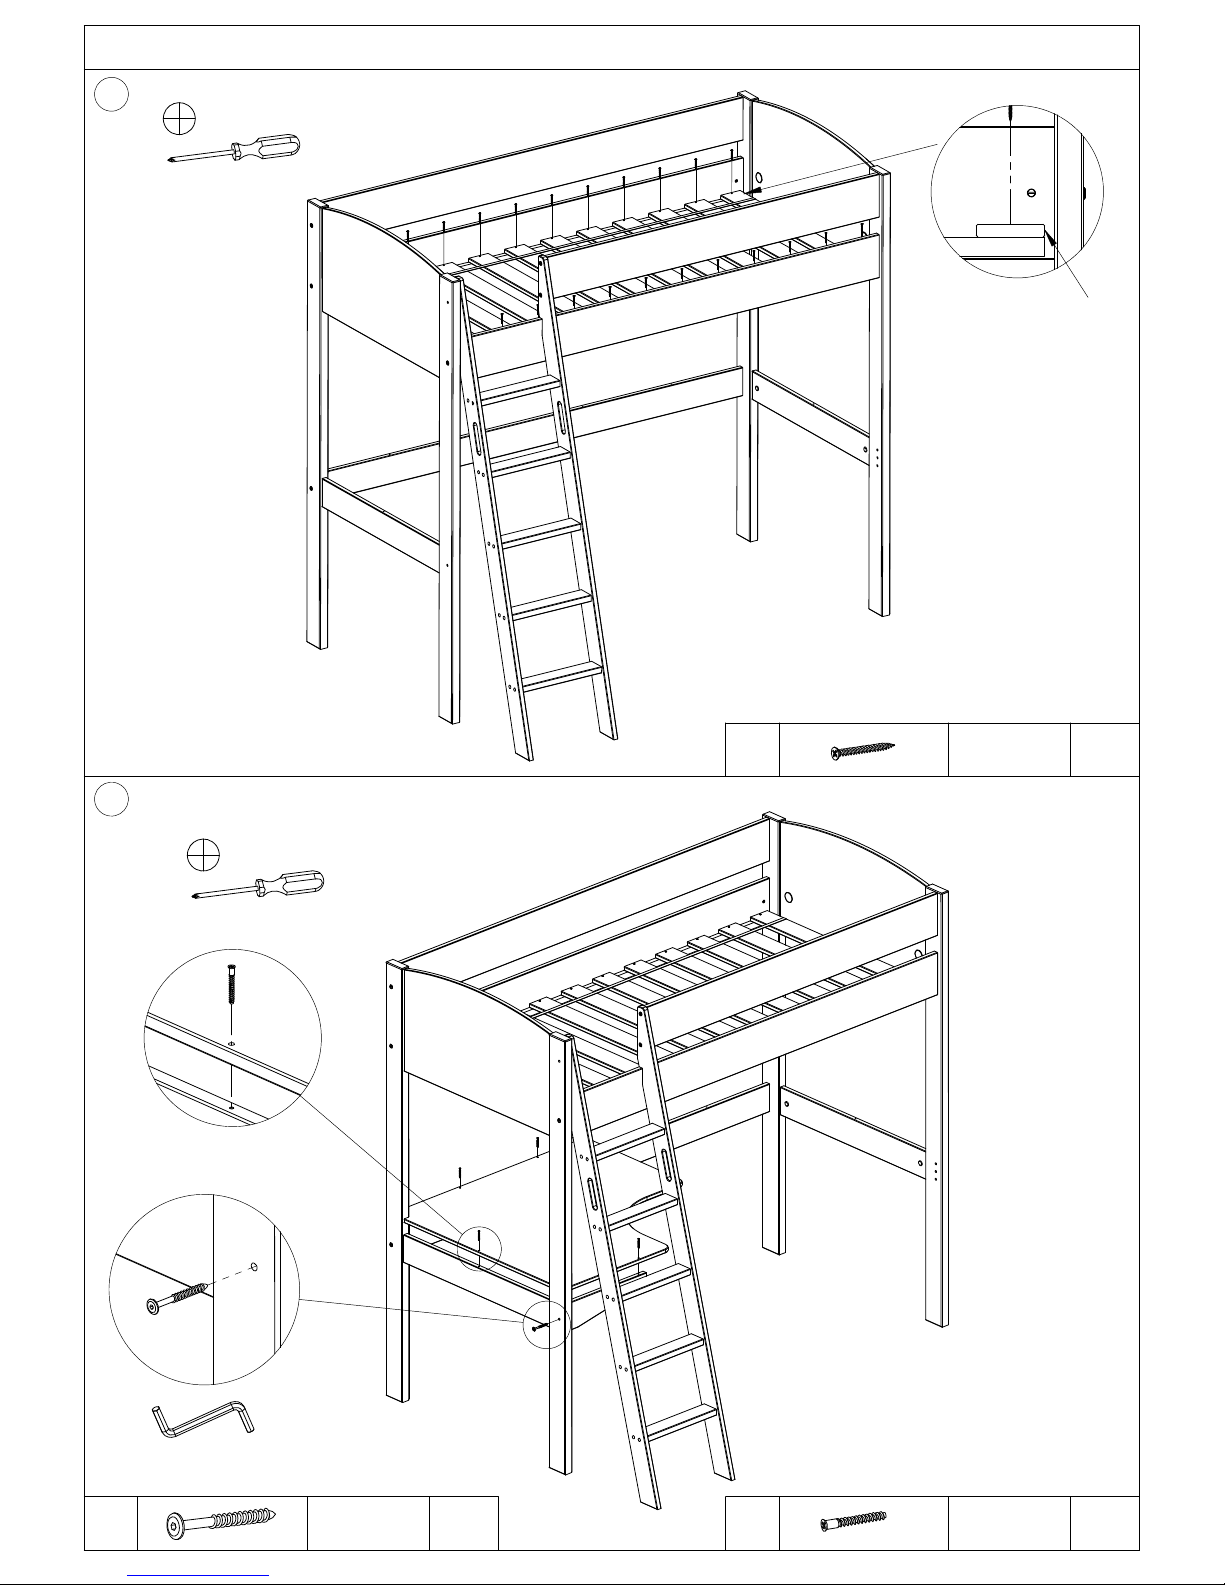
24x
14
Q
9/10
9
10
Q3,5x40x24
G 6,3x70 x1 P 5x38 x4
14
NB!
P
13
12
G
P
P
P
G
P
4mm
Page 10
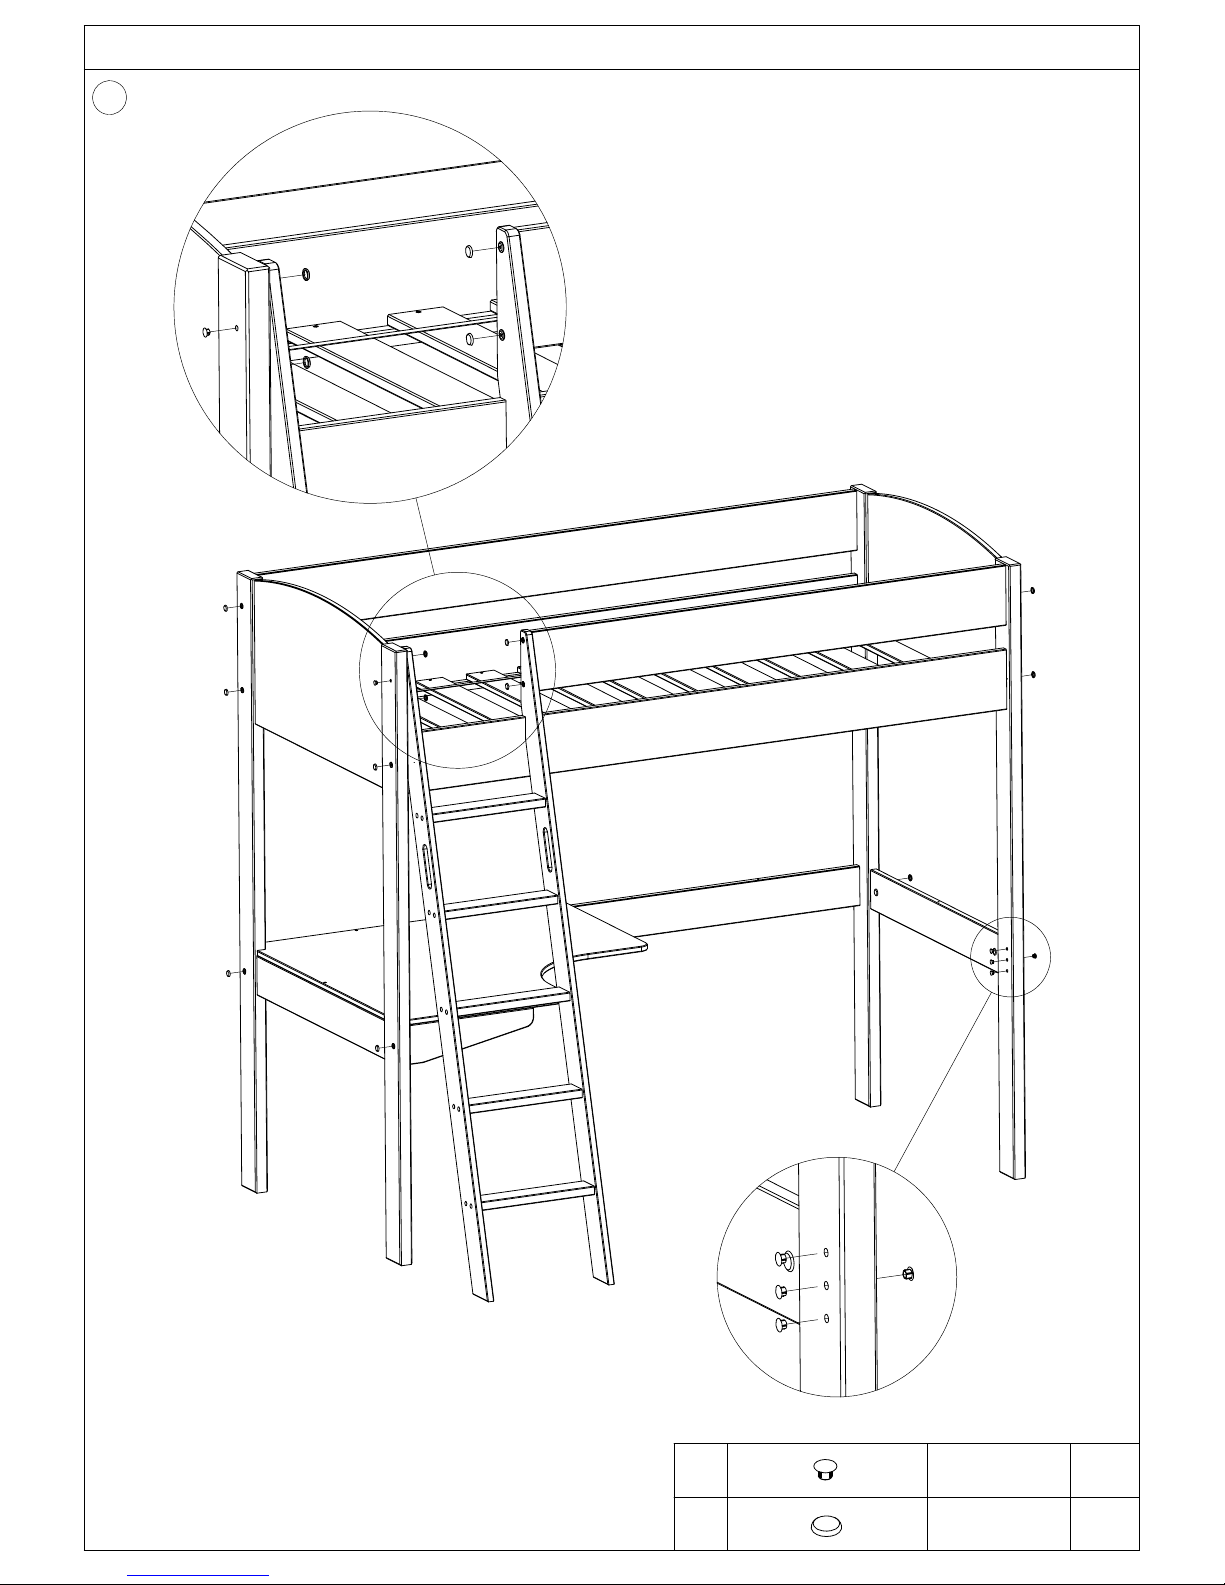
11
S D8x13 x5
U D15x18 x14
10/10
2x
S
U
S
U
U
U
U
U
U
U
U
2x
U
3xS
2xU
2xU
S
3xSS
 Loading...