

st model DG-1000 Product Manual

This electric R/C model plane is not a toy.
Assemble the plane according to the instructuons,Do not
alter or modify the model,If you make any modifications,
you will void your warranty.
Children under 12 years old must use it accompanied by
an aduit.
Test the operation of the model before each flight to insure
that all equipment is operating properly,and that the model
remains structurally sound.
Fly only on calm days(with wind speeds less than 6 mph)
and in large open areas free of trees,people,building or
any other obsracles.
REMEMBER:Take your time and follow the instructions to
end up with a well-built model that is durable and easy to fly.
SAFETY PRECAUTIONS
DG-1000
PRODUCT MANUAL
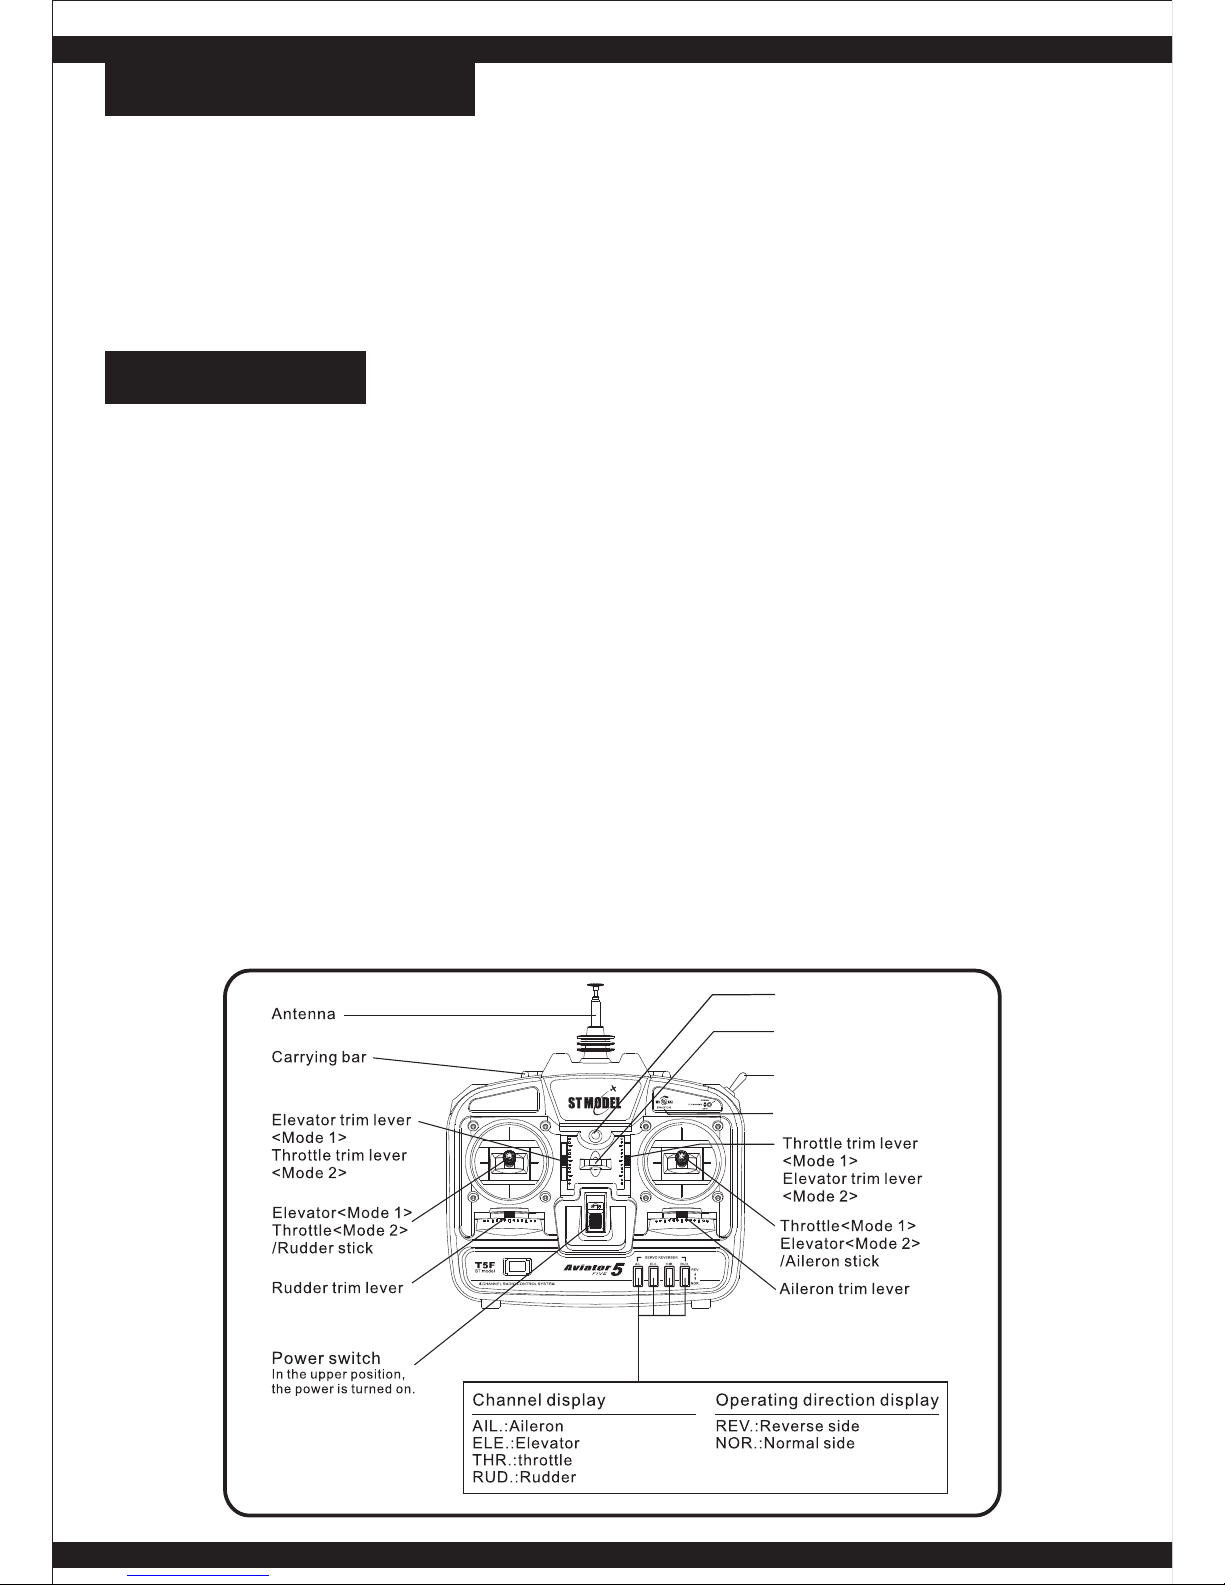
Neck strap
attachment p oint
LED
Flying mode sw itch
End poi nt ad juster of
CH 5
SPECIFICATIONS
GLOSSARY
Length:970mm/38.2in
Wing span:2010mm/ 79.1in
Wing area:22.5dm/ 348.7in
Flying weight:750g/ 36.5oz
Wing load:33.3g/ dm
Power system:Brushless motor ,1300mAh 11.1V Li- Po battery
Propeller:7"×5"
Radio required:5CH transmitter & 6CH receiver , 4 micro servos, and one standard servo;
2
2
Aileron:Controls roll(right/left);
Elevator:Controls pitch(up/down);
Rudder:Controls yaw(right/left direction);
Receiver (RX):provides input to the control surfaces and ESC ;
Power system-ESC(Electronic Speed control):Controls the speed of motor;
Retractable motor system (RMS):The Motor is installed on the retractable gear! Motor
system will be unfolded from the fuselage when the plane needs to climb, and the
motor runs the propeller to provide thrust .When the plane is in the situation of glide,
the motor system will be retracted into the fuselage to reduce the drag.
Li-Po battery :Rechargeable batteries which are used to power the airplane .Li-Po batteries
are lighter and smaller than the most other types of rechargeable batteries;
Transmitter (TX) :The hand-held unit that sends signal to the receiver. Moving the sticks
control direction, climb/descent, roll , motor speed and the RMS for folding / unfolding;
Flying mode switch:There are two flying mode of DG 1000: “NORMAL” mode and the “AUTO”
mode, it is switched by a selector switch on the transmitter. The RMS is always
unfolded when the “NORMAL” mode is on, The throttle stick (CH3) just control the
motor speed; When you choose the “AUTO” model, The folding / unfolding of RMS will
be controlled by the throttle stick in special process, while the throttle stick will control
the motor speed.
-1-
2

CONTENTS OF KIT
PREPARE THE TRANSMITTER
Motor ESC
Antenna
Receiver
Aileron Servos
Rudder Servo
Elevator Servo
Li- Po Battery
CH3
driving servo RMS
CH 1
CH
2
CH
5
01、Fuselage ……………………….. X1
02、Hatch …………………………… X1
03、Left Wing ………………………..X1
04、Right Wing ………………………X1
05、Stabilizer ………………………..X1
1、Locate the transmitter ;
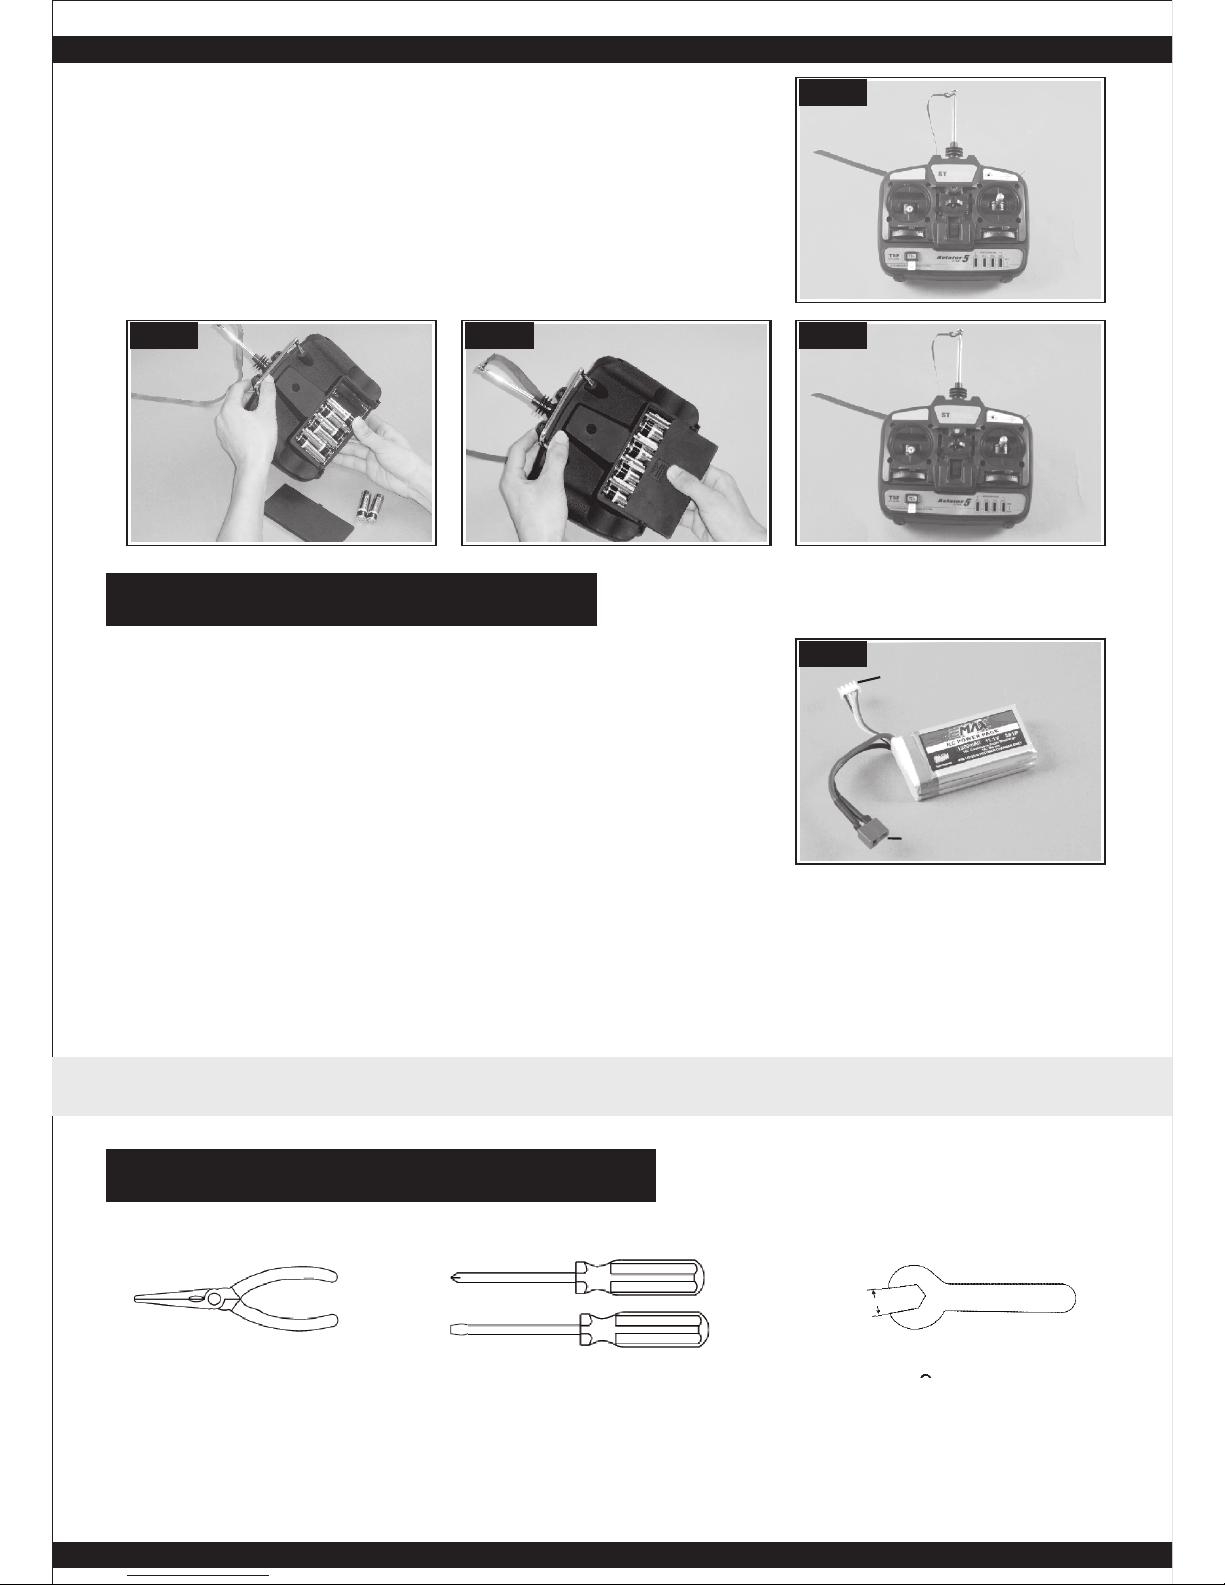
2、The transmitter requires eight alkaline “AA” batteries. To install the batteries, remove the
battery hatch by sliding it down and inserting them into place(PIC.02). Be sure to follow
the polarity diagram inside the battery compartment. Reinstall the battery hatch(PIC.03).
CAUTION:(1)、Don't use rechargeable batteries (NiCd & NiMh) ;
(2)、Don't mix old and new batteries;
(3)、Don't mix alkaline and standard (carbon-zinc)batteries;
3、Switch the transmitter on and check the LED on the front of the transmitter(PIC.04). If the
green LED is on it is safe to fly.If the red LED is flashing, install fresh batteries. Also
check to make sure that the batteries are installed correctly.
(PIC.01)
06、Screw …………………………… X1
07、Wing Connecter ……………….. X1
08、Transmitter …………………….. X1
09、Battery park ……………………..X1
10、Decals …………………………… X1
11、Product Manual ………………... X1
-2-
03
04
01
05
06
09
07
08
02
-3-
4、We suggests that the Flying mode should be on the
“NORMAL” mode, while the throttle trim will be at min.
5、Switch the transmitter off and stand by for later use.
PIC.01
PIC.03
PIC.02
PIC.04
ASSEMBLE THE AIRPLANE
Tool will be required for assembly as below
Nipper pliers Screw driver Spanner
5.5mm
CHARGE THE BATTERY
Dg1000 is equipped with a 3cell-11.1V Li-Po battery
pack(PIC.05).The Li-Po battery has two connectors. One is
for cell balance charging and the other is for discharging.
CAETION: 、Only charge the Li-Po battery with Li-Po
battery balance charger. Or use a conforming charger
which can ensure the Li-Po battery safety during
charging.
⑵、Before charging, disconnect the battery with
any power. After each flight ,remove the pack from the
airplane and allow it to cool completely before recharging.
3、During the charging process, keep the charger or battery pack in a normal temperature
area and away from source of ignition. Do not cover the charger or battery pack with
carpet, clothe or anything else. Air circulation is necessary for proper cooling.
4、Important: Never leave a charging battery unattended. Please stop charging immediately
of the battery temperature rise rapidly.
⑴
Please choose the proper power, battery and transmitter or it will reduce the longevity
under the incorrect improvements.
Disc ha rging c on nec to r
Bala nc e charg in g Con ne ct or
PIC.05

PIC.11 PIC.12
PIC.13
PIC.14 PIC.15
PIC.17 PIC.18 PIC.19
-4-
5、Insert the wing connector into one of the wings correctly as the picture shows
(PIC.15-PIC.17),and put the aileron servo wire through the fuselage into the canopy as
picture shows (PIC.18,PIC.19).
INSTALL THE FUSELAGE
1、Parts for installation:
⑴、Fuselage&Hatch
(PIC.06);
⑵、Horizontal Stabilizer
(PIC.07);
⑶、Screw(PIC.08);
⑷、Left Wing & Right Wing
(PIC.09);
⑸、Wing Connecter(PIC.10);
PIC.07
PIC.06
PIC.08
PIC.09
PIC.10
2、Install the “Z” end of push rod to the horns of elevator ;
3、Install the horizontal stabilizer onto the holder on fin as picture shows(PIC.12,PIC.13);
4、Fix the horizontal stabilizer with the screw to avoid loosening(PIC.14);
(PIC.11)
X
PIC.16
 Loading...