

Page 1

UM2169
User manual
Getting started with the Sigfox S2-LP kit
Introduction
The STSW-S2LP-SFX-DK is an evaluation SW package for Sigfox networking with the S2-LP high performance, ultra-low power
RF transceiver. It is designed to operate in the majority of radio configuration zones (RCZ) described by Sigfox.
The STSW-S2LP-SFX-DK SW package supports the STEVAL-FKI868V1, STEVAL-FKI868V2, STEVAL-FKI915V1, X-NUCLEO-
S2868A2 and X-NUCLEO-S2915A1 kit platforms.
In addition, the package includes the STDES-MONARCH, the STEVAL-FKI001V1 and support for the STEVAL-IDB007V2 and
STEVAL-IDB008V2 (kits to be used in conjunction with the shields included in the above mentioned kits). The latter solution
enables the support for BlueNRG1/2 System-on-Chip alternatively to the STM32 microcontroller.
It provides an S2-LP Sigfox library with a complete set of APIs to develop embedded applications.
The S2-LP - Sigfox Demo GUI PC application provides an interactive interface to transmit messages to the Sigfox network and
program the STEVAL-FKI nodes with the Sigfox ID to set the node for network communication.
For details regarding the BlueNRG-1/-2 hardware and software development kit, refer to STSW-BLUENRG1/2-DK.
UM2169 - Rev 7 - September 2020
For further information contact your local STMicroelectronics sales office.
www.st.com
Page 2

1 Sigfox S2-LP kit content
The package includes:
• the Sigfox Demo GUI and corresponding firmware to:
– prepare the board with ID/PAC/Key from the pool assigned to ST devices (see Section 4 Demo
description)
– run a demo that transmits user defined messages to the Sigfox network (see Section 5 Push button
demo description)
• a framework to develop embedded Sigfox-enabled applications, with examples in the source code.
• an application note which describes the Sigfox firmware framework based on the S2-LP transceiver and on
both STM32 MCU and BlueNRG1/2 SoC, with guidelines on how to develop solutions that are optimized for
power.
• the Sigfox Flasher, a tool and related software APIs to store Sigfox credentials and manufacturing calibration
values (frequency offset and RSSI), in a secure way, into the MCU internal Flash.
UM2169
Sigfox S2-LP kit content
UM2169 - Rev 7
page 2/32
Page 3

2 Requirements
2.1 Hardware requirements
A Windows® PC with:
• 2 USB ports
• 135 MB free hard disk space
At least one of the following ST evaluation kits:
• STEVAL-FKI868V2 or X-NUCLEO-S2868A2 (for RC1, RC3, RC5 and RC6) kit with STM32 Nucleo-64
development board or STEVAL-IDB007V2/IDB008V2 board
• STEVAL-FKI915V1 or X-NUCLEO-S2915A1 (for RC2 and RC4) with STM32 Nucleo-64 development board
or STEVAL-IDB007V2/IDB008V2 board
• STEVAL-FKI001V1 development kit
2.2 Software prerequisites
• Microsoft Windows 7 or later
• Adobe Acrobat Reader 6.0 or later
• BlueNRG-1 ST-LINK-Utility
• STM32CubeProgrammer
One of the following integrated development environments (to develop embedded Sigfox-enabled applications):
1. IAR EWARM 8.32.1 or later
2. Keil MDK-ARM µVision 5.17 or later
UM2169
Requirements
UM2169 - Rev 7
page 3/32
Page 4

3 Board registration
3.1 ST-side registration
This registration procedure has to be performed only once via the ST GUI.
Step 1.
STM32 STEVAL-FKI001V1
Connect the STM32 Nucleo-64 development board to a PC
via USB. Windows should automatically recognize the board
as a hard drive
Figure 1. NUCLEO disk drive
UM2169
Board registration
Connect the STEVAL-FKI001V1 development board to a PC
via USB and connect an ST-Link programmer to the
JTAG/SWD connector.
Step 2.
STM32 STEVAL-FKI001V1
Flash the development board by simply dragging the
appropriate bin file (in the Binaries/Sigfox_CLI_Demo_Project
folder) to the NODE drive. Choose the bin file according to
your STM32 Nucleo-64 development board:
– SIGFOX_CLI_DEMO_NUCLEO_XX.bin
Open the BlueNRG-1 ST-LINK Utility and flash the
development board by simply dragging the
SIGFOX_CLI_DEMO_FKI001V1.hex file (in the Binaries/
Sigfox_CLI_Demo_Project folder) into the application window
and select [Target]>[Program] and then press [Start].
UM2169 - Rev 7
page 4/32
Page 5

Step 3. Open the ST Sigfox GUI and the COM port associated with the development board.
Figure 2. Sigfox Demo GUI main window
UM2169
ST-side registration
UM2169 - Rev 7
page 5/32
Page 6

Step 4. Click on the [Open] button.
If the board does not contain Sigfox data, a Board Preparation wizard appears.
UM2169
ST-side registration
Figure 3. ST Registration procedure 1/3
UM2169 - Rev 7
page 6/32
Page 7

Step 5. Click the [Next] button
You will be prompted to complete a short form with your:
– name
– company name
– e-mail address
– radio configuration zone (RCZ) number
Note: You must specify the correct RC zone to avoid generating an incorrect ID. Please refer to https://
build.sigfox.com/sigfox-radio-configurations-rc for the updated list of Sigfox Radio Configuration (RC) zones.
Figure 4. ST Registration procedure 2/3
UM2169
ST-side registration
UM2169 - Rev 7
page 7/32
Page 8

Step 6. Click on the [Generate mail] button
A window appears with the e-mail data you need to send.
UM2169
ST-side registration
Figure 5. Generated mail pop-up
Step 7. Send an email with the Destination Address, Subject and e-mail text shown in the popup window
You will receive an answer (at the e-mail address you specified previously) with an activation string
Step 8. Paste the activation string you receive in the text box and click Next
Figure 6. ST Registration procedure 3/3
UM2169 - Rev 7
page 8/32
Page 9

Step 9. If the activation string is correct, the board is programmed with the Sigfox account data and the ID and
PAC is shown on the final page
The board is now ready and you can register the board in its own Sigfox backend
3.2 Sigfox side registration
Visit https://buy.sigfox.com/activate for ST development kit registration.
Step 1. Insert the country where the board should operate the ID and PAC of the board.
Step 2. Then fill a form to obtain an account on the sigfox backend.
An e-mail will be sent to the specified e-mail address.
Step 3. Choose a password and sign in to its own backend from https://backend.sigfox.com.
Step 4. Go to the DEVICE section.
This section provides a list of registered devices and other data.
UM2169
Sigfox side registration
Figure 7. Sigfox device page
Step 5. Click on the device ID to access a node summary page:
Figure 8. Sigfox device information
UM2169 - Rev 7
page 9/32
Page 10

Step 6. Click on messages to show a list of all sent messages.
For each message, the following information is shown:
– the date and time
– the data in hex (so if the transmission occurred with the S2-LP Sigfox GUI, the data should be the
transmitted message in hex)
– the location of the node (link to a map)
– a link quality indicator (SNR bar)
Figure 9. Sigfox device messages
UM2169
Sigfox side registration
UM2169 - Rev 7
page 10/32
Page 11
4 Demo description
The demo can run either on a kit connected to a PC running the Sigfox Demo GUI (Section 4.1 Sigfox Demo
GUI ), or on a kit supplied via USB in standalone mode (Section 4.2 Demo without connection to a PC).
4.1 Sigfox Demo GUI
After board registration, you can transmit messages using the GUI.
Step 1. Flash the board with the appropriate Sigfox_CLI_Demo firmware, located in the Binaries/
Sigfox_CLI_Demo_Project folder
Step 2. Connect the STM32 Nucleo-64 or STEVAL-FKI001V1 development board to a PC via USB.
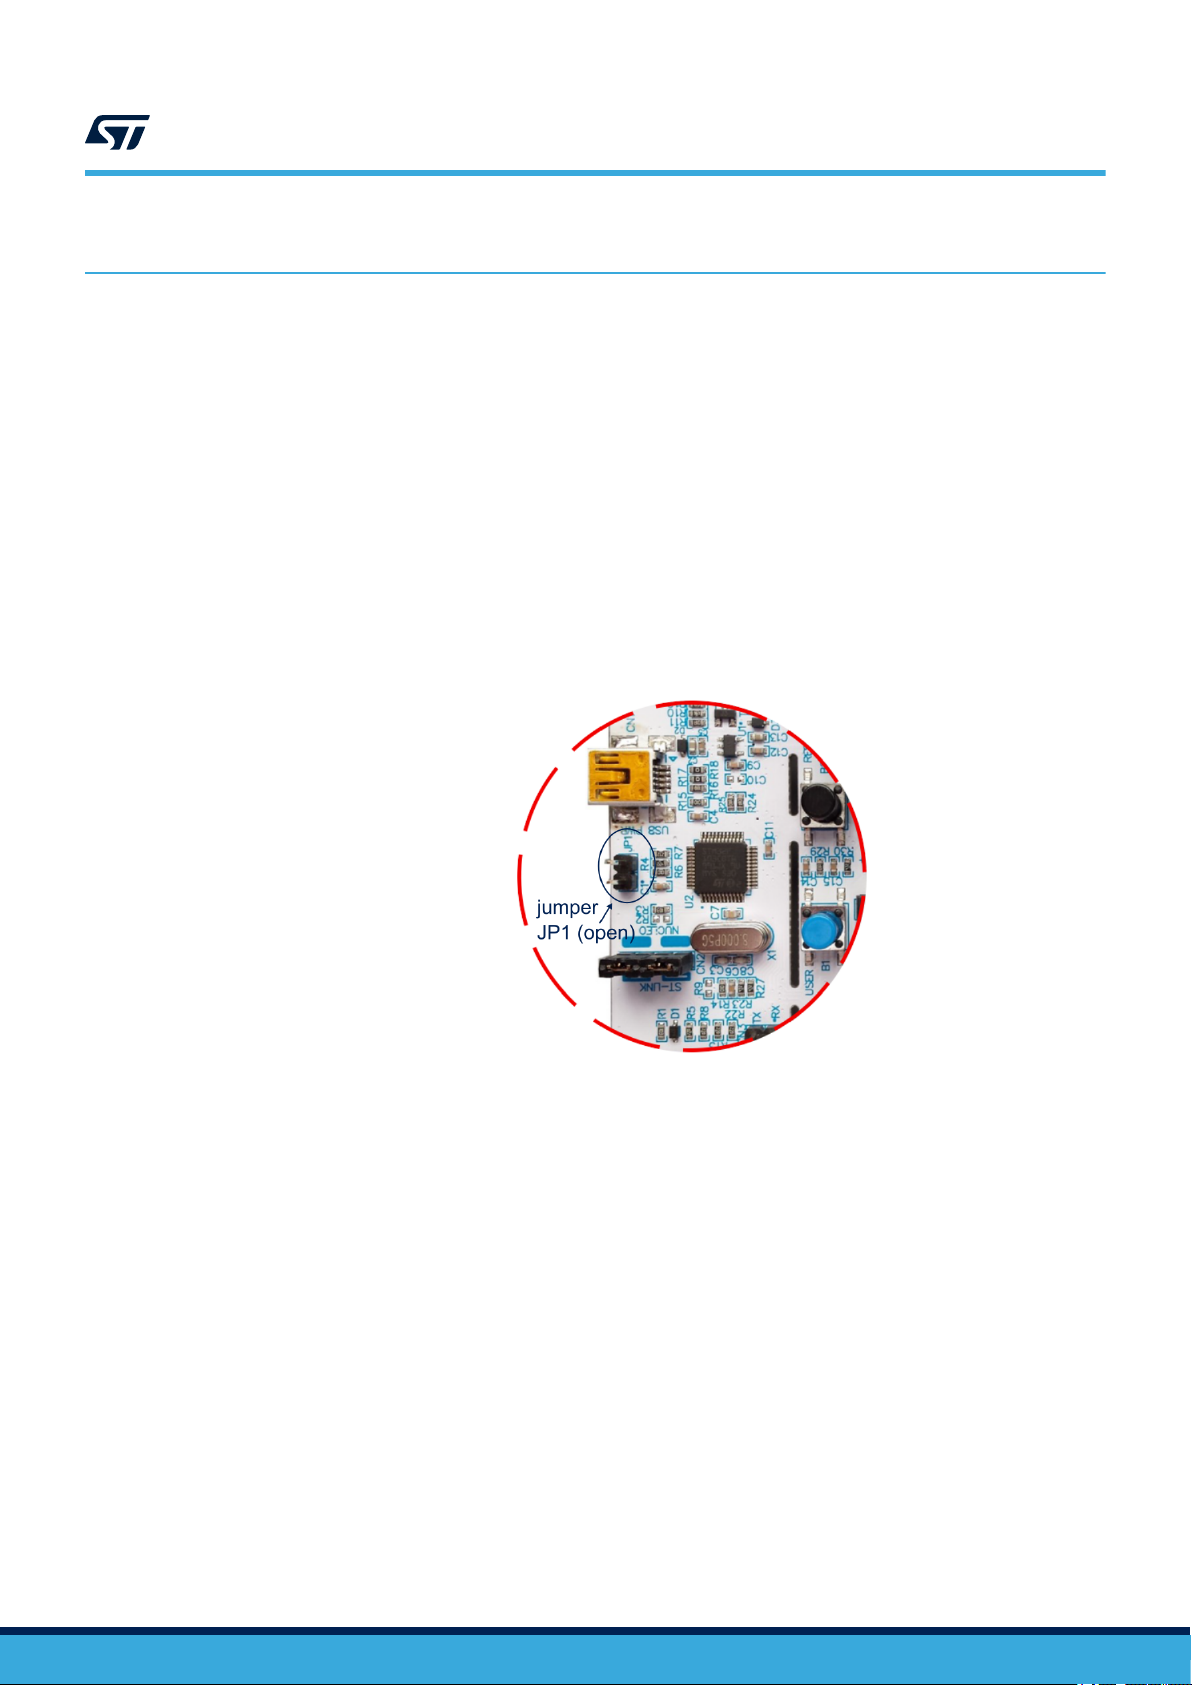
Step 3. (For STM32 only) Ensure jumper JP1 (near the USB connector) is open so the PC to assign a COM
port to it.
LEDs LD1 and LD3 on the board should both be lit.
UM2169
Demo description
Figure 10. JP1 position on STM32 Nucleo board
UM2169 - Rev 7
page 11/32
Page 12

Step 4. Launch the Sigfox Demo GUI on your PC
Figure 11. Sigfox Demo GUI main window
UM2169
Sigfox Demo GUI
Step 5. Click on the TX button to transmit data.
In adherence with protocol, the frame is repeated three times with a 500 ms interval; the duration of
each frame is shown in the Frame duration box.
The frames received by the base-stations are shown in the DEVICE > Messages section of the sigfox
backend.
Note: The maximum length of a message is 12 bytes, as per the sigfox protocol.
Step 6. Check the Ask for response checkbox and then click TX again.
The message is sent with a response request and the transmission is followed by a reception phase of
up to 50 s. The received message is shown in the Messages section of the GUI.
Step 7. To set the response for each device from the sigfox backend, log-in, go to the DEVICE TYPE tab and
click on the device type description.
Figure 12. Sigfox DEVICE TYPE tab
UM2169 - Rev 7
page 12/32
Page 13

Step 8. Click Edit to change the Downlink data parameters.
Step 9. Check the uC goes to low power checkbox to set the microcontroller in low power mode during radio
transactions.
4.1.1 Sigfox Demo GUI menu items
The File menu can be used to access the Demo firmware and Sigfox library version information.
For radio configuration zones 2 and 4, there is also the Set Std Configuration option described in
Section 4.3.3 node_set_std_config command description.
The Help menu provides GUI version information.
UM2169
Demo without connection to a PC
Figure 13. Sigfox DEVICE TYPE parameters
4.2 Demo without connection to a PC
In this mode, the board is not connected to a PC
Step 1. (For STM32 only) Close jumper JP1 in Figure 10. JP1 position on STM32 Nucleo board.
This allows the STM32 to execute the firmware program without being enumerated to a USB host
device.
LED LD1 will blink and LD3 will remain lit.
Step 2. Press the blue button (on STM32 Nucleo boards) or the SW1 button (on STEVAL-FKI001V1).
The node transmits a 32-bit counter to the network representing the number of times this button has
been pressed since the last reset.
4.3 Using the command line
The SIGFOX_CLI_DEMO_NUCLEO firmware lets send simple commands using a serial terminal.
Step 1. Open the COM port with a baudrate of 115200
A simple command shell opens.
Step 2. Press the reset button.
The board resets and a string containing ID and PAC in hex format is printed.
Figure 14. Command line terminal box
UM2169 - Rev 7
page 13/32
Page 14

Step 3. Type help.
A list of all commands is shown.
UM2169
Using the command line
Figure 15. Command line function list
4.3.1 Command line function description
Table 1. Available command line functions
NAME ARGUMENTS DESCRIPTION
fw_version
node_send_oob
node_set_rc_sync_period
set_payload_encryption
get_id
get_pac
get_rcz
node_open
node_close
None Returns the firmware version
None Sends OOB frame
Period Sets the RC SYNC period
0: no
1: yes
None Returns the Sigfox ID of the board
None Returns the Sigfox PAC of the board
None Returns the RCZ
None
None Closes the Sigfox library
Sets the encryption of the payload
Opens the Sigfox library
Must be called before performing any send
operation
UM2169 - Rev 7
page 14/32
Page 15

NAME ARGUMENTS DESCRIPTION
list-of-bytes: must be enclosed
between { } brackets and
node_send_frame
node_set_std_config
node_reset
node_get_info
node_execute_monarch_scan
node_stop_monarch_scan
node_monarch_test_mode
start_continuous_transmission
stop_continuous_transmission
switch_pa
set_lbt_thr_offset
get_lbt_thr_offset
set_smps_voltage
set_xtal_frequency_offset
reduce_output_power
set_low_power
represented in hex without
spaces.
tx_repetitions: integer
require_downlink: integer
conf_word0,conf_word1,
conf_word2 : 3 conf words
of 32bits each
default_sigfox_channel can be
from 1 to 82
None Resets the Sigfox library state
None
rc_capabilities_bit_mask: Bit
Mask of the RCx on which the
scan has to be executed (see
Table 2. Sigfox Monarch RC
Capabilities bitmask) timer: Scan
duration value unit: Unit to be
considered for the scan time
computation
None Stops a RC scan which is on going
rc: rc zone
test_mode: the type of test to
perform
rc_capabilities
Frequency: the frequency of the
continuous wave
Mode: Type of modulation to use
in continuous mode (see
Table 3. Continuous
transmission types of
modulation)
None Stops a continuous wave or modulation
0: no
1: yes
lbt_thr: the LBT threshold
None Returns the value of the LBT threshold
voltage_level: the desired output
voltage (see
Table 4. set_smps_voltage
argument values)
Crystal compensation value (Hz)
reduction: the reduction factor in
0.5 dB (approx)
1: enable_low_power (default)
0: disable_low_power
See Section 4.3.2 node_send_frame
command description
Sets the standard channel configuration.
This function is only for RCZ2 and 4.
See Section 4.3.3 node_set_std_config
command description
Returns info on send frame depending on
the mode you're using
This function executes a scan to detect a
Sigfox Beacon
Performs Sigfox tests for Monarch
Executes a continuous wave or modulation
Sets or unsets the presence of the PA
Sets the LBT threshold value to use during
Sigfox certification
This allows changing the SMPS output
voltage in order to change the maximum
output power. The function accepts the
codes in table xx3
Aligns the crystal frequency adding the
compensation value
Reduces the output power of the
transmitted signal by a factor.
= reduction argument * 0.5 dB
Enables or disables microcontroller low
power mode during transmission and
reception operations
UM2169
Using the command line
UM2169 - Rev 7
page 15/32
Page 16

NAME ARGUMENTS DESCRIPTION
1: switch to the public key
switch_public_key
0: use the key of this specific
The public key is [00, 11, 22, … , FF]
node.
reboot
node_get_version
node_get_std_config
node_test_mode
None Reboots the device
None Returns the version of the Sigfox library
None
RCZ: integer
Test_Mode: integer
Returns the standard channel configuration
in memory
Executes a specified test mode
Lib_ID: Integer
0=Sigfox
get_lib_version
1=MCU_API
2=RF_API
Gets version of specified module.
5=MONARCH_API
6=DEVICE_CONFIG_API
set_payload_encription
set_frequency_offset -
DEPRECATED
(1)
set_rssi_offset
get_rssi_offset
node_send_bit
1: enable payload encryption
0: disable payload encryption
Enables payload encryption
Offset (Hz): real Overrides default offset calibration
Offset: real Sets RSSI calibration value
None Returns the last RSSI offset in memory
Bit to send: 1 or 0
Number of repetition: integer
Sends a single bit n times
Opens Sigfox library with a specified RC
node_open_with_zone
RCZ: integer
zone (see Table 9. Supported Sigfox RC
zones)
switch_test_credentials
1. Only for backward compatibility. Please, now refer to the set_xtal_frequency_offset command
1: Enable test credentials
0: Disable test credentials
Enables credentials to be used during
Sigfox verified tests
UM2169
Using the command line
UM2169 - Rev 7
Table 2. Sigfox Monarch RC Capabilities bitmask
Bit7
- - RC6 RC5 RC4 RC3 RC2 RC1
Bit6 Bit5 Bit4 Bit3 Bit2 Bit1 Bit0
Table 3. Continuous transmission types of modulation
Modulation mode
No modulation 0
DBPSK 100bps 1
DBPSK 600bps 2
Value
page 16/32
Page 17

Table 4. set_smps_voltage argument values
Argument SMPS value
7 1.8 V
6 1.7 V
5 1.6 V
4 1.5 V
3 1.4 V
2 1.3 V
4.3.2 node_send_frame command description
To send a frame, call the node_open command and then the node_send_frame command specifying the
following parameters:
1. The list of bytes to be transmitted: given as a hexadecimal string (12 bytes max.).
2. tx_repetitions:
– If require_downlink is set, the frame is sent tx_repetitions + 1 times (tx_repetitions ≤ 2)
– If initiate_downlink_flag is not set, tx_repetitions is forced to 2.
3. require_downlink: Request a downlink frame from the base-station and wait for reception.
Note: The behavior of the node is different in uplink (require_downlink=0) and downlink
(require_downlink=1).
The following procedures are initiated in the different cases:
• uplink :
– Send uplink frames (3)
UM2169
Using the command line
Command example: node_send_frame {012345} 0 0
Command response: {{(node_send_frame)} API call...{sfx_error:00}}
• downlink :
– Send uplink frames (1 to 3)
– Receive downlink frame
– Send out of band frame (Voltage, temperature and RSSI)
Command example: node_send_frame {012345} 2 1
Command response: {{(node_send_frame)} API call...{sfx_error:00}
{customer_resp: 0x00,0x00,0x00,0x50,0x6C,0x75,0x74,0x6F}}
4.3.3 node_set_std_config command description
FCC allows the transmitters to choose different macro channels to implement a frequency hopping pattern
allowed by the standard. These macro channels can be chosen through three 32-bit configuration words.
Each bit of the config_words[0,1,2] array represents a macro channel according to the following mapping:
Table 5. Macro channel mapping - config_words[0]
Macro Ch. 1 2 3 4 5 6 7 … 32
Frequency (MHz) 902.2 902.5 902.8 903.1 903.4 903.7 904.0 … 911.5
config_words[0] bit 0 1 2 3 4 5 6 … 31
UM2169 - Rev 7
page 17/32
Page 18

UM2169
Using the command line
Table 6. Macro channel mapping - config_words[1]
Macro Ch. 33 34 35 36 37 38 39 … 64
Frequency (MHz) 911.8 912.1 912.4 912.7 913.0 913.3 913.6 … 921.1
config_words[1] bit 0 1 2 3 4 5 6 … 31
Table 7. Macro channel mapping - config_words[2]
Macro Ch. 65 66 67 68 69 70 71 … 86
Frequency (MHz) 921.4 921.7 922.0 922.3 922.6 922.9 923.2 … 927.7
config_words[2] bit 0 1 2 3 4 5 6 … 21
A macro channel is only enabled when the corresponding config_words[] bit is set to 1. At least 9 macro
channels must be enabled to meet the FCC specifications.
The last argument is an integer representing the sigfox_default_channel. It should be set as follows:
• For RCZ2, the operational frequency should be 902.2MHz and the default channel is 1.
• For RCZ4, it is necessary to keep the 902.2 MHz frequency in the open function but, since the sigfox
operational channel is at 920.8MHz, we need to set the default channel to 63.
By default the GUI uses the following std_config:
Parameter
config_words[0] 0x000001FF 0x00000000
config_words[1] 0x00000000 0xF0000000
config_words[2] 0x00000000 0x00001F
sigfox_default_channel 1 63
Note: This command is ineffective for RCZ1.
Table 8. Default STD config
RCZ2 RCZ4
UM2169 - Rev 7
page 18/32
Page 19

5 Push button demo description
This is an ST-Sigfox demo showing how to use the Sigfox protocol to send a message to a base station each time
the blue button on the STM32 Nucleo board, the button 2 of the STEVAL-IDB007V2/STEVAL-IDB008V2 board, or
the SW1 button on the STEVAL-FKI001V1 is pressed. The payload of the message is a number representing the
number of times the button has been pressed since the last boot sequence.
If something goes wrong during initialization, the green LED on the STM32 Nucleo board or the red lLED on the
STEVAL-IDB007V2/STEVAL-IDB008V2 board will blink continuously.
The root folder of the project is Projects/Projects_Cube/Sigfox_Applications/Sigfox_PushButton_Demo_Project.
The same example is provided both for MDK-ARM Keil and IAR Embedded Workbench integrated development
environments.
5.1 KEIL project
To use the project with KEIL µVision 5 for ARM®:
Step 1. Open the KEIL µVision 5 for ARM and select Project→Open Project.
Step 2. Open the KEIL project
Projects/Projects_Cube/S2-LP_Sigfox_DK/SigFox_PushButton_Project
UM2169
Push button demo description
Step 3. Select the desired platoform (STM32 or BlueNRG) and open the project in the MDK-ARM folder
Step 4. Select the configuration and go to Project→Rebuild all target files.
This will recompile and link the entire application
Step 5. Select Project→Download to download the corresponding binary image.
5.2 IAR project
To use the project with IAR Embedded Workbench for ARM®:
Step 1. Open the Embedded Workbench for ARM and select File→Open→Workspace.
Step 2. Open the IAR project
Projects\Projects_Cube\S2-LP_SigFox_DK\SigFox_PushButton_Project
Step 3. Select the desired platoform (STM32 or BlueNRG) and open the project in the EWARM folder
Step 4. Select Project→Rebuild All.
This will recompile and link the entire application
Step 5. Select Project→Download and Debug to download the corresponding binary image.
UM2169 - Rev 7
page 19/32
Page 20

6 Sigfox CLI demo description
This ST-Sigfox demo shows how to use a command line interface (CLI) to send commands which use the Sigfox
protocol to send messages and perform pre-certification tests (for the available commands refer to
Section 4.3 Using the command line).
6.1 STEVAL-IDB007V2/STEVAL-IDB008V2 limitations
As described in Section 6.5 BlueNRG-1/2 support, the STEVAL-IDB007V2/STEVAL-IDB008V2 evaluation
boards cannot use the UART and the external EEPROM at the same time, so the EEPROM cannot be used in
this project.
For this reason, in the CLI Project, you should use the define USE_FLASH for the MCU Flash to store credentials
and any other Sigfox nonvolatile data.
UM2169
Sigfox CLI demo description
6.2
Sigfox pre-certification tests
The CLI project includes the SIGFOX ADDON library that allows performing the entire test suite before the official
certification.
The test procedure requires the RSA-SDR-Dongle kit from Sigfox.
Test can be performed calling the node_test_mode command specifying RCZ and Test ID.
6.2.1 Sigfox RCZ values
RCZ ID RCZ Name Description
0 SFX_RC1 Radio Configuration 1
1 SFX_RC2 Radio Configuration 2
2 SFX_RC3A Radio Configuration 3A
3 SFX_RC3C Radio Configuration 3C
4 SFX_RC4 Radio Configuration 4
5 SFX_RC5 Radio Configuration 5
6 SFX_RC6 Radio Configuration 6
8 SFX_RC101 Radio Configuration 101
6.2.2 Sigfox test ID values
Table 9. Supported Sigfox RC zones
UM2169 - Rev 7
Table 10. Sigfox suitable test ID values
Test ID Test name
0 SFX_TEST_MODE_TX_BPSK
1 SFX_TEST_MODE_TX_PROTOCOL
2 SFX_TEST_MODE_RX_PROTOCOL
3 SFX_TEST_MODE_RX_GFSK
4 SFX_TEST_MODE_RX_SENSI
5 SFX_TEST_MODE_TX_SYNTH
6 SFX_TEST_MODE_TX_FREQ_DISTRIBUTION
7 SFX_TEST_MODE_RX_MONARCH_PATTERN_LISTENING_SWEEP
8 SFX_TEST_MODE_RX_MONARCH_PATTERN_LISTENING_WINDOW
page 20/32
Page 21

Test ID Test name
9 SFX_TEST_MODE_RX_MONARCH_BEACON
10 SFX_TEST_MODE_RX_MONARCH_SENSI
11 SFX_TEST_MODE_TX_BIT
12 SFX_TEST_MODE_PUBLIC_KEY
13 SFX_TEST_MODE_NVM
6.3 KEIL project
To use the project with KEIL μVision 5 for ARM®:
• Open the KEIL μVision 5 for ARM and select Project→Open Project
• Open the Keil project in
– Projects\Projects_Cube\S2-LP_SigFox_DK\SigFox_CLI_Demo_Project
• Select the desired platform (STM32 or BlueNRG) and open the project in the MDK-ARM folder
• Select the configuration and go to Project→Rebuild all target files
– This will recompile and link the entire application
• Select Project→Download to download the corresponding binary image
UM2169
KEIL project
6.4
IAR project
To use the project with IAR Embedded Workbench for ARM©:
Step 1. Open the Embedded Workbench for ARM©.
Step 2. Select [File]>[Open]>[Workspace].
Step 3. Open the IAR project
Projects\Projects_Cube\S2-LP_SigFox_DK\SigFox_CLI_Demo_Project
Step 4. Select the desired platform (STM32 or BlueNRG) and open the project in the EWARM folder.
Step 5. Select [Project]>[Rebuild All]
Step 6. Select [Project]>[Download and Debug] to download the corresponding binary image.
6.5 BlueNRG-1/2 support
The STSW-S2LP-SFX-DK SW package supports the STEVAL-FKI001V1, the Monarch Reference Design and the
STEVAL-IDB007V2/STEVAL-IDB008V2 platforms.
To use them, you have to download and install the latest STSW-BLUENRG1-DK software package from
www.st.com to install the USB-to-serial driver needed for the applications requiring the serial port.
For the STEVAL-IBD007V2 and the STEVAL-IDB008V2 some hardware modifications are also needed to ensure
compatibility with S2-LP evaluation kits.
6.5.1 Changes to the STEVAL-IDB007V2 and STEVAL-IDB008V2 boards
To make the STEVAL-IDB007V2 or STEVAL-IDB008V2 boards compatible with the STEVAL-FKI868V2/STEVAL-
FKI915V1 boards, you have to apply some changes to the board, on the bottom layer:
Step 1. Remove R12 resistor.
UM2169 - Rev 7
Step 2. Create a short-circuit between pin 8 and pin 7 of CN3 connector.
Step 3. Remove R25, R21, R19, R16 resistors.
Step 4. Set a short between the internal pad of R21 and R17 resistors.
page 21/32
Page 22

Step 5. Set a short between pin 6 of CN4 connector and the internal pad of R19 resistor.
Figure 16. STEVAL-IDB007V1/2 or STEVAL-IDB008V2 hardware modifications
UM2169
BlueNRG-1/2 support
6.5.2 BlueNRG-1/2 SoC connections for STEVAL-IDB007V2 and STEVAL-IDB008V2
After applying the modifications, the STEVAL-IDB007V2 and STEVAL-IDB008V2 platform pin connection is as
described the following table.
Table 11. STEVAL-IDB007V2 platform pin description with board function
Function
3D
accelerometer
and
gyroscope
JTAG
JTMS-
SWTDIO
JTCK-
SWTCK
UM2169 - Rev 7
Pin
name
DIO10 1
DIO9 2
DIO8 3 SPI_CS
DIO7 4 DL2
Pin
num.
LEDs S2-LP Buttons FKI_E2PROM
Pressure
sensor
Arduino connectors
CN1 CN2 CN3 C4
pin 1
(IO8)
pin 2
(IO9)
pin 2
(TX)
pin 6
(SCL)
page 22/32
Page 23

Function
Pin
name
DIO6 5 DL1 SDN
DIO5 7 PUSH2
DIO4 8 SCL
DIO3 9 SPI_SDO SPI_SDO SPI_SDO
DIO2 10 SPI_SDA SPI_SDA SPI_SDA
DIO1 11 SPI_CS
DIO0 12 SPI_SCL SPI_SCL SPI_SCL
DIO14 13 DL3 SPI_CS
RESET 25 RESET RESET RESET
DIO13 29 GPIO3 PUSH1
DIO12 30 INT1
DIO11 32
Pin
num.
LEDs S2-LP Buttons FKI_E2PROM
Pressure
sensor
SDA
(PUSH2
button)
3D
accelerometer
and
gyroscope
JTAG
JTAG-
TDO
JTAG-
TDI
UM2169
BlueNRG-1/2 support
Arduino connectors
CN1 CN2 CN3 C4
pin 7
(IO6)
pin 9
(SDA)
pin 10
(SCL)
pin 5
(MISO)
pin 4
(MOSI)
pin 3
(CS)
pin 6
(SCK)
(NRST)
pin 3
pin 6
(IO5)
pin 5
(IO4)
pin 4
(IO3)
pin 8
(IO7)
pin 1
(RX)
pin 3
(IO2)
pin 5
(SDA)
pin 4
(AD3)
pin 3
(AD2)
pin 1
(AD0)
pin 2
(AD1)
6.5.3 S2-LP
The S2-LP is placed in the STEVAL-FKI868V2 and STEVAL-FKI915V1 boards connected to the STEVAL-
IDB007V2 and STEVAL-IDB008V2 through the Arduino connectors (CN1-4) and can be driven by the
BlueNRG-1/2 via SPI.
GPIO3 is connected to the BlueNRG-1/2 wake-up pin used to notify some events.
The BlueNRG-1/2 SoC acts as a SPI master and can be used to configure the device through registers and to
send/receive data to/from the sub-1GHz channels.
6.5.4 E2PROM
The E2PROM containing the manufacturing data of the S2-LP board can be accessed by the BlueNRG-1/2 using
the SPI bus.
Important:
Since the EEPROM CS signal is shared with the TX signal of the BlueNRG UART port (IO8), UART and EEPROM should be
used in an exclusive way.
6.5.5 Hardware setup
Step 1. Connect a 2.4 GHz antenna to the STEVAL-IDB007V2 SMA connector.
Step 2. Connect an 868/915MHz antenna to the STEVAL-FKI868V2 and STEVAL-FKI915V1 SMA connector.
Step 3. Ensure the jumper configuration on the board is as described in Section 6.5.1 Changes to the
STEVAL-IDB007V2 and STEVAL-IDB008V2 boards.
UM2169 - Rev 7
page 23/32
Page 24

Step 4. Connect the motherboard to the PC via a USB cable.
Step 5. Verify the PWR LED DL4 light is on.
6.6 Sigfox Flasher
Sigfox board information (ID, PAC and KEY) can be stored in the device Flash memory using the
SIGFOX_FLASHER tool included with the STSW-S2LP-SFX-DK package.
Before proceeding, you need to obtain valid credentials from Sigfox (for further details, contact your local
reference for Sigfox).
However, you can use the test credentials for test purposes:
• ID = 0xFEDCBA98
• KEY = 0x0123456789ABCDEF0123456789ABCDEF
The SIGFOX_FLASHER is a tool to setup Sigfox credentials and board information related to Sigfox operations.
The output of this tool is a binary file and, optionally, the information stored in the file can be directly flashed to the
device.
All the examples included in this package can be programmed to read Sigfox credentials from Flash by simply
declaring the USE_FLASH define in the pre-processor defined symbols.
Together with ID, PAC and KEY, other information stored in the Flash memory is related to:
• RCZ
• frequency offset
• RSSI offset
• LBT offset
UM2169
Sigfox Flasher
6.6.1 Prerequisites
To save credentials in your device using the tool, ensure you have installed the right version of ST-LINK utility (for
BlueNRG-1/BlueNRG-2 boards) or STM32CubeProg (for STM32 boards) as shown in the table below.
Once installed, check the application path with the one listed in the app.cfg file.
Default values for app.cfg are:
STM_32=C:/Program Files/STMicroelectronics/STM32Cube/STM32CubeProgrammer/bin/
STM32_Programmer_CLI.exe
BLNRG1=C:\Program Files (x86)\STMicroelectronics\BlueNRG-1_2 ST-Link Utility V 2.0.0\STLINK_Utility\BlueNRG-1_ST-LINK_CLI.exe
6.6.2 Usage
After receiving your valid credentials, go to the SfxFlasher folder and open a Windows command window.
The SIGFOX_FLASHER tool supports a series of options as listed in the following table.
Table 12. ST-LINK utility and related devices
Device Software required
STM32 STM32CubeProg
BlueNRG1/2 STSW-BNRG1STLINK
UM2169 - Rev 7
page 24/32
Page 25

Parameter Description
Data
-e Encryption mode: none, fixed, variable
-k key 16-byte long encryption key when fixed mode selected
-f [file name] Output file name
-w [address] Write directly in the Flash memory
-sn serial number A specific ST-LINK serial number
A string in the form of ID;PAC;KEY;RCZ;FrequencyOffset;RSSIOffset;LBTOffset
Example:
> SIGFOX_FLASHER
"FEDCBA98;0102030405060708;0123456789ABCDEF0123456789ABCDEF;1;1740;21;0" -e fixed
–k 995511775533664400AABBCCDDEEFF00 –f myCredentials.bin -sn 31FF72064D43373017240843 -w
Note: The values for RC Zone field are:
• 1 = RC1
• 2 = RC2
• 3 = RC3c
• 4 = RC4
• 5 = RC5
The command in the example generates the myCredentials.bin file which, through the –w option, is automatically
flashed at the default location according to the table below.
UM2169
Sigfox Flasher
Table 13. SIGFOX_FLASHER parameters
Device
STM32L0 0x0800FF00
STM32L1 0x08000200
STM32F0 0x0801F000
STM32F4 0x08004000
BlueNRG-1 0x10066000
BlueNRG-2 0x1007E000
6.6.3 Encryption
The Sigfox key can be optionally encrypted using an AES 128 bit encoding algorithm, with a 16-byte long key.
There are three ways of handling key encryption:
• no encryption
• fixed encryption
• variable encryption
6.6.3.1 No encryption
With the -e none option, the key provided as input will be stored as is, without any encryption or elaboration.
6.6.3.2 Fixed encryption
The term fixed identifies an encryption key used always as is for each board.
When fixed encryption is selected, using the -e fixed option, the custom key has to be provided with the -k option
as in the example above.
Table 14. Devices and related default Sigfox board data address
Default Sigfox board data address
UM2169 - Rev 7
page 25/32
Page 26

6.6.3.3 Variable encryption
The term variable identifies a different encryption key for every board based on its own unique ID.
To enable this type of encryption, type the option -e variable.
UM2169
Sigfox Flasher
UM2169 - Rev 7
page 26/32
Page 27

Revision history
Date Version Changes
01-Feb-2017 1 Initial release.
07-Sep-2018 2
11-Mar-2019
02-Sep-2019 4 Updated Section 6.6 Sigfox credentials and Section 6.6.1 Prerequisites.
13-Sep-2019 5 Updated Table 2. Available command line functions.
27-Mar-2020 6
17-Sep-2020 7 Updated Section 6.6.2 Usage.
Table 15. Document revision history
Updated Introduction, Section 1 Sigfox S2-LP kit content, Section 2.1 Hardware requirements, Table
1. Sigfox radio configuration zone, Figure 6. ST Registration procedure 3/3, Figure 7. Sigfox device
page, Figure 8. Sigfox device information, Figure 9. Sigfox device messages, Figure 12. Sigfox
DEVICE TYPE tab, Figure 13. Sigfox DEVICE TYPE parameters, Figure 15. Command line function
list, Table 2. Available command line functions and Table 3. Macro channel mapping config_words[0].
Added Section 6.1 STEVAL-IDB007V2/STEVAL-IDB008V2 limitations, Section 6 Sigfox CLI demo
description, Section 6.2 Sigfox pre-certification tests, Section 6.2.1 Sigfox RCZ values, Section 6.2.2
Sigfox test ID values, Section 6.3 IAR project, Section 6.4 BlueNRG-1/2 support, Section 6.5
Hardware requirements, Section 6.6 Changes to the STEVAL-IDB007V1/2 and STEVALIDB008V1/2
boards, Section 6.7 BlueNRG-1 SoC connections, Section 6.8 S2-LP, Section 6.9 E2PROM, Section
6.10 Hardware setup, Section 6.11 Sigfox credentials, Section 6.12 Prerequisites, Section 6.13
Usage, Section 6.14 Encryption, Section 6.14.1 No encryption, Section 6.14.2 Fixed encryption and
Section 6.14.3 Variable encryption.
Minor text edits.
Updated Table 11. Sigfox suitable test ID values.
3
Updated Section 3.1 ST-side registration and STEVAL-FKI001V1.
Minor text changes.
Updated Introduction, Section 1 Sigfox S2-LP kit content, Section 2.1 Hardware requirements,
Section 2.2 Software prerequisites, Section 3.1 ST-side registration, Section 6.2 Sigfox
precertification tests and Section 6.2.1 Sigfox RCZ values.
UM2169
UM2169 - Rev 7
page 27/32
Page 28

UM2169
Contents
Contents
1 Sigfox S2-LP kit content ...........................................................2
2 Requirements .....................................................................3
2.1 Hardware requirements .........................................................3
2.2 Software prerequisites ..........................................................3
3 Board registration .................................................................4
3.1 ST-side registration.............................................................4
3.2 Sigfox side registration ..........................................................9
4 Demo description.................................................................11
4.1 Sigfox Demo GUI .............................................................11
4.1.1 Sigfox Demo GUI menu items..............................................13
4.2 Demo without connection to a PC................................................13
4.3 Using the command line........................................................13
4.3.1 Command line function description ..........................................14
4.3.2 node_send_frame command description......................................17
4.3.3 node_set_std_config command description ...................................17
5 Push button demo description ....................................................19
5.1 KEIL project ..................................................................19
5.2 IAR project ...................................................................19
6 Sigfox CLI demo description ......................................................20
6.1 STEVAL-IDB007V2/STEVAL-IDB008V2 limitations .................................20
6.2 Sigfox pre-certification tests.....................................................20
6.2.1 Sigfox RCZ values ......................................................20
6.2.2 Sigfox test ID values .....................................................20
6.3 KEIL project ..................................................................21
6.4 IAR project ...................................................................21
6.5 BlueNRG-1/2 support ..........................................................21
6.5.1 Changes to the STEVAL-IDB007V2 and STEVAL-IDB008V2 boards ................21
6.5.2 BlueNRG-1/2 SoC connections for STEVAL-IDB007V2 and STEVAL-IDB008V2 .......22
6.5.3 S2-LP ................................................................23
UM2169 - Rev 7
page 28/32
Page 29

UM2169
Contents
6.5.4 E2PROM..............................................................23
6.5.5 Hardware setup.........................................................23
6.6 Sigfox Flasher ................................................................24
6.6.1 Prerequisites ...........................................................24
6.6.2 Usage ................................................................24
6.6.3 Encryption.............................................................25
Revision history .......................................................................27
UM2169 - Rev 7
page 29/32
Page 30

UM2169
List of tables
List of tables
Table 1. Available command line functions ....................................................... 14
Table 2. Sigfox Monarch RC Capabilities bitmask................................................... 16
Table 3. Continuous transmission types of modulation ............................................... 16
Table 4. set_smps_voltage argument values ...................................................... 17
Table 5. Macro channel mapping - config_words[0].................................................. 17
Table 6. Macro channel mapping - config_words[1].................................................. 18
Table 7. Macro channel mapping - config_words[2].................................................. 18
Table 8. Default STD config.................................................................. 18
Table 9. Supported Sigfox RC zones ........................................................... 20
Table 10. Sigfox suitable test ID values ........................................................... 20
Table 11. STEVAL-IDB007V2 platform pin description with board function................................... 22
Table 12. ST-LINK utility and related devices ....................................................... 24
Table 13. SIGFOX_FLASHER parameters ........................................................ 25
Table 14. Devices and related default Sigfox board data address ......................................... 25
Table 15. Document revision history .............................................................27
UM2169 - Rev 7
page 30/32
Page 31

UM2169
List of figures
List of figures
Figure 1. NUCLEO disk drive .................................................................4
Figure 2. Sigfox Demo GUI main window......................................................... 5
Figure 3. ST Registration procedure 1/3 .........................................................6
Figure 4. ST Registration procedure 2/3 .........................................................7
Figure 5. Generated mail pop-up ..............................................................8
Figure 6. ST Registration procedure 3/3 .........................................................8
Figure 7. Sigfox device page .................................................................9
Figure 8. Sigfox device information .............................................................9
Figure 9. Sigfox device messages ............................................................ 10
Figure 10. JP1 position on STM32 Nucleo board ................................................... 11
Figure 11. Sigfox Demo GUI main window........................................................12
Figure 12. Sigfox DEVICE TYPE tab............................................................12
Figure 13. Sigfox DEVICE TYPE parameters...................................................... 13
Figure 14. Command line terminal box .......................................................... 13
Figure 15. Command line function list ........................................................... 14
Figure 16. STEVAL-IDB007V1/2 or STEVAL-IDB008V2 hardware modifications.............................. 22
UM2169 - Rev 7
page 31/32
Page 32

UM2169
IMPORTANT NOTICE – PLEASE READ CAREFULLY
STMicroelectronics NV and its subsidiaries (“ST”) reserve the right to make changes, corrections, enhancements, modifications, and improvements to ST
products and/or to this document at any time without notice. Purchasers should obtain the latest relevant information on ST products before placing orders. ST
products are sold pursuant to ST’s terms and conditions of sale in place at the time of order acknowledgement.
Purchasers are solely responsible for the choice, selection, and use of ST products and ST assumes no liability for application assistance or the design of
Purchasers’ products.
No license, express or implied, to any intellectual property right is granted by ST herein.
Resale of ST products with provisions different from the information set forth herein shall void any warranty granted by ST for such product.
ST and the ST logo are trademarks of ST. For additional information about ST trademarks, please refer to www.st.com/trademarks. All other product or service
names are the property of their respective owners.
Information in this document supersedes and replaces information previously supplied in any prior versions of this document.
© 2020 STMicroelectronics – All rights reserved
UM2169 - Rev 7
page 32/32
 Loading...