

Page 1

Starting STM8 Microcontrollers
STM8 microcontrollers are 8-bit general purpose microcontrollers from STMicroelectronics (STM).
STM is famous mainly for its line of 32-bit ARM Cortex microcontrollers – the STM32s. STM8
microcontrollers are rarely discussed in that context. However, STM8 MCUs are robust and most
importantly they come packed with lots of hardware features. Except for the ARM core, 32-bit
architecture, performance and some minor differences, STM8s have many peripheral similarities to
STM32s. In my opinion, STM8s are equally or sometimes more matched than the popular PICs and
AVRs in all areas. Unlike PICs and AVRs however, I have seen STM8s mostly in various SMD packages.
Only a handful of STM8 chips are available in PDIP/through-hole packages. I think it is a big reason for
which most small industries and hobbyists don’t play with them as much as with other 8-bit families.
People like to setup their test projects in breadboards, trial PCBs or strip-boards first, prototype and
then develop for production. To cope with this issue, STM has provided several affordable STM8
Discovery (Disco) boards to get started with. Besides there are many cheap STM8 breakout-boards
from China.
I have experience playing with AVRs, PICs, 8051s, STM32s, MSP430s, TivaC and so on. To be honest, I
thought learning about STM8 micros is a pure waste of time and energy. The learning curve will be
steep. Things and tools would be different and thus difficult. However, gradually I found these MCUs
very useful and there’s literally no complexity at all. The main drive factor for learning STM8s is the
price factor. They are hell cheap. When it comes down to other things, I have not found any book on
STM8s written in English. There’s literally no 100% complete blog post on the internet that shows the
basics. Similarly, same story with tools. I have been using MikroC for AVRs, 8051s and ARMs and it is
my favourite but at the time of writing, there’s no MikroC compiler for STM8 family. I have also not
stumbled upon any Arduino-like IDE that supports STM8 micros. Arduino-based solutions are also not
my favourite as they don’t go deep and have several limitations. Maybe it is not my luck. After much
study and search, I found out that there are a few C compilers for STM8s. However, any new tool is
both different and difficult at first. It is not always easy to adapt to new environments. You may never
know what unanticipated challenges and harshness a new environment may throw at you even when
you reach certain levels of expertise. I also don’t want to use any pirated software and so a free
compiler was a major requirement. I found out ST Visual Develop and Cosmic COSC compiler are both
free tools. Cosmic used to be a paid tool but now it is absolutely free. The only easy thing till then was
buying the STM8S Value Line Discovery board for just a few dollars and downloading the stuffs.
Page 2

The STM8 Family
There are over a hundred STM8 microcontrollers available today. The STM8 family can be simplified
into three categorical groups as shown below.
There are subgroups within these groups but broadly speaking these three groups are what by which
we can define the entire family. STM8S micros are general purpose robust and reliable micros that
can be employed in almost all scopes. This is the most commonly used group and in fact we will be
exploring it in this article. They are also cheap and smart. The second group – the STM8A family is
intended mainly for automotive industries. This group is packed with additional hardware interfaces
like CAN and LIN that are musts according to present-day automotive industry doctrine. The STM8As
are also very robust and are designed to withstand the harsh extremes of an automobile. For instance,
STM8As can withstand high temperatures, in excess of 100°C. The last group consists of STM8L micros
which are crafted for low power or battery-backed applications. Virtually they consume no power in
idle mode. Thus, if you need high power savings or energy cuts in your projects, this group is the best
choice. There are also low power versions of automotive-standard STM8 micros that are labelled
STM8AL. Apart from all these there is also one version of STM8 micros that are specifically designed
for capacitive touch applications. These are called STM8Ts.
The features and benefits of STM8 micros are numerous and can’t simply be expressed in few words.
The more you explore, the more you will feel. STM8s can be powered with 3.3V or 5V DC power
supplies and have built-in brownout detection circuitry. The low power editions can operate at much
lower voltages than these values. Official STM8 Discovery boards come with voltage selection jumpers
to allow users to select operating voltage level as required. There is very minimum risk of program
corruption due to EMI or some other similar unprecedented factors. There is fail-safe security for the
clock system which ensures that a system based on a STM8 micro won’t stop working or stuck up
should its external clock source fail. All internal hardware possesses more features than any other
competitive 8-bit microcontroller families that are widely available in the market. The best part is the
price benefit. You pay less for the most. All these features are well-suited for extremely harsh
industrial environments. STM8s are designed with maximum possible combinations of features.
Beyond your wildest wet dream, there are many extraordinary stuffs waiting to be unboxed.
Page 3

Overview of the Discovery Board
For getting started with STM8s, STM has provided several STM8 Disco boards. There are also other
third party boards too. However, I strongly recommend Disco boards for learning and experimental
purposes. There are several reasons for this recommendation. One main reason is the fact that all
Disco boards come with on-board detachable ST-Link programmers and they are extremely cheap.
Shown below is the top layout of a STM8S discovery board.
The board I used here in this article hosts a STM8S003K3T6 micro. It is an 32 pin entry-level micro with
8kB flash, 1kB RAM and 128 byte true data EEPROM. It comes with some additional hardware – a LED
connected to PD0 and a push button connected to PB7. Just as I said it also houses a detachable STLink programmer. However, I don’t recommend separating the programmer from the whole package.
The board also has a prototyping area should one needs to prototype something. The overall board
has a small form-factor and is a bit longer than a standard credit card. There are several other similar
and popular STM8 Discovery boards like the STM8S105 Discovery.
Page 4

There are also bulks of cheap Chinese minimum system STM8 dev boards hosting different STM8
chips. Overall the boards and the chips are so cheap that many simple cheap gadgets from China are
based on STM8 MCUs.
Some cheap STM8-based simple products are shown below:
The first one is a cheap DIY LC meter LC-100A. The other one is a simple DC panel meter. These are
just simple examples. There are many industrial and sophisticated products based on STM8 micros.
Page 5

Hardware Tools
The list of hardware tools needed is not very long. We will obviously need a STM8 board and I prefer
a Discovery board over other boards since it comes with a built-in ST-Link programmer/debugger
hardware. If you have some other board like the ones I already showed, you will need a ST-Link
programmer. I recommend an additional ST-Link programmer apart from the one available on board.
ST-Link programmers/debuggers communicate with target STM8 micros via SWIM interface. This
interface is the standard for all STM8 micros. Basically, it is a four-wire interface with two wire (VDD
and GND) being used for powering the target. The rest two are reset I/O and SWIM I/O. In the official
ST-Link V2 programmer unlike other ST-Link programmers, there is a dedicated port for SWIM
interface with STM8 inscribed near it. Cheap USB flash drive-sized ST-Links are also available in the
market and they are portable and as good as the official ones.
Apart from these we will also require some basic electronic lab stuffs like a USB-to-serial converter,
connecting/jumper wires, LEDs, buttons, various types of sensors, etc. that are typically found in a
common Arduino starter kit.
Page 6

It is yet better if you have either a logic analyser or oscilloscope. A good multimeter and a wellregulated DC power supply/source are must haves. You can also use a cell phone charging power bank
as a power source since Disco boards have USB ports.
Page 7

Software Tools
Just like any other software developer, my choice of language for software development is C language.
I don’t want to spend time coding complex stuffs in assembly language. Apart from that I chose C
language for the fact that STMicroelectronics has provided a Standard Peripheral Library (SPL) that is
very easy to use. With SPL, it becomes totally unnecessary to program each register with meaningless
numbers and maintain coding sequence. We will never need to access registers for any reasons as
everything is done under the hood of SPL. All sequences are deal inside the SPL. All that we will ever
need is the clear concept of each hardware block, their working principles, their capabilities and
limitations.
We will need an Integrated Development Environment (IDE) and a C-language toolchain. The best
stuffs you can get your hands on at zero costs are ST Visual Develop (STVD) IDE and Cosmic C compiler.
Both are free but a rather difficult to use at first. STVD also comes with a programmer software tool
called ST Visual Programmer (STVP). We’ll need STVP to upload codes to target STM8 micros.
Cosmic used to be a paid tool just like your PC’s antivirus software but at the time of writing this article,
the Cosmic team has made it absolutely free for STM8 family. However, to use it you will need to
register and acquire a license key via email. Usually this procedure of acquiring license and registration
is maintained automatically by the software company’s server but with Cosmic it is different story.
You will need to wait for some guy at Cosmic end to respond to your license request. It may take a
few minutes or even a day but still the best part is getting a full version compiler for nothing.
You can get
STVD from here: http://www.st.com/en/development-tools/stvd-stm8.html and
Cosmic C compiler from here: http://www.cosmic-software.com/download.php.
Page 8

You need to register in order to download both software. For Cosmic you will also need to acquire a
free license for it work. So just fill in some basic info about you.
Firstly, we will need to install STVD. Installation procedure is simple and same as typical software
installation. Just click next, next and next. After that we will need to install Cosmic C compiler. Again,
just next, next and next until the screen as shown below.
Page 9

After installation, you’ll prompted for licence. You must register your license unless you have already
registered. If you have already registered, then you’ll be asked if to overwrite registration. You should
skip reregistering.
For the first run, you’ll get the following screen looking for a valid license.
You must fill all the starred (*) points to complete the process of registration. Select “Write to File”
option and save the file as a text (.txt) file. The file name should be “CM8_license.txt”. Send this file
to stm8_Free@cosmic.fr with subject “STM8FSE, STM32 32K License Request”. Now you’ll need to
wait for the Cosmic team to respond to you. They’ll send you an email back with an electronic key license.
The file will have a name like “license.lic” and the email will have some instructions.
Page 10

This was my emailed license.
Once you get the license, you’ll need to show the software its location and complete the licensing
process as shown below. Save the license file in a secured location.
At the end of this process, we can enjoy the compiler without any limitations.
I also recommend that you download Sublime Text (https://www.sublimetext.com/) or Notepad++
(https://notepad-plus-plus.org/) for viewing your code with ease. These are very cool software. This
is not mandatory though.
Page 11

STM8CubeMX
Should I or should I not feel fortunate was my question at the time of writing this article and that’s
because STM8CubeMX was released in late February 2017. Yes, that’s the time when I was compiling
all these STM8 stuffs together. Prior to that I was wondering about a software similar to
STM32CubeMX but for STM8s. Back then, I could not find one and raw documentations were only
helpers. Although it is still in its early stages of development and still not as robust as its STM32 cousin
in terms of code generation capabilities and other areas, we can expect great innovations in the near
future. It reminds me of the early days of STM32CubeMX. Not everyone expected it to overcome all
the challenges in a very short period of time. At present, we can use STM8CubeMX for common info
on STM8 chips like pin assignments/mapping, basic technical specs like memory capacities, possible
clock configurations, etc. I can just wonder the potential future integrations and bug fixes. Power
consumption calculator is one such tool hopefully to be integrated. STM, most likely, has some serious
big plans for it. Nevertheless, we must thank STM for this cool software.
Visit http://www.st.com/en/development-tools/stm8cubemx.html to download STM8CubeMX.
I recommend using it only as reference. Don’t make yourself dependent on it. There are still many
bugs fixes that are yet to be addressed. One example is as in the above screenshot. Notice Timer 3
(TIM3) is missing although STM8S003 has this timer. I’m pretty sure the software developers are
working hard on such silly issues. For now, it is more like a promise of good tidings to come. This is
why I haven’t included it in the “must-have” software list and wanted it to be discussed separately.
Page 12

Preparing the Software Tools
Firstly, we need three major documents before starting to program STM8 micros. These are as follows:
1. STM8 Reference Manual.
http://www.st.com/content/ccc/resource/technical/document/reference_manual/9a/1b/85
/07/ca/eb/4f/dd/CD00190271.pdf/files/CD00190271.pdf/jcr:content/translations/en.CD001
90271.pdf
2. Datasheet of the MCU (STM8S003) that we’ll be using.
http://www.st.com/content/ccc/resource/technical/document/datasheet/42/5a/27/87/ac/
5a/44/88/DM00024550.pdf/files/DM00024550.pdf/jcr:content/translations/en.DM0002455
0.pdf
3. STM8SVLDiscovery Board User Manual.
http://www.st.com/content/ccc/resource/technical/document/user_manual/c8/37/11/ba/b
5/e7/4c/ee/DM00040810.pdf/files/DM00040810.pdf/jcr:content/translations/en.DM00040
810.pdf
These docs will be needed everywhere during learning session. The reference manual states the use
and purpose of all the hardware blocks in details. It includes register descriptions, naming conventions,
modes of operation of all hardware, etc. However, it does not specify the specifications of a given
STM8 micro and that’s because it is a generalized literature for all STM8S and STM8AF micros. As we
know even within a family of micros, one MCU differs from another in many aspects. Most commonly
this variation comes in the form of memory capacities and I/O pin counts. Sometimes electrical specs
also vary and so to know the limits and general specs of our target MCUs we need to checkout their
respective datasheets. Lastly the Discovery board user manual is most useful for the hardware
schematics, pin assignments and layouts. If you are using some other board then I suggest that you
acquire at least its schematic.
Now with Cosmic, STVD and STVP installed our software tool setup is almost ready. There are two
approaches to STM8 programming. The first uses the traditional concepts of register-access-based
coding, meaning you’ll have to set up every register on your own. The second way utilizes a specialized
method of coding by using standard libraries developed by STM that are both universal and platform
independent, meaning your C code will be same for any compiler using these libraries. These libraries
are called Standard Peripheral Libraries (SPL). With these libraries, no one will ever need to get down
to register-level access. The libraries are so coded that a coder will only have to know his/her chips’
hardware specs and some basics of these hardware. On the coding part, he/she will only have to set
properties and desired values. The SPL manages the rest. For instance, when setting up a UART, we
will only need to set interrupts, IOs and UART properties like baud rate, parity, etc. All of these setups
are done with meaningful numbers and texts.
The STMicroelectronics Standard Peripheral Libraries (SPL) for STM8 microcontrollers can be found
here: http://www.st.com/en/embedded-software/stsw-stm8069.html.
Page 13

I wrote this article using SPL since it will be ridiculous to code STM8s using the old-fashioned way of
configuring registers one-by-one manually. Thus, it is a mandatory download item. You should
preserve and retain the downloaded SPL zip file fully intact. You may need it when things get messy.
Now make two folders and name them “inc” and “src”. The “inc” folder will be filled with all the header
files (“.h” extension files) from the extracted zip file. Similarly, the “src” folder will be holding the
source files (“.c” extension files). For ease of work, it is better to keep these folders secured just like
the SPL zip file because every time when we will be making new projects the files in these folders will
be needed. You can copy these files to your project folder or you can keep it centrally somewhere. I
prefer the former method as doing so will not have any conflicting issue with other projects needing
modifications. However, it will cost hard-drive space. This method is however less confusing and
trouble-free for beginners. Extract all the files as shown below:
Note that there are more header files than source files. This is because there are two extra header
files – stm8s.h and stm8s_conf.h that define processor type and processor properties. To make things
work, we will have to comment one line of the stm8s_conf.h. You will find a line at the bottom of this
file written as:
#define USE_FULL_ASSERT (1).
You need to comment or disable this line, otherwise the compiler will throw tons of error messages.
Always check this at the start of a project. Surely, we don’t want to assert our code.
Page 14

Creating a New Code Project
Assuming that STVD, STVP and Cosmic are properly installed, we will see how to create a new project.
1. Firstly, run STVD.
2. Select File >> New Workspace.
3. Select Create workspace and project.
Page 15

4. Select workspace folder and workspace name.
5. Set project name and select toolchain STM8 Cosmic. You may need to set the path of your
Cosmic compiler’s installation location. In my case, it is:
C:\Program Files (x86)\COSMIC\FSE_Compilers\CXSTM8
Page 16

6. Type and select target chip part number. Last two or three digits and letters are enough for
finding the correct micro.
7. Now add the source and header files from the previously mentioned SPL folder.
Page 17

8. After file inclusions, the workspace tab changes as shown below.
9. Locate and open main.c file from the source tab, and then type #include "stm8s.h" at the top
as shown below:
Page 18

10. You’ll have to edit the STM8S.h header file and uncomment the chip number you are going to
use as shown below:
11. Compile the code once using the key combination CTRL+F7 or by pressing the compile button.
If everything is okay, there should be no error or warning message. The reason for this blank
compilation is to use the compiler’s powerful code assistant feature. With this feature, we can
predict or complete a piece of code line by only writing the first few letters and then pressing
CTRL + SPACE keys simultaneously.
Page 19

During compilation, you may get tons of errors for hardware files that are not available in your target
STM8S micro. For instance, CAN hardware is not available in STM8S003K3 and so if you have added
CAN source and header files you will get an error for that. Once identified by the error messages, the
corresponding header and source files for that particular hardware must be removed.
Similarly, one more caution must be observed. Unless your code is using any interrupt, interrupt
source and header files (stm8s_it.h and stm8s_it.c) must be excluded. Sometimes it is better to add
only those files that you will need to complete a project. For example, if your project is just using
GPIOs, it is better to add GPIO files only along with stm8s.h and stm8s_conf.h. However, I recommend
this technique only after you have mastered STM8 coding well because in most cases you will need
multiple hardware which have dependencies on each other. As an example, when using SPI, you’ll
need both GPIO and SPI modules. If you understand these dependencies, it is okay to select files as
per need. You can, then, comment out unnecessary hardware module files specified in the stm8s.h
header file and get a faster compilation and build process. After compilation, you should always
build/rebuild your project by hitting the Build or Rebuild button. This will generate the final s19 output
file in either Debug or Release folder according to the generation mode selected. If things are in order,
there should be no error or warning message.
Lastly, I have not found any useful simulation software like Proteus VSM or Electronic Workbench that
support STM8 family. Thus, we have to debug our code in real-life with real hardware. It may sound
difficult but actually it is not so. We can, however, use such software to make models of STM8 micros
and make our PCBs. I don’t like simulations as they are not always accurate and real-world type.
One more advice I would like to give to the readers. Please read the SPL help file. It is located in the
SPL zip file under the name stm8s-a_stdperiph_lib_um.chm. It explains each function, definition, data
structure, all internal hardware modules and how to use them properly. This is a very important
document and your best friend in coding STM8 micros. Apart from this document the reference
manual is equally important as it details the capabilities of all internal hardware. I won’t be detailing
the internal hardware much as these docs will be doing so.
Page 20

Uploading Code
Codes generated by Cosmic C compiler have s19 file extensions. It is similar to typical hex file format,
containing user code as hex values. Well since we don’t need to modify finally generated output files,
it doesn’t really matter in which format it is. All we will need is to upload them to our target MCUs.
We can do it in two ways – either by using STVP or STVD.
Firstly, let’s check the method with STVP. Run STVP software. For the first time the following window
will appear. From here we have to select ST-Link programmer, SWIM interface and our target chip.
STVP interface looks like any other programmer interface as shown below:
Page 21

Notice the mid tabs at the bottom of the hex values. From here we can see the hex values for program
memory, data/EEPROM memory and configuration settings. The configuration setting bits are
intended for setting some special hardware configurations or extending features of the target as well
as setting memory readout protection.
Try not to mess with security or protection bit at first or during tests as it will lock your chip up,
rendering it useless. You won’t simply be able to write it again until you unlock it. Unless needed, we
won’t be changing any default configuration bit. One thing to note is the fact that upon new
compilation and build, the newly generated output file is automatically reloaded. The rest of the stuffs
like loading or saving a s19 file, reading, writing and others are as simple as like with other
programmers. I won’t be explaining these steps as I assume that readers of this article already know
how to do all these from their previous experiences with other MCUs.
Now we will explore how we can upload a code to our target using STVD. After compiling and building
a project successfully without any error, the compiler will generate a s19 output file either in Debug
or Release folder depending on which mode of compilation selected. By default, Debug mode is
selected unless the coder changed it and so our desired s19 file will be in this folder. First, we need to
open the programmer interface. We can do that either by clicking the icon as shown below:
or we can go to Tools >> Programmer.
Page 22

We will get a new window as shown below:
As the name of the new window suggests, it is a light-weight programmer interface but good enough
for our purpose. Notice that there are many options and four tabs. Here again we need to select
programmer, programming interface (SWIM) and erase/blank check options. Then we go to the next
tab to select files for EEPROM (if any) and Program (also Flash/Code) memory as shown below. You
can add/remove files just as usually.
Page 23

Next, we set configuration bits if needed from the tab as shown below:
Finally, we are ready to upload code. Just hit the start button and wait for the process to finish.
Every time a code is programmed, it is verified automatically.
Page 24

General Purpose Input Output (GPIO)
The very first “Hello World” project that we do with every new embedded device is a simple LED
blinking program. Here we do the same. We will be basically testing both input and output function
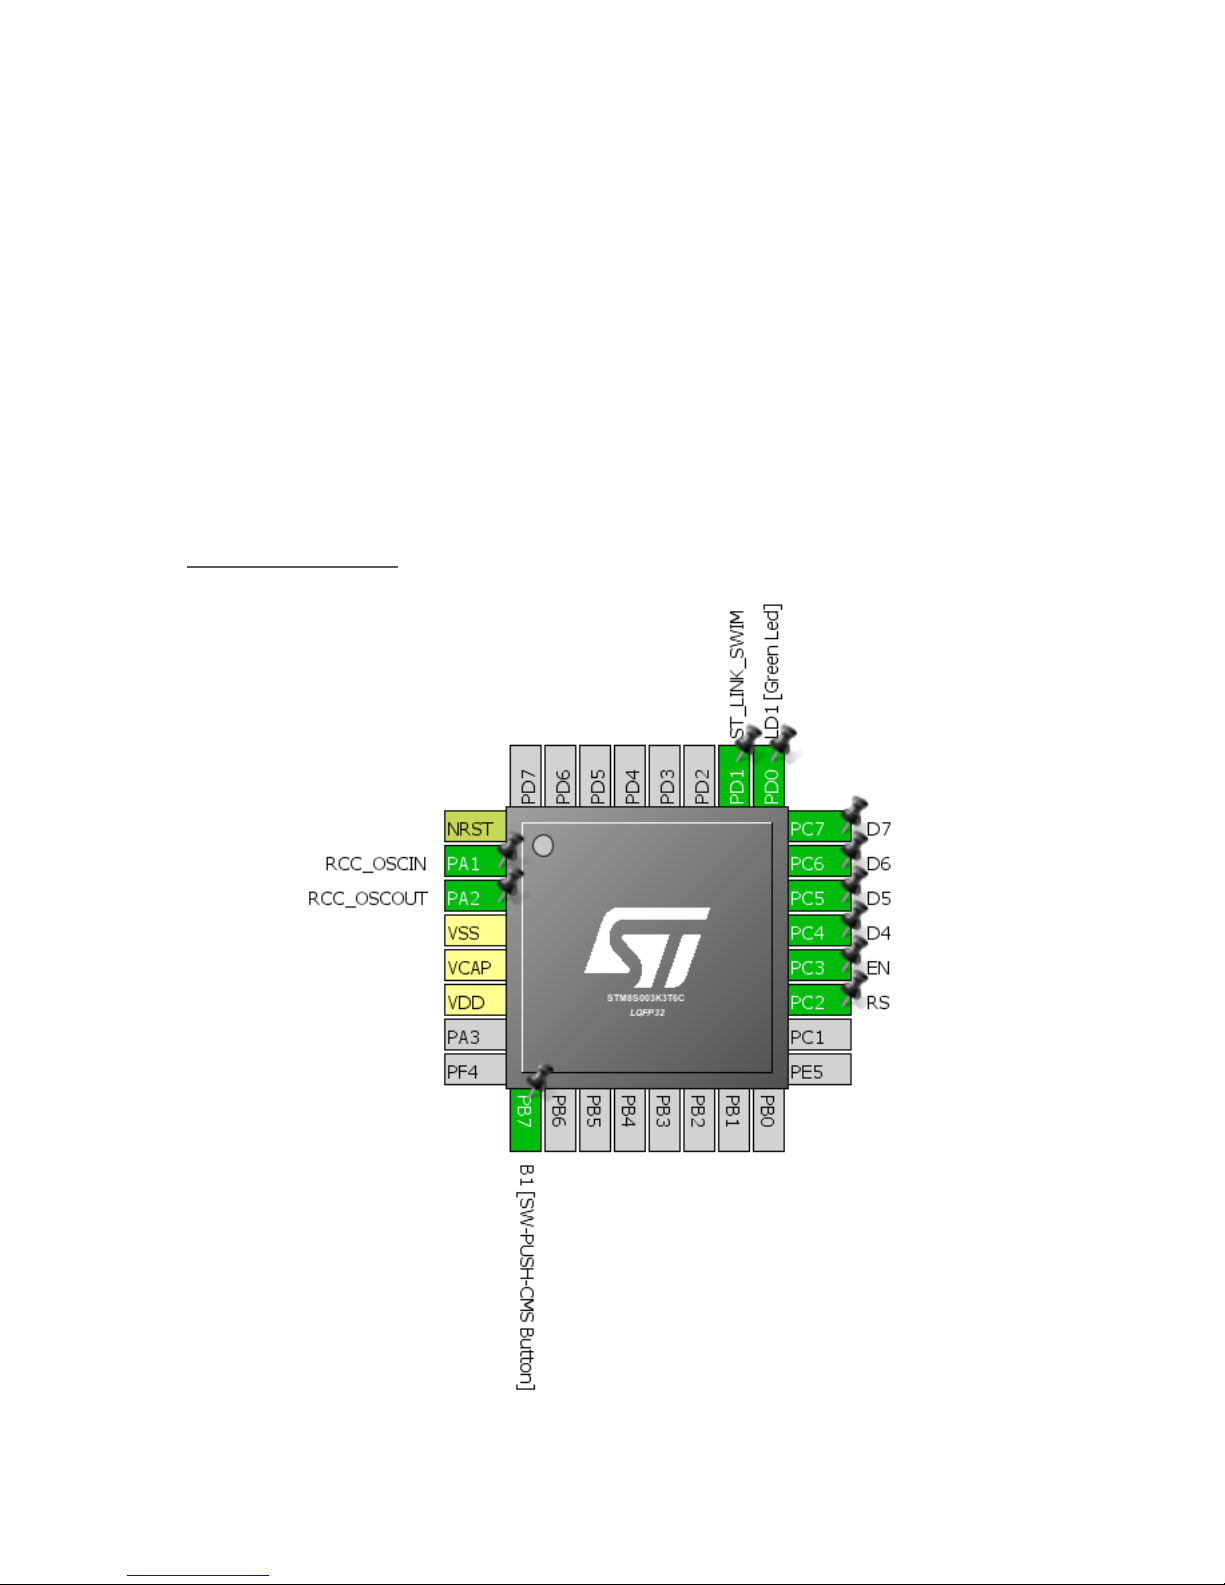
by making a variable flash rate blinking LED. Check the schematic of the Disco board. Check the pins
with which the on-board LED and the push button are connected.
You can also use the STM8CubeMX in board selector mode for this too.
Page 25

Shown below is the internal block diagram of GPIO pins:
Because each I/O is independently configurable and have many options associated with it, its block
looks complex at first sight. Check the various options every I/O possess:
Page 26

Shown below are the SPL functions associated with the GPIO module.
Observe the code below. This is the power of the ST’s SPL. The code is written with no traditional
register access. Everything here has a meaningful nomenclature, just like regular naming/words of the
reference manual/comments. There shouldn’t be any issue understanding the code. The code is
almost Arduino-like. Here we are polling an input pin’s state to alter the blink rate of a LED.
Page 27

Hardware Connection
Co de Example
#include "STM8S.h"
void main (void)
{
bool i = 0;
GPIO_DeInit(GPIOB);
GPIO_DeInit(GPIOD);
GPIO_Init(GPIOB, GPIO_PIN_7, GPIO_MODE_IN_FL_NO_IT);
GPIO_Init(GPIOD, GPIO_PIN_0, GPIO_MODE_OUT_PP_LOW_FAST);
for(;;)
{
if(GPIO_ReadInputPin(GPIOB, GPIO_PIN_7) == FALSE)
{
while(GPIO_ReadInputPin(GPIOB, GPIO_PIN_7) == FALSE);
Page 28

i ^= 1;
}
switch(i)
{
case 0:
{
delay_ms(1000);
break;
}
case 1:
{
delay_ms(200);
break;
}
}
GPIO_WriteReverse(GPIOD, GPIO_PIN_0);
}
}
Explanation
The following lines deinitialize the GPIOs we used. Every time you reconfigure or setup a hardware
peripheral for the first time you must deinitialize it before using it. Though it is not mandatory, it will
remove any chance of wrong/conflicting configurations.
GPIO_DeInit(GPIOB);
GPIO_DeInit(GPIOD);
After deinitialization, we are good to go for initializing or setting up the GPIOs. Inputs can be with or
without internal pull-up resistors. Outputs can be either push-pull totem-pole or open drain types.
Each pin can be individually configured and does not have any dependency on another. The following
codes set GPIO PB7 as a floating input with no interrupt capability and GPIO PD0 as a fast push-pull
output. PB7 is set up as a floating input rather than an internally pulled-up input because the button
on the Disco board is already pulled up externally.
GPIO_Init(GPIOB, GPIO_PIN_7, GPIO_MODE_IN_FL_NO_IT);
GPIO_Init(GPIOD, GPIO_PIN_0, GPIO_MODE_OUT_PP_LOW_FAST);
The remaining part of the code in the main loop is just polling the button’s state and altering the delay
time for toggling the LED if the button is pressed.
for(;;)
{
if(GPIO_ReadInputPin(GPIOB, GPIO_PIN_7) == FALSE)
{
while(GPIO_ReadInputPin(GPIOB, GPIO_PIN_7) == FALSE);
i ^= 1;
}
switch(i)
{
case 0:
{
delay_ms(1000);
break;
}
Page 29

case 1:
{
delay_ms(200);
break;
}
}
GPIO_WriteReverse(GPIOD, GPIO_PIN_0);
}
Demo
Video link: https://www.youtube.com/watch?v=Rr1vpfoze4w
Page 30

Clock System (CLK)
The internal network of STM8 clock system allows us to tune up operating speeds of peripherals and
CPU according to our needs. Software delays and power consumption depend on how the clock
system is set.
In STM8 micros, there are three main clock sources – High Speed Internal Clock (HSI), High Speed
External Clock (HSE) and Low Speed Internal Clock (LSI). The HSI has an oscillating frequency of 16MHz
and is an internal RC oscillator with good precision – about 1% tolerant over a wide temperature range.
HSE can be an external clock circuitry, temperature-compensated crystal oscillator (TCXO) or ordinary
crystal resonator. It accepts all frequencies from 1MHz to 24MHz. Lastly, LSI clock is also an
independent internal RC oscillator-based clock source that is mainly intended for idle or low power
operating modes and the independent watchdog timer (IWDG). It has a fixed factory calibrated
operating frequency of 128kHz and is not as accurate as HSI or HSE. There are also clock
dividers/prescalers at various points to scale clocks as per requirement. Mainly two prescalers are
what we need – the HSI prescaler and the CPU divider. Peripherals are directly feed by the main clock
source. Additionally, there is a clock output pin (CCO) that outputs a given clock frequency. It can be
used to clock another micro, generate clock for other devices like logic ICs. It can also be used as a free
oscillator or perform clock performance tests. There’s fail-safe clock security that makes HSI backup
of HSE. Should HSE fail, HSI takes over automatically. Check the internal block diagram below:
Page 31

Hardware Connection
Page 32

Co de Example
The code example below demonstrates how to run the CPU at 2MHz clock using HSI and extract
500kHz clock output from CCO pin using CCO output selection. HSE is divided by 8, i.e. 16MHz divided
by 8 equals 2MHz. This 2MHz is the master clock source and further divided four times to get 500kHz.
Note CCO pin is only available in some pins. For example, in STM8S003K3 this pin is either PD0 pin or
PC4. We will need to override the default function of PD0 pin to favour for CCO output. To do so, we
will need to change Alternate Function (AFR5) configuration bit during code upload.
#include "STM8S.h"
#define LED_pin GPIO_PIN_0
#define LED_port GPIOD
void setup(void);
void clock_setup(void);
void GPIO_setup(void);
void main(void)
{
setup();
GPIO_WriteLow(LED_port, LED_pin);
while(TRUE)
{
};
}
void setup(void)
{
clock_setup();
GPIO_setup();
}
void clock_setup(void)
{
CLK_DeInit();
CLK_HSECmd(DISABLE);
CLK_LSICmd(DISABLE);
CLK_HSICmd(ENABLE);
while(CLK_GetFlagStatus(CLK_FLAG_HSIRDY) == FALSE);
CLK_ClockSwitchCmd(ENABLE);
CLK_HSIPrescalerConfig(CLK_PRESCALER_HSIDIV8);
CLK_SYSCLKConfig(CLK_PRESCALER_CPUDIV4);
CLK_ClockSwitchConfig(CLK_SWITCHMODE_AUTO, CLK_SOURCE_HSI,
DISABLE, CLK_CURRENTCLOCKSTATE_ENABLE);
CLK_PeripheralClockConfig(CLK_PERIPHERAL_I2C, DISABLE);
CLK_PeripheralClockConfig(CLK_PERIPHERAL_SPI, DISABLE);
CLK_PeripheralClockConfig(CLK_PERIPHERAL_UART1, DISABLE);
CLK_PeripheralClockConfig(CLK_PERIPHERAL_AWU, DISABLE);
CLK_PeripheralClockConfig(CLK_PERIPHERAL_ADC, DISABLE);
CLK_PeripheralClockConfig(CLK_PERIPHERAL_TIMER1, DISABLE);
CLK_PeripheralClockConfig(CLK_PERIPHERAL_TIMER2, DISABLE);
CLK_PeripheralClockConfig(CLK_PERIPHERAL_TIMER4, DISABLE);
Page 33

CLK_CCOConfig(CLK_OUTPUT_CPU);
CLK_CCOCmd(ENABLE);
while(CLK_GetFlagStatus(CLK_FLAG_CCORDY) == FALSE);
}
void GPIO_setup(void)
{
GPIO_DeInit(LED_port);
GPIO_Init(LED_port, LED_pin, GPIO_MODE_OUT_OD_HIZ_FAST);
}
Explanation
The full explanation of this code is given in the last segment of this article. The only thing I’ll describe
here is this part:
CLK_CCOConfig(CLK_OUTPUT_CPU);
CLK_CCOCmd(ENABLE);
while(CLK_GetFlagStatus(CLK_FLAG_CCORDY) == FALSE);
These lines select the clock source that the CCO pin will output, enable the CCO module and wait for
it to stabilize. Here I selected the CCO to output CPU clock.
Demo
Video link: https://www.youtube.com/watch?v=IeLUc_s3jBE
Page 34

External Interrupt (EXTI)
External interrupt is an additional feature of GPIOs in input mode. It makes a micro to respond
instantly to changes done on it GPIO input pin(s) by an external events/triggers, skipping other tasks.
External interrupts are useful in many scenarios. For instance, an emergency button. Consider the case
of a treadmill. You are running at a speed and suddenly you get an ache in one of your ankles. You’ll
surely want to stop running immediately. Rather decreasing speed in small steps, you can hit the
emergency button to quickly stop the treadmill. The emergency button will interrupt all other
processes and immediately instruct the treadmill’s CPU to decrease speed faster than otherwise
possible. Thus, it has high priority over other processes.
In most 8-bit micros, there are few external interrupt pins and very limited options are available for
them but that’s not the case with STM’s micros. In STM8s, almost all GPIO pins have independent
external interrupt capability with input Schmitt triggers. Additionally, there’s interrupt controller to
set interrupt priority.
Page 35

Hardware Connection
Co de Example
We will do the same variable flash rate LED blinking example as in the GPIO example but this time with
the DISCO board’s button in external interrupt mode. The code here needs special attention as now
we will see how interrupts are configured and coded. This code is way different than anything I saw
before. I’m saying so because you’ll need to follow certain steps unlike other compilers. In other
compilers, all we do is create the interrupt function and tell the compiler the interrupt vector address.
Same here too but too many steps involved.
Page 36

Now check the interrupt vector table of STM8S003 below:
You’ll find this table not in the reference manual but in the device’s datasheet. This table varies with
devices and so be sure of correct datasheet. The DISCO board’s button is connected to PB7 and so
clearly, we will need IRQ4, i.e. EXTI1 or PORTB external interrupts. All external interrupts on GPIOB
pin are masked in this vector address.
Please note that codes that use peripheral interrupts need stm8s_it.h and stm8s_it.c files. Therefore,
add them if you are to use interrupts.
Page 37

main.c
#include "stm8s.h"
bool state = FALSE;
void GPIO_setup(void);
void EXTI_setup(void);
void clock_setup(void);
void main(void)
{
GPIO_setup();
EXTI_setup();
clock_setup();
do
{
GPIO_WriteReverse(GPIOD, GPIO_PIN_0);
if(state == TRUE)
{
delay_ms(100);
}
else
{
delay_ms(1000);
}
}while (TRUE);
}
void GPIO_setup(void)
{
GPIO_DeInit(GPIOB);
GPIO_Init(GPIOB, GPIO_PIN_7, GPIO_MODE_IN_PU_IT);
GPIO_DeInit(GPIOD);
GPIO_Init(GPIOD, GPIO_PIN_0, GPIO_MODE_OUT_PP_LOW_FAST);
}
void EXTI_setup(void)
{
ITC_DeInit();
ITC_SetSoftwarePriority(ITC_IRQ_PORTB, ITC_PRIORITYLEVEL_0);
EXTI_DeInit();
EXTI_SetExtIntSensitivity(EXTI_PORT_GPIOB, EXTI_SENSITIVITY_FALL_ONLY);
EXTI_SetTLISensitivity(EXTI_TLISENSITIVITY_FALL_ONLY);
enableInterrupts();
}
void clock_setup(void)
{
CLK_DeInit();
CLK_HSECmd(DISABLE);
CLK_LSICmd(DISABLE);
CLK_HSICmd(ENABLE);
while(CLK_GetFlagStatus(CLK_FLAG_HSIRDY) == FALSE);
Page 38

CLK_ClockSwitchCmd(ENABLE);
CLK_HSIPrescalerConfig(CLK_PRESCALER_HSIDIV1);
CLK_SYSCLKConfig(CLK_PRESCALER_CPUDIV1);
CLK_ClockSwitchConfig(CLK_SWITCHMODE_AUTO, CLK_SOURCE_HSI,
DISABLE, CLK_CURRENTCLOCKSTATE_ENABLE);
CLK_PeripheralClockConfig(CLK_PERIPHERAL_SPI, DISABLE);
CLK_PeripheralClockConfig(CLK_PERIPHERAL_I2C, DISABLE);
CLK_PeripheralClockConfig(CLK_PERIPHERAL_ADC, DISABLE);
CLK_PeripheralClockConfig(CLK_PERIPHERAL_AWU, DISABLE);
CLK_PeripheralClockConfig(CLK_PERIPHERAL_UART1, DISABLE);
CLK_PeripheralClockConfig(CLK_PERIPHERAL_TIMER1, DISABLE);
CLK_PeripheralClockConfig(CLK_PERIPHERAL_TIMER2, DISABLE);
CLK_PeripheralClockConfig(CLK_PERIPHERAL_TIMER4, DISABLE);
}
stm8_interrupt_vector.c
/* BASIC INTERRUPT VECTOR TABLE FOR STM8 devices
* Copyright (c) 2007 STMicroelectronics
*/
#include "stm8s_it.h"
typedef void @far (*interrupt_handler_t)(void);
struct interrupt_vector {
unsigned char interrupt_instruction;
interrupt_handler_t interrupt_handler;
};
//@far @interrupt void NonHandledInterrupt (void)
//{
/* in order to detect unexpected events during development,
it is recommended to set a breakpoint on the following instruction
*/
// return;
//}
extern void _stext(); /* startup routine */
struct interrupt_vector const _vectab[] = {
{0x82, (interrupt_handler_t)_stext}, /* reset */
{0x82, NonHandledInterrupt}, /* trap */
{0x82, NonHandledInterrupt}, /* irq0 */
{0x82, NonHandledInterrupt}, /* irq1 */
{0x82, NonHandledInterrupt}, /* irq2 */
{0x82, NonHandledInterrupt}, /* irq3 */
{0x82, (interrupt_handler_t)EXTI1_IRQHandler}, /* irq4 */
{0x82, NonHandledInterrupt}, /* irq5 */
{0x82, NonHandledInterrupt}, /* irq6 */
{0x82, NonHandledInterrupt}, /* irq7 */
{0x82, NonHandledInterrupt}, /* irq8 */
{0x82, NonHandledInterrupt}, /* irq9 */
{0x82, NonHandledInterrupt}, /* irq10 */
{0x82, NonHandledInterrupt}, /* irq11 */
{0x82, NonHandledInterrupt}, /* irq12 */
{0x82, NonHandledInterrupt}, /* irq13 */
{0x82, NonHandledInterrupt}, /* irq14 */
{0x82, NonHandledInterrupt}, /* irq15 */
{0x82, NonHandledInterrupt}, /* irq16 */
{0x82, NonHandledInterrupt}, /* irq17 */
Page 39

{0x82, NonHandledInterrupt}, /* irq18 */
{0x82, NonHandledInterrupt}, /* irq19 */
{0x82, NonHandledInterrupt}, /* irq20 */
{0x82, NonHandledInterrupt}, /* irq21 */
{0x82, NonHandledInterrupt}, /* irq22 */
{0x82, NonHandledInterrupt}, /* irq23 */
{0x82, NonHandledInterrupt}, /* irq24 */
{0x82, NonHandledInterrupt}, /* irq25 */
{0x82, NonHandledInterrupt}, /* irq26 */
{0x82, NonHandledInterrupt}, /* irq27 */
{0x82, NonHandledInterrupt}, /* irq28 */
{0x82, NonHandledInterrupt}, /* irq29 */
};
Now check the top parts of the stm8s_it.h and stm8s_it.c files respectively.
stm8s_it.h
stm8s_it.c
These must be coded.
Page 40

Explanation
Most part of the code is same as previous codes and so I won’t be going through them again. However,
there’s something new:
void EXTI_setup(void)
{
ITC_DeInit();
ITC_SetSoftwarePriority(ITC_IRQ_PORTB, ITC_PRIORITYLEVEL_0);
EXTI_DeInit();
EXTI_SetExtIntSensitivity(EXTI_PORT_GPIOB, EXTI_SENSITIVITY_FALL_ONLY);
EXTI_SetTLISensitivity(EXTI_TLISENSITIVITY_FALL_ONLY);
enableInterrupts();
}
This function is where we are setting up the external interrupt. The first two lines deinitiate the
interrupt controller and set priority while initiating it. It is not mandatory unless you want to set
interrupt priority. Then we configure the external interrupt on PORTB pins. We also set the edge that
will invoke an interrupt. Finally, we enable global interrupt. There goes the main.c file
Now it’s time to explain the stm8_interrupt_vector.c file. The top part of this file must include this
line #include "stm8s_it.h". It must also have the following section commented out:
//@far @interrupt void NonHandledInterrupt (void)
//{
/* in order to detect unexpected events during development,
it is recommended to set a breakpoint on the following instruction
*/
// return;
//}
We need to let our compiler know the name of the function that it should call when a particular
interrupt is triggered. There are two parts for that. Firstly, the interrupt vector address and secondly
the name of the function. This is reason for this line:
{0x82, (interrupt_handler_t)EXTI1_IRQHandler}, /* irq4 */
Lastly, the stm8s_it.h and stm8s_it.c files contain the prototype and the function that will execute the
interrupt service routine (ISR). In our case, the ISR will change the logic state of the Boolean variable
state. This will alter that flashing rate in the main loop.
Demo
Video link: https://www.youtube.com/watch?v=P6qdmWgH-Ls
Page 41

Beeper (BEEP)
The beeper hardware is a sound generation unit. This is a hardware not found in other micros and is
useful in scenarios where we need an audible output. An alarm is a good example. The beeper unit
uses LSI to generate 1kHz, 2kHz and 4kHz square wave outputs that can be directly feed to a small
piezo tweeter (not buzzer). In most STM8 micros, the beeper module’s I/O pin (PD4) is not accessible
unless alternate function configuration bit is altered during code upload. However, there are few
exceptional chips like the STM8S003 in which we don’t need to change any configuration bit at all. The
beeper module has dependencies with the Auto-Wake-Up (AWU) module.
Hardware Connection
Page 42

Co de Example
#include "STM8S.h"
void clock_setup(void);
void GPIO_setup(void);
void beeper_setup(void);
void main(void)
{
clock_setup();
GPIO_setup();
beeper_setup();
while(TRUE)
{
GPIO_WriteLow(GPIOD, GPIO_PIN_0);
BEEP_Cmd(ENABLE);
delay_ms(200);
GPIO_WriteHigh(GPIOD, GPIO_PIN_0);
BEEP_Cmd(DISABLE);
delay_ms(200);
};
}
void clock_setup(void)
{
CLK_DeInit();
CLK_HSECmd(DISABLE);
CLK_LSICmd(ENABLE);
while(CLK_GetFlagStatus(CLK_FLAG_LSIRDY) == FALSE);
CLK_HSICmd(ENABLE);
while(CLK_GetFlagStatus(CLK_FLAG_HSIRDY) == FALSE);
CLK_ClockSwitchCmd(ENABLE);
CLK_HSIPrescalerConfig(CLK_PRESCALER_HSIDIV1);
CLK_SYSCLKConfig(CLK_PRESCALER_CPUDIV1);
CLK_ClockSwitchConfig(CLK_SWITCHMODE_AUTO, CLK_SOURCE_HSI,
DISABLE, CLK_CURRENTCLOCKSTATE_ENABLE);
CLK_PeripheralClockConfig(CLK_PERIPHERAL_SPI, DISABLE);
CLK_PeripheralClockConfig(CLK_PERIPHERAL_I2C, DISABLE);
CLK_PeripheralClockConfig(CLK_PERIPHERAL_ADC, DISABLE);
CLK_PeripheralClockConfig(CLK_PERIPHERAL_AWU, ENABLE);
CLK_PeripheralClockConfig(CLK_PERIPHERAL_UART1, DISABLE);
CLK_PeripheralClockConfig(CLK_PERIPHERAL_TIMER1, DISABLE);
CLK_PeripheralClockConfig(CLK_PERIPHERAL_TIMER2, DISABLE);
CLK_PeripheralClockConfig(CLK_PERIPHERAL_TIMER4, DISABLE);
}
void GPIO_setup(void)
{
GPIO_DeInit(GPIOD);
GPIO_Init(GPIOD, GPIO_PIN_0, GPIO_MODE_OUT_OD_LOW_FAST);
GPIO_Init(GPIOD, GPIO_PIN_4, GPIO_MODE_OUT_PP_HIGH_FAST);
}
void beeper_setup(void)
Page 43

{
BEEP_DeInit();
BEEP_LSICalibrationConfig(128000);
BEEP_Init(BEEP_FREQUENCY_2KHZ);
}
Explanation
As stated earlier beeper module is dependent on the AWU module and so we need to enable this
module’s peripheral clock:
CLK_PeripheralClockConfig(CLK_PERIPHERAL_AWU, ENABLE);
We need to set the beeper port pin as an output pin:
GPIO_Init(GPIOD, GPIO_PIN_4, GPIO_MODE_OUT_PP_HIGH_FAST);
Configuring the beeper is straight. Just like other peripherals, we deinitialize it first and set both LSI
and beep frequency. Optionally we can calibrate the LSI.
void beeper_setup(void)
{
BEEP_DeInit();
BEEP_LSICalibrationConfig(128000);
BEEP_Init(BEEP_FREQUENCY_2KHZ);
}
To activate/deactivate the beeper we need to use the following instructions:
BEEP_Cmd(ENABLE);
BEEP_Cmd(DISABLE);
Demo
Video link: https://www.youtube.com/watch?v=LDPtULsJao8
Page 44
Alphanumerical LCD
Alphanumerical displays are the most common and basic form of displays after seven segments and
LED displays. They are useful for projecting multiple data quickly in ways that are otherwise difficult
with other kinds of displays.
To interface a LCD with a STM8 micro, we need LCD library. The STM8 SPL does not have a library for
such displays and we need to code it on our own. Interfacing a LCDs are not difficult tasks as no special
hardware is required to drive LCDs other than GPIOs. However, there are some tasks needed in the
software end. We need to include the library files. The process of library inclusion is discussed in the
later part of this article as it needs some special attentions. The example I’m sharing here uses 6 GPIO
pins from GPIOC. The read-write (R/W) pin of the LCD is connected to ground. The layout is as shown
below.
Hardware Connection
Page 45

Co de Example
lcd.h
#include "stm8s.h"
#define LCD_PORT GPIOD
#define LCD_RS GPIO_PIN_2
#define LCD_EN GPIO_PIN_3
#define LCD_DB4 GPIO_PIN_4
#define LCD_DB5 GPIO_PIN_5
#define LCD_DB6 GPIO_PIN_6
#define LCD_DB7 GPIO_PIN_7
#define clear_display 0x01
#define goto_home 0x02
#define cursor_direction_inc (0x04 | 0x02)
#define cursor_direction_dec (0x04 | 0x00)
#define display_shift (0x04 | 0x01)
#define display_no_shift (0x04 | 0x00)
#define display_on (0x08 | 0x04)
#define display_off (0x08 | 0x02)
#define cursor_on (0x08 | 0x02)
#define cursor_off (0x08 | 0x00)
#define blink_on (0x08 | 0x01)
#define blink_off (0x08 | 0x00)
#define _8_pin_interface (0x20 | 0x10)
#define _4_pin_interface (0x20 | 0x00)
#define _2_row_display (0x20 | 0x08)
#define _1_row_display (0x20 | 0x00)
#define _5x10_dots (0x20 | 0x40)
#define _5x7_dots (0x20 | 0x00)
#define DAT 1
#define CMD 0
void LCD_GPIO_init(void);
void LCD_init(void);
void LCD_send(unsigned char value, unsigned char mode);
void LCD_4bit_send(unsigned char lcd_data);
void LCD_putstr(char *lcd_string);
void LCD_putchar(char char_data);
void LCD_clear_home(void);
void LCD_goto(unsigned char x_pos, unsigned char y_pos);
void toggle_EN_pin(void);
void toggle_io(unsigned char lcd_data, unsigned char bit_pos, unsigned char pin_num);
Page 46

lcd.c
#include "lcd.h"
void LCD_GPIO_init(void)
{
GPIO_Init(LCD_PORT, LCD_RS, GPIO_MODE_OUT_PP_HIGH_FAST);
GPIO_Init(LCD_PORT, LCD_EN, GPIO_MODE_OUT_PP_HIGH_FAST);
GPIO_Init(LCD_PORT, LCD_DB4, GPIO_MODE_OUT_PP_HIGH_FAST);
GPIO_Init(LCD_PORT, LCD_DB5, GPIO_MODE_OUT_PP_HIGH_FAST);
GPIO_Init(LCD_PORT, LCD_DB6, GPIO_MODE_OUT_PP_HIGH_FAST);
GPIO_Init(LCD_PORT, LCD_DB7, GPIO_MODE_OUT_PP_HIGH_FAST);
delay_ms(10);
}
void LCD_init(void)
{
LCD_GPIO_init();
toggle_EN_pin();
GPIO_WriteLow(LCD_PORT, LCD_RS);
GPIO_WriteLow(LCD_PORT, LCD_DB7);
GPIO_WriteLow(LCD_PORT, LCD_DB6);
GPIO_WriteHigh(LCD_PORT, LCD_DB5);
GPIO_WriteHigh(LCD_PORT, LCD_DB4);
toggle_EN_pin();
GPIO_WriteLow(LCD_PORT, LCD_DB7);
GPIO_WriteLow(LCD_PORT, LCD_DB6);
GPIO_WriteHigh(LCD_PORT, LCD_DB5);
GPIO_WriteHigh(LCD_PORT, LCD_DB4);
toggle_EN_pin();
GPIO_WriteLow(LCD_PORT, LCD_DB7);
GPIO_WriteLow(LCD_PORT, LCD_DB6);
GPIO_WriteHigh(LCD_PORT, LCD_DB5);
GPIO_WriteHigh(LCD_PORT, LCD_DB4);
toggle_EN_pin();
GPIO_WriteLow(LCD_PORT, LCD_DB7);
GPIO_WriteLow(LCD_PORT, LCD_DB6);
GPIO_WriteHigh(LCD_PORT, LCD_DB5);
GPIO_WriteLow(LCD_PORT, LCD_DB4);
toggle_EN_pin();
LCD_send((_4_pin_interface | _2_row_display | _5x7_dots), CMD);
LCD_send((display_on | cursor_off | blink_off), CMD);
LCD_send(clear_display, CMD);
LCD_send((cursor_direction_inc | display_no_shift), CMD);
}
void LCD_send(unsigned char value, unsigned char mode)
{
switch(mode)
{
case DAT:
{
GPIO_WriteHigh(LCD_PORT, LCD_RS);
break;
}
case CMD:
{
GPIO_WriteLow(LCD_PORT, LCD_RS);
Page 47

break;
}
}
LCD_4bit_send(value);
}
void LCD_4bit_send(unsigned char lcd_data)
{
toggle_io(lcd_data, 7, LCD_DB7);
toggle_io(lcd_data, 6, LCD_DB6);
toggle_io(lcd_data, 5, LCD_DB5);
toggle_io(lcd_data, 4, LCD_DB4);
toggle_EN_pin();
toggle_io(lcd_data, 3, LCD_DB7);
toggle_io(lcd_data, 2, LCD_DB6);
toggle_io(lcd_data, 1, LCD_DB5);
toggle_io(lcd_data, 0, LCD_DB4);
toggle_EN_pin();
}
void LCD_putstr(char *lcd_string)
{
do
{
LCD_send(*lcd_string++, DAT);
}while(*lcd_string != '\0');
}
void LCD_putchar(char char_data)
{
LCD_send(char_data, DAT);
}
void LCD_clear_home(void)
{
LCD_send(clear_display, CMD);
LCD_send(goto_home, CMD);
}
void LCD_goto(unsigned char x_pos, unsigned char y_pos)
{
if(y_pos == 0)
{
LCD_send((0x80 | x_pos), CMD);
}
else
{
LCD_send((0x80 | 0x40 | x_pos), CMD);
}
}
void toggle_EN_pin(void)
{
GPIO_WriteHigh(LCD_PORT, LCD_EN);
delay_ms(2);
GPIO_WriteLow(LCD_PORT,LCD_EN);
}
void toggle_io(unsigned char lcd_data, unsigned char bit_pos, unsigned char pin_num)
Page 48

{
bool temp = FALSE;
temp = (0x01 & (lcd_data >> bit_pos));
switch(temp)
{
case TRUE:
{
GPIO_WriteHigh(LCD_PORT, pin_num);
break;
}
default:
{
GPIO_WriteLow(LCD_PORT, pin_num);
break;
}
}
}
main.c
#include "STM8S.h"
#include "lcd.h"
void clock_setup(void);
void GPIO_setup(void);
void main(void)
{
const char txt1[] = {"MICROARENA"};
const char txt2[] = {"SShahryiar"};
const char txt3[] = {"STM8S003K"};
const char txt4[] = {"Discovery"};
unsigned char s = 0x00;
clock_setup();
GPIO_setup();
LCD_init();
LCD_clear_home();
LCD_goto(3, 0);
LCD_putstr(txt1);
LCD_goto(3, 1);
LCD_putstr(txt2);
delay_ms(4000);
LCD_clear_home();
for(s = 0; s < 9; s++)
{
LCD_goto((3 + s), 0);
LCD_putchar(txt3[s]);
delay_ms(90);
}
for(s = 0; s < 9; s++)
{
LCD_goto((3 + s), 1);
LCD_putchar(txt4[s]);
Page 49

delay_ms(90);
}
while (TRUE);
}
void clock_setup(void)
{
CLK_DeInit();
CLK_HSECmd(DISABLE);
CLK_LSICmd(DISABLE);
CLK_HSICmd(ENABLE);
while(CLK_GetFlagStatus(CLK_FLAG_HSIRDY) == FALSE);
CLK_ClockSwitchCmd(ENABLE);
CLK_HSIPrescalerConfig(CLK_PRESCALER_HSIDIV8);
CLK_SYSCLKConfig(CLK_PRESCALER_CPUDIV1);
CLK_ClockSwitchConfig(CLK_SWITCHMODE_AUTO, CLK_SOURCE_HSI,
DISABLE, CLK_CURRENTCLOCKSTATE_ENABLE);
CLK_PeripheralClockConfig(CLK_PERIPHERAL_SPI, DISABLE);
CLK_PeripheralClockConfig(CLK_PERIPHERAL_I2C, DISABLE);
CLK_PeripheralClockConfig(CLK_PERIPHERAL_ADC, DISABLE);
CLK_PeripheralClockConfig(CLK_PERIPHERAL_AWU, DISABLE);
CLK_PeripheralClockConfig(CLK_PERIPHERAL_UART1, DISABLE);
CLK_PeripheralClockConfig(CLK_PERIPHERAL_TIMER1, DISABLE);
CLK_PeripheralClockConfig(CLK_PERIPHERAL_TIMER2, DISABLE);
CLK_PeripheralClockConfig(CLK_PERIPHERAL_TIMER4, DISABLE);
}
void GPIO_setup(void)
{
GPIO_DeInit(LCD_PORT);
}
Explanation
There’s little to explain this code as it involves GPIOs only. The codes for the LCD are coded using all
available info on its datasheet, just initialization and working principle. One thing to note, however, is
the CPU clock speed. If the CPU clock is too fast, LCDs may not work. This is because most LCDs have
a maximum working frequency of 250kHz. It is best to keep this frequency below 200kHz.
CLK_HSIPrescalerConfig(CLK_PRESCALER_HSIDIV8);
CLK_SYSCLKConfig(CLK_PRESCALER_CPUDIV1);
Page 50

Demo
Video link: https://www.youtube.com/watch?v=TJg2Tuu4QaQ
Page 51

Analog-to-Digital Converter (ADC)
ADC is a very important peripheral in any modern-day microcontroller. It is used to read analogue
outputs from sensors, sense voltage levels and so on. For example, we can use an ADC to read a LM35
temperature sensor. The voltage output from the sensor is proportional to temperature and so we
can use the voltage info to back-calculate temperature. STM8S003K3 has four ADC channels
associated with one ADC block. Other STM8 micros have more ADC channels and ADC blocks. The ADC
of STM8 micros is just as same as the ADCs of other micros. There are a few additional features. Shown
below is the block diagram of the STM8’s ADC peripheral:
A few things must be noted before using the ADC. These enhance performance significantly:
• Input impedance should be less than 10kΩ.
• It is better to keep ADC clock within or less than 4MHz.
• Schmitt triggers must be disabled.
• Opamp-based input buffer and filter circuits are preferred if possible.
• If the ADC has reference source pins, they should be connected to a precision reference source
like LM336. It is recommended to use a good LDO regulator chip otherwise.
• Unused ADC pins should not be configured or disabled. This will reduce power consumption.
• Rather taking single samples, ADC readings should be sampled at fixed regular intervals and
averaged to get rid of minute fluctuations in readings.
• Right-justified data alignment should be used as it is most convenient to use.
• PCB/wire tracks leading to ADC channels must be short to reduce interference effects.
Page 52

Hardware Connection
Co de Example
#include "STM8S.h"
void clock_setup(void);
void GPIO_setup(void);
void ADC1_setup(void);
void lcd_print(unsigned char x_pos, unsigned char y_pos, unsigned int value);
void main()
{
unsigned int A0 = 0x0000;
clock_setup();
GPIO_setup();
ADC1_setup();
Page 53

LCD_init();
LCD_clear_home();
LCD_goto(0, 0);
LCD_putstr("STM8 ADC");
LCD_goto(0, 1);
LCD_putstr("A0");
while(TRUE)
{
ADC1_StartConversion();
while(ADC1_GetFlagStatus(ADC1_FLAG_EOC) == FALSE);
A0 = ADC1_GetConversionValue();
ADC1_ClearFlag(ADC1_FLAG_EOC);
lcd_print(4, 1, A0);
delay_ms(90);
};
}
void clock_setup(void)
{
CLK_DeInit();
CLK_HSECmd(DISABLE);
CLK_LSICmd(DISABLE);
CLK_HSICmd(ENABLE);
while(CLK_GetFlagStatus(CLK_FLAG_HSIRDY) == FALSE);
CLK_ClockSwitchCmd(ENABLE);
CLK_HSIPrescalerConfig(CLK_PRESCALER_HSIDIV2);
CLK_SYSCLKConfig(CLK_PRESCALER_CPUDIV4);
CLK_ClockSwitchConfig(CLK_SWITCHMODE_AUTO, CLK_SOURCE_HSI,
DISABLE, CLK_CURRENTCLOCKSTATE_ENABLE);
CLK_PeripheralClockConfig(CLK_PERIPHERAL_SPI, DISABLE);
CLK_PeripheralClockConfig(CLK_PERIPHERAL_I2C, DISABLE);
CLK_PeripheralClockConfig(CLK_PERIPHERAL_ADC, ENABLE);
CLK_PeripheralClockConfig(CLK_PERIPHERAL_AWU, DISABLE);
CLK_PeripheralClockConfig(CLK_PERIPHERAL_UART1, DISABLE);
CLK_PeripheralClockConfig(CLK_PERIPHERAL_TIMER1, DISABLE);
CLK_PeripheralClockConfig(CLK_PERIPHERAL_TIMER2, DISABLE);
CLK_PeripheralClockConfig(CLK_PERIPHERAL_TIMER4, DISABLE);
}
void GPIO_setup(void)
{
GPIO_DeInit(GPIOB);
GPIO_Init(GPIOB, GPIO_PIN_0, GPIO_MODE_IN_FL_NO_IT);
GPIO_DeInit(GPIOC);
GPIO_DeInit(GPIOD);
GPIO_Init(GPIOD, GPIO_PIN_3, GPIO_MODE_IN_PU_NO_IT);
}
void ADC1_setup(void)
{
ADC1_DeInit();
ADC1_Init(ADC1_CONVERSIONMODE_CONTINUOUS,
ADC1_CHANNEL_0,
Page 54

ADC1_PRESSEL_FCPU_D18,
ADC1_EXTTRIG_GPIO,
DISABLE,
ADC1_ALIGN_RIGHT,
ADC1_SCHMITTTRIG_CHANNEL0,
DISABLE);
ADC1_Cmd(ENABLE);
}
void lcd_print(unsigned char x_pos, unsigned char y_pos, unsigned int value)
{
char chr = 0x00;
chr = ((value / 1000) + 0x30);
LCD_goto(x_pos, y_pos);
LCD_putchar(chr);
chr = (((value / 100) % 10) + 0x30);
LCD_goto((x_pos + 1), y_pos);
LCD_putchar(chr);
chr = (((value / 10) % 10) + 0x30);
LCD_goto((x_pos + 2), y_pos);
LCD_putchar(chr);
chr = ((value % 10) + 0x30);
LCD_goto((x_pos + 3), y_pos);
LCD_putchar(chr);
}
Explanation
First, we need to enable the peripheral clock of the ADC module:
CLK_PeripheralClockConfig(CLK_PERIPHERAL_AWU, DISABLE);
Secondly, we have to set out ADC pin as a floating GPIO with no interrupt capability:
GPIO_Init(GPIOB, GPIO_PIN_0, GPIO_MODE_IN_FL_NO_IT);
ADC setup needs a few info regarding the desired ADC channel:
void ADC1_setup(void)
{
ADC1_DeInit();
ADC1_Init(ADC1_CONVERSIONMODE_CONTINUOUS,
ADC1_CHANNEL_0,
ADC1_PRESSEL_FCPU_D18,
ADC1_EXTTRIG_GPIO,
DISABLE,
ADC1_ALIGN_RIGHT,
ADC1_SCHMITTTRIG_CHANNEL0,
DISABLE);
ADC1_Cmd(ENABLE);
}
Page 55

The second line of the above function states that we are going to use ADC channel 0 (PB0) with no
Schmitt trigger. We are also not going to use external triggers from timer/GPIO modules. Since the
master clock is running at 8MHz, the ADC prescaler divides the master/peripheral clock to get a
sampling frequency of 444kHz. We are also going to use continuous conversion mode because we
want to continually read the ADC input and don’t want to measure it in certain intervals. Lastly rightjustified data alignment is used as it is easy to read from such.
In the main loop, we need to start ADC conversion and wait for the conversion to complete. We are
not using interrupt methods and so we need to poll if ADC conversion has completed. At the end of
conversion, we can read the ADC and clear ADC End of Conversion (EOC) flag.
ADC1_StartConversion();
while(ADC1_GetFlagStatus(ADC1_FLAG_EOC) == FALSE);
A0 = ADC1_GetConversionValue();
ADC1_ClearFlag(ADC1_FLAG_EOC);
The rest of the code is about printing the ADC data on a LCD.
Demo
Video link: https://www.youtube.com/watch?v=rx68zPDEZUU
Page 56

Analog Watchdog (AWD)
The AWD is one additional feature that most microcontrollers in the market do not have. AWD is more
like a comparator but with the exception that we can set both the upper and lower limits of this
comparator as per our requirement unlike fixed levels in other micros. The region between the upper
and lower limits is called guarded zone. Beyond the boundaries of the guarded zone, the AWD unit
kicks off.
The AWD unit is very useful in situations where we need to monitor the output of a sensor for example
and take quick actions. For instance, consider a temperature controller. We would want the controller
to turn on a heater should temperature fall below some level and turn it off when temperature rises
to some high value without complex calculations and constant monitoring in our application firmware.
In other microcontrollers, we would have accomplished this simple task using conditional IF-ELSE
statements.
Page 57
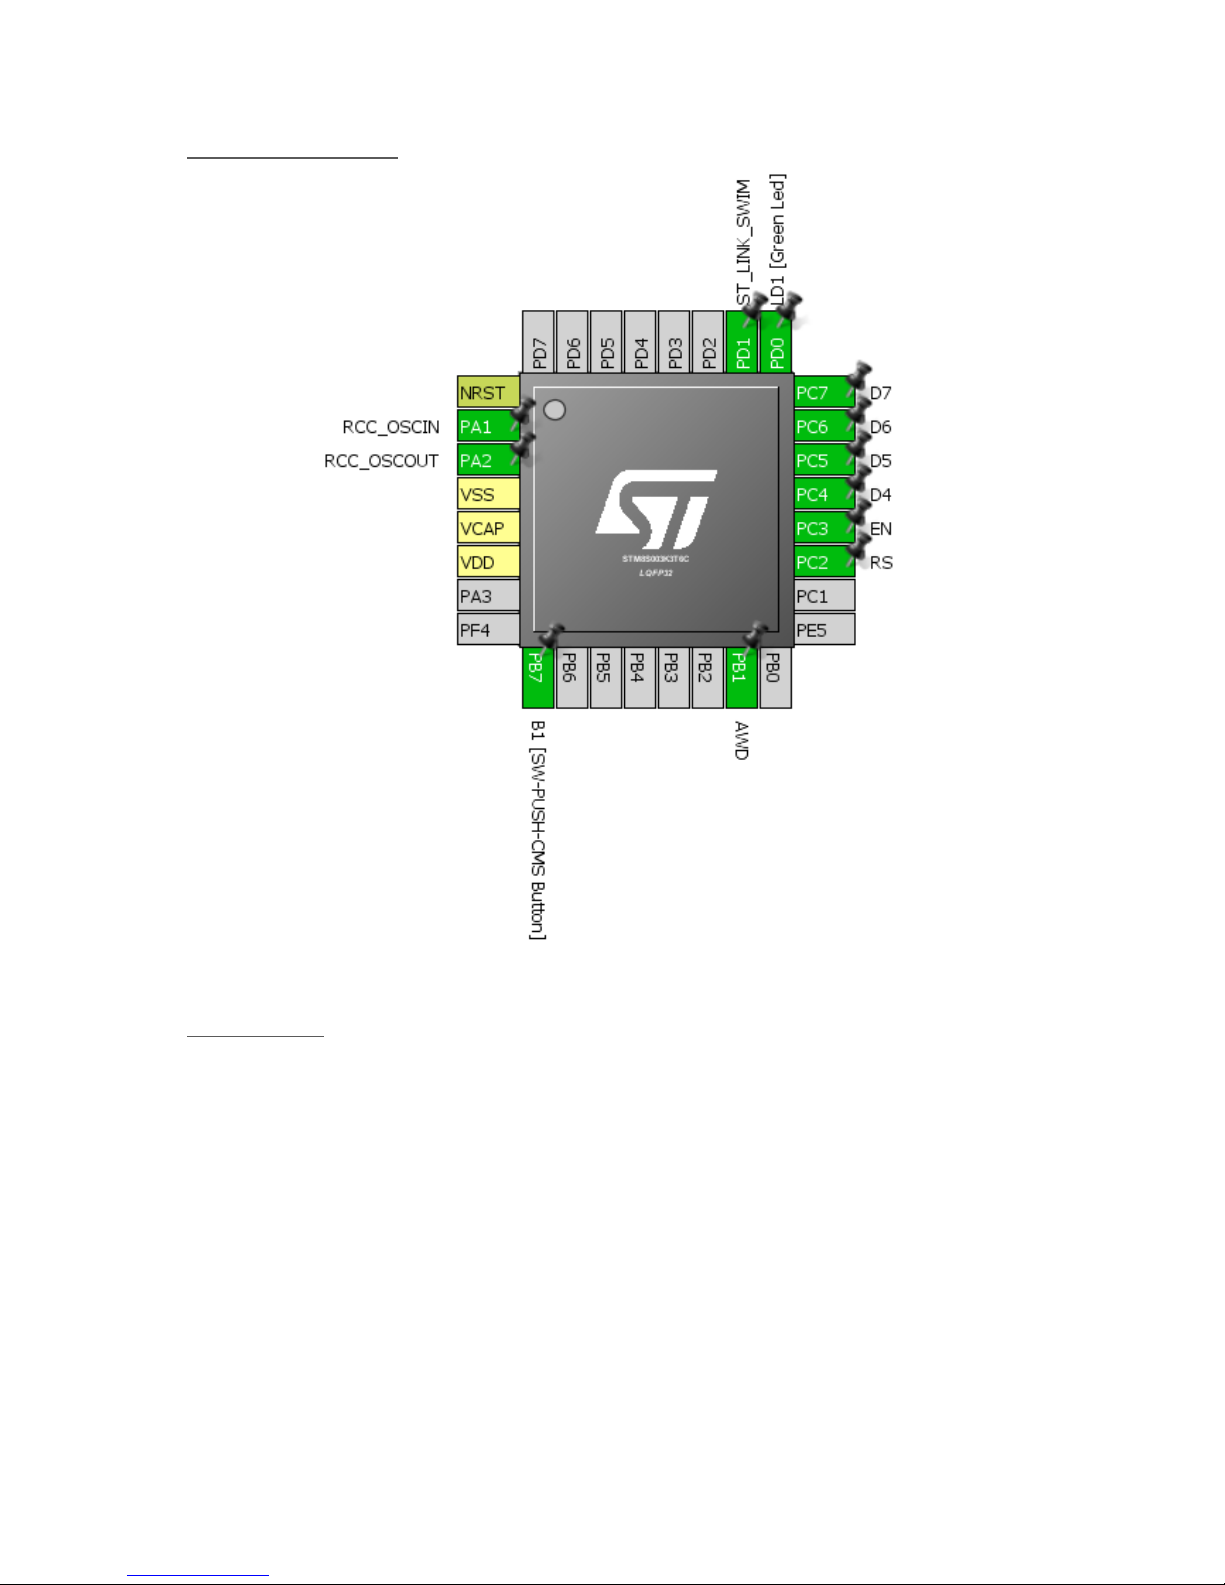
Hardware Connection
Co de Example
#include "STM8S.h"
void clock_setup(void);
void GPIO_setup(void);
void ADC1_setup(void);
void lcd_print(unsigned char x_pos, unsigned char y_pos, unsigned int value);
void main()
{
unsigned int a1 = 0x0000;
clock_setup();
GPIO_setup();
ADC1_setup();
LCD_init();
LCD_clear_home();
Page 58

LCD_goto(0, 0);
LCD_putstr("STM8 AWD");
LCD_goto(0, 1);
LCD_putstr("A1");
while (TRUE)
{
ADC1_ClearFlag(ADC1_FLAG_EOC);
ADC1_StartConversion();
while(ADC1_GetFlagStatus(ADC1_FLAG_EOC) == 0);
a1 = ADC1_GetConversionValue();
lcd_print(4, 1, a1);
if(ADC1_GetFlagStatus(ADC1_FLAG_AWD))
{
GPIO_WriteReverse(GPIOD, GPIO_PIN_0);
ADC1_ClearFlag(ADC1_FLAG_AWD);
}
else
{
GPIO_WriteHigh(GPIOD, GPIO_PIN_0);
}
delay_ms(90);
};
}
void clock_setup(void)
{
CLK_DeInit();
CLK_HSECmd(DISABLE);
CLK_LSICmd(DISABLE);
CLK_HSICmd(ENABLE);
while(CLK_GetFlagStatus(CLK_FLAG_HSIRDY) == FALSE);
CLK_ClockSwitchCmd(ENABLE);
CLK_HSIPrescalerConfig(CLK_PRESCALER_HSIDIV2);
CLK_SYSCLKConfig(CLK_PRESCALER_CPUDIV4);
CLK_ClockSwitchConfig(CLK_SWITCHMODE_AUTO, CLK_SOURCE_HSI,
DISABLE, CLK_CURRENTCLOCKSTATE_ENABLE);
CLK_PeripheralClockConfig(CLK_PERIPHERAL_SPI, DISABLE);
CLK_PeripheralClockConfig(CLK_PERIPHERAL_I2C, DISABLE);
CLK_PeripheralClockConfig(CLK_PERIPHERAL_ADC, ENABLE);
CLK_PeripheralClockConfig(CLK_PERIPHERAL_AWU, DISABLE);
CLK_PeripheralClockConfig(CLK_PERIPHERAL_UART1, DISABLE);
CLK_PeripheralClockConfig(CLK_PERIPHERAL_TIMER1, DISABLE);
CLK_PeripheralClockConfig(CLK_PERIPHERAL_TIMER2, DISABLE);
CLK_PeripheralClockConfig(CLK_PERIPHERAL_TIMER4, DISABLE);
}
void GPIO_setup(void)
{
GPIO_DeInit(GPIOB);
GPIO_Init(GPIOB, GPIO_PIN_1, GPIO_MODE_IN_FL_NO_IT);
GPIO_DeInit(GPIOD);
GPIO_Init(GPIOD, GPIO_PIN_0, GPIO_MODE_OUT_PP_HIGH_FAST);
GPIO_Init(GPIOD, GPIO_PIN_3, GPIO_MODE_IN_PU_NO_IT);
}
Page 59

void ADC1_setup(void)
{
ADC1_DeInit();
ADC1_Init(ADC1_CONVERSIONMODE_SINGLE,
ADC1_CHANNEL_1,
ADC1_PRESSEL_FCPU_D10,
ADC1_EXTTRIG_GPIO,
DISABLE,
ADC1_ALIGN_RIGHT,
ADC1_SCHMITTTRIG_CHANNEL1,
DISABLE);
ADC1_AWDChannelConfig(ADC1_CHANNEL_1, ENABLE);
ADC1_SetHighThreshold(600);
ADC1_SetLowThreshold(200);
ADC1_Cmd(ENABLE);
}
void lcd_print(unsigned char x_pos, unsigned char y_pos, unsigned int value)
{
char chr = 0x00;
chr = ((value / 1000) + 0x30);
LCD_goto(x_pos, y_pos);
LCD_putchar(chr);
chr = (((value / 100) % 10) + 0x30);
LCD_goto((x_pos + 1), y_pos);
LCD_putchar(chr);
chr = (((value / 10) % 10) + 0x30);
LCD_goto((x_pos + 2), y_pos);
LCD_putchar(chr);
chr = ((value % 10) + 0x30);
LCD_goto((x_pos + 3), y_pos);
LCD_putchar(chr);
}
Explanation
The code for the AWD example is just as the one demonstrated in the ADC example. However, this
time the ADC channel is channel 1 (PB1). Setting up the AWD is simple. We just need to set the limits,
specify which channel to be monitored and enable the AWD unit.
ADC1_AWDChannelConfig(ADC1_CHANNEL_1, ENABLE);
ADC1_SetHighThreshold(600);
ADC1_SetLowThreshold(200);
Here we have set 600 and 200 ADC counts as upper and lower limits respectively.
Page 60

In the main function, we are simply polling AWD flag. If an AWD (beyond boundary zone) event on
PB1 pin occurs the LED on PD0 starts flashing. If PB1 senses voltage between 200 and 600 ADC counts,
the LED is turned off, indicating guarded zone.
if(ADC1_GetFlagStatus(ADC1_FLAG_AWD))
{
GPIO_WriteReverse(GPIOD, GPIO_PIN_0);
ADC1_ClearFlag(ADC1_FLAG_AWD);
}
else
{
GPIO_WriteHigh(GPIOD, GPIO_PIN_0);
}
Page 61

Demo
Video link: https://www.youtube.com/watch?v=bvVNuVpeFPk
Page 62

Independent Watchdog (IWDG)
The IWDG is just the ordinary watchdog timer we usually find in any modern micro. The purpose of
this timer is to recover a micro from an unanticipated event that may result in unresponsive or erratic
behaviour. As the name suggests, this timer does not share anything with any other internal hardware
peripheral and is clocked by LSI (128kHz) only. Thus, it is invulnerable to main clock (HSE or HSI) failure.
The IWDG works by decrementing a counter, counting time in the process. When the counter hits
zero, a reset is issued. Usually we would want that this reset never occurs and so the counter is
periodically updated in the application firmware. If for some reason, the counter is not refreshed, a
reset will occur, recovering the MCU from a disastrous situation.
Configuring the IWDG is very easy with SPL. There are certain steps to follow but SPL manages them
well internally. All we’ll need is to configure the IWDG and reload it periodically before time runs out.
The formula required to calculate timeout is given below:
Page 63

Typical values of timeout are as shown below:
Hardware Connection
Page 64

Co de Example
#include "STM8S.h"
void clock_setup(void);
void GPIO_setup(void);
void IWDG_setup(void);
void main(void)
{
unsigned int t = 0;
clock_setup();
GPIO_setup();
GPIO_WriteLow(GPIOD, GPIO_PIN_0);
for(t = 0; t < 60000; t++);
IWDG_setup();
while(TRUE)
{
GPIO_WriteReverse(GPIOD, GPIO_PIN_0);
for(t = 0; t < 1000; t++)
{
if(GPIO_ReadInputPin(GPIOB, GPIO_PIN_7) == FALSE)
{
IWDG_WriteAccessCmd(IWDG_WriteAccess_Enable);
IWDG_ReloadCounter();
IWDG_WriteAccessCmd(IWDG_WriteAccess_Disable);
}
}
};
}
void clock_setup(void)
{
CLK_DeInit();
CLK_HSECmd(DISABLE);
CLK_LSICmd(ENABLE);
while(CLK_GetFlagStatus(CLK_FLAG_LSIRDY) == FALSE);
CLK_HSICmd(ENABLE);
while(CLK_GetFlagStatus(CLK_FLAG_HSIRDY) == FALSE);
CLK_ClockSwitchCmd(ENABLE);
CLK_HSIPrescalerConfig(CLK_PRESCALER_HSIDIV8);
CLK_SYSCLKConfig(CLK_PRESCALER_CPUDIV4);
CLK_ClockSwitchConfig(CLK_SWITCHMODE_AUTO, CLK_SOURCE_HSI,
DISABLE, CLK_CURRENTCLOCKSTATE_ENABLE);
CLK_PeripheralClockConfig(CLK_PERIPHERAL_SPI, DISABLE);
CLK_PeripheralClockConfig(CLK_PERIPHERAL_I2C, DISABLE);
CLK_PeripheralClockConfig(CLK_PERIPHERAL_ADC, DISABLE);
CLK_PeripheralClockConfig(CLK_PERIPHERAL_AWU, DISABLE);
CLK_PeripheralClockConfig(CLK_PERIPHERAL_UART1, DISABLE);
CLK_PeripheralClockConfig(CLK_PERIPHERAL_TIMER1, DISABLE);
CLK_PeripheralClockConfig(CLK_PERIPHERAL_TIMER2, DISABLE);
CLK_PeripheralClockConfig(CLK_PERIPHERAL_TIMER4, DISABLE);
}
Page 65

void GPIO_setup(void)
{
GPIO_DeInit(GPIOB);
GPIO_DeInit(GPIOD);
GPIO_Init(GPIOB, GPIO_PIN_7, GPIO_MODE_IN_PU_NO_IT);
GPIO_Init(GPIOD, GPIO_PIN_0, GPIO_MODE_OUT_PP_LOW_FAST);
}
void IWDG_setup(void)
{
IWDG_Enable();
IWDG_WriteAccessCmd(IWDG_WriteAccess_Enable);
IWDG_SetPrescaler(IWDG_Prescaler_128);
IWDG_SetReload(0x99);
IWDG_WriteAccessCmd(IWDG_WriteAccess_Disable);
}
Explanation
In this example, we need not to look at peripheral and CPU clock as IWDG is not dependent on them.
Still we can see that the CPU is running at 500kHz speed while the peripherals at 2MHz speed.
CLK_HSIPrescalerConfig(CLK_PRESCALER_HSIDIV8);
CLK_SYSCLKConfig(CLK_PRESCALER_CPUDIV4);
To setup the IWDG, we need to enable it first and then apply Write Access Protection key (0x55). We
just need to set the prescaler and the counter value. The down counter will start from this value and
count down to zero unless refreshed. In this example, the prescaler is set to 128 and reload value is
set to 153 (0x99). Thus, with these we get a timeout of approximately 300ms. After entering these
values we must prevent accidental changes in the firmware and so to do so the write access must be
disabled.
void IWDG_setup(void)
{
IWDG_Enable();
IWDG_WriteAccessCmd(IWDG_WriteAccess_Enable);
IWDG_SetPrescaler(IWDG_Prescaler_128);
IWDG_SetReload(0x99);
IWDG_WriteAccessCmd(IWDG_WriteAccess_Disable);
}
Disco board’s user button and LED are used for the demo. At the very beginning, the LED is lit for some
time before the IWDG is configured, indicating the start of the firmware. In the main loop, the LED is
toggled with some delay arranged by a for loop. Inside the loop, the button’s state is polled. If the
button is kept pressed it will always be in logic low state, reloading the IWDG counter. If its state
changes to logic high and 300ms passes out, a reset is triggered.
GPIO_WriteReverse(GPIOD, GPIO_PIN_0);
for(t = 0; t < 1000; t++)
{
if(GPIO_ReadInputPin(GPIOB, GPIO_PIN_7) == FALSE)
{
IWDG_WriteAccessCmd(IWDG_WriteAccess_Enable);
IWDG_ReloadCounter();
IWDG_WriteAccessCmd(IWDG_WriteAccess_Disable);
}
}
Page 66

Note it is possible to calibrate LSI. It is however rarely needed.
Demo
Video link: https://www.youtube.com/watch?v=05XKoy0ieHo
Page 67

Window Watchdog (WWDG)
The WWDG is a bit more advanced watchdog timer. Unlike the IWDG, it will trigger a reset condition
if its counter is reloaded earlier or later than a predefined time window. This kind of timer is usually
found in high-end microcontrollers like ARMs, ATXMegas and recently released micros. Cool features
like this and others make me feel that indeed STM8s are high-end affordable 8-bit alternatives when
compared to traditional 8-bit MCUs.
The WWDG works by comparing a down counter against a window register. The counter can only be
refreshed when its value is greater than 0x3F and less than window register value. If the counter is
refreshed before the value set on window register or when the counter is less than or equal to 0x3F.
If the counter hits the value 0x3F, reset automatically triggers. It is programmer’s responsibility to
refresh the counter at proper time. Note unlike IWDG, WWDG is not independent of main clock.
Page 68

Hardware Connection
Co de Example
The code example here demonstrates WWDG action. Simply Disco board’s user LED and button are
used. When the code starts executing, the LED starts blinking slowly, indicating the start of the code.
When the code executes the main loop, the LED blinks rapidly to indicate main loop execution. If the
button is pressed randomly the micro is reset because the counter is refreshed before the allowed
time. Sometimes the micro may not reset because the counter may be in the allowed window – hence
the name Window Watchdog.
#include "STM8S.h"
void clock_setup(void);
void GPIO_setup(void);
void WWDG_setup(void);
void main(void)
{
unsigned char i = 0x00;
clock_setup();
GPIO_setup();
for(i = 0x00; i < 0x04; i++)
{
Page 69

GPIO_WriteReverse(GPIOD, GPIO_PIN_0);
delay_ms(40);
}
WWDG_setup();
while(TRUE)
{
if((GPIO_ReadInputPin(GPIOB, GPIO_PIN_7) == FALSE) || ((WWDG_GetCounter() > 0x60) &&
(WWDG_GetCounter() < 0x7F)))
{
WWDG_SetCounter(0x7F);
}
GPIO_WriteReverse(GPIOD, GPIO_PIN_0);
delay_ms(20);
};
}
void clock_setup(void)
{
CLK_DeInit();
CLK_HSECmd(DISABLE);
CLK_LSICmd(DISABLE);
CLK_HSICmd(ENABLE);
while(CLK_GetFlagStatus(CLK_FLAG_HSIRDY) == FALSE);
CLK_ClockSwitchCmd(ENABLE);
CLK_HSIPrescalerConfig(CLK_PRESCALER_HSIDIV8);
CLK_SYSCLKConfig(CLK_PRESCALER_CPUDIV64);
CLK_ClockSwitchConfig(CLK_SWITCHMODE_AUTO, CLK_SOURCE_HSI,
DISABLE, CLK_CURRENTCLOCKSTATE_ENABLE);
CLK_PeripheralClockConfig(CLK_PERIPHERAL_I2C, DISABLE);
CLK_PeripheralClockConfig(CLK_PERIPHERAL_SPI, DISABLE);
CLK_PeripheralClockConfig(CLK_PERIPHERAL_ADC, DISABLE);
CLK_PeripheralClockConfig(CLK_PERIPHERAL_AWU, DISABLE);
CLK_PeripheralClockConfig(CLK_PERIPHERAL_UART1, DISABLE);
CLK_PeripheralClockConfig(CLK_PERIPHERAL_TIMER1, DISABLE);
CLK_PeripheralClockConfig(CLK_PERIPHERAL_TIMER2, DISABLE);
CLK_PeripheralClockConfig(CLK_PERIPHERAL_TIMER4, DISABLE);
}
void GPIO_setup(void)
{
GPIO_DeInit(GPIOB);
GPIO_Init(GPIOB, GPIO_PIN_7, GPIO_MODE_IN_PU_NO_IT);
GPIO_DeInit(GPIOD);
GPIO_Init(GPIOD, GPIO_PIN_0, GPIO_MODE_OUT_OD_HIZ_FAST);
}
void WWDG_setup(void)
{
WWDG_Init(0x7F, 0x60);
}
Page 70

Explanation
There’s no way to enable watchdogs manually in software as they are always enabled. However, there
are configuration bits to select if the IWDG and the WWDG are enabled in software or hardware. They
only come in effect when configured. This is cool.
For WWDG, we just need to set the value of the down counter and the window register value only.
void WWDG_setup(void)
{
WWDG_Init(0x7F, 0x60);
}
We need to monitor the WWDG in order to reload it when it is the right time window.
while(TRUE)
{
if((GPIO_ReadInputPin(GPIOB, GPIO_PIN_7) == FALSE) || ((WWDG_GetCounter() > 0x60) && (WWDG_GetCounter() <
0x7F)))
{
WWDG_SetCounter(0x7F);
}
GPIO_WriteReverse(GPIOD, GPIO_PIN_0);
delay_ms(20);
};
Remember too early of too late will reset the micro.
Demo
Video link: https://www.youtube.com/watch?v=a_JWHJCh_-o
Page 71

Timer Overview
Timers are perhaps the most versatile piece of hardware in any micro. As their name tells, timers are
useful for measurement of timed events like frequency, time, phase sequence, etc. and generate
time-based events like PWM, waveform, etc.
Timers are also needed for touch sensing applications.
In any STM8 micro, there are three categories of timers. These are:
• Advanced Control Timer (TIM1)
• General Purpose Timers (TIM2, TIM3 & TIM5)
• Basic Timers (TIM4 & TIM6)
The basic working principle of all timers are same with some minor differences. Advanced timers are
mainly intended for applications requiring specialized motor control, SMPSs, inverters, waveform
generation, pulse width measurements, etc. Then there are general purpose timers that share almost
all the features of advanced timer without the advanced features like brake, dead-time control, etc.
Basic timers are all same as general purpose timers but lack PWM output/capture input pins and are
intended mainly for time base generations. Here’s the summary of all timers of STM8 micros:
Unlike the timers of other micros, STM8 timers have the more functionality that are otherwise only
available in some special micros only. Timer cover a significant part of the reference manual. They are
so elaborate that it is not possible to describe all of them in just one post. Therefore, here we’ll be
exploring the basics for now.
Page 72

Time Base Generation (TIM2)
Time base generation is the most basic property of any timer and is also the most needed requirement
in embedded systems. This mode can be used with or without interrupt. We’ll first check the method
firstly without interrupt and then with interrupt.
With time base generation, we can accurately time stuffs and events that are more precise than using
delays, loops or other methods. Time base generation utilizes hardware timers and so work
independently from other processes. It has many uses. For instance, with it we can avoid software
delays, generate time slots of a Real-Time Operating System (RTOS) and many other tasks.
The time base unit for all timers of STM8 is all same. There are a few differences. For example, Timer
1 (TIM1) has a repetition counter. It is like a counter within another counter. Other timers lack this
part. All timers can count up while advance timers can count down too.
The basic theory of time base generation is you have a peripheral clock which you would like to scale
according to your need. Thus, you prescale it and use the new clock to run a counter. The counter will
tick, incrementing count as time flies. It is just like counting from 0 to 100 and repeating from 0 again
after reaching 100. Shown below is the generalized formula for finding an important event called timer
reload:
This is the amount of time that will pass before timer overflow event occurs and the timer restarts
from its initial count.
In my example, the peripheral or master clock is set to 2MHz. Thus, to make timer 2 (TIM2) reload
after roughly 2 seconds, I have to prescale it by a factor of 2048 and load it with 1952 counts. Note
that TIM2 doesn’t have a repetition counter and so it is set to 1.
= 1.998s
Page 73

Hardware Connection
Co de Example
In this example, Disco board’s user LED is turned-on and off without using any software delay. TIM2 is
used to create time delay as such that the code is not stuck in a time-wasting loop.
#include "STM8S.h"
void clock_setup(void);
void GPIO_setup(void);
void TIM2_setup(void);
void main(void)
{
clock_setup();
GPIO_setup();
TIM2_setup();
while(TRUE)
{
if(TIM2_GetCounter() > 976)
Page 74

{
GPIO_WriteHigh(GPIOD, GPIO_PIN_0);
}
else
{
GPIO_WriteLow(GPIOD, GPIO_PIN_0);
}
};
}
void clock_setup(void)
{
CLK_DeInit();
CLK_HSECmd(DISABLE);
CLK_LSICmd(DISABLE);
CLK_HSICmd(ENABLE);
while(CLK_GetFlagStatus(CLK_FLAG_HSIRDY) == FALSE);
CLK_ClockSwitchCmd(ENABLE);
CLK_HSIPrescalerConfig(CLK_PRESCALER_HSIDIV8);
CLK_SYSCLKConfig(CLK_PRESCALER_CPUDIV1);
CLK_ClockSwitchConfig(CLK_SWITCHMODE_AUTO, CLK_SOURCE_HSI,
DISABLE, CLK_CURRENTCLOCKSTATE_ENABLE);
CLK_PeripheralClockConfig(CLK_PERIPHERAL_SPI, DISABLE);
CLK_PeripheralClockConfig(CLK_PERIPHERAL_I2C, DISABLE);
CLK_PeripheralClockConfig(CLK_PERIPHERAL_ADC, DISABLE);
CLK_PeripheralClockConfig(CLK_PERIPHERAL_AWU, DISABLE);
CLK_PeripheralClockConfig(CLK_PERIPHERAL_UART1, DISABLE);
CLK_PeripheralClockConfig(CLK_PERIPHERAL_TIMER1, DISABLE);
CLK_PeripheralClockConfig(CLK_PERIPHERAL_TIMER2, ENABLE);
CLK_PeripheralClockConfig(CLK_PERIPHERAL_TIMER4, DISABLE);
}
void GPIO_setup(void)
{
GPIO_DeInit(GPIOD);
GPIO_Init(GPIOD, GPIO_PIN_0, GPIO_MODE_OUT_OD_HIZ_SLOW);
}
void TIM2_setup(void)
{
TIM2_DeInit();
TIM2_TimeBaseInit(TIM2_PRESCALER_2048, 1952);
TIM2_Cmd(ENABLE);
}
Explanation
Firstly, the CPU and the peripheral clock is set at 2MHz.
CLK_HSIPrescalerConfig(CLK_PRESCALER_HSIDIV8);
CLK_SYSCLKConfig(CLK_PRESCALER_CPUDIV1);
….
….
CLK_PeripheralClockConfig(CLK_PERIPHERAL_TIMER2, ENABLE);
Page 75

As explained earlier, to get 2 second timer reload interval we need to prescale the timer by 2048 and
load its counter with 1952. This is what should be the setup for TIM2:
void TIM2_setup(void)
{
TIM2_DeInit();
TIM2_TimeBaseInit(TIM2_PRESCALER_2048, 1952);
TIM2_Cmd(ENABLE);
}
Our goal is to keep the LED on for 1 second and off for 1 second. It takes 1952 TIM2 counts for 2 second
interval and so one second passes when this count is 976. Thus, in the main loop we are checking the
value of TIM2’s counter. From 0 to 976 counts, the LED is on and from 977 to 1952 counts, the LED is
off. Note that the LED’s positive end is connected to VDD and so it will turn on only PD0 is low.
if(TIM2_GetCounter() > 976)
{
GPIO_WriteHigh(GPIOD, GPIO_PIN_0);
}
else
{
GPIO_WriteLow(GPIOD, GPIO_PIN_0);
}
Demo
Video link: https://youtu.be/ZstHDHAAHOM
Page 76
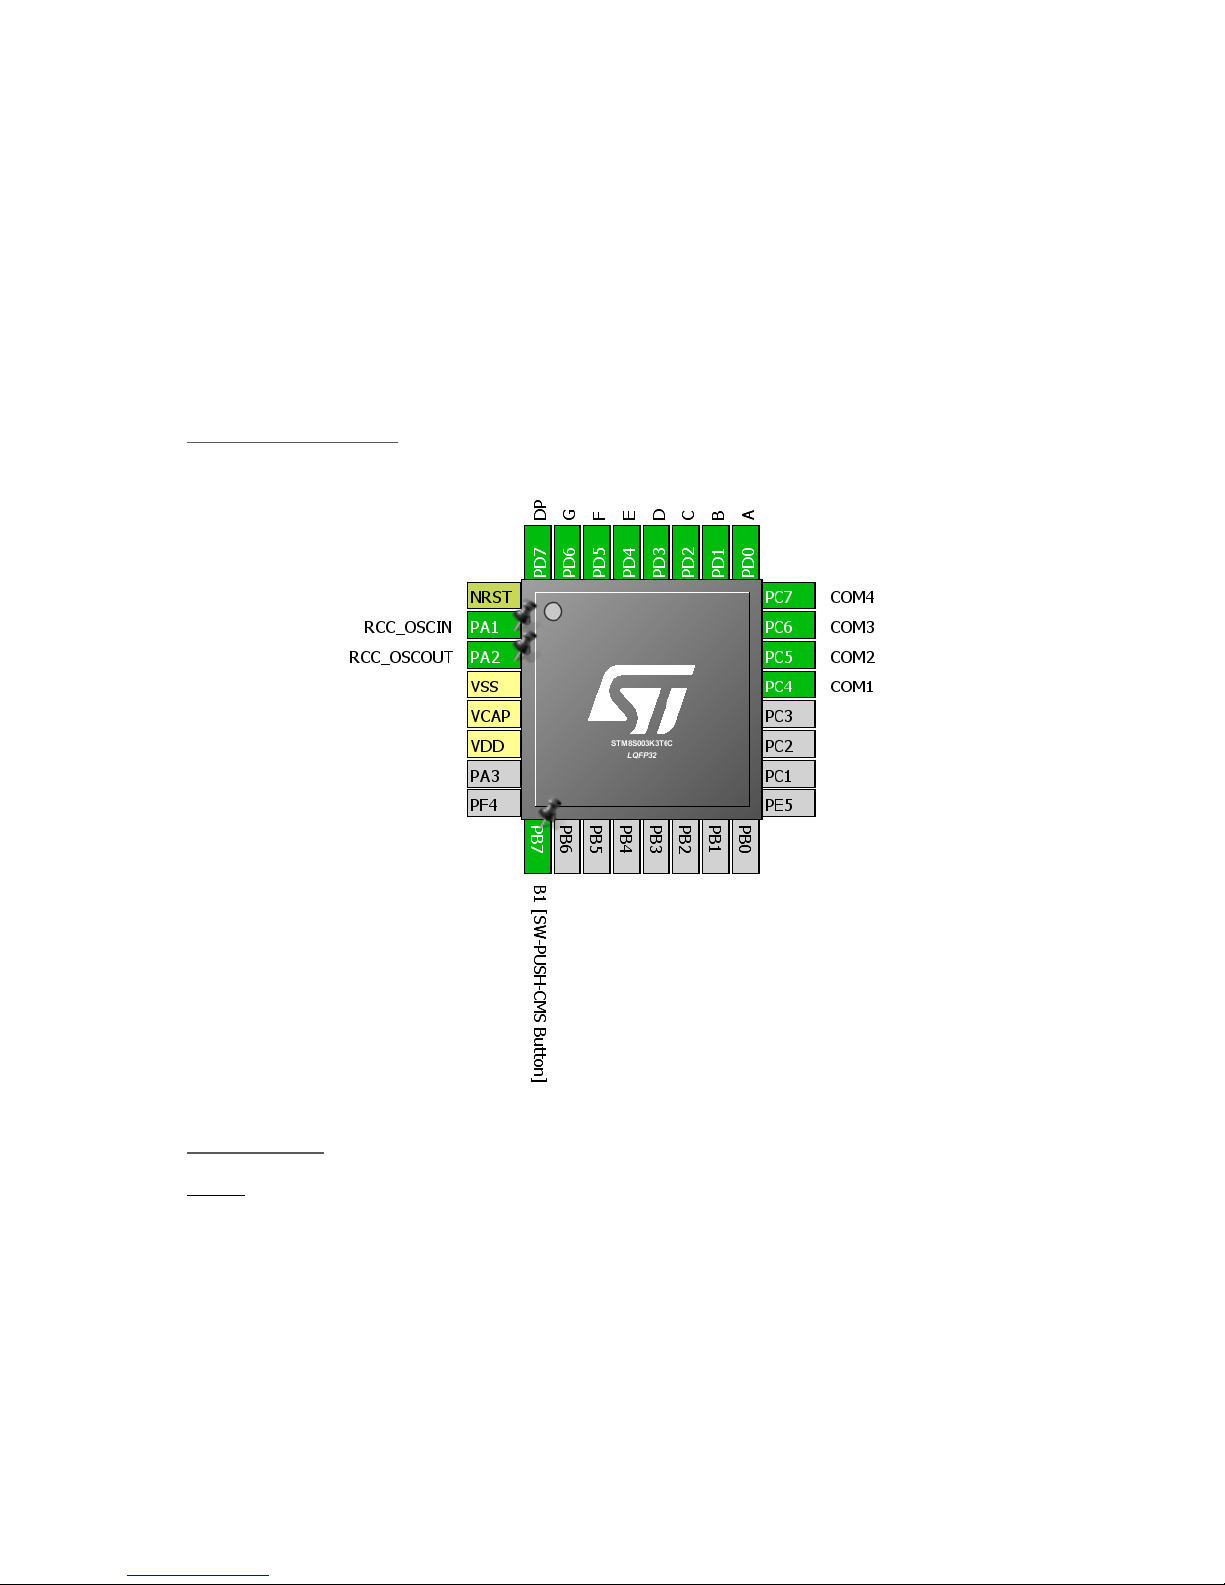
Timer Interrupt (TIM4)
In this example uses the same concepts of the previous example but it is based on timer interrupt –
TIM4 interrupt. Timer interrupts are very important interrupts apart from other interrupts in a micro.
To me they are highly valuable and useful.
This example demonstrates how to scan and project information on multiple seven segment displays
with timer interrupt while the main loop can process the information to be displayed.
Hardware Connection
Co de Example
main.c
#include "STM8S.h"
unsigned int value = 0x00;
unsigned char n = 0x00;
unsigned char seg = 0x01;
const unsigned char num[0x0A] = {0xC0, 0xF9, 0xA4, 0xB0, 0x99, 0x92, 0x82, 0xF8, 0x80, 0x90};
Page 77

void GPIO_setup(void);
void clock_setup(void);
void TIM4_setup(void);
void main(void)
{
GPIO_setup();
clock_setup();
TIM4_setup();
while (TRUE)
{
value++;
delay_ms(999);
};
}
void GPIO_setup(void)
{
GPIO_DeInit(GPIOC);
GPIO_Init(GPIOC, ((GPIO_Pin_TypeDef)(GPIO_PIN_4 | GPIO_PIN_5 | GPIO_PIN_6 | GPIO_PIN_7)),
GPIO_MODE_OUT_PP_HIGH_FAST);
GPIO_DeInit(GPIOD);
GPIO_Init(GPIOD, GPIO_PIN_ALL, GPIO_MODE_OUT_PP_HIGH_FAST);
}
void clock_setup(void)
{
CLK_DeInit();
CLK_HSECmd(DISABLE);
CLK_LSICmd(DISABLE);
CLK_HSICmd(ENABLE);
while(CLK_GetFlagStatus(CLK_FLAG_HSIRDY) == FALSE);
CLK_ClockSwitchCmd(ENABLE);
CLK_HSIPrescalerConfig(CLK_PRESCALER_HSIDIV8);
CLK_SYSCLKConfig(CLK_PRESCALER_CPUDIV1);
CLK_ClockSwitchConfig(CLK_SWITCHMODE_AUTO, CLK_SOURCE_HSI,
DISABLE, CLK_CURRENTCLOCKSTATE_ENABLE);
CLK_PeripheralClockConfig(CLK_PERIPHERAL_SPI, DISABLE);
CLK_PeripheralClockConfig(CLK_PERIPHERAL_I2C, DISABLE);
CLK_PeripheralClockConfig(CLK_PERIPHERAL_ADC, DISABLE);
CLK_PeripheralClockConfig(CLK_PERIPHERAL_AWU, DISABLE);
CLK_PeripheralClockConfig(CLK_PERIPHERAL_UART1, DISABLE);
CLK_PeripheralClockConfig(CLK_PERIPHERAL_TIMER1, DISABLE);
CLK_PeripheralClockConfig(CLK_PERIPHERAL_TIMER2, DISABLE);
CLK_PeripheralClockConfig(CLK_PERIPHERAL_TIMER4, ENABLE);
}
void TIM4_setup(void)
{
TIM4_DeInit();
TIM4_TimeBaseInit(TIM4_PRESCALER_32, 128);
TIM4_ITConfig(TIM4_IT_UPDATE, ENABLE);
TIM4_Cmd(ENABLE);
enableInterrupts();
}
Page 78

stm8s_it.h (top part only)
#ifndef __STM8S_IT_H
#define __STM8S_IT_H
@far @interrupt void TIM4_UPD_IRQHandler(void);
/* Includes ------------------------------------------------------------------*/
#include "stm8s.h"
stm8s_it.c (top part only)
#include "stm8s.h"
#include "stm8s_it.h"
extern unsigned int value;
extern unsigned char n;
extern unsigned char seg;
extern const unsigned char num[10];
void TIM4_UPD_IRQHandler(void)
{
switch(seg)
{
case 1:
{
n = (value / 1000);
GPIO_Write(GPIOD, num[n]);
GPIO_Write(GPIOC, 0xE0);
break;
}
case 2:
{
n = ((value / 100) % 10);
GPIO_Write(GPIOD, num[n]);
GPIO_Write(GPIOC, 0xD0);
break;
}
case 3:
{
n = ((value / 10) % 10);
GPIO_Write(GPIOD, num[n]);
GPIO_Write(GPIOC, 0xB0);
break;
}
case 4:
{
n = (value % 10);
GPIO_Write(GPIOD, num[n]);
GPIO_Write(GPIOC, 0x70);
break;
}
}
seg++;
if(seg > 4)
Page 79

{
seg = 1;
}
TIM4_ClearFlag(TIM4_FLAG_UPDATE);
}
stm8_interrupt_vector.c
#include "stm8s_it.h"
typedef void @far (*interrupt_handler_t)(void);
struct interrupt_vector {
unsigned char interrupt_instruction;
interrupt_handler_t interrupt_handler;
};
//@far @interrupt void NonHandledInterrupt (void)
//{
/* in order to detect unexpected events during development,
it is recommended to set a breakpoint on the following instruction
*/
//return;
//}
extern void _stext(); /* startup routine */
struct interrupt_vector const _vectab[] = {
{0x82, (interrupt_handler_t)_stext}, /* reset */
{0x82, NonHandledInterrupt}, /* trap */
{0x82, NonHandledInterrupt}, /* irq0 */
{0x82, NonHandledInterrupt}, /* irq1 */
{0x82, NonHandledInterrupt}, /* irq2 */
{0x82, NonHandledInterrupt}, /* irq3 */
{0x82, NonHandledInterrupt}, /* irq4 */
{0x82, NonHandledInterrupt}, /* irq5 */
{0x82, NonHandledInterrupt}, /* irq6 */
{0x82, NonHandledInterrupt}, /* irq7 */
{0x82, NonHandledInterrupt}, /* irq8 */
{0x82, NonHandledInterrupt}, /* irq9 */
{0x82, NonHandledInterrupt}, /* irq10 */
{0x82, NonHandledInterrupt}, /* irq11 */
{0x82, NonHandledInterrupt}, /* irq12 */
{0x82, NonHandledInterrupt}, /* irq13 */
{0x82, NonHandledInterrupt}, /* irq14 */
{0x82, NonHandledInterrupt}, /* irq15 */
{0x82, NonHandledInterrupt}, /* irq16 */
{0x82, NonHandledInterrupt}, /* irq17 */
{0x82, NonHandledInterrupt}, /* irq18 */
{0x82, NonHandledInterrupt}, /* irq19 */
{0x82, NonHandledInterrupt}, /* irq20 */
{0x82, NonHandledInterrupt}, /* irq21 */
{0x82, NonHandledInterrupt}, /* irq22 */
{0x82, (interrupt_handler_t)TIM4_UPD_IRQHandler}, /* irq23 */
{0x82, NonHandledInterrupt}, /* irq24 */
{0x82, NonHandledInterrupt}, /* irq25 */
{0x82, NonHandledInterrupt}, /* irq26 */
{0x82, NonHandledInterrupt}, /* irq27 */
{0x82, NonHandledInterrupt}, /* irq28 */
{0x82, NonHandledInterrupt}, /* irq29 */
};
Page 80

Explanation
Both the peripheral and CPU clocks are running at 2MHz.
CLK_HSIPrescalerConfig(CLK_PRESCALER_HSIDIV8);
CLK_SYSCLKConfig(CLK_PRESCALER_CPUDIV1);
....
….
CLK_PeripheralClockConfig(CLK_PERIPHERAL_TIMER4, ENABLE);
TIM4 is a basic timer and so it is better to use it for such tasks. We initialize it by setting its prescaler
to 32 and loading its counter with 128. These values will make TIM4 overflow and interrupt every 2ms
– enough time to project info in one seven segment. There are 4 seven segment displays and so within
8ms all four are updated and your eyes see it as if all projecting info at the same time – a trick of vision.
Lastly, we need to enable what kind of interrupt we are expecting from the timer and finally enable
the global interrupt.
void TIM4_setup(void)
{
TIM4_DeInit();
TIM4_TimeBaseInit(TIM4_PRESCALER_32, 128);
TIM4_ITConfig(TIM4_IT_UPDATE, ENABLE);
TIM4_Cmd(ENABLE);
enableInterrupts();
}
Remember the first interrupt example? We have to let the compiler know which interrupt we are
using. If you look at the datasheet, you’ll see that TIM4 update/overflow is located in IRQ23. We need
this and so we should make the following change in the stm8_interrupt_vector.c file:
{0x82, (interrupt_handler_t)TIM4_UPD_IRQHandler}, /* irq23 */
Remember to add the interrupt header and source files as we are going to use interrupt here. Inside
the ISR, we do the scanning of each seven segment. Every time an overflow interrupt occurs, a seven
segment is changed. At the end of the ISR a counter is incremented to select the next display when
new overflow event occurs. Inside the Switch-Case, we turn on the seven segment and decide the
value that seven segment should show. Finally, the timer overflow/update flag is cleared.
switch(seg)
{
case 1:
{
n = (value / 1000);
GPIO_Write(GPIOD, num[n]);
GPIO_Write(GPIOC, 0xE0);
break;
}
case 2:
{
n = ((value / 100) % 10);
GPIO_Write(GPIOD, num[n]);
GPIO_Write(GPIOC, 0xD0);
break;
}
case 3:
{
Page 81

n = ((value / 10) % 10);
GPIO_Write(GPIOD, num[n]);
GPIO_Write(GPIOC, 0xB0);
break;
}
case 4:
{
n = (value % 10);
GPIO_Write(GPIOD, num[n]);
GPIO_Write(GPIOC, 0x70);
break;
}
}
seg++;
if(seg > 4)
{
seg = 1;
}
TIM4_ClearFlag(TIM4_FLAG_UPDATE);
Demo
Video link: https://youtu.be/Sa20Hf2N4gE
Page 82

General Purpose Pulse Width Modulation (TIM2 PWM)
Pulse Width Modulation (PWM) is a must-have feature of any microcontroller. PWM has many uses
like motor control, SMPSs, lighting control, sound generation, waveform generation, etc. Unlike other
micros which have limited PWM channels, STM8 has several PWM channels. For instance, STM8S003K
has seven independent PWM channels, three of which belong to TIM2 – a general purpose (GP) timer.
PWMs generated by GP timers are basic PWMs. They can be used for simple tasks like LED brightness
control, servo motor control, etc. that don’t require advanced features like dead-time, brake or
complementary waveform generation. In this section, we will see how to use TIM2 to generate simple
PWMs.
Please note that in more advanced STM8 micros, timer I/Os are dependent on alternate function
configuration bits. Check those bits before uploading codes. In some STM8 micros, the I/Os are also
remappable, meaning that the I/Os can be swapped in different GPIOs. Take the help of STM8CubeMx
if needed.
Hardware Connection
Page 83

Co de Example
This is a pretty simple example. Here all three channels of TIM2 are used to smoothly fade and glow
three LEDs connected to the timer channels.
#include "STM8S.h"
void clock_setup(void);
void GPIO_setup(void);
void TIM2_setup(void);
void main(void)
{
signed int pwm_duty = 0x0000;
clock_setup();
GPIO_setup();
TIM2_setup();
while(TRUE)
{
for(pwm_duty = 0; pwm_duty < 1000; pwm_duty += 10)
{
TIM2_SetCompare1(pwm_duty);
TIM2_SetCompare2(pwm_duty);
TIM2_SetCompare3(pwm_duty);
delay_ms(10);
}
for(pwm_duty = 1000; pwm_duty > 0; pwm_duty -= 10)
{
TIM2_SetCompare1(pwm_duty);
TIM2_SetCompare2(pwm_duty);
TIM2_SetCompare3(pwm_duty);
delay_ms(10);
}
};
}
void clock_setup(void)
{
CLK_DeInit();
CLK_HSECmd(DISABLE);
CLK_LSICmd(DISABLE);
CLK_HSICmd(ENABLE);
while(CLK_GetFlagStatus(CLK_FLAG_HSIRDY) == FALSE);
CLK_ClockSwitchCmd(ENABLE);
CLK_HSIPrescalerConfig(CLK_PRESCALER_HSIDIV8);
CLK_SYSCLKConfig(CLK_PRESCALER_CPUDIV1);
CLK_ClockSwitchConfig(CLK_SWITCHMODE_AUTO, CLK_SOURCE_HSI,
DISABLE, CLK_CURRENTCLOCKSTATE_ENABLE);
CLK_PeripheralClockConfig(CLK_PERIPHERAL_SPI, DISABLE);
CLK_PeripheralClockConfig(CLK_PERIPHERAL_I2C, DISABLE);
CLK_PeripheralClockConfig(CLK_PERIPHERAL_ADC, DISABLE);
CLK_PeripheralClockConfig(CLK_PERIPHERAL_AWU, DISABLE);
CLK_PeripheralClockConfig(CLK_PERIPHERAL_UART1, DISABLE);
CLK_PeripheralClockConfig(CLK_PERIPHERAL_TIMER1, DISABLE);
CLK_PeripheralClockConfig(CLK_PERIPHERAL_TIMER2, ENABLE);
CLK_PeripheralClockConfig(CLK_PERIPHERAL_TIMER4, DISABLE);
Page 84

}
void GPIO_setup(void)
{
GPIO_DeInit(GPIOA);
GPIO_Init(GPIOA, GPIO_PIN_3, GPIO_MODE_OUT_PP_HIGH_FAST);
GPIO_DeInit(GPIOD);
GPIO_Init(GPIOD, ((GPIO_Pin_TypeDef)GPIO_PIN_3 | GPIO_PIN_4), GPIO_MODE_OUT_PP_HIGH_FAST);
}
void TIM2_setup(void)
{
TIM2_DeInit();
TIM2_TimeBaseInit(TIM2_PRESCALER_32, 1000);
TIM2_OC1Init(TIM2_OCMODE_PWM1, TIM2_OUTPUTSTATE_ENABLE, 1000, TIM2_OCPOLARITY_HIGH);
TIM2_OC2Init(TIM2_OCMODE_PWM1, TIM2_OUTPUTSTATE_ENABLE, 1000, TIM2_OCPOLARITY_LOW);
TIM2_OC3Init(TIM2_OCMODE_PWM1, TIM2_OUTPUTSTATE_ENABLE, 1000, TIM2_OCPOLARITY_HIGH);
TIM2_Cmd(ENABLE);
}
Explanation
Again, the CPU and the peripheral clock is set at 2MHz.
CLK_HSIPrescalerConfig(CLK_PRESCALER_HSIDIV8);
CLK_SYSCLKConfig(CLK_PRESCALER_CPUDIV1);
….
….
CLK_PeripheralClockConfig(CLK_PERIPHERAL_TIMER2, ENABLE);
Next, we need to configure the PWM GPIOs as outputs.
void GPIO_setup(void)
{
GPIO_DeInit(GPIOA);
GPIO_Init(GPIOA, GPIO_PIN_3, GPIO_MODE_OUT_PP_HIGH_FAST);
GPIO_DeInit(GPIOD);
GPIO_Init(GPIOD, ((GPIO_Pin_TypeDef)GPIO_PIN_3 | GPIO_PIN_4), GPIO_MODE_OUT_PP_HIGH_FAST);
}
Just like other microcontrollers, PWM generation involves a timer. Here as said TIM2 is that timer. We
need to set time base first before actually configuring the PWM channels.
void TIM2_setup(void)
{
TIM2_DeInit();
TIM2_TimeBaseInit(TIM2_PRESCALER_32, 1000);
TIM2_OC1Init(TIM2_OCMODE_PWM1, TIM2_OUTPUTSTATE_ENABLE, 1000, TIM2_OCPOLARITY_HIGH);
TIM2_OC2Init(TIM2_OCMODE_PWM1, TIM2_OUTPUTSTATE_ENABLE, 1000, TIM2_OCPOLARITY_LOW);
TIM2_OC3Init(TIM2_OCMODE_PWM1, TIM2_OUTPUTSTATE_ENABLE, 1000, TIM2_OCPOLARITY_HIGH);
TIM2_Cmd(ENABLE);
}
In the codes above, TIM2 has a time base of 16ms or 62.5kHz. This time base is further divided by the
Output Compare (OC) unit. Thus, here the 62.5kHz base is further divided by 1000 to get 62.5Hz PWM
frequency. The maximum duty cycle is therefore 1000. Additionally, we can set PWM polarity and
command the channel if or if not should it behave in an inverted manner.
Page 85

To change PWM duty, we need to call the following function:
TIM2_SetCompareX(pwm_duty); // where X represents channel ID (1, 2 or 3)
Note that in STM8 micros, there is a trade-off between duty cycle and PWM frequency. If the PWM
resolution, i.e. duty cycle is big then PWM frequency is small and vice-versa. This is true for all timers.
Demo
Video link: https://www.youtube.com/watch?v=BPS5unUHDz4
Page 86

Advanced Pulse Width Modulation (TIM1 PWM)
Timer 1 (TIM1) is an advance timer and so the PWMs generated by it have several additional features
that are not available with other timers. For example, it is possible to generate complimentary PWMs
with TIM1. Up to three sets of complementary PWMs can be generated. Such PWMs are useful in
designing three phase inverters, rectifiers and other power-related tasks. TIM1 PWMs are also very
useful for motor control applications. It is also possible to add dead-time and brake. Apart from these
TIM1 can also generate PWMs just like GP timers. In this mode however, complimentary PWM outputs
are unavailable and up to four independent PWM channels can be made available.
In this example, I have demonstrated how to create complementary PWMs in TIM1 PWM channel 1.
Hardware Connection
Page 87

Co de Example
#include "STM8S.h"
void clock_setup(void);
void GPIO_setup(void);
void TIM1_setup(void);
void main(void)
{
signed int i = 0;
clock_setup();
GPIO_setup();
TIM1_setup();
while(TRUE)
{
for(i = 0; i < 1000; i += 1)
{
TIM1_SetCompare1(i);
delay_ms(1);
}
for(i = 1000; i > 0; i -= 1)
{
TIM1_SetCompare1(i);
delay_ms(1);
}
};
}
void clock_setup(void)
{
CLK_DeInit();
CLK_HSECmd(DISABLE);
CLK_LSICmd(DISABLE);
CLK_HSICmd(ENABLE);
while(CLK_GetFlagStatus(CLK_FLAG_HSIRDY) == FALSE);
CLK_ClockSwitchCmd(ENABLE);
CLK_HSIPrescalerConfig(CLK_PRESCALER_HSIDIV1);
CLK_SYSCLKConfig(CLK_PRESCALER_CPUDIV1);
CLK_ClockSwitchConfig(CLK_SWITCHMODE_AUTO, CLK_SOURCE_HSI,
DISABLE, CLK_CURRENTCLOCKSTATE_ENABLE);
CLK_PeripheralClockConfig(CLK_PERIPHERAL_I2C, DISABLE);
CLK_PeripheralClockConfig(CLK_PERIPHERAL_SPI, DISABLE);
CLK_PeripheralClockConfig(CLK_PERIPHERAL_ADC, DISABLE);
CLK_PeripheralClockConfig(CLK_PERIPHERAL_AWU, DISABLE);
CLK_PeripheralClockConfig(CLK_PERIPHERAL_UART1, DISABLE);
CLK_PeripheralClockConfig(CLK_PERIPHERAL_TIMER1, ENABLE);
CLK_PeripheralClockConfig(CLK_PERIPHERAL_TIMER2, DISABLE);
CLK_PeripheralClockConfig(CLK_PERIPHERAL_TIMER4, DISABLE);
}
void GPIO_setup(void)
{
GPIO_DeInit(GPIOB);
GPIO_Init(GPIOB, GPIO_PIN_0, GPIO_MODE_OUT_PP_HIGH_FAST);
GPIO_DeInit(GPIOC);
Page 88

GPIO_Init(GPIOC, GPIO_PIN_1, GPIO_MODE_OUT_PP_HIGH_FAST);
}
void TIM1_setup(void)
{
TIM1_DeInit();
TIM1_TimeBaseInit(16, TIM1_COUNTERMODE_UP, 1000, 1);
TIM1_OC1Init(TIM1_OCMODE_PWM1,
TIM1_OUTPUTSTATE_ENABLE,
TIM1_OUTPUTNSTATE_ENABLE,
1000,
TIM1_OCPOLARITY_LOW,
TIM1_OCNPOLARITY_LOW,
TIM1_OCIDLESTATE_RESET,
TIM1_OCNIDLESTATE_RESET);
TIM1_CtrlPWMOutputs(ENABLE);
TIM1_Cmd(ENABLE);
}
Explanation
This time we used the full 16MHz speed of HSI both for peripheral and CPU clocks:
CLK_HSIPrescalerConfig(CLK_PRESCALER_HSIDIV1);
CLK_SYSCLKConfig(CLK_PRESCALER_CPUDIV1);
….
….
CLK_PeripheralClockConfig(CLK_PERIPHERAL_TIMER1, ENABLE);
Like as with the previous example PWM output GPIOs are set as outputs:
void GPIO_setup(void)
{
GPIO_DeInit(GPIOB);
GPIO_Init(GPIOB, GPIO_PIN_0, GPIO_MODE_OUT_PP_HIGH_FAST);
GPIO_DeInit(GPIOC);
GPIO_Init(GPIOC, GPIO_PIN_1, GPIO_MODE_OUT_PP_HIGH_FAST);
}
TIM1 and OC channel initialization is just like the previous example with some minor differences. The
time base generation part seems to have some additional arguments. These are because:
• Unlike other timers, TIM1 prescaler value is not a fixed set of multiples of 2.
• The counting mode is not just up mode counting. Counting mode can also be down counting.
• TIM1 has additional repetition counter.
• Except the basic timers all timers in STM8 are 16-bit timer.
If you open the header file for TIM1, you’ll see many functions. Many of these functions are not
available with other timers, expressing the power of an advance timer.
Page 89

Likewise, there are some additional info we must feed when configuring the OC channels. We need to
set info about complementary channels even if we don’t need them. We can additionally set the
default idle states of PWMs apart from polarities.
void TIM1_setup(void)
{
TIM1_DeInit();
TIM1_TimeBaseInit(16, TIM1_COUNTERMODE_UP, 1000, 1);
TIM1_OC1Init(TIM1_OCMODE_PWM1,
TIM1_OUTPUTSTATE_ENABLE,
TIM1_OUTPUTNSTATE_ENABLE,
1000,
TIM1_OCPOLARITY_LOW,
TIM1_OCNPOLARITY_LOW,
TIM1_OCIDLESTATE_RESET,
TIM1_OCNIDLESTATE_RESET);
TIM1_CtrlPWMOutputs(ENABLE);
TIM1_Cmd(ENABLE);
}
To change the duty cycle of a channel, we need to call this function:
TIM1_SetCompareX(duty_cycle); // where X represents channel ID (1, 2, 3 or 4)
Complementary outputs occur in pairs and so they are interdependent. That’s why there is no
separate function for outputs labelled N.
Page 90

Demo
Video link: https://youtu.be/uclCXH1ZPWU
Page 91

Timer Input Capture (TIM1 & TIM2)
Input capture is needed for measurements of pulses, pulse widths, frequencies, phase detection and
similar stuffs. With external interrupts these measurements can be done with some limitations.
However, using timer capture has some serious benefits. First of all, accuracy of measurements and
secondly timer capture simplifies many tasks as timers themselves time stuffs properly. Dedicated
hardware make stuffs like PWM measurement less complex and resource-friendly too.
STM8 timers have several capture channels just like output compare channels (PWM). The number of
input capture channels is same as the number of PWM channels. Except basic timers all timers have
input capture option.
Hardware Connection
Page 92

Co de Example
In this demo, TIM2 is configured to generate PWM on its CH1 output. TIM1 is configured to capture
every rising edge of incoming waveform at its input capture channel CH1. When a capture event
occurs, the current time count of TIM1 is saved. By deducting the recent capture count from the
previous capture count, we can measure time period of the incoming PWM signal and hence its
frequency. If the frequency is too high, TIM1 may overflow and so we need to take care of it too. We,
thus, need to check TIM1 overflow event too.
main.c
#include "STM8S.h"
#include "lcd.h"
unsigned int overflow_count = 0;
unsigned long pulse_ticks = 0;
unsigned long start_time = 0;
unsigned long end_time = 0;
void clock_setup(void);
void GPIO_setup(void);
void TIM1_setup(void);
void TIM2_setup(void);
void lcd_print(unsigned char x_pos, unsigned char y_pos, unsigned long value);
void main()
{
unsigned long time_period = 0;
clock_setup();
GPIO_setup();
TIM1_setup();
TIM2_setup();
LCD_init();
LCD_clear_home();
LCD_goto(0, 0);
LCD_putstr("T/ms:");
delay_ms(10);
while(TRUE)
{
time_period = pulse_ticks;
lcd_print(0, 1, time_period);
delay_ms(400);
};
}
void clock_setup(void)
{
CLK_DeInit();
CLK_HSECmd(DISABLE);
CLK_LSICmd(DISABLE);
CLK_HSICmd(ENABLE);
while(CLK_GetFlagStatus(CLK_FLAG_HSIRDY) == FALSE);
CLK_ClockSwitchCmd(ENABLE);
CLK_HSIPrescalerConfig(CLK_PRESCALER_HSIDIV8);
Page 93

CLK_SYSCLKConfig(CLK_PRESCALER_CPUDIV2);
CLK_ClockSwitchConfig(CLK_SWITCHMODE_AUTO, CLK_SOURCE_HSI,
DISABLE, CLK_CURRENTCLOCKSTATE_ENABLE);
CLK_PeripheralClockConfig(CLK_PERIPHERAL_SPI, DISABLE);
CLK_PeripheralClockConfig(CLK_PERIPHERAL_I2C, DISABLE);
CLK_PeripheralClockConfig(CLK_PERIPHERAL_ADC, DISABLE);
CLK_PeripheralClockConfig(CLK_PERIPHERAL_AWU, DISABLE);
CLK_PeripheralClockConfig(CLK_PERIPHERAL_UART1, DISABLE);
CLK_PeripheralClockConfig(CLK_PERIPHERAL_TIMER1, ENABLE);
CLK_PeripheralClockConfig(CLK_PERIPHERAL_TIMER2, ENABLE);
CLK_PeripheralClockConfig(CLK_PERIPHERAL_TIMER4, DISABLE);
}
void GPIO_setup(void)
{
GPIO_DeInit(GPIOC);
GPIO_Init(GPIOC, GPIO_PIN_1, GPIO_MODE_IN_FL_NO_IT);
GPIO_DeInit(GPIOD);
GPIO_Init(GPIOD, GPIO_PIN_4, GPIO_MODE_OUT_PP_HIGH_FAST);
}
void TIM1_setup(void)
{
TIM1_DeInit();
TIM1_TimeBaseInit(2000, TIM1_COUNTERMODE_UP, 55535, 1);
TIM1_ICInit(TIM1_CHANNEL_1, TIM1_ICPOLARITY_RISING, TIM1_ICSELECTION_DIRECTTI, 1, 1);
TIM1_ITConfig(TIM1_IT_UPDATE, ENABLE);
TIM1_ITConfig(TIM1_IT_CC1, ENABLE);
TIM1_Cmd(ENABLE);
enableInterrupts();
}
void TIM2_setup(void)
{
TIM2_DeInit();
TIM2_TimeBaseInit(TIM2_PRESCALER_32, 1250);
TIM2_OC1Init(TIM2_OCMODE_PWM1, TIM2_OUTPUTSTATE_ENABLE, 1000, TIM2_OCPOLARITY_LOW);
TIM2_SetCompare1(625);
TIM2_Cmd(ENABLE);
}
void lcd_print(unsigned char x_pos, unsigned char y_pos, unsigned long value)
{
char tmp[6] = {0x20, 0x20, 0x20, 0x20, 0x20, 0x20} ;
tmp[0] = (((value / 100000) % 10) + 0x30);
tmp[1] = (((value / 10000) % 10) + 0x30);
tmp[2] = (((value / 1000) % 10) + 0x30);
tmp[3] = (((value / 100) % 10) + 0x30);
tmp[4] = (((value / 10) % 10) + 0x30);
tmp[5] = ((value % 10) + 0x30);
LCD_goto(x_pos, y_pos);
LCD_putstr(tmp);
}
Page 94

stm8_interrupt_vector.c (Interrupt vector address part only)
….
{0x82, (interrupt_handler_t)TIM1_UPD_IRQHandler}, /* irq11 */
{0x82, (interrupt_handler_t)TIM1_CH1_CCP_IRQHandler}, /* irq12 */
….
stm8s_it.h (Top part only)
#ifndef __STM8S_IT_H
#define __STM8S_IT_H
@far @interrupt void TIM1_UPD_IRQHandler(void);
@far @interrupt void TIM1_CH1_CCP_IRQHandler(void);
/* Includes ------------------------------------------------------------------*/
#include "stm8s.h"
….
stm8s_it.c (Top part only)
#include "stm8s.h"
#include "stm8s_it.h"
extern unsigned int overflow_count;
extern unsigned long pulse_ticks;
extern unsigned long start_time;
extern unsigned long end_time;
void TIM1_UPD_IRQHandler(void)
{
overflow_count++;
TIM1_ClearITPendingBit(TIM1_IT_UPDATE);
TIM1_ClearFlag(TIM1_FLAG_UPDATE);
}
void TIM1_CH1_CCP_IRQHandler(void)
{
end_time = TIM1_GetCapture1();
pulse_ticks = ((overflow_count << 16) - start_time + end_time);
start_time = end_time;
overflow_count = 0;
TIM1_ClearITPendingBit(TIM1_IT_CC1);
TIM1_ClearFlag(TIM1_FLAG_CC1);
}
….
Page 95

Explanation
The clocks and peripherals are set first. We are using 2MHz peripheral clock and the CPU is running
at 0.5MHz.
CLK_HSIPrescalerConfig(CLK_PRESCALER_HSIDIV8);
CLK_SYSCLKConfig(CLK_PRESCALER_CPUDIV2);
….
….
CLK_PeripheralClockConfig(CLK_PERIPHERAL_TIMER1, ENABLE);
CLK_PeripheralClockConfig(CLK_PERIPHERAL_TIMER2, ENABLE);
GPIOs must be set too. Since TIM2 is to output PWM, its CH1 must be set output. Likewise, TIM1’s
CH1 GPIO must be set as an input.
GPIO_DeInit(GPIOC);
GPIO_Init(GPIOC, GPIO_PIN_1, GPIO_MODE_IN_FL_NO_IT);
GPIO_DeInit(GPIOD);
GPIO_Init(GPIOD, GPIO_PIN_4, GPIO_MODE_OUT_PP_HIGH_FAST);
TIM1 need to be configured for input capture. We need to set time base for TIM1 first. It is set as such
that TIM1 will overflow every second. Then we set input capture channel by specifying the edge
sensitivity, channel, mode and scalars. Since we will be using interrupts, we must enable relevant
interrupts.
void TIM1_setup(void)
{
TIM1_DeInit();
TIM1_TimeBaseInit(2000, TIM1_COUNTERMODE_UP, 55535, 1);
TIM1_ICInit(TIM1_CHANNEL_1, TIM1_ICPOLARITY_RISING, TIM1_ICSELECTION_DIRECTTI, 1, 1);
TIM1_ITConfig(TIM1_IT_UPDATE, ENABLE);
TIM1_ITConfig(TIM1_IT_CC1, ENABLE);
TIM1_Cmd(ENABLE);
enableInterrupts();
}
TIM2 is set for PWM generation on its CH1. The generated PWM will have a frequency of 50Hz and
50% duty cycle. The setup of TIM2 should be by now self-explanatory:
void TIM2_setup(void)
{
TIM2_DeInit();
TIM2_TimeBaseInit(TIM2_PRESCALER_32, 1250);
TIM2_OC1Init(TIM2_OCMODE_PWM1, TIM2_OUTPUTSTATE_ENABLE, 1000, TIM2_OCPOLARITY_LOW);
TIM2_SetCompare1(625);
TIM2_Cmd(ENABLE);
}
In the vector table of stm8_interrupt_vector.c file, we need to specify the interrupts we will be
using:
{0x82, (interrupt_handler_t)TIM1_UPD_IRQHandler}, /* irq11 */
{0x82, (interrupt_handler_t)TIM1_CH1_CCP_IRQHandler}, /* irq12 */
Page 96

We have to specify the interrupt subroutine (ISR) prototype functions in the stm8s_it.h file. These
functions are the places where the code will jump when respective interrupt occurs:
@far @interrupt void TIM1_UPD_IRQHandler(void);
@far @interrupt void TIM1_CH1_CCP_IRQHandler(void);
The ISR functions are coded in the stm8s_it.c file:
void TIM1_UPD_IRQHandler(void)
{
overflow_count++;
TIM1_ClearITPendingBit(TIM1_IT_UPDATE);
TIM1_ClearFlag(TIM1_FLAG_UPDATE);
}
The first part is dealing with TIM1 overflow. If a capture occurs when TIM1 count is near to reset value
we need to take this account. This part does so and an overflow counter is incremented.
void TIM1_CH1_CCP_IRQHandler(void)
{
end_time = TIM1_GetCapture1();
pulse_ticks = ((overflow_count << 16) - start_time + end_time);
start_time = end_time;
overflow_count = 0;
TIM1_ClearITPendingBit(TIM1_IT_CC1);
TIM1_ClearFlag(TIM1_FLAG_CC1);
}
The second part is where TIM1 capture is recorded. Once a rising edge is captured, an interrupt is
issued. In the interrupt, we must first save the current TIM1 counter count in the variable named
end_time. The formula for pulse tick is then computed. Note how the TIM1 overflow is addressed in
the formula. The new start time should be the previous capture time because we need to deduct old
capture count from new capture count. Lastly, overflow counter, capture flag and pending interrupts
are cleared.
In the main loop, we are just displaying the time period of capture in a LCD while everything is being
processed in the background by interrupts:
while(TRUE)
{
time_period = pulse_ticks;
lcd_print(0, 1, time_period);
delay_ms(400);
};
Page 97

Demo
Video link: https://youtu.be/bzLUDwuFQTw
Page 98

Communication Overview
STM8 microcontrollers are packed with several communication interfaces. These interfaces are
needed to communicate with external devices like sensors, actuators, drives, etc. The most commonly
used ones are Serial Communication (UART), Serial Peripheral Interface (SPI) and Inter-Integrated
Circuit (I2C). There are also other additional more robust communication interfaces like Controller
Area Network (CAN), Local Interconnect Network (LIN), Infrared Data Association (IrDA) and RS-485.
The latter communications will not be discussed here in this article and are kept for future issues.
These are methods are, however, not frequently used and are special forms of communications. For
example, CAN and LIN are mostly used in automotive industries. Each method communication has its
own advantages and disadvantages. Here we’ll see the individual basics of various methods of
communications.
Comm.
Description
I/O
Max.
Speed
Max.
Distance
Max. Possible Number
of Devices in a Bus
UART
Asynchronous serial point-to-
point communication
2
115.2kbps
15m
2 (Point-to-Point)
SPI
Short-range synchronous
master-slave serial
communication
3/4
4Mbps
0.1m
Virtually unlimited
I2C
Synchronous master-slave serial
communication using one data
and one clock line
2
1Mbps
0.5m
127
RS-485
Asynchronous single master
differential 2 wire serial
communication
2
115.2kbps
1.2km
Several
CAN
Differential communication with
multi-master support
2
1Mbps
5km
Several
LIN
Asynchronous 2 wire serial
communication similar to UART
2
20kbps
40m
Several
IrDA
Wireless serial communication
using infrared medium
2
115.2kbps
<1m
2 (Point-to-Point)
In STM8 microcontrollers, LIN, IrDA, RS-485 and UART all share the UART hardware peripheral. For
other communications, there are dedicated separate hardware. We will now be exploring the basic
ones here.
Page 99

Serial Communication (UART)
Serial communication is perhaps the mostly-used classic communication method for interfacing a PC
or other machines with a micro. With just two wire, we can achieve a full-duplex point-to-point
communication. Owing to its simplicity and wide usage, it is the communication interface backbone
that is used with GSM modems, RF modules, Bluetooth devices like RN-52, Wi-Fi devices like the
popular ESP8266, etc. It is also widely used in industries. Other communications rely on it, for example,
RS-485, LIN, etc.
Most STM8s have at least one UART module. Some have more than one. Different UARTs have
different features as shown:
To learn more about UART visit the following link:
https://learn.mikroe.com/uart-serial-communication/
The UARTs of STM8 micros are so robust and packed with so many features that it is quite impossible
to explain them all in this one article. Here we will explore the basic serial communication only. LIN
and IRDA will hopefully be covered in future articles.
Page 100

Hardware Connection
Co de Example
#include "STM8S.h"
void clock_setup(void);
void GPIO_setup(void);
void UART1_setup(void);
void main(void)
{
unsigned char i = 0;
char ch = 0;
clock_setup();
 Loading...