


UM2468
User manual
STM32CubeMonitor-UCPD software tool for USB Type-C™ Power Delivery port
management
Introduction
STM32CubeMonitor-UCPD (STM32CubeMonUCPD) is a software tool to configure and monitor the USB Type-C® Power
Delivery (UCPD) ports on equipped STM32 boards. The configuring part allows the modification of the USB Type-C® Power
Delivery port default configuration. Checks of Power Delivery contract establishment and activity are possible with the
monitoring tool.
UM2468 - Rev 2 - September 2020
For further information contact your local STMicroelectronics sales office.
www.st.com

1 Features
The main features of the STM32CubeMonitor-UCPD software tool are the following:
• Configures and monitors USB Type-C® Power Delivery (UCPD) ports of STMicroelectronics Type-C Power
Delivery boards.
• Sends device policy manager (DPM) messages to the distant USB Type-C® Power Delivery port.
This software applies to STM32 Arm®-based microcontrollers.
Note: Arm is a registered trademark of Arm Limited (or its subsidiaries) in the US and/or elsewhere.
UM2468
Features
UM2468 - Rev 2
page 2/37

2 Getting started
2.1 Computer requirements
Supported operating systems and architectures
• Windows® 7, 8 and 10: 64-bit (x64)
• Linux® (tested on Red Hat®, Fedora®, and Ubuntu®, 64-bit)
• macOS® (minimum version OS X® Yosemite)
Note:
Note: Oracle and Java are registered trademarks of Oracle and/or its affiliates.
Red Hat® is a registered trademark of Red Hat, Inc.
Fedora® is a trademark of Red Hat, Inc.
macOS® is a trademark of Apple Inc. registered in the U.S. and other countries.
Ubuntu® is a registered trademark of Canonical Ltd.
Software requirements
For Linux®, Java™ runtime is required by the installer.
UM2468
Getting started
2.2 Hardware requirements
• One free USB2 or USB3 host port
• Mini-B or Micro-B cable depending on the target board to access the STM32 ST-LINK
• STMicroelectronics target board with USB Type-C® and a firmware (embedding the tracer or the
cubemon_ucpd_emb module) latest version as described in STM32 STM application (UM2063), downloaded
from STMicroelectronics website www.st.com) selecting X-CUBE-USB-PD, or built through STM32CubeMX.
2.3 Installing
2.3.1 Installing STM32CubeMonitor-UCPD
The user must have the administrator rights on the computer to perform the installation.
The steps needed to install the STM32CubeMonitor-UCPD software tool are detailed below (all files can be
downloaded from the STMicroelectronics website www.st.com):
1. Download SetupSTM32CubeMonitor-UCPD.zip and unzip it in a temporary location.
2. Perform setup process associated with the environment (x.y.z represents STM32CubeMonitor-UCPD
software version):
– Windows: launch SetupSTM32CubeMonitor-UCPD-x.y.z.exe and follow the instructions provided.
– Linux: launch SetupSTM32CubeMonitor-UCPD-x.y.z.jar and follow the instructions provided.
– macOS: launch SetupSTM32CubeMonitor-UCPD-x.y.z.dmg and, into the installer window, drag and
drop the STM32CubeMonitor-UCPD icon on the Applications icon.
If another version of STM32CubeMonitor-UCPD is already installed, the existing version must be uninstalled
before installing the new version (see Section 2.4 for more details).
UM2468 - Rev 2
page 3/37

2.3.2 Installing the USB driver for ST-LINK
Note: This section is only applicable to Windows operating systems.
Follow the steps detailed below to install the USB driver for ST-LINK (all files can be downloaded from the
STMicroelectronics website www.st.com):
1. Download the USB driver for ST-LINK (STSW-LINK009).
2. Go in the directory C:\Program Files (x86)\STMicroelectronics\Software\Virtual comport driver and launch
the files listed below (depending on the operating system):
– Windows 7 64-bit: launch Win7/dpinst_amd64.exe.
– Windows 8.x and Windows 10 64-bit: launch Win8/dpinst_amd64.exe.
3. Plug the board with the USB cable. Windows detects it as "STMicroelectronics ST-LINK Virtual COM port”,
named COMxx.
Example: COM10.
2.4 Uninstalling STM32CubeMonitor-UCPD
The steps needed to uninstall STM32CubeMonitor-UCPD are detailed below for the various operating systems:
• Windows
Two possible options:
1. Open the Windows Control panel. Select Programs and Features to display the list of programs
installed on the computer. Right-click on STM32CubeMonitor-UCPD from the STMicroelectronics
publisher and select the uninstall function.
2. Go in the installation location (for example C:\Program Files\STMicroelectronics\ STM32CubeUCPD),
go in the Uninstaller folder and launch uninstaller.jar.
• Linux
Go in the STM32CubeMonitor-UCPD installation location (example $HOME/STMicroelectronics/
STM32CubeMonitor-UCPD), go in the Uninstaller folder and launch uninstaller.jar.
• macOS
Drag and drop the STM32CubeMonitor-UCPD application icon onto the Trash icon.
UM2468
Uninstalling STM32CubeMonitor-UCPD
2.5 Uninstalling the USB driver for ST-LINK
Note: This section is only needed for Windows operating systems.
Perform the following steps to uninstall the STMicroelectronics USB driver for ST-LINK:
1. Open the Windows Control panel.
2. Select Programs and Features to display the list of programs installed on the computer.
3. Right-click on Windows Driver Package - STMicroelectronics (WinUSB) STLinkWinUSB from the
STMicroelectronics publisher and select the uninstall function.
UM2468 - Rev 2
page 4/37
3 Windows structure - main areas
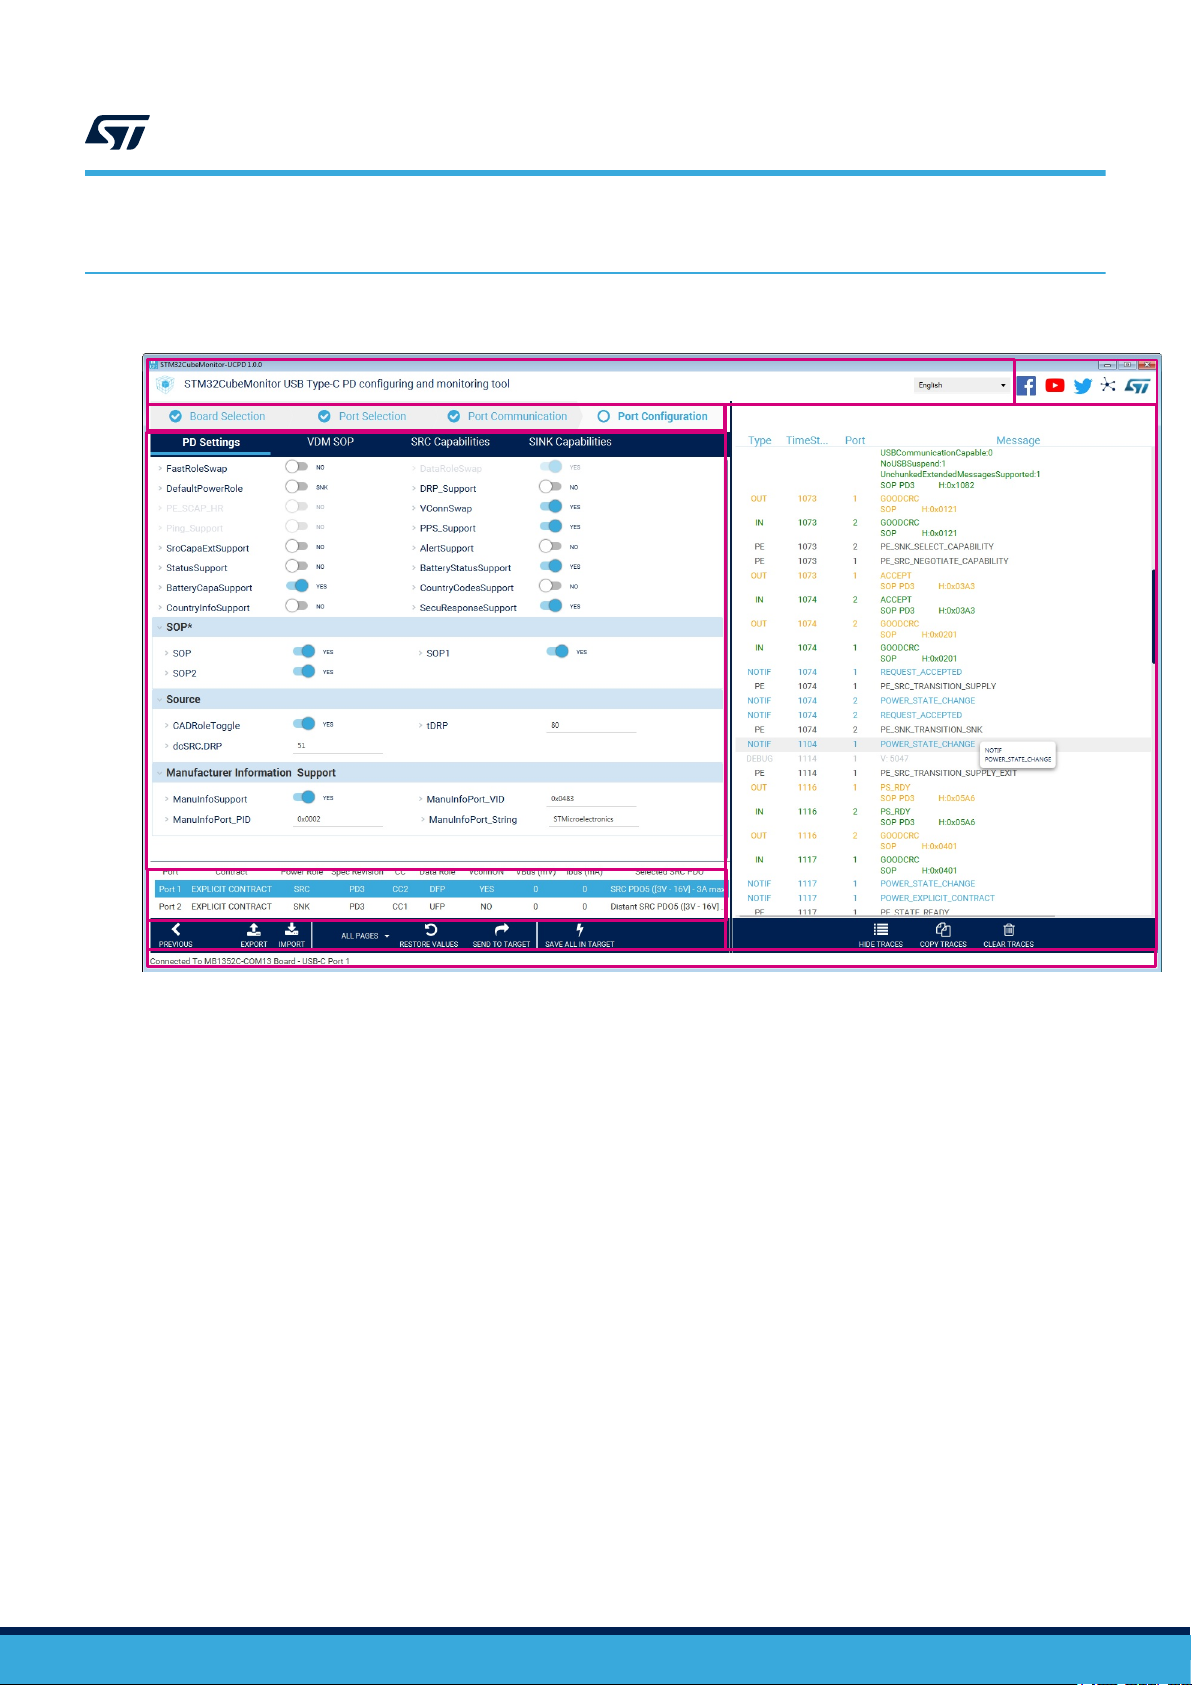
Figure 1. Overview of all panels
UM2468
Windows structure - main areas
1
2
3
4
8
5
6
7
The main areas are the following (also shown in the figure above):
• Area 1: Application Title panel
• Area 2: Social panel, linked to STMicroelectronics social networks shown in the figure below
• Area 3: Ribbon panel, where the four main states are listed and accessible step after step:
1. Board selection
2. Port Selection
3. Port Configuration
4. Port Communication
Chevron-right and chevron-left buttons in the Button panel allow navigation to the previous or next step.
• Area 4: Main panel content is state-dependent (see Section 4 How to use STM32CubeMonitor-UCPD).
• Area 5: Port Status panel gives a sum up of each board port (see Section 4.4 Port Status information).
• Area 6: Button panelists the actions.
• Area 7: Status bar panel displays the board version and the port selected when relevant.
• Area 8: Traces panel (see Section 5 Traces information)
UM2468 - Rev 2
page 5/37

Figure 2. Social network shortcut area
This area contains five shortcuts to social networks and web pages:
• The Facebook™ icon leads to the official STMicroelectronics Facebook page.
•
The YouTube™ icon leads to the official STMicroelectronics YouTube page.
•
The Twitter™ icon leads to the official STMicroelectronics Twitter page.
• The Share icon leads to the ST Community web site.
• The ST icon leads to the official STMicroelectronics web site.
UM2468
Windows structure - main areas
UM2468 - Rev 2
page 6/37
4 How to use STM32CubeMonitor-UCPD
4.1 Board detection and selection
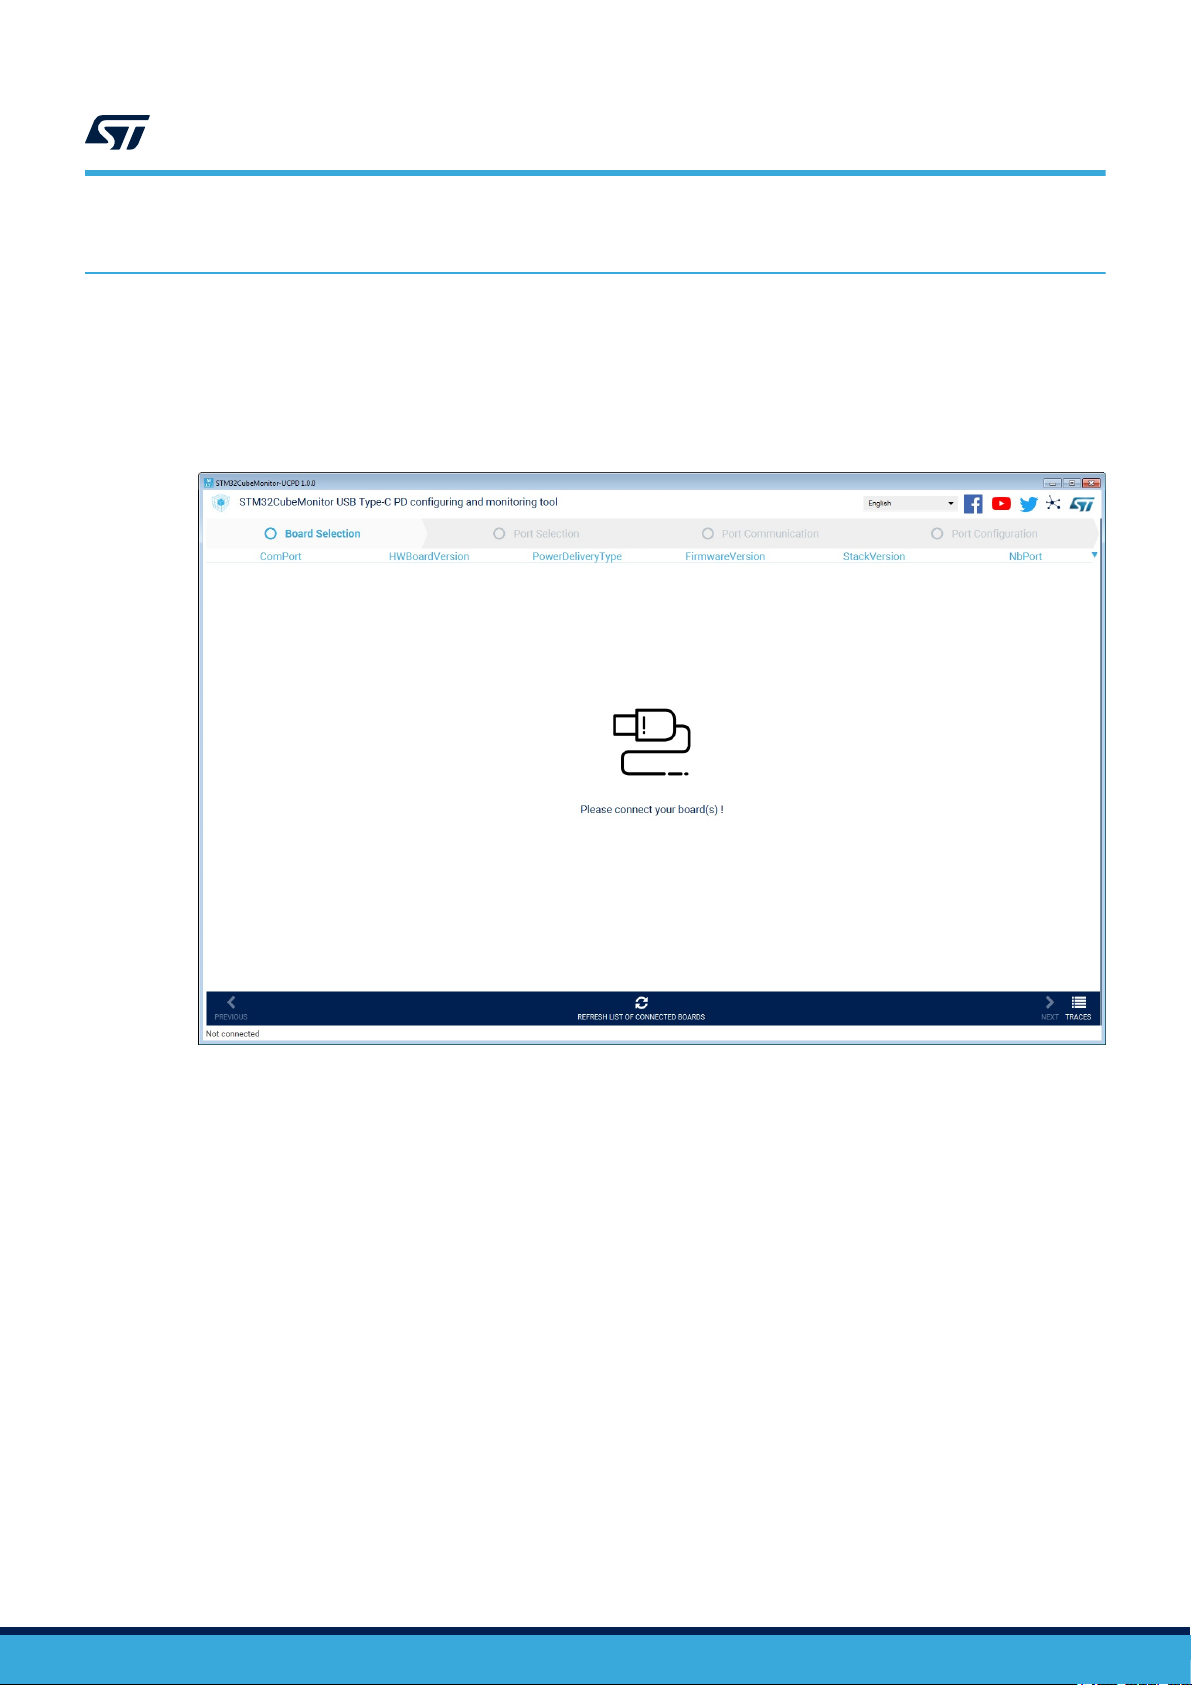
The detection of a board is automatically launched when the application starts.
If there is no board connected via USB to the computer, the application displays an invitation to connect the board
as shown in the figure below.
Figure 3. Invitation to connect the board
UM2468
How to use STM32CubeMonitor-UCPD
To see a new connected board, click on the button Refresh list of connected boards. The application sends a
message to all devices, waiting for an appropriate response to distinguish ST-UCPD GUI capable boards from the
other boards.
An ST-UCPD GUI capable board is a device that contains a firmware source code to communicate between
STM32CubeMonitor-UCPD application and the device.
Note: If the GUI responder is not activated in the embedded firmware, but the debug trace is available (UART through
VCP of the STLINK and the compilation switch _TRACE activated) the user may still see the trace in UCPD
monitor by clicking on the Trace button in the bottom right corner.
UM2468 - Rev 2
page 7/37
UM2468
Board detection and selection
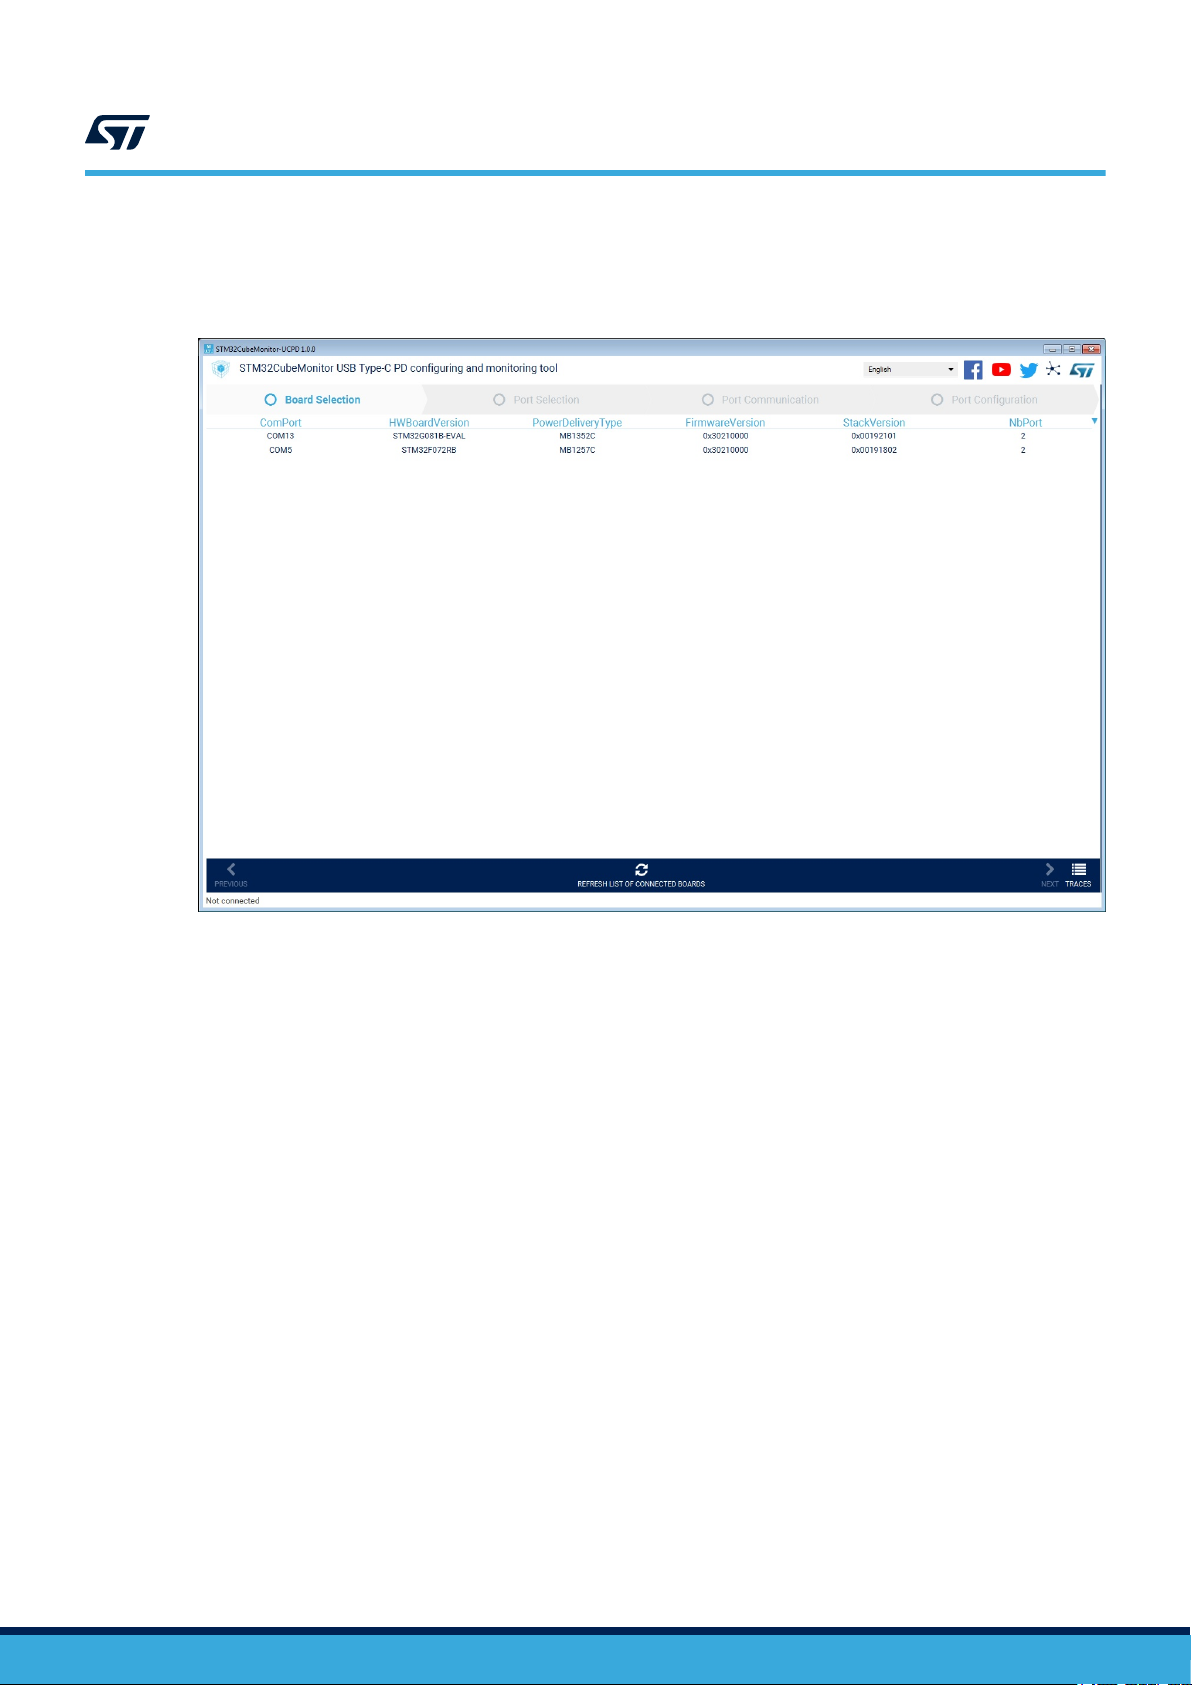
All devices identified as ST-UCPD GUI capable are displayed in the Board Selection panel as shown in the figure
below.
Figure 4. Board Selection window
Parameters for each board are the following:
• Communication port assigned to the device (ComPort)
• Hardware board version
• Power delivery type
• Firmware version
• Stack version
• Number of USB Type-C® ports on the board (NbPort)
If a board is disconnected, it is removed from the Board Selection panel.
To select a board, move the mouse pointer on the corresponding line. The line is greyed out when selected. Then,
double click on the line or click on chevron-right. The board is selected and the application window moves to the
Port Selection window.
UM2468 - Rev 2
page 8/37

4.2 Port Selection
When a board is selected, the Port Selection window is opened as shown in the figure below.
UM2468
Port Selection
Figure 5. Port Selection window
4
3
4.3
1
2
The following details are provided on this window:
1. Port Status information panel. Refer to Section 4.4.2 Port Status information - Selected port).
2. The board selected in the previous steps is reported here (PowerDeliveryType and ComPort boards
parameters are described in Section 4.1 Board detection and selection).
3. List of USB Type-C® PD available on the selected board (two in this example), with the port number written
on the board (PortNumber) and the PD specification revision supported by the port (PDSpecRevision).
4. Click on it to select the static parameters to display. Refer to the USB PD standards for further definition of
these parameters on the USB web site.
Port selection can be performed in zone 1, or 3.
Port Selection action
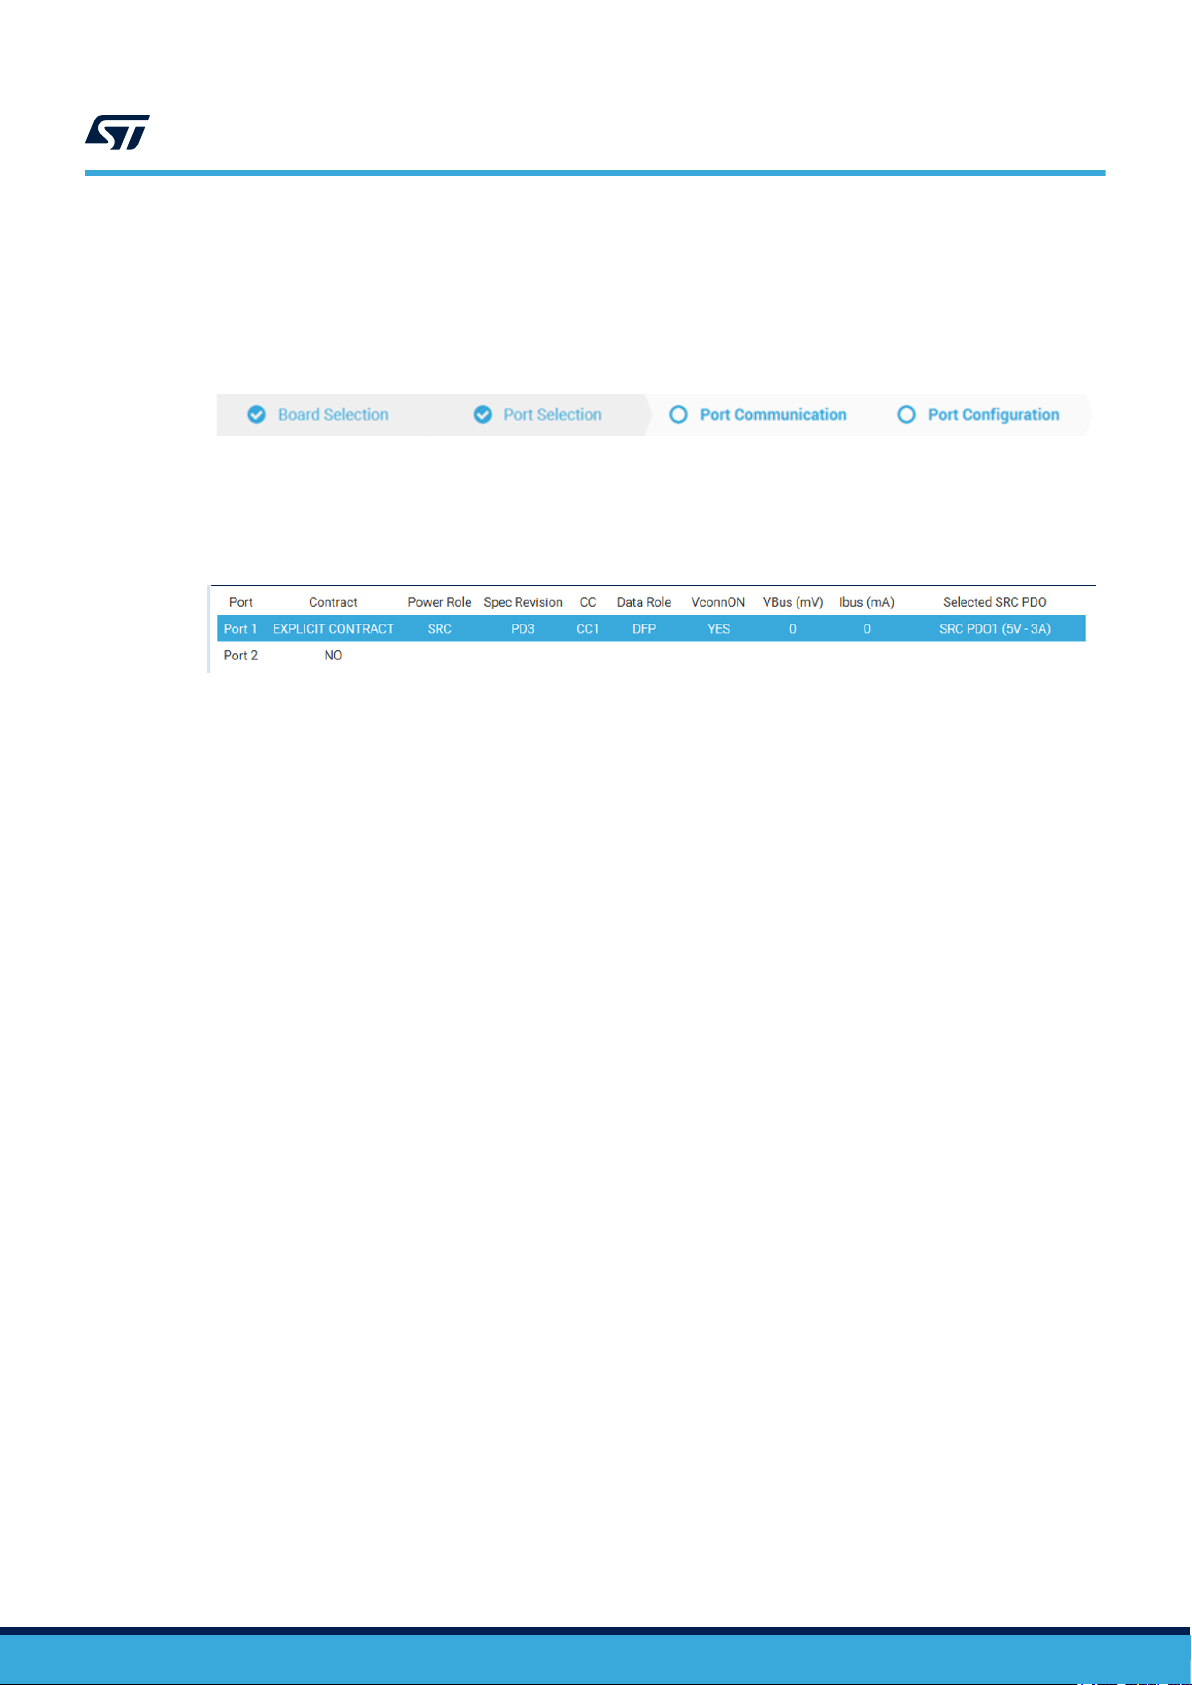
The figure below shows the port parameters. On the Port Status panel, the port selected is highlighted in light
blue (see next section for more details). In the Status bar, the selected port number is added, close to the
selected board identification.
Figure 6. Port selected: Port Status panel, Button and Status bars
UM2468 - Rev 2
page 9/37
4.4 Port Status information
The Port Status panel is displayed as soon as a board is selected. This panel is available in the Port Selection,
Port Communication and Port Configuration windows. Refer to the figure below.
This Port Status panel lists all the USB Type-C® with Power Delivery ports available on the board. Refer to the
figure below.
UM2468
Port Status information
Figure 7. Port Selection ribbon
Figure 8. Port Status panel
For each port, the following characteristics are displayed:
• Contract: If this field is not NO, it means the port established a contract with a distant port and relevant
characteristics of this contract are displayed in the next columns.
• Power Role:
– If this field is SNK, the Selected SRC PDO is the PDO selected of the distant port.
– If this field is SRC, the Selected SRC PDO is the PDO selected of the current port.
• Spec Revision and CC, Data Role, VconnON : characteristics defined in the norm (http://www.usb.org/
developers/powerdelivery)
• VBus and IBus: filled as soon as measurements are done (see Section 4.5.2 )
• Selected SRC PDO: selected PDO
– If the current port is connected as Source, the Selected SRC PDO is its own PDO selected which is
displayed.
– If the current port is connected as Sink, the selected SRC PDO is the selected SRC PDO of the distant
port on which the port is connected.
When the user double clicks on a port in the Port Status panel, the selected port changes, and information in Port
communication or port configuration is updated.
UM2468 - Rev 2
page 10/37
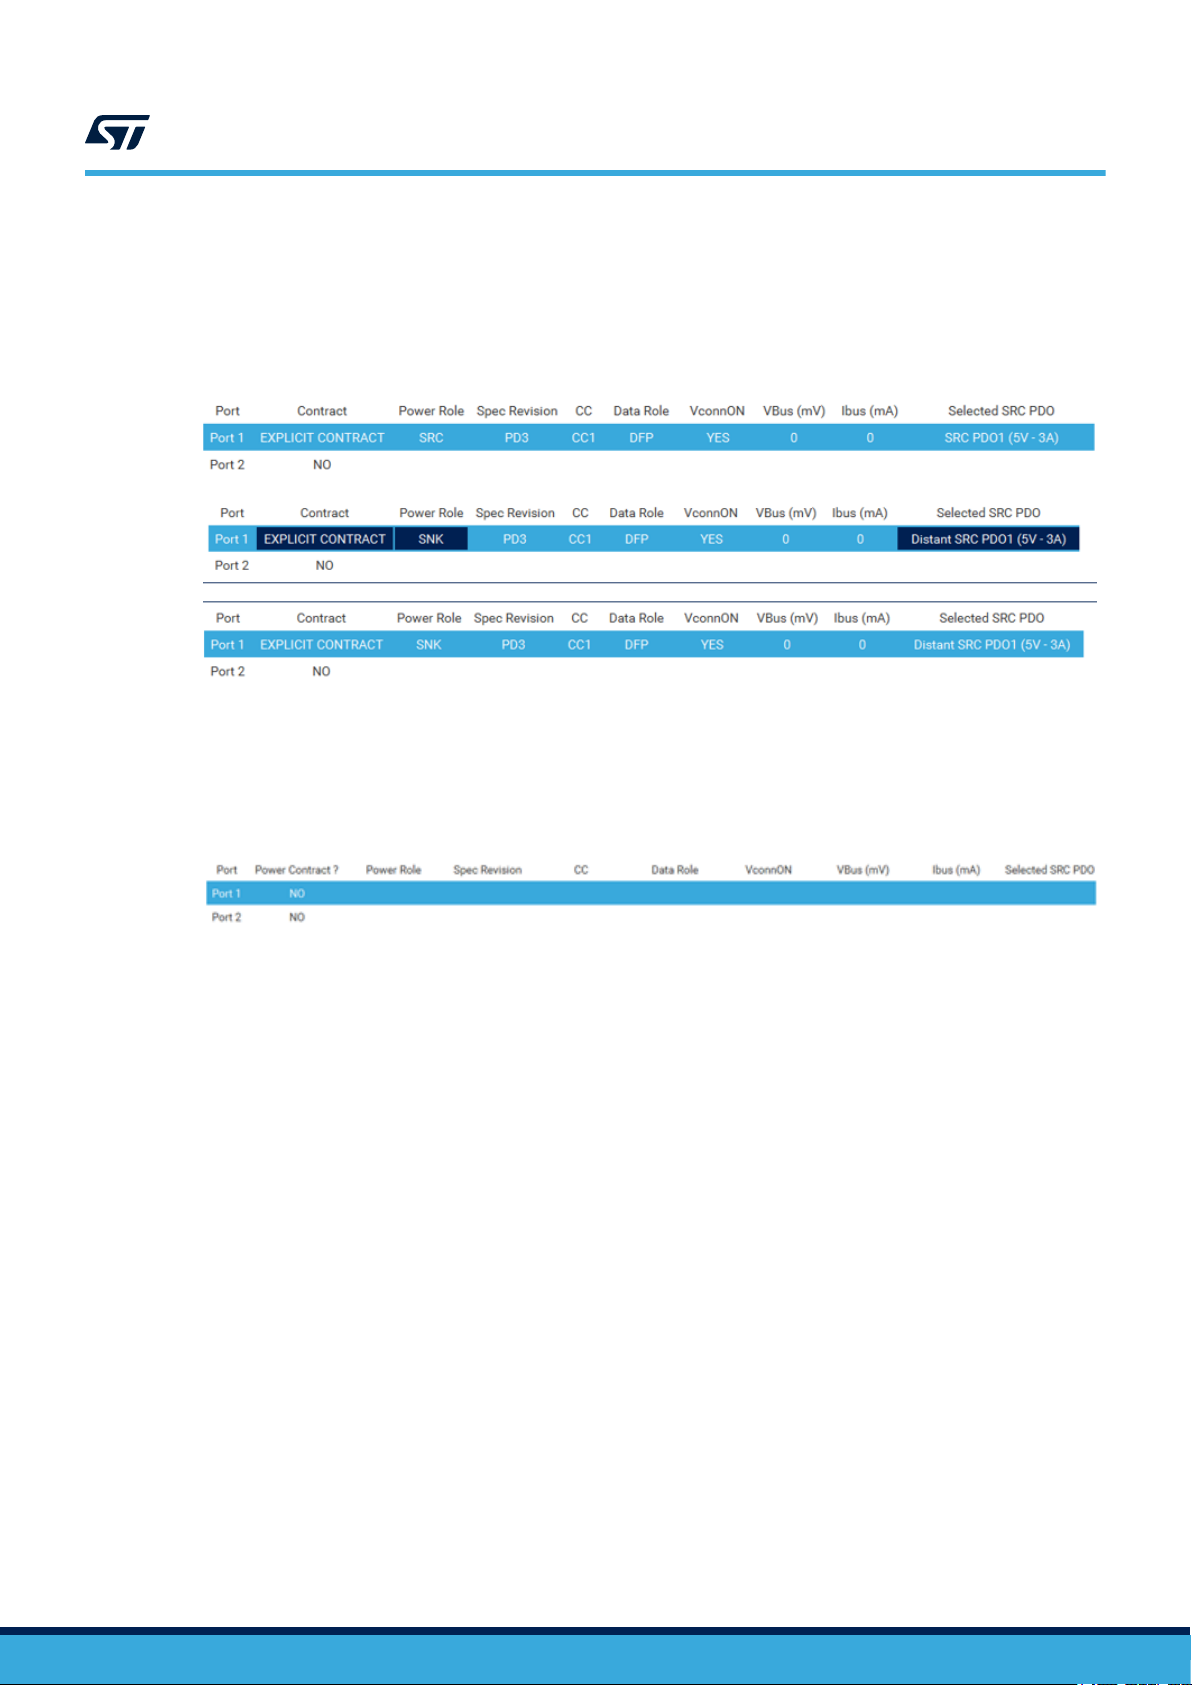
4.4.1 Port Status information update
When one of the parameters is updated, its value blinks for several seconds to draw attention. Updates can come
from hard-cable disconnection or message sent which involved the contract cancellation or modification (see
figure below).
Figure 9. Parameter blink when the update is done
UM2468
Port Communication
4.4.2 Port Status information - Selected port
As soon as the Port Communication or Port Configuration window is selected, the Port Status panel highlights the
selected port in blue, as shown in the figure below.
Figure 10. Selected port highlighted
4.5 Port Communication
Click on the tab item Port Communication to see specific content, which can be useful only if the selected port is
plugged to another device port.
UM2468 - Rev 2
page 11/37
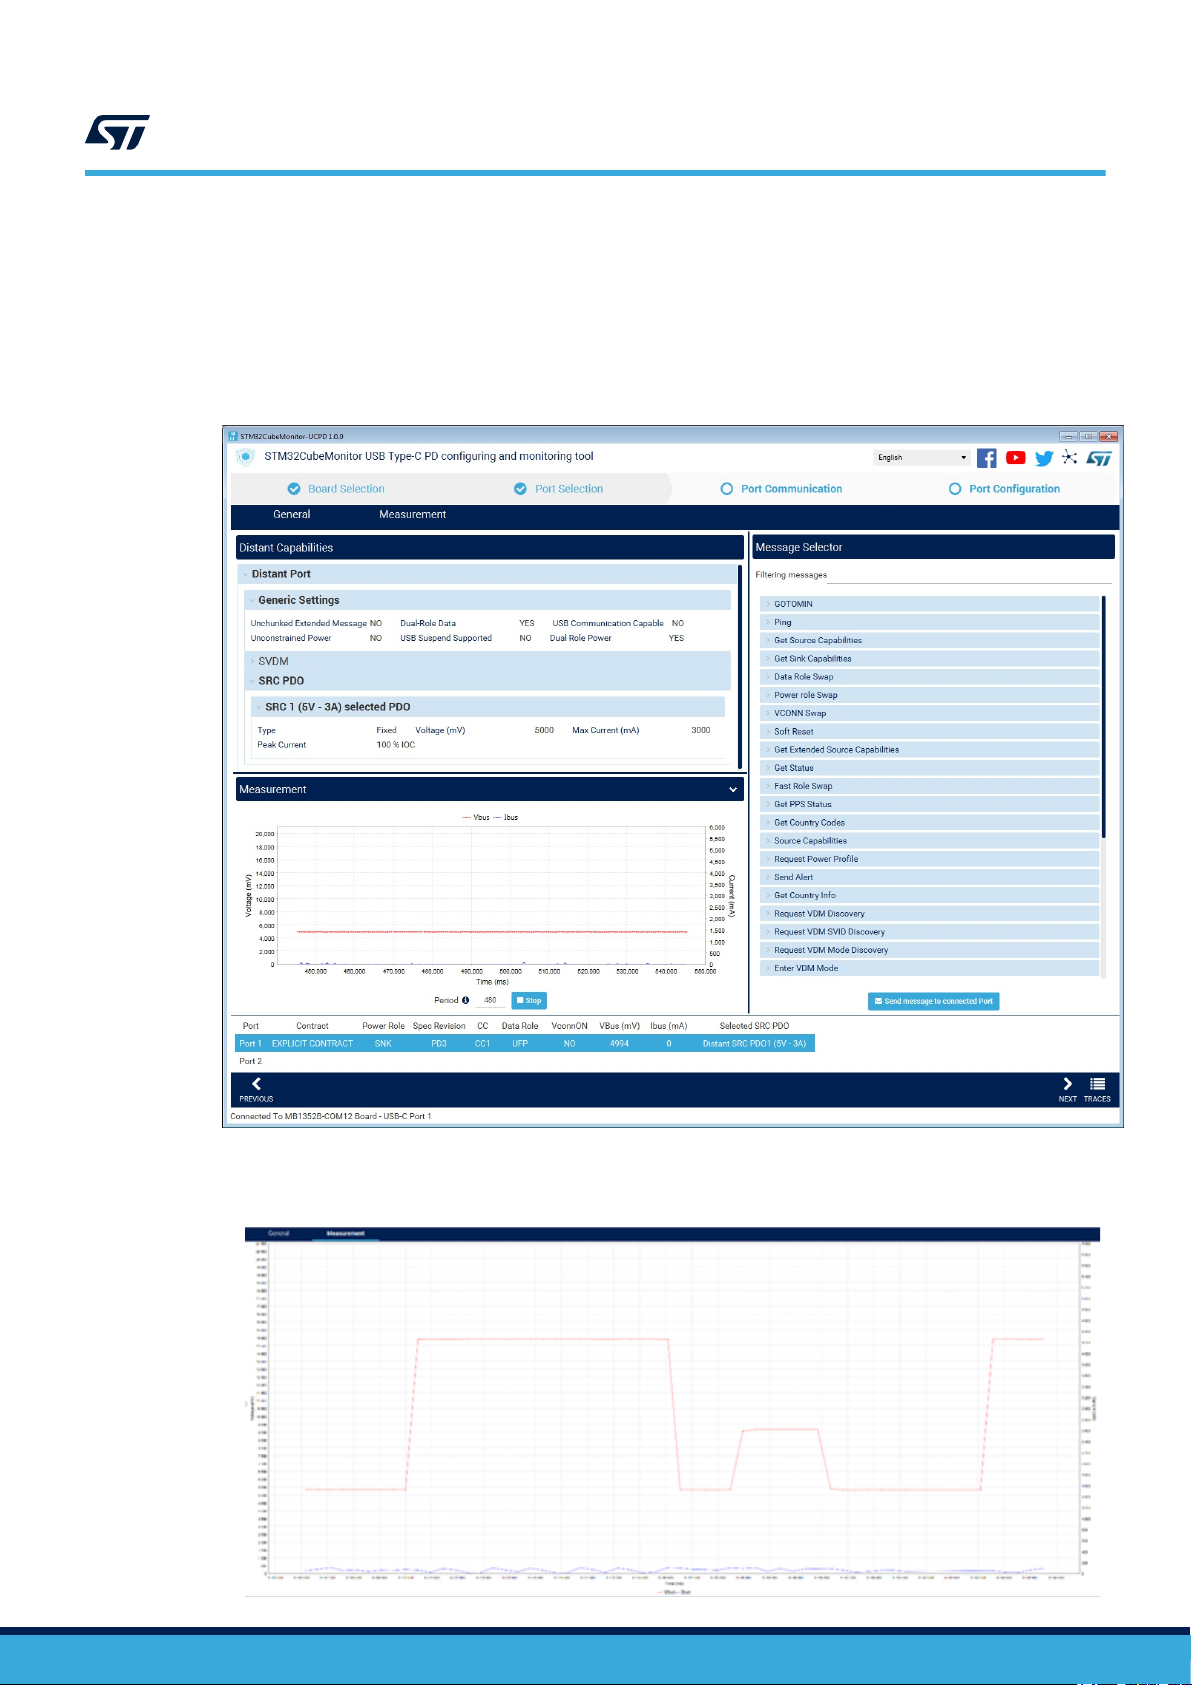
The two following tabs are displayed:
• The General tab, including three panels shown in the figure below:
– DISTANT CAPABILITIES: capabilities of the distant device port
– MEASUREMENT: start/stop measures for this connection
– MESSAGE SELECTOR: messages sent to the distant device port
Figure 11. General tab overview
UM2468
Port Communication
UM2468 - Rev 2
• The Measurement tab, which displays a full-screen view of the measurement graph (see figure below).
Figure 12. Measurement tab overview
page 12/37

4.5.1 Distant Capabilities panel
The Distant Capabilities panel contains information coming from the distant port regarding its capabilities
(Settings, PDO and VDM), depending on the selected Power Role, in a read-only mode.
The PDO used for the current contract is mentioned as the selected PDO.
If the port is connected as Sink, the panel displays the Source capabilities of the distant port as shown in the
figure below.
UM2468
Port Communication
Figure 13. SRC capabilities of the distant port
If the port is connected as Source, the panel displays the Sink capabilities of the distant port, and if an electronic
cable is in use, the information related to it is displayed (see figure below).
Figure 14. SINK capabilities of the distant port
UM2468 - Rev 2
page 13/37

Each capability is summarized but the detailed view is available by clicking on the chevron-right as shown in the
figure below.
4.5.2 Measurement panel
This panel shows a graphical view of the measures, containing the two following controls:
• Start/Stop button to activate or deactivate the measures
• Period to set the period in ms (between 40 and 5000 ms with 40 ms step)
When the measurement period is set to 0, it means the measurement is not yet launched or is stopped.
The measures are only available when the port is connected. When measures are started but the port is not
connected, there is no measurement done.
As shown in the figure below, two different measures are done: the voltage (Vbus) in mV and the current (Ibus) in
mA. Current values for Ibus and Vbus are also visible in the Port Status panel. Refer to Section 4.4 Port Status
information.
UM2468
Port Communication
Figure 15. Distant PDO details
Figure 16. Measurement panel
UM2468 - Rev 2
page 14/37

The steps to follow are detailed below:
1. Select a given period (for example 480 ms).
2. Activate the measurement by clicking on the Start button.
Figure 17. Measurement panel registering
UM2468
Port Communication
3. Deactivate the measurement by clicking on the Stop button.
UM2468 - Rev 2
page 15/37

4.5.3 Message Selector panel
When a distant port is connected, it is possible to send messages to this distant port. The list of messages is
available in the Message Selector panel as shown in the figure below.
UM2468
Port Communication
Figure 18. Message Selector panel
UM2468 - Rev 2
To reduce the number of messages visible, this list can be filtered with the Filtering messages field (see the
example in the figure below).
Figure 19. Messages filtering
page 16/37

UM2468
Port Communication
Select the message to send by clicking on it. When a message is selected, additional parameters to fill are
displayed if any (see figure below).
Figure 20. Message parameters setting
Send the selected message by clicking on the button Send message to connected Port or double-click on the
message itself. If the message is correctly sent, the Send message to connected Port button becomes green for a
few seconds.
Figure 21. Send message button
Note: A message is considered as correctly sent when the firmware takes into account the message, but the attached
action can fail. The analysis must be done with available monitoring panels (such as Measurement, Distant Port
Capabilities, Port Status, and Traces).
UM2468 - Rev 2
page 17/37

UM2468
Port Communication
If the message is not correctly sent, a specific pop-up with warning or error message appears as shown in the
figure below.
Figure 22. Message-warning information
4.5.4 Typical use case with the General tab
This typical use case shows actions performed with the Message Selector panel and the analysis done with
monitoring panels Measurement, Distant Port Capabilities, Port Status, and Traces.
This use case is the selection of a new capability for the current contract.
UM2468 - Rev 2
page 18/37

UM2468
Port Communication
The initial status is port connected with the selected PDO SRC1, visible in the Distant Port Capabilities panel. The
voltage measured in the Measurement panel is around 5000 mV.
Figure 23. Overview communication panel
UM2468 - Rev 2
page 19/37

UM2468
Port Communication
In the Message Selector panel, select Request Power profile, and fill the additional parameters RDOPosition and
RequestedVoltage as shown in the figure below.
Figure 24. Message selection
UM2468 - Rev 2
page 20/37

As soon as the message is sent, the modifications listed below are visible (Refer to Figure 25):
• Selected PDO in the Distant Port Capabilities panel is now SRC2.
• Voltage measured is around 9000 mV in the Measurement panel.
Figure 25. New power contract
UM2468
Port Communication
UM2468 - Rev 2
page 21/37

4.6 Port Configuration
4.6.1 Overall presentation
The Port Configuration window, shown in the figure below, is used to configure the selected port.
UM2468
Port Configuration
Figure 26. Port Configuration window
The PD Settings and VDM SOP tabs display the configuration parameters of the selected port.
The SRC capabilities panel displays the source PDO configured on this port.
The SINK capabilities panel displays the sink PDO configured on this port.
4.6.2 Button bar details
The Button bar (see figure below) provides the following actions:
• The EXPORT button is used to save the current configuration in a text file.
• The IMPORT button is used to upload a saved configuration.
• The SEND TO TARGET button saves the parameter modified from the user interface on the board. In this
case, the saving is done only in RAM memory. It means that, after reset or board disconnection, the updates
are lost.
• The SAVE ALL IN TARGET button saves the parameter modified from the user interface on the board as the
SEND TO TARGET button, but this action saves also these updates in the Flash memory. It means that,
after reset or board disconnection, the updates are kept.
• The RESTORE VALUES button restores the values displayed in the user interface as they are on the board.
Figure 27. Button bar
UM2468 - Rev 2
page 22/37

Because the Port Configuration window contains four tabs on which parameter update can be performed, the
actions SAVE IN TARGET, SEND TO TARGET or RESTORE VALUES can be applied to the four tabs in the
same time (ALL TABS), or only for the tab displayed in the user interface (CURRENT TAB).
4.6.3 Modify the configuration - Update parameter presentation
The default view is shown in the figure below.
Figure 28. Default parameter view
Each parameter has its own self-content help, click on the chevron-right as shown in the figure below.
Figure 29. Extended parameter view
UM2468
Port Configuration
In addition to the signification of the parameter, this area also displays the currently registered value on the board.
If the value is changed in the GUI interface, an attention mark is displayed close to the new value, and the
onboard value is still visible (see figure below).
Figure 30. Parameter modified
To save the parameter in the board, use one of the buttons Send to target or Save all in target (Refer to the figure
below).
Figure 31. Parameter saved
When a value is required, then the range allowed is mentioned in the help (Refer to the figure below).
UM2468 - Rev 2
Figure 32. Range
page 23/37

The user interface controls the value set with the range. If the value is out of range then it is highlighted in red.
Figure 33. Value out of range
4.6.4 SRC/SNK capabilities tabs - PDO management
Source PDO and Sink PDO have some generic read-only parameters, which are visible on the top of the panel.
On each panel, a sum-up of each PDO is displayed as shown in the figure below.
Figure 34. Parameters of the PDOs
UM2468
Port Configuration
Click on the chevron-right of the PDO to see all its parameters (see the figure below).
Figure 35. Detailed parameters of a PDO
Click on chevron-right of the PDO parameter to get the help, range, and the value in the board (Refer to the figure
below).
Figure 36. PDO parameter: help, range, and value in the board
UM2468 - Rev 2
page 24/37

4.6.5 Add a PDO
The first step to add a PDO is to define its type, with one of the two following ways:
• From a picklist as shown in the below figure
• With a value to choose from a predefined range.
When the new PDO is created, it appears as new PDO up to the sending to the target (see figure below).
UM2468
Port Configuration
Figure 37. Add a new fixed PDO
Figure 38. New PDO created (not saved yet)
After saving, the new PDO is integrated into the numbered list as shown in the figure below.
Figure 39. New PDO saved
UM2468 - Rev 2
page 25/37

4.6.6 Delete a PDO
View details of the PDO to delete and click on the Delete button as shown in the figure below.
The deleted PDO appears in red up to the sending to the target (see the figure below).
UM2468
Port Configuration
Figure 40. Select the PDO to delete
Figure 41. PDO to delete selected
4.6.7 Configuration saving
The tool proposes to save the selected port configuration for further needs. The EXPORT button allows this
saving in a text file with a predefined name and location (which can be updated) (see the figure below).
Figure 42. Export the configuration of a port
UM2468 - Rev 2
The IMPORT button allows the saved configuration to be loaded only in the user interface.
page 26/37

UM2468
Port Configuration
The differences between the current configuration and the configuration loaded are highlighted in the user
interface as shown in the figure below.
Figure 43. Modified parameter after importing a configuration file
To set effectively the configuration imported in the board, use
button.
SEND TO TARGET or SAVE ALL IN TARGET
UM2468 - Rev 2
page 27/37

5 Traces information
Debug information is displayed by the tool on a dedicated Debug panel.
There are five types of debug information listed below:
• Type-C Event (EVENT)
• Power Delivery Notification traces (NOTIF)
• Traces of messages sent to the distant device (OUT)
• Traces of messages received from the distant device (IN)
• Debug traces (DEBUG)
5.1 Message contents
Message type contents are described in the user manual STM32 TCPM Application (UM2063).
5.2 Traces panel
The Traces panel, shown in the figure below, includes the following four columns:
1. Type of the message (EVENT, NOTIF, OUT, IN or DEBUG)
2. Timestamp of the message. The timestamp is current hardware value in milliseconds since the boot of the
hardware platform.
3. USB Type-C® port number of the message
4. Content of the message
UM2468
Traces information
Figure 44. Traces panel
UM2468 - Rev 2
page 28/37

5.3 Traces panel functionality
This panel offers functionalities to select, copy, and clear traces. It can also be done using the mouse and
keyboard controls (Ctrl‑V), or buttons Copy Traces, Load Traces, or Clear Traces. Selections can be copied
(Ctrl‑V) in usual text editors.
The panel can be also hidden if needed by clicking on Hide Traces.
5.4 Read saved traces file
By default, the Traces are saved:
• In the Windows® directory c:\Users\your_login\AppData\Local\Temp\STM32CubeMonitor-UCPD
\Acquisition,
• In the Linux® directory "java temp directory"/STM32CubeMonitor-UCPD/Acquisition,
• Or in the macOS® directory "user home directory"/Library/Caches/STM32CubeMonitor-UCPD,
with the .cpd extension.
When the tool is not connected to any board, the Traces panel proposes a Load Traces button in order to read a
saved .cpd file saved in the application folder.
UM2468
Traces panel functionality
Figure 45. Load Traces button
UM2468 - Rev 2
page 29/37

UM2468
Troubleshooting
6 Troubleshooting
6.1 Board not detected
If the board is not detected after clicking on the "Refresh list of connected boards", unplug the board, plug it again
and have a new click on the "Refresh" button.
Note: If the GUI responder is not activated in the embedded firmware, but the debug trace is available (UART through
VCP of the STLINK and the compilation switch _TRACE activated) the user may still see the trace in UCPD
monitor by clicking on the Trace button in the bottom right corner.
UM2468 - Rev 2
page 30/37

7 Support material
7.1 Hardware
STM32 Nucleo pack for USB Type-C™ and any board embedding Power Delivery https://www.st.com/en/
applications/connectivity/usb-type-c-and-power-delivery.html.
7.2 Software
X-CUBE-USB-PD is STM32 USB Power Delivery firmware with the tracer and the cubemon_ucpd_emb modules
on their latest version (as described in STM32 TPM application (UM2063), available from www.st.com , or built
through STM32CubeMX) or any new Power Delivery firmware from STM32G0, G4, L5 MCU Package.
For more information, refer to the USB Power Delivery overview wiki page https://wiki.st.com/stm32mcu/wiki/
USB_Power_Delivery_overview.
UM2468
Support material
UM2468 - Rev 2
page 31/37

Revision history
Table 1. Document revision history
Date Version Changes
15-Nov-2018 1 Initial release.
Updated:
1-Sep-2020 2
• Section 2.1 Computer requirements
• Section 2.3.2 Installing the USB driver for ST-LINK
UM2468
UM2468 - Rev 2
page 32/37

UM2468
Contents
Contents
1 Features...........................................................................2
2 Getting started ....................................................................3
2.1 Computer requirements .........................................................3
2.2 Hardware requirements .........................................................3
2.3 Installing ......................................................................3
2.3.1 Installing STM32CubeMonitor-UCPD .........................................3
2.3.2 Installing the USB driver for ST-LINK .........................................4
2.4 Uninstalling STM32CubeMonitor-UCPD ...........................................4
2.5 Uninstalling the USB driver for ST-LINK............................................4
3 Windows structure - main areas....................................................5
4 How to use STM32CubeMonitor-UCPD .............................................7
4.1 Board detection and selection ....................................................7
4.2 Port Selection .................................................................9
4.3 Port Selection action............................................................9
4.4 Port Status information .........................................................10
4.4.1 Port Status information update .............................................11
4.4.2 Port Status information - Selected port .......................................11
4.5 Port Communication ...........................................................11
4.5.1 Distant Capabilities panel .................................................13
4.5.2 Measurement panel .....................................................14
4.5.3 Message Selector panel ..................................................16
4.5.4 Typical use case with the General tab........................................18
4.6 Port Configuration .............................................................22
4.6.1 Overall presentation .....................................................22
UM2468 - Rev 2
4.6.2 Button bar details .......................................................22
4.6.3 Modify the configuration - Update parameter presentation ........................23
4.6.4 SRC/SNK capabilities tabs - PDO management ................................24
4.6.5 Add a PDO ............................................................25
4.6.6 Delete a PDO ..........................................................26
4.6.7 Configuration saving .....................................................26
page 33/37

UM2468
Contents
5 Traces information................................................................28
5.1 Message contents .............................................................28
5.2 Traces panel .................................................................28
5.3 Traces panel functionality.......................................................29
5.4 Read saved traces file .........................................................29
6 Troubleshooting ..................................................................30
6.1 Board not detected ............................................................30
7 Support material..................................................................31
7.1 Hardware ....................................................................31
7.2 Software .....................................................................31
Revision history .......................................................................32
UM2468 - Rev 2
page 34/37

UM2468
List of tables
List of tables
Table 1. Document revision history ............................................................. 32
UM2468 - Rev 2
page 35/37

UM2468
List of figures
List of figures
Figure 1. Overview of all panels ............................................................... 5
Figure 2. Social network shortcut area .......................................................... 6
Figure 3. Invitation to connect the board .........................................................7
Figure 4. Board Selection window..............................................................8
Figure 5. Port Selection window ...............................................................9
Figure 6. Port selected: Port Status panel, Button and Status bars .......................................9
Figure 7. Port Selection ribbon ...............................................................10
Figure 8. Port Status panel .................................................................10
Figure 9. Parameter blink when the update is done ................................................. 11
Figure 10. Selected port highlighted ............................................................ 11
Figure 11. General tab overview ..............................................................12
Figure 12. Measurement tab overview ..........................................................12
Figure 13. SRC capabilities of the distant port ..................................................... 13
Figure 14. SINK capabilities of the distant port ..................................................... 13
Figure 15. Distant PDO details................................................................ 14
Figure 16. Measurement panel ...............................................................14
Figure 17. Measurement panel registering........................................................ 15
Figure 18. Message Selector panel ............................................................16
Figure 19. Messages filtering.................................................................16
Figure 20. Message parameters setting .........................................................17
Figure 21. Send message button .............................................................. 17
Figure 22. Message-warning information......................................................... 18
Figure 23. Overview communication panel .......................................................19
Figure 24. Message selection ................................................................ 20
Figure 25. New power contract ...............................................................21
Figure 26. Port Configuration window ...........................................................22
Figure 27. Button bar ...................................................................... 22
Figure 28. Default parameter view ............................................................. 23
Figure 29. Extended parameter view ...........................................................23
Figure 30. Parameter modified................................................................ 23
Figure 31. Parameter saved ................................................................. 23
Figure 32. Range ......................................................................... 23
Figure 33. Value out of range ................................................................. 24
Figure 34. Parameters of the PDOs ............................................................ 24
Figure 35. Detailed parameters of a PDO ........................................................ 24
Figure 36. PDO parameter: help, range, and value in the board .........................................24
Figure 37. Add a new fixed PDO .............................................................. 25
Figure 38. New PDO created (not saved yet)...................................................... 25
Figure 39. New PDO saved.................................................................. 25
Figure 40. Select the PDO to delete ............................................................ 26
Figure 41. PDO to delete selected ............................................................. 26
Figure 42. Export the configuration of a port ......................................................26
Figure 43. Modified parameter after importing a configuration file ........................................27
Figure 44. Traces panel .................................................................... 28
Figure 45. Load Traces button ................................................................ 29
UM2468 - Rev 2
page 36/37

UM2468
IMPORTANT NOTICE – PLEASE READ CAREFULLY
STMicroelectronics NV and its subsidiaries (“ST”) reserve the right to make changes, corrections, enhancements, modifications, and improvements to ST
products and/or to this document at any time without notice. Purchasers should obtain the latest relevant information on ST products before placing orders. ST
products are sold pursuant to ST’s terms and conditions of sale in place at the time of order acknowledgement.
Purchasers are solely responsible for the choice, selection, and use of ST products and ST assumes no liability for application assistance or the design of
Purchasers’ products.
No license, express or implied, to any intellectual property right is granted by ST herein.
Resale of ST products with provisions different from the information set forth herein shall void any warranty granted by ST for such product.
ST and the ST logo are trademarks of ST. For additional information about ST trademarks, please refer to www.st.com/trademarks. All other product or service
names are the property of their respective owners.
Information in this document supersedes and replaces information previously supplied in any prior versions of this document.
© 2020 STMicroelectronics – All rights reserved
UM2468 - Rev 2
page 37/37
 Loading...