

Page 1

Introduction
The STEV
AL-GPT001V1 is an add-on development kit for the STEVAL-STLCS01V1 SensorTile module.
The kit and the module create a whole system which represents a multi-sensor IoT node with increased energy autonomy
thanks to the power harvested from thin-film solar modules (under indoor or outdoor lighting conditions) and conditioned to
recharge the battery through the SPV1050TTR energy harvester and battery charger.
The STEVAL-GPT001V1 kit consists of a watch-shaped silicon strap embedding three PV panels, a cradle board (which is an
evolution of the STLCR01V1 SensorTile Cradle board) whose core product is the SPV1050TTR and the power management
section to recharge a 100 mAh Li-Po battery.
The SPV1050TTR optimizes the energy harvested from the PV panels, thanks to the embedded MPPT algorithm, and
recharges the battery while guaranteeing over-voltage and under-voltage protection; the harvested energy allows a longer
system autonomy and makes available a 3.3 V LDO output to supply the STEVAL-STLCS01V1 SensorTile module.
The customized STSW-GPT001V1 software offers a complete framework to build a typical multi-sensor node application and to
monitor battery charge, system autonomy, recharge time and the energy stored.
The firmware can be uploaded onto the STEVAL-STLCS01V1 SensorTile module via the STEVAL-GPT001V1 cradle board
SWD connector.
Figure 1. STEVAL-GPT001V1 development kit
Getting started with the STEVAL-GPT001V1 SensorTile add-on development kit
powered by thin-film solar modules
UM2260
User manual
UM2260 - Rev 2 - November 2018
For further information contact your local STMicroelectronics sales of
fice.
www.st.com
Page 2

1 Getting started
1.1 Hardware description
1.1.1 Kit overview
The STEV
AL-GPT001V1 kit is an add-on to the SensorTile cradle board with on-board charger for Li-Ion and Li-
Po batteries, a fuel gauge and a humidity and temperature sensor, housed in a watch-shaped silicon strap with
embedded PV solar panels.
The user can plug the STEVAL-STLCS01V1 SensorTile module to the STEVAL-GPT001V1 via a dedicated
connector (CN2).
The kit has been designed for evaluation purpose and to support the development and prototyping phase of new
projects.
A complete hardware and software file package is available at www.st.com containing:
• Hardware files (schematics, Gerber, BoM)
• Software files:
– Basic firmware (.hex), running on STEVAL-STLCS01V1 SensorTile module
– Complete software app. (.apk) to monitor and run the whole system features via smartphone and tablet
The kit features:
• Sensor Tile Cradle with SPV1050TTR energy harvester and battery charger, humidity and temperature
sensor, gas gauge, lithium battery charger, micro-USB port, ON/OFF switch and breakaway SWD connector
• 3.7 V / 100 mAh Li-Po battery
• SWD programming cable
• Silicon strap embedding the thin-film flexible solar modules and housing the SensorTile Cradle and the
battery
• Software libraries and tools:
– STSW-GPT001V1: dedicated SensorTile firmware package supporting different algorithms tailored to
the on-board sensors and computation of system autonomy and charge stored in the battery
– FP-SNS-ALLMEMS1: STM32 ODE function pack
– FP-SNS-MOTENV1: STM32Cube function pack
– STBLESensor: iOS and Android demo apps
– BlueST-SDK: iOS and Android software development kit
– Compatible with STM32 ecosystem through STM32Cube support
• STEVAL-STLCS01V1 SensorTile module (not included in the kit)
• Firmware debug/upload through the SWD connector and cable
• RoHS and WEEE compliant
1.1.1.1 Watch-shaped silicon strap
The watch-shaped silicon strap has been designed to embed high efficiency flexible PV panels and to host both
the STEV
AL-GPT001V1 cradle board and the 100mAh battery provided in the STEVAL-GPT001V1 development
kit.
The PV panels are connected to the input stage of the STEVAL-GPT001V1 cradle board.
As shown in Figure 1. STEVAL-GPT001V1 development kit:
• A PV panel is embedded in the front quadrant and can reach up to about 4 mW;
• Two PV panels are embedded in the lateral straps and each of them can provide up to about 2 mW each at
1 Sun.
The four PV panels embedded in the strap are connected in parallel, so that, in total, they can supply up to 8 mW
at 1 Sun.
Three dedicated slots are available on the back and right side of the quadrant for direct access to the SWD, to the
micro-USB connector and to the ON/OFF switch (SW1).
UM2260
Getting started
UM2260 - Rev 2
page 2/25
Page 3
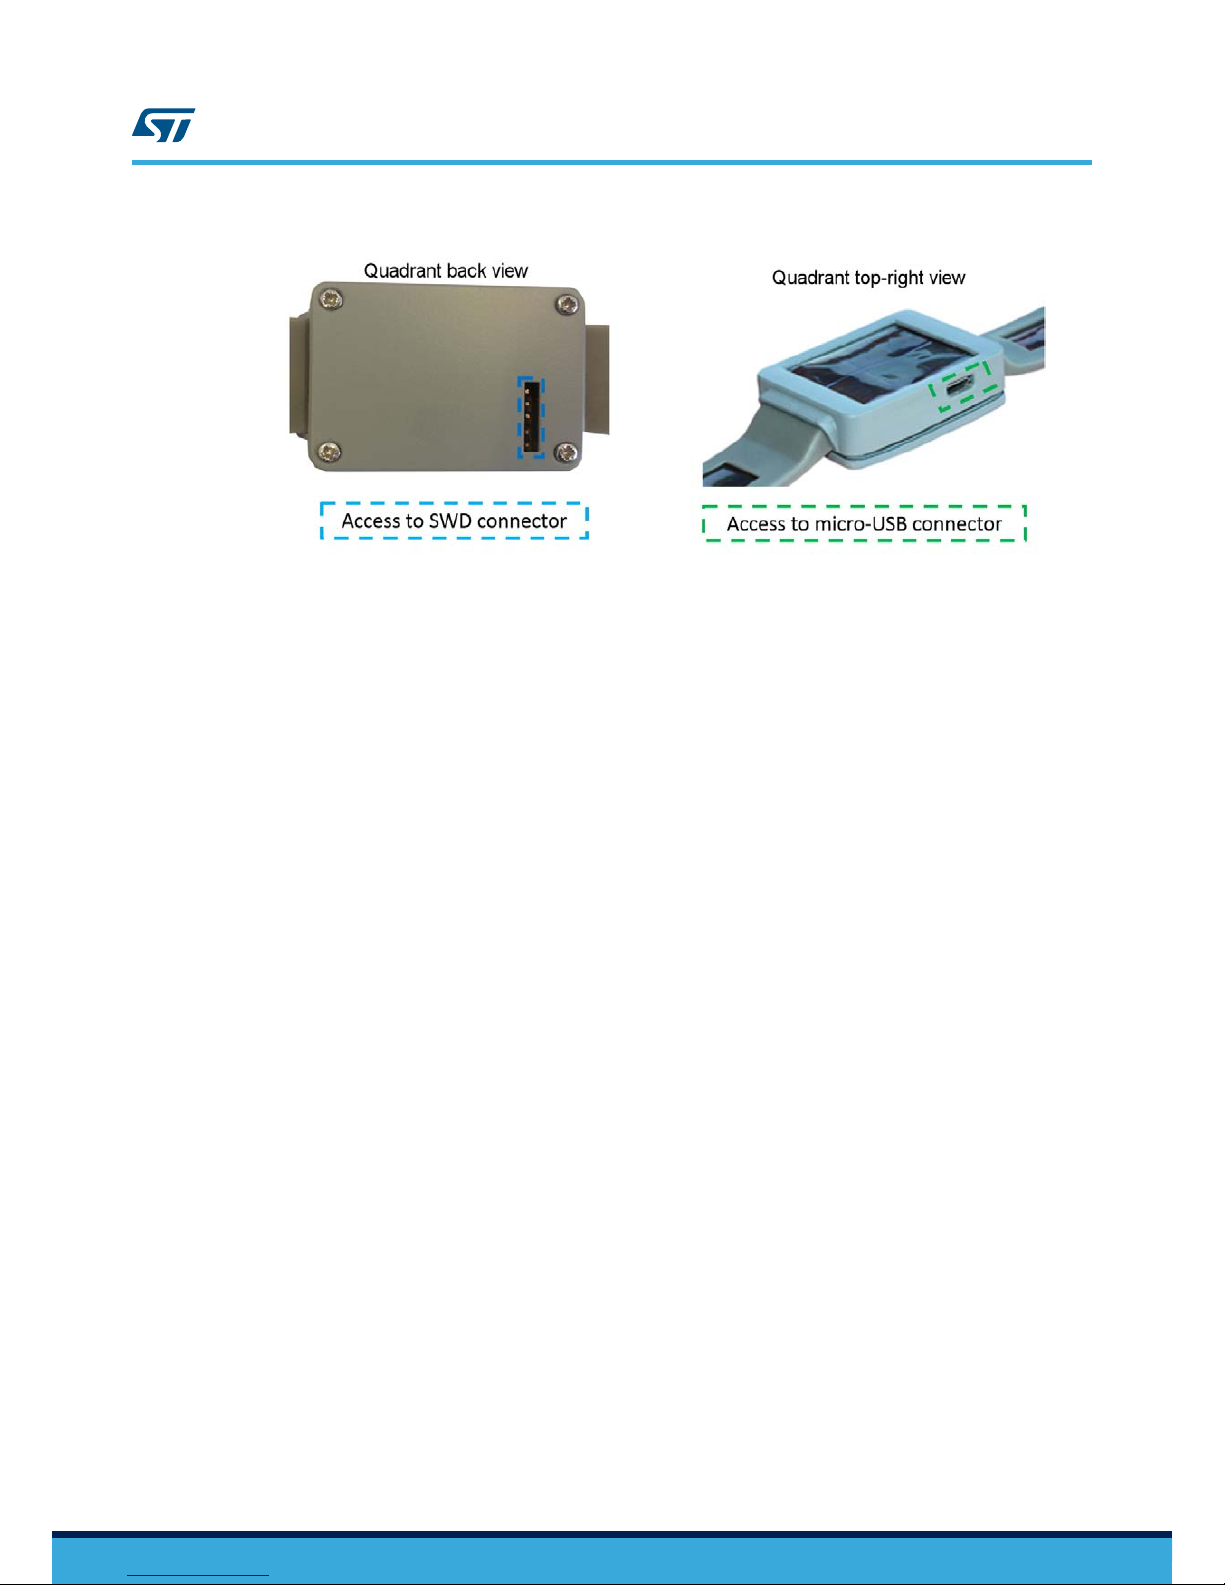
Figure 2. STEV
AL-GPT001V1 kit: smart watch direct access points
The back cover can be removed to access the battery and the STEVAL-GPT001V1 cradle board.
1.1.1.2 STEVAL-GPT001V1 cradle board
The STEVAL-GPT001V1 cradle board hosts and supplies the STEVAL-STLCS01V1 SensorTile module; it
increases the autonomy of the SensorTile module when the 5 V USB supply source is not available, thanks to the
harvested energy provided by the PV panels.
The cradle board features:
• A pluggable or solderable interface (CN2) for the STEVAL-STLCS01V1 SensorTile module
• SPV1050TTR – high efficiency harvester, battery charger and power manager
• SW1 - ON/OFF switch to enable/disable the LDO supplying the SensorTile module
• STBC08PMR – 800 mA standalone linear Li-Ion battery charger
• HTS221 – capacitive digital sensor for relative humidity and temperature
• STC3115 – fuel gauge IC
• USBLC6-2P6 – very low capacitance ESD protection
• USB type A to micro-B USB connector for power supply and communication
• SWD connector for programming and debugging
1.1.1.3 Battery
The battery included in the kit is a one cell (3.7 V) lithium polymer battery able to supply up to 100 mAh (refer to
Section 1.4.5 STEV
AL-GPT001V1 programming interface for instructions on how to connect the battery to the
STEVAL-GPT001V1 cradle board).
1.1.1.4 SWD cable
The five-way SWD cable easily allows the STEV
AL-GPT001V1 cradle board to be connected to a programmer/
debugger system such as ST-LINK V2.1 (refer to Section 1.4.5 STEVAL-GPT001V1 programming interface for
further details on the programming interface).
1.2 Software description
The STSW-GPT001V1 software available with the STEV
AL-GPT001V1 development kit is based on the STSW-
STLKT01 SensorTile kit software, with the addition of the following functions:
• Running mode, which calculates the system autonomy on the basis of the battery current sensed by
STC3115 through resistor R9. This computation is based on the STEVAL-STLCS01V1 module average
current consumption when the PV modules constitute the available energy source. The software returns the
battery charge level, the average current consumption and the estimated overall system autonomy.
• Sleep mode: the interrupt to wake up the microcontroller is provided by the accelerometer output being
inactive for a time period longer than 1 minute by default. It can be changed and set up according to the
specific firmware needs. In this condition, the RTC of the microcontroller remains active to count the time
elapsed during the low power consumption mode. Battery charge measurement just before and after the
sleep mode allows calculating the amount of charge stored during this time frame.
UM2260
Software description
UM2260 - Rev 2
page 3/25
Page 4

1.3 STBLESensor app description
1.3.1 SensorTile module activation and transmission
When active (see Section 1.4.1 Startup), the SensorT
ile module can transmit the environmental data to
STBLESensor app for smartphones and tablets.
To start transmitting data, the SensorTile module has to be virtually connected to the app by the scan procedure
described below.
Step 1. Launch the STBLESensor app
Step 2. Click on the Start Scanning icon
Figure 3. STBLESensor app - Start Scanning tab
Step 3. After a few seconds the app will show the SensorT
ile module device list identified by the scanning
procedure.
UM2260
STBLESensor app description
UM2260 - Rev 2
page 4/25
Page 5

Figure 4. STBLESensor app - Device List tab
Step 4. After having selected one among the available devices, the app will automatically move to the
Environmental tab showing the ambient temperature [°C], pressure [mBar] and humidity [%] values:
UM2260
STBLESensor app description
UM2260 - Rev 2
page 5/25
Page 6

Figure 5. STBLESensor app - Environmental tab
Step 5. Scroll the display to left/right to move over the different tabs available in the app (plots of environmental
sensors, accelerometer, Rssi and battery information).
1.3.2 Rssi and Battery information tab
The Rssi and Battery information tab shows the transmission signal Rssi level and a fully detailed information list
related to the battery when the system is powered by solar modules:
•
Charging level [%]
• Status (Discharging/Charging)
• Voltage [V]
• Current [mA] (net current = charging current minus load current)
• Estimated system autonomy [minutes], according to the charge level and to the current drained by the load
The harvested current allows increasing the system autonomy significantly.
The figure below shows the Rssi and battery information tab in 3 different cases:
• without any external recharge source connected to the cradle board (neither USB nor PV panels)
• with PV panels
• with a USB source connected
UM2260
STBLESensor app description
UM2260 - Rev 2
page 6/25
Page 7
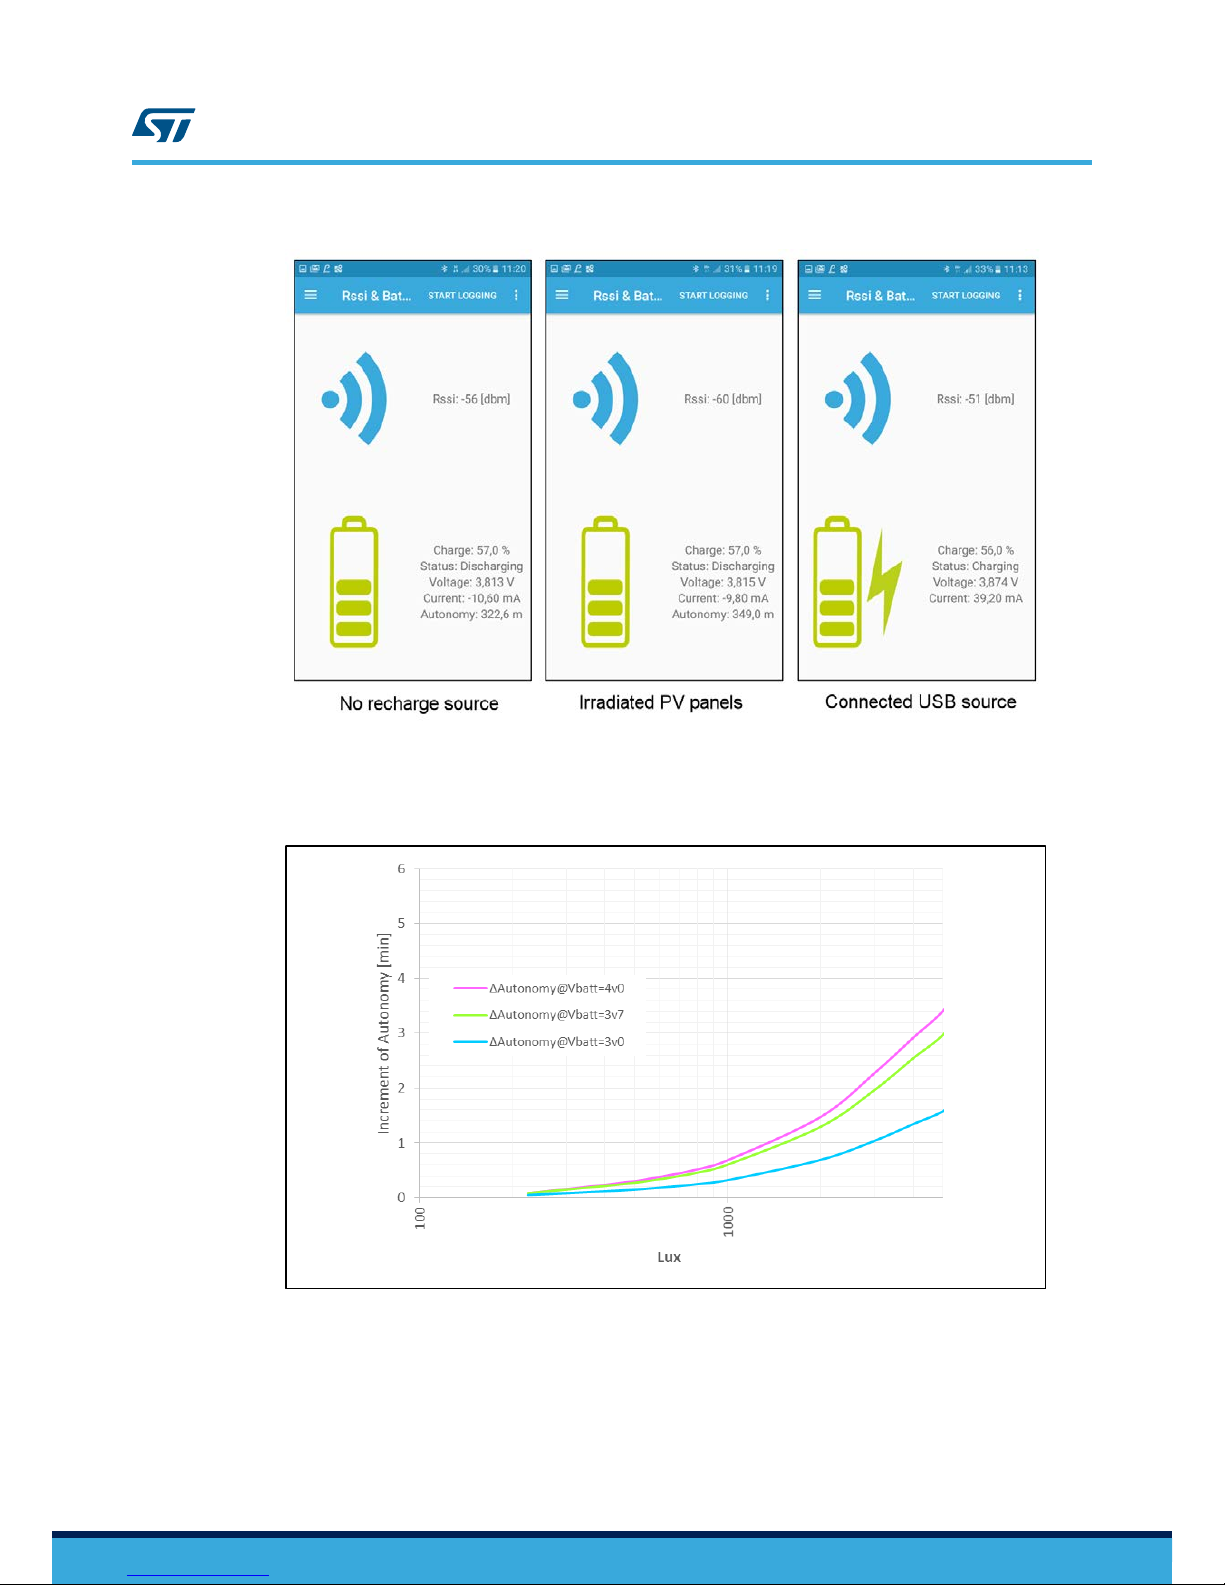
Figure 6. STBLESensor app - Rssi and Battery information tab
The figures below show the increase of system autonomy in minutes thanks to the lighting energy from 6500 K
fluorescent lamp (250 to 5 k Lux) and solar (from 0.06 and 1 W/m2) light conditions.
Figure 7. System autonomy vs. irradiance (indoor)
UM2260
STBLESensor app description
UM2260 - Rev 2
page 7/25
Page 8

Figure 8. System autonomy vs. irradiance (outdoor)
The STSW-GPT001V1 firmware is designed to automatically enter a low consumption mode (sleep mode) in case
the app is closed (BLE network processor inactive) and after one minute of inactivity of the SensorT
ile module
accelerometer.
The system automatically restarts working normally when the accelerometer detects a movement.
In the Rssi and Battery information tab, it is possible to monitor system sleep time duration and the amount of
charge accumulated at the same time (Delta Charge), as shown in the following picture.
UM2260
STBLESensor app description
UM2260 - Rev 2
page 8/25
Page 9

Figure 9. STBLESensor app - Rssi and Battery information tab after sleep mode
1.4 System setup
1.4.1 Startup
To start the system up, the SensorTile module and the battery must be plugged into the cradle board; the battery
has to be supplied by the PV panels or by a 5 V source otherwise it remains electrically isolated.
The STEV
AL-GPT001V1 cradle board power management architecture electrically connects the battery when the
voltage on the SPV1050TTR STORE pin triggers the 4.1 V EOC threshold (set by the resistor partitioning R14,
R15 and R16) and the Q1 pass transistor is consequently activated (see Section 1.4.3.2 Protection).
The PV panels supply the system when irradiated by a light source: the battery electrical connection and the
related recharge are fully managed by the SPV1050TTR (the energy harvesting system is described in
Section 1.4.3.3 Recharge through PV modules).
Another option to start the system up is plugging a 5 V source (e.g. USB port) to the micro-USB connector: the
battery electrical connection and Q1 activation are managed by SPV1050TTR while the charging profile is
managed by the STBC08PMR (with a charge current limited to 50 mA by R5 = 20 kΩ) (see
Section 1.4.3.4 Recharge via micro-USB connector).
The SensorTile module is supplied by the 3.3 V LDO integrated in the SPV1050TTR: to enable the LDO, slide the
SW1 to ON position.
Note: Regardless of the SW1 status, the 3.3 V LDO is forced off by the SPV1050TTR until Q1 is OFF.
If the quadrant back case is open, you can check if the STEVAL-STLCS01V1 module is powered on through the
red LED placed in the bottom right corner (blinking = power on).
If the back case is closed, you can check if the SensorTile module is working by launching the scan procedure on
the dedicated app (see Section 1.3.1 SensorTile module activation and transmission).
UM2260
UM2260 - Rev 2
page 9/25
Page 10

1.4.2 SensorTile module connection
The SensorTile (STEV
AL-STLCS01V1) is a tiny, square-shaped IoT module built on an 80 MHz STM32L476JG
microcontroller and a Bluetooth low energy connectivity based on BlueNRG network processor as well as a wide
spectrum of motion and environmental MEMS sensors, including a digital microphone.
Figure 10. STEVAL-STLCS01V1 SensorTile module
The SensorTile module is not included in the STEV
AL-GPT001V1 kit but can be purchased separately and easily
plugged to the STEVAL-GPT001V1 cradle board via CN2 connector (as shown in the figure below).
Figure 11. SensorTile module connected to the STEVAL-GPT001V1 cradle board
1.4.3 Battery
1.4.3.1 Connection
The STEVAL-GPT001V1 development kit contains a battery disconnected from the board.
To connect the battery:
Step 1. Unscrew and remove the cover on the back of the quadrant.
UM2260
UM2260 - Rev 2
page 10/25
Page 11

Step 2. Plug the battery cable in the related BA
TT connector slot.
Step 3. Place the cover back, paying attention to the SWD connector position, and screw it in place.
Figure 12. STEVAL-GPT001V1 watch-shape silicon strap (external back view) and battery
connection (internal view)
1.4.3.2 Protection
The high precision voltage monitoring on the SPV1050TTR ST
ORE pin allows a reliable recharge or discharge of
the battery avoiding over-voltage or under-voltage events that may shorten the battery lifetime or damage the
battery itself. In fact,in both cases, the SPV1050TTR stops supplying or draining current when the concerned set
threshold is triggered.
When the battery is connected, the pass transistor Q1 remains OFF until the system is supplied.
Q1 activation occurs when the STORE pin voltage triggers EOC threshold = 4.1 V.
When Q1 is not active the voltage on its body diode (VFW) links the STORE pin voltage to the battery voltage
(V
STORE
= VFW + V
BATT
).
Thus, the VFW defines the minimum battery voltage level for the system to connect the battery: Q1 is ON and the
battery can start supplying the load only when V
BATT
= 4.1 V-VFW.
The VFW can vary according to the current flowing through Q1 body diode (VFW = 150 mV
@IFW=500nA
; VFW = 500
mV
@IFW=50mA
).
Vice versa, when the STORE pin voltage is below the UVP threshold (2.4 V according to R15, R16, R17 settings),
the SPV1050TTR turns Q1 off to disconnect the battery from the load.
1.4.3.3 Recharge through PV modules
The SPV1050 controls the PV panel harvesting and conditioning of the extracted power to recharge the battery.
It integrates a high efficiency boost architecture which, combined with the high accuracy MPPT algorithm, ensures
long SensorTile module autonomy and battery recharging in indoor and outdoor conditions(For further details,
refer to the SPV1050 datasheet at www.st.com.).
The STEVAL-GPT001V1 cradle board embeds a sensing circuit automatically able to track the environmental
irradiance and to optimize the system MPP working point. It is based on an operational amplifier (TSU111) in
differential configuration that discriminates the PV panel current values above 1 mA or below 0.8 mA as per
firmware value set-up.
By default, its companion Q2 MOSFET is OFF and the whole harvesting system is optimized for indoor irradiation
conditions(i.e. The input current is below 0.8 mA (~6 k Lux or 50 mW/m2)).
On the contrary, if the input sensed current is higher than 1 mA (Corresponding to ~10 k Lux or 70 mW/m2.), then
Q2 switches ON consequently modifying the resistor partitioning ratio on the SPV1050 MPP-SET pin. The MPP
has to be changed due to the PV panels different specs below 0.8 and above 1 mA (Vmpp/Voc).
On the battery return path, the STC3115 implements a high performance gas gauge for current and voltage
battery monitoring; related data are used by the firmware running on the SensorTile STM32L4 to check the
battery charging status, calculate and show either the system autonomy increases in running mode or the battery
charge gain after a micro sleep mode period.
UM2260
UM2260 - Rev 2
page 11/25
Page 12

The figures below show the energy harvester circuit performance in terms of MPPT accuracy and power
conversion ef
ficiency in case of light source from a fluorescent tube lamp 6’500 K (irradiation levels from 250 to 5
k Lux) and from the solar light (from 0.06 to 1 W/m2) irradiation conditions.
Figure 13. STEVAL-GPT001V1 cradle board battery energy harvesting: indoor irradiation
Figure 14. STEV
AL-GPT001V1 cradle board battery energy harvesting: outdoor irradiation
1.4.3.4 Recharge via micro-USB connector
The STEV
AL-GPT001V1 cradle board has an ESD protected micro-USB connector that can be plugged to a 5 V
supply source (e.g., a USB port) to activate a fast battery recharge controlled by the STBC08PMR(For details on
the device, refer to the related datasheet at www.st.com).
The ESD protection is featured by USBLC6-2P6, a monolithic application specific device dedicated to high speed
interfaces. The very low line capacitance ensures a high level of signal integrity without compromising sensitive
chip protection against the most stringently characterized ESD strikes.
The STBC08PMR is a constant current/constant voltage charger for single-cell Li-Ion batteries designed to work
within USB power specifications.
The charge voltage is fixed at 4.2 V (typical value) and current limitation can be programmed via a single resistor
connected between PROG pin and GND.
UM2260
UM2260 - Rev 2
page 12/25
Page 13

In the STEVAL-GPT001V1 cradle board current limitation is set at 50 mA by R5 = 20 kΩ.
The red LED (CHRG), mounted between 5 V supply rail and STBC08PMR CHGR pin, remains activated until full
battery charge is achieved.
The STBC08PMR BA
T output pin is connected to the battery through the SPV1050TTR STORE pin and the pass
transistor Q1.(As aforementioned this architecture allows full battery protection by avoiding over-voltage and
under-voltage events.)
1.4.4 Humidity and temperature sensor
The HTS221
is an ultra-compact sensor for relative humidity and temperature measurement.
It includes a sensing element (manufactured using a proprietary ST process) and a mixed signal ASIC to provide
measurement data through digital serial interfaces.
The sensing element consists of a polymer dielectric planar capacitor structure capable of detecting relative
humidity variations and temperature.
The HTS221 is fully monitored by the firmware running on the SensorTile module; thus, the sensed values are
displayed by the app dedicated tab(For further details about HTS221, refer to the related datasheet freely
downloadable from www. st.com.).
1.4.5 STEVAL-GPT001V1 programming interface
When the SensorTile module is supplied (see Section 1.4.3.1 Connection, Section 1.4.2 SensorT
ile module
connection and Section 1.4.1 Startup) and connected to the STEVAL-GPT001V1 cradle board or to the
STLCX01V1 SensorTile Cradle expansion board, the dedicated firmware STSW-GPT001V1 can be uploaded
through the SWD cable and an ST-Link programmer.
The easiest way is using an STM32 Nucleo board which bundles an ST-LINK V2.1 debugger and programmer.
Step 1. Ensure CN2 jumpers are OFF.
Step 2. Connect your STM32 Nucleo board to the cradle, paying attention to the position of pin 1 on both SWD
connectors.
The STEVAL-GPT001V1 SWD connector is directly accessible from the cover back without opening
the case.
Figure 15. STEVAL-GPT001V1 cradle board and STM32 Nucleo connection via SWD connectors
Step 3. Connect the ST
-LINK V2.1 to a USB port of a PC/laptop where the STM32 ST-LINK Utility is installed.
Step 4. Launch the STM32 ST-LINK Utility and virtually connect it to the ST-LINK V2.1 ([Target]>[Connect]).
From [File]>[Open] you can browse your folder and select the file STSW-GPT001V1.bin.
Step 5. Upload the firmware STSW-GPT001V1.bin ([Target]>[Program & Verify]>[Start address:
0x08004000]).
Step 6. Virtually disconnect the ST-Link V2.1 [Target Disconnect].
Step 7. Disconnect the SWD cable from the cradle.
The uploaded firmware starts running automatically.
UM2260
UM2260 - Rev 2
page 13/25
Page 14

2 Schematic diagram
Figure 16. STEV
AL-GPT001V1 circuit schematic: power and connectors
USB, SWD, Power switch
VPROG = 1V
IBAT=(VPROG/RPROG)x1000
RPROG=1000*VPROG/IBAT
V_USB VBat
V_USB V_USB
V_USB
VBat
VBat
VDD
V_USB
VBat
VDD
VDD
VDD
LDO3v3
LDO3v3
LDO3v3
RXD-USB_DM
RXD-USB_DP
SWDCLK
SWDIO
RESET
I2C_SDA
I2C_SCL
SWDCLK
MIC_CLK
SWDIO
SWDCLK
RESET
RXD-USB_DP I2C_SCL
RXD-USB_DM I2C_SDA
SD_SCK SD_CS
SD_MISO SD_MOSI
VSTORE
MIC_CLK SWDIO
SWDCLK
RESET
I2C_SCL
I2C_SDA
SD_CS
SD_MOSI
SD_MISO
RXD-USB_DP
RXD-USB_DM
SD_SCK
I2C_SCL
I2C_SDA
R8
1K
C1
100 nF
R3
2K
U1USBLC6-2P6
D1
1
GND
2
D2
3
VBUS
5
D3
4
D4
6
R4
DNM
U4STC3115IQT
CG
6
GND
5
NC
4
SCL
3
SDA
2
ALM
1
BATD/CD
8
VCC
9
RSTIO
7
VIN
10
BATT
1
2
3
C8
100 nF
SensorTile
1
2
3
4
5
6
7
8
9 10
14
16
15
13
12
11
17
18
USBUSB-MICRO
1
2
3
4
SH1
SH2
5
CHRG
2 1
LED1
2 1
R11
NC
C2
4.7 µF
BM10B(0.8)-16DP-0.4 V(51)
CN2
12
34
56
78
910
1112
1314
1516
G1G2
G3G4
C7
4.7 µF
U2STBC08PMR
PROG
5
CHRG
3
PAD
7
BAT
1
Vcc
6
GND
4
PWR_ON
2
U5HTS221
SDA
4
DRDY
3
SCL
2
VDD
1
GND
5
CS
6
R23NM
R5
20K
R10
0R
SWD
1
2
3
4
5
C10
1 µF
R9
50mOHM
C3
4.7 µF
R220 ohm
CHRG
BAT_NTC
Bat-
CHRG
Bat-
BAT_NTC
Battery connector
Battery charger
U2
SensorTile connector
SensorTile footprint
UM2260
Schematic diagram
UM2260 - Rev 2
page 14/25
Page 15

Figure 17. STEV
AL-GPT001V1 circuit schematic: harvesting
R30/R28 = R29/R27 = 10
Vout = R30/R28(Vp-Vm)
@200Lux Ipv = 30 µA => Vout ~= 4 mV
@1sun Ipv = 16 mA => Vout ~= 1.60 V
VBat
LDO3v3
VSTORE
MIC_CLK
SD_CS
SD_MOSI
L122uH
1 2
U6
SPV1050
1
1
2
2
3
3
4
4
5
5
6677889910
10
11
11
12
12
13
13
14
14
15
15
16
16
17171818191920
20
21
21
SW2
1
2
3
R30
330k Ohm
C15
100nF
12
C12
10 nF
12
R17
4.02M
PV+
1
1
R31
8.2M
+
-
U7A
4
1
6235
C11
4.7 µF
12
Q2
STL10N3LLH5
5
4
2 6
7
8
3
1
9
R120 Ohm
Q1
C14
100 nF
1
2
1
1
R15
6.8M
R261 Ohm
R273.3k Ohm
R18
5.1M
R16
3M
R29
330k Ohm
TP7
1
1
SW1
450301014042
R132.7M
R283.3k Ohm
C16
22nF
12
TP1A
1
1
1
1
R14
8.2M
C13
47 µF
12
TP6
BATT-CHG
1
1
R32
100k Ohm
VSTORE
VSTORE
TP1B
PV+
PV-
PV-
TP2B
TP2A
BATT-CON
STL4P2UH7
TSU111
(DFN6 1.2x1.3)
UM2260
Schematic diagram
UM2260 - Rev 2
page 15/25
Page 16

3 Bill of materials
Table 1. STEV
AL-GPT001V1 bill of materials
Item Q.ty Ref. Part/Value Description Manufacturer Order code
1 1 BATT
Battery
connector
Molex 78171-0003
2 1 CHRG 0402 Red LED Any
3 4 C1, C8, C14, C15
100 nF 16 V
±10% 0402
Capacitors Murata GRM155R71C104KA88J
4 4 C2, C3 C7, C11
4.7 µF 10 V
0402 X5R
Capacitors Murata ZRB15XR61A475KE01D
5 1 C10
1 µF 10 V 0402
X5R
Capacitor Any
6 1 LED1 0402 Green LED Any
7 1 R3 2 kΩ 0402 Resistor Any
8 1 R8 1 kΩ 0402 Resistor Any
9 1 R5
20 kΩ ±1%
0402
Resistor Any
10 0 R4, R11, R23
Resistors (not
mounted)
Any
11 3 R10, R12, R22
0 Ω 63 mW
0402
Resistors Vishay CRCW04020000Z0ED
12 1 R9
50 mΩ ±1/16
W 0402
Resistor Panasonic ERJ-2BWFR050X
14 1 SWD Pitch 2.54 mm
Circuit jumper
plug
Omron XJ8B-0511
15 1 SensorTile SensorTile
SensorTile
connectable
sensor node
ST STEVAL-STLCS01V1
16 1 USB USB Micro-B GCT USB3075-30-A
17 1 U1
USBLC6-2P6
SOT666
Very low
capacitance
ESD
protection
ST USBLC6-2P6
18 1 U2
STBC08PMR
DFN6
800 mA
standalone
linear Li-Ion
battery
charger with
thermal
regulation
ST STBC08PMR
19 1 U4
STC3115IQT
DFN10
Gas gauge IC
with alarm
output for
handheld
applications
ST STC3115IQT
20 1 U5
HTS221
HLGA-6L (2 x 2
x 0.9 mm)
Capacitive
digital sensor
for relative
humidity and
temperature
ST HTS221
UM2260
Bill of materials
UM2260 - Rev 2
page 16/25
Page 17

Item Q.ty Ref. Part/Value Description Manufacturer Order code
21 1 U6
SPV1050
VFQFPN 3 mm
x 3 mm
Ultra low
power energy
harvester and
battery
charger with
embedded
MPPT and
LDOs
ST SPV1050TTR
22 1 L1
22 µH 0.4 A
±20%
3.0x3.0x1.4
[mm3]
Fixed inductor CoilCraft LPS3015-223
23 1 C13
47 µF 10 V
±20% 0805
Multilayer
ceramic
capacitor
EPCOS/TDK C2012X5R1A476M125AC
24 1 C12
10 nF 16 V
±10% 0402
Capacitor Murata GRM155B31H103KA88D
25 1 R13
2.7MΩ 63mW
0402
Resistor Vishay CRCW04022M72FKED
26 1 R18
5.1MΩ 63mW
0402
Resistor Multicomp MC00625W040215M10
27 1 R14
8.2MΩ 63mW
0402
Resistor Multicomp MC00625W040218M20
28 1 R31
5.6MΩ 63mW
0402
Resistor Multicomp MC00625W040215M60
29 1 R15
6.8MΩ 63mW
0402
Resistor Multicomp MC00625W040216M80
30 1 R16
3.0MΩ 63mW
0402
Resistor Multicomp MC00625W040213M00
31 1 R17
4.22MΩ 63mW
0402
Resistor Vishay CRCW04024M22FKED
32 1 Q1
STL4P2UH7
PowerFlat
2mm x 2mm
Power
MOSFET
ST STL4P2UH7
33 1 Q2
STL10N3LLH5
PowerFLA
T
3.3x3.3
N-channel 30
V, 0.015 Ohm,
9 A,
PowerFLAT
STripFET V
Power
MOSFET
ST STL10N3LLH5
34 1 CN2
BM10B(0.8)-16
DP-0.4V(51)
SMT
High contact
reliability
connector
Hirose Electric
Co Ltd
BM10B(0.8)-16DP-0.4V(5
1)
35 2 TP6, TP7 SMT Ø = 1mm Test points Any
36 1 SW1
3v3 1 row, 3
ways, PTH,
100mils
Switch Wurth 4.50301E+11
37 1 R32
100 kΩ 100
mW 0402
Resistor Vishay CRCW0402100KFKEDHP
38 2 R27, R28
3.3 kΩ 63 mW
0402
Resistors Rohm MCR01MZPF3301
39 2 R29, R30
330 kΩ 63 mW
0402
Resistors Vishay CRCW0402330KFKED
UM2260
Bill of materials
UM2260 - Rev 2
page 17/25
Page 18

Item Q.ty Ref. Part/Value Description Manufacturer Order code
40 1 R26
1 Ω 200 mW
0402
Resistor Vishay CRCW04021R00FKEDHP
41 1 C16
22 nF 16 V
0402
Capacitor AVX 0402YC223KAT2A
42 1 U7A
TSU111 DFΝ6
1.2x1.3
Nanopower
high accuracy
CMOS OpAmp
ST TSU111IQ1T
43 1 SW2
2 way,
JMP-0402-3
Jumper Any
44 1 Battery 3.7 V 100 mAh
LiPO-501225
3pin
connector
Himax
electronics
LiPO-501225
45 1 SWD Cable
2.54 mm, L =
15cm
SWD cable Any
46 1 Bracelet Bracelet Skorpion
47 1 PV panel (FRONT)
FlexRB-15-403
0 Vmp = 1.5V
,
Imp = 80µA
@1kLUX
PV panel Ribes Tech FlexRB-15-4030
48 2
PV panel
(LA
TERAL)
FlexRB-15-401
5 Vmp = 1.5V,
Imp = 40µA
@1kLUX
PV panel Ribes Tech FlexRB-15-4015
UM2260
Bill of materials
UM2260 - Rev 2
page 18/25
Page 19

4 Board layout
Figure 18. STEV
AL-GPT001V1: top layer
Figure 19. STEVAL-GPT001V1: bottom layer
UM2260
Board layout
UM2260 - Rev 2
page 19/25
Page 20

Figure 20. STEV
AL-GPT001V1 component placement (top and bottom layers)
UM2260
Board layout
UM2260 - Rev 2
page 20/25
Page 21

Revision history
T
able 2. Document revision history
Date Version Changes
25-Sep-2017 1 Initial release.
09-Nov-2018 2
Updated Figure 1. STEV
AL-GPT001V1 development kit.
Minor text changes.
UM2260
UM2260 - Rev 2
page 21/25
Page 22

Contents
1 Getting started ....................................................................2
1.1 Hardware description ...........................................................2
1.1.1 Kit overview ............................................................2
1.2 Software description ............................................................3
1.3 STBLESensor app description....................................................4
1.3.1 SensorT
ile module activation and transmission..................................4
1.3.2 Rssi and Battery information tab .............................................6
1.4 System setup ..................................................................9
1.4.1 Startup ................................................................9
1.4.2 SensorTile module connection ..............................................9
1.4.3 Battery ...............................................................10
1.4.4 Humidity and temperature sensor ...........................................13
1.4.5 STEVAL-GPT001V1 programming interface ...................................13
2 Schematic diagram ...............................................................14
3 Bill of materials...................................................................16
4 Board layout......................................................................19
Revision history .......................................................................21
UM2260
Contents
UM2260 - Rev 2
page 22/25
Page 23

List of tables
T
able 1. STEVAL-GPT001V1 bill of materials...................................................... 16
Table 2. Document revision history.............................................................21
UM2260
List of tables
UM2260 - Rev 2
page 23/25
Page 24

List of figures
Figure 1. STEV
AL-GPT001V1 development kit..................................................... 1
Figure 2. STEVAL-GPT001V1 kit: smart watch direct access points ......................................3
Figure 3. STBLESensor app - Start Scanning tab ...................................................4
Figure 4. STBLESensor app - Device List tab......................................................5
Figure 5. STBLESensor app - Environmental tab ...................................................6
Figure 6. STBLESensor app - Rssi and Battery information tab .........................................7
Figure 7. System autonomy vs. irradiance (indoor) ..................................................7
Figure 8. System autonomy vs. irradiance (outdoor) ................................................. 8
Figure 9. STBLESensor app - Rssi and Battery information tab after sleep mode .............................9
Figure 10. STEVAL-STLCS01V1 SensorTile module................................................. 10
Figure 11. SensorTile module connected to the STEVAL-GPT001V1 cradle board ............................10
Figure 12. STEVAL-GPT001V1 watch-shape silicon strap (external back view) and battery connection (internal view) ... 11
Figure 13. STEVAL-GPT001V1 cradle board battery energy harvesting: indoor irradiation ....................... 12
Figure 14. STEVAL-GPT001V1 cradle board battery energy harvesting: outdoor irradiation ...................... 12
Figure 15. STEVAL-GPT001V1 cradle board and STM32 Nucleo connection via SWD connectors ................. 13
Figure 16. STEVAL-GPT001V1 circuit schematic: power and connectors ..................................14
Figure 17. STEVAL-GPT001V1 circuit schematic: harvesting........................................... 15
Figure 18. STEVAL-GPT001V1: top layer ........................................................ 19
Figure 19. STEVAL-GPT001V1: bottom layer......................................................19
Figure 20. STEVAL-GPT001V1 component placement (top and bottom layers) .............................. 20
UM2260
List of figures
UM2260 - Rev 2
page 24/25
Page 25

IMPORTANT NOTICE – PLEASE READ CAREFULLY
STMicroelectronics NV and its subsidiaries (“ST”) reserve the right to make changes, corrections, enhancements, modifications, and improvements to ST
products and/or to this document at any time without notice. Purchasers should obtain the latest relevant information on ST products before placing orders. ST
products are sold pursuant to ST’
s terms and conditions of sale in place at the time of order acknowledgement.
Purchasers are solely responsible for the choice, selection, and use of ST products and ST assumes no liability for application assistance or the design of
Purchasers’ products.
No license, express or implied, to any intellectual property right is granted by ST herein.
Resale of ST products with provisions different from the information set forth herein shall void any warranty granted by ST for such product.
ST and the ST logo are trademarks of ST. All other product or service names are the property of their respective owners.
Information in this document supersedes and replaces information previously supplied in any prior versions of this document.
© 2018 STMicroelectronics – All rights reserved
UM2260
UM2260 - Rev 2
page 25/25
 Loading...