

Page 1

User Manual
Ver. 1.00
All brand names and trademarks are properties of their
respective owners.
Page 2

Page 2
Contents:
Chapter 1: Introduction ...................................................... 3
1.1 Product Introduction .................................................... 3
1.2 Features ........................................................................ 3
1.3 System Requirements .................................................. 4
1.4 Package Contents ......................................................... 4
Chapter 2: Getting Started ................................................. 5
2.1 Driver Installation ........................................................ 5
2.1.1 Installation for Windows ....................................... 5
2.1.2 Installation for Mac OS X ..................................... 8
2.2 Verifying the installation ............................................ 10
2.2.1 Verifying for Windows........................................ 10
2.2.2 Verifying for Mac OS X...................................... 11
2.3 Display Configuration ............................................... 12
Page 3

Page 3
Chapter 1: Introduction
1.1 Product Introduction
This USB 3.1 Gen1 Type-C to DisplayPort 4K Adapter connects a 4K
TV, monitor, or projector to your computer system. The adapter adds
Ultra 4K video support to your computer system through an available
USB 3.0 port. It supports a resolution up to 3840 x 2160. It is Windows
and Mac compatible.
1.2 Features
An ideal solution for expanding the connectivity of MacBook or
USB-C enabled host machine
Highest performance USB graphics solution available. Combines
both video and audio over a single USB cable and DisplayPort
cable
Connect multiple monitors with resolution as high as 3840x2160
(4K) to Windows-based laptops and desktops
Connects to Windows PCs via SuperSpeed USB 3.0. USB bus
Page 4

Page 4
power (no power adapter required). Adapter is backwards
compatible with USB 2.0, but in most cases performance above
1080P over USB 2.0 will be unsatisfactory
Supports DisplayPort displays up to 3840x2160@30Hz.
3440x1440 displays will refresh at 50Hz. 2560X1600,
2560x1440, 1920x1080 (1080P) and all lower modes will refresh
at 60Hz
1.3 System Requirements
Windows® 7/8/8.1/10 (32/64 bit); Mac OS X 10.8 or above
Available USB Type-C port
1.4 Package Contents
1 x USB 3.1 Gen Type-C to DisplayPort 4K Adapter
1 x User Manual
1 x Driver CD
Page 5

Page 5
Chapter 2: Getting Started
2.1 Driver Installation
The following section shows you how to install the USB 3.1 Gen1
Type-C to DisplayPort 4K Adapter driver on different operating
systems.
Important! Please connect the USB 3.1 Gen1 Type-C to DisplayPort
4K Adapter to your PC before the install.
2.1.1 Installation for Windows
1. Insert the provided CD into your disk drive. The CD-ROM will
start automatically. The following screen will show up and please
click “Install Driver”.
Page 6

Page 6
*Note: Actual image may vary
Note: If the install program doesn’t run automatically, please
locate and double-click on the Autorun.exe file in the CD to
launch the install program.
2. Please click “USB 3.0 4K DP/HDMI”
*Note: Actual image may vary
Page 7

Page 7
3. Please click “Install” to continue.
4. Click “Finish” to end of the driver installation steps.
Page 8

Page 8
Note: On some machines, you may need to reboot before you can use
USB 3.1 Gen1 Type-C to DisplayPort 4K Adapter.
2.1.2 Installation for Mac OS X
1. Insert the provided CD into your CD-ROM drive.
2. Double-click the “USB Graphics” disc icon, double-click
package file “mac.dmg”, the following “USB Graphics” virtual
disk will be appeared on the desktop of your Mac OS X system.
Then double click “Drivers” folder.
Page 9

Page 9
3. Double Click “USB 3.0 4K DP/HDMI Adapter” folder.
4. Select “DisplayLink Software Installer” to begin installing the
DisplayLink Driver on your Mac.
Page 10

Page 10
5. Follow the instructions on screen to install the driver. After driver
installation is complete, you must restart your computer.
2.2 Verifying the installation
2.2.1 Verifying for Windows
1. Click on the “Device Manager” tab in the Windows Control
Panel.
Start > Control Panel > Device Manager
2. In the USB Display Adapters group, an item named USB 3.0 4K
Display Adapter should be displayed.
Page 11

Page 11
Note: If there is a question or exclamation mark next to that item, then
the driver is not properly installed. Please delete the item, select the
Delete the driver software for this device option (if provided),
unplug the USB 3.1 Gen1 Type-C to DisplayPort 4K Adapter from
your computer and then repeat the installation steps.
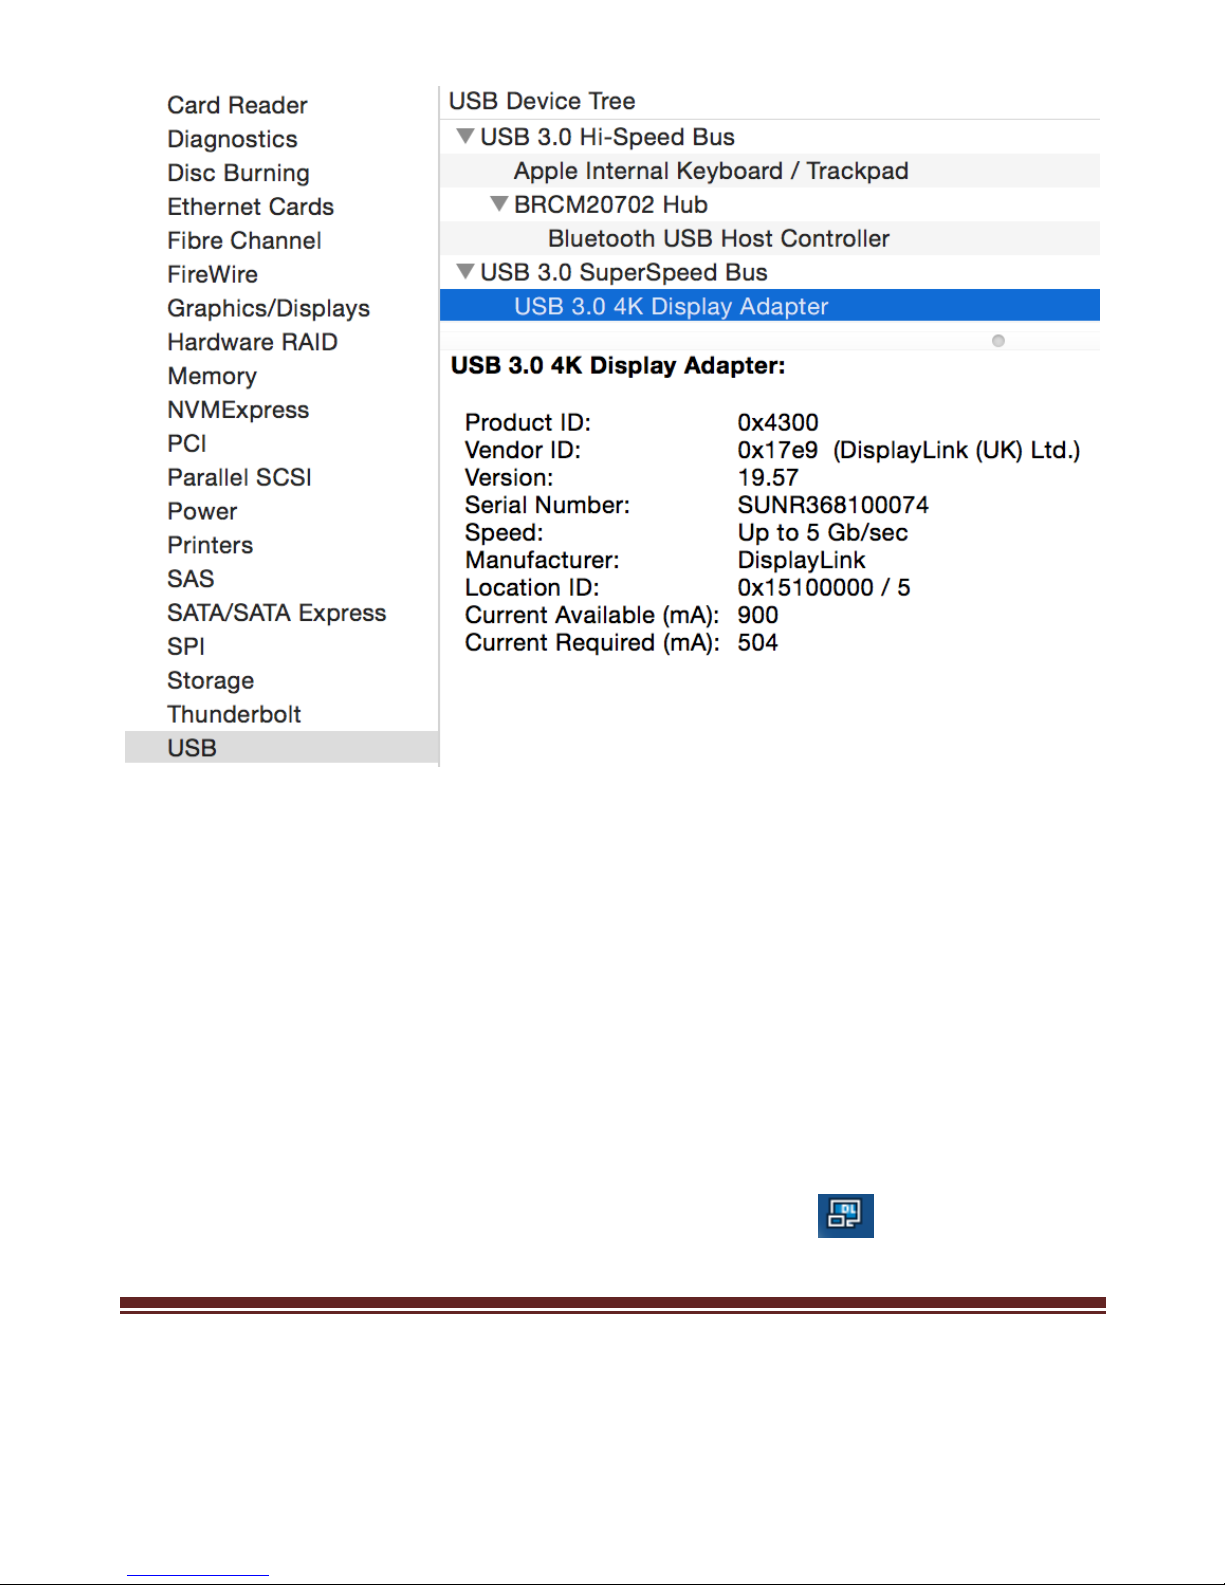
2.2.2 Verifying for Mac OS X
1. Choose About this Mac from the Apple menu.
2. Click on System Report…
3. In the Contents sidebar select USB from the Hardware section.
4. Scroll the list to reveal the USB 3.1 Gen1 Type-C to DisplayPort
4K Adapter information
Page 12
Page 12
2.3 Display Configuration
When USB 3.1 Gen1 Type-C to DisplayPort 4K Adapter is attached, an
icon appears in the taskbar. This gives you access to the DiaplayLink
manager menu.
To use the DisplayLink Manager Menu
1. From the taskbar, click the DisplayLink icon
Page 13

Page 13
2. A menu appears with several options. These are shown and
described below.
Screen Resolution: Click to select an available resolution. Note:
This function is disabled in mirror mode, as the resolution is
defined by the resolution of the primary monitor
Screen Rotation: Rotates the screen according to the desired
orientation
Extend to: Extends the screen according to the desired orientation
Extend: This is the default settings of the USB 3.1 Gen1 Type-C
Page 14

Page 14
to DisplayPort 4K Adapter. This mode extends your desktop for
easy viewing of multiple windows. The window will move off the
primary display from the right side and enter the extended display
from the left side
Set as Main Monitor: Sets the extended screen as the main
screen
Mirror: Duplicates the primary monitor to the monitor which
connects with the USB 3.1 Gen1 Type-C to DisplayPort 4K
Adapter
Off: Turns off the USB 3.1 Gen1 Type-C to DisplayPort 4K
Adapter
Fit to TV: Adjusts the size of the desktop on the TV. Note: This
function works only when one display is connected
Audio Setup: Opens the Windows Audio Configuration window
Video Setup: Opens the Windows Display Settings window
 Loading...