

Page 1
Sync 5z smartphone Setup
and Frequently Asked Questions
What will this help you with?
1. Basic setup – learn how to remove your back case, how to insert your sim
cards & SD card, how to insert your battery, how to charge your device.
2. Audio Profiles - learn how to update your various profile settings, including
Ringtones, Notifications and System sounds.
3. Memory and storage management – learn how to free more space.
4. Power management – learn how to maximise your battery performance.
5. STK Care – learn how STK can help solve issues 24/7 on live chat.
6. Update your phones software & More support details.
1. Basic set up
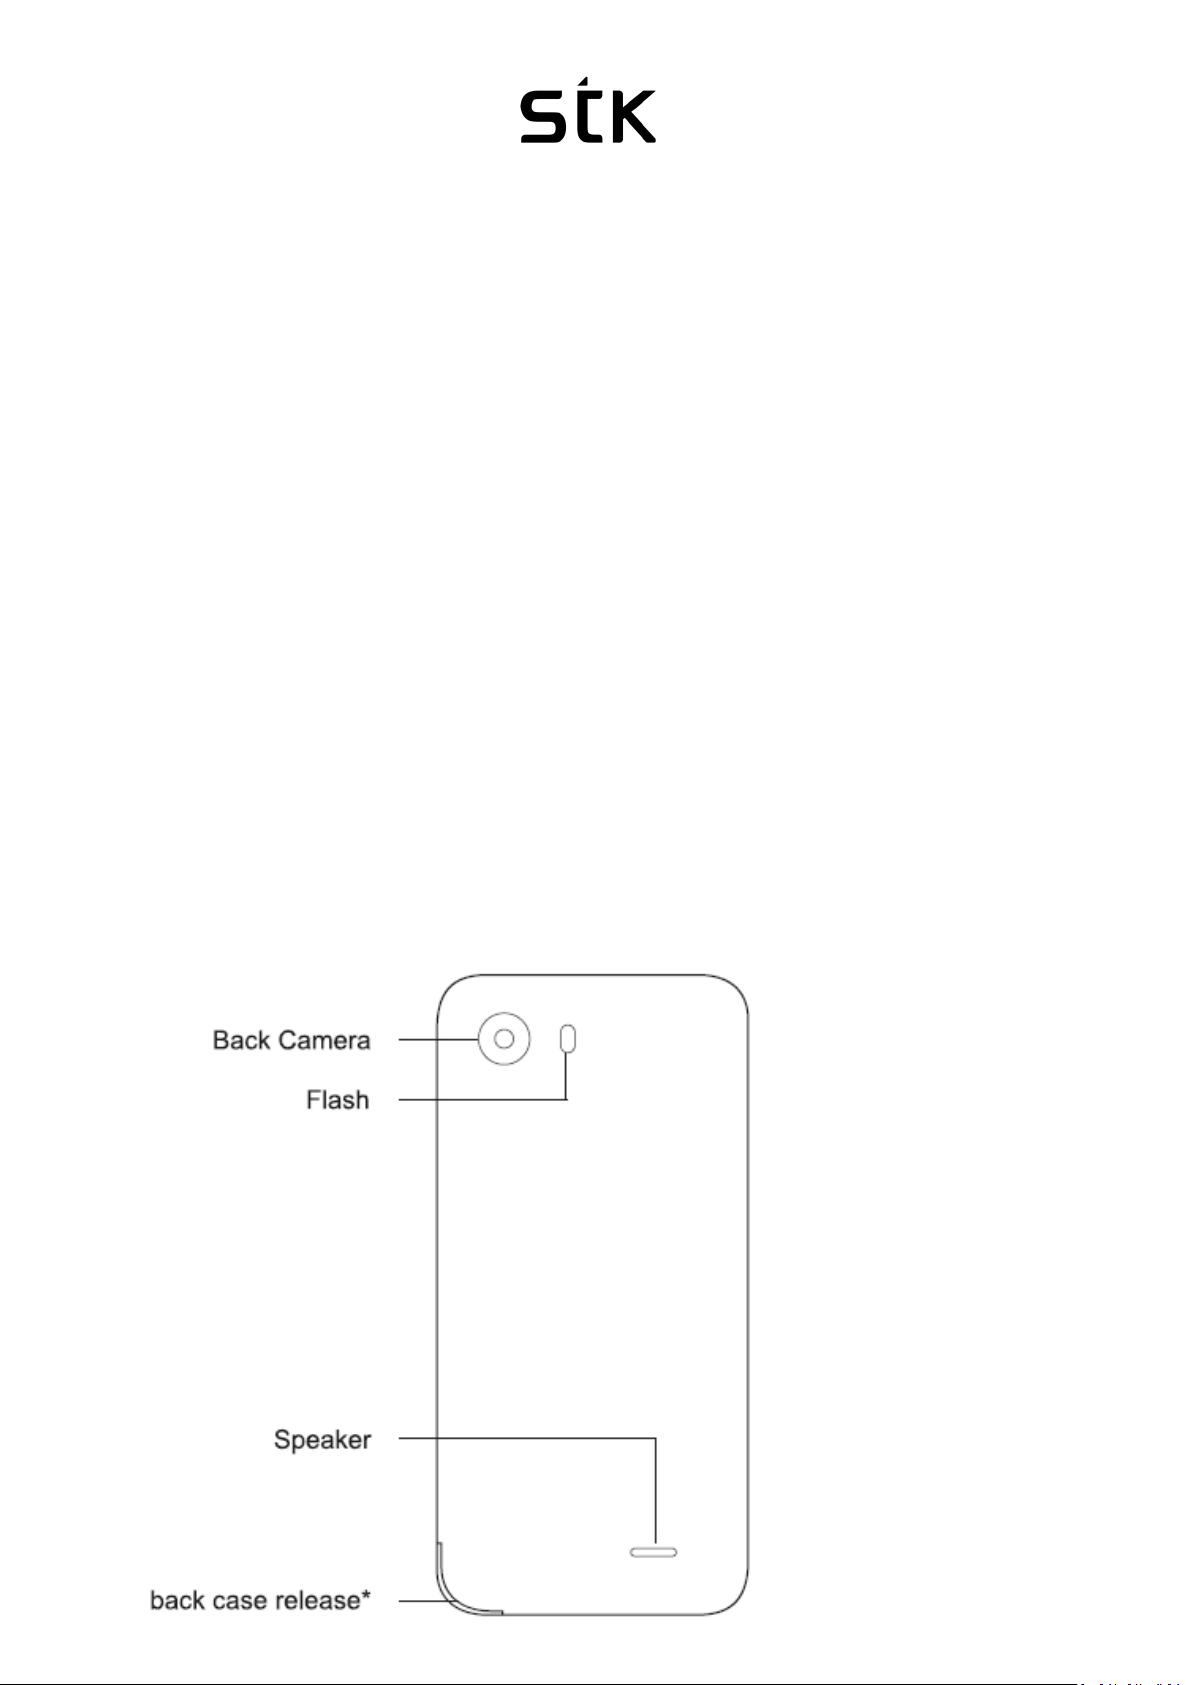
1. 1 How to remove the back case
* Gently prise back case away
from handset. Ensure care is
taken to avoid injury or damage
to the handset.
Page 2
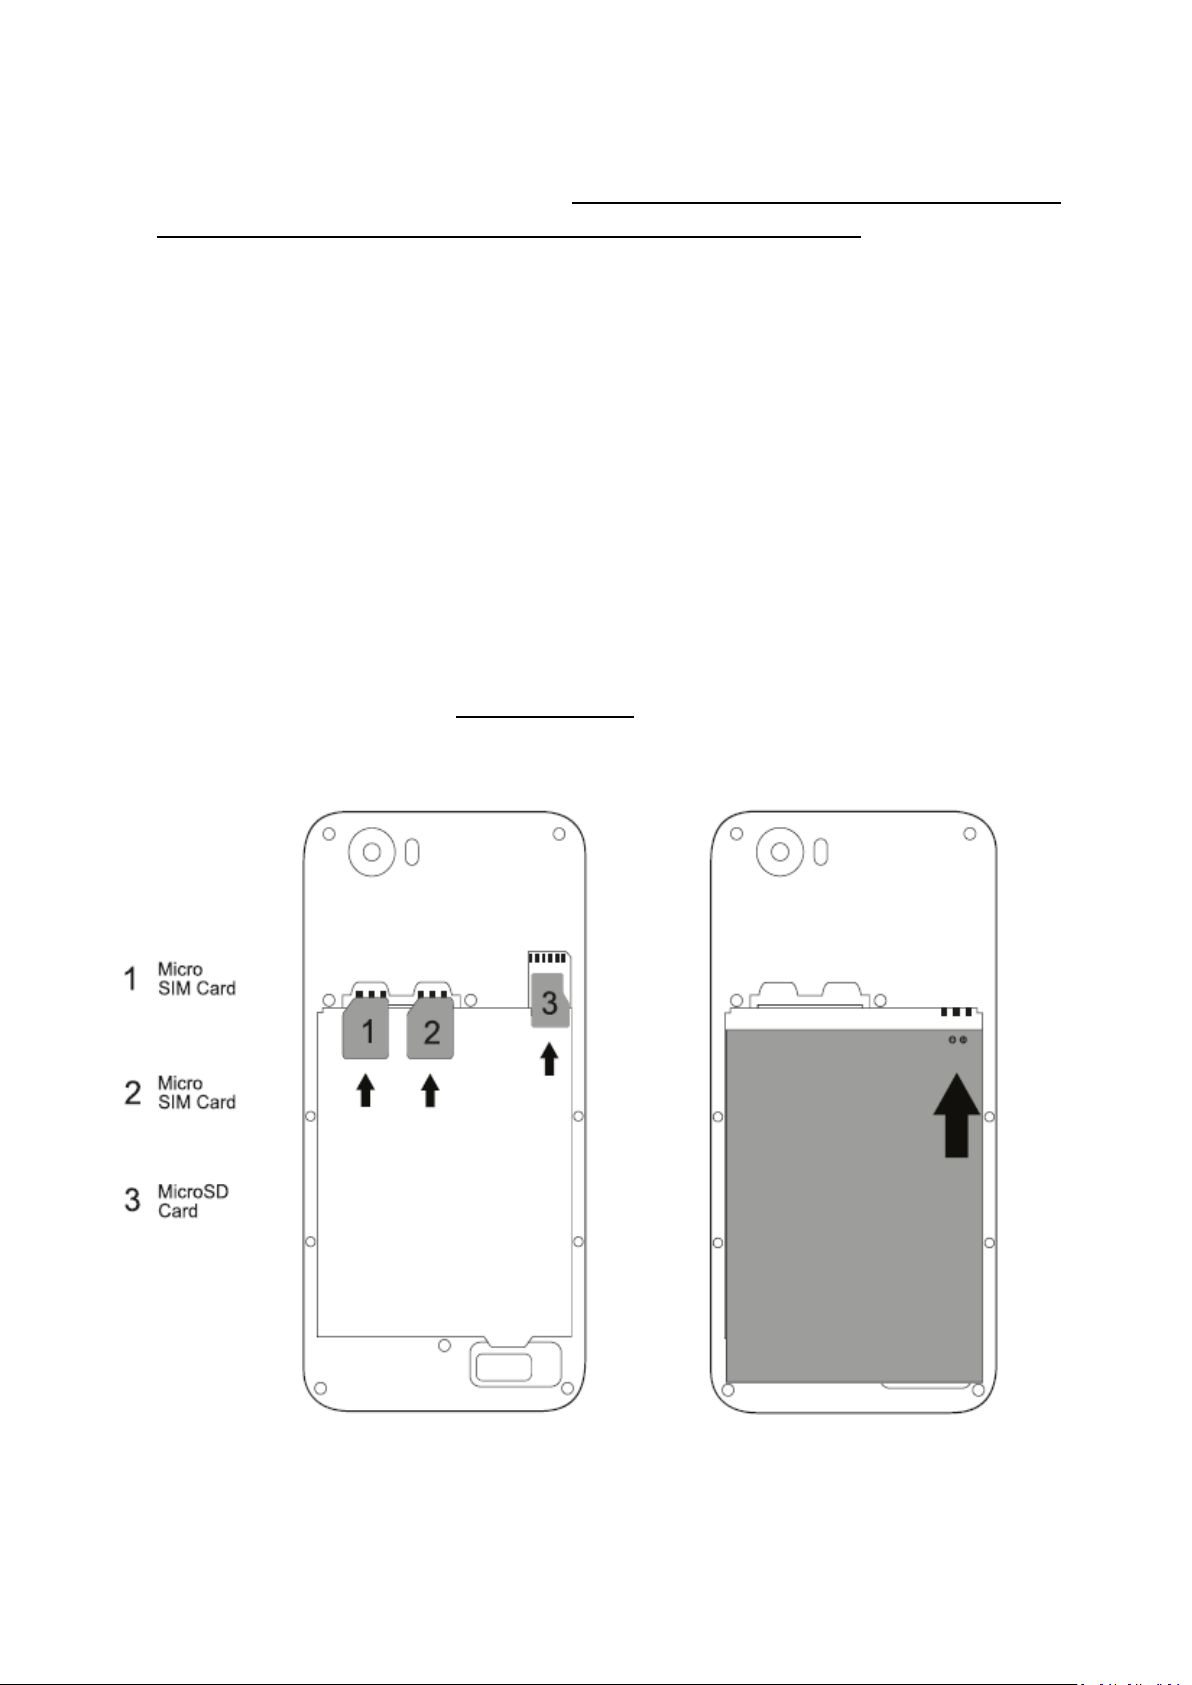
1.2 How to insert your SIM Cards
3G 2G
Must be a Micro SIM, not a standard or Nano SIM. If you do not have a Micro SIM,
your network operator will be able to provide you one. Please insert as per
diagrams below, contact side down. 3G data can only work on one sim slot, at a
time, but you can change this in the “Settings” -> “Sim Cards”.
This phone is SIM-Free unlocked, which means, it will accept any UK operator SIM
card (To use the Internet, you may need to contact your Network Operator and
ask for the correct Settings).
1.3 How to insert your SD Card/memory card (sold separately)
This device will accept compatible SD Cards up to 32GB (also see Memory /
storage management for useful information).
1.4 How to insert the Battery
Carefully place the battery into the battery compartment, ensuring the
connectors on the battery are facing the right direction and align to the
connectors inside the battery compartment. Always charge your battery fully
before starting the device but please note, when you are setting up the phone
and downloading the initial setup or over the first day, this will use a large
majority of the battery, so do this at home and be ready to charge again.
1.5 How to charge your device
Connect your Micro USB cable and 3-pin charger together (which are provided).
Plug the 3-pin charger in to a wall socket, and plug the Micro USB cable into your
device.
Page 3
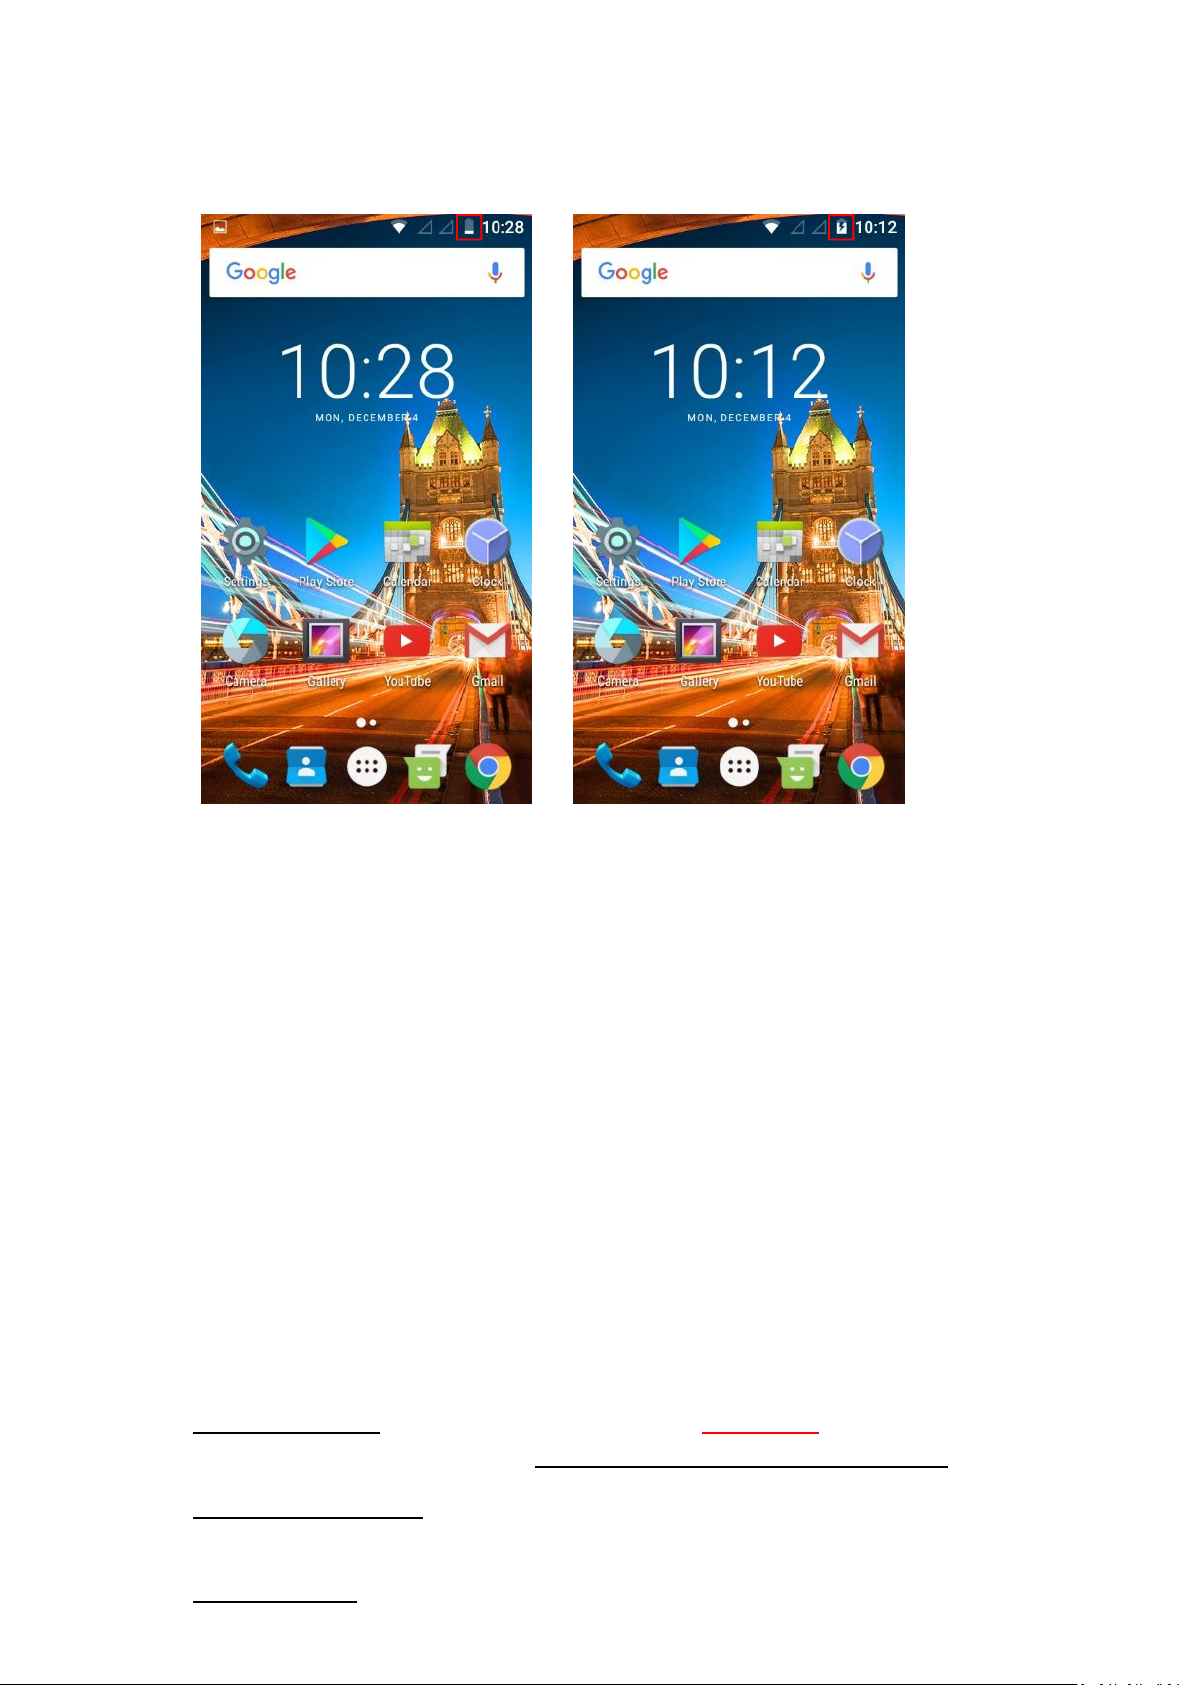
The device will show you it is charging by turning on the battery indicator, on your
screen, if your phone is off, or by showing you a charging symbol in the top-hand
side of your device. If it is completely out of battery, it might take a while to start
the battery indicator.
2. Audio Profiles
Learn how to update your various profile settings, including Ringtones, Notification,
System sounds.
2.1 Changing your ringtones:
The options to change your ringtone will only be enabled if you have correctly inserted
your SIM card into your device. You will know if your SIM Card is NOT inserted correctly,
if the options are greyed out (not selectable).
From your home screen or menu select/press “Settings” (Cog Wheel icon).
select/press “Audio Profiles” > select/press “General” > select/press “Edit”
select/press “Ringtone SIM1” or “Ringtone SIM2” (if you have inserted a second SIM
card)
IMPORTANT, you will then see the below 3 options.
1 “Media storage” - (preferred option, select “just once”.) This is where the
Android ringtones are stored. We recommend you use this option.
2 “Custom Ringtones” - ringtones or music downloaded - if you are new to
Android, we do not recommend you use this option.
3 “File Explorer” - Allows you to view your phone storage folders - if you are new
to Android, we do not recommend you use this option.
Page 4
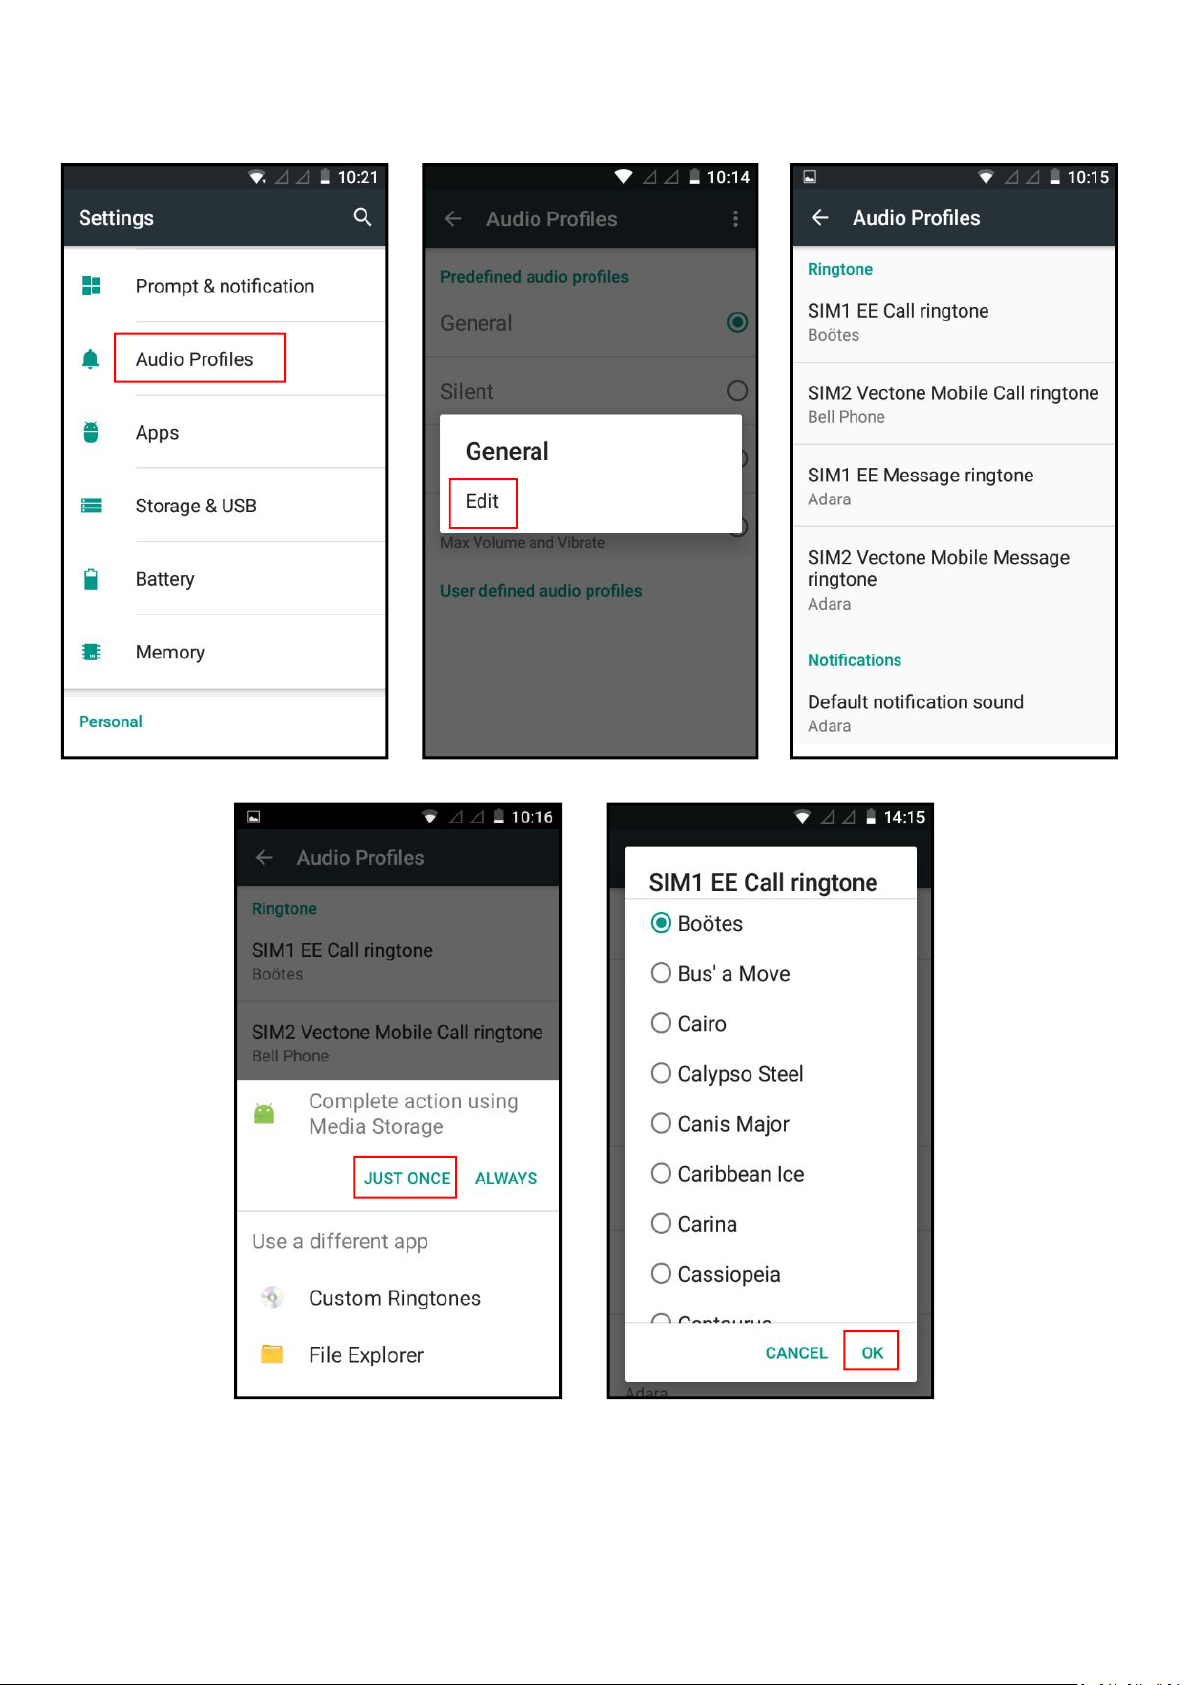
Select your ringtone from the available, preinstalled list, and it should play so you
v
can hear what it sounds like. Then just exit once you are happy.
Page 5
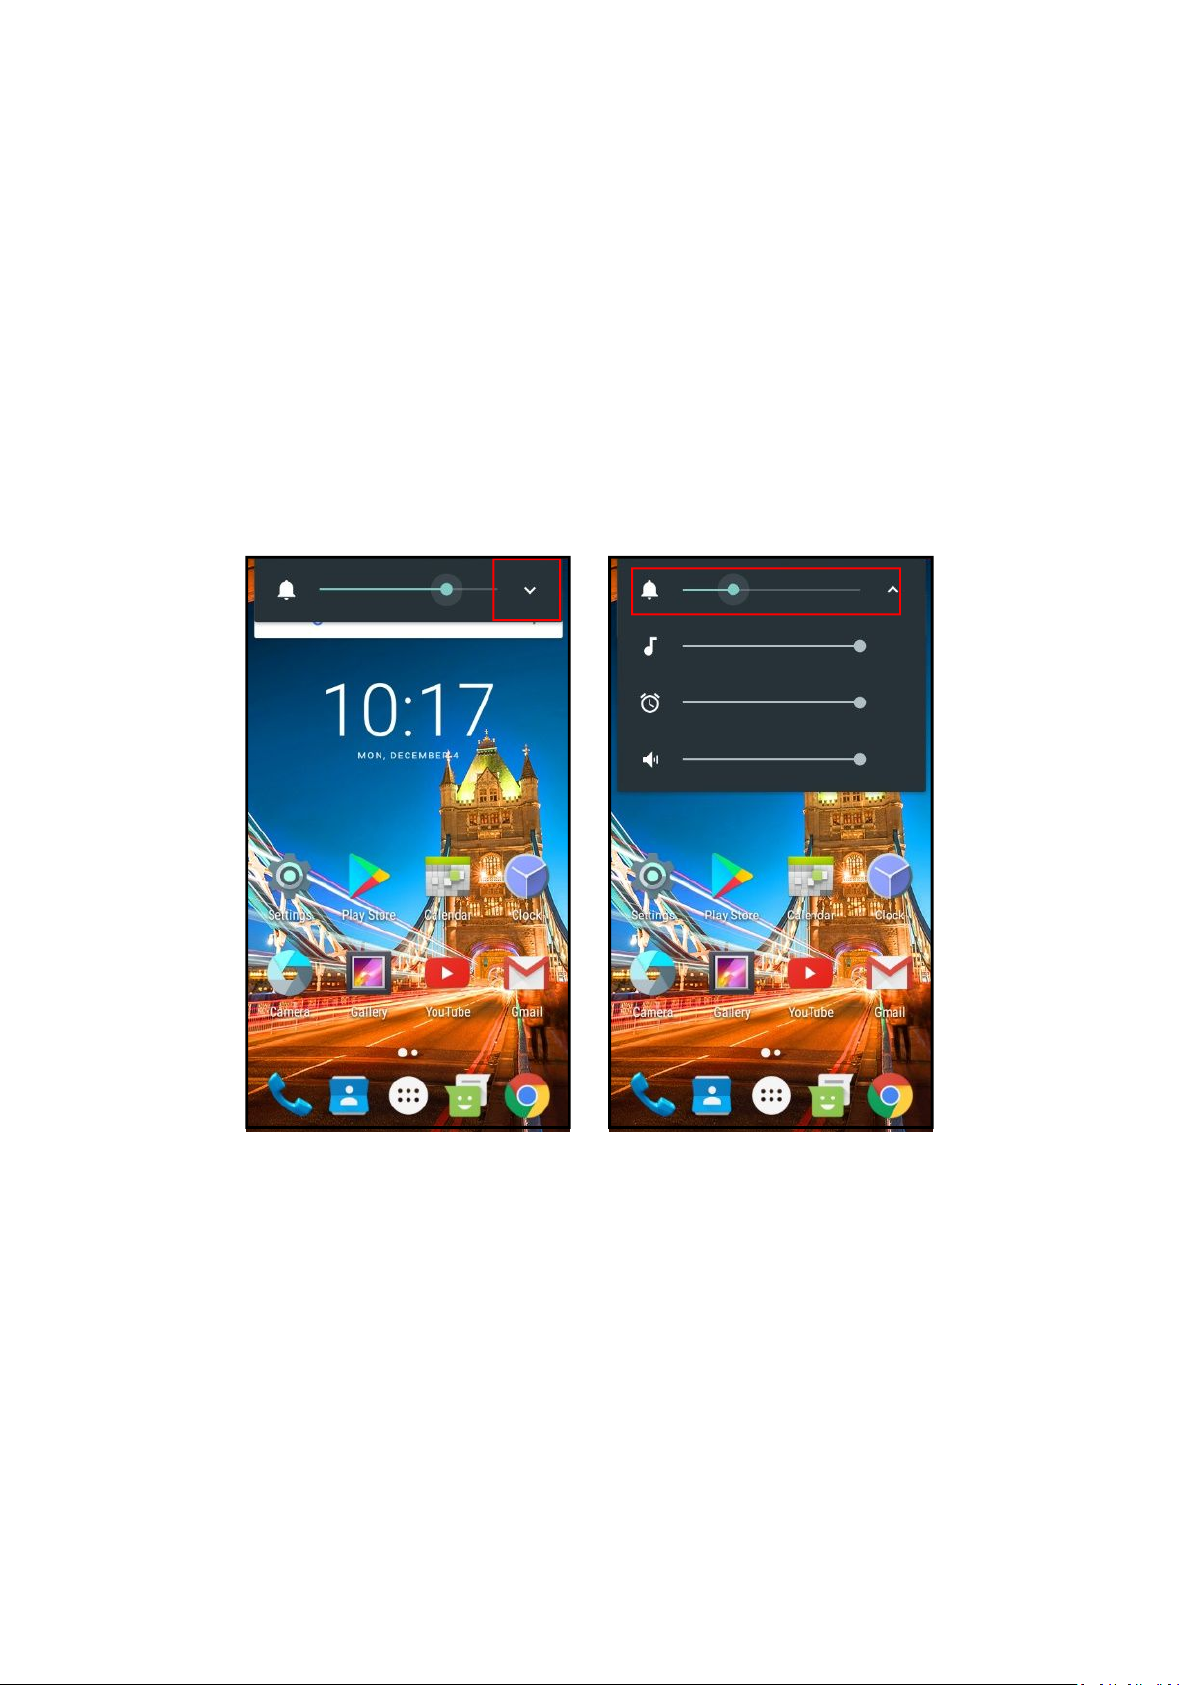
2.2 Adjusting your ringtone volume and other system sounds
Press the volume-up or down button, located on the top-right side edge of your
device (with the screen facing you).
You will see a small volume indicator appear that moves back or forward as you
continue to press the volume up or down buttons. Select/press the on-screen
volume indicator to manually adjust your volume.
You can also adjust your alarm clock and notification volume by pressing the volume
up or down button -> clicking the white arrow “v” which brings up further volume
settings to adjust the alarm clock and notification volume.
If you have put your device on silent by pressing the volume down, then you might
need to adjust all these volumes settings back to original settings each time or you
might not hear the ringtone, notifications (like text messages) or alarm clock.
3. Memory/storage management
3.1 Using your SD memory Card storage (SD Card, sold separately)
You can store your media files including music, photos, videos and apps directly onto
your SD Card which will free up your system storage. When you insert your SD memory
card it usually gives you an option to save to the SD memory card, as default, but we still
recommend the steps below:
From your home screen or menu select/press “Settings” (Cog Wheel icon).
Select/press “Storage & USB”
Under the ‘Default write disk’ heading select the “SD card” option.
Page 6
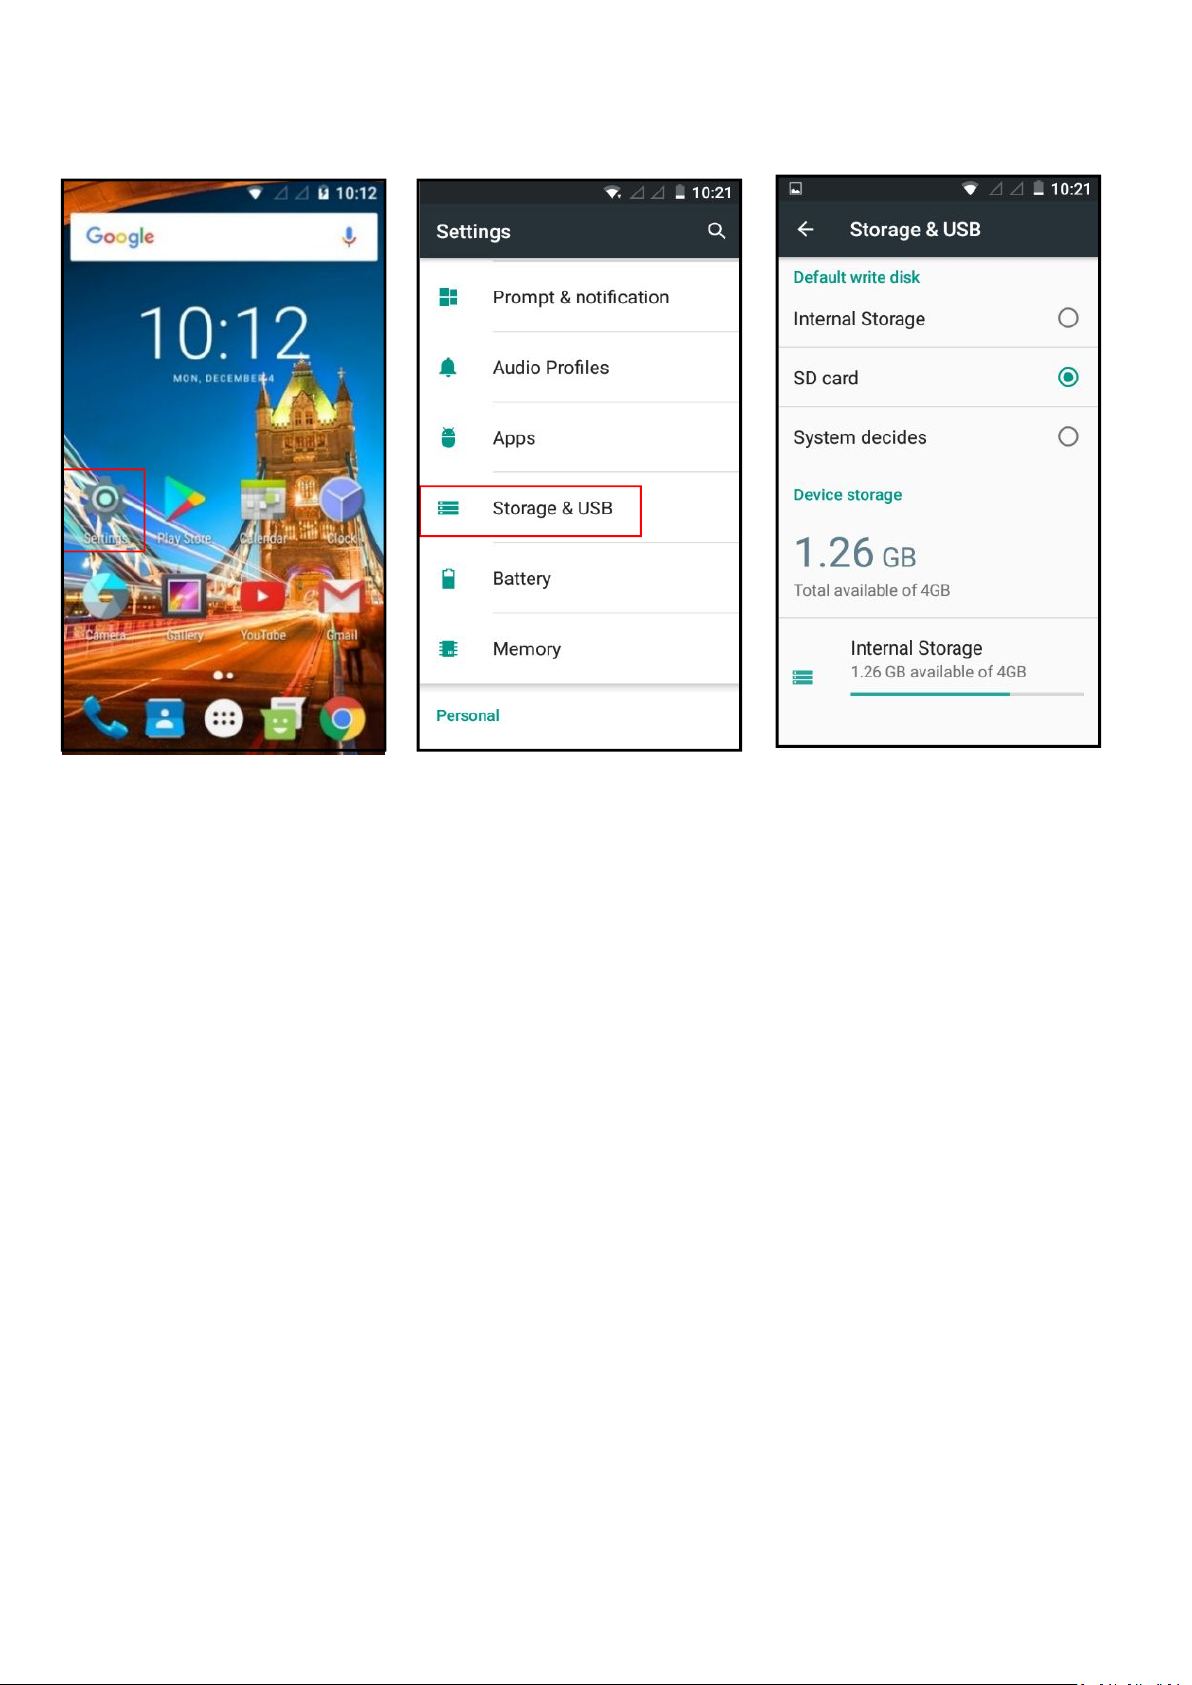
Now most files will be automatically saved onto your SD card, however some apps you
download from the Google Play store will still download to your device memory and you
will have to follow the steps below in 3.2.
3.2 How to move your files/apps from your in-built memory to
your SD card
This helps you free space on your device, so you can enjoy more apps, photos etc.
Not all applications can be moved from the device to your SD card, as some may be
preinstalled by Google – it is usually only the apps you download from the Google play
store.
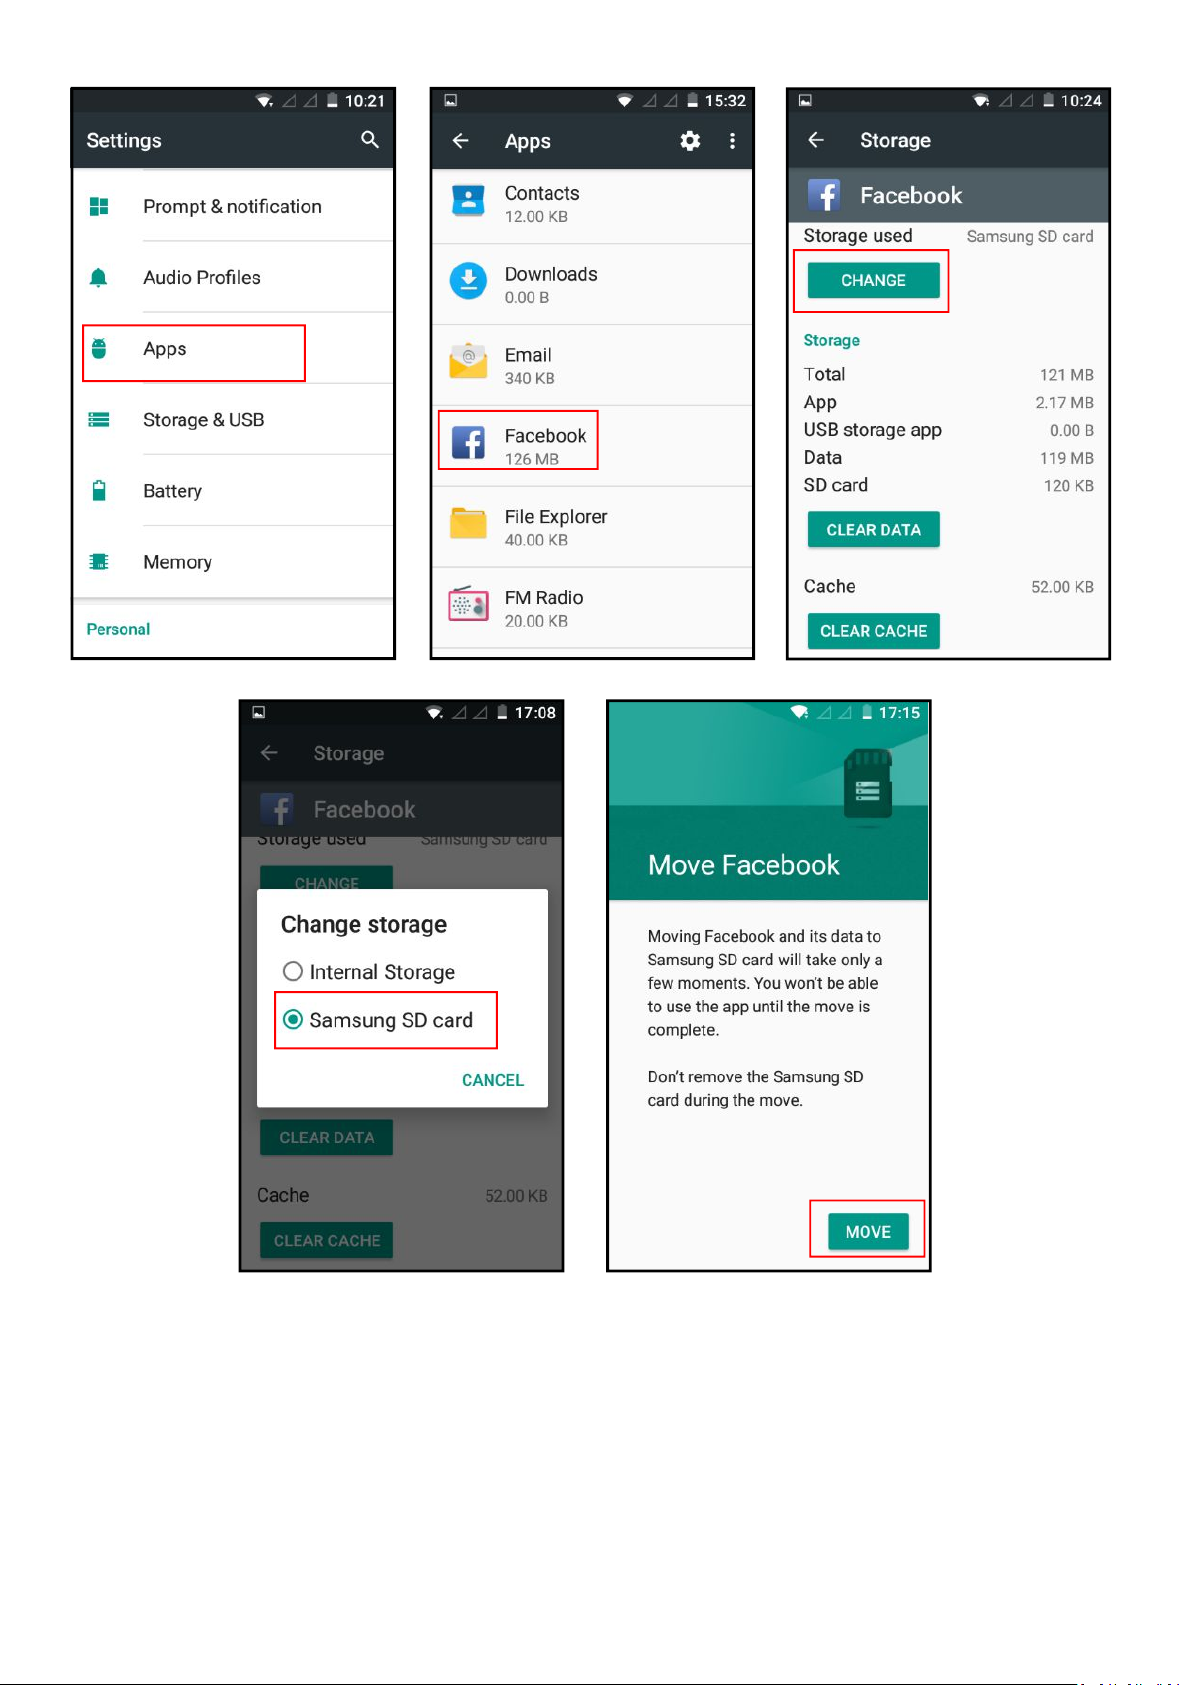
From your home screen or menu select/press “Settings” (Cog Wheel icon).
Select/press “Apps” > select an app you wish to move e.g. Facebook (that you would
have downloaded and installed from the Google Play Store)
Select/press “Storage” from the “App info” screen.
Under the “Storage used” heading, select/press the “Change” button.
Under the “Change storage” pop-up select “SD Card”
Select/press the “Move” button.
The process will take several minutes, based on the size of the app. You can exit the
screen and go back later to see if it has been done.
Page 7
Page 8
4. Power management - how to maximise your battery
life.
Always charge your battery fully. Please note when you are setting up the
phone and downloading the initial setup or over the first day, until the
phone loads all its updates, this will use a large majority of the battery, so
do this at home and be ready to charge again.
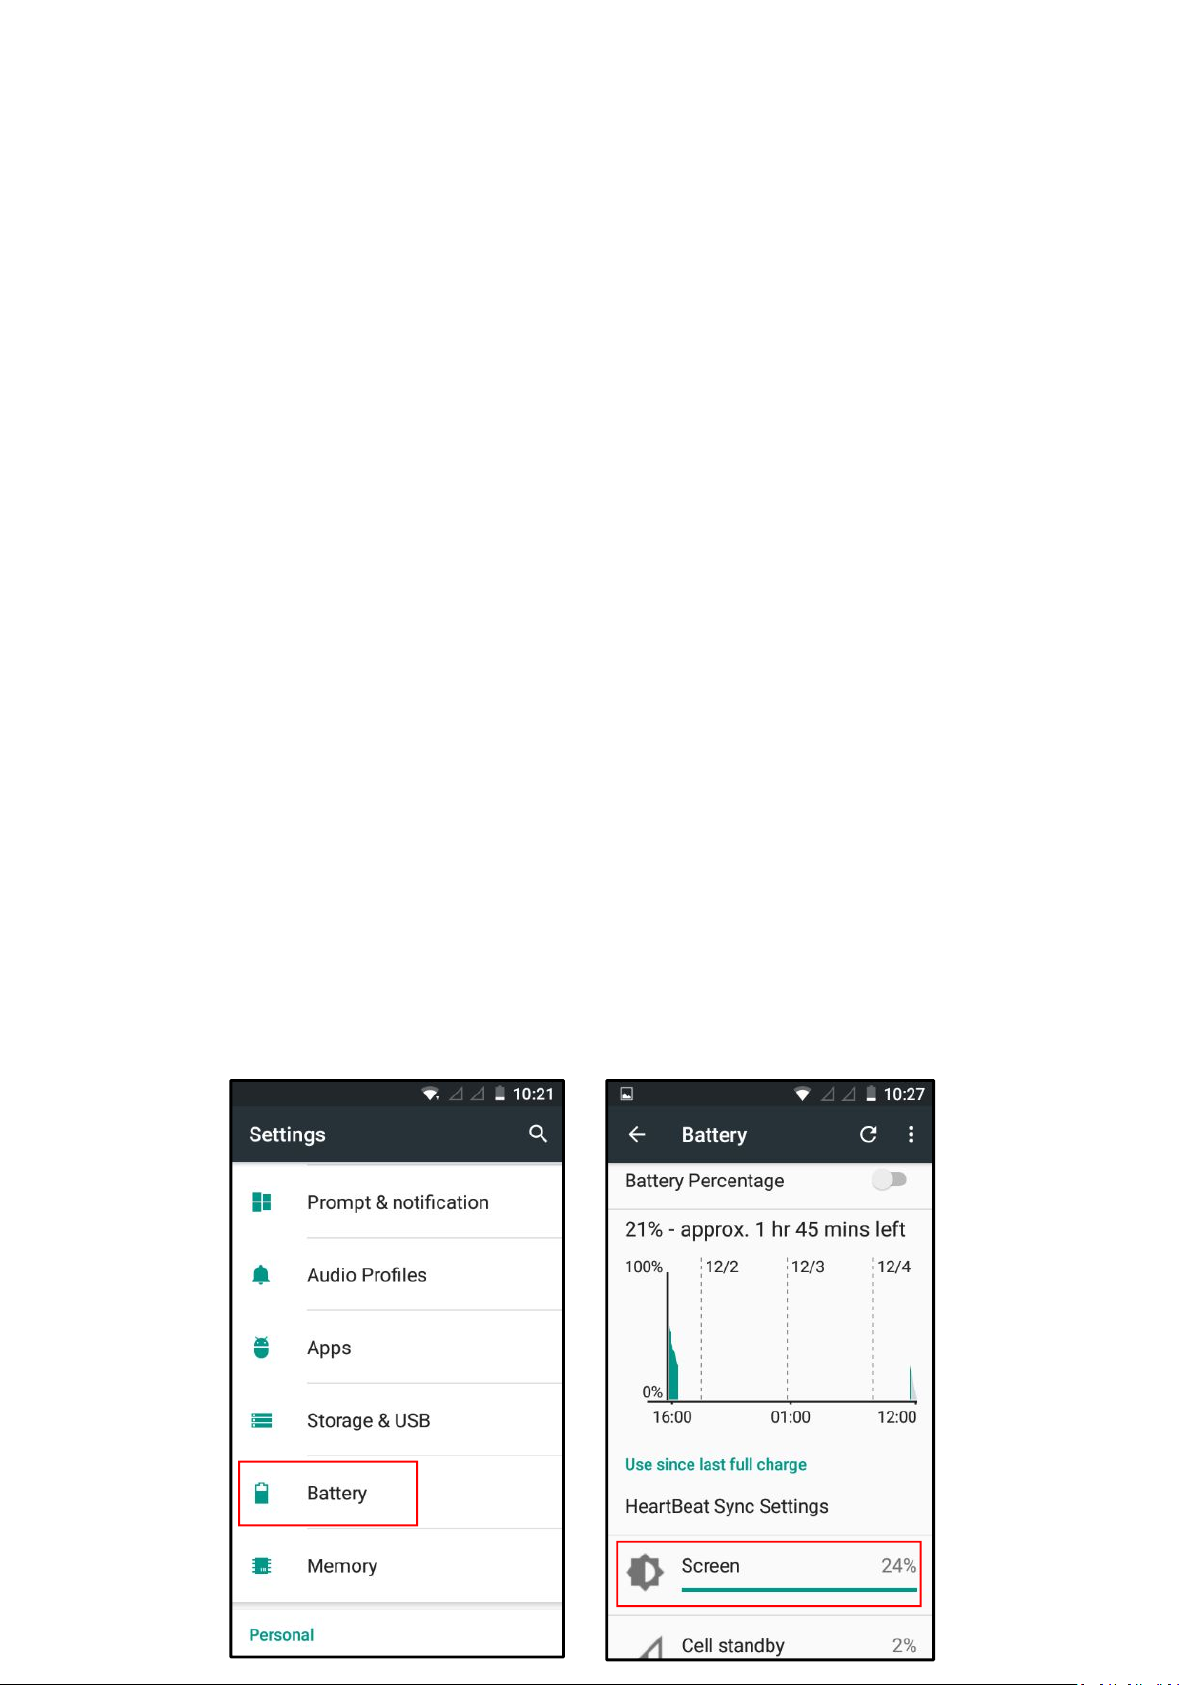
From your home screen or menu select/press “Settings” (Cog Wheel icon).
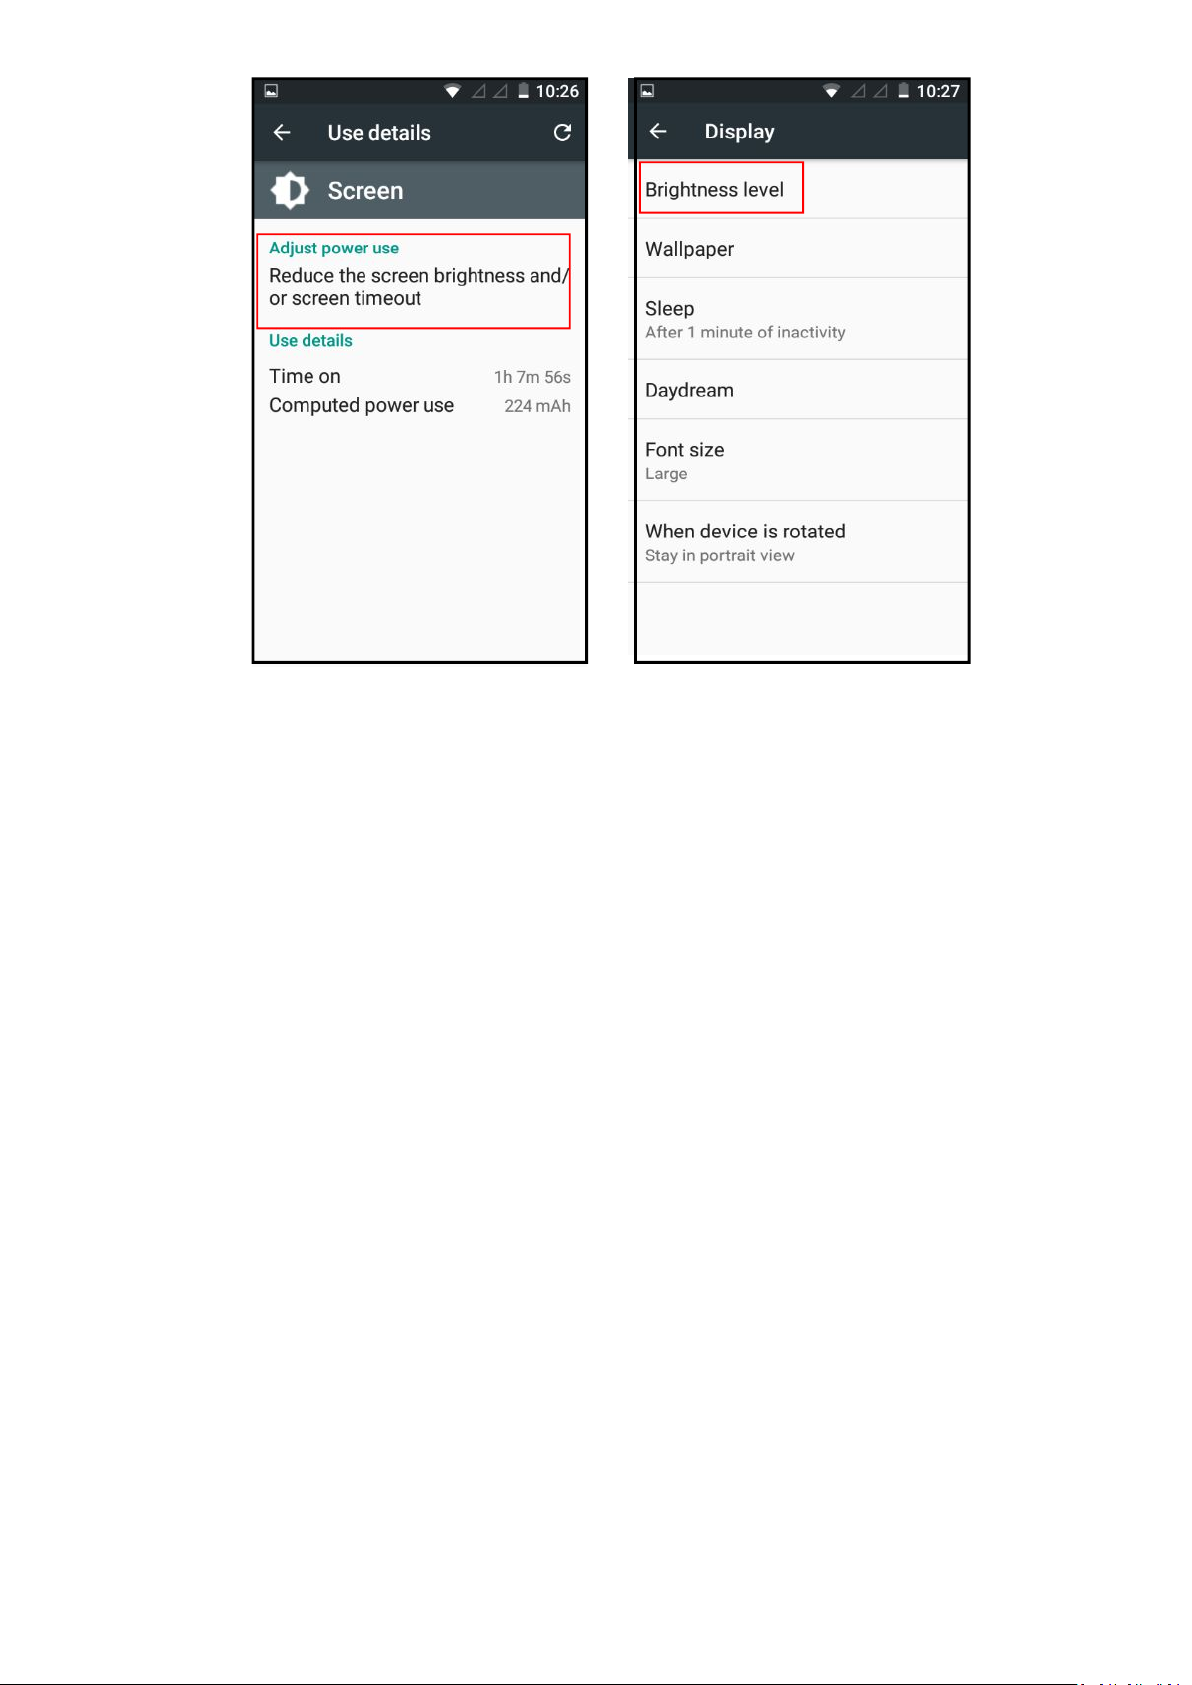
Select/press “Battery” – here you will see what apps or operations are using the
most power.
If you click on each one of these operations e.g. “Screen” it will give you friendly
hints on how to “adjust power use”
Not all apps or operations will be able to be adjusted to reduce battery consumption,
as they may be important to keep the device running.
For example, if you select/press on “Screen” it will say “Adjust power use”, if you
select/press on “Reduce the screen brightness and/or screen timeout” it will take
you to the display menu where you can perform functions like reducing brightness
level, which will save battery consumption.
You should also regularly shut down your open applications, this can be done by STK
Care (see below) or Simply by holding down the round “o” button at the bottom of
your screen for 2 seconds, or until they appear. This will display all your open
applications. You can now press the “x” at the top right of each of these applications
or Simply swipe left or right and they will disappear, whilst bringing forward the
behind application to select or close/shut down.
Page 9
5. STK Care
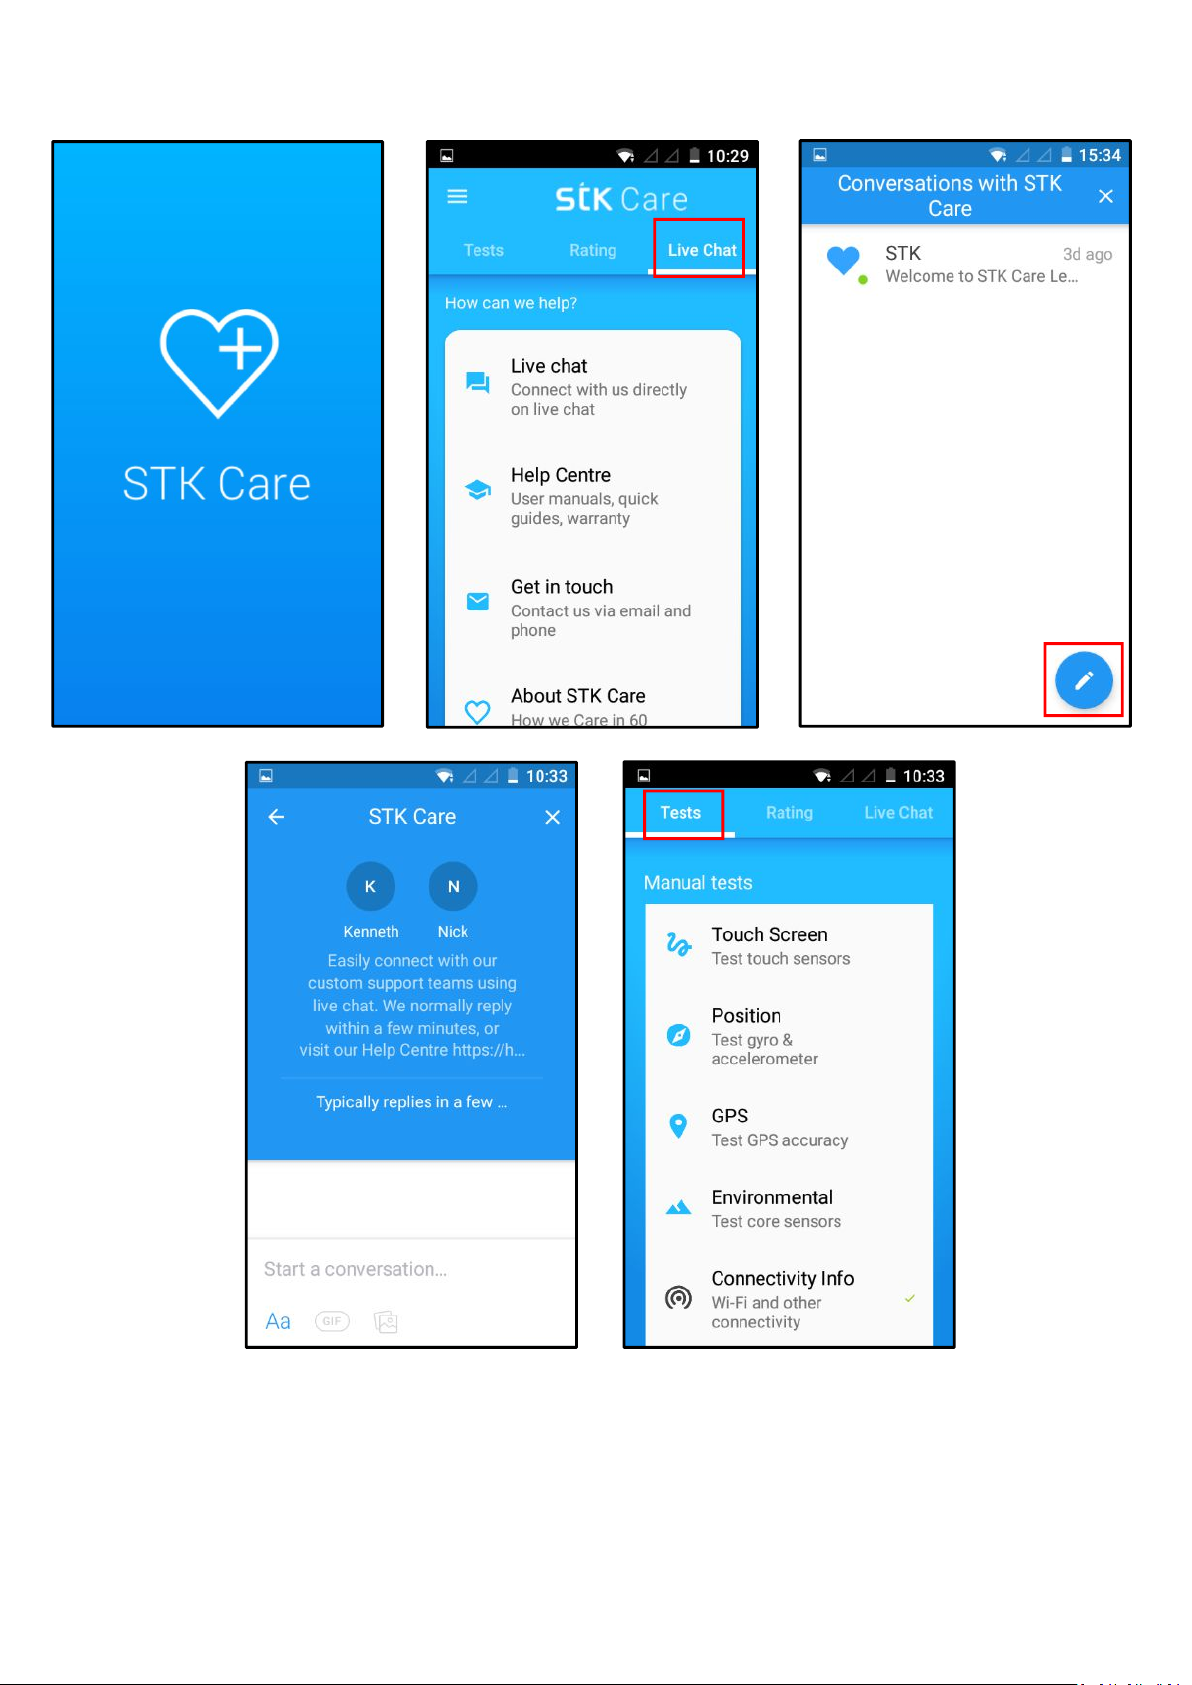
This will help you manage application use and helps to validate your, 3year, warranty - amongst other operations. It will also help get in touch
with STK - 24 hours a day, 7 days a week, to help resolve issues (you will
need a data connection or Wi-Fi connection for this & make sure your
battery has over 50% charge left).
From your home screen or menu select/press “Settings” (Cog Wheel icon).
Select/press “STK Care” application – there may be some screens to skip past that
tell you about STK care.
For Live Chat – Select/press “Live chat” or “Live Help” and follow the steps to get in
contact with STK. This should take you to a screen to have a conversation with STK. If
you select/press the bottom right pencil you should be able to enter a chat with our
customer service team. At busy periods, it does take some time for a response, but
we will come back to you.
This application will also run tests and notify you of any applications using too much
memory and power. It will help you keep everything running brand new, every day.
Page 10
Page 11
6. Update your phone
From time to time we release new versions of software, to improve the
device, usually you get notified when there is a new version to download
and install (only do this over Wi-Fi and if your battery is charged over 50%).
To check if you have the latest version:
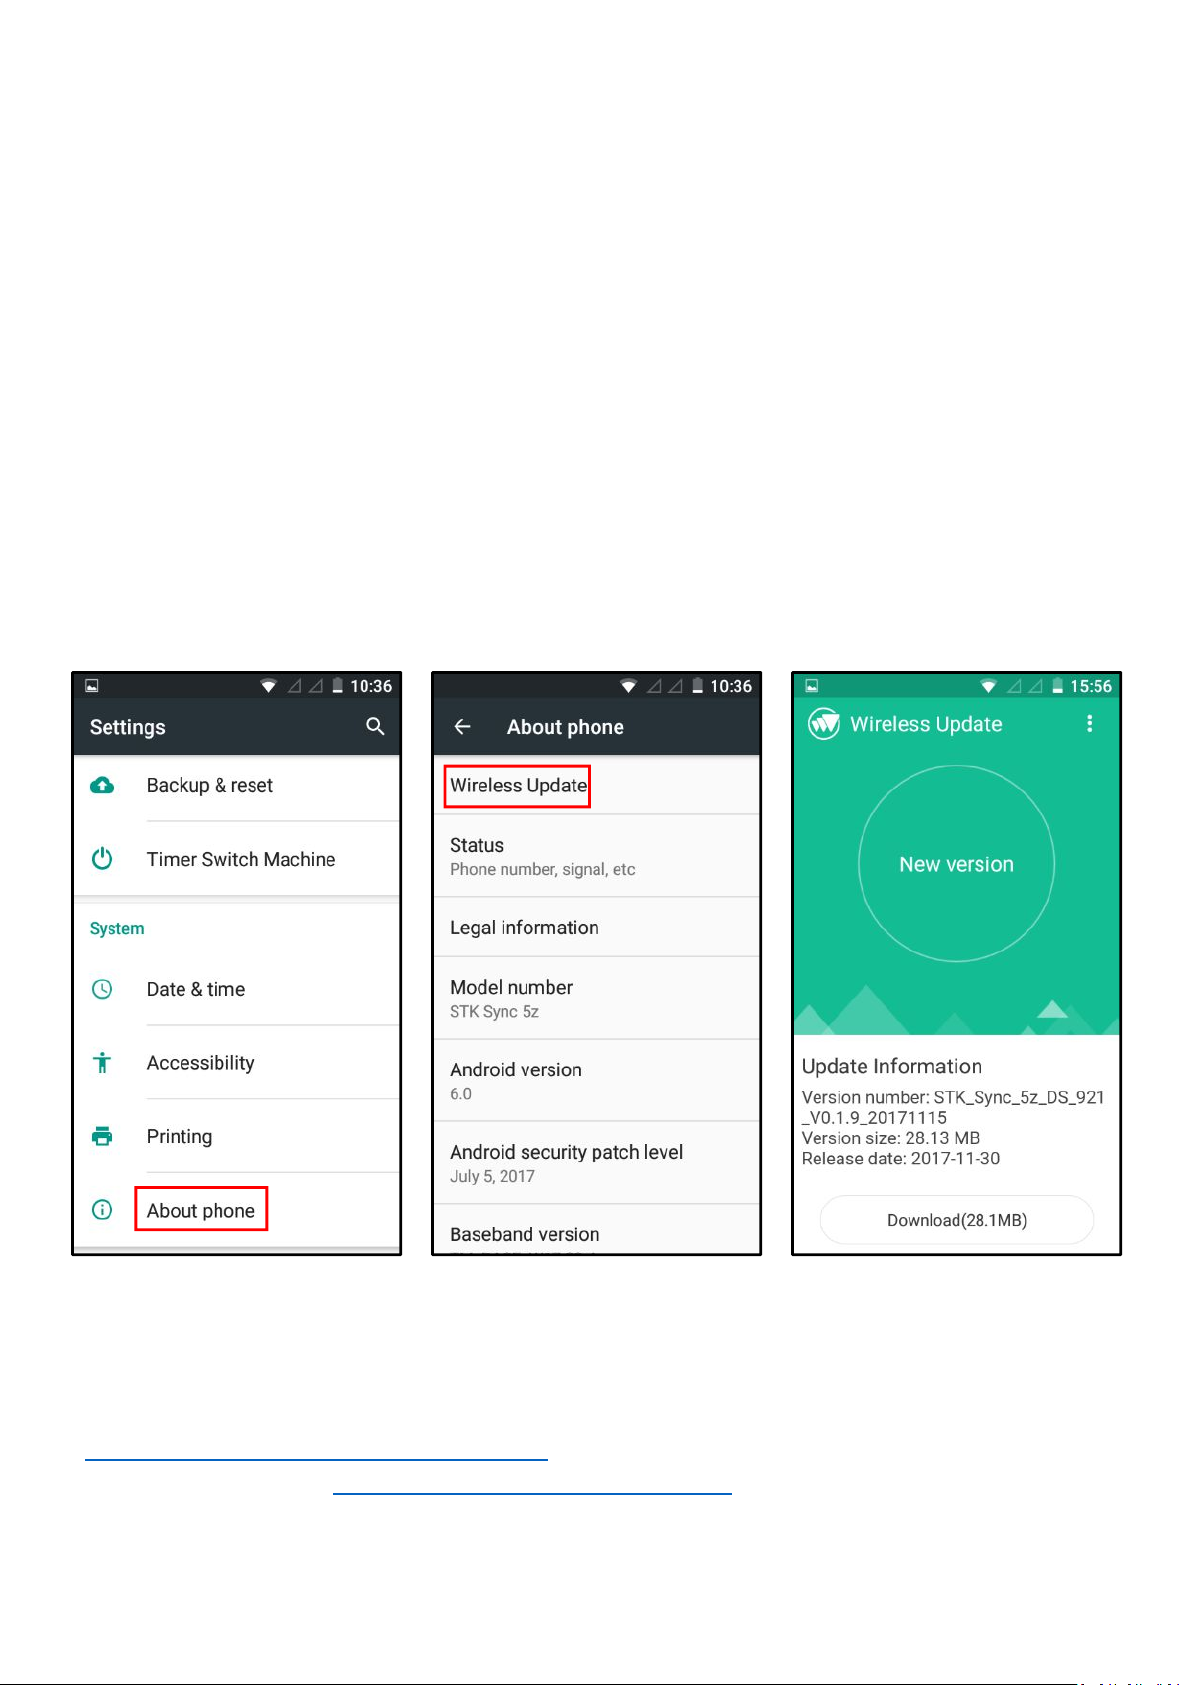
From your home screen or menu select/press “Settings” (Cog Wheel icon).
Scroll down and select/press “About phone”
Select/press “Wireless update” – this will now check if your device software is up to
date. If it is, it will inform you. If not, it will ask you to download, and then once
finished, install your update, which can take up to 5 – 10 minutes (only do this
over Wi-Fi and if your battery is charged over 50%)
Need more support?
Go to STK live chat, there is always someone there to help rescue you, or please visit
https://www.stklife.com/sync5z-support. If you have an issue with the device, please
raise a ticket through https://stklife.supportsystem.com/ or contact your retailer.
 Loading...