

Page 1

v1.0 11/06/2019
User
Manual
Strivr Training System
for use with Pico G2
Page 2

Strivr is a registered trademark of Strivr Labs, Inc. Copyright ©2019 Strivr Labs, Inc.
All rights reserved.
Page 3

Contents
System Setup ..........................................................................................................................................................................................................1
Product Care & Maintenance ........................................................................................................................................................................6
Facilitating Training ............................................................................................................................................................................................9
FAQ & Troubleshooting .................................................................................................................................................................................. 12
Contact Us ............................................................................................................................................................................................................14
Health & Safety Warnings .............................................................................................................................................................................15
Page 4

Page 5
User Manual
System Setup
System Setup
1. Designate a table or shelf near a power outlet to set up the VR training system on. You will need about a
32”x24” surface for five headsets.
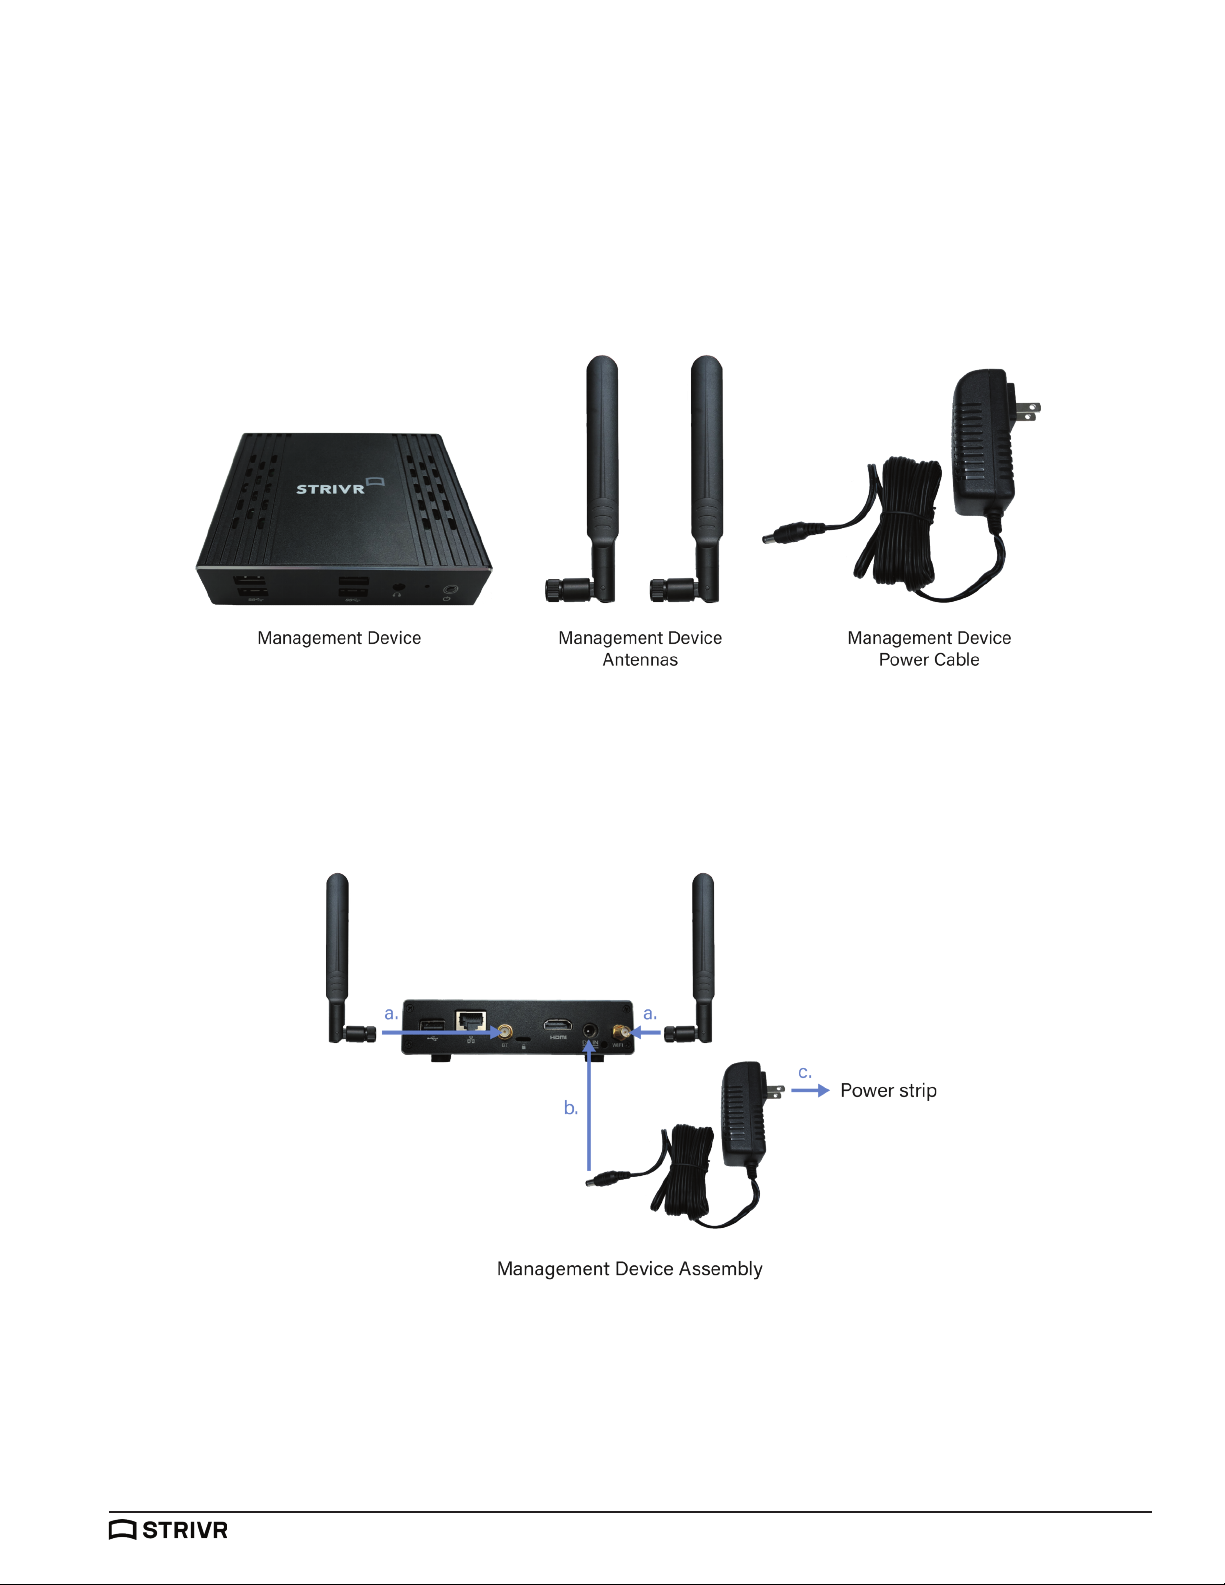
2. Locate the box containing the Management Device. Unbox the Management Device and the accessories
with it:
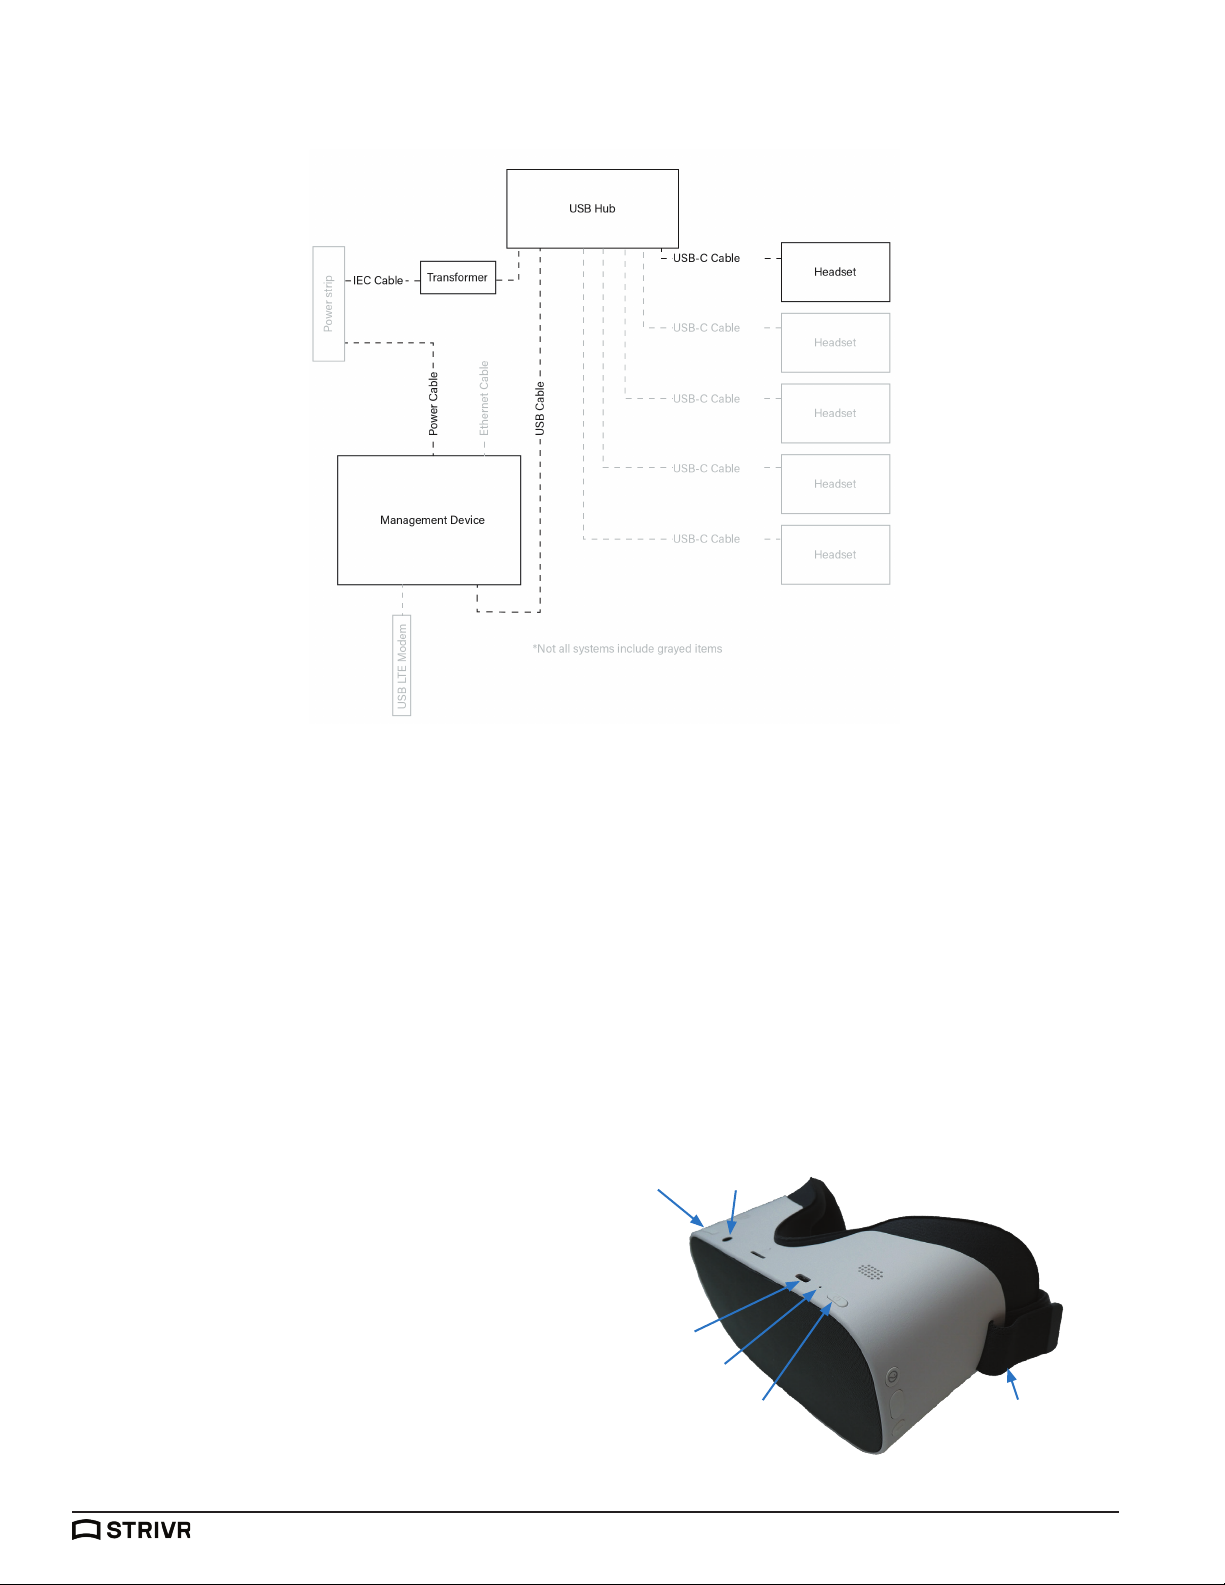
3. Assemble the Management Device using the diagram below:
a. Screw the Management Device Antennas onto the Management Device.
b. Plug the Power cable into the Management Device.
c. Plug the other end of the Power cable into a power strip.
support.strivr.com
1
Page 6
User Manual System Setup
4. Check that a green light is illuminated on the front of the Management Device indicating it is powered
on.
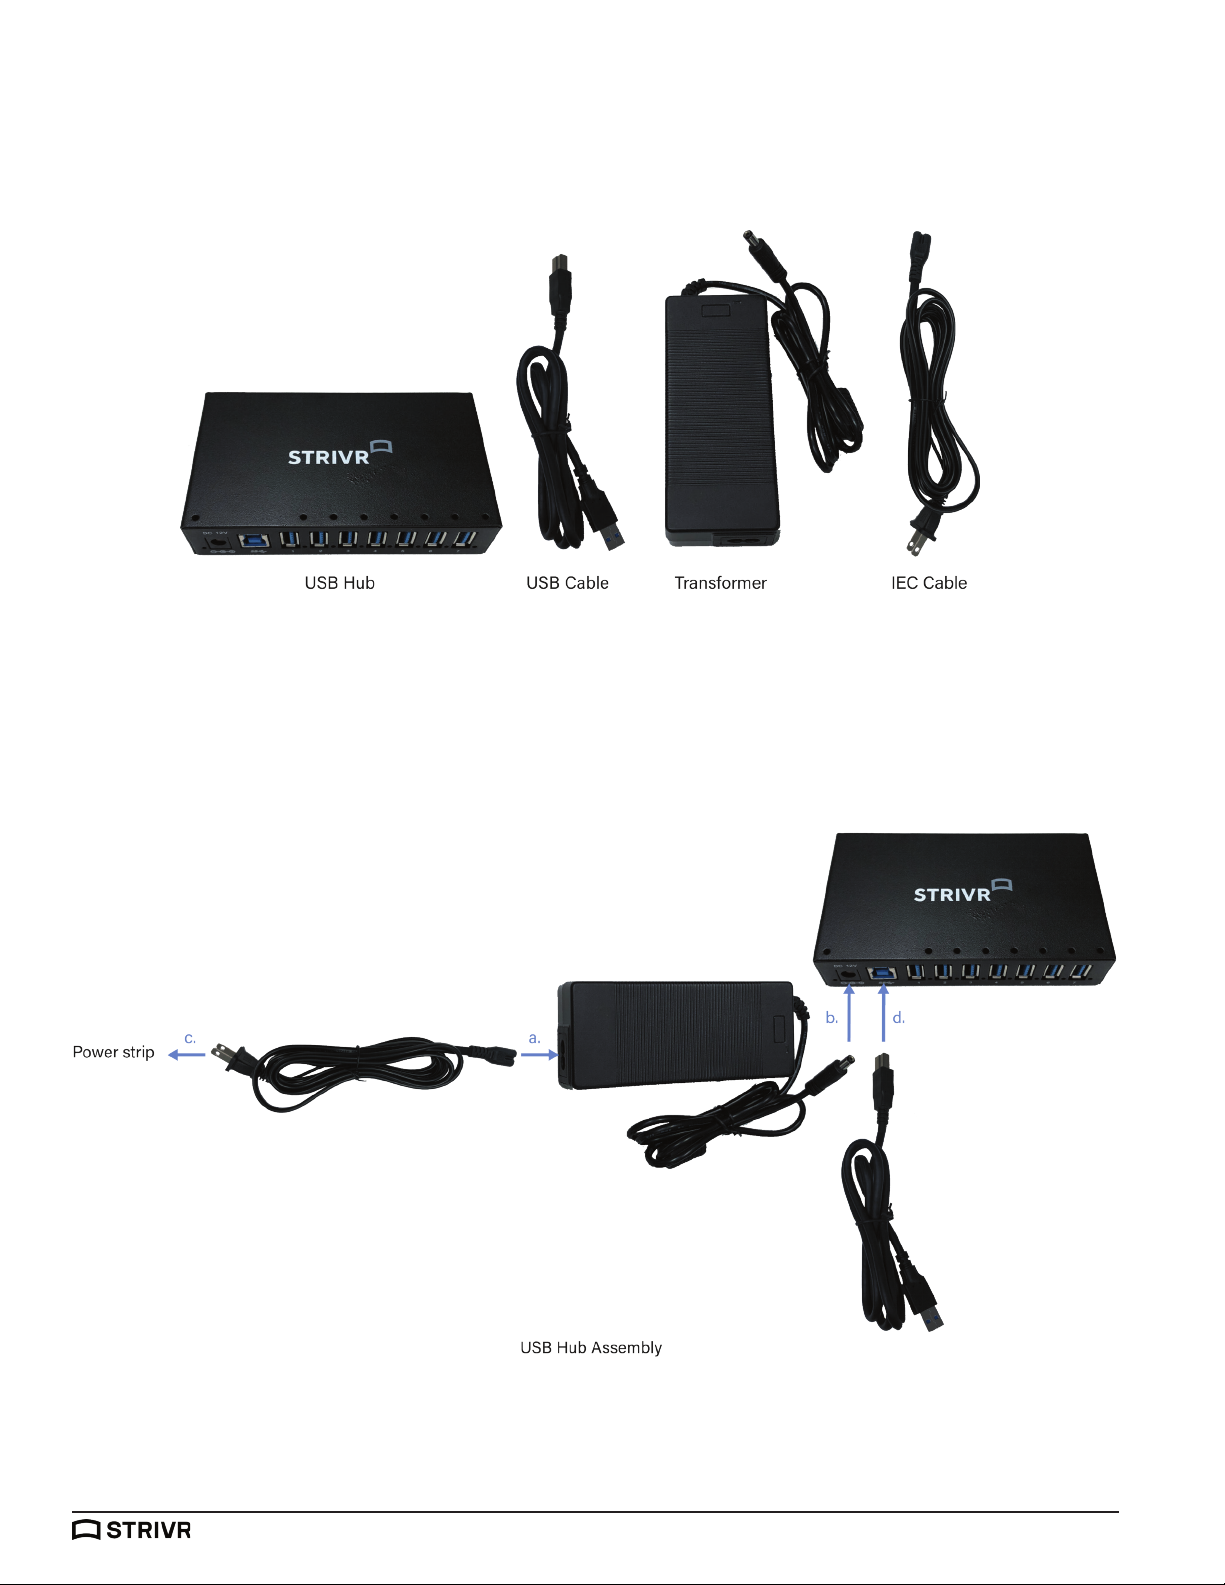
5. Locate the box containing the USB hub. Unbox the USB hub and the accessories with it:
6. Assemble the USB hub using the diagram below:
a. Plug the IEC cable into the Transformer.
b. Plug the Transformer into the USB hub.
c. Plug the other end of the IEC cable into a power strip.
d. Plug the USB cable into the USB hub.
support.strivr.com
2
Page 7

User Manual
System Setup
7. Plug the other end of the USB cable into the back of the Management Device (the side with the
antennas):
8. Locate the white USB-C cable(s). There will be one per headset. Plug each USB-C cable into the USB
hub (up to 5 per USB hub):
9. Locate the Pico G2 boxes. Inside each is a headset tethered to a controller.
10. Peel the protective plastic film o the lenses of each headset.
support.strivr.com
3
Page 8
User Manual System Setup
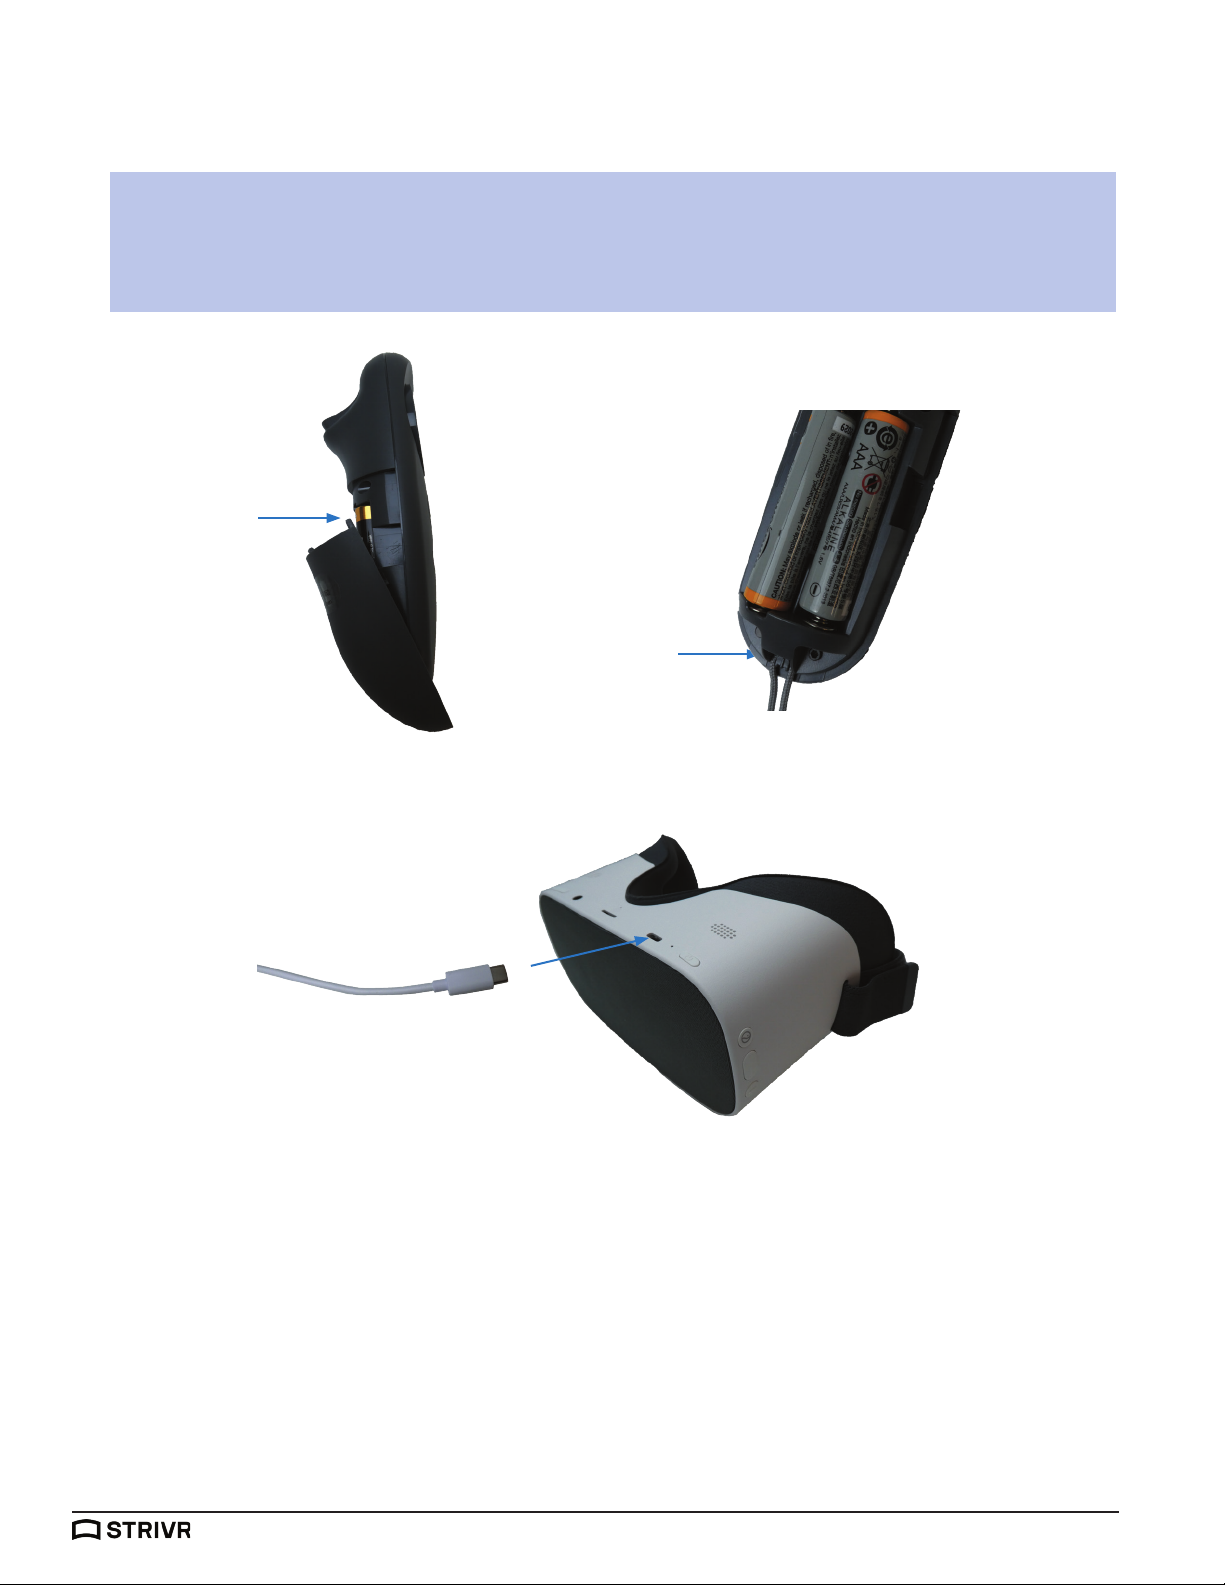
11. For each controller, pull down on the lower half of it to reveal the battery compartment. If batteries are
not already inserted, insert two AAA batteries.
NOTE: Be careful not to detach the tether. If you do, open the battery compartment cover and
loop it back around the small plastic peg. When you close the battery compartment cover, be
sure the tether cord is lined up with the hole at the bottom of the cover, allowing the cover to
close properly. See image below.
Battery
compartment
Tether
peg
12. Plug a USB-C cable into each headset to charge:
USB-C cable
13. Turn each headset on: press and hold the power button on the top of each headset for about 5 seconds,
or until the blue indicator light next to the Power button illuminates. Check to see that it is powered on
by holding the headset up to your eyes and the screen inside will illuminate.
support.strivr.com
4
Page 9
User Manual
System Setup
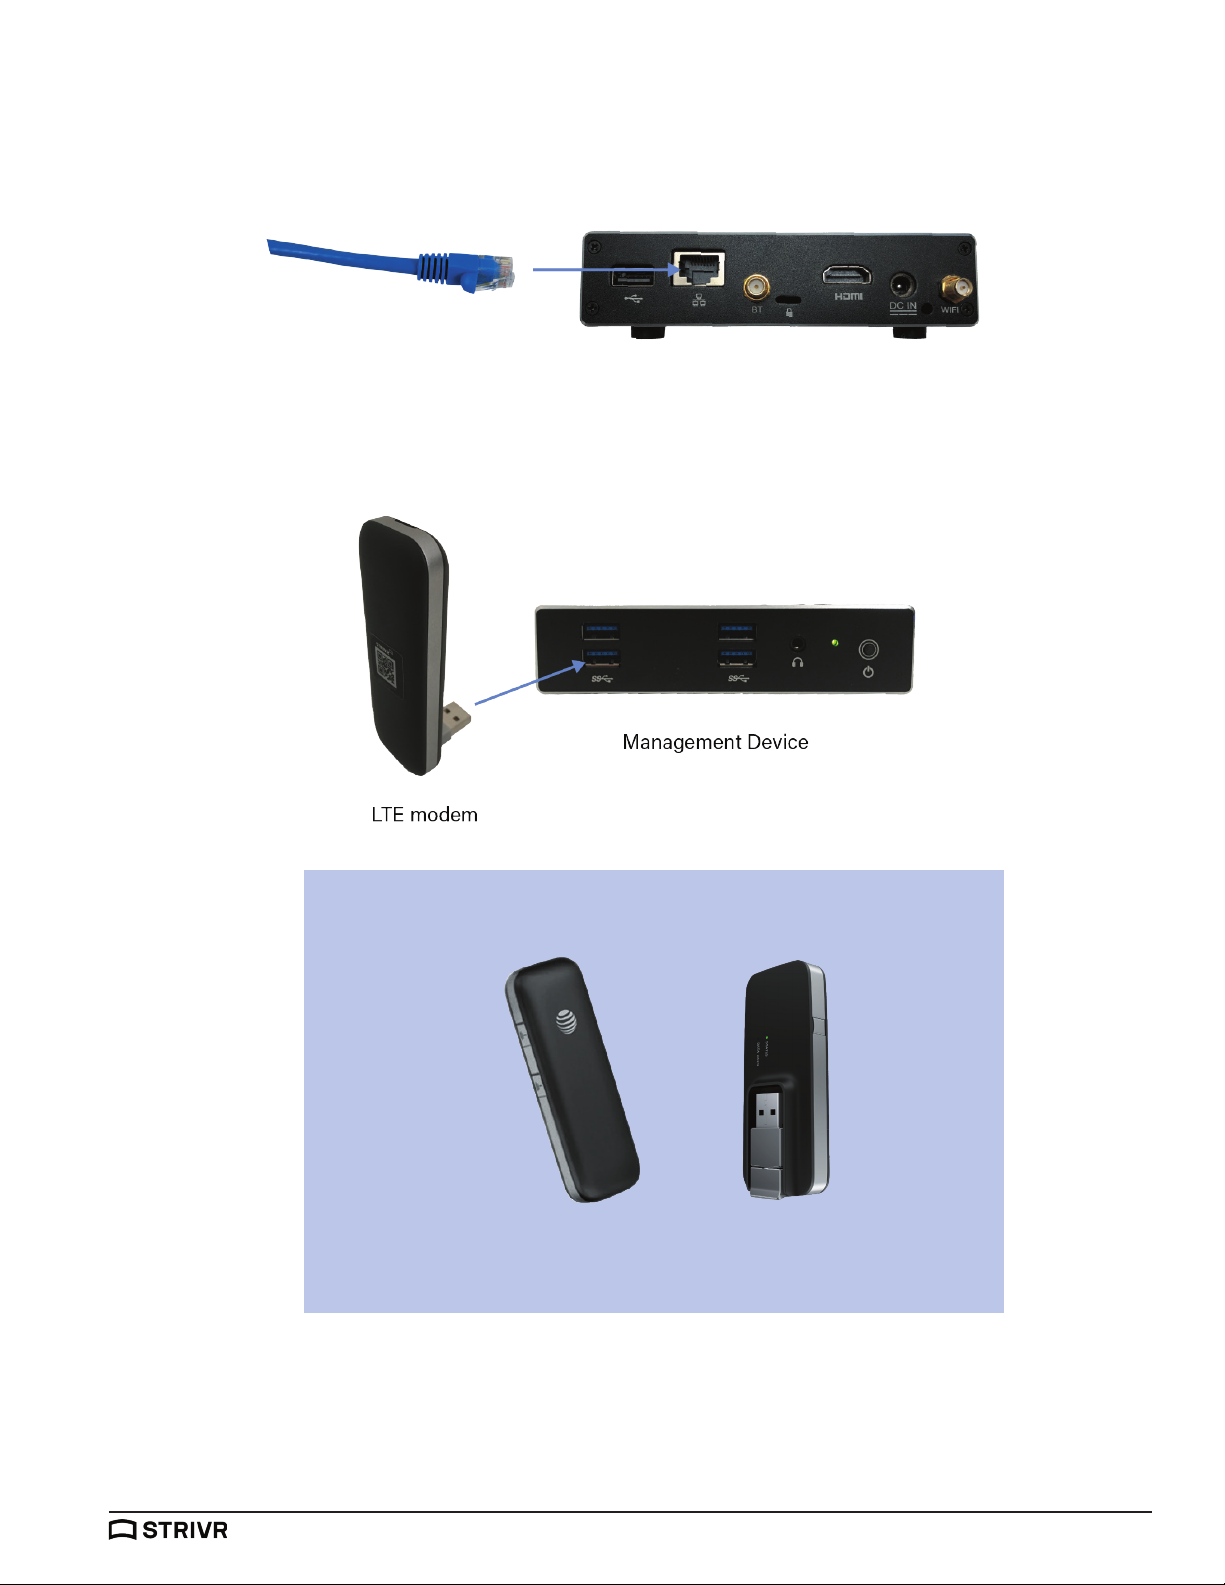
14. Connect the Management Device to Internet via one of the following methods:
a. Hard-wired via ethernet cable (instruction provided by your company if applicable)
Ethernet cable Management Device
b. LTE Modem plugged into USB port on the front of the Management Device (will be included in box if
applicable to you)
NOTE: You may have an AT&T or Verizon LTE modem.
AT&T LTE
modem
Verizon LTE
modem
c. If neither of the above apply you may have received separate instructions from your company.
support.strivr.com
5
Page 10
User Manual System Setup
15. If needed, check your final setup against the full schematic below:
Storage Space
To ensure proper cooling:
• Never stack any of the electronic components on top of each other.
• Do not store in or on insulated/fabric areas.
• Do not store in direct sunlight.
If your system came with plastic bins for storage and transportation of the headsets, place each headsetcontroller pair inside a section of the bin. Leave the Management Device and USB hub outside of the bins in
a permanent location.
Product Care & Maintenance
Pico G2 Headset - Underside
Powering on the Headset
To turn the headset on, press and hold down
the power button located on the top of the
headset for about 5 seconds or until the
indicator light next to the power button turns
blue. To check to see that it is powered on,
hold the headset up to your eyes and the
screen inside will illuminate. If the power
button is accidentally pressed during training,
the display will go to sleep. Short press it
again to turn the display back on and resume
training.
Volume
control
Charging port
Indicator
light
Headphone
jack
Power
Side strap
support.strivr.com
6
Page 11

Product Care & MaintenanceUser Manual
Charging the Headset
Plug the headset into the USB-C cable to charge whenever it is not in use for training. Ensure that the
headset is powered on before plugging it in so that the device can receive updates. From a full charge, the
headset will last approximately two hours. You may check the precise battery level percentage in the menu
of the headset. When the light on the top of the headset turns red, there is less than 15% battery life left. See
the table below for more details on the LED indicator.
LED Indicators
Depending on the color and whether they’re solid or blinking, the lights on the Pico G2 headset will indicate
the following:
HEADSET LIGHT INDICATOR MEANINGS
COLOR STATE MEANING
Red Solid Low Battery (Less than 20%)
Red Blinking Display is On and Low Battery
Blue Solid Display is On
PLUGGED IN:
Green Solid Battery is Charging (Above 90%)
Yellow Solid Battery is Charging (Below 90%)
Adjusting the Volume
Use the volume button located on the top of the headset to adjust the sound level.
Built-in Speakers vs. Headphones
The headset has built-in speakers. These speakers are good for self-guided training or training in small
groups. However, in larger open settings with many people or a lot of external noise, we recommended using
over-ear headphones (as opposed to on-ear or earbuds) for comfort, noise cancellation, and sanitation
purposes. Plug the headphones into the headphone jack on the side of the headset next to the charging
port.
support.strivr.com
7
Page 12
User Manual Product Care & Maintenance
Changing the Controller Batteries
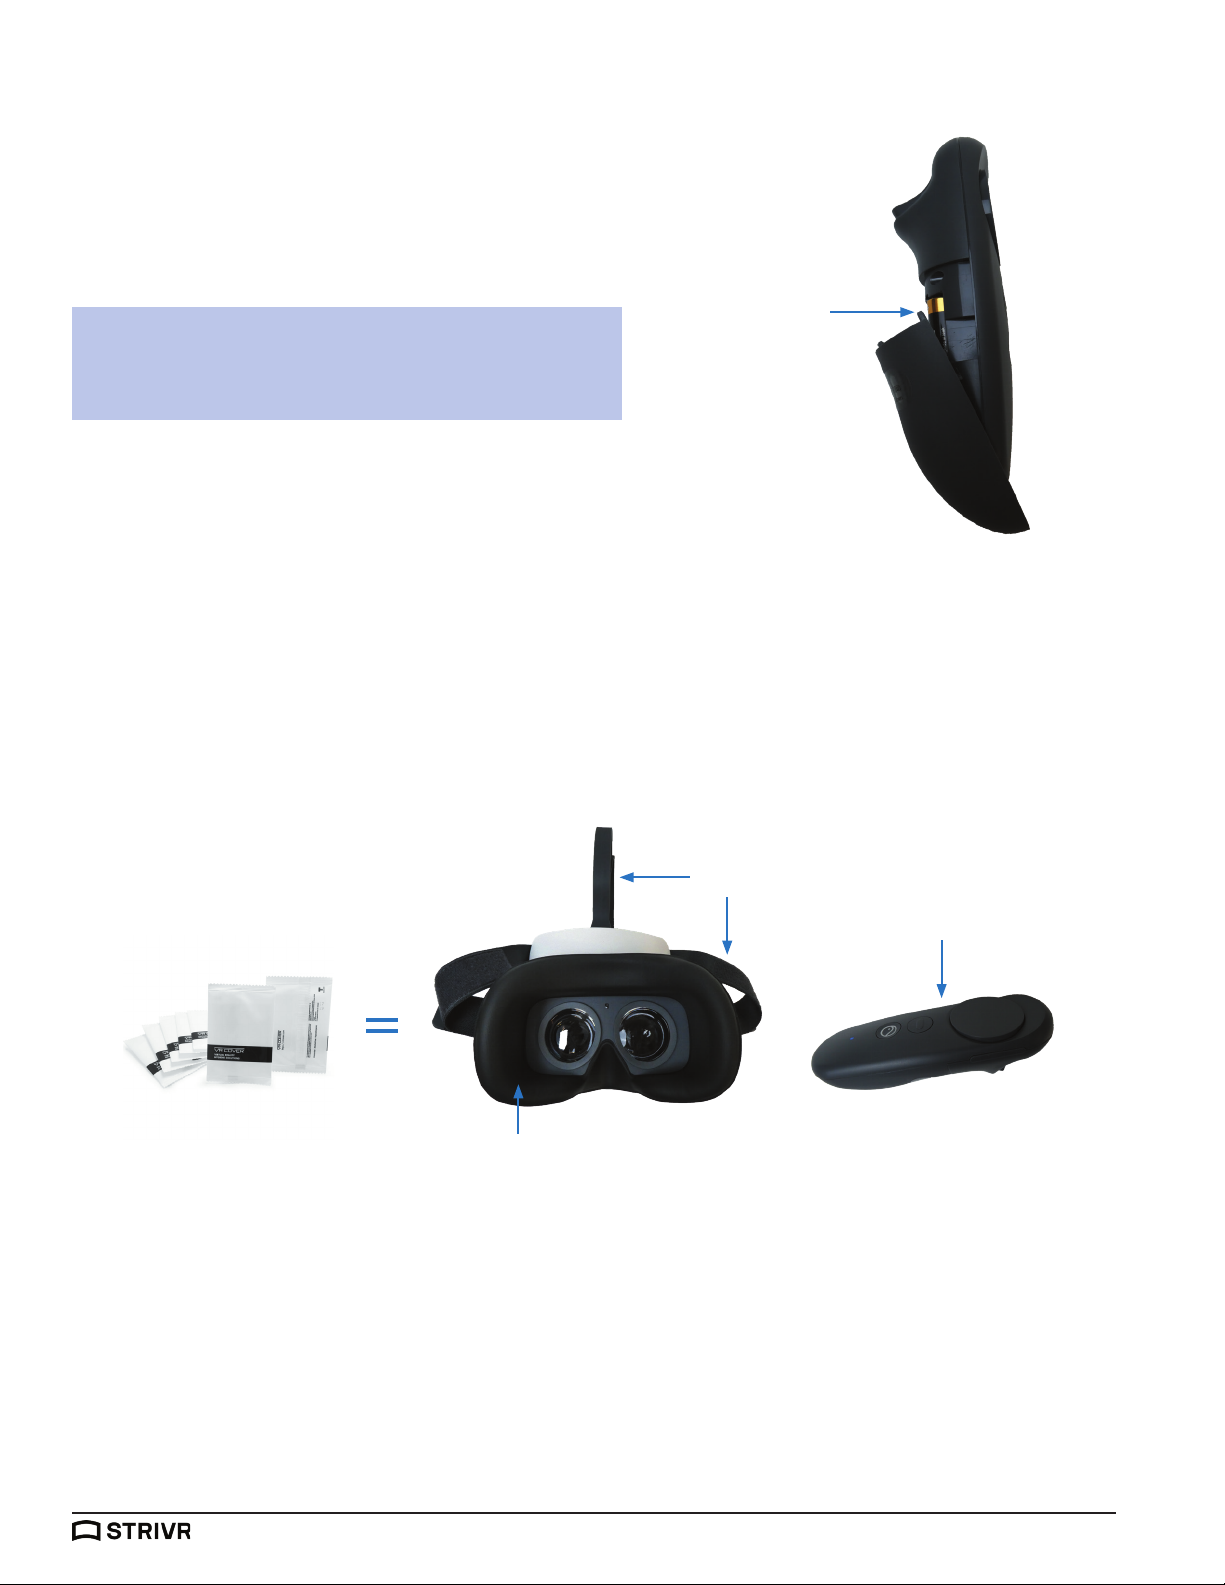
The controller takes two AAA batteries. To change the
batteries, pull down on the lower half of the controller
to remove the end cap and replace the batteries. You
may check the precise battery level percentage during
training by holding the controller in front of the headset.
Battery
NOTE: Be careful not to detach the tether. If you do,
reassemble it by opening the battery compartment
and looping it back around the small plastic peg.
compartment
Cleaning and Sanitation
Use the wet anti-bacterial wipes to clean the straps, headset facial interface foam, and the controller after
each session. A starter pack of wipes is included with your system. To order more wipes please visit: vrcover.
com/product/antibacterial-hygiene-wipes/. If you want to use alternative wipes, make sure they are antibacterial, hypoallergenic, non-abrasive, and alcohol-free.
Straps
Controller
Wet Anti-bacterial wipe Facial Interface
support.strivr.com
8
Page 13
Facilitating TrainingUser Manual
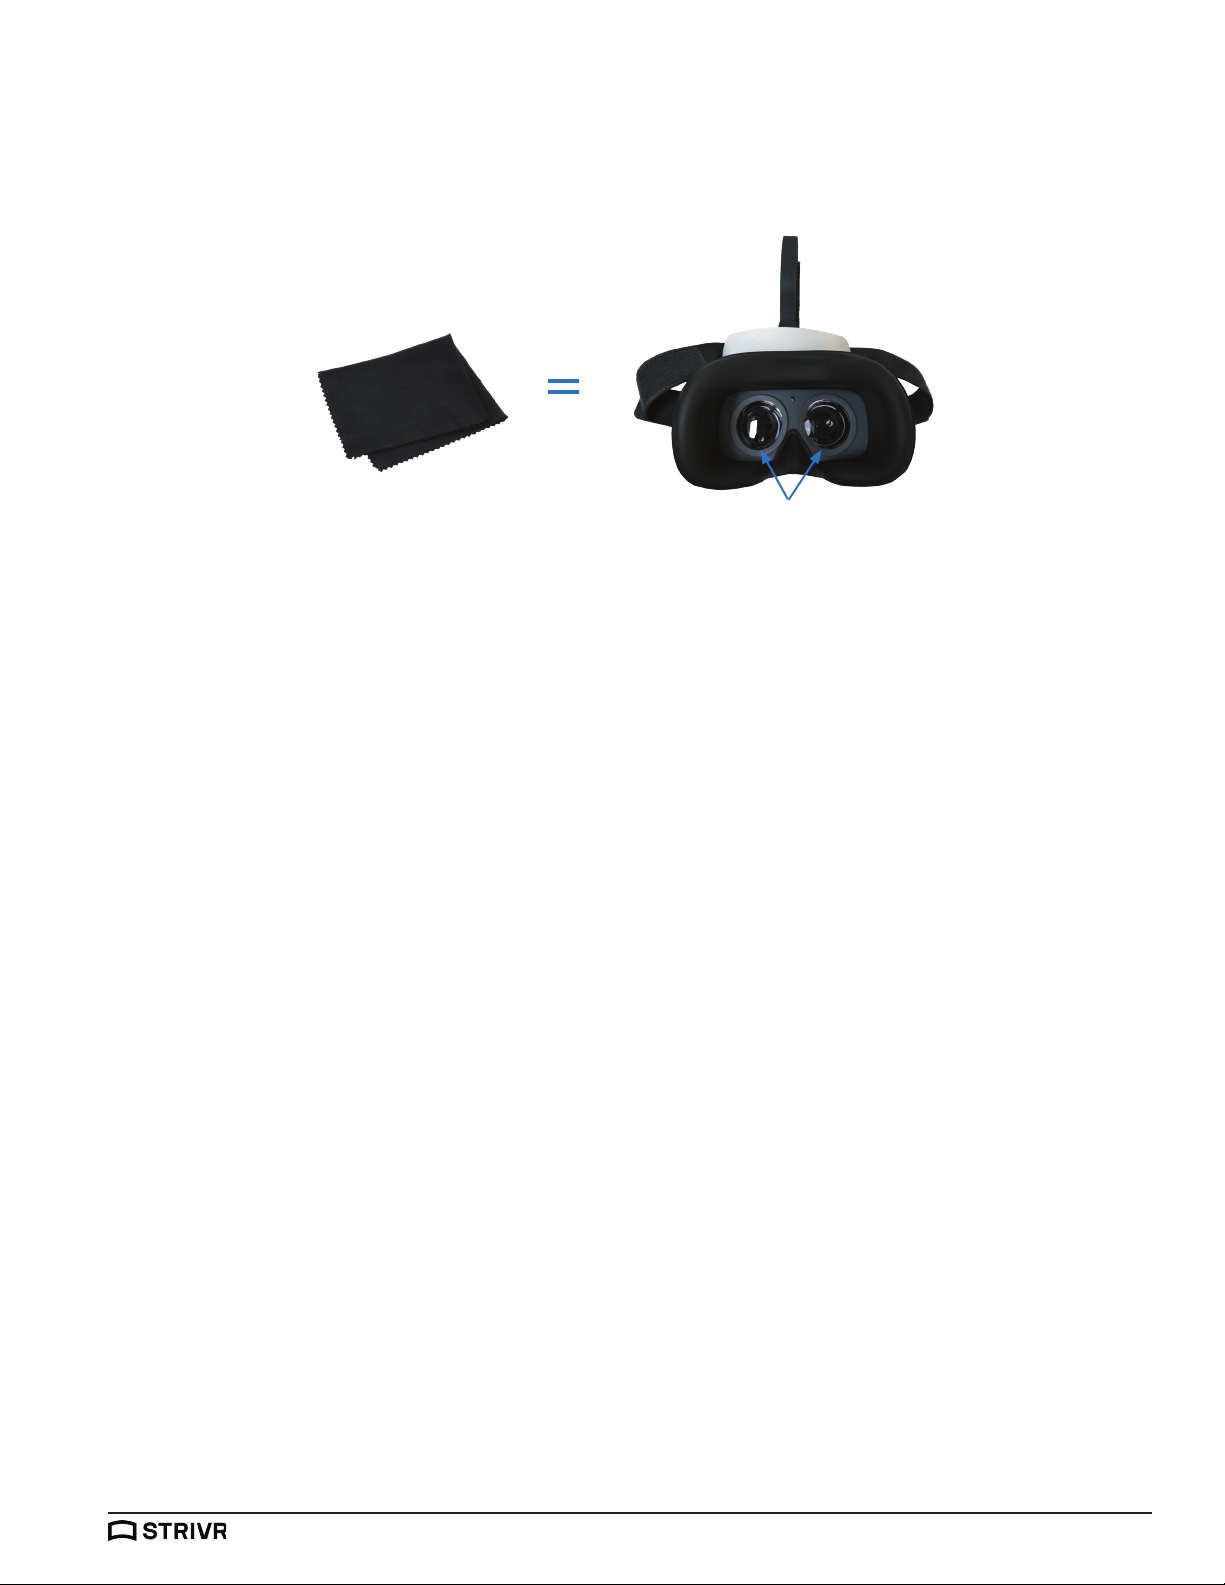
Use the dry lens micro-fiber cloth included with your system to clean the headset lenses as needed. Don’t
use liquid or chemical cleansers. Starting from the center of the lens, gently wipe the lens in a circular
motion moving outwards.
Dry Microfiber Cloth Lenses
Handling the Headset
• To avoid damaging the lenses and display, keep your headset away from direct sunlight.
• Avoid sharp objects near the lenses.
• Be gentle when adjusting your headset and tightening the straps.
• Do not leave the headset in extremely hot locations or near heat sources.
Facilitating Training
Retrieving the Headset
When a trainee is to begin training,
1. Carefully unplug the headset from its USB-C cable.
2. Give the trainee the headset, controller and a wet anti-bacterial wipe.
3. Direct the trainee to have their Login ID at hand, as they will need it to log into the training session.
Choosing a Training Space
• If possible, train in a quiet area with minimal noise and distraction.
• Ensure that foot traic is low in the area chosen.
• If the experience will be taken seated, have a swivel chair available for the trainee to sit and turn in.
Taking the experience seated is recommended when a facilitator is not present or feels discomfort.
• If the experience will be taken standing, you may want to have a chair or table nearby for the trainee to
rest a hand on to ground themselves in the physical space.
• Facilitators may check on trainees during training sessions to ensure safe training.
support.strivr.com
9
Page 14
User Manual Facilitating Training
Putting on and Adjusting the Headset
• Make sure the trainee is aware of their surroundings before putting on the headset.
• The headset has two side velcro straps and one top rubber strap. Trainees should put the headset on like
a pair of goggles and adjust the side straps until the headset is comfortable and does not feel like it is
falling down. The inner portion of the top strap can be removed if the headset feels too tight.
• Glasses: If the trainee wears glasses, they should wear their glasses inside of the headset. Trainees
should put the headset over their glasses first, before pulling the straps back over their head. In the rare
case that the glasses frames are too large to fit inside of the headset, they may remove their glasses.
• Larger hairstyles, headwraps, or other headwear: The headset’s straps can accommodate almost any
hairstyle or headwrap. First, trainees should adjust the side straps to their loosest setting. Then, put the
headset display up over their eyes first. The trainee can remove the inner portion of the rubber top strap
if necessary. The trainee may then tighten the side straps such that the headset’s display remains secure
over their eyes.
• Headphones: If using external headphones, instruct trainees to put them around their neck first, then,
after putting on and adjusting the headset, lift the headphones over their ears.
Using the Controller
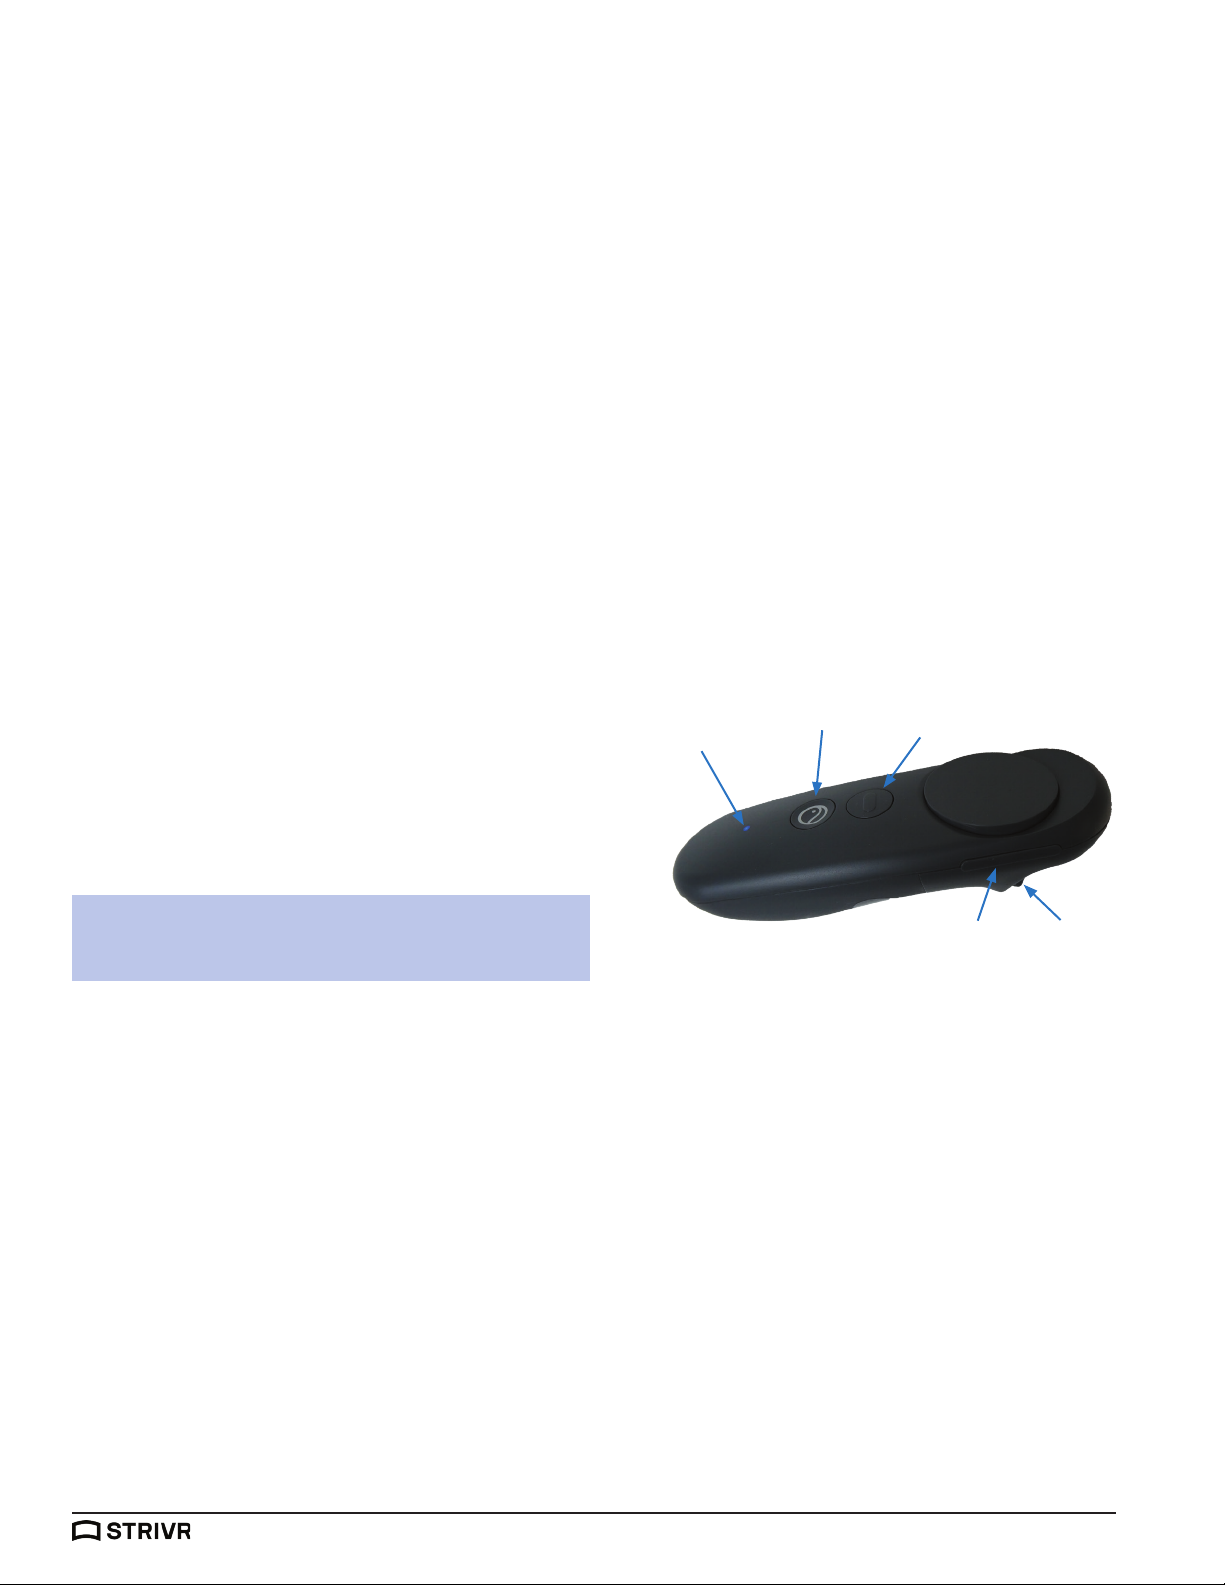
• To select menu items and interactive elements,
pull the trigger button.
• To re-calibrate (re-center) the controller, press
Indicator light
Back buttonHome button
and hold the Home button for two seconds.
• To pause or exit to the menu, use the back button.
• To raise or lower the volume, use the Volume
control.
NOTE: Back button may not be available in all
experiences.
Volume control Trigger
Controller Calibration
If the controller is not functioning properly, you can re-pair it with the headset by pressing the Home button.
The indicator light will begin blinking. When the light turns o, the controller is paired.
If the position of the in-headset view is not properly centered, hold the Home button for 2 seconds and it will
be re-centered.
support.strivr.com
10
Page 15
Facilitating TrainingUser Manual
Logging Out
• Trainees should select “Log o” inside the headset before ending their training session and taking o the
headset. A complete training session includes three steps: Successful login, Successful completion of
training, and successful logout.
• Auto-Log Out: The headset will automatically log out of the current session and start a new one when it
is plugged into the USB-C cable.
Returning the Headset
When a trainee finishes training,
• Clean the headset using the approved wet anti-bacterial wipe. Clean the headset straps, headset facial
interface foam, and the controller.
• Plug the headset back into the USB-C cable.
• Perform a visual check to ensure the headset is powered on and connected.
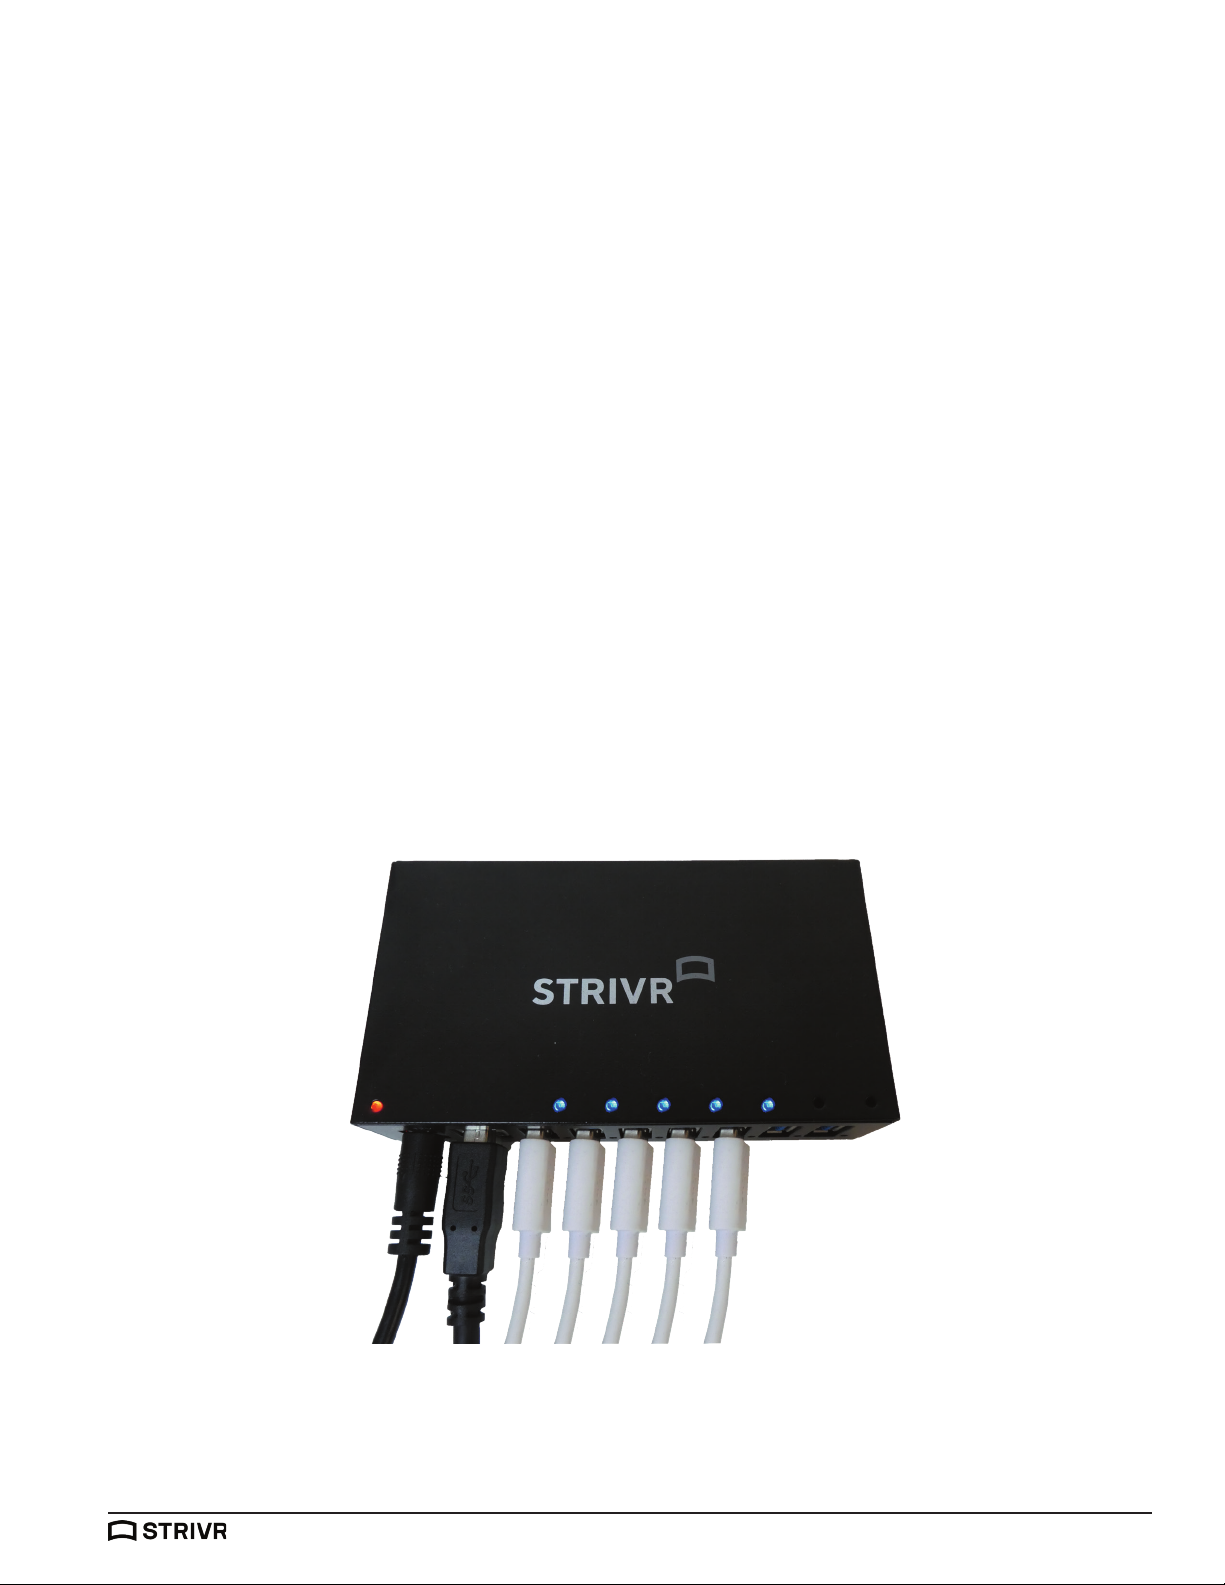
° After plugging the headset into the hub, the headset should display a green or yellow charging light
(or red if the headset is under 20% battery.)
° Follow the charging cable back to the USB hub and verify the hub port displays a blue light.
° There should be a one-to-one ratio of connected headsets and blue lights on the hub.
° If a connected port does not display a blue light, the headset is not fully connected and is probably
turned o. If a headset is not fully connected, it can’t transmit data or receive new content, and
trainees will not get credit for completed training. Disconnect the headset, hold the headset power
button down until the blue power light comes on, and then reconnect it.
support.strivr.com
11
Page 16

User Manual FAQs & Troubleshooting
FAQ & Troubleshooting
My controller is not showing up or is in the wrong place.
If you’re having trouble using the controller, try one of the following:
• Press and hold down the Home button for 2 seconds to re-calibrate (re-center) the controller.
• Pull down on the lower half of the controller to access the battery compartment and make sure the
batteries are clicked down all the way.
• You may need to re-pair the controller. Make sure the headset is nearby to pair. Press the Home
button. When the blinking light on the controller turns o, the controller is paired and you may
resume training.
• If the solutions above do not work, try replacing the controller batteries.
I can’t find the training program inside the headset.
Try plugging the headset into the USB-C cable for about 15 seconds, then unplug it and resume training.
If you still cannot locate the training, please contact Strivr support.
The screen inside the headset is black. How do I turn it on?
If you see all black in the headset try one of the following solutions:
• Short press the power button on the underside of the headset (on the trainee’s left side) once to
wake the headset, then resume.
• Press and hold the power button the underside of the headset (on the trainee’s left side) for about 5
seconds, or until the blue power light comes on.
• If it is still dark. the battery may be low. Plug the headset into the USB-C cable for at least 15 minutes
to charge and then repeat the step above.
The headset is not charging when it’s plugged in.
• Plug the headset in to charge and note the LED light color. If the light is green or yellow, the headset
is currently charging. If the light shows red, the battery is very low.
• If after 15 minutes no light shows, check that the USB-C cable is securely plugged into the headset.
• If it will still not charge, please contact Strivr support.
How do I adjust the headset to fit over my glasses/hair/etc.?
Please see the “Facilitating Training” section of this manual for instructions on adjusting the headset for
dierent scenarios.
The velcro straps fell o the headset or are too loose! Did I break it?
You may re-run the side straps back through the loops, then back around the loop and press them to the
velcro fabric at the desired length.
Why does the view in the headset look blurry or foggy?
• If the view appears blurry, try slowly moving the headset up or down on your face until the picture is
clear or wiping the lenses with the dry microfiber cloth included with your system.
• In cold climates, the lenses of the headset can become foggy. If this occurs frequently, try placing the
headset on your head (but not over your eyes) for a few minutes to warm it up before training.
support.strivr.com
12
Page 17

FAQs & TroubleshootingUser Manual
Why is everything gray in the headset?
• Be sure to look all around in the 360-degree view. There may be a menu option behind you.
• Try plugging the headset into the USB-C cable for 15 seconds to restart the session, then unplug and
resume training.
Why does the in-headset view appear tilted?
If you start your session with your headset at an angle, the view may lock to that angle. Re-center the
view by pressing the Home button on the controller.
How do I change the volume?
Use the volume up/down buttons on the underside of the headset (on the trainee’s right side) to adjust
the volume level. You can also use the Volume control on the Pico controller. For best results, train in an
area with minimal external noise.
How do I change the controller battery?
Pull down on the lower half of the controller to open the battery compartment. Change the AAA batteries
and replace the cover. Note that you will need to re-pair the controller after changing the batteries.
How do I get replacement parts?
For replacement parts (facial interfaces, controllers, etc.) please call the Strivr support line.
support.strivr.com
13
Page 18

User Manual Contact Us
Contact Us
Strivr Support:
https://support.strivr.com
US & Canada: +1 855-897-0082
UK: +44 808-169-4550
[email protected]
Support Hours:
Monday-Friday
5:00am-5:00pm Pacific
support.strivr.com
14
Page 19

Health & Safety WarningUser Manual
Health & Safety Warnings
Strivr
USING VIRTUAL REALITY (“VR”) CAN POTENTIALLY HAVE UNINTENDED HARMFUL EFFECTS ON YOUR HEALTH
OR SAFETY. TO REDUCE THE RISK OF PERSONAL INJURY, DISCOMFORT, OR PROPERTY DAMAGE, PLEASE
ENSURE THAT ALL USERS READ THESE WARNINGS CAREFULLY BEFORE USE.
CONSULT WITH A PHYSICIAN BEFORE USING VR IF YOU ARE PREGNANT, ELDERLY, EPILEPTIC, OR HAVE VISION,
PSYCHIATRIC, HEART, OR OTHER SERIOUS MEDICAL CONDITIONS. THIS PRODUCT SHOULD NOT BE USED
BY CHILDREN UNDER THE AGE OF 13. DO NOT USE IF YOU ARE SICK, FATIGUED, UNDER THE INFLUENCE OF
INTOXICANTS/DRUGS, OR NOT FEELING WELL, AS IT MAY EXACERBATE YOUR CONDITION.
PHOTOSENSITIVITY & SEIZURES
Some individuals may experience epileptic seizures or blackouts when exposed to certain light patterns or flashing
lights. Exposure to certain patterns or backgrounds on a screen or when viewing video content, such as VR content,
may trigger epileptic seizures or blackouts. These conditions may trigger previously undetected epileptic symptoms
or seizures even in persons who have no history of prior seizures or epilepsy. If you, or anyone in your family has an
epileptic condition or has had seizures of any kind, consult your physician before using these Services.
NAUSEA & POTENTIAL HEALTH EFFECTS
VR may trigger motion sickness in some individuals due to the dierence in the field of vision and focus points between
the real world and the virtual world. Cease use of VR immediately if you experience disorientation or motion sickness.
IMMEDIATELY DISCONTINUE use and consult your physician before resuming use of the Services if you experience
any of the following health problems or symptoms at any time before, during, or after use:
• Dizziness
• Altered, blurred, or double vision or eye discomfort
• Eye or muscle twitches
• Loss of awareness
• Disorientation
• Panic or anxiety attack
• Excessive sweating
• Nausea
• Lightheadedness
• Seizures
• Any involuntary movement or convulsion
• Any symptoms similar to motion sickness
Symptoms of VR exposure can persist and become more apparent hours after use. Post-use symptoms can include
the symptoms above, as well as excessive drowsiness and decreased ability to multitask. These symptoms may put
you at an increased risk of injury when engaging in normal activities in the real world. Do not drive, operate machinery,
or engage in other visually or physically demanding activities that have potentially serious consequences (e.g. death,
personal injury, property damage), or other activities that require unimpaired balance and hand-eye coordination until
you have fully recovered from any symptoms.
RESUME USE OF VR ONLY ON APPROVAL OF YOUR PHYSICIAN.
RADIO WAVES & MEDICAL DEVICES
VR hardware (including headsets, controllers, and other devices) may contain magnets or components that emit
radio waves. The frequencies of these radio waves may interfere with pacemakers, hearing aids, defibrillators, or
other implanted electrical devices. If you have a pacemaker or other implanted medical device, DO NOT USE STRIVR
WITHOUT FIRST CONSULTING YOUR DOCTOR OR THE MANUFACTURER OF YOUR MEDICAL DEVICE. Maintain
a safe distance between these devices and your medical devices, and stop using these devices if you observe a
persistent interference with your medical device.
support.strivr.com
15
Page 20

User Manual Health & Safety Warning
SAFETY PRECAUTIONS
Wearing a VR headset may distract you from, and will completely block your view of, your actual, physical surroundings.
Always be aware of your surroundings before beginning use and while using the headset. Use caution to avoid injury.
Use of a VR headset may cause loss of balance. Remain seated unless your training module requires standing. The
objects you see in the VR environment do not exist in the real world, so do not sit, stand, or lean on VR objects, or
attempt to use them for support. Serious injuries can occur from tripping, running into or striking walls, furniture or
other objects, so clear an area for safe use before using the headset.
Take special care to ensure that you are not near other people, objects, stairs, open doorways, windows, furniture,
open flames, ceiling fans or light fixtures, televisions or monitors, or other items that you may impact when using—or
immediately after using—a VR headset. Remove any tripping hazards from the area before using the headset.
While using a VR headset, you may need to extend your arms fully out to the side or over your head, so make sure all of
those areas are clear. Remember that while using a VR headset, other people may enter your immediate area without
your awareness. Be cautious when extending your arms, moving around, and using the controller to avoid contacting
other individuals who may have entered the area.
Read and follow all setup and operating instructions, and review all recommendations for use of the VR headset and
controllers.
CONTENT
VIEWER DISCRETION ADVISED. CONTENT VIEWED IN THE VR HEADSET MAY CONTAIN VIOLENT IMAGES OR
STRONG OR PROFANE LANGUAGE (e.g. armed robbery). If you have a history of any physical or psychological
problems triggered by experiencing scary, violent, or anxiety-inducing images or videos, avoid viewing the triggering
content or do not use the VR headset.
support.strivr.com
16
Page 21

Health & Safety WarningUser Manual
Pico
Before using this product, please read the following warnings and information and follow all product safety and
operating instructions. Failure to follow these guidelines can result in personal injuries (including electric shock, fire,
and other injuries), damage to property, and even death. If you allow others to use this product, you are responsible for
ensuring that each user is aware of and follows all product safety and operating instructions.
1. Please make sure to use it in a safe environment. This product creates an immersive virtual reality scene for you.
When you use it, you cannot see what’s around you. Please move within a safe space and keep an eye on your
surroundings. Do not approach stairs, windows, heat sources or other hazardous areas.
2. Please make sure that you are in good health before using the product. If you are a pregnant woman, an elderly
person or suer from serious physical, mental, visual or heart diseases, please consult a doctor before use.
3. When using the controller, please make sure that there is enough clearance at the top of your head and around to
extend your arms. Please hold the controller firmly. Loosening or hitting other people or objects during use may cause
injury or damage to the people, pets or objects around you.
4. A few people may experience epilepsy, fainting, severe dizziness and other symptoms due to flash and images, even
though they may not have such a medical history. If you have a similar medical history, please consult your doctor
before use.
5. This product provides an immersive virtual content experience, and certain types of content may cause your
discomfort. When the following symptoms occur, you should stop using it immediately and seek medical assistance
timely.
• Seizures, loss of consciousness, convulsions, involuntary movements, direction disorders, nausea, dizziness,
drowsiness, or fatigue;
• Eye pain or discomfort, eye strain, eye convulsions, or visual abnormalities (such as hallucinations, ambiguity, or
diplopia);
• Skin itching, eczema, swelling, irritation or other discomfort;
• Excessive sweating, impaired balance, impaired hand-eye coordination, or other similar motor symptoms. You
cannot drive, operate machines, or participating in activities that may have potentially serious consequences
before recovering from these symptoms.
6. This product may emit radio waves and interfere nearby electronic devices. If you are wearing a pacemaker or other
implanted medical device, do not use it until you consult a doctor or medical device manufacturer.
7. Please use the charging equipment supplied with the product package or conforming to the input value marked on
the product nameplate, otherwise it may cause accidents. Do not attempt to replace the battery yourself. Doing so may
cause damage to the battery, overheating, fire, or personal injury. The battery can only be replaced by Pico or a Pico
authorized service provider, and replacing with a battery of the wrong model by yourself may pose a risk of explosion.
8. Both the headset and the controller of this product contain lithium-ion polymer or lithium-ion batteries. Please
recycle and dispose the device properly according to local regulations. Keep the device away from excessive humidity
and extreme temperatures and avoid direct sunlight or ultraviolet radiation
9. Do not disassemble, replace, or repair the device yourself. Otherwise, it will lose its warranty. If you need repair
service, please contact customer service or have it repaired by a Pico authorized service provider.
10. Children at the age of 12 or under are not advised to use this product, which may be harmful to the children’s health
and safety. Keep headsets, controllers, and accessories out of reach of children. Teenagers over the age of 12 must be
supervised by adults to prevent accidents.
For more information, please visit:
https://www.pico-interactive.com/en/terms/user_safety.html
support.strivr.com
17
Page 22

Page 23

Page 24

www.strivr.com
 Loading...