

Page 1
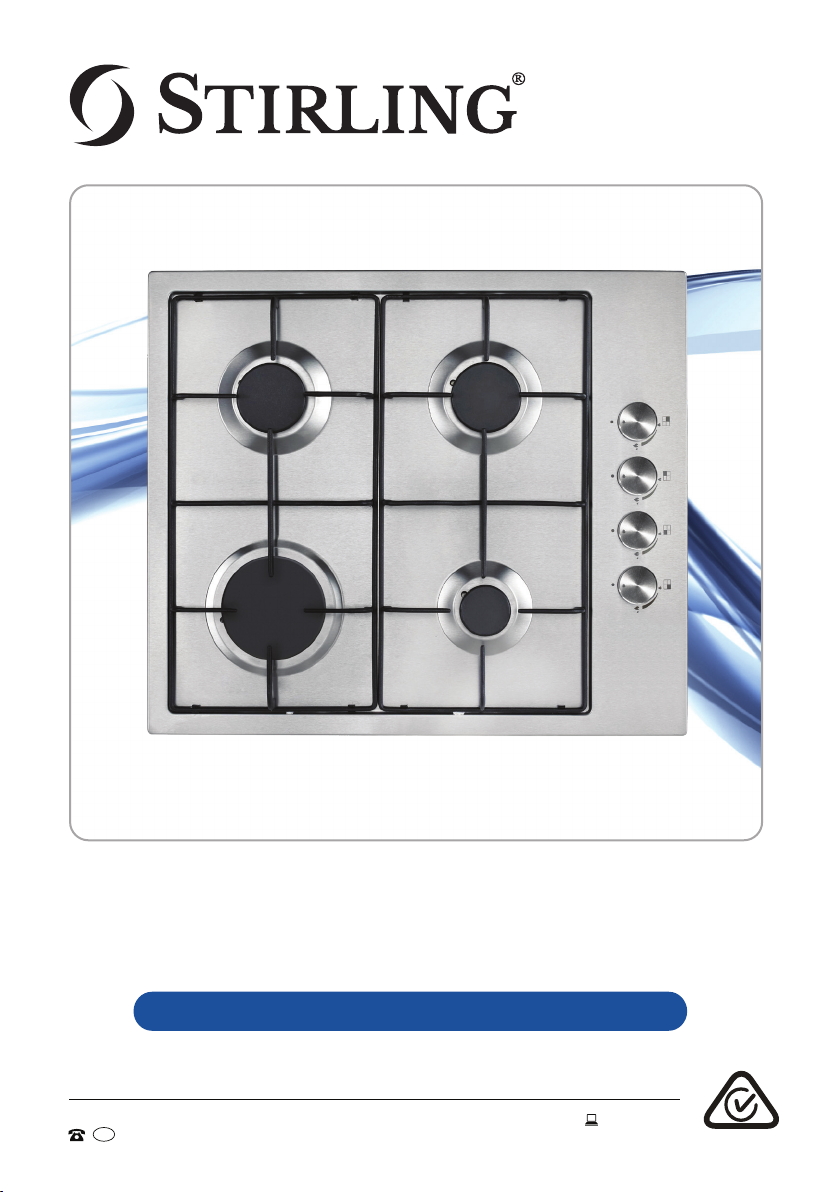
Gas Cooktop
Model Number STR-BGC
INSTRUCTION MANUAL
AFTER SALES SUPPORT
AUS
1300 886 649
MODEL: STR-BGC PRODUCT CODE: 60165 06/2018
E209
Page 2

Welcome
Congratulations on choosing to buy a STIRLING® product.
®
All products brought to you by STIRLING
are manufactured to the highest
standards of performance and safety and, as part of our philosophy of
customer service and satisfaction, are backed by our comprehensive
3 Year In Home Warranty. We hope you will enjoy using your purchase
for many years to come.
2
AFTER SALES SUPPORT
AUS
1300 886 649
MODEL: STR-BGC PRODUCT CODE: 60165 06/2018
Page 3

Contents
02 Welcome
04 Warranty Details
05 General Safety Instructions
08 Product Overview
10 Installation
24 Instructions
27 FAQs & Troubleshooting Guide
28 Other Useful Information
31 Repair and Refurbished Goods or Parts Notice
AFTER SALES SUPPORT
AUS
1300 886 649
MODEL: STR-BGC PRODUCT CODE: 60165 06/2018
3
Page 4

Gas Cooktop
Warranty Details
The product is guaranteed to be free from defects in workmanship and
parts for a period of 36 months from the date of purchase. Defects that
occur within this warranty period, under normal use and care, will be
repaired, replaced or refunded at our discretion. The benets conferred by
this warranty are in addition to all rights and remedies in respect of the
product that the consumer has under the Competition and Consumer Act
2010 and similar state and territory laws.
Our goods come with guarantees that cannot be excluded under the
Australian Consumer Law. You are entitled to a replacement or refund for
a major failure and to compensation for any other reasonably foreseeable
loss or damage. You are also entitled to have the goods repaired or
replaced if the goods fail to be of acceptable quality and the failure does
not amount to a major failure.
4
AFTER SALES SUPPORT
AUS
1300 886 649
MODEL: STR-BGC PRODUCT CODE: 60165 06/2018
Page 5

General Safety Instructions
IMPORTANT SAFETY INSTRUCTIONS
READ CAREFULLY AND KEEP FOR FUTURE REFERENCE
Read this manual thoroughly before first use, even if you are familiar with
this type of product. The safety precautions enclosed herein reduce the risk
of re, electric shock and injury when correctly adhered to. Make sure you
understand all instructions and warnings. Keep the manual in a safe place
for future reference, along with the completed warranty card and purchase
receipt. If you sell or transfer ownership of this product, pass on these
instructions to the new owner.
Always follow basic safety precautions and accident prevention
measures when using an electrical appliance, including the following:
• Professional installation only: This cooktop must be installed by a
licensed plumber/gastter in accordance with all instructions in this manual
and all applicable rules and regulations. Any electrical work required for
installation must be carried out by a licensed electrician. Comprehensive
installation instruction follow on pages 10 to 23 of this manual.
• Electric shock hazard: This appliance must be connected to a good
earth wiring system. Before carrying out any work on the electrical section
of the appliance, or any maintenance work or repairs, the appliance must
be disconnected from the mains. If accessible, always switch off the
cooktop at the wall before cleaning the appliance. Failure to follow this
advice may result in death or electric shock.
• Hot surface hazard: While in use, direct contact with the cooktop surface
may cause burns! Take utmost care when the equipment is in use. Do not
touch the cooktop components (base, burners, caps, enamelled trivets)
when hot. We recommend using oven gloves when handling cookware.
• Fire hazard: Never leave items on top of the cooktop as this can be a
re hazard when switched on. In case of a re, never try to extinguish it
with water. Switch off the burner and cover the ame(s) with a lid or re
blanket.
• Explosion hazard: Do not use or store ammable materials such as petrol
near the cooktop. Do not spray aerosols near the cooktop when it is in
use. Do not modify the appliance. Failure to follow this advice may result
in death or serious injury.
AFTER SALES SUPPORT
AUS
1300 886 649
MODEL: STR-BGC PRODUCT CODE: 60165 06/2018
5
Page 6

General Safety Instructions (Cont.)
General usage conditions and restrictions
• Domestic use only: This cooktop is designed for indoor domestic use
only; commercial catering may invalidate the warranty. The cooktop can
be built into a standard kitchen cabinet or housing unit.
• Intended purpose: Only use this cooktop for its intended purpose, in
its intended environment and as described in this manual. Any other use
may cause re, electric shock or injury, and invalidate the warranty.
• No space heating: Do not use this cooktop for space heating purposes.
• Ventilation: Heat, steam and moisture will be created during use of
the cooktop. Take care to avoid injury and ensure that the kitchen is
adequately ventilated.
• Follow instructions: Make sure to observe all rules and provisions in
this instruction manual. Do not allow anybody who is not familiar with the
contents of this manual to operate the cooktop. These instructions are
not intended to cover every possible condition and situation. As with any
electrical household appliance, use common sense and caution when
installing, operating and maintaining the cooktop.
• Power cord: Do not allow the power cord to come into contact with
areas on the cooktop that get hot. Check the cord regularly for damage.
Do not use the appliance if the cord, or any other part of the appliance,
has been damaged. If the supply cord is damaged, it must be replaced
by the manufacturer or its service agent or a similarly qualied person in
order to avoid a hazard.
• Usage restriction: This appliance is not intended for use by persons
(including children) with reduced physical, sensory or mental capabilities,
or lack of experience and knowledge, unless they have been given
supervision or instruction concerning the use of the appliance by a
person responsible for their safety.
• Children and pets: Cooking appliances become very hot in use, therefore
ensure children and pets are kept away. If it is necessary for younger family
members to be in the kitchen, ensure that they are kept under close supervision at all times. Do not allow children to operate or play with any part
of the appliance. CAUTION: The cooking process has to be supervised. A
short term cooking process has to be supervised continuously.
• Pots and pans: Do not use unstable or plastic cookware, or aluminium
foil containers on the cooktop. Do not let large cookware overlap the
bench as this could deect heat onto the benchtop, which could damage
the surface. Pot and pan handles may become hot during use; position
handles away from the edge of the cooktop and out of children’s reach.
6
AFTER SALES SUPPORT
AUS
1300 886 649
MODEL: STR-BGC PRODUCT CODE: 60165 06/2018
Page 7

General Safety Instructions (Cont.)
• Marine craft and leisure vehicles: Where this appliance is installed for
use with LPG in marine craft or in caravans, it shall not be used as a
space heater. This appliance is NOT recommended for installation on any
type of marine vessel.
• WARNING: Danger of fire! Never leave the cooktop unattended during
use, as this is a re risk. Oils and fats in pots and pans may catch re due
to overheating.
• No work surface: Do not store any items on the cooktop or use it as a
work surface.
• Combustible materials: Do not cover the cooktop or place combustible
materials on or near the surface even when the cooktop is not in use.
• Frying food: When frying food on the cooktop, check constantly and
ensure the oil is not overheating and becoming a re hazard. Do not ll
deep frypans more than one third full of oil. Do not leave unattended.
• Clean regularly: In the interests of safety and hygiene, ensure the cooktop
is kept clean as a build-up of grease could cause a re hazard. Switch off
all controls and allow the cooktop surface to cool before cleaning.
• Cleaning precautions: Disconnect the appliance from the mains before
cleaning, if your setup allows and the plug is accessible. Do not immerse
the appliance or power cord in water or any other liquid. Do not use steam
cleaning equipment for cleaning the cooktop. Do not use scourers or any
other harsh abrasive cleaning agents, as these can scratch the nish.
• Handle with care: Do not place or drop heavy objects on your cooktop.
• Disconnect: Do not disconnect the appliance with wet hands. Grip by
the plug, do not pull by the cord when disconnecting.
• Damage/repair: Do not use the cooktop if any part has been damaged
or does not work properly. Only have it repaired by an authorised service
centre. Incorrect repair could expose you to the risk of electric shock, re
or injury. Prolonged use of the unit in such conditions could cause re or
electrocution. In case of damage, contact our after sales support centre
using the details at the bottom of this page.
• Do not modify: Do not attempt to modify the appliance.
• Do not use when faulty: Do not use the cooktop in the event of a
technical fault. Any faults must be xed by an appropriately qualied and
authorised person. Contact our after sales support line for advice.
• Liability: We assume no liability for any eventual damages or injury to
persons caused by misuse of the product or noncompliance with these
instructions.
AFTER SALES SUPPORT
AUS
1300 886 649
MODEL: STR-BGC PRODUCT CODE: 60165 06/2018
7
Page 8

Product Overview
Scope of delivery
Gas cooktop
A
A
E
F
D
A Semirapid gas burner (2x 6.5MJ/h)
B Rapid gas burner (10.8MJ/h)
C Auxiliary gas burner (3.6MJ/h)
D Enamelled trivet (pan support)
E Control panel
F Stainless steel surface
AFTER SALES SUPPORT
8
AUS
B
1300 886 649
C
E Control panel
From top to bottom:
Rear right burner control
Rear left burner control
Front left burner control
Front right burner control
MODEL: STR-BGC PRODUCT CODE: 60165 06/2018
D
Page 9
Product Overview (Cont.)
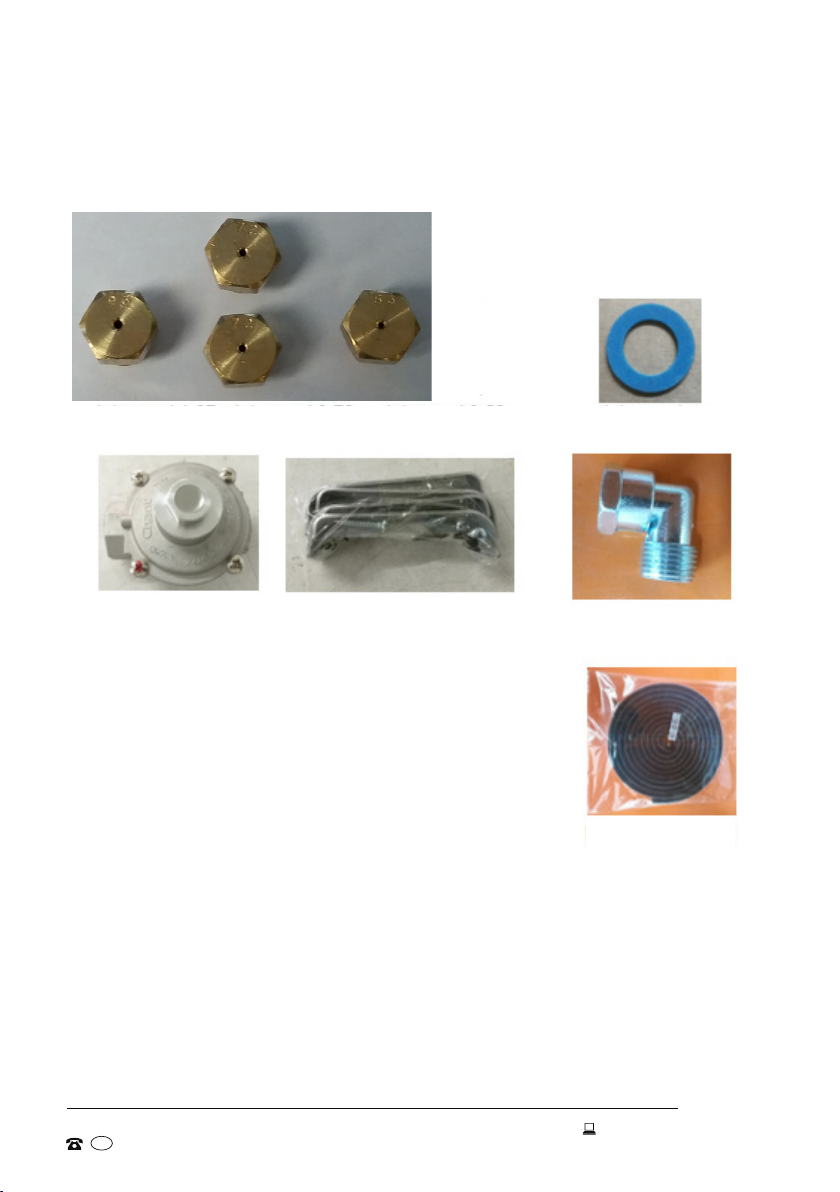
Installation hardware
As pictured below:
Injectors: 1x ∅0.93mm, 2x ∅0.72mm, 1x ∅0.53mm Joint gasket
Gas regulator Accessory bag (with 4 NG connector
mounting brackets and screws)
Documentation (not shown):
Instruction manual
Sealing tape
Quick start guide
Warranty certicate
NOTE:
Due to continued product improvement, images and illustrations in this manual may
vary slightly from the product purchased. All images in this manual are for reference
purposes only. Parts are not necessarily pictured to scale.
AFTER SALES SUPPORT
AUS
1300 886 649
MODEL: STR-BGC PRODUCT CODE: 60165 06/2018
9
Page 10

Installation
Unpacking the appliance
• This product has been packaged to protect it against transportation
damage. Unpack the appliance but keep all packaging materials until
you have made sure your new gas cooktop is undamaged and in perfect
condition.
• Some parts on the appliance are protected by a plastic film, which must
be removed before the appliance is used. Remove any lm or stickers
that may be present on the hob surface before use.
• The carton is recyclable. Whenever possible, reuse the carton and recycle
it when disposing of the packaging materials.
• Plastic wrapping can be a suffocation hazard for babies and young
children, so ensure all packaging materials are out of their reach and
disposed of safely.
WARNING: Professional installation only!
• This cooktop must be correctly installed by an authorised, licensed
gastter/plumber only, in accordance with Gas Installation Code
AS/NZS 5601, all other applicable rules and regulations and all
instructions in this manual. It is in your interest and that of your safety
to ensure compliance.
• Do not try to install the cooktop yourself! Doing so will expose you
to danger and void the warranty. Improper installation, adjustment,
alteration or service can cause injury or damage. We decline any
responsibility for injury or damage, to persons or property, as a result of
improper use or installation.
• This appliance is not connected to a ue for discharge of the
combustion products; therefore, it must be connected in compliance
with the above mentioned installation rules. Particular attention must
be paid to the instructions given on the opposite page for ventilation.
• Any adjustments, conversions and maintenance of this product may
only be carried out by an appropriately authorised person, as mentioned
above.
• The safety and automatic adjustment devices of the appliance may
only be modied by an authorised service agent.
10
AFTER SALES SUPPORT
AUS
1300 886 649
MODEL: STR-BGC PRODUCT CODE: 60165 06/2018
Page 11

Installation (Cont.)
Important installation advice
• NG / LPG: This appliance is intended for use with natural gas. If it is to be
used with LPG, follow the conversions instructions starting on page 18.
• Location: The cooktop may be located in a kitchen, kitchen/dining room
or a bed-sitting room, but not in a room containing a bath or shower. The
cooktop must not be installed in a bed-sitting room of less than 20m3.
If used with LPG, the cooktop shall not be installed in a room or space
below ground level, such as in a basement.
• Other use: This appliance is unsuitable for use in marine craft, caravans
or mobile homes unless each burner is fitted with a flame safeguard.
• Heat resistance of surrounding surfaces: Wall and bench surfaces
must be capable of sustaining temperatures of 85°C above the ambient
room temperature while in use and be resistant to heat, steam and
condensation. Certain types of vinyl or laminate kitchen furniture are
particularly prone to heat damage or discolouration at temperatures below
the guidelines given above. We assume no liability for any damage caused
if the appliance is installed contrary to this advice. Do not install the
cooktop near curtains or other ammable materials.
• Ventilation requirements: This appliance must only be used in rooms
equipped with adequate ventilation. The use of a gas cooking appliance
results in the production of heat and moisture in the room where it is
installed. Always ensure that the kitchen is well ventilated; keep natural
ventilation holes open or install a rangehood.
– Prolonged intensive use of the appliance may require additional or more
effective ventilation, for example, opening of a window or increasing the
level of mechanical ventilation, where present.
– If the room has a volume between 5 and 10m³, it will require an air vent
of 50cm² (effective area), unless it has a door which opens directly to the
outside.
– If the room has a volume of less than 5m³, it will require an air vent of
100cm² (effective area).
– If the room has a volume that exceeds 11m³, then no air vent is required.
– If there are any other fuel burning appliances in the same room,
the installer must consult relevant standards to determine air vent
requirements.
– Remember that the quantity of air necessary for combustion must never
be less than 2m³/h for each kW of power (see total power in kW on the
appliance rating plate).
AFTER SALES SUPPORT
AUS
1300 886 649
MODEL: STR-BGC PRODUCT CODE: 60165 06/2018
11
Page 12
Installation (Cont.)
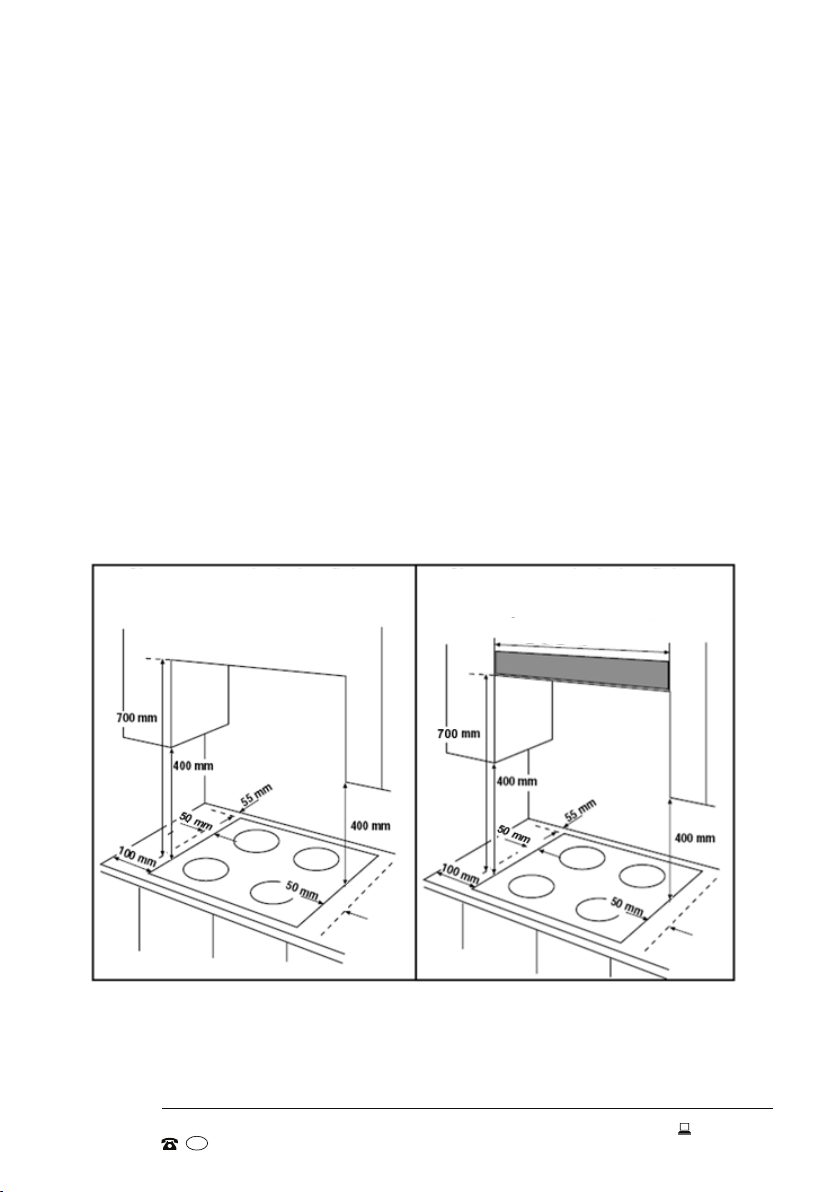
Clearances required
This appliance is to be built into a kitchen unit (depending on size) or 600mm
worktop, providing the following minimum distances are allowed:
• The edges of the cooktop must be a minimum distance of 55mm from a
side or rear wall.
• 700mm between the highest point of the cooktop surface (including the
trivets) and the underside of any horizontal surface directly above it.
• 400mm between the cooktop surface, providing that the underside of
the horizontal surface is in line with the outer edge of the cooktop. If the
underside of the horizontal surface is lower than 400mm, then it must be
at least 50mm away from the outer edges of the cooktop.
• 50mm clearance around the appliance and between the cooktop surface
and any combustible materials.
• Fire resistant materials (such as ceramic tiles) are required up to 450mm
above the burner top.
12
Clearances required when tting the
cooktop without a rangehood.
Fig. 1
AFTER SALES SUPPORT
AUS
1300 886 649
Clearances required when tting the
cooktop with a rangehood.
*
see below
Rangehood
MODEL: STR-BGC PRODUCT CODE: 60165 06/2018
Page 13
Installation (Cont.)
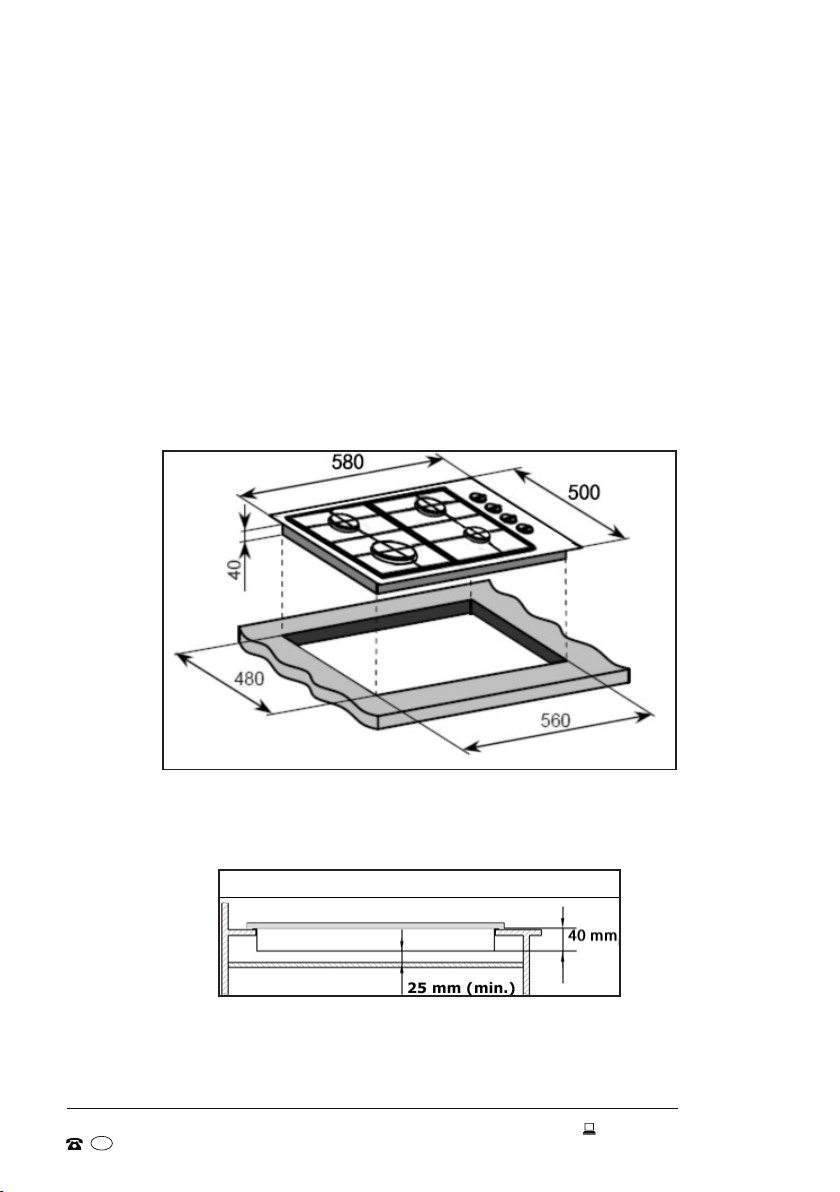
Benchtop preparation
• Make sure the kitchen area is dry and there is sufcient ventilation and
easy access to all control elements.
• Do not install the cooktop near curtains or other ammable materials.
• If you have (or plan to have) a rangehood tted above the cooktop,
check in the rangehood instructions that you will have the required
clearance before starting with the installation.
• To install the cooktop in your benchtop, make an opening with the
dimensions given below (Fig. 2).
• The required clearances for the cooktop are illustrated on page 12 (Fig. 1).
Fig. 2
• IMPORTANT: You must have a gap of at least 25mm between the
underside of the appliance and any surface underneath it (Fig. 3).
Fig. 3
AFTER SALES SUPPORT
AUS
1300 886 649
MODEL: STR-BGC PRODUCT CODE: 60165 06/2018
13
Page 14

Installation (Cont.)
Applying the seal
The installation hardware includes a length of sealing tape, which when
applied around the cooktop prevents liquid from entering the cabinet.
Follow the instructions below in order to correctly apply this sealing tape
before inserting the cooktop into the work surface.
• Remove the enamelled trivets and the burner caps, then turn the
cooktop upside down and place it on a cushioned mat, taking care not
to damage the ignition plugs and the thermocouples.
• Detach the backing strip from the sealing tape but ensure that the
transparent adhesive still adheres to the seal itself.
• Apply the sealing tape as illustrated below (Fig. 4). Correctly position
the sealing tape under the edge, ensuring that the outer part of the seal
perfectly matches the outer edge of the cooktop. The ends of the strips
must t together without overlapping.
Fig. 4
• Evenly and securely x the seal to the cooktop, pressing it rmly in place
at the underside of the cooktop.
• IMPORTANT: Do not use a silicon sealant to seal the appliance against
the aperture. This will make it difcult to remove the cooktop from the
aperture in future if it needs to be serviced.
Inserting and fixing the cooktop
• Place a mounting bracket over the hole that matches the size of the
screws—there are appropriate screw holes in each corner of the hob.
• Insert a screw (A) through the mounting bracket (B) and slightly tighten it
so that the bracket is attached to the cooktop, but you can still adjust its
position (Fig. 5, page 15).
• Carefully turn the cooktop back over and then gently lower it into the
aperture hole that you have cut out until it is resting rmly on the cabinet/
benchtop surface.
AFTER SALES SUPPORT
AUS
14
1300 886 649
MODEL: STR-BGC PRODUCT CODE: 60165 06/2018
Page 15
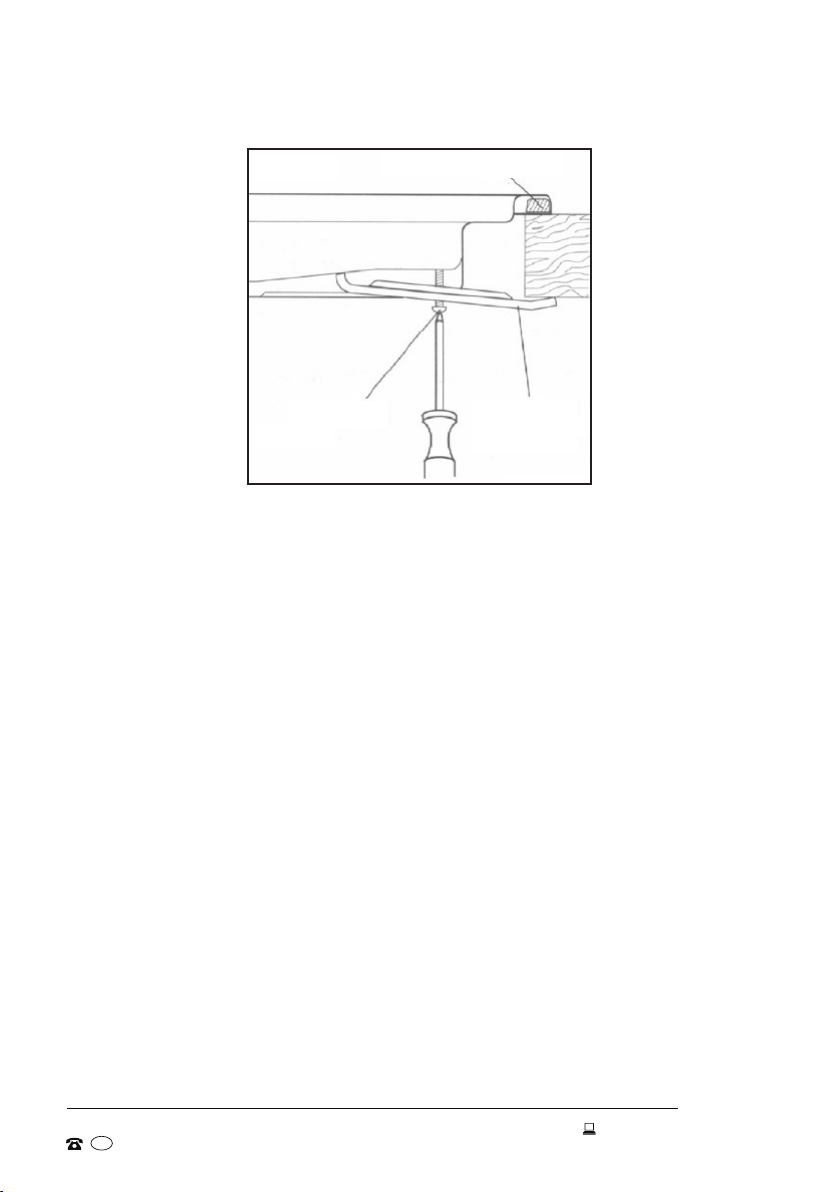
Installation (Cont.)
Fig. 5
(A) Screw
Sealing tape
(B) Mounting
bracket
• Place a mounting bracket over the hole that matches the size of the
screws—there are appropriate screw holes in each corner of the hob.
• Insert a screw (A) through the mounting bracket (B) and slightly tighten it
so that the bracket is attached to the cooktop, but you can still adjust its
position (Fig. 5).
• On the underside of the cooktop, adjust the mounting brackets into a
position that is suitable for your benchtop. Then fully tighten the screws
(A) to secure the cooktop into position.
Electrical connection
• Connection: The appliance is equipped with an electrical cord and
power plug, which must be connected to the mains electricity supply
in order for the ignition to work. Insert the power plug rmly into an
appropriate electrical outlet and switch on power at the outlet.
• Wall socket: The electric wall outlet must be properly earthed and
accessible. It must be suitable for the power drawn by the appliance.
The outlet voltage and circuit frequency must correspond to the voltage
stated on the appliance rating label.
• Power cord: When installing the appliance, make sure that the power
supply cord does not come into contact with any parts of the cooktop
that get hot during use, or with hot cookware. If the supply cord is
damaged, it must be replaced by the manufacturer or a similarly qualied
person in order to avoid a hazard.
AFTER SALES SUPPORT
AUS
1300 886 649
MODEL: STR-BGC PRODUCT CODE: 60165 06/2018
15
Page 16
Installation (Cont.)
Electrical work
Should any electrical work be required associated with the electrical outlet
that is to be used for the cooktop, all such work must be carried out by an
appropriately qualied, licensed electrician in accordance with the latest
edition of AS/NZS 3000 Wiring Regulations.
WARNING: 240V — Disconnect power before servicing the unit!
Before connecting the appliance, make sure that the supply voltage marked
on the rating plate corresponds with your mains supply voltage.
Cable type: H05RR-F 3G 0.75mm2.
The mains supply cable is supplied with this product.
Replacing the mains supply cable
If the mains supply cable is damaged, then it must be replaced by an
appropriate replacement in accordance with the following instructions:
• Switch the appliance off at your mains supply.
• Open the box of the supply board.
• Unscrew the clamp xing the cable.
• Replace the cable with one of the same length and in accordance with
the specication given on the previous page.
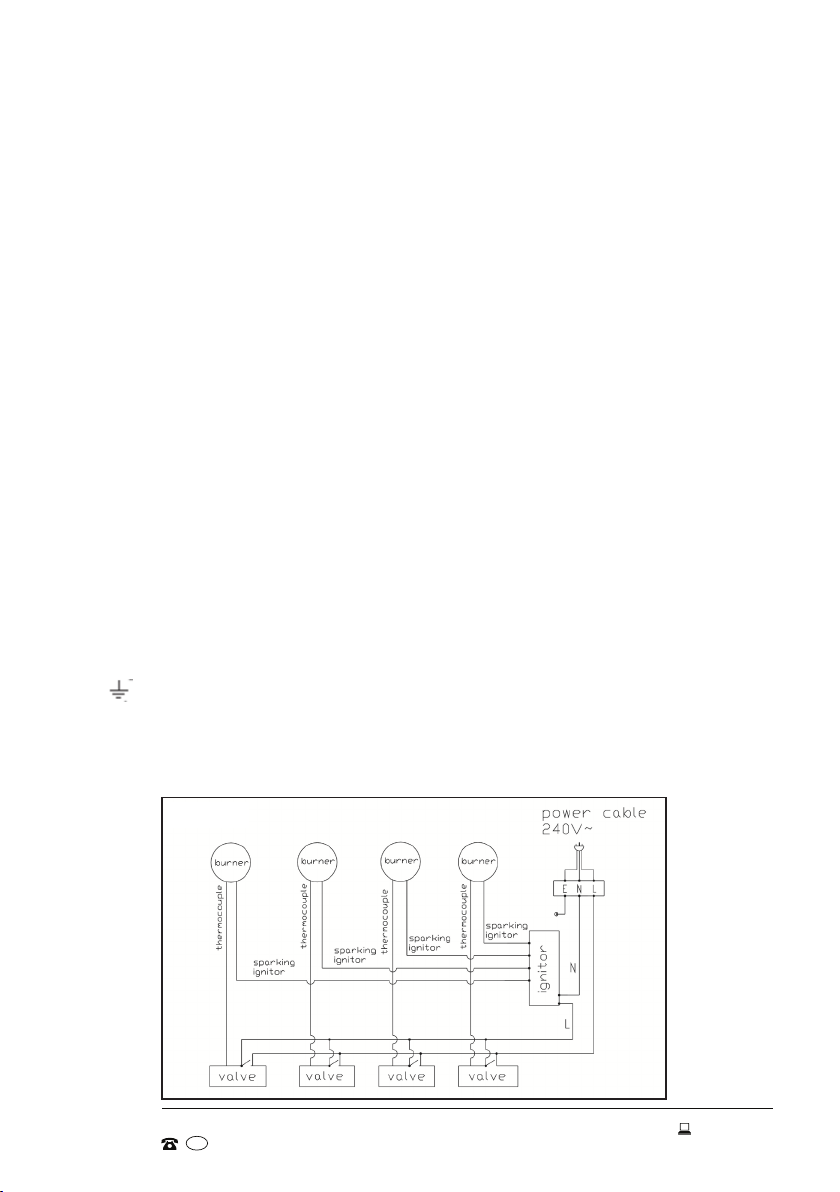
• The “green-yellow” earth wire must be connected to the terminal marked
. It must be about 10mm longer than the live and neutral wires.
• The “blue” neutral wire must be connected to the terminal marked with
the letter (N). The live wire must be connected to the terminal marked with
the letter (L).
16
Fig. 6
AFTER SALES SUPPORT
AUS
1300 886 649
MODEL: STR-BGC PRODUCT CODE: 60165 06/2018
Page 17

Installation (Cont.)
Gas connection
• Safety regulation: This cooktop must be correctly installed by an
authorised, licensed gastter/plumber only, in accordance with Gas
Installation Code AS/NZS 5601, all other applicable rules and regulations
and all instructions in this manual. It is in your interest and that of your
safety to ensure compliance. Failure to install the cooktop correctly could
invalidate the warranty, liability claims and lead to prosecution.
• Connection parts: The appliance must be connected to the gas supply
by use of a 15mm x ½” female coupler, seal, copper pipe or a exible hose
(Fig. 7), and an isolation tap tted in an easily accessible position.
Gas rail
Seal
15mm x ½” (12.7mm)
female coupler
Fig. 7
• Accessibility: Make sure that it is possible to run gas lines to the gas
connection point of the appliance. The gas connection point must be
accessible without having to remove the cooktop. If a exible hose is used,
the connection point must also be accessible without having to remove the
cooktop.
Dual gas regulator valve
The supplied dual gas regulator valve (Fig. 8) is a low-pressure pipeline
regulator valve, built-in voltage regulator for gas products. It is factory-set
for use with Natural Gas (NG), but can be adjusted for use with Liqueed
Petroleum Gas (LPG).
Fig. 8
AFTER SALES SUPPORT
AUS
1300 886 649
MODEL: STR-BGC PRODUCT CODE: 60165 06/2018
17
Page 18

Installation (Cont.)
Performance parameters
NG LPG
Operating temperature –20°C to 60°C
Inlet pressure setting
Outlet pressure 5±0.3 in.wc 10±0.5 in.wc
Inlet side screw 1/4 NPT
Outlet side screw 1/4 NPT
6 in.wc
Installing the gas regulator
• When installing the gas regulator, ensure that its valve outlet thread
matches the thread of the gas connector.
• Use an appropriate sealant around the threads.
• Ensure that the gas regulator valve installation location is perpendicular.
• After installation, open the gas source switch and check the valve body
connections with soap and water for leaks.
Converting the gas regulator for use with LPG
This cooktop is tted out for use with Natural Gas (NG). If it is to be used with
liqueed petroleum gas (LPG), the gas regulator valve has to be converted.
• Using special tools, open the cover of the gas regulator valve by turning it
anticlockwise (Fig. 9-A, page 19).
• Remove the adaptor from the top cover (Fig. 9-B).
• Pull out the adaptor, invert it and replace the top cover (Fig. 9-C).
• Invert the assembled adaptor’s top cover and replace the regulator valve
(Fig. 9-D).
11 in.wc
NOTE: Do not adjust the regulator valve body piece in the above procedure,
otherwise it will affect the performance parameters set in the factory.
WARNING:
• The regulator valve outlet pressure is set at the factory, please do not
adjust it in order to avoid the occurrence of safety accidents.
• If you nd any abnormality of the regulator valve, stop using the appliance
and contact our after sales support centre for advice. Do not attempt any
maintenance yourself.
AFTER SALES SUPPORT
AUS
18
1300 886 649
MODEL: STR-BGC PRODUCT CODE: 60165 06/2018
Page 19

Installation (Cont.)
Fig. 9-A
Factory-set state
Fig. 9-B
Fig. 9-C Fig. 9-D
Gas adjustment (conversion for use with LPG)
This cooktop is tted out for use with Natural Gas (NG). If it is to be used with
liqueed petroleum gas (LPG), the gas regulator valve and the burners have
to be converted.
IMPORTANT: Before starting the conversion, make sure all gas is
switched off (and preferably disconnected from the appliance) and the
electrical power has been disconnected.
• Remove the trivets, burners, burner crowns and caps (Fig. 10-A).
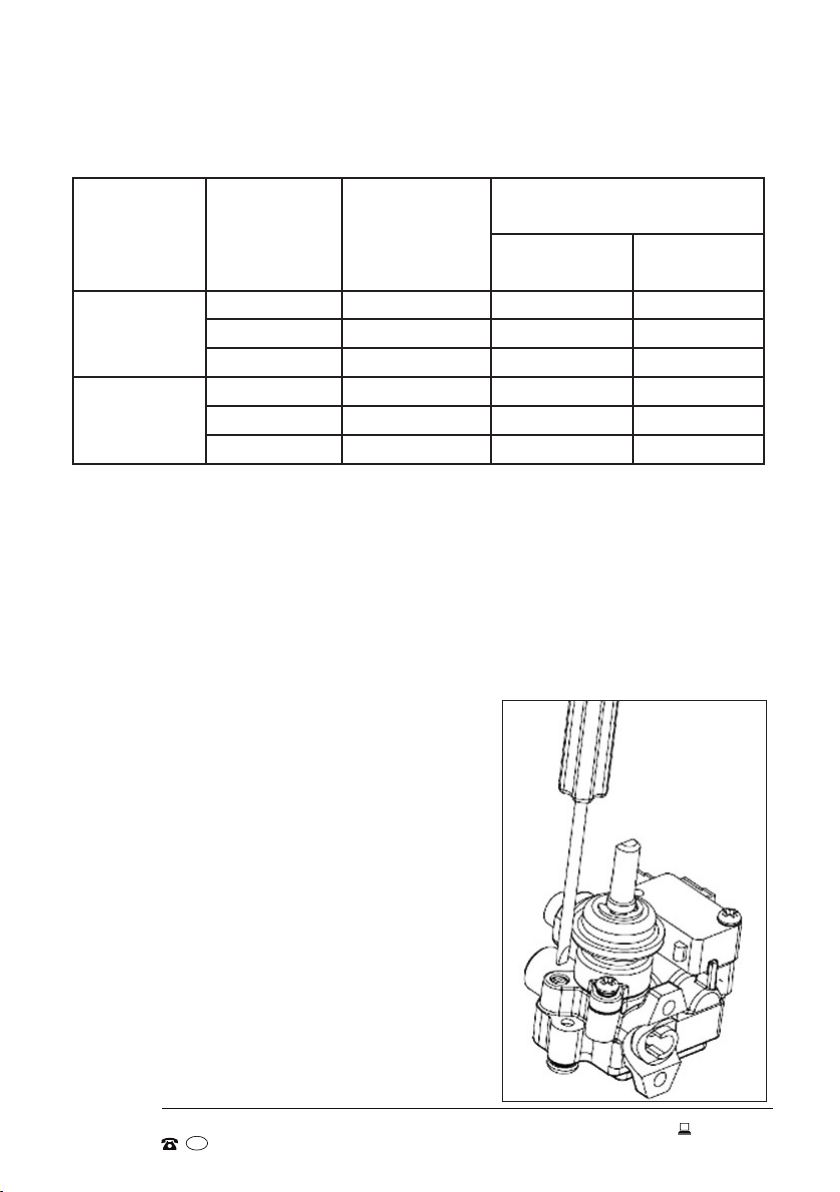
• Unscrew the injector (Fig. 10-B) and replace it with the stipulated injector
for the new gas supply (see the Table 1 on next page).
AFTER SALES SUPPORT
AUS
1300 886 649
Fig. 10-A Fig. 10-B
MODEL: STR-BGC PRODUCT CODE: 60165 06/2018
19
Page 20
Installation (Cont.)
Table 1: General injectors
Type of Gas Nozzle mm Burner
Power (MJ/)
Max. Min.
Natural Gas
(NG)
LPG
Butane
Propane
1.49 Rapid 10.8 5.4
1.16 Semirapid 6.5 3.24
0.85 Auxiliary 3.6 1.8
0.93 Rapid 11 5.4
0.72 Semirapid 6.6 3.24
0.53 Auxiliary 3.7 1.8
• Reassemble all the burners carefully; in particular you should make sure
that the burner crown is correctly placed on the burner.
• IMPORTANT: The minimum ow adjustment process must be completed
before the appliance is next used.
Minimum flow adjustment for hob gas taps
IMPORTANT: Before adjusting the minimum flow of the burners, make
sure all gas is switched off (and preferably disconnected from the
appliance) and the electrical power has been disconnected.
• Remove all the trivets, burner crowns and
caps, and knobs.
• Unscrew the screws of the panel, then
remove the panel.
• Install the burner cap, burner crown and
knob of the burner. Switch the burner on
and set the knob at the minimum position.
• Place a small-bladed screwdriver on the
screw to adjust the minimum ow (as
shown in Fig. 11).
• Unscrew the adjusting screw in order to
increase the gas ow, or tighten it in order
to decrease the gas ow.
• The correct adjustment is obtained when
the ame has a length of about 3–4 mm.
Fig. 11
20
AFTER SALES SUPPORT
AUS
1300 886 649
MODEL: STR-BGC PRODUCT CODE: 60165 06/2018
Page 21

Installation (Cont.)
• For NG and LPG the adjusting screw must be tightly screwed in.
• Make sure that the ame does not go out by quickly turning from
maximum ow to minimum ow. If it does, then remove the control knob
and make further adjustments to the gas ow, testing it again once the
adjustment has been made.
• Repeat this process for each one of the gas taps.
• Install the panel and ret the caps, burner crowns and knobs after
nishing the adjustment.
Hose assembly
• The nal gas connection shall be made using a exible hose or annealed
copper tubing of sufcient length to permit the insertion and removal of the
appliance. For gas appliances connected using a exible hose, install with
a hose assembly that complies with AS/NZ 1869 (AGA approved), 10mm
ID class B or D, and in accordance with AS/NZS 5601. This hose must not
exceed 1.2m in length.
• Ensure that the hose does not contact the hot surfaces of the hotplate,
oven, dishwasher or any other appliance that may be installed underneath
or next to the cooktop. The hose should be positioned so that it does not
interfere with drawers or other moving parts, and so that it is not subjected
to abrasion, kinking, or permanent deformation. The hose should be able
to be inspected along its entire length. Unions compatible with the ttings
must be used and all connections must be tested.
• A restraining wire or chain of adequate strength is to be xed to the
appliance and the wall within 50mm of each connection point. The
length of the chain or wire is not to exceed 80% of the length of the hose
assembly.
• It is recommended that a manual shut-off valve be installed in the gas
supply line, in an accessible position external to the appliance, so that the
gas supply to the appliance can be shut off in the event of an emergency or
for servicing without having to remove the appliance.
• For the connection of the electric cord and plug, the general purpose outlet
and switch must not be installed within the appliance recess and must be
readily accessible without having to remove the appliance.
AFTER SALES SUPPORT
AUS
1300 886 649
MODEL: STR-BGC PRODUCT CODE: 60165 06/2018
21
Page 22

Installation (Cont.)
Commissioning process
The below process must be performed on the gas cooktop by the authorised
plumber/gastter before leaving:
• Conrm that the supplied gas regulator is correct.
• Turn on and light the rapid burner only to check operation.
• Measure and conrm the test point pressure is correct.
• Make any adjustment, change, modication or repair required due to
inadequate performance of the cooktop.
Final installation checks
After commissioning and before leaving, the installer must check and ensure
that:
• All parts (burners, trivets, knobs) and the gas pipe are installed correctly.
• The ignition system is working satisfactorily on all burners, both individually
and combined.
• When lit, each burner produces a well dened blue ame without any
yellow tipping.
• Each burner ame remains lit when the respective control knob is rotated
quickly from the HIGH to the LOW position.
• The duplicate data label provided with this appliance is attached to an
accessible and nearby surface for easy reference.
• There are no leaks in the gas supply. We recommend conducting a
full gas soundness check according to the requirements of AS/NZS
5601. Whenever any change to the installation is made that may affect
gas soundness (e.g., adjustments involving any disconnection and
reconnection), follow the below leak test procedure. Never use a naked
flame to check for gas leaks!
In a small container, mix up a solution of water and detergent or soap.
Make sure that the gas supply is turned on and all gas control valves on
the appliance are off. Using a brush or spray bottle, apply the solution to
the gas line and each joint in the gas line, including any exible hosing and
regulator. Bubbling of the solution will indicate that there is a leak present.
Retighten or reseal any joints that are leaking. If the leak persists, contact
our after sales support centre for assistance.
22
AFTER SALES SUPPORT
AUS
1300 886 649
MODEL: STR-BGC PRODUCT CODE: 60165 06/2018
Page 23

Installation (Cont.)
Gas tap maintenance
IMPORTANT: These maintenance operations MUST ONLY be carried out
by a registered gasfitter.
IMPORTANT: Before carrying out any maintenance operations,
disconnect the appliance from the gas and electricity supplies.
If a gas tap becomes stiff to operate, then you should proceed as follows:
• Remove the control knobs, trivets, burners, hob xing screws and
mounting brackets.
• Remove the hob from the worktop and remove any protective covers from
the underside.
• Disconnect the xings holding the tap to the fascia panel and separate the
assembly. Then clean the cone and seating with a cloth dampened with
solvent.
• Lightly smear the cone with high temperature grease, reassemble into
position and rotate a few times.
• Remove the cone again and remove any excess grease, making sure that
the gas ducts are not obstructed with grease.
• Carefully reassemble the components and perform a gas soundness test.
If it becomes necessary to replace a gas tap, then you should proceed as
follows:
• Remove the control knobs, trivets, burners, hob xing screws and
mounting brackets.
• Remove the hob from the worktop and remove any protective covers from
the underside.
• Disconnect the xings holding the tap to the fascia panel and separate the
assembly.
• Disconnect the gas pipe from the gas tap, and then disassemble them from
the gas rail by removing the xing screws.
• When tting a new tap, ensure that a new gasket is used.
• Reconnect the gas tap, perform a gas soundness test, and then
reassemble the hob.
AFTER SALES SUPPORT
AUS
1300 886 649
MODEL: STR-BGC PRODUCT CODE: 60165 06/2018
23
Page 24
Instructions
Before first use
• When your new gas cooktop has been professionally installed, please
take the time to read this manual thoroughly to familiarise yourself with the
appliance. Pay particular attention to the safety instructions on pages 5–7.
• Clean the cooktop surface as described in the “Care and cleaning”section.
• Check and ensure the cooktop is securely plugged into an appropriate
wall outlet and power is switched on to the outlet.
The cooktop
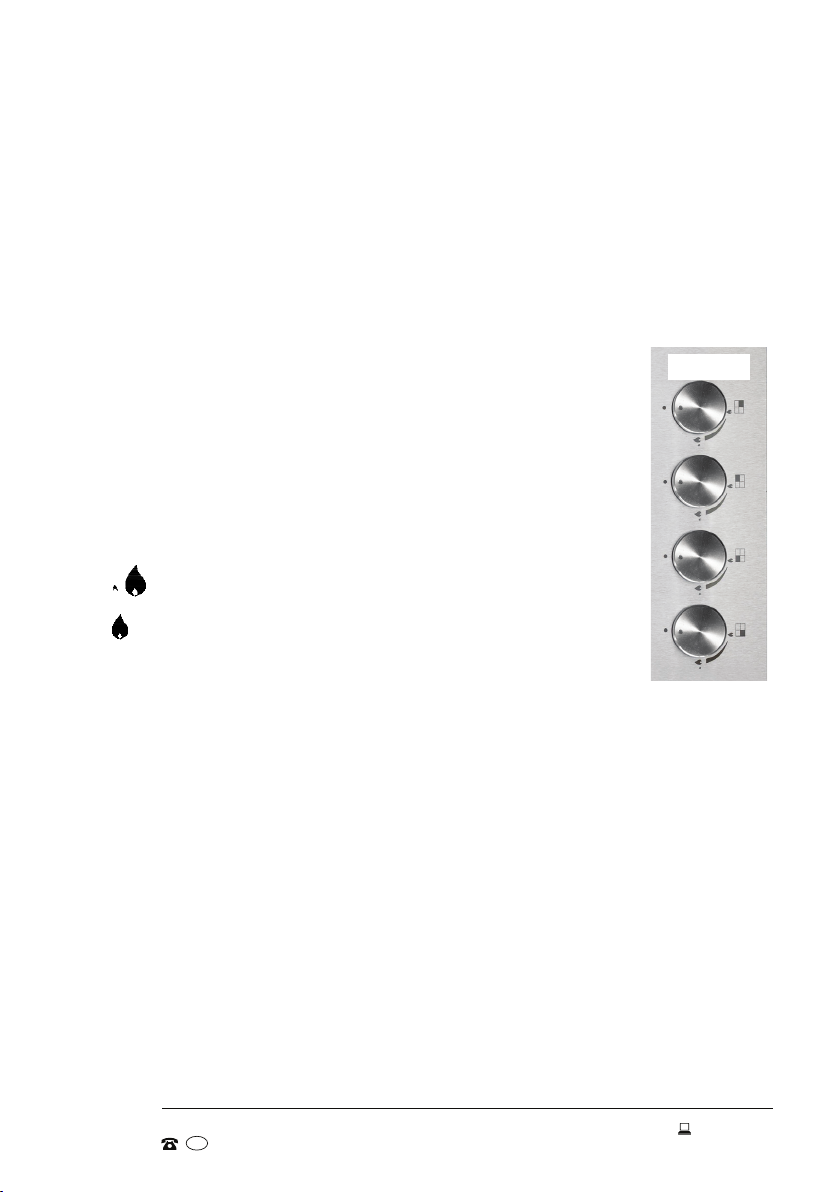
• The control panel at the side of the cooktop has four
control knobs, one for each burner; the small diagram to
the right of each knob (Fig.12) illustrates which burner it
controls.
• The following symbols will appear on the control panel,
next to each control knob:
OFF: Gas off
Large ame: HIGH (maximum) setting
Small ame: LOW (minimum) setting
• The minimum setting is at the end of the anticlockwise
rotation of the control knob.
• All operation positions must be selected between the maximum and
minimum position.
• Never select a knob position between the maximum and off position.
Lighting a burner
• Press down the control knob gently and turn it anticlockwise to the
HIGH position. When the burner lights, keep the knob depressed for
approximately 20 seconds to ensure it stays lit when released.
NOTE: You can use matches to light the burners in the event of a power
failure.
• Turn the knob to the required position, anywhere between the HIGH and
LOW settings. Do NOT set it between OFF and HIGH.
• In the event of a burner ame being accidentally extinguished, turn off the
burner control and wait for at least one minute before reigniting it.
• After use, always turn the control knob fully clockwise to the gas off
position.
AFTER SALES SUPPORT
AUS
24
1300 886 649
MODEL: STR-BGC PRODUCT CODE: 60165 06/2018
Fig. 12
Page 25
Instructions (Cont.)
Flame failure feature
• Each burner on this gas cooktop is tted with a ame failure safety device,
which is designed to stop the ow of gas to the burner head in the event
of the ame going out. To ensure the ame stays lit, you must hold down
the control knob for approximately 15 seconds before releasing it.
• Gas cooktops with a ame failure safety device have ignition plugs
(ignitors) and ame failure probes (thermocouples), which need to be kept
clean for proper operation.
Cooking on the gas cooktop
In order to avoid
unnecessary energy
use, it is important to
use appropriately sized
pots and pans for each
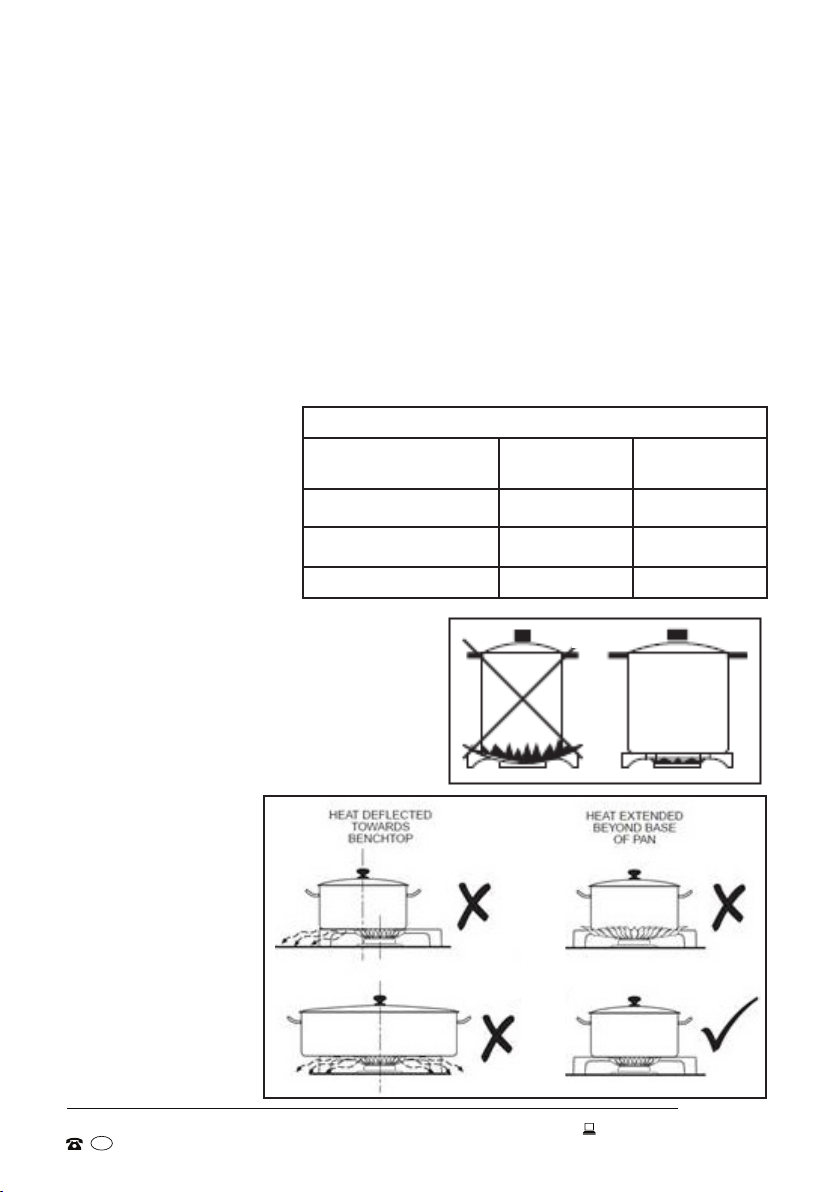
burner (Table 2).
Auxiliary burner
Semirapid burner
Table 2: Appropriate Pan Size
Burner
Minimum
Diameter
8cm 16cm
12cm 20cm
Maximum
Diameter
Rapid burner
• Make sure your pot/pan has a at
base (Fig. 13).
• Position your pot/pan properly on
the trivets above the burners. Do
not use saucepans that overlap the
boundaries of the cooktop, otherwise
heat may get
deected
Fig. 14
towards the
cooktop or
benchtop,
which could
deteriorate
these surfaces;
see Fig.14
for optimum
placement.
AFTER SALES SUPPORT
AUS
1300 886 649
18cm 22cm
Fig. 13
MODEL: STR-BGC PRODUCT CODE: 60165 06/2018
25
Page 26

Instructions (Cont.)
• Do not place anything, for example a ame tamer or
asbestos mat, between the pan and trivet as it may
result in serious damage to the appliance
(Fig. 15-A).
• Do not remove the trivet and enclose the burner with
a wok stand as this will concentrate and deect the
heat onto the cooktop surface
(Fig. 15-B).
• Do not use large pots or heavy weights which can
bend the trivet or deect the ame onto the cooktop
surface (Fig. 15-C).
• When boiling food, use as little water as possible to
reduce cooking times.
• Preferably cover pots and pans with a lid to permit
cooking at a lower heat. When the contents start
boiling, turn the knob down to the LOW position.
• Always switch off the burner before removing the pot/
pan.
Fig. 15-A
Fig. 15-B
Fig. 15-C
26
AFTER SALES SUPPORT
AUS
1300 886 649
MODEL: STR-BGC PRODUCT CODE: 60165 06/2018
Page 27

FAQs & Troubleshooting Guide
If you experience problems with your gas cooktop, or it appears not to be
operating correctly, check the information below for solutions to common
problems. If none of the solutions offered help you solve your problem, please
contact our after sales support centre for advice; contact details are printed
at the bottom of the page. Do not attempt to repair the appliance yourself!
Problem Possible cause and solution
The burner
produces an
uneven or yellow
ame rather
than a blue one.
The burner fails
to ignite.
The burner
sparks but there
is no gas.
I can smell gas. • Check whether any gas tap has been left on.
Still not
working?
Switch off the burner and check the following points:
• Are the burners tted correctly?
• Are the holes in the burner clear?
• Are all parts of the burner clean and dry?
• Check that no dust has fallen into the ame turning it
yellow.
• If none of the above solved the irregular burning issue,
call your licensed gastter or our after sales support
centre and arrange a service.
• Check and ensure that the cooktop is plugged in and
power is turned on at the outlet.
• Check whether your home circuit breaker has ipped
or the fuse blown, and ip or replace as necessary.
• Make sure that the ignitor is not coated with food
spillage. Clean and check it for proper operation.
• Make sure you are holding down the control knob for
about 20 seconds when lighting a burner.
• Make sure the gas is turned on.
• Check that the burner holes are not blocked.
• If all burners are off, switch off the gas at the mains
and call our after sales support centre, or the gastter
who installed your cooktop, for service.
• DO NOT search with a naked ame, smoke, strike any
matches or press an ignitor.
• DO NOT operate electrical switches or devices,
including mobile phones.
Call your licensed gastter, or our after sales support
centre, and arrange a service.
AFTER SALES SUPPORT
AUS
1300 886 649
MODEL: STR-BGC PRODUCT CODE: 60165 06/2018
27
Page 28

Other Useful Information
Care and cleaning
CAUTION!
• Before cleaning the cooktop, unplug the appliance from the mains
electricity supply.
• Make sure that all burners are switched off and the cooktop surface is
cool enough to touch before cleaning.
• Do not use abrasive or harsh cleaning agents (such as scouring powders,
abrasive stones, wire brushes and so on) or sharp objects that may
scratch the stainless steel cooktop
Cleaning the cooktop
To ensure food safety and keep the cooktop in good working order, clean it
regularly after each use.
Stainless steel surfaces
• Although it is easier to clean some deposits whilst the hob surface is still
warm, make sure that the hob surface, trivets and hob burners have all
cooled sufficiently before you attempt to touch them.
• Any residues that are left on the cooktop surface from cleaning agents
will damage it. Remove any residues from the cooktop surface with a soft
cloth or sponge, dampened in warm, soapy water and wrung out.
• Dry the cooktop with a clean, dry cloth.
• We recommend using an appropriate stainless steel cleaner and polish
regularly on the stainless steel surfaces.
• The control knobs may be removed for thorough cleaning, if necessary,
but ensure not to damage the seal.
Enamelled parts
• Remove the enamelled trivets (Fig. 16:
A) and burner caps (Fig. 16: B) from the
cooktop and clean them the same way
as the cooktop surface: with a soft cloth
wrung out in warm, soapy water.
• Remove tough stains from enamelled
parts using a nonabrasive liquid
detergent, a creamy cleanser suitable for
cleaning vitreous enamel or a fine steel
wool soap pad.
AFTER SALES SUPPORT
AUS
28
1300 886 649
surface
.
Fig. 16
A
B
C
D
MODEL: STR-BGC PRODUCT CODE: 60165 06/2018
Page 29

Other Useful Information (Cont.)
Service and repair
CAUTION!
• This appliance must only be serviced by authorised personnel.
• If your cooktop appears not to be operating correctly, disconnect it from
your mains supply and then contact our after sales support centre.
• Do not attempt to repair the appliance yourself! Gas appliances should
be checked and maintained by authorised personnel on a regular basis
in order to maintain proper function and safety.
• Please note that if you book a service, the appliance must be accessible
for the technician to perform any necessary repair. If the cooktop is
installed in such a way that the technician is concerned that damage will be
caused to the appliance or your kitchen, then they will not complete a repair.
Spare parts
Our after sales support centre stocks the following spare parts for the
STR-BGC STIRLING Gas Cooktop. To purchase a part, call the centre on
1300 886 649 or email us at [email protected]
• Accessories bag (mounting brackets and screws)
• Burner cap: auxiliary, semirapid, rapid
• Burner cup: auxiliary, semirapid, rapid
• Burner crown (ame spreader): auxiliary, semirapid, rapid
• Gas regulator
• Gas valve
• Ignitor
• Injector ∅0.85, ∅1.16, ∅1.49, ∅0.53, ∅0.72, ∅0.93
• Joint gasket
• Knob (round)
• Power cable
• Sparking ignition 150, 300 400
• Thermocouple 250, 500
• Trivets (enamelled pan stands)
AFTER SALES SUPPORT
AUS
1300 886 649
MODEL: STR-BGC PRODUCT CODE: 60165 06/2018
29
Page 30
Other Useful Information (Cont.)
Technical specifications
Rated Input Voltage
Certied Gas Type NG + LPG
Cooktop Material Stainless Steel
Flame Failure Device Yes (x4)
Cooktop dimensions 580 (W) x 500 (D) x 92 (H) mm
Benchtop cut-out
dimensions
Weight 6.0kg
Regulated for: Natural Gas Regulated for: LPG
Inj. ∅
(mm)
Auxiliary 0.85 3.6
Semirapid 1.16 6.5 0.72 6.6
Rapid 1.49 10.8 0.93 11.0
Total 27.4 27.9
220–240V ~ 50-60Hz 0.8W
560 (W) x 480 (D) mm
MJ/hr
Gas
Pressure
1.0kPa
Inj. ∅
(mm)
0.53 3.7
MJ/hr Gas
Pressure
2.75kPa
Compliance
This appliance has been fully tested and meets all requirements as set out by
standards AS/NZS 60335.1 and AS 60335.2.102 for electrical safety and
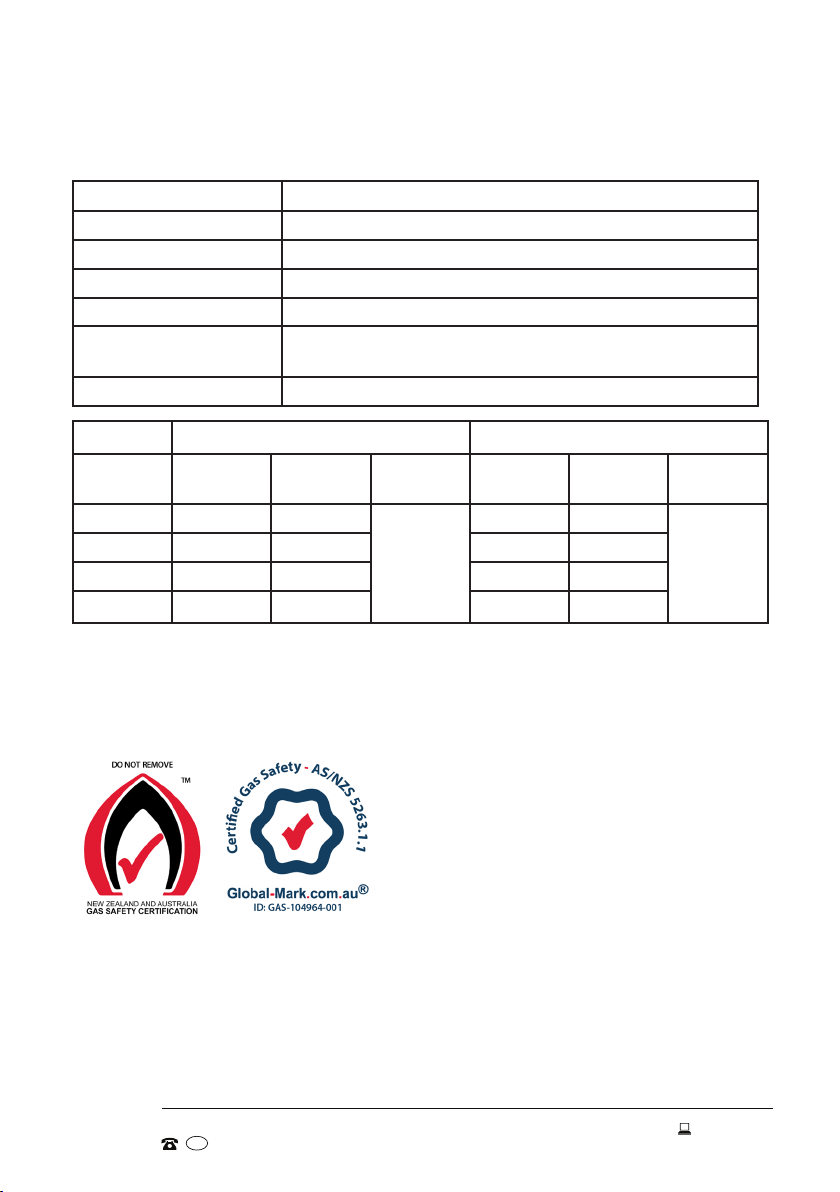
AS/NZS 5263.1.1 for gas safety.
Responsible disposal
At the end of its working life, do not throw the appliance out with your
household rubbish. Electrical and electronic products contain substances that
can have a detrimental effect on the environment and human health if disposed
of inappropriately. Observe any local regulations regarding the disposal of
electrical consumer goods and dispose of it appropriately for recycling. Contact
your local authorities for advice on recycling facilities in your area.
AFTER SALES SUPPORT
AUS
30
1300 886 649
MODEL: STR-BGC PRODUCT CODE: 60165 06/2018
Page 31

Gas Cooktop
Repair and Refurbished
Goods or Parts Notice
Unfortunately, from time to time, faulty products are manufactured which need to
be returned to the supplier for repair.
Please be aware that if your product is capable of retaining user-generated data
(such as les stored on a computer hard drive, telephone numbers stored on
a mobile telephone, songs stored on a portable media player, games saved on
a games console or les stored on a USB memory stick) during the process of
repair, some or all of your stored data may be lost. We recommend you save this
data elsewhere prior to sending the product for repair.
You should also be aware that rather than repairing goods, we may replace them with
refurbished goods of the same type or use refurbished parts in the repair process.
Please be assured though, refurbished parts or replacements are only used
where they meet ALDI’s stringent quality specifications.
If at any time you feel your repair is being handled unsatisfactorily, you may
escalate your complaint. Please telephone us on 1300 886 649 or write to us at:
Tempo (Aust) Pty Ltd ABN 70 106 100 252
PO BOX 6056 Frenchs Forest, Sydney, Australia NSW 2086
Telephone: 1300 886 649 (Aust) - Fax: (02) 9975 2688
Tempo Help Desk: 1300 886 649 (Aust)
(Operating Hours: Mon-Fri 08:30am to 06:00pm EST)
Email: [email protected]
AFTER SALES SUPPORT
AUS
1300 886 649
MODEL: STR-BGC PRODUCT CODE: 60165 06/2018
31
Page 32

Warranty returns
Should you for any reason need to return this
product for a warranty claim, make sure to
include all accessories with the product.
Product does not work?
If you encounter problems with this product, or if it fails to
perform to your expectations, make sure to contact our
After Sales Support Centre on 1300 886 649.
For an electronic copy of this manual,
go to www.stirlingappliances.com.au and download a copy.
Instruction Manual Revision Index
Version No Issue Date Description
V1.0 12 January 2018 Original release
V1.1 22 January 2018 Minor revision, page 30
V1.2 29 January 2018 Minor revision, page 30
V1.3 01 February 2018 Minor update, page 20
V1.4 06 March 2018 Release date updated in footer
AFTER SALES SUPPORT
AUS
1300 886 649
MODEL: STR-BGC PRODUCT CODE: 60165 06/2018
 Loading...