

Page 1
- 1 -
PRESCRIBING INFORMATION
FOREWORD
Read this manual carefully before using your StimTec
NEO unit.
The manufacturer strongly recommends carefully reading
the “Warnings and Cautions”, and subsequent chapters
of this manual.
W ARNINGS AND CAUTIONS
Prescription labeling:
Federal law restricts this device to sale or use by or on
the order of a practitioner appropriately licensed by the
state or province.
Contraindications:
1. Do not use this device on patients who have a
cardiac pacemaker, implanted defibrillator, or other
implanted metallic or electronic device, because this
may cause electric shock, burns, electrical
interference, or death.
2. Do not use this device on patients whose pain
syndromes are undiagnosed.
WARNINGS
1. Do not apply stimulation over the patient’s neck or
mouth because this could cause severe muscle
spasms resulting in closure of the airway, difficulty in
breathing, or adverse effects on heart rhythm or
blood pressure.
Page 2

- 2 -
2. Do not apply stimulation across the patient’s chest,
because the introduction of electrical current into the
chest may cause rhythm disturbances to the
patient’s heart, which could be lethal.
3. Do not apply stimulation over open wounds or
rashes, or over swollen, red, infected, or inflamed
areas or skin eruptions (e.g., phlebitis,
thrombophlebitis, varicose veins).
4. Do not apply stimulation over, or in proximity to,
cancerous lesions.
5. Do not apply stimulation in the presence of electronic
monitoring equipment (e.g., cardiac monitors, ECG
alarms), which may not operate properly when the
electrical stimulation device is in use.
6. Do not apply stimulation when the patient is in the
bath or shower.
7. Do not apply stimulation while the patient is sleeping.
8. Do not apply stimulation while the patient is driving,
operating machinery, or during any activity in which
electrical stimulation can put the patient at risk of
injury.
9. Consult with the patient’s physician before using this
device, because the device may cause lethal rhythm
disturbances to the heart in susceptible individuals.
10. Apply stimulation only to normal, intact, clean,
healthy skin.
Page 3

- 3 -
PRECAUTIONS
1. TENS is not effective for pain of central origin,
including headache.
2. TENS is not a substitute for pain medications and
other pain management therapies.
3. TENS devices have no curative value.
4. TENS is a symptomatic treatment and, as such,
suppresses the sensation of pain that would
otherwise serve as a protective mechanism.
5. Effectiveness is highly dependent upon patient
selection by a practitioner qualified in the
management of pain patients.
6. The long-term effects of electrical stimulation are
unknown.
7. Since the effects of stimulation of the brain are
unknown, stimulation should not be applied across
the head, and electrodes should not be placed on
opposite sides of the head.
8. The safety of electrical stimulation during pregnancy
has not been established.
9. Some patients may experience skin irritation or
hypersensitivity due to the electrical stimulation or
electrical conductive medium (gel).
10. Patients with suspected or diagnosed heart disease
should follow precautions recommended by their
physicians.
11. Patients with suspected or diagnosed epilepsy
should follow precautions recommended by their
physicians.
Page 4

- 4 -
12. Use caution when the patient has a tendency to
bleed internally, such as following an injury or
fracture.
13. Use caution following recent surgical procedures
when stimulation may disrupt the patient’s healing
process.
14. Use caution if stimulation is applied over the
menstruating or pregnant uterus.
15. Use caution if stimulation is applied over areas of
skin with less than normal sensitivity.
16. Keep this device out of the reach of children.
17. Use this device only with the leads, electrodes, and
accessories recommended by the manufacturer.
18. Use this device only under the continued supervision
of a Professional Healthcare Provider.
ADVERSE REACTIONS
· Patients may experience skin irritation and burns
beneath the stimulation electrodes applied to the skin.
·Patients may experience headache and other painful
sensations during or following the application of
electrical stimulation near the eyes and to the head
and face.
·Patients should stop using the device and should
consult with their physicians if they experience
adverse reactions from the device.
Page 5

- 5 -
GENERAL WARNINGS
1. Do not immerse any part of the unit in water.
2. Do not place the unit close to excessive heat.
3. Do not use any electrodes which are less than
50mm X 50mm.
4. Use only the specified battery: 1x 3.7volt
rechargeable lithium battery. The use of any other
battery could damage the unit.
5. Remove battery if unit is not used for a long period of
time.
6. Do not use the unit while asleep.
7. Keep the unit away from sources of high magnetic
fields such as TV’S, microwave ovens, and hi-fi
speakers, as these may affect the LCD screen.
8. Temperature & Relative Humidity of storage:
-20°C–+40°C, 8%--70% R.H.
9. Temperature & Relative Humidity of transportation:
-20°C–+40°C, 8%--70% R.H.
Page 6

- 6 -
CONTENTS
Prescribing Information………………………..…… 1
Contents …...……………………….…………..….. 6
Operating Instructions for Healthcare Provider…. 7
Instruction for Use……………….…………..…….. 9
How to Assemble Your Unit…………….….……… 10
After Use…....……………………….….…..….…… 14
Operation of the STIMTEC NEO Unit……....…… 16
Specifications……………….…..………..…..…….. 20
Other Features…………………………...…....…… 24
Electrodes Placement…………………...………… 27
Page 7

- 7 -
OPERATING INSTRUCTIONS
FOR HEALTHCARE PROVIDER
INTENDED USE
The StimTec NEO combines the treatment capabilities of
a TENS device, an EMS or NMES device, a MIC
stimulator, and an IFT stimulator all in one unit.
TENS stands for Transcutaneous Electrical Nerve
Stimulation. The TENS settings are used to provide
symptomatic pain relief for chronic, acute or
post-operative pain.
EMS stands for Electrical Neuromuscular Stimulation.
The EMS settings are used to provide a muscular training
for localized regeneration and muscular hypertrophy.
MIC stands for MicroCurrent Stimulation. The MIC
settings are used to provide symptomatic pain relief for
chronic, acute or post-operative pain.
IFT stands for Interferential Stimulation. The IFT settings
are indicated for symptomatic relief of chronic intractable
pain.
How does TENS/EMS/MIC/IFT work?
For the TENS treatment:
Transcutaneous Electrical Nerve Stimulation (TENS)
is believed to work by stimulating your body's own natural
defenses against pain. The unit produces a gentle
stimulus that is communicated through electrodes
normally placed over the area of pain. This stimulus helps
the body to produce natural pain relievers called
endorphins.
The correct positioning of the electrodes is important and
we recommend correct placement through
Page 8

- 8 -
experimentation. Some people feel immediate benefit
from EMS/TENS, however some may only achieve
benefit after repeated treatment sessions and over an
extended period of time.
For EMS treatment:
Electrical Neuromuscular Stimulation (EMS) is
believed to work by stimulating the muscles with electrical
impulses. When the muscle receives impulses, it
contracts as if the brain has sent the signal itself. As the
pulse strength increases, the muscle flexes as in physical
exercise. Then when the pulse ceases, the muscle
relaxes and the cycle is repeated.
For MIC treatment:
MicroCurrent Stimulation (MIC) is a type of therapy
where very low current is sent into the cells of the body.
MIC is a very faint current that is so small it is measured
in millionths of an amp (Microamps). Human cells
generate a current that is in the micro amp range which is
why some can’t feel it – the current is so low it doesn’t
stimulate the sensory nerves.
MIC is a physiological electric modality that increases
ATP (energy) production in the cells of your body. This
dramatically increases the tissue’s healing rate. The
immediate response to the correct MIC frequency
suggests that other mechanisms are involved as well.
The exact effects or changes in the tissue can be
noticeable; scars can suddenly soften; trigger points often
become less painful when the “correct” frequency is
applied. In many situations the changes can be long
lasting and even permanent in some cases.
For IFT treatment:
Interferential Stimulation (IFT) is an anti-inflammatory
based treatment modality characterized by two
Page 9

- 9 -
alternating-current sine waves or square waves of
differing frequencies that “work” together to produce an
IFT current that is also known as a beat pulse or
alternating modulation frequency. One of the two currents
is usually held at 4,000 Hz, and the other can be held
constant or varied over a range of 4,004 to 4,160 Hz.
Because of the interference between the two frequencies,
IFT waves create low impedance when crossing the skin
into soft tissues. The IFT currents can stimulate sensory,
motor, and pain fibers. These large impulse fibers
interfere with the transmission of pain messages at the
spinal cord level. This deep tissue penetration stimulates
parasympathetic nerve fibers for increased blood flow
and edema reduction. It utilizes the low electric-current to
stimulate muscle nerves to achieve the symptomatic
relief of chronic intractable pain, post-traumatic pain, and
post-surgical pain.
INSTRUCTIONS FOR USE
Your StimTec NEO has been designed to be simple and
easy to use.
CONTENT IN THE PACK
Your StimTec NEO pack should contain the following:
• 1 ¯ StimTec NEO Unit
• 2 ¯ Leads
• 4 ¯ Self Adhesive Electrodes with Connectors
(Size: 50mm ¯ 50mm)
• 1 ¯ 3.7V Rechargeable Lithium Battery (BL-6F)
• 1 ¯ AC Power Cord
• 1 ¯ Battery Charging Cradle
• 1 ¯ User Manual
Page 10
- 10 -
HOW TO ASSEMBLE YOUR UNIT
Assembly of the StimTec NEO Unit is very simple and
requires only five steps.
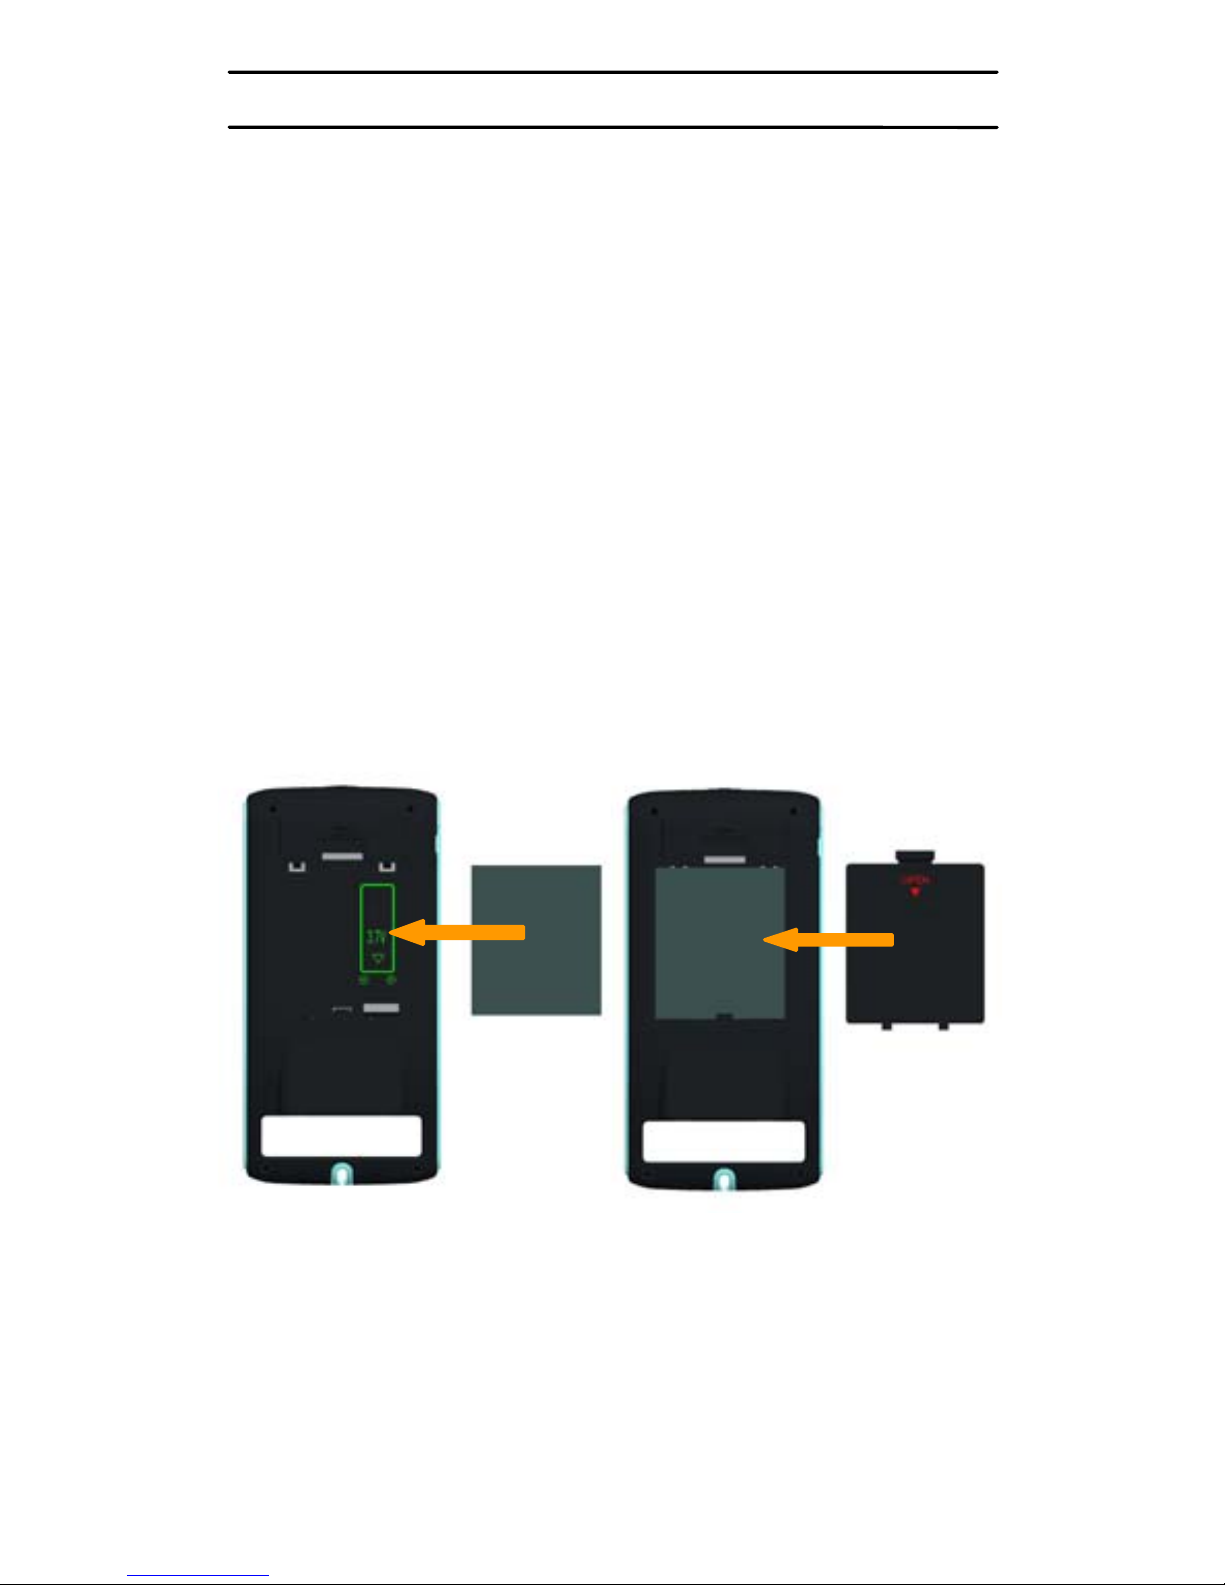
STEP 1 BATTERY
Slide belt clip down to access battery cover. Remove the
battery cover and insert the battery, as shown on the
diagram inside the battery compartment. Replace the
battery cover.
NOTE: Fully charge battery before initial use. See
“Charging The Battery” on Page 15.
Insert the battery Replace the battery cover
Page 11
- 11 -
CAUTION
There is a risk of explosion if the battery is fitted
incorrectly. Replace with the 3.7 volt lithium battery.
Do not dispose of the battery in a fire and keep them
out of reach of children. The battery must be removed
from the unit if unit is not used for a long period of
time.
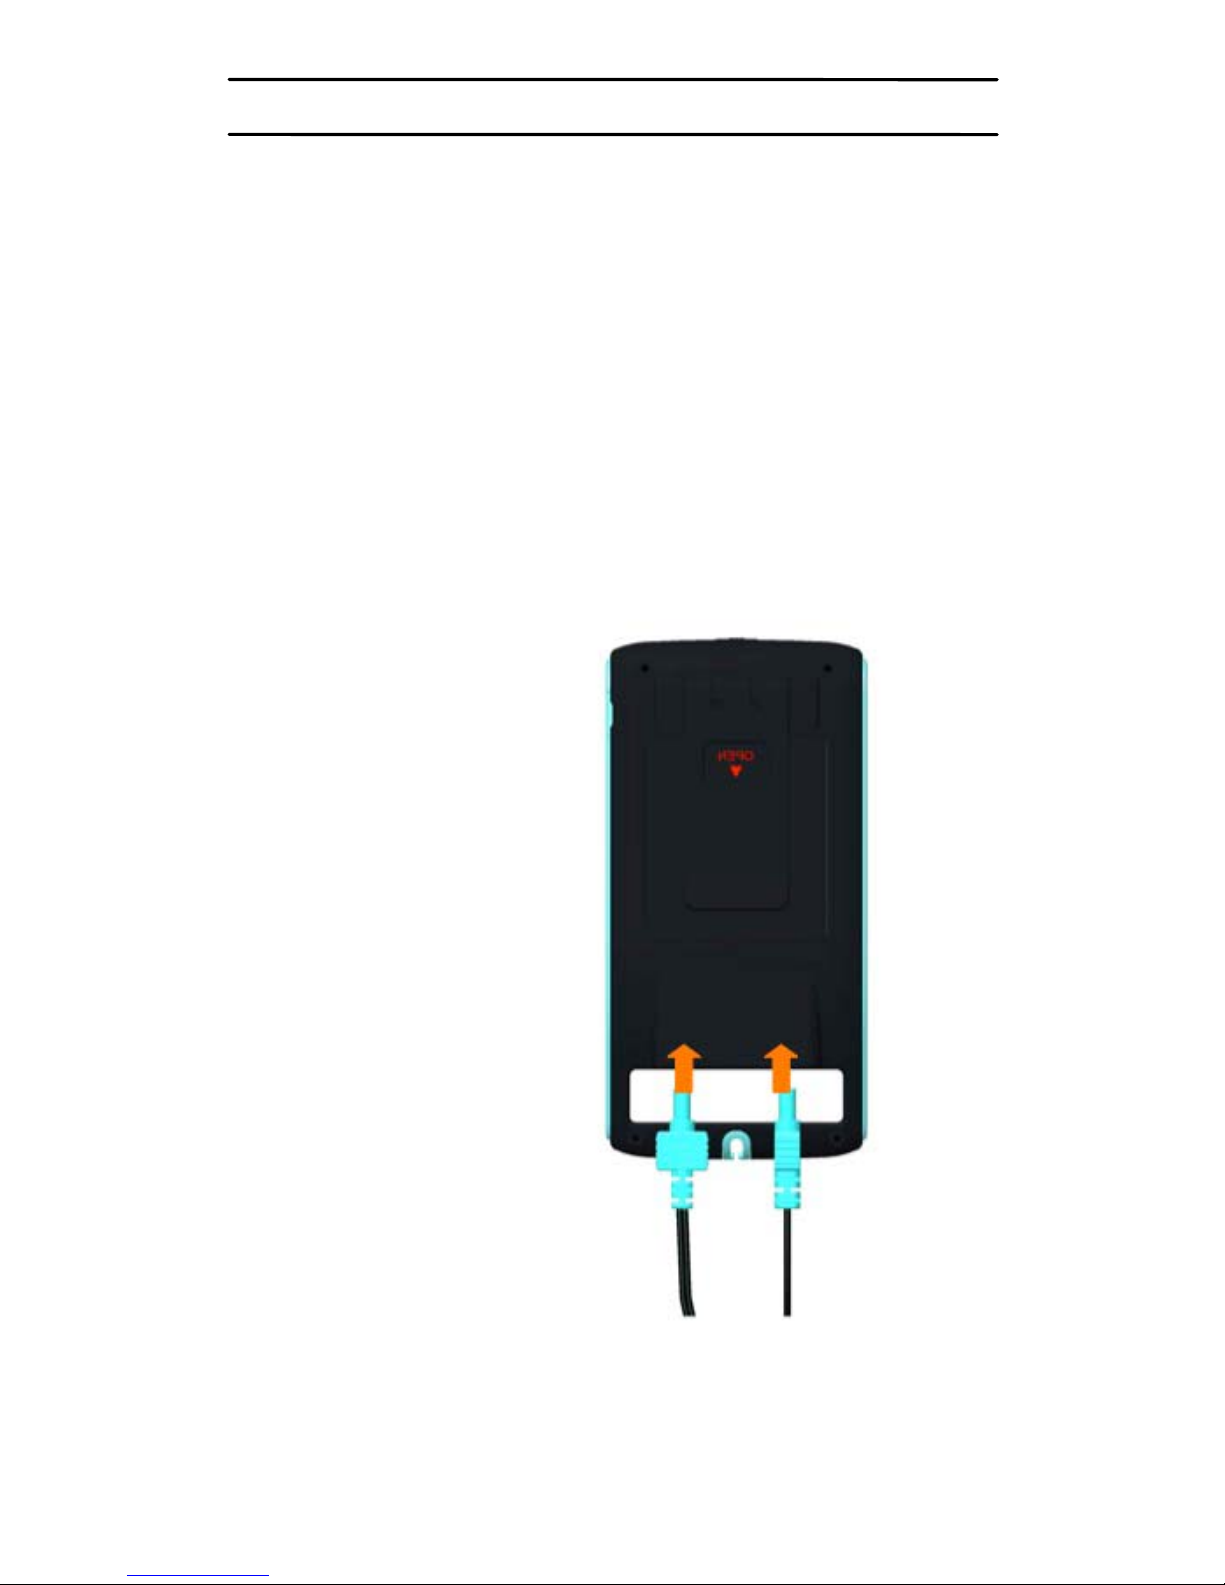
STEP 2 LEADS
If only using one lead, insert into one jack. If using two
leads, insert into both jacks.
A B
A: Insert the lead wires
B: Turn the plug on the lead wire 90° to lock it between
the main body and handle of the unit. This prevents
accidental disconnection during treatment.
Page 12
- 12 -
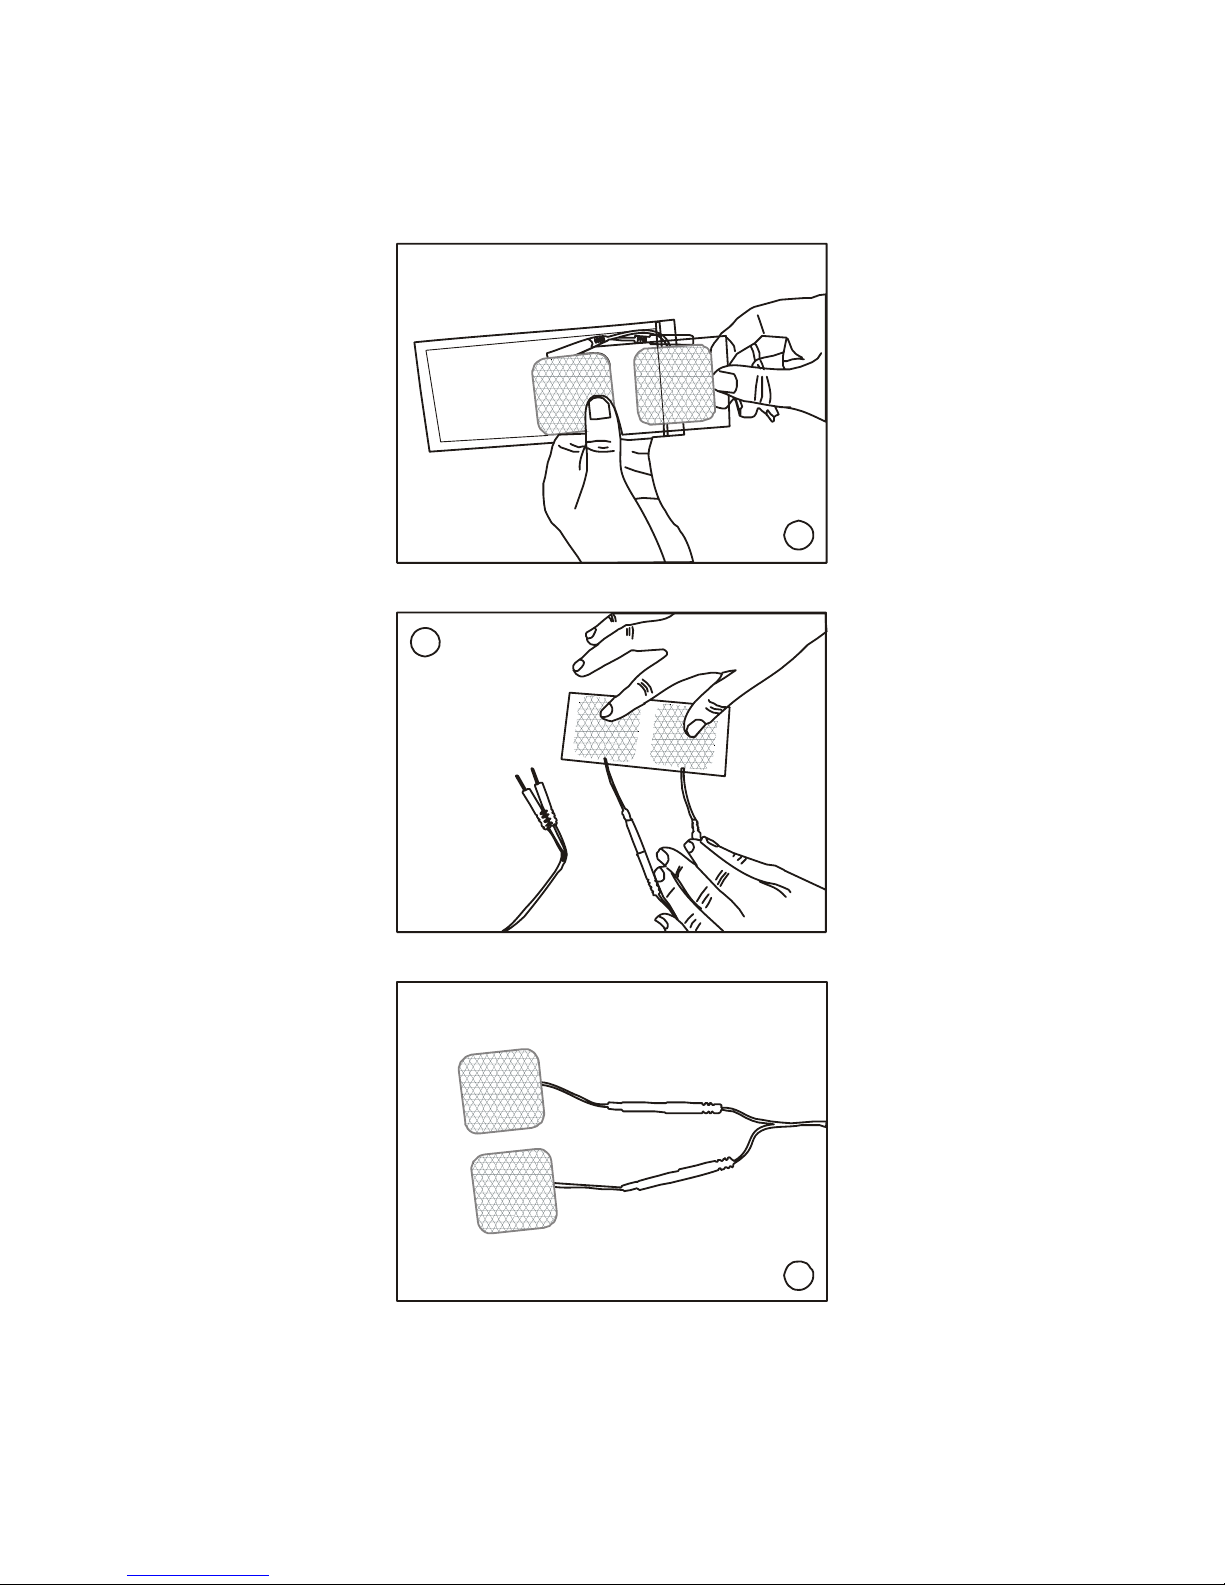
STEP 3 ELECTRODES
Remove electrodes from the bag and connect to the
leads.
5
6
7
Page 13
- 13 -
STEP 4 PLACEMENT OF ELECTRODES
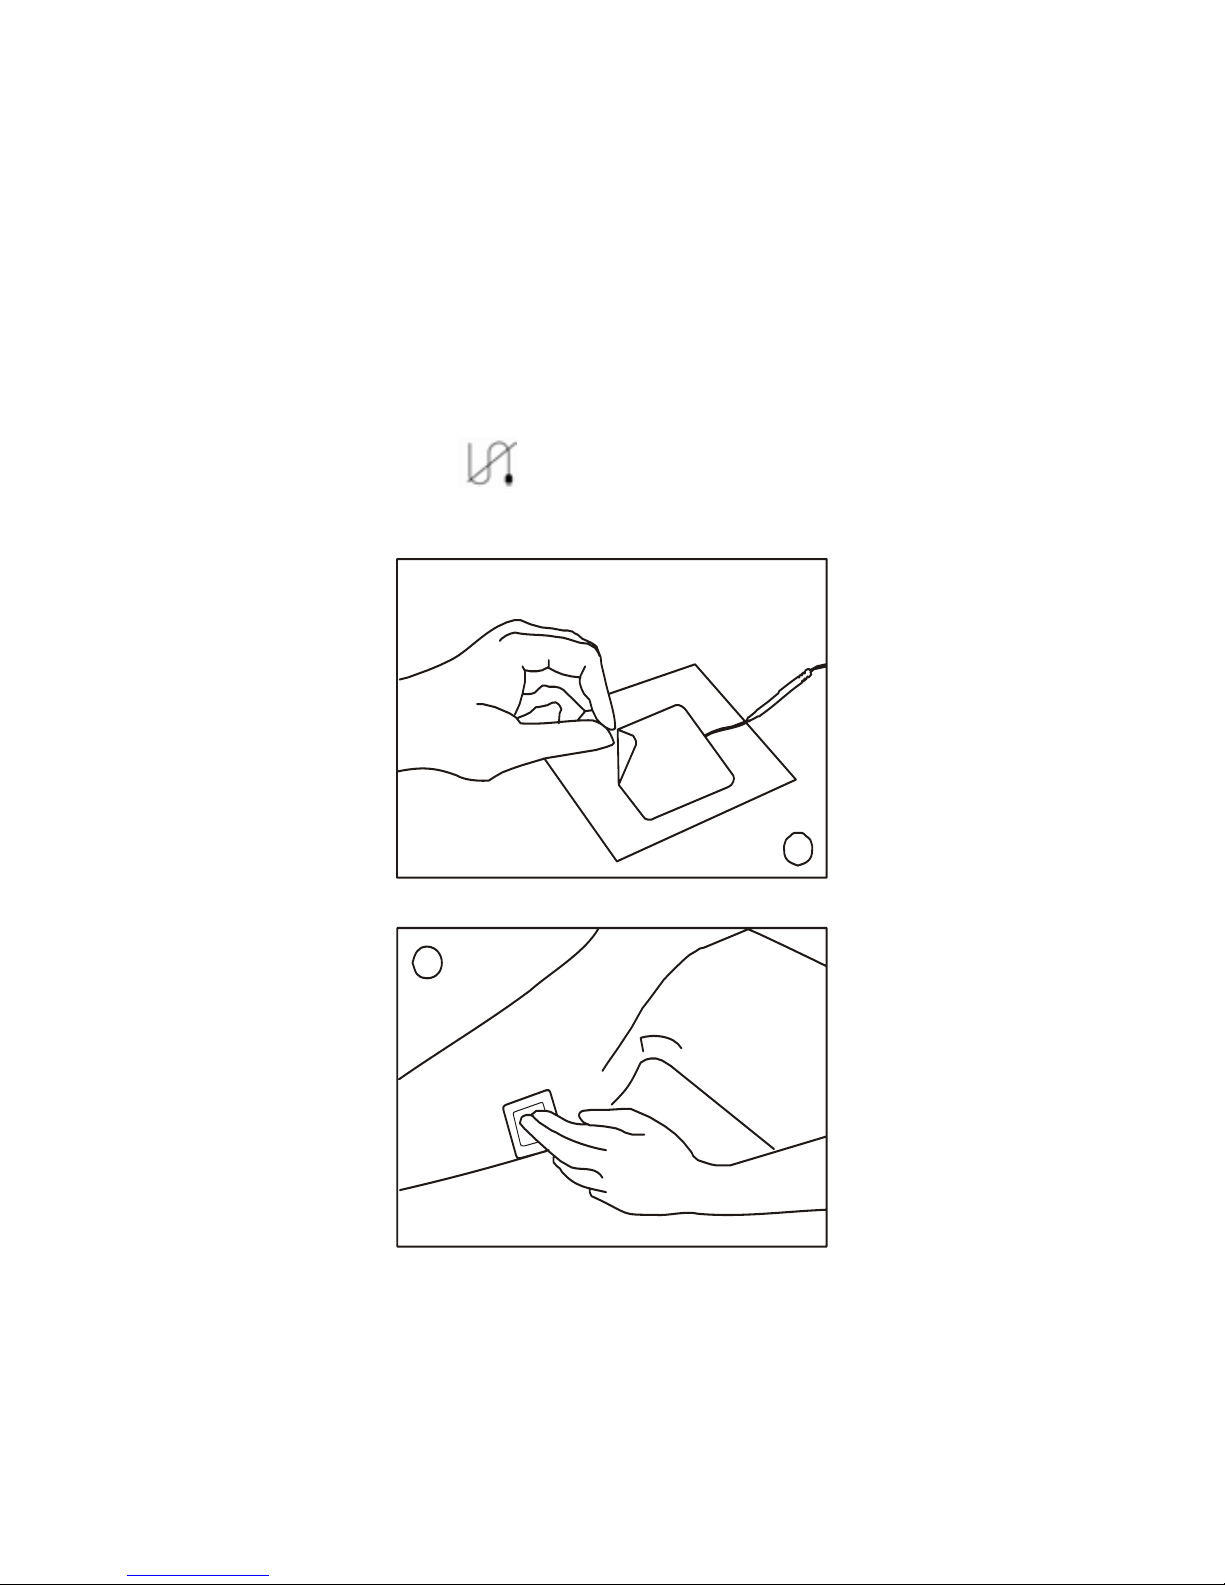
Ensure wherever you intend to place the electrodes, the
skin is clean and thoroughly dry. Remove the electrodes
from the clear plastic shield and position on your body as
required.
Please note: Attempting to increase intensity without
electrodes connected and placed on the treatment area is
not possible. The symbol on the display will notify you
if this occurs.
8
9
STEP 5 READING
Read “Operation of the StimTec NEO Unit” on page 16,
and decide how to use the unit for the treatment.
Page 14
- 14 -
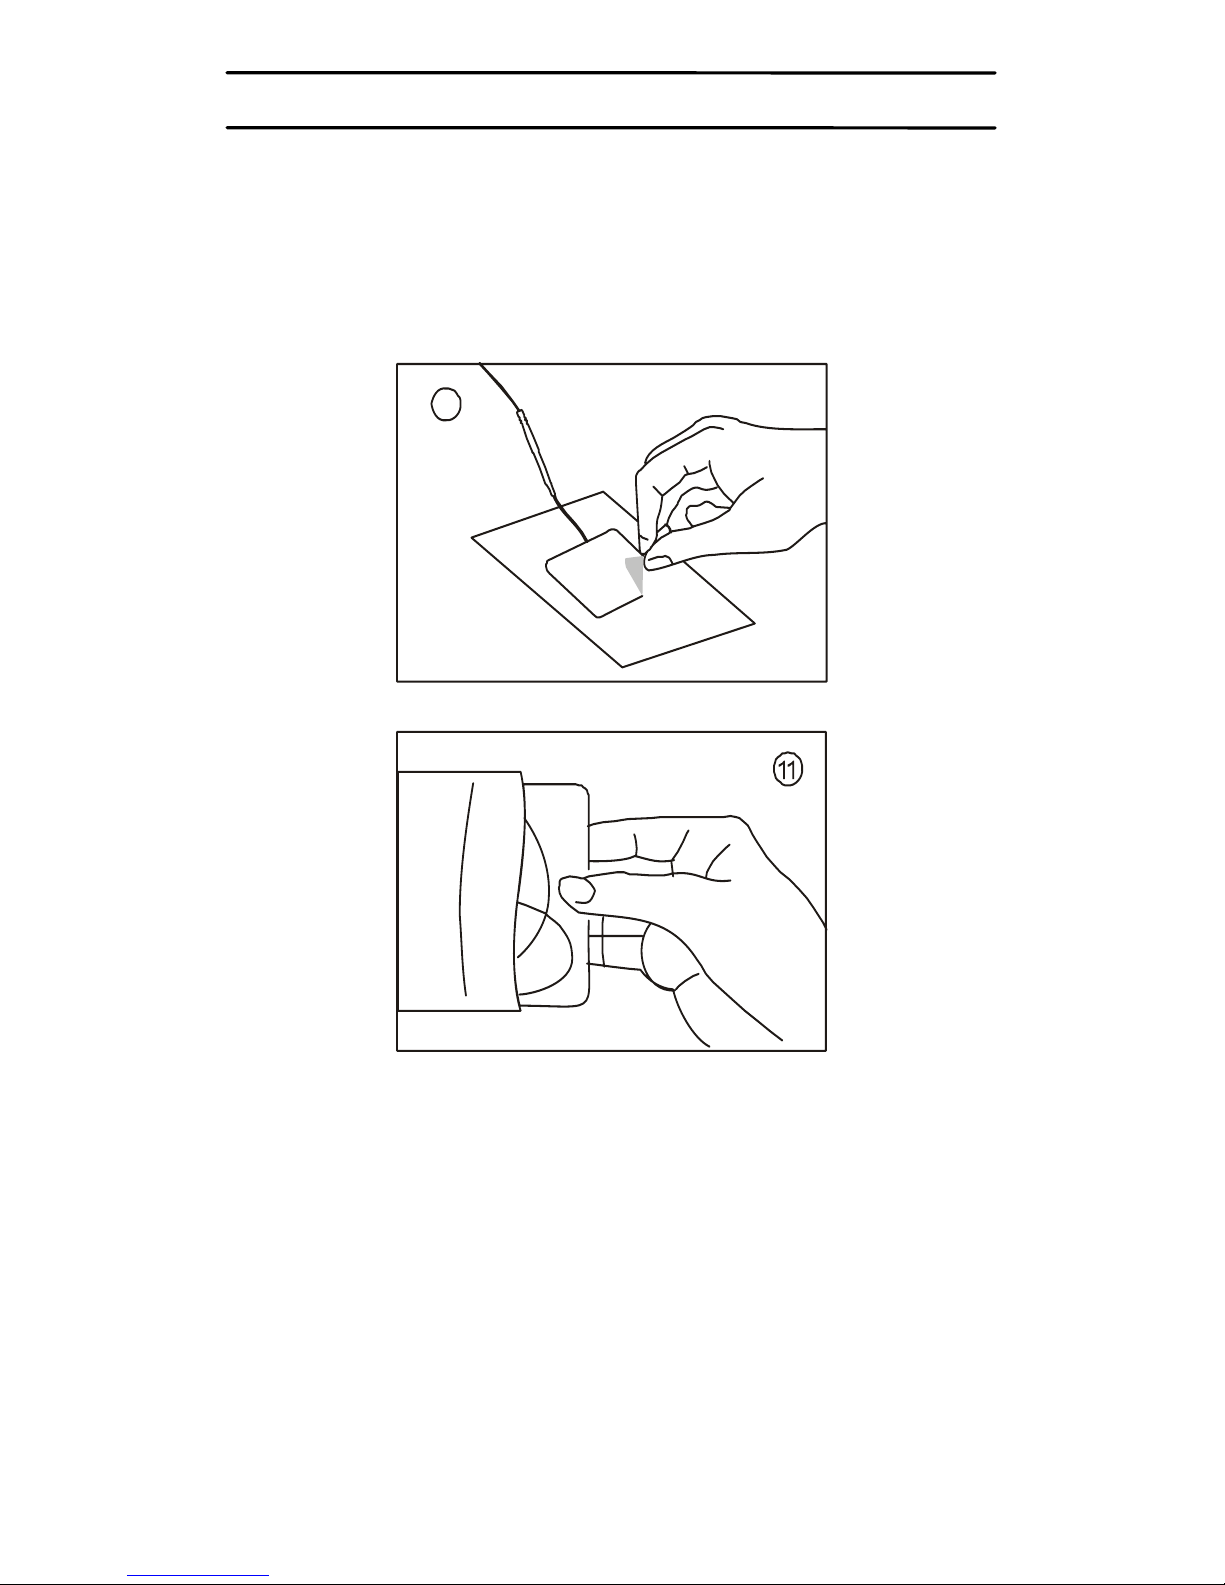
NOTE: AFTER USE
Always ensure that the unit is switched OFF before
removing the electrodes. After use, return the electrodes
to the clear plastic shields. There is no need to separate
the lead wires from the electrodes.
10
Life of the electrodes: When the electrodes initially lose
their adhesive quality, it is possible to reactivate their
adhesiveness by applying a fine spray of water. Replace
the electrodes when they lose their adhesive quality in
order not to affect the efficiency of the unit.
Page 15

- 15 -
CHARGING THE BATTERY
The StimTec NEO is powered by a type BL-6F
rechargeable Lithium battery. A separate Charging Cradle
and Power Adaptor are included in the kit.
When the battery is running low, a low battery indicator
will show on the screen (battery symbol). Although the
display fades as the battery runs down, the strength of
the output does not change until the warning is shown.
When the battery is fully charged, the indicator light on
the cradle will change from red to green.
NOTE
1. Remove the battery from the StimTec NEO if the unit
is unlikely to be used for a long period.
2. When the battery is running low, it has to be
removed from the unit and charged in the charging
cradle.
3. Use only the power adaptor and charging cradle
supplied.
USE OF OTHER CHAGERS COULD BE HAZARDOUS.
Page 16
- 16 -
OPERATION OF THE STIMTEC NEO UNIT
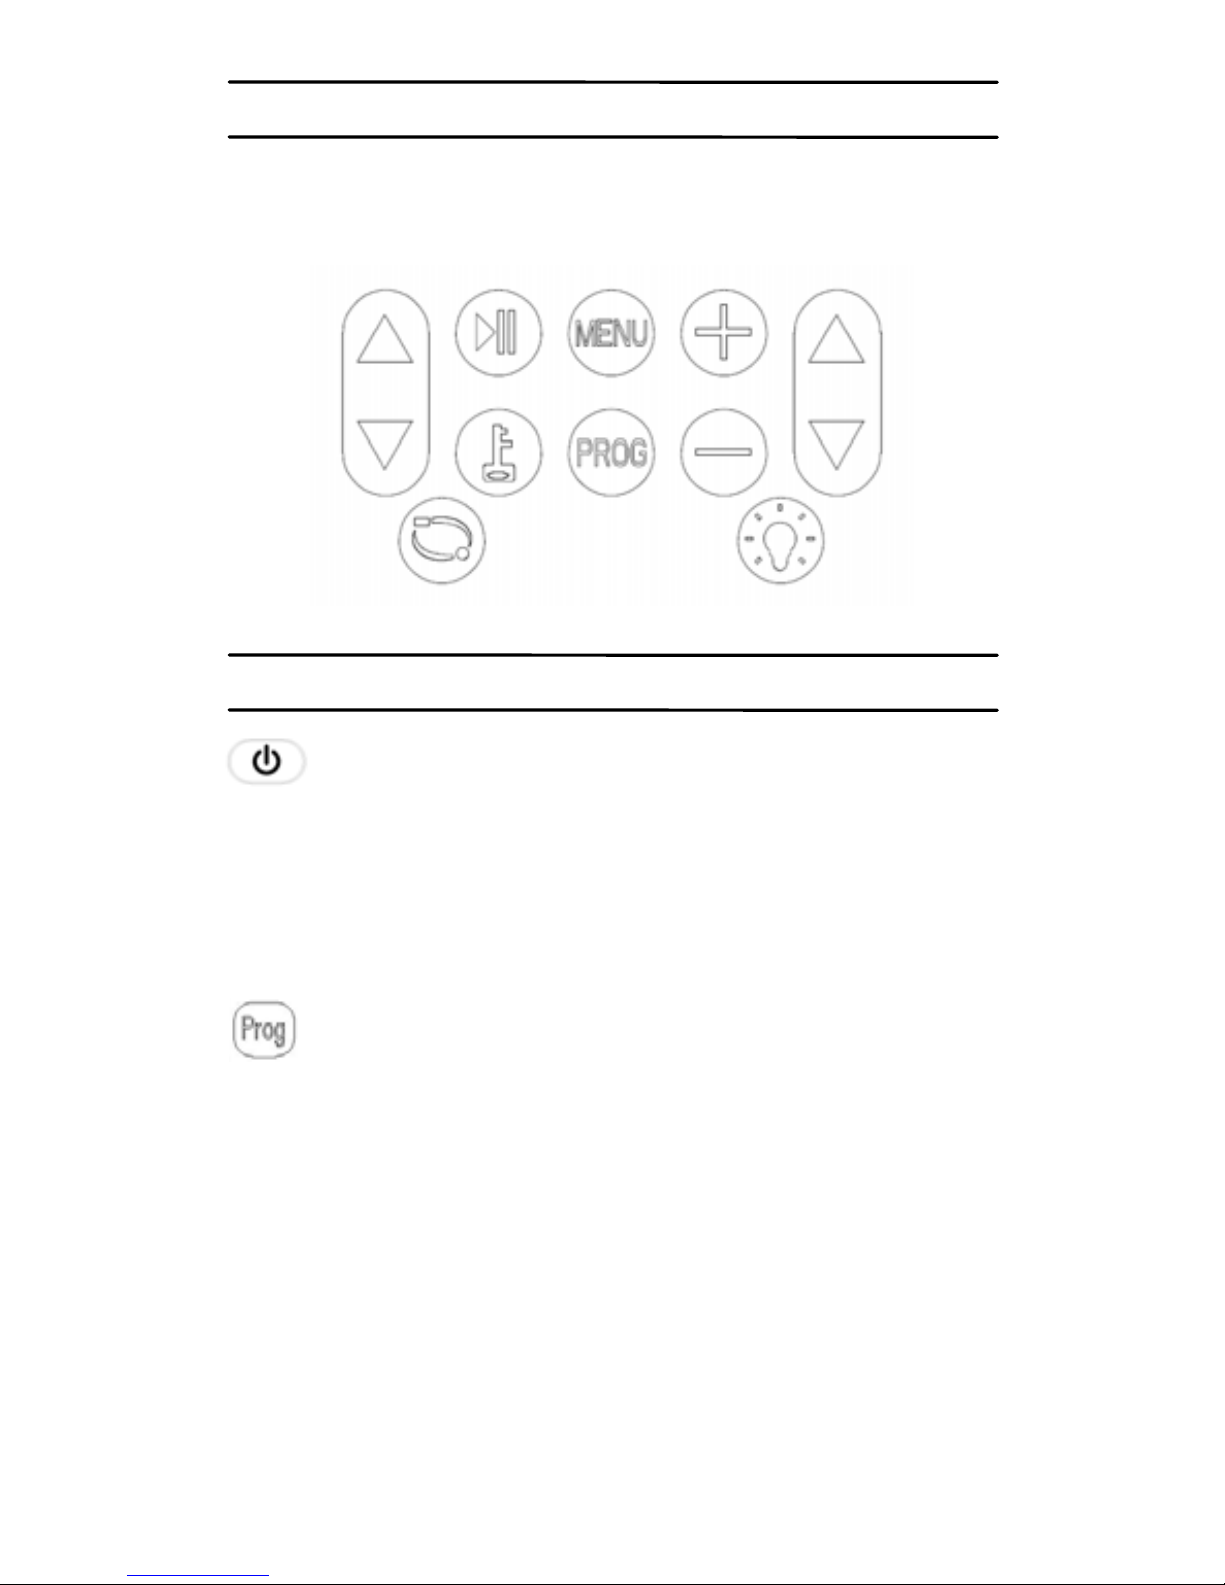
StimTec NEO Unit is easy to operate using the keys
shown in the following diagram.
WHAT DOES EACH KEY DO
This key switches the unit on or off. Press once
and the unit is on, the LCD display located at the front of
the unit will light up, there will be no feeling from either
lead at this point as the intensity always starts at zero.
Press this key again and the unit will switch off.
There are four stimulation types available with the
StimTec NEO (TENS, EMS, MicroCurrent and
Interferential stimulation).
Press and hold the “Prog” key at least 3 seconds, to
switch between TENS – EMS – MICRO – IFT. The
symbol “TENS”, “EMS”, “MICRO” and “IFT” will display
on the LCD accordingly.
Once the stimulation type is selected, press the “Prog”
key to select the related programs.
Page 17
- 17 -
There are a total of 40 programs available:
For TENS treatment:
Program 0-13 --- TENS Preset programs
Program 14-21 --- TENS Manual programs
For EMS treatment:
Program 22-31 --- EMS Preset programs
Program 32, 33 --- EMS Manual programs
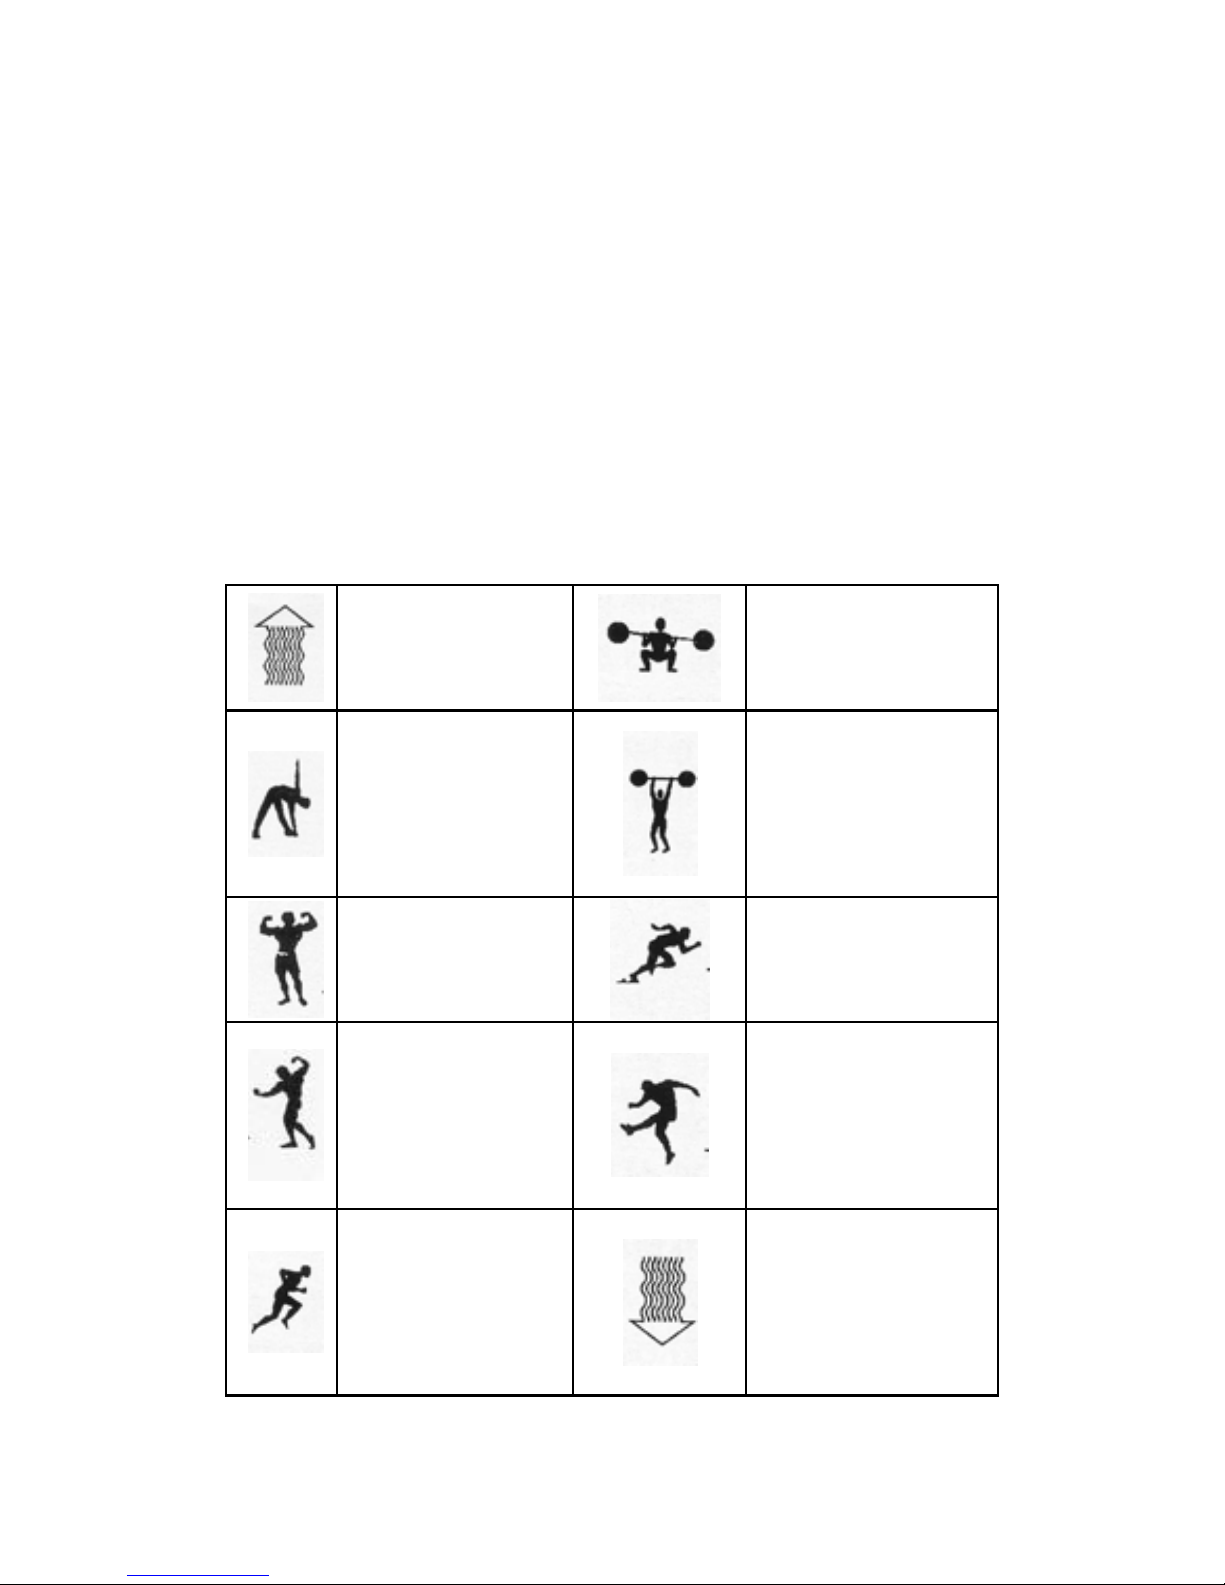
In EMS preset modes (Prog 22- Prog 31) the treatment
status symbols below will be displayed.
WARM-UP FORCE 1
AEROBIC
EXERCISE
FORCE 2
TONING FAS T F OR CE
HARDENING
EXPLOSIVE
FORCE
RESISTING
FORCE
PROGRESSIVE
RECUPERATION
Page 18

- 18 -
For MIC treatment:
Program 34 --- Micro Preset programs
Program 35 --- Micro Manual programs
For IFT treatment:
Program 36-39 --- IFT Manual program
Press this key to select the following parameters
one by one:
TENS Preset Mode(P0-P13) :
Treatment Timer (min)
TENS Manual Mode(P14-P21) :
FREQUENCY (Hz)
PULSE WIDTH (μs)
Waveform
Treatment Timer (min)
EMS Manual Mode(P32-P33) :
FREQUENCY (Hz)
PULSE WIDTH (μs)
Waveform
Treatment Timer (min)
SYNCHRONOUS/ALTERNATING
ON TIME (sec)
OFF TIME (sec)
RAMP UP TIME (sec)
RAMP DOWN TIME (sec)
Page 19
- 19 -
MicroCurrent Mode :
FREQUENCY (Hz) (P35)
Treatment Timer (min) (P34,P35)
IFT Mode (P36-P39) :
FREQUENCY (Hz)
Treatment Timer (min)
Press these keys to increase or decrease the
value of the parameter, which has been selected
by MENU key.
Press these keys to adjust the intensity of channel
1 and channel 2. Left side is for channel 1; right
side is for channel 2.
Pause key: Press this key to make the unit pause;
to continue treatment, press and hold down this
key again.
For TENS preset modes (Prog 2- Prog 13), if a
preset mode is working, press this key to skip a phase
(sub-programs Ⓐ Ⓑ Ⓒ). For EMS preset and manual
modes (Prog 22- Prog 33), if a preset mode is working,
press this key to choose the treatment area.
Press and hold this key for at least 3 seconds to
LOCK or UNLOCK parameters. When the unit is locked,
only intensity and treatment timer can be adjusted.
The symbol displayed on the LCD screen indicates
that the unit is locked.
Page 20

- 20 -
SPECIFICATIONS
Model: StimTec NEO
Channel Dual, isolated
TENS:
Intensity 0-150mA zero to peak at 500ohm load
Frequency 1-150 Hz
Pulse width 50, 60, 70, 80, 90, 100, 110, 120, 130,
140, 150, 160, 170, 180,190, 200, 210,
220, 230, 240, 250μs
Waveform Symmetrical bi-phase rectangular,
Asymmetrical bi-phase rectangular,
Mono-phase rectangular
Treatment timer Continuous, 15, 30, 45, 60, 90min
The PRESET program apply a sequence of 3
sub-programs Ⓐ Ⓑ Ⓒ, optimized to treat the specific
pain situation. The characters Ⓐ, Ⓑ or Ⓒwill flash,
showing the phase in use or will be ON to show the
completed phase.
Mode Constant A – Both Pulse Rate and Pulse Width
are adjustable. Default values are PR=3Hz and
PW=250μs characterized by a decontracturating effect.
Use this program if you want to relax the painful area.
The stimulation level must be set to produce a gentle
muscular contraction.
Mode Constant B – Both Pulse Rate and Pulse Width
are adjustable. Default values are PR=10Hz and
PW=150μs characterized by an endorphins stimulating
effect. Use this program if you want produce endorphins
at the painful area. The stimulation may reach the
muscular contraction level. If the Pulse Rate will be
Page 21

- 21 -
increased, the stimulation level must be set to avoid the
muscular contraction.
Mode Constant C – Both Pulse Rate and Pulse Width
are adjustable. Default values are PR=70Hz and
PW=50μs characterized by an endorphins stimulating
effect through the Gate-control mechanism. Use this
program in case of ACUTE PAIN. The stimulation level
must be set to avoid the muscular contraction.
Mode MODulation SW (A) – Pulse Rate SWeep
modulation. Pulse Rate is automatically modulated within
F1=50Hz and F2=80Hz (adjustable); each frequency step
will last 1 sec. F2 can be changed only if the intensity
level of both channels are set to 0. The Pulse Width is
200μs (adjustable from 50μS to 250μS).
Mode MODulation 2F (B) – Pulse Rate Dual
Frequencies modulation. Pulse Rate is automatically
changed every 5 seconds, between F1=70Hz (adjustable)
and F2=5Hz. F1 can be changed only if the intensity level
of both channels are set to 0. The Pulse Width is 50μs
(adjustable from 50μS to 250μS).
Mode Burst A – 3 second Burst sequence = 1s on, 2s off.
Both Pulse Rate and Pulse Width are adjustable. Default
values are PR=30Hz and PW=250μs. The stimulation
level must be set to produce a gentle muscular
contraction.
Mode Burst B – 1.5 second Burst sequence = 0.5s on,
1s off. Both Pulse Rate and Pulse Width are adjustable.
Default values are PR=50Hz and PW=200μs. The
stimulation level must be set to produce a gentle
muscular contraction.
Page 22
- 22 -
Mode Burst C – 0.75 second Burst sequence = 0.25s on,
0.5s off. Both Pulse Rate and Pulse Width are adjustable.
Default values are PR=100Hz and PW=150μs. The
stimulation level must be set to produce a gentle
muscular contraction.
EMS:
Intensity 0-150mA zero to peak at 1000ohm
load
Frequency 1-120 Hz
Pulse width Positive phase: 50-400μs, in steps of
50μs
Waveform Symmetrical Bi-Phasic rectangular,
Alternated Bi-Phasic rectangular
Ramp up time 0-8s in steps of 1s
Ramp down time 0-8s in steps of 1s
On time 1-60s in steps of 1s
Off time 0-60s in steps of 1s
Treatment timer Continuous, 10, 20, 30, 45, 60, 90min
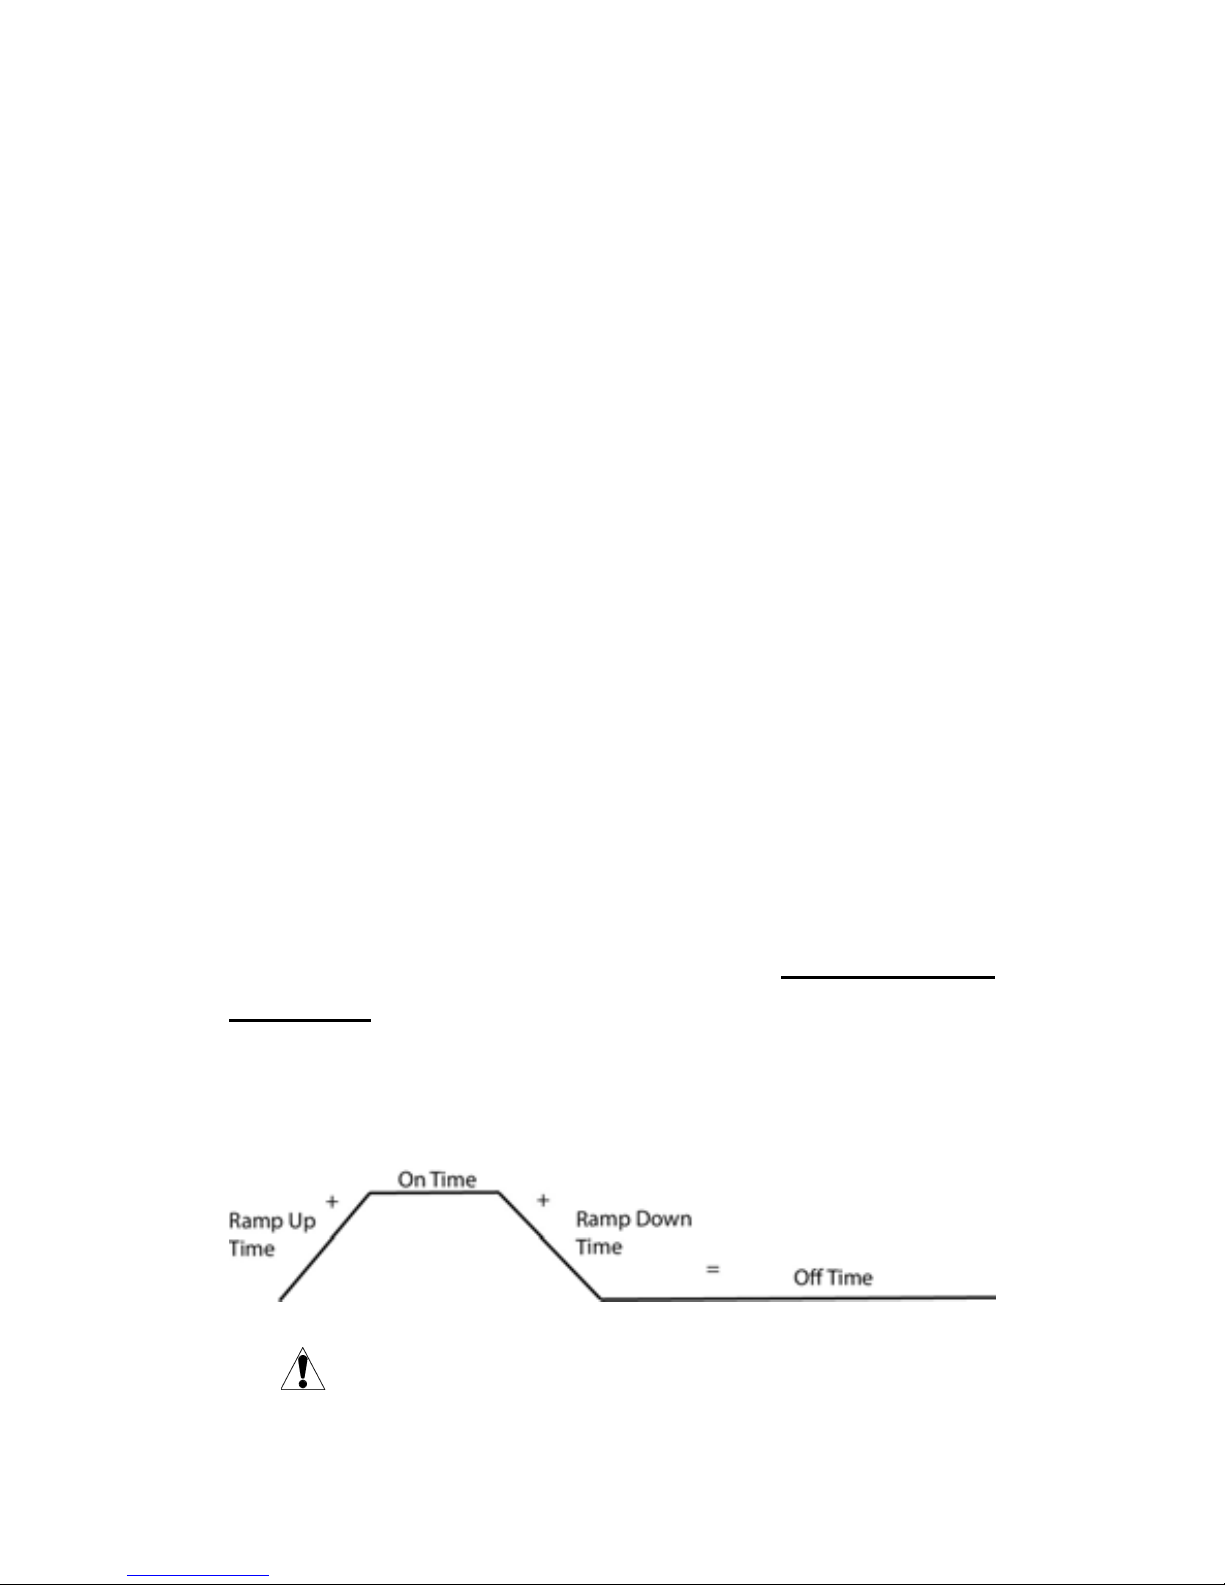
Program 32&33 (manual) – When using ALTERNATIING
Frequency
, ensure that the “Ramp Up Time”, “On Time”,
and “Ramp Down Time” equals “Off Time”.
Ramp Up + On Time + Ramp Down = Off Time
The will appear on your screen if this formula is not
followed in EMS manual mode.
Page 23

- 23 -
MicroCurrent:
Frequency 94Hz fixed (A)/ 0.5,8,80Hz(B)
Pulse width 250uS fixed (A),2.1ms fixed (B)
Wave form Mono-Phase rectangular,
Symmetrical Bi-Phasic rectangular
Treatment timer Continuous, 10, 20, 30, 45, 60, 90min
Interferential(IFT):
Carrier Frequency 4000Hz fixed (CH1)
Modulating Frequency 4004-4160Hz,
in steps of 4Hz (CH2)
Pulse width 125μs
Wave form Symmetrical balanced Sine wave
Treatment timer Continuous, 10, 20, 30, 45, 60,
90min
Programs:
1) P0-P21
TENS programs
Program 0-13 --- TENS Preset programs
Program 14-21 --- TENS Manual programs
2) P22-P33: EMS Modes
Program 22-31 --- EMS Preset programs
Program 32,33 --- EMS Manual programs
3) P34-P35: MicroCurrent Modes
Program 34 --- Micro Preset programs
Program 35 --- Micro Manual programs
4) P36-P39: Interferential(IFT) Modes
Program 36-39 --- IFT Manual program
Page 24

- 24 -
OTHER FEATURES
1. When the unit is turned on, if any of the keys are not
pressed within 5 minutes, it will automatically shut
off.
2. When the treatment timer has been set, it begins to
count down one minute by one minute and is
displayed on the LCD. Once it counts down to zero,
the device automatically shuts off.
3. The treatment time will be accumulatively recorded
when the output level is above zero, by pressing
“CH1▼” key and “Prog“ key for 3 seconds, the
accumulative treatment time in minutes can be
displayed, or return back to the previous normal
display in toggle; by pressing “CH2▼” key and
“Prog“ key for 3 seconds will clear the treatment time
to zero.
4. When the program changes, the output level will go
down to zero immediately.
5. When the unit is turned on, it will automatically enter
the mode that the unit had worked in before the unit
was turned off.
6. When the battery is low, the battery icon will flash
indicating that the batteries should be recharged.
7. When one or both of the electrodes are not placed
firmly on the skin, the output level goes immediately
to zero.
Page 25
- 25 -
Waveform Information
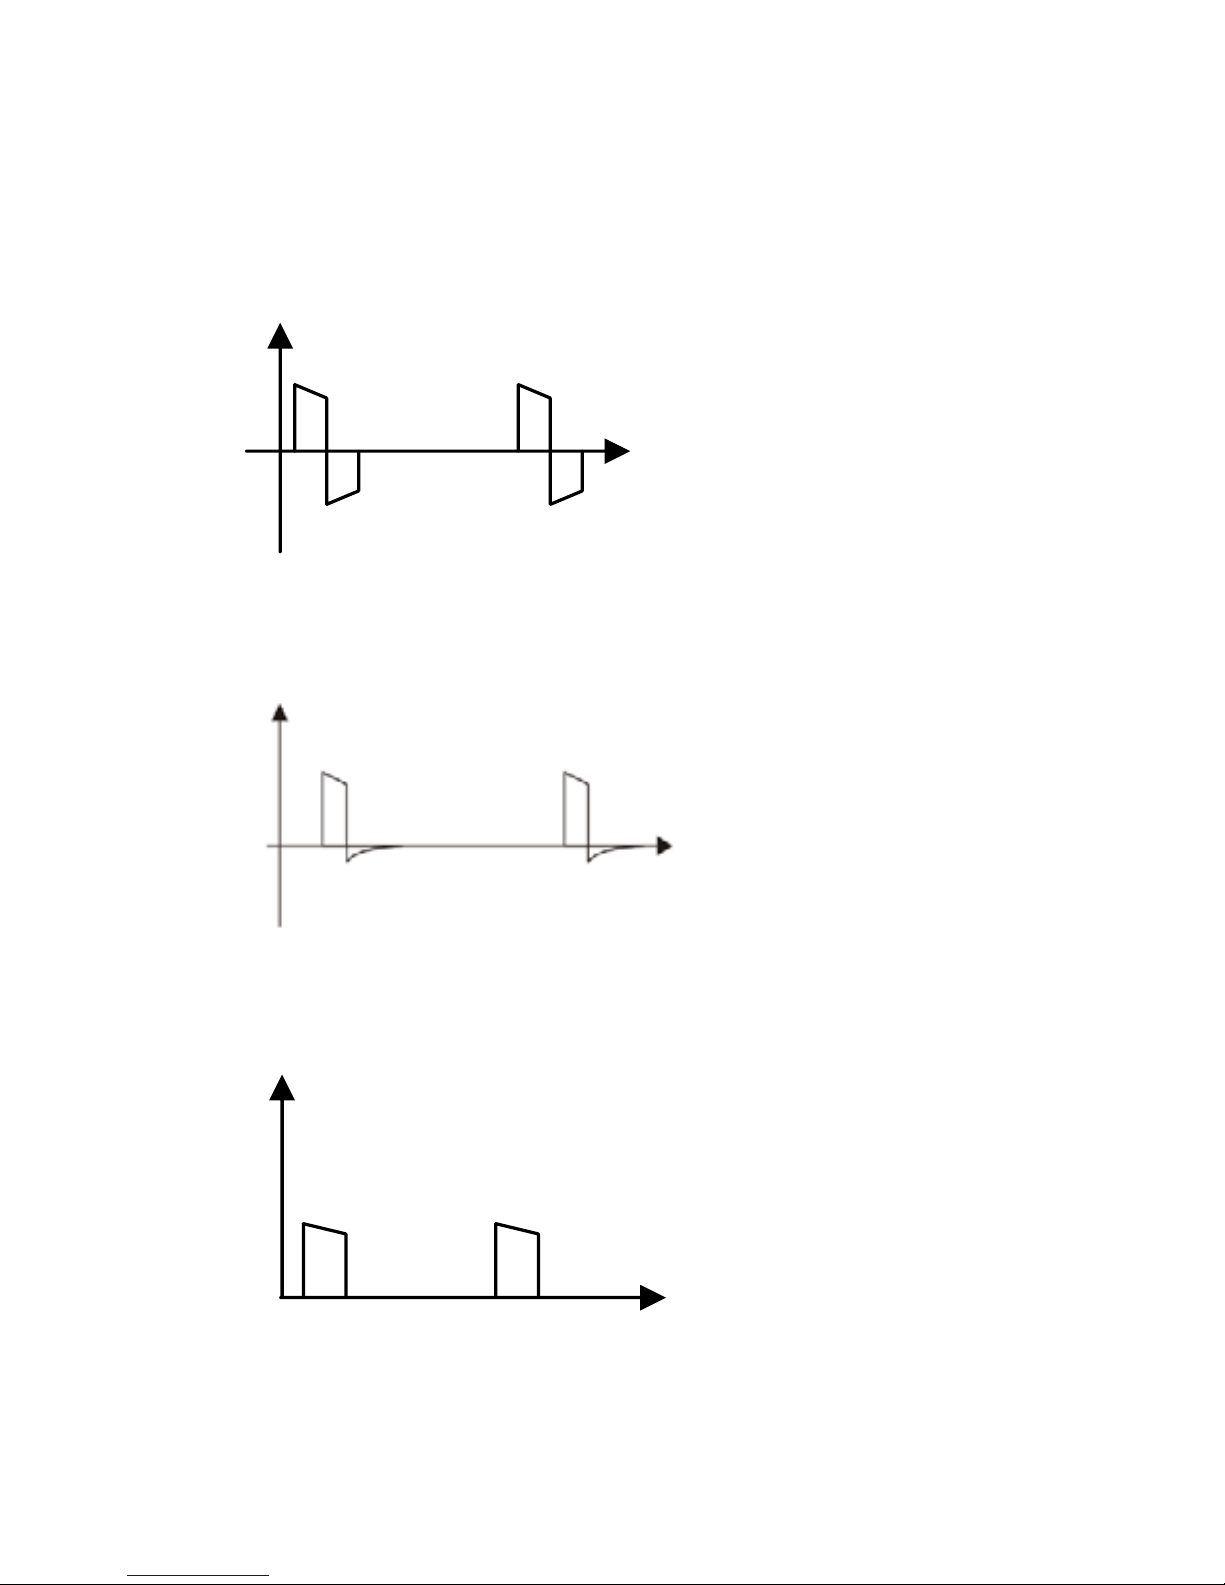
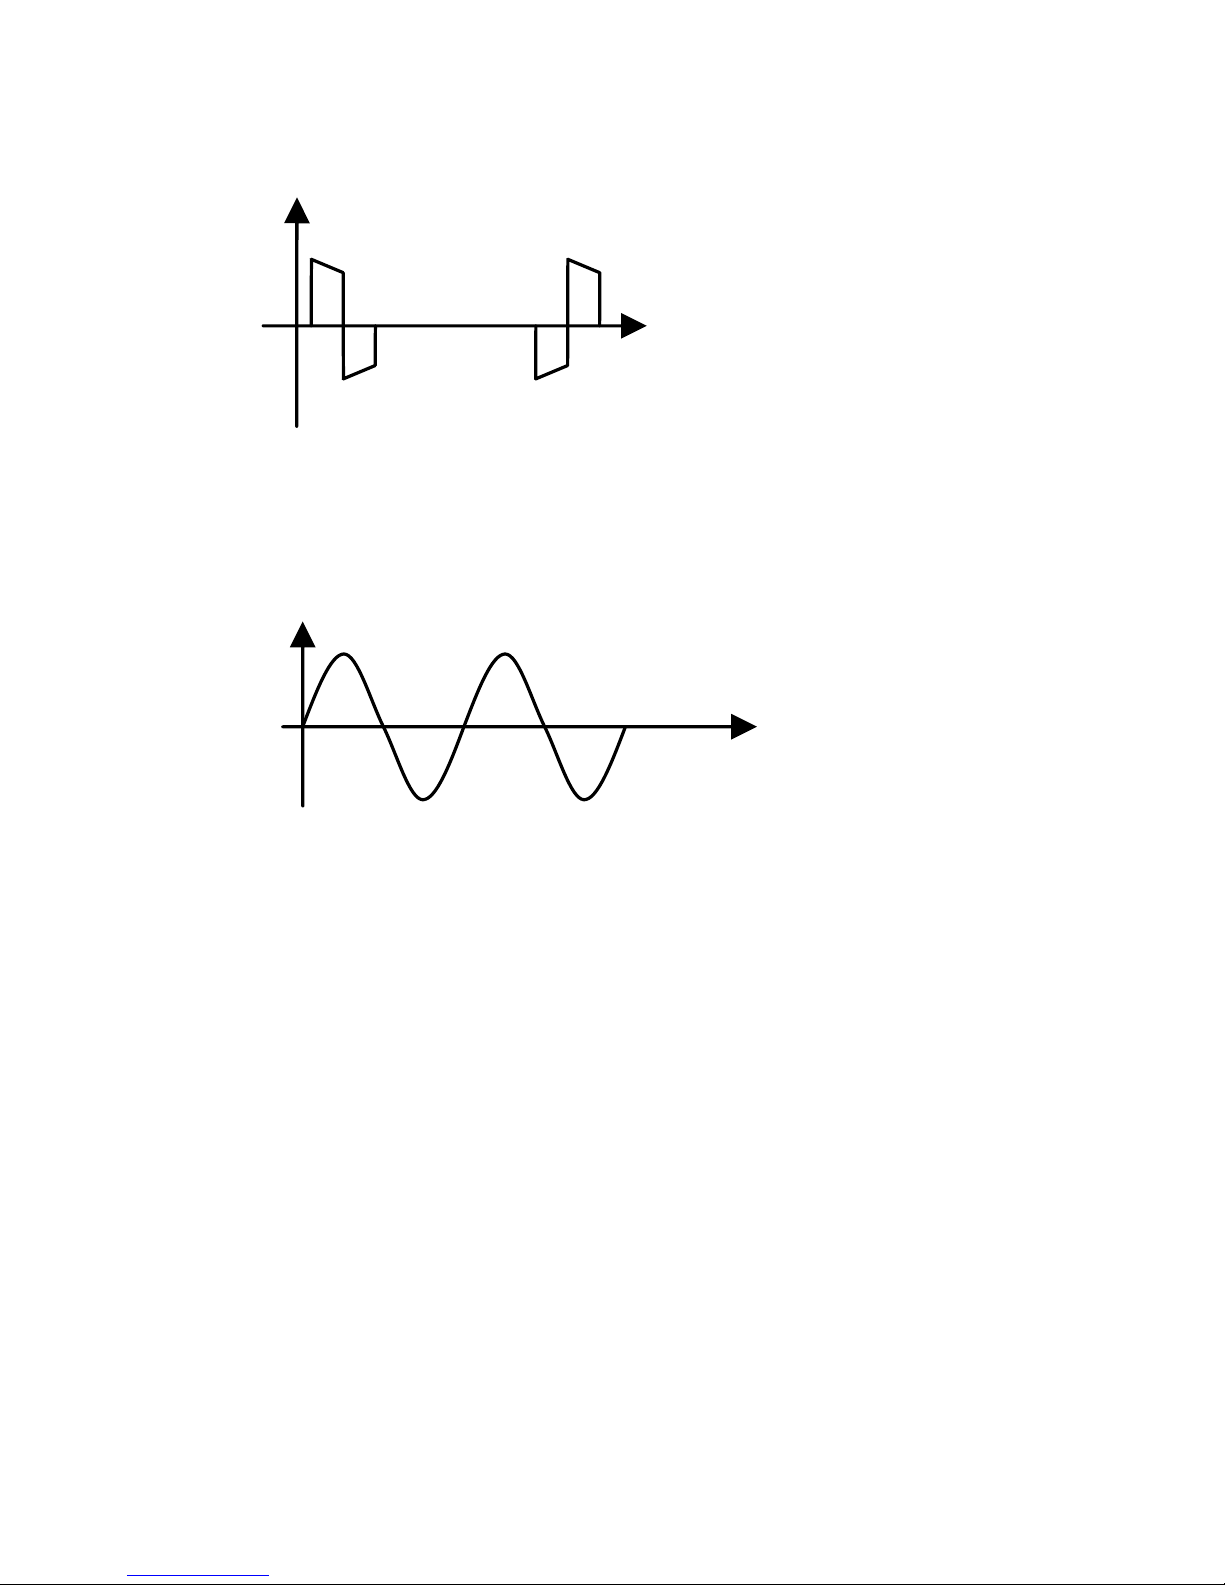
There are 5 types of waveforms:
(1). Symmetrical Bi-Phasic rectangular waveform
Amplitude
Time
(2). Asymmetrical Bi-Phasic rectangular waveform
Amplitude
Time
(3). Mono-Phasic waveform
Amplitude
Time
Page 26
- 26 -
(4). Alternated Bi-Phasic rectangular waveform
Amplitude
Time
(5). Symmetrical balanced Sine waveform
Amplitude
Time
Page 27
- 27 -
ELECTRODES PLACEMENT
Please study the body maps in this guide, which illustrate
placement of the electrodes depending on your symptoms.
Examples of electrodes placement for TENS:
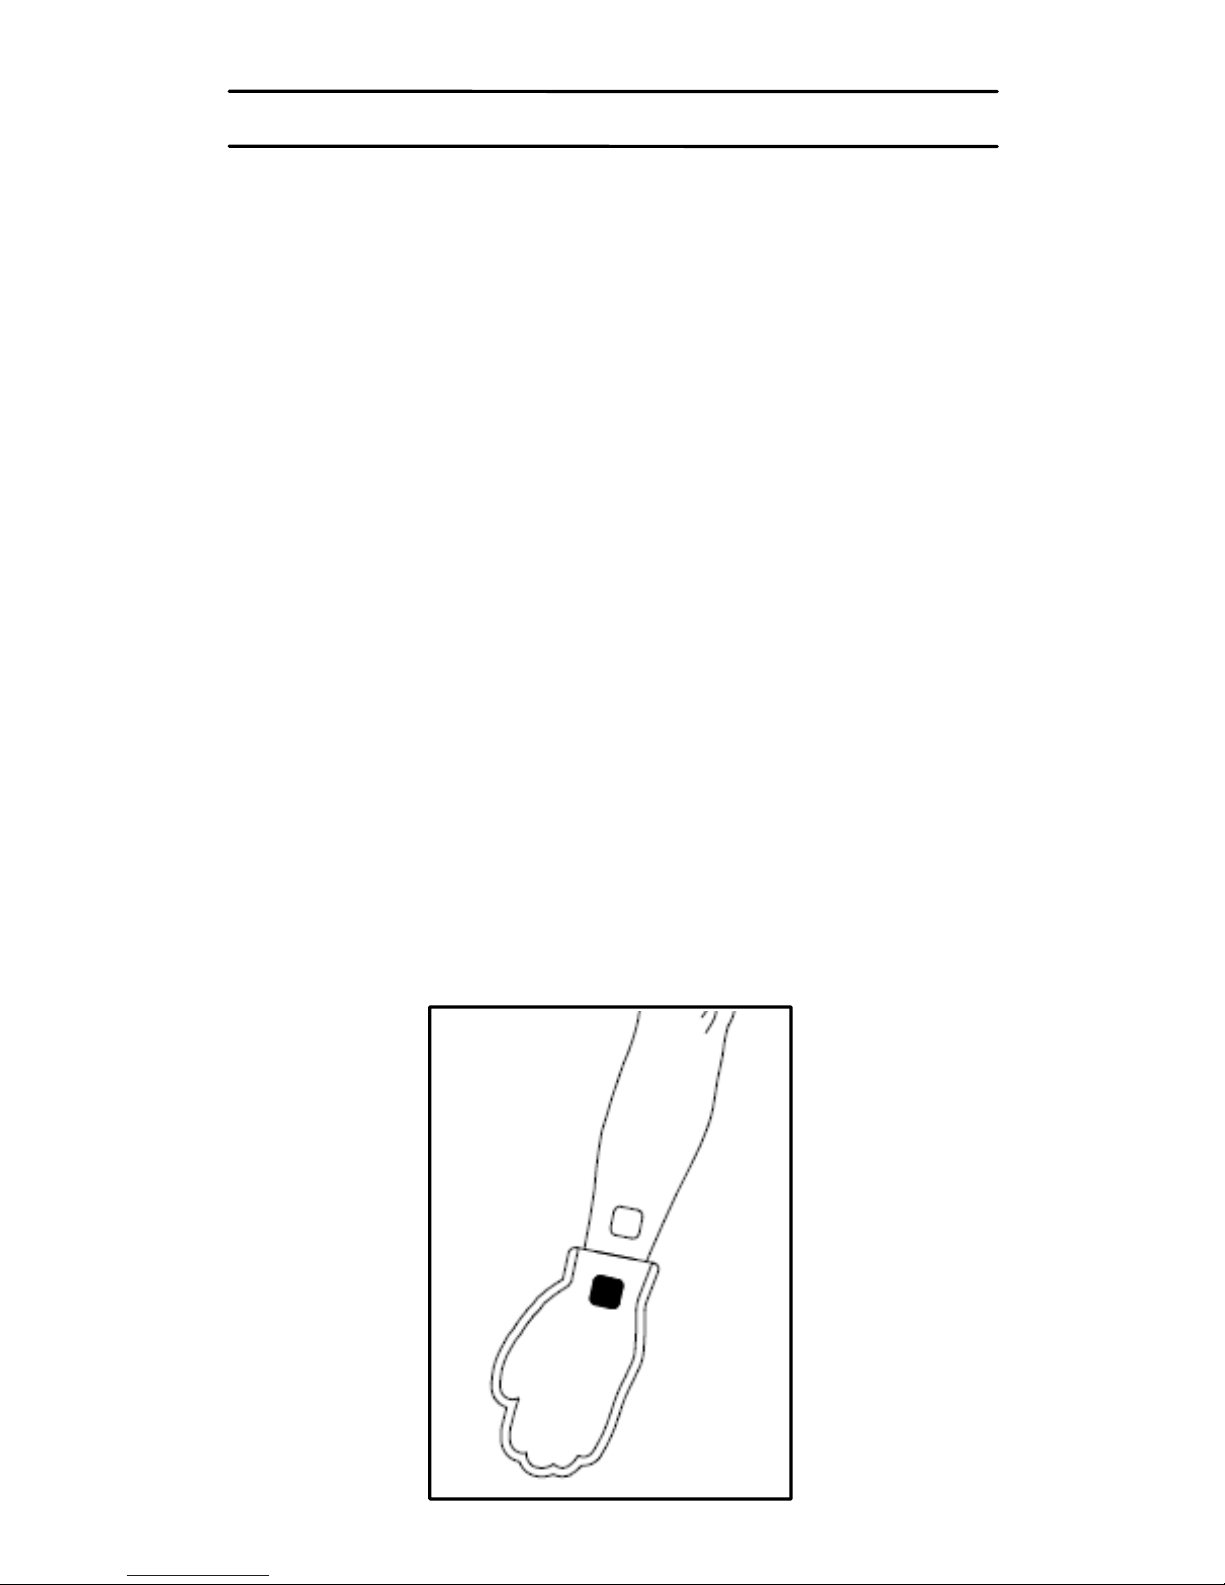
0 & 1 – HANDS & FEET
These modes require the use of special electrode garments
not included. These program modes should only be used
under the direct care and supervision of your Professional
Healthcare Provider.
Note to Professional Healthcare Provider: Should you
choose to source electrode garments and prescribe these
treatment modes, please ensure that the garment selected
is designed to function in accordance with the following
instructions for use, and with the output specifications of
this device.
Using a single channel, connect one lead to the garment,
and connect the other lead to an electrode which is placed
on the lower arm or lower leg.
Page 28
- 28 -
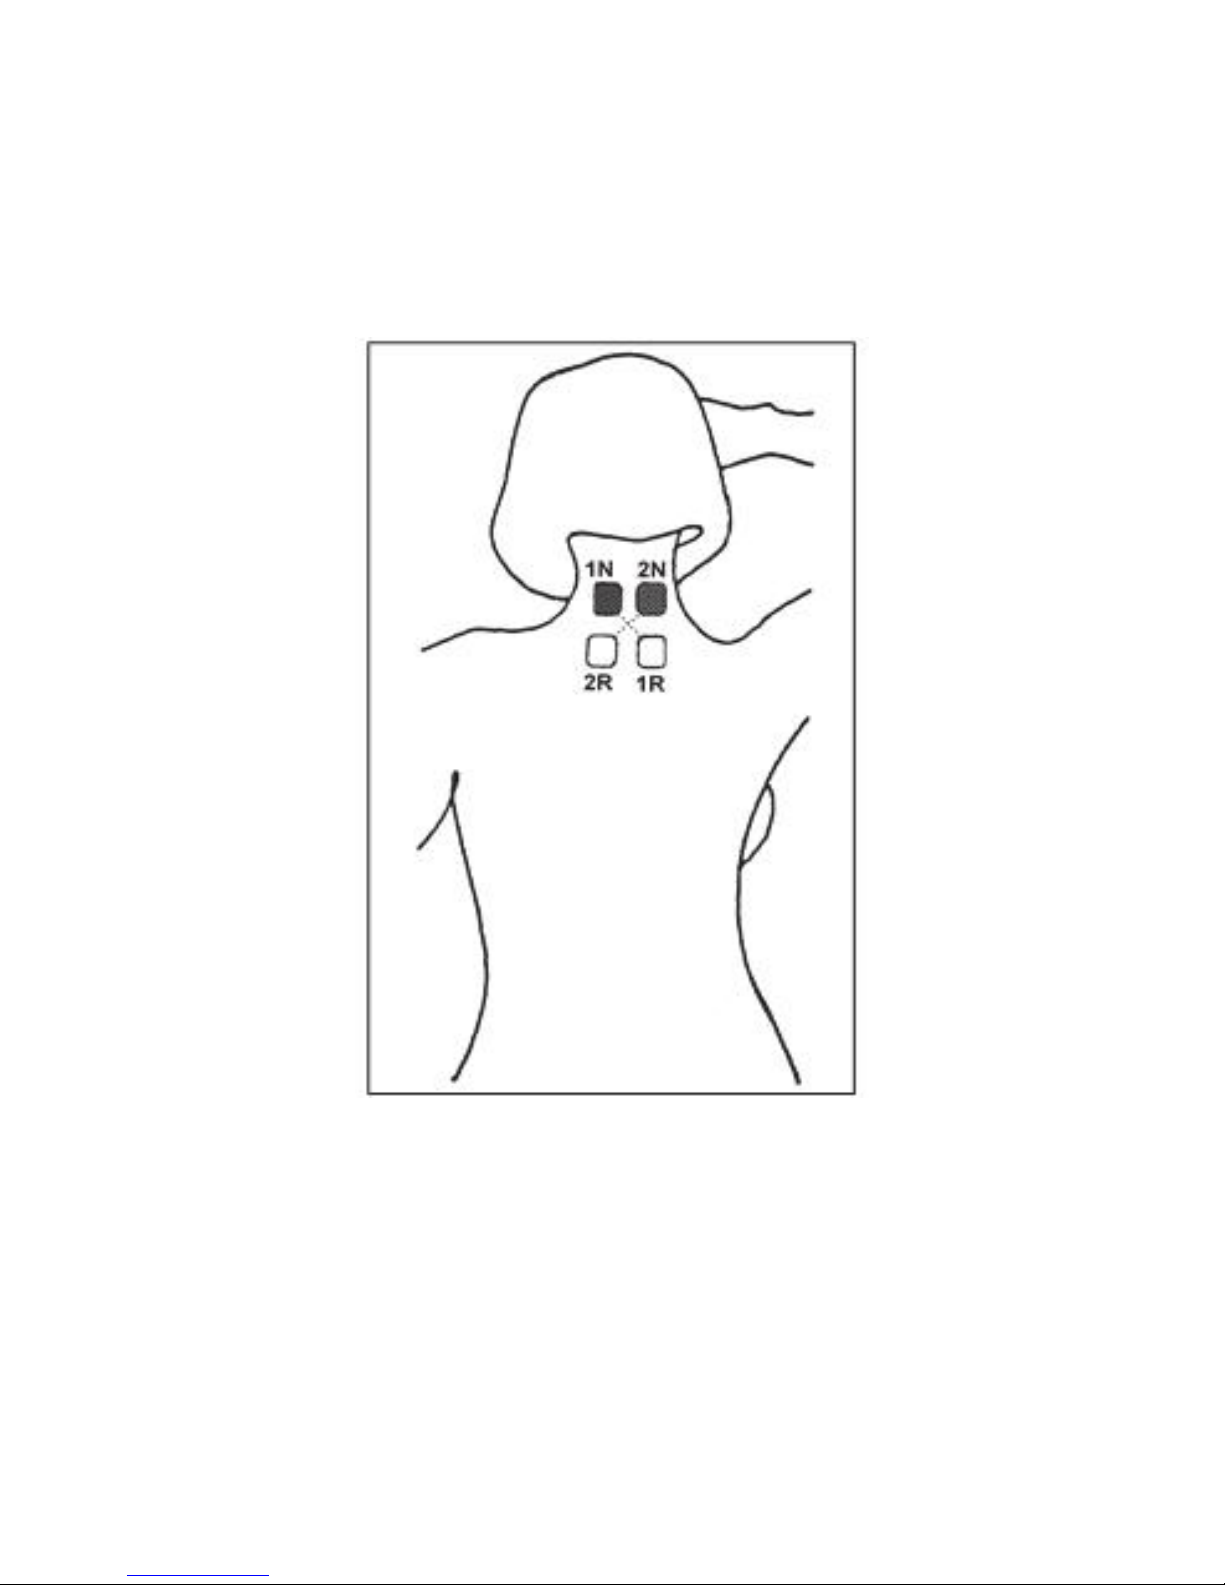
2 – NECK PAIN
Using both leads, place the electrodes at the back of the
neck and over the top of your shoulders.
Note: Do not place electrodes on the side or front of the
neck.
Page 29
- 29 -
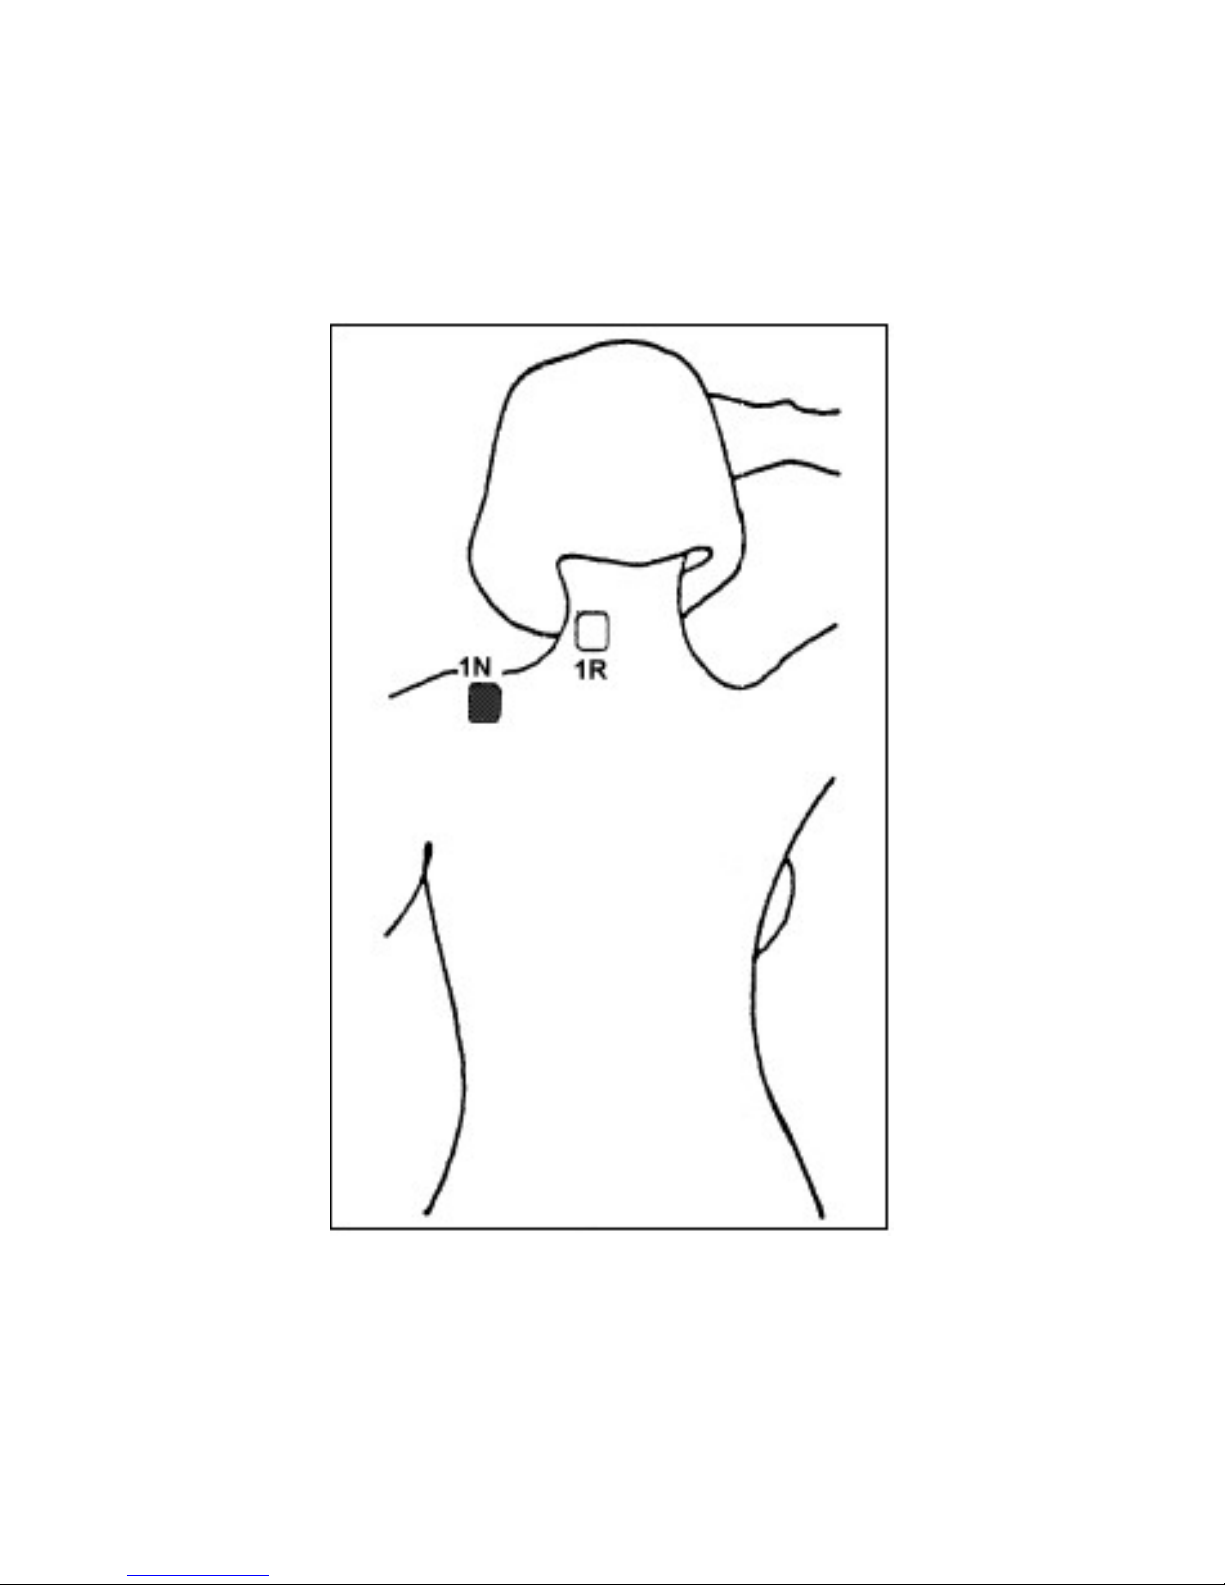
3 – TORTICOLLIS
Using a single channel, place the electrodes, over the area
of maximum pain.
Page 30
- 30 -
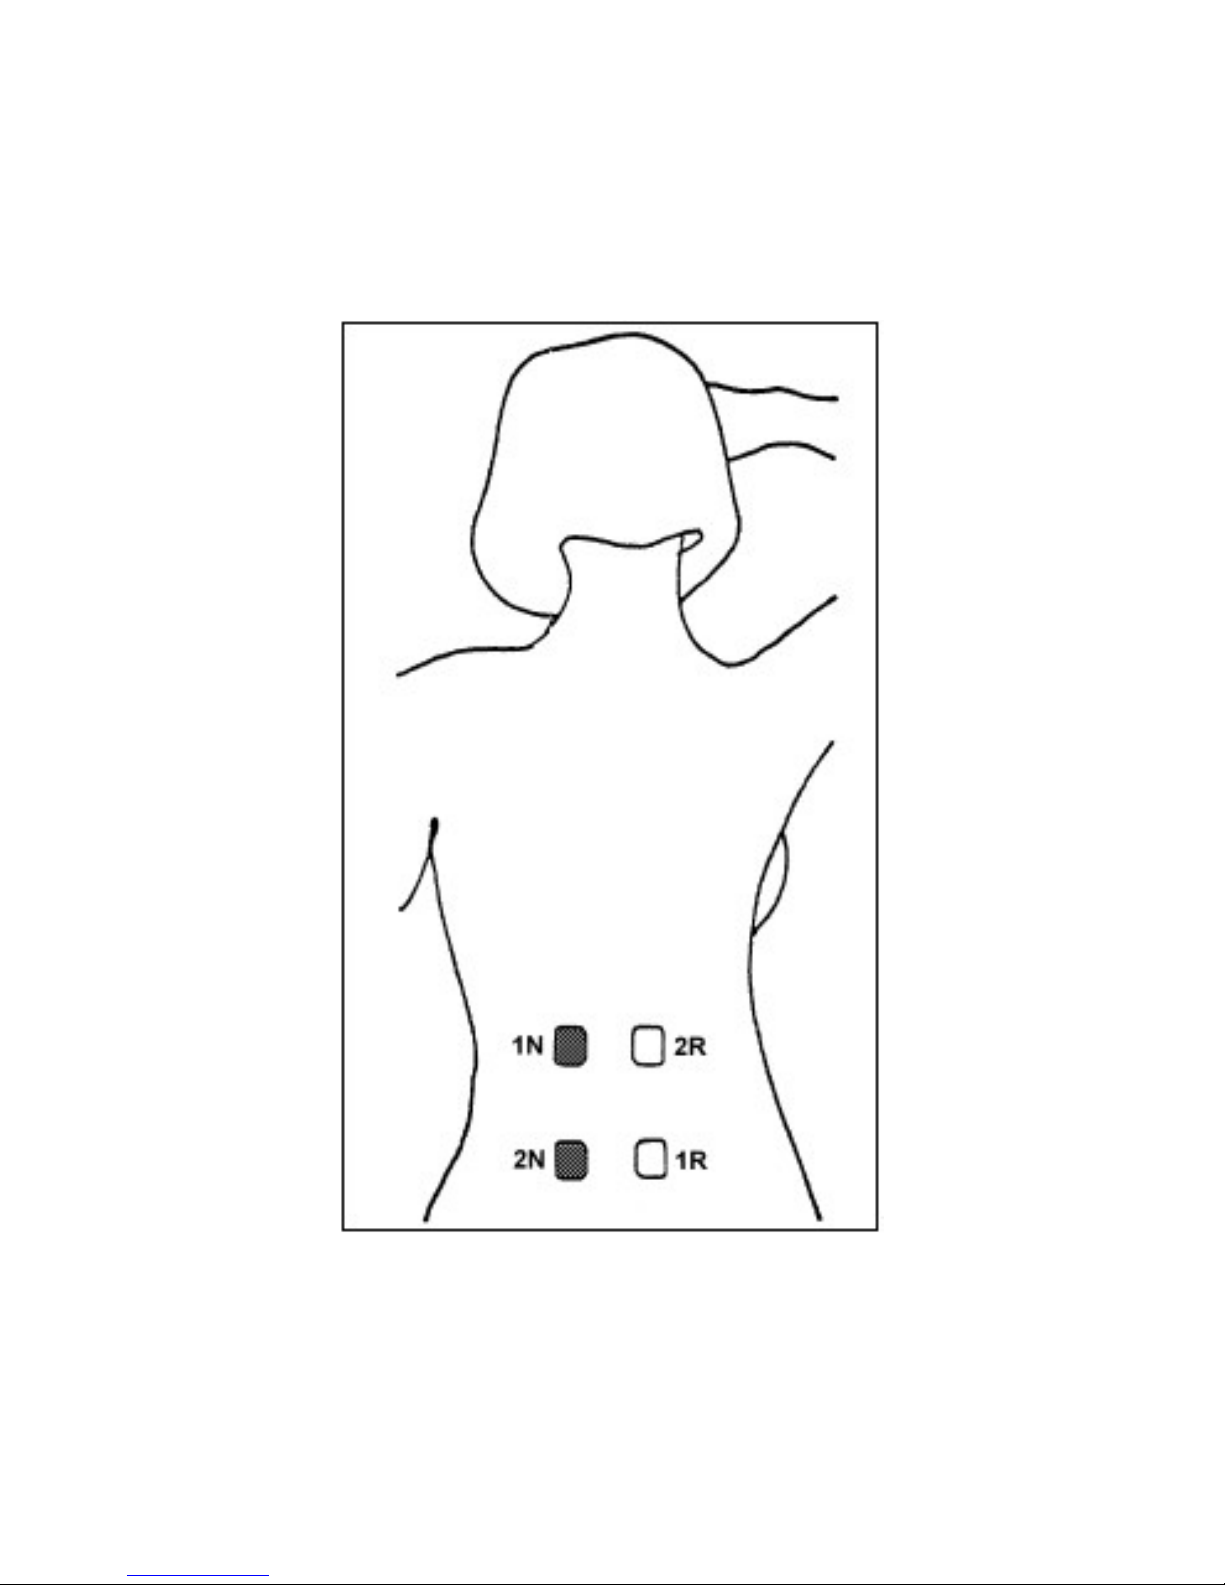
4 – LOW BACK PAIN
Using both leads, place electrodes on either side of the
spine, crossing the channels, at the site of pain.
Page 31
- 31 -
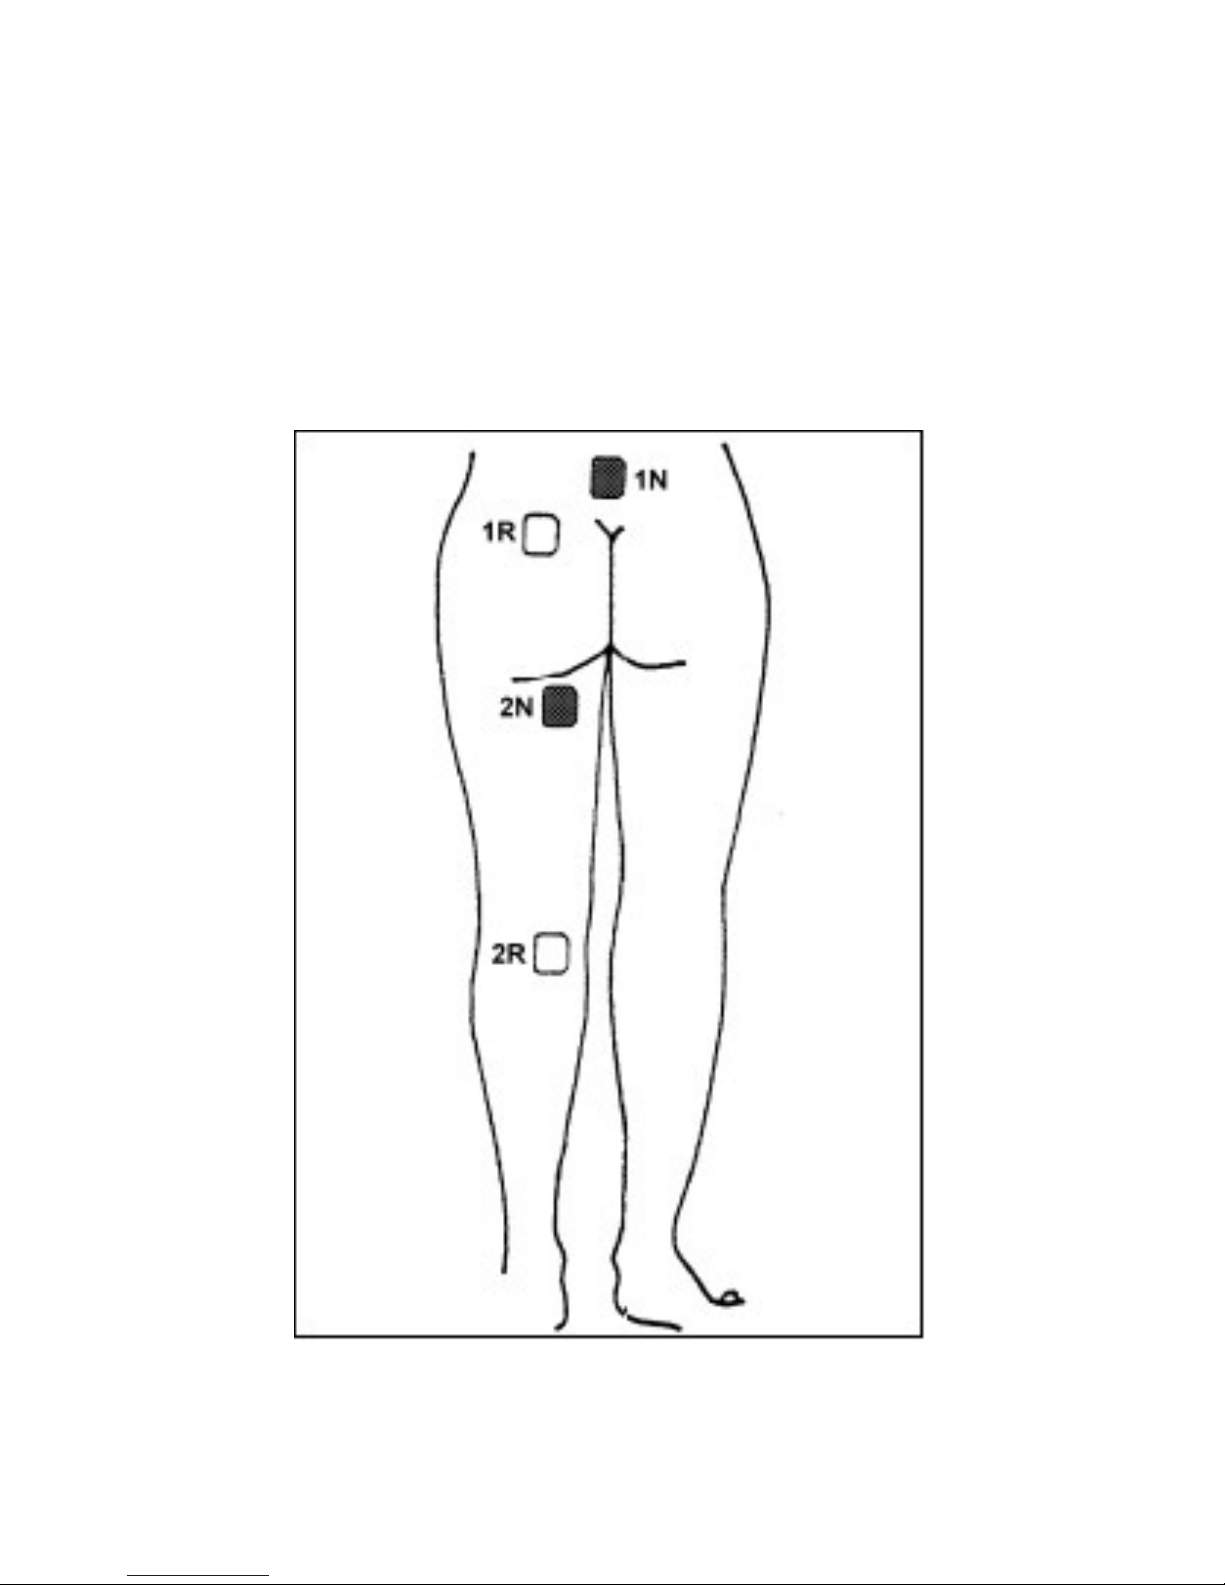
5 – SCIATICA
Using both leads, take the first lead and place the electrode
with the black adapter on your lower back on one side of
your spine, and the second electrode with the red adapter
at the top of the back of your leg. With the second lead,
place the other two electrodes lower down as illustrated.
Page 32
- 32 -
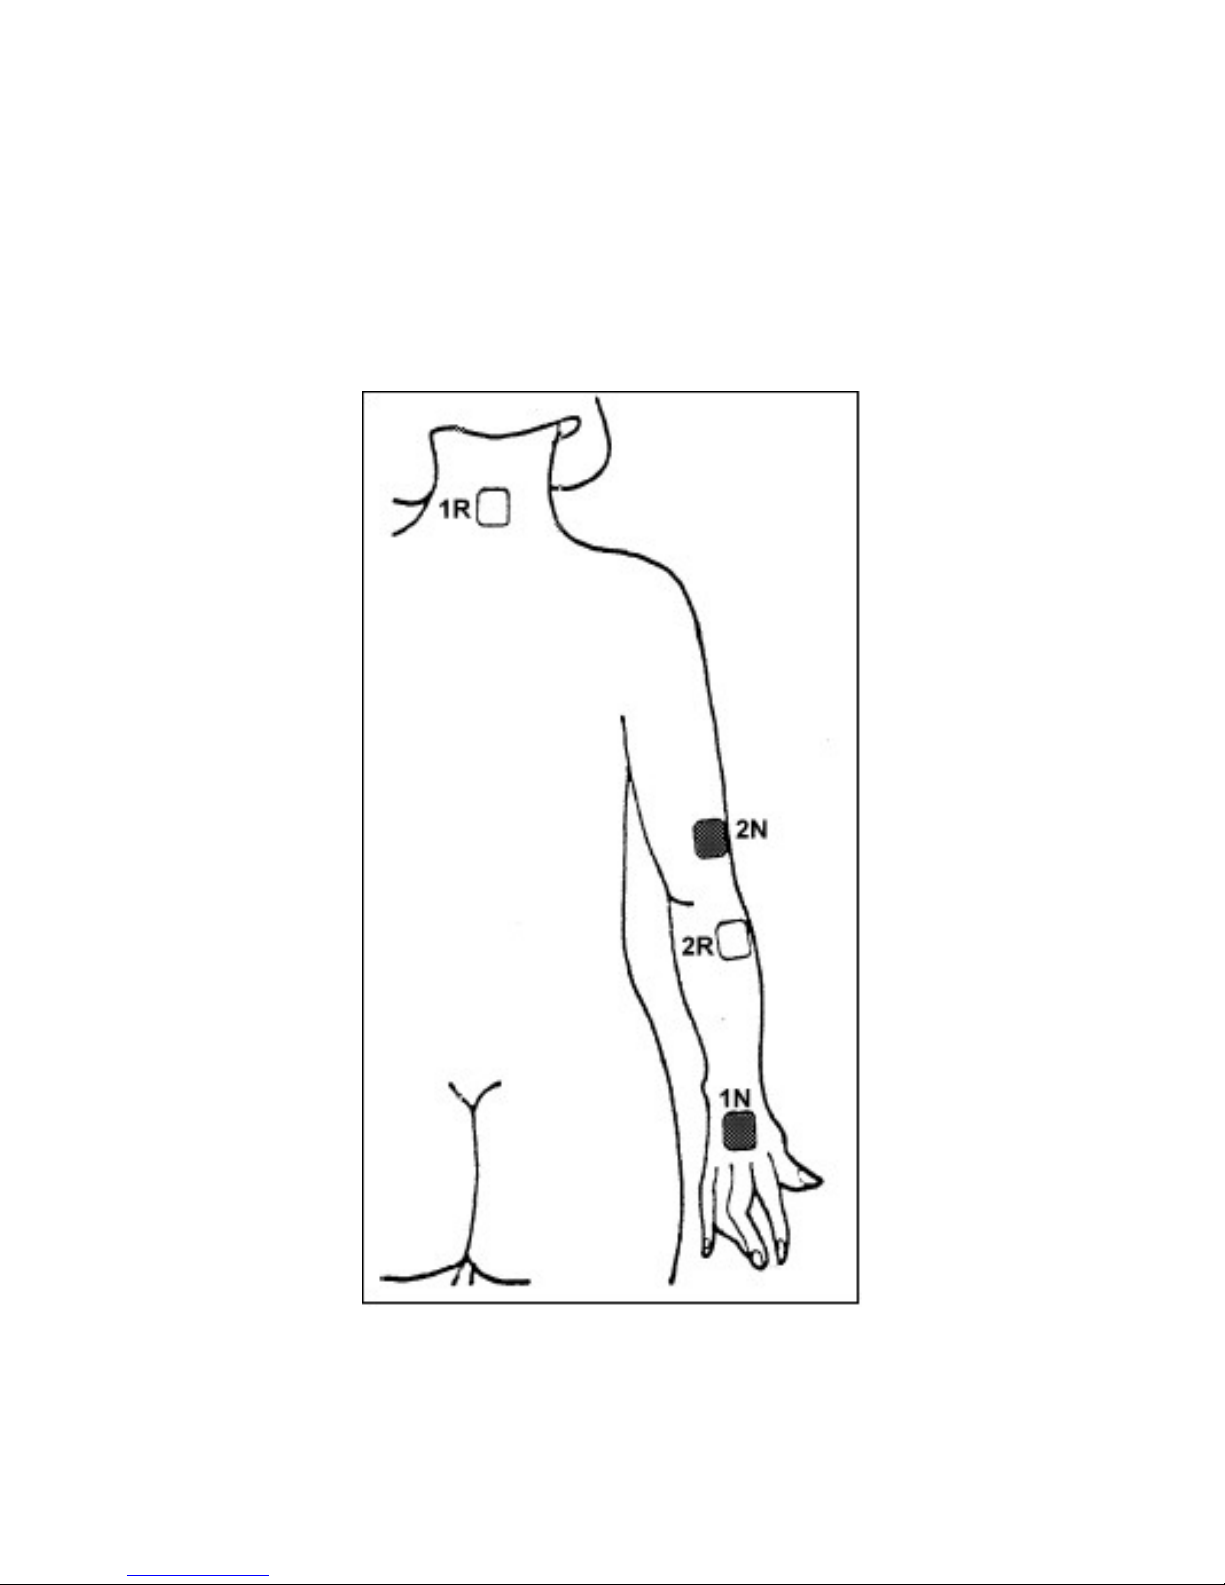
6 – EPICONDYLITIS
Using both leads, place electrodes on either side of the
elbow.
Page 33
- 33 -
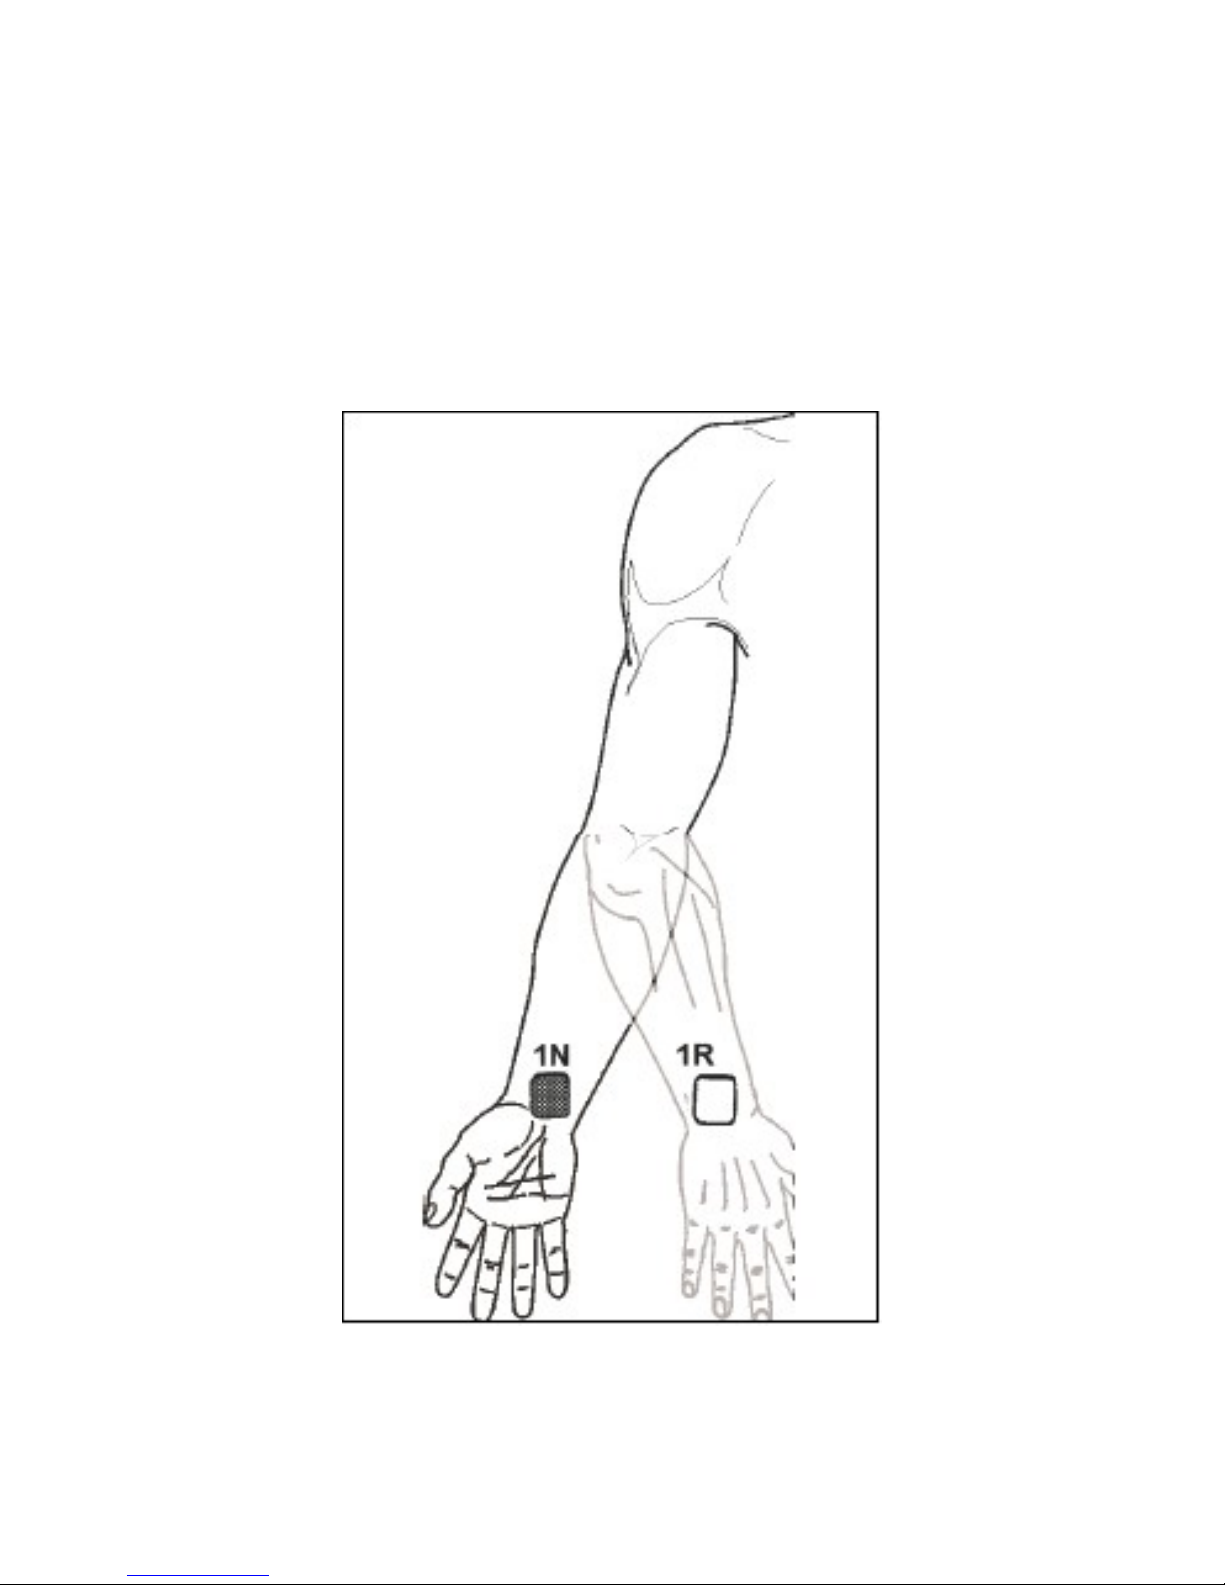
7 – WRIST PAIN
Using a single channel, place the electrodes over the area
of maximum pain on each side of the wrist.
Page 34
- 34 -
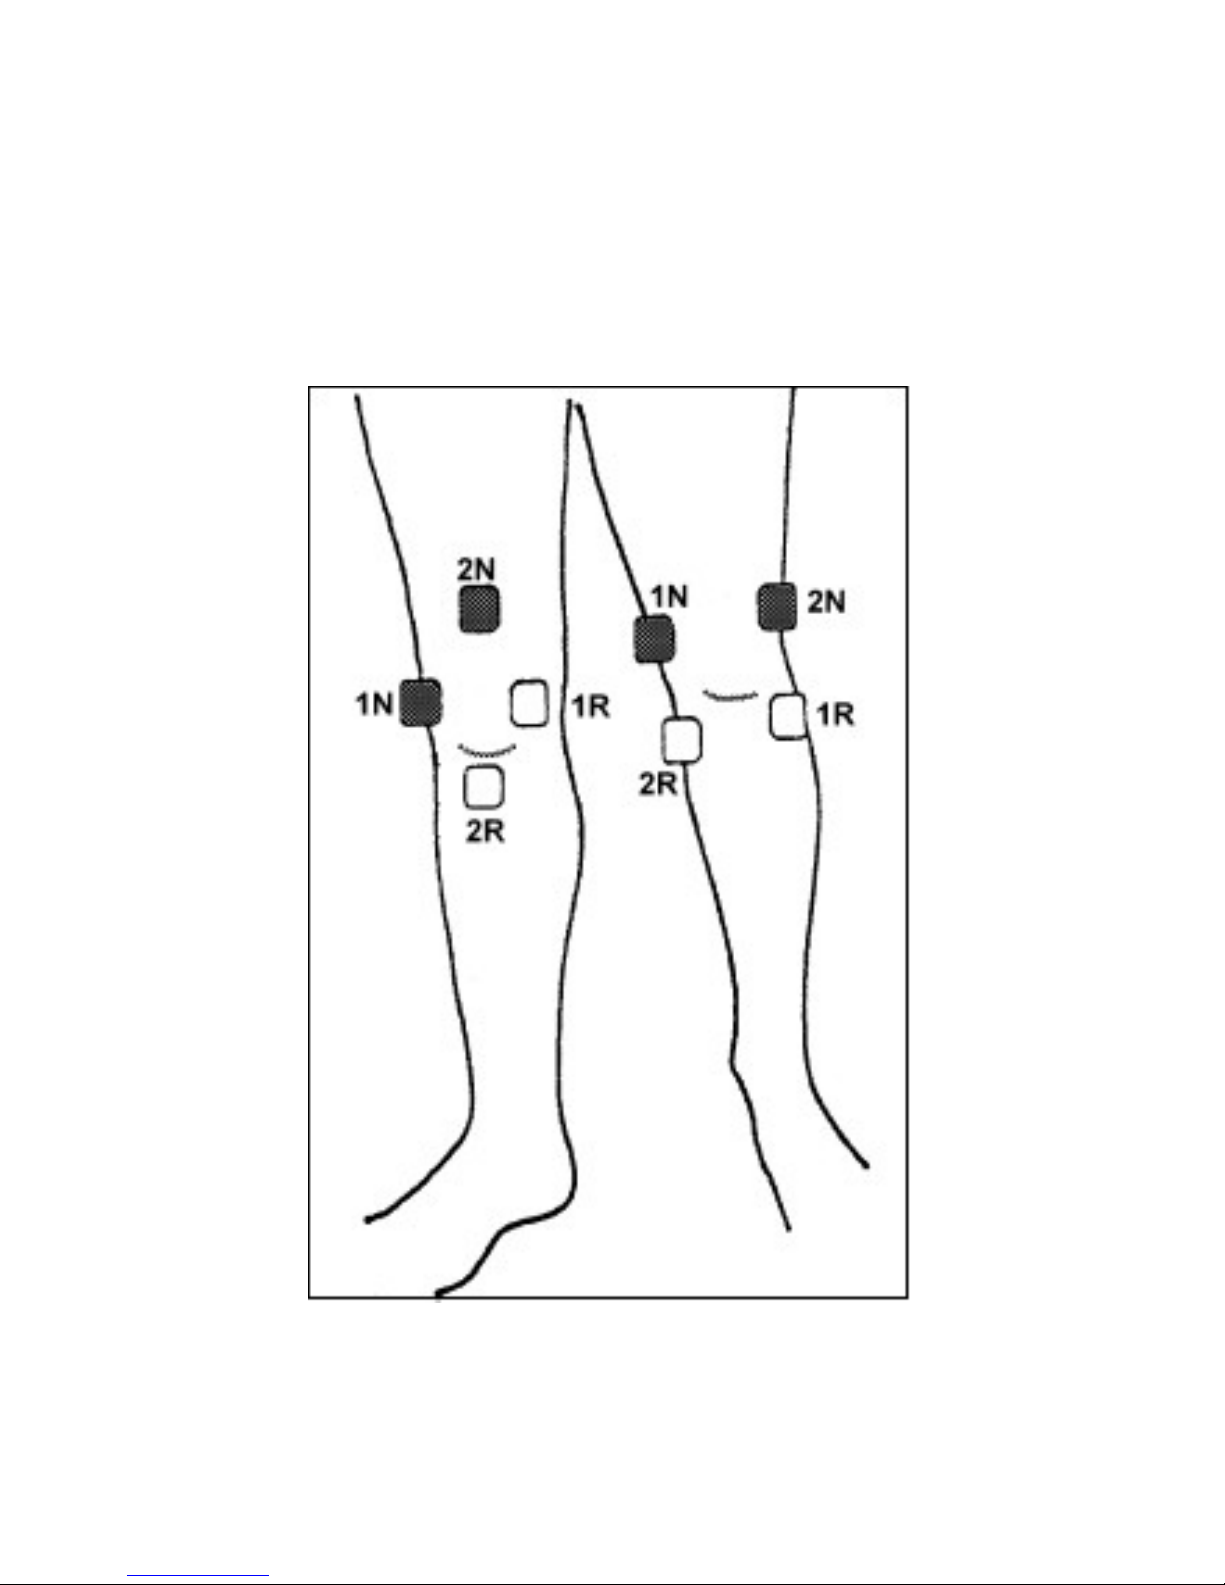
8 – KNEE PAIN (CHRONIC)
Using both leads, place electrodes over the top and base of
the knee. Avoid placing directly on the kneecap.
Below are two common application techniques.
Page 35
- 35 -
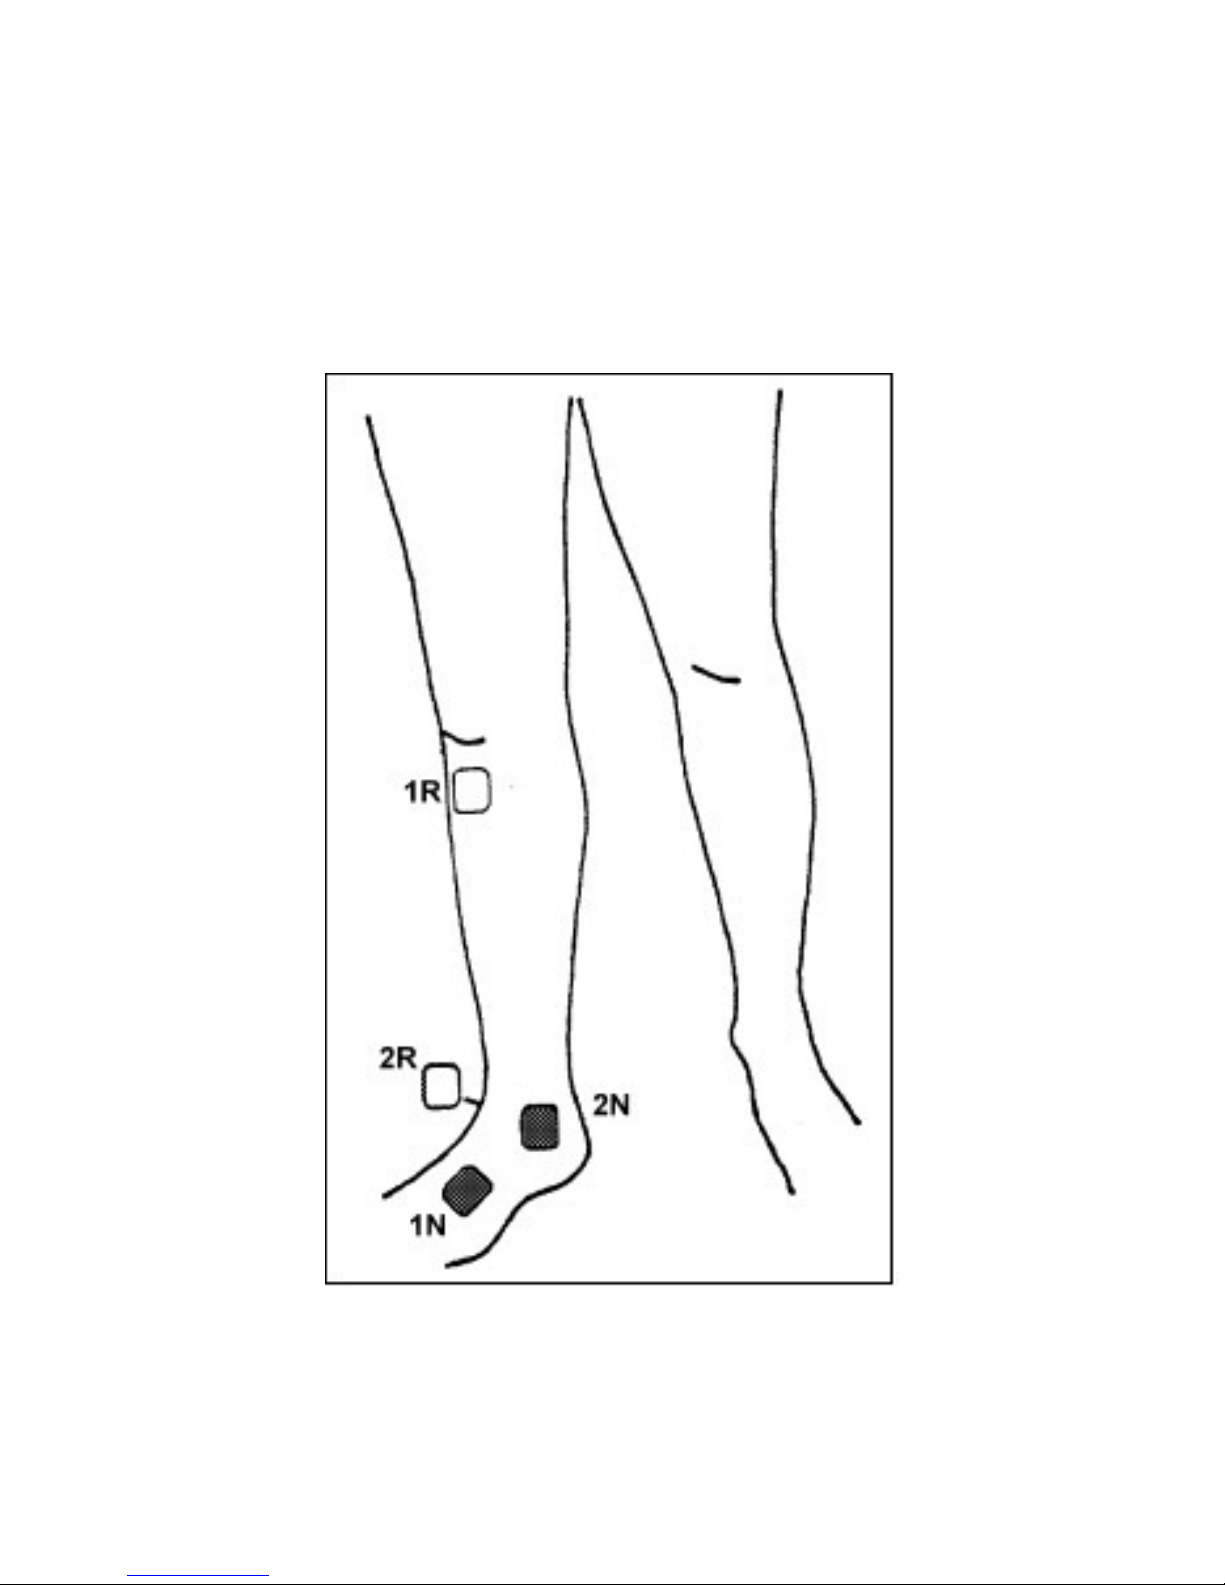
9 – ANKLE SPRAIN
Using both leads, place an electrode from one lead on
either side of the leg, and the other electrode on your ankle.
The electrodes from the other lead will be placed along the
affected nerve.
Page 36
- 36 -
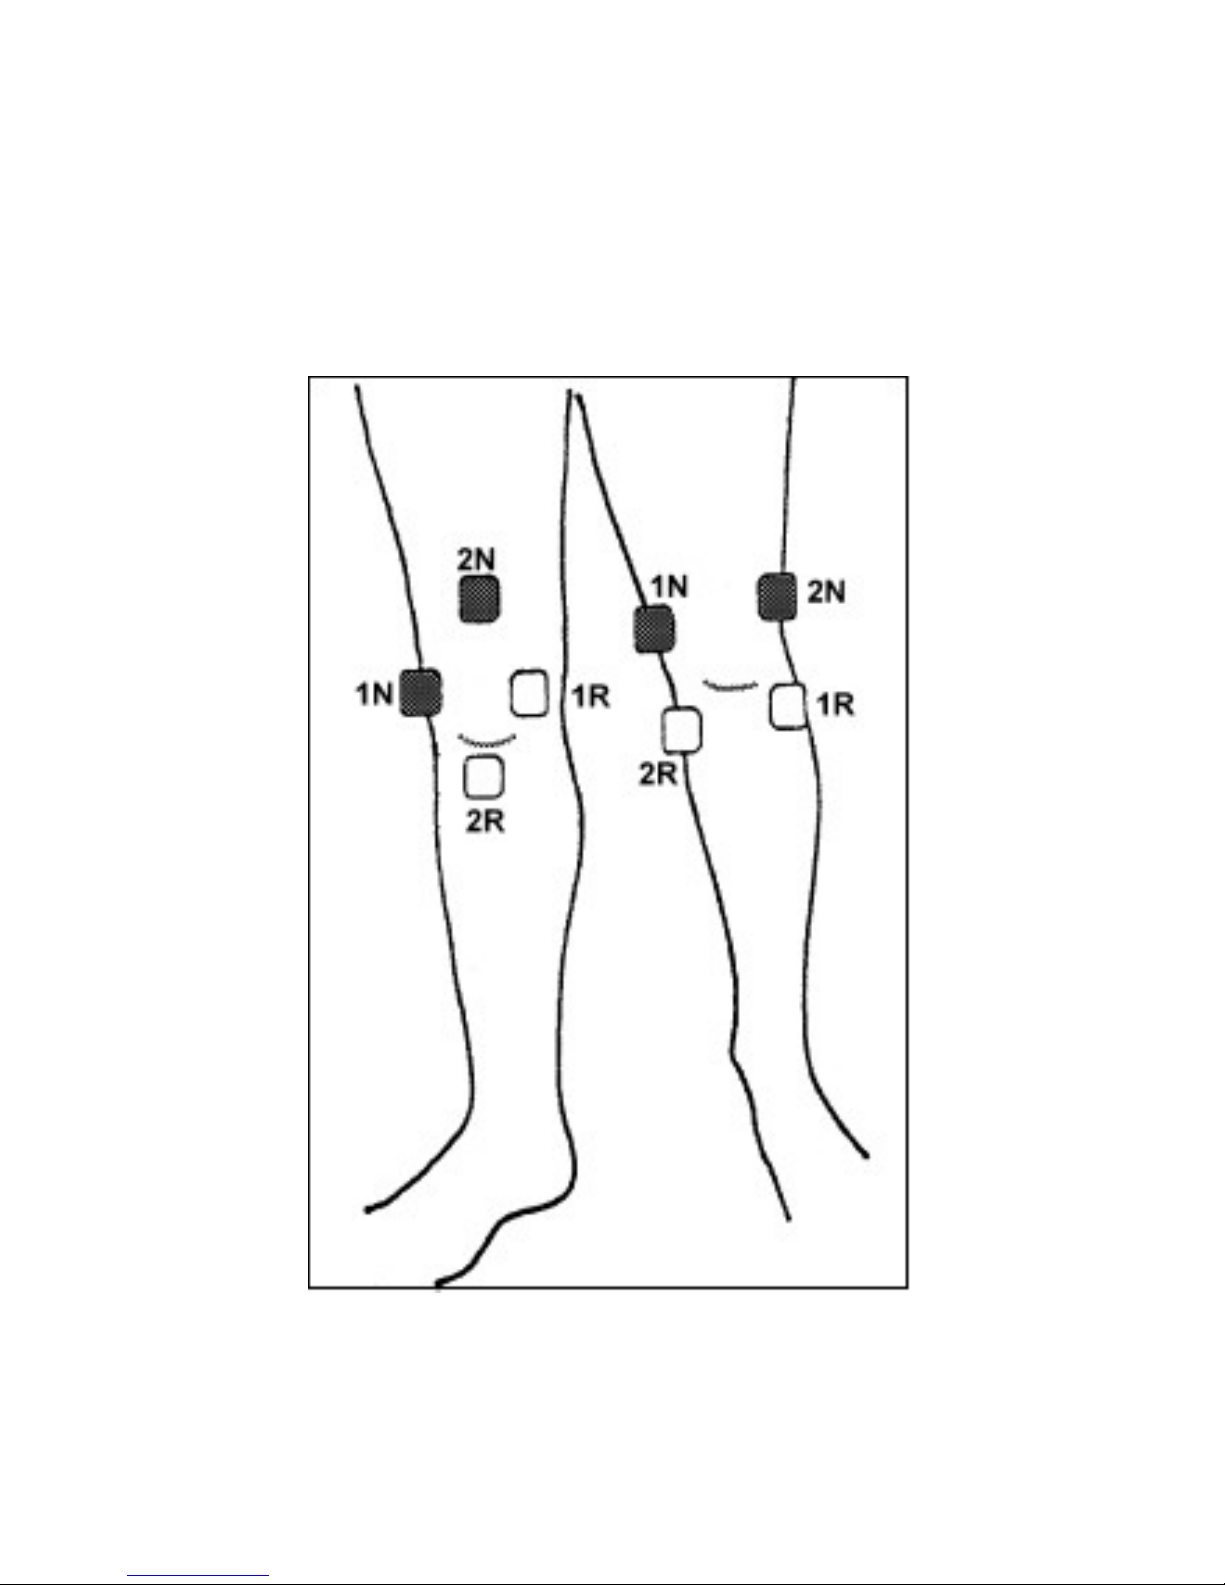
10 – KNEE PAIN (ACUTE)
Using both leads, place electrodes over the top and base of
the knee. Avoid placing directly on the kneecap.
Below are two common application techniques.
Page 37
- 37 -
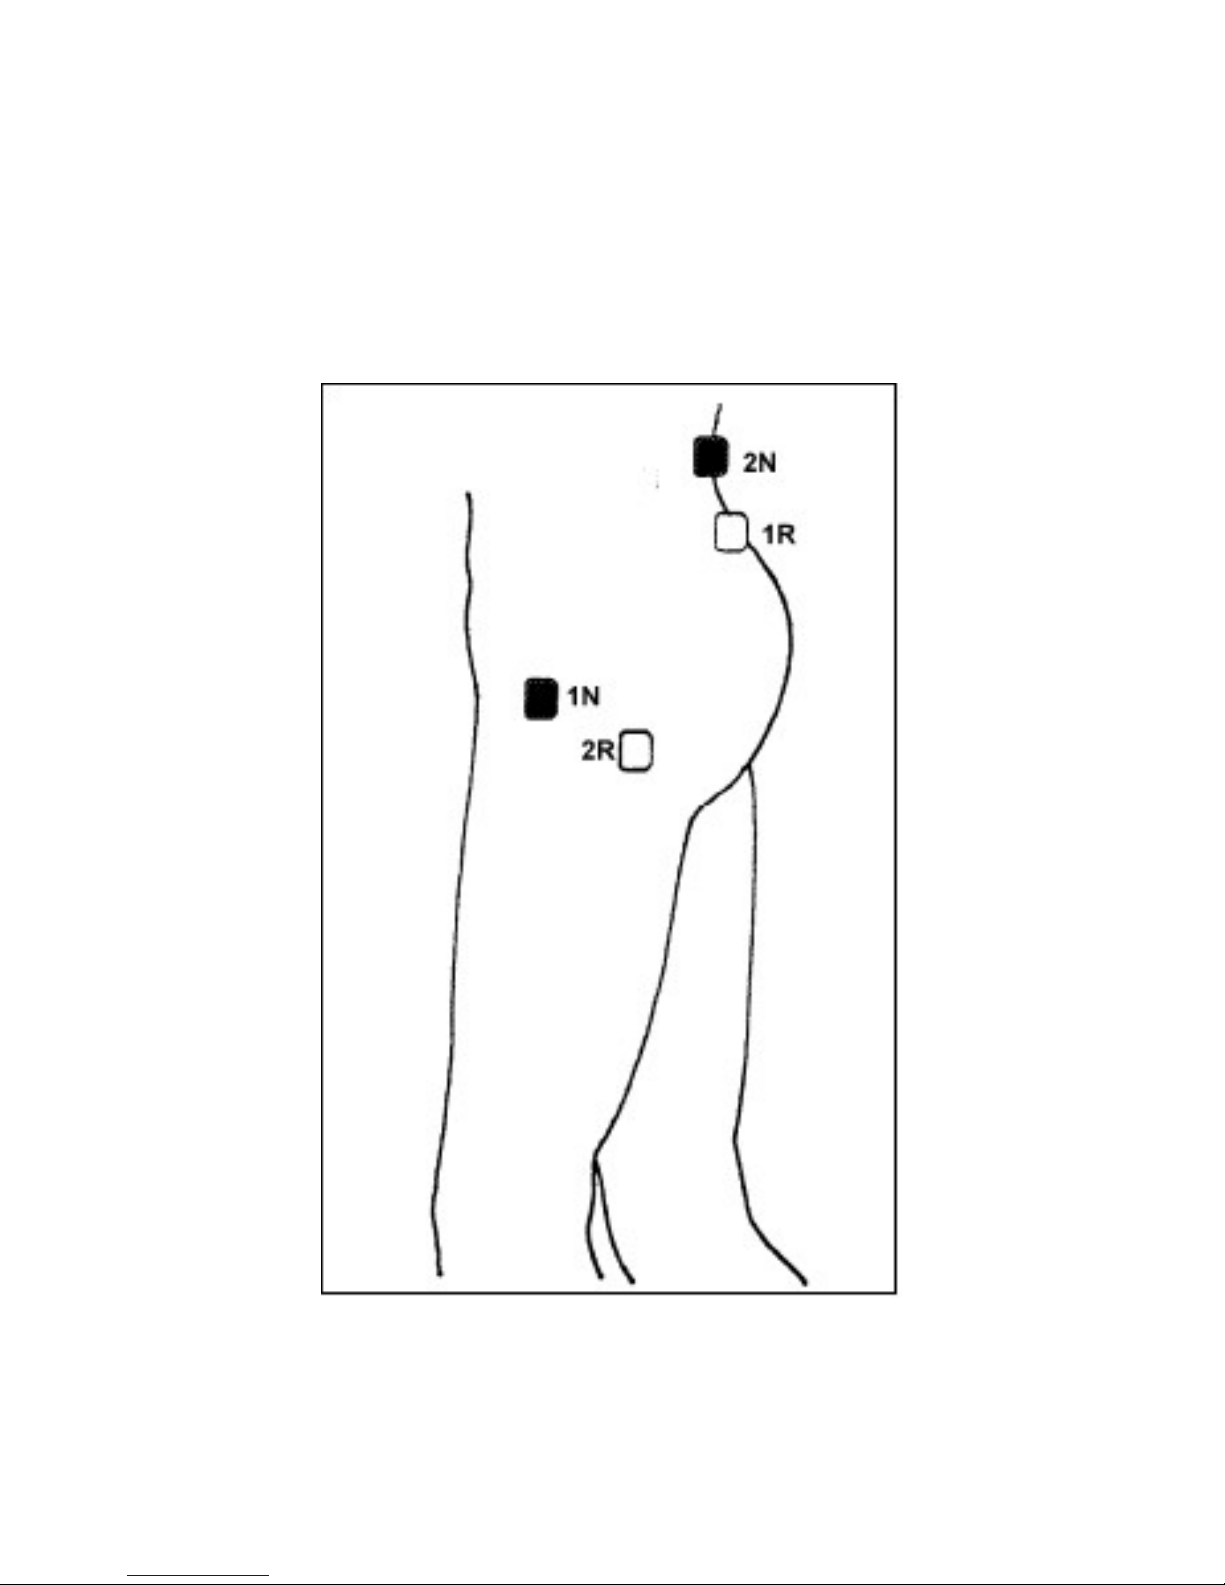
11 – HIP PAIN (COXALGIA)
Using both lead wires, place one electrode from each lead
wire on your lower back on the side of the spine related to
the affected hip. The remaining electrodes must be placed
on the area of pain, on your hip.
Page 38
- 38 -
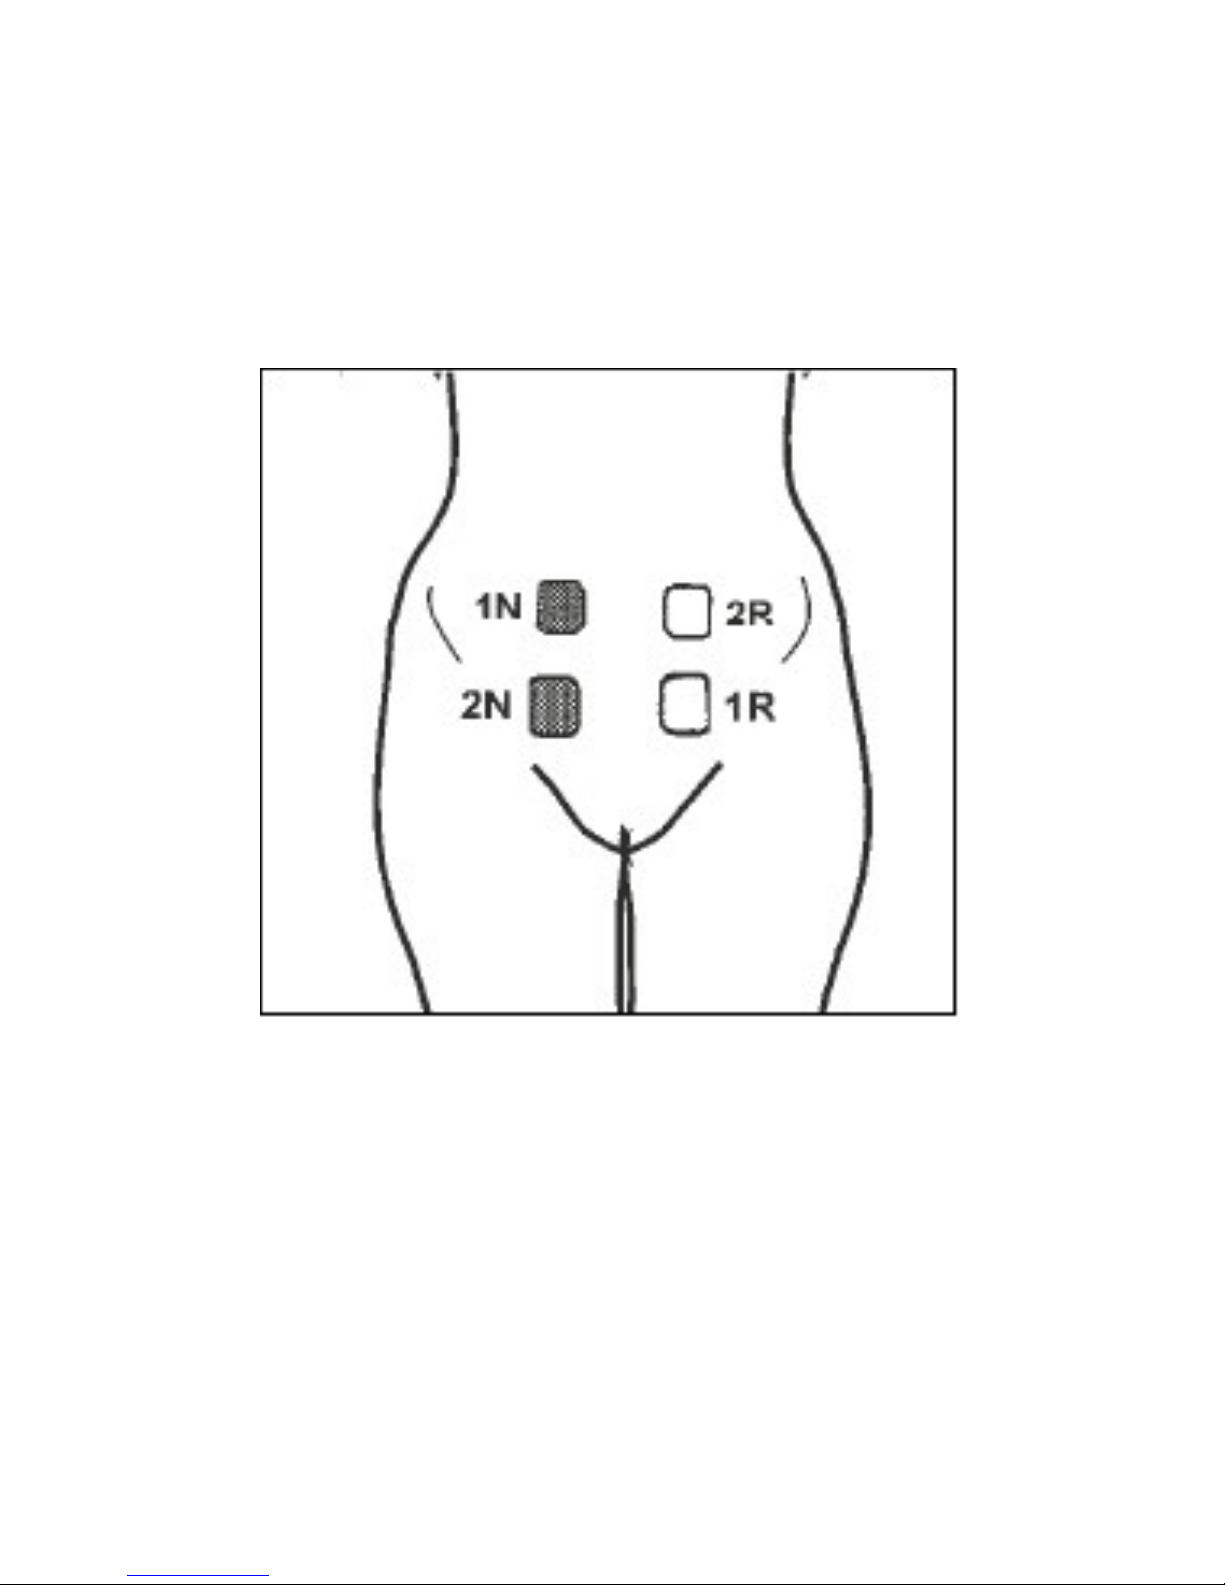
12 – MENSTRUAL PAIN
Using both lead wires, place electrodes over the tummy
area as shown.
Page 39
- 39 -
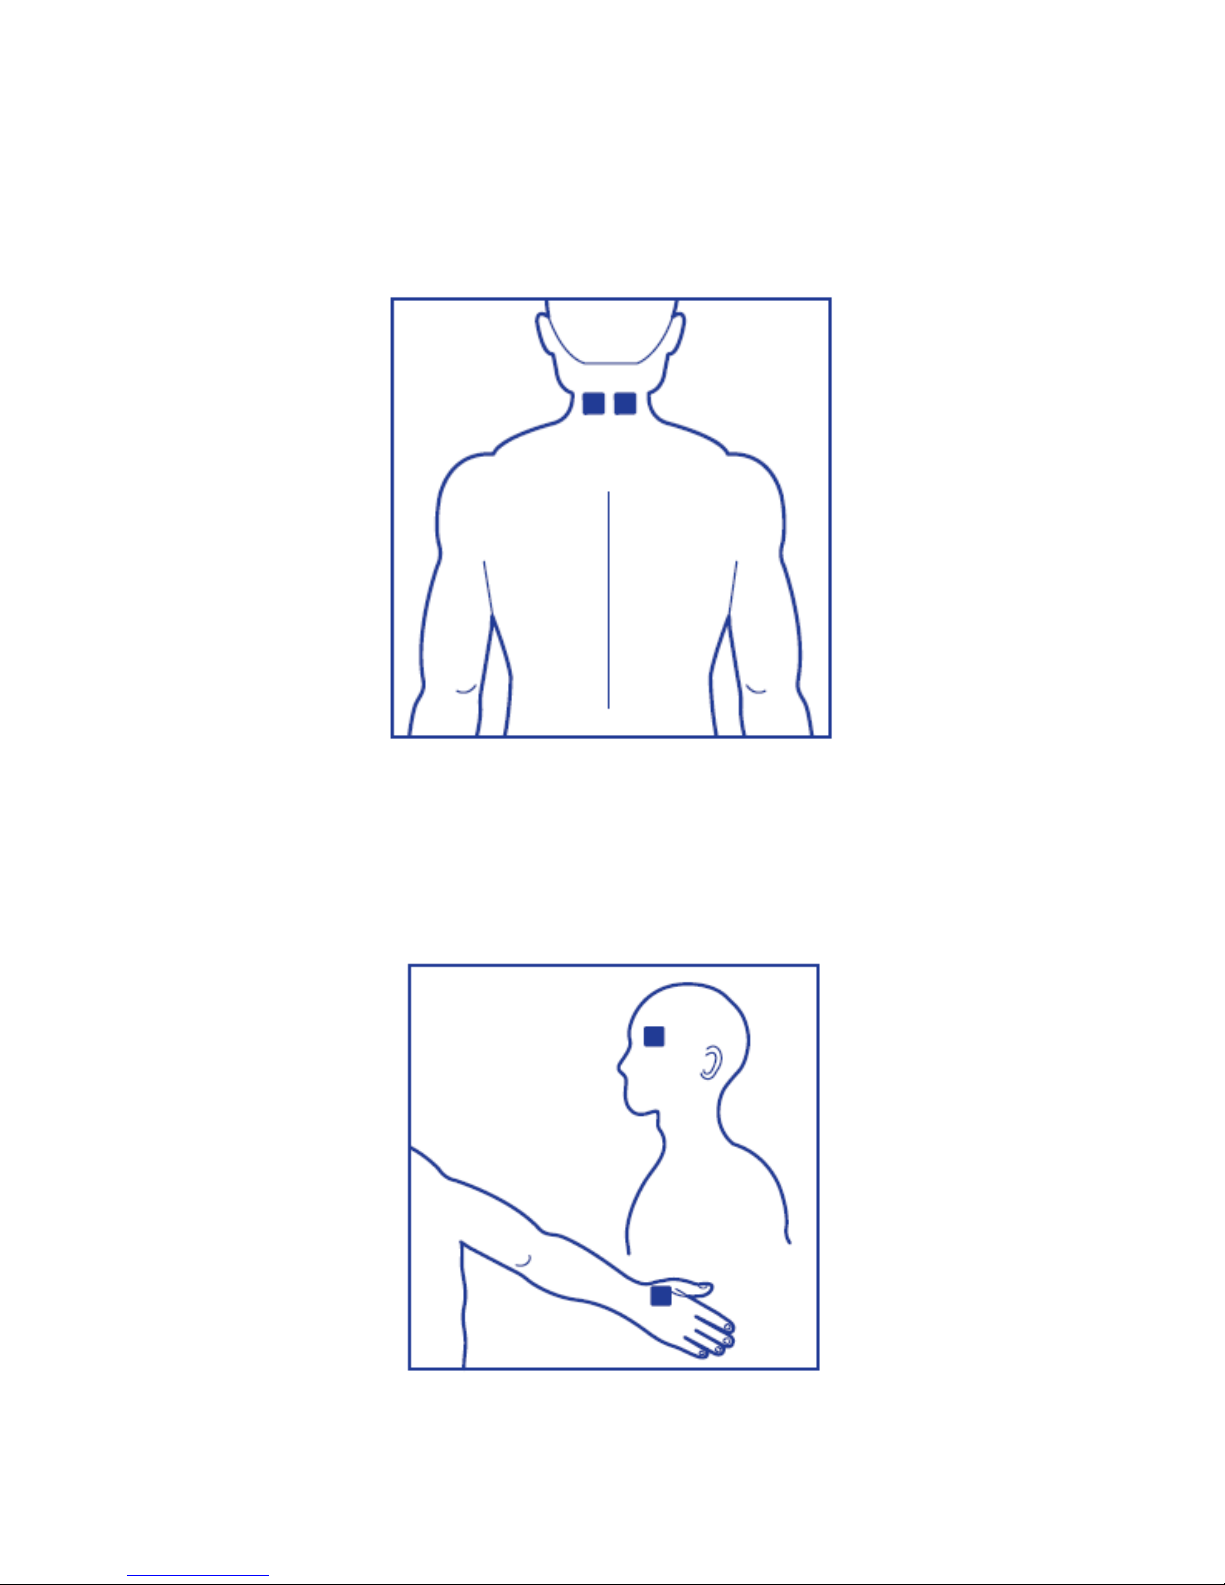
13 – MIGRAINE
Using only 2 electrodes, place each on the back of the
neck.
Note: Do not place electrodes on the side or front of the
neck.
MIGRAINE (ADDITIONAL POSITION)
Using only 2 electrodes, place one on the left temple, and
the other on the back of your right hand between your
thumb and first finger.
Note: If only 2 electrodes are being used, connect both
electrodes to the 2-lead single-channel lead wire.
Page 40
- 40 -
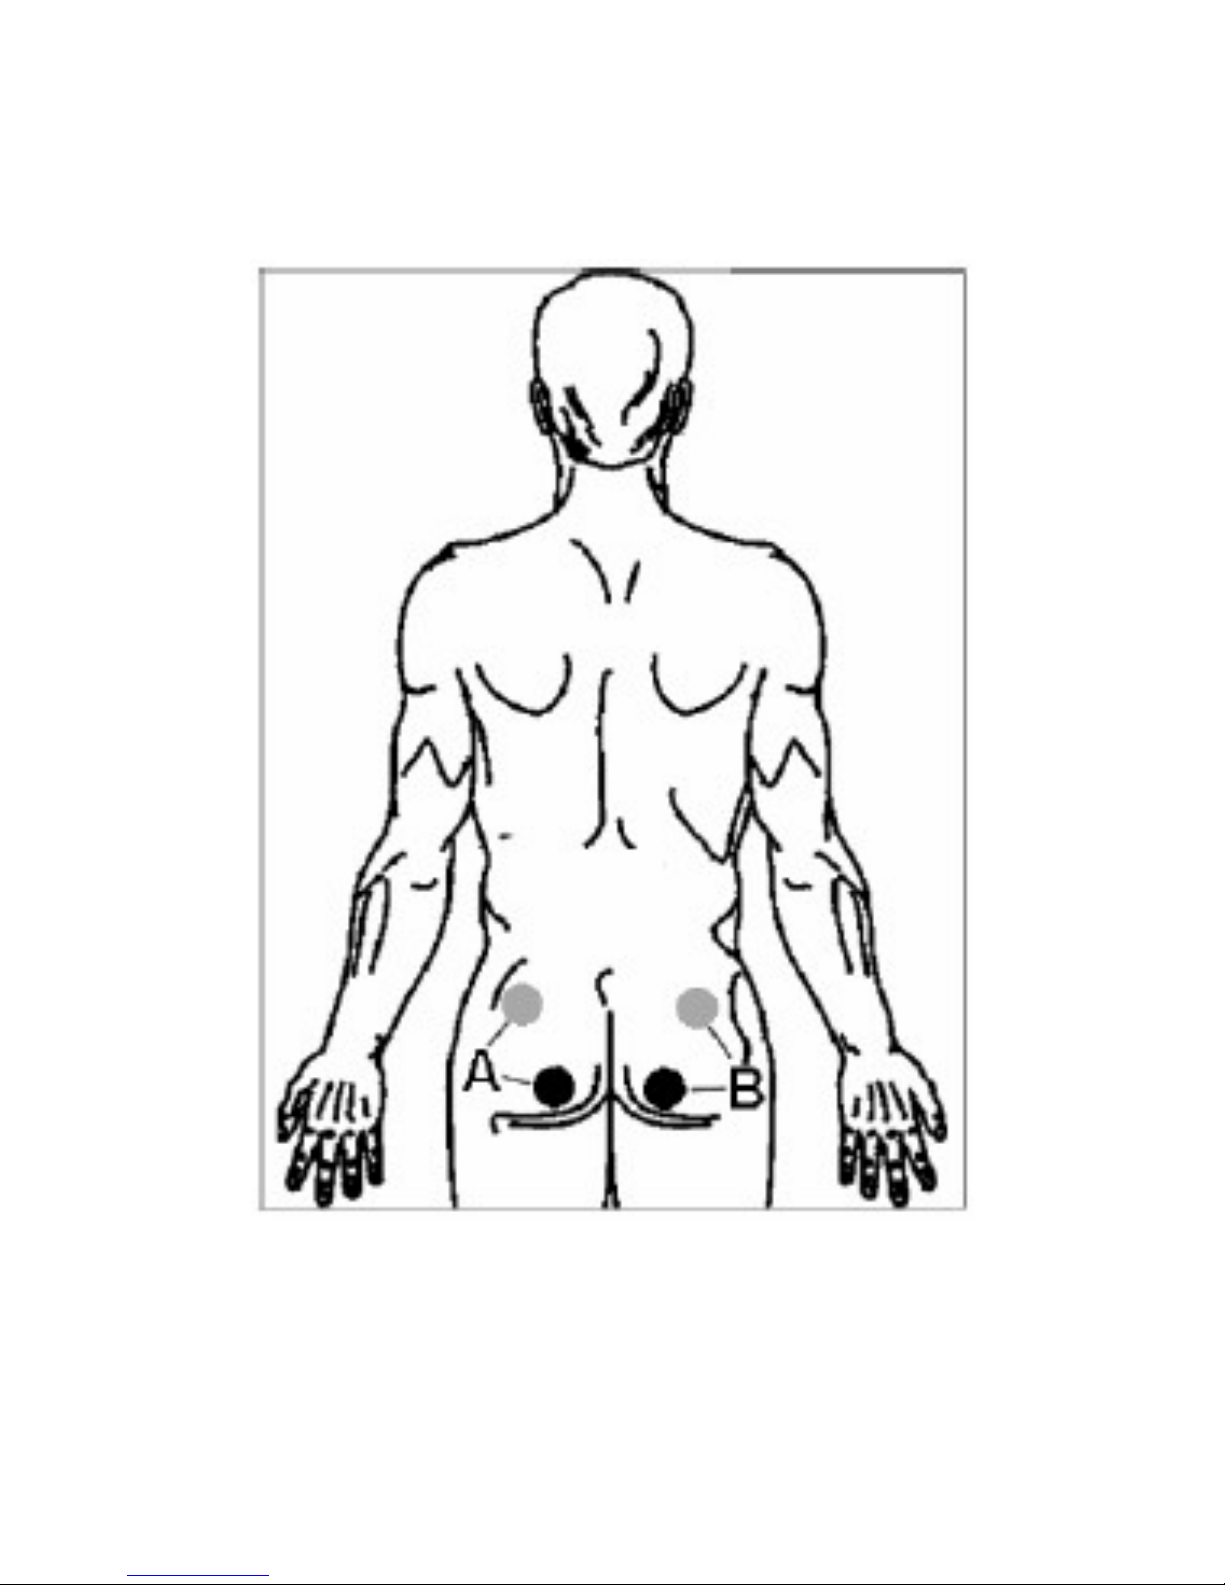
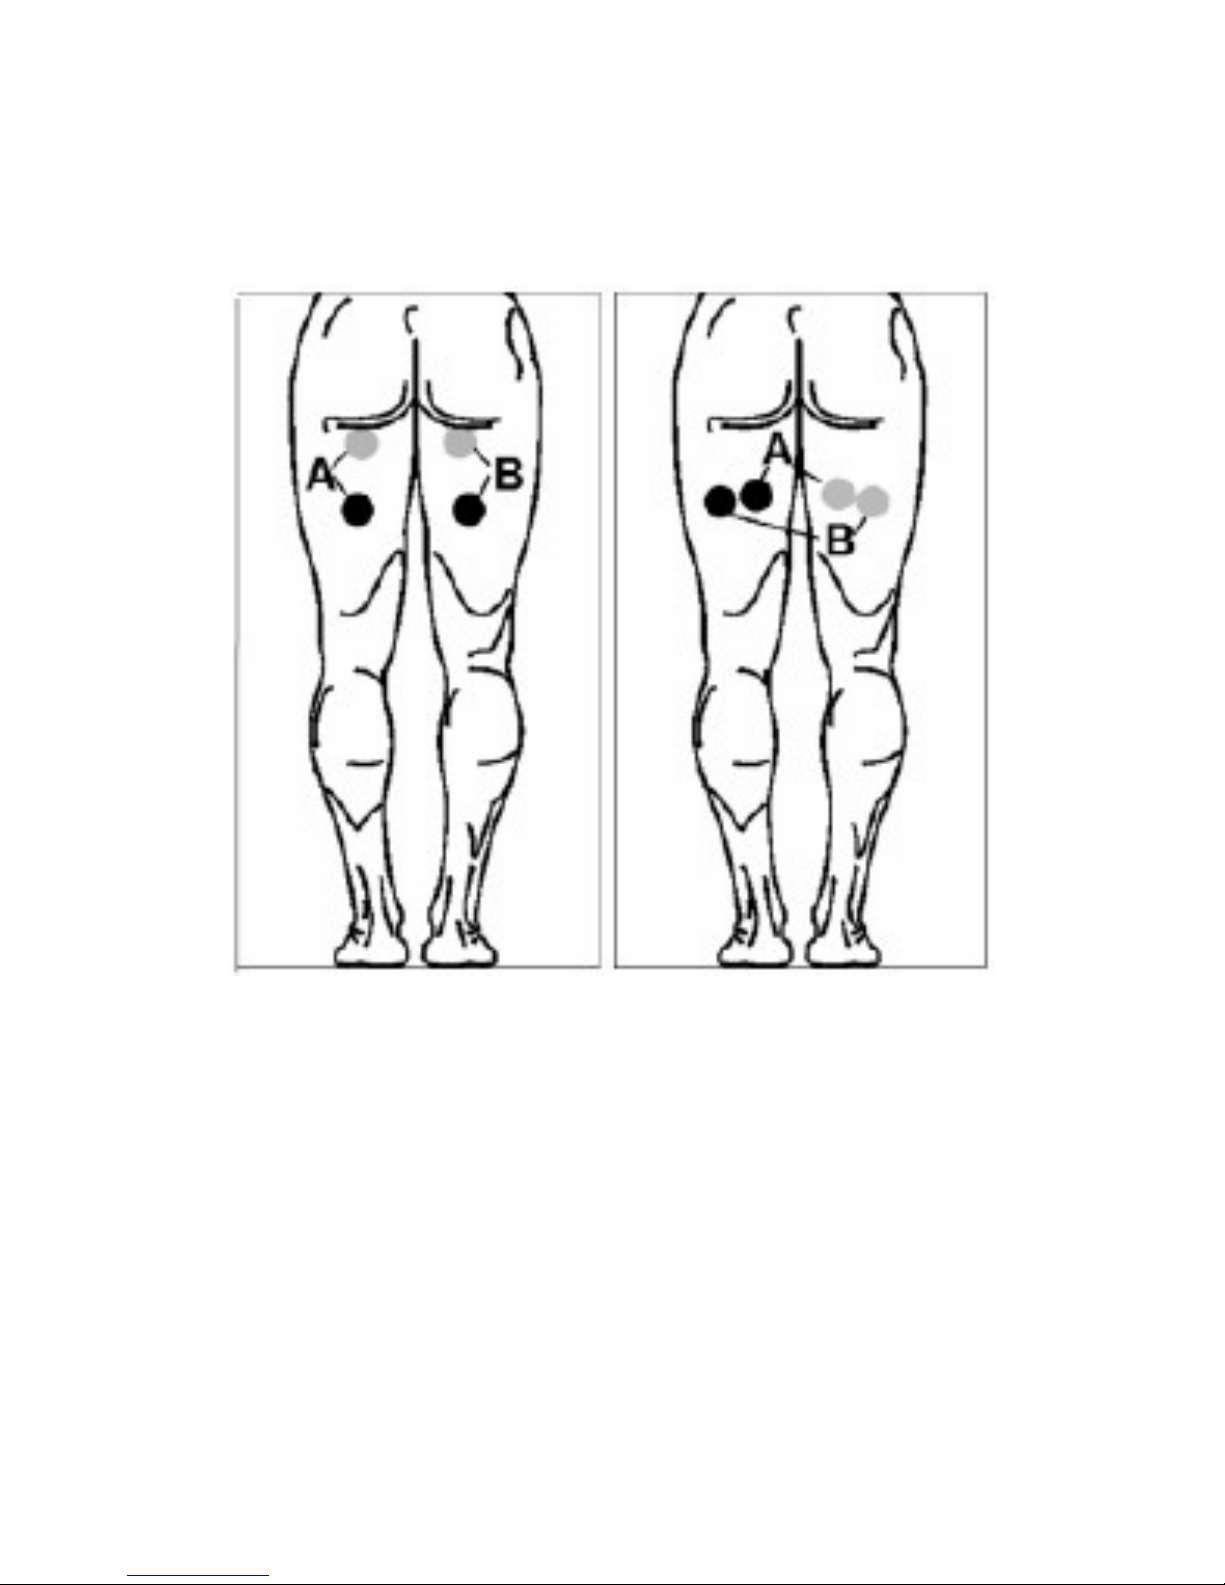
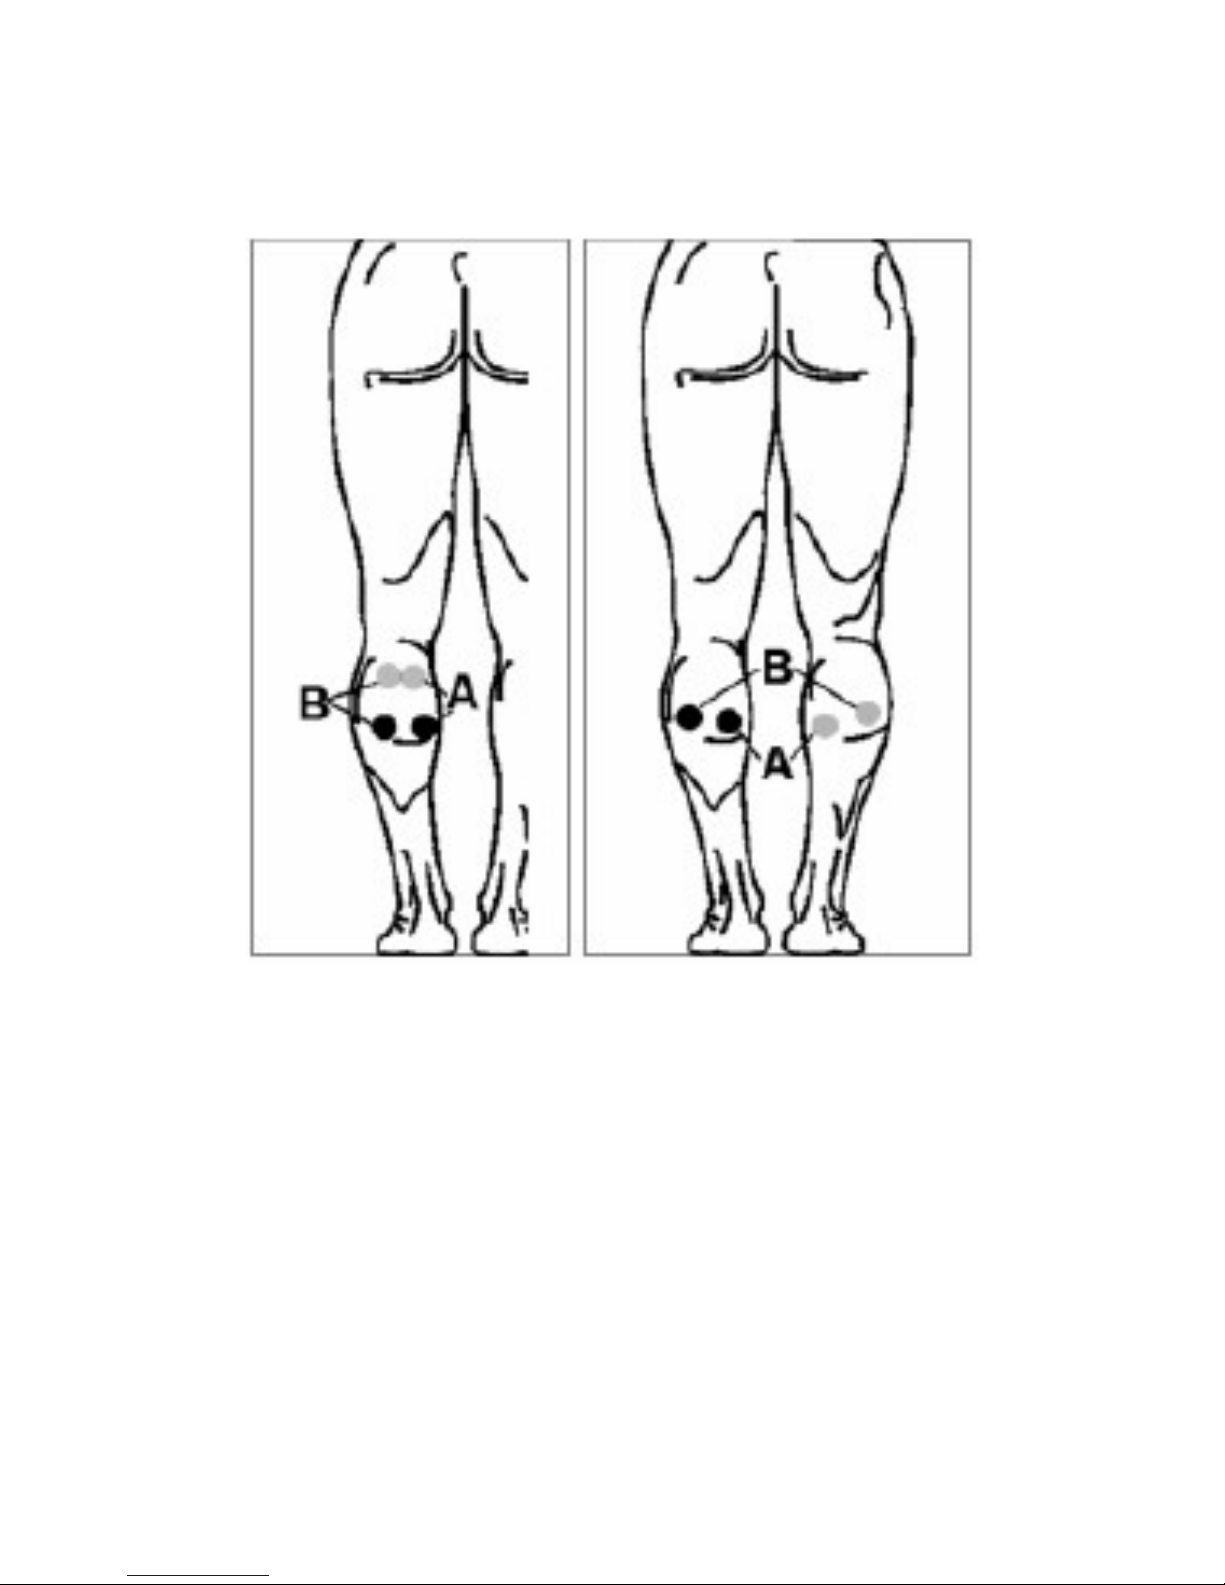
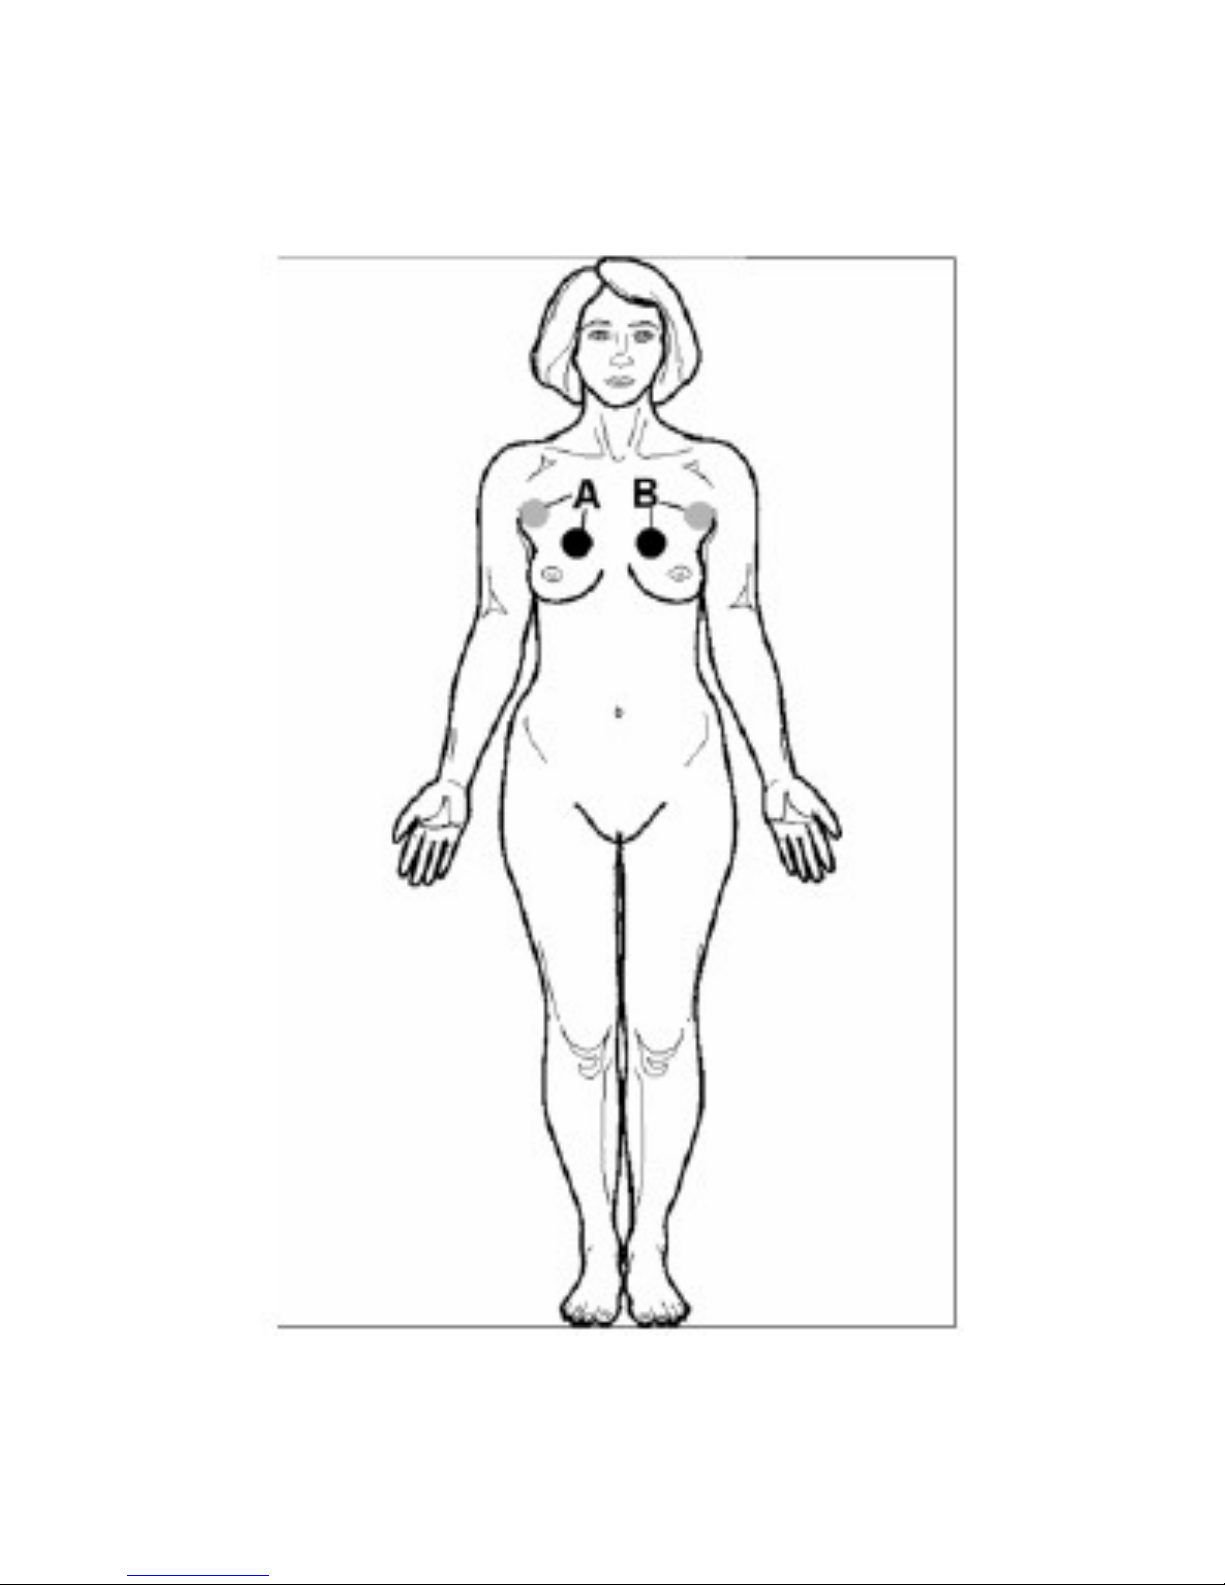
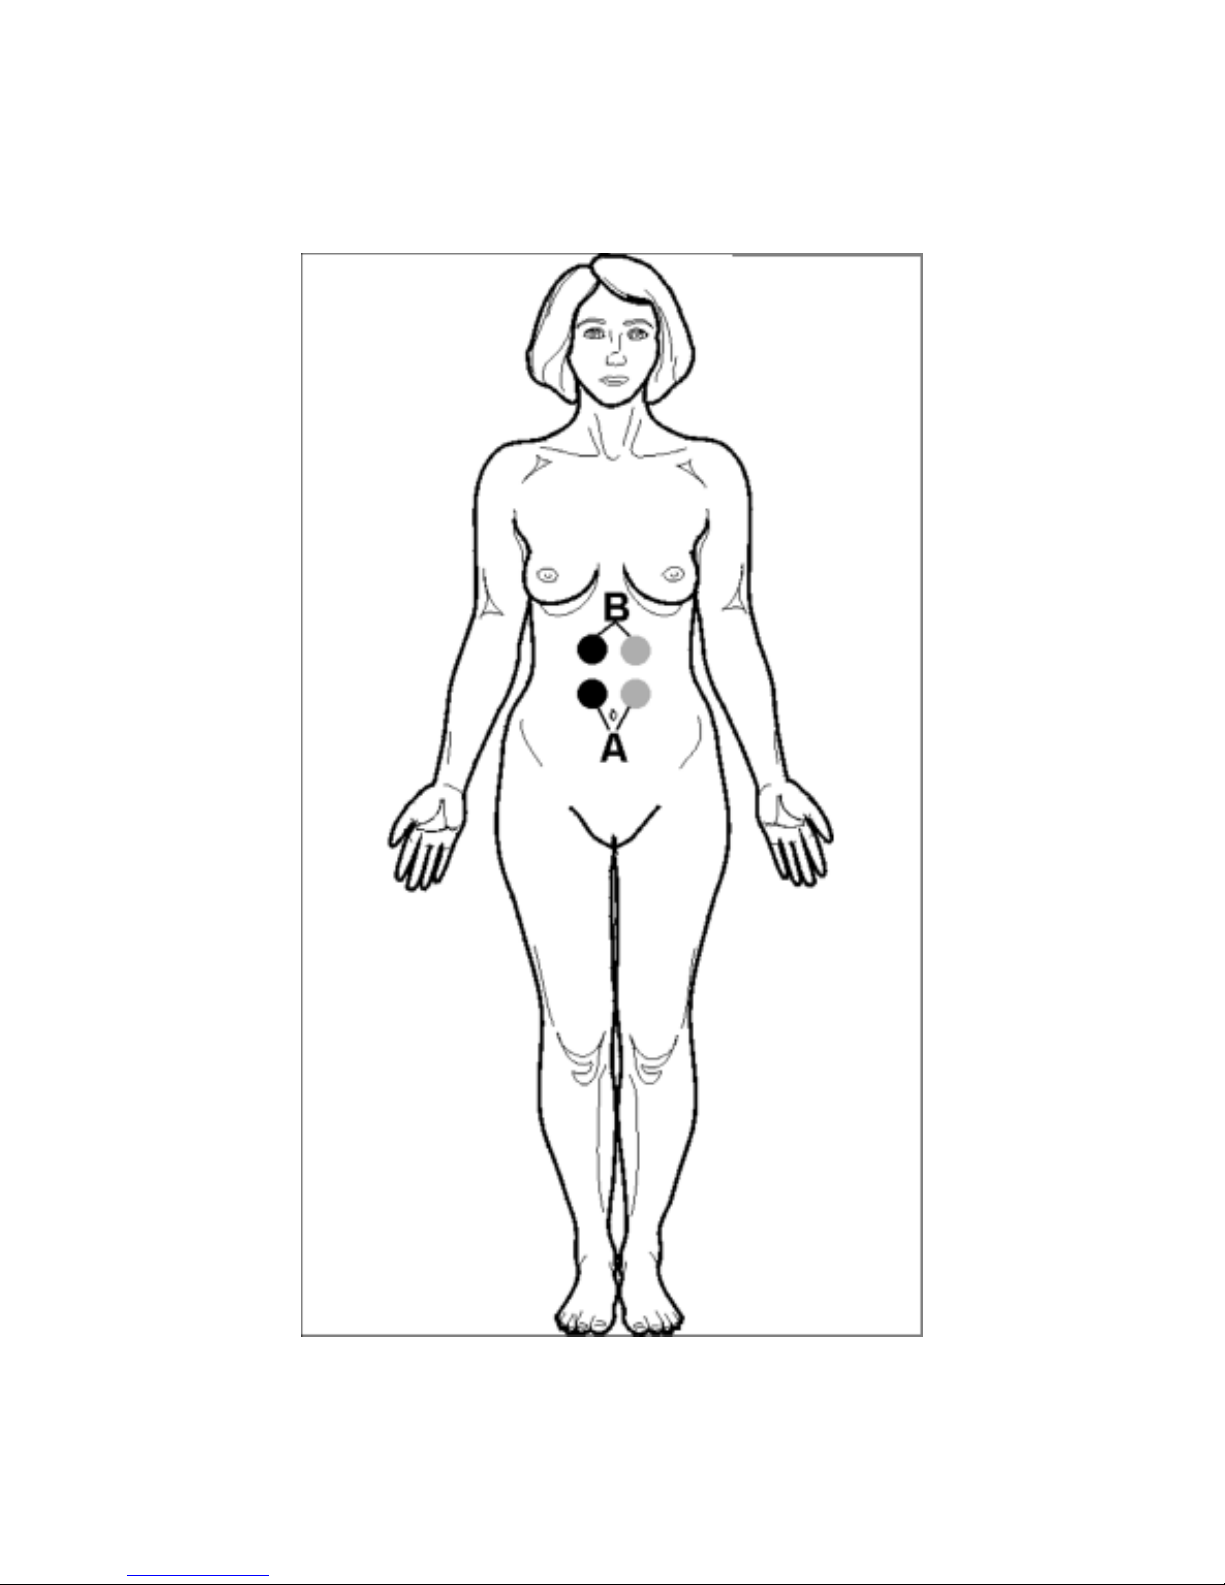
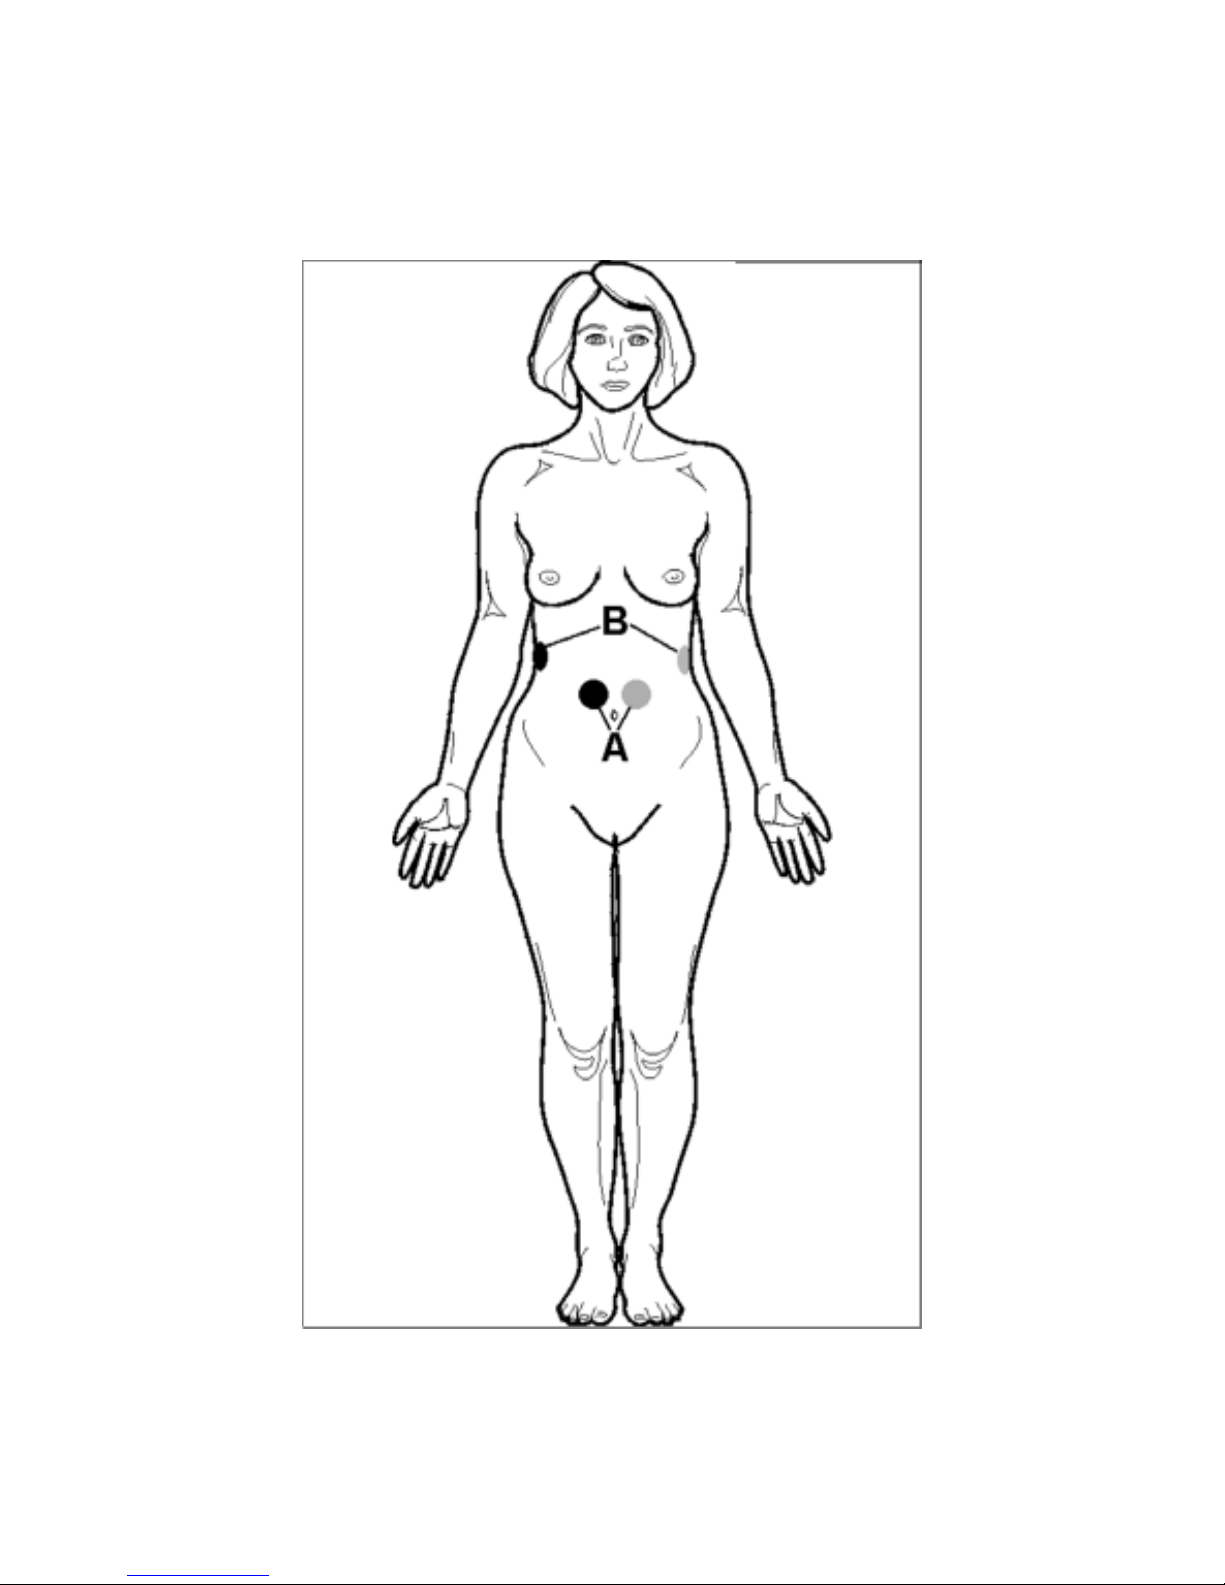
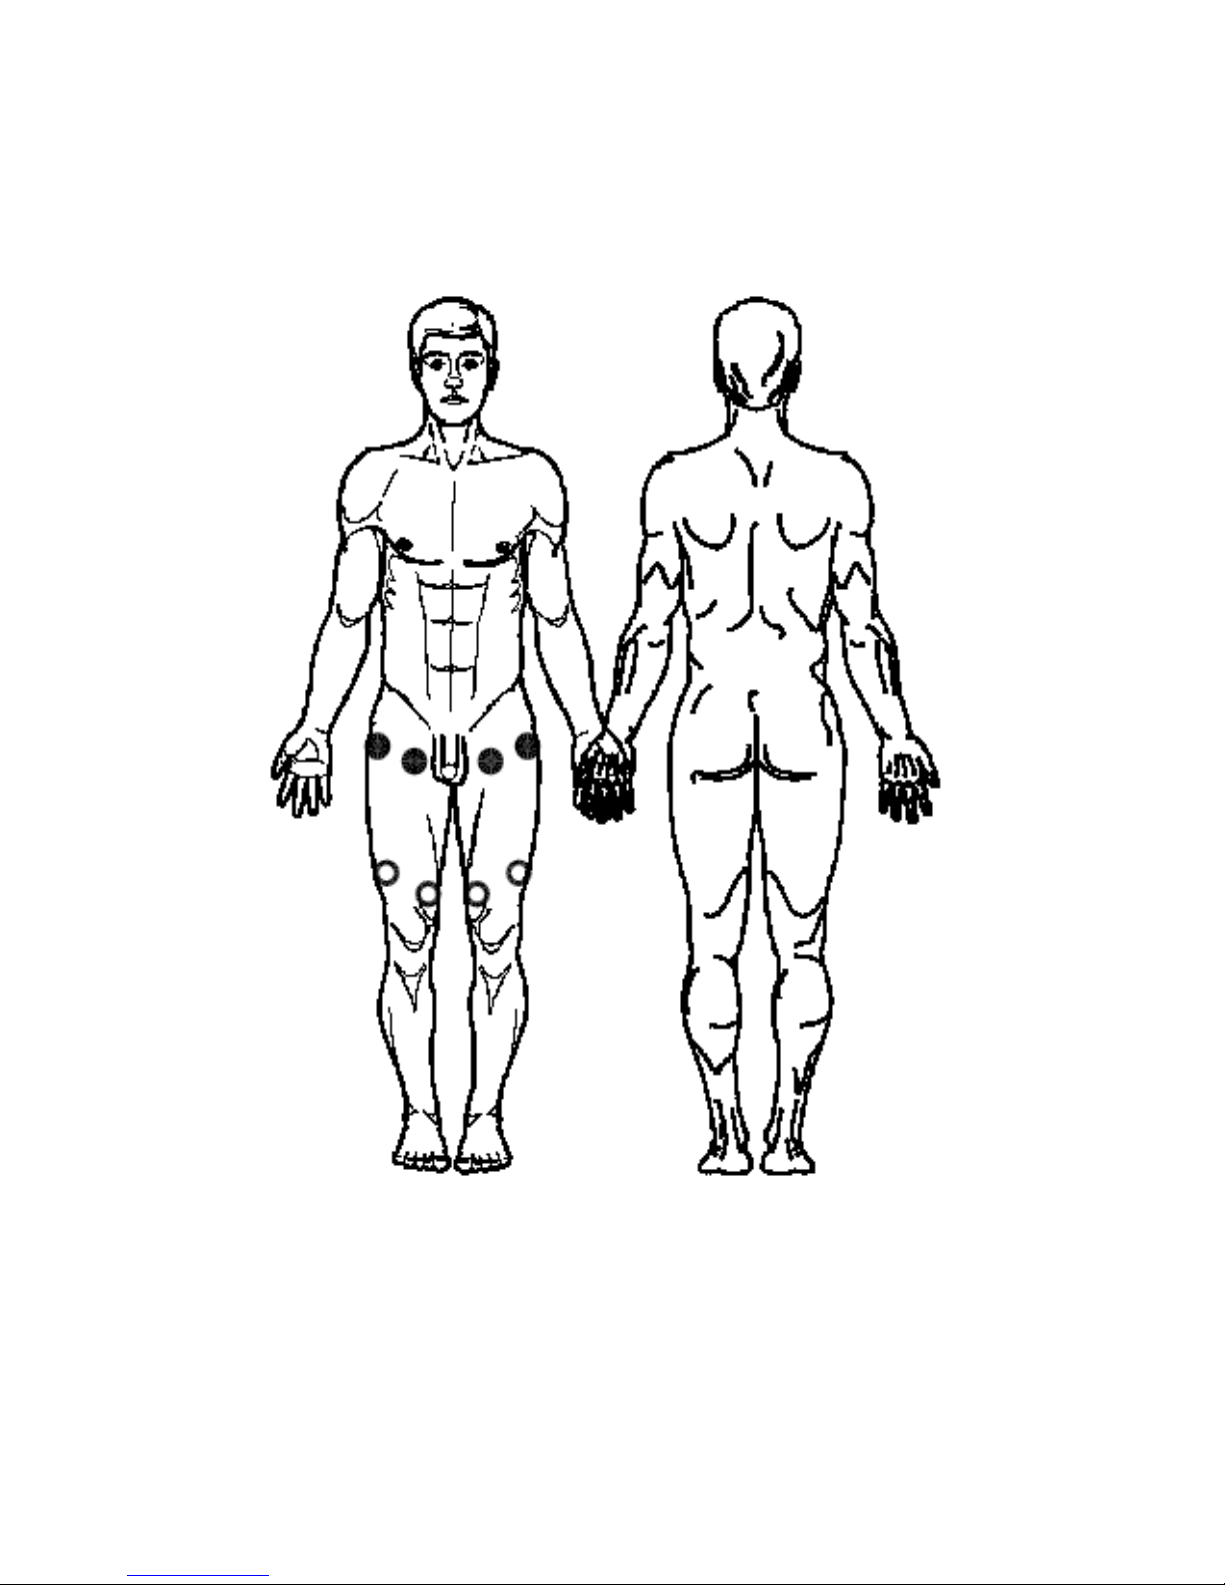
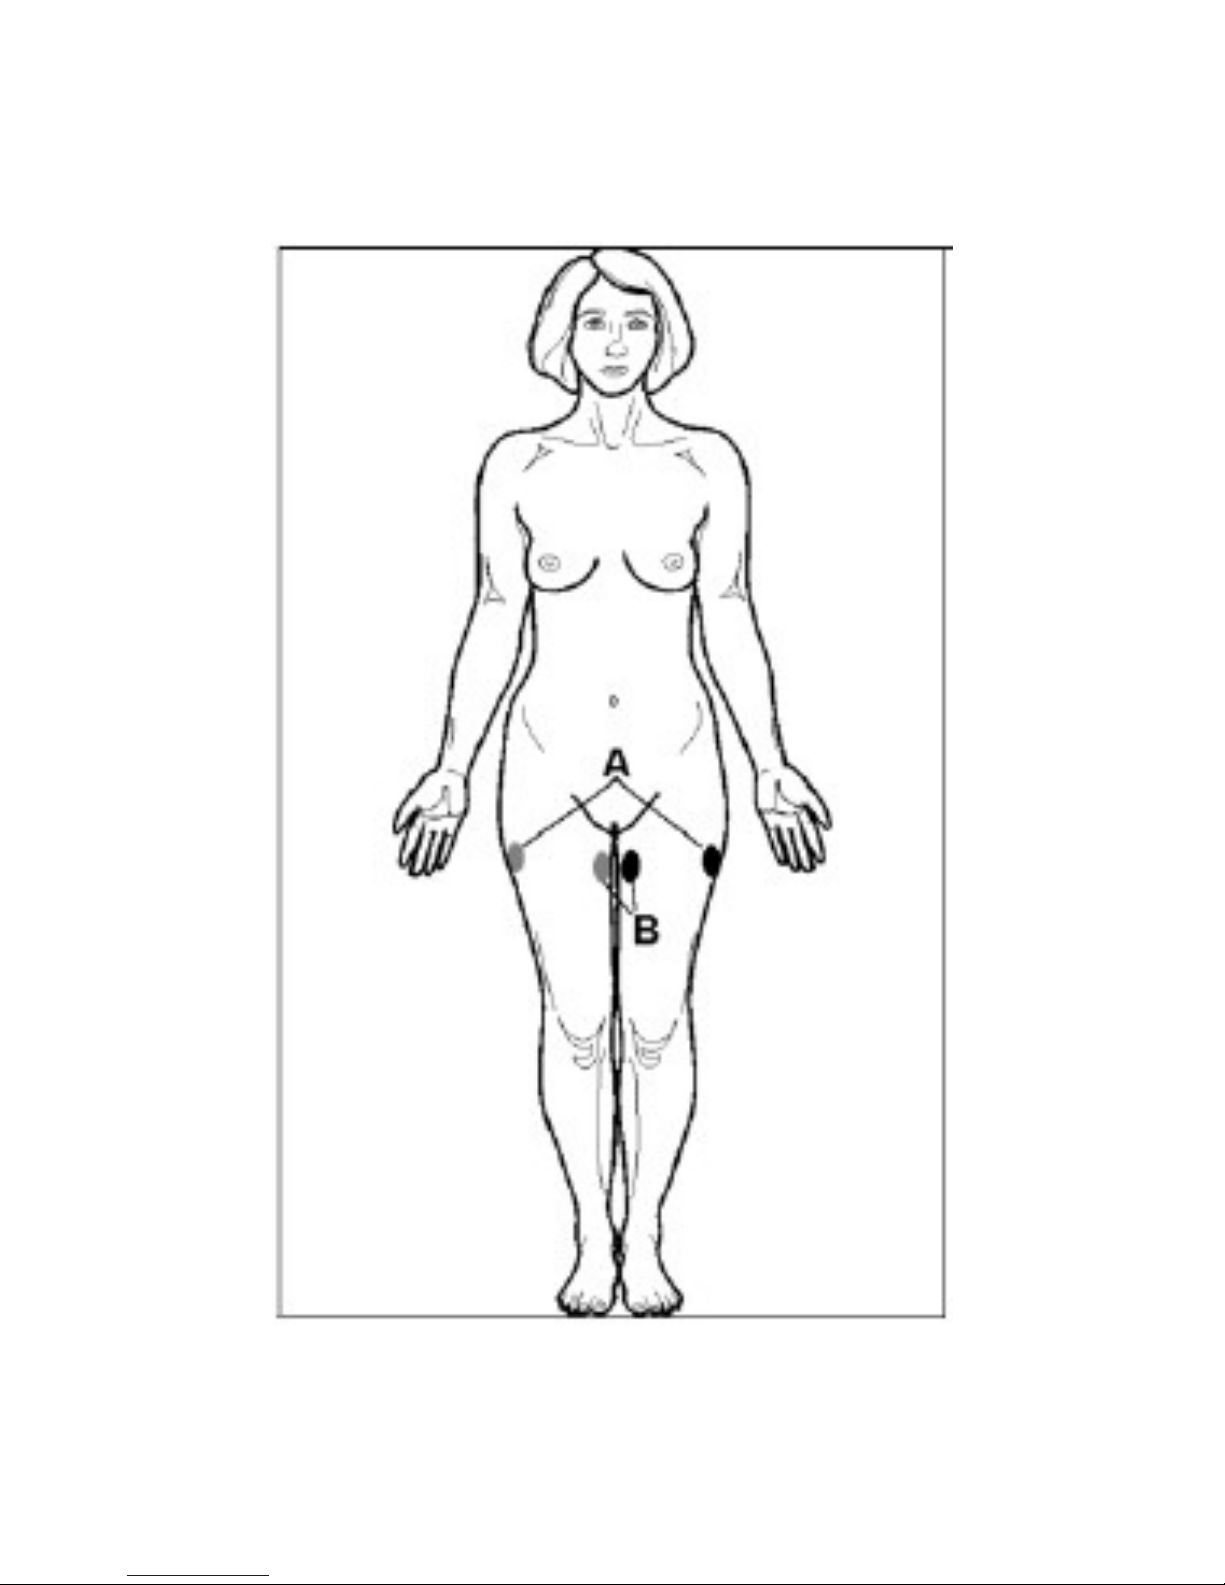
Examples of electrodes placement for EMS:
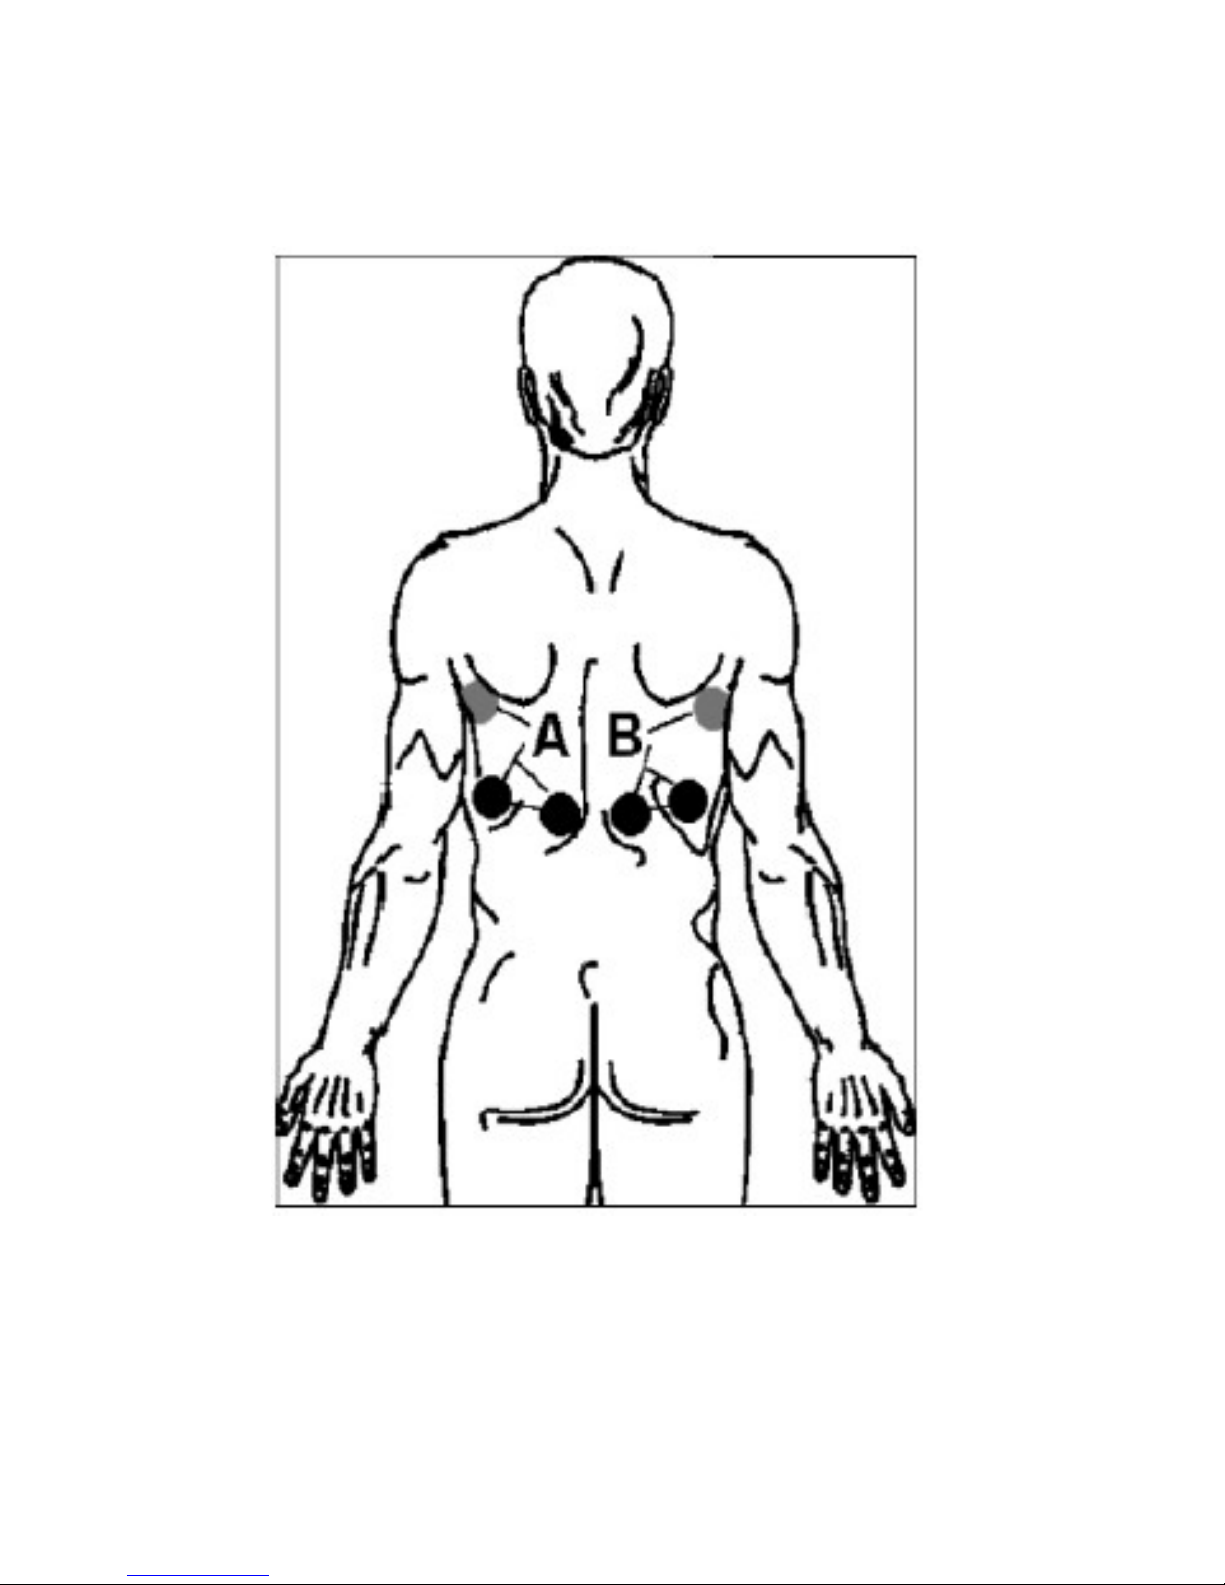
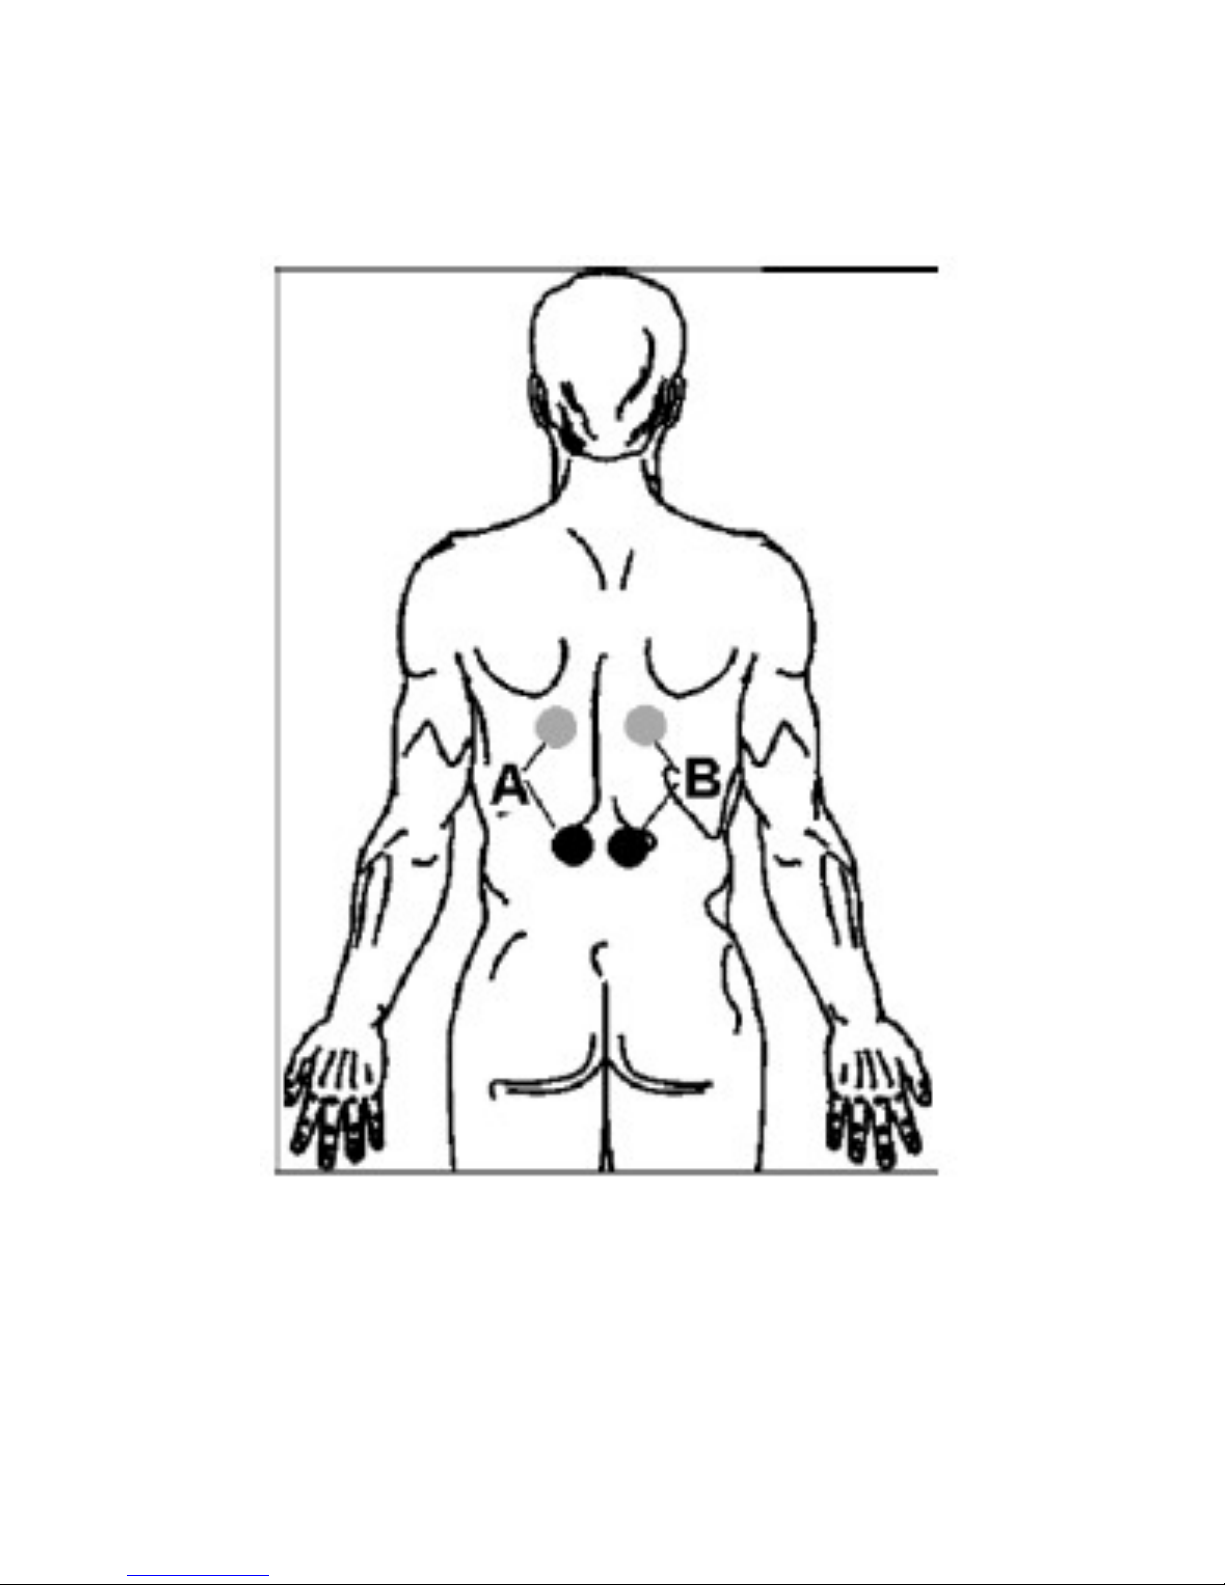
Please Note: In EMS mode, electrode placement is not
determined by the program mode selected. Simply select
your program mode, then place electrodes on the
required treatment area according to the following
diagrams.
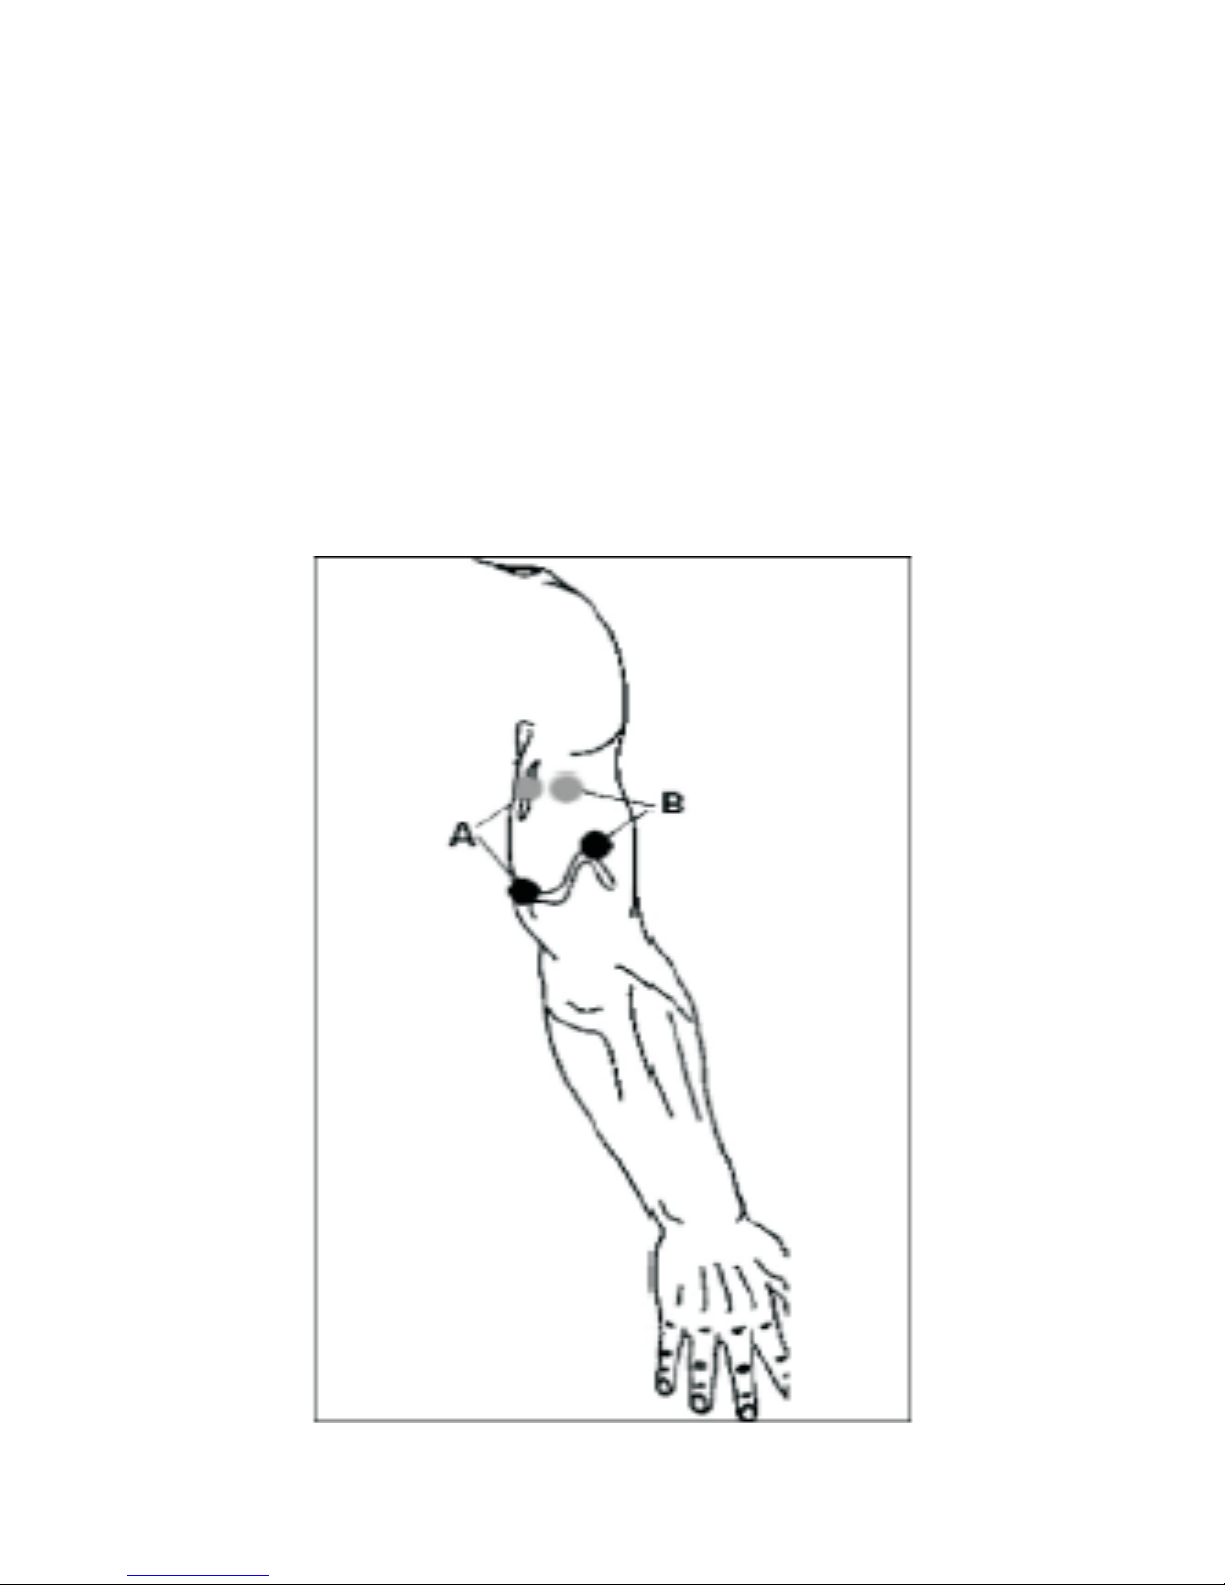
TRICEPS
Page 41
- 41 -
LATISSIMUS DORSI
Page 42
- 42 -
SPINALIS MUSCLE (BACK)
Page 43
- 43 -
GLUTEUS
Page 44
- 44 -
HAMSTRINGS
Page 45
- 45 -
CALVES
Page 46
- 46 -
BREAST
Page 47
- 47 -
ABDOMEN
Page 48
- 48 -
ABDOMEN + WAIST
Page 49
- 49 -
QUADRICEPS
Page 50
- 50 -
THIGHS
Page 51

- 51 -
NOTE: When the using MicroCurrent or
Interferential stimulation, please consult your
doctor for directions on electrode placement.
ELECTRODES
The electrodes that are supplied with your STIMTEC
NEO Unit are self-adhesive and can be used several
times. Skin must be allowed to breathe, so the
electrodes should be removed periodically. When not in
use, the electrodes should be placed onto the clear
plastic shield.
The condition of the electrodes has a direct effect on
conductivity, and therefore the effectiveness of the
treatment. When the electrodes start to lose their
adhesive quality, it is possible to reactivate their
adhesiveness by applying a fine spray of water to the
gel side of the electrode. In time, this technique will not
work, the gel will not reactivate, and new electrodes
should be used.
WARNINGS
Do not use any electrodes less than 50mm X 50mm.
Allergic reactions to the self-adhesive electrodes can
occur even though they are hypoallergenic.
• Do not apply to broken skin.
• Do not apply electrodes to areas with less than
normal sensitivity. This could lead to setting
intensities at higher levels than intended.
Page 52

- 52 -
 Loading...