

Stihl STIHL RMI 422 P STIHL RMI 422 P (en / fr) [en, fr]

STIHL RMI 422 P (CA)
{
Instruction Manual
Notice d’emploi

G Instruction Manual
1 - 85
F Notice d’emploi
86 - 179

Contents
English
1 Introduction
2 Guide to Using this Manual
2.1 Signal Words
2.2 Symbols in Text
3 Main Parts
3.1 Robotic Mower
3.2 Docking Station
3.3 Control Panel
3.4 Installation Material
Original Instruction ManualPrinted on chlorine-free paper
4 Safety Symbols
4.1 Robotic Mower
. . . . . . . . . . . . . . . . . . . . . . . . . . . . . . . . . . . . . . . . .
. . . . . . . . . . . . . . . . . . . . . . . . . .
. . . . . . . . . . . . . . . . . . . . . . . . . . . . . . . . . . . . . . . .
. . . . . . . . . . . . . . . . . . . . . . . . . . . . . . . . . . . . .
. . . . . . . . . . . . . . . . . . . . . . . . . . . . . . . . . . . . . . . . . .
. . . . . . . . . . . . . . . . . . . . . . . . . . . . . . . . . . . . . .
. . . . . . . . . . . . . . . . . . . . . . . . . . . . . . . . . . . . .
. . . . . . . . . . . . . . . . . . . . . . . . . . . . . . . . . . . . . . .
. . . . . . . . . . . . . . . . . . . . . . . . . . . . . . . . .
. . . . . . . . . . . . . . . . . . . . . . . . . . . . . . . . . . . . .
. . . . . . . . . . . . . . . . . . . . . . . . . . . . . . . . . . . . . .
5 IMPORTANT SAFETY INSTRUCTIONS
5.1 Intended Use
5.2 Operator
5.3 Personal Protective Equipment
5.4 Robotic Mower
5.5 Integrated Battery
5.6 Using the Robotic Mower
. . . . . . . . . . . . . . . . . . . . . . . . . . . . . . . . . . . . . . . .
. . . . . . . . . . . . . . . . . . . . . . . . . . . . . . . . . . . . . . . . . . . .
. . . . . . . . . . . . . . . . . . . . . .
. . . . . . . . . . . . . . . . . . . . . . . . . . . . . . . . . . . . . .
. . . . . . . . . . . . . . . . . . . . . . . . . . . . . . . . . . .
. . . . . . . . . . . . . . . . . . . . . . . . . . .
6 Docking Station and Power Supply Safety
6.1 Introduction
6.2 Warnings and Instructions
. . . . . . . . . . . . . . . . . . . . . . . . . . . . . . . . . . . . . . . .
. . . . . . . . . . . . . . . . . . . . . . . . . .
7 Maintenance, Repair and Storage
7.1 Warnings and Instructions
Printing inks contain vegetable oils, paper can be recycled.
8 Operating Principle
9 Key Features
9.1 Key Features
. . . . . . . . . . . . . . . . . . . . . . . . . . . . . . . . . . . . . . .
. . . . . . . . . . . . . . . . . . . . . . . . . . . . . . . . . . . . . . .
10 Installing the Robotic Mower
. . . . . . . . . . . . . . . . . . . . . . . . . .
. . . . . . . . . . . . . . . . . . . . . . . . . . . . . . . . .
. . . . . . . . . . . . . . . . . . . . . . .
10.1 Preparing the Lawn and the Robotic Mower for
Operation
. . . . . . . . . . . . . . . . . . . . . . . . . . . . . . . . . . . . . . . . . .
10.2 Setting the Language, Date and Time
10.3 Installing the Docking Station
10.4 Installing the Perimeter Wire
. . . . . . . . . . . . . . . . . . . . . .
. . . . . . . . . . . . . . . . . . . . . . .
. . . . . . . . . . . . .
. . . . . . . . . .
. . . . . . . . . . . . . . . . . .
. . . . . . . . . . . . . .
10.5 Connecting the Perimeter Wire to the Docking
3
3
10.6 Linking the Robotic Mower and Docking Station
3
10.7 Checking the Installation
3
10.8 Programming the Robotic Mower: the Mowing
4
10.9 Completing the Initial Installation and First
4
5
11 Installing the Perimeter Wire
5
11.1 Planning the Layout of the Mowing Area
6
11.2 Making a Sketch of the Mowing Area
6
11.3 Measuring Wire Clearances with the STIHL Ruler
6
11.4 Routing the Perimeter Wire in Confined Areas
7
11.5 Routing Around Restricted Areas
7
11.6 Installing Linked Areas and Secondary Areas
7
11.7 Installing Corridors
7
11.8 Installing Search Loops
8
11.9 Installing Linking Sections
9
11.10 Accurate Mowing Along Edges
10
11.11 Sloping Terrain in the Mowing Area
11.12 Installing Reserve Wire
13
11.13 Using Wire Connectors
13
14
12 Docking Station
12.1 LED on the Docking Station
16
12.2 Docking Station Controls
16
12.3 Docking the Robotic Mower
17
12.4 Charging the Robotic Mower
17
13 Control Panel Display Information
17
13.1 Information Area
19
13.2 Status Screens
14 Menu Functions
19
14.1 Navigating the Menus
19
14.2 Overview
20
14.3 Commands
23
14.4 Information
. . . . . . . . . . . . . . . . . . . . . . . . . . . . . . . . . . . . . . . . . . . . .
Station
. . . . . . . . . . . . . . . . . . . . . . . . . . .
. . . . . . . . . . . . . . . . . . . . . . . . . . . . . . . . . . . . . . . . . . . . . . .
Plan
Mowing Operation
. . . . . . . . . . . . . . . . . . . . . . . . . . . . . . . . . .
. . . . . . . . . . . . . . . . . . . . . . .
. . . . . . . . . . . . . . . . . . . . . . . . . . . . . . . . .
. . . . . . . . . . . . . . . . . . . . . . . . . . . .
. . . . . . . . . . . . . . . . . . . . . . . . .
. . . . . . . . . . . . . . . . . . . .
. . . . . . . . . . . . . . . . . . . . . . . . . . .
. . . . . . . . . . . . . . . . . . . . . . . . . . .
. . . . . . . . . . . . . . . . . . . . . . . . . . . . . . . . . . . .
. . . . . . . . . . . . . . . . . . . . . . . .
. . . . . . . . . . . . . . . . . . . . . . . . . . .
. . . . . . . . . . . . . . . . . . . . . . . .
. . . . . . . . . . . . . . . . . . . . . . .
. . . . . . . . . . . . . . . . . . . . . . . . . . . . . . . . . . .
. . . . . . . . . . . . . . . . . . . . . . . . . . . . . . . . . . . .
. . . . . . . . . . . . . . . . . . . . . . . . . . . . . . . . . . . .
. . . . . . . . . . . . . . . . . . . . . . . . . . . . . .
. . . . . . . . . . . . . . . . . . . . . . . . . . . . . . . . . . . . . . . . . .
. . . . . . . . . . . . . . . . . . . . . . . . . . . . . . . . . . . . . . . .
. . . . . . . . . . . . . . . . . . . . . . . . . . . . . . . . . . . . . . . .
. . . .
. . . . . . . . . . .
. . . . . . . . . . . . . . .
. . .
. . . . .
. . . . . . . . . . . . . . . . . .
. . . . . .
. . . . . . . . . . . . . . .
. . . . . . . . . . . . . . . . . .
26
29
30
31
32
33
33
33
34
35
36
37
37
38
39
39
40
40
40
41
41
42
42
42
43
43
44
45
45
46
47
48
{
© ANDREAS STIHL AG & Co. KG 2018
0478-131-8245-A. VA0.A18.
0000008184_001_GB
0478-131-8245-A
This instruction manual is protected by copyright. All rights reserved, especially the rights to reproduce, translate and process
with electronic systems.
1

English
14.5 Mowing Plan
14.6 Active Times
14.7 Mowing Duration
15 Settings
15.1 Settings Overview
15.2 iMow Settings
15.3 Installation
15.4 Safety
15.5 Service
15.6 Setting Starting Points
16 During Operation
16.1 Automatic Mowing
16.2 Mowing Duration
16.3 Opening and Closing the Flap
16.4 Adjusting the Cutting Height
. . . . . . . . . . . . . . . . . . . . . . . . . . . . . . . . . . . . . . .
. . . . . . . . . . . . . . . . . . . . . . . . . . . . . . . . . . . . . . .
. . . . . . . . . . . . . . . . . . . . . . . . . . . . . . . . . . .
. . . . . . . . . . . . . . . . . . . . . . . . . . . . . . . . . . . . . . . . . . . .
. . . . . . . . . . . . . . . . . . . . . . . . . . . . . . . . . .
. . . . . . . . . . . . . . . . . . . . . . . . . . . . . . . . . . . . . .
. . . . . . . . . . . . . . . . . . . . . . . . . . . . . . . . . . . . . . . . .
. . . . . . . . . . . . . . . . . . . . . . . . . . . . . . . . . . . . . . . . . . . . .
. . . . . . . . . . . . . . . . . . . . . . . . . . . . . . . . . . . . . . . . . . . .
. . . . . . . . . . . . . . . . . . . . . . . . . . . . .
. . . . . . . . . . . . . . . . . . . . . . . . . . . . . . . . . . .
. . . . . . . . . . . . . . . . . . . . . . . . . . . . . . . . .
. . . . . . . . . . . . . . . . . . . . . . . . . . . . . . . . . . .
. . . . . . . . . . . . . . . . . . . . . .
. . . . . . . . . . . . . . . . . . . . . . . .
16.5 Adjusting the Mowing Duration and Active Times
16.6 Mowing Outside of Active Times
17 Transporting
. . . . . . . . . . . . . . . . . . . . . . . . . . . . . . . . . . . . . . .
17.1 Transporting the Robotic Mower
. . . . . . . . . . . . . . . . . . .
. . . . . . . . . . . . . . . . . . .
18 Storing the Robotic Mower and Docking Station
18.1 Robotic Mower
18.2 Docking Station and Power Supply
19 Cleaning
. . . . . . . . . . . . . . . . . . . . . . . . . . . . . . . . . . . . .
. . . . . . . . . . . . . . . . .
. . . . . . . . . . . . . . . . . . . . . . . . . . . . . . . . . . . . . . . . . . .
19.1 Cleaning the Robotic Mower and Docking Station
20 Inspection and Maintenance
20.1 Inspection and Maintenance Intervals
20.2 Inspecting the Mowing Blade
20.3 Replacing the Mowing Blade
20.4 Mounting and Removing the Carrier Plate
21 Troubleshooting Guide
21.1 Messages
21.2 Robotic Mower
. . . . . . . . . . . . . . . . . . . . . . . . . . . . . . . . . . . . . . . . . .
. . . . . . . . . . . . . . . . . . . . . . . . . . . . . . . . . . . . .
21.3 Searching for a Wire Break
22 Specifications
. . . . . . . . . . . . . . . . . . . . . . . . . . . . . . . . . . . . . .
22.1 STIHL RMI 422 P (CA) Robotic Mower (iMow)
22.2 STIHL AAI 80 Battery
. . . . . . . . . . . . . . . . . . . . . . . .
. . . . . . . . . . . . . .
. . . . . . . . . . . . . . . . . . . . . . .
. . . . . . . . . . . . . . . . . . . . . . .
. . . . . . . . . .
. . . . . . . . . . . . . . . . . . . . . . . . . . . . .
. . . . . . . . . . . . . . . . . . . . . . . .
. . . . .
. . . . . . . . . . . . . . . . . . . . . . . . . . . . . .
22.3 STIHL ADO 401 Docking Station and
OWA-60U-27VCAM Power Supply
. . . . . . . . . . . . . . . . .
. . .
. . . .
. . .
49
22.4 Symbols on the Robotic Mower, Battery, Docking
50
51
52
52
52
53
54
55
56
56
56
57
Station and Power Supply
22.5 Engineering Improvements
22.6 FCC 15 Compliance Statement and ISED
Declarations
. . . . . . . . . . . . . . . . . . . . . . . . . . . . . . . . . . . . . . .
23 Replacement Parts and Equipment
23.1 Genuine STIHL Replacement Parts
23.2 Standard Replacement Parts and Accessories
24 Disposal
. . . . . . . . . . . . . . . . . . . . . . . . . . . . . . . . . . . . . . . . . . .
24.1 Disposal of the Robotic Mower, Docking Station
and Power Supply
. . . . . . . . . . . . . . . . . . . . . . . . . . . . . . . . . .
25 Installation Examples
25.1 Installation Examples
. . . . . . . . . . . . . . . . . . . . . . . . . .
. . . . . . . . . . . . . . . . . . . . . . . . .
. . . . . . . . . . . . . . . . . . . . . . . . . . . . . .
. . . . . . . . . . . . . . . . . . . . . . . . . . . . . .
57
57
58
59
59
59
60
60
60
61
61
62
62
62
63
64
66
66
72
76
77
77
77
77
. . . . . . . . . . . . . . . . .
. . . . . . . . . . . . . . . .
. . . . .
77
78
78
79
79
79
79
79
80
80
2
0478-131-8245-A
1 Introduction
English
1Introduction
Thank you for your purchase. The information contained in
this manual will help you receive maximum performance and
satisfaction from your STIHL robotic mower and, if followed,
reduce the risk of injury from its use.
IMPORTANT
READ CAREFULLY BEFORE USE
KEEP FOR FUTURE REFERENCE
Because a robotic mower is a high-speed cutting
tool, designed for operation independent from
the acti ve contr ol or sup ervisio n of an ope rator,
special safety precautions must be observed to
reduce the risk of personal injury.
Read this instruction manual thoroughly before
setting up your robotic mower and periodically
thereafter. Follow all safety precautions.
Careless or improper use of the robotic mower
can cause serious or fatal injury.
Discuss setup and operation of your robotic mower with your
authorized STIHL iMow servicing dealer. STIHL
recommends having an authorized STIHL iMow servicing
dealer set up your robotic mower.
Do not lend or rent your robotic mower without this
instruction manual. Allow only persons who fully understand
the information in this manual to set up, operate or maintain
the robotic mower. The operator must be familiar with the
robotic mower's controls before starting work. The operator
is responsible for accidents or hazards occurring to other
people or their property.
For further information, or if you do not understand any of
the instructions in this manual, please go to www.stihl.ca or
contact your authorized STIHL iMow servicing dealer.
2 Guide to Using this Manual
2.1 Signal Words
This manual contains safety information that requires your
special attention. Such information is introduced with the
following symbols and signal words:
DANGER
Indicates a hazardous situation that, if not avoided, will
result in death or serious injury.
WARNING
Indicates a hazardous situation that, if not avoided, could
result in death or serious injury.
NOTICE
Indicates a risk of property damage, including damage to the
machine or its individual components.
2.2 Symbols in Text
The following symbol is included to assist you with the use
of the manual:
Refers to a designated chapter or sub-chapter in this
instruction manual.
0478-131-8245-A
3
English
3 Main Parts
3Main Parts
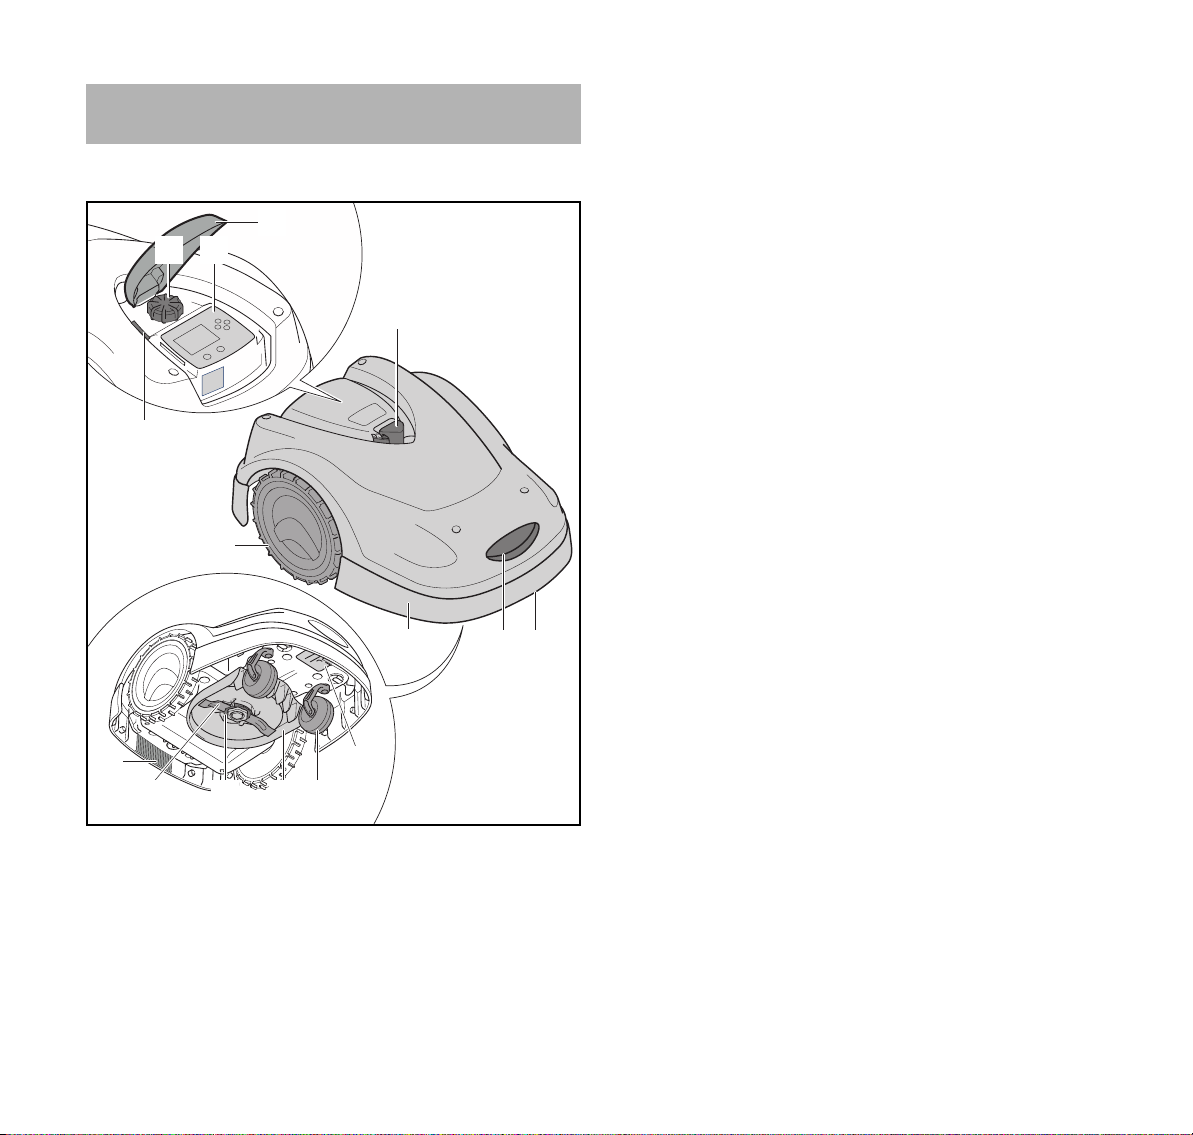
3.1 Robotic Mower
3
1 2
5
#
4
6
7
10
11
1 Cutting Height Adjustment Knob
For adjusting the height of the mowing blade.
2 Control Panel
For navigating the mower's menu options.
3Flap
Covers the control panel and cutting height adjustment
knob.
15
141312
8
9
4 Rain Sensor
Detects rainfall.
5 STOP Button
Stops the robotic mower and the mowing blade.
6 Rear Wheels
The mower's drive wheels.
7Hood
Covers the mower's internal parts.
8 Charging Contacts
Electrical contacts in the robotic mower for connecting to
the docking station for charging.
9 Front Carrying Handle (integrated into the Hood)
For lifting and transporting the robotic mower.
10 Rear Carrying Handle (integrated into the Hood)
For lifting and transporting the robotic mower.
11 Mowing Blade
Metal blade for cutting grass.
12 Carrier Plate
For mounting and securing the mowing blade.
13 Mower Deck
Underside of the mower where mowing and mulching
operations take place.
14 Front Wheels
Guide wheels for the robotic mower.
15 Battery Compartment
Compartment for the integrated lithium ion battery.
0000-GXX-4374-A1
# Rating Plate
Contains electrical information and the product's serial
number.
4
0478-131-8245-A
3 Main Parts
1
4
2
3
0000-GXX-4376-A0
English
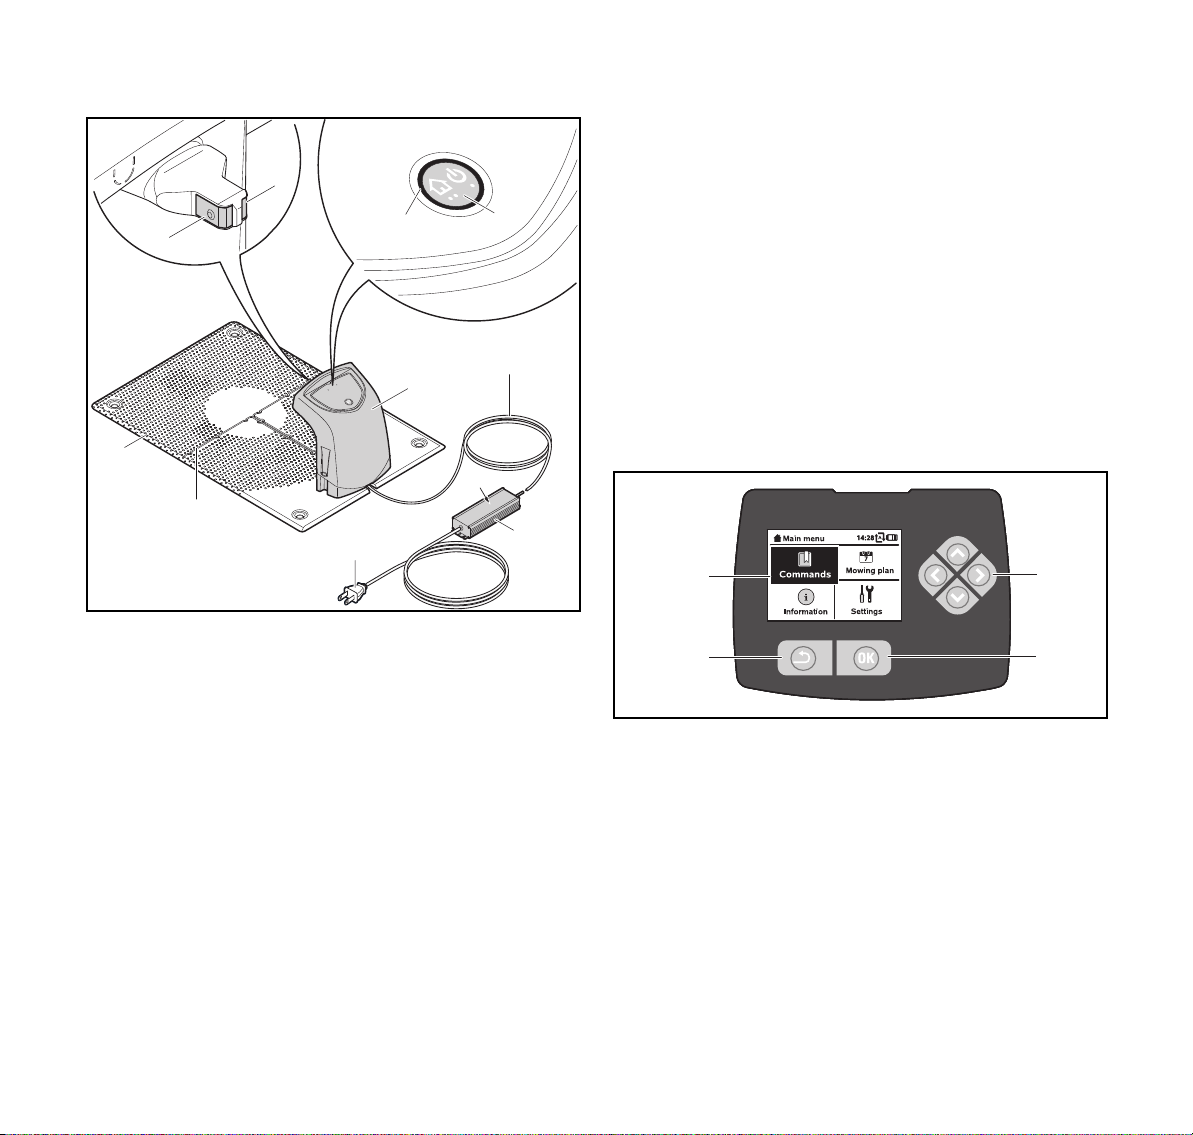
3.2 Docking Station
1
1
#
2
4
9
#
8
7
1 Charging Contacts
Electrical contacts for connecting the docking station to
the robotic mower for charging.
2LED
Indicates the operating status of the docking station and
perimeter wire signal.
3 ON/OFF/Home Button
Turns the signal to the perimeter wire on and off.
Commands the robotic mower to return to the docking
station, when pressed twice within two seconds.
4Cover
Covers the charging contacts and other electronics of the
docking station.
5 Power Supply Cord
Supplies the docking station with electricity when
plugged into an electrical outlet.
6 Power Supply
Supplies the docking station and perimeter wire with
electricity when plugged into an electrical outlet.
7Plug
Connects the power supply cord to an electrical outlet.
3
5
8 Wire Channels
For securing the perimeter wire in the base plate.
9 Base Plate
Base of the docking station.
# Rating Plate
Contains electrical information and the product's serial
number.
3.3 Control Panel
6
0000-GXX-5344-A0
1 Graphical Display
Displays the robotic mower's menus and messages.
2 Navigation Pad
For navigating the mower's menu options.
3 OK Button
For selecting menu options on the control panel.
4 Back Button
For navigating the robotic mower's menus.
0478-131-8245-A
5
English
1
2
3
0000-GXX-3340-A1
4 Safety Symbols
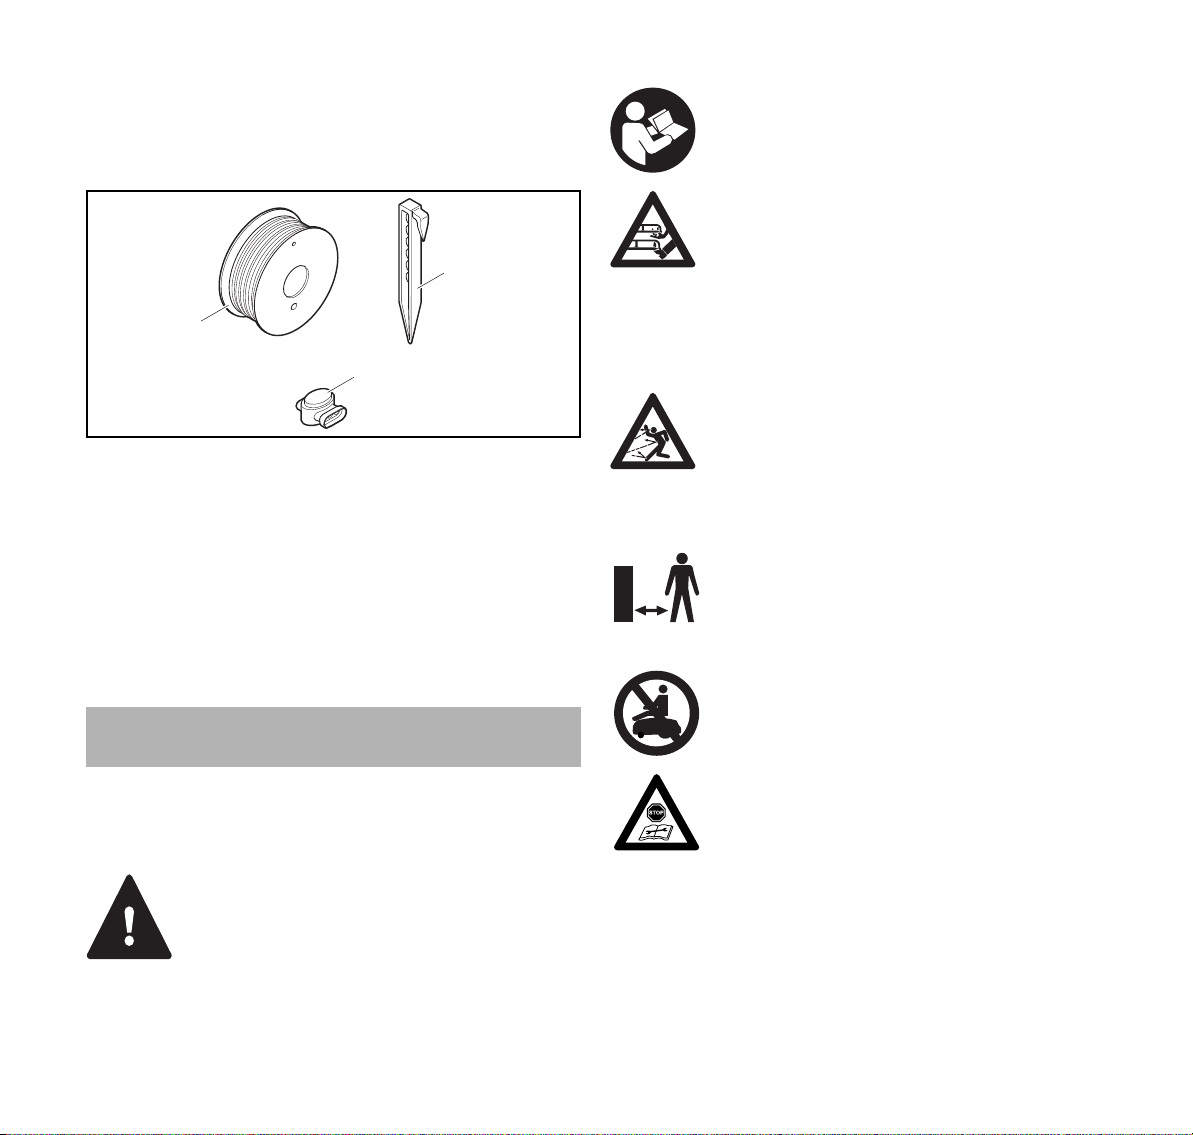
3.4 Installation Material
STIHL recommends having your robotic mower and the
perimeter wire installed by an authorized STIHL iMow
servicing dealer.
1 Perimeter Wire
Transmits an electrical signal to the robotic mower and
defines the mowing area for automatic mowing
operation.
2 Wire Stakes
Used to secure the perimeter wire.
3 Wire Connectors
Electrical connectors used to link sections of perimeter
wire.
4 Safety Symbols
Read and follow all safety precautions in the
instruction manual. Improper use can lead to
serious or fatal personal injury or property
damage.
To reduce the risk of laceration injuries, keep
hands, feet and other body parts away from the
mowing blade. Never put hands or feet under the
mower, particularly during operation. Never
attempt to clear clippings or debris from the
mowing blade or mowing deck without first
switching off the robotic mower and disabling it
by pressing and holding the STOP button for five
seconds, @ 5.6.3.
The rotating cutting attachment may throw or
fling foreign objects directly or by ricochet. To
reduce the risk of personal injury from thrown
objects, inspect the mowing area and remove
stones, pieces of metal, glass, wire and other
objects that could be thrown by the cutting
attachment, @ 5.6.3.
To reduce the risk of personal injury, keep other
persons, especially children, and animals away
from the mower during operation. Do not operate
the mower when children or pets are or may be
in the mowing area or vicinity, @ 5.6.3.
Never stand on, sit on or attempt to ride the
robotic mower or allow others to do so. Serious
personal injury and damage to the robotic
mower could result, @ 5.6.3.
4.1 Robotic Mower
The following safety symbols are found on the robotic
mower:
To reduce the risk of injury, follow the specified
safety precautions.
6
Always disable the robotic mower by pressing
and holding the STOP button for 5 seconds
before lifting, transporting, inspecting, cleaning
or servicing, @ 5.6.3.
0478-131-8245-A
5 IMPORTANT SAFETY INSTRUCTIONS
English
5 IMPORTANT SAFETY
INSTRUCTIONS
5.1 Intended Use
WARNING
■ This robotic mower is intended for autonomous,
programmable lawn care. Use for other purposes may
increase the risk of personal injury and property damage.
■ The robotic mower is intended for cutting grass in yards up
to approximately a quarter of an acre (1000 m²).
■ The ADO 401 docking station and the OWA-60U-27VCAM
power supply are designed for charging the lithium ion
battery integrated into the robotic mower and supplying
low voltage electrical current to the perimeter wire. Use of
the docking station or power supply for any purpose not
authorized or intended may result in serious injury or
death.
■ Improper or unauthorized use of the robotic mower, its
integrated battery or the docking station and power supply
could result in personal injury or property damage. Use
the ADO 401 docking station, the STIHL RMI 422 P (CA)
robotic mower and its integrated battery only as described
in this manual.
5.2 Operator
WARNING
■ According to STIHL's current information, the electric
motor of this robotic mower should not interfere with a
pacemaker.
– However, persons with a pacemaker should consult
their physician and pacemaker manufacturer before
operating this robotic mower.
5.3 Personal Protective Equipment
WARNING
■ To reduce the risk of personal injury, always wear proper
clothing and protective apparel when:
– installing the docking station and setting up the robotic
mower for operation;
– installing or repairing the perimeter wire;
– entering the mowing area or approaching the mower
while in operation;
– replacing the mowing blade;
– inspecting or cleaning the robotic mower;
■ To reduce the risk of eye injury:
Wear goggles or close-fitting protective
glasses with adequate side protection that
are impact-rated and marked as complying
with CSA Z94 when setting up the docking
station and robotic mower, installing or
repairing the perimeter wire, inspecting or
cleaning the mower, replacing the mowing
blade and any time you are in the mowing
area during operation.
■ Good footing is very important. To help maintain a secure
footing and reduce the risk of injury:
– Always wear substantial footwear with non-slip
soles. Do not wear sandals, flip-flops, open-toed or
similar footwear.
■ To improve your grip and help protect your hands:
– Always wear heavy-duty, non-slip work gloves made
of leather or another wear resistant material when
setting up the docking station and robotic mower,
installing or repairing the perimeter wire, inspecting
0478-131-8245-A
7

English
5 IMPORTANT SAFETY INSTRUCTIONS
or cleaning the mower, replacing the mowing blade
and any other time you are handling the robotic
mower.
■ To reduce the risk of personal injury:
– Wear overalls or long pants when approaching the
robotic mower while in operation. Do not wear
shorts.
– Secure hair above shoulder level before performing
any installation, setup, inspection, service,
maintenance or cleaning activities, and before
approaching the robotic mower while in operation.
5.4 Robotic Mower
WARNING
■ If the moving mowing blade contacts you, it will result in
serious laceration injuries. To reduce the risk of such
injuries:
– Keep hands, feet and other parts of your body away
from the mowing blade.
– Never touch the moving mowing blade with your
hand or any other part of your body.
■ To reduce the risk of personal injury to the operator and
bystanders:
– Always press and hold the STOP button
for 5 seconds to activate the disabling
device before assembling, transporting,
adjusting, inspecting, cleaning,
servicing, maintaining or storing.
– Never lift the robotic mower or reach
under the hood to clear clippings or
debris, or for any other reason, without
first activating the disabling device and
confirming that the mowing blade has
come to a complete stop.
■ Although certain unauthorized attachments may fit STIHL
robotic mowers, their use may be extremely dangerous.
Only attachments supplied by STIHL or expressly
approved by STIHL for use with this specific iMow model
are authorized.
– Use only attachments supplied or expressly
approved by STIHL.
– Never modify this robotic mower or its software in
any way.
– Never attempt to modify or override the robotic
mower's controls or safety devices in any way.
– Never use a robotic mower that has been modified or
altered from its original design.
■ If the robotic mower is dropped or subjected to similar
heavy impacts:
– Check that it is undamaged, in good condition and
functioning properly before continuing work.
– Check that the controls and safety devices are
working properly.
– Check the display for error messages, @ 21.1.
– Never work with a damaged or malfunctioning
robotic mower.
– Never use or charge a robotic mower if the hood or
housing is cracked, deformed or excessively hot, if
battery fluid is leaking from the battery compartment,
or if the battery is otherwise damaged. A damaged
battery increases the risk of personal injury and
property damage from short circuit, fire or explosion.
In case of doubt, have the robotic mower checked by
your authorized STIHL iMow servicing dealer before
using it.
■ If the robotic mower is damaged, not working properly or
has been immersed in water or other liquids, its
components, including its integrated battery, may no
8
0478-131-8245-A
5 IMPORTANT SAFETY INSTRUCTIONS
English
longer function properly and safety devices may be
inoperative. To reduce the risk of personal injury and
property damage:
– Take the robotic mower to your authorized STIHL
iMow servicing dealer to be checked before further
use.
■ Genuine STIHL replacement parts are specifically
designed to match your robotic mower and meet safety
and performance requirements. Use of parts that are not
authorized or approved by STIHL may cause serious or
fatal injury or property damage.
– STIHL recommends that only identical STIHL
replacement parts be used.
5.5 Integrated Battery
WARNING
■ Use of an unauthorized charging device can damage the
lithium ion battery inside the robotic mower and result in
fire, explosion and personal injury and property damage.
– Charge the robotic mower only with a genuine
STIHL ADO 401 docking station and
OWA-60U-27VCAM power supply.
■ The robotic mower's integrated battery contains safety
features and devices which, if damaged, may allow it to
generate heat, rupture, leak, ignite or explode.
– Be alert for signs that the battery may be damaged:
never use or charge a robotic mower if the hood or
housing is cracked, deformed or excessively hot, if
battery fluid is leaking from the battery compartment,
or if the battery is otherwise damaged. A damaged
battery increases the risk of personal injury and
property damage from short circuit, fire or explosion.
– The battery is integrated into the robotic mower and
should not be removed by the operator. Have the
integrated battery removed by an authorized STIHL
iMow servicing dealer when the battery is depleted
or the mower reaches the end of its useful life. Never
attempt to remove the battery or open or
disassemble the robotic mower's hood for any
reason.
– Never subject the robotic mower to heavy impacts or
attempt to crush, drop or otherwise damage it.
– Never heat the robotic mower above
212 °F (100 °C) or place it on or near
fires, stoves or other high-temperature
locations.
– Never expose the robotic mower to microwaves or
high pressures.
– Never insert foreign objects into the robotic mower's
charging socket or other openings.
■ High temperatures may cause the robotic mower's
integrated battery to generate heat, rupture, leak, ignite or
explode, resulting in severe or fatal personal injury and
property damage. Exposure to temperatures outside the
recommended temperature range may also damage the
battery and reduce its useful life.
– Use and store the robotic mower only
within an ambient temperature range of
32 °F to 122 °F (0 °C to 50 °C).
– Never store the robotic mower inside a
vehicle in hot weather.
■ To reduce the risk of personal injury and property damage
in the event the robotic mower emits smoke, an unusual
smell or feels unusually hot while using, charging or
storing:
– Immediately discontinue using or charging the
robotic mower and prepare to contact the authorities
in the event of fire or explosion.
■ To reduce the risk of electric shock:
– Never immerse the robotic mower in
water or other liquids.
– Do not attempt to repair, open or disassemble the
robotic mower. There are no user-serviceable parts
inside.
0478-131-8245-A
9

English
5 IMPORTANT SAFETY INSTRUCTIONS
■ If the integrated battery is damaged, battery fluid can leak
from the robotic mower. Leaking battery fluid can cause
skin and eye irritation or chemical burns.
– Avoid contact with skin and eyes.
– Use an inert absorbent such as sand on spilled fluids
or liquids.
– In the event of accidental contact with battery fluids
or liquids, immediately rinse the contact area
thoroughly with mild soap and water.
– If battery fluids or liquids get into your eye(s): Do not
rub. Rinse water over the open eye(s) for at least 15
minutes and seek medical attention.
■ A battery fire can be dangerous. To reduce the risk of
severe personal injury and property damage in the event
of fire:
– Evacuate the area. Fire can spread rapidly. Stay
clear of any vapors generated and maintain a safe
distance.
– Contact the fire department.
– Although water can be used to put out a battery fire,
use of a multi-purpose, dry chemical fire
extinguisher is preferable.
– Consult the fire department regarding proper
disposal of the burned battery.
5.6 Using the Robotic Mower
5.6.1 Before Operation
WARNING
■ Misuse or unauthorized use may result in personal injury
and property damage.
– Use the robotic mower only as described in this
instruction manual.
■ Using a robotic mower that is damaged, improperly
adjusted or maintained, or not completely and securely
assembled can lead to a malfunction and increase the risk
of serious personal injury or death.
– Never operate a robotic mower that is damaged,
improperly maintained or not completely and
properly assembled.
– Always check your robotic mower for proper
condition and operation before starting work.
– Never attempt to modify or override the controls or
safety devices in any way.
– If your robotic mower or any part is damaged or does
not function properly, take it to your authorized
STIHL iMow servicing dealer. Do not use the robotic
mower until the problem has been corrected.
■ To help reduce the risk of serious personal injury or death
from unintentional starting:
– Always press and hold the STOP button
for 5 seconds to activate the disabling
device before assembling, transporting,
adjusting, inspecting, cleaning,
servicing, maintaining or storing the
robotic mower.
10
0478-131-8245-A

5 IMPORTANT SAFETY INSTRUCTIONS
English
5.6.2 Working Conditions
WARNING
■ Sparks generated from operation of the robotic mower
may be capable of igniting combustible gases, liquids,
vapors, dusts or other combustible materials and
substances. To reduce the risk of fire and explosion:
– Never operate the robotic mower in a location where
combustible gases, liquids, vapors, dusts or other
combustible materials and substances are present.
– Read and follow recommendations issued by
government authorities (e.g., CCOHS) for identifying
and avoiding the hazards of combustible gases,
liquids, vapors, dusts or other combustible materials
and substances.
■ If a rotating metal blade strikes a rock or other hard object,
sparks may be created, which can ignite flammable
materials under certain circumstances. Flammable
materials can include dry vegetation and brush,
particularly when weather conditions are hot and dry.
– When there is a risk of fire or wildfire, do not use the
robotic mower around flammable materials or
around dry vegetation or brush.
– Contact your local fire authorities or the Canadian
Forest Service if you have any question about
whether vegetation and weather conditions are
suitable for the use of a metal blade.
■ Use of this robotic mower can generate dust and other
substances containing chemicals known to cause
respiratory problems, cancer, birth defects and other
reproductive harm.
– Consult governmental agencies such as ECCC,
CCOHS and PHAC and other authoritative sources
on hazardous materials if you are unfamiliar with the
risks associated with the particular substances you
are cutting or with which you are working.
■ Inhalation of certain dusts, especially organic dusts such
as mold or pollen, can cause susceptible persons to have
an allergic or asthmatic reaction. Substantial or repeated
inhalation of dust or other airborne contaminants,
especially those with a smaller particle size, may cause
respiratory or other illnesses.
– Control dust at the source where possible.
– To the extent possible, operate the robotic mower so
that the wind or operating process directs any dust,
mist or other particulate matter raised by the robotic
mower away from the operator.
– When respirable dust or other particulate matter
cannot be kept at or near background levels, always
wear a respirator that is approved by PHAC and
rated for worksite-specific conditions. Follow the
recommendations of governmental authorities (e.g.,
CCOHS/PHAC) and occupational and trade
associations.
■ If the vegetation being cut or the surrounding ground is
coated with a chemical substance, such as a pesticide,
fertilizer or herbicide:
– Read and follow the instructions and warnings that
accompanied the substance coating the vegetation
or surrounding ground.
0478-131-8245-A
11
English
5 IMPORTANT SAFETY INSTRUCTIONS
5.6.3 Operating Instructions
WARNING
■ In the event of an emergency:
– Push and hold the STOP button for 5 seconds to
stop the mower and its cutting attachment. The
display shows the message "Disab. device. Unlock
using the indicated key combination."
■ The mowing blade continues to rotate for a short period
after the motor is switched off. This is known as the
"flywheel effect." To reduce the risk of serious personal
injury from contact with the cutting attachment:
– Activate the disabling device and wait for the
mowing blade to stop before lifting or carrying the
mower. Never attempt to lift or tilt the robotic mower
while it is running.
■ The rotating mowing blade may throw or fling foreign
objects directly or by ricochet. Objects that are thrown or
flung, including broken mowing blades, may result in
serious or fatal injury to the operator or bystanders. To
reduce the risk of severe personal injury:
– Inspect the mowing area. Remove
stones, pieces of metal, glass, wire or
other objects that could be thrown or
flung by the cutting attachment, damage
the cutting attachment or cause damage
to property (e.g., parked vehicles,
windows).
– Remove objects from the mowing area
such as toys, balls, lawn furniture,
landscape ornaments, flower pots,
garden hoses, lawn equipment and
anything else that could impede the
proper operation of the robotic mower or
become entangled in its mowing blade.
– Keep bystanders, especially children,
and animals away from the mowing area
during the robotic mower's active
mowing times and any other time the
robotic mower is in operation. Any
person who enters the mowing area
during operation of the mower must wear
proper eye protection and proper
protective equipment as specified in this
instruction manual.
– Never allow children or anyone else to ride on,
approach or play with the robotic mower. Keep
children and other bystanders out of the mowing
area while the mower is in operation.
– Never allow the robotic mower to operate if you know
that animals or persons are or may be in the mowing
area.
■ When the red STOP button on top of the robotic mower is
pressed, operation of the mower will stop and the mowing
blade will come to a stop after a few moments. The
message "STOP button pressed" will appear in the
display. To reduce the risk of injury from contact with the
mowing blade, always press the STOP button:
– Before changing settings in the menu.
– Before setting up a mowing plan or otherwise
programming the robotic mower.
– Before adjusting the cutting height.
■ Press and hold the STOP button for 5 seconds to activate
the disabling device:
– Before lifting, carrying or transporting the robotic
mower.
– Before removing blockages or objects near the mower
deck or mowing blade.
– Before mounting, removing, inspecting or cleaning the
mowing blade.
– Before reaching under the mower for any reason.
– Before checking or cleaning the robotic mower.
12
0478-131-8245-A
6 Docking Station and Power Supply Safety
English
■ Stop and inspect the robotic mower for damage if it hits a
foreign object or exhibits unusual operating behavior,
such as abnormal vibration. After disabling the robotic
mower, inspect the cutting assembly (mowing blade,
blade shaft and blade mount). If the unit continues to
function abnormally, take it to an authorized STIHL iMow
servicing dealer for service before restarting and allowing
the robotic mower to operate.
■ To reduce the risk of severe personal injuries from
unintentional starting:
– Never touch the mowing blade with your
hands, feet or any other part of your body
without first de-activating the machine.
Press and hold the STOP button for 5
seconds and confirm that the mowing
blade has stopped.
■ A damaged or loose mowing blade may vibrate, crack,
break or come off the robotic mower, which may result in
serious or fatal injury.
– Make sure the mowing blade is undamaged and
properly tightened before starting work.
– If the mowing blade loosens after being properly
tightened, stop work immediately and have the
robotic mower repaired by your authorized STIHL
iMow servicing dealer.
– Never use a robotic mower with a loose or damaged
mowing blade.
6 Docking Station and Power Supply
Safety
6.1 Introduction
This section contains the general safety warnings and
instructions prescribed for the docking station and power
supply. Additional important warnings and instructions are
provided in subsequent sections of this manual.
READ AND FOLLOW ALL SAFETY INSTRUCTIONS.
WARNING
■ When using the docking station and power supply, basic
safety precautions should always be followed to reduce
the risk of fire, electric shock and personal injury and
property damage, including the following:
1)READ AND FOLLOW ALL SAFETY INSTRUCTIONS.
2)Read and follow all instructions that are on the docking
station and power supply or provided with the docking
station or power supply.
3)Do not use an extension cord.
4)Reference the National Electrical Code, ANSI/NFPA 70,
specifically for the installation of wiring and clearances
from power and lighting conductors.
5)Installation work and electrical wiring must be done by
qualified person(s) in accordance with all applicable
codes and standards, including fire-rated construction.
6)Do not install or use within 10 feet of a swimming pool.
7)Do not use in a bathroom.
8)WARNING: Risk of Electric Shock. When used outdoors,
install only to a covered Class A GFCI protected
receptacle that is weatherproof with the power supply
connected to the receptacle. If one is not provided, contact
a qualified electrician for proper installation. Ensure that
the power supply and cord do not interfere with completely
closing the receptacle cover.
9)WARNING: Risk of Fire. Installation involves special
wiring methods to run wiring through a building structure.
Consult a qualified electrician.
10)WARNING: Risk of Electric Shock. Mount the unit at a
height greater than 1 foot from the ground surface.
SAVE THESE INSTRUCTIONS – This manual contains
important safety and operating instructions for the STIHL
ADO 401 Docking Station and the OWA-60U-27VCAM
power supply.
0478-131-8245-A
13
English
6 Docking Station and Power Supply Safety
6.2 Warnings and Instructions
WARNING
■ To reduce the risk of fire, electric shock and other
personal injury or property damage:
– Read and follow all cautionary markings on the
docking station, power supply and robotic mower
and all instructions in this manual before using the
docking station.
– Use the ADO 401 docking station and
OWA-60U-27VCAM power supply only for charging
the STIHL RMI 422 P (CA) robotic mower. Using the
docking station or power supply for other purposes
is prohibited and may lead to fire, explosion or
electric shock, resulting in serious or fatal personal
injury and property damage.
– Never use a damaged or improperly functioning
docking station or power supply.
– Never use or charge a robotic mower if the hood or
housing is cracked, deformed or excessively hot, if
battery fluid is leaking from the battery compartment,
or if the battery is otherwise damaged. A damaged
battery increases the risk of personal injury and
property damage from short circuit, fire or explosion.
– Connect the power supply cord only to a properly
covered Class A Ground Fault Circuit Interruptor
(GFCI) receptacle that has an enclosure that is
weatherproof with an attachment plug cap inserted
or removed. Do not use with receptacles that are
weatherproof only when the receptacle is covered
(attachment plug cap not inserted and receptacle
cover closed).
– Never plug the docking station into a power strip or
an extension cord.
– Do not operate a docking station or power supply
that has received a sharp or heavy blow, has been
dropped or is otherwise damaged or not functioning
properly in any way.
– Do not attempt to repair, open or disassemble the
docking station or power supply. There are no userserviceable parts inside.
■ The docking station and power supply heat up during the
charging process. To reduce the risk of fire:
– Use the docking station and power supply only within
an ambient temperature range of 32 °F to 122 °F
(0 °C to 50 °C).
– Do not operate the docking station on a combustible
surface (e.g., paper, cardboard, textiles) or in a
combustible environment.
– Allow the docking station and power supply to cool
down normally. Do not cover them.
■ The docking station can produce sparks which may ignite
combustible gases, liquids, vapors, dusts or other
combustible materials. To reduce the risk of fire and
explosion:
– Do not operate in a location where combustible
gases, liquids, vapors, dusts or other combustible
materials are present.
■ Using a damaged power supply cord or plug may result in
fire, electric shock and other serious personal injury or
property damage. To reduce these risks:
– Check the power supply cord and plug
before use and regularly thereafter for
damage. If damaged, immediately
disconnect from the electrical outlet.
– Unplug the power supply from the electrical outlet
when the docking station is not in use.
– Never jerk the power supply cord to disconnect it
from the electrical outlet. To unplug, grasp the plug,
not the power supply cord.
– Do not use the power supply cord for any other
purpose, e.g., for carrying or hanging up the power
supply.
– Make sure the power supply cord is located or
marked so that it will not be stepped on, tripped over,
come in contact with sharp objects or moving parts,
or otherwise be subjected to damage or stress.
14
0478-131-8245-A
6 Docking Station and Power Supply Safety
English
■ In case of fire, or if the docking station or power supply
emits smoke, an unusual smell, feels hot or appears
abnormal in any other way:
– Immediately disconnect the power supply from the
outlet and prepare to contact the authorities in the
event of fire or explosion.
– Have the docking station and power supply
inspected and repaired by an authorized STIHL
iMow servicing dealer before use.
WARNING
■ To reduce the risk of fire, electric shock and other
personal injury or property damage:
– Insert the power supply only into a covered Class A
GFCI receptacle that has an enclosure that is
weatherproof with an attachment plug cap inserted
or removed. Do not use with receptacles that are
weatherproof only when the receptacle is covered
(attachment plug cap not inserted and receptacle
cover closed.)
– Mount the power supply unit at a height greater than
1 foot (0.3 m) from the ground surface.
– Never plug the power supply into a power strip or
extension cord.
■ To reduce the risk of personal injury or property damage:
– Return the robotic mower to the docking station and
disconnect the power supply from the power
receptacle if there is a threat of lightning strikes in
the vicinity.
– Check the power supply cord and plug
regularly for damage. If they become
damaged, immediately disconnect from
the electrical outlet. Never use a
damaged power supply cord or plug.
– Do not abrade, crush, jerk, or otherwise
abuse or misuse the power supply cord
or p lu g. Pro te ct it fr om h ea t, oi l an d s ha rp
edges.
– If the power supply cord or plug becomes
damaged, replace the power supply.
– Unplug the power supply cord when the
docking station is not in use.
– Never yank or jerk the power supply cord
to disconnect. To unplug, grasp the plug,
not the power supply cord.
– Make sure the power supply cord is
positioned and secured or marked so
that it will not be stepped on, tripped
over, come in contact with sharp objects,
moving parts, or otherwise be subjected
to damage or stress.
DANGER
■ Using a damaged power supply cord or plug may result in
fire, electric shock and other personal injury or property
damage. To reduce the risk of electrocution:
0478-131-8245-A
15
English
7 Maintenance, Repair and Storage
7 Maintenance, Repair and Storage
7.1 Warnings and Instructions
WARNING
■ There are no user-authorized repairs for the robotic
mower, docking station or power supply. To reduce the
risk of fire, electric shock or other personal injury and
property damage:
– Users may carry out only the cleaning and
maintenance operations described in this manual.
Users must not attempt any other cleaning,
maintenance or repair.
– Strictly follow the cleaning and maintenance
instructions in the appropriate sections of this
instruction manual.
– STIHL recommends that all repair work be
performed by authorized STIHL iMow servicing
dealers.
– Maintain and replace warning and instruction labels
as necessary.
■ Unintentional starting may result in personal injury or
property damage. To reduce the risk of personal injury
and property damage from unintentional starting:
– Always press and hold the STOP button
for 5 seconds to activate the disabling
device before assembling, transporting,
adjusting, inspecting, cleaning,
servicing, maintaining or storing the
robotic mower.
■ The mowing blade is the only user-serviceable part on the
robotic mower.
– Wear heavy-duty, non-slip work gloves made of
leather or another wear resistant material when
handling the mowing blade.
– Replace the mowing blade when it becomes worn or
damaged.
– Tighten all nuts, bolts and screws after replacing the
mowing blade.
■ Use of parts that are not authorized or approved by STIHL
may cause serious or fatal injury or property damage.
– STIHL recommends that only authorized STIHL
replacement parts be used for repair or
maintenance.
■ To reduce the risk of electric shock:
– Unplug the power supply from the electrical outlet
before inspecting the docking station or perimeter
wire.
– Regularly check the docking station and ensure that
the insulation of the power supply cord and plug are
in good condition and show no signs of aging
(brittleness), wear or damage. Check the charging
contacts for signs of corrosion or damage that may
lead to short circuit during charging.
– Replace the power supply if its power supply cord or
plug is damaged.
■ Improper storage can result in unauthorized use, damage
to the robotic mower, its integrated battery and docking
station, and an increased risk of fire, electric shock and
other personal injury or property damage.
– Press and hold the STOP button for 5 seconds to
activate the disabling device.
– Allow the robotic mower to cool down for
approximately 5 minutes before storing.
– Before storing, always unplug the docking station
from the electrical outlet.
– Store the robotic mower and docking station indoors
in a dry, secure place out of the reach of children and
other unauthorized users.
– Store the robotic mower only within an ambient
temperature range of 32 °F to 122 °F (0 °C to 50 °C).
SAVE THESE
INSTRUCTIONS
16
0478-131-8245-A
8 Operating Principle
English
8 Operating Principle
A
3
1
5
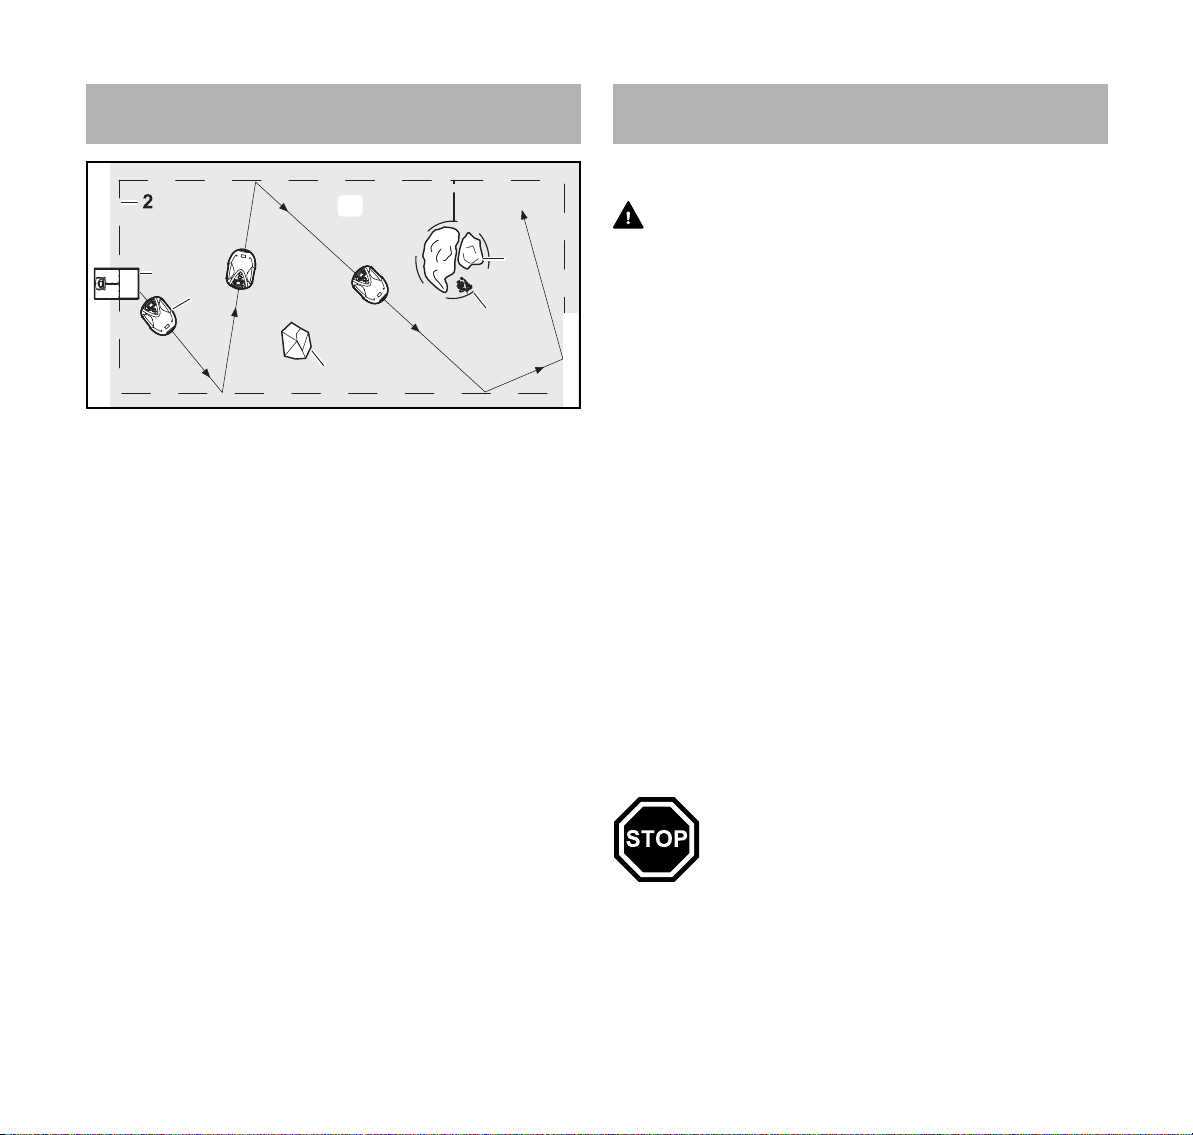
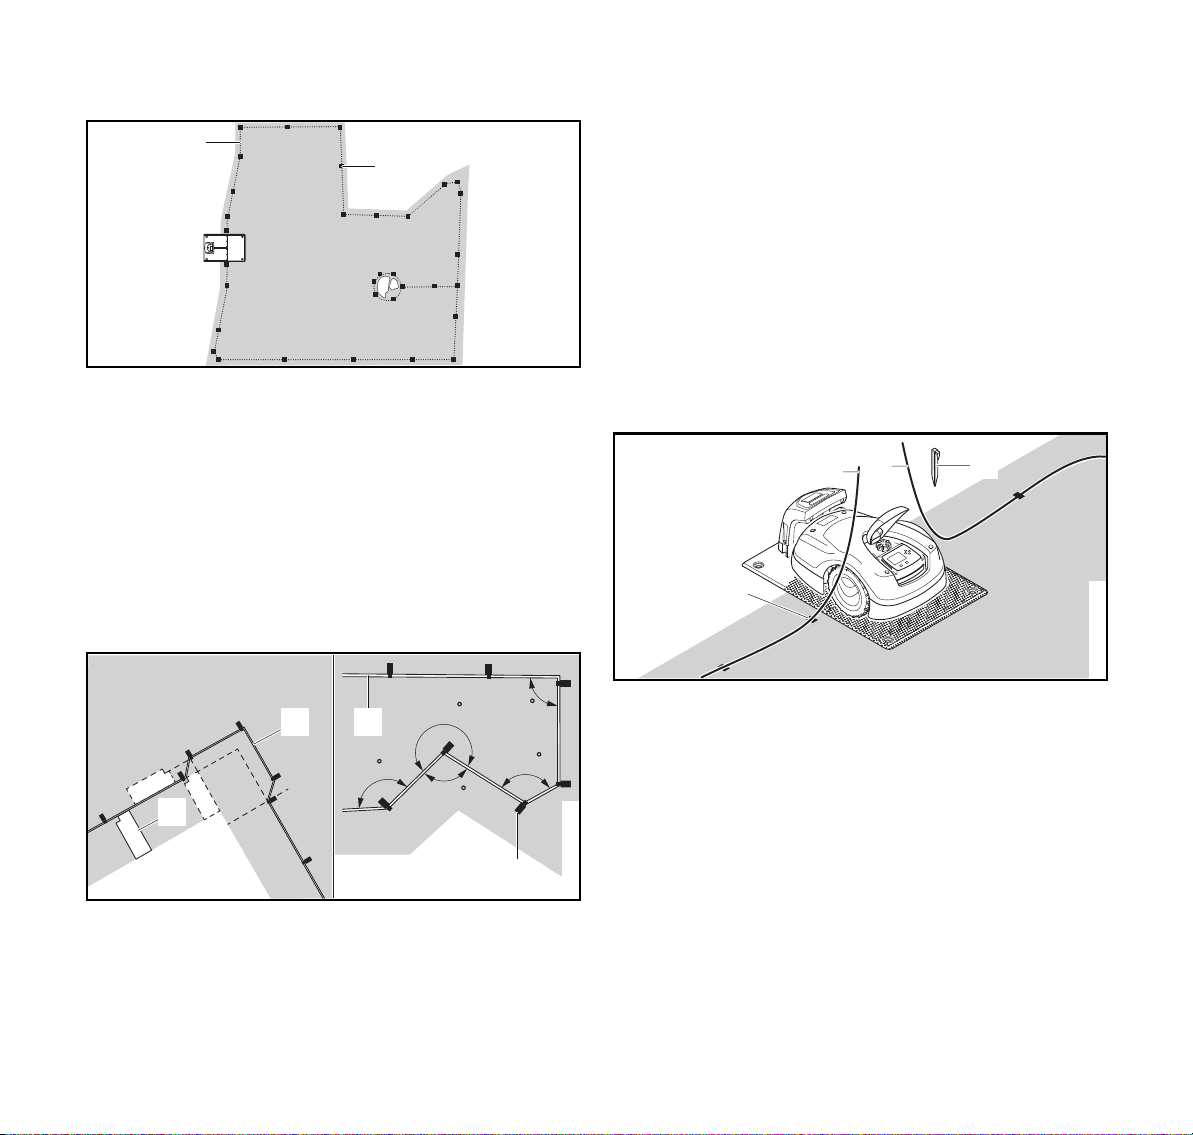
This iMow (1) is a mulching mower, designed for
autonomous, programmable lawn care. It mows the lawn in
randomly chosen paths. During mulching, the grass
clippings are further shredded in the mowing deck after
cutting. They then fall back into the turf, where they
decompose.
In order for the robotic mower to detect the borders of the
mowing area (A), a perimeter wire (2) must be laid around
that area. A low-voltage electrical signal generated by the
docking station (3) flows through this perimeter wire.
Solid obstacles of sufficient size and weight (5) in the
mowing area are detected by the robotic mower's impact
sensor. Obstacles and areas that the robotic mower must
avoid (4) should be separated from the mowing area using
the perimeter wire.
4
2
9Key Features
9.1 Key Features
WARNING
The robotic mower is equipped with several devices to help
reduce the risk of personal injury or property damage during
use. If a safety device has a malfunction, do not operate the
robotic mower and take the it to an authorized STIHL iMow
servicing dealer to be repaired.
1. STOP button
0000-GXX-3427-A1
If you push the STOP button, the mower and its mowing
blade will stop and the display will show the message "STOP
button pressed." The robotic mower cannot be operated
while this message is active, @ 21.1.
If you want to resume automatic mowing, the robotic mower
will ask whether automatic operation is to be continued. To
continue automatic operation:
► Confirm the message "STOP button pressed" by pressing
the OK button.
► Select "Yes" and press the OK button.
The robotic mower resumes automatic mowing in
accordance with the mowing plan.
► Select "No" and press the OK button to have the robotic
mower remain stationary in the mowing area and switch
off automatic mowing, @ 14.3.
2. Disabling device
To activate the disabling device, press and hold
the STOP button for 5 seconds. The mower and
its mowing blade stop and the display shows the
message "Disab. device. Unlock using the
indicated key combination." The robotic mower
cannot be operated while this message is
active,@ 21.1.
► To activate the disabling device in the "Commands" menu,
select "Lock iMow" and confirm by pressing the OK button,
@ 14.3.
0478-131-8245-A
17

English
a
b
24°
0000-GXX-3662-A0
9 Key Features
► To activate the disabling device in the "Settings" menu,
open the "Safety" submenu, select "Lock iMow" and
confirm by pressing the OK button, @ 15.4.
To deactivate the disabling device:
► Wake up the robotic mower, if required, by pressing any
button.
► Press the Back button and the OK button in the sequence
illustrated on the display.
Once the disabling device is deactivated, the robotic
mower can be operated again.
3. Impact sensor
The hood is designed to function as an impact sensor.
During automatic operation, the robotic mower stops if the
hood contacts a solid obstacle taller than 3.9 in. (10 cm).
The robotic mower then turns and continues automatic
mowing in another direction. If the impact sensor is triggered
too frequently, the mowing blade will stop rotating.
NOTICE
The impact sensor may not detect certain obstacles, such as
small flower pots or other lighter objects, which can be
knocked over or damaged. STIHL recommends removing
obstacles or blocking them off by creating restricted areas
through the placement of the perimeter wire, @ 11.5.
5. Tilt sensor
If the robotic mower exceeds the permissible incline of more
than 21.8° (40 %), the robotic mower will turn and continue
mowing in a different direction. An incline of 21.8°
corresponds to a vertical height increase of a = 15.7 in.
(40 cm) for a b = 39.4 in. (100 cm) horizontal distance.
Exclude such inclines from the mowing area and trim the
excluded area with a suitable line trimmer or other tool.
In the event of a rollover, the wheel drive stops and the
mowing blade will stop within a short period.
6. Illuminated display
The display is backlit during operation to help you track the
robotic mower in darkness.
4. Lifting protection
If you attempt to lift the robotic mower by the hood or at the
carrying handles during operation, its lift sensor will be
activated and will stop the mowing blade within a short
period. Nevertheless, do not attempt to lift or reach under
the robotic mower for any reason without first activating the
disabling device and ensuring that the mowing blade has
stopped.
18
7. Anti-theft alarm
When the anti-theft alarm is activated:
– An alarm signal sounds when the robotic mower is lifted
unless the PIN code is entered within one minute,
@ 15.4.
– If you replace the docking station or robotic mower after
completing the initial setup, you will need to link the
robotic mower and docking station before use, @ 10.6.
0478-131-8245-A
10 Installing the Robotic Mower
English
10 Installing the Robotic Mower
10.1 Preparing the Lawn and the Robotic Mower for Operation
To prepare the lawn for installation of the perimeter wire:
► Mow the lawn using a conventional lawn mower. An ideal
grass height is 1.2 in. to 1.6 in. (3 cm to 4 cm).
► If the surface is hard and dry, water the mowing area
lightly in order to make it easier to drive in the perimeter
wire stakes.
To prepare the robotic mower for operation, follow the builtin installation assistant, which guides you through the initial
installation of the robotic mower:
► Set the time and the date on the robotic mower, @ 10.2.
► Install the docking station, @ 10.3.
► Install the perimeter wire, @ 11.
► Connect the perimeter wire to the docking station,
@ 10.5.
► Link the robotic mower and the docking station, @ 10.6.
► Check the installation, @ 10.7.
► Program the robotic mower and create an automatic
mowing plan, @ 12.4.
► Complete the initial installation and begin mowing,
@ 14.5.
Consult an authorized STIHL iMow servicing dealer for
further information on installing the perimeter wire and
setting up the robotic mower. STIHL recommends having an
authorized STIHL iMow servicing dealer set up your robotic
mower.
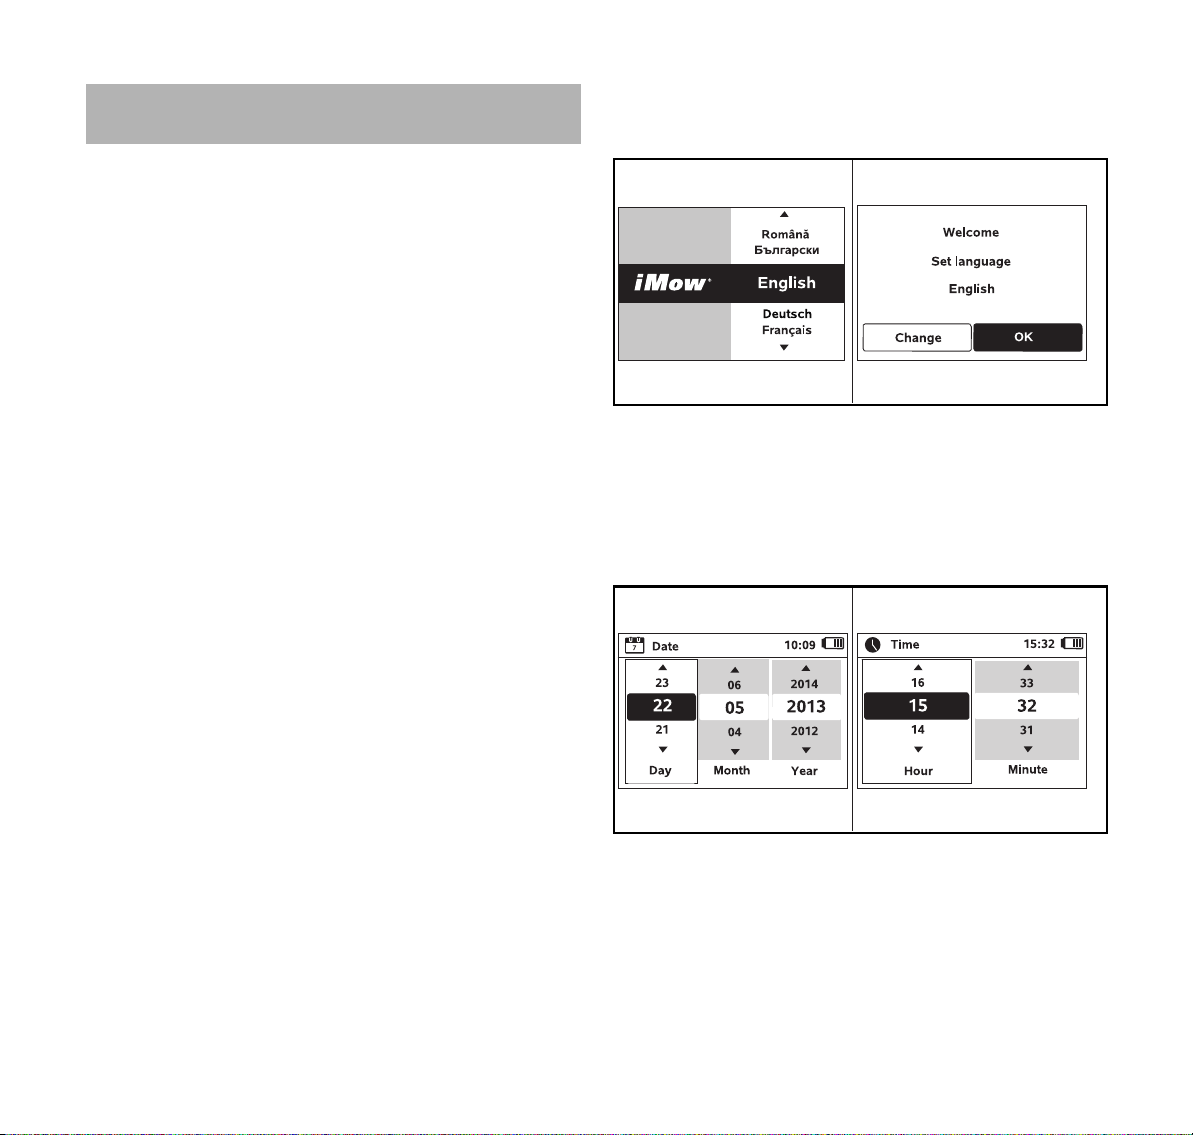
10.2 Setting the Language, Date and Time
Always set the correct date and time to ensure an accurate
mowing plan and to prevent automatic mowing at unwanted
times.
► During the initial installation, press any button on the
control panel / manual controller to activate the installation
assistant.
0000-GXX-3343-A10000-GXX-3344-A0
► Select the desired language and press the OK button.
► Confirm your language selection by pressing the OK
button or select "Change" to repeat the language
selection.
► If prompted, enter the 9-digit serial number of the robotic
mower found on the rating plate behind the control panel /
manual controller.
► Set the current date using the navigation pad and confirm
it by pressing the OK button.
► Set the current time using the navigation pad and confirm
it by pressing the OK button.
0478-131-8245-A
19

English
3
a
1
1
2
0000-GXX-3345-A0
10 Installing the Robotic Mower
10.3 Installing the Docking Station
WARNING
To reduce the risk of injury during installation and operation,
read and follow the docking station safety precautions and
instructions in this manual, @ 6. To reduce the risk of eye
injury, always wear close-fitting protective eyewear when
installing the docking station and perimeter wire, @ 5.3.
WARNING
To reduce the risk of fire and electric shock, install the
docking station's power supply at least one foot off the
ground and ensure that there is no risk that it may be
immersed in water or other liquids. Do not place the power
supply on the ground or at ground level. Always install the
power supply on a stable surface.
WARNING
Since the docking station and power supply heat up during
the charging process, do not operate the docking station on
a combustible surface or in a location where combustible
gases, liquids, vapors, dusts or other materials and
substances are present, @ 6.
WARNING
To reduce the risk of fire and electric shock, connect the
docking station only to a covered Class A GFCI receptacle
that has an enclosure that is weatherproof with an
attachment plug cap inserted or removed. Do not use with
receptacles that are weatherproof only when the receptacle
is covered (attachment plug cap not inserted and receptacle
cover closed). Ensure that the docking station is located in
sufficient proximity to reach a covered Class A GFCI
receptacle with the 33 ft. (10 m) power supply cord. Do not
use an extension cord. Use of extension cords are not
authorized and increase the risk of electric shock and fire.
Always ensure that the power supply cord is out of the
cutting path of the robotic mower.
► Depending on your lawn, you may install the docking
station partly within the mowing area (internal docking
station) or outside the mowing area (external docking
station). Review the installation examples provided in this
instruction manual, @ 25.
To install the docking station within the mowing area:
► Leave a free, level area (3) with a radius of at least a = 3.3
ft. (1 m) in the mowing area (2) in front of the docking
station (1), free of hills, inclines, depressions, holes or
obstacles. Select an area free of magnetic or electrical
interference. For example, never install over a metal grate
or near an electrical motor, such as a swimming pool
pump.
To install the docking station outside the mowing area:
1
c
b
1
a
2
b
► Select an area outside of the perimeter wire that is flat and
free of hills, inclines, depressions, holes or obstacles.
Select an area free of magnetic interference. For example,
never install over a metal grate or near an electrical motor,
such as a swimming pool pump.
► Position the docking station (1) outside the mowing
area (2) that meets the following requirements:
0000-GXX-3346-A0
20
0478-131-8245-A
10 Installing the Robotic Mower
6
7
8
0000-GXX-5345-A0
English
– Minimum clearance to the mowing area:
a = 19.7 in. (50 cm)
– Width of the free area: b = 17.3 in. (44 cm)
– Maximum clearance to the mowing area:
c = 39.4 ft. (12 m)
► When installing the docking station outside the mowing
area, install "search loops" to allow the robotic mower to
more easily find the docking station. Search loops are
explained later in this manual, @ 11.8.
To secure the docking station:
4
1
► For longer service life, STIHL recommends installing the
docking station in a protected, shady location.
► Select an area free of magnetic interference. For example,
never install over a metal grate or near an electrical motor,
such as a swimming pool pump.
► Ensure that the docking station is located in sufficient
proximity to reach a covered Class A GFCI receptacle with
the 33 ft. (10 m) power supply cord. Do not use an
extension cord.
► The ground selected for the docking station should be flat
and level. The base plate should not have an incline of
more than more than d = 3.2 in. (8 cm) or a downward
slope of more than e = 0.8 in. (2 cm).
► Secure the docking station (1) in position at the chosen
location using four pegs (4). Make sure the base plate fully
contacts the ground at all four corners.
To connect the power supply to the docking station:
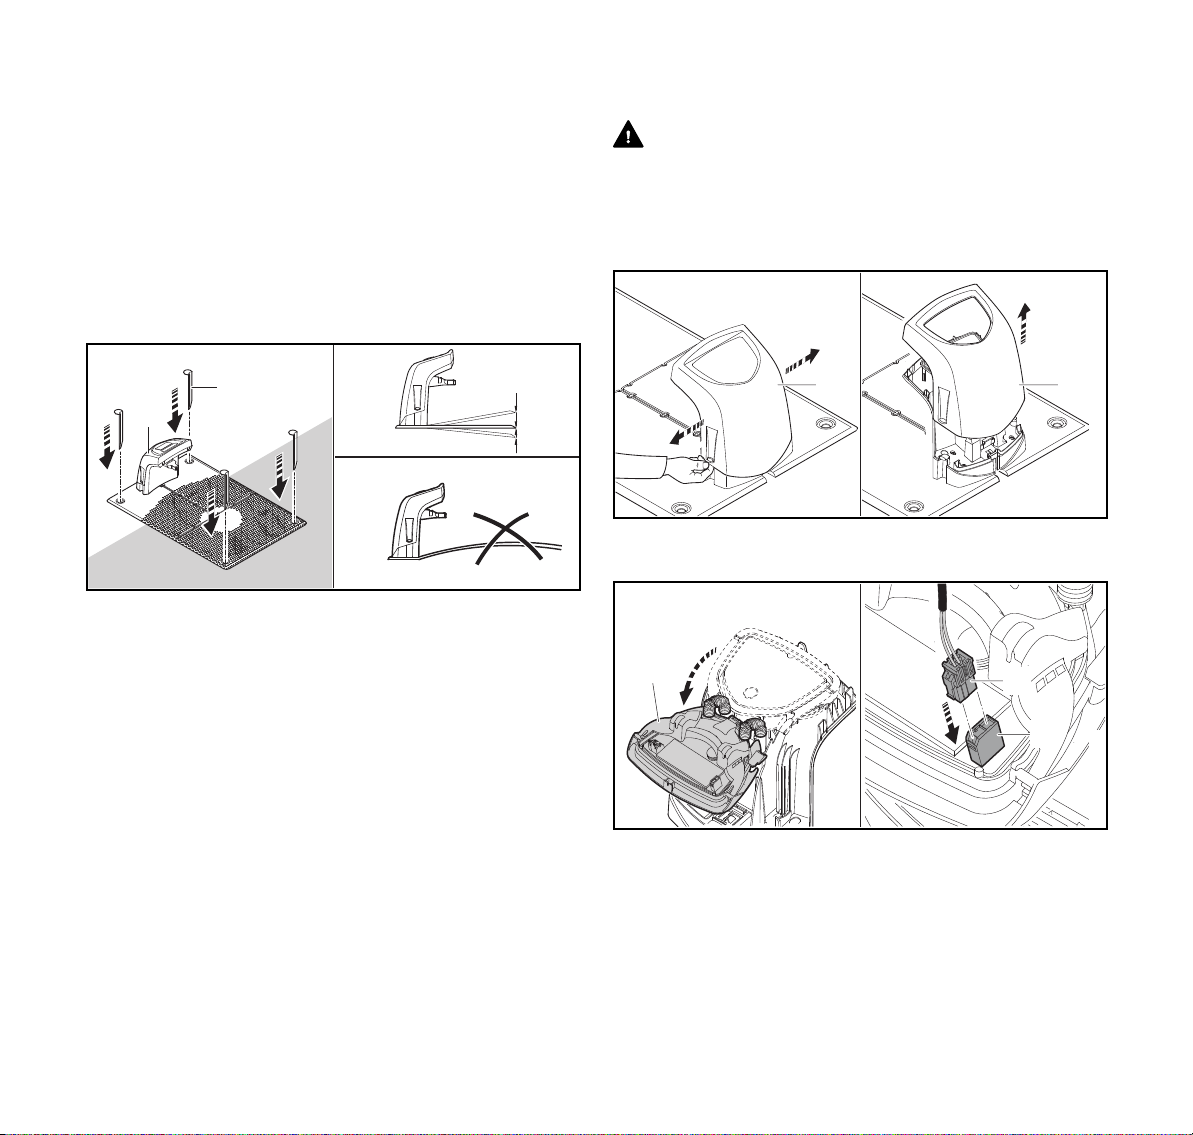
WARNING
To reduce the risk of electric shock, make sure the power
supply is not plugged into the electrical socket when
handling the connector and inserting it into the docking
station. Always unplug the power supply from the electrical
socket before removing the cover of the docking station.
d
e
► Remove the docking station cover (5) by lifting it over the
tabs on each side.
0000-GXX-3347-A1
► Fold the panel (6) forward and hold it in the open position.
► Insert the connector (7) to the left port (8) on the circuit
board of the panel as illustrated.
5 5
0000-GXX-3348-A1
0478-131-8245-A
21

English
6
0000-GXX-5347-A0
9
10
10
10
► Guide the power supply cord through the strain relief (9),
through the cable duct (10) and out the rear of the docking
station.
The power supply is rated for outdoor use. For longer
service life, STIHL recommends protecting the power supply
from direct sunlight and damp or wet conditions.
When installing the power supply, ensure that no electrical
cables, pipes or other service lines run in the wall behind the
power supply.
To mount the power supply:
10 Installing the Robotic Mower
► Align the power supply as shown above. Mount to a wall
with the following dimensions:
– a = minimum 1 ft. (30 cm)
– b = minimum 3.9 in. (10 cm)
– c = 4.72 in. (120 mm)
► Route the power supply cord outside the mowing area, out
of working range of the mowing blade, and secure it to the
ground or route it through a cable duct.
► Direct the power supply cord away from the docking
station in order to avoid electrical interference with the
0000-GXX-5346-A0
perimeter wire signal. Make sure that it will not be in the
cutting path of the robotic mower.
1 2
b
c
a
► Install the power supply outside the mowing area. Always
install the power supply at least one foot above the ground
and never at ground level or in any location where it could
be immersed in water or other liquids.
► Use appropriate screw-in wall anchors or other similar
mounting devices if an appropriate wall stud is not
available.
22
► Close the panel (6) taking care not to pinch the power
supply cord or the perimeter wire.
5
0000-GXX-3609-A0
0000-GXX-3350-A0
► Re-attach the cover (5), taking care not to pinch the power
supply cord or the perimeter wire.
0478-131-8245-A
10 Installing the Robotic Mower
0000-GXX-4471-A0
11
0000-GXX-4383-A2
English
► Connect the docking station only to a covered Class A
GFCI receptacle that has an enclosure that is
weatherproof with the attachment plug cap inserted or
removed and that matches the voltage and electrical
frequency stated on the power supply.
The LED on the docking station will flash red rapidly when
the perimeter wire is installed and properly connected to
the docking station.
► Press the OK button on the control panel / manual
controller.
If an external docking station has been installed, STIHL
recommends defining at least one starting point outside the
corridor to the docking station after initial installation is
complete, @ 15.6.
NOTICE
A canopy top is available to protect the docking station from
the elements. Exposure to direct sunlight can lead to
increased temperatures inside the machine and battery
compartment, which can increase battery charging times
and reduce battery life.
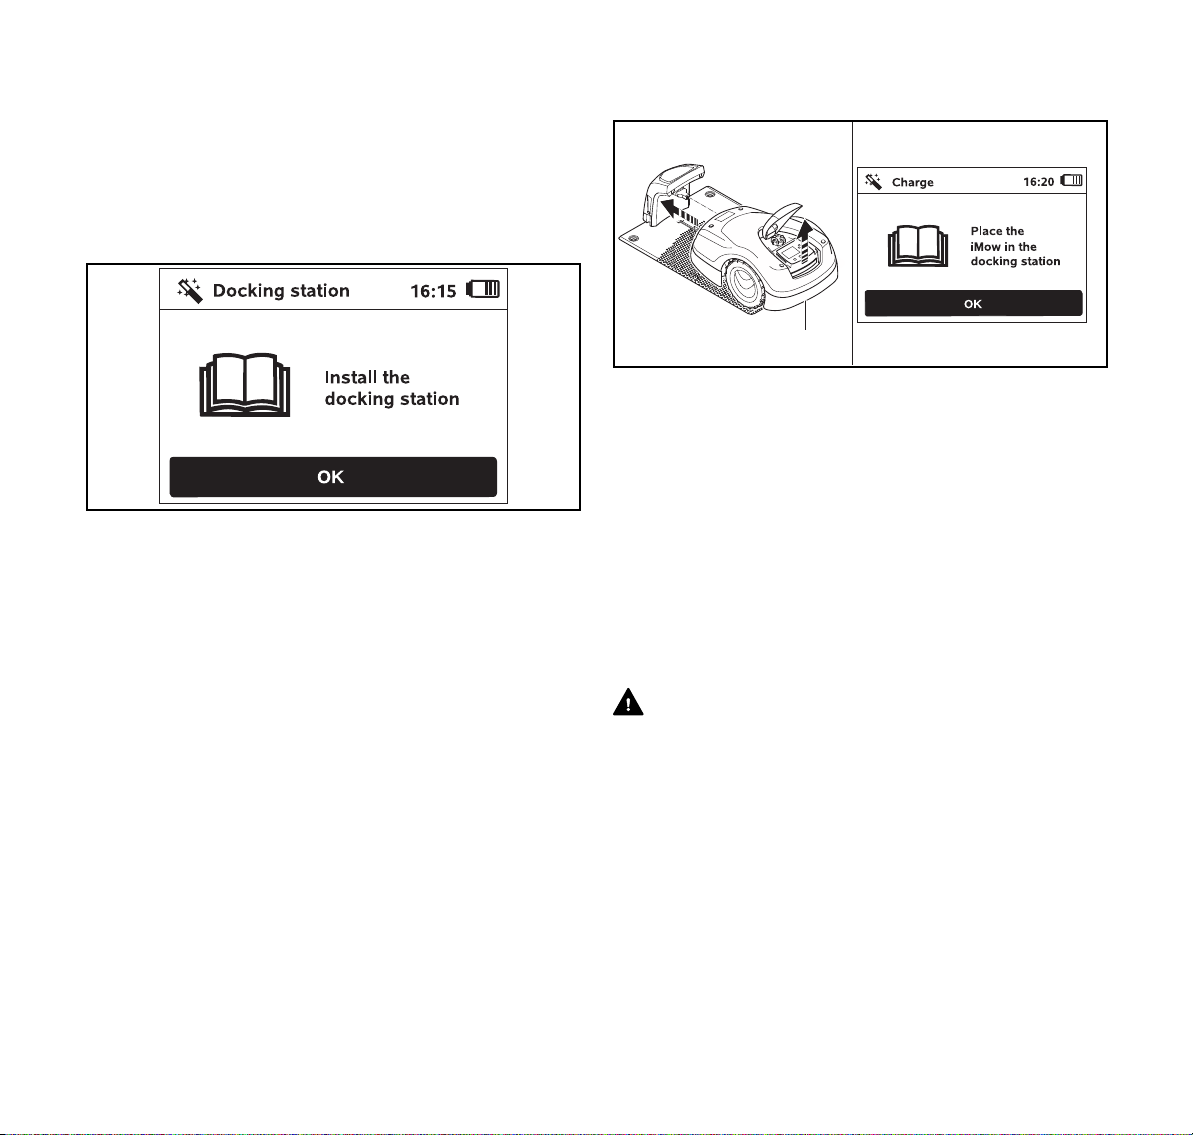
To charge the robotic mower:
► Lift the robotic mower slightly by the rear carrying
handle (11) to relieve the weight on the drive wheels.
► Push the robotic mower, resting on its front wheels, into
the docking station.
The LED on the docking station flashes slowly after
docking.
► Press the OK button on the robotic mower's control panel.
If the battery is discharged, a plug symbol will appear at
the top right corner of the display after docking and the
battery will charge while the perimeter wire is being
installed.
10.4 Installing the Perimeter Wire
WARNING
To reduce the risk of injury to bystanders and unauthorized
users, secure the perimeter wire in the ground with the wire
stakes. Ensure that the perimeter wire and stakes are buried
or properly secured low enough to the ground that they will
not get caught in the robotic mower's mowing blade and will
not present a tripping hazard. To reduce the risk of eye
injury, always wear close-fitting protective eyewear when
installing the docking station and perimeter wire, @ 5.3.
0478-131-8245-A
► Before installing the perimeter wire, read the entire
chapter on routing the perimeter wire. Plan the wire
routing in detail, @ 11. In particular, observe the wire
23
English
1
a
1
2
B
A
0000-GXX-5348-A0
10 Installing the Robotic Mower
clearances and install restricted areas, reserve wire,
linking sections, secondary areas and corridors during
wire routing.
2
B
1
a
1
A
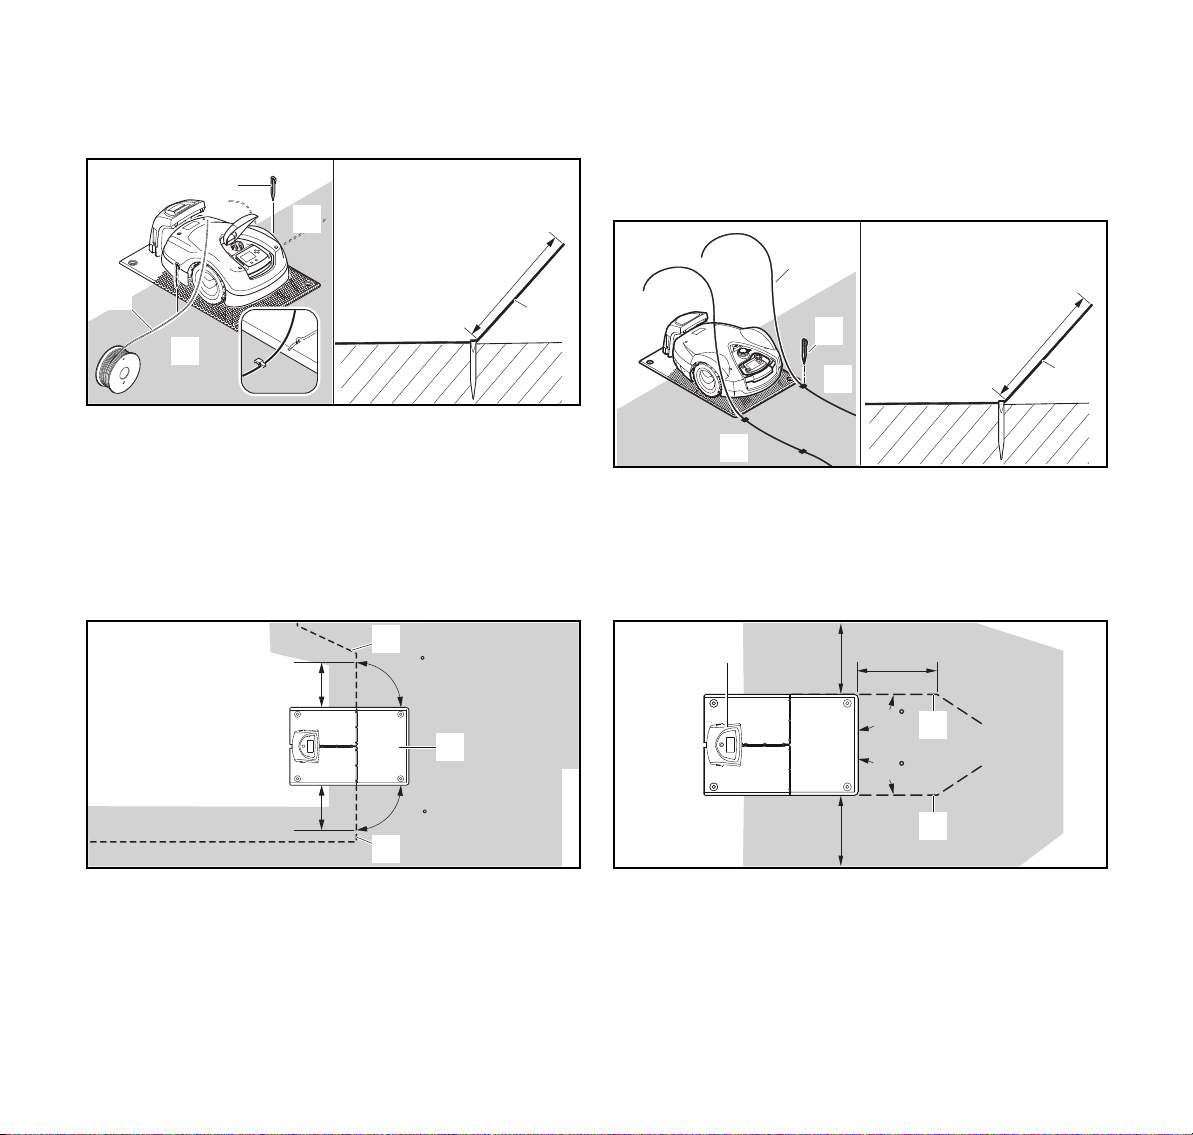
► Secure the perimeter wire (1) with a wire stake (2) on the
left side (A) or on the right side (B) of the docking station,
next to a wire outlet in the base plate.
► Leave a section of wire (1) with a length of approximately
a = 4.92 ft. (1,5 m). This segment will later be connected
to the docking station.
To install the perimeter wire around an internal docking
station:
1
a
90
► If the "Passage" feature in the "Installation" settings is
activated (@ 15.3), this section of perimeter wire (a) must
be longer, at least a = 4.9 ft. (1.5 m).
To install the perimeter wire around an external docking
station:
0000-GXX-4384-A0
► Secure the perimeter wire (1) with a wire stake (2) on the
left front side (A) or on the right front side (B) of the
docking station, next to a wire outlet in the base plate.
► Leave a section of wire (1) with a length of approximately
a = 6.56 ft. (2 m). This segment will later be connected to
the docking station.
3
b
a
3
a
90
2
► Install the perimeter wire (2) on the left side and on the
right side of the docking station (1) in a straight line with a
length of a = 23.6 in. (60 cm) and at right angles (90°) to
the base plate.
24
90
1
90
b
0000-GXX-3353-A0
► Install the perimeter wire (2) in front of and behind the
docking station (1) with a clearance of
a = 19.7 in. (50 cm) and at right angles (90°) to the base
plate.
► Install a corridor, leaving a minimum clearance of
b = 17.3 in. (44 cm) to the side of the base plate.
1
0000-GXX-3354-A0
0478-131-8245-A
10 Installing the Robotic Mower
1
2
0000-GXX-3355-A0
English
To install the perimeter wire around the mowing area:
► Install the perimeter wire (1) around the mowing area and
around any obstacles, @ 11.5.
► Secure it to the ground using wire stakes (2).
One wire stake per 3.28 ft. (1 m) is sufficient as a rough
guide. The perimeter wire must always lie flat on the lawn,
low enough that it will not be cut by the robotic mower's
blade. Gradually over time, the mowing and mulching
process will help conceal the perimeter wire below the
surface of the grass. Alternatively, the perimeter wire can
be buried up to a depth of 3.9 in. (10 cm).
► Check perimeter wire clearances using the STIHL Ruler,
@ 11.3.
1
1
90
90
90
90
90
4
5
2
► Maintain a greater wire clearance at the corners around
high obstacles such as wall corners or high flowerbeds (5)
to prevent the robotic mower from scraping against the
obstacle.
► Install the perimeter wire (1) with the aid of the STIHL
Ruler (4) as illustrated.
► Never install the perimeter wire at angles less than 90°.
► If necessary, extend the perimeter wire using wire
connectors, @ 11.13.
► In the case of several adjacent mowing areas, install
secondary areas (@ 11.6) or join the mowing areas with
corridors (@ 11.7).
► If you install the perimeter wire around areas smaller than
48 square yards (40 m²), the STIHL Small Area Module
AKM 100 (special accessory) must also be installed. For
more information, contact your authorized STIHL iMow
servicing dealer.
To finish installing the perimeter wire:
1
1
2
2
► Drive in the last wire stake (2) on the left or right next to
the base plate, next to the wire outlet.
► Drive the wire stakes fully into the ground.
► Cut the perimeter wire (1) so that you have a section of
wire approximately 4.92 ft. (1,5 m) in length available to
connect to the docking station.
► If installing the perimeter wire around an external docking
station: Cut the perimeter wire (1) so that you have a
section of wire approximately 6.56 ft. (2 m) in length
0000-GXX-3356-A0
available to connect to the docking station.
► Press the OK button on the control panel.
If the robotic mower's battery is not sufficiently charged to
work through the remaining steps of the installation, the
robotic mower will display a message that it is charging. If
0000-GXX-4385-A0
0478-131-8245-A
25
English
you receive this message, keep the robotic mower in the
docking station to continue charging. Moving ahead to the
next step of the installation assistant by pressing the OK
button is only possible once the necessary battery voltage is
available.
NOTICE
For the first two weeks of operation after initial installation,
set the mowing height on the robotic mower to its highest
level. That will help reduce the likelihood of cutting the
perimeter wire with the mowing blade.
NOTICE
Take care when using a trimmer near the
perimeter of the mowing area. If you are not
careful, perimeter wire that is not buried could be
cut by the rotating trimmer line.
NOTICE
Further information on installation of the docking station is
contained in the installation examples section, @ 25.
10.5 Connecting the Perimeter Wire to the Docking Station
10 Installing the Robotic Mower
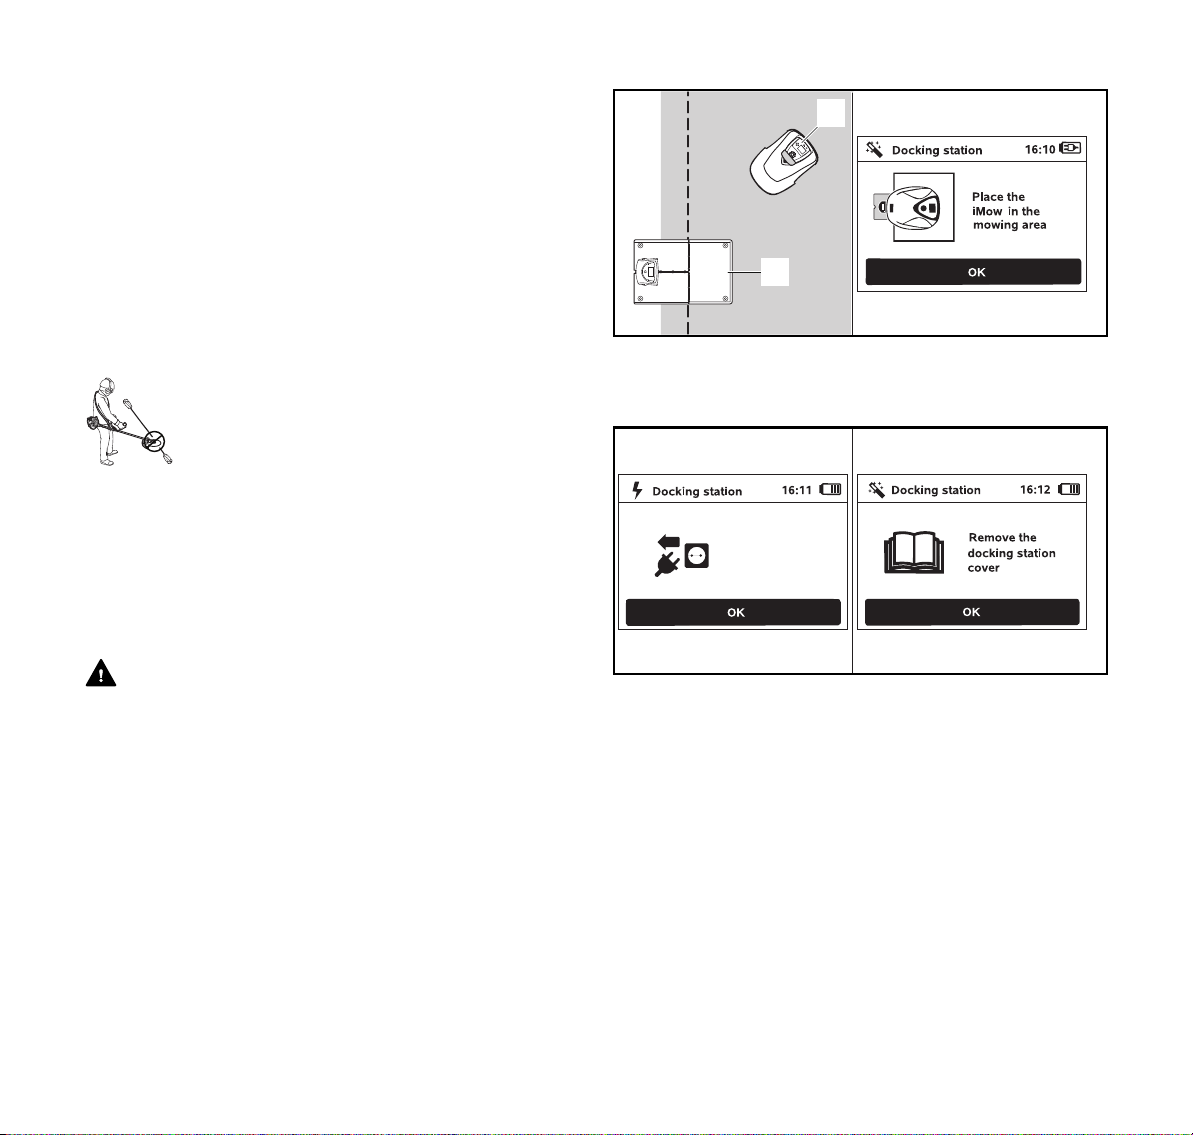
1
2
► Place the robotic mower (1) next to the docking station (2)
in the mowing area as illustrated.
► Press the OK button on the control panel.
Unplug the
docking station
0000-GXX-3358-A10000-GXX-3359-A1
WARNING
To reduce the risk of fire, electric shock and other personal
injury, unplug the power supply from the electrical outlet
before attempting to connect the perimeter wire to the
docking station. Always unplug the unit before removing the
cover from the docking station.
26
► Disconnect the plug from the electrical outlet and press
the OK button.
► Remove the cover, @ 10.3.
► Press the OK button on the control panel.
0478-131-8245-A
10 Installing the Robotic Mower
4
5
6
3
0000-GXX-5349-A0
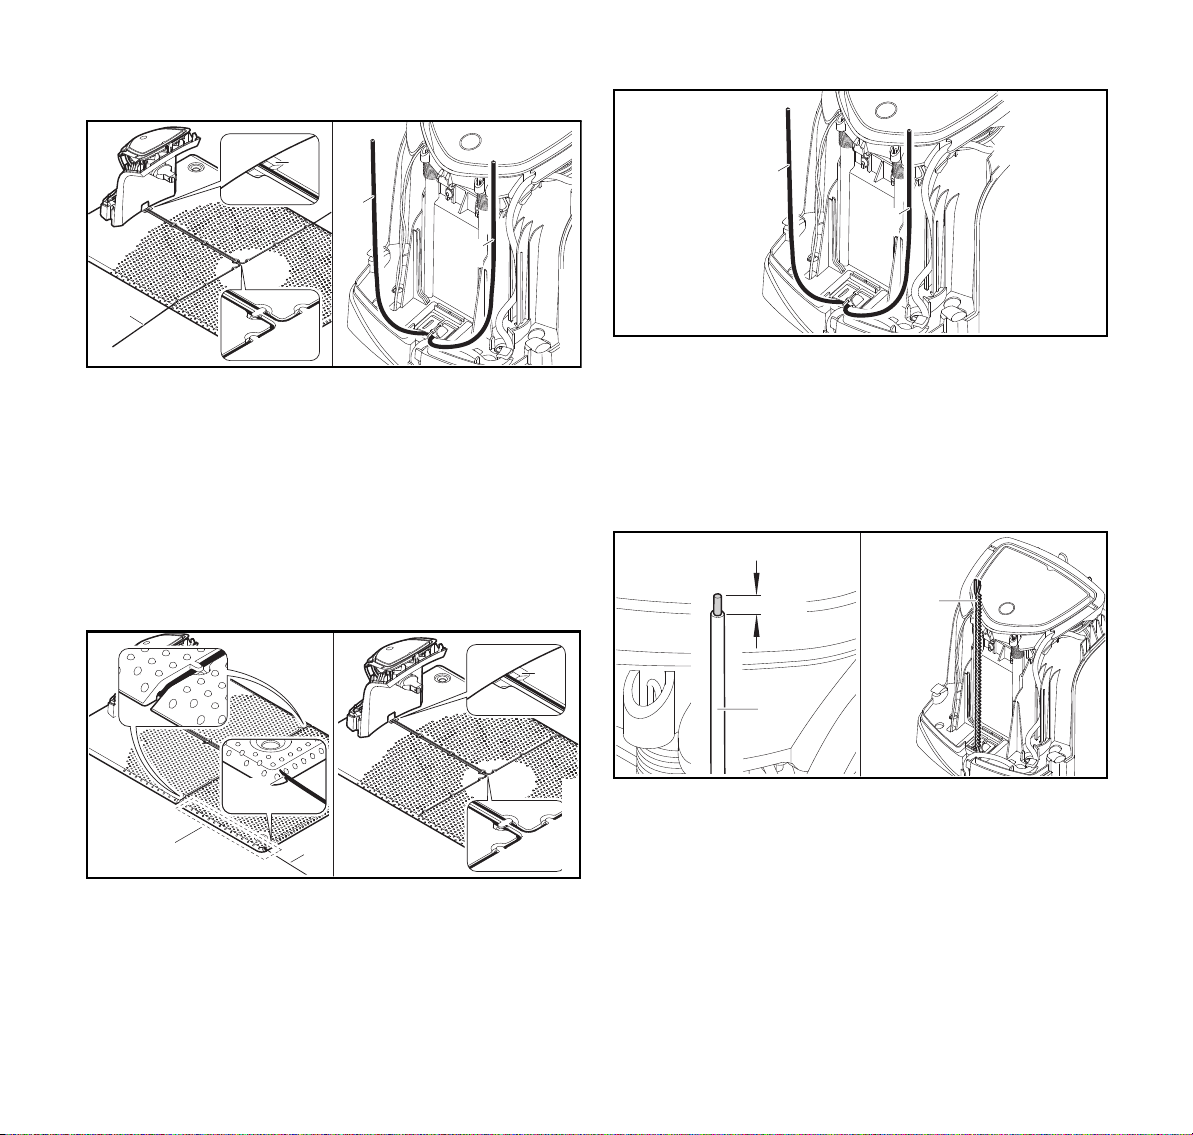
To connect the perimeter wire to an internal docking station:
► Insert the perimeter wire (3) into the wire channels in the
base plate and guide it through the port (4) to the rear of
the docking station.
► Cut the ends of the perimeter wire (5 and 6) so that
approximately 15.7 in. (40 cm) is available for insertion
into the docking station. Additional length is not needed.
► Do not coil excess wire behind the docking station.
Excess wire can interfere with operation of the robotic
mower.
English
5
6
0000-GXX-5351-A0
► Cut the ends of the perimeter wire (5 and 6) so that
approximately 15.7 in. (40 cm) is available for insertion
into the docking station. Additional length is not needed.
► Do not coil excess wire behind the docking station.
Excess wire can interfere with operation of the robotic
mower.
To connect the perimeter wire to the panel:
To connect the perimeter wire to an external docking station:
a
5 + 6
4
5
0000-GXX-5352-A0
7
7
► Guide the perimeter wire (3) though the wire channel in
the floor plate (7). Thread the perimeter wire into the wire
outlets. If necessary, loosen the wire stakes.
► Insert the perimeter wire (3) into the wire channels in the
base plate and guide it through the port (4) to the rear of
the docking station.
0478-131-8245-A
3
► Use a suitable tool to strip a = 0.236 in. (6 mm) from the
of the left perimeter wire (5) end and twist the perimeter
wire strands.
0000-GXX-5350-A0
► Twist both perimeter wire ends together (5 and 6).
► Open the panel, @ 10.3.
27
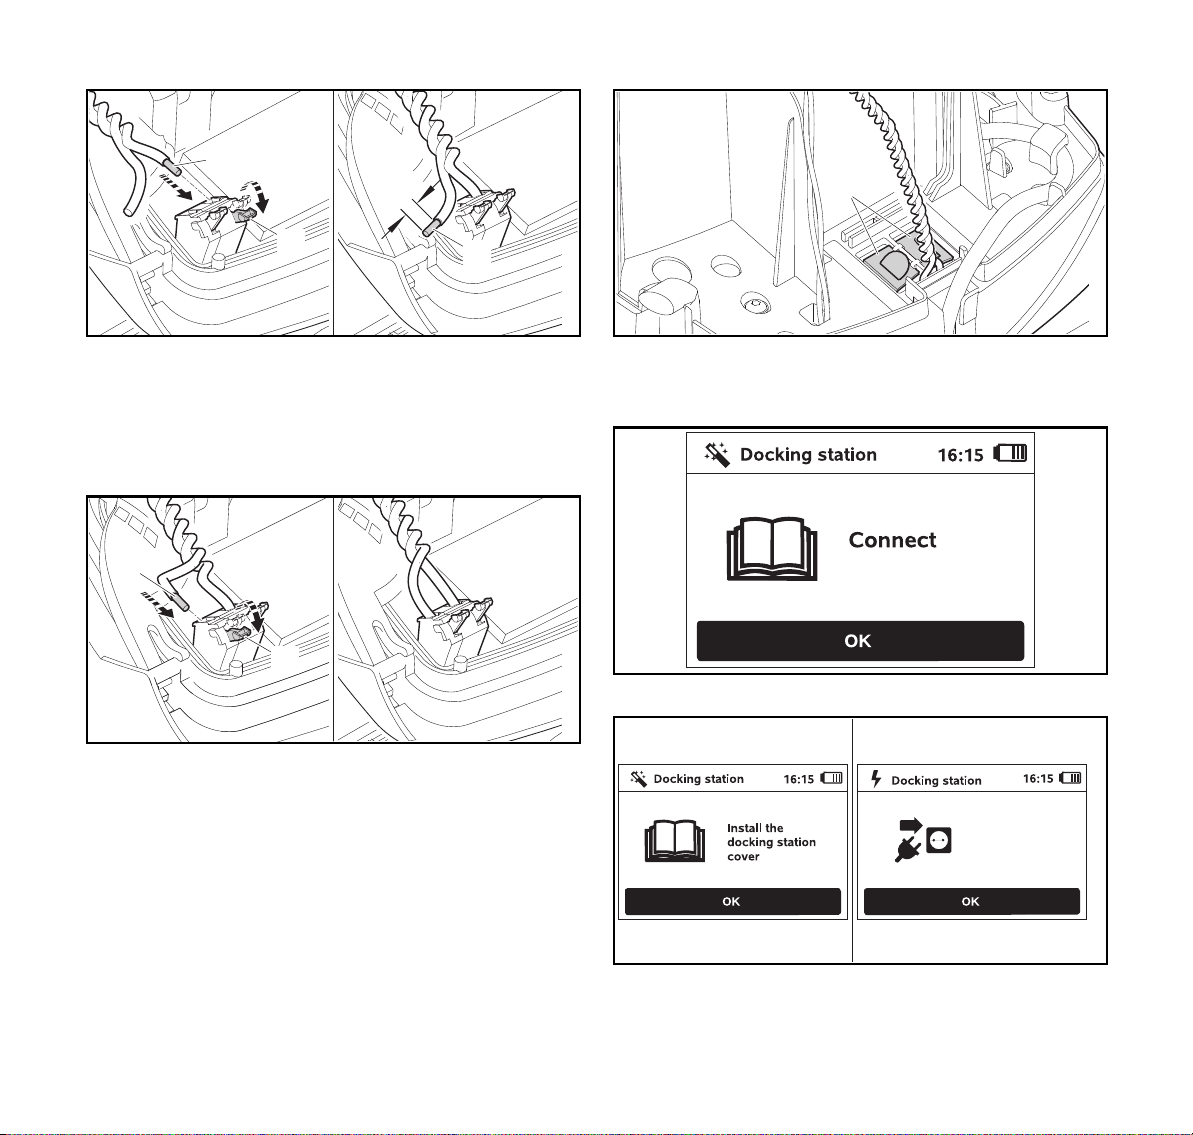
English
6
9
0000-GXX-5354-A0
0000-GXX-3363-A1
Plug in the
docking station
10 Installing the Robotic Mower
5
a
10
8
6
► Press and hold the left clamping lever (8).
► Insert the stripped perimeter wire end (5) into the clamping
block as far as it will go and release the clamping lever (8).
► Use a suitable tool to strip a = 0.236 in. (6 mm) from the
end of the right perimeter wire (6) and twist the perimeter
wire strands.
► Press and hold the right clamping lever (9).
► Insert the stripped perimeter wire end (6) into the clamping
block as far as it will go and release the clamping lever (9).
► Close the panel taking care not to pinch the power supply
cord or the perimeter wire.
0000-GXX-5353-A0
► Close the cover of the cable duct (10).
► Check the routing of the perimeter wire. The two perimeter
wire ends must be routed as illustrated.
perimeter wire
► Press the OK button on the control panel.
0000-GXX-5355-A0
0000-GXX-5413-A1
28
0478-131-8245-A
 Loading...