


STIHL MSA 220 C
Instruction Manual
Notice d’emploi

G Instruction Manual
1 - 58
F Notice d’emploi
59 - 122

Contents
English
1 Introduction
2 Guide to Using this Manual
2.1 Signal Words
2.2 Symbols in Text
3 Main Parts
3.1 Chain Saw and Battery
4 Safety Symbols on the Products
4.1 Chain Saw
Original Instruction ManualPrinted on chlorine-free paper
4.2 Battery
. . . . . . . . . . . . . . . . . . . . . . . . . . . . . . . . . . . . . . . . .
. . . . . . . . . . . . . . . . . . . . . . . . . .
. . . . . . . . . . . . . . . . . . . . . . . . . . . . . . . . . . . . . . . .
. . . . . . . . . . . . . . . . . . . . . . . . . . . . . . . . . . . . .
. . . . . . . . . . . . . . . . . . . . . . . . . . . . . . . . . . . . . . . . . .
. . . . . . . . . . . . . . . . . . . . . . . . . . . . . .
. . . . . . . . . . . . . . . . . . . . .
. . . . . . . . . . . . . . . . . . . . . . . . . . . . . . . . . . . . . . . . . .
. . . . . . . . . . . . . . . . . . . . . . . . . . . . . . . . . . . . . . . . . . . . . .
5 IMPORTANT SAFETY INSTRUCTIONS
5.1 Intended Use
5.2 Operator
5.3 Personal Protective Equipment
5.4 Chain Saw
5.5 Using the Chain Saw
. . . . . . . . . . . . . . . . . . . . . . . . . . . . . . . . . . . . . . . .
. . . . . . . . . . . . . . . . . . . . . . . . . . . . . . . . . . . . . . . . . . . .
. . . . . . . . . . . . . . . . . . . . . .
. . . . . . . . . . . . . . . . . . . . . . . . . . . . . . . . . . . . . . . . . .
. . . . . . . . . . . . . . . . . . . . . . . . . . . . . . . .
6 Kickback and Other Reactive Forces
6.1 Reactive Forces
6.2 Kickback
6.3 Pull-in
. . . . . . . . . . . . . . . . . . . . . . . . . . . . . . . . . . . . . . . . . . .
. . . . . . . . . . . . . . . . . . . . . . . . . . . . . . . . . . . . . . . . . . . . . .
6.4 Pushback
. . . . . . . . . . . . . . . . . . . . . . . . . . . . . . . . . . . .
. . . . . . . . . . . . . . . . . . . . . . . . . . . . . . . . . . . . . . . . . .
7 Proper Techniques for Basic Bucking, Limbing,
Pruning and Felling
7.1 Intended Uses
Printing inks contain vegetable oils, paper can be recycled.
7.2 Bucking
7.3 Limbing
7.4 Pruning
. . . . . . . . . . . . . . . . . . . . . . . . . . . . . . . . . . . . . . . . . . . .
. . . . . . . . . . . . . . . . . . . . . . . . . . . . . . . . . . . . . . . . . . . .
. . . . . . . . . . . . . . . . . . . . . . . . . . . . . . . . . . . . . . . . . . . .
7.5 Cutting Logs Under Tension
7.6 Felling
. . . . . . . . . . . . . . . . . . . . . . . . . . . . . . . . . . . . . . . . . . . . .
8 Battery Safety
8.1 Warnings and Instructions
. . . . . . . . . . . . . . . . . . . . . . . . . . . . . . . .
. . . . . . . . . . . . . . . . . . . . . . . . . . . . . . . . . . . . . .
. . . . . . . . . . . . . . . . . . . . . . . .
. . . . . . . . . . . . . . . . . . . . . . . . . . . . . . . . . . . . . .
. . . . . . . . . . . . . . . . . . . . . . . . . .
9 Maintenance, Repair and Storage
9.1 Warnings and Instructions
10 Before Starting Work
. . . . . . . . . . . . . . . . . . . . . . . . . .
. . . . . . . . . . . . . . . . . . . . . . . . . . . . . . .
. . . . . . . . . . . . .
. . . . . . . . . . . . . . .
. . . . . . . . . . . . . . . . . .
10.1 Preparing the Chain Saw for Operation
2
11 Charging the Battery
2
11.1 Setting up the Charger
2
11.2 Charging
3
12 LED Diagnostics and Acoustic Signals
3
12.1 STIHL AP Battery
3
12.2 STIHL AR Backpack Battery
4
13 STIHL AR Backpack Battery
4
13.1 Positioning and Adjusting the Connecting Cord
5
13.2 Putting on and Adjusting the Harness
5
14 Assembling the Chain Saw
5
14.1 Cutting Attachment
6
14.2 Mounting and Removing the Guide Bar and
7
8
9
14
14
15
19
20
Chain
14.3 Tensioning the Chain
14.4 Lubricating the Saw Chain and Guide Bar
15 The Chain Brake
15.1 Engaging the Chain Brake
15.2 Disengaging the Chain Brake
15.3 Maintaining the Chain Brake
. . . . . . . . . . . . . . . . . . . . . . . . . . . . . . . . . . . . . . . . . . .
. . . . . . . . . . . . . . . . . . . . . . . . . . . . . . . . . . . . . . . . . . . . . .
. . . . . . . . . . . . . . . . . . . . . . . . . . . . . . .
. . . . . . . . . . . . . . . . . . . . . . . . . . . . .
. . . . . . . . . . . . . . . . . . . . . . . . . . . . . . . . . .
. . . . . . . . . . . . . . . . . . . . . . .
. . . . . . . . . . . . . . . . . . . . . . .
. . . . . . . . . . . . . . . . . . . . . . . . .
. . . . . . . . . . . . . . . . . . . . . . . . . . . . . . . .
. . . . . . . . . . . . . . . . . . . . . . . . . . . . . .
. . . . . . . . . . . . . . . . . . . . . . . . . . . . . . . . . . .
. . . . . . . . . . . . . . . . . . . . . . . . .
. . . . . . . . . . . . . . . . . . . . . .
. . . . . . . . . . . . . . . . . . . . . . .
16 Inserting and Removing the Battery
16.1 Inserting the Battery
20
16.2 Removing the Battery
20
17 Switching the Chain Saw On and Off
20
17.1 Switching On
21
17.2 Switching Off
22
23
18 Checking the Chain Saw
24
18.1 Checking the Operation of the Chain Brake
18.2 Testing the Controls
27
18.3 Testing Chain Lubrication
27
19 After Finishing Work
29
19.1 Preparing for Transportation or Storage
29
20 Transporting the Chain Saw and Battery
30
. . . . . . . . . . . . . . . . . . . . . . . . . . . . . . .
. . . . . . . . . . . . . . . . . . . . . . . . . . . . . .
. . . . . . . . . . . . . . . . . . . . . . . . . . . . . . . . . . . . . .
. . . . . . . . . . . . . . . . . . . . . . . . . . . . . . . . . . . . . .
. . . . . . . . . . . . . . . . . . . . . . . . . . .
. . . . . . . . . . . . . . . . . . . . . . . . . . . . . . .
. . . . . . . . . . . . . . . . . . . . . . . . . .
. . . . . . . . . . . . . . . . . . . . . . . . . . . . . . .
. . . . . . . . . . . .
. . . . . . . . . . . . .
. . . . .
. . . . . . . . . . . . . .
. . . . . . . . . .
. . . . . . . . . . . . . . . .
. . . . . . . . . . . . . . .
. . . . . . . .
. . . . . . . . . . . .
. . . . . . . . . . .
30
30
30
31
32
32
32
34
34
35
35
35
36
37
38
39
39
40
40
41
41
41
42
42
42
42
42
43
43
44
44
44
© ANDREAS STIHL AG & Co. KG 2019
0458-795-8221-A. VA0.C19.
0000008767_001_GB
0458-795-8221-A
This instruction manual is protected by copyright. All rights reserved, especially the rights to reproduce, translate and process
with electronic systems.
1

English
1 Introduction
20.1 Chain Saw
20.2 Battery
21 Storing the Chain Saw and Battery
21.1 Chain Saw
21.2 Battery
22 Cleaning
22.1 Cleaning the Chain Saw and Battery
22.2 Cleaning the Guide Bar and Saw Chain
23 Inspection and Maintenance
23.1 Inspecting and Maintaining the Chain Saw
23.2 Inspecting and Maintaining the Chain Sprocket
23.3 Inspecting and Maintaining the Guide Bar
23.4 Inspecting, Maintaining and Sharpening the Saw
Chain
24 Troubleshooting Guide
24.1 Chain Saw and Battery
25 Specifications
25.1 STIHL MSA 220 C
25.2 Chain Sprockets
25.3 Minimum Groove Depth of Guide Bars
25.4 Depth Gauge Setting
25.5 Symbols on the Chain Saw
25.6 Engineering Improvements
25.7 EMC Compliance Statement for Power Tool and
Charger
26 CSA Standard
26.1 Chain Saw Class
26.2 Definition of the Chain Saw Classes according to
CSA Z62.1
27 Combinations of Guide Bars and Saw Chains
27.1 STIHL MSA 220 C
28 Replacement Parts and Equipment
28.1 Genuine STIHL Replacement Parts
29 Disposal
29.1 Disposal of the Chain Saw
29.2 Battery Recycling
. . . . . . . . . . . . . . . . . . . . . . . . . . . . . . . . . . . . . . . . .
. . . . . . . . . . . . . . . . . . . . . . . . . . . . . . . . . . . . . . . . . . . . .
. . . . . . . . . . . . . . . . .
. . . . . . . . . . . . . . . . . . . . . . . . . . . . . . . . . . . . . . . . .
. . . . . . . . . . . . . . . . . . . . . . . . . . . . . . . . . . . . . . . . . . . . .
. . . . . . . . . . . . . . . . . . . . . . . . . . . . . . . . . . . . . . . . . . .
. . . . . . . . . . . . . . .
. . . . . . . . . . . .
. . . . . . . . . . . . . . . . . . . . . . . .
. . . . . . . . .
. . . . . . . . . .
. . . . . . . . . . . . . . . . . . . . . . . . . . . . . . . . . . . . . . . . . . . . . .
. . . . . . . . . . . . . . . . . . . . . . . . . . . . .
. . . . . . . . . . . . . . . . . . . . . . . . . . . . .
. . . . . . . . . . . . . . . . . . . . . . . . . . . . . . . . . . . . . .
. . . . . . . . . . . . . . . . . . . . . . . . . . . . . . . . .
. . . . . . . . . . . . . . . . . . . . . . . . . . . . . . . . . . .
. . . . . . . . . . . . .
. . . . . . . . . . . . . . . . . . . . . . . . . . . . . . .
. . . . . . . . . . . . . . . . . . . . . . . . .
. . . . . . . . . . . . . . . . . . . . . . . . .
. . . . . . . . . . . . . . . . . . . . . . . . . . . . . . . . . . . . . . . . . . . .
. . . . . . . . . . . . . . . . . . . . . . . . . . . . . . . . . . . . . .
. . . . . . . . . . . . . . . . . . . . . . . . . . . . . . . . . . .
. . . . . . . . . . . . . . . . . . . . . . . . . . . . . . . . . . . . . . . . .
. . . . . .
. . . . . . . . . . . . . . . . . . . . . . . . . . . . . . . . .
. . . . . . . . . . . . . . . . .
. . . . . . . . . . . . . . . .
. . . . . . . . . . . . . . . . . . . . . . . . . . . . . . . . . . . . . . . . . . .
. . . . . . . . . . . . . . . . . . . . . . . . .
. . . . . . . . . . . . . . . . . . . . . . . . . . . . . . . . . .
. . . . .
44
1 Introduction
45
45
Thank you for your purchase. The information contained in
45
this manual will help you receive maximum performance and
45
satisfaction from your STIHL chain saw and, if followed,
46
reduce the risk of injury from its use.
46
SAVE THIS MANUAL!
46
47
47
47
47
48
52
52
54
Have your authorized STIHL servicing dealer show you how
54
to operate your chain saw. All safety precautions that are
generally observed when working with an axe or a hand saw
54
also apply to the operation of chain saws. Observe all
54
applicable federal, state and local safety regulations,
54
standards and ordinances.
54
55
Do not lend or rent your chain saw without this instruction
manual. Allow only persons who have the proper training
55
and fully understand the information in this manual to
operate the chain saw.
55
For further information, or if you do not understand any of
55
the instructions in this manual, please go to www.stihl.ca or
contact your authorized STIHL servicing dealer.
55
56
56
2 Guide to Using this Manual
58
58
2.1 Signal Words
58
58
This manual contains safety information that requires your
special attention. Such information is introduced with the
58
following symbols and signal words:
Because a chain saw is a high-speed woodcutting tool, special safety precautions must be
observed to reduce the risk of personal injury.
Read this instruction manual thoroughly before
use and periodically thereafter. Follow all safety
precautions. Careless or improper use of the
chain saw can cause serious or fatal injury.
2
0458-795-8221-A
3 Main Parts
English
DANGER
Indicates a hazardous situation that, if not avoided, will
result in death or serious injury.
WARNING
Indicates a hazardous situation that, if not avoided, could
result in death or serious injury.
NOTICE
Indicates a risk of property damage, including damage to the
machine or its individual components.
2.2 Symbols in Text
The following symbol is included to assist you with the use
of the manual:
Refers to a designated chapter or sub-chapter in this
instruction manual.
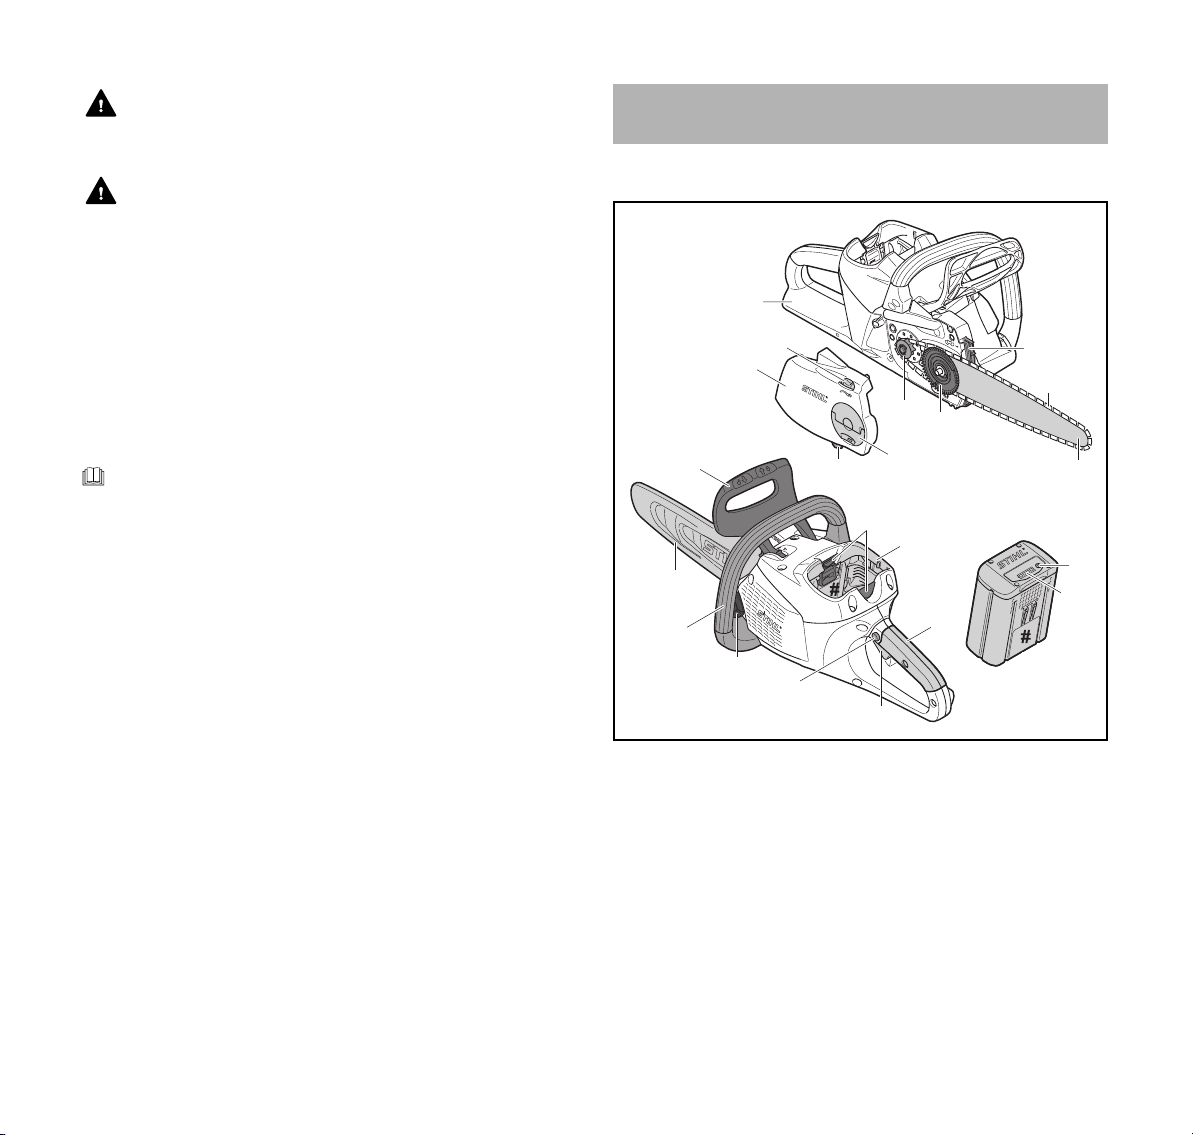
3 Main Parts
3.1 Chain Saw and Battery
1
8
7
11
15
16
17
9
12
18
19
2
10
4
5
3
6
13
22
21
14
20
0000-GXX-3094-A1
0458-795-8221-A
1 Rear Hand Guard
Helps protect the operator's right hand in the event the
chain breaks or comes off the bar.
2 Chain Sprocket
Drives the saw chain.
3 Tensioning Gear
Shifts the guide bar and tensions or loosens the saw
chain.
3
English
4 Safety Symbols on the Products
4Bumper Spike
Helps hold the saw steady against the wood during
cutting.
5 Saw Chain
Toothed cutting tool consisting of cutters, tie straps and
drive links.
6 Guide Bar
Supports and guides the saw chain.
7 Chain Sprocket Cover
Covers the chain sprocket.
8 Adjusting Wheel
Permits precise adjustment of saw chain tension.
9 Chain Catcher
Helps contain the saw chain and reduce the risk of
operator contact in the event the chain breaks or comes
off the bar.
10 Wingnut
Tightens the chain sprocket cover to the chain saw.
11 Front Hand Guard
Helps protect the operator's left hand from projecting
branches and contact with the saw chain. Serves as the
activation lever for the chain brake.
12 Locking Levers
Secure the battery in the battery compartment.
13 Battery Compartment
Holds the battery.
14 Rear Handle
Handle for the operator's right hand.
15 Chain Scabbard
Covers the guide bar and saw chain to reduce the risk of
injury from inadvertent contact during transportation and
storage.
16 Front Handle
Handle for the operator's left hand.
17 Oil Filler Cap
Closes and seals the oil tank.
18 Trigger Switch Lockout
Prevents activation of the trigger switch until depressed.
19 Trigger Switch
Switches the motor on and off.
20 Battery
Supplies electrical power to the motor.
21 Battery LEDs
Indicate the battery's state of charge and display error
messages regarding potential malfunctions in the battery
or power tool.
22 Push Button
Activates the battery's LEDs.
# Rating Plate
Contains electrical information and the product's serial
number.
4 Safety Symbols on the Products
4.1 Chain Saw
The following safety symbols are found on the chain saw:
To reduce the risk of injury, follow the specified
safety precautions.
Read and follow all safety precautions in the
instruction manual. Improper use can lead to
serious or fatal personal injury or property
damage.
To reduce the risk of serious personal injury and
hearing loss, always wear proper eye protection,
hearing protection and an approved protective
helmet, @ 5.3.
4
0458-795-8221-A
5 IMPORTANT SAFETY INSTRUCTIONS
English
Avoid contact of the bar tip with any object. This
can cause the bar to kick suddenly up and back,
which may result in serious or fatal injury. Always
use two hands to operate the saw, @ 6.
To reduce the risk of injury or property damage
from unintended activation, remove the battery
any time the saw is not in use, @ 5.5.
4.2 Battery
The following safety symbols are found on the AR series
backpack battery and the AP series battery:
AR Series Backpack Battery and AP Series Battery
To reduce the risk of injury, follow the specified
safety precautions.
Read and follow all safety precautions in the
battery's instruction manual and the manual for
the STIHL tool powered by this battery. Improper
use can lead to serious or fatal personal injury or
property damage.
To reduce the risk of personal injury or property
damage from fire, explosion or burns, including
chemical burns, do not disassemble, crush,
drop, damage or heat above 212 °F (100 °C).
Never expose to fire or incinerate, @ 8.
To reduce the risk of personal injury or property
damage from fire, use and store only within an
ambient temperature range of 14 °F to
122 °F (- 10 °C to 50 °C), @ 8.
AR Series Backpack Battery only
To reduce the risk of personal injury or property
damage from a short circuit, fire or explosion,
keep dry. Protect from rain, water, liquids and
damp conditions. Never immerse in water or
other liquids, @ 8.
AP Series Battery only
To reduce the risk of personal injury or property
damage from a short circuit, fire or explosion,
keep dry. Never immerse in water or other
liquids, @ 8.
Batteries sold separately.
5 IMPORTANT SAFETY
INSTRUCTIONS
5.1 Intended Use
WARNING
■ This chain saw is designed for cutting small and medium
diameter trees, branches and limbs. It is not designed for
felling large trees or cutting large diameter logs. Use of the
chain saw for operations different than intended could
result in serious injury or death.
– Cut wood only. For example, do not use chain saw
for cutting metal, plastic or masonry.
– Use this chain saw only for light-duty or moderate-
duty cutting tasks.
– Do not use it for any other purposes.
■ For cutting larger trees, logs or branches, a more
powerful, faster saw may be necessary to reduce the risk
of binding, stalling or other risks caused by a change in
conditions during longer cutting times. This batteryoperated chain saw is not suitable for cutting larger trees
and logs, and its use could lead to a loss of control of the
object being cut and serious personal injury or death.
– Before starting any felling operation, fully charge
your STIHL AP or AR battery.
■ Before starting any bucking, limbing, pruning or felling
operation, ensure that all necessary cuts can be
completed using the charge remaining in the STIHL AP or
AR series battery. If you are unsure:
– Have multiple charged batteries available for use;
– Select a more powerful chain saw;
0458-795-8221-A
5

English
5 IMPORTANT SAFETY INSTRUCTIONS
– Select a more powerful battery; or
– Consult a reputable tree removal professional.
■ Read and follow the operating and use instructions in this
manual for approved applications and recommended
working techniques.
■ The saw chain has many sharp cutters. If they contact
your flesh, they will cut you even if the chain is not moving.
– Always wear heavy-duty work gloves when handling
the saw or its chain.
– Keep hands, feet and other parts of your body away
from the chain.
■ Reactive forces, including kickback, can be dangerous.
– Pay special attention to the sections of this
instruction manual dealing with reactive forces.
■ Observe all applicable federal, state and local safety
regulations, standards and ordinances.
■ Improper use could result in personal injury or property
damage, including damage to the chain saw.
– Use the chain saw and battery only as described in
this manual.
– Never attempt to modify or override the chain saw's
controls or safety devices in any way.
– Never use a chain saw that has been modified or
altered from its original design.
– Be sure to read and follow the warnings and
instructions for your battery and charger before
charging or starting work.
■ This power tool may be powered by a STIHL AP series
battery. Alternatively, it may be powered by a STIHL AR
series backpack battery in combination with an
AP adapter.
Batteries, chargers and other accessories are sold
separately.
5.2 Operator
WARNING
■ Working with the chain saw can be strenuous. The
operator must be in good physical condition and mental
health. To reduce the risk of personal injury from fatigue
and loss of control:
– Check with your doctor before using the chain saw if
you have any health condition that may be
aggravated by strenuous work.
– Do not operate the chain saw while under the
influence of any substance (drug, alcohol or
medication, etc.) that might impair vision, balance,
dexterity or judgment.
– Be alert. Do not operate the chain saw when you are
tired. Take a break if you become tired.
– Do not permit minors to use the chain saw.
– Bystanders, especially children, and animals should
not be allowed in the area where the chain saw is in
use.
■ Prolonged use of a chain saw (or other power tools)
exposing the operator to vibration may produce white
finger disease (Raynaud's phenomenon) or carpal tunnel
syndrome. These conditions reduce the hand's ability to
feel and regulate temperature. They produce numbness
and burning sensations and may also cause nerve and
circulation damage as well as tissue necrosis.
■ All factors which contribute to white finger disease are not
known. Cold weather, smoking and diseases or physical
conditions that affect blood vessels and blood transport,
as well as high vibration levels and long periods of
exposure to vibration, are mentioned as factors in the
development of white finger disease.
■ To reduce the risk of white finger disease and carpal
tunnel syndrome:
– Wear gloves while working and keep your hands
warm.
– Keep the chain saw well maintained. An improperly
maintained chain saw or one with loose components
will tend to have higher vibration levels.
6
0458-795-8221-A

5 IMPORTANT SAFETY INSTRUCTIONS
English
– Keep the saw chain sharp. A dull chain will increase
cutting time, and pressing a dull chain through wood
will increase the vibration transmitted to your hands.
– Maintain a firm grip at all times, but do not squeeze
the handles with constant, excessive pressure. Take
frequent breaks.
■ These precautions do not guarantee that you will not
sustain white finger disease or carpal tunnel syndrome.
– Closely monitor the condition of your hands and
fingers if you are a regular operator.
– Seek medical advice immediately if any of the above
symptoms appear.
■ According to STIHL's current knowledge, the electric
motor of this chain saw should not interfere with a
pacemaker.
– However, persons with a pacemaker or other
implanted medical device should consult their
physician and device manufacturer before operating
this chain saw.
5.3 Personal Protective Equipment
WARNING
■ To reduce the risk of personal injury:
– Always wear proper clothing and protective apparel,
including proper eye protection.
■ Loss of control and severe cut injuries may result if hair,
clothing or apparel make contact with the moving saw
chain or otherwise become entangled in the components
of the saw. To reduce the risk of severe personal injury:
– Wear sturdy and snug-fitting clothing that
also allows complete freedom of
movement.
– Wear the type of overalls, long pants or
chaps that contain pads of cut-retardant
material.
– Wear a long-sleeve shirt or jacket.
– Avoid loose-fitting jackets, scarves, neckties, flared
or cuffed pants, jewelry and any other apparel that
could be caught on branches, brush or the moving
chain.
– Secure hair above shoulder level before starting
work.
■ To reduce the risk of eye injury:
– Always wear goggles or close-fitting
protective glasses with adequate top and
side protection that are impact-rated and
marked as complying with CSA Z94.
– To reduce the risk of injury to your face, STIHL
recommends that you also wear a face shield or face
screen over your goggles or protective glasses.
■ To reduce the risk of head injury from falling branches or
other objects encountered during work:
– Wear an approved protective helmet.
■ Prolonged exposure to power tool noise may result in
permanent hearing damage. To reduce the risk of hearing
damage:
– Wear sound barriers (ear plugs or ear
muffs).
– Regular operators should have their
hearing checked periodically.
– Be particularly alert and cautious when
using hearing protection. Your ability to
hear shouts, alarms or other audible
warnings is restricted.
■ Good footing is very important. To help maintain a secure
footing and reduce the risk of injury while working:
– Wear sturdy boots with non-slip soles.
Steel-toed safety boots are
recommended. Do not wear sandals, flipflops, open-toed or similar footwear.
■ To improve your grip and help protect your hands:
0458-795-8221-A
7

English
5 IMPORTANT SAFETY INSTRUCTIONS
– Always wear heavy-duty non-slip work
gloves made of leather or another wearresistant material when handling the
chain saw or its chain.
5.4 Chain Saw
WARNING
■ To reduce the risk of electric shock:
– Do not immerse the chain saw in water or other
fluids.
– Store the chain saw indoors.
■ The saw chain has many sharp cutters. Contacting the
cutters may result in serious laceration injuries, even if the
chain is not moving. To reduce the risk of such injuries:
– Keep hands, feet and other parts of your body away
from the chain.
– Wear heavy-duty work gloves when handling the
chain saw or its chain.
– Never touch a moving chain with your hand or any
other part of your body.
– Cover the guide bar with a chain scabbard before
transporting or storing the chain saw to reduce the
risk of injury from inadvertent contact.
■ Reactive forces, including kickback, can be dangerous.
– Pay special attention to the section of this instruction
manual on "Kickback and Other Reactive Forces,"
@ 6.
■ This battery-powered chain saw is intended only for
cutting small and medium diameter trees, branches and
limbs. Use for other purposes may increase the risk of
personal injury and property damage.
– Do not use the chain saw for felling large trees or
cutting large diameter logs.
– Read and follow the operating instructions in this
manual for approved applications, @ 7.
■ To reduce the risk of personal injury to the operator and
bystanders:
– Always release the trigger switch,
engage the chain brake by moving the
front hand guard to and remove the
battery before assembling, transporting,
adjusting, inspecting, cleaning,
servicing, maintaining or storing the
chain saw and any other time it is not in
use.
■ Although certain unauthorized attachments may fit your
STIHL chain saw, their use may be extremely dangerous.
Only attachments supplied by STIHL or expressly
approved by STIHL for use with this specific model are
recommended.
– Use only attachments supplied or expressly
approved by STIHL.
– Never modify this chain saw in any way.
– Never attempt to modify or override the chain saw's
controls or safety devices in any way.
– Never use a chain saw that has been modified or
altered from its original design.
■ If the chain saw is dropped or subjected to similar heavy
impacts:
– Check that it is undamaged, in good condition and
functioning properly before continuing work.
– Check that the controls and safety devices, including
the chain brake, are working properly, @ 18.1.
– Check the LEDs for error messages, @ 12.1.2 or
@ 12.2.2.
– Check that the battery has not been damaged.
Never use or charge a malfunctioning, damaged,
cracked, leaking or deformed battery.
– Never work with a damaged or malfunctioning chain
saw or battery. In case of doubt, have the chain saw
and battery checked by your authorized STIHL
servicing dealer.
8
0458-795-8221-A

5 IMPORTANT SAFETY INSTRUCTIONS
English
■ If the chain saw or battery is damaged, not working
properly, has been left outdoors or dropped into water or
other liquid, its components may no longer function
properly and safety devices may be inoperative. To
reduce the risk of personal injury and property damage:
– Take the chain saw and battery to your authorized
STIHL servicing dealer to be checked before further
operation.
■ Genuine STIHL replacement parts are specifically
designed to match your chain saw and meet safety and
performance requirements. Use of parts that are not
authorized or approved by STIHL may cause serious or
fatal injury or property damage.
– STIHL recommends that only identical STIHL
replacement parts be used.
5.5 Using the Chain Saw
5.5.1 Before Operation
WARNING
■ Misuse or unauthorized use may result in personal injury
and property damage.
– Use the chain saw only as described in this
instruction manual.
■ For proper assembly of the bar and chain:
– Read and follow the instructions on mounting the
guide bar and chain, @ 14.2.1.
■ The chain, guide bar and sprocket must match each other
in gauge and pitch. Before mounting or replacing:
– Read the information on guide bar and chain
combinations, @ 27.
– Read and follow the instructions on kickback and
other reactive forces, @ 6.
– Select the shortest bar that will meet your cutting
needs. Longer bars add weight and may be more
difficult to control.
■ Proper tension of the chain is extremely important to
maximize cutting performance and reduce the risk of
personal injury from chain breakage, derailment or
reactive forces:
– Read and follow the chain tensioning instructions,
@ 14.3.
– Always make sure the chain sprocket cover is
tightened securely after tensioning the chain in order
to secure the bar. Never start the chain saw with the
chain sprocket cover loose or missing.
– Check chain tension once more after tightening the
chain sprocket cover.
– After adjusting the chain, let the motor run for a
minute or two, then switch the motor off and engage
the chain brake. Remove the battery and recheck
chain tension.
– Check chain tension periodically thereafter at
regular intervals (only after engaging the chain brake
and removing the battery).
– Never cut with a loose chain. If the chain becomes
loose while cutting, switch off the motor, engage the
chain brake and remove the battery from the chain
saw before tightening the chain. Never attempt to
adjust the chain while the battery is inserted.
■ Using a chain saw that is damaged, improperly adjusted
or maintained, or not completely and securely assembled
can lead to a malfunction and increase the risk of serious
personal injury or death.
– Never operate a chain saw that is damaged,
improperly maintained or not completely and
securely assembled.
– Always check your chain saw for proper condition
and operation before starting work, particularly the
trigger switch, trigger switch lockout, front hand
guard, chain brake and cutting attachment.
– Ensure that the trigger switch and trigger switch
lockout move freely and always spring back to the
locked position when released. The trigger switch
must not engage until the trigger switch lockout is
depressed.
0458-795-8221-A
9
English
5 IMPORTANT SAFETY INSTRUCTIONS
– Never attempt to modify or override the controls or
safety devices in any way.
– If your saw or any part is damaged or does not
function properly, take it to your authorized STIHL
servicing dealer. Do not use the saw until the
problem has been corrected.
■ Before inserting the battery:
– Check the contacts in the battery compartment for
corrosion or other foreign matter and keep clean.
– Never insert or use a malfunctioning, damaged,
cracked, leaking or deformed battery.
– Read and follow the instructions on switching on the
chain saw, @ 17.1.
■ To help reduce the risk of serious personal injury or death
from unintentional starting:
– Be sure the trigger switch and trigger switch lockout
are in the off position when inserting the battery.
– Avoid contacting the trigger switch lockout and
trigger switch when grasping the rear handle of the
chain saw.
– Release the trigger switch and trigger switch lockout
and engage the chain brake before removing the
battery.
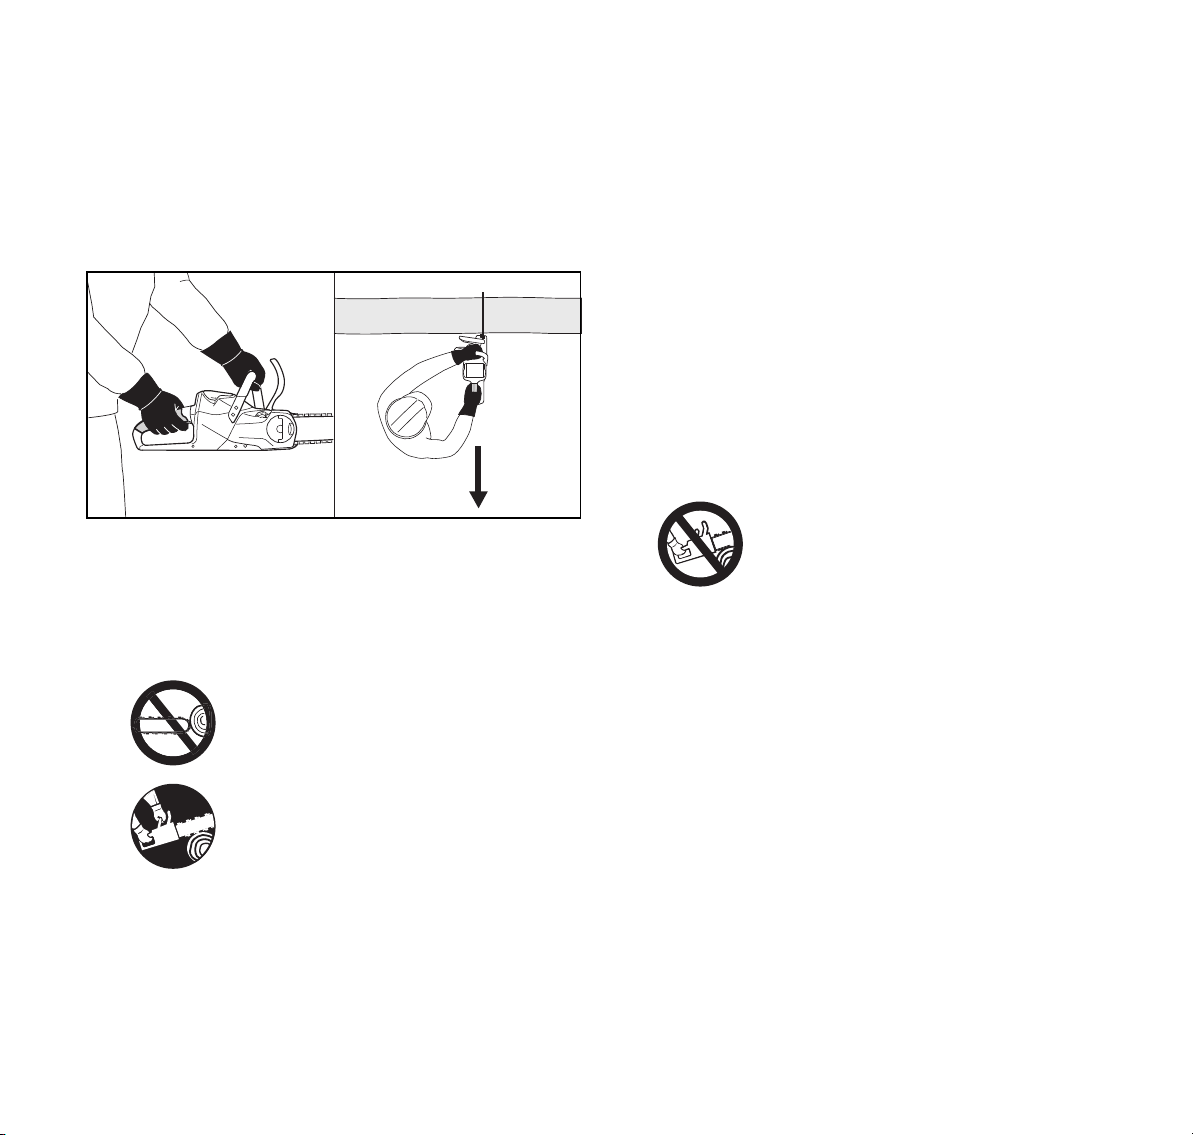
– Remove the battery and engage the
chain brake before assembling,
transporting, adjusting, inspecting,
cleaning, servicing, maintaining or
storing the chain saw and any time it is
not in use.
– Never leave the chain saw unattended when the
battery is inserted.
– Never store the battery in the chain saw.
■ Before disengaging the chain brake and switching on your
chain saw, take the following steps to reduce the risk of
personal injury from reactive forces, loss of control or
inadvertent contact with the chain:
– Be sure that the guide bar and chain are clear of you
and all other obstructions and objects, including the
ground.
– Never attempt to switch on the chain saw when the
guide bar is in a cut or kerf. Doing so could lead to
reactive forces and injury.
– Read and follow the instructions on switching on the
chain saw, @ 17.1.
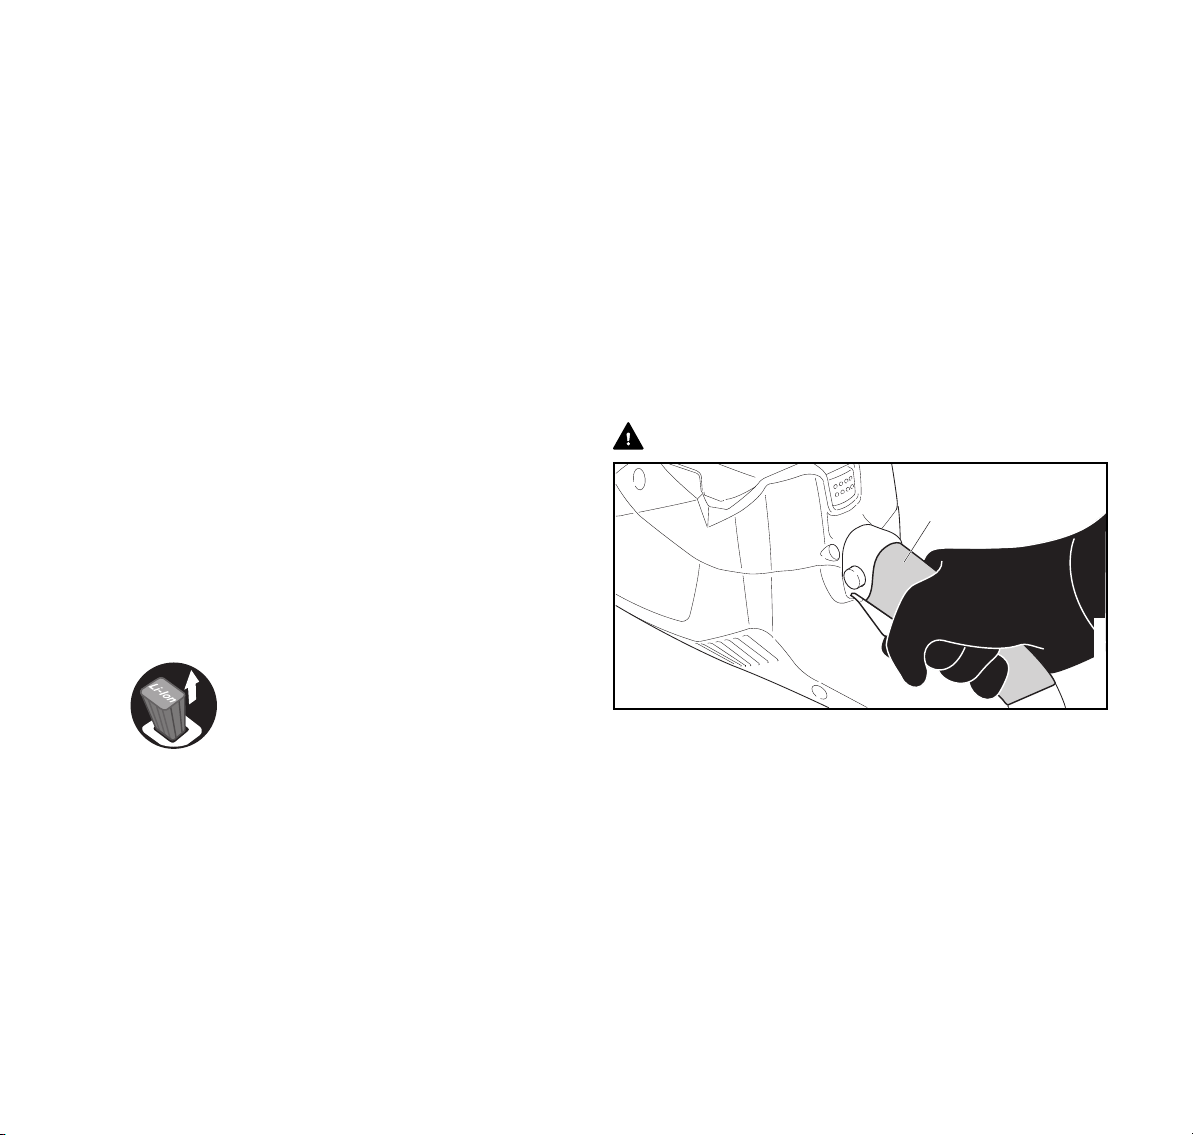
5.5.2 Holding and Controlling the Chain Saw
WARNING
■
1
0000-GXX-4945-A0
10
0458-795-8221-A
5 IMPORTANT SAFETY INSTRUCTIONS
0000-GXX-1888-A1
English
■ To reduce the risk of personal injury from unintentional
starting when grasping the rear handle or carrying the
chain saw:
– Wrap the fingers of your right hand tightly around the
rear handle, identified by shading in the illustration
above (1). Avoid grasping the chain saw outside the
shaded area or contacting the trigger switch lockout
or trigger switch.
■
■ To maintain a firm grip and properly control your chain
saw:
– Keep the handles clean and dry at all times. Keep
them free of moisture, pitch, oil, grease and resin.
■ To reduce the risk of serious or fatal injuries to the
operator or bystanders from loss of control:
– Avoid contacting any object with the
upper quadrant of the tip of the guide
bar. It may cause kickback to occur.
– Always hold the chain saw firmly with
both hands when you are working.
– Place your left hand on the front handle and your
right hand on the rear handle (see illustration
above). Left-handers must follow these instructions
too.
– Wrap your fingers tightly around the handles,
keeping the handles cradled between your thumb
and forefinger.
– Position the chain saw in such a way that all parts of
your body are clear of the cutting attachment
whenever the motor is running. Stand to the left of
the cut while bucking, outside of the cutting plane
(see illustration above).
– Read and follow all warnings and instructions in the
chapter Kickback and Reactive Forces, @ 6.
■ Operating the chain saw with one hand is extremely
dangerous. One-handed operation makes it difficult to
oppose and absorb reactive forces (pushback, pull-in,
kickback) without losing control of the chain saw. It also
makes it difficult to prevent the bar and chain from skating
or bouncing along a limb or log. To reduce the risk of
serious or fatal injury to the operator or bystanders from
loss of control:
– Never attempt to operate the chain saw
with one hand.
■ To reduce the risk of serious or fatal cut injuries to the
operator or bystanders from loss of control, keep proper
footing and balance at all times:
– Take special care in overgrown or wet terrain and
always watch for hidden obstacles such as tree
stumps, roots, rocks, holes and ditches to avoid
stumbling.
– Be extremely cautious when working on slopes or
uneven ground.
– For better footing, always clear away fallen
branches, scrub and cuttings. Freshly debarked logs
and other material can increase the danger of
slipping, tripping or falling.
– Use extreme caution when cutting small-size brush,
branches and saplings because slender material
may catch the chain and spring toward you or pull
you off balance.
■ To reduce the risk of injury from loss of control:
0458-795-8221-A
11

English
0000-GXX-1889-A0
5 IMPORTANT SAFETY INSTRUCTIONS
– Never work on a ladder, roof, in a tree or
while standing on any other insecure
support.
– Never operate the chain saw above
shoulder height.
– Do not overreach. Keep proper footing and balance
at all times.
– Never switch on the chain saw when the guide bar is
in a cut or kerf. Doing so could lead to reactive forces
and injury. Instead, remove the guide bar from the
cut and re-enter at full speed, taking care to avoid
contacting any object with the tip of the guide bar.
■ The bumper spike is designed to provide greater control
of the chain saw while cutting. If you work without the
bumper spike, the chain saw may pull you forward
suddenly. This could cause loss of control or, if the tip of
the guide bar strikes an object, kickback.
– Always work with the bumper spike to maintain
better control of the saw.
■ Applying pressure to the chain saw when reaching the end
of a cut may cause the bar and rotating chain to accelerate
out of the kerf, go out of control and strike the operator or
some other object. To reduce the risk of injury:
– Use caution when approaching the end of a cut.
– Never put pressure on the chain saw when reaching
the end of a cut.
– STIHL recommends that first-time chain saw users
cut logs on a sawhorse.
5.5.3 Working Conditions
WARNING
■ Operate your chain saw only under good visibility during
favorable daylight conditions.
– Postpone the work if the weather is windy, foggy,
rainy or inclement.
– Never cut near power lines.
■ Your chain saw is a one-person machine.
– Do not allow other persons in the general work area.
– Bystanders, especially children, and animals should
not be allowed in the area where it is in use.
– Switch off the motor immediately if you are
approached.
■ To reduce the risk of injury to bystanders and
unauthorized users:
– Never leave the chain saw unattended when the
battery is inserted.
– Switch off the chain saw, engage the chain brake
and remove the battery during work breaks and any
other time the chain saw is not in use.
■ Sparks generated from the operation of the chain saw may
be capable of igniting combustible gases, liquids, vapors,
dusts or other combustible materials and substances. To
reduce the risk of fire and explosion:
– Never operate the chain saw in a location where
combustible gases, liquids, vapors, dusts or other
combustible materials and substances are present.
– Read and follow recommendations issued by
government authorities (e.g., CCOHS) for identifying
and avoiding the hazards of combustible gases,
liquids, vapors, dusts or other combustible materials
and substances.
■ If a rotating saw chain strikes a rock or other hard object,
sparks may be created, which can ignite flammable
materials under certain circumstances. Flammable
materials can include dry vegetation and brush,
particularly when weather conditions are hot and dry.
– When there is a risk of fire or wildfire, do not use your
chain saw around flammable materials or around dry
vegetation or brush.
– Contact your local fire authorities or the Canadian
Forest Service if you have any question about
whether vegetation and weather conditions are
suitable for the use of a chain saw.
12
0458-795-8221-A

5 IMPORTANT SAFETY INSTRUCTIONS
English
■ Use of this chain saw (including sharpening the saw
chain) can generate dust, oil mist and other substances
containing chemicals known to cause respiratory
problems, cancer, birth defects and other reproductive
harm.
– Consult governmental agencies such as ECCC,
CCOHS and PHAC and other authoritative sources
on hazardous materials if you are unfamiliar with the
risks associated with the particular substances you
are cutting or with which you are working.
■ Inhalation of certain dusts, especially organic dusts such
as mold or pollen, can cause susceptible persons to have
an allergic or asthmatic reaction. Substantial or repeated
inhalation of dust or other airborne contaminants,
especially those with a smaller particle size, may cause
respiratory or other illnesses. This includes wood dust,
especially from hardwoods, but also from some softwoods
such as Western Red Cedar.
– Control dust (such as saw dust) and mists (such as
oil mist from chain lubrication) at the source where
possible.
– Always work with a properly sharpened saw chain,
which produces wood chips rather than fine dust.
– To the extent possible, operate the chain saw so that
the wind or operating process directs any dust, mist
or other particulate matter raised by the chain saw
away from the operator.
– When respirable dust or other particulate matter
cannot be kept at or near background levels, always
wear a respirator that is approved by NIOSH and
rated for worksite-specific conditions. Follow the
recommendations of governmental authorities (e.g.,
CCOHS/PHAC) and occupational and trade
associations.
■ If the vegetation being cut or the surrounding ground is
coated with a chemical substance, such as pesticide or
herbicide:
– Read and follow the instructions and warnings that
accompanied the substance coating the vegetation
or surrounding ground.
■ Breathing asbestos dust is dangerous and can cause
severe or fatal illness, respiratory illness or cancer,
including mesothelioma. The use and disposal of
asbestos-containing products is strictly regulated by
CCOHS and ECCC.
– Do not use your chain saw to cut or disturb asbestos
or asbestos-containing products.
– Stop work immediately and contact the relevant
state and local authorities and/or ECCC, your
employer or local CCOHS representative if you
have reason to believe that you might be disturbing
asbestos.
■ Repeated contact with waste oil can cause skin cancer
and its use is harmful to the environment.
– Do not use waste oil to lubricate the bar and chain of
your STIHL chain saw.
5.5.4 Operating Instructions
WARNING
■ To reduce the risk of severe personal injuries from
unintentional starting:
– Never touch a chain with your hand or any part of
your body when the battery is inserted, even when
the chain is not rotating.
– Avoid contacting the trigger switch lockout and
trigger switch when grasping the control handle of
the chain saw.
0458-795-8221-A
13
English
6 Kickback and Other Reactive Forces
■ The chain continues to move for a short period after the
trigger switch is fully released.
– Wait for the chain to stop and engage the chain
brake before walking with the chain saw or putting it
down.
■ In the event of an emergency:
– Switch off the motor immediately, engage the chain
brake and remove the battery.
■ Your chain saw is equipped with a chain catcher. It is
designed to reduce the risk of personal injury in the event
of a thrown or broken chain.
– Never operate the chain saw with a damaged or
missing chain catcher.
■ Contacting foreign objects while sawing might cause the
chain to break or be thrown, or cause the chain saw to
propel dangerous debris or kick back in the direction of the
operator. To reduce the risk of severe or fatal personal
injury caused by contact with foreign objects:
– Inspect the tree, log or branch before cutting.
– Remove any foreign objects to ensure that the wood
is free of materials such as nails, spikes, cables, or
wires.
– Before starting a cut, ensure that it can be completed
without contacting surrounding objects or structures
such as fencing or stonework.
■ Check the chain and guide bar at regular short intervals
during operation, or immediately if there is a change in
cutting behavior:
– Switch off the motor, activate the chain brake and
remove the battery.
– Check the condition and tension of the chain. Look
for damage to the chain or guide bar.
– If the chain cannot be properly tensioned, or if other
components of the saw are worn or damaged, stop
work immediately and take your chain saw to an
authorized STIHL servicing dealer for inspection,
repair or maintenance.
DANGER
■ To reduce the risk of electrocution:
– Never operate this chain saw in the
vicinity of any wires or cables that may
be carrying electric current.
– Never cut near power lines.
– Do not rely on the chain saw's insulation
against electric shock.
6 Kickback and Other Reactive Forces
6.1 Reactive Forces
WARNING
■ Reactive forces may occur any time the chain is rotating.
Reactive forces can cause serious or fatal personal injury.
■ The powerful forces used to cut wood can be reversed and
work against the operator. If the rotating saw chain is
suddenly and significantly slowed or stopped by contact
with any solid object such as a log or branch or is pinched,
the reactive forces may occur instantly.
■ These reactive forces may result in loss of control, which,
in turn, may cause serious or fatal injury.
– An understanding of the causes of these reactive
forces may help you avoid the element of surprise
and loss of control. Surprise contributes to
accidents.
The most common reactive forces are:
– Kickback
– Pull-in
– Pushback
14
0458-795-8221-A
6 Kickback and Other Reactive Forces
0000-GXX-1374-A0
English
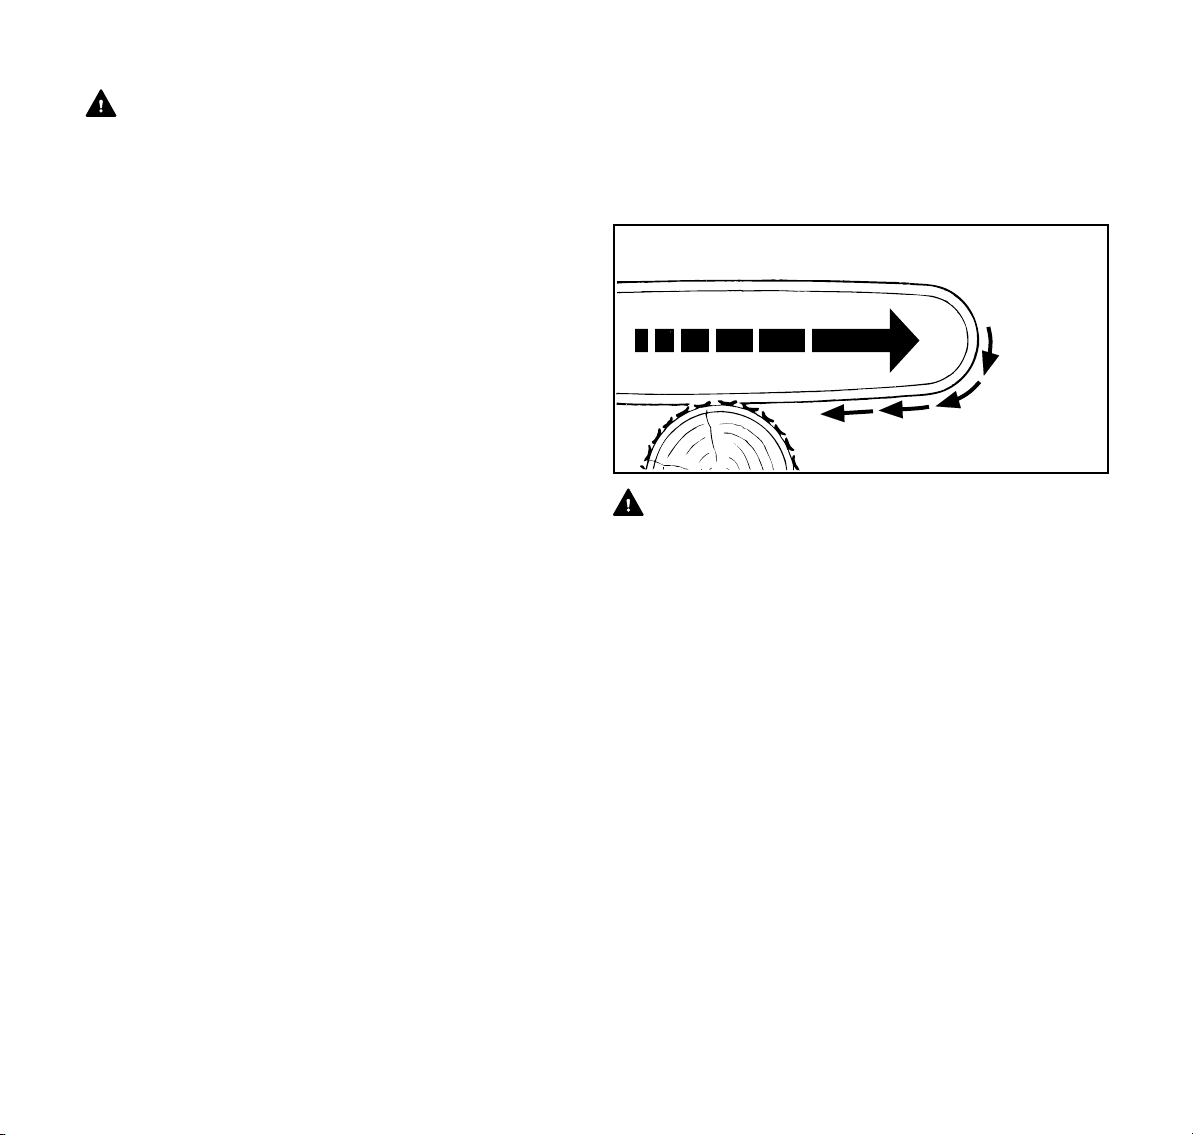
6.2 Kickback
6.2.1 Kickback
WARNING
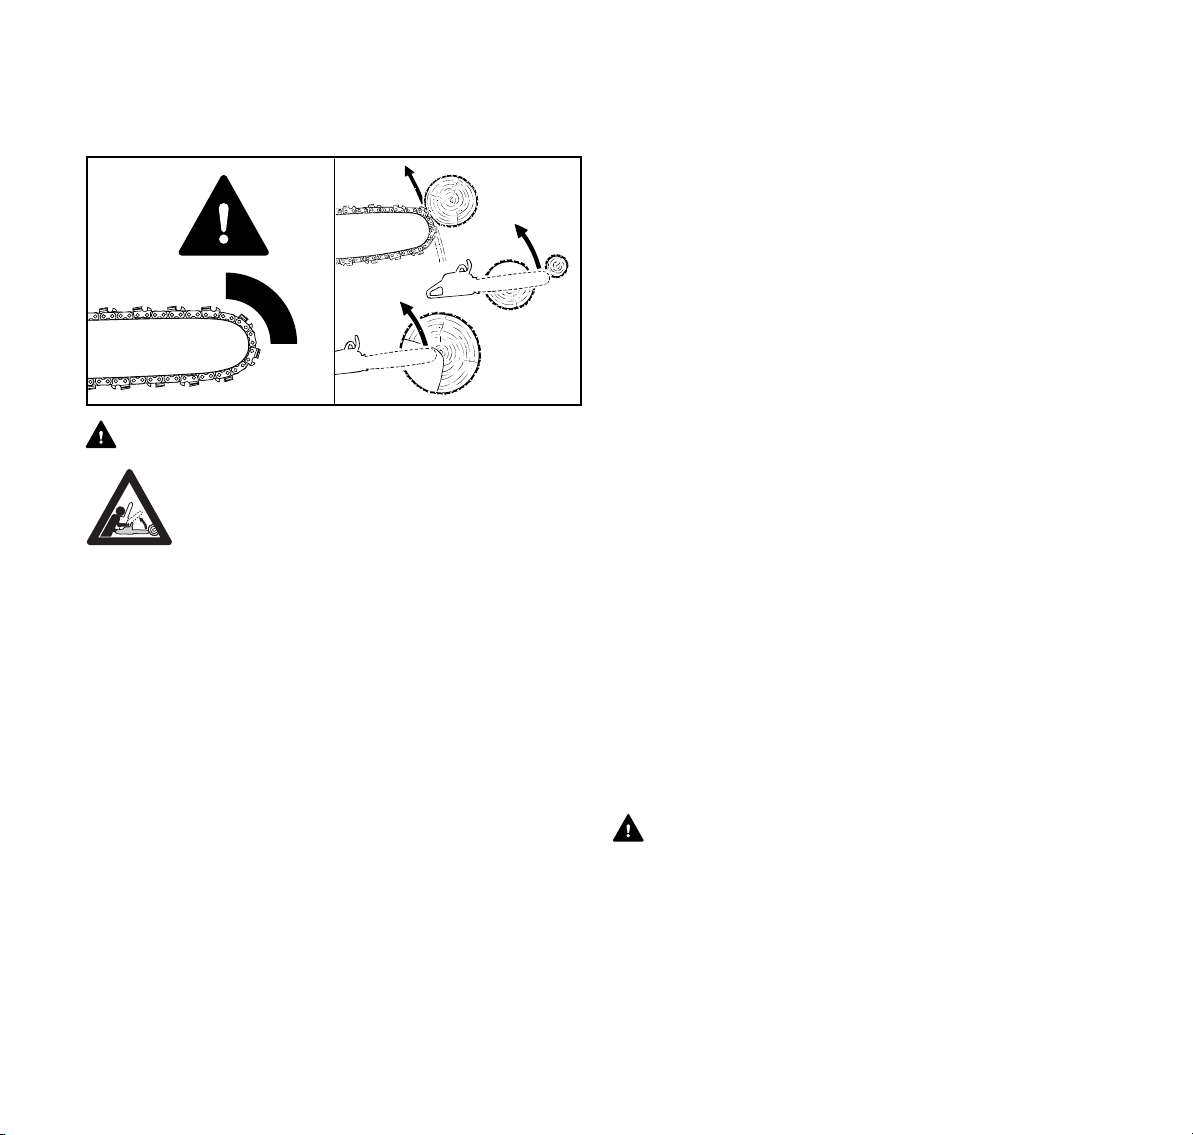
Kickback may occur when the moving chain near
the upper quadrant of the bar nose contacts a
solid object or is pinched.
■ When this occurs, the energy driving the chain can create
a force that moves the chain saw in a direction opposite to
the chain movement at the point where the chain is slowed
or stopped. This may fling the bar up and back in a
lightning fast reaction mainly in the plane of the bar and
can cause severe or fatal injury to the operator.
■ Kickback may occur, for example, when the chain near the
upper quadrant of the bar nose contacts the wood or is
pinched during limbing or when it is incorrectly used to
begin a plunge or boring cut.
■ The greater the force of the kickback reaction, the more
difficult it becomes for the operator to control the chain
saw. Many factors influence the occurrence and force of
the kickback reaction. These include chain speed, the
speed at which the bar and chain contact the object, the
location and angle of contact, the condition of the chain,
and how quickly the chain is slowed or stopped, among
other factors.
– The type of bar and chain you use is an important
factor in the occurrence and force of the kickback
reaction. Some STIHL bar and chain types are
designed to reduce kickback forces.
– STIHL recommends the use of reduced kickback
bars and low kickback chains.
6.2.2 Chain Saw Kickback Standards
The following standards apply with respect to kickback:
– CSA Z62.1
– CSA Z62.3
These standards, referred to as "the chain saw kickback
standards" in this chapter, set certain performance and
design criteria related to chain saw kickback.
To comply with the chain saw kickback standards, electric
chain saws:
– must, in their original condition, meet a 45° computer-
derived kickback angle when equipped with certain cutting
attachments; and
– must be equipped with at least two devices to reduce the
risk of kickback injury, such as a chain brake, low kickback
chain, reduced kickback bar, etc.
The computer-derived angles for electric chain saws are
measured by applying a computer program to test results
from a kickback test machine.
WARNING
■ Compliance with the chain saw kickback standards does
not mean that the bar and saw chain will rotate at most 45°
in a real life kickback.
■ The computer-derived angles of the chain saw standards
may bear no relationship to actual kickback bar rotation
angles that may occur in a real life cutting situation.
0458-795-8221-A
15
English
■ Devices designed to reduce the risk of kickback injuries
may lose some of their effectiveness when they are no
longer in their original condition, especially if they have
been improperly maintained.
– Read and follow the safety precautions and
instructions in this manual.
– When working, always position the chain saw such
that your body is clear of the cutting attachment and
outside of the cutting plane.
– Follow the maintenance and service instructions in
this manual.
■ For the chain saw to meet the chain saw kickback
standards, use only the following cutting attachments:
– Compliant bar and chain combinations listed in
"Combinations of Guide Bars and Saw Chains,"
@ 27;
– Other replacement bar and saw chain combinations
marked in accordance with the standards for use on
the chain saw; or
– Replacement saw chain designated "low kickback
saw chain."
6.2.3 Devices for Reducing the Risk of Kickback Injury
The STIHL Quickstop chain brake and STIHL's greenlabeled, reduced kickback bars and green-labeled, low
kickback chains are designed to reduce the risk of kickback
injury.
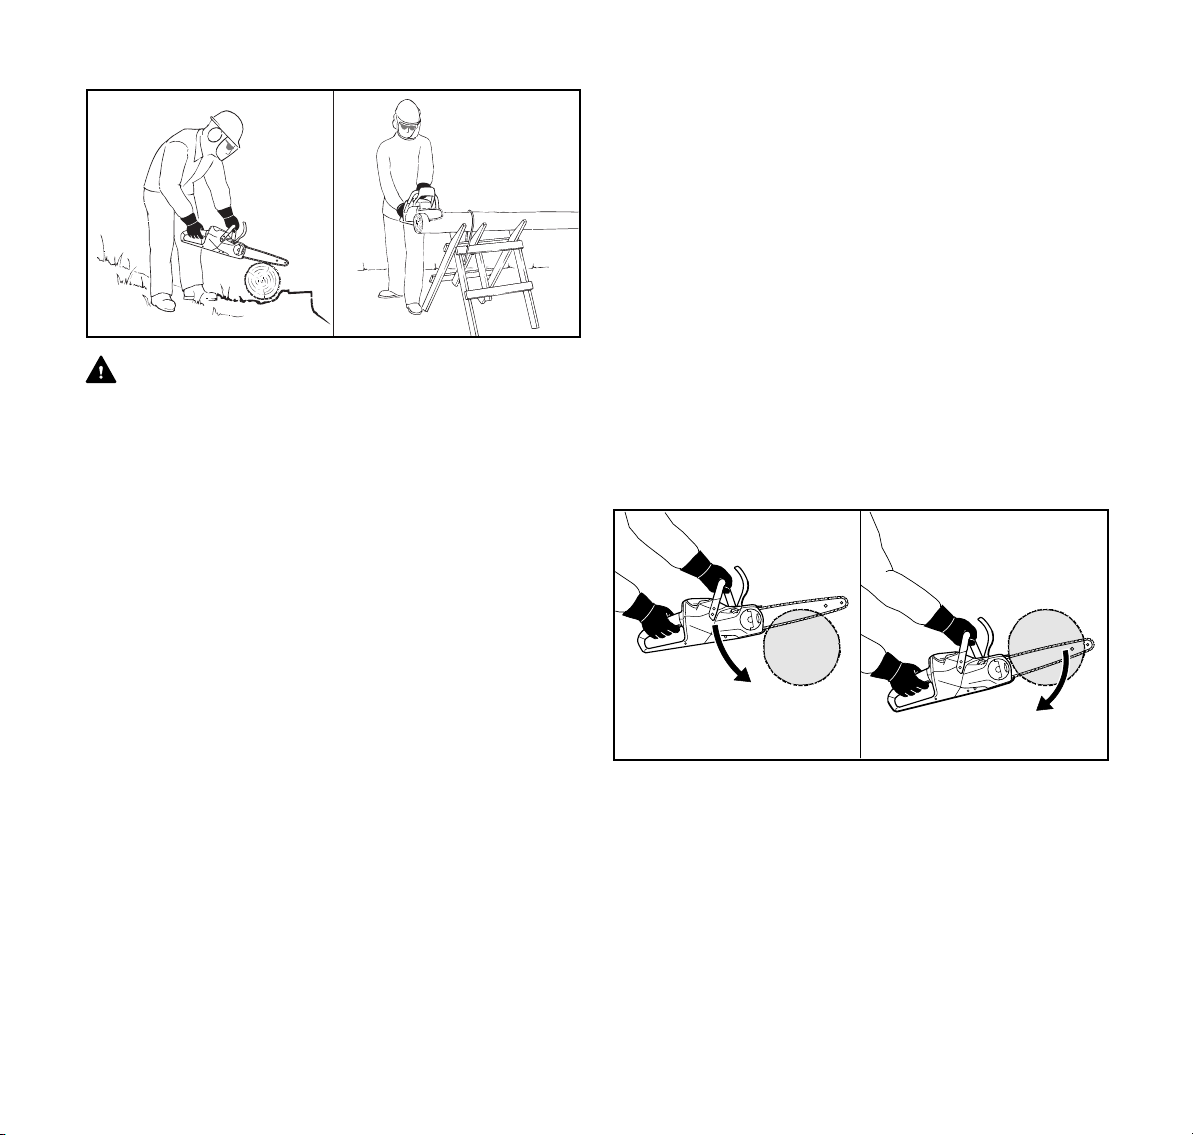
1. STIHL Quickstop Chain Brake
6 Kickback and Other Reactive Forces
0000-GXX-1890-A0
There are two mechanisms for activating the chain brake if
it is in a properly maintained condition:
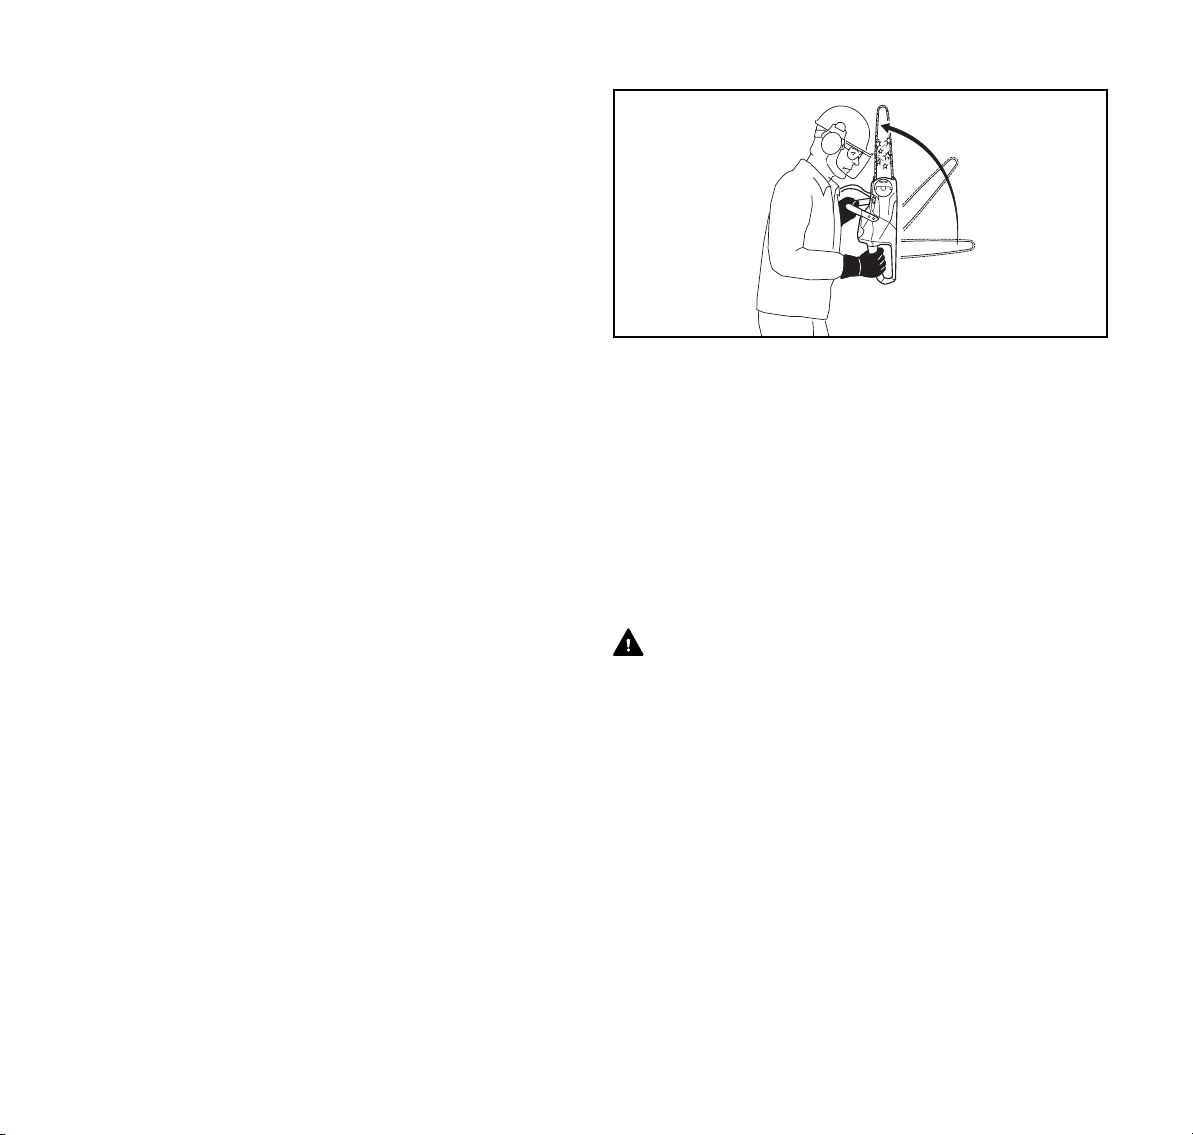
– Manual Activation: If a kickback occurs, the chain saw
moves upwards toward the user in a rotating motion
around the front handle. The brake is designed to engage
if the left hand contacts the front hand guard, which is the
activation lever for the brake, and pushes it forward.
– Inertia Activation: All STIHL chain saws are equipped with
an inertia Quickstop chain brake. If the kickback impulse
is strong enough, this alone is sufficient to engage the
brake even without contacting the front hand guard.
WARNING
■ To reduce the risk of kickback injury:
– Never use a saw if the chain brake does not function
properly.
– When in doubt, take the saw to an authorized STIHL
servicing dealer for inspection and/or repair.
– Do not use the saw until the problem has been
corrected.
■ In a kickback situation, the front hand guard helps protect
your left hand from contacting the chain. Removal of the
front hand guard on a chain saw equipped with a
16
0458-795-8221-A

6 Kickback and Other Reactive Forces
English
Quickstop chain brake will reduce this protection and also
disable the chain brake, increasing the risk of kickback
injury.
– Never operate your saw without a properly
functioning front hand guard. If the front hand guard
is missing, manual activation and inertia activation of
the chain brake will be completely disabled.
– Never attempt to remove, modify or disable the front
hand guard or any other component of the chain
brake.
■ No Quickstop or other chain brake device prevents
kickback. These devices are designed to reduce the risk
of injury, if activated, in certain kickback situations. To
reduce the risk of severe personal injury or death from
kickback:
– Always follow the instructions in this manual and
follow good working technique. For example,
position your body clear of the cutting attachment
whenever the motor is running. Stand to the left of
the cut while bucking, outside of the cutting plane.
See chapter "Holding and Controlling the Chain
Saw", @ 5.5.2.
– Maintain as much distance as possible, and never
less than 45 degrees, between the bar and your
body to ensure that the Quickstop has sufficient time
to activate and stop the chain before reaching any
part of your body.
– Follow the other precautions provided in chapter
@ 7.
■ An improperly maintained chain brake may increase the
time needed to stop the chain after activation, or may not
activate at all. For the Quickstop to reduce the risk of
kickback injury, it must be properly maintained and in
good working order.
– Read and follow the instructions on engaging and
disengaging the chain brake, @ 15.1, and
maintaining and repairing it, @ 15.3.
STIHL offers a variety of guide bars and chains. STIHL
reduced kickback bars and low kickback chains are
designed to reduce the risk of kickback injury. Other chains
are designed to achieve higher cutting performance or
sharpening ease, but are more prone to kickback and may
kick back with more energy, making it more difficult to
control the chain saw.
STIHL has developed a color code system to help you
identify the STIHL reduced kickback bars and low kickback
chains.
– Cutting attachments with green labels on the packaging
are designed to reduce the risk of kickback injury.
– Matching green-marked or labeled chain saws with green-
labeled bars and green-labeled chains provides
compliance with the computed kickback angle
requirements of the chain saw standards when the
products are in their original condition.
– Products with yellow labels are for users with
extraordinary cutting needs, who have experience and
specialized training for dealing with kickback.
STIHL recommends the use of its green-labeled reduced
kickback bars, green-labeled low kickback chains and a
chain saw equipped with a STIHL Quickstop chain brake for
both experienced and inexperienced operators.
STIHL recommends green-labeled bars and chains for all
chain saws. See your "STIHL Bar and Chain Information"
leaflet for details.
New bar and chain combinations may be developed after
publication of this literature, which will, in combination with
certain electric chain saws, comply with the chain saw
standards as well.
2. Low Kickback Saw Chain and Reduced Kickback Bars
0458-795-8221-A
17

English
6 Kickback and Other Reactive Forces
WARNING
■ Use of bar and chain combinations not listed in the STIHL
Bar and Chain Information leaflet (or other combinations
that do not comply with the chain saw standards) may
increase kickback forces as well as the propensity for
kickback and increase the risk of kickback injury.
– Please ask your authorized STIHL servicing dealer
to properly match your chain saw with the
appropriate bar and chain combination to reduce the
risk of kickback injury.
■ Reduced kickback bars and low kickback chains do not
prevent kickback, but they are designed to reduce the risk
of kickback injury.
– STIHL recommends green-labeled bars and green-
labeled chains for all chain saws and all users.
■ Even if your saw is equipped with a Quickstop chain
brake, a reduced kickback bar and/or low kickback chain,
this does not eliminate the risk of injury from kickback.
– Observe all safety precautions discussed in this
manual to avoid kickback situations.
a. Low Kickback Saw Chain
Some types of chain have specially designed components to
reduce the propensity for kickback and the force of kickback
if it occurs. STIHL has developed low kickback chain for your
chain saw.
A "low kickback chain" is a chain that has met the kickback
performance requirements of CSA Z62.3 when tested
according to the provisions specified in CSA Z62.3.
WARNING
■ Some low kickback chains have not been tested with all
chain saw and bar combinations. There are potential saw,
bar and low kickback chain combinations which have not
been specifically certified to comply with the 45°
computer-derived kickback angle of the chain saw
standards.
– STIHL recommends green-labeled bars and green-
labeled chains for all chain saws and all users.
– Please see your STIHL Bar and Chain Information
leaflet for the appropriate bar and chain
combinations for your saw.
– Please ask your authorized STIHL servicing dealer
to properly match your chain saw with the
appropriate bar and chain combination to reduce the
risk of kickback injury.
■ A blunt or incorrectly sharpened chain may reduce or
negate the effectiveness of design features intended to
reduce the propensity for kickback and kickback energies.
Improper lowering or sharpening of the depth gauges or
changing the shape of the cutters may increase the risk
and the energy of kickback.
– Always cut with a properly sharpened chain.
– Read and follow the instructions on sharpening a
chain, @ 23.4.
■ Any chain saw mounted with a bow guide is potentially
very dangerous. The risk of kickback is increased with a
bow guide because of the increased kickback contact area
and because the design of bow guides places the upper
portion of the bar closer to the operator's body. Using a
low kickback chain will not significantly reduce the risk of
kickback injury when used on a bow guide.
– Never mount a bow guide on any STIHL chain saw.
b. Reduced Kickback Bars
STIHL green-labeled reduced kickback bars are designed to
reduce the risk of kickback injury when used with STIHL
green-labeled low kickback chains.
18
0458-795-8221-A
6 Kickback and Other Reactive Forces
0000-GXX-1348-A0
English
WARNING
■ When used with other, more aggressive chains,
green-labeled reduced kickback bars may be less
effective in reducing kickback.
– STIHL recommends green-labeled bars and green-
labeled chains for all chain saws and all users.
■ For proper balance and to comply with the chain saw
standards:
– Use only bar lengths listed in this manual, @ 27.
6.2.4 To Avoid Kickback
The best protection from personal injury that may result from
kickback is to avoid kickback situations:
1)Hold the chain saw firmly and with both hands and
maintain a secure grip, with your right hand on the rear
handle and left hand on the front handle. Maintain a
secure grip with thumbs and fingers encircling the chain
saw handles. Don't let go.
2)Make sure the area in which you are cutting is free from
obstructions.
3)Be aware of the location of the guide bar nose at all times.
Never let the nose of the guide bar unintentionally contact
any object. Do not cut limbs with the nose of the guide bar.
Be especially careful near wire fences and when cutting
small, tough limbs, small size brush and saplings which
may easily catch the saw chain.
4)Do not overreach.
5)Do not cut above shoulder height.
6)Begin cutting and continue at full speed.
7)Cut only one log at a time.
8)Use extreme caution when re-entering a previous cut.
9)Do not attempt to plunge cut if you are not experienced
with this cutting technique.
10)Be alert for shifting of the log or other forces that may
cause the cut to close and pinch the saw chain.
11)Maintain saw chain properly. Cut with a correctly
sharpened, properly tensioned saw chain at all times.
12)Stand to the side of the cutting path of the chain saw.
13)Use only replacement bars and chains specified by
STIHL, or the equivalent.
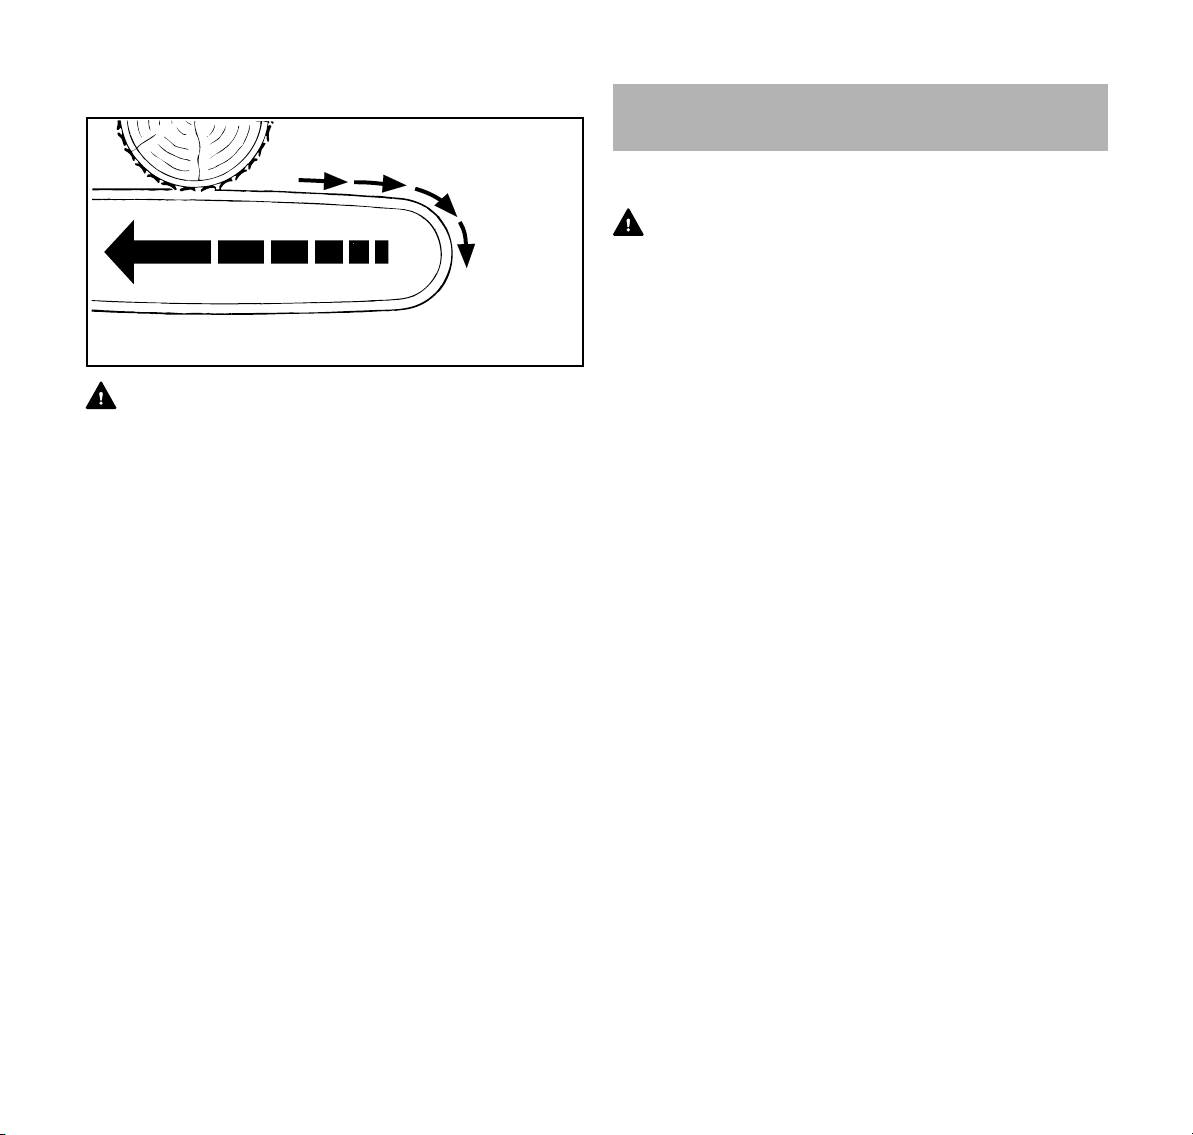
6.3 Pull-in
WARNING
■ Pull-in occurs when the chain on the bottom of the bar is
suddenly stopped or significantly slowed when it is
pinched, caught or encounters a foreign object in the
wood. The reaction of the chain pulls the saw forward and
may cause the operator to lose control, which, in turn, may
cause serious or fatal injury. If the tip contacts an object,
kickback may occur.
■ Pull-in usually occurs when the bumper spike of the saw
is not held securely against the tree or limb and when the
chain is not rotating at full speed before it contacts the
wood.
■ To reduce the risk of pull-in:
– Cut with a sharp, properly tensioned chain.
– Always start a cut with the chain rotating at full speed
and with the bumper spike in contact with the wood.
– Use wedges to open the kerf or cut, where possible.
– Use extreme caution when cutting small-size brush
and saplings which may easily catch the chain,
spring towards you or pull you off balance.
0458-795-8221-A
19
English
0000-GXX-1349-A0
7 Proper Techniques for Basic Bucking, Limbing, Pruning and Felling
6.4 Pushback
WARNING
■ Pushback occurs when the chain on the top of the bar is
suddenly stopped or significantly slowed when it is
pinched, caught or encounters a foreign object in the
wood. The reaction of the chain may drive the saw rapidly
straight back toward the operator, causing loss of control
which, in turn, may cause serious or fatal injury.
■ Pushback usually occurs when the top of the bar is used
for cutting.
■ To reduce the risk of pushback:
– Be alert to forces or situations that may cause
material to pinch or bind the top of the chain.
– Do not cut more than one log at a time.
– Do not twist the chain saw when withdrawing the bar
from an underbuck cut because the chain can pinch
or bind.
– Cut with a sharp, properly tensioned chain.
7 Proper Techniques for Basic Bucking,
Limbing, Pruning and Felling
7.1 Intended Uses
WARNING
■ This chain saw is not designed for felling large trees or
cutting large diameter logs.
■ For cutting larger trees, logs or branches, a larger, more
powerful and faster saw may be necessary to reduce the
risk of binding, stalling or a change in conditions during
longer cutting times. Interruption of cutting speeds or a
loss of power during a felling or limbing operation can
result in an inability to control the fall of a tree or limb, and
can lead to serious or fatal personal injury.
■ Before starting any felling, limbing, bucking or pruning
operation, fully charge your STIHL AP or AR battery.
■ Before starting any bucking, limbing, pruning or felling
operation, ensure that all necessary cuts can be
completed using the charge remaining in the STIHL AP or
AR series battery. If you are unsure:
– Have multiple charged batteries available for use;
– Select a more powerful chain saw;
– Select a more powerful battery; or
– Consult a reputable tree removal professional.
■ Position the chain saw in such a way that your body is
clear of the cutting attachment whenever the motor is
running. Stand to the left of the cut while bucking, outside
of the cutting plane.
20
7.2 Bucking
Bucking is cutting a log into sections.
0458-795-8221-A
7 Proper Techniques for Basic Bucking, Limbing, Pruning and Felling
0000-GXX-1375-A0
0000-GXX-1214-A0
■ When cutting smaller logs, make sure the log is properly
■ Failing to control the saw at the bottom of a bucking cut
WARNING
■ Be aware of rolling logs. Rolling logs can cause serious or
fatal personal injury. To prevent a log from rolling while
bucking:
– Make sure the log is secure and will not roll downhill
before starting your cut. If necessary, use sturdy
wedges, shims or chocks.
– If on a slope, always stand on the uphill side of the
log.
– Never stand on the log.
■ To reduce the risk of kickback caused by contacting the
nose of the guide bar with other logs or limbs:
– Cut only one log at a time.
– Do not cut logs in a pile.
■ When cutting splintered wood, sharp slivers of wood may
be caught and flung in the direction of the operator of the
saw or bystanders.
– Use caution when cutting splintered wood and
always wear appropriate apparel and personal
protective equipment, including eye protection.
– Keep bystanders out of the work area.
When bucking:
► Position the bumper spike of the saw against the log and
► Continually repositioning the bumper spike while pushing
7.3 Limbing
Limbing is removing the branches from a fallen tree.
English
supported to reduce the risk of personal injury from loss of
control of the chain saw or movement of the log. Small
logs can move when contacted by the teeth of the chain:
– Place logs through "V-shaped" supports on top of a
sawhorse whenever possible.
– Never permit another person to hold the log.
– Never stabilize the log with your leg or foot.
can cause severe personal injury or death.
– Prepare the saw to exit the bottom of the cut by
reducing the feed force you exert on the saw.
– Cushion the weight of the saw so that the bar and
chain are not thrust downward into your lower body
and legs as the bar/chain exits the cut.
use it as a fulcrum.
the guide bar completely through the log.
0458-795-8221-A
21
English
7 Proper Techniques for Basic Bucking, Limbing, Pruning and Felling
WARNING
■ To prevent a log from rolling while limbing:
– Start limbing by leaving the limbs on the lower,
downhill side of the log to hold the log off the ground.
– Stabilize the log with sturdy wedges, shims or
chocks, if necessary.
– Never stand on a log while limbing it.
■ There is an increased danger of kickback during limbing
operations, as limbs, leaves, stems and other material can
entangle (bind) the cutters of the chain in the upper
quadrant of the bar nose, causing the chain to slow or stop
suddenly.
– Do not use the nose of the bar to cut limbs.
– Be extremely cautious and avoid contacting the log,
the ground, other limbs and any leafy materials with
the nose of the guide bar.
■ When underbucking freely hanging limbs, a pinch may
result or the limb may fall, hitting the operator or the chain
saw and causing loss of control.
– If a pinch occurs that traps or holds the bar or chain,
switch off the motor, activate the chain brake and
remove the battery from the saw before attempting
to remove the saw from the cut, exercising caution
that the limb does not suddenly snap or release.
■ Limbs or logs under tension (spring poles) can spring back
toward you with great force, striking you or causing you to
lose control of the saw, resulting in severe or fatal injury.
– Be extremely cautious when cutting limbs or logs
that may be under tension.
– Read and follow the warnings and instructions on
cutting logs under tension, @ 7.5.
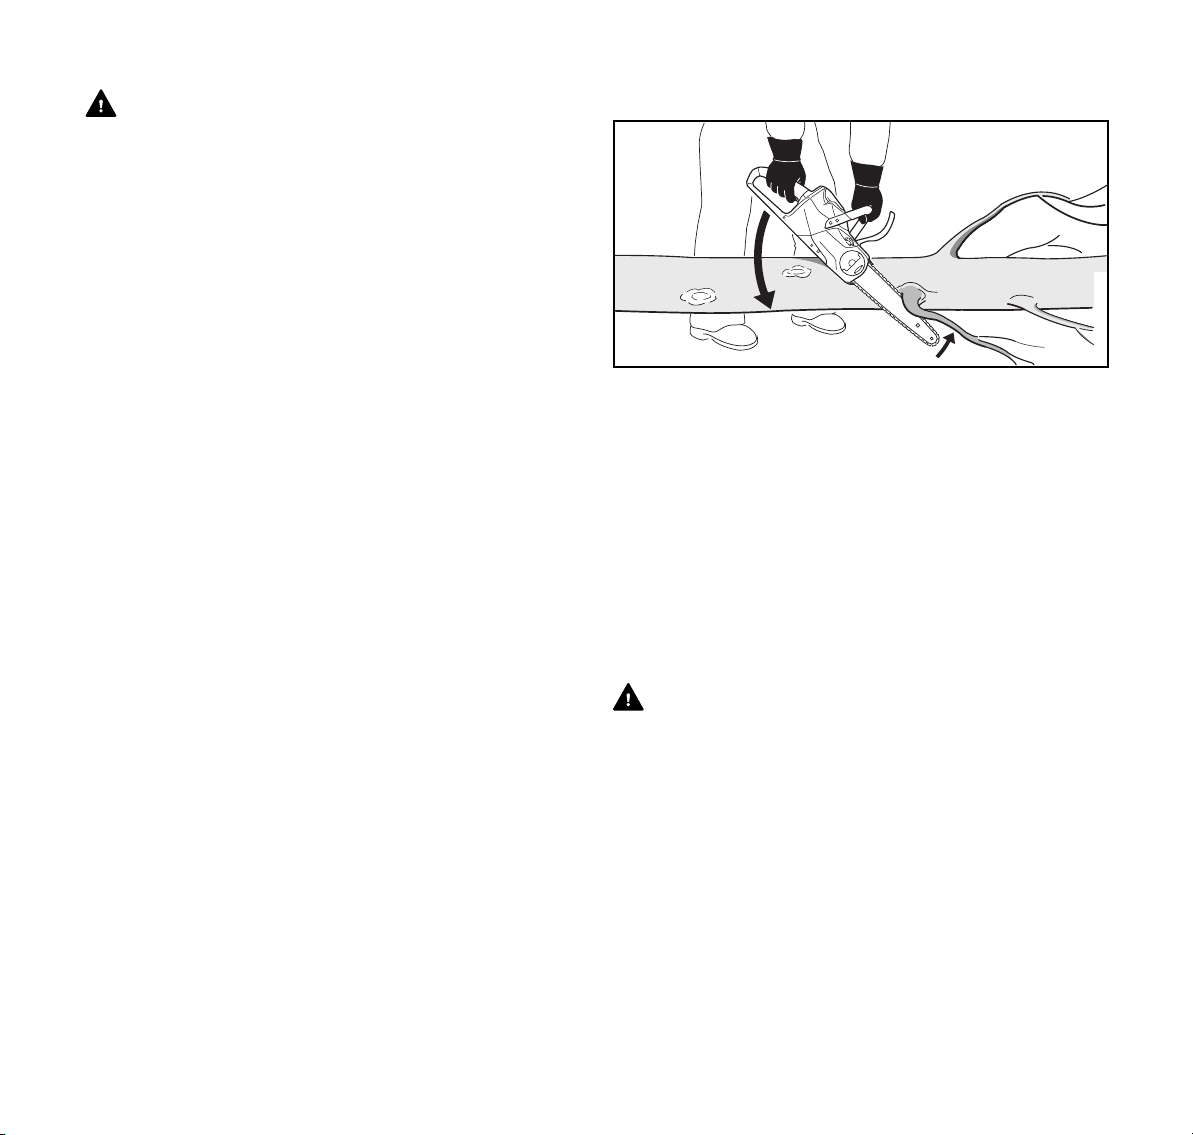
When limbing:
0000-GXX-1262-A0
► Rest the chain saw on the log.
► Stand on the side of the log opposite the limb to be cut if
it can be done safely.
► Push the guide bar at full throttle with a hinge motion
against the branch.
► Cut the branch with the top or the bottom side of the guide
bar, keeping the tip of the bar free of the log, the ground,
other limbs and any leafy materials.
7.4 Pruning
Pruning is selectively removing branches from a standing
tree.
WARNING
■ To reduce the risk of injury from loss of control:
– Do not use the chain saw one-handed.
– Never work on a ladder, on a roof, in a tree or while
standing on any other insecure support.
– Never operate the chain saw above shoulder height
or cut overhead.
– Do not overreach.
– If you are unable to follow these instructions, you
must use a different tool, such as a pole pruner, or
have the work performed by a reputable tree service.
22
0458-795-8221-A
7 Proper Techniques for Basic Bucking, Limbing, Pruning and Felling
0000-GXX-1245-A0
1
2
1
2
English
■ To reduce the risk of injury:
– Never stand directly underneath the branch you are
cutting.
– Watch for falling branches. As soon as the branch
starts to fall, step aside and keep a sufficient
distance away from the falling wood. A branch may
spring back at you after it hits the ground.
– Prior to beginning work, clear the work area of limbs
and brush to reduce the risk of tripping and losing
control of the chain saw.
To cut branches from a standing tree:
2
1
► Make the first cut (1) on the underside of the branch,
approximately 2 in. (5 cm) from the trunk. Cut through
approximately 1/4 of the diameter of the branch. This will
help prevent the branch from splintering after it is cut.
► Make the second cut (2) on the top side of the branch,
approximately 2 in. (5 cm) from the first cut.
► As soon as the branch starts to fall, withdraw the chain
saw and let the branch fall to the ground.
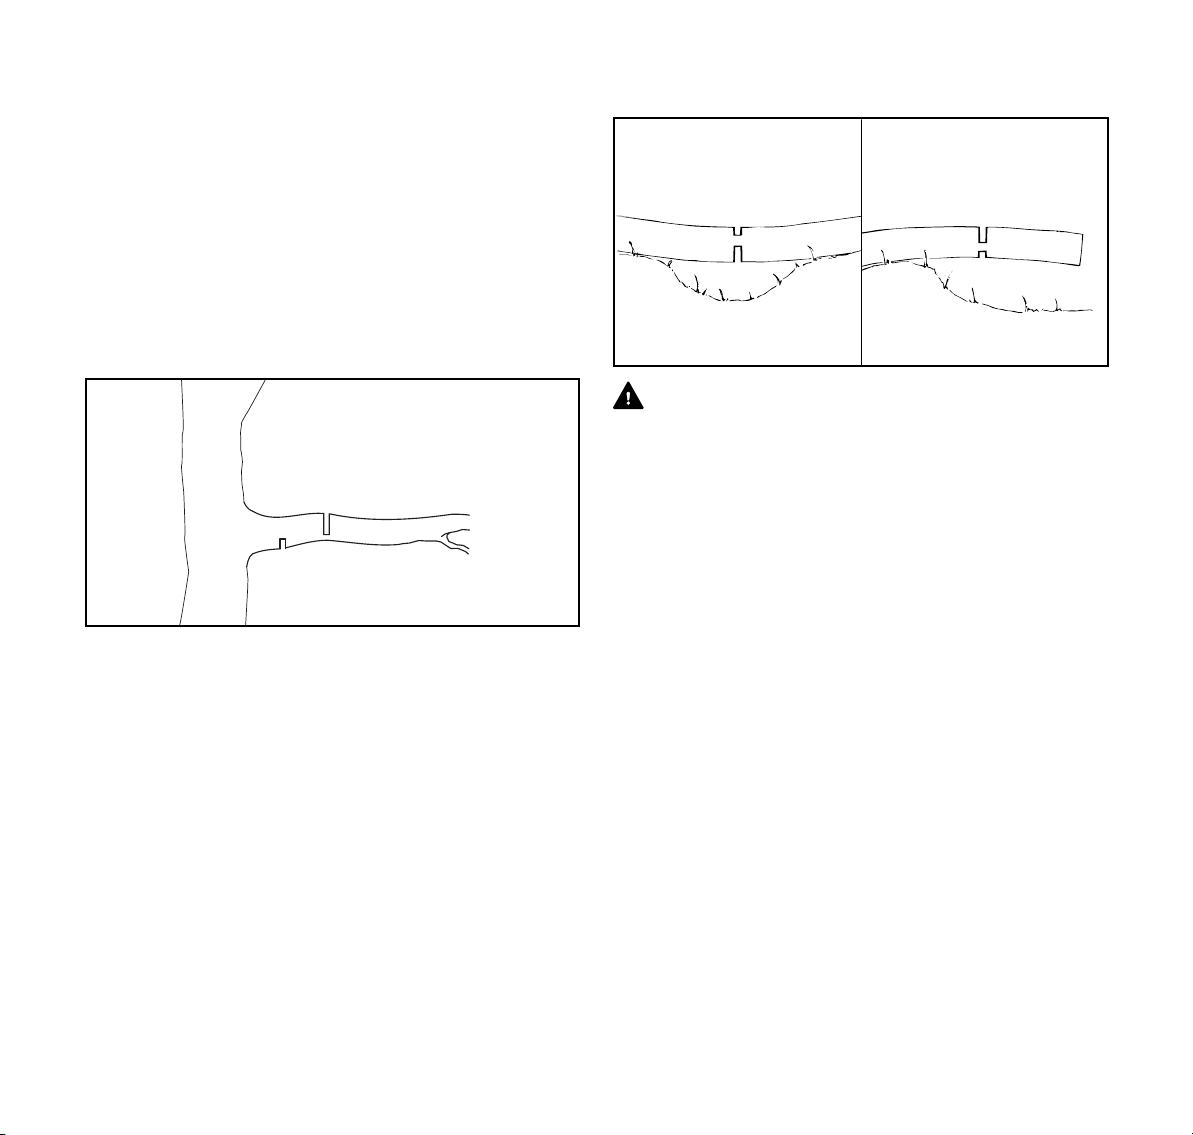
7.5 Cutting Logs Under Tension
WARNING
■ There is an increased danger of pinching the chain saw
when cutting logs under tension. The tension in wood can
also release suddenly and with great force, propelling the
log, limb or chain saw into the saw operator, causing injury
or loss of control.
■ To reduce the risk of severe or fatal personal injury from
reactive forces, including kickback, or loss of control when
cutting wood under tension:
0000-GXX-1627-A0
– Always start with a relieving cut (1) at the
compression side of the log, and then make a
bucking cut (2) at the tension side.
– If a pinch occurs that traps the bar/chain, switch off
the motor, activate the chain brake, remove the
battery and remove the saw from the log, exercising
caution that the limb does not suddenly snap or
release.
■ Working in areas where logs, limbs and roots are tangled
is extremely dangerous.
– Drag the logs, limbs and other material to be cut into
a clear area before cutting. Pull out exposed and
cleared logs first. Do not cut where the tip of the bar
may come into contact with other logs, limbs or leafy
material.
0458-795-8221-A
23
English
7 Proper Techniques for Basic Bucking, Limbing, Pruning and Felling
7.6 Felling
7.6.1 Felling Conditions Felling is cutting down a tree. Before felling a tree, carefully
consider all of the conditions that may affect the direction of
fall.
WARNING
■ This chain saw is not designed for felling large trees, and
using it to cut large trees could result in an inability to
control the fall of the tree or limb, and can lead to serious
or fatal personal injury.
■ Before starting the felling operation, make sure the saw
you are using has sufficient size, power and run time to
complete the felling operation efficiently and without recharging. Alternatively, have multiple charged batteries
available for use, select a more powerful chain saw, select
a more powerful battery, or consult a reputable tree
removal professional.
■ There are a number of factors that may affect and change
the intended direction of fall, e.g. wind direction and
speed, lean of tree, surrounding trees and obstacles,
sloping ground, one-sided limb or foliage structure, wood
structure, decay, snow load, etc.
– To reduce the risk of severe or fatal injury to yourself
or others, look for, analyze and plan for these
conditions prior to beginning the cut, and be alert for
a change in direction while the tree is falling.
■ Felling a tree that has a diameter greater than twice the
effective cutting length of the guide bar requires use of
either the sectioning felling back cut or plunge-cut
method. Neither of these cutting techniques is
recommended for this model chain saw. These methods
can be extremely dangerous because they involve the use
of the nose of the guide bar and can result in kickback.
Only properly trained professionals should attempt these
techniques. If you are inexperienced with a chain saw,
plunge-cutting should not be attempted. Seek the help of
a qualified professional.
■ Never attempt to cut a large diameter tree with a chain
saw that lacks sufficient size, power or run-time to
complete the task efficiently.
■ Trees that are split, decayed or rotted inside or that are
leaning or otherwise under tension are more likely to snap
or split while being cut, causing serious or fatal injury to
the operator or bystanders.
– Always observe and be aware of the general
condition of the tree.
– Inexperienced users should never attempt to cut
such trees.
– Also look for broken or dead branches which could
vibrate loose and fall on the operator during the
felling operation. Certain types of trees are more
susceptible to this condition, such as Douglas firs.
You should check with a reputable tree service if you
have questions about the stability of the trees you
will be cutting.
– When felling on a slope, the operator should stand
on the uphill side if possible.
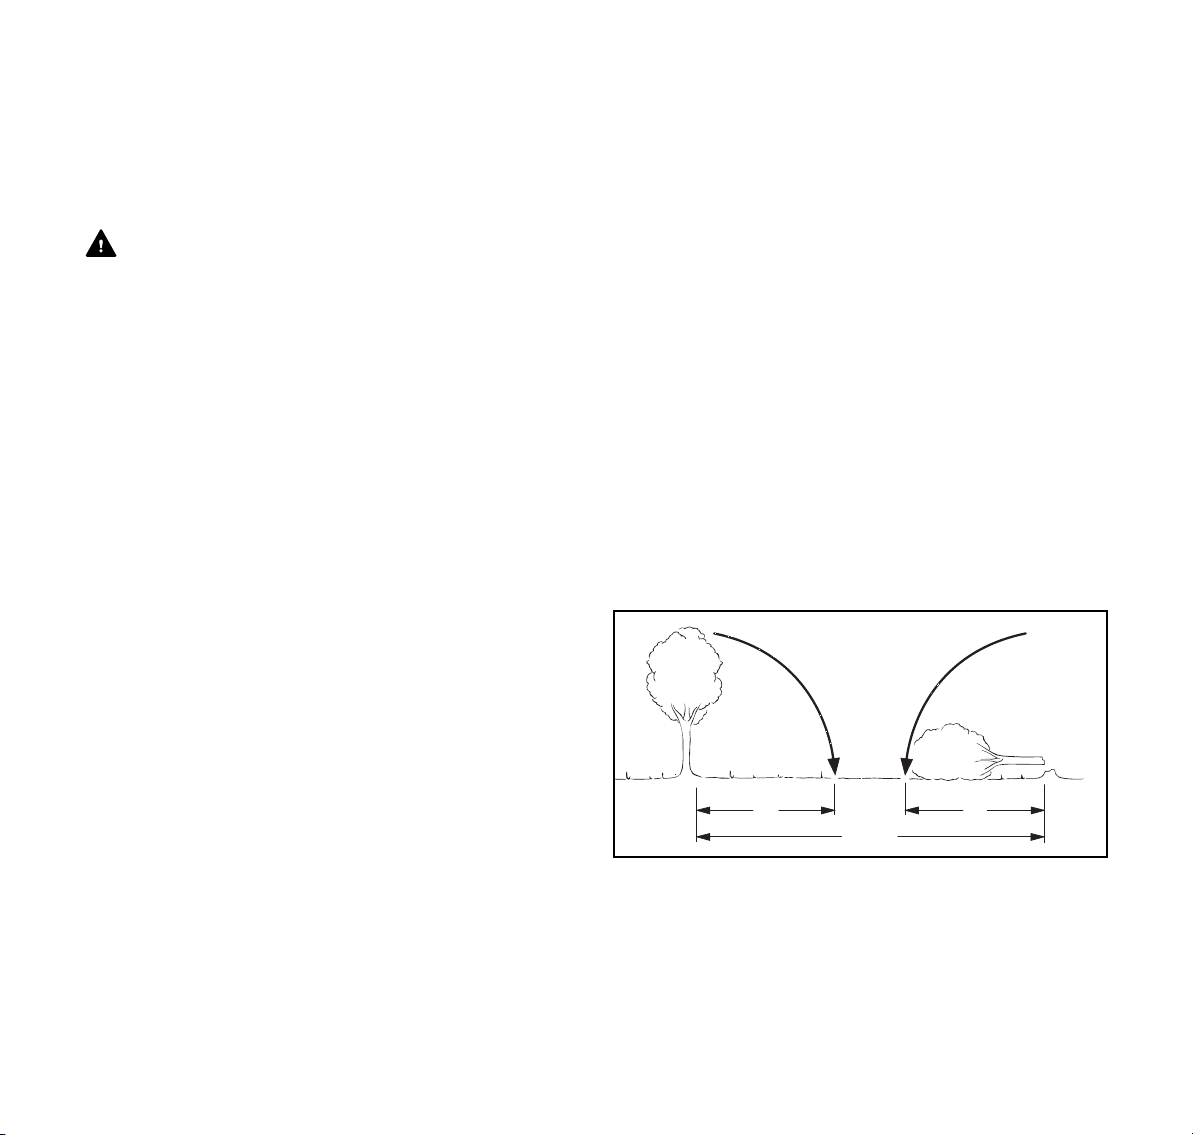
When felling:
1 1
► Maintain a distance of at least 2 1/2 tree lengths from the
nearest person or structure.
► Take extra precautions in the vicinity of roads, railways
and power lines. Inform the police, utility company or
railway authority before beginning to cut.
1
2
/
1
2
2
/
0000-GXX-1437-A0
24
0458-795-8221-A
7 Proper Techniques for Basic Bucking, Limbing, Pruning and Felling
C
0000-GXX-1438-A0
C
C
0000-GXX-1439-A0
C
English
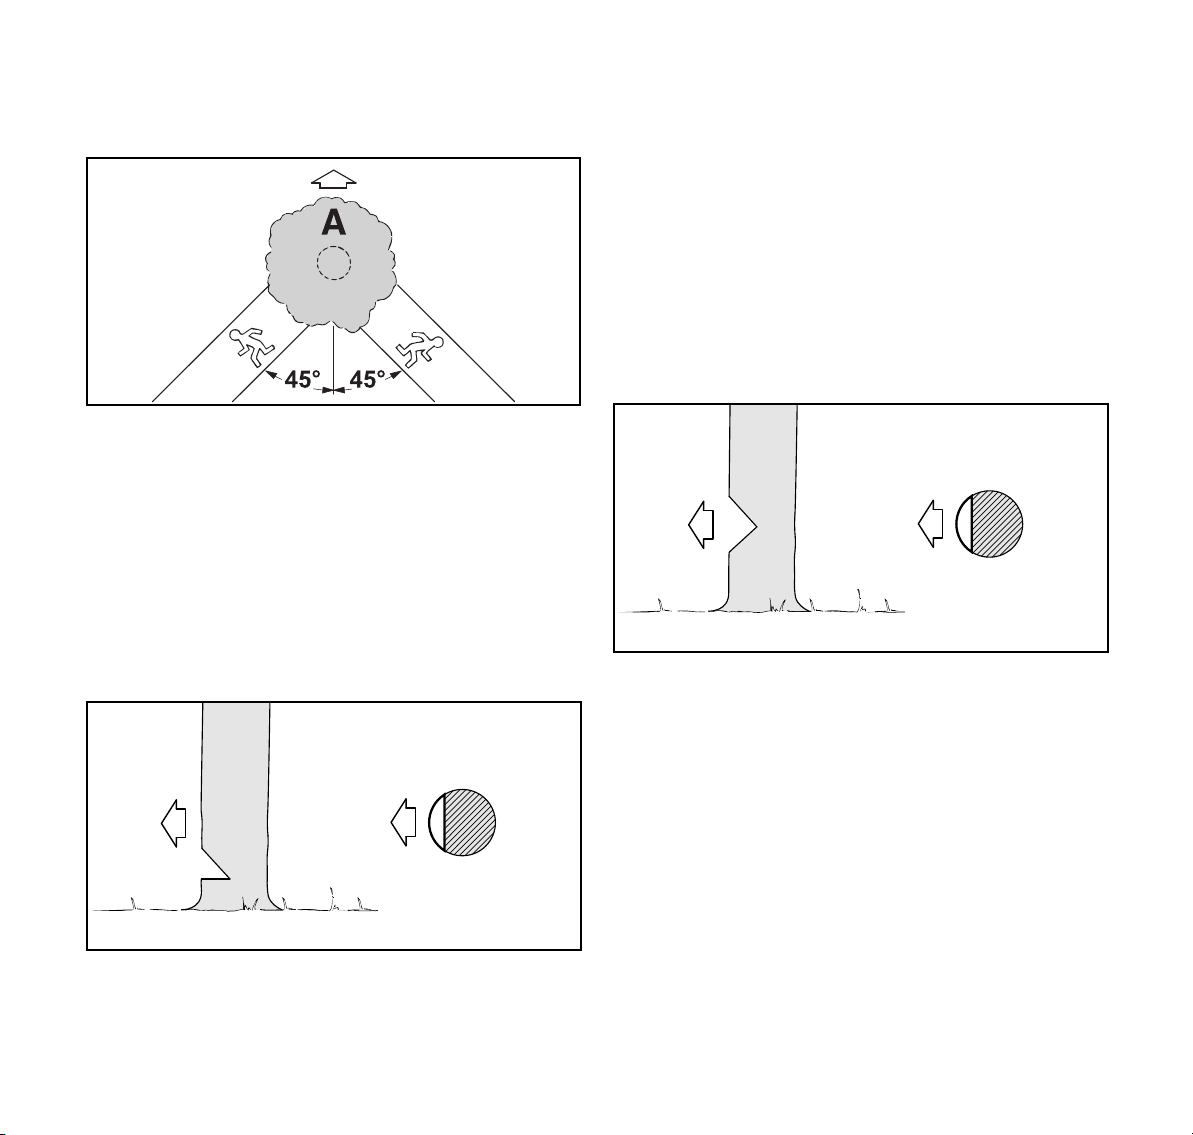
7.6.2 Escape Path
Before making your first cut, prepare an escape path:
B
B
► First clear limbs and brush from the area around the base
of the tree. Remove vegetation from the lower portion of
the tree with an axe.
► Next, establish at least two clear paths of escape (B) and
remove any obstacles such as brush, small trees and
other vegetation. These paths should lead away from the
planned direction of the tree's fall (A) at a 45° angle from
the expected fall line. Place all tools and equipment a safe
distance away from the tree, but not on the escape paths.
7.6.3 Conventional Notch
For a conventional notch:
► The felling notch determines the direction of the tree's fall.
Make the felling notch perpendicular to the line of fall you
have determined, close to the ground.
► Be aware of conditions such as wind, limb and foliage
structure, tree lean, the slope of the terrain and other
factors that could alter the direction of fall.
► Cut down at a 45° angle to a depth of approximately 1/5 to
1/4 of the trunk diameter.
► Make a horizontal cut that meets the bottom of the first cut.
► Remove the resulting 45° piece. The size of the wedge will
vary by tree size. The larger the tree, the larger the wedge.
This model chain saw is not intended for felling large
diameter trees.
7.6.4 Open-faced Notch
For an open-faced notch:
0000-GXX-1246-A0
► The felling notch determines the direction of the tree's fall.
Make the felling notch perpendicular to the line of fall you
have determined, close to the ground.
► Be aware of conditions such as wind, limb and foliage
structure, tree lean, slope of the terrain and other factors
that could alter the direction of fall.
► Cut down at a 50° angle to a depth of approximately 1/5 to
1/4 of the trunk diameter.
► Make a second cut that meets the bottom of the first cut
from below at a 40° angle.
► Remove the resulting 90° piece. The size of the wedge will
vary by tree size. The larger the tree, the larger the wedge.
This model chain saw is not intended for felling large
diameter trees.
0458-795-8221-A
25
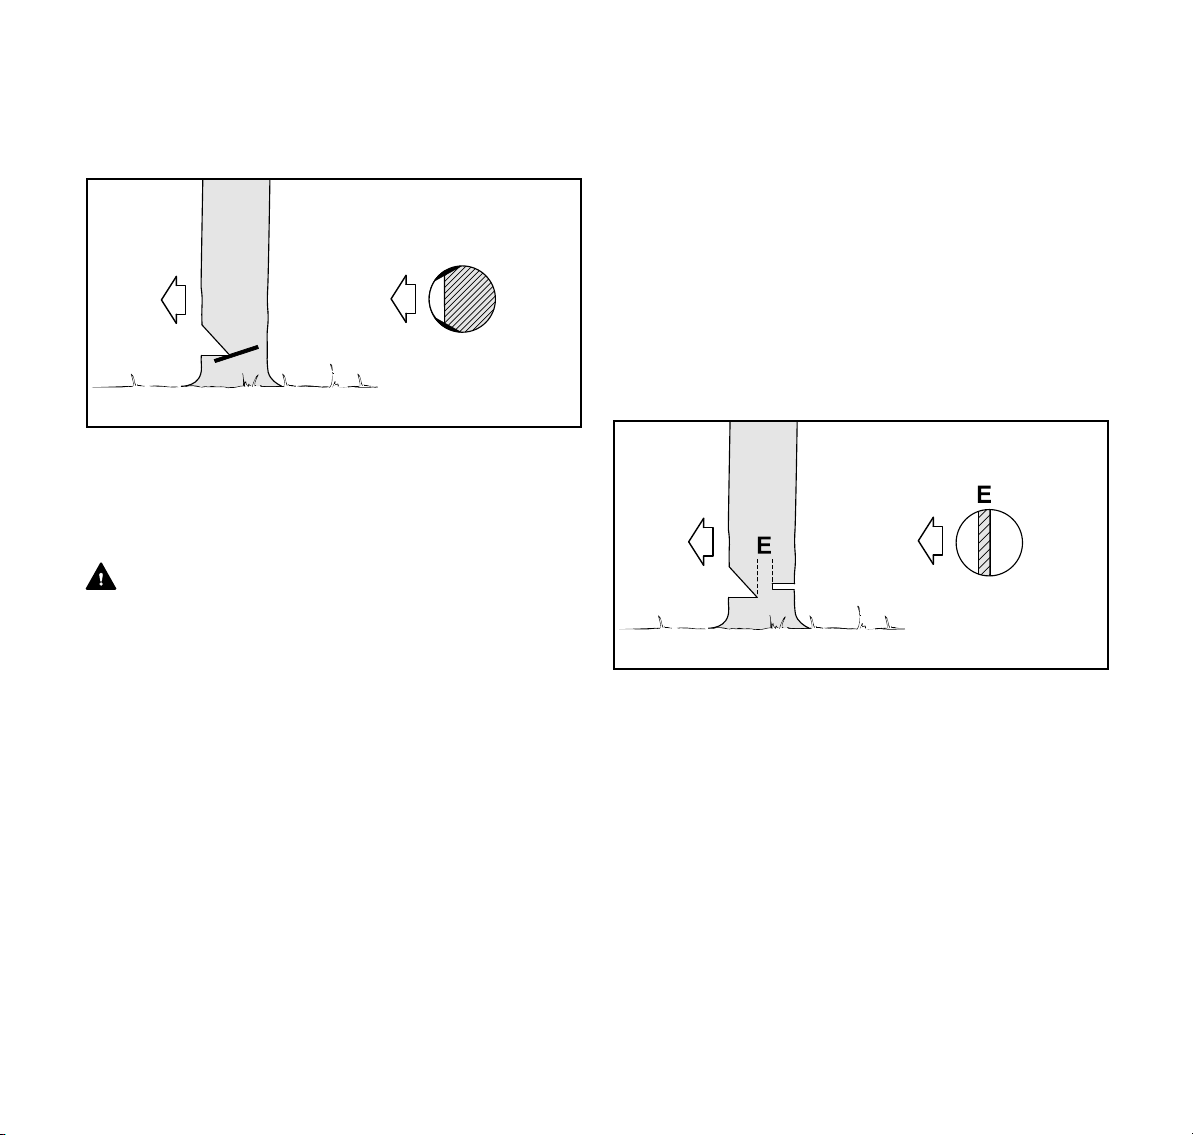
English
0000-GXX-1250-A1
D
0000-GXX-1440-A0
D
7 Proper Techniques for Basic Bucking, Limbing, Pruning and Felling
7.6.5 Sapwood Cuts
Sapwood cuts help prevent soft woods in summer from
splintering when they fall:
► Make cuts at both sides of the trunk, at the same height as
the subsequent felling back cut.
► Cut to no more than width of guide bar.
7.6.6 Felling Back Cut
WARNING
■ If the tip of the bar contacts a wedge that has been used
to help keep the kerf or cut open, it may cause kickback.
Wedges should be of wood or plastic and never steel,
which can damage the chain.
■ Whichever felling method you select, never cut through
the hinge when making your felling back cut. The hinge
helps control the fall of the tree. Cutting through the hinge
will eliminate the feller's ability to control the tree's fall and
may result in serious or fatal personal injury or property
damage.
■ In order to reduce the risk of personal injury, never stand
directly behind the tree when it is about to fall, since part
of the trunk may split and come back towards the operator
(barber-chairing), or the tree may jump backwards off the
stump.
■ Always keep to the side of the falling tree. When the tree
starts to fall, withdraw the bar, release the trigger switch,
engage the chain brake and walk away briskly on the pre-
planned escape path.
■ Watch out for limbs falling from the felled tree.
■ Be extremely careful with partially fallen trees. When the
tree hangs or for some other reason does not fall
completely, set the saw aside and pull the tree to the
ground with a cable winch, block and tackle or tractor.
Trying to cut it down with your saw is extremely dangerous
and may result in serious or fatal injury. Trees of this
nature can fall suddenly and often are under tension.
The tree is brought down with the felling back cut (D).
For both conventional and open-faced notches:
► Begin 1 to 2 in. (2.5 to 5 cm) higher than the bottom of the
felling notch.
► Cut horizontally toward the felling notch.
► Leave approximately 1/10 of the diameter of the tree
uncut. This is the hinge (E) that will help control the fall of
the tree.
► Do not cut through the hinge because you could lose
control of the direction of the fall.
► If necessary, wedges can be driven into the felling back
cut to keep the cut open and to help control the direction
of the fall. For example, if a tree tends to "sit back,"
causing a bind of the saw, wedges can be used to re-
position it.
26
0458-795-8221-A
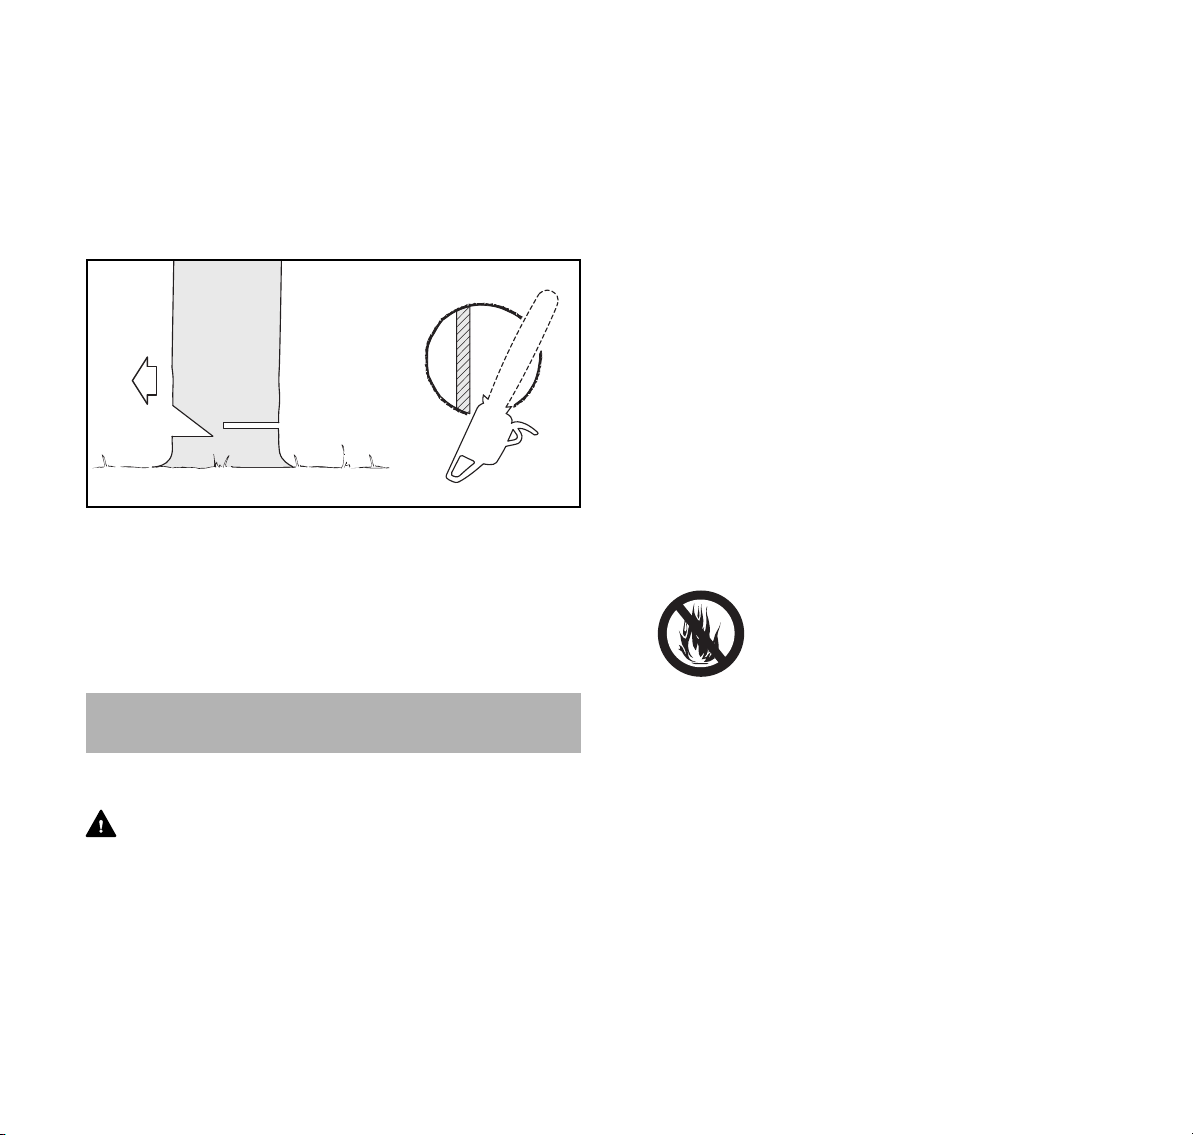
8 Battery Safety
English
This model chain saw is not intended for felling large
diameter trees.
7.6.7 Fan Cut
Use the simple fan cut for making the felling back cut on
trees with a diameter less than the effective cutting length of
the guide bar.
► After creating the felling notch, engage the bumper spikes
of the chain saw directly behind the location of the
intended hinge and 1 to 2 in. (2.5 to 5 cm) higher than the
bottom of the felling notch. Pivot the saw around this point
only as far as the back of the hinge. Do not cut through the
hinge. The bumper spike should roll against the trunk until
the back cut is complete.
8 Battery Safety
8.1 Warnings and Instructions
WARNING
■ Read and follow the safety precautions on the battery and
all warnings and instructions that accompany it.
■ Use of unauthorized batteries can damage the power tool
and result in fire, explosion and personal injury and
property damage.
– Use only genuine STIHL AR or AP series batteries
with this power tool.
■ Use of STIHL AR or AP series batteries for any purpose
other than powering STIHL power tools could be
extremely dangerous.
– Use STIHL AR and AP series batteries only to power
compatible STIHL power tools.
■ Use of unauthorized chargers can damage the battery and
result in fire, explosion and personal injury and property
damage.
– Charge STIHL AP series batteries only with genuine
STIHL AL 101, AL 300 or AL 500 series chargers.
– Charge STIHL AR series backpack batteries only
with genuine STIHL AL 300 or AL 500 series
0000-GXX-1441-A1
■ The battery contains safety features and devices which, if
■ High temperatures may cause the battery to generate
chargers.
damaged, may allow the battery to generate heat, rupture,
leak, ignite or explode.
– Never heat the battery above 212 °F
(100 °C).
– Never incinerate or place the battery on
or near fires, stoves or other hightemperature locations.
– Never use or charge a malfunctioning, damaged,
cracked, leaking or deformed battery.
– Never open, disassemble, crush, drop, subject to
heavy impact or otherwise damage the battery.
– Never expose the battery to microwaves or high
pressures.
– Never insert objects into the battery's cooling slots.
heat, rupture, leak, ignite or explode, resulting in severe or
fatal personal injury and property damage. Exposure to
temperatures outside the recommended temperature
range may also reduce battery life and performance.
0458-795-8221-A
27

English
8 Battery Safety
– Use and store the battery only within an
ambient temperature range of 14 °F to
122 °F (-10 °C to 50 °C).
– Never store the battery in direct sunlight
or inside a vehicle in hot weather.
■ To reduce the risk of personal injury and property damage
in the event the battery emits smoke, an unusual smell or
feels unusually hot while using, charging or storing:
– Immediately discontinue using or charging the
battery. Contact the authorities in the event of fire or
explosion.
■ To reduce the risk of a short circuit, which could lead to
electric shock, fire and explosion:
– Keep the STIHL AR series backpack
battery dry. Protect it from rain, water
and other liquids.
– Attach the rain cover to the STIHL AR
series battery before starting work in rain
or in very damp conditions.
– If a STIHL AP series battery has been
exposed to rain during work, remove it
from the battery bag and allow it to dry
indoors. Make sure it is completely dry
before charging or use.
– Never immerse any STIHL battery in
water or other liquids.
– Never bridge the battery terminals with wires or
other metallic objects.
– Keep a battery that is not in use away from metal
objects (e.g., paper clips, nails, coins, keys).
– Never transport or store the battery in a metal
container.
– Store the battery indoors in a dry room.
– Never store the battery in damp or corrosive
environments or in conditions that could lead to
corrosion of its metal components.
– Protect the battery from exposure to corrosive
agents such as garden chemicals and de-icing salts.
– Protect the battery from exposure to conductive
liquids such as salt water.
– Do not attempt to repair, open or disassemble the
battery. There are no user-serviceable parts inside.
■ Leaking battery fluid is potentially harmful and can cause
skin and eye irritation, chemical burns and other serious
personal injury.
– Avoid contact with skin and eyes.
– Use an inert absorbent such as sand on spilled
battery fluid.
– In the event of accidental contact, immediately rinse
the contact area thoroughly with mild soap and
water.
– If fluid gets into your eye(s): do not rub. Rinse water
over the open eye(s) for at least 15 minutes and
seek medical attention.
■ A battery fire can be dangerous. To reduce the risk of
severe personal injury and property damage in the event
of fire:
– Evacuate the area. Fire can spread rapidly. Stay
clear of any vapors generated and maintain a safe
distance.
– Contact the fire department.
– Although water can be used to put out a battery fire,
use of a multi-purpose dry chemical fire extinguisher
is preferable.
– Consult the fire department regarding proper
disposal of a burned battery.
28
0458-795-8221-A

9 Maintenance, Repair and Storage
English
9 Maintenance, Repair and Storage
9.1 Warnings and Instructions
WARNING
■ There are no user-authorized repairs for the battery or
chain saw. To reduce the risk of fire, electric shock or
other personal injury and property damage:
– Users may carry out only the cleaning and
maintenance operations described in this manual.
Users must not attempt any other cleaning,
maintenance or repair.
– Strictly follow the cleaning and maintenance
instructions in the appropriate sections of this
instruction manual.
– STIHL recommends that all repair work be
performed by authorized STIHL servicing dealers.
■ Unintentional starting may result in personal injury or
property damage. To reduce the risk of personal injury
and property damage from unintentional starting:
– Engage the chain brake by moving the
front hand guard forward to and
remove the battery before inspecting the
chain saw or carrying out any cleaning,
maintenance or repair work, before
storing, and any other time it is not in
use.
■ The bar and chain are the only user-serviceable parts of
the chain saw. Proper maintenance will help maintain
cutting performance and reduce the risk of personal injury
caused by chain derailment and reactive forces.
– Wear gloves when handling the saw chain.
– Keep the chain, guide bar and sprocket clean.
– Replace the chain and guide bar when they become
worn or damaged.
– Keep the chain sharp and at proper tension.
– Tighten all nuts, bolts and screws after each use.
■ Like an automobile brake, the chain brake on your chain
saw incurs wear each time it is engaged. In order for the
chain brake on your STIHL chain saw to properly perform
its function of reducing the risk of kickback and other
injuries, it must be properly maintained. For the proper
and effective operation of the chain brake, return the chain
saw to your STIHL servicing dealer for periodic inspection
and servicing of the brake system according to the
following schedule:
– Heavy Usage: every 3 months
– Moderate Usage: every 6 months
– Occasional Usage: every 12 months
■ Return the chain saw immediately for maintenance
whenever there is a change in its operating
characteristics.
■ Use of parts that are not authorized or approved by STIHL
may cause serious or fatal injury or property damage.
– STIHL recommends that only identical authorized
STIHL replacement parts be used for repair or
maintenance.
■ To reduce the risk of short circuit and fire:
– Keep the battery guides free of foreign matter. Clean
as necessary with a dry cloth or soft, dry brush.
■ Improper storage can result in unauthorized use, damage
to the chain saw and battery, and an increased risk of fire,
electric shock and other personal injury or property
damage.
– Engage the chain brake by moving the front hand
guard forward to and remove the battery from the
chain saw before storing.
– Never store the chain saw and charger with the
battery inserted.
– Store the chain saw and battery indoors in a dry,
secure place that cannot be accessed by children or
other unauthorized users.
– Never store the battery in the chain saw, in the
charger, in a metal container or in a container with
metal objects (e.g., paper clips, nails, coins, keys).
0458-795-8221-A
29

English
10 Before Starting Work
10 Before Starting Work
10.1 Preparing the Chain Saw for Operation
Before starting work:
► Fully charge the battery, @ 11.2.
► Mount the guide bar and saw chain, @ 14.2.1.
► Tension the chain, @ 14.3.
► Fill the chain oil tank, @ 14.4.2.
► Check the chain brake, @ 18.1.
► Check the controls for proper function and condition,
@ 18.2.
► Check the chain oil flow rate, @ 18.3.
11 Charging the Battery
11.1 Setting up the Charger
WARNING
Read and follow the safety precautions on the battery and
charger and all warnings and instructions that accompany
those products. To reduce the risk of short circuit, which
could lead to electric shock, fire and explosion, make sure
the charger and its components are dry and not damaged;
operate the charger indoors at an appropriate ambient
temperature.
WARNING
A typical household electric circuit is between 15 and 20
amps. A single STIHL AL 500 charger draws approximately
4.8 amps. A single AL 300 charger draws approximately
4.4 amps. To reduce the risk of fire from overloading an
electrical circuit:
► Ensure the electrical system is rated to withstand the
expected electrical draw before charging your battery.
► Charge multiple batteries one at a time or on separate
circuits, unless you know your circuit can handle the total
expected draw from multiple chargers.
WARNING
Since the charger heats up during the charging process, do
not operate the charger on a combustible surface or in a
location where combustible gases, liquids, vapors, dusts or
other materials and substances are present.
To set up the charger:
4
3
1
► Insert the plug (3) into a properly installed electrical
outlet (4) matching the voltage and electrical frequency
stated on the rating plate on the charger.
The charger runs a self-test immediately after it is plugged
in. The charger LED (1) will glow green for about 1 second,
then it will glow red briefly before going out. Once the LED
goes out, the self-test is complete and the charger is ready
to charge the battery.
2
0000-GXX-3228-A1
30
0458-795-8221-A

11 Charging the Battery
3
2
1
0000-GXX-2680-A0
3
45
English
► Position the power supply cord (2) so that it will not be
stepped on, tripped over, come in contact with sharp
objects or moving parts or otherwise present a tripping
hazard or be subjected to damage or stress.
11.2 Charging
WARNING
STIHL batteries contain safety features and devices which,
if damaged, may allow the battery to generate heat, rupture,
leak, ignite or explode. Never charge a malfunctioning,
damaged, cracked, leaking or deformed battery or use a
charger that has been damaged. Never insert a wet battery
or battery adapter. Never use a wet charger. Follow all
product-specific warnings and instructions accompanying
your battery and charger.
A battery is not fully charged when it ships from the factory.
STIHL recommends that you fully charge the battery before
using it the first time.
Operate the charger only indoors, in dry rooms and within an
ambient temperature range of 41 °F to 104 °F (5 °C to
40 °C).
The battery heats up during operation of the power tool. If a
hot battery is connected to the charger, it may be necessary
for it to cool down before charging starts. The charging
process begins only after the battery has cooled down
sufficiently.
Charging time depends on a number of factors, including
battery condition and the ambient temperature. For a
complete list of approximate charging times, see
www.stihl.com/charging-times.
To charge an AR battery:
► Push the plug of the connecting cord (1) into the
socket (2) of the AP Adapter (3) until it stops.
► Push the AP Adapter into the charger (5) until it stops.
The LED on the charger (4) glows green when the battery
is charging.
The LEDs on the AR battery glow green and show the
state of charge.
When the LEDs on the battery turn off, the charging
process is complete and the charger will shut itself off.
► Remove the AP Adapter from the charger and disconnect
the charger's power supply cord from the electrical outlet
when charging is complete.
► Charge STIHL AR backpack batteries only with genuine
STIHL AL 300 or AL 500 series chargers.
To charge an AP battery:
3
0458-795-8221-A
2
4
1
0000-GXX-3918-A0
31

English
1
0000-GXX-1248-A0
20-40%
40-60%
60-80%
80-100%
0-20%
12 LED Diagnostics and Acoustic Signals
► Push the battery (2) into the charger (3) until it stops.
The LED on the charger glows green when the battery is
charging.
The LEDs (1) on the battery glow green and show the
state of charge.
When the LEDs on the battery go out, the charging
process is complete and the charger will shut itself off.
► Remove the battery from the charger and disconnect the
charger's power supply cord from the electrical outlet.
► Charge STIHL AP series batteries only with genuine
STIHL AL 101, AL 300 or AL 500 series chargers.
12 LED Diagnostics and Acoustic Signals
12.1 STIHL AP Battery
12.1.1 Battery Status Four LEDs show the status of the battery. These LEDs can
glow or flash green or red.
If one LED glows r ed continuou sly: the battery is
either too hot or too cold. Allow the battery to
warm up or cool down gradually at an ambient
temperature of about 50 °F to 68 °F (10 °C to
20 °C).
If all 4 LEDs flash red: the battery has a
malfunction and must be replaced. Do not
attempt to charge, use or store the battery.
12.1.2 Power Tool Status
The same LEDs on the battery will indicate the status of the
power tool.
If three LEDs glow red continuously: the power tool motor is
too hot. Allow the motor to cool down.
If three LEDs flash red when you activate the trigger switch:
the power tool has an electrical malfunction. Do not operate
the power tool. Have it checked by an authorized STIHL
servicing dealer before use or storage.
For troubleshooting information, @ 24.
12.1.3 Charge Status
The LEDs on the battery also show the battery's state of
charge.
To determine the battery's state of charge:
► Press the button (1) on the battery.
The LEDs on the battery will glow or flash green for about
5 seconds and indicate the state of charge (see
illustration).
For example:
If four green LEDs glow continuously: full charge.
If one green LED is flashing: less than 20 % charge.
12.2 STIHL AR Backpack Battery
12.2.1 Battery Status Six LEDs and an acoustic signal indicate the status of the
battery.
32
0458-795-8221-A

12 LED Diagnostics and Acoustic Signals
1
2
3
.......
0000-GXX-3229-A1
0000-GXX-2673-A0
100 % 0 %
English
If three LEDs glow red continuously: the power tool motor is
too hot. Allow the motor to cool down.
If three LEDs flash red when you activate the trigger switch:
the power tool has an electrical malfunction. Do not operate
the power tool. Have it checked by an authorized STIHL
servicing dealer before use or storage.
For troubleshooting information, @ 24.
12.2.3 Charge Status
The LEDs and acoustic signals on the battery also indicate
the battery's state of charge.
1 A short beep
The acoustic signal works as it should.
2 Four long beeps
The battery's charge is low. Recharge the battery.
3 Rapid succession of short beeps
There is a malfunction in the battery. The signal stops
automatically after a few seconds. Do not attempt to
charge, use or store the battery. Replace the battery.
These LEDs can glow or flash green or red.
If one LED glows r ed continuou sly: the battery is
either too hot or too cold. Allow the battery to
warm up or cool down gradually at an ambient
temperature of about 50 °F to 68 °F (10 °C to
20 °C).
If the four right side LEDs flash red and a rapid
succession of several short beeps is emitted: the
battery has a malfunction and must be replaced.
Do not attempt to charge, use or store the
battery.
► Be aware that your ability to hear the acoustic signal may
be reduced when wearing hearing protection.
12.2.2 Power Tool Status
When the battery is connected to the power tool, the same
LEDs on the battery will indicate the status of the power tool.
To determine the battery's state of charge:
► Press the button (1) on the backpack battery.
A single short beep will be emitted. The LEDs on the battery
will glow or flash green for about 5 seconds and indicate the
state of charge (see illustration).
For example:
If six green LEDs glow continuously: full charge.
If one green LED is flashing and four long beeps are emitted:
less than 20 % charge.
0458-795-8221-A
33

English
13 STIHL AR Backpack Battery
13 STIHL AR Backpack Battery
13.1 Positioning and Adjusting the Connecting Cord
WARNING
Chain saws are designed for right-handed use only - with the
operator's right hand on the rear handle and left hand on the
front handle. Left-handers must follow these instructions
too. (See illustration, Chapter @ 5.5.2). Accordingly, to
reduce the risk of personal injury, run the connecting cord
through the guide on the shoulder strap on the opertor's right
side only. Never run the cord through the guides on the
shoulder strap on the operator's left side.
WARNING
To reduce the risk of injury from tripping or losing control of
the chain saw, always secure the connecting cord through
the backpack guides and with the hook and eye fasteners as
described below. Position and secure the connecting cord
on your right side and so that it will not interfere with proper
working technique or your ability to maintain control of the
chain saw.
WARNING
Manage the cord to prevent it from contacting the saw chain
or catching on objects, which could cause you to lose
balance or control of the chain saw, resulting in serious
personal injury and property damage.
The connecting cord can be secured in different positions
and adjusted to suit the height and reach of the operator.
A
1
1
B
1
1
1
1
The connecting cord can run through the guides on the
shoulder strap (Illustration A) or along the back
plate (Illustration B). Secure the connecting cord to the
backpack with the hook and eye fasteners (1) on the right
side of the operator's body, where the chain saw is held and
controlled. Do not allow the connecting cord to swing across
your body or hang at your side.
C
The length of the connecting cord can be adjusted by
making a loop around the top (Illustration C) or on the side
(Illustration D) of the backpack battery.
► Position and secure the connecting cord so that it will not
interfere with proper working technique or your ability to
maintain control of the chain saw.
D
0000-GXX-7802-A0
0000-GXX-2803-A1
34
0458-795-8221-A

14 Assembling the Chain Saw
1
0000-GXX-7803-A0
0000-GXX-2815-A1
3
English
13.2 Putting on and Adjusting the Harness
WARNING
To reduce the risk of personal injury, the operator must be
able to remove the backpack battery quickly in the event of
an emergency. In an emergency, open and remove the waist
belt and chest strap quickly before dropping the battery to
the ground.
To ensure a proper fit:
► Put the backpack battery on your back.
► Fasten and adjust the waist belt (2) so that it rests
comfortably but securely on your hips.
► Fasten the chest strap (1) and adjust it so that it fits
comfortably but securely across your chest.
► To remove the harness, open the quick-release fasteners
on the waist belt and chest strap and loosen the harness
straps by lifting the sliding adjusters.
To help reduce the risk of injury in the event of an
emergency, practice quickly opening the fastener on the
waist belt, loosening the shoulder straps and removing the
battery.
NOTICE
To avoid damage, ease the battery to the ground when
practicing. Do not allow the battery to drop to the ground and
do not throw it.
14 Assembling the Chain Saw
14.1 Cutting Attachment
WARNING
If non-matching components are used, the cutting
attachment will be damaged beyond repair after a short
period of operation, and the chain could de-rail, resulting in
serious or fatal personal injury.
A cutting attachment consists of the chain, guide bar and
chain sprocket.
► Adjust the harness straps so that the back padding fits
firmly and securely against your back.
► Thread the end of the waist belt through the loop (3).
0458-795-8221-A
1
2
a
3
t = a 2
0000-GXX-1445-A0
35

English
0000-GXX-1199-A0
1
3
2
4
4
5
0000-GXX-1200-A0
5
6
14 Assembling the Chain Saw
– The pitch (t) of the chain (1), chain sprocket and, if using
a Rollomatic guide bar, the nose sprocket must match.
– The drive link gauge (2) of the chain must match the
groove width of the guide bar (3).
14.2 Mounting and Removing the Guide Bar and Chain
14.2.1 Mounting the Guide Bar and Chain
WARNING
Make sure the battery is removed and the chain brake is
engaged before starting assembly. Never operate your
chain saw without a properly mounted guide bar and chain,
@ 5.5. Use only guide bar and chain combinations
expressly recommended or approved by STIHL, @ 5.4.
WARNING
The chain has many sharp cutters. If they contact your flesh,
they will cut you, even if the chain is not moving, @ 5.4.
Always wear heavy-duty work gloves when mounting or
otherwise handling the chain, @ 5.3.
To mount the guide bar and chain:
► Switch off the chain saw, @ 17.1.
► Engage the chain brake, @ 15.1.
► Remove the battery, @ 16.2.
► Turn the wingnut counterclockwise until the chain
sprocket cover (3) can be removed.
► Remove the chain sprocket cover.
► Remove the tensioning gear (4).
► Remove the screw (5).
► Position the guide bar (6) on the tensioning gear so that
the pins of the tensioning gear fit in the holes of the guide
bar.
► Insert the screw and tighten it.
4
► Raise the handle (1) of the wingnut (2).
36
0000-GXX-1201-A0
► Position the chain in the groove of the guide bar, starting
at the tip.
► Make sure that the cutters in the groove on the top side of
the guide bar face the tip of the bar. STIHL chains are
manufactured with arrows on the tie straps to help the
operator determine the proper direction of the chain.
Arrows on the tie straps on the top of the bar must point
toward the bar tip.
0458-795-8221-A

14 Assembling the Chain Saw
3
2
0000-GXX-1202-A0
4
6
0000-GXX-1203-A0
4
English
► Turn the tensioning gear clockwise until it stops.
► Point the guide bar tip away from the chain sprocket (2),
with the teeth of the tensioning gear (4) facing away from
the motor.
► Place the chain around the chain sprocket.
► Slide the guide bar over the collar screw (3). The head of
the collar screw must protrude into the oblong hole.
► If necessary, turn the adjusting wheel slightly until the
chain sprocket cover sits flush against the housing.
► Turn the wingnut clockwise until the chain sprocket cover
is firmly attached to the saw.
► Close the handle of the wingnut.
14.2.2 Removing the Guide Bar and Chain
► Raise the handle of the wingnut to open and then turn the
wingnut counterclockwise until the chain sprocket cover
can be removed.
► Remove the chain sprocket cover.
► Turn the tensioning gear counterclockwise until it stops
and the chain is loose.
► Remove the guide bar, including the tensioning gear and
chain.
NOTICE
The top and bottom of the guide bar are symmetrical, and
the bar may be mounted with the printing facing up or down.
Flipping the guide bar each time the chain is sharpened or
changed will help reduce uneven wear and improve its
service life.
14.3 Tensioning the Chain
► Disengage the chain brake, @ 15.2.
► Direct the drive links into the groove of the guide bar
(arrow) while turning the tensioning gear (4)
counterclockwise until it stops.
The guide bar and chain must be firmly and securely
mounted on the saw.
► Fit the sprocket cover on the saw so that it is flush with the
housing.
► When fitting the chain sprocket cover, the teeth of the
adjusting wheel and the tensioning gear must mesh.
0458-795-8221-A
WARNING
To reduce the risk of severe personal injury from chain
derailment, check chain tension frequently, @ 5.5. At
operating temperatures, the chain stretches and sags. New
chain tends to stretch more than used chain. Tension the
chain so that the drive links cannot come out of the groove
on the underside of the guide bar.
To properly tension the chain:
► Switch off the chain saw, @ 17.2.
► Engage the chain brake, @ 15.1.
► Remove the battery, @ 16.2.
► Raise the handle of the wingnut (1).
► Turn the wingnut counterclockwise twice or until the chain
is loose.
37

English
2
0000-GXX-1204-A2
1
a
14 Assembling the Chain Saw
► Disengage the chain brake, @ 15.2.
► Lift the guide bar tip.
► Turn the adjusting wheel (2) clockwise to tighten the
chain.
A properly adjusted chain will sit closely against the
underside of the guide bar but can still be pulled easily
along the bar by hand. Always wear gloves when handling
the chain.
► If the chain cannot be moved along the guide bar, it is too
tight.
– Reduce the tension by turning the adjusting wheel
counterclockwise until the chain can move freely along
the guide bar.
– Ensure that the drive links remain in the groove and that
the chain fits snugly against the underside of the guide
bar.
► Once the chain is properly tensioned, tighten the wingnut
by hand to secure the chain sprocket cover.
14.4 Lubricating the Saw Chain and Guide Bar
14.4.1 Bar and Chain Lubricant
WARNING
Never operate your saw without bar and chain lubrication. If
the chain runs dry, the cutting attachment will be damaged
beyond repair within a very short time. A damaged chain
may break, resulting in severe or fatal personal injury.
Always check chain lubrication and the oil level in the tank
before starting work and periodically during work.
WARNING
Never use waste oil to lubricate your STIHL saw chain and
guide bar. Repeated contact with waste oil can cause skin
cancer. Moreover, waste oil is environmentally harmful.
Bar and chain oil lubricates and cools the rotating saw chain.
The service life of the chain and guide bar depends on the
quality of the lubricant. It is therefore essential to use only a
specially formulated chain lubricant.
► For automatic and reliable lubrication of the chain and
guide bar, use only an environmentally compatible quality
chain and bar lubricant. STIHL recommends using rapidly
biodegradable STIHL BioPlus.
NOTICE
Biodegradable chain oil must be resistant to aging, since it
will otherwise quickly turn to resin. This results in hard
deposits that are difficult to remove, especially in the area of
the chain drive and chain. It may even cause the oil pump to
seize.
NOTICE
Always release tension on the chain after finishing work. The
chain contracts as it cools down. If it is not slackened, it can
damage the drive shaft and bearings. Properly re-tension
the chain before using the saw again.
38
NOTICE
Waste oil does not have the necessary lubricating properties
and is unsuitable for chain lubrication.
0458-795-8221-A

15 The Chain Brake
0000-GXX-2930-A1
123
4
5
English
14.4.2 Filling the Chain Oil Tank
Opening and Filling the Chain Oil Tank
To fill the chain oil tank:
► Switch off the chain saw, @ 17.2.
► Engage the chain brake, @ 15.1.
► Remove the battery, @ 16.2.
► Position the chain saw on a level surface with the oil filler
cap facing upwards.
► Clean the area around the oil filler cap with a slightly
dampened cloth.
► Flip up the grip and press the cap down firmly (1).
► Turn the cap slowly counter-clockwise (2) to the open
position (3). In the open position, the exterior positioning
mark (4) on the cap will line up with the symbol (5) on the
chain oil tank housing
► Remove the cap and fill the tank with bar and chain oil.
► Take care not to spill bar and chain oil while refilling the
tank.
► Do not overfill the tank. Leave approximately 0.5 in.
(13 mm) of air space.
Closing
To close the tank:
1
4
1
2
► Raise the grip on the top of the cap until it is upright at a
90° angle. Insert the cap in the chain oil tank opening with
the exterior positioning mark (1) lined up with the open
symbol (2) on the chain oil tank housing.
► Using the grip, press the cap down firmly while turning it
clockwise to the closed position (approximately 1/4 turn).
In the closed position, the interior (4) and exterior (1)
positioning marks will align with the closed symbol (3) on
the chain oil tank housing.
► Fold the grip flush with the top of the cap and check for
tightness.
► If the grip does not lie completely flush with the cap or the
detent on the grip does not fit in the corresponding recess
in the tank opening, or if the cap is loose, the cap is not
properly seated and you must repeat the above steps.
3
15 The Chain Brake
15.1 Engaging the Chain Brake
WARNING
The chain brake will operate only if it has been properly
maintained and the front hand guard has not been modified,
@ 6.2.
0000-GXX-2931-A1
0458-795-8221-A
39

English
15 The Chain Brake
WARNING
No chain brake device prevents kickback. This device is
designed to reduce the risk of kickback injury, if activated, in
certain kickback situations. For the chain brake to reduce
the risk of kickback injury, it must be properly maintained
and in good working order, @ 6.2.
In the event of a kickback, the chain brake is designed to
engage if the left hand contacts the front hand guard and
pushes it forward.
The chain brake is also designed to be activated by the
inertia of the front hand guard if the forces are sufficiently
high. When the brake is activated by inertia, the hand guard
accelerates toward the bar nose, even if your hand is not
behind the hand guard, e.g., during a felling back cut.
Engaging the chain brake locks the chain. To manually
engage the chain brake:
► Push the front hand guard to the position, away from the
front handle.
You will hear an audible click when the front hand guard
reaches the locked position.
15.2 Disengaging the Chain Brake
WARNING
Before disengaging the chain brake and switching on your
chain saw, be sure that the guide bar and saw chain are
clear of you and all other obstructions and objects, including
the ground, @ 5.5.
Disengaging the chain brake unlocks the chain. To
disengage the chain brake:
► Pull the front hand guard to the position, toward the
front handle.
You will hear an audible click when the front hand guard
reaches the unlocked position. In this position, the chain
brake is disengaged and the saw can be switched on.
15.3 Maintaining the Chain Brake
WARNING
An improperly maintained chain brake may increase the time
needed to stop the saw chain after activation, or it may not
activate or stop the chain at all, @ 6.2. The chain brake is
subject to wear, depending on the amount of usage,
conditions under which the saw is used and other factors.
0000-GXX-3100-A0
Excessive wear will reduce the effectiveness of the chain
brake and can render it inoperable.
► Your chain saw should be returned to your authorized
STIHL servicing dealer for periodic inspection and
servicing of the brake system according to the following
schedule:
– Heavy Usage: every 3 months
– Part-Time Usage: every 6 months
– Occasional Usage: every 12 months
0000-GXX-3101-A0
40
0458-795-8221-A

16 Inserting and Removing the Battery
1
2
0000-GXX-3102-A0
English
16 Inserting and Removing the Battery
16.1 Inserting the Battery
WARNING
Never use a malfunctioning, damaged, cracked, leaking or
deformed battery, @ 8. Use and store the battery only
within an ambient temperature range of 14 °F to 122 °F (- 10
°C to 50 °C), @ 8.
WARNING
To reduce the risk of unintended activation, never store the
battery in the chain saw, @ 21.2.
To insert the battery:
► Engage the chain brake, @ 15.1.
16.2 Removing the Battery
WARNING
To reduce the risk of severe personal injury from unintended
activation, always remove the battery before assembling,
transporting, adjusting, cleaning, servicing, maintaining or
storing the chain saw and any other time it is not in use.
WARNING
Use care when ejecting the battery to prevent it from falling
and causing personal injury or property damage.
To remove the battery:
► Release the trigger switch.
► Place the chain saw on a level surface.
2
1
► Press down on the locking levers (1) to eject the
battery (2) from the battery compartment.
0000-GXX-3103-A0
► Place the chain saw on a level surface.
► Insert the battery (1) into the battery compartment (2) until
it stops.
The battery is properly inserted when you hear a audible
click and the battery is flush with the top of the housing. In
this position, there is electrical contact between the
battery and the chain saw.
Since a new battery is not fully charged, STIHL recommends
that you fully charge the battery before using it the first time,
@ 11.2.
0458-795-8221-A
NOTICE
Avoid exposing the battery to excessive heat or prolonged
periods of direct sunlight. Use or storage outside the
recommended ambient temperature range can reduce the
performance and/or service life of the battery.
41

English
2
0000-GXX-4949-A0
1
17 Switching the Chain Saw On and Off
17 Switching the Chain Saw On and Off
17.1 Switching On
WARNING
Never operate your chain saw if it is modified, damaged,
improperly adjusted or maintained, not completely and
securely assembled or not functioning properly, @ 5.4. To
reduce the risk of personal injury, always wear proper
clothing and protective apparel, including proper eye
protection, when operating your chain saw, @ 5.3.
Before switching on:
► Make sure you have a secure and firm footing.
► Stand upright.
► Always hold and operate the chain saw with your right
hand firmly on the rear or control handle and your left hand
firmly on the front handle. Always hold the chain saw with
two hands in this manner, whether you are right-handed or
left-handed.
To switch the chain saw on:
► Disengage the chain brake, @ 15.2.
The motor will not switch on unless the hand guard is set to
the position and the trigger switch lockout and trigger
switch are pressed at the same time. Once the trigger switch
is activated and the saw is running, the operator need not
continue to hold down the trigger switch lockout.
17.2 Switching Off
WARNING
The saw chain will continue to rotate for a short while after
the trigger switch is released. To avoid serious or fatal injury,
avoid contact with the moving saw chain. To reduce the risk
of personal injury from unintended activation or
unauthorized use, switch off the motor, ensure the chain has
stopped, engage the chain brake and remove the battery
before transporting or putting the chain saw down.
To switch the chain saw off:
► Release the trigger switch so that it springs back to the
locked position. In the locked position, activation of the
trigger switch is once again blocked by the trigger switch
lockout.
The saw chain will continue to rotate for a short while after
the trigger switch is released. Take care to avoid contact
after releasing the trigger switch and when setting down
the chain saw.
► Depress and hold the trigger switch lockout (1) with your
thumb.
► While holding the trigger switch lockout, squeeze the
trigger switch (2) with your index finger.
The saw chain will start rotating.
42
18 Checking the Chain Saw
18.1 Checking the Operation of the Chain Brake
WARNING
Operating the saw with a missing, damaged, modified or
improperly maintained chain brake increases the risk of
severe or fatal injury from kickback. Never attempt to modify
or disable the chain brake. Never operate a saw if the chain
brake has been modified or does not function properly. If you
detect a change in the operating characteristics of the chain
brake, have your saw serviced immediately by an authorized
STIHL servicing dealer.
0458-795-8221-A

18 Checking the Chain Saw
2
0000-GXX-4949-A0
1
English
Before starting work, check the operation of the chain brake:
► Disengage the chain brake, @ 15.2.
► Switch on the chain saw, @ 17.1.
► Engage the chain brake by pushing the front hand guard
to the position, away from the front handle.
A properly functioning chain brake will stop the chain
within fractions of a second.
► If the chain brake fails to stop the chain within fractions of
a second, have the saw inspected and repaired by an
authorized STIHL servicing dealer.
18.2 Testing the Controls
Before starting work, confirm that the trigger switch
lockout (1) and the trigger switch (2) are undamaged and
functioning properly.
To test the controls:
► Remove the battery.
► Attempt to depress the trigger switch.
If the trigger switch can be depressed without first
depressing the trigger switch lockout, take the chain saw
to an authorized STIHL servicing dealer to be repaired
before use.
► Insert the battery and hold the chain saw firmly with both
hands, your left hand on the front handle and your right
hand on the rear handle. Release the chain brake and
switch on the chain saw by depressing the trigger switch
lockout and trigger switch.
If the chain does not start rotating, engage the chain brake
and remove the battery. Take the chain saw to an
authorized STIHL servicing dealer to be repaired before
use.
► Insert the battery and hold the chain saw firmly with both
hands, your left hand on the front handle and your right
hand on the rear handle. Release the chain brake and
switch on the chain saw by depressing the trigger switch
lockout and trigger switch. Then release the trigger switch.
If the saw chain does not stop rotating after you release
the trigger switch, engage the chain brake and remove the
battery. Take the chain saw to an authorized STIHL
servicing dealer to be repaired before use.
Trigger Switch Lockout (1) and Trigger Switch (2)
WARNING
To reduce the risk of serious or fatal injuries, keep hands,
feet and other parts of the body away from the chain. Do not
touch the saw chain while the battery is inserted. Never
touch moving chain with your hand or any part of your body,
@ 5.5.2. Keep bystanders out of the area while testing the
controls.
0458-795-8221-A
18.3 Testing Chain Lubrication
WARNING
Never operate your saw without bar and chain lubrication. If
the chain runs dry, the cutting attachment will be damaged
beyond repair within a very short time. A damaged chain
may break, resulting in severe or fatal personal injury.
Always check chain lubrication and the oil level in the tank
before starting work and periodically during work.
To confirm that the chain oil is flowing properly:
► Insert the battery, @ 16.1.
► Disengage the chain brake, @ 15.2.
► Point the guide bar toward a bright surface.
43

English
19 After Finishing Work
► Switch on the chain saw, @ 17.1.
The chain should throw off a small amount of oil.
If the chain oil cannot be seen, check the oil level and refill
the tank as necessary.
Refill the tank as necessary.
► Test the chain lubrication again.
► If chain lubrication oil is still not visible, the lubrication
mechanism is not functioning. Take the saw to an
authorized STIHL servicing dealer to be repaired before
use.
19 After Finishing Work
19.1 Preparing for Transportation or Storage
WARNING
To reduce the risk of personal injury from unintended
activation or unauthorized use, switch off the chain saw,
engage the chain brake and remove the battery before
transporting the chain saw or putting it down. To reduce the
risk of injuries from the sharp cutters on the chain, always
cover the guide bar with the chain scabbard before
transporting or storing the saw.
To prepare the saw for transportation or storage:
► Switch off the chain saw, @ 17.2.
► Engage the chain brake, @ 15.1.
► Remove the battery, @ 16.2.
► Release the chain brake and loosen the chain.
► Re-engage the chain brake.
► Slide a chain scabbard over the guide bar so that it covers
the entire guide bar.
► If the battery or chain saw became wet during operation,
allow them to dry separately and completely before
charging or storing.
► Before using the saw, remember to re-tension the chain.
NOTICE
The chain contracts as it cools down. Failing to loosen the
chain after finishing work can damage the drive shaft and
bearings.
20 Transporting the Chain Saw and
Battery
20.1 Chain Saw
When transporting the chain saw:
0000-GXX-7018-A0
► Slide a chain scabbard over the guide bar so that it covers
the entire guide bar.
► When transporting the saw by hand, hold it by the front
handle with the guide bar pointing backwards, opposite
the direction in which you are walking.
► When transporting the saw in a vehicle, cover the guide
bar with a chain scabbard. Secure and position the chain
saw to prevent turnover, impact and damage.
Your saw comes standard with a chain scabbard that
matches the cutting attachment. If you use guide bars of
different lengths on the saw, the length of the chain
scabbard must be matched to the guide bar to reduce the
risk of injury. It should cover the full length of the guide bar.
44
0458-795-8221-A

21 Storing the Chain Saw and Battery
English
20.2 Battery
WARNING
To reduce the risk of a short circuit, which could lead to
electric shock, fire and explosion, never transport the battery
in a metal container or near metal objects (e.g., paper clips,
nails, coins, keys), @ 8.
When transporting the battery:
► Place the battery in a non-metal container or carton and
secure it against impact or damage. Never transport the
battery in a metal or other container that is capable of
conducting electricity, or near metal objects (e.g., paper
clips, nails, coins, keys).
► If you are transporting the battery in a vehicle, secure it
and its container to prevent turnover, impact and damage.
STIHL batteries comply with the requirements set forth in
UN-Manual ST/SG/AC.10/11/Rev.5/Part III, Subsection
38.3.
Commercial air, vessel and ground transportation of lithium
ion cells and batteries is regulated. The battery is classified
as a UN 3480, Class 9, packaging group II product. Shipping
it, either as a complete tool or the battery, requires
compliance with all applicable shipping regulations. Check
with the ground, vessel, air cargo or passenger airline to
determine if transport is prohibited or subject to restrictions
or exemptions prior to shipping or travel.
Normally, no further conditions have to be met by the user in
order to transport STIHL batteries by road to the power tool's
operating site. Check and comply with any special
regulations that may apply to your situation.
For further information please go to
www.stihlusa.com/battery-transportation-safety.
21 Storing the Chain Saw and Battery
21.1 Chain Saw
WARNING
Store the chain saw indoors in a dry, secure place that
cannot be accessed by children or other unauthorized users,
@ 5.4. Never store the battery in the chain saw or charger.
Improper storage can result in unauthorized use and
damage to the chain saw, @ 5.4.
When storing the saw for three months or longer:
► Remove any wood chips or debris from the battery
compartment.
► Remove the chain and guide bar.
► Clean and spray the guide bar with a resin solvent, such
as STIHL Resin Remover and Lubricant.
► Clean the saw, @ 22.
► Fill up the chain oil tank, @ 14.4.2.
► Store the saw indoors in a dry and secure location, out of
the reach of children and other unauthorized persons.
21.2 Battery
WARNING
To reduce the risk of a short circuit, which could lead to
electric shock, fire and explosion, never store the battery in
a metal container or near metal objects, @ 8. If the battery
is damp or wet, allow it to dry thoroughly before storing,
@ 8.
WARNING
High temperatures can damage the battery and result in loss
of performance and a shortened battery life. It may also
cause the battery to generate heat, rupture, leak, ignite or
explode, resulting in severe or fatal personal injury or
property damage. Use and store the battery only within an
0458-795-8221-A
45

English
22 Cleaning
ambient temperature range of 14 °F to 122 °F (- 10 °C to
50 °C), @ 8. Never store the battery in direct sunlight or
inside a vehicle in hot weather, @ 8.
To properly store the battery:
► Take the battery out of the chain saw or the charger.
► Make sure the battery is dry and store it indoors in a dry
and secure location.
► Keep it out of the reach of children and other unauthorized
persons.
► Protect the battery against dampness and corrosive
agents such as garden chemicals and de-icing salts.
► Protect the battery from exposure to conductive liquids
such as salt water.
► For maximum battery life, store the battery at an ambient
temperature between 50 °F and 68 °F (10 °C and 20 °C)
with a charge between 40 % and 60 % (2 green LEDs).
► Do not leave spare batteries unused. Use them in rotation.
22 Cleaning
22.1 Cleaning the Chain Saw and Battery
WARNING
To reduce the risk of personal injury from unintended
activation, remove the battery and engage the chain brake
before carrying out any cleaning work, @ 8. Users of this
chain saw should carry out only the cleaning described in
this manual.
To clean the chain saw and battery:
► Clean the chain saw's polymer components with a slightly
dampened cloth. Do not use detergents or solvents. They
may damage the polymer components.
► Remove the sprocket cover and clean the area around the
chain sprocket with a slightly dampened cloth or resin
solvent, such as STIHL Resin Remover & Lubricant.
► Do not use a pressure washer to clean the chain saw or
spray it with water or other liquids.
► Keep the battery housing and guides free from foreign
matter and clean as necessary with a soft brush or soft,
dry cloth.
22.2 Cleaning the Guide Bar and Saw Chain
WARNING
To reduce the risk of personal injury from unintended
activation, remove the battery and engage the chain brake
before carrying out any cleaning work, @ 8. Users of this
chain saw should carry out only the cleaning described in
this manual.To help prevent injuries, always wear heavyduty work gloves when handling the chain.
To properly clean the guide bar and chain:
► Remove the guide bar and the chain, @ 14.2.2.
3
1
2
► Clean the oil outlet duct (1), oil inlet bore (2) and groove
(3) with a brush, a slightly dampened cloth or resin
solvent, such as STIHL Resin Remover & Lubricant. Do
not use detergents.
► Clean the chain with a brush, a slightly dampened cloth or
resin solvent. Do not use detergents.
► Do not use a pressure washer to clean the guide bar or
chain or otherwise spray them with water or other liquids.
3
0000-GXX-1215-A0
46
0458-795-8221-A

23 Inspection and Maintenance
a
0000-GXX-1216-A0
0000-GXX-1217-A0
23 Inspection and Maintenance
23.1 Inspecting and Maintaining the Chain Saw
WARNING
To reduce the risk of personal injury from unintended
activation, remove the battery before inspecting the chain
saw or carrying out any maintenance, @ 9. Carry out only
the maintenance operations described in this manual. There
are no user-authorized repairs. STIHL recommends that
repair work be performed by authorized STIHL servicing
dealers.
Proper maintenance of the chain saw includes the following
activities:
► Inspecting the chain sprocket periodically and having a
worn chain sprocket replaced by an authorized STIHL
servicing dealer.
► Inspecting the guide bar for proper groove depth and
spread and replacing the guide bar it if it shows signs of
excessive wear or damage.
► Periodically sharpening the chain, maintaining the depth
limiting guides at the appropriate height and replacing the
saw chain when indicated by the relevant wear marks or
when the chain is damaged or shows signs of excessive
wear.
► Having worn, missing or damaged safety labels replaced
by an authorized STIHL servicing dealer.
If you make a warranty claim for a component which has not
been serviced or maintained properly, coverage may be
denied.
English
► Check the chain sprocket cover for wear marks.
► If the wear marks are deeper than a = 0.020 in. (0.5 mm),
have the chain sprocket replaced.
STIHL recommends using genuine STIHL chain sprockets to
ensure optimal functioning of the chain brake.
Alternating between two chains helps reduce wear to the
chain sprocket.
23.3 Inspecting and Maintaining the Guide Bar
► Switch off the chain saw, engage the chain brake and
remove the battery.
► Remove the guide bar and saw chain, @ 14.2.2.
23.2 Inspecting and Maintaining the Chain Sprocket
► Switch off the chain saw, engage the chain brake and
remove the battery.
► Disengage the chain brake, @ 15.2.
► Remove the chain sprocket cover, saw chain and guide
bar.
0458-795-8221-A
► Measure the depth of the guide bar groove in the area with
the greatest wear using the measuring tool on the file
gauge (special accessory, not included).
47

English
1
0000-GXX-1218-A0
2
23 Inspection and Maintenance
► Replace the guide bar if the measured depth is less than
the required minimum depths stated in @ 25.3.
► Check the spread of the guide bar groove with the
measuring tool on the file gauge.
► Replace the guide bar if the groove is narrowed, spread or
shows other signs of substantial wear or damage.
To maintain the guide bar:
► Flip the guide bar after each sharpening and each time the
chain is changed. This will help reduce uneven wear.
There is no "top" or "bottom" of the bar. It may be used in
either orientation, even though the printing on the bar may
be upside down.
3
1
2
► Clean the oil outlet duct (1), oil inlet bore (2) and groove
(3) with a brush, a slightly dampened cloth or resin
solvent, such as STIHL Resin Remover & Lubricant. Do
not use detergents.
► Periodically remove any metal burrs that develop along
the guide bar with a flat file or a STIHL guide bar dressing
tool.
► Replace the guide bar if the burrs cannot be filed or if the
guide bar becomes damaged.
3
23.4 Inspecting, Maintaining and Sharpening the
Saw Chain
WARNING
An improperly sharpened chain can increase the risk of
kickback and other reactive forces, resulting in severe
personal injury or death. For example, depth gauges that are
too low or cutters that are filed incorrectly can increase the
kickback tendency of the chain saw and can increase
kickback forces, making it more difficult to control the saw.
Always review and follow the sharpening angles and
dimensions recommended by STIHL when checking or
sharpening the chain.
WARNING
Never use a dull or damaged chain. This leads to increased
physical strain, increased vibration load, unsatisfactory
cutting results and increased wear. If the chips from cutting
are fine, more like saw dust than wood chips, the chain likely
is dull.
► Switch off the chain saw, engage the chain brake and
remove the battery.
0000-GXX-1215-A0
► Check the height of the depth gauge (1) with a STIHL file
gauge (2) matching the pitch of the chain.
► If the depth gauge protrudes higher than the file gauge,
file the depth gauge to the appropriate height.
48
0458-795-8221-A

23 Inspection and Maintenance
0000-GXX-1372-A0
1
2
3
4
► Work carefully. Do not file the depth gauge too low. A
depth gauge that is too low must be replaced or
sharpened by an authorized STIHL servicing dealer, as it
can increase the kickback tendency of the chain saw and
can increase kickback forces.
STIHL chain is manufactured with wear marks to help the
operator identify excessive wear. The wear marks depicted
above (1 - 4) must remain visible.
► Replace the chain if any wear marks are no longer visible.
► Check the 30° sharpening angle of the cutters with a
STIHL file gauge matching the pitch of the chain.
► If the sharpening angle is incorrect, file the cutters to a 30°
angle.
► If you are unable to achieve the proper angle, or suspect
you have not achieved the proper angle, have the chain
sharpened by an authorized STIHL servicing dealer.
An improperly filed chain can be very dangerous. It can
increase the potential for reactive forces, including kickback,
and also increase the magnitude of those reactive forces.
English
a
0000-GXX-1446-A0
The chain pitch marking (a) is embossed in the area of the
depth gauge of each cutter.
The markings mean the following:
Marking (a) Saw Chain Pitch
11/4"
2 .325"
33/8"
4 .404"
6 3/8" PICCO
7 1/4" PICCO
To sharpen the chain:
► Switch off the chain saw, engage the chain brake and
remove the battery.
► Select a chain file with a diameter matching the pitch of
the chain.
Other files are unsuitable and can result in improperly filed
chain, which can increase the potential and force of
kickback and other reactive forces.
► Clamp the guide bar if necessary to make filing easier.
► To advance the chain, first disengage the chain brake,
@ 15.2.
► Use a file holder.
File holders have markings that indicate the proper
sharpening angle.
0458-795-8221-A
49

English
0000-GXX-1219-A0
0000-GXX-1220-A1
23 Inspection and Maintenance
► File all the cutters with an identical angle. Two or three
strokes of the file are usually sufficient for simple
resharpening. Remove a little material with each stroke.
Sharpening at varying or inconsistent angles or heights
can be very dangerous and may result in rough or uneven
running of the chain and increased wear, even to the point
of chain breakage. It also can increase the tendency and
force of kickback and other reactive forces.
► Guide the file horizontally at a right angle to the side
surface of the guide bar in accordance with the specified
angle.
► File only from the inside of the cutter outward.
► Lift the file on the backstroke. The file only sharpens on
the forward stroke.
► Do not file tie straps or drive links.
► Periodically rotate the file in order to avoid uneven wear.
► To remove a file burr from the cutter tooth, run the cutter
across a piece of hardwood.
► Check the sharpening angle with a file gauge.
All cutters must be of equal length and filed down to the
length of the shortest cutter. Otherwise, the tendency and
force of kickback and other reactive forces will increase.
STIHL recommends having your chain sharpened by an
authorized STIHL servicing dealer to reduce the risk of
severe or fatal injury from an improperly sharpened chain.
WARNING
Depth gauges that are too low increase the potential and
force of kickback and other reactive forces, which can
increase the risk of serious personal injury. Always maintain
the proper distance (a) between the depth gauge and the top
of the cutter.
a
0000-GXX-1447-A0
The depth gauge determines the depth to which the cutter
penetrates the wood and thus the chip thickness.
A depth gauge that is too low will increase the kickback
tendency of the chain saw and can increase kickback forces.
A depth gauge that is too high will prevent the cutter from
entering the workpiece and will lead to poor cutting
performance. Always keep the required distance (a)
between depth gauge and cutting edge, @ 25.4.
50
0458-795-8221-A

23 Inspection and Maintenance
To properly lower the depth gauge:
► Lay the appropriate file gauge for the chain pitch on the
chain and press it against the cutter to be checked. If the
depth gauge protrudes past the file gauge, the depth
gauge must be filed down.
► File the depth gauge so that it is flush with the top of the
file gauge.
► Afterwards, remove the file gauge and file the leading
edge of the depth gauge parallel to the service mark.
When doing this, be careful not to further lower the highest
point of the depth gauge.
► Lay the file gauge on the chain to check the height of the
file gauge. The highest point of the depth gauge must be
flush with the top of the file gauge.
► After sharpening, clean the chain thoroughly, removing
any filings or grinding dust.
► Oil the chain thoroughly.
English
0458-795-8221-A
51

English
24 Troubleshooting Guide
24.1 Chain Saw and Battery
Always remove the battery before carrying out any inspection, cleaning or maintenance.
Condition LEDs on
Battery
Chain saw does not
start when switched
on.
1 LED flashes
green.
STIHL AR only:
Additionally,
four long beeps
are emitted.
1 LED glows
red.
4 LEDs flash
red.
STIHL AR only:
Additionally, a
rapid
succession of
short beeps is
emitted.
3 LEDs glow
red.
3 LEDs flash
red.
Possible Cause Remedy
No electrical contact
between chain saw
and battery.
Battery has low
charge.
Battery too hot / too
cold.
Malfunction in
battery.
Chain saw too hot. ► Allow the chain saw to cool down.
Malfunction in chain
saw.
► Remove the battery, @ 16.2.
► Engage the chain brake, @ 15.1.
► Visually check the electrical contacts in the battery
compartment and on the battery.
► Reinsert the battery, @ 16.1.
► Charge the battery, @ 11.
► Allow the battery to warm up or cool down gradually at
ambient temperatures of about 50 °F to 68 °F (10 °C to
20 °C).
► Remove the battery and reinsert it, @ 16.
► Switch on the chain saw, @ 17.1.
► If the LEDs continue to flash, do not attempt to use.
The battery has a malfunction and must be replaced.
► Remove the battery and reinsert it, @ 16
► Switch on the chain saw, @ 17.1.
► If the LEDs still flash, do not attempt to use.
The chain saw has a malfunction and must be checked by
a servicing dealer.
24 Troubleshooting Guide
52
0458-795-8221-A

24 Troubleshooting Guide
Always remove the battery before carrying out any inspection, cleaning or maintenance.
Condition LEDs on
Battery
Chain saw cuts out
during operation.
1 LED glows
red.
3 LEDs glow
red.
Possible Cause Remedy
Battery too hot / too
cold.
Chain saw too hot.
► Remove the battery, @ 16.2.
► Engage the chain brake, @ 15.1.
► Allow the chain saw and battery to cool down gradually at
ambient temperatures of about 50 °F to 68 °F (10 °C to
20 °C).
English
Runtime is too short. Battery not fully
charged.
Useful life of battery
has been reached or
exceeded.
During sawing, the
wood smokes or
smells burnt.
The chain is dull or
improperly
sharpened.
Working technique is
improper or the saw
is being mis-used.
Insufficient bar and
chain oil.
Battery is not being
charged even though
1 LED glows
red.
Battery too hot / too
cold.
LED on charger
glows green.
► Charge the battery, @ 11.
► Have the battery checked by an authorized STIHL servicing
dealer.
► Properly sharpen the chain, @ 23.4.
► Obtain instruction on proper working technique.
► Have the chain lubrication mechanism checked by an
authorized STIHL servicing dealer.
► Allow the battery to warm up or cool down gradually at
ambient temperatures of about 50 °F to 68 °F (10 °C to
20 °C).
► Operate the charger only in enclosed, dry rooms at ambient
temperatures of 41 °F to 104 °F (5 °C to 40 °C).
0458-795-8221-A
53

English
XXX / YYY
25 Specifications
25 Specifications
25.1 STIHL MSA 220 C
– Approved battery types:
–STIHL AP series
– STIHL AR series
– Weight without battery, guide bar and saw chain:
6.4 lbs. (2.9 kg)
– Maximum oil tank volume: 7.1 oz. (0.21 l)
For technical information regarding the STIHL AP and
AR series batteries, see the product information
accompanying your battery.
For technical information regarding the STIHL AL 101, 300
and 500 series chargers, see the product information
accompanying your charger.
Batteries, chargers and other accessories sold separately.
Contact your authorized STIHL servicing dealer for pricing
and availability.
25.2 Chain Sprockets
The following chain sprockets are available for this model
chain saw:
– 6-tooth for 3/8" PICCO pitch
– 7-tooth for 1/4" pitch
25.4 Depth Gauge Setting
The depth gauge setting of a saw chain depends on the pitch
of the chain.
– Depth gauge setting for 3/8" PICCO pitch chains:
0.026 in. (0.65 mm)
– Depth gauge setting for 1/4" pitch chains: 0.018 in.
(0.45 mm)
25.5 Symbols on the Chain Saw
Symbol Explanation
VVolt
Maximum guide bar length
XXX
Saw chain
XXX
Maximum computed kickback angle without
chain brake / Maximum computed kickback
angle with chain brake
Engage the chain brake
Disengage the chain brake
Chain oil tank
25.3 Minimum Groove Depth of Guide Bars
The minimum groove depth of a guide bar depends on the
pitch of the guide bar.
– Minimum groove depth for 3/8" PICCO pitch guide bars:
0.197 in. (5 mm)
– Minimum groove depth for 1/4" pitch guide bars: 0.157 in.
(4 mm)
54
Maximum guide bar length
Direction of saw chain rotation
Turn clockwise to tension the saw chain
Certification/listing mark of CSA
0458-795-8221-A

26 CSA Standard
English
STIHL products must not be disposed of in the
household trash, but only in accordance with local,
state and federal laws and regulations and as
provided in this manual, @ 29.
25.6 Engineering Improvements
STIHL's philosophy is to continually improve all of its
products. As a result, engineering changes and
improvements are made from time to time. Therefore, some
changes, modifications and improvements may not be
covered in this manual. If the operating characteristics or the
appearance of your machine differs from those described in
this manual, please contact your STIHL dealer or the STIHL
distributor for your area for assistance.
25.7 EMC Compliance Statement for Power Tool and Charger
This Class B digital apparatus complies with Canadian
ICES-003.
26 CSA Standard
26.1 Chain Saw Class
This battery powered chain saw is classified according
CSA Z62.1 as a class 2A saw.
– Class 1C: A fuel powered consumer chain saw, intended
for general use by homeowners, cottagers, campers, etc.,
and for general applications such as clearing, pruning and
cutting firewood
– Class 2A: An electrically powered professional chain saw,
intended for use by trained workers, where the operator is
expected to use the chain saw for extended periods of
time on a daily basis
– Class 2B: A battery powered professional chain saw,
intended for use in tree service work, limited to a weight of
5 kg (11 lb) with battery
– Chain saws according to CAN/CSA-C22.2
No. 60745-2-13: An electrically powered consumer chain
saw, intended for general use by homeowners, cottagers,
campers, etc., and for general applications such as
clearing, pruning, and cutting firewood
26.2 Definition of the Chain Saw Classes according to CSA Z62.1
– Class 1A: A fuel powered professional chain saw,
intended for use by trained workers, where the operator is
expected to use the chain saw for extended periods of
time on a daily basis
– Class 1B: A fuel powered professional chain saw for tree
service, limited to a dry weight of 4.3 kg (9.5 lb), intended
for use by trained workers, where the operator is expected
to use the chain saw for extended periods of time on a
daily basis
0458-795-8221-A
55

English
27 Combinations of Guide Bars and Saw Chains
27.1 STIHL MSA 220 C
Pitch Drive link
gauge/Groove
width
3/8“ P
1/4“
1)
Low kickback STIHL saw chain (with green label)
2)
STIHL saw chain (with yellow label)
0.050 in.
(1.3 mm)
0.050 in.
(1.3 mm)
Length Guide bar Number of teeth
of sprocket nose
12 in.
(30 cm)
14 in.
(35 cm)
16 in.
(40 cm)
12 in.
(30 cm)
14 in.
(35 cm)
16 in.
(40 cm)
12 in.
Rollomatic E
Rollomatic E light
(30 cm)
14 in.
(35 cm)
16 in.
(40 cm)
12 in.
(30 cm)
14 in.
(35 cm)
16 in.
(40 cm)
12 in.
(30 cm)
Carving E - 64 13 RMS (Type 3661)
27 Combinations of Guide Bars and Saw Chains
Drive link
Saw chain
count
44
50
63 PS3 (Type 3616)
55
44
50
63 PS (Type 3617)
55
9
44
50
63 PM3 (Type 3636)
55
44
50
63 PD3 (Type 3612)
55
1)
2)
1)
1)
2)
56
0458-795-8221-A

27 Combinations of Guide Bars and Saw Chains
The guide bar and chain combinations listed above meet the
45° computed kickback angle requirement of CSA Z 62.3
when used on this model chain saw with the matching chain
sprocket listed above.
Use replacement guide bars or chains only as listed above
or as listed elsewhere by STIHL as conforming with the 45°
computed kickback angle requirement of CSA Z 62.3 when
used on this model chain saw.
The listed guide bars are green-labeled reduced kickback
STIHL guide bars.
The chains listed below are green-labeled low kickback
STIHL saw chains:
– 63 PS3 (Type 3616)
– 63 PM3 (Type 3636)
– 63 PD3 (Type 3612)
Since new bar/chain combinations may be developed after
publication of this manual, ask your authorized STIHL
servicing dealer for the latest STIHL recommendations.
English
0458-795-8221-A
57

English
28 Replacement Parts and Equipment
28 Replacement Parts and Equipment
28.1 Genuine STIHL Replacement Parts
STIHL recommends the use of genuine STIHL replacement
parts. Genuine STIHL parts can be identified by the STIHL
part number, the logo and, in some cases, by the
STIHL parts symbol . The symbol may appear alone on
small parts.
29 Disposal
29.1 Disposal of the Chain Saw
STIHL products must not be thrown in household trash or
disposed of except as outlined in this manual.
► Take the chain saw, accessories and packaging to an
approved disposal site for environmentally friendly
recycling.
► Contact your authorized STIHL
latest information on disposal and recycling.
29.2 Battery Recycling
servicing dealer for the
STIHL is committed to the development of products
that are environmentally responsible. This
commitment does not stop when the product leaves
the authorized STIHL servicing dealer. STIHL has
partnered with the RBRC (Rechargeable Battery
Recycling Corporation) to promote the collection and
recycling of spent STIHL lithium ion batteries in the
United States and Canada.
The RBRC seal indicates that STIHL has prepaid for battery
recycling. RBRC has a toll free phone number (1-800-822-
8837) that connects you to information on battery recycling
locations and information on battery disposal bans or
restrictions in your area. You can also return your spent
battery to any authorized STIHL servicing dealer for
recycling free of charge.
WARNING
Handle discharged/depleted batteries carefully. Even if
believed to be discharged, lithium ion batteries may never
totally discharge and still may deliver a dangerous short
circuit current. If damaged or exposed to high temperatures,
they may leak, generate heat, catch fire or explode.
► Observe all federal, state and local disposal rules and
regulations.
► Contact your authorized STIHL servicing dealer for the
latest information on waste disposal.
► Recycle depleted batteries promptly.
► Keep batteries away from children. Do not disassemble
and do not dispose of in fire.
58
0458-795-8221-A

Table des matières
français
1 Préface
. . . . . . . . . . . . . . . . . . . . . . . . . . . . . . . . . . . . . . . . . . . .
2 Indications concernant la présente Notice
d'emploi
2.1 Mentions d’avertissement
2.2 Symboles employés dans le texte
3 Principales pièces
3.1 Tronçonneuse et batterie
. . . . . . . . . . . . . . . . . . . . . . . . . . . . . . . . . . . . . . . . . . . .
. . . . . . . . . . . . . . . . . . . . . . . . . .
. . . . . . . . . . . . . . . . . .
. . . . . . . . . . . . . . . . . . . . . . . . . . . . . . . . . .
. . . . . . . . . . . . . . . . . . . . . . . . . . .
4 Symboles de sécurité sur les produits
4.1 Tronçonneuse
Notice d'emploi d'origineImprimé sur papier blanchi sans chlore
4.2 Batterie
. . . . . . . . . . . . . . . . . . . . . . . . . . . . . . . . . . . . . .
. . . . . . . . . . . . . . . . . . . . . . . . . . . . . . . . . . . . . . . . . . . .
5 CONSIGNES DE SÉCURITÉ IMPORTANTES
5.1 Utilisation prévue
5.2 Opérateur
. . . . . . . . . . . . . . . . . . . . . . . . . . . . . . . . . . .
. . . . . . . . . . . . . . . . . . . . . . . . . . . . . . . . . . . . . . . . . .
5.3 Équipement de protection individuelle
5.4 Tronçonneuse
5.5 Utilisation de la tronçonneuse
6 Rebond et autres forces réactives
6.1 Forces réactives
6.2 Rebond
6.3 Accrochage
6.4 Refoulement
. . . . . . . . . . . . . . . . . . . . . . . . . . . . . . . . . . . . . .
. . . . . . . . . . . . . . . . . . . . . .
. . . . . . . . . . . . . . . . . .
. . . . . . . . . . . . . . . . . . . . . . . . . . . . . . . . . . .
. . . . . . . . . . . . . . . . . . . . . . . . . . . . . . . . . . . . . . . . . . . .
. . . . . . . . . . . . . . . . . . . . . . . . . . . . . . . . . . . . . . . .
. . . . . . . . . . . . . . . . . . . . . . . . . . . . . . . . . . . . . . .
7 Techniques appropriées pour le tronçonnage de
L'encre d'imprimerie contient des huiles végétales, le papier
est recyclable.
base, l’ébranchage, l’élagage et l’abattage
7.1 Utilisations prévues
7.2 Tronçonnage
7.3 Ébranchage
7.4 Élagage
. . . . . . . . . . . . . . . . . . . . . . . . . . . . . . . . . . . . . . . .
. . . . . . . . . . . . . . . . . . . . . . . . . . . . . . . . . . . . . . . . . . . .
7.5 Coupe de billes sous tension
7.6 Abattage
. . . . . . . . . . . . . . . . . . . . . . . . . . . . . . . . . . . . . . . . . . .
8 Sécurité de la batterie
8.1 Avertissements et instructions
. . . . . . . . . . . . . . . . . . . . . . . . . . . . . . . .
. . . . . . . . . . . . . . . . . . . . . . . . . . . . . . . . . . . . . . .
. . . . . . . . . . . . . . . . . . . . . . .
. . . . . . . . . . . . . . . . . . . . . . . . . . . . . .
. . . . . . . . . . . . . . . . . . . . . .
9 Maintenance, réparation et rangement
9.1 Avertissements et instructions
. . . . . . . . . . . . . . . . . . . . . .
. . . . . . . . . . . . . .
. . . . . .
. . . . . . . . . . . . . .
. . . . . . . . .
. . . . . . . . . . . . .
10 Avant d'entreprendre le travail
61
. . . . . . . . . . . . . . . . . . . . . .
10.1 Préparation de la tronçonneuse en vue de
61
61
61
62
62
63
63
63
64
64
65
66
67
69
75
75
75
80
81
l’utilisation
11 Recharge de la batterie
11.1 Installation du chargeur
11.2 Charge
12 DEL de diagnostic et signaux sonores
12.1 Batterie STIHL AP
12.2 Batterie en sac à dos STIHL AR
13 Batterie en sac à dos STIHL AR
13.1 Positionnement et réglage du cordon de
raccordement
13.2 Passage et ajustement du harnais
14 Assemblage de la tronçonneuse
14.1 Outil de coupe
14.2 Montage et démontage du guide-chaîne et de la
chaîne
14.3 Tendre la chaîne
14.4 Lubrification de la chaîne coupante et du guidechaîne
15 Le frein de chaîne
15.1 Serrage du frein de chaîne
15.2 Desserrage du frein de chaîne
81
15.3 Maintenance du frein de chaîne
81
16 Insertion et retrait de la batterie
82
16.1 Insertion de la batterie
83
16.2 Retrait de la batterie
83
17 Mise en marche et arrêt de la tronçonneuse
84
17.1 Mise en marche
85
17.2 Mise à l’arrêt
89
18 Contrôle de la tronçonneuse
89
18.1 Contrôle du fonctionnement du frein de chaîne
91
18.2 Vérification des commandes
91
18.3 Test de la lubrification de la chaîne
. . . . . . . . . . . . . . . . . . . . . . . . . . . . . . . . . . . . . . . . .
. . . . . . . . . . . . . . . . . . . . . . . . . . . .
. . . . . . . . . . . . . . . . . . . . . . . . . . . .
. . . . . . . . . . . . . . . . . . . . . . . . . . . . . . . . . . . . . . . . . . . .
. . . . . . . . . . . . . . . . . . . . . . . . . . . . . . . . .
. . . . . . . . . . . . . . . . . . .
. . . . . . . . . . . . . . . . . . . .
. . . . . . . . . . . . . . . . . . . . . . . . . . . . . . . . . . . . . .
. . . . . . . . . . . . . . . . . . .
. . . . . . . . . . . . . . . . . . . . . . . . . . . . . . . . . . . . .
. . . . . . . . . . . . . . . . . . . . . . . . . . . . . . . . . . . . . . . . . . . . .
. . . . . . . . . . . . . . . . . . . . . . . . . . . . . . . . . .
. . . . . . . . . . . . . . . . . . . . . . . . . . . . . . . . . . . . . . . . . . . .
. . . . . . . . . . . . . . . . . . . . . . . . . . . . . . . . .
. . . . . . . . . . . . . . . . . . . . . . . .
. . . . . . . . . . . . . . . . . . . .
. . . . . . . . . . . . . . . . . . .
. . . . . . . . . . . . . . . . . . .
. . . . . . . . . . . . . . . . . . . . . . . . . . . .
. . . . . . . . . . . . . . . . . . . . . . . . . . . . . .
. . . . . . . . . . . . . . . . . . . . . . . . . . . . . . . . . . .
. . . . . . . . . . . . . . . . . . . . . . . . . . . . . . . . . . . . . .
. . . . . . . . . . . . . . . . . . . . . .
. . . . . . . . . . . . . . . . . . . . . .
. . . . . . . . . . . . . .
. . . . . . . . . . . . . . . . .
. . . . . . .
. . . .
. . . . . . . . . . . . . . .
92
92
92
92
93
94
94
95
96
96
97
98
98
98
100
101
103
103
103
104
104
104
104
105
105
106
106
106
106
107
© ANDREAS STIHL AG & Co. KG 2019
0458-795-8221-A. VA0.C19.
0000008767_001_F
0458-795-8221-A
La présente Notice d'emploi est protégée par des droits d'auteur. Tous droits réservés, en particulier tout droit de copie, de traduction et de traitement avec des systèmes électroniques quelconques.
59

français
Table des matières
19 Après avoir terminé le travail
19.1 Préparation pour le transport ou l’entreposage
20 Transport de la tronçonneuse et de la batterie
20.1 Tronçonneuse
20.2 Batterie
. . . . . . . . . . . . . . . . . . . . . . . . . . . . . . . . . . . .
. . . . . . . . . . . . . . . . . . . . . . . . . . . . . . . . . . . . . . . . . . .
21 Stockage de la tronçonneuse et de la batterie
21.1 Tronçonneuse
21.2 Batterie
22 Nettoyage
. . . . . . . . . . . . . . . . . . . . . . . . . . . . . . . . . . . .
. . . . . . . . . . . . . . . . . . . . . . . . . . . . . . . . . . . . . . . . . . .
. . . . . . . . . . . . . . . . . . . . . . . . . . . . . . . . . . . . . . . . .
22.1 Nettoyage de la tronçonneuse et de la batterie
. . . . . . . . . . . . . . . . . . . . . .
. . . .
. . . . .
. . . . .
. . . .
22.2 Nettoyage du guide-chaîne et de la chaîne
coupante
23 Inspection et maintenance
23.1 Inspection et maintenance de la tronçonneuse
23.2 Inspection et maintenance du pignon
23.3 Inspection et maintenance du guide-chaîne
. . . . . . . . . . . . . . . . . . . . . . . . . . . . . . . . . . . . . . . . . .
. . . . . . . . . . . . . . . . . . . . . . . . .
. . . .
. . . . . . . . . . . . . .
. . . . . . .
23.4 Inspection, maintenance et affûtage de la chaîne
coupante
24 Guide de dépannage
24.1 Tronçonneuse et batterie
25 Spécifications
25.1 STIHL MSA 220 C
25.2 Pignons
. . . . . . . . . . . . . . . . . . . . . . . . . . . . . . . . . . . . . . . . . .
. . . . . . . . . . . . . . . . . . . . . . . . . . . . . .
. . . . . . . . . . . . . . . . . . . . . . . . . .
. . . . . . . . . . . . . . . . . . . . . . . . . . . . . . . . . . . . .
. . . . . . . . . . . . . . . . . . . . . . . . . . . . . . . .
. . . . . . . . . . . . . . . . . . . . . . . . . . . . . . . . . . . . . . . . . . .
25.3 Profondeur de rainure minimale des guidechaines
25.4 Réglage de la jauge de profondeur
25.5 Symboles sur la tronçonneuse
25.6 Améliorations technologiques
. . . . . . . . . . . . . . . . . . . . . . . . . . . . . . . . . . . . . . . . . . .
. . . . . . . . . . . . . . . .
. . . . . . . . . . . . . . . . . . . .
. . . . . . . . . . . . . . . . . . . . .
25.7 Déclaration de conformité de l'appareil et du
chargeur avec la directive CEM (sur la
compatibilité électromagnétique)
26 Norme CSA
. . . . . . . . . . . . . . . . . . . . . . . . . . . . . . . . . . . . . . .
26.1 Classe de tronçonneuse
. . . . . . . . . . . . . . . . . . . . . . . . . .
. . . . . . . . . . . . . . . . . .
26.2 Définition des classes de tronçonneuse selon
CSA Z62.1
. . . . . . . . . . . . . . . . . . . . . . . . . . . . . . . . . . . . . . . .
27 Combinaisons de guide-chaînes et de chaînes
coupantes
27.1 STIHL MSA 220 C
. . . . . . . . . . . . . . . . . . . . . . . . . . . . . . . . . . . . . . . . .
. . . . . . . . . . . . . . . . . . . . . . . . . . . . . . . .
107
107
108
108
108
109
109
109
110
110
110
110
110
111
111
112
116
116
118
118
118
118
118
118
119
119
119
119
119
120
120
28 Pièces de rechange et équipement
. . . . . . . . . . . . . . . .
28.1 Pièces de rechange originales STIHL
29 Élimination
29.1 Mise au rebut de la tronçonneuse
29.2 Recyclage de la batterie
. . . . . . . . . . . . . . . . . . . . . . . . . . . . . . . . . . . . . . . .
. . . . . . . . . . . . . . . . .
. . . . . . . . . . . . . . . . . . . . . . . . . .
. . . . . . . . . . . . .
122
122
122
122
122
60
0458-795-8221-A

1 Préface
français
1Préface
Nous vous remercions pour votre achat. Les informations
contenues dans le présent manuel vous aideront à obtenir
des performances et une satisfaction maximales de votre
tronçonneuse STIHL et, si elles sont respectées, réduiront le
risque de blessure résultant de son utilisation.
CONSERVEZ CE MANUEL !
Une tronçonneuse étant un outil de coupe du
bois à grande vitesse, des précautions
particulières doivent être observées pour réduire
le risque de blessures.
Lisez attentivement le présent manuel
d’utilisation avant utilisation et consultez-le
ensuite régulièrement. Respectez toutes les
consignes de sécurité. Une utilisation
imprudente ou inadaptée de la tronçonneuse
peut entraîner des blessures graves, voire
mortelles.
Demandez à votre distributeur agréé STIHL de vous montrer
comment utiliser votre tronçonneuse. Toutes les consignes
de sécurité qui sont généralement observées lors des
travaux avec une hache ou une scie à main doivent
également être appliquées à l’utilisation des tronçonneuses.
Observez toutes les règlementations de sécurité, normes et
ordonnances en vigueur au niveau national, régional et
local.
Ne prêtez et ne louez pas votre tronçonneuse sans le
présent manuel d’utilisation. N’autorisez l’utilisation de la
tronçonneuse qu’à des personnes ayant suivi la formation
appropriée et qui comprennent parfaitement les
informations contenues dans le présent manuel.
Pour plus d’informations, ou si vous ne comprenez pas
certaines instructions du présent manuel, veuillez consulter
le site www.stihl.ca ou prendre contact avec un distributeur
agréé STIHL.
2 Indications concernant la présente
Notice d'emploi
2.1 Mentions d’avertissement
Ce manuel contient des informations de sécurité qui
nécessite votre attention particulière et qui sont signalées
par les symboles et les mentions d’avertissement suivants :
DANGER
Indique une situation dangereuse qui, si elle n’est pas
évitée, entraînera la mort ou des blessures graves.
AVERTISSEMENT
Indique une situation dangereuse qui, si elle n’est pas
évitée, pourrait entraîner la mort ou des blessures graves.
AVIS
Indique un risque de dommages matériels, y compris les
dommages à la machine ou à ses composants individuels.
2.2 Symboles employés dans le texte
Le symbole suivant est inséré dans le texte pour vous
faciliter l'utilisation de la présente Notice :
Ce symbole renvoie au chapitre ou sous-chapitre
indiqué, de la présente Notice d'emploi.
0458-795-8221-A
61

français
3 Principales pièces
3 Principales pièces
3.1 Tronçonneuse et batterie
1
8
7
2
3
11
10
9
12
13
15
14
16
17
18
19
1 Protège-main arrière
Aide à protéger la main droite de l’opérateur dans le cas
où la chaîne se brise ou se détache du guide.
2 Pignon
Entraîne la chaîne coupante.
3 Roue dentée de tension
Déplace le guide-chaîne et tend ou détend la chaîne
coupante.
4
20
5
6
22
21
4Griffe
Aide à maintenir la tronçonneuse stable contre l’arbre
pendant la coupe.
5 Chaîne coupante
Outil de coupe denté composé de gouges, de liens
d’attache et de maillons-guides.
6 Guide-chaîne
Supporte et guide la chaîne coupante.
7 Couvercle de pignon
Recouvre le pignon.
8 Molette de réglage
Permet un réglage précis de la tension de la chaîne.
9 Attrape-chaîne
Aide à retenir la chaîne coupante et réduit le risque de
contact avec l’opérateur dans le cas où la chaîne se
brise ou se détache du guide.
10 Écrou papillon
Fixe le couvercle de pignon à la tronçonneuse.
11 Protège-main avant
Aide à protéger la main gauche de l’opérateur contre les
branches qui dépassent et le contact avec la chaîne.
Sert le levier d’activation pour le frein de chaîne.
12 Leviers de verrouillage
Bloquent la batterie dans son logement.
13 Logement de la batterie
0000-GXX-3094-A1
Accueille la batterie.
14 Poignée arrière
Poignée pour la main droite de l’opérateur.
15 Fourreau de chaîne
Couvre le guide-chaîne et la chaîne coupante afin de
réduire le risque de blessure par un contact involontaire
pendant le transport et le stockage.
16 Poignée avant
Poignée pour la main gauche de l’opérateur.
17 Bouchon du réservoir à huile
Ferme hermétiquement le réservoir à huile.
62
0458-795-8221-A

4 Symboles de sécurité sur les produits
français
18 Bouton de blocage de la gâchette
Il faut enfoncer ce bouton pour pouvoir actionner la
gâchette.
19 Gâchette
Met en marche et arrête le moteur.
20 Batterie
Fournit l’énergie électrique au moteur.
21 DEL sur la batterie
Indiquent l’état de charge de la batterie et signalent des
messages d’erreur concernant d’éventuels
dysfonctionnements au niveau de la batterie ou de l’outil
électrique.
22 Bouton poussoir
Active les DEL de la batterie.
# Plaque signalétique
Comporte des caractéristiques électriques ainsi que le
numéro de série du produit.
4 Symboles de sécurité sur les produits
4.1 Tronçonneuse
Les symboles de sécurité suivants se trouvent sur la
tronçonneuse :
Pour réduire le risque de blessure, respectez les
consignes de sécurité spécifiées.
Lisez et observez toutes les consignes de
sécurité dans le manuel d’utilisation. Une
utilisation incorrecte peut causer des blessures
graves, voire mortelles, ou des dommages
matériels.
Pour réduire tout risque de lésion corporelle
grave et de perte de l’audition, portez toujours
une protection oculaire appropriée, une
protection auditive et un casque homologué,
@ 5.3.
Évitez tout contact du nez du guide-chaîne avec
un objet quelconque. Cela pourrait provoquer un
rebond soudain du guide-chaîne vers le haut et
l’arrière et entraîner ainsi des blessures graves,
voire mortelles. Il faut toujours tenir la
tronçonneuse à deux mains pendant l’utilisation,
@ 6.
Pour réduire tout risque de blessure ou de
dommage matériel résultant d’une activation
involontaire, retirez la batterie à chaque fois que
la tronçonneuse n’est pas utilisée, @ 5.5.
4.2 Batterie
Les symboles de sécurité suivants se trouvent sur la batterie
en sac à dos série AR et sur la batterie série AP :
Batterie en sac à dos série AR et batterie série AP
Pour réduire le risque de blessure, respectez les
consignes de sécurité spécifiées.
Lisez et observez toutes les consignes de
sécurité dans le présent manuel de la batterie et
dans le manuel de l’outil électrique STIHL
alimenté par cette batterie. Une utilisation
incorrecte peut causer des blessures graves,
voire mortelles, ou des dommages matériels.
Pour réduire le risque de blessures ou de
dommages matériel résultant d’un incendie,
d’une explosion ou de brûlures, y compris les
brûlures chimiques, ne démontez pas la
batterie, ne la broyez pas, ne l’endommagez
pas et ne la chauffez pas à plus de 212 °F
(100 °C). Ne l’exposez jamais au feu et ne
l’incinérez pas, @ 8.
0458-795-8221-A
63

français
5 CONSIGNES DE SÉCURITÉ IMPORTANTES
Pour réduire le risque de blessures ou de
dommages matériel résultant d’un incendie,
l’utilisez et stockez uniquement dans une plage
de températures ambiantes de 14 °F à 122 °F (10 °C à 50 °C), @ 8.
Batterie en sac à dos série AR seulement
Pour réduire tout risque de blessures ou de
dommages matériel résultant d’un court-circuit,
d’un incendie ou d’une explosion, gardez-la au
sec. Protégez-la contre la pluie, l’eau, les
liquides et les conditions humides. Ne
l’immergez jamais dans l’eau ou d’autres
liquides, @ 8.
Batterie série AP seulement
Pour réduire tout risque de blessures ou de
dommages matériel résultant d’un court-circuit,
d’un incendie ou d’une explosion, gardez-la au
sec. Ne l’immergez jamais dans l’eau ou
d’autres liquides, @ 8.
Batteries vendues séparément.
5 CONSIGNES DE SÉCURITÉ
IMPORTANTES
5.1 Utilisation prévue
AVERTISSEMENT
■ Cette tronçonneuse est destinée à la coupe d'arbres et de
branches de petit et moyen diamètre. Elle n’est pas
conçue pour l’abattage de grands arbres ou la coupe de
billes de grand diamètre. L’utilisation de la tronçonneuse
pour des opérations différentes de celles pour lesquelles
elle a été conçue peut entraîner de graves blessures et
même la mort.
– Coupez uniquement du bois. N’utilisez pas, par
exemple, la tronçonneuse pour couper du métal, du
plastique ou des éléments de maçonnerie.
– N'utilisez cette tronçonneuse que pour des travaux
de coupe légers ou modérés.
– Ne l’utilisez pas pour un quelconque autre usage.
■ Une tronçonneuse plus puissante et plus rapide peut être
nécessaire pour la découpe d’arbres, de billes ou de
branches de plus grande taille, ce afin de réduire les
risques de coincement, de calage ou d’autres risques
causés par un changement des conditions pendant les
périodes de coupe plus longues. Cette tronçonneuse sur
batterie ne convient pas pour couper des arbres et des
billes de grande taille, et son utilisation pourrait entraîner
une perte de contrôle de l’objet coupé ainsi que des
blessures graves ou la mort.
– Avant de commencer toute opération d'abattage,
chargez complètement votre batterie STIHL AP ou
AR.
■ Avant de commencer toute opération de tronçonnage,
d’ébranchage, de taille/élagage ou d’abattage, veillez à ce
que toutes les coupes nécessaires pourront être
terminées avec la charge restante dans la batterie STIHL
série AP ou AR. Si vous n'êtes pas sûr :
– Ayez plusieurs batteries chargées à portée de main ;
– Choisissez une tronçonneuse plus puissante ;
– Choisissez une batterie plus puissante ; ou
– Consultez un professionnel de l'abattage d'arbres
digne de confiance.
■ Lisez et observez les instructions d’utilisation du présent
manuel pour les applications approuvées et les
techniques de travail recommandées.
64
0458-795-8221-A

5 CONSIGNES DE SÉCURITÉ IMPORTANTES
français
■ La tronçonneuse comporte de nombreuses gouges
tranchantes. Si elles entrent en contact avec votre chair,
elles vous couperont même si la chaîne est immobile.
– Portez toujours des gants de travail robustes lors de
la manipulation de tronçonneuse ou de sa chaîne.
– Gardez les mains, les pieds et les autres parties du
corps à distance de la chaîne.
■ Les forces de réaction, y compris le rebond, peuvent être
dangereuses.
– Accordez une attention particulière à la section du
présent manuel qui concerne les forces réactives.
■ Observez toutes les règlementations de sécurité, normes
et ordonnances en vigueur au niveau national, régional et
local.
■ Un usage incorrect risque d’entraîner des lésions
corporelles ou des dommages matériels, y compris des
dommages à la tronçonneuse.
– Utilisez la tronçonneuse et la batterie uniquement de
la manière décrite dans le présent manuel.
– N’essayez jamais de modifier ou de neutraliser
d’une manière quelconque les dispositifs de
commande et de sécurité de la tronçonneuse.
– N’utilisez jamais une tronçonneuse qui a été
modifiée ou transformée par rapport à sa conception
originale.
– Assurez-vous de lire et de suivre les avertissements
et les instructions de votre batterie et de votre
chargeur avant de charger ou de commencer à
travailler.
■ Cet outil électrique peut être alimenté par une batterie
STIHL série AP. Il peut également être alimenté par une
batterie à dos STIHL série AR en combinaison avec un
adaptateur AP.
Les batteries, chargeurs et autres accessoires sont vendus
séparément.
5.2 Opérateur
AVERTISSEMENT
■ Le travail avec la tronçonneuse peut être fatigant.
L’opérateur doit être en bonne condition physique et
mentale. Pour réduire tout risque de blessure résultant de
la fatigue ou d’une perte de contrôle :
– Consultez votre médecin avant d’utiliser la
tronçonneuse si vous avez un problème de santé qui
peut-être être aggravé par un travail pénible.
– N’utilisez pas la tronçonneuse pendant que vous
êtes sous l'influence d’une substance quelconque
(drogue, alcool, médicaments, etc.) qui peut altérer
la vision, l'équilibre, la dextérité ou le jugement.
– Soyez vigilant. N’utilisez pas la tronçonneuse
lorsque vous êtes fatigué. Faites une pause lorsque
vous vous sentez fatigué.
– N’autorisez pas les mineurs à utiliser la
tronçonneuse.
– Il convient que les spectateurs, notamment les
enfants et les animaux, ne soient pas autorisés dans
la zone d’utilisation de la tronçonneuse.
■ L'utilisation prolongée d'une tronçonneuse (ou d’autres
outils électriques) exposant l'utilisateur à des vibrations
peut produire la maladie du doigt mort (phénomène de
Raynaud) ou le syndrome du canal carpien. Ces
conditions réduisent la capacité de la main à ressentir et
à réguler la température. Elles produisent un
engourdissement et des sensations de brûlure et peuvent
également causer des dommages nerveux et circulatoire
ainsi qu’une nécrose des tissus.
■ Tous les facteurs qui contribuent à la maladie des doigts
morts ne sont pas connus. Le temps froid, le fait de fumer
et des maladies ou conditions physiques qui affectent les
vaisseaux sanguins et le transport du sang, ainsi que des
niveaux de vibration élevés et de longues périodes
d’exposition aux vibrations, sont mentionnés comme des
facteurs favorisant le développement de la maladie des
doigts morts.
0458-795-8221-A
65

français
5 CONSIGNES DE SÉCURITÉ IMPORTANTES
■ Pour réduire le risque de maladie des doigts morts et de
syndrome du canal carpien :
– Portez des gants et gardez vos mains au chaud.
– Gardez la tronçonneuse en bon état. Une
tronçonneuse mal entretenue ou dont certains
éléments sont desserrés aura tendance à avoir des
niveaux de vibrations plus élevés.
– Gardez la chaîne bien affûtée. Une chaîne
émoussée prolongera le temps de coupe et
l’enfoncement d’une chaîne émoussée à travers le
bois augmentera les vibrations transmises aux
mains.
– Assurez un maintien ferme à tout moment, mais ne
comprimez pas les poignées avec une pression
constante et excessive. Faites des pauses
fréquentes.
■ Ces précautions ne garantissent pas que vous ne
souffriez pas de la maladie des doigts morts ou du
syndrome du canal carpien.
– Surveillez de près l’état de vos mains et de vos
doigts si vous êtes un opérateur régulier.
– Consultez immédiatement un médecin si l’un des
symptômes ci-dessus apparaît.
■ D’après les connaissances actuelles de STIHL, le moteur
électrique de cette tronçonneuse ne devrait pas
provoquer d’interférences avec un stimulateur cardiaque.
– Il convient cependant que les porteurs de
stimulateur cardiaque ou d’un autre dispositif
médical implanté consultent leur médecin et le
fabricant du dispositif avant d’utiliser cette
tronçonneuse.
5.3 Équipement de protection individuelle
AVERTISSEMENT
■ Pour réduire les risques de lésion corporelle :
– Portez toujours des vêtements adéquats et une
combinaison de protection ainsi qu’une protection
oculaire appropriée.
■ Le contact des cheveux, des vêtements ou de la
combinaison avec la chaîne coupante en mouvement ou
le fait qu’ils soient happés par d’autres composants de la
tronçonneuse peut entraîner une perte de contrôle et de
graves coupures. Pour réduire les risques de lésion
corporelle grave :
– Portez des vêtements robustes et bien
ajustés qui offrent également une totale
liberté de mouvement.
– Portez des types de salopettes, de
pantalons ou de jambières avec
rembourrage intégré en matériau
retardant la coupe.
– Portez une chemise ou une veste à manches
longues.
– Évitez les vestes amples, les foulards, les cravates,
les pantalons à pattes d’éléphant ou à revers, les
bijoux et les autres accessoires qui pourraient rester
accrochés aux branches, aux buissons ou à la
chaîne en mouvement.
– Attachez les cheveux au-dessus des épaules avant
de commencer le travail.
■ Pour réduire les risques de lésion oculaire :
– Portez toujours des lunettes protectrices
ou des lunettes de sécurité étanches
avec protection supérieure et latérale
adéquate qui sont résistantes aux chocs
et marquées comme étant conformes à
la norme CSA Z94.
– Pour réduire le risque de blessures au niveau de la
face, STIHL vous recommande de porter également
une visière ou un masque de sécurité au-dessus de
vos lunettes protectrices ou lunettes de sécurité.
66
0458-795-8221-A

5 CONSIGNES DE SÉCURITÉ IMPORTANTES
français
■ Pour réduire le risque de blessure à la tête par des chutes
de branches ou d’autres objets pendant le travail :
– Portez un casque de protection homologué.
■ Une exposition prolongée au bruit des outils électriques
peut entraîner des dommages auditifs permanents. Pour
réduire le risque de lésions auditives :
– Portez des barrières acoustiques
(bouchons d’oreille ou des coquilles
antibruit).
– Il convient que les opérateurs réguliers
fassent contrôler périodiquement leur
audition.
– Soyez particulièrement vigilant et
prudent lorsque vous utilisez une
protection auditive. Votre capacité à
entendre les cris, les alarmes ou d’autres
avertissements sonores est limitée.
■ Une bonne tenue sur pieds est très importante. Pour aider
à garder une bonne tenue sur pieds et réduire le risque de
blessures en travaillant :
– Portez des bottes robustes équipées de
semelles antidérapantes. Les bottes de
sécurité à embout d’acier sont
recommandées. Ne portez pas de
sandales, de tongs, de chaussures à
bout ouvert ou similaire.
■ Pour améliorer votre préhension et aider à protéger vos
mains :
– Portez toujours des gants de travail
antidérapants de robustes en cuir ou en
un autre matériau résistant à l’usure lors
de la manipulation de la tronçonneuse ou
de sa chaîne.
5.4 Tronçonneuse
AVERTISSEMENT
■ Pour réduire le risque d’électrocution :
– N’immergez pas la tronçonneuse dans l’eau ou
d’autres liquides.
– Entreposez la tronçonneuse à l’intérieur.
■ La tronçonneuse comporte de nombreuses gouges
tranchantes. Un contact avec les gouges peut causer de
graves blessures de lacération, même si la chaîne est
immobile. Pour réduire les risques de telles blessures :
– Gardez les mains, les pieds et les autres parties du
corps à distance de la chaîne.
– Portez des gants de travail robustes lors de la
manipulation de la tronçonneuse ou de sa chaîne.
– Ne touchez jamais une chaîne en mouvement avec
votre main ou toute autre partie de votre corps.
– Couvrez le guide-chaîne avec un fourreau de chaîne
avant de transporter ou d’entreposer la
tronçonneuse afin de réduire le risque de blessure
par contact accidentel.
■ Les forces de réaction, y compris le rebond, peuvent être
dangereuses.
– Accordez une attention particulière à la section du
présent manuel intitulée « Rebond et autres forces
réactives », @ 6.
■ Cette tronçonneuse à batterie est destinée uniquement à
la coupe d'arbres et de branches de petit et moyen
diamètre. Une utilisation à d’autres fins peut augmenter le
risque de lésions corporelles et de dommages matériels.
– N’utilisez pas la tronçonneuse pour l’abattage des
grands arbres ou la coupe de billes de grand
diamètre.
– Lisez et observez les instructions d’utilisation du
présent manuel pour les applications approuvées,
@ 7.
■ Pour réduire le risque de blessure à l’utilisateur et aux
spectateurs pendant l’utilisation :
0458-795-8221-A
67

français
5 CONSIGNES DE SÉCURITÉ IMPORTANTES
– Relâchez toujours la gâchette, serrez le
frein de chaîne en amenant le protègemain avant en position et retirez la
batterie avant tout assemblage,
transport, réglage, inspection,
nettoyage, réparation, entretien ou avant
d’entreposer la tronçonneuse et à tout
moment lorsqu’elle n’est pas utilisée.
■ Bien que certains accessoires non autorisés puissent
s’adapter sur votre tronçonneuse STIHL, leur utilisation
peut s’avérer extrêmement dangereuse. Seuls sont
recommandés les accessoires fournis par STIHL ou
expressément autorisés par STIHL pour une utilisation
avec ce modèle spécifique.
– Utilisez uniquement les accessoires livrés ou
expressément autorisés par STIHL.
– N’apportez jamais aucune modification à la
tronçonneuse, quelle qu’elle soit.
– N’essayez jamais de modifier ou de neutraliser
d’une manière quelconque les dispositifs de
commande et de sécurité de la tronçonneuse.
– N’utilisez jamais une tronçonneuse qui a été
modifiée ou transformée par rapport à sa conception
originale.
■ Si la tronçonneuse chute ou est soumise à des chocs
importants similaires :
– Vérifiez qu'il n'est pas endommagé et qu’il
fonctionne normalement avant de poursuivre le
travail.
– Vérifiez que les commandes et les dispositifs de
sécurité, y compris le frein de chaîne, fonctionnent
correctement, @ 18.1.
– Vérifiez les éventuels messages d’erreur des DEL,
@ 12.1.2ou @ 12.2.2..
– Vérifiez que la batterie n’a pas été endommagée.
N’utilisez et ne chargez jamais une batterie
défectueuse, endommagée, fissurée, fuyante ou
déformée.
– Ne travaillez jamais avec une tronçonneuse ou un
batterie endommagée ou dont le fonctionnement est
incorrect. En cas de doute, faites contrôler la
tronçonneuse et la batterie par votre distributeur
agréé STIHL.
■ Si la tronçonneuse ou la batterie sont endommagées, ne
fonctionnent pas correctement, ont été laissées à
l’extérieur ou sont tombées dans l’eau ou d’autres
liquides, leurs composants peuvent ne plus fonctionner
correctement et les dispositifs de sécurité peuvent être
inopérants. Pour réduire les risques de lésion corporelle
et de dommages matériels :
– Faites vérifier la tronçonneuse et la batterie par
votre distributeur agréé STIHL avant toute autre
opération.
■ Les pièces de rechange STIHL authentiques sont
conçues spécifiquement pour correspondre à votre
tronçonneuse et répondent aux exigences de sécurité et
de performances. L’utilisation de pièces qui ne sont pas
autorisées ou homologuées par STIHL peut causer des
blessures graves ou la mort ou des dommages matériels.
– STIHL recommande d’utiliser exclusivement des
pièces de rechange STIHL identiques.
68
0458-795-8221-A

5 CONSIGNES DE SÉCURITÉ IMPORTANTES
français
5.5 Utilisation de la tronçonneuse
5.5.1 Avant l’utilisation
AVERTISSEMENT
■ Une utilisation incorrecte ou non autorisée peut causer
des lésions corporelles ou des dommages matériels.
– Utilisez la tronçonneuse uniquement de la manière
décrite dans le présent manuel.
■ Pour un assemblage correct de la chaîne et de son guide :
– Lisez et observez les instructions relatives au
montage du guide-chaîne et de la chaîne,
@ 14.2.1.
■ La chaîne, le guide-chaîne et le pignon doivent coïncider
entre eux au niveau du calibre et du pas. Avant un
montage ou un remplacement :
– Lisez les informations relatives aux combinaisons de
guide-chaîne et de chaîne, @ 27.
– Lisez et observez les instructions relatives au
rebond et aux autres forces réactives, @ 6.
– Sélectionnez le guide-chaîne le plus court qui
répondra à vos besoins de coupe. Les guidechaînes plus longs ajoutent du poids et peuvent être
plus difficiles à contrôler.
■ Une tension correcte de la chaîne est extrêmement
importante pour maximiser les performances de coupe et
réduire le risque de blessure résultant d’une rupture de la
chaîne, d’un déraillement ou des forces réactives :
– Lisez et observez les instructions relatives à la
tension de la chaîne, @ 14.3.
– Assurez-vous toujours que le couvercle du pignon
est bien serré après avoir tendu la chaîne afin de
fixer le guide-chaîne. Ne démarrez jamais la
tronçonneuse avec le couvercle de pignon desserré
ou manquant.
– Vérifiez une nouvelle fois la tension de la chaîne
après avoir serré le couvercle de pignon.
– Après avoir réglé la chaîne, laissez tourner le moteur
pendant une ou deux minutes, puis arrêtez le moteur
et serrez le frein de chaîne. Retirez la batterie et
revérifiez la tension de la chaîne.
– Contrôlez ensuite la tension de la chaîne à
intervalles réguliers (mais seulement après avoir
serré le frein de chaîne et retiré la batterie).
– Ne coupez jamais avec une chaîne détendue. Si la
chaîne se détend pendant la coupe, arrêtez le
moteur, serrez le frein de chaîne et retirez la batterie
de la tronçonneuse avant de tendre la chaîne. Ne
tentez jamais de régler la chaîne alors que la
batterie est en place.
■ L’utilisation d’une tronçonneuse endommagée, mal
réglée, mal entretenue ou qui n’est pas assemblée
entièrement et de manière sûre peut entraîner un
dysfonctionnement et accroître le risque de blessures
graves ou de mort.
– N’utilisez jamais une tronçonneuse qui est
endommagée, mal entretenue ou qui n’est pas
assemblée entièrement et de manière sécurisée.
– Avant de commencer le travail, vérifiez toujours si
votre tronçonneuse est en bon état et fonctionne
bien, notamment le commutateur de la gâchette, le
bouton de blocage de la gâchette, le protège-main
avant, le frein de chaîne et l’outil de coupe.
– Assurez-vous que la gâchette et le bouton de
blocage de la gâchette se déplacent librement et
retournent toujours en position verrouillée en les
relâchant. La gâchette ne doit pas venir en prise tant
que le bouton de blocage est enfoncé.
– N’essayez jamais de modifier ou de neutraliser
d’une manière quelconque les dispositifs de
commande et de sécurité.
– Si votre tronçonneuse ou une partie de celle-ci est
endommagée ou ne fonctionne pas correctement,
amenez-le à votre distributeur agréé STIHL.
N’utilisez pas la tronçonneuse avant d’avoir corrigé
le problème.
0458-795-8221-A
69

français
5 CONSIGNES DE SÉCURITÉ IMPORTANTES
■ Avant d’insérer la batterie :
– Vérifiez que les contacts dans le logement de la
batterie ne présentent aucune trace de corrosion ni
d’autres corps étrangers et tenez-les propre.
– N’insérez ni n’utilisez jamais une batterie
défectueuse, endommagée, fissurée, fuyante ou
déformée.
– Lisez et observez les instructions relatives à la mise
en marche de la tronçonneuse, @ 17.1.
■ Pour contribuer à réduire les risques de blessure grave ou
mortelle résultant d’un démarrage involontaire :
– Assurez-vous que la gâchette et son bouton de
blocage se trouvent en position d’arrêt au moment
d’insérer la batterie.
– Évitez d’entrer en contact avec le bouton de blocage
de la gâchette et la gâchette lorsque vous saisissez
la poignée arrière de la tronçonneuse.
– Relâchez la gâchette et son bouton de blocage et
serrez le frein de chaîne avant de retirer la batterie.
– Retirez la batterie et serrez le frein de
chaîne avant tout assemblage, transport,
réglage, inspection, nettoyage,
réparation, entretien ou avant
d’entreposer la tronçonneuse et à tout
moment lorsqu’elle n’est pas utilisée.
– Ne laissez jamais la tronçonneuse sans surveillance
lorsque la batterie est en place.
– N’entreposez jamais la batterie dans la
tronçonneuse.
■ Avant de desserrer le frein de chaîne et de mettre votre
tronçonneuse en marche, prenez les mesures suivantes
pour réduire le risque de blessure pouvant résulter des
forces réactives, d’une perte de contrôle ou d’un contact
accidentel avec la chaîne :
– Assurez-vous que le guide-chaîne et la chaîne sont
éloignés de vous-même ainsi que de tous les autres
obstacles et objets, y compris le sol.
– N’essayez jamais de démarrer la tronçonneuse
lorsque le guide-chaîne se trouve dans une coupe
ou un trait de scie. Cela pourrait conduire à des
forces de réaction et des blessures.
– Lisez et observez les instructions relatives à la mise
en marche de la tronçonneuse, @ 17.1.
5.5.2 Tenue et contrôle de la tronçonneuse
AVERTISSEMENT
■
1
■ Pour réduire le risque de blessures résultant d’un
démarrage involontaire lorsque vous saisissez la poignée
arrière ou transportez la tronçonneuse :
– Enroulez étroitement les doigts de votre main droite
autour de la poignée arrière, identifiée par la zone
grisée dans l’illustration ci-dessus (1). Évitez de
0000-GXX-4945-A0
70
0458-795-8221-A

5 CONSIGNES DE SÉCURITÉ IMPORTANTES
0000-GXX-1888-A1
français
saisir la tronçonneuse hors de la zone grisée ou
d’entrer en contact avec le bouton de blocage de la
gâchette ou la gâchette.
■
■ Pour maintenir une prise ferme et bien contrôler votre
tronçonneuse :
– Gardez les poignées propres et sèches à tout
moment. Gardez-les exemptes d’humidité, de poix,
d’huile, de graisse et de résine.
■ Pour réduire le risque de blessures graves ou mortelles à
l’opérateur et aux spectateurs suite à une perte de
contrôle :
– Évitez tout contact d’un objet
quelconque avec le quadrant supérieur
de la pointe du guide-chaîne. Un rebond
risquerait de se produire.
– Tenez toujours la tronçonneuse
fermement avec les deux mains lorsque
vous travaillez.
– Placez votre main gauche sur la poignée avant et la
main droite sur la poignée arrière (voir l’illustration
ci-dessus). Les gauchers doivent également suivre
ces instructions.
– Enroulez étroitement vos doigts autour des
poignées, en gardant les poignées prises en tenaille
entre le pouce et l’index.
– Positionnez la tronçonneuse de manière à ce que
toutes les parties de votre corps soient dégagées de
l’outil de coupe à chaque fois que le moteur est en
marche. Tenez-vous à gauche de la coupe pendant
le tronçonnage, en-dehors du plan de coupe (voir
l’illustration ci-dessus).
– Lisez et observez les avertissements et les
instructions figurant dans le chapitre Rebond et
forces réactives, @ 6.
■ Il est extrêmement dangereux d’utiliser la tronçonneuse
d’une seule main. Lors de l’utilisation d’une seule main, il
est plus difficile de repousser et d’absorber les forces
réactives (refoulement, accrochage, rebond) sans perdre
le contrôle de la tronçonneuse. Il est également plus
difficile d’empêcher le guide-chaîne et la chaîne de
patiner ou de rebondir le long d’une branche ou d’une
bille. Pour réduire le risque de blessures graves ou
mortelles à l’opérateur et aux spectateurs suite à une
perte de contrôle :
– N’essayez jamais d’utiliser la
tronçonneuse d’une seule main.
■ Pour réduire le risque de coupures graves ou mortelles à
l’opérateur et aux spectateurs suite à une perte de
contrôle, gardez une bonne tenue sur pieds et un bon
équilibre à tout moment :
– Soyez particulièrement attentif aux obstacles
cachés, tels que des souches d’arbres, les racines,
les rochers, les trous et les fossés pour éviter de
trébucher, si le terrain est envahi par la végétation
ou humide.
– Soyez extrêmement prudent lorsque vous travaillez
sur des pentes ou un sol irrégulier.
– Pour une meilleure tenue sur pieds, écartez toujours
les branches, les broussailles et les déblais tombés
au sol. Les billes et autres matériaux fraîchement
écorcés peuvent accroître le risque de glissade, de
trébuchement ou de chute.
0458-795-8221-A
71

français
0000-GXX-1889-A0
5 CONSIGNES DE SÉCURITÉ IMPORTANTES
– Soyez extrêmement prudent lorsque vous coupez
des buissons de petite taille, des branches et des
gaules, car le matériau mince peut être capturé dans
la chaîne et être projeté dans votre direction ou vous
déséquilibrer.
■ Pour réduire le risque de blessure résultant d’une perte de
contrôle :
– Ne travaillez jamais sur une échelle, sur
un toit, dans un arbre ou en vous tenant
debout sur tout autre support instable.
– N’utilisez jamais la tronçonneuse au-
dessus de la hauteur des épaules.
– Ne vous penchez pas trop. Gardez une bonne tenue
sur pieds et un bon équilibre à tout moment.
– Ne démarrez jamais la tronçonneuse lorsque le
guide-chaîne se trouve dans une coupe ou un trait
de scie. Cela pourrait conduire à des forces de
réaction et des blessures. Au lieu de cela, retirez le
guide-chaîne de la coupe puis pénétrez-y de
nouveau à pleine vitesse en veillant à éviter tout
contact de la pointe du guide-chaîne avec un objet
quelconque.
■ La griffe est conçue pour offrir un plus grand contrôle de
la tronçonneuse pendant la coupe. Si vous travaillez sans
la griffe, la tronçonneuse risque de vous tirer
soudainement vers l’avant. La conséquence pourrait être
une perte de contrôle ou un rebond si la pointe du guidechaîne frappe un objet.
– Travaillez toujours avec la griffe pour maintenir un
meilleur contrôle de la tronçonneuse.
■ Une pression exercée sur la tronçonneuse en arrivant à la
fin d’une coupe peut entraîner une accélération du guidechaîne et de la chaîne en rotation hors du trait de scie, une
perte de contrôle et une frappe de l’opérateur ou d’un
autre objet. Pour réduire le risque de blessure :
– Soyez prudent en approchant de la fin d’une coupe.
– N’exercez jamais de pression sur la tronçonneuse
lorsque vous atteignez la fin d’une coupe.
– STIHL recommande que les utilisateurs novices de
la tronçonneuse coupent les billes sur un chevalet.
5.5.3 Conditions de travail
AVERTISSEMENT
■ N’utilisez votre tronçonneuse que dans de bonnes
conditions de visibilité à la lumière du jour.
– Reportez le travail si le temps est venteux, brumeux,
pluvieux ou peu clément.
– Ne coupez jamais près de lignes électriques.
■ Votre tronçonneuse est une machine pour une seule
personne.
– Ne permettez-pas à d’autres personnes de se tenir
dans la zone de travail générale.
– Les spectateurs, en particulier les enfants, et les
animaux ne devraient pas être autorisés dans la
zone où il est utilisé.
– Arrêtez immédiatement le moteur si quelqu’un
s’approche de vous.
■ Pour réduire le risque de blessure aux spectateurs et
utilisateurs non autorisés :
– Ne laissez jamais la tronçonneuse sans surveillance
lorsque la batterie est en place.
– Éteignez la tronçonneuse, serrez le frein de chaîne
et retirez la batterie pendant les interruptions du
travail et à tout autre moment lorsque la
tronçonneuse n’est pas utilisée.
72
0458-795-8221-A

5 CONSIGNES DE SÉCURITÉ IMPORTANTES
français
■ Les étincelles générées par le fonctionnement de la
tronçonneuse peuvent enflammer des gaz combustibles,
liquides, vapeurs, poussières inflammables ou d’autres
matériels et substances combustibles. Pour réduire les
risques d’incendie et d’explosion :
– N’utilisez jamais la tronçonneuse dans un endroit où
se trouvent des gaz, liquides, vapeurs, poussières
inflammables ou autres matières et substances
combustibles.
– Lisez et observez les recommandations émises par
les autorités gouvernementales (par exemple le
CCHST) pour identifier et éviter les risques liés aux
gaz, liquides, vapeurs, poussières inflammables ou
autres matières et substances combustibles.
■ Des étincelles peuvent se produire si une chaîne
coupante en rotation heurte une roche ou un autre objet
dur, lesquelles peuvent enflammer des matériaux
inflammables dans certaines circonstances. Les
matériaux inflammables peuvent inclure une végétation et
des buissons secs, en particulier lorsque les conditions
météorologiques sont chaudes et sèches.
– N’utilisez pas votre tronçonneuse à proximité de
matériaux inflammables ou autour d’une végétation
ou de buissons lorsqu’il existe un risque d’incendie
ou de feu incontrôlé.
– Contactez le centre local des pompiers ou le Service
canadien des forêts pour savoir si la végétation et
les conditions météorologiques sont appropriées
pour l’utilisation d’une tronçonneuse.
■ L’utilisation de cette tronçonneuse (y compris l’affûtage de
la chaîne coupante) peut générer de la poussière, un
brouillard d’huile et d’autres substances contenant des
produits chimiques connus pour causer des problèmes
respiratoires, le cancer, des malformations congénitales
et d’autres problèmes de reproduction.
– Consulter les organismes gouvernementaux tels
que l’ECCC, le CCHST et l’ASPC et d’autres
sources faisant autorité sur les matières
dangereuses si vous n’êtes pas familiarisé avec les
risques associés aux substances particulières que
vous coupez ou avec lesquelles vous travaillez.
■ L’inhalation de certaines poussières, en particulier des
poussières organiques tels que les moisissures ou le
pollen, peut provoquer une réaction allergique ou
asthmatique chez les personnes sensibles. Une inhalation
importante ou répétée de la poussière ou d’autres
contaminants aérosols, notamment ceux ayant une taille
de particules plus petites, peut causer des maladies
respiratoires ou autres. Cela inclut la poussière de bois,
notamment en provenance de feuillus, mais aussi de
certains résineux tels que le cèdre rouge de l’ouest.
– Contrôlez autant que possible la poussière (comme
la sciure) et les brouillards (comme le brouillard
d’huile de lubrification de la chaîne) à la source.
– Travaillez toujours avec une chaîne coupante bien
affûtée, qui produit des copeaux de bois plutôt que
des poussières fines.
– Dans la mesure du possible, utilisez la tronçonneuse
de sorte que le vent ou le fonctionnement dirige la
poussière, le brouillard ou les autres particules
soulevés par la tronçonneuse loin de l’opérateur.
– Lorsqu’il est impossible de maintenir les poussières
respirables ou d’autres matières particulaires à des
niveaux de fond ou proches de ceux-ci, portez
toujours un appareil respiratoire homologué par
l’ASPC et adapté aux conditions spécifiques du lieu
de travail. Suives les recommandations des
autorités gouvernementales (par exemple
CCHST/ASPC) et des associations professionnelles
et commerciales.
■ Si la végétation coupée ou la terre environnante est
recouverte d’une substance chimique comme un pesticide
ou un herbicide :
– Lisez et observez les instructions et les
avertissements accompagnant la substance qui
recouvre la végétation ou la terre environnante.
■ L’inhalation de poussière d’amiante est dangereuse et
peut causer des maladies graves, voire mortelles, des
maladies respiratoires ou le cancer, y compris le
0458-795-8221-A
73

français
5 CONSIGNES DE SÉCURITÉ IMPORTANTES
mésothéliome. L’utilisation et la mise au rebut des
produits contenant de l’amiante sont strictement
réglementées par le CCHST et l’ECCC.
– N’utilisez pas la tronçonneuse pour couper ou
désagréger de l’amiante ou des produits contenant
de l’amiante.
– Arrêtez immédiatement le travail et contactez les
autorités compétentes nationales et locales et/ou
l’ECCC, votre employeur ou le représentant local du
CCHST si vous avez des raisons de penser que
vous pourriez être amené à désagréger de
l’amiante.
■ Un contact répété avec de l’huile usée peut causer le
cancer de la peau et son utilisation est nocive pour
l’environnement.
– N’utilisez pas d’huile usagée pour lubrifier le guide-
chaîne et la chaîne de la tronçonneuse STIHL.
5.5.4 Instructions d’utilisation
AVERTISSEMENT
■ Pour réduire les risques de blessures graves résultant
d’un démarrage involontaire :
– Ne touchez jamais une chaîne avec votre main ou
toute autre partie de votre corps lorsque la batterie
est insérée, même si la chaîne ne tourne pas.
– Évitez d’entrer en contact avec le bouton de blocage
de la gâchette et la gâchette lorsque vous saisissez
la poignée de commande de la tronçonneuse.
■ La chaîne continue de se déplacer pendant une courte
période après avoir complètement relâché la gâchette.
– Attendez que la chaîne s’arrête et serrez le frein de
chaîne avant de vous déplacer avec la tronçonneuse
ou de l’abaisser.
■ En cas d’urgence :
– Arrêtez immédiatement le moteur, serrez le frein de
chaîne et retirez la batterie.
■ Votre tronçonneuse est équipée d’un attrape-chaîne. Il est
conçu pour réduire le risque de blessure dans le cas d’une
éjection ou d’une rupture de la chaîne.
– N’utilisez jamais la tronçonneuse lorsque l’attrape-
chaîne est endommagé ou manquant.
■ Un contact avec des corps étrangers pendant la coupe
peut provoquer une rupture ou une éjection de la chaîne,
ou encore amener la tronçonneuse à projeter des débris
dangereux ou rebondir dans la direction de l’opérateur.
Pour réduire les risques de blessures graves ou mortelles
résultant d’un contact avec des corps étrangers :
– Examinez l’arbre, la bille ou la branche avant de
couper.
– Enlevez tous les corps étrangers pour garantir que
le bois est exempt de matériaux tels que des clous,
des pointes, des câbles ou des fils.
– Avant de commencer une coupe, assurez-vous
qu’elle peut être menée à bien sans entrer en
contact avec des objets ou des structures
environnantes telles qu’une clôture ou un ouvrage
en pierre.
■ Vérifiez la chaîne et le guide-chaîne à de courts
intervalles pendant l’utilisation, ou immédiatement si vous
constatez un changement dans le comportement de
coupe :
– Arrêtez le moteur, serrez le frein de chaîne et retirez
la batterie.
– Vérifiez l’état et la tension de la chaîne. Vérifiez
l’absence de dommages sur la chaîne ou le guidechaîne.
74
0458-795-8221-A

6 Rebond et autres forces réactives
0000-GXX-1374-A0
français
– S’il est impossible de tendre correctement la chaîne,
ou si d’autres composants de la tronçonneuse sont
usés ou endommagés, arrêtez immédiatement le
travail et amenez votre tronçonneuse à un
distributeur agréé STIHL pour examen, réparation
ou maintenance.
DANGER
■ Pour réduire le risque d’électrocution :
– N’utilisez jamais cette tronçonneuse à
proximité de fils ou de câbles qui
pourraient être sous tension.
– Ne coupez jamais près de lignes
électriques.
– Ne comptez pas sur l’isolation de la
tronçonneuse pour vous protéger des
électrocutions.
6 Rebond et autres forces réactives
6.1 Forces réactives
AVERTISSEMENT
■ Les forces réactives peuvent survenir à tout moment
lorsque la chaîne tourne. Les forces réactives peuvent
causer des blessures graves ou mortelles.
■ Les puissantes forces utilisées pour couper du bois
peuvent être inversées et agir contre l’opérateur. Si la
chaîne coupante en rotation est soudainement et
considérablement ralentie ou arrêtée par le contact avec
un objet solide comme une bille ou une branche ou si elle
est coincée, des forces réactives peuvent se produire
instantanément.
■ Ces forces réactives peuvent entraîner une perte de
contrôle qui, à son tour, peut causer des blessures graves
ou mortelles.
– Une compréhension des causes de ces forces
réactives peut vous aider à éviter l’élément de
surprise et la perte de contrôle. La surprise favorise
les accidents.
Les forces réactives les plus courantes sont :
– Rebond
– Accrochage
– Refoulement
6.2 Rebond
6.2.1 Rebond
AVERTISSEMENT
Le rebond peut se produire lorsque le nez de la
chaîne en mouvement près du quadrant
supérieur du guide-chaîne entre en contact avec
un objet solide ou est coincé.
■ Lorsque cela se produit, l’énergie qui entraîne la chaîne
peut créer une force qui déplace la tronçonneuse dans
une direction opposée au mouvement de la chaîne à
l’endroit où cette dernière est ralentie ou arrêtée. Cette
réaction peut lancer le guide-chaîne vers le haut et en
arrière dans une réaction à la rapidité de l’éclair,
0458-795-8221-A
75

français
6 Rebond et autres forces réactives
principalement dans le plan du guide-chaîne, et peut
causer des blessures graves, voire mortelles pour
l’opérateur.
■ Le rebond peut se produire, par exemple, lorsque le nez
de la chaîne près du quadrant supérieur du guide-chaîne
entre en contact avec le bois ou se coince pendant
l’ébranchage ou encore en cas d’utilisation incorrecte
pour amorcer une coupe plongeante ou perforante.
■ Plus la force du rebond est élevée, plus il est difficile pour
l’opérateur de contrôler la tronçonneuse. De nombreux
facteurs influencent l’apparition et la force de la réaction
de rebond. Ceux-ci incluent la vitesse de la chaîne, la
vitesse à laquelle le guide-chaîne et la chaîne entrent en
contact avec l’objet, l’emplacement et l’angle de contact,
l’état de la chaîne et la rapidité avec laquelle la chaîne est
ralentie ou arrêtée, entre autres facteurs.
– Le type de guide-chaîne et de chaîne que vous
utilisez est un facteur important dans l’apparition et
la force de la réaction de rebond. Certains types de
guide-chaînes et de chaînes STIHL sont conçus
pour réduire les forces de rebond.
– STIHL recommande d’utiliser des guide-chaînes à
rebond réduit et des chaînes à faible rebond.
6.2.2 Normes de rebond des tronçonneuses
Les normes suivantes s’appliquent au rebond :
– CSA Z62.1
– CSA Z62.3
Ces normes, appelées « normes de rebond des
tronçonneuses » dans ce chapitre, définissent certains
critères de performance et de conception en rapport avec le
rebond d’une tronçonneuse.
Pour être conformes à ces normes de rebond des
tronçonneuses, les tronçonneuses électriques :
– doivent, dans leur état d’origine, respecter un angle de
rebond dérivé par ordinateur de 45° lorsqu’elles sont
équipées de certains outils de coupe ; et
– doivent être équipées d’au moins deux dispositifs servant
à réduire le risque de blessure par rebond, comme un frein
de chaîne, une chaîne à faible rebond, un guide-chaîne à
rebond réduit, etc.
Les angles dérivés par ordinateur pour les tronçonneuses
électriques sont mesurés en appliquant un programme
informatique aux résultats des essais menés sur une
machine d’essai de rebond.
AVERTISSEMENT
■ La conformité aux normes de rebond des tronçonneuses
ne signifie pas que le guide-chaîne et la chaîne
effectueront une rotation maximale de 45° lors d’un
rebond en situation réelle.
■ Les angles dérivés par ordinateur des normes de rebond
des tronçonneuses peuvent n’avoir aucun rapport avec
des angles de rotation réels du guide-chaîne qui peuvent
se produire dans une situation de coupe réelle.
■ Les dispositifs conçus pour réduire le risque de blessures
résultant d’un rebond peuvent perdre une partie de leur
efficacité quand ils ne sont plus dans leur état d’origine,
surtout s’ils ont été mal entretenus.
– Lisez et observez les consignes de sécurité et les
instructions dans le présent manuel.
– Lors du travail, positionnez la tronçonneuse de
manière à ce que votre corps soit dégagé de l’outil
de coupe et à l’extérieur du plan de coupe.
– Observez les instructions de maintenance et
d’entretien dans le présent manuel.
■ Pour que la tronçonneuse soit conforme aux normes de
rebond des tronçonneuses, utilisez uniquement les outils
de coupe suivants :
– Combinaisons de guide-chaînes et de chaînes
compatibles indiquées dans « Combinaisons de
guide-chaînes et de chaînes coupantes », @ 27.
– Autres combinaisons de guide-chaînes et de
chaînes marquées conformément aux normes pour
une utilisation sur la tronçonneuse ; ou
76
0458-795-8221-A

6 Rebond et autres forces réactives
français
– Chaîne coupante de rechange marquée « chaîne à
faible rebond ».
6.2.3 Dispositifs servant à réduire le risque de blessure par rebond
Le frein de chaîne Quickstop STIHL et les guide-chaînes à
rebond réduit à étiquette verte ainsi que les chaînes à faible
rebond à étiquette verte STIHL sont conçus pour réduire le
risque de blessure par rebond.
1. Frein de chaîne Quickstop STIHL
Il existe deux mécanismes qui activent le frein de chaîne si
celui-ci est bien entretenu :
– Activation manuelle : Si un rebond se produit, la
tronçonneuse se déplace vers le haut vers l’utilisateur
dans un mouvement de rotation autour de la poignée
avant. Le frein est conçu pour se serrer si la main gauche
entre en contact avec le protège-main avant, qui est le
levier d’activation du frein et le pousse vers l’avant.
– Activation par inertie : Toutes les tronçonneuses STIHL
sont équipées d’un frein de chaîne à inertie Quickstop. Si
l’impulsion du rebond est suffisamment puissante, elle
suffit à elle seule pour enclencher le frein, même sans
contact avec le protège-main avant.
AVERTISSEMENT
■ Pour réduire le risque de blessure par rebond :
– N’utilisez jamais une tronçonneuse si le frein de
chaîne ne fonctionne pas correctement.
– En cas de doute, amenez la tronçonneuse à un
distributeur agréé STIHL pour examen et/ou
réparation.
– N’utilisez pas la tronçonneuse avant d’avoir corrigé
le problème.
■ En cas de rebond, le protège-main avant aide à protéger
votre main gauche contre un contact avec la chaîne. La
dépose du protège-main avant sur une tronçonneuse
équipée d’un frein de chaîne Quickstop réduira cette
protection et désactivera également le frein de chaîne,
augmentant le risque de blessure par rebond.
– N’utilisez jamais votre tronçonneuse en l’absence
d’un protège-main avant parfaitement fonctionnel. Si
le protège-main avant est manquant, l’activation
manuelle et l’activation par inertie du frein de chaîne
0000-GXX-1890-A0
■ Aucun Quickstop ou autre dispositif de frein de chaîne
seront complètement désactivées.
– Ne tentez jamais de retirer, modifier ou désactiver le
protège-main avant ou tout autre composant du frein
de chaîne.
n’empêche le rebond. Ces dispositifs sont conçus pour
réduire le risque de blessure, lorsqu’ils sont activés, dans
certaines situations de rebond. Pour réduire les risques de
blessures graves ou mortelles résultant d’un rebond :
– Observez toujours les instructions du présent
manuel et appliquez une technique de travail
adéquate. À titre d’exemple, positionnez votre corps
de manière à ce qu’il soit dégagé de l’outil de coupe
à chaque fois que le moteur est en marche. Tenezvous à gauche de la coupe pendant le tronçonnage,
en-dehors du plan de coupe. Voir le chapitre
« Tenue et contrôle de la tronçonneuse », @ 5.5.2.
– Gardez une distance aussi grande que possible et
jamais moins de 45 degrés entre le guide-chaîne et
votre corps pour garantir que le Quickstop ait
0458-795-8221-A
77

français
6 Rebond et autres forces réactives
suffisamment de temps pour s’activer et arrêter la
chaîne avant de parvenir à une quelconque partie de
votre corps.
– Suivez les autres précautions indiquées au chapitre
@ 7.
■ Un frein de chaîne mal entretenu peut augmenter le temps
nécessaire pour arrêter la chaîne après l’activation, ou
peut ne pas s’activer du tout. Pour que le dispositif
Quickstop puisse réduire le risque de blessure par
rebond, il doit être bien entretenu et en bon état de
fonctionnement.
– Lisez et observez les instructions relatives au
serrage et au relâchement du frein de chaîne,
@ 15.1, et concernant sa maintenance et sa
réparation, @ 15.3.
2. Chaîne à faible rebond et guide-chaînes à rebond réduit
STIHL propose divers guide-chaînes et chaînes. Les guidechaînes à rebond réduit et les chaînes à faible rebond STIHL
sont conçus pour réduire le risque de blessure par rebond.
D’autres chaînes sont conçues pour atteindre des
performances de coupe supérieures ou faciliter l’affûtage,
mais elles sont plus prédisposées au rebond et peuvent
rebondir avec plus d’énergie, rendant plus difficile le
contrôle de la tronçonneuse.
STIHL a mis au point un système de codage en couleur pour
vous aider à identifier les guide-chaînes à rebond réduit et
les chaînes à faible rebond STIHL.
– Les outils de coupe pourvus d’étiquettes vertes sur
l’emballage sont conçus pour réduire le risque de blessure
par rebond.
– Les tronçonneuses correspondantes, dont les guide-
chaînes et les chaînes comportent un marquage ou un
étiquetage vert, apportent la conformité aux exigences en
matière d’angle de rebond calculé des normes sur les
tronçonneuses lorsque les produits sont dans leur état
d’origine.
– Les produits comportant des étiquettes jaunes sont
destinés aux utilisateurs ayant des besoins de coupe
extraordinaires, expérimentés et ayant suivi une formation
spécialisée pour faire face aux rebonds.
STIHL recommande à tous les opérateurs, aussi bien
expérimentés que novices en matière de tronçonneuses,
d’utiliser ses guide-chaînes à rebond réduit à étiquetage
vert, ses chaînes à faible rebond à étiquetage vert et une
tronçonneuse équipée d’un frein de chaîne Quickstop
STIHL.
STIHL recommande les guide-chaînes et les chaînes à
marquage vert pour toutes les tronçonneuses. Consultez
votre brochure « Informations sur les guide-chaînes et les
chaînes STIHL » pour plus d’informations.
De nouvelles combinaisons de guide et de chaîne peuvent
être développées après la publication de ce document qui,
en combinaison avec certaines tronçonneuses électriques,
respecteront elles aussi les normes sur les tronçonneuses.
AVERTISSEMENT
■ L’utilisation de combinaisons de guide-chaîne et de
chaîne ne figurant pas dans la brochure « Informations
sur les guide-chaînes et les chaînes STIHL » (ou d’autres
combinaisons non conformes aux normes sur les
tronçonneuses) peuvent augmenter les forces de rebond
ainsi que la prédisposition au rebond et accroître ainsi le
risque de blessure par rebond.
– Pour réduire le risque de blessure par rebond,
adressez-vous à votre distributeur agréé STIHL qui
vous recommandera la combinaison appropriée de
guide-chaîne et de chaîne pour votre tronçonneuse.
■ Les guide-chaînes à rebond réduit et les chaînes à faible
rebond n’empêchent pas le rebond, mais ils sont conçus
pour réduire le risque de blessure par rebond.
– STIHL recommande les guide-chaînes à étiquette
verte et les chaînes à étiquette verte pour toutes les
tronçonneuses et tous les utilisateurs.
■ Le risque de blessure par rebond n’est pas totalement
éliminé, même si votre tronçonneuse est équipée d’un
frein de chaîne Quickstop, d’un guide-chaîne à rebond
réduit et d’une chaîne à faible rebond.
– Observez toutes les consignes de sécurité
présentées dans le présent manuel pour éviter les
situations de rebond.
78
0458-795-8221-A

6 Rebond et autres forces réactives
français
a. Chaîne coupante à faible rebond
Certains types de chaînes comprennent des composants
spécialement conçus pour réduire la prédisposition au
rebond et la force du rebond, s’il se produit. STIHL a mis au
moins des chaînes à faible rebond pour votre tronçonneuse.
Une « chaîne à faible rebond » est une chaîne qui a satisfait
aux exigences de performance de rebond de la norme
CSA Z62.3 lorsqu’elle est soumise à essai conformément
aux dispositions spécifiées dans la norme CSA Z62.3.
AVERTISSEMENT
■ Certaines chaînes à faible rebond n’ont pas été soumises
à essai avec toutes les combinaisons de tronçonneuse et
de guide-chaîne. Il existe potentiellement certaines
combinaisons de guide-chaîne et de chaîne à faible
rebond qui n’ont pas été spécifiquement certifiées
conformes à l’angle de rebond dérivé par ordinateur de
45° des normes sur les tronçonneuses.
– STIHL recommande les guide-chaînes à étiquette
verte et les chaînes à étiquette verte pour toutes les
tronçonneuses et tous les utilisateurs.
– Consultez votre brochure « Informations sur les
guide-chaînes et les chaînes STIHL » pour la
combinaison guide/chaîne appropriée pour votre
tronçonneuse.
– Pour réduire le risque de blessure par rebond,
adressez-vous à votre distributeur agréé STIHL qui
vous recommandera la combinaison appropriée de
guide-chaîne et de chaîne pour votre tronçonneuse.
■ Une chaîne émoussée ou mal affûtée peut réduire ou
annuler l’efficacité des caractéristiques de conception
visant à réduire la prédisposition aux rebonds et les
énergies de rebond. Un abaissement ou un affûtage
incorrect des limiteurs de profondeur ou un changement
de forme des gouges peut accroître le risque et l’énergie
du rebond.
– Coupez toujours avec une chaîne bien affûtée.
– Lisez et observez les instructions relatives à
l’affûtage d’une chaîne, @ 23.4.
■ Toute tronçonneuse montée avec un guide en archet est
potentiellement très dangereuse. Un guide en archet
augmente le risque de rebond en raison de la surface de
contact de rebond accrue et parce que la conception des
guides en archet place la partie supérieure du guidechaîne plus près du corps de l’opérateur. L’utilisation
d’une chaîne à faible rebond ne réduira pas fortement le
risque de blessure par rebond lorsqu’elle est utilisée sur
un guide en archet.
– Ne montez jamais un guide en archet sur une
tronçonneuse STIHL.
b. Guide-chaînes à rebond réduit
Les guide-chaînes à rebond réduit à étiquette verte STIHL
sont conçus pour réduire le risque de blessure par rebond
lorsqu’ils sont utilisés avec les chaînes à faible rebond à
étiquette verte STIHL.
AVERTISSEMENT
■ Les guide-chaînes à rebond réduit à étiquette verte
peuvent s’avérer moins efficaces pour réduire le rebond
lorsqu’ils sont utilisés avec d’autres chaînes plus
agressives.
– STIHL recommande les guide-chaînes à étiquette
verte et les chaînes à étiquette verte pour toutes les
tronçonneuses et tous les utilisateurs.
■ Pour un équilibre correct et en vue de se conformer aux
normes sur les tronçonneuses :
– Utilisez exclusivement les longueurs de guide-
chaîne mentionnées dans le présent manuel, @ 27.
6.2.4 Pour éviter le rebond
La meilleure protection contre les lésions corporelles
pouvant résulter d’un rebond consiste à éviter les situations
de rebond :
1)Tenez la tronçonneuse fermement et des deux mains et
maintenez une prise solide, avec votre main droite sur la
poignée arrière et votre main gauche sur la poignée avant
(poignée tubulaire). Maintenez une prise solide avec les
pouces et les doigts encerclant les poignées de la
tronçonneuse. Ne lâchez pas.
0458-795-8221-A
79

français
0000-GXX-1348-A0
6 Rebond et autres forces réactives
2)Assurez-vous que la zone dans laquelle vous effectuez la
coupe est exempte de tout obstacle.
3)Soyez à tout moment conscient de l’endroit où se trouve
le nez du guide-chaîne. Ne laisser jamais le nez du guidechaîne entrer accidentellement en contact avec un objet
quelconque. Ne coupez pas de branches avec le nez du
guide-chaîne. Soyez particulièrement prudent près des
clôtures et lors de la coupe de petites branches dures, de
buissons de petite taille et de gaules qui peuvent
facilement être capturés dans la chaîne.
4)Ne vous penchez pas trop.
5)Ne coupez pas au-dessus de la hauteur des épaules.
6)Commencez la coupe et continuez à pleine vitesse.
7)Coupez une seule bille à la fois.
8)Soyez extrêmement prudent lorsque vous vous engagez
de nouveau dans une coupe précédente.
9)Ne tentez pas une coupe en plongée si vous n’êtes pas
expérimenté avec cette technique de coupe.
10)Soyez vigilant au déplacement de la bille ou à d’autres
forces qui peuvent causer une fermeture de la coupe et un
coincement de la chaîne coupante.
11)Entretenez bien la chaîne coupante. Coupez avec une
chaîne bien affûtée et correctement tendue à tout
moment.
12)Tenez-vous sur le côté du chemin de coupe de la
tronçonneuse.
13)Utiliser uniquement des guide-chaînes et des chaînes de
rechange spécifiés par STIHL, ou leur équivalent.
6.3 Accrochage
AVERTISSEMENT
■ L’accrochage se produit lorsque la chaîne sur le dessous
du guide-chaîne est brusquement arrêtée ou
considérablement ralentie lorsqu’elle se coince, est
capturée ou rencontre un corps étranger dans le bois. La
réaction de la chaîne tire la tronçonneuse vers l’avant et
peut entraîner une perte de contrôle par l’opérateur qui, à
son tour, peut causer des blessures graves ou mortelles.
Si la pointe touche un objet, un rebond peut se produire.
■ L’accrochage se produit généralement lorsque la griffe de
la tronçonneuse n’est pas fermement plaquée contre
l’arbre ou la branche et lorsque la chaîne ne tourne pas à
pleine vitesse avant d’attaquer le bois.
■ Pour réduire le risque d’accrochage :
– Coupez avec une chaîne affûtée et bien tendue.
– Commencez toujours une coupe avec la chaîne
tournant à pleine vitesse et avec la griffe en contact
avec le bois.
– Lorsque c’est possible, utilisez des coins d’abattage
pour ouvrir le trait de scie ou la coupe.
– Soyez extrêmement prudent lorsque vous coupez
des buissons de petite taille et des gaules qui
peuvent facilement être capturés dans la chaîne et
être projeté dans votre direction ou vous
déséquilibrer.
80
0458-795-8221-A

7 Techniques appropriées pour le tronçonnage de base, l’ébranchage, l’élagage et
0000-GXX-1349-A0
français
6.4 Refoulement
AVERTISSEMENT
■ Le refoulement se produit lorsque la chaîne sur le dessus
du guide-chaîne est brusquement arrêtée ou
considérablement ralentie lorsqu’elle se coince, est
capturée ou rencontre un corps étranger dans le bois. La
réaction de la chaîne peut entraîner rapidement la
tronçonneuse en ligne droite vers l’arrière en direction de
l’opérateur, provoquant une perte de contrôle qui, à son
tour, peut causer des blessures graves ou mortelles.
■ Le refoulement se produit généralement lorsque le dessus
du guide-chaîne est utilisé pour la découpe.
■ Pour réduire le risque de refoulement :
– Soyez attentif aux forces ou aux situations avec
lesquelles le haut de la chaîne risque d’être coincé
ou attaché par le matériau.
– Ne coupez pas plus d’une bille à la fois.
– N’exercez pas une torsion sur la tronçonneuse
lorsque vous retirez le guide-chaîne d’une coupe par
le dessous, car la chaîne risque de se coincer ou de
s’attacher.
– Coupez avec une chaîne affûtée et bien tendue.
7 Techniques appropriées pour le
tronçonnage de base, l’ébranchage,
l’élagage et l’abattage
7.1 Utilisations prévues
AVERTISSEMENT
■ Cette tronçonneuse n’est pas conçue pour l’abattage de
grands arbres ou la coupe de billes de grand diamètre.
■ Une tronçonneuse plus grande, plus puissante et plus
rapide peut être nécessaire pour la découpe d’arbres, de
billes ou de branches de plus grande taille, ce afin de
réduire les risques de coincement, de calage de
changement des conditions pendant les périodes de
coupe plus longues. Une interruption des vitesses de
coupe ou une perte de puissance lors d’une opération
d’abattage ou d’ébranchage peut se traduire par une
incapacité à contrôler la chute d’un arbre ou de la branche
et peut entraîner des blessures graves, voire mortelles.
■ Avant de commencer toute opération d'abattage,
d'ébranchage, de tronçonnage ou d'élagage, chargez
complètement votre batterie STIHL AP ou AR.
■ Avant de commencer toute opération de tronçonnage,
d’ébranchage, de taille/élagage ou d’abattage, veillez à ce
que toutes les coupes nécessaires pourront être
terminées avec la charge restante dans la batterie STIHL
série AP ou AR. Si vous n'êtes pas sûr :
– Ayez plusieurs batteries chargées à portée de main ;
– Choisissez une tronçonneuse plus puissante ;
– Choisissez une batterie plus puissante ; ou
– Consultez un professionnel de l'abattage d'arbres
digne de confiance.
■ Positionnez la tronçonneuse de manière à ce que votre
corps soit dégagé de l’outil de coupe à chaque fois que le
moteur est en marche. Tenez-vous à gauche de la coupe
pendant le tronçonnage, en-dehors du plan de coupe.
0458-795-8221-A
81

français
0000-GXX-1214-A0
7 Techniques appropriées pour le tronçonnage de base, l’ébranchage, l’élagage et
7.2 Tronçonnage
Le tronçonnage est la coupe d’une bille en sections.
AVERTISSEMENT
■ Ayez conscience des billes qui roulent. Les billes qui
roulent peuvent causer des blessures graves ou
mortelles. Pour empêcher une bille de rouler tout en
tronçonnant :
– Assurez-vous que la bille est bien calée et ne roulera
pas en aval avant de commencer votre coupe. Si
nécessaire, utilisez des coins d’abattage, des
plaques ou des cales robustes.
– Sur une pente, tenez-vous toujours en amont de la
bille.
– Ne vous tenez jamais sur la bille.
■ Pour réduire le risque de rebond causé par un contact du
nez du guide-chaîne avec d’autres billes ou branches :
– Coupez une seule bille à la fois.
– Ne coupez pas des billes empilées.
■ Lorsque vous coupez du bois craquelé, des éclats de bois
acérés peuvent être capturés et jetés en direction de
l’opérateur de la tronçonneuse ou des spectateurs.
– Soyez prudent lorsque vous coupez du bois
craquelé et portez toujours des vêtements
appropriés et un équipement de protection
individuelle, y compris une protection oculaire.
– Gardez les spectateurs hors de la zone de travail.
■ Lorsque vous coupez des billes de petite taille, assurez-
vous que la bille est bien supportée pour réduire le risque
de blessure, de perte de contrôle de la tronçonneuse ou
de mouvement de la bille. Les petites billes peuvent
bouger lors du contact avec les dents de la chaîne :
– Lorsque cela est possible, placez les billes en
travers de supports en forme de « V » sur le dessus
d’un chevalet.
– Ne permettez jamais à une autre personne de tenir
la bille.
– Ne stabilisez jamais la bille avec votre jambe ou
votre pied.
■ Un manque de contrôle de la tronçonneuse au fond d’une
0000-GXX-1375-A0
coupe de tronçonnage peut causer des blessures graves
ou la mort.
– Préparer la tronçonneuse à la sortie par le fond de la
coupe en réduisant la force d’avance que vous
exercez sur la tronçonneuse.
– Amortissez le poids de la tronçonneuse afin que le
guide-chaîne et la chaîne ne soient pas propulsés
vers le bas dans votre bassin et vos jambes au
moment où le guide-chaîne/la chaîne sort de la
coupe.
Lors du tronçonnage :
► Positionnez la griffe de la tronçonneuse contre la bille et
utilisez-la comme point d’appui.
► Repositionnez continuellement la griffe tout en poussant
le guide-chaîne complètement à travers la bille.
82
0458-795-8221-A

7 Techniques appropriées pour le tronçonnage de base, l’ébranchage, l’élagage et
0000-GXX-1262-A0
français
7.3 Ébranchage
L’ébranchage consiste à retirer les branches d’un arbre
abattu.
AVERTISSEMENT
■ Pour empêcher une bille de rouler pendant l’ébranchage :
– Commencez l’ébranchage en laissant les branches
sur le côté inférieur, en aval de la bille maintenir
celle-ci surélevée du sol.
– Si nécessaire, stabilisez la bille avec des coins
d’abattage, des plaques ou des cales robustes.
– Ne vous tenez jamais sur une bille pendant son
ébranchage.
■ Il existe un risque accru de rebond au cours des
opérations d’ébranchage, car les branches, les feuilles,
les tiges et d’autres matériaux peuvent s’empêtrer dans
(se lier avec) les gouges de la chaîne dans le quadrant
supérieur du nez du guide-chaîne, causant un
ralentissement ou un arrêt soudain de la chaîne.
– N’utilisez pas le nez du guide-chaîne pour couper
des branches.
– Soyez extrêmement prudent et évitez tout contact
avec la bille, le sol, d’autres branches et tout
matériel feuillu avec le nez du guide-chaîne.
■ Lors d’un tronçonnage par le dessous de branches
suspendues librement, il y a risque de coincement ou de
chute de la branche qui pourrait venir frapper l’opérateur
ou la tronçonneuse et entraîner une perte de contrôle.
– S’il se produit un coincement qui piège ou retient le
guide-chaîne ou la chaîne, arrêtez le moteur, serrez
le frein de chaîne et retirez la batterie de la
tronçonneuse avant d’essayer d’enlever la
tronçonneuse de la coupe, en procédant avec
prudence car la branche risque de se détendre ou de
se libérer soudainement.
■ Les branches ou les billes sous tension (perches à
ressort) peuvent se redresser vers vous avec beaucoup
de force, vous heurter ou vous amener à perdre le
contrôle de la tronçonneuse, causant des blessures
graves ou mortelles.
– Soyez extrêmement prudent lorsque vous coupez
des branches ou des billes qui peuvent être sous
tension.
– Lisez et observez les avertissements et les
instructions relatives à la coupe des billes sous
tension, @ 7.5.
Lors de l’ébranchage :
► Faites reposer la tronçonneuse sur la bille.
► Tenez-vous du côté de la bille à l’opposé de la branche à
couper, si cette posture est possible en toute sécurité.
► Poussez le guide-chaîne à plein régime avec un
mouvement de charnière contre la branche.
► Coupez la branche avec le coté supérieur ou inférieur du
guide-chaîne, en maintenant la pointe du guide espacé de
la bille, des autres branches et de tous les matériels
feuillus.
0458-795-8221-A
7.4 Élagage
L’élagage consiste à retirer les branches d’un arbre sur pied.
83

français
0000-GXX-1245-A0
1
2
1
2
7 Techniques appropriées pour le tronçonnage de base, l’ébranchage, l’élagage et
AVERTISSEMENT
■ Pour réduire le risque de blessure résultant d’une perte de
contrôle :
– N’utilisez pas la tronçonneuse d’une seule main.
– Ne travaillez jamais sur une échelle, sur un toit, dans
un arbre ou en vous tenant debout sur tout autre
support instable.
– N’utilisez jamais la tronçonneuse au-dessus de la
hauteur des épaules ni pour une coupe au-dessus
de la tête.
– Ne vous penchez pas trop.
– Si vous n’êtes pas en mesure de suivre ces
instructions, vous devez utiliser un outil différent
comme une perche élagueuse ou alors faire réaliser
le travail par .un arboriculteur compétent
■ Pour réduire le risque de blessure :
– Ne vous tenez pas directement sous la branche que
vous coupez.
– Prenez garde aux chutes de branches. Dès que la
branche commence à tomber, faites un pas sur le
côté et gardez une distance suffisante de bois
tombant. Une branche peut rebondir vers vous après
avoir touché le sol.
– Avant de commencer le travail, dégagez la zone de
travail des branches et buisson pour réduire le
risque de blessure et de perte de contrôle de la
tronçonneuse.
2
1
0000-GXX-1627-A0
► Effectuez une première coupe (1) sur le dessous de la
branche, à environ 2 in. (5 cm) du tronc. Coupez à travers
environ 1/4 du diamètre de la branche. Cela contribuera à
éviter que la branche vole en éclats après avoir été
coupée.
► Effectuez la deuxième coupe (2) sur le dessus de la
branche, à environ 2 in. (5 cm) de la première coupe.
► Dès que la branche commence à tomber, retirez la
tronçonneuse et laissez la branche chuter au sol.
7.5 Coupe de billes sous tension
Pour couper les branches d’un arbre sur pied :
84
AVERTISSEMENT
■ Il existe un risque accru de coincement de la
tronçonneuse lors du tronçonnage de billes sous tension.
La tension dans le bois peut également se libérer
0458-795-8221-A

7 Techniques appropriées pour le tronçonnage de base, l’ébranchage, l’élagage et
français
soudainement et avec une grande force, propulsant la
bille, une branche ou la tronçonneuse vers l’opérateur,
causant des blessures ou une perte de contrôle.
■ Pour réduire le risque de blessures graves ou mortelles
résultant des forces réactives, y compris le rebond, une
perte de contrôle lors de la coupe de bois sous tension :
– Commencez toujours par une coupe de
soulagement (1) du côté de la compression de la
bille, puis effectuez une coupe de tronçonnage (2)
du côté de la tension.
– S’il se produit un coincement qui piège le guide-
chaîne ou la chaîne, arrêtez le moteur, serrez le frein
de chaîne, retirez la batterie puis enlevez la
tronçonneuse de la bille, en procédant avec
prudence car la branche risque de se détendre ou de
se libérer soudainement.
■ Il est extrêmement dangereux de travailler dans des
zones où les billes, les branches et les racines sont
enchevêtrées.
– Faites glisser les billes, les branches et les autres
matériaux à couper dans une zone dégagée avant
de couper. Commencez par tirer les billes qui sont
exposées et dégagées. Ne pas couper à un endroit
où la pointe du guide-chaîne peut entrer en contact
avec d’autres billes, des branches ou du matériel
feuillu.
7.6 Abattage
7.6.1 Conditions d’abattage L’abattage est la coupe d’un arbre en vue de l’abattre. Avant
d’abattre un arbre, examinez attentivement toutes les
conditions qui peuvent affecter la direction de la chute.
AVERTISSEMENT
■ La tronçonneuse n’est pas conçue pour l’abattage de
grands arbres et son utilisation à cet effet peut se traduire
par une incapacité à contrôler la chute de l’arbre ou de la
branche et peut entraîner des blessures graves, voire
mortelles.
■ Avant de commencer l’opération d’abattage, assurez-
vous que la tronçonneuse que vous utilisez possède une
taille, une puissance et une durée de fonctionnement
suffisantes pour pouvoir terminer l’opération d’abattage
efficacement et sans recharge. Vous pouvez aussi utiliser
plusieurs batteries chargées, choisir une tronçonneuse
plus puissante, choisir une batterie plus puissante ou
consulter un professionnel de l'enlèvement d'arbres de
bonne réputation.
■ Il existe plusieurs facteurs qui peuvent affecter et modifier
la direction prévue de la chute, par exemple, la direction
et la vitesse du vent, le pencher de l’arbre, les arbres et
les obstacles environnants, un terrain en pente, une
structure à branches ou feuillage unilatéral, la structure du
bois, la pourriture, la charge de neige, etc.
– Pour réduire le risque de blessures graves ou
mortelles pour vous-même ou des tiers, recherchez,
analysez et prévoyez ces conditions avant de
commencer la coupe, et soyez attentif à un
changement de direction du vent pendant la chute
de l’arbre.
■ L’abattage d’un arbre dont le diamètre est supérieur à
deux fois la longueur de coupe effective du guide-chaîne
nécessite soit l’utilisation de la méthode d’abattage au
trait d’abattage par section, soit par coupe en plongée.
Aucune de ces techniques de coupe n’est recommandée
pour ce modèle de tronçonneuse. Ces méthodes peuvent
être extrêmement dangereuses, car elles impliquent
l’utilisation du nez du guide-chaîne et peuvent provoquer
un rebond. Il convient que seuls des professionnels
dument formés essaient ces techniques. Si vous êtes
inexpérimenté avec une tronçonneuse, il convient de ne
pas essayer la coupe en plongée. Demandez l’aide d’un
professionnel qualifié.
■ N’essayez jamais de couper un arbre de gros diamètre
avec une tronçonneuse dont la taille, la puissance ou la
durée d’utilisation est insuffisante pour terminer la tâche
de manière efficace.
■ Les arbres qui sont fendus, pourris ou décomposés à
l’intérieur ou qui sont penchés ou soumis à d’autres
contraintes sont susceptibles de changer brusquement de
0458-795-8221-A
85

français
C
0000-GXX-1438-A0
C
7 Techniques appropriées pour le tronçonnage de base, l’ébranchage, l’élagage et
position ou de se fendre pendant la coupe, causant des
blessures graves, voire mortelles à l’opérateur ou aux
spectateurs.
– Observez toujours l’état général de l’arbre et ayez-
en conscience.
– Il convient que les utilisateurs inexpérimentés ne
tentent jamais de couper de tels arbres.
– Recherchez aussi des branches cassées ou mortes
qui pourraient se détacher en vibrant et tomber sur
l’opérateur lors de l’opération d’abattage. Certains
types d’arbres sont plus sensibles à cette condition,
comme les sapins de Douglas. Il convient de vérifier
avec un arboriculteur compétent si vous avez des
questions sur la stabilité des arbres que vous
prévoyez de couper.
– Lors de la coupe sur une pente, il convient que
l’opérateur se tienne si possible du côté amont.
Lors de l’abattage :
7.6.2 Chemin de fuite
Avant d’effectuer votre première coupe, préparez un chemin
de fuite :
B
B
► Dégagez tout d’abord les branches et les buissons de la
zone autour de la base de l’arbre. Retirez la végétation de
la partie inférieure de l’arbre avec une hache.
► Établissez ensuite au moins deux chemins de fuite
dégagés (B) et supprimez tous les obstacles tels que les
buissons, les petits arbres et d’autres végétaux. Il
convient que ces chemins mènent à l’opposé de la
direction prévue de la chute de l’arbre (A), à un angle de
45° de la ligne de chute attendue. Placez tous les outils et
équipements à une distance de sécurité de l’arbre, mais
pas sur les chemins de fuite.
0000-GXX-1246-A0
1 1
► Gardez une distance d’au moins 2 1/2 longueurs d’arbre
par rapport à la personne ou la structure la plus proche.
► Prenez des précautions supplémentaires à proximité des
routes, des chemins de fer et des lignes électriques.
Informez la police, le distributeur d’électricité ou l’autorité
ferroviaire avant de commencer à couper.
1
2
/
1
2
2
/
86
7.6.3 Entaille conventionnelle
Pour une entaille conventionnelle :
0000-GXX-1437-A0
0458-795-8221-A

7 Techniques appropriées pour le tronçonnage de base, l’ébranchage, l’élagage et
C
0000-GXX-1439-A0
C
0000-GXX-1250-A1
français
► L’entaille d’abattage détermine la direction de la chute de
l’arbre. Réalisez l’entaille d’abattage perpendiculaire à la
ligne de chute que vous avez déterminée, à proximité du
sol.
► Soyez conscient des conditions telles que le vent, la
structure des branches et du feuillage, l’inclinaison de
l’arbre, la pente du terrain et d’autres facteurs qui
pourraient modifier la direction de la chute.
► Couper vers le bas à un angle de 45° jusqu’à une
profondeur d’environ 1/5 à 1/4 du diamètre du tronc.
► Effectuez une coupe horizontale qui rencontre le bas de la
première coupe.
► Retirez la pièce de 45° ainsi obtenue. La taille du coin
d’abattage variera selon la taille de l’arbre. Plus l’arbre est
grand, plus le coin d’abattage est grand. Ce modèle de
tronçonneuse n’est pas conçu pour l’abattage d’arbres de
grand diamètre.
7.6.4 Entaille à face ouverte
Pour une entaille à face ouverte :
► Couper vers le bas à un angle de 50° jusqu’à une
profondeur d’environ 1/5 à 1/4 du diamètre du tronc.
► Effectuez une deuxième coupe qui rencontre le bas de la
première coupe à un angle de 40° par le bas.
► Retirez la pièce de 90° ainsi obtenue. La taille du coin
d’abattage variera selon la taille de l’arbre. Plus l’arbre est
grand, plus le coin d’abattage est grand. Ce modèle de
tronçonneuse n’est pas conçu pour l’abattage d’arbres de
grand diamètre.
7.6.5 Coupes d’aubier
Les coupes d’aubier aident à prévenir les bois tendres en
été de voler en éclats lorsqu’ils tombent :
► Effectuez des coupes sur les deux côtés du tronc, à la
même hauteur que le trait d’abattage qui suit.
► Ne coupez pas plus que la largeur du guide-chaîne.
► L’entaille d’abattage détermine la direction de la chute de
l’arbre. Réalisez l’entaille d’abattage perpendiculaire à la
ligne de chute que vous avez déterminée, à proximité du
sol.
► Soyez conscient des conditions telles que le vent, la
structure des branches et du feuillage, l’inclinaison de
l’arbre, la pente du terrain et d’autres facteurs qui
pourraient modifier la direction de la chute.
0458-795-8221-A
7.6.6 Trait d’abattage
AVERTISSEMENT
■ Si la pointe du guide-chaîne entre en contact avec un coin
d’abattage qui a été utilisé pour aider à garder le trait de
scie ou la coupe ouvert, il peut provoquer un rebond. Il
convient d’utiliser uniquement des coins d’abattage en
bois ou en plastique et jamais en acier, ce qui peut
endommager la chaîne.
■ Quelle que soit la méthode d’abattage que vous avez
choisie, ne coupez jamais à travers la charnière lorsque
vous effectuez votre trait d’abattage. La charnière vous
87

français
D
0000-GXX-1440-A0
D
7 Techniques appropriées pour le tronçonnage de base, l’ébranchage, l’élagage et
aide à contrôler la chute de l’arbre. Une coupe à travers la
charnière empêchera le bûcheron de contrôler la chute de
l’arbre et peut entraîner des blessures graves, voire
mortelles, ou des dommages matériels.
■ Pour réduire le risque de blessures, ne vous tenez jamais
directement derrière l’arbre lorsqu’il est sur le point de
tomber, car une partie du tronc peut se fendre et revenir
vers l’opérateur (fauteuil de coiffeur), ou alors l’arbre peut
bondir en arrière au bas de la souche.
■ Tenez vous toujours à côté de l’arbre qui tombe. Lorsque
l’arbre commence à tomber, retirer le guide-chaîne,
relâchez la gâchette, serrez le frein de chaîne et éloignezvous d’un bon pas sur le chemin de fuite préalablement
prévu.
■ Méfiez-vous des branches qui tombent de l’arbre abattu.
■ Soyez extrêmement prudent avec les arbres partiellement
tombés. Lorsque l’arbre reste accroché ou ne tombe pas
complètement pour une raison quelconque, mettez la
tronçonneuse de côté et tirez l’arbre vers le sol avec un
treuil à câble, un palan à moufles ou un tracteur. Toute
tentative de couper l’arbre avec la tronçonneuse pour le
faire chuter jusqu’au bout est extrêmement dangereuse et
peut entraîner des blessures graves, voire mortelles. Les
arbres de cette nature peuvent tomber soudainement et
sont souvent sous tension.
Pour les entailles aussi bien conventionnelles et à face
ouverte :
► Commencez 1 à 2 in. (2,5 à 5 cm) plus haut que le fond de
l’entaille d’abattage.
► Couper horizontalement vers l’entaille d’abattage.
► Laissez environ 1/10 du diamètre de l’arbre non coupé. Il
s’agit de la charnière (E) qui vous aidera à contrôler la
chute de l’arbre.
► Ne coupez pas à travers la charnière, vous risqueriez de
perdre le contrôle de la direction de la chute.
► Si nécessaire, des coins d’abattage peuvent être
enfoncés dans le trait d’abattage pour garder la coupe
ouverte et pour aider à contrôler la direction de la chute.
Par exemple, si un arbre a tendance à « s’asseoir en
arrière », provoquant une attache de la tronçonneuse, des
coins d’abattage peuvent être utilisés pour repositionner.
Ce modèle de tronçonneuse n’est pas conçu pour l’abattage
d’arbres de grand diamètre.
7.6.7 Coupe en éventail
Utilisez la coupe en éventail simple pour effectuer le trait
d’abattage sur les arbres ayant un diamètre inférieur à la
longueur de coupe effective du guide-lame.
L’arbre est amené au sol avec le trait d’abattage (D).
88
0000-GXX-1441-A1
► Après avoir créé l’entaille d’abattage, mettez la griffe de la
tronçonneuse en prise directement derrière
l’emplacement de la charnière prévue et 1 à 2 in. (2,5 à 5
cm) plus haut que le bas de l’entaille d’abattage. Faites
pivoter la scie autour de ce point sans dépasser l’arrière
0458-795-8221-A

8 Sécurité de la batterie
français
de la charnière. Ne coupez pas à travers la charnière. La
griffe devrait rouler contre le tronc jusqu’à ce que le trait
d’abattage soit terminé.
8 Sécurité de la batterie
8.1 Avertissements et instructions
AVERTISSEMENT
■ Lisez et observez les consignes de sécurité sur la batterie
ainsi que les avertissements et les instructions qui
accompagnent ce produit.
■ L’utilisation de batteries non autorisées peut endommager
l’outil électrique et provoquer un incendie, une explosion
ainsi que des blessures corporelles et des dommages
matériels.
– Utilisez uniquement des batteries STIHL séries AR
ou AP authentiques avec cet outil électrique.
■ L’utilisation de batteries STIHL séries AR ou AP à des fins
autres que l’alimentation des outils électriques STIHL
pourrait être extrêmement dangereuse.
– Utilisez les batteries STIHL séries AR et AP
uniquement pour l’alimentation des outils
électriques STIHL compatibles.
■ L’utilisation de chargeurs non autorisés peut endommager
la batterie et provoquer un incendie, une explosion ainsi
que des blessures corporelles et des dommages
matériels.
– Chargez uniquement les batteries STIHL série AP
avec des chargeurs originaux de la série STIHL AL
101, AL 300 ou AL 500.
– Chargez uniquement les batteries en sac à dos
STIHL série AR avec des chargeurs originaux de la
série STIHL AL 300 ou AL 500.
■ La batterie contient des caractéristiques de sécurité et
des dispositifs qui, s’ils sont endommagés, peuvent
amener la batterie à produire de la chaleur, se rompre,
fuite, prendre feu ou exploser.
– Ne chauffez jamais la batterie au-dessus
de 212 °F (100 °C).
– N’incinérez jamais la batterie ni ne la
placez sur ou à proximité de flammes, de
cuisinières ou d’autres endroits où la
température est élevée.
– N’utilisez et ne chargez jamais une batterie
défectueuse, endommagée, fissurée, fuyante ou
déformée.
– Ne jamais ouvrir la batterie, la démonter, l’écraser,
la faire chuter, lui faire subir des chocs importants ou
l’endommager d’une autre manière.
– N’exposez jamais la batterie à des microondes ou
des hautes pressions.
– N’insérez jamais aucun objet dans les fentes de
refroidissement de la batterie.
■ Les températures élevées peuvent amener la batterie à
produire de la chaleur, se rompre, fuir, prendre feu ou
exploser, entraînant des blessures graves ou mortelles et
des dommages matériels. L’exposition à des
températures en dehors de la plage de températures
recommandée peut également réduire la durée de vie et
les performances de la batterie.
– Utilisez et stockez la batterie uniquement
dans une plage de températures
ambiantes de 14 °F à 122 °F (-10 °C à
50 °C).
– N’entreposez jamais la batterie en plein
soleil ou à l’intérieur d’un véhicule par
temps chaud.
0458-795-8221-A
89

français
8 Sécurité de la batterie
■ Pour réduire le risque de blessures et de dommages
matériels dans le cas où la batterie émet de la fumée, une
odeur inhabituelle ou est anormalement chaude pendant
l’utilisation, la charge ou l’entreposage :
– Cessez immédiatement d’utiliser ou de charger la
batterie. Contactez les autorités en cas d’incendie
ou d’explosion.
■ Pour réduire tout risque de court-circuit, ce qui pourrait
entraîner une décharge électrique, un incendie ou une
explosion :
– Gardez la batterie STIHL AR série au
sec. Protégez-la de la pluie, de l’eau et
des autres liquides.
– Fixez la housse imperméable à la
batterie série STIHL AR avant de
commencer à travailler sous la pluie ou
sous des conditions très humides.
– Si une batterie STIHL série AP a été
exposée à la pluie pendant le travail,
retirez-la du sac de la batterie et laissezla sécher à l'intérieur. Assurez-vous
qu’elle est complètement sèche avant de
la charger ou de l'utiliser.
– N’immergez jamais une batterie STIHL
dans l’eau ou d’autres liquides.
– Ne court-circuitez jamais les bornes de la batterie
avec des fils ou d’autres objets métalliques.
– Tenez une batterie qui n’est pas utilisée à l’écart des
objets métalliques (trombones, clous, pièces de
monnaie, clés).
– Ne transportez ou n’entreposez jamais la batterie
dans une boîte métallique.
– Entreposez la batterie à l’intérieur dans un local sec.
– N’entreposez jamais la batterie dans des
environnements humides ou corrosifs, ni dans des
conditions qui pourraient provoquer la corrosion de
ses composants métalliques.
– Protéger la batterie contre une exposition à des
agents corrosifs tels que les produits chimiques de
jardins et des sels de déneigement.
– Protéger la batterie contre une exposition à des
liquides conducteurs tels que l’eau salée.
– N’essayez pas de réparer, d’ouvrir ou de démonter
la batterie. Aucune pièce réparable par l’utilisateur
ne s’y trouve.
■ Une fuite de liquide de la batterie est potentiellement
dangereuse et peut provoquer une irritation de la peau et
des yeux, des brûlures chimiques et d’autres blessures
graves.
– Évitez tout contact avec la peau et les yeux.
– Utilisez un absorbant inerte comme le sable sur les
liquides de batterie déversés.
– En cas de contact accidentel, rincez immédiatement
la surface de contact avec de l’eau et du savon doux.
– Si le liquide pénètre dans vos yeux : ne pas frotter.
Rincez les yeux ouverts à l’eau pendant au moins 15
minutes et consultez un médecin.
■ L’incendie d’une batterie peut être dangereux. Pour
réduire les risques de blessure grave et de dommages
matériels en cas d’incendie :
– Évacuez la zone. Le feu peut se propager
rapidement. Tenez-vous à l’écart des vapeurs
éventuellement générées et gardez une distance
sûre.
– Contactez les pompiers.
– Bien qu’il soit possible d’utiliser de l’eau pour
éteindre un feu de batterie, l’utilisation d’un
extincteur chimique sec multi-usages est préférable.
– Consultez les pompiers concernant une mise au
rebut appropriée d’une batterie brûlée.
90
0458-795-8221-A

9 Maintenance, réparation et rangement
français
9 Maintenance, réparation et rangement
9.1 Avertissements et instructions
AVERTISSEMENT
■ Il n’existe aucune réparation de la batterie ou de la
tronçonneuse que l’utilisateur est autorisé à effectuer luimême. Pour réduire les risques d’incendie, d’électrocution
ou d’autres lésions corporelles et dommages matériels :
– Les utilisateurs peuvent effectuer uniquement les
opérations de maintenance et de nettoyage décrites
dans le présent manuel. Les utilisateurs ne doivent
pas tenter toute autre opération de maintenance ou
de réparation.
– Respectez scrupuleusement les instructions de
nettoyage et de maintenance dans la section
appropriée du présent manuel d’utilisation.
– STIHL recommande de faire effectuer toutes les
opérations de réparation par un distributeur agréé
STIHL.
■ Un démarrage involontaire peut causer des lésions
corporelles ou des dommages matériels. Pour réduire les
risques de lésion corporelle et de dommages matériels
résultant d’un démarrage involontaire :
– Serrez le frein de chaîne en amenant le
protège-main avant vers l’avant en
position et retirez la batterie avant
d’inspecter la tronçonneuse ou
d’effectuer toute opération de nettoyage,
d’entretien ou de réparation, avant de
l’entreposer et à tout moment lorsqu’elle
n’est pas utilisée.
■ Le guide-chaîne et la chaîne sont les seules pièces de la
tronçonneuse qui peuvent être entretenues par
l’utilisateur. Une maintenance correcte contribuera à
conserver les performances de coupe et à réduire le
risque de blessure résultant d’un déraillement de la
chaîne et des forces réactives.
– Portez des gants lorsque vous manipulez la chaîne
coupante.
– Gardez la chaîne, le guide-chaîne et le pignon
propres.
– Remplacez la chaîne et le guide-chaîne lorsqu’ils
sont usés ou endommagés.
– Gardez la chaîne bien affûtée et à une tension
correcte.
– Serrez tous les écrous, les boulons et les écrous
après chaque utilisation.
■ Comme un frein d’automobile, le frein de chaîne de votre
tronçonneuse subit de l’usure à chaque fois qu’il est serré.
Pour que le frein de chaîne sur votre tronçonneuse STIHL
puisse adéquatement remplir sa fonction de réduction du
risque de rebond et d’autres blessures, il doit être
correctement entretenu. Pour garantir un fonctionnement
correct et efficace du frein de chaîne, retournez la
tronçonneuse à votre distributeur agréé STIHL pour une
inspection périodique et l’entretien du système de
freinage conformément au calendrier ci-après :
– Usage intensif : tous les 3 mois
– Usage modéré : tous les 6 mois
– Usage occasionnel : tous les 12 mois
■ Retournez la tronçonneuse immédiatement pour
maintenance dès que vous constatez un changement
dans ses caractéristiques de fonctionnement.
0458-795-8221-A
91

français
10 Avant d'entreprendre le travail
■ L’utilisation de pièces qui ne sont pas autorisées ou
homologuées par STIHL peut causer des blessures
graves ou la mort ou des dommages matériels.
– STIHL recommande d’utiliser exclusivement des
pièces de rechange STIHL identiques agrées pour la
réparation ou la maintenance.
■ Pour réduire les risques de court-circuit et d’incendie :
– Gardez les guides de la batterie exempts de corps
étrangers. Nettoyez suivant le besoin avec un
chiffon sec ou un pinceau doux et sec.
■ Un entreposage incorrect peut donner lieu à une
utilisation non autorisée, causer des dommages à la
tronçonneuse et à la batterie ainsi qu’un risque accru
d’incendie, d’électrocution et d’autres lésions corporelles
ou dommages matériels.
– Serrez le frein de chaîne en amenant le protège-
main avant en position et retirez la batterie de la
tronçonneuse avant de l’entreposer.
– N’entreposez jamais la tronçonneuse et le chargeur
avec la batterie insérée.
– Entreposez la tronçonneuse et la batterie à
l’intérieur dans un endroit sec et protégé, hors de
portée des enfants et des autres utilisateurs non
autorisés.
– N’entreposez jamais la batterie dans la
tronçonneuse, dans le chargeur, dans un récipient
métallique ou dans un récipient avec des objets
métalliques (par exemple trombones, clous, pièces
de monnaie, clés).
10 Avant d'entreprendre le travail
10.1 Préparation de la tronçonneuse en vue de l’utilisation
► Tendez la chaîne, @ 14.3.
► Remplissez le réservoir à huile de chaîne, @ 14.4.2.
► Vérifiez le frein de chaîne, @ 18.1
► Vérifiez le bon fonctionnement et le bon état des
commandes, @ 18.2
► Vérifiez le débit de l’huile de chaîne, @ 18.3.
11 Recharge de la batterie
11.1 Installation du chargeur
AVERTISSEMENT
Lisez et observez les consignes de sécurité sur la batterie et
le chargeur ainsi que les avertissements et les instructions
qui accompagnent ces produits. Pour réduire le risque de
court-circuit, ce qui pourrait provoquer une électrocution, un
incendie ou une explosion, assurez-vous que le chargeur et
ses composants sont secs et non endommagés ; utilisez le
chargeur à l’intérieur à une température ambiante
appropriée.
AVERTISSEMENT
La capacité d’un circuit électrique domestique classique est
de 15 à 20 A. Un seul chargeur STIHL AL 500 consomme
environ 4,8 A. Un seul chargeur AL 300 consomme environ
4,4 A. Pour réduire le risque d’incendie résultant d’un circuit
électrique surchargé :
► Assurez-vous que l’installation électrique est conçue pour
résister à la consommation attendue avant de charger
votre batterie.
► Si vous devez charger plusieurs batteries, chargez-les
une à une ou sur des circuits séparés, sauf si vous avez
la certitude que votre circuit est capable de fournir la
puissance totale requise par plusieurs chargeurs.
Avant de commencer le travail :
► Chargez complètement la batterie, @ 11.2..
► Montez le guide-chaîne et la chaîne, @ 14.2.1
92
0458-795-8221-A

11 Recharge de la batterie
3
2
0000-GXX-3228-A1
4
1
français
AVERTISSEMENT
Du fait que le chargeur chauffe pendant le processus de
charge, ne l’utilisez pas sur une surface combustible ou à un
endroit où se trouvent des gaz, liquides, vapeurs,
poussières ou autres matières et substances inflammables.
Pour installer le chargeur :
► Insérez la fiche (3) dans une prise électrique (4) installée
conformément aux normes et dont la tension et la
fréquence électriques coïncident avec celles indiquées
sur la plaque signalétique sur le chargeur.
Le chargeur exécute un auto-test immédiatement après
avoir été branché. La DEL (1) du chargeur s’allumera en vert
pendant environ 1 seconde, puis s’allumera brièvement en
rouge avant de s’éteindre. Une fois que la DEL s’éteint,
l’auto-test terminé et le chargeur est prêt à charger la
batterie.
► Positionnez le cordon d’alimentation (2) de manière à ce
qu’il ne risque pas d’être piétiné, de provoquer un
trébuchement ou d’entrer en contact avec des objets
tranchants ou des pièces mobiles, ni ne représente un
risque de trébuchement ou puisse subir d’autres
dommages ou contraintes.
11.2 Charge
AVERTISSEMENT
Les batteries STIHL contiennent des caractéristiques et des
dispositifs de sécurité qui, s’ils sont endommagés, peuvent
amener la batterie à produire de la chaleur, se rompre, fuir,
prendre feu ou exploser. Ne chargez jamais une batterie
défectueuse, endommagée, fissurée, fuyante ou déformée
et n’utilisez jamais un chargeur qui a été endommagé.
N'insérez jamais une batterie humide ou un adaptateur
humide. N’utilisez jamais un chargeur humide. Respectez
toutes les mises en garde et instructions spécifiques au
produit accompagnant votre batterie et votre chargeur.
Une batterie n'est pas complètement chargée lorsqu'elle est
expédiée de l'usine. STIHL vous recommande de charger
complètement la batterie avant de l’utiliser la première fois.
Utilisez le chargeur uniquement à l’intérieur, dans des
locaux secs, dans une plage de températures ambiantes de
41 °F à 104 °F (5 °C à 40 °C).
La batterie chauffe pendant le fonctionnement de l’outil
électrique. Si vous raccordez une batterie chaude au
chargeur, il sera peut-être nécessaire de la laisser refroidir
avant que la charge commence. Le processus de charge
commence seulement une fois que la batterie a
suffisamment refroidi.
Le temps de charge dépend de plusieurs facteurs,
notamment l’état de la batterie et de la température
ambiante. Pour une liste complète des temps de charge
approximatifs, voir www.stihl.com/charging-times.
0458-795-8221-A
93

français
3
2
1
0000-GXX-2680-A0
3
45
1
2
3
4
0000-GXX-3918-A0
12 DEL de diagnostic et signaux sonores
Pour charger une batterie AR :
► Enfoncez la fiche du cordon de raccordement (1) dans la
prise (2) de l’adaptateur AP (3) jusqu’en butée.
► Enfoncez l’adaptateur AP dans le chargeur (5) jusqu’en
butée.
La DEL sur le chargeur (4) s'allume en vert lorsque la
batterie se charge.
Les DEL sur la batterie AR s'allument en vert et indiquent
l'état de charge.
Lorsque les DEL sur la batterie s’éteignent, le processus
de charge est terminé et le chargeur s’arrête de lui-même.
► Lorsque la charge est terminée, retirez l’adaptateur AP du
chargeur et débranchez le cordon d’alimentation du
chargeur de la prise électrique.
► Chargez uniquement les batteries en sac à dos STIHL AR
avec des chargeurs originaux de la série STIHL AL 300 ou
AL 500.
Pour charger une batterie AP :
► Enfoncez la batterie (2) dans le chargeur (3) jusqu’en
butée.
La DEL sur le chargeur s'allume en vert lorsque la batterie
se charge.
Les DEL (1) sur la batterie s'allument en vert et indiquent
l'état de charge.
Lorsque les DEL sur la batterie s’éteignent, le processus
de charge est terminé et le chargeur s’arrête de lui-même.
► Retirez la batterie du chargeur et débranchez le cordon
d’alimentation du chargeur de la prise électrique.
► Chargez uniquement les batteries série STIHL AP avec
des chargeurs originaux de la série STIHL AL 101, AL 300
ou AL 500.
12 DEL de diagnostic et signaux sonores
12.1 Batterie STIHL AP
12.1.1 État de la batterie L’état de la batterie est indiqué par quatre DEL. Ces DEL
peuvent être allumées ou clignoter en vert ou en rouge.
94
0458-795-8221-A

12 DEL de diagnostic et signaux sonores
1
0000-GXX-1248-A0
20-40%
40-60%
60-80%
80-100%
0-20%
1
2
3
.......
0000-GXX-3229-A1
français
Si une DEL qui reste continuellement allumée
en rouge : la batterie est trop chaude ou trop
froide. Laissez la batterie se réchauffer ou
refroidir progressivement à une température
ambiante d’environ 50 °F à 68 °F (10 °C à
20 °C).
Si les quatre DEL clignotent en rouge : La
batterie est défaillante et doit être remplacée.
► Appuyez sur le bouton (1) sur la batterie.
Les DEL sur la batterie s’allumeront ou clignoteront en
vert pendant 5 secondes environ et indiqueront ainsi l’état
de charge (voir l’illustration).
Par exemple :
Si quatre DEL vertes s’allument en continu : pleine charge.
Si une DEL verte c lignote : il reste moins de 20 % de charge.
N’essayez pas de charger, d’utiliser ou
d’entreposer la batterie.
12.1.2 État de l’outil électrique
Les mêmes DEL sur la batterie indiqueront l’état de l’outil
électrique.
12.2 Batterie en sac à dos STIHL AR
12.2.1 État de la batterie L’état de la batterie est indiqué par six DEL et un signal
sonore.
Si trois DEL restent continuellement allumées en rouge :
l’outil électrique est trop chaud. Laissez refroidir le moteur.
Si trois DEL clignotent lorsque vous actionnez la gâchette :
l’outil électrique présente un dysfonctionnement électrique.
N’utilisez pas l’outil électrique. Faites-la vérifier par un
distributeur agréé STIHL avant de l’utiliser ou de
l’entreposer.
Pour les informations de dépannage, @ 24.
12.1.3 État de charge
Les DEL sur la batterie indiquent également l’état de charge
de cette dernière.
1 Un bip court
Pour déterminer l’état de charge de la batterie :
Le signal acoustique fonctionne comme il se doit.
2 Quatre bips longs
La charge de la batterie est faible. Rechargez la batterie.
3 Succession rapide de bips courts
Il y a un dysfonctionnement de la batterie. Le signal
s’arrête automatiquement après quelques secondes.
N’essayez pas de charger, d’utiliser ou d’entreposer la
batterie. Remplacez la batterie.
Ces DEL peuvent être allumées ou clignoter en vert ou en
rouge.
0458-795-8221-A
95

français
0000-GXX-2673-A0
100 % 0 %
13 Batterie en sac à dos STIHL AR
Si une DEL qui reste continuellement allumée
en rouge : la batterie est trop chaude ou trop
froide. Laissez la batterie se réchauffer ou
refroidir progressivement à une température
ambiante d’environ 50 °F à 68 °F (10 °C à
20 °C).
Si les quatre DEL latérales clignotent en rouge
et qu’une succession rapide de plusieurs bips
sonores courts est émise : la batterie est
défaillante et doit être remplacée. N’essayez
pas de charger, d’utiliser ou d’entreposer la
batterie.
► Gardez à l’esprit que votre capacité à entendre le signal
sonore peut être réduite lorsque vous portez une
protection auditive.
12.2.2 État de l’outil électrique
Lorsque la batterie est raccordée à l’outil électrique, les
mêmes DEL sur la batterie indiqueront l’état de l’outil
électrique.
Si trois DEL restent continuellement allumées en rouge :
l’outil électrique est trop chaud. Laissez refroidir le moteur.
Si trois DEL clignotent lorsque vous actionnez la gâchette :
l’outil électrique présente un dysfonctionnement électrique.
N’utilisez pas l’outil électrique. Faites-la vérifier par un
distributeur agréé STIHL avant de l’utiliser ou de
l’entreposer.
Pour les informations de dépannage, @ 24.
12.2.3 État de charge
Les DEL et les signaux sonores sur la batterie indiquent
également l’état de charge de celle-ci.
Pour déterminer l’état de charge de la batterie :
► Appuyez sur le bouton (1) sur la batterie en sac à dos.
Un bip sonore court unique sera émis. Les DEL sur la
batterie s’allumeront ou clignoteront en vert pendant
5 secondes environ et indiqueront ainsi l’état de charge (voir
l’illustration).
Par exemple :
Si six DEL vertes s’allument en continu : pleine charge.
Si une DEL verte clignote et quatre bips longs sont émis : il
reste moins de 20 % de charge.
13 Batterie en sac à dos STIHL AR
13.1 Positionnement et réglage du cordon de raccordement
AVERTISSEMENT
Les tronçonneuses sont conçues pour les droitiers
uniquement - avec la main droite de l'opérateur sur la
poignée arrière et la main gauche sur la poignée avant. Les
gauchers doivent également suivre ces instructions. (Voir
l'illustration, chapitre@ 5.5.2). Par conséquent, pour
réduire le risque de blessures corporelles, faites passer le
cordon de raccordement dans le guide de la sangle d'épaule
sur le côté droit de l'opérateur uniquement. Ne jamais faire
passer le cordon dans les guides de la sangle d’épaule du
côté gauche de l'opérateur.
96
0458-795-8221-A

13 Batterie en sac à dos STIHL AR
1
0000-GXX-7803-A0
français
AVERTISSEMENT
Pour réduire le risque de blessures par trébuchement ou
perte de contrôle de la tronçonneuse, fixez toujours le
cordon de raccordement à l'aide des guides du sac à dos et
des attaches à crochet et à œillet comme décrit ci-dessous.
Positionnez et fixez le cordon de raccordement à votre côté
droit de façon à ce qu'il n'interfère pas avec la bonne
technique de travail ou votre capacité à garder le contrôle de
la tronçonneuse.
AVERTISSEMENT
Arrangez le cordon pour l’empêcher d’entrer en contact avec
la tronçonneuse ou d’être saisi par d’autres objets, ce qui
risquerait de vous faire perdre l’équilibre ou le contrôle de
votre tronçonneuse, avec pour conséquence des blessures
graves et de sérieux dommages matériels.
Le cordon de raccordement peut être fixé dans différentes
positions et réglé pour s’adapter à la hauteur et la portée de
l’opérateur.
A
1
1
B
1
1
1
1
C
La longueur du cordon de raccordement peut être réglée en
faisant une boucle autour du dessus (Illustration C) ou sur le
côté (Illustration D) de la batterie en sac à dos.
► Positionnez et fixez le cordon de raccordement de façon
à ce qu'il n'interfère pas avec la bonne technique de travail
ou votre capacité à garder le contrôle de la tronçonneuse.
D
13.2 Passage et ajustement du harnais
AVERTISSEMENT
Pour réduire le risque de blessure, l’opérateur doit être en
mesure de retirer la batterie en sac à dos rapidement en cas
d’urgence. En situation d’urgence, ouvrez et retirez
rapidement la ceinture et la sangle de poitrine avant de
laisser chuter la batterie au sol.
0000-GXX-2803-A1
Le cordon de raccordement peut être posé à travers les
guides sur la sangle d’épaule (illustration A) ou le long de la
plaque arrière (illustration B). Fixez le cordon de
raccordement au sac à dos en utilisant avec le crochet et les
œillets (1) sur le côté droit du corps de l’opérateur duquel la
tronçonneuse est tenue et commandée. Ne laissez pas le
cordon de raccordement osciller le long de votre corps ni
pendre sur votre côté.
0458-795-8221-A
Pour garantir un ajustement adéquat :
0000-GXX-7802-A0
► Mettez la batterie en sac à dos sur votre dos.
97

français
0000-GXX-2815-A1
3
1
2
3
a
t = a 2
0000-GXX-1445-A0
14 Assemblage de la tronçonneuse
► Serrez et réglez la ceinture (2) de manière à ce qu’elle
repose confortablement mais fermement sur vos hanches.
► Attachez la sangle pectorale (1) et réglez-la de manière à
ce qu'elle s'adapte confortablement mais solidement à
votre poitrine.
► Réglez les sangles du harnais de manière à ce que le
rembourrage dorsal repose fermement et de manière
stable sur votre dos.
► Enfilez l’extrémité de la ceinture à travers la boucle (3).
► Pour retirer le harnais, ouvrez les attaches à fermeture
rapide sur la ceinture et la sangle de poitrine, puis
desserrez les sangles du harnais en soulevant les
éléments de réglage coulissants.
Pour contribuer à réduire le risque de blessure en situation
d’urgence, entraînez-vous à ouvrir rapidement l’attache sur
la ceinture, à desserrer les bretelles et à retirer la batterie.
AVIS
Pour éviter tout dommage, déposez la batterie sur le sol en
douceur lorsque vous vous entraînez. Ne laissez pas la
batterie chuter au sol et ne la jetez pas.
14 Assemblage de la tronçonneuse
14.1 Outil de coupe
AVERTISSEMENT
Si les composants utilisés ne sont pas assortis, l’outil de
coupe sera endommagé de manière irréversible après une
courte période de fonctionnement, et la chaîne pourrait
dérailler, entraînant des blessures graves ou mortelles.
Un outil de coupe se compose de la chaîne, du guide-chaîne
et du pignon.
– Le pas (t) de la chaîne (1), du pignon, et du pignon de nez
en cas d’utilisation d’un guide-chaîne Rollomatic, doivent
coïncider.
– Le calibre des maillons-guides (2) de la chaîne doit
correspondre à la largeur de la rainure du guidechaîne (3).
14.2 Montage et démontage du guide-chaîne et de la chaîne
14.2.1 Montage du guide-chaîne et de la chaîne
98
AVERTISSEMENT
Assurez-vous que la batterie est retirée et que le frein de
chaîne est serré avant de commencer le montage. N’utilisez
jamais votre tronçonneuse lorsque le guide-chaîne et la
0458-795-8221-A
 Loading...