

Page 1

Instruction Manual
Notice d’emploi
STIH)
STIHL KM 85
BA_KM85_82_U_L4.book Seite 0 Donnerstag, 28. Oktober 2004 8:13 08
All manuals and user guides at all-guides.com
all-guides.com
Page 2
1KM 85, KM 85 R
English
BA_SE_111_006_01_06.fmPrinted on chlorine-free paper.
Printing inks contain vegetable oils; paper can be recycled.
© ANDREAS STIHL AG & Co. KG, 2006
0458 462 8221. M0,5. K6. CP. Printed in USA
STIHl
Contents
KombiSystem ................................... 2
Guide to Using this Manual .............. 2
Safety Precautions and
Working Techniques ......................... 3
Approved KombiTools .................... 11
Mounting the Bike Handle .............. 11
Adjusting the Throttle Cable ........... 13
Mounting the Loop Handle ............. 13
Fuel ................................................ 15
Fueling ............................................ 16
Starting / Stopping the Engine ........ 16
Operating Instructions .................... 19
Cleaning the Air Filter ..................... 20
Spark Arresting Screen
in Muffler ......................................... 20
Motor Management ........................ 21
Adjusting the Carburetor ................ 21
Checking the Spark Plug ................ 23
Replacing the Starter Rope
and Rewind Spring ......................... 24
Storing the Machine ........................ 26
Maintenance Chart ......................... 27
Main Parts and Controls ................. 28
Specifications ................................. 30
Special Accessories ....................... 31
Maintenance and Repairs ............... 31
STIHL Limited Emission Control
Warranty Statement ........................ 32
Allow only persons who understand the
manuals of the KombiEngine and the
KombiTool to operate your power tool.
To receive maximum performance and
satisfaction from your STIHL power tool,
it is important that you read and
understand the maintenance and safety
precautions, starting on page 3, before
using your power tool.
Contact your STIHL dealer or the STIHL
distributor for your area if you do not
understand any of the instructions in the
two manuals.
All manuals and user guides at all-guides.com
Page 3
2
English
KM 85, KM 85 R
!Warning!
Because this power tool is a high-speed
working tool, some special safety
precautions must be observed to reduce
the risk of personal injury. Careless or
improper use may cause serious or even
fatal injury.
STIHL's philosophy is to continually
improve all of its products. As a result,
engineering changes and improve-
ments are made from time to time.
Therefore, STIHL cannot be responsible
for changes, modifications or
improvements not covered in this
manual. If the operating characteristics
or the appearance of your power tool
differs from those described in the two
manuals, please contact your STIHL
dealer for information and assistance.
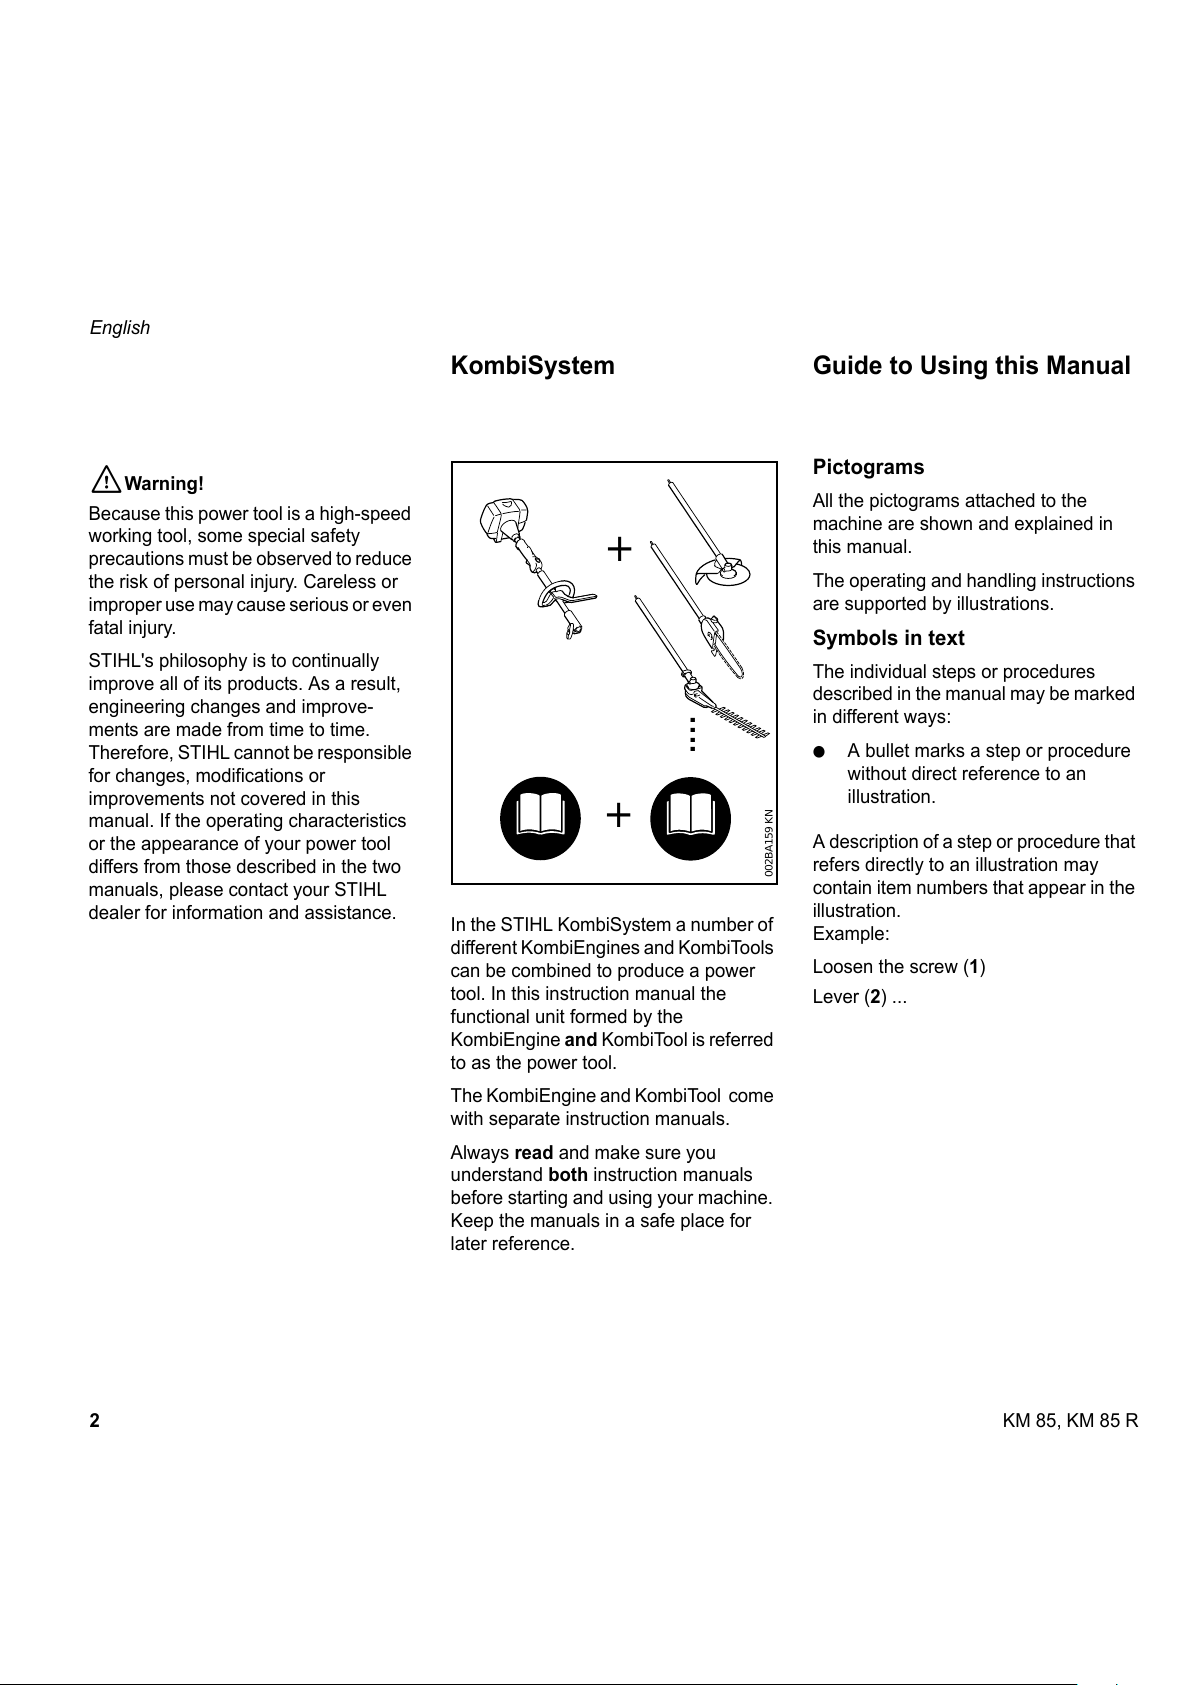
In the STIHL KombiSystem a number of
different KombiEngines and KombiTools
can be combined to produce a power
tool. In this instruction manual the
functional unit formed by the
KombiEngine and KombiTool is referred
to as the power tool.
The KombiEngine and KombiTool come
with separate instruction manuals.
Always read and make sure you
understand both instruction manuals
before starting and using your machine.
Keep the manuals in a safe place for
later reference.
Pictograms
All the pictograms attached to the
machine are shown and explained in
this manual.
The operating and handling instructions
are supported by illustrations.
Symbols in text
The individual steps or procedures
described in the manual may be marked
in different ways:
: A bullet marks a step or procedure
without direct reference to an
illustration.
A description of a step or procedure that
refers directly to an illustration may
contain item numbers that appear in the
illustration.
Example:
Loosen the screw (1)
Lever (2) ...
KombiSystem
.
.
.
.
002BA159 KN
+
+
Guide to Using this Manual
All manuals and user guides at all-guides.com
Page 4
3KM 85, KM 85 R
English
In addition to the operating instructions,
this manual may contain paragraphs
that require your special attention. Such
paragraphs are marked with the
symbols described below:
Warning where there is a risk of an
accident or personal injury or
serious damage to property.
Caution where there is a risk of
damaging the machine or its
individual components.
Note or hint which is not essential
for using the machine, but may
improve the operator’s under-
standing of the situation and result
in better use of the machine.
Note or hint on correct procedure in
order to avoid damage to the
environment.
Equipment and features
This instruction manual may refer to
several models with different
features. Components that are not
installed on all models and related
applications are marked with an
asterisk (*). Such components may
be available as special accessories
from your STIHL dealer.
Engineering improvements
STIHL’s philosophy is to continually
improve all of its products. As a result,
engineering changes and improvements
are made from time to time. If the
operating characteristics or the
appearance of your machine differ from
those described in this manual, please
contact your STIHL dealer for
assistance.
Therefore some changes, modifications
and improvements may not be covered
in this manual.
Because this
KombiEngine is the
engine for a high-speed,
power tool, special safety
precautions must be
observed to reduce the
risk of personal injury.
It is important that you
read, fully understand and
observe the following
safety precautions and
warnings. Read the
instruction manuals and
the safety precautions of your
KombiEngine and KombiTool
periodically. Careless or improper use
may cause serious or fatal injury.
Have your STIHL dealer show you how
to operate your power tool. Observe all
applicable local safety regulations,
standards and ordinances.
!Warning!
Do not lend or rent your power tool
without the instruction manuals. Be sure
that anyone using it understands the
information contained in these manuals.
Safety Precautions and
Working Techniques
All manuals and user guides at all-guides.com
Page 5
4
English
KM 85, KM 85 R
!Warning!
Minors should never be allowed to use
this power tool. Bystanders, especially
children, and animals should not be
allowed in the area where it is in use.
!Warning!
To reduce the risk of injury to bystanders
and damage to property, never let your
power tool run unattended. When it is
not in use (e.g. during a work break),
shut it off and make sure that
unauthorized persons do not use it.
Most of these safety precautions and
warnings apply to the use of all STIHL
power tools. Different models may have
different parts and controls. See the
appropriate section of your
KombiEngine and KombiTool instruction
manuals for a description of the controls
and the function of the parts of your
model.
Safe use of a KombiEngine involves
1. the operator
2. the power tool
3. the use of the power tool.
THE OPERATOR
Physical Condition
You must be in good physical condition
and mental health and not under the
influence of any substance (drugs,
alcohol, etc.) which might impair vision,
dexterity or judgment. Do not operate
this machine when you are fatigued.
!Warning!
Be alert – if you get tired, take a break.
Tiredness may result in loss of control.
Working with any power tool can be
strenuous. If you have any condition that
might be aggravated by strenuous work,
check with your doctor before operating
this machine.
!Warning!
Prolonged use of a power tool (or other
machines) exposing the operator to
vibrations may produce whitefinger
disease (Raynaud's phenomenon) or
carpal tunnel syndrome.
These conditions reduce the hand's
ability to feel and regulate temperature,
produce numbness and burning
sensations and may cause nerve and
circulation damage and tissue necrosis.
All factors which contribute to white-
finger disease are not known, but cold
weather, smoking and diseases or
physical conditions that affect blood
vessels and blood transport, as well as
high vibration levels and long periods of
exposure to vibration are mentioned as
factors in the development of whitefinger
disease. In order to reduce the risk of
whitefinger disease and carpal tunnel
syndrome, please note the following:
– Most STIHL power tools are
available with an anti-vibration
(“AV”) system designed to reduce
the transmission of vibrations
created by the engine to the
operator's hands. An AV system is
recommended for those persons
using power tools on a regular or
sustained basis.
– Wear gloves and keep your hands
warm.
– Keep the AV system well
maintained. A power tool with loose
components or with damaged or
worn AV buffers will tend to have
higher vibration levels.
– Maintain a firm grip at all times, but
do not squeeze the handles with
constant, excessive pressure. Take
frequent breaks.
All manuals and user guides at all-guides.com
Page 6

5KM 85, KM 85 R
English
All the above-mentioned precautions do
not guarantee that you will not sustain
whitefinger disease or carpal tunnel
syndrome. Therefore, continual and
regular users should closely monitor the
condition of their hands and fingers. If
any of the above symptoms appear,
seek medical advice immediately.
!Warning!
The ignition system of the STIHL unit
produces an electromagnetic field of a
very low intensity. This field may
interfere with some pacemakers. To
reduce the risk of serious or fatal injury,
persons with a pacemaker should
consult their physician and the
pacemaker manufacturer before
operating this tool.
Proper Clothing
!Warning!
To reduce the risk of injury, the operator
should wear proper protective apparel.
!Warning!
Power tool noise may
damage your hearing.
Wear sound barriers (ear
plugs or ear mufflers) to
protect your hearing.
Continual and regular
users should have their hearing checked
regularly.
Be particularly alert and cautious when
wearing hearing protection because
your ability to hear warnings (shouts,
alarms, etc.) is restricted.
For further instructions on proper
clothing see the safety precautions in
the instruction manual of the KombiTool
you are using.
THE POWER TOOL
For illustrations and definitions of the
power tool parts see the chapter on
“Main Parts and Controls.”
!Warning!
Never modify this power tool in any way.
Only attachments supplied by STIHL or
expressly approved by STIHL for use
with the specific STIHL KombiEngine
model are authorized. Although certain
unauthorized attachments are useable
with STIHL power tools, their use may, in
fact, be extremely dangerous.
If this tool is subjected to unusually high
loads for which it was not designed (e.g.
heavy impact or a fall), always check
that it is in good condition before
continuing work. Check in particular that
the fuel system is tight (no leaks) and
that the controls and safety devices are
working properly. Do not continue
operating this machine if it is damaged.
In case of doubt, have it checked by your
STIHL servicing dealer.
All manuals and user guides at all-guides.com
all-guides.com
Page 7

6
English
KM 85, KM 85 R
THE USE OF THE POWER TOOL
Transporting the Power Tool
!Warning!
Always switch off the engine and make
sure the working tool has stopped before
putting a power tool down. When
transporting your power tool in a vehicle,
properly secure it to prevent turnover,
fuel spillage and damage to the power
tool.
Fuel
Your STIHL power tool uses an oil-
gasoline mixture for fuel (see the chap-
ter on “Fuel” of your instruction manual).
!Warning!
Gasoline is an extremely
flammable fuel. If spilled
and ignited by a spark or
other ignition source, it
can cause fire and serious
burn injury or property
damage. Use extreme caution when
handling gasoline or fuel mix.
Do not smoke or bring any fire or flame
near the fuel or the power tool. Note that
combustible fuel vapor may escape from
the fuel system.
Fueling Instructions
!Warning!
Fuel your power tool in well-ventilated
areas, outdoors. Always shut off the
engine and allow it to cool before
refueling. Gasoline vapor pressure may
build up inside the fuel tank depending
on the fuel used, the weather conditions
and the tank venting system.
In order to reduce the risk of burns and
other personal injury from escaping gas
vapor and fumes, remove the fuel filler
cap on your power tool carefully so as to
allow any pressure build-up in the tank
to release slowly. Never remove the fuel
filler cap while the engine is running.
Select bare ground for fueling and move
at least 10 feet (3 m) from the fueling
spot before starting the engine. Wipe off
any spilled fuel before starting your
machine.
!Warning!
Check for fuel leakage while refueling
and during operation. If fuel leakage is
found, do not start or run the engine until
the leak is fixed and any spilled fuel has
been wiped away. Take care not to get
fuel on your clothing. If this happens,
change your clothing immediately.
Different models may be equipped with
different fuel caps.
Cap with grip
!Warning!
In order to reduce the risk of fuel spillage
and fire from an improperly tightened
fuel cap, correctly position and tighten
the fuel cap in the fuel tank opening.
To do this with this STIHL
cap, raise the grip on the
top of the cap until it is
upright at a 90° angle.
Insert the cap in the fuel
tank opening with the
triangular marks on the grip of the cap
and on the fuel tank opening lining up.
Using the grip, turn the cap firmly
clockwise as far as it will go (approx. a
quarter turn).
Fold the grip flush with the
top of the cap. If the grip
does not lie completely
flush with the cap and the
detent on the grip does
not fit in the
corresponding recess in the filler neck,
the cap is not properly seated and
tightened and you must repeat the
above steps.
All manuals and user guides at all-guides.com
Page 8

7KM 85, KM 85 R
English
Screw cap
!Warning!
Unit vibrations can cause
an improperly tightened
fuel filler cap to loosen or
come off and spill
quantities of fuel. In order
to reduce the risk of fuel
spillage and fire, tighten the fuel filler cap
by hand as securely as possible.
Before Starting
!Warning!
Always check your KombiEngine for
proper condition and operation before
starting, particularly the throttle trigger,
throttle trigger interlock, stop switch and
working tool. The throttle trigger (if
applicable) must move freely and always
spring back to the idle position. Never
attempt to modify the controls or safety
devices.
!Warning!
Never use a power tool that is damaged
or not properly maintained.
!Warning!
Check that the spark plug boot is
securely mounted on the spark plug – a
loose boot may cause arcing that could
ignite combustible fumes and cause a
fire.
Keep the handles clean and dry at all
times; it is particularly important to keep
them free of moisture, pitch, oil, grease
or resin in order for you to maintain a firm
grip and properly control your power
tool.
Starting
Start the engine at least 10 feet
(3 meters) from the fueling spot,
outdoors only.
For specific starting instructions, see the
appropriate section of your
KombiEngine and KombiTool manuals.
Place the power tool on firm ground or
other solid surface in an open area.
Maintain good balance and secure
footing.
!Warning!
To reduce the risk of injury from loss of
control, be absolutely sure that the
working tool is clear of you and all other
obstructions and objects, including the
ground, because when the engine starts
at starting-throttle, engine speed will be
fast enough for the clutch to engage and
move the working tool.
!Warning!
Your power tool is a one-person
machine. Do not allow other persons in
the general work area, even when
starting.
!Warning!
To reduce the risk of injury from loss of
control, do not attempt to “drop start”
your power tool.
!Warning!
When you pull the starter grip, do not
wrap the starter rope around your hand.
Do not let the grip snap back, but guide
the starter rope to rewind it properly.
Failure to follow this procedure may
result in injury to your hand or fingers
and may damage the starter
mechanism.
See also the safety precautions on
Starting in the instruction manual of the
KombiTool.
All manuals and user guides at all-guides.com
Page 9
8
English
KM 85, KM 85 R
Important Adjustments
!Warning!
To reduce the risk of personal injury from
loss of control or contact with the
running working tool, do not use a power
tool with incorrect idle adjustment. At
correct idle speed, the working tool
should not move. For directions on how
to adjust idle speed, see the appropriate
section of your instruction manual. If you
cannot set the correct idle speed, have
your STIHL dealer check your power
tool and make proper adjustments and
repairs.
During Operation
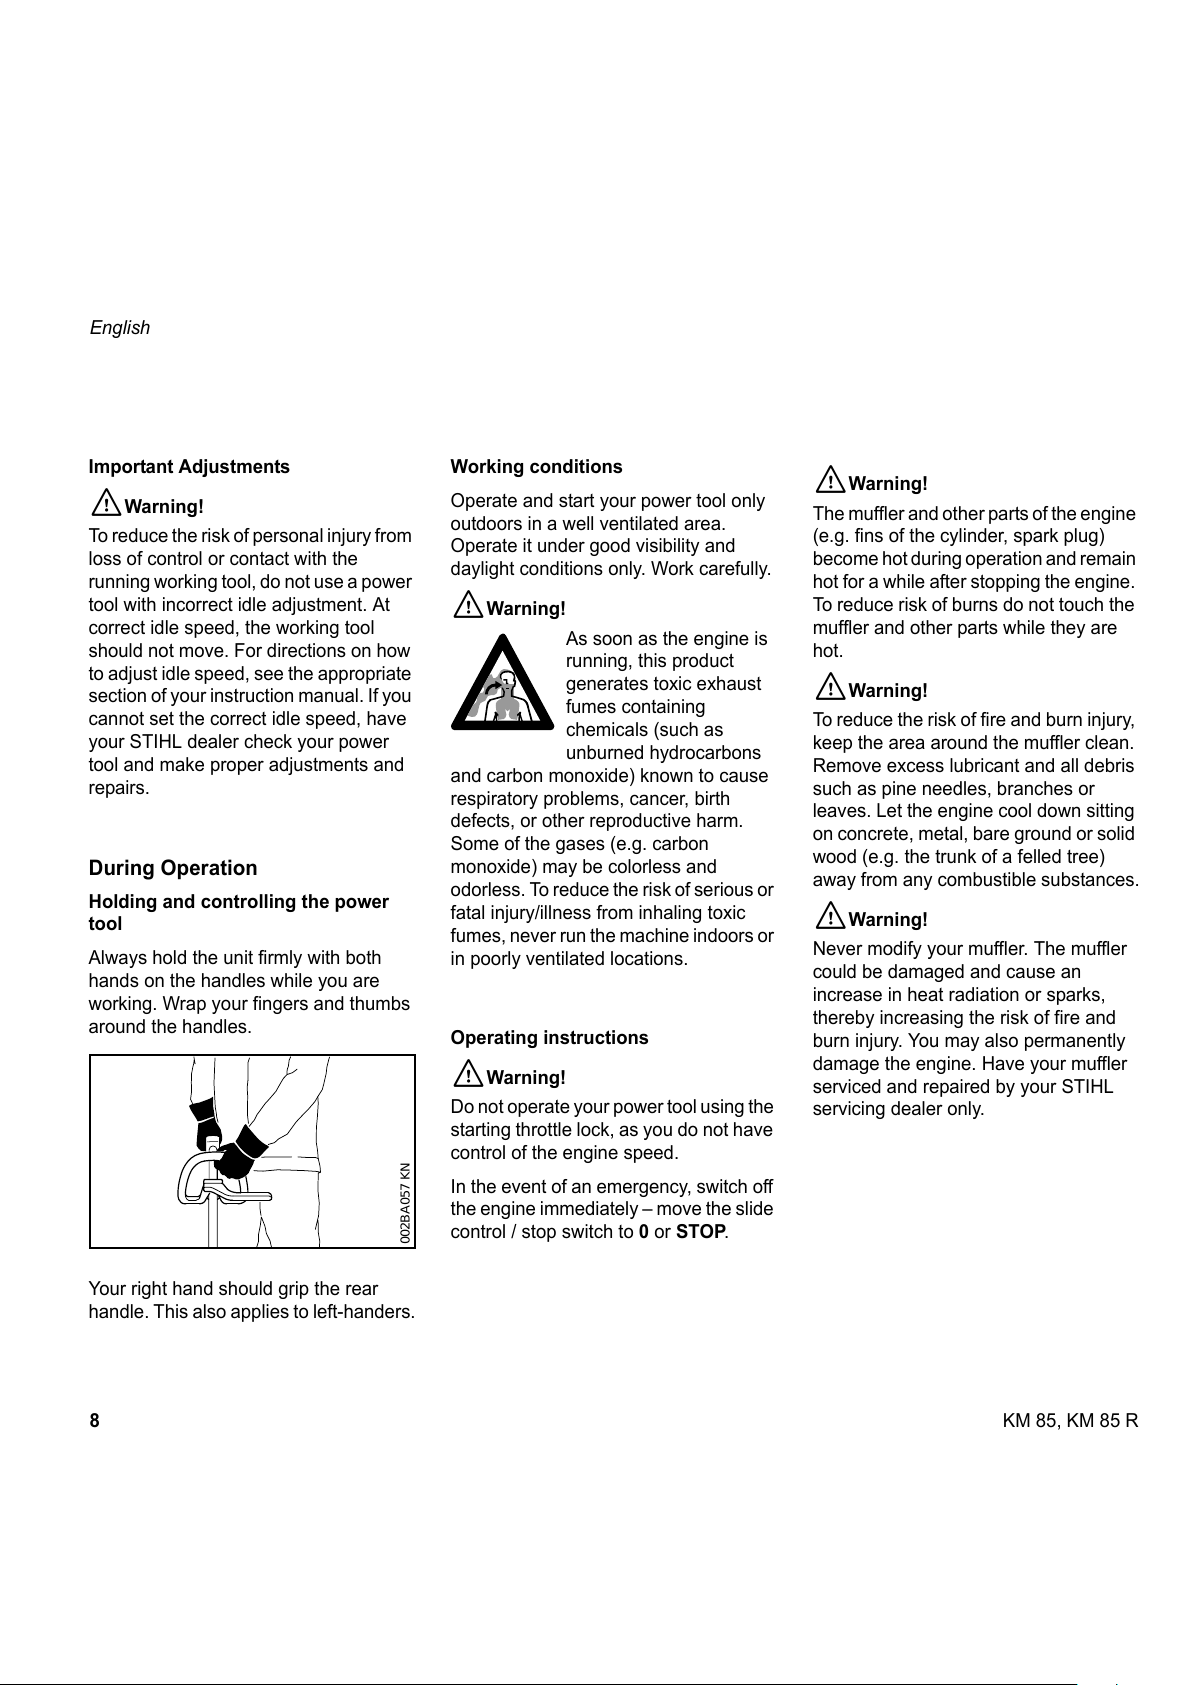
Holding and controlling the power
tool
Always hold the unit firmly with both
hands on the handles while you are
working. Wrap your fingers and thumbs
around the handles.
Your right hand should grip the rear
handle. This also applies to left-handers.
Working conditions
Operate and start your power tool only
outdoors in a well ventilated area.
Operate it under good visibility and
daylight conditions only. Work carefully.
!Warning!
As soon as the engine is
running, this product
generates toxic exhaust
fumes containing
chemicals (such as
unburned hydrocarbons
and carbon monoxide) known to cause
respiratory problems, cancer, birth
defects, or other reproductive harm.
Some of the gases (e.g. carbon
monoxide) may be colorless and
odorless. To reduce the risk of serious or
fatal injury/illness from inhaling toxic
fumes, never run the machine indoors or
in poorly ventilated locations.
Operating instructions
!Warning!
Do not operate your power tool using the
starting throttle lock, as you do not have
control of the engine speed.
In the event of an emergency, switch off
the engine immediately – move the slide
control / stop switch to 0 or STOP.
!Warning!
The muffler and other parts of the engine
(e.g. fins of the cylinder, spark plug)
become hot during operation and remain
hot for a while after stopping the engine.
To reduce risk of burns do not touch the
muffler and other parts while they are
hot.
!Warning!
To reduce the risk of fire and burn injury,
keep the area around the muffler clean.
Remove excess lubricant and all debris
such as pine needles, branches or
leaves. Let the engine cool down sitting
on concrete, metal, bare ground or solid
wood (e.g. the trunk of a felled tree)
away from any combustible substances.
!Warning!
Never modify your muffler. The muffler
could be damaged and cause an
increase in heat radiation or sparks,
thereby increasing the risk of fire and
burn injury. You may also permanently
damage the engine. Have your muffler
serviced and repaired by your STIHL
servicing dealer only.
002BA057 KN
All manuals and user guides at all-guides.com
Page 10
9KM 85, KM 85 R
English
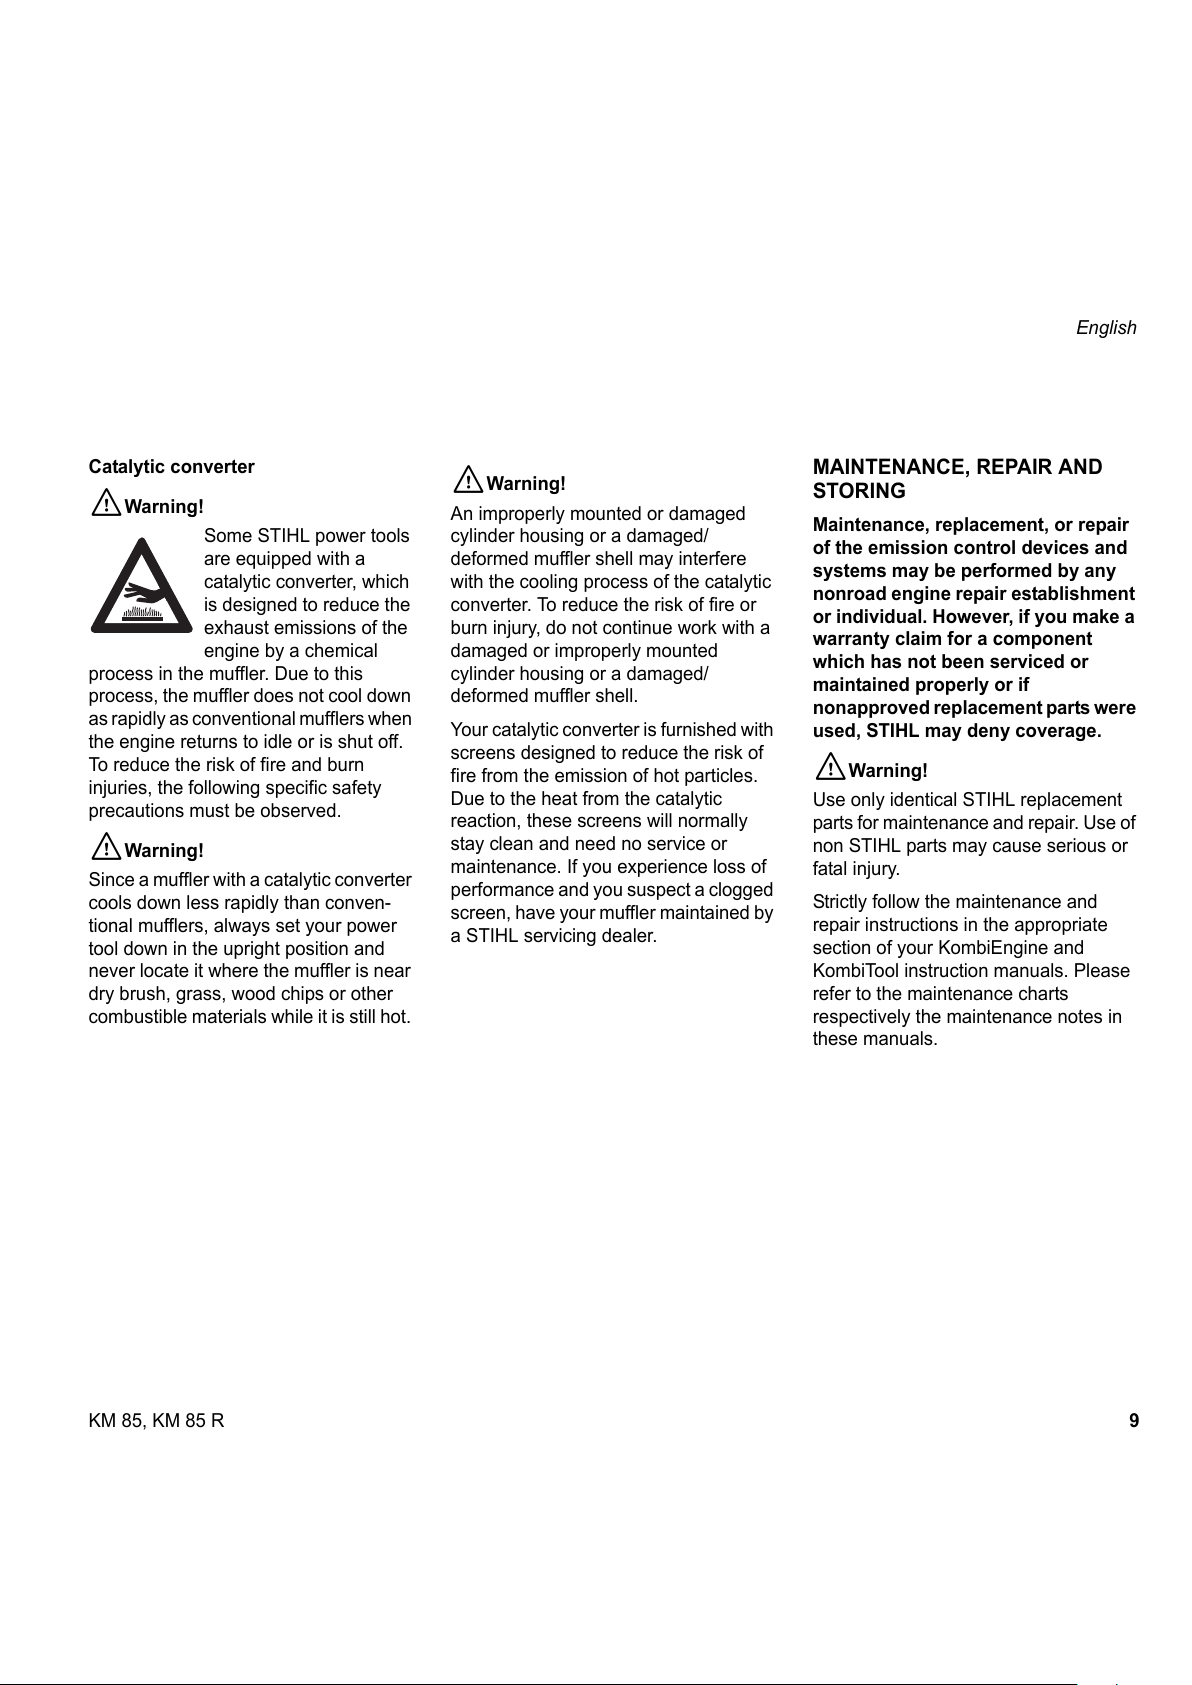
Catalytic converter
!Warning!
Some STIHL power tools
are equipped with a
catalytic converter, which
is designed to reduce the
exhaust emissions of the
engine by a chemical
process in the muffler. Due to this
process, the muffler does not cool down
as rapidly as conventional mufflers when
the engine returns to idle or is shut off.
To reduce the risk of fire and burn
injuries, the following specific safety
precautions must be observed.
!Warning!
Since a muffler with a catalytic converter
cools down less rapidly than conven-
tional mufflers, always set your power
tool down in the upright position and
never locate it where the muffler is near
dry brush, grass, wood chips or other
combustible materials while it is still hot.
!Warning!
An improperly mounted or damaged
cylinder housing or a damaged/
deformed muffler shell may interfere
with the cooling process of the catalytic
converter. To reduce the risk of fire or
burn injury, do not continue work with a
damaged or improperly mounted
cylinder housing or a damaged/
deformed muffler shell.
Your catalytic converter is furnished with
screens designed to reduce the risk of
fire from the emission of hot particles.
Due to the heat from the catalytic
reaction, these screens will normally
stay clean and need no service or
maintenance. If you experience loss of
performance and you suspect a clogged
screen, have your muffler maintained by
a STIHL servicing dealer.
MAINTENANCE, REPAIR AND
STORING
Maintenance, replacement, or repair
of the emission control devices and
systems may be performed by any
nonroad engine repair establishment
or individual. However, if you make a
warranty claim for a component
which has not been serviced or
maintained properly or if
nonapproved replacement parts were
used, STIHL may deny coverage.
!Warning!
Use only identical STIHL replacement
parts for maintenance and repair. Use of
non STIHL parts may cause serious or
fatal injury.
Strictly follow the maintenance and
repair instructions in the appropriate
section of your KombiEngine and
KombiTool instruction manuals. Please
refer to the maintenance charts
respectively the maintenance notes in
these manuals.
All manuals and user guides at all-guides.com
Page 11
10
English
KM 85, KM 85 R
!Warning!
Always stop the engine and make sure
that the working tool is stopped before
doing any maintenance or repair work or
cleaning the power tool. Do not attempt
any maintenance or repair work not
described in your KombiEngine and
KombiTool instruction manuals. Have
such work performed by your STIHL
servicing dealer only.
!Warning!
Use the specified spark plug and make
sure it and the ignition lead are always
clean and in good condition. Always
press spark plug boot snugly onto spark
plug terminal of the proper size. (Note: If
terminal has detachable SAE adapter
nut, it must be attached.) A loose
connection between spark plug boot and
the ignition wire connector in the boot
may create arcing that could ignite
combustible fumes and cause a fire.
!Warning!
Never test the ignition system with the
ignition wire boot removed from the
spark plug or with a removed spark plug,
since uncontained sparking may cause
a fire.
!Warning!
Do not operate your power tool if the
muffler is damaged, missing or modified.
An improperly maintained muffler will
increase the risk of fire and hearing loss.
If your muffler was equipped with a
spark-arresting screen to reduce the risk
of fire, never operate your power tool if
the screen is missing or damaged.
Remember that the risk of forest fires is
greater in hot or dry weather.
Store the power tool in a dry and high or
locked location out of reach of children.
Before storing for longer than a few
days, always empty the fuel tank. See
chapter "Storing the machine" in this
manual.
All manuals and user guides at all-guides.com
all-guides.com
Page 12
11KM 85, KM 85 R
English
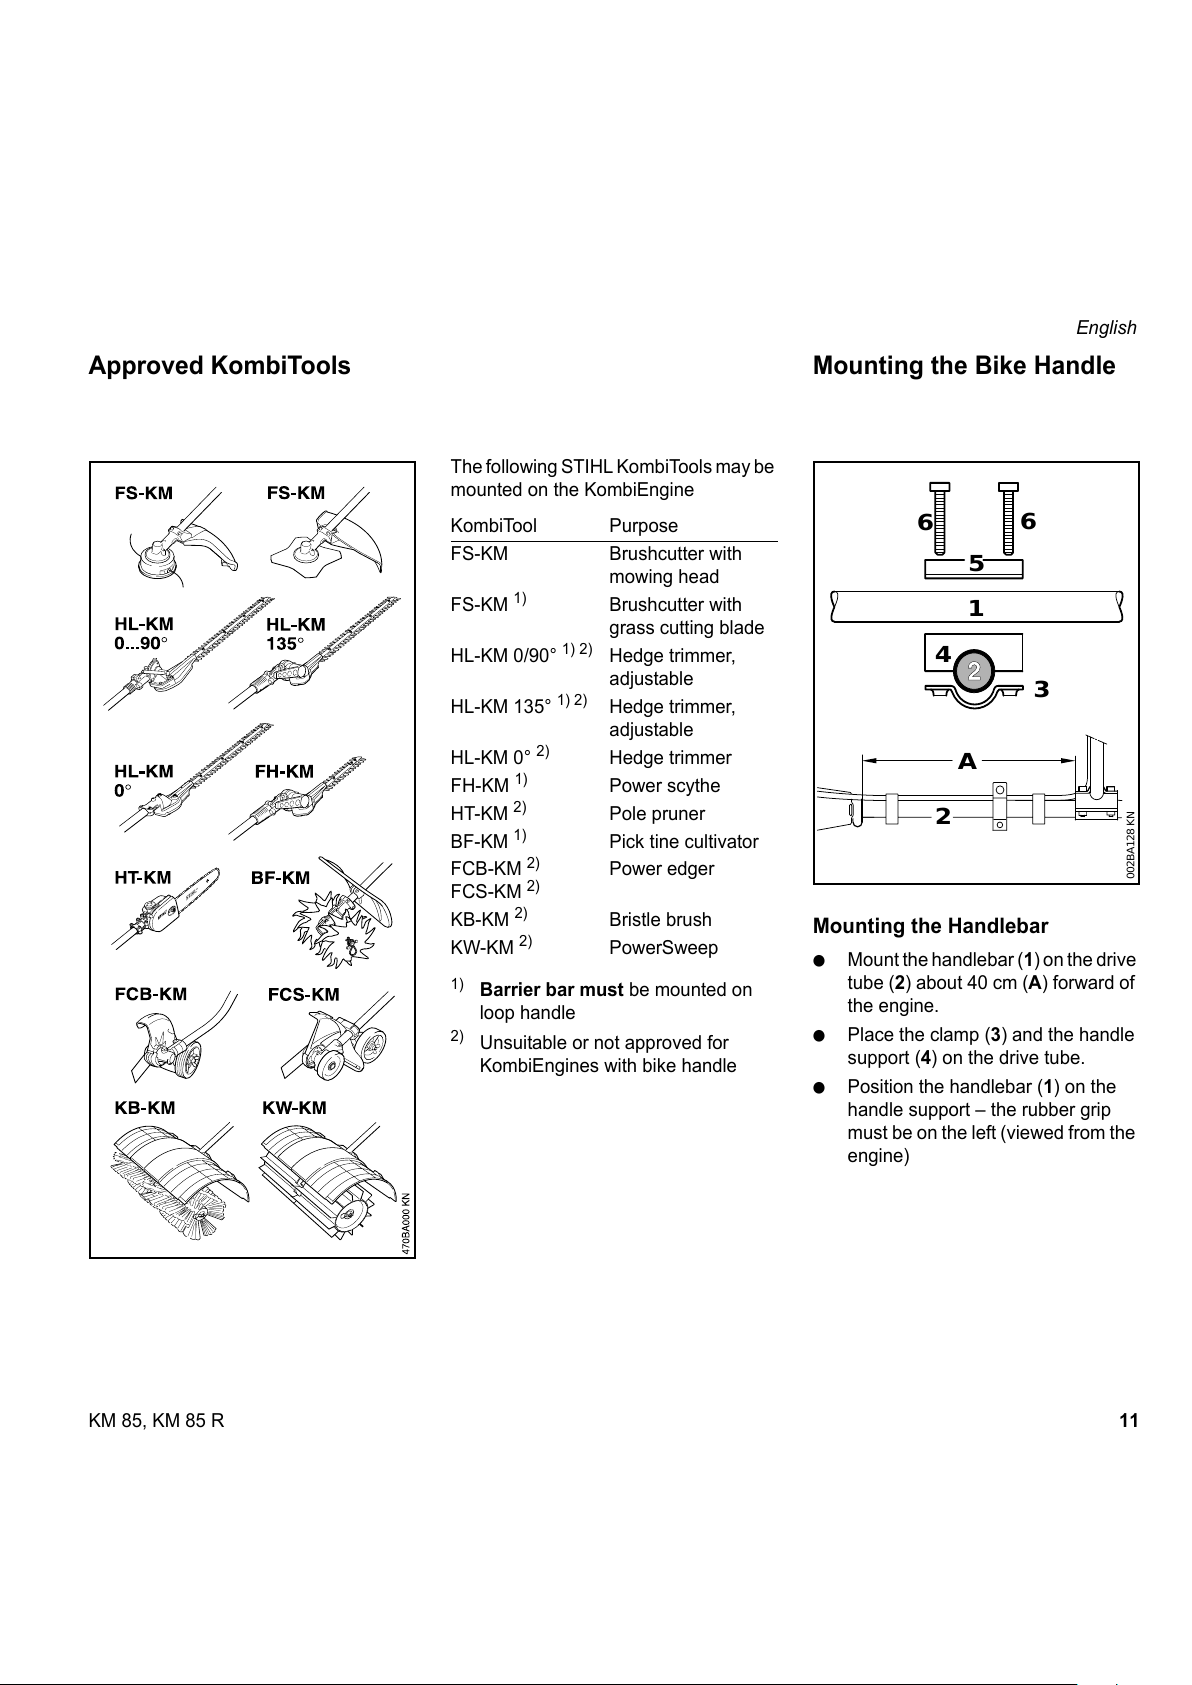
The following STIHL KombiTools may be
mounted on the KombiEngine
1)
Barrier bar must be mounted on
loop handle
2)
Unsuitable or not approved for
KombiEngines with bike handle
Mounting the Handlebar
: Mount the handlebar (1) on the drive
tube (2) about 40 cm (A) forward of
the engine.
: Place the clamp (3) and the handle
support (4) on the drive tube.
: Position the handlebar (1) on the
handle support – the rubber grip
must be on the left (viewed from the
engine)
Approved KombiTools
KombiTool Purpose
FS-KM Brushcutter with
mowing head
FS-KM
1)
Brushcutter with
grass cutting blade
HL-KM 0/90°
1) 2)
Hedge trimmer,
adjustable
HL-KM 135°
1) 2)
Hedge trimmer,
adjustable
HL-KM 0°
2)
Hedge trimmer
FH-KM
1)
Power scythe
HT-KM
2)
Pole pruner
BF-KM
1)
Pick tine cultivator
FCB-KM
2)
FCS-KM
2)
Power edger
KB-KM
2)
Bristle brush
KW-KM
2)
PowerSweep
Mounting the Bike Handle
1
3
4
5
6
A
6
2
002BA128 KN
All manuals and user guides at all-guides.com
Page 13
12
English
KM 85, KM 85 R
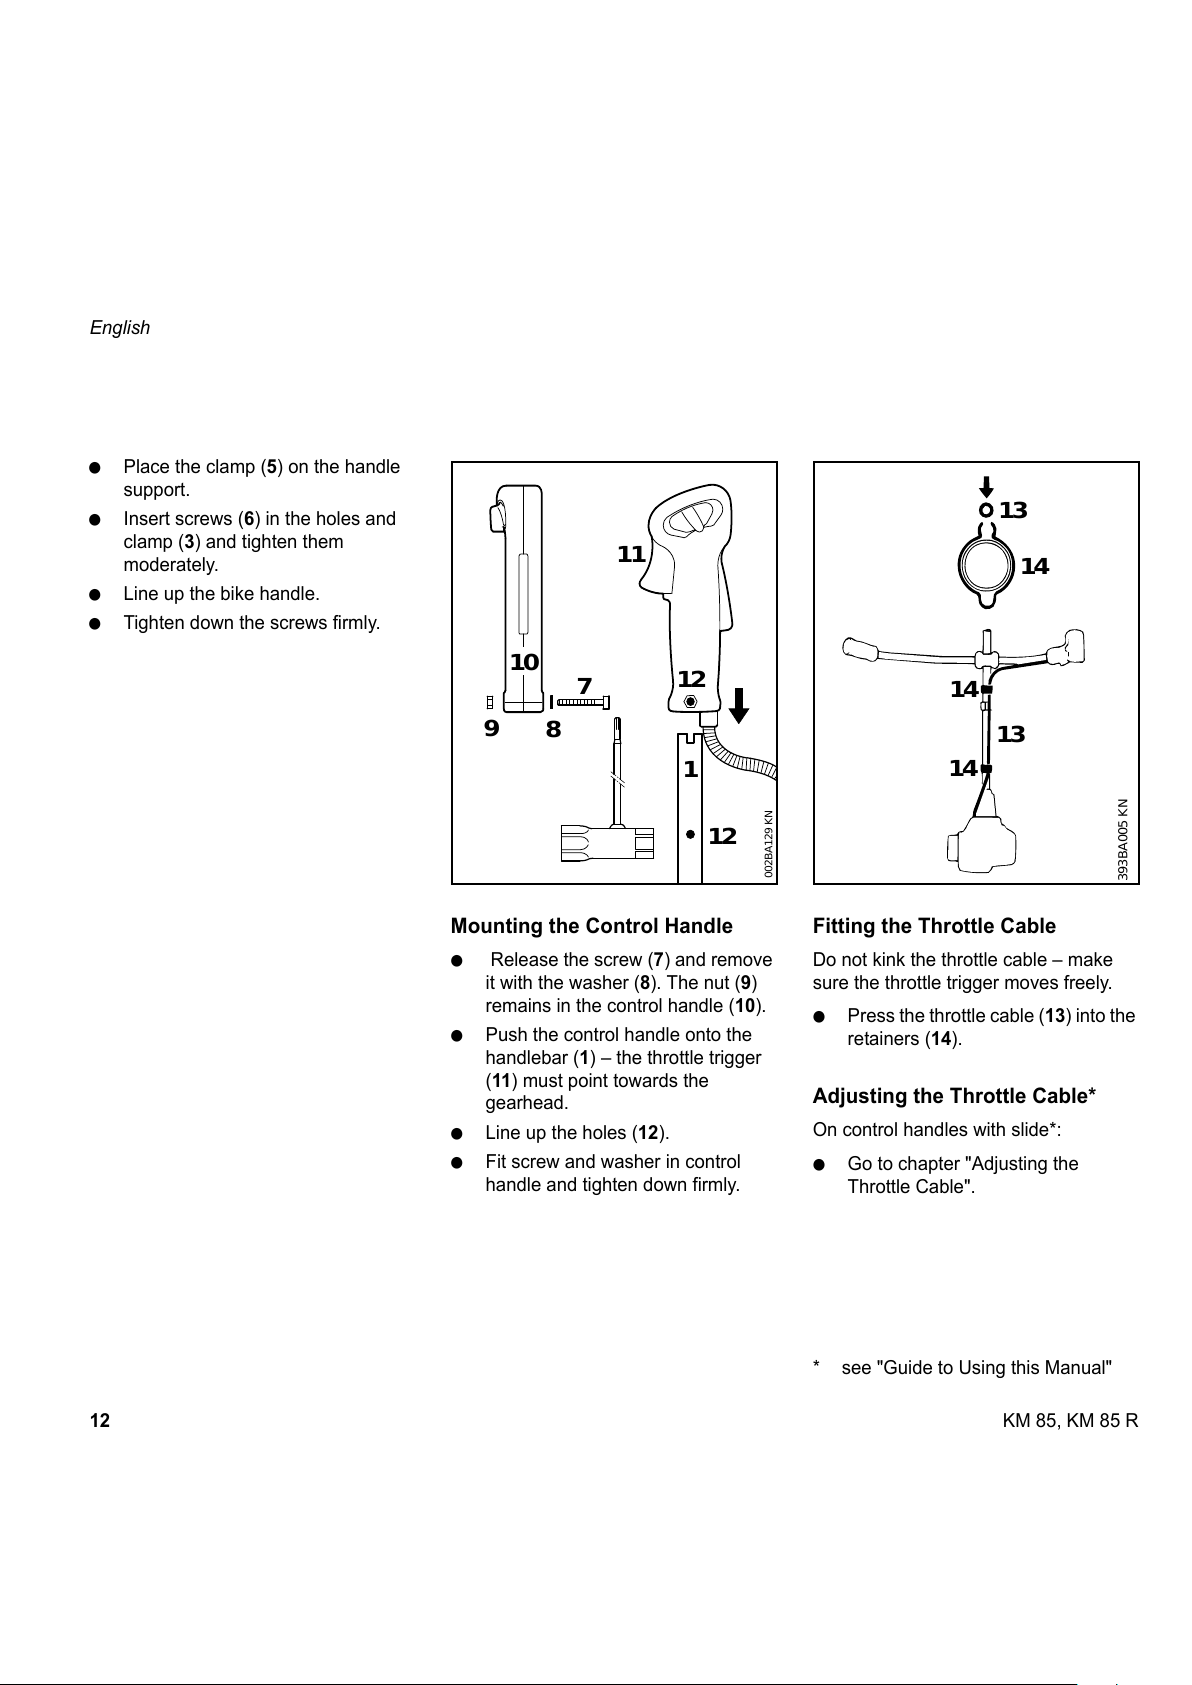
: Place the clamp (5) on the handle
support.
: Insert screws (6) in the holes and
clamp (3) and tighten them
moderately.
: Line up the bike handle.
: Tighten down the screws firmly.
Mounting the Control Handle
: Release the screw (7) and remove
it with the washer (8). The nut (9)
remains in the control handle (10).
: Push the control handle onto the
handlebar (1) – the throttle trigger
(11) must point towards the
gearhead.
: Line up the holes (12).
: Fit screw and washer in control
handle and tighten down firmly.
Fitting the Throttle Cable
Do not kink the throttle cable – make
sure the throttle trigger moves freely.
: Press the throttle cable (13) into the
retainers (14).
Adjusting the Throttle Cable*
On control handles with slide*:
: Go to chapter "Adjusting the
Throttle Cable".
* see "Guide to Using this Manual"
8
7
10
11
1
12
002BA129 KN
12
9
13
14
13
14
14
393BA005 KN
All manuals and user guides at all-guides.com
Page 14
13KM 85, KM 85 R
English
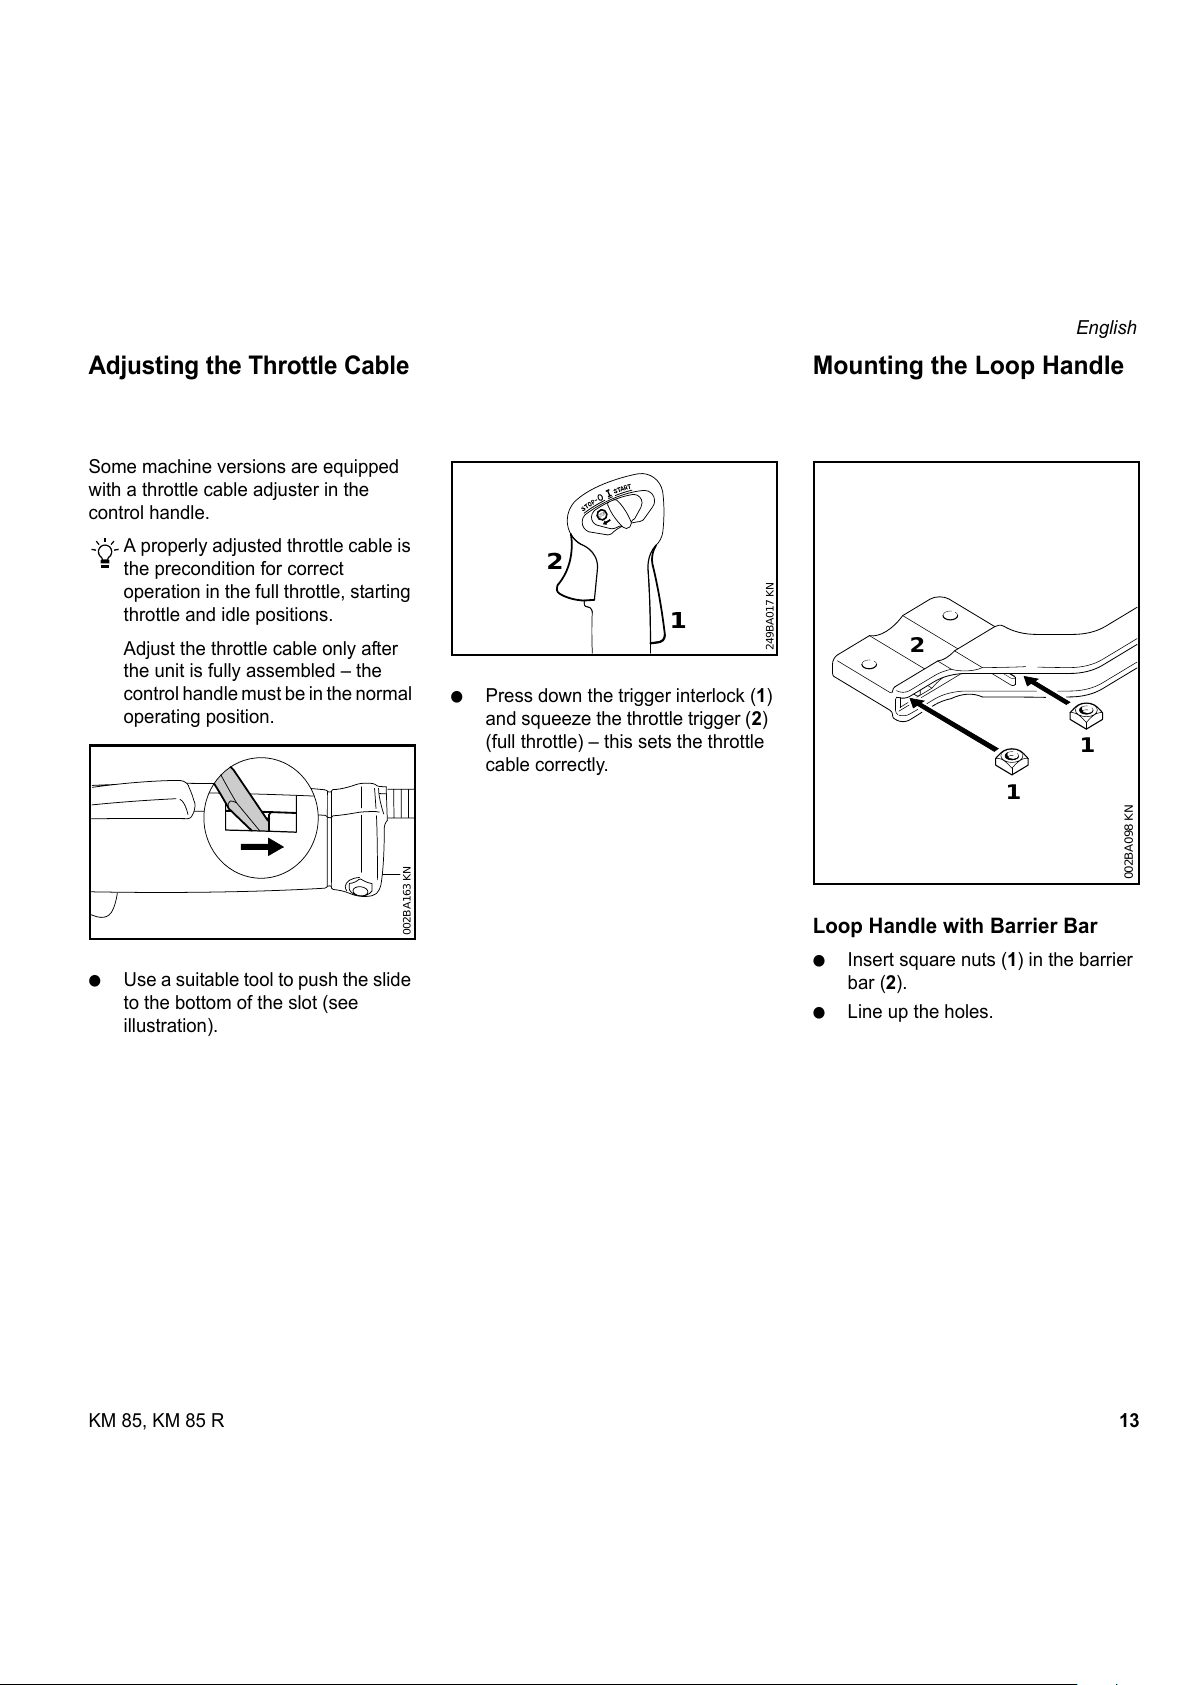
Some machine versions are equipped
with a throttle cable adjuster in the
control handle.
A properly adjusted throttle cable is
the precondition for correct
operation in the full throttle, starting
throttle and idle positions.
Adjust the throttle cable only after
the unit is fully assembled – the
control handle must be in the normal
operating position.
: Use a suitable tool to push the slide
to the bottom of the slot (see
illustration).
: Press down the trigger interlock (1)
and squeeze the throttle trigger (2)
(full throttle) – this sets the throttle
cable correctly.
Loop Handle with Barrier Bar
: Insert square nuts (1) in the barrier
bar (2).
: Line up the holes.
Adjusting the Throttle Cable
002BA163 KN
STOP
249BA017 KN
1
2
Mounting the Loop Handle
2
002BA098 KN
1
1
All manuals and user guides at all-guides.com
Page 15
14
English
KM 85, KM 85 R
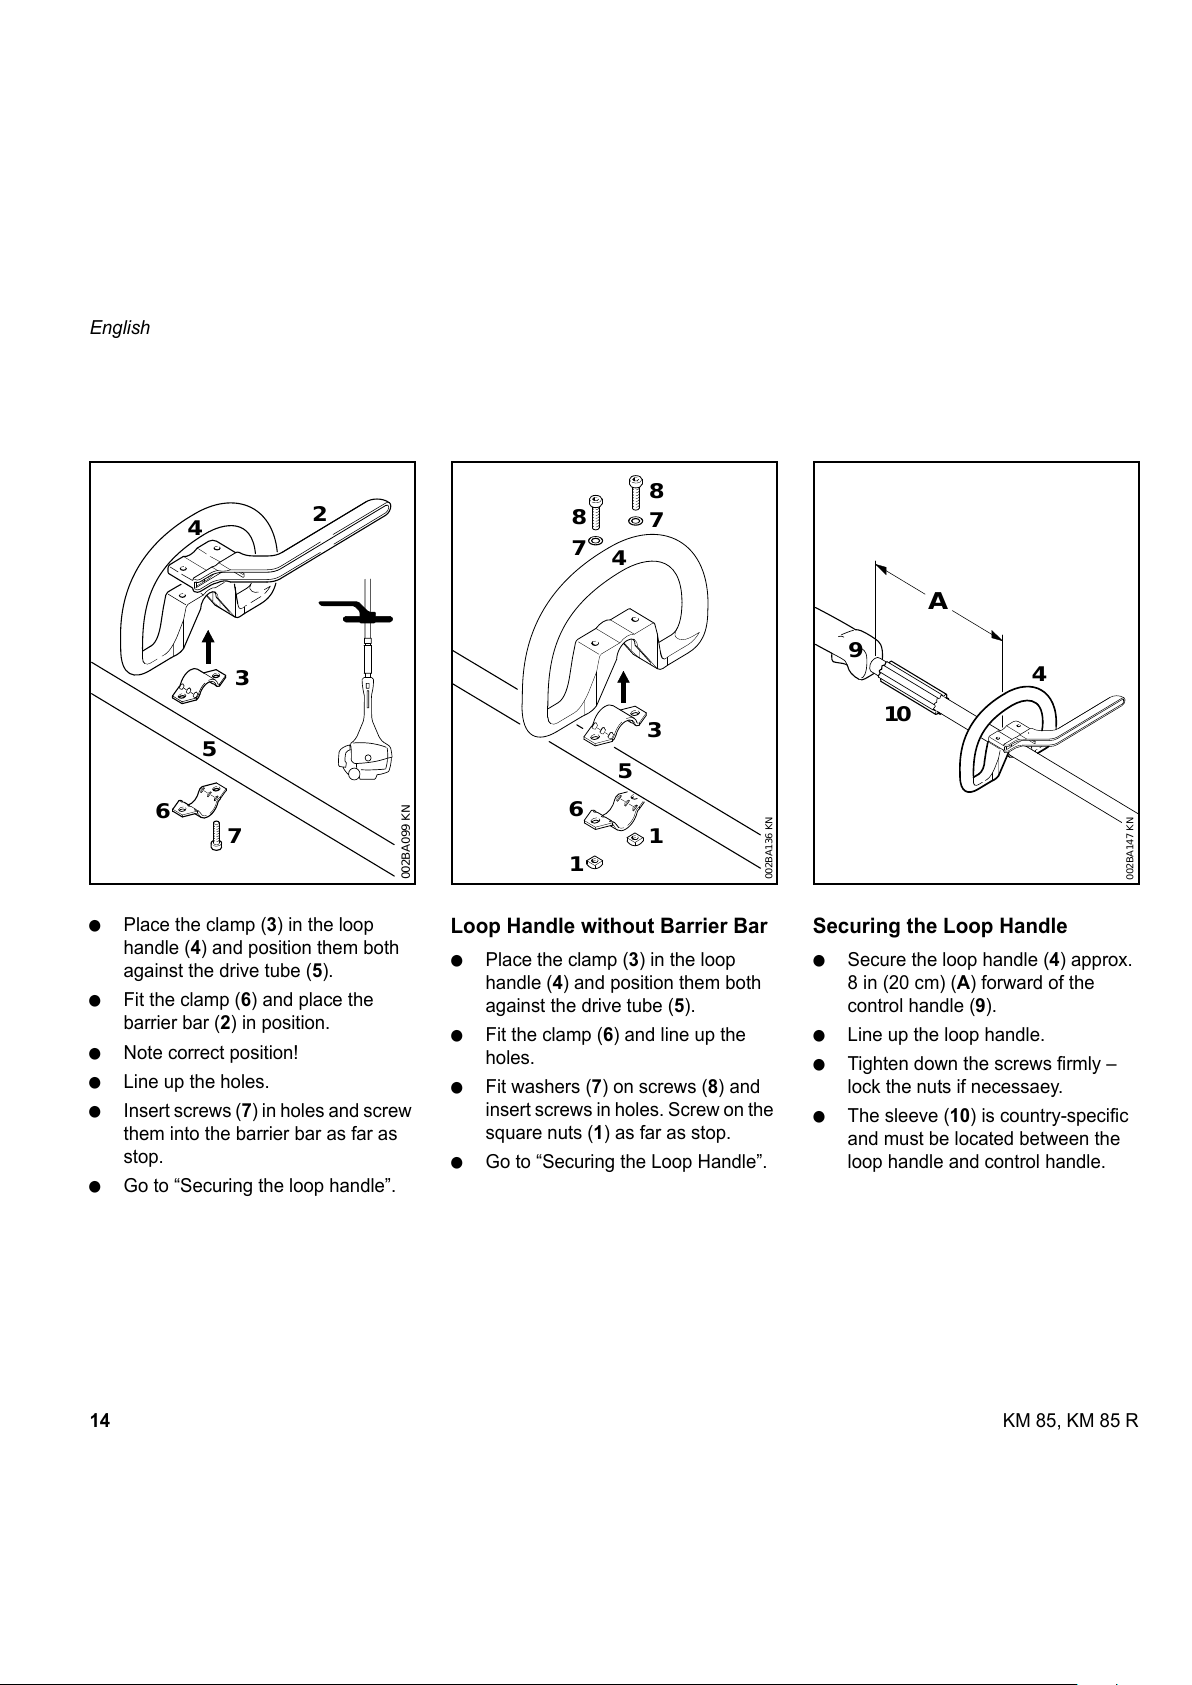
: Place the clamp (3) in the loop
handle (4) and position them both
against the drive tube (5).
: Fit the clamp (6) and place the
barrier bar (2) in position.
: Note correct position!
: Line up the holes.
: Insert screws (7) in holes and screw
them into the barrier bar as far as
stop.
: Go to “Securing the loop handle”.
Loop Handle without Barrier Bar
: Place the clamp (3) in the loop
handle (4) and position them both
against the drive tube (5).
: Fit the clamp (6) and line up the
holes.
: Fit washers (7) on screws (8) and
insert screws in holes. Screw on the
square nuts (1) as far as stop.
: Go to “Securing the Loop Handle”.
Securing the Loop Handle
: Secure the loop handle (4) approx.
8 in (20 cm) (A) forward of the
control handle (9).
: Line up the loop handle.
: Tighten down the screws firmly –
lock the nuts if necessaey.
: The sleeve (10) is country-specific
and must be located between the
loop handle and control handle.
5
4
002BA099 KN
2
3
6
7
4
5
002BA136 KN
1
6
1
3
8
7
8
7
10
9
4
002BA147 KN
A
All manuals and user guides at all-guides.com
Page 16
15KM 85, KM 85 R
English
This engine is certified to operate on
unleaded gasoline and with the mix ratio
50:1.
Your engine requires a mixture of high-
quality premium gasoline and high-
quality two-stroke air-cooled engine oil.
Use premium branded unleaded
gasoline with a minimum octane rating
of 89 RON.
Note: Models equipped with a catalytic
converter require unleaded gasoline. A
few tankfuls of leaded gasoline can
reduce the efficiency of the catalytic
converter by more than 50%.
Fuel with a lower octane rating may
result in preignition (causing "pinging")
which is accompanied by an increase in
engine temperature. This, in turn,
increases the risk of the piston seizure
and damage to the engine.
The chemical composition of the fuel is
also important. Some fuel additives not
only detrimentally affect elastomers
(carburetor diaphragms, oil seals, fuel
lines etc.), but magnesium castings as
well. This could cause running problems
or even damage the engine. For this
reason it is essential that you use only
high-quality fuels!
Fuels with different percentages of
ethanol are being offered. Ethanol can
affect the running behaviour of the
engine and increase the risk of lean
seizure.
Use only STIHL two-stroke engine oil or
equivalent high-quality two-stroke air-
cooled engine oils for mixing.
We recommend STIHL 50:1 two-stroke
engine oil since it is specially formulated
for use in STIHL engines.
Do not use BIA or TCW (two-stroke
water cooled) mix oils!
Use only STIHL 50:1 heavy-duty
engine oil or an equivalent quality two-
stroke engine oil for the fuel mix in
models equipped with a catalytic
converter.
Take care when handling gasoline.
Avoid direct contact with the skin and
avoid inhaling fuel vapour.
The canister should be kept tightly
closed in order to avoid any moisture
getting into the mixture.
The fuel tank and the canister in which
fuel mix is stored should be cleaned
from time to time.
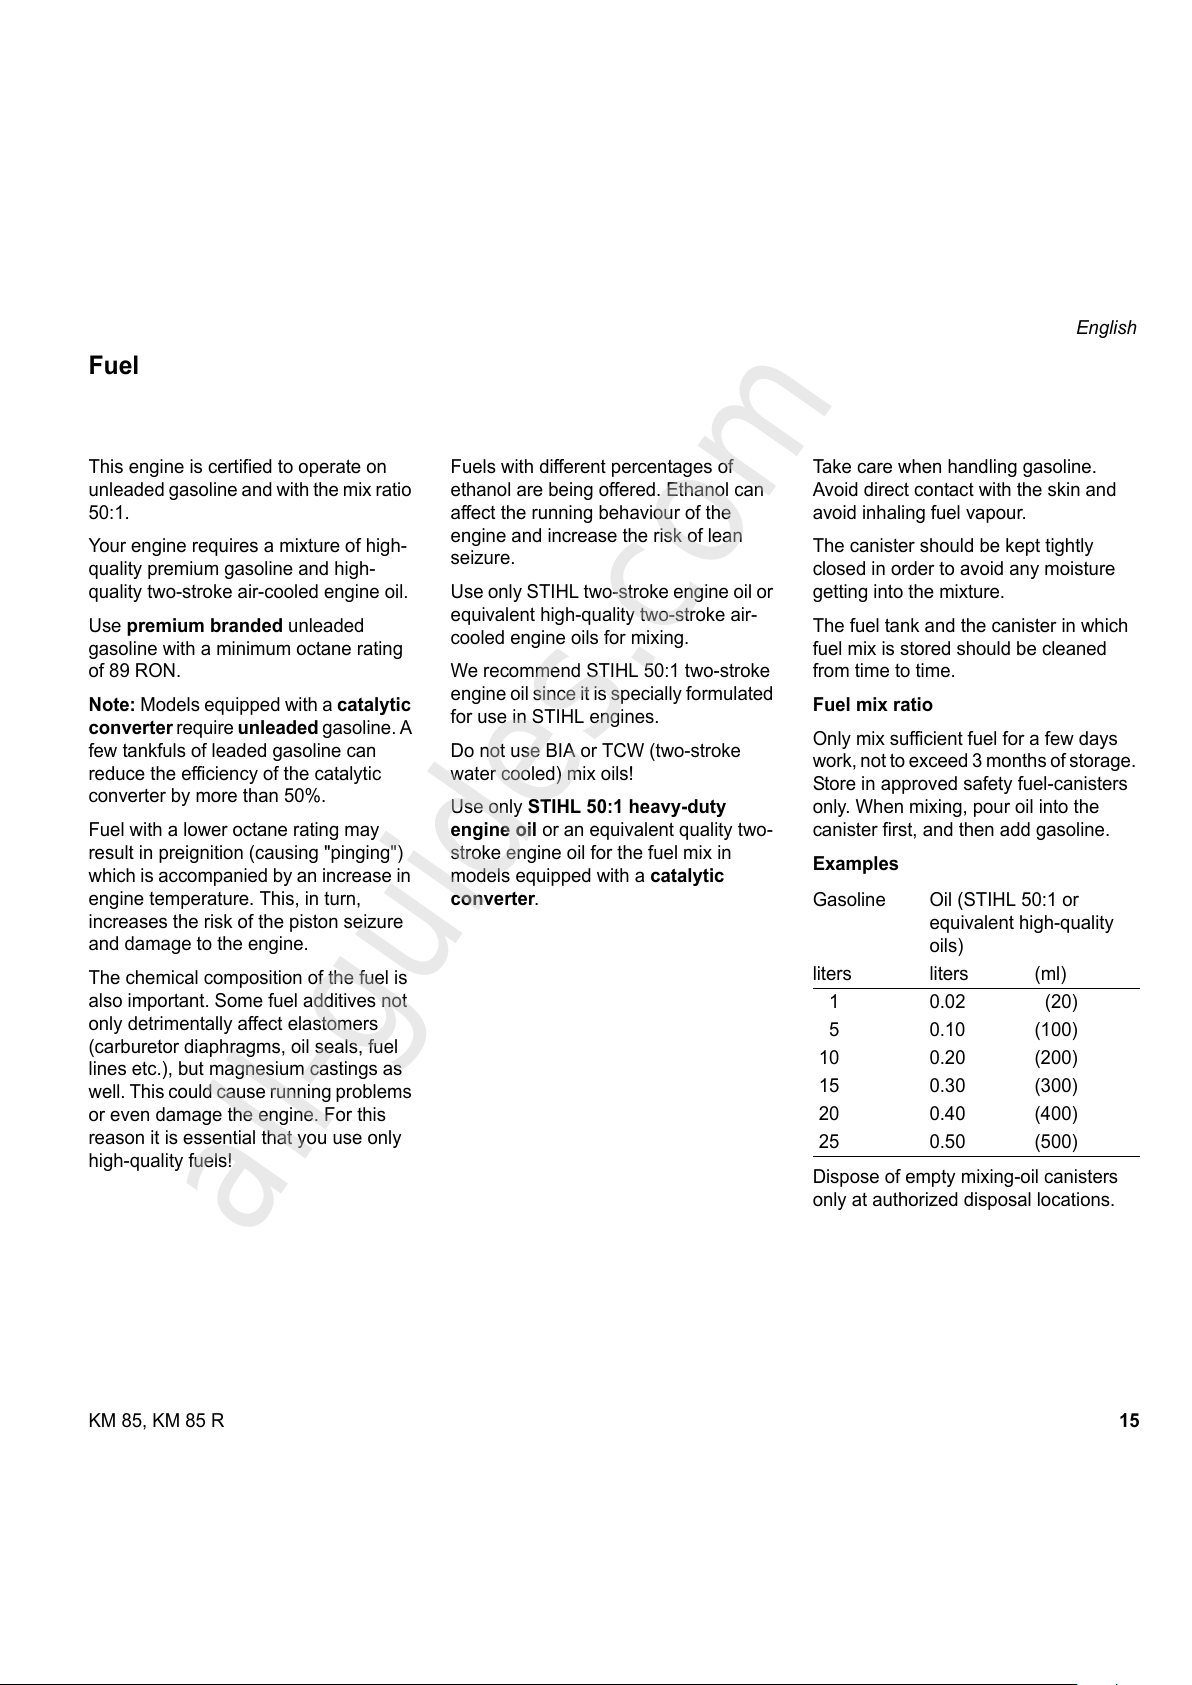
Fuel mix ratio
Only mix sufficient fuel for a few days
work, not to exceed 3 months of storage.
Store in approved safety fuel-canisters
only. When mixing, pour oil into the
canister first, and then add gasoline.
Examples
Dispose of empty mixing-oil canisters
only at authorized disposal locations.
Fuel
Gasoline Oil (STIHL 50:1 or
equivalent high-quality
oils)
liters liters (ml)
1 0.02 (20)
5 0.10 (100)
10 0.20 (200)
15 0.30 (300)
20 0.40 (400)
25 0.50 (500)
All manuals and user guides at all-guides.com
all-guides.com
Page 17
16
English
KM 85, KM 85 R
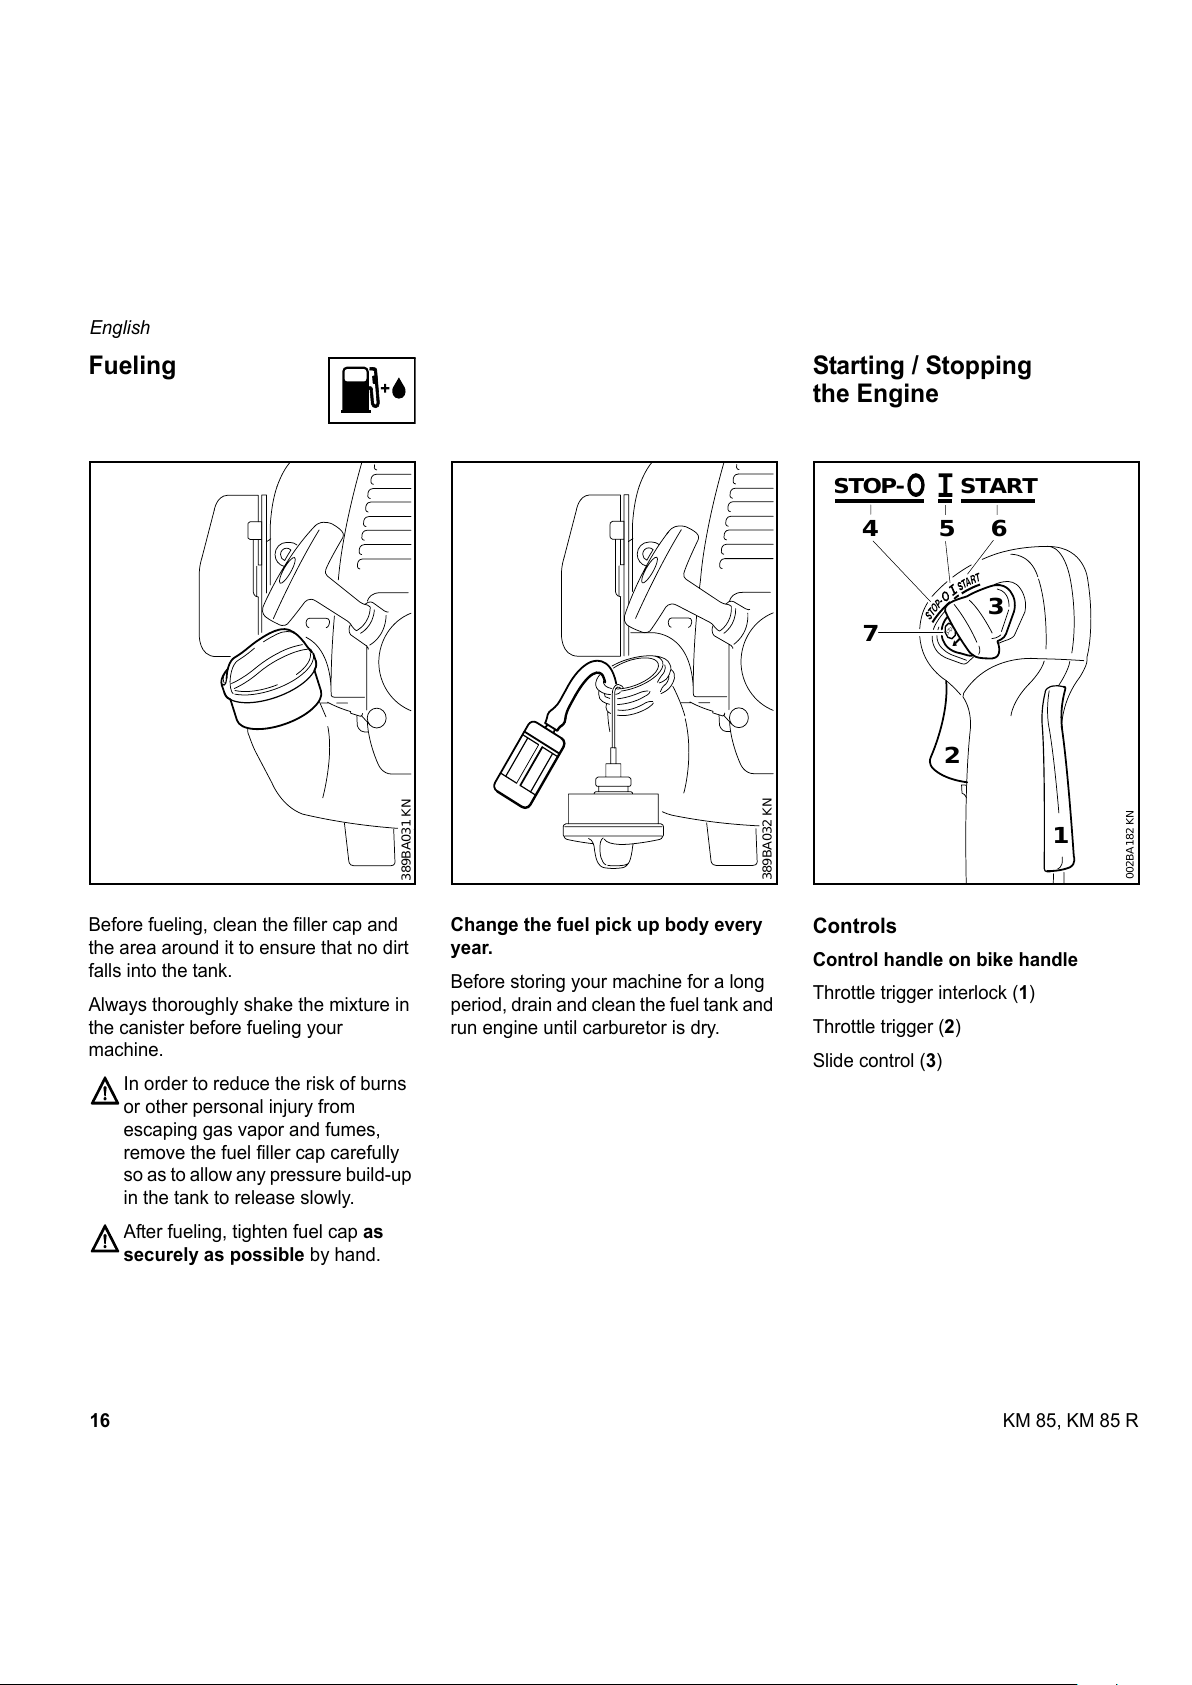
Before fueling, clean the filler cap and
the area around it to ensure that no dirt
falls into the tank.
Always thoroughly shake the mixture in
the canister before fueling your
machine.
In order to reduce the risk of burns
or other personal injury from
escaping gas vapor and fumes,
remove the fuel filler cap carefully
so as to allow any pressure build-up
in the tank to release slowly.
After fueling, tighten fuel cap as
securely as possible by hand.
Change the fuel pick up body every
year.
Before storing your machine for a long
period, drain and clean the fuel tank and
run engine until carburetor is dry.
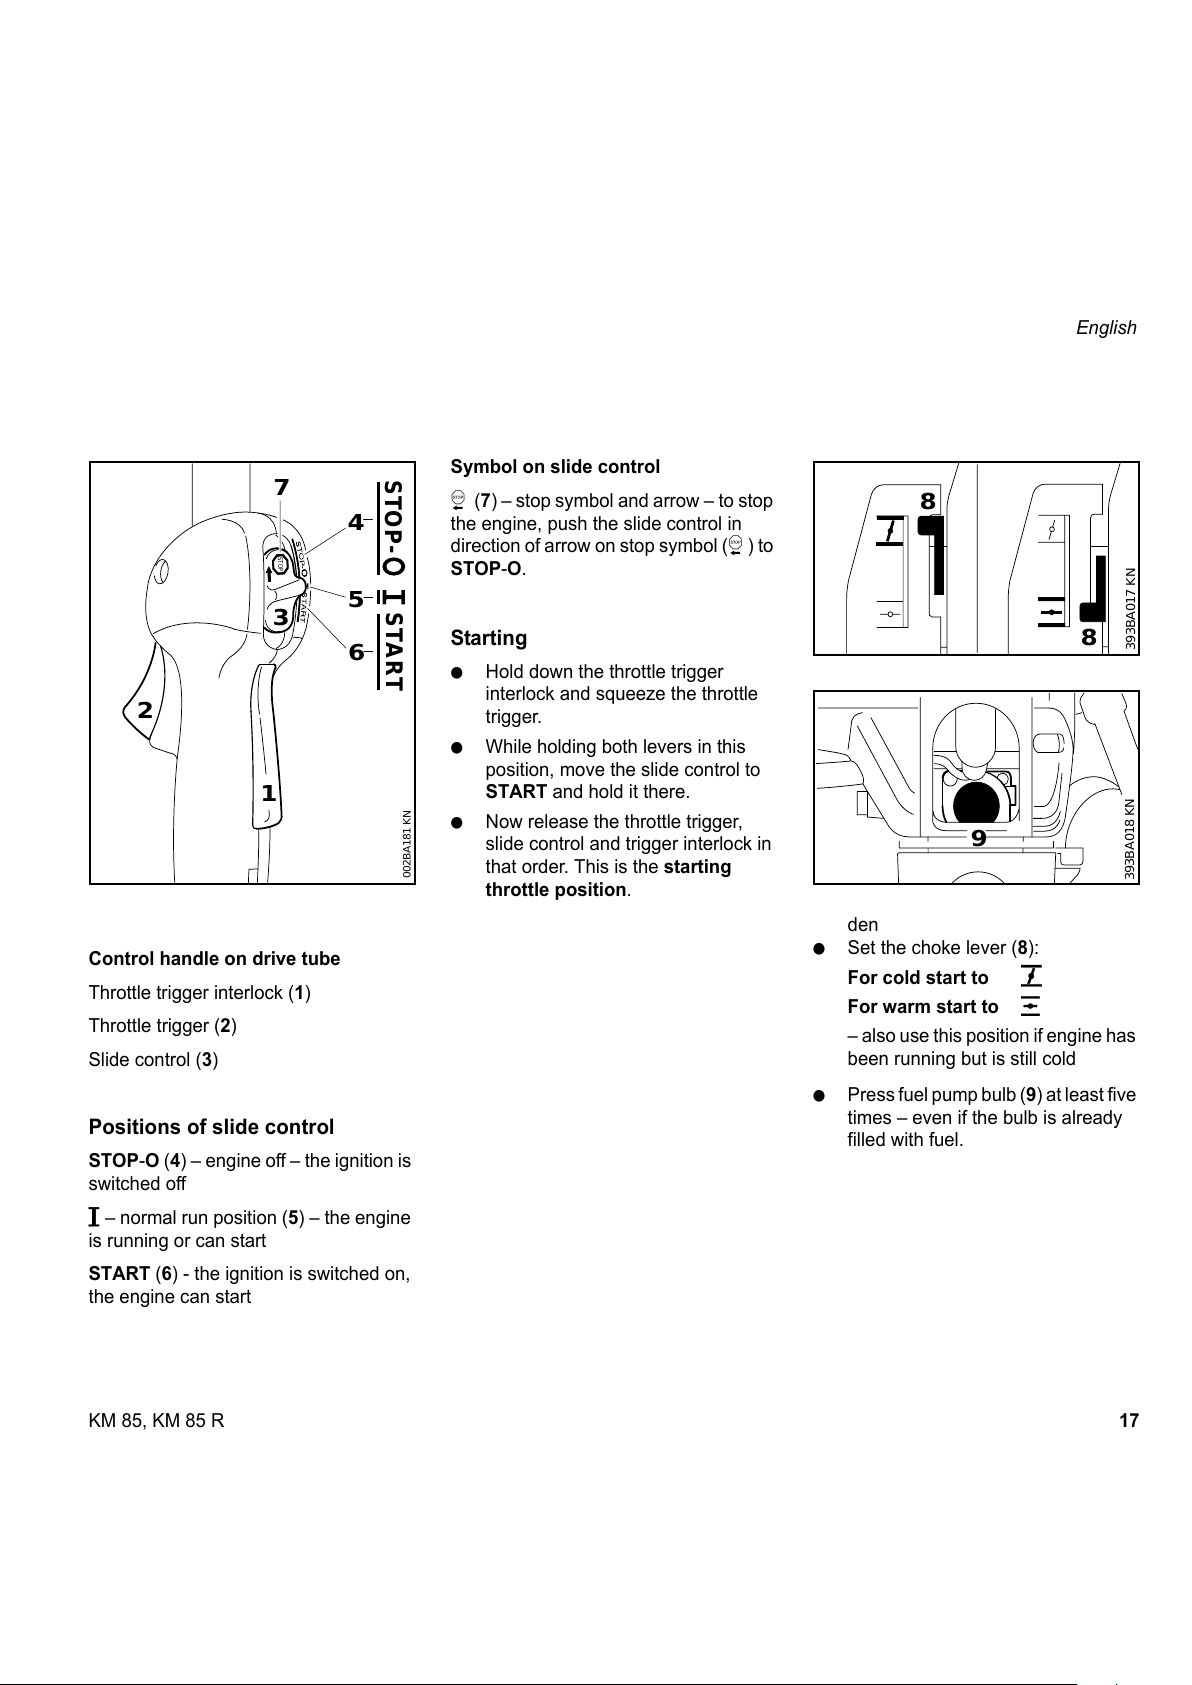
Controls
Control handle on bike handle
Throttle trigger interlock (1)
Throttle trigger (2)
Slide control (3)
Fueling
389BA031 KN
389BA032 KN
Starting / Stopping
the Engine
3
STOP
56
4
7
002BA182 KN
1
2
START
STOP-
All manuals and user guides at all-guides.com
Page 18
17KM 85, KM 85 R
English
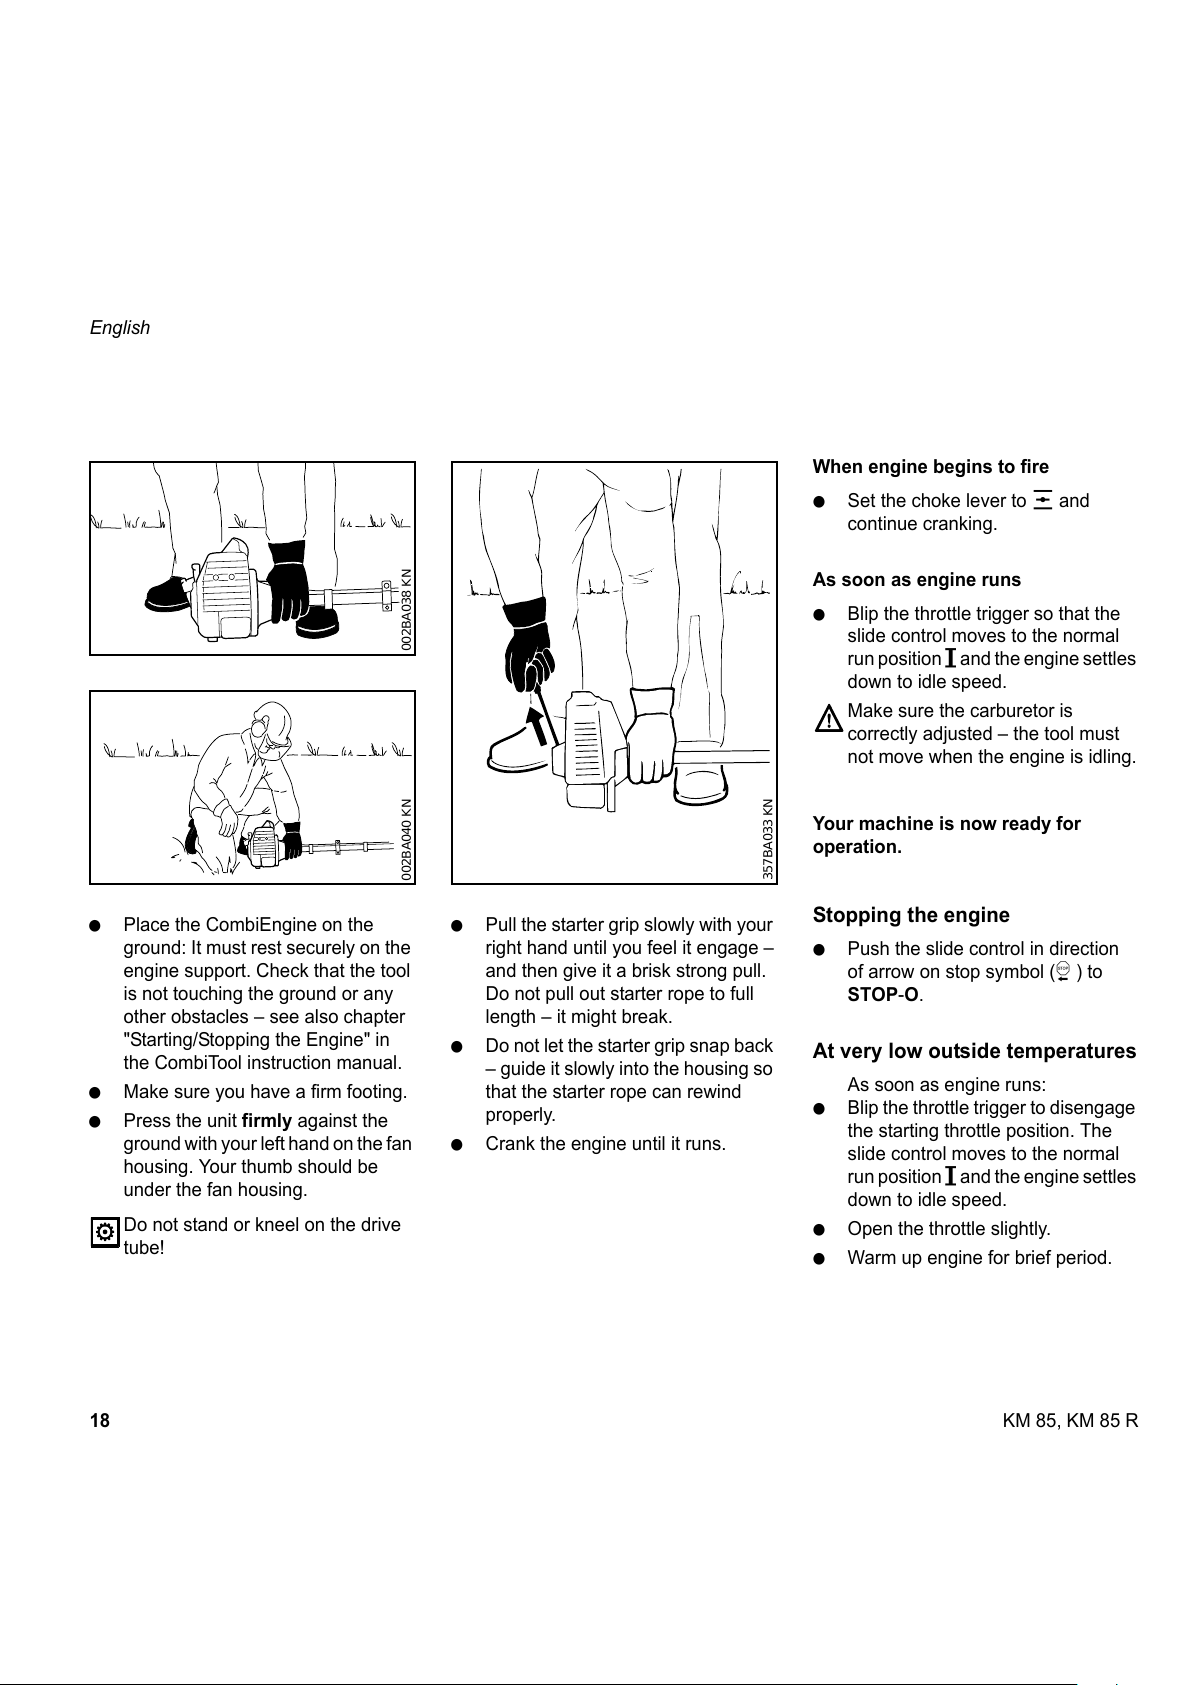
Control handle on drive tube
Throttle trigger interlock (1)
Throttle trigger (2)
Slide control (3)
Positions of slide control
STOP-O (4) – engine off – the ignition is
switched off
# – normal run position (5) – the engine
is running or can start
START (6) - the ignition is switched on,
the engine can start
Symbol on slide control
h (7) – stop symbol and arrow – to stop
the engine, push the slide control in
direction of arrow on stop symbol (h ) to
STOP-O.
Starting
: Hold down the throttle trigger
interlock and squeeze the throttle
trigger.
: While holding both levers in this
position, move the slide control to
START and hold it there.
: Now release the throttle trigger,
slide control and trigger interlock in
that order. This is the starting
throttle position.
den
: Set the choke lever (8):
For cold start to
g
For warm start to e
– also use this position if engine has
been running but is still cold
: Press fuel pump bulb (9) at least five
times – even if the bulb is already
filled with fuel.
3
STOP
2
5
6
4
7
002BA181 KN
START
STOP-
1
393BA017 KN
8
8
393BA018 KN
9
All manuals and user guides at all-guides.com
Page 19
18
English
KM 85, KM 85 R
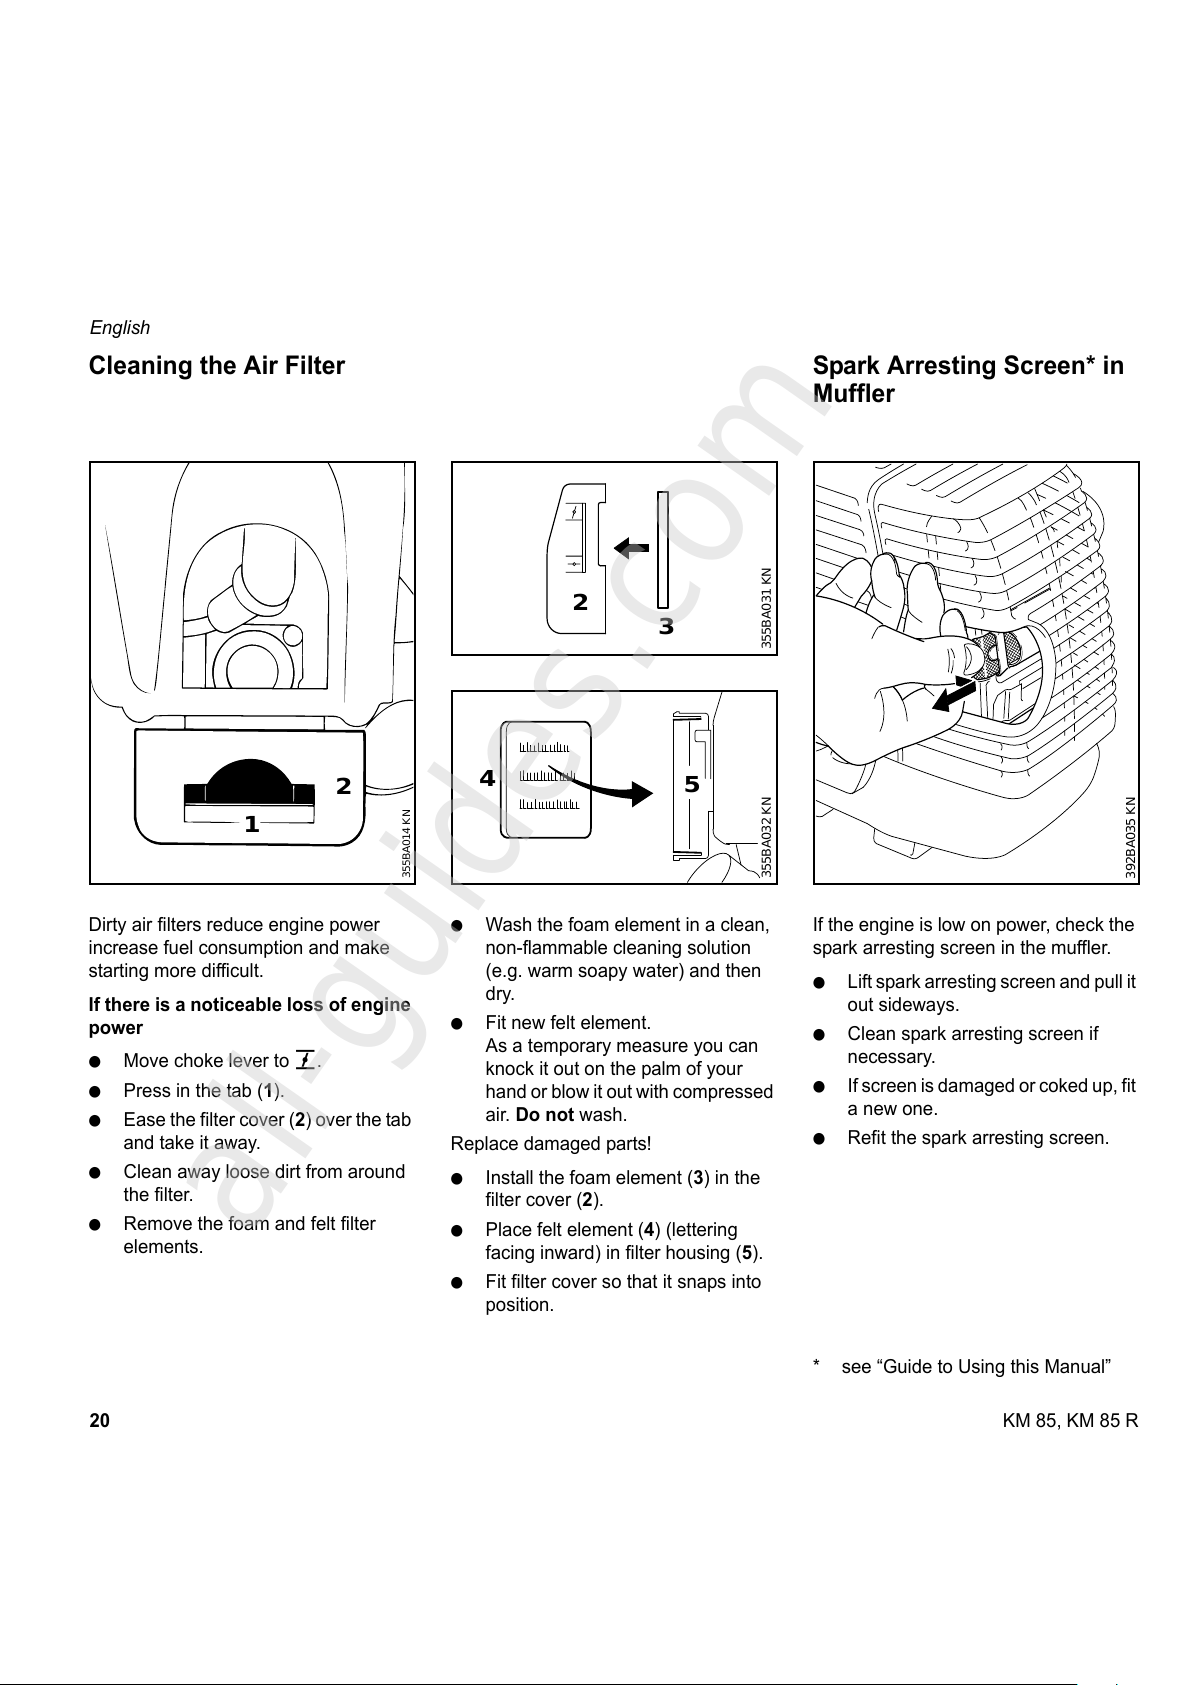
: Place the CombiEngine on the
ground: It must rest securely on the
engine support. Check that the tool
is not touching the ground or any
other obstacles – see also chapter
"Starting/Stopping the Engine" in
the CombiTool instruction manual.
: Make sure you have a firm footing.
: Press the unit firmly against the
ground with your left hand on the fan
housing. Your thumb should be
under the fan housing.
Do not stand or kneel on the drive
tube!
: Pull the starter grip slowly with your
right hand until you feel it engage –
and then give it a brisk strong pull.
Do not pull out starter rope to full
length – it might break.
: Do not let the starter grip snap back
– guide it slowly into the housing so
that the starter rope can rewind
properly.
: Crank the engine until it runs.
When engine begins to fire
: Set the choke lever to e and
continue cranking.
As soon as engine runs
: Blip the throttle trigger so that the
slide control moves to the normal
run position # and the engine settles
down to idle speed.
Make sure the carburetor is
correctly adjusted – the tool must
not move when the engine is idling.
Your machine is now ready for
operation.
Stopping the engine
: Push the slide control in direction
of arrow on stop symbol (h ) to
STOP-O.
At very low outside temperatures
As soon as engine runs:
: Blip the throttle trigger to disengage
the starting throttle position. The
slide control moves to the normal
run position # and the engine settles
down to idle speed.
: Open the throttle slightly.
: Warm up engine for brief period.
002BA038 KN
002BA040 KN
357BA033 KN
All manuals and user guides at all-guides.com
Page 20

19KM 85, KM 85 R
English
If the engine does not start
Choke lever
If you did not move the choke lever to e
quickly enough after the engine began to
fire, the combustion chamber has
flooded.
: Move the choke lever to e
: Set the slide control, interlock lever
and throttle trigger to the starting
throttle position.
: Start the engine by pulling the
starter rope firmly. 10 to 20 pulls
may be necessary.
If the engine still does not start:
: Move the slide control to STOP-O.
: Pull off the spark plug boot (10).
: Unscrew and dry off the spark plug.
: Open the throttle wide.
: Crank the engine several times with
the starter to clear the combustion
chamber.
: Refit the spark plug. Connect the
spark plug boot (press it down
firmly).
: Move the slide control to START.
: Set the choke lever to e –
even if engine is cold.
: Now start the engine.
Throttle cable adjustment
: Check adjustment of throttle cable –
see chapter on "Adjusting the
Throttle Cable".
Tank run until dry
: After refueling, press the fuel pump
bulb at least five times – even if bulb
is already filled with fuel.
: Set choke lever according to engine
temperature.
: Now start the engine.
During break-in period
A factory new machine should not be run
at high revs (full throttle off load) for the
first three tank fillings. This avoids
unnecessary high loads during the
break-in period.
As all moving parts have to bed in during
the break-in period, the frictional
resistances in the engine are greater
during this period.
The engine develops its maximum
power after about 5 to 15 tank fillings.
During operation
After a long period of full-throttle
operation, allow engine to run for a while
at idle speed so that the heat in the
engine can be dissipated by flow of
cooling air. This protects engine-
mounted components (ignition,
carburetor) from thermal overload.
After finishing work
Storing for short period:
Wait for engine to cool down. Drain the
fuel tank and keep the unit in a dry place,
away from sources of ignition, until you
need it again.
Storing for a long period:
see chapter "Storing the Machine".
10
393BA042 KN
Operating Instructions
All manuals and user guides at all-guides.com
Page 21
20
English
KM 85, KM 85 R
Dirty air filters reduce engine power
increase fuel consumption and make
starting more difficult.
If there is a noticeable loss of engine
power
: Move choke lever to g.
: Press in the tab (1).
: Ease the filter cover (2) over the tab
and take it away.
: Clean away loose dirt from around
the filter.
: Remove the foam and felt filter
elements.
: Wash the foam element in a clean,
non-flammable cleaning solution
(e.g. warm soapy water) and then
dry.
: Fit new felt element.
As a temporary measure you can
knock it out on the palm of your
hand or blow it out with compressed
air. Do not wash.
Replace damaged parts!
: Install the foam element (3) in the
filter cover (2).
: Place felt element (4) (lettering
facing inward) in filter housing (5).
: Fit filter cover so that it snaps into
position.
If the engine is low on power, check the
spark arresting screen in the muffler.
: Lift spark arresting screen and pull it
out sideways.
: Clean spark arresting screen if
necessary.
: If screen is damaged or coked up, fit
a new one.
: Refit the spark arresting screen.
* see “Guide to Using this Manual”
Cleaning the Air Filter
355BA014 KN
2
1
2
3
355BA031 KN
4
5
355BA032 KN
Spark Arresting Screen* in
Muffler
392BA035 KN
All manuals and user guides at all-guides.com
all-guides.com
Page 22
21KM 85, KM 85 R
English
Exhaust emissions are controlled by the
design of the fundamental engine
parameters and components (e.g.
carburation, ignition, timing and valve or
port timing) without the addition of any
major hardware.
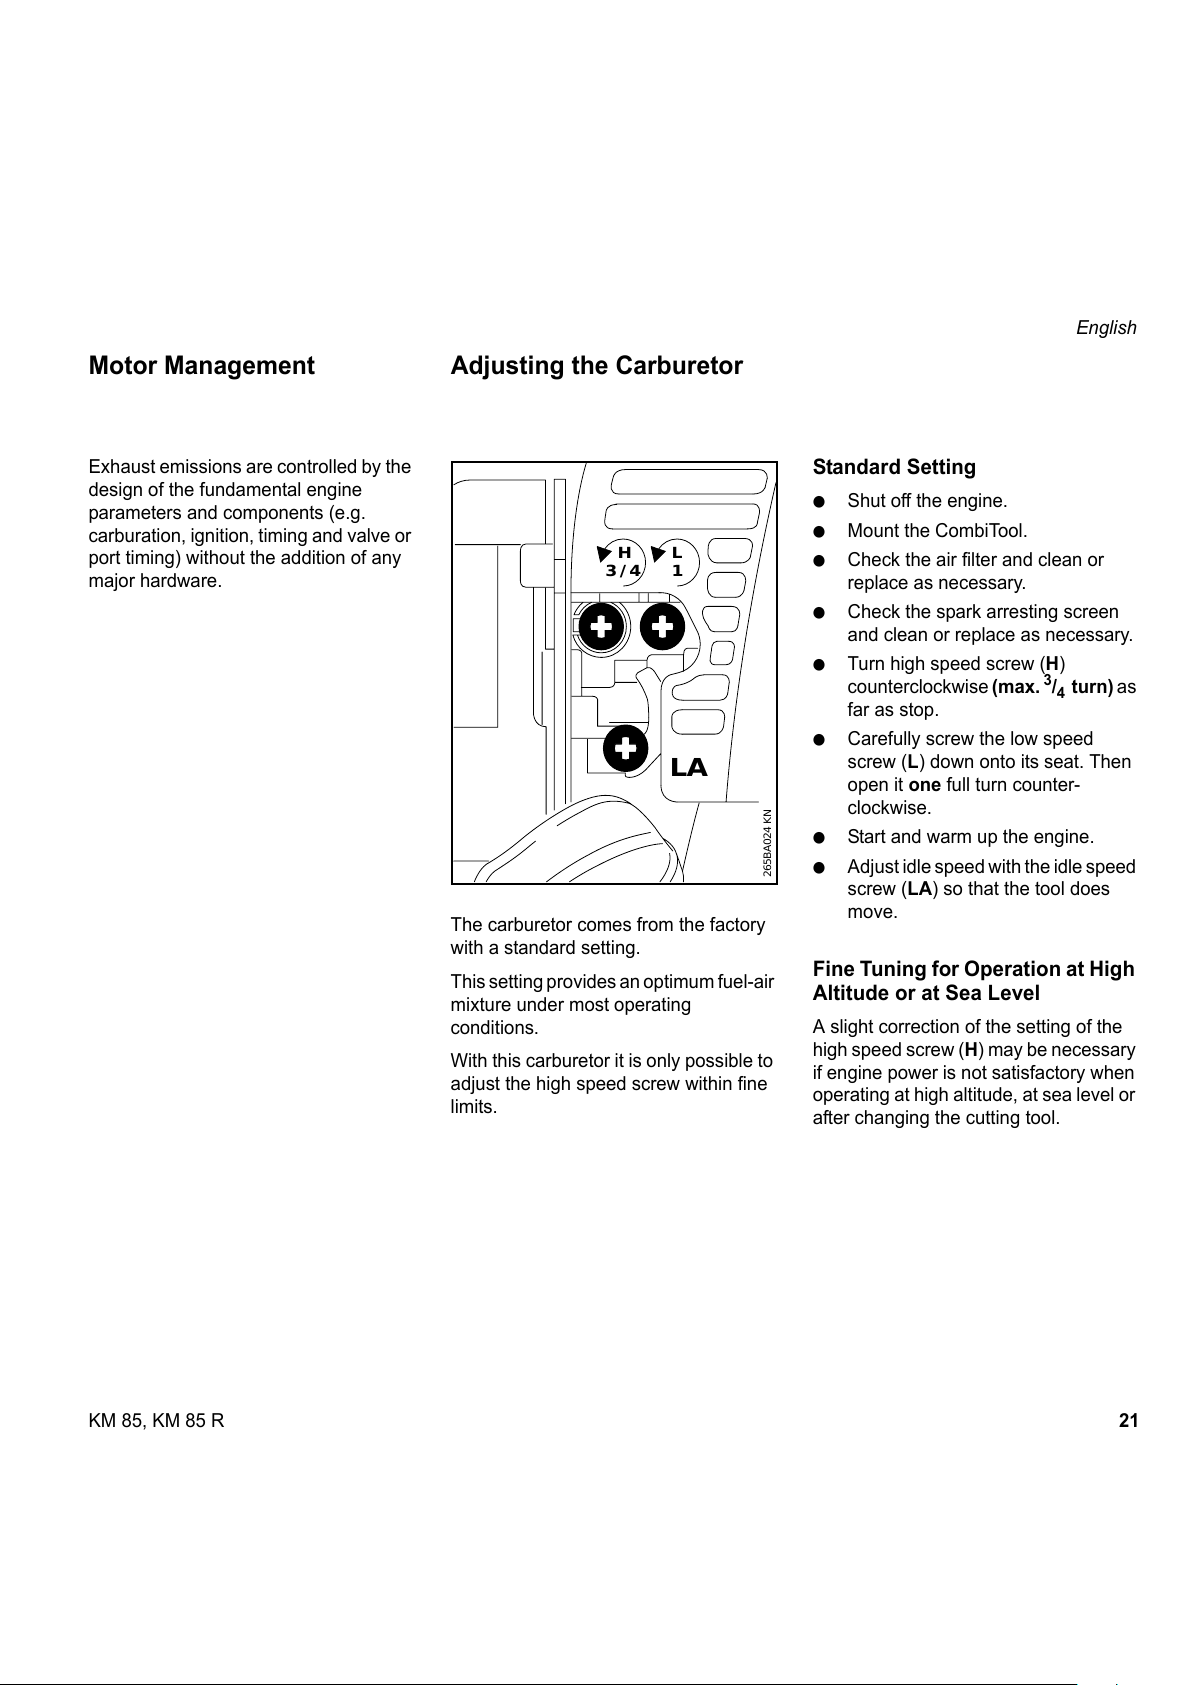
The carburetor comes from the factory
with a standard setting.
This setting provides an optimum fuel-air
mixture under most operating
conditions.
With this carburetor it is only possible to
adjust the high speed screw within fine
limits.
Standard Setting
: Shut off the engine.
: Mount the CombiTool.
: Check the air filter and clean or
replace as necessary.
: Check the spark arresting screen
and clean or replace as necessary.
: Turn high speed screw (H)
counterclockwise (max.
3
/4 t ur n) as
far as stop.
: Carefully screw the low speed
screw (L) down onto its seat. Then
open it one full turn counter-
clockwise.
: Start and warm up the engine.
: Adjust idle speed with the idle speed
screw (LA) so that the tool does
move.
Fine Tuning for Operation at High
Altitude or at Sea Level
A slight correction of the setting of the
high speed screw (H) may be necessary
if engine power is not satisfactory when
operating at high altitude, at sea level or
after changing the cutting tool.
Motor Management Adjusting the Carburetor
265BA024 KN
LA
HL
1
3 / 4
All manuals and user guides at all-guides.com
Page 23
22
English
KM 85, KM 85 R
Rule of thumb
Turn high speed screw (H) about
1
/4
turn for every 1000 m (3300 ft)
change in altitude.
: Carry out standard setting.
: Warm up engine for about 3
minutes.
At high altitude
: Turn high speed screw (H) clock-
wise (leaner) no further than stop.
At sea level
: Turn high speed screw (H) counter-
clockwise (richer) no further than
stop.
Maximum engine speed is normally
reached with the standard setting in
each case.
Adjusting Idle Speed
It is usually necessary to change the
setting of the idle speed screw (LA)
after every correction to the low speed
screw (L).
: Warm up the engine for about 3
minutes.
Engine stops while idling
: Turn idle speed screw (LA) slowly
clockwise until the engine runs
smoothly – the tool must not move.
CombiTool moves when engine is
idling
: Turn idle speed screw (LA) counter-
clockwise until the tool stops moving
and then turn the screw about
another 1/2 to 1 turn in the same
direction.
Erratic idling behavior, engine stops
even though setting of LA screw is
correct, poor acceleration
Idle setting too lean:
: Turn low speed screw (L)
counterclockwise (about 1/4 turn)
until the engine runs and
accelerates smoothly.
Erratic idling behavior
Idle setting too rich:
: Turn low speed screw (L) clockwise
(about 1/4 turn) until the engine runs
and accelerates smoothly.
All manuals and user guides at all-guides.com
Page 24
23KM 85, KM 85 R
English
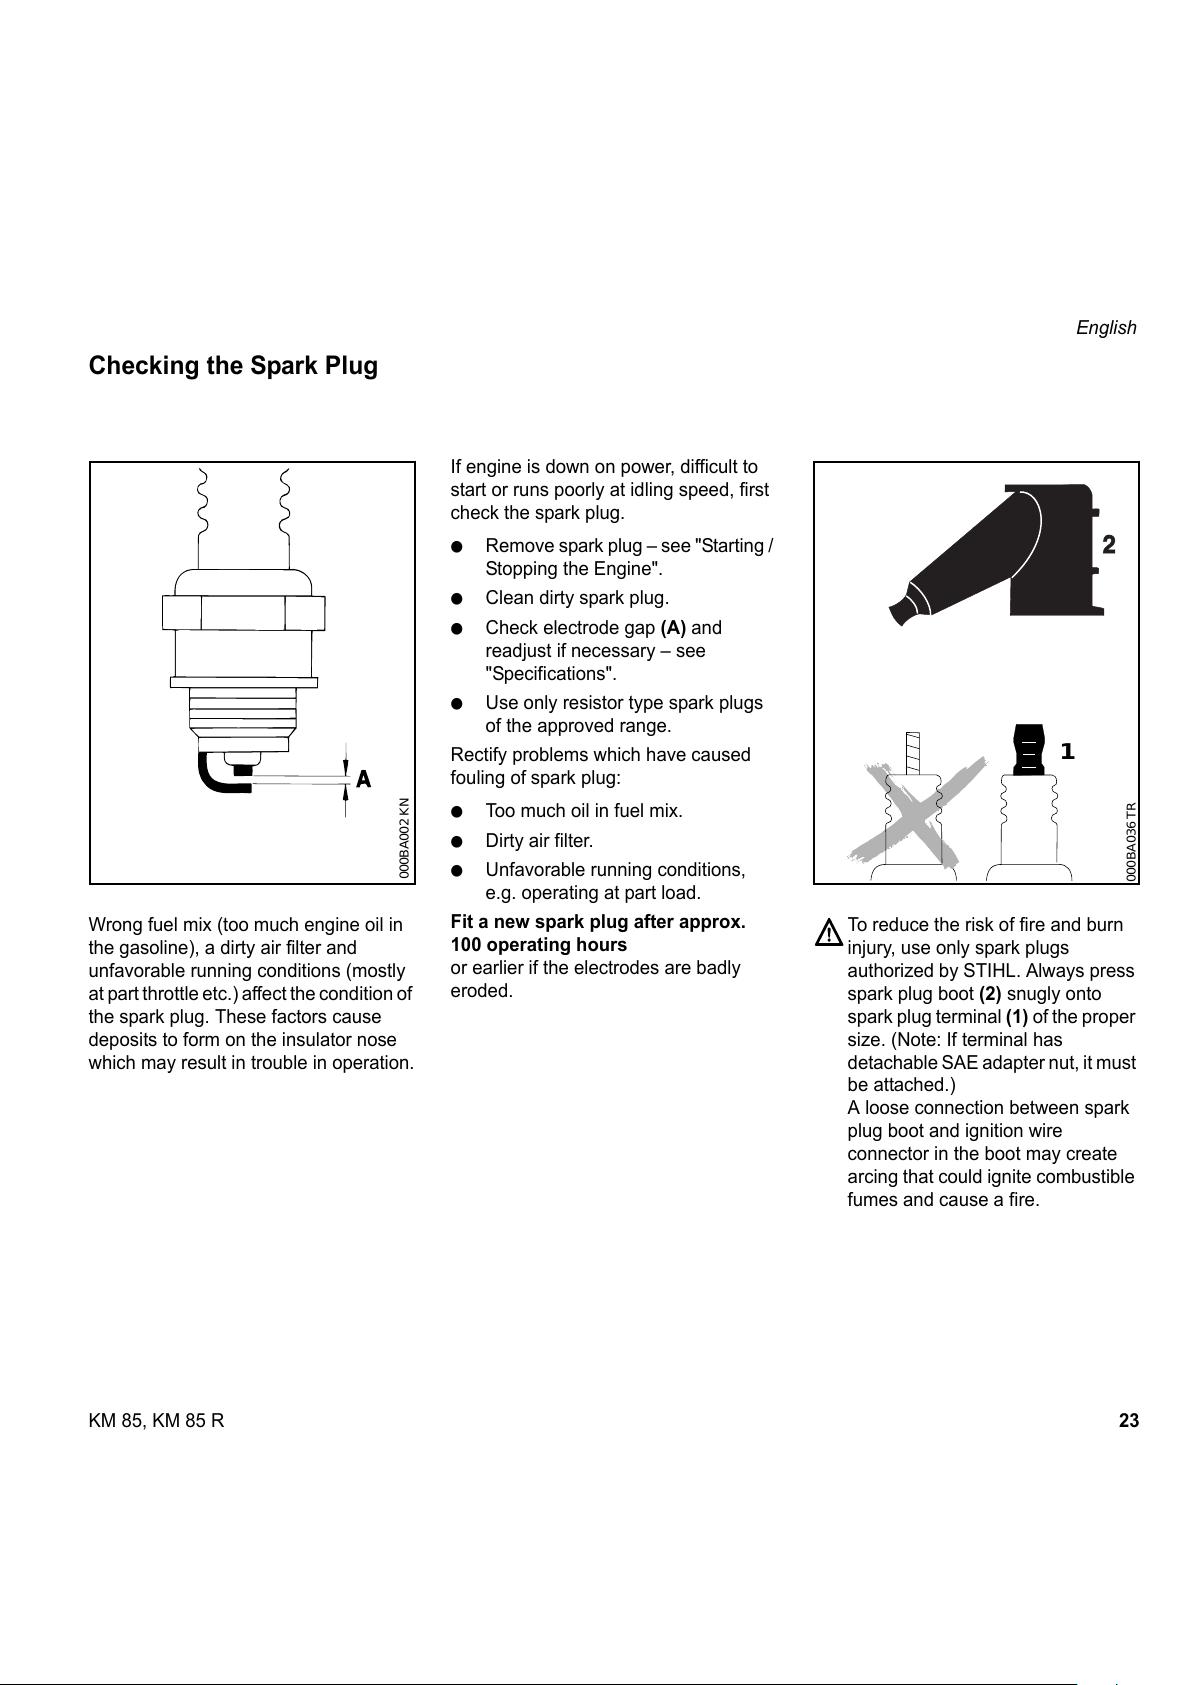
Wrong fuel mix (too much engine oil in
the gasoline), a dirty air filter and
unfavorable running conditions (mostly
at part throttle etc.) affect the condition of
the spark plug. These factors cause
deposits to form on the insulator nose
which may result in trouble in operation.
If engine is down on power, difficult to
start or runs poorly at idling speed, first
check the spark plug.
: Remove spark plug – see "Starting /
Stopping the Engine".
: Clean dirty spark plug.
: Check electrode gap (A) and
readjust if necessary – see
"Specifications".
: Use only resistor type spark plugs
of the approved range.
Rectify problems which have caused
fouling of spark plug:
: Too much oil in fuel mix.
: Dirty air filter.
: Unfavorable running conditions,
e.g. operating at part load.
Fit a new spark plug after approx.
100 operating hours
or earlier if the electrodes are badly
eroded.
To reduce the risk of fire and burn
injury, use only spark plugs
authorized by STIHL. Always press
spark plug boot (2) snugly onto
spark plug terminal (1) of the proper
size. (Note: If terminal has
detachable SAE adapter nut, it must
be attached.)
A loose connection between spark
plug boot and ignition wire
connector in the boot may create
arcing that could ignite combustible
fumes and cause a fire.
Checking the Spark Plug
000BA002 KN
0
00BA036 TR
1
All manuals and user guides at all-guides.com
Page 25
24
English
KM 85, KM 85 R
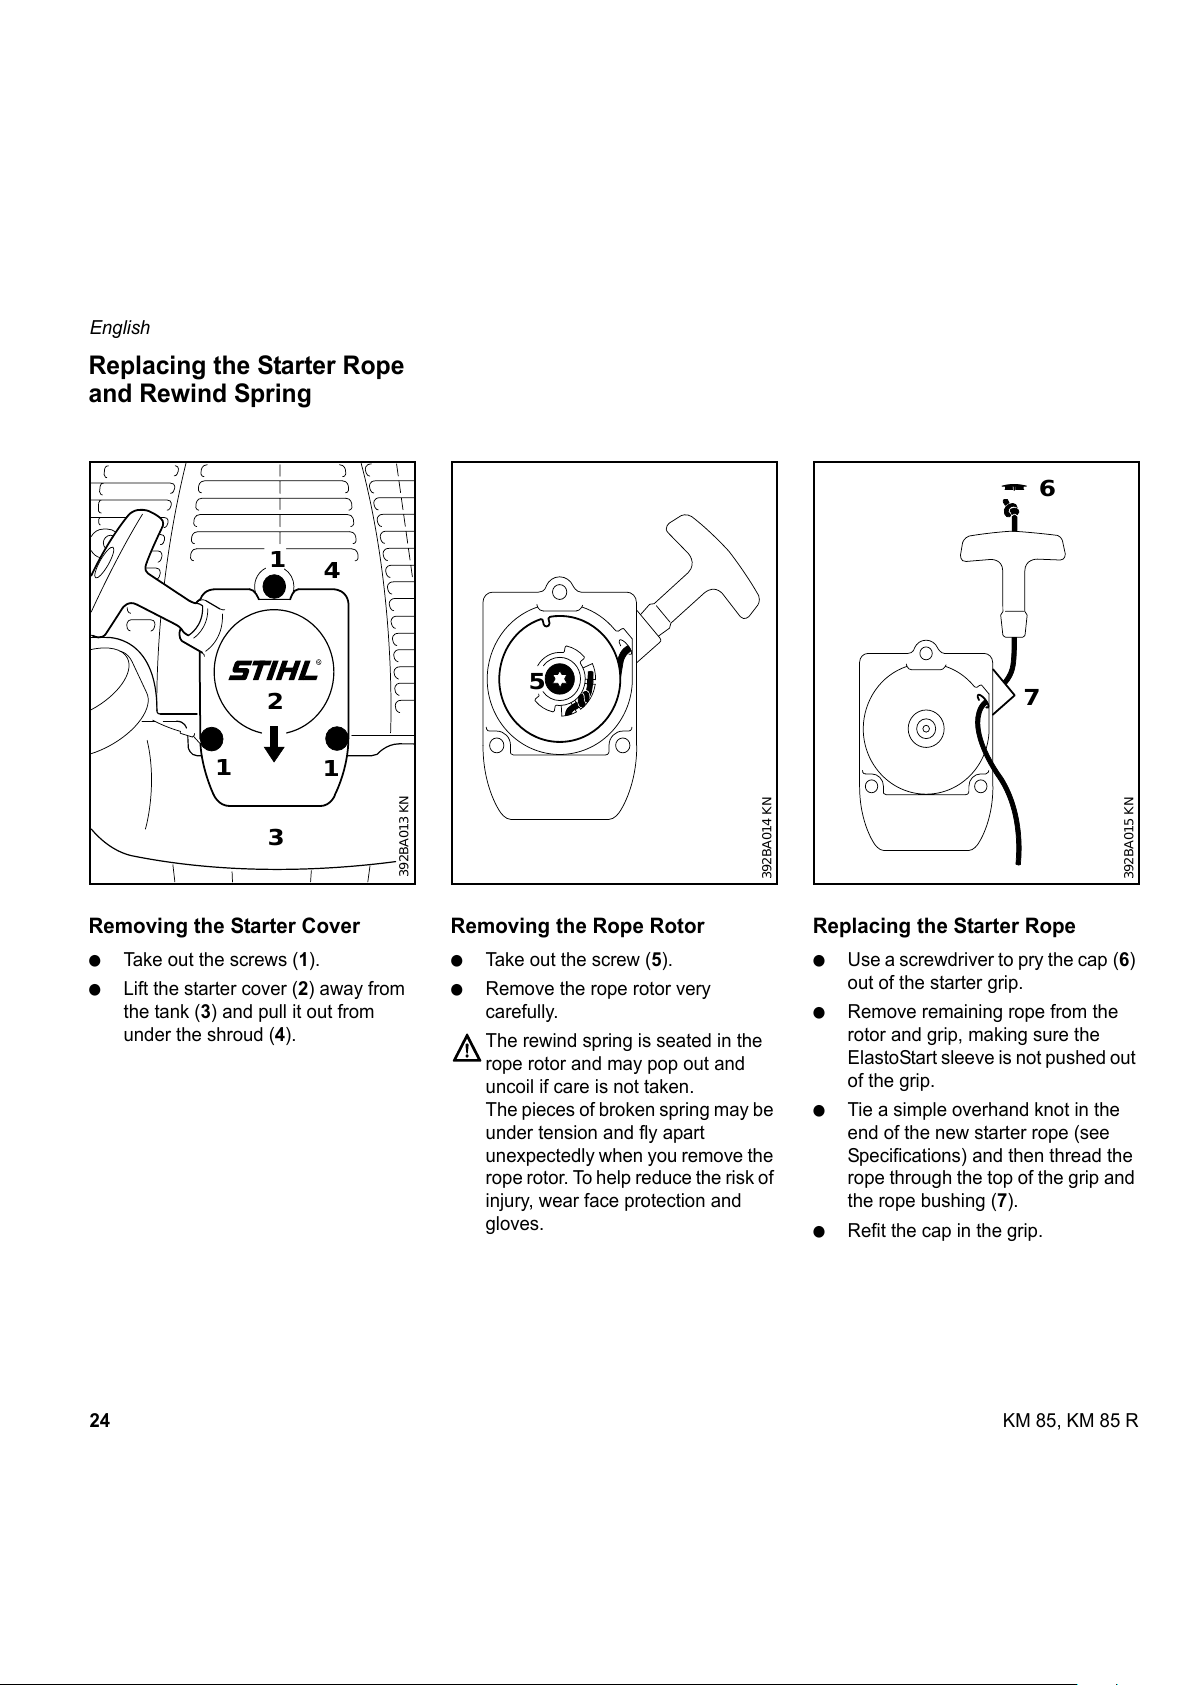
Removing the Starter Cover
: Take out the screws (1).
: Lift the starter cover (2) away from
the tank (3) and pull it out from
under the shroud (4).
Removing the Rope Rotor
: Take out the screw (5).
: Remove the rope rotor very
carefully.
The rewind spring is seated in the
rope rotor and may pop out and
uncoil if care is not taken.
The pieces of broken spring may be
under tension and fly apart
unexpectedly when you remove the
rope rotor. To help reduce the risk of
injury, wear face protection and
gloves.
Replacing the Starter Rope
: Use a screwdriver to pry the cap (6)
out of the starter grip.
: Remove remaining rope from the
rotor and grip, making sure the
ElastoStart sleeve is not pushed out
of the grip.
: Tie a simple overhand knot in the
end of the new starter rope (see
Specifications) and then thread the
rope through the top of the grip and
the rope bushing (7).
: Refit the cap in the grip.
Replacing the Starter Rope
and Rewind Spring
1
1
1
2
3
4
392BA013 KN
5
392BA014 KN
6
7
392BA015 KN
All manuals and user guides at all-guides.com
Page 26

25KM 85, KM 85 R
English
: Pull the rope through the rotor and
secure it with a simple overhand
knot.
: Go to "Installing the rope rotor".
Replacing a Broken Rewind
Spring
Two types of replacement spring are
available from the factory:
– A ready-to-fit rewind spring secured
with a wire retainer.
– A rope rotor with pre-installed
rewind spring.
Installing the ready-to-fit rewind
spring
: Lubricate the spring with a few
drops of non-resinous oil – see
"Special Accessories" – do not open
the wire retainer!
: Carefully remove the parts of the old
spring from the starter cover and
rope rotor.
: Insert the new rewind spring in the
rope rotor and, at the same time,
engage the outer spring loop in the
rotor’s recess – the wire retainer
slips off in this process.
If the spring pops out and uncoils,
refit it in the counterclockwise
direction, starting outside and
working inwards.
: Go to "Installing the Rope Rotor".
Installing rope rotor with rewind
spring
: Carefully unpack the new rope rotor
with rewind spring. The spring may
pop out if not handled with care –
risk of injury.
: Lubricate the spring with a few
drops of non-resinous oil – see
"Special Accessories".
: Go to "Installing the Rope Rotor".
Installing the Rope Rotor
: Check dimension a for inner spring
anchor loop and bend it slightly if
necessary.
: Coat rope rotor bearing bore with
non-resinous oil – see "Special
Accessories".
: Slide the rotor onto the starter post –
turn it back and forth until the rewind
spring anchor loop (8) engages.
: Insert the screw (5) and tighten it
down securely.
: Go to "Tensioning the Rewind
Spring".
392BA024 KN
a
389BA029 KN
a = 2mm
(0.08 in)
8
392BA025 KN
All manuals and user guides at all-guides.com
all-guides.com
Page 27

26
English
KM 85, KM 85 R
Tensioning the Rewind Spring
: Make a loop in the unwound
starter rope and use it to turn
the rope rotor six full revolutions
counterclockwise. Hold the rotor
steady – straighten the twisted rope
– release the rotor –
let go of rope slowly so that it winds
onto the rotor.
: Check spring tension:
– The starter grip must be firmly
seated in the rope guide bushing.
If the grip droops to one side: Add
one more turn on rope rotor to
increase spring tension.
– When the starter rope is fully
extended it must be possible to
rotate the rotor another half turn. If
this is not the case, the spring is
overtensioned and could break.
Take one turn of rope off the rotor.
: Go to "Fitting the Starter Cover".
Fitting the Starter Cover
: Push the upper mounting boss (2)
under the shroud (4) –
line up the tank (3)and push the
lower part of cover onto the tank.
: Insert and tighten down the housing
screws (1).
For periods of about 3 months or longer:
: Drain and clean the fuel tank in a
well ventilated area.
: Dispose fuel properly in accordance
with local environmental
requirements.
: Run the engine until the carburetor
is dry – this helps prevent the
carburetor diaphragms sticking
together.
: Thoroughly clean the machine - pay
special attention to the cylinder fins
and the air filter.
: Remove the tool – clean and inspect
it.
: Store the machine in a dry, high or
locked location – out of the reach
of children and other unauthorized
persons.
392BA044 KN
1
1
1
2
3
4
393BA045 KN
Storing the Machine
All manuals and user guides at all-guides.com
Page 28

27KM 85, KM 85 R
English
1)
STIHL recommends a STIHL servicing dealer
* See “Guide to Using this Manual”
Maintenance Chart
Please note that the following maintenance intervals apply for normal operating
conditions. If your daily working time is longer than normal or working conditions
are difficult (very dusty work area, etc.), shorten the specified intervals accordingly.
before
starting work
after finishing
work or daily
after each
refueling stop
weekly
monthly
every 12
months
if problem
if damaged
as required
Complete machine
Visual inspection (condition,
leaks)
XX
Clean
X
Control handle Check operation
XX
Air filter
Clean
XX
Replace
X
Pickup body in fuel tank
Check
X
Replace
XXX
Fuel tank Clean
XX
Carburetor
Check idle adjustment – working
tool must not move
XX
Readjust idle
X
Spark plug
Readjust electrode gap
X
Replace after 100 hours of
operation
Cooling inlets
Inspect
X
Clean
X
Spark arresting screen* in muffler
Inspect
XX
Replace
XX
Accessible screws and nuts
(not adjusting screws)
Retighten
X
Antivibration elements
Check
XXX
Have replaced by dealer
1)
X
Safety labels Replace
X
All manuals and user guides at all-guides.com
Page 29

28
English
KM 85, KM 85 R
1Fuel pump
2 Choke lever
3 Carburetor adjusting screws
4 Starter grip
5 Fuel filler cap
6Fuel tank
7 Muffler (with spark arresting
screen*)
8 Throttle trigger
9 Slide control
10 Throttle trigger interlock
11 Bike handle
12 Handle support
13 Throttle cable retainer
14 Carrying ring
15 Spark plug boot
16 Air filter cover
17 Machine support
18 Wing screw
19 Coupling sleeve
20 Barrier bar*
21 Loop handle
22 Drive tube
# Serial number
* see "Guide to Using this Manual"
Main Parts and Controls
19
4
12
13
11
8
9
10
13
14
15
16
17
9
10
8
21
20
14
19
18
462BA000 KN
1
2
3
5
6
7
22
22
#
18
All manuals and user guides at all-guides.com
Page 30

29KM 85, KM 85 R
English
Definitions
1. Fuel Pump
Provides additional fuel feed for a
cold start.
2. Choke Lever
Eases engine starting by enriching
mixture.
3. Carburetor Adjusting Screws
For tuning the carburetor
4. Starter Grip
The grip of the pull starter, which is
the device to start the engine.
5. Fuel Filler Cap
For closing the fuel tank.
6. Fuel Tank
For fuel mixture consisting of
gasoline and oil.
7. Muffler
(with spark arresting screen)
Reduces exhaust noises and
diverts exhaust gases away from
operator.
8. Throttle Trigger
Controls the speed of the engine.
9. Slide Control
For starting throttle, run and stop.
Keeps the throttle partially open
during starting, switches the
engine’s ignition off to stop the
engine.
10. Throttle Trigger Interlock
Must be depressed before the
throttle trigger can be activated.
11. Bike Handle
For easy control of the machine with
both hands.
12. Handle Support
Connects the drive tube and bike
handle.
13. Throttle Cable Retainer
Secures the throttle cable to the
drive tube.
14. Carrying Ring
Connects the machine to the
harness.
15. Spark Plug Boot
Connects the spark plug to the
ignition lead.
16. Air Filter Cover
Encloses and protects the air filter.
17. Machine Support
For resting machine on the ground.
18. Wing Screw
Secures the lower part of the drive
tube (stub shaft).
19. Coupling Sleeve
Connects the drive tube to the lower
part of the drive tube (stub shaft).
20. Barrier Bar
Helps maintain clearance between
working tool and feet and legs of
operator.
21. Loop Handle
For easy control of the machine.
22. Drive Tube
Encloses and protects the drive
shaft between the engine and
gearhead.
All manuals and user guides at all-guides.com
Page 31

30
English
KM 85, KM 85 R
EPA / CEPA:
The Emission Compliance Period
referred to on the Emissions
Compliance Label indicates the number
of operating hours for which the engine
has been shown to meet Federal
emission requirements.
Category A = 300 hours, B = 125 hours,
C = 50 hours
CARB:
The Emission Compliance Period used
on the CARB Air Index Label indicates
the terms:
Extended = 300 hours
Intermediate = 125 hours
Moderate = 50 hours
Engine
Ignition System
This ignition system conforms to all
requirements of the Canadian
Interference-Causing Equipment
Regulations ICES-002.
Fuel System
Rewind Starter
Weight
1)
Version with bike handle
2)
Version with loop handle
Single cylinder two-stroke engine
Displacement: 25.4 cm
3
Bore: 34 mm
Stroke: 28 mm
Engine power to
ISO 8893: 0,95 kW (1.3 bhp)
Idle speed: 2,800 rpm
Engine cutoff
speed (nominal): 10,500 rpm
Specifications
Type: Electronic magneto ignition
Spark plug
(suppressed):
Bosch WSR 6 F,
NGK BPMR 7 A
oder Champion
RCJ 6Y
Electrode gap: 0.5 mm
Spark plug thread: M 14 x 1.25;
9.5 mm lang
Carburetor: All position diaphragm
carburetor with integral fuel pump
Air filter: Foam and felt
elements
Fuel tank capacity: 0.44 l (440 cm
3
)
Starter rope: Ø 2,7 mm diameter,
910 mm long
dry, without CombiTool
KM 85
1)
4.3 kg
KM 85 R
2)
4.0 kg
All manuals and user guides at all-guides.com
all-guides.com
Page 32
31KM 85, KM 85 R
English
Safety glasses
Shoulder strap
Full harness
Combination wrench
Carburetor screwdriver
STIHL ElastoStart (starter rope with grip)
Special resin-free lubricating oil
Contact your STIHL dealer for the latest
information on these and other special
accessories.
See also the information on special
accessories in your CombiTool
instruction manual.
Users of this unit should carry out only
the maintenance operations described
in this manual. Other repair work may be
performed only by authorized STIHL
service shops.
Warranty claims following repairs can be
accepted only if the repair has been
performed by an authorized STIHL
servicing dealer using original STIHL
replacement parts.
Original STlHL parts can be identified by
the STlHL part number, the
STIHl
logo and, in some cases, by the STlHL
parts symbol (. This symbol may
appear alone on small parts.
Special Accessories Maintenance and Repairs
All manuals and user guides at all-guides.com
Page 33

32
English
KM 85, KM 85 R
Your Warranty Rights
and Obligations
STIHL Limited is pleased to explain the
Emission Control System Warranty on
your equipment type engine. In Canada
new 1999 and later model year small off-
road equipment engines must be
designed, built and equipped, at the time
of sale, to meet the U.S. EPA regulations
for small non road engines. The
equipment engine must be free from
defects in materials and workmanship
which cause it to fail to conform with
U.S. EPA standards for the first two
years of engine use from the date of sale
to the ultimate purchaser.
STIHL Limited must warrant the
emission control system on your small
off-road engine for the period of time
listed below provided there has been no
abuse, neglect or improper maintenance
of your small off-road equipment engine.
Your emission control system includes
parts such as the carburetor and the
ignition system. Also included may be
hoses, and connectors and other
emission related assemblies.
Where a warrantable condition exists,
STIHL Limited will repair your small off-
road equipment engine at no cost to you,
including diagnosis (if the diagnostic
work is performed at an authorized
dealer), parts, and labor.
Manufacturer's Warranty
Coverage:
In Canada 1999 and later model year
small off-road equipment engines are
warranted for two years. If any emission-
related part on your engine is defective,
the part will be repaired or replaced by
STIHL Limited free of charge.
Owner's Warranty
Responsibilities:
As the small off-road equipment engine
owner, you are responsible for the per-
formance of the required maintenance
listed in your owner's manual. STIHL
Limited recommends that you retain all
receipts covering maintenance on your
small off-road equipment engine, but
STIHL Limited cannot deny warranty
solely for the lack of receipts or for your
failure to ensure the performance of all
scheduled maintenance.
Any replacement part or service that is
equivalent in performance and durability
may be used in non-warranty mainten-
ance or repairs, and shall not reduce the
warranty obligations of the engine
manufacturer.
As the small off-road equipment engine
owner, you should be aware, however,
that STIHL Limited may deny you
warranty coverage if your small off-road
equipment engine or a part has failed
due to abuse, neglect, improper
maintenance or unapproved
modifications.
You are responsible for presenting your
small off-road equipment engine to a
STIHL service center as soon as a
problem exists. The warranty repairs will
be completed in a reasonable amount of
time, not to exceed 30 days.
If you have any questions regarding your
warranty rights and responsibilities,
please contact a STIHL customer
service representative at
www.stihl.ca
or you can write to :
STIHL Ltd.,
1515 Sise Road
Box 5666
CA-LONDON ONTARIO; N6A 4L6
Coverage by STIHL Limited
STIHL Limited warrants to the ultimate
purchaser and each subsequent pur-
chaser that your small off-road
equipment engine will be designed, built
and equipped, at the time of sale, to
meet all applicable regulations. STIHL
Limited also warrants to the initial
purchaser and each subsequent
purchaser that your engine is free from
defects in materials and workmanship
which cause the engine to fail to conform
with applicable regulations for a period
of two years.
Warranty Period
The warranty period will begin on the
date the utility equipment engine is
purchased by the initial purchaser and
STIHL Limited Emission Control Warranty Statement
This statement is given voluntarily, based on the MOU (Memorandum of
Understanding) as agreed in April 1999 between Environmental Canada and STIHL Limited
All manuals and user guides at all-guides.com
Page 34
33KM 85, KM 85 R
English
you have signed and sent back the war-
ranty card to STIHL Ltd. If any emission
related part on your engine is defective,
the part will be replaced by STIHL
Limited at no cost to the owner.
Any warranted part which is not
scheduled for replacement as required
maintenance, or which is scheduled only
for regular inspection to the effect of
"repair or replace as necessary" will be
warranted for the warranty period. Any
warranted part which is scheduled for
replacement as required maintenance
will be warranted for the period of time
up to the first scheduled replacement
point for that part.
Diagnosis
You, as the owner, shall not be charged
for diagnostic labor which leads to the
determination that a warranted part is
defective. However, if you claim
warranty for a component and the
machine is tested as non-defective,
STIHL Limited will charge you for the
cost of the emission test.
Mechanical diagnostic work will be per-
formed at an authorized STIHL servicing
dealer. Emission test may be performed
either at STIHL Incorporated,
536 Viking Drive, P.O. Box 2015, Virginia
Beach, VA 23452 or at any independent
test laboratory.
Warranty Work
STIHL Limited shall remedy warranty
defects at any authorized STIHL
servicing dealer or warranty station. Any
such work shall be free of charge to the
owner if it is determined that a warranted
part is defective. Any manufacturer-
approved or equivalent replacement part
may be used for any warranty
maintenance or repairs on emission-
related parts and must be provided
without charge to the owner. STIHL
Limited is liable for damages to other
engine components caused by the
failure of a warranted part still under
warranty.
The following list specifically defines the
emission-related warranted parts:
Carburetor
Choke (Cold start enrichment system)
Intake manifold
Air filter
Spark plug
Magneto or electronic ignition system
(ignition module)
Catalytic converter (if applicable)
Fasteners
Where to make a claim for
Warranty Service
Bring the product to any authorized
STIHL servicing dealer and present the
signed warranty card.
Maintenance Requirements
The maintenance instructions in this
manual are based on the application of
the recommended 2-stroke fuel-oil
mixture (see also instruction "Fuel").
Deviations from this recommendation
regarding quality and mixing ratio of fuel
and oil may require shorter maintenance
intervals.
Limitations
This Emission Control Systems War-
ranty shall not cover any of the following:
: repair or replacement required
because of misuse, neglect or lack
of required maintenance,
: repairs improperly performed or re-
placements not conforming to
STIHL Limited specifications that
adversely affect performance and/
or durability, and alterations or
modifications not recommended or
approved in writing by STIHL
Limited,
and
: replacement of parts and other
services and adjustments
necessary for required maintenance
at and after the first scheduled
replacement point.
All manuals and user guides at all-guides.com
Page 35

34
English
KM 85, KM 85 R
All manuals and user guides at all-guides.com
Page 36
35KM 85, KM 85 R
français
BA_SE_111_006_02_06.fmImprimé sur papier blanchi sans chlore.
L’encre d’imprimerie contient des huiles végétales, le papier est recyclable.
© ANDREAS STIHL AG & Co. KG, 2006
0458 462 8221. M0,5. K6. CP. Printed in USA
STIHl
Table des matières
CombiSystème ............................... 36
Indications concernant la
présente Notice d’emploi ................ 36
Prescriptions de sécurité et
techniques de travail ...................... 37
Outils CombiSystème
autorisés ......................................... 45
Montage du guidon ......................... 45
Réglage du câble de
commande des gaz ........................ 47
Montage de la
poignée circulaire ........................... 47
Carburant ....................................... 49
Faire le plein de carburant .............. 50
Mise en route / arrêt du moteur ...... 50
Instructions de service .................... 53
Nettoyage du filtre à air .................. 54
Grille pare-étincelles
du silencieux ................................... 54
Réglage du moteur ......................... 55
Réglage du carburateur .................. 55
Contrôle de la bougie ..................... 57
Remplacement du câble
de lancement et du
ressort de rappel ............................ 58
Rangement du dispositif ................. 60
Instructions pour la maintenance
et l’entretien .................................... 61
Principales pièces ........................... 62
Caractéristiques techniques ........... 64
Accessoires optionnels ................... 65
Instructions pour la réparation ........ 65
Garantie de la Société
STIHL Limited relative
au système antipollution ................. 66
Ne confiez ce dispositif à moteur qu’à
des personnes qui comprennent parfai-
tement la Notice d’emploi du moteur
CombiSystème et celle de l’outil Combi-
Système.
Pour obtenir les meilleures perfor-
mances et être satisfait de votre disposi-
tif à moteur STIHL, il est très important
que vous ayez bien lu et compris les ins-
tructions de maintenance et les prescrip-
tions de sécurité, à partir de la page 37,
avant d’utiliser ce dispositif à moteur.
Si vous ne comprenez pas parfaitement
certaines instructions des deux Notices
d’emploi, veuillez consulter votre
concessionnaire ou distributeur STIHL.
All manuals and user guides at all-guides.com
all-guides.com
Page 37
36
français
KM 85, KM 85 R
!Attention !
Ce dispositif étant un outil de travail à
haute vitesse, il faut impérativement res-
pecter des prescriptions de sécurité par-
ticulières afin de réduire le risque de
blessure. Une utilisation inadéquate ou
imprudente risque de causer des bles-
sures graves, voire même mortelles.
La philosophie de STIHL consiste à
poursuivre le développement continu de
tous ses produits. Ceux-ci sont donc
susceptibles d’être l’objet de modifica-
tions et de perfectionnements techni-
ques. Si les caractéristiques ou l’aspect
de votre dispositif à moteur diffèrent des
descriptions des deux Notices d’emploi,
veuillez consulter votre concessionnaire
STIHL qui pourra vous donner des
informations complémentaires et vous
conseiller.
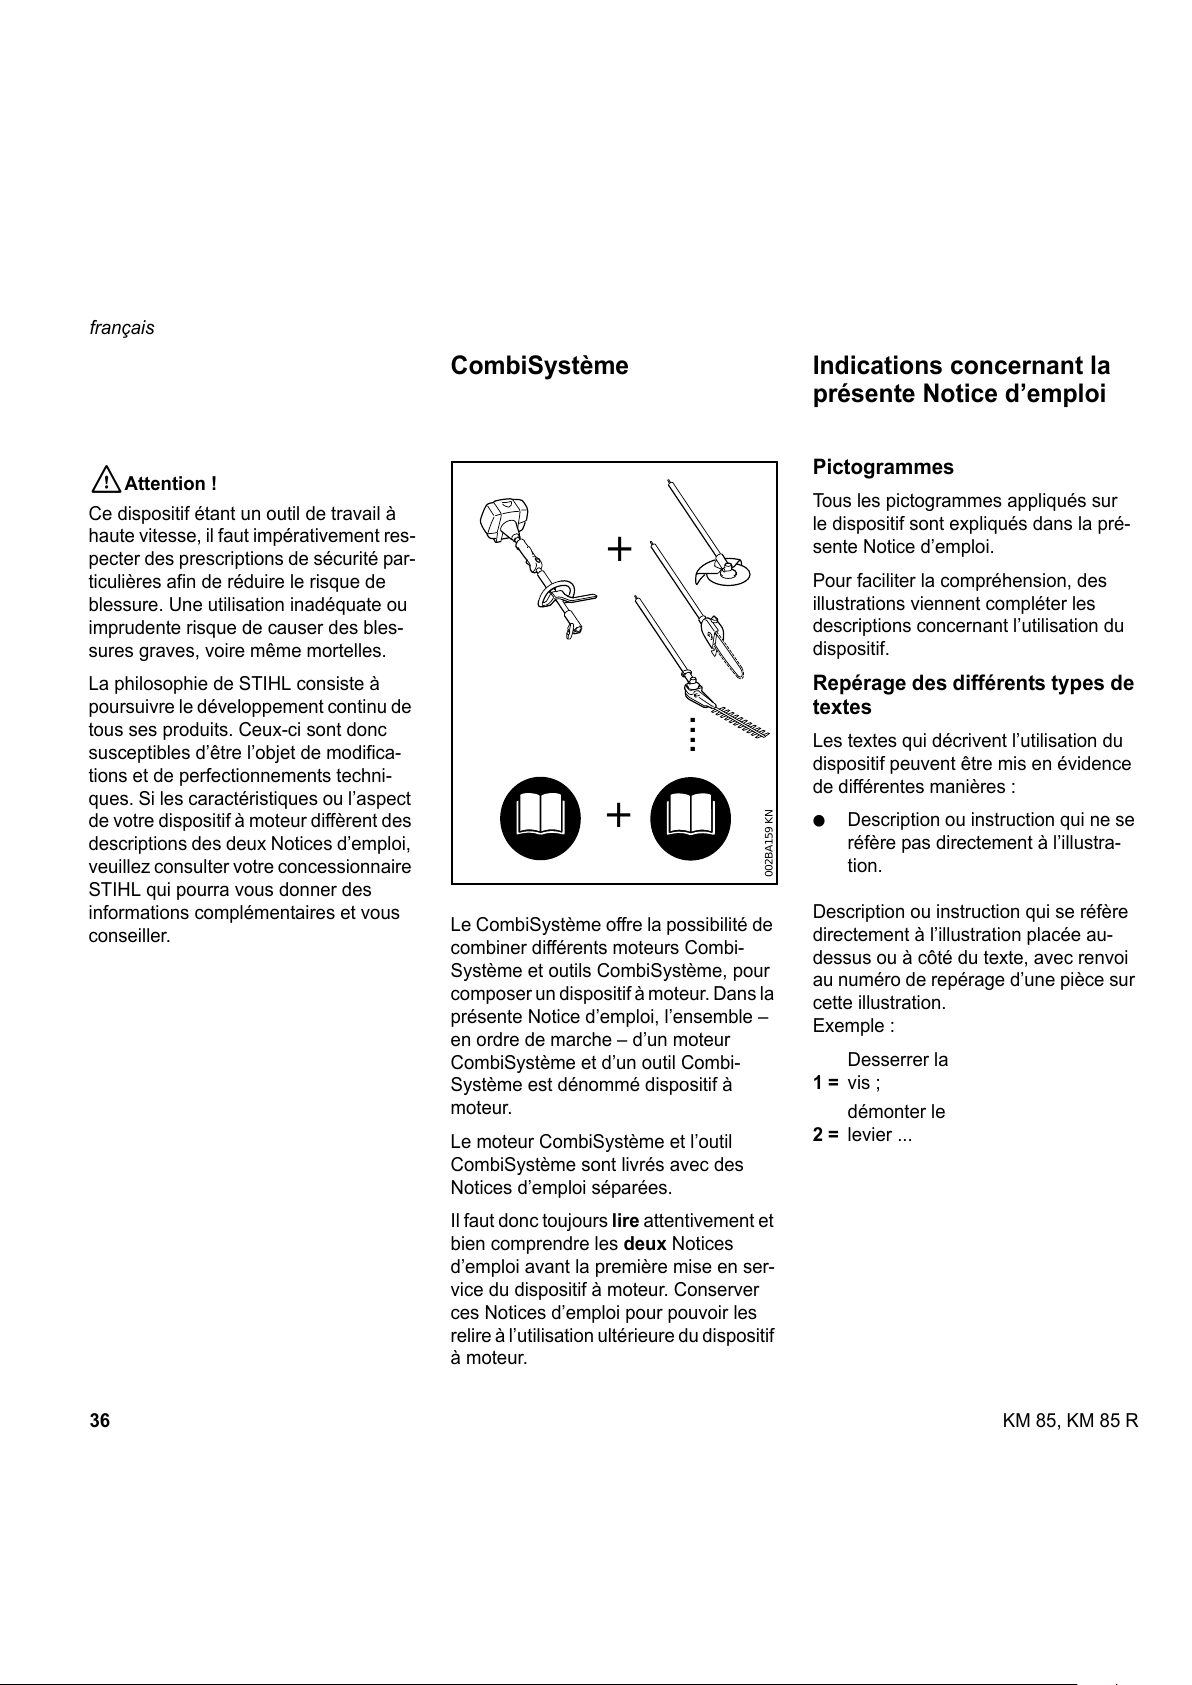
Le CombiSystème offre la possibilité de
combiner différents moteurs Combi-
Système et outils CombiSystème, pour
composer un dispositif à moteur. Dans la
présente Notice d’emploi, l’ensemble –
en ordre de marche – d’un moteur
CombiSystème et d’un outil Combi-
Système est dénommé dispositif à
moteur.
Le moteur CombiSystème et l’outil
CombiSystème sont livrés avec des
Notices d’emploi séparées.
Il faut donc toujours lire attentivement et
bien comprendre les deux Notices
d’emploi avant la première mise en ser-
vice du dispositif à moteur. Conserver
ces Notices d’emploi pour pouvoir les
relire à l’utilisation ultérieure du dispositif
à moteur.
Pictogrammes
Tous les pictogrammes appliqués sur
le dispositif sont expliqués dans la pré-
sente Notice d’emploi.
Pour faciliter la compréhension, des
illustrations viennent compléter les
descriptions concernant l’utilisation du
dispositif.
Repérage des différents types de
textes
Les textes qui décrivent l’utilisation du
dispositif peuvent être mis en évidence
de différentes manières :
: Description ou instruction qui ne se
réfère pas directement à l’illustra-
tion.
Description ou instruction qui se réfère
directement à l’illustration placée au-
dessus ou à côté du texte, avec renvoi
au numéro de repérage d’une pièce sur
cette illustration.
Exemple :
Desserrer la
1 = vis ;
démonter le
2 = levier ...
CombiSystème
.
.
.
.
002BA159 KN
+
+
Indications concernant la
présente Notice d’emploi
All manuals and user guides at all-guides.com
Page 38
37KM 85, KM 85 R
français
Outre la description concernant l’utilisa-
tion, la présente Notice d’emploi peut
renfermer des textes complémentaires
importants. Ces passages sont repérés
par l’un des pictogrammes suivants :
Avertissement contre un risque
d’accident et de blessure ainsi que
de graves dommages matériels.
Avertissement contre un risque de
détérioration du dispositif ou de cer-
tains composants.
Indication pas forcément indispen-
sable pour la manipulation du dispo-
sitif, mais pouvant être utile pour
une meilleure compréhension et
une utilisation optimale.
Indication à suivre pour ménager
l’environnement avec une utilisation
éco-compatible.
Volume de fourniture /
équipement
La présente Notice d’emploi est
valable pour des modèles qui ne
sont pas tous dotés des mêmes
équipements. Les composants qui
ne sont pas compris sur tous les
modèles et les utilisations qui s’y
rapportent sont repérés par un asté-
risque
*. Les composants qui ne
font pas partie du volume de fourni-
ture standard et qui sont par consé-
quent repérés par un astérisque
*
peuvent être fournis par le reven-
deur STIHL à titre d’accessoires
optionnels.
Développement technique
La philosophie de STIHL consiste à
poursuivre le développement continu de
toutes ses machines et de tous ses
dispositifs ; c’est pourquoi nous devons
nous réserver tout droit de modification
du volume de fourniture, en ce qui
concerne la forme, la technique et les
équipements.
On ne pourra donc en aucun cas se pré-
valoir des indications et illustrations de
la présente Notice d’emploi à l’appui de
revendications quelconques.
Ce moteur Combi-
Système est conçu pour
constituer un dispositif à
moteur dont l'outil de tra-
vail fonctionne à haute
vitesse et c'est pourquoi il
faut prendre des précau-
tions particulières afin de
réduire les risques de
blessure.
Il est donc important de
lire, de comprendre
parfaitement et d'obser-
ver les prescriptions de
sécurité et les avertisse-
ments ci-après. Il convient
de relire périodiquement les Notices
d'emploi et les prescriptions de sécurité
du moteur CombiSystème et de l'outil
CombiSystème. Une utilisation impru-
dente ou inadéquate peut causer
des blessures graves, voire même
mortelles.
L'utilisateur doit donc demander au
revendeur STIHL de lui montrer com-
ment utiliser son dispositif à moteur.
Respecter toutes les règles de sécurité,
normes et prescriptions locales appli-
cables.
!Attention !
Ne pas prêter ou louer le dispositif à
moteur sans y joindre les Notices
d'emploi. S'assurer que toute personne
utilisant ce dispositif à moteur comprend
parfaitement les instructions de ces
Notices d'emploi.
Prescriptions de sécurité et
techniques de travail
All manuals and user guides at all-guides.com
Page 39

38
français
KM 85, KM 85 R
!Attention !
Les jeunes encore mineurs ne sont pas
autorisés à manier ce dispositif à
moteur. Veillez à ce que des personnes,
en particuliers des enfants, ou des ani-
maux ne se trouvent pas sur l'aire d'utili-
sation du dispositif à moteur.
!Attention !
Afin de réduire le risque de blessure de
personnes qui pourraient se trouver à
proximité et d'endommagement de leur
propriété, ne jamais laisser le dispositif à
moteur en marche sans surveillance.
Lorsqu'il n’est pas employé (p. ex. au
cours d'une pause), il faut arrêter le
moteur et prendre les précautions
nécessaires pour que le dispositif ne
puisse pas être utilisé par des per-
sonnes non autorisées.
La plupart de ces prescriptions de sécu-
rité et avertissements sont valables pour
tous les dispositifs à moteur STIHL.
Divers modèles peuvent toutefois avoir
des composants ou des commandes dif-
férents. Pour la description des com-
mandes et du fonctionnement des com-
posants du modèle de dispositif à
moteur considéré, consulter le chapitre
correspondant des Notices d'emploi du
moteur CombiSystème et de l'outil
CombiSystème.
Les prescriptions à suivre pour utiliser
un moteur CombiSystème en toute
sécurité s'appliquent:
1. à l'utilisateur ;
2. au dispositif à moteur ;
3. à l'utilisation du dispositif à moteur.
L’UTILISATEUR
Condition physique
L'utilisateur doit être en bonne condition
physique et mentale et il ne doit pas être
sous l'influence de substances quel-
conques (drogues, alcool, etc.) risquant
d'entraver sa vue, sa dextérité ou sa
capacité de jugement. Ne jamais tra-
vailler avec ce dispositif à moteur en
étant fatigué.
!Attention !
Il faut toujours rester vigilant – si l'on se
sent fatigué, faire une pause. La fatigue
peut entraîner une perte de contrôle. Le
travail avec un dispositif à moteur peut
être fatigant. Si son état de santé risque
d'être aggravé par un travail fatigant,
l'utilisateur devrait consulter un médecin
avant d'entreprendre des travaux avec
ce dispositif à moteur.
!Attention !
L'utilisation prolongée d'un dispositif à
moteur (ou de toute autre machine)
exposant l'utilisateur aux vibrations peut
provoquer la maladie des « doigts
blancs » (phénomène de Raynaud) ou
le syndrome du tunnel carpien.
Ces phénomènes réduisent l'aptitude
des mains à percevoir et à régler la tem-
pérature, entraînant une insensibilité
des doigts et une sensation brûlante.
Cela peut causer des troubles nerveux
et circulatoires ainsi qu'une nécrose.
Tous les facteurs qui contribuent à la
maladie des doigts blancs ne sont pas
connus, mais on sait que le temps froid,
le fait de fumer et des maladies ou des
conditions physiques affectant les
artères et la circulation sanguine, ainsi
qu’un niveau de vibrations élevé et de
longues périodes d’exposition aux vibra-
tions comptent parmi les facteurs qui
favorisent le développement de la mala-
die des doigts blancs. Afin de réduire le
risque de la maladie des doigts blancs et
du syndrome du tunnel carpien, veuillez
tenir compte des indications suivantes :
– La plupart des dispositifs à moteur
STIHL sont livrables avec un sys-
tème antivibratoire (« AV ») conçu
pour réduire la transmission, aux
mains de l'utilisateur, des vibrations
engendrées par le moteur. Un sys-
tème AV est recommandé pour les
personnes qui utilisent des disposi-
tifs à moteur régulièrement ou pen-
dant d'assez longues périodes.
– Porter des gants et prendre soin
d'avoir toujours les mains au chaud.
– Veiller à ce que le système AV soit
bien entretenu. Sur un dispositif à
moteur avec des composants des-
serrés ou avec des butoirs AV
endommagés ou usés, le taux de
vibrations est plus élevé.
All manuals and user guides at all-guides.com
Page 40
39KM 85, KM 85 R
français
– Toujours saisir fermement les poi-
gnées, mais ne pas les serrer cons-
tamment avec une pression exces-
sive. Faire des pauses fréquentes.
*Toutes les précautions énoncées ci-
avant ne peuvent pas exclure le risque
de la maladie des doigts blancs ou d'un
syndrome du tunnel carpien. C'est pour-
quoi les personnes qui utilisent conti-
nuellement ou régulièrement un tel dis-
positif à moteur doivent attentivement
surveiller l'état de leurs mains et de leurs
doigts. Si l'un des symptômes ci-dessus
se manifeste, consulter immédiatement
un médecin.
!Attention !
Le système d'allumage du dispositif à
moteur STIHL génère un champ électro-
magnétique de très faible intensité.
Ce champ peut produire des interfé-
rences avec certains stimulateurs car-
diaques. Afin de prévenir le risque de
conséquences graves, voire même
mortelles, les personnes portant un sti-
mulateur cardiaque devraient consulter
leur médecin et le fabricant de leur sti-
mulateur cardiaque avant de travailler
avec ce dispositif à moteur.
Vêtements appropriés
!Attention !
Pour réduire le risque de blessure, l'utili-
sateur devrait porter un équipement de
protection approprié.
!Attention !
Le bruit du dispositif à
moteur peut causer des
lésions de l'ouïe. Porter
des protège-oreilles (tam-
pons ou capsules insono-
risantes) pour protéger
l'ouïe. Les personnes qui travaillent
régulièrement et longuement avec ce
dispositif à moteur devraient faire vérifier
leur ouïe périodiquement.
En travaillant avec des protège-oreilles,
il faut faire tout particulièrement atten-
tion, parce que des bruits signalant un
danger (cris, signaux sonores etc.) sont
moins bien perceptibles.
Pour les instructions relatives aux vête-
ments appropriés, voir les Prescriptions
de sécurité qui figurent dans la Notice
d'emploi de l'outil CombiSystème utilisé.
LE DISPOSITIF À MOTEUR
Pour les illustrations et les définitions
des composants du dispositif à moteur,
voir le chapitre « Principales pièces ».
!Attention !
Ne jamais apporter de modifications
quelconques sur le dispositif à moteur.
Utiliser exclusivement les équipements
livrés par STIHL ou expressément auto-
risés par STIHL pour ce modèle de
moteur CombiSystème STIHL bien
déterminé. Même si certains équipe-
ments non autorisés pouvaient être rap-
portés sur le dispositif à moteur STIHL,
leur usage serait extrêmement dange-
reux.
Si le dispositif à moteur a été soumis à
des sollicitations sortant du cadre de
l'utilisation normale (p. ex. s'il a été sou-
mis à des efforts violents, en cas de
choc ou de chute), avant de le remettre
en marche, il faut impérativement
s'assurer qu'il se trouve en parfait état
de fonctionnement. Contrôler tout parti-
culièrement l'étanchéité du système de
carburant (absence de fuites) et la fiabi-
lité des commandes et des dispositifs de
sécurité. Il ne faut en aucun cas conti-
nuer d'utiliser ce dispositif à moteur s'il
est endommagé. En cas de doute, le
faire contrôler par le revendeur STIHL.
All manuals and user guides at all-guides.com
Page 41
40
français
KM 85, KM 85 R
L’UTILISATION DU DISPOSITIF À
MOTEUR
Transport du dispositif à moteur
!Attention !
Toujours arrêter le moteur et s'assurer
que l'outil de travail est arrêté, avant de
poser le dispositif à moteur sur le sol.
Pour transporter le dispositif à moteur
dans un véhicule, l'assurer de telle sorte
qu'il ne risque pas de se renverser, ce
qui pourrait l'endommager et entraîner
une fuite de carburant.
Carburant
Le dispositif à moteur STIHL fonctionne
avec un mélange d'essence et d'huile
(voir chapitre « Carburant » de la Notice
d'emploi).
!Attention !
L'essence est un carbu-
rant extrêmement inflam-
mable. Le carburant ren-
versé et enflammé par
une étincelle ou par toute
autre source d'allumage
peut entraîner un incendie, ainsi que de
graves brûlures et des dégâts matériels
importants. Il faut donc être très prudent
lors de la manipulation de l'essence ou
du mélange.
Ne pas fumer, manipuler le carburant à
proximité d'un feu ou s'approcher avec
une flamme. À noter que des vapeurs de
carburant peuvent s'échapper du sys-
tème d'alimentation en carburant.
Instructions pour faire le plein
!Attention !
Faire le plein du dispositif à moteur à
un endroit bien aéré, seulement en plein
air. Toujours arrêter le moteur et
attendre qu'il soit refroidi avant de
refaire le plein. Suivant le carburant
utilisé, les conditions climatiques et le
système d'aération du réservoir de car-
burant, les vapeurs d'essence empri-
sonnées dans le réservoir de carburant
peuvent se trouver sous pression.
Afin de réduire le risque de brûlures ou
d'autres blessures, à l'échappement de
vapeurs et de gaz d'essence, enlever
prudemment le bouchon du réservoir de
carburant du dispositif à moteur, de telle
sorte qu'une surpression interne puisse
s'échapper lentement. Ne jamais enle-
ver le bouchon du réservoir de carburant
lorsque le moteur est en marche.
Pour faire le plein, choisir un endroit bien
dégagé et, avant de lancer le moteur,
aller au moins à 10 pieds (3 m) du lieu où
l'on a fait le plein. Avant de lancer le
moteur, essuyer le carburant qui aurait
pu déborder.
!Attention !
En faisant le plein, et à l'utilisation du
dispositif à moteur, s'assurer qu'il ne
présente pas de fuites. Si l'on constate
une fuite, ne pas laisser le moteur en
marche ou le redémarrer avant d'avoir
éliminé la fuite et essuyé le carburant qui
s'est échappé. Ne pas se renverser de
l'essence sur les vêtements. Le cas
échéant, se changer immédiatement.
Divers modèles peuvent être munis de
différents bouchons de réservoir de car-
burant.
Bouchon à ailette rabattable
!Attention !
Afin de réduire le risque de fuite de car-
burant et d'incendie par suite du desser-
rage du bouchon du réservoir de carbu-
rant, le bouchon du réservoir doit être
correctement positionné et fermement
serré dans l'orifice de remplissage du
réservoir de carburant.
À cet effet, sur ce bou-
chon de réservoir STIHL,
relever l'ailette rabattable
située au-dessus du bou-
chon de telle sorte qu'elle
se trouve à angle droit par
rapport au bouchon. Présenter le bou-
chon de telle sorte que les repères trian-
gulaires situés sur l'ailette rabattable et
sur l'orifice du réservoir de carburant
coïncident. En agissant sur l'ailette, faire
tourner le bouchon dans le sens des
aiguilles d'une montre, le plus ferme-
ment possible (environ 1/4 de tour).
Rabattre l'ailette de telle
sorte qu'elle affleure avec
le dessus du bouchon. Si
l'ailette rabattable
n'affleure pas avec le bou-
chon du réservoir et que
le talon de l'ailette rabattable ne se
prend pas dans le logement prévu dans
le goulot de remplissage du réservoir,
cela signale que le bouchon n'est pas
All manuals and user guides at all-guides.com
all-guides.com
Page 42

41KM 85, KM 85 R
français
correctement positionné et serré. Il faut
alors recommencer toute la procédure
décrite ci-avant.
Bouchon à visser
!Attention !
S'il n'est pas fermement
serré, le bouchon de
réservoir peut se desser-
rer sous l'effet des vibra-
tions. Une grande quan-
tité de carburant peut
alors s'échapper. Pour écarter le risque
de perte de carburant et d'incendie,
serrer le bouchon le plus fermement
possible, à la main.
Avant la mise en route
!Attention !
Avant la mise en route, toujours s'assu-
rer que le moteur CombiSystème se
trouve en bon état de fonctionnement,
en particulier la gâchette d'accélérateur,
le blocage de gâchette d'accélérateur, le
commutateur d'arrêt et l'outil de travail.
La gâchette d'accélérateur (le cas
échéant) doit pouvoir être actionnée
facilement et elle doit toujours revenir
d'elle-même en position de ralenti. Ne
jamais essayer de modifier les éléments
de commande ou les équipements de
sécurité.
!Attention !
Ne jamais utiliser un dispositif à moteur
endommagé ou qui n'a pas fait l'objet
d'une maintenance adéquate.
!Attention !
S'assurer que le contact de câble d'allu-
mage est bien serré sur la bougie – un
contact desserré peut produire un arc
électrique qui risque d'enflammer les
vapeurs de carburant et de causer un
incendie.
Les poignées doivent être toujours
propres et sèches : veiller tout particu-
lièrement à ce qu'elles ne soient pas
mouillées ou poisseuses, enduites
d'huile, de graisse ou de résine – pour
que l'on puisse parfaitement les tenir et
contrôler le dispositif à moteur.
Mise en route du moteur
Pour la mise en route du moteur, aller au
moins à 10 pieds (3 mètres) du lieu où
l'on a fait le plein de carburant – et uni-
quement en plein air.
Pour les instructions spécifiques concer-
nant le lancement du moteur, voir le cha-
pitre correspondant des Notices
d'emploi du moteur CombiSystème et
de l'outil CombiSystème. Poser le dispo-
sitif à moteur sur un sol ferme ou sur une
surface stable, sur une aire dégagée.
Prendre une position stable et sûre.
!Attention !
Afin de réduire le risque de blessure par
suite d'une perte de contrôle, veillez
impérativement à ce que l'outil de travail
ne vous touche pas et n'entre en contact
ni avec le sol, ni avec un objet quel-
conque, car lorsque le moteur démarre
avec la commande d'accélérateur encli-
quetée en position de démarrage le
régime du moteur peut être suffisant
pour que l'embrayage vienne en prise et
entraîne l'outil de travail.
!Attention !
Le dispositif à moteur est conçu pour
être manié par une seule personne. Ne
tolérer aucune autre personne dans la
zone de travail, pas même au moment
de la mise en route du moteur.
!Attention !
Afin de réduire le risque de blessure par
suite d'une perte de contrôle, ne pas
essayer de démarrer le dispositif à
moteur « à bout de bras ».
!Attention !
En tirant la poignée du lanceur, ne pas
s'enrouler le câble de lancement autour
de la main. Ne pas lâcher la poignée du
lanceur et la laisser revenir brusque-
ment en arrière, mais la guider au retour
afin que le câble de lancement s'enroule
correctement. Si l'on ne respecte pas
ces recommandations, on risque de se
blesser la main ou les doigts ou
d'endommager le lanceur.
All manuals and user guides at all-guides.com
Page 43

42
français
KM 85, KM 85 R
Voir aussi les Prescriptions de sécurité
relatives à la mise en route du moteur,
dans la Notice d'emploi de l'outil Combi-
Système utilisé.
Ajustages importants
!Attention !
Afin de réduire le risque de blessure, par
suite d'une perte de contrôle ou d'un
contact avec l'outil de travail en mouve-
ment, ne jamais utiliser le dispositif à
moteur si le ralenti n'est pas correcte-
ment réglé. Lorsque le régime de ralenti
est correctement réglé, l'outil de travail
doit être arrêté au ralenti. En ce qui con-
cerne les instructions à suivre pour le
réglage du régime de ralenti, voir le cha-
pitre correspondant de la Notice
d'emploi. Si vous ne pouvez pas régler
correctement le régime de ralenti,
demandez au revendeur STIHL de con-
trôler le dispositif à moteur et de le régler
correctement ou de le réparer si néces-
saire.
Au cours du travail
Prise en mains et guidage du disposi-
tif à moteur
Au cours du travail, toujours tenir ferme-
ment le dispositif à moteur à deux
mains, par les poignées. Empoigner les
poignées en les entourant avec les
pouces.
Prendre la poignée arrière de la main
droite. Cela est également valable pour
les gauchers.
Conditions de travail
Démarrer et utiliser le dispositif à moteur
exclusivement à l'extérieur, dans un
espace bien aéré. Travailler seulement
dans de bonnes conditions de visibilité,
à la lumière du jour. Travailler prudem-
ment.
!Attention !
Dès que le moteur tourne,
le dispositif à moteur
dégage des gaz d'échap-
pement toxiques conte-
nant des substances chi-
miques (p. ex. des
hydrocarbures imbrûlés et de l'oxyde de
carbone) susceptibles de provoquer des
maladies du système respiratoire, un
cancer, des malformations de naissance
ou d'autres défauts génétiques. Certains
de ces gaz (p. ex. l'oxyde de carbone)
sont incolores et inodores.
Pour réduire le risque d'intoxication
grave, voire mortelle, par suite de l'inha-
lation de gaz toxiques, ne jamais faire
fonctionner le dispositif à moteur dans
des locaux ou dans des espaces mal
aérés.
Instructions de travail
!Attention !
Ne pas travailler avec la commande
d'accélérateur encliquetée en position
de démarrage, car il serait alors impos-
sible de contrôler le régime du moteur.
En cas d'urgence, arrêter immédiate-
ment le moteur – placer le curseur com-
biné / le commutateur d'arrêt en position
0 ou STOP.
!Attention !
Le silencieux et d'autres pièces du
moteur (p. ex. les ailettes de refroidisse-
ment du cylindre, la bougie) chauffent au
cours de l'utilisation et restent chauds
pendant un certain temps après l'arrêt
du moteur. Afin de réduire le risque de
brûlures, ne pas toucher au silencieux
ou à d'autres pièces tant qu'ils sont
chauds.
!Attention !
Afin de réduire le risque d'incendie et de
brûlures, veiller à ce que le voisinage du
silencieux soit propre. Enlever les
dépôts excessifs de lubrifiant et tous les
débris tels que les aiguilles de sapin, les
brindilles ou les feuilles.
002BA057 KN
All manuals and user guides at all-guides.com
Page 44

43KM 85, KM 85 R
français
Laisser le moteur refroidir en le posant
sur une surface en béton ou en métal,
sur le sol nu ou sur un gros morceau de
bois (p. ex. sur le tronc d'un arbre
abattu), loin de toute substance inflam-
mable.
!Attention !
Ne jamais modifier le silencieux. Le
silencieux pourrait être endommagé et
cela entraînerait un plus grand dégage-
ment de chaleur ou d'étincelles qui aug-
menterait le risque d'incendie et de brû-
lures. Toute modification du silencieux
peut aussi entraîner l'endommagement
durable du moteur. Faire entretenir et
réparer le silencieux exclusivement par
le revendeur STIHL.
Pot catalytique (catalyseur)
!Attention !
Certains dispositifs à
moteur STIHL sont équi-
pés d’un catalyseur qui
réduit les émissions de
nuisances du moteur en
assurant des réactions
chimiques à l’intérieur du silencieux. En
raison de ces réactions chimiques, au
ralenti ou lorsqu’on arrête le moteur, le
silencieux refroidit plus lentement qu’un
silencieux sans catalyseur. Afin de
réduire le risque d’incendie et de brû-
lures, il faut donc respecter les prescrip-
tions de sécurité particulières précisées
ci-après.
!Attention !
Étant donné qu’un silencieux à cataly-
seur refroidit plus lentement qu’un silen-
cieux ordinaire, le dispositif à moteur
doit toujours être rangé debout tant que
le silencieux est très chaud. Ne jamais le
ranger de telle sorte que le silencieux
encore très chaud se trouve à proximité
de buissons, d’herbe, de copeaux de
bois ou d’autres matières inflammables.
!Attention !
Un montage incorrect ou un endomma-
gement du carter du cylindre ou bien
l’endommagement ou une déformation
du silencieux gêne le refroidissement du
catalyseur. Pour réduire le risque
d’incendie ou de brûlures, ne pas pour-
suivre le travail si le carter du cylindre
est endommagé ou mal monté ou bien si
le silencieux est endommagé ou
déformé.
Le catalyseur est fourni avec des grilles
réduisant le risque d’incendie par suite
d’un jaillissement de particules très
chaudes. Étant donné la forte chaleur
dégagée par la réaction catalytique, ces
grilles restent généralement propres et
ne nécessitent normalement pas
d’entretien. En cas de perte de puis-
sance, si l’on suppose qu’elle provient
de l’encrassement d’une grille, deman-
der au revendeur STIHL de procéder à
la maintenance du silencieux.
MAINTENANCE, RÉPARATION ET
RANGEMENT
La maintenance, le remplacement ou
la réparation de pièces du système
antipollution peuvent être exécutés
par une entreprise ou une personne
compétente pour la réparation de
moteurs d’engins mobiles non rou-
tiers. STIHL peut rejeter toute
demande de garantie pour un compo-
sant dont l’entretien ou la mainte-
nance n’a pas été effectué correcte-
ment ou si l’on a utilisé des pièces de
rechange non autorisées.
!Attention !
Pour la maintenance et les réparations,
utiliser exclusivement des pièces de
rechange d’origine STIHL. L’utilisation
de pièces non d’origine STIHL peut cau-
ser des blessures graves, voire même
mortelles.
Suivre strictement les instructions pour
la maintenance et les réparations, préci-
sées dans les chapitres correspondants
des Notices d'emploi du moteur Combi-
Système et de l'outil CombiSystème.
Respecter les tableaux et les instruc-
tions de maintenance et d’entretien qui
figurent dans ces Notices d’emploi.
All manuals and user guides at all-guides.com
Page 45

44
français
KM 85, KM 85 R
!Attention !
Toujours arrêter le moteur et s’assurer
que l’outil de travail est arrêté avant
d’entreprendre une opération de mainte-
nance ou une réparation quelconque, ou
le nettoyage du dispositif à moteur. Ne
pas essayer d’effectuer une opération
de maintenance ou une réparation non
décrite dans les Notices d'emploi du
moteur CombiSystème et de l'outil
CombiSystème. Faire exécuter de telles
opérations exclusivement par le reven-
deur STIHL.
!Attention !
Utiliser la bougie spécifiée et s’assurer
que la bougie et le câble d’allumage sont
toujours propres et en bon état. Toujours
fermement presser le contact du câble
d’allumage sur la bougie munie d’un
raccord de dimensions correctes.
(Nota : Si le raccord est constitué d’un
écrou SAE amovible, cet écrou doit être
serré.) Une connexion mal serrée entre
la bougie et le câble d’allumage peut
engendrer un arc électrique risquant
d’enflammer les vapeurs de carburant et
de causer un incendie.
!Attention !
Ne jamais contrôler le système
d’allumage avec le contact de câble
d’allumage débranché ou avec la
bougie dévissée, car un jaillissement
d’étincelles risque de provoquer un
incendie.
!Attention !
Ne pas utiliser le dispositif à moteur si
le silencieux est défectueux, manque ou
a été modifié. Un silencieux mal entre-
tenu accroît le risque d’incendie et de
troubles auditifs. Si le silencieux est
muni d’une grille pare-étincelles, afin de
réduire le risque d’incendie, ne jamais
utiliser le dispositif à moteur si la grille
pare-étincelles manque ou est endom-
magée. À noter que l’utilisation par
temps très chaud ou sec présente de
plus grands risques d’incendie de forêt.
Conserver le dispositif à moteur à un
endroit sec et surélevé ou fermé à clé,
hors de portée des enfants.
Avant de ranger le dispositif à moteur
pour une période dépassant quelques
jours, toujours vider le réservoir de car-
burant. Voir « Rangement du dispositif »
dans la présente Notice d’emploi.
All manuals and user guides at all-guides.com
Page 46

45KM 85, KM 85 R
français
Les outils CombiSystème STIHL sui-
vants sont autorisés pour le montage sur
le moteur CombiSystème :
1)
La protection (pour garder une dis-
tance de sécurité entre l’outil de tra-
vail et les pieds et jambes de l’utilisa-
teur) doit être impérativement
montée sur la poignée circulaire.
2)
Cet outil ne convient pas ou n’est
pas autorisé pour les moteurs
CombiSystème à guidon (poignée à
deux mains).
Montage du tube de poignée
Fixer le
1 = tube de poignée à une distance
A = env. 40 cm du moteur, sur le
2 = tube ;
appliquer la
3 = monture de serrage et le
4 = support de poignée sur le tube ;
poser le
1 = tube de poignée dans le support de
poignée –
la poignée en caoutchouc doit se
trouver du côté gauche (vu du côté
du moteur, en direction du tube de
poignée) ;
Outils CombiSystème
autorisés
Outil
CombiSystème
Fonction
FS-KM Débroussailleuse
avec tête faucheuse
FS-KM
1)
Débroussailleuse
avec couteau à
herbe
HL-KM 0/90°
1) 2)
Coupe-haies, à
angle réglable
HL-KM 135°
1) 2)
Coupe-haies, à
angle réglable
HL-KM 0°
2)
Coupe-haies
FH-KM
1)
Faucheuse
HT-KM
2)
Perche élagueuse
BF-KM
1)
Houe-bineuse
FCB-KM
2)
FCS-KM
2)
Dresse-bordures
KB-KM
2)
Balai brosse
KW-KM
2)
Balai racleur
Montage du guidon
1
3
4
5
6
A
6
2
002BA128 KN
All manuals and user guides at all-guides.com
all-guides.com
Page 47

46
français
KM 85, KM 85 R
poser la
5 = monture de serrage sur le support
de poignée ;
passer les
6 = vis à travers les trous des pièces et
les visser jusqu’en appui dans la
3 = monture de serrage ;
: ajuster la poignée tubulaire ;
: serrer fermement les vis.
Montage de la poignée de
commande
Dévisser la
7= vis et l’enlever avec la
8= rondelle ;
9= l’écrou reste dans la
10= poignée de commande ;
: présenter la poignée de commande
de telle sorte que la
11= gâchette d’accélérateur soit orien-
tée en direction du réducteur et la
glisser sur
1= l’extrémité du tube de poignée, de
telle sorte que les
12= trous coïncident ;
: visser la vis avec la rondelle et la
serrer.
Fixation du câble de commande
des gaz
Il ne doit pas être plié ou former des
courbes trop serrées – la gâchette
d’accélérateur doit pouvoir être action-
née facilement !
Enfoncer le
13= câble dans les
14= attaches de câble.
Réglage du câble de commande
des gaz*
sur poignée de commande à cliquet* :
: pour continuer, voir « Réglage du
câble de commande des gaz »
* voir « Indications concernant la
présente Notice d’emploi »
8
7
10
11
1
12
002BA129 KN
12
9
13
14
13
14
14
393BA005 KN
All manuals and user guides at all-guides.com
Page 48
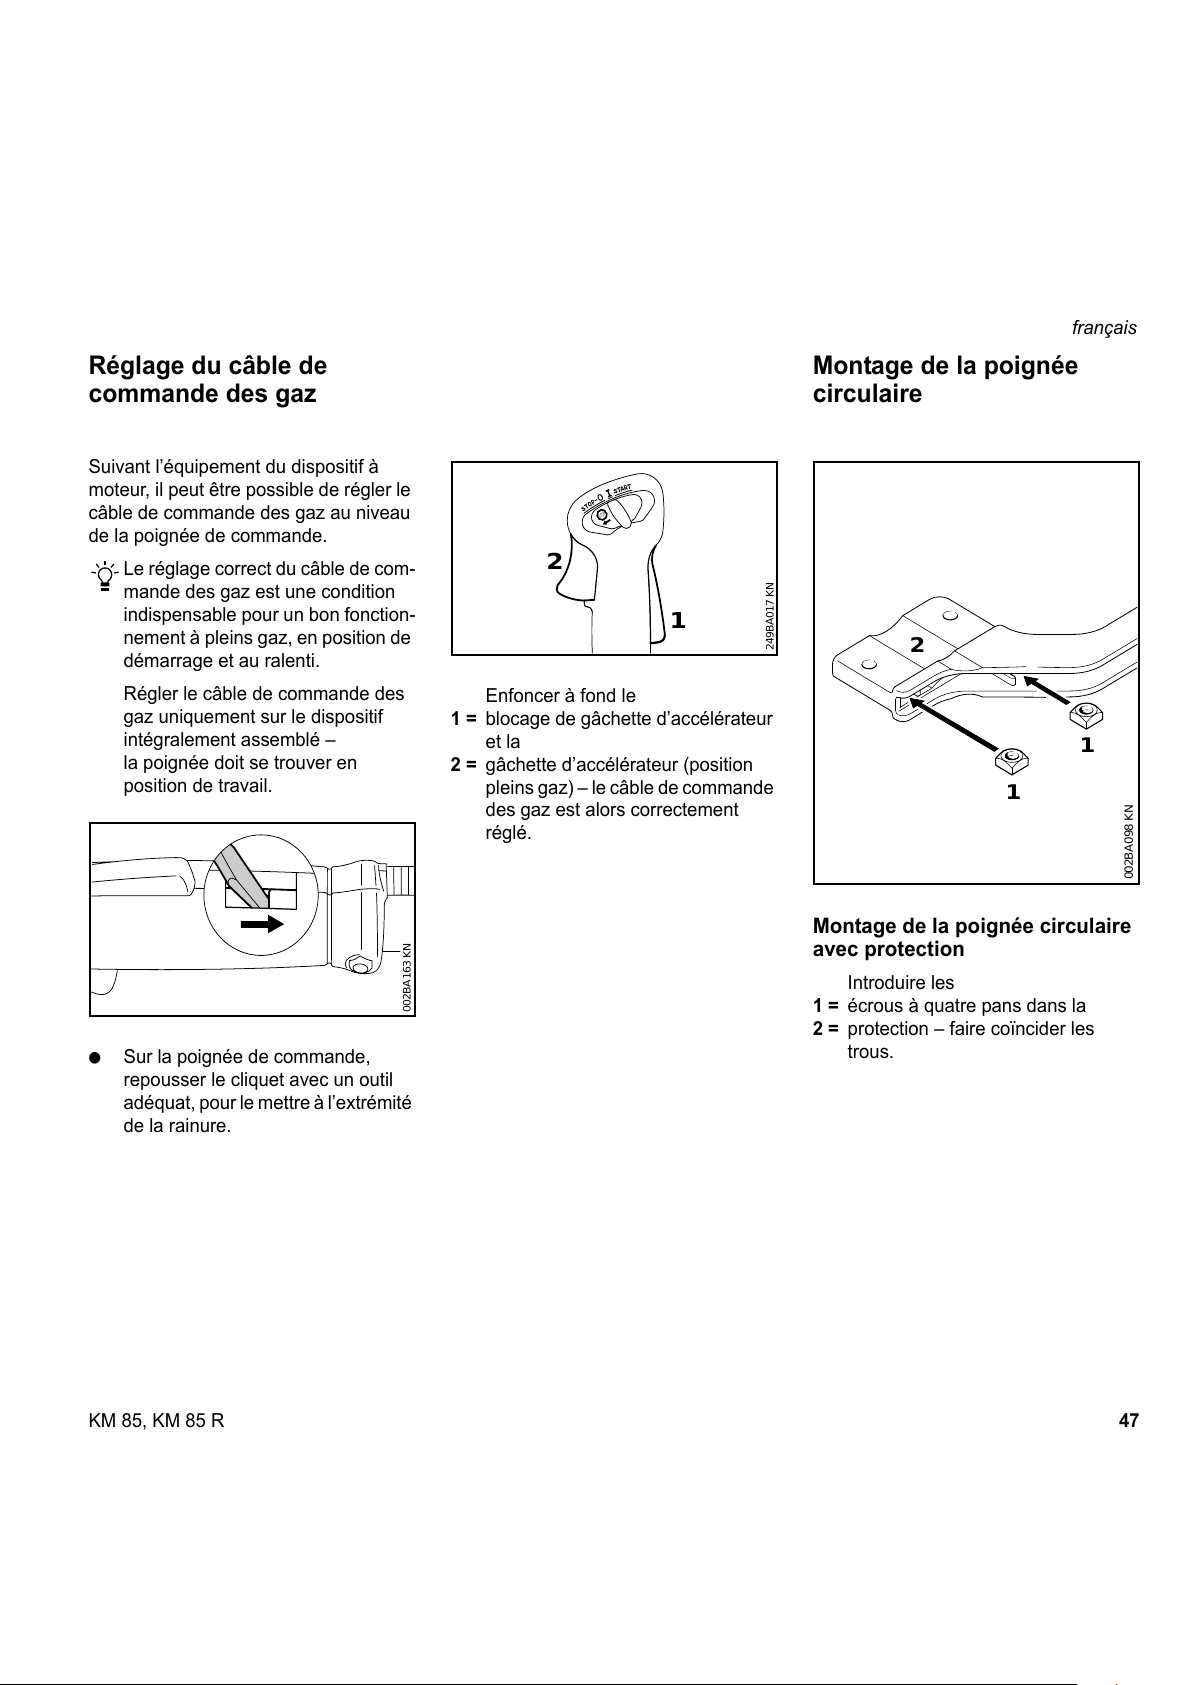
47KM 85, KM 85 R
français
Suivant l’équipement du dispositif à
moteur, il peut être possible de régler le
câble de commande des gaz au niveau
de la poignée de commande.
Le réglage correct du câble de com-
mande des gaz est une condition
indispensable pour un bon fonction-
nement à pleins gaz, en position de
démarrage et au ralenti.
Régler le câble de commande des
gaz uniquement sur le dispositif
intégralement assemblé –
la poignée doit se trouver en
position de travail.
: Sur la poignée de commande,
repousser le cliquet avec un outil
adéquat, pour le mettre à l’extrémité
de la rainure.
Enfoncer à fond le
1 = blocage de gâchette d’accélérateur
et la
2 = gâchette d’accélérateur (position
pleins gaz) – le câble de commande
des gaz est alors correctement
réglé.
Montage de la poignée circulaire
avec protection
Introduire les
1 = écrous à quatre pans dans la
2 = protection – faire coïncider les
trous.
Réglage du câble de
commande des gaz
002BA163 KN
STOP
249BA017 KN
1
2
Montage de la poignée
circulaire
2
002BA098 KN
1
1
All manuals and user guides at all-guides.com
Page 49
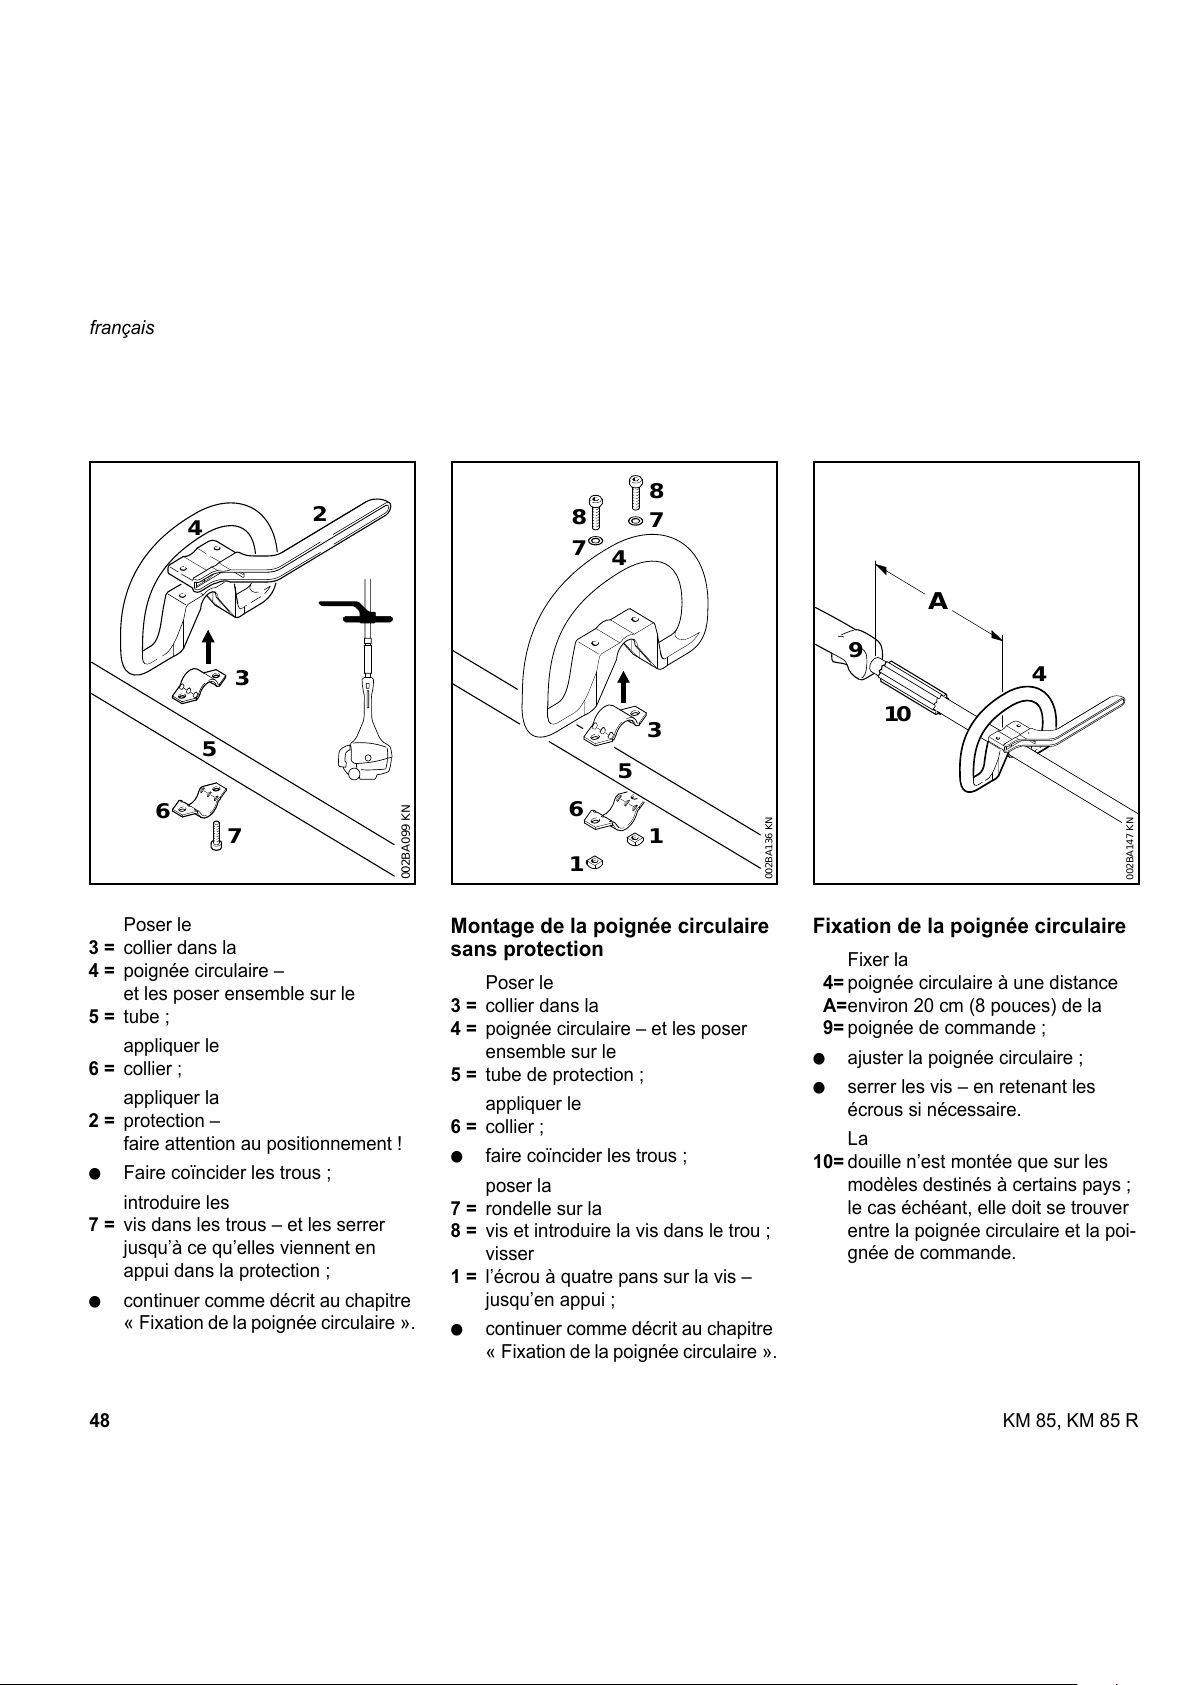
48
français
KM 85, KM 85 R
Poser le
3 = collier dans la
4 = poignée circulaire –
et les poser ensemble sur le
5 = tube ;
appliquer le
6 = collier ;
appliquer la
2 = protection –
faire attention au positionnement !
: Faire coïncider les trous ;
introduire les
7 = vis dans les trous – et les serrer
jusqu’à ce qu’elles viennent en
appui dans la protection ;
: continuer comme décrit au chapitre
« Fixation de la poignée circulaire ».
Montage de la poignée circulaire
sans protection
Poser le
3 = collier dans la
4 = poignée circulaire – et les poser
ensemble sur le
5 = tube de protection ;
appliquer le
6 = collier ;
: faire coïncider les trous ;
poser la
7 = rondelle sur la
8 = vis et introduire la vis dans le trou ;
visser
1 = l’écrou à quatre pans sur la vis –
jusqu’en appui ;
: continuer comme décrit au chapitre
« Fixation de la poignée circulaire ».
Fixation de la poignée circulaire
Fixer la
4= poignée circulaire à une distance
A=environ 20 cm (8 pouces) de la
9= poignée de commande ;
: ajuster la poignée circulaire ;
: serrer les vis – en retenant les
écrous si nécessaire.
La
10= douille n’est montée que sur les
modèles destinés à certains pays ;
le cas échéant, elle doit se trouver
entre la poignée circulaire et la poi-
gnée de commande.
5
4
002BA099 KN
2
3
6
7
4
5
002BA136 KN
1
6
1
3
8
7
8
7
10
9
4
002BA147 KN
A
All manuals and user guides at all-guides.com
Page 50
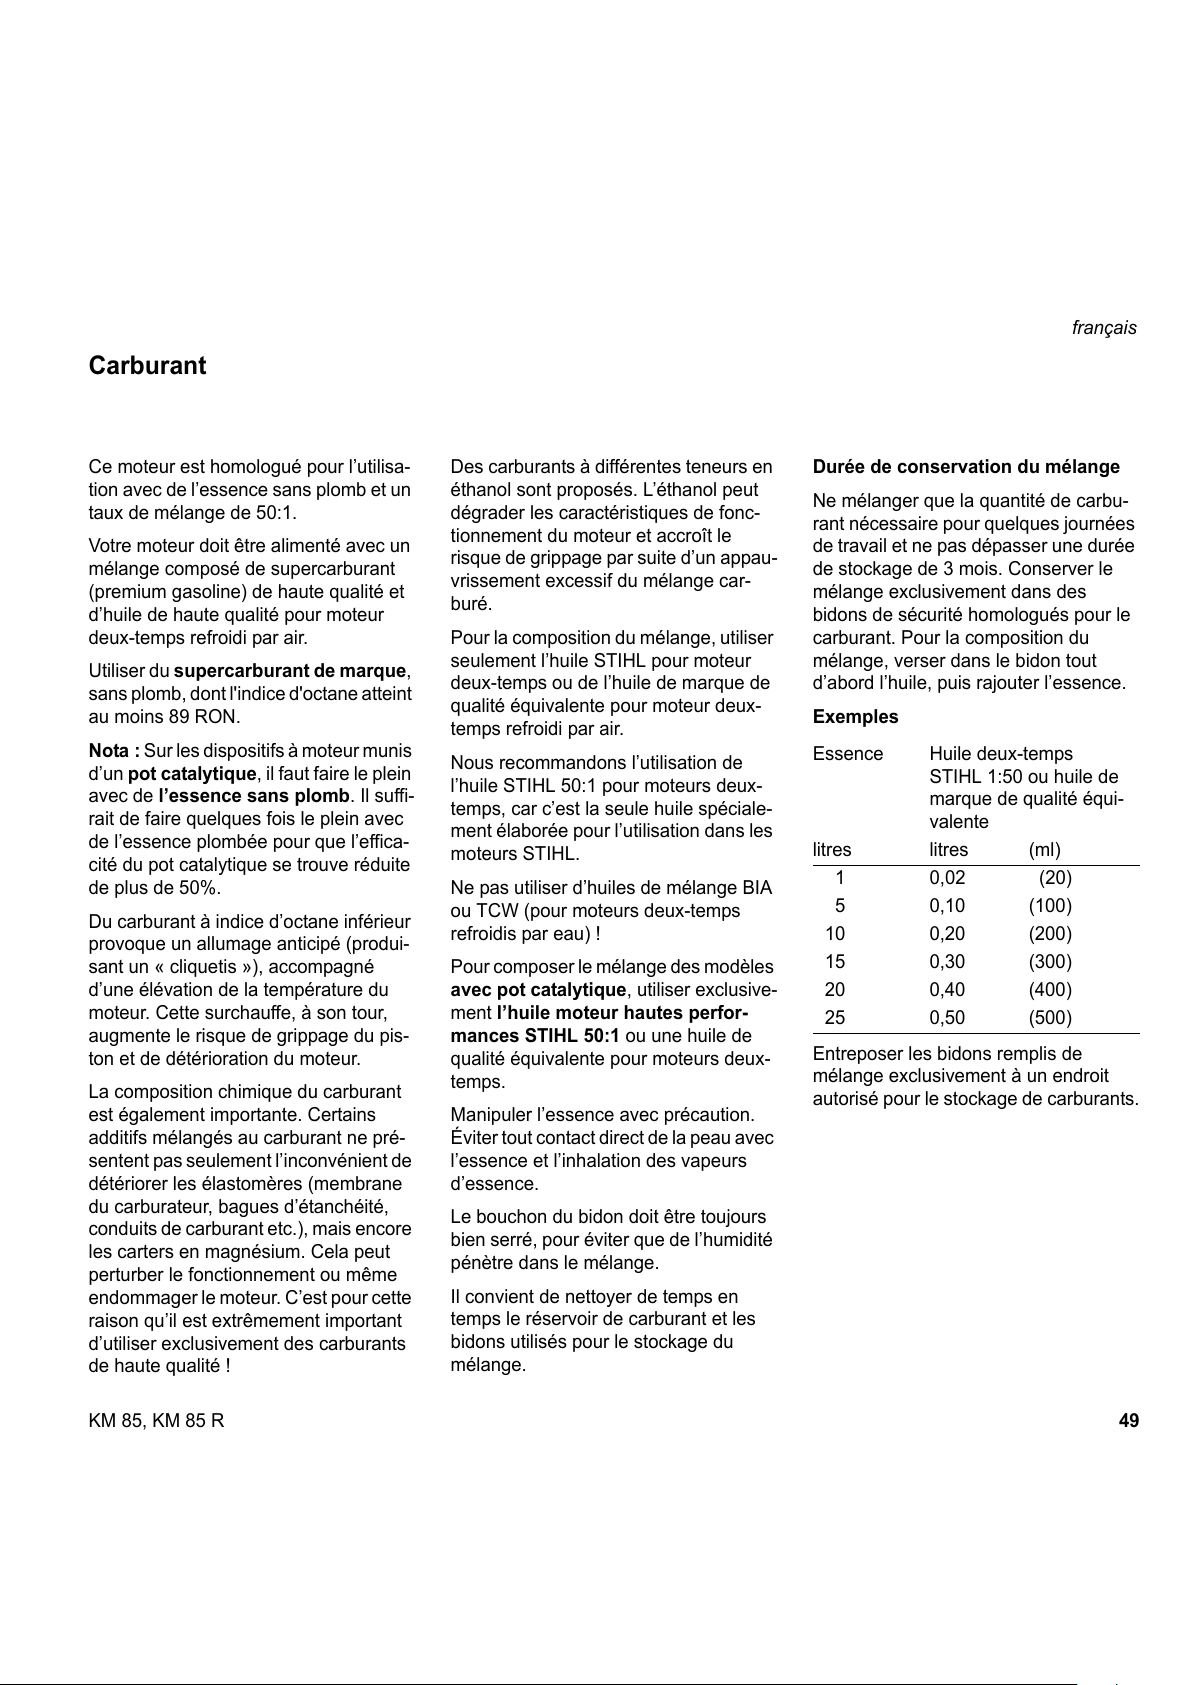
49KM 85, KM 85 R
français
Ce moteur est homologué pour l’utilisa-
tion avec de l’essence sans plomb et un
taux de mélange de 50:1.
Votre moteur doit être alimenté avec un
mélange composé de supercarburant
(premium gasoline) de haute qualité et
d’huile de haute qualité pour moteur
deux-temps refroidi par air.
Utiliser du supercarburant de marque,
sans plomb, dont l'indice d'octane atteint
au moins 89 RON.
Nota : Sur les dispositifs à moteur munis
d’un pot catalytique, il faut faire le plein
avec de l’essence sans plomb. Il suffi-
rait de faire quelques fois le plein avec
de l’essence plombée pour que l’effica-
cité du pot catalytique se trouve réduite
de plus de 50%.
Du carburant à indice d’octane inférieur
provoque un allumage anticipé (produi-
sant un « cliquetis »), accompagné
d’une élévation de la température du
moteur. Cette surchauffe, à son tour,
augmente le risque de grippage du pis-
ton et de détérioration du moteur.
La composition chimique du carburant
est également importante. Certains
additifs mélangés au carburant ne pré-
sentent pas seulement l’inconvénient de
détériorer les élastomères (membrane
du carburateur, bagues d’étanchéité,
conduits de carburant etc.), mais encore
les carters en magnésium. Cela peut
perturber le fonctionnement ou même
endommager le moteur. C’est pour cette
raison qu’il est extrêmement important
d’utiliser exclusivement des carburants
de haute qualité !
Des carburants à différentes teneurs en
éthanol sont proposés. L’éthanol peut
dégrader les caractéristiques de fonc-
tionnement du moteur et accroît le
risque de grippage par suite d’un appau-
vrissement excessif du mélange car-
buré.
Pour la composition du mélange, utiliser
seulement l’huile STIHL pour moteur
deux-temps ou de l’huile de marque de
qualité équivalente pour moteur deux-
temps refroidi par air.
Nous recommandons l’utilisation de
l’huile STIHL 50:1 pour moteurs deux-
temps, car c’est la seule huile spéciale-
ment élaborée pour l’utilisation dans les
moteurs STIHL.
Ne pas utiliser d’huiles de mélange BIA
ou TCW (pour moteurs deux-temps
refroidis par eau) !
Pour composer le mélange des modèles
avec pot catalytique, utiliser exclusive-
ment l’huile moteur hautes perfor-
mances STIHL 50:1 ou une huile de
qualité équivalente pour moteurs deux-
temps.
Manipuler l’essence avec précaution.
Éviter tout contact direct de la peau avec
l’essence et l’inhalation des vapeurs
d’essence.
Le bouchon du bidon doit être toujours
bien serré, pour éviter que de l’humidité
pénètre dans le mélange.
Il convient de nettoyer de temps en
temps le réservoir de carburant et les
bidons utilisés pour le stockage du
mélange.
Durée de conservation du mélange
Ne mélanger que la quantité de carbu-
rant nécessaire pour quelques journées
de travail et ne pas dépasser une durée
de stockage de 3 mois. Conserver le
mélange exclusivement dans des
bidons de sécurité homologués pour le
carburant. Pour la composition du
mélange, verser dans le bidon tout
d’abord l’huile, puis rajouter l’essence.
Exemples
Entreposer les bidons remplis de
mélange exclusivement à un endroit
autorisé pour le stockage de carburants.
Carburant
Essence Huile deux-temps
STIHL 1:50 ou huile de
marque de qualité équi-
valente
litres litres (ml)
10,02 (20)
5 0,10 (100)
10 0,20 (200)
15 0,30 (300)
20 0,40 (400)
25 0,50 (500)
All manuals and user guides at all-guides.com
Page 51
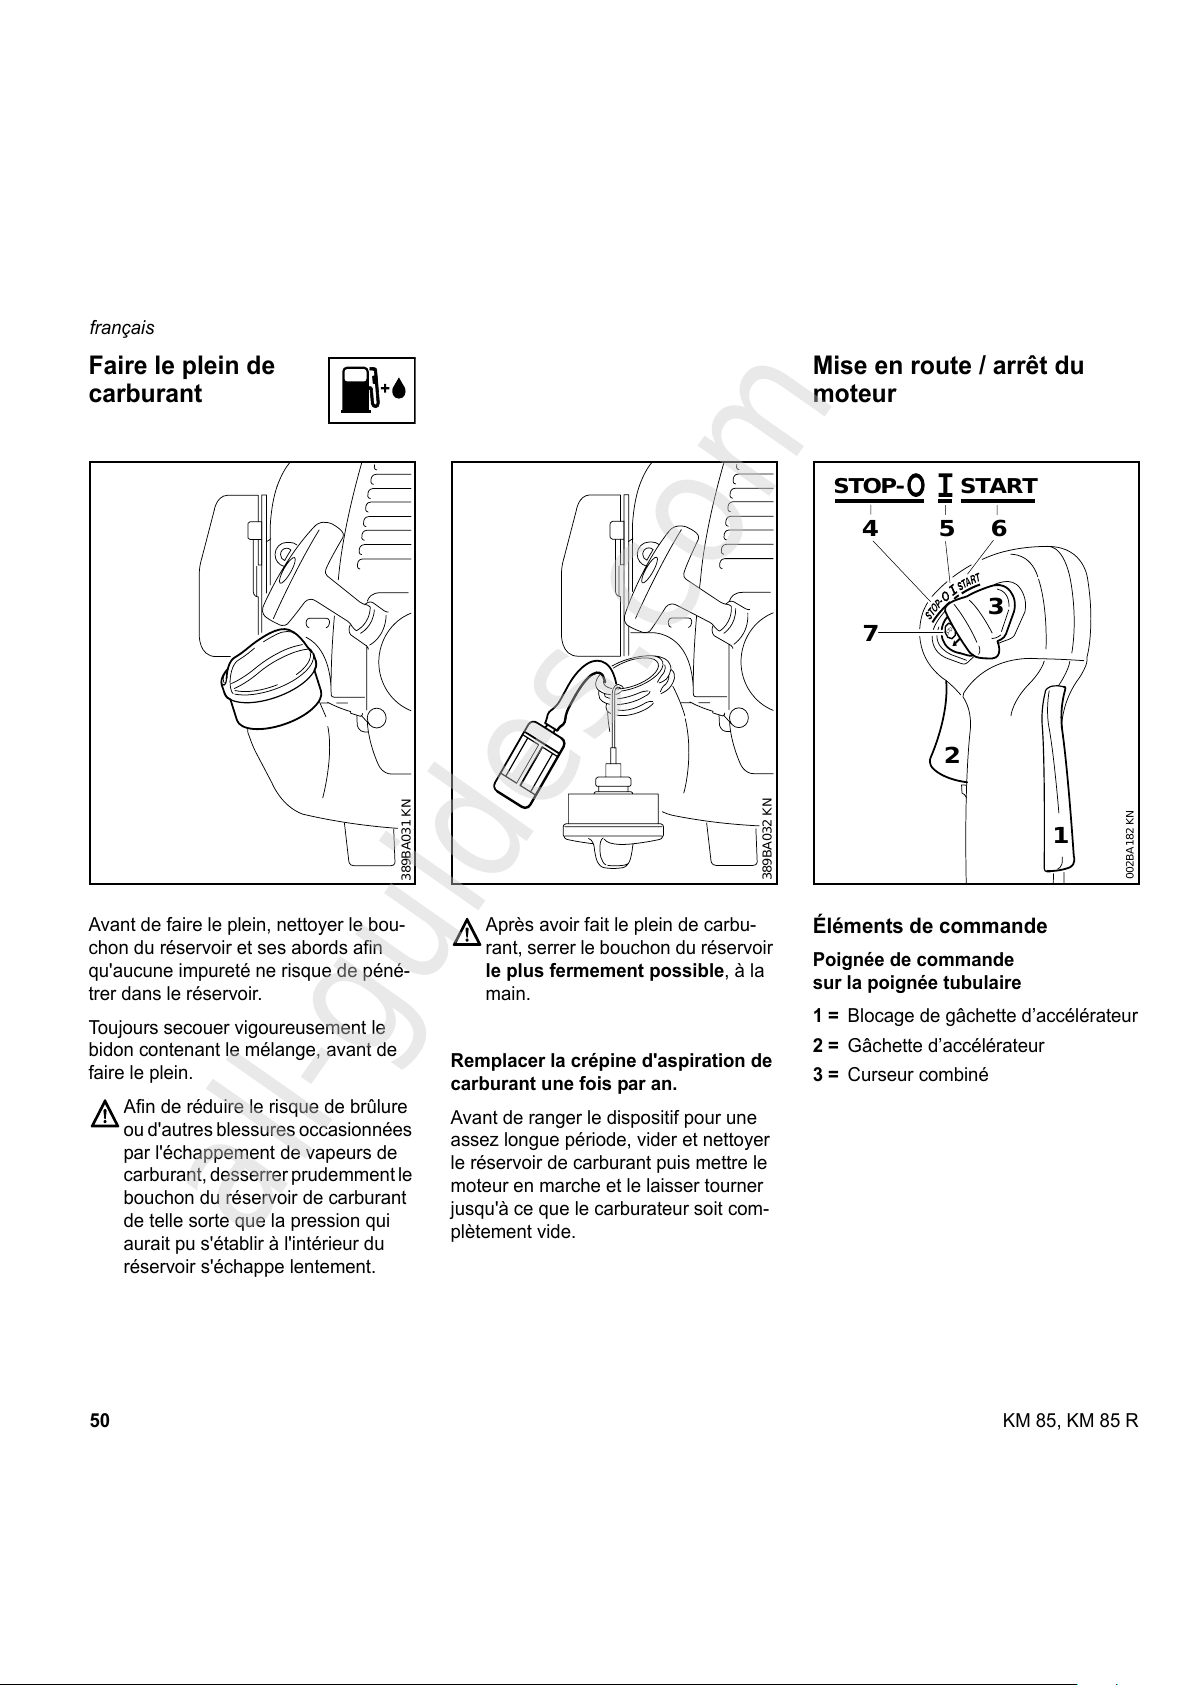
50
français
KM 85, KM 85 R
Avant de faire le plein, nettoyer le bou-
chon du réservoir et ses abords afin
qu'aucune impureté ne risque de péné-
trer dans le réservoir.
Toujours secouer vigoureusement le
bidon contenant le mélange, avant de
faire le plein.
Afin de réduire le risque de brûlure
ou d'autres blessures occasionnées
par l'échappement de vapeurs de
carburant, desserrer prudemment le
bouchon du réservoir de carburant
de telle sorte que la pression qui
aurait pu s'établir à l'intérieur du
réservoir s'échappe lentement.
Après avoir fait le plein de carbu-
rant, serrer le bouchon du réservoir
le plus fermement possible, à la
main.
Remplacer la crépine d'aspiration de
carburant une fois par an.
Avant de ranger le dispositif pour une
assez longue période, vider et nettoyer
le réservoir de carburant puis mettre le
moteur en marche et le laisser tourner
jusqu'à ce que le carburateur soit com-
plètement vide.
Éléments de commande
Poignée de commande
sur la poignée tubulaire
1 = Blocage de gâchette d’accélérateur
2 = Gâchette d’accélérateur
3 = Curseur combiné
Faire le plein de
carburant
389BA031 KN
389BA032 KN
Mise en route / arrêt du
moteur
3
STOP
56
4
7
002BA182 KN
1
2
START
STOP-
All manuals and user guides at all-guides.com
all-guides.com
Page 52
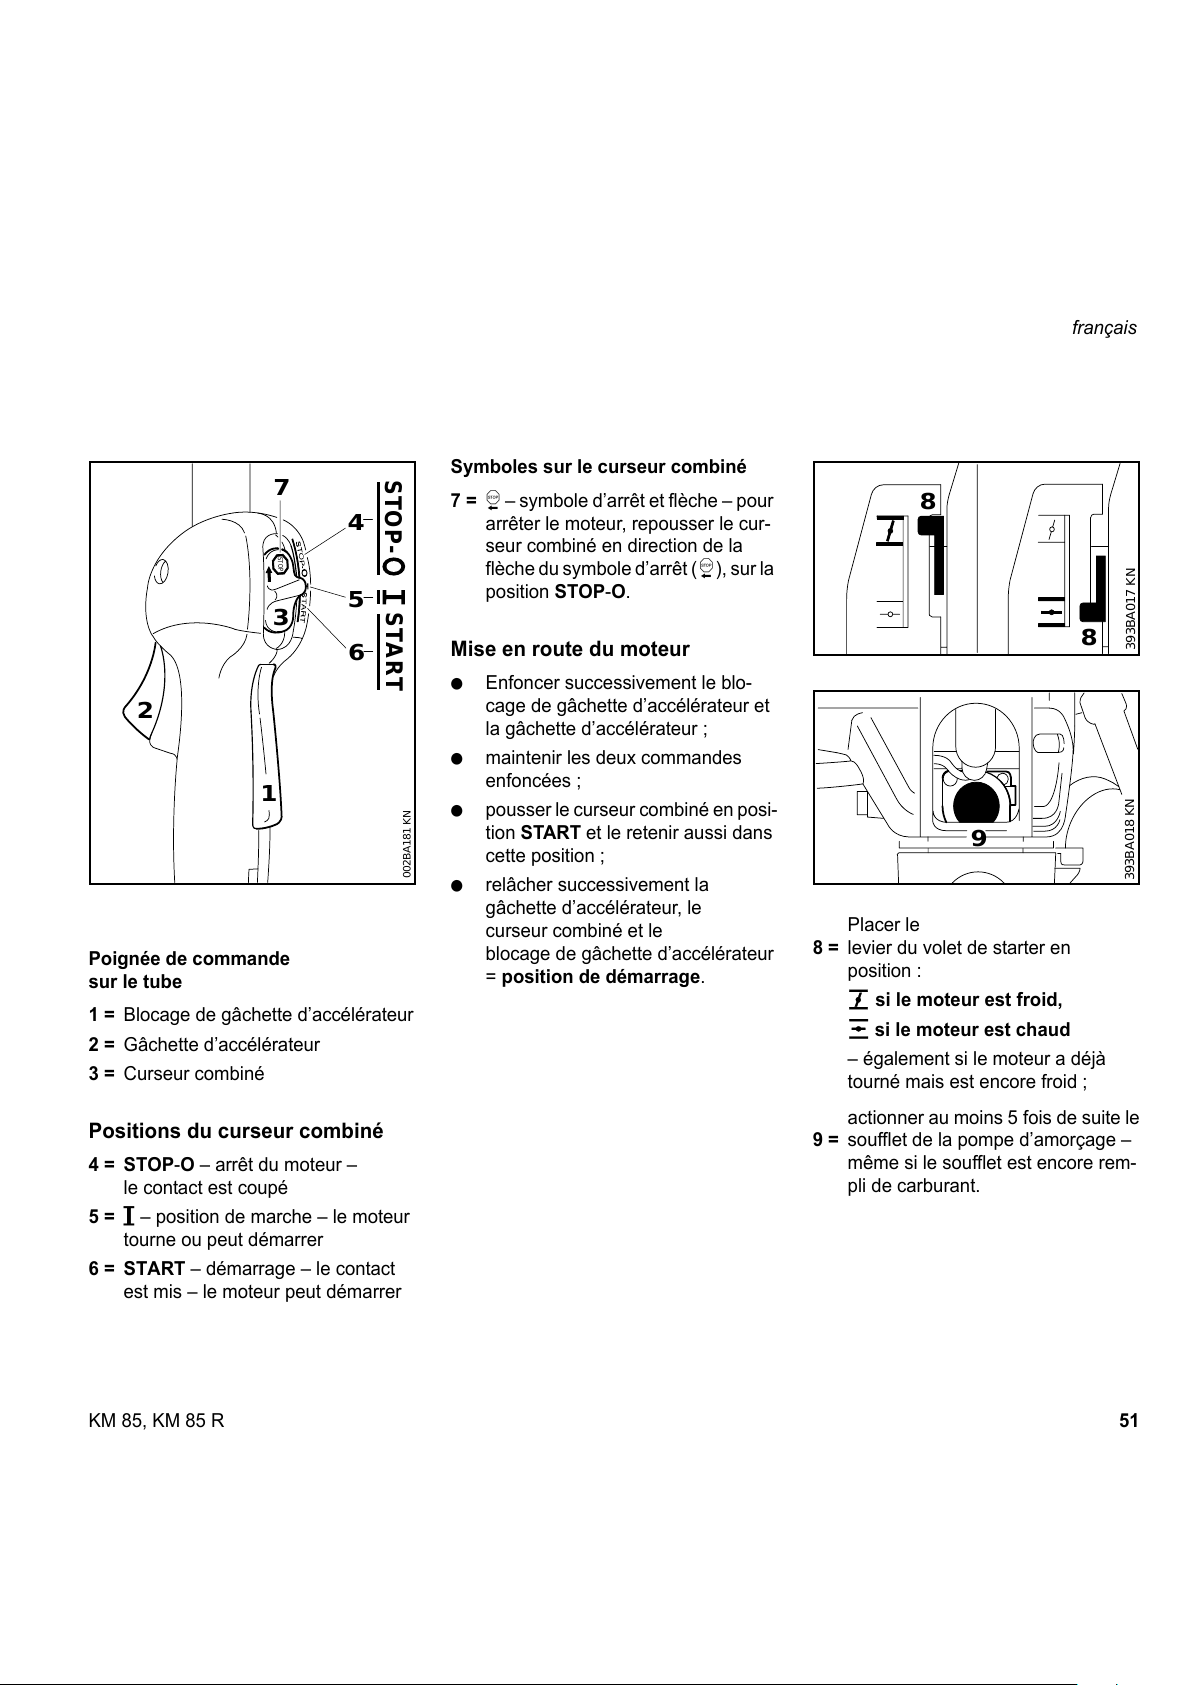
51KM 85, KM 85 R
français
Poignée de commande
sur le tube
1 = Blocage de gâchette d’accélérateur
2 = Gâchette d’accélérateur
3 = Curseur combiné
Positions du curseur combiné
4 = STOP-O – arrêt du moteur –
le contact est coupé
5 = # – position de marche – le moteur
tourne ou peut démarrer
6 = START – démarrage – le contact
est mis – le moteur peut démarrer
Symboles sur le curseur combiné
7 = h – symbole d’arrêt et flèche – pour
arrêter le moteur, repousser le cur-
seur combiné en direction de la
flèche du symbole d’arrêt ( h), sur la
position STOP-O.
Mise en route du moteur
: Enfoncer successivement le blo-
cage de gâchette d’accélérateur et
la gâchette d’accélérateur ;
: maintenir les deux commandes
enfoncées ;
: pousser le curseur combiné en posi-
tion START et le retenir aussi dans
cette position ;
: relâcher successivement la
gâchette d’accélérateur, le
curseur combiné et le
blocage de gâchette d’accélérateur
= position de démarrage.
Placer le
8 = levier du volet de starter en
position :
g si le moteur est froid,
e si le moteur est chaud
– également si le moteur a déjà
tourné mais est encore froid ;
actionner au moins 5 fois de suite le
9 = soufflet de la pompe d’amorçage –
même si le soufflet est encore rem-
pli de carburant.
3
STOP
2
5
6
4
7
002BA181 KN
START
STOP-
1
393BA017 KN
8
8
393BA018 KN
9
All manuals and user guides at all-guides.com
Page 53
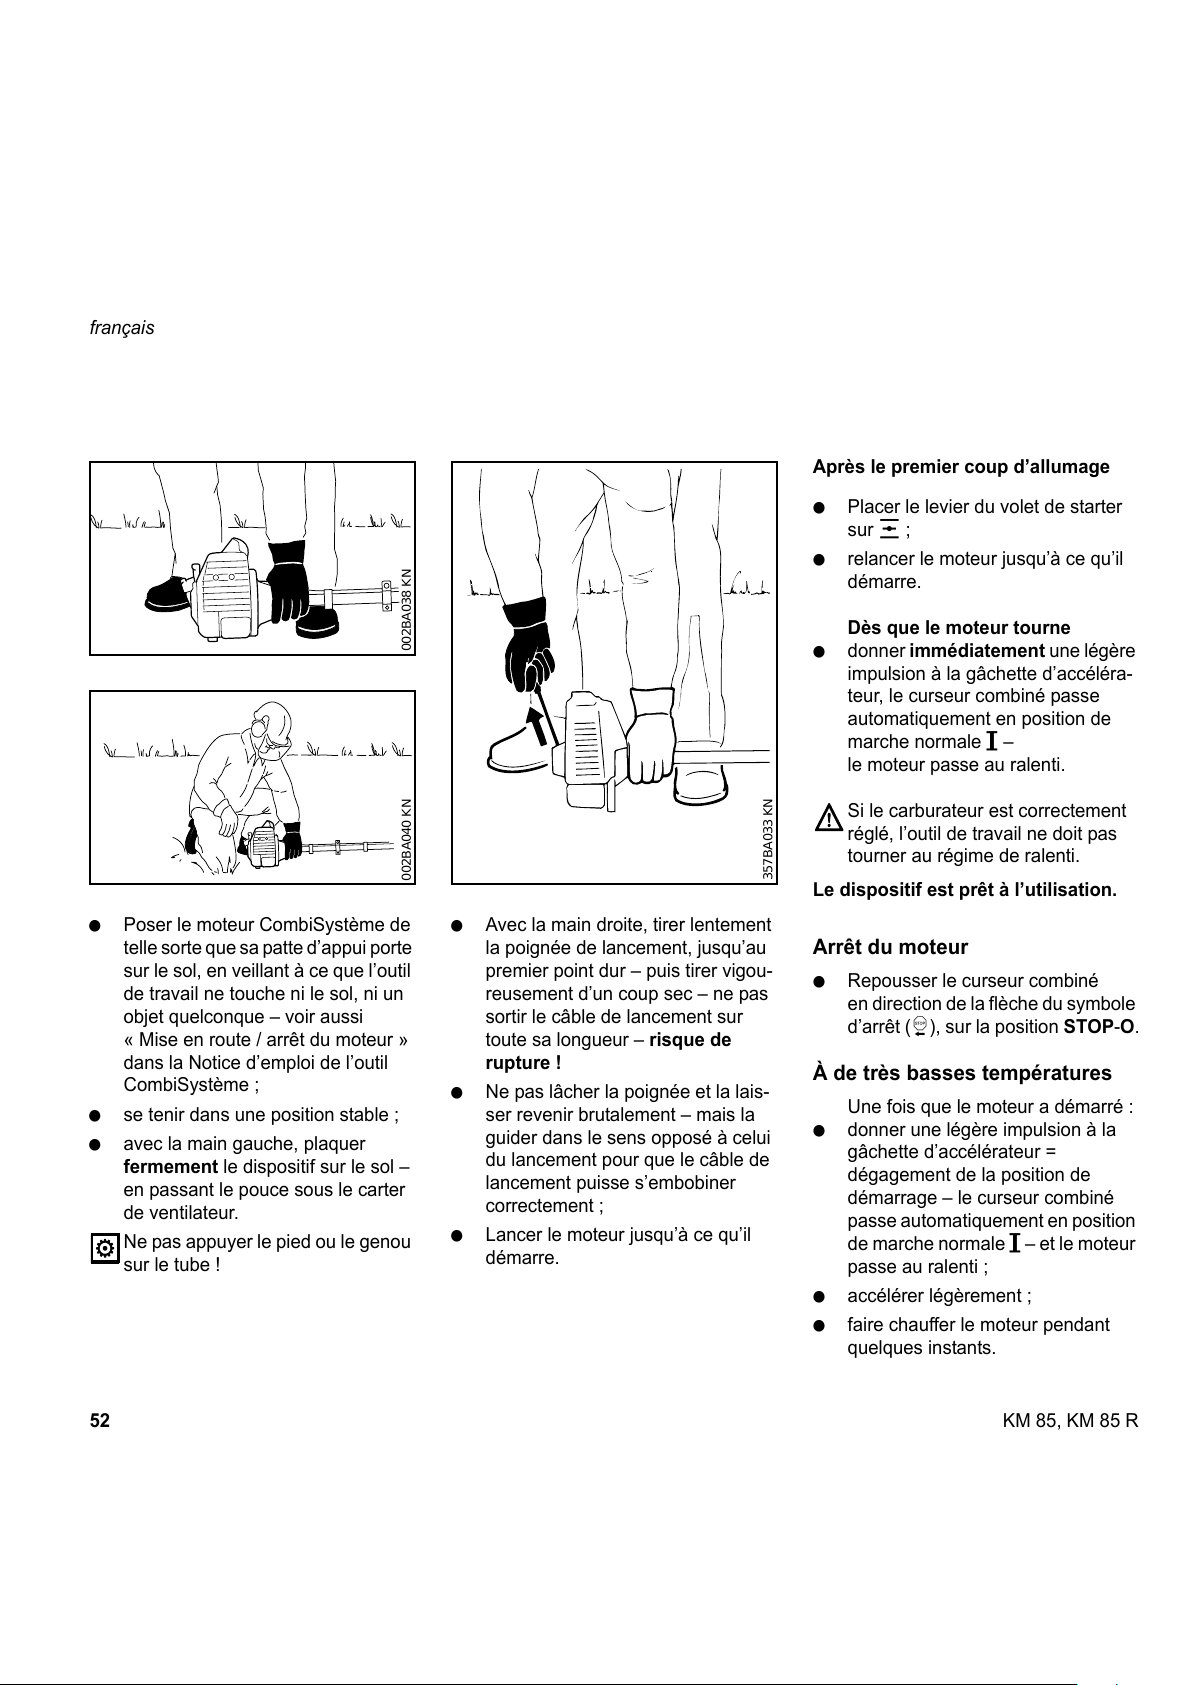
52
français
KM 85, KM 85 R
: Poser le moteur CombiSystème de
telle sorte que sa patte d’appui porte
sur le sol, en veillant à ce que l’outil
de travail ne touche ni le sol, ni un
objet quelconque – voir aussi
« Mise en route / arrêt du moteur »
dans la Notice d’emploi de l’outil
CombiSystème ;
: se tenir dans une position stable ;
: avec la main gauche, plaquer
fermement le dispositif sur le sol –
en passant le pouce sous le carter
de ventilateur.
Ne pas appuyer le pied ou le genou
sur le tube !
: Avec la main droite, tirer lentement
la poignée de lancement, jusqu’au
premier point dur – puis tirer vigou-
reusement d’un coup sec – ne pas
sortir le câble de lancement sur
toute sa longueur – risque de
rupture !
: Ne pas lâcher la poignée et la lais-
ser revenir brutalement – mais la
guider dans le sens opposé à celui
du lancement pour que le câble de
lancement puisse s’embobiner
correctement ;
: Lancer le moteur jusqu’à ce qu’il
démarre.
Après le premier coup d’allumage
: Placer le levier du volet de starter
sur e ;
: relancer le moteur jusqu’à ce qu’il
démarre.
Dès que le moteur tourne
: donner immédiatement une légère
impulsion à la gâchette d’accéléra-
teur, le curseur combiné passe
automatiquement en position de
marche normale # –
le moteur passe au ralenti.
Si le carburateur est correctement
réglé, l’outil de travail ne doit pas
tourner au régime de ralenti.
Le dispositif est prêt à l’utilisation.
Arrêt du moteur
: Repousser le curseur combiné
en direction de la flèche du symbole
d’arrêt (h), sur la position STOP-O.
À de très basses températures
Une fois que le moteur a démarré :
: donner une légère impulsion à la
gâchette d’accélérateur =
dégagement de la position de
démarrage – le curseur combiné
passe automatiquement en position
de marche normale # – et le moteur
passe au ralenti ;
: accélérer légèrement ;
: faire chauffer le moteur pendant
quelques instants.
002BA038 KN
002BA040 KN
357BA033 KN
All manuals and user guides at all-guides.com
Page 54
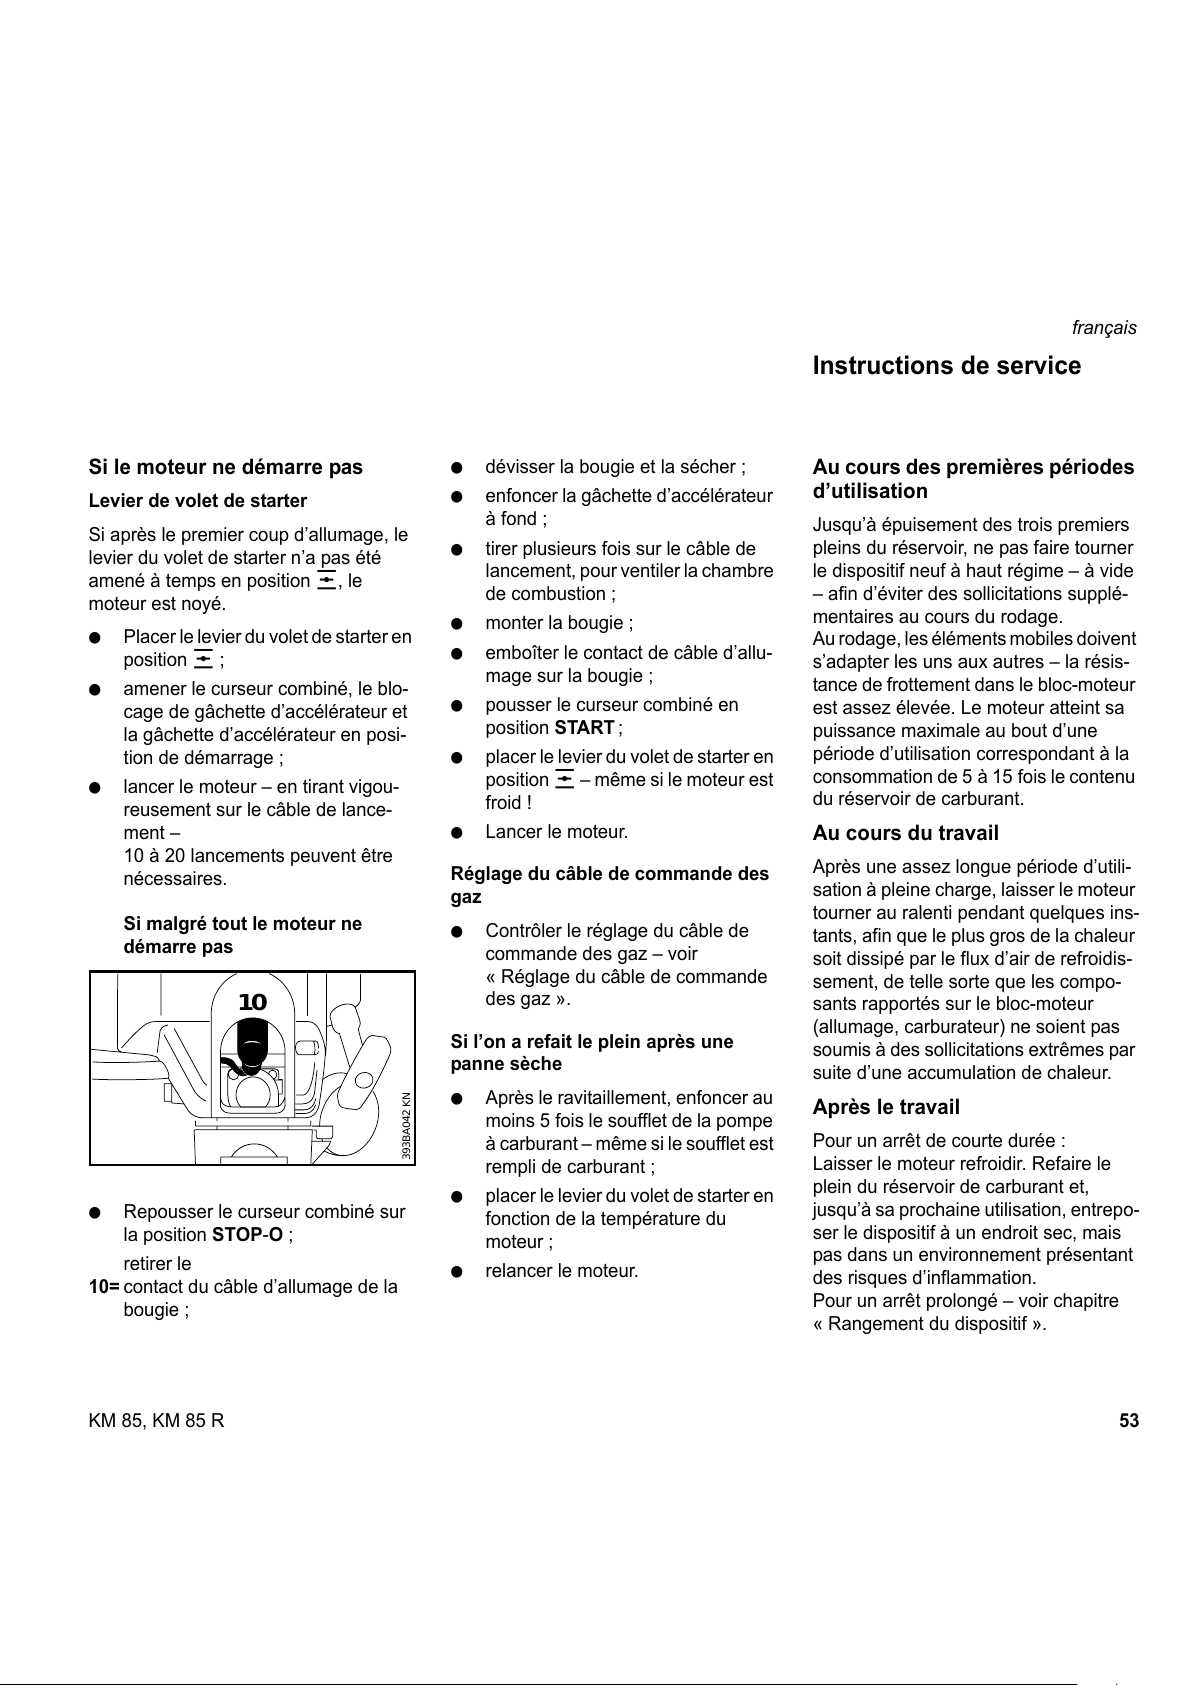
53KM 85, KM 85 R
français
Si le moteur ne démarre pas
Levier de volet de starter
Si après le premier coup d’allumage, le
levier du volet de starter n’a pas été
amené à temps en position e, le
moteur est noyé.
: Placer le levier du volet de starter en
position e ;
: amener le curseur combiné, le blo-
cage de gâchette d’accélérateur et
la gâchette d’accélérateur en posi-
tion de démarrage ;
: lancer le moteur – en tirant vigou-
reusement sur le câble de lance-
ment –
10 à 20 lancements peuvent être
nécessaires.
Si malgré tout le moteur ne
démarre pas
: Repousser le curseur combiné sur
la position STOP-O ;
retirer le
10= contact du câble d’allumage de la
bougie ;
: dévisser la bougie et la sécher ;
: enfoncer la gâchette d’accélérateur
à fond ;
: tirer plusieurs fois sur le câble de
lancement, pour ventiler la chambre
de combustion ;
: monter la bougie ;
: emboîter le contact de câble d’allu-
mage sur la bougie ;
: pousser le curseur combiné en
position START;
: placer le levier du volet de starter en
position e – même si le moteur est
froid !
: Lancer le moteur.
Réglage du câble de commande des
gaz
: Contrôler le réglage du câble de
commande des gaz – voir
« Réglage du câble de commande
des gaz ».
Si l’on a refait le plein après une
panne sèche
: Après le ravitaillement, enfoncer au
moins 5 fois le soufflet de la pompe
à carburant – même si le soufflet est
rempli de carburant ;
: placer le levier du volet de starter en
fonction de la température du
moteur ;
: relancer le moteur.
Au cours des premières périodes
d’utilisation
Jusqu’à épuisement des trois premiers
pleins du réservoir, ne pas faire tourner
le dispositif neuf à haut régime – à vide
– afin d’éviter des sollicitations supplé-
mentaires au cours du rodage.
Au rodage, les éléments mobiles doivent
s’adapter les uns aux autres – la résis-
tance de frottement dans le bloc-moteur
est assez élevée. Le moteur atteint sa
puissance maximale au bout d’une
période d’utilisation correspondant à la
consommation de 5 à 15 fois le contenu
du réservoir de carburant.
Au cours du travail
Après une assez longue période d’utili-
sation à pleine charge, laisser le moteur
tourner au ralenti pendant quelques ins-
tants, afin que le plus gros de la chaleur
soit dissipé par le flux d’air de refroidis-
sement, de telle sorte que les compo-
sants rapportés sur le bloc-moteur
(allumage, carburateur) ne soient pas
soumis à des sollicitations extrêmes par
suite d’une accumulation de chaleur.
Après le travail
Pour un arrêt de courte durée :
Laisser le moteur refroidir. Refaire le
plein du réservoir de carburant et,
jusqu’à sa prochaine utilisation, entrepo-
ser le dispositif à un endroit sec, mais
pas dans un environnement présentant
des risques d’inflammation.
Pour un arrêt prolongé – voir chapitre
« Rangement du dispositif ».
10
393BA042 KN
Instructions de service
All manuals and user guides at all-guides.com
Page 55

54
français
KM 85, KM 85 R
Si les filtres à air sont encrassés, la puis-
sance du moteur baisse, la consomma-
tion de carburant augmente et la mise
en route du moteur devient plus difficile.
Si l'on constate une baisse sensible
de la puissance du moteur
: Placer le levier du volet de démar-
rage sur la position f ;
enfoncer la
1 = languette ;
faire basculer le
2 = couvercle de filtre par-dessus cette
languette et le retirer ;
: nettoyer grossièrement le voisinage
du filtre ;
: sortir le filtre en matière cellulaire et
le filtre en feutre ;
: laver le filtre en matière cellulaire
dans un bain de nettoyage propre et
ininflammable (p. ex. : eau savon-
neuse chaude) et le sécher ;
: remplacer le filtre en feutre !
Pour un dépannage provisoire, le
battre ou le passer à la soufflette –
ne pas le laver !
Remplacer impérativement les pièces
endommagées !
Poser le
3 = filtre en matière cellulaire dans le
2 = couvercle de filtre ;
loger le
4 = filtre en feutre, avec l’inscription
tournée vers l’intérieur, dans le
5 = boîtier de filtre ;
: remonter le couvercle de filtre et le
faire encliqueter.
Si la puissance du moteur baisse,
contrôler la grille pare-étincelles du
silencieux.
: Soulever la grille pare-étincelles et
l’extraire latéralement ;
: nettoyer la grille pare-étincelles si
elle est encrassée ;
: la remplacer en cas de détérioration
ou si elle est fortement calaminée ;
: remonter la grille pare-étincelles.
* voir « Indications concernant la
présente Notice d’emploi »
Nettoyage du filtre à air
355BA014 KN
2
1
2
3
355BA031 KN
4
5
355BA032 KN
Grille pare-étincelles* du
silencieux
392BA035 KN
All manuals and user guides at all-guides.com
Page 56
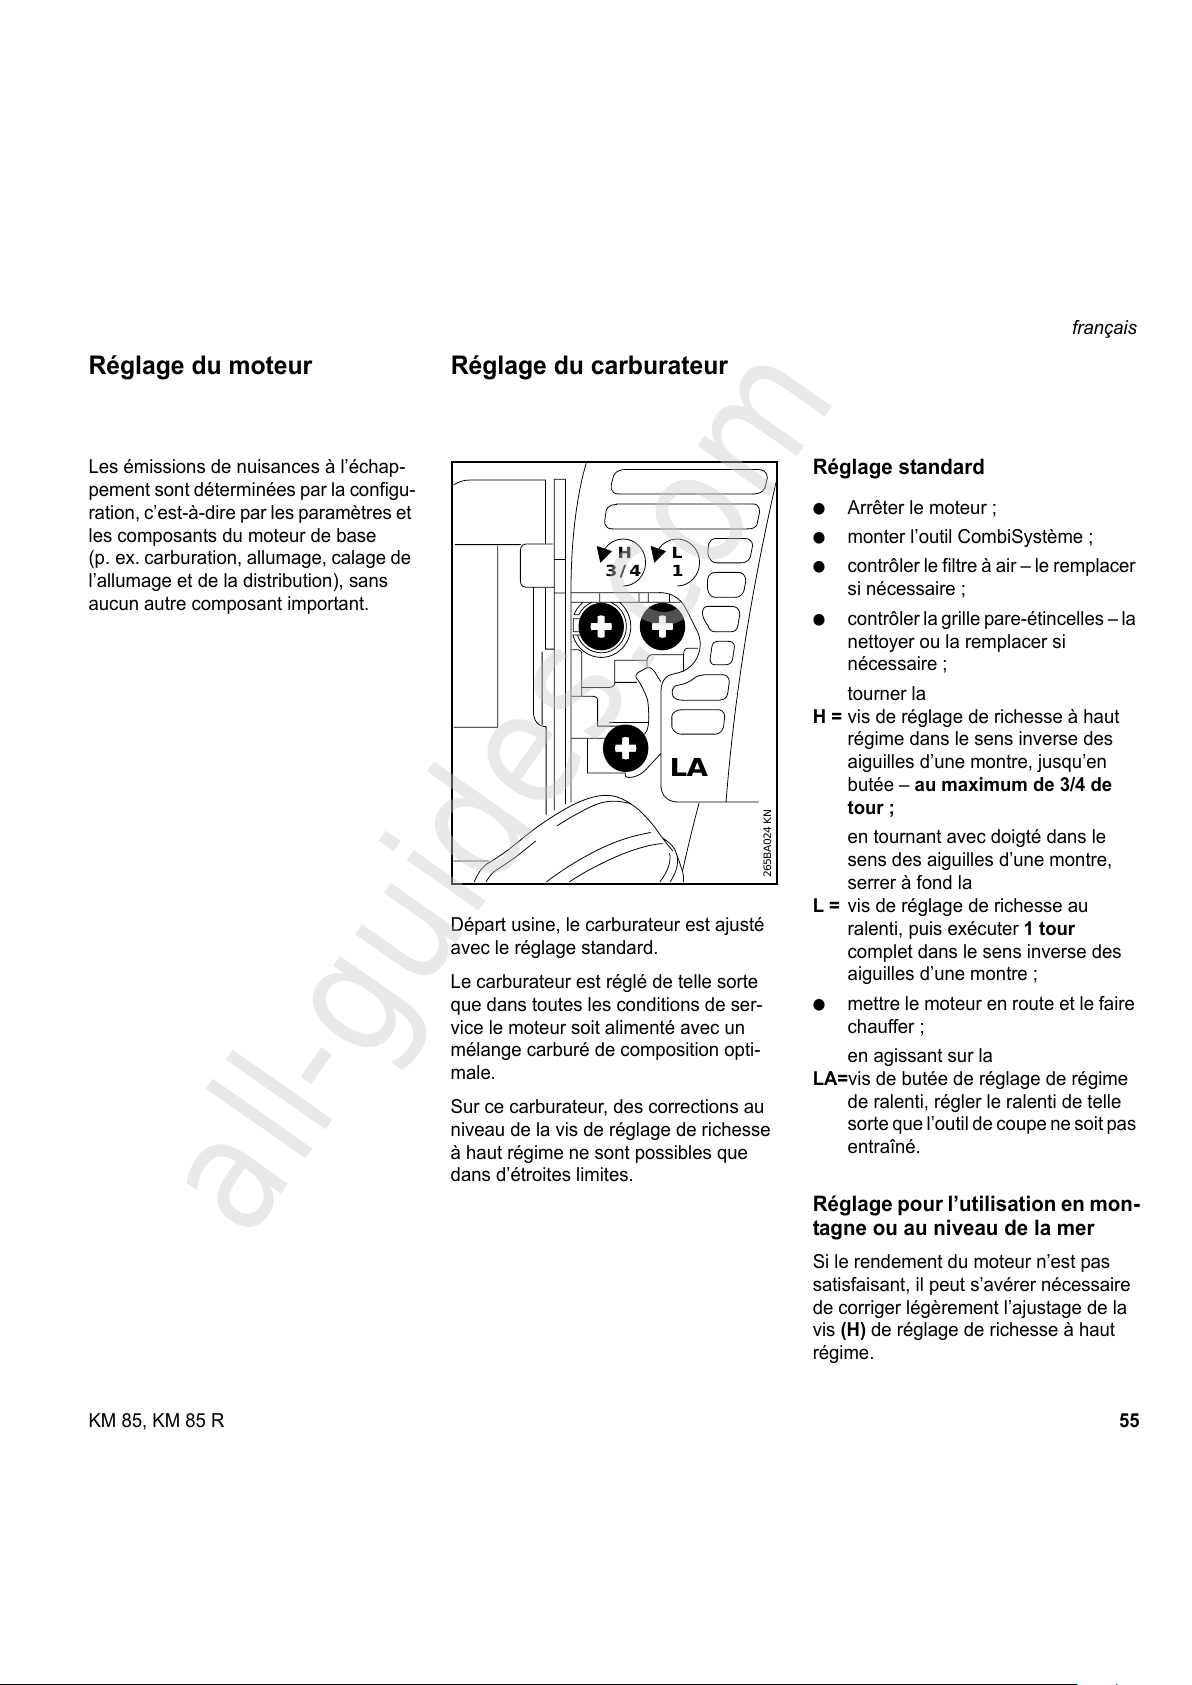
55KM 85, KM 85 R
français
Les émissions de nuisances à l’échap-
pement sont déterminées par la configu-
ration, c’est-à-dire par les paramètres et
les composants du moteur de base
(p. ex. carburation, allumage, calage de
l’allumage et de la distribution), sans
aucun autre composant important.
Départ usine, le carburateur est ajusté
avec le réglage standard.
Le carburateur est réglé de telle sorte
que dans toutes les conditions de ser-
vice le moteur soit alimenté avec un
mélange carburé de composition opti-
male.
Sur ce carburateur, des corrections au
niveau de la vis de réglage de richesse
à haut régime ne sont possibles que
dans d’étroites limites.
Réglage standard
: Arrêter le moteur ;
: monter l’outil CombiSystème ;
: contrôler le filtre à air – le remplacer
si nécessaire ;
: contrôler la grille pare-étincelles – la
nettoyer ou la remplacer si
nécessaire ;
tourner la
H = vis de réglage de richesse à haut
régime dans le sens inverse des
aiguilles d’une montre, jusqu’en
butée – au maximum de 3/4 de
tour ;
en tournant avec doigté dans le
sens des aiguilles d’une montre,
serrer à fond la
L = vis de réglage de richesse au
ralenti, puis exécuter 1tour
complet dans le sens inverse des
aiguilles d’une montre ;
: mettre le moteur en route et le faire
chauffer ;
en agissant sur la
LA=vis de butée de réglage de régime
de ralenti, régler le ralenti de telle
sorte que l’outil de coupe ne soit pas
entraîné.
Réglage pour l’utilisation en mon-
tagne ou au niveau de la mer
Si le rendement du moteur n’est pas
satisfaisant, il peut s’avérer nécessaire
de corriger légèrement l’ajustage de la
vis (H) de réglage de richesse à haut
régime.
Réglage du moteur Réglage du carburateur
265BA024 KN
LA
HL
1
3 / 4
All manuals and user guides at all-guides.com
all-guides.com
Page 57
56
français
KM 85, KM 85 R
Valeur indicatrice
Par tranche de 1000 m (3300 ft)
de variation d’altitude, il convient
de faire tourner la vis (H) de
réglage de richesse à haut régime
d’env. 1/4 de tour.
: Procéder au réglage de base.
: Faire chauffer le moteur pendant
environ 3 minutes.
En montagne
Tourner la
H = vis de réglage de richesse à haut
régime dans le sens des aiguilles
d’une montre (appauvrissement du
mélange carburé) – au maximum
jusqu’en butée.
Au niveau de la mer
Tourner la
H = vis de réglage de richesse à haut
régime dans le sens inverse des
aiguilles d’une montre (enrichisse-
ment du mélange carburé) – au
maximum jusqu’en butée.
Normalement, le régime maximal
est déjà respectivement atteint avec
le réglage standard.
Réglage du ralenti
Après chaque correction effectuée au
niveau de la vis de réglage de richesse
au ralenti (L), il faut généralement corri-
ger aussi l’ajustage de la vis de butée de
réglage de régime de ralenti (LA).
: Faire chauffer le moteur pendant
environ 3 minutes.
Si le moteur cale au ralenti
Tourner lentement la
LA=vis de butée de réglage de régime
de ralenti dans le sens des aiguilles
d’une montre jusqu’à ce que le
moteur tourne rond – l’outil de
travail ne doit pas être entraîné.
Si l’outil de travail est entraîné au
ralenti
Tourner la
LA=vis de butée de réglage de régime
de ralenti dans le sens inverse des
aiguilles d’une montre jusqu’à ce
que l’outil de travail s’arrête – puis
tourner encore dans le même sens
de 1/2 tour à 1 tour complet.
Si le régime de ralenti n’est pas
régulier, si le moteur cale malgré une
correction avec la vis LA, si l’accélé-
ration n’est pas satisfaisante
Le réglage du ralenti est trop
pauvre –
tourner la
L = vis de réglage de richesse au ralenti
dans le sens inverse des aiguilles
d’une montre (environ 1/4 de tour),
jusqu’à ce que le moteur tourne
rond et accélère bien.
Si le régime de ralenti n’est pas
régulier
Le réglage du ralenti est trop
riche –
tourner la
L = vis de réglage de richesse au ralenti
dans le sens des aiguilles d’une
montre (environ 1/4 de tour),
jusqu’à ce que le moteur tourne
rond et accélère encore bien.
All manuals and user guides at all-guides.com
Page 58

57KM 85, KM 85 R
français
Un mélange de carburant incorrect (trop
grand pourcentage d’huile moteur dans
l’essence), un filtre à air colmaté et des
conditions de fonctionnement défavora-
bles (lorsque la machine est principale-
ment utilisée avec commande d’accélé-
rateur à mi-course etc.) ont une
influence défavorable sur l’état de la
bougie. Ces facteurs entraînent la for-
mation de dépôts sur l’extrémité de l’iso-
lateur, ce qui provoque des perturba-
tions du fonctionnement.
En cas de puissance insuffisante du
moteur, de mauvais démarrage ou de
perturbations au ralenti : contrôler tout
d’abord la bougie.
: Démonter la bougie comme décrit
au chapitre « Mise en route / arrêt
du moteur » ;
: nettoyer la bougie encrassée ;
: Contrôler l'écartement des électro-
des (A) – le rectifier si nécessaire –
pour la valeur correcte, voir
« Caractéristiques techniques ».
: Utiliser exclusivement une bougie
ayant la valeur thermique requise.
Supprimer les causes de l’encrasse-
ment de la bougie :
: trop d’huile moteur dans le carbu-
rant,
: filtre à air encrassé,
: conditions de service défavorables,
p.ex. utilisation fréquente avec com-
mande d‘accélérateur à mi-course.
Remplacer la bougie après
env. 100 heures de service –
ou plus tôt, si les électrodes sont forte-
ment usées.
Afin de réduire le risque d’incendie
et de brûlure, utiliser exclusivement
les bougies autorisées par STIHL.
Le contact (2) du câble d’allumage
doit être toujours fermement pressé
sur le raccord (1) de la bougie.
(Nota : si le raccord est constitué
d’un écrou SAE amovible, cet écrou
doit être serré).
Une connexion mal serrée, entre le
raccord de la bougie et le contact du
câble d’allumage peut engendrer un
arc électrique risquant d’enflammer
les vapeurs de carburant et de cau-
ser un incendie.
Contrôle de la bougie
000BA002 KN
0
00BA036 TR
1
All manuals and user guides at all-guides.com
Page 59
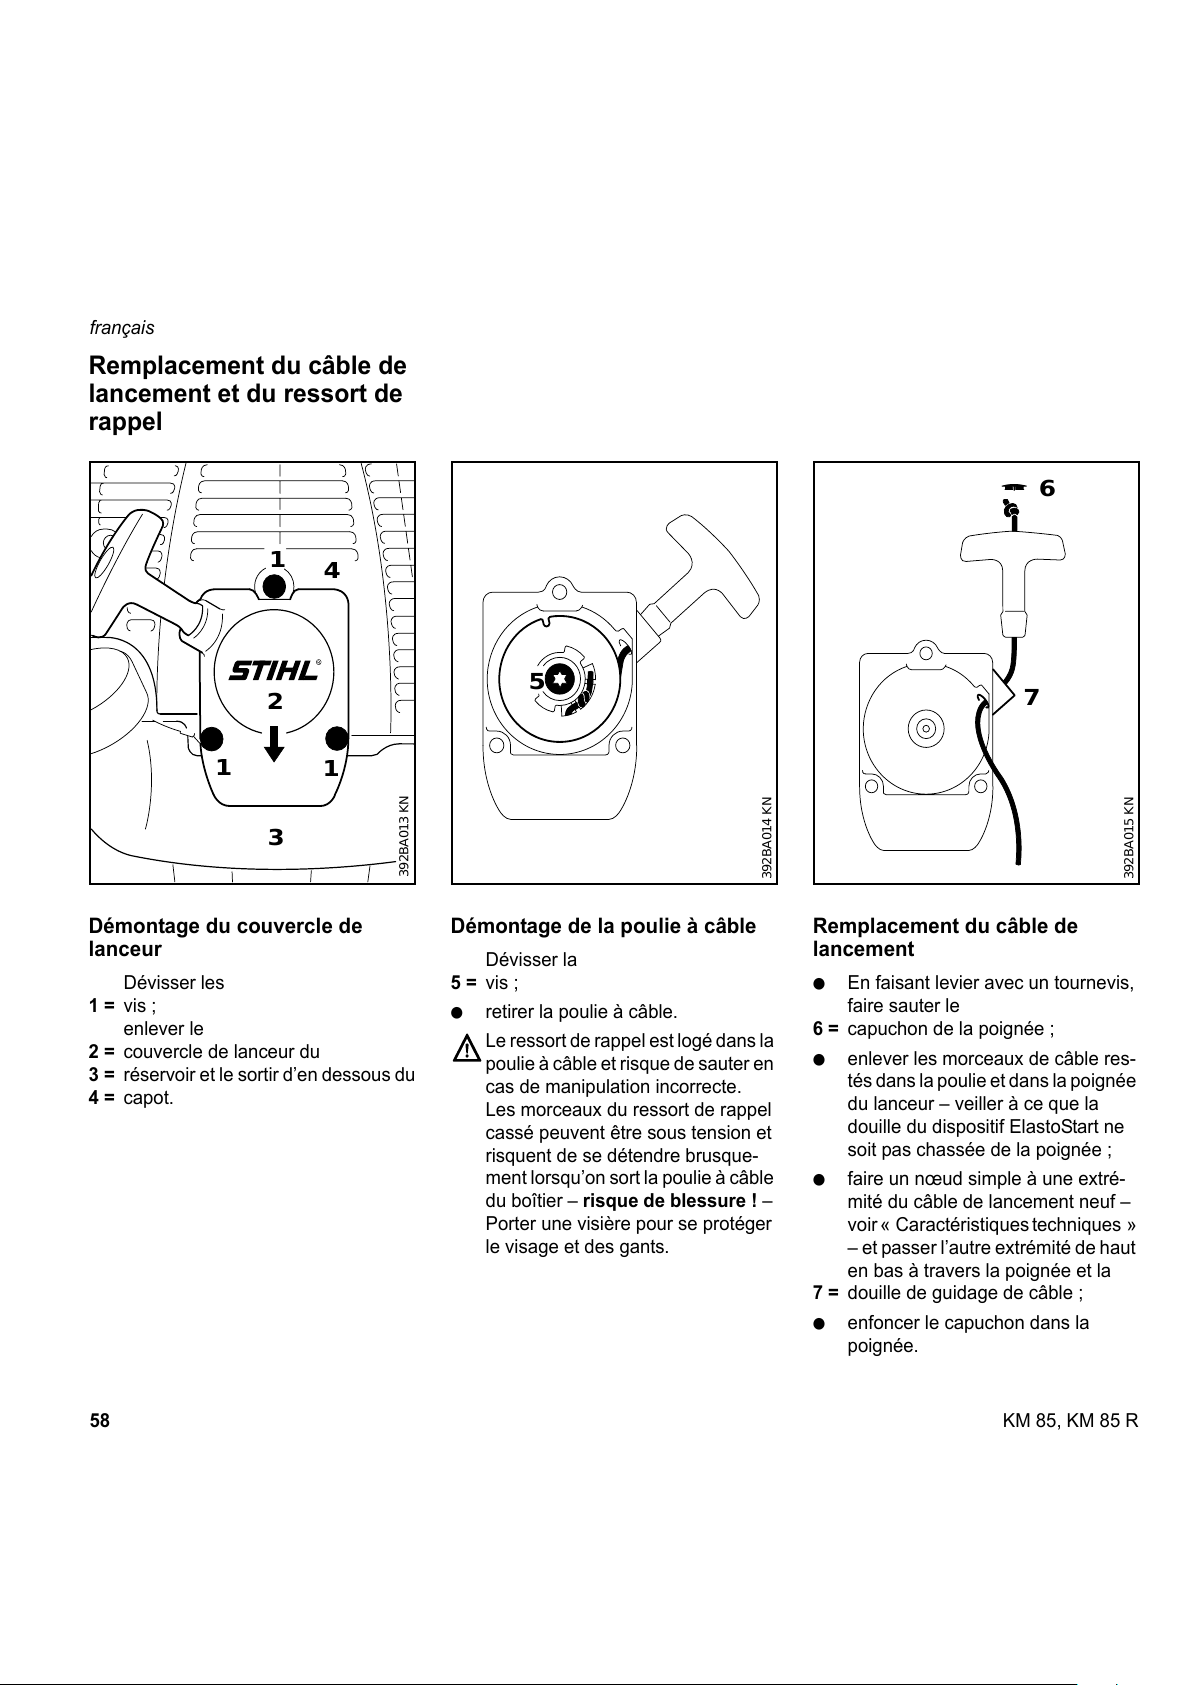
58
français
KM 85, KM 85 R
Démontage du couvercle de
lanceur
Dévisser les
1 = vis ;
enlever le
2 = couvercle de lanceur du
3 = réservoir et le sortir d’en dessous du
4 = capot.
Démontage de la poulie à câble
Dévisser la
5 = vis ;
: retirer la poulie à câble.
Le ressort de rappel est logé dans la
poulie à câble et risque de sauter en
cas de manipulation incorrecte.
Les morceaux du ressort de rappel
cassé peuvent être sous tension et
risquent de se détendre brusque-
ment lorsqu’on sort la poulie à câble
du boîtier – risque de blessure ! –
Porter une visière pour se protéger
le visage et des gants.
Remplacement du câble de
lancement
: En faisant levier avec un tournevis,
faire sauter le
6 = capuchon de la poignée ;
: enlever les morceaux de câble res-
tés dans la poulie et dans la poignée
du lanceur – veiller à ce que la
douille du dispositif ElastoStart ne
soit pas chassée de la poignée ;
: faire un nœud simple à une extré-
mité du câble de lancement neuf –
voir « Caractéristiques techniques »
– et passer l’autre extrémité de haut
en bas à travers la poignée et la
7 = douille de guidage de câble ;
: enfoncer le capuchon dans la
poignée.
Remplacement du câble de
lancement et du ressort de
rappel
1
1
1
2
3
4
392BA013 KN
5
392BA014 KN
6
7
392BA015 KN
All manuals and user guides at all-guides.com
Page 60

59KM 85, KM 85 R
français
: Faire passer le câble de lancement
à travers la poulie à câble et l’assu-
rer dans la poulie avec un nœud
simple ;
: pour continuer, voir « Montage de la
poulie à câble »
Remplacement d’un ressort de
rappel cassé
Départ usine, les ressorts de rappel peu-
vent être livrés sous différentes formes :
– ressort de rappel prêt au montage,
avec une boucle en fil de fer servant
d’attache de sûreté ;
– poulie à câble avec ressort de
rappel déjà monté.
Montage d’un ressort de rappel prêt
au montage
: Humecter le ressort de quelques
gouttes d’huile non résineuse – voir
« Accessoires optionnels » – ne pas
ouvrir la boucle en fil de fer (attache
de sûreté) !
: Sortir prudemment les morceaux du
ressort cassé du couvercle de lan-
ceur et de la poulie à câble ;
: mettre le nouveau ressort de rappel
dans la poulie à câble – introduire
simultanément l’œillet extérieur du
ressort dans la découpure de la
poulie à câble – pendant cette opé-
ration, la boucle en fil de fer s’enlève
– si le ressort s’est échappé de son
boîtier, le remonter – en l’enroulant
dans le sens inverse des aiguilles
d’une montre – de l’extérieur vers
l’intérieur ;
: pour continuer, voir « Montage de la
poulie à câble »
Montage d’une poulie à câble avec
ressort de rappel
: Sortir prudemment la nouvelle pou-
lie à câble avec ressort de rappel –
en cas de manipulation inadéquate,
le ressort de rappel risque de
s’échapper –
risque de blessure !
: Humecter le ressort de quelques
gouttes d’huile non résineuse – voir
« Accessoires optionnels » ;
: pour continuer, voir « Montage de la
poulie à câble »
Montage de la poulie à câble
: Vérifier la cote a de l’œillet intérieur
du ressort – en rectifier légèrement
la courbure si nécessaire ;
: enduire l’alésage de logement de la
poulie à câble avec de l’huile non
résineuse – voir « Accessoires
optionnels » ;
: mettre la poulie sur l’axe – la faire
jouer dans les deux sens jusqu’à ce
que
8 = l’œillet du ressort de rappel
s’encliquette ;
visser et serrer la
5 = vis ;
: pour continuer, voir « Tension du
ressort de rappel ».
392BA024 KN
a
389BA029 KN
a = 2mm
(0.08 in)
8
392BA025 KN
All manuals and user guides at all-guides.com
Page 61

60
français
KM 85, KM 85 R
Tension du ressort de rappel
: Former une boucle avec le câble de
lancement déroulé et, avec cette
boucle, tourner la poulie à câble de
six tours dans le sens inverse des
aiguilles d’une montre – retenir la
poulie à câble – tirer le câble vrillé
vers l’extérieur et le remettre en
ordre – lâcher la poulie – relâcher
lentement le câble de lancement –
afin qu’il puisse s’enrouler sur la
poulie ;
: contrôler la tension du ressort :
– la poignée du lanceur doit être fer-
mement tirée dans la douille de gui-
dage de câble. Si elle pend sur le
côté, retendre le ressort en exécu-
tant un tour supplémentaire ;
– lorsque le câble est totalement sorti,
il doit être encore possible de faire
tourner la poulie à câble d’un demi-
tour. Si cela n’est pas possible, le
ressort est trop tendu –
il risque de casser ! – enlever une
spire du câble de la poulie
: pour continuer, voir « Montage du
couvercle de lanceur ».
Montage du couvercle de lanceur
: Glisser l’œillet de fixation supérieur
du
2 = couvercle sous le
4 = capot – ajuster le
3 = réservoir –
presser la partie inférieure du
couvercle sur le réservoir ;
visser et serrer les
1 = vis.
En cas d’arrêt de travail d’environ 3 mois
ou plus :
: vider le réservoir de carburant, à un
endroit bien aéré, et le nettoyer ;
: Éliminer le carburant conformément
aux prescriptions pour la protection
de l'environnement
: faire tourner le moteur jusqu’à ce
que le carburateur soit complète-
ment vide, sinon les membranes du
carburateur risquent de se coller ;
: nettoyer soigneusement le dispo-
sitif, en particulier les ailettes de
refroidissement du cylindre et le
filtre à air :
: enlever l’outil de travail, le nettoyer
et le contrôler ;
: conserver le dispositif à un endroit
sec et sûr – le ranger de telle sorte
qu’il ne puisse pas être utilisé sans
autorisation (p. ex. par des enfants).
392BA044 KN
1
1
1
2
3
4
393BA045 KN
Rangement du dispositif
All manuals and user guides at all-guides.com
all-guides.com
Page 62

61KM 85, KM 85 R
français
1)
STIHL recommande de s’adresser au reven-
deur spécialisé STIHL
* voir « Indications concernant la
présente Notice d’emploi »
Instructions pour la mainte-
nance et l’entretien
Les indications ci-après sont valables pour des conditions d’utilisation normales.
Pour des conditions plus difficiles (ambiance très poussiéreuse etc.) et des jour-
nées de travail plus longues, il faut réduire, en conséquence, les intervalles indi-
qués.
avant de
commencer le travail
après le travail ou
une fois par jour
après chaque plein
du réservoir
une fois par semaine
une fois par mois
une fois par an
en cas de panne
en cas de
détérioration
au besoin
Machine complète
Contrôle visuel (état, étanchéité)
XX
Nettoyage
X
Poignée de commande Contrôle de fonctionnement
XX
Filtre à air
Nettoyage
XX
Remplacement
X
Crépine d’aspiration dans le réservoir
de carburant
Contrôle
X
Remplacement
XXX
Réservoir de carburant Nettoyage
XX
Carburateur
Contrôle du ralenti, l’outil de tra-
vail ne doit pas être entraîné
XX
Réglage du ralenti
X
Bougie
Ajustage de l’écartement des
électrodes
X
remplacement toutes les 100
heures de service
Ouvertures d’admission d’air de refroidisse-
ment
Contrôle visuel
X
Nettoyage
X
Grille pare-étincelles* dans le silencieux
Contrôle
XX
Remplacement
XX
Vis et écrous accessibles
(à l’exception des vis de réglage)
Resserrage
X
Éléments antivibratoires
contrôle
XXX
remplacement par le revendeur
spécialisé
1)
X
Étiquettes de sécurité remplacement
X
All manuals and user guides at all-guides.com
Page 63

62
français
KM 85, KM 85 R
1 Pompe d’amorçage
2 Levier de volet de démarrage
3 Vis de réglage de carburateur
4 Poignée du lanceur
5 Bouchon du réservoir de carburant
6 Réservoir de carburant
7 Silencieux
(avec grille pare-étincelles*)
8 Gâchette d’accélérateur
9 Curseur combiné
10 Blocage de gâchette d’accélérateur
11 Poignée tubulaire à deux mains
(guidon)
12 Support de poignée
13 Attache de câble de commande des
gaz
14 Anneau de suspension
15 Contact de bougie
16 Couvercle de filtre à air
17 Patte d’appui du dispositif
18 Vis à garrot
19 Manchon d’accouplement
20 Protection*
21 Poignée circulaire
22 Tube
# Numéro de machine
* voir « Indications concernant la
présente Notice d’emploi »
Principales pièces
19
4
12
13
11
8
9
10
13
14
15
16
17
9
10
8
21
20
14
19
18
462BA000 KN
1
2
3
5
6
7
22
22
#
18
All manuals and user guides at all-guides.com
Page 64
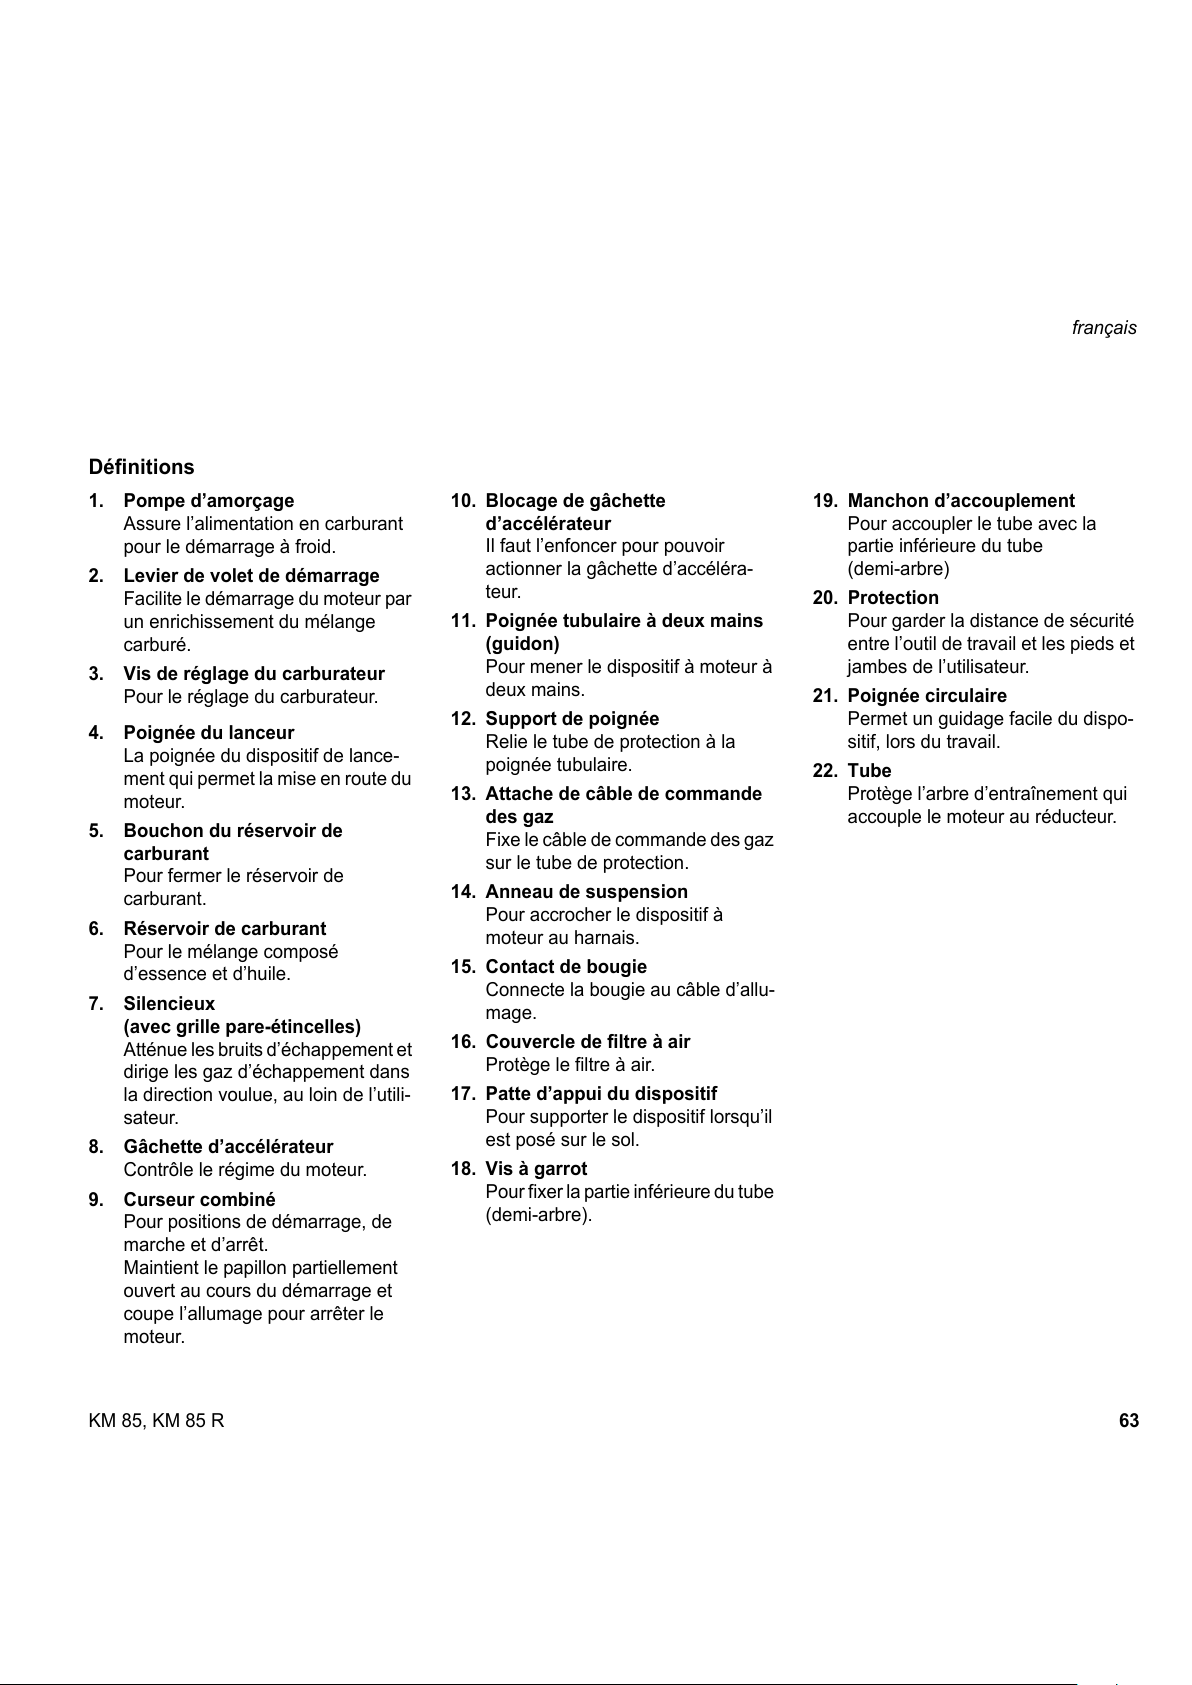
63KM 85, KM 85 R
français
Définitions
1. Pompe d’amorçage
Assure l’alimentation en carburant
pour le démarrage à froid.
2. Levier de volet de démarrage
Facilite le démarrage du moteur par
un enrichissement du mélange
carburé.
3. Vis de réglage du carburateur
Pour le réglage du carburateur.
4. Poignée du lanceur
La poignée du dispositif de lance-
ment qui permet la mise en route du
moteur.
5. Bouchon du réservoir de
carburant
Pour fermer le réservoir de
carburant.
6. Réservoir de carburant
Pour le mélange composé
d’essence et d’huile.
7. Silencieux
(avec grille pare-étincelles)
Atténue les bruits d’échappement et
dirige les gaz d’échappement dans
la direction voulue, au loin de l’utili-
sateur.
8. Gâchette d’accélérateur
Contrôle le régime du moteur.
9. Curseur combiné
Pour positions de démarrage, de
marche et d’arrêt.
Maintient le papillon partiellement
ouvert au cours du démarrage et
coupe l’allumage pour arrêter le
moteur.
10. Blocage de gâchette
d’accélérateur
Il faut l’enfoncer pour pouvoir
actionner la gâchette d’accéléra-
teur.
11. Poignée tubulaire à deux mains
(guidon)
Pour mener le dispositif à moteur à
deux mains.
12. Support de poignée
Relie le tube de protection à la
poignée tubulaire.
13. Attache de câble de commande
des gaz
Fixe le câble de commande des gaz
sur le tube de protection.
14. Anneau de suspension
Pour accrocher le dispositif à
moteur au harnais.
15. Contact de bougie
Connecte la bougie au câble d’allu-
mage.
16. Couvercle de filtre à air
Protège le filtre à air.
17. Patte d’appui du dispositif
Pour supporter le dispositif lorsqu’il
est posé sur le sol.
18. Vis à garrot
Pour fixer la partie inférieure du tube
(demi-arbre).
19. Manchon d’accouplement
Pour accoupler le tube avec la
partie inférieure du tube
(demi-arbre)
20. Protection
Pour garder la distance de sécurité
entre l’outil de travail et les pieds et
jambes de l’utilisateur.
21. Poignée circulaire
Permet un guidage facile du dispo-
sitif, lors du travail.
22. Tube
Protège l’arbre d’entraînement qui
accouple le moteur au réducteur.
All manuals and user guides at all-guides.com
Page 65
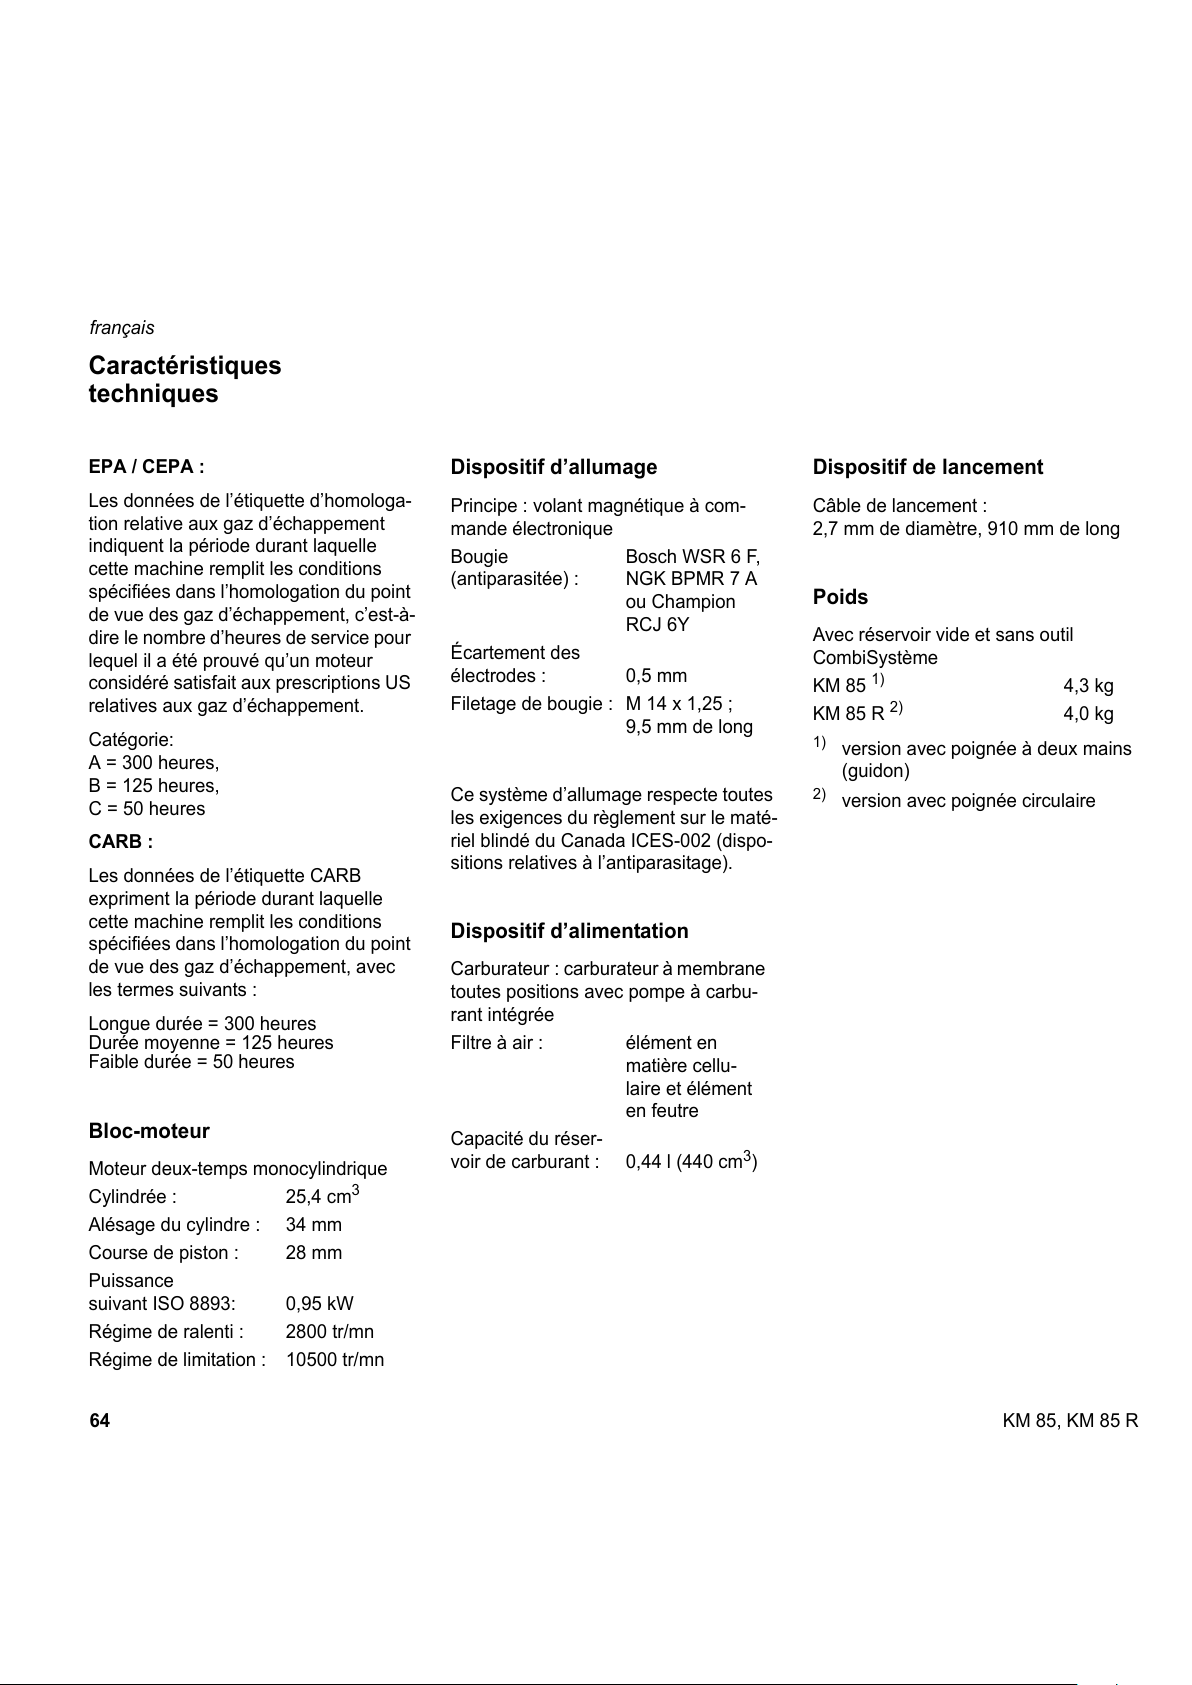
64
français
KM 85, KM 85 R
EPA / CEPA :
Les données de l’étiquette d’homologa-
tion relative aux gaz d’échappement
indiquent la période durant laquelle
cette machine remplit les conditions
spécifiées dans l’homologation du point
de vue des gaz d’échappement, c’est-à-
dire le nombre d’heures de service pour
lequel il a été prouvé qu’un moteur
considéré satisfait aux prescriptions US
relatives aux gaz d’échappement.
Catégorie:
A = 300 heures,
B = 125 heures,
C = 50 heures
CARB :
Les données de l’étiquette CARB
expriment la période durant laquelle
cette machine remplit les conditions
spécifiées dans l’homologation du point
de vue des gaz d’échappement, avec
les termes suivants :
Longue durée = 300 heures
Durée moyenne = 125 heures
Faible durée = 50 heures
Bloc-moteur
Dispositif d’allumage
Ce système d’allumage respecte toutes
les exigences du règlement sur le maté-
riel blindé du Canada ICES-002 (dispo-
sitions relatives à l’antiparasitage).
Dispositif d’alimentation
Dispositif de lancement
Poids
1)
version avec poignée à deux mains
(guidon)
2)
version avec poignée circulaire
Moteur deux-temps monocylindrique
Cylindrée : 25,4 cm
3
Alésage du cylindre : 34 mm
Course de piston : 28 mm
Puissance
suivant ISO 8893: 0,95 kW
Régime de ralenti : 2800 tr/mn
Régime de limitation : 10500 tr/mn
Caractéristiques
techniques
Principe : volant magnétique à com-
mande électronique
Bougie
(antiparasitée) :
Bosch WSR 6 F,
NGK BPMR 7 A
ou Champion
RCJ 6Y
Écartement des
électrodes : 0,5 mm
Filetage de bougie : M 14 x 1,25 ;
9,5 mm de long
Carburateur : carburateur à membrane
toutes positions avec pompe à carbu-
rant intégrée
Filtre à air : élément en
matière cellu-
laire et élément
en feutre
Capacité du réser-
voir de carburant : 0,44 l (440 cm
3
)
Câble de lancement :
2,7 mm de diamètre, 910 mm de long
Avec réservoir vide et sans outil
CombiSystème
KM 85
1)
4,3 kg
KM 85 R
2)
4,0 kg
All manuals and user guides at all-guides.com
Page 66
65KM 85, KM 85 R
français
Lunettes de protection
Harnais simple
Harnais double
Clé multiple
Tournevis pour carburateur
ElastoStart STIHL (câble de lancement
avec poignée)
Huile lubrifiante spéciale exempte de
résine
Pour obtenir des informations d’actualité
sur ces accessoires ou sur d’autres
accessoires optionnels, veuillez vous
adresser au revendeur spécialisé
STIHL.
Consulter aussi les indications relatives
aux accessoires optionnels, dans la
Notice d’emploi de l’outil
CombiSystème.
L’utilisateur de ce dispositif ne doit
effectuer que les interventions de main-
tenance et d’entretien décrites dans la
présente Notice d’emploi.
Les réparations plus poussées ne
doivent être effectuées que par un
atelier de réparation STIHL autorisé.
Après des réparations, nous ne pouvons
accorder la garantie que si les répara-
tions ont été effectuées par un Service
STIHL autorisé, en utilisant des pièces
détachées d’origine STIHL.
Les pièces détachées d’origine STIHL
sont reconnaissables à leur référence
de pièce de rechange STIHL, à
l’empreinte du nom
STIHl
et, le cas
échéant, à la marque spéciale d’identifi-
cation des pièces détachées STIHL (.
Il se peut que les petites pièces ne por-
tent que la marque spéciale.
Accessoires optionnels Instructions pour la
réparation
All manuals and user guides at all-guides.com
all-guides.com
Page 67
66
français
KM 85, KM 85 R
Vos droits et obligations dans le
cadre de la garantie
STIHL Limited expose ici la garantie
relative au système antipollution du
moteur de votre type de dispositif. Au
Canada, sur le plan construction et équi-
pement, les moteurs neufs de petits dis-
positifs à moteur non-routiers, du millé-
sime 1999 ou d’un millésime ultérieur,
doivent, au moment de la vente, être
conformes aux dispositions U.S. EPA
pour petits moteurs qui ne sont pas des-
tinés à des véhicules routiers. Le moteur
du dispositif doit être exempt de vices de
matériaux et de fabrication qui entraîne-
raient une non-conformité avec les dis-
positions EPA au cours des deux pre-
mières années de service du moteur, à
dater de la vente au consommateur
final. Pour la période ci-dessus, STIHL
Limited doit assumer la garantie sur le
système antipollution du moteur de votre
petit dispositif non-routier, à condition
que votre moteur n’ait pas été utilisé ou
manipulé de façon inadéquate ou mal
entretenu.
Votre système antipollution comprend
aussi des pièces telles que le carbura-
teur et l’allumage. Il peut aussi englober
des flexibles, raccords et autres compo-
sants influant sur les émissions de nui-
sances.
Dans un cas de garantie, STIHL Limited
devra réparer le moteur de votre dispo-
sitif non-routier et ce, gratuitement pour
vous. La garantie englobe le diagnostic
(s’il est exécuté par un concessionnaire)
ainsi que les pièces et la main-d’œuvre.
Durée de la garantie du fabricant
Au Canada, les moteurs de petits dispo-
sitifs à moteur non destinés à la circula-
tion routière, du millésime 1999 ou d’un
millésime ultérieur, bénéficient égale-
ment d’une garantie de deux ans. Si une
pièce du système antipollution du
moteur de votre dispositif s’avère défec-
tueuse, elle est réparée ou remplacée
gratuitement par STIHL Limited.
Obligations du propriétaire
En tant que propriétaire du moteur du
petit dispositif à moteur non-routier, vous
êtes responsable de l’exécution de la
maintenance indispensable prescrite
dans la notice d’emploi de votre disposi-
tif. STIHL Limited recommande de con-
server toutes les quittances des opéra-
tions de maintenance exécutées sur le
moteur de votre dispositif non-routier.
STIHL Limited ne peut toutefois pas
vous refuser une garantie sur votre
moteur pour la seule raison que des
quittances manqueraient ou que vous
auriez négligé d’assurer l’exécution de
toutes les opérations de maintenance
prévues. Pour la maintenance ou les
réparations qui ne sont pas effectuées
sous garantie, il est permis d’employer
des pièces de rechange ou des métho-
des de travail donnant une exécution et
une longévité équivalant à celles de
l’équipement de première monte et ce,
sans que cela réduise, pour le fabricant
du moteur, l’obligation de fournir une
garantie.
En tant que propriétaire du petit dispo-
sitif à moteur non-routier, vous devez
toutefois savoir que STIHL Limited peut
vous refuser la garantie si le moteur ou
une partie du moteur de votre dispositif
tombe en panne par suite d’une utilisa-
tion inadéquate, d’un manque de pré-
caution, d’une maintenance incorrecte
ou de modifications non autorisées.
Vous êtes tenu d’amener le moteur de
votre petit dispositif à moteur non-routier
à un centre de Service Après-Vente
STIHL dès qu’un problème survient. Les
travaux sous garantie seront exécutés
dans un délai raisonnable qui ne devra
pas dépasser 30 jours.
Si vous avez des questions concernant
vos droits et obligations dans le cadre de
la garantie, veuillez consulter un con-
seiller du Service Après-Vente STIHL
(www.stihl.ca) ou écrire à :
STIHL Ltd.,
1515 Sise Road
Box 5666
CA-LONDON ONTARIO ; N6A 4L6.
Etendue de la garantie
STIHL Limited garantit, à l’acheteur final
et à tout acquéreur ultérieur, que le
moteur de votre petit dispositif non-
routier satisfait à toutes les prescriptions
en vigueur au moment de la vente, sur le
plan construction, fabrication et équipe-
ment. STIHL Limited garantit en outre au
premier acquéreur et à tous les acqué-
reurs ultérieurs, pour une période de
deux ans, que votre moteur est exempt
de tout vice de matériaux et de tout vice
de fabrication entraînant une non-
conformité avec les prescriptions en
vigueur.
Garantie de la Société STIHL Limited relative au système antipollution
Cette déclaration est fournie volontairement et elle se base sur l’accord conclu en avril 1999 entre
l’Office de l’Environnement du Canada et STIHL Limited.
All manuals and user guides at all-guides.com
Page 68
67KM 85, KM 85 R
français
Période de garantie
La période de garantie commence le
jour où le premier acheteur fait l’acquisi-
tion du moteur du dispositif et où vous
avez retourné à STIHL Ltd. la carte de
garantie portant votre signature. Si une
pièce faisant partie du système antipol-
lution de votre dispositif est défec-
tueuse, la pièce est remplacée gratuite-
ment par STIHL Limited.
Durant la période de garantie, une
garantie est fournie pour toute pièce
sous garantie qui ne doit pas être rem-
placée à l’occasion d’une opération de
maintenance prescrite ou pour laquelle
« la réparation ou le remplacement, si
nécessaire » n’est prévu qu’à l’occasion
de l’inspection périodique. Pour toute
pièce sous garantie qui doit être rempla-
cée dans le cadre d’une opération de
maintenance prescrite, la garantie est
fournie pour la période qui précède le
premier remplacement prévu.
Diagnostic
Les coûts occasionnés pour le diagnos-
tic ne sont pas facturés au propriétaire,
si ce diagnostic confirme qu’une pièce
sous garantie est défectueuse. Si, par
contre, vous revendiquez un droit à la
garantie pour une pièce et qu’une défec-
tuosité n’est pas constatée au diagnos-
tic, STIHL vous facturera les coûts du
test d’émissions.
Le diagnostic de la partie mécanique
doit être exécuté par un concessionnaire
STIHL.
Le test d’émissions peut être exécuté
soit par STIHL Incorporated,
536 Viking Drive, P.O. Box 2015,
Virginia Beach, VA 23452,
soit par un laboratoire indépendant.
Travaux sous garantie
STIHL Limited doit faire éliminer les
défauts sous garantie par un conces-
sionnaire STIHL ou une station de
garantie. Tous les travaux seront effec-
tués sans facturation au propriétaire si
l’on constate qu’une pièce sous garantie
est effectivement défectueuse. Toute
pièce autorisée par le fabricant ou pièce
de rechange équivalente peut être utili-
sée pour toute opération de mainte-
nance ou réparation sous garantie
touchant une pièce du système antipol-
lution et elle doit être mise gratuitement
à la disposition du propriétaire, si la
pièce en question est encore sous
garantie. STIHL Limited assume la res-
ponsabilité de dommages causés à
d’autres composants du moteur par la
pièce encore couverte par la garantie.
La liste suivante précise les pièces cou-
vertes par la garantie antipollution :
Carburateur
Starter (volet de démarrage/enrichisse-
ment de démarrage à froid)
Coude d’admission
Filtre à air
Bougie
Volant magnétique ou allumage électro-
nique (module d’allumage)
Pot catalytique (le cas échéant)
Eléments d’assemblage et raccords
Pour faire valoir un droit à la garantie
Présenter le dispositif à un concession-
naire STIHL, avec la carte de garantie
signée.
Prescriptions de maintenance
Les prescriptions de maintenance qui
figurent dans la présente Notice
d’emploi présument que l’on utilise le
mélange d’essence et d’huile prescrit
pour le moteur deux-temps (voir aussi
chapitre « Carburant »). En cas d’utilisa-
tion de carburants et d’huiles d’autre
qualité ou d’un taux de mélange diffé-
rent, il peut être nécessaire de raccour-
cir les intervalles de maintenance.
Restrictions
Cette garantie sur le système antipollu-
tion ne couvre pas
: les réparations et remplacements
nécessaires par suite d’une utilisa-
tion inadéquate ou d’une négli-
gence, de l’omission des opérations
de maintenance indispensables, de
réparations incorrectes ou du mon-
tage de pièces non conformes aux
exigences de STIHL Limited – s’il en
résulte un effet défavorable sur le
rendement et/ou la longévité – ou
par suite de modifications que
STIHL Limited n’a ni recomman-
dées, ni autorisées par écrit ;
: le remplacement de pièces et
d’autres prestations de services et
réglages qui s’avèrent nécessaires
dans le cadre des travaux de main-
tenance indispensables, à
l’échéance du premier remplace-
ment prévu et par la suite.
All manuals and user guides at all-guides.com
Page 69

68
français
KM 85, KM 85 R
All manuals and user guides at all-guides.com
Page 70

0458 462 8221
englisch / English / französisch / français / CDN
BA_KM85_82_U_L4.book Seite 1 Donnerstag, 28. Oktober 2004 8:13 08
All manuals and user guides at all-guides.com
 Loading...