

Page 1
OWNER'S MANUAL
FOLD AND ROLL PLAYBACK
TABLE TENNIS TABLE
Thank you for buying our product. We try hard to ensure that our products are of high quality and
free of problems, such as manufacturing defects or missing parts. However, if you have any
problems with your new product, please
DO NOT RETURN IT TO THE STORE!DO NOT RETURN IT TO THE STORE!
MODEL NOs.
T8524
WARRANTY
DO NOT RETURN THIS PRODUCT TO THE STORE!
Contact Escalade® Sports customer service department at:
Phone: 1-866-873-3528 Toll – Free !
Fax: 1-866-873-3533 Toll – Free !
E-mail: tabletennis@escaladesports.com
Mailing Address (correspondence only):
Escalade Sports
PO Box 889
Evansville, IN 47706
Please provide model number and/or part number (not just the key number) of the product and/or part when
you call or write. These numbers can be found on the product, packaging, and/or in this Owner’s Manual.
Manufacturer warrants to the original retail purchaser, this product to be free from defects in material and
workmanship for a period of one (1) year from the date of purchase.
Should this product become defective due to material or workmanship within the warranty period, contact
our Customer Service Department for repair or replacement at our option.
This warranty is not transferable and does not cover normal wear and tear, bowing of the table or damage
caused by improper handling, installation or use of this product. This warranty is also void if product is in
any way abused, damaged, or modified from its original state, or if used for other than residential use.
Please visit our World Wide Web site at:
www.escaladesports.com
LIMITED 1 YEAR WARRANTY
Actual product may
differ slightly from that
shown in illustrations.
READ ASSEMBLY &
OPERATING INSTRUCTIONS
AND ALL SAFETY
INFORMATION CAREFULLY !
This warranty gives you specific legal rights, and you may have other rights which vary from state to state.
CAUTION
THIS IS A GAME TABLE. DO NOT SIT, STAND, LEAN, WALK OR JUMP ON TABLE! FAILURE TO
COMPLY WITH THIS CAUTION COULD RESULT IN PERSONAL INJURY AND/OR PROPERTY
DAMAGE!
This table must be kept indoors to prevent damage to the playing surface. Dampness and extreme
temperature changes which occur on patios or similar areas can cause wood to warp, swell, crack,
or blister.
UNLEVEL FLOORSUNLEVEL FLOORS
UNLEVEL FLOORS
UNLEVEL FLOORSUNLEVEL FLOORS
If table does not seem level, it is probably because floor is not level. Move table several inches
(set table in playing position) in different directions to find the best location for the table then
level table using leg levelers.
CARE AND MAINTENANCE
You have purchased a quality product that will give you years of enjoyment. By following these simple maintenance
steps you will add to the life of your new table. The top (playing surface) of your table is of a particle board construction.
Like all products made of wood, it can be affected by atmospheric conditions, meaning both temperature and humidity.
This may cause a slight sag or distortion as top expands or contracts. This is normal and should not cause concern
as it does not detract from the play or utility value of the table. To help minimize this problem, store table in folded
up position in a dry area when not in use.
STORAGE OF YOUR TABLE
This table must be stored indoors to prevent damage to the playing surface. Dampness and extreme
temperature changes can cause the wood to warp, swell, crack, or blister. When your table is not in use, it should
be folded up in a dry area.
CLEANING YOUR TABLE
To clean your table use a soft damp NOT WET cloth only. To prevent damage to your table's playing surface DO
NOT use any chemicals, abrasive, or cleaning products on your table's playing surface.
IMPORTANT: Periodically , lubricate all moving parts, including pivot points, to assure smooth opening and closing.
A light lubricant such as WD-40 is recommended.
© 2012 Escalade Sports
2L-4139-00
Page 2
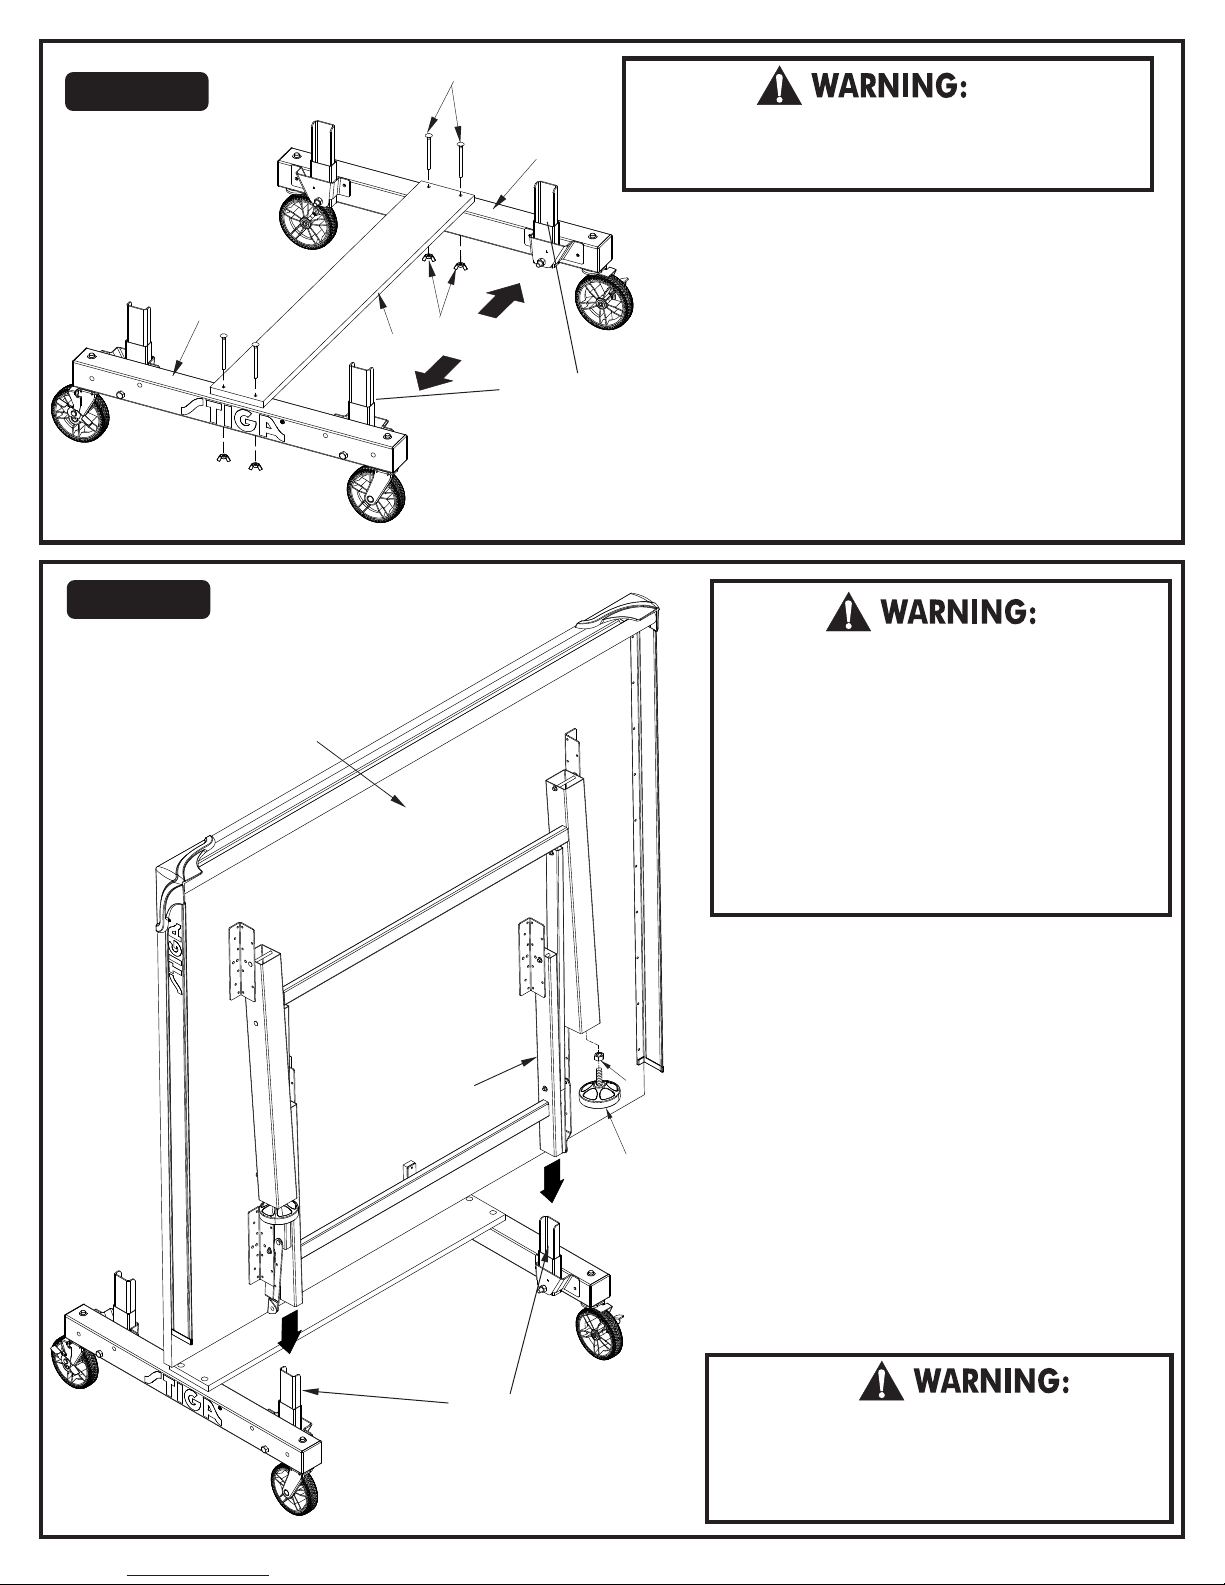
Figure 1
Figure 2
34
READ AND FOLLOW ALL ASSEMBLY, OPERATING, AND
1
SAFETY INSTRUCTIONS CAREFULLY. AT LEAST THREE (3)
ADULTS ARE NEEDED TO PUT THIS TABLE TOGETHER!
1. Attach Wood Bottom Board (#33) to Caster
Beam Assemblies (#1) as shown in Figure 1.
1
35
33
PIVOT TUBES MUST
FACE INWARD AS
Turn Caster Beams as shown and attach board
with four Carriage Bolts (#34), and four Wing
Nuts (#35). Tighten Wing Nuts securely. See
Figure 1.
SHOWN.
19
Strut Leg
Assembly
40
17
AT LEAST THREE (3) ADULTS ARE NEEDED TO
COMPLETE THE REST OF THIS ASSEMBLY! WHEN
ASSEMBLING TOPS TO BASE, HANDLE TOP
ASSEMBLIES BY GRASPING ONLY THE TOPS
THEMSELVES. DO NOT GRASP METAL LEGS, HSUPPORT, LINKAGE, OR HINGES. THESE PARTS
CAN MOVE AND COULD PINCH FINGERS OR
HANDS CAUSING SERIOUS INJURY! ASSEMBLE
AS SHOWN WITH LEGS FULLY CLOSED AND TOPS
IN A VERTICAL POSITION. DO NOT OPEN LEGS
AND TRY TO ASSEMBLE. TABLE TOPS ARE HEAVY
DO NOT ATTEMPT TO ASSEMBLE ALONE!
2. Have two adults hold the table top (#19) upright,
while a third adult attaches ends of the Strut Leg
Assembly (#18) tube with top of pivot tubes on
caster rails (#1). Slide tubes together. See
Figure 2.
3. Repeat this process for the other caster rail. Then
slide second table top down over remaining two
pivot tubes, making sure the playing surface of the
second top faces the playing surface of the first.
4. If Leg Levelers (#17) and Hex Nuts (#40) are not
already pre-installed, thread one Hex Nut (#40) to
each Leg Leveler (#17). Then install Leg
Levelers to the legs as shown in Figure 2.
Pivot Tubes
DO NOT OPEN THE TABLE TO PLAYING POSITION UNTIL
BOTH TOPS ARE INSTALLED! DO NOT LEAVE TABLE
STANDING UNATTENDED. IT COULD BE KNOCKED
OVER CAUSING SERIOUS BODILY INJURY OR
PROPERTY DAMAGE.
2
Page 3
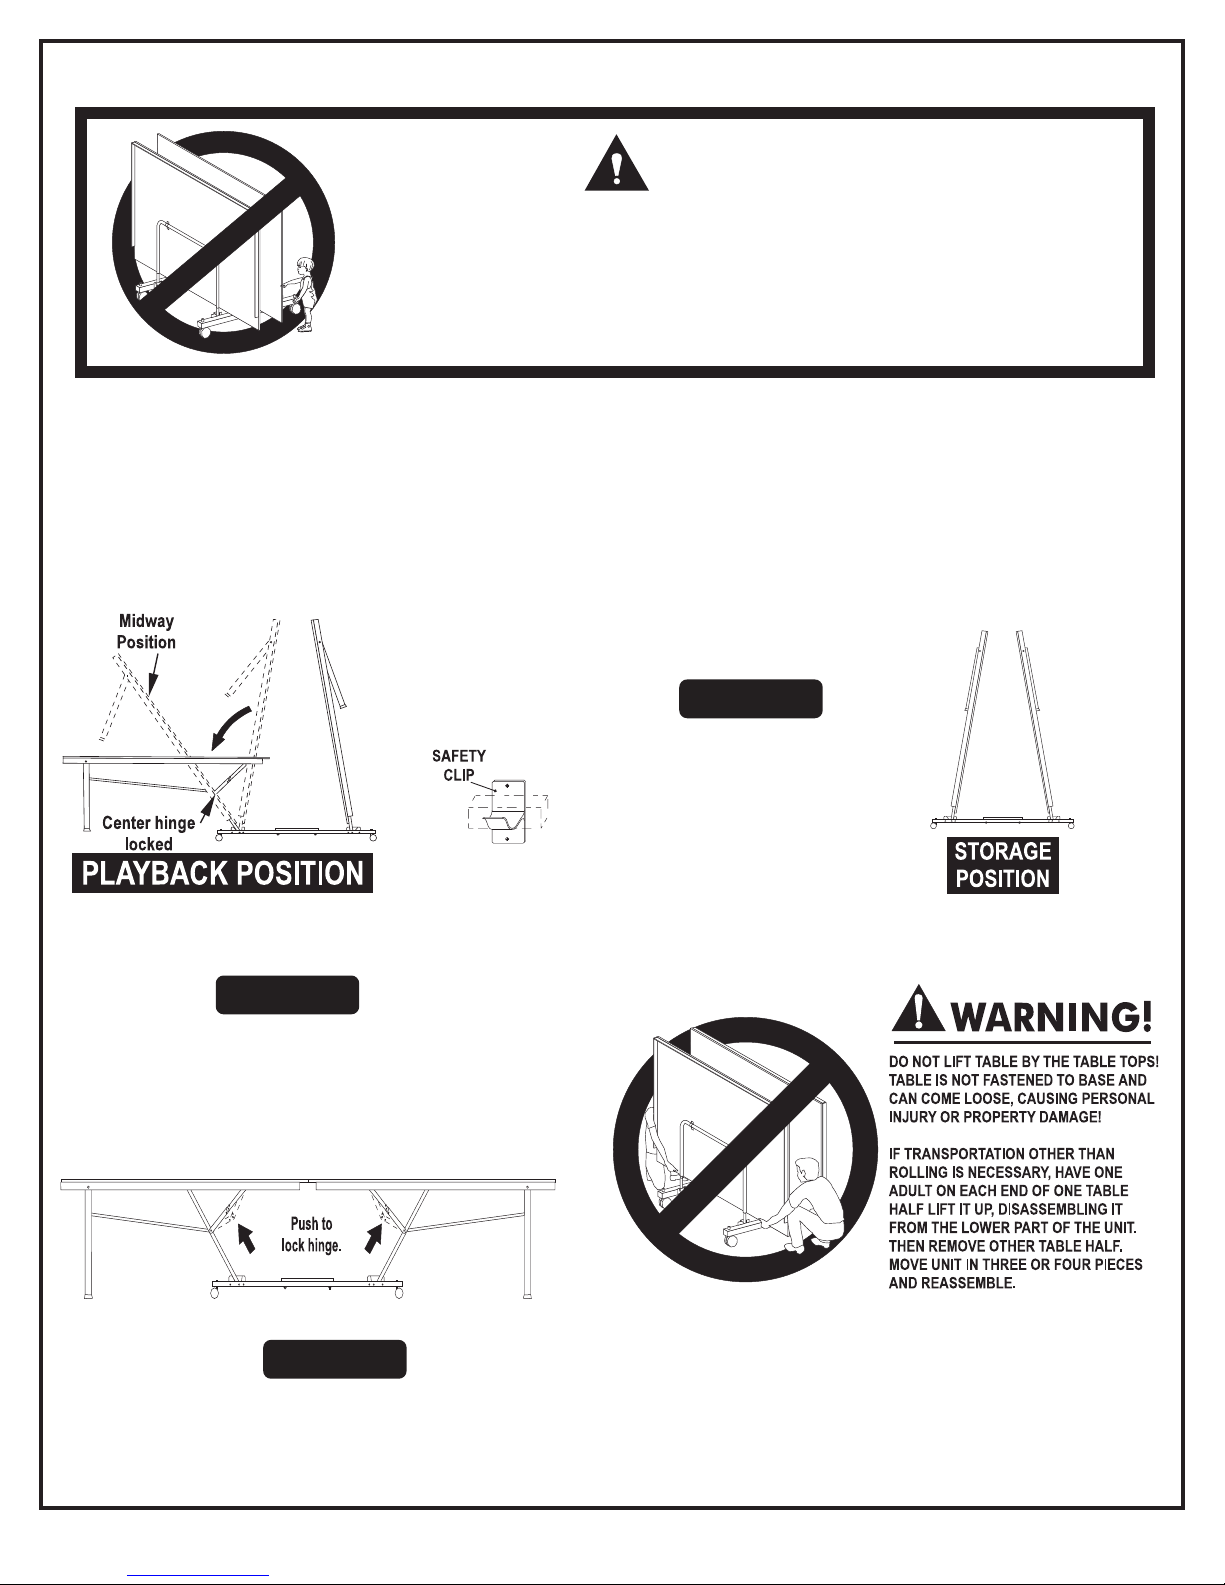
OPENING AND CLOSING INSTRUCTIONS
CAUTION:
EXERCISE CAUTION IN OPENING/CLOSING TABLE. SMALL CHILDREN, OR CHILDREN NOT
PROPERLY INSTRUCTED IN ITS USE, MUST NOT BE ALLOWED TO OPEN/CLOSE TABLE.
IMPROPER HANDLING AND MISUSE CAN RESULT IN SERIOUS INJURY OR DAMAGE. DO NOT
CLIMB, STAND, OR JUMP ON TABLE. MOISTURE AND CONDENSATION WILL DAMAGE PLAYING
SURFACE OF THIS TABLE. STORE IN DRY, INDOOR PLACE.
TO OPEN:
1. Pull legs out slightly from one table top half.
2. Hold center of top edge. Gently pull outward to midway
position. Continue to pull until disengaged from safety clips
and legs rest on the floor. Do not leave table partially opened
at midway position. See Figure 3.
TO CLOSE:
1. Unlock all four hinges.
2. Lift table half to midpoint until the safety clips are engaged.
Then continue lifting until closed.
3. Raise other table half in the same manner.
Figure 5
Figure 3
3. Open other table half as in step 1 and 2.
4. Lock all four center hinges. See Figure 4.
Figure 4
3
Page 4

22
20
10
28
14
26
32
31
27
19
21
26
14
25
24
24
15
26
21
40
36
22
17
18
3
11
18
10
26
31
16
15
14
14
26
8
37
9
33
8
9
34
2
35
30
1
6
29
12
5
Replacement Parts List for Model Number T8524
Key# Part # Description Qty.
1
4A-5534-00
8S-4560-02
2
2M-6118-00
3
1B-4045-00
5
2Q-4029-00
2Q-4030-00
6
2B-4043-02
7
2S-6283-02
8
8S-4564-01
9
2S-6284-02
10
1B-4082-99
11
3M-6273-00
12
4A-5543-00
14
2B-6087-02
15
3B-6013-02
16
3B-6016-02
17
2Q-6467-00
18
1A-4125-01
19
4A-6324-01
Caster Rail Assembly
Caster Rail only
Spacer Block
#8 x 1 1/4" Screw
5" Caster
5" Caster with Lock
3/8 Pushnut
RH Pivot Bracket
Pivot Tube
LH Pivot Bracekt
#8 x 9/16 SMS
Plastic Clip
Hinge / Bracket Assembly
Nylon Washer
1/4 x 1 3/8" Rivet
1/4 x 2 3/16" Rivet
Leg Leveler - M12
Strut Leg
Half Top
2
2
2
4
2
2
4
2
4
2
136
2
4
20
4
4
4
2
2
2L-4139-00
Key# Part # Description Qty.
20
2S-5136-01
21
2S-4668-02
22
2S-4668-03
24
1A-4126-01
25
8S-6425-04
26
2B-4035-02
27
3B-4021-02
28
3B-4020-02
29
3M-6890-00
30
5A-4276-00
31
2S-6139-01
32
3M-4167-00
33
2W-6258-02
34
1B-4158-02
35
1N-0001-02
36
3M-4150-00
37
3M-4151-00
40
2B-6284-00
41
4
2L-4139-00
Ball Storage End Rail
Right Hand Side Rail
Left Hand Side Rail
Leg Assembly
Linkage Tube
1/4 Pushnut
1/4 x 3 1/2" Rivet
1/4 x 2 7/8" Rivet
2 1/2" Square Tube Plug
Net and Post kit
Mounting Bracket
Corner Protector
Wood Bottom Board
1/4-20 x 3 1/2 Carriage Bolt
1/4-20 Wing Nut
RH Side Rail End Cap
LH Side Rail End Cap
M12 x 1 3/4 Hex Nut
T8524 Owner’s Manual
2
2
2
2
4
16
4
4
4
1
8
4
1
4
4
2
2
4
1
Page 5

MANUAL DEL USUARIO
NO. DE MODELO
T8524
GARANTIA
MESA DE TENIS DE MESA
Le agradecemos la compra de nuestro producto. Nosotros tratamos de asegurarnos que nuestros
productos sean de la más alta calidad y libre de problemas, como defectos de fabricacion
o partes incompletas. Sin embargo, si usted tiene algún problema con su producto nuevo,
por favor NO LO REGRESE A LA TIENDA!
POR FAVOR NO DEVUELVA ESTE PRODUCTO A LA TIENDA!
Contacte al departamento de servicio al cliente de Escalade® Sports:
Teléfono: 1-866-873-3528 ¡Sin costo alguno!
Fax: 1-866-873-3533 ¡Sin costo alguno!
E-mail: tabletennis@escaladesports.com
Apartado postal (sólo para correspondencia):
Escalade Sports
PO Box 889
Evansville, IN 47706
Por favor cuando llame o escriba, proporcione el número del modelo y la clave con el número completo de la
parte del producto. Estos números se encuentran en el producto, en el empaque y en el Manual del Usuario.
GARANTÍA LIMITADA POR UN AÑO
El fabricante garantiza al comprador original, que este producto está libre de defectos de material y fabricación
durante un período de un (1) año a partir de la fecha de compra.
En caso de que este producto resultara con algún defecto debido a materiales o mano de obra dentro del
período de garantía, contacte nuestro Departamento de Servicio al Cliente para su reparación o reemplazo
según nuestro criterio.
Esta garantía no es transferible y no cubre el uso y desgaste normal, como que la mesa se haga panda u otros
daños causados por el manejo indebido, instalación o uso de este producto. Esta garantía se anulará si el
producto ha sido abusado de cualquier manera, dañado o modificado de su estado original, o si es utilizado
para fines distintos al del uso residencial.
Esta garantía le otorga derechos legales específicos, y también es posible que usted tenga otros derechos que
puedan variar de estado a estado.
Visite nuestra página Web:
www.escaladesports.com
El Producto actual
puede variar un poco
del que se muestra
en las ilustraciones.
LEA Y SIGA LAS INSTRUCCIONES
DE ENSAMBLAR
FUNCIONAMIENTO Y
SEGURIDAD ATENTAMENTE.
© 2012 Escalade Sports
ADVERTENCIA!
ESTA ES UNA MESA DE TENIS, POR LO TANTO NO SE SIENTE, NI SE PARE, RECARGUE, CAMINE O SALTE SOBRE LA
MESA! EL INCUMPLIMENTO DE ESTA PRECAUCION PUEDE RESULTAR CON LESIONES PERSONALES Y/O DAÑOS A
SU MESA!
Esta mesa se debe guardar en el interior para prevenir daños en la superficie de juego. La humedad y los cambios
buscos de temperatura pueden provocar alabeo, hinchazón, fisuras o ampollado de la madera. Cuando la mesa no
se encuentra en uso, guardar plegada en lugar seco. debido a la naturaleza del aglomerado, se puede alabear la
superficie. La humedad puede aumentar este efecto que es normal y no afecta el uso de la mesa.
PISOS DESNIVELADOS
Si la mesa parece estar desnivelada, es probablemente porque el piso no está nivelado. Mueva la mesa varias
pulgadas (coloque la mesa en posición de juego) en diferentes direcciones para encontrar la mejor ubicación para la
mesa después nivele la mesa con los niveladores de las patas .
CUIDADO Y MANTENIMIENTO
Usted ha comprado un producto de calidad que podrá disfrutar muchos años. Si sigue estos simples pasos de mantenimiento,
alargará la vida de la mesa. El tablero (superficie de juego) está construido de aglomerado. Al igual que todos los productos
de madera, se puede ver afectado por cambios de temperatura y humedad causando una leve deformación por expansión o
contracción. Esta situación es normal y no resta valor a la mesa ni afecta el juego. Guardar en posición de almacenaje en
un lugar seco cuando no está en uso.
GUARDADO DE LA MESA
Se debe guardar la mesa en el interior para prevenir daños en la superficie de juego. La humedad y los cambios
buscos de temperatura pueden provocar alabeo, hinchazón, fisuras o ampollado de la madera. Cuando la mesa no se
encuentra en uso, guardar plegada en lugar seco.
LIMPIEZA
Para limpiar la mesa, utilizar un trapo suave y húmedo solamente (NO MOJADO). Para evitar daños en la superficie de juego,
NO utilizar agentes químicos, abrasivos ni productos de limpieza sobre el tablero.
IMPORTANTE: Periódicamente, Lubricar todas las partes movibles, incluyendo los puntos de giro. Esto garantizará la
seguridad y facilidad de uso. Un lubricante como WD-40 es recomendado.
2L-4139-00
Page 6

1. Una la Tabla Inferior (#33) a el Carril con Llantas
(#1) como se muestra en la Figura 1. Voltee los
Carriles como esta ilustrado y una la Tabla
inferior con cuatro Tornillos de Carruaje (#34) y
cuatro Tuercas de Mariposa (#35). Apriete bien
las Tuercas de Mariposa. Vea la Figura 1.
POR LO MENOS SE REQUIEREN TRES (3) ADULTOS
PARA TERMINAR EL RESTO DEL ENSAMBLADO!
CUANDO ENSAMBLE LOS TABLEROS A LA BASE,
MUEVA EL TABLERO SOSTENIENDOLO ÚNICAMENTE
DE LA PARTE POSTERIOR, NO SE DETENGA DE LAS
PATAS DE METAL, DEL TUBO DE SOPORTE-U, DE LOS
TUBOS CONECTORES Ó DE LAS BISAGRAS. ESTAS
PARTES PUEDEN MOVERSE Y PODRÍAN LASTIMAR
LOS DEDOS O LAS MANOS, CAUSANDO LESIONES
GRAVES. POR FAVOR ENSAMBLE LA MESA COMO SE
MUESTRA, CON LAS PATAS COMPLETAMENTE
CERRADAS Y EL TABLERO EN POSICIÓN VERTICAL.
NO ABRA LAS PATAS Y TRATE DE ENSAMBLARLAS.
LOS TABLEROS ESTÁN MUY PESADOS-NO INTENTE
ENSAMBLAR (ARMAR) LA MESA SÓLO!
2
Page 7

INSTRUCIONES PARA ABRIR Y CERRAR LA MESA
ADVERTENCIA!
PONGA ATENCIÓN AL ABRIR Y AL CERRAR LA MESA. MENORES DE EDAD QUE NO
SABEN EL USO APROPIADO DE LAS INSTRUCCIONES NO SE LES DEBE PERMITIR ABRIR
Y CERRAR LA MESA. EL MANEJO O USO INCORRECTO DE LA MESA PUEDE CAUSAR
LESIONES GRAVES O DAÑOS MATERIALES. NO DEBEN DE PARARSE, SUBIRSE O
BRINCAR SOBRE LA MESA. LA HUMEDAD Y LA CONDENSACIÓN DAÑARÍAN LA
SUPERFICIE DE LA MESA. LA MESA DEBE ESTAR EN EL INTERIOR Y EN UN LUGAR SECO.
PARA ABRIR:
Jale Las patas hacia afuera de la mesa de una de las mitades.
1.
2.
Párese enfrente del centro de la mitad de la mesa, Suavemente jale el
tubo de soporte hacia afuera hacia usted hasta la position media.
Continúe jalando del centro y de la parte superior de la mesa hasta
que las patas se apoyen en el piso. No deje la mesa parcialmente
abierta en posición media. Ver la Figura 3.
Posición a la
mitad
Clip de
Seguridad
Bisagra del Centro
asegurada
POSICION PARA JUGAR SOLO
PARA CERRAR:
1.
Desenganche las cuatro bisagras.
2. Levante una mitad del tablero al punto medio hasta que
se enganchen los clips de seguridad. Continúe
levantando hasta cerrar.
3. Levantar la otra mitad del tablero de la misma manera.
Figura 5
POSICION PARA
GUARDAR
Figura 3
3.
Abra la Segunda mitad como está descrito en el paso1 y 2.
4.
Asegure las cuatro bisagras del centro. Ver la Figura 4.
Empuje para
asegurar bisagra
Figura 4
ADVERTENCIA!
¡ NO CARGUE LA MESA DE LOS DOS
TABLEROS! LA MESA NO ESTA SUJETA A
LA BASE Y SE PUEDE SALIR DE SU
LUGAR CAUSANDO LESIONES GRAVES
PERSONALES O DAÑOS MATERIALES!
SI ES NECESARIO TRASPORTAR LA
MESA, EN LUGAR DE RODARLA SE
REQUIEREN DOS (2) ADULTOS. CADA
UNO TIENE QUE ESTAR EN CADA LADO
DE LA MITAD DE LA MESA PARA
DESENSAMBLARLA DE LA PARTE
INFERIOR. Y POSTERIORMENTE
REMUEVA LA OTRA MITAD DE LA MESA.
TRANSPORTE O CAMBIE LA MESA EN
TRES O CUATRO PIEZAS Y VUELVA AN
ENSAMBLARLA
3
Page 8

22
20
32
21
24
21
1
2
3
5
6
7
8
9
10
11
12
14
15
16
17
18
19
4A-5534-00
8S-4560-02
2M-6118-00
1B-4045-00
2Q-4029-00
2Q-4030-00
2B-4043-02
2S-6283-02
8S-4564-01
2S-6284-02
1B-4082-99
3M-6273-00
4A-5543-00
2B-6087-02
3B-6013-02
3B-6016-02
2Q-6467-00
1A-4125-01
4A-6324-01
2
2
2
4
2
2
4
2
4
2
136
2
4
20
4
4
4
2
2
5
20
21
22
24
25
26
27
28
29
30
31
32
33
34
35
36
37
40
41
8
37
9
2S-5136-01
2S-4668-02
2S-4668-03
1A-4126-01
8S-6425-04
2B-4035-02
3B-4021-02
3B-4020-02
3M-6890-00
5A-4276-00
2S-6139-01
3M-4167-00
2W-6258-02
1B-4158-02
1N-0001-02
3M-4150-00
3M-4151-00
2B-6284-00
2L-4139-00
40
17
18
3
11
34
2
35
33
8
9
30
1
6
36
29
2L-4139-00
2
2
2
2
4
16
4
4
4
1
8
4
1
4
4
2
2
4
1
 Loading...