

Page 1

STIGA
READY
READY HST
8211-0335-01
Page 2
SVENSKA
S
8
7
9
1
2 3
4 5
1
2
3
4
5
6
Page 3
SVENSKA
S
0,7 - 0,8 mm
6 7
8 9
10 11
12 13
Page 4
ENGLISH
GB
GENERAL
This symbol indicates WARNING. Personal injury and/or damage to property
may result if the instructions are not
followed carefully.
You must read these instructions for
use and the accompanying pamphlet
“SAFETY INSTRUCTIONS” carefully, before starting up the machine.
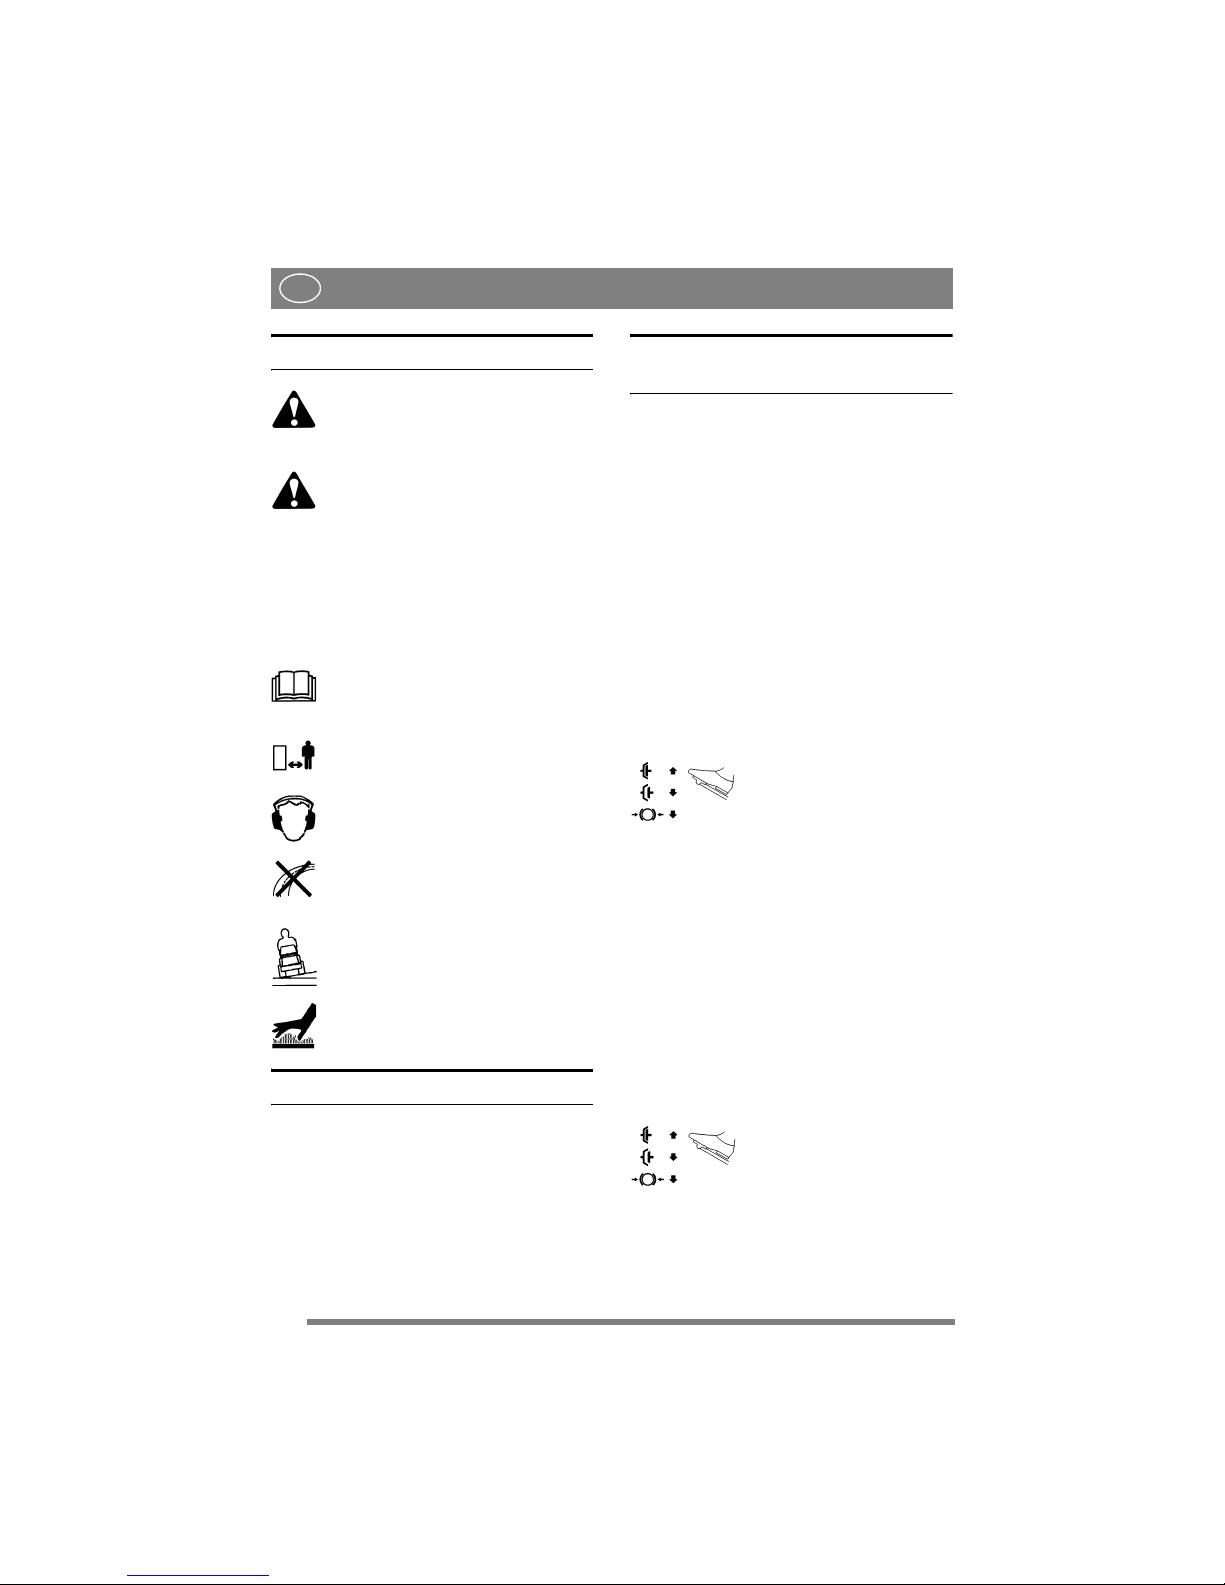
SYMBOLS
The following symbols appear on the machine.
They are there to remind you of the care and attention required in use.
This is what the symbols mean:
Warning!
Read the instruction manual and the safety
manual before using the machine.
Warning!
Watch out for discarded objects. Keep onlookers away.
Warning!
Always wear hearing protectors.
Warning!
This machine is not designed to be driven
on public roads.
Warning!
The machine, equipped with original accessories, may not be driven on slopes
greater than 10º in any direction.
Warning!
Risk of burn injuries. Do not touch the silencer.
GENERAL
This machine is available in two versions.
• Ready, manual transmission, designated
Ready.
• Ready, hydrostatic transmission, designated
Ready HST.
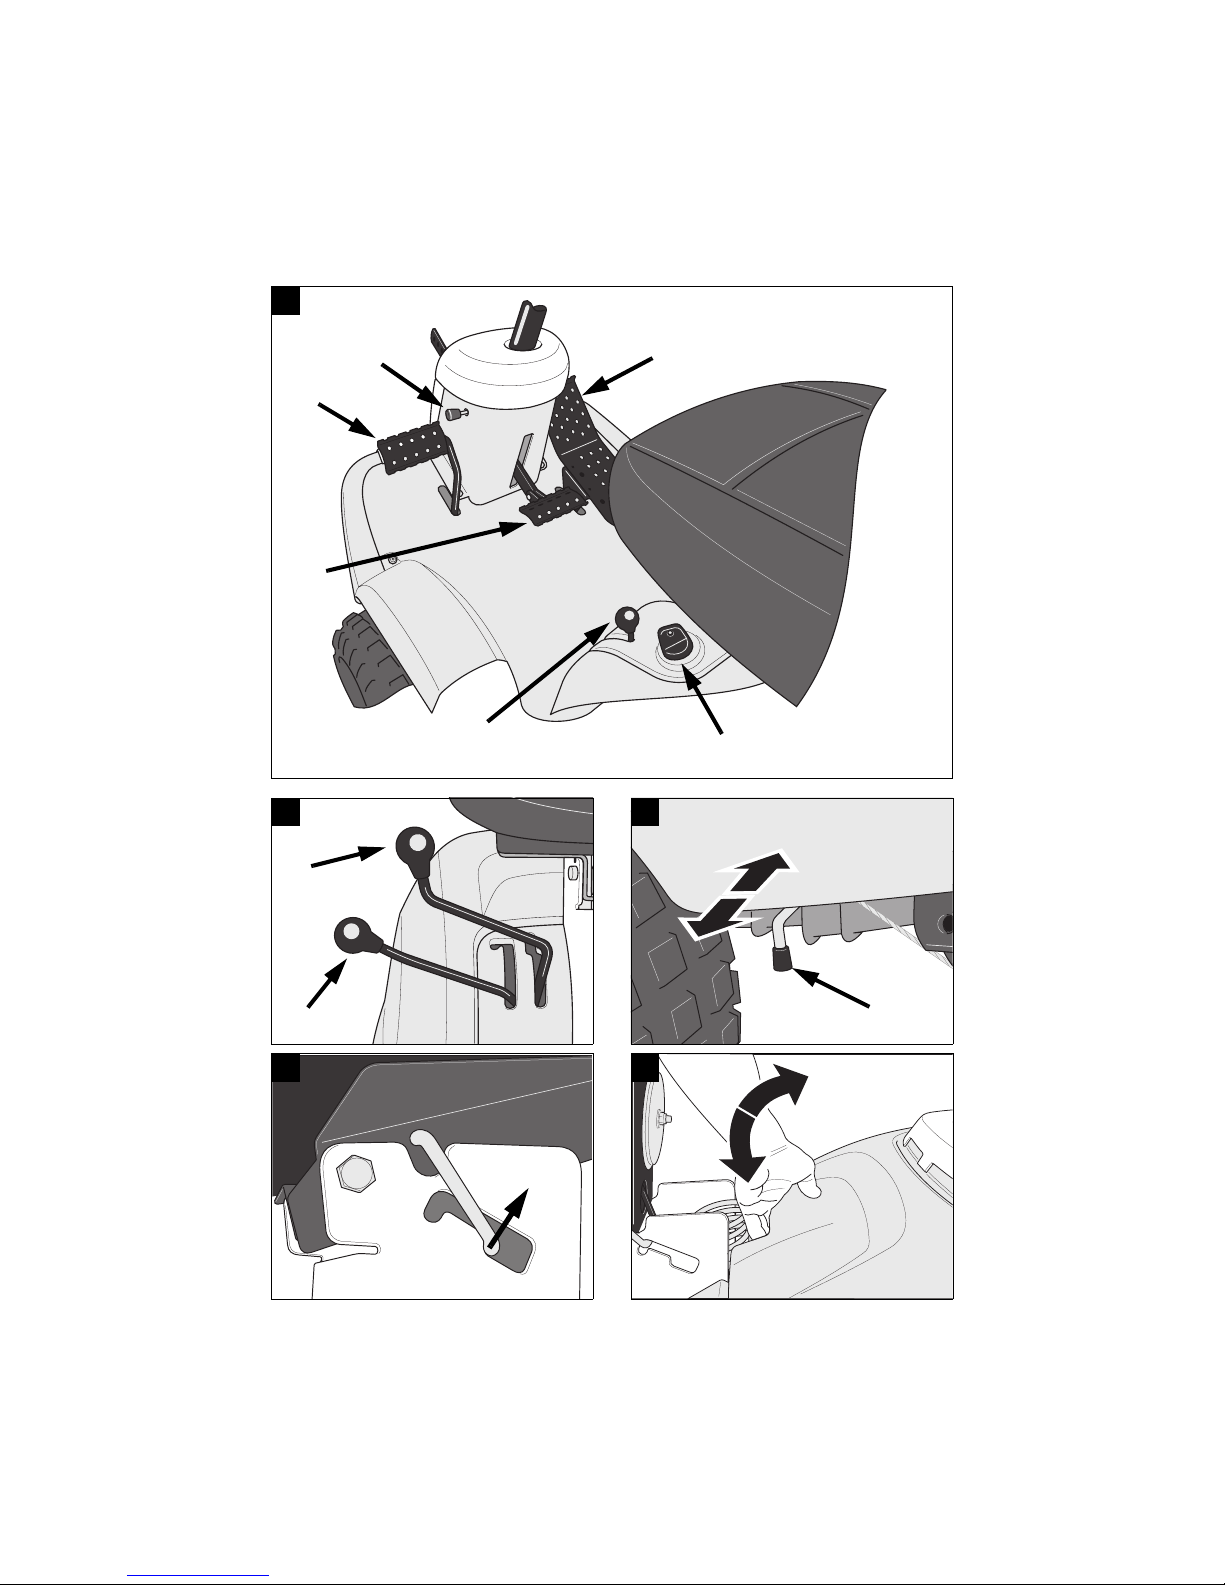
CONTROLS AND
INSTRUMENTS
Items 1 - 9, see figures 1 - 3.
1. IMPLEMENT LIFTER
A pedal for raising a front-mounted implement to
the transport position.
To lift up the implement, press the pedal down as
far as it will go. Then release the pedal, the implement lifter is now locked in the raised position.
To lower the implement, press the pedal down so
that the lock is released. Lower the implement lifter to the working position by slowly lifting your
foot from the pedal.
2A. SERVICE BRAKE/CLUTCH
(Ready)
A pedal that combines both service brake and
clutch. There are 3 positions:
1. Pedal released – forward drive
engaged. The machine will
move if a gear is engaged. Service brake not activated.
2. Pedal depressed halfway –
forward drive disengaged, gear
shifting can be performed. Service brake not activated.
3. Pedal fully depressed – forward drive disengaged. Service
brake fully activated.
NOTE! You must never regulate the operating
speed by slipping the clutch. Use a suitable gear instead, so that the right speed is obtained.
2B. SERVICE BRAKE (Ready HST)
A pedal that acts on the machine’s braking system.
There are 3 positions:
1. Pedal released – service brake
not activated.
2. Pedal depressed halfway –
forward drive disengaged. Service brake not activated.
3. Pedal fully depressed – forward drive disengaged. Service
brake fully activated.
Page 5

ENGLISH
GB
3. PARKING BRAKE
An inhibitor that can lock the brake pedal in the depressed position.
Depress the brake pedal fully. Raise the
inhibitor and then release the brake pedal.
The parking brake is released by pressing
the brake pedal. The spring-loaded inhibitor slides
to one side.
Make sure that the parking brake is released when
operating the machine.
4. DRIVE PEDAL (Ready HST)
A pedal that activates the variable transmission.
1. Depress the pedal with the
ball of your foot – the machine
moves forwards.
2. No load on the pedal – the machine is stationary.
3. Depress the pedal with your
heel – the machine reverses.
The drive pedal regulates the speed. The more
pressure applied, the faster the machine will move.
5. THROTTLE/CHOKE CONTROL
A control for setting the engine speed and to choke
the engine when starting from cold.
1. Choke – for starting a cold engine. The
choke is located in the top of the groove.
Avoid operating the machine in this posi-
tion, taking care to move the control to full
throttle (see below) when the engine is
warm.
2. Full throttle – when the machine is in
operation, full throttle should always be
used.
3. Idling.
6. IGNITION LOCK
Ignition lock used for starting/stopping the engine.
Four positions:
1. Stop position – the engine is short-
circuited. The key can be removed.
2/3. Operating position.
4. Start position – the electric start motor
is activated when the key is turned to the
spring-loaded start position. Once the engine has started, let the key return to operating position 2/3.
7. GEAR LEVER (Ready)
A lever for selecting one of the five forward gears
in the gearbox (1-2-3-4-5), neutral (N) or reverse
(R).
The clutch pedal must be kept pressed in when
changing gear.
NOTE! You must make sure the machine is quite
stationary before changing from reverse to forward
gear or vice versa. If a gear does not engage immediately, release the clutch pedal and then press it in
once again. Engage the gear once again. Never
force a gear in.
8. POWER TAKE-OFF
A lever for engaging and disengaging the power
take-off for operating the cutting deck. Two positions:
1.Forward position – power take-off disengaged.
2. Backward position – power take-off engaged.
9. CLUTCH RELEASE LEVER
(Ready HST)
A lever for disengaging the variable transmission.
Enables the machine to be moved by hand without
the help of the engine. Two positions:
1. Lever pressed in – transmission engaged for normal operation.
2. Lever pulled out – transmission disengaged. The machine
can be moved by hand.
The machine may not be towed over long distances
or at high speeds. The transmission could be damaged.
Page 6

ENGLISH
GB
AREAS OF USE
The machine may only be used for the following
tasks using the genuine STIGA accessories stated.
Mowing:
With cutting deck 13-2940 (85M).
The maximum vertical load on the towing hitch
must not exceed 100 N.
The maximum over-run load on the towing hitch
from towed accessories must not exceed 500 N.
NOTE! Before using a trailer – contact your insur-
ance company.
NOTE! This machine is not intended to be driven
on public roads.
STARTING AND OPERATION
ENGINE CASING
To fill with fuel and to inspect and maintain the engine and battery, open the engine casing. The en-
gine must not be running when the casing is
opened.
Opening:
1. Ensure that the control arms are in their forward
positions.
2. Raise the seat lock (fig. 2) and fold the seat forwards.
3. Grasp the front edge of the engine casing and
fold up the casing (fig. 3).
Closing:
Grasp the front edge of the engine casing and fold
down the casing (fig. 3).
The machine may not be operated un-
less the engine casing is folded down.
Risk of burns and crushing injuries.
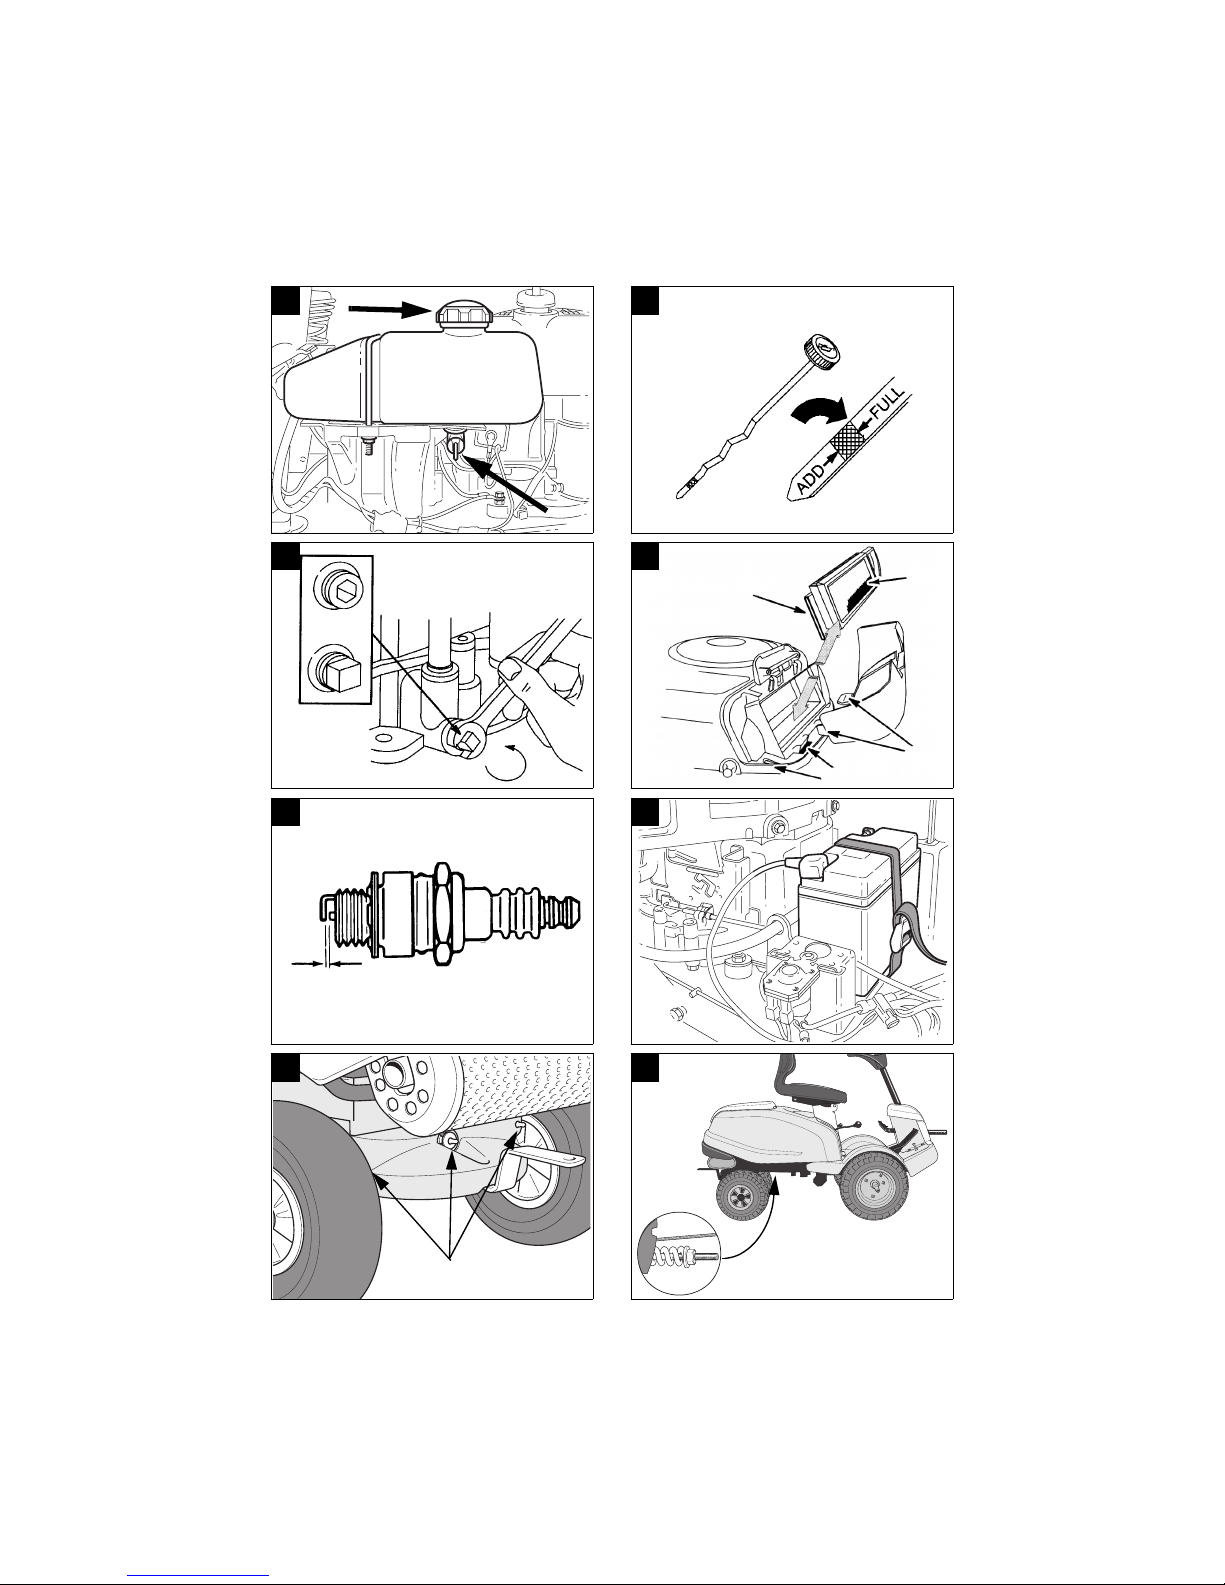
FILLING THE FUEL TANK
Open the engine casing as above. Unscrew the filler cap and fill with clean, lead-free petrol. You
must never use 2-stroke petrol mixed with oil (fig.
6).
NOTE! Bear in mind that ordinary lead-free petrol
is a perishable; do not purchase more petrol than
can be used within thirty days.
Environmental petrol can be used, i.e. alkylate petrol. This type of petrol has a composition that is
less harmful for people and nature.
Petrol is highly inflammable. Always
store fuel in containers that are made
especially for this purpose.
Only fill or top up with petrol outdoors,
and never smoke when filling or topping up. Fill up with fuel before starting
the engine. Never remove the filler cap
or fill with petrol while the engine is
running or still warm.
Never completely fill the petrol tank. Leave an
empty space (= at least 2-3 cm at the top of the
tank) to allow the petrol to expand when it warms
up without overflowing.
CHECKING THE ENGINE OIL LEVEL
On delivery, the crankcase is filled with SAE 30
oil.
Check the oil level every time before using to
ensure it is correct. The machine should be
standing on level ground.
Wipe clean around the oil dipstick. Unscrew and pull it up. Wipe off the dipstick.
Slide it down completely and tighten it.
Then unscrew it and pull it up again. Read off the
oil level. Top up with oil to the “FULL” mark, if
the level comes below it (fig. 7).
SAFETY SYSTEM
This machine is equipped with a safety system that
consists of:
- a switch on the gearbox (only Ready).
- a switch on the break pedal (only Ready HST).
- a switch in the seat/seat bracket (all).
In order to start the machine, the following are nec-
essary:
- gear lever in neutral (only Ready).
- brake pedal pressed down.
- driver sitting on seat.
- power take-off disengaged.
Always check the operation of the safety system before using the machine!
With the engine running and the driver sitting on
the seat, check as follows:
- select a gear, lift your weight off the seat – the
Page 7

ENGLISH
GB
engine must stop (only Ready).
- press the drive pedal so that the machine starts
to move, release the drive pedal – the machine
should stop (only Ready HST).
- engage the power take-off, lift your weight off
the seat – the engine should stop.
Do not use the machine if the safety sys-
tem is not working! Take the machine
to a service workshop for inspection!
STARTING ENGINE
1. Open the fuel cock (fig. 6).
2. Make sure that the spark plug cable is properly
in place.
3. Check to make sure that the power take-off is
disengaged.
4a. Ready: Put the gear lever in neutral.
4b. Ready HST: Do not keep your foot on the
drive pedal.
5. Starting cold engine – put the throttle control in
the choke position. Starting warm engine – put the
throttle control at full throttle (approx. 1 cm behind
the choke position).
6. Depress the brake pedal fully.
7. Turn the ignition key and start the engine.
8. Once the engine has started, move the throttle
control gradually to full throttle if the choke has
been used.
9. When starting from cold, do not make the machine work under load immediately, but let the engine run for a few minutes first. This will allow the
oil to warm up.
When in use, always operate the engine at full
throttle.
STOPPING
Disengage the power take-off. Apply the parking
brake.
Allow the engine to idle 1 - 2 mins. Stop the engine
by turning off the starter key.
Shut off the petrol cock. This is particularly important if the machine is to be transported on a trailer
for example.
If the machine is left unattended, re-
move the ignition key. Also remove the
spark plug cable from the spark plug.
The engine may be very warm immediately after it is shut off. Do not touch the
silencer, cylinder or cooling fins. This
can cause burn injuries.
DRIVING TIPS
Make sure that there is the correct quantity of oil in
the engine when driving on slopes (oil level on
“FULL”).
Be careful when driving on slopes. No
sudden starting or stopping when moving up or down a slope. Never drive
across a slope. Move from the top down,
and from the bottom to the top.
The machine, equipped with original
accessories, may not be driven on slopes
greater than 10º in any direction.
Reduce the speed on slopes and when
making sharp turns to prevent the machine from tipping over or you losing
control of the machine.
Do not turn the steering wheel to full
lock when driving in top gear and at full
throttle. The machine can easily topple
over.
Keep hands and fingers well away from
the seat bracket. Risk of crushing injuries. Never drive with the engine casing
open.
Never drive with the cutting deck in the
raised position. This damages the deck
drive belt.
SERVICE AND MAINTENANCE
SERVICE PROGRAM
In order to keep the machine in good condition, as
regards reliability and operational safety as well as
from an environmental perspective, STIGA’s service program should be followed.
We recommend that all service work is carried out
by an authorised workshop. This guarantees that
the work is performed by trained personnel and
with genuine spare parts.
PREPARATIONS
Unless otherwise stated, all service and maintenance must be carried out on a stationary machine
Page 8

ENGLISH
GB
when the engine is not running.
Prevent the machine from rolling by al-
ways applying the parking brake.
Prevent unintentional starting of the
motor by disengaging the drive, shut-
ting off the engine and disconnecting
the spark plug cable or removing the
starter key.
CLEANING
To reduce the risk of fire, keep the en-
gine, silencer, battery and fuel tank free
from grass, leaves and oil.
To reduce the risk of fire, regularly
check the machine for oil and/or fuel
leakage.
When washing the machine with water under high
pressure, do not point the jet directly at the transmission.
Do not point jets of water directly at the engine.
Use a brush or compressed air in order to clean it.
ENGINE OIL
Change engine oil the first time after 5 hours of operation, and subsequently after every 50 hours of
operation or once a season.
Change the oil more often (after 25 hours of operation or at least once a season) if the engine has to
operate under demanding conditions or if the ambient temperature is high.
Change oil when the engine is warm. Always use
a good grade of oil (service grade SF, SG or SH).
The engine oil may be very hot if it is
drained off directly after the engine is
shut off. So allow the engine to cool a
few minutes before draining the oil.
Unscrew the oil drain plug (fig. 8). It is situated on
the left of the engine (machine viewed from the
rear).
Collect the oil in a collection vessel. Then take
the oil to a recycling station. Do not allow oil to
get on the V-belts.
Screw in the oil drain plug.
Remove the dipstick and fill up with new oil to the
“FULL” mark.
Oil capacity: 1.4 litres
Oil type, summer (> 4ºC): SAE-30
(SAE 10W-30 can also be used. However, oil consumption may increase somewhat if 10W-30 is
used. Therefore, check the oil level more regularly
if you use this type of oil).
Oil type, winter (< 4ºC): SAE 5W-30
(if this oil is not available, use SAE 10W-30).
Use oil without any additives.
Do not fill with too much oil. This can cause the
engine to overheat.
AIR FILTER - ENGINE
Change the pre-filter once a year or every 25 hours
of operation.
Clean the paper filter insert once a year or after
every 100 hours of operation, whichever comes
first.
NOTE! Both filters should be replaced/cleaned
more often if the machine operates on dusty
ground.
1. Remove the protective cover on the air filter
(fig. 9).
2. Dismantle the paper filter insert and the foam
pre-filter. Make sure that no dirt gets into the carburettor. Clean the air filter housing.
3. Replace the pre-filter.
4. Clean the paper filter insert as follows: Knock it
lightly against a flat surface. If the filter is very
dirty, change it.
5. Assemble in the reverse order.
Petroleum-based solvents such as kerosene may
not be used for cleaning the paper filter insert.
These solvents can destroy the filter.
Do not use compressed air for cleaning the paper
filter insert. The paper filter insert must not be
oiled.
SPARK PLUG
Clean the spark plug after every 100 hours of operation or once a season. For replacing a spark plug,
a spark plug sleeve A and a torsion pin B are provided in the accessories bag.
The engine manufacturer recommends:
Champion RC12YC.
Page 9

ENGLISH
GB
Correct spark gap: 0.7 - 0.8 mm (fig. 10).
COOLING AIR INTAKE - ENGINE
The engine is air-cooled. A blocked cooling system can damage the engine. The engine should be
cleaned at least once a year or every 100 hours of
operation.
Remove the fan casing. Clean the cooling fins on
the cylinder, the fan and the rotating protective
grille. Clean more frequently if mowing dry grass.
BATTERY
The battery is a valve-regulated battery with 12 V
nominal voltage. The battery is completely maintenance free. You don’t have to check or top up the
electrolyte level (fig. 11).
On delivery, the battery is in the accessories box.
The battery must be fully charged be-
fore being used for the first time. The
battery should always be stored fully
charged. If the battery is stored while
totally flat it could sustain permanent
damage.
If the machine is not going to be used for an extended period (more than 1 month), the battery
should be charged, disconnected and then stored in
a cool, safe place. Charge the battery completely
before reinstalling.
The battery can be charged in two ways:
1. Via a battery charger (recommended). This must
be a charger with constant voltage. The battery
can be damaged if a standard type battery
charger (for acid batteries) is used.
Stiga recommends a battery charger with item
no. 1136-0602-01 which may be ordered from
an authorised dealer.
2. You can also allow the engine to charge the bat-
tery. In this case it is very important, above all
when starting the machine for the first time and
when it has not been used for a long time, to allow the engine to run continuously for at least
45 minutes.
Do not short circuit the battery’s termi-
nals. Sparks occur which can result in
fire. Do not wear metal jewellery which
can come into contact with the battery
terminals.
In the event of damage to the battery casing,
cover, terminals or interference to the strip covering the valves, the battery should be replaced.
If the battery terminals are coated with oxide, they
should be cleaned. Clean the battery terminals with
a wire brush and grease them.
LUBRICATION - CHASSIS
The machine has three grease nipples on the rear
axle which are lubricated with universal grease
every 25 hours of operation
(fig. 12).
Apply universal grease to all the plastic bearings a
couple of times per season.
Apply universal grease to the control arm joints a
couple of times each season.
Apply a coating of engine oil to the tension arm
joints a couple of times each season.
Apply a few drops of engine oil to both ends of the
throttle control cables a couple of times a season.
Ready HST:
The hydrostatic transmission is filled with oil
(10W-40) on delivery from the factory. Unless it is
opened (only to be performed by a specialist), and
provided no leakage occurs, no topping up with oil
should normally be carried out. Transmission oil
does not normally need to be changed.
STEERING CABLE
The steering cables should be adjusted for the first
time after the machine has been in operation for 2
- 3 hours, and then after every 25 hours of operation.
Tension the steering cables by tightening up the
nut (fig. 13). Important! The screws in the ends of
the cable should be held firmly during adjustment
so that the cable is not twisted. Using an adjustable
wrench or similar, grasp the key handle on the
screws in the ends of the cable.
Adjust the steering cables until all play is removed.
Do not tension the steering cables too hard. Other-
wise the steering will be heavy and wear and tear
on the cables will increase.
Page 10

ENGLISH
GB
PATENT - DESIGN
REGISTRATION
This machine or parts thereof is covered by the following patent and design registration:
9901091-0 (SE), 9901730-3 (SE)
00921248.1 (EPC), 00931809.8 (EPC)
GGP reserves the right to make alterations to the product
without prior notification.
Page 11

6B.Uppmätt ljudeffektnivå
Mitattu äänitehotaso
Målt lydeffektniveau
Målt lydeffektnivå
Gemessener geräuschpegel
Measured sound power level
Niveau de puissance acoustique mesuré
Gemeten geluidsniveau
Livello di potenza sonora misurato
Nivel de potencia de sonido medido
Nível de potência sonora medido
Nieprzekraczalny poziom hałasu
Замеренный уровень шума
Naměřená úroveň hluku
Mért hangteljesítményszint
Izmerjena raven zvočne jakosti
6A.Garanterad ljudeffektnivå
Taattu äänitehotaso
Garanteret lydeffektniveau
Garantert lydeffektnivå
Garantierter Geräuschpegel
Guaranteed sound power level
Niveau de puissance acoustique garanti
Gegarandeerd geluidsniveau
Livello di potenza sonora garantito
Nivel de potencia de sonido garantizado
Nível de ruído garantido
Nieprzekraczalny poziom hałasu
Гарантированный предельный уровень шума
Zaručená úroveň hluku
Garantált hangteljesítményszint
Zajamčena raven zvočne jakosti
99 dB(A)
EG-försäkran om överensstämmelse
EY-vaatimustenmukaisuusvakuutus
EU-overensstemmelseserklæring
EU-forsikring om overensstemmelse
EG-Konformitätsbescheinigung
EC conformity declaration
Déclaration de conformité CE
EU-gelijkvormigheidsverklaring
Dichiarazione di conformità CE
Declaración de conformidad CE
Declaração de conformidade da CE
Deklaracja zgodności EC
Декларация EC о соответствии
Deklarace shody s EU
EK megfelelőségi nyilatkozat
Izjava ES o skladnosti
1.Kategori
Luokka
Kategori
Kategori
Kategorie
Category
Catégorie
Categorie
Categoria
Categoría
Categoria
Kategoria
Категория
Kategorie
Kategória
Kategorija
5.Vibration
Tärinä
Vibration
Vibrasjon
Vibration
Vibration
Vibration
Vibratie
Vibrazioni
Vibración
Vibração
Wibracje
Вибрация
Vibrace
Vibráció
Tresljaji
Gräsklippare med bensinmotor
Bensiinimoottorikäyttöinen ruohonleikkuri
Plæneklipper med benzinmotor
Gressklipper med bensinmotor
Rasenmäher mit Benzinmotor
Lawnmowers with petrol engines
Tondeuses à moteur à explosion
Grasmaaiers met benzinemotor
Tosaerba con motori a benzina
Cortacéspedes con motor de gasolina
Máquinas de cortar relva com motores a gasolina
Kosiarki do trawy z silnikiem benzynowym
Газонокосилк и с бензиновым двигателем
Sekačky trávy s benzinovým motorem
Benzinmotoros fűnyíró
Kosilnice z bencinskimi motorji
V301
1. 13-2715 + 13-2940
2. 13-2716 + 13-2940
< 0.5 m/s
2
< 2.5 m/s
2
2.Typ
Tyyppi
Typ e
Typ e
Typ
Typ e
Typ e
Typ e
Tipo
Tipo
Tipo
Typ
Тип
Typ
Típus
Tip
3.Art.nr.
Tuotenumero
Art.nr.
Art.nr.
Art.-Nr.
Item no
N° d'article
Itemnr.
Articolo n.
Nº de
referencia
Item nº
Pozycja nr
Поз.
Císlo položky
Tételszám
Izdelek, št.
4.Tillverkare
Valmistaja
Producent
Produsent
Hersteller
Manufacturer
Fabricant
Fabrikant
Produttore
Fabricante
Fabricante
Producent
Изготовитель
Výrobce
Gyártó
Proizvajalec
GGP Sweden AB
P.O. Box 1006
SE-573 28 Tranås
Sweden
8.Fabrikat
Val mis te
Fabrikat
Fabrikat
Fabrikat
Make
Marque
Fabricage
Marca
Marca
Marca
Marka
Торговая
марка
Značka
Gyártmány
Znamka
STIGA
9.Klippbredd
Leikkuuleveys
Klippebredde
Klippebredde
Schnittbreite
Cutting width
Largeur de coupe
Snijwijdte
Larghezza di taglio
Ancho de corte
Largura de corte
Szerokość koszenia
Рабочий захват
Šířka sekání
Vágási szélesség
Širina košnje
85 cm
10.Serienr
Valmistenumero
Serienr.
Serienr.
Seriennummer
Serial number
Numéro de série
Serienummer
Numero di serie
Número de serie
Número de série
Numer seryjny
Заводской номер
Číslo série
Sorozatszám
Serijska številka
Se dekal på chassit
Katso tarra rungossa
Se mærkat på chassis
Se etikett på chassiset
Siehe Schild am Chassis
See label on chassis
Voir la plaque sur le châssis
Zie label op chassis
Vedi etichetta sul telaio
Véase la etiqueta en el chasis
Ver etiqueta no chassis
Patrz etykieta na podwoziu
См. табличку на шасси
Viz štítek na podvozku
Lásd az alvázon lévő adattáblát!
Glej nalepko na šasiji
(LWA)
100 dB(A)
11.Motor / Moottori / Motor / Motor / Motor / Engine / Moteur / Motor /
Motore / Motor / Motor / Silnik / Двигатель / Motor / Motor / Motor
Fabrikat
Val mis te
Fabrikat
Fabrikat
Fabrikat
Make
Marque
Fabricage
Marca
Marca
Marca
Marka
Марка
Značka
Gyártmány
Znamka
Briggs & Stratton
21A907Modell
Malli
Model
Modell
Modell
Model
Modèle
Model
Modello
Modelo
Modelo
Model
Модель
Model
Modell
Model
12.Rotationshastighet
Pyörimisnopeus
Rotationshastighed
Rotasjonshastighet
Umdrehungsgeschwindigkeit
Rotation speed
Vitesse de rotation
Rotatiesnelheid
Velocità di rotazione
Régimen
Velocidade de rotação
Predkośc obrotów
Частота вращения
Rych lost ot áčení
Rotációs sebesség
Hitrost vrtenja
3200 rpm
7.Anmält organ
Ilmoitettu laitos
Bemyndiget organ
Underrettet organ
Anmeldeorganisation
Notified body
Organisme notifié
Keuringsinstantie
Organismo notificato
Organismo notificado
Organismo notificado
Urzad zatwierdzajacy
Упо лн омоче н на я организация
Oprávnený orgán
Az értesítés címzettje
Obveščeni organ
ITS Testing &
Certification Ltd
Notified Body representative 0359
Page 12

EG-försäkran om överensstämmelse
EY-vaatimustenmukaisuusvakuutus
EU-overensstemmelseserklæring
EU-forsikring om overensstemmelse
EG-Konformitätsbescheinigung
EC conformity declaration
Déclaration de conformité CE
Holländska
Dichiarazione di conformità
Declaración de conformidad CE
Declaração de conformidade da CE
Deklaracja zgodności EC
Deklarace shody s EU
EK megfelelőségi nyilatkozat
Izjava ES o skladnosti
Denna produkt är i överensstämmelse med
- direktiv 89/336/EEG om elektromagnetisk kompatibilitet
- maskindirektiv 98/37/EEG med särskilda hänvisningar till direktivets bilaga 1
om väsentliga hälso- och säkerhetskrav i samband med tillverkning
- ljuddirektiv 2000/14/EG
Maskinen är utvecklad och tillverkad enligt följande standard:
- EN 836, EN 292-2, EN 1033, EN ISO 3767, EN ISO 14982
Tämä tuote täyttää seuraavien direktiivien vaatimukset
- sähkömagneettista yhteensopivuutta koskeva direktiivi 89/336/ETY
- konedirektiivi 98/37/ETY viitaten erityisesti direktiivin liitteeseen 1, joka
käsittelee olennaisia terveys- ja turvallisuusvaatimuksia valmistuksen
yhteydessä
- meludirektiivi 2000/14/EG
Tuote on kehitetty ja valmistettu seuraavien normien mukaisesti:
- EN 836, EN 292-2, EN 1033, EN ISO 3767, EN ISO 14982
Dette produkt er i overensstemmelse med
- direktiv 89/336/EØF om elektromagnetisk kompatibilitet
- direktiv 98/37/EØF om indbyrdes tilnærmelse af medlemsstaternes
lovgivning om maskiner med særlig henvisning til direktivets bilag 1 om
væsentlige sikkerheds- og sundhedskrav i forbindelse med konstruktion og
fremstilling
- direktiv 2000/14/EF om støjemission
Produktet er udviklet og fremstillet i overensstemmelse med følgende normer:
- EN 836, EN 292-2, EN 1033, EN ISO 3767, EN ISO 14982
Dette produktet er i overensstemmelse med
- direktiv 89/336/EØF om elektromagnetisk kompatibilitet
- maskindirektiv 98/37/EØF med særskilte henvisninger til direktivets bilag 1
om vesentlige helse- og sikkerhetskrav i forbindelse med produksjon
- lyddirektiv 2000/14/EF
Produktet en utviklet og produsert i overensstemmelse med følgende normer:
--EN 836, EN 292-2, EN 1033, EN ISO 3767, EN ISO 14982
Dieses Produkt ist in Übereinstimmung mit
- Direktive 89/336/EEG zur elektromagnetischen Kompatibilität
- Maschinendirektive 98/37/EEG mit besonderem Hinweis auf Anlage 1 der
Direktive über wichtige Gesundheits- und Sicherheitsanforderungen im
Zusammenhang mit der Herstellung
- Schallschutzdirektive 2000/14/EG
Das Erzeugnis ist in Übereinstimmung mit folgenden Normen entwickelt und
gefertig worden:
- EN 836, EN 292-2, EN 1033, EN ISO 3767, EN ISO 14982
This product conforms to
- Electromagnetic Compatibility Directive 89/336/EEC
- Machinery Directive 98/37/EEC with special reference to appendix 1 of the
directive regarding essential health and safety requirements in conjunction
with manufacturing
- Noise Emission Directive 2000/14/EC
This product has been developed and manufactured in conformance with the
following standards:
- EN 836, EN 292-2, EN 1033, EN ISO 3767, EN ISO 14982
Ce produit est conforme à
- La Directive compatibilité électromagnétique 89/336/EEC
- La Directive machines 98/37/EEC, avec une référence particulière à
l'annexe 1 de la directive concernant les exigences essentielles en matière de
santé et de sécurité dans le cadre de la fabrication
- La Directive émissions de bruit 2000/14/EC
Le produit en question a été mis au point et fabriqué conformément aux
normes suivantes:
- EN 836, EN 292-2, EN 1033, EN ISO 3767, EN ISO 14982
Dit product voldoet aan
- Richtlijn voor elektromagnetische compatibiliteit 89/336/EEC
- Richtlijn voor machines 98/37/EEC met speciale verwijzing naar aanhangsel
1van de richtlijn voor essentiële gezondheids-en veiligheidsvereisten i.v.m.
fabricage
- Richtlijn voor geluidsproductie 2000/14/EC
Het product is in overeenstemming met volgende normen ontwikkeld en
vervaardigd:
- EN 836, EN 292-2, EN 1033, EN ISO 3767, EN ISO 14982
Questo prodotto è conforme alla
- Direttiva sulla compatibilità elettromagnetica 89/336/EEC
- Direttiva Macchine 98/37/EEC con particolare riferimento all'appendice 1
della direttiva riguardante i requisiti essenziali in materia di salute e sicurezza
relativi alla fabbricazione
- Direttiva sulle emissioni sonore 2000/14/EC
Riferimento alle norme armonizzate:
- EN 836, EN 292-2, EN 1033, EN ISO 3767, EN ISO 14982
Este producto respeta las siguientes normas:
- Directiva 89/336/CEE sobre compatibilidad electromagnética
- Directiva 98/37/CEE sobre máquinas, especialmente su anexo 1 sobre los
requisitos esenciales de seguridad y de salud relativos a la fabricación de las
máquinas
- Directiva 2000/14/CE relativa a las emisiones sonoras
Referente a standards armonizados:
- EN 836, EN 292-2, EN 1033, EN ISO 3767, EN ISO 14982
Este produto está em conformidade com
- Directiva sobre Compatibilidade Electromagnética 89/336/CEE
- Directiva relativa às Máquinas 98/37/CEE com referência especial ao
apêndice 1 da directiva referente aos requisitos essenciais de saúde e
segurança em conjunto com os de fabrico.
- Directiva sobre Emissão de Ruído 2000/14/CE
Referencias à normas harmonizadas:
- EN 836, EN 292-2, EN 1033, EN ISO 3767, EN ISO 14982
Ten produkt odpowiada nastepujacym normom:
- Kompatybilnośc elektromagnetyczna - dyrektywa 89/336/EEC
- Maszyny - dyrektywa 98/37/EEC, a szczególnie dodatkiem 1 dyrektywy,
dotyczacym podstawowych wymogów w zakresie zdrowia i
bezpieczenstwa w zwiazku z produkcja
- E misja halasu - dyrektywa 2000/14/EC
W odniesieniu do norm harmonizujących:
- EN 836, EN 292-2, EN 1033, EN ISO 3767, EN ISO 14982
Tento výrobek vyhovuje
- Smernici o elektromagnetické kompatibilite 89/336/EEC
- Smernici o strojních zarízeních 98/37/EEC se speciálním odkazem na
prílohu 1 uvedené smernice týkající se duležitých požadavku na ochranu
zdraví a bezpecnost v souvislosti s výrobou
- Smernici o emisích hluku 2000/14/EC
Použité harmonizované normy:
- EN 836, EN 292-2, EN 1033, EN ISO 3767, EN ISO 14982
Ez a termék megfelel
- az elekt romágneses kompatibilitásról szóló 89/336/EGK irányelvnek,
- a gépek ről szóló 98/37/EGK irányelvnek, különös tekintettel az
irányelvnek a gyártással összefüggő, az alapvető egészségi és biztonsági
követelményekre vonatkozó 1. függelékére, és
- a zajkibocsátásról szóló 2000/14/EK irányelvnek.
- a termék fejlesztése és gyártása a következő szabványokkal összhangban
történt:
- EN 836, EN 292-2, EN 1033, EN ISO 3767, EN ISO 14982
Ta izdelek je v skladu z
- Direktivo 89/336/EGS o elektromagnetni zdru_ljivosti
- Direktivo 98/37/EGS o strojih, s posebnim sklicevanjem na njen Dodatek
1 v zvezi z osnovnimi zdravstvenimi in varnostnimi zahtevami, skupaj s
proizvodnjo
- Di rektivo 2000/14/ES o emisijah hrupa
Hivatkozás a harmonizált szabványokra:
- EN 836, EN 292-2, EN 1033, EN ISO 3767, EN ISO 14982
Utfärdat i Tranås
Annettu Tranåsissa
Udfærdiget i Tranås
Utstedt i Tranås
Ausgefertigt in Tranås,
Schweden
Issued in Tranås
Fait à Tranås
Gepubliceerd in Tranås
Rilasciata a Tranås
Emitido en Tranås
Publicado em Tranås
Wydano w Tranås
Выдано в Tranås
Vydáno v Tranåsu
Kibocsátva Tranåsban
Izdano v Tranås
2003-12-02
Certifieringsansvarig
Sertifioinnista vastaava
Certificeringsansvarlig
Sertifiseringsansvarlig
Für die Zertifizierung
verantwortlich
Certification Manager
Directeur de Cert ification
Certification Manager
Direttore Certificazione
Responsable de
certificación
Director de Certificação
Kierownik ds. legalizacji
Начальник службы
сертификации
Vedoucí pro certifikaci
a tanúsításért felelős
igazgató
Poslovodja za izdajo
certifikatov
Mats Antonsson
Page 13

www.stiga.com
GGP Sweden AB · Box 1006 · SE-573 28 TRANÅS
 Loading...