

Page 1

STIGA
MULTICLIP
48
PRO 48
51 S
PRO 51 S
8211-0224-10
Page 2
S
A
SVENSKA
2.
1.
E
A
3.
D
5.
2
4.
Page 3
FULL
x
FULL
ADD
SVENSKA
S
ADD
6. Briggs & Stratton LS 45 7. Honda
FULL
0,15 l.
ADD
8. Briggs & Stratton XTE 60
9. Briggs & Stratton Intek
FULL
ADD
3
10. Briggs & Stratton LS 45 11. Briggs & Stratton XTE 60
STOP
G
12. Honda
13. Multiclip 48/Pro 48, Briggs & Stratton
3
Page 4
S
STOP
STOP
SVENSKA
G
G
I
14. Multiclip 51 S, Briggs & Stratton 15. Multiclip 48, Honda
G
M
N
18. Multiclip 51 S/PRO 51 S
17.16. Pro 51 S
19. Briggs & Stratton LS 45
21. Honda20. Briggs & Stratton XTE 60 / Intek
4
Page 5

SVENSKA
Briggs & Stratton:0,76mm
0,75 mm
Honda: 0,7-0,8 mm
S
T
22.
I
24. PRO 51S
K
S
23. Multiclip 51 S
K
L
H
25. Multiclip 51 S, PRO 51 S
27b.
P
40 Nm
27a.26. PRO 48, PRO 51 S
U
V
40 Nm
28. PRO 51 S
5
Page 6

S
SVENSKA
6
Page 7

ENGLISH
SYMBOLS
The following symbols can be found on the machine to remind you of the care and attention that
are required during use.
The symbols mean:
Warning! Read the Instruction Book and
Safety Manual before using the machine.
GB
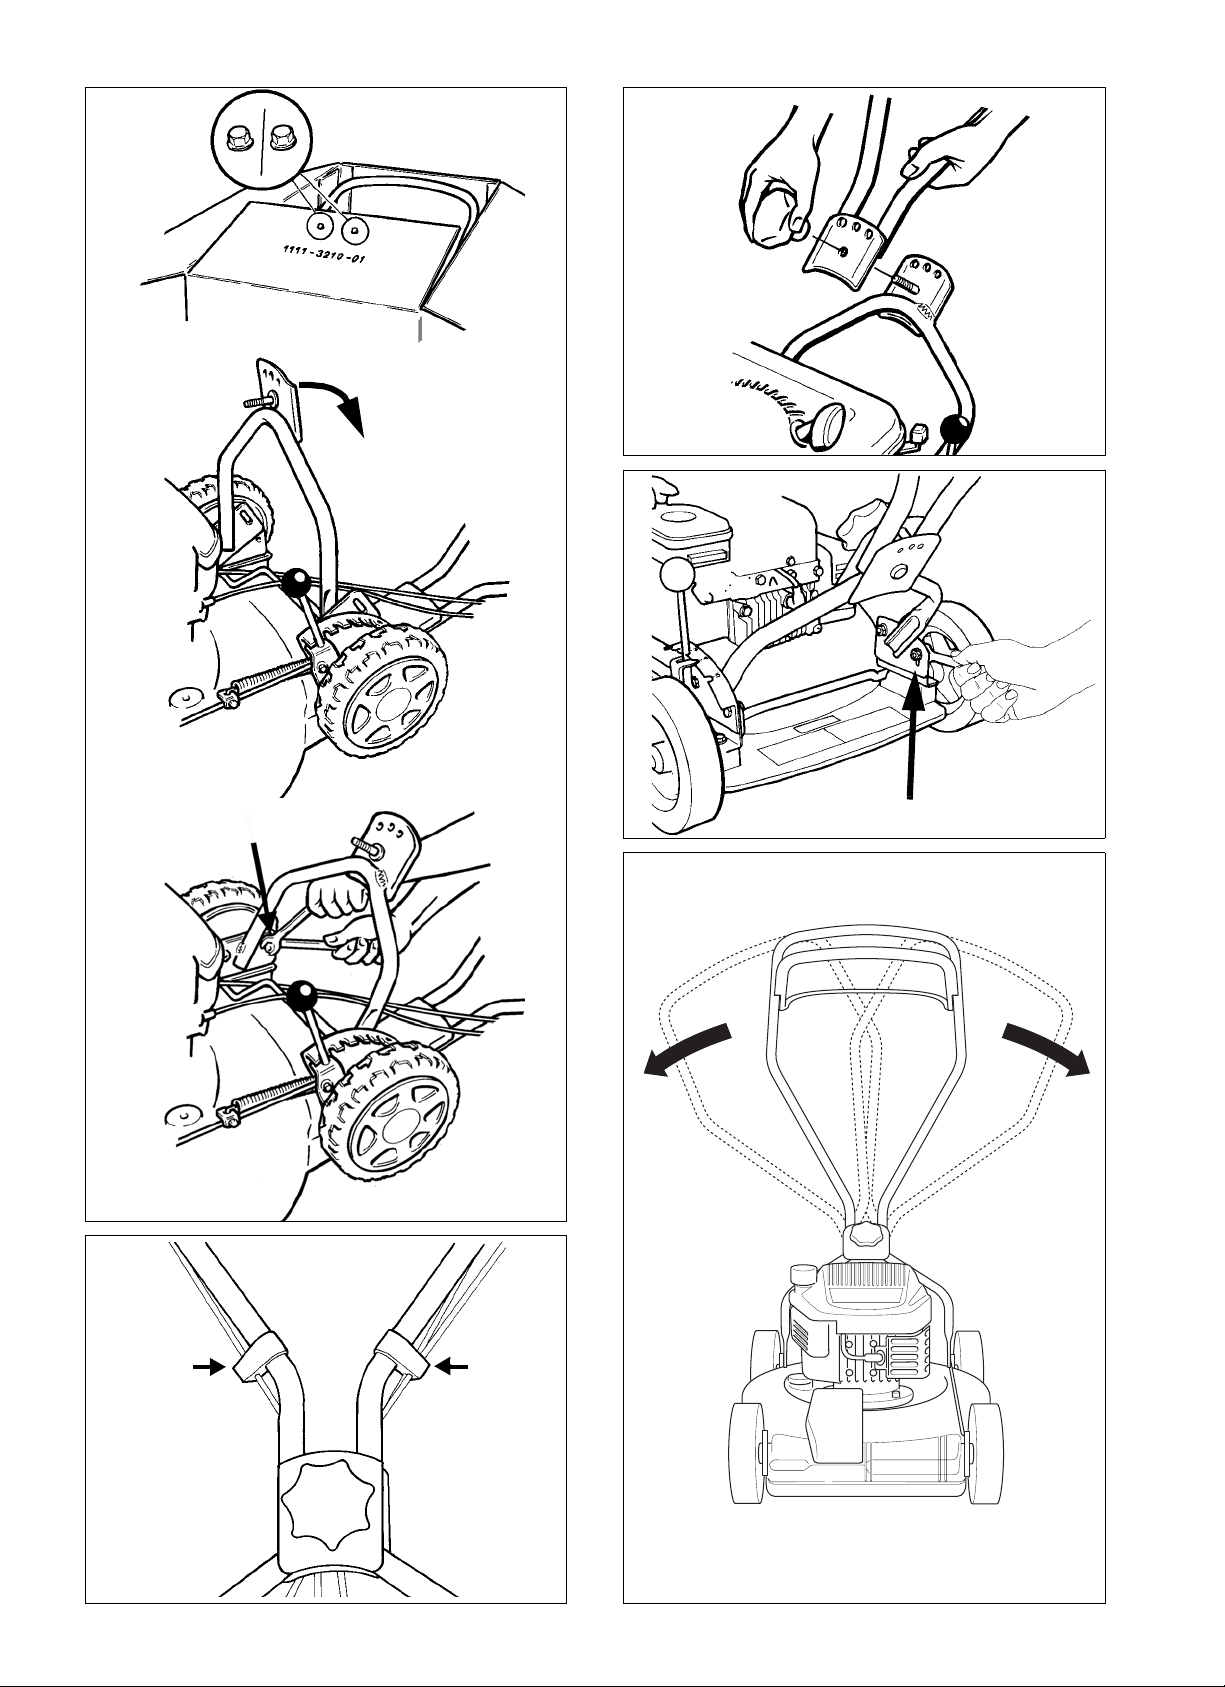
HANDLE, UPPER PART
Fit the upper part of the handlebar (fig. 2). The
height of the handlebar above the ground can be
adjusted within certain limits since the lower part
is provided with slotted holes at the rear (fig. 3).
If necessary the upper part can be turned to one
side to facilitate mowing close up to walls (fig. 4).
CABLE HOLDERS
Secure the cables in the cable holders (fig. 5):
Warning! Keep onlookers away . Beware
of objects being flung out.
Warning! Keep hands and feet clear of the
cutting deck when the machine is running.
Warning! Before starting any repair work,
remove the spark plug cable from the
spark plug.
IMPORTANT
Certain sections apply to only one or a few of the
models. Where this is the case, the name of the
model appears at the start of the section.
Certain models do not have throttle control. The
engine’s speed is set for optimal function and minimal exhaust emissions.
INSTALLATION
HANDLE/BUMPER
(PRO 51 S)
Press in the end plugs in the openings on the handle. Place the handle on the cover so that the holes
in the handle are aligned with the holes in the cover. Thread through the carriage bolts from underneath and secure with the locking nuts U.Presson
the nut caps V (fig 28).
D: Start/Stop cable + Honda: Throttle cable
E: Multiclip 51S/PRO 51S: Clutch cable
USING THE MOWER
BEFORE STARTING
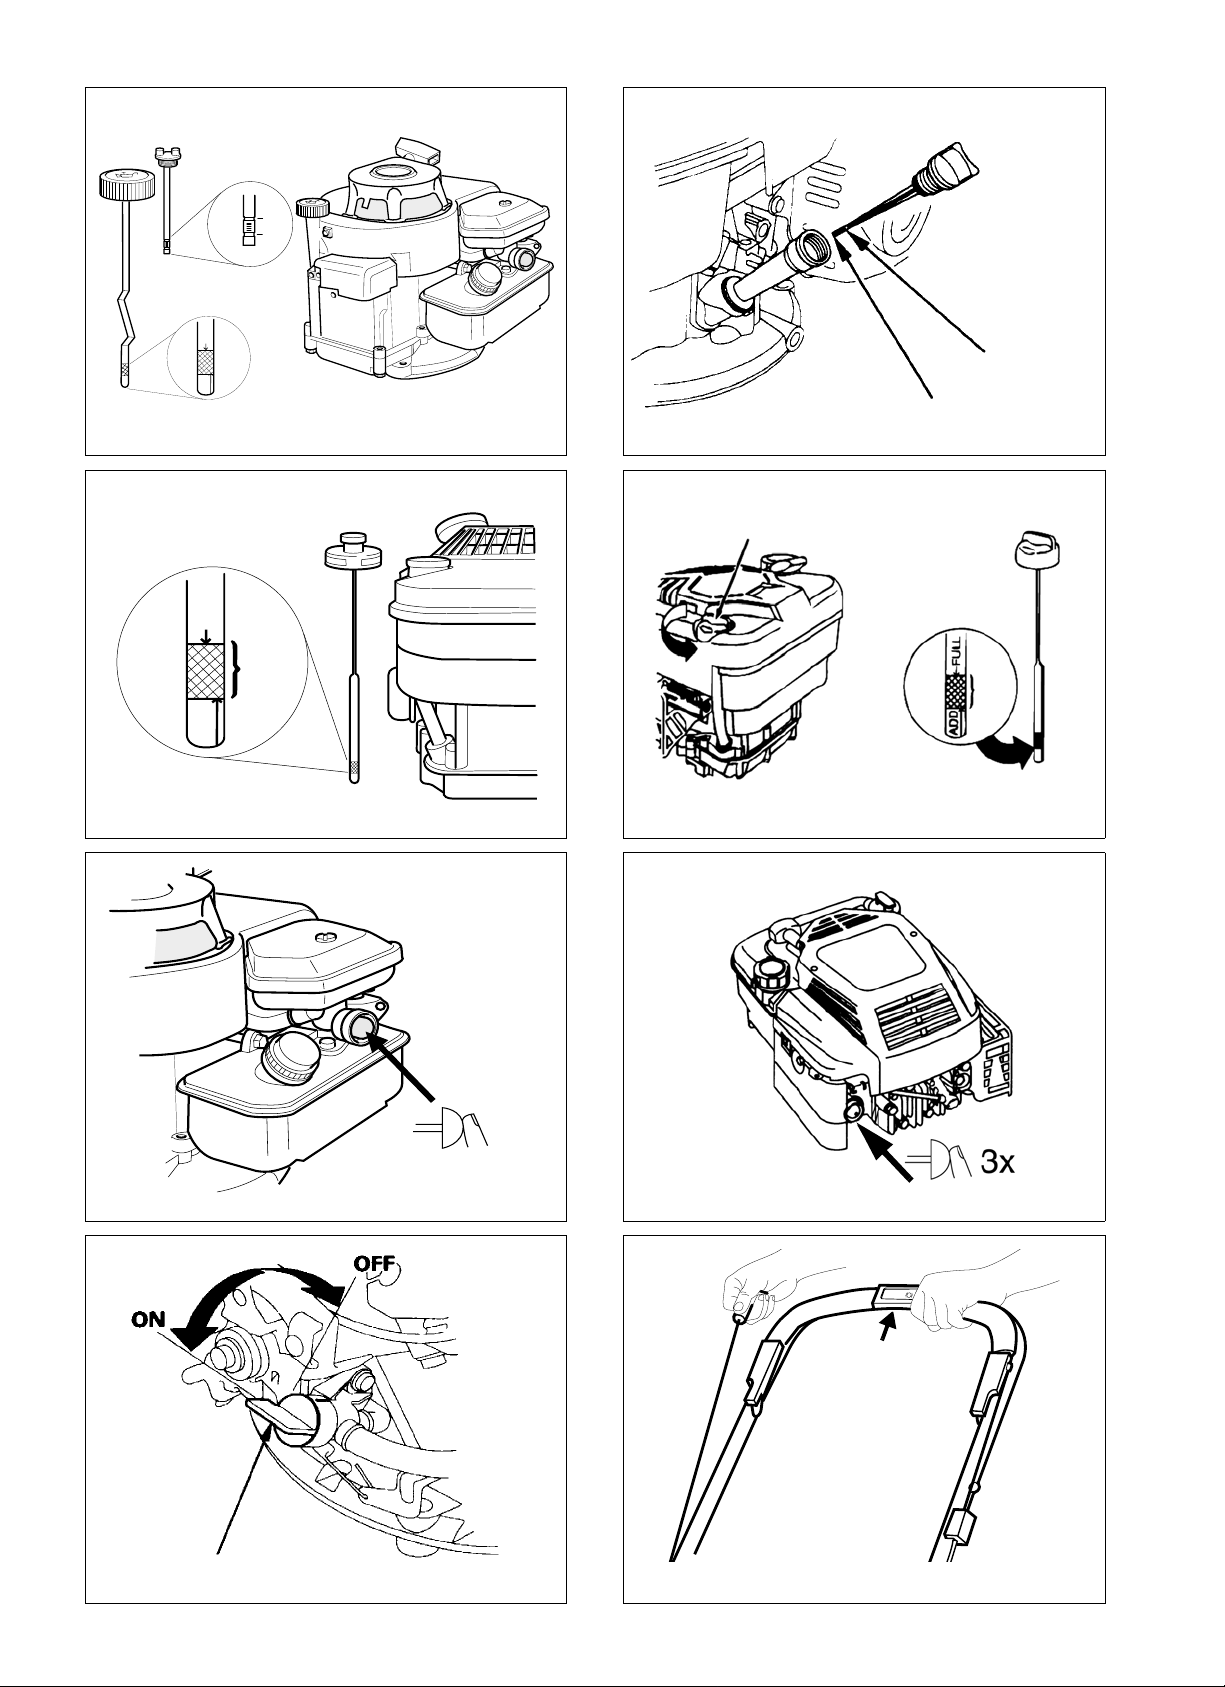
FILL THE CRANKCASE WITH OIL
The lawnmower is delivered without
any oil in the engine crankcase. The
crankcase must be filled with oil before
the engine is startedfor the first time.
Remove the oildipstick(fig. 6-9).Fill the engine’s
crankcasewith 0.55 litres of good qualityoil (serviceclassSE,SForSG).UseSAE30orSAE10W30 oil.
Fill until the oil reaches the “FULL/MAX” mark
on the dipstick. Do not overfill.
CHECK THE OIL LEVEL
Check before using the machine that the oil level is
between ‘FULL/MAX’ and ‘ADD/MIN’ on the
dipstick. The mower should stand level.
Remove and wipe offthe dipstick (fig. 6-9). Slide it
down completelyand tighten it. Unscrew and pull it
up again. Read off the oil level. If the oil level is
low , fill with oil up to the ‘FULL/MAX’ mark.
FILL UP THE PETROL TANK
Fill with petrol before starting the engine. Never remove the filler cap or fill
with petrol while the engine is running
or still warm.
HANDLE, L OWER PART
(PRO 48/PRO 51S)
Fold back and screw tight the lower part of the
handle using the screws A (fig. 1).
Never completely fill the petrol tank. Allow a littleroom for the petrol to expand
if necessary.
7
Page 8

GB
ENGLISH
Preferably use an environmentally friendly petrol,
i.e. alkylate petrol. This type of petrol has a composition that is less harmful to people and nature.
It has e.g. no lead additives, no oxygenators (alcohols and ethers), no alkenes and no benzene.
NOTE! If you change to environmentallyfriendly petrolin anengine previously
run on ordinary lead-free petrol (95),
the petrol manufacturer’s recommendations must be followed carefully.
Ordinary lead-free 95 octane petrol can also be
used. You must never use 2-stroke petrol mixed
with oil.
NOTE! Bearin mind that petrol is a perishable,do
not purchase more petrol than can be used within
30 days.
STARTING THE ENGINE
(Briggs & Stratton)
1. Place the lawnmower on flat, firm ground. Do
not start in long grass.
2. Make sure the spark plug cable is connected to
the spark plug.
3. When starting a cold engine: Press down the
primer fully 6 times (fig. 10, 11).
When starting a warm engine the primer does
not need to be used. If the engine stops due to a
lack of fuel, refill and press down the primer 3
times.
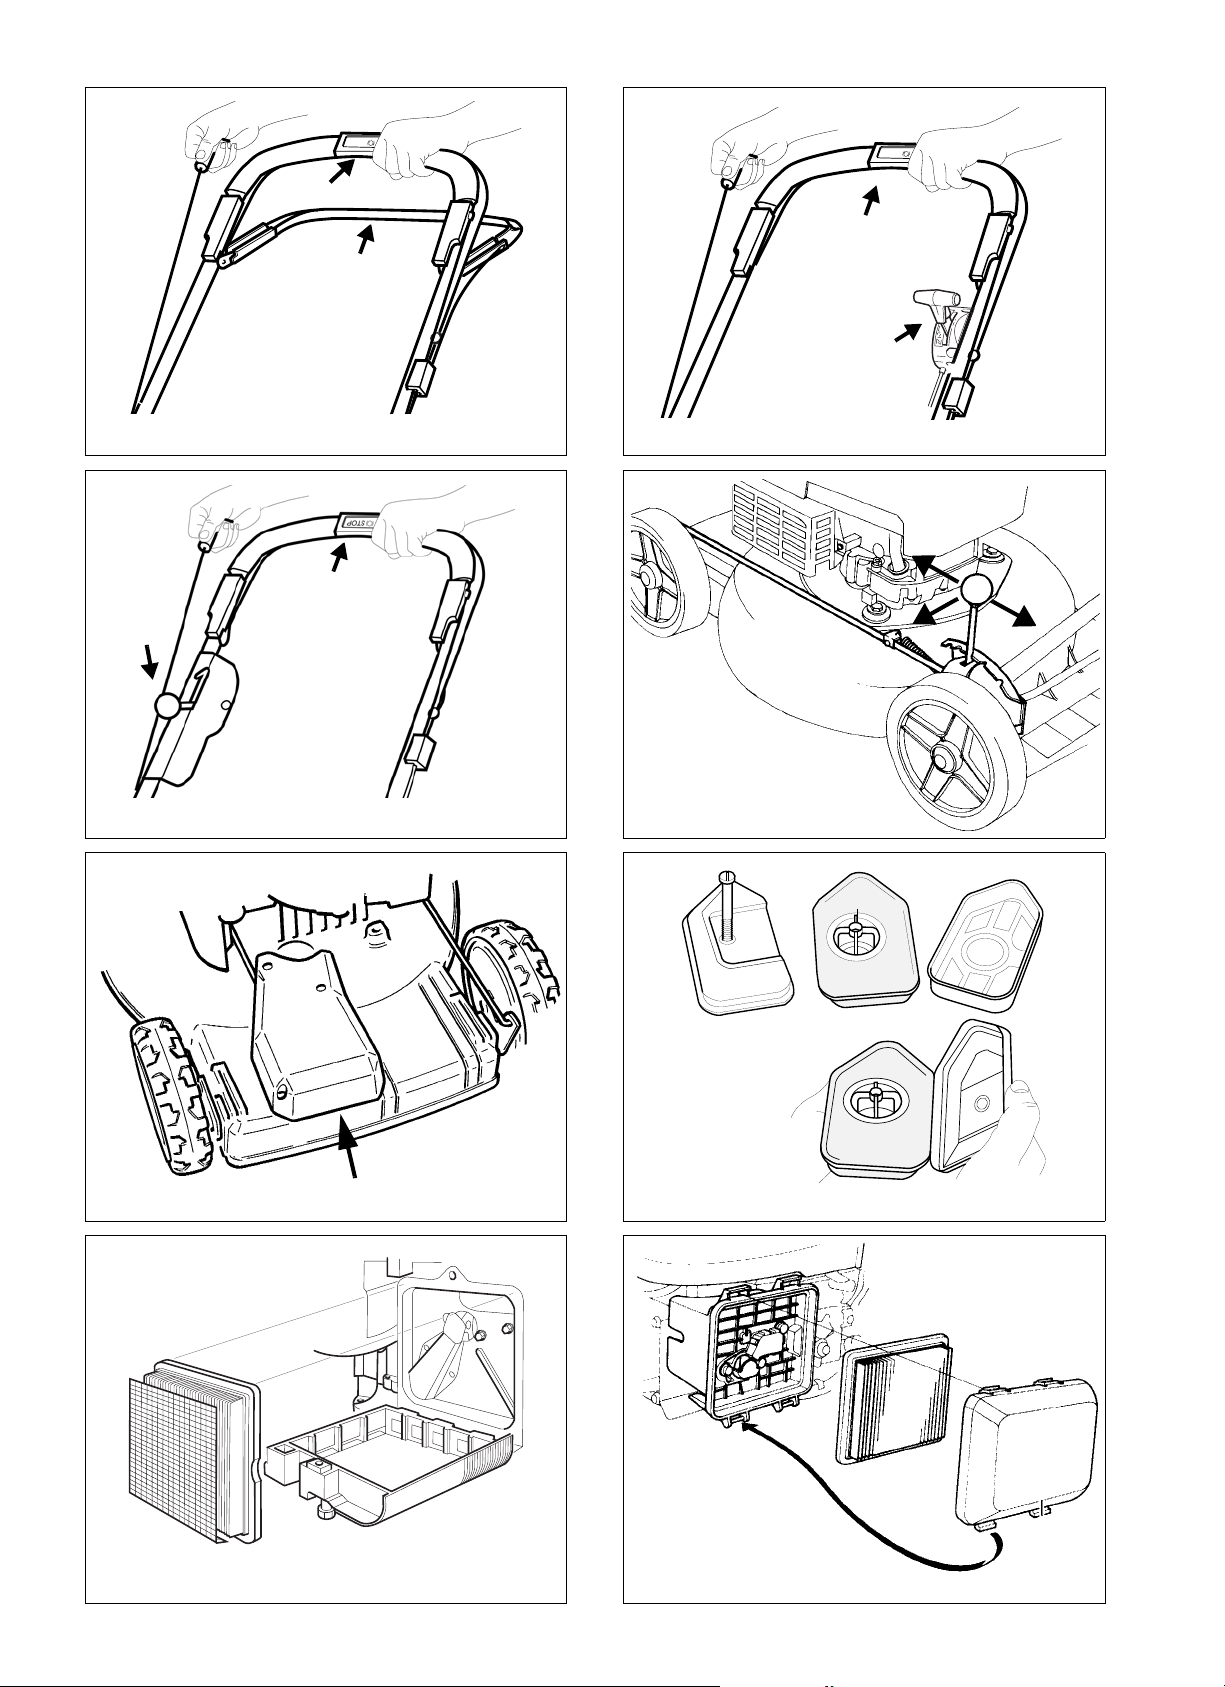
3. PRO 51S: Set the clutch control M to (fig.
16).
4. Press the Start/Stop loopG towards the handle.
NOTE! The Start/Stop loopG must be kept
pressed in to prevent the engine stopping
(fig. 13-16).
5 Grasp the starter handle and start the engine by
pulling briskly on the starter cord.
STARTING THE ENGINE (Honda)
1. Place the lawnmower on flat, firm ground. Do
not start in long grass.
2. Make sure the spark plug cable is connected to
the spark plug.
3. Open the fuel tap (fig. 12).
4. Move the throttle control N to the choke position . NOTE! It is not necessary to use the
choke position when the engine is warm
(fig. 15).
5. Press the Start/Stop loopG towards the handle.
NOTE! The Start/Stop loopG must be kept
pressedintopreventtheenginestopping
(fig. 15).
6. Grasp the starter handle and start the engine by
pulling briskly on the starter cord.
7. When the engine starts, move the throttle control backwards until max. revs are obtained.
NOTE! The engine should always be run at
maximum revs to avoid abnormal machine vibrations.
Keep hands and feet away from the rotating blade(s). Never put your hand or
foot unde r the blade casing or in the
grass ejector while the engine is running.
TRANSMISSION
(Multiclip 51S)
Engage the drive by pressing the clutch loop I towardsthehandle.Disengagethe driveby releasing
the clutch loop I (fig. 14).
By pressing down the handlebar so that the driving
wheels areraisedslightlyfrom the ground, turning,
reversing, moving round trees, etc., can be performed without having to disengage the drive system.
For ease of starting, press down
the handle so that the front wheels lift slightly
from the ground.
Keep hands and feet away from the rotating blade(s). Never put your han d or
foot under the blade casing or in the
grass ejector while the engine is running.
8
TRANSMISSION (PRO 51S)
Engage the drive by moving the clutch control M
to (fig. 16). Make sure the clutch control is al-
ways moved fully either to one or the other position.
Page 9

ENGLISH
GB
By pressing down the handlebar so that the driving
wheels are raised slightlyfrom the ground, turning,
reversing, moving round trees, etc., can be performed without having to disengage the drive system.
STOPPING THE ENGINE
The engine may be very warm immediately after it is shut off. Do not touch the
silencer, cylinder or cooling flanges.
This can cause burn injuries.
1. PRO 51S: Disengage the drive. Set the clutch
control M to (fig. 16).
Honda: Close the fuel tap.
2. Release Start/Stop loop Gto stop the engine
(fig. 13-16). This loop must not be disengaged
(e.g. by setting it in the depressed position
against the handle), as it will not be possible to
stop the engine.
3. If the lawnmower is leftunattended, remove the
sparkplugcablefromthesparkplug.
Ifthe start/stoploop ceases towork, stop
the engine by removing the spark plug
cable from the spark plug. Immediately
take the lawnmower to an authorised
workshop for repair.
MOWING TIPS
Before mowing the lawn, take care to remove any
stones, toys and other hard objects.
A machine with the MULTICLIP system cuts the
grass, chops it finely and then blows it down into
the lawn. The grass clippings do not need to be collected.
The following rules should be observed to give the
best MULTICLIP effect:
1. Use a high engine speed (full throttle).
2. Do not cut the grass too short. Not more than 1/
3rd of the length should be cut off.
3. Ensure that the area under the mower casing is
always kept clean.
4. Always use a well-sharpened blade.
5. Avoidmowingwhen the grassis wet. Thegrass
sticks more easily to the underside of the casing, giving poorer mowing results.
CUTTING HEIGHT
Shut off the engine before adjusting the
cutting height.
Do not set the c utting height so low that
the blade( s) come into contact with uneven g round.
The mower has single-lever control for adjusting
the cutting height. Pull the lever outwards and then
set the mowing height to a position suitable for the
state of the lawn (fig. 17).
MAINTENANCE
No servicing is to be carried out on the
engine or mower unit without first
switching off the engine and removing
the spark plug cable from the spark
plug.
Stoptheengineandremovethespark
plug cable if the mower is to be lifted,
e.g. during transportation.
If the lawnmower needs to be tilted, it
must be tilted so that the engine’s spark
plugfaces upwards. Tilt thelawnmowe r
when the fuel tank is empty.
COOLING SYSTEM
Before each use, the engine ’s cooling system must
be cleaned. Clean the cylinder’s cooling flanges
and air intake of grass remains, dirt, etc.
CLEANING
After use, the mower should be cleaned. This is
particularly important on the underside of the
mower casing. Rinse clean with the garden hose.
The mower will then last longer and work better.
NOTE! High-pressure washersshould not be used.
If grass has dried on to the mower casing, it can be
scraped clean.
Clean the silencer and the surrounding
area regularly to remove grass, dirt and
flammable waste products.
Multiclip 51S/PRO 51S: NOTE! Once or twice
during the mowing season, cleaning should be carried out under the transmission casing (fig. 18).
Remove the transmission casing and clean with a
brush or blow with compressed air.
9
Page 10

GB
ENGLISH
OIL CHANGE
Change the oil when the engine is warm
and the fuel tank is empty. In order to
prevent burns, take care while draining
as the oil is hot.
Change the oil the first time after 5 hours of operation, and subsequently every 50 hours of operation or once a season. Remove the dipstick, tilt the
mower and let the oil run out into a container . Be
careful not to let any oil run on to the grass.
Fill with new oil: Use SAE 30 or SAE 10W-30oil.
The crankcase holds approx. 0.55 litres. Fill until
the oil reaches the “FULL/MAX” mark on the dipstick.Do not overfill.
AIR FILTER
A dirty and blocked air filter reduces the engine
output and increases engine wear.
Briggs & Stratton LS 45 (fig. 19): Carefully remove the air cleaner so that no dirt falls down into
thecarburettor. Remove the expandedplasticfilter
and wash it in liquid detergent and water. Dry the
filter.Pour a little oil on the filter and squeeze it in.
Reinstall the air cleaner.
Clean the filter every three months or after every
25 hours ofuse, whichever occurs first. More often
if t he lawnmower is used on dusty ground.
Briggs & Stratton XTE 60, Intek (fig. 20):Undo
the screw and fold down the cover of the air cleaner. Carefully remove the filter cartridge. Knock it
against a flat surface. Replace the filter cartridge
withanewoneifitisstilldirty.
Clean the filter every three months or after every
25 hours of use, whichever occurs first. More frequently if the engine is working on dusty ground.
Honda ( fig. 21): Remove the cover and take out the
filter. Carefully check the filter for holes or other
damage. A broken or damaged filter must be replaced.
To remove dirt, carefully knock the filter several
times against a hard surface or use compressed air
from the back of the filter to blow-clean. Do not try
tobrush the filter clean as this forces dirt down into
the fibres. A very dirty f ilter should be replaced.
Clean the air filter after every 25 hours of operation or once a season. More frequently if the engine is working on dusty ground.
SPARK PLUG
Neverremovethesparkplugorspark
plug cable when checking to see if there
is a spark. Use a n approved test instrument.
Clean the spark plug regularly (every 100 hours of
operation). Use a wire brush for cleaning.
Change the spark plug if the electrodes are excessively burnt or if the plug is damaged. The engine
manufacturers give the following recommendations (fig. 22):
Briggs & Stratton: Champion J19LM (RJ19LM),
Spark gap 0.76 mm.
Honda GCV: BPR6ES (NGK).
Sparkgap0.7-0.8mm.
ADJUSTING THE CLUTCH CABLE
(Multiclip 51S)
If the drive does not engage when the clutch loop
is pressed against the handle, or if the lawnmower
feels cumbersome or slow,this may be because the
clutch in the transmission is slipping. To rectify
this situation, adjust the clutch cable as follows:
1. When the clutch loop is released, it should be
possible to push the mower without any resistance. If this is not the case, screw in the nipple
T until the mower can be pushed (fig. 23).
2. When the clutch loop is
pressedinapprox.2cm(position 1), there should be some
resistance when pushing the
lawnmower. With the clutch
loopfullypressedin (position
2) it should not be possible to
push the mower.Unscrew the
nipple T until this position is
achieved.
ADJUSTING THE CLUTCH CABLE
(PRO 51S)
Check the clutch function (fig. 24):
1. Push the mower forwards and backwards with
disengaged transmission.
2. Set the clutch control to the position and
push the mower until the front wheels engage.
10
Page 11

ENGLISH
GB
3. In this position, the spring H should be extend-
ed 6 mm from it’sunloaded position to provide
sufficient locking force in the transmission.
4. If the spring is not extended sufficiently, adjust
the wire nipple I at the handlebar.
5. First loosen the locking nut S and then adjust
the nipple I.
6. Set the clutch control to the position and
check that the transmission is di sengaged by
rolling the mower forwards and b ackwards.
ADJUSTING DRIVE BELT
(Multiclip 51S, PRO 51S)
Check the belt tension regularly. The drive belt is
correctly adjusted when the shoulder bolt K is centred in the front hole on the engine bracket
(fig. 25).
Incorrect belt tension can bring about abnormal vibrations in the handle (the belt is tensioned too
tightly) or the belt can start to slide (the belt is not
tensioned enough).
Adjust the drive belt like this: Stop the engine and
remove the spark plug cable from the spark plug.
Dismantle the transmission casing. Undo the
screw L. Pull the transmission forwards so that the
belt is tensioned and tighten the screw L. The drive
belt must be adjusted so that the shoulder bolt K is
centred in the front hole on the engine bracket.
SHOCK-ABSORBER
(PRO 48, PRO 51S)
The forward shock-absorber P (fig. 26) takes up a
greater load. Check the shock-absorber twice per
season. If the shock-absorber shows signs of damage or wear it should be replaced.
CHANGING BLADES
Wear protective gloves when changing
blades to avoid cutting yourself.
Blunt and damaged blades tear up the grass and
make the lawn unsightly after mowing. New wellsharpened blades cut off the grass. This gives a
green and fresh appearance after mowing.
Always check the blade after an impact. First disconnect the spark plug cable. If the blade system
has been damaged, defective parts should be replaced. Always use genuine spare parts.
To replace the blade, undo the screw (fig. 27). Fit
the new blade so that the stamped STIGA logo is
facing the blade holder (not facing the grass). Reinstall as illustrated. Tighten the screw properly.
Tightening torque 40 Nm.
When replacing the blade, the blade screw should
also be replaced.
The guarantee does not cover damage to the blade,
blade holder or engine caused by running into obstacles.
When replacing the blade, blade holder and blade
screw, always use genuine spare parts. Non-genuine spare parts can entail a risk of injury or damage, even if they fit the machine.
SHARPENING THE BLADES
Sharpening of the blades must be performed by
wet grinding, using a whetstone or a grindstone.
For safety reasons, the blades should not be sharpened on an emery wheel. Too high temperature
could cause the blade to become brittle.
Once t h e blade has been sharpened, it
must then be balanced to av oid vibration damage.
STORAGE
WINTER STORAGE
Empty the fuel tank. Start the engine and let it run
until it stops. T he same petrol must not remain in
the tank for more than one month.
Tip up the mower and unscrew the spark plug.
Pour a tablespoon of engine oil into the spark plug
hole. Pull o ut the starter h andle slowly so that the
oil is distributed in the cylinder.Screw in the spark
plug.
Thoroughly clean the mower andstore it indoors in
a dry place.
SERVICING
Genuine spare parts are supplied by service workshops and by many dealers.
www.stiga.com
11
Page 12

MOWING AHEAD
GGP Sweden AB·Box 1006·SE-573 28 TRANÅS
www.stiga.com
 Loading...