

Page 1

DEUTSCH
D
Multiclip
8211-0229-06
Page 2
S
SVENSKA
A
1.
3.
2.
4.
5.
7. 8.
2
6.
Page 3

SVENSKA
9. 10.
S
3
Page 4

ENGLISH
GB
SYMBOLS
The following symbols are displayed on the machine in order to remind you about the safety precautions and attention necessary when using the
machine.
The symbols mean:
Warning! Read the Instruction Book and
Safety Manual before using the machine.
Warning!Keep spectators away.Beware of
objects being flung out.
Warning! Before starting any repair work,
disconnect the plug from the wall socket.
Warning! Keep the extension cord away
from the cutting deck.
Warning!Do notput handsor feetunderthe
cover of the machine when it is running.
USING THE MOWER
CONNECTING
Connect the machine to an earthed, single phase
electric socket. The circuit must be protected by a
10A slow fuse.
Only use an extension cable that is approved for
outdoor use with a maximum length of 50 m. It
should not be lighter than type 245 IEC 53
(H05RR-F) or 227 IEC 53 (H05VV-F). If you are
unsure of anything, please contact your dealer.
Checkthat the extensioncableis not damaged,each
time before using the machine. The machine may
not be used if the extension cable is damaged.Relievetheextension cable intheloadreliefunit on the
steering handle (fig. 3, 4).
We recommend that you use an earth leakage circuit breaker that will cut off the power if anything
happens to the machine or the extension lead. If
you use a portable earth leakage circuit breaker
this must be fitted between the electric socket and
the extension lead.Test the operation of the earth
leakage circuit breaker before use.
If uncertain, contact your retailer.
Warning! The blades continue to rotate
even after the machine has been switched
off.
STOP
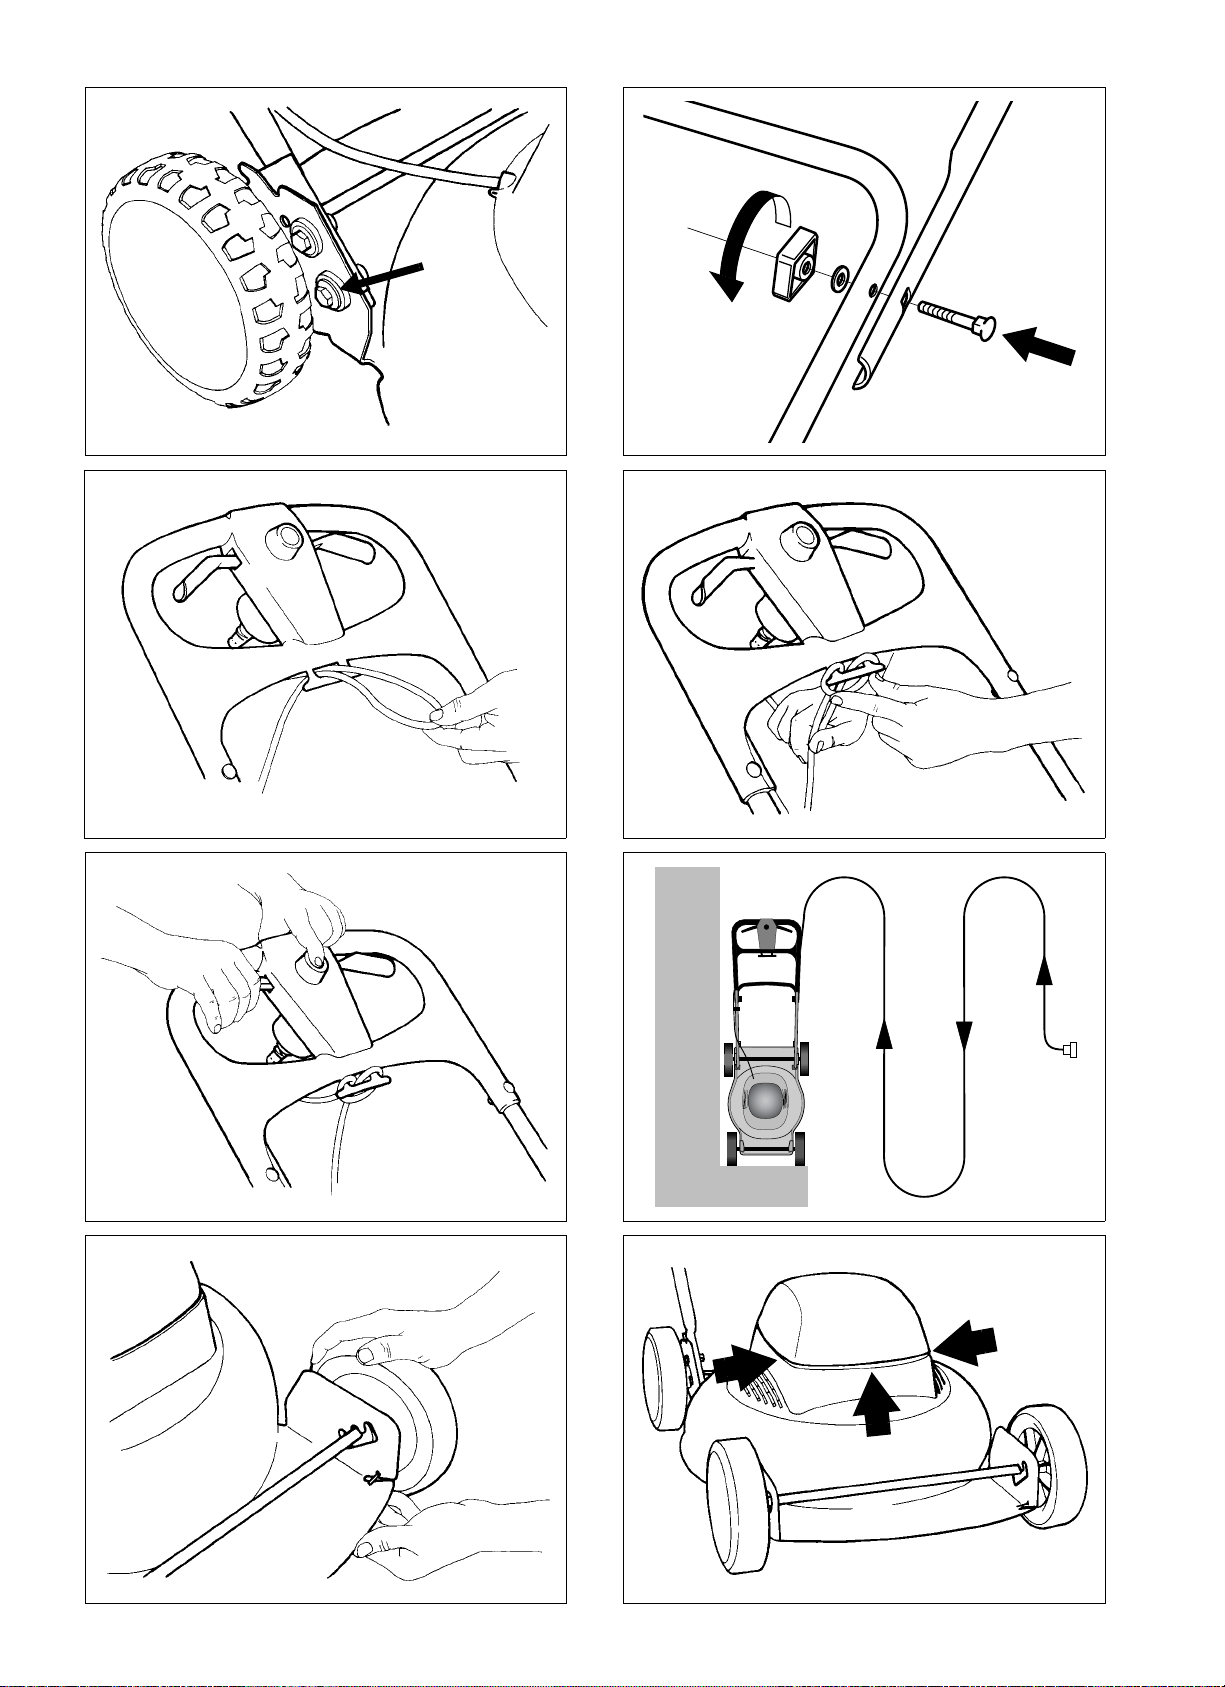
ASSEMBLING
HANDLEBAR
1. Setthehighest cutting height(position3,see also
under heading “CUTTING HEIGHT”)
2. The parts used for installation of the lower section of the steeringhandle are installed in a package.Removethe parts from thelowerholeonthe
chassis. Then fold the lower section of the steering handle up and fit the parts.NOTE that the
washer Ashould befitted between thescrew and
the plastic bushing (fig. 1).
3. Fold the upper section of the steering handle up
and tighten the lock knobs (fig. 2).
START/STOP OF ENGINE
Keephands andfeet well awayfrom the
rotating blade(s). Never put your hand
or foot under the blade casing or in the
grass evacuation unit while the motor is
running.
When starting up the motor, press the handlebar to
lift the front wheels and in that way reduce the resistance from the grass at the starting moment.
Do not engage and disengage the motor repeatedly
since this will build up heat because of the high current when starting, and this could, consequently,
cause motor damages.
Press the block button 1. Start the engine by pressing inthe starthandle 2 against the steering (fig.5).
Release the start handle to stop the engine.
OVERLOADING THE ENGINE
The lawn mower has an integrated overload protector. If this trips the engine will not start. Let the engine cool for 2 minutes before restarting.
If the mower still does not start, contact an authorised service workshop.
5
Page 5

GB
ENGLISH
MOWING TIPS
Always mow so the cable is laid out behind you on
the grass (fig. 6).
Never cross the cable! Should this happen by accid ent, stop the motor,pull out
the plug and check if the cable is damaged.
Before mowing the lawn, take care to remove any
stones toys and other hard objects.
A machinewith MULCHER systemcuts thegrass,
chops it finely and then blows it down in the lawn.
The grass clippings need not to be collected.
The following rules should be observed to give
best MULCHER effect:
1. Do not cut the grass too short. Not more than 1/
3rd of the length should be cut off.
2. Always keep it clean under the mower casing.
3. Always use a well sharpened blade.
4. Avoidmowingwhen the grass is w et. Thegrass
then sticks tothe undersideof the casing, giving
poor mowing results.
CUTTING HEIGHT
MAINTENANCE
CHANGING BLADES
You must never service the motor or the lawn
mower before first shutting off the motor and pulling out the plug.
Use protective glovesto prevent cuts when changing blades/knifeblades.
Blunt and damaged blades tear off the grass and
spoilthelookof thelawnaftermowing.New,well
sharpened blades cut the grass cleanly, so that the
lawn looks green and fresh even after mowing.
To replace the cutting blades, slacken the screw using the enclosed blade wrench. Fit the new blade
so that the punched STIGA logotype on the blade
is facing upwards towards the chassis (not down
towards the grass). Refit the screw and tighten to
20 Nm.
When replacing the blade, the blade screw should
also be replaced.
The guarantee does not cover damage to the blade,
blade holder or engine caused by running into obstacles.
Do not set the cutting height so low that
the blade/blades can hit unev en ground.
When adjusting the cutting height - always first disconnect the plug.
The cutting height can be adjusted to three positions by moving the wheel axles (fig. 7).
Position 1 = Lowest cutting height
Position3=Highestcuttingheight
CLEANING
In orderto function properly the engine must be effectively cooled. This isdone by a fan which sucks
in air at the air intake on the engine casing (fig. 8).
To make sure that the cooling system functions
properly the air intake must be thoroughly cleaned
if it has become blocked.
The machine should be cleaned each time after
use. For best possible mowing results it is important that the underside of the chassis is kept clean.
Use a brush or blow with compressed air.
When replacing the blade, the blade holder and
blade screw, always use original spare parts. Nonauthentic spare parts could lead to the risk of personal injury or damage, even if they fit the machine.
SHARPENING OF THE BLADES
Sharpening of the blades must be done by wet
method grinding, using a whetstone or a grindstone.
For the sake of safety, the blades should not be
sharpenedonanemerywheel.Averyhightemperature could cause the blade to become brittle.
Once the blade has been sharpened, it
must then be balanced so as to avoid vibration damage (fig. 10).
STORAGE
Thoroughly cleanthe mowerand storeit indoors in
a dry place.
The machine mustnot b e washed down with water.
6
 Loading...