

Page 1

DEUTSCH
D
Multiclip
8211-0203-09
46 S
46 SE
Page 2
SVENSKA
A
S
1.
3.
2.
4.
F
FULL
ADD
E
E
5. Multiclip 46 SE
FULL
0,15 l.
ADD
7. Briggs & Stratton ES 45
FULL
ADD
6. Briggs & Stratton LS 45 / LS 38
FULL
ADD
8. Honda
3
Page 3
S
x
3x
MAX
MIN
SVENSKA
G
STOP
9. Tecumseh
G
11. Multiclip 46 SE
N
STOP
MAX
MIN
I
N
10. Multiclip 46 S
I
3x
12. Briggs & Stratton ES 45
3
13. Briggs & Stratton LS 45 / LS 38
15. Honda 16.
4
14. Tecumseh
Page 4
SVENSKA
S
S
S
17.
19. 20.
18.
S
21. Briggs & Stratton LS 45 / LS 38 22. Briggs & Stratton ES 45
23. Honda
5
Page 5

S
SVENSKA
Briggs & Stratton : 0,75 mm
0,75 mm
Tecumseh: 0,6 mm
Honda: 0,7-0,8 mm
24. Tecumseh
E
A
C
D
25.
T
U
26.
6
27.
27.
40 Nm
40 Nm
28.
Page 6

ENGLISH
SYMBOLS
The following symbols are displayed on the machine in orde r to remind you about the safety precautions and attention necessary when using the
machine.
The symbols mean:
Warning! Read the Instruction Book and
Safety Manual before using the machine.
GB
CONTROLS
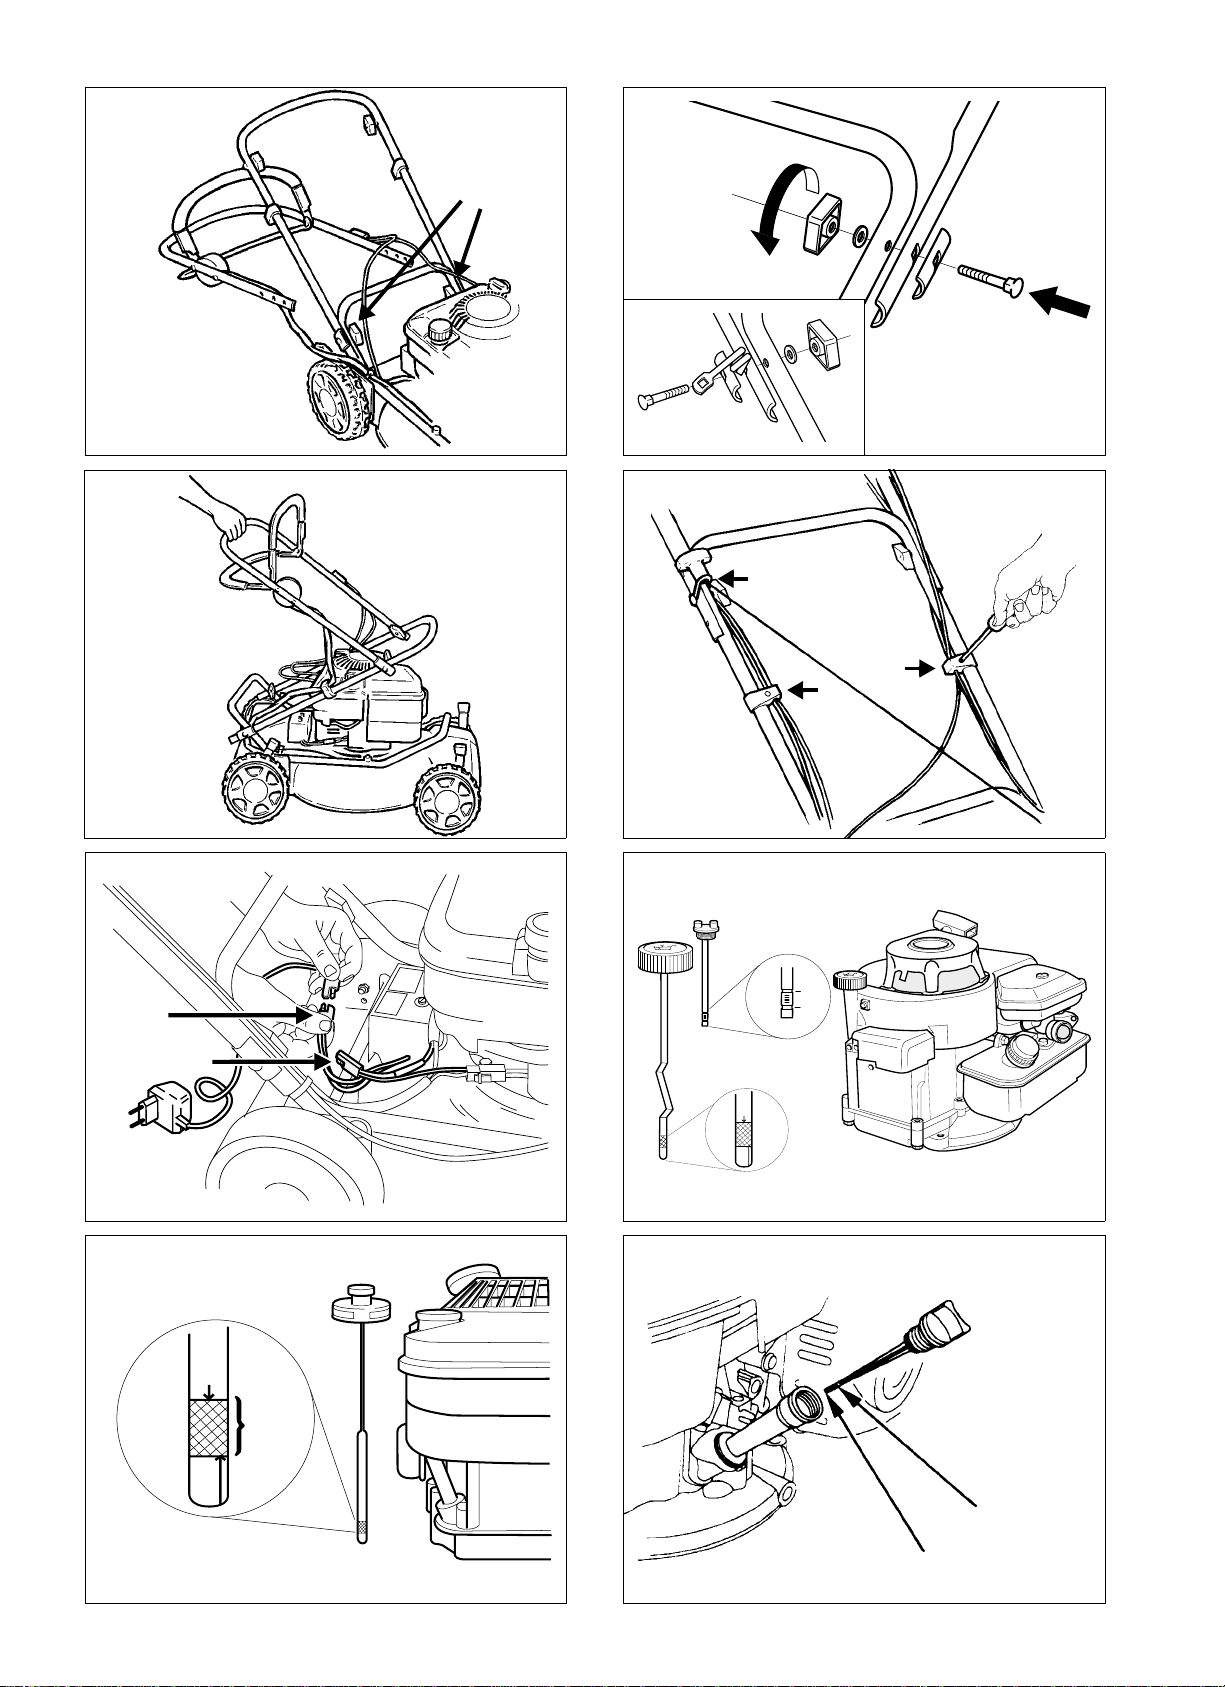
Fit the wires and electric cable (only Multiclip 46
SE)in the cable retainerE (fig. 4). Secure the starter handle in the eyelet F on the right-hand side of
the steering handle.
BATTERY (Multiclip 46 SE)
Electrolyte in the battery is toxic and
corrosive. It can cause serious corrosion
damage etc. Avoi d all contact with skin,
eyes and clothing.
Warning! Keep spectators away. Beware
of objects being flung out.
Warning! Do not put hands or feet under
the cover of the machine when it is running.
Warning! Before starting any repa ir work,
remove the spark plug cable from the
spark plugs.
IMPORTANT
Certain models do not have a throttle. The motor
speed is set for optimal function and minimal exhaust emissions.
ASSEMBLING
HANDLEBAR
Before starting the mower the first time, you
should charge the battery for 24 hours. Refer also
to the section titled 'MAINTENANCE, BATTERY'.
USING THE MOWER
BEFORE STARTING
FILL THE CRANKCASE WITH OIL
The lawn mower is delivered without
any oil in the motor crankcase. The
crankcase m ust, therefore,be filled with
oil before the motor is started the first
time.
1. Remove the oil dipstick (fig. 6,7,8,9).
2. Fill the engine's crankcase with 0.6 litres of
good quality oil (service class SE, SF or SG)
Use SAE 30 or SAE 10W- 30 oil.
3. Fill until the oil reaches the “FULL/MAX”
mark on the dip stick. Do n ot fill with too much
oil.
Lift the upper part of the handlebar and position it
behind the machine. Move the lower part of the
handlebar upwards and tighten the locking knobs
A (fig. 1).
Then fittheupper part of the handlebar.A securing
eye for the starting handle is fitted on the righthand side (fig. 2).
Storage position: Slacken the locking knobs on the
lower part of the handlebar and move it forwards.
Then slacken the locking knobs on the upper part
of the handlebar and move it backwards (fig. 3).
Note that you must check to make sure that the
wiresdo not fasten and break when the steeringhandle is moved upwards or into the storage position.
CHECKING THE OIL LEVEL
Check before using the machine that the oil level is
between “FULL/MAX” and “ADD/MIN” on the
dipstick.
Briggs & Stratton, Honda: Remove and dry the
dipstick (fig. 6,7,8). Slide it down completely and
tighten it. Unscrew and pull it up again. Read-off.
If the oil level is low, fill with oil up to the “FULL/
MAX” mark.
Tecumseh:Clean the area round the oil plug, then
remove the plug (fig. 9). If the oil is not level with
the edge of the hole, carefully pour in clean oil. Replace the oil plug.
7
Page 7

GB
ENGLISH
FILL UP THE PETROL TANK
Fill with pe trol before starting the motor. Never remove the filler cap or fill
with petrol while the mot or is running
or still w arm.
Never fill the fuel tank completely full
but allow a little room for the petrol to
expand.
Always use pure unleaded petrol. You must never
use 2-stroke petrol mixed with oil.
NOTE that you should always remember that petrol is a perishable commodity. Never buy more
petrol than what you can use up in 30 days.
STARTING THE ENGINE
(Briggs & Stratton, Tecumseh)
1. Place the lawn mower on flat, firm ground. Do
notstartinhighgrass.
2. Make sure the spark plug lead is connected to
the spark plug.
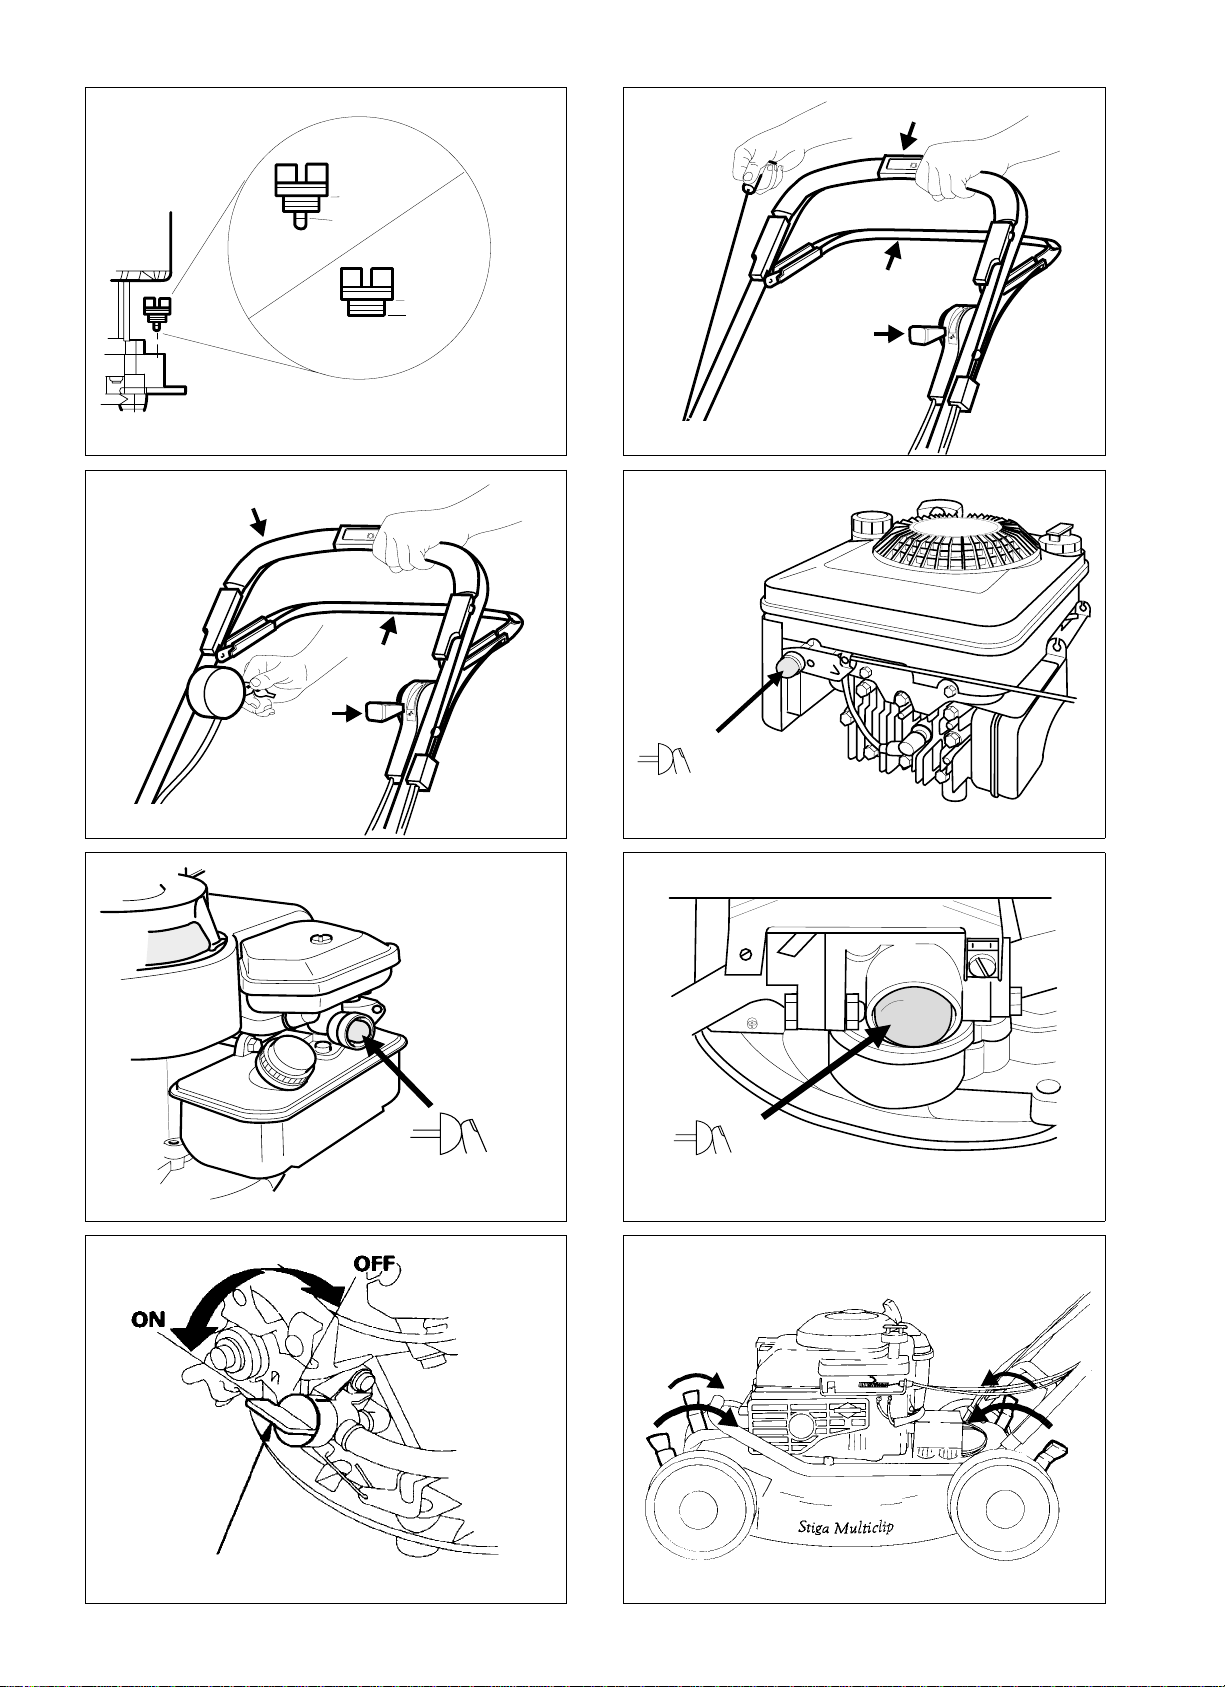
3. If the lawnmower is equipped with a throttle lever, set throttle lever N in full throttle position
(fig. 10,11).
4. When starting a cold engine: Press down the
primer fully three times (fig. 12,13,14).
When starting a warm engine the primer
doesn’t need to be used. If the engine stops due
to a lack of petrol, refill and press down the
primer three times.
5. Press in the Start/Stop-loop G against the steering. Note that the Start/Stop loop G must be
kept pressed-in to prevent the engine from stopping (fig. 10,11).
6. To facilitate star ting of the engine - press down
the handlebar so that the front wheels lift slightly from the ground. Do not start in tall grass.
Multiclip46 S: Grasp the starter handle and
start the engine by pulling briskly on the starter
handle.
Keephands and feet well away fromthe
rotating blade(s). Never put your hand
or foot under the blade casing or in the
grass evacuation unit while the moto r is
running.
STARTING THE ENGINE (Honda)
1. Place the lawn mower on flat, firm ground. Do
not start in high grass.
2. Make sure the spark plug lead is connected to
the spark plug.
3. Open the fuel cock (fig. 15).
4. Move the throttle control N to the chokeposition . Note ! Don't use the choke position
when the engine is warm (fig. 10).
5. Press in the Start/Stop-loop G against the steering. Note that the Start/Stop loop G must be
kept pressed-in to prevent the engine from stopping (fig. 10).
6. Grasp the starter handle and start the engine by
pulling briskly on the starter handle.
7. When the motor starts, move the throttle lever
backwards until the max. rotation speed is obtained. Note! The engine should always be run
at the maximum rotation speed to avoid abnormal engine vibrations.
Keephands and feet well away fromthe
rotating blade(s). Never put your hand
or foot under the blade casing or in the
grass evacuation unit while the moto r is
running.
ENGAGE/DISENGAGE THE DRIVE
Engage the drive by pressing coupling clamp I
against the steering handle. Disengage the drive by
releasing coupling clamp I (fig. 10,11).
By pressing down the handlebar so that the driving
wheels release their grip on the ground, turning, reversing, moving round trees etc. can be done without having to disengage the drive system.
Multiclip 46 SE: Startthe engine by turning the
starterkeyclock-wise.Releasethekeyassoonas
the engine starts. Always make short attempts at
starting to prevent discharging the battery.
7. To achieve the best cutting results, you should
always run the engine at full-speed.
8
Page 8

ENGLISH
GB
STOPPING THE ENGINE
Themotormaybeverywarmimmediately after it is shut off. Do not touch the
silencer, cylinder or cooling flanges as it
can cause burns and injury.
1. Release Start/Stop brace G to stop the engine
(fig. 10, 11).This brace must not be disengaged
(e.g. through fixing it in the depressed position
against the steering), as the engine cannot be
stopped.
Honda: Close the fuel cock.
2. If the lawn mower is left unattended to, remove
the lead from the spark plug.
Multiclip46 SE: Also remove the starter key.
If the start/stop loop no longer w orks,
stop the e ngine by removing the lead
from the spark plug. Immediately take
the lawn mower to an authorised workshop for repairs.
MOWING TIPS
Before mowing the lawn, take care to remove any
stones toys and other hard objects.
A machinewith MULCHER system cuts the grass,
chops it finely and then blows it down in the lawn.
The grass clippings need not to be collected.
Note! the height setting works in the opposite direction on the back axle respective front axle.
Make sure you set the same cutting height on all
wheels (fig. 16).
MAINTENANCE
Noserviceistobemadeonthemotoror
grass cutter unit without first switc hing
off the motor and removi ng the spark
plug cable from the spark pl ug.
Multiclip 46 SE: No service measures
should be carried out on the engine or
lawn mower if the battery terminal is
not disconnected from the engine terminal (fig. 5).
Stop the motor and remove the spark
plug cable if the mower is to be lifted,
e.g. with transportation.
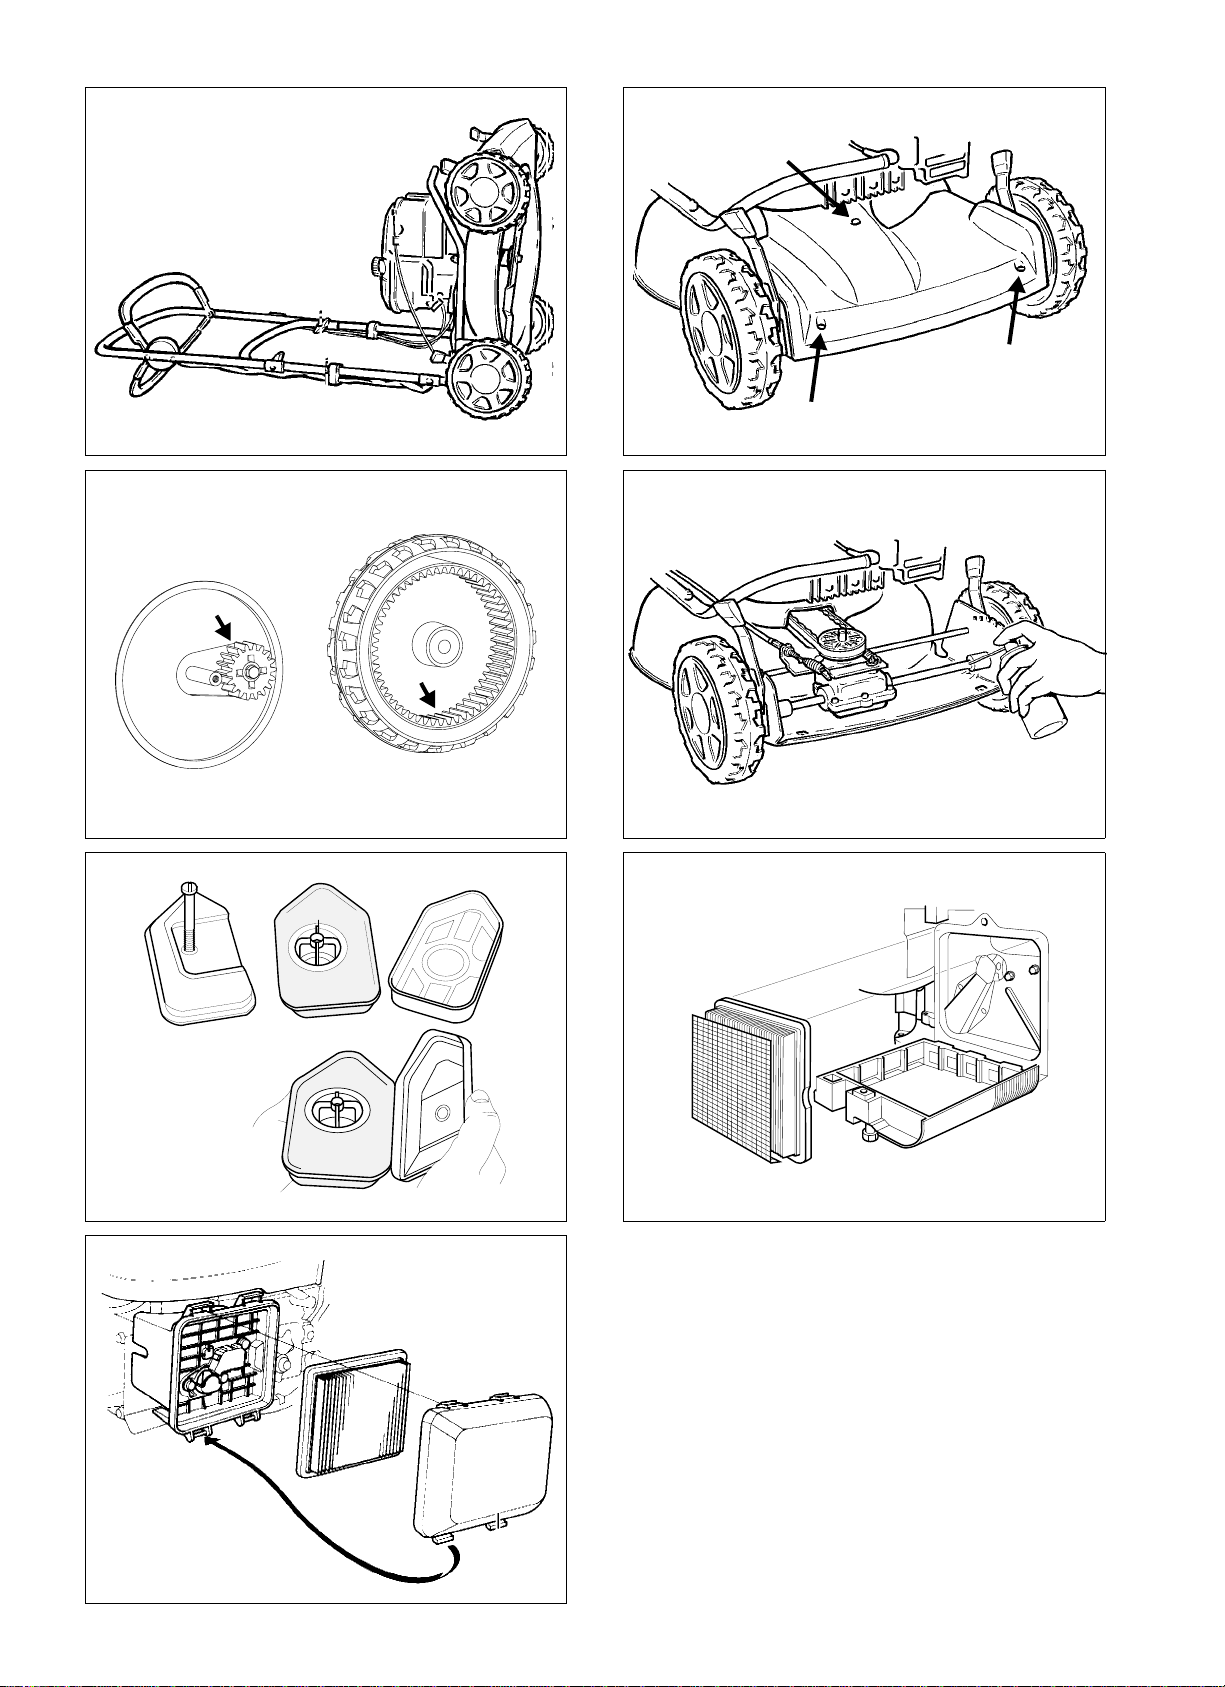
If the machine has to be inclined when
replacing blades, changing oil, cleaning,
etc., you should slacken the locking
knobs and move the ste ering handle forwards. Raise the mower backwards to
allowthemachineto reston thesteering
brace as shown in (fig. 17).
CLEANING
The following rules should be observed to give
best MULCHER effect:
1. Use a high engine speed (full throttle).
2. Do not cut the grass too short. Not more than
1/3rd of the length should be cut off.
3. Always keep it clean under the mower casing.
4. Always use a well sharpened blade.
5. Avoid mowingwhenthegrassis wet. The grass
then sticks to the underside of the casing, giving
poor mowing results.
CUTTING HEIGHT
Shut off the motor before adjusting the
cutting height.
Do not se t the cutting height so low that
the blade/blades can hit uneven ground.
The mower has a quick setting with 4 cutting
heights on each wheel.
After e ach time it is used the mower should be
cleaned. This is particularly important on the underside of the mower casing. Wash out w ith the
garden hose. The mower will then last longer and
function better.
Note! High pressure washing units should not be
used. If grass has dried on to the cutterhead casing
it can be removed by scraping. If necessary, give
the underside a touch of paint to prevent rusting.
Clean the silencer and the surrounding
area regularly to remove grass, dirt and
flammable waste products.
Note that you should clean the area under the timing gear casingonce or twice a year.Setat the lowestmowingheight. Slackenthescrewsandremove
thetiming gear casing(fig. 18). Clean witha brush
or compressed air.
9
Page 9

GB
ENGLISH
The inside of the drive wheels should be cleaned
once a season. To clean a wheel, remove the hubcap, screw, washer, and wheels. Brush or blow the
gear and the gear ring on the wheel to clean them
from grass and dirt (fig. 19). Remount the wheel.
COOLING SYSTEM
Before use, the engine's cooling system should be
cleaned. Clean the cylinder's cooling fins and the
airintake,removinganygrasscuttings, dirt and the
like.
LUBRICATION
Set at the lowest cutting height. Slacken thescrews
and remove the transmission casing. Lubricate the
driveshaft bythe slide bearingswith oilor oilspray
at least once a season (fig. 20).
CHANGING OIL
Replace the oil when the e n gine i s w arm
and the fuel tank is empty. Take care
whiledrainingastheoilishot,thisisto
prevent burns.
Change the oil the first time after 5 hours of operation, and subsequently after every 50 hours of operationor once a season. Remove the dip stick, tilt
the mower and let the oil run out into a container.
Becarefulnottoletanyoilrunontothegrass.
Fill with new oil: use oil of SAE 30 or SAE 10W30 quality. The crankcase holds approx. 0.6 litre.
Fill until the oil reaches the “FULL/MAX” mark
on the dip stick. Do not fill with too much oil.
AIR FILTER
A dirty and blocked air filter reduces the engine
output and increases engine wear.
Briggs & Stratton LS 45 / LS 38: Carefully remove the air cleaner so that no dirt falls down into
the carburettor (fig. 21). Take out the foam plastic
filter element and wash it in liquid detergent and
water. Dry the filter element. Pour a little oil on the
filter element and squeeze it in. Refit the air cleaner.
Wash the filter every three months or every 25
hours running, whichever comes first, or more frequently if used in dusty conditions.
Briggs & Stratton ES 45: Loosen the screw and
fold down the cover of the air cleaner. Carefully
remove the filter cartridge (fig. 22). Knock it
against a flat surface. Replace the filter cartridge
withanewoneifitisstilldirty.
Clean the filter every three months or after every
25 hours of use, which ever occurs first. More often if the lawn mower is used on dusty ground.
Honda: Take off the cover then remove the filter
(Fig. 23). Check the filter carefully for holes or
other damage. A broken or damaged filter must be
replaced.
To remove dirt, tap the filter several times against
a hard surface, or blow compressed air through the
filter from the back. Try not to clean the filter by
brushing, as this will force the dirt into the fibres.
A very dirty filter should be replaced.
Clean the air filter after every 25 hours of use, or
once every season; more often if the motor is used
on d usty terrain.
Tecumseh: Check the air filter after every 25
hours of use, more often if the engine is used in
dusty conditions. If the foam filter is dirty or
blocked it should be replaced.
Dismantle the cover A. Clean inside the cover A
and the filter support E, (fig. 24). Soak the foam
filter C with two teaspoons (approx. 20 ml) of engine oil. Massage the filter with a clean cloth to remove any excess oil. Also check the seal D,
replace it if damaged or deformed.
Refit the cover A.
SPARKING PLUG
Neverremovethesparkplugortheignition lead when checking to see if there is
any spark, always use an approved test
instrument.
Clean the sparking plug regularly (every 100 hours
running). Use a wire brush for cleaning and adjust
the correct spark gap (fig. 25).
Change the sparking plug if the electrodes are excessively burnt or if the plug is damaged. The recommendations of the engine manufacturers are as
follows:
Briggs &Stratton: Champion J19LM (RJ19LM),
Spark gap 0,75 mm.
10
Honda: BPR6ES (NGK),
Spark gap 0,7-0,8 mm.
Page 10

ENGLISH
GB
Tecumseh: Cham pion RJ17LM, RJ19LM,
Spark gap 0,6 mm.
BATTERY (Multiclip 46 SE)
Electrolyte in the battery is toxic and
corrosive. Itcan causeseriouscorrosion
damage etc. Avoid all contact with skin,
eyes and clothing.
In normal use during the season, the battery is
chargedby the engine. If the engine cannot be started with the starter key,itmay be because the battery
is 'dead'. Connect the battery chargerto the terminal
on the battery and put on charge for 24 hours (fig.
5). On completion of charging, connect the battery
terminal to the terminal on the motor.
Note! The battery charger must not be connected
to the engine terminal. The engine cannot be started by using the charger as a source of power supply, and the charger will be damaged.
WINTER STORAGE
3. When the clutch loop is
pressed in approx. 2 cm (position 1) there should be some resistance when moving the
mower backwards. With the
clutchloopfullypressedin(position2) it shouldnot be possible
to pull the mower backwards.
Loosen the locking nut U and
screw ou t the nipple T until this
position is achieved.
4.Finally tighten the locking nut
U.
CHANGING BLADES
Useprotectiveglovestopreventcuts
when changing blades/knifeblades.
Blunt and damaged blades tear off the grass and
spoilthelookof the lawnaftermowing.New, well
sharpened blades cut the grass cleanly, so that the
lawn looks green and fresh even after mowing.
Store the lawn mower for the winter with the batterywell-charged in a dry and cool place(between
0° C and +15° C). At least once during the winter
storage period the battery should be maintenancecharged. Before the start of the season the battery
should be charged once again for 24 hours.
ADJUSTING THE CLUTCH CABLE
If the drive does not engage when the coupling
clamp is pressed against the steering handle the
reason may be that the clutch cable is too slack.
Adjust as follows:
1. Remove the transmission cover by unscrewing
the screws S (fig. 18).
2. When the clutch loop is released it should be
possible to pull the mower backwards without
any resistance. If this is not the case, loosen the
locking nut U andscrewinthenippleTuntilthe
mower can be moved backwards (fig. 26).
Always check the blade after an impact. First disconnect the ignition cable. If the blade system has
been damaged the defective parts must be
changed. Always use genuine spare parts.
To replace the blade, slacken the scre w K. Fit the
new blade so that the stamped STIGA logotype is
turned facing the blade attachment (and not facing
the grass). Refit the washer and screw. Tighten the
screw fully to a torque of 40 Nm (fig. 27).
When replacing the blade, the blade screw should
also be replaced.
The guarantee does not cover damage to the blade,
blade holder or engine caused by running into obstacles.
When replacing the blade, the blade holder and
blade screw, always use original spare parts. Nonauthentic spare parts could lead to the risk of personal injury or damage, even if they fit the machine.
SHARPENING OF THE BLADES
Sharpening of the blades must be done by wet
method grinding, using a whetstone or a grindstone.
For the sake of safety, the blades should not be
sharpenedonanemerywheel.Averyhightemperature could cause the b lade to become brittle.
11
Page 11

GB
Once the blade has been shar pene d , it
must then be balanced so as to avoid vibration damage (fig. 28).
ENGLISH
STORAGE
WINTER STORAGE
Empty the fuel tank. Start the engine and let it run
until it stops. The same petrol must no t remain in
the tank for more than one month.
Tipup the mower and screw out the sparking plug.
Pour a teaspoon of engine oil in the sparking plug
hole. Pull out the starting handle slowly so that the
oil is distributed in the cylinder. Screw in the
sparking plug.
Thoroughly clean the mower and store it indoors in
a dry place.
12
 Loading...