

Page 1

www.stigagames.com
GB
ASSEMBLY INSTRUCTION MANUAL
SE
MONTERINGSANVISNING
GUARD 34”
ART. NO. 61 -482 0-34
Page 2

GB
ENGLISH
STIGA Guard 34” - Art.no. 61-4820-34
OWNER’S MANUAL
1. Read this manual carefully before starting assembly. Read each step completely before
beginning each step.
2. Some smaller parts may be shipped inside larger parts. Check inside all parts and cartons
before assembling or ordering parts.
3. Leave bolts slightly loose until you are instructed to tighten them.
4. To make assembly as easy as possible, place all parts of the trainer in a cleared area and
remove the packaging material. Organize all parts as per parts identifier in the assembly
manual. Do not dispose of the packing material until assembly is completed.
5. Take time to correctly orientate parts exactly as per each assembly diagram.
6. Save this instruction in the event that the manufacturer has to be contacted for replacement
parts.
WARNING!
FAILURE TO FOLLOW THESE SAFETY INSTRUCTIONS MAY RESULT IN SERIOUS INJURY
AND/OR PROPERTY DAMAGE
• Not suitable for children under 7 years. Contains small parts and long cord.
• Strangulation hazard, keep young children away from netting.
• This product should be assembled by two adults.
• Check that all parts are included before assembly.
• If any breakage is found on the product, please stop assembling or disassembling it.
• Check the product before each use. Make sure fittings are tightened. Never play on damaged
equipment.
• Do not leave the system standing upright without having filled the base with sand or water.
• Check the product for leaks often. Leaking water will lighten the base and cause the system to
become unstable and tip over.
• During play, keep your face and mouth away from the backboard, rim and net. If your teeth or face
come into contact with the rim and net, serious Injury can occur.
• Do not climb, jump, hang, sit or lean on the product. This product is not designed to support
a player hanging from the rim.
• Do not hang anything off the rim or backboard and do not use the system to lift or hoist anything.
• This product is not to be stored or used on a slope or hill area. Make sure the ground is free from
stones, gravel or any other debris which may cause damage to the base.
• Always exercise caution when moving basket system.
• When adjusting the height or moving the basket system, keep your fingers and hands away from
the moving parts. Do not allow children to adjust the height or move the system.
• This product should only be used under direct adult supervision.
• Do not use the system in windy or severe weather conditions. Do not use near overhead powerlines.
• Regularly check the pole and metal parts for rust.
2
Page 3

SVENSKA
SE
STIGA Guard 34” - Art.no. 61-4820-34
ÄGARMANUAL
1. Läs manualen noggrant innan montering. Fullfölj varje steg innan du påbörjar ett nytt.
2. Mindre delar kan fraktas inuti större delar. Vänligen kontrollera alla delar innan montering eller
beställning av reservdelar.
3. Lämna skruvarna något lösa tills du uppmanas dra åt dem.
4. För enklast montering, placera alla delar på en öppen och ren yta.
5. Ta dig tid att organisera vilka delar som hör till vilket steg i manualen.
6. Spara manualen för framtida syfte.
VARNING!
AVVIKELSER FRÅN NEDANSTÅENDE SÄKERHETSFÖRESKRIFTER KAN LEDA TILL
ALLVARLIGA SKADOR OCH/ELLER EGENDOMFÖRSTÖRELSE.
• Varning! Ej lämplig för barn under 7 år. Innehåller små delar och långt snöre.
• Strypningsrisk, håll mindre barn borta ifrån nätet.
• Denna produkt bör monteras av två vuxna.
• Kontrollera att alla delar finns med innan montering.
• Om någon del är trasig på produkten, avbryt monteringen.
• Kontrollera produkten varje gång innan användning. Kontrollera att skruvar och muttrar
är åtdragna. Spela aldrig om produkten är trasig.
• Låt ej ställningen stå upprätt utan att basen är fylld med sand eller vatten.
• Kontrollera ofta att basen inte har några läckor. Läckande vatten gör basen lättare vilket får
ställningen att bli instabil och välta.
• Håll ansikte och mun borta från backboard, ring och nät under pågående spel. Om dina
tänder eller ditt ansikte kommer i kontakt med ring och nät kan allvarlig skada uppstå.
• Klättra, hoppa, häng, sitt och luta dig inte på produkten. Denna produkt är inte lämpad för att
spelare hänger på korgen.
• Häng ej föremål på korgen eller ställningens backboard och använd inte ställningen för att
lyfta eller häva upp föremål.
• Produkten är ej avsedd att användas på sluttande mark. Kontrollera att marken under ej har
stenar, grus eller annat som kan orsaka skada på basen.
• Var försiktig vid förflyttning av basketställningen.
• Vid justering av höjd eller flytt av basketställningen, se till att hålla fingrar och händer borta
från de rörliga delarna. Låt ej barn ändra höjd eller flytta ställningen.
• Denna produkt bör endast användas under uppsikt av vuxen.
• Använd ej ställningen vid stark blåst, kraftig nederbörd, åska eller liknande väder.
Använd ej nära kraftledning.
• Kontrollera regelbundet efter rost på stolpen och metalldelar.
3
Page 4

Pos.
/ Fig.
P1 1
P2 1
P3 1
P4 1
P5 1
P6 1
P7 2
P8 2
P9 1
P10 2
P11 1
P12 1
P13 1
P14 1
H1 5
H2 3
H3 8
H4 6
H5 1
H6 2
H7 3
H8 1
H9 2
H10 1
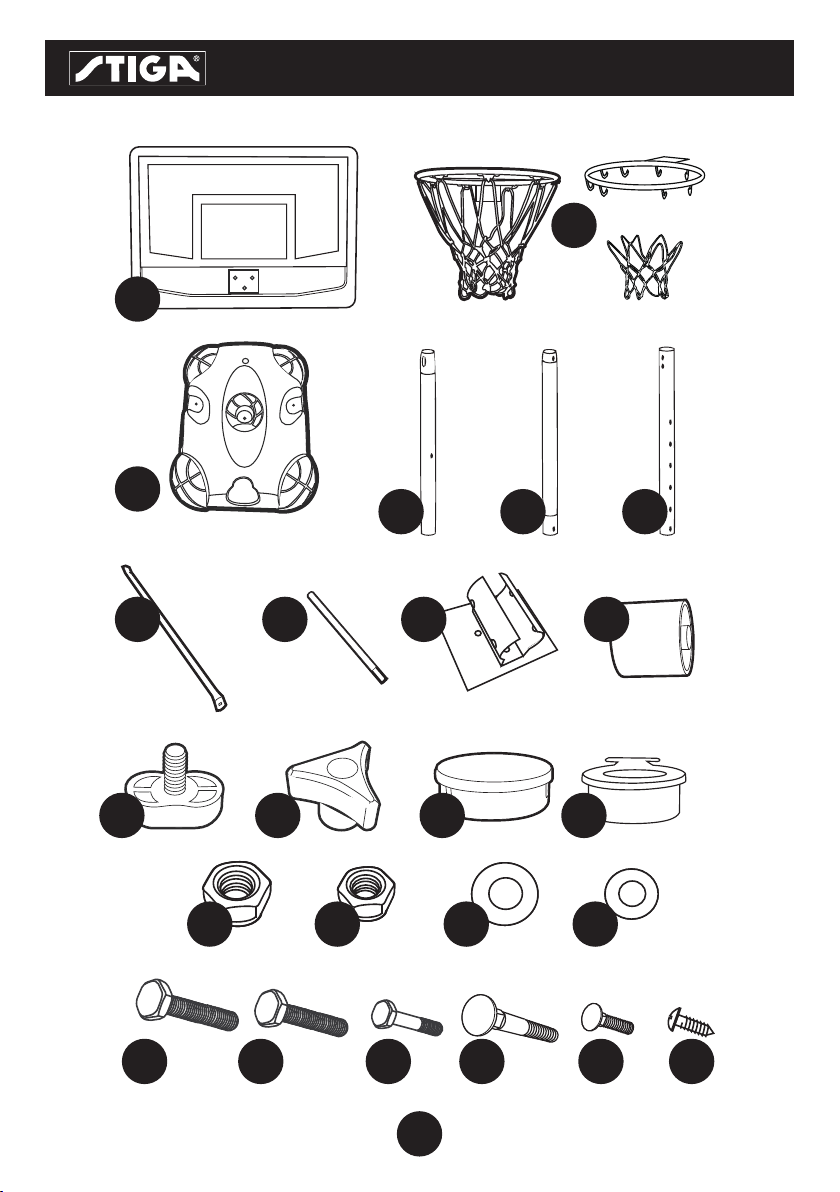
PC(S) /
ANTAL
CONTENT / INNEHÅLL
STIGA Guard 34” - Art.no. 61-4820-34
Description Benämning
Backboard Backboard
Rim Korg
Base Bas
Bottom Pole Nedre stolpe
Middle Pole Mittstolpe
Top Pole Övre stolpe
Support Arm Stödarm
Wheel Axle Hjulaxel
Pole Bracket Stolpfäste
Wheel Hjul
Plastic Nut Plastskruv
Triangle Nut Triangelskruv
Top Pole Cap Lock till Övre stolpe
Base Cap Baslock
Lock Nut M8 Mutter M8
Lock Nut M6 Mutter M6
Washer M8 Bricka M8
Washer M6 Bricka M6
Bolt M8 x 65mm Bult M8 x 65mm
Bolt M8 x 60mm Bult M8 x 60mm
Bolt M6 x 30mm Bult M6 x 30mm
Bolt M8 x 65mm Bult M8 x 65mm
Bolt M8 x 20mm Bult M8 x 20mm
Screw M5 x 16mm Skruv M5 x 16mm
RECOMMENDED TOOLS* / REKOMMENDERADE VERKTYG*
10
*NOT INCLUDED / INGÅR EJ
4
Page 5
P1
P3
CONTENT / INNEHÅLL
STIGA Guard 34” - Art.no. 61-4820-34
P2
P4
P5 P6
P7
P11
H1
H5 H8 H9 H10
P12 P13 P14
H2
H6
H7
P9 P10P8
H3
H4
5
Page 6

STEP 1 / STEG 1
STIGA Guard 34” - Art.no. 61-4820-34
P10
P7
H9
P14
H9
3
2a
P8
H3
P4
H3
H5
H1
H3
H1
P3
2b
1
P11
6
Page 7

STEP 1 / STEG 1
STIGA Guard 34” - Art.no. 61-4820-34
Pos. /
Fig.
PC(S) /
ANTAL
P3 1
P4 1
P7 2
P8 2
P10 2
P11 1
P14 1
H1 3 Lock Nut M8 Mutter M8
H3 4 Washer M8 Bricka M8
H5 1 Bolt M8 x 65mm Bult M8 x 65mm
H9 2
Description Benämning
Base Bas
Bottom Pole Nedre stolpe
Support Arm Stödarm
Axle Hjulaxel
Wheel Hjul
Plastic nut Plastskruv
Base cap Baslock
Bolt M8 x 20mm Bult M8 x 20mm
ENGLISH
1. Attach the Bottom Pole (P4) on the groove of the Base (P3), secure it by using the
Plastic Screw (P11) from under the base.
2a. Attach the Support Arms (P7) on the base by using 2 square bolts (H9)
2 washers (H3) and 2 nuts (H1) through the arms,
2b. Attach the support arms on the bottom pole with 1 hex head bolt (H5)
through 2 washers (H3) one on each side of the pole, and 1 nut (H1).
3. Place the Axles (P8) into the Wheels (P10), put them into the grooves of the base.
4. Tighten all screws.
SVENSKA
1. Placera Nedre stolpe (P4) i hålet i Basen (P3), fäst med Plastskruven (P11) underifrån.
2a. Fäst Stödarmarna (P7) på basen genom att använda 2 bultar (H9), 2 brickor (H3)
och 2 muttrar (H1) genom armarna.
2b. Fäst stödarmarna vid den nedre stolpen med 1 bult (H5) genom 2 brickor (H3),
en på var sida om stolpen, och 1 mutter (H1).
3. Placera Hjulaxlarna (P8) in genom Hjulen (P10) och sätt fast dem i basen.
4. Dra åt alla skruvar.
7
Page 8

STEP 2 / STEG 2
STIGA Guard 34” - Art.no. 61-4820-34
P1
P9
1
H7
H7 H4
H7H4 H4
H4H2H4
H2
H4 H2
2
8
Page 9

STEP 2 / STEG 2
STIGA Guard 34” - Art.no. 61-4820-34
Pos. /
Fig.
PC(S) /
ANTAL
P1 1
P2 1
P9 1
H2 3
H4 6 Washe r M6 Bricka M6
H7 3
Description Benämning
Backboard Backboard
Rim Korg
Pole Bracket Stolpfäste
Lock Nut M6 Mutter M6
Bolt M6 x 30mm Bult M6 x 30 mm
ENGLISH
1. Attach the rim on the groove of the Backboard (P1) and attach the Pole Bracket (P9)
on the backside of the backboard, at the joint by using 3 bolts (H7), 6 washers (H4)
and 3 nuts (H2).
NET AND RIM ASSEMBLY
2. Take the loops at the top edge of the net. Hook one loop over and around center
of one rim hook. Pull loop down to secure loop within the rim hook. Repeat for
remaining net loops.
SVENSKA
1. Fäst korgen vid hålen i Backboarden (P1) och fäst Stolpfästet (P9) på baksidan med
hjälp av 3 bultar (H7), 6 brickor (H4) och 3 muttrar (H2).
FÄST NÄTET I KORGEN
2. Ta öglorna i den övre kanten på nätet. Haka i en ögla över och runt mitten på en korgkrok.
Dra öglan neråt för att säkra fast öglan på kroken. Upprepa med resten av öglorna.
9
Page 10

STEP 3 / STEG 3
STIGA Guard 34” - Art.no. 61-4820-34
P6
1
H8
P5
P12
H1 H3
2
P6
P13
P9
P1
H3 H6
10
Page 11

STEP 3 / STEG 3
STIGA Guard 34” - Art.no. 61-4820-34
Pos. /
Fig.
PC(S) /
ANTAL
P1 1
P5 1
P6 1
P9 1
P12 1
P13 1
H1 2 Lock Nut M8 Mutter M8
H3 4 Washer M8 Bricka M8
H6 2 Bolt M8 x 60mm Bult M8 x 60mm
H8 1 Bolt M8 x 65mm Bult M 8 x 65mm
Description Benämning
Backboard Backboard
Middle Pole Mittstolpe
Top Pole Övre stolpe
Pole Bracket Stolpfäste
Triangle Nut Triangelmutter
Top Pole Cap Lock till Övre stolpe
ENGLISH
1. Insert the Top Pole (P6) in the Middle Pole (P5). At the joint, place a square bolt (H8)
and lock it with the Triangle Nut (P12).
2. Attach the top pole inside the bracket (P9). Lock it at the joint with 2 hex head bolts
(H6) 4 washers (H3), one at each side of the bracket, and 2 nuts (H1),
Put the cap (P13) at the top of the top pole.
3. Tighten all screws.
SVENSKA
1. Sätt i Övre stolpe (P6) i Mittstolpen (P5). Vid skarven, placera en bult (H8) och lås fast
den med Triangelmuttern (P12).
2. Placera Stolpfästet (P9) på den övre stolpen. Lås fast den med hjälp av 2 bultar (H6),
4 brickor (H3), en på var sida om stolpfästet, och 2 muttrar (H1). Sätt fast Locket till
den övre stolpen (P13) på stolpen.
3. Dra åt alla skruvar.
11
Page 12

STEP 4 / STEG 4
STIGA Guard 34” - Art.no. 61-4820-34
P6
H10
P5
P4
2
1
12
Page 13

STEP 4 / STEG 4
STIGA Guard 34” - Art.no. 61-4820-34
Pos. /
Fig.
PC(S) /
ANTAL
P4 1
P5 1
P6 1
H10 1
Description Benämning
Bottom Pole Nedre stolpe
Middle Pole Mittenstolpe
Top Pole Övre stolpe
Screw M5 x 16mm Skruv M5 x 16mm
ENGLISH
1. Insert the Middle pole (P5) inside the Bottom pole (P4). Lock it in place with
the Screw (H10).
HEIGHT ADJUSTMENT
2. To adjust the height, loosen the Triangle nut and the Bolt that is connecting
the Top pole with the Middle pole and lower or raise the top pole to another
hole that is in the desired height.
SVENSKA
1. Sätt i Mittenstolpen (P5) i den Nedre stolpen (P4). Lås fast den med skruven (H10).
JUSTERA HÖJD
2. För att justera höjd, skruva loss Triangelmuttern och Bulten som fäster Övre stolpen
i Mittstolpen och sänk eller höj den övre stolpen till ett annat hål i önskad höjd.
Skruva dit bult och mutter igen.
13
Page 14

STEP 5 / STEG 5
STIGA Guard 34” - Art.no. 61-4820-34
ENGLISH
RECOMMENDATIONS
It is recommended filling the base with sand, not water. If water is used, make sure to empty
all the water completely from the base before the temperature approaches or falls below the
freezing point. Freezing water may crack the base and cause leaks. This will result in failure of
the system, and could result in serious injury.
FILLING THE BASE
1. Place the base where it will be used. Unscrew and remove the base cap.
2. First adult: Tip the base up att 45° angle.
3. Second adult: Carefully pour sand into base.
4. Allow sand to slide into lower end of base near the wheels. Gradually lower base as sand is
poured to ensure sand fills the entire base. Once full, put back the base cap.
5. NOTE: If filling with water, DO NOT tip base up.
SVENSKA
REKOMMENDATION
Det rekommenderas att fylla basen med sand istället för vatten. Om vatten används, var noga
med att tömma basen helt innan temperaturen utomhus når minusgrader. Fryst vatten i basen
kan orsaka skada och läckor. Är ställningen trasig kan den orsaka allvarliga skador. Spela aldrig
med en skadad produkt.
FYLLA BASEN
1. Placera basen där den ska användas. Skruva loss och ta bort Baslocket.
2. Vuxen 1: Tippa bakre delen av basen uppåt i en 45° vinkel.
3. Vuxen 2: Häll försiktigt sand i basen.
4. Låt sanden glida ner i den nedre delen av basen nära hjulen. Sänk gradvis basen ju mer sand som
hälls i för att vara säker på att sanden fyller hela basen. När basen är full, sätt tillbaka baslocket.
5. OBSERVERA: Om du fyller basen med vatten, tippa INTE basen uppåt.
14
Page 15

STEP 6 / STEG 6
STIGA Guard 34” - Art.no. 61-4820-34
ENGLISH
MOVING SYSTEM
1. Adjust backboard to lowest position.
2. While holding the pole and lifting the back of the base, carefully lean system forward until
wheels touch ground.
3. While holding pole and base, roll system to desired location.
4. Stand pole upright and set base flat on ground.
5. ALWAYS check to make sure system is stable in new location.
SVENSKA
FLYTTA STÄLLNINGE N
1. Sänk ner Backboarden till lägsta position.
2. Håll i stolpen och lyft samtidigt den bakre delen av basen, luta försiktigt hela ställningen
framåt tills hjulen rör vid marken.
3. Håll i stolpen och basen och rulla ställningen till önskad plats.
4. Res stolpen upprätt och ställ basen plant på marken.
5. KONTROLLERA alltid att ställningen står stabilt på sin nya placering.
15
Page 16

www.stigagames.com
HUVUDKONTOR/HEAD OFFICE
STIGA SPORTS AB
Box 642
631 08 ESKILSTUNA, SWEDEN
Phone +46 16 162 600
Fax +46 16 122 601
E-mail stiga@stigasports.se
DENMARK
denmark@stigasports.se
AUSTRIA
austria@stigasports.se
If you need to contact the distributor in your country,
visit our website www.stigagames.com and go to the
link DISTRIBUTORS, where you can find detailed
contact information.
On the webpage you will also find the STIGA Games
assortment and manuals for download.
NORWAY
norway@stigasports.se
FRANCE
france@stigasports.se
FINLAND
finland@stigasports.se
GERMANY
germany@stigasports.se
8200-0507-04-A05
We accept n o liabilit y for typo graphi cal error s, and reserve the right to make ch anges in te rms of mater ials and d esign.
/ 2016 -04-26 © Copyright S TIGA Sports AB .
 Loading...