

Page 1

STIGA GARDEN
COMBI
MULTICLIP
8211-0202-11
Page 2

H
I
1.
5.
G
-
+
2.
D
3. 7.
G
C
6.
4.
8.
Page 3
9.
13.
10.
14.
N
M
11. 15.
12.
16.
Page 4
17.
18.
5
2
3
6
1
7
3
3.19.
4
Page 5

GB
ENGLISH
GENERAL
This symbol indicates WARNI NG. Personalinjuryand/ordamagetoproperty
may result if the instructionsare not
followed carefully.
SYMBOLS
The following symbols can be found on the machine to remind you of the care and attention that
are required during use:
The symbols mean:
Warning!
Readthe instruction manual and the safety
manual before using the machine.
Warning!
Do not insert your hands or feet under the
cover when the machine is in operation.
1 Shim washer 16 x 38 x 1.0
2 Locking nut
2 Wing nut
2 Washer 8.4 x 24 x 2.0
1 Battery mount
STEERING WHEEL
Install the wheel on the steering column with the
enclosed pin and push on the steering column
sleeve.
The shim washers in theaccessories bag should be
installed between the lower and upper steering column jacket to compensate for any axial play: 0, 1
or 2 washers may be necessary (fig. 1).
BATTERY
The battery is a valve-regulated battery with 12 V
nominal voltage. T he battery is maintenance-free
insofar as you don’t have to check or top up the
electrolyte level.
Warning!
Watch out for discarded objects. Keep onlookers away.
Warning!
Before starting repair work, remove the
spark plug cable from the spark plug.
Warning!
Use hearing protectors.
Warning!
This machineis not designed to be driven
on public roads.
INSTALLATION
To avoid injury and damage to people
andproperty,trynot to startthe engine
before all the measures under “ASSEMBLY“ have been carried out.
On delivery, the battery is in the accessories box.
The battery must be fully charged before being used f or the first time. The
battery should always be stored fully
charged. If the battery is stored for
longer than 10 days without being
charged, it can be damaged.
If the machine is not going to be used for an extended period (more than 1 month), the battery
shouldbe charged, disconnected and then storedin
a cool, safe place. Charge the battery completely
before reinstalling.
The battery can be charged in two ways:
1. Viaabattery charger (recommended). Thismust
be a charger with constant voltage. The battery
can be damaged if a standard type battery
charger (for acid batteries) is used.
Stigarecommendsbatterychargerwithitemno.
1136-0602-01 which may be ordered by an authorised dealer.
ACCESSORIES BAG
A plastic bag is enclosed with the machine containing:
No. Designation Dimension
1 Spark plug sleeve
1 Torsion pin for ditto
1 Shim washer 16 x 38 x 0.5
2. You can also allow the engine to charge the battery. In this case it is very important, above all
when starting the machine for the firsttime and
when it has not been used for a long time, to allow the engine to run continuously for at least
45 minutes.
Page 6

ENGLISH
GB
Do not short circuit the battery’s terminals. Sparks occur which can result in
fire. Do not wear metal jewellery which
can come into contactwith the battery
terminals.
In the event of damage to the battery
casing, cover, terminals or interference
to the strip covering the valves, the battery should be replaced.
If the battery terminals are coated with oxide, they
shouldbecleaned. Clean the battery terminals with
awirebrushandgreasethem.
Position the battery in the appropriate place under
the engine casing and thread over the battery
mount in accordance with fig. 2. Press down the
mount into the appropriate holes.Place the locking
nuts in the wing nuts. Thread the washers onto the
battery mount’s legs from below and secure with
the wing nuts so that the battery is securely mounted. Connect the battery cables.
NOTE! Toavoid damage to theengine andthe battery, the positive battery cable (+) should always
be connected to the battery first.
Do not run the engine when the battery is disconnected.
4. Install the battery cables.
GRASS COLLECTOR (Accessory)
Assemble the grass collector according to the separate assembly instructions suppliedwiththe grass
collector.
The ejector tube G may only be used together
with the complete grass collector.
When using the grass collector, all components
which make up the collector must be installed on
the machine (fig. 5).
Never use the machine without the collection sackH and the long ejectortube
beinginstalled. There isa riskof stones
and other objects being thrown out, injuringpeople and animals ordamaging
property .
Warning for the rotating blade. Never
put your hand or foot in the ejector
opening.
CONTROLS
Items 1 - 7, see figures 18 - 19.
TYRE PRESSURE
Check the air pressure in the tyres. Correct air
pressure:
Front: 1.7 bar (24 psi)
Rear: 0.6 bar (9 psi)
CUTTING DECK
The deck’sparallel alignment with the surface can
beadjusted with nutsD at the reardeck suspension
mounts (fig. 3).
Multiclip (Garden Multiclip - Garden Combi):
The unit is installed on the machine on delivery.
Collector (Garden Combi):
Theunitis installedon the machine on deliverybut
must be completed with ejector tubes.
1. Disconnect the battery cables.
2. Remove the cover C (fig. 4).
3. Install the ejector tube G (fig. 4). Use the same
screws and nuts as were used for the cover.
Under no circumstances may the lawnmowerbestartedifthecoverhasnot
been replaced with the ejector tube.
1. HEIGHT SETTING LEVER
Lever for setting the height of the cutting deck
above the ground.
Release the lever by pushing it inwards.
Then move it up or down to the desired
position.
The lever has fivepositions, giving cutting heights
from 35 to 75 mm.
2. BLADE ENGAG ING LEVER
Lever for engaging the drive for the cutting deck.
There are two positions:
1. Lever in the forward position – the
blade rotates.
2. Lever in t he rear position – the blade
does not rotate. Theblade brake is activated.
3. SERVICE BRAKE/CLUTCH
A pedal that combines both service brake and
clutch. There are 3 positions:
Page 7

GB
ENGLISH
1. Pedal released – forward
drive engaged. The machine
will move if a gear is engaged.
Service brake not activated.
2. Pedal depressed halfway –
forward drivedisengaged, gear
shifting can be performed.
Service brake not activated.
3. Pedal fully depressed – forward drive disengaged. Service
brake fully activated.
4. PARKING BRAKE
An inhibitor that can lock thebrake pedal inthe depressed position.
Depress the brake pedal fully. Move the
brake inhibitor to theside and thenrelease
the brake pedal.
The parking brake is released by gently pressing
the brake pedal. The spring-loaded inhibitor slides
to one side.
once again. Engage the gear once again. Never
forceagearin.
7. STARTER KEY
Ignition lock used for starting/stopping the engine.
There are 3 positions:
STOP
START-
1. Stop position – the engine is shortcircuited. The key can be removed.
2. Operating position (no symbol).
3. Start position – the electric start motor
is activated when the key is turned to the
spring-loaded start position. Once the engine has started, let the key return to operating position.
USING THE MOWER
AREAS OF USE
The machine may only be used for the following
tasks using the genuine STIGA accessories stated.
Make sure that the parking brake is released when
operating the machine.
5. THROTTLE/CHOKE CONTROL
A control forsettingthe engine speedand to choke
the engine when starting from cold
Idling.
Full throttle – when the machine is in operation, full throttle should always be
used. Full throttle located1 - 1.5 cm from
the bottom edge of the groove.
Choke – for starting a cold engine. The
choke is located in the bottom of the
groove.
6. GEAR LEVER
A lever for selecting one of the five forward gears
in the gearbox (1 - 2 - 3 - 4 - 5), neutral (N) or reverse (R).
The clutch pedal (on the left-hand side of the machine) must be depressed when changing gear.
1. Mowing
With the cutting deck mounted originally.
2. Grass clipping and leaf collection
Using towed collector 13-1978 (30“).
3. Grass and leaf transport
Using dump cart 13-1979 (Standard) or combi
cart 13-1992 (plastic).
The maximum vertical load on the towing hitch
must not exceed 100 N.
The maximum over-run load on the towing hitch
from towed accessories must not exceed 500 N.
NOTE! Before using a trailer, contact your insurance company.
NOTE! This machine is not intended to be driven
on public roads.
BEFORE STARTING
Youmustreadtheseinstructionsforuse
and the accompanying pamphlet
“SAFETY INSTRUCTIONS“ carefully, before starting up the machine.
NOTE! You must make sure the machine is quite
stationarybeforechanging from reverse to forward
gear or vice versa. If a gear does notengage immediately,release the clutch pedal and then press it in
SAFETY SYSTEM
This machine is equippedwith a safetysystem that
consists of:
Page 8

ENGLISH
GB
- a switch on the gearbox
- a switch in the seat mount
- a switch at the blade engaging lever
- a replaceable, electronic safety module which
controls the system
In order tostart the machine, the followingare necessary:
- the gear lever in neutral
- driver sitting on seat
- the blade engaging lever in the rear position (=
blade
disengaged)
Always check the operation of the safety system before using the machine!
Check as follows:
- start the engine, sit on the seat, engage a gear,
lift your weight
off the seat – the engine should stop.
- start the engine again, sit on the seat, engage
the blade, lift your weight off the seat – the en-
gine should stop.
Do notuse themachine if the safety systemisnotworking!Takethemachineto
a service workshop for inspection!
FILL UP T HE PETROL TANK
Always use lead-free petrol. You must
never use 2-stroke petrol mixed with oil.
NOTE! Bear in mind that ordinary lead-free petrol
is a perishable; do not purchase more petrol than
can be used within thirty days.
Environmentally friendly petrol can be used, i.e.
alkylate petrol. This type of petrol has a composition that is less harmful for people and nature.
Check theoil level every time before using.The
machine should be standing on level ground.
Removedipstick B and wipe itoff.Slideit
down completely and tighten it.
Then unscrew it and pull it up again. Read off the
oil level. Top up with oil to the “FULL“ mark, if
the oil level comes below it (figs. 11 - 12).
STARTING THE ENGINE
1. Open the fuel cock.
2. Make sure that the sparking plug cable is properly in place.
3. Make sure that the cutting deck is disengaged.
The blade engaging lever should be in its rear position.
4. Put the gear lever in neutral.
5. Starting cold engine – put the throttle control in
the choke position.
Starting warm engine – put the throttle control at
full throttle (1 - 1.5 cm above the choke position).
6. Depress the brake pedal fully.
7. Turn the starter key and start the engine.
8. Once the engine has started, move the throttle
control gradually to full throttle if the choke has
been used.
9. When starting from cold, do not make the machine work under load immediately, but let the engine run for afew minutes first. Thiswill allow the
oil to warm up.
STOPPING
Move the blade engaging lever backwards to the
disengaged position. Apply the parking brake.
Petrol is highly inflammable. Always
storepetrolin containersthat are made
especially for this purpose.
Onlyfill or topupwith petrol outdoors,
and never smoke when filling or topping up. Fill with petrol before starting
the engine. Never remove the filler cap
or fill with petrol while the engine is
running or still warm.
CHECK THE ENG INE’S OIL LEVEL
On delivery, the engine’s crankcase is filled with
SAE 30 oil.
Allow the engine to idle 1 - 2 mins.
Stopthe engine byturning off the starterkey. Then
remove the starter key.
Shut off the petrol cock.
If the machine is left unattended, remove the s park plug cable from the
spark plug.
The engine may be very warm immediatelyafteritis shut off. Donottouchthe
silencer, cylinder or cooling fins. This
can cause burn injuries.
Page 9

GB
ENGLISH
CUTTING TIPS
Before mowing the lawn, take care to remove any
loose stones, toys and other hard objects.
Locate any fixed objects before mowing a lawn
you are unfamiliar with. Loose and/or fixed objects can seriously damage the cutting deck.
Do not cut wet grass ( during or immediately after
rain).
Keep hands and feet away from the rotating blade. Never put your hand or
foot under the blade casing or in the
grass ejector while the engine is running.
MAINTENANCE
No servicing may be carried out on the
engine or cutting deck unless:
-theenginehasstopped.
-the starterkey has been removed.
-the spark plug cablehasbeen removed
from the spark plug.
-the parking brake has been applied.
-the cutting deck is disengaged.
MAINTENANCE TIPS
The machine is designed to stand on its end during
maintenance work (fig. 7).
If the engine hasstopped due tothegrass being too
thick: disengage the cutting deck and move the
machine to a cut area before engaging it again.
For optimum ‘Multiclip effect’, follow these tips:
- cut frequently.
- run the engine at full revs.
- keep the underside of the cutting deck clean.
- use sharp blades.
- do not cut wet grass.
- cut twice (with different cutting heights) if
the grass is long.
OPERATION
Makesurethat there is the correctquantityof oil in
the engine when mowing on slopes (oil level on
“FULL“).
Be careful when driving on slopes. No
sudden starting or stopping when movingupordown a slope.Nevercut across
a slope. Move from the top down, and
from the bottom to the top.
The machine, equipped with original
accessories, may notbedriven onslopes
greater than 10º in any direction.
Reduce the speed on slopes and when
making s harp turns to prevent the machine from tipping over or you losing
control of the machine.
Ifthe machine istostandon its end,the
petrol and engine oil must have been
drained out first.
CLEANING
Rinse clean the underside of the cutting deck with
the garden hose.
NOTE! Do not aim the jet directly at the transmission or the air filter.
OIL CHANGE, ENGINE
Change the oil the first time after 5 hours of operation, and subsequently every 50 hours of operation or once a season. Change oil when the engine
is warm.
Always use a good grade of oil (service grade SF,
SG or SH).
The engine oil may bevery warmif itis
drained off directly after the engine is
shut off. Therefore, allow the engine to
cool a few minutes before draining the
oil.
1. Tilt the machine to the left (machine viewed
fromthe rear). Unscrew theoildrainplugJ(fig. 8).
Let the oil run out into a collection vessel. Do not
allow oil to get on the V-belts. Screw in the oil
plug.
2. Remove the dipstick and fill up with new oil.
Oil capacity: 1.4 litres
Oil type, summer: SAE-30
(SAE 10W-30 can also be used. However, oil consumption may increase somewhat if 10W-30 is
used. Therefore, check the oillevel more regularly
if you use this type of oil).
Page 10

ENGLISH
GB
Oil type, winter: SAE 5W-30
(if this oil is not available, use SAE 10W-30).
Use oil without any additives.
Do not fill with too much oil. This can cause the
engine to overheat.
Check t he oil level e ach time after filling. The level should be at “FULL“.
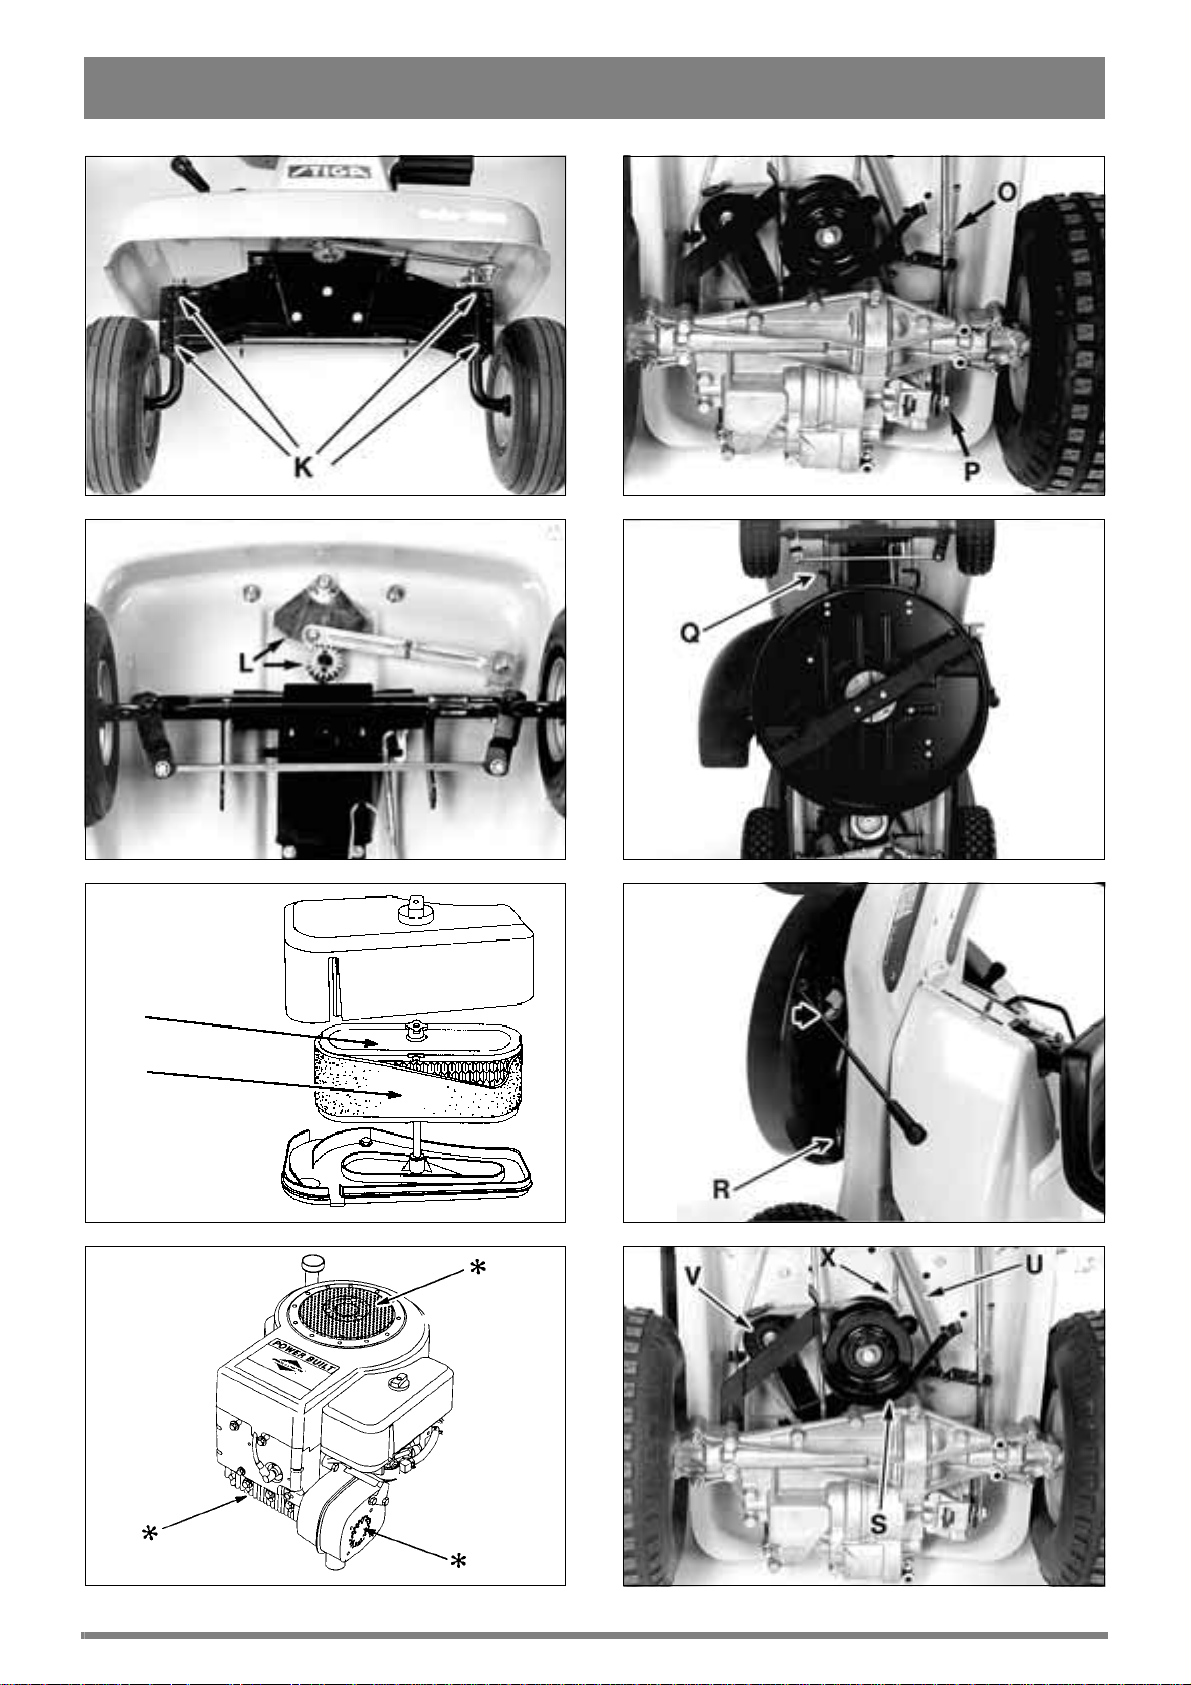
LUBRICATION
The front axle has four lubrication points K
(fig.9).Fillwith grease (useagrease gun) once per
season.
Lubricate the steering pinions L with grease acouple of times per season (fig. 10).
Also lubricate the machine’s other moving parts a
couple of times per season.
AIR FILTER
Important! Never run the engine without the air
cleaner being installed.
Foam filter (pre-filter): Clean every 3 months or
after every 25 hours of operation, whichever
comes first.
Paper filter: Replaceannually or after 100hours of
operation. More often if the machine works under
extremely dusty conditions.
KEEP THE ENGINE CLEAN
The engine is air-cooled. A blocked cooling system can damage the engine.
Clean the cylinder’s cooling fins and air intake of
grass and dirt every 5 hours ordaily (fig.12). This
is particularly important when mowing dry grass.
Also clean around the silencer to avoid fire.
Use compressed airor a brushfor cleaning. Donot
point jets of water directly at the engine.
When cutting dry grass for an extended period of
time, the engine’sinteriorcooling fins may needto
be cleaned. Contact an authorised service station.
SPARK PLUG
Check and clean the spark plug every 100 hoursof
operation.
Clean the spark plug with a wire brush (not sand
blasting) and reset the spark gap to 0.75 mm.
Replace the spark plug if the electrodes are excessively burnt. For replacing a spark plug, a spark
plug sleeve and a torsion pin are provided in the
accessories bag.
The engine manufacturer recommends:
Champion J19LM or similar.
CARBURETTOR
1. Remove the air filter’s protective cover and
foam filter (fig. 11).
2.Washthe pre-filter M inliquid detergentand wa-
ter. Squeeze dry. Pour a little oil on the filter and
squeeze in the oil.
3. Liftout the paper filterN and clean the air filter
housing carefully to prevent dirt getting into the
carburettor.
4. Clean the paper filter insert as follows:Knock it
lightly against a flat surface. If the filter is very
dirty, change it.
5. Assemble in the reverse order.
Petroleum-based solvents may not be used when
cleaning the paper filter. These solvents can destroy the filter.
Do not use compressed air for cleaning the paper
filter insert. The paper filter insert must not be
oiled.
The carburettor is correctly set at the factory and
no adjustment is normally required.
If the carburettor does need adjustment, contact a
service station.
ADJUSTING CLUTCH/BRAKE
If the drive beltslips(it can stretch slightly when it
becomes worn), there is an adjustment on the gearshift/brake linkage.
Adjustment: Move the locking pin O to the rear
hole (fig. 13).
The brakes are adjusted with nut P on the brake
arm (fig. 13).
Afteradjusting,makesure that the clutch is always
activated before the brake.
REMOVING THE CUTTING DECK
1. Apply the parking brake.
2. Lift the machine and stand it on its end.
Page 11

GB
ENGLISH
Ifthe machine is tostandon its end,the
petrol and engine oil must have been
drained out first.
3. Set the lowest cutting height and remove the
locking pin Q (fig. 14).
4. Remove the two rear locking pins R and the ca-
bles for the switch contact on the deck (fig. 15).
5. Force the belt offthe pulley (bendthe belt guide
S upwards) (fig. 16).
6. Lift off the deck.
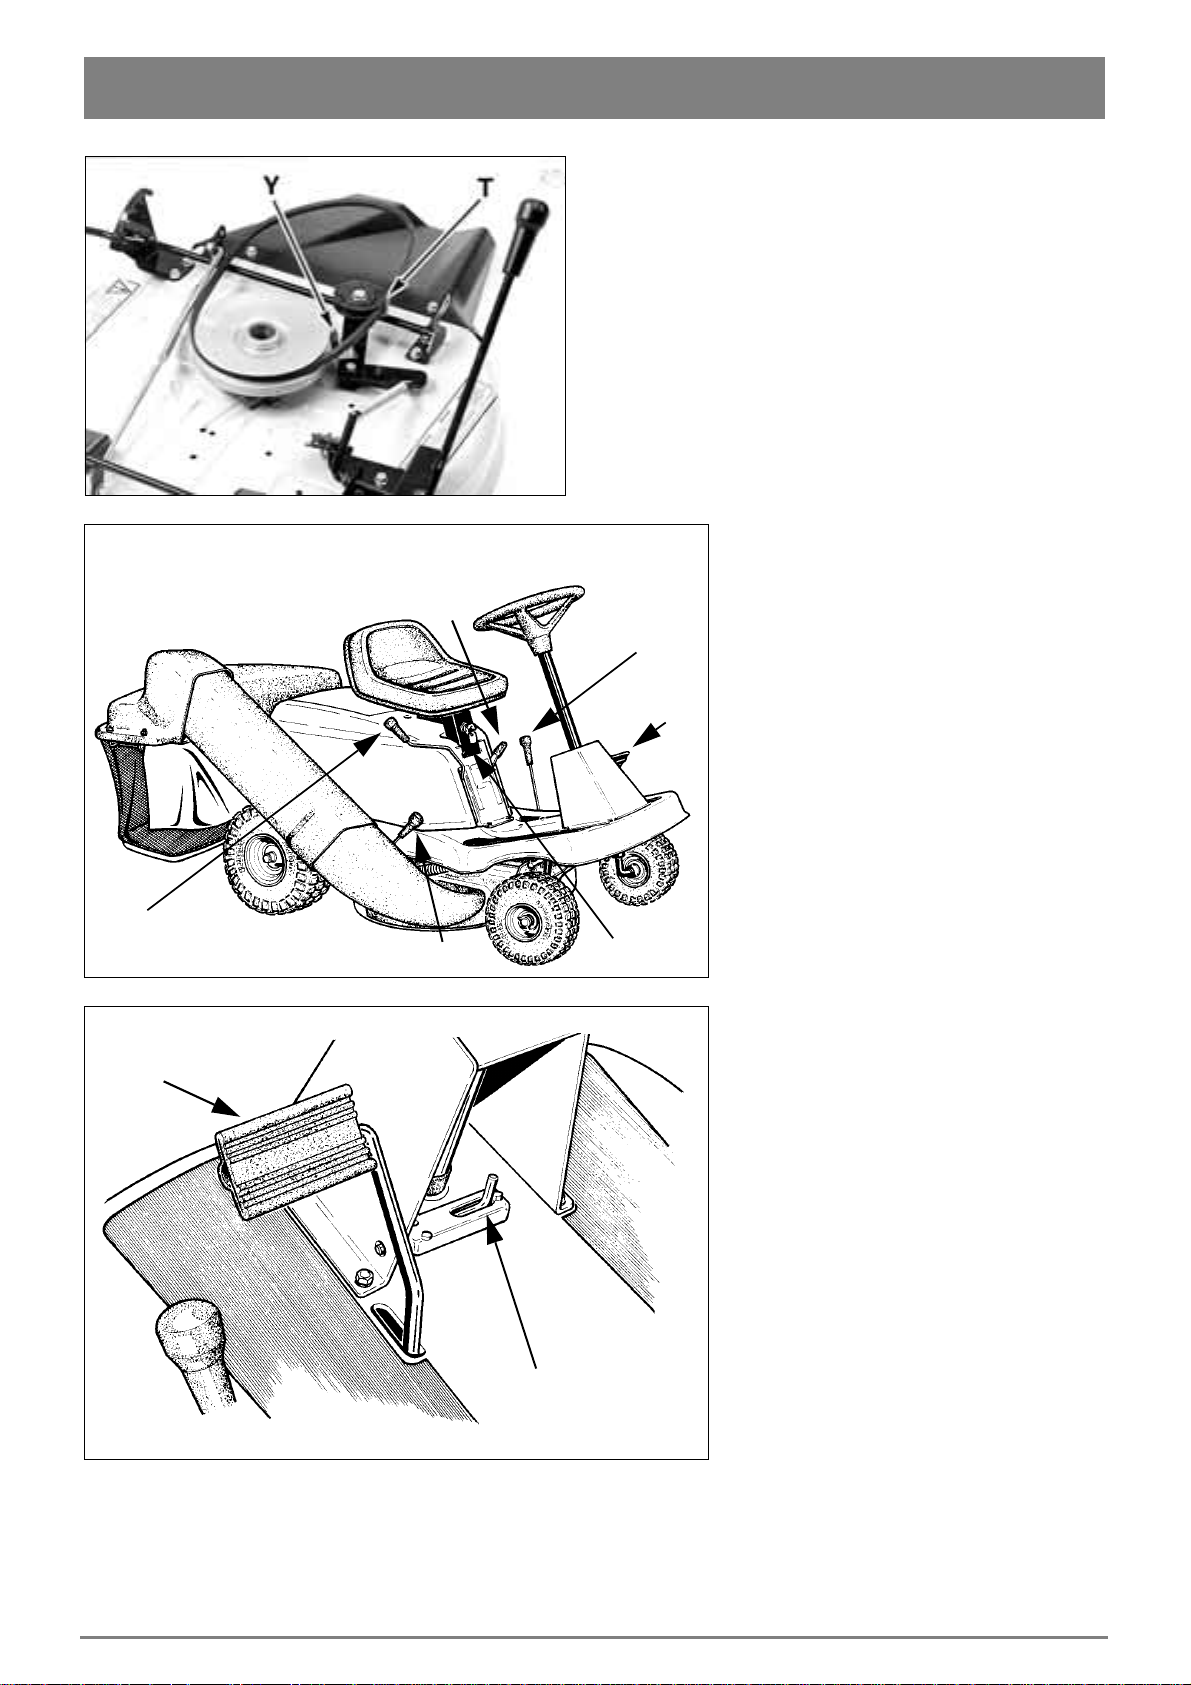
REPLACING V-BELT
ENGINE - CUTTING DECK
1. Remove the cutting deck (see above).
2. Remove the belt loop T. Remove the old belt
(fig. 17).
3. Install a new genuine belt in reverse order.
REPLACING V-BELT
ENGINE - TRANSMISSION
1. Apply the parking brake.
2. Lift the machine and stand it on its end.
Ifthe machine is tostandon its end,the
petrol and engine oil must have been
drained out first.
3. Remove the cutting deck (see above).
3. Tighten screw and nut.
Replace the brake lining when it is worn.
BLADE
Ensure that the blade is always sharp. This produces the best cutting results.
SHARPENING
For safety reasons, the blade should not be sharpened on an emery wheel. Incorrect sharpening (=
too high temperature) could cause the blade to become brittle.
Sharpening of the blades must be done by wet
method grinding, using a whetstone or a grindstone.
Once the blade has been sharpened, it
must then be balanced to avoid vibration damage.
REPLACING THE BLADE
When replacing the blade, blade holder and blade
screw – always use genuine spare parts.
Always use original spare parts. Nongenuine spare parts can entail a risk of
injury, even if they fit the machine.
When replacing the blade, the centre bolt should
also be replaced. This is equipped with a lock.
Blade screw tightening torque: 65 Nm.
4. Undo spring U and remove the belt idler V (fig.
16).
5. Disconnect the belt guide X and turn it to one
side.
6. Force the defective belt over the transmission’s
belt pulley. Work from the machine’s upper side.
Use the hole in the base plate.
7. Force the belt over the engine belt pulley. Bend
down the belt guide Sand placethe belt in the lower groove. Bend up the belt guide and remove the
defective belt.
8. Install a new genuine belt in reverse order.
ADJUSTING BLADE BRAKE
1. Set the blade engaging lever in the rear, disen-
gaged position.
2. Undo the blade brake Y and adjust so that it is
lying flush with the belt pulley (fig. 17).
SPARE PARTS
STIGA genuine spare parts and accessories aredesigned specifically for STIGA machines. Please
notethat‘non-genuine’ spare partsandaccessories
have not been checked or approved by STIGA.
The use of such parts and accessories
can affect the function andsafety of the
machine. STIGA accepts no responsibility for damage or injuries caused by
such products.
STIGA reserves the right to make alterations to the product
without prior notification.
Page 12

MOWING AHEAD
Box 1006 · SE-573 28 TRANÅS
www.stiga.com
 Loading...