

Page 1

1 - 8 8 8 - 9 9 6 - 2 7 2 9
F A X : 1 - 8 6 6 - 8 7 3 - 3 5 3 1
@ e s c a l a d e s p o r t s . c o mgameroom
W e s t r i v e t o e n s u r e t h a t o u r p r o d u c t s a r e o f t h e h i g h e s t q u a l i t y
e o f m a n u f a c t u r i n g d e f e c t s o r m i s s i n g p a r t s . H o w e v e r , i f
a n d f r e
y o u h a v e a n y p r o b l e m s w i t h y o u r n e w p r o d u c t ,
D O N O
T R E T U R N I T T O T H E S T O R E,
p l e a s e c o n t a c t u s t o l l f r e e @ :
O r w r i t e t o :
E s c a l a d e S p o r t s
C u s t o m e r S e r v i c e D e p a r t m e n t
P . O . B o x 8 8 9
E v a n s v i l l e , I N 4 7 7 0 6
date code (if W h e n c o n t a c t i n g E s c a l a d e S p o r t s p l e a s e p r o v i d e y o u r m o d e l n u m b e r ,
p l a c e m e n t p a r t . T h e s e n u m b e r s a r e
a p p l i c a b l e ) , a n d p a r t n u m b e r i f r e q u e s t i n
g a r e
l o c a t e d o n t h e p r o d u c t , p a c k a g i n g , a n d i n t h i s o w n e r s m a n u a l .
Y o u r M o d e l N u m b e r
w h e n i n q u i r i n g a b o u t p a r t s . edoc e tad P l e a s e h a v e y o u r
G02238W
F o r C u s t o m e r S e r v i c e C a l l 1 - 8 8 8 - 9 9 6 - 2 7 2 91 © 2 0 11 E s c a l a d e S p o r t s
:edoC e taD
2 - G02238W - - GI
All Rights Reserved
Purchase Date:
PLEASE RETAIN THIS INSTRUCTION MANUAL FOR FUTURE REFERENCE
Page 2
888-996-2729 F o r C u s t o m e r S e r v i c e C a l l 1 -2 © 2 0 11 E s c a l a d e S p o r t s
All Rights Reserved
IMPORTANT! READ EACH STEP
IN THIS MANUAL BEFORE YOU
BEGIN THE ASSEMBLY.
mini table tennis
No tools required
1. Some drawings or images in this manual may not look exactly like your product. Please
read and understand the text before starting each assembly step.
table game.
Page 3
888-996-2729 - 1 l l a C e c i v r e S r e m o t s u C r o F 3 s t r o p S e d a l a c s E 110 2 ©
All Rights Reserved
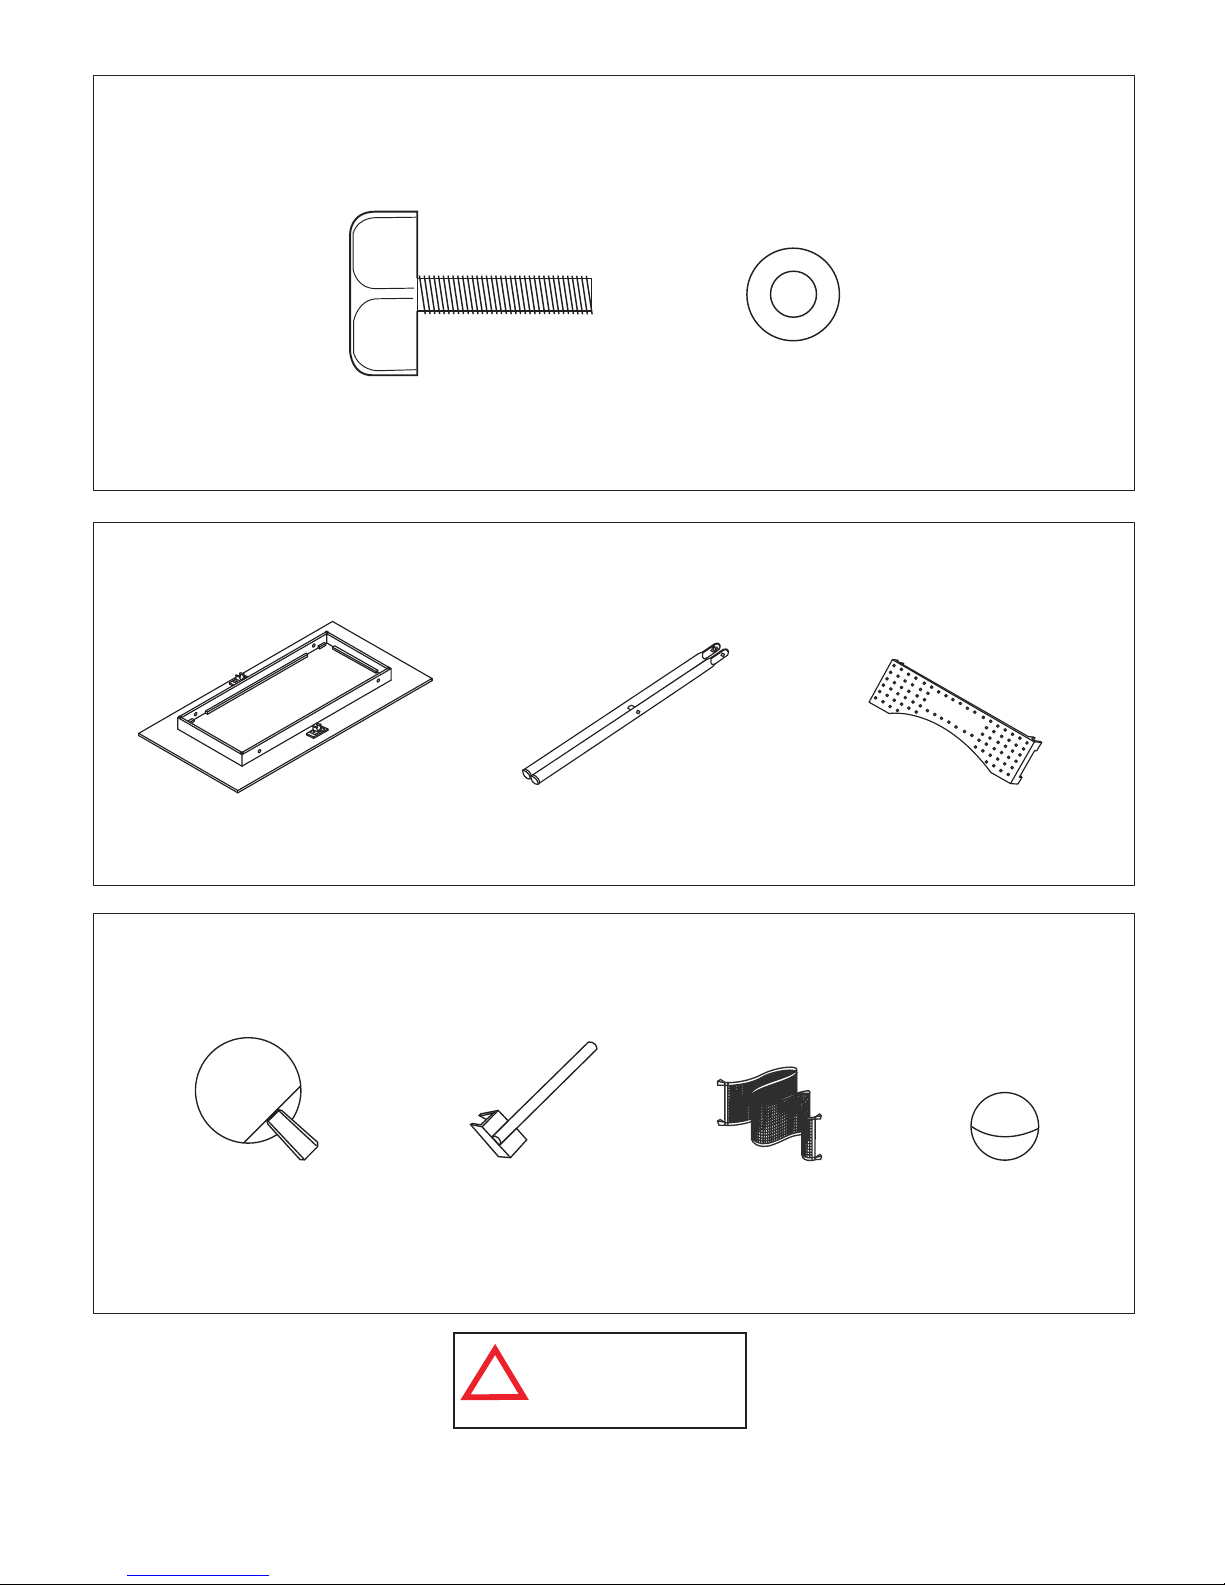
HARDWARE IDENTIFIER (To Scale)
PART IDENTIFIER (Not To Scale)
H1 - 8mm x 32mm
Knob Bolt (4)
P1 - Table Tennis
Board (1)
P2 - Leg (2) P3 - Leg Panel (2)
!
WARNING:
CHOKING HAZARD
Small parts.
Not for children under 3 yrs.
H2 - 8.5mm x 19mm
Flat Washer (4)
A G I T S
ACCESSORY IDENTIFIER (Not To Scale)
A4 - Table Tennis
Ball (2)
A1R - Red Table Tennis
Paddle (1)
A1B - Blue Table Tennis
Paddle (1)
A2 - Table Tennis
Net Post (2)
A3 - Table Tennis
Net (1)
Page 4
888-996-2729 - 1 l l a C e c i v r e S r e m o t s u C r o F 4 s t r o p S e d a l a c s E 110 2 ©
All Rights Reserved
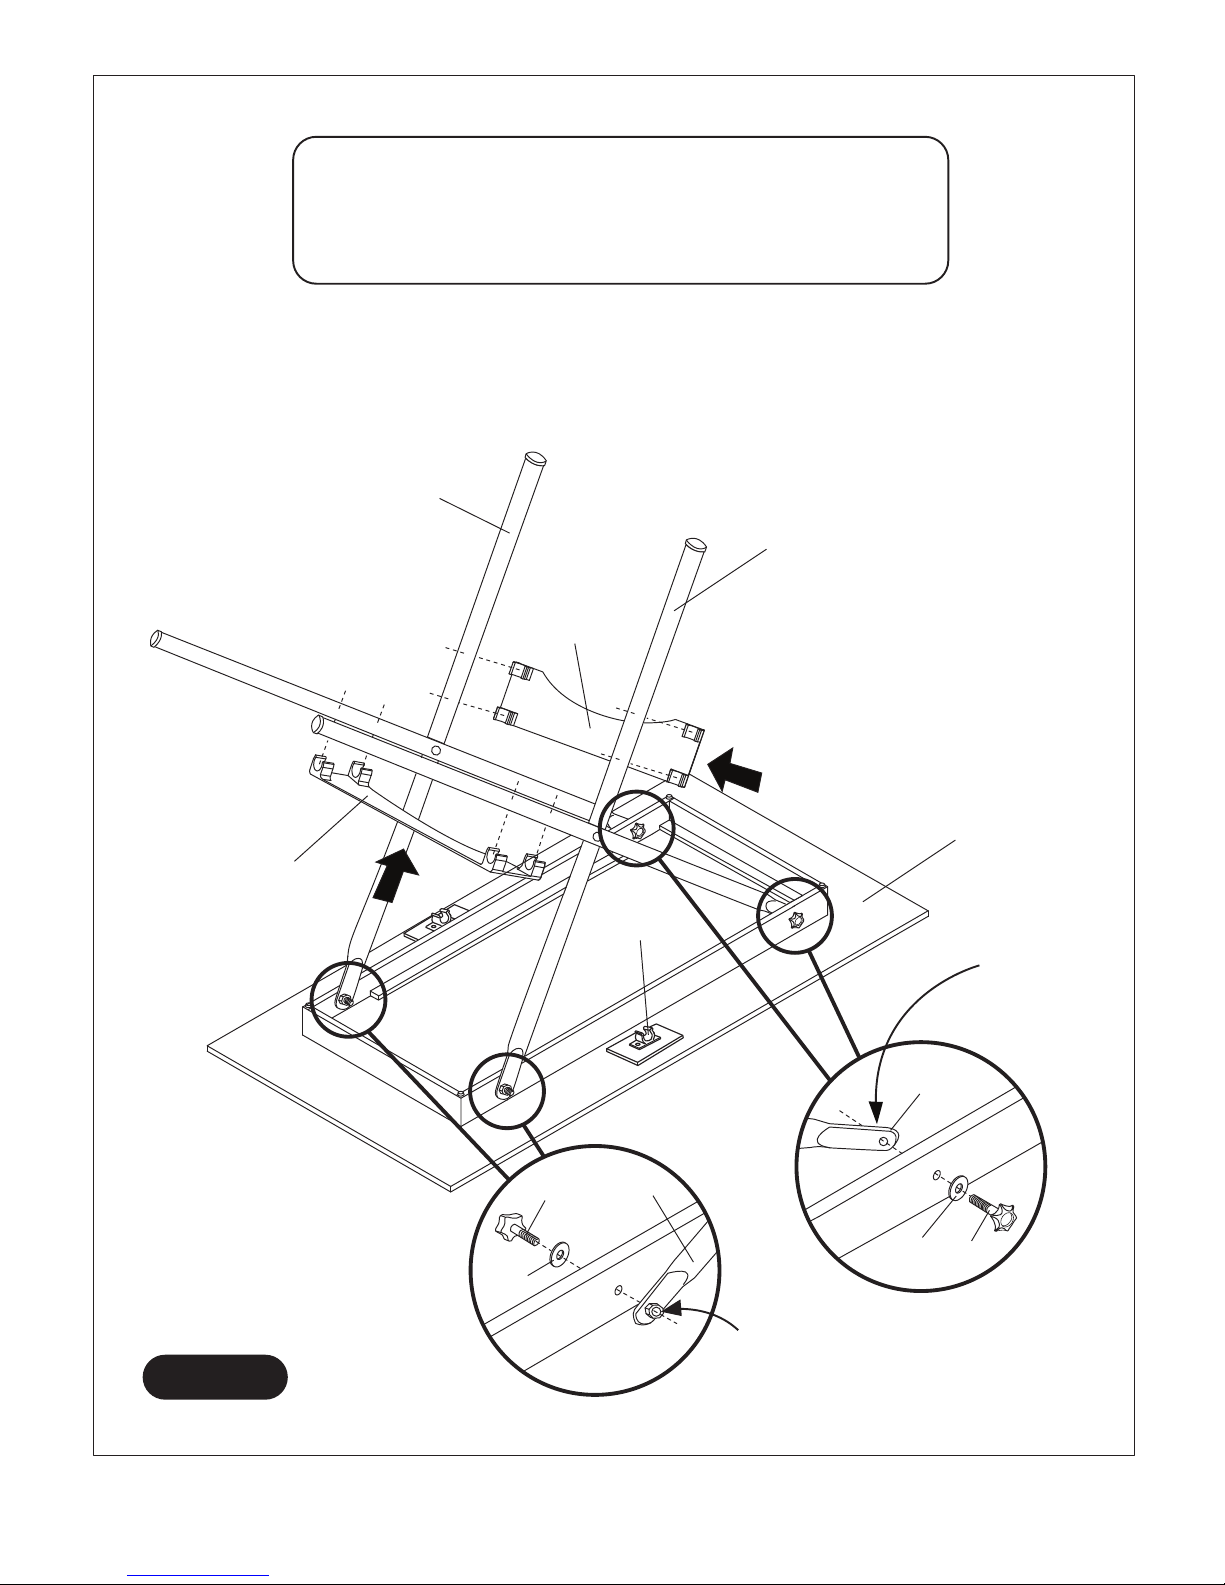
STEP 1:
Leave Table Tennis Board P1 face down in carton to assemble.
Attach Legs P2 using Knob Bolts H1 with Flat Washers H2 as shown in DETAIL A & DETAIL B.
Snap Leg Panels P3 onto Legs as shown in FIGURE 1.
PARTS REQUIRED:
1 pc - P1 Table Tennis Board 4 pcs - H1 Knob Bolt
2 pcs - P2 Leg 4 pcs - H2 Flat Washer
2 pcs - P3 Leg Panel
FIGURE 1
DETAIL A
DETAIL B
C1
P1
P2
P3
NOTE:
Welded nut
on this side.
P2
NOTE:
Welded nut
on this side.
H1
H2
P2
H1
H2
P2
P3
Page 5
888-996-2729 F o r C u s t o m e r S e r v i c e C a l l 1 -5 © 2 0 11 E s c a l a d e S p o r t s
All Rights Reserved
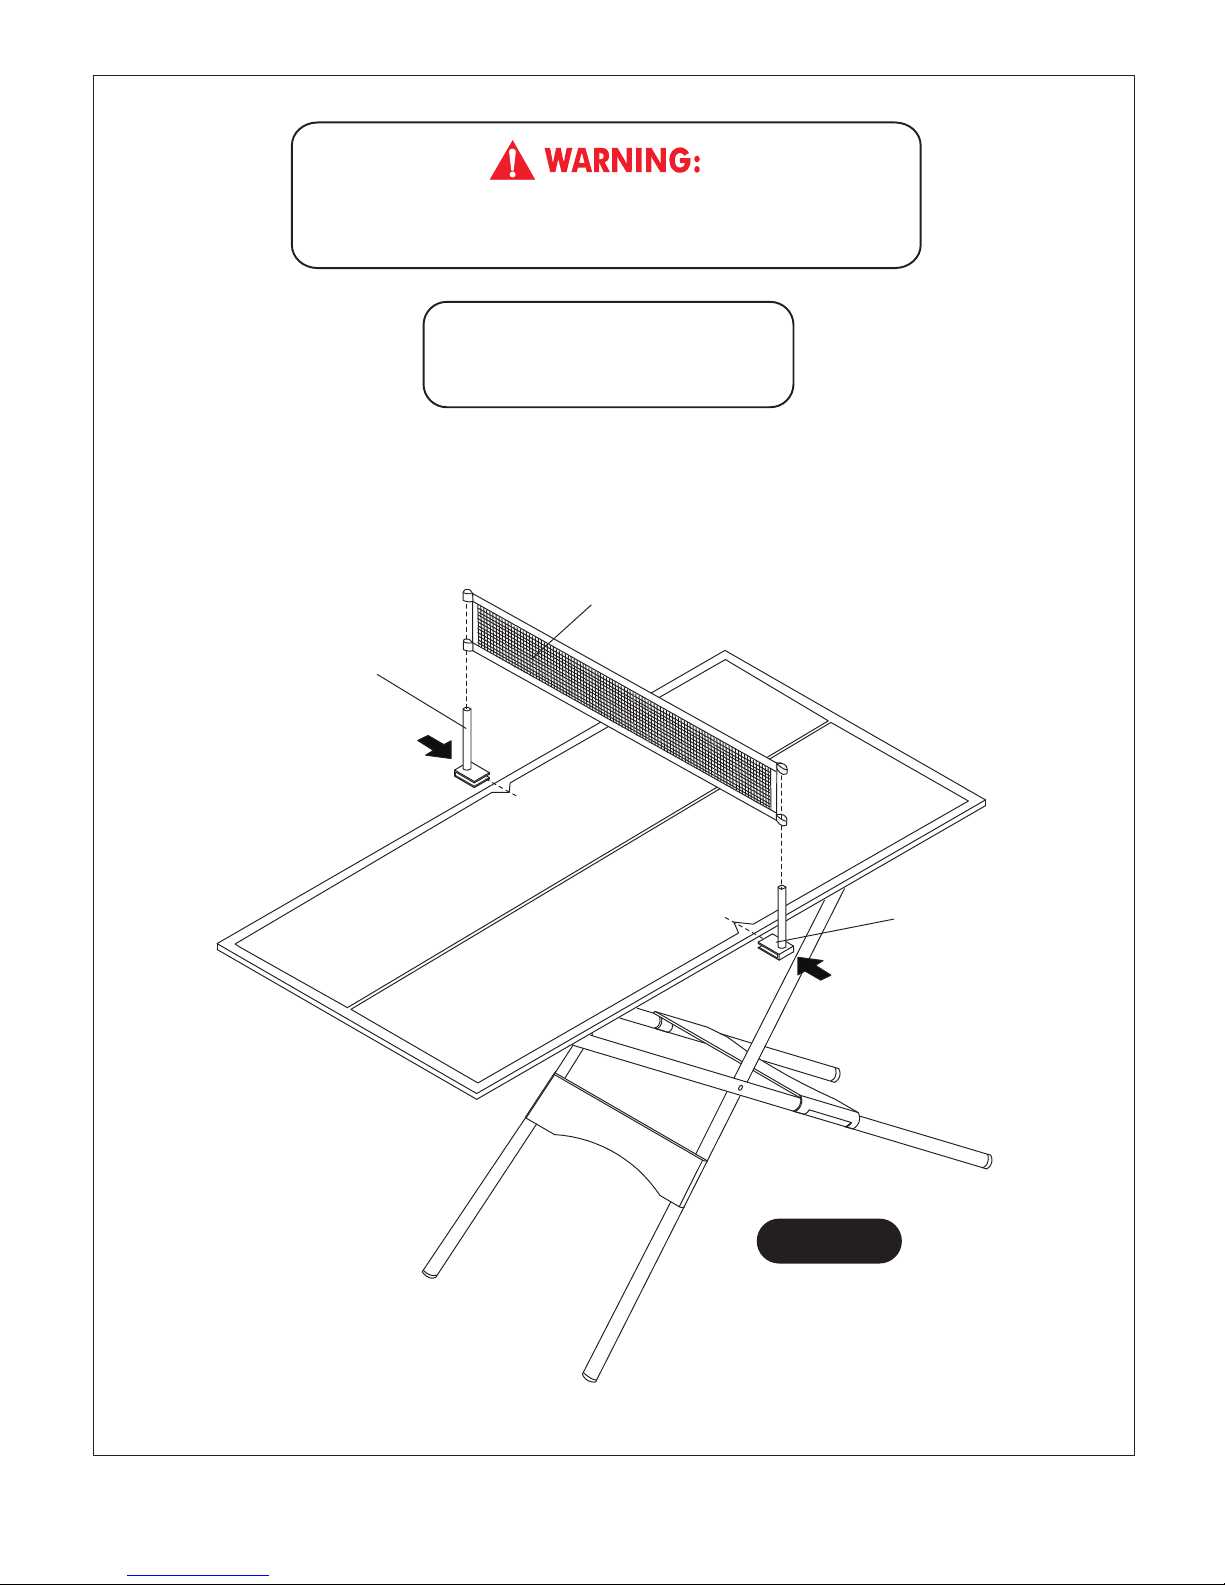
STEP 2:
With the help of another adult, carefully lift and rotate table into upright position.
First, attach Table Tennis Net Post A2 onto the table as shown in FIGURE 2 .
Next, attach Table Tennis Net A3 as shown in FIGURE 2 .
PARTS REQUIRED:
2 pcs - A2 Table Tennis Net Post
1 pc - A3 Table Tennis Net
FIGURE 2
THIS STEP REQUIRES TWO ADULTS.
VERY CAREFULLY TURN THE TABLE OVER AND SET IT ON ITS LEGS.
A3
A2
A2
Page 6

888-996-2729 F o r C u s t o m e r S e r v i c e C a l l 1 -6 © 2 0 11 E s c a l a d e S p o r t s
All Rights Reserved
TIPS TO PROPERLY STORE YOUR MINI TABLE TENNIS TABLE GAME
AND AVOID LOSS OF HARDWARE:
1. Remove Leg Panels P3 , Knob Bolts H1 and Flat Washers H2 from previous assembly STEP 1.
2. Next, thread Knob Bolts H1 and Flat Washers H2 on each Leg P2 as shown in FIGURE 3.
3. Attach Legs P2 on Plastic Clips C1 as shown in FIGURE 4. Place Leg Panels P3 inside of
support brace as shown in FIGURE 4.
FIGURE 4
P2
C1
P3
FIGURE 3
P2
NOTE:
Welded Nut
on this side.
H1
H2
H1
Page 7

888-996-2729 F o r C u s t o m e r S e r v i c e C a l l 1 -7 © 2 0 11 E s c a l a d e S p o r t s
All Rights Reserved
Congratulations
Care and Use instructions below to ensure many years of trouble free use of your mini table
tennis game.
eht eton esaelP .emag elbat sinnet elbat inim r uoy d elbmessa w on e vah u o Y !
CARE AND USE OF YOUR MINI TABLE TENNIS TABLE GAME
DO NOT store this product outdoors.
3 .
DO NOT
DO NOT
DO NOT
4 .
s i t , c l i m b o r l e a n o n t h e t a b l e .
5 .
This will damage the legs. d r a g t h e t a b l e w h e n m o v i n g i t .
s e t d r i n k s o n t h e t a b l e .
1.
Clean table with a Clean Damp Cloth.
2.
02238GIH1 8 mm x 32 mm
Knob Bolt 4
02238GIH2 8.5 mm x 19 mm
Flat Washer 4
02238GIP1 Table Tennis Board 1
02238GIP2 Leg 2
02238GIP3 Leg Panel 2
Qty
Description
Part#
PRODUCT PARTS LIST
02238GIA1R Red Table Tennis
Paddle 1
02238GIA1B Blue Table Tennis
Paddle 1
02238GIA2 Table Tennis Net Post 2
02238GIA3 Table Tennis Net 1
02238GIA3 Table Tennis Ball 2
02238GIC1 Plastic Clip 2
02238GIK1 Hardware Kit 1
02238GIM1 Owners Manual 1
Qty
Description
Part#
Page 8

888-996-2729 F o r C u s t o m e r S e r v i c e C a l l 1 -8 © 2 0 11 E s c a l a d e S p o r t s
All Rights Reserved
y ESCALADE T h i s c u s t o m e r w a r r a n t y e x t e n d s t o t h e o r i g i n a l o w n e r , o n t h e p u r c h a s e o f a n
S P O R T S P r o d u c t ( h e r e i n a f t e r r e f e r r e d a s t h e " P r o d u c t " ) .
W A R R A N T Y D U R A T I O N : T h i s P r o d u c t i s w a r r a n t e d t o t h e
o r i g i n a l o w n e r , f o r a p e r i o d o f 9 0
d a y s f r o m t h e o r i g i n a l p u r c h a s e .
W A R R A N T Y C O V E R A G E : E S C A L A D E S P O R T S w a r r a n t s t o t h e o r i g i n a l o w n e r , t h i s p r o d u c t
t o b e f r e e f r o m d e f e c t s i n m a t e r i a l a n d w o r k m a n s h i p w h e n u s e d f o r t h e i n t e n d e d p u r p o s e
u n d
e r n o r m a l u s e a n d c o n d i t i o n s . T H I S W A R R A N T Y I S V O I D I F T H E P R O D U C T H A S B E E N
D A M A G E D B Y A C C I D E N T , U N R E A S O N A B L E U S E , N E G L I G E N C E , I M P R O P E R S E R V I C E ,
F A I L U R E T O F O L L O W I N S T R U C T I O N S P R O V I D E D W I T H T H E P R O D U C T O R O T H E R
C A U S E S N O T A R I S I N G O U T O F
D E F E C T S I N M A T E R I A L A N D W O R K M A N S H I P .
W A R R A N T Y R E P L A C E M E N T : D u r i n g t h e a b o v e 9 0 d a y w a r r a n t y p e r i o d ,
E S C A L A D E S P O R T S s h a l l p r o v i d e r e p l a c e m e n t c o m p o n e n t s o r r e p l a c e w i t h a c o m p a r a b l e
e c t i v e u n d e r n o r m a l u s e a n d p r o p e r c a r e , p l e a s e p r o
d u c t a t o u r c h o o s i n g . I f p r o d u c t i s d e f
c o n t a c t o u r C u s t o m e r S e r v i c e D e p t .
/ C u s t o m e r S e r v i c e D e p t .888-996-2729 1 -
O r W r i t e u s a t :
E s c a l a d e ® S p o r t s , I n c . - P . O . B o x 8 8 9 , E v a n s v i l l e , I N 4 7 7 0 6
A t t n : C u s t o m e r S e r v i c e D e p t .
O r E - m a i l u s a t :
@ e s c a l a d e s p o r t
s . c o mgameroom
Other than shipping requirements, no charge will be made for such replacement of in-warranty
products.
S : W A R R A N T Y D I S C L A I M E R A N Y I M P L I E D W A R R A N T I E S A R I S I N G O U T
O F T H I S S A L E , I N C L U D I N G B U T N O T L I M I T E D T O T H E I M P L I E D W A R R A N T I E S
O F M E R C H A N T A B I L I T Y A N D F I T N E S S F O R A P A R T I C U L A R P U R P O S E , A R E
H E A B O V E 9 0 D A Y P E R I O D . E S C A L A D E S P O R T L I M I T
E D I N D U R A T I O N T O T S
S H A L L N O T B E L I A B L E F O R L O S S O F U S E O F T H E P R O D U C T O R O T H E R
C O N S E Q U E N T I A L O R I N C I D E N T A L C O S T S , E X P E N S E S O R D A M A G E S
I N C U R R E D B Y T H E C O N S U M E R O F A N Y O T H E R U S E .
S o m e s t a t e s d o n o t a l l o w t h e e x c l u s i o n o r l i m i t a t i o n o f i m p l i e d w a r r a n t i e s o r c o n s e q u e n t i a l o r
i n c i d e n t a l d a m a g e s , s o t h e a b o v e l i m i t a t i o n s o r e x c l u s i o n s m a y n o t a p p l y t o y o u .
L E G A L R E M E D I E S : T h i s w a r r a n t y g i v e s y o u s p e c i f i c l e g a l r i g h t s a n d y o u m a y a l s o h a v e
t s w h i c h m a y v a r y f r o m s t a t e t o s t a t e . o t h e r
r i g h
9 0 D A Y L I M I T E D W A R R A N T Y
Page 9

888-996-2729 1 -
F A X : 1 - 8 6 6 - 8 7 3 - 3 5 3 1
@ e s c a l a d e s p o r t s . c o mgameroom
G02238W
888-996-2729 1 -9 © 2 0 11 E s c a l a d e S p o r t s
2 - G02238W - - GI
Nosotros tratamos de asegurarnos que nuestros productos se n a
ed sotcefed omoc ,samelborp ed erbil y dadilac atla s á m al ed
eneit detsu iS ,ograbme niS .satelpmocni setrap ó n ó icacirbaf
rovaf rop ,otcudorp us noc amelborp n ú gla
NO LO DEVUELVA A LA TIENDA ,
pongase en contacto con nosotros llamando gratis al:
O escriba a:
s t ropS e d a lacsE
la n ó icnetA ed otnematrapeD
Cliente
9 8 8 x oB . O. P
60774 N I e llivsnavE
:ne be W oitis o r tseu n etisiV
.setrap eticilos odnauc oledom ed orem ú n le agnet rovaf roP
Cuando se ponga en contacto con Escalade Sports,incluya el n ú mero de
modelo de su producto,el c ó digo de la fecha(si lo hubiera)y la referencia de
la pieza si solicita una pieza de sustituc i ó n.Encontra r á estos n ú meros en e l
producto,el embalaje y este manual de usuario .
N ú mero de modelo:
C
ó digo de fecha:
Fecha de adquisici ó n:
.AICNEREFER A RA P SENOICCURTSNI ED L AUNAM ETSE EV R ESNOC
.sodavreser sohcered sol sodo T
ó icnetA ed oicivreS
n at cliente
Page 10

888-996-2729 1 -10 © 2 0 11 E s c a l a d e S p o r t s
IMP SOL SODOT AEL !ET NA T R O
PASOS DE ESTE MANUAL ANTES
DE COMENZAR A ARMAR.
LOS DIBUJOS DE ESTE MANUAL
PUEDEN HABERSE EXAGERADO
O MODIFICADO PARA
MOSTRAR LOS DETALLES.
IMPORTANTE!
SE REQUIEREN DOS ADULTOS PARA ARMAR
ESTE MINI JUEGO DE TENIS DE MESA
No herramientas necesarias:
iniM le ramra a raznemoc ed setna sojesnoc setneiugis sol ednerpmoc euq ed eser ú gesA
Juego de Tenis de Mesa.
1 .
Algunos dibujos o im
á genes de este manual puede ser que no se vean exactamente igual
raznemoc ed setna otxet le rednerpmoc y reel ed eser ú gesA .otcudorp us a
a ensamblar cada paso.
Consejos de ensamblamiento
LEA Y SIGA LAS INSTRUCCIONES DE ENSAMBLAMIENTO,
FUNCIONAMIENTO Y SEGURIDAD ATENTAMENTE.
SE REQUIEREN DOS ADULTOS PARA ARMAR
EL MINI JUEGO DE TENIS DE MESA.
PRECAUCIÓN:
.sodavreser sohcered sol sodo T
Servicio de Atenci ó n al cliente
Page 11

888-996-2729 1 -11 © 2 0 11 E s c a l a d e S p o r t s
IDENTIFICADOR DE PARTES (No estan a escala)
P1 - Tablero de tenis de mesa
(1)
P2 - Patas (2) P3 - Placa para las patas (2)
S T I G A
IDENTIFICADOR DE ACCESORIOS (No estan a escala)
A4 - Pelota (2)
A1R - Raqueta de tenis de
mesa roja (1)
A1B - Raqueta de tenis de
mesa azul (1)
A2 - Poste para la red (2) A3 - Red de tenis
de mesa (3)
IDENTIFICADOR DE TORNILLOS (A escala)
!
ADVERTENC : A I
PELIGRO DE ASFIXIA
Piezas pequeñas.
No adecuado para niños
menores de 3 años.
Servicio de atenci
ó n al cliente
.sodavreser sohcered sol sodo T
H1 - 8mm x 32mm
Tornillo con Manija (4)
H2 - 8.5mm x 19mm
Arandela plana (4)
Page 12

888-996-2729 1 -12 © 2 0 11 E s c a l a d e S p o r t s
PASO 1:
Para ensamblar esta mesa, coloque el tablero de tenis de mesa P1 boca abajo sobre el cartón.
Inserte las patas P2 con los tornillos de manija H1, las arandelas planas H2 como se indica
abajo en el DETALLE A y DETALLE B. Coloque las placas para las patas P3 como se
indica en la FIGURA 1.
PIEZAS NECESARIAS:
1 pz - P1 Tablero de tenis de mesa 4 pzs - H1 Tornillo con Manija
2 pzs - P2 Patas 4 pzs - H2 Arandela plana
2 pzs - P3 Placa para las patas
.sodavreser sohcered sol sodo T
Servicio de atenci ó
n al cliente
FIGURA 1
Detalle A
Detalle B
C1
P1
P2
P3
NOTA:
Tuerca
Soldada
en este lado.
P2
NOTA:
Tuerca
Soldada
en este lado.
H1
H2
P2
H1
H2
P2
P3
Page 13

888-996-2729 1 -13 © 2 0 11 E s c a l a d e S p o r t s
PASO 2:
Con la ayuda de otro adulto, voltee la mesa con cuidado para colocarla sobre sus patas.
Coloque los postes A2 como se indica en la FIGURA 2 .
Ponga la red A3 como se muestra en la FIGURA 2.
2 pzs - A2 Poste para la red
1 pz - A3 Red de tenis de mesa
FIGURA 2
A3
A2
A2
!
ADVERTENCIA:
ESTE PASO REQUIERE DOS ADULTOS
CON CUIDADO VOLTEE LA MESA Y COLOQUELA
SOBRE SUS PATAS
PIEZAS NECESARIAS:
Todos los derechos reservados.
Servicio de atenci
ó
n al cliente
Page 14

888-996-2729 1 -14 © 2 0 11 E s c a l a d e S p o r t s
CONSEJOS PARA EL CORRECTO ALMACENAMIENTO DE SU MINI
JUEGO DE TENIS DE MESA PARA EVITAR EL ESTRAVÍO DE
COMPONENTES Y PARTES DEL ARMADO
1. Remueva las placas de las patas P3 , los tornillos H1 , las arandelas H2 y ensamblados en
el Paso 1.
2. Ensamble los tornillos H1 , las arandelas H2 y los separadores H3 en las patas P2 , tal y
como se muestra en la FIGURA 3 .
3. Enganche las patas P2 a los enganches de plástico C1 , como aparece en la FIGURA 4 .
Coloque los las placas de las patas P3 dentro de los soportes, como se muestra en la
FIGURA 4 .
FIGURA 4
Todos los derechos reservados.
Servicio de atenci ó
n al cliente
FIGURA 3
NOTA:
Tuerca Soldada
en este lado.
H1
H2
H1
P2
C1
P3
P2
Page 15

888-996-2729 1 -15 © 2 0 11 E s c a l a d e S p o r t s
USO Y CUIDADO DE SU MINI JUEGO DE TENIS DE MESA
Felicidades! Ahora ha terminado de armar su Mini Juego de Tenis de Mesa. Siga las instrucciones
de uso
y cuidado siguientes para garantizar que le dure muchos años libre de problemas.
1. Limpie el tablero con un paño limpio y húmedo.
2. No guarde este producto afuera.
3. No se siente, suba o apoye sobre la mesa.
4. No arrastre la mesa cuando la mueva de un sitio a otro, porque las patas se
pueden dañar.
5. No ponga bebidas sobre la mesa.
.sodavreser sohcered sol sodo T
Servicio de Atenci ó
n al cliente
02238GIH1 Tornillo con manija de
8 mm x 32 mm 4
02238GIH2 Arandela plana de
8.5 mm x 19 mm 4
02238GIP1 Tablero de tenis de mesa 1
02238GIP2 Patas 2
02238GIP3 Placa para patas 2
LISTA DE PARTES DE ESTE PRODUCTO
02238GIA1R Raqueta de tenis de
mesa roja 1
02238GIA1B Raqueta de tenis de
mesa azul
1
02238GIA2 Poste para la red de
tenis de mesa 2
02238GIA3 Red de tenis de mesa
02238GIA3 Pelota de tenis de mesa 2
02238GIC1 Enganche de plástico
02238GIK1 Juego de piezas para el
armado
02238GIM1 Manual de usuario 1
Descripción
Descripción
Cant.
Cant.
Clave#
Clave#
1
1
2
Page 16

888-996-2729 1 -16 © 2 0 11 E s c a l a d e S p o r t s
@ e s c a l a d e s p o r t s . c o mgameroom
Esta garantía es válida para la adquisición de cualquier producto ESCALADESPORTS original
(en adelante "el Producto").
DURACIÓN DE LA GARANTÍA: Este Producto está garantizado durante un período de 90 días a
partir de su adquisició . n
COBERTURA DE LA GARANTÍ : A ESCALADE SPORTS garantiza al comprador del producto
original que cualquier Producto de su fábrica carece de defectos materiales o de fabricación si se
utiliza para el fin para el que se han diseñado en condiciones normales y con un uso adecuad . o
ESTA GARANTÍA SERÁ NULA SI EL PRODUCTO SE HA DAÑADO POR ACCIDENTE, UN USO
NO RAZONABLE, NEGLIGENCIA, UNA REPARACIÓN INADECUADA, SI NO SE HAN SEGUIDO
LAS INSTRUCCIONES SUMINISTRADAS CON EL PRODUCTO O POR OTRA CAUSA NO
D
ERIVADA DE DEFECTOS MATERIALES O DE FABRICACIÓN DEL PRODUCT . O
ALCANCE DE LA GARANTÍ : A Durante ese período de garantía de 90 días,
ESCALADESPORTS reparará o sustituirá por un modelo similar, el Producto o componente que
se haya demostrado que estaba defectuoso, con un uso normal y un cuidado adecuado, y que
nosotros examinemos y confirmemos que no está defectuoso; póngase en contacto con nuestro
Departamento de Garantía . s
1-888-996-2729 / Dept. Garantía . s
O escríbanos a:
60774 N I , ellivsnavE , 988 x oB . O. P - . cnI , stropS ® edalacsE
: ttA Departamento de Garantía . s
rtcele oerroc nu sone í vne O
ó nico a:
Para la reparación o sustitución de los Productos en garantía, deberá usarse una forma de
envío que no sea a cobro revertido. ESCALADE SPORTS recomienda encarecidamente
asegurar el Producto por su valor antes de enviarlo.
DESCARGO DE RESPONSABILIDAD: CUALQUIER GARANTÍA IMPLÍCITA QUE
SURGA DE ESTA VENTA, INCLUYENDO, ENTRE OTRAS, LAS GARANTÍAS
IMPLÍCITAS DE LA VENTA Y LA ADAPTACIÓN PARA UN FIN EN PARTICULAR,
SE LIMITA A LA DURACIÓN DEL PERÍODO DE 90 DÍAS CITADO
ANTERIORMENTE. ESCALADE SPORTS NO SERÁ RESPONSABLE DE LA
IMPOSIBILIDAD DE UTILIZAR EL PRODUCTO NI DE OTROS COSTES
INDIRECTOS, GASTOS O DAÑOS CAUSADOS POR EL CLIENTE O POR
CUALQUIER OTRO USO.
Algunos estados no permiten la exclusión o limitación de las garantías implícitas o derivadas o
los daños incidentales, de modo que las limitaciones citadas no serán de aplicación en ese caso.
RECURSOS LEGALES: Esta garantía le otorga derechos legales específicos, aunque también
puede disfrutar de otros derechos que variarán de un estado a otro.
GARANTÍA LIMITADA A 90 DÍAS
.sodavreser sohcered sol sodo T
Servicio de Atenci ó n al cliente
 Loading...