

Page 1
DEUTSCH
D
Performance Power 350
8211-0319-02
INSTRUCTIONS FOR USE
Page 2
2
SVENSKA
S
1.
2.
1
3
2
4
3 = 40 mm
4 = 50 mm
2 = 30 mm
1 = 20 mm
3
4
∅ 130 mm
∅ 160 mm
A
B
C
1
2
1
2
4
5
3
7
8
9
7
7
7
2
2
3.
4.
1
Page 3
3
SVENSKA
S
5.
6.
7.
Page 4

4
ENGLISH
GB
SAFETY INSTRUCTIONS
SYMBOLS
The following symbols can be found on the machine to remind you of the care and attention that
are required during use.
The symbols mean:
Warning! Read the Instruction Book and
Safety Manual before using the machine.
Warning! Keep onlookers away. Beware
of objects being flung out.
Warning! Before carrying out any repair
work make sure the machine is unplugged.
Warning! Keep the extension cable away
from the cutting system.
Warning! Keep hands and feet clear of the
under chassis when the machine is running.
Warning! The blade continues to rotate
even after the machine has been switched
off.
GENERAL
This symbol indicates WARNING! Personal injury and/or damage to property
may result if the instructions are not followed carefully.
• Please read through these instructions carefully.
Learn all the controls and the correct use of the
machine.
• This machine is only intended for mowing
lawns. Other use, such as cutting bushes, hedges, climbing plants, etc., is forbidden due to the
risk of injury.
• Never allow children or anyone who is not familiar with these instructions to use the lawnmower. Local regulations may impose
restrictions as regards the age of the driver.
• Never carry out mowing if others, particularly
children or animals, are in the vicinity.
• Remember that the driver is responsible for accidents that happen to other people or their
property.
• Do not use the machine if you are under the influence of alcohol, drugs or medication. Neither
should you use it when you are tired or feeling
unwell.
PREPARATIONS
• Wear strong shoes and long trousers when
mowing. Do not operate the machine barefoot
or wearing sandals.
• Always use hearing protectors.
• Carefully check the area that is to be mowed
and remove all stones, sticks, steel wire and other objects.
• Before use: always check that blades and
mounting devices are not worn or damaged. Replace worn or damage parts as a set so that the
correct balance is maintained.
Connecting the machine
• For increased safety, an earth leakage circuit
breaker with a breaking current not greater than
30 mA should be connected between the wall
socket and the cable.
• Before using the machine, always check that the
cable is not damaged. The machine must not be
used if the cable is damaged.
OPERATION
• Only mow in daylight or in good lighting conditions.
• If possible, avoid mowing wet grass.
• Be sure to move steadily on slopes.
• Walk, don’t run.
• With wheeled lawnmowers, cut across a slope,
never up and down.
• Take great care when changing direction on a
slope.
STOP
Page 5

5
ENGLISH
GB
• Do not mow slopes with a gradient of more than
15°.
• Take great care when reversing or when pulling
the lawnmower towards yourself.
• Shut off the engine if the lawnmower has to be
tilted during transport on surfaces other than
grass, and when the lawnmower is being transported to and from the area to be mowed.
• Never operate the lawnmower with insufficient
protection or without safety devices in place,
e.g. a grass collector.
• Start the engine carefully, following the instructions. Keep your feet away from the blades.
• Do not tilt the mower when the engine is started, apart from when the mower has to be tilted
when starting. If this is the case, it should not be
tilted more than necessary, and the part that is
furthest away from the operator should be tilted.
• Keep your hands and feet away from the rotating blade and other rotating parts. If there is an
ejector opening, never insert your hand into it.
• The blade bar continues to rotate for a short
while after the starter handle has been released.
• If the machine is equipped with a grass ejector,
this should always be kept free of branches,
rubbish, etc.
• Never lift or carry the lawnmower while the engine is running.
Shut off the engine and pull out the plug:
• When you leave the lawnmower.
• To remove sticks and rubbish or when the discharge has become clogged.
• To check, clean or service the machine.
• When you have driven over a foreign object and
want to check whether there is any damage as well
as carry out repairs before restarting the mower.
• To check the machine if it begins to vibrate excessively. (Check immediately).
• Always ensure that the cable is kept well away
from the blade. If the lead is damaged during
mowing, stop the machine immediately and unplug the cable from the wall socket before
checking the cable. A damaged cable should be
repaired by a qualified electrician or replaced.
MAINTENANCE AND STORAGE
• Check that all nuts and screws are tightened so
that the machine is in safe working condition.
• If the machine is equipped with a grass collector, check frequently for wear and damage to
the grass collector.
• For the sake of safety, replace worn or damaged
parts.
• Thoroughly clean the mower and store it indoors in a dry place. The machine must not be
rinsed with water.
• Store the machine so that children cannot get to
it.
ENVIRONMENT
For environmental reasons, we recommend that
particular attention is given to the following
points:
• When your machine has to be replaced after
many years of service or is no longer required,
we recommend that it is handed in to your dealer for recycling.
Page 6

6
ENGLISH
GB
INSTALLATION
PARTS TO INSTALL
TOOLS FOR INSTALLATION
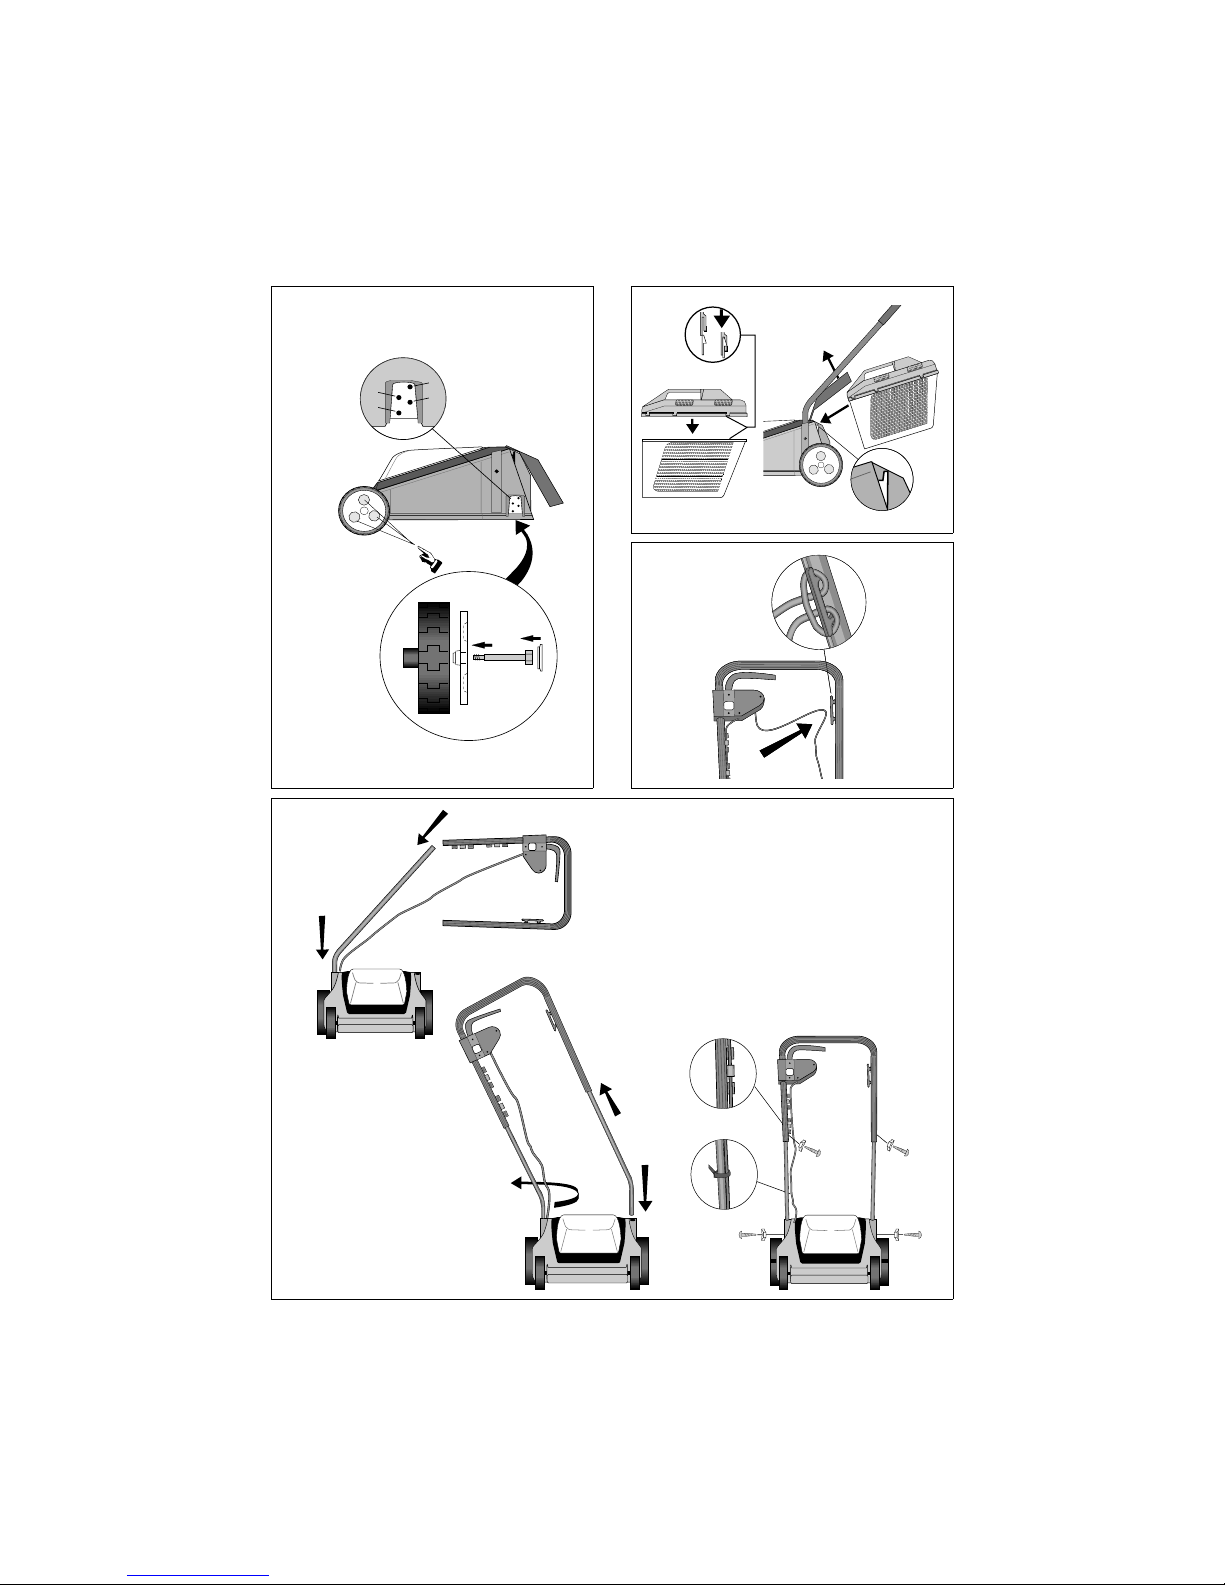
WHEELS/CUTTING HEIGHT (fig. 1)
1. Press the wheel bolt A into the wheel cap B.
2. Snap centre cap C in place.
3. Install the wheel in one of the mounting plate’s
four positions.
4. Tighten properly by hand with the aid of the finger grip in the wheel cap.
Note! The same cutting height should be set for all
wheels.
HANDLE (fig. 2)
1. Press one handle tube down into the mount on
the left-hand side (see picture).
2. Push on the upper part of handle.
3. Turn the entire handle in the opposite direction
(see picture).
4. Insert the other handle tube into the upper part.
5. Press the handle tube down into the mount on
the right-hand side.
6. Turn back the entire handle until straight.
7. Fit the screws. Tighten properly.
8. Secure the electric cable with a cable tie.
GRASS COLLECTOR (fig. 3)
Snap together the grass collector’s upper and lower
sections.
Open the flap on the machine and attach the grass
collector to the chassis.
Note! The lawnmower can be operated without the
grass collector. The grass is then left in a line behind the machine.
USING THE LAWNMOWER
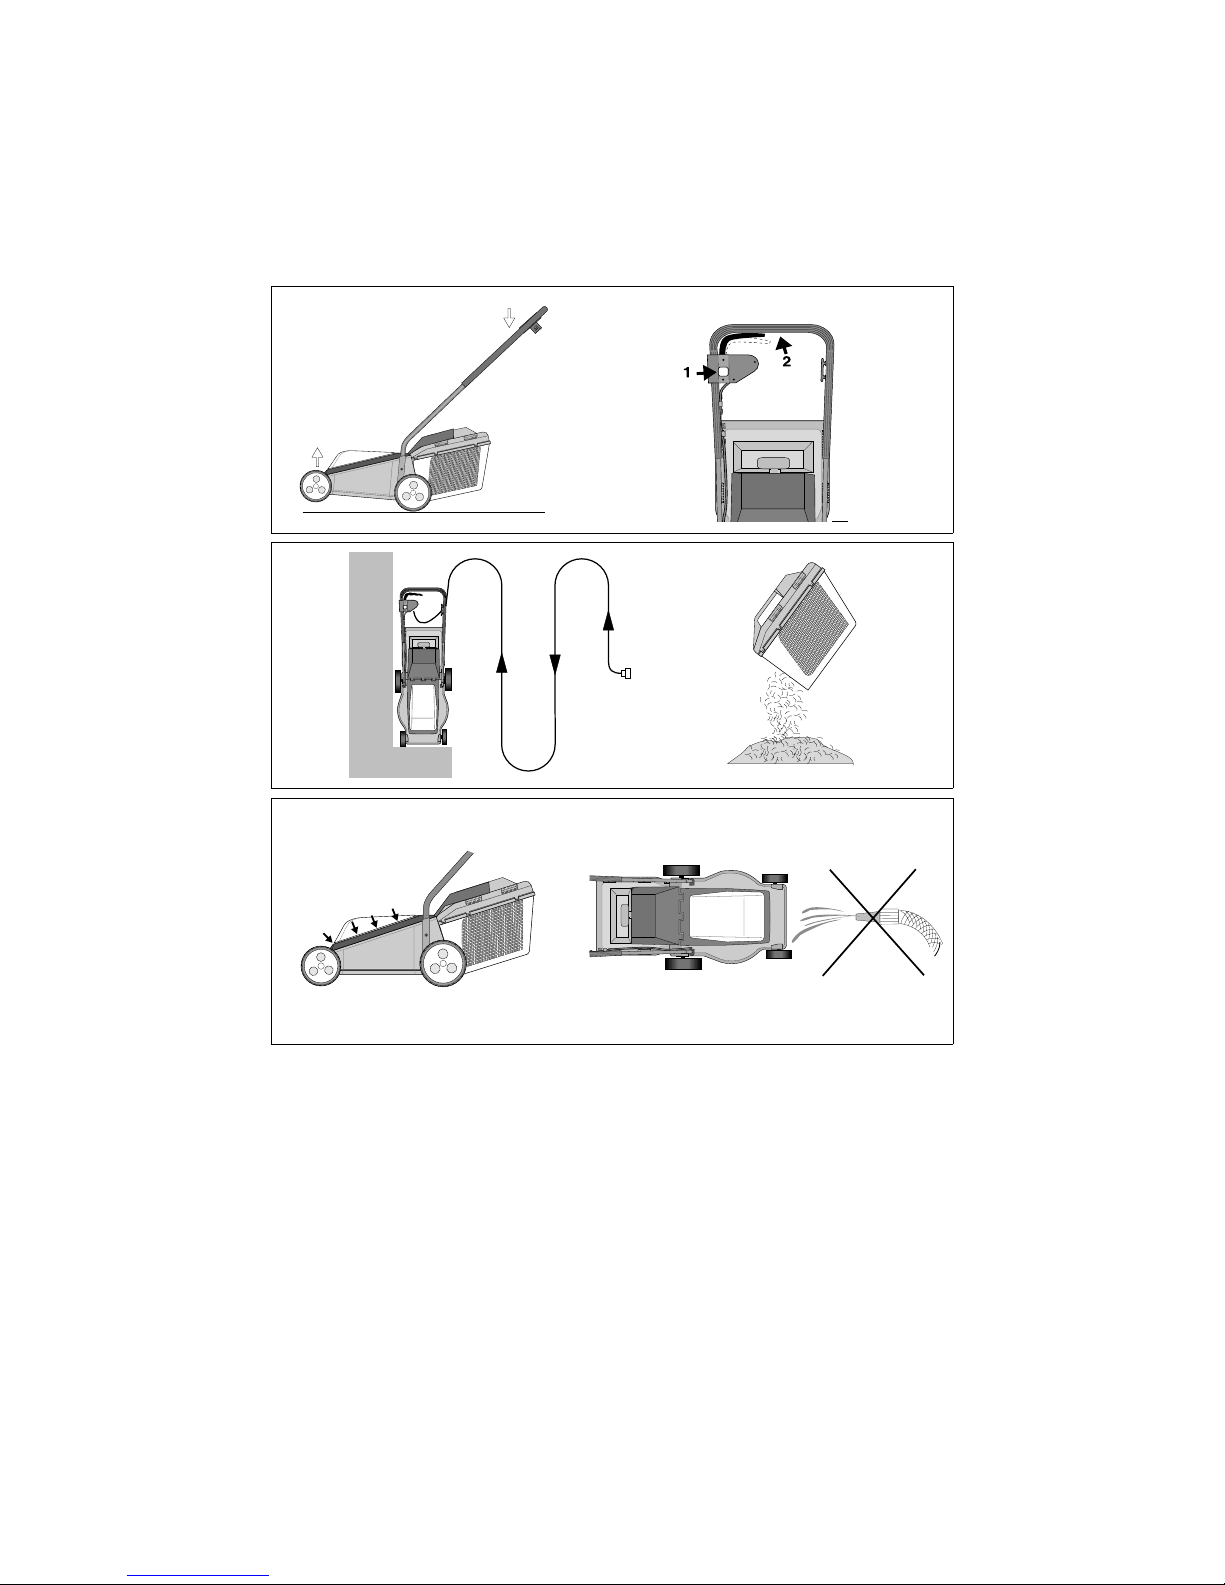
CONNECTION (fig 4)
Only use the machine with the cable supplied with
your mower.
If the cable is damaged, it must be replaced by an
authorised service dealer.
Relieve the load on the cable in the cable holder on
the handle.
START / STOP (fig. 5)
Start the lawnmower on a flat, firm surface. Do not
start in long grass. Press the handle down so that
the front wheels are raised slightly from the ground
to reduce grass resistance
Starting the motor:
1. Press the button.
2. Squeeze the handle towards the handlebar.
Stopping the motor: Release the handle.
CUTTING (fig. 6)
Always cut away from the cable.
Wheels
Handle
Page 7

7
ENGLISH
GB
Empty the grass collector in good time to ensure
that the grass ejector does not become blocked, so
impairing the collecting ability.
To avoid overloading the motor, do not push the
lawnmower too fast in long grass.
MAINTENANCE
CHANGING THE BLADE
Always unplug at the mains before performing
maintenance, cleaning or other work on the machine.
Wear protective gloves. Loosen the blade bolt with
a 26 mm spanner. Fit the new blade, tightening
torque 15 Nm.
Always use genuine spare parts.
CLEANING/STORAGE (fig. 7)
After use, always clean the lawnmower with a
brush or cloth.
The cooling air intake around the motor casing
must be kept free from grass and dirt so that the
motor does not overheat.
The underside of the chassis can be scraped clean.
Never rinse with water.
The lawnmower must be stored dry.
SERVICING
Original spare parts are supplied by authorised
dealers.
ACCESSORIES/SPARE PARTS
Always use genuine spare parts and accessories. Non-genuine spare parts and
accessories have not been checked and
approved by the lawnmower manufacturer. The use of non-genuine spare
parts and accessories can entail a risk of
injury, even if they fit the machine. The
lawnmower manufacturer accepts no
responsibility for injury or damage
caused by such parts or accessories.
Genuine spare parts are supplied by authorised
service stations and by many dealers.
We recommend that the machine be handed in to
an authorised service workshop for service, main-
tenance and checking of safety devices once a year.
For service and spare parts, please contact B&Q
stores or telephone 08457 023674.
PRODUCT IDENTITY
The product’s identity is determined by the machine’s item and serial numbers.
Found on this sticker affixed to the machine’s
chassis:
Use these identification terms during all contact
with authorised service dealers when purchasing
spare parts.
As soon as possible after acquiring the machine,
the above number should be written in on the last
page of this publication.
The lawnmower manufacturer reserves the right to
make alterations to the product without prior notification.
PURCHASE TERMS
A full guarantee is issued against manufacturing
and material defects. The user must carefully follow the instructions given in the enclosed documentation.
Guarantee period
For consumer use: two years from the purchase
date.
For professional use: three months from the purchase date.
Exceptions
The guarantee does not cover damage due to:
- neglect of the user to acquaint himself with accompanying documentation
- carelessness
- incorrect and non-permitted use or assembly
- the use of non-genuine spare parts
- the use of accessories not supplied or approved
by the manufacturer
TYP
ART. NR.
SERIE NR.
XX-XXXX-XX
XXXXXXXX
TM:HYKVÄKSYMA
maahantuoja STIGA OY
L
WA
TÜV Rheinland
geprüfte
Sicherheit
S
N
D
FI
22 Kg
1,6 kW
230 V 50 Hz
2850 min
Nätsäkring 10 A
R
S461
86
ITEM NO.
SERIAL NO.
Page 8

8
ENGLISH
GB
Neither does the guarantee cover:
- wearing components such as blades, belts,
wheels and cables
- normal wear
- engines. These are covered by the appropriate
manufacturer’s guarantees with separate terms
and conditions.
The purchaser is covered by each country’s national laws. The rights to which the purchaser is entitled with the support of these laws are not
restricted by this guarantee.
1.Category Lawnmower with electric engine
E3312.Type
12-45113.Item no
GGP Sweden AB
P.O. Box 1006
SE-573 28 Tranås
Sweden
4.Manufacturer
STOP
5.Vibration
< 2.5 m/s
2
(ISO 5349)
6A.Guaranteed sound power level
(L
WA)
89 dB(A)
6B.Measured sound power level 87 dB(A)
7.Notified body
ITS Testing &
Certification Ltd
Notified Body representative 0359
8.Make Performance Power
9.Cutting width 32 cm
10.Serial number See label on chassis
11.Engine
Make ATB
BSABF-71/2-B 50,
BSABF-71/2-B 60
Model
12.Rotation speed 2850 rpm
This product conforms to
- Low Voltage Directive 73/23/EEC
- Electromagnetic Compatibility Directive 89/336/EEC
- Machinery Directive 98/37/EEC with special reference to
appendix 1 of the directive regarding essential health and
safety requirements in conjunction with manufacturing
- Noise Emission Directive 2000/14/EC
Managing DirectorMats Antonsson
Issued in Tranås 2002-09-04
EC conformity declaration
 Loading...