

STIEBEL ELTRON CNS 50-2 E, CNS 75-2 E, CNS 100-1 E, CNS 100-2 E, CNS 150-1 E Operation And Installation
...Page 1
OPERATION AND INSTALLATION
GUÍA DE OPERACIÓN E INSTALACIÓN
MODE D’EMPLOI ET MANUEL D’INSTALLATION
WALL MOUNTED CONVECTION HEATER
CONVECTOR DE PARED
APPAREIL DE CHAUFFAGE À CONVECTION MURAL
» CNS 50-2 E
» CNS 75-2 E
» CNS 100-1 E
» CNS 100-2 E
» CNS 150-1 E
» CNS 150-2 E
» CNS 200-2 E
» CNS 240-2 E
Simply the Best
STIEBEL ELTRON, Inc.
17 West Street | West Hatfield, MA 01088
Tel. 413-247-3380 | Fax 413-247-3369
Email info@stiebel-eltron-usa.com
www.stiebel-eltron-usa.com
296658-XXXXX-9046
Page 2
2 |CNS E WWW.STIEBEL-ELTRON-USA.COM
CONTENTS | OPERATION
IMPORTANT INSTRUCTIONS
1. IMPORTANT INSTRUCTIONS
SAVE THESE INSTRUCTIONS
When using electrical appliances, basic precautions should always
be followed to reduce the risk of fire, electric shock, and injury to
persons, including the following:
1. Read all instructions before installing or using this heater.
2. This heater is hot when in use. To avoid burns, do not let bare
skin touch hot surfaces. Keep combustible materials, such as
furniture, pillows, bedding, papers, clothes, etc. and curtains at
least 3 feet (1 m) from the front of the heater and keep them at
least 3 feet (1 m) away from the sides and rear.
3. Extreme caution is necessary when any heater is used by or
near children or invalids and whenever the heater is left operating
and unattended.
4. Do not operate any heater after it malfunctions. Disconnect
power at service panel and have heater inspected by a reputable
electrician before reusing.
1.1 Document information
The chapter Operation is intended for users and heating
contractors.
The chapter Installation is intended for heating contractors.
Read these instructions carefully before using the
appliance and retain them for future reference. Pass
on the instructions to any new users.
1.2 Key to symbols
1.2.1 Layout of safety information
Safety information comprises a warning symbol, a keyword and
a text giving information. Safety information is printed on a grey
background.
Example:
DANGER Electrocution
Install the appliance in such a way that control
equipment...
1 2 3
4
1 Symbol (see chapter on warning symbols/symbols)
2 Keyword (see chapter on keywords)
3 Description (see chapter on warning symbols/symbols)
4 Information text
1.2.2 Keywords
KEYWORD Description
DANGER
The keyword DANGER indicates information which must be
observed, otherwise serious injury or death will result.
WARNING
The keyword WARNING indicates information that must be
observed, otherwise serious injury or death may result.
CAUTION
The keyword CAUTION indicates information that must be
observed, otherwise relatively serious or light injuries may
result.
OPERATION
1. Important instructions _________________________________________2
1.1 Document information �������������������������������������������� 2
1.2 Key to symbols ������������������������������������������������������ 2
2. Safety ____________________________________________________________3
2.1 Intended use ��������������������������������������������������������� 3
2.2 Safety information ������������������������������������������������� 3
2.3 Test symbols ��������������������������������������������������������� 4
3. Register your product __________________________________________ 4
4. Appliance description __________________________________________4
5. Operation _______________________________________________________4
5.1 Description of the user interface �������������������������������� 4
5.2 Frost protection ����������������������������������������������������� 4
5.3 Limiting the temperature controller ���������������������������� 4
5.4 Shutting down ������������������������������������������������������ 5
6. Cleaning, care and maintenance ______________________________ 5
7. What to do if ... _________________________________________________5
INSTALLATION
8. Safety ____________________________________________________________5
8.1 General safety instructions ��������������������������������������� 5
8.2 Instructions, standards and regulations ����������������������� 5
9. Appliance description __________________________________________ 5
9.1 Standard delivery ��������������������������������������������������� 5
10. Installation ______________________________________________________5
10.1 Installing the wall mounting bracket ��������������������������� 5
10.2 Appliance installation ��������������������������������������������� 6
10.3 Dismounting the appliance ��������������������������������������� 6
10.4 Power supply �������������������������������������������������������� 6
11. Troubleshooting_________________________________________________6
12. Appliance handover ____________________________________________6
13. Specification _____________________________________________________ 7
13.1 Dimensions of wall mounted version ��������������������������� 7
13.2 Specification table �������������������������������������������������� 7
ENVIRONMENT AND RECYCLING
CUSTOMER SERVICE AND WARRANTY
Page 3
OPERATION
SAFETY
WWW.STIEBEL-ELTRON-USA.COM CNS E| 3
ENGLIS H
1.2.3 Warning symbols/symbols
Warning symbol
Description
Injury
Electrocution
Burns or scalding
!
Other situations
Fire
Never cover the appliance
Appliance disposal
1.2.4 Text symbols and layout in this documentation
Read the text next to this symbol carefully.
» The "»" symbol indicates that you should do something. The
action you need to take is described step by step.
—Passages with the "
–" symbol show you lists of items.
1.2.5 Information on the appliance
Never cover the appliance
1.2.6 Units of measurement
The dimensions in this document are given in in / mm.
Any alternative units of measurements are specified
accordingly.
2. Safety
2.1 Intended use
This appliance is designed to heat living areas.
Any other use beyond that described shall be deemed inappropriate.
Observation of these instructions is also part of the correct use of
this appliance. Any modifications or conversions to the appliance
void all warranty rights.
2.2 Safety information
Operate the appliance only when fully installed and with all safety
equipment fitted.
WARNING Fire
Never operate this appliance ...
— in rooms where the appliance is at risk of fire or
explosion as a result of chemicals, dust, gases or
vapours.
— in the direct proximity of pipes or receptacles that
carry or contain flammable or explosive materials.
— if work such as laying cables, grinding or sealing
is carried out in the installation room.
— if sprays, floor polish or similar products
containing napsan are used. Vent the room
sufficiently before heating.
— if the minimum clearances to adjacent object
surfaces are not maintained, for example to
furniture, net curtains, curtains, textiles or other
flammable materials (for minimum clearances, see
pg. 7 section 13.1).
— if an appliance component is damaged, the
appliance has fallen over or already had a fault.
WARNING Injury
Where children or persons with limited physical,
sensory or mental capabilities are allowed to control
this appliance, ensure that this will only happen under
supervision or after appropriate instructions by a
person responsible for their safety.
Children must be supervised to ensure that they never
play with the appliance.
WARNING Fire
Never place any flammable, combustible or insulating
objects or materials, such as laundry, blankets,
magazines, containers with floor polish or napsan,
spray cans or similar on the appliance or in direct
proximity to it.
WARNING Burns
The surfaces of the appliance casing and the expelled
air become hot during operation (more than 176 °F /
80 °C).
CAUTION Overheating
Never cover the appliance
Page 4
OPERATION
REGISTER YOUR PRODUCT
4 |CNS E WWW.STIEBEL-ELTRON-USA.COM
Never step on the appliance.
ETL / UL designation
The ETL / UL designation shows that the appliance meets all
essential requirements according to UL 499
2.3 Type label
See type plate.
The type plate is located on the right on the exterior of the
appliance.
3. Register your product
YOU MUST REGISTER THIS PRODUCT WITHIN 90 DAYS OF PURCHASE
ON OUR WEB SITE IN ORDER TO ACTIVATE THE STANDARD
WARRANTY OR TO BE ELIGIBLE FOR THE EXTENDED WARRANTY. GO
TO OUR WEB SITE AT WWW.STIEBEL-ELTRON-USA.COM AND CLICK ON
REGISTER YOUR PRODUCT.
Before beginning the registration process, we suggest that
you gather the necessary information which will be as follows:
Type, Example: CNS 100-2 E (from the white label that is on
the right side of the unit)
Number listed after “Nr.”
Place of Purchase
Purchase Date
First & Last Name
Email address
Physical Address
Phone Number
IF YOU HAVE ANY QUESTIONS CONCERNING THE REGISTRATION PROCESS OR WARRANTY OPTIONS, PLEASE CONTACT
STIEBEL ELTRON USA DIRECTLY AT (800)-582-8423.
4. Appliance description
The appliance is an electric direct heater only for installation on
a wall.
The appliance is suitable as a full heating system in bathrooms,
for example, or for use between seasons and as a booster heater
in smaller rooms, such as hobby and guest rooms.
The air in the appliance is heated by a heating element and
expelled via natural convection through the air outlet grille at the
top. Cool room air flows in through the apertures at the bottom
of the appliance.
After mounting the appliance on the wall and making the electrical
connection using a permanent power supply via an appliance
socket, the appliance is ready for operation.
4.1 Series CNS-E
After mounting the appliance on the wall and making the electrical
connection using a main breaker, the appliance is ready for
operation.
5. Operation
5.1 Description of the user interface
» Switch the appliance ON via the switch on the right hand side
of the appliance.
» Set the required room temperature via the continuously variable
temperature selector (for temperatures see specification
chapter).
26�07�31�0037
As soon as the selected room temperature is reached, it is
constantly maintained at this selected temperature through
periodic heating (the output of the appliance must correspond at
least to the required heat demand of the room).
If several appliances are installed in a single room, the setting
at the temperature selector on each appliance can be different.
To avoid excessive power consumption when windows are open,
you should stop the appliance while venting.
5.2 Frost protection
» Turn the temperature selector as far to the right as possible. In
this position, the temperature controller switches on the heating
element automatically if the room temperature drops below the
frost protection temperature (47 °F / 7 °C).
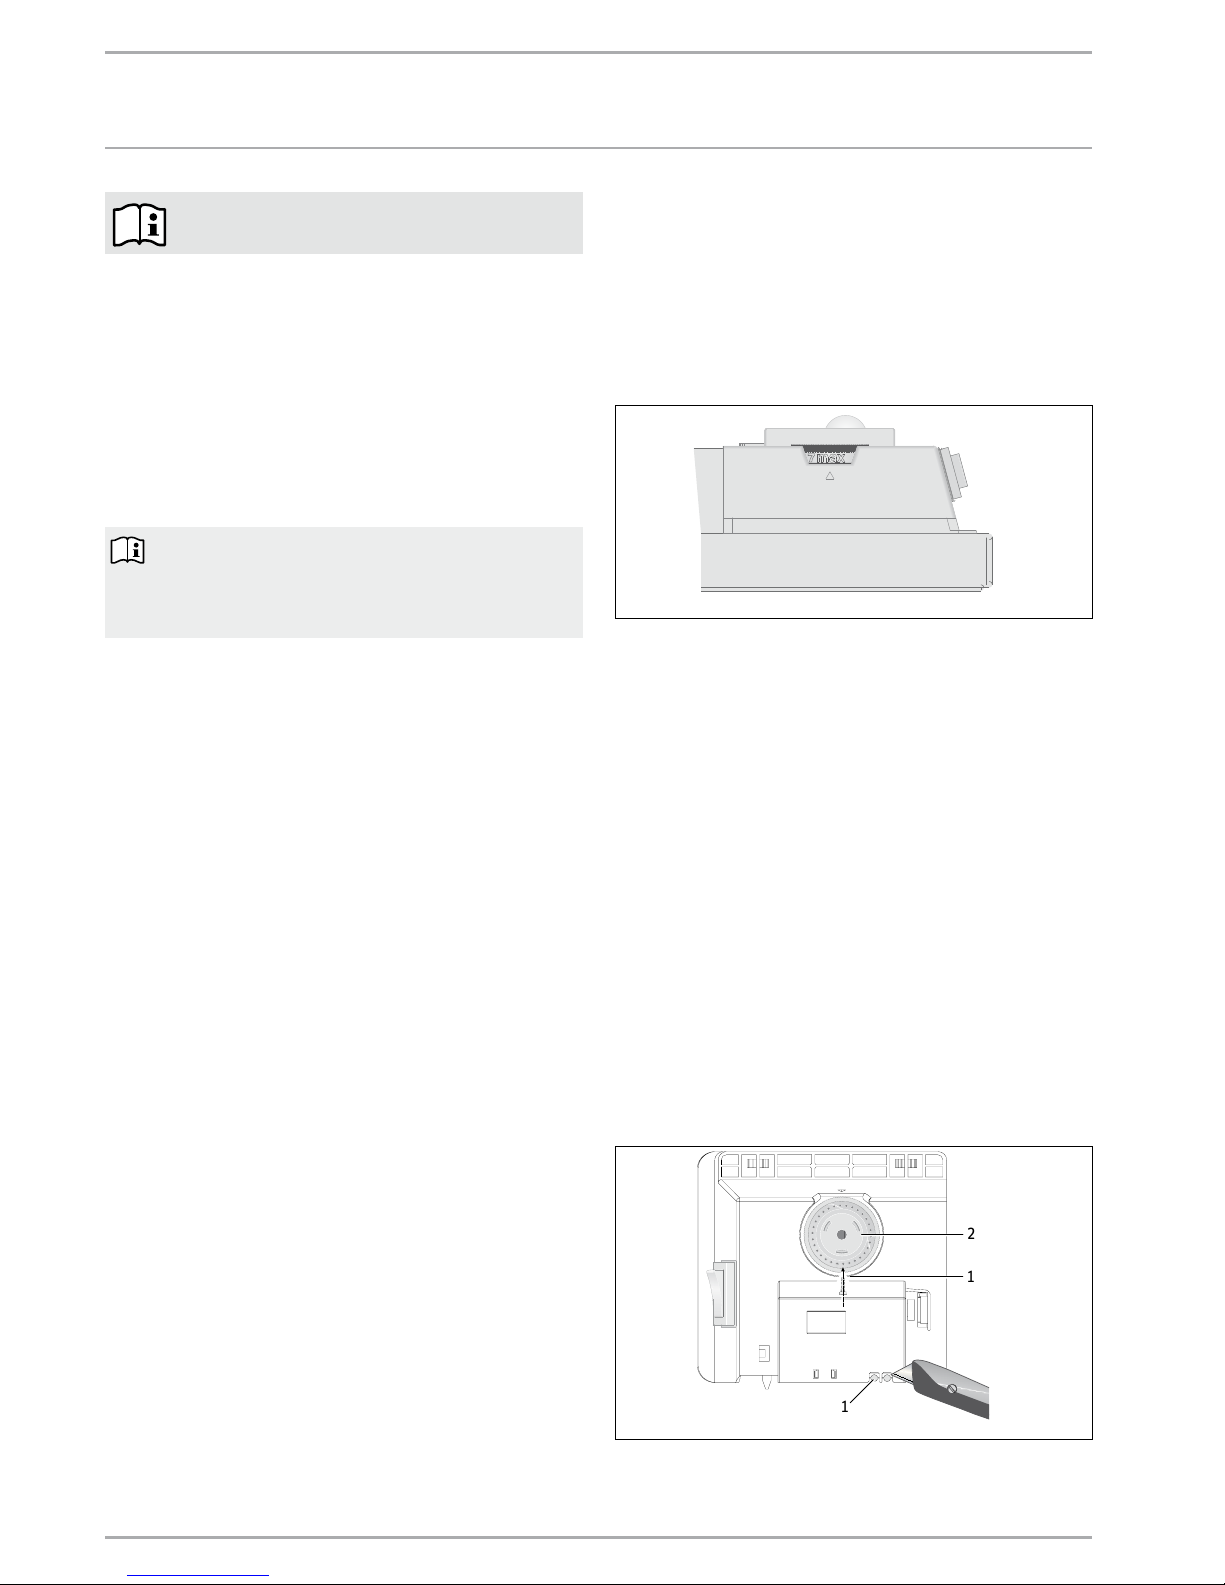
5.3 Limiting the temperature controller
Using the two pins fitted to the back of the control casing, you
can fix the temperature controller at a certain setting or limit the
temperature setting range.
» Break out the pins.
» To fix the selected temperature, push a pin into the hole opposite
(see diagram).
1
1
2
26�07�31�0038
1 Pin
2 Temperature selector
Page 5

OPERATION
CLEANING, CARE AND MAINTENANCE
WWW.STIEBEL-ELTRON-USA.COM CNS E| 5
ENGLIS H
» To limit the temperature setting range, set the minimum and
maximum values at the temperature selector, and push a pin for
each into the slightly offset hole opposite (see diagram).
26�07�31�0171
1
1
2
1 Pin
2 Temperature selector
5.4 Shutting down
» Move the switch on the right of the appliance to OFF.
6. Cleaning, care and maintenance
!
WARNING
Before cleaning, make sure the power has been turned
off at the circuit breaker panel and that the heating
element of the heater is cool. Failure to do so could
result in serious burns, electrocution, serious bodily
injury, or death.
If a pale brownish discolouration appears on the appliance casing,
wipe this off as soon as possible with a damp cloth. Clean the
appliance when cold with ordinary cleaning products. Avoid
abrasive or corrosive cleaning products.
CAUTION Fire
Never spray cleaning spray into the air slot.
Ensure that no moisture can enter the appliance.
As part of regular maintenance, we recommend also having the
control components checked. The safety and control components
should be checked by a contractor no more than ten years after
commissioning.
7. What to do if ...
... the appliance does not heat up:
Check the temperature set at the appliance and the circuit breaker
box.
The appliance has a safety temperature controller that shuts
the appliance down if it overheats. After the cause has been
removed (for example air outlet or inlet apertures covered) and
the appliance has cooled down for a few minutes, operation starts
again.
If you cannot remedy the fault, contact your contractor. To facilitate
and speed up your enquiry, please provide the number on the type
plate (Nr. XXXXXX - XXXX - XXXXXX)
8. Safety
Only qualified contractors should carry out installation,
commissioning, maintenance and repair of the appliance.
8.1 General safety instructions
We guarantee trouble-free function and operational reliability
only if the original accessories and spare parts intended for the
appliance are used.
DANGER Electrocution
If you mount the appliance on the wall, do so in such
a way that control equipment cannot be touched by a
person in the bath or shower.
!
CAUTION
— Only fit the wall mounted appliance to a vertical
wall that is temperature-resistant to at least 185 °F
/ 85 °C.
— Observe the minimum clearances to adjacent
object surfaces (for minimum clearances see
specification chapter).
— Never install the appliance directly below a wall
socket.
— Ensure that the power cable is not in contact with
any appliance components.
8.2 Instructions, standards and regulations
Observe all applicable national and regional regulations
and instructions.
Observe the Building and Garage Regulations [or local
regulations].
9. Appliance description
9.1 Standard delivery
Wall mounting bracket (hooked into the appliance)
10. Installation
10.1 Installing the wall mounting bracket
You can also use the wall mounting bracket as a template for wall
mounting; this ensures the required floor clearance.
» Unhook the wall mounting bracket.
» Place the centred wall mounting bracket level on the ground
and mark holes 1 and 2.
» Lift up the wall mounting bracket so that its lower holes match
up with the markings you have just made on the installation wall.
» Mark holes 3 and 4 on the installation wall.
Page 6

6 |CNS E WWW.STIEBEL-ELTRON-USA.COM
INSTALLATION
TROUBLESHOOTING
aaa
26�07�31�0124
1
3
2
4
» Drill holes at all four markings. Secure the wall mounting bracket
with suitable materials (screws, rawl plugs) depending on the
type of wall. With the vertical slots, you can compensate for an
offset fixing hole.
10.2 Appliance installation
» Hook the appliance by its slots in the back of the appliance on
to all four tabs of the wall mounting bracket simultaneously.
» Push the appliance to latch it in position.
» Turn the locking bolt in the wall mounting bracket fully clockwise;
this locks the appliance in place.
» Push the safety cap onto the locking bolt to prevent it from
loosening.
26�07�31�0035
1
2
1 Locking bolt
2 Wall mounting bracket
26�07�31�0127
1
2
3
1 Appliance
2 Safety cap
3 Locking bolt
10.3 Dismounting the appliance
» Remove the safety cap from the locking bolt.
26�07�31�0128
1
2
3
1 Appliance
2 Safety cap
3 Locking bolt
» Undo the locking bolt on the wall mounting bracket.
» Lift the appliance up slightly and pull it forwards and away from
the wall mounting bracket.
10.4 Power supply
» Ensure the on-site supply cable has an adequate cross-section.
» Ensure a socket or junction box for a permanent power supply
is installed at a distance of at least 4˝ / 10 cm from the side of
the appliance.
DANGER Electrocution!
Carry out all electrical connection and installation
work in accordance with all national, state and local
building code.
DANGER Electrocution!
Each heater must be wired directly to the circuit
breaker panel with the proper size breaker and wire
gauge.
DANGER Electrocution!
Do not plug the heater into a wall outlet.
The specified voltage on the nameplate must match
the voltage at the circuit breaker panel.
11. Troubleshooting
The power cable must only be replaced by a contractor using our
original spare parts.
12. Appliance handover
Explain the functions of the appliance to the user. Draw special
attention to the safety information. Hand the operating and
installation instructions to the user.
Page 7
WWW.STIEBEL-ELTRON-USA.COM CNS E| 7
ENGLIS H
INSTALLATION
SPECIFICATION
13. Specification
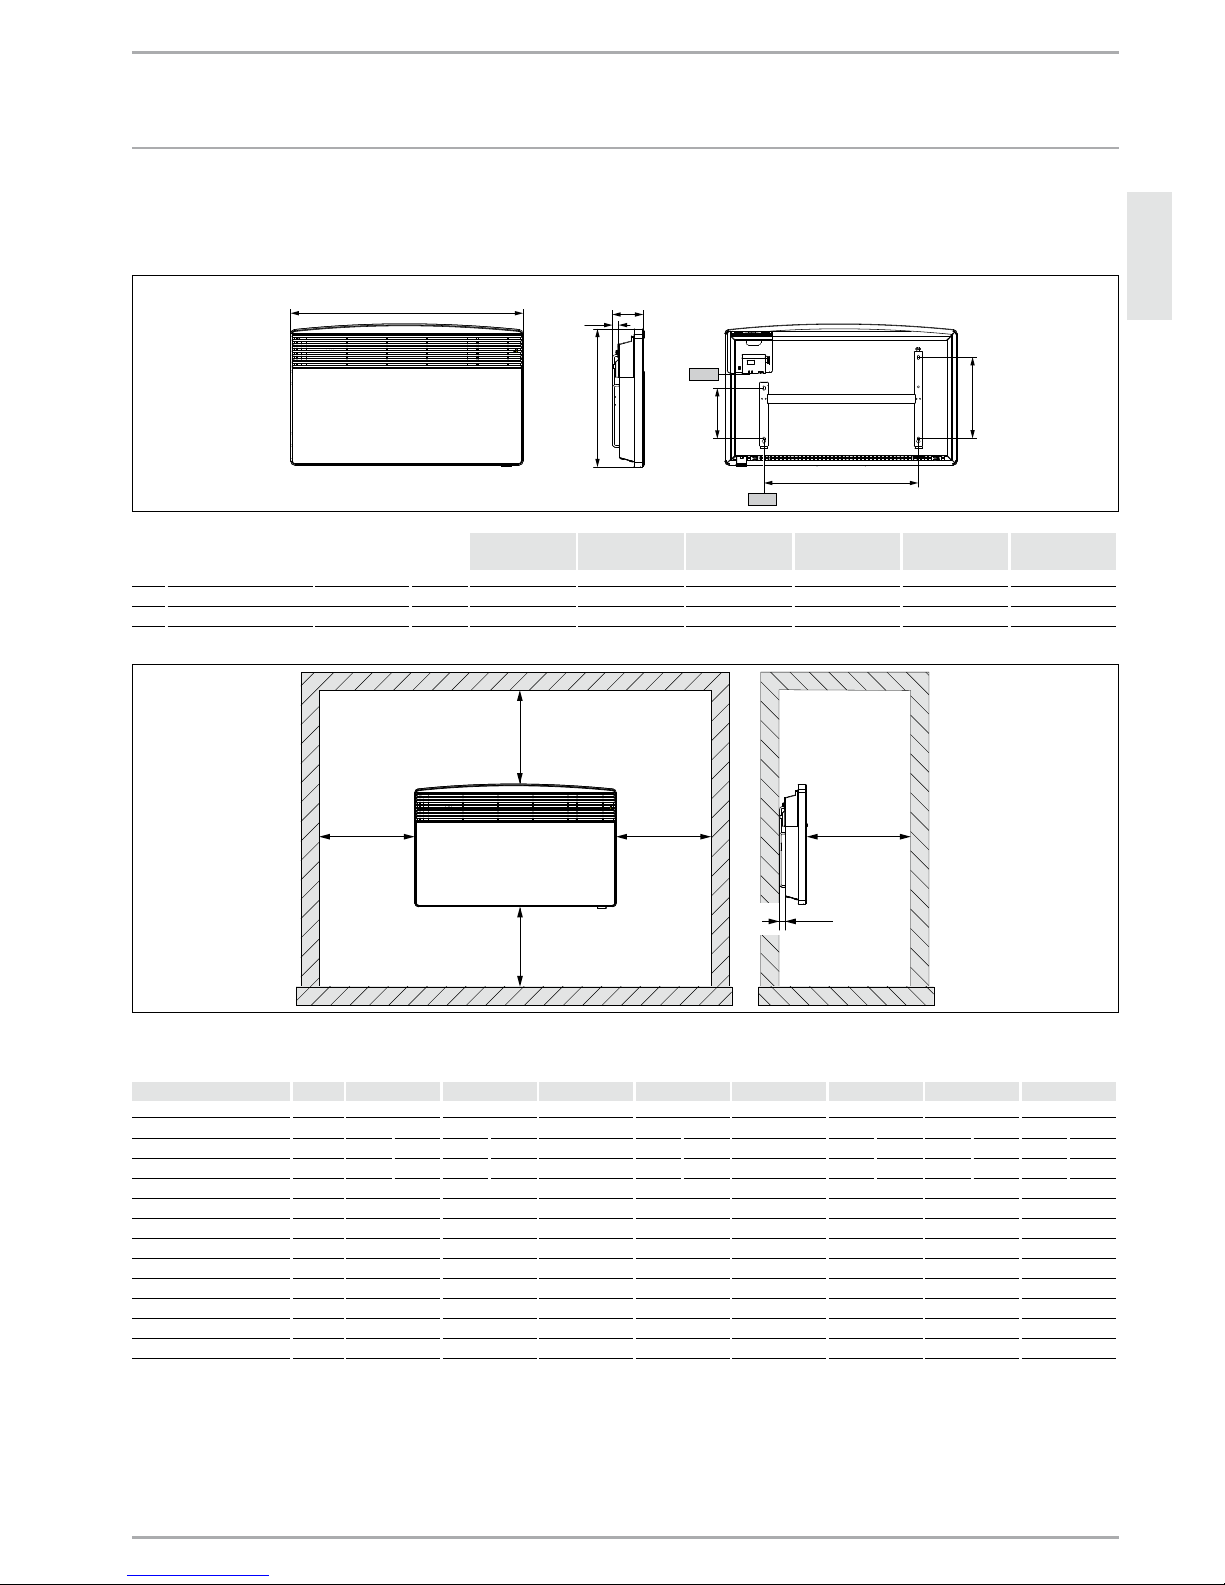
13.1 Dimensions of wall mounted version
b01
a20
min. 1˝ / 20
4˝ / 100
17.75˝ / 450
6.4˝ / 163
10.25˝ / 261
i13
in / mm
80�07�31�0009
CNS
50-2 E
CNS
75-2 E
CNS
100-1,-2 E
CNS
150-1,-2 E
CNS
200-2 E
CNS
240-2 E
A20 Appliance Width in / mm 14.5 / 370 17.5 / 445 17.5 / 445 23.25 / 590 29.1 / 740 35.0 / 890
B01 Electrical cable entry
i13 Wall mounting bracket Hole spacing in / mm 4.75 / 121 7.7 / 195 7.7 / 195 13.5 / 343 19.3 / 491 25.2 / 639
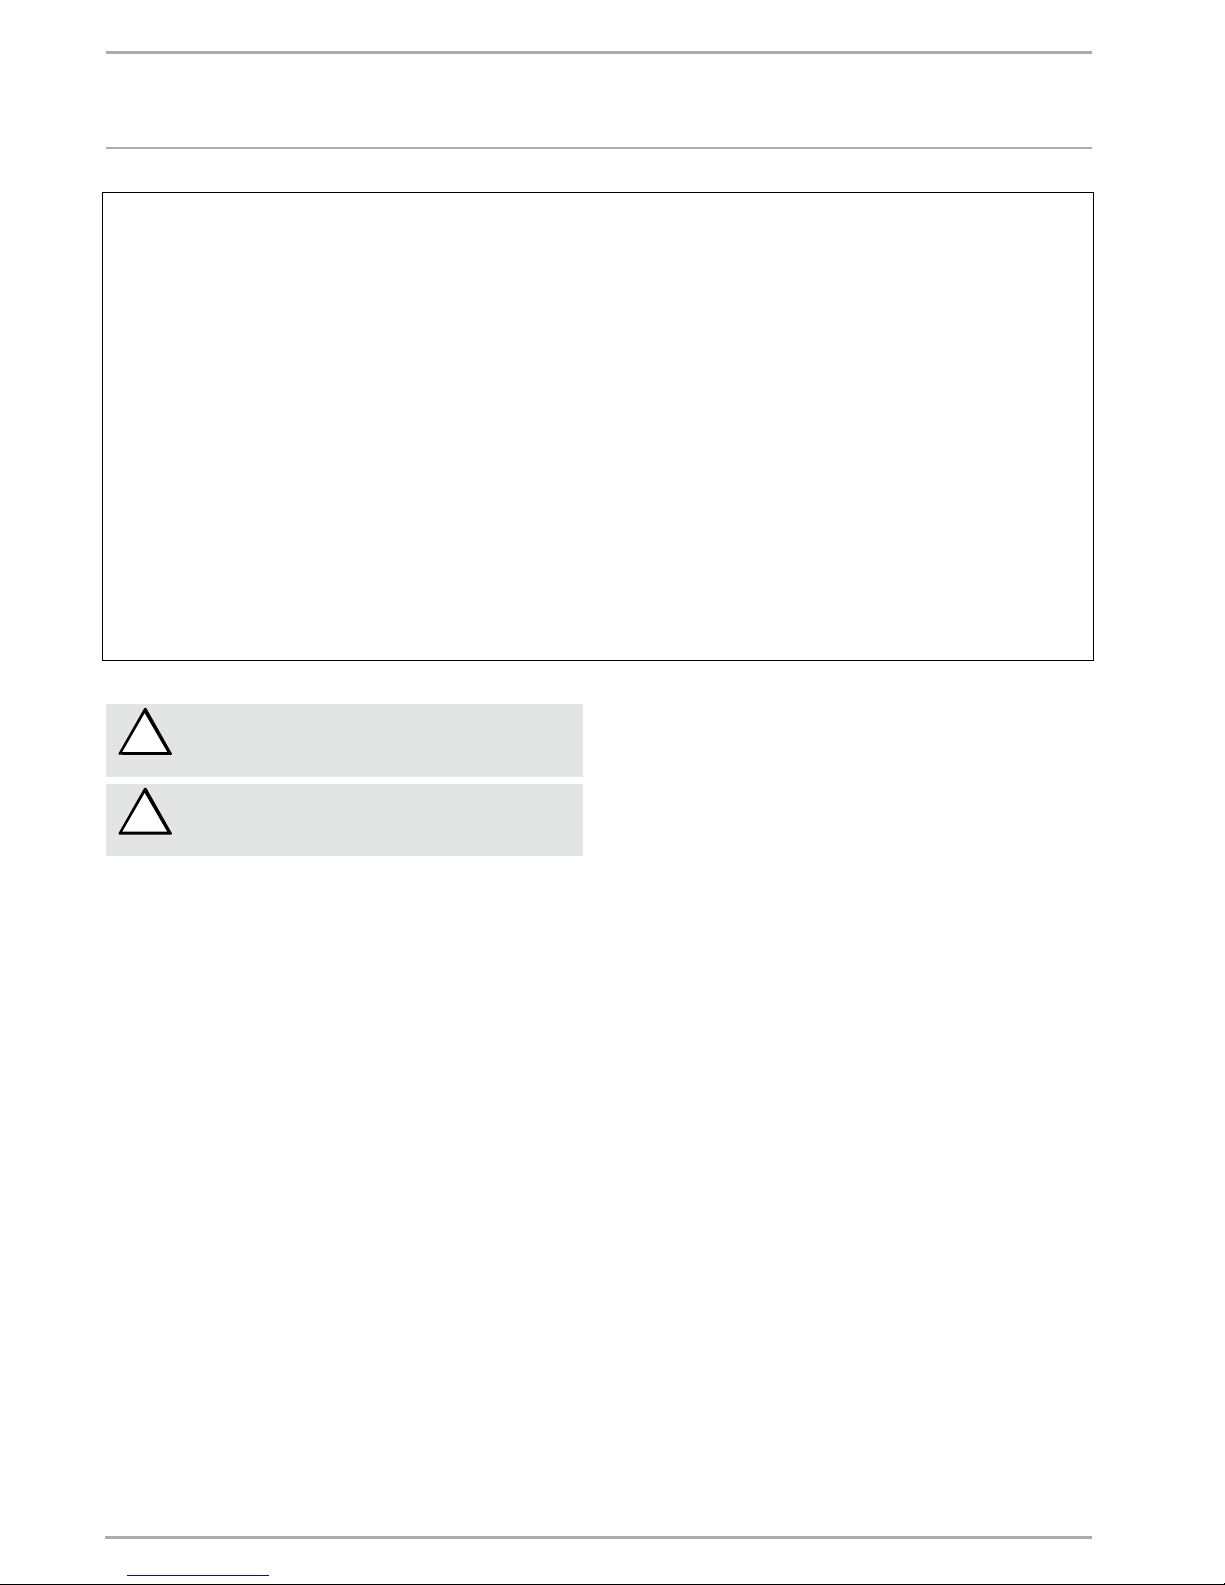
min. 20mm
min. 1
˝
min. 500mm
min. 20˝
min. 100mm
min. 250mm
min. 10˝
min. 4˝
min. 100mm
min. 4˝
min. 100mm
min. 4˝
D0000019283
13.2 Specification table
Model CNS 50-2 E CNS 75-2 E CNS 100-1 E CNS 100-2 E CNS 150-1 E CNS 150-2 E CNS 200-2 E CNS 240-2 E
Item No. 231542 232068 233586 231543 233587 231544 231545 231546
Voltage V 240 208 240 208 120 240 208 120 240 208 240 208 240 208
Wattage kW 0.5 0.38 0.75 0.56 1.0 1.0 0.75 1.5 1.5 1.13 2.0 1.5 2.4 1.8
Amperage A 2.1 1.8 3.1 2.7 8.3 4.2 3.6 12.5 6.3 5.4 8.3 7.2 10.0 8.7
Temperature range °F / °C 43-86 / 6-30 43-86 / 6-30 43-86 / 6-30 43-86 / 6-30 43-86 / 6-30 43-86 / 6-30 43-86 / 6-30 43-86 / 6-30
Frost protection setting °F / °C 47 / 7 47 / 7 47 / 7 47 / 7 47 / 7 47 / 7 47 / 7 47 / 7
Height in / mm 17.75 / 450 17.75 / 450 17.75 / 450 17.75 / 450 17.75 / 450 17.75 / 450 17.75 / 450 17.75 / 450
Width in / mm 14.5 / 370 17.5 / 445 17.5 / 445 17.5 / 445 23.25 / 590 23.25 / 590 29.1 / 740 35.0 / 890
Depth in / mm 4.0 / 100 4.0 / 100 4.0 / 100 4.0 / 100 4.0 / 100 4.0 / 100 4.0 / 100 4.0 / 100
Weight lb / kg 8.4 / 3.8 9.7 / 4.4 9.7 / 4.4 9.7 / 4.4 12.6 / 5.7 12.6 / 5.7 15.0 / 6.8 17.9 / 8.1
IP-Rating IP24 IP24 IP24 IP24 IP24 IP24 IP24 IP24
Protection class I I I I I I I I
Color alpine white alpine white alpine white alpine white alpine white alpine white alpine white alpine white
Page 8
WARRANTY AND CUSTOMER SERVICE - ENVIRONMENT AND RECYCLING
8 |CNS E WWW.STIEBEL-ELTRON-USA.COM
!
The installation, electrical connection and first operation of this appliance should be carried out by a qualified
installer.
!
The company does not accept liability for failure of any
goods supplied which have not been installed and ope-
rated in accordance with the manufacturer‘s instructions.
Environment and recycling
Please help us to protect the environment by disposing of the
packaging in accordance with the national regulations for waste
processing.
WARRANTY
RESIDENTIAL & COMMERCIAL WARRANTY: STIEBEL ELTRON WARRANTS TO THE ORIGINAL OWNER THAT THE CNS CONVECTION
HEATER WILL BE FREE FROM DEFECTS IN WORKMANSHIP AND MATERIALS FOR A PERIOD OF THREE (3) YEARS FROM THE DATE OF
PURCHASE. SHOULD THE PART(S) PROVE TO BE DEFECTIVE UNDER NORMAL USE DURING THIS PERIOD, STIEBEL ELTRON, INC. WILL
BE RESPONSIBLE FOR REPLACEMENT OF THE DEFECTIVE PART(S) ONLY. STIEBEL ELTRON, INC. IS NOT RESPONSIBLE FOR LABOR
CHARGES TO REMOVE AND/OR REPLACE THE DEFECTIVE PART(S), OR ANY INCIDENTIAL OR CONSEQUENTIAL EXPENSES.
SHOULD THE OWNER WISH TO RETURN THE CONVECTION HEATER FOR REPAIR, THE OWNER MUST FIRST SECURE WRITTEN AUTHORIZATION FROM STIEBEL ELTRON, INC. THE OWNER SHALL BE REQUIRED TO SHOW PROOF OF PURCHASE DATE, AND TO PAY ALL
TRANSPORTATION COSTS TO RETURN THE DEFECTIVE PART(S) OR TANKLESS ELECTRIC WATER HEATER FOR REPAIR OR REPLACEMENT. WARRANTY IS VOID IF HEATER HAS BEEN INSTALLED OR USED IMPROPERLY OR IF DESIGN HAS BEEN ALTERED IN ANY WAY.
STIEBEL ELTRON, INC.
17 West Street
West Hatfield, MA 01088, USA
PHONE: 800.582.8423 or 413.247.3380
FAX: 413.247.3369
Email info@stiebel-eltron-usa.com
www.stiebel-eltron-usa.com
CUSTOMER SERVICE AND WARRANTY
ENVIRONMENT AND RECYCLING
Page 9

WWW.STIEBEL-ELTRON-USA.COM CNS E| 9
ESPAÑOL
CONTENTS | OPERATION
INSTRUCCIONES IMPORTANTES
1. INSTRUCCIONES IMPORTANTES
GUARDE ESTAS INSTRUCCIONES
Siempre que se utilizan artefactos eléctricos, se deben tomar
precauciones básicas para reducir los riesgos de incendio, shock
eléctrico y lesiones personales, incluyendo las siguientes:
1. Lea todas las instrucciones antes de instalar o utilizar el
calefac tor.
2. El calefactor se calienta cuando está funcionando. Para prevenir
quemaduras, evite que la piel desnuda entre en contacto con las
superficies calientes. Mantenga materiales combustibles, tales
como muebles, almohadas, ropa de cama, papeles, ropa, etc.
y cortinas a una distancia de al menos 1 m (3 ft) del frente del
calefactor, y a una distancia de al menos 1 m (3 ft) de los laterales
y la parte posterior del artefacto.
3. Se deben tomar precauciones extremas cuando cualquier
calefactor es utilizado por o cerca de niños o personas
discapacitadas y cuando el calefactor se deja funcionando y sin
vigilancia.
4. No utilice ningún calefactor que haya tenido un funcionamiento
defectuoso. Desconecte la energía del panel de servicio y haga que
un electricista confiable lo revise antes de reutilizarlo.
1.1 Información del documento
El capítulo Operación está destinado a usuarios y técnicos en
calefacción.
El capítulo Instalación está destinado a técnicos en calefacción.
Lea las instrucciones cuidadosamente antes de utilizar
el artefacto y guárdelas para consultas futuras. Pásele
las instrucciones a cualquier nuevo usuario.
1.2 Explicación de símbolos
1.2.1 Presentación de la información de seguridad
La información de seguridad comprende un símbolo de advertencia,
una palabra clave y un texto informativo. La información de
seguridad está impresa sobre un fondo gris.
Ejemplo:
PELIGRO Choque Eléctrico
DESCONECTE TODOS LOS POLOS DE LA FUENTE
DE ALIMENTACIÓN.
1 2 3
4
1 Símbolo (ver capítulo sobre símbolos de advertencia/
símbolos)
2 Palabra clave (ver capítulo sobre palabras clave)
3 Descripción (ver capítulo sobre símbolos de advertencia/
símbolos)
4 Texto informativo
OPERACIÓN
1. Instrucciones importantes �������������������������������������9
1.1 Información sobre el documento �������������������������������� 9
1.2 Explicación de símbolos ������������������������������������������� 9
2. Seguridad ������������������������������������������������������ 10
2.1 Uso previsto �������������������������������������������������������� 10
2.2 Información de seguridad ��������������������������������������� 10
2.3 Sellos de verificación ��������������������������������������������� 11
3. Registre su producto ����������������������������������������� 11
4. Descripción del artefacto ������������������������������������ 11
5. Operación ����������������������������������������������������� 11
5.1 Descripción de la interface de usuario ������������������������ 11
5.2 Protección anticongelante ���������������������������������������11
5.3 Limitación del controlador de temperatura ������������������ 11
5.4 Apagado ������������������������������������������������������������� 12
6. Limpieza, cuidado y mantenimiento ������������������������ 12
7. Qué hacer si ... ������������������������������������������������ 12
INSTALACIÓN
8. Seguridad ������������������������������������������������������ 12
8.1 Instrucciones generales de seguridad ������������������������ 12
8.2 Instrucciones, estándares y normativa ������������������������ 12
9. Descripción del artefacto ������������������������������������ 13
9.1 Entrega estándar �������������������������������������������������� 13
10. Instalación ����������������������������������������������������� 13
10.1 Instalación del soporte para montaje en pared ������������� 13
10.2 Instalación del artefacto ����������������������������������������� 13
10.3 Desmontaje del artefacto ���������������������������������������� 13
10.4 Suministro de energía �������������������������������������������� 13
11. Resolución de problemas ������������������������������������ 14
12. Traspaso del artefacto ��������������������������������������� 14
13. Especificaciones ���������������������������������������������� 14
13.1 Dimensiones de la versión de pared �������������������������� 14
13.2 Tabla de especificaciones ���������������������������������������� 15
MEDIOAMBIENTE Y RECICLAJE
SERVICIO AL CLIENTE Y GARANTÍA
Page 10

OPERACIÓN
SEGURIDAD
10 |CNS E WWW.STIEBEL-ELTRON-USA.COM
1.2.2 Palabras clave
PALABRA CLAVE Descripción
PELIGRO
La palabra clave PELIGRO indica información que debe
respetarse, ya que de lo contrario pueden producirse
lesiones serias o incluso la muerte.
ADVERTENCIA
La palabra clave ADVERTENCIA indica información
que debe respetarse, ya que de lo contrario pueden
producirse lesiones serias o incluso la muerte.
PRECAUCIÓN
La palabra clave PRECAUCIÓN indica información
que debe respetarse, ya que de lo contrario pueden
producirse lesiones relativamente serias o leves.
1.2.3 Símbolos de advertencia/símbolos
Símbolo de advertencia
Descripción
Lesiones
Electrocución
Quemaduras o escaldaduras
!
Otras situaciones
Incendio
Nunca cubra el artefacto
Desecho del artefacto
1.2.4 Símbolos de texto y su presentación en esta
documentación
Lea el texto que está junto a este símbolo
cuidadosamente.
» El símbolo “»” indica que usted debe realizar alguna acción. La
acción que debe realizar se describe paso a paso.
—Los pasajes que contienen el símbolo “–” le presentan listas
de ítems.
1.2.5 Información sobre el artefacto
Nunca cubra el artefacto
1.2.6 Unidades de medida
Las dimensiones se indican en este documento en
in. / mm. Cualquier unidad de medida alternativa se
especifica según el caso.
2. Seguridad
2.1 Uso previsto
Este artefacto está diseñado para calefaccionar espacios en
viviendas.
Cualquier otro uso diferente del descripto será considerado
inapropiado. El cumplimiento de estas instrucciones es también
parte del uso correcto de este artefacto. Cualquier modificación
o transformación del artefacto invalida todos los derechos de
garantía.
2.2 Información de seguridad
Utilice el artefacto solamente una vez que se encuentra
completamente instalado y con todos los dispositivos de seguridad
colocados.
ADVERTENCIA Incendio
Nunca opere el artefacto ...
— en habitaciones donde el artefacto esté en riesgo
de incendio o explosión como resultados de
productos químicos, polvos, gases o vapores.
— en proximidad inmediata de cañerías o recipientes
que transportan o contienen materiales
inflamables o explosivos.
— si en la habitación donde está instalado se están
realizando trabajos tales como tendido de cables,
molienda o sellado.
— si se utilizan aerosoles, lustra pisos o productos
similares que contienen napsan. Ventile bien la
habitación antes de calefaccionar.
— si no se mantienen las holguras mínimas respecto
de las superficies de objetos adyacentes, como ser
muebles, cortinas de red, cortinas, textiles u otros
materiales inflamables (por holguras mínimas,
consulte pág 14 sección 13.1).
— si un componente del artefacto está dañado, el
artefacto se ha caído o ya tenía una falla.
ADVERTENCIA Lesiones
Si se permite que niños o personas con capacidades
físicas, sensoriales o mentales limitadas controlen este
artefacto, asegúrese que ello solamente ocurra bajo
vigilancia o después que la persona responsable de su
seguridad haya impartido las instrucciones debidas.
Se debe vigilar a los niños para asegurar que nunca
jueguen con el artefacto.
ADVERTENCIA Incendio
Nunca coloque objetos o materiales inflamables,
combustibles o aislantes, tales como ropa, ropa de
cama, revistas, recipientes con lustra pisos o napsan,
latas de aerosol o similares sobre el artefacto o en
proximidad inmediata al mismo.
Page 11

OPERACIÓN
REGISTRE SU PRODUCTO
WWW.STIEBEL-ELTRON-USA.COM CNS E| 11
ESPAÑOL
un enchufe adecuado para artefactos, el mismo se encuentra listo
para operar.
4.1 Serie CNS-E
Después de instalar el artefacto en la pared y realizar la conexión
eléctrica utilizando un disyuntor principal, el artefacto está listo
para operar.
5. Operación
5.1 Descripción de la interface de usuario
» Encienda el artefacto colocando en ON la llave que se encuentra
en el lado derecho del mismo.
» Seleccione la temperatura deseada utilizando el selector
de temperatura de variación continua (para consultar las
temperaturas vea el capítulo de especificaciones).
26�07�31�0037
Tan pronto como se alcanza la temperatura elegida en la habitación,
la misma se mantiene en forma constante mediante calentamientos
periódicos (la salida del artefacto debe corresponder al menos con
la demanda de calor de la habitación).
Si se instalan varios artefactos en un mismo ambiente, la
temperatura seleccionada en cada artefacto puede ser diferente.
Para evitar el consumo excesivo de energía cuando las ventanas se
encuentren abiertas, se debería apagar el artefacto para ventilar.
5.2 Protección anticongelante
» Gire el selector de temperatura lo más hacia la derecha posible.
En esta posición, el controlador de temperatura enciende el
elemento calefactor en forma automática si la temperatura en
la habitación cae por debajo de la temperatura de protección
anticongelante (47 °F / 7 °C).
5.3 Limitación del controlador de temperatura
Se puede fijar el controlador de temperatura en una posición
determinada o limitar el rango de variación de temperaturas
utilizando dos pines ubicados en la parte posterior de la carcasa.
» Retire los pines.
» Para fijar la temperatura elegida, coloque un pin en el orificio
opuesto (ver diagrama).
Page 12

OPERACIÓN
LIMPIEZA, CUIDADO Y MANTENIMIENTO
12 |CNS E WWW.STIEBEL-ELTRON-USA.COM
1
1
2
26�07�31�0038
1 Pin
2 Selector de temperatura
» Para limitar el rango de variación de temperatura, elija los
valores máximo y mínimo con el selector de temperatura e
inserte un pin para cada uno en los orificios que se encuentran
ligeramente desplazados en el lado opuesto (ver diagrama).
26�07�31�0171
1
1
2
1 Pin
2 Selector de temperatura
5.4 Apagado
» Coloque la llave que se encuentra en el lado derecho del
artefacto en la posición OFF.
6. Limpieza, cuidado y mantenimiento
!
ADVERTENCIA
Antes de comenzar a limpiar, asegúrese que se ha
desconectado la energía en el panel del circuito
disyuntor y que el elemento calentador del calefactor
este frío. No hacerlo puede resultar en quemaduras
severas, electrocución, lesiones corporales severas o
muerte.
Si aparece una decoloración clara con tintes marrones en la
carcasa del artefacto, límpiela tan pronto como sea posible con
un paño húmedo. Limpie el artefacto una vez que está frío con
productos de limpieza habituales. Evite utilizar productos de
limpieza abrasivos o corrosivos.
PRECAUCIÓN Incendio
Nunca rocíe aerosol de limpieza en la ranura del aire.
Asegúrese que no pueda entrar humedad al artefacto.
Como parte del mantenimiento habitual, recomendamos que
también se revisen los componentes de control. Los componentes
de seguridad y control deben ser revisados por un contratista no
más allá de diez años después de la puesta en funcionamiento.
7. Qué hacer si ...
... el artefacto no calienta:
Check the temperature set at the appliance and the circuit breaker
box.
Verifique la temperatura a la que se reguló el artefacto y la caja
del disyuntor del circuito.
El artefacto tiene un control de seguridad de temperatura que
lo apaga si se sobrecalienta. Después que se eliminó la causa
(por ejemplo se encontraban cubiertas las aberturas de entrada
o salida de aire) y el artefacto se enfrió durante unos minutos, se
reanuda la operación.
Si no puede solucionar la falla, contacte a su contratista.
Para facilitar y agilizar su consulta, por favor suminístrele
el número que se encuentra en la placa de características
(Núm XXXXXX - XXXX - XXXXXX).
8. Seguridad
La instalación, puesta en marcha, mantenimiento y reparación del
artefacto debe ser realizada solamente por contratistas calificados.
8.1 Instrucciones de seguridad general
Garantizamos el funcionamiento sin problemas y la seguridad
operativa solamente si se utilizan los accesorios originales y los
repuestos previstos para el artefacto.
PELIGRO Electrocución
Si instala el artefacto en la pared, hágalo de modo tal
que los dispositivos de control no puedan ser tocados
por una persona que esté en la bañera o en la ducha.
!
PRECAUCIÓN
— Solamente amure el artefacto a una pared vertical
que resista temperaturas de al menos 85 °C /
1 85 ° F.
— Respete las holguras mínimas respecto de las
superficies de objetos adyacentes (por holguras
mínimas ver el capítulo de especificaciones).
— Nunca instale el artefacto justo debajo de un
tomacorriente.
— Asegúrese que el cable de alimentación no esté en
contacto con componente alguno del artefacto.
8.2 Instrucciones, estándares y normativa
Respete todas las normas e instrucciones nacionales
y regionales aplicables.
Respete la Normativa de Construcción de Edificios y
Garajes (o normativa local que corresponda).
9. Descripción del artefacto
9.1 Entrega estándar
Soporte para montaje en pared (enganchado en el artefacto)
Page 13

WWW.STIEBEL-ELTRON-USA.COM CNS E| 13
ESPAÑOL
INSTALACIÓN
INSTALACIÓN
10. Instalación
10.1 Instalación del soporte para montaje en pared
El soporte puede usarse también como una plantilla para montar
el artefacto en la pared; esto asegura la distancia requerida al
piso.
» Desenganche el soporte para montaje en pared.
» Apoye el nivel del soporte para montaje en pared centrado sobre
el piso y marque los orificios 1 y 2.
» Levante el soporte de modo tal que los orificios inferiores se
superpongan a las marcas que acaba de hacer en la pared donde
se va a realizar la instalación.
» Marque los orificios 3 y 4 en la pared de instalación.
aaa
26�07�31�0124
1
3
2
4
» Perfore la pared en los cuatro puntos marcados utilizando
un taladro. Asegure el soporte con implementos adecuados
(tornillos, tacos) dependiendo del tipo de pared. Las ranuras
verticales le permiten compensar desplazamientos en los
orificios de sujeción.
10.2 Instalación del artefacto
» Enganche el artefacto por medio de las ranuras ubicadas en
la parte trasera a las cuatro lengüetas del soporte en forma
simultánea.
» Empuje el artefacto para trabarlo en posición.
» Gire completamente el perno de bloqueo del soporte en la
dirección de las agujas del reloj; esto traba el artefacto en su
lugar.
» Presione la tapa de seguridad sobre el perno de bloqueo para
impedir que se afloje.
26�07�31�0035
1
2
1 Perno de bloqueo
2 Soporte para montaje en pared
26�07�31�0127
1
2
3
1 Artefacto
2 Tapa de seguridad
3 Perno de bloqueo
10.3 Desmontaje del artefacto
» Retire la tapa de seguridad del perno de bloqueo.
26�07�31�0128
1
2
3
1 Artefacto
2 Tapa de seguridad
3 Perno de bloqueo
» Destrabe el perno de bloqueo del soporte para montaje en
pared.
» Levante el artefacto ligeramente y tírelo hacia adelante,
alejándolo del soporte.
10.4 Suministro de energía
» Asegúrese que el cable de alimentación de la instalación tenga
una sección transversal adecuada.
» Asegúrese que haya un tomacorriente o caja de conexión para
el suministro permanente de energía instalado a una distancia
de al menos 10 cm/ 4 in del costado del artefacto.
Page 14

14 |CNS E WWW.STIEBEL-ELTRON-USA.COM
INSTALACIÓN
RESOLUCIÓN DE PROBLEMAS
PELIGRO Electrocución
Llevar a cabo todas las conexiones eléctricas e
instalación de acuerdo con todos los códigos de
construcción nacionales, estatales y locales.
PELIGRO Electrocución
Cada calentador debe ser conectado directamente
al panel de interruptores de circuito usando el
interruptor y calibre del cable adecuados.
PELIGRO Electrocución
No enchufe el calentador en un enchufe de la pared.
El voltaje especificado en la placa de identificación debe
coincidir con el voltaje en el panel de interruptores.
11. Resolución de problemas
El cable de alimentación debe ser reemplazado solamente por un
contratista utilizando nuestros repuestos originales.
12. Traspaso del artefacto
Explique las funciones del artefacto al usuario. Haga especial
hincapié en la información de seguridad. Entregue las instrucciones
de operación e instalación al usuario.
13. Especificaciones
13.1 Dimensiones de la versión de pared
b01
a20
min. 1˝ / 20
4˝ / 100
17.75˝ / 450
6.4˝ / 163
10.25˝ / 261
i13
in / mm
80�07�31�0009
CNS
50-2 E
CNS
75-2 E
CNS
100-1,-2 E
CNS
150-1,-2 E
CNS
200-2 E
CNS
240-2 E
A20 Artefacto Ancho in / mm 14.5 / 370 17.5 / 445 17.5 / 445 23.25 / 590 29.1 / 740 35.0 / 890
B01 Entrada del cable de corriente
i13
Soporte para el
montaje en pared
Distancia entre
orificios
in / mm 4.75 / 121
7.7 / 195
7.7 / 195
13.5 / 343
19.3 / 491
25.2 / 639
min. 20mm
min. 1
˝
min. 500mm
min. 20˝
min. 100mm
min. 250mm
min. 10˝
min. 4˝
min. 100mm
min. 4˝
min. 100mm
min. 4˝
D0000019283
Page 15

WWW.STIEBEL-ELTRON-USA.COM CNS E| 15
ESPAÑOL
TABLA DE ESPECIFICACIONES | GARANTÍA
MEDIO AMBIENTE Y RECICLAJE
!
La instalación, conexión eléctrica y primera
operación de este artefacto debe ser realizada
por un instalador calificado.
!
La compañía no acepta responsabilidad alguna por
la falla de cualquier artículo suministrado que no
haya sido instalado y operado de acuerdo con las
instrucciones del fabricante.
Medioambiente y reciclaje
Por favor ayúdenos a proteger el medioambiente eliminando el
embalaje en concordancia con la normativa nacional para el
tratamiento de residuos.
GARANTÍA
GARANTÍA RESIDENCIAL Y COMERCIAL: STIEBEL ELTRON GARANTIZA AL PROPIETARIO ORIGINAL QUE EL CONVECTOR DE PARED SERIE
CNS E ESTÉ LIBRE DE DEFECTOS DE MANO DE OBRA Y MATERIALES POR UN PERIODO DE TRES (3) AÑOS A PARTIR DE LA FECHA DE
COMPRA. SI LA(S) PARTE(S) RESULTA DEFECTUOSA BAJO USO NORMAL DURANTE ESTE PERIODO, STIEBEL ELTRON, INC SE HACE
RESPONSABLE DEL REEMPLAZO DE LA(S) PARTE(S) DEFECTIVA(S) SOLAMENTE. STIEBEL ELTRON, INC. NO SE HACE RESPONSABLE DE
COSTOS LABORALES PARA REMOVER Y / O REEMPLAZAR LA(S) PIEZA(S) DEFECTUOSA(S), O CUALQUIER OTRO GASTO ACCIDENTAL
O CONSECUENTE.
SI EL DUEÑO QUIERE DEVOLVER EL CONVECTOR PARA LA REPARACIÓN, EL DUEÑO DEBE OBTENER UNA AUTORIZACIÓN
POR ESCRITO DE STIEBEL ELTRON, INC Y ESTAR PREPARADO PARA COMPROBAR LA FECHA DE COMPRA Y PARA PAGAR TODOS
LOS GASTOS DE TRANSPORTE PARA DEVOLVER LA(S) PIEZA(S) DEFECTUOSA(S) O EL CONVECTOR PARA LA REPARACIÓN
O SUSTITUCIÓN. LA GARANTÍA ES NULA SI EL SECADOR DE MANOS HA SIDO INSTALADO O USADO MAL O SI EL DISEÑO HA SIDO
ALTERADO DE ALGUNA MANERA.
STIEBEL ELTRON, INC.
17 West Street
West Hatfield, MA 01088, USA
PHONE: 800.582.8423 or 413.247.3380
FAX: 413.247.3369
Email info@stiebel-eltron-usa.com
www.stiebel-eltron-usa.com
13.2 Tabla de especificaciones
Modelo CNS 50-2 E CNS 75-2 E CNS 100-1 E CNS 100-2 E CNS 150-1 E CNS 150-2 E CNS 200-2 E CNS 240-2 E
# Catálogo 231542 232068 233586 231543 233587 231544 231545 231546
Voltage V 240 208 240 208 120 240 208 120 240 208 240 208 240 208
Potencia kW 0.5 0.38 0.75 0.56 1.0 1.0 0.75 1.5 1.5 1.13 2.0 1.5 2.4 1.8
Amperaje A 2.1 1.8 3.1 2.7 8.3 4.2 3.6 12.5 6.3 5.4 8.3 7.2 10.0 8.7
Rango de temperatura °F / °C 43-86 / 6-30 43-86 / 6-30 43-86 / 6-30 43-86 / 6-30 43-86 / 6-30 43-86 / 6-30 43-86 / 6-30 43-86 / 6-30
Ajuste de protección
anticongelante
°F / °C
47 / 7
47 / 7
47 / 7
47 / 7
47 / 7
47 / 7
47 / 7
47 / 7
Altura in / mm 17.75 / 450 17.75 / 450 17.75 / 450 17.75 / 450 17.75 / 450 17.75 / 450 17.75 / 450 17.75 / 450
Ancho in / mm 14.5 / 370 17.5 / 445 17.5 / 445 17.5 / 445 23.25 / 590 23.25 / 590 29.1 / 740 35.0 / 890
Profundidad in / mm 4.0 / 100 4.0 / 100 4.0 / 100 4.0 / 100 4.0 / 100 4.0 / 100 4.0 / 100 4.0 / 100
Peso lb / kg 8.4 / 3.8 9.7 / 4.4 9.7 / 4.4 9.7 / 4.4 12.6 / 5.7 12.6 / 5.7 15.0 / 6.8 17.9 / 8.1
Calificación IP IP24 IP24 IP24 IP24 IP24 IP24 IP24 IP24
Clase de protección I I I I I I I I
Color blanco alpin blanco alpin blanco alpin blanco alpin blanco alpin blanco alpin blanco alpin blanco alpin
Page 16

16 |CNS E WWW.STIEBEL-ELTRON-USA.COM
TABLE DES MATIÈRES | MODE D’EMPLOI
DIRECTIVES IMPORTANTES
1. DIRECTIVES IMPORTANTES
GARDER CES DIRECTIVES POUR
RÉFÉRENCE ULTÉRIEURE.
Pour réduire le risque d’incendie, de choc électrique ou de
blessures, respectez les directives suivantes lorsque vous utilisez
des appareils électriques :
1. Lire toutes les instructions avant d’installer ou d’utiliser cet
appareil de chauffage.
2. Cet appareil est chaud lorsqu’il est en marche. Pour éviter de
vous brûler, ne touchez pas les surfaces chaudes avec la peau
nue. Gardez les matériaux combustibles, comme les meubles, les
coussins, la literie, le papier, les vêtements, etc. et les rideaux à au
moins 1 m (3 pi) de distance du devant de l’appareil de chauffage
et au moins à 1 m (3 pi) de distance latéralement et à l’arrière.
3. Prenez de grandes précaution lorsque tout appareil de chauffage
doit être utilisé en présence ou par des enfants ou des personnes
invalides, ainsi que chaque fois qu’il est laissé en marche sans
surveillance.
4. Ne faites pas fonctionner tout appareil de chauffage qui aurait
mal fonctionné préalablement. Débranchez le cordon électrique à
la prise et faites examiner l’appareil par un électricien de bonne
réputation avant de le réutiliser.
1.1 Généralités à propos de ce document
Le chapitre Mode d’emploi est à l’attention des utilisateurs et des
entrepreneurs en systèmes de chauffage.
Le chapitre Installation est à l’attention des entrepreneurs en
systèmes de chauffage.
Lisez attentivement ces directives avant d’utiliser
l’appareil puis mettez-les de côté pour référence
ultérieure. Transférez ce document à toute personne
qui utilisera l’appareil.
1.2 Légende des symboles
1.2.1 Présentation des renseignements relatifs à la sécurité
Les renseignements relatifs à la sécurité consistent en un symbole
d’avertissement, un mot-clé et un paragraphe explicatif. Les
renseignements relatifs à la sécurité sont imprimés sur fond gris.
Exemple :
PELIGRO Choque Eléctrico
DESCONECTE TODOS LOS POLOS DE LA FUENTE
DE ALIMENTACIÓN.
1 2 3
4
1 Symbole (voir le chapitre sur les symboles d’avertissement/
symboles)
2 Mot-clé (voir le chapitre sur les mots-clés)
3 Description (voir le chapitre sur les symboles
d’avertissement/symboles)
4 Explications
MODE D’EMPLOI
1. Directives importantes ��������������������������������������� 16
1.1 Généralités à propos de ce document ������������������������� 16
1.2 Légende des symboles ������������������������������������������� 16
2. Sécurité �������������������������������������������������������� 17
2.1 Usage prévu �������������������������������������������������������� 17
2.2 Renseignements relatifs à la sécurité ������������������������� 17
2.3 Symboles des normes �������������������������������������������� 18
3. Inscrivez votre produit ��������������������������������������� 18
4. Description de l’appareil ������������������������������������� 18
5. Mode d’emploi ������������������������������������������������ 18
5.1 Description de l’interface utilisateur �������������������������� 18
5.2 Protection contre le gel ������������������������������������������ 18
5.3 Restrictions pour le contrôle des températures ������������� 19
5.4 Désactivation ������������������������������������������������������� 19
6. Nettoyage, soin et entretien ��������������������������������� 19
7. Que faire si… �������������������������������������������������� 19
INSTALLATION
8. Sécurité �������������������������������������������������������� 19
8.1 Généralités relatives à la sécurité ������������������������������ 19
8.2 Directives, normes et règlements ������������������������������ 20
9. Description de l’appareil ������������������������������������� 20
9.1 Livraison normale ������������������������������������������������� 20
10. Installation ���������������������������������������������������� 20
10.1 Installation du support mural �����������������������������������20
10.2 Installation de l’appareil ����������������������������������������� 20
10.3 Installation de l’appareil ����������������������������������������� 20
10.4 Configuration électrique ����������������������������������������� 21
11. Dépannage ���������������������������������������������������� 21
12. Transfert de l’appareil ��������������������������������������� 21
13. Spécification ��������������������������������������������������� 21
13.1 Dimensions de la version murale ������������������������������ 21
13.2 Tableau des spécifications ��������������������������������������� 22
ENVIRONNEMENT ET RECYCLAGE
SERVICE CLIENTÈLE ET GARANTIE
Page 17

OPERATION
SÉCURITÉ
WWW.STIEBEL-ELTRON-USA.COM CNS E| 17
FR ANÇAIS
1.2.2 Mots-clés
MOT CLÉ Description
DANGER
Le mot-clé DANGER signale qu’il faut respecter les
informations données, faute de quoi on risque des
blessures graves, voire mortelles.
AVERTISSEMENT Le mot clé AVERTISSEMENT signale qu’il faut respecter
les informations données, faute de quoi on pourrait
provoquer des blessures graves, voire mortelles.
ATTENTION
Le mot clé ATTENTION signale qu’il faut respecter
les informations données, faute de quoi on risque de
provoquer des blessures légères, voire relativement
graves.
1.2.3 Symboles d’avertissement/symboles
Symbole d’avertissement
Description
Blessure
Électrocution
Brûlures ou échaudures
!
Autres situations
Incendie
Ne recouvrez jamais cet appareil
Mise au rebut de l’appareil
1.2.4 Symboles et présentation du texte dans ce document
Lisez attentivement le texte à côté de ce symbole.
» Ce symbole « » » indique qu’il vous faut agir. Les mesures à
prendre sont décrites de manière très détaillée.
—Les passages avec ce symbole « - » vous indiquent des listes.
1.2.5 Renseignements relatifs à l’appareil
Ne recouvrez jamais cet appareil
1.2.6 Unités de mesure
Les dimensions dans ce document sont données en
po / mm. Toute autre unité de mesure sera spécifiée
le cas échéant.
2. Sécurité
2.1 Usage prévu
Cet appareil est conçu pour chauffer des pièces habitées.
Tout autre usage au-delà de l’usage décrit sera jugé inapproprié.
L’usage correct comprend également le respect de ces directives.
Toute modification ou conversion de l’appareil annulera tous les
droits dans le cadre de la garantie.
2.2 Renseignements relatifs à la sécurité
N’utilisez l’appareil que lorsqu’il est entièrement installé avec tout
l’équipement de sécurité conforme.
AVERTISSEMENT Incendie
N’utilisez jamais cet appareil…
— dans des pièces où l’appareil pourrait s’enflammer
ou exploser du fait du contact avec des produits
chimiques, de la poussière, des gaz ou des
vapeurs.
— à proximité directe de conduites ou de conteneurs
transportant ou contenant des produits
inflammables ou explosifs.
— si l’on exécute des travaux de pose de câbles, de
fraisage ou de pose de mastic d’étanchéité dans la
pièce d’installation.
— si l’on utilise des vaporisateurs, de l’encaustique
ou des produits du même genre contenant du
napsan. Aérez suffisamment la pièce avant de
mettre l’appareil en marche.
— si les distances minimales par rapport aux
surfaces des objets adjacents ne sont pas
respectées, par exemple des meubles, des
voilages, des rideaux, des tissus ou d’autres
matériaux inflammables (pour les distances
minimales, cf. page 21 section 13.1).
— si une pièce de l’appareil est endommagée, s’il est
tombé ou s’il présente déjà un vice.
AVERTISSEMENT Blessure
Lorsque des enfants ou des personnes aux capacités
physiques, sensorielles ou mentales limitées
sont autorisés à utiliser cet appareil, veillez à ce
qu’ils soient sous la surveillance d’une personne
responsable de leur sécurité ou qu’on leur ait expliqué
le fonctionnement de manière approprié.
Veillez à surveiller les enfants pour vous assurer qu’ils
ne jouent pas avec cet appareil.
AVERTISSEMENT Incendie
Ne mettez jamais d’objets ni de matériaux
inflammables, combustibles ou d’isolation, comme des
vêtements qui viennent d’être lavés, des couvertures,
des magazines, des contenants d’encaustique ou de
napsan, des canettes de vaporisateur, ou tout autre
objet du même genre sur l’appareil ou à proximité
directe de celui-ci.
Page 18

OPERATION
INSCRIVEZ VOTRE PRODUIT
18 |CNS E WWW.STIEBEL-ELTRON-USA.COM
—modifications techniques
—utilisation de pièces de rechange non approuvées
4. Description de l’appareil
L’appareil est un appareil de chauffage direct, électrique, pouvant
uniquement être installé sur un mur.
L’appareil peut servir de chauffage unique pour les salles de
bain, par exemple, ou comme chauffage d’appoint hors saison
ou pour les pièces plus petites comme un atelier de bricolage ou
des chambres d’amis.
L’air dans l’appareil est chauffé par un élément chauffant et soufflé
par le biais de la convection naturelle par la grille de sortie d’air
qui se trouve en haut. L’air ambiant entre par les ouvertures en
bas de l’appareil.
Après avoir fixé l’appareil au mur et après avoir fait les
branchements électriques à l’aide d’une prise permanente,
l’appareil est prêt à l’emploi.
4.1 Série CNS-E
Après avoir fixé l’appareil au mur et après avoir fait les
branchements électriques à l’aide d’un disjoncteur principal,
l’appareil est prêt à l’emploi.
5. Mode d’emploi
5.1 Description de l’interface utilisateur
» Mettez l’appareil en marche en appuyant sur l’interrupteur ON
(marche) à droite de l’appareil.
» Programmez la température ambiante voulue par le biais
du sélecteur de température réglable en continu (pour les
températures, cf. le chapitre sur les spécifications).
26�07�31�0037
Dès que la température ambiante est atteinte, elle est maintenue
constante par le biais de chauffage intermittent (la température
sortant de l’appareil doit correspondre au moins à la température
désirée pour la pièce).
Si plusieurs appareils de chauffage sont installés dans une même
pièce, le réglage du sélecteur de température de chaque appareil
peut être différent.
Pour éviter un surcroît de consommation d’énergie, lorsque les
fenêtres sont ouvertes, vous devriez éteindre l’appareil lorsque
vous aérez la pièce.
5.2 Protection contre le gel
» Tournez le sélecteur de température à fond vers la droite. À
cette position, la commande de température active l’élément
Page 19

OPERATION
NETTOYAGE, SOIN ET ENTRETIEN
WWW.STIEBEL-ELTRON-USA.COM CNS E| 19
FR ANÇAIS
chauffant automatiquement si la température ambiante passe
au-dessous de la température de protection contre le gel (47
°F / 7 °C).
5.3 Restrictions pour le contrôle des températures
À l’aide des deux goupilles encastrées à l’arrière du boîtier de
commande vous pouvez fixer la commande de température
à une certaine température ou limiter la plage de réglage des
températures.
» Cassez les goupilles.
» Pour fixer la température sélectionnée, enfoncez une goupille
dans le trou opposé (voir le schéma).
1
1
2
26�07�31�0038
1 Goupille
2 Sélecteur de température
» Pour limiter la plage de réglage des températures, fixez les
valeurs maximale et minimale permises dans le sélecteur de
température, puis enfoncez une goupille pour chacune dans le
trou opposé légèrement décalé (voir le schéma).
26�07�31�0171
1
1
2
1 Goupille
2 Sélecteur de température
5.4 Désactivation
» Déplacez l’interrupteur à droite de l’appareil sur OFF (arrêt).
6. Nettoyage, soin et entretien
!
AVERTISSEMENT
Avant de nettoyer, veillez à ce que l’appareil ait été
désactivé au panneau du disjoncteur et que l’élément
chauffant de l’appareil soit froid. Le non-respect
de cette directive pourrait entraîner des brûlures,
l’électrocution, des blessures graves, voire mortelles.
Si une tache brune claire apparaît sur le boîtier de l’appareil,
essuyez-là dès que possible à l’aide d’un chiffon humide.
Nettoyez l’appareil lorsqu’il est froid avec des produits nettoyants
ordinaires. Évitez les produits nettoyants abrasifs ou corrosifs.
ATTENTION Incendie
Ne vaporisez jamais un produit nettoyant en aérosol
dans la fente d’admission de l’air.
Veillez à ce qu’aucune trace d’humidité ne pénètre
dans l’appareil.
Nous vous conseillons de faire inspecter les éléments de commande
dans le cadre d’un entretien de routine. Les éléments de sécurité
et de commande doivent être examinés par un entrepreneur dans
les premiers dix ans de mise en service.
7. Que faire si…
... L’appareil ne chauffe pas :
Vérifiez la température réglée à l’appareil et le boîtier du
disjoncteur.
L’appareil possède une commande de température de sécurité qui
désactive l’appareil en cas de surchauffe. Une fois que la cause
à l’origine du problème a été éliminée (par exemple la sortie
d’air ou les fentes d’admission de l’air ont été recouvertes) et que
l’appareil s’est refroidi pendant quelques minutes, il se remet en
marche automatiquement.
Si vous ne pouvez pas remédier au problème, contactez votre
entrepreneur en chauffage. Pour faciliter et accélérer votre
requête, veuillez fournir le numéro qui se trouve sur la plaque
signalétique (n° XXXXXX - XXXX - XXXXXX).
8. Sécurité
Seuls les entrepreneurs qualifiés peuvent exécuter l’installation,
la mise en service, l’entretien et la réparation de l’appareil.
8.1 Généralités relatives à la sécurité
Nous garantissons que l’appareil fonctionnera sans problème et
de manière fiable uniquement si les accessoires d’origine et les
pièces après-vente d’origine ont été utilisés.
DANGER Électrocution
Si vous fixez l’appareil au mur, faites en sorte que
l’équipement de commande ne puisse pas être touché
par une personne se trouvant dans la baignoire ou
dans la douche.
Page 20

20 |CNS E WWW.STIEBEL-ELTRON-USA.COM
INSTALLATION
DESCRIPTION DE L’APPAREIL
!
ATTENTION
— Ne fixez l’appareil mural que sur une cloison
verticale résistant aux températures allant jusqu’à
85 °C / 185 °F.
— Respectez les distances minimales vis-à-vis des
surfaces des objets adjacents (pour les distances
minimales, cf. le chapitre sur les spécifications).
— N’installez jamais l’appareil directement sous une
prise murale.
— Veillez à ce que le câble ne soit touche aucun
composant de l’appareil.
8.2 Directives, normes et règlements
Respectez tous les règlements et directives nationaux
et régionaux en vigueur.
Respectez les règlements relatifs aux bâtiments et
aux garages [ou les règlements locaux] en vigueur.
9. Description de l’appareil
9.1 Livraison normale
Support mural (qui s’accroche dans l’appareil).
10. Installation
10.1 Installation du support mural
Vous pouvez également utiliser le support mural comme gabarit
pour la fixation au mur; cela garantit que la distance par rapport
au sol sera respectée.
» Décrochez le support mural.
» Placez le support mural centré sur le sol, à niveau, et faites les
repères pour les trous 1 et 2.
» Soulevez le support mural de sorte que ses trous inférieurs
soient en face des repères que vous venez de faire sur le mur.
» Faites les repères pour les trous 3 et 4 sur le mur.
aaa
26�07�31�0124
1
3
2
4
» Percez les trous pour chacun des quatre repères. Fixez le support
mural à l’aide de la quincaillerie appropriée (vis, chevilles) en
fonction du type de cloison. Avec les fentes verticales, vous
pouvez compenser un trou de fixation légèrement décalé.
10.2 Installation de l’appareil
» Accrochez l’appareil en utilisant les fentes à l’arrière de l’appareil
simultanément sur les quatre languettes du support mural.
» Appuyez sur l’appareil pour l’enclencher dans la bonne position.
» Tournez à fond dans le sens horaire le boulon bloquant sur le
support mural; cela permet de bloquer l’appareil à la position
voulue.
» Appuyez le capuchon de sécurité sur le boulon bloquant pour
éviter qu’il ne se desserre.
26�07�31�0035
1
2
1 Boulon bloquant
2 Support mural
26�07�31�0127
1
2
3
1 Appareil
2 Capuchon de sécurité
3 Boulon bloquant
10.3 Démontage de l’appareil
» Retirez le capuchon de sécurité du boulon bloquant.
26�07�31�0128
1
2
3
1 Appareil
2 Capuchon de sécurité
3 Boulon bloquant
Page 21

WWW.STIEBEL-ELTRON-USA.COM CNS E| 21
FR ANÇAIS
INSTALLATION
DÉPANNAGE
» Dévissez le boulon bloquant sur le support mural.
» Soulevez légèrement l’appareil et tirez-le vers l’avant pour le
décrocher du support mural.
10.4 Configuration électrique
» Veillez à ce que le câble d’alimentation sur place possède une
section suffisante.
» Veillez à ce qu’une prise ou un disjoncteur pour une alimentation
permanente soit installé à au moins 10 cm (4 po) du côté de
l’appareil.
DANGER Électrocution!
Il est important de réaliser tous les raccordements et
installations électriques en respectant tous les codes
de bâtiments nationaux, provinciaux et locaux.
DANGER Électrocution!
Chaque appareil de chauffage doit être connecté
directement au panneau électrique avec le disjoncteur
de la taille recommandée avec le bon calibre de filage.
DANGER Électrocution!
Ne branchez pas l’appareil de chauffage dans une
prise murale.
La tension spécifiée sur la plaque signalétique
doit correspondre à latension sur le panneau de
disjoncteur.
11. Dépannage
Le câble d’alimentation ne doit être remplacé que par un électricien
utilisant nos pièces d’après-vente d’origine.
12. Transfert de l’appareil
Expliquez les fonctions de l’appareil à la personne qui va l’utiliser. Attirez en particulier l’attention de votre interlocuteur sur les
renseignements relatifs à la sécurité. Remettez le mode d’emploi et les directives d’installation à la personne qui va l’utiliser.
13. Spécification
13.1 Dimensions de la version murale
b01
a20
min. 1˝ / 20
4˝ / 100
17.75˝ / 450
6.4˝ / 163
10.25˝ / 261
i13
in / mm
80�07�31�0009
CNS
50-2 E
CNS
75-2 E
CNS
100-1,-2 E
CNS
150-1,-2 E
CNS
200-2 E
CNS
240-2 E
A20 Appareil Largeur in / mm 14.5 / 370 17.5 / 445 17.5 / 445 23.25 / 590 29.1 / 740 35.0 / 890
B01 Admission du câble électrique
i13 Support mural Espacement
des trous
in / mm 4.75 / 121
7.7 / 195
7.7 / 195
13.5 / 343
19.3 / 491
25.2 / 639
min. 20mm
min. 1
˝
min. 500mm
min. 20˝
min. 100mm
min. 250mm
min. 10˝
min. 4˝
min. 100mm
min. 4˝
min. 100mm
min. 4˝
D0000019283
Page 22

22 |CNS E WWW.STIEBEL-ELTRON-USA.COM
TABLEAU DES SPÉCIFICATIONS | GARANTIE
ENVIRONNEMENT ET RECYCLAGE
!
L’installation, le branchement électrique et la
première mise en route de cet appareil doivent
être exécutés par un prestataire qualifié.
!
La société rejette toute responsabilité pour toute
défaillance du produit livré qui n'aurait pas été
installé et mis en route conformément aux
directives du fabricant.
Environnement et recyclage
Veuillez nous aider à protéger l’environnement en mettant les
matériaux d'emballage au rebut conformément aux règlements
nationaux relatifs au traitement des déchets.
Garantie
GARANTIE RÉSIDENTIELLE ET COMMERCIALE : STIEBEL ELTRON, INC. GARANTIT LE APPAREIL DE CHAUFFAGE À CONVECTION MURAL
DE LA SÉRIE CNS E CONTRE TOUT VICE DE FABRICATION ET DE MATÉRIEL AU PROPRIÉTAIRE INITIAL PENDANT UNE PÉRIODE DE
TROIS (3) ANS À PARTIR DE LA DATE D’ACHAT. SI UNE PIÈCE QUELCONQUE S’AVÈRE DÉFECTUEUSE PENDANT CETTE PÉRIODE, DANS
DES CONDITIONS D’UTILISATION NORMALE, STIEBEL ELTRON, INC. S’ENGAGE À REMPLACER CETTE PIÈCE (OU CES PIÈCES, LE CAS
ÉCHÉANT) UNIQUEMENT. STIEBEL ELTRON, INC. N’ASSUME AUCUNE RESPONSABILITÉ POUR LES FRAIS DE MAIN D’ŒUVRE ENCOURUS POUR LE RETRAIT OU LE REMPLACEMENT DE LA PIÈCE DÉFECTUEUSE, NI POUR TOUT AUTRE FRAIS FORTUIT OU CONSÉCUTIF.
SI LE PROPRIÉTAIRE DÉSIRAIT RETOURNER LE APPAREIL DE CHAUFFAGE POUR QU’IL SOIT RÉPARÉ, IL DOIT D’ABORD OBTENIR
L’AUTORISATION EXPRESSE DE STIEBEL ELTRON, INC. LE PROPRIÉTAIRE DOIT ENSUITE APPORTER LA PREUVE DE LA DATE D’ACHAT
ET PAYER TOUS LES FRAIS DE PORT POUR RENVOYER LA PIÈCE DÉFECTUEUSE OU LE APPAREIL DE CHAUFFAGE POUR QU’IL SOIT
RÉPARÉ OU REMPLACÉ. UNE INSTALLATION OU UNE UTILISATION ERRONÉE DU SÉCHOIR DE MAINS OU TOUTE MODIFICATION DE LA
CONCEPTION AURONT POUR EFFET D‘ANNULER LA GARANTIE.
STIEBEL ELTRON, INC.
17 West Street
West Hatfield, MA 01088, USA
PHONE: 800.582.8423 or 413.247.3380
FAX: 413.247.3369
Email info@stiebel-eltron-usa.com
www.stiebel-eltron-usa.com
CUSTOMER SERVICE AND WARRANTY
ENVIRONMENT AND RECYCLING
13.2 Tableau des spécifications
Modèle CNS 50-2 E CNS 75-2 E CNS 100-1 E CNS 100-2 E CNS 150-1 E CNS 150-2 E CNS 200-2 E CNS 240-2 E
N° de catalogue 231542 232068 233586 231543 233587 231544 231545 231546
Tension V 240 208 240 208 120 240 208 120 240 208 240 208 240 208
Puissance kW 0.5 0.38 0.75 0.56 1.0 1.0 0.75 1.5 1.5 1.13 2.0 1.5 2.4 1.8
Ampérage A 2.1 1.8 3.1 2.7 8.3 4.2 3.6 12.5 6.3 5.4 8.3 7.2 10.0 8.7
Plage des températures °F / °C 43-86 / 6-30 43-86 / 6-30 43-86 / 6-30 43-86 / 6-30 43-86 / 6-30 43-86 / 6-30 43-86 / 6-30 43-86 / 6-30
Réglage pour la
protection contre le gel °F / °C
47 / 7
47 / 7
47 / 7
47 / 7
47 / 7
47 / 7
47 / 7
47 / 7
Hauteur in / mm 17.75 / 450 17.75 / 450 17.75 / 450 17.75 / 450 17.75 / 450 17.75 / 450 17.75 / 450 17.75 / 450
Largeur in / mm 14.5 / 370 17.5 / 445 17.5 / 445 17.5 / 445 23.25 / 590 23.25 / 590 29.1 / 740 35.0 / 890
Profondeur in / mm 4.0 / 100 4.0 / 100 4.0 / 100 4.0 / 100 4.0 / 100 4.0 / 100 4.0 / 100 4.0 / 100
Poids lb / kg 8.4 / 3.8 9.7 / 4.4 9.7 / 4.4 9.7 / 4.4 12.6 / 5.7 12.6 / 5.7 15.0 / 6.8 17.9 / 8.1
Indice IP IP24 IP24 IP24 IP24 IP24 IP24 IP24 IP24
Catégorie de Protection I I I I I I I I
Couleur blanc alpin blanc alpin blanc alpin blanc alpin blanc alpin blanc alpin blanc alpin blanc alpin
Page 23

WWW.STIEBEL-ELTRON-USA.COM CNS E| 23
NOTES | NOTAS
Page 24

A 296658-37773-8872
 Loading...