

Page 1
OPERATION AND INSTALLAT ION
WALL MOUNTED CONVECTOR HEATER
» CNS 100 A
» CNS 150 A
» CNS 200 A
» CNS 250 A
Page 2

CONTENTS | OPERATION
GENERAL INfORMATION
OPERATION
1. General information �������������������������������������������� 2
1.1 Document information �������������������������������������������� 2
1.2 Key to symbols ������������������������������������������������������ 2
2. Safety ������������������������������������������������������������3
2.1 Intended use ��������������������������������������������������������� 3
2.2 Safety information ������������������������������������������������� 3
2.3 Test symbols ��������������������������������������������������������� 4
3. Appliance description ������������������������������������������4
4. Operation �������������������������������������������������������4
4.1 Description of the user interface �������������������������������� 4
4.2 Frost protection ����������������������������������������������������� 4
4.3 Limiting the temperature controller ���������������������������� 4
4.4 Shutting down ������������������������������������������������������ 5
5. Cleaning, care and maintenance ������������������������������ 5
6. What to do if ... �������������������������������������������������5
7. Safety ������������������������������������������������������������5
7.1 General safety instructions ��������������������������������������� 5
7.2 Instructions, standards and regulations ����������������������� 5
8. Appliance description ������������������������������������������5
8.1 Standard delivery ��������������������������������������������������� 5
9. Installation ������������������������������������������������������5
9.1 Installation with wall mounting bracket ����������������������� 5
INSTALLATION
10. Appliance handover ��������������������������������������������6
11. Specification ����������������������������������������������������� 7
11.1 Dimensions and minimum clearances ������������������������� 7
11.2 Specification table �������������������������������������������������� 7
CUSTOMER SERVICE AND WARRANTY
ENVIRONMENT AND RECYCLING
1. General information
1.1 Document information
The chapter Operation is intended for users and heating
contractors.
The chapter Installation is intended for heating contractors.
Read these instructions carefully before using the
appliance and retain them for future reference. Pass
on the instructions to any new users.
1.2 Key to symbols
1.2.1 Layout of safety information
Safety information comprises a warning symbol, a keyword and
a text giving information. Safety information is printed on a grey
background.
Example:
1 2 3
DANGER Electrocution
Install the appliance in such a way that control
equipment...
4
1 Symbol (see chapter on warning symbols/symbols)
2 Keyword (see chapter on keywords)
3 Description (see chapter on warning symbols/symbols)
4 Information text
1.2.2 Keywords
KEYWORD Description
DANGER
The keyword DANGER indicates information which must be
observed, otherwise serious injury or death will result.
WARNING
CAUTION
2 |CNS A WWW.STIEBEL-ELTRON.COM
The keyword WARNING indicates information that must be
observed, otherwise serious injury or death may result.
The keyword CAUTION indicates information that must be
observed, otherwise relatively serious or light injuries may
result.
Page 3
OPERATION
!
SAfETY
1.2.3 Warning symbols/symbols
Warning symbol
1.2.4 Text symbols and layout in this documentation
Description
Injury
Electrocution
Burns or scalding
Other situations
Fire
Never cover the appliance
Appliance disposal
Read the text next to this symbol carefully.
2.2 Safety information
Operate the appliance only when fully installed and with all safety
equipment fitted.
WARNING Fire
Never operate this appliance ...
— in rooms where the appliance is at risk of fire or
explosion as a result of chemicals, dust, gases or
vapours.
— in the direct proximity of pipes or receptacles that
carry or contain flammable or explosive materials.
— if work such as laying cables, grinding or sealing
is carried out in the installation room.
— if sprays, floor polish or similar products
containing napsan are used. Vent the room
sufficiently before heating.
— if the minimum clearances to adjacent object
surfaces are not maintained, for example to
furniture, net curtains, curtains, textiles or other
flammable materials (for minimum clearances, see
specification chapter).
— if an appliance component is damaged, the
appliance has fallen over or already had a fault.
ENGLISH
» The "»" symbol indicates that you should do something. The
action you need to take is described step by step.
— Passages with the "
1.2.5 Information on the appliance
Never cover the appliance
–" symbol show you lists of items.
1.2.6 Units of measurement
The dimensions in this document are given in mm.
Any alternative units of measurements are specified
accordingly.
2. Safety
2.1 Intended use
This appliance is designed to heat living areas.
This appliance is designed for domestic use. It can be used safely
by untrained persons. The appliance can also be used in a nondomestic environment, e.g. in a small business, as long as it is
used in the same way.
Any other use beyond that described shall be deemed inappropriate.
Observation of these instructions is also part of the correct use of
this appliance. Any modifications or conversions to the appliance
void all warranty rights.
WARNING Injury
!
The appliance may be used by children aged 8 and up
and persons with reduced physical, sensory or mental
capabilities or a lack of experience provided that they
are supervised or they have been instructed on how
to use the appliance safely and have understood the
resulting risks. Children must never play with the
appliance. Children must never clean the appliance or
perform user maintenance unless they are supervised.
WARNING Fire
Never place any flammable, combustible or insulating
objects or materials, such as laundry, blankets,
magazines, containers with floor polish or napsan,
spray cans or similar on the appliance or in direct
proximity to it.
WARNING Burns
The surfaces of the appliance casing and the expelled
air become hot during operation (more than 80 °C).
CAUTION Overheating
Never cover the appliance
Never step on the appliance.
WWW.STIEBEL-ELTRON.COM CNS A| 3
Page 4
OPERATION
APPLIANCE DESCRIPTION
CE designation
The CE designation shows that the appliance meets all essential
requirements according to the:
— Electromagnetic Compatibility Directive
— Low Voltage Directive
2.3 Test symbols
See type plate.
The type plate is located on the right on the exterior of the
appliance.
3. Appliance description
The appliance is an electric direct heater only for installation on
a wall.
The appliance is suitable as a full heating system in bathrooms,
for example, or for use between seasons and as a booster heater
in smaller rooms, such as hobby and guest rooms.
The air in the appliance is heated by a heating element and
expelled via natural convection through the air outlet grille at the
top. Cool room air flows in through the apertures at the bottom
of the appliance.
After mounting the appliance on the wall and making the
electrical connection using a mains plug, the appliance is ready
for operation.
4. Operation
4.1 Description of the user interface
» Switch the appliance ON via the switch on the r.h. side of the
appliance.
4.2 Frost protection
» Turn the temperature selector as far to the right as possible. In
this position, the temperature controller switches on the heating
automatically if the room temperature drops to approx. + 6 °C.
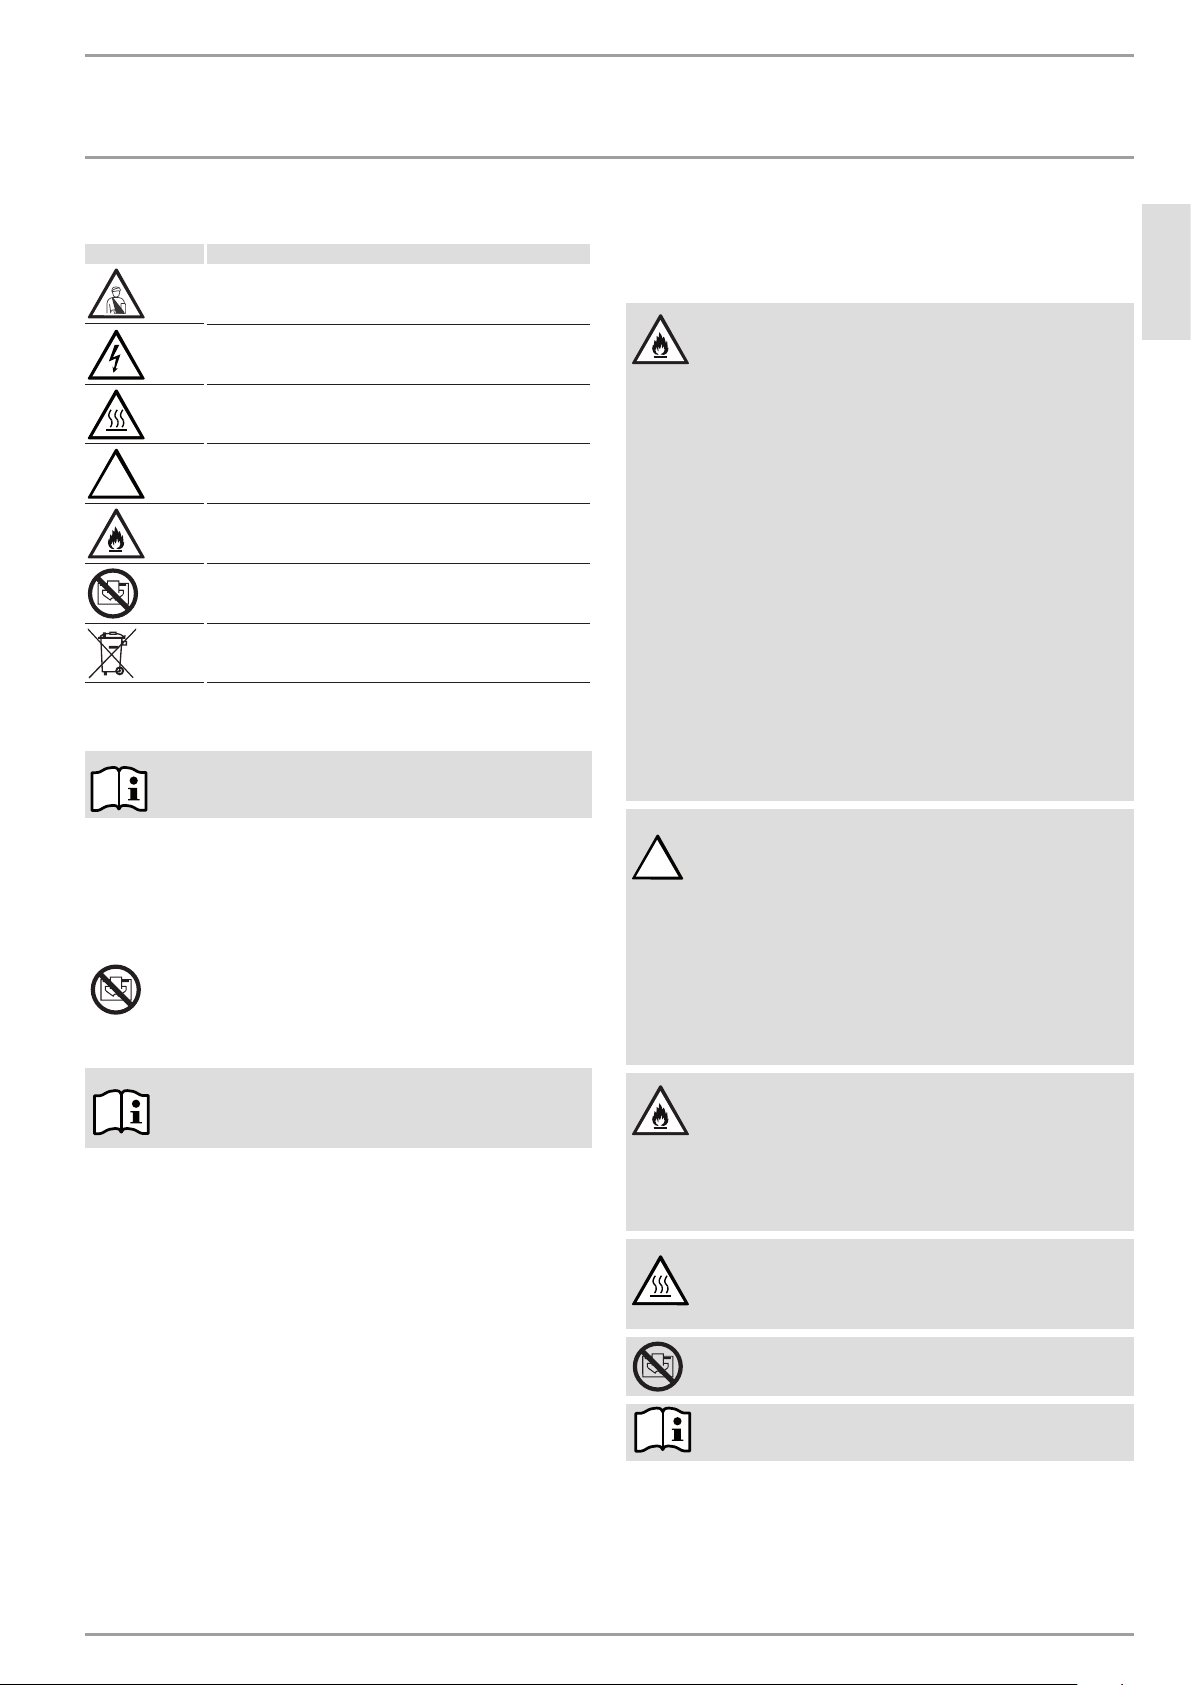
4.3 Limiting the temperature controller
Using the two pins fitted to the back of the control casing, you
can fix the temperature controller at a certain setting or limit the
temperature setting range.
» Break out the pins.
» To fix the selected temperature, push a pin into the hole opposite
(see diagram).
2
1
1
26�07�31�0038
1 Pin
2 Temperature selector
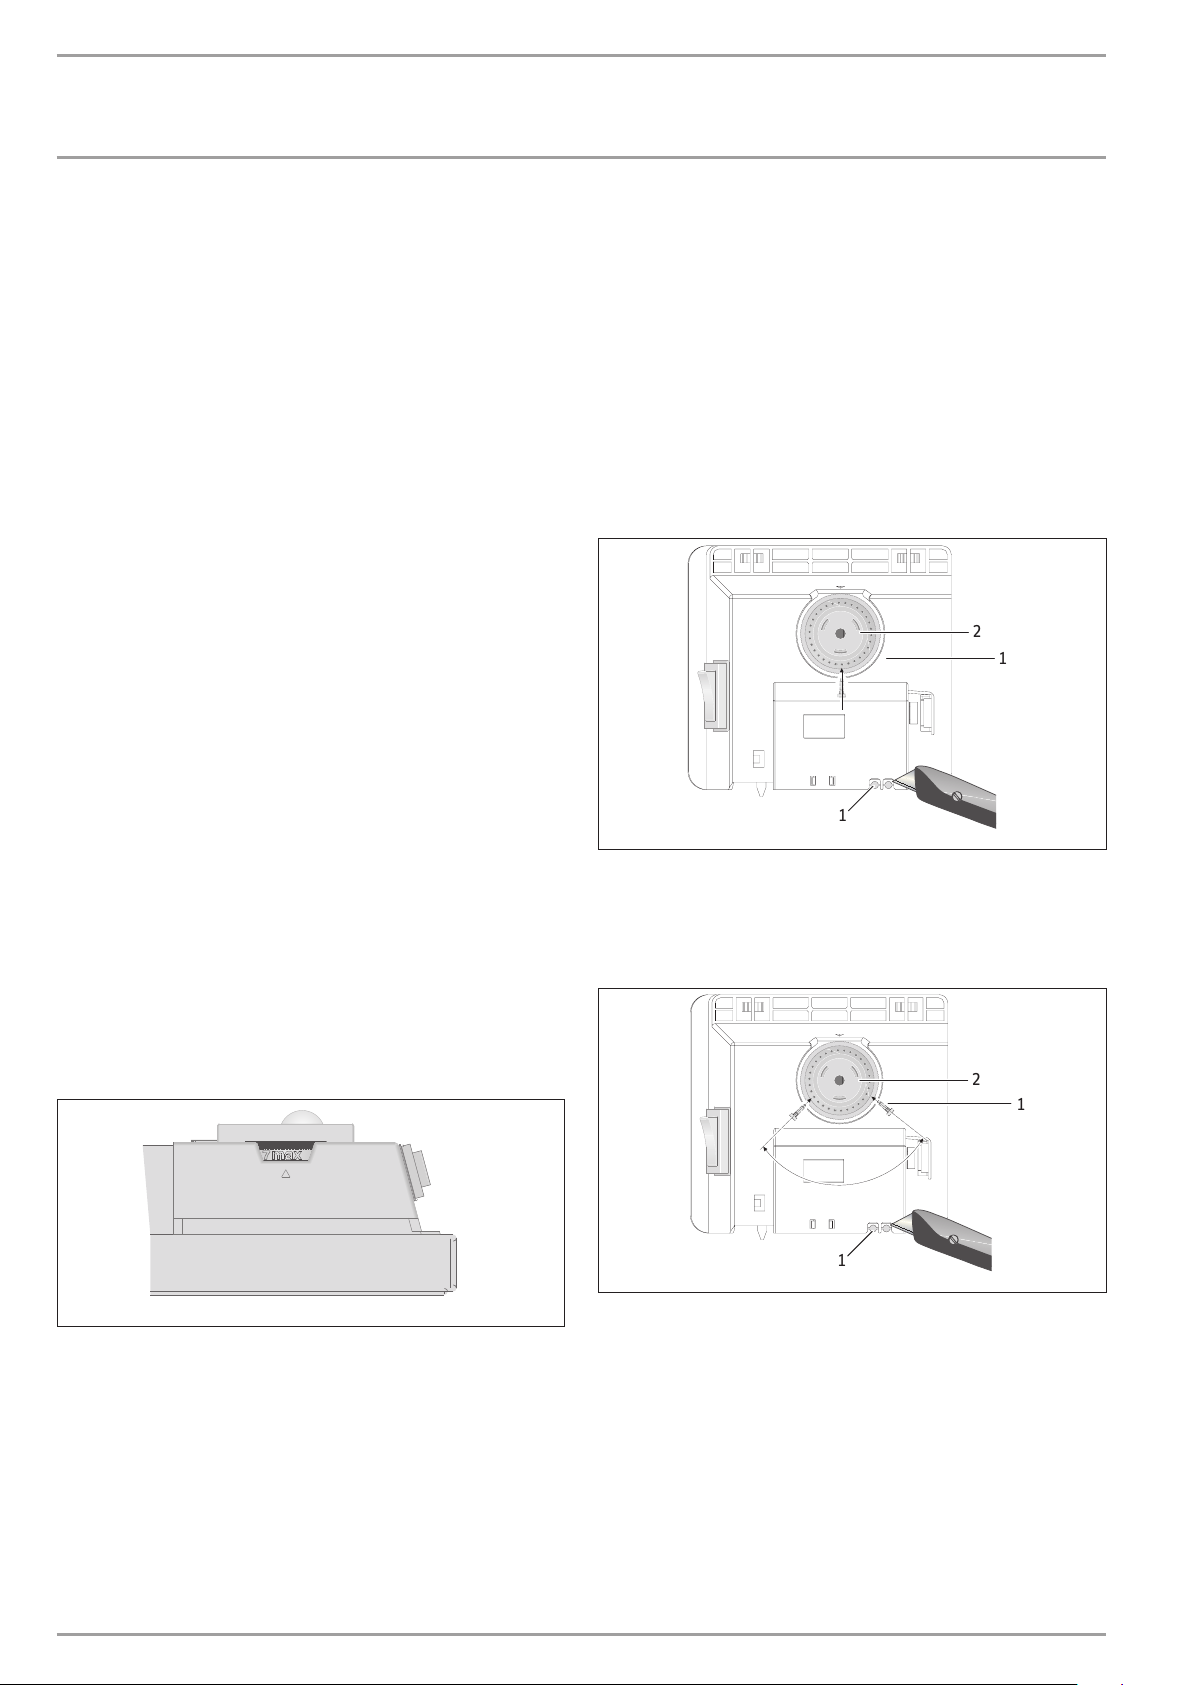
» To limit the temperature setting range, set the minimum and
maximum values at the temperature selector, and push a pin for
each into the slightly offset hole opposite (see diagram).
» Set the required room temperature via the continuously variable
temperature selector (for temperatures see specification
chapter).
As soon as the selected room temperature is reached, it is
constantly maintained at this selected temperature through
periodic heating (the output of the appliance must correspond at
least to the required heat demand of the room).
If several appliances are installed in a single room, the setting
at the temperature selector on each appliance can be different.
To avoid excessive power consumption when windows are open,
you should stop the appliance while venting.
2
1
1
26�07�31�0037
1 Pin
2 Temperature selector
4.3.1 External room temperature controller
If required, the appliance can be operated on site with a
commercially available external room temperature controller.
» To do this, turn the temperature selector as far to the right as
possible.
» Fit the room thermostat as far from the appliance as possible,
at least 1.5 m above the ground.
26�07�31�0171
4 |CNS A WWW.STIEBEL-ELTRON.COM
Page 5

OPERATION | INSTALLATION
CLEANING, CARE AND MAINTENANCE
4.4 Shutting down
» Move the switch on the right of the appliance to OFF.
» Pull the mains plug out of the socket.
5. Cleaning, care and maintenance
If a pale brownish discolouration appears on the appliance casing,
wipe this off as soon as possible with a damp cloth. Clean the
appliance when cold with ordinary cleaning products. Avoid
abrasive or corrosive cleaning products.
CAUTION Fire
Never spray cleaning spray into the air slot.
Ensure that no moisture can enter the appliance.
As part of regular maintenance, we recommend also having the
control components checked. The safety and control components
should be checked by a contractor no more than ten years after
commissioning.
6. What to do if ...
... the appliance does not heat up:
Check the temperature set at the appliance and the MCB/fuse in
your fuse box.
The appliance has a safety temperature controller that shuts
the appliance down if it overheats. After the cause has been
removed (for example air outlet or inlet apertures covered) and
the appliance has cooled down for a few minutes, operation starts
again.
If you cannot remedy the fault, contact your contractor. To facilitate
and speed up your enquiry, please provide the number on the type
plate (no. XXXXXX - XXXX - XXXXXX):
7. Safety
Only qualified contractors should carry out installation,
commissioning, maintenance and repair of the appliance.
7.1 General safety instructions
We guarantee trouble-free function and operational reliability
only if the original accessories and spare parts intended for the
appliance are used.
DANGER Electrocution
If you mount the appliance on the wall, do so in such
a way that control equipment cannot be touched by a
person in the bath or shower.
CAUTION
!
— Only fit the wall mounted appliance to a vertical
wall that is temperature-resistant to at least 85 °C.
— Observe the minimum clearances to adjacent
object surfaces (for minimum clearances see
specification chapter).
— Never install the appliance directly below a wall
socket.
— Ensure that the power cable is not in contact with
any appliance components.
7.2 Instructions, standards and regulations
Observe all applicable national and regional regulations
and instructions.
Observe the Building and Garage Regulations [or local
regulations].
ENGLISH
8. Appliance description
8.1 Standard delivery
— Wall mounting bracket (hooked into the appliance)
9. Installation
9.1 Installation with wall mounting bracket
9.1.1 Installing the wall mounting bracket
You can also use the wall mounting bracket as a template for wall
mounting; this ensures the required floor clearance.
» Unhook the wall mounting bracket.
» Place the centred wall mounting bracket level on the ground
and mark holes 1 and 2.
» Lift up the wall mounting bracket so that its lower holes match
up with the markings you have just made on the installation wall.
» Mark holes 3 and 4 on the installation wall.
WWW.STIEBEL-ELTRON.COM CNS A| 5
Page 6

INSTALLATION
APPLIANCE hANDOvER
3
4
1
aaa
» Drill holes at all four markings. Secure the wall mounting bracket
with suitable materials (screws, rawl plugs) depending on the
type of wall. With the vertical slots, you can compensate for an
offset fixing hole.
9.1.2 Appliance installation
» Hook the appliance by its slots in the back of the appliance on
to all four tabs of the wall mounting bracket simultaneously.
2
9.1.3 Dismounting the appliance
» Remove the safety cap from the locking bolt.
1
1 Appliance
2 Safety cap
3 Locking bolt
» Undo the locking bolt on the wall mounting bracket.
26�07�31�0124
» Lift the appliance up slightly and pull it forwards and away from
the wall mounting bracket.
9.1.4 Power supply
» Ensure the on-site supply cable has an adequate cross-section.
» Ensure a socket or junction box for a permanent power supply
is installed at a distance of at least 10 cm from the side of the
appliance.
2
3
26�07�31�0128
» Push the appliance to latch it in position.
» Turn the locking bolt in the wall mounting bracket fully clockwise;
this locks the appliance in place.
» Push the safety cap onto the locking bolt to prevent it from
loosening.
1
2
1 Locking bolt
2 Wall mounting bracket
1
2
3
DANGER Electrocution!
Carry out all electrical connection and installation
work in accordance with relevant regulations.
DANGER Electrocution!
The appliance must be able to be separated from the
mains power supply by an isolator that disconnects all
poles with at least 3 mm contact separation.
DANGER Electrocution!
Do not install the appliance with a fixed power cable.
Observe the type plate. The specified voltage must
match the mains voltage.
26�07�31�0035
10. Appliance handover
Explain the functions of the appliance to the user. Draw special
attention to the safety information. Hand the operating and
installation instructions to the user.
26�07�31�0127
1 Appliance
2 Safety cap
3 Locking bolt
6 |CNS A WWW.STIEBEL-ELTRON.COM
Page 7

INSTALLATION
SPECIfICATION
11. Specification
11.1 Dimensions and minimum clearances
ENGLISH
80�07�31�0009
CNS
100 A
Appliance Height mm 450
A20 Appliance Width mm 445 590 740 890
Appliance Depth mm 100
Appliance Minimum top clearance mm 250
Appliance Minimum bottom clearance mm 100
Appliance Minimum r.h. clearance mm 100
Appliance Minimum l.h. clearance mm 100
Appliance Minimum front clearance mm 500
Appliance Minimum rear clearance mm 22
B01 Electrical cabel entry
G05 Wall mounting bracket Hole spacing mm 195 343 491 639
CNS
150 A
CNS
200 A
CNS
250 A
11.2 Specification table
CNS 100 A CNS 150 A CNS 200 A CNS 250 A
Connection output kW 1,0 1,5 2,0 2,4
Setting range °C 7-30 7-30 7-30 7-30
Frost protection setting °C 7 7 7 7
Power connection 1/N~220 -2 40 V 1/N~220 -2 40 V 1/N~220 -2 40 V 1/N~24 0 V
Height mm 450 450 450 450
Width mm 445 590 740 890
Depth mm 100 100 100 100
Weight kg 4,4 5,7 6,8 8,1
IP-Rating IP24 IP24 IP24 IP24
Protection class II II II II
Colour alpineweiß alpineweiß alpineweiß alpineweiß
220734 220735 220736 220737
WWW.STIEBEL-ELTRON.COM CNS A| 7
Page 8

AUSTRALIA
CUSTOMER SERVICE AND WARRANTY
Stiebel Eltron Warranty for Hand Dryers & Space Heaters –
Models HTE, ULTRONIC, CNS, CK & CK Z.
Who gives the warranty
1. The warranty is given by Stiebel Eltron (Aust) Pty Ltd (A.B.N.
82 066 271 083), 6 Prohasky Street, Port Melbourne, Victoria, 3207
(“we”, “us” or “our”).
The warranty
2. This warranty applies to Stiebel Eltron Hand Dryers and Space
Heaters – Models HTE 4, HTE 5, ULTRONIC, CNS 100, CNS 150, CNS
200, CNS 250, CK 20S and CKZ 20S (the “unit”) manufactured after
1 January 2012.
3. Subject to the warranty exclusions we will repair or replace, at
our absolute discretion, a faulty component in your unit free of
charge if it fails to operate in accordance with its specifications
during the warranty period.
4. If we repair or replace a faulty component to your unit under
this warranty, the warranty period is not extended from the time
of the repair or replacement.
5. The warranty period commences on the date of purchase of the
unit. Where the date of purchase is not known, then the warranty
period will commence 2 months after the date of manufacture.
6. The warranty period for a unit is shown in the table below.
Component Warranty period
All components 2 years from the date of purchase of the
unit.
Your entitlement to make a warranty claim
7. You are entitled to make a warranty claim if:
7.1. you own the unit or if you have the owner’s consent to
represent the owner of the unit;
7.2. you contact us within a reasonable time of discovering the
problem with the unit;
9. The contact details for you to make your warranty claim are:
Name: Stiebel Eltron (Aust) Pty Ltd
Address: 6 Prohasky Street,
Port Melbourne,
Victoria, 3207
Telephone: 1800 153 351
(8.00 am to 5.00 pm AEST Monday to Friday)
Contact person: Customer Service Representative
E-mail: service@stiebel.com.au
10. We will arrange a suitable time with you to inspect and test
the unit.
Warranty exclusions
11. We may reject your warranty claim if:
11.1. The unit was not installed by registered and qualified
tradespeople, where required.
11.2. The unit was not installed and commissioned:
(a) in Australia;
(b) in accordance with the Operating and Installation
Guide; and
(c) in accordance with the relevant statutory
and local requirements of the State or
Territory in which the unit is installed.
11.3. The unit has not been operated or maintained in accordance
with the Operating and Installation Guide.
11.4. The unit does not bear its original Serial Number or Rating
Label.
11.5. The unit was damaged by any or any combination of the
following:
(a) normal fair wear and tear;
(b) connection to an incorrect power supply;
How you make a warranty claim
8. To make a warranty claim you must provide us with the
following information:
8.1. The model number of the unit;
8.2. A description of the problem with the unit;
8.3. The name, address and contact details (such as phone number
and e-mail address) of the owner;
8.4. The address where the unit is installed and the location (e.g.
in living room);
8.5. The serial number of the unit;
8.6. The date of purchase of the unit and the name of the seller
of the unit;
8.7. The date of installation of the unit where appropriate;
8.8. A copy of the certificate of compliance when the unit was
installed where appropriate.
8 |CNS A WWW.STIEBEL-ELTRON.COM
(c) connection to faulty equipment, such as
faulty circuit breaker;
(d) accidental damage;
(e) act of God, including damage by flood,
storm, fire, lightning strike and the like;
(f) wiring not to AS3000 Standards
11.6. The unit was damaged before it was installed e.g. it was
damaged in transit.
11.7. An unauthorised person has modified, serviced, repaired or
attempted to repair the unit without our consent.
11.8. Non genuine parts other than those manufactured or
approved by us have been used on the unit.
12. We may charge you:
12.1. for any additional transport costs if the unit is installed more
than 30 kilometres from our closest authorised service technician.
Page 9

AUSTRALIA
CUSTOMER SERvICE AND WARRANTY | ENvIRONMENT AND RECYCLING
12.2. for the extra time it takes our authorised service technician
to access the unit for inspection and testing if it is not sited in
accordance with the Operating and Installation Guide and not
readily accessible for inspection.
12.3. for any extra costs of our authorised service technician to
make the unit safe for inspection.
13. You must ensure that access to the unit by our authorised
service technician is safe and free from obstruction.
14. Our authorised service technician may refuse to inspect and
test the unit until you provide safe and free access to it, at your
cost.
15. If we reject your warranty claim in accordance with clause 11,
we may charge you for our authorised service technician’s labour
costs to inspect and test the unit.
16. In order to properly test the unit we may remove it to another
location for testing.
ENGLISH
Australian Consumer Law
17. Our goods come with guarantees that cannot be excluded
under the Australian Consumer Law. You are entitled to a
replacement or refund for a major failure and compensation for
any other reasonably foreseeable loss or damage. You are also
entitled to have the goods repaired or replaced if the goods fail
to be of acceptable quality and the failure does not amount to a
major failure.
18. The Stiebel Eltron warranty for the unit is in addition to any
rights and remedies you may have under the Australian Consumer
Law.
Guarantee
The warranty conditions of our German companies do not
apply to appliances acquired outside of Germany. In countries
where our subsidiaries sell our products, it is increasingly the
case that warranties can only be issued by those subsidiaries.
Such warranties are only granted if the subsidiary has issued
its own terms of warranty. No other warranty will be granted.
We shall not provide any warranty for appliances acquired in
countries where we have no subsidiary to sell our products.
This will not aect warranties issued by any importers.
Environment and recycling
We would ask you to help protect the environment. After use,
dispose of the various materials in accordance with national
regulations.
WWW.STIEBEL-ELTRON.COM CNS A| 9
Page 10

NOTES
10 |CNS A WWW.STIEBEL-ELTRON.COM
Page 11

NOTES
ENGLISH
WWW.STIEBEL-ELTRON.COM CNS A| 11
Page 12

g
y
Deutschland
STIEBEL ELTRON GmbH & Co. KG
Dr.-Stiebel-Straße 33 | 37603 Holzminden
Tel. 05531 702-0 | Fax 05531 702-480
info@stiebel-eltron.de
www.stiebel-eltron.de
Australia
STIEBEL ELTRON Australia Pty. Ltd.
6 Prohasky Street | Port Melbourne VIC 3207
Tel. 03 9645-1833 | Fax 03 9645-4366
info@stiebel.com.au
www.stiebel.com.au
Austria
STIEBEL ELTRON Ges.m.b.H.
Eferdinger Str. 73 | 4600 Wels
Tel. 07242 47367-0 | Fax 07242 47367-42
info@stiebel-eltron.at
www.stiebel-eltron.at
Belgium
STIEBEL ELTRON bvba/sprl
't Hofveld 6 - D1 | 1702 Groot-Bijgaarden
Tel. 02 42322-22 | Fax 02 42322-12
info@stiebel-eltron.be
www.stiebel-eltron.be
China
STIEBEL ELTRON (Guangzhou) Electric Appliance
Co., Ltd.
Rm 102, F1, Yingbin-Yihao Mansion, No. 1
Yingbin Road
Panyu District | 511431 Guangzhou
Tel. 020 39162209 | Fax 020 39162203
info@stiebeleltron.cn
www.stiebeleltron.cn
Czech Republic
STIEBEL ELTRON spol. s r.o.
K Hájům 946 | 155 00 Praha 5 - Stodůlky
Tel. 251116-111 | Fax 235512-122
info@stiebel-eltron.cz
www.stiebel-eltron.cz
Denmark
Pettinaroli A/S
Mandal Allé 21 | 5500 Middelfart
Tel. 06341 666-6 | Fax 06341 666-0
info@stiebel-eltron.dk
www.stiebel-eltron.dk
Finland
STIEBEL ELTRON OY
Kapinakuja 1 | 04600 Mäntsälä
Tel. 020 720-9988
info@stiebel-eltron.fi
www.stiebel-eltron.fi
Verkauf Tel. 05531 702-110 | Fax 05531 702-95108 | info-center@stiebel-eltron.de
Kundendienst Tel. 05531 702-111 | Fax 05531 702-95890 | kundendienst@stiebel-eltron.de
Ersatzteilverkauf Tel. 05531 702-120 | Fax 05531 702-95335 | ersatzteile@stiebel-eltron.de
France
STIEBEL ELTRON SAS
7-9, rue des Selliers
B.P 85107 | 57073 Metz-Cédex 3
Tel. 0387 7438-88 | Fax 0387 7468-26
info@stiebel-eltron.fr
www.stiebel-eltron.fr
Hungary
STIEBEL ELTRON Kft.
Gyár u. 2 | 2040 Budaörs
Tel. 01 250-6055 | Fax 01 368-8097
info@stiebel-eltron.hu
www.stiebel-eltron.hu
Japan
NIHON STIEBEL Co. Ltd.
Kowa Kawasaki Nishiguchi Building 8F
66-2 Horikawa-Cho
Saiwai-Ku | 212-0013 Kawasaki
Tel. 044 540-3200 | Fax 044 540-3210
info@nihonstiebel.co.jp
www.nihonstiebel.co.jp
Netherlands
STIEBEL ELTRON Nederland B.V.
Daviottenweg 36 | 5222 BH 's-Hertogenbosch
Tel. 073 623-0000 | Fax 073 623-1141
info@stiebel-eltron.nl
www.stiebel-eltron.nl
Poland
STIEBEL ELTRON Polska Sp. z O.O.
ul. Działkowa 2 | 02-234 Warszawa
Tel. 022 60920-30 | Fax 022 60920-29
biuro@stiebel-eltron.pl
www.stiebel-eltron.pl
Russia
STIEBEL ELTRON LLC RUSSIA
Urzhumskaya street 4,
building 2 | 129343 Moscow
Tel. 0495 7753889 | Fax 0495 7753887
info@stiebel-eltron.ru
www.stiebel-eltron.ru
Slovakia
TATRAMAT - ohrievače vody s.r.o.
Hlavná 1 | 058 01 Poprad
Tel. 052 7127-125 | Fax 052 7127-148
info@stiebel-eltron.sk
www.stiebel-eltron.sk
Switzerland
STIEBEL ELTRON AG
Industrie West
Gass 8 | 5242 Lupfig
Tel. 056 4640-500 | Fax 056 4640-501
info@stiebel-eltron.ch
www.stiebel-eltron.ch
Thailand
STIEBEL ELTRON Asia Ltd.
469 Moo 2 Tambol Klong-Jik
Amphur Bangpa-In | 13160 Ayutthaya
Tel. 035 220088 | Fax 035 221188
info@stiebeleltronasia.com
www.stiebeleltronasia.com
United Kingdom and Ireland
STIEBEL ELTRON UK Ltd.
Unit 12 Stadium Court
Stadium Road | CH62 3RP Bromborough
Tel. 0151 346-2300 | Fax 0151 334-2913
info@stiebel-eltron.co.uk
www.stiebel-eltron.co.uk
United States of America
STIEBEL ELTRON, Inc.
17 West Street | 01088 West Hatfield MA
Tel. 0413 247-3380 | Fax 0413 247-3369
info@stiebel-eltron-usa.com
www.stiebel-eltron-usa.com
4<AMHCMN=gfiegi>
Irrtum und technische Änderungen vorbehalten! | Subject to errors and technical changes! | Sous réserve
d‘erreurs et de modifications techniques! | Onder voorbehoud van ver
Salvo error o modificación técnica! | Excepto erro ou alteração técnica | Zastrzeżone zmian
ewentualne błędy | Omyly a technické změny jsou vyhrazeny! | A muszaki változtatások és tévedések jogát
fenntartjuk! |
technické zmeny sú vyhradené! Stand 9030
Отсутствие ошибок не гарантируется. Возможны технические изменения.
issingen en technische wijzigingen! |
techniczne i
| Chyby a
A 265846-38463-9031
B 265848-38463-9031
 Loading...