

Page 1
Wireless Garage Door Sensor STI-WS105
Installation and operating instructions
1. Introduction
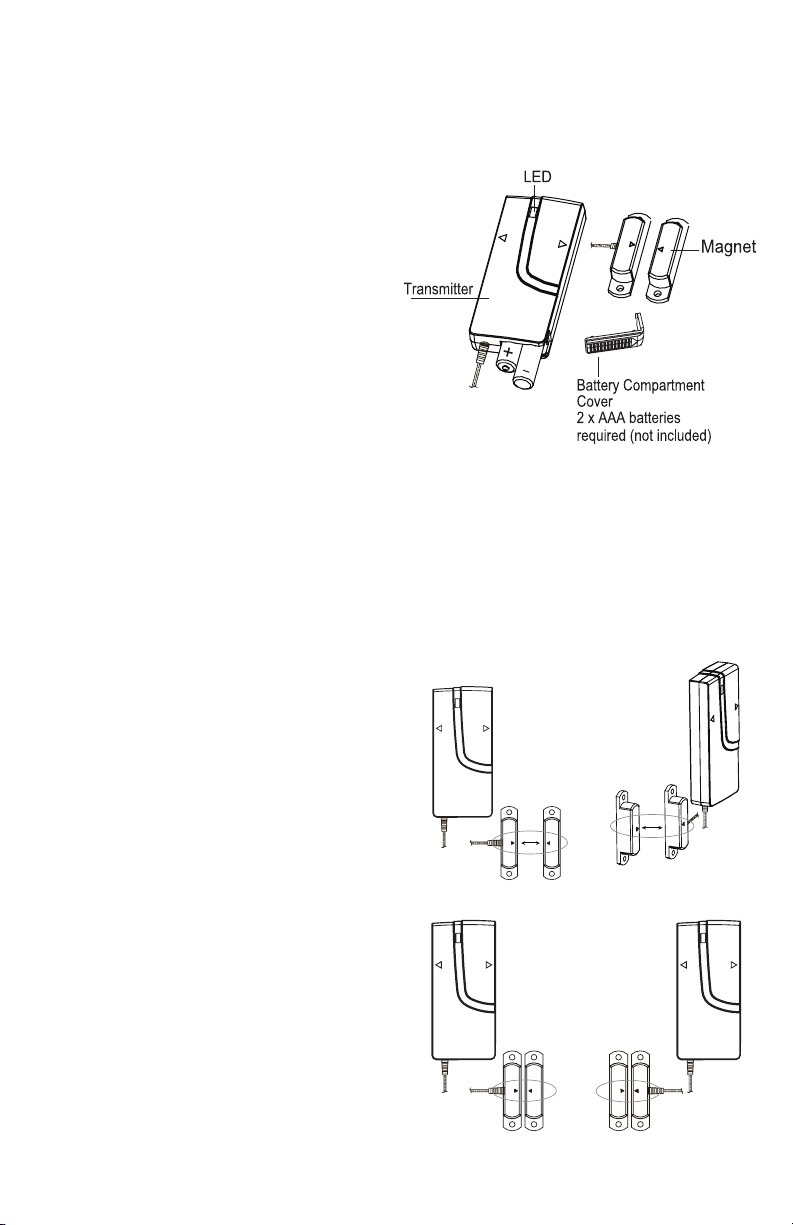
The Garage Sensor consists of two pieces.
The sensor detects when garage door is
opened. The two parts are fastened on garage
door and its frame. One part functions as a
transmitter and t he other as a magnet. Once
the sensor is installed, any abnormality in the
circuit will trigger an alert message that i s
transmitted to the smart panel.
It is typically designed for the roller shuttle
garage door; it can also be used in other types
of garage doors (e.g. sectional garage door if it
can fit the installation requirements).
2. Installation
First, determine the location of the sensors.
*NOTE:
- Make sure the garage door sensor is installed indoor.
- The Sensors should be mounted at the lower part of the garage door and its frame.
- There are some installation criterion, please see the below two pictures for reference.
- The Sensors should not be placed near extreme
temperature sources (ovens, stoves, etc.)
A. Installing the Garage Sensor
- Mount the transmitter on a fixed flat surface of
the garage frame.
- Mount the magnet on garage door
- The transmitter side marked w ith a > /< must
match the same position on both sides of the
diagram.
- The transmitter and the magnet must be no more
than 3/8” apart.
B. Mouning with the double sided adhesive
- Ensure that the mounting surface is clean.
- eel back one l ayer of the protective film and
P
attach it to the transmitter.
P
- eel back the remaining layer of the protective
film and press the transmitter firmly in place
against the mounting surface until firmly attached.
- Repeat to attach the magnet.
1
less than 3/8”
less than 3/8”
Page 2

3. House Security Code and Zone Code Settings
You can change the house security code on each sensor, smart panel and other modules of
your security system to avoid interference with other systems. In most cases you will NOT
need to change the factory settings of the house security code.
If the Panel and sensors activate intermittently or do not work at all, you may be able to solve
the problem by changing the house security codes on all system modules.
Step 1: There are 4 jumpers/dip-switches on each device. Remove the jumper compartment
cover, then pull out the jumper to change the house security code setting. Make sure the
jumpers on the Panel and the sensors match exactly.
- Panel
Jumpers for
house security code
HOUSE CODE
4321
-Each sensor
Default house code:
1: ON, 2: ON, 3: ON, 4: ON
*Jumper: ON = Plugged, OFF = Pull Out
Dip-Switches for
house security code
- System Controller
Default house code: 1: ON, 2: ON, 3: ON, 4: ON
Step 2: There is one jumper on each sensor. First, determine the location of the sensor in your
home, then remove the jumper compartment cover. Pull out the jumper and reassign it to the
target zone (zone 1-8), replace the screw and cover to complete the zone code setting.
rof repmuJ
edoC enoZ
Default zone code: Zone 1
4. Maintenance
The product may be cleaned with a soft damp cloth and then wiped dry. Do not use abrasive,
solvent based or aerosol cleaners as this may damage and/or discolor the product. Do not
allow water to enter or attempt to clean inside the unit.
5. Batteries
Do not allow batteries to corrode and leak as this may cause permanent damage to the
product.Take care to insert the batteries with the correct polarity as shown inside the battery
compartments. Do not mix new and old batteries or different types of batteries. Do not fit
rechargeable batteries.
At the end of their useful life the batteries should be disposed of via a suitable recycling center.
Do not dispose of with your normal household waste. DO NOT BURN.
Page 3

6. Alarm System Limitations
Even the most advanced alarm systems cannot guarantee 100% protection against burglary
or environmental problems. All alarm systems are subject to p ossible compromise or
failure-to-warn for a variety of reasons.
* Please note you may encounter problems with your system if:
The Sensors are not placed within hearing range of persons sleeping or remote parts of the
premises.
The Sensors are placed behind doors or other obstacles.
Intruders gain access through unprotected points of entry (where sensors are not located).
Intruders have the technical means of bypassing, jamming or disconnecting all or part of the
system.
The power to the sensors is inadequate or disconnected.
The Sensors are not located in proper environmental/temperature conditions i.e. too close
to a heat source.
* Inadequate maintenance is the most common cause o f alarm failure; therefore, test your
system at least once per week to be sure the Sensors and sirens are working properly.
* Although having an alarm system may make you eligible for reduced insurance premiums,
the system is no substitute for insurance.
7. Warranty
One year limited warranty.
Electronic warranty form at www.sti-usa.com/wc14.
Safety Technology
International, Inc.
Waterford, MI 48327
800-888-4784 (4STI)
www.sti-usa.com
STI 2010
 Loading...