

Page 1
COMMERCIAL TREADMILL
S-900
USER MANUAL
Page 2

CONTENTS
1.STRUCTURE.................................................................................................................................1
2.SPECIFICATION............................................................................................................................1
3.SAFETY INSTRUCTION...........................................................................................................2,3
4.PACKING LIST..............................................................................................................................3
5.ASSEMBLY ..........................................................................................................................3,4,5,6
6.PANNEL......................................................................................................................................7,8
7.DEBUGGING.................................................................................................................................8
8. USAGE INSTRUCTION.......................................................................................................8,9,10
9. WINDOWS.............................................................................................................................10,11
10. MAINTENANCE.................................................................................................................11,12
11. ERRORS&SOLUTIONS.....................................................................................................12,13
12. AUTOMATIC LUBRICATION.................................................................................................13
Page 3
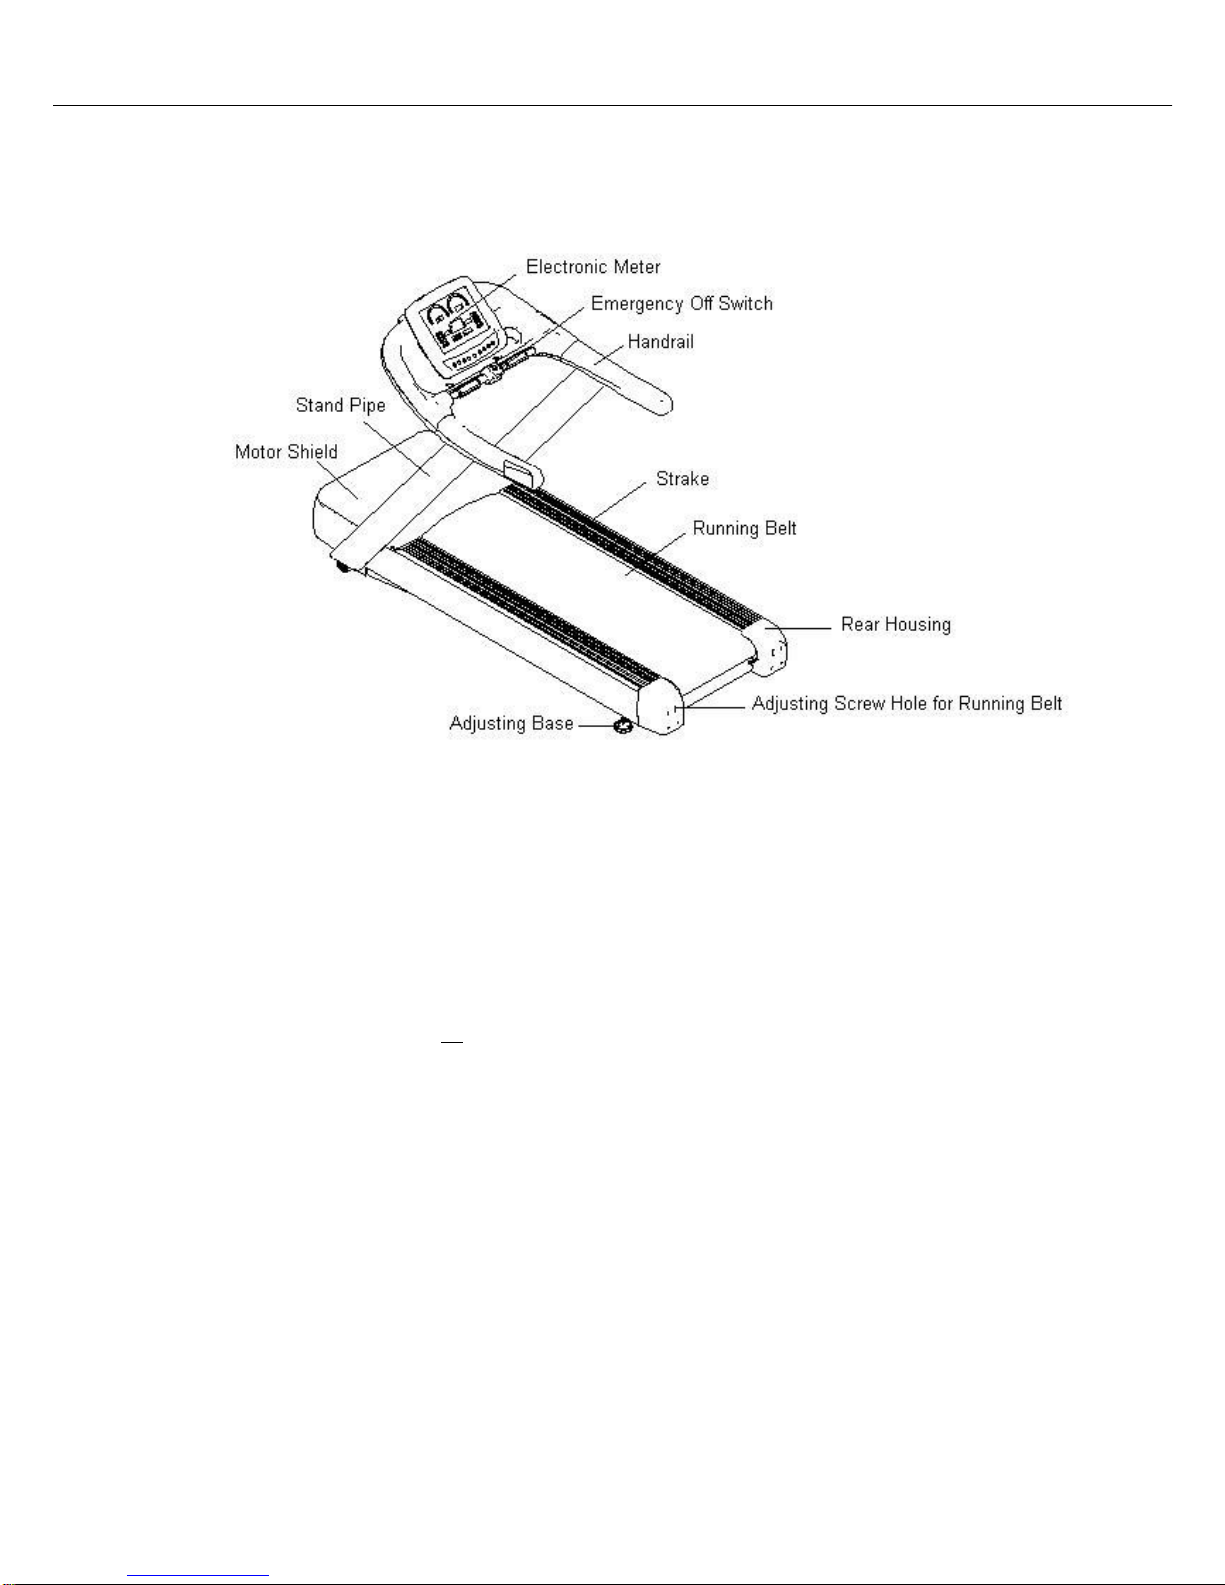
1.STRUCTURE
2.SPECIFICATION
Input voltage:AC 220V+10%(50Hz or 60Hz)
Rated power of motor:3.0HP
Max power of motor:7HP
Working temperature:0-40℃
Speed range:1.0-20.0(km/h)
Time range:0:00-99:59(min:sec)
Distance range:0.00-99.9(km)
Calorie range:0-999(Kcal)
Heart rate range:50-256(times/ minites)
Incline range:(0—20)%
Overload protector:13A
Power line:16A , AC 250V
3. SAFETY INSTRUCTION
Page 4

Notice: Please read the following safety instruction carefully before using the
machine.
1.The machine is only to be used after connect with the groud wire.
2.The treadmill should be put inside of the roon, avoid moisture. Do not allow to put
water or other liquid on the machine, and any other things on or insert the machine.
3.When the machine run, the moving parts will produce electrostatic, should be far
away from flammable and explosive substances.
4.Using the treadmill shall ensure that its feet on reliable, stable place. And behind the
treadmill shall remain 2000 mm * 1000 mm security space.
5.Ground wire must be reliable connected, the same power supply circuit should
avoid to use other appliances as far as possible
6.Suggest wearing sports clothes and appropriate sports shoes when run on the
Treadmill, it is strictly prohibited to run on the Treadmill with barefeet.
7.Don't allow two or more people run on the machine at the same time, Max User
weight 170kgs.
8.It is strictly prohibited to start the machine when you stand on the running belt.
You have stand on the two sides bar before it run, hold the hand rail then use the use
the machine before after it run.
9.The heart rate sensor does not belong to medical equipment, there are many reasons
can cause detection is inaccurate and test results is only for reference. (30 seconds
later will have a more accurate heart rate)
visual ahead.Avoid stepping the edge of the running space. If first use, hold the
handrail with two hands to keep balance
10.This product is mainly used in professional fitness club. The second is community
or company gym.
11.Action Guidance
A. Running Motion: can consume energy , improve cardio-pulmonary function,
accelerate blood circulation, improve the comprehensive quality of the human body,
reach the purpose of reducing weight and body building.
B. Before start to run, feet shall stand on side bars, when the running belt start to run,
then set feet one the belt. When you run, both hands shoud in the shape of half fist,
arms swing naturally visual ahead.Avoid stepping the edge of the running space. If
first use, hold the handrail with two hands to keep balance.
C. Be slow and gentle while adjust the speed and gradient
D. The user is allowed to get off the running board only the running belt is stopped
running absolutely.
12. Pick the equipped power line and plug the socket into the matched jack properly
in front of the machine.
13. Any adjusting equipment on machine should not be in a state of relaxation
14. This machine should be used in supervised area. NO children under 12, the old,the
disabled and cardiopathy is allowed to use. The juveniles should use the machine
under the guidance of the career man.
15. Please cut off the power timely after stopped using machine(the red power button
in front of the machine)
Page 5

16. Improper or overload training may damaged the TV and control
unit, speeding drive system aging,even causing the injury.
17. No hand touch of any treadmill parts during running.
18. For user with long hair should be aware of the hair safety
19. Any uncomfortable or abnormal while using, please stop running and consult the
doctor.
20. Emergency stop button is placed in the middle of the front handlebar. Any
emergency, click the emergency stop button quickly and the machine will be stopped
immediately.
21.Ask the career man to check the status of the driving parts before using. Any
loosing, tighten or replace the parts.
22. There should be clear notice for treadmills under maintence or repairing.
23. The career man should take off the power line and keep it carefully in case of any
unauthorized users.
24. This machine complied with SC type under EN 957-6.
4. PACKING LIST
Remark: 12
pcs 12*25
hexagon
socket screw
will be needed for a treadmill,(4pcs as spare parts)
5.ASSEMBLY
Make assembly work easier.
Follow the steps will make the assembling work very easily.
● As the size of treadmill is big, please select a proper space to install the treadmill
and make sure the enough space.
● Put all parts in clear area, don’t throw away the package before work finished.
● Must fasten all screws unless there is special notice, check again whether all
NO
Name
Qty
Remarks
1
Main Body 1
2
Console 1
3
Pillar 2
4
12*25 hexagon socket screw
10
Spring washer
5
12*25 hexagon socket screw
6
Spring washer
6
M10 “L”Inner Hex Wrench
1
Assemble Pillar
7
M10“T”
1
Adjust Running Belt
8
Cross Screwdriver
1
Assemble Motor
9
Manual 1
10
Quality Certification
1 11
Power Line
1
16A 250V
Page 6

screws are tightened after installation.
● Make sure that all parts are assembled by drawing instruction.
STEP 1
Remove the packing, remove the motor shield
Tools:Phillips screwdriver
Assembly instructions:
1) Take one Phillips screwdriver
2) Take of the screws from the motor cover
3) Put the motor cover in safe area
STEP 2
Connect the wire, and assemble the column
Page 7

Tool: “L”socket head wrench(M10)
Assemble instruction:
(1)Tear up the packing on the columns
(2)Fix one column to the right place
(3)4 pieces of cylinder head socket screws(M12*25), 1 piece“L”socket head wrench, fix the screws.
(4)Repeat the procedures (2), (3)
STEP3
Connection line, assembly digital watch
Tools: T inner hexagon spanner(M10)
Instruction for assembly:(This installation step should be two people cooperation)
(1)Electronic communications leads to dock with the post telecommunication lines.
(2)Fix the electronic watch column corresponding position, as shown:
(3)Take L inner hexagon spanner, take two M12 x 25 cylinder head hex socket screws, tighten digital
watches as shown in column position accordingly.
(4)Repeat step (3).
STEP 4
Page 8

Assemble motor cover
Tool: cross screwdriver
1) Power on, turn on the switch in front of the treadmill
2) Press “START/PAUSE” on the console to check if the treadmill is working well
3) If the treadmill works well, place the motor cover in the right place
4) A cross screwdriver, 7 pieces of M5*20 cross screws to fix the motor cover
6. PANNEL
Page 9

⑾ ⑴ ⑵ ⑶ ⑷ ⑸ ⑹ ⑺ ⑻ ⑼ ⑽
1. Slope rising button 2. The slope down button 3. mode button 4. confirm button 5.
Start / pause button 6. reset button 7. program button 8. Speed reduction button 9.
Speed acceleration 10. Speed direct selection area 11. Slope direct selection area
(1) Slope rising button:In the operation process of the machine,Press this button to
increase the machine's upward slope.
(2)The slope down button:In the operation process of the machine,Press this button to
decrease the machine's upward slope.
(3)mode button:In the standby mode, press this button to set the time, distance,
calories reciprocal movement patterns
(4)confirm button:in the customers setting,Press this button, confirm to enter or exit
setup mode
(5)Start / pause button:In the operation process of the machine, press start/pause, the
treadmill start to press, press the second time for this button, it will into the pause
status again.
(6)reset button: when the treadmill in suspended state, press the button, all window
parameter become to zero
(7)program button:In standby mode, press the button, it can switch 8 fixed
program(P1—P8 U1—U2)and 2 program with User defined
(8)Speed reduction button:Press the button to reduce the speed of the treadmill.
(9)Speed acceleration:Press the button to reduce the speed of the treadmill
(10)Speed direct selection area:in the manual mode of operation,press the button in
this area it can change the speed to the Button marks.
(11)Slope direct selection area: in the manual mode of operation,press the button in
this area it can change the slope to the Button marks.
7. DEBUGGING
1. Before connect to power. Please confirm if the power supply voltage is normal or
not, also the ground wire, use hands to push running belt to see if it is run well, have
any of sound and if the resistance is normal.
2.Switch on the power, open the red power switch on front of the machine, electronic
panel light. Three second later enter to the standby mode. Press the "start/pause"
button, treadmill start to run, the running speed is1 km/h, please observe if all the
components of run normally.
3.Press all the key on the electronic panel, observe whether each button labeled with
the function of the corresponding buttons, whether valid and feel is in good condition.
4.Press the safety switch, observe if the electronic panel matrix screen and time
window display "Er 6" (emergency stop action) tip character in the same time, and if
the running machine will stop.
Page 10

5.Use Hands to shake machine armrest, confirm the machine if stable.
6.Adjust the tension of running belt when treadmill running, see "Roating
Maintainance of Treadmill".
8. USAGE INSTRUCTION
1.Power-on: Insert the plug of treadmill power cord running machine front-end power
outlet inside, (note: the socket line must be reliable grounding on the mainland), open
running mechanical and electrical source switch, display data is zero, three seconds
after the machine into standby mode, press start/pause button, the machine began to
run. Press the start/pause key twice, the machine stopped running stop counting.
2. Direct starting
In standby mode, press the start/pause button, the machine runs at a speed of 1 km/h.
Press speed, treadmill running speed speeding up, slowly press deceleration, treadmill
speed slowly reduce each change at a speed of 0.1 km/h can be arbitrary direct area
according to the slope and treadmill speed digital keys. Realize the direct control of
the slope and the speed.
3. Model( countdown)setting
A Countdown Model:First press the set key, enter the time setting mode from bottom,
parameter value, time window shows the default time 30:00 minutes, can be used
to speed up slow down button to change the time value; After the machine start to
set the time value of reciprocal count, countdown to zero, the running machine
alarm and stop the lattice screen: boot operation, display the number 3 2 1 3
seconds countdown; When stop buzzer sound 3 sound; Runtime, dot matrix screen
markers of runway lights gradually (a circle standard 400 meters of the runway,
the runway is made up of 36 markers), the center of the runway shows actual
running laps (if center according to 1, it means the running 400 meters first lap 2,
said the running 400 meters, the second lap and so on)
B. Inverse distance mode
Second press set key, enter the distance from bottom set mode, the distance from
the window parameter values, show
Default distance is 5.00 km; adjust the distance by speed +/-, the distance counts
down after the treadmill starts, it alarms and stops when it comes to 0.
C.Calories count down mold
It comes to Calories count down mold when you press the “set”for the 3
rd
time, the
calory window flushes, and it shows the calory is 100 kc; adjust the calory by speed
+/-the distance counts down after the treadmill starts, it alarms and stops when it
comes to 0.
4.Start/Suspend
Page 11

When Standby, press “start/suspend” once, the treadmill starts to work, and all the
datas start counting; press”start/suspend” twice, the treadmill stops and it stops
counting (not 0). Press “reset”, all the data comes to 0 and it comes to “standby”.
5.Incline direct choose:
Incline direct choose, it has 8 direct press buttons means”2 4 6 8 10 12
14 16” incline. It comes to the relative incline when you press the button you
need.
6.Manual incline adjustment:
You can press the incline adjustment button to choose the incline to change the
incline degree.
Attention: incline scope: (1-20)
7. Speed direct selection:
In the process of the manual mode, pressing any number key of speed direction area
any numeric keys, the treadmill will be adjust to the speed value of labeled button (2 4
6 8 10 12 14 16)
8. Automatic change the speed:
In the standby mode, press the "program" button, can choose different fixation
procedures. Press the "start / pause" button, the treadmill will be running according to
the specified system. The time cycle of each fixed program is 30 minutes, According
to the speed to set each time cycle value of fixed program. Press the Enter button to
finish the setting.
9. Manual speed adjustment:
In manual mode, pressing "accelerator", "slow down" button or press speed direction
button can change the speed of the treadmill. In the process of fixed program, it can
not change the speed value manually.
10. user program: In the standby mode, press program button 9 times, it will into the
USER1. At this time, the number of times window flicker, The time period is 30
minutes. It can using acceleration, deceleration button to set for each cycle time value
of fixed program. Press button confirm, it can switch into the speed setting mode, all
together have 16 phases, press the button of add and subtract of speed to set the speed
value of each phases.
Press “confirmation” to switch the speed,after finish,press“start/Pause“button to start
the machine.The user-defined program will automatically retained until the next user
to change it.
11. Heart Rate Test
(1)Hold the heart rate sensor,when sensor feel the signal of your hand, the heart
window shows “Hr”,after 5 second5 Heart rate figure.
(2)Before exercise,the foot stand the strip of both side,touch the heart sensor,it will
show the accurate figure of your heart rate.
(3)After exercise,the foot stand the strip of both side,touch the heart sensor,it will
show the accurate figure of your heart rate.
Remark: In order to make more accurate for the heart rate, don't measure it when you
are doing exercise. Please
12. Gradient calibration mode
Page 12

In the mode of standby,,Press speed up, down, gradient up,gradient down button at
same time,After 3 second, come into Gradient calibration mode. and then,Lift motor
will reach summit and then come to the lowest point. When finish,the machine will
into the mode of standby.
Remark: when come out the mistake, please use revise mode to recover the incline
motor's movement.
9.WINDOWS
Remark: When button works, the buzzer will buzz ” di—” a long buzz; ”bi bi” will
be heard when the button does not work.
1)Power up, a long “di--” will be heard, Luminescence tube, Digital tube and
Vibrating screen all display within 3 seconds. Meanwhile, lifting motor back to
zero (it stays if already zero), it will standby after 3 seconds. Time: “0:00”, Incline:
“0”, Heart Rate: “Hr”, Distance: “0.00”, Calories: “0”, Speed: “1.0”. Now, you
can operate the panel.
A.“Incline/Heart Rate”: Incline and heart rate number can be both displayed. Heart
rate statistics will be displayed when no incline input, otherwise, incline statistics
will be displayed; it will be switched displayed when both input. Heart rate shows
7 seconds, incline statistics show 3 seconds.
B.“Speed/Calories”: speed and calories statistics switched displayed. Speed shows 7
seconds, calories show 3 seconds.
C. Matrix: after all display done, press”start”, the matrix counts down 3, 2, 1, a lane of
standard 400m is displayed in manual mode; a ladder diagram is displayed in
fixed program. “safe” is displayed when emergency stop available, and “safe” also
displayed in Time window. “Pause” is displayed in matrix when pause. A speed
matrix will be displayed in fixed model and self defined model; a standard lane of
400m will be displayed in manual mode. Notice: Vibrating screen shows 1-99 laps,
it backs to 0 when reach 100 laps, counts from 1.
10. MAINTENANCE
Our Treadmill adopts imported special running belt, use nylon and nylon mixed
material also special production technology produced, with the advantage of small
friction coefficient, high tensile strength, low noise, etc. The running board use the
special double anti-vibration system, The top of the urea formaldehyde resin panel
finish high, super wear-resistant, make the sport more comfortable and smooth!
1.When the machine dirt or less oil, will cause friction coefficient and the load output
power increase between running board and running belt. So may lead to running
board and running belt surface damage seriously, (motor, frequency converter, roller,
the motor belt, etc.) the entire transmission system seriously damaged. The damage is
not within the scope of the warranty.
2.Each week has to check the lubrication situation of runningl board and . Please
lubricate according to the usage frequency (if more than 6 hours per day, then
lubricate once 10 days, the lubricate volume is 50ml, if less than 6 hours per day, then
lubricate once 15 days, the lubricate volume is about 50ml.
Page 13

Remark: please not not over lubricating, correct lubricationg is the key factor to keep
the usage life.
3. Judge the friction
Unclean or less lubricating will cause the incresement of friction between running
belt and board, will harm to motor and transducer, the features are as follows:
(1): When off position, it is hard or impossible to move the running belt.
4. Running belt deviation Adjustment:
Both before delivery and after installation, we will make the adjustment on the
running belt .After a period of time running belt running deviation phenomenon
may occur. The causes of this phenomenon are the following several aspects:
(1) Host is not smooth.
(2) The users’ feet are not run with the center of the area when running.
5. Man-made running deviation phenomenon, no-load running two to three minutes
can be back to normal. For running deviation phenomenon which cannot be
automatically move back, should use the special tools (M10) T Allen key in a quarter
of a circle (ninety degrees) adjusted end cover screw and the screw hole.
6. Specific adjustment method: if run with partial slant to the left, can adjust the
adjusting screw of the left, clockwise or counter-clockwise adjust the adjusting screw
on the right. If the running belt to the right, can adjust to the right of the adjusting
screw clockwise or counter-clockwise adjust the adjusting screw of the left, Suggest
every time make the adjustment of ninety degrees (a quarter circle)
Running belt running deviation does not belong to the warranty scope, mainly by the
user on its own maintenance. Running belt running deviation will be seriously
damaged belt. Must timely discovery, correct in a timely manner.
7.Adjusting methods for running belt: if the running belt in a loosing state, the user
may slipping during running; if the running belt in a tighten state, it may increase the
output power of the motor and transducer. In above two situation, the running belt
should both be adjusted.
(1)Tighten: Using the professional tools-M10 “T”arm inner hex wrench, to adjusting
the adjust screw in the left and right adjusting hole in the back end cover, revolving
the wrench 1/4 circle clockwise each time.(Same range in both side)
(2)Loosing: Using the professional tools-M10 “T”arm inner hex wrench, to adjusting
the adjust screw in the left and right adjusting hole in the back end cover, revolving
the wrench 1/4 circle anticlockwise each time.(Same range in both side)
8.Running belt adjusting sketch map:
Page 14

11. ERRORS&SOLUTIONS
The machine in the running process (matrix screen) may appear the following fault
conditions:
“Er1”,“Er6”:Abnormal communication protection
Cause:Abnormal communication between display panel and control panel
Examination content: Inverter and panel communication cables.
Er2:Low-voltage protection
Cause:Machine power supply input voltage is too low.
Examination content:Make sure power supply voltage is within the prescribed
scope(220V+10%)
Er3:Over-voltage protection
Cause:Machine power supply input voltage is too high
Examination content:Make sure power supply voltage is within the prescribed
scope(220V+10%)
Er5:Over temperature Protection
Cause:Inverter power module temperature rise is too high
Examination content:Machine in operation process whether converter cooling fan
to stop working
“SAFE”:The abrupt stop switch is wrong
Cause:Stop device
Examination content:Scram button, abrupt stop switch box inside the control panel,
abrupt stop switch wired.
12. AUTOMATIC LUBRICATION
This treadmill is equipped with Automatic Lubricant system. The original setting are
as follows: Automatic Lubricant time:60s
Automatic Lubricant distance: 600KM, which means the automatic Lubricant system
will begin to adding oil when the machine reach a distance of 600km, and adding
50ml-60ml each time.The Club can also resetting the automatic lubricant system
parameters (time and distance )according to their actual situation. The setting steps are
As follows:
1) Press the speed “+”& “-” button simultaneously under ready model, then press the
Page 15

emergency stop button for 2 seconds, leave the button and the machine enter into
parameters setting interface. The speed “+”& “-” button can be released.The speed
window show “0”and also the same as time window. The speed window shows
parameters code, while the time window show the corresponding parameter data.
2) Press “Start/Pause”button for eight times, the speed window will show “8”as
automatic lubricant distance. The time window show the original automatic lubricant
distance. In this status, the distance data can be reset through pressing the speed “+”&
“-” button. Setting over. Press the “Start/Pause”button to save the settings and also
shift to the time setting interface. The speed window will show “9” and the time
window will show the original automatic lubricant time.In this status, the time data
can be reset through pressing the speed “+”& “-” button. Setting over, pressing the
“Start/Pause”button to save the settings and also shift to the next parameters. Finally
press the emergency stop button and then release it to back to the ready model.
Notice:
1) Owing to the different using situation of each club, if necessary, please set the
automatic lubricant parameters as above step.
2) Check the oil in the oiler every each months and add the lubrication timely.
 Loading...